03 integrate webapisignalr
TRANSCRIPT

AngularJS + Asp.Net Web Api + SignalR :前後端整合篇開發技巧實戰系列 (3/6) - Web 前後端整合講師 : 郭二文 ([email protected])

Document, Source code & Training Video (3/6)• https://github.com/erhwenkuo/
PracticalCoding

Previous Training Session Document, Source code & Training Video (2/6)
• https://www.youtube.com/watch?v=EVvC4YGXfDI
• http://www.slideshare.net/erhwenkuo/02-integrate-highchart

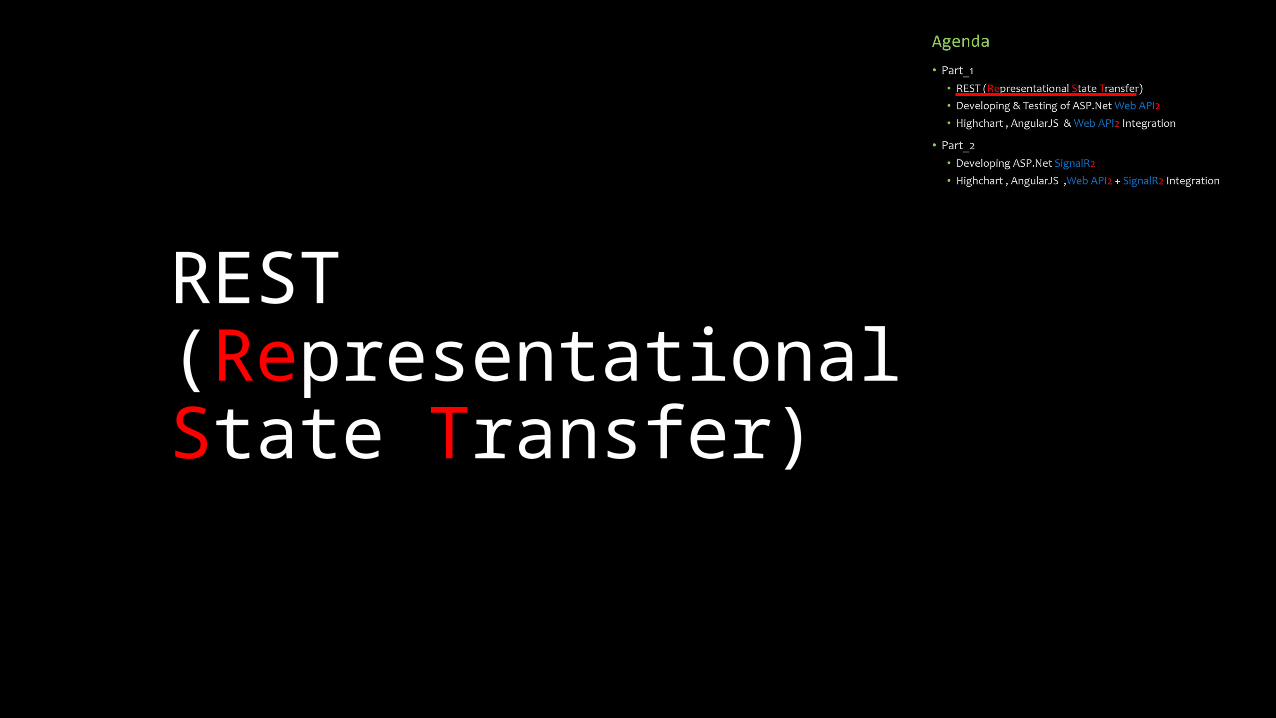
Agenda
• Part_1• REST (Representational State Transfer)
• Developing & Testing of ASP.Net Web API2
• Highchart , AngularJS & Web API2 Integration
• Part_2• Developing ASP.Net SignalR2
• Highchart , AngularJS ,Web API2 + SignalR2 Integration
REST (Representational State Transfer)

What is REST?
• REST stands for Representational State Transfer
• REST is an architecture style for designing networked applications
• RESTful applications use HTTP requests to post data (create and/or update), read data (e.g., make queries), and delete data
• REST is a lightweight alternative to mechanisms like RPC (Remote Procedure Calls) and Web Services (SOAP, WSDL, et al.)

Advantages Of REST
• Separates server implementation from the client’s perception of resources (use standard HTTP GET/POST/PUT/DELETE verbs)
• Scales well to large numbers of clients
• Support intermediaries (proxies and gateways) as data transformation and caching components

Protocol Usage by Web API
• REST web api taking over SOAP web services
• Google deprecated all SOAP web services and converted to REST web apis

Developing & Testing of ASP.Net Web API2

Develop WEP API to service Chartdata
• In this portion, an Asp.Net Web API will be developed to server our Chartdata• Data Definition:
• Period: 期間 (yyyy-MM-dd)
• TAIEX: 台股加權指數• MonitoringIndex: 景氣對策信號• LeadingIndex: 景氣領先指標• CoincidentIndex: 景氣同時指標• LaggingIndex: 景氣落後指標
• Data File Path• PracticalCoding\web\chartdata.csv
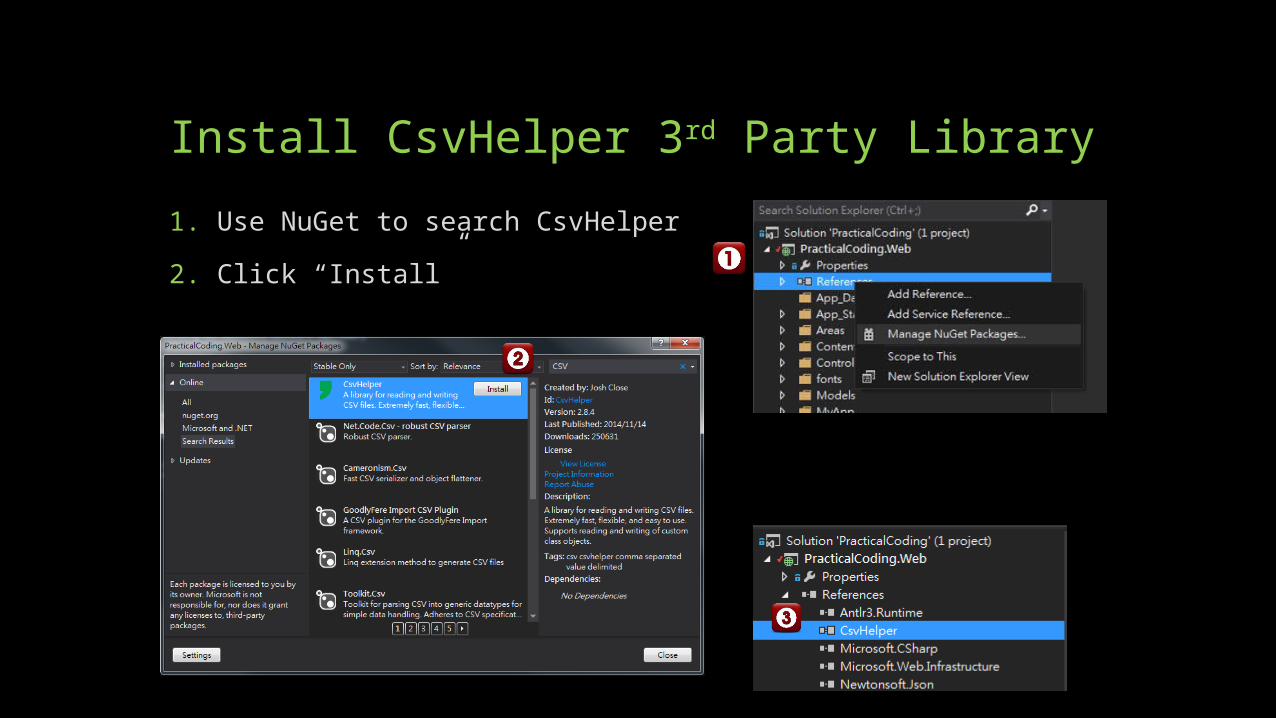
Install CsvHelper 3rd Party Library
1. Use NuGet to search CsvHelper
2. Click “Install”
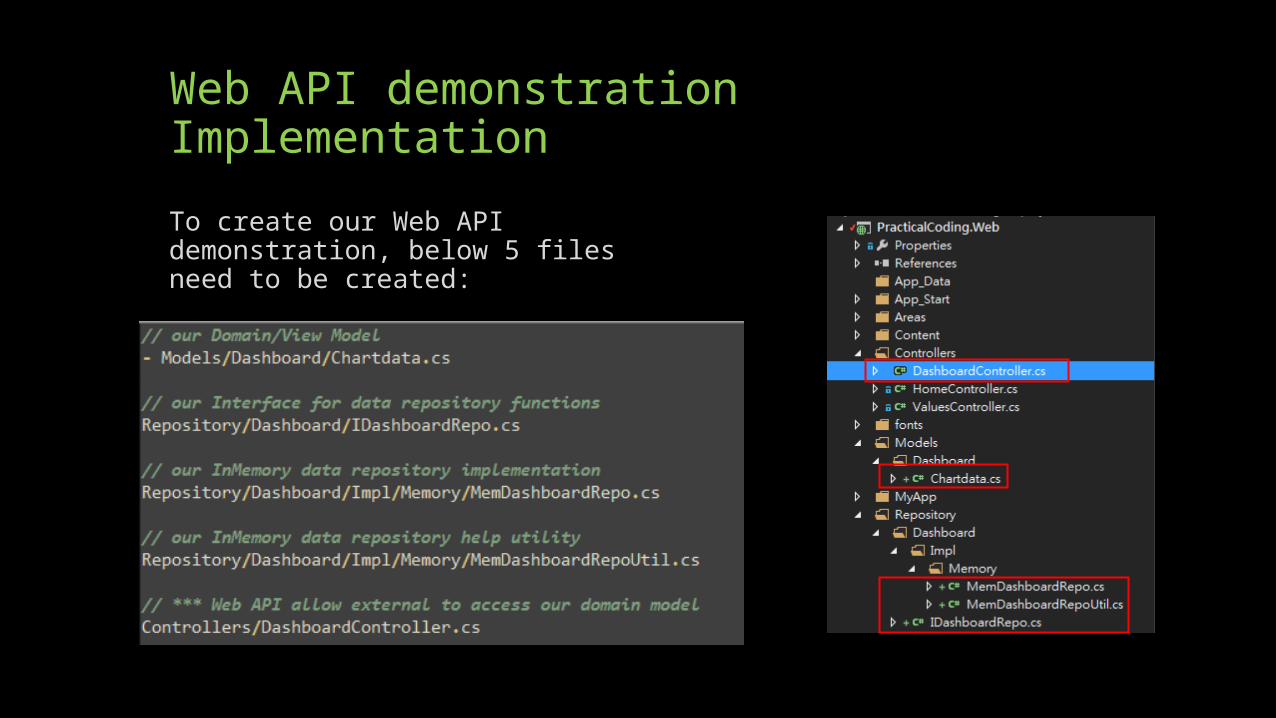
Web API demonstration Implementation
To create our Web API demonstration, below 5 files need to be created:
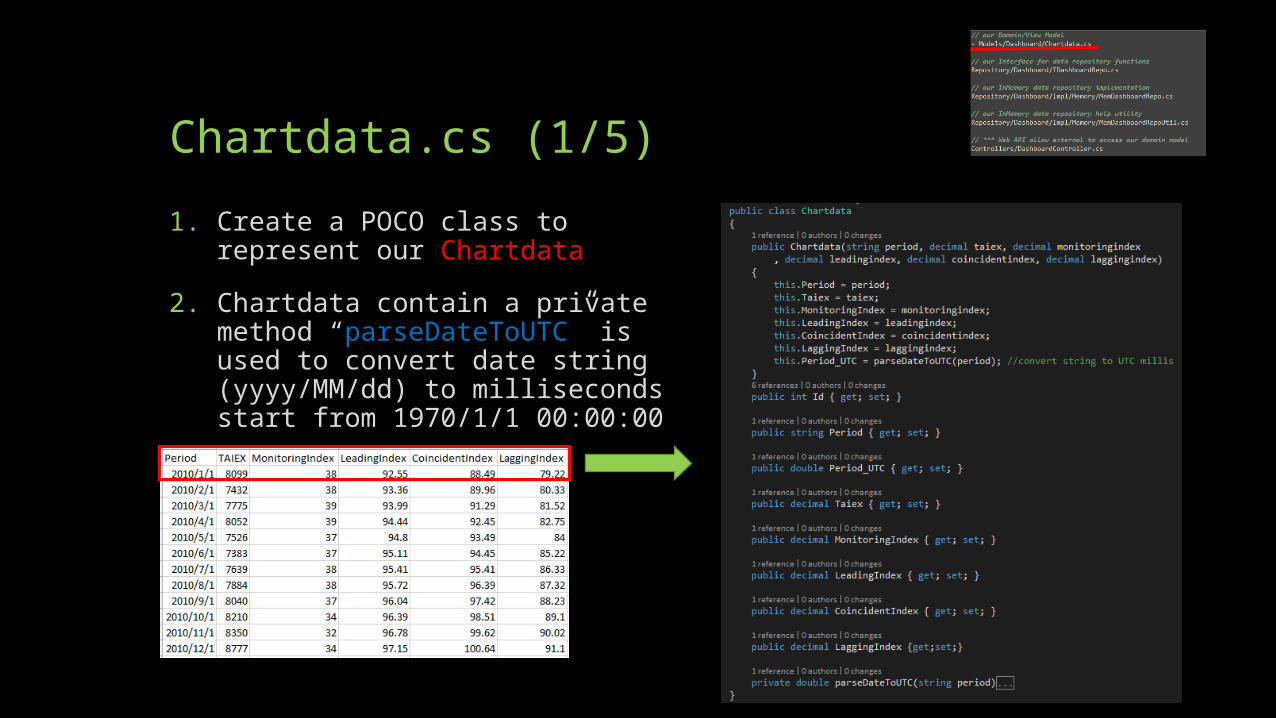
Chartdata.cs (1/5)
1. Create a POCO class to represent our Chartdata
2. Chartdata contain a private method “parseDateToUTC” is used to convert date string (yyyy/MM/dd) to milliseconds start from 1970/1/1 00:00:00
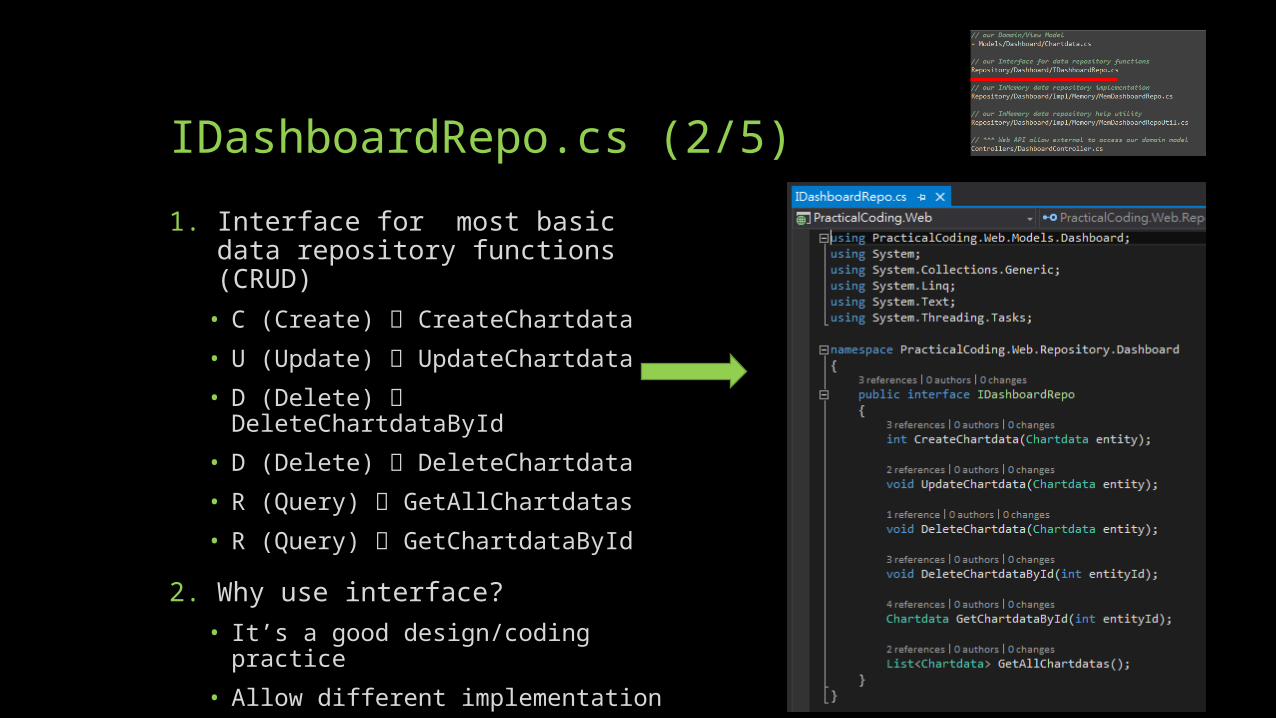
IDashboardRepo.cs (2/5)
1. Interface for most basic data repository functions (CRUD)
• C (Create) CreateChartdata
• U (Update) UpdateChartdata
• D (Delete) DeleteChartdataById
• D (Delete) DeleteChartdata
• R (Query) GetAllChartdatas
• R (Query) GetChartdataById
2. Why use interface?
• It’s a good design/coding practice
• Allow different implementation
• Allow dynamic replacement

MemDashboardRepo.cs (3/5)
1. IDashboard Interface implementation using in-memory C# Dictionary object to hold our demonstration data
2. Notes: To simplify demonstration, there is no code to prevent multi-concurrent access/modification handling
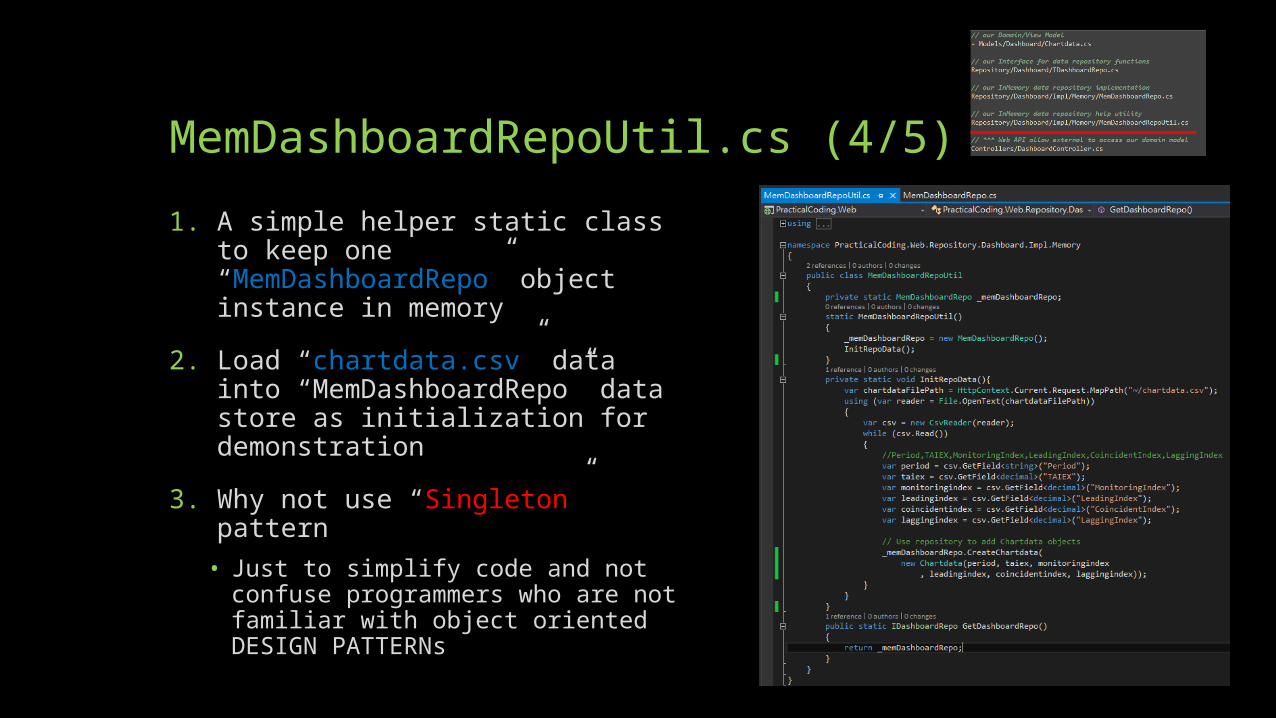
MemDashboardRepoUtil.cs (4/5)
1. A simple helper static class to keep one “MemDashboardRepo” object instance in memory
2. Load “chartdata.csv” data into “MemDashboardRepo” data store as initialization for demonstration
3. Why not use “Singleton” pattern
• Just to simplify code and not confuse programmers who are not familiar with object oriented DESIGN PATTERNs

DashboardController.cs (5/5)
1. Choose “Controllers” folder
2. RighClick and choose below menu item
• “Add” “Controller…”
3. Choose “Web API2 Controller with read/write actions” template

DashboardController.cs (5/5)
1. Change Controller name to “DashboardController”
2. A new class named “DashboardController.cs” should be created under “Controllers” folder

DashboardController.cs (5/5)

DashboardController.cs (5/5)

Testing ASP.Net Web API–GET, POST, PUT, DELETE using Fiddler2
1. What is “Fiddler2”
• The free web debugging proxy for any browser, system or platform
• Developed by “Telerick”
2. Where to get & install
• Go to “Fiddler” download page “http://www.telerik.com/download/fiddler”
• Click “Download Fiddler2” link
• Execute “fiddler2set.exe”

Testing ASP.Net Web API–GET
1. Hit “F5” to run “PracticalCoding.Web” project
2. Find the url and port, for example: “http://localhost:53895”
3. Click “Composer” Tab, Change method to “GET”, past our WebUrl with our web api path to Fiddler http://localhost:53895/api/dashboard/
4. Hit “Execute” button
Demo

Testing ASP.Net Web API–GET Result
1. Http Status Code (200 – OK) in left panel
2. Click “JSON” Tab
3. A JSON object array contains 58 objects
Demo

Testing ASP.Net Web API–GET
1. Hit “F5” to run “PracticalCoding.Web” project
2. Find the url and port, for example: “http://localhost:53895”
3. Click “Composer” Tab, Change method to “GET”, past our WebUrl with our web api path to Fiddler http://localhost:53895/api/dashboard/58
4. Hit “Execute” button
Demo

Testing ASP.Net Web API–GET Result
1. Click Http Status Code (200 – OK) in left panel
2. Click “JSON” Tab
3. A JSON object contains Chartdata object in JSON notation
Demo

Testing ASP.Net Web API–POST
1. Click “Composer” Tab, Change method to “POST”, past our WebUrl with our web api path to Fiddler http://localhost:53895/api/dashboard/
2. Add “Content-Type: application/json” to indicates the content in the request body is JSON object
3. Hit “Execute” button
Demo
Testing ASP.Net Web API–POST
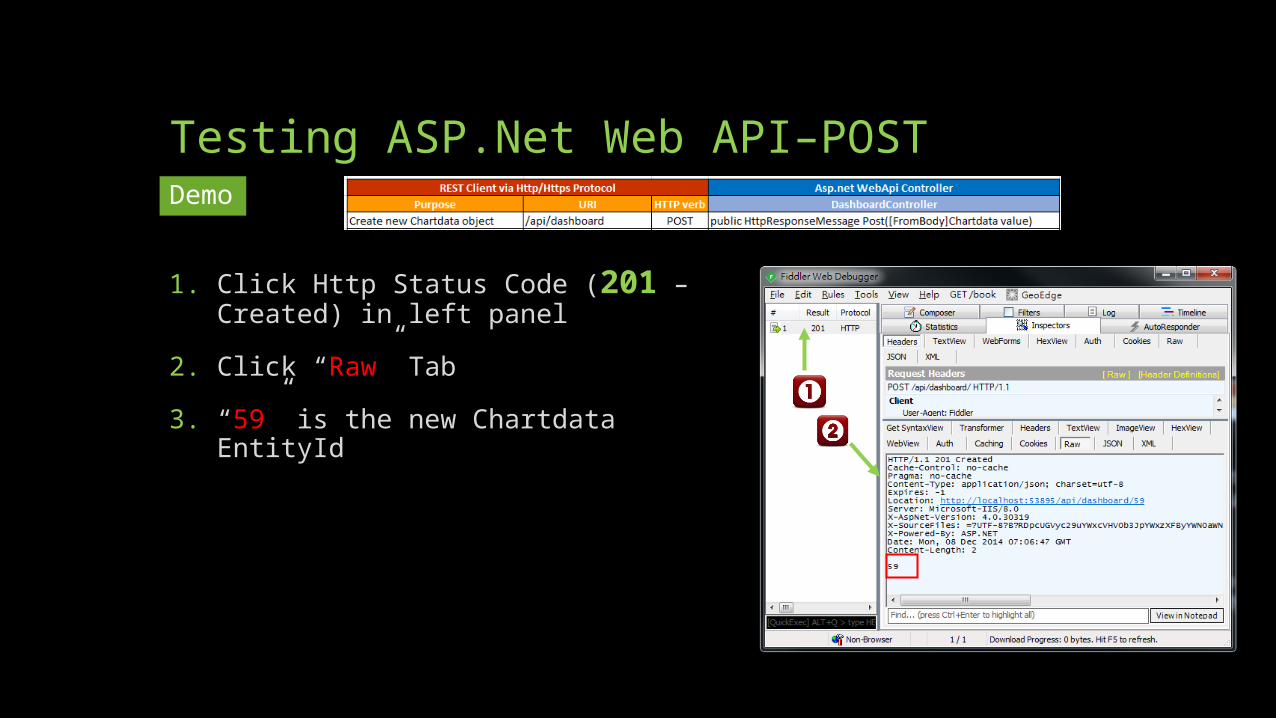
1. Click Http Status Code (201 – Created) in left panel
2. Click “Raw” Tab
3. “59” is the new Chartdata EntityId
Demo

Testing ASP.Net Web API–PUT
1. Click “Composer” Tab, Change method to “PUT”, past our WebUrl with our web api path with EntityId to Fiddler http://localhost:53895/api/dashboard/59
2. Add “Content-Type: application/json” to indicates the content in the request body is JSON object
3. Put Entity Object in JSON style in “Request Body”
4. Hit “Execute” button
Demo

Testing ASP.Net Web API–PUT
1. Click Http Status Code (204 – No Content) in left panel
Demo

Testing ASP.Net Web API–DELETE
1. Click “Composer” Tab, Change method to “DELETE”, past our WebUrl with our web api path with EntityId to Fiddler http://localhost:53895/api/dashboard/59
2. Hit “Execute” button
Demo

Testing ASP.Net Web API–PUT
1. Click Http Status Code (204 – No Content) in left panel
Demo

Highchart , AngularJS & Asp.Net Web API2 Integration

Setup SPA Folder
1. Copy “05_AngularWithHighchart” folder and paste as “06_AngularWithWebApi”
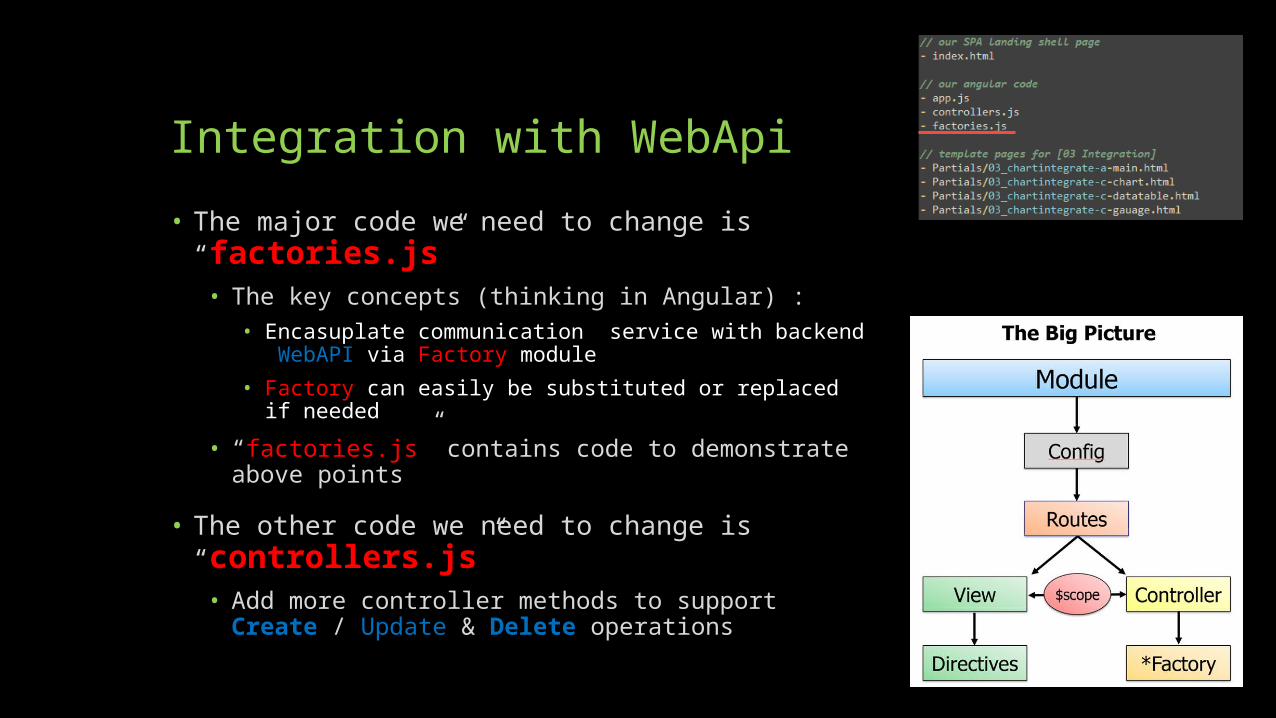
Integration with WebApi
• The major code we need to change is “factories.js”
• The key concepts (thinking in Angular) :• Encasuplate communication service with backend
WebAPI via Factory module
• Factory can easily be substituted or replaced if needed
• “factories.js” contains code to demonstrate above points
• The other code we need to change is “controllers.js”
• Add more controller methods to support Create / Update & Delete operations

Integration with WebApi(factories.js)• Cleanup all static trainingdatas object array
Before
After

Integration with WebApi(factories.js)• Change “factory.getTrainingDatas” method to
retrieve data from remote WebApi “/api/dashboard”Befor
eAfter
Get the data from local static
variable
Get the data via remote WebApi
using angular
$http service object

Integration with WebApi (Query)
1. Select “06_AngularWithWebApi” and Hit “F5” to run
2. Click “03 IntegrationDATATABLE”
3. The result will show on a table also use Browser tools will show XHR result from WebApi
Demo Page
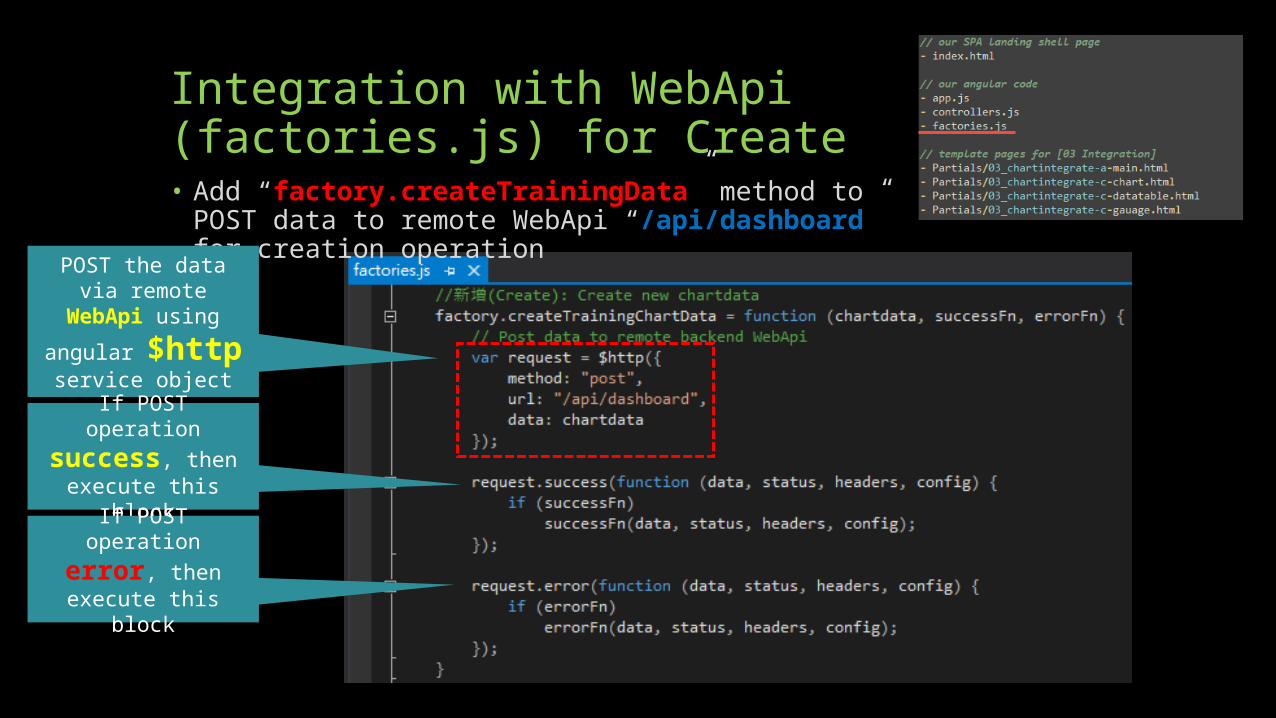
Integration with WebApi(factories.js) for Create• Add “factory.createTrainingData” method to
POST data to remote WebApi “/api/dashboard” for creation operation
POST the data via remote WebApi
using angular
$http service object
If POST operation success, then
execute this block
If POST operation error, then
execute this block

Integration with WebApi(factories.js) for Update• Add “factory.updateTrainingData” method to PUT
data to remote WebApi “/api/dashboard/{id}”
PUT the data via remote WebApi
using angular
$http service object
If PUT operation success, then
execute this block
If PUT operation error, then
execute this block

Integration with WebApi(factories.js) for Delete• Add “factory.deleteTrainingData” method to PUT
data to remote WebApi “/api/dashboard/{id}”
DELETE the data via remote
WebApi using
angular $http service object
If DELETE operation success, then
execute this block
If DELETE operation error, then
execute this block

Integration with WebApi (Create)
1. Select “06_AngularWithWebApi” and Hit “F5” to run
2. Click “03 Integration DATATABLE Create Form”
3. Input all necessary data and Hit “Create”
Demo Page

Integration with WebApi (Update)
1. Select “06_AngularWithWebApi” and Hit “F5” to run
2. Click “03 Integration DATATABLE Update Form”
3. Input all necessary data and Hit “Update”
Demo Page

Integration with WebApi (Delete)
1. Select “06_AngularWithWebApi” and Hit “F5” to run
2. Click “03 Integration DATATABLE Delete Form”
3. Input all necessary data and Hit “Delete”
Demo Page

Developing ASP.Net SignalR2

SignarR Web Resources• http://signalr.net
• http://www.asp.net/signalr

What is SignalR?
• A library of adding real-time web functionality to Asp.Net applications
• Real-time web functionality is the ability to have server code push content to connected clients instantly as it becomes available, rather than having the server wait for a client to request new data.

Environment Setup
1. Use NuGet to search “SignalR”
2. Click “Install”

Environment Setup
1. Add “OWIN Startup class” named “Startup.cs” under “ProjectCoding” webroot
2. Input “app.MapSignalR();” as show below

Simple SignalR Chat Application (JQUERY)
1. Create below files to build a simple SignalR Chat application

Simple SignalR Chat Application (JQUERY) – Server “ChatHub.cs”
1. Add new item -> “SignalR Hub Class(v2)” -> “ChatHub.cs”
A method which can used to broadcast a
message to all SingnalR connected
Clients

Simple SignalR Chat Application (JQUERY) – Client Html

Simple SignalR Chat Application (JQUERY)
1. Select “07_SignalRChat/01_SimpleChat_Jquery.html” and Hit “F5” to run
2. Open Multi-Browers to chat with each other
Demo

Simple SignalR Chat Application (AngularJs)
1. Create below files to build a simple SignalR Chat application using AngularJS

Create SignalR Hub class
1. Add new item -> “SignalR Hub Class(v2)” -> “ChatHub2.cs”
A method which can used to broadcast a
message to all SingnalR connected
Clients except message issuer
A simple POCO class as
communication message object

AngularJs Module wrapped SignalR• https://github.com/JustMaier/angular-
signalr-hub

Find Good Bootstrap UI Style Template• http://bootsnipp.com

02_SimpleChat_Angular.html

02_SimpleChat_Angular.html
Ask AngularJS to inject
“chatHubFactory”
Ask AngularJS to inject “$rootScope”

Simple SignalR Chat Application (AngularJS)
1. Select “07_SignalRChat/02_SimpleChat_Angular.html” and Hit “F5” to run
2. Open Multi-Browers to chat with each other
Demo

Simple SignalR Chat Application (EventBus)
1. The drawback of previous Chat application sample
• Tightly coupled – Client and Server Hub are very tight coupled, think about how many Server Hubs class we need to create for different scenarios?
2. Let’s refactoring previous SignalR Chat application using “EventBus” concept

Create SignalR Hub class
1. Add new item -> “SignalR Hub Class(v2)” -> “EventBusHub.cs”
2. Add new POCO class “SignalREvent.cs”
A method which can used to broadcast a
message to all SingnalR connected
A simple POCO class as
communication message object

Create Customise AngularJS “EventBus” module

UI AngularJS Code
Delegate message sending via
“EventBusHub”
Only listen “Event” whatever this UI
interesting

Simple SignalR Chat Application (EventBus)
1. Select “07_SignalRChat/02_SimpleChat_EventBus.html” and Hit “F5” to run
2. Open Multi-Browers to chat with each other
Demo

Highchart , AngularJS ,Web API2 + SignalR2 Integration

Integration with SignalR
• Copy “06_AngularWithWebApi” to “08_AngularWithSignalR ”

Integration with SignalR –**SignalRDashboardController.cs (WebApi)**• Copy “DashboardController.cs” to “SignalRDashboardController.cs”
Get SignalR “EventBus” Hub
Context reference

Integration with SignalR –**SignalRDashboardController.cs (WebApi)**• Add below code block in WebApi “Post (Create)” method to broadcast a
“SignalREvent”

Integration with SignalR –**SignalRDashboardController.cs (WebApi)**• Add below code block in WebApi “PUT (Update) ” method to broadcast
a “SignalREvent”

Integration with SignalR –**SignalRDashboardController.cs (WebApi)**• Add below code block in WebApi “Delete” method to broadcast a
“SignalREvent”

Integration with SignalR
• Modify “index.html” to include “SignalR” related javascripts

Integration with SignalR
• Modify “app.js” to have AngularJS include “EventBus” module

Integration with SignalR
• Modify “controllers.js -> 03_myapp_integrateDataTableCtrl” to listen SignalREvent published by “EventBus”
Inject “EventBusHub”

Integration with SignalR• Modify “factories.js -> 03_myapp_integrateLineCtrl”
to listen SignalREvent published by “EventBus” and refresh chart
• Modify “factories.js -> 03_myapp_integrateDualAxesCtrl” to listen SignalREvent published by “EventBus” and refresh chart
• Modify “factories.js -> 03_myapp_integrateMultiAxesCtrl” to listen SignalREvent published by “EventBus” and refresh chart
• Modify “factories.js -> 03_myapp_integrateGauageCtrl” to listen SignalREvent published by “EventBus” and refresh chart

Integration with SignalR
1. Select “08_AngularWithSignalR/index.html” and Hit “F5” to run
2. Open Multi-Browers to see charts reflect changes whenever C/U/D operations occurred
Demo

Next Session:AngularJS + Highchart + Asp.Net WebApi2 + SignalR2 + Entity Framework6