994 quick-start guide 070910 - keynet laser 994 - quick...select : key search select : car model...
TRANSCRIPT

©2010 Bianchi USA, Inc. All Rights Reserved.

How to turn OFF the machine1. Select BACK TO MAIN MENU from any screen
4. Screen will display NOW YOU CAN TURN OFF THE MACHINE.
2. Select: EXIT 3. Select: OFF
How to connect cables and turn the machine ON
1. Attach the 9-pin connector cable to the LOWER port on the back of the console AND to the back of the machine. SECURE WITH ATTACHED SCREWS!
2. Attach power cord to back of machine and plug into a properly grounded outlet.
3. Make sure the ON/OFF switch above the power cord is to the ON position.
4. Rotate the Emergency Stop button towards the back of the machine until it releases outward.
5. The machine will now begin to start-up. This process takes a few seconds. Proceed with Password Entry.
5. Press the Emergency Stop Button to turn OFF the machine.
Setting up the
©2010 Bianchi USA, Inc. All Rights Reserved.
Do Not Install Jaw Until Instructed on Page 2 of this Guide
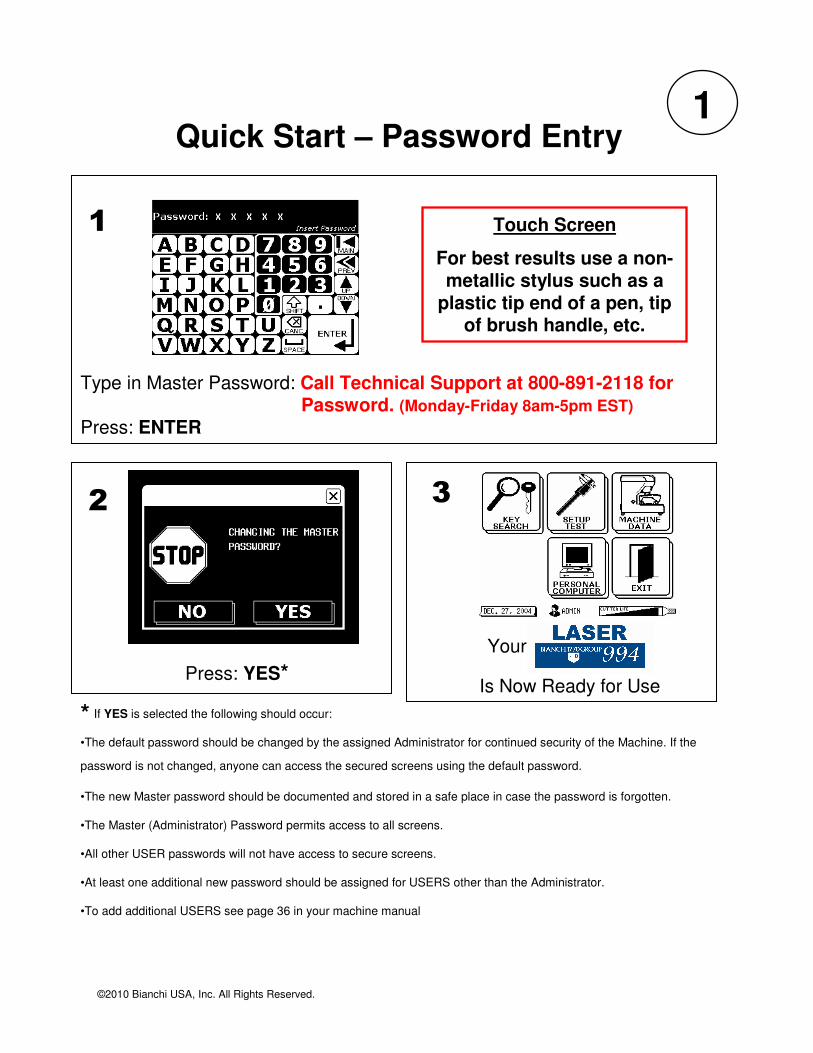
1
Type in Master Password: Call Technical Support at 800-891-2118 for Password. (Monday-Friday 8am-5pm EST)
Press: ENTER
Is Now Ready for Use
If YES is selected the following should occur:
•The default password should be changed by the assigned Administrator for continued security of the Machine. If the
password is not changed, anyone can access the secured screens using the default password.
•The new Master password should be documented and stored in a safe place in case the password is forgotten.
•The Master (Administrator) Password permits access to all screens.
•All other USER passwords will not have access to secure screens.
•At least one additional new password should be assigned for USERS other than the Administrator.
•To add additional USERS see page 36 in your machine manual
*
Quick Start – Password Entry
Press: YES*
Touch Screen
For best results use a non-metallic stylus such as a
plastic tip end of a pen, tip of brush handle, etc.
Your
©2010 Bianchi USA, Inc. All Rights Reserved.

IMPORTANT
©2010 Bianchi USA, Inc. All Rights Reserved.

2
1. Select: Setup/Test
2. Select: Setup
3. Select: Jaw Setup
4. Select: Desired Jaw (use DOWN arrow to select other jaws). Press: Enter
Install Jaw to far left of carriage until it stops. CLAMP TIGHT WITH JAW LEVER.
5. Insert the SILVER TEMPLATE. (metal bar with key ring in accessory kit). Hold blank FLAT in jaw & press down while tightening. Press: YES to calibrate jaw
6. SETUP OK – Remove TEMPLATE
Press: OK
Jaw Calibration Procedure
©2010 Bianchi USA, Inc. All Rights Reserved.

Cutter Calibration Procedure3
Calibrate the Jaw(s) before calibrating the cutter. (See JAW CALIBRATION PROCEDURE ON PAGE 2). This will ensure proper key cutting.
1. Select:Setup Test
2. Select:Setup
3. Select:Cutter Setup
4. Insert Brass Test Blank (from toolbox). Press: YES
6. Cutter will notch brass blank.
7. Remove ALL chips from key with brush.
Press: YES
8. Tracer will verify calibration.
Press: OK. Remove blank.
5. The tracer will locate the jaw.
For initial setup, go directly to Step 3 after
calibrating jaws.
©2010 Bianchi USA, Inc. All Rights Reserved.

How to Cut by Code
Select: Key Search Select : Search by Code
Enter Desired Key Code Press: ENTER
Follow screen prompts –Insert correct Jaw and clamp tight.Insert key blank - Press down on blank while clamping jaw tight.Press: YES
Verify key code is correctPress: ENTER
If desired vehicle is not displayed–Touch: Down Arrow to view additional vehicles with similar codes.Press: Desired Make/ModelPress: ENTER
If required, Enter Your Password:
Follow on-screen prompts until cutting is complete.
4
Key blank reference is displayed Press: Enter
©2010 Bianchi USA, Inc. All Rights Reserved.

How to Cut by Decode
Select : Key Search Select : Car Model Selection
5A
If desired Make is not displayed–Touch: Down Arrow to view additional vehicles with similar codes.Select: Desired MakePress: ENTER
If desired Model is not displayed–Touch: the Down Arrow to view additional vehicles with similar codes.Select: Desired ModelPress: ENTER
If desired Year range is not displayed–Touch: Down Arrow to view other key styles.Select: Desired Year rangePress: ENTER
Select : Cut by Decode
Continue
Decode Metal Keys Only! Do Not Decode Plastic Keys!
©2010 Bianchi USA, Inc. All Rights Reserved.

Insert Jaw and clamp tight.Insert ORIGINAL key blank- press down on blank while clamping jaw tight. Press: YES
BRUSH OFF ALL CHIPS -Turn key over and press down on blank while clamping jawtight. Press: YES
Decoding InProcess
Verify Decoded KeyPress: Enter
5B
Key blank reference list is displayedPress: ENTER
Remove ORIGINAL key. Insert new key blank- press downOn blank while clamping jaw tight.Press: YES
How to Cut by Decode (cont.)
©2010 Bianchi USA, Inc. All Rights Reserved.

How to Replace the Cutter 6
Reset Cutter Counter? Press: YES (only if cutter is brand new)
Select: SETUP TEST
Select: SETUP
Select: CUTTER CHANGE
** DO NOT INSTALL CUTTER ** – Press CONTINUE
1. Insert RED rod through hole in top of machine
2. Rotate rod until it drops into position
3. Press down to lock onto cutter
4. Rotate until arrow on RED rod points left (9 o’clock position)
5. Insert LONG T-wrench into black collar on left side of cutter guard
6. Loosen 4 turns. Leave wrench in place
7. Remove RED rod with cutter attached
8. DO NOT INSTALL NEW CUTTER AT THIS TIME!!!
9. Press: CONTINUE
10. Insert new cutter on RED rod – Pressing in until It clicks
11. Insert RED rod with new cutter through hole in the top of the machine
12. Rotate until cutter RESTS LIGHTLY on the SILVER DOT on the jaw
13. Tighten setscrew with the Long T-wrench
14. Remove T-wrench and RED rod – Press: YES
©2010 Bianchi USA, Inc. All Rights Reserved.

How to Change the Tracer7
1. Remove Jaw
2. Make sure the RED lever is flipped to the right
3. Remove the chip tray by lifting up the front of tray and tilting tray backward
4. CAREFULLY slide the tray to the left. BE SURE NOT TO HIT THE TRACER
1. Use small T-wrench to loosen tracer setscrew.
2. Insert into hole in right side of shield
3. Unscrew 4 turns
4. Pull out tracer
5. You may use pliers to remove the tracer if it is broken or bent.
1. Install new tracer as far is it will go up - you cannot go too far.
2. Be sure flat side of tracer is to the right to allow the setscrew to seat properly.
3. Tighten setscrew. DO NOT OVER TIGHTEN!
4. SEE JAW SETUP AND CUTTER SETUP INSTRUCTIONS ON PAGES 2 & 3.
©2010 Bianchi USA, Inc. All Rights Reserved.

How to Update Software8
1. Select: Setup Test
2. Select: Update Software
3. Select: Smart Media
4. When prompted, insert Smart Media in slot on back of console.
Press: OK
5. The machine will automatically update and display “Update OK”
Remove the Smart Media card ONLY after password screen is again displayed.
©2010 Bianchi USA, Inc. All Rights Reserved.

Short Form Instructions
For Technical Support call 1-800-891-2118
©2010 Bianchi USA, Inc. All Rights Reserved.
Start

Bianchi 994 Replacement Parts List
B3318Automatic Vacuum Attachment
B33172.5mm T-wrench (Short)
B33163mm T-wrench (Long)
B3352Infiniti Adaptors
B3326Fan Filter
B3314Blue "D" Jaw
B3313Green "C" Jaw
B3312Gray "B" Jaw
B3311Red "A" Jaw
B3354Jaw calibration template
B3319Cutter setup blanks (5pk)
B3353Honda test blanks (5pk)
B3315Plunger Tool
B3310Tracer
B3320Universal 2.5mm cutter
Part NumberDescription