antoniox 12 luglio 2006 bmw + suzuki + kawasaki + scooter...
TRANSCRIPT

1 of 23
SOSTITUZIONE ED EQUILIBRATURA DEGLI PNEUMATICI FAI-DA-TE Antoniox 12 Luglio 2006 BMW + Suzuki + Kawasaki + scooter del fratello E' alfin giunto il momento di cambiare le gomme alla Rosina. E tornano i problemi di sempre. Ci sono un paio di officine che si occupano dello smontaggio ma bisogna acquistare da loro altri-menti rispondono "no, guarda, sono troppo occupato oggi"... e acquistare da loro vuol dire subire un ricarico che non esito a definire eccessivo. I gommisti le stallonano e rimontano (mugugnando oppure facendomi notare gentilmente che anche loro vendono Metz) ma non equilibrano, uno perchè non hanno l'attrezzatura e l'altro perchè "ci vuole troppo tempo per montare l'accessorio" (???) Non mi dispiacerebbe attrezzarmi e provare a fare da me anche perchè ho un set di cerchi di ricam-bio, male che vada non resto a piedi. Ho dato un'occhiata al video http://video.google.com/videoplay?do...781&pr=goog-sl ed ora vorrei porre alcune domande. Innanzitutto : ne vale la pena? ATTREZZATURA 1 attrezzo svita-valvole per sgonfiare rapi-damente e completamente la gomma.
3 ferri smontagomme o cacciagomme, lunghezza 400 mm circa. http://www.redracingparts.com/it/italy.htmli offre al prezzo di 6 € l’uno + trasporto. http://shop.crosshop.it/ li offre al prezzo di 9 € l’uno IVA inclusa + trasporto.
3 salva-cerchio di plastica. Servono per non graffiare il cerchio quan-do si usano i ferri cacciagomme. http://shop.crosshop.it/ li offre al prezzo di 9,50 € l’uno IVA inclusa + trasporto. Possono sostituirli alcune strisce angolari di plastica ricavate dai flaconi dell'olio.
Pasta lubrificante per montaggio gomme. E’ una specie di sapone che non indurisce, asciuga rapidamente, non corrode la gomma e il cerchio. http://shop.crosshop.it/ offre il secchiello da 1 kg al prezzo di 17 € IVA inclusa + trasporto.
2 of 23
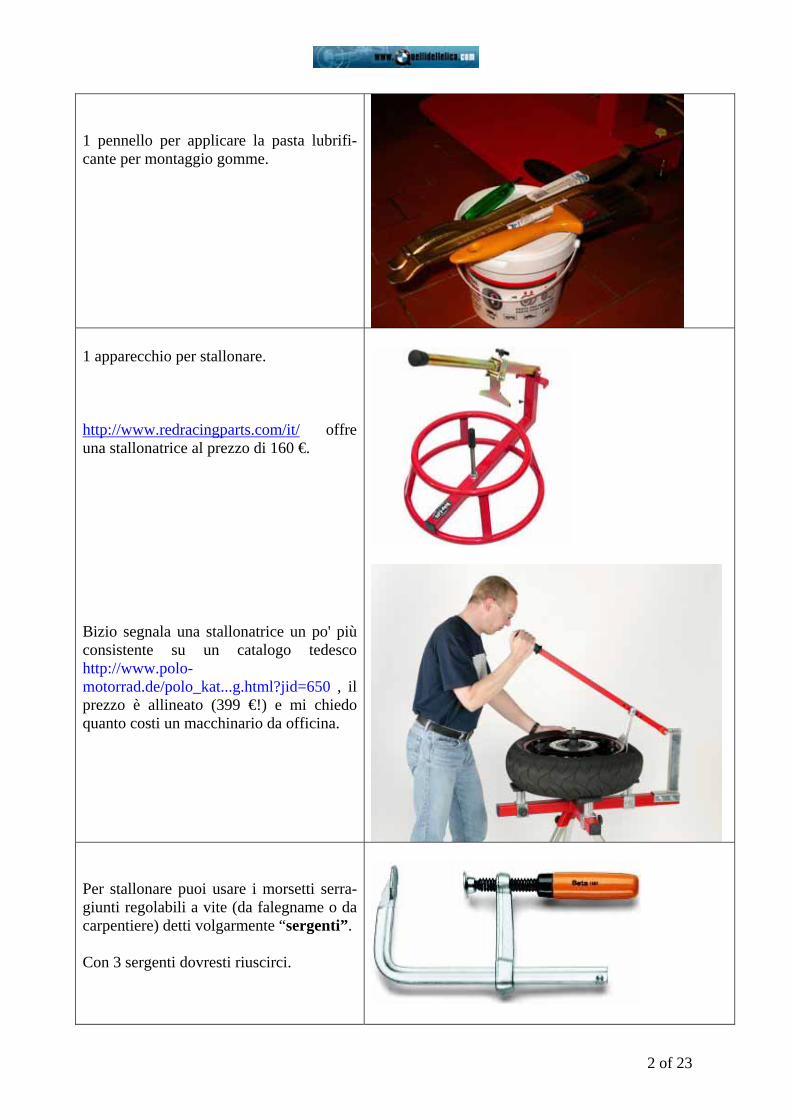
1 pennello per applicare la pasta lubrifi-cante per montaggio gomme.
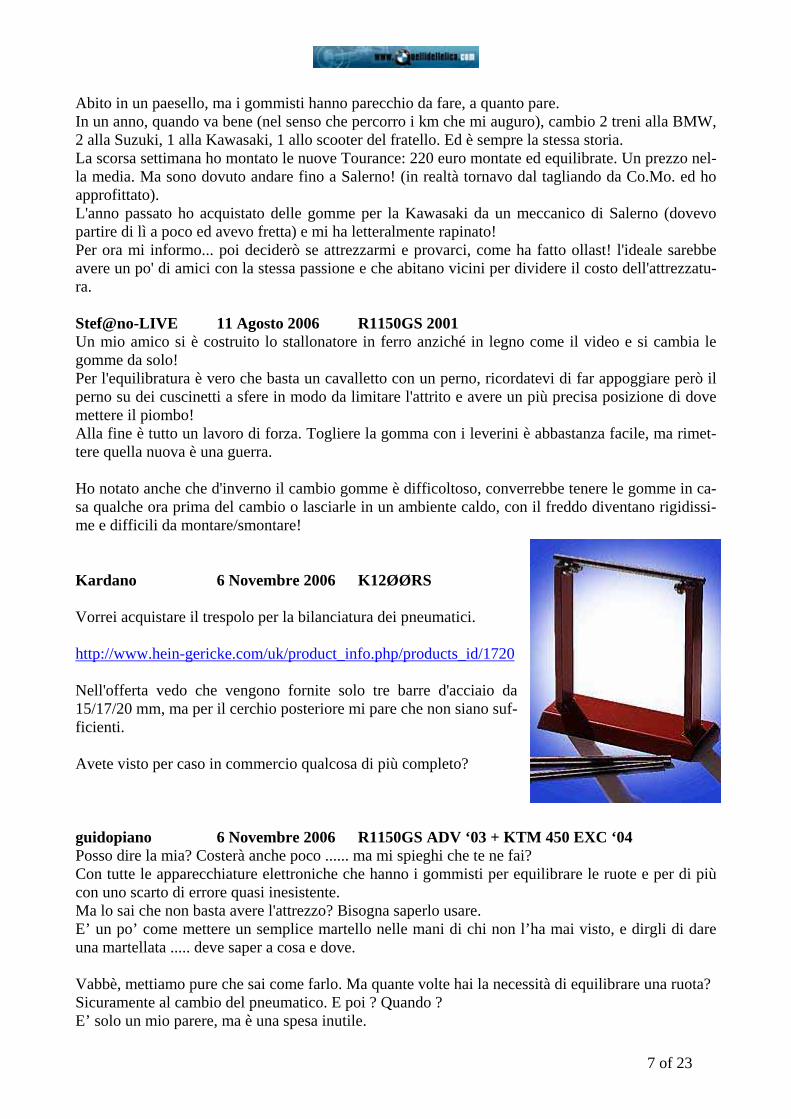
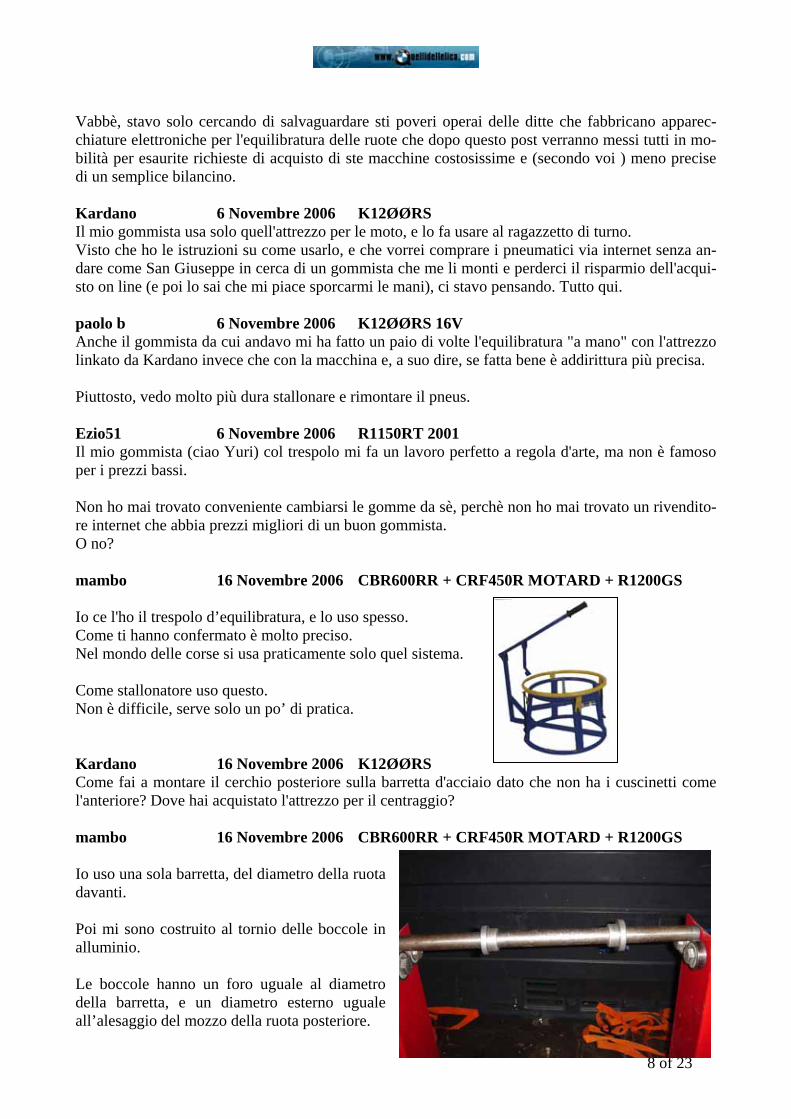
1 apparecchio per stallonare. http://www.redracingparts.com/it/ offre una stallonatrice al prezzo di 160 €. Bizio segnala una stallonatrice un po' più consistente su un catalogo tedesco http://www.polo-motorrad.de/polo_kat...g.html?jid=650 , il prezzo è allineato (399 €!) e mi chiedo quanto costi un macchinario da officina.
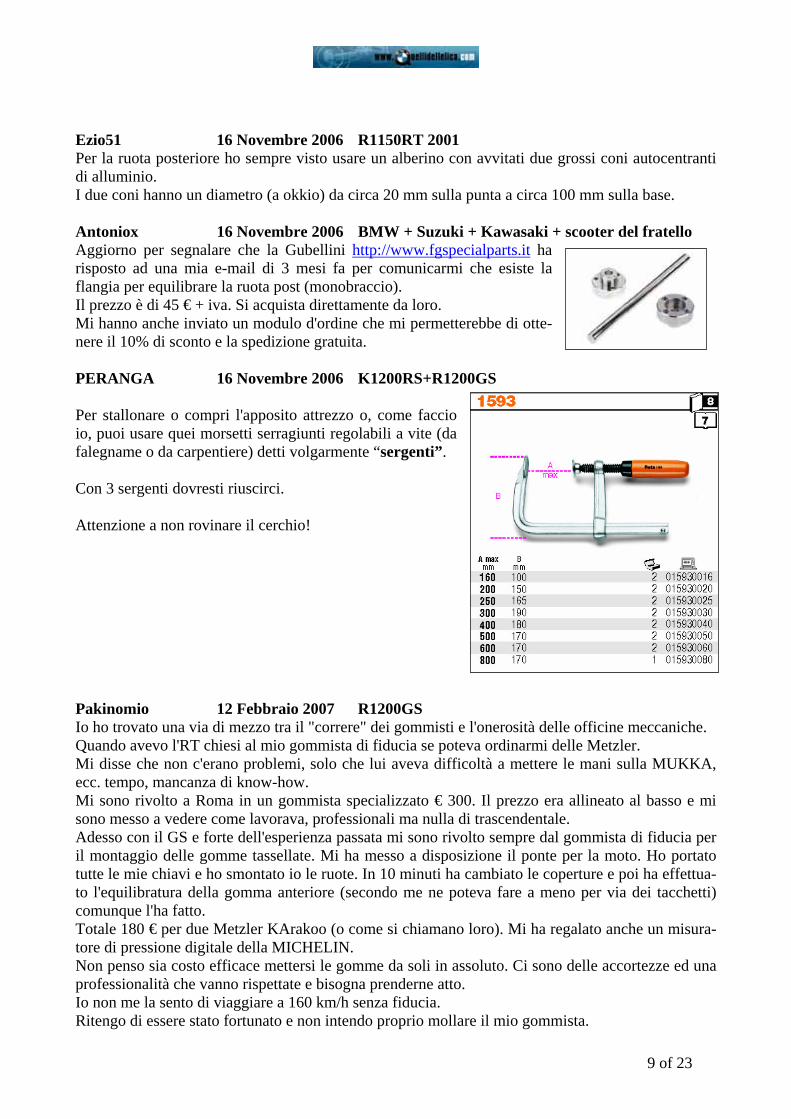
Per stallonare puoi usare i morsetti serra-giunti regolabili a vite (da falegname o da carpentiere) detti volgarmente “sergenti”. Con 3 sergenti dovresti riuscirci.

3 of 23
2 tavole di legno per appoggiare il cerchio sul pavimento senza danneggiare il mozzo o il disco.
Foto non disponibile
Compressore. Basta anche una pompa a pedale da 5/10 euro che raggiunga 4/5 atm. Ci sono dei compressorini a 12 V che rag-giungono 12 atm (13 euro).
1 Pistola di gonfiaggio con manometro di qualità, tarato e ritarabile. Yuri consigliava l'EuroDainu della Miche-lin, che si trova a 75 € + IVA + spedizio-ne, distribuito anche da Wurth. Per chi vuol spendere meno, il compresso-rino o la pompa a pedale può essere af-fiancato da un piccolo manometro digitale.
http://www.redracingparts.com/it/italy.htm offre un’equilibratrice statica, con bolla per livellarla, a 106 € + IVA + spedizione + Adattatore per ruote BMW

4 of 23
https://www3.polo-expressversand.com/ offre un’equilibratrice statica, con bolla per livellarla, a 69 € + IVA + spedizione + Adattatore per ruote BMW
piombi adesivi per l'equilibratura http://www.laghiar-franken.it/ offre una confezione di barre con suddivisione di 8 x 5 g, larghezza 10,0 mm, altezza 4,7 mm incluso nastro adesivo. Unità d'imballo: 40 g / 25 pezzi
SOSTITUZIONE DEL PNEUMATICO Nota: Se il pneumatico è freddo può essere più difficoltoso l'inserimento nel cerchio. Si suggerisce quindi, nella stagione invernale, di tenere qualche ora gli pneumatici in luogo caldo. (A) Sonfiare il pneumatico e smontare la valvolina interna. (B) Stallonare il pneumatico utilizzando l’apposito apparecchio o i morsetti sergenti. Rigirare la ruota ed allo stesso modo si stallonano i fianchi anche dall'altra parte. (C) Lubrificare col pennello il bordo libero interno del cerchio, tenendo lo pneumatico schiacciato con le ginocchia. (D) Sistemare i proteggi-cerchio di plastica. (E) Separare la gomma dal cerchio dandoci dentro con i ferri.

5 of 23
(F) Pulire il cerchio ora che è nudo e crudo. (G) Lubrificare il primo bordo esterno del nuovo pneumatico. (H) Posizionare il nuovo pneumatico sul cerchio in modo che i puntini rossi o gialli di bilanciamen-to coincidano con la valvola sul cerchio. Verificare anche il senso di rotazione indicato da una grossa freccia sul fianco del pneumatico. (I) Inserire il nuovo pneumatico sul cerchio. Durante il montaggio, la parte di fianco già dentro il cerchio deve stare al centro del canale, altri-menti il tallone della gomma forzerà troppo. Terminare l’inserimento della gomma sistemando i proteggi-cerchio di plastica e utilizzando i ferri. (L) Inserire analogamente anche il "secondo bordo" del pneumatico. (M) Gonfiare bene finchè non si sentono 2 "scoppi" a significare che il pneumatico ha aderito per-fettamente al cerchio. (N) Rimontare la valvolina. (O) Gonfiare la gomma con precisione alla pressione corretta. EQUILIBRATURA (P) Prima di usare il trespolo equilibratore ricordarsi di livellarlo usando la bolla incorporata. (Q) Per coloro che intendono fare cambio tra gomme stradali e da off e viceversa (magari per una giornata) è buona norma fare un segno su cerchio e pneumatico prima di smontarlo. Al rimontaggio, allineando i segni, si avrà la garanzia di aver ripristinato l'equilibratura precedente. (R) Mettere la ruota sull'equilibratrice, al centro, e vedere se si muove. (S) Se non è equilibrata il cerchio tenderà a girare portando il punto più pesante verso il basso. Fare varie prove facendo girare la ruota partendo da diverse posizioni. Posizionarla di volta in volta pazientemente facendogli fare 1/4 di giro e identificare il punto più pesante. Alla fine una volta individuato il punto più pesante, mettere un peso perfettamente sulla verticale del punto più pesante (appoggiarlo solo, senza fissarlo, magari bisognerà cambiarlo). (T) Far girare di nuovo la ruota e vedere che succede. Se si ferma sempre nello stesso punto di pri-ma aggiungere gradualmente altro peso, se cambia provare a togliere peso. Quando alla fine la ruota comincerà a fermarsi sempre in punti differenti allora l'equilibratura sarà fatta. (U) Una volta terminata l'operazione, fissare per bene i pesi. (V) Rimontare il cerchio sulla mukka e via.

6 of 23
Alpheus 12 Luglio 2006 Ktm 990 Adventure + Suzuki Dr 350 S Il problema mi sa che è stallonare il pneumatico con le leve ... rovini tutto il cerchio greenmanalishi 12 Luglio 2006 FIREBLADE 1000 - R1150GS Se guardi sul sito di red racing parts vendono la stallonatrice manuale ed anche l'equilibratrice, mi pare che con 250 euri ti compri tutto. mammolo 17 Luglio 2006 MC65 colla + R1100GS 1994 Per equilibrare il tutto, basta un perno e due cavalletti: - infili il perno nella ruota (cerchio + pneumatico montato e gonfiato) e l'appoggi sui due cavalletti. - vedi da che parte gira la ruota; quella sarà la parte più pesante della ruota. - si applicano i contrappesi a tentativi fino a quando la ruota, girata a mano di un quarto di giro per volta, rimane ferma dove l'abbiamo posta. Ti ringrazio per lo spunto che hai dato. Credo che anch'io proverò a cambiare i copertoni da solo. Il gommista era l'ultimo a mettere le mani sulla mia moto (non vado da un meccanico da 5 anni) e credo che non ce le metterà più neanche lui. Antoniox 17 Luglio 2006 BMW + Suzuki + Kawasaki + scooter del fratello Ok, chiaro che per equilibrare il tutto basta un perno e due cavalletti. Ma resta il problema per la ruota posteriore (con monobraccio). Ci vuole per forza una flangia che lo tenga perpendicolare al perno. Nulla che un tornitore non pos-sa realizzare in 10 minuti. Ma a quel punto dovrebbe essere solidale col perno stesso e quindi il per-no dovrebbe ruotare su cuscinetti... Insomma, per il posteriore serve l'equilibratrice o sbaglio? Ollast 7 Agosto 2006 R1100RS - F650GS/Dakar Giusto qualche giorno fa ho cambiato in casa le gomme del Dakar. Nessuno smonta-valvola: avendo camera d'aria, il problema non si poneva. Per sfilare lo stelo della valvola basta un cappelletto apposito con il dentino che lo aggancia. Ho stallonato le gomme usando il cavalletto laterale dell’altra moto. Il resto è stata una estenuante questione di wrestling tra me e le gomme. Avrei voluto avere i profili di plastica proteggi-cerchi: qualunque altro accrocchio (cartone, pezzo di bottiglia in pet, trancio di camera d'aria, ecc.) mostrava invariabilmente la tendenza a saltare. E' stato determinante l'apporto del lubrificante speciale che i gommisti mi dicono non essere in commercio ma di cui mi hanno regalato una piccola quantità. In precedenti occasioni avevo usato sapone per i piatti, ma da più parti questo viene sconsigliato in quanto, diversamente dal lubrificante per gomme, risulta persistente. Nessuna equilibratura: in questo caso non ho fatto altro che rimontare due gomme che avevo smon-tato in precedenza e di cui avevo segnato la posizione rispetto alla valvola. Se dovessi fare i cambi di gomma con una maggiore sistematicità prenderei in considerazione quel-l'attrezzatura di cui al link, ma per ora mi accontento di sapere come si fa: della serie "impara l'arte e mettila da parte". Antoniox 9 Agosto 2006 BMW + Suzuki + Kawasaki + scooter del fratello Premetto di non aver mai sostituito da solo uno pneumatico. Ho difficoltà a trovare un gommista che mi faccia il lavoro bene ed a costi accettabili. E' quasi impossibile trovarne uno che smonti e rimonti le gomme non comprate da lui.
7 of 23
Abito in un paesello, ma i gommisti hanno parecchio da fare, a quanto pare. In un anno, quando va bene (nel senso che percorro i km che mi auguro), cambio 2 treni alla BMW, 2 alla Suzuki, 1 alla Kawasaki, 1 allo scooter del fratello. Ed è sempre la stessa storia. La scorsa settimana ho montato le nuove Tourance: 220 euro montate ed equilibrate. Un prezzo nel-la media. Ma sono dovuto andare fino a Salerno! (in realtà tornavo dal tagliando da Co.Mo. ed ho approfittato). L'anno passato ho acquistato delle gomme per la Kawasaki da un meccanico di Salerno (dovevo partire di lì a poco ed avevo fretta) e mi ha letteralmente rapinato! Per ora mi informo... poi deciderò se attrezzarmi e provarci, come ha fatto ollast! l'ideale sarebbe avere un po' di amici con la stessa passione e che abitano vicini per dividere il costo dell'attrezzatu-ra. Stef@no-LIVE 11 Agosto 2006 R1150GS 2001 Un mio amico si è costruito lo stallonatore in ferro anziché in legno come il video e si cambia le gomme da solo! Per l'equilibratura è vero che basta un cavalletto con un perno, ricordatevi di far appoggiare però il perno su dei cuscinetti a sfere in modo da limitare l'attrito e avere un più precisa posizione di dove mettere il piombo! Alla fine è tutto un lavoro di forza. Togliere la gomma con i leverini è abbastanza facile, ma rimet-tere quella nuova è una guerra. Ho notato anche che d'inverno il cambio gomme è difficoltoso, converrebbe tenere le gomme in ca-sa qualche ora prima del cambio o lasciarle in un ambiente caldo, con il freddo diventano rigidissi-me e difficili da montare/smontare! Kardano 6 Novembre 2006 K12ØØRS Vorrei acquistare il trespolo per la bilanciatura dei pneumatici. http://www.hein-gericke.com/uk/product_info.php/products_id/1720 Nell'offerta vedo che vengono fornite solo tre barre d'acciaio da 15/17/20 mm, ma per il cerchio posteriore mi pare che non siano suf-ficienti. Avete visto per caso in commercio qualcosa di più completo? guidopiano 6 Novembre 2006 R1150GS ADV ‘03 + KTM 450 EXC ‘04 Posso dire la mia? Costerà anche poco ...... ma mi spieghi che te ne fai? Con tutte le apparecchiature elettroniche che hanno i gommisti per equilibrare le ruote e per di più con uno scarto di errore quasi inesistente. Ma lo sai che non basta avere l'attrezzo? Bisogna saperlo usare. E’ un po’ come mettere un semplice martello nelle mani di chi non l’ha mai visto, e dirgli di dare una martellata ..... deve saper a cosa e dove. Vabbè, mettiamo pure che sai come farlo. Ma quante volte hai la necessità di equilibrare una ruota? Sicuramente al cambio del pneumatico. E poi ? Quando ? E’ solo un mio parere, ma è una spesa inutile.
8 of 23
Vabbè, stavo solo cercando di salvaguardare sti poveri operai delle ditte che fabbricano apparec-chiature elettroniche per l'equilibratura delle ruote che dopo questo post verranno messi tutti in mo-bilità per esaurite richieste di acquisto di ste macchine costosissime e (secondo voi ) meno precise di un semplice bilancino. Kardano 6 Novembre 2006 K12ØØRS Il mio gommista usa solo quell'attrezzo per le moto, e lo fa usare al ragazzetto di turno. Visto che ho le istruzioni su come usarlo, e che vorrei comprare i pneumatici via internet senza an-dare come San Giuseppe in cerca di un gommista che me li monti e perderci il risparmio dell'acqui-sto on line (e poi lo sai che mi piace sporcarmi le mani), ci stavo pensando. Tutto qui. paolo b 6 Novembre 2006 K12ØØRS 16V Anche il gommista da cui andavo mi ha fatto un paio di volte l'equilibratura "a mano" con l'attrezzo linkato da Kardano invece che con la macchina e, a suo dire, se fatta bene è addirittura più precisa. Piuttosto, vedo molto più dura stallonare e rimontare il pneus. Ezio51 6 Novembre 2006 R1150RT 2001 Il mio gommista (ciao Yuri) col trespolo mi fa un lavoro perfetto a regola d'arte, ma non è famoso per i prezzi bassi. Non ho mai trovato conveniente cambiarsi le gomme da sè, perchè non ho mai trovato un rivendito-re internet che abbia prezzi migliori di un buon gommista. O no? mambo 16 Novembre 2006 CBR600RR + CRF450R MOTARD + R1200GS Io ce l'ho il trespolo d’equilibratura, e lo uso spesso. Come ti hanno confermato è molto preciso. Nel mondo delle corse si usa praticamente solo quel sistema. Come stallonatore uso questo. Non è difficile, serve solo un po’ di pratica. Kardano 16 Novembre 2006 K12ØØRS Come fai a montare il cerchio posteriore sulla barretta d'acciaio dato che non ha i cuscinetti come l'anteriore? Dove hai acquistato l'attrezzo per il centraggio? mambo 16 Novembre 2006 CBR600RR + CRF450R MOTARD + R1200GS Io uso una sola barretta, del diametro della ruota davanti. Poi mi sono costruito al tornio delle boccole in alluminio. Le boccole hanno un foro uguale al diametro della barretta, e un diametro esterno uguale all’alesaggio del mozzo della ruota posteriore.
9 of 23
Ezio51 16 Novembre 2006 R1150RT 2001 Per la ruota posteriore ho sempre visto usare un alberino con avvitati due grossi coni autocentranti di alluminio. I due coni hanno un diametro (a okkio) da circa 20 mm sulla punta a circa 100 mm sulla base. Antoniox 16 Novembre 2006 BMW + Suzuki + Kawasaki + scooter del fratello Aggiorno per segnalare che la Gubellini http://www.fgspecialparts.it ha risposto ad una mia e-mail di 3 mesi fa per comunicarmi che esiste la flangia per equilibrare la ruota post (monobraccio). Il prezzo è di 45 € + iva. Si acquista direttamente da loro. Mi hanno anche inviato un modulo d'ordine che mi permetterebbe di otte-nere il 10% di sconto e la spedizione gratuita. PERANGA 16 Novembre 2006 K1200RS+R1200GS Per stallonare o compri l'apposito attrezzo o, come faccio io, puoi usare quei morsetti serragiunti regolabili a vite (da falegname o da carpentiere) detti volgarmente “sergenti”. Con 3 sergenti dovresti riuscirci. Attenzione a non rovinare il cerchio! Pakinomio 12 Febbraio 2007 R1200GS Io ho trovato una via di mezzo tra il "correre" dei gommisti e l'onerosità delle officine meccaniche. Quando avevo l'RT chiesi al mio gommista di fiducia se poteva ordinarmi delle Metzler. Mi disse che non c'erano problemi, solo che lui aveva difficoltà a mettere le mani sulla MUKKA, ecc. tempo, mancanza di know-how. Mi sono rivolto a Roma in un gommista specializzato € 300. Il prezzo era allineato al basso e mi sono messo a vedere come lavorava, professionali ma nulla di trascendentale. Adesso con il GS e forte dell'esperienza passata mi sono rivolto sempre dal gommista di fiducia per il montaggio delle gomme tassellate. Mi ha messo a disposizione il ponte per la moto. Ho portato tutte le mie chiavi e ho smontato io le ruote. In 10 minuti ha cambiato le coperture e poi ha effettua-to l'equilibratura della gomma anteriore (secondo me ne poteva fare a meno per via dei tacchetti) comunque l'ha fatto. Totale 180 € per due Metzler KArakoo (o come si chiamano loro). Mi ha regalato anche un misura-tore di pressione digitale della MICHELIN. Non penso sia costo efficace mettersi le gomme da soli in assoluto. Ci sono delle accortezze ed una professionalità che vanno rispettate e bisogna prenderne atto. Io non me la sento di viaggiare a 160 km/h senza fiducia. Ritengo di essere stato fortunato e non intendo proprio mollare il mio gommista.

10 of 23
Ezio51 19 Febbraio 2007 R1150RT 2001 Guardate un po’ questo magnifico reportage fotografico che casca a fagiolo. http://www.bmwmoa.org/forum/showthread.php?t=15338 JimVonBaden1 05 Febbraio 2007 R1200GS 2005 Since I am often asked to help people change their tires, I thought it would be cool to make up a lit-tle tutorial about how it is done. It wont substitute for direct experience, but it should give you a start. I will list torque values where appropriate, as well as any hints that might help. This tire was about worn out anyhow, but the nail in it made me do it sooner. See this thread on how to plug a tire. If you plan on doing it yourself, it helps to have an assistant. Mine for the evening was my GF Tina. She is assisting by taking pictures! Normally your assistant will help in a more di-rect way!
Bike on the centerstand, remove the lug bolts. On the 12GS/ST/RT it is a T-55 Torx socket. No need to remove the brake caliper on the 12 series, though some 1100/1150 R bikes and K bikes need the caliper removed as the rotor comes off with the wheel.
Once the wheel is off, remove the valve cap and valve core with the removal tool. I always have a couple spare valve cores in case one is bad.

11 of 23
Breaking the bead is made fairly easy with the HF tire changing tool with motorcycle adapter. I make sure not to let the edge of the tool touch the edge of the wheel. I am pretty good at avoiding scratches to the wheel, but it takes practice. Once you have pushed the bead down off the wheel, you need to push it off all the way around by hand. Flip the wheel over and do it again. Notice that I use a piece of thick vinyl under the wheel to protect it. I also make sure to not break the bead near the valve core with the machine. I am using the removal bar for leverage. It probably looks harder than it is. Then I mount the rim on the HF tire clamp. I make sure the clamps are in the right position to allow the center of the wheel to be centred. That way I can install the center levering bar. Don’t be afraid to pull it down snug, your wheel can take it. I also have nylon blocks, made by my friend Kermit, that protect the wheel. The HF clamps are painted metal, and will scratch the wheels. These nylon clamps also work better with GS wheels. Using a lube, either special tire lube, or dish-washing liquid and soap, make sure you apply plenty to the tire bead, and rim. Spray WD40 is also good around the rim bead.
I also use a piece of leather over the end of the HF tire bar to protect the rim. I lube it lightly as well. Note: There are a few good other bars out there with nylon ends, like the Nomar, but I find the HF init works fine, and came free.

12 of 23
Insert the thin end of the bar in between the tire and rim.
Catch the lip of the bead on the tire and pull the bar over.
Hook the bar on the center levering bar and begin to pull. The bar will slide along removing the tire. You may need to hold the tire to keep it from moving on the clamps, and you may need to lift up a little to make sure the tire doesn’t slip back on.
Pull it all the way around, or until the upper bead comes completely loose.

13 of 23
With the upper bead off, you can lift the tire and lube the lower bead.
This is a little tricky, but not bad with a little practice. Next you lift the tire and insert the removal tool under the lower bead. Then twist the bar to lift the bead.
As before, you pull the lever around the bar while lifting on the tire.
As you come around the bar, the tire will come completely free. But don’t remove the tire yet. Let it rest on the rim and check the direction of the rotation.

14 of 23
It is a good idea to check the rotation, see ar-row, then place the tire on the ground in the same orientation as it came off, just in case you forgot the direction.
Here is the wheel on the stand. It is a food look at how it fits. At this time it is a good idea to clean the inside of the rim, and make sure there is no damage, and no burrs on the rim. Some people actually clean the wheel now as well!
Here is a nice look at how Kermit’s rim protec-tors work on the HF unit. And no, he doesn’t make them publicly. You can make your own from a 1” square block of nylon. We also add small sections of bicycle inner tube to keep the rim from slipping.
Clip the tires from the package, and ensure they are the correct size. (You should probably do this BEFORE remov-ing your old tires and wheels.)

15 of 23
Check the rotation of the new tire. Make sure it is pointing in the same direction. Ignore the tread pattern unless you know that you want to put it on backwards (NOT recom-mended unless you KNOW what you are do-ing).
Make sure you flip the tire over and lube the bottom side thoroughly for installation. Note: I said flip, but keep in mind some tires have a directional arrow only on one side, so the arrow may be on the bottom. Just make sure you have the orientation cor-rect.
Flip the tire over and push one side on, just the lower bead. At this time you can use the heal of your hand, or a rubber mallet to force the tire over the rim.
Keep the lower bead centred on the rim, in the indented spot, and the upper bead above the rim. It takes a bit of work on some tires, but isn’t that hard. Occasionally you may have to “spoon” the tire on the last little bit. See this technique later.

16 of 23
Once the lower bead is all the way on, lube the upper bead thoroughly.
I install a C-clamp on the wheel with a piece of leather, you can use rubber or plastic, to keep the bead from “walking” around as I spoon on the tire
I also insert rim protectors to prevent scratches. Notice I used zip ties on them? This is to make them retrievable if they slip off into the tire as I install it. They also help in that I can hold on to them so they don’t slip. You could use thick nylon, plastic or rubber, but these are nice in that they stay in place.
I use a 14” Motion Prow lever to “spoon” on the tires. Notice the orientation of the lever. It is precisely this shape of the lever that makes me use it. It is easy to get in, grips well, and allows a lot of leverage. Make sure the lever is used only on the rim protectors to avoid scratching the rim.

17 of 23
I have a couple of generic 9” levers that I use to hold the bead in place while I am moving the big one to the next spot. Make sure you place it under the rim protector as shown.
Here you can see I have moved over about 6 inches and am beginning to lever the tire on again.
I have moved again. Note: It is very important to keep the upper bead of the tire in the deeper middle of the rim. This gives you the needed room to be able to lever the bead over the other side of the rim. If you find the tire getting very hard, or impossi-ble to lever, you most likely need to move the bead on the opposite side into the well of the rim. It will often move out on its own. When you get near all the way around you will find that you have to lever smaller pieces of the bead. The last little bit will be hardest, but you shouldn’t have to muscle it excessively. It should pop on fairly easily. Occasionally you may need to give it a rap with a rubber mallet.

18 of 23
Remove the rim protectors and the C-clamp. Make sure there is still plenty of lube on it, as it will help the bead seat when inflating the tire.
Install the valve core and cap. Then bounce the tire several times around the circumference. This helps to set the bead.
Using a compressor with decent power. DO NOT HOLD THE TIRE NEAR THE RIM during this process. As the tire inflates it will POP onto the rim in a couple spots. If your fingers are in there you will not like the results. See the red arrow! I have had a few instances where the tire took as much as 4 bar of pressure to seat the bead. I wouldn’t generally go any higher than 3,5 bar, though I know a few who have gone as high as 5 bar. If the bead wont seat, and no air is staying in, you may have to use a ratcheting strap to com-press the tire to get the bead to seat with air pressure. Just make sure you remove the strap as soon as it takes air in and holds a few pounds. The pressure on the strap will not only make it hard to get off, but might cause the strap to come off explosively.

19 of 23
My friend Chris made this stand for me, and I attached the beamerbalancer bearings to it.
Place the beamerbalancer insert onto the wheel, ignore the rod for a moment.
Install the adapter using wing nuts and nylon washers. Then add the rod through and put on the stepped sliders with black o-ring retainers, see above, and place it on the stand.
20 of 23
Notice I leave the weights on the rim? This is because sometimes it is right on with original weights, and this way I don’t have to remove them. By the way, I did not balance this wheel. It was done for me at the MOA by the NoMar guy. I wouldn’t normally use that much weight, I would rotate the tire on the rim.
Rotate the tire 90 degrees from where it is and let go. The tire will, if not balanced, rotate on its own so that the heavy spot is down. If the weights are on, and the tire moves on its own. Remove them. If you release the tire and it doesn’t move, try again 180 degrees off, and if it still doesn’t move, the tire is balanced.
Try this several times until you are certain of where the heavy spot is, always down.
Next get some alcohol for the rim. No, not to get it drunk, but to clean it. Spray WD40 is also good around the rim bead.

21 of 23
Clean the top of the rim; opposite the heavy spot exactly 180 degrees, with alcohol to re-move grease and dirt. Note: In this picture I spun the wheel 180° to show me cleaning the wheel.
The speed the wheel spins when released will give you some clue about the weight needed, but it takes some experience. Most wheels take less than 30 grams of weight, so you shouldn’t start with more than that. I use tape to hold the weights on to test how much you need. Go through the process of checking at 90° intervals for balance. Once the wheel stops moving on its own when you re-lease it, it might move a tiny bit and that is OK, you know you have the right amount of weight in the right spot. I split the weights as evenly as possible and adhere them on both sides of the wheel. I don’t know if it helps, but it looks better, and works on car wheels.
You are now ready to remove it from the bal-ancer, and install it back on the bike. Place the wheel back on the bike and install all the lug nuts finger tight. Then torque them to 60 Nm in a crosshatch fashion.
22 of 23
Now on to the front wheel. Raise the front of the bike using a jack, like I did, or block it up with wood, or anything you choose. It doesn’t have much weight on it, and it will be stable on the centerstand. Remove the caliper bolts.
Remove the inspection sticker placard if you have one.
Tweak the caliper sideways on the rotor, this is especially important for bikes with 17” rims, as you would otherwise not be able to work the caliper off. It also spreads the pads making reinstallation much easier.
I just gently let the caliper hang by the brake line. The caliper doesn’t weigh much, and it doesn’t hurt it. However, if it bothers you, use a string or coat hanger to hang the caliper. Now do the same to the other side.

23 of 23
Next loosen the pinch bolt, but don’t remove it, just so it has no torque on it at all, a couple threads out from finger tight.
I made a tool for the 22mm axle shaft out of a 13/16” Taiwan spark plug socket. I just cut the end off. This makes it easier to carry and use, but you could use the socket on the extension back-wards to do the same thing.
Loosen the axle shaft and remove it. Be ready to catch the tire as it will drop par-tially when you pull the axle shaft out. Also catch the spacer on the left, opposite, side. Pull the axle shaft out and remove the wheel. See the above for dismounting and mounting the tire, as well as balancing it.
Install the front wheel in reverse order of re-moval, and tighten the bolts to the following torques: Front axle 50 Nm Pinch Bolt 19 Nm Caliper Bolts 30 Nm When you are done, and the bike is ready to ride, make sure you give the brakes a couple pumps to get full power back. (Servo brakes do not need this, but you should test them before riding off.) Other advice, make sure you take it pretty easy until the tires are scrubbed in. Depending on how you ride, this could be up to 200 miles.