appendix c instructions for using the ir spectrometer · appendix(c:(instructions(for ......
TRANSCRIPT

_____________________________________________________________________________________1
Appendix C: Instructions for Using the IR Spectrometer
Written by Danielle M. Solano
Department of Chemistry & Biochemistry California State University, Bakersfield
Recommended Resources
• Video ~ Infra-‐Red Spectroscopy (How IR works) http://youtu.be/DDTIJgIh86E
• Video ~ Infrared Spectroscopy (How to Interpret an IR spectrum) http://www.youtube.com/watch?v=ItW6Mj2CQKc
• Website ~ Characteristic IR Absorption Frequencies of Organic Functional Groups http://www2.ups.edu/faculty/hanson/Spectroscopy/IR/IRfrequencies.html
Safety Notes
• Remember to wear safety equipment when handling samples.
IR Spectrometer with necessary equipment
1
2 3
4 5
6
1. Adjustment Knob
2. Needle tip
3. Sample Reservoir
4. Methanol
5. Cotton Swabs
6. KimTech Wipes
Appendix C: Instructions for Using the IR Spectrometer
_____________________________________________________________________________________2
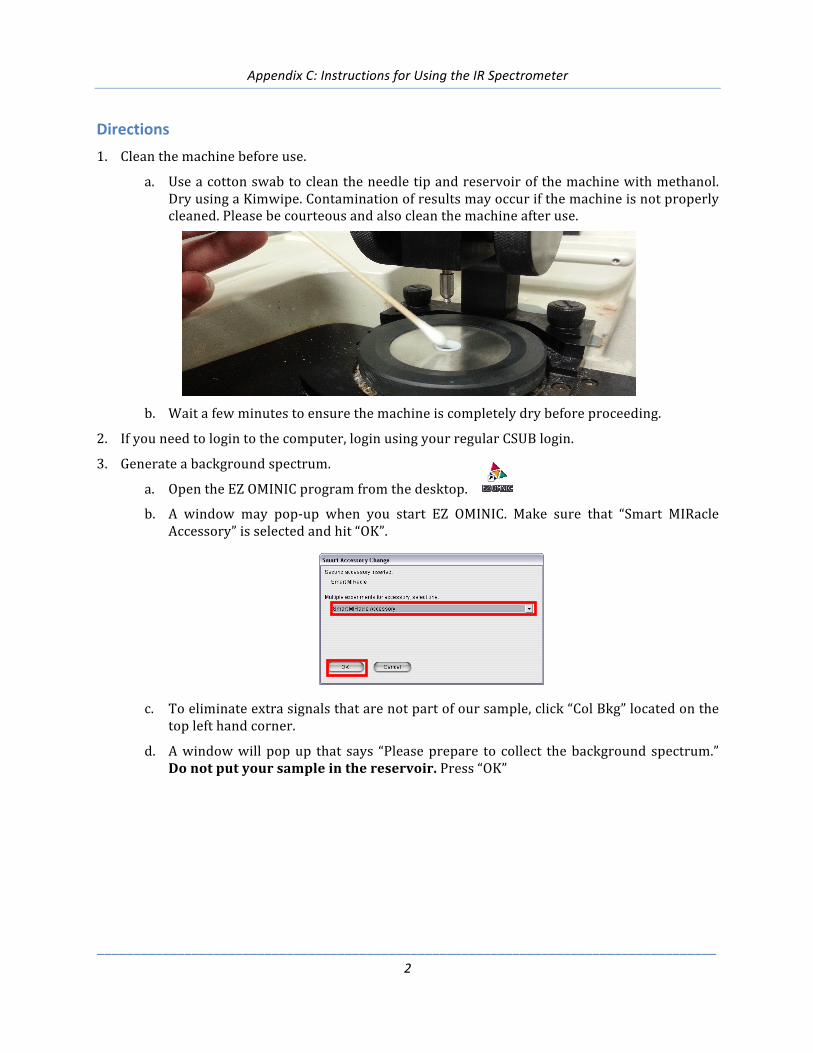
Directions 1. Clean the machine before use.
a. Use a cotton swab to clean the needle tip and reservoir of the machine with methanol. Dry using a Kimwipe. Contamination of results may occur if the machine is not properly cleaned. Please be courteous and also clean the machine after use.
b. Wait a few minutes to ensure the machine is completely dry before proceeding.
2. If you need to login to the computer, login using your regular CSUB login.
3. Generate a background spectrum.
a. Open the EZ OMINIC program from the desktop.
b. A window may pop-‐up when you start EZ OMINIC. Make sure that “Smart MIRacle Accessory” is selected and hit “OK”.
c. To eliminate extra signals that are not part of our sample, click “Col Bkg” located on the
top left hand corner.
d. A window will pop up that says “Please prepare to collect the background spectrum.” Do not put your sample in the reservoir. Press “OK”

Appendix C: Instructions for Using the IR Spectrometer
_____________________________________________________________________________________3
e. As the computer processes the noise, you should see a spectrum being generated. It
should look like the spectrum below.
f. Once the spectrum is completed, a new window will open asking if you want to add to
Window1. Click “No.”

Appendix C: Instructions for Using the IR Spectrometer
_____________________________________________________________________________________4
4. Generate your IR spectrum.
a. After the background is generated, click the “Col Smp” located on the upper left hand corner.
b. A new window should pop up asking you to enter the spectrum title. Enter your name
and/or something that describes your sample. This file will contain your IR results. Hit “OK”.
c. Another window should pop up letting you know that you can now prepare to collect
your sample spectrum. Do not press “OK” until you have loaded your sample.
d. Load your sample into the sample reservoir.
Liquid samples: Use a pipette to transfer a drop or two of sample into the reservoir. Use the adjustment knob to lower the needle tip into the reservoir so that it is completely submerged. Dry samples: Break up any large chunks of sample. Use a spatula to pack it into the reservoir. Lower the needle tip using the adjustment knob until it is covered with sample. Dry samples are usually more difficult to get an accurate reading. If the IR results do not come out cleanly, try adjusting the height of the needle tip, adding more or less sample, and/or packing the sample more tightly.
e. Once you have loaded your sample, select “OK” from the “Confirmation” window to generate your IR spectrum.

Appendix C: Instructions for Using the IR Spectrometer
_____________________________________________________________________________________5
f. View your IR spectrum and determine if you have generated a good spectrum. If your
spectrum has any peaks going up (see the example of the bad spectrum below), return to step 1 and try again.
Example of a bad spectrum Example of a good spectrum
g. Once the spectrum is completed, a new window will open asking if you want to add to
Window1. Click “Yes.”
h. You should now see only your IR spectrum. (If you see another IR spectrum that is not
yours, click on the spectrum and select “Clear” from the top menu bar to eliminate it.)

Appendix C: Instructions for Using the IR Spectrometer
_____________________________________________________________________________________6
i. To label your peaks, click “Find Peaks”.
j. Move the horizontal line up and down by clicking on the spectrum until you see all the
peaks you want.
k. Click the “Replace” button on the upper right of the spectrum.
5. Save your results. (If you prefer, you can take a picture of the spectrum with your phone.)
a. Go to File à Save as…
b. Make sure that the “Save in” option is to the “Desktop” or to your flash drive.
c. Type your name as the “File name” and make sure that the “Save as type” is in “TIFF” format. Select “Save.” The IR spectrum is now on the desktop. You can either save it to a flash drive or email it to yourself.

Appendix C: Instructions for Using the IR Spectrometer
_____________________________________________________________________________________7
6. Clean the machine as described in step 1.