arizona department of health services … arizona department of health services bureau of nutrition...
TRANSCRIPT

1
ARIZONA DEPARTMENT OF
HEALTH SERVICES
BUREAU OF NUTRITION &
PHYSICAL ACTIVITY
LABORATORY PROCEDURE MANUAL
14th
Edition
Revised: March 2017
2
Table of Contents
Chapter 1 Introduction
Chapter 2 Safety
Chapter 3 Information About Blood Testing
Training
Work Area
Hemoglobin Measuring Machines
Storage of Cuvettes
Chapter 4 Daily Steps for Performing Hemoglobin Tests
Procedure for Collecting and Measuring Blood Samples for HemoCue®
Factors Responsible for Poor Results
Hemoglobin Screening Policy and Participant Category Screening
Requirements
Hemoglobin Cutoff levels for Anemia, Nutritionist range, and Very Low
Hemoglobin values
HANDS Pending Codes for Anthropometry and Bloodwork
Chapter 5 Administration & Maintenance of HemoCue® Equipment for the Local Agencies
Equipment
Receiving a New or Loaner Analyzer
Inventory Control - Equipment Returns or Replacements
Maintenance of the Analyzer
Problems With the HemoCue® Analyzer
System Maintenance Log
Chapter 6 Glossary
Chapter 7 Bibliography
3
Table of Contents (continued)
Chapter 8 Using the Masimo Pronto - Overview
Chapter 9 Equipment Needed
Chapter 10 Initializing the Pronto for Clinic Use
Chapter 11 Test Preparation and Performing a Reading
Chapter 12 Troubleshooting
Interfering Factors
Difficulty or No SpHb Reading
Excessive Ambient or Strobing light
Low Signal IQ/Light Present
Other Causes
Chapter 13 Administration and Maintenance of the Masimo Pronto for the Local Agencies
Cleaning
Other Information:
Receiving a New Pronto
Equipment Returns or Replacements Appendices Appendix A – CDC Cutoffs for Anemia
Appendix B – Anthropometrics Tool (Arizona WIC – Anthropometric/Laboratory
Observation)
Appendix C – Contact List
Appendix D – HemoCue Hb 201+ System Maintenance Log
Appendix E – Trouble Shooting Guide
Appendix F – CLIA Application for Certification

4
Chapter 1. Introduction
Purpose
The purpose of the Arizona Department of Health Services (ADHS), Bureau of
Nutrition & Physical Activity (BNPA) Laboratory Procedure Manual is to provide
guidance to local agency staff while performing hemoglobin tests used in the Special
Supplemental Nutrition Program for Women, Infants and Children (WIC). The
manual is designed to be user-friendly.
Effective January 1, 2010, the Arizona WIC Program transitioned to the HemoCue
201+ analyzers. HemoCue 201+ analyzers are the primary measurement method for
hemoglobin status in children under 2 years old who require screening for anemia.
HemoCue 201+ analyzers require a small blood sample size, do not track or store
data, and have an internal electronic self-test. The self-test verifies the performance of
the optronic unit and is performed every second hour that the machine is on.
Beginning in September 2012 Arizona WIC introduced the Masimo Pronto Pulse CO-
Oximeter as the primary measurement method for hemoglobin status in adults and
children 2 years and older. It replaces the HemoCue analyzer for all WIC participants
at least 2 years old except for circumstances when a reading cannot be obtained using
the Pronto. The Pronto has been cleared for use in the clinical setting by FDA
because it is both accurate and reliable compared with the reference standard
measurement for venous hemoglobin. (Postgraduate Medicine, a peer reviewed
journal for physicians, compared results using both the Masimo Pronto and Hemocue
201 hemoglobin analyzers. The author concluded that the Pronto results were similar
to that of the Hemocue analyzer.)
For situations in which a measurement cannot be obtained using the Masimo Pronto,
or for children under two years of age who require hemoglobin measurement, the
HemoCue Analyzer will continue to be used.
Here is what you will find in the revised thirteenth edition of the lab manual:
Training
Local Agencies have the option to designate a Local Agency trainer who, after
becoming certified by ADHS Bureau of Nutrition & Physical Activity, can act as the
Agency’s trainer for new & existing staff. They must also undergo reevaluation once
every three (3) years by ADHS BNPA to ensure their competency.
New Employees will receive training on hemoglobin measurement and be observed
regularly according to the New Employee Training Plan. Existing employees will be
monitored regularly during Local Agency Self Assessments (P&P Chapter 15, Section
E).
High
Hemoglobin
Cutoffs
THE NUTRITIONIST LEVEL CUTOFF FOR HIGH HEMOGLOBIN HAS
BEEN REMOVED (Appendix B – CDC Cutoffs for Anemia) in the
reference tables.

5
(High hemoglobin readings among WIC clients do not need to be
referred to the High Risk Nutritionist.)
Hemoglobin
Reference
Tables
The table in Appendix B has been edited to improve clarity. Low
hemoglobin cutoff numbers have been replaced by the range of values
between the Nutritionist level and low hemoglobin cutoff. The statement
“and below” has been added to the Nutritionist level cutoff for low
hemoglobin to indicate values lower than the cutoff are included.

6
Chapter 2. Safety
Universal
Precautions
In 1991, the Occupational Safety and Health Administration (OSHA) published the
Occupational Exposure to Bloodborne Pathogens Standard. The purpose of the
standard is to minimize, if not eliminate, occupational exposure to bloodborne
pathogens and, if followed, should keep you safe when you work in your lab area. The
standard outlines necessary engineering and work practice controls, as well as requiring
the availability and use of personal protective equipment (PPE).
One section of the standard deals with “Universal Precautions (UP)." This term is
simply an approach or strategy designed to keep you safe when you work with blood or
other bodily fluids. Under UP, the blood and certain bodily fluids of all individuals are
considered potentially infectious. Standardized practices focus on treating every
sample of blood as if it were disease-infected. Handle all human blood and certain
human bodily fluids as if they were known to be infected with Human Immuno-
deficiency Virus (HIV), Hepatitis B (HBV), Hepatitis C (HCV) or other bloodborne
pathogens. Ask your supervisor if you have further questions.
These precautions are intended to prevent the transmission of infectious bodily fluids
through parenteral routes such as mucous membranes and non-intact skin.
In 2001, the standard was revised to conform to the Needlestick Safety and Prevention
Act. The act directed OSHA to revise the Bloodborne Pathogens (BBP) Standard in
the areas of the Exposure Control Plan with new record-keeping requirements,
employee input for work practice controls and modification of definitions of
engineering controls.
Personal
Work
Practices
To comply with the OSHA standard, a written exposure control plan must be in place
at each WIC clinic/site. The plan includes a copy of local policies and procedures for
employee safety and a procedure for reporting accidents. Your manual should be kept
close at hand and you should adhere to all of the practices as suggested in this manual.
Each local agency will develop blood-borne pathogen information and training
programs for all employees.
For your personal protection, follow these guidelines:
Get a Hepatitis B vaccination.
Do not allow or bring food, drinks or medication into technical work areas.
Do not touch your face, apply makeup or handle contact lenses while in work
areas where there is a reasonable likelihood of occupational exposure.
Food and drink shall not be kept in refrigerators, freezers, shelves or on
countertops where blood or other potentially infectious materials are present.
7
Safety Continued
Personal Work
Practices
Continued
The single most important means of preventing the spread of infection is
hand-washing. Wash your hands:
At the beginning and end of your shift
Before a skin puncture and after removing your gloves
Before using the Masimo Pronto (see Chapter 11. Test Preparation and
Performing a Reading)
After physical contact with participants. For example, after weighing
an infant in diaper only, or positioning a child’s head for height
measurement.
After touching contaminated objects or using restroom facilities
After making contact with your eyes, nose or mouth
Before and after eating, drinking or handling food
Cover any break in the skin with a bandage.
Wear disposable gloves when there is a possibility of contact with bloodborne
pathogens.
Use new gloves for every blood draw, even if participants are from the same
family.
Take advantage of all training offered by your employer. Your employer has
considered the risks of contamination and established its own standards based
on "reasonable risk."
Note: Your local agency may determine whether masks, eye protection
devices such as goggles or glasses with solid side shields, or chin length face
shields, should be worn.
Usually, protective devices for eyes, nose or mouth are worn whenever
splashes, spray, splatter, or droplets of blood or other potentially infectious
materials may be generated and contamination may be anticipated. It is
generally accepted that the HemoCue® test for hemoglobin does not splatter
or spray blood.
Warning!
If blood touches your skin or hair, wash the area with soap and water, and tell
your supervisor immediately.
If blood splashes into your eyes, flush them with water. Contact a physician.
If you are accidentally stuck by a contaminated lancet, contact your supervisor.
Arrange to see a licensed healthcare provider for a medical evaluation and
counseling and to be tested for Human Immunodeficiency Virus (HIV) and
Hepatitis B Virus (HBV).
8
Safety Continued
Worksite
Protection
Recommended Lancet for Heel Punctures: Single-Use Capillary Blood
Sampling Device, 1.8mm needle. o (for infants 9-18 months and children with very small fingers)
For children 12-18 months of age:
o Staff may use their discretion to perform a heel stick with 1.8 mm
lancet
OR
o Staff may use their discretion to perform a finger puncture with a 1.8
mm lancet.
Recommended Lancet for Finger Punctures: Single-Use Capillary Blood
Sampling Device, 2.25mm needle. (for children >18 months and adults).
Clean the work site at the beginning and end of each workday or after any
contact with blood or other potentially infectious materials.
Use a prepared bleach solution (see below) or an EPA-registered disinfectant
that is effective as a tuberculocidal and kills Human Immunodeficiency Virus
(HIV) and Hepatitis B Virus (HBV).
A list of EPA-registered disinfectants can be found at the following address:
https://www.epa.gov/pesticide-registration/selected-epa-registered-
disinfectants Be sure to read descriptions carefully and choose a disinfectant
that is effective against TB, HIV, and HBV.
In order to decontaminate contaminated work surfaces. Be sure to:
1) Wear clean gloves
2) Completely remove all blood before applying the disinfectant
3) Leave the surface wet with the disinfectant for:
If using bleach solution, l0 minutes
If using premixed solution, longest kill time listed on label
4) Dispose of the infectious waste in accordance with federal, state, or local
regulations (see page seven)
EPA-registered tuberculocidal disinfectants and bleach solutions are
appropriate for removing blood or other potentially infectious materials on
surfaces and instruments. The Material Safety Data Sheet (MSDS) for
commercial disinfectants must be posted in the clinic and all employees must
be aware of its location.
Preparation
and Storage of
Disinfectant
Solution
Prepare a fresh bleach (5.25% sodium hypochlorite) solution daily.
To prepare a 10% bleach solution, mix 1 part household bleach with 9 parts
tap water.
Store at room temperature in an opaque plastic bottle labeled "10% Bleach."
The date of preparation and the expiration date should be clearly marked on
the outside.
Note: The expiration date is at the end of the seventh calendar day.
Store out of the reach of children.

9
Safety Continued
Disposal of
Laboratory
Waste and
Supplies
Discard all contaminated sharps, i.e.: retractable lancets & cuvettes, in special
receptacles usually referred to as “sharps” containers. There are a variety of
styles, and all are clearly marked with a biohazard symbol (see figure to the
left). The container must be rigid, puncture-resistant, leak-proof, and
disposable with a locking lid.
Regardless of whether or not lancets contain safety features, such as
retractable blades, all used lancets and other sharp objects must be disposed of
immediately in a “sharps” container. When this container is filled to the
acceptable level, it must be properly disposed of as biohazardous waste.
Throw away other potentially infectious trash that is saturated with blood in a
red, plastic biohazard bag. Find out from your supervisor how to handle
biohazardous waste since it must be decontaminated before it can be disposed
of in a landfill.
All waste that is saturated and dripping with blood must be
Sterilized
Incinerated or
Chemically disinfected prior to mixing and disposing with ordinary waste.
Waste, such as lint-free tissue, alcohol preps, gloves, bandages & wrappers,
that contain blood but is not dripping, can be discarded in a regular trash bag
if there are no means for biohazard waste disposal. Best Practice states it
should be disposed of in a biohazard bag.
Keep the biohazard bag and all trash out of the reach of children.
10
Chapter 3. Information About Blood Testing
Type of Blood
Tests
There are many components of blood, and many tests are done for diagnostic
purposes. The only blood test that will be addressed in this manual is hemoglobin.
Hemoglobin
Testing
WIC staff conduct hemoglobin tests to screen and assess the participant’s nutritional
status. The test measures the amount of hemoglobin in the red blood cells. The
hemoglobin test is performed because it is a quick screening tool for iron deficiency
anemia.
Milking
To press out, drain off, remove, or draw out blood as if by milking. Squeezing/milking
dilutes the blood and gives a false low reading. Low readings obtained from squeezing/
milking may falsely indicate the possibility of anemia.
Anemia
A low hemoglobin test result indicates the possibility of anemia. Anemia is a
condition in which there are low levels of hemoglobin in the blood, with symptoms
such as poor appetite, tiredness, weakness, developmental delays and learning
problems present. It is the most prevalent risk factor of WIC participants. In the WIC
program, a low hemoglobin level is most often treated with education and foods high
in iron and Vitamin C. Referral for high-risk counseling and medical treatment may
also be indicated. (Appendix A)
Anemia Cutoffs
Arizona uses the 1998 Centers for Disease Control and Prevention (CDC) Guidelines
for anemia cutoffs (Appendix B). These cutoffs are also recommended by the
Institute of Medicine as an acceptable reference. The cut-off values for anemia vary
with altitude, age, sex, smoking status and stage of pregnancy.
Correct Values
You, as a health professional/paraprofessional, have an important responsibility for
correctly assessing values which may determine whether or not a person is eligible for
the WIC Program. The values also determine the type of counseling and referral a
participant receives.
Training
The Local Agency Director or designated Local Agency trainer is responsible for
ensuring the training, monitoring and supervision of the staff members who perform
laboratory collection and analysis. Training must be adequate to meet the Clinical
Laboratory Improvement Amendments (CLIA ‘88) regulations & follow the National
Committee for Clinical Laboratory Standards (NCCLS) H4-A4 guidelines. The
designated trainer must be certified and reevaluated once every three years by ADHS
Bureau of Nutrition & Physical Activity to ensure competency.

11
Information about Blood Testing Continued
Laboratory
Certification
The Local Agency Director or designee is responsible for obtaining and maintaining
a Certificate of Waiver in accordance with Clinical Laboratory Improvement
Amendment (CLIA) regulations. The Clinical Laboratory Program, regulates all
laboratory testing (except research) performed on humans, under the Clinical
Laboratory Improvement Amendment (CLIA). CLIA is the Clinical Laboratory
Improvement Amendments and is regulated by the federal government through the
state agency, the regional office and the central office.
A laboratory may apply for a CLIA certificate through the Office of Laboratory
Licensure and Certification (OLLC), CLIA Program. Call (602) 364-0738, or write
to 250 N. 17th Avenue, Phoenix, AZ 85007-3231.
Payments are sent to:
CLIA Laboratory Program
P.O. Box 530882
Atlanta, GA 30353-0882
Checks should be made out to CLIA Laboratory Program and should include the
CLIA number on the check to ensure that the payment is applied to the correct
account. Do not send payments to the state. Payments may also be made online at
Pay.gov.
Contact OLLC at (602) 364-0738 or Denise Barbeau for a change of ownership,
director, or address, or to request an application.
Note: Arizona does not currently have state licensure for clinical laboratories and
does not license clinical laboratory testing personnel and phlebotomists.
For additional information, please visit cms.gov. Additional questions may be
directed to your WIC Nutrition Consultant

12
Information about Blood Testing Continued
Work Area
Select a work area for collection of the laboratory specimen.
An ideal work area:
Is clean
Ensures client and staff safety
Has a surface which is smooth, free of cracks, and washable
Ensures patient privacy
Is away from noise and confusion
Has a chair and table
Hemoglobin
Measuring
Machines
HB 201+
The HemoCue® 201+ system is an analyzer, a portable instrument with a sliding
cuvette holder and display screen. The analyzer measures the amount of hemoglobin
contained in a blood sample. The measurement takes up to 60 seconds and is
expressed as grams per deciliter or g/dl. After reading the sample, the value will
remain displayed on the screen as long as the cuvette holder is in the measuring
position. When a new sample is placed in the cuvette holder, the analyzer erases the
previous value and replaces it with the new value.
The analyzer operates on AC power (AC adapter included) or 4 AA batteries. The
battery symbol on the display indicates low battery power; if showing, replace the
batteries as soon as possible.
Daily care of the hemoglobin analyzer is explained in Chapter 6 of this manual.
Detailed cleaning instructions are also found in the HemoCue Hb 201+ Analyzer
Operating Manual.
Storage of
Cuvettes
Store cuvettes at room temperature. Do not expose to any direct heat source.
Label the vial with the date on which it is opened.
Label the vial with the date on which the contents of the vial expire (vial
expires 90 days after opening). Note: an unopened vial of cuvettes has a
two-year shelf life from the date of manufacture.
Snap the vial cap closed each time a cuvette is removed. Never leave the cap
partially open. The cuvettes are very sensitive to humidity and moisture.
Remove one cuvette at a time for testing.

ADHS/PHS/BNPA 13 Original: January 1983
Laboratory Manual Revised: March 2015
Chapter 4. Daily Steps for Performing Hemoglobin Tests
with HemoCue
Identify Client
Assure that the consent boxes are checked and the client or authorized
representative has signed and dated the Rights & Obligations form.
Explain
Procedure
Explain the procedure to the client or authorized representative in simple
terms. Reassure them, especially when using an invasive hemoglobin test such
as the HemoCue 201.
Example (using the HemoCue 201):
"I am going to make a little poke in your finger/heel to get a few drops of
blood to put the blood into this little container. Then I am going to put it into
this machine to find out how much iron it has in it." Be honest with him/her.
If he/she asks if it may hurt, answer, "Yes, it may hurt a little."
Don’t ever say, “No, it won’t hurt.”
Cleanse/Glove
Hands
Wash hands with soap and water (or cleanse with an alcohol-based hand sanitizer or
hand wipes if a sink is not available). You may wait until after supplies are assembled
to put on gloves.
CHANGE GLOVES BETWEEN EVERY CLIENT!
Assemble
Supplies
Wash hands with soap and water before assembling supplies and putting on gloves.
HemoCue® Analyzer
Gloves
Alcohol prep pads
Sterile lancets
Lint-free tissues/KimWipes or Gauze pad
Closed vial of cuvettes (remove 1 at a time & recap)
Bandages (not for children under age 2)
Sharps container
Biohazard bag
10% bleach solution or disinfectant
Soap and water, alcohol-based hand sanitizer or hand wipes
Put gloves on after supplies are assembled if you haven’t already done so.

ADHS/PHS/BNPA 14 Original: January 1983
Laboratory Manual Revised: March 2015
Daily Steps for Performing Hemoglobin Tests Continued
Position Client
For infants and children with very small fingers up to 18 months of age, a
seated adult holds the infant/child over adult’s shoulder or baby lies face-down
across lap for heel stick.
NOTE: The heel site is recommended for infants 9-12 months of age to
prevent possible bone or nerve damage in areas where there is less flesh.
For children 12-18 months it is at the staff’s discretion to continue with a
heel stick or to use a smaller 1.8mm lancet on their finger. Children over
18 months of age should not receive a heel stick.
For everyone else, seat client and extend arm with palm up.
BE SURE THAT PUNCTURE SITE IS LOWER THAN THE HEART.
Choose Site
For infants and children with very small fingers, use either side of the
plantar (bottom) surface of the heel when the baby is held over caregiver’s
shoulder. Never puncture the back curvature of the heel.
Note: Do not "milk" the heel to speed the process. Squeezing/milking
dilutes the blood and gives a false low reading
For everyone else, seat the participant or ask someone to help with a child. For
instance, the caregiver may hold the child in his/her lap using both arms to keep
the child still while you perform the procedure.
Have the client extend his/her arm with the hand lower than the heart and palm
facing up. Use the middle or ring finger, but choose a finger that doesn’t have a
ring on it.
Note: Do not "milk" the finger to speed the process. Squeezing/milking
dilutes the blood and gives a false low reading
Warm the Site
(If Necessary)
The site should not be cold, blue, swollen or calloused.
If cold, warm the site by holding it in your hands, rubbing it for a minute, or by
having the participant wash their hands vigorously with warm running water
and soap or gently shake her hands. The site does not need to be cleaned again
with an alcohol pad.
ADHS/PHS/BNPA 15 Original: January 1983
Laboratory Manual Revised: March 2015
Cleanse the Site
Cleanse the site thoroughly with an alcohol pad (unless the participant washed
their hands with warm water and soap).
Wipe the site with a tissue or lint-free wipe. Be sure skin is dry.
Note: Pooled alcohol at the puncture site will dilute and hemolyze the blood,
giving a lower reading, if the skin surface is not dried completely.
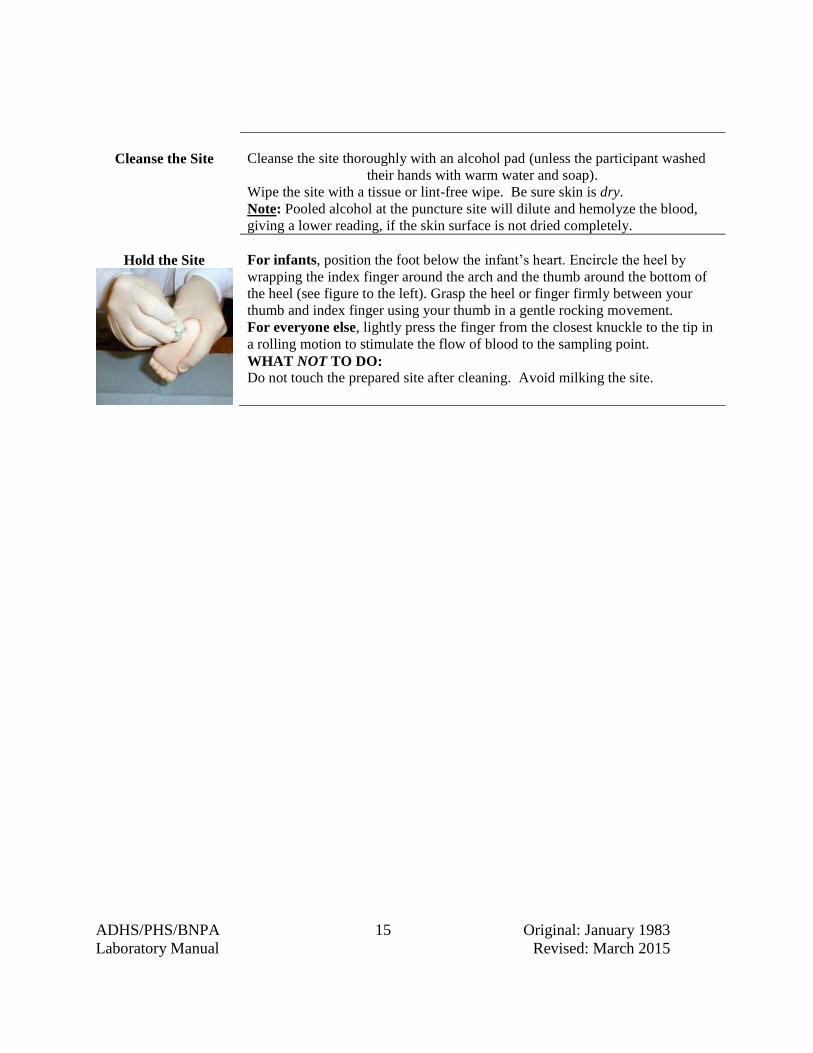
Hold the Site
For infants, position the foot below the infant’s heart. Encircle the heel by
wrapping the index finger around the arch and the thumb around the bottom of
the heel (see figure to the left). Grasp the heel or finger firmly between your
thumb and index finger using your thumb in a gentle rocking movement.
For everyone else, lightly press the finger from the closest knuckle to the tip in
a rolling motion to stimulate the flow of blood to the sampling point.
WHAT NOT TO DO: Do not touch the prepared site after cleaning. Avoid milking the site.

ADHS/PHS/BNPA 16 Original: January 1983
Laboratory Manual Revised: March 2015
Daily Steps for Performing Hemoglobin Tests Continued
Puncture
IMPORTANT: If the lancet is blade-shaped, it should be placed
perpendicularly to the whorls of the fingerprint/footprint so
the blood is more easily collected into the cuvette.
Create a firm surface where you are going to puncture by
pulling the skin taut or tight with your index finger near the
first joint of the finger on the client’s hand.
For infants, 9-18 months of age or children with very small
fingers, puncture only on the medial or lateral side of the bottom
surface of the heel. See figure to the left.
Do not puncture the foot if there are bruises,
abrasions or sloughing skin present.
For everyone else, children > 18 months of age and adults,
puncture the side of the fingerpad nearest the thumb in one
continuous motion using a retractable lancet. This will allow for
easy blood collection. Puncturing on the side of the fingerpad
is recommended and will hurt less than on top of the fingerpad
since there are less nerve endings. The finger should be facing
upwards upon puncture.
Fill the Cuvette
To ensure accuracy, you must wipe away the first two to
three drops of blood. This will stimulate spontaneous blood
flow, resulting in a better sample. If necessary, press gently
again with thumb and forefinger until another drop of blood
appears. Avoid "milking." Do not touch the heel or
finger at the site of puncture.
All drops should be large enough so they “sit” on top of the heel or finger like a bead.
Ensure that the drop of blood is big enough to fill the entire cuvette, including the
tip. Touch the tip of the cuvette, pointing downward, into the middle of the blood drop
so the cuvette touches the skin. Allow the cuvette to fill in one step. The cuvette will
fill itself automatically. Never "top off" the cuvette if it doesn’t fill in the first swipe.

ADHS/PHS/BNPA 17 Original: January 1983
Laboratory Manual Revised: March 2015
Daily Steps for Performing Hemoglobin Tests Continued
Fill the Cuvette
Continued
Wipe excess blood off the flat outside surfaces of the cuvette.
Keep it at a 45o angle. Be careful not to touch the open-ended tip so that blood is not
pulled back out of the cuvette.
Example
Using a gauze pad or lint-free wipe, "swipe" the cuvette as if you were sharpening a
knife to remove any excess blood from the outside surfaces. Avoid the open "slit" of
the cuvette with the gauze or wipe.
If the cuvette does not fill completely on the first try, or if air bubbles are visible,
discard the cuvette, wipe the puncture site and allow a new, larger bead of blood to
form before collecting into the new cuvette.
Measuring
Hemoglobin
Value
Pull the cuvette holder out to loading position. Turn the analyzer on by pressing and
holding the On/Off button until the display is activated. The machine will run a self-
test and then display three flashing dashes.
Within 10 minutes of filling the cuvette, place it in its holder and gently push the
holder into the analyzer with two fingers. When closed, the analyzer will automatically
start the measuring procedure and the result will appear on the display within 15-60
seconds.
Seal and
Bandage Site
Place dry gauze or lint-free tissue over the puncture site and apply gentle pressure until
the wound is clotted. Elevating the hand or foot above the level of the heart will help
to stop the blood flow. Apply the bandage.
Note: Do not use bandages on the finger of a child less than two years of age to
prevent potential ingestion and choking.
When to Run a
Second Test
Occasionally, a second test must be run, such as when the displayed hemoglobin value
is in the “Nutritionist” range (see P&P Chapter 2, Appendix P). A second sample must
be taken from a different site, preferably a finger on the other hand and/or by a
different user. The higher of the two hemoglobin values is entered into the HANDS
computer system and should also be used for referral purposes.
Example
A 6.9 g/dl reading is obtained from an 18-month-old. The second reading is 8.5 g/dl.
Record 8.5 g/dl, counsel and write this higher value on the referral form to the medical
provider.
ADHS/PHS/BNPA 18 Original: January 1983
Laboratory Manual Revised: March 2015
Daily Steps for Performing Hemoglobin Tests Continued
Very low
hemoglobin
values
A very low hemoglobin level is a serious medical concern and is life-threatening. Local
Agencies must establish a referral plan and train staff to ensure that all participants
with confirmed very low hemoglobin values are referred for an immediate medical
evaluation, either with their primary care provider or, if unavailable, at an emergency
medical center. Local Agencies will work with county/agency Health Program Officers
to determine clinic referral procedures. All referrals must be documented in HANDS.
See P&P Chapter 2, Appendix P for more information about very low hemoglobin
levels.
Cleanse Surface
If any blood spills on the HemoCue® Analyzer, work surfaces or skin, clean with a
10% bleach solution or disinfectant spray immediately.
Disposal of
Supplies
Throw away any paper wrappers, alcohol preps, gauze, lint-free tissues, gloves
and other supplies which are not saturated and dripping with blood in a
wastebasket.
Throw away any supplies that are saturated and dripping with blood in the red
biohazard bag. If your gloves are contaminated with blood, turn the gloves
inside out while taking them off and place in the biohazard bag with the other
supplies.
Throw away all lancets and used cuvettes in the sharps container.
Remove Gloves
and Wash
Hands
Remove and discard gloves after each client and after handling contaminated waste.
Clean hands with soap and water, alcohol-based hand cleanser or hand wipes if water is
not available. Antiseptic hand cleanser in conjunction with clean cloth/paper towels or
antiseptic towelettes, are examples of acceptable alternatives to running water.
However, when these types of alternatives are used, employees should wash their
hands (or other affected areas) with soap and running water as soon as possible.

ADHS/PHS/BNPA 19 Original: January 1983
Laboratory Manual Revised: March 2015
Daily Steps for Performing Hemoglobin Tests Continued
Factors
Responsible
for Poor
Results
Mechanical problems such as:
Malfunctioning equipment
Machine not clean
Cuvettes past expiration date or left exposed to air
Poor collection technique, such as:
Not thoroughly drying the site prior to puncture
Milking the site
Not wiping away the first two to three drops of blood
"Topping off" the cuvette with additional blood, resulting in air bubbles or
layers in the cuvette
Not filling the cuvette entirely
Leaving the filled cuvette out of hemoglobin machine more than 10 minutes
before measuring
Blood Work Requirements, Options and Referrals
Hemoglobin screening policy and participant category screening requirements
For information about hemoglobin screening policy, participant category screening requirements
(including the quick reference table), and allowed exceptions for hemoglobin screening see P&P
Chapter 2, Appendix P http://azdhs.gov/prevention/azwic/agencies/index.php#manuals.
Cutoff levels for Anemia, Nutritionist range, and Very Low Hemoglobin values
For information about “Anemia” cutoff values, “Nutritionist” range cutoff values and “Very Low
Hemoglobin” cutoff values see P&P Chapter 2, Appendix P.
http://azdhs.gov/prevention/azwic/agencies/index.php#manuals
HANDS Pending Codes for Anthropometry and Bloodwork
For Information about HANDS Pending Codes for Anthropometry and Bloodwork see P&P
Chapter 2, Appendix Q. http://azdhs.gov/prevention/azwic/agencies/index.php#manuals
ADHS/PHS/BNPA 20 Original: January 1983
Laboratory Manual Revised: March 2015
Chapter 5. Administration & Maintenance of
HemoCue® Equipment for the Local Agencies (see Chapter 15 for Administration and Maintenance of the Masimo Pronto)
Equipment
The state agency has a small surplus of HemoCue analyzers. Please contact your
Nutrition Services consultant to acquire additional Hb 201 analyzers. Local agencies
are responsible for procuring all related supplies for hemoglobin screening.
Cuvettes will be purchased by local agencies directly from HemoCue. Please place
your order with:
Stephanie DeJong [email protected]
1-612-791-1095
Please specify you want a minimum of 12 months or longer
expiration date from date of delivery
Part Number: 111716 for HemoCue Microcuvettes
Order by the box. One box has 200 microcuvettes (4 vials of 50 each).
**For agencies that need smaller quantities:
Part Number: 111715 for individually wrapped HemoCue
Microcuvettes in 100-pack
HemoCue
Inventory
Control -
Equipment
Returns or
Replacements
(see Chapter 15 for
Masimo Pronto)
The Local Agency administration or HemoCue® Lead will maintain current
inventory of existing analyzers at all clinics, including backup equipment not in use.
Inventory should include a minimum of serial numbers and corresponding site
locations. This will include any loaner equipment received from HemoCue® during
repairs. Any changes in inventory will be immediately reported to the State office.
Each Local Agency will have a minimum of one spare analyzer on hand at all
times. Some agencies will have more spares available based on their size. A small
quantity of analyzers will also be available for order at the state agency. Please
contact your WIC Nutrition Consultant to order analyzers.

ADHS/PHS/BNPA 21 Original: January 1983
Laboratory Manual Revised: March 2015
Chapter 5. Administration & Maintenance of
HemoCue® Equipment for the Local Agencies Continued
Quality Control
When the analyzer is turned on, it will perform a self-test. The self-test verifies the
performance of the optronic unit and is performed every second hour that the
machine is on. If the self-test fails, see Maintenance section below.
There is no need to perform other quality control tests, unless required by your Local
Agency.
Maintenance of
the Analyzer
Analyzers should be cleaned to resolve certain error codes and as needed. See the
Trouble Shooting Guide in Appendix F. Local Agencies will develop policies for
maintaining cleanliness of the analyzer. Cleaning instructions can also be found in
the HemoCue® Hb 201+ Operating Manual.
NOTE: When the Operating Manual states to clean the analyzer/cuvette holder
with alcohol, it refers to Swedish alcohol, not alcohol sold in the US. Instead of
alcohol, use mild soap and water.
The cuvette holder can be cleaned with mild soap and water and left to dry
completely before reinserting into the analyzer.
The exterior of the analyzer can be cleaned with mild soap and water.
Chain of
Support for
Troubleshooting
The following chain of support should be followed when resolving challenges with
the Analyzer ONLY AFTER THE ERROR HAS BEEN ADDRESSED WITHOUT
RESOLUTION:
1st Contact – Site Supervisor
2nd
Contact – Site Supervisor or Local Agency HemoCue Lead will call the state
WIC Nutrition Consultant to report the problem. The state contact will walk the
Local Agency through correcting the problem.
3rd
Contact - If the problem requires additional attention the site will be instructed to
contact Arizona’s personal technical support with HemoCue® at 1-800-881-1611,
extension 128. See Appendix D for contact names and phone numbers.
Problems with the HemoCue® Analyzer
System
Maintenance
Log
The HemoCue® Hb 201
+ System Maintenance Log will be maintained in a notebook
in the clinic’s lab area. In the event of a problem with the analyzer, all relevant
information should be recorded on the Maintenance Log. See Appendix E.

ADHS/PHS/BNPA 22 Original: January 1983
Laboratory Manual Revised: March 2015
Chapter 6. Glossary
Accuracy
The agreement of results with the true value for specimens measured.
Anemia
Hemoglobin concentration (or hematocrit) below the 5th percentile of the
distribution of hemoglobin or hematocrit of healthy, well-nourished individuals
of the same sex, age and stage of pregnancy.
Biohazard
Bag/Container
A bag or container constructed of material of sufficient single thickness and
strength to pass the 165-ram dropped dart impact resistant test as prescribed
by STM D-1709-91 and certified by the bag manufacturer (usually red or
orange and labeled "Biohazard").
Calibration
A means to determine the accuracy of an instrument by comparing it with a
known standard. The HemoCue® Analyzer does a calibration “self-test” each
time the analyzer is turned on.
CLIA (‘88)
Clinical Laboratory Improvement Amendment of 1988 – a public law
governing the operation of clinical laboratories in the U.S. and mandating that
all laboratories must be regulated using the same standards regardless of the
location, type or size.
Cuvette
A small transparent container in which solutions are placed for photometric
analysis.
EPA-
registered
Disinfectant
A cleanser that is recognized by the Environmental Protection Agency as being
effective against tuberculosis-causing bacteria as well as HIV & HBV. It is used
to decontaminate work surfaces.
Hemoglobin
The main component of red blood cells. It serves as a vehicle for transportation
of oxygen to the tissues and carbon dioxide from the tissues to the lungs.
Hemolysis
The destruction of red blood cell membrane causing release of hemoglobin
into surrounding serum or plasma.
Iron
Deficiency
Anemia
A reduction in the number of red blood cells resulting from iron depletion
as evidenced by other laboratory testing.

ADHS/PHS/BNPA 23 Original: January 1983
Laboratory Manual Revised: March 2015
Glossary Continued
Lancet
A sharp metal needle or blade, often encased in plastic, which is used to puncture
the skin in order to collect a blood sample. It is individually packaged to ensure
sterility. OSHA requires it to be retractable or self-sheathing, disposable and used
only once.
Milking
To press out, drain off, remove, or draw out blood as if by milking.
Rocking
A method used to increase blood circulation and flow to the skin puncture site by
using a thumb or finger in a gentle rocking movement (lightly press the finger from
the knuckle nearest the fingertip toward the end of the finger).
Sharps
A medical device or instrument such as a hypodermic needle, syringe, lancet,
scalpel blade, cuvette, Pasteur pipette or broken glass that can cause a cut,
puncture, or laceration.
Universal
Precautions
A set of rules established by the CDC, and adopted by OSHA, to control infection
from bodily fluids in the health care setting.
Standard
Precautions
Guidelines that apply to blood, all bodily fluids, non-intact skin and mucous
membranes; replace Universal Precautions and are to be used for the care of all
patients since everyone is assumed to be infected and, therefore, a possible
contaminating factor.
Vial
A small container with a lid, used especially for storing liquids.

ADHS/PHS/BNPA 24 Original: January 1983
Laboratory Manual Revised: March 2015
Chapter 7. Bibliography
1. Arizona Secretary of State. (November 15, 1999). Arizona Administrative Code Title 18
Environmental Quality Chapter 13 Department of Environmental Quality Solid Waste
Management. Retrieved March 3, 2004, from http://sosaz.com/public_services/Title_18/18-
13.htm.
2. Centers for Disease Control and Prevention. Recommendations for Prevention of HIV
Transmission in Health-Care Settings. Morbidity and Mortality Weekly Report
1987;36(SU02):001.
3. Centers for Disease Control and Prevention. (2003). Clinical Laboratory Improvement
Amendments (CLIA). Retrieved March 6, 2004, from
http://www.phppo.cdc.gov/clia/regs/toc.aspx.
4. Centers for Disease Control and Prevention. Guideline for Hand Hygiene in Health-Care
Settings: Recommendations of the Healthcare Infection Control Practices Advisory
Committee and the HICPAC/SHEA/APIC/IDSA Hand Hygiene Task Force. Morbidity
and Mortality Weekly Report 2002;51:RR-16.
5. Centers for Disease Control and Prevention. Recommendations to Prevent and Control Iron
Deficiency in the United States. Morbidity and Mortality Weekly Report 1998;47:RR-3.
6. HemoCue®. HemoCue Hb 201 DM Analyzer Instructions for Use. HemoCue Distributor USA.
HemoCue Inc. Lake Forest, CA.
7. HemoCue®. HemoCue Hb 201 DM Analyzer and HemoCue DM Docking Station Reference
Manual. HemoCue Distributor USA. HemoCue Inc. Lake Forest, CA
8. Maricopa County Department of Public Health. (2003). Procedure for the Collection &
Determination of Hemoglobin Levels.
9. McCall, R., Tankersley, D. (2003). Phlebotomy Essentials (3rd
Ed.). Philadelphia,
Lippincott Williams & Wilkins.
10. Occupational Safety & Health Administration. (n.d.). Occupational Safety & Health
Standards Part 1910. In Regulations (Standards – 29 CFR). Retrieved from
http://www.osha.gov/pls/oshaweb/owastand.display_standard_group?p_toc_level=1&p_par
t_number=1910.
11. Occupational Safety and Health Administration. (1991). Occupational exposure to
bloodborne pathogens: Final rule. 29 CFR Part 1910.1030.

ADHS/PHS/BNPA 25 Original: January 1983
Laboratory Manual Revised: March 2015
12. Occupational Safety and Health Administration. (1991). Occupational exposure to
bloodborne pathogens: Needlestick and other sharps injuries: Final rule. 29 CFR Part
1910, Docket No. H370A, RIN 1218-AB85.
13. United States Department of Labor, Occupational Safety and Health Administration
(OSHA). Occupational Safety and Health Standards. 1992.
14. Wisconsin State WIC Program. Operations Manual- Nutrition Services 3.11-1. February,
2004.

26
Chapter 8. Using the Masimo Pronto
How It Works
The Masimo Pronto measures total hemoglobin concentration of the blood. The sensor
attached to the machine emits multiple lightwaves through the capillary bed of the
fingertip. Changes in the light absorption can be used to measure the functional arterial
oxygen saturation of the blood, from which the hemoglobin concentration can be
calculated. (In a similar way the HemoCue Analyzer emits wavelengths of light to
calculate total hemoglobin by the degree of light absorption in the blood droplet
collected in a cuvette.)
Safety
Conducting a hemoglobin spot check is noninvasive and requires no blood. The
Masimo Pronto is safe to use outside of the lab area. There is no risk of transmitting
bloodborne diseases to WIC staff or other WIC participants when conducting spot
checks with the Pronto device. Hand-washing procedures and antibacterial agents (such
as hand sanitizer and alcohol wipes) are required to prevent the transmission of
contagious diseases. The use of gloves is not necessary for the safety of staff or
participants.
Choosing a
Location
The selected location for using the Pronto device should be a comfortable area, free of
excessive noise or distractions.
NOTE: It is not recommended to conduct hemoglobin tests with the Pronto device in a
common lab area where other measurements or finger pokes are made. The sights and
sounds of other participants who may be stressed or upset by lab procedures will make
it more difficult to keep participants relaxed and motionless when using the Pronto.
When To Use
The Pronto replaces the HemoCue analyzer for all WIC participants at least 2 years old
including women, except for circumstances when a reading cannot be obtained using
the Pronto. The Pronto has been cleared for use in the clinical setting by FDA. An
independent study in a peer-reviewed scientific journal concluded that the bias and
standard deviation for the Pronto results were similar to that of the HemoCue analyzer.

27
Chapter 9. Equipment Needed
Equipment
Equipment needed to conduct tests using the Masimo Pronto Pulse CO-
Oximeter:
- Masimo Pronto Pulse CO-Oximeter unit
- RC1 Patient Cable
One foot patient cable that connects to rainbow DCI and rainbow DC-IP
- Rainbow DCI Digit Sensor (Adult sized, includes slender digit
gauge)
28
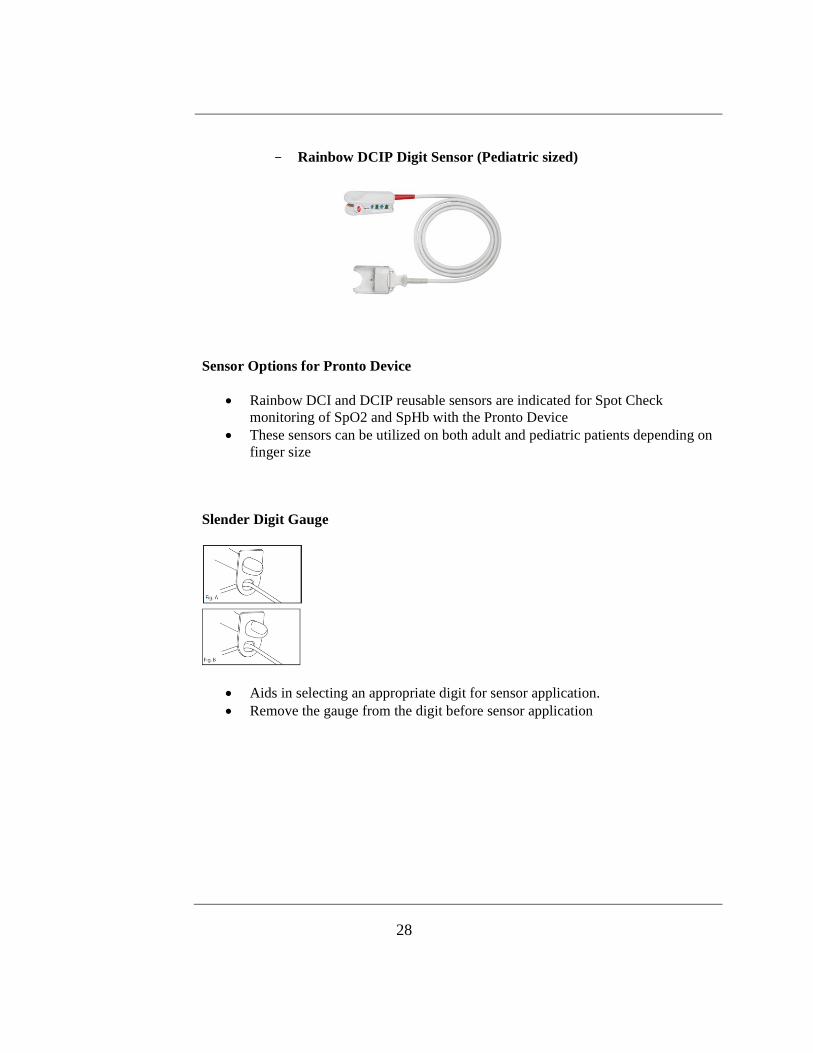
- Rainbow DCIP Digit Sensor (Pediatric sized)
Sensor Options for Pronto Device
Rainbow DCI and DCIP reusable sensors are indicated for Spot Check
monitoring of SpO2 and SpHb with the Pronto Device
These sensors can be utilized on both adult and pediatric patients depending on
finger size
Slender Digit Gauge
Aids in selecting an appropriate digit for sensor application.
Remove the gauge from the digit before sensor application
29
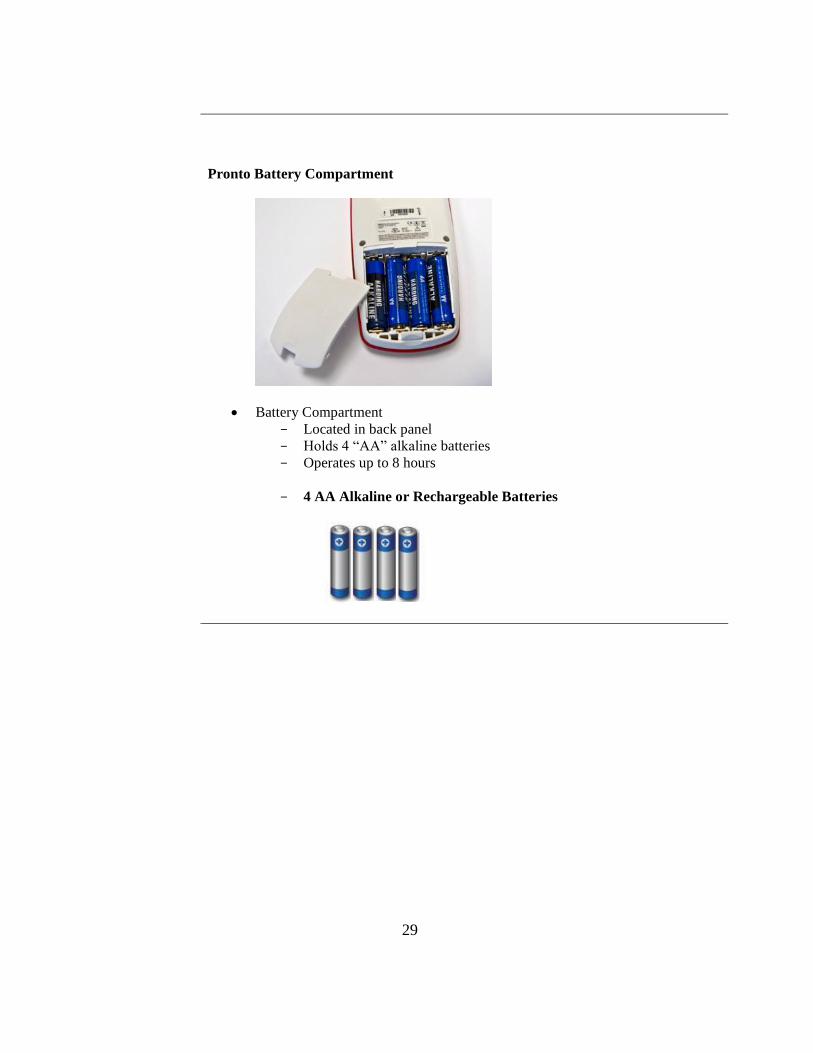
Pronto Battery Compartment
Battery Compartment
- Located in back panel
- Holds 4 “AA” alkaline batteries
- Operates up to 8 hours
- 4 AA Alkaline or Rechargeable Batteries

30
Chapter 10. Initializing the Pronto for Clinic Use
Initializing a
New Device
Setting up a new device:
- Open box, remove the device (enclosed in rubber casing) from box.
- Remove the device from rubber boot.
- On back of machine near the bottom is the housing for four AA batteries.
Depress tab to allow battery cover to slide away. Insert batteries according to
illustrated graphic guide inside battery case.
- Device will activate automatically. If machine goes to sleep, or if batteries
already inserted, press green power button underneath up/down arrow buttons.
Parameter/Measurement Display
Parameter/ Measurement Numeric Display - Displays parameter/measurement
numeric values once a spot check test is complete.

31
Pulse Indicator
Pulse Indicator - Flashes with patient's pulse reading (BPM) during spot check
test period.
Spot Check Progress Indicator
Spot Check Progress Indicator - Incrementally illuminates upward after a SpHb
spot check has been initiated. This indicates progress towards completion of a
SpHb spot check. A fully illuminated spot check progress indicator indicates a
completed spot check.
Parameter/ Measurement Label Display
Parameter/ Measurement Label Display - Displays parameter/measurement
label once a spot check test is complete.
Battery Level Indicator
Battery Level Indicator - Battery charge level is indicated by four LED
indicators. All four indicators will be lit when the batteries are full, with fewer
indicators being lit as the batteries lose their charge.
Low SIQ Indicator
Low SIQ Indicator - SIQ is a signal identification and confidence indicator.
When this indicator illuminates, re-checking the measurement is necessary.

32
Sensor Use Indicator
Sensor Use Indicator - This illuminates to display the approximate number of
uses remaining for the attached sensor. The bottom LED will turn red when the
remaining uses for the connected sensor are low. The approximate number of
sensor uses remaining is displayed upon power up (if a sensor is attached) and
when a sensor is connected.
Power On/Off Button
Power On/Off Button – Powers the instrument on or off.
Press the button once to power on, press and hold the Button for 2 seconds to
power off.
33
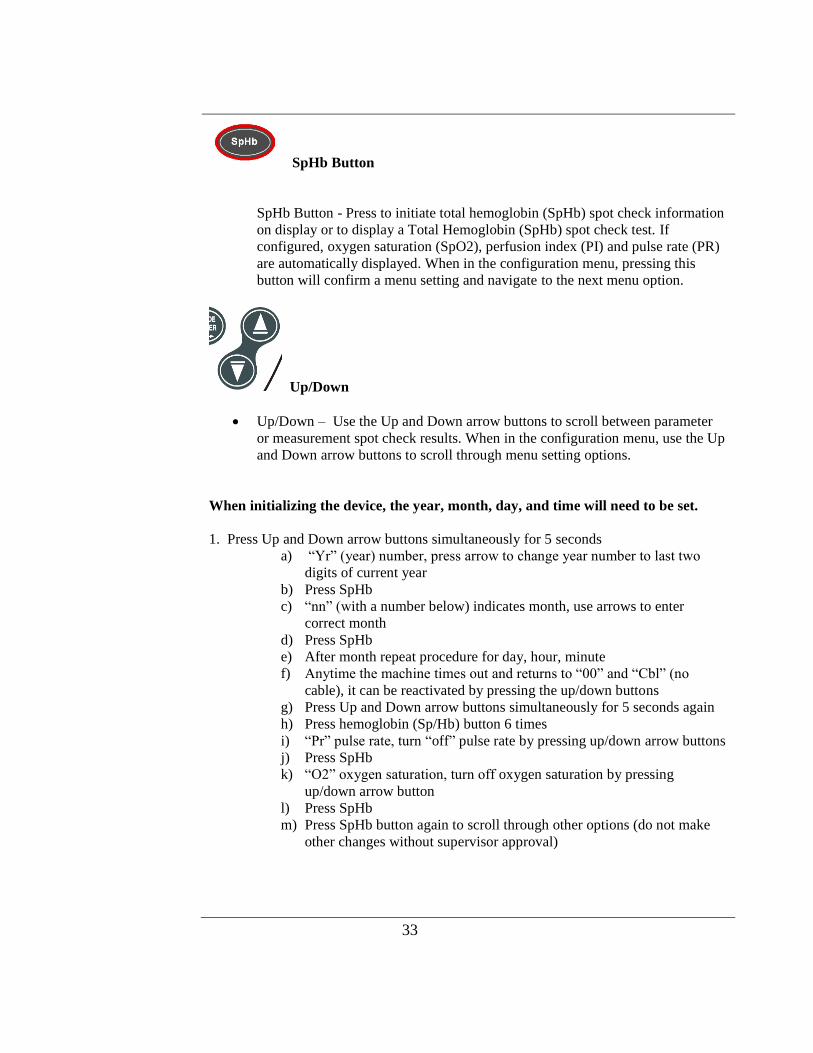
SpHb Button
SpHb Button - Press to initiate total hemoglobin (SpHb) spot check information
on display or to display a Total Hemoglobin (SpHb) spot check test. If
configured, oxygen saturation (SpO2), perfusion index (PI) and pulse rate (PR)
are automatically displayed. When in the configuration menu, pressing this
button will confirm a menu setting and navigate to the next menu option.
Up/Down
Up/Down – Use the Up and Down arrow buttons to scroll between parameter
or measurement spot check results. When in the configuration menu, use the Up
and Down arrow buttons to scroll through menu setting options.
When initializing the device, the year, month, day, and time will need to be set.
1. Press Up and Down arrow buttons simultaneously for 5 seconds
a) “Yr” (year) number, press arrow to change year number to last two
digits of current year
b) Press SpHb
c) “nn” (with a number below) indicates month, use arrows to enter
correct month
d) Press SpHb
e) After month repeat procedure for day, hour, minute
f) Anytime the machine times out and returns to “00” and “Cbl” (no
cable), it can be reactivated by pressing the up/down buttons
g) Press Up and Down arrow buttons simultaneously for 5 seconds again
h) Press hemoglobin (Sp/Hb) button 6 times
i) “Pr” pulse rate, turn “off” pulse rate by pressing up/down arrow buttons
j) Press SpHb
k) “O2” oxygen saturation, turn off oxygen saturation by pressing
up/down arrow button
l) Press SpHb
m) Press SpHb button again to scroll through other options (do not make
other changes without supervisor approval)
34
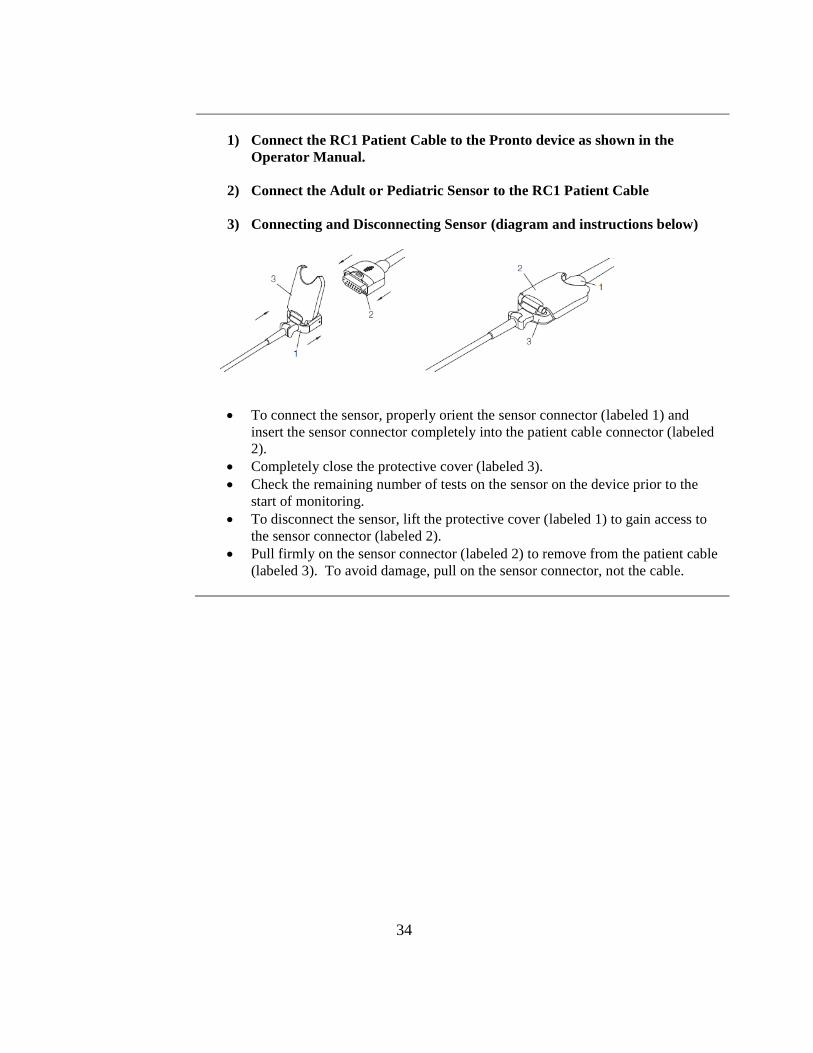
1) Connect the RC1 Patient Cable to the Pronto device as shown in the
Operator Manual.
2) Connect the Adult or Pediatric Sensor to the RC1 Patient Cable
3) Connecting and Disconnecting Sensor (diagram and instructions below)
To connect the sensor, properly orient the sensor connector (labeled 1) and
insert the sensor connector completely into the patient cable connector (labeled
2).
Completely close the protective cover (labeled 3).
Check the remaining number of tests on the sensor on the device prior to the
start of monitoring.
To disconnect the sensor, lift the protective cover (labeled 1) to gain access to
the sensor connector (labeled 2).
Pull firmly on the sensor connector (labeled 2) to remove from the patient cable
(labeled 3). To avoid damage, pull on the sensor connector, not the cable.
35
Chapter 11. Test Preparation and Performing a Reading
Test Preparation
Sensor
Selection
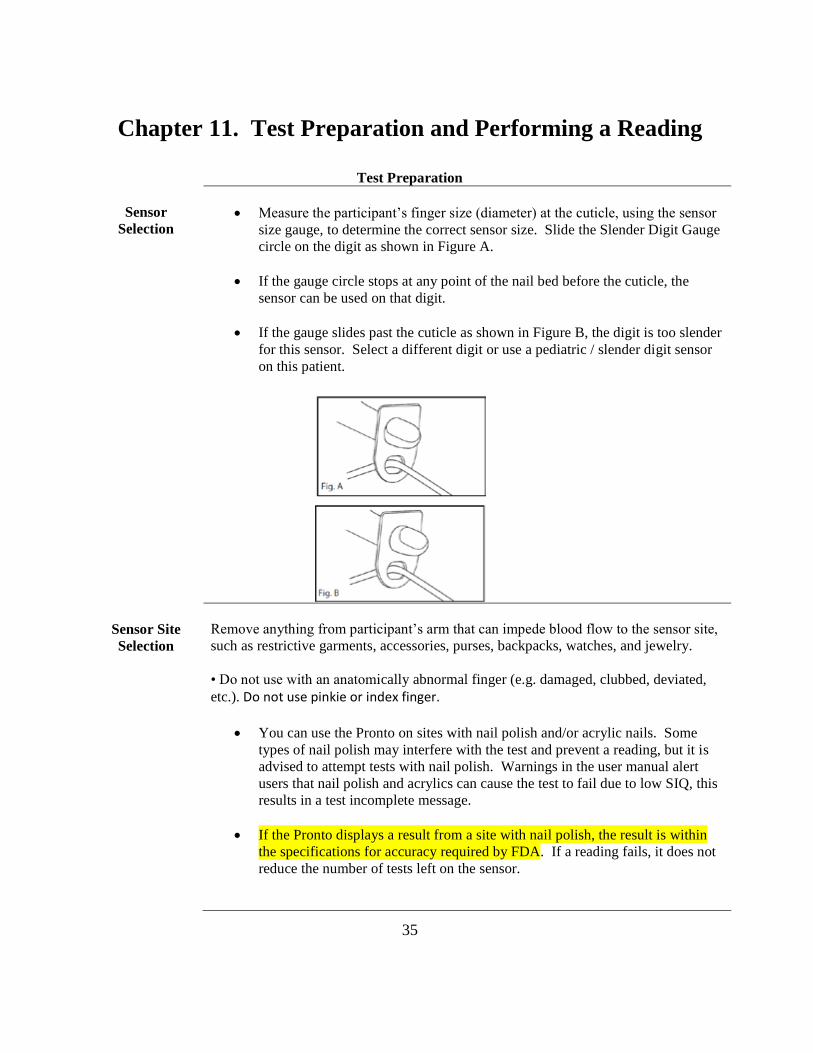
Measure the participant’s finger size (diameter) at the cuticle, using the sensor
size gauge, to determine the correct sensor size. Slide the Slender Digit Gauge
circle on the digit as shown in Figure A.
If the gauge circle stops at any point of the nail bed before the cuticle, the
sensor can be used on that digit.
If the gauge slides past the cuticle as shown in Figure B, the digit is too slender
for this sensor. Select a different digit or use a pediatric / slender digit sensor
on this patient.
Sensor Site
Selection
Remove anything from participant’s arm that can impede blood flow to the sensor site,
such as restrictive garments, accessories, purses, backpacks, watches, and jewelry.
• Do not use with an anatomically abnormal finger (e.g. damaged, clubbed, deviated,
etc.). Do not use pinkie or index finger.
You can use the Pronto on sites with nail polish and/or acrylic nails. Some
types of nail polish may interfere with the test and prevent a reading, but it is
advised to attempt tests with nail polish. Warnings in the user manual alert
users that nail polish and acrylics can cause the test to fail due to low SIQ, this
results in a test incomplete message.
If the Pronto displays a result from a site with nail polish, the result is within
the specifications for accuracy required by FDA. If a reading fails, it does not
reduce the number of tests left on the sensor.
36
Hand washing or hand sanitizer for staff is
required to reduce the transmission of contagious
disease.
The use of alcohol wipes on the participant’s finger
(or thumb as appropriate) is required to ensure the
site is clean and dry prior to testing.
• Select the client’s testing finger in the following priority:
>> ring or middle finger
>> The thumb may be used instead for children at least 2 years old with very
small fingers.
NOTE: For customer support and to request in-person demonstrations for using the Masimo Pronto
contact the Masimo customer service representative Leslie Russell [email protected]

37
Proper Sensor
Conditioning
Limit movement by securely resting client’s hand and arm with sensor on a horizontal
surface. Position hand below heart level to improve circulation and increase perfusion
index.
• Examine the finger while placed in the sensor to ensure the emitter and detector are
directly aligned on top of each other and there is no gap between the sensor and
fingertip. See figures C and D.
• Make sure fingertip is inserted all the way and touching the finger stop inside the
sensor (allowing long finger nails to extend beyond the finger stop).
• Ensure cable runs flat over the top of the hand lined up with the middle of the finger
with no kinks or twists so the cable does not pull on the sensor. See figure E.
• Instruct client to remain still without any sensor movement. Excessive light may
affect the reading. Keep the sensor positioned horizontally. Covering the sensor with
a hand or cloth will shield the sensor from excessive light. Asking caregivers to
cover the hand of children may also help to limit excessive movement during the
measurement.
Tips about using the Pronto
Once the Pronto is activated, it automatically powers off after 1 minute to spare battery
power. Turn machine off when not in use to save battery power.
Fresh batteries (alkaline, non-rechargeable) can be expected to last for approximately 8
hours of use, usually 200-250 tests per battery replacement
38
Rechargeable batteries may be used but may need to be replaced more frequently than
non-rechargeable alkaline batteries.
The Pronto cannot be plugged in, it only uses battery power
Alkaline (non-rechargeable) batteries: When the battery meter display is down to ONE
bar, change the batteries. [Note: there is nothing in the manual that indicates this. This is
a agencies decision.]
Rechargeable batteries: When battery meter display is down to TWO bars, change the
batteries
Tips about the sensors
Adult and pediatric sized sensors can be used
Slender digit guide attached to sensor for selecting appropriately sized sensor
(Pediatric/Slender digit sensor is frequently used with women with slender fingers.)
The finger of a child must be long enough and wide enough to get a reading. The thumb
may be used instead for children at least 2 years old with very small fingers.
Each sensor can be used for a specific number or tests (200, 400, or 1000), display
displays the remaining number of tests when powered on
The sensors DO NOT have a shelf life. They do not expire or become unusable if they
have remaining test capacity
The pediatric sensor has an illustration of “paper dolls” along the side of the sensor
When the sensor has only 20 tests left the display shows TWO red bars
39
Performing a Reading
Performing a
Reading -
Overview
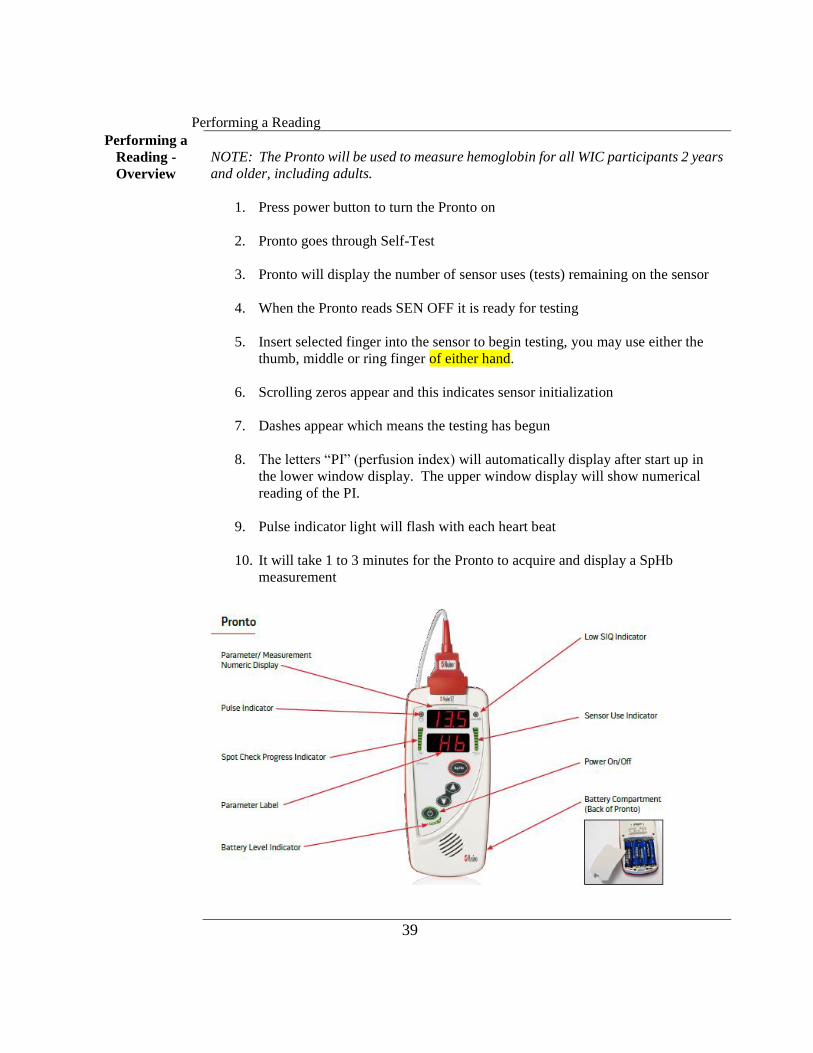
NOTE: The Pronto will be used to measure hemoglobin for all WIC participants 2 years
and older, including adults.
1. Press power button to turn the Pronto on
2. Pronto goes through Self-Test
3. Pronto will display the number of sensor uses (tests) remaining on the sensor
4. When the Pronto reads SEN OFF it is ready for testing
5. Insert selected finger into the sensor to begin testing, you may use either the
thumb, middle or ring finger of either hand.
6. Scrolling zeros appear and this indicates sensor initialization
7. Dashes appear which means the testing has begun
8. The letters “PI” (perfusion index) will automatically display after start up in
the lower window display. The upper window display will show numerical
reading of the PI.
9. Pulse indicator light will flash with each heart beat
10. It will take 1 to 3 minutes for the Pronto to acquire and display a SpHb
measurement
40
11. The Spot Check Progress indicator incrementally illuminates from bottom to
top and an audible tone will sound when the SpHb measurement is ready to
display
12. Press SpHb button when ready to view SpHb results
13. SpHb data will display for 5 minutes while the sensor is attached to the finger
14. After removing the sensor from the finger, SpHb data is available for 5
minutes by depressing either the up or down arrow
Conducting a
Successful Test
Perfusion Index (PI) is a numeric indication of the pulse strength at the measurement
site
- Its numerical value ranges between 0.02% and 20%
- Lower values indicate lower perfusion, i.e. cold hands
- PI varies between monitoring sites and from patient to patient, as
physiologic conditions vary
- During sensor placement, use sites with higher PI readings for best results
- Monitor the trend of the PI for changes in physiologic conditions
To successfully conduct a test the “PI” perfusion index must measure 1.0 or greater
Raise hand to approximately chest level to improve circulation, perfusion index.
At WIC the Masimo Pronto is only used for children over 2 yrs old
Tests require participant to remain still until reading is completed
The device DOES NOT save the readings, be sure to record results immediately
While testing is in progress a beep will be heard that signals the reading has been taken
(complete); press SpHb button after the beep to read HB value
If the yellow light is on, the test did not work (incomplete)
It will take 1-3 minutes for the Pronto to acquire an accurate SpHb spot check
Press SpHb Button when ready to view SpHb results or to perform additional SpHb spot
checks
The Spot Check Progress Indicator incrementally illuminates from bottom to top and an
audible tone will sound when the SpHb measurement is ready to display

41
Use the Up or Down Arrow to navigate through the parameter and
measurement values that have been spot checked
SpHb data will display for 5 minutes. After 5 minutes, the data can only be
obtained by downloading the data through the trend monitor or when another test is
performed
42
Chapter 12. Troubleshooting
Interfering
Factors and
Troubleshooting
NOTE: The Masimo Pronto Operator Manual states “inaccurate readings may be
caused by: Externally applied coloring (such as nail polish)”. This means that some
colors and types of nail polish may slightly affect the reading. Masimo maintains (and
an independent study supports) that the most extreme differences observed with nail
polish still fall within the performance accuracy range they claim in product
specifications. Best practice is to obtain measurements without nail polish, but readings
obtained with nail polish are acceptable.
Acrylic fingernails may sometimes interfere with a successful reading
Metallic fingernail polish may interfere with reading
Black or dark purple painted nails may interfere
Sensor inspections should be done several times a day, debris and grime
block sensors (use alcohol wipe)
Hands dyed with henna, indocyanine green or methylene blue will interfere
and make readings inaccurate
Changes in heart rate cause problems with testing. Choose a relaxed setting
where participants are less likely to be stressed
4-6% of the population have subclinical issues that will prevent a good
reading (carboxyhemoglobin, other irregularities)
If perfusion index “PI” is less than 1.0, choose another finger
Difficulty or No
SpHb Reading
Possible causes include:
Interference from line frequency induced noise (electrical interference from a
coiled or twisted sensor cable, for example)
Inappropriate sensor
Excessive motion
Recommendations:
Ensure there is no coiling of the sensor cable
Run sensor cable straight up the back of the hand and lower arm
Verify use of digit gauge to select correct sensor
Minimize or eliminate motion at the measurement site
Excessive
ambient or
Shield the sensor from excessive light.

43
strobing light
Low Perfusion Index (PI)
Causes and Solutions
Causes Improper sensor type or application
Sensor applied too tightly
Hypothermia (abnormally low body temperature)
Vasoconstriction (narrowing of the blood vessels)
Hypovolemia (decreased blood volume)
Peripheral Vascular Disease
Solutions Rule out occlusion of blood flow
Assure sensor is not attached too tightly
Attempt to warm the patient or sensor site
Move the sensor to a better perfused site if possible (try another finger or opposite hand)
Sensor Fails to Initialize – Circulating LED’s
44
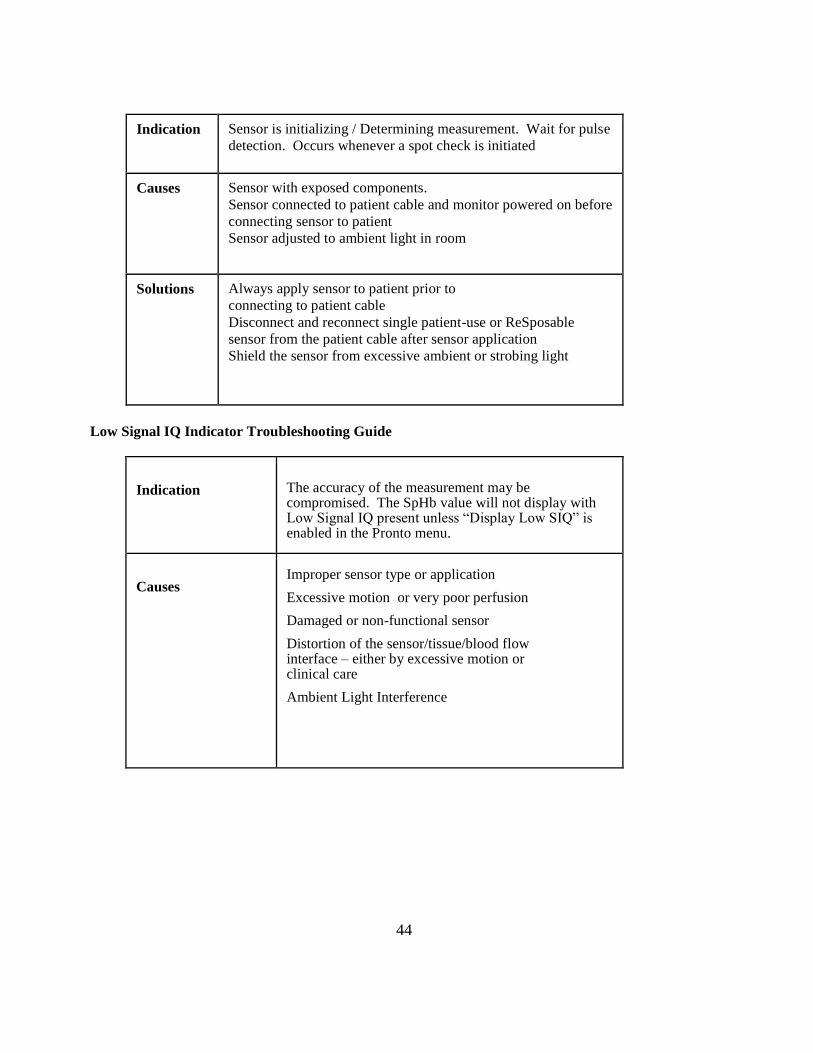
Indication Sensor is initializing / Determining measurement. Wait for pulse
detection. Occurs whenever a spot check is initiated
Causes Sensor with exposed components.
Sensor connected to patient cable and monitor powered on before
connecting sensor to patient
Sensor adjusted to ambient light in room
Solutions Always apply sensor to patient prior to
connecting to patient cable
Disconnect and reconnect single patient-use or ReSposable
sensor from the patient cable after sensor application
Shield the sensor from excessive ambient or strobing light
Low Signal IQ Indicator Troubleshooting Guide
Indication The accuracy of the measurement may be compromised. The SpHb value will not display with Low Signal IQ present unless “Display Low SIQ” is enabled in the Pronto menu.
Causes Improper sensor type or application
Excessive motion or very poor perfusion
Damaged or non-functional sensor
Distortion of the sensor/tissue/blood flow interface – either by excessive motion or clinical care
Ambient Light Interference

45
Solutions Assess patient
Rule out occlusion of blood flow
Ensure proper sensor application and placement
Determine if an extreme change in patient’s physiology and blood flow occurred
Apply Ambient Light Shielding
Retest after performing above
Number of SpHb sensor readings available will NOT be reduced when Low SIQ occurs

46
Chapter 13. Administration and Maintenance of the Masimo
Pronto for the Local Agencies
Administration and Maintenance of Masimo Pronto for the Local Agencies
When to use HemoCue: For all WIC participants requiring hemoglobin measurement between 9
months and less than 2 years of age, the HemoCue analyzer is required.
Cleaning the
Pronto
The Pronto requires cleaning at least once daily, and should be cleaned
immediately if you notice debris or grime.
It is recommended to spray cleanser on a cloth and NOT directly on the Masimo.
The outer surface of the Pronto can be cleaned with a soft cloth dampened with
soap and a warm water solution.
Other appropriate cleaning agents include commercial products such as Cidex
Plus (3.4% Glutaraldehyde), 0.25% Ammonium Chloride, 70% Isopropyl
Alcohol, or by preparing a 10% Bleach solution.
Do not allow liquids to enter the interior of the Pronto. Do not autoclave, pressure
sterilize, or gas sterilize the Pronto.
Do not soak or immerse the Pronto in any liquid. Do not use petroleum based or
acetone solutions, or other harsh solvents to clean the Pronto.
Cleaning Reusable
Rainbow Sensors
Remove the sensor from the patient and disconnect from the patient cable.
Disconnect the patient cable from the device.
Wipe the entire sensor and / or patient cable clean with 70% Isopropyl alcohol
pad.
Allow to air dry thoroughly before returning it to operation
To prevent damage, do not soak or immerse in any liquid solution.
Do not attempt to sterilize by irradiation, steam, autoclave, or ethylene oxide.
47
Ordering Equipment, Returns or Replacements
To order new Pronto machines or to order replacement sensors, please contact the Masimo
customer service representative Leslie Russell [email protected]
For returns or to replace Masimo machines, please contact your Nutrition Services Consultant.
NOTE: The sensors should not be discarded with other disposable waste. When all the loaded tests have
been used, sensors are considered electronic waste and should be treated like cell phones and other
electronic devices. Please check with your agency about their policy for disposal of electronic waste.
Receiving a New Pronto
Instructions for opening a new machine: (See Chapter 10 Initializing a New Machine)
When receiving a new Masimo machine, please use the following instructions to initialize the machine for
use at WIC. Features such as pulse rate and oxygen saturation are not used in the WIC setting and will be
disabled to reduce the use of batteries and sensors for non-WIC purposes.

48
Appendix A – CDC Cutoffs for Anemia

49
Cutoff values for Hemoglobin Levels at 0-2,999 feet
Pregnant Breastfeeding/Post-Partum Infant and Child
1st Trimester 2nd Trimester 3rd Trimester 12 years to
14 years 11
months
Infant Child
Smoking Status action
0 – 13 weeks 14 – 26 weeks 27 + weeks 15 years +
6 to 23
months 2 to 5 years
Non-Smoker
Low Hemoglobin 8.6 to 10.9 8.2 to 10.4 8.6 to 10.9 9.3 to 11.7 8.9 to 11.9 8.0 to 10.9 8.3 to 11.0
Nutritionist 8.5 or lower 8.1 or lower 8.5 or lower 9.2 or lower 8.8 or lower 7.9 or lower 8.2 or lower
up to 1 pack Low Hemoglobin 8.9 to 11.2 8.4 to 10.7 8.9 to 11.2 9.6 to 12.0 9.5 to 12.2
(1-19 cigarettes) Nutritionist 8.8 or lower 8.3 or lower 8.8 or lower 9.5 or lower 9.4 or lower
1-2 packs Low Hemoglobin 9.6 to 11.4 8.0 to 10.9 9.6 to 11.4 9.8 to 12.2 10.0 to 12.4
(20-39 cigarettes) Nutritionist 9.5 or lower 7.9 or lower 9.5 or lower 9.7 or lower 9.9 or lower
2+ packs Low Hemoglobin 10.3 to 11.6 7.6 to 11.1 10.3 to 11.6 10.0 to 12.4 10.5 to 12.6
(40+ cigarettes) Nutritionist 10.2 or lower 7.5 or lower 10.2 or lower 9.9 or lower 10.4 or lower
Hemoglobin values at or below the " Low Hemoglobin " cutoff are reported as anemic in WIC
Hemoglobin values in the "Nutritionist" range are referred to a Nutritionist
50
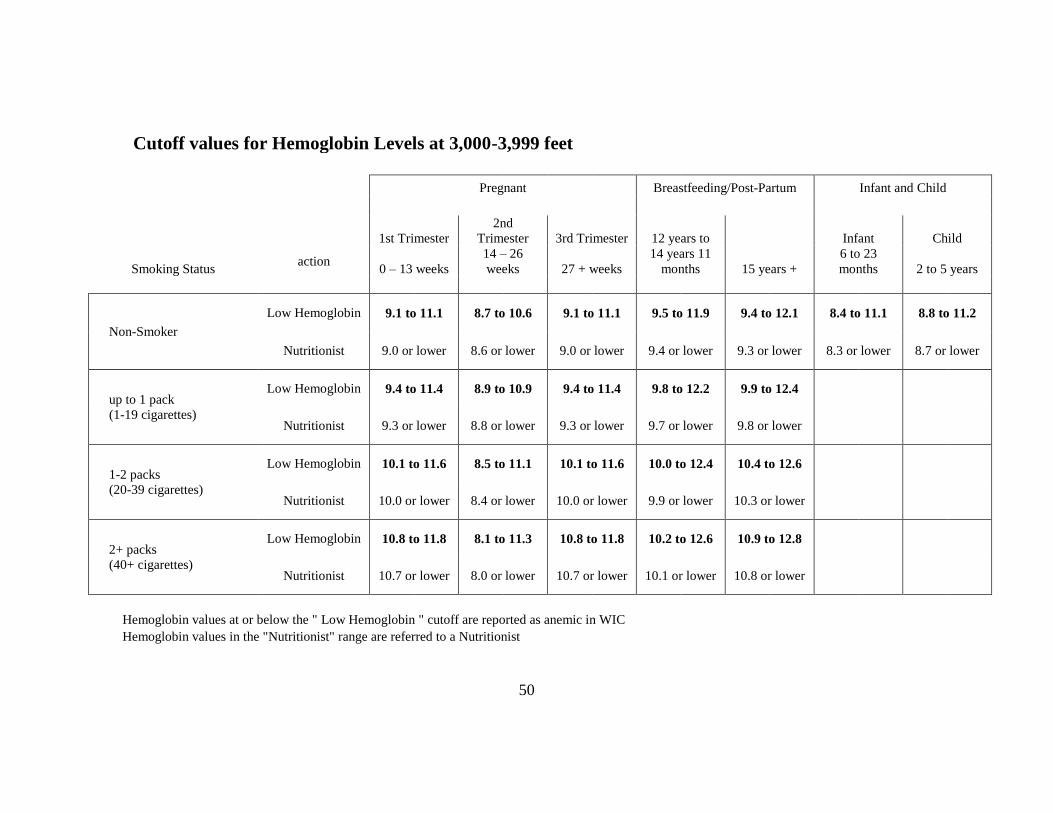
Cutoff values for Hemoglobin Levels at 3,000-3,999 feet
Pregnant Breastfeeding/Post-Partum Infant and Child
1st Trimester
2nd
Trimester 3rd Trimester 12 years to
14 years 11
months
Infant Child
Smoking Status action
0 – 13 weeks
14 – 26
weeks 27 + weeks 15 years +
6 to 23
months 2 to 5 years
Non-Smoker
Low Hemoglobin 9.1 to 11.1 8.7 to 10.6 9.1 to 11.1 9.5 to 11.9 9.4 to 12.1 8.4 to 11.1 8.8 to 11.2
Nutritionist 9.0 or lower 8.6 or lower 9.0 or lower 9.4 or lower 9.3 or lower 8.3 or lower 8.7 or lower
up to 1 pack Low Hemoglobin 9.4 to 11.4 8.9 to 10.9 9.4 to 11.4 9.8 to 12.2 9.9 to 12.4
(1-19 cigarettes) Nutritionist 9.3 or lower 8.8 or lower 9.3 or lower 9.7 or lower 9.8 or lower
1-2 packs Low Hemoglobin 10.1 to 11.6 8.5 to 11.1 10.1 to 11.6 10.0 to 12.4 10.4 to 12.6
(20-39 cigarettes) Nutritionist 10.0 or lower 8.4 or lower 10.0 or lower 9.9 or lower 10.3 or lower
2+ packs Low Hemoglobin 10.8 to 11.8 8.1 to 11.3 10.8 to 11.8 10.2 to 12.6 10.9 to 12.8
(40+ cigarettes) Nutritionist 10.7 or lower 8.0 or lower 10.7 or lower 10.1 or lower 10.8 or lower
Hemoglobin values at or below the " Low Hemoglobin " cutoff are reported as anemic in WIC
Hemoglobin values in the "Nutritionist" range are referred to a Nutritionist

51
Cutoff values for Hemoglobin Levels at 4,000-4,999 feet
Pregnant Breastfeeding/Post-Partum Infant and Child
1st Trimester
2nd
Trimester 3rd Trimester 12 years to
14 years 11
months
Infant Child
Smoking Status action
0 – 13 weeks
14 – 26
weeks 27 + weeks 15 years +
6 to 23
months 2 to 5 years
Non-Smoker
Low Hemoglobin 9.2 to 11.2 8.9 to 10.7 9.2 to 11.2 9.6 to 12.0 9.5 to 12.2 8.5 to 11.2 8.9 to 11.3
Nutritionist 9.1 or lower 8.8 or lower 9.1 or lower 9.5 or lower 9.4 or lower 8.4 or lower 8.8 or lower
up to 1 pack Low Hemoglobin 9.5 to 11.5 9.1 to 11.0 9.5 to 11.5 9.9 to 12.3 10.0 to 12.5
(1-19 cigarettes) Nutritionist 9.4 or lower 9.0 or lower 9.4 or lower 9.8 or lower 9.9 or lower
1-2 packs Low Hemoglobin 10.3 to 11.7 8.7 to 11.2 10.3 to 11.7 10.1 to 12.5 10.5 to 12.7
(20-39 cigarettes) Nutritionist 10.2 or lower 8.6 or lower 10.2 or lower 10.0 or lower 10.4 or lower
2+ packs Low Hemoglobin 11.0 to 11.9 8.3 to 11.4 11.0 to 11.9 10.3 to 12.7 11.0 to 12.9
(40+ cigarettes) Nutritionist 10.9 or lower 8.2 or lower 10.9 or lower 10.2 or lower 10.9 or lower
Hemoglobin values at or below the " Low Hemoglobin " cutoff are reported as anemic in WIC
Hemoglobin values in the "Nutritionist" range are referred to a Nutritionist

52
Cutoff values for Hemoglobin Levels at 5,000-5,999 feet
Pregnant Breastfeeding/Post-Partum Infant and Child
1st Trimester
2nd
Trimester 3rd Trimester 12 years to
14 years 11
months
Infant Child
Smoking Status action
0 – 13 weeks
14 – 26
weeks 27 + weeks 15 years +
6 to 23
months 2 to 5 years
Non-Smoker
Low Hemoglobin 9.4 to 11.4 9.0 to 10.9 9.4 to 11.4 9.8 to 12.2 9.6 to 12.4 8.6 to 11.4 9.0 to 11.5
Nutritionist 9.3 or lower 8.9 or lower 9.3 or lower 9.7 or lower 9.5 or lower 8.5 or lower 8.9 or lower
up to 1 pack Low Hemoglobin 9.7 to 11.7 9.3 to 11.2 9.7 to 11.7 10.1 to 12.5 10.2 to 12.7
(1-19 cigarettes) Nutritionist 9.6 or lower 9.2 or lower 9.6 or lower 10.0 or lower 10.1 or lower
1-2 packs Low Hemoglobin 10.4 to 11.9 8.9 to 11.4 10.4 to 11.9 10.3 to 12.7 10.7 to 12.9
(20-39 cigarettes) Nutritionist 10.3 or lower 8.8 or lower 10.3 or lower 10.2 or lower 10.6 or lower
2+ packs Low Hemoglobin 11.1 to 12.1 8.5 to 11.6 11.1 to 12.1 10.5 to 12.9 11.2 to 13.1
(40+ cigarettes) Nutritionist 11.0 or lower 8.4 or lower 11.0 or lower 10.4 or lower 11.1 or lower
Hemoglobin values at or below the " Low Hemoglobin " cutoff are reported as anemic in WIC
Hemoglobin values in the "Nutritionist" range are referred to a Nutritionist
53
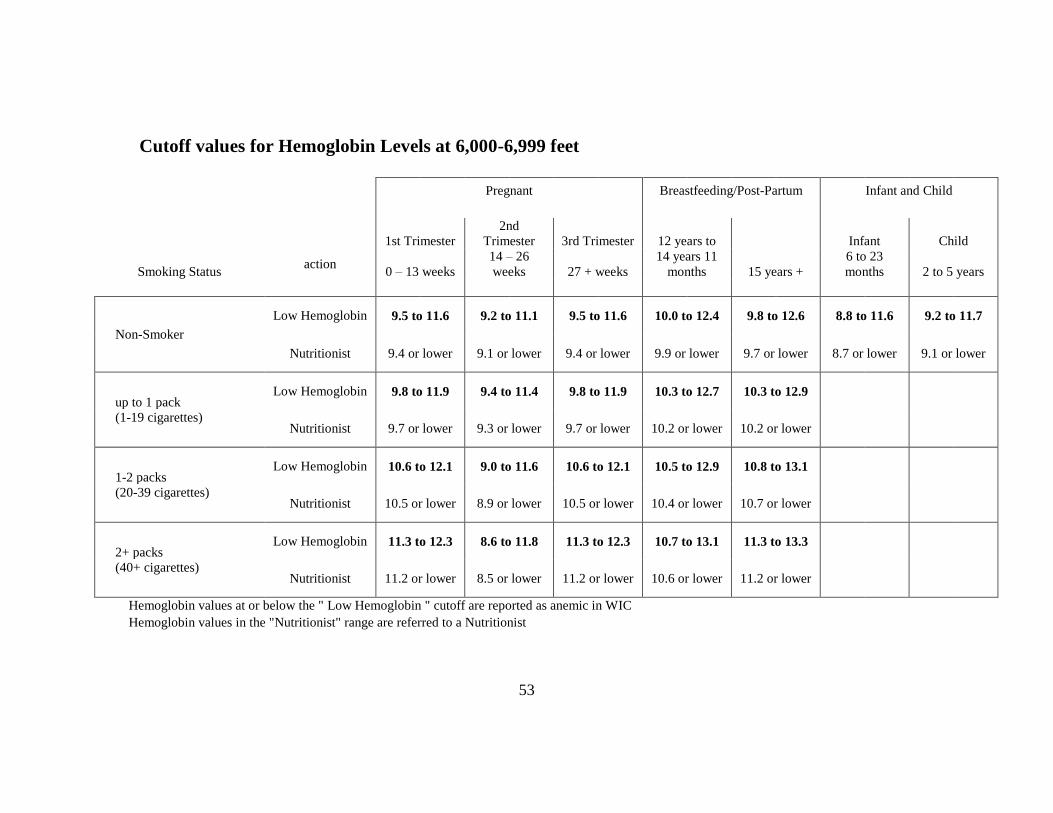
Cutoff values for Hemoglobin Levels at 6,000-6,999 feet
Pregnant Breastfeeding/Post-Partum Infant and Child
1st Trimester
2nd
Trimester 3rd Trimester 12 years to
14 years 11
months
Infant Child
Smoking Status action
0 – 13 weeks
14 – 26
weeks 27 + weeks 15 years +
6 to 23
months 2 to 5 years
Non-Smoker
Low Hemoglobin 9.5 to 11.6 9.2 to 11.1 9.5 to 11.6 10.0 to 12.4 9.8 to 12.6 8.8 to 11.6 9.2 to 11.7
Nutritionist 9.4 or lower 9.1 or lower 9.4 or lower 9.9 or lower 9.7 or lower 8.7 or lower 9.1 or lower
up to 1 pack Low Hemoglobin 9.8 to 11.9 9.4 to 11.4 9.8 to 11.9 10.3 to 12.7 10.3 to 12.9
(1-19 cigarettes) Nutritionist 9.7 or lower 9.3 or lower 9.7 or lower 10.2 or lower 10.2 or lower
1-2 packs Low Hemoglobin 10.6 to 12.1 9.0 to 11.6 10.6 to 12.1 10.5 to 12.9 10.8 to 13.1
(20-39 cigarettes) Nutritionist 10.5 or lower 8.9 or lower 10.5 or lower 10.4 or lower 10.7 or lower
2+ packs Low Hemoglobin 11.3 to 12.3 8.6 to 11.8 11.3 to 12.3 10.7 to 13.1 11.3 to 13.3
(40+ cigarettes) Nutritionist 11.2 or lower 8.5 or lower 11.2 or lower 10.6 or lower 11.2 or lower
Hemoglobin values at or below the " Low Hemoglobin " cutoff are reported as anemic in WIC
Hemoglobin values in the "Nutritionist" range are referred to a Nutritionist
54
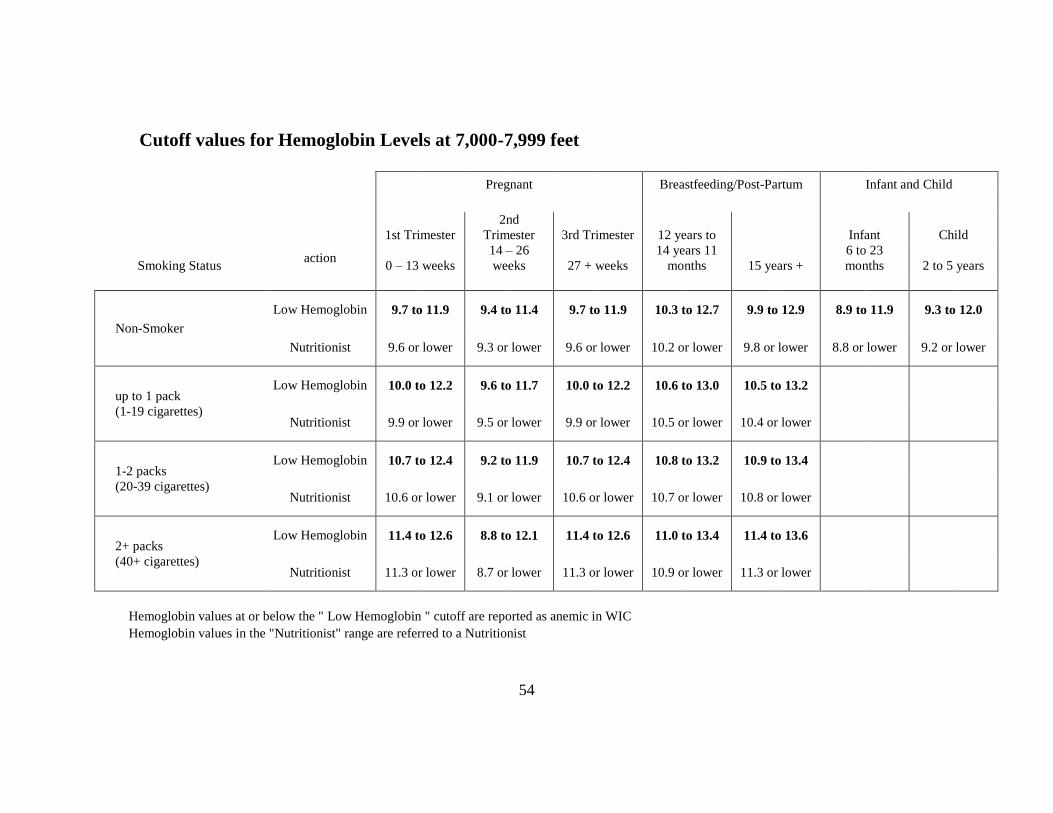
Cutoff values for Hemoglobin Levels at 7,000-7,999 feet
Pregnant Breastfeeding/Post-Partum Infant and Child
1st Trimester
2nd
Trimester 3rd Trimester 12 years to
14 years 11
months
Infant Child
Smoking Status action
0 – 13 weeks
14 – 26
weeks 27 + weeks 15 years +
6 to 23
months 2 to 5 years
Non-Smoker
Low Hemoglobin 9.7 to 11.9 9.4 to 11.4 9.7 to 11.9 10.3 to 12.7 9.9 to 12.9 8.9 to 11.9 9.3 to 12.0
Nutritionist 9.6 or lower 9.3 or lower 9.6 or lower 10.2 or lower 9.8 or lower 8.8 or lower 9.2 or lower
up to 1 pack Low Hemoglobin 10.0 to 12.2 9.6 to 11.7 10.0 to 12.2 10.6 to 13.0 10.5 to 13.2
(1-19 cigarettes) Nutritionist 9.9 or lower 9.5 or lower 9.9 or lower 10.5 or lower 10.4 or lower
1-2 packs Low Hemoglobin 10.7 to 12.4 9.2 to 11.9 10.7 to 12.4 10.8 to 13.2 10.9 to 13.4
(20-39 cigarettes) Nutritionist 10.6 or lower 9.1 or lower 10.6 or lower 10.7 or lower 10.8 or lower
2+ packs Low Hemoglobin 11.4 to 12.6 8.8 to 12.1 11.4 to 12.6 11.0 to 13.4 11.4 to 13.6
(40+ cigarettes) Nutritionist 11.3 or lower 8.7 or lower 11.3 or lower 10.9 or lower 11.3 or lower
Hemoglobin values at or below the " Low Hemoglobin " cutoff are reported as anemic in WIC
Hemoglobin values in the "Nutritionist" range are referred to a Nutritionist

55
Appendix B - Anthropometrics Tool (Bloodwork procedures only
displayed)

56
Arizona WIC – Anthropometric/Laboratory Observation
(Bloodwork procedures only displayed)

57
Appendix C – Contact List
58
HemoCue Technical Support
You should only contact HemoCue directly if you are instructed to do so by ADHS staff.
HemoCue Technical Support: (800) 426-7256
Arizona Department of Health Services HemoCue Equipment Support
If you are experiencing issues with HemoCue equipment, you must follow the procedures in
Appendix F of this manual.
If you are unable to access the HemoCue Troubleshooting Assistance Request Form on the
azwic.gov website (as detailed in Appendix F), you may call (602) 542-1886 and ask for the WIC
Nutrition Consultant.
Masimo Pronto Technical Support
To order new Pronto machines or to order replacement sensors, please contact the Masimo
customer service representative Leslie Russell [email protected]
For returns or to replace Masimo machines, please contact your Nutrition Services Consultant.

59
Appendix D – HemoCue® Hb 201
+ System Maintenance Log
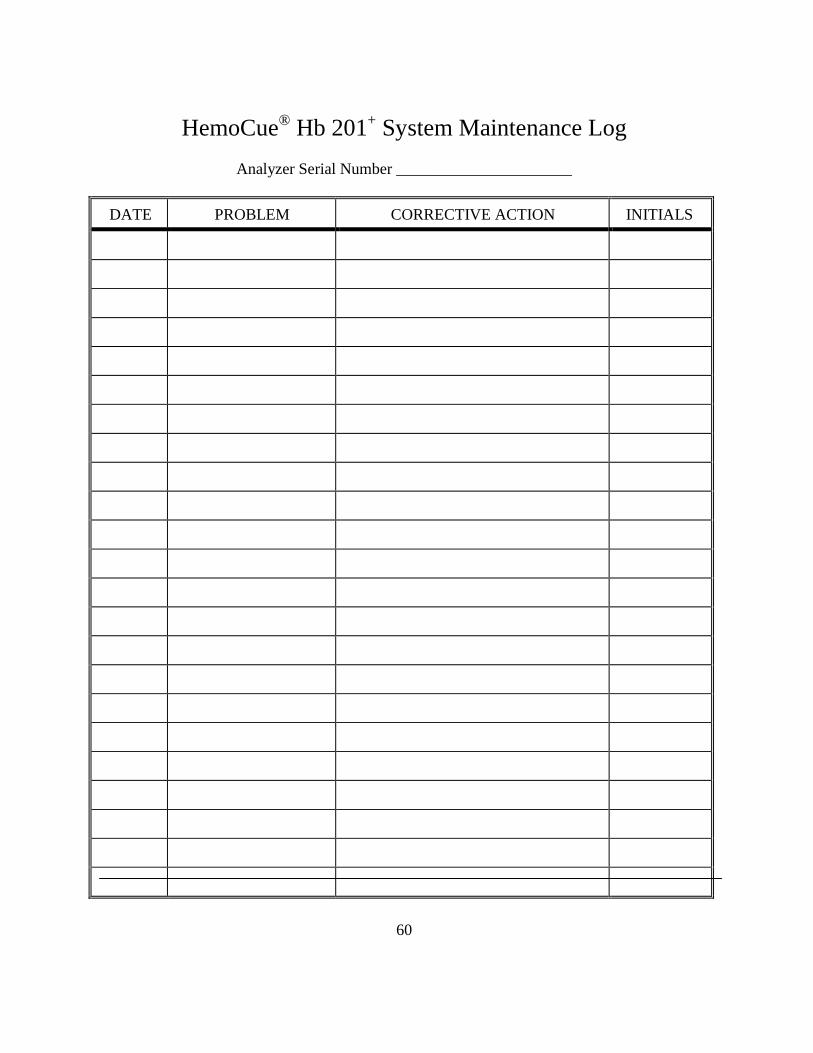
60
HemoCue® Hb 201+ System Maintenance Log
Analyzer Serial Number ______________________
DATE PROBLEM CORRECTIVE ACTION INITIALS

61
Appendix E – Trouble Shooting Guide
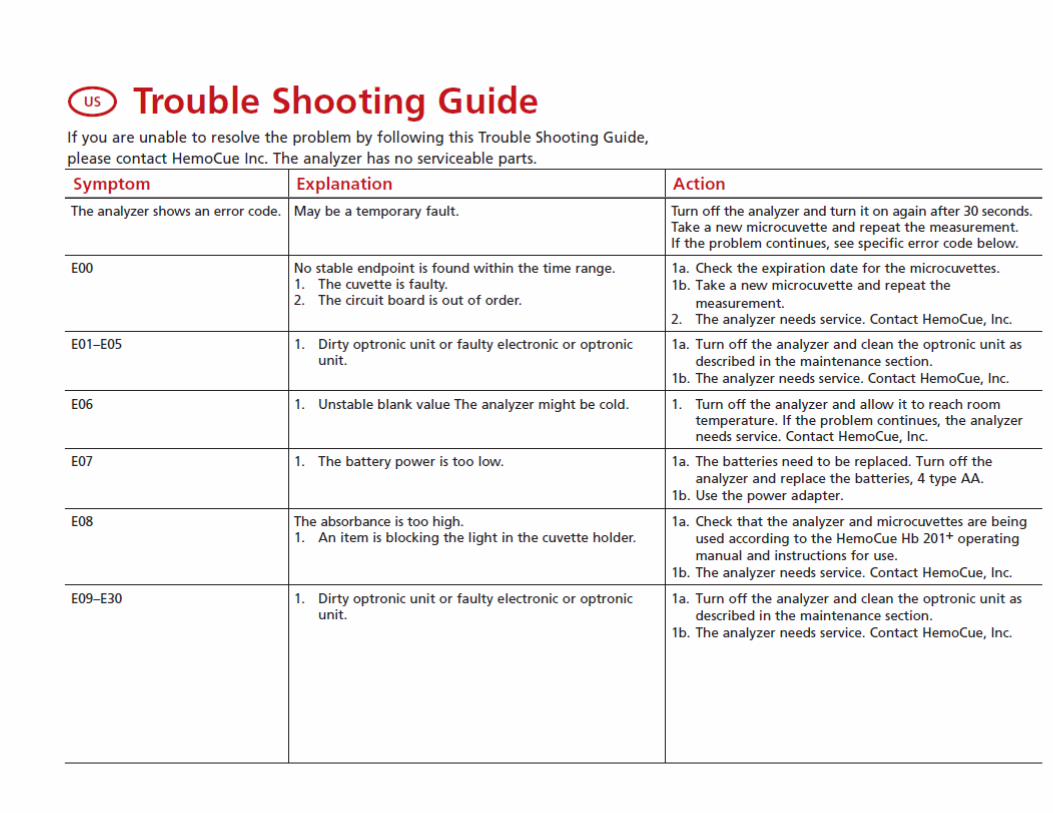
62

63

64
Appendix F – CLIA Application for Certification
http://www.azdhs.gov/lab/license/certification/applications.htm

65
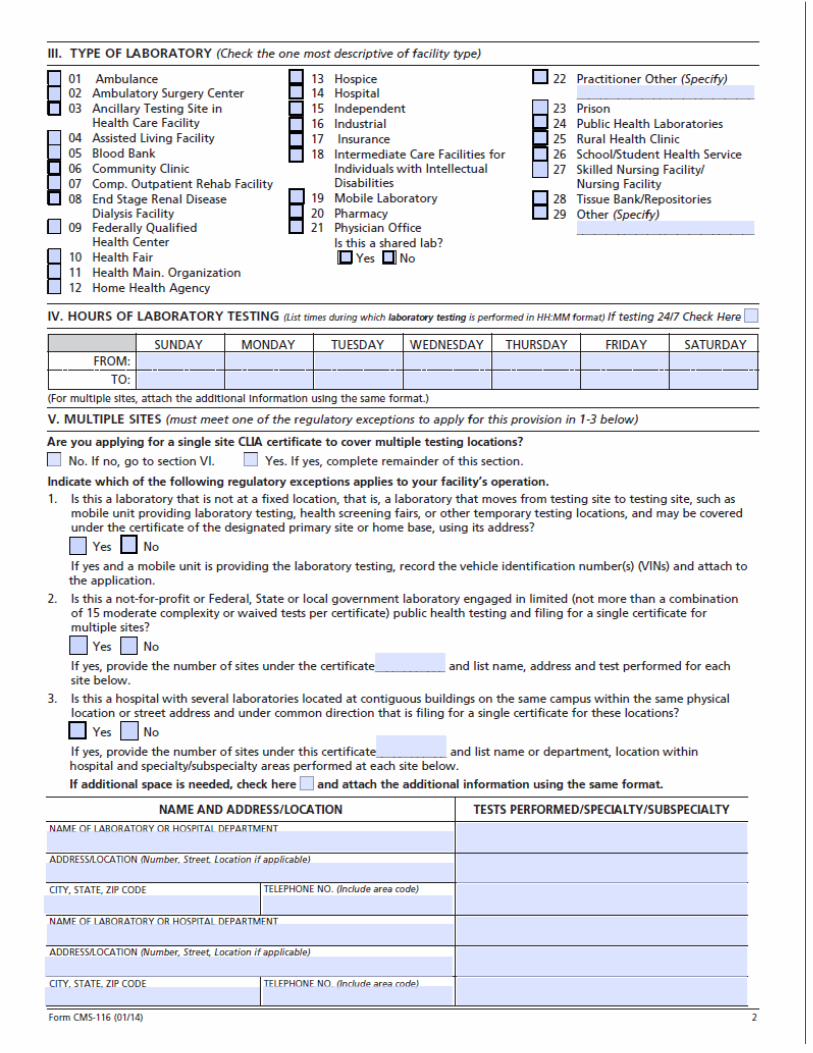
66

67
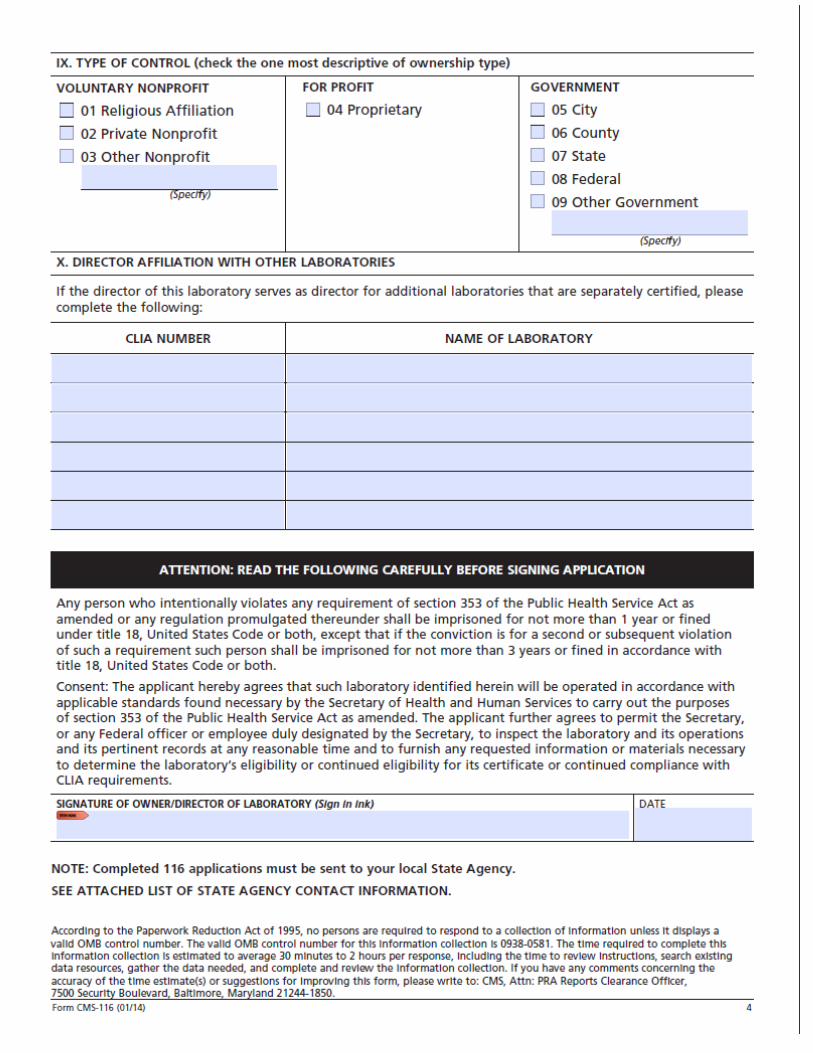
68

69

70

71

72
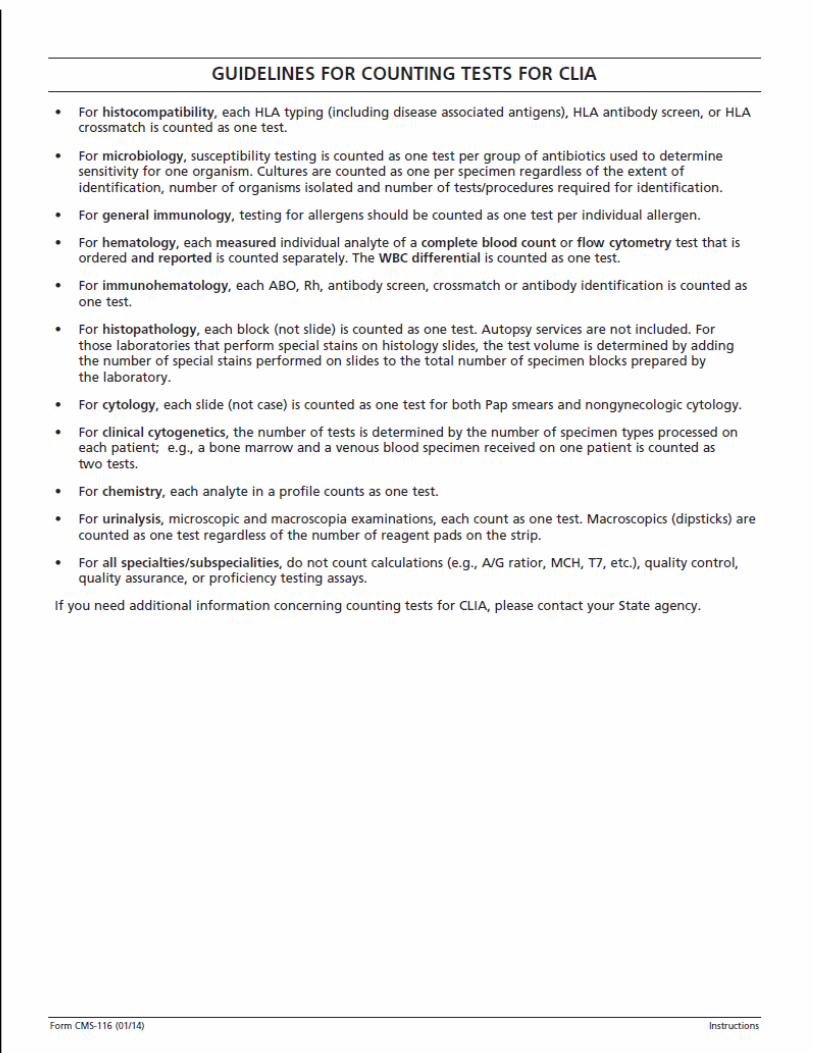
73

74