bike owners manual
TRANSCRIPT

BIK
E O
WN
ER
S M
AN
UA
LO
WN
ER
S M
AN
UA
L /
BE
DIE
NU
NG
SA
NL
EIT
UN
G /
MA
NU
EL
D’U
TIL
ISA
TIO
N
SC
OT
T2
00
8
SCOTT SPORTS SA / 17 RTE DU CROCHET / 1762 GIVISIEZ / SWITZERLAND
© 2008 SCOTT SPORTS SA, ALL RIGHTS RESERVED
CONFORME AUX EXIGENCES DE SECURITE
NF R30-020
The lengths of the grey beam shows the optimum eye-to-eye distance of the rear shock.
Der graue Balken zeigt den optimalen Bolzenabstand des Dämpfers.
La longueur de la barre grise représente l’écart optimal entre les points de fixation
de l’amortisseur
SAG-BOY
SC
OT
T-S
PO
RT
S.C
OM GAMBLER
V
00
FRANÇAIS
DEUTSCH
01
ENGLISH
> Gambler Concept P. 02
> Geometry/Technical Data Gambler P. 03
> Adjustment of head angle P. 04
> 2 different headtube inserts P. 05
> 3 different rear travel options P. 06
> Recommended Tools for the Shock Set-Up P. 06
> Basic Set-Up of the Gambler Rear Suspension P. 07
> Adjustment of Seatpost-Height P. 09
> IDS Drop Out System P. 10
> Front Fork Set-Up/Change of Front Fork P. 11
> Pivot Maintenance P. 11
> Warranty P. 12
CONTENT
The Gambler should be adjusted exactlyto the current rider for reaching maximum safety and fun while riding.
All adjustments should be done at thelocal Scott dealer or following to thismanual.

02
FRANÇAIS
DEUTSCH
03
ENGLISH
Gambler is the result of 2 years of research and deve-lopment searching for one of the most versatile anddurable FR and DH bikes available on the market, butstill easy in set-up and maintenance.
Scott’s focus was to combine solid construction withoptimized kinematics. This respecting the demands ofriders concerning geometry, suspension characteristics,low center of gravity and stiffness.
Gambler was designed for riders looking for a dualsuspended FR bike or a race oriented DH bike offeringrear wheel travel between 190 and 230 mm.
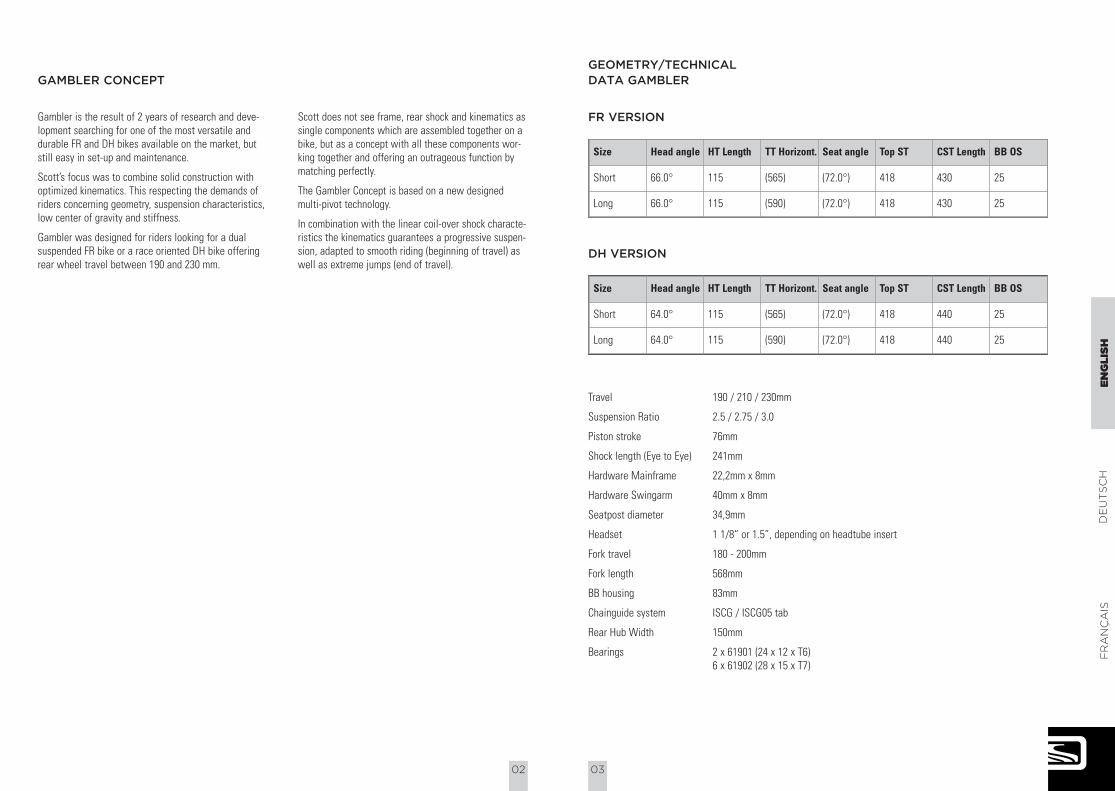
GAMBLER CONCEPTGEOMETRY/TECHNICAL DATA GAMBLER
Scott does not see frame, rear shock and kinematics assingle components which are assembled together on abike, but as a concept with all these components wor-king together and offering an outrageous function bymatching perfectly.
The Gambler Concept is based on a new designedmulti-pivot technology.
In combination with the linear coil-over shock characte-ristics the kinematics guarantees a progressive suspen-sion, adapted to smooth riding (beginning of travel) aswell as extreme jumps (end of travel).
Size Head angle HT Length TT Horizont. Seat angle Top ST CST Length BB OS
Short 66.0° 115 (565) (72.0°) 418 430 25
Long 66.0° 115 (590) (72.0°) 418 430 25
Travel 190 / 210 / 230mm
Suspension Ratio 2.5 / 2.75 / 3.0
Piston stroke 76mm
Shock length (Eye to Eye) 241mm
Hardware Mainframe 22,2mm x 8mm
Hardware Swingarm 40mm x 8mm
Seatpost diameter 34,9mm
Headset 1 1/8“ or 1.5”, depending on headtube insert
Fork travel 180 - 200mm
Fork length 568mm
BB housing 83mm
Chainguide system ISCG / ISCG05 tab
Rear Hub Width 150mm
Bearings 2 x 61901 (24 x 12 x T6)6 x 61902 (28 x 15 x T7)
FR VERSION
Size Head angle HT Length TT Horizont. Seat angle Top ST CST Length BB OS
Short 64.0° 115 (565) (72.0°) 418 440 25
Long 64.0° 115 (590) (72.0°) 418 440 25
DH VERSION

04
FRANÇAIS
DEUTSCH
05
ENGLISH
On Gambler you can adjust the headangle within a fewminutes for a better handling depending on your ridingstyle and track condition/style.
HHooww ttoo aaddjjuusstt tthhee hheeaaddaannggllee::
You need
- a 4mm Allen key bit for a tighening torque key
- a 56mm wrench (attached to this bike)
ADJUSTMENT OF HEAD ANGLE
3. IMPORTANT: Please make sure that there is no gap between the collar on the downside of the insert and the headtube clamp on the frame.
1. Loose the three screws on the head of the headtube with a 4mm allen key but do not remove them completely. These screws hold the insert in Place. Please note that it is not necessary to disassemble the fork or any other components.
2. Turn the insert with the 56mm wrench which is attached to your bike/frameset. The slot of the insert should always be in line with the slot of the headtube clamp. The resulting angle is engraved in the insert for both options.
4. tighten the 3 screws with 5Nm/44in-lbs
2 DIFFERENT HEADTUBE INSERTS
On Gambler you have 2 options for the headsetdiameter (1 1/8” and 1.5”).
You can order the headtube inserts via your localScott dealer with:
210127 Headtube InsertGambler 1 1/8”, 1size
210128 Headtube InsertGambler 1.5”, 1size
For removing/assemblying them please contactyour local Scott dealer as you might need somespecial tools for the headset dis-/assembly as wellas a tightening torque key to fix the inserts in theheadtube section.
IItt iiss vveerryy iimmppoorrttaanntt ttoo ffoollllooww tthhee ttiigghhtteenniinngg ttoorrqquuee iinnddiiccaattiioonnss sshhoowwnn oonn tthhee ppaarrttss..

06
FRANÇAIS
DEUTSCH
07
ENGLISH
3 DIFFERENT REAR TRAVEL OPTIONS
RECOMMENDED TOOLS FOR THE SET-UP
The Set-Up of the rear shock can be easy done within afew minutes.
PPlleeaassee ttaakkee tthhiiss ttiimmee ttoo aavvooiidd ddaannggeerroouuss rriiddiinngg ppeerrffoorr--mmaannccee aanndd ttoo ggeett tthhee bbeesstt oouutt ooff yyoouurr GGaammbblleerr..
Please make sure that the coil spring on the shock mat-ches to your riding weight (including your riding gear).
We recommend following coil springs:
On Gambler you have 3 options for the rear travel asshown on the drawing below:
Please read this manual and the manual of the rearshock manufacturer carefully before you start the set-up procedure.
In addition we strongly recommend using a tighteningtorque key with a 6mm allen key insert.
To simplify the check of the SAG (= negative travel) of the rear shock please use the “SAG-Boy” printed asa beam on the cover of this manual.
SET-UP GAMBLER
Weight(kg)
190 mmrear travel
210 mmrear travel
230 mmrear travel
50 - 60 250 x 3.25 300 x 3.25 350 x 3.25
60 - 70 300 x 3.25 350 x 3.25 400 x 3.25
70 - 80 350 x 3.25 400 x 3.25 450 x 3.25
80 - 90 400 x 3.25 450 x 3.25 500 x 3.25
For fine tuning the SAG and the corresponding eye-to-eye distance of the shock bolts you can tighten or releasethe pretension of the coil spring but please respect the maximum and minimum spring indications of the shockmanufacturer.
The eye-to-eye distance between the shock bolts should be in basic set up 212mm (40% SAG).
This length is also indicated on the cover of this manual by the colored beam of the SAG-Boy.
For further details on the shock set-up please follow the indications of the rear shock manufacturer attached to this bike.

08
FRANÇAIS
DEUTSCH
09
ENGLISH
“Rebound” describes the speed the shock comes backto its original length after absorbing an obstacle.
By using the red rebound screw you can adjust therebound step by step.
Please refer to the following instruction:
Ride your bike off a pavement (remain in the saddle)and check how many times it bounces.
- if it bounces 1-2 times, the set up is good.
- If it bounces more than 3 times the rebound is too fast. Turn the screw 1-2 “clicks” clockwise
- If it does not bounce the rebound is too slow. Turn the screw 1-2 “clicks” counter clockwise.
BASIC SET-UP OF REBOUND
IImmppoorrttaanntt!!
Note that you have to mount the rear shockalways as shown underneath.
Mounting the rear shock in a different positioncan cause severe damages to the frame, thelinkage levers and the rear shock.
IImmppoorrttaanntt::
AAfftteerr aa ddiissmmaannttlleemmeenntt ooff tthhee rreeaarr sshhoocckk,, bbootthhffiixxiinngg bboollttss sshhoouulldd bbee ttiigghhtteenneedd wwiitthh aa ttiigghhtteenniinngg ttoorrqquuee ooff 3355NNmm//330088iinn--llbbss..
IIff tthhiiss iiss nnoott ddoonnee ccoorrrreeccttllyy tthhee rreeaarr sshhoocckk ccaannbbee ddaammaaggeedd..
SET-UP OF OTHER SHOCK MODELS
SSccootttt ssttrroonnggllyy rreeccoommmmeennddss uussiinngg oonnllyy tthhee oorriiggiinnaallllyyssppeecciiffiieedd sshhoocckk wwiitthh tthhee GGaammbblleerr bbiikkee, as we have cho-sen carefully both parts for a perfect matching combi-nation.
If you want to use a different rear shock model than theone originally on the bike, please make sure that theshock will not in any position hit the frame and cause adamage to the frame.
Please follow the instruction below:
Please make sure that the rear shock or its accessoryparts do not touch the frame when mounting or suspending.
For doing so release the air/remove the coil, install theshock and compress the shock completely.
If the shock touches the frame while doing so, do notuse this shock in order to avoid damage to frame, swingarm or shock
ADJUSTMENT OF SEATPOST-HEIGHT
IImmppoorrttaanntt::
TThhee sseeaattppoosstt hhaass ttoo bbee iinnsseerrtteedd iinnttoo tthheesseeaattttuubbee aatt aa mmiinniimmuumm ooff 8800mmmm..
NNeevveerr uussee aannootthheerr sseeaattppoosstt ddiiaammeetteerr tthhaann3344..99mmmm oorr ttrryy ttoo uussee aa sshhiimm//rreedduucceerr bbeett--wweeeenn sseeaattppoosstt aanndd ffrraammee..
When lowering down the seatpost, please makesure that it will not hit the shock below whileriding! This could result in serious damage on bikeparts and result in a dangerous riding condition.

The Gambler offers the possibility not only to changedrop out hanger in case of damage, you also can choo-se between different 3 different drop outs of the ScottIDS (Interchangeable Drop-Out System):
10
FRANÇAIS
DEUTSCH
11
ENGLISH
IDS DROP OUT SYSTEMFRONT FORK SET-UP/CHANGE OF FRONT FORK
For the set up of the front fork please use the fork specific manual attached to the bike.
We recommend using front forks with a travel between180 and 200 mm (568mm fork length), as this will notinfluence the geometry and alter handling of the bike.
PIVOT MAINTENANCE
The pivots and bearings on SCOTT Gambler areextremely easy to maintain.
An external treatment with a grease spray afterevery bike wash is all you have to do. We do notrecommend heavy grease sprays since these willleave a film on the parts which is difficult to remo-ve. We recommend the same for the chain also.
If you have to change the bearings you can orderthem included in a service kit (Scott article number:210126) at your local SCOTT dealer or buy themwith international parts number as shown above inthe specs list in a hardware store.
IInn ccaassee ooff aa cchhaannggee ooff tthhee bbeeaarriinnggss oorr ooff tthhee rreeaarrsswwiinnggaarrmm yyoouu sshhoouulldd ccoonnttaacctt yyoouurr llooccaall SSCCOOTTTT ddeeaalleerr aass yyoouu nneeeedd aa ssppeecciiaall ttooooll kkiitt ffoorr ddiissaasssseemm--bbllyy aanndd aasssseemmbbllyy..
Inline on Gambler DH you will find following drop out(10mm longer as FR drop out):
Inline you will find on Gambler FR following drop out:
Another Option is SRAM-Maxle System for12mm/150mm through axle hubs (same length as your FR dropout), available at yourlocal authorized Scott dealer:

12
FRANÇAIS
DEUTSCH
13
ENGLISH
Model __________________________
Year __________________________
Size __________________________
Frame __________________________
SCOTT bikes are made using the most innovative produc-tion and quality methods. They are equipped with bestcomponents of well known parts suppliers.
Doing so SCOTT warrants its frames and swingarmsfor two years for defects in material and/or work-manship in case of purchase of completely assemblednew bikes. The warranty period starts at the day ofpurchase.
This warranty is limited to the first buyer, what meansthe first person who uses the bike and only with the useit was made for. The bike is to purchase via authorizedSCOTT-dealers to the exclusion of purchases via internetauctions.
In case of a warranty claim the decision to repair or toreplace the defective part is up to SCOTT. Non defectiveparts will only be replaced at the guarantee’s ownexpense.
Wear and tear elements are not covered by the warranty.
You will find at the end of this manual a protocol for thehanding over of the bike which will remain in copy atthe SCOTT dealer after acceptance and signature of theconsumer.
It is obligatory to show this protocol of handing overtogether with the bike or the defective part in case ofa warranty claim given that it provides evidence ofpurchase. Otherwise no warranty is granted.
Claims must be made directly through an authorizeddealer with the protocol of handing over. For informationregarding the nearest dealer, write or call this companyor the national SCOTT distributor.
Normal wear, accident, neglect, abuse, improper assembly,improper maintenance by other than an authorized dealeror use of parts or devices not consistent with the useoriginally intended for the bicycle as sold (downhillraces, freestyle, stunts) are not covered by this warranty.
Under reservation of national warrant of merchantability.
WARRANTYWARRANTY