centrale di comando as24 per motori interrati … · messa a terra al fine di ottenere un corretto...
TRANSCRIPT

ITA ENG FRA ESP DEU POR 6-1622377 rev.1 04/02/2016 Pag 1 di 8
La centrale di comando AS24 è indicata per le installazioni a 1 o 2 ante battenti con motore a corrente continua 24V e un assorbimento massimo di 7A. Il quadro di comando permette una regolazione precisa della forza di spinta delle ante, della velocità e della sensibilità in fase di rallentamento. È possibile regolare il ritardo della seconda anta durante la fase di apprendimento. La centrale può memorizzare fino a 30 trasmettitori e 8000 trasmettitori con la memoria esterna con la funzione passo a passo e pedonale. È dotata di ingressi per fotocellula interna ed esterna, finecorsa di apertura e possibilità di collegare pulsanti per il passo passo, il pedonale e lo stop. Le uscite comprendono un lampeggiante a 24Vac, la possibilità di collegare un 2°canale radi o ausiliare (utilizzando un ricevitore molex) ed una scheda di espansione con più funzioni. È previsto l’uso di batterie tampone ove si rendesse necessario assicurare il servizio in mancanza di energia elettrica.
1. Introduzione
CENTRALE DI COMANDO AS24 PER MOTORI INTERRATI Centralina di comando per 1-2 motori 24Vcc
2. Configurazione
Fig.1
Connettore modulo radio
24 Vac
Pulsanti
Led di segnalazione
Connettore per scheda R2 (non in dotazione)
Utilizzare questo punto per collegare la carcassa dei motori alla centralina e alla terra. Molex modulo
radio
3. Collegamenti elettrici
SCELTA MOTORI
Se il cancello è a battente, collegare all’uscita MOTORE 1 l’anta che va in battuta e a cui è collegata un’eventuale elettroserratura. Il MOTORE 1 viene attivato sempre per primo in apertura, e per secondo in chiusura.
MESSA A TERRA
Al fine di ottenere un corretto funzionamento degli accessori (fotodispositivi in particolare) collegati alla centralina è molto importante che tutto il sistema (automazione + motori + centralina) abbia un unico riferimento di massa. Si devono quindi collegare tra di loro la struttura metallica dell’automazione, la carcassa dei motori e la centralina con il morsetto di terra. Per il collegamento sulla centralina si veda la figura 1.
Trimmer di regolazione
Dip switch
Running AMP.SENS
Automatic RECLOSING
Slowdown VELOCITY
Slowdown AMP.SENS
FUNCTION SELECT
Modalità funzionamento su sense (vedi paragrafo 15)
J1
Rosso Blu
Fusibile 10A per motore 1
Fusibile 10A per motore 2
Fusibile 2.5A per lampeggiante
ATTENZIONE: prima di qualsiasi attivazione e/o mess a in opera, leggere attentamente i seguenti paragra fi che descrivono le programmazioni e le impostazioni principali dell’automazione. Nella programmazione, seguire scrupolosamente l’ordine e le istruzioni riportate. Non entrare nel raggio d’azione dell’automazione mentre è in movime nto o durante le programmazioni. Prima di ogni modi fica attendere il completo arresto del sistema. Non permettere a persone estranee e/o non qualificate interventi e/o la presenza nel raggio d ’azione del sistema.
Per un corretto funzionamento dell’automazione, è a ssolutamente indispensabile l’uso dei fermi meccan ici in apertura e in chiusura.
Fig 2
LEGENDA: PP : Pulsante passo-passo. PED : Pulsante pedonale o ingresso orologio. Stop: Stop. Com : Comune. Foto INT: Fotocellula interna. Foto EST: Fotocellula esterna. F.C.1: Finecorsa apertura anta 1. F.C.2: Finecorsa apertura anta 2. ANT.: Ingresso antenna GND ANT.: Calza antenna
4W MAX (170mA)
Esempi carico massimo accessori Vdc (4W):
• 3 coppie di fotocellule FTALL.
• 2 coppie di fotocellule FTALL e un ricevitore R.CO.O (sistema costa radio).
• 2 coppie di fotocellule FTALL e un ricevitore B.RO X40 DISPLAY.
• 1 coppia di fotocellule FTALL, un ricevitore B.RO X40 DISPLAY e un ricevitore R.CO.O.
Qualunque contatto Normalmente Chiuso (N.C.) deve essere ponti-cellati al comune se non utilizzato.
7 8 9 10 11 12 5 6

ITA ENG FRA ESP DEU POR 6-1622377 rev.1 04/02/2016 Pag 2 di 8
Prima di dare alimentazione alla centrale, controllare tutti i cablaggi effettuati. In particolare controllare che non ci siano fili spellati, cortocircuiti tra fili e che tutti gli accessori siano collegati alla morsettiera nei punti indicati nello schema a pagina 1. Una volta data alimentazione verificare che: 1. Il led POWER sia acceso fisso. 2. Gli ingressi normalmente chiusi devono avere il corrispondente led acceso. Il led si deve spegnere quando si apre il contatto dell’ingresso. 3. Verificare che il modulo radio sia inserito e funzionante. 4. Posizionare il DIP 1 su ON 5. Verificare il collegamento dei motori seguendo la procedura descritta di seguito:
4. Controlli preliminari
Premere e mantenere premu-to il tasto ROSSO (P1). L’anta 1 si deve aprire.
Posizione Dipswitch
Se l’anta 1 si chiude, arrestare tutto ed invertire i fili del motore 1 (morsetti 18 e 19).
Rilasciare il tasto ROSSO. Premere e mantenere premuto quello BLU (P2). L’anta 2 si deve aprire.
SI
Se l’anta 2 si chiude, arrestare tutto ed invertire i fili del motore 2 (morsetti 20 e 21).
Rilasciare il tasto BLU. Premere e mantenere premut o nuovamente il tasto BLU (P2). L’anta 2 si deve chiu dere. Riportarla chiusa e rilasciare il tasto.
Premere e mantenere premuto il tasto ROSSO. L’anta 1 si deve chiudere. Riportarla chiusa e rilasciare il tasto.
Verificare i cablaggi e ripetere la prova.
Verificare i cablaggi e ripetere la prova.
Se si muove l’anta 2, arrestare tutto ed invertire i fili del motore 1 con quelli del motore 2.
Se l’anta 1 non si muove, verificare i cablaggi del motore 1 (morsetti 18 e 19) e ripetere la prova.
Se l’anta 2 non si muove, verificare i cablaggi del motore 2 (morsetti 20 e 21) e ripetere la prova.
SI
SI
NO
NO
NO
NO
Nota bene: durante queste movimentazioni le fotocel lule, la radio e i pulsanti NON sono attivi .
SI
Memorizzare almeno un telecomando. Per programmare la corsa delle ante si può utilizzare un telecomando a 2 tasti. Durante invece il funzionamento normale (quindi non in programmazione) il 1° tasto memorizzato esegue la funzione di pas so passo (apertura e chiusura del cancello), il 2° tasto la funzione di apertura pedo nale (apertura totale o parziale della 1a anta). Il terzo tasto gestisce la luce di cortesia.
5. Apprendimento telecomandi
Premere e rilasciare il tasto ROSSO (P1). Il led lampeggiante si accende fisso.
Premere e rilasciare il 1° tasto del telecomando. Il lampeggiante emette 2 lampeggi.
Il 1° tasto è memorizzato. Premere e rilasciare il tasto ROSSO. Il led lampeggiante si accende fisso.
Se il lampeggiante ha emesso 1 lampeggio, il tasto premuto era già memorizzato e si può continuare la procedura, in ca so contrario verificare che il telecomando funzioni, che abbia l a tessa decodifica impostata nella centrale e che sia inserito il modu lo radio. A questo punto ripetere la prova.
Premere e rilasciare il 2° tasto del telecomando. Il lampeggiante emette 1 lampeggio
I 2 tasti sono memorizzati e la procedura termina. Ripetere la procedura dal punto A se si desidera apprendere il tasto per la gestione della luce di cortesia
Verificare che i dip 1 e 2 siano su OFF ripetere la prova.
Verificare che il telecomando funzioni, che abbia l a tessa decodifica impostata nella centrale e che sia inser ito il modulo radio. A questo punto ripetere la prova.
SI
SI
SI
SI
NO
NO
NO
A
Posizione Dipswitch
Verificare che i dip 1 e 2 siano su OFF ripetere la prova.
NO
Posizione Dipswitch
ITA ENG FRA ESP DEU POR 6-1622377 rev.1 04/02/2016 Pag 3 di 8
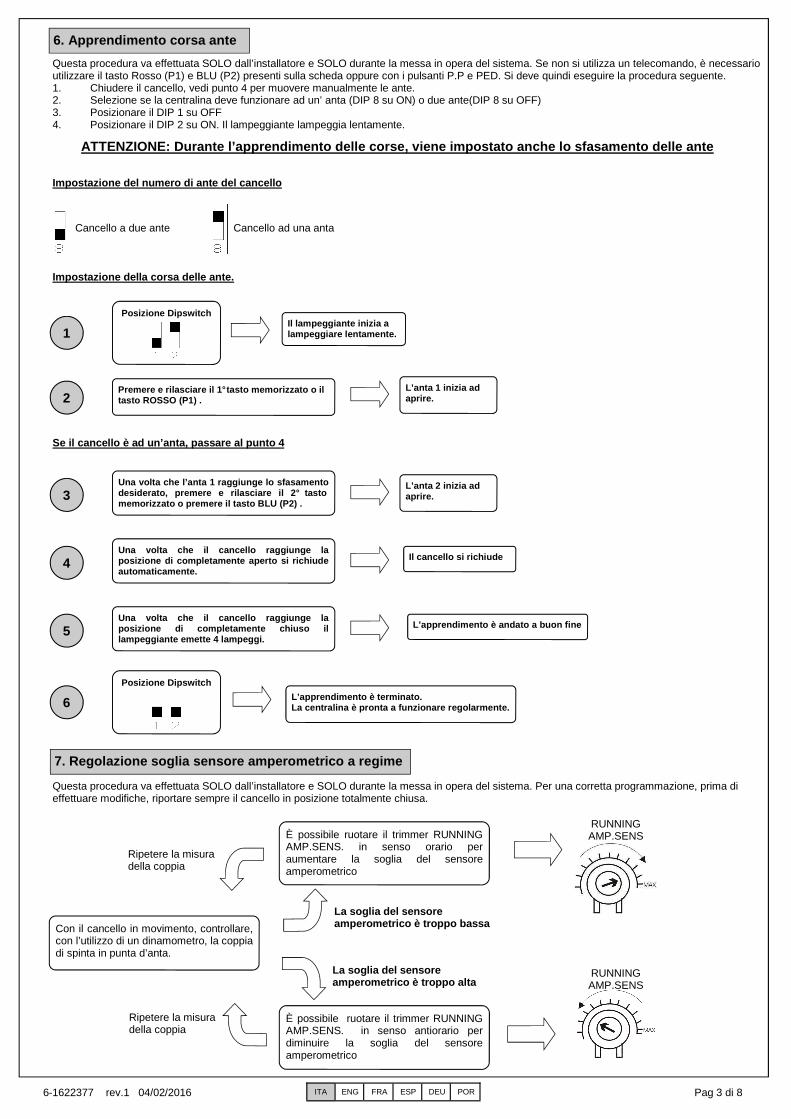
6. Apprendimento corsa ante
Questa procedura va effettuata SOLO dall’installatore e SOLO durante la messa in opera del sistema. Se non si utilizza un telecomando, è necessario utilizzare il tasto Rosso (P1) e BLU (P2) presenti sulla scheda oppure con i pulsanti P.P e PED. Si deve quindi eseguire la procedura seguente. 1. Chiudere il cancello, vedi punto 4 per muovere manualmente le ante. 2. Selezione se la centralina deve funzionare ad un’ anta (DIP 8 su ON) o due ante(DIP 8 su OFF) 3. Posizionare il DIP 1 su OFF 4. Posizionare il DIP 2 su ON. Il lampeggiante lampeggia lentamente.
Il lampeggiante inizia a lampeggiare lentamente.
ATTENZIONE: Durante l’apprendimento delle corse, vi ene impostato anche lo sfasamento delle ante
Posizione Dipswitch
Cancello a due ante Cancello ad una anta
1
2 Premere e rilasciare il 1° tasto memorizzato o il tasto ROSSO (P1) .
L’anta 1 inizia ad aprire.
3 Una volta che l’anta 1 raggiunge lo sfasamento desiderato, premere e rilasciare il 2° tasto memorizzato o premere il tasto BLU (P2) .
L’anta 2 inizia ad aprire.
Se il cancello è ad un’anta, passare al punto 4
Impostazione del numero di ante del cancello
4 Una volta che il cancello raggiunge la posizione di completamente aperto si richiude automaticamente.
Il cancello si richiude
5
Posizione Dipswitch L’apprendimento è terminato.
La centralina è pronta a funzionare regolarmente.
Una volta che il cancello raggiunge la posizione di completamente chiuso il lampeggiante emette 4 lampeggi.
L’apprendimento è andato a buon fine
6
Impostazione della corsa delle ante.
7. Regolazione soglia sensore amperometrico a regim e
Questa procedura va effettuata SOLO dall’installatore e SOLO durante la messa in opera del sistema. Per una corretta programmazione, prima di effettuare modifiche, riportare sempre il cancello in posizione totalmente chiusa.
RUNNING AMP.SENS
Con il cancello in movimento, controllare, con l’utilizzo di un dinamometro, la coppia di spinta in punta d’anta.
La soglia del sensore amperometrico è troppo bassa
È possibile ruotare il trimmer RUNNING AMP.SENS. in senso orario per aumentare la soglia del sensore amperometrico
È possibile ruotare il trimmer RUNNING AMP.SENS. in senso antiorario per diminuire la soglia del sensore amperometrico
La soglia del sensore amperometrico è troppo alta
Ripetere la misura della coppia
RUNNING AMP.SENS
Ripetere la misura della coppia

ITA ENG FRA ESP DEU POR 6-1622377 rev.1 04/02/2016 Pag 4 di 8
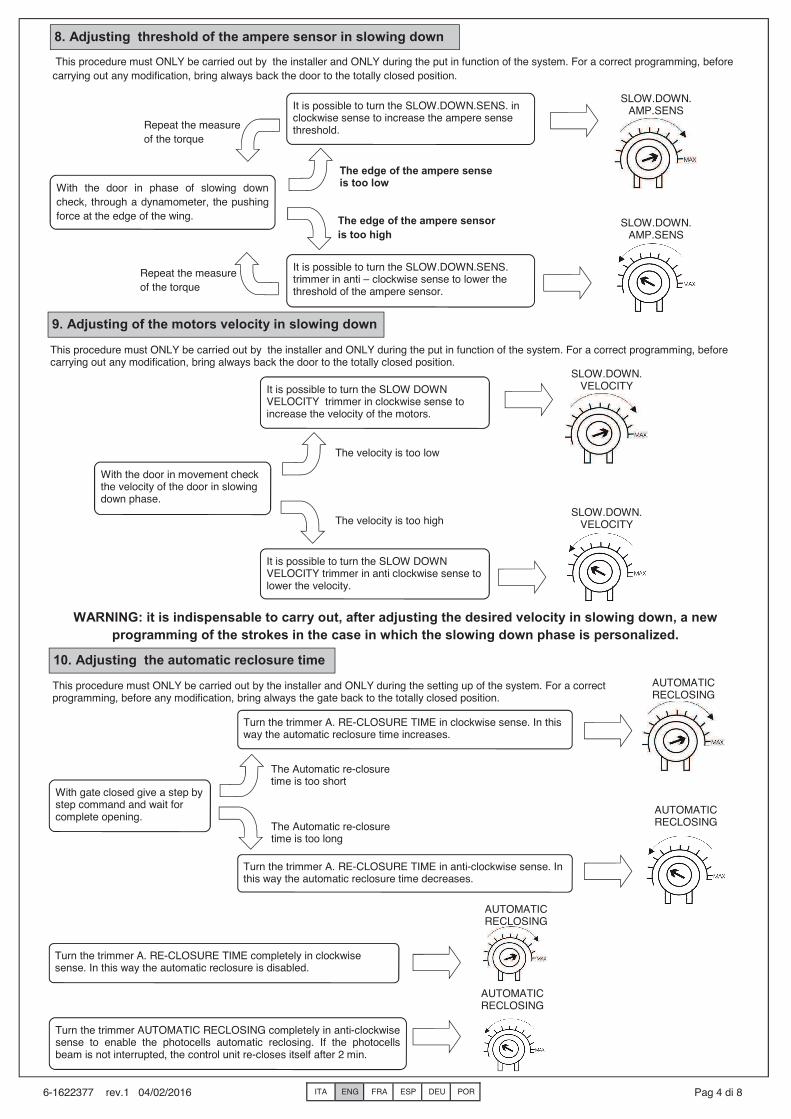
8. Regolazione soglia sensore amperometrico in rall entamento
Questa procedura va effettuata SOLO dall’installatore e SOLO durante la messa in opera del sistema. Per una corretta programmazione, prima di effettuare modifiche, riportare sempre il cancello in posizione totalmente chiusa.
SLOW.DOWN.SENS
SLOW.DOWN.SENS
9. Regolazione velocità motori in rallentamento
Questa procedura va effettuata SOLO dall’installatore e SOLO durante la messa in opera del sistema. Per una corretta programmazione, prima di effettuare modifiche, riportare sempre il cancello in posizione totalmente chiusa.
SLOW.DOWN.VELOCITY
Con il cancello in movimento, controllare, la velocità del cancello in fase di rallentamento
È possibile ruotare il trimmer SLOW.DOWN.VELOCITY. in senso orario per aumentare la velocità dei motori.
È possibile ruotare il trimmer SLOW.DOWN.VELOCITY. in senso antiorario per diminuire la velocità dei motori.
La velocità è troppo alta SLOW.DOWN.
VELOCITY
Con il cancello in fase di rallentamento, controllare, con l’utilizzo di un dinamometro, la coppia di spinta in punta d’anta.
La soglia del sensore amperometrico è troppo bassa
È possibile ruotare il trimmer SLOW.DOWN.SENS in senso orario per aumen-tare la soglia del sensore amperometrico .
È possibile ruotare il trimmer SLOW.DOWN.SENS. in senso antiorario per diminuire la soglia del sensore amperometrico .
La soglia del sensore amperometrico è troppo alta
Ripetere la misura della coppia
Ripetere la misura della coppia
La velocità è troppo bassa
10. Regolazione tempo di richiusura automatica
Questa procedura va effettuata SOLO dall’installatore e SOLO durante la messa in opera del sistema. Per una corretta programmazione, prima di effettuare modifiche, riportare sempre il cancello in posizione totalmente chiusa.
Con il cancello chiuso dare un comando di passo passo ed attendere l’apertura completa.
Il tempo di richiusura automatica è troppo breve
Ruotare il trimmer AUTOMATIC RECLOSING in senso orario. In questo modo si aumenta il tempo di richiusura automatica.
Il tempo di richiusura automatica è troppo lungo
Ruotare il trimmer AUTOMATIC RECLOSING in senso antiorario. In questo modo si diminuisce il tempo di richiusura automatica.
AUTOMATIC RECLOSING
AUTOMATIC RECLOSING
Ruotare il trimmer AUTOMATIC RECLOSING tutto in senso orario. In questo modo si disabilita la richiusura automatica.
AUTOMATIC RECLOSING
AUTOMATIC RECLOSING
Ruotare il trimmer AUTOMATIC RECLOSING tutto in senso antiorario per abilitare la richiusura automatica da fotocellule. Se il fascio delle fotocellule non viene interrotto, la centralina richiude dopo 2 min.
N.B: è indispensabile, dopo aver impostato la veloc ità in rallentamento desiderata, effettuare una nuo va programmazione delle corse nel caso si abbia person alizzato la fase di rallentamento.

ITA ENG FRA ESP DEU POR 6-1622377 rev.1 04/02/2016 Pag 5 di 8
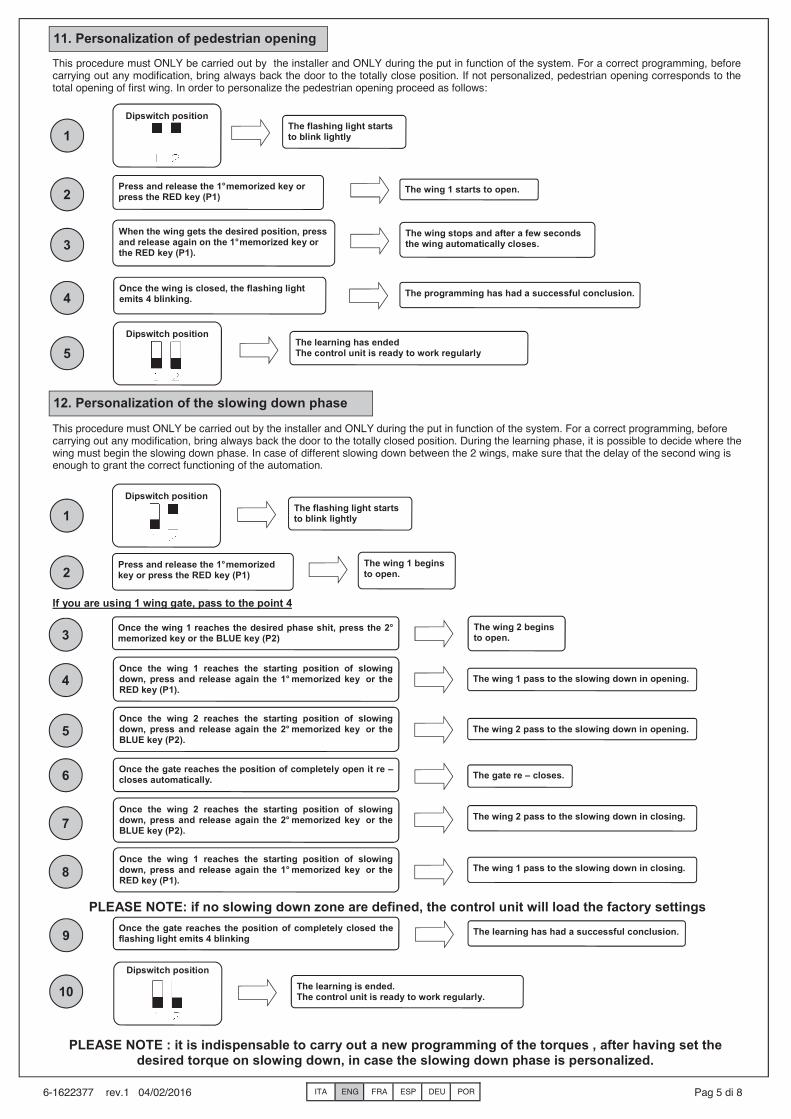
11. Personalizzazione dell’apertura pedonale
Questa procedura va effettuata SOLO dall’installatore e SOLO durante la messa in opera del sistema. Per una corretta programmazione, prima di effettuare modifiche, riportare sempre il cancello in posizione totalmente chiusa oppure con i pulsanti P.P e PED. Se non viene personalizzata, l’apertura pedonale corrisponde all’apertura totale della prima anta. Per personalizzare l’apertura pedonale procedere come segue:
Il lampeggiante inizia a lampeggiare lentamente.
Posizione Dipswitch 1
2 Premere e rilasciare il 1° tasto memorizzato o premere il tasto ROSSO (P1) .
L’anta 1 inizia ad aprire.
3 Quando l’anta ha raggiunto la posizione desiderata, premere e rilasciare nuovamente sul 1° tasto memorizzato o il tasto ROSSO (P1).
L’anta si ferma e dopo qualche secondo l’anta si richiude automaticamente.
4 Una volta chiuso il cancello, il lampeggiante emette 4 lampeggi.
La programmazione è andata a buon fine.
5
Posizione Dipswitch
L’apprendimento è terminato La centralina è pronta a funzionare regolarmente.
12. Personalizzazione della fase di rallentamento
Questa procedura va effettuata SOLO dall’installatore e SOLO durante la messa in opera del sistema. Per una corretta programmazione, prima di effettuare modifiche, riportare sempre il cancello in posizione totalmente chiusa. Durante la fase di apprendimento, è possibile decidere dove il cancello deve iniziare la fase di rallentamento. In caso di rallentamento diverso fra le due ante, assicurarsi che il ritardo seconda anta sia sufficiente a garantire il corretto funzionamento dell’automazione.
Il lampeggiante inizia a lampeggiare lentamente.
Posizione Dipswitch 1
2 Premere e rilasciare il 1° tasto memorizzato o il tasto ROSSO (P1) .
L’anta 1 inizia ad aprire.
3 Una volta che l’ante 1 raggiunge lo sfasamento desi derato, premere il 2° tasto memorizzato o il tasto BLU (P2 ) .
L’anta 2 inizia ad aprire.
Se il cancello è ad un’anta, passare al punto 4
6 Il cancello si richiude.
4
Posizione Dipswitch L’apprendimento è terminato.
La centralina è pronta a funzionare regolarmente.
Una volta che il cancello raggiunge la posizione di completamente chiuso il lampeggiante emette 4 lampe ggi.
L’apprendimento è andato a buon fine. 9
10
Una volta che l’anta 1 raggiunge la posizione d’ini zio rallentamento desiderato, premere e rilasciare nuov amente il 1° tasto memorizzato o il tasto ROSSO (P1) .
L’anta 1 passa in rallentamento in apertura.
5 Una volta che l’anta 2 raggiunge la posizione d’ini zio rallentamento desiderato, premere e rilasciare nuov amente il 2° tasto memorizzato o il tasto BLU (P2) .
L’anta 2 passa in rallentamento in apertura.
7
Una volta che l’anta 1 raggiunge la posizione d’ini zio rallentamento desiderato, premere e rilasciare nuov amente il 1° tasto memorizzato o il tasto ROSSO (P1) .
L’anta 1 passa in rallentamento in chiusura. 8
Una volta che l’anta 2 raggiunge la posizione d’ini zio rallentamento desiderato, premere e rilasciare nuov amente il 2° tasto memorizzato o il tasto BLU (P2) .
L’anta 2 passa in rallentamento in chiusura.
Una volta che il cancello raggiunge la posizione di completamente aperto si richiude automaticamente.
N.B: è indispensabile, dopo aver impostato la veloc ità in rallentamento desiderata, effettuare una nuo va programmazione delle corse nel caso si abbia person alizzato la fase di rallentamento.
N.B: Se non vengono definite delle zone di rallentam ento, la centralina caricherà le impostazioni di fa bbrica

ITA ENG FRA ESP DEU POR 6-1622377 rev.1 04/02/2016 Pag 6 di 8
13.5 Colpo d’ariete ed elettroserratura
Se l’automazione è dotata di elettroserratura è consigliabile che, a cancello chiuso, il motore agisca in chiusura per un breve tempo prima di iniziare la fase di apertura (colpo d’ariete). Questa funzione consente di sbloccare in ogni caso l’elettroserratura anche in condizioni atmosferiche gravose (ad esempio ghiaccio). Per attivare il colpo d’ariete e l’ettroserratura, impostare il dip n°5 a ON.
13.6 Test fotocellule
Questa centrale è dotata di una funzione che permette di effettuare un controllo sul funzionamento delle fotocellule prima di ogni azionamento del motore. Si ha così la possibilità di incrementare la sicurezza del sistema in caso di danneggiamento del fotodispositivo (p.e. relè di uscita incollato) o di un cortocircuito indesiderato sull’ingresso fotocellule. In caso di guasto la centrale lo segnala effettuando un singolo lampeggio alla pressione di un tasto e non eseguendo alcuna movimentazione. Questo controllo viene effettuato dopo che la centrale ha ricevuto un comando a muovere, ma prima di dare tensione al motore. Impostare il dip n°6 su ON per attivare il test fotocellule.
13.7 Funzione orologio
Posizionando il dip n°7 su ON si attiva la funzione orologio. L’ingresso pedonale diventa ingresso orologio dove è possibile collegare un timer per l’apertura programmata del cancello. Il contatto viene interpretato come richiesta di apertura e di permanenza nello stato aperto finché il contatto rimane chiuso. Quando il contatto si apre, il cancello si chiude automaticamente.
13.8 Impostazione del numero di ante
La centralina AS24 è in grado di funzionare con i cancelli ad una o due ante. Questa impostazione viene effettuata posizionando il dip n°8 so OFF se si vuole il funzionamento a due ante e su ON se si vuole il funzionamento ad un’anta singola. Questa impostazione DEVE essere eseguita prima dell’apprendimento delle corse.
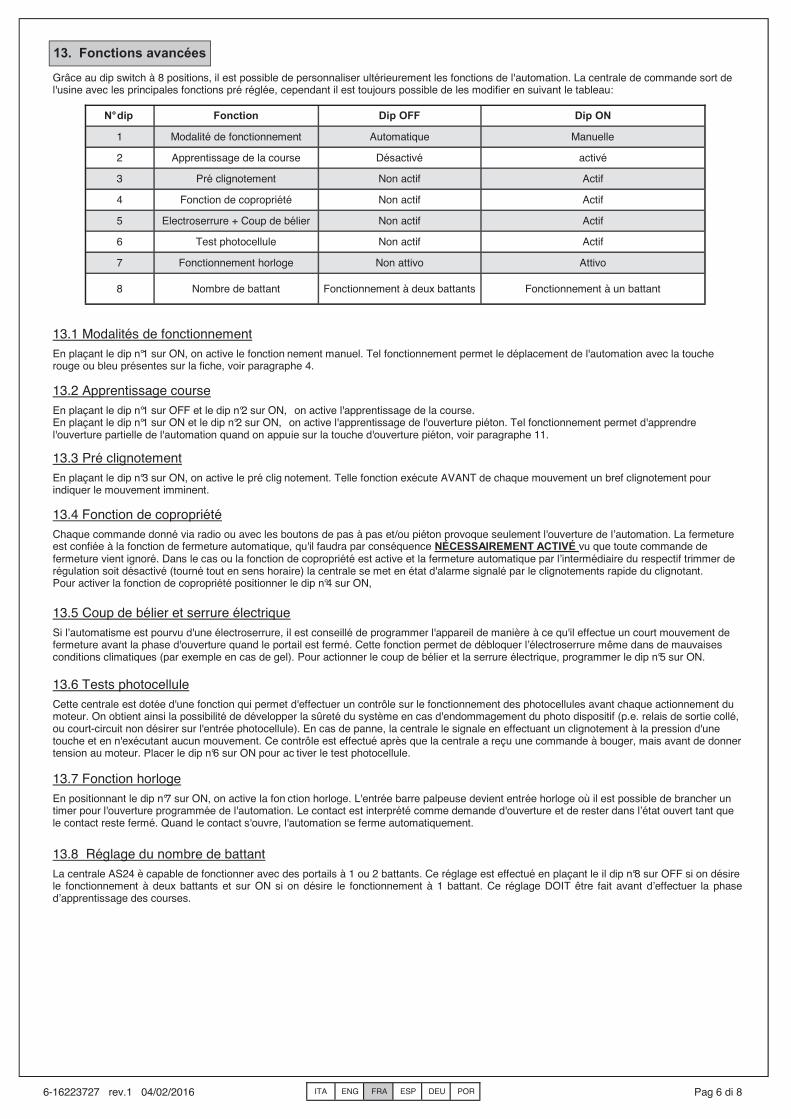
13. Funzioni avanzate
Tramite il dip switch a 8 posizioni, è possibile personalizzare ulteriormente le funzioni dell’automazione. Di norma la centrale di comando esce dalla fabbrica già con le principali funzioni preimpostate, tuttavia è sempre possibile modificarle seguendo la tabella:
N° dip Funzione Dip OFF Dip ON
1 Modalità di funzionamento Automatico Manuale
2 Apprendimento corse Disabilitato Abilitato
3 Prelampeggio Non attivo Attivo
4 Funzione condominiale Non attivo Attivo
5 Elettroserratura + Colpo d’ariete Non attivo Attivo
6 Test fotocellule Non attivo Attivo
7 Funzionamento orologio Non attivo Attivo
8 Numero di ante Funzionamento a due ante Funzionamento ad una anta.
13.3 Prelampeggio
Impostando il dip n°3 su ON si abilita il prelampeg gio. Tale funzione esegue PRIMA di ogni movimentazione un breve lampeggio ad indicare l’imminente movimento.
13.1 Modalità di funzionamento
Impostando il dip n°1 su ON si abilita il funzionam ento manuale. Tale funzionamento permette lo spostamento del cancello con i tasti rossi e blu presenti sulla scheda (vedi paragrafo 4).
13.2 Apprendimento corse
Impostando il dip n°1 su OFF ed il dip n°2 so ON si abilita l’apprendimento delle corse. Tale funzionamento permette di apprendere le corse e lo sfasamento delle ante (vedi paragrafo 6). Impostando il dip n°1 su ON ed il dip n°2 so ON si abilita l’apprendimento dell’apertura pedonale. Tale funzionamento permette di apprendere l’apertura della prima anta quando viene premuto il tasto di apertura pedonale (vedi paragrafo 11).
13.4 Funzione condominiale
Ogni comando impartito via radio o con i pulsanti di passo-passo e/o pedonale provoca solo l’apertura del portone. La chiusura è affidata alla funzione di richiusura automatica, che dovrà pertanto ESSERE NECESSARIAMENTE ATTIVATA in quanto ogni comando di chiusura viene ignorato. Nel caso in cui la funzione condominiale sia attiva e venga disabilitata la richiusura automatica tramite il rispettivo trimmer di regolazione (ruotato tutto in senso orario), la centralina si pone in stato di allarme segnalato mediante lampeggi veloci del lampeggiante. Per attivare la funzione condominiale, posizionare il dip n°4 su ON
ITA ENG FRA ESP DEU POR 6-1622377 rev.1 04/02/2016 Pag 7 di 8
17. Stato di allarme della centralina
Se il lampeggiante lampeggia velocemente o rimane acceso fisso, significa che la centralina è in stato di allarme. Ogni comando viene ignorato fino alla risoluzione dell’anomalia.
Condominiale attiva + richiusura automatica disabilitata
Abilitare la richiusura automatica ruotando il trimmer in senso antiorario oppure disabilitare la funzione condominiale (dip4 su off).
Causa anomalia Soluzione Segnalazione anomalia
Lampeggio veloce del lampeggiante
Lampeggiante accesso fisso
Intervento della protezione termica della centralina. Assorbimento di corrente troppo elevato. Il valore non deve superare 7A per più di 3 sec.
Ogni comando viene ignorato per 20 sec. Controllare lo stato dei motori e il loro assorbimento.
Qualora si renda necessario variare il tipo di decodifica (da codice variabile a codice fisso o viceversa) o cancellare tutti i telecomandi appresi, procedere come segue: 1. Togliere l’alimentazione al sistema. 2. Premere il tasto blu se si vuole selezionare la decodifica a codice fisso o premere il tasto rosso se si vuole selezionare la decodifica a codice
variabile. 3. Mantenerli premuti mentre si ridà tensione al sistema. 4. Mantenerli ancora premuti finché il lampeggiante non si accende 3 volte. 5. A questo punto rilasciare il tasto ed attendere che il lampeggiante si spenga. La selezione della decodifica e la cancellazione totale della
memoria sono stati effettuati.
16. Selezione del tipo di decodifica e cancellazio ne totale della memoria.
14. Modalità d’intervento delle fotocellule
La modalità di intervento delle fotocellule è distinta:
• Le fotocellule interne bloccano il movimento fino a rimozione dell’ostacolo, quindi comportano la riapertura completa del cancello.
• Le fotocellule esterne non intervengono in apertura, mentre invertono immediatamente il moto fino alla riapertura completa nel caso di ostacolo in chiusura.
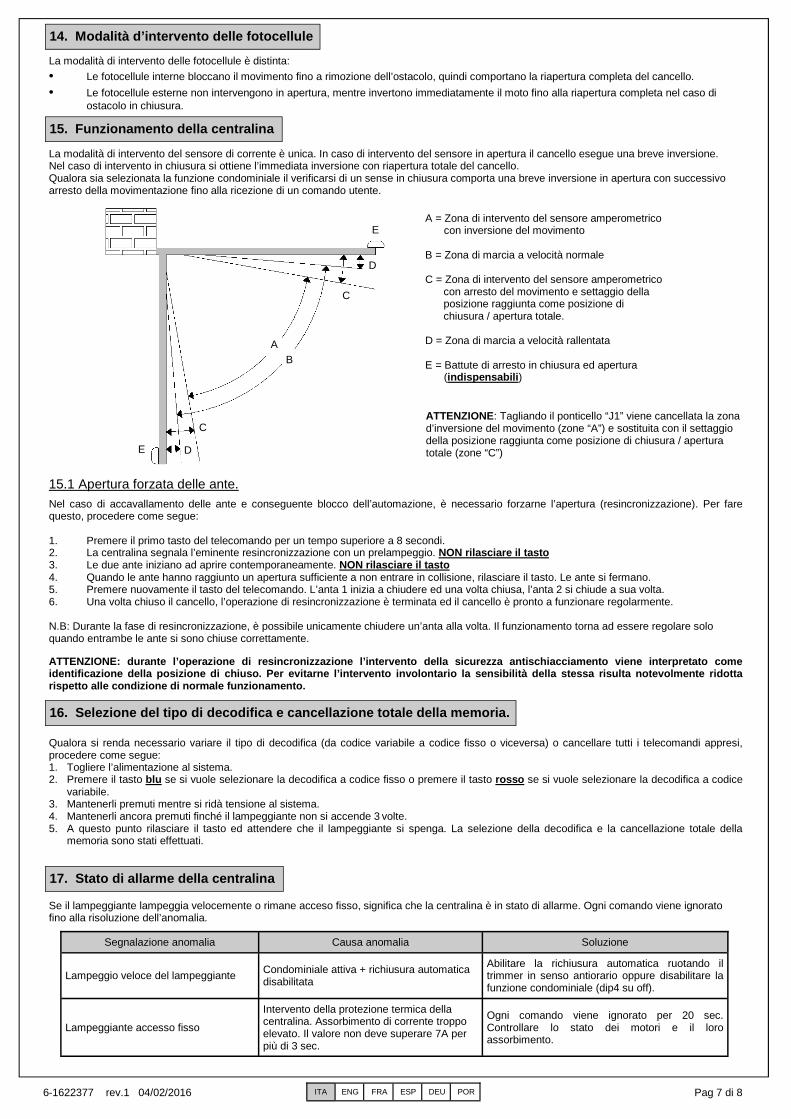
15. Funzionamento della centralina
La modalità di intervento del sensore di corrente è unica. In caso di intervento del sensore in apertura il cancello esegue una breve inversione. Nel caso di intervento in chiusura si ottiene l’immediata inversione con riapertura totale del cancello. Qualora sia selezionata la funzione condominiale il verificarsi di un sense in chiusura comporta una breve inversione in apertura con successivo arresto della movimentazione fino alla ricezione di un comando utente.
A = Zona di intervento del sensore amperometrico con inversione del movimento
B = Zona di marcia a velocità normale C = Zona di intervento del sensore amperometrico
con arresto del movimento e settaggio della posizione raggiunta come posizione di chiusura / apertura totale.
D = Zona di marcia a velocità rallentata E = Battute di arresto in chiusura ed apertura
(indispensabili )
A B
C
D
C
D
E
E
ATTENZIONE: Tagliando il ponticello “J1” viene cancellata la zona d’inversione del movimento (zone “A”) e sostituita con il settaggio della posizione raggiunta come posizione di chiusura / apertura totale (zone “C”)
15.1 Apertura forzata delle ante.
Nel caso di accavallamento delle ante e conseguente blocco dell’automazione, è necessario forzarne l’apertura (resincronizzazione). Per fare questo, procedere come segue: 1. Premere il primo tasto del telecomando per un tempo superiore a 8 secondi. 2. La centralina segnala l’eminente resincronizzazione con un prelampeggio. NON rilasciare il tasto 3. Le due ante iniziano ad aprire contemporaneamente. NON rilasciare il tasto 4. Quando le ante hanno raggiunto un apertura sufficiente a non entrare in collisione, rilasciare il tasto. Le ante si fermano. 5. Premere nuovamente il tasto del telecomando. L’anta 1 inizia a chiudere ed una volta chiusa, l’anta 2 si chiude a sua volta. 6. Una volta chiuso il cancello, l’operazione di resincronizzazione è terminata ed il cancello è pronto a funzionare regolarmente. N.B: Durante la fase di resincronizzazione, è possibile unicamente chiudere un’anta alla volta. Il funzionamento torna ad essere regolare solo quando entrambe le ante si sono chiuse correttamente.
ATTENZIONE: durante l’operazione di resincronizzazi one l’intervento della sicurezza antischiacciamento viene interpretato come identificazione della posizione di chiuso. Per evit arne l’intervento involontario la sensibilità della stessa risulta notevolmente ridotta rispetto alle condizione di normale funzionamento.

ITA ENG FRA ESP DEU POR 6-1622377 rev.1 04/02/2016 Pag 8 di 8
20. Risoluzione problemi
Questo paragrafo vuole dare alcune indicazioni per i problemi più frequenti che si verificano. Prima di procedere oltre, verificare che i led presenti sulla scheda siano correttamente accesi o spenti; lo stato di questi led è riportato nella seguente tabella: Se qualche led non risulta nello stato corretto verificare il corrispondente ingresso. Eventualmente escludere gli accessori esterni, ponticellando i relativi ingressi (fotocellule, finecorsa, stop) con il comune (nel caso di contatti normalmente chiusi). Verificare i punti della tabella seguente:
Passo passo Pedonale / orologio
stop Fotocellula esterna
Fotocellula interna
Finecorsa Anta 1
Finecorsa Anta 2
spento spento acceso acceso acceso acceso acceso
STATO LED
Tipo di guasto Probabile causa Soluzione
Attivando il comando di apertura, le ante non si muovono
Mancanza di alimentazione elettrica Verificare la presenza della tensione elettrica e tutti i collegamenti alla rete elettrica.
Fusibile bruciato Sostituire il fusibile con uno di pari caratteristiche
Attivando il comando di apertura, le ante si muovono in chiusura
Cavi motore invertiti Verificare il cablaggio dei motori invertendoli se necessario.
Non si riesce ad entrare in programmazione telecomandi
• I dip non sono correttamente impostati
• Il tipo di decodifica impostato nella centrale non corrisponde al tipo di telecomando in uso
Non si riesce ad entrare in programmazione corsa
Il cancello non è chiuso Riportare (in manuale) il cancello in chiusura. Riprovare ad entrare in apprendimento.
La centrale è alimentata ma il cancello non si muove.
Un ingresso normalmente chiuso non è attivo
Verificare l’ingresso fotocellule, l’ingresso stop e i finecorsa. Se non utilizzati cortocircuitarli con il comune.
• Posizionare i DIP 1 e 2 su OFF
• Verificare quale decodifica è stata impostata ed eventualmente selezionare quella corrispondente ai telecomandi in uso.
In fase di apprendimento, un anta si ferma prima di arrivare in apertura totale
Soglia del trimmer RUNNING AMP.SENS troppo bassa.
Aumentare il valore d’intervento del sensore amperometrico
In fase di apprendimento, Le ante arrivano in apertura totale ma il cancelli non si richiude
Soglia del trimmer RUNNING AMP.SENS troppo alta.
Diminuire il valore d’intervento del sensore amperometrico
GARANZIA - La garanzia del produttore ha validità a termini di legge dalla data stampigliata sul prodotto ed è limitata alla riparazione o sostituzione gratuita dei pezzi riconosciuti dallo stesso come difettosi per mancanza di qualità essenziali nei materiali o per deficienza di lavorazione. La garanzia non copre danni o difetti dovuti ad agenti esterni, deficienza di manutenzione, sovraccarico, usura naturale, scelta del tipo inesatto, errore di montaggio, o altre cause non imputabili al produttore. I prodotti manomessi non saranno né garantiti né riparati. I dati riportati sono puramente indicativi. Nessuna responsabilità potrà essere addebitata per riduzioni di portata o disfunzioni dovute ad interferenze ambientali. La responsabilità a carico del produttore per i danni derivati a chiunque da incidenti di qualsiasi natura cagionati da nostri prodotti difettosi, sono soltanto quelle che derivano inderogabilmente dalla legge italiana.
La centrale AS24 possiede un connettore (vedi schema pag.1) dove è possibile inserire una scheda aggiuntiva R2 per avere le uscite per il collegamento dell’elettroserratura e della luce di cortesia. Il tempo di accensione della luce di cortesia è di 1 min e 30 secondi. L’accensione avviene ad ogni operazione dell’utente.
CONNETTORE DA INSERIRE ALLA CENTRALE
MORSETTI 1 E 2: Contatto uscita luce di cortesia. Temporizzato 90 sec. MORSETTI 3 E 4: Contatto uscita elettroserratura. Temporizzato 5 sec.
FORO PER CONNETTERE IL DISTANZIALE TRA LA SCHEDA AGGIUNTIVA E LA CENTRALINA
CONTATTI PULITI SENZA TENSIONE Carico max 220 V - 5 A
1 2 3 4
ELS LC
Vac/dc Vac/dc
18. Scheda aggiuntiva (non in dotazione)
Nel caso in cui si utilizzi un radio ricevitore a scheda è possibile dotare la centralina di un morsetto di uscita per un secondo canale radio (con contatto N.A.). Se, invece, si desidera utilizzare il modulo ibrido presente sulla scheda, il secondo canale radio non è disponibile.
19. Secondo canale radio
ITA ENG FRA ESP DEU POR 6-1622377 rev.1 04/02/2016 Pag 1 di 8
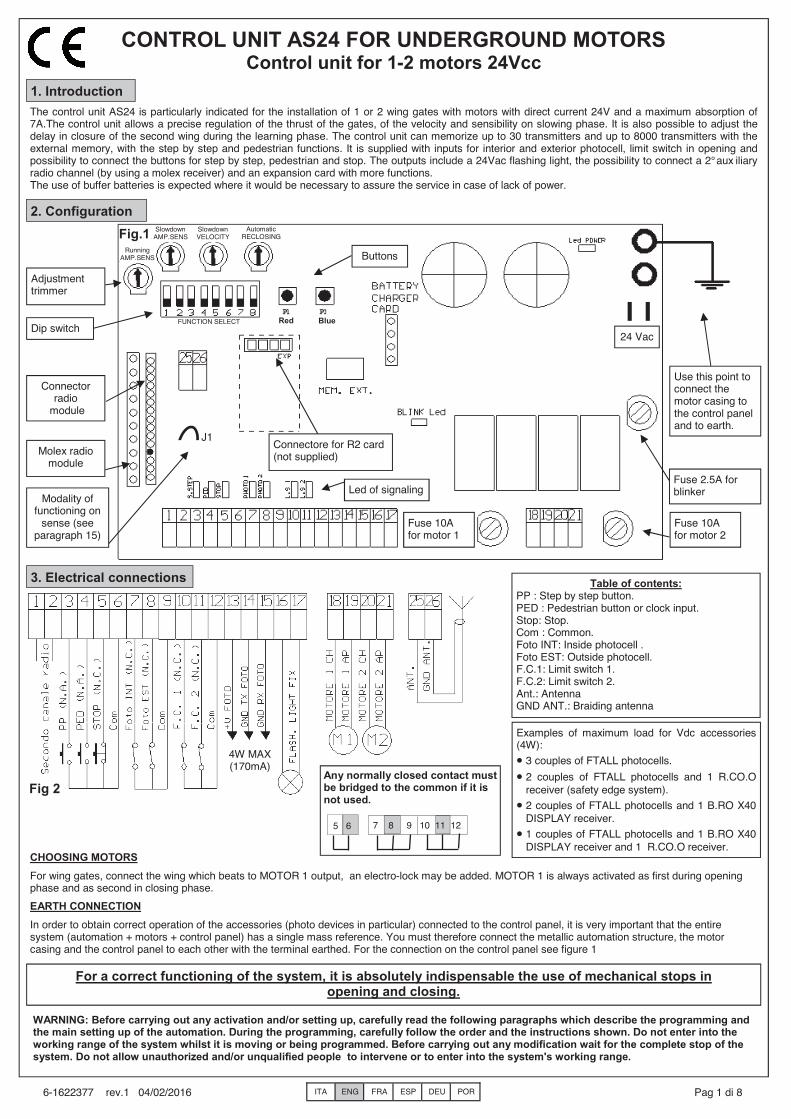
The control unit AS24 is particularly indicated for the installation of 1 or 2 wing gates with motors with direct current 24V and a maximum absorption of7A.The control unit allows a precise regulation of the thrust of the gates, of the velocity and sensibility on slowing phase. It is also possible to adjust the delay in closure of the second wing during the learning phase. The control unit can memorize up to 30 transmitters and up to 8000 transmitters with the external memory, with the step by step and pedestrian functions. It is supplied with inputs for interior and exterior photocell, limit switch in opening and possibility to connect the buttons for step by step, pedestrian and stop. The outputs include a 24Vac flashing light, the possibility to connect a 2° aux iliary radio channel (by using a molex receiver) and an expansion card with more functions. The use of buffer batteries is expected where it would be necessary to assure the service in case of lack of power.
1. Introduction
CONTROL UNIT AS24 FOR UNDERGROUND MOTORS Control unit for 1-2 motors 24Vcc
2. Configuration
Fig.1
Connector radio
module
24 Vac
Buttons
Led of signaling
Connectore for R2 card (not supplied)
Use this point to connect the motor casing to the control panel and to earth.
Molex radio module
Any normally closed contact must be bridged to the common if it is not used.
7 8 9 10 11 12 5 6
3. Electrical connections
CHOOSING MOTORS
For wing gates, connect the wing which beats to MOTOR 1 output, an electro-lock may be added. MOTOR 1 is always activated as first during opening phase and as second in closing phase.
EARTH CONNECTION
In order to obtain correct operation of the accessories (photo devices in particular) connected to the control panel, it is very important that the entire system (automation + motors + control panel) has a single mass reference. You must therefore connect the metallic automation structure, the motor casing and the control panel to each other with the terminal earthed. For the connection on the control panel see figure 1
Adjustment trimmer
Dip switch
Running AMP.SENS
Automatic RECLOSING
Slowdown VELOCITY
Slowdown AMP.SENS
FUNCTION SELECT
Modality of functioning on
sense (see paragraph 15)
J1
Red Blue
Fuse 10A for motor 1
Fuse 10A for motor 2
Fuse 2.5A for blinker
WARNING: Before carrying out any activation and/or setting up, carefully read the following paragraphs which describe the programming and the main setting up of the automation. During the programming, carefully follow the order and the instructions shown. Do not enter into the working range of the system whilst it is moving or being programmed. Before carrying out any modification wait for the complete stop of the system. Do not allow unauthorized and/or unqualified people to intervene or to enter into the system's working range.
For a correct functioning of the system, it is absolutely indispensable the use of mechanical stops in opening and closing.
Fig 2
Table of contents: PP : Step by step button. PED : Pedestrian button or clock input. Stop: Stop. Com : Common. Foto INT: Inside photocell . Foto EST: Outside photocell. F.C.1: Limit switch 1. F.C.2: Limit switch 2. Ant.: Antenna GND ANT.: Braiding antenna
4W MAX (170mA)
Examples of maximum load for Vdc accessories (4W):
• 3 couples of FTALL photocells.
• 2 couples of FTALL photocells and 1 R.CO.O
receiver (safety edge system).
• 2 couples of FTALL photocells and 1 B.RO X40
DISPLAY receiver.
• 1 couples of FTALL photocells and 1 B.RO X40
DISPLAY receiver and 1 R.CO.O receiver.
ITA ENG FRA ESP DEU POR 6-1622377 rev.1 04/02/2016 Pag 2 di 8
Before connecting the control panel to the power supply, check all wirings which have been carried out. In particular check that there are no damaged wires, short-circuits between wires and that all accessories are connected to the terminal board in the points shown on the diagram on the previous page. Once the power supply is connected check that: 1. The POWER LED is constantly lit. 2. The normally closed inputs must have the corresponding LED lit. The LED must turn off when the input contact is opened. 3. Check that the radio module is inserted and working. 4. Set the dipswitch 1 on ON 5. Check the motor connection by following the procedure as described below
4. Preliminary checks
Press and keep press the RED button (P1): Wing 1 (the beating one) must open.
Dipswitch position If wing 1 closes, stop everything and invert the motor 1 wires (terminals 18 and 19).
Release the RED button. Press and keep pressed the BLUE one (P2). Wing 2 should open.
SI
If wing 2 closes, stop everything and invert the motor 2 wires (terminals 20 and 21)
Release the BLUE button. Press and keep pressed again the BLUE one (P2). Wing 2 should close. Bringit in close position then release the button.
Press and keep pressed again the RED button (P1). Wing 1 should close. Bring it in close position then release the button.
Check the wirings and repeat the test.
Check the wirings and repeat the test.
If wing 2 moves, stop everything and invert motor 1wires with motor 2 wires.
If wing 1 does not move, check the wiring of motor 1 (terminals 18 and 19) and repeat the test.
If wing 2 does not move, check the wiring of motor 2 (terminals 20 and 21) and repeat the test.
SI
SI
NO
NO
NO
NO
PLEASE NOTE: During these movements the photocells, the radio and the buttons are NOT active.
SI
Memorize at least one 2-key remote control. In order to program the wing stroke use a 2-key remote control. During normal operation however, (i.e. not during programming) the 1st memorized key carries out the step by step function (opening and closing of the gate), the 2nd key carries out the pedestrian opening (complete opening of the 1st wing). The 3rd key operates the courtesy light.
5. Remote control learning
Press and release the RED button: The flashing signal's LED is permanently lit .
Press the remote control's 1st key. The flashing signal emits 2 flashes .
The remote control's 1st key is now memorized. Press and release the RED button: The flashing signal's LED is permanently lit.
If flashing signal has emitted 1 flash, the pressed key had already been memorized and it is possible to continue with the procedure. Otherwise, check that the remote control is working, that it has the same decoding settings of the control panel and that the radio module is correctly inserted. Then repeat the test
Press the remote control's 2nd key. The flashing signal emits 1 flash
The 2 buttons are now memorized and the procedure ends. Repeat the procedure from point « A » if you want to learn the button for thecourtesy light control.
Check that the dipswitch 1 and 2 are set OFF. repeat the test
Check that the remote control works, that it has the same decoding set in the control panel and that the radio mo-dule is inserted. Then repeat the test .
SI
SI
SI
SI
NO
NO
NO
A
Dipswitch position Check that the dipswitch 1 and 2 are set OFF. repeat the test NO
Dipswitch position

ITA ENG FRA ESP DEU POR 6-1622377 rev.1 04/02/2016 Pag 3 di 8
6. Setting the wing stroke
This procedure must ONLY be carried out by the installer and ONLY during the setting up of the system. If you do not utilize any transmitter, it is necessary to use the Red key (P1) and BLUE (P2) present on the card or with P.P and PED buttons. Then you must carry out the following procedure: 1. Close the door, see point 4, to move the wings manually. 2. Select if the control unit must work one wing (DIP 8 on ON) or 2 wings (DIP 8 on OFF). 3. Put the DIP 1 on OFF. 4. Put the DIP 2 on ON. The flashing light blinks slowly.
The flashing light starts to blink lightly
WARNING: during the learning of the strokes, the phase shift of the wings is also set.
Dipswitch position
2 wings door 1 wing door
1
2 Press and release the 1° memorized key or press the RED key (P1)
The wing 1 begins to open.
3 Once the wing 1 reaches the desired phase shit, press and release the 2°memorized key or the BLUE key (P2)
The wing 2 begins to open.
If you are using a single wing gate, pass to the point 4
Setting of the wings number
4 Once the gate reaches the position of completely open it re – closes automatically.
The gate re – closes.
5
Dipswitch position
The learning is ended. The control unit is ready to work regularly.
Once the gate reaches the position of completely closed the flashing light emits 4 blinking
The learning has had a successful conclusion.
6
Setting of the wings stroke
7. Adjusting threshold of the ampere sensor operating
This procedure must ONLY be carried out by the installer and ONLY during the put in function of the system. For a correct programming, before carrying out the modifications, bring always back the door to the totally closed position.
RUNNING AMP.SENS
With the wing in movement check, through a dynamometer, the pushing force at the edge of the wing.
The edge of the ampere sense is too low.
It is possible to turn the RUNNING AMP. SENSE trimmer in clockwise sense to increase the threshold of the ampere sensor.
It is possible to turn the RUNNING AMP.SENS. trimmer in anti – clockwise sense to lower the threshold of the ampere sensor.
The edge of the ampere sensor is too high.
Repeat the measure
of the torque
RUNNING AMP.SENS
Repeat the measure
of the torque
ITA ENG FRA ESP DEU POR 6-1622377 rev.1 04/02/2016 Pag 4 di 8
8. Adjusting threshold of the ampere sensor in slowing down
This procedure must ONLY be carried out by the installer and ONLY during the put in function of the system. For a correct programming, before
carrying out any modification, bring always back the door to the totally closed position.
SLOW.DOWN.AMP.SENS
SLOW.DOWN.AMP.SENS
9. Adjusting of the motors velocity in slowing down
This procedure must ONLY be carried out by the installer and ONLY during the put in function of the system. For a correct programming, before carrying out any modification, bring always back the door to the totally closed position.
SLOW.DOWN.VELOCITY
With the door in movement check the velocity of the door in slowing down phase.
It is possible to turn the SLOW DOWN VELOCITY trimmer in clockwise sense to increase the velocity of the motors.
It is possible to turn the SLOW DOWN VELOCITY trimmer in anti clockwise sense to lower the velocity.
The velocity is too high SLOW.DOWN.
VELOCITY
With the door in phase of slowing down
check, through a dynamometer, the pushing
force at the edge of the wing.
The edge of the ampere sense is too low
It is possible to turn the SLOW.DOWN.SENS. in clockwise sense to increase the ampere sense threshold.
It is possible to turn the SLOW.DOWN.SENS. trimmer in anti – clockwise sense to lower the threshold of the ampere sensor.
The edge of the ampere sensor is too high
Repeat the measure
of the torque
Repeat the measure
of the torque
The velocity is too low
10. Adjusting the automatic reclosure time
This procedure must ONLY be carried out by the installer and ONLY during the setting up of the system. For a correct programming, before any modification, bring always the gate back to the totally closed position.
With gate closed give a step by step command and wait for complete opening.
The Automatic re-closure time is too short
Turn the trimmer A. RE-CLOSURE TIME in clockwise sense. In this way the automatic reclosure time increases.
The Automatic re-closure time is too long
Turn the trimmer A. RE-CLOSURE TIME in anti-clockwise sense. In this way the automatic reclosure time decreases.
AUTOMATIC RECLOSING
AUTOMATIC RECLOSING
Turn the trimmer A. RE-CLOSURE TIME completely in clockwise sense. In this way the automatic reclosure is disabled.
AUTOMATIC RECLOSING
AUTOMATIC RECLOSING
Turn the trimmer AUTOMATIC RECLOSING completely in anti-clockwise sense to enable the photocells automatic reclosing. If the photocells beam is not interrupted, the control unit re-closes itself after 2 min.
WARNING: it is indispensable to carry out, after adjusting the desired velocity in slowing down, a newprogramming of the strokes in the case in which the slowing down phase is personalized.
ITA ENG FRA ESP DEU POR 6-1622377 rev.1 04/02/2016 Pag 5 di 8
11. Personalization of pedestrian opening
This procedure must ONLY be carried out by the installer and ONLY during the put in function of the system. For a correct programming, before carrying out any modification, bring always back the door to the totally close position. If not personalized, pedestrian opening corresponds to the total opening of first wing. In order to personalize the pedestrian opening proceed as follows:
The flashing light starts to blink lightly
Dipswitch position
1
2 Press and release the 1° memorized key or press the RED key (P1)
The wing 1 starts to open.
3 When the wing gets the desired position, press and release again on the 1° memorized key or the RED key (P1).
The wing stops and after a few seconds the wing automatically closes.
4 Once the wing is closed, the flashing light emits 4 blinking.
The programming has had a successful conclusion.
5
Dipswitch position The learning has ended The control unit is ready to work regularly
12. Personalization of the slowing down phase
This procedure must ONLY be carried out by the installer and ONLY during the put in function of the system. For a correct programming, before carrying out any modification, bring always back the door to the totally closed position. During the learning phase, it is possible to decide where the wing must begin the slowing down phase. In case of different slowing down between the 2 wings, make sure that the delay of the second wing is enough to grant the correct functioning of the automation.
The flashing light starts to blink lightly
Dipswitch position
1
2 Press and release the 1° memorized key or press the RED key (P1)
The wing 1 begins to open.
3 Once the wing 1 reaches the desired phase shit, press the 2°memorized key or the BLUE key (P2)
The wing 2 begins to open.
If you are using 1 wing gate, pass to the point 4
6 The gate re – closes.
4
Dipswitch position
The learning is ended. The control unit is ready to work regularly.
Once the gate reaches the position of completely closed the flashing light emits 4 blinking
The learning has had a successful conclusion. 9
10
Once the wing 1 reaches the starting position of slowing down, press and release again the 1° memorized key or the RED key (P1).
The wing 1 pass to the slowing down in opening.
5 Once the wing 2 reaches the starting position of slowing down, press and release again the 2° memorized key or the BLUE key (P2).
The wing 2 pass to the slowing down in opening.
7
Once the wing 1 reaches the starting position of slowing down, press and release again the 1° memorized key or the RED key (P1).
The wing 1 pass to the slowing down in closing. 8
Once the wing 2 reaches the starting position of slowing down, press and release again the 2° memorized key or the BLUE key (P2).
The wing 2 pass to the slowing down in closing.
Once the gate reaches the position of completely open it re – closes automatically.
PLEASE NOTE : it is indispensable to carry out a new programming of the torques , after having set thedesired torque on slowing down, in case the slowing down phase is personalized.
PLEASE NOTE: if no slowing down zone are defined, the control unit will load the factory settings

ITA ENG FRA ESP DEU POR 6-1622377 rev.1 04/02/2016 Pag 6 di 8
13.5 Water hammer and electrical lock
If the automation is equipped with an electro lock it is advisable that, with the gate closed, the motor acts in closure for a short time before startingthe opening phase. This functions allows you to un-lock the electro lock even in harsh weather conditions (e.g. ice). In order to activate the water hammer set dip no. 5 to ON.
13.6 Photocells check
This control unit is equipped with a function which allows you to carry out a check of the photocells operation before any turning on of the motor. In this way there is the possibility of increasing the safety of the system in case of photo device damaging (for example output relay stuck) or of an unwanted short – circuit on the photocell input. In case of breakdown, the control panel will signal it through a single flashing when a key is pressed and no movement will take place. This check is carried out after the control panel has received an order to move, but therefore powering the motor. Set dip n° 6 on ON to activate the photo cell check.
13.7 Clock function
Setting the dip n° 7 on ON the timing function is a ctivated. The pedestrian input becomes timing input where it is possible to connect a timer for the programming opening of the gate. The contact is interpreted as request of opening and of permanence on the opening state until the contact remains closed. When the contact opens, the gate automatically closes.
13.8 Wings number setting
The control unit AS24 can work with 1 or 2 wing gates. This setting is carried out putting the dip n°8 on OFF if you want a 2 wing functioning and on ON if you want a single wing functioning. This setting MUST be carried out before the learning of the strokes.
13. Advanced functions
Through the 8-position dip switch, it is possible to personalize further the automation functions. As standard the control panel leaves the factory with all the main functions already set, however, it is always possible to modify them by following the table:
Dip No. function Dip OFF Dip ON
1 modality of functioning Automatic Manual
2 learning of the courses disabled enabled
3 Pre-flashing Not active Active
4 Condominium function Not active Active
5 electrical lock + water hammer Not active Active
6 Photocell check disabled enabled
7 time set Not active Active
8 number of wings 2 wings functioning 1 wing functioning
13.3 Pre – flashing
Setting the dip nr.3 on ON the pre – flashing is enabled. This function means that before any movement there will be a brief flashing in order to
indicate the movement is about to begin. Remember to turn the control unit off and then on again after modifying the dip switch’s configuration.
13.1 Modality of functioning
Setting the dip n° 1 on ON and the dip n°2 on OFF, the manual functioning is enabled. This functioning allows the displacement of the wing with the red and blue keys present on the card (see section 4)
13.2 Strokes learning
Setting the dip n°1 on OFF and the dip n°2 on ON, t he learning of the strokes is enabled. This functioning allows to learn the courses and the phase shift of the wings (see section 6). Setting the dip n° 1 on ON and the dip n° 2 on ON, the pedestrian opening is enabled. This functioning allows to learn the opening of the first wing when the pedestrian opening key is pressed (see section 11).
13.4 Condominium function
Every command sent via radio or with the step by step buttons and/or pedestrian buttons will only open the door. Reclosure is entrusted to the automatic reclosure function, which must be activated since all closure command are ignored. In case the condominium function is active and the automatic reclosure is deactivated by means of the respective regulation trimmer (turned completely in clockwise sense), the control panel puts itself in state of signalled alarm, with door closed, through fast blinkings of the flashing light. Set dip n° 4 on ON to activate the condominium function.

ITA ENG FRA ESP DEU POR 6-1622377 rev.1 04/02/2016 Pag 7 di 8
17. State of alarm of the control unit
If the flashing light blinks fastly or remains fixed, it means that the control unit is in state of alarm. Any command is ignored until the resolution of the problem.
Condominium active + automatic reclosure deactivated
Enable the automatic re-closure by turning the trimmer in anti clockwise sense or deactivate the condominium function (dip 4 off).
Probable cause Solution Type of problem
Fast blinking of the flashing light
Flashing light still and lit
Intervention of thermical protection of the control unit. Too high stream absorption. The value must not be higher than 7A for more than 3 sec.
Each command is ignored for 20 seconds. Check the motor status and their absorption.
In case it would be necessary to modify the decoding type (from rolling code to fix code or vice versa), or cancel all the learned transmitters, proceed as follows:
1. Cut off the power supply to the system 2. Press the blue key if you want to select the fix code decoding or press the red if you want to select the rolling code decoding 3. Keep them pressed while you give again tension 4. Keep them again pressed until the flashing light lights on 3 times 5. At this point release the key and wait until the flashing light lights off. The selection of the decoding and the total deletion of the memory
have not been carried out.
16. Selection of the decoding type and total deletion of the memory
14. Modality of photocells intervention
The modality of photocells intervention is different:
• The internal photocells unlock the movement until the obstacle is removed, so they involve the complete opening of the gate.
• The external photocells do not intervene in opening, while they immediately invert the motion until the complete re opening in case of ob-
stacle in closing.
15. Control unit operation mode
The modality of intervention of the current sensor is only one. In case of intervention of the sensor in opening, the gate carry out a short inversion. In case of intervention in closing , the immediate inversion is got with the total re opening of the gate. In case the condominium function is selected, the happening of a sense in closing involves a short inversion in opening with a successive stop of
the motion until the reception of an order.
A
B
C
D
C
D
E
E
WARNING: cutting the little bridge “J1” the inversion movement zone is cancelled (zone “A”) and substituted with the setting of the position reached as total closing/opening position (zone “C”).
A= Intervention zone of the amperometric sensor with movement inversion
B= Normal speed run zone
C= Intervention zone of the amperometric sensor with movement stop and setting of the reached position as total closing/opening position. In the version with encoder this area is not present.
D= Low speed run zone
E= Mechanical stops at opening and closing (Absolutely necessary )
15.1 Forced opening of the wings
In case of wing’s overlap and consequent block of the automation, it is necessary to force the opening (re – synchronization). To do this, proceed as follows: 1. Press the first key of the transmitter for a time superior than 8 seconds 2. The control unit signals the imminent re – synchronization with a pre – flashing. DO NOT release the key 3. The two wings start to open contemporarily. DO NOT release the key4. When the wings have reached an opening sufficient to not come into collision, release the key. The wings stop. 5. Press again the key of the transmitter. The wing 1 starts to close itself and once closed, the wing 2 also closes . 6. Once closed the gate, the operation of re – synchronization is ended and the wing is ready to work regularly.
NOTE: During the phase of re – synchronization, it is possible to close only 1 wing at a time. The functioning come back to be regular only when both wings are correctly closed.
WARNING: during the operation of re – synchronization the intervention of the anti – squashing security is interpreted as identification of the close position. In order to avoid the voluntary intervention, the sensitivity of the same results remarkably reduced respect to the conditions of normal functioning.

ITA ENG FRA ESP DEU POR 6-1622377 rev.1 04/02/2016 Pag 8 di 8
20. Problem solving
This paragraph intends to give some indications for solving the most common problems. Before proceeding, check that the LED present on the panel are correctly on or off, according to the following diagram:
If one of more LED are not in the correct status check the corresponding input. In case exclude the external accessories bridging the related inputs (photocell, stop, limit switch) with the common in case of normally closed contact. Check the points in the following table:
Step by step Pedestrian setting or clock
stop External photocell
Internal photocell
Limit switch Wing 1
Limit switch Wing 2
off off on on on on on
LED STATUS
Type of problem possible cause Solution
On activating the open command, the wings do not move.
Loss of electrical power. Check the presence of electrical power and all the connections of the electrical network.
Burned fuse Replace the fuse with one with the same characteristics
On activating the open command, the wings move for a brief moment and then stop.
Incorrect encoder connection Check encoder wiring
On activating the open command, the wings close.
Motor cables inverted
Impossible to programme remote controls. The type of decoding set in the control panel does not correspond to the type of remote control used.
Check which decoding was set and select the one which corresponds to the remote controls in use.
It is impossible to enter in wing stroke programming mode.
The gate is not closed
Close (in manual) the gate. If the gate was closed, set the SW1 selector to manual mode, wait 1 second and put it back into automatic mode. Try again to enter into setting mode.
Check motor wiring, inverting them if necessary.
During the learning, a wing stop before to reach the total opening.
RUNNING AMP.SENS. Trimmer threshold too low
Increase the intervention value of the ampere sensor.
On learning phase, le wings arrive on total opening but the gate does not re-close.
RUNNING AMP.SENS. Trimmer threshold too high
Decrease the intervention value of the ampere sensor.
GUARANTEE - In compliance with legislation, the manufacturer’s guarantee is valid from the date stamped on the product and is restricted to the repair or free replacement of the parts accepted by the manufacturer as being defective due to poor quality materials or manufacturing defects. The guarantee does not cover damage or defects caused by external agents, faulty maintenance, overloading, natural wear and tear, choice of incorrect product, assembly errors, or any other cause not imputable to the manufacturer. Products that have been misused will not be guaran-teed or repaired. Printed specifications are only indicative. The manufacturer does not accept any responsibility for range reductions or malfunc-tions caused by environmental interference. The manufacturer’s responsibility for damage caused to persons resulting from accidents of any na-ture caused by our defective products, are only those responsibilities that come under Italian law.
The control unit AS24 has a connector (see diagram on page 1) where it is possible to insert an additional card in order to have the outputs for connection of the electric lock and the courtesy light. The lighting time of the courtesy light is fixed at 1 minute and 30 seconds. It lights for every operation of the user.
18. Additional card (not supplied as standard)
In case in which you utilize a radio receiver with card, it is possible to provide the control unit with an output terminal for a second radio channel (with N.O. contact). Instead, if you want to utilize the radio module present on the card, the second radio channel is not available.
19. Second radio channel
CONNECTOR TO BE INSTALLED IN THE CONTROL UNIT.
TERMINALS 1 & 2: Output for courtesylight. Timed for 90 SEC. TERMINALS 3 & 4: Output for electrical lock. Timed for 3 SEC.
HOLE TO CONNECT THE SPACER BETWEEN THE ADDITIONAL CARD AND THE CONTROL BOX.
CLEAN CONTACTS WITHOUT VOLTAGE Max load 220 V - 5 A
1 2 3 4
ELS
LC
Vac/dc Vac/dc

ITA ENG FRA ESP DEU POR 6-16223727 rev.1 04/02/2016 Pag 1 di 8
1 Introduction
CENTRAL DE COMMANDE AS24 POUR MOTEURS ENTERRÉS Centrale de commande pour 1 - 2 moteurs 24Vcc
2. Configuration
Fig.1
Connecteur module radio
24 Vac
Boutons
Led di segnalazione
Connecteur pour carte R2 (pas en dotation)
Utiliser ce point pour brancher la carcasse des moteurs à la centrale et à la terre.
Molex module radio
N'importe quel contact Normale-ment Fermé (N.C) doit être shunté si non utilisé pas.
7 8 9 10 11 12 5 6
Trimmer de régulation
Dip switch
Running AMP.SENS
Automatic RECLOSING
Slowdown VELOCITY
Slowdown AMP.SENS
FUNCTION SELECT
Modalité de fonctionnement sur sens (voir
paragraphe 15)
J1
Rouge Bleu
Fusible 10A pour moteur 1
Fusible 10A pour moteur 2
Fusible 2.5A pour clignotant
ATTENTION: avant l'activation quelconque et/ou mis en oeuvre, lire attentivement les paragraphes suivants qui décrivent la programmation et les réglages principales de l'automation. Dans la programmation, suivre scrupuleusement l'ordre et les instructions reportées. Ne pas entrer dans le rayon d'action de l'automation pendant qu'il est en mouvement ou pendant la programmation. Avant de chaque modification attendre l�arrête complet du système. Ne pas permettre à des personnes étrangers et/ou non qualifiées l�intervention et/ou la présence dans le rayon d'action du système.
Pour un correct fonctionnement de l�automation, il est absolument indispensable l�utilisation des butées mécaniques en ouverture et fermeture.
MISE À TERRE
Afin d'obtenir un bon fonctionnement des accessoires (dispositifs photoélectriques en particulier) brancher au boîtier de commande, il est très importantque tout le système (automatisme + moteurs + boîtier de commande) soit relié à une unique masse. Il faut donc relier entre eux la structure métallique del'automatisme, la carcasse des moteurs et le boîtier de commande avec la borne de terra. Pour la connexions à la centrale voir l’illustration ci-dessus.
CHOIX MOTEURS
Si le portail est à battants, brancher à la sortie MOTEUR 1 le battant qui s’ouvre en premier et auquel est éventuellement reliée une électroserrure. Le MOTEUR 1 est toujours actionné en premier en ouverture, et en deuxième en fermeture.
La centrale de commande AS24 indiquée pour les installations à 1 ou 2 moteurs à courant continu 24V et une absorption maximum de 7A. Le tableau de bord permet une régulation précise de la force de poussée, de la vitesse et sensibilité en phase de ralentissement. Il est possible de régler le déphasage des battants pendant la phase d’apprentissage des courses. La centrale peut mémoriser jusqu'à 30 transmetteurs et 8000 transmetteurs avec la mémoire extérieure avec la fonction pas à pas et piéton. Elle est fournie d'entrées pour photocellule interne et externe, fin de course de ouverture et possibilité de brancher les boutons pour le pas à pas, le piéton et le stop. Les sorties comprennent un clignotant à 24Vac, la possibilité de brancher un deuxième canalradio (en utilisant un récepteur molex) et une carte d’expansion avec plusieurs fonctions. L'usage de batteries tampon est prévu là ou il se rend nécessaire d'assurer le service en cas de panne de courrant.
LÉGENDE: PP: Bouton pas à pas. PED: Bouton piéton ou entrée horloge. Stop: Stop. Com: Commun. Foto INT: Photocellule interne. Foto EST: Photocellule externe. F.C.1: Fin de course ouverture bat.1. F.C.2: Fin de course ouverture bat.2. ANT.: Entrée antenne GND ANT.: Blindage antenne
3. Connexions électriques
Deu
xièm
e ca
nal r
adio
Fig 2
4W MAX (170mA)
Exemples charge maximale accessoires Vdc (4W):
• 3 paires de photocellules FTALL.
• 2 paires de photocellules FTALL et un récepteur R.CO.O (système barres palpeuses).
• 2 paires de photocellules FTALL et un récepteur B.RO X40 DISPLAY.
• 1 paire de photocellules FTALL, un récepteur B.RO X40 DISPLAY et un récepteur R.CO.O.

ITA ENG FRA ESP DEU POR 6-16223727 rev.1 04/02/2016 Pag 2 di 8
Appuyer sur la touche ROUGE. L'automation on doit s�ouvrir. Régler le fin de course d'ouverture
Si le battant 1 se ferme, vérifier les câblage du moteur 1 (bornes 18 et 19) et répéter l’essai.
Relâcher la touche ROUGE et appuyer sur la touche BLEU. Le battant 2 doit s’ouvrir. Régler le fin de course d'ouverture
Relâcher la touche BLEU. Appuyer de nouveau sur la touche BLEU. La battant 2 doit se fermer. Repor-ter le en position de fermeture et relâcher la touche
Appuyer sur la touche ROUGE. Le battant 1 doit se fermer. Reporter le en position de fermeture et relâcher la touche.
Si le battant 2 se déplace, arrêter tout et inverser les fils du moteur 1 avec ceux du moteur 2.
Si le battant 1 ne bouge pas, vérifier les câblage du moteur 1 (bornes 18 et 19) et répéter l’essai.
Position Dipswitch
Nota bene: durante queste movimentazioni le fotocellule, la radio e i pulsanti NON sono attivi.
Posizione Dipswitch
Mémoriser au moins une télécommande. Pour programmer la course de l’automation, il est possible d’utiliser une télécommande à 2 touches. Par contre, pendant le fonctionnement normal, donc pas en programmation, la 1° touche mémorisée exécute la fonction de pas à pas (ouverture et fermeture de l'automation) la 2° touche gère l’ouve rture piéton (ouverture partielle). La troisième touche gère la lumière de courtoisie.
5. Apprentissage télécommande
Appuyer et relâcher la touche ROUGE (P1). Le led clignotant s'allume fixe.
Appuyer et relâcher la 1° touche de la télécommande. Le clignotant émet 2 clignotements.
La 1° touche est mémorisée. Appuyer et relâcher la touche ROUGE. Le led clignotant s'allume fixe.
Si le clignotant a émis 1 clignotement, la touche pressée était déjà mémorisée et on peut continuer la procédure, en cas contraire vérifier que la télécommande fonctionne, quelle aie la même décodification réglée sur la centrale et que le module radio soit inséré. À ce point répéter l’essai.
Appuyer et relâcher la 2° touche de la télécommande. Le clignotant émet 1 clignotement.
Les 2 touches sont mémorisées et la procédure est terminée. Répéter la procédure du point À si on désire apprendre la touche pour la lumière de courtoisie.
Vérifier que les dip 1 et 2 soient sur OFF et répéter le test.
Vérifier que la télécommande fonctionne, quelle aie la même décodification réglée sur la centrale et que le module radio soit inséré. À ce point répéter l’essai.
A
Position Dipswitch Vérifier que les dip 1 et 2 soient sur OFF et répéter le test.
OUI
NON
OUI
OUI
OUI
NON
NON
NON
Avant de donner alimentation à la centrale, contrôler tous les câblages effectués. En particulier, contrôler qu'il y n'ait pas fils écorchés, courts-circuits entre fils et que tous les accessoires soient branchés aux points indiqués dans le schéma à la page 1. Une fois alimenté le système, vérifier que: 1. Le led POWER soit allumé fixe. 2. Les entrées normalement fermées doivent avoir le led correspondant allumé. Le led ON doit s’éteindre quand le contact de l'entrée s'ouvre. 3. Vérifier que le module radio soit correctement inséré et fonctionnant. 4. Positionner le DIP 1 sur ON 5. Vérifier les connexions des moteurs en suivant la procédure suivante:
4. Contrôles préliminaires
Si le battant 2 se ferme, vérifier les câblage du moteur 2 (bornes 20 et 21) et répéter l’essai.
Si le battant 2 ne bouge pas, vérifier les câblage du moteur 2 (bornes 20 et 21) et répéter l’essai.
Vérifier les câblages et répéter l’essai
Vérifier les câblages et répéter l’essai
NON
NON
NON
NON
OUI
OUI
OUI
OUI

ITA ENG FRA ESP DEU POR 6-16223727 rev.1 04/02/2016 Pag 3 di 8
6. Apprentissage des courses
ATTENTION: Pendant l�apprentissage des courses, on décide aussi le déphasage des battants
Posizione Dipswitch
Portail à deux battants Portail à un battant
1
2 Appuyer et relâcher la 1° touche mémorisée ou la touche ROUGE (P1).
3 Une foi que le battant 1 rejoint le déphasage désiré, appuyer sur la 2° touche mémorisée ou sur la touche BLEU (P2).
Réglage du nombre de battant du portail
4 Une fois que l'automation atteint la position de complètement ouverte, elle se referme automatiquement.
5
Position Dipswitch
Une fois que l'automation atteint la position de complètement fermé le clignotant émet 4 clignotements.
6
Réglage de la course des battants
7. Régulation du seuil du capteur ampérométrique a régime
Cette procédure doit être effectuée SEULEMENT par l'installateur et SEULEMENT pendant la mise en oeuvre du système. Pour une programmation correcte, avant d'effectuer des modifications reporter toujours l'automation en position totalement fermée.
RUNNING AMP.SENS
Avec l'automation en mouvement, contrôler, avec un dynamomètre, le couple de poussé.
Le seuil du capteur ampérométrique est trop bas.
Il est possible de tourner le trimmer RUNNING AMP.SENS dans le sens des aiguilles d’une montre pour augmenter le seuil du capteur ampérométrique.
Il est possible de tourner le trimmer RUNNING AMP.SENS en sens inverse aux aiguilles d'une montre pour diminuer le seuil du capteur ampérométrique.
Le seuil du capteur ampérométrique est trop haut.
Répéter la mesure du couple
RUNNING AMP.SENS
Répéter la mesure du couple
Le clignotant commence à clignoter lentement.
Le battant 1 commence à s’ouvrir.
Le battant 2 commence à s’ouvrir
l'automation se referme.
L'apprentissage est terminé. La centrale est prête à fonctionner régulièrement.
L'apprentissage est allé à bon fin.
Si l�automation est à un seul battant, passer au point 4
Cette procédure doit être effectuée SEULEMENT par l'installateur et SEULEMENT pendant la mise en oeuvre du système. Si on n'utilise pas de télécommande, il est nécessaire d'utiliser la touche Rouge (P1) et BLEU (P2) présentent sur la fiche ou avec les boutons P.P et PED. Il faut exécuter ensuite la procédure suivante. 1. Fermer l'automation, voir point 4 pour bouger l'automation manuellement. 2. Sélectionner si la centrale doit fonctionner à un battant (DIP 8 sur ON) ou avec deux battants (Dip 8 sur OFF) 3. Positionner le DIP 1 sur OFF 4. Positionner le DIP 2 sur ON. Le clignotant clignote lentement.

ITA ENG FRA ESP DEU POR 6-16223727 rev.1 04/02/2016 Pag 4 di 8
10. Régulation du temps de fermeture automatique
Cette procédure doit être effectuée SEULEMENT par l'installateur et SEULEMENT pendant la mise en oeuvre du système. Pour une programmation correcte, avant d'effectuer des modifications reporter toujours l'automation en position totalement fermée.
Avec l'automation fermé donner une commande de pas à pas et attendre l'ouverture complète.
Le temps de richiusura automatique est trop court
Tourner le trimmer AUTOMATIC RECLOSING en sens horaire. De cette manière on augmente le temps de fermeture automatique.
Le temps de fermeture automatique est trop long
Tourner le trimmer AUTOMATIC RECLOSING en sens inverse aux aiguilles d'une montre. De cette manière on diminue le temps de fermeture automatique.
AUTOMATIC RECLOSING
AUTOMATIC RECLOSING
Tourner le trimmer AUTOMATIC RECLOSING tout en sens horaire. De cette manière on désactive la fermeture automatique.
AUTOMATIC RECLOSING
AUTOMATIC RECLOSING
Tourner le trimmer AUTOMATIC RECLOSING tout en sens antihoraire pour activer la fermeture automatique par photocellule. Si les photo-cellules non viennent pas interrompues, la centrale ferme après 2 min.
Désactivation de la fermeture automatique
Fermeture automatique par photocellule
9. Régulation vitesse moteur en ralentissement
Cette procédure doit être effectuée SEULEMENT par l'installateur et SEULEMENT pendant la mise en oeuvre du système. Pour une programmation correcte, avant d'effectuer des modifications reporter toujours l'automation en position totalement fermée.
SLOW.DOWN.VELOCITY
Avec l'automation en mouvement, contrôler, la vitesse en phase de ralentissement.
Il est possible de tourner le trimmer SLOW. DOWN. VELOCITY en sens horaire pour augmenter la vitesse du moteur.
Il est possible de tourner le trimmer SLOW. DOWN. VELOCITY en sens inverse aux aiguilles d'une montrepour diminuer la vitesse du moteur.
La vitesse est trop haute SLOW.DOWN.VELOCITY
La velocità è troppo bassa
N.B: Ils est indispensable, après avoir réglé la vitesse en ralentissement désirée, effectuer une nouvelle programmation des course dans le cas ou on aie personnaliser la phase di ralentissement (chap.12).
8. Régulation du seuil du capteur ampérométrique en ralentissement
Cette procédure doit être effectuée SEULEMENT par l'installateur et SEULEMENT pendant la mise en oeuvre du système. Pour une programmation correcte, avant d'effectuer des modifications reporter toujours l'automation en position totalement fermée.
SLOW.DOWN.AMP.SENS
SLOW.DOWN.AMP.SENS
Avec l'automation en mouvement, contrôler, avec un dynamomètre, le couple de poussé.
Le seuil du capteur ampérométrique est trop bas.
Il est possible de tourner le trimmer SLOW. DOWN. AMP. SENS en sens horaire pour augmenter le seuil du capteur ampérométrique.
Il est possible de tourner le trimmer SLOW. DOWN. AMP. SENS. Dans le sens inverse aux aiguilles d'une montre pour diminuer le seuil du capteur ampérométrique.
Le seuil du capteur ampérométrique est trop haut.
Répéter la mesure du couple
Répéter la mesure du couple
ITA ENG FRA ESP DEU POR 6-16223727 rev.1 04/02/2016 Pag 5 di 8
12. Personnalisation de la phase de ralentissement
Cette procédure doit être effectuée SEULEMENT par l'installateur et SEULEMENT pendant la mise en oeuvre du système. Pour une programmation correcte, avant d'effectuer des modifications reporter toujours l'automation en position totalement fermée. Pendant la phase d'apprentissage, il est possible de décider où l'automation doit commencer la phase de ralentissement. Dans le cas de ralentissement différent entre les deux battants, s’assurer que le déphasage entre les battants soit suffisant pour garantir un fonctionnement correcte de l’automation.
Le clignotant commence à clignoter lentement.
Position Dipswitch
1
2 Appuyer et relâcher la 1° touche mémorisée ou la to uche ROUGE (P1).
Le battant 1 commence à s’ouvrir.
3 Une foi que le battant 1 rejoint le déphasage désiré, appuyer sur la 2° touche mémorisée ou sur la toucheBLEU (P2).
Le battant 2 commence à s’ouvrir
Si l�automation est à un seul battant, passer au point 4
6 l'automation se referme.
4
Position Dipswitch
L'apprentissage est terminé. La centrale est prête à fonctionner régulièrement.
Une fois que l'automation atteint la position de complètement fermé le clignotant émet 4 clignotements.
L'apprentissage est allé à bon fin. 9
10
Une fois que le battant 1 atteint la position de début ralentissement désiré, appuyer et relâcher de nouveau la 1° touche mémorisée ou la touche ROUGE (P1).
5 Une fois que le battant 2 atteint la position de début ralentissement désiré, appuyer et relâcher de nouveau la 2° touche mémorisée ou la touche BLEU (P2).
Le battant 2 passe en ralentissement en ouverture.
7
Une fois que le battant 1 atteint la position de début ralentissement désiré, appuyer et relâcher de nouveau la 1° touche mémorisée ou la touche ROUGE (P1).
Le battant 1 passe en ralentissement en fermeture. 8
Une fois que le battant 2 atteint la position de début ralentissement désiré, appuyer et relâcher de nouveau la 2° touche mémorisée ou la touche BLEU (P2).
Le battant 2 passe en ralentissement en fermeture.
Une fois que l'automation atteint la position de complètement ouverte, elle se referme automatiquement.
N.B: Il est indispensable, après avoir régler la vitesse de ralentissement désirée, effectuer une nouvelle programmation des course dans le cas ou la phase de ralentissement aie été personnalisée.
N.B: Si aucunes zones de ralentissements sont définies, la centrale charge les réglage d�usine
Le battant 1 passe en ralentissement en ouverture.
11. Personnalisation de l'ouverture piéton (ouverture partielle)
Cette procédure doit être effectuée SEULEMENT par l'installateur et SEULEMENT pendant la mise en oeuvre du système. Pour une programmation correcte, avant d'effectuer des modifications reporter toujours l'automation en position totalement fermée. Si elle n'est pas personnalisée, l'ouverture piéton correspond à l'ouverture totale du battant 1. Pour personnaliser l'ouverture piéton procéder de la façon suivante:
Le clignotant commence à clignoter lentement.
Position Dipswitch
1
2 Appuyer et relâcher la 1° touche mémorisée ou la touche ROUGE (P1).
Le battant 1 commence à s’ouvrir.
3 Quand le battant 1 rejoint la position désirée, appuyer et relâcher de nouveau la 1° touche mémorisée ou la touche ROUGE (P1).
Le battant 1 s’arrête et après quelques secondes se referme automatiquement.
4 Une fois fermée l'automation, le clignotant émet 4 clignotements. L'apprentissage est allé à bon fin.
5
Position Dipswitch L'apprentissage est terminé. La centrale est prête à fonctionner régulièrement.
ITA ENG FRA ESP DEU POR 6-16223727 rev.1 04/02/2016 Pag 6 di 8
13.5 Coup de bélier et serrure électrique
Si l’automatisme est pourvu d'une électroserrure, il est conseillé de programmer l'appareil de manière à ce qu'il effectue un court mouvement de fermeture avant la phase d'ouverture quand le portail est fermé. Cette fonction permet de débloquer l’électroserrure même dans de mauvaises conditions climatiques (par exemple en cas de gel). Pour actionner le coup de bélier et la serrure électrique, programmer le dip n°5 sur ON.
13.6 Tests photocellule
Cette centrale est dotée d'une fonction qui permet d'effectuer un contrôle sur le fonctionnement des photocellules avant chaque actionnement du moteur. On obtient ainsi la possibilité de développer la sûreté du système en cas d'endommagement du photo dispositif (p.e. relais de sortie collé, ou court-circuit non désirer sur l'entrée photocellule). En cas de panne, la centrale le signale en effectuant un clignotement à la pression d'une touche et en n'exécutant aucun mouvement. Ce contrôle est effectué après que la centrale a reçu une commande à bouger, mais avant de donner tension au moteur. Placer le dip n°6 sur ON pour ac tiver le test photocellule.
13.7 Fonction horloge En positionnant le dip n°7 sur ON, on active la fon ction horloge. L'entrée barre palpeuse devient entrée horloge où il est possible de brancher un timer pour l'ouverture programmée de l'automation. Le contact est interprété comme demande d'ouverture et de rester dans l’état ouvert tant que le contact reste fermé. Quand le contact s'ouvre, l'automation se ferme automatiquement.
13.8 Réglage du nombre de battant
La centrale AS24 è capable de fonctionner avec des portails à 1 ou 2 battants. Ce réglage est effectué en plaçant le il dip n°8 sur OFF si on désire le fonctionnement à deux battants et sur ON si on désire le fonctionnement à 1 battant. Ce réglage DOIT être fait avant d’effectuer la phase d’apprentissage des courses.
13. Fonctions avancées
Grâce au dip switch à 8 positions, il est possible de personnaliser ultérieurement les fonctions de l'automation. La centrale de commande sort de l'usine avec les principales fonctions pré réglée, cependant il est toujours possible de les modifier en suivant le tableau:
N° dip Fonction Dip OFF Dip ON
1 Modalité de fonctionnement Automatique Manuelle
2 Apprentissage de la course Désactivé activé
3 Pré clignotement Non actif Actif
4 Fonction de copropriété Non actif Actif
5 Electroserrure + Coup de bélier Non actif Actif
6 Test photocellule Non actif Actif
7 Fonctionnement horloge Non attivo Attivo
8 Nombre de battant Fonctionnement à deux battants Fonctionnement à un battant
13.3 Pré clignotement
En plaçant le dip n°3 sur ON, on active le pré clig notement. Telle fonction exécute AVANT de chaque mouvement un bref clignotement pour indiquer le mouvement imminent.
13.1 Modalités de fonctionnement
En plaçant le dip n°1 sur ON, on active le fonction nement manuel. Tel fonctionnement permet le déplacement de l'automation avec la touche rouge ou bleu présentes sur la fiche, voir paragraphe 4.
13.2 Apprentissage course En plaçant le dip n°1 sur OFF et le dip n°2 sur ON, on active l'apprentissage de la course. En plaçant le dip n°1 sur ON et le dip n°2 sur ON, on active l'apprentissage de l'ouverture piéton. Tel fonctionnement permet d'apprendre l'ouverture partielle de l'automation quand on appuie sur la touche d'ouverture piéton, voir paragraphe 11.
13.4 Fonction de copropriété
Chaque commande donné via radio ou avec les boutons de pas à pas et/ou piéton provoque seulement l'ouverture de l’automation. La fermeture est confiée à la fonction de fermeture automatique, qu'il faudra par conséquence NÉCESSAIREMENT ACTIVÉ vu que toute commande de fermeture vient ignoré. Dans le cas ou la fonction de copropriété est active et la fermeture automatique par l’intermédiaire du respectif trimmer de régulation soit désactivé (tourné tout en sens horaire) la centrale se met en état d'alarme signalé par le clignotements rapide du clignotant. Pour activer la fonction de copropriété positionner le dip n°4 sur ON,

ITA ENG FRA ESP DEU POR 6-16223727 rev.1 04/02/2016 Pag 7 di 8
14. Modalité d'intervention des photocellules
La modalité d’intervention des photocellules est différencié:
• Les photocellule interne bloquent le mouvement tant que l’obstacle est présent, après quoi, comporte la réouverture complète de l’automation
• Les photocellule externe n'interviennent pas en ouverture, pendant qu'ils inversent immédiatement le mouvement jusqu'à l’ouverture complète dans le cas d'obstacle en fermeture.
15. Fonctionnement de la centrale
La modalité d'intervention du capteur de courant est unique. En cas d'intervention du capteur en ouverture l'automation s'arrête. Dans le cas d'intervention en fermeture on obtient l'inversion immédiate avec ouverture totale de l'automation. Si la fonction de copropriété est sélectionnée et qu’il se vérifie un sense en fermeture, cela comporte une brève inversion en ouverture avec suivi de l’arrêt de l’automation jusqu'à la réception d'une commande d’un utilisateur.
A = Zone d'intervention du capteur ampérométrique avec inversion du mouvement.
B = Zone de marche à la vitesse normale.
C = Zone d'intervention du capteur amperometrico avec arrêt du mouvement et mémorisation de la position atteinte comme position de fermeture / ouverture totale (Resynchronisation).
D = Zone de marche à la vitesse ralentie.
E= Buttée mécanique en ouverture et fermeture (indispensable)
A B
C
D
C
D
E
E
ATTENTION: En coupant le pont “J1” on efface la zone d’inversion du mouvement (zone “A”) et on la remplace avec la mémorisation de la position rejointe comme position d’ouverture / fermeture totale (zone “C”)
17. État d'alarme de la centrale
Si le clignotant clignote rapidement ou il reste allumé fixe, il signifie que la centrale est en état d'alarme. Chaque commande vient ignoré jusqu'à la résolution de l'anomalie.
Copropriété active + richiusura automatique désactivée.
Activer la fermeture automatique en tournant le trimmer en sens inverse aux aiguilles d'une montre ou désactiver la fonction de copropriété (dip4 sur off).
Cause de l'anomalie Solution Signalisation anomalie
Clignotement rapide du clignotant.
Clignotement allumé fixe.
Intervention de la protection thermique de la centrale. Absorption de courant trop élevé. La valeur ne doit pas dépasser 7A pour plus que 3 sec.
Chaque commande vient ignoré pour 20 sec. Contrôler l'état des moteurs et leur absorption.
S'il se rende nécessaire de changer le type de décodification (de code variable au code fixe ou vice versa), ou effacer toutes les télécommandes apprises procéder de la façon suivante,: 1. Enlever l'alimentation au système. 2. Appuyer sur la touche bleue si on veut sélectionner la décodification à code fixe ou presser la touche rouge si on veut sélectionner la
décodification à code variable. 3. Maintenir appuyé pendant que l’on redonne tension au système. 4. Maintenir encore appuyé tant que le clignotant ne s'allume pas 3 fois. 5. À ce point relâcher la touche et attendre que le clignotant s'éteigne. La sélection de la décodification et l'effacement total de la mémoire ont
été effectués.
16. Sélection du type de décodification et effacement total de la mémoire .
15.1 Ouverture forcée des battants.
Dans le cas ou les battants soient inversé (le battant 1 est en buttée de fermeture avant le battant 2) et donc que l’automation soit bloquer, il est nécessaire de forcer l’ouverture des battants (resynchronisation). Pour faire cela, procéder con suit:
1. Appuyer la première touche de la télécommande pour un temps supérieur à 8 secondes. 2. La centrale signale l’éminente resynchronisation avec un pré clignotement. NE PAS relâcher la touche3. Les deux battants commencent à s’ouvrir en même temps. NE PAS relâcher la touche4. Quand les battants ont rejoint une ouverture suffisante pour ne pas entrer en collision, relâcher la touche. Les battants s’arrêtent. 5. Appuyer de nouveau sur la touche de la télécommande. Le battant 1 commence a se fermer et une foi qu’il rejoint la buttée de fermeture,
le battant 2 commence a se ferme à son tour. 6. Une foi fermé le portail, l’opération de resychronisation est terminé et le portail peut fonctionner régulièrement.
N.B: Pendant la phase de resynchronisation, il est seulement possible de fermer un battant à la foi. Le fonctionnement retourne à la normalité quand les deux battants se sont fermés correctement.
ATTENTION: pendant l�opération de resynchronisation, l�intervention de la sécurité anti-écrasement vient interprété comme identification de la position de fermeture. Pour éviter une intervention involontaire, la sensibilité même vient considérablement réduite par rapport aux conditions normales de fonctionnement.

ITA ENG FRA ESP DEU POR 6-16223727 rev.1 04/02/2016 Pag 8 di 8
20. Risoluzione problemi
Ce paragraphe veut donner quelques indications pour les problèmes les plus fréquents qui se vérifient. Avant de procéder, vérifier que les led présents sur la fiche soient allumés correctement ou éteints; l'état de ces led est reporté dans le tableau suivant:
Si quelques led ne résulte pas dans l’état correct, vérifier l'entrée correspondante. Éventuellement exclure les accessoires extérieurs, en shuntant les entrées relatives (photocellule) fin de course, stop, avec le commun, dans le cas de contacts fermé normalement. Vérifier les points du tableau suivant:
Type de panne Cause probable Solution
En activant le commandement d'ouverture, l'automation ne bouge pas.
Manque d'alimentation électrique. Vérifier la présence de la tension électrique et toutes les liaisons au réseau électrique.
Fusible brûlé. Remplacer le fusible avec un de mêmes caractéristiques.
En activant la commande d'ouverture, l'automation ne va en fermeture. Câbles moteur inversés. Vérifier le câblage des moteurs en les inversant
si nécessaire ou en coupant le petit pont J2.
On ne réussit pas à entrer en programmation des télécommandes.
• Les dip ne sont pas placés correctement.
• Le type de décodification de la centrale ne correspond pas au type de télécommande en usage.
Non si riesce ad entrare in programmazione corsa.
On ne réussit pas à entrer en programmation des courses.
Reporter, en manuel, l'automation en fermeture. Réessayer à entrer en apprentissage.
La centrale est alimentée mais l'automation ne bouge pas.
Une entrée normalement fermée n'est pas active.
Vérifier l'entrée photocellule, l'entrée stop et les fins de course. Si non utilisé, shunter les au commun.
• Positionner les DIP 1 et 2 sur OFF.
• Vérifier quel décodification a été réglée et éventuellement sélectionner celle correspondante aux télécommandes en usage.
En phase d'apprentissage, l'automation s'arrête avant d'arriver en ouverture totale.
Seuil du trimmer RUNNING AMP.SENS trop de bas.
Augmenter le seuil d'intervention du capteur ampérométrique.
En phase d'apprentissage, l'automation arrive en ouverture totale mais l'automation il ne se referme pas.
Seuil du trimmer RUNNING AMP.SENS trop de haut.
Diminuer le seuil d'intervention du capteur ampérométrique.
GARANTIE - La garantie du producteur a une validité conforme aux dispositions de la loi à compter de la date estampillée sur le produit et se limite à la réparation ou substitution gratuite des pièces reconnues par le fabricant comme défectueuses pour cause de défaut des caractéristiques essentielles des matériaux ou pour cause de défaut d'usinage. La garantie ne couvre pas les dommages ou défauts dus aux agents externes, à tout manque d'entretien, toute surtension, usure naturelle, tout choix inadapté du type de produit, toute erreur de montage, ou autres causes non imputables au producteur. Les produits modifiés ne seront ni garantis ni réparés. Les données reportées sont purement indicatives. Le producteur ne pourra en aucun cas être reconnu comme responsable des réductions de portée ou diffusions dues à toute interférence environnementale. La responsabilité du producteur pour les dommages subis par toute personne pour cause d'accidents de toute nature dus à un produit défectueux, est limitée aux responsabilités visées par la loi italienne.
Dans le cas ou on utilise un récepteur radio embrochable, il est possible d’équiper la centrale d’un bornier de sortie pour un deuxième canal radio(avec contact N.O.). Si on désire utiliser le module radio présent sur la carte, le deuxième canal radio n’est pas disponible.
19. Deuxième canal radio
Pas à pas Piéton / Horloge stop Photocellule
externe Photocellule
interne Fin de course
Battant 1 Fin de course
Battant 2
éteint éteint allumé allumé allumé / éteint allumé allumé
ÉTAT DES LED
La carte AS24 à un connecteur (voir schéma page 1) où il est possible insérer une carte additionnelle pour avoir les sorties pour le branchement de l’électroserrure et de la minuterie d’éclairage. Le temps d�allumage de la minuterie d�éclairage est fixé à 1 min et 30 secondes. L’allumage est effectué à chaque départ du moteur.
CONNECTEUR A INSÉRER A LA CENTRALE AS24
BORNES 1 ET 2: Contact sortie minuterie d’éclairage. Temporisé 90 sec. BORNES 3 ET 4: Contact sortie électroserrure. Tem-porisé 3 sec.
TROU POUR JOINDRE L’ENTRETOISE ENTRE LA CARTE ADDITIONNELLE ET LA CENTRALE.
CONTACTS SECS SANS TENSION Charge maximum 230 V - 5 A
1 2 3 4
ELS LC
Vac/dc Vac/dc
18. Carte supplémentaire (pas en dotation)

ITA ENG FRA ESP DEU POR 6-1622377 rev.1 04/02/2016 Pag 1 di 8
El cuadro de control AS24 es especialmente indicado para las instalaciones de puertas de 1 o 2 hojas con motor de corriente continua 24V y con absorción máxima de 7A. El cuadro de contro permite una regulación precisa de la fuerza de empuje de las hojas, de la velocidad y de la sensibilidad en fase de ralentización. Además, es posible ajustar el retraso de la segunda hoja durante la fase de aprendizaje. La central puede memorizar hasta 30 emisores y 8000 emisores con la memoria externa con la función paso-paso y peatonal. Es equipada para entradas de fotocélulas internas y externas, finales de carrera en apertura y posibilidad de conectar los pulsadores para el paso paso, el peatonal y el stop. Las salidas incluyen una luz intermitente de 24Vac, la posibilidad de conectar un 2° canal ra dio auxiliar (utilizando un receptor molex) y una tarjeta de expansión con más funciones. Es predispuesto para el uso de baterías flotantes si necesario el funcionamiento en caso de falta de corriente.
1. Introducción
CUADRO DE MANDO AS24 PARA MOTORES ENTERRADOS Cuadro de mando para 1-2 motores 24Vcc
2. Configuración
Fig.1
Conector módulo radio
24 Vac
Botones
Led de señalización
Conector para tarjeta R2 (en dotación)
Utilizar este punto para conectar la tapa de los motores al cuadro de mando y a tierra.
Molex módulo radio
Cualquier contacto Normalmente Cerrado (N.C.) debe ser puenteado
si no se utiliza.
7 8 9 10 11 12 5 6
3. Conexiones eléctricas
SELECCION MOTORES
Si la puerta es batiente, conectar a la salida MOTOR 1 la hoja que va en batiente y a la cual es conectada eventualmente la cerradura eléctrica. El MOTOR 1 se activa primero en apertura y luego en cierre.
PUESTA A TIERRA
Para obtener un correcto funcionamiento de los accesorios (en particular fotodispositivos) conectados al cuadro de mando, es muy importante que toda la instalación (automación + motores + cuadro de mando) tenga una única referencia de masa. Deben conectarse entre sí la estructura metálica del automatismo, la tapa de los motores y el cuadro de mando con el terminal de tierra. Para la conexión del cuadro de mando ver la figura 1.
Trimmer de regulación
Dip switch
Running AMP.SENS
Automatic RECLOSING
Slowdown VELOCITY
Slowdown AMP.SENS
FUNCTION SELECT
Modalidad de funcionamiento
en sense (ver párrafo 15)
J1
Rojo Azul
Fusible 10A para motor 1
Fusible 10A para motor 2
Fusible 2.5A para intermitente
ATENCION: Antes de cualquier activación y/o puesta en marcha del sistema, leer con atención los apartados que describen las programacio-nes y los principales ajustes del automatismo. En la programación, seguir detallamente las órdenes y las instrucciones indicadas. No entrar en el radio de acción del automatismo mientras que esta en movimiento o durante las programaciones. Antes de una modificación esperar la parada completa del sistema. No se permite a personas extrañas y/o no calificadas intervenciones y/o la presencia en el radio de acción del sistema.
Para un correcto funcionamiento del automatismo es absolutamente indispensable el uso de los paros mecánicos en apertura y en el cierre
Fig 2
DESCRIPCION: PP: Pulsador paso-paso. PED:Pulsador peatonal o entrada reloj. Stop: Stop. Com: Común. Foto INT: Fotocélula interna. Foto EST: Fotocélula externa. F.C.1: Final de carrera apertura hoja 1. F.C.2: Final de carrera apertura hoja 2. ANT.: Entrada antena GND ANT.: Masa antena
4W MAX (170mA)
Ejemplos carga máxima accesorios Vdc (4W):
• 3 pares de fotocélulas FTALL.
• 2 pares de fotocélulas FTALL y un receptor
R.CO.O (sistema banda radio).
• 2 pares de fotocélulas FTALL y un receptor B.RO X40 DISPLAY.
• 1 par de fotocélulas FTALL, un receptor B.RO
X40 DISPLAY y un receptor R.CO.O.

ITA ENG FRA ESP DEU POR 6-1622377 rev.1 04/02/2016 Pag 2 di 8
Antes de conectar el cuadro a la corriente, comprobar todos los cableados realizados. En particular comprobar que no hayan cables pelados, cortocircuitos entre hilos y que todos los accesorios sean conectados a a regleta de bornes en los puntos que indica el esquema de la página 1. Una vez conectada la alimentación verificar que: 1. El led POWER se enciende permanente/fijo. 2. Las entradas normalmente cerradas tengan el correspondiente led encendido. El led debe apagarse cuando se abre la entrada. 3. Verificar que el módulo radio haya sido enchufado correctamente y que funcione. 4. Posicionar el DIP 1 en ON 5. Comprobar la conexión de los motores siguiendo el procedimiento descripto a continuación:
4. Controles preliminares
Soltar y mantener presionada la tecla ROJA (P1). La hoja 1 debe abrirse.
Si la hoja 1 se cierra, detener todo movimiento e invertir los cables del motor 1 (bornes 18 y 19).
Liberar la tecla ROJA. Presionar y mantener presionado el AZUL (P2). La hoja 2 se abre.
SI
Si la hoja 2 se cierra, detener e invertir los cables del motor 2 (bornes 20 y 21).
Soltar la tecla AZUL. Pulsar y mantener presionada nuevamente la tecla AZUL (P2). La hoja 2 debe cerrarse. Lllevarla de nuevo en cierre y soltar la tecla.
Pulsar y mantener presionada la tecla ROJA. La hoja 1 se cierra. Cerrarla y soltar la tecla.
Verificar el cableados y y repetir la prueba.
Verificar el cableado y repetir la prueba.
Si se mueve la hoja 2, detener todo e invertir los cables del motor 1 con los del motor 2.
Si la hoja 1 no se mueve, verificar los cableados del motor 1 (bornes 18 y 19) repetir la prueba.
Si la hoja 2 no se mueve, verificar los cables del motor 2 (bornes 20 y 21) y repetir la prueba.
SI
SI
NO
NO
NO
NO
Importante: durante estos movimientos las fotocélulas, la radio y los pulsadores NO estan activos.
SI
Memorizar al menos un emisor. Para programar la carrera de las hojas se utiliza un emisor de 2 teclas. Durante el funcionamiento normal (por lo tanto, no en programación) la 1° tecla memorizado r ealiza la función de paso-paso (apertura y cierre de la puerta), la 2° tecla la función de apertura peatonal (apertura total o parcial de la 1a hoja). La tercer tecla acciona la luz de cortesía.
5. Aprendizaje emisores
Pulsar y soltar la tecla ROJA (P1). El led destella se enciende fijo.
Pulsar y soltar el 1° tecla del emisor. El intermitente hace 2 destellos.
La 1° tecla está memorizada. Pulsar y soltar la tecla ROJA. El led destella se enciende fijo.
Si el intermitente ha emitido 1 destello, la tecla pulsada ya habia sido memorizada y puede continuarse con el procedimiento, en caso contrario verificar que el emisor funcione, que tenga la misma codificación ajustada al cuadro de mando y que el módulo radio sea correctamente enchufado. A continuación repetir la prueba.
Pulsar y soltar la 2° tecla del emisor. El intermitente realiza un 1 destello
Las 2 teclas se memorizan y el procedimiento termina. Repetir el procedimiento desde el punto A si se desea memorizar la tecla para la gestión de la luz de cortesía
Verificar que los dip 1 y 2 sean en OFF. Repetir la prueba.
Verificar que el emisor funcione, que tenga el mismo código regulada al cuadro de mando y que el módulo sea correctamente enchufado. A continuación repetir la prueba.
SI
SI
SI
SI
NO
NO
NO
A
Verificar que el dip 1 y 2 sean en OFF ripetere la prova.
NO
Posición Dipswitch
Posición Dipswitch
Posición Dipswitch

ITA ENG FRA ESP DEU POR 6-1622377 rev.1 04/02/2016 Pag 3 di 8
6. Aprendizaje recorrido hoja.
Este procedimiento debe ser efectuado SOLO por el instalador y SOLAMENTE durante la puesta en funcionamiento del sistema. Si no se utiliza un emisor, es necesario utilizar la tecla Roja (P1) y Azul (P2) presentes en la tarjeta, o bien con los pulsadores P.P y PED. A este punto, se debe realizarel siguiente procedimiento. 1. Cerrar la puerta, ver punto 4 para el movimiento manual de las hojas. 2. Seleccionar si el cuadro de mando debe funcionar para una hoja (DIP 8 en ON) o dos hojas (DIP 8 en OFF) 3. Posicionar el DIP 1 en OFF. 4. Posicionar el DIP 2 en ON. El intermitente destella lentamente.
El intermitente comienza a destellar lentamente.
ATENCION: Durante el aprendizaje del recorrido se regula también el desfase de las hojas
Posición Dipswitch
Puerta con dos hojas Puerta con una hoja
1
2 Presionar y soltar la 1° tecla memorizada o la tecla ROJA (P1) .
La hoja 1 inicia a abrirse.
3 Una vez que la hoja 1 alcanza el desfase deseado, presionar y soltar la 2° tecla memorizada o presionar la tecla AZUL (P2) .
La hoja 2 inicia a abrirse.
Si la puerta es de una hoja, pasar al punto 4
Regulación del número de hojas de la puerta
4 Una vez que la puerta alcanza la posición completamente abierta se cierra automáticamente.
La puerta se cierra
5
Posición Dipswitch
El aprendizaje ha terminado. El cuadro esta lista a funcionar normalmente.
Una vez que la puerta alcanza la posición de completamente cerrado el intermitente destella emitiendo 4 destellos.
El aprendizaje se ha realizado
6
Regulación del recorrido de las hojas
7. Regulación umbral sensor amperométrico a régimen
Este procedimiento debe ser efectuado SOLO por el instalador y SOLO durante la puesta a punto del sistema. Para una correcta programación, antes de efectuar las modificaciones, llevar siempre la puerta en la posición completamente cerrada.
RUNNING AMP.SENS
Con la puerta en movimiento, controlar con el uso de un dinamómetro, el par de empuje en la punta de la hoja.
El umbral del sensor amperométrico es muy bajo
Es posible girar el trimmer RUNNING AMP.SENS. hacia la derecha para aumentar el umbral del sensor amperométrico
Es posible girar el trimmer RUNNING AMP.SENS. hacia la izquierda para disminuir el umbral del sensor amperométrico
El umbral del sensor amperométrico es muy alto
Repetir la medida del par
RUNNING AMP.SENS
Repetir la medida del par

ITA ENG FRA ESP DEU POR 6-1622377 rev.1 04/02/2016 Pag 4 di 8
8. Regulación umbral sensor amperométrico en ralentización
Este procedimiento debe ser realizada SOLO por el instalador y SOLO durante la puesta en funcionamiento del sistema. Para una correcta programación, antes de hacer modificaciones, llevar siempre la puerta en posición totalmente cerrada.
SLOW.DOWN.SENS
SLOW.DOWN.SENS
9. Regulación velocidad motores en ralentización
Este procedimiento debe ser realizado SOLO por el instalador y SOLO durante la puesta en funcionamiento del sistema. Para una correcta programación, antes de hacer modificaciones, llevar siempre la puerta en posición totalmente cerrada.
SLOW.DOWN.VELOCITY
Con la puerta en movimiento, controlar la velocidad de la puerta en fase de ralentización
Es posible girar el trimmer SLOW.DOWN.VELOCITY. hacia la derecha para aumentar la velocidad de los motores.
Es posible girar el trimmer SLOW.DOWN.VELOCITY. hacia la izquierda para disminuir la velocidad de los motores.
La velocidad es muy alta SLOW.DOWN.
VELOCITY
Con la puerta en fase de ralentización, controlar con el uso de un dinamómetro, el par de empuje en la punta de la hoja.
El umbral del sensor amperométrico es demasiado corto
Es posible girar el trimmer SLOW.DOWN.SENS hacia la derecha para aumentar el umbral del sensor amperométrico.
Es posible girar el trimmer SLOW.DOWN.SENS. Hacia la izquierda para disminuir el umbral del sensor amperométrico.
El umbral del sensor amperométrico es demasiado largo
Repetir la medida del par
Repetir la medida del par
La velocidad es muy baja
10. Regulación del tiempo de cerradura automática
Este procedimiento debe ser realizado SOLO por el instalador y SOLO durante la puesta en funcionamiento del sistema. Para una correcta programación, antes de efectuar cambios llevar siempre la hoja a la posición totalmente cerrada.
Con la puerta cerrada dar una orden de paso paso y esperar la apertura completa.
El tiempo de cerradura automática es demasiado corto.
Girar el trimmer AUTOMATIC RECLOSING hacia la derecha. De esta manera se aumenta el tiempo de cerradura automática.
El tiempo cerradura au-tomática es demasiado largo
Girar el trimmer AUTOMATIC RECLOSING hacia la izquierda. De esta manera se disminuye el tiempo de cerradura automática.
AUTOMATIC RECLOSING
AUTOMATIC RECLOSING
Girar el trimmer AUTOMATIC RECLOSING todo hacia la derecha. De esta manera se desactiva la cerradura automática.
AUTOMATIC RECLOSING
AUTOMATIC RECLOSING
Girar el trimmer AUTOMATIC RECLOSING todo hacia la izquierda para habilitar la cerradura automática de fotocélulas. Si el haz de las fotocélulas no es interrumpido, el cuadro se cierra luego de 2 min.
N.B: es indispensable, luego de regulado la velocidad en ralentización deseada, efectuar una nueva programación de los recorridos en el caso sea personalizado la fase de ralentización.

ITA ENG FRA ESP DEU POR 6-1622377 rev.1 04/02/2016 Pag 5 di 8
11. Personalización de la apertura peatonal.
Este procedimiento debe ser efectuado SOLO por el instalador y SOLO durante la puesta en funcionamiento del sistema. Para una correcta programación, antes de efectuar modificaciones, llevar siempre la puerta en la posición totalmente cerrada o bien con los pulsadores P.P y PED. Si no ha sido personalizada la apertura peatonal corresponde a la apertura total de la primera hoja. Para personalizar la apertura peatonal proceder como descripto a continuación:
El intermitente comienza a destellar lentamente.
Posición Dipswitch
1
2 Pulsar y soltar la 1° tecla memorizada o presionar la tecla ROJA (P1) .
La hoja 1 comienza a abrirse
3 Cuando la hoja ha alcanzado la posición deseada, presionar y soltar nuevamente en la 1° tecla memorizada o la tecla ROJA (P1).
La hoja se detiene y luego de algunos segundos la hoja se cierra
4 Una vez cerrada la puerta, el intermitente realiza 4 destellos.
La programación se ha realizado
5 El aprendizaje se ha completado. El cuadro esta lista para funcionar regularmente.
12. Personalización de la fase de ralentización
Este procedimiento debe ser realizado SOLO por el instalador y SOLO durante la puesta en funcionamiento del sistema. Para una correcta programación, antes de efectuar modificaciones llevar siempre la hoja a la posición totalmente cerrada. Durante la fase de aprendizaje, es posible decidir donde la puerta debe iniciar la fase de ralentización. En caso de ralentización distinto de las dos hojas, controlar que el retraso de la segunda hoja sea suficiente para garantizar el correcto funcionamiento del automatismo.
El intermitente comienza a destellar lentamente.1
2 Pulsar y soltar la 1° tecla memorizada o la tecla ROJA (P1).
La hoja 1 inicia a abrirse.
3 Una vez que la hoja 1 alcanza el desfase deseado, presionar la 2° tecla memorizada o la tecla AZUL (P2).
La hoja 2 inicia a abrirse.
Si la puerta es de una hoja, pasar al punto 4
6 La puerta se cierra.
4
El aprendizaje se ha realizado. El cuadro està listo para funcionar.
Una vez que la puerta alcanza la posición de totalmente cerrado el intermitente realiza 4 destellos.
El aprendizaje se ha realizado. 9
10
Una vez que la hoja 1 alcanza la posición de inicioralentización deseado, pulsar y soltar de nuevo la 1° tecla memorizada o la tecla ROJA (P1).
La hoja 1 pasa en ralentización en apertura.
5 Una vez que la hoja 2 alcanza la posición de inicio ralentización deseado, pulsar y soltar de nuevo la 2° tecla memorizada o la tecla AZUL (P2).
La hoja 2 pasa en ralentización en apertura.
7
Una vez que la hoja 1 alcanza la posición de inicioralentización deseado, pulsar y soltar de nuevo la 1° tecla memorizada o la tecla ROJA (P1).
La hoja 1 pasa en ralentización en el cierre.8
Una vez que la hoja 2 alcanza la posición de incio ralentización deseado, pulsar y liberar de nuevo la 2° tecla memorizada o la tecla AZUL (P2).
La hoja 2 pasa en ralentización en el cierre.
Una vez que la puerta alcanza la posición de totalmente abierto se cierra automáticamente.
NOTA: Luego de haber regulado la velocidad en ralentización deseada es indispensable, efetuar una nueva programación de los recorridos en el caso se habia personalizado en la fase de ralentización.
NOTA: Si no se definen las zonas de ralentización, el cuadro toma las regulaciones de fábrica
Posición Dipswitch
Posición Dipswitch
Posición Dipswitch

ITA ENG FRA ESP DEU POR 6-1622377 rev.1 04/02/2016 Pag 6 di 8
13.5 Golpe de ariete y electrocerradura
Si el automatismo es con cerradura eléctrica se recomienda que con la hoja cerrada, el motor actue durante un breve ciclo de tiempo antes de empezar la fase de apertura (golpe de ariete). Esta función permite desbloquear en cualquier ocasión la cerradura eléctrica incluso en condicio-nes atmosféricas precarias (por ejemplo hielo). Para activar el golpe de ariete y cerradura eléctrica regular el dip n°5 en ON.
13.6 Test fotocélulas
Este cuadro de mando tiene una función que permite efectuar un control de funcionamiento de las fotocélulas antes de cada accionamiento del motor. En esta manera es posible aumentar la seguridad del sistema en caso de daño del fotodispositivo (por ej. relè de salida encolado) o de un cortocircuito indeseado en el ingreso fotocélulas. En caso de avería, el cuadro lo señala con un encendido fijo del intermitente y sin efectuar ningún movimiento. Este control se efectua una vez que el cuadro ha recibido un mando de movimiento, pero antes de dar tensión al motor. Regular el dip n°6 en ON para activar el test fotoc élulas.
13.7 Función reloj
Posicionando el dip n°7 en ON se activa la función reloj. El ingreso peatonal se transforma en ingreso reloj donde es posible conectar un timer para la apertura programada de la puerta. El contacto es interpretado como solicitud de apertura y de permanencia en el estado abierto hasta que el contacto permanece cerrado. Cuando el contacto se abre, la puerta se cierra automáticamente.
13.8 Regulación del número de hojas
El cuadro AS24 puede funcionar con las puertas de una o dos hojas. Esta regulación se realiza posicionando el dip n°8 en OFF si se quiere el funcionamiento con dos hojas y en ON si se quiere el funcionamiento de una hoja individual. Esta regulación DEBE ser realizada antes del aprendizaje del recorrido.
13. Funciones avanzadas
Mediante el dip switch de 8 posiciones, es posible personalizar aún mas las funciones del automatismo. El cuadro de mando sale de fábrica con las principales funciones programadas, sin embargo es posible modificarlas siguiendo las instrucciones de la siguiente tabla:
N° dip Funciones Dip OFF Dip ON
1 Modalidad de funcionamiento Automático Manual
2 Aprendizaje recorrido Desactivado Habilitado
3 Predestello No activado Activado
4 Función comunitaria No activado Activado
5 Cerradura eléctrica +
Golpe de ariete No activado Activado
6 Test fotocélulas No activado Activado
7 Funcionamiento reloj No activado Activado
8 Número de hojas Funcionamiento a dos hojas Funcionamiento a una hoja
13.3 Predestello
Regulando el dip n°3 e ON se habilita el predestell o. Esta función efectua ANTES de cada movimiento un breve destello indicando el inminente movimiento. Recordar de apagar y encender de nuevo el cuadro de mando después de alguna modificación de la configuración del dip switch.
13.1 Modalidad de funcionamiento
Poniendo el dip n°1 en ON se habilita el funcionam iento manual. Tal funcionamiento permite el desplazamiento de la puerta con las teclas roja y azul presentes en la tarjeta (ver parágrafo 4).
13.2 Aprendizaje recorrido
Regulando el dip n°1 en OFF y el dip n°2 en ON se h abilita el aprendizaje del recorrido. Tal funcionamiento permite memorizar los recorridos o el desfase de las hojas (ver parágrafo 6). Regulando el dip n°1 en ON y el dip n°2 en ON se ha bilita el aprendizaje de la apertura peatonal. Tal funcionameinto permite memorizar la apertura de la primer hoja cuando es presionada la tecla de apertura peatonal (ver parágrafo 11).
13.4 Función comunitaria
Cada orden impartida por radio o con los pulsadores de paso paso y/o peatonal hace solamente la apertura de la puerta. El cierre depende de la función de cerradura automática, que por tanto tendrá que SER NECESARIAMENTE ACTIVADA ya que toda orden de cierre es ignorada. En el caso que la función comunitaria sea activa y se desactive la cerradura automática por medio del correspondiente trimmer de regulación (girar completamente hacia la derecha), el cuadro pasa al estado de alarma que es indicado por destellos veloces del intermitente. Para activar la fun-ción comunitaria, posicionar el dip n°4 en ON

ITA ENG FRA ESP DEU POR 6-1622377 rev.1 04/02/2016 Pag 7 di 8
17. Estado de alarma del cuadro del cuadro de mando.
Si el intermitente destella rapidamente o permanece encendido fijo, significa que el cuadro esta en estado de alarma. Cada mando es ignorado hasta la resolución de la anomalía.
Comunitaria activa + cerradura automática deshabilitada
Habilitar la cerradura automática girando el trimmer hacia la izquierda o bien deshabilitar la función comunitaria (dip4 en off).
Causa anomalía Solución Señalización anomalía
Destello rápido del intermitente
Luz intermitente encendida fija
Intervención de la protección térmica de la central de mando. Absorción de corriente demasiado elevado. El valor no debe superar 7A por más de 3 seg.
Cada mando es ignorado por 20 seg. Controlar el estado de los motores y su absorción.
En el momento que sea necesario cambiar el tipo de decodificación (de código variable a código fijo o viceversa) o anulados todos los emisores memorizados, proceder como se indica a continuación: 1. Quitar alimentación al sistema. 2. Presionar la tecla azul si se quiere seleccionar la decodificación de código fijo o presionar la tecla roja si se quiere seleccionar la
decodificación de código variable. 3. Mantener presionado mientras se vuelve a dar tensión al sistema. 4. Mantener presionadas las teclas hasta que el intermitente no se encienda 3 veces. 5. A este punto soltar la tecla y esperar que el intermitente se apague. La selección de la decodificación y la cancelación total de la memoria han
sido realizadas.
16. Selección del tipo de decodificación y anulación total de la memoria.
14. Modalidad de intervención de las fotocélulas
La modalidad de intervención de las fotocélulas es distinta:
• Las fotocélulas internas blocan el movimiento hasta que se elimine el obstáculo, por lo tanto realizan la apertura completa de la puerta.
• Las fotocélulas externas no funcionan en apertura, mientras invierte immediatamente el movimiento hasta la apertura completa en el caso de obstáculo en cierre.
15. Funcionamento del cuadro de mando
La modalidad de intervención del sensor de corriente es única. En caso de intervención del sensor en apertura la puerta realiza una breve inver-sión. En el caso de intervención en cierre se obtiene la inmediata inversión con reapertura total de la puerta. En el momento que sea seleccionada la función comunitaria al verificarse un sense en cierre comporta una breve inversión en apertura con suce-sivo paro del movimiento hasta la recepción de un mando usuario.
A = Zona de intervención del sensor amperométrico con inversión del movimiento
B = Zona de marcha con velocidad normal
C = Zona de intervención del sensor amperométrico con paro del movimiento y poniendo en la posición alcanzada como posición de cierre / apertura total.
D = Zona de marcha con velocidad reducida
E = Topes de detención en cierre y apertura (indispensables)
A
B
C
D
C
D
E
E
ATENCION: Cortando el puentecillo “J1” es cancelada la zona de inversión del movimiento (zona “A”) y sustituida con la memorización de la posición alcanzada como posición de cierre / apertura total (zona “C”)
15.1. Apertura forzada de la hoja
En el caso de sobreposición de las hojas y consiguiente bloqueo del automatismo, es necesario forzar la apertura (resincronización). Para hacer esta operación, proceder como se indica a continuación: 1. Presionar la primer tecla del mando por un tiempo superior de 8 segundos. 2. El cuadro de mando indica la resincronización con un predestello. NO soltar la tecla3. Las dos hojas comienzan a abrir contemporáneamente. NO soltar la tecla4. Cuando las hojas han alcanzado una apertura suficiente y no entran en colisión, soltar la tecla. Las hojas se paran. 5. Presionar nuovamente la tecla del mando. La hoja 1 inicia a cerrarse, una vez cerrada la hoja 2 comienza a su vez a cerrarse. 6. Una vez cerrada la puerta, la operación de resincronización esta completada y la puerta esta pronta para funcionar normalmente.
NOTA: Durante la fase de resincronización, es posible únicamente cerrar una hoja a la vez. El funcionamiento es regular una vez que las 2 hojas se cierran correctamente.
ATENCION: Durante la operación de resincronización. La intervención de la seguridad antiaplastamiento es interpretada como identifica-ción de la posición cerrada. Para evitar la intervención involuntario la sensibilidad de la misma resulta notablemente reducida respecto a la condición de funcionamiento normal.

ITA ENG FRA ESP DEU POR 6-1622377 rev.1 04/02/2016 Pag 8 di 8
20. Solución de problemas
Este apartado pretende ofrecer algunas indicaciones para los problemas más frecuentes que suelen presentarse. Antes de proceder, comprobar que los led presentes en la tarjeta están correctamente encendidos o apagados, de acuerdo con la siguiente tabla:
Si algún led no resulta en el estado correcto controlar el correspondiente ingreso. Eventualmente, excluir los accesorios externos puenteando las relativas entradas (fotocélulas, final de carrera, stop) con el común (en el caso de contactos normalmente cerrados).
Paso paso Peatonal / reloj stop Fotocélula externa Fotocélula interna Final de carrera Hoja 1 Final de carrera Hoja 2
apagado apagado encendido encendido encendido encendido encendido
ESTADO LED
Tipo de problema Posible causa Solución
Al activar el mando de apertura las hojas no se mueven
Falta de alimentación eléctrica Comprobar la presencia de la tensión eléctrica y todas las conexiones a la red eléctrica.
Fusible quemado Sustituir el fusible con uno de iguales características
Al activar el mando de apertura las hojas se mueven en cierre
Cables motores invertidos Verificar el cableado de los motores, si es necesario invertir los cables
No se logra entrar en programación emisores
• Los dip no son regulados
correctamente
• El tipo de decodificación regulado en el cuadro no corresponde al tipo de emisor en uso
No se logra entrar en programación recorrido La puerta no está cerrada Llevar (en manual) la puerta a posición de cierre. Probar de nuevo entrar en el aprendizaje.
El cuadro es alimentado pero la puerta no se mueve.
Una entrada normalmente cerrada no es activado
Verificar la entrada de las fotocélulas, la entradastop y los finales de carrera. Si no se utilizan, ponerlos en cortocircuito con el común.
• Posicionar los DIP 1 y 2 en OFF
• Verificar cual codificación ha sido regulada y
eventualmente seleccionar la que corresponde a los emisores en uso.
En fase de aprendizaje, una hoja se detiene antes de llegar a la apertura completa
Umbral del trimmer RUNNING AMP.SENS demasiado baja.
Aumentar el valor de intervención del sensor amperométrico
En fase de aprendizaje, las hojas llegan en apertura completa pero la puerta no se cierra
Umbral del trimmer RUNNING AMP.SENS demasiado alta.
Disminuir el valor de intervención del sensor amperométrico
GARANTIA - La garantía del fabricante tiene validez en términos legales a partir de la fecha impresa y se limita a la reparación o sustitución gratuita de las piezas reconocidas como defectuosas por falta de cuidados esenciales en los materiales o por defectos de fabricación. La garantía no cubre daños o defectos debidos a agentes externos, defectos de mantenimiento, sobrecarga, desgaste natural, elección inexacta, error de montaje u otras causas no imputables al fabricante. Los productos manipulados no seran objeto de garantiá y no seran reparados. Los datos expuestos son meramente indicativos. No podrá imputarse ninguna responsabilidad por reducciones de alcance o disfunciones debidas a interferencias ambientales. La responsabilidad a cargo del fabricante por daños derivados a personas por accidentes de cualquier tipo ocasionados por nuestros productos defectuosos, son solo aquellos derivados inderogablemente de la ley italiana.
El cuadro AS24 tiene un conector (ver esquema pág.1) donde es posible enchufar una tarjeta adicional R2 para tener las salidas para la conexión de la cerradura eléctrica y de la luz de cortesía. El tiempo de encendido de la luz de cortesía es de 1 min y 30 segundos. El encendido se realiza con cada operación del usuario.
CONECTOR QUE TIENE QUE SER ENCHUFADO EN EL CUADRO
BORNES 1 Y 2: Contacto salida luz de cortesía. Temporizado 90 seg. BORNES 3 Y 4: Contacto salida cerradura eléctri-ca. Temporizado 5 seg.
AGUJERO PARA CONECTAR EL DISTANCIAL ENTRE LA TARJETA Y EL CUADRO
CONTACTOS LIMPIOS SIN CORRIENTE Carga máx 220 V - 5 A
1 2 3 4
ELS LC
Vac/dc Vac/dc
18. Tarjeta adicional (no en dotación)
En el caso que se utilice un receptor radio de tarjeta es posible equipar el cuadro de mando con un borne de salida para un segundo canal radio (con contacto N.A.). Si en cambio, se desea utilizar el módulo híbrido presente en la tarjeta, el segundo canal radio no es disponible.
19. Segundo canal radio

ITA ENG FRA ESP DEU POR 6-1622377 rev.1 04/02/2016 Pag 1 di 8
Die Steuerung AS24 ist für den Betrieb von 1 oder 2 Fluegeltöre mit 24V Gleichstrommotoren und eine max Aufnahme von 7A geeignet. Die Schalttafel erlaubt eine präzise Regulierung der Fluegelskraftschub, der Geschwindlichkeit und der Empfindlichkeit in der Abnahmenphase. Es ist möglich die Verspätung des zweiten Tores whärend der Erlernungsphase zu regulieren. Die Steuerung kann bis zu 30 Sender und 8000 Sender mit Aussengedächniss durch Schritt für Schritt Funktion speichern. Sie hat Eingänge fuer Äussere– und Innerephotozell, Öffnungssendlauf und die Möglichkeit den zweiten Hilfsfunkkanal zu verbinden (beim Benützung einer Molex Empfangsgerät) und eine Erweiterungsplatine mit mehr Funkionen. Die Benützung von Stockbatterien ist vorausgesehen, um Betrieb im Strommangel zu sichern.
1. Einleitung
STEUERUNGSPLATINE AS24 für die U-Bahn-Motoren Steuerungsplatine für 1-2 Motoren 24Vcc
2. Konfiguration
Fig.1
Funkenmdul Verbinder
24 Vac
Druckknöpfe
Led Signalisierung
Verbinder fuer PlatineR2 (nicht im Ausstattung
Diese Punkte benützen um Motorgehaeusenzum Platinen und Erdung zu verbinden.
Molex Funkmodul
Jeglicher normalerweise geschlos-seer Kontakt (N.C.) muss, falls unbentzt überbrückt werden
7 8 9 10 11 12 5 6
3. Elektrische Verbindungen
MOTORAUSWHAL
Falls Gittertor Fluegel hat, verbinden Sie an Motorausgang 1 die Fluegel, die am Schlagen ist und die mit einem eventuellen elektrischen Schloss verbunden ist. MOTOR 1 wird immer am ersten beim Öffnung und am zweiten beim Schliessung im Betrieb gesetzt.
ERDUNG Um ein korrekter Betrib von Zubehoer (besondersweise Photovorrichtungen), die an der Platine verbunden sind, ist es sehr wichtig, daß das komplete System (Automation + Motoren + Platine) ein eiziges Massehinweis hat. Man soll die metallische Struktur der Automation, Motorgeähause und Platine mit Herdklammer verbinden. Für die Verbindung auf Platine bezihen Sie sich an Bild 1.
Regelung-strimmer
Dip switch
Running AMP.SENS
Automatic RECLOSING
Slowdown VELOCITY
Slowdown AMP.SENS
FUNCTION SELECT
Sense (beziehen Sie sich an
Abschnitt 15) Betriebsmodalität
J1
Rosso Blu
Schmelzsi-cherung 10A fuer Motor 1
Schmelzsi-cherung 10A fuer Motor 2
Schmelzsiche-rung 2.5A fuer Blinker
VORSICHT: Vor Beginn irgendeine Aktivierung and/oder Setzung in Betrieb, lesen Sie vollständig folgendes Seiten, die Programmierungen und Hauptanlagen von Automation beschreiben. Beim Programmierung, folgen Sie aufmerksam Ordnung und geschriebenen Beschreibungen. Während Bewegung oder Programmierung treten Sie nicht im Arbeitskreis von Automation! Bevor irgendeine Änderung, warten Sie auf die komplete Stopp von System. Fremden und oder nicht Fachpersonell können keinen Eingriff machen und/oder im Systemarbeitskreis bleiben.
Fuer eine korrekte Arbeitsweise der Automation, ist unbedingt nötig die Benützung von mekanischen Halter beim Öffnung und Schliessung.
Fig 2
LEGENDE: PP : Taste Schritt für Schritt. PED : Taste Fuessgäenger oder Uhreintritt Stop: Stop. Com : Gemeinsam. Foto INT: Innere Fotozell. Foto EST: Äussere Fotozell. F.C.1: Endlauf Türöffnung 1. F.C.2: Endlauf Türöffnung 2. ANT.: Antenne Eingang GND ANT.: Strumpfantenne
4W MAX (170mA)
VDC (4W) Zubehör Maximallast-Beispiele:
• 3 Paar FTALL Lichtschranken.
• 2 Paar FTALL Lichtschranken und ein R.CO.O Empfänger (Funk-Sicherheitsleistensystem).
• 2 Paar FTALL Lichtschranken und ein B.RO X40 DISPLAY Empfänger.
• 1 Paar FTALL Lichtschranken, ein B.RO X40 DISPLAY Empfänger und ein R.CO.O Empfänger.
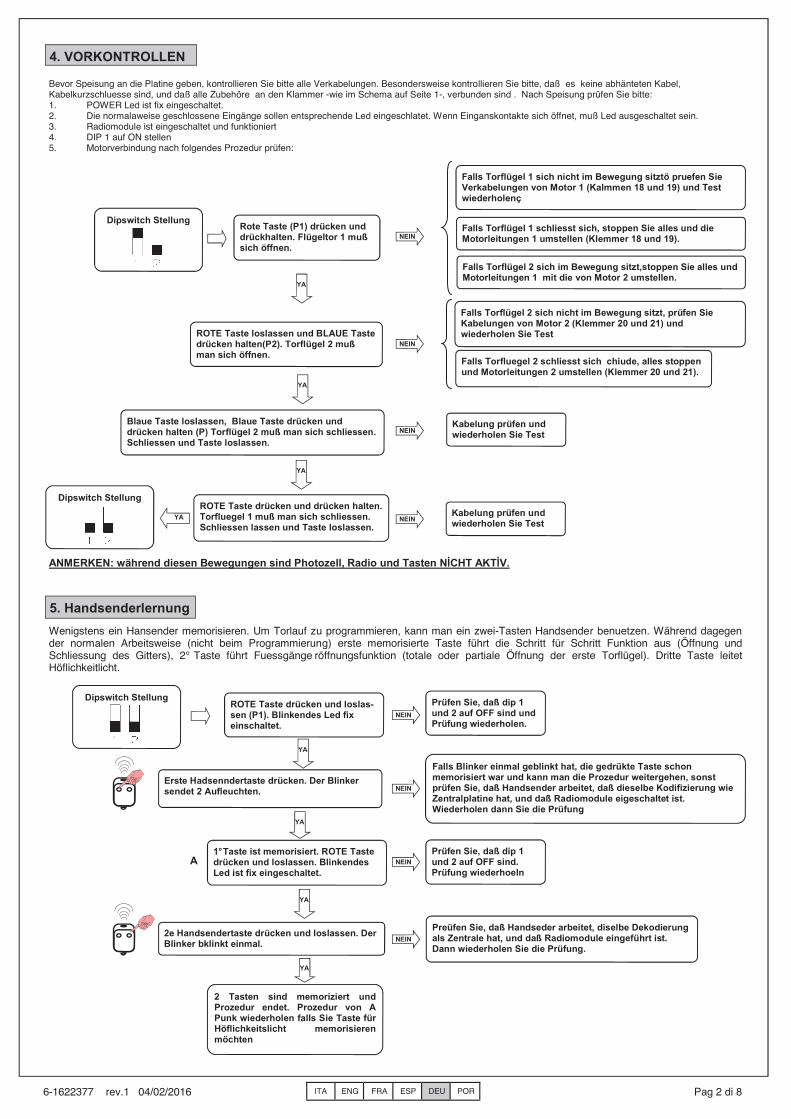
ITA ENG FRA ESP DEU POR 6-1622377 rev.1 04/02/2016 Pag 2 di 8
Bevor Speisung an die Platine geben, kontrollieren Sie bitte alle Verkabelungen. Besondersweise kontrollieren Sie bitte, daß es keine abhänteten Kabel, Kabelkurzschluesse sind, und daß alle Zubehöre an den Klammer -wie im Schema auf Seite 1-, verbunden sind . Nach Speisung prüfen Sie bitte: 1. POWER Led ist fix eingeschaltet. 2. Die normalaweise geschlossene Eingänge sollen entsprechende Led eingeschlatet. Wenn Einganskontakte sich öffnet, muß Led ausgeschaltet sein. 3. Radiomodule ist eingeschaltet und funktioniert 4. DIP 1 auf ON stellen 5. Motorverbindung nach folgendes Prozedur prüfen:
4. VORKONTROLLEN
Rote Taste (P1) drücken und drückhalten. Flügeltor 1 muß sich öffnen.
Dipswitch Stellung Falls Torflügel 1 schliesst sich, stoppen Sie alles und die Motorleitungen 1 umstellen (Klemmer 18 und 19).
ROTE Taste loslassen und BLAUE Taste drücken halten(P2). Torflügel 2 muß man sich öffnen.
YA
Falls Torfluegel 2 schliesst sich chiude, alles stoppen und Motorleitungen 2 umstellen (Klemmer 20 und 21).
Blaue Taste loslassen, Blaue Taste drücken und drücken halten (P) Torflügel 2 muß man sich schliessen. Schliessen und Taste loslassen.
ROTE Taste drücken und drücken halten. Torfluegel 1 muß man sich schliessen. Schliessen lassen und Taste loslassen.
Kabelung prüfen und wiederholen Sie Test
Kabelung prüfen und wiederholen Sie Test
Falls Torflügel 2 sich im Bewegung sitzt,stoppen Sie alles und Motorleitungen 1 mit die von Motor 2 umstellen.
Falls Torflügel 1 sich nicht im Bewegung sitztö pruefen Sie Verkabelungen von Motor 1 (Kalmmen 18 und 19) und Test wiederholenç
Falls Torflügel 2 sich nicht im Bewegung sitzt, prüfen Sie Kabelungen von Motor 2 (Klemmer 20 und 21) und wiederholen Sie Test
YA
YA
ANMERKEN: während diesen Bewegungen sind Photozell, Radio und Tasten NİCHT AKTİV.
YA
Wenigstens ein Hansender memorisieren. Um Torlauf zu programmieren, kann man ein zwei-Tasten Handsender benuetzen. Während dagegen der normalen Arbeitsweise (nicht beim Programmierung) erste memorisierte Taste führt die Schritt für Schritt Funktion aus (Öffnung und Schliessung des Gitters), 2° Taste führt Fuessgänge röffnungsfunktion (totale oder partiale Öffnung der erste Torflügel). Dritte Taste leitet Höflichkeitlicht.
5. Handsenderlernung
ROTE Taste drücken und loslas-sen (P1). Blinkendes Led fix einschaltet.
Erste Hadsenndertaste drücken. Der Blinker sendet 2 Aufleuchten.
1° Taste ist memorisiert. ROTE Taste drücken und loslassen. Blinkendes Led ist fix eingeschaltet.
Falls Blinker einmal geblinkt hat, die gedrükte Taste schon memorisiert war und kann man die Prozedur weitergehen, sonst prüfen Sie, daß Handsender arbeitet, daß dieselbe Kodifizierung wie Zentralplatine hat, und daß Radiomodule eigeschaltet ist. Wiederholen dann Sie die Prüfung
2e Handsendertaste drücken und loslassen. Der Blinker bklinkt einmal.
2 Tasten sind memoriziert und Prozedur endet. Prozedur von A Punk wiederholen falls Sie Taste für Höflichkeitslicht memorisieren möchten
Prüfen Sie, daß dip 1 und 2 auf OFF sind. Prüfung wiederhoeln
Preüfen Sie, daß Handseder arbeitet, diselbe Dekodierung als Zentrale hat, und daß Radiomodule eingeführt ist. Dann wiederholen Sie die Prüfung.
YA
YA
YA
YA
NEIN
A
Dipswitch Stellung Prüfen Sie, daß dip 1 und 2 auf OFF sind und Prüfung wiederholen.
Dipswitch Stellung
NEIN
NEIN
NEIN
NEIN
NEIN
NEIN
NEIN

ITA ENG FRA ESP DEU POR 6-1622377 rev.1 04/02/2016 Pag 3 di 8
6. Torlauflernung
Diese Prozedur muss NUR beim Installateur durchegeführt werden und NUR beim System Setzung im Betrieb. Falls kein Handsender benützt worden ist, ist es nötig ROTE- (P1) und BLAUE Taste (P2) auf der Platine oder mit P.P und PED Tasten benützen. Man muss dann folgendes Prozedur ausführen. 1. Gittertor schliessen, sehen Sie Punkt 4 um Flügeltore mit der Hand im Bewegung zu setzen 2. Wählen Sie, ob Steureung mit einem (DIP 8 auf ON) oder zwei Flügel (DIP 8 auf OFF) arbeiten soll 3. Stellen Sie DIP 1 auf OFF
Der Blinker startet langsam blinken.
VORSİCHT: Während Lauflernung wird auch Flügelphasenverschiebung angesetzt.
Dipswitch Stellung
Zweiflügel Tor Einflügel Tor
1
2 Erste memorisierte oder Rote Taste drücken und loslassen (P1) .
Torfluegel 1 start Öffnung.
3
Wann Torflügel 1 die gewünschte Phasenverschiebung erreicht hat, 2 memorisierte Taste drücken und loslasse oder BLAUE Taste drücken. (P2) .
Torflügel 2 start Öffnung
Falls Gitter ein Flügel hat, gehen Sie zum Punkt 4
Gitterflügelsanlage
4 Wann Gitter erreicht die Position komplett geöffnet, es schliesst sich automatisch. Gittertor schliesst sich
5
Dipswitch Stellung
Lernung ist am Ende. Die Steuerung ist fertig regelmässig zu arbeiten
Wenn Gitter erreicht die Position komplett geschlossen, blinkt Blinker 4 Mals. Lernung ist gut geendet
6
Torlaufanlage.
7. Regulierung von Strommessersensorschwelle in Betrieb
Diese Prozedur muß NUR beim Installateur durchgeführt werden und NUR beim System Setzung im Betrieb. Für eine korrekte Prgrammierung, bevor Änderungen durchzuführen, tragen Sie Gitter immer in Position total geschlossen.
RUNNING AMP.SENS
Beim Gitter im Bewegung, prüfen Sie, beim Benuetzung von Dynamometer, Drehmomentdruck im Flügelspitze.
Die Schwelle von Strommer-sensor ist zu niedrig
Es ist möglich trimmer RUNNING AMP.SENS. Im Uhrzeigersinn umzulaufen um Strommessersensor Schwelle erhöhen
Es ist möglich trimmer RUNNING AMP.SENS. Entgegen dem uhrzeigersinn umzulaufen um Strommessersensor zu verminden
Die Schwelle von Strommer-sensor ist zu hoch
Wiederholen Sie Drehmomentmass
RUNNING AMP.SENS
Wiederholen Sie Drehmomentmass

ITA ENG FRA ESP DEU POR 6-1622377 rev.1 04/02/2016 Pag 4 di 8
8. Regulierung von Strommessersensorschwelle im Verlangsamung
Diese Prozedur muss NUR beim Installateur durchgeführt und NUR während System Setzung im Betrieb. Um eine korrekte Programmierung, bevor Änderungen durchzuführen, tragen Sie Gitter immer in Position total geschlossen.
SLOW.DOWN.SENS
SLOW.DOWN.SENS
9. Regulierung von Motorgeschwindlichkeit in Verlangsamungsphase
Diese Prozedur muss NUR beim Installateur durchgefuehrt und NUR während System Setzung im Betrieb. Um eine korrekte Programmierung, bevor Änderungen durchzuführen, tragen Sie Gitter immer in Position total geschlossen.
SLOW.DOWN.VELOCITY
Mit Gittertor im Betrieb, prüfen Sie, Gittergeschwindlichkeit in Verlangsamungsphase
Es ist möglich Trimmer SLOW. DOWN. VELOCI-TY im Uhrzeigersinn umlaufen, um Motorgesch-windlickeit zu erhöhen
Es ist möglich Trimmer SLOW. DOWN. VELOCITY entgegen Uhrzeigersinn umlaufen, um Motorgeschwindlickeit zu niedrigen
Geschwindlickeit ist zu hochSLOW.DOWN.
VELOCITY
Mit Gittertor im Verlangsamunsphase, prüfen Sie—mit Benützung von Dynamometer, Drehemomentdruck imFlügelspitze.
Schwelle von Stommessersensor ist zu niedrig
Es ist möglich Trimmer SLOW.DOWN.SENS im Uhrzeigersinn umlaufen, um die Schwelle von Strommessersensor zu erhöhen
Es ist möglich Trimmer SLOW.DOWN.SENS entgegegn Uhrzeigersinn umlaufen, um die Schwelle von Strommessersensor zu vermindern .
Schwelle von Stommessersensor ist zu hoch
Wiederholen Sie Drehmomentmass
Wiederholen Sie Drehmomentmass
Geschwindlickeit ist zu niedrig
10. Regulierung von automatischer Wiederschliessungzeit
Diese Prozedur muss NUR beim Installateur durchgeführt und NUR während System Setzung im Betrieb. Um eine korrekte Programmierung, bevor Änderungen durchzufuehren, tragen Sie Gitter immer in Position total geschlossen.
Mit geschlossenem Gitter geben Sie Befehl von Schritt fuer Schritt und komplete Öffnung wartenmpleta.
Automatische Schliesszeit ist zu kurz
Trimmer AUTOMATIC RECLOSING im Uhrzeigersinn umlaufen. İn dieser Weise wird die automatische Schliesszeit verlängt worden
Automatische Schliesszeit ist zu lang
Trimmer AUTOMATIC RECLOSING entgegen Uhrzeigersinn umlaufen. In dieser Weise wird die automatische Schliesszeit verkurzt worden.
AUTOMATIC RECLOSING
AUTOMATIC RECLOSING
Trimmer AUTOMATIC RECLOSING alles im Uhrzeigersinn umlaufen. In dieser Weise wird die automatische Wiederschliessung de-aktiviert
AUTOMATIC RECLOSING
AUTOMATIC RECLOSING
Trimmer AUTOMATIC RECLOSING alles entgegen im Uhrzeigersinn umlaufen um automatische Schliessung aus Fotozell zu aktivieren. Wenn Fotozellband nicht unterbrochen ist, schliesst sich die Zentrale nach dopo 2 min.
N.B: es ist unerlässig, nach Aktivierung der gewünschte Verlangsamunggeschwindlichkeit, eine neue Laufprogrammierung durchzufuehren, falls die Verlangsamungsphase personalisiert worden ist.

ITA ENG FRA ESP DEU POR 6-1622377 rev.1 04/02/2016 Pag 5 di 8
11. Personalisierung der Fußgängeröffnung
Diese Prozedur muss NUR beim Installateur durchgeführt und NUR während System Setzung im Betrieb. Um eine korrekte Programmierung, bevor Änderungen durchzuführen, tragen Sie Gitter immer in Position total geschlossen oder mit Tasten P.P und PED. Wenn nicht personalisiert, Fußgängeröffnung entspricht dem total Öffnung des ersten Flügels. Um Fußgängeröffnung zu personalisieren folgen Sie folgenden Punkte:
Der Blinker startet langsam blinken
Dipswitch Position
1
2 1 memorisierete Taste drücken und loslassen oder ROTE Taste druecken (P1) .
Flügel 1 startet Öffnung.
3 Wenn Flügel die gewünschte Position erhalten hat, drücken und loslassen auf erste memorisierte oder ROTE Taste
Flügel stoppt und nach einigen Sekunden Flügel schliesst sich automatisch
4 Wenn Gitter geschlossen, der Blinker blinkt 4 mals.
Programmierung ist zum guten Ende geführt worden
5
Dipswitch Position Lernung ist fertig. Die Steuerung ist fertig regermaessig zu funktionieren.
12. Personalisierung der Varlangsamungphase
Diese Prozedur muss NUR beim Installateur durchgeführt und NUR während System Setzung im Betrieb. Um eine korrekte Programmierung, bevor Änderungen durchzufuehren, tragen Sie Gitter immer in Position total geschlossen. Während Lernungsphase, ist es möglich zu bestimmen, wo Gittertor Verlangsamungsphase starten soll. Falls werschiedene Verlangsamung zwischen die zwei Flügel, versichern Sie , daß die Verspätung von zweitem Flügel genug ist, um korrekte Arbeit der Steuerung versichern kann.
Der Blinker startet langsam blinken.
Dipswitch Position
1
2 Erste memorisierete oder ROTE Taste drücken und loslassen (P1)
Flügel 1 startet Öffnung.
3 Wann Fluegeltor 1 erreicht die gewünschte Phasenverschiebung, drücken Sie die 2° memorisierte oder BLAUE Taste (P2) .
Fluegel 1 startet Öffnung.
Wenn Gittertor ein Flügel hat, gehen Sie Punkt 4
6 Gittertor schliesst sich
4
Dipswitch Position Lernung ist fertig. Die Steuerung ist fertig regelmässig zu arbeiten.
Wann Gittertor erreicht die Position von komplett geschlossen, der Blinker blinket 4-mals.
Lernung ist gut geendet.9
10
Wann Fluegel 1 erreicht di Position von gewünschte Anfangsverlangsamung, erste memorisierte oder ROTE Taste dürcken und nochmals losslassen (P1) .
Flügel 1 gehet in Öffnungsverlangsamung
5 Wann Flügel 2 erreicht di Position von gewünschte Anfangsverlangsamung, zweite memorisierte oder BLAUE Taste dürcken und nochmals losslassen (P2) .
Flügel 2 gehet in Öffnungsverlangsamung
7
Wann Fluegel 1 erreicht di Position von gewünschte Anfangsverlangsamung, erste memorisierte oder ROTE Taste dürcken und nochmals losslassen (P1) . .
Fluegel 1 geht in Schliessungsverangsamung8
Wann Fluegel 2 erreicht di Position von gewünschte Anfangsverlangsamung, zweite memorisierte oder BLAUE Taste dürcken und nochmals losslassen (P2) .
Fluegel 2 geht in Schliessungsverangsamung
Wann Gittertor erreicht die vollständige gehöffnete Position, er schliesst sich automatisch.
N.B: es ist unerlässig, nach Aktivierung der gewünschte Verlangsamunggeschwindlichkeit, eine neue Laufprogrammierung durchzuführen, falls die Verlangsamungsphase personalisiert worden ist
N.B: Wenn keine Verlansamungszonen festsetzten worden sind, memorisiert die Steuerung die Werkaufgaben
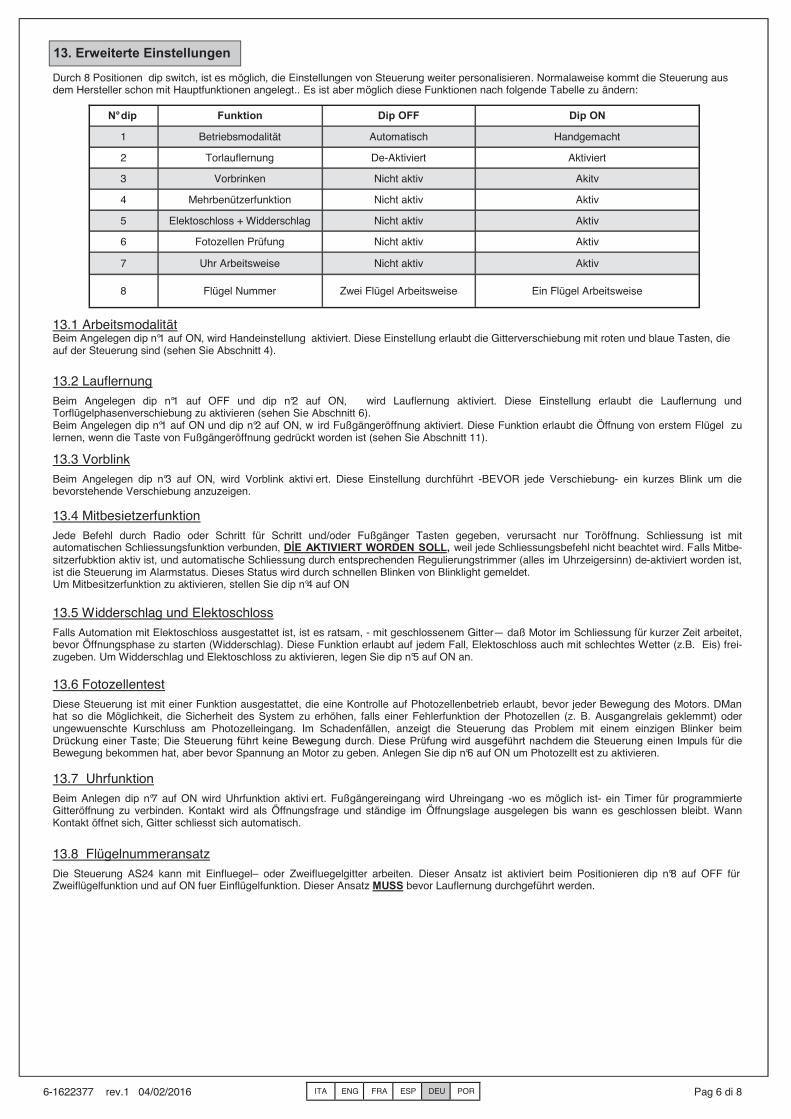
ITA ENG FRA ESP DEU POR 6-1622377 rev.1 04/02/2016 Pag 6 di 8
13.5 Widderschlag und Elektoschloss
Falls Automation mit Elektoschloss ausgestattet ist, ist es ratsam, - mit geschlossenem Gitter— daß Motor im Schliessung für kurzer Zeit arbeitet, bevor Öffnungsphase zu starten (Widderschlag). Diese Funktion erlaubt auf jedem Fall, Elektoschloss auch mit schlechtes Wetter (z.B. Eis) frei-zugeben. Um Widderschlag und Elektoschloss zu aktivieren, legen Sie dip n°5 auf ON an.
13.6 Fotozellentest
Diese Steuerung ist mit einer Funktion ausgestattet, die eine Kontrolle auf Photozellenbetrieb erlaubt, bevor jeder Bewegung des Motors. DMan hat so die Möglichkeit, die Sicherheit des System zu erhöhen, falls einer Fehlerfunktion der Photozellen (z. B. Ausgangrelais geklemmt) oder ungewuenschte Kurschluss am Photozelleingang. Im Schadenfällen, anzeigt die Steuerung das Problem mit einem einzigen Blinker beim Drückung einer Taste; Die Steuerung führt keine Bewegung durch. Diese Prüfung wird ausgeführt nachdem die Steuerung einen Impuls für die Bewegung bekommen hat, aber bevor Spannung an Motor zu geben. Anlegen Sie dip n°6 auf ON um Photozellt est zu aktivieren.
13.7 Uhrfunktion
Beim Anlegen dip n°7 auf ON wird Uhrfunktion aktivi ert. Fußgängereingang wird Uhreingang -wo es möglich ist- ein Timer für programmierte Gitteröffnung zu verbinden. Kontakt wird als Öffnungsfrage und ständige im Öffnungslage ausgelegen bis wann es geschlossen bleibt. Wann Kontakt öffnet sich, Gitter schliesst sich automatisch.
13.8 Flügelnummeransatz
Die Steuerung AS24 kann mit Einfluegel– oder Zweifluegelgitter arbeiten. Dieser Ansatz ist aktiviert beim Positionieren dip n°8 auf OFF für Zweiflügelfunktion und auf ON fuer Einflügelfunktion. Dieser Ansatz MUSS bevor Lauflernung durchgeführt werden.
13. Erweiterte Einstellungen
Durch 8 Positionen dip switch, ist es möglich, die Einstellungen von Steuerung weiter personalisieren. Normalaweise kommt die Steuerung aus dem Hersteller schon mit Hauptfunktionen angelegt.. Es ist aber möglich diese Funktionen nach folgende Tabelle zu ändern:
N° dip Funktion Dip OFF Dip ON
1 Betriebsmodalität Automatisch Handgemacht
2 Torlauflernung De-Aktiviert Aktiviert
3 Vorbrinken Nicht aktiv Akitv
4 Mehrbenützerfunktion Nicht aktiv Aktiv
5 Elektoschloss + Widderschlag Nicht aktiv Aktiv
6 Fotozellen Prüfung Nicht aktiv Aktiv
7 Uhr Arbeitsweise Nicht aktiv Aktiv
8 Flügel Nummer Zwei Flügel Arbeitsweise Ein Flügel Arbeitsweise
13.3 Vorblink
Beim Angelegen dip n°3 auf ON, wird Vorblink aktivi ert. Diese Einstellung durchführt -BEVOR jede Verschiebung- ein kurzes Blink um die bevorstehende Verschiebung anzuzeigen.
13.1 ArbeitsmodalitätBeim Angelegen dip n°1 auf ON, wird Handeinstellung aktiviert. Diese Einstellung erlaubt die Gitterverschiebung mit roten und blaue Tasten, die auf der Steuerung sind (sehen Sie Abschnitt 4).
13.2 Lauflernung
Beim Angelegen dip n°1 auf OFF und dip n°2 auf ON, wird Lauflernung aktiviert. Diese Einstellung erlaubt die Lauflernung und Torflügelphasenverschiebung zu aktivieren (sehen Sie Abschnitt 6). Beim Angelegen dip n°1 auf ON und dip n°2 auf ON, w ird Fußgängeröffnung aktiviert. Diese Funktion erlaubt die Öffnung von erstem Flügel zu lernen, wenn die Taste von Fußgängeröffnung gedrückt worden ist (sehen Sie Abschnitt 11).
13.4 Mitbesietzerfunktion
Jede Befehl durch Radio oder Schritt für Schritt und/oder Fußgänger Tasten gegeben, verursacht nur Toröffnung. Schliessung ist mit automatischen Schliessungsfunktion verbunden, DİE AKTIVIERT WORDEN SOLL, weil jede Schliessungsbefehl nicht beachtet wird. Falls Mitbe-sitzerfubktion aktiv ist, und automatische Schliessung durch entsprechenden Regulierungstrimmer (alles im Uhrzeigersinn) de-aktiviert worden ist, ist die Steuerung im Alarmstatus. Dieses Status wird durch schnellen Blinken von Blinklight gemeldet. Um Mitbesitzerfunktion zu aktivieren, stellen Sie dip n°4 auf ON
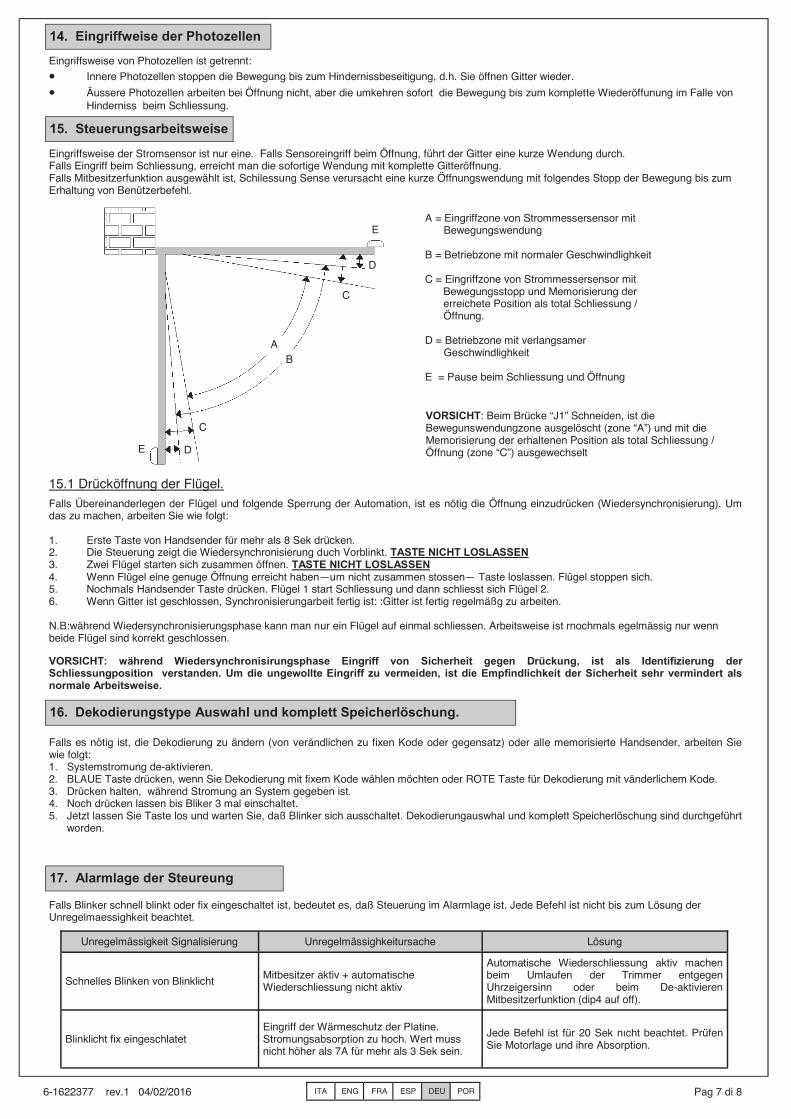
ITA ENG FRA ESP DEU POR 6-1622377 rev.1 04/02/2016 Pag 7 di 8
17. Alarmlage der Steureung
Falls Blinker schnell blinkt oder fix eingeschaltet ist, bedeutet es, daß Steuerung im Alarmlage ist. Jede Befehl ist nicht bis zum Lösung der Unregelmaessighkeit beachtet.
Mitbesitzer aktiv + automatische Wiederschliessung nicht aktiv
Automatische Wiederschliessung aktiv machen beim Umlaufen der Trimmer entgegen Uhrzeigersinn oder beim De-aktivieren Mitbesitzerfunktion (dip4 auf off).
Unregelmässighkeitursache Lösung Unregelmässigkeit Signalisierung
Schnelles Blinken von Blinklicht
Blinklicht fix eingeschlatet Eingriff der Wärmeschutz der Platine. Stromungsabsorption zu hoch. Wert muss nicht höher als 7A für mehr als 3 Sek sein.
Jede Befehl ist für 20 Sek nıcht beachtet. Prüfen Sie Motorlage und ihre Absorption.
Falls es nötig ist, die Dekodierung zu ändern (von verändlichen zu fixen Kode oder gegensatz) oder alle memorisierte Handsender, arbeiten Sie wie folgt: 1. Systemstromung de-aktivieren. 2. BLAUE Taste drücken, wenn Sie Dekodierung mit fixem Kode wählen möchten oder ROTE Taste für Dekodierung mit vänderlichem Kode. 3. Drücken halten, während Stromung an System gegeben ist. 4. Noch drücken lassen bis Bliker 3 mal einschaltet. 5. Jetzt lassen Sie Taste los und warten Sie, daß Blinker sich ausschaltet. Dekodierungauswhal und komplett Speicherlöschung sind durchgeführt
worden.
16. Dekodierungstype Auswahl und komplett Speicherlöschung.
14. Eingriffweise der Photozellen
Eingriffsweise von Photozellen ist getrennt:
• Innere Photozellen stoppen die Bewegung bis zum Hindernissbeseitigung, d.h. Sie öffnen Gitter wieder.
• Äussere Photozellen arbeiten bei Öffnung nicht, aber die umkehren sofort die Bewegung bis zum komplette Wiederöffunung im Falle von Hinderniss beim Schliessung.
15. Steuerungsarbeitsweise
Eingriffsweise der Stromsensor ist nur eine. Falls Sensoreingriff beim Öffnung, führt der Gitter eine kurze Wendung durch. Falls Eingriff beim Schliessung, erreicht man die sofortige Wendung mit komplette Gitteröffnung. Falls Mitbesitzerfunktion ausgewählt ist, Schilessung Sense verursacht eine kurze Öffnungswendung mit folgendes Stopp der Bewegung bis zum Erhaltung von Benützerbefehl.
A = Eingriffzone von Strommessersensor mit Bewegungswendung
B = Betriebzone mit normaler Geschwindlighkeit
C = Eingriffzone von Strommessersensor mit Bewegungsstopp und Memorisierung der erreichete Position als total Schliessung / Öffnung.
D = Betriebzone mit verlangsamer Geschwindlighkeit
E = Pause beim Schliessung und Öffnung
A
B
C
D
C
D
E
E
VORSICHT: Beim Brücke “J1” Schneiden, ist die Bewegunswendungzone ausgelöscht (zone “A”) und mit die Memorisierung der erhaltenen Position als total Schliessung / Öffnung (zone “C”) ausgewechselt
15.1 Drücköffnung der Flügel.
Falls Übereinanderlegen der Flügel und folgende Sperrung der Automation, ist es nötig die Öffnung einzudrücken (Wiedersynchronisierung). Um das zu machen, arbeiten Sie wie folgt:
1. Erste Taste von Handsender für mehr als 8 Sek drücken. 2. Die Steuerung zeigt die Wiedersynchronisierung duch Vorblinkt. TASTE NICHT LOSLASSEN3. Zwei Flügel starten sich zusammen öffnen. TASTE NICHT LOSLASSEN4. Wenn Flügel eine genuge Öffnung erreicht haben—um nicht zusammen stossen— Taste loslassen. Flügel stoppen sich. 5. Nochmals Handsender Taste drücken. Flügel 1 start Schliessung und dann schliesst sich Flügel 2. 6. Wenn Gitter ist geschlossen, Synchronisierungarbeit fertig ist: :Gitter ist fertig regelmäßg zu arbeiten.
N.B:während Wiedersynchronisierungsphase kann man nur ein Flügel auf einmal schliessen. Arbeitsweise ist rnochmals egelmässig nur wenn beide Flügel sind korrekt geschlossen.
VORSICHT: während Wiedersynchronisirungsphase Eingriff von Sicherheit gegen Drückung, ist als Identifizierung der Schliessungposition verstanden. Um die ungewollte Eingriff zu vermeiden, ist die Empfindlichkeit der Sicherheit sehr vermindert als normale Arbeitsweise.

ITA ENG FRA ESP DEU POR 6-1622377 rev.1 04/02/2016 Pag 8 di 8
20. Problemlösung
Dieser Abschnitt gibt einige Auskünfte für die öftene Probleme. Bevor weitergehen, prüfen Sie, daß led auf der Platine korrekt eingeschaltet oder ausgeschaltet sind; Ledstatus ist im folgenden Tabelle geschrieben:
Wenn einige Led nicht im korrekte Lage ist, prüfen Sie den entsprechenden Eingang. Möglicherweise äussere Zubehöre ausschliessen, beim Überbrucken der bezüglichen Eingänge (Photozell, Endlauf, Stopp) mit Gewönlichen (im Falle von Verbindungen, die normalaweise geschlossen sind). Prüfen Sie die Punkte wie im folgende Tabelle:
Schritt fuer Schritt
Fußgänger / Uhr
stop Äussere Photozell
Innere Photozell Torflügel 1 Endlauf
Torflügel 2 Endlauf
ausgeschaltet ausgeschaltet eingeschaltet eingeschaltet eingeschaltet eingeschaltet eingeschaltet
LED STATUS
Schadentyp Mögliche Ursache Lösung
Beim Aktivierung der Öffnungsbefehl, die Flügel bewegen sich nicht
Keine elektische Stromung Elektrische Stromung und alle Anschlüsse pruefen.
Gebrannte Schmelzsicherung Schmelzsicherung mit eine von gleichen Kennzeichen aendern.
Beim Aktivierung der Öffnungsbefehl, Flügel bewegen sich in Schliessung
Motorkabelung umgestellt Motorkabelung pruefen und umstellen wenn nötig.
Man kann nicht im Handsenderprogrammierung eintreten
• dip sind nicht korrekt angelegt
• Dekodierung der Platine ist nicht entsprechend zu dem Handsender im Benuetzung
Man kann nicht im Laufprogrammierung eintreten Gitter ist nicht geschlossen Gitter im Schliesslage stellen (beim Hand). Pruefen Sie Lernung nochmals
Die Steuerung ist gespeist aber Gitter bewegt sich nicht.
Ein normalaweise geschlossene Eingang ist nicht aktiv
Fotozelleingang pruefen, Stoppeingang und Endlauf. Wenn nicht benuetzt, kurzschlussen Sie mit gewönlichen.
• Stellen Sie DIP 1 und 2 auf OFF
• Pruefen Sie welche Dekodierung eigestellt worden ist und eventuell waehlen Sie die, entsprechenden zu den Handsendern im Benuetzung.
In Lernungsphase ein Fluegel stoppt bevor die komplete Oeffbung zu arreichen
Schwelle von trimmer RUNNING AMP.SENS zu niedrig.
Erhöhen Sie Eingriffwert von Strommessersensor
In Lernungsphase erreichen die Flügel komplete Öffnung aber Gitter schliesst sich nicht wieder
Schwelle von trimmer RUNNING AMP.SENS zu hoch
Vermindern Sie Eingriffwert von Strommessersensor
Die Steuerung AS24 hat einen Verbinder (sehen Sie Schema Seite.1) wo es möglich ist, eine Zusatzplatine R2 einzuführen. Das gibt die Möglichkeit Ausgänge für Verbindung mit Elektroschloss und Höflichkeitlicht zu haben. Zuendungszeit der Höflichkeitlicht ist 1 min und 30 Sek. Zuendung passiert für jede Aktion des Benutzers.
VERBINDER İM ZENTRALE EINZUSTEC-KEN
KLAMMER 1 UND 2: Verbindung Höflichkeitlich-tausgang. Zeitgeber 90 sec. KLAMMER 3 UND 4: Verbindung Elektoschlos-sausgang. Zeitgeber 5 sec.
LOCH UM SPACER ZWISCHEN ZUSATZPLATINE UND STEUERUNG ZU VERBINDEN
SAUBERE VERBINDUNGEN OHNE SPANNUNG Max Belastung 220 V - 5 A
1 2 3 4
ELS LC
Vac/dc Vac/dc
18. Zusatzplatine (nicht ausgerüstet)
Beim Benützung von Funkempfängsgerät, ist es möglich die Platine mit einem Ausgangklammer für ein zweites Funkkanal auszustatten (mit Verbindung N.A.). Wenn Sie hybrid Module auf der Platine benützen möchten, ist zweite Funkkanal nicht verfügbar.
19. Zweite Funkkanal
GARANTIE – Die gesetzliche Herstellergarantie läuft mit dem auf dem Produkt aufgedruckten Datum an und beschränkt sich auf die kostenlose Reparatur oder den kostenlosen Ersatz der Teile, die aufgrund schwerer Materialmängel oder schlechter Verarbeitung vom Hersteller als fehlerhaft anerkannt werden. Die Garan-tie deckt keine durch äußere Einwirkung, mangelnde Wartung, Überlastung, natürlichen Verschleiß, falsche Typenwahl, und Montagefehler verursachte Schäden oder andere nicht dem Hersteller anzulastende Schäden oder Fehler. Durch Manipulierung beschädigte Produkte werden weder ersetzt noch repariert. Die angegebenen Daten sind als unverbindliche Richtwerte zu betrachten. Es besteht kein Ersatzanspruch im Falle einer verminderten Reichweite oder bei Funk-tionsstörungen aufgrund von Umwelteinflüssen. Die Verantwortlichkeit des Herstellers für Personenschäden durch Unfälle jeglicher Art aufgrund einer Fehlerhaf-tigkeit unserer Produkte beschränkt sich unabdingbar auf die nach italienischem Gesetz vorgesehene Haftung.