corente cloud services exchange による virtual private network(vpn) 設定概要
Post on 14-Apr-2017
38 views
TRANSCRIPT

Copyright © 2014 Oracle and/or its affiliates. All rights reserved. |Copyright © 2017 Oracle and/or its affiliates. All rights reserved. |
Corente Cloud Services Exchange によるVirtual Private Network(VPN) 設定概要
2017 年 3 月 2 日クラウド・テクノロジー事業統括 Cloud/Big Data/DIS プロダクト本部エンジニアリング部黒田壮大

Copyright © 2017, Oracle and/or its affiliates. All rights reserved. |
• 以下の事項は、弊社の一般的な製品の方向性に関する概要を説明するものです。また、情報提供を唯一の目的とするものであり、いかなる契約にも組み込むことはできません。以下の事項は、マテリアルやコード、機能を提供することをコミットメント(確約)するものではないため、購買決定を行う際の判断材料になさらないで下さい。オラクル製品に関して記載されている機能の開発、リリースおよび時期については、弊社の裁量により決定されます。
Oracle と Java は、 Oracle Corporation 及びその子会社、関連会社の米国及びその他の国における登録商標です。文中の社名、商品名等は各社の商標または登録商標である場合があります。2

Copyright © 2017, Oracle and/or its affiliates. All rights reserved. |
Virtual Private Network(VPN) 設定概要Oracle Network Cloud Service
Corente Cloud Services Exchange を使ってみよう1
2
3
Copyright © 2017 Oracle and/or its affiliates. All rights reserved. |
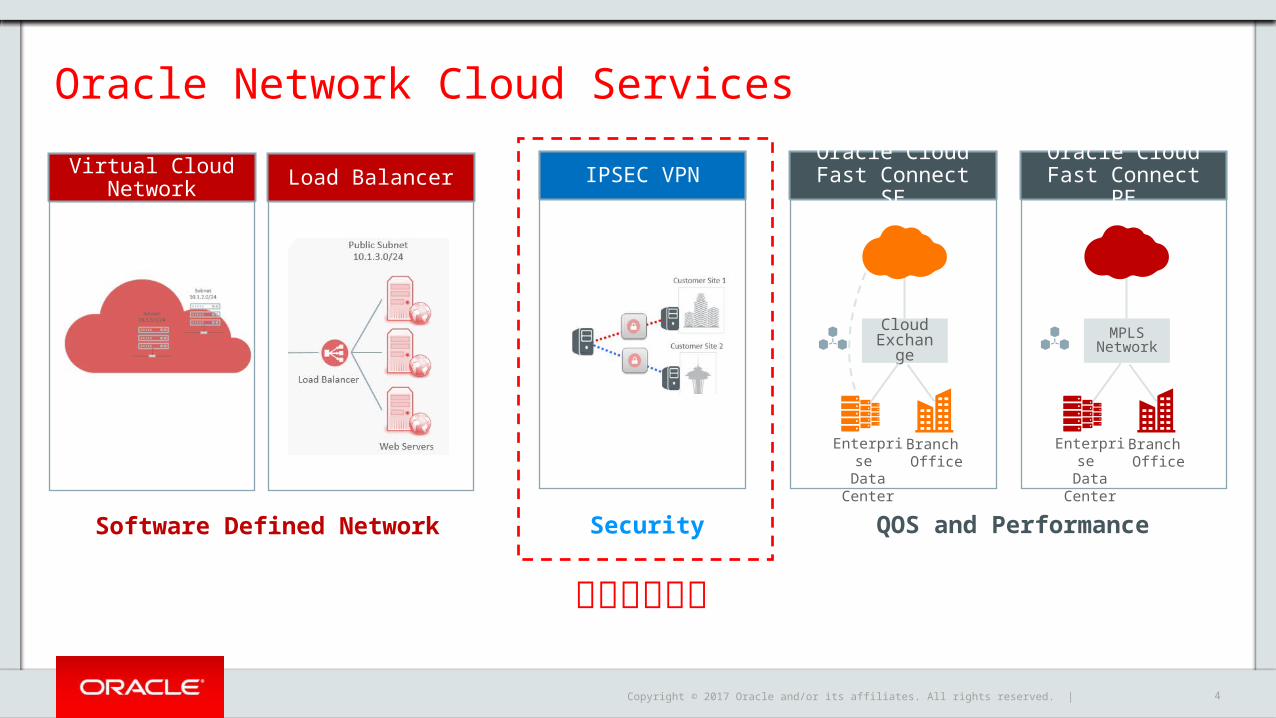
Oracle Network Cloud Services
Oracle Cloud Fast Connect SE
Cloud Exchange
Enterprise Data
Center
Branch Office
Oracle Cloud Fast Connect PE
MPLS Network
Enterprise Data
Center
Branch Office
IPSEC VPNVirtual Cloud Network Load Balancer
Software Defined Network Security QOS and Performance
本日のテーマ4
Copyright © 2017 Oracle and/or its affiliates. All rights reserved. |
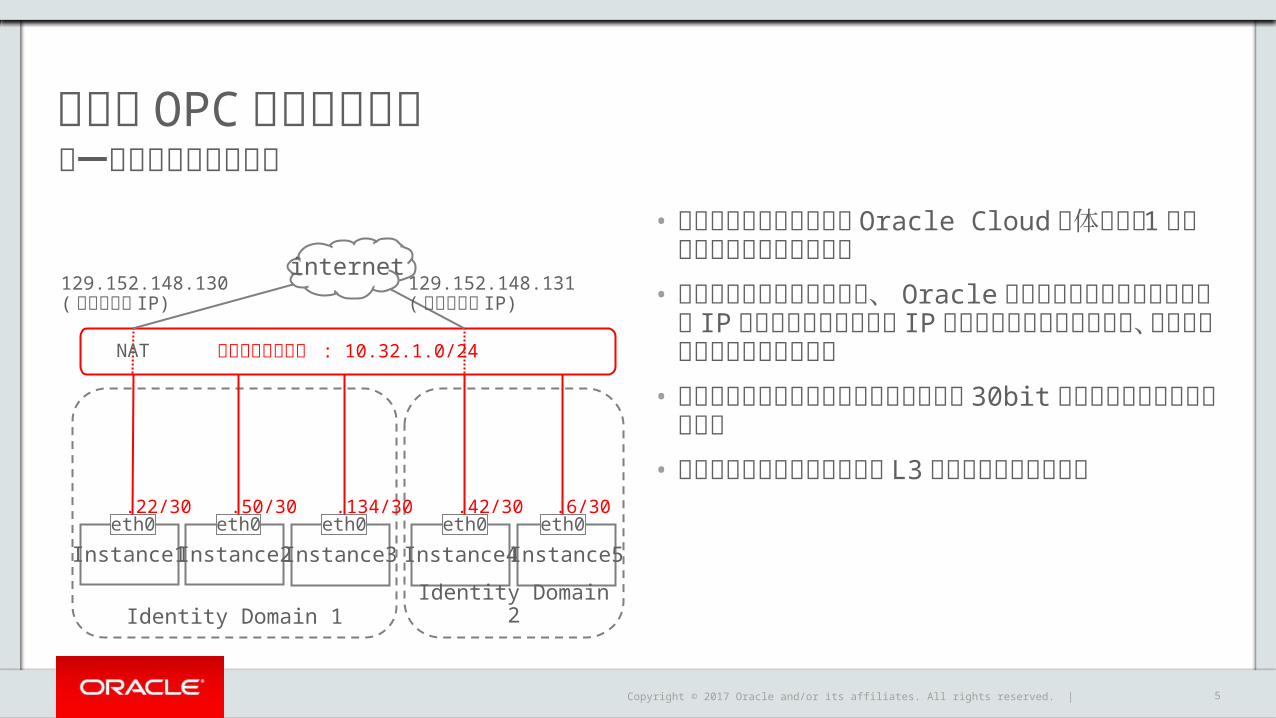
従来の OPC ネットワーク• すべてのインスタンスは Oracle Cloud 全体共有の 1 つのネットワークのみに所属• インスタンスを起動すると、 Oracle が提供する共通のプライベート IP アドレスのプールから IP アドレスが都度割り振られ、停止したらプールに返還される• 各インスタンスはそれぞれネットマスク 30bitの独立したセグメントに所属• 全てのインスタンス間通信は L3 スイッチを介して伝達
5
単一の共有ネットワーク
Instance1eth0
Instance2 Instance3 Instance4eth0 eth0 eth0
共有ネットワーク : 10.32.1.0/24
Instance5eth0
internet
.22/30 .42/30
Identity Domain 1 Identity Domain 2
.50/30 .134/30 .6/30
NAT
129.152.148.131( グローバル IP)
129.152.148.130( グローバル IP)
Copyright © 2017 Oracle and/or its affiliates. All rights reserved. |
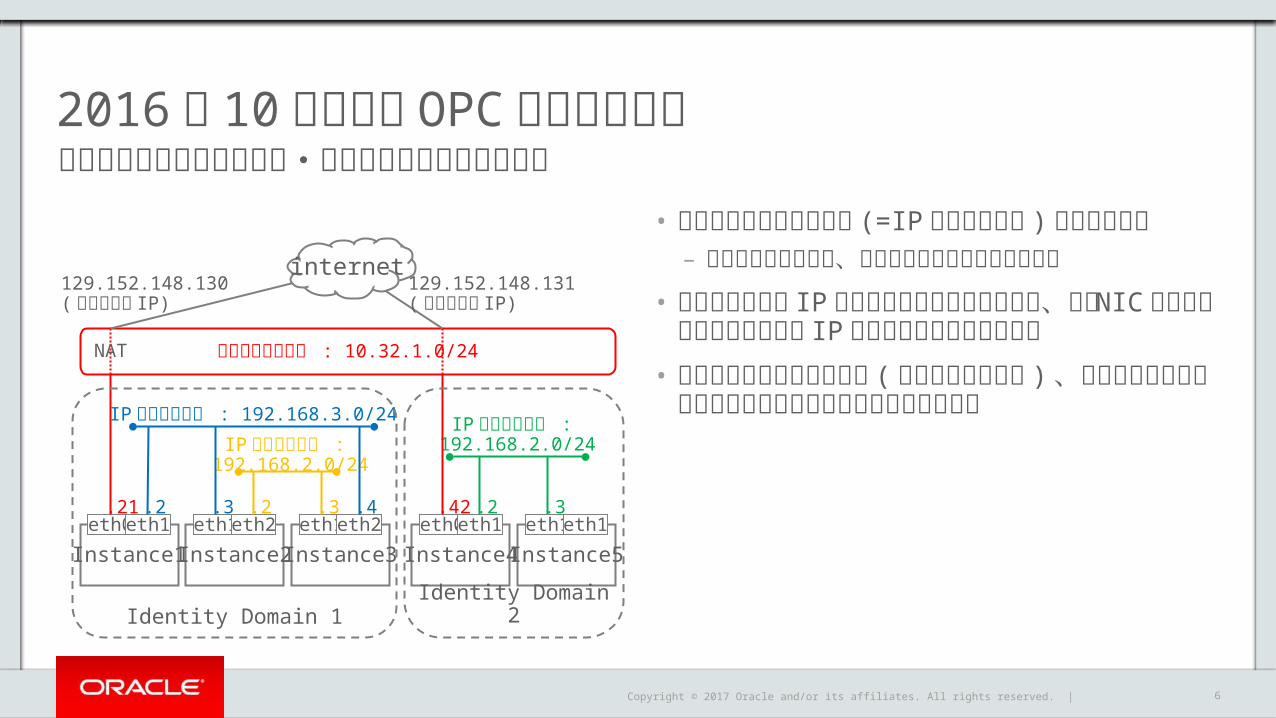
• 顧客が自由にサブネット (=IP ネットワーク )を構築できる– サブネットの大きさ、アドレス範囲を自由に設定可能
• インスタンスを IP ネットワークに所属させると、仮想 NIC が追加されサブネット内の IP アドレスが割り当てられる• 旧来のネットワークは存続 ( 共有ネットワーク ) 、インターネットへのゲートウェイはこのネットワークを利用
6
Instance1eth0 eth1
IP ネットワーク : 192.168.3.0/24
IP ネットワーク : 192.168.2.0/24
IP ネットワーク : 192.168.2.0/24
Instance2 Instance3 Instance4eth1 eth2 eth1 eth2 eth0 eth1
共有ネットワーク : 10.32.1.0/24
Instance5eth1 eth1
internet
.21 .42.2 .3
Identity Domain 1 Identity Domain 2
.4.2 .3 .2 .3
129.152.148.130( グローバル IP)
129.152.148.131( グローバル IP)
2016 年 10 月以降の OPC ネットワーク加えて複数のプライベート・ネットワークが構築可能に
NAT
Copyright © 2017 Oracle and/or its affiliates. All rights reserved. |
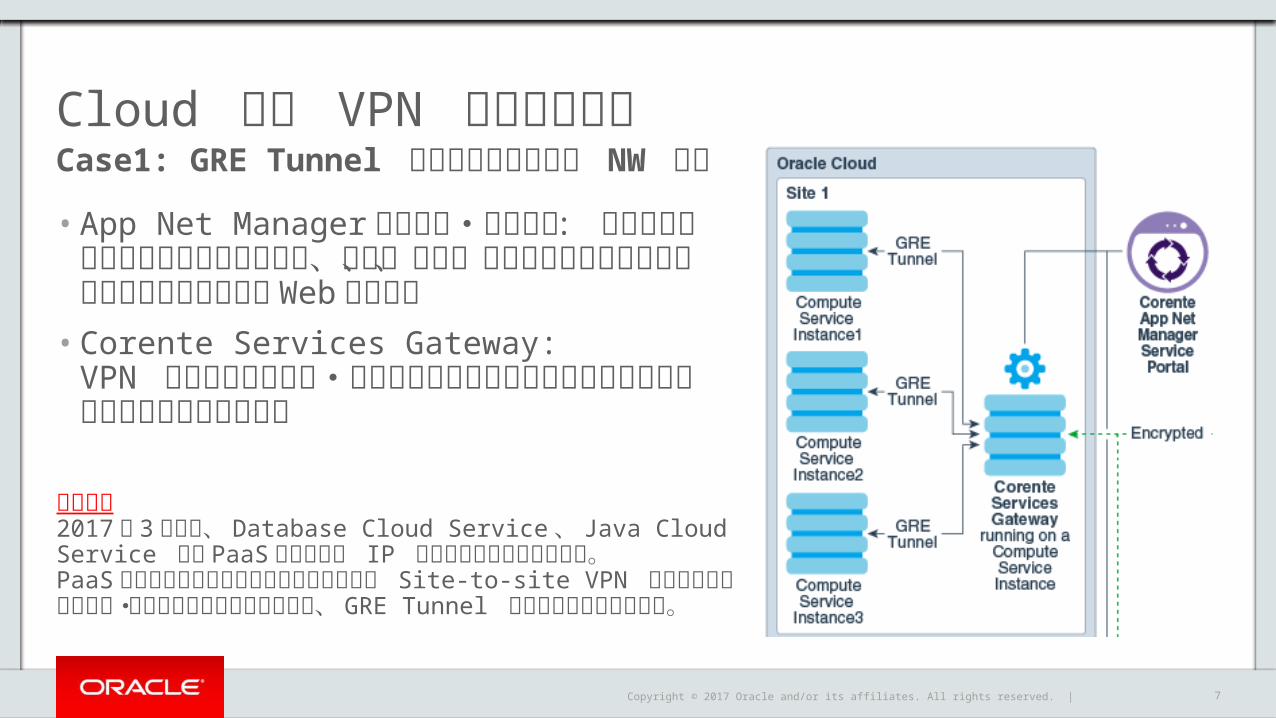
Cloud 側の VPN 設定ポイントCase1: GRE Tunnel によるプライベート NW 設定
7
ポイント2017 年 3 月現在、 Database Cloud Service 、 Java Cloud Service 等の PaaS サービスは IP ネットワークに未対応です。PaaS サービスを含むインスタンス群に対して Site-to-site VPN を用いたプライベート・ネットワークを構成するには、 GRE Tunnel の設定が必要となります。
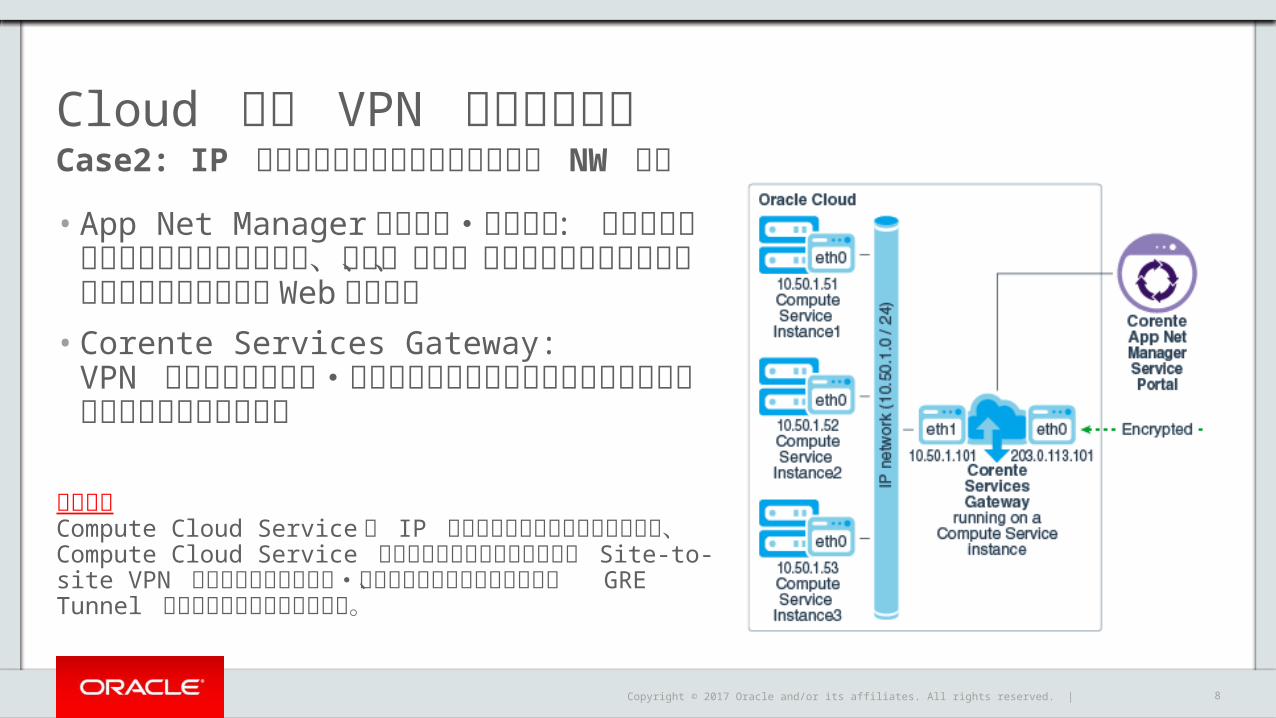
• App Net Manager サービス・ポータル : ネットワークのコンポーネントを作成、構成、変更、削除および監視するために使用するセキュアな Web ポータル• Corente Services Gateway:
VPN 接続でのセキュア・アクセスおよびデータ転送を容易にするプロキシとして機能する
Copyright © 2017 Oracle and/or its affiliates. All rights reserved. |
Cloud 側の VPN 設定ポイント• App Net Manager サービス・ポータル : ネットワークのコンポーネントを作成、構成、変更、削除および監視するために使用するセキュアな Web ポータル• Corente Services Gateway:
VPN 接続でのセキュア・アクセスおよびデータ転送を容易にするプロキシとして機能する
Case2: IP ネットワークによるプライベート NW 設定
8
ポイントCompute Cloud Service は IP ネットワークに対応しているため、
Compute Cloud Service のインスタンス群のみに対して Site-to-site VPN を用いたプライベート・ネットワークを構成するには、 GRE Tunnel の設定が必須ではありません。

Copyright © 2017 Oracle and/or its affiliates. All rights reserved. |
オンプレミス側の VPN 設定ポイントCorente Services Gateway の対向側機器を選択
1. 対向側も Corente Services Gateway を利用する 2. 対向側には Ipsec に対応する機器を利用する
9

Copyright © 2017 Oracle and/or its affiliates. All rights reserved. | 10
Corente Services Gateway の対向側機器の選択1. 対向側も Corente Services Gateway を利用する場合
– 仮想アプライアンス・イメージをダウンロードして利用• VMWare 、 Xen 、 Oracle VM
– Corente のソフトウェアをダウンロードし、サーバーにインストールして利用
2. 対向側には IPsec に対応する機器を利用する場合– マニュアルに記載されている「サーティファイされるコンフィグレーション(Certified Configuration)」を満たしている IPsec 機器であれば、 Corente Services Gateway の対向側機器として利用可能– 一部の機種については、 My Oracle Support に機器側の設定手順が掲載
• Cisco ASA 5505 (Doc ID 2153452.1)• SonicWall TZ190 (Doc ID 2153603.1)• Juniper JuneOS15 (Doc ID 2164001.1)
– また、以下の仮想アプライアンスの設定手順が掲載• Cisco CSR1000v (How to connect an application on Ravello to Oracle IaaS/PaaS services (e.g. DBCS etc.) over VPN)
Copyright © 2017 Oracle and/or its affiliates. All rights reserved. | 11
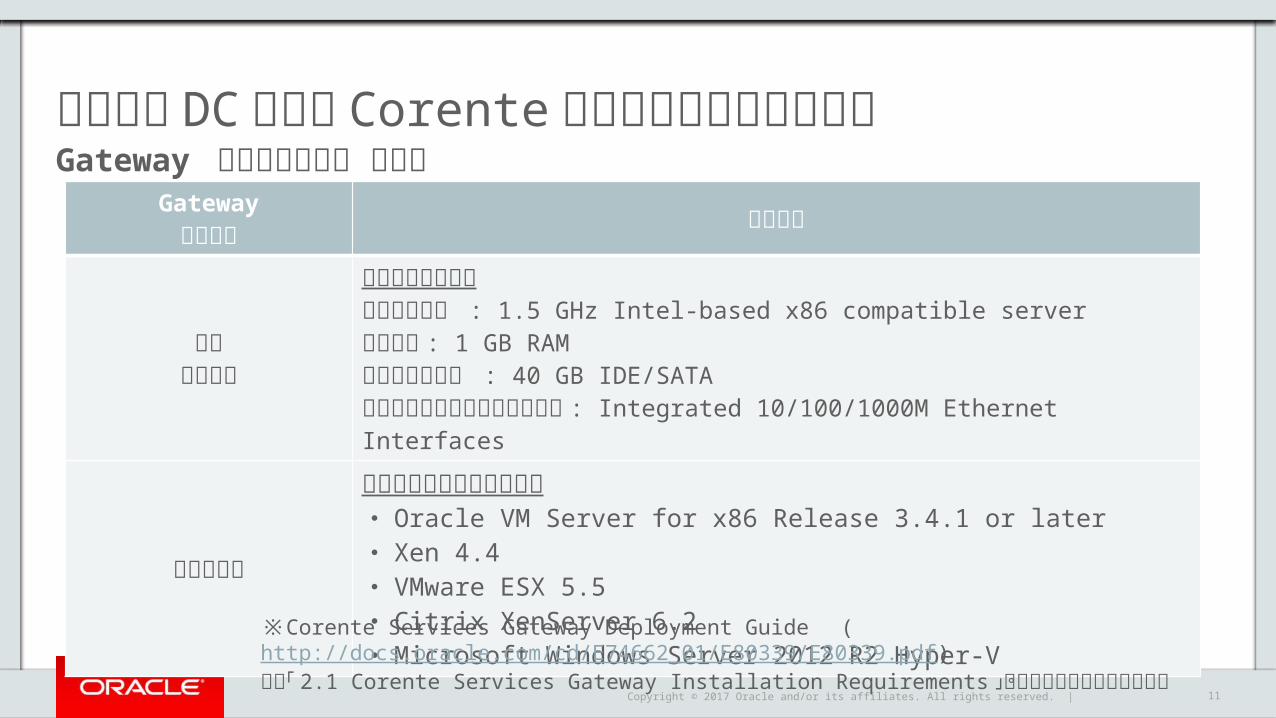
ローカル DC 側にも Corente を利用する際の検討事項Gateway を構築する環境 の選択
Gateway構築環境 設置要件
物理サーバー
ハードウェア要件プロセッサー : 1.5 GHz Intel-based x86 compatible serverメモリー : 1 GB RAMハードドライブ : 40 GB IDE/SATAネットワークインターフェイス : Integrated 10/100/1000M Ethernet Interfaces
仮想マシン
サポートしている仮想環境・ Oracle VM Server for x86 Release 3.4.1 or later・ Xen 4.4・ VMware ESX 5.5・ Citrix XenServer 6.2・ Microsoft Windows Server 2012 R2 Hyper-V※Corente Services Gateway Deployment Guide (http://docs.oracle.com/cd/E74662_01/E80339/E80339.pdf
)内の「 2.1 Corente Services Gateway Installation Requirements 」に詳細は記載されています。
Copyright © 2017 Oracle and/or its affiliates. All rights reserved. |
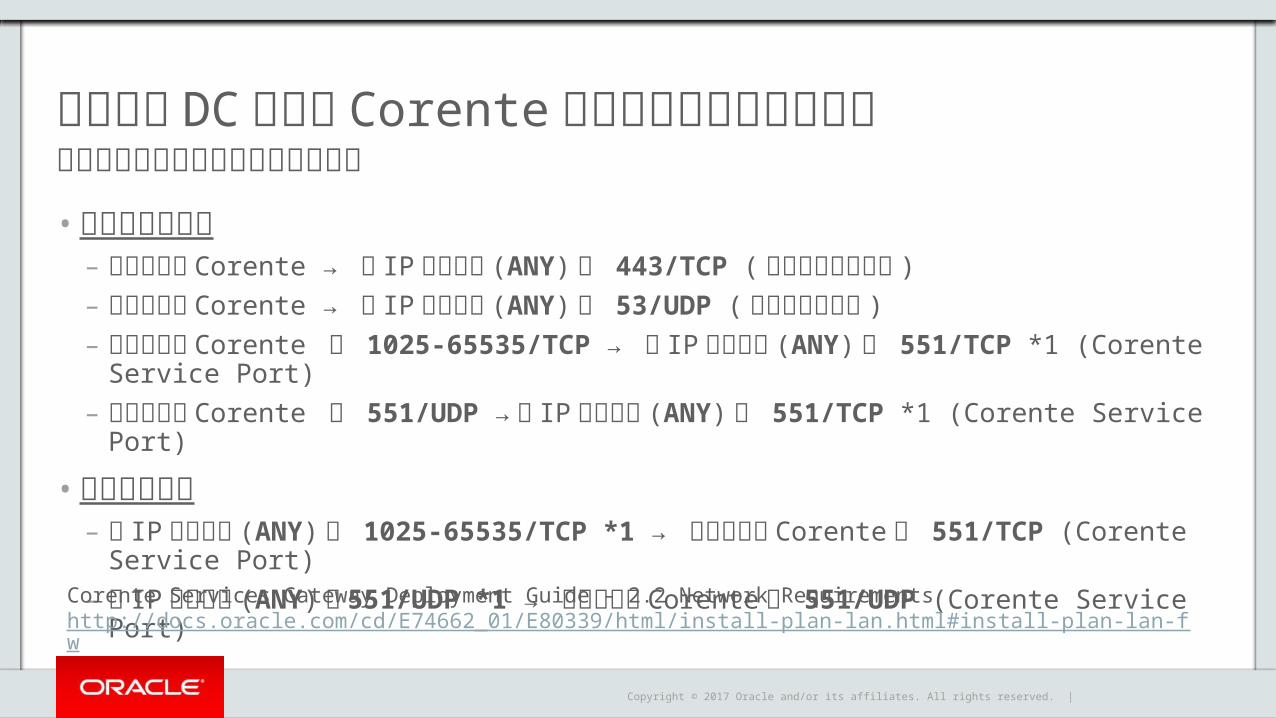
ローカル DC 側にも Corente を利用する際の通信要件• アウトバウンド
– ローカル側 Corente → 全 IP アドレス (ANY) の 443/TCP ( 設定の反映で使用 )– ローカル側 Corente → 全 IP アドレス (ANY) の 53/UDP ( 名前解決で使用 )– ローカル側 Corente の 1025-65535/TCP → 全 IP アドレス (ANY) の 551/TCP *1 (Corente Service
Port)– ローカル側 Corente の 551/UDP → 全 IP アドレス (ANY) の 551/TCP *1 (Corente Service Port)
• インバウンド– 全 IP アドレス (ANY) の 1025-65535/TCP *1 → ローカル側 Corente の 551/TCP (Corente Service
Port)– 全 IP アドレス (ANY) の 551/UDP *1 → ローカル側 Corente の 551/UDP (Corente Service Port)
以下のファイアウォール設定が必要
Corente Services Gateway Deployment Guide - 2.2 Network Requirementshttp://docs.oracle.com/cd/E74662_01/E80339/html/install-plan-lan.html#install-plan-lan-fw

Copyright © 2017 Oracle and/or its affiliates. All rights reserved. |
VPN 構成別のセットアップ方法とドキュメント
13
※ 2017 年 3 月現在、 Database Cloud Service 、 Java Cloud Service 等の PaaS サービスは IP ネットワークに未対応です。PaaS サービスを含むインスタンス群に対して Site-to-site VPN を用いたプライベート・ネットワークを構成するには、GRE Tunnel の設定が必要となります。
接続先サービス
クラウド側プライベート NW
対向側機器 ゲートウェイの冗長化
クラウド側 GWセットアップ方法 ドキュメント
Compute Cloud
Service のみ IP ネットワークCorente 冗長化なし Orchestration Setting Up VPN from a Corente
Services Gateway to an IP Network in Oracle Cloud
コンソール Using Oracle Compute Cloud Service (IaaS) - Setting Up VPN
IPsec 機器 冗長化なし Orchestration Setting Up VPN from a Third-Party Gateway to an IP Network in Oracle Cloud
コンソール Using Oracle Compute Cloud Service (IaaS) - Setting Up VPN
Active-Active HA コンソール Configuring Active-Active HA
PaaS サービスを含む GRE トンネル※ Corente 冗長化なし Orchestration Setting Up VPN from Corente
Services Gateway On-Premises to the Shared Network
IPsec 機器 冗長化なし Orchestration Setting Up VPN from a Third-Party Gateway On-Premises to the Shared Network
Copyright © 2017, Oracle and/or its affiliates. All rights reserved. |
Virtual Private Network(VPN) 設定概要Oracle Network Cloud Service
Corente Cloud Services Exchange を使ってみよう1
2
14
Copyright © 2017, Oracle and/or its affiliates. All rights reserved. |
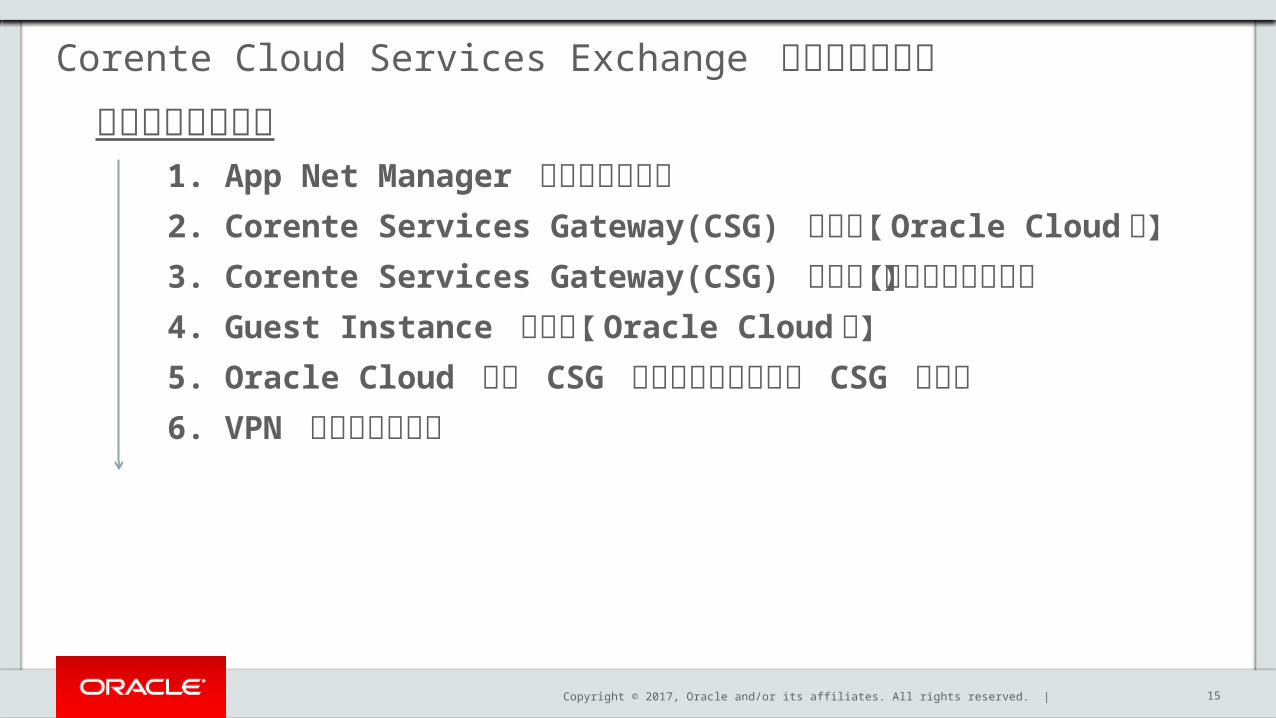
Corente Cloud Services Exchange を使ってみよう
使ってみよう手順 1. App Net Manager のインストール
2. Corente Services Gateway(CSG) の構築【 Oracle Cloud側】
3. Corente Services Gateway(CSG) の構築【オンプレミス側】
4. Guest Instance の構築【 Oracle Cloud 側】
5. Oracle Cloud 側の CSG とオンプレミス側の CSG の接続
6. VPN 接続の疎通確認
15
Copyright © 2017, Oracle and/or its affiliates. All rights reserved. |
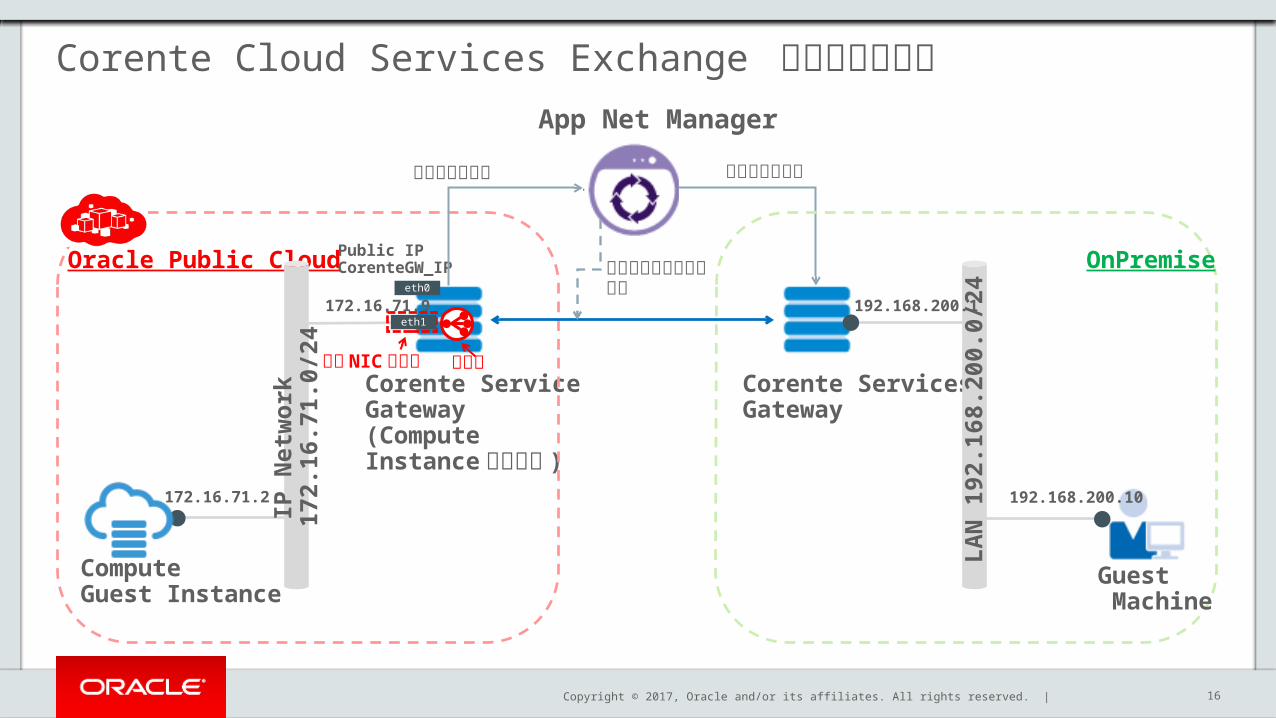
Corente Cloud Services Exchange を使ってみよう
16
App Net Manager
Corente Service Gateway(Compute Instance 上で稼働 )
172.16.71.9
Oracle Public Cloud
172.16.71.2
ComputeGuest Instance
Corente ServicesGateway
OnPremise
LAN
192
.168
.200
.0/2
4192.168.200.1
192.168.200.10
Guest Machine
IP N
etw
ork
17
2.16
.71.
0/24
仮想 NIC セットルート
Public IPCorenteGW_IP
eth1
eth0
構成情報の作成構成情報が反映
パートナーシップの設定
Copyright © 2017, Oracle and/or its affiliates. All rights reserved. |
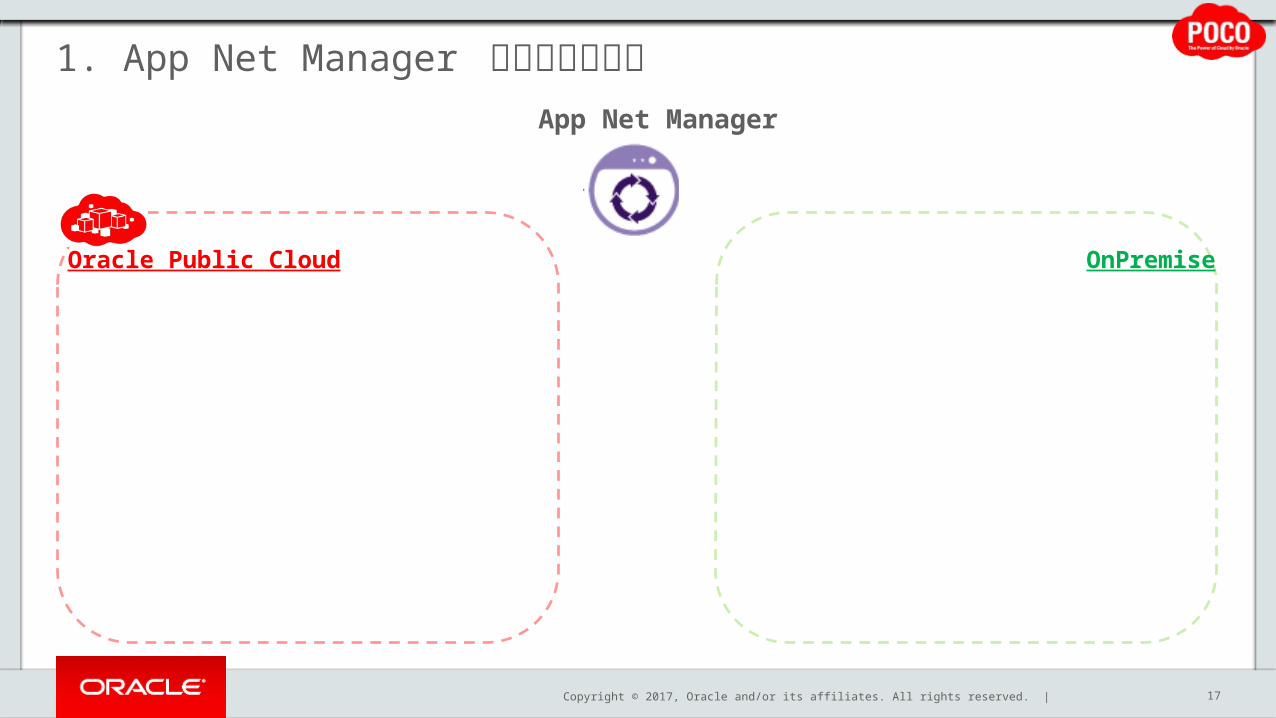
1. App Net Manager のインストール
17
App Net Manager
Oracle Public Cloud OnPremise
Copyright © 2017, Oracle and/or its affiliates. All rights reserved. |
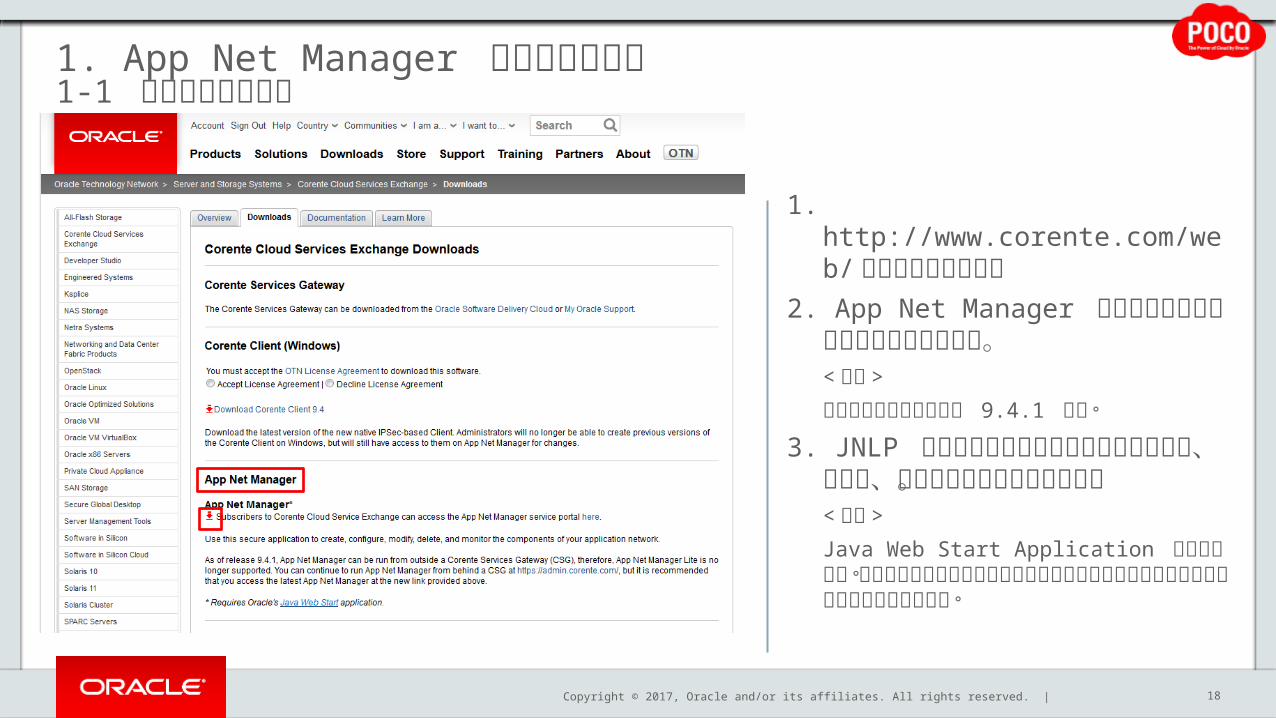
1. App Net Manager のインストール1-1 インストール実行
18
1. http://www.corente.com/web/にアクセスします。
2. App Net Manager のダウンロードボタンをクリックします。< 補足 >現在の最新バージョンは 9.4.1 です。
3. JNLP ファイルがダウンロードされますので、その後、インストールを実行します。< 補足 >Java Web Start Application が起動します。インストールされていない場合はウィザードの手順に沿ってセットアップをして下さい。

Copyright © 2017, Oracle and/or its affiliates. All rights reserved. |
1. App Net Manager のインストール1-2 App Net Manger のログイン
19
1. インストールが正常に完了すると、App Net Manager が立ち上がり、ログイン情報を入力を求められます。
2. ログイン情報はサービス契約後にメールで通知が届きますので、必要事項を入力し、 Login をクリックします。
Copyright © 2017, Oracle and/or its affiliates. All rights reserved. |
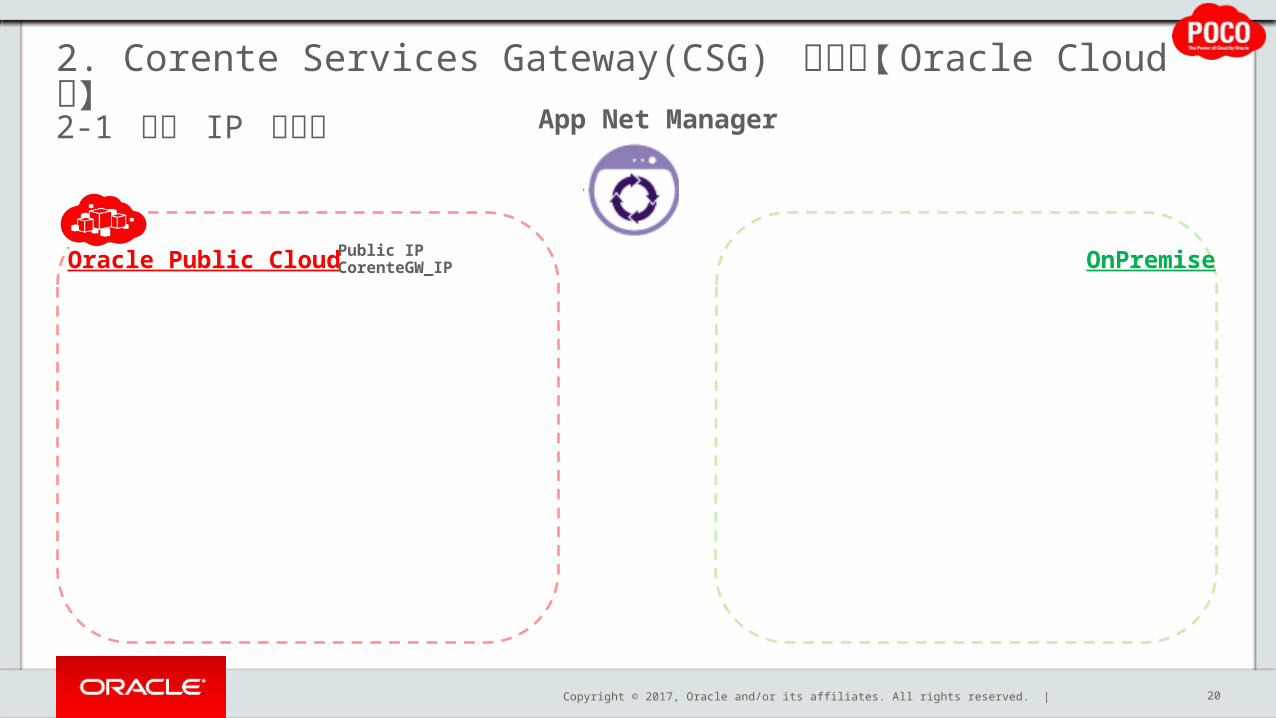
2. Corente Services Gateway(CSG) の構築【 Oracle Cloud 側】2-1 予約 IP の作成
20
App Net Manager
Oracle Public Cloud Public IPCorenteGW_IP OnPremise

Copyright © 2017, Oracle and/or its affiliates. All rights reserved. |
2. Corente Services Gateway(CSG) の構築【 Oracle Cloud 側】2-1 予約 IP の作成
21
1. Oracle Cloud にログインし、 Compute Service のサービス・コンソールを開きます。
2. CSG で使用する Public IP を作成するために、 Network タブをクリックします。
3. IP Reservations を選択し、 Create IP Reservation をクリックし、新規の IP を作成します。
4. Name 欄に任意の IP 名を入力します。
5. For Instance は None のままで、Create をクリックします。

Copyright © 2017, Oracle and/or its affiliates. All rights reserved. |
2. Corente Services Gateway(CSG) の構築【 Oracle Cloud 側】2-1 予約 IP の作成
22
1. 作成した IP が画面上で追加され、Public IP が割り当てられていることを確認します。
2. 情報更新及び削除は右側の ボタンから実施することが出来ます。

Copyright © 2017, Oracle and/or its affiliates. All rights reserved. |
2. Corente Services Gateway(CSG) の構築【 Oracle Cloud 側】2-2 IP Network の作成
23
App Net Manager
Oracle Public Cloud Public IPCorenteGW_IP OnPremise
IP N
etw
ork
17
2.16
.71.
0/24
Copyright © 2017, Oracle and/or its affiliates. All rights reserved. |
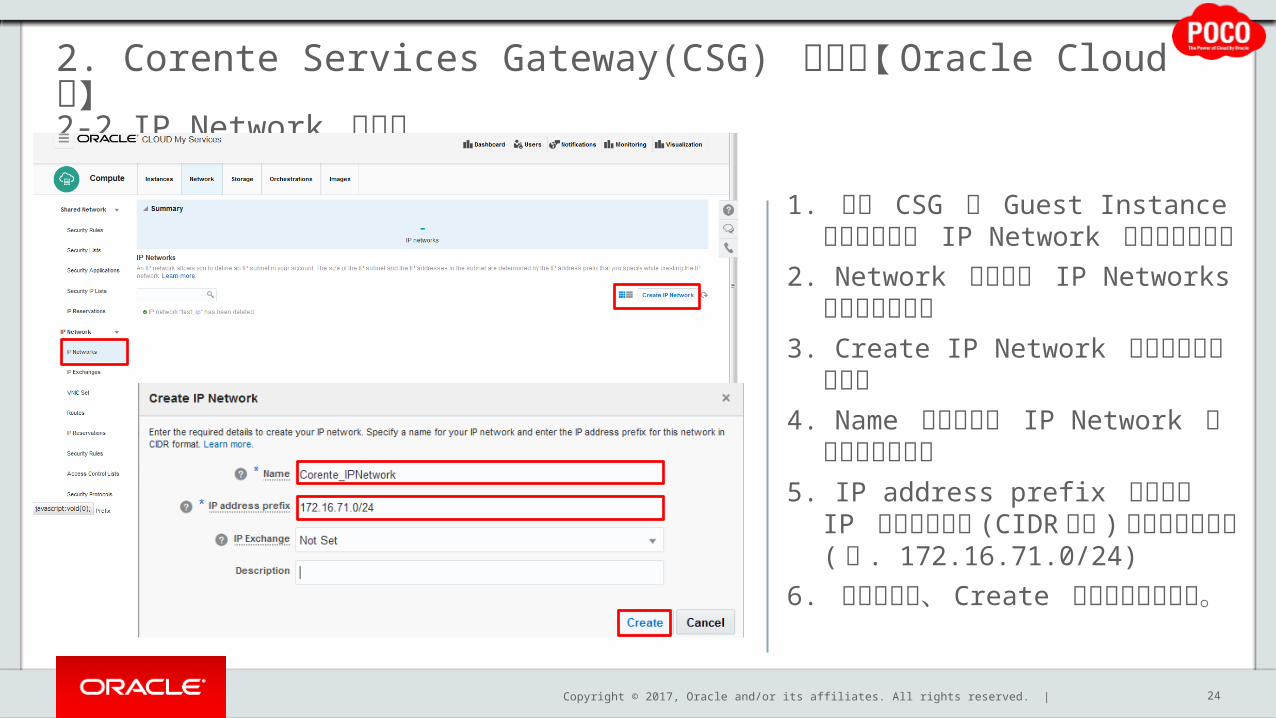
2. Corente Services Gateway(CSG) の構築【 Oracle Cloud 側】2-2 IP Network の作成
24
1. 次に CSG と Guest Instance 接続用の新規 IP Network を作成します。
2. Network タブから IP Networks を選択します。
3. Create IP Network をクリックします。
4. Name 欄に任意の IP Network 名を入力します。
5. IP address prefix に任意の IP アドレス範囲 (CIDR 表記 ) を記入します。 ( 例 . 172.16.71.0/24)
6. 上記入力後、 Create をクリックします。

Copyright © 2017, Oracle and/or its affiliates. All rights reserved. |
2. Corente Services Gateway(CSG) の構築【 Oracle Cloud 側】2-2 IP Network の作成
25
1. IP Networks の画面上に、作成した IP Network が表示されていることを確認します。
2. IP Network の情報更新及び削除は右側の ボタンから実施することが出来ます。
Copyright © 2017, Oracle and/or its affiliates. All rights reserved. |
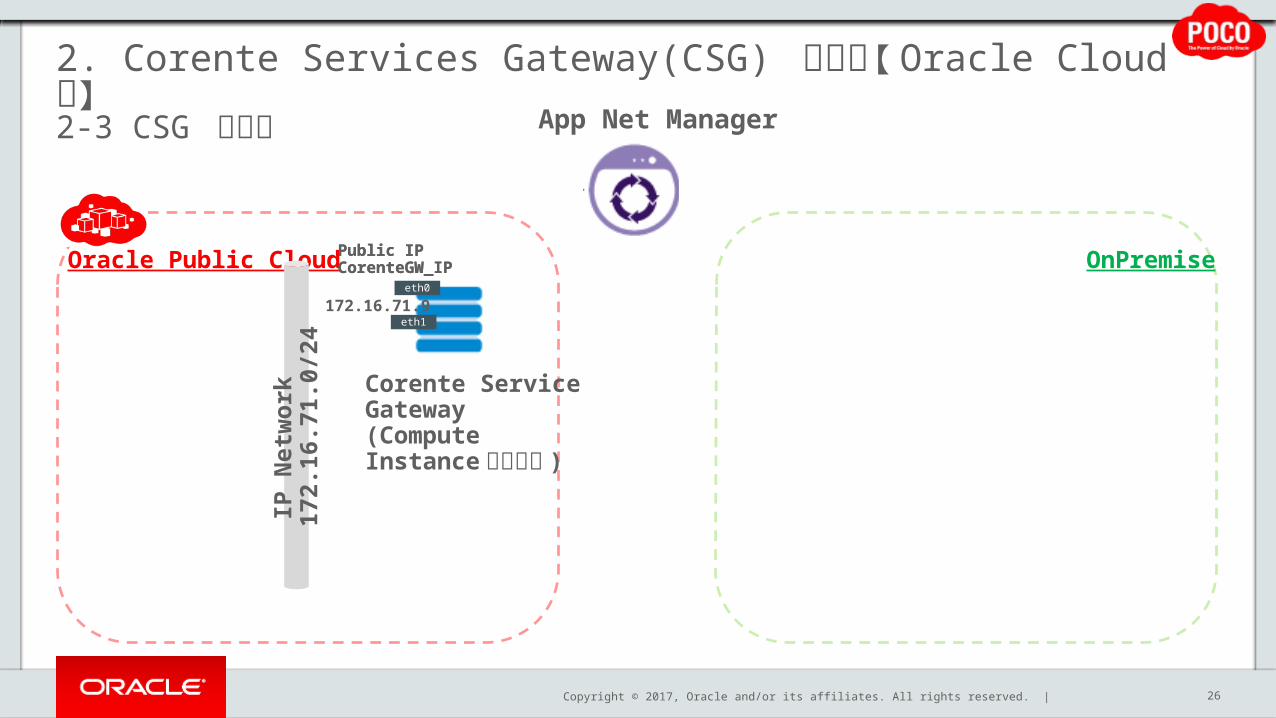
2. Corente Services Gateway(CSG) の構築【 Oracle Cloud 側】2-3 CSG の作成
26
App Net Manager
Oracle Public Cloud Public IPCorenteGW_IP OnPremise
IP N
etw
ork
17
2.16
.71.
0/24
Corente Service Gateway(Compute Instance 上で稼働 )
172.16.71.9
Public IPCorenteGW_IP
eth1
eth0
Copyright © 2017, Oracle and/or its affiliates. All rights reserved. |
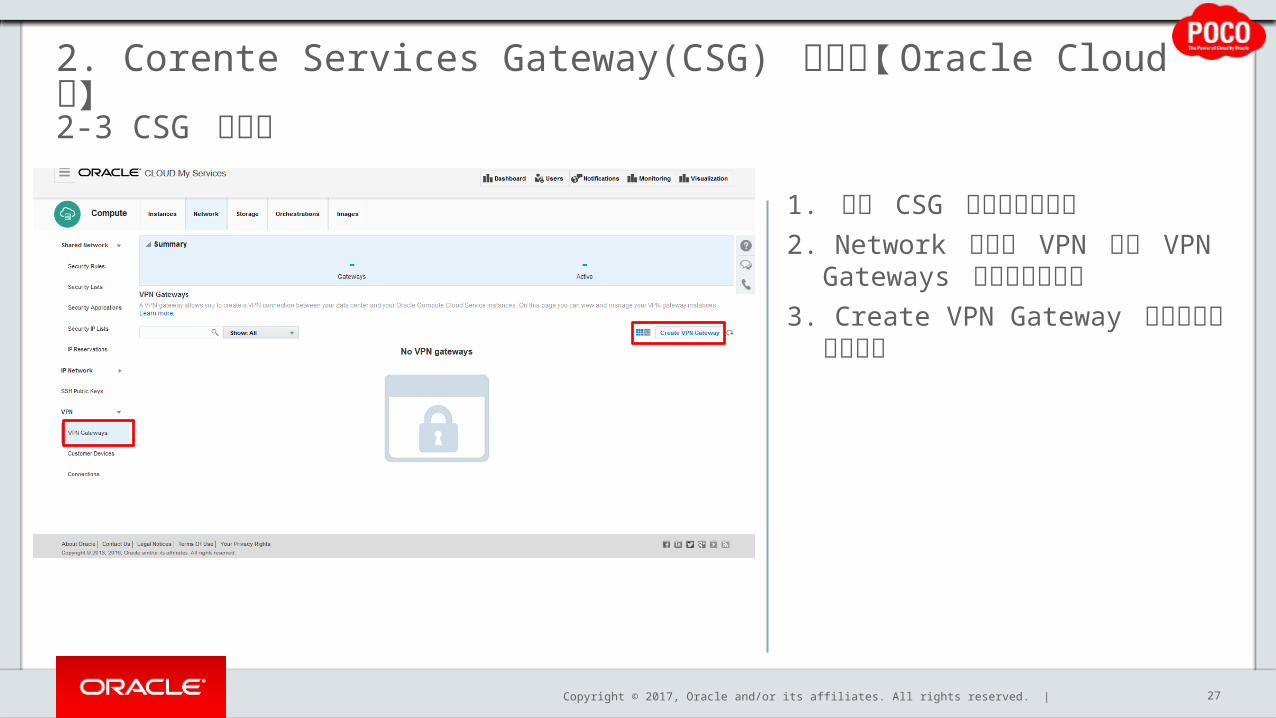
2. Corente Services Gateway(CSG) の構築【 Oracle Cloud 側】2-3 CSG の作成
27
1. 次に CSG を作成します。2. Network タブの VPN 枠の
VPN Gateways を選択します。3. Create VPN Gateway をクリッ
クします。

Copyright © 2017, Oracle and/or its affiliates. All rights reserved. |
2. Corente Services Gateway(CSG) の構築【 Oracle Cloud 側】2-3 CSG の作成
28
1. Name 欄に任意の VPN Gateway 名を入力します。
2. IP Reservation に事前に作成した Public IP を選択します。
3. Image List で CSG のイメージを選択します。
4. Instance Type で Dual-homed か Single-homed を選びます。
5. 事前に作成した IP Network を選択します。
6. CSG の IP Network Address を入力後、 Create をクリックします。
Copyright © 2017, Oracle and/or its affiliates. All rights reserved. |
2. Corente Services Gateway(CSG) の構築【 Oracle Cloud 側】2-3 CSG の作成
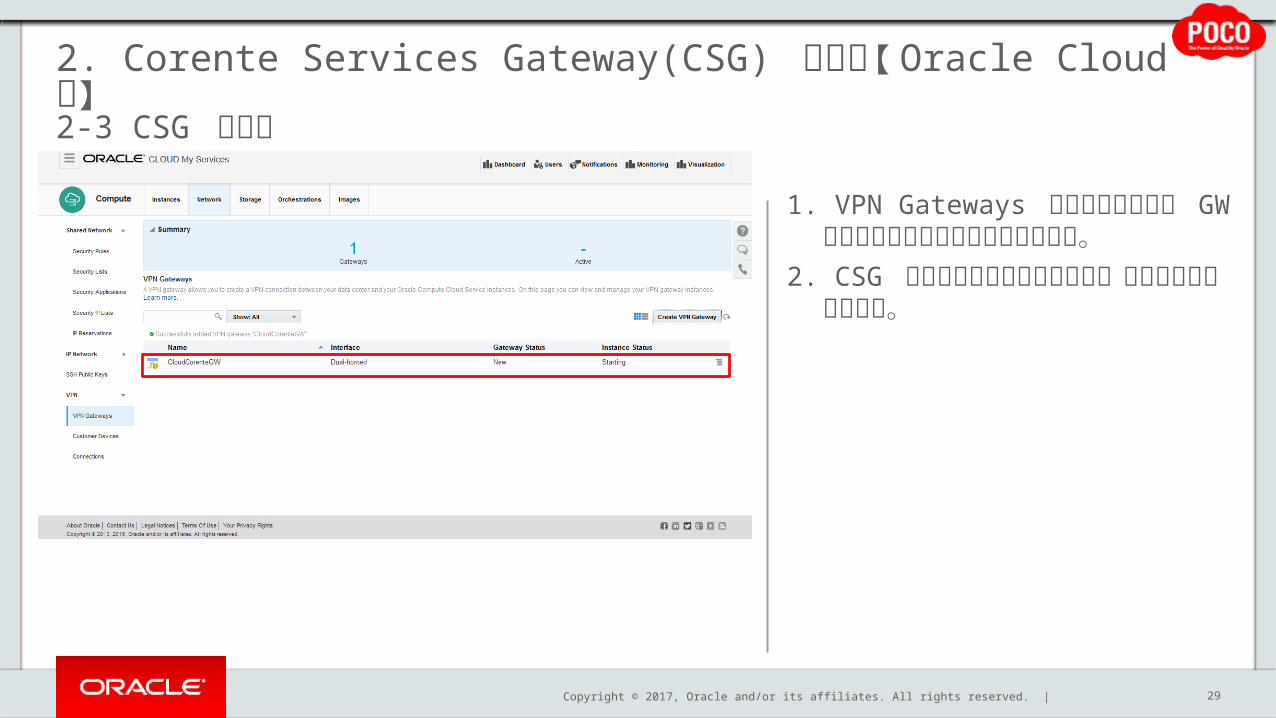
29
1. VPN Gateways ページに作成した GW が表示されていることを確認します。
2. CSG の構築が開始されますので、完成するのを待ちます。
Copyright © 2017, Oracle and/or its affiliates. All rights reserved. |
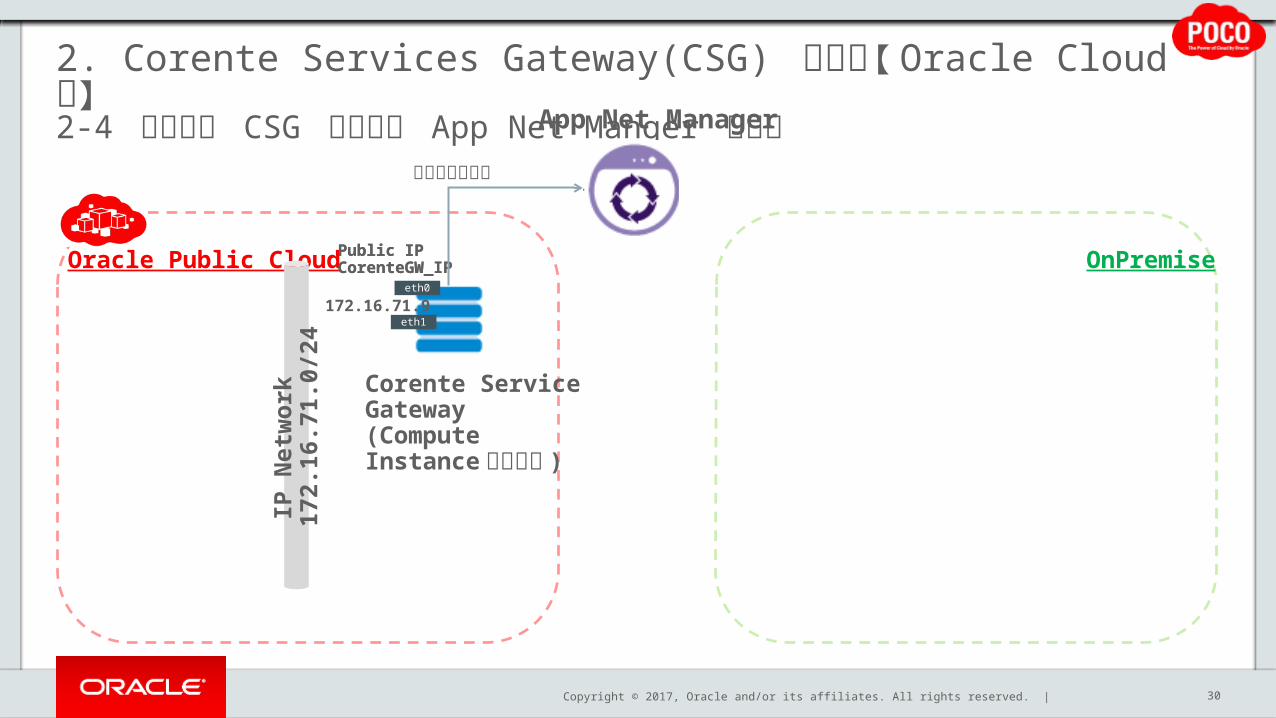
2. Corente Services Gateway(CSG) の構築【 Oracle Cloud 側】2-4 作成した CSG の情報を App Net Manger で確認
30
App Net Manager
Oracle Public Cloud Public IPCorenteGW_IP OnPremise
IP N
etw
ork
17
2.16
.71.
0/24
Corente Service Gateway(Compute Instance 上で稼働 )
172.16.71.9
Public IPCorenteGW_IP
eth1
eth0
構成情報が反映
Copyright © 2017, Oracle and/or its affiliates. All rights reserved. |
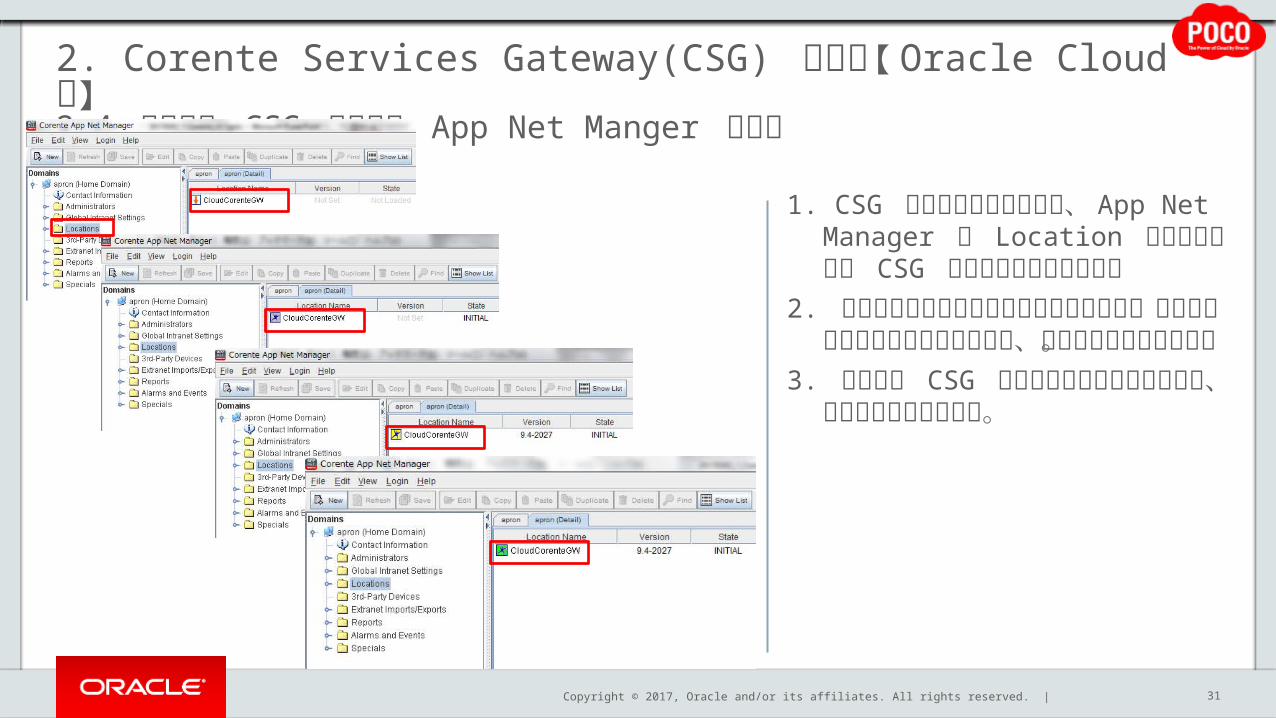
2. Corente Services Gateway(CSG) の構築【 Oracle Cloud 側】2-4 作成した CSG の情報を App Net Manger で確認
31
1. CSG の構築が開始されると、 App Net Manager の Location タブに作成した CSG の名前が表示されます。
2. 構築が進むとステータスが変わっていき、最終的に緑色のステータスになれば、構築が完了となります。
3. 作成した CSG の構成情報を確認する場合は、名前をクリックします。

Copyright © 2017, Oracle and/or its affiliates. All rights reserved. |
2. Corente Services Gateway(CSG) の構築【 Oracle Cloud 側】2-4 作成した CSG の情報を App Net Manger で確認
32
1. Location タブでは構築した CSG の地域情報などが記載されています。# 今回のケースでは、 US のデータセンター環境に構築しています。

Copyright © 2017, Oracle and/or its affiliates. All rights reserved. |
2. Corente Services Gateway(CSG) の構築【 Oracle Cloud 側】2-4 作成した CSG の情報を App Net Manger で確認
33
1. 次に Network タブをクリックします。
2. LAN Interface には、割り当てた IP Network のアドレス及びサブネットマスクが反映されています。
3. WAN Interface には、自動的に割り当てられた Private IP のアドレスが指定されています。
Copyright © 2017, Oracle and/or its affiliates. All rights reserved. |
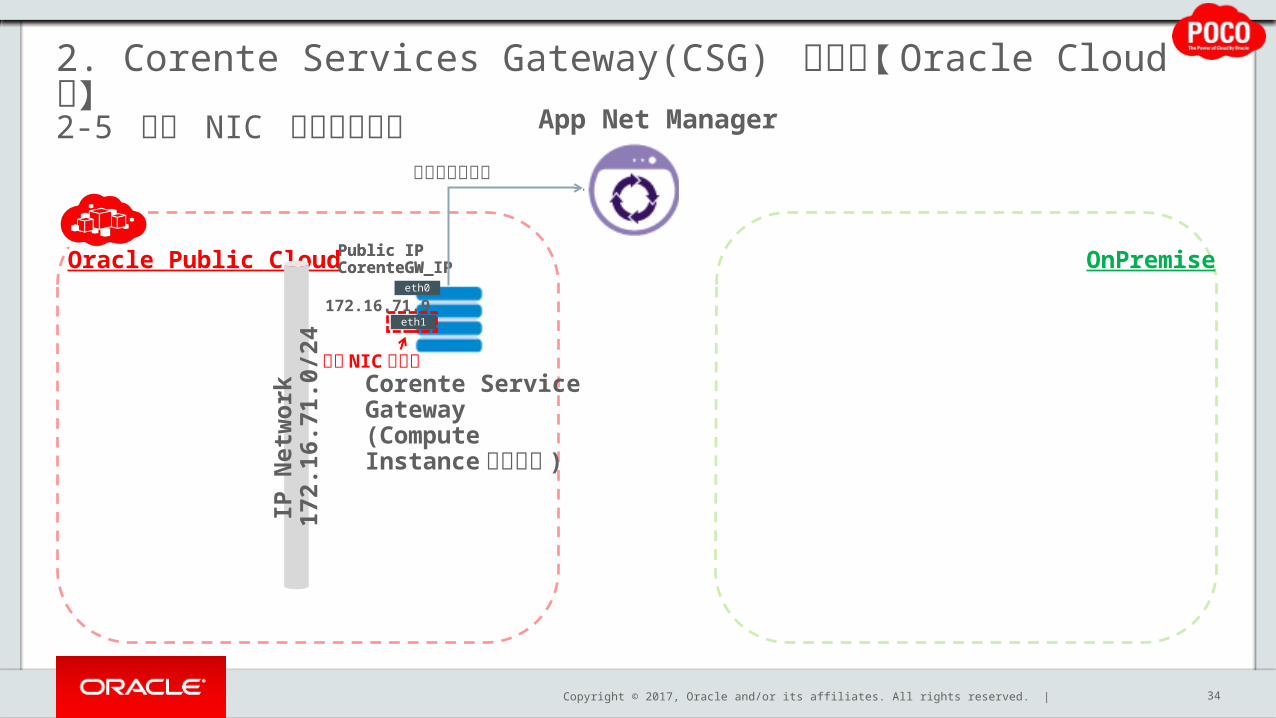
2. Corente Services Gateway(CSG) の構築【 Oracle Cloud 側】2-5 仮想 NIC セットの設定
34
App Net Manager
Oracle Public Cloud Public IPCorenteGW_IP OnPremise
IP N
etw
ork
17
2.16
.71.
0/24
Corente Service Gateway(Compute Instance 上で稼働 )
172.16.71.9
Public IPCorenteGW_IP
eth1
eth0
構成情報が反映
仮想 NIC セット

Copyright © 2017, Oracle and/or its affiliates. All rights reserved. |
2. Corente Services Gateway(CSG) の構築【 Oracle Cloud 側】2-5 仮想 NIC セットの設定
35
1. IP Network からオンプレミスの特定ネットワークに出る経路を設定します。
2. まず、 VNIC Set を定義します。3. Network タブの VNIC Set を選
択し、 Create VNIC Set をクリックします。
4. Name 欄に任意の VNIC Set 名を入力します。
5. VNIC List に、作成した CSG のNIC を選択し、 Create をクリックします。
Copyright © 2017, Oracle and/or its affiliates. All rights reserved. |
2. Corente Services Gateway(CSG) の構築【 Oracle Cloud 側】2-5 仮想 NIC セットの設定
36
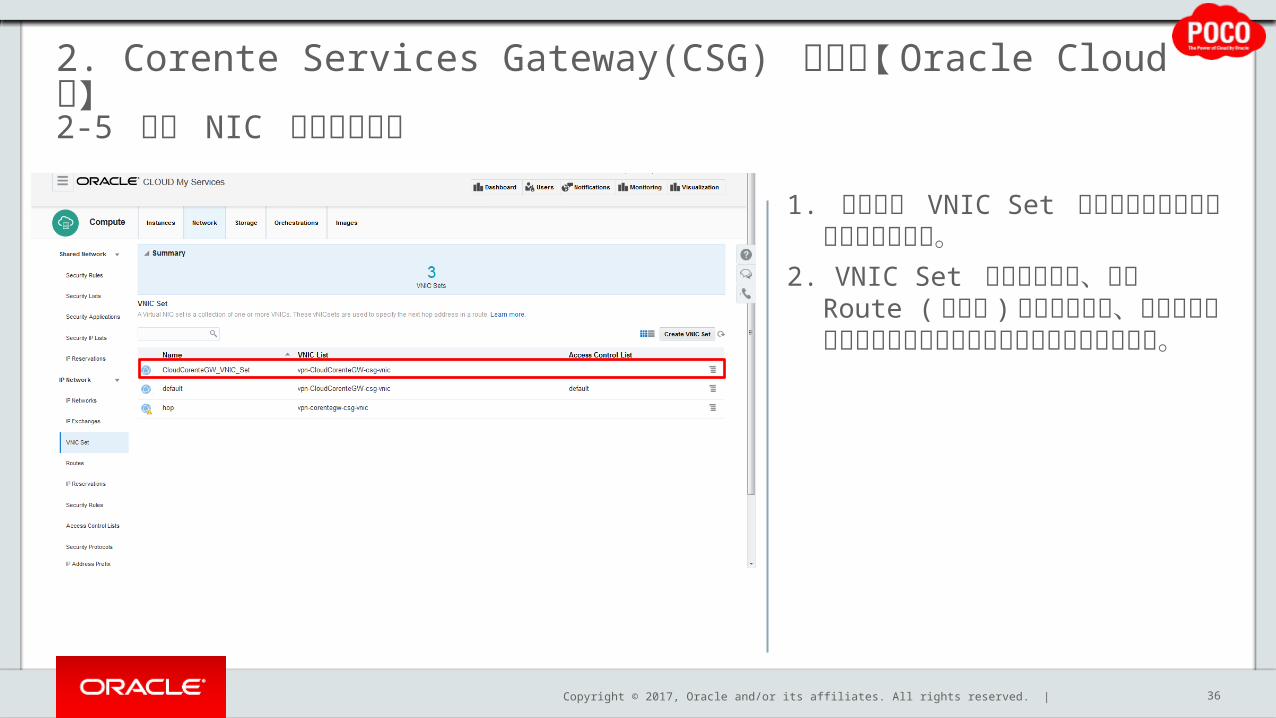
1. 作成した VNIC Set が表示されていることを確認します。
2. VNIC Set の作成完了後、次に Route ( ルート ) の設定を行い、オンプレミスの特定ネットワークに出る経路を定義します。

Copyright © 2017, Oracle and/or its affiliates. All rights reserved. |
2. Corente Services Gateway(CSG) の構築【 Oracle Cloud 側】2-6 ルートの設定
37
App Net Manager
Oracle Public Cloud Public IPCorenteGW_IP OnPremise
IP N
etw
ork
17
2.16
.71.
0/24
Corente Service Gateway(Compute Instance 上で稼働 )
172.16.71.9
Public IPCorenteGW_IP
eth1
eth0
構成情報が反映
仮想 NIC セットルート
Copyright © 2017, Oracle and/or its affiliates. All rights reserved. |
2. Corente Services Gateway(CSG) の構築【 Oracle Cloud 側】2-6 ルートの設定
38
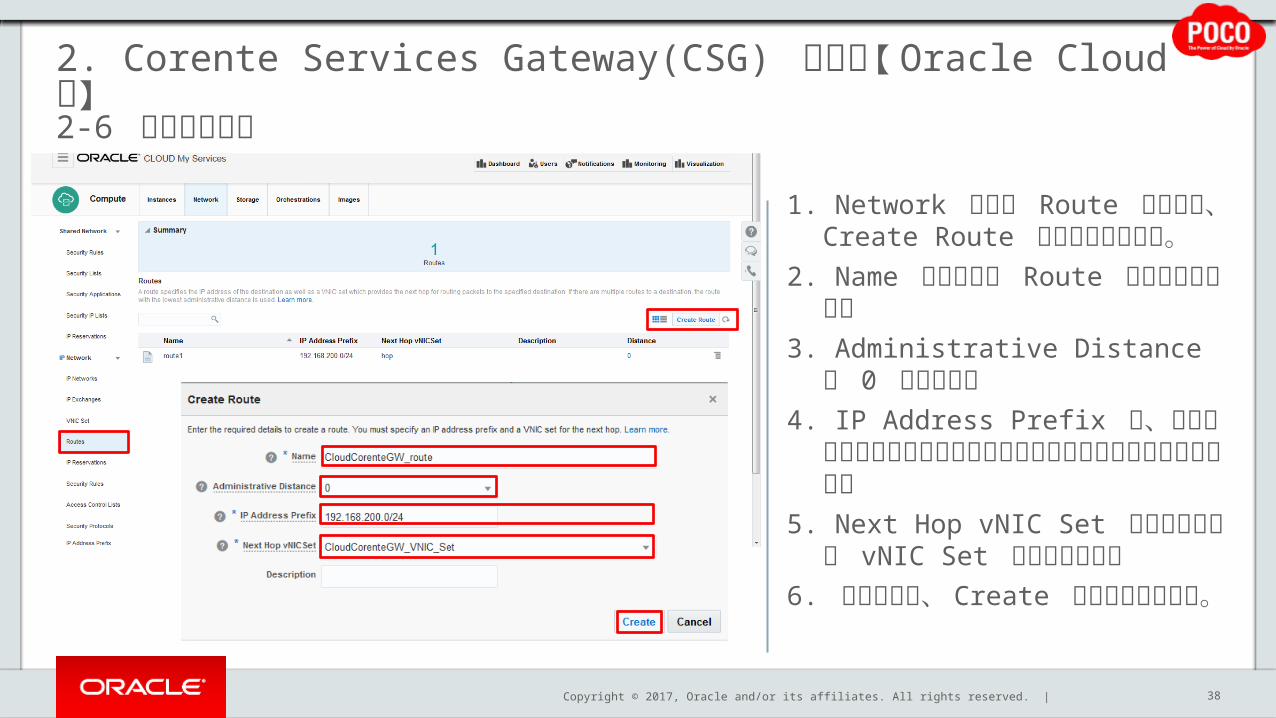
1. Network タブの Route を選択し、 Create Route をクリックします。
2. Name 欄に任意の Route 名を入力します。
3. Administrative Distance は 0 にします。
4. IP Address Prefix に、接続したいオンプレミス環境のネットワークレンジを指定します。
5. Next Hop vNIC Set に先程作成した vNIC Set を指定します。
6. 上記入力後、 Create をクリックします。
Copyright © 2017, Oracle and/or its affiliates. All rights reserved. |
2. Corente Services Gateway(CSG) の構築【 Oracle Cloud 側】2-6 ルートの設定
39
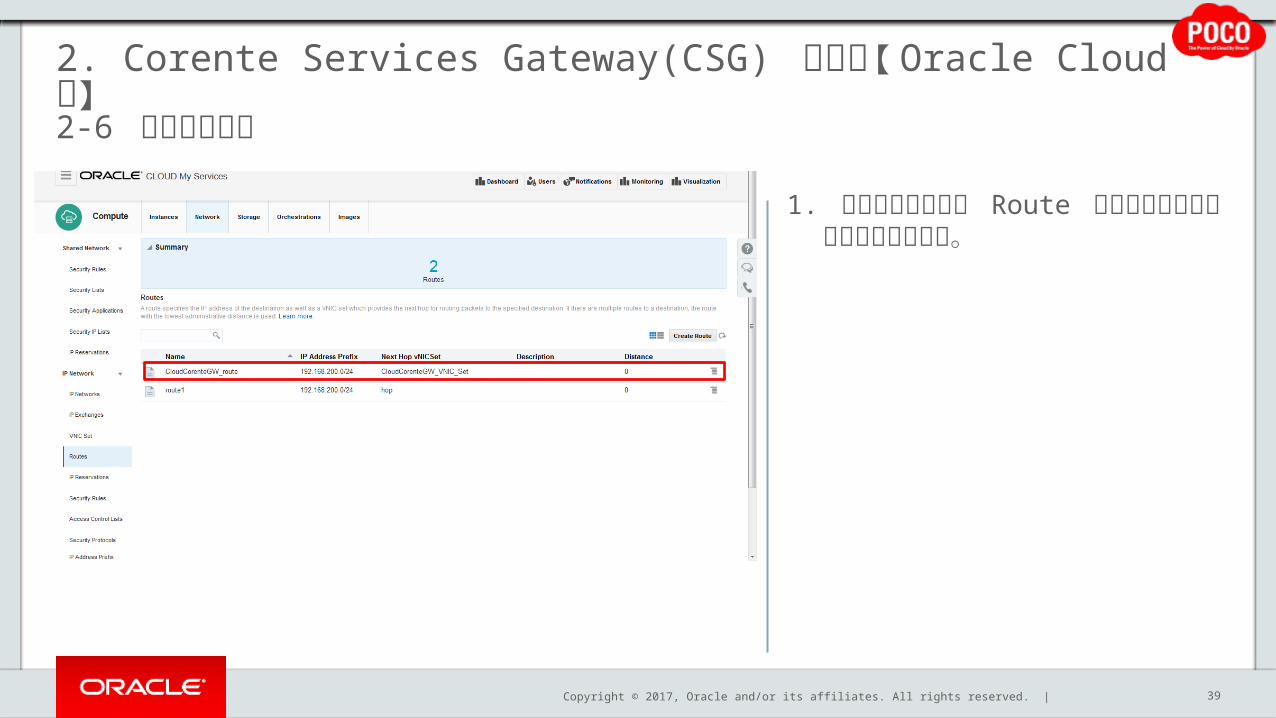
1. 画面上に作成した Route が表示されていることを確認します。
Copyright © 2017, Oracle and/or its affiliates. All rights reserved. |
3. Corente Services Gateway(CSG) の構築【オンプレミス側】3-1 App Net Manager を使用した CSG の構成情報の事前作成
40
App Net Manager
Oracle Public Cloud Public IPCorenteGW_IP OnPremise
IP N
etw
ork
17
2.16
.71.
0/24
Corente Service Gateway(Compute Instance 上で稼働 )
172.16.71.9
Public IPCorenteGW_IP
eth1
eth0
構成情報が反映
仮想 NIC セットルート
構成情報の作成
Copyright © 2017, Oracle and/or its affiliates. All rights reserved. | 41
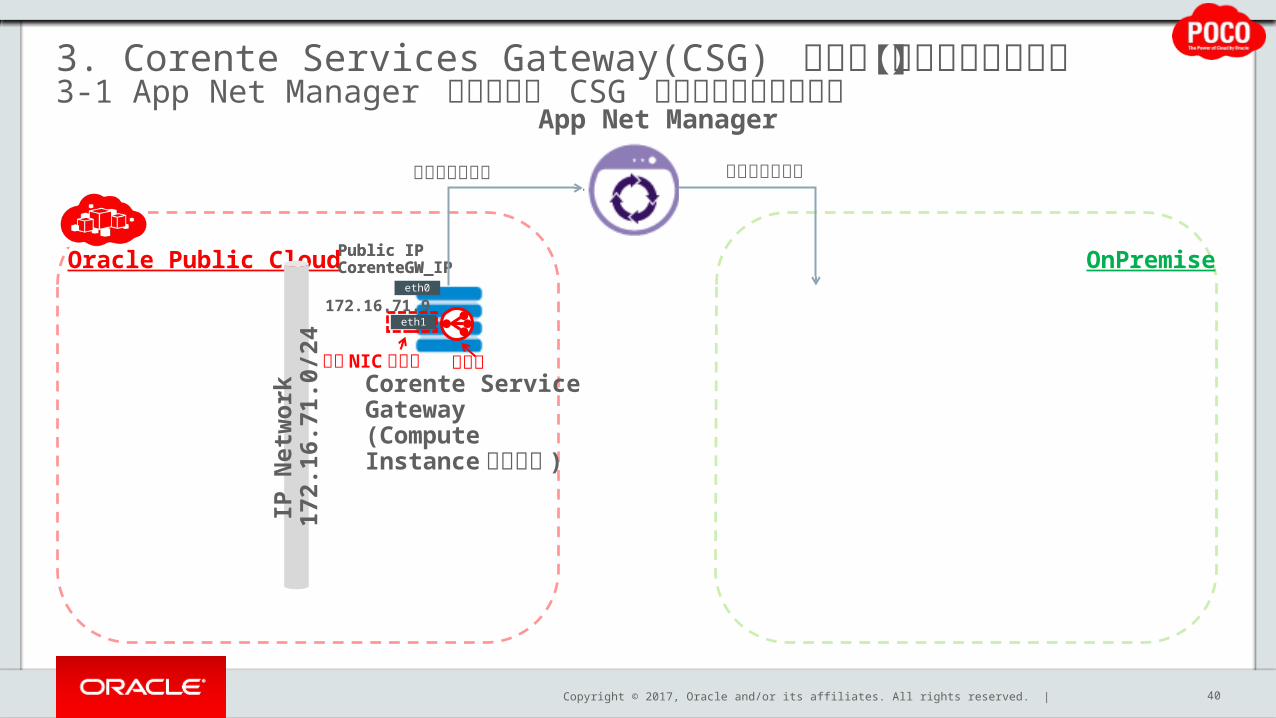
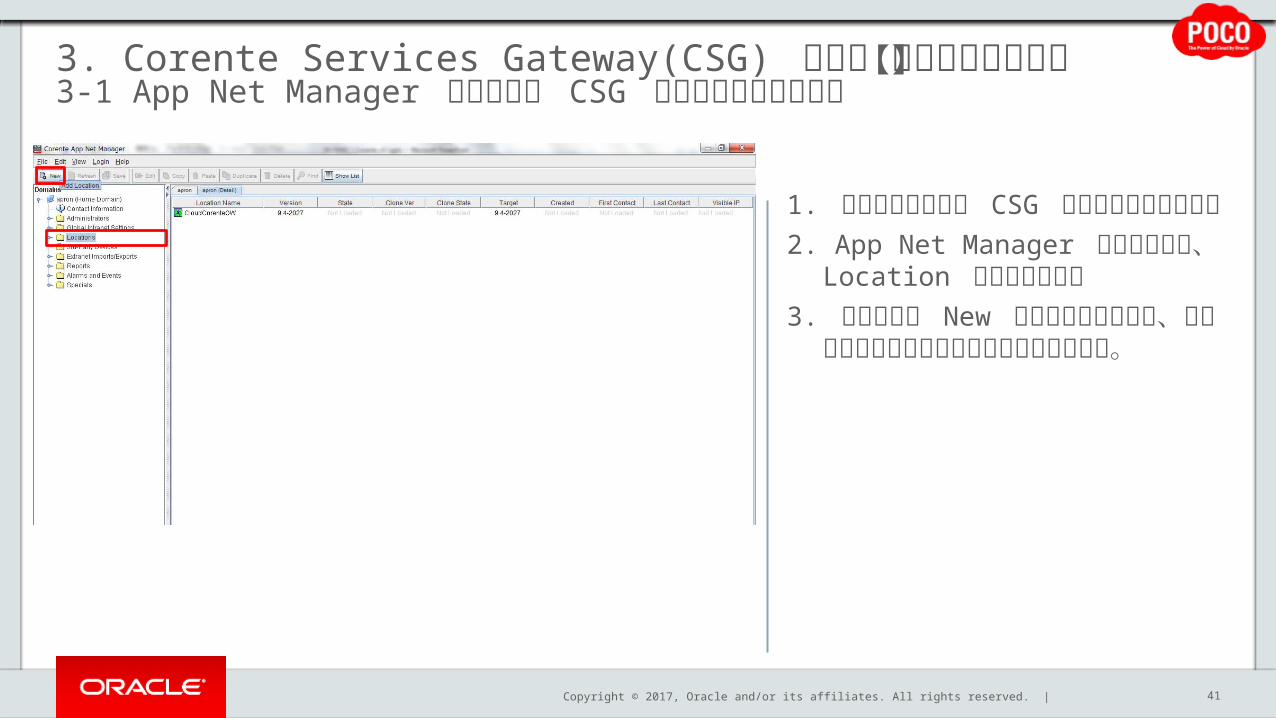
1. オンプレミス側に CSG を構築していきます。
2. App Net Manager にログインし、Location を選択します。
3. 画面左上の New ボタンをクリックし、コンフィグレーション情報を設定してきます。
3. Corente Services Gateway(CSG) の構築【オンプレミス側】3-1 App Net Manager を使用した CSG の構成情報の事前作成
Copyright © 2017, Oracle and/or its affiliates. All rights reserved. | 42
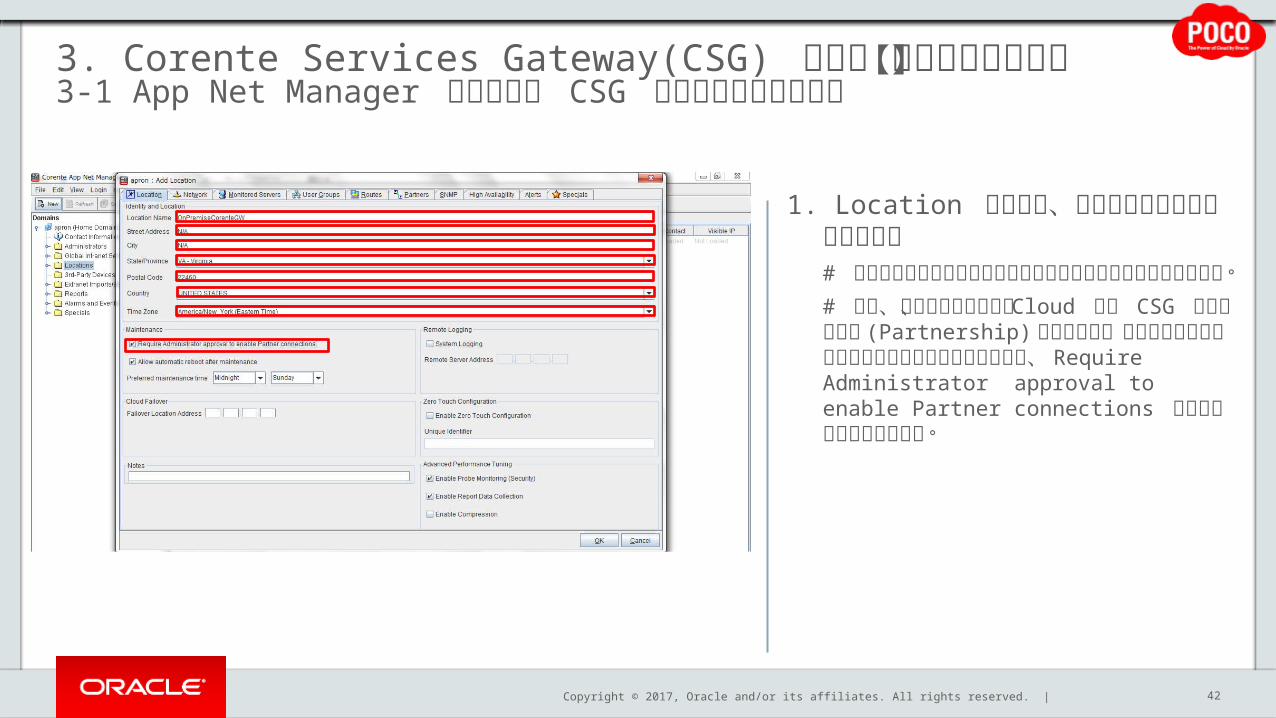
1. Location タブでは、地域情報を入力していきます。# 今回はバージニア州の環境をオンプレミス環境と見立てています。
# また、任意となりますが、 Cloud 側の CSG との接続設定 (Partnership) を行う際に、セキュリティの都合上パスワード入力をさせるために、 Require Administrator approval to enable Partner connections にチェックを入れています。
3. Corente Services Gateway(CSG) の構築【オンプレミス側】3-1 App Net Manager を使用した CSG の構成情報の事前作成
Copyright © 2017, Oracle and/or its affiliates. All rights reserved. |
3. Corente Services Gateway(CSG) の構築【オンプレミス側】3-1 App Net Manager を使用した CSG の構成情報の事前作成
43
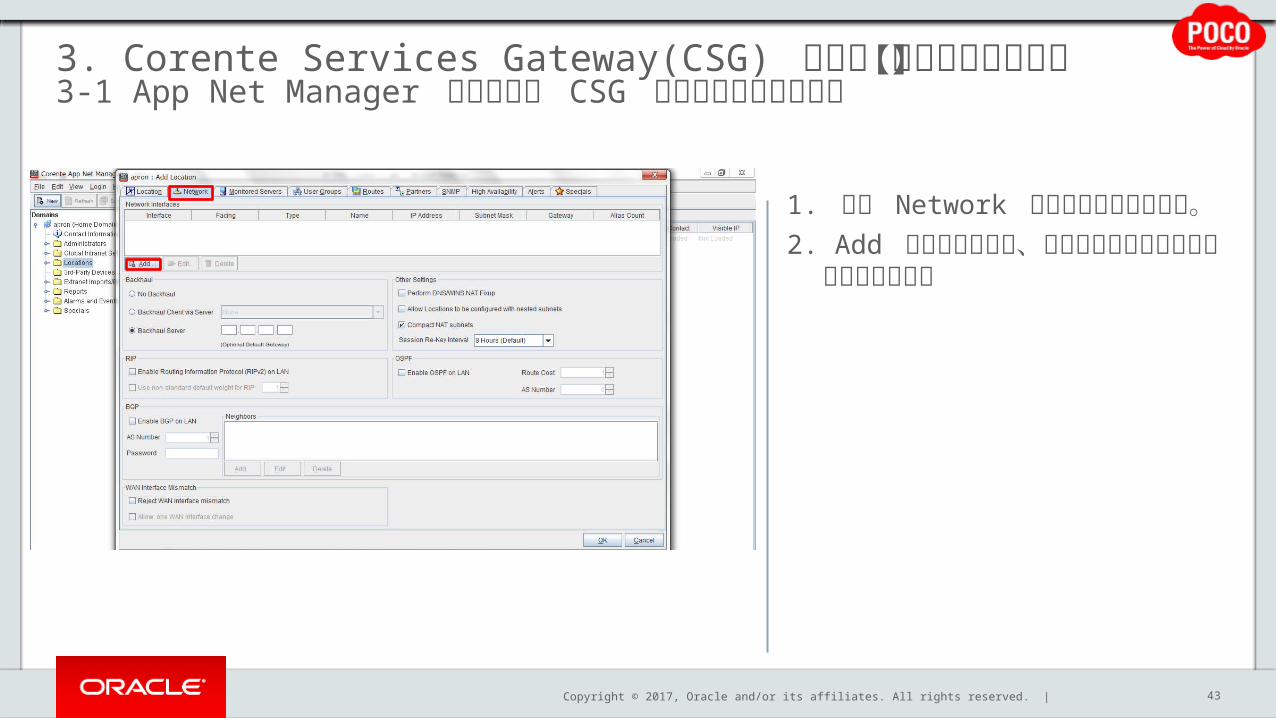
1. 次に Network タブをクリックします。
2. Add ボタンを選択し、ネットワーク情報を入力していきます。
Copyright © 2017, Oracle and/or its affiliates. All rights reserved. | 44
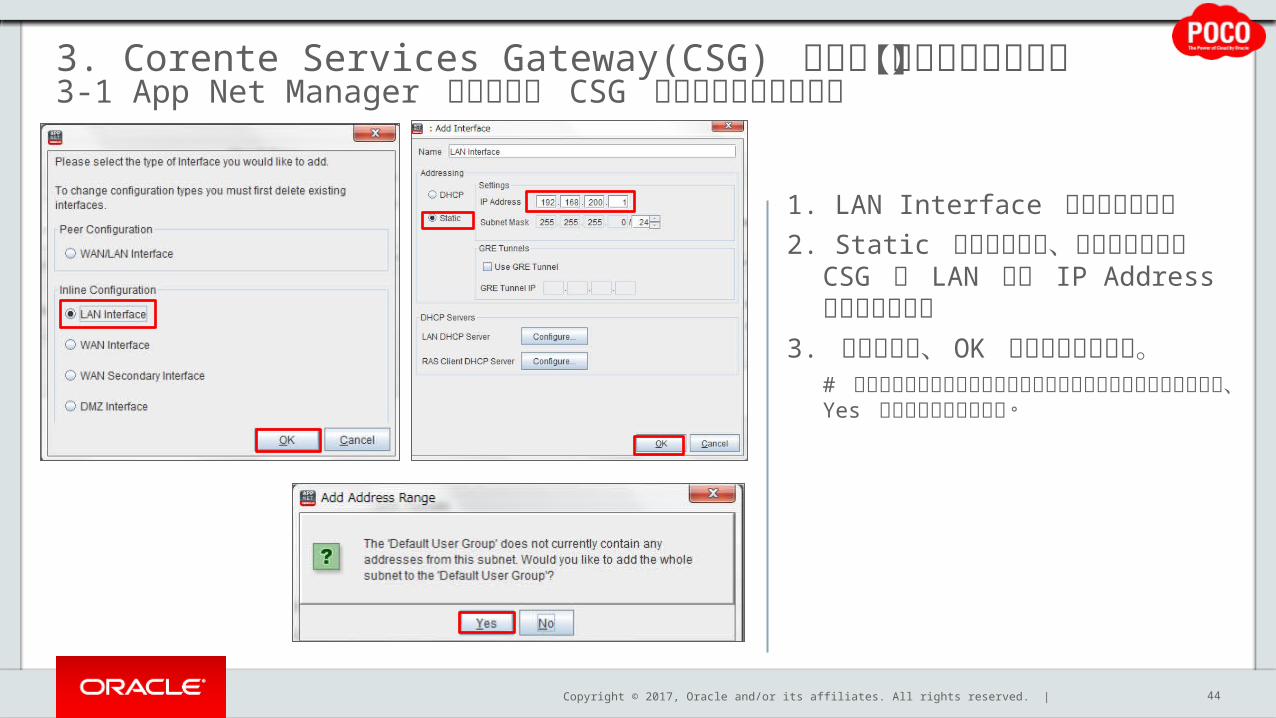
1. LAN Interface を選択します。2. Static をクリックし、オンプレ
ミスの CSG の LAN 用の IP Address を入力します。
3. 入力完了後、 OK をクリックします。# ユーザーグループの設定に関するメッセージが表示された場合は、 Yes をクリックして下さい。
3. Corente Services Gateway(CSG) の構築【オンプレミス側】3-1 App Net Manager を使用した CSG の構成情報の事前作成
Copyright © 2017, Oracle and/or its affiliates. All rights reserved. | 45
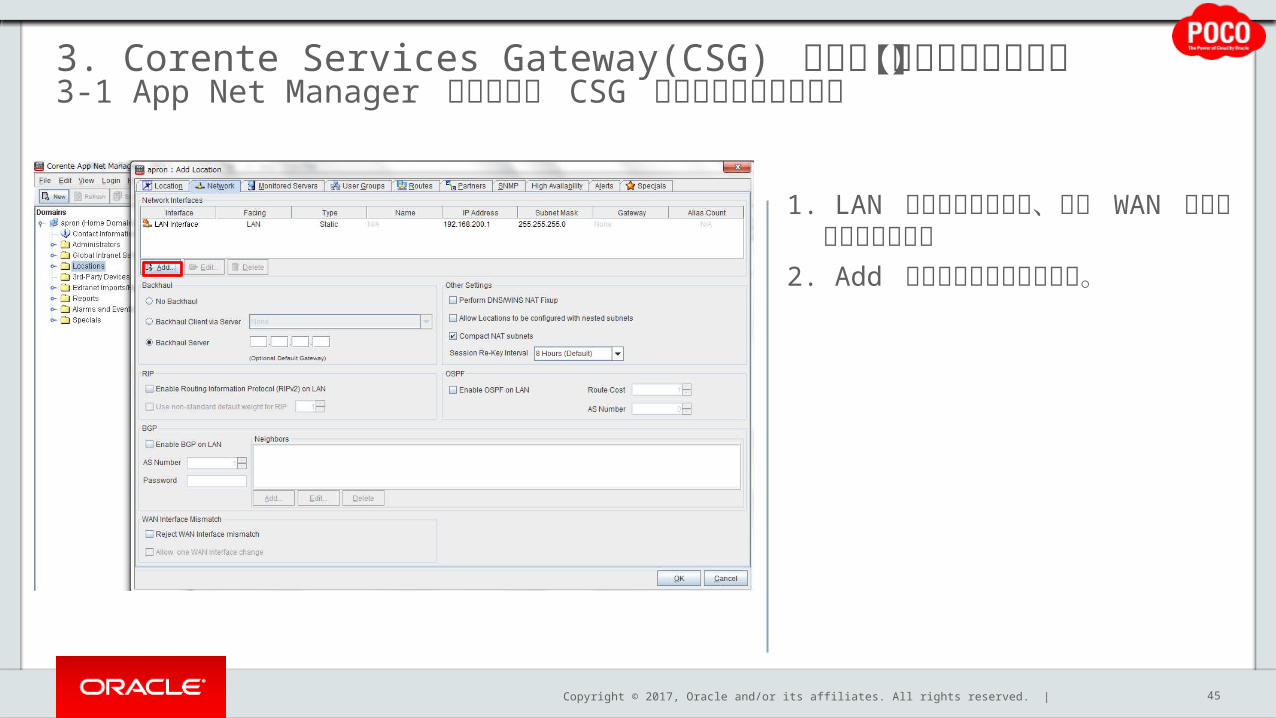
1. LAN 側の設定が完了後、次に WAN 側の設定を加えます。
2. Add ボタンをクリックします。
3. Corente Services Gateway(CSG) の構築【オンプレミス側】3-1 App Net Manager を使用した CSG の構成情報の事前作成
Copyright © 2017, Oracle and/or its affiliates. All rights reserved. | 46
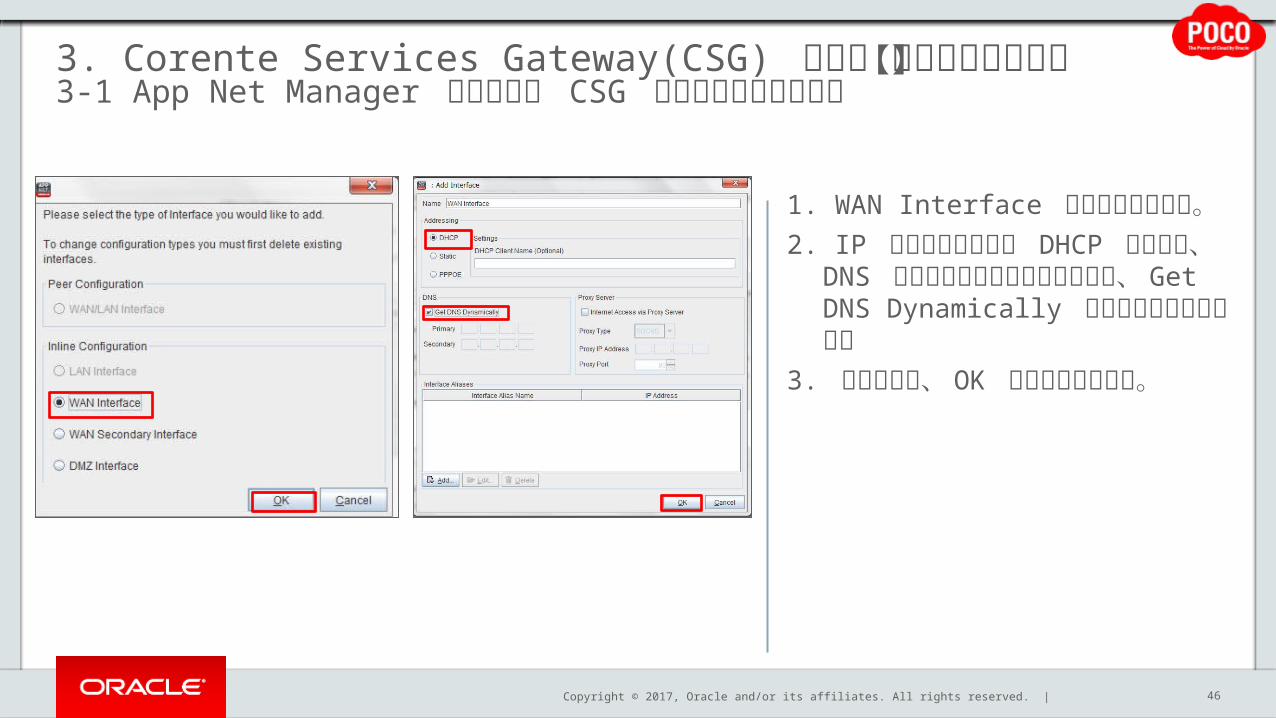
1. WAN Interface をクリックします。
2. IP の割り当て方法に DHCP を選択し、 DNS 情報を自動的に取得できるよう、 Get DNS Dynamically にチェックを入れます。
3. 上記入力後、 OK をクリックします。
3. Corente Services Gateway(CSG) の構築【オンプレミス側】3-1 App Net Manager を使用した CSG の構成情報の事前作成
Copyright © 2017, Oracle and/or its affiliates. All rights reserved. | 47
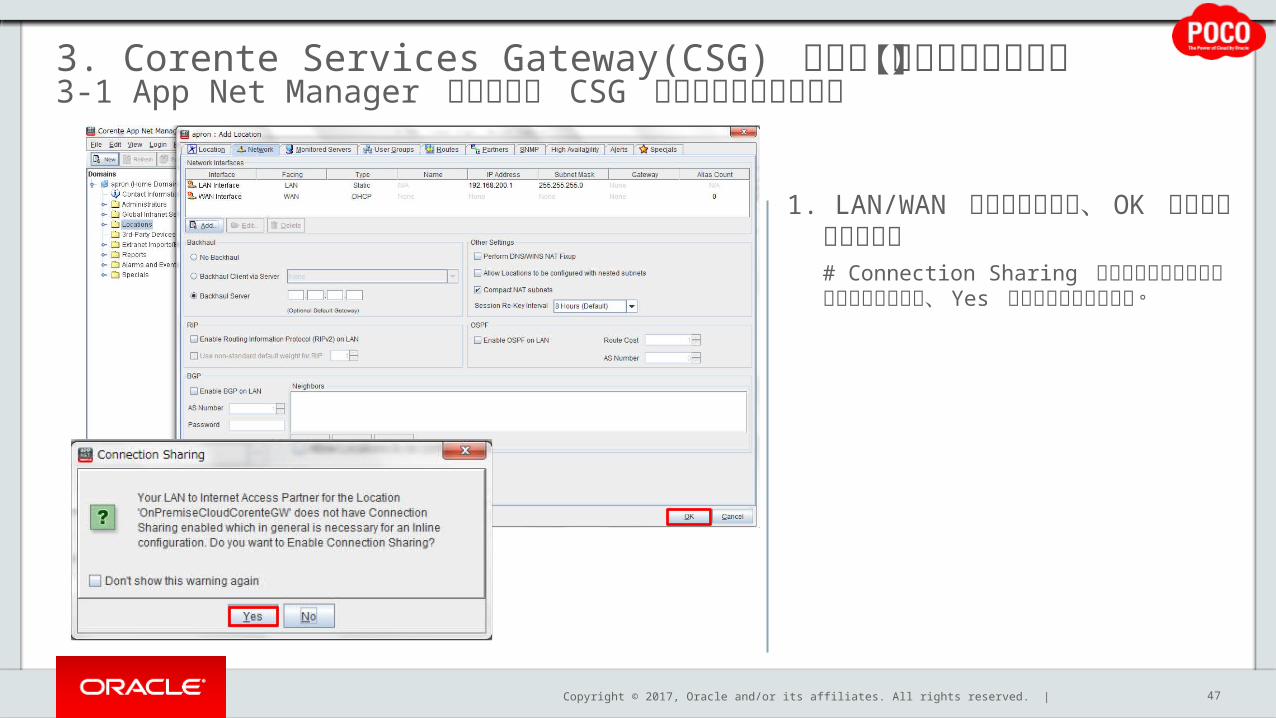
1. LAN/WAN の設定が終了後、 OK をクリックします。# Connection Sharing に関するメッセージが表示された場合は、 Yes をクリックして下さい。
3. Corente Services Gateway(CSG) の構築【オンプレミス側】3-1 App Net Manager を使用した CSG の構成情報の事前作成
Copyright © 2017, Oracle and/or its affiliates. All rights reserved. | 48
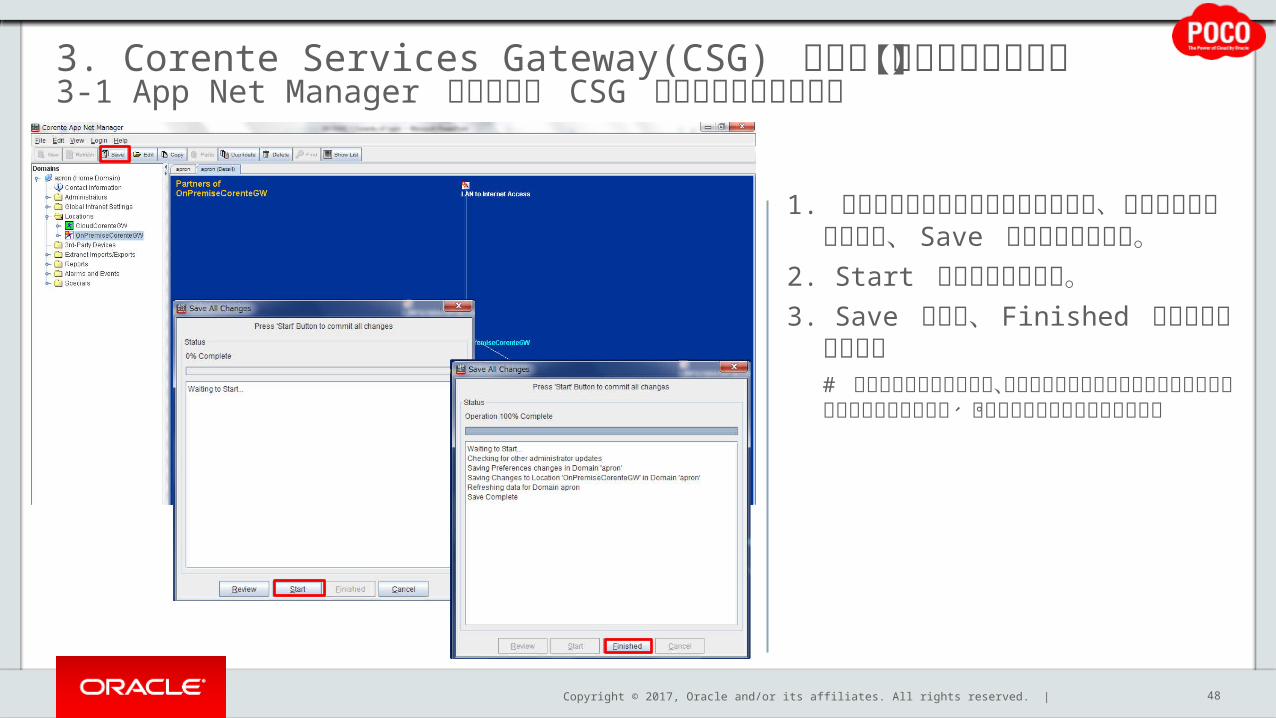
1. コンフィグレーション設定が完了後、情報を保存するために、 Save をクリックします。
2. Start をクリックします。3. Save 終了後、 Finished をク
リックします。# 設定の保存を行わないと、コンフィグレーション情報のダウンロードが実行出来ないため、この作業は必ず実施して下さい。
3. Corente Services Gateway(CSG) の構築【オンプレミス側】3-1 App Net Manager を使用した CSG の構成情報の事前作成
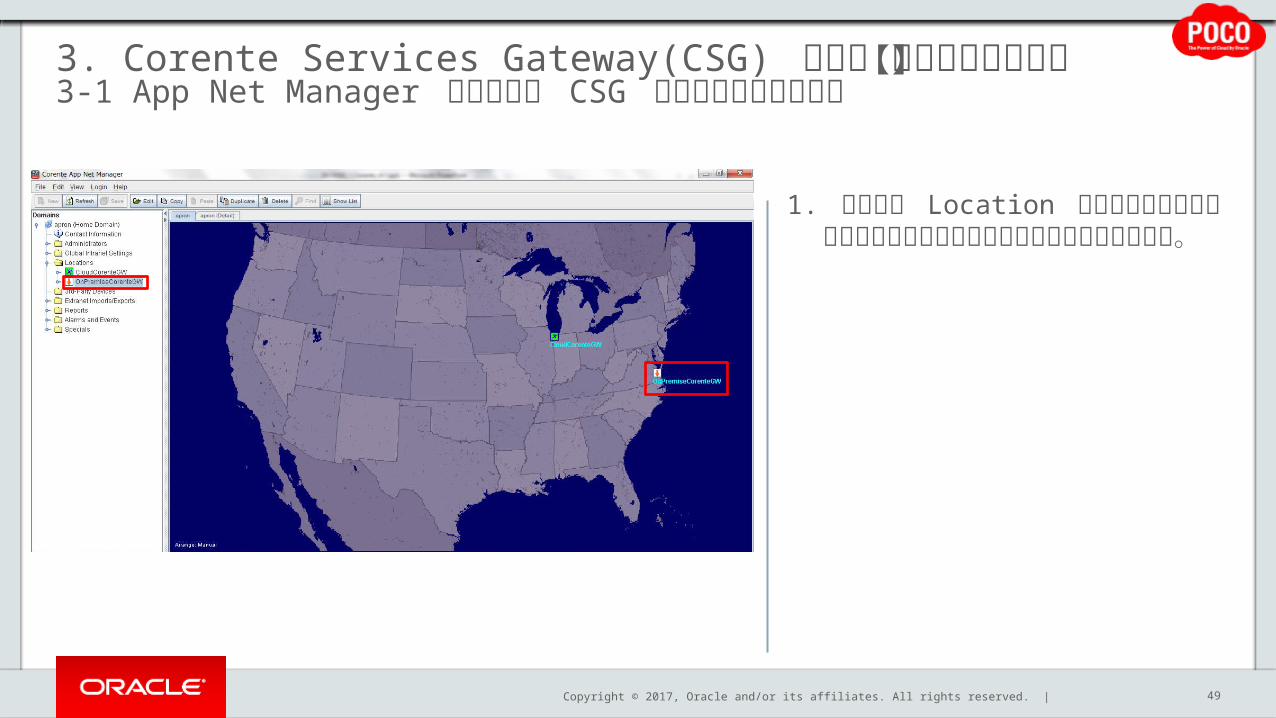
Copyright © 2017, Oracle and/or its affiliates. All rights reserved. | 49
1. 作成した Location のステータスがダウンロード可能な状態になれば事前作業は完了です。
3. Corente Services Gateway(CSG) の構築【オンプレミス側】3-1 App Net Manager を使用した CSG の構成情報の事前作成
Copyright © 2017, Oracle and/or its affiliates. All rights reserved. |
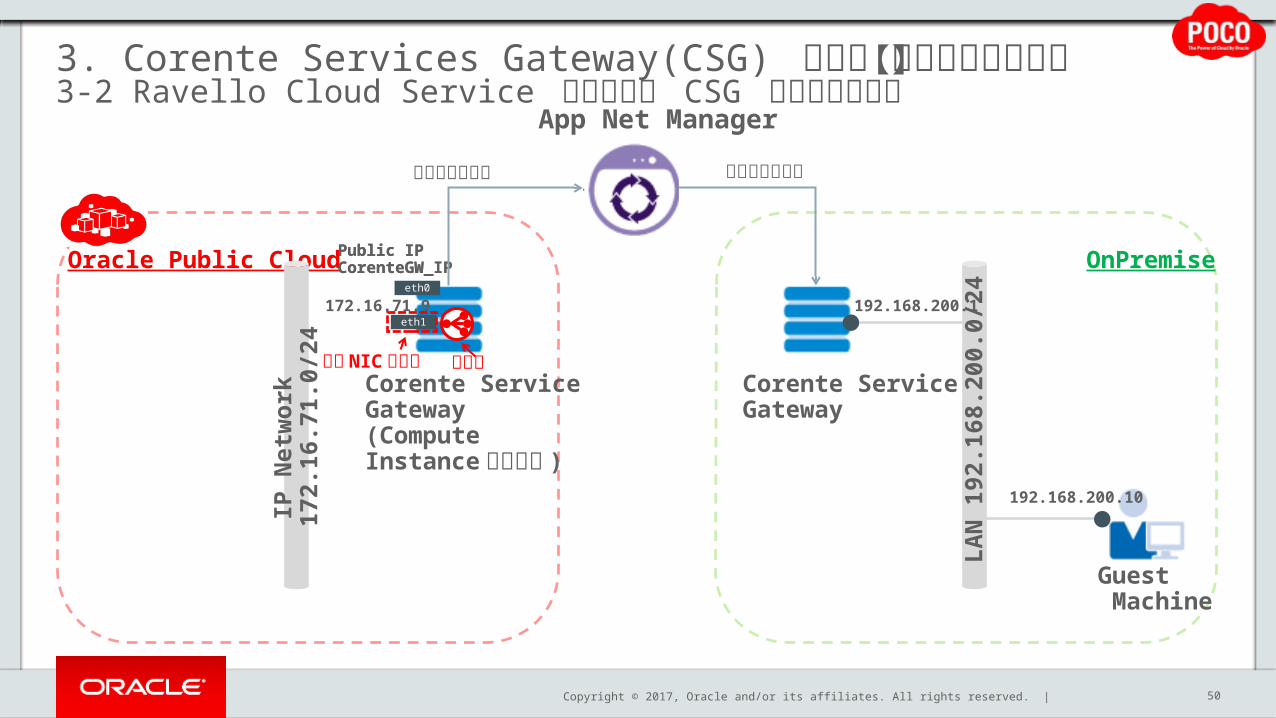
3. Corente Services Gateway(CSG) の構築【オンプレミス側】3-2 Ravello Cloud Service を使用した CSG のセットアップ
50
App Net Manager
Oracle Public Cloud Public IPCorenteGW_IP OnPremise
IP N
etw
ork
17
2.16
.71.
0/24
Corente Service Gateway(Compute Instance 上で稼働 )
172.16.71.9
Public IPCorenteGW_IP
eth1
eth0
構成情報が反映
仮想 NIC セットルート
構成情報の作成
Corente Service Gateway
LAN
192
.168
.200
.0/2
4192.168.200.1
192.168.200.10
Guest Machine

Copyright © 2017, Oracle and/or its affiliates. All rights reserved. | 51
1. Ravello Cloud Service にログインします。
2. Create Application をクリックし、新規のアプリケーションを作成します。
3. Name 欄に任意の Application 名を入力します。
4. From Blueprint から Corente 用の Blueprint を選択します。# この Blueprint は事前に用意しておく必要があります。 Ravello Repo から Corente の VM を入手することも可能です。
3. Corente Services Gateway(CSG) の構築【オンプレミス側】3-2 Ravello Cloud Service を使用した CSG のセットアップ

Copyright © 2017, Oracle and/or its affiliates. All rights reserved. | 52
1. Canvas 上に Corente VM と Guest VM が表示されます。# Corente VM が CSG 、 Guest VM が CSG を通じて Cloud 側の環境にアクセスするための VM です。
2. Guest VM にリモートアクセスするための Key ファイルが指定されていないため、エラーメッセージが表示されています。
3. Corente Services Gateway(CSG) の構築【オンプレミス側】3-2 Ravello Cloud Service を使用した CSG のセットアップ
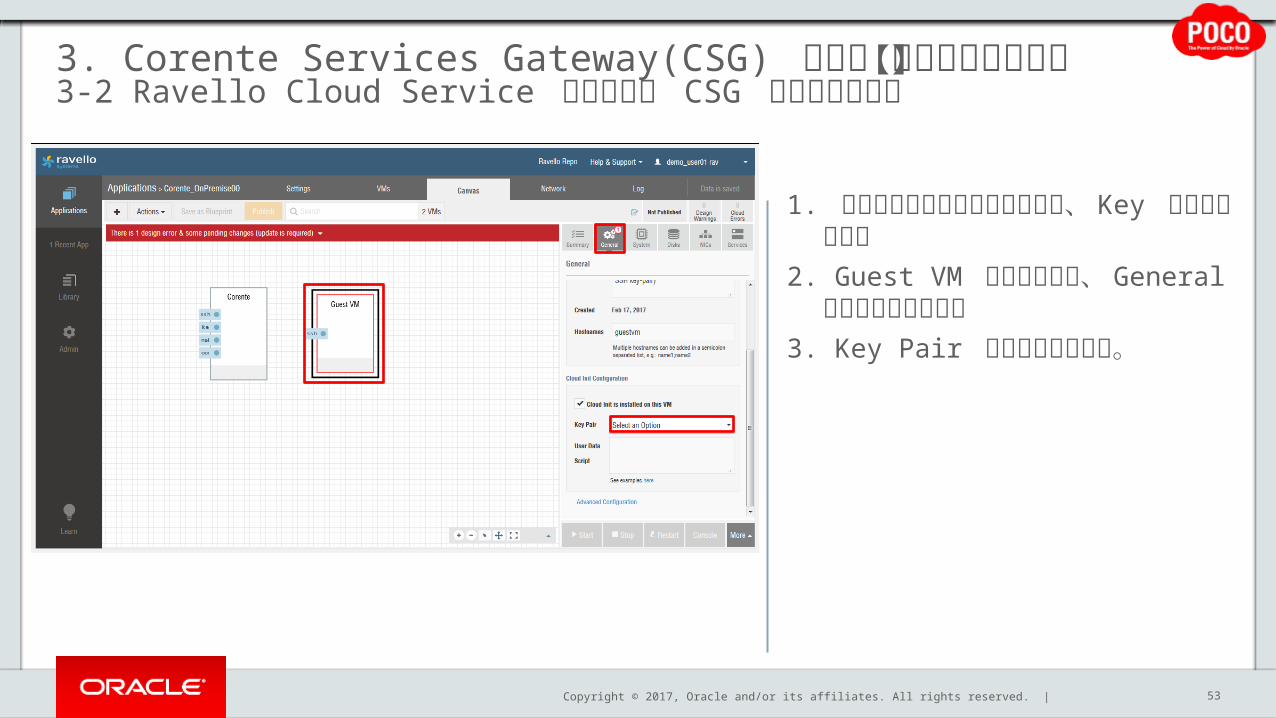
Copyright © 2017, Oracle and/or its affiliates. All rights reserved. | 53
1. エラーメッセージを消すために、Key を生成します。
2. Guest VM をクリックし、 General タブを選択します。
3. Key Pair をクリックします。
3. Corente Services Gateway(CSG) の構築【オンプレミス側】3-2 Ravello Cloud Service を使用した CSG のセットアップ
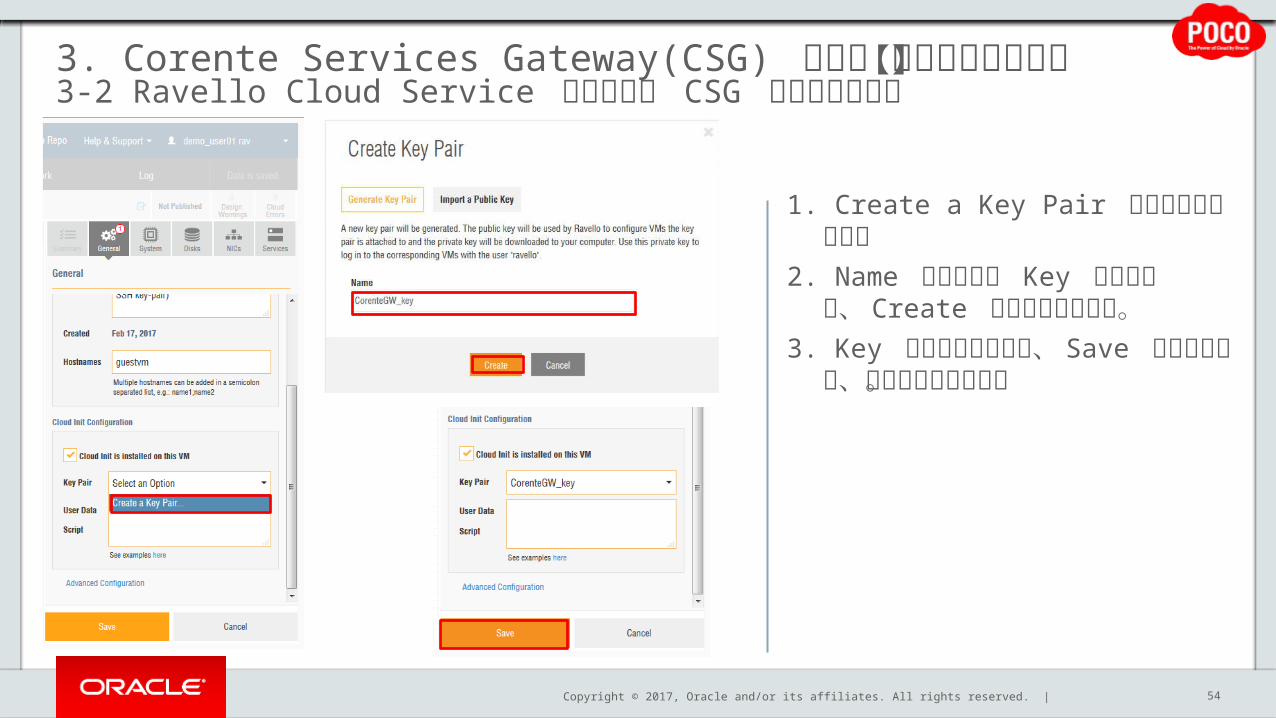
Copyright © 2017, Oracle and/or its affiliates. All rights reserved. | 54
1. Create a Key Pair をクリックします。
2. Name 欄に任意の Key 名を入力し、 Create をクリックします。
3. Key ファイルを保存後、 Save をクリックし、設定を保存します。
3. Corente Services Gateway(CSG) の構築【オンプレミス側】3-2 Ravello Cloud Service を使用した CSG のセットアップ

Copyright © 2017, Oracle and/or its affiliates. All rights reserved. | 55
1. 次に Network タブで、 VM のネットワーク情報を確認します。# Corente VM (192.168.200.1) と Guest VM (192.168.200.10) が192.168.0.0/255.255.0.0 で繋がっており、 Corente VM は外部接続用に 172.16.69.50 の IP も割り当てています。
2. ネットワーク情報を確認後、 Publish ボタンをクリックし、 Public Cloud 環境にデプロイします。
3. Corente Services Gateway(CSG) の構築【オンプレミス側】3-2 Ravello Cloud Service を使用した CSG のセットアップ

Copyright © 2017, Oracle and/or its affiliates. All rights reserved. | 56
1. Performance をクリックし、 Location に US East 1 を選択します。
2. Application の停止時間の設定を、Never にします。
3. 上記入力後、 Publish をクリックします。
3. Corente Services Gateway(CSG) の構築【オンプレミス側】3-2 Ravello Cloud Service を使用した CSG のセットアップ
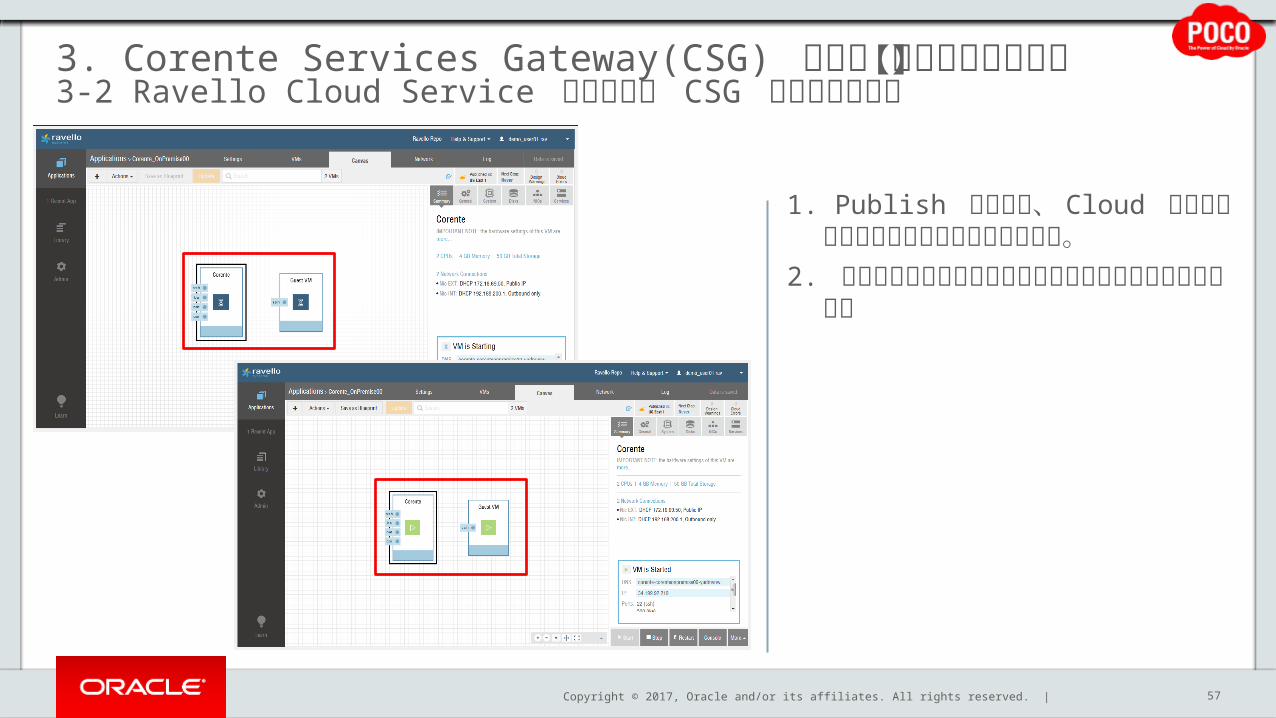
Copyright © 2017, Oracle and/or its affiliates. All rights reserved. | 57
1. Publish を実施後、 Cloud 環境へのデプロイが完了するのを待ちます。
2. ステータスの砂時計マークが緑色になれば準備完了です。
3. Corente Services Gateway(CSG) の構築【オンプレミス側】3-2 Ravello Cloud Service を使用した CSG のセットアップ

Copyright © 2017, Oracle and/or its affiliates. All rights reserved. | 58
1. Corente VM をクリックし、右下にある Console を選択します。
2. リモート接続し、 VM のセットアップが進んでいることを確認します。
3. Corente Services Gateway(CSG) の構築【オンプレミス側】3-2 Ravello Cloud Service を使用した CSG のセットアップ
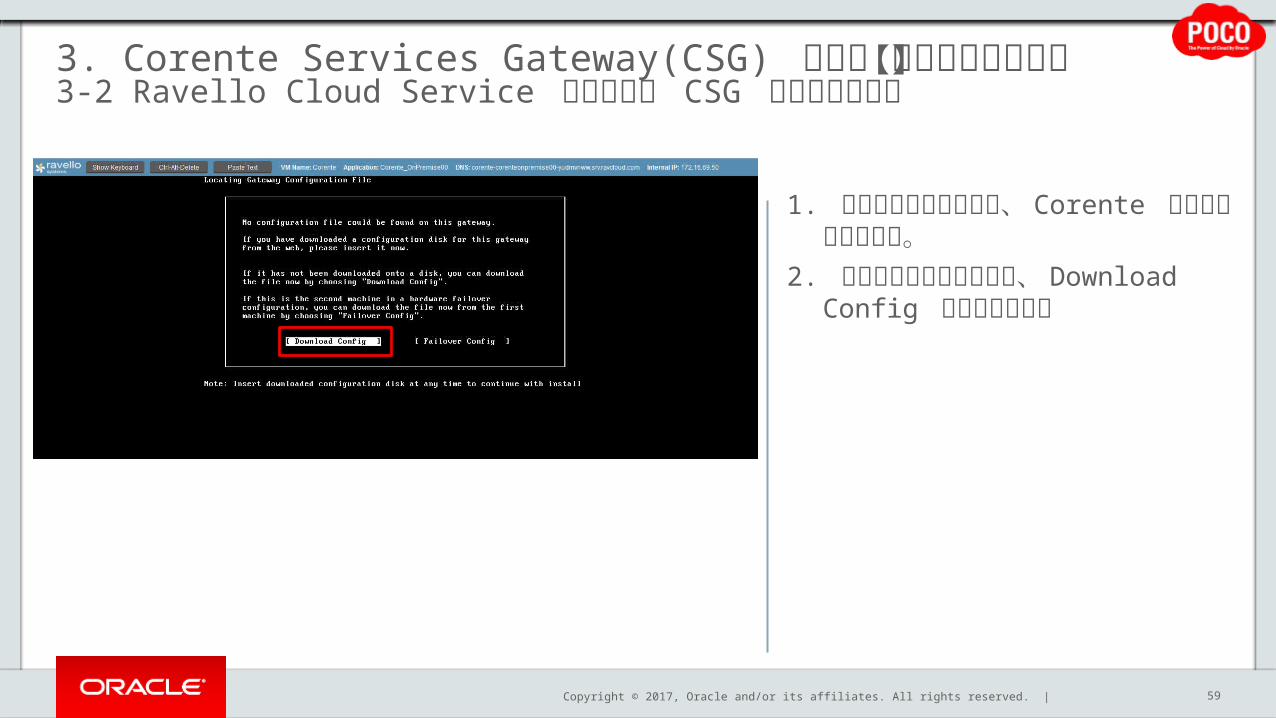
Copyright © 2017, Oracle and/or its affiliates. All rights reserved. | 59
1. セットアップが進むと、 Corente の設定が始まります。
2. 左の画面になりましたら、 Download Config を選択します。
3. Corente Services Gateway(CSG) の構築【オンプレミス側】3-2 Ravello Cloud Service を使用した CSG のセットアップ
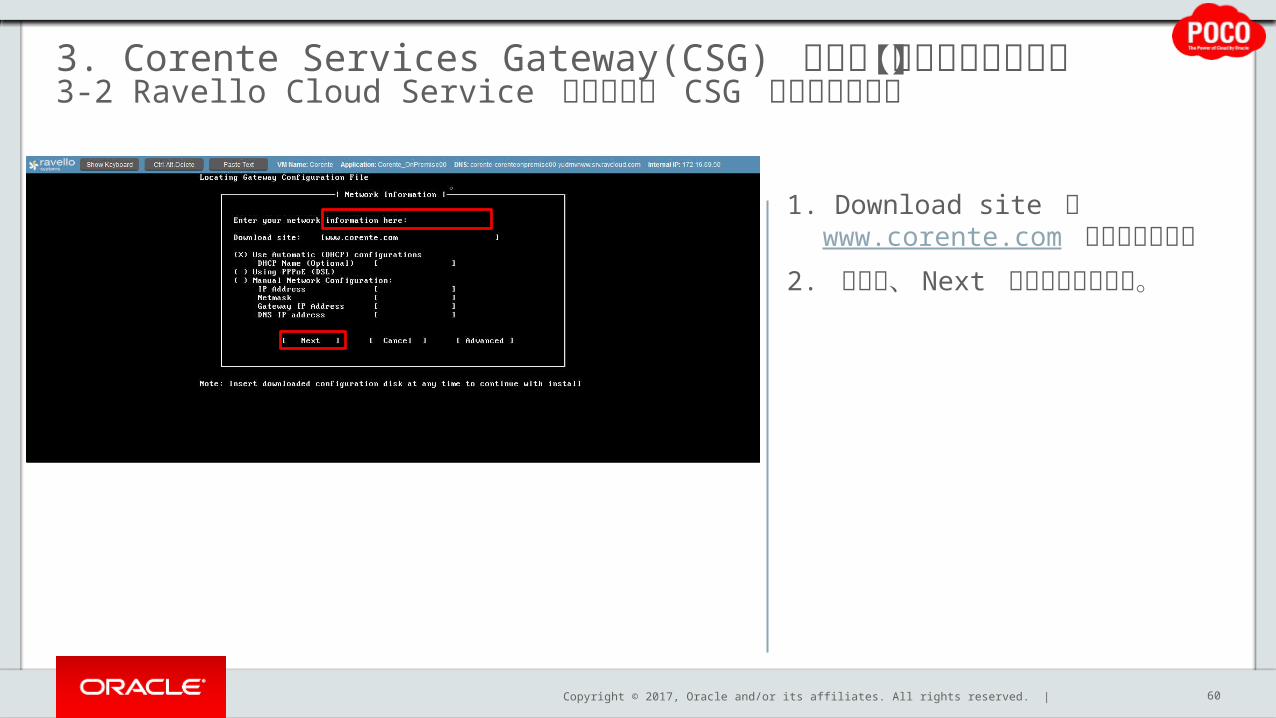
Copyright © 2017, Oracle and/or its affiliates. All rights reserved. | 60
1. Download site に www.corente.com と入力します。
2. 入力後、 Next をクリックします。
3. Corente Services Gateway(CSG) の構築【オンプレミス側】3-2 Ravello Cloud Service を使用した CSG のセットアップ

Copyright © 2017, Oracle and/or its affiliates. All rights reserved. | 61
1. Username と Password に App Net Manager の入力情報と同じユーザー名 /パスワードを入力します。
2. Gateway Name に App Net Manager で作成した、 Location 名を入力します。
3. 上記入力後、 Continue をクリックします。
3. Corente Services Gateway(CSG) の構築【オンプレミス側】3-2 Ravello Cloud Service を使用した CSG のセットアップ
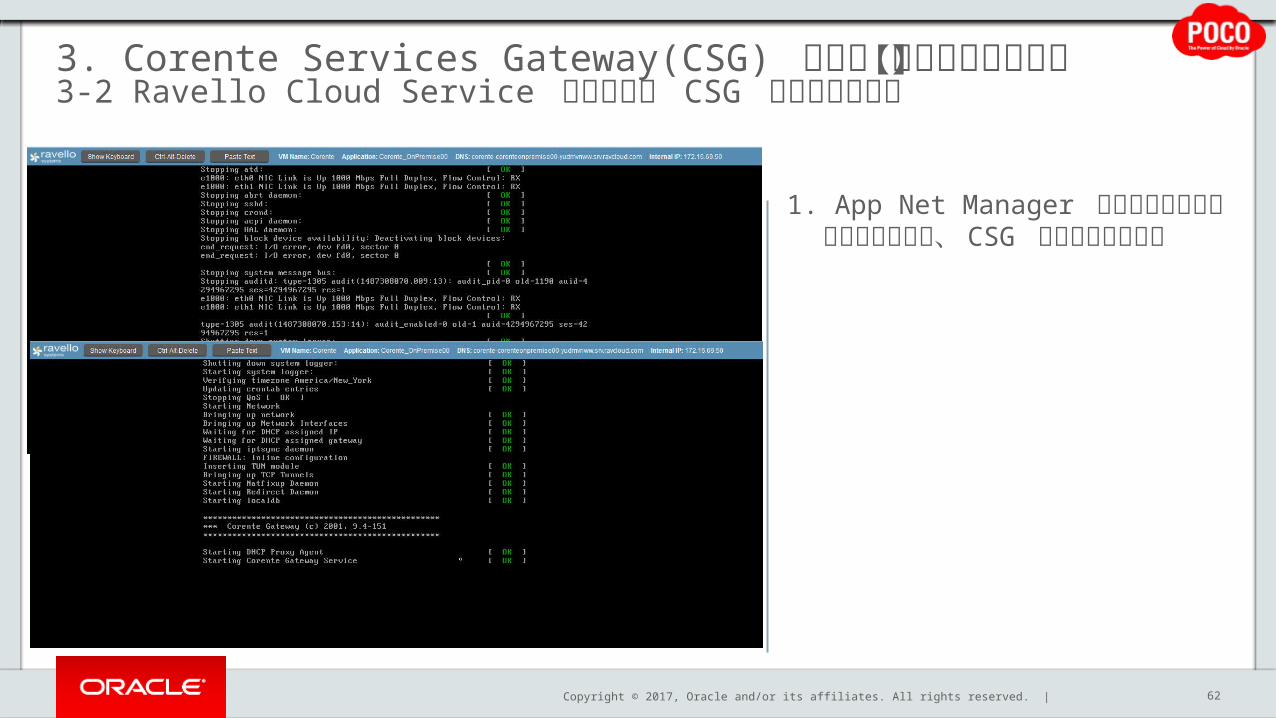
Copyright © 2017, Oracle and/or its affiliates. All rights reserved. | 62
1. App Net Manager で事前作成した構成情報をもとに、 CSG が作成されます。
3. Corente Services Gateway(CSG) の構築【オンプレミス側】3-2 Ravello Cloud Service を使用した CSG のセットアップ
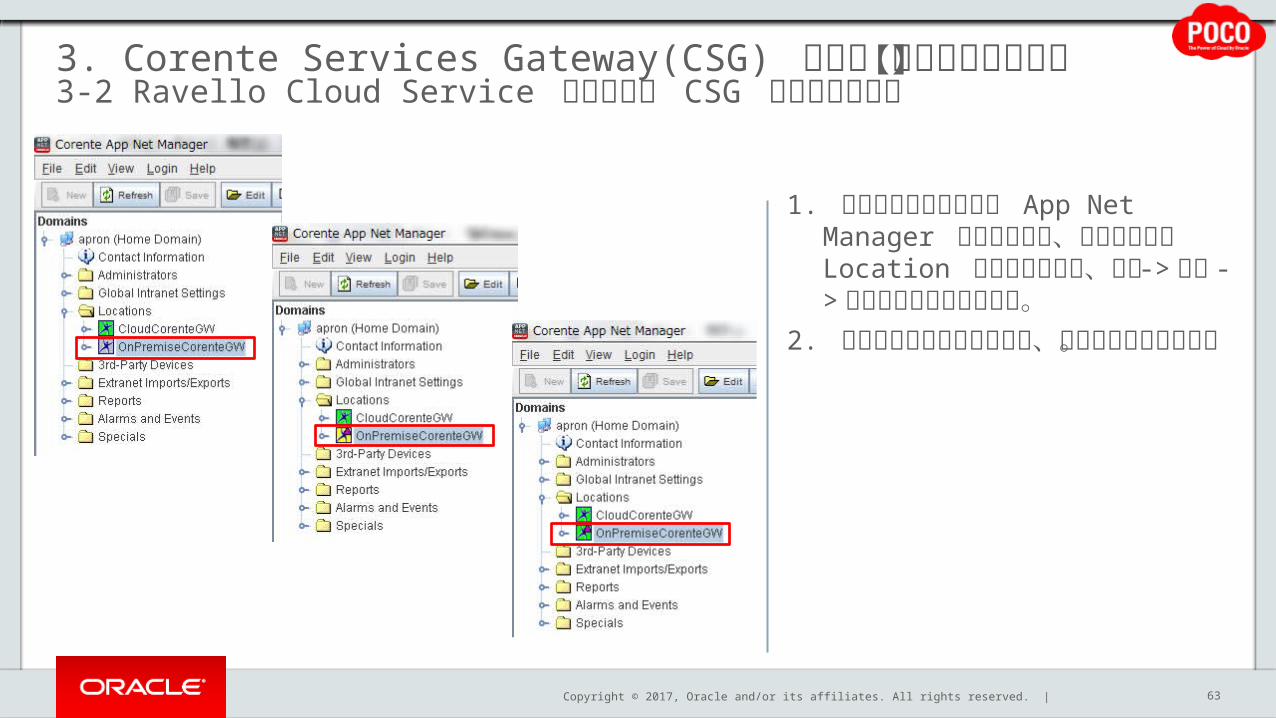
Copyright © 2017, Oracle and/or its affiliates. All rights reserved. | 63
1. 作成が進んでいる間に App Net Manager を確認すると、事前作成した Location のステータスが、灰色 ->黄色 -> 緑色と変わっていきます。
2. ステータスが緑色になれば、構築完了となります。
3. Corente Services Gateway(CSG) の構築【オンプレミス側】3-2 Ravello Cloud Service を使用した CSG のセットアップ
Copyright © 2017, Oracle and/or its affiliates. All rights reserved. |
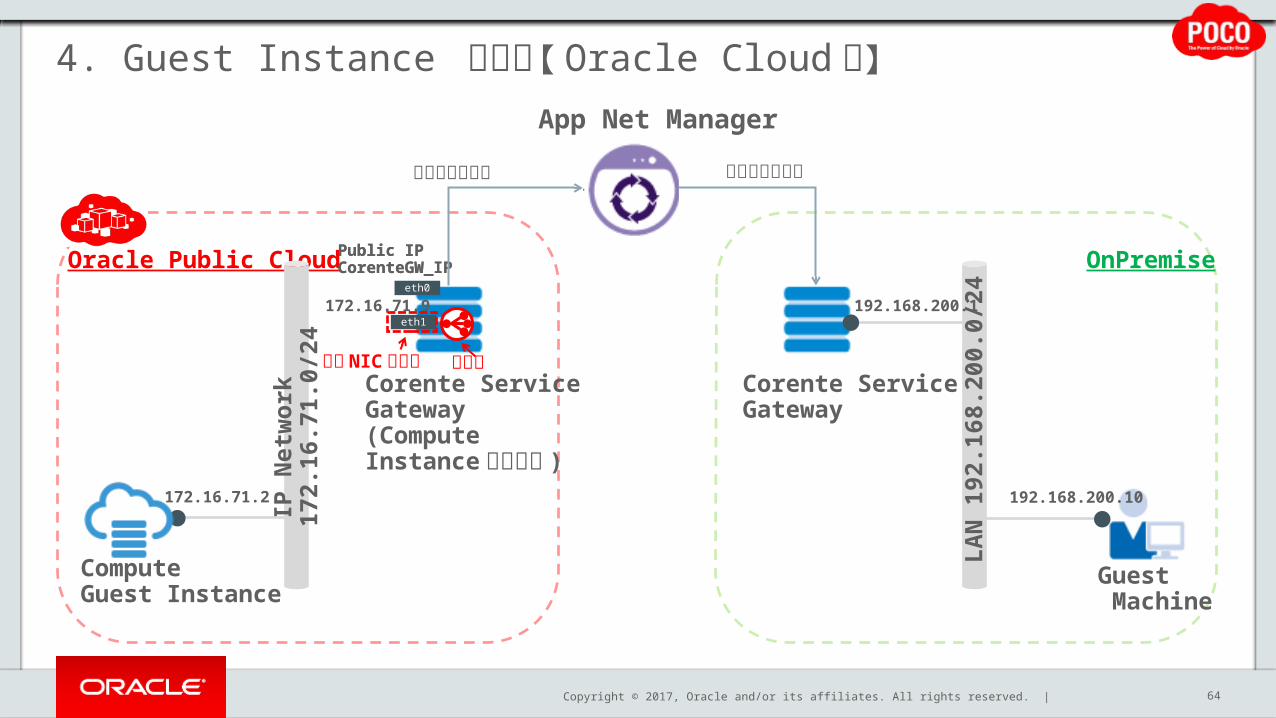
4. Guest Instance の構築【 Oracle Cloud 側】
64
App Net Manager
Oracle Public Cloud Public IPCorenteGW_IP OnPremise
IP N
etw
ork
17
2.16
.71.
0/24
Corente Service Gateway(Compute Instance 上で稼働 )
172.16.71.9
Public IPCorenteGW_IP
eth1
eth0
構成情報が反映
仮想 NIC セットルート
構成情報の作成
Corente Service Gateway
LAN
192
.168
.200
.0/2
4192.168.200.1
192.168.200.10
Guest Machine
172.16.71.2
ComputeGuest Instance
Copyright © 2017, Oracle and/or its affiliates. All rights reserved. |
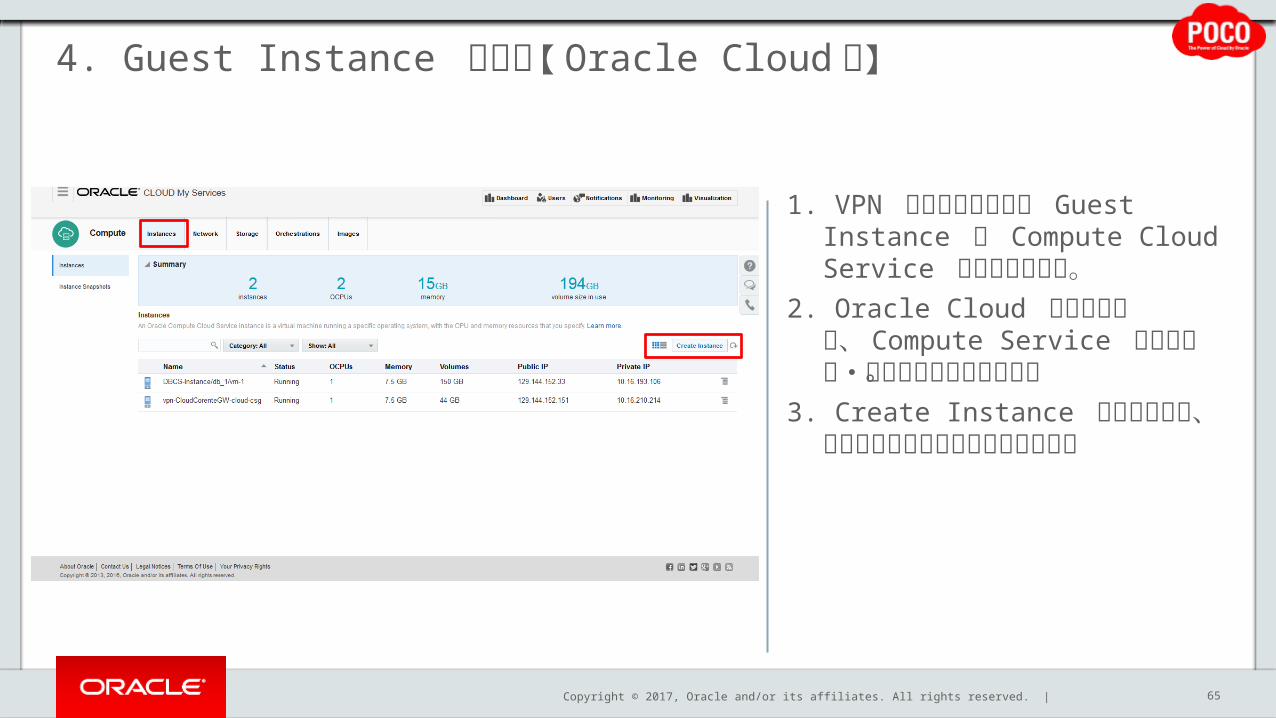
4. Guest Instance の構築【 Oracle Cloud 側】
65
1. VPN で接続するための Guest Instance を Compute Cloud Service 上に作成します。
2. Oracle Cloud にログインし、 Compute Service のサービス・コンソールを開きます。
3. Create Instance をクリックし、新規のインスタンスを作成します。
Copyright © 2017, Oracle and/or its affiliates. All rights reserved. |
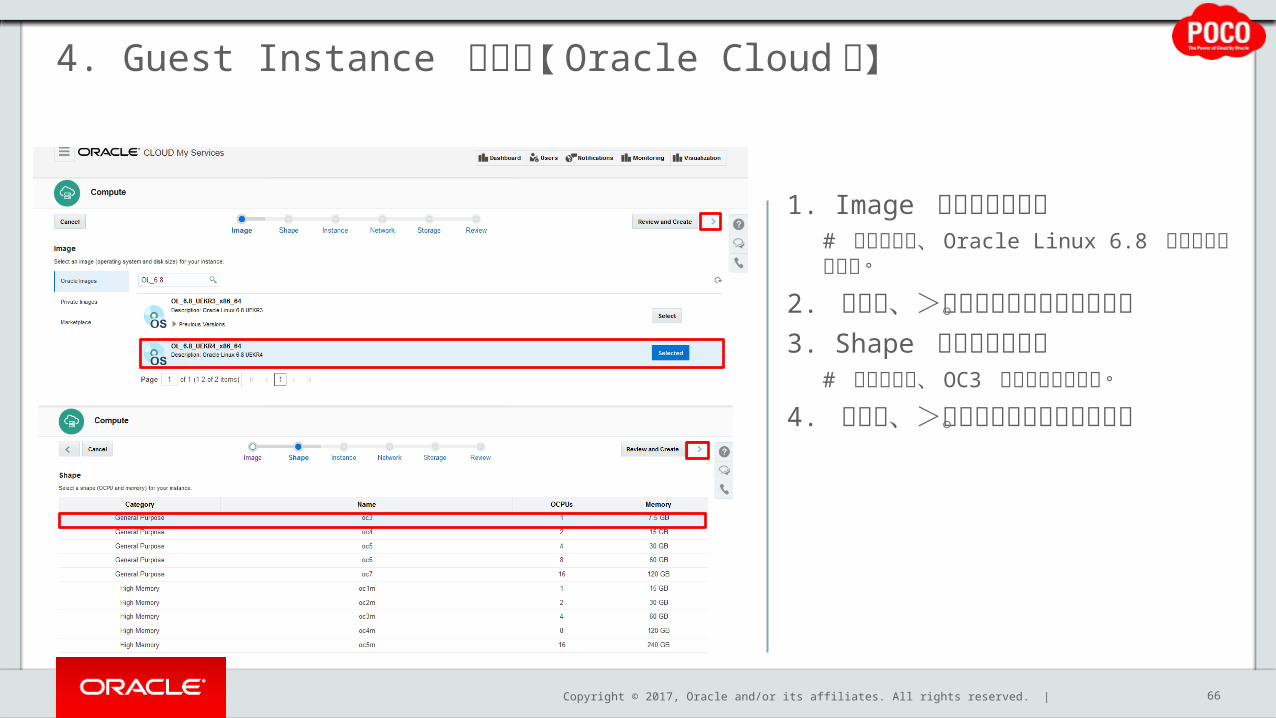
4. Guest Instance の構築【 Oracle Cloud 側】
66
1. Image を選択します。# 左の例では、 Oracle Linux 6.8 を選択しています。
2. 入力後、>ボタンをクリックします。
3. Shape を選択します。# 左の例では、 OC3 を選択しています。
4. 選択後、>ボタンをクリックします。

Copyright © 2017, Oracle and/or its affiliates. All rights reserved. |
4. Guest Instance の構築【 Oracle Cloud 側】
67
1. Instance の詳細情報を入力します。# 左の例では、 Name 及び Label に CloudGuestVM を、 SSH Keys に事前作成済みの Public Key を選択しています。
2. 入力後、>ボタンをクリックします。
Copyright © 2017, Oracle and/or its affiliates. All rights reserved. |
4. Guest Instance の構築【 Oracle Cloud 側】
68
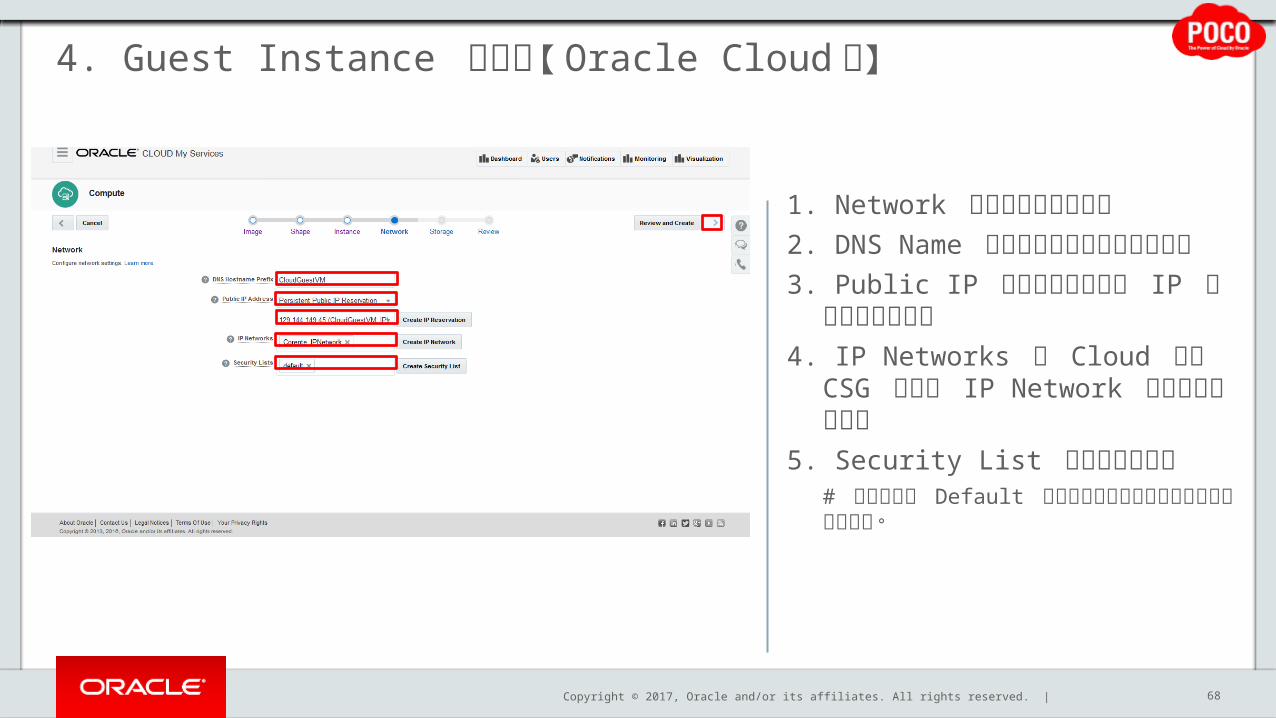
1. Network の設定を行います。2. DNS Name に任意の名前を入力
します。3. Public IP に事前予約済みの IP
を割り当てます。4. IP Networks に Cloud 側の
CSG と同じ IP Network を割り当てます。
5. Security List を設定します。# 左の例では Default のセキュリティリストを割り当てています。
Copyright © 2017, Oracle and/or its affiliates. All rights reserved. |
4. Guest Instance の構築【 Oracle Cloud 側】
69
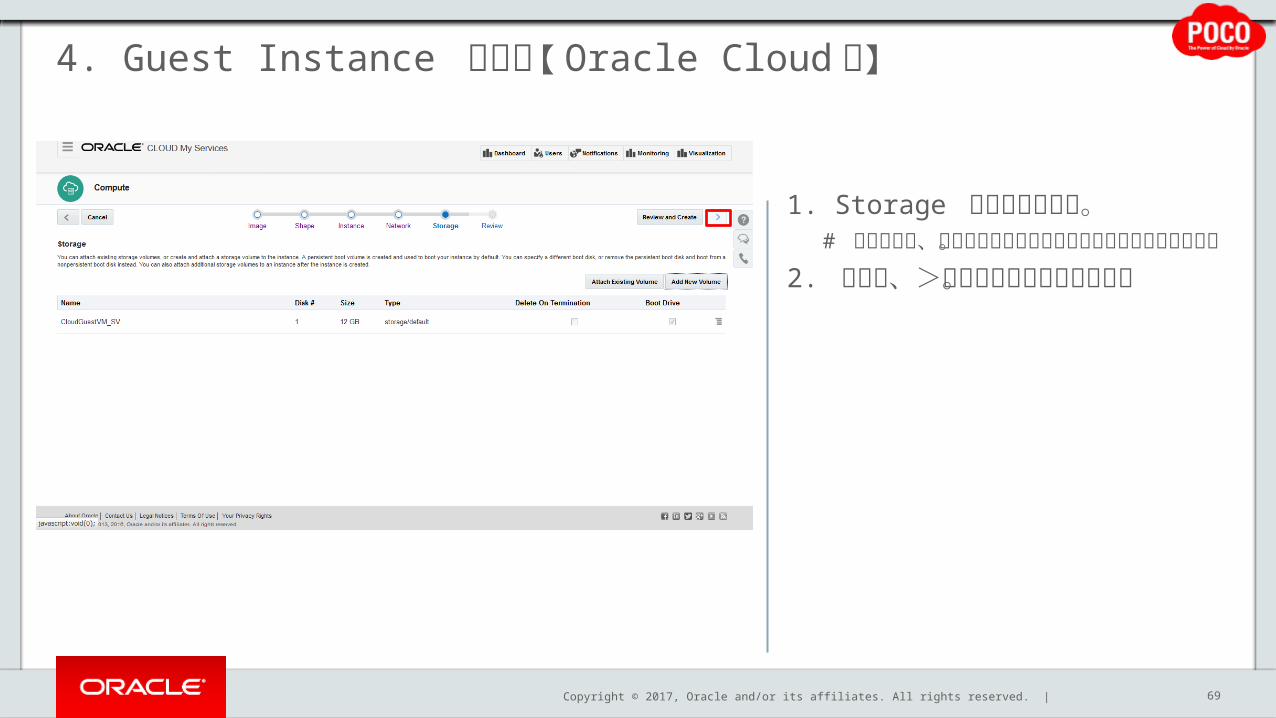
1. Storage 設定を加えます。# 左の例では、事前作成済みのボリュームを割り当てています。
2. 入力後、>ボタンをクリックします。
Copyright © 2017, Oracle and/or its affiliates. All rights reserved. |
4. Guest Instance の構築【 Oracle Cloud 側】
70
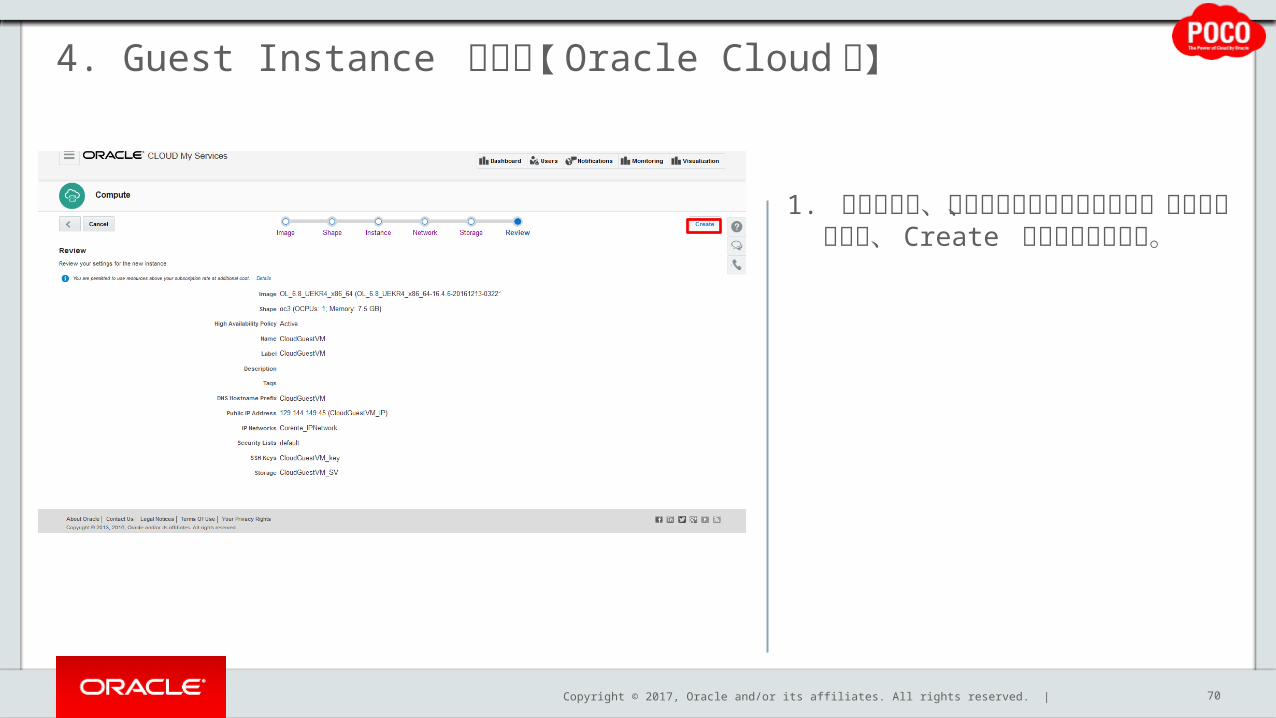
1. 確認画面で、入力事項を再度チェックし、問題がなければ、 Create をクリックします。
Copyright © 2017, Oracle and/or its affiliates. All rights reserved. |
4. Guest Instance の構築【 Oracle Cloud 側】
71
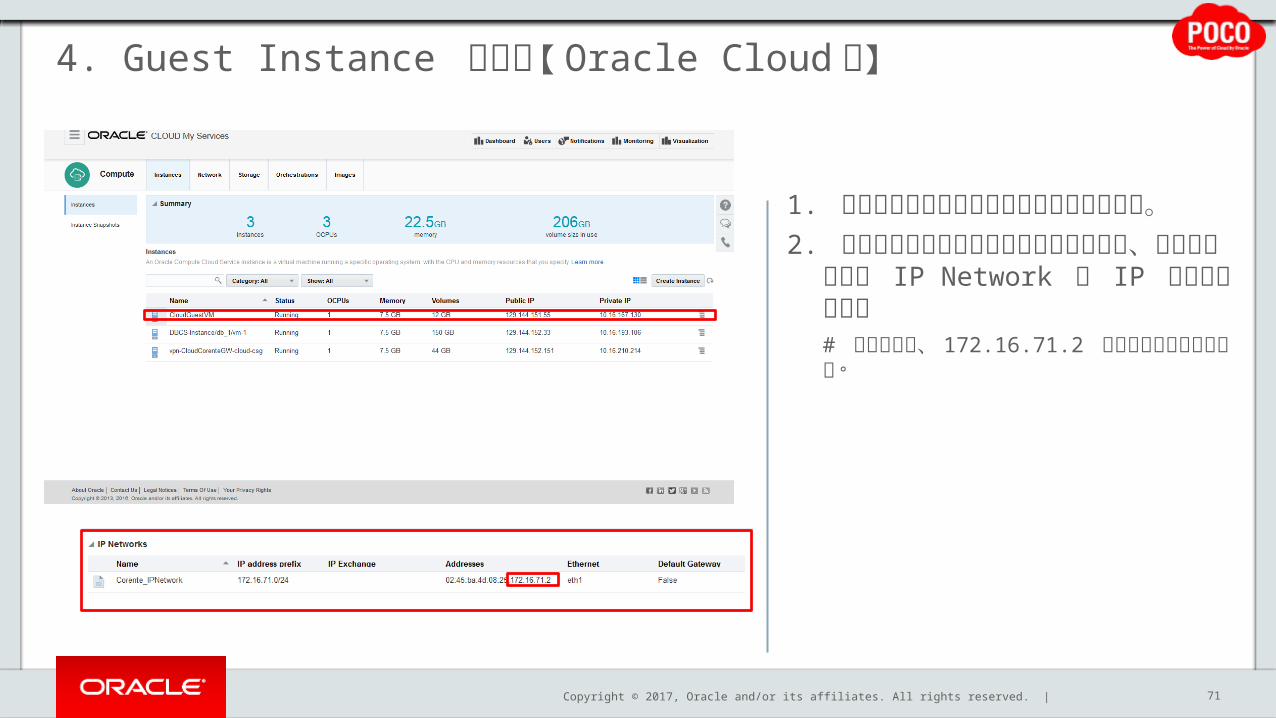
1. しばらくするとインスタンスが起動します。
2. 起動した新規インスタンスをクリックし、割り当てられた IP Network の IP を確認します。# 左の例では、 172.16.71.2 が割り当てられています。
Copyright © 2017, Oracle and/or its affiliates. All rights reserved. |
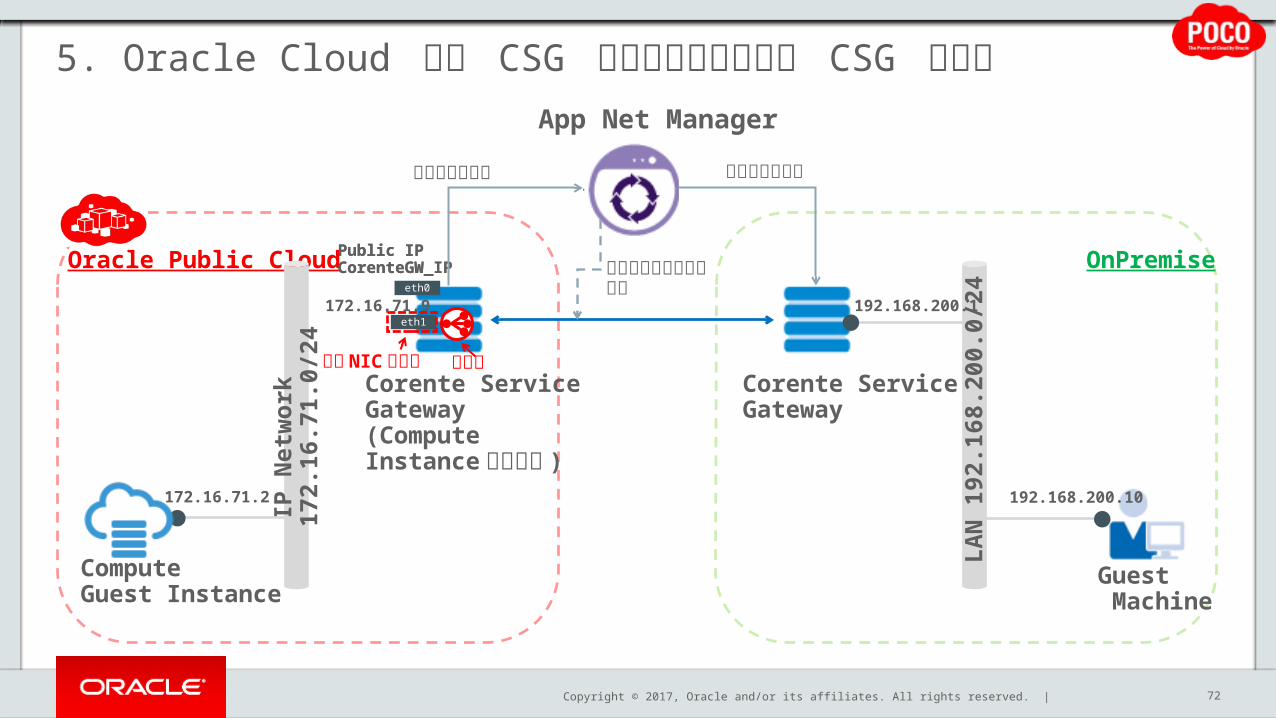
5. Oracle Cloud 側の CSG とオンプレミス側の CSG の接続
72
App Net Manager
Oracle Public Cloud Public IPCorenteGW_IP OnPremise
IP N
etw
ork
17
2.16
.71.
0/24
Corente Service Gateway(Compute Instance 上で稼働 )
172.16.71.9
Public IPCorenteGW_IP
eth1
eth0
構成情報が反映
仮想 NIC セットルート
構成情報の作成
Corente Service Gateway
LAN
192
.168
.200
.0/2
4192.168.200.1
192.168.200.10
Guest Machine
172.16.71.2
ComputeGuest Instance
パートナーシップの設定

Copyright © 2017, Oracle and/or its affiliates. All rights reserved. |
5. Oracle Cloud 側の CSG とオンプレミス側の CSG の接続
73
1. 構築した Oracle Cloud 側の CSG とオンプレミス側の CSG を App Net Manager を使って接続させます。
2. App Net Manager にログインし、File タブをクリックします。
3. Wizard から Partner Locations をクリックします。
Copyright © 2017, Oracle and/or its affiliates. All rights reserved. |
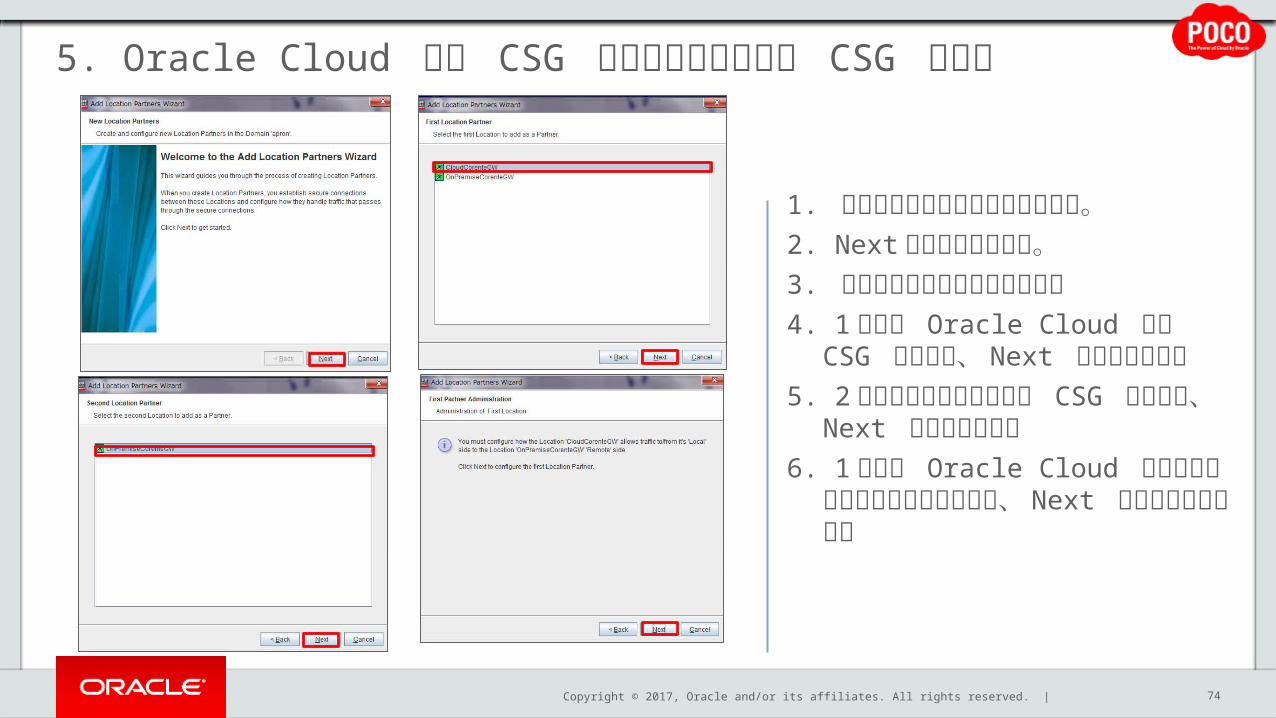
5. Oracle Cloud 側の CSG とオンプレミス側の CSG の接続
74
1. 設定画面が新規に立ち上がります。2. Next をクリックします。3. 接続させる環境を選択します。4. 1 つ目に Oracle Cloud 側の
CSG を選択し、 Next を選択します。
5. 2 つ目にオンプレミス側の CSG を選択し、 Next を選択します。
6. 1 つ目の Oracle Cloud 側の接続環境の設定を進めるために、 Next をクリックします。
Copyright © 2017, Oracle and/or its affiliates. All rights reserved. |
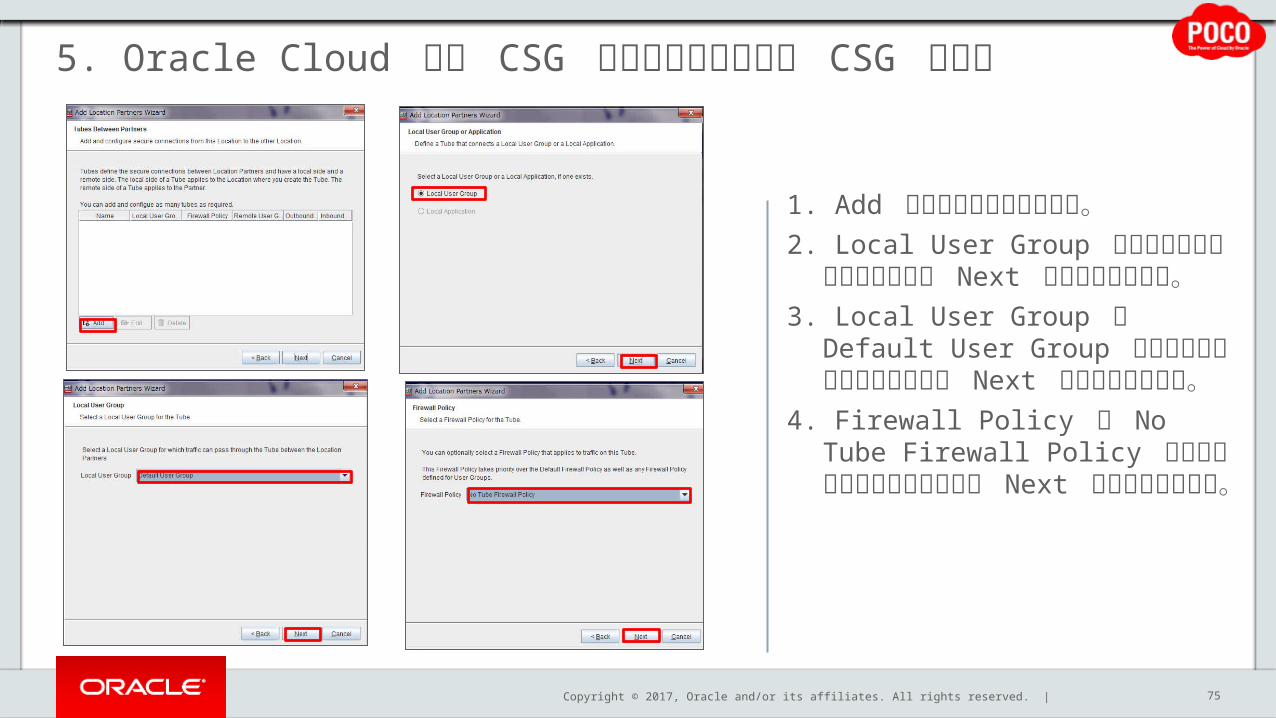
5. Oracle Cloud 側の CSG とオンプレミス側の CSG の接続
75
1. Add ボタンをクリックします。2. Local User Group が選択されて
いることを確認し Next をクリックします。
3. Local User Group に Default User Group が選択されていることを確認し Next をクリックします。
4. Firewall Policy に No Tube Firewall Policy が選択されていることを確認し Next をクリックします。

Copyright © 2017, Oracle and/or its affiliates. All rights reserved. |
5. Oracle Cloud 側の CSG とオンプレミス側の CSG の接続
76
1. Remote User Group が選択されていることを確認し Next をクリックします。
2. Remote User Group に Default User Group が選択されていることを確認し Next をクリックします。
3. Inbound QOS に None が選択されていることを確認し Next をクリックします。
4. Outbound QOS に None が選択されていることを確認し Next をクリックします。
Copyright © 2017, Oracle and/or its affiliates. All rights reserved. |
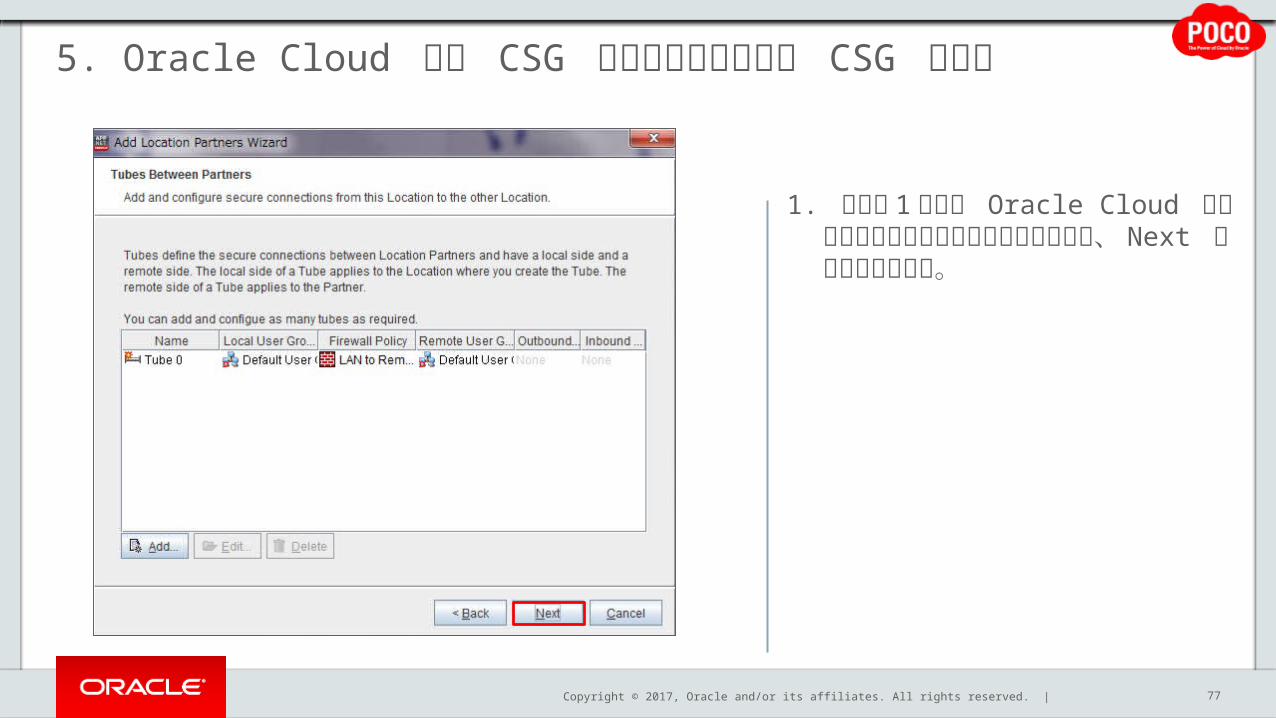
5. Oracle Cloud 側の CSG とオンプレミス側の CSG の接続
77
1. 以上で 1 つ目の Oracle Cloud 側の接続環境の設定は完了となりますので、 Next をクリックします。

Copyright © 2017, Oracle and/or its affiliates. All rights reserved. |
5. Oracle Cloud 側の CSG とオンプレミス側の CSG の接続
78
1. 次に、 2 つ目のオンプレミス側の接続環境の設定を進めるために、Next をクリックします。
2. Add ボタンをクリックします。3. Local User Group が選択されて
いることを確認し Next をクリックします。
4. Firewall Policy に No Tube Firewall Policy が選択されていることを確認し Next をクリックします。
Copyright © 2017, Oracle and/or its affiliates. All rights reserved. |
5. Oracle Cloud 側の CSG とオンプレミス側の CSG の接続
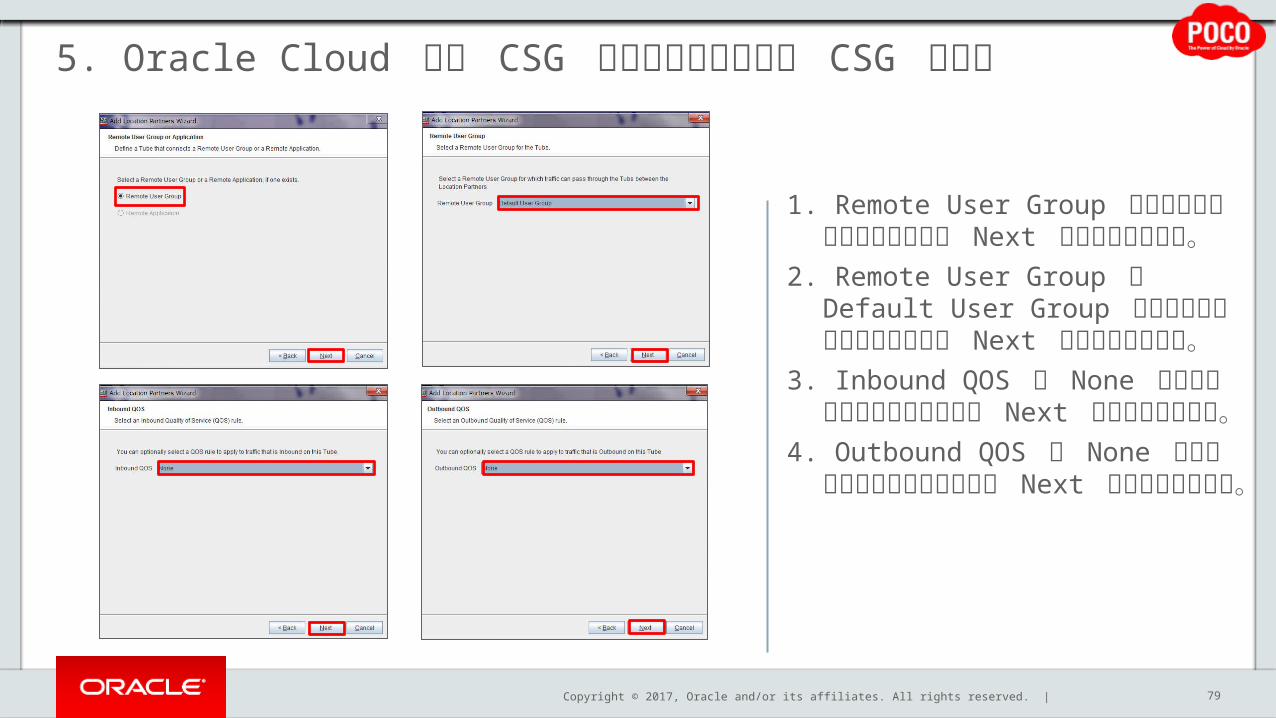
79
1. Remote User Group が選択されていることを確認し Next をクリックします。
2. Remote User Group に Default User Group が選択されていることを確認し Next をクリックします。
3. Inbound QOS に None が選択されていることを確認し Next をクリックします。
4. Outbound QOS に None が選択されていることを確認し Next をクリックします。
Copyright © 2017, Oracle and/or its affiliates. All rights reserved. |
5. Oracle Cloud 側の CSG とオンプレミス側の CSG の接続
80
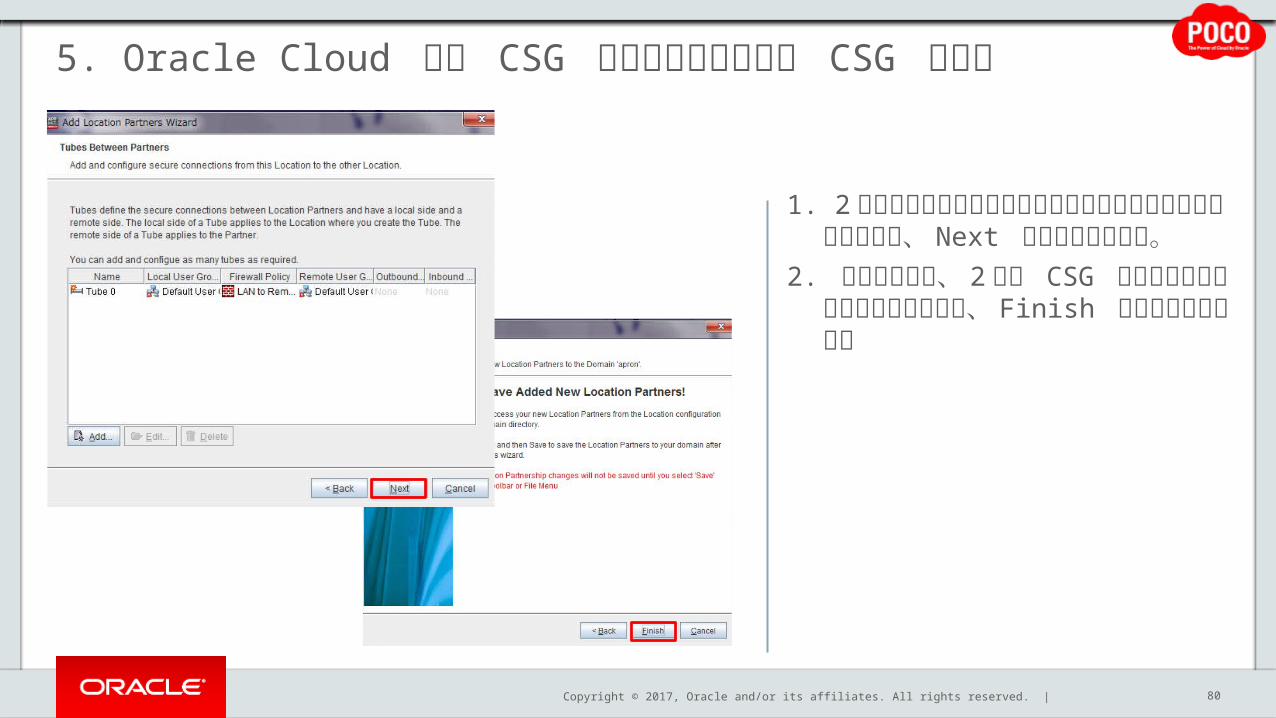
1. 2 つ目のオンプレミス側の接続環境の設定は完了となりますので、Next をクリックします。
2. 以上の作業で、 2 つの CSG 間の接続設定が完了となりますので、Finish をクリックします。

Copyright © 2017, Oracle and/or its affiliates. All rights reserved. |
5. Oracle Cloud 側の CSG とオンプレミス側の CSG の接続
81
1. 接続設定の情報を保存するために、Save をクリックします。
2. Start をクリックします。3. Save 終了後、 Finished をク
リックします。# 接続設定の情報保存を行わないと、 VPN 接続が出来ないため、この作業は必ず実施して下さい。
Copyright © 2017, Oracle and/or its affiliates. All rights reserved. |
5. Oracle Cloud 側の CSG とオンプレミス側の CSG の接続
82
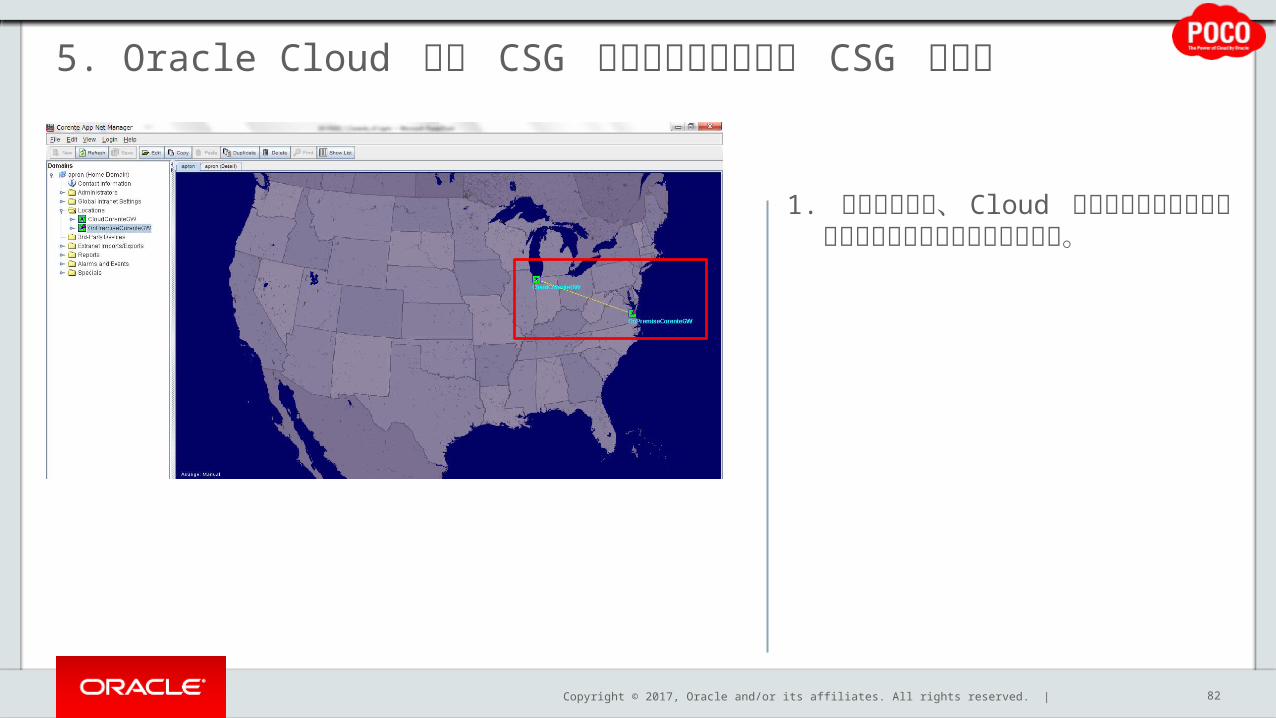
1. 地図画面上で、 Cloud とオンプレミス間に線が引かれていることを確認します。

Copyright © 2017, Oracle and/or its affiliates. All rights reserved. |
5. Oracle Cloud 側の CSG とオンプレミス側の CSG の接続
83
1. VPN で接続させるために、オンプレミス側の Location 情報を右クリックし、 Approve Partner Connections を選択します。
2. Password 情報の入力を求められますので、 App Net Manager にログインする際に入力したパスワードを打ち込みます。
3. 入力後 Approve をクリックし、OK をクリックします。

Copyright © 2017, Oracle and/or its affiliates. All rights reserved. |
5. Oracle Cloud 側の CSG とオンプレミス側の CSG の接続
84
1. Cloud とオンプレミス間に引かれている線の色が緑色に変わったことを確認します。# 緑色のステータスになると VPN 接続が完了となります。

Copyright © 2017, Oracle and/or its affiliates. All rights reserved. |
6. VPN 接続の疎通確認
85
App Net Manager
Oracle Public Cloud Public IPCorenteGW_IP OnPremise
IP N
etw
ork
17
2.16
.71.
0/24
Corente Service Gateway(Compute Instance 上で稼働 )
172.16.71.9
Public IPCorenteGW_IP
eth1
eth0
構成情報が反映
仮想 NIC セットルート
構成情報の作成
Corente Service Gateway
LAN
192
.168
.200
.0/2
4192.168.200.1
192.168.200.10
Guest Machine
172.16.71.2
ComputeGuest Instance
パートナーシップの設定

Copyright © 2017, Oracle and/or its affiliates. All rights reserved. |
6. VPN 接続の疎通確認6-1 オンプレミス側の Guest VM にアクセス
86
1. Ravello で立ち上げた Guest VM に SSH でアクセスします。
# Public IP は、 Guest VM をクリックし、Summary タブから確認が出来ます。
Key には Publish の前に作成したものを使います。ユーザー名は Ravello です。
Copyright © 2017, Oracle and/or its affiliates. All rights reserved. |
6. VPN 接続の疎通確認6-2 Oracle Cloud 側の Guest Instance にアクセス
87
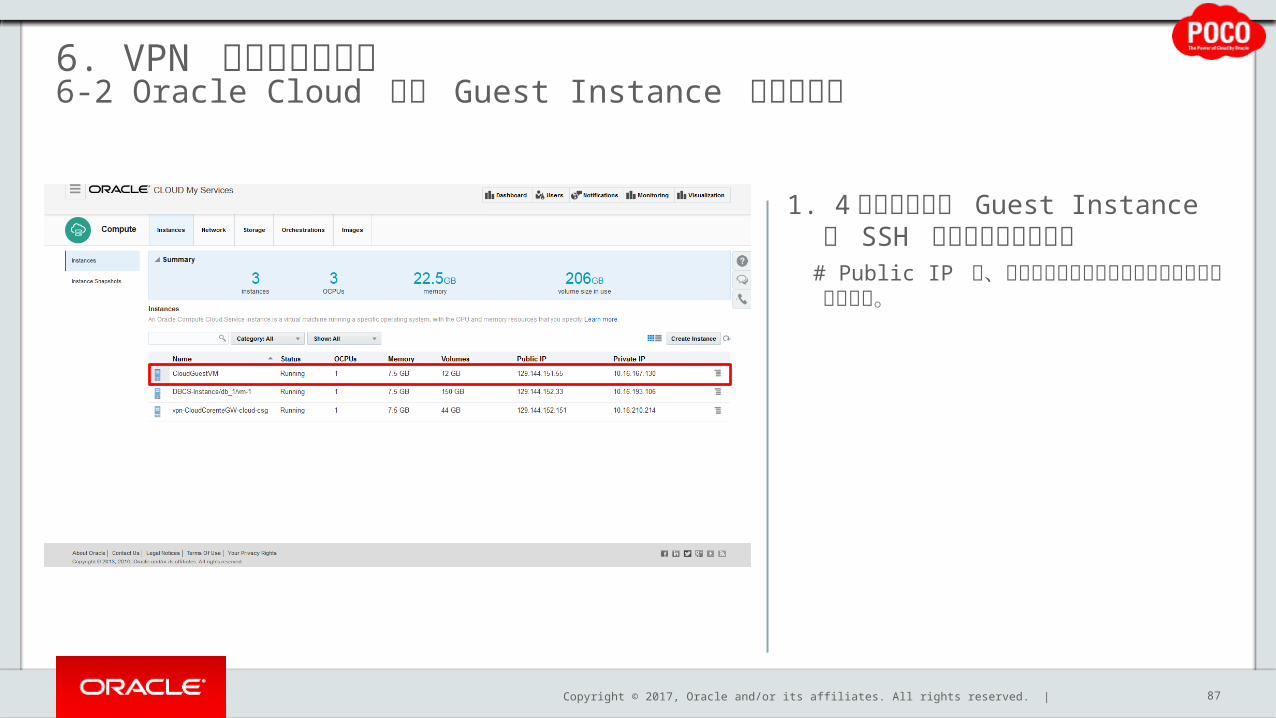
1. 4章で作成した Guest Instance に SSH でアクセスします。
# Public IP は、サービスコンソール上からから確認が出来ます。

Copyright © 2017, Oracle and/or its affiliates. All rights reserved. |
6. VPN 接続の疎通確認6-3 Ping コマンドによる疎通確認
88
1. Oracle Cloud 側の Guest Instance とオンプレミス側の Guest VM が Ping で疎通が出来ることを確認します。# Ping コマンド実施前に、 ip route add コマンドでリモート接続のルート設定を行います。
# sudo ip route add 192.168.200.0/24 dev eth1
Oracle Cloud 側 の Guest Instance
# sudo ip route add 172.16.71.0/24 via 192.168.200.1# ping 172.16.71.2
オンプレミス側の Guest VM
# ping 192.168.200.10
Oracle Cloud 側 の Guest Instance


Copyright © 2017, Oracle and/or its affiliates. All rights reserved. |