criterion quick start guide for instructor (v13)
TRANSCRIPT

Criterion はエデュケーショナル・テスティング・サービスの登録商標です
Version 13
Instructor
I N D E X
Quick Start GuideEnglish Version
Rev. 2015.6.24
Part 1. Creating an Instructor Account / Signing In 2
Part 2. Adding Classes 3
Part 3. Registering Students 4
Part 4. If a Student forgets his/her Password 8
Part 5. Managing Assignments 10
Part 6. Viewing Students' Submissions / Comments / Dialogue 12
Part 7. Printing the Results / Saving the results as a PDF file 14
Appendix A: Peer Review Functions 16
2
<< Back to Index
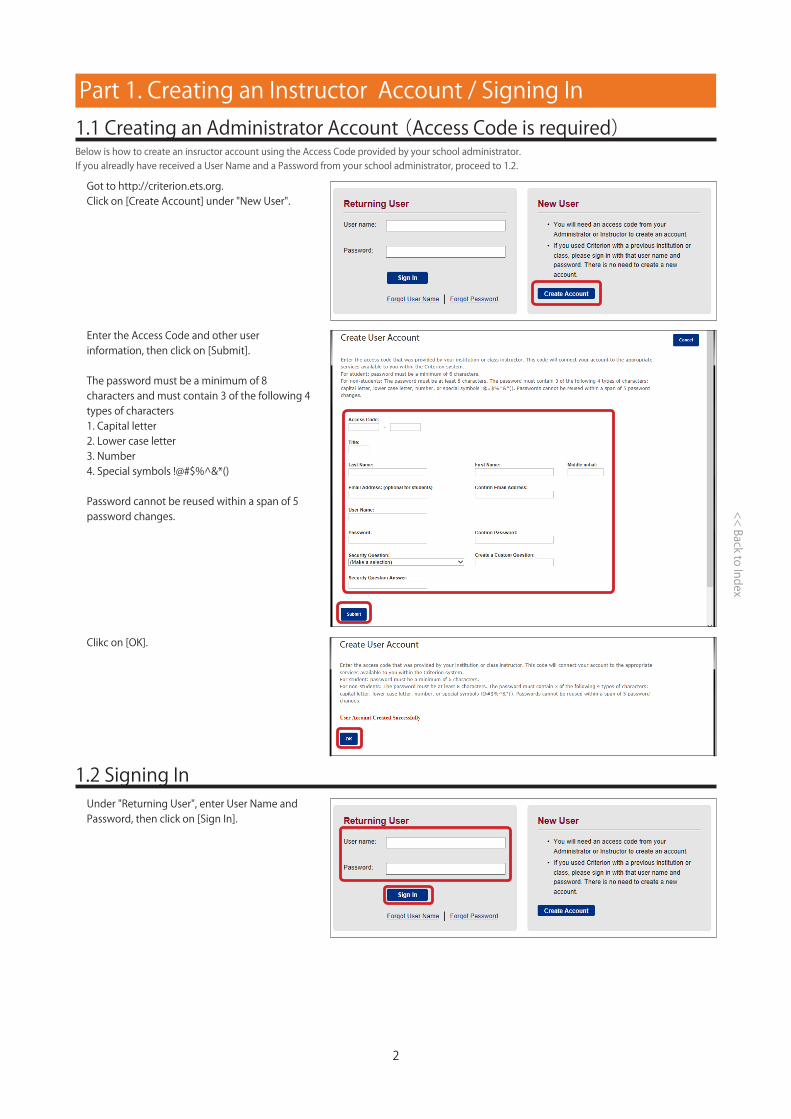
1.1 Creating an Administrator Account (Access Code is required)Below is how to create an insructor account using the Access Code provided by your school administrator.If you alreadly have received a User Name and a Password from your school administrator, proceed to 1.2.
Got to http://criterion.ets.org. Click on [Create Account] under "New User".
Enter the Access Code and other user information, then click on [Submit].
The password must be a minimum of 8 characters and must contain 3 of the following 4 types of characters1. Capital letter2. Lower case letter3. Number4. Special symbols !@#$%^&*()
Password cannot be reused within a span of 5 password changes.
Clikc on [OK].
Part 1. Creating an Instructor Account / Signing In
1.2 Signing InUnder "Returning User", enter User Name and Password, then click on [Sign In].

3
<< Back to Index
Part 2. Adding Classes2.1 Adding a Class
Sign in as an Insructor. If you are already signed in as an Instructor, click on "Home".
Click on [Add].
Set the following options and click on [Save].
If successful, the following message will appear.
Level: Select your SchoolClass Name: Enter the Class NameClass Grade Level: Select the Grade LevelWriter's Handbook Version: Select properlySpellcheck Dictionary: Tick either or both of the choicesClass End Date: Set when neededTime Zone: Select "(GMT+9:00) Osaka, Sapporo, Tokyo"Courtesy Name: Optional

4
<< Back to Index
3.1 Adding a Student to a ClassBelow is how Instructor can add a student to a class.
Part 3. Registering Students
Click on a class.
Click on [ROSTER].
Click on [Add Student].
Enter the student information and click on [Submit].For student, the password must be a minimum of 6 characters (no need to combine different types of characters).When the student signs in for the first time, s/he will be aked to set the Security Question/Answer and reset the password.
After adding studentss, click on [Cancel] to exit from this page.
Sign in as an Instructor. If you are already signed in as an Instructor, click on "Home".

5
<< Back to Index
3.2 Getting Class Access Code (for Student)Below is how to get a Class Access Code to register a student to a class.*This is only necessary if an instructor needs to register self as a student (3.3) or if students will register themselves to a class (3.4).
In the Class list, tick a box next to a class, then click on [Get Access Code].
Select "Student" and click on [Get Access Code].
Take a note of the Access Code and click on [Close].

6
<< Back to Index
3.3 Insructor registering as a StudentBelow is how the Insructor register self also as a Student using the Class Access Code gained at 3.2.
Sign in as an Instructor. If you are already signed in as an Instructor, click on "Home".
Click on [Enter Access Code].
Enter the Access Code obtained at 3.2 and click on [Connect].
Make sure the class information is correct and click on [Connect].
7
<< Back to Index
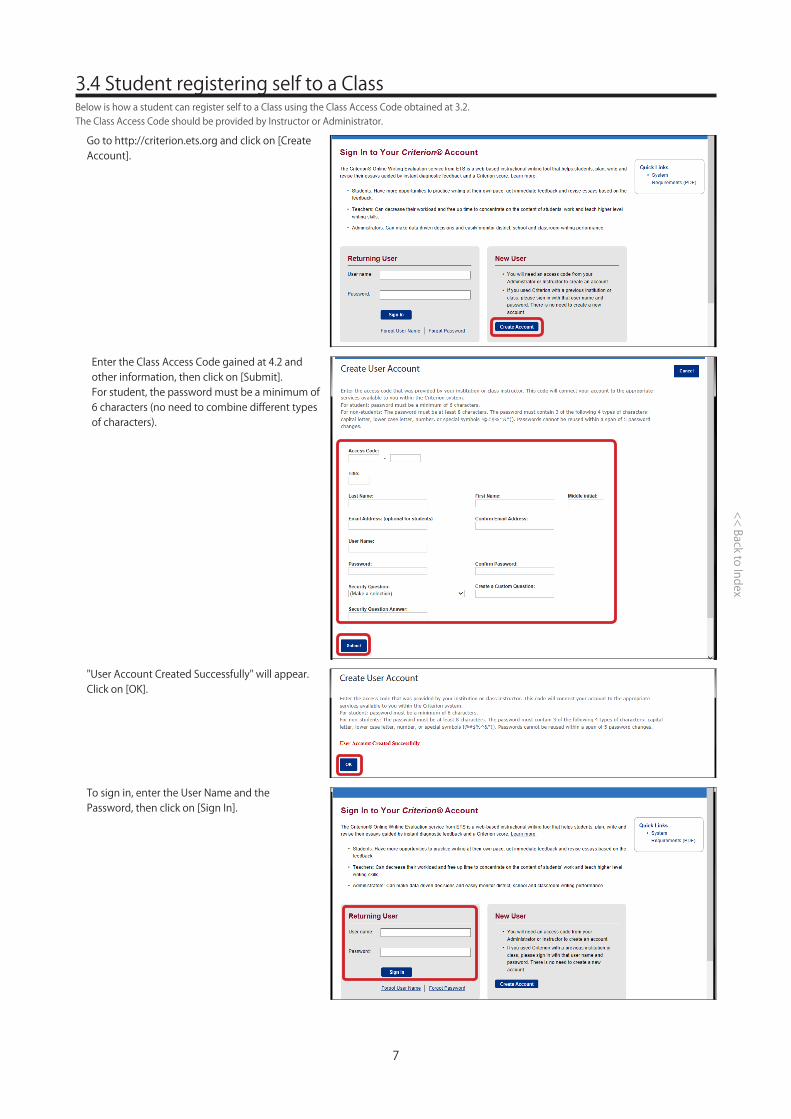
3.4 Student registering self to a ClassBelow is how a student can register self to a Class using the Class Access Code obtained at 3.2.The Class Access Code should be provided by Instructor or Administrator.
To sign in, enter the User Name and the Password, then click on [Sign In].
Go to http://criterion.ets.org and click on [Create Account].
Enter the Class Access Code gained at 4.2 and other information, then click on [Submit].For student, the password must be a minimum of 6 characters (no need to combine different types of characters).
"User Account Created Successfully" will appear.Click on [OK].

8
<< Back to Index
4.1 Using "Forgot Password" function (by Student)In Version 13, Administrator and Instructor are not able to see or modify students' passwords.If a student forgets his/her password, s/he needs to answer the security question. If the student cannot remember the answer to the security question, either, see 4.2 "Resetting Student Password".
(Student) Click on [Forgot Password].
(Student) Enter teh User Name and the Temporary Password, then click on [Sign In].
(Student) Enter the new password twice and click on [Submit].
(Student) "Password changed successfully." will appear.Click on [OK].
(Student) Enter User Name and click on [Submit].
(Student) Enter the answer to the Security Question and click on [Submit].
(Student) Take a note of Temporary Password and click on [OK].
Part 4. If a Student forgets his/her Password

9
<< Back to Index
4.2 Resetting Student PasswordBelow is how Instructor can reset a student's password.
In the [Roster] tab, tick the box of a student and click on [Reset Password].
Take a note of the Temporary Password and tell it to the student.
Click on [OK].
(Student) Enter the User Name and Password ,and clikc on [Sign In].
(Student) Enter the new pasword twice and click on "Submit"
(Student) "Password changed successfully." will appear. Click on [OK].

10
<< Back to Index
5.1 Adding an Assignment
Part 5. Managing Assignments
Click on a Classes.
Click on [Add].
Sign in as an Insructor. If you are already signed in as an Instructor, click on "Home".
Click on [Assignments].

11
<< Back to Index
Set the options and clik on [Save].
← Assignment name can be modified
↑ Any URLs on the Internet ↑ This name will be presented on student screen
← How the planning tools will be available to students
← Ticking this wil set the time limit (30 or 45 minutes) and wil automatically allow only 1 attempt.
← 10 is the number set by default. 10 is also the maximum number of attempts per assignment.
← Saved drafts will be available for Instructors to read, print and add comments to.
← Peer Review function is off by default.
← Showing the trait feedback or not
← Set the window for students to submit an essay to this assignment
↓ Either show each result or not ↓ Eitether show each result or not when an advisory is given to the eesay
← Choose from Topic Library, Scored Instructor Topic, and Text Editor
↑ Prompt↑ Level(e.g. TOEFL, 9th Gdade) ↑ Mode (e.g. Persuasive)
Do not forget to click on [Save}
12
<< Back to Index
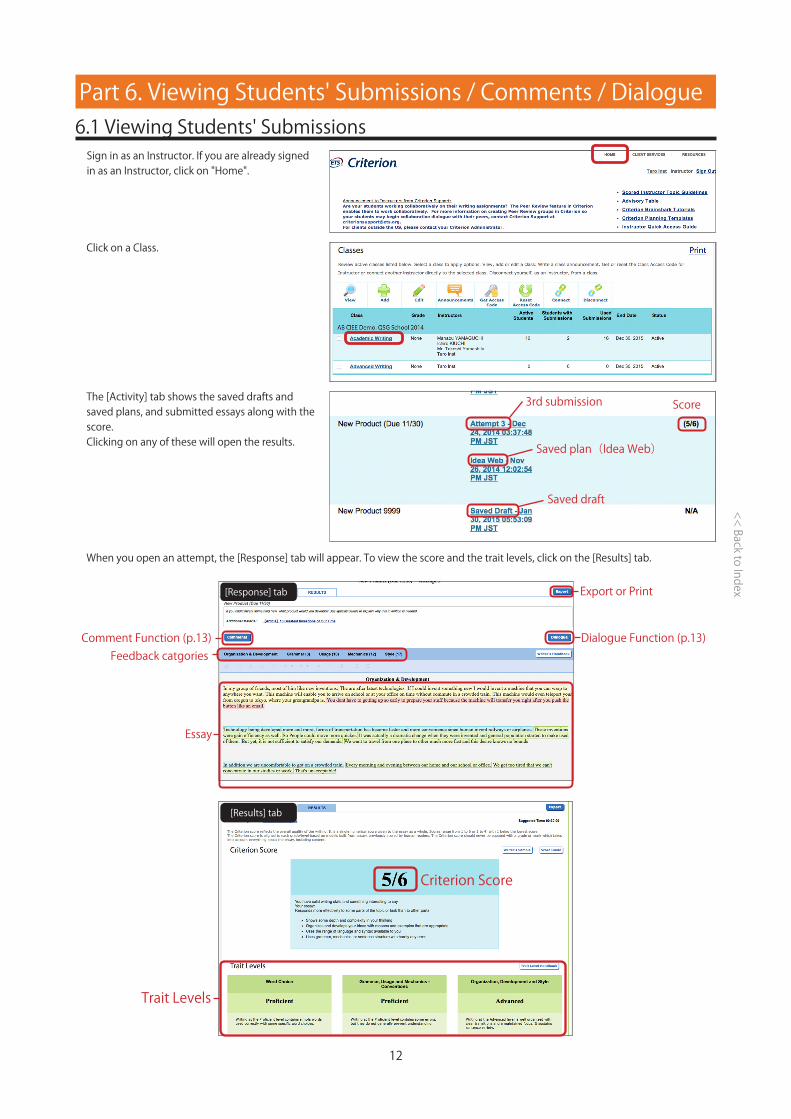
6.1 Viewing Students' Submissions
When you open an attempt, the [Response] tab will appear. To view the score and the trait levels, click on the [Results] tab.
Part 6. Viewing Students' Submissions / Comments / Dialogue
Sign in as an Instructor. If you are already signed in as an Instructor, click on "Home".
Click on a Class.
The [Activity] tab shows the saved drafts and saved plans, and submitted essays along with the score. Clicking on any of these will open the results.
3rd submission Score
Saved plan(Idea Web)
Saved draft
Trait Levels
Criterion Score
Export or Print
Feedback catgories
Essay
[Response] tab
[Results] tab
Dialogue Function (p.13)Comment Function (p.13)

13
<< Back to Index
6.2 Comments Function
6.3 Dialogue Function
Open an Essay and click on [Comments].
Open an essay and click on [Dialogue].
Click on a word in the essay and click on [Add Comment].
Enter your comment in the box that will appear on the right side of the essay and click on [Enter].
Enter your comment in the box that will appear on the right side of the window and click on [Send].Click [Reflesh] to load the latest communication.
Click on [× ] to close the Dialogue window.
After adding comments, click on [Save].
Below is how Instructor can attach comments to words in student's essay. This function is not available to Administrator.
Below is how Instructor can add comments on the essay or communicate with the student using the Dialogue funcion.

14
<< Back to Index
7.1 Printing the results / Saving the results as a PDF (of an Attempt)
Open an attempt and click on [Export].
Select the types of results and clickon [Export].
Open the downloaded HTML file and print or save as a PDF file. Saving as a PDF file may not be available depending on the kinds or versions of either the OS or the brower.
Below is how to print the results or saving them as a PDF document of an Attempt.
Part 7. Printing the Results / Saving the results as a PDF file

15
<< Back to Index
7.2 Printing the Reports/ Saving the Reports as a PDF fileBelow is how to print the various kinds of reports and save them as PDF files.
Open the [Reports] tab of a class.
Select either of the following among [Select a Report].
Click on [Print].
The printing dialogue wil appear. Set the options and print the report or save it as a PDF file.
Set the options.
Click on [View Report]
Start Date / End Date: Start date and end date of the searchStudent: "All Students" or individual studentAssignment: "All Assignments" or individual assignmentAttempt: "Most Recent Attempt" or "All Attempts"
Score Analysis Report: Sammary of the Results and EssaysExpanded Performance Detail Report: Details of the results and EssaysExpanded Performance Summary Report: Sammary of the Results, Numbers of Errors by Type and Essays.

16
<< Back to Index
Select students from the roster and move them to the "Selected Students" box. Enter the name of the group and clickon [Create].
The created groups will appear under Peer Groups:.DO NOT FORGET to click on [Save].
NOTE: Peer Review Functions are not available to assignments with an administrator assignment.
A-1 Creating Peer GroupsOpen the [Assignments] tab of a class. Either add a new assignment or edit an assignment. To edit an assignment, tick the box next to an assignment and click on [Edit].
Select "Yes" for Peer Review:
Peer Group Dialogue: Students will be able to exchange messages among the peer group. Instructor will also be able to see and add messages.Peer Group Commnets: Students will be able to attatch comments on each word in peer's essays.
Appendix A: Peer Review Functions
DO NOT FORGET to click on [Save].

17
<< Back to Index
A-2 Editing and Deleting Peer GroupsUnder "Edit a Group:", select a group to edit or delete.
The members of the selected group will appear in the "Selected Students" box. To edit the group, add or remove some mumbers and click on [Update]. To delete the group, click on [Delete].
Peer Review Dialogue and Comments: Student View
Click on [Dialogue].
The names of the members of the same group who alraedy submitted an essay will appear in blue. Click one of the mumbers.
Selet a word and click on [Add Comment]. To remove a comment, click on [Remove Comment].
Exchange messages among members of the same group.
Dialogue
Comments
Enter a comment and
click on [Send].