cvc-20-ag
TRANSCRIPT

7/28/2019 cvc-20-ag
http://slidepdf.com/reader/full/cvc-20-ag 1/116
Americas Headquarters
Cisco Systems, Inc.170 West Tasman DriveSan Jose, CA 95134-1706USAhttp://www.cisco.comTel: 408 526-4000
800 553-NETS (6387)Fax: 408 527-0883
Cisco AnyConnect VPN Client
Administrator Guide
Version 2.0
Customer Order Number: OL-12950-011

7/28/2019 cvc-20-ag
http://slidepdf.com/reader/full/cvc-20-ag 2/116
THE SPECIFICATIONS AND INFORMATION REGARDING THE PRODUCTS IN THIS MANUAL ARE SUBJECT
TO CHANGE WITHOUT NOTICE. ALL STATEMENTS, INFORMATION, AND RECOMMENDATIONS IN THIS
MANUAL ARE BELIEVED TO BE ACCURATE BUT ARE PRESENTED WITHOUT WARRANTY OF ANY KIND,
EXPRESS OR IMPLIED. USERS MUST TAKE FULL RESPONSIBILITY FOR THEIR APPLICATION OF ANY PRODUCTS.
THE SOFTWARE LICENSE AND LIMITED WARRANTY FOR THE ACCOMPANYING PRODUCT ARE SET FORTH IN THE INFORMATION PACKET THAT
SHIPPED WITH THE PRODUCT AND ARE INCORPORATED HEREIN BY THIS REFERENCE. IF YOU ARE UNABLE TO LOCATE THE SOFTWARE LICENSE
OR LIMITED WARRANTY, CONTACT YOUR CISCO REPRESENTATIVE FOR A COPY.
The Cisco implementation of TCP header compression i s an adaptation of a program developed by the University of California, Berkeley ( UCB) as part of UCB’s public
domain version of the UNIX operating system. All rights reserved. Copyright © 1981, Regents of the University of California.
NOTWITHSTANDING ANY OTHER WARRANTY HEREIN, ALL DOCUMENT FILES AND SOFTWARE OF THESE SUPPLIERS ARE P ROVIDED “AS IS” WITH
ALL FAULTS. CISCO AND THE ABOVE-NAMED SUPPLIERS DISCLAIM ALL WARRANTIES, EXPRESSED OR IMPLIED, INCLUDING, WITHOUT
LIMITATION, THOSE OF MERCHANTABILITY, FITNESS FOR A PARTICULAR PURPOSE AND NONINFRINGEMENT OR ARISING FROM A COURSE OF
DEALING, USAGE, OR TRADE PRACTICE.
IN NO EVENT SHALL CISCO OR ITS SUPPLIERS BE LIABLE FOR ANY INDIRECT, SPECIAL, CONSEQUENTIAL, OR INCIDENTAL DAMAGES, INCLUDING,
WITHOUT LIMITATION, LOST PROFITS OR LOSS OR DAMAGE TO DATA ARISING OUT OF THE USE OR INABILITY TO USE THIS M ANUAL, EVEN IF CISCOOR ITS SUPPLIERS HAVE BEEN ADVISED OF THE POSSIBILITY OF SUCH DAMAGES.
CCVP, the Cisco logo, and the Cisco Square Bridge logo are trademarks of Cisco Systems, Inc.; Changing the Way We Work, Live, Play, and Learn is a service mark of
Cisco Systems, Inc.; and Access Registrar, Aironet, BPX, Catalyst, CCDA, CCDP, CCIE, CCIP, CCNA, CCNP, CCSP, Cisco, the Cisco Certified Internetwork Expert logo,
Cisco IOS, Cisco Press, Cisco Systems, Cisco Systems Capital, the Cisco Systems logo, Cisco Unity, Enterprise/Solver, EtherChannel, EtherFast, EtherSwitch, Fast Step,
Follow Me Browsing, FormShare, GigaDrive, HomeLink, Internet Quotient, IOS, iPhone, IP/TV, iQ Expertise, the iQ logo, iQ Net Readiness Scorecard, iQuick Study,
LightStream, Linksys, MeetingPlace, MGX, Networking Academy, Network Registrar, Packet , PIX, ProConnect, ScriptShare, SMARTnet, StackWise, The Fastest Way to
Increase Your Internet Quotient, and TransPath are registered trademarks of Cisco Systems, Inc. and/or its affiliates in the United States and certain other countries.
All other trademarks mentioned in this document or Website are the property of their respective owners. The use of the word partner does not imply a partnership relationship
between Cisco and any other company. (0705R)
Any Internet Protocol (IP) addresses used in this document are not intended to be actual addresses. Any examples, command display output, and figures included in the
document are shown for illustrative purposes only. Any use of actual IP addresses in illustrative content is unintentional and coincidental.
Cisco AnyConnect VPN Client Administrator Guide
© 2007 Cisco Systems, Inc. All rights reserved.

7/28/2019 cvc-20-ag
http://slidepdf.com/reader/full/cvc-20-ag 3/116
iii
Cisco AnyConnect VPN Client Administrator Guide
OL-12950-01
C O N T E N T S
About This Guide vii
Document Objectives vii
Audience vii
Related Documentation viii
Document Organization viii
Document Conventions ix
Obtaining Documentation, Obtaining Support, and Security Guidelines ix
CHA P T E R 1 Introduction 1-1
AnyConnect Client Features 1-1
Remote User Interface 1-2
Getting and Installing the Files You Need 1-7
CSA Interoperability with the AnyConnect Client and Cisco Secure Desktop 1-7
CHA P T E R 2 Common AnyConnect VPN Client Installation and Configuration Procedures 2-1
Installing the AnyConnect Client 2-1
Before You Install the AnyConnect Client 2-2
Ensuring Automatic Installation of AnyConnect Clients 2-2
AnyConnect Client and New Windows Installations 2-3
Adding a Security Appliance to the List of Trusted Sites (Internet Explorer) 2-3
Adding a Security Certificate in Response to Browser Security Alert Windows 2-4
Replacing a Digital Certificate with a Trusted Certificate 2-7
Installing the AnyConnect Client on a User’s PC 2-8
Installing the AnyConnect Client Using the Microsoft Windows Installer on a PC Running
Windows 2-8
Installing the AnyConnect Client on a PC Running Linux 2-8
Installing the AnyConnect Client on a PC Running MAC OSX 2-9
CHA P T E R 3 Installing the AnyConnect Client and Configuring the Security Appliance with ASDM 3-1
CHA P T E R 4 Installing the AnyConnect Client on a Security Appliance Using CLI 4-1
Enabling AnyConnect Client SSL VPN Connections Using CLI 4-2

7/28/2019 cvc-20-ag
http://slidepdf.com/reader/full/cvc-20-ag 4/116
Contents
iv
Cisco AnyConnect VPN Client Administrator Guide
OL-12950-01
Disabling Permanent Client Installation 4-4
CHA P T E R 5 Configuring AnyConnect Features Using ASDM 5-1
Enabling Datagram Transport Layer Security (DTLS) with AnyConnect (SSL) Connections 5-1
Configuring DTLS 5-2
Prompting Remote Users 5-4
Enabling IPv6 VPN Access 5-5
Enabling Modules for Additional AnyConnect Features 5-5
Configuring, Enabling, and Using Other AnyConnect Features 5-6
Configuring Certificate-only Authentication 5-6
Using Compression 5-9
Changing Compression Globally 5-10
Changing Compression for Groups and Users 5-10
Enabling AnyConnect Keepalives 5-11
Enabling AnyConnect Rekey 5-12
Enabling and Adjusting Dead Peer Detection 5-14
Configuring the Dynamic Access Policies Feature of the Security Appliance 5-15
Cisco Secure Desktop Support 5-15
CHA P T E R 6 Configuring AnyConnect Features Using CLI 6-1
Enabling Datagram Transport Layer Security (DTLS) with AnyConnect (SSL) Connections 6-1
Enabling DTLS Globally for a Specific Port 6-2
Enabling DTLS for Specific Groups or Users 6-2
Prompting Remote Users 6-2
Enabling IPv6 VPN Access 6-3
Enabling Modules for Additional AnyConnect Features 6-4
Configuring, Enabling, and Using Other AnyConnect Features 6-5
Configuring Certificate-only Authentication 6-5
Using Compression 6-5
Configuring the Dynamic Access Policies Feature of the Security Appliance 6-6
Cisco Secure Desktop Support 6-6
Enabling AnyConnect Rekey 6-6
Enabling and Adjusting Dead Peer Detection 6-7
Enabling AnyConnect Keepalives 6-8
CHA P T E R 7 Configuring and Using AnyConnect Client Operating Modes and User Profiles 7-1
AnyConnect Client Operating Modes 7-1
Using the AnyConnect CLI Commands to Connect (Standalone Mode) 7-1
7/28/2019 cvc-20-ag
http://slidepdf.com/reader/full/cvc-20-ag 5/116
Contents
v
Cisco AnyConnect VPN Client Administrator Guide
OL-12950-01
Connecting Using WebLaunch 7-3
User Log In and Log Out 7-4
Logging In 7-4
Logging Out 7-4
Configuring and Using User Profiles 7-4
Enabling AnyConnect Client Profile Downloads 7-5
Configuring Profile Attributes 7-10
Enabling Start Before Logon (SBL) for the AnyConnect Client 7-11
XML Settings for Enabling SBL 7-11
CLI Settings for Enabling SBL 7-11
Configuring the ServerList Attribute 7-12
Configuring the Certificate Match Attribute 7-12
Certificate Key Usage Matching 7-12
Extended Certificate Key Usage Matching 7-13
Certificate Distinguished Name Mapping 7-13
Certificate Matching Example 7-15
CHA P T E R 8 Customizing and Localizing the AnyConnect Client 8-1
Customizing the End-user Experience 8-1
Language Translation (Localization) for User Messages 8-3
Understanding Language Translation 8-3
Configuring Language Localization Using ASDM 8-4
Creating or Modifying a Translation Table Using ASDM 8-6Import/Export Language Localization 8-7
Creating or Modifying a Translation Table Using CLI 8-8
CHA P T E R 9 Monitoring and Maintaining the AnyConnect Client 9-1
Viewing AnyConnect Client and SSL VPN Sessions 9-1
Adjusting MTU Size Using ASDM 9-2
Adjusting MTU Size Using CLI 9-2
Logging Off AnyConnect Client Sessions 9-3
Updating AnyConnect Client and SSL VPN Client Images 9-4
APPEND I X A Sample AnyConnect Profile and XML Schema A-1
Sample AnyConnect Profile A-1
Sample AnyConnect Profile Schema A-3

7/28/2019 cvc-20-ag
http://slidepdf.com/reader/full/cvc-20-ag 6/116
Contents
vi
Cisco AnyConnect VPN Client Administrator Guide
OL-12950-01
APPEND I X B Using Microsoft Active Directory to Add the Security Appliance to the List of Internet ExplorerTrusted Sites for Domain Users B-1
INDEX
7/28/2019 cvc-20-ag
http://slidepdf.com/reader/full/cvc-20-ag 7/116
vii
Cisco AnyConnect VPN Client Administrator Guide
OL-12950-01
About This Guide
OL-12950-01
This preface introduces the Cisco AnyConnect VPN Client Administrator Guide, and includes thefollowing sections:
Document Objectives, page vii
• Audience, page vii
• Related Documentation, page viii
• Document Organization, page viii
• Document Conventions, page ix
• Obtaining Documentation, Obtaining Support, and Security Guidelines, page ix
Document Objectives
The purpose of this guide is to help you configure the Cisco AnyConnect VPN Client parameters on thesecurity appliance. This guide does not cover every feature, but describes only the most commonconfiguration scenarios.
You can configure and monitor the security appliance by using either the command-line interface orASDM, a web-based GUI application. ASDM includes configuration wizards to guide you through somecommon configuration scenarios, and online Help for less common scenarios. For more information, see:http://www.cisco.com/univercd/cc/td/doc/product/netsec/secmgmt/asdm/index.htm
This guide applies to the Cisco ASA 5500 series security appliances (ASA 5505 and higher).Throughout this guide, the term “security appliance” applies generically to all supported models, unlessspecified otherwise. The PIX family of security appliances is not supported.
AudienceThis guide is for network managers who perform any of the following tasks:
• Manage network security
• Install and configuresecurity appliances
• Configure VPNs

7/28/2019 cvc-20-ag
http://slidepdf.com/reader/full/cvc-20-ag 8/116
viii
Cisco AnyConnect VPN Client Administrator Guide
OL-12950-01
About This Guide
Related Documentation
Related DocumentationFor more information, refer to the following documentation:
• Cisco ASA 5500 Series Adaptive Security Appliance Getting Started Guide
• Cisco ASA 5500 Series Release Notes• Cisco ASDM Release Notes
• Cisco ASDM Online Help
• Release Notes for Cisco AnyConnect VPN Client, Release 2.0
• Cisco Security Appliance Command Reference
• Cisco Security Appliance Logging Configuration and System Log Messages
• Cisco Secure Desktop Configuration Guide for Cisco ASA 5500 Series Administrators
Document OrganizationThis guide includes the chapters and appendixes described in Table 1.
Table 1 Document Organization
Chapter/Appendix Definition
Chapter 1, “Introduction” Provides a high-level overview of the Cisco Anyconnect VPN Client.
Chapter 2, “CommonAnyConnect VPN ClientInstallation and ConfigurationProcedures”
Describes how to access the required files and install the Cisco AnyConnect VPN Clienton the security appliance and on the remote user PCs.
Chapter 3, “Installing theAnyConnect Client andConfiguring the SecurityAppliance with ASDM”
Describes how to use ASDM to install the Cisco AnyConnect VPN Client on the securityappliance.
Chapter 4, “Installing theAnyConnect Client on a SecurityAppliance Using CLI”
Describes how to use the command-line interface to install the Cisco AnyConnect VPNClient on the security appliance.
Chapter 5, “ConfiguringAnyConnect Features UsingASDM”
Describes how to use ASDM to configure the various features of the Cisco AnyConnectVPN Client on the security appliance.
Chapter 6, “ConfiguringAnyConnect Features Using
CLI”
Describes how to use ASDM to configure the various features of the Cisco AnyConnectVPN Client on the security appliance.
Chapter 7, “Configuring andUsing AnyConnect ClientOperating Modes and UserProfiles”
Describes how to configure and use AnyConnect client operating modes and XML usersprofiles.
Chapter 8, “Customizing andLocalizing the AnyConnectClient”
Describes how to customize and localize the end-user interface of the Cisco AnyConnectVPN Client.

7/28/2019 cvc-20-ag
http://slidepdf.com/reader/full/cvc-20-ag 9/116
ix
Cisco AnyConnect VPN Client Administrator Guide
OL-12950-01
About This Guide
Document Conventions
Document ConventionsCommand descriptions use these conventions:
• Braces ({ }) indicate a required choice.
• Square brackets ([ ]) indicate optional elements.
• Vertical bars ( | ) separate alternative, mutually exclusive elements.
• Right-pointing angle brackets (>) indicate a sequence in a path.
• Boldface indicates commands and keywords that are entered literally as shown.
• Italics indicate arguments for which you supply values.
Examples use these conventions:
• Examples depict screen displays and the command line in screen font.• Information you need to enter in examples is shown in boldface screen font.
• Variables for which you must supply a value are shown in italic screen font.
Note Means reader take note. Notes contain helpful suggestions or references to material not covered in themanual.
Obtaining Documentation, Obtaining Support, and Security
GuidelinesFor information on obtaining documentation, obtaining support, providing documentation feedback,security guidelines, and also recommended aliases and general Cisco documents, see the monthlyWhat’s New in Cisco Product Documentation, which also lists all new and revised Cisco technicaldocumentation, at:
http://www.cisco.com/en/US/docs/general/whatsnew/whatsnew.html
Chapter 9, “Monitoring andMaintaining the AnyConnect
Client”
Describes how to monitor and maintain the Cisco AnyConnect VPN Client using thesecurity appliance
Appendix A, “SampleAnyConnect Profile and XMLSchema”
Provides a sample AnyConnect user XML profile and an XML schema that you can use tovalidate the user profiles you create.
Appendix B, “Using MicrosoftActive Directory to Add theSecurity Appliance to the List of Internet Explorer Trusted Sitesfor Domain Users”
Describes in detail how an Active Directory Domain Administrator can push to remoteusers a group policy that adds the security appliance to the list of trusted sites in InternetExplorer.
Table 1 Document Organization (continued)
Chapter/Appendix Definition

7/28/2019 cvc-20-ag
http://slidepdf.com/reader/full/cvc-20-ag 10/116
x
Cisco AnyConnect VPN Client Administrator Guide
OL-12950-01
About This Guide
Obtaining Documentation, Obtaining Support, and Security Guidelines

7/28/2019 cvc-20-ag
http://slidepdf.com/reader/full/cvc-20-ag 11/116
C H A P T E R
1-1
Cisco AnyConnect VPN Client Administrator Guide
OL-12950-01
1Introduction
This book describes a process for getting the Cisco AnyConnect VPN Client up and running on yourcentral-site security appliance and on your remote users’ PCs. In this context, PC refers generically toWindows, Mac, and Linux devices, but the focus in this document is primarily on Windows PC users.
AnyConnect Client FeaturesThe Cisco AnyConnect VPN Client is the next-generation VPN client, providing remote users withsecure VPN connections to the Cisco 5500 Series Adaptive Security Appliance running ASA version 8.0and higher or ASDM 6.0 and higher. It does not connect with a PIX device nor with a VPN 3000 SeriesConcentrator.
Note PIX does not support SSL VPN connections, either clientless or AnyConnect.
The AnyConnect client supports Windows Vista, Windows XP and Windows 2000, Mac OS X (Version10.4 or later) on either Intel or PowerPC, and Red Hat Linux (Version 9 or later). See the Release Notes
for the full set of platform requirements and supported versions.
As the network administrator, you configure the AnyConnect client features on the security appliance.Then, you can load the client on the security appliance and have it automatically download to remoteusers when they log in, or you can manually install the client as an application on PCs. The client allowsuser profiles that are displayed in the user interface and define the names and addresses of hostcomputers.
The network administrator can assign particular features to individual users or groups. The AnyConnectclient includes the following features:
• Datagram Transport Layer Security (DTLS) with SSL connections—Avoids latency and bandwidthproblems associated with some SSL-only connections and improves the performance of real-timeapplications that are sensitive to packet delays. DTLS is a standards-based SSL protocol that
provides a low-latency data path using UDP. For detailed information about DTLS, see RFC 4347(http://www.ietf.org/rfc/rfc4347.txt).
• Standalone Mode—Allows a Cisco AnyConnect VPN client to be established as a PC applicationwithout the need to use a web browser to establish a connection.
• Command Line Interface (CLI)—Provides direct access to client commands at the commandprompt.
• Microsoft Installer (MSI)—Gives Windows users a pre-install package option that providesinstallation, maintenance, and removal of AnyConnect client software on Windows systems.

7/28/2019 cvc-20-ag
http://slidepdf.com/reader/full/cvc-20-ag 12/116
1-2
Cisco AnyConnect VPN Client Administrator Guide
OL-12950-01
Chapter 1 Introduction
Remote User Interface
• IPv6 VPN access—Allows access to IPv6 resources over a public IPv4 connection (Windows XPSP2, Windows Vista, Mac OSX, and Linux only).
• Start Before Login (SBL)—Allows for login scripts, password caching, drive mapping, and more,for Windows.
• Certificate-only authentication—Allows users to connect with digital certificate and not provide a
user ID and password.
• Simultaneous AnyConnect client and clientless, browser-based connections—Allows a user to haveboth an AnyConnect (standalone) connection and a Clientless SSL VPN connection (through abrowser) at the same time to the same IP address. Each connection has its own tunnel.
• Compression—Increases the communications performance between the security appliance and theclient by reducing the size of the packets being transferred. Compression works only for TLS.
• Fallback from DTLS to TLS—Provides a way of falling back from DTLS to TLS if DTLS is nolonger working.
• Language Translation (localization)—Provides a way of implementing translation for user messagesthat appear on the client user interface.
• Dynamic Access Policies feature of the security appliance—Lets you configure authorization thataddresses the variables of multiple group membership and endpoint security for VPN connections.
• Cisco Secure Desktop support—Validates the security of client computers requesting access to yourSSL VPN, helps ensure they remain secure while they are connected, and attempts to remove tracesof the session after they disconnect. The Cisco AnyConnect VPN Client supports the SecureDesktop functions of Cisco Secure Desktop for Windows 2000 and Windows XP.
• Rekey—Specifies that SSL renegotiation takes place during rekey.
Note The Cisco AnyConnect VPN Client can coexist with the IPSec Cisco VPN Client, but they cannot beused simultaneously.
Remote User InterfaceRemote users see the Cisco AnyConnect VPN Client user interface ( Figure 1-1). The Connection tabprovides a drop-down list of profiles for connecting to remote systems. You can optionally configure abanner message to appear on the Connection tab. The status line at the bottom of the interface shows thestatus of the connection.

7/28/2019 cvc-20-ag
http://slidepdf.com/reader/full/cvc-20-ag 13/116
1-3
Cisco AnyConnect VPN Client Administrator Guide
OL-12950-01
Chapter 1 Introduction
Remote User Interface
Figure 1-1 Cisco AnyConnect VPN Client User Interface, Connection Tab
If you do not have certificates set up, you might see the dialog box shown in Figure 1-2. When you seethis dialog box, click Yes to connect.
Figure 1-2 Security Alert Dialog Box
Note Note: Most users (those with correct certificate deployments) do not see this dialog box.
Table 1-1 shows the circumstances and results when the Security Alert dialog box appears.

7/28/2019 cvc-20-ag
http://slidepdf.com/reader/full/cvc-20-ag 14/116
1-4
Cisco AnyConnect VPN Client Administrator Guide
OL-12950-01
Chapter 1 Introduction
Remote User Interface
The Security Alert dialog box appears only on the first connection attempt to a given security appliance.After the connection is successfully established, the “thumbprint” of the server certificate is saved in thepreferences file, so the user is not prompted on subsequent connections to the same security appliance.
If the user switches to a different security appliance and back, the Security Alert dialog box appearsagain.
For detailed information and examples of instances in which the remote user does or does not see theSecurity Alert dialog box, see Adding a Security Certificate in Response to Browser Security AlertWindows, page 2-4.
Table 1-1 Certificate, Security Alert, and Connection Status
Certificate StatusDoes SecurityAlert Appear? Client Connection Status
Server certificate sent to the client fromthe security appliance is independentlyverifiable and the certificate has noserious errors.
No Success
Server certificate sent to the client fromthe security appliance is not independently verifiable and thecertificate contains serious errors.
No Failure
Server certificate sent to the client fromthe security appliance is not independently verifiable and thecertificate does not contain serious errors.
Yes Because the client cannot verify thecertificate, it is still a security concern.The client asks the user whether tocontinue with the connection attempt.

7/28/2019 cvc-20-ag
http://slidepdf.com/reader/full/cvc-20-ag 15/116
1-5
Cisco AnyConnect VPN Client Administrator Guide
OL-12950-01
Chapter 1 Introduction
Remote User Interface
Figure 1-3 shows the Statistics tab, including current connection information.
Figure 1-3 Cisco AnyConnect VPN Client User Interface, Statistics Tab
Clicking the Details tab shows Statistics Details window (Figure 1-4). The Statistics tab in the StatisticsDetails window has detailed connection statistical information, including the tunnel state and mode, theduration of the connection, the number of bytes and frames sent and received, address information,transport information, and Cisco Secure Desktop posture assessment status. The Reset button on this tabresets the transmission statistics. The Export button lets you export the current statistics, interface, and
routing table to a text file. The AnyConnect client prompts you for a name and location for the text file.The default name is AnyConnect-ExportedStats.txt, and the default location is on the desktop.

7/28/2019 cvc-20-ag
http://slidepdf.com/reader/full/cvc-20-ag 16/116
1-6
Cisco AnyConnect VPN Client Administrator Guide
OL-12950-01
Chapter 1 Introduction
Remote User Interface
Figure 1-4 Cisco AnyConnect VPN Client User Interface, Statistics Tab, Statistics Details Tab
Clicking the Route Details tab (Figure 1-5) shows the secured and non-secured routes for thisconnection.
Figure 1-5 Cisco AnyConnect VPN Client User Interface, Statistics Tab, Route Details Tab
Note A Secured Routes entry with the destination 0.0.0.0 and the subnet mask 0.0.0.0 means that all traffic istunneled.
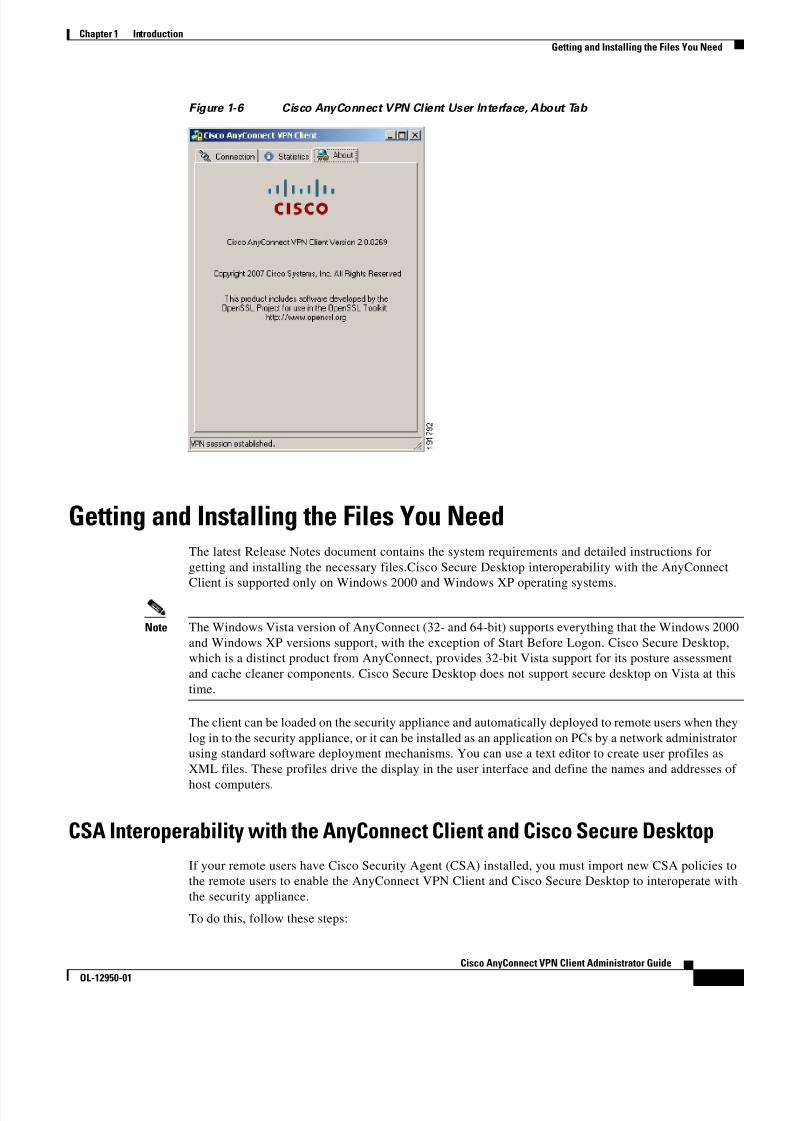
The About tab (Figure 1-6) shows version, copyright, and documentary information about the CiscoAnyConnect Client.
7/28/2019 cvc-20-ag
http://slidepdf.com/reader/full/cvc-20-ag 17/116
1-7
Cisco AnyConnect VPN Client Administrator Guide
OL-12950-01
Chapter 1 Introduction
Getting and Installing the Files You Need
Figure 1-6 Cisco AnyConnect VPN Client User Interface, About Tab
Getting and Installing the Files You NeedThe latest Release Notes document contains the system requirements and detailed instructions forgetting and installing the necessary files.Cisco Secure Desktop interoperability with the AnyConnect
Client is supported only on Windows 2000 and Windows XP operating systems.
Note The Windows Vista version of AnyConnect (32- and 64-bit) supports everything that the Windows 2000and Windows XP versions support, with the exception of Start Before Logon. Cisco Secure Desktop,which is a distinct product from AnyConnect, provides 32-bit Vista support for its posture assessmentand cache cleaner components. Cisco Secure Desktop does not support secure desktop on Vista at thistime.
The client can be loaded on the security appliance and automatically deployed to remote users when theylog in to the security appliance, or it can be installed as an application on PCs by a network administratorusing standard software deployment mechanisms. You can use a text editor to create user profiles asXML files. These profiles drive the display in the user interface and define the names and addresses of
host computers.
CSA Interoperability with the AnyConnect Client and Cisco Secure Desktop
If your remote users have Cisco Security Agent (CSA) installed, you must import new CSA policies tothe remote users to enable the AnyConnect VPN Client and Cisco Secure Desktop to interoperate withthe security appliance.
To do this, follow these steps:

7/28/2019 cvc-20-ag
http://slidepdf.com/reader/full/cvc-20-ag 18/116
1-8
Cisco AnyConnect VPN Client Administrator Guide
OL-12950-01
Chapter 1 Introduction
Getting and Installing the Files You Need
Step 1 Retrieve the CSA policies for the AnyConnect client and Cisco Secure Desktop. You can get the filesfrom:
• The CD shipped with the security appliance.
• The software download page for the ASA 5500 Series Adaptive Security Appliance at
http://www.cisco.com/cgi-bin/tablebuild.pl/asa.The filenames are AnyConnect-CSA.zip and CSD-for-CSA-updates.zip
Step 2 Extract the .export files from the .zip package files.
Step 3 Choose the correct version of the .export file to import. The Version 5.2 export files work for CSAVersions 5.2 and higher. The 5.x export files are for CSA Versions 5.0 and 5.1.
Step 4 Import the file using the Maintenance > Export/Import tab on the CSA Management Center.
Step 5 Attach the new rule module to your VPN policy and generate rules.
For more information, see the CSA document Using Management Center for Cisco Security Agents 5.2.Specific information about exporting policies is located in the section Exporting and ImportingConfigurations.
7/28/2019 cvc-20-ag
http://slidepdf.com/reader/full/cvc-20-ag 19/116
C H A P T E R
2-1
Cisco AnyConnect VPN Client Administrator Guide
OL-12950-01
2Common AnyConnect VPN Client Installation andConfiguration Procedures
Installing the AnyConnect Client
The installation and configuration consists of two parts: what you have to do on the security applianceand what you have to do on the remote PC. The AnyConnect client software part of the ASA Release8.0(1) and later and ASDM Release 6.0 and later. You can decide whether to make the AnyConnect clientsoftware permanently resident on the remote PC, or whether to have it resident only for the duration ofthe connection.
This chapter contains procedures for installing the AnyConnect client software on the ASA5500 usingthe Adaptive Security Device Manager (ASDM) or the CLI command interface. It also describes how toinstall the AnyConnect client on a user’s PC and how to enable AnyConnect client features afterinstallation.
WebLaunch Mode
Without a previously-installed client, remote users enter into their browser the IP address or DNS name
of an interface configured to accept clientless SSL VPN connections. Unless the security appliance isconfigured to redirect http:// requests to https://, users must enter the URL in the form https://<address>
Note A user with a clientless SSL VPN connection can switch to an AnyConnect client SSL VPN connectionby clicking the AnyConnect drawer on the portal and following the instructions on that page.
After the user enters the URL, the browser connects to that interface and displays the login screen. If theuser satisfies the login and authentication, and the security appliance identifies the user as requiring theclient, it loads the client that matches the operating system of the remote computer. After loading, theclient installs and configures itself, establishes a secure SSL connection and either remains or uninstallsitself (depending on the security appliance configuration) when the connection terminates.
Standalone Mode
In the case of a previously-installed client, when the user authenticates, the security appliance examinesthe revision of the client, and upgrades the client as necessary.
When the client negotiates an SSL VPN connection with the security appliance, it connects usingTransport Layer Security (TLS). The client can also negotiate a simultaneous Datagram Transport LayerSecurity (DTLS) connection. DTLS avoids latency and bandwidth problems associated with some SSLconnections and improves the performance of real-time applications that are sensitive to packet delays.

7/28/2019 cvc-20-ag
http://slidepdf.com/reader/full/cvc-20-ag 20/116
2-2
Cisco AnyConnect VPN Client Administrator Guide
OL-12950-01
Chapter 2 Common AnyConnect VPN Client Installation and Configuration Procedures
Before You Install the AnyConnect Client
The AnyConnect client can be downloaded from the security appliance, or it can be installed manuallyon the remote PC by the system administrator. This document contains information about how toconfigure the features of the AnyConnect client. For more detailed information about configuring theAnyConnect client and other SSL VPN connections on the security appliance, see “Configuring SSLVPN Connections” in Cisco Security Appliance Command Line Configuration Guide. For detaileddescriptions of the commands referred to in this administrator’s guide, see the Cisco ASA 5500
Command Reference Guide for version 8.0 or later.
The security appliance loads the client based on the group policy or username attributes of the userestablishing the connection. You can configure the security appliance to automatically download theclient, or you can configure it to prompt the remote user about whether to download the client. In thelatter case, if the user does not respond, you can configure the security appliance to either download theclient after a timeout period or present the portal page.
Note When using Start Before Logon, the VPN Gina (VPN Graphical Identification and Authentication) acannot be installed dynamically if the AnyConnect client is installed manually. The VPN Gina can beinstalled either before or after the AnyConnect client, but they must either be both installed manually orboth installed dynamically (CSCsh38590).
This section describes installation-specific issues and procedures for the AnyConnect client Release2.0(1), and contains the following sections:
• Before You Install the AnyConnect Client, page 2-2
• Installing the AnyConnect Client on a User’s PC, page 2-8
• Installing the AnyConnect Client on a User’s PC, page 2-8
Before You Install the AnyConnect ClientThe following sections contain recommendations to ensure successful AnyConnect client installation, as
well as tips about certificates, Cisco Security Agent (CSA), adding trusted sites, and responding tobrowser alerts:
• Ensuring Automatic Installation of AnyConnect Clients, page 2-2
• AnyConnect Client and New Windows Installations, page 2-3
• Adding a Security Appliance to the List of Trusted Sites (Internet Explorer), page 2-3
• Adding a Security Certificate in Response to Browser Security Alert Windows, page 2-4
Ensuring Automatic Installation of AnyConnect Clients
The following recommendations and caveats apply to the automatic installation of AnyConnect clientsoftware on client PCs:
• To minimize user prompts during AnyConnect client setup, make sure certificate data on client PCsand on the security appliance match:
– If you are using a Certificate Authority (CA) for certificates on the security appliance, chooseone that is already configured as a trusted CA on client machines.
– If you are using a self-signed certificate on the security appliance, be sure to install it as a trustedroot certificate on clients.

7/28/2019 cvc-20-ag
http://slidepdf.com/reader/full/cvc-20-ag 21/116
2-3
Cisco AnyConnect VPN Client Administrator Guide
OL-12950-01
Chapter 2 Common AnyConnect VPN Client Installation and Configuration Procedures
Before You Install the AnyConnect Client
The procedure varies by browser. See the procedures that follow this section.
– Make sure the Common Name (CN) in security appliance certificates matches the name clientsuse to connect to it. By default, the security appliance certificate CN field is its IP address. If clients use a DNS name, change the CN field on the security appliance certificate to that name.
• The Cisco Security Agent (CSA) might display warnings during the AnyConnect client installation.
Current shipping versions of CSA do not have a built-in rule that is compatible with the AnyConnectclient. You can create the following rule using CSA version 5.0 or later by following these steps:
Step 1 In the Rule Module: “Cisco Secure Tunneling Client Module”, add a FACL:
Priority Allow, no Log, Description: “Cisco Secure Tunneling Browsers, read/write
vpnweb.ocx”
Applications in the following class: “Cisco Secure Tunneling Client - Controlled Web
Browsers”
Attempt: Read file, Write File
On any of these files: @SYSTEM\vpnweb.ocx
Step 2 Application Class: “Cisco Secure Tunneling Client - Installation Applications” add the following
process names:
**\vpndownloader.exe
@program_files\**\Cisco\Cisco AnyConnect VPN Client\vpndownloader.exe
This rule will be built in to a future release of CSA.
• We recommend that Microsoft Internet Explorer (MSIE) users add the security appliance to the listof trusted sites, or install Java. Doing so enables the ActiveX control to install with minimalinteraction from the user. This is particularly important for users of Windows XP SP2 with enhancedsecurity. Windows Vista users must add the security appliance to the list of trusted sites in order touse the dynamic deployment feature. Refer to the following sections for instructions.
AnyConnect Client and New Windows Installations
In rare circumstances, if you install the AnyConnect client on a computer that has a new or cleanWindows installation, the AnyConnect client might fail to connect, and your computer might display thefollowing message:
The required system DLL (filename) is not present on the system.
This could occur if the computer does not have the file MSVCP60.dll or MSVCRT.dll located in thewinnt\system32 directory. For more information about this problem, see the Microsoft Knowledge Base,article 259403, at http://support.microsoft.com/kb/259403.
Adding a Security Appliance to the List of Trusted Sites (Internet Explorer)
To add a security appliance to the list of trusted sites, use Microsoft Internet Explorer and do thefollowing steps.

7/28/2019 cvc-20-ag
http://slidepdf.com/reader/full/cvc-20-ag 22/116
2-4
Cisco AnyConnect VPN Client Administrator Guide
OL-12950-01
Chapter 2 Common AnyConnect VPN Client Installation and Configuration Procedures
Before You Install the AnyConnect Client
Note Adding a security appliance to the list of trusted sites for Internet Explorer is required for those runningWindows Vista who want to use WebLaunch.
Step 1 Go to Tools > Internet Options > Trusted Sites.The Internet Options window opens.
Step 2 Click the Security tab.
Step 3 Click the Trusted Sites icon.
Step 4 Click Sites.
The Trusted Sites window opens.
Step 5 Type the host name or IP address of the security appliance. Use a wildcard such ashttps://*.yourcompany.com to allow all ASA 5500s within the yourcompany.com domain to be used tosupport multiple sites.
Step 6 Click Add.
Step 7 Click OK.
The Trusted Sites window closes.
Step 8 Click OK in the Internet Options window.
Note To use Microsoft Active Directory to add the security appliance to the list of Internet Explorer trustedsites for domain users, see Using Microsoft Active Directory to Add the Security Appliance to the Listof Internet Explorer Trusted Sites for Domain Users, page B-1.
When a user gets the server certificate for the security appliance from a globally trusted certificateauthority—for example, Verisign or Cisco—the user never sees a Security Alert pop-up when connectingto that security appliance.
Adding a Security Certificate in Response to Browser Security Alert Windows
This section explains how to install a self-signed certificate as a trusted root certificate on a client inresponse to the browser alert windows.
Connecting to this security appliance.
A remote user using standalone mode might see a Security Alert dialog box in several possible loginsituations. The following examples and scenarios show some instances. After these descriptions, you’ll
see how to add a security certificate to avoid these situations.
The following examples illustrate sequences of events involving the pop-up Security Alert dialog box.
Example Set 1
1. A user connects to badly configured security appliance #1. As a result, the user sees the pop-upSecurity Alert dialog box.
2. The user approves the certificate.

7/28/2019 cvc-20-ag
http://slidepdf.com/reader/full/cvc-20-ag 23/116
2-5
Cisco AnyConnect VPN Client Administrator Guide
OL-12950-01
Chapter 2 Common AnyConnect VPN Client Installation and Configuration Procedures
Before You Install the AnyConnect Client
3. The user connects successfully to security appliance #1.
4. The user disconnects from security appliance #1.
5. The user reconnects to badly configured security appliance #1.
6. The user does not see the pop-up dialog box, because the certificate is stored in the preferences file.
The user connects successfully to security appliance #1.7. The user disconnects from security appliance #1.
8. The user connects to correctly configured security appliance #2.
9. The user sees no dialog box and connects successfully.
10. The user disconnects from security appliance #2.
11. The user connects to badly configured security appliance #1.
12. The user sees a pop-up Security Alert dialog box prompt.
Example Set 2
The following are examples of non-serious errors that result in a Security Alert dialog box prompting
the user.• Invalid Common Name: The hostname in the certificate sent to us from the security appliance does
not match the hostname that the user connected to.
For example, the user connects to 10.94.147.93, and the certificate received from the securityappliance contains cvc-asa06.cisco.com. 10.94.147.93 and cvc-asa06.cisco.com might or might notbe the same machine. The Security Alert dialog box prompts the user to approve or disapprove thecertificate.
• Invalid Date: The certificate received from the security appliance has expired or is not yet valid. Thiscould be because the date on the customer's machine is incorrect or because the certificate really isinvalid. The Security Alert dialog box prompts the user to approve or disapprove the certificate.
• Invalid Certificate Authority: The certificate received from the security appliance has been signed
by a Certificate Authority that is not recognized by the AnyConnect client. The AnyConnect clientprompts the user for approval/disapproval. Recommendation: The root certificate (certificate of theCertificate Authority) should be imported into the client machine out of band (via E-mail, website,floppy disk, CD, and so on).
Example Set 3
The following are examples of serious errors that result in no Security Alert prompt and no connection
• Certificate cannot be read.
• Bad password.
• Certificate not sent to the client.
• Bad Usage: Certificate received from the security appliance was not meant to be used as a server
certificate.
Scenarios Where a User Might See the Security Alert
• Scenario A: The user gets the server certificate for their security appliance from a non-trustedcertificate authority; for example, their own certificate authority or cacert.org.
The user sees the Security Alert pop-up on the first connection attempt but never thereafter until heor she switches to a different security appliance and back.
7/28/2019 cvc-20-ag
http://slidepdf.com/reader/full/cvc-20-ag 24/116
2-6
Cisco AnyConnect VPN Client Administrator Guide
OL-12950-01
Chapter 2 Common AnyConnect VPN Client Installation and Configuration Procedures
Before You Install the AnyConnect Client
Recommendation: Administrators should import the root certificate that was used to sign that servercertificate (for example, their own certificate authority or cacert.org) into every client machine outof band via E-mail, website, floppy disk, and so on.
• Scenario B: The user gets the server certificate for the security appliance from the certificateauthority that sits on the security appliance.
The user sees the Security Alert pop-up on the first connection attempt but never thereafter until heor she switches to a different security appliance and back.
Recommendation: Administrators should import the root certificate of the certificate authority thatsits on the security appliance into every client machine out of band via E-mail, website, floppy disk,and so on.
• Scenario C : the security appliance is at default configuration and certificates haven't beenconfigured.
When at default, the security appliance generates a self-signed server certificate that theAnyConnect client does not trust.
The user sees the Security Alert pop-up on the first connection attempt but never thereafter until heor she switches to a different security appliance and back.
Recommendation: Administrators should correctly configure certificates on their security appliancebefore attempting client connections to them.
In Response to a Microsoft Internet Explorer “Security Alert” Window
The following procedure explains how to install a self-signed certificate as a trusted root certificate ona client in response to a Microsoft Internet Explorer Security Alert window. This window opens whenyou establish a Microsoft Internet Explorer connection to a security appliance that is not recognized asa trusted site. The upper half of the Security Alert window shows the following text:
Information you exchange with this site cannot be viewed or changed by others.
However, there is a problem with the site's security certificate. The security
certificate was issued by a company you have not chosen to trust. View the certificate
to determine whether you want to trust the certifying authority.
Install the certificate as a trusted root certificate as follows:
Step 1 Click View Certificate in the Security Alert window.
The Certificate window opens.
Step 2 Click Install Certificate.
The Certificate Import Wizard Welcome opens.
Step 3 Click Next.
The Certificate Import Wizard – Certificate Store window opens.
Step 4 Select “Automatically select the certificate store based on the type of certificate.”
Step 5 Click Next.
The Certificate Import Wizard – Completing window opens.
Step 6 Click Finish.
Step 7 Another Security Warning window prompts “Do you want to install this certificate?” Click Yes.
The Certificate Import Wizard window indicates the import is successful.
Step 8 Click OK to close this window.

7/28/2019 cvc-20-ag
http://slidepdf.com/reader/full/cvc-20-ag 25/116
2-7
Cisco AnyConnect VPN Client Administrator Guide
OL-12950-01
Chapter 2 Common AnyConnect VPN Client Installation and Configuration Procedures
Before You Install the AnyConnect Client
Step 9 Click OK to close the Certificate window.
Step 10 Click Yes to close the Security Alert window.
The security appliance window opens, signifying the certificate is trusted.
In Response to a Netscape, Mozilla, or Firefox “Certified by an Unknown Authority” Window
The following procedure explains how to install a self-signed certificate as a trusted root certificate ona client in response to a “Web Site Certified by an Unknown Authority” window. This window openswhen you establish a Netscape, Mozilla, or Firefox connection to a security appliance that is notrecognized as a trusted site. This window shows the following text:
Unable to verify the identity of <Hostname_or_IP_address> as a trusted site.
Install the certificate as a trusted root certificate as follows:
Step 1 Click the Examine Certificate button in the “Web Site Certified by an Unknown Authority” window.
The Certificate Viewer window opens.
Step 2 Click the “Accept this certificate permanently” option.
Step 3 Click OK.
The security appliance window opens, signifying the certificate is trusted.
Replacing a Digital Certificate with a Trusted Certificate
A trusted Certificate is the most secure option. You can replace the central-site security appliance digitalcertificate with a trusted certificate by following the procedures in this section. By default, the security
appliance has a self-signed Certificate that is regenerated every time the device is rebooted. You canpurchase a Certificate from a CA provider like Verisign or Entrust with the name matching theFully-Qualified Domain Name (FQDN) of your central-site security appliance (for example,vpn.yoursys.com), or you can have the security appliance issue a permanent Certificate for itself byentering the following commands, replacing x.x.x.x with the IP of your security appliance outside orpublic address:
crypto ca trustpoint self
enrollment self
subject-name CN=x.x.x.x,CN=vpn.yoursys.com
crl configure
crypto ca enroll self
ssl trust-point self outside
write
When users first connect using AnyConnect, they should click “View Certificate”, install this newcertificate, then click “Yes” to proceed. The next time they re-connect, they do not see the security alertpopup, even if the security appliance is rebooted.

7/28/2019 cvc-20-ag
http://slidepdf.com/reader/full/cvc-20-ag 26/116
2-8
Cisco AnyConnect VPN Client Administrator Guide
OL-12950-01
Chapter 2 Common AnyConnect VPN Client Installation and Configuration Procedures
Installing the AnyConnect Client on a User’s PC
Installing the AnyConnect Client on a User’s PCYou can set up a user’s PC to run the AnyConnect client in standalone mode by installing the clientsoftware for the appropriate operating system directly on the user’s PC. In standalone mode, the userstarts the AnyConnect client software without first establishing a web connection. The client uses
essentially the same authentication mechanisms as the web-enabled (WebLaunch) mode, but the clientdisplays a GUI to the user, asking for the authentication credentials. The following sections describe howto install the client on Windows, Linux, and Mac systems.
• Installing the AnyConnect Client Using the Microsoft Windows Installer on a PC RunningWindows, page 2-8
• Installing the AnyConnect Client on a PC Running Linux, page 2-8
• Installing the AnyConnect Client on a PC Running MAC OSX, page 2-9
Installing the AnyConnect Client Using the Microsoft Windows Installer on a PCRunning Windows
To install the AnyConnect client on a PC running Windows, follow these steps. We suggest you acceptthe defaults unless your system administrator has instructed otherwise.
Note Vista users must add the security appliance to the trusted zone for automatic installation by the securityappliance to work (CSCsh23752).
Step 1 Exit all Windows programs, and disable any antivirus software (recommended).
Step 2 Download the AnyConnect client MSI file from the Cisco site; for example,anyconnect-win-2.0.xxx.msi, where xxx represents the current build number. See the Release Notes for
the current release for the full set of operating-system-specific download sites.Step 3 Double-click the MSI file. The welcome screen for the Cisco AnyConnect VPN Client Setup Wizard
displays.
Step 4 Click Next. The End-User License Agreement displays. Accept the license agreement and click OK. TheSelect Installation Folder screen displays.
Step 5 Accept the default folder or enter a new folder and click Next. The Ready to Install screen displays.
Step 6 Click Install. The client installs and displays the status bar during installation. After installing, theCompleting the Cisco AnyConnect VPN Client Setup Wizard screen displays.
Step 7 Click Next. The wizard disappears and the installation is complete.
You can also use the Microsoft Installer to load the AnyConnect client software on the user’sWindows-based PC. MSI gives Windows users a pre-install package option that provides installation,maintenance, and removal of AnyConnect client software on Windows systems.
Installing the AnyConnect Client on a PC Running Linux
To install the AnyConnect client on a PC Running Linux, follow these steps:

7/28/2019 cvc-20-ag
http://slidepdf.com/reader/full/cvc-20-ag 27/116
2-9
Cisco AnyConnect VPN Client Administrator Guide
OL-12950-01
Chapter 2 Common AnyConnect VPN Client Installation and Configuration Procedures
Installing the AnyConnect Client on a User’s PC
Step 1 For Linux, the client files are contained in a tar/gz file. Unpack the archive with a tar command. Forexample:
tar xvzf AnyConnect-Linux-Release-2.0.0xxx.tar.gz
The files necessary for installation are placed in the folder ciscovpn.
Step 2 Change to the ciscovpn folder. As a root user, run the script named vpn_install.sh. For example:
[root@linuxhost]# cd ciscovpn
[root@linuxhost]# ./vpn_install.sh
The client installs in the directory /opt/cisco/vpn. This script also installs the daemon vpnagentd and setsit up as a service that is automatically started when the system boots.
After installing the client, you can start the client manually from the user interface with the Linuxcommand /opt/cisco/vpn/bin/vpnui or with the client CLI command /opt/cisco/vpn/bin/vpn.
Installing the AnyConnect Client on a PC Running MAC OSXThe AnyConnect client image for MAC OSX is a DMG disk image installation package. To install theAnyConnect client on a system running MAC OSX, follow these steps:
Step 1 Transfer the installation package file to the desktop and double-click the file. Select one of the followingfiles:
• anyconnect-macosx-i386-2.0.xxx.dmg
• anyconnect-macosx-powerpc-2.0.xxx.dmg
This creates a VPN icon representing the installation package file.
Step 2 Double-click the vpn icon to initiate the installation. Follow the sequence of the vpnclient installer,accepting the licensing agreement, selecting the destination volume, and then selecting the “Upgrade”option to perform a basic installation.
Note The installer requires that you authenticate.s
The installation is complete.

7/28/2019 cvc-20-ag
http://slidepdf.com/reader/full/cvc-20-ag 28/116
2-10
Cisco AnyConnect VPN Client Administrator Guide
OL-12950-01
Chapter 2 Common AnyConnect VPN Client Installation and Configuration Procedures
Installing the AnyConnect Client on a User’s PC

7/28/2019 cvc-20-ag
http://slidepdf.com/reader/full/cvc-20-ag 29/116
C H A P T E R
3-1
Cisco AnyConnect VPN Client Administrator Guide
OL-12950-01
3Installing the AnyConnect Client and Configuring
the Security Appliance with ASDM
Installing the client on the security appliance consists of copying a client image to the security applianceand identifying the file to the securi ty appliance as a client image. With multiple clients, you must alsoassign the order in which the security appliance loads the clients to the remote PC.
Note The AnyConnect client configuration uses the same parameters as the SSL VPN Client. Many of the filenames, panel names, and ASDM navigation elements, as well as most of the CLI commands include theprefix svc, indicating this similarity.
Perform the following steps to install the client:
Step 1 Load the AnyConnect client images to the security appliance. On the ASDM toolbar, click Configuration. The navigation pane displays features to configure.
Step 2 In the navigation pane, click Remote Access VPN. The navigation pane displays VPN features.
Step 3 Choose Network (Client) Access > Advanced > SSL VPN > Client Settings . The SSL VPN ClientSettings panel displays. (Figure 3-1).
This panel lists any AnyConnect client files that have been identified as AnyConnect client images. Theorder in which they appear in the table reflects the order in which they download to the remote computer.

7/28/2019 cvc-20-ag
http://slidepdf.com/reader/full/cvc-20-ag 30/116
3-2
Cisco AnyConnect VPN Client Administrator Guide
OL-12950-01
Chapter 3 Installing the AnyConnect Client and Configuring the Security Appliance with ASDM
Figure 3-1 SSL VPN Client Panel
To add an AnyConnect client image, Click Add in the SSL VPN Client Images area. The Add SSL VPNClient Image dialog appears (Figure 3-2).
Figure 3-2 Add SSL VPN Client Image Dialog
If you already have an image located in the flash memory of the security appliance, you can enter the
name of the image in the Flash SVC Image field, and cl ick OK. The SSL VPN Client Settings panel nowshows the AnyConnect client images you identified (Figure 3-3).

7/28/2019 cvc-20-ag
http://slidepdf.com/reader/full/cvc-20-ag 31/116
3-3
Cisco AnyConnect VPN Client Administrator Guide
OL-12950-01
Chapter 3 Installing the AnyConnect Client and Configuring the Security Appliance with ASDM
Figure 3-3 SSL VPN Client Panel with AnyConnect Client Images
Note The security appliance downloads portions of each client in the order you specify until it matches theoperating system of the remote PC. Therefore, assign the topmost position to the image used by the mostcommonly-encountered operating system.
Step 4 Click on an image name, and use the Move Up or Move Down button to change the position of the imagewithin the list.
This establishes the order in which the security appliance loads them to the remote computer. Thesecurity appliance loads the AnyConnect client image at the top of the list of images first. Therefore, youshould move the image used by the most commonly-encountered operating system to the top of the list
Step 5 Enable the security appliance to download the AnyConnect client to remote users. Go to Network(Client) Access > SSL VPN Connection Profiles. The SSL VPN Connection Profiles panel appears(Figure 3-4). Check Enable Cisco AnyConnect VPN Client or legacy SSL VPN client access on theinterfaces selected in the table below.

7/28/2019 cvc-20-ag
http://slidepdf.com/reader/full/cvc-20-ag 32/116
3-4
Cisco AnyConnect VPN Client Administrator Guide
OL-12950-01
Chapter 3 Installing the AnyConnect Client and Configuring the Security Appliance with ASDM
Figure 3-4 Enable SSL VPN Client Check Box
Step 6 Configure a method of address assignment. You can use DHCP, and/or user-assigned addressing. Youcan also create a local IP address pool and assign the pool to a tunnel group.
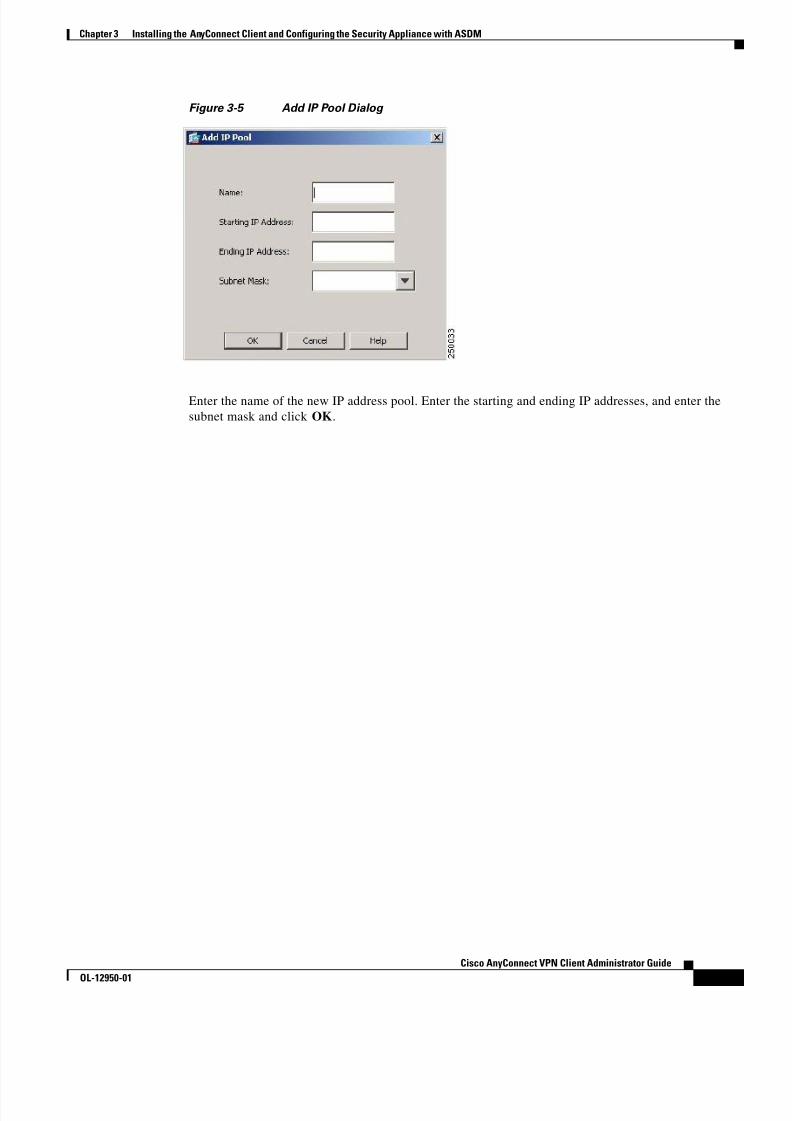
To create an IP address pool, choose Network (Client) Access > Address Management > AddressPools. Click Add. The Add IP Pool dialog appears (Figure 3-5).
7/28/2019 cvc-20-ag
http://slidepdf.com/reader/full/cvc-20-ag 33/116
3-5
Cisco AnyConnect VPN Client Administrator Guide
OL-12950-01
Chapter 3 Installing the AnyConnect Client and Configuring the Security Appliance with ASDM
Figure 3-5 Add IP Pool Dialog
Enter the name of the new IP address pool. Enter the starting and ending IP addresses, and enter thesubnet mask and click OK.

7/28/2019 cvc-20-ag
http://slidepdf.com/reader/full/cvc-20-ag 34/116
3-6
Cisco AnyConnect VPN Client Administrator Guide
OL-12950-01
Chapter 3 Installing the AnyConnect Client and Configuring the Security Appliance with ASDM
Step 7 Assign the IP address pool to a Connection (tunnel group). To do this, chooseNetwork (Client) Access > SSLVPN Connection Profiles. The SSL VPN Connection Profiles panelappears (Figure 3-6):
Figure 3-6 Client Address Pool Assignment
To edit an existing connection profile, highlight a connection in the table, and click Edit. The Edit SSLVPN Connection > Basic dialog box appears. To add a new connection profile, click Add. The Add SSLVPN Connection > Basic dialog box appears, which is identical to the Edit dialog box, except that youmust supply a name for the connection profile. Then proceed as follows.

7/28/2019 cvc-20-ag
http://slidepdf.com/reader/full/cvc-20-ag 35/116
3-7
Cisco AnyConnect VPN Client Administrator Guide
OL-12950-01
Chapter 3 Installing the AnyConnect Client and Configuring the Security Appliance with ASDM
Click Select in the Client Address Assignment area. The Select Address Pool dialog box appears(Figure 3-7), containing available address pools. Select a pool The pool you select appears in the Assignfield in the Assigned Address pools area. Click OK.
Figure 3-7 Select Address Pool Dialog
Step 8 Identify SSL VPN as a permitted VPN tunneling protocol for the group or user.
Choose Network (Client) Access > Group Policies from the navigation pane. Highlight the grouppolicy in the Group Policy table, and click Edit.

7/28/2019 cvc-20-ag
http://slidepdf.com/reader/full/cvc-20-ag 36/116
3-8
Cisco AnyConnect VPN Client Administrator Guide
OL-12950-01
Chapter 3 Installing the AnyConnect Client and Configuring the Security Appliance with ASDM
The Edit Internal Group Policy dialog appears (Figure 3-8):
Figure 3-8 Edit Internal Group Policy, General Tab
Check the SSL VPN Client check box to include SSL VPN as a tunneling protocol.

7/28/2019 cvc-20-ag
http://slidepdf.com/reader/full/cvc-20-ag 37/116
3-9
Cisco AnyConnect VPN Client Administrator Guide
OL-12950-01
Chapter 3 Installing the AnyConnect Client and Configuring the Security Appliance with ASDM
Step 9 Configure SSL VPN attributes for a user or group. To display SSL VPN features for groups, In thenavigation pane of the Internal Group Policy dialog, choose Advanced > SSL VPN Client. The SSLVPN Client features display Figure 3-9.
Figure 3-9 SSL VPN Client Features
Configure the following features on the SSL VPN Client tab:
• Keep Installer on Client System—Enable to allow permanent client installation on the remotecomputer. Enabling disables the automatic uninstalling feature of the client. The client remainsinstalled on the remote computer for subsequent connections, reducing the connection time for theremote user.
• Compression—Compression increases the communications performance on low-bandwidth linksbetween the security appliance and the client by reducing the size of the packets being transferred.On broadband connections, compression might degrade performance.
• Datagram TLS—Datagram Transport Layer Security (DTLS) allows the AnyConnect Client
establishing an SSL VPN connection to use two simultaneous tunnels—an SSL tunnel and a DTLStunnel. Using DTLS avoids latency and bandwidth problems associated with SSL connections andimproves the performance of real-time applications that are sensitive to packet delays.
Note Compression and DTLS are mutually exclusive. If you enable both, DTLS is inactive for theclient connection.

7/28/2019 cvc-20-ag
http://slidepdf.com/reader/full/cvc-20-ag 38/116
3-10
Cisco AnyConnect VPN Client Administrator Guide
OL-12950-01
Chapter 3 Installing the AnyConnect Client and Configuring the Security Appliance with ASDM
• Keepalive Messages—Enter an number, from 15 to 600 seconds, in the Interval field to enable andadjust the interval of keepalive messages to ensure that an connection through a proxy, firewall, orNAT device remains open, even if the device limits the time that the connection can be idle.Adjusting the interval also ensures that the client does not disconnect and reconnect when the remoteuser is not actively running a socket-based application, such as Microsoft Outlook or MicrosoftInternet Explorer.
• MTU—Adjust the Maximum Transmission Unit (MTU) in bytes, from 256 to 1406 bytes. Thissetting affects only the AnyConnect client connections established in SSL, with or without DTLS.By default, the MTU size adjusts automatically based on the MTU of the interface that theconnection uses, minus the IP/UDP/DTLS overhead.
• Client Profile to Download—Specify a file on flash as a client profile. A profile is a group of configuration parameters that the AnyConnect Client uses to configure the connection entries thatappear in the client user interface, including the names and addresses of host computers.
• Optional Client Module to Download—Specify any modules that the AnyConnect client needs todownload to enable more features, such as Start Before Logon (SBL). To minimize download time,the AnyConnect Client requests downloads (from the security appliance) only of core modules thatit needs for each feature that it supports.
The attributes you configure on the Group Policies > Advanced > SSL VPN Client dialog box set theprofile for the AnyConnect Client.
7/28/2019 cvc-20-ag
http://slidepdf.com/reader/full/cvc-20-ag 39/116
C H A P T E R
4-1
Cisco AnyConnect VPN Client Administrator Guide
OL-12950-01
4Installing the AnyConnect Client on a SecurityAppliance Using CLI
Installing the AnyConnect client on the security appliance consists of copying a client image to thesecurity appliance and identi fying the file as a client image. With multiple clients, you must also assignthe order that the security appliance downloads the clients to the remote PC.
Note The AnyConnect client configuration uses the same parameters as the SSL VPN Client. Most of the CLIcommands and many of the file names include the prefix svc, indicating this similarity.
Perform the following steps to install the client:
Step 1 Copy the client image package to the security appliance using the copy command from privileged EXECmode, or using another method. This example copies the images from a tftp server using thecopy tftp command:
hostname# copy tftp flash
Address or name of remote host []? 209.165.200.226
Source filename []? anyconnect-win-2.0.0.0343.pkg
Destination filename []? anyconnect-win-2.0.0.0343.pkg
Accessing
tftp://209.165.200.226/anyconnect-win-2.0.0.0343.pkg...!!!!!!!!!!!!!!!!!!!!!!!!!!
Writing file
disk0:/cdisk71...!!!!!!!!!!!!!!!!!!!!!!!!!!!!!!!!!!!!!!!!!!!!!!!!!!!!!!!!!!!!!!!!!!!!!!!!
319662 bytes copied in 3.695 secs (86511 bytes/sec)
Step 2 Identify a file on flash as an SSL VPN client package file using the svc image command from webvpnconfiguration mode:
svc image filename order
The security appliance expands the file in cache memory for downloading to remote PCs. If you havemultiple clients, assign an order to the client images with the order argument.
The security appliance downloads portions of each client in the order you specify until it matches theoperating system of the remote PC. Therefore, assign the lowest number to the image used by the mostcommonly-encountered operating system. For example:
hostname(config-webvpn)# svc image anyconnect-win-2.0.0343-k9.pkg 1
hostname(config-webvpn)# svc image anyconnect-macosx-i386-2.0.0343-k9.pkg 2
hostname(config-webvpn)# svc image anyconnect-linux-2.0.0343-k9.pkg 3

7/28/2019 cvc-20-ag
http://slidepdf.com/reader/full/cvc-20-ag 40/116
4-2
Cisco AnyConnect VPN Client Administrator Guide
OL-12950-01
Chapter 4 Installing the AnyConnect Client on a Security Appliance Using CLI
Enabling AnyConnect Client SSL VPN Connections Using CLI
Note The security appliance expands SSL VPN client and the Cisco Secure Desktop images in cache memory.If you receive the error message ERROR: Unable to load SVC image - increase disk space via the'cache-fs' command , use the cache-fs limit command to adjust the size of cache memory:
Step 3 Check the status of the clients using the show webvpn svc command:hostname(config-webvpn)# show webvpn svc
1. disk0:/anyconnect-win-2.0.0343-k9.pkg 1
CISCO STC win2k+
2,0,0343
Tue 03/27/2007 4:16:21.09
2. disk0:/anyconnect-macosx-i386-2.0.0343-k9.pkg 2
CISCO STC Darwin_i386
2,0,0
Tue Mar 27 05:09:16 MDT 2007
3. disk0:/anyconnect-linux-2.0.0343-k9.pkg 3
CISCO STC Linux
2,0,0
Tue Mar 27 04:06:53 MST 2007
3 SSL VPN Client(s) installed
Enabling AnyConnect Client SSL VPN Connections Using CLIAfter installing the client, enable the security appliance to allow AnyConnect VPN client SSL VPNconnections by performing the following steps:
Step 1 Enable WebVPN on an interface using the enable command from webvpn mode:
enable interfaceFor example:
hostname(config)# webvpn
hostname(config-webvpn)# enable outside
You must enable WebVPN on the interface before enabling DTLS.
Step 2 Enable SSL VPN connections globally, using the svc enable command from webvpn configurationmode.
For example:
hostname(config-webvpn)# svc enable
Step 3 Enable DTLS on an interface, using the dtls enable command in webvpn mode. For example:
hostname(config-webvpn)# dtls enable outside
Step 4 Configure a method of address assignment. You can use DHCP, and/or user-assigned addressing. Youcan also create a local IP address pool using the ip local pool command from global configuration mode:
ip local pool poolname startaddr-endaddr mask mask
The following example creates the local IP address pool vpn_users:
hostname(config)# ip local pool vpn_users 209.165.200.225-209.165.200.254
mask 255.255.255.224

7/28/2019 cvc-20-ag
http://slidepdf.com/reader/full/cvc-20-ag 41/116
4-3
Cisco AnyConnect VPN Client Administrator Guide
OL-12950-01
Chapter 4 Installing the AnyConnect Client on a Security Appliance Using CLI
Enabling AnyConnect Client SSL VPN Connections Using CLI
Step 5 Assign IP addresses to a tunnel group. One method you can use to do this is to assign a local IP addresspool with the address-pool command from general-attributes mode:
address-pool poolname
To do this, first enter the tunnel-group name general-attributes command to enter general-attributes
mode. Then specify the local IP address pool using the address-pool command.In the following example, the user configures the existing tunnel group telecommuters to use the addresspool vpn_users created in step 3:
hostname(config)# tunnel-group telecommuters general-attributes
hostname(config-tunnel-general)# address-pool vpn_users
Step 6 Assign a default group policy to the tunnel group with the default-group-policy command from tunnelgroup general attributes mode:
default-group-policy name
In the following example, the user assigns the group policy sales to the tunnel group telecommuters:
hostname(config-tunnel-general)# default-group-policy sales
Step 7 Create and enable a group alias that displays in the group list on the WebVPN Login page using thegroup-alias command from tunnel group webvpn attributes mode:
group-alias name enable
First exit to global configuration mode, and then enter the tunnel-group name webvpn-attributes command to enter tunnel group webvpn attributes mode.
In the following example, the user enters webvpn attributes configuration mode for the tunnel grouptelecommuters, and creates the group alias sales_department :
hostname(config)# tunnel-group telecommuters webvpn-attributes
hostname(config-tunnel-webvpn)# group-alias sales_department enable
Step 8 Enable the display of the tunnel-group list on the WebVPN Login page from webvpn mode:
tunnel-group-list enable
First exit to global configuration mode, and then enter webvpn mode.
In the following example, the user enters webvpn mode, and then enables the tunnel group list:
hostname(config)# webvpn
hostname(config-webvpn)# tunnel-group-list enable
Step 9 Specify SSL as a permitted VPN tunneling protocol for the group or user with the vpn-tunnel-protocolsvc command in group-policy mode or username mode:
vpn-tunnel-protocol svc
You can also specify other protocols to permit by adding the names of those protocols to this command.For more information about the vpn-tunnel-protocol command, see the command description in Cisco
Security Appliance Command Reference.
To specify SSL as a permitted tunneling protocol, first exit to global configuration mode, enter thegroup-policy name attributes command to enter group-policy mode, or the username name attributescommand to enter username mode, and then enter the webvpn command to enter webvpn mode andchange the WebVPN settings for the group or user.
The following example identifies SSL as the only permitted tunneling protocol for the group-policysales:
hostname(config)# group-policy sales attributes

7/28/2019 cvc-20-ag
http://slidepdf.com/reader/full/cvc-20-ag 42/116
4-4
Cisco AnyConnect VPN Client Administrator Guide
OL-12950-01
Chapter 4 Installing the AnyConnect Client on a Security Appliance Using CLI
Disabling Permanent Client Installation
hostname(config-group-policy)# webvpn
hostname(config-group-webvpn)# vpn-tunnel-protocol svc
For more information about assigning users to group policies, see “Configuring Tunnel Groups, Group
Policies, and Users” in Cisco Security Appliance Command Line Configuration Guide.
Disabling Permanent Client InstallationDisabling permanent AnyConnect client installation disables the automatic uninstalling feature of theclient. The client remains installed on the remote computer for subsequent connections, reducing theconnection time for the remote user.
To disable permanent AnyConnect client installation for a specific group or user, use thesvc keep-installer command from group-policy or username webvpn modes:
svc keep-installer none
The default is that permanent installation of the client is enabled. The client on the remote computerstays installed at the end of every session. The following example configures the existing group-policysales to not keep the client installed on the remote computer:
hostname(config)# group-policy sales attributes
hostname(config-group-policy)# webvpn
hostname(config-group-policy)# svc keep-installer none

7/28/2019 cvc-20-ag
http://slidepdf.com/reader/full/cvc-20-ag 43/116
C H A P T E R
5-1
Cisco AnyConnect VPN Client Administrator Guide
OL-12950-01
5Configuring AnyConnect Features Using ASDM
The AnyConnect client includes the following features, which you configure on the security appliance
• Enabling Datagram Transport Layer Security (DTLS) with AnyConnect (SSL) Connections,page 5-1
• Prompting Remote Users, page 5-4
• Enabling IPv6 VPN Access, page 5-5
• Enabling Modules for Additional AnyConnect Features, page 5-5
• Configuring Certificate-only Authentication, page 5-6
• Using Compression, page 5-9
• Configuring DTLS, page 5-2
• Enabling AnyConnect Keepalives, page 5-11
• Configuring the Dynamic Access Policies Feature of the Security Appliance, page 5-15
• Cisco Secure Desktop Support, page 5-15
• Enabling AnyConnect Rekey, page 5-12
• Enabling and Adjusting Dead Peer Detection, page 5-14
Enabling Datagram Transport Layer Security (DTLS) withAnyConnect (SSL) Connections
Datagram Transport Layer Security avoids latency and bandwidth problems associated with someSSL-only connections, including AnyConnect connections, and improves the performance of real-timeapplications that are sensitive to packet delays. DTLS is a standards-based SSL protocol that provides alow-latency data path using UDP. For detailed information about DTLS, see RFC 4347(http://www.ietf.org/rfc/rfc4347.txt).
Datagram Transport Layer Security (DTLS) allows the AnyConnect client establishing an SSL VPNconnection to use two simultaneous tunnels—an SSL tunnel and a DTLS tunnel. Using DTLS avoidslatency and bandwidth problems associated with some SSL connections and improves the performanceof real-time applications that are sensitive to packet delays.
If you do not enable DTLS, AnyConnect/SSL VPN connections connect with an SSL VPN tunnel only.
You cannot enable DTLS globally with ASDM. The following section describes how to enable DTLSfor any specific interface.

7/28/2019 cvc-20-ag
http://slidepdf.com/reader/full/cvc-20-ag 44/116
5-2
Cisco AnyConnect VPN Client Administrator Guide
OL-12950-01
Chapter 5 Configuring AnyConnect Features Using ASDM
Enabling Datagram Transport Layer Security (DTLS) with AnyConnect (SSL) Connections
To enable DTLS for a specific interface, select Configuration > Remote Access VPN > Network (Client)Access > Advanced > SSL VPN Connection profiles. The SSL VPN Connection Profiles dialog boxopens (Figure 5-1).
Figure 5-1 Enable DTLS Check Box
To enable DTLS on an interface, select the check box in its row. To specify a separate UDP port to usefor AnyConnect, enter the port number in the UDP Port field. The default value is port 443.
Configuring DTLSIf DTLS is configured and UDP is interrupted, the remote user’s connection automatically falls back from DTLS to TLS. The default is enabled; however, DTLS is not enabled by default on any individualinterface.
Enabling DTLS allows the AnyConnect client establishing an AnyConnect VPN connection to use twosimultaneous tunnels—an SSL tunnel and a DTLS tunnel. Using DTLS avoids latency and bandwidthproblems associated with some SSL connections and improves the performance of real-time applicationsthat are sensitive to packet delays.

7/28/2019 cvc-20-ag
http://slidepdf.com/reader/full/cvc-20-ag 45/116
5-3
Cisco AnyConnect VPN Client Administrator Guide
OL-12950-01
Chapter 5 Configuring AnyConnect Features Using ASDM
Enabling Datagram Transport Layer Security (DTLS) with AnyConnect (SSL) Connections
If you do not enable DTLS, AnyConnect client users establishing SSL VPN connections connect onlywith an SSL VPN tunnel. To enable DTLS, use the Datagram TLS setting in either Group Policy orUsername. The paths to this setting are:
• Configuration > Remote Access VPN > Network (Client) Access > Group Policies > Add or Edit >Add or Edit Internal Group Policy > Advanced > SSL VPN Client
• Configuration > Remote Access VPN > Network (Client) Access > AAA Setup > Local Users > Addor Edit > Add or Edit User Account > VPN Policy > SSL VPN Client
• Device Management > Users/AAA > User Accounts > Add or Edit > Add or Edit User Account >VPN Policy > SSL VPN Client
Figure 5-2 shows an example of configuring the DTLS setting for an internal group policy.
Figure 5-2 Enabling or Disabling DTLS
Note When using the AnyConnect client with DTLS on security appliance, Dead Peer Detection must be
enabled in the group pol icy on the security appliance to allow the AnyConnect client to fall back to TLS,if necessary. Fallback to TLS occurs if the AnyConnect client cannot send data over the UPD/DTLSsession, and the DPD mechanism is necessary for fallback to occur.

7/28/2019 cvc-20-ag
http://slidepdf.com/reader/full/cvc-20-ag 46/116
5-4
Cisco AnyConnect VPN Client Administrator Guide
OL-12950-01
Chapter 5 Configuring AnyConnect Features Using ASDM
Prompting Remote Users
Prompting Remote UsersTo enable the security appliance to prompt remote AnyConnect VPN client users to download the client,select Configuration > Device Management > Users/AAA > User Accounts > Add or Edit. The Add orEdit dialog box appears. In the navigation panel on the left, select VPN Policy > SSL VPN Client >
Login Setting (Figure 5-3).
Figure 5-3 Edit User Account Dialog Box for Prompt Setting
Deselect the Inherit check box, if necessary, and in the Post Login Setting area, select the option Promptuser to choose. To disable this option, select Do not prompt user to choose.
When you enable the prompting option, another field becomes available, asking you to specify the
number of seconds the user has to choose before the Default Post Login selection takes effect.
Select the Default Post Login selection to specify the action that the AnyConnect client takes if the userdoes not make a selection before the timer specified in the prompting option expires. The options are:
• Go to Clientless SSL VPN Portal—Immediately displays the portal page for Clientless SSL VPN.The user can still invoke the AnyConnect client from the portal by clicking Start AnyConnect Client.
• Download SSL VPN Client—Immediately starts downloading the AnyConnect client to the remoteuser’s PC.

7/28/2019 cvc-20-ag
http://slidepdf.com/reader/full/cvc-20-ag 47/116
5-5
Cisco AnyConnect VPN Client Administrator Guide
OL-12950-01
Chapter 5 Configuring AnyConnect Features Using ASDM
Enabling IPv6 VPN Access
Figure 5-4 shows the prompt displayed to remote users when either the default svc timeout value or thedefault webvpn timeout value is configured (in this case, the timeout was set to 35 seconds):
Figure 5-4 Prompt Displayed to Remote Users for SSL VPN Client Download
Enabling IPv6 VPN AccessThe AnyConnect client allows access to IPv6 resources over a public IPv4 connection (Windows XPSP2, Windows Vista, Mac OSX, and Linux only). You must use the command-line interface to configureIPv6; ASDM does not support IPv6.
For more information about enabling IPv6, see Chapter 6, “Configuring AnyConnect Features UsingCLI.”
Enabling Modules for Additional AnyConnect FeaturesAs new features are released for the AnyConnect client, you must update the AnyConnect clients of yourremote users for them to use the new features. To minimize download time, the AnyConnect clientrequests downloads (from the security appliance) only of modules that it needs for each feature that itsupports.
To enable new features, you must specify the new module names as part of the group-policy or usernameconfiguration. Possible paths to the dialog box where you can specify these modules are:
• Configuration > Remote Access VPN > Network (Client) Access > Group Policies > Add or Edit >Add or Edit Internal Group Policy > Advanced > SSL VPN Client
• Configuration > Remote Access VPN > Network (Client) Access > AAA Setup > Local Users > Addor Edit > Add or Edit User Account > VPN Policy > SSL VPN Client
• Device management > Users/AAA > User Accounts > Add or Edit > Add or Edit User Account >VPN Policy > SSL VPN Client.
Specify the module name, for example, sbl for the Start Before Logon feature, in the Optional ClientModule to Download field. Separate multiple strings with commas. Figure 5-5 shows an example.
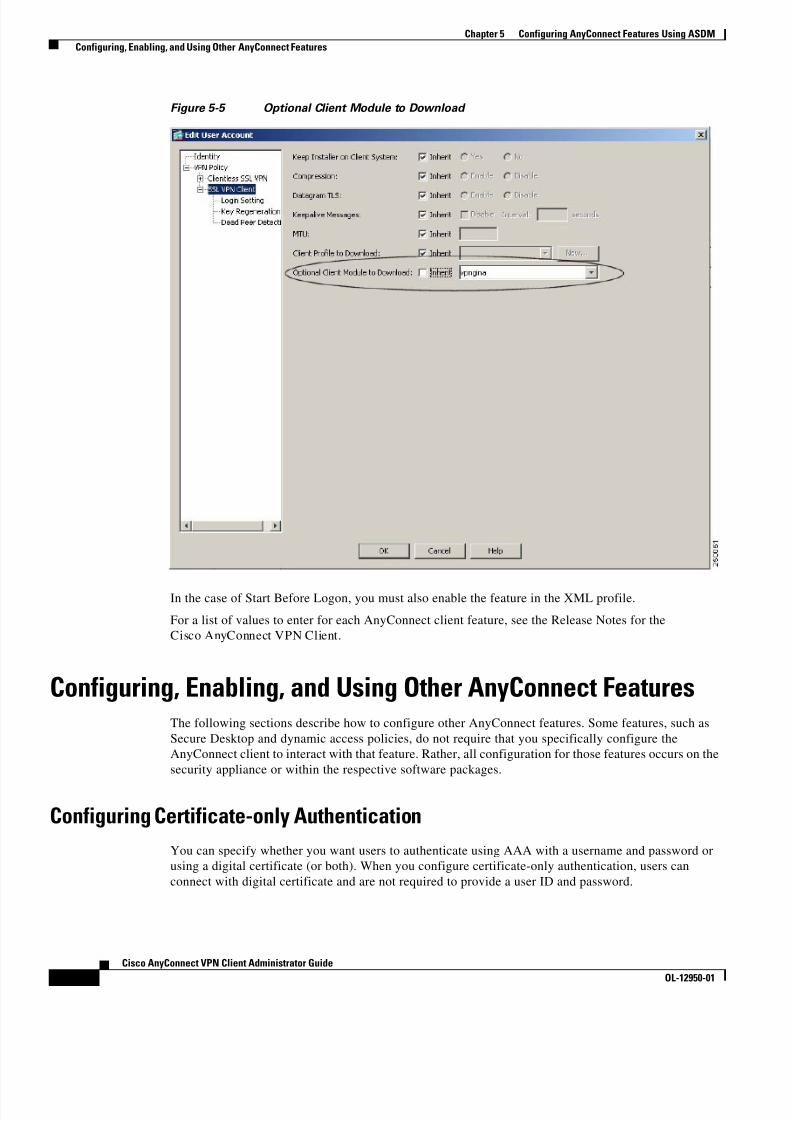
7/28/2019 cvc-20-ag
http://slidepdf.com/reader/full/cvc-20-ag 48/116

7/28/2019 cvc-20-ag
http://slidepdf.com/reader/full/cvc-20-ag 49/116
5-7
Cisco AnyConnect VPN Client Administrator Guide
OL-12950-01
Chapter 5 Configuring AnyConnect Features Using ASDM
Configuring, Enabling, and Using Other AnyConnect Features
To configure certificate-only authentication using ASDM, select Configuration > Remote Access >Network (Client) Access > SSL VPN Connection Profiles, and in the Connection Profiles area, selectAdd or Edit. This displays the Add or Edit SSL VPN Connect Profile dialog box with the Basic optionselected. In the Authentication area, select only Certificate as the Method.
Figure 5-6 Configuring Certificate-Only Authentication, Edit SSL VPN Dialog Box
To make this feature take effect, you must also enable AnyConnect client access on particular interfacesand ports, as needed. To do this, select Configuration > Remote Access VPN > Network (Client)Access > SSL VPN Connection Profiles. The SSL VPN Connection Profiles dialog box (Figure 5-7)appears.

7/28/2019 cvc-20-ag
http://slidepdf.com/reader/full/cvc-20-ag 50/116
5-8
Cisco AnyConnect VPN Client Administrator Guide
OL-12950-01
Chapter 5 Configuring AnyConnect Features Using ASDM
Configuring, Enabling, and Using Other AnyConnect Features
Figure 5-7 SSL VPN Connection Profiles Dialog Box
In the Access Interfaces area, select the check box Enable Cisco AnyConnect VPN Client or legacy SSLVPN Client access on the interfaces selected in the table below. Then select the check boxes for theinterfaces on which you want to enable access. Specify the Access Port. The default access port is 443.
If you want to assign a specific certificate to an interface, click Assign Certificate to Interface. Thisopens the SSL Settings dialog box (Figure 5-8).

7/28/2019 cvc-20-ag
http://slidepdf.com/reader/full/cvc-20-ag 51/116
5-9
Cisco AnyConnect VPN Client Administrator Guide
OL-12950-01
Chapter 5 Configuring AnyConnect Features Using ASDM
Configuring, Enabling, and Using Other AnyConnect Features
Figure 5-8 SSL Settings Dialog Box
In the Certificates area, specify which certificates, if any, you want to use for SSL authent ication on eachinterface. If you do not specify a certificate for a particular interface, the fallback certificate will be used.In the Fallback Certificate field, select a certificate from the drop-down list. The default is --None--.
Using Compression
On low-bandwidth connections, compression increases the communications performance between the
security appliance and the client by reducing the size of the packets being transferred. By default,compression for all SSL VPN connections is enabled on the security appliance, both at the global leveland for specific groups or users. For broadband connections, compression might result in poorerperformance.
By default, if you have not changed the compression setting globally, compression is enabled. You canconfigure compression globally using the CLI command compression svc command from globalconfiguration mode.
7/28/2019 cvc-20-ag
http://slidepdf.com/reader/full/cvc-20-ag 52/116
5-10
Cisco AnyConnect VPN Client Administrator Guide
OL-12950-01
Chapter 5 Configuring AnyConnect Features Using ASDM
Configuring, Enabling, and Using Other AnyConnect Features
Changing Compression Globally
To change the global compression settings, use the compression svc command from globalconfiguration mode:
compression svc
no compression svc
To remove the command from the configuration, use the no form of the command.
In the following example, compression is disabled for all SSL VPN connections globally:
hostname(config)# no compression svc
Changing Compression for Groups and Users
You can also configure compression for specific groups or users using ASDM with the svc compression command in group-policy and username webvpn modes. The global setting overrides the group-policyand username settings.
To change compression for a specific group or user, use the Compression setting in either Group Policyor Username. You can get to this setting through any of the following paths:
• Configuration > Remote Access VPN > Network (Client) Access > Group Policies > Add or Edit >Add or Edit Internal Group Policy > Advanced > SSL VPN Client
• Configuration > Remote Access VPN > Network (Client) Access > AAA Setup > Local Users > Addor Edit > Add or Edit User Account > VPN Policy > SSL VPN Client
• Device Management > Users/AAA > User Accounts > Add or Edit > Add or Edit User Account >VPN Policy > SSL VPN Client
Figure 5-9 shows an example of configuring the compression setting for an internal group policy.

7/28/2019 cvc-20-ag
http://slidepdf.com/reader/full/cvc-20-ag 53/116
5-11
Cisco AnyConnect VPN Client Administrator Guide
OL-12950-01
Chapter 5 Configuring AnyConnect Features Using ASDM
Configuring, Enabling, and Using Other AnyConnect Features
Figure 5-9 Compression Setting
By default, for groups and users, SSL compression is set to Inherit. If you deselect Inherit, the default isenabled (equivalent to deflate in the CLI).
Note For compression to work, it must be enabled both globally (by the compression svc commandconfigured from global configuration mode) and for the specific group policy or username. If either is set to disable (or to the none or the no form of the command), compression is disabled
Enabling AnyConnect Keepalives
You can adjust the frequency of keepalive messages to ensure that an AnyConnect client or SSL VPNconnection through a proxy, firewall, or NAT device remains open, even if the device limits the time thatthe connection can be idle. Adjusting the frequency also ensures that the client does not disconnect andreconnect when the remote user is not actively running a socket-based application, such as Microsoft
Outlook or Microsoft Internet Explorer.
To set the frequency of keepalive messages, use the Keepalive Messages setting in either Group Policyor Username. The paths to this setting are:
• Configuration > Remote Access VPN > Network (Client) Access > Group Policies > Add or Edit >Add or Edit Internal Group Policy > Advanced > SSL VPN Client
• Configuration > Remote Access VPN > Network (Client) Access > AAA Setup > Local Users > Addor Edit > Add or Edit User Account > VPN Policy > SSL VPN Client

7/28/2019 cvc-20-ag
http://slidepdf.com/reader/full/cvc-20-ag 54/116
5-12
Cisco AnyConnect VPN Client Administrator Guide
OL-12950-01
Chapter 5 Configuring AnyConnect Features Using ASDM
Configuring, Enabling, and Using Other AnyConnect Features
• Device Management > Users/AAA > User Accounts > Add or Edit > Add or Edit User Account >VPN Policy > SSL VPN Client
Figure 5-10 shows an example of configuring the keepalive messages setting for an internal group policy.
Figure 5-10 Configuring Keepalive Messages
Configure the Keepalive Messages field for this attributeby deselecting Inherit and entering a number,from 15 to 600 seconds, in the Interval field to enable and adjust the interval of keepalive messages toensure that an connection through a proxy, firewall, or NAT device remains open, even if the devicelimits the time that the connection can be idle . Adjusting the interval also ensures that the client does notdisconnect and reconnect when the remote user is not actively running a socket-based application, suchas Microsoft Outlook or Microsoft Internet Explorer.
Enabling AnyConnect Rekey
Configuring AnyConnect Rekey specifies that SSL renegotiation takes place during rekey. When thesecurity appliance and the SSL VPN client perform a rekey, they renegotiate the crypto keys andinitialization vectors, increasing the security of the connection.
To enable Rekey, use the Key Regeneration dialog box in either Group Policy or Username. The pathsto this setting are:
• Configuration > Remote Access VPN > Network (Client) Access > Group Policies > Add or Edit >Add or Edit Internal Group Policy > Advanced > SSL VPN Client > Key Regeneration

7/28/2019 cvc-20-ag
http://slidepdf.com/reader/full/cvc-20-ag 55/116
5-13
Cisco AnyConnect VPN Client Administrator Guide
OL-12950-01
Chapter 5 Configuring AnyConnect Features Using ASDM
Configuring, Enabling, and Using Other AnyConnect Features
• Configuration > Remote Access VPN > Network (Client) Access > AAA Setup > Local Users > Addor Edit > Add or Edit User Account > VPN Policy > SSL VPN Client > Key Regeneration
• Device Management > Users/AAA > User Accounts > Add or Edit > Add or Edit User Account >VPN Policy > SSL VPN Client > Key Regeneration
Figure 5-11 shows an example of configuring the Rekey setting for an internal group policy.
Figure 5-11 Configuring Rekey Attributes
Key renegotiation occurs when the security appliance and the client perform a rekey and they renegotiatethe crypto keys and initialization vectors, increasing the security of the connection. The fields on thisdialog box are as follows:
• Renegotiation Interval—Clear the Unlimited check box to specify the number of minutes from thestart of the session until the rekey takes place, from 1 to 10080 (1 week).
• Renegotiation Method—Check the None check box to disable rekey, check the SSL check box tospecify SSL renegotiation during a rekey, or check the New Tunnel check box to establish a new
tunnel during rekey.
Note The security appliance does not currently support inline DTLS rekey. The AnyConnect client, therefore,treats all DTLS rekey events as though they were of the new tunnel method instead of the inline ssl type(CSCsh93610).

7/28/2019 cvc-20-ag
http://slidepdf.com/reader/full/cvc-20-ag 56/116
5-14
Cisco AnyConnect VPN Client Administrator Guide
OL-12950-01
Chapter 5 Configuring AnyConnect Features Using ASDM
Configuring, Enabling, and Using Other AnyConnect Features
Enabling and Adjusting Dead Peer Detection
Dead Peer Detection (DPD) ensures that the security appliance (gateway) or the client can quickly detecta condition where the peer is not responding, and the connection has failed.
Note When using the AnyConnect client with DTLS on security appliance, Dead Peer Detection must beenabled in the group policy on the security appliance to allow the AnyConnect client to fall back to TLS,if necessary. Fallback to TLS occurs if the AnyConnect client cannot send data over the UPD/DTLSsession, and the DPD mechanism is necessary for fallback to occur.
To enable DPD on the security appliance or client for a specific group or user, and to set the frequencywith which either the security appliance or client performs dead-peer detection, use the Dead PeerDetection dialog box for either group-policy or username. The paths to this setting are:
• Configuration > Remote Access VPN > Network (Client) Access > Group Policies > Add or Edit >Add or Edit Internal Group Policy > Advanced > SSL VPN Client > Dead Peer Detection
• Configuration > Remote Access VPN > Network (Client) Access > AAA Setup > Local Users > Add
or Edit > Add or Edit User Account > VPN Policy > SSL VPN Client > Dead Peer Detection• Device Management > Users/AAA > User Accounts > Add or Edit > Add or Edit User Account >
VPN Policy > SSL VPN Client > Dead Peer Detection
Figure 5-12 shows an example of configuring the Dead Peer Detection setting for an internal grouppolicy.
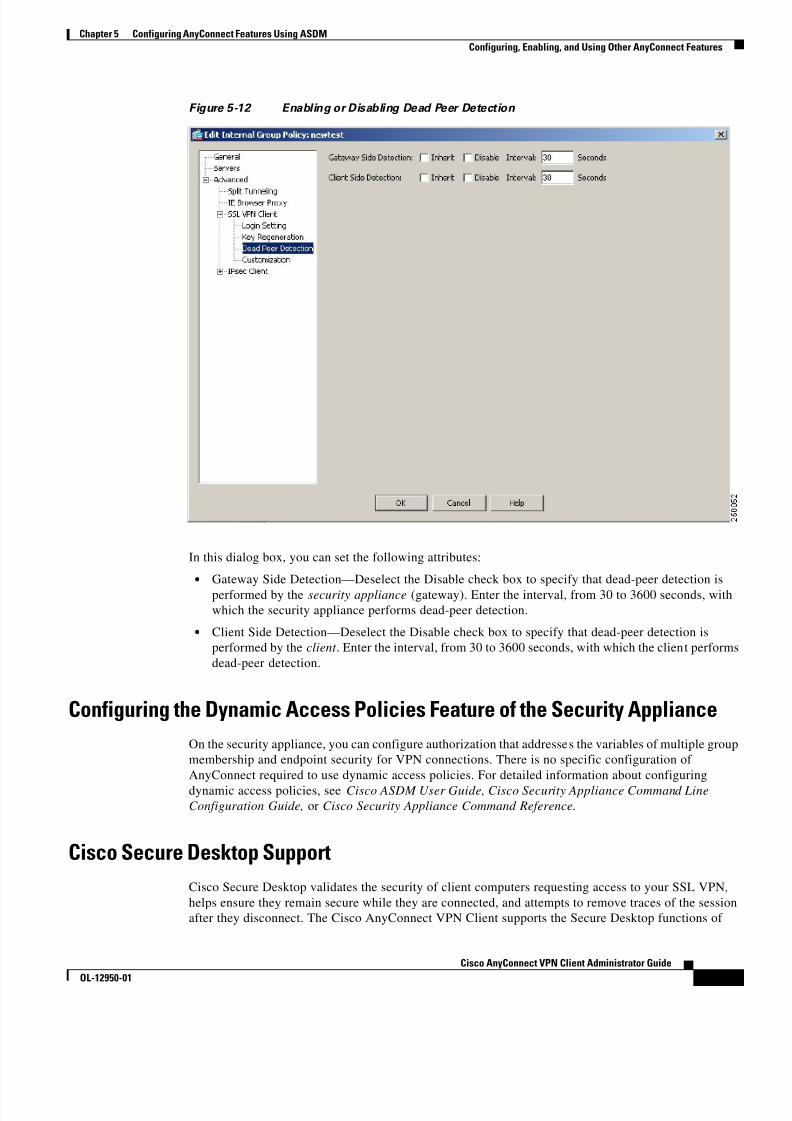
7/28/2019 cvc-20-ag
http://slidepdf.com/reader/full/cvc-20-ag 57/116
5-15
Cisco AnyConnect VPN Client Administrator Guide
OL-12950-01
Chapter 5 Configuring AnyConnect Features Using ASDM
Configuring, Enabling, and Using Other AnyConnect Features
Figure 5-12 Enabling or Disabling Dead Peer Detection
In this dialog box, you can set the following attributes:
• Gateway Side Detection—Deselect the Disable check box to specify that dead-peer detection isperformed by the security appliance (gateway). Enter the interval, from 30 to 3600 seconds, withwhich the security appliance performs dead-peer detection.
• Client Side Detection—Deselect the Disable check box to specify that dead-peer detection isperformed by the client . Enter the interval, from 30 to 3600 seconds, with which the client performsdead-peer detection.
Configuring the Dynamic Access Policies Feature of the Security Appliance
On the security appliance, you can configure authorization that addresses the variables of multiple groupmembership and endpoint security for VPN connections. There is no specific configuration of AnyConnect required to use dynamic access policies. For detailed information about configuring
dynamic access policies, see Cisco ASDM User Guide, Cisco Security Appliance Command LineConfiguration Guide, or Cisco Security Appliance Command Reference.
Cisco Secure Desktop Support
Cisco Secure Desktop validates the security of client computers requesting access to your SSL VPN,helps ensure they remain secure while they are connected, and attempts to remove traces of the sessionafter they disconnect. The Cisco AnyConnect VPN Client supports the Secure Desktop functions of

7/28/2019 cvc-20-ag
http://slidepdf.com/reader/full/cvc-20-ag 58/116
5-16
Cisco AnyConnect VPN Client Administrator Guide
OL-12950-01
Chapter 5 Configuring AnyConnect Features Using ASDM
Configuring, Enabling, and Using Other AnyConnect Features
Cisco Secure Desktop for Windows 2000 and Windows XP. There is no specific configuration of AnyConnect required to use Secure Desktop. For detailed information about configuring Cisco SecureDesktop, see the Cisco Secure Desktop Configuration Guide for Cisco ASA 5500 Series Administrators(Software Release 3.2).

7/28/2019 cvc-20-ag
http://slidepdf.com/reader/full/cvc-20-ag 59/116
C H A P T E R
6-1
Cisco AnyConnect VPN Client Administrator Guide
OL-12950-01
6Configuring AnyConnect Features Using CLI
The AnyConnect client includes the following features, which you configure on the security appliance
• Enabling Datagram Transport Layer Security (DTLS) with AnyConnect (SSL) Connections,page 6-1
• Prompting Remote Users, page 6-2
• Enabling IPv6 VPN Access, page 6-3
• Enabling Modules for Additional AnyConnect Features, page 6-4
• Configuring Certificate-only Authentication, page 6-5
• Using Compression, page 6-5
• Configuring the Dynamic Access Policies Feature of the Security Appliance, page 6-6
• Configuring the Dynamic Access Policies Feature of the Security Appliance, page 6-6
• Cisco Secure Desktop Support, page 6-6
• Enabling AnyConnect Rekey, page 6-6
• Enabling and Adjusting Dead Peer Detection, page 6-7
• Enabling AnyConnect Keepalives, page 6-8
Enabling Datagram Transport Layer Security (DTLS) withAnyConnect (SSL) Connections
Datagram Transport Layer Security avoids latency and bandwidth problems associated with someSSL-only connections, including AnyConnect connections, and improves the performance of real-timeapplications that are sensitive to packet delays. DTLS is a standards-based SSL protocol that provides alow-latency data path using UDP. For detailed information about DTLS, see RFC 4347(http://www.ietf.org/rfc/rfc4347.txt).
Datagram Transport Layer Security (DTLS) allows the AnyConnect client establishing an SSL VPNconnection to use two simultaneous tunnels—an SSL tunnel and a DTLS tunnel. Using DTLS avoidslatency and bandwidth problems associated with some SSL connections and improves the performanceof real-time applications that are sensitive to packet delays.
If you do not enable DTLS, SSL VPN connections connect with an SSL VPN tunnel only.

7/28/2019 cvc-20-ag
http://slidepdf.com/reader/full/cvc-20-ag 60/116
6-2
Cisco AnyConnect VPN Client Administrator Guide
OL-12950-01
Chapter 6 Configuring AnyConnect Features Using CLI
Prompting Remote Users
Enabling DTLS Globally for a Specific Port
To enable DTLS globally for a particular port, use the dtls port command:
[no] dtls port port_number
For example:hostname(config-webvpn)# dtls outside
Enabling DTLS for Specific Groups or Users
To enable DTLS for specific groups or users, use the svc dtls enable command in group policy webvpnor username webvpn configuration mode:
[no] svc dtls enable
If DTLS is configured and UDP is interrupted, the remote user’s connection automatically falls back from DTLS to TLS. The default is enabled; however, DTLS is not enabled by default on any individualinterface.
Enabling DTLS allows the AnyConnect client establishing an AnyConnect VPN connection to use twosimultaneous tunnels—an SSL tunnel and a DTLS tunnel. Using DTLS avoids latency and bandwidthproblems associated with some SSL connections and improves the performance of real-time applicationsthat are sensitive to packet delays.
If you do not enable DTLS, AnyConnect client users establishing SSL VPN connections connect onlywith an SSL VPN tunnel.
The following example enters group policy webvpn configuration mode for the group policy sales andenables DTLS:
hostname(config)# enable inside
hostname(config)# group-policy sales attributeshostname(config-group-policy)# webvpn
hostname(config-group-webvpn)# svc dtls enable
Prompting Remote UsersYou can enable the security appliance to prompt remote AnyConnect VPN client users to download theclient with the svc ask command from group policy webvpn or username webvpn configuration modes:
[no] svc ask {none | enable [default {webvpn | svc} timeout value]}
svc ask enable prompts the remote user to download the client or go to the WebVPN portal page
and waits indefinitely for user response.
svc ask enable default svc immediately downloads the client.
svc ask enable default webvpn immediately goes to the portal page.
svc ask enable default svc timeout value prompts the remote user to download the client or go tothe WebVPN portal page and waits the duration of value before taking the defaultaction—downloading the client.

7/28/2019 cvc-20-ag
http://slidepdf.com/reader/full/cvc-20-ag 61/116
6-3
Cisco AnyConnect VPN Client Administrator Guide
OL-12950-01
Chapter 6 Configuring AnyConnect Features Using CLI
Enabling IPv6 VPN Access
svc ask enable default webvpn timeout value prompts the remote user to download the client orgo to the WebVPN portal page, and waits the duration of value before taking the defaultaction—displaying the WebVPN portal page.
Figure 6-1 shows the prompt displayed to remote users when either default svc timeout value ordefault webvpn timeout value is configured:
Figure 6-1 Prompt Displayed to Remote Users for SSL VPN Client Download
The following example configures the security appliance to prompt the remote user to download theclient or go to the WebVPN portal page and to wait 10 seconds for user response before downloadingthe client:
hostname(config-group-webvpn)# svc ask enable default svc timeout 10
Enabling IPv6 VPN AccessThe AnyConnect client allows access to IPv6 resources over a public IPv4 connection (Windows XPSP2, Windows Vista, Mac OSX, and Linux only). You must use the command-line interface to configure
IPv6; ASDM does not support IPv6.
You enable IPv6 access using the ipv6 enable command as part of enabling SSL VPN connections. Thefollowing is an example for an IPv6 connection that enables IPv6 on the outside interface:
hostname(config)# interface GigabitEthernet0/0
hostname(config-if)# ipv6 enable
To enable IPV6 SSL VPN, do the following general actions:
1. Enable IPv6 on the outside interface.
2. Enable IPv6 and an IPv6 address on the inside interface.
3. Configure an IPv6 address local pool for client assigned IP Addresses.
4. Configure an IPv6 Tunnel default gateway.To implement this procedure, do the following steps:
Step 1 Configure Interfaces:
interface GigabitEthernet0/0
nameif outside
security-level 0
ip address 192.168.0.1 255.255.255.0
ipv6 enable ; Needed for IPv6.

7/28/2019 cvc-20-ag
http://slidepdf.com/reader/full/cvc-20-ag 62/116
6-4
Cisco AnyConnect VPN Client Administrator Guide
OL-12950-01
Chapter 6 Configuring AnyConnect Features Using CLI
Enabling Modules for Additional AnyConnect Features
!
interface GigabitEthernet0/1
nameif inside
security-level 100
ip address 10.10.0.1 255.255.0.0
ipv6 address 2001:DB8::1/32 ; Needed for IPv6.
ipv6 enable ; Needed for IPv6.
Step 2 Configure an 'ipv6 local pool' (used for AnyConnect Client IPv6 address assignment):
ipv6 local pool ipv6pool 2001:DB8:1:1::5/32 100 ; Use your IPv6 prefix here
Note You still need to configure an IPv4 address pool when using IPv6 (using the ip local poolcommand)
Step 3 Add the ipv6 address pool to your Tunnel group policy (or group-policy):
tunnel-group YourTunGrp1 general-attributes ipv6-address-pool ipv6pool
Note Again, you must also configure an IPv4 address pool here as well (using the 'address-pool'command).
Step 4 Configure an IPv6 Tunnel Default Gateway:
ipv6 route inside ::/0 X:X:X:X::X tunneled
Enabling Modules for Additional AnyConnect FeaturesAs new features are released for the AnyConnect client, you must update the AnyConnect clients of yourremote users for them to use the new features. To minimize download time, the AnyConnect clientrequests downloads (from the security appliance) only of modules that it needs for each feature that itsupports. To enable new features, you must specify the new module names using the svc modules command from group policy webvpn or username webvpn configuration mode:
[no] svc modules {none | value string}
Separate multiple strings with commas.
For a list of values to enter for each AnyConnect client feature, see the release notes for theCisco AnyConnect VPN Client.
In the following example, the network administrator enters group-policy attributes mode for the group
policy telecommuters, enters webvpn configuration mode for the group policy, and specifies the stringvpngina to enable the AnyConnect client feature Start Before Login:
hostname(config)# group-policy telecommuters attributes
hostname(config-group-policy)# webvpn
hostame(config-group-webvpn)# svc modules value vpngina

7/28/2019 cvc-20-ag
http://slidepdf.com/reader/full/cvc-20-ag 63/116
6-5
Cisco AnyConnect VPN Client Administrator Guide
OL-12950-01
Chapter 6 Configuring AnyConnect Features Using CLI
Configuring, Enabling, and Using Other AnyConnect Features
Configuring, Enabling, and Using Other AnyConnect FeaturesThe following sections describe how to configure other AnyConnect features. Some features, such asSecure Desktop and dynamic access policies, do not require that you specifically configure theAnyConnect client to interact with that feature. Rather, all configuration for those features occurs on the
security appliance or within the software package itself.
Configuring Certificate-only Authentication
You can specify whether you want users to authenticate using AAA with a username and password orusing a digital certificate (or both). When you configure certificate-only authentication, users canconnect with digital certificate and are not required to provide a user ID and password. To configurecertificate-only authentication using CLI, use the authentication command with the keyword certificatein tunnel-group webvpn mode. For example:
hostname(config)# tunnel-group testgroup webvpn-attributes
asa2(config-tunnel-webvpn)# authentication ?
asa2(config-tunnel-webvpn)# authentication certificate
Note You must configure ssl certificate-authentication interface <interface> port < port > for this option totake effect.
To configure certificate-only authentication using ASDM, select Configuration > Remote Access >Network (Client) Access > SSL VPN Connection Profiles, and in the Connection Profiles area, selectAdd or Edit. This displays the Add or Edit SSL VPN Connect Profile dialog box with the Basic optionselected. In the Authentication area, specify only Certificate as the Method.
Using Compression
On low-bandwidth connections, compression increases the communications performance between thesecurity appliance and the client by reducing the size of the packets being transferred. By default,compression for all SSL VPN connections is enabled on the security appliance, both at the global leveland for specific groups or users. For broadband connections, compression might result in poorerperformance.
You can configure compression globally using the compression svc command from global configurationmode. You can also configure compression for specific groups or users with the svc compression command in group-policy and username webvpn modes. The global setting overrides the group-policyand username settings.
Changing Compression Globally
To change the global compression settings, use the compression svc command from globalconfiguration mode:
compression svc
no compression svc
To remove the command from the configuration, use the no form of the command.
In the following example, compression is disabled for all SSL VPN connections globally:
hostname(config)# no compression svc

7/28/2019 cvc-20-ag
http://slidepdf.com/reader/full/cvc-20-ag 64/116
6-6
Cisco AnyConnect VPN Client Administrator Guide
OL-12950-01
Chapter 6 Configuring AnyConnect Features Using CLI
Configuring, Enabling, and Using Other AnyConnect Features
Changing Compression for Groups and Users
To change compression for a specific group or user, use the svc compression command in thegroup-policy and username webvpn modes:
svc compression {deflate | none}no svc compression {deflate | none}
By default, for groups and users, SSL compression is set to deflate (enabled).
To remove the svc compression command from the configuration and cause the value to be inheritedfrom the global setting, use the no form of the command:
The following example disables compression for the group-policy sales:
hostname(config)# group-policy sales attributes
hostname(config-group-policy)# webvpn
hostname(config-group-webvpn)# svc compression none
Note For compression to work, both the compression svc command (configured from globalconfiguration mode) and the svc compression command (configured in group-policy andusername webvpn modes) must be enabled. If either command is set to none or to the no form,compression is disabled.
Configuring the Dynamic Access Policies Feature of the Security Appliance
On the security appliance, you can configure authorization that addresses the variables of multiple groupmembership and endpoint security for VPN connections. There is no specific configuration of AnyConnect required to use dynamic access policies. For detailed information about configuringdynamic access policies, see Cisco ASDM User Guide, Cisco Security Appliance Command Line
Configuration Guide, or Cisco Security Appliance Command Reference.
Cisco Secure Desktop Support
Cisco Secure Desktop validates the security of client computers requesting access to your SSL VPN,helps ensure they remain secure while they are connected, and attempts to remove traces of the sessionafter they disconnect. The Cisco AnyConnect VPN Client supports the Secure Desktop functions of Cisco Secure Desktop for Windows 2000 and Windows XP. There is no specific configuration of AnyConnect required to use Secure Desktop. For detailed information about configuring Cisco SecureDesktop, see the Cisco Secure Desktop Configuration Guide for Cisco ASA 5500 Series Administrators(Software Release 3.2).
Enabling AnyConnect Rekey
Configuring AnyConnect Rekey specifies that SSL renegotiation takes place during rekey.
When the security appliance and the SSL VPN client perform a rekey, they renegotiate the crypto keysand initialization vectors, increasing the security of the connection.
To enable the client to perform a rekey on an SSL VPN connection for a specific group or user, use thesvc rekey command from group-policy and username webvpn modes.

7/28/2019 cvc-20-ag
http://slidepdf.com/reader/full/cvc-20-ag 65/116
6-7
Cisco AnyConnect VPN Client Administrator Guide
OL-12950-01
Chapter 6 Configuring AnyConnect Features Using CLI
Configuring, Enabling, and Using Other AnyConnect Features
[no] svc rekey {method {new-tunnel | none | ssl} | time minutes}
method new-tunnel specifies that the client establishes a new tunnel during rekey.
method none disables rekey.
method ssl specifies that SSL renegotiation takes place during rekey.
time minutes specifies the number of minutes from the start of the session or from the last rekey untilthe next rekey takes place, from 1 to 10080 (1 week).
In the following example, the client is configured to renegotiate with SSL during rekey, which takesplace 30 minutes after the session begins, for the existing group-policy sales:
hostname(config)# group-policy sales attributes
hostname(config-group-policy)# webvpn
hostname(config-group-policy)# svc rekey method ssl
hostname(config-group-policy)# svc rekey time 30
Note The security appliance does not currently support inline DTLS rekey. The AnyConnect client, therefore,treats all DTLS rekey events as though they were of the new tunnel method instead of the inline ssl type
(CSC93610).
Enabling and Adjusting Dead Peer Detection
Dead Peer Detection (DPD) ensures that the security appliance (gateway) or the client can quickly detecta condition where the peer is not responding, and the connection has failed.
Note When using the AnyConnect client with DTLS on security appliance, Dead Peer Detection must beenabled in the group policy on the ASA to allow the AnyConnect client to fall back to TLS, if necessary.Fallback to TLS occurs if the AnyConnect client cannot send data over the UPD/DTLS session, and theDPD mechanism is necessary for fallback to occur.
To enable DPD on the security appliance or client for a specific group or user, and to set the frequencywith which either the security appliance or client performs DPD, use the svc dpd-interval commandfrom group-policy or username webvpn mode:
svc dpd-interval {[gateway {seconds | none}] | [client {seconds | none}]}
no svc dpd-interval {[gateway {seconds | none}] | [client {seconds | none}]}
Where:
gateway seconds enables DPD performed by the security appliance (gateway) and specifies thefrequency, from 30 to 3600 seconds, with which the security appliance (gateway) performs DPD.
gateway none disables DPD performed by the security appliance.
client seconds enable DPD performed by the client, and specifies the frequency, from 30 to 3600seconds, with which the client performs DPD.
client none disables DPD performed by the client.
To remove the svc dpd-interval command from the configuration, use the no form of the command
The following example sets the frequency of DPD performed by the security appliance to 30 seconds,and the frequency of DPD performed by the client set to 10 seconds for the existing group-policy sales
hostname(config)# group-policy sales attributes

7/28/2019 cvc-20-ag
http://slidepdf.com/reader/full/cvc-20-ag 66/116
6-8
Cisco AnyConnect VPN Client Administrator Guide
OL-12950-01
Chapter 6 Configuring AnyConnect Features Using CLI
Configuring, Enabling, and Using Other AnyConnect Features
hostname(config-group-policy)# webvpn
hostname(config-group-policy)# svc dpd-interval gateway 30
hostname(config-group-policy)# svc dpd-interval client 10
Enabling AnyConnect Keepalives
You can adjust the frequency of keepalive messages to ensure that an AnyConnect client or SSL VPNconnection through a proxy, firewall, or NAT device remains open, even if the device limits the time thatthe connection can be idle. Adjusting the frequency also ensures that the client does not disconnect andreconnect when the remote user is not actively running a socket-based application, such as MicrosoftOutlook or Microsoft Internet Explorer.
To set the frequency of keepalive messages, use the svc keepalive command from group-policy webvpnor username webvpn configuration mode:
[no] svc keepalive {none | seconds}
none disables client keepalive messages.
seconds enables the client to send keepalive messages, and specifies the frequency of the messages
in the range of 15 to 600 seconds.
The default is keepalive messages are disabled.
Use the no form of the command to remove the command from the configuration and cause the valueto be inherited:
In the following example, the security appliance is configured to enable the client to send keepalivemessages with a frequency of 300 seconds (5 minutes), for the existing group-policy sales:
hostname(config)# group-policy sales attributes
hostname(config-group-policy)# webvpn
hostname(config-group-webvpn)# svc keepalive 300

7/28/2019 cvc-20-ag
http://slidepdf.com/reader/full/cvc-20-ag 67/116
C H A P T E R
7-1
Cisco AnyConnect VPN Client Administrator Guide
OL-12950-01
7Configuring and Using AnyConnect ClientOperating Modes and User Profiles
AnyConnect Client Operating Modes
The user can use the AnyConnect Client in the following modes:• Standalone mode—Lets the user establish a Cisco AnyConnect VPN client connection without the
need to use a web browser. If you have permanently installed the AnyConnect client on the user’sPC, the user can run in standalone mode. In standalone mode, a user opens the AnyConnect client
just like any other application and enters the username and password credentials into the fields of the AnyConnect GUI. Depending on ho w you configure the system, the user might also be requiredto select a group. When the connection is established, the security appliance checks the version of the client on the user’s PC and, if necessary, downloads the latest version.
• WebLaunch mode—Lets the user enter the URL of the security appliance in the Address or Locationfield of a browser using the https protocol. The user then enters the username and passwordinformation on a Logon screen and selects the group and clicks submit. If you have specified abanner, that information appears, and the user acknowledges the banner by clicking Continue.
The portal window appears. To start the AnyConnect client, the user clicks Start AnyConnect on themain pane. A series of documentary windows appears. When the Connection Established dialog boxappears, the connection is working, and the user can proceed with online activities.
Using the AnyConnect CLI Commands to Connect (Standalone Mode)
The Cisco AnyConnect VPN Client provides a command line interface (CLI) for users who prefer toissue commands instead of using the graphical user interface. The following sections describe how tolaunch the CLI command prompt.
For Windows
To launch the CLI command prompt and issue commands on a Windows system, locate the file vpncli.exein the Windows folder C:\Program Files\Cisco\Cisco AnyConnect VPN Client. Double-click the filevpncli.exe.
For Linux and Mac OS X
To launch the CLI command prompt and issue commands on a Linux or Mac OS X system, locate thefile vpn in the folder /opt/cisco/vpn/bin/. Execute the file vpn.

7/28/2019 cvc-20-ag
http://slidepdf.com/reader/full/cvc-20-ag 68/116
7-2
Cisco AnyConnect VPN Client Administrator Guide
OL-12950-01
Chapter 7 Configuring and Using AnyConnect Client Operating Modes and User Profiles
AnyConnect Client Operating Modes
You can run the CLI in interactive mode, in which it provides its own prompt, or you can run it with thecommands on the command line. Table 7-1 shows the CLI commands.
The following examples show the user establishing and terminating a connection from the commandline:
Windows
connect 209.165.200.224
Establishes a connection to a security appliance with the address 209.165. 200.224. After contacting therequested host, the AnyConnect client displays the group to which the user belongs and asks for theuser’s username and password. If you have specified that an optional banner be displayed, the user mustrespond to the banner. The default response is n, which terminates the connection attempt. For example:
VPN> connect 209.165.200.224
>>contacting host (209.165.200.224) for login information...
>>Please enter your username and password.
Group: testgroup
Username: testuser
Password: ********
>>notice: Please respond to banner.
VPN>
STOP! Please read. Scheduled system maintenance will occur tonight from 1:00-2:00 AM for
one hour. The system will not be available during that time.
accept? [y/n] y
>> notice: Authentication succeeded. Checking for updates...
>> state: Connecting
>> notice: Establishing connection to 209.165.200.224.
>> State: Connected
>> notice: VPN session established.
VPN>
stats
Displays statistics for the current connection; for example:
VPN> stats
[ Tunnel Information ]
Time Connected:01:17:33
Client Address:192.168.23.45
Server Address:209.165.200.224
[ Tunnel Details ]
Tunneling Mode:All Traffic
Protocol: DTLS
Protocol Cipher: RSA_AES_256_SHA1
Protocol Compression: None
Table 7-1 AnyConnect Client CLI Commands
Command Action
connect IP address or alias Client establishes a connection to a specific security appliance.
disconnect Client closes a previously established connection.
stats Displays statistics about an established connection.
quit Exits the CLI interactive mode.
exit Exits the CLI interactive mode.
7/28/2019 cvc-20-ag
http://slidepdf.com/reader/full/cvc-20-ag 69/116
7-3
Cisco AnyConnect VPN Client Administrator Guide
OL-12950-01
Chapter 7 Configuring and Using AnyConnect Client Operating Modes and User Profiles
AnyConnect Client Operating Modes
[ Data Transfer ]
Bytes(sent/received): 1950410/23861719
Packets (sent/received): 18346/28851
Bypassed (outbound/inbound): 0/0
Discarded (outbound/inbound): 0/0
[ Secure Routes ]
Network Subnet
0.0.0.0 0.0.0.0
VPN>
disconnect
Closes a previously established connection; for example:
VPN> disconnect
>> state: Disconnecting
>> state: Disconnected
>> notice: VPN session ended.
VPN>
quit or exit
Either command exits the CLI interactive mode; for example:
quit
goodbye
>>state: Disconnected
Linux or Mac OS X
/opt/cisco/vpn/bin/vpn connect 1.2.3.4
Establishes a connection to a security appliance with the address 1.2.3.4.
/opt/cisco/vpn/bin/vpn connect some_asa_alias
Establishes a connection to a security appliance by reading the profile and looking up the aliassome_asa_alias in order to find its address.
/opt/cisco/vpn/bin/vpn stats
Displays statistics about the vpn connection.
/opt/cisco/vpn/bin/vpn disconnect
Disconnect the vpn session if it exists.
Connecting Using WebLaunch
The Cisco AnyConnect VPN Client provides a browser interface for users who prefer to a graphical userinterface. WebLaunch mode lets the user enter the URL of the security appliance in the Address orLocation field of a browser using the https protocol. For example:
https://209.165.200.225
The user then enters the username and password information on a Logon screen and selects the groupand clicks submit. If you have specified a banner, that information appears, and the user acknowledgesthe banner by clicking Continue.
The portal window appears. To start the AnyConnect client, the user clicks Start AnyConnect on the mainpane. A series of documentary windows appears. When the Connection Established dialog box appears,the connection is working, and the user can proceed with online activities.

7/28/2019 cvc-20-ag
http://slidepdf.com/reader/full/cvc-20-ag 70/116
7-4
Cisco AnyConnect VPN Client Administrator Guide
OL-12950-01
Chapter 7 Configuring and Using AnyConnect Client Operating Modes and User Profiles
Configuring and Using User Profiles
Note For Windows Vista users who use the Internet Explorer browser, you must add the security appliance tothe list of trusted sites, as described in Adding a Security Appliance to the List of Trusted Sites (InternetExplorer), page 2-3.
User Log In and Log Out
You might find it useful to provide the following instructions to your remote users.
Logging In
Your system administrator has assigned you a remote access username and password. Before you log in,you must get this information from your system administrator.
Step 1 Enter your remote access username in the Username field.
Step 2 Enter your remote access password in the Password field.
Step 3 Click Login.
Step 4 If you receive a certificate warning, install the certificate.
Your remote access home page appears.
Logging Out
To end your remote access session, click the “Close Window” (X) icon in the toolbar or click the Logoutlink. The Logout page appears, confirming that your session has been terminated and offering you the
opportunity to log in again.Quitting the browser also logs out the session.
Caution Security note: Always log out when you finish your session. Logging out is especially important whenyou are using a public computer such as in a library or Internet cafe. If you do not log out, someone whouses the computer next could access your files. Don't risk the security of your organization! Always logout.
Configuring and Using User ProfilesAn AnyConnect client user profile is an XML file that lets you identify the secure gateway (securityappliance) hosts that you want to expose to the user community. In addition, the profile conveysadditional connection attributes and constraints on a user.
Usually, a user has a single profile file. This profile contains all the hosts needed by a user, and additionalsettings as needed. In some cases, you might want to provide more than one profile for a given user. Forexample, someone who works from multiple locations might need more than one profile. In such cases,

7/28/2019 cvc-20-ag
http://slidepdf.com/reader/full/cvc-20-ag 71/116
7-5
Cisco AnyConnect VPN Client Administrator Guide
OL-12950-01
Chapter 7 Configuring and Using AnyConnect Client Operating Modes and User Profiles
Configuring and Using User Profiles
the user selects the appropriate profile from a drop-down list. Be aware, however, that some of the profilesettings, such as Start Before Login, control the connection experience at a global level. Other settings,such as those unique to a particular host, depend on the host selected.
Enabling AnyConnect Client Profile DownloadsAn AnyConnect client profile is a group of configuration parameters, stored in an XML file, that theclient uses to configure the connection entries that appear in the client user interface. The clientparameters (XML tags) include the names and addresses of host computers and settings to enableadditional client features.
You can create and save XML profile files using a text editor. The client installation contains one profiletemplate (AnyConnectProfile.tmpl) that you can edit and use as a basis to create other profile files.
The profile file is downloaded from the security appliance to the remote users’s PC, so you must firstimport the profile(s) into the security appliance in preparation for downloading to the remote PC. Youcan import a profile using either ASDM or the command-line interface. See Appendix A, “SampleAnyConnect Profile and XML Schema” for a sample AnyConnect profile.
When the AnyConnect client starts, it reads the preferences.xml file in the following directory:
C:\Documents and Settings\<your_username>\Application Data\Cisco\Cisco AnyConnect VPN Client.
The preferences.xml file contains the username and the security appliance IP address/hostname from thelast successful connection. The client then establishes an initial connection to the security appliance toget the list of tunnel groups to display in the GUI. during this initial connection, if the security applianceis no longer accessible or if the hostname cannot be resolved, the user sees the message, “Connectionattempt has failed” or “Connection attempt has failed due to unresolvable host entry.”
You can place a copy of your profile (for example, CiscoAnyConnectProfile.xml) in the directory:C:\Documents and Settings\All Users\Application Data\Cisco\Cisco AnyConnect VPN Client\ProfileThe location for Windows Vista is slightly different: C:\ProgramData\Cisco\Cisco AnyConnect VPNClient\Profile The host that appears in the Connect to combo box is the first one listed in the profile or
the last host you successfully connected with.Follow these steps to edit profiles and use ASDM to enable the security appliance to download them toremote clients:
Step 1 Retrieve a copy of the profiles file (AnyConnectProfile.xml) from a client installation. Table 7-2 showsthe installation path for each operating system.
Step 2 Edit the profiles file. The example below shows the contents of the profiles file (AnyConnectProfile.xml)for Windows:
<?xml version="1.0" encoding="UTF-8"?>
<!--
Table 7-2 Operating System and Profile File Installation Path
Operating System Installation Path
Windows %PROGRAMFILES%\Cisco\Cisco AnyConnect VPN Client\ 1
1. %PROGRAMFILES% refers to the environmental variable by the same name. In most Windows installation, thisis C:\Program Files.
Linux /opt/cisco/vpn/profile
Mac OS X /opt/cisco/vpn/profile
7/28/2019 cvc-20-ag
http://slidepdf.com/reader/full/cvc-20-ag 72/116
7-6
Cisco AnyConnect VPN Client Administrator Guide
OL-12950-01
Chapter 7 Configuring and Using AnyConnect Client Operating Modes and User Profiles
Configuring and Using User Profiles
This is a template file that can be configured to support the
identification of secure hosts in your network.
The file needs to be renamed to CiscoAnyConnectProfile.xml.
The svc profiles command imports updated profiles for downloading to
client machines.
--><Configuration>
<ClientInitialization>
<UseStartBeforeLogon>false</UseStartBeforeLogon>
</ClientInitialization>
<HostProfile>
<HostName></HostName>
<HostAddress></HostAddress>
</HostProfile>
<HostProfile>
<HostName></HostName>
<HostAddress></HostAddress>
</HostProfile>
</Configuration>
The <HostProfile> tags are frequently edited so that the AnyConnect client displays the names andaddresses of host computers for remote users. The following example shows the <HostName> and<HostAddress> tags, with the name and address of a host computer inserted:
<HostProfile>
<HostName>Sales_gateway</HostName>
<HostAddress>209.165.200.225</HostAddress>
</HostProfile>
Step 3 To identify to the security appliance the client profiles file to load into cache memory, selectConfiguration > Remote Access VPN > Network (Client) Access > Advanced > Client Settings(Figure 7-1).
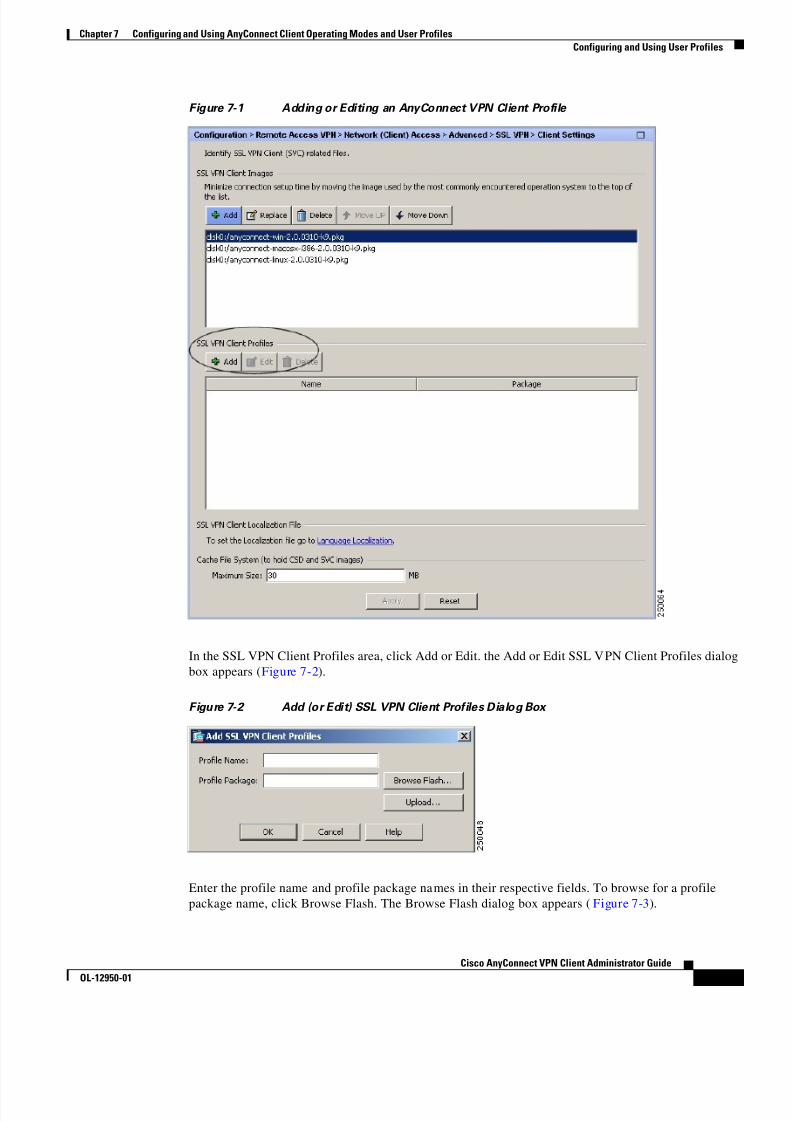
7/28/2019 cvc-20-ag
http://slidepdf.com/reader/full/cvc-20-ag 73/116
7-7
Cisco AnyConnect VPN Client Administrator Guide
OL-12950-01
Chapter 7 Configuring and Using AnyConnect Client Operating Modes and User Profiles
Configuring and Using User Profiles
Figure 7-1 Adding or Editing an AnyConnect VPN Client Profile
In the SSL VPN Client Profiles area, click Add or Edit. the Add or Edit SSL VPN Client Profiles dialogbox appears (Figure 7-2).
Figure 7-2 Add (or Edit) SSL VPN Client Profiles Dialog Box
Enter the profile name and profile package names in their respective fields. To browse for a profilepackage name, click Browse Flash. The Browse Flash dialog box appears (Figure 7-3).

7/28/2019 cvc-20-ag
http://slidepdf.com/reader/full/cvc-20-ag 74/116
7-8
Cisco AnyConnect VPN Client Administrator Guide
OL-12950-01
Chapter 7 Configuring and Using AnyConnect Client Operating Modes and User Profiles
Configuring and Using User Profiles
Figure 7-3 Browse Flash Dialog Box
Select a file from the table. The file name appears in the File Name field below the table. Click OK. Thefile name you selected appears in the Profile Package field of the Add or Edit SSL VPN Client Profilesdialog box.
Step 4 Click OK in the Add or Edit SSL VPN Client dialog box. This makes profiles available to group policiesand username attributes of client users.
Step 5 To configure a profile for a group policy, select Configuration > Remote Access VPN > Network (Client)
Access > Group Policies. Select an existing group policy and click Edit or click Add to configure a newgroup policy. In the navigation pane, select Advanced > SSL VPN Client. The Add or Edit InternalGroup Policy dialog box appears (Figure 7-4).

7/28/2019 cvc-20-ag
http://slidepdf.com/reader/full/cvc-20-ag 75/116
7-9
Cisco AnyConnect VPN Client Administrator Guide
OL-12950-01
Chapter 7 Configuring and Using AnyConnect Client Operating Modes and User Profiles
Configuring and Using User Profiles
Figure 7-4 Add or Edit Internal Group Policy Dialog Box
Continue with Step 7.
Step 6 To configure a profile for a user, select Configuration > Device Management > Users/AAA > User
Accounts. Select an existing username and click Edit or click Add to configure a new username. In thenavigation pane, select VPN Policy > SSL VPN Client. To modify an existing user’s profile, select thatuser from the table and click Edit. To Add a new user, click Add. The Add or Edit User Account dialogbox appears (Figure 7-5).
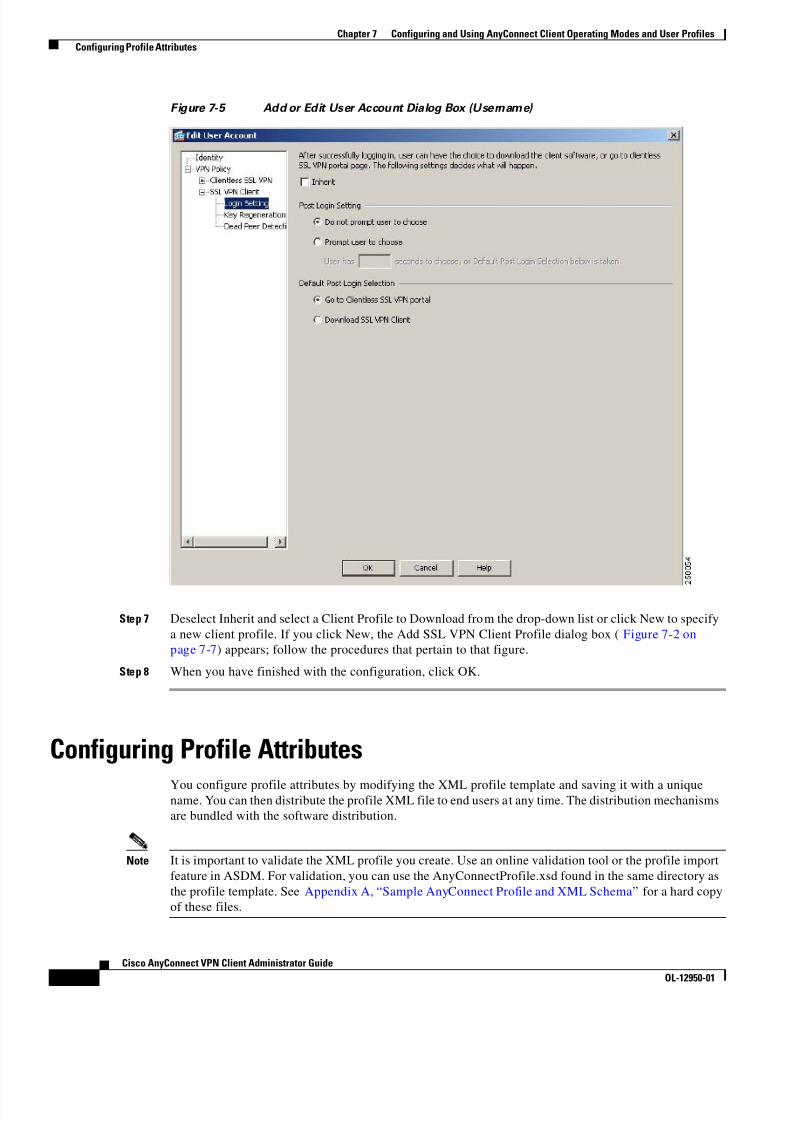
7/28/2019 cvc-20-ag
http://slidepdf.com/reader/full/cvc-20-ag 76/116
7-10
Cisco AnyConnect VPN Client Administrator Guide
OL-12950-01
Chapter 7 Configuring and Using AnyConnect Client Operating Modes and User Profiles
Configuring Profile Attributes
Figure 7-5 Add or Edit User Account Dialog Box (Username)
Step 7 Deselect Inherit and select a Client Profile to Download from the drop-down list or click New to specifya new client profile. If you click New, the Add SSL VPN Client Profile dialog box (Figure 7-2 onpage 7-7) appears; follow the procedures that pertain to that figure.
Step 8 When you have finished with the configuration, click OK.
Configuring Profile Attributes
You configure profile attributes by modifying the XML profile template and saving it with a uniquename. You can then distribute the profile XML file to end users at any time. The distribution mechanismsare bundled with the software distribution.
Note It is important to validate the XML profile you create. Use an online validation tool or the profile importfeature in ASDM. For validation, you can use the AnyConnectProfile.xsd found in the same directory asthe profile template. See Appendix A, “Sample AnyConnect Profile and XML Schema” for a hard copyof these files.

7/28/2019 cvc-20-ag
http://slidepdf.com/reader/full/cvc-20-ag 77/116
7-11
Cisco AnyConnect VPN Client Administrator Guide
OL-12950-01
Chapter 7 Configuring and Using AnyConnect Client Operating Modes and User Profiles
Configuring Profile Attributes
The following sections describe how to modify the profiles template to configure the profile attributes.
Enabling Start Before Logon (SBL) for the AnyConnect Client
With SBL enabled, the user sees the AnyConnect GUI logon dialog before the Windows logon dialogbox appears. This establishes the VPN connection first. Available only for Windows platforms, StartBefore Logon lets the administrator control the use of login scripts, password caching, mapping networkdrives to local drives, and more. You can use the SBL feature to activate the VPN as part of the logonsequence. SBL is disabled by default.
XML Settings for Enabling SBL
The element value for UseStartBeforeLogon allows this feature to be turned on (true) or off (false). If the you set this value to true in the profile, additional processing occurs as part of the logon sequence.See the Start Before Logon description for additional details.
You enable SBL by setting the <UseStartBefore Logon> value in the CiscoAnyConnect.xml file to true
<?xml version="1.0" encoding="UTF-8" ?><Configuration>
<ClientInitialization>
<UseStartBeforeLogon>true</UseStartBeforeLogon>
</ClientInitialization>
To disable SBL, set the same value to false.
To enable the UserControllable feature, use the following statement when enabling SBL:
<UseStartBeforeLogon userControllable=”false”>true</UseStartBeforeLogon>
Any user setting associated with this attribute is stored elsewhere.
CLI Settings for Enabling SBLTo minimize download time, the AnyConnect client requests downloads (from the security appliance)only of core modules that it needs for each feature that it supports. To enable new features, such as StartBefore Logon (SBL), you must specify the module name using the svc modules command from grouppolicy webvpn or username webvpn configuration mode:
[no] svc modules {none | value string}
The string for SBL is vpngina
In the following example, the user enters group-policy attributes mode for the group policytelecommuters, enters webvpn configuration mode for the group policy, and specifies the string vpnginato enable SBL:
hostname(config)# group-policy telecommuters attributes
hostname(config-group-policy)# webvpn
hostame(config-group-webvpn)# svc modules value vpngina
In addition, the administrator must ensure that the AnyConnect profile.xml file has the<UseStartBeforeLogon> statement set to true. For example:
<UseStartBeforeLogon UserControllable=“false”>true</UseStartBeforeLogon>
The system must be rebooted before Start Before Logon takes effect.

7/28/2019 cvc-20-ag
http://slidepdf.com/reader/full/cvc-20-ag 78/116
7-12
Cisco AnyConnect VPN Client Administrator Guide
OL-12950-01
Chapter 7 Configuring and Using AnyConnect Client Operating Modes and User Profiles
Configuring Profile Attributes
Note Start Before Logon works only for PCs that are part of a domain and not part of a workgroup or workingstandalone. Start Before Logon is not compatible with Cisco Secure Desktop.
You must also specify on the security appliance that you want to allow SBL (or any other modules for
additional features). See the description in the section Enabling Modules for Additional AnyConnectFeatures, page 5-5 (ASDM) or Enabling Modules for Additional AnyConnect Features, page 6-4 (CLI)for a description of how to do this.
Configuring the ServerList Attribute
One of the main uses of the profile is to provide a means of supplying a user of the client with a list of hosts to which they can connect. The user then selects the appropriate server. This server list consists of host name and host address pairs. The host name can be an alias used to refer to the host, an FQDN, oran IP address. If an FQDN or IP address is used, a HostAddress element is not required. In establishinga connection, the host address is used as the connection address unless it is not supplied. This allows thehost name to be an alias or other name that need not be directly tied to a network addressable host. If nohost address is supplied, the connection attempt tries to connect to the host name.
As part of the definition of the server list, a default server can be specified. This default server isidentified as such the first time a user attempts a connection using the client. If a user connects with aserver other than the default then for this user, the new default is the selected server. The user selectiondoes not alter the contents of the profile. Instead, the user selection is entered into the user preferences.
<?xml version="1.0" encoding="UTF-8" ?>
<Configuration>
<ServerList>
<HostEntry>
<HostName>MarketingASA01</HostName>
<HostAddress>209.165.200.224,/HostAddress>
</HostEntry>
<HostEntry>
<HostName>EngineeringASA01</HostName>
<HostAddress>209.165.200.225,/HostAddress>
</HostEntry>
</ServerList>
Configuring the Certificate Match Attribute
The AnyConnect client supports the following certificate match types. Some or all of these may be usedfor client certificate matching. Certificate matching are global criteria that can be set in an AnyConnectprofile. The criteria are:
• Key Usage
• Extended Key Usage
• Distinguished Name
Certificate Key Usage Matching
Certificate key usage offers a set of constraints on the broad types of operations that can be performedwith a given certificate. The supported set includes:

7/28/2019 cvc-20-ag
http://slidepdf.com/reader/full/cvc-20-ag 79/116
7-13
Cisco AnyConnect VPN Client Administrator Guide
OL-12950-01
Chapter 7 Configuring and Using AnyConnect Client Operating Modes and User Profiles
Configuring Profile Attributes
• DIGITAL_SIGNATURE
• NON_REPUDIATION
• KEY_ENCIPHERMENT
• DATA_ENCIPHERMENT
• KEY_AGREEMENT• KEY_CERT_SIGN
• CRL_SIGN
• ENCIPHER_ONLY
• DECIPHER_ONLY
The profile can contain none or more matching criteria. If one or more criteria are specified, a certificatemust match at least one to be considered a matching certificate.
The example in Certificate Matching Example, page 7-15 shows how you might configure theseattributes.
Extended Certificate Key Usage Matching
This matching allows an administrator to limit the certificates that can be used by the client, based onthe Extended Key Usage fields. Table 7-3 lists the well known set of constraints with their correspondingobject identifiers (OIDs).
As an administrator, you can add your own OIDs if the OID you want is not in the well known set. Theprofile can contain none or more matching criteria. A certificate must match all specified criteria to beconsidered a matching certificate. See profile example in Appendix A, “Sample AnyConnect Profile andXML Schema” for an example.
Certificate Distinguished Name Mapping
The certificate distinguished name mapping capability allows an administrator to limit the certificatesthat can be used by the client to those matching the specified criteria and criteria match conditions.Table 7-4 lists the supported criteria:
Table 7-3 Extended Certificate Key Usage
Constraint OID
serverAuth 1.3.6.1.5.5.7.3.1
clientAuth 1.3.6.1.5.5.7.3.2
codeSign 1.3.6.1.5.5.7.3.3
emailProtect 1.3.6.1.5.5.7.3.4
ipsecEndSystem 1.3.6.1.5.5.7.3.5
ipsecTunnel 1.3.6.1.5.5.7.3.6
ipsecUser 1.3.6.1.5.5.7.3.7
timeStamp 1.3.6.1.5.5.7.3.8
OCSPSign 1.3.6.1.5.5.7.3.9
dvcs 1.3.6.1.5.5.7.3.10

7/28/2019 cvc-20-ag
http://slidepdf.com/reader/full/cvc-20-ag 80/116
7-14
Cisco AnyConnect VPN Client Administrator Guide
OL-12950-01
Chapter 7 Configuring and Using AnyConnect Client Operating Modes and User Profiles
Configuring Profile Attributes
The profile can contain none or more matching criteria. A certificate must match all specified criteria tobe considered a matching certificate. Distinguished Name matching offers additional match criteria,including the ability for the administrator to specify that a certificate must or must not have the specifiedstring, as well as whether wild carding for the string should be allowed. See Appendix A, “SampleAnyConnect Profile and XML Schema,” for an example.
Table 7-4 Criteria for Certificate Distinguished Name Mapping
Identifier Description
CN SubjectCommonName
SN SubjectSurNameGN SubjectGivenName
N SubjectUnstructName
I SubjectInitials
GENQ SubjectGenQualifier
DNQ SubjectDnQualifier
C SubjectCountry
L SubjectCity
SP SubjectState
ST SubjectState
O SubjectCompany
OU SubjectDept
T SubjectTitle
EA SubjectEmailAddr
ISSUER-CN IssuerCommonName
ISSUER-SN IssuerSurName
ISSUER-GN IssuerGivenName
ISSUER-N IssuerUnstructName
ISSUER-I IssuerInitials
ISSUER-GENQ IssuerGenQualifier
ISSUER-DNQ IssuerDnQualifier
"SSUER-C IssuerCountry
ISSUER-L IssuerCity
ISSUER-SP IssuerState
ISSUER-ST IssuerState
ISSUER-O IssuerCompany
ISSUER-OU IssuerDept
ISSUER-T IssuerTitle
ISSUER-EA IssuerEmailAddr

7/28/2019 cvc-20-ag
http://slidepdf.com/reader/full/cvc-20-ag 81/116
7-15
Cisco AnyConnect VPN Client Administrator Guide
OL-12950-01
Chapter 7 Configuring and Using AnyConnect Client Operating Modes and User Profiles
Configuring Profile Attributes
Certificate Matching Example
The following example shows how to enable the attributes that you can use to refine client certificateselection.
<CertificateMatch>
<!--
Specifies Certificate Key attributes that can be used for choosing
acceptable client certificates.
-->
<KeyUsage>
<MatchKey>Non_Repudiation</MatchKey>
<MatchKey>Digital_Signature</MatchKey>
</KeyUsage>
<!--
Specifies Certificate Extended Key attributes that can be used for
choosing acceptable client certificates.
-->
<ExtendedKeyUsage>
<ExtendedMatchKey>ClientAuth</ExtendedMatchKey>
<ExtendedMatchKey>ServerAuth</ExtendedMatchKey>
<CustomExtendedMatchKey>1.3.6.1.5.5.7.3.11</CustomExtendedMatchKey>
</ExtendedKeyUsage><!--
Certificate Distinguished Name matching allows for exact
match criteria in the choosing of acceptable client
certificates.
-->
<DistinguishedName>
<DistinguishedNameDefinition Operator="Equal" Wildcard="Enabled">
<Name>CN</Name>
<Pattern>ASASecurity</Pattern>
</DistinguishedNameDefinition>
<DistinguishedNameDefinition Operator="Equal" Wildcard="Disabled">
<Name>L</Name>
<Pattern>Boulder</Pattern>
</DistinguishedNameDefinition>
</DistinguishedName></CertificateMatch>

7/28/2019 cvc-20-ag
http://slidepdf.com/reader/full/cvc-20-ag 82/116
7-16
Cisco AnyConnect VPN Client Administrator Guide
OL-12950-01
Chapter 7 Configuring and Using AnyConnect Client Operating Modes and User Profiles
Configuring Profile Attributes

7/28/2019 cvc-20-ag
http://slidepdf.com/reader/full/cvc-20-ag 83/116
C H A P T E R
8-1
Cisco AnyConnect VPN Client Administrator Guide
OL-12950-01
8Customizing and Localizing the AnyConnectClient
Customizing the End-user Experience
You can customize certain elements, such as the corporate logo, of the AnyConnect client graphical userinterface that the remote user sees upon logging in. You customize the AnyConnect Client user interfaceby replacing files that affect the interface with your own, custom files. For example, with a Windowsinstallation, you can change the company logo from the default Cisco logo by replacing the filecompany_logo.bmp with your own file.
You can also customize the client by translating user messages into other languages.
The sections that follow list the files you can replace for each operating system supported by theAnyConnect client.
Note There is no automated mechanism included with the client to allow customizing the bitmaps and icons.Customizing requires that you manually copy the custom files to the filenames and locations listed in
this section.
For Windows
All files for Windows are located in %PROGRAMFILES%\Cisco\Cisco AnyConnect VPN Client\res\.Table 8-1 lists the files that you can replace and the client GUI area affected.
Note %PROGRAMFILES% refers to the environmental variable by the same name. In most Windowsinstallation, this is C:\Program Files.
Table 8-1 Customizing the AnyConnect VPN Client for Windows GUI
Filename in WindowsInstallation Client GUI Area Affected
company_logo.bmp Corporate logo that appears on each tab of the user interface.
ConnectionTab.ico Icon that appears on the Connection tab.
StatsTab.ico Icon that appears on the Statistics tab.
AboutTab.ico Icon that appears on the About tab.

7/28/2019 cvc-20-ag
http://slidepdf.com/reader/full/cvc-20-ag 84/116
8-2
Cisco AnyConnect VPN Client Administrator Guide
OL-12950-01
Chapter 8 Customizing and Localizing the AnyConnect Client
Customizing the End-user Experience
For Linux
All files for Linux are located in /opt/cisco/vpn/pixmaps/. Table 8-2 lists the files that you can replaceand the client GUI area affected.
For Mac OS X
All files for OS X are located in /Applications/Cisco AnyConnect VPN Client/Contents/Resources.Table 8-3 lists the files that you can replace and the client GUI area affected.
connected.ico Tray icon that displays when the client is connected.
unconnected.ico Tray icon that displays when the client is not connected.disconnecting.ico Tray icon that displays when the client is in the process of disconnecting.
Table 8-1 Customizing the AnyConnect VPN Client for Windows GUI (continued)
Filename in WindowsInstallation Client GUI Area Affected
Table 8-2 Customizing the AnyConnect VPN Client for Linux GIU
Filename in LinuxInstallation Client GUI Area Affected
company-logo.png Corporate logo that appears on each tab of the user interface.
vpnui48.png Main program icon.
systray_connected.png Tray icon that displays when the client is connected.
systray_notconnected.png Tray icon that displays when the client is not connected.
systray_disconnecting.png Tray icon that displays when the client is in the process of disconnecting.
cvc-info.png Icon that appears on the Statistics tab.
cvc-disconnect.png Icon that appears next to the Disconnect button.
cvc-connect.png Icon that appears next to the Connect button, and on the Connection tab.
cvc-about.png Icon that appears on the About tab.
Table 8-3 Customizing the AnyConnect VPN Client for Mac OS X
Filename in Mac OS XInstallation Client GUI Area Affected
bubble.png Notification bubble that appears when the client connects or disconnects.
logo.png Logo icon that appears on main screen in the top right corner.
menu_idle.png Disconnected idle menu bar icon.
menu_connected.png Connected state menu bar icon.
menu_error.png Error state menu bar icon.
connected.png Icon that displays under the disconnect button when the client is connected.
warning.png Icon that replaces login fields on various authentication/certificate warnings.
vpngui.icns Mac OS X icon file format that is used for all icon services, such as Dock,Sheets, and Finder.

7/28/2019 cvc-20-ag
http://slidepdf.com/reader/full/cvc-20-ag 85/116
8-3
Cisco AnyConnect VPN Client Administrator Guide
OL-12950-01
Chapter 8 Customizing and Localizing the AnyConnect Client
Customizing the End-user Experience
Language Translation (Localization) for User Messages
Localization provides a way of implementing translation for user messages that appear on the client userinterface. The security appliance provides language translation for the portal and screens displayed tousers that initiate browser-based, Clientless SSL VPN connections, as well as the interface displayed to
Cisco AnyConnect VPN Client users.This section describes how to configure the security appliance to translate these user messages andincludes the following sections:
• Understanding Language Translation, page 8-3
• Creating or Modifying a Translation Table Using CLI, page 8-8
• Referencing the Language in a Customization Object, page 8-10
• Changing a Group Policy or User Attributes to Use the Customization Object, page 8-12
Understanding Language Translation
Functional areas and their messages that are visible to remote users are organized into translationdomains. Table 8-4 shows the translation domains and the functional areas translated.
The standard software image package for the security appliance includes a translation table template for
each domain. The templates for plug-ins are included with the plug-ins and define their own translationdomains.
You can export the template for a translation domain, which in some cases creates an XML file of thetemplate at the URL or IP address you provide. The message fields in this file are empty. You can editthe messages and import the template to create a new translation table object that resides in flashmemory.
Table 8-4 Translation Domains and Functional Areas Affected
Translation Domain Functional Areas Translated
AnyConnect Messages displayed on the user interface of the Cisco AnyConnect VPNClient.
CSD Messages for the Cisco Secure Desktop (CSD).
customization Messages on the logon and logout pages, portal page, and all the messagescustomizable by the user.
banners Banners displayed to remote users and messages when VPN access is denied.
PortForwarder Messages displayed to Port Forwarding users.
url-list Text that user specifies for URL bookmarks on the portal page.
webvpn All the layer 7, AAA and portal messages that are not customizable.
plugin-ica Messages for the Citrix plug-in.
plugin-rdp Messages for the Remote Desktop Protocol plug-in.
plugin-telnet,ssh Messages for the Telnet and SSH plug-in.
plugin-vnc Messages for the VNC plug-in.

7/28/2019 cvc-20-ag
http://slidepdf.com/reader/full/cvc-20-ag 86/116
8-4
Cisco AnyConnect VPN Client Administrator Guide
OL-12950-01
Chapter 8 Customizing and Localizing the AnyConnect Client
Customizing the End-user Experience
You can also export an existing translation table. The XML file created displays the messages you editedpreviously. Reimporting this XML file with the same language name creates a new version of thetranslation table object, overwriting previous messages.
Some templates are static, but some change based on the configuration of the security appliance. Becauseyou can customize the logon and logout pages, portal page, and URL bookmarks for clientless users, the
security appliance generates the customization and url-list translation domain templates dynamically,and the template automatically reflects your changes to these functional areas.
After you create translation tables, they are available to customization objects that you create and applyto group policies or user attributes. With the exception of the AnyConnect translation domain, atranslation table has no effect, and messages are not translated on user screens, until you create acustomization object, identify a translat ion table to use in that object, and specify that customization forthe group policy or user. Changes to the AnyConnect translations are automatically downloaded toclients the next time they connect to the Secure Gateway.
Configuring Language Localization Using ASDM
To use ASDM to configure language localization, select Configuration > Remote Access VPN >
Clientless SSL VPN Access > Portal > Language Localization. This opens the Language Localizationpane (Figure 8-1).
Note Both the AnyConnect VPN client and Clientless SSL VPN use the same localization mechanism, and thepath merely reflects this.
The language localization pane shows the language of existing language localization tables and thelanguage localization templates the translation tables are based on and lets you add, edit, delete, import,or export language localization templates. Using the buttons on this pane, you can configure languagetranslation tables that the security appliance uses to translate titles and messages associated with theportal page, the AnyConnect VPN client user interface, Cisco Secure Desktop, and plug-ins.

7/28/2019 cvc-20-ag
http://slidepdf.com/reader/full/cvc-20-ag 87/116
8-5
Cisco AnyConnect VPN Client Administrator Guide
OL-12950-01
Chapter 8 Customizing and Localizing the AnyConnect Client
Customizing the End-user Experience
Figure 8-1 Language Localization Pane
Fields
• Add—Launches the Add Localization Entry dialog where you can select a localization template toadd and you can edit the contents of the template.
• Edit—Launches the Edit Localization Entry dialog for the selected language in the table, and allowsyou to edit the previously-imported language localization table.
• Delete—Deletes a selected language localization table.
• Import—Launches the Import Language Localization dialog where you can import a languagelocalization template or table.
• Export—Launches the Export Language Localization dialog where you can export a languagelocalization template or table to a URL or IP address where you can make changes to the table ortemplate.
• Language—The language of existing Language Localization tables.
• Language Localization Template—The template on which the table is based.

7/28/2019 cvc-20-ag
http://slidepdf.com/reader/full/cvc-20-ag 88/116
8-6
Cisco AnyConnect VPN Client Administrator Guide
OL-12950-01
Chapter 8 Customizing and Localizing the AnyConnect Client
Customizing the End-user Experience
Creating or Modifying a Translation Table Using ASDM
To create a translation table, do the following steps:
Step 1 On the Language Localization pane, click Add or Edit. The Add (or Edit) Language Localization dialog
box (Figure8-2) displays. You can add a new translation table, based on a template, or you can modifyan already-imported translation table from this pane.
Figure 8-2 Add Language Localization Dialog Box
Step 2 Select a Language Localization Template from the drop-down box. The entries in the box correspond tofunctional areas that are translated. For list of templates and functional areas, see Table 8-4 on page 8-3.
Step 3 Specify a language for the template. The template becomes a translation table in cache memory with thename you specify. Use an abbreviation that is compatible with the language options for your browser.For example, if you are creating a table for the Chinese language, and you are using Internet Explorer,use the abbreviation zh, that is recognized by Internet Explorer.
Note Consult the online help for your specific browser to see what the appropriate language abbreviations arefor that browser and make sure that you have added the appropriate languages to your list of languagesthat you want to use to display web pages in that browser. Adding languages does not ensure that your
computer has a font that can display web pages in your preferred language. In addition, most web pagescontain information that tells the browser what language encoding (language and character set) to use.Your browser might have a facility to automatically determine the appropriate encoding. See the onlinehelp for your browser for specific information about multiple language support.
Step 4 Edit the translation table. For each message represented by the msgid field that you want to translate,enter the translated text between the quotes of the associated msgstr field. The example below shows themessage Connected, with the Spanish text in the msgstr field:
msgid "Connected"

7/28/2019 cvc-20-ag
http://slidepdf.com/reader/full/cvc-20-ag 89/116
8-7
Cisco AnyConnect VPN Client Administrator Guide
OL-12950-01
Chapter 8 Customizing and Localizing the AnyConnect Client
Customizing the End-user Experience
msgstr "Conectado"
Note With the AnyConnect VPN Client, the first user message to appear does not correctly translate,because that message is missing from the AnyConnect message catalog in the AnyConnect.potemplate. You retrieve AnyConnect.po from the security appliance using the export procedure. Youexport the AnyConnect template, AnyConnect.po, add the additional message, and insert the desiredtranslations for the messages currently in the file. When this is complete, you use the importprocedure, which specifies the language. You do not reimport the template itself. Only the updatedfile, which inclludes the translations, is reloaded.
To ensure that the first user message appears correctly translated, add the following lines to themessage catalog file that you are using for translations, before re-importing it with the missingtags:
msgid "Please enter your username and password."
msgstr ""
The message string (msgstr) value should be your translation of the English string in msgid.
Step 5 Click OK. The new table appears in the list of translation tables.
Import/Export Language Localization
To import or export a translation table, click Import or Export on the Language Localization pane. Thisopens the Import or Export Language Localization pane (Figure 8-3), on which you can import or exporta translation table to the security appliance to provide translation of user messages.
Translation templates are XML files that contain message fields that can be edited with translated
messages. You can export a template, edit the message fields, and import the template as a newtranslation table, or you can export an existing translation table, edit the message fields, and re-importthe table to overwrite the previous version.
Figure 8-3 Import Language Localization Pane
7/28/2019 cvc-20-ag
http://slidepdf.com/reader/full/cvc-20-ag 90/116
8-8
Cisco AnyConnect VPN Client Administrator Guide
OL-12950-01
Chapter 8 Customizing and Localizing the AnyConnect Client
Customizing the End-user Experience
Fields
• Language—Enter a name for the language.
• When exporting, it is automatically filled-in with the name from the entry you selected in the table.
• When importing, you enter the language name in the manner that you want it to be identified. Theimported translation table then appears in the list with the abbreviation you designated. To ensurethat your browser recognizes the language, use language abbreviations that are compatible with thelanguage options of the browser. For example, if you are using IE, use zh as the abbreviation for theChinese language.
• Localization Template Name—The name of the XML file containing the message fields. Thefollowing templates are available:
– AnyConnect—Messages displayed on the user interface of the Cisco AnyConnect VPN Client.
– CSD—Messages for the Cisco Secure Desktop (CSD).
– customization—Messages on the logon and logout pages, portal page, and all the messagescustomizable by the user.
– keepout—Message displayed to remote users when VPN access is denied.
–PortForwarder—Messages displayed to Port Forwarding users.
– url-list—Text that user specifies for URL bookmarks on the portal page.
– webvpn—All the layer 7, AAA and portal messages that are not customizable.
– plugin-ica—Messages for the Citrix plug-in.
– plugin-rdp—Messages for the Remote Desktop Protocol plug-in.
– plugin-telnet,ssh—Messages for the TELNET and SSH plug-in.
– plugin-vnc—Messages for the VNC plug-in.
• Select a file—Choose the method by which you want to import or export the file.
– Remote server—Select this option to import a customization file that resides on a remote server
accessible from the security appliance.– Path—Identify the method to access the file (ftp, http, or https), and provide the path to the file.
– Flash file system—Choose this method to export a file that resides on the security appliance.
– Path—Provide the path to the file.
– Browse Flash—Browse to the path for the file.
– Local computer—Choose this method to import a file that resides on the local PC.
– Path—Provide the path to the file.
– Browse Local Files—Browse to the path for the file.
• Import/Export Now—Click to import or export the file.
Creating or Modifying a Translation Table Using CLI
The following procedure describes how to create translation tables:

7/28/2019 cvc-20-ag
http://slidepdf.com/reader/full/cvc-20-ag 91/116
8-9
Cisco AnyConnect VPN Client Administrator Guide
OL-12950-01
Chapter 8 Customizing and Localizing the AnyConnect Client
Customizing the End-user Experience
Step 1 Export a translation table template to a computer with the export webvpn translation-table commandfrom privileged EXEC mode.
In the following example, the show webvpn translation-table command shows available translationtable templates and tables.
hostname# show import webvpn translation-tableTranslation Tables' Templates:
AnyConnect
PortForwarder
banners
csd
customization
url-list
webvpn
Translation Tables:
test customization
hostname#
The next example exports the translation table template for the AnyConnect domain, which affectsmessages displayed to AnyConnect client users. In this example, the filename of the XML file created
is test (user-specified), and it contains empty message fields:hostname# export webvpn translation-table AnyConnect template tftp://209.165.200.225/test
Step 2 Edit the translation table XML file.
The following example shows a portion of the template that was exported as test . The end of this outputincludes a message ID field (msgid) and a message string field (msgstr) for the message Clientless SSLVPN Service, which is displayed on the portal page when a Clientless user establishes a VPN connection.The complete template contains many pairs of message fields:
# Copyright (C) 2007 by Cisco Systems, Inc.
#
#, fuzzy
msgid ""
msgstr ""
"Project-Id-Version: ASA\n"
"Report-Msgid-Bugs-To: [email protected]\n"
"POT-Creation-Date: 2007-04-23 18:57 GMT\n"
"PO-Revision-Date: YEAR-MO-DA HO:MI+ZONE\n"
"Last-Translator: FULL NAME <EMAIL@ADDRESS>\n"
"Language-Team: LANGUAGE <[email protected]>\n"
"MIME-Version: 1.0\n"
"Content-Type: text/plain; charset=UTF-8\n"
"Content-Transfer-Encoding: 8bit\n"
#: DfltCustomization:24 DfltCustomization:64
msgid "Clientless SSL VPN Service"
msgstr ""
The message ID field (msgid) contains the default translation. The message string field (msgstr) that
follows msgid provides the translation. To create a translation, enter the translated text between thequotes of the msgstr string.
Step 3 Import the translation table using the import webvpn translation-table command from privilegedEXEC mode.
In the following example, the XML file is imported es-us—the abbreviation for Spanish spoken in theUnited States.

7/28/2019 cvc-20-ag
http://slidepdf.com/reader/full/cvc-20-ag 92/116
8-10
Cisco AnyConnect VPN Client Administrator Guide
OL-12950-01
Chapter 8 Customizing and Localizing the AnyConnect Client
Customizing the End-user Experience
hostname# import webvpn translation-table customization language es-us
tftp://209.165.200.225/portal
hostname# !!!!!!!!!!!!!!!!!!!!!!!!!!!!!!!!!!!
hostname# show import webvpn translation-table
Translation Tables' Templates:
AnyConnect
PortForwarder
csdcustomization
keepout
url-list
webvpn
Citrix-plugin
RPC-plugin
Telnet-SSH-plugin
VNC-plugin
Translation Tables:
es-us customization
If you import a translation table for the AnyConnect domain, your changes to the AnyConnecttranslations are automatically downloaded to clients the next time they connect to the Secure Gateway.
If you import a translation table for any other domain, you must continue to Step 4, where you create acustomization object, identify the translation table to use in that object, and specify that customizationobject for the group policy or user.
Referencing the Language in a Customization Object
Now that you have created a translation table, you need to refer to this table in a customization object.
Steps 4 through 6 describe how to export the customization template, edit it, and import it as acustomization object:
Step 4 Export a customization template to a URL or IP address where you can edit it using the export webvpncustomization template command from privileged EXEC mode. The example below exports thetemplate and creates the copy sales at the URL or IP address specified:
hostname# export webvpn customization template tftp://209.165.200.225/sales
Step 5 Edit the customization template and reference the previously-imported translation table.
Two areas of XML code in the customization template pertain to translation tables. The first area, shownbelow, specifies the translation tables to use:
<localization>
<languages>en,ja,zh,ru,fr</languages>
<default-language>en</default-language>
</localization>
The <languages> tag in the code is followed by the names of the translation tables. In this example code,they are en, ja, zh, ru, and fr (English, Japanese, Chinese, Russian, and French). For the customizationobject to call these translation tables correctly, the tables must have been previously imported using the
exact same names. These names must be compatible with language options of the browser.
Note Consult the online help for your specific browser to see what the appropriate language abbreviations arefor that browser and make sure that you have added the appropriate languages to your list of languagesthat you want to use to display web pages in that browser. Adding languages does not ensure that yourcomputer has a font that can display web pages in your preferred language. In addition, most web pages

7/28/2019 cvc-20-ag
http://slidepdf.com/reader/full/cvc-20-ag 93/116
8-11
Cisco AnyConnect VPN Client Administrator Guide
OL-12950-01
Chapter 8 Customizing and Localizing the AnyConnect Client
Customizing the End-user Experience
contain information that tells the browser what language encoding (language and character set) to use.Your browser might have a facility to automatically determine the appropriate encoding. See the onlinehelp for your browser for specific information about multiple language support.
The <default-language> tag specifies the language that the remote user first encounters when connectingto the security appliance. In the example code above, the language is English.
Figure 8-4 shows the login page and the Language Selector. This Language Selector gives remote usersestablishing an SSL VPN connection the ability to select the language of their choice.
Figure 8-4 Language Selector
The following XML code affects the display of the Language Selector, and includes the <languageselector> tag and the associated <language> tags that enable and customize the Language Selector:
<auth-page>
....
<language-selector>
<mode>enable</mode>
<title l10n="yes">Language:</title><language>
<code>en</code>
<text>English</text>
</language>
<language>
<code>es-us</code>
<text>Spanish</text>
</language>
</language-selector>
The <language-selector> group of tags includes the <mode> tag that enables and disables the displayingof the Language Selector, and the <title> tag that specifies the title of the drop-down box listing thelanguages.
The <language> group of tags includes the <code> and <text> tags that map the language namedisplayed in the Language Selector drop-down box to a specific translation table.
Make your changes to this file and save the file.
Step 6 Import the customization template as a new object named sales, using the import webvpncustomization command from privileged EXEC mode. For example:
hostname# import webvpn customization sales tftp://209.165.200.225/sales
hostname# !!!!!!!!!!!!!!!!!!!!!!!!!!!!!!!!!!!

7/28/2019 cvc-20-ag
http://slidepdf.com/reader/full/cvc-20-ag 94/116

7/28/2019 cvc-20-ag
http://slidepdf.com/reader/full/cvc-20-ag 95/116
C H A P T E R
9-1
Cisco AnyConnect VPN Client Administrator Guide
OL-12950-01
9Monitoring and Maintaining the AnyConnectClient
This chapter describes some common maintenance and monitoring procedures for network administrators dealing with the Cisco AnyConnect Client. You perform these procedures on the securityappliance:
• Viewing AnyConnect Client and SSL VPN Sessions, page 9-1
• Adjusting MTU Size Using ASDM, page 9-2
• Logging Off AnyConnect Client Sessions, page 9-3
• Updating AnyConnect Client and SSL VPN Client Images, page 9-4
Viewing AnyConnect Client and SSL VPN SessionsYou can view information about active sessions using the show vpn-sessiondb command in privilegedEXEC mode:
show vpn-sessiondb svc
The following example shows the output of the show vpn-sessiondb svc command:
hostname# show vpn-sessiondb svc
Session Type: SVC
Username : testuser Index : 17
Assigned IP : 209.165.200.224 Public IP : 192.168.23.45
Protocol : Clientless SSL-Tunnel DTLS-Tunnel
Encryption : RC4 AES128 Hashing : SHA1
Bytes Tx : 17457 Bytes Rx : 69502
Group Policy : GroupPolicy Tunnel Group : CertGroup
Login Time : 15:19:57 EDT Fri May 25 2007
Duration : 0h:04m:27s
NAC Result : Unknown
VLAN Mapping : N/A VLAN : none
To see more detailed information, including the number of AnyConnect (SSL VPN) tunnels, DTLStunnels, and Clientless tunnels, use the command show vpn-sessiondb detail svc.

7/28/2019 cvc-20-ag
http://slidepdf.com/reader/full/cvc-20-ag 96/116
9-2
Cisco AnyConnect VPN Client Administrator Guide
OL-12950-01
Chapter 9 Monitoring and Maintaining the AnyConnect Client
Viewing AnyConnect Client and SSL VPN Sessions
Adjusting MTU Size Using ASDM
You can adjust the Maximum Transmission Unit size (from 256 to 1406 bytes) for SSL VPN connectionsestablished by the AnyConnect Client by selecting Configuration > Remote Access VPN > Network (Client) Access > Group Policies > Add or Edit. The Edit Internal Group Policy dialog box opens (fig).
Figure 9-1 Edit Internal Group Policy Dialog Box
Select Advanced > SSL VPN Client. Uncheck the Inherit check box and specify the appropriate value inthe MTU field. The default size for this command in the default group policy is 1406. The MTU size isadjusted automatically based on the MTU of the interface that the connection uses, minus theIP/UDP/DTLS overhead.
This setting affects only the AnyConnect Client. The Cisco SSL VPN Client (SVC) is not capable of adjusting to different MTU sizes. This setting affects AnyConnect Client connections established in SSLand those established in SSL with DTLS.
Adjusting MTU Size Using CLI
You can adjust the Maximum Transmission Unit size (from 256 to 1406 bytes) for SSL VPN connectionsestablished by the AnyConnect Client by using the svc mtu command from group policy webvpn orusername webvpn configuration mode:
[no] svc mtu size
7/28/2019 cvc-20-ag
http://slidepdf.com/reader/full/cvc-20-ag 97/116
9-3
Cisco AnyConnect VPN Client Administrator Guide
OL-12950-01
Chapter 9 Monitoring and Maintaining the AnyConnect Client
Viewing AnyConnect Client and SSL VPN Sessions
This command affects only the AnyConnect Client. The Cisco SSL VPN Client (SVC) is not capable ofadjusting to different MTU sizes.
The default size for this command in the default group policy is 1406. The MTU size is adjustedautomatically based on the MTU of the interface that the connection uses, minus the IP/UDP/DTLSoverhead.
This command affects AnyConnect Client connections established in SSL and those established in SSLwith DTLS.
The following example configures the MTU size to 1200 bytes for the group policy telecommuters:
hostname(config)# group-policy telecommuters attributes
hostname(config-group-policy)# webvpn
hostname(config-group-webvpn)# svc mtu 1200
Many consumer-grade end user terminating devices (for example, a home router) do not properly handlethe creation or assembly of IP fragments. This is particularly true of UDP. Since DTLS is a UDP-basedprotocol, it is sometimes necessary to reduce the MTU to prevent fragmentation. The MTU parameter isused by both the client and the security appliance to set the maximum size of the packet to be transmittedover the tunnel. If an end user is experiencing a significant amount of lost packets, or if an application
such as Microsoft Outlook is not functioning over the tunnel, it might indicate a fragmentation issue.Lowering the MTU for that user or group of users may address the problem.
The client proposes an MTU value that is 94 bytes less than the MTU of the physical adapter used forthe SSL and DTLS connection to the security appliance. The security appliance accepts the lesser of theconfigured MTU or the value proposed by the client. Both the client and the security appliance use thevalue selected by the security appliance.
For example, if the physical adapter on the PC has been changed to use an MTU of 1300, then the clientproposes an MTU of 1206 to the security appliance. If the security appliance is set for a value lower than1206, both the client and the security appliance use the lower value that was set using the MTUconfiguration command.
Logging Off AnyConnect Client SessionsTo log off all AnyConnect Client and SSL VPN sessions, use the vpn-sessiondb logoff svc command inglobal configuration mode:
vpn-sessiondb logoff svc
In response, the system asks you to confirm that you want to log off the VPN sessions. To confirm pressEnter or type y. Entering any other key cancels the logging off.
The following example logs off all SSL VPN sessions:
hostname# vpn-sessiondb logoff svc
INFO: Number of sessions of type "svc" logged off : 1
Do you want to logoff the VPN session(s)? [confirm]
INFO: Number of sessions logged off : 6
hostname#
You can log off individual sessions using either the name option, or the index option:
vpn-sessiondb logoff name name
vpn-sessiondb logoff index index
For example, to log off the user named tester, enter the following command:
hostname# vpn-sessiondb logoff name tester
Do you want to logoff the VPN session(s)? [confirm]

7/28/2019 cvc-20-ag
http://slidepdf.com/reader/full/cvc-20-ag 98/116
9-4
Cisco AnyConnect VPN Client Administrator Guide
OL-12950-01
Chapter 9 Monitoring and Maintaining the AnyConnect Client
Viewing AnyConnect Client and SSL VPN Sessions
INFO: Number of sessions with name "tester" logged off : 1
hostname#
You can find both the username and the index number (established by the order of the client images) inthe output of the show vpn-sessiondb svc command (see Viewing AnyConnect Client and SSL VPNSessions, page 9-1).
The following example terminates that session using the name option of the vpn-sessiondb logoff command:
hostname# vpn-sessiondb logoff name testuser
INFO: Number of sessions with name "tesstuser" logged off : 1
Updating AnyConnect Client and SSL VPN Client Images
You can update the client images on the security appliance at any time using the following procedure:
Step 1 Copy the new client images to the security appliance using the copy command from privileged EXEC
mode, or using another method.
Step 2 If the new client image files have the same filenames as the files already loaded, reenter the svc image command that is in the configuration. If the new filenames are different, uninstall the old files using theno svc image command. Then use the svc image command to assign an order to the images and causethe security appliance to load the new images.

7/28/2019 cvc-20-ag
http://slidepdf.com/reader/full/cvc-20-ag 99/116
A-1
Cisco AnyConnect VPN Client Administrator Guide
OL-12950-01
A P P E N D I X ASample AnyConnect Profile and XML Schema
This appendix contains a sample AnyConnect profile and a sample AnyConnect profile schema. Both ofthese are delivered witht the client and are present in a client installation in the same directory. Theprofile defines the attributes configured for a particular user. The schema defines the profile format thatis allowed. The schema is suitable for use as a validation mechanism.
• Sample AnyConnect Profile, page A-1• Sample AnyConnect Profile Schema, page A-3
Sample AnyConnect Profile<?xml version="1.0" encoding="UTF-8"?>
<!--
This is a sample of a Cisco AnyConnect VPN Client Profile XML file.
This file is intended to be maintained by a Secure Gateway administrator
and then distributed with the client software. The xml file based on
this schema can be distributed to clients at any time. The distribution
mechanisms supported are as a bundled file with the software distributionor as part of the automatic download mechanism. The automatic download
mechanism only available with certain Cisco Secure Gateway products.
NOTE: Administrators are strongly encouraged to validate XML profile they
create using an online validation tool or via the profile import
functionality in ASDM. Validation can be accomplished with the
AnyConnectProfile.xsd found in this directory.
AnyConnectProfile is the root element representing the AnyConnect Client
Profile
-->
<AnyConnectProfile xmlns="http://schemas.xmlsoap.org/encoding/"
xmlns:xsi="http://www.w3.org/2001/XMLSchema-instance"
xsi:schemaLocation="http://schemas.xmlsoap.org/encoding/ AnyConnectProfile.xsd">
<!--The ClientInitialization section represents global settings for the
client. In some cases (e.g. BackupServerList) host specific overrides
are possible.
-->
<ClientInitialization>
<!--
The Start Before Logon feature can be used to activate the VPN as
part of the logon sequence.
UserControllable:

7/28/2019 cvc-20-ag
http://slidepdf.com/reader/full/cvc-20-ag 100/116
A-2
Cisco AnyConnect VPN Client Administrator Guide
OL-12950-01
Appendix A Sample AnyConnect Profile and XML Schema
Sample AnyConnect Profile
Does the administrator of this profile allow the user to control
this attribute for their own use. Any user setting associated
with this attribute will be stored elsewhere.
-->
<UseStartBeforeLogon UserControllable="false">false</UseStartBeforeLogon>
<!--
If user is importing a certificate using the enrollment feature,
this attribute will enforce any pin application requirement.-->
<CertEnrollmentPin>pinAllowed</CertEnrollmentPin>
<!--
This section enables the definition of various attributes that
can be used to refine client certificate selection.
-->
<CertificateMatch>
<!--
Certificate Key attributes that can be used for choosing
acceptable client certificates.
-->
<KeyUsage>
<MatchKey>Non_Repudiation</MatchKey>
<MatchKey>Digital_Signature</MatchKey>
</KeyUsage><!--
Certificate Extended Key attributes that can be used for
choosing acceptable client certificates.
-->
<ExtendedKeyUsage>
<ExtendedMatchKey>ClientAuth</ExtendedMatchKey>
<ExtendedMatchKey>ServerAuth</ExtendedMatchKey>
<CustomExtendedMatchKey>1.3.6.1.5.5.7.3.11</CustomExtendedMatchKey>
</ExtendedKeyUsage>
<!--
Certificate Distinguished Name matching allows for exact
match criteria in the choosing of acceptable client
certificates.
-->
<DistinguishedName><DistinguishedNameDefinition Operator="Equal" Wildcard="Enabled">
<Name>CN</Name>
<Pattern>ASASecurity</Pattern>
</DistinguishedNameDefinition>
<DistinguishedNameDefinition Operator="Equal" Wildcard="Disabled">
<Name>L</Name>
<Pattern>Boulder</Pattern>
</DistinguishedNameDefinition>
</DistinguishedName>
</CertificateMatch>
<!--
Collection of one or more backup servers to be used in case
the user selected one fails.
-->
<BackupServerList>
<!--
Can be a FQDN or IP address.
-->
<HostAddress>cvc-asa-02.cisco.com</HostAddress>
<HostAddress>10.94.146.172</HostAddress>
</BackupServerList>
</ClientInitialization>
<!--
This section contains the list of hosts the user will be able to
select from.
-->

7/28/2019 cvc-20-ag
http://slidepdf.com/reader/full/cvc-20-ag 101/116
A-3
Cisco AnyConnect VPN Client Administrator Guide
OL-12950-01
Appendix A Sample AnyConnect Profile and XML Schema
Sample AnyConnect Profile Schema
<ServerList>
<!--
This is the data needed to attempt a connection to a specific
host.
-->
<HostEntry>
<!--
Can be an alias used to refer to the host or an FQDN orIP address. If an FQDN or IP address is used, a
HostAddress is not required.
-->
<HostName>CVC-ASA-02</HostName>
<HostAddress>cvc-asa-02.cisco.com</HostAddress>
</HostEntry>
<HostEntry>
<HostName>CVC-ASA-01</HostName>
<HostAddress>10.94.146.172</HostAddress>
<!--
This backup server list represents an override to the
global one defined previously.
-->
<BackupServerList>
<HostAddress>cvc-asa-03.cisco.com</HostAddress><HostAddress>10.94.146.173</HostAddress>
</BackupServerList>
</HostEntry>
</ServerList>
</AnyConnectProfile>
Sample AnyConnect Profile Schema<?xml version="1.0" encoding="UTF-8"?>
<!-- edited with XMLSpy v2006 rel. 3 sp1 (http://www.altova.com) by Chris Fitzgerald
(private) -->
<xs:schema xmlns:xs="http://www.w3.org/2001/XMLSchema"
xmlns:ns1="http://schemas.xmlsoap.org/encoding/"
targetNamespace="http://schemas.xmlsoap.org/encoding/" elementFormDefault="qualified"
attributeFormDefault="unqualified">
<xs:annotation>
<xs:documentation>pwd</xs:documentation>
</xs:annotation>
<xs:complexType name="HostEntry">
<xs:annotation>
<xs:documentation>This is the data needed to attempt a connection to a
specific host.</xs:documentation>
</xs:annotation>
<xs:sequence>
<xs:element name="HostEntry" maxOccurs="unbounded">
<xs:annotation>
<xs:documentation>A HostEntry comprises the data needed to identify and
connect to a specific host.</xs:documentation>
</xs:annotation>
<xs:complexType>
<xs:sequence>
<xs:element name="HostName">
<xs:annotation>
<xs:documentation>Can be an alias used to refer to the host
or an FQDN or IP address. If an FQDN or IP address is used, a HostAddress is not
required.</xs:documentation>
7/28/2019 cvc-20-ag
http://slidepdf.com/reader/full/cvc-20-ag 102/116
A-4
Cisco AnyConnect VPN Client Administrator Guide
OL-12950-01
Appendix A Sample AnyConnect Profile and XML Schema
Sample AnyConnect Profile Schema
</xs:annotation>
</xs:element>
<xs:element name="HostAddress" minOccurs="0">
<xs:annotation>
<xs:documentation>Can be a FQDN or IP
address.</xs:documentation>
</xs:annotation>
</xs:element><xs:element name="BackupServerList" type="ns1:BackupServerList"
minOccurs="0">
<xs:annotation>
<xs:documentation>Collection of one or more backup servers
to be used in case the user selected one fails.</xs:documentation>
</xs:annotation>
</xs:element>
</xs:sequence>
</xs:complexType>
</xs:element>
</xs:sequence>
</xs:complexType>
<xs:complexType name="AnyConnectClientProfile">
<xs:annotation>
<xs:documentation>This is the XML schema definition for the Cisco AnyConnectVPN Client Profile XML file. The VPN Client Initialization is a repository of information
used to manage the Cisco VPN client software. This file is intended to be maintained by a
Secure Gateway administrator and then distributed with the client software. The xml file
based on this schema can be distributed to clients at any time. The distribution
mechanisms supported are as a bundled file with the software distribution or as part of
the automatic download mechanism. The automatic download mechanism only available with
certain Cisco Secure Gateway products.</xs:documentation>
</xs:annotation>
<xs:sequence>
<xs:element name="ClientInitialization" minOccurs="0">
<xs:annotation>
<xs:documentation>The ClientInitialization section represents global
settings for the client. In some cases (e.g. BackupServerList) host specific overrides
are possible.</xs:documentation>
</xs:annotation><xs:complexType>
<xs:sequence>
<xs:element name="UseStartBeforeLogon" default="false"
minOccurs="0">
<xs:annotation>
<xs:documentation>The Start Before Logon feature can be used
to activate the VPN as part of the logon sequence.</xs:documentation>
</xs:annotation>
<xs:complexType>
<xs:simpleContent>
<xs:extension base="ns1:simpleBinary">
<xs:attribute name="UserControllable"
default="false">
<xs:annotation>
<xs:documentation>Does the administrator of
this profile allow the user to control this attribute for their own use. Any user setting
associated with this attribute will be stored elsewhere.</xs:documentation>
</xs:annotation>
<xs:simpleType>
<xs:restriction base="xs:string">
<xs:enumeration value="true">
<xs:annotation>
<xs:documentation>user is allowed
to control this setting.</xs:documentation>
</xs:annotation>
</xs:enumeration>

7/28/2019 cvc-20-ag
http://slidepdf.com/reader/full/cvc-20-ag 103/116
A-5
Cisco AnyConnect VPN Client Administrator Guide
OL-12950-01
Appendix A Sample AnyConnect Profile and XML Schema
Sample AnyConnect Profile Schema
<xs:enumeration value="false">
<xs:annotation>
<xs:documentation>user is not
allowed to control this setting.</xs:documentation>
</xs:annotation>
</xs:enumeration>
</xs:restriction>
</xs:simpleType></xs:attribute>
</xs:extension>
</xs:simpleContent>
</xs:complexType>
</xs:element>
<xs:element name="CertEnrollmentPin" default="pinAllowed"
minOccurs="0">
<xs:annotation>
<xs:documentation>If user is importing a certificate using
the enrollment feature, this attribute will enforce any pin application
requirement.</xs:documentation>
</xs:annotation>
<xs:simpleType>
<xs:restriction base="xs:string">
<xs:enumeration value="noPin"><xs:annotation>
<xs:documentation>user may not enter a pin when
enrolling a certificate.</xs:documentation>
</xs:annotation>
</xs:enumeration>
<xs:enumeration value="pinAllowed">
<xs:annotation>
<xs:documentation>user may enter a pin when
enrolling a certificate.</xs:documentation>
</xs:annotation>
</xs:enumeration>
<xs:enumeration value="pinRequired">
<xs:annotation>
<xs:documentation>user must enter a pin when
enrolling a certificate.</xs:documentation></xs:annotation>
</xs:enumeration>
</xs:restriction>
</xs:simpleType>
</xs:element>
<xs:element name="CertificateMatch" minOccurs="0">
<xs:annotation>
<xs:documentation>This section enables the definition of
various attributes that can be used to refine client certificate
selection.</xs:documentation>
</xs:annotation>
<xs:complexType>
<xs:sequence>
<xs:element name="KeyUsage" type="ns1:KeyUsage"
minOccurs="0">
<xs:annotation>
<xs:documentation>Certificate Key attributes
that can be used for choosing acceptable client certificates.</xs:documentation>
</xs:annotation>
</xs:element>
<xs:element name="ExtendedKeyUsage"
type="ns1:ExtendedKeyUsage" minOccurs="0">
<xs:annotation>
<xs:documentation>Certificate Extended Key
attributes that can be used for choosing acceptable client
certificates.</xs:documentation>

7/28/2019 cvc-20-ag
http://slidepdf.com/reader/full/cvc-20-ag 104/116
A-6
Cisco AnyConnect VPN Client Administrator Guide
OL-12950-01
Appendix A Sample AnyConnect Profile and XML Schema
Sample AnyConnect Profile Schema
</xs:annotation>
</xs:element>
<xs:element name="DistinguishedName"
type="ns1:DistinguishedName" minOccurs="0">
<xs:annotation>
<xs:documentation>Certificate Distinguished Name
matching allows for exact match criteria in the choosing of acceptable client
certificates.</xs:documentation></xs:annotation>
</xs:element>
</xs:sequence>
</xs:complexType>
</xs:element>
<xs:element name="BackupServerList" type="ns1:BackupServerList"
minOccurs="0">
<xs:annotation>
<xs:documentation>Collection of one or more backup servers
to be used in case the user selected one fails.</xs:documentation>
</xs:annotation>
</xs:element>
</xs:sequence>
</xs:complexType>
</xs:element><xs:element name="ServerList" type="ns1:HostEntry" minOccurs="0">
<xs:annotation>
<xs:documentation>This section contains the list of hosts the user will
be able to select from.</xs:documentation>
</xs:annotation>
</xs:element>
</xs:sequence>
</xs:complexType>
<xs:complexType name="BackupServerList">
<xs:annotation>
<xs:documentation>Collection of one or more backup servers to be used in case
the user selected one fails.</xs:documentation>
</xs:annotation>
<xs:sequence>
<xs:element name="HostAddress" maxOccurs="unbounded"><xs:annotation>
<xs:documentation>Can be a FQDN or IP address.</xs:documentation>
</xs:annotation>
</xs:element>
</xs:sequence>
</xs:complexType>
<xs:complexType name="KeyUsage">
<xs:annotation>
<xs:documentation>Certificate Key attributes that can be used for choosing
acceptable client certificates.</xs:documentation>
</xs:annotation>
<xs:sequence>
<xs:element name="MatchKey" maxOccurs="9">
<xs:annotation>
<xs:documentation>One or more match key may be specified. A
certificate must match at least one of the specified key to be
selected.</xs:documentation>
</xs:annotation>
<xs:simpleType>
<xs:restriction base="xs:string">
<xs:enumeration value="Decipher_Only"/>
<xs:enumeration value="Encipher_Only"/>
<xs:enumeration value="CRL_Sign"/>
<xs:enumeration value="Key_Cert_Sign"/>
<xs:enumeration value="Key_Agreement"/>
<xs:enumeration value="Data_Encipherment"/>

7/28/2019 cvc-20-ag
http://slidepdf.com/reader/full/cvc-20-ag 105/116
A-7
Cisco AnyConnect VPN Client Administrator Guide
OL-12950-01
Appendix A Sample AnyConnect Profile and XML Schema
Sample AnyConnect Profile Schema
<xs:enumeration value="Key_Encipherment"/>
<xs:enumeration value="Non_Repudiation"/>
<xs:enumeration value="Digital_Signature"/>
</xs:restriction>
</xs:simpleType>
</xs:element>
</xs:sequence>
</xs:complexType><xs:complexType name="ExtendedKeyUsage">
<xs:annotation>
<xs:documentation>Certificate Extended Key attributes that can be used for
choosing acceptable client certificates.</xs:documentation>
</xs:annotation>
<xs:sequence>
<xs:element name="ExtendedMatchKey" nillable="false" minOccurs="0"
maxOccurs="10">
<xs:annotation>
<xs:documentation>Zero or more extended match key may be specified. A
certificate must match all of the specified key(s) to be selected.</xs:documentation>
</xs:annotation>
<xs:simpleType>
<xs:restriction base="xs:string">
<xs:whiteSpace value="collapse"/><xs:enumeration value="ServerAuth">
<xs:annotation>
<xs:documentation>1.3.6.1.5.5.7.3.1</xs:documentation>
</xs:annotation>
</xs:enumeration>
<xs:enumeration value="ClientAuth">
<xs:annotation>
<xs:documentation>1.3.6.1.5.5.7.3.2</xs:documentation>
</xs:annotation>
</xs:enumeration>
<xs:enumeration value="CodeSign">
<xs:annotation>
<xs:documentation>1.3.6.1.5.5.7.3.3</xs:documentation>
</xs:annotation>
</xs:enumeration><xs:enumeration value="EmailProtect">
<xs:annotation>
<xs:documentation>1.3.6.1.5.5.7.3.4</xs:documentation>
</xs:annotation>
</xs:enumeration>
<xs:enumeration value="IPSecEndSystem">
<xs:annotation>
<xs:documentation>1.3.6.1.5.5.7.3.5</xs:documentation>
</xs:annotation>
</xs:enumeration>
<xs:enumeration value="IPSecTunnel">
<xs:annotation>
<xs:documentation>1.3.6.1.5.5.7.3.6</xs:documentation>
</xs:annotation>
</xs:enumeration>
<xs:enumeration value="IPSecUser">
<xs:annotation>
<xs:documentation>1.3.6.1.5.5.7.3.7</xs:documentation>
</xs:annotation>
</xs:enumeration>
<xs:enumeration value="TimeStamp">
<xs:annotation>
<xs:documentation>1.3.6.1.5.5.7.3.8</xs:documentation>
</xs:annotation>
</xs:enumeration>
<xs:enumeration value="OCSPSign">

7/28/2019 cvc-20-ag
http://slidepdf.com/reader/full/cvc-20-ag 106/116
A-8
Cisco AnyConnect VPN Client Administrator Guide
OL-12950-01
Appendix A Sample AnyConnect Profile and XML Schema
Sample AnyConnect Profile Schema
<xs:annotation>
<xs:documentation>1.3.6.1.5.5.7.3.9</xs:documentation>
</xs:annotation>
</xs:enumeration>
<xs:enumeration value="DVCS">
<xs:annotation>
<xs:documentation>1.3.6.1.5.5.7.3.10</xs:documentation>
</xs:annotation></xs:enumeration>
</xs:restriction>
</xs:simpleType>
</xs:element>
<xs:element name="CustomExtendedMatchKey" minOccurs="0" maxOccurs="10">
<xs:annotation>
<xs:documentation>Zero or more custom extended match key may be
specified. A certificate must match all of the specified key(s) to be selected. The key
should be in OID form (e.g. 1.3.6.1.5.5.7.3.11)</xs:documentation>
</xs:annotation>
<xs:simpleType>
<xs:restriction base="xs:string">
<xs:whiteSpace value="collapse"/>
<xs:minLength value="1"/>
<xs:maxLength value="30"/></xs:restriction>
</xs:simpleType>
</xs:element>
</xs:sequence>
</xs:complexType>
<xs:complexType name="DistinguishedName">
<xs:annotation>
<xs:documentation>Certificate Distinguished Name matching allows for exact
match criteria in the choosing of acceptable client certificates.</xs:documentation>
</xs:annotation>
<xs:sequence>
<xs:element name="DistinguishedNameDefinition" maxOccurs="10">
<xs:annotation>
<xs:documentation>This element represents the set of attributes to
define a single Distinguished Name mathcing definition.</xs:documentation></xs:annotation>
<xs:complexType>
<xs:sequence>
<xs:element name="Name">
<xs:annotation>
<xs:documentation>Distinguished attribute name to be used in
mathcing.</xs:documentation>
</xs:annotation>
<xs:simpleType>
<xs:restriction base="xs:string">
<xs:enumeration value="CN">
<xs:annotation>
<xs:documentation>Subject Common
Name</xs:documentation>
</xs:annotation>
</xs:enumeration>
<xs:enumeration value="SN">
<xs:annotation>
<xs:documentation>Subject Sur
Name</xs:documentation>
</xs:annotation>
</xs:enumeration>
<xs:enumeration value="GN">
<xs:annotation>
<xs:documentation>Subject Given
Name</xs:documentation>

7/28/2019 cvc-20-ag
http://slidepdf.com/reader/full/cvc-20-ag 107/116
A-9
Cisco AnyConnect VPN Client Administrator Guide
OL-12950-01
Appendix A Sample AnyConnect Profile and XML Schema
Sample AnyConnect Profile Schema
</xs:annotation>
</xs:enumeration>
<xs:enumeration value="N">
<xs:annotation>
<xs:documentation>Subject Unstruct
Name</xs:documentation>
</xs:annotation>
</xs:enumeration><xs:enumeration value="I">
<xs:annotation>
<xs:documentation>Subject
Initials</xs:documentation>
</xs:annotation>
</xs:enumeration>
<xs:enumeration value="GENQ">
<xs:annotation>
<xs:documentation>Subject Gen
Qualifier</xs:documentation>
</xs:annotation>
</xs:enumeration>
<xs:enumeration value="DNQ">
<xs:annotation>
<xs:documentation>Subject DnQualifier</xs:documentation>
</xs:annotation>
</xs:enumeration>
<xs:enumeration value="C">
<xs:annotation>
<xs:documentation>Subject
Country</xs:documentation>
</xs:annotation>
</xs:enumeration>
<xs:enumeration value="L">
<xs:annotation>
<xs:documentation>Subject
City</xs:documentation>
</xs:annotation>
</xs:enumeration><xs:enumeration value="SP">
<xs:annotation>
<xs:documentation>Subject
State</xs:documentation>
</xs:annotation>
</xs:enumeration>
<xs:enumeration value="ST">
<xs:annotation>
<xs:documentation>Subject
State</xs:documentation>
</xs:annotation>
</xs:enumeration>
<xs:enumeration value="O">
<xs:annotation>
<xs:documentation>Subject
Company</xs:documentation>
</xs:annotation>
</xs:enumeration>
<xs:enumeration value="OU">
<xs:annotation>
<xs:documentation>Subject
Department</xs:documentation>
</xs:annotation>
</xs:enumeration>
<xs:enumeration value="T">
<xs:annotation>
7/28/2019 cvc-20-ag
http://slidepdf.com/reader/full/cvc-20-ag 108/116
A-10
Cisco AnyConnect VPN Client Administrator Guide
OL-12950-01
Appendix A Sample AnyConnect Profile and XML Schema
Sample AnyConnect Profile Schema
<xs:documentation>Subject
Title</xs:documentation>
</xs:annotation>
</xs:enumeration>
<xs:enumeration value="EA">
<xs:annotation>
<xs:documentation>Subject Email
Address</xs:documentation></xs:annotation>
</xs:enumeration>
<xs:enumeration value="ISSUER-CN">
<xs:annotation>
<xs:documentation>Issuer Common
Name</xs:documentation>
</xs:annotation>
</xs:enumeration>
<xs:enumeration value="ISSUER-SN">
<xs:annotation>
<xs:documentation>Issuer Sur
Name</xs:documentation>
</xs:annotation>
</xs:enumeration>
<xs:enumeration value="ISSUER-GN"><xs:annotation>
<xs:documentation>Issuer Given
Name</xs:documentation>
</xs:annotation>
</xs:enumeration>
<xs:enumeration value="ISSUER-N">
<xs:annotation>
<xs:documentation>Issuer Unstruct
Name</xs:documentation>
</xs:annotation>
</xs:enumeration>
<xs:enumeration value="ISSUER-I">
<xs:annotation>
<xs:documentation>Issuer
Initials</xs:documentation> </xs:annotation>
</xs:enumeration>
<xs:enumeration value="ISSUER-GENQ">
<xs:annotation>
<xs:documentation>Issuer Gen
Qualifier</xs:documentation>
</xs:annotation>
</xs:enumeration>
<xs:enumeration value="ISSUER-DNQ">
<xs:annotation>
<xs:documentation>Issuer Dn
Qualifier</xs:documentation>
</xs:annotation>
</xs:enumeration>
<xs:enumeration value="ISSUER-C">
<xs:annotation>
<xs:documentation>Issuer
Country</xs:documentation>
</xs:annotation>
</xs:enumeration>
<xs:enumeration value="ISSUER-L">
<xs:annotation>
<xs:documentation>Issuer City</xs:documentation>
</xs:annotation>
</xs:enumeration>
<xs:enumeration value="ISSUER-SP">

7/28/2019 cvc-20-ag
http://slidepdf.com/reader/full/cvc-20-ag 109/116
A-11
Cisco AnyConnect VPN Client Administrator Guide
OL-12950-01
Appendix A Sample AnyConnect Profile and XML Schema
Sample AnyConnect Profile Schema
<xs:annotation>
<xs:documentation>Issuer
State</xs:documentation>
</xs:annotation>
</xs:enumeration>
<xs:enumeration value="ISSUER-ST">
<xs:annotation>
<xs:documentation>IssuerState</xs:documentation>
</xs:annotation>
</xs:enumeration>
<xs:enumeration value="ISSUER-O">
<xs:annotation>
<xs:documentation>Issuer
Company</xs:documentation>
</xs:annotation>
</xs:enumeration>
<xs:enumeration value="ISSUER-OU">
<xs:annotation>
<xs:documentation>Issuer
Department</xs:documentation>
</xs:annotation>
</xs:enumeration><xs:enumeration value="ISSUER-T">
<xs:annotation>
<xs:documentation>Issuer
Title</xs:documentation>
</xs:annotation>
</xs:enumeration>
<xs:enumeration value="ISSUER-EA">
<xs:annotation>
<xs:documentation>Issuer Email
Address</xs:documentation>
</xs:annotation>
</xs:enumeration>
</xs:restriction>
</xs:simpleType>
</xs:element><xs:element name="Pattern" nillable="false">
<xs:annotation>
<xs:documentation>The string to use in the
match.</xs:documentation>
</xs:annotation>
<xs:simpleType>
<xs:restriction base="xs:string">
<xs:minLength value="1"/>
<xs:maxLength value="30"/>
<xs:whiteSpace value="collapse"/>
</xs:restriction>
</xs:simpleType>
</xs:element>
</xs:sequence>
<xs:attribute name="Wildcard" default="Disabled">
<xs:annotation>
<xs:documentation>Should the pattern include wildcard pattern
matching. With wildcarding enabled, the pattern can be anywhere in the
string.</xs:documentation>
</xs:annotation>
<xs:simpleType>
<xs:restriction base="xs:string">
<xs:enumeration value="Disabled">
<xs:annotation>
<xs:documentation>wildcard pattern match is not
enabled for this definition</xs:documentation>

7/28/2019 cvc-20-ag
http://slidepdf.com/reader/full/cvc-20-ag 110/116
A-12
Cisco AnyConnect VPN Client Administrator Guide
OL-12950-01
Appendix A Sample AnyConnect Profile and XML Schema
Sample AnyConnect Profile Schema
</xs:annotation>
</xs:enumeration>
<xs:enumeration value="Enabled">
<xs:annotation>
<xs:documentation>wildcard pattern match is enabled
for this definition</xs:documentation>
</xs:annotation>
</xs:enumeration></xs:restriction>
</xs:simpleType>
</xs:attribute>
<xs:attribute name="Operator" default="Equal">
<xs:annotation>
<xs:documentation>The operator to be used in performing the
match</xs:documentation>
</xs:annotation>
<xs:simpleType>
<xs:restriction base="xs:string">
<xs:enumeration value="Equal">
<xs:annotation>
<xs:documentation>equivalent to
==</xs:documentation>
</xs:annotation></xs:enumeration>
<xs:enumeration value="NotEqual">
<xs:annotation>
<xs:documentation>equivalent to
!=</xs:documentation>
</xs:annotation>
</xs:enumeration>
</xs:restriction>
</xs:simpleType>
</xs:attribute>
</xs:complexType>
</xs:element>
</xs:sequence>
</xs:complexType>
<xs:element name="AnyConnectProfile" type="ns1:AnyConnectClientProfile"><xs:annotation>
<xs:documentation>The root element representing the AnyConnect Client
Profile</xs:documentation>
</xs:annotation>
</xs:element>
<xs:simpleType name="simpleBinary">
<xs:restriction base="xs:string">
<xs:enumeration value="true">
<xs:annotation>
<xs:documentation>enables the Start Before Logon
feature</xs:documentation>
</xs:annotation>
</xs:enumeration>
<xs:enumeration value="false">
<xs:annotation>
<xs:documentation>disables the Start Before Logon
feature.</xs:documentation>
</xs:annotation>
</xs:enumeration>
</xs:restriction>
</xs:simpleType>
</xs:schema>

7/28/2019 cvc-20-ag
http://slidepdf.com/reader/full/cvc-20-ag 111/116
B-1
Cisco AnyConnect VPN Client Administrator Guide
OL-12950-01
A P P E N D I X BUsing Microsoft Active Directory to Add theSecurity Appliance to the List of Internet ExplorerTrusted Sites for Domain Users
An Active Directory Domain Administrator can push a group policy to domain users that adds thesecurity appliance to the list of trusted sites in Internet Explorer. Note that this differs from the procedureto add the security appliance to the list of trusted sites by individual users, described in Adding a SecurityAppliance to the List of Trusted Sites (Internet Explorer), page 2-3. This procedure applies only toInternet Explorer on Windows machines that are managed by a domain administrator.
Note Adding a security appliance to the list of trusted sites for Internet Explorer is required for those runningWindows Vista who want to use WebLaunch.
To create a policy to add the Security Appliance to the Trusted Sites security zone in Internet Explorerby Group Policy using Active Directory, perform the following steps:
Step 1 Log on as a member of the Domain Admins group.
Step 2 Open the Active Directory Users and Computers MMC snap-in.
Step 3 Right-click the Domain or Organizational Unit where you want to create the Group Policy Object andclick Properties.
Step 4 Select the Group Policy tab.
Step 5 Click New.
Step 6 Type a name for the new Group Policy Object and press Enter.
Step 7 To prevent this new policy from being applied to some users or groups, click Properties. Select theSecurity tab. Add the user or group that you want to prevent from having this policy, then clear the Readand the Apply Group Policy check boxes in the Allow column. Click OK.
Step 8 Click Edit.
Step 9 Navigate to User Configuration > Windows Settings > Internet Explorer Maintenance > Security.
Step 10 Right-click Security Zones and Content Ratings in the right-hand pane and click Properties.
Step 11 Select Import the current security zones and privacy settings. If prompted, click Continue.
Step 12 Click Modify Settings.
Step 13 Select Trusted Sites and click Sites.

7/28/2019 cvc-20-ag
http://slidepdf.com/reader/full/cvc-20-ag 112/116
B-2
Cisco AnyConnect VPN Client Administrator Guide
OL-12950-01
Appendix B Using Microsoft Active Directory to Add the Security Appliance to the List of Internet Explorer Trusted
Step 14 Type the URL for the Security Appliance that you want to add to the list of Trusted Sites and click Add.The format can contain a hostname (https://vpn.mycompany.com) or IP address (https://192.168.1.100).It can be an exact match (https://vpn.mycompany.com) or a wildcard (https://*.mycompany.com).
Step 15 Click Close (or OK and OK).
Step 16 Click Close (or OK until all dialog boxes are closed, and close any snap-in window)s.
Step 17 Allow sufficient time for the policy to propagate throughout the domain or forest.

7/28/2019 cvc-20-ag
http://slidepdf.com/reader/full/cvc-20-ag 113/116
IN-1
Cisco AnyConnect VPN Client Administrator Guide
OL-12950-01
I N D E X
A
About tab 1-6
Add IP Pool dialog 3-4
Add SSL VPN Client Image dialog 3-2
AnyConnect Client
configuring address assignment 3-4
features 1-1, 5-1, 6-1installing 2-1
installing images 3-1
installing on a security appliance with CLI 4-1
ASDM
installing AnyConnect images 3-1
automatic installation 2-2
C
certificate, self-signed or trusted root 2-4
certificate distinguished name mapping 7-13
certificate key usage matching 7-12
certificate key usage matching, extended 7-13
certificate match attribute 7-12
certificate-only authentication 1-2
Cisco Secure Desktop 1-2
CLI
commands 1-1
Linux connection commands 7-1
Mac OS X connection commands 7-1
Windows connection commands 7-1
Client Profile to Download
configuring with ASDM 3-10
Command Line Interface 1-1
compression
configuring with ASDM 3-9, 5-9
configuring with CLI 6-5
definition 1-2
Connection tab 1-3
customizing the end-user experience 8-1
D
Datagram Transport Layer Security (DTLS) 1-1
configuring with ASDM 3-9
enabling 5-1, 6-1
Dead Peer Detection (DPD), enabling 5-14, 6-7
documentation, related viii
DTLS
(Datagram Transport Layer Security) 1-1
connection 2-1
enabling 5-1, 6-1
fallback to TLS 1-2
dynamic access policies 1-2, 5-15, 6-6
E
Edit Internal Group Policy dialog 3-8
Edit SSL VPN Connection dialog 3-6
end-user interface
customizing 8-1
extended certificate key usage matching 7-13
F
fallback from DTLS to TLS 1-2
configuring with ASDM 5-2
configuring with CLI 6-2

7/28/2019 cvc-20-ag
http://slidepdf.com/reader/full/cvc-20-ag 114/116
Index
IN-2
Cisco AnyConnect VPN Client Administrator Guide
OL-12950-01
features, AnyConnect 1-1, 5-1, 6-1
Firefox, certificates 2-7
G
getting the necessary files 1-7
GUI, customizing 8-1
I
installation 1-7, 2-1
automatic 2-2
new /clean Windows 2000 installation issue 2-3
preparation 2-2
installing AnyConnect
Mac OSX 2-9
Windows PC 2-8
interface
customizing 8-1
user 1-2
Internet Explorer
adding security appliance to trusted sites 2-3
adding security appliance to trusted sites usingAD B-1
IPv6 VPN
access 1-2
access, enabling with ASDM 5-5
access, enabling with CLI 6-3
K
keepalive messages 5-11, 6-8
configuring with ASDM 3-10
Keep Installer on Client System
ASDM 3-9
key usage
certificate matching 7-12
certificate matching, extended 7-13
L
language localization
template 8-6
translation 1-2
language localization (translation), configuring withASDM 8-4
language translation 8-3
Linux
AnyConnect CLI commands 7-1
localization 1-2, 8-3
localization template 8-6
M
Mac OS X
AnyConnect CLI commands 7-1
Mac OSX, installing AnyConnect 2-9
Maximum Transmission Unit (MTU)
configuring with ASDM 3-10
Microsoft Installer (MSI) 1-1
mode, standalone and weblaunch 7-1
modules, adding
ASDM 5-5
CLI 6-4
Mozilla, certificates 2-7
MSI (Microsoft Installer) 1-1
N
Netscape, certificates 2-7
O
Optional Client Module to Download, configuring withASDM 3-10

7/28/2019 cvc-20-ag
http://slidepdf.com/reader/full/cvc-20-ag 115/116
Index
IN-3
Cisco AnyConnect VPN Client Administrator Guide
OL-12950-01
P
profile
attributes, configuring 7-11
downloading 7-5
user 7-4
prompting remote users 5-4, 6-2
R
rekey 1-2
remote user, prompting 5-4, 6-2
Route Details tab 1-6
S
SBL (start before login) 1-2
Security Alert dialog box 1-3
See also AnyConnect Client.
See also SSL VPN Client
Select Address Pool dialog 3-7
self-signed certificate 2-4
ServerList attribute 7-12
simultaneous client and clientless connections 1-2
SSL VPN Client
configuring
features 3-9
tunneling protocol 3-8
enabling
address assignment 4-2
permanent installation 4-4
tunnel group 4-3installing
images 4-1
order 4-1
logging out sessions 9-3
viewing sessions 9-1
SSL VPN Client Images panel 3-2
SSL VPN connections, enabling 4-2
SSL VPN Connections panel 3-3, 3-6
standalone mode 1-1, 2-1, 7-1
start before login (SBL) 1-2
start before logon (SBL)
configuring with ASDM 3-10
enabling 7-11
installation requirements 2-2
Statistics Details window 1-5
Statistics tab 1-5
svc modules, adding
ASDM 5-5
CLI 6-4
T
template, localization 8-6
TLS (Transport Layer Security), connection 2-1
translation, language 8-3
translation table, creating or modifying
using ASDM 8-6
translation tables, creating or modifying
using CLI 8-8
Transport Layer Security (TLS), connection 2-1
trusted root certificate 2-4
trusted sites
adding, using Active Directory B-1
adding on individual PCs 2-3
U
user interface
customizing 8-1overview 1-2
user profile 7-4
V
VPN Gina
7/28/2019 cvc-20-ag
http://slidepdf.com/reader/full/cvc-20-ag 116/116
Index
installation requirements 2-2
W
WebLaunch
mode 2-1
trusted sites IE requirement, AD B-1
trusted sites IE requirement, individual 2-4
WebLaunch mode 7-1
Windows AnyConnect CLI commands 7-1
Windows PC, installing AnyConnect 2-8
Windows Vista
trusted sites requirement 2-4, B-1