
Graduat en Mitjans Audiovisuals
TXIKIA
Report
AMAIA SÉMPER GONZÁLEZ PONENT: DAVID MINGUILLÓN
SUMMER 2013
Thanks
Thanks to everyone who supported me.
3 TXIKIA-Report
Resum
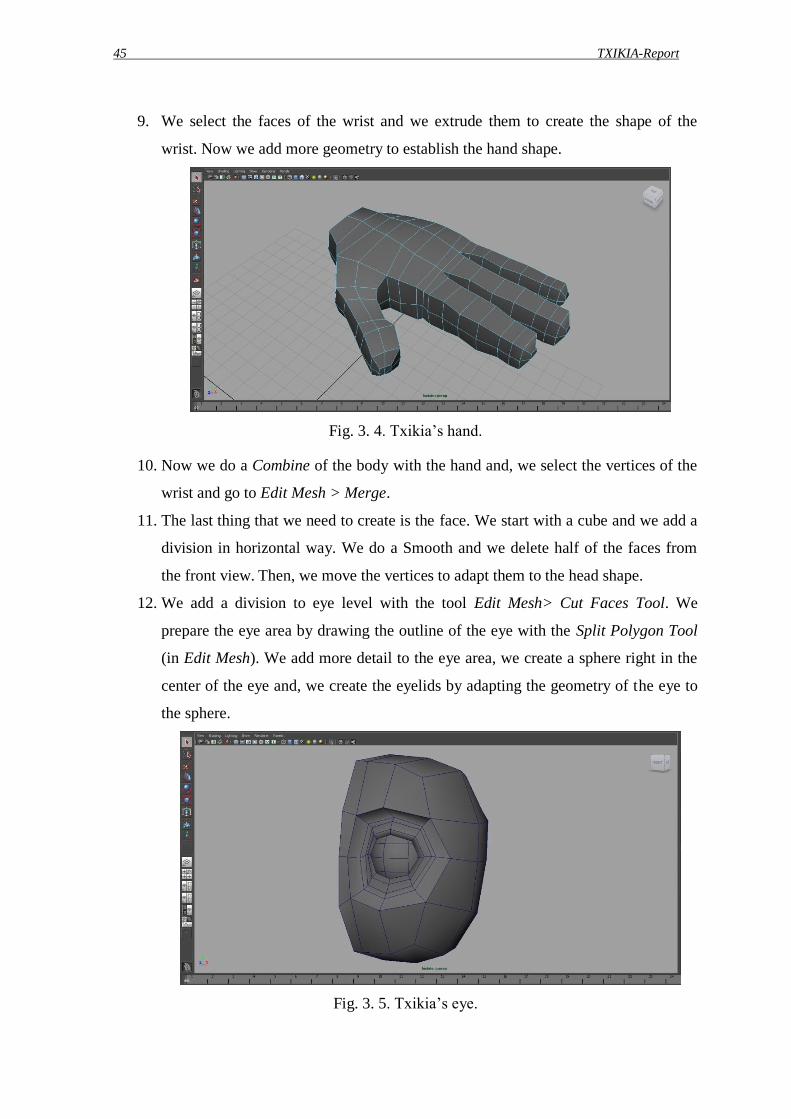
L’objectiu d’aquest projecte es crear un curt d’animació profesional amb la finalitat
d’aprendre i millorar en els procesos de relització d’un curtmetratge: el modelatje, la
creació del Set up, la texturització, la iluminació y l’animació. I aconseguir que els
personatges tinguin fluïdesa de moviments y una bona expresivitat, ja que això fa que la
história sigui creible.
Resumen
El objetivo de este proyecto es crear un corto de animación profesional con la finalidad de
aprender y mejorar en los procesos de la realización del cortometraje: el modelaje, la
creación del Set up, la texturización, la iluminación y la animación. Y conseguir que los
personajes tengan fluidez de movimientos y buena expresividad, ya que es lo que hace que
la historia sea creible.
Abstract
The objective of this project is to create a professional animated short, in order to learn and
improve the processes of the short film: modeling, creating the Set up, texturing, lighting
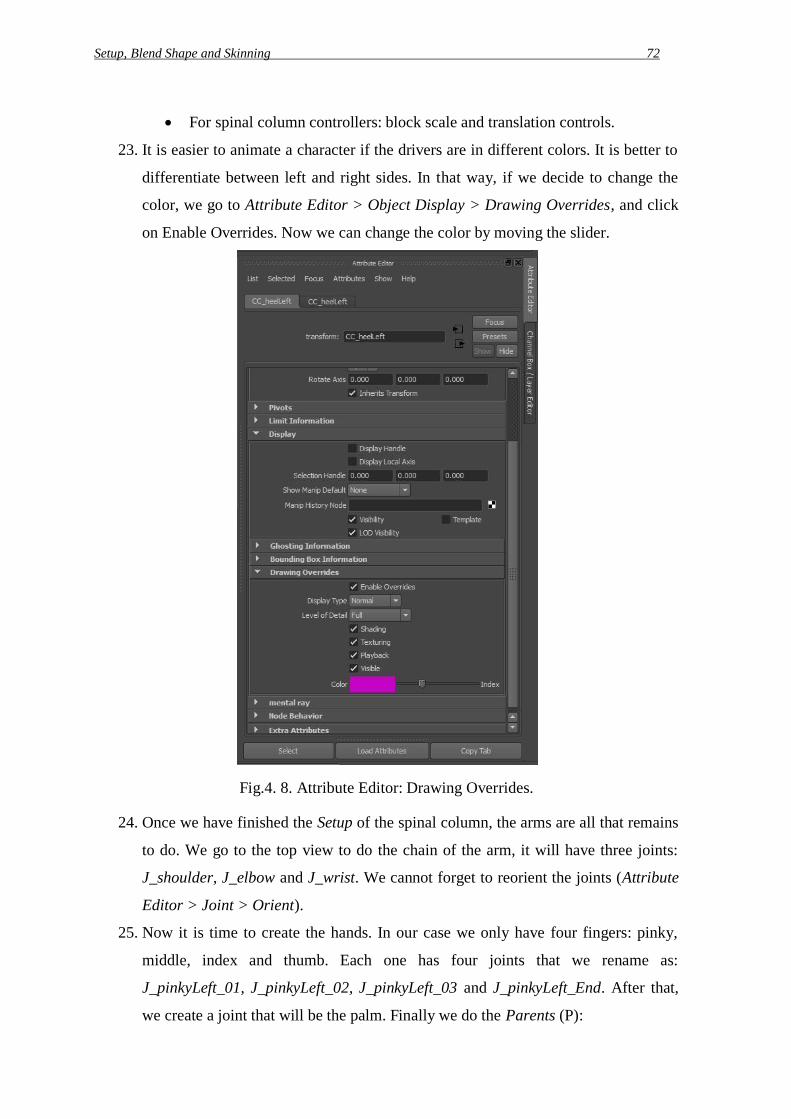
and animating. And also, get a fluidity of movements and very expressive characters, as it
is what makes believable the story.

Preproduction 4
5 TXIKIA-Report
Index.
Figures index. ................................................................................................. 7
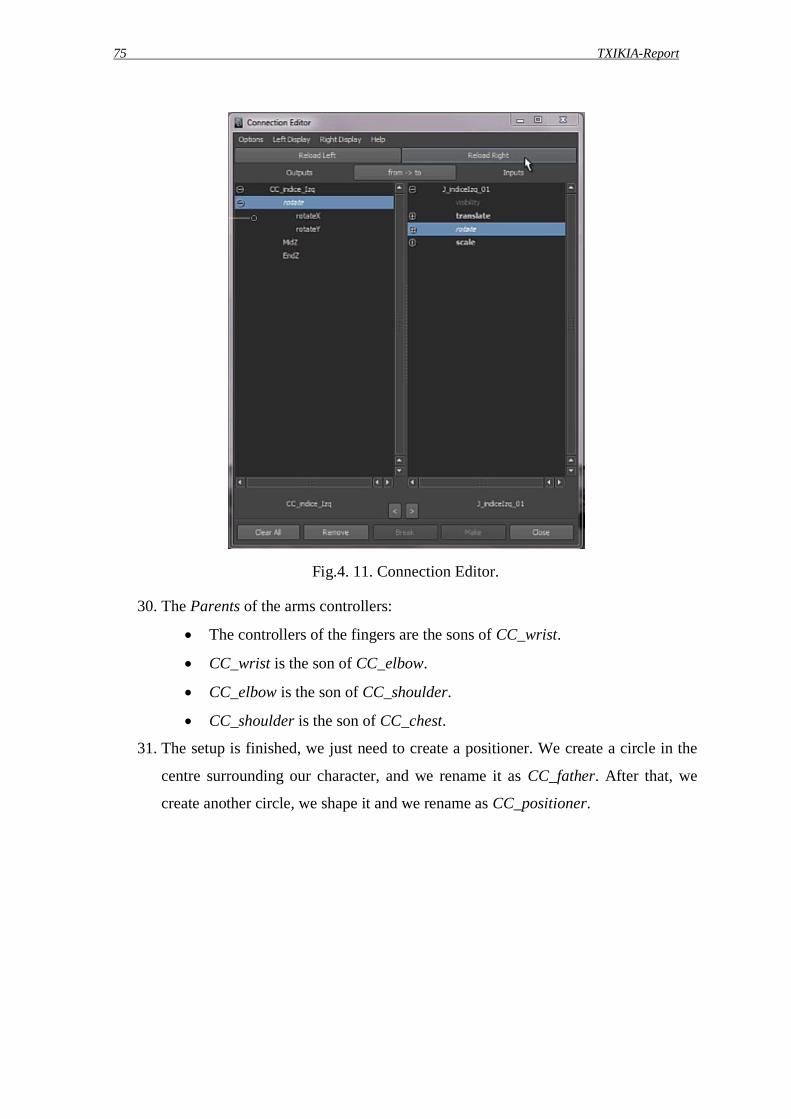
Tables index. ................................................................................................ 11
Glossary of terms. ........................................................................................ 13
1. Objectives. ............................................................................................... 15
1.1. Purpose. ..................................................................................................................... 15
1.2. Finality. ..................................................................................................................... 15
1.3. Object. ....................................................................................................................... 15
1.4. Abast. ........................................................................................................................ 15
2. Preproduction. .......................................................................................... 17
2.1. Research. ................................................................................................................... 17
2.1.1. Film references. ............................................................................................................. 17
2.1.2. Animation techniques. ................................................................................................... 18
2.2. Synopsis. ................................................................................................................... 18
2.3. Characters. ................................................................................................................ 18
2.3.1. Txikia. ........................................................................................................................... 19
2.3.2. Tara. .............................................................................................................................. 21
2.3.3. Gogor. ........................................................................................................................... 23
2.4. Script. ........................................................................................................................ 24
2.5. Storyboard. ................................................................................................................ 26
2.6. Shooting script. ......................................................................................................... 39
3. Modelling. ................................................................................................ 43
3.1. Characters. ................................................................................................................ 43
3.2. Buildings. .................................................................................................................. 48
3.2.1. Houses. .......................................................................................................................... 48
3.2.2. Building. ........................................................................................................................ 50
3.3. Landscape. ................................................................................................................ 51
3.3.1. Mountains. ..................................................................................................................... 51
3.3.2. Mushrooms. ................................................................................................................... 51
3.4. Forniture and decoration. .......................................................................................... 52
3.4.1. Sink. .............................................................................................................................. 52
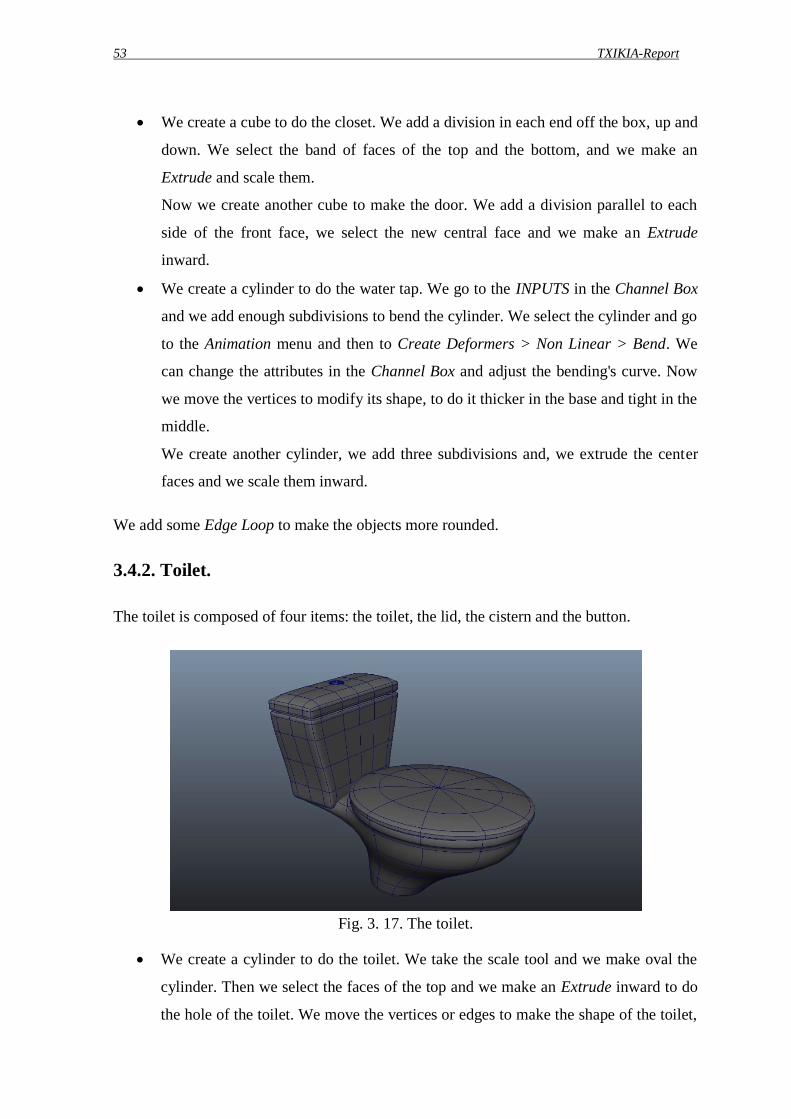
3.4.2. Toilet. ............................................................................................................................ 53

Preproduction 6
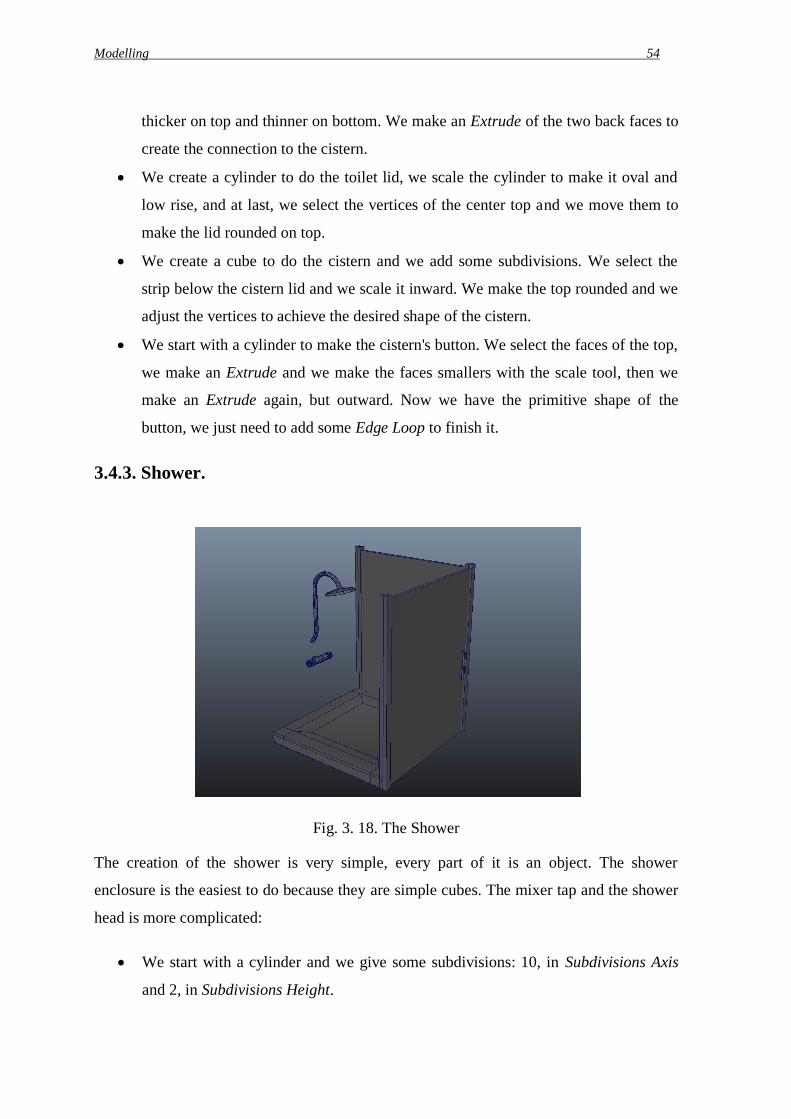
3.4.3. Shower. ..........................................................................................................................54
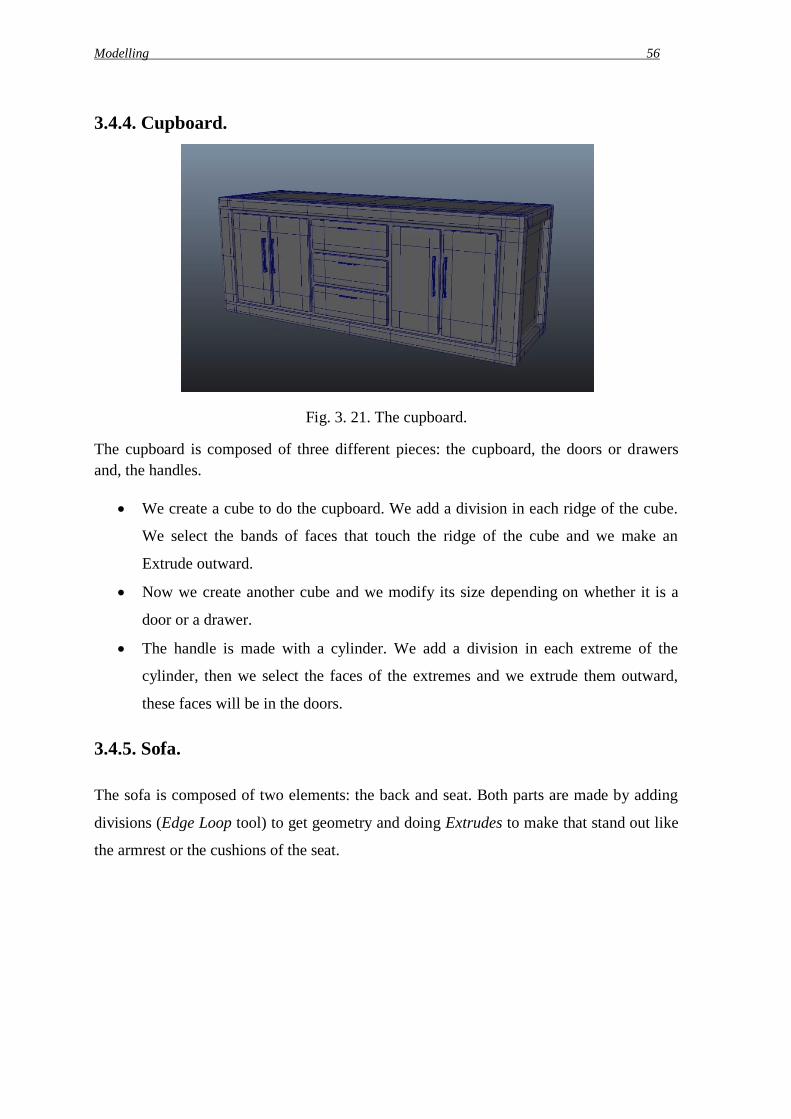
3.4.4. Cupboard. ......................................................................................................................56
3.4.5. Sofa. ..............................................................................................................................56
3.4.6. Table and chairs. ............................................................................................................57
3.5. Motorbike. ................................................................................................................ 58
3.6. Box of chocolates. .................................................................................................... 61
3.7. Shovel. ...................................................................................................................... 62
3.8. Necklace. .................................................................................................................. 63
4. Setup, Blend Shape and Skinning. ............................................................ 65
4.1. Setup. ........................................................................................................................ 65
4.2. Setup faces expressions. ........................................................................................... 77
4.3. Skinning. ................................................................................................................... 83
5. Lights, materials and textures. .................................................................. 87
5.1. Lights. ....................................................................................................................... 87
5.2. Materials and textures. .............................................................................................. 90
6. Animating and rendering. ....................................................................... 101
6.1. Animating. .............................................................................................................. 101
6.2. Rendering. ............................................................................................................... 102
7. Postproduction. ...................................................................................... 105
7.1. Video Edit. .............................................................................................................. 105
7.1. Unforeseen problems. ............................................................................................. 105
6. Conclusions. ........................................................................................... 107
7. References. ............................................................................................. 109

7 TXIKIA-Report
Figures index.
Fig. 2. 1. The first sketch of Txikia. .................................................................................... 20
Fig. 2. 2. Final sketch of Txikia. .......................................................................................... 20
Fig. 2. 3. Txikia 3D views: front, side and back. ................................................................ 21
Fig. 2. 4. Tara’s sketch. ....................................................................................................... 22
Fig. 2. 5. Tara 3D views: front, side and back. .................................................................... 22
Fig. 2. 6. Gogor’s sketch. .................................................................................................... 23
Fig. 2. 7. Gogor 3D views: front, side and back. ................................................................. 24
Fig. 3. 1. Txikia: Chest, paunch and arm. ............................................................................ 43
Fig. 3. 2. Txikia’s foot. ........................................................................................................ 44
Fig. 3. 3. Txikia’s body. ...................................................................................................... 44
Fig. 3. 4. Txikia’s hand. ....................................................................................................... 45
Fig. 3. 5. Txikia’s eye. ......................................................................................................... 45
Fig. 3. 6. Txikia’s snout. ...................................................................................................... 46
Fig. 3. 7. Txikia’s beard. ...................................................................................................... 46
Fig. 3. 8. Txikia’s mouth. .................................................................................................... 47
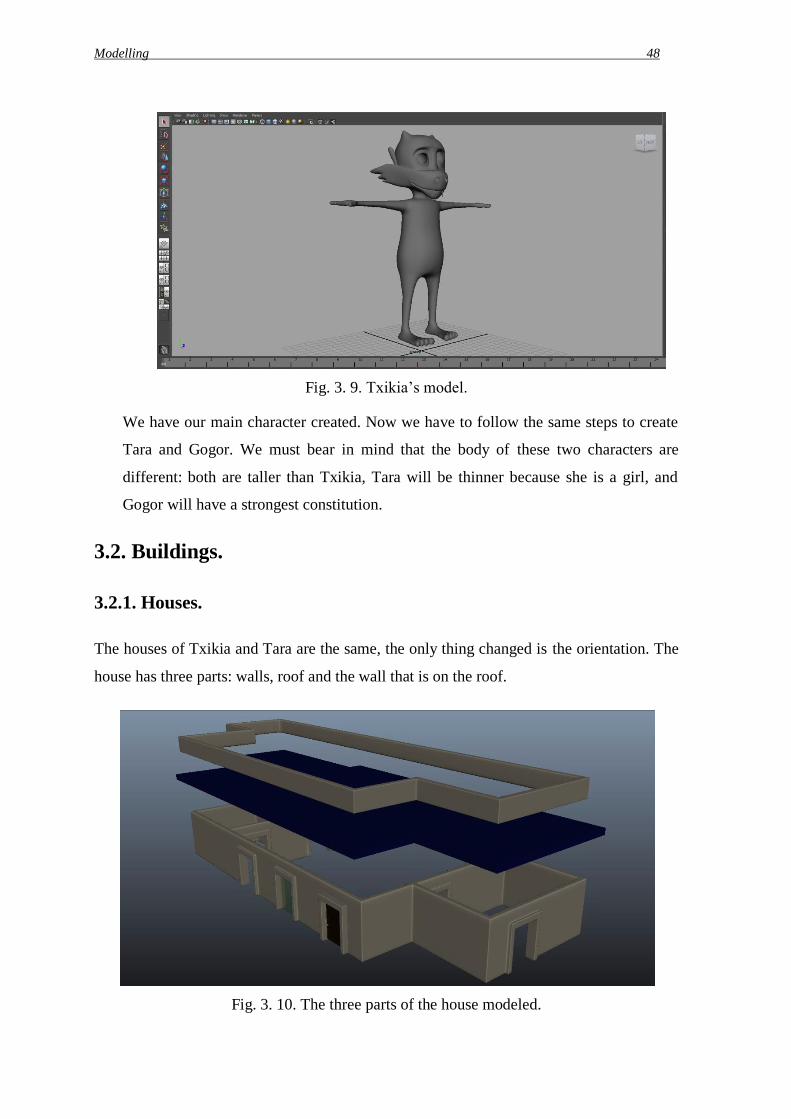
Fig. 3. 9. Txikia’s model. .................................................................................................... 48
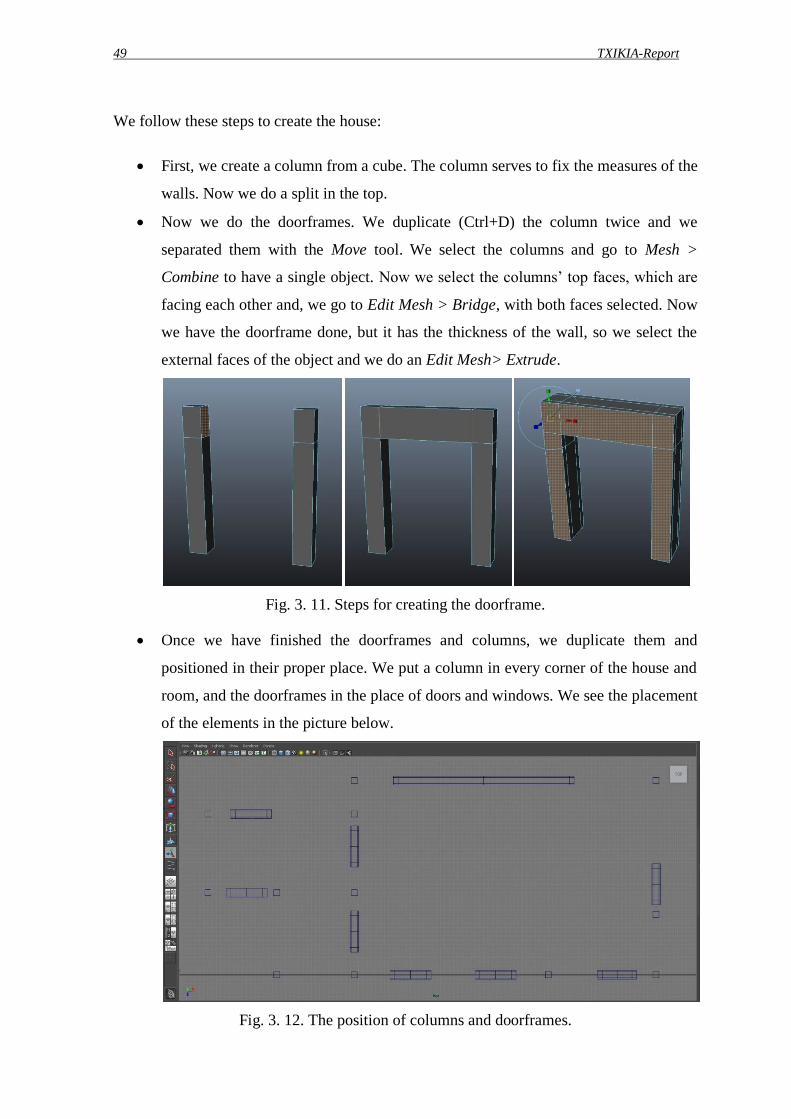
Fig. 3. 10. The three parts of the house modeled. ............................................................... 48
Fig. 3. 11. Steps for creating the doorframe. ....................................................................... 49
Fig. 3. 12. The position of columns and doorframes. .......................................................... 49
Fig. 3. 13. The walls. ........................................................................................................... 50
Fig. 3. 14. The building. ...................................................................................................... 50
Fig. 3. 15. The mushrooms. ................................................................................................. 52
Fig. 3. 16. The sink. ............................................................................................................. 52
Fig. 3. 17. The toilet. ........................................................................................................... 53
Fig. 3. 18. The Shower ........................................................................................................ 54
Fig. 3. 19. The mixer tap. .................................................................................................... 55
Fig. 3. 20. Shower head. ...................................................................................................... 55
Fig. 3. 21. The cupboard. ..................................................................................................... 56
Fig. 3. 22. The sofa. ............................................................................................................. 57
Preproduction 8
Fig. 3. 23. Table and chairs. ................................................................................................ 57
Fig. 3. 24. Image reference. ................................................................................................. 58
Fig. 3. 25. The motorbike modeled. .................................................................................... 58
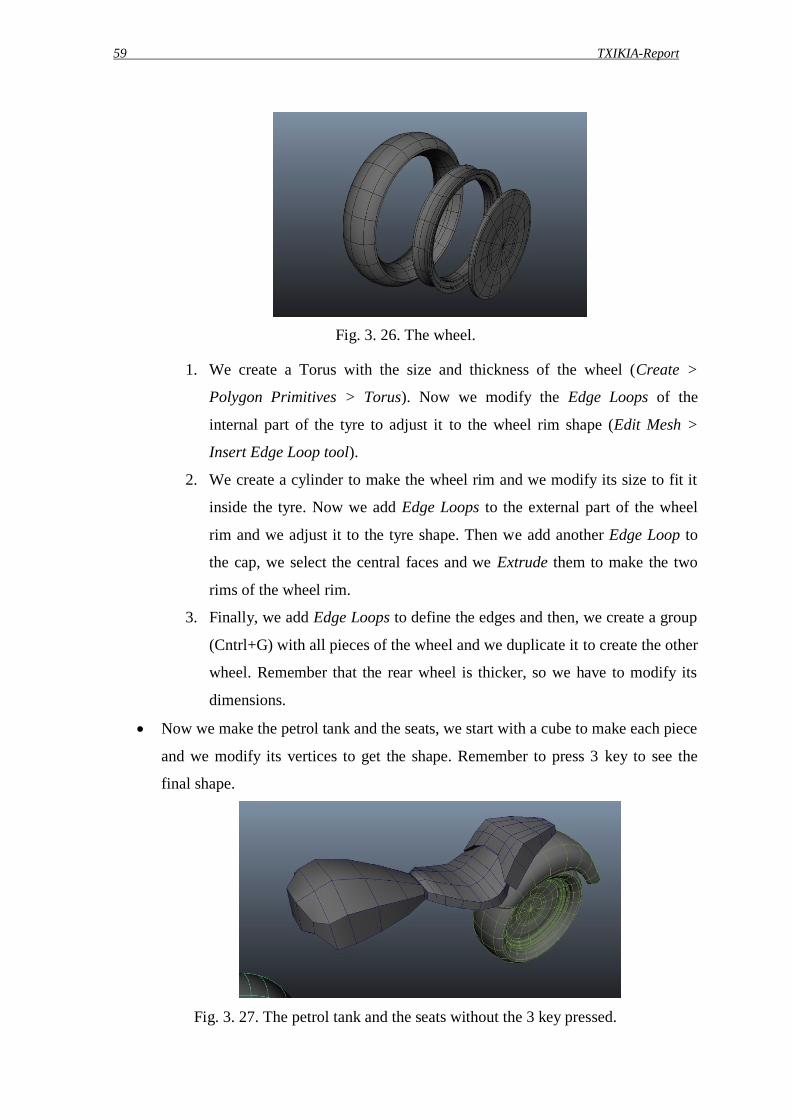
Fig. 3. 26. The wheel. .......................................................................................................... 59
Fig. 3. 27. The petrol tank and the seats without the 3 key pressed. ................................... 59
Fig. 3. 28. The petrol tank and the seats with the 3 key pressed. ........................................ 60
Fig. 3. 29. The engine. ......................................................................................................... 60
Fig. 3. 30. The exhaust pipe. ............................................................................................... 61
Fig. 3. 31. Box of chocolates. .............................................................................................. 62
Fig. 3. 32. The shovel. ......................................................................................................... 63
Fig. 3. 33. The pearl necklace. ............................................................................................ 63
Fig.4. 1. The position of the joints from the side view. ...................................................... 65
Fig.4. 2. Joint rotation. ........................................................................................................ 66
Fig.4. 3. The Reverse Foot. ................................................................................................. 67
Fig.4. 4. Orient Constraint Options. .................................................................................... 68
Fig.4. 5. The controllers of the foot. .................................................................................... 69
Fig.4. 6. The controller shape of the hip. ............................................................................ 70
Fig.4. 7. The spinal column with the controllers. ................................................................ 71
Fig.4. 8. Attribute Editor: Drawing Overrides. ................................................................... 72
Fig.4. 9. The joints of the hand. .......................................................................................... 73
Fig.4. 10. Display: Add Attribute. ....................................................................................... 74
Fig.4. 11. Connection Editor. .............................................................................................. 75
Fig.4. 12. The father and positioned controllers.................................................................. 76
Fig.4. 13. Txikia Blend Shape. ............................................................................................ 77
Fig.4. 14. Limit Information options box. ........................................................................... 79
Fig.4. 15. Txikia’s control panel. ........................................................................................ 80
Fig.4. 16. Set Driven Key display. ...................................................................................... 80
Fig.4. 17. The controllers of the eyes. ................................................................................. 81
Fig.4. 18. Create Character Set Options. ............................................................................. 82
Fig.4. 19. Smooth Bind Options. ......................................................................................... 83
Fig.4. 20. Paint Skin Weights Tool. .................................................................................... 84
Fig.4. 21. Mirror Skin Weights Options. ............................................................................. 85

9 TXIKIA-Report
Fig.5. 1. Render Settings: Indirect Lighting. ....................................................................... 87
Fig.5. 2. Sun direction. ........................................................................................................ 87
Fig.5. 3. Physical Sky settings. ............................................................................................ 88
Fig.5. 4. The bathroom lighting. .......................................................................................... 89
Fig.5. 5. Spot Light Attributes. ............................................................................................ 89
Fig.5. 6. The living room lighting. ...................................................................................... 90
Fig.5. 7. Area Light Attributes. ........................................................................................... 90
Fig.5. 8. Hypershade. ........................................................................................................... 91
Fig.5. 9. Material Attributes. ............................................................................................... 91
Fig.6. 1. Graph Editor. ....................................................................................................... 101
Fig.6. 2. Render Settings: Indirect Lighting. ..................................................................... 102
Fig.6. 3. Render Settings: Quality. .................................................................................... 103

Preproduction 10

11 TXIKIA-Report
Tables index.
Table. 1. Shooting script. ..................................................................................................... 42
Table. 2. Expressions. .......................................................................................................... 78

Preproduction 12

13 TXIKIA-Report
Glossary of terms.
CC Controller
FT Freeze transformation
GRP Group
His History
Hshd Hypershade
IK Inverse kinematic
J Joint
LB Left button
LYR Layer
RF Reverse foot

Preproduction 14

15 TXIKIA-Report
1. Objectives.
1.1. Purpose.
The purpose is to learn how to use the applications of 3D in every step needed to do a
short. At first, a short film animation needs the modelling of the characters and the
background, after that, we have to apply the textures and the bones to finally do the rigging
of the body and the facial rigging in order to animate the character. Therefore, my purpose
is to improve on every branch of animation.
1.2. Finality.
The finality of this project is to create a professional animated short, in order to learn and
improve the processes of the short film
1.3. Object.
Txikia consists in an animation short film made in 3D animation with duration of 4:34
minutes.
1.4. Abast.
On the one hand, I want to present my animated short to some aniamtion festivals. On the
other hand, this short will help me at the time to submit my resume to companies.

Preproduction 16
17 TXIKIA-Report
2. Preproduction.
2.1. Research.
One of the first things that are done when starting a project is a research for ideas,
references, styles and techniques. The research helps to improve the main idea
complementing it and making it stronger. Without a guide, it is easy to get off the way or
the style that is wanted to achieve, so it is important to keep in mind the references, both
technical and artistic, that initially had been determined, because that will be a help
throughout the process of creation and production.
I have divided my research into two. On the one hand, I have made a research of
cinematographic references that has helped me in creating a style of short, an aesthetic, and
a type of characters, textures and rigging. On the other hand, I have made a search of
animation techniques, methods and technology. That is because is the first time that I do all
the process of creating a 3D animated short.
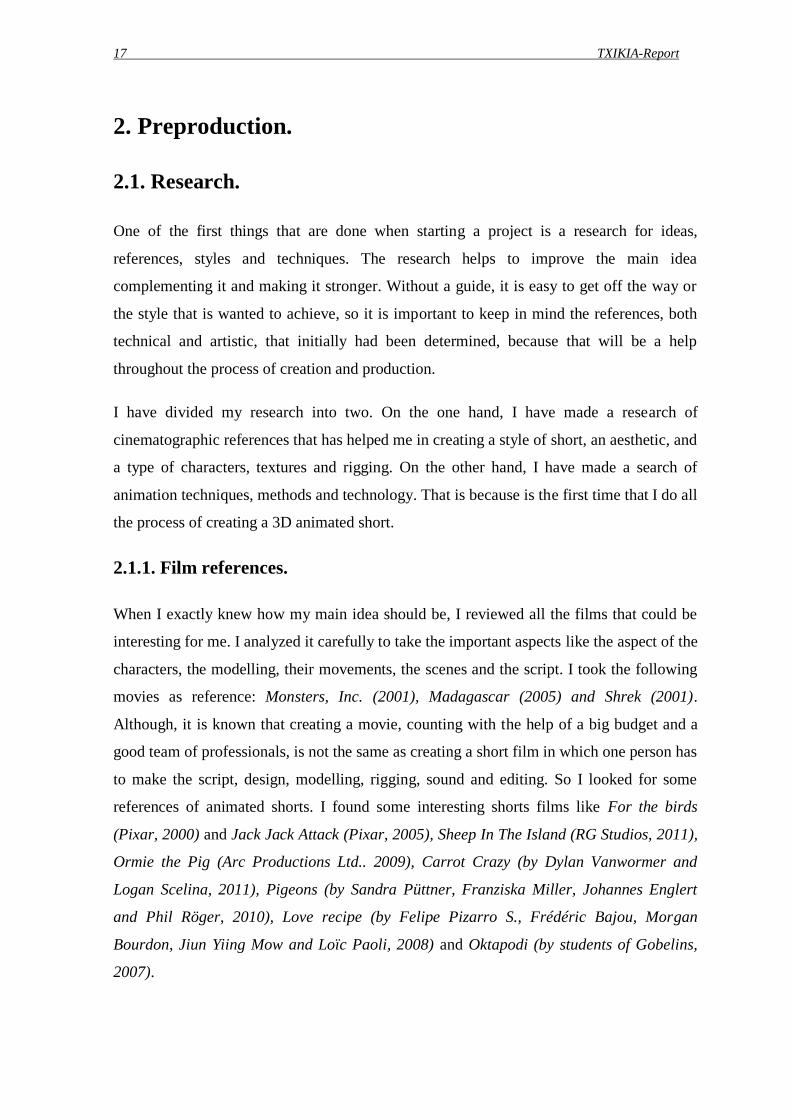
2.1.1. Film references.
When I exactly knew how my main idea should be, I reviewed all the films that could be
interesting for me. I analyzed it carefully to take the important aspects like the aspect of the
characters, the modelling, their movements, the scenes and the script. I took the following
movies as reference: Monsters, Inc. (2001), Madagascar (2005) and Shrek (2001).
Although, it is known that creating a movie, counting with the help of a big budget and a
good team of professionals, is not the same as creating a short film in which one person has
to make the script, design, modelling, rigging, sound and editing. So I looked for some
references of animated shorts. I found some interesting shorts films like For the birds
(Pixar, 2000) and Jack Jack Attack (Pixar, 2005), Sheep In The Island (RG Studios, 2011),
Ormie the Pig (Arc Productions Ltd.. 2009), Carrot Crazy (by Dylan Vanwormer and
Logan Scelina, 2011), Pigeons (by Sandra Püttner, Franziska Miller, Johannes Englert
and Phil Röger, 2010), Love recipe (by Felipe Pizarro S., Frédéric Bajou, Morgan
Bourdon, Jiun Yiing Mow and Loïc Paoli, 2008) and Oktapodi (by students of Gobelins,
2007).

Preproduction 18
2.1.2. Animation techniques.
My knowledge of Autodesk Maya was not enough to make a short film, so I had to do a
research and gather all possible information about the creation of a short animation: what
steps to follow, the modelling of characters, the setup, and other things to consider such as
rigging, as it is very complex.
On the one hand I found several interesting books which talk about the theoretical part of
the animation process. Some of them are The Animator's Survival Kit (Richard Williams,
2001) and The Illusion of Life, Disney Animation (Frank Thomas and Ollie Johnson, 1981).
Both books talk mostly about how things move or how they should move to be credible,
and what working methods are used to do it. Both books talk about the 12 principles of
animation, that helps us make our creations more credible, and improve the
communication, expression and storytelling of our animation, increasing its value and
enjoyment of it (see Annex I for more information).
On the other hand I also watched some tutorials which could have helped me in the
technique part of the short film, but I thought I was using too many hours with little profit.
So I decided to assist in a Maya animation course at 9zeros, Initiation to Autodesk Maya.
In this course I improved my knowledge in modelling, texturing and rigging, and the most
important, I learned how to do the setup.
2.2. Synopsis.
The short film is about a young monster named Txikia, who is in love with his neighbour
Tara. They were dating a year before, but she left him because she met Gogor, a stronger
and taller monster than Txikia. He can not forget her and still keeps trying to get her back
giving her presents she will like. Tara takes advantage of this situation and does not say no
to any present Txikia gives her, as she likes his money and his goodness.
2.3. Characters.
One of my aims was to create a new breed of characters, so I could add some features that
can make them more distinctive and at the same time having more expressions.
19 TXIKIA-Report
The characters that I created are characterized by having a colourful skin, antennas, fangs
and a big snout. Their colour and hue of the skin vary according to sex and age, in this
way, males are bluish or greenish and females are pinkish. The antennas, which move
according to their mood, are placed on both sides of the head at eye level. These are long
and rounded, and wider at the end. The fangs protrude from the upper lip to the height of
the chin, and their thickness varies according to the age. They also have a big snout from
which departs two whiskers that extends backwards, surpassing the limit of the head.
2.3.1. Txikia.
Description.
As I explained in the general section, the characteristics of the characters vary according to
sex and age. Txikia is the youngest of the three, and because of that, his skin color is light
green and his fangs are thinner than Gogor’s, Tara's boyfriend.
Txikia is a short and slim guy. His head is proportionally larger than his body. His eyes
contrast with his skin tone because they are big and blue, which makes him more
expressive and, overall, cute and friendly.
Txikia is a cheerful, friendly and hardworking guy. He always cares about the people
around him and treats them with kindness, generosity and education. He is very passionate
and is always confident, sometimes too much that he becomes a naive.
Relationships.
Txikia had a very nice relationship with his neighbour Tara one year ago, but one day she
broke up with him because she met a taller, stronger and more handsome guy than Txikia.
Since then, Txikia has not stopped thinking about Tara and is unable to forget her, so he
never stops trying to conquer her. Tara is his weakness, he would leave everything to be
with her. The love he feels makes him blind and at the same time, a naive.
Preproduction 20
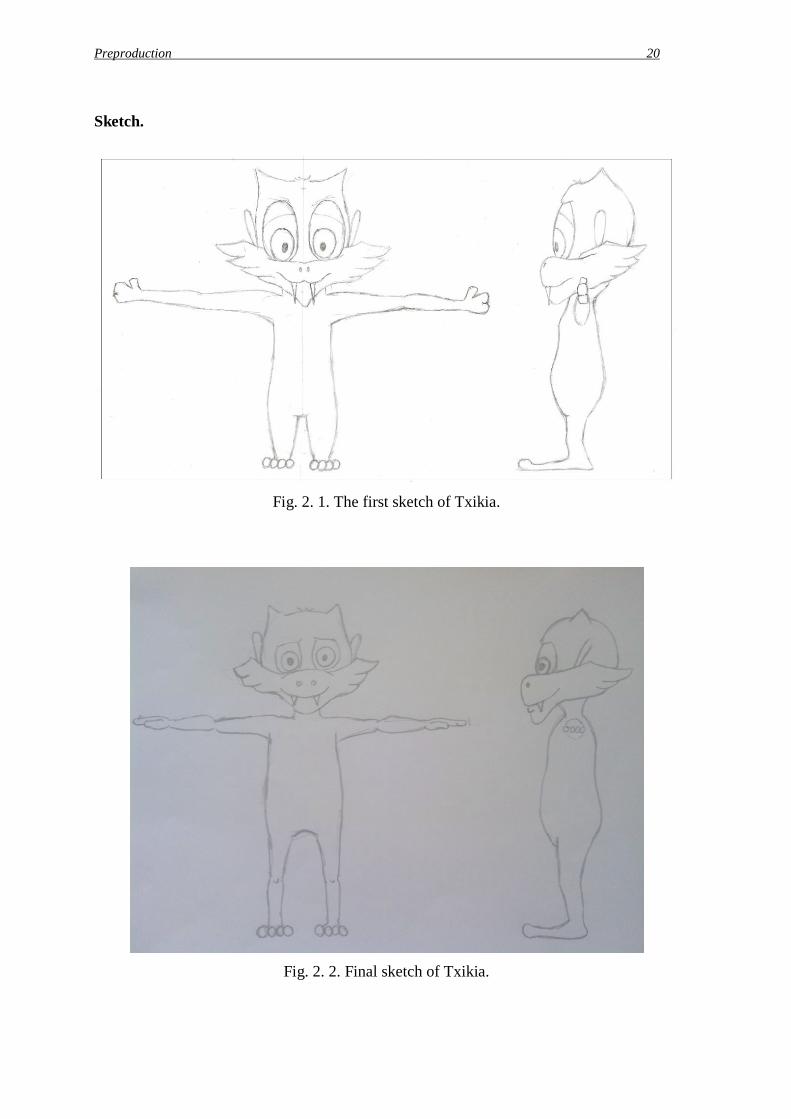
Sketch.
Fig. 2. 1. The first sketch of Txikia.
Fig. 2. 2. Final sketch of Txikia.

21 TXIKIA-Report
Character Views.
Fig. 2. 3. Txikia 3D views: front, side and back.
2.3.2. Tara.
Description.
Tara is a young montser with pinkish skin, and for the fact of being a woman she does not
have fangs. She is tall and svelte. She is a pretty thin girl, with wasp waist and pert bum.
Her eyes also contrast with her skin tone as they are light green.
Tara is impudent and vain, and she likes to brag. She has a shallow character, and she is
only interested in expensive and beautiful things, and in handsome, tall and strong men.
She is very selfish and egocentric and not able to see beyond her interests, she just thinks
of herself without worrying about the other people’s feelings. She is an interested person,
she can make you feel like a king one day and it is better not to cross with her the next day.
Tara is bad tempered, liar, malicious and insolent.
Relationships.
Tara was Txikia’s girlfriend. They loved each other a lot at the beginning but then she
became egocentric and superficial. One day she met a monster named Gogor, he was taller
and stronger than Txikia, so she broke up with her boyfriend to be with Gogor.

Preproduction 22
Sketch.
Fig. 2. 4. Tara’s sketch.
Character Views.
Fig. 2. 5. Tara 3D views: front, side and back.

23 TXIKIA-Report
2.3.3. Gogor.
Description.
Gogor is the largest of the three. He is characterized by having a bluish skin tone and fangs
thicker than Txikia’s. He is tall and strong, a boy from gym, very muscular, with big arms
and short and thin legs. His eyes are brown honey.
Gogor, despite being a pimp boy of the gym, is honest, very quiet and sincere guy in the
background, but he can be a grump sometimes.
Relationships.
Gogor is Tara's boyfriend. They will celebrate a year together since she broke up with
Txikia.
Sketch.
Fig. 2. 6. Gogor’s sketch.
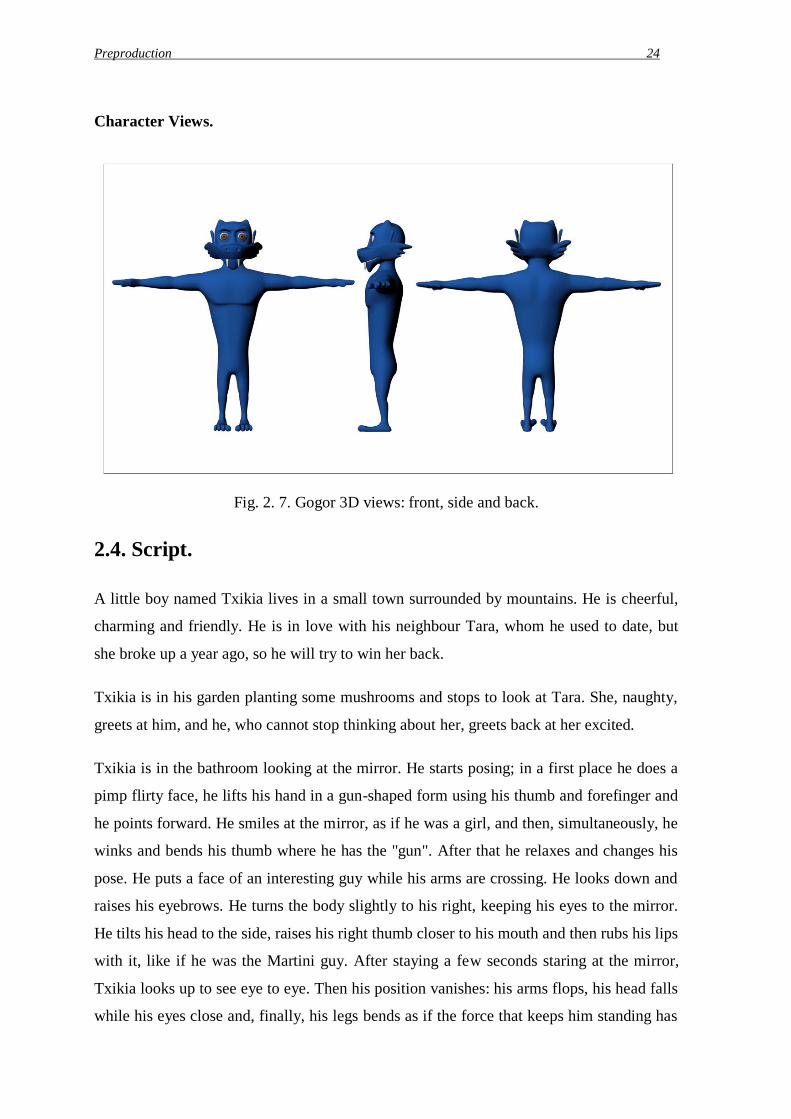
Preproduction 24
Character Views.
Fig. 2. 7. Gogor 3D views: front, side and back.
2.4. Script.
A little boy named Txikia lives in a small town surrounded by mountains. He is cheerful,
charming and friendly. He is in love with his neighbour Tara, whom he used to date, but
she broke up a year ago, so he will try to win her back.
Txikia is in his garden planting some mushrooms and stops to look at Tara. She, naughty,
greets at him, and he, who cannot stop thinking about her, greets back at her excited.
Txikia is in the bathroom looking at the mirror. He starts posing; in a first place he does a
pimp flirty face, he lifts his hand in a gun-shaped form using his thumb and forefinger and
he points forward. He smiles at the mirror, as if he was a girl, and then, simultaneously, he
winks and bends his thumb where he has the "gun". After that he relaxes and changes his
pose. He puts a face of an interesting guy while his arms are crossing. He looks down and
raises his eyebrows. He turns the body slightly to his right, keeping his eyes to the mirror.
He tilts his head to the side, raises his right thumb closer to his mouth and then rubs his lips
with it, like if he was the Martini guy. After staying a few seconds staring at the mirror,
Txikia looks up to see eye to eye. Then his position vanishes: his arms flops, his head falls
while his eyes close and, finally, his legs bends as if the force that keeps him standing has

25 TXIKIA-Report
been over. Seconds later he looks at the mirror like if he was going to find there the
solution to recaptivate his neighbour’s heart. And in the end he raises his forefinger in
order to show he has a good idea. Then he diverts the view slowly to the side and looks at a
bouquet of flowers for a while.
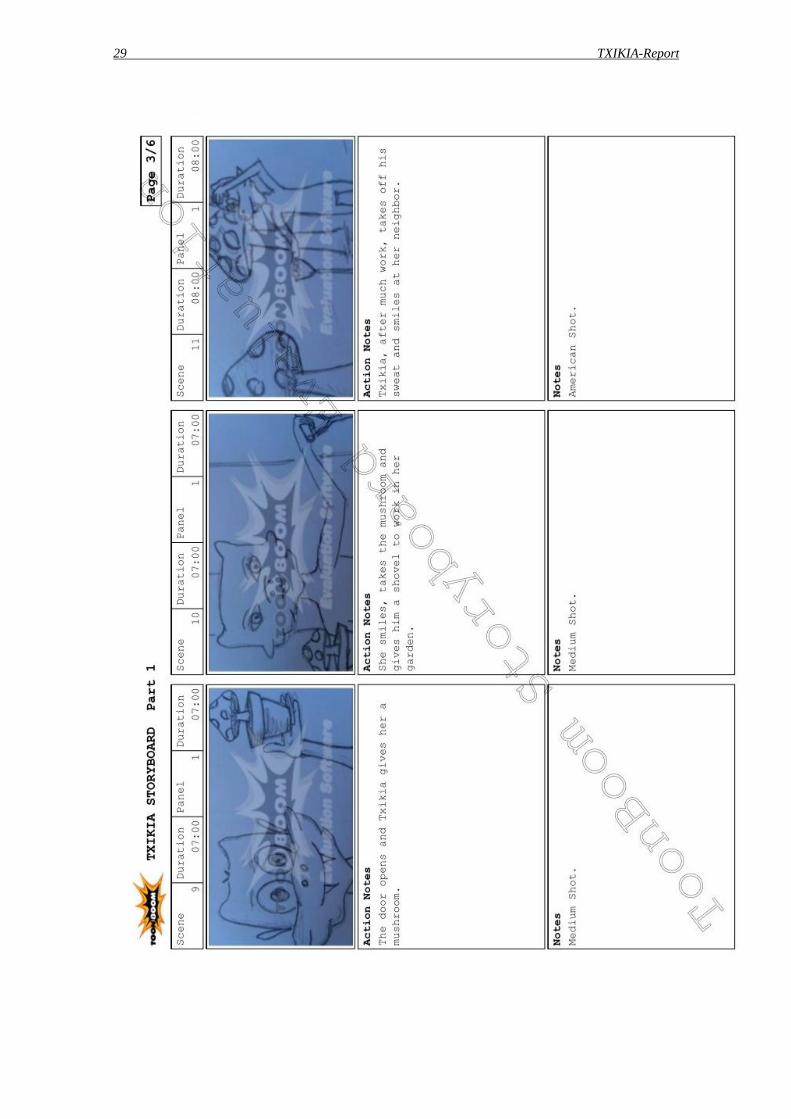
Txikia leaves home happily holding a mushroom in a pot and he goes to Tara’s house. He
arrives at the entrance door and knocks with his knuckles. The door opens and she comes
out with a do-not-bother-me face. He smiles and extends his arm to give her the
mushroom. She smiles while she picks it and takes out a shovel for Txikia, making him do
some gardening work.
Txikia breathes deeply and looks at his neighbour after working for a long time. She looks
at him while she holds a San Francisco cocktail in one hand, and she fans with the other.
In the evening Txikia is at home thinking about her and looking at a picture of Tara and
him while they were together.
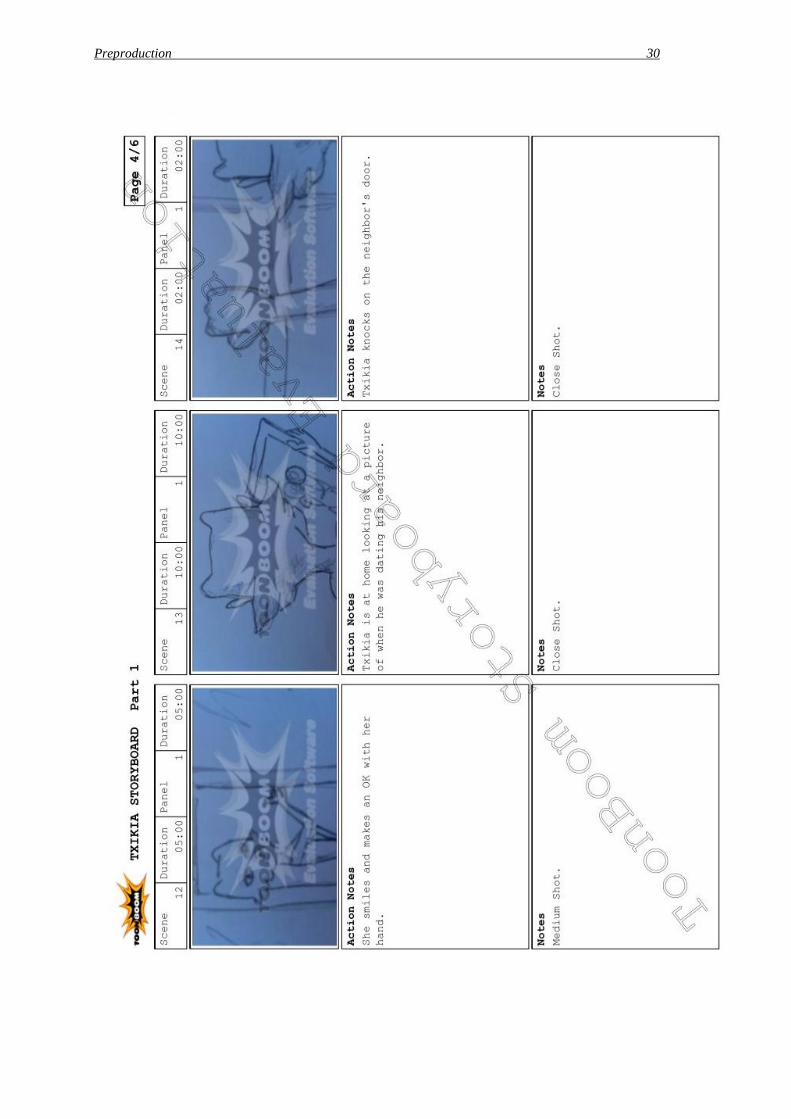
On the next day Txikia decides to go to Tara’s house to see her again. She opens the door
with a scowl and Txikia smiles at her, but she is only interested in material things, so she
extends her arm in order to say “give me some presents”. Txikia shrugs and spreads his
hands saying he has nothing to give her. Tara realizes that he has not brought anything and
slams the door in his nose.
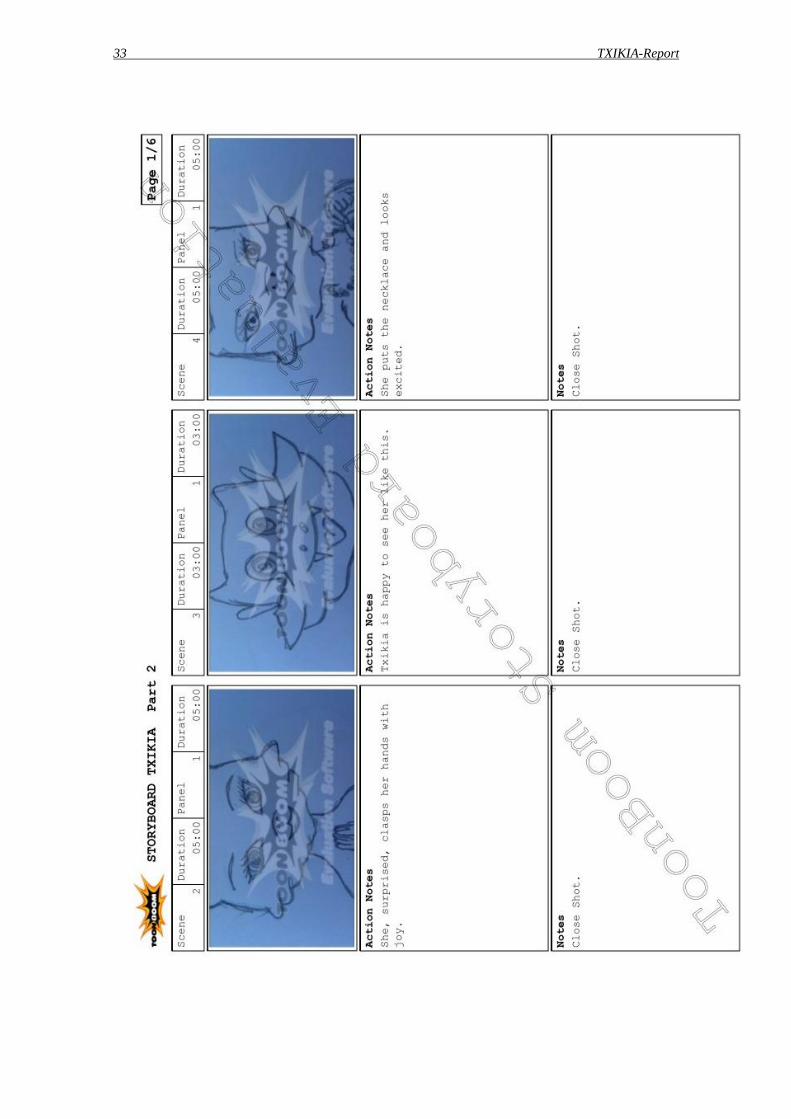
Txikia, despite having gone wrong the last time he went at her house, decides to try to
conquer her again, but this time he brings a gorgeous necklace. Tara is very surprised and
claps her hands with joy. She puts the necklace on and looks it excitedly. Txikia closes his
eyes and leans to her looking for a kiss. She looks at him and gives him a kiss on the
forehead. He smiles keeping his eyes closed, but she closes the door right after the kiss.
Txikia, in desperation, comes back to Tara’s house, but this time he decides to speak clear
and tell her all his feelings, so he buys a box of chocolates and puts a note on it saying "I
love you". While he is going to her house, Gogor, a handsome guy with a motorbike, stops
in front Tara’s house and greets. He is her boyfriend. As Tara walks toward Gogor, Txikia
approaches her with a box of chocolates. She looks at him with disgust and pushes him
away. Txikia falls down upset and gets annoyed. Gogor is surprised and angry, and he
Preproduction 26
realizes that his girlfriend is not the kind of person he wants to be with, so he breaks the
relationship up.
Txikia goes back home sad. Minutes later, he listens somebody knocking on the door.
When he opens it, he sees Tara staring at him with a huge smile meaning to say “forgive
me”, and trying to get a date with him. Txikia smiles thinking “this is my chance”, and
slams the door at Tara’s nose.
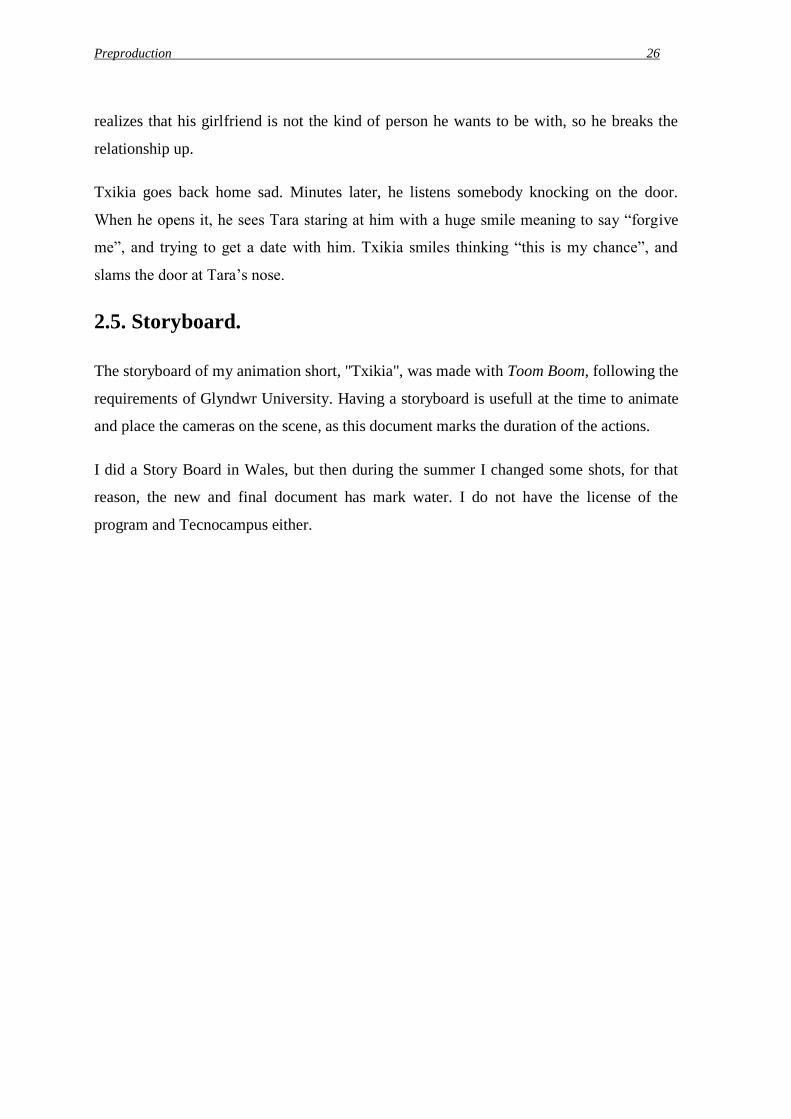
2.5. Storyboard.
The storyboard of my animation short, "Txikia", was made with Toom Boom, following the
requirements of Glyndwr University. Having a storyboard is usefull at the time to animate
and place the cameras on the scene, as this document marks the duration of the actions.
I did a Story Board in Wales, but then during the summer I changed some shots, for that
reason, the new and final document has mark water. I do not have the license of the
program and Tecnocampus either.

27 TXIKIA-Report

Preproduction 28
29 TXIKIA-Report
Preproduction 30

31 TXIKIA-Report

Preproduction 32
33 TXIKIA-Report
Preproduction 34

35 TXIKIA-Report

Preproduction 36

37 TXIKIA-Report

Preproduction 38

39 TXIKIA-Report
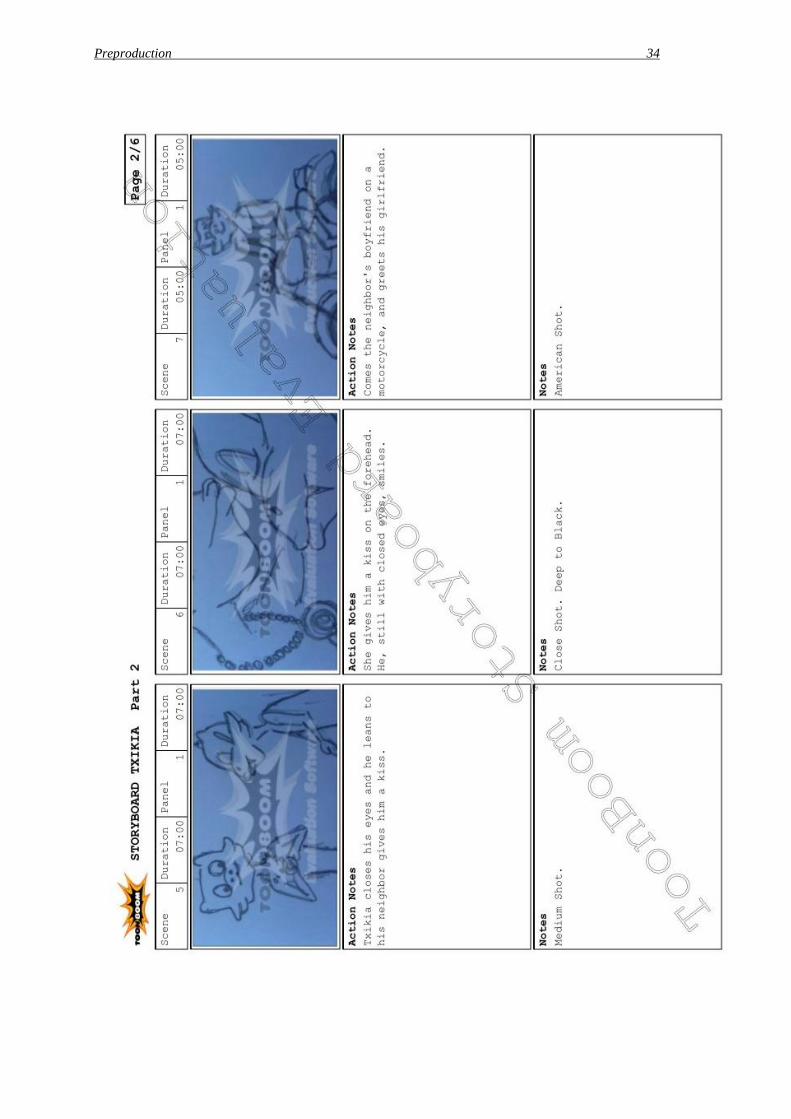
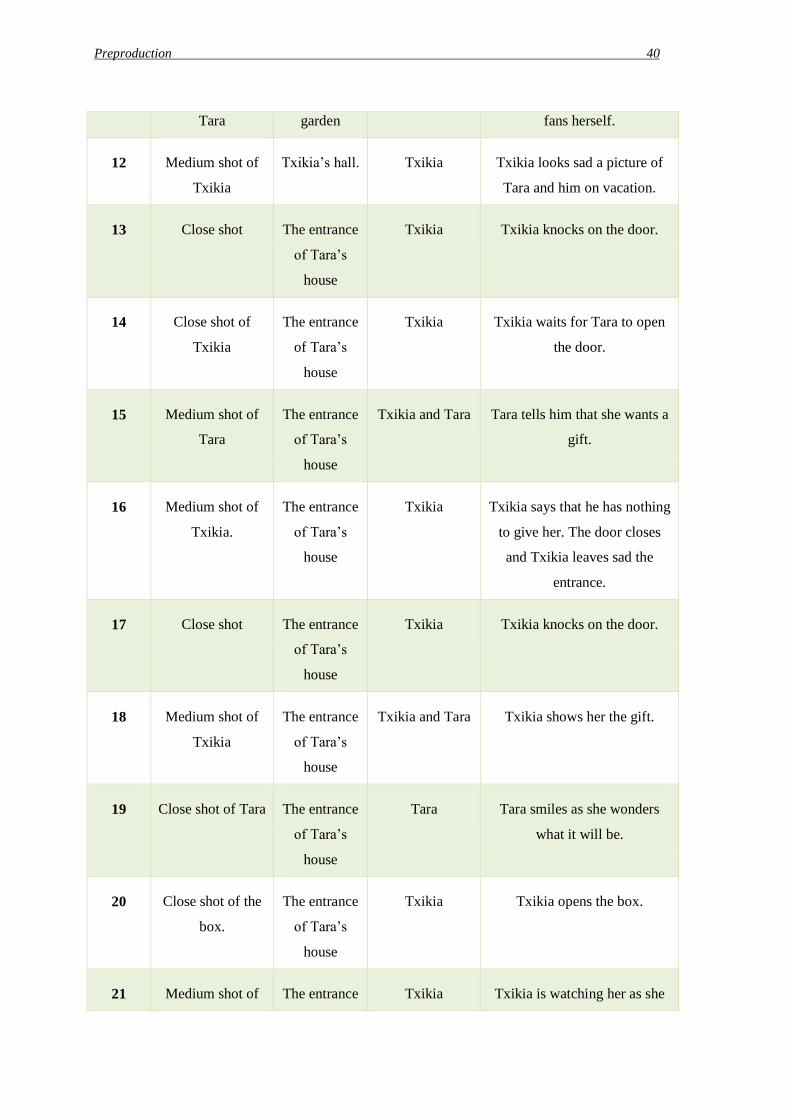
2.6. Shooting script.
SHOT SHOT
DESCRIPTION
LOCATION CHARACTER ACTION
1 Long shot of the
landscape and
Zoom In
Landscape - -
2 Medium shot of
Txikia
Txikia’s
garden
Txikia Txikia is planting mushrooms.
3 Long shot Txikia’s
garden
Txikia Txikia stand up.
4 Medium shot of
Tara
Tara’s
garden
Tara Tara greets.
5 Close shot of
Txikia
Txikia’s
garden
Txikia Txikia greets.
6 Medium shot of
Txikia
Txikia’s
bathroom
Txikia Txikia is gesturing.
7 Close shot. The entrance
of Tara’s
house.
Txikia Txikia knocks on the door.
8 Medium shot of
Txikia
The entrance
of Tara’s
house
Txikia and Tara Txikia gives her a mushroom.
9 Medium shot of
Tara
The entrance
of Tara’s
house
Txikia and Tara She takes the mushroom and
gives him a shovel.
10 Large shot of
Txikia
Tara’s
garden
Txikia He breathes hard of exhaustion
and looks toward Tara.
11 Medium shot of Tara’s Tara She, with a cocktail in hand,
Preproduction 40
Tara garden fans herself.
12 Medium shot of
Txikia
Txikia’s hall. Txikia Txikia looks sad a picture of
Tara and him on vacation.
13 Close shot The entrance
of Tara’s
house
Txikia Txikia knocks on the door.
14 Close shot of
Txikia
The entrance
of Tara’s
house
Txikia Txikia waits for Tara to open
the door.
15 Medium shot of
Tara
The entrance
of Tara’s
house
Txikia and Tara Tara tells him that she wants a
gift.
16 Medium shot of
Txikia.
The entrance
of Tara’s
house
Txikia Txikia says that he has nothing
to give her. The door closes
and Txikia leaves sad the
entrance.
17 Close shot The entrance
of Tara’s
house
Txikia Txikia knocks on the door.
18 Medium shot of
Txikia
The entrance
of Tara’s
house
Txikia and Tara Txikia shows her the gift.
19 Close shot of Tara The entrance
of Tara’s
house
Tara Tara smiles as she wonders
what it will be.
20 Close shot of the
box.
The entrance
of Tara’s
house
Txikia Txikia opens the box.
21 Medium shot of The entrance Txikia Txikia is watching her as she
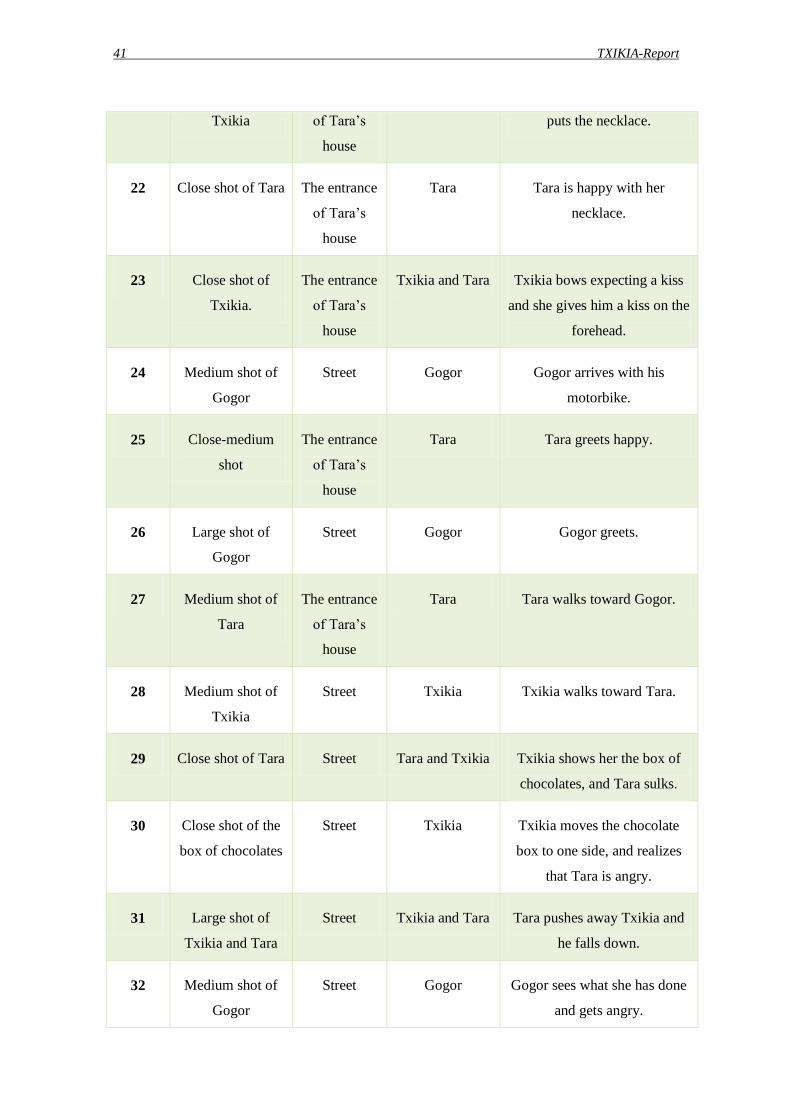
41 TXIKIA-Report
Txikia of Tara’s
house
puts the necklace.
22 Close shot of Tara The entrance
of Tara’s
house
Tara Tara is happy with her
necklace.
23 Close shot of
Txikia.
The entrance
of Tara’s
house
Txikia and Tara Txikia bows expecting a kiss
and she gives him a kiss on the
forehead.
24 Medium shot of
Gogor
Street Gogor Gogor arrives with his
motorbike.
25 Close-medium
shot
The entrance
of Tara’s
house
Tara Tara greets happy.
26 Large shot of
Gogor
Street Gogor Gogor greets.
27 Medium shot of
Tara
The entrance
of Tara’s
house
Tara Tara walks toward Gogor.
28 Medium shot of
Txikia
Street Txikia Txikia walks toward Tara.
29 Close shot of Tara Street Tara and Txikia Txikia shows her the box of
chocolates, and Tara sulks.
30 Close shot of the
box of chocolates
Street Txikia Txikia moves the chocolate
box to one side, and realizes
that Tara is angry.
31 Large shot of
Txikia and Tara
Street Txikia and Tara Tara pushes away Txikia and
he falls down.
32 Medium shot of
Gogor
Street Gogor Gogor sees what she has done
and gets angry.

Preproduction 42
33 Large shot of
Txikia
Street Txikia Txikia is on the ground in
pain.
34 Medium shot of
Tara and Gogor
Street Tara and Gogor Tara wants to stroke Gogor,
but he moves away. He wants
nothing else of her and leaves.
35 Medium shot of
Tara
The entrance
of Txikia’s
house
Tara Tara knocks on the door.
36 Medium shot The entrance
of Txikia’s
house
Txikia and Tara Txikia opens the door.
Tara says sorry.
37 Close-medium
shot
The entrance
of Txikia’s
house
Txikia Txikia says goodbye to her and
closes the door.
38 Large shot Txikia’s
house
Txikia Txikia jumps toward the
camera and winks.
Table. 1. Shooting script.
43 TXIKIA-Report
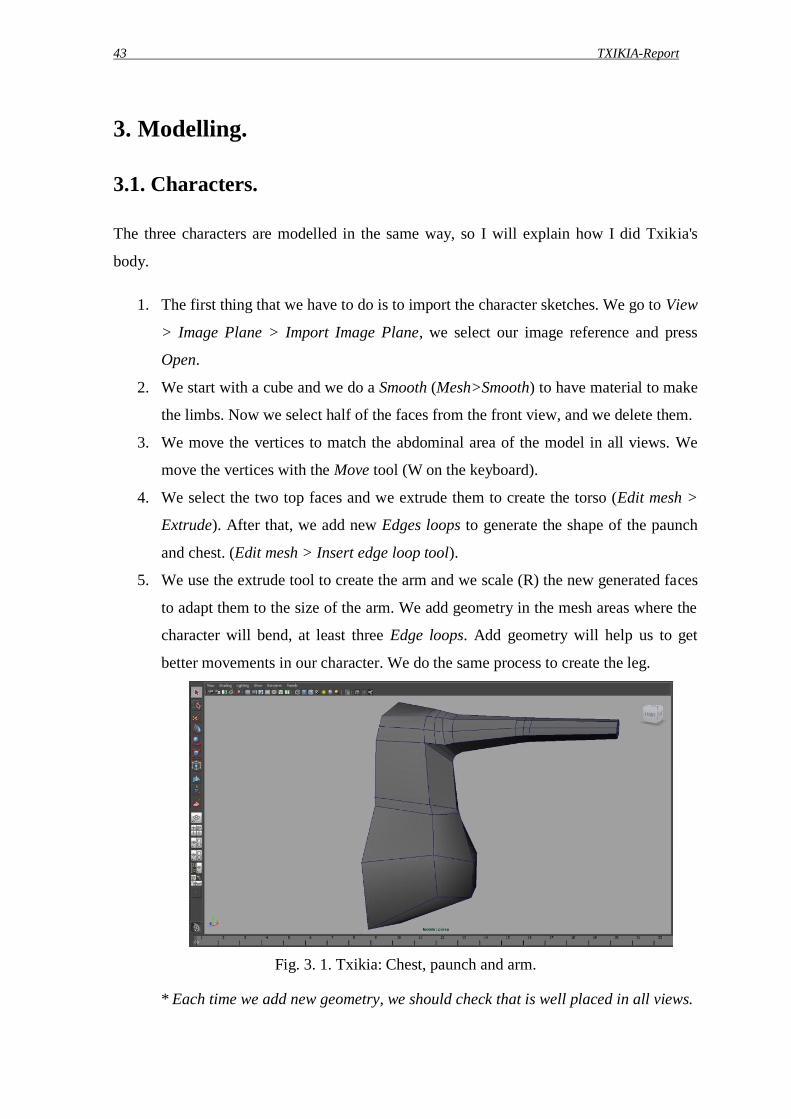
3. Modelling.
3.1. Characters.
The three characters are modelled in the same way, so I will explain how I did Txikia's
body.
1. The first thing that we have to do is to import the character sketches. We go to View
> Image Plane > Import Image Plane, we select our image reference and press
Open.
2. We start with a cube and we do a Smooth (Mesh>Smooth) to have material to make
the limbs. Now we select half of the faces from the front view, and we delete them.
3. We move the vertices to match the abdominal area of the model in all views. We
move the vertices with the Move tool (W on the keyboard).
4. We select the two top faces and we extrude them to create the torso (Edit mesh >
Extrude). After that, we add new Edges loops to generate the shape of the paunch
and chest. (Edit mesh > Insert edge loop tool).
5. We use the extrude tool to create the arm and we scale (R) the new generated faces
to adapt them to the size of the arm. We add geometry in the mesh areas where the
character will bend, at least three Edge loops. Add geometry will help us to get
better movements in our character. We do the same process to create the leg.
Fig. 3. 1. Txikia: Chest, paunch and arm.
* Each time we add new geometry, we should check that is well placed in all views.

Modelling 44
6. We move the vertices to adjust them to the shape of the character in all views. We
extrude the tip faces of the leg to create the foot, and we add geometry to have
enough material to shape the foot (See the image bellow).
Fig. 3. 2. Txikia’s foot.
7. Once we have the torso, arm and leg, we select the mesh and we duplicate it
(Cntrl+D). Now we go to the Channel Box and we scale the X of the new mesh in -
1. Then, we select the mesh and by pressing Shift we select the other and, we go to
Mesh > Combine. We have already achieved a single object, now we must paste the
parts. We select the centerline of vertices and we go to Edit Mesh > Merge.
Fig. 3. 3. Txikia’s body.
8. After doing the body, we proceed to do the hand. We start creating a cube, we scale
to adjust to the hand shape, and we add some subdivisions. Now, we select the
faces that correspond to the fingers and we extrude them with the option Edit Mesh
> Keep Faces Together switched off. We add geometry to the fingers.
45 TXIKIA-Report
9. We select the faces of the wrist and we extrude them to create the shape of the
wrist. Now we add more geometry to establish the hand shape.
Fig. 3. 4. Txikia’s hand.
10. Now we do a Combine of the body with the hand and, we select the vertices of the
wrist and go to Edit Mesh > Merge.
11. The last thing that we need to create is the face. We start with a cube and we add a
division in horizontal way. We do a Smooth and we delete half of the faces from
the front view. Then, we move the vertices to adapt them to the head shape.
12. We add a division to eye level with the tool Edit Mesh> Cut Faces Tool. We
prepare the eye area by drawing the outline of the eye with the Split Polygon Tool
(in Edit Mesh). We add more detail to the eye area, we create a sphere right in the
center of the eye and, we create the eyelids by adapting the geometry of the eye to
the sphere.
Fig. 3. 5. Txikia’s eye.

Modelling 46
13. Now we add geometry to prepare the area of the snout and, we extrude the frontal
faces. We continue adding Edge loops to the snout to have enough material to adapt
the shape.
Fig. 3. 6. Txikia’s snout.
14. Now is time to make the beards that stand backwards. We select lateral faces and
we extrude them out. We add some geometry with the Split Polygon Tool and we
move the vertices to get the shape of the beard.
Fig. 3. 7. Txikia’s beard.
15. We selected a face behind the beard and we extrude it to create the antenna. Then
we add two Edge Loops so that we can do the antenna thicker in the center.
16. We selected a face of the snout and we extrude inward to create the nostrils.
17. Now we create the mouth. We draw the outline of the mouth with the Split Polygon
Tool, and then, we select the faces inside of the outline and we delete them. We

47 TXIKIA-Report
select the edges of the mouth and we go doing extrudes and moving the vertices
until we get the mouth cavity.
Fig. 3. 8. Txikia’s mouth.
* We can see the final shape pressing 3 on the keyboard, is like a Smooth. We press
1 to return to the original.
18. We select a face of the palate and we extrude it to do the fang. We add geometry
and we scale the vertices of the tip to get a sharp tip.
19. Once we are sure that the half the face is finished, we select the model and
duplicate it (Cntrl + D), and we change the scale of the copy on the X axis to -1.
We select both models and we do a Combine. Now we select vertices of the center
and we go to Edit Mesh > Merge Vertices.
20. We create the neck by extruding four faces of the bottom of the head. We delete the
faces of the bottom of the neck. Now we prepare the geometry of the body for the
neck. We delete the four faces of the body where the neck has to be connected. We
press V (Snap Point) to snap the points, then we select both models and we do a
Combine. We just need to select the vertices of the neck's union and do a Merge
Vertices. We have finished the whole body.
Modelling 48
Fig. 3. 9. Txikia’s model.
We have our main character created. Now we have to follow the same steps to create
Tara and Gogor. We must bear in mind that the body of these two characters are
different: both are taller than Txikia, Tara will be thinner because she is a girl, and
Gogor will have a strongest constitution.
3.2. Buildings.
3.2.1. Houses.
The houses of Txikia and Tara are the same, the only thing changed is the orientation. The
house has three parts: walls, roof and the wall that is on the roof.
Fig. 3. 10. The three parts of the house modeled.
49 TXIKIA-Report
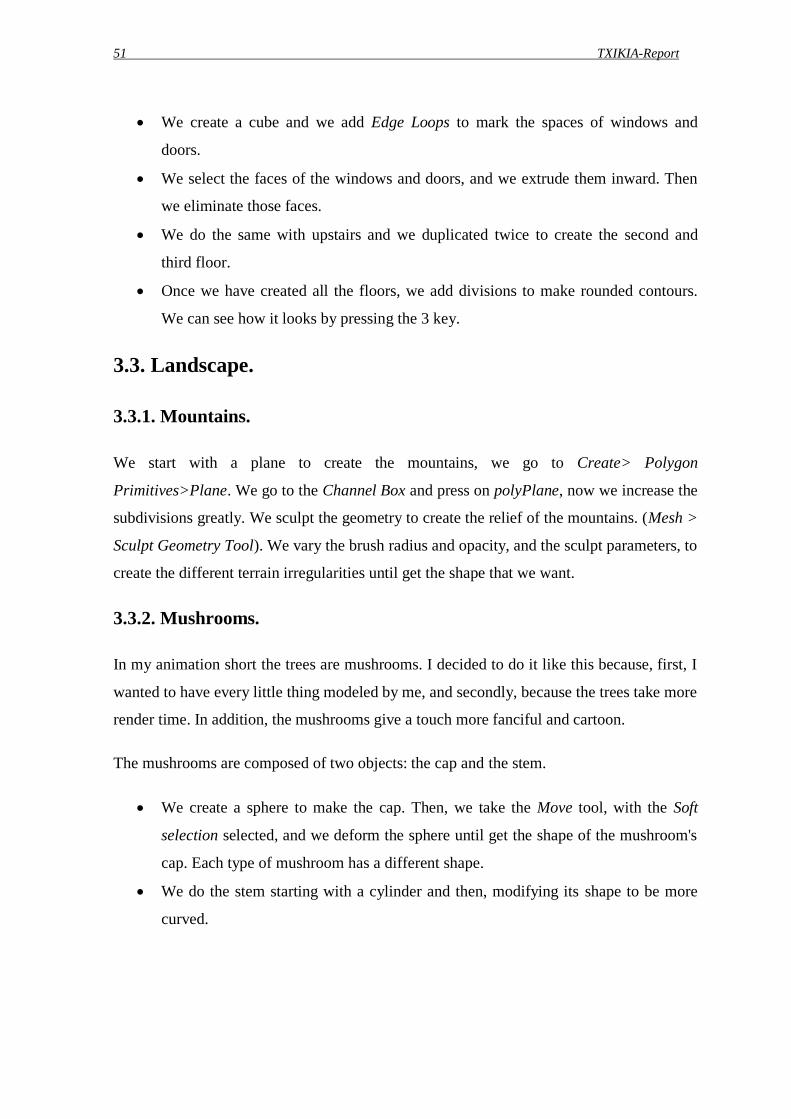
We follow these steps to create the house:
First, we create a column from a cube. The column serves to fix the measures of the
walls. Now we do a split in the top.
Now we do the doorframes. We duplicate (Ctrl+D) the column twice and we
separated them with the Move tool. We select the columns and go to Mesh >
Combine to have a single object. Now we select the columns’ top faces, which are
facing each other and, we go to Edit Mesh > Bridge, with both faces selected. Now
we have the doorframe done, but it has the thickness of the wall, so we select the
external faces of the object and we do an Edit Mesh> Extrude.
Fig. 3. 11. Steps for creating the doorframe.
Once we have finished the doorframes and columns, we duplicate them and
positioned in their proper place. We put a column in every corner of the house and
room, and the doorframes in the place of doors and windows. We see the placement
of the elements in the picture below.
Fig. 3. 12. The position of columns and doorframes.

Modelling 50
We select all the columns and doorframes that we have placed, and we do a
Combine. Now we have to connect all the faces that are facing each other to create
the walls. We do it with the Bridge tool. Once we have connected all the faces, we
select the top faces of the wall and we extrude them up.
Fig. 3. 13. The walls.
We create a bow to do the roof. It must have the measure of the central room and
low height. We do some divisions at the height of the other rooms and then extrude
the sides to create the ceiling of the rooms. We do the divisions with the Insert
Edge Loop tool in the Edit Mesh menu.
We follow the same process of creating the wall to do the wall that is on the roof.
3.2.2. Building.
Fig. 3. 14. The building.
The building is very simple, is made from cubes, each floor is one. The steps to create it
are:
51 TXIKIA-Report
We create a cube and we add Edge Loops to mark the spaces of windows and
doors.
We select the faces of the windows and doors, and we extrude them inward. Then
we eliminate those faces.
We do the same with upstairs and we duplicated twice to create the second and
third floor.
Once we have created all the floors, we add divisions to make rounded contours.
We can see how it looks by pressing the 3 key.
3.3. Landscape.
3.3.1. Mountains.
We start with a plane to create the mountains, we go to Create> Polygon
Primitives>Plane. We go to the Channel Box and press on polyPlane, now we increase the
subdivisions greatly. We sculpt the geometry to create the relief of the mountains. (Mesh >
Sculpt Geometry Tool). We vary the brush radius and opacity, and the sculpt parameters, to
create the different terrain irregularities until get the shape that we want.
3.3.2. Mushrooms.
In my animation short the trees are mushrooms. I decided to do it like this because, first, I
wanted to have every little thing modeled by me, and secondly, because the trees take more
render time. In addition, the mushrooms give a touch more fanciful and cartoon.
The mushrooms are composed of two objects: the cap and the stem.
We create a sphere to make the cap. Then, we take the Move tool, with the Soft
selection selected, and we deform the sphere until get the shape of the mushroom's
cap. Each type of mushroom has a different shape.
We do the stem starting with a cylinder and then, modifying its shape to be more
curved.

Modelling 52
Fig. 3. 15. The mushrooms.
3.4. Forniture and decoration.
3.4.1. Sink.
The sink is composed of three items: the sink, the closet and the water tap.
Fig. 3. 16. The sink.
We make the sink starting with a cube. We add a division parallel to each side of
the top face to mark the cavity of the sink. (Edit Mesh > Insert Edge Loop tool).
We select the new top central face and we do an Extrude inward (Edit Mesh >
Extrude). We make an Extrude again and we scale that face to get the drain's
dimension of the sink. Now we add some divisions and we move the vertices to get
more material to make the drain round.
53 TXIKIA-Report
We create a cube to do the closet. We add a division in each end off the box, up and
down. We select the band of faces of the top and the bottom, and we make an
Extrude and scale them.
Now we create another cube to make the door. We add a division parallel to each
side of the front face, we select the new central face and we make an Extrude
inward.
We create a cylinder to do the water tap. We go to the INPUTS in the Channel Box
and we add enough subdivisions to bend the cylinder. We select the cylinder and go
to the Animation menu and then to Create Deformers > Non Linear > Bend. We
can change the attributes in the Channel Box and adjust the bending's curve. Now
we move the vertices to modify its shape, to do it thicker in the base and tight in the
middle.
We create another cylinder, we add three subdivisions and, we extrude the center
faces and we scale them inward.
We add some Edge Loop to make the objects more rounded.
3.4.2. Toilet.
The toilet is composed of four items: the toilet, the lid, the cistern and the button.
Fig. 3. 17. The toilet.
We create a cylinder to do the toilet. We take the scale tool and we make oval the
cylinder. Then we select the faces of the top and we make an Extrude inward to do
the hole of the toilet. We move the vertices or edges to make the shape of the toilet,
Modelling 54
thicker on top and thinner on bottom. We make an Extrude of the two back faces to
create the connection to the cistern.
We create a cylinder to do the toilet lid, we scale the cylinder to make it oval and
low rise, and at last, we select the vertices of the center top and we move them to
make the lid rounded on top.
We create a cube to do the cistern and we add some subdivisions. We select the
strip below the cistern lid and we scale it inward. We make the top rounded and we
adjust the vertices to achieve the desired shape of the cistern.
We start with a cylinder to make the cistern's button. We select the faces of the top,
we make an Extrude and we make the faces smallers with the scale tool, then we
make an Extrude again, but outward. Now we have the primitive shape of the
button, we just need to add some Edge Loop to finish it.
3.4.3. Shower.
Fig. 3. 18. The Shower
The creation of the shower is very simple, every part of it is an object. The shower
enclosure is the easiest to do because they are simple cubes. The mixer tap and the shower
head is more complicated:
We start with a cylinder and we give some subdivisions: 10, in Subdivisions Axis
and 2, in Subdivisions Height.

55 TXIKIA-Report
Fig. 3. 19. The mixer tap.
We go to Edit Mesh > Offset Edge Loop tool and we add two divisions to mark the
two controllers, left and right.
We select a face of the two extremes and we make an Extrude to create the button
of each controller.
We add two Edge Loops on each side of the division we have done for making the
controllers, and we make the center Edge Loop smaller. Thus, appear that there are
three pieces.
Finally, we make an Extrude of the two back faces, which are those that will be
attached to the wall.
Fig. 3. 20. Shower head.
We start with a cylinder to make the shower head. The cylinder must be longer than
wide.
We make the curve of the shower head with the Bend tool and we modify the
settings until get the curve we want (Animation > Create Deformers > Nonlinear >
Bend).
We select the faces of the top extreme and we make an Extrude to create the
shower head.
Modelling 56
3.4.4. Cupboard.
Fig. 3. 21. The cupboard.
The cupboard is composed of three different pieces: the cupboard, the doors or drawers
and, the handles.
We create a cube to do the cupboard. We add a division in each ridge of the cube.
We select the bands of faces that touch the ridge of the cube and we make an
Extrude outward.
Now we create another cube and we modify its size depending on whether it is a
door or a drawer.
The handle is made with a cylinder. We add a division in each extreme of the
cylinder, then we select the faces of the extremes and we extrude them outward,
these faces will be in the doors.
3.4.5. Sofa.
The sofa is composed of two elements: the back and seat. Both parts are made by adding
divisions (Edge Loop tool) to get geometry and doing Extrudes to make that stand out like
the armrest or the cushions of the seat.

57 TXIKIA-Report
Fig. 3. 22. The sofa.
3.4.6. Table and chairs.
Fig. 3. 23. Table and chairs.
The table top is a simple oval cylinder and the table leg is also a cylinder, but modified
with the Scale tool to be narrower above than below.
The chairs are composed of three pieces. We start from two cubes to do the back and seat
of the table. Then we add some divisions to do the sides rounded and look like it is
padding, and then we flatten the back. We make the chair leg with a cube and we add some
divisions to have enough geometry to do the shape of the base. Now we extrude the face of
the back to create the leg, and we add more Edge Loops to do the semi-circle.

Modelling 58
3.5. Motorbike.
The motorbike is made of a set of pieces. The first thing I did was a search for an image
reference, in order to create a proportionate motorbike.
Fig. 3. 24. Image reference.
Fig. 3. 25. The motorbike modeled.
We need to follow the next steps:
The first thing we do is the wheel, which has two pieces: tyre and wheel rim.
59 TXIKIA-Report
Fig. 3. 26. The wheel.
1. We create a Torus with the size and thickness of the wheel (Create >
Polygon Primitives > Torus). Now we modify the Edge Loops of the
internal part of the tyre to adjust it to the wheel rim shape (Edit Mesh >
Insert Edge Loop tool).
2. We create a cylinder to make the wheel rim and we modify its size to fit it
inside the tyre. Now we add Edge Loops to the external part of the wheel
rim and we adjust it to the tyre shape. Then we add another Edge Loop to
the cap, we select the central faces and we Extrude them to make the two
rims of the wheel rim.
3. Finally, we add Edge Loops to define the edges and then, we create a group
(Cntrl+G) with all pieces of the wheel and we duplicate it to create the other
wheel. Remember that the rear wheel is thicker, so we have to modify its
dimensions.
Now we make the petrol tank and the seats, we start with a cube to make each piece
and we modify its vertices to get the shape. Remember to press 3 key to see the
final shape.
Fig. 3. 27. The petrol tank and the seats without the 3 key pressed.

Modelling 60
Fig. 3. 28. The petrol tank and the seats with the 3 key pressed.
The engine has four pieces, two of which are the same, so we just have to duplicate
it once made the first.
Fig. 3. 29. The engine.
1. We create a cylinder to do the central piece of the engine. We modify the
cylinder to be oval. We select the faces of the cap and by the Estrude and
Scale tool, do the two circles that stand out.
2. We make the piece below starting with a cube. First, we prepare the
geometry of the front doing a circle. Then we make various extrudes to do
the part that stand out. Now we add some divisions to the top of the object,
and then we extrude the faces to do the extremes that stand out.
3. The other two pieces are the same, so we create one and then we duplicate
it. We start with a cube and we do a division above the middle of the object.
We add twenty five divisions below the division we have done. Now we
select the loops of faces that are odd, I mean one in two. Then we do an
Extrude inward with the faces selected. After that we modify the shape to be
thicker above than below, and then we rotate it few degrees.
61 TXIKIA-Report
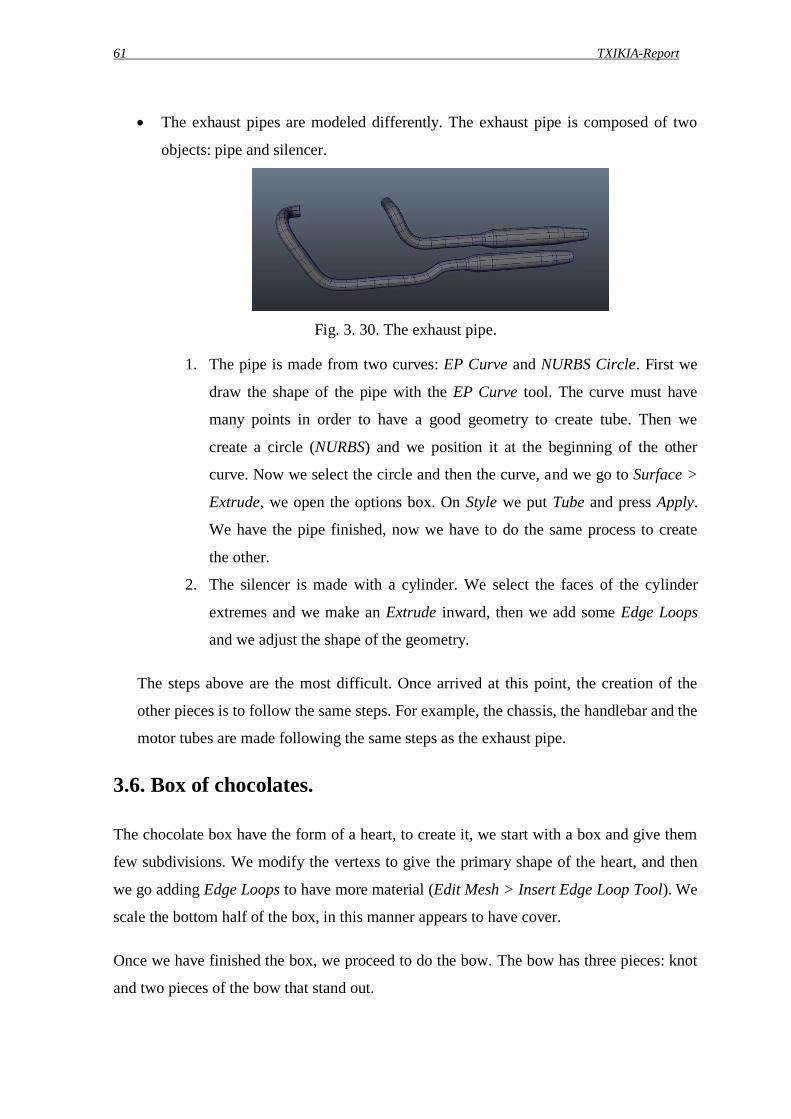
The exhaust pipes are modeled differently. The exhaust pipe is composed of two
objects: pipe and silencer.
Fig. 3. 30. The exhaust pipe.
1. The pipe is made from two curves: EP Curve and NURBS Circle. First we
draw the shape of the pipe with the EP Curve tool. The curve must have
many points in order to have a good geometry to create tube. Then we
create a circle (NURBS) and we position it at the beginning of the other
curve. Now we select the circle and then the curve, and we go to Surface >
Extrude, we open the options box. On Style we put Tube and press Apply.
We have the pipe finished, now we have to do the same process to create
the other.
2. The silencer is made with a cylinder. We select the faces of the cylinder
extremes and we make an Extrude inward, then we add some Edge Loops
and we adjust the shape of the geometry.
The steps above are the most difficult. Once arrived at this point, the creation of the
other pieces is to follow the same steps. For example, the chassis, the handlebar and the
motor tubes are made following the same steps as the exhaust pipe.
3.6. Box of chocolates.
The chocolate box have the form of a heart, to create it, we start with a box and give them
few subdivisions. We modify the vertexs to give the primary shape of the heart, and then
we go adding Edge Loops to have more material (Edit Mesh > Insert Edge Loop Tool). We
scale the bottom half of the box, in this manner appears to have cover.
Once we have finished the box, we proceed to do the bow. The bow has three pieces: knot
and two pieces of the bow that stand out.
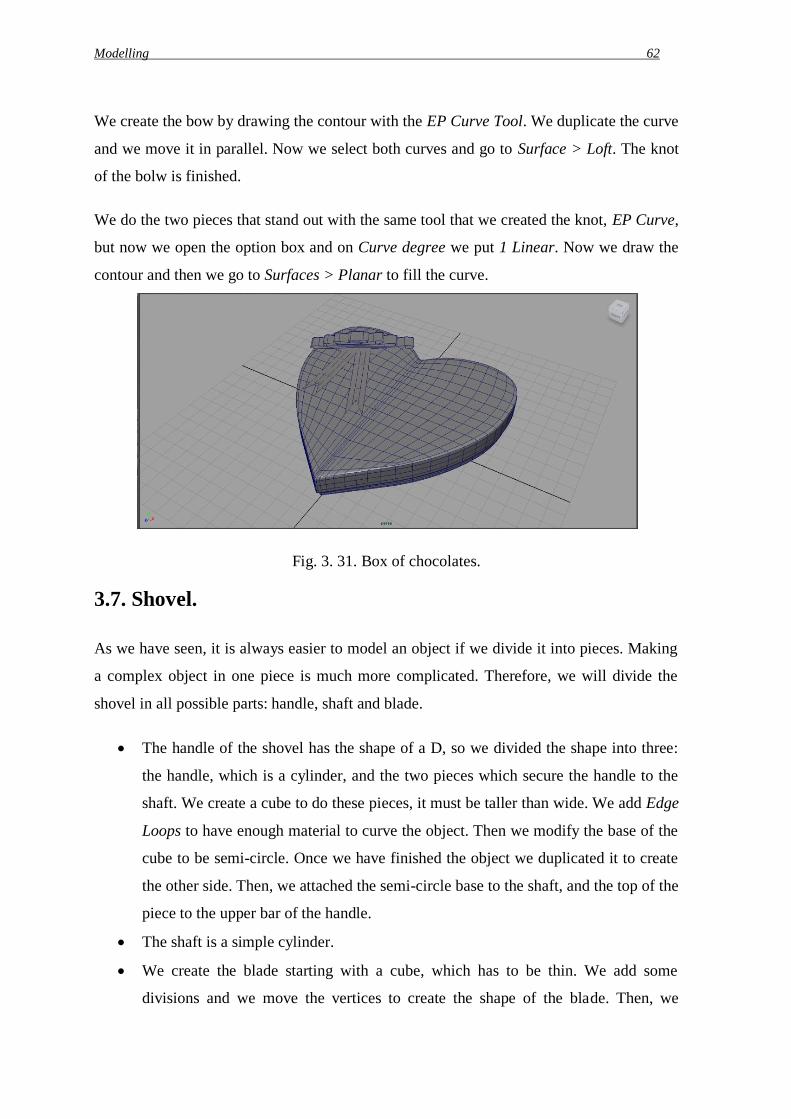
Modelling 62
We create the bow by drawing the contour with the EP Curve Tool. We duplicate the curve
and we move it in parallel. Now we select both curves and go to Surface > Loft. The knot
of the bolw is finished.
We do the two pieces that stand out with the same tool that we created the knot, EP Curve,
but now we open the option box and on Curve degree we put 1 Linear. Now we draw the
contour and then we go to Surfaces > Planar to fill the curve.
Fig. 3. 31. Box of chocolates.
3.7. Shovel.
As we have seen, it is always easier to model an object if we divide it into pieces. Making
a complex object in one piece is much more complicated. Therefore, we will divide the
shovel in all possible parts: handle, shaft and blade.
The handle of the shovel has the shape of a D, so we divided the shape into three:
the handle, which is a cylinder, and the two pieces which secure the handle to the
shaft. We create a cube to do these pieces, it must be taller than wide. We add Edge
Loops to have enough material to curve the object. Then we modify the base of the
cube to be semi-circle. Once we have finished the object we duplicated it to create
the other side. Then, we attached the semi-circle base to the shaft, and the top of the
piece to the upper bar of the handle.
The shaft is a simple cylinder.
We create the blade starting with a cube, which has to be thin. We add some
divisions and we move the vertices to create the shape of the blade. Then, we

63 TXIKIA-Report
prepare the geometry to make an Extrude in the area where the shaft has to be
attached.
Fig. 3. 32. The shovel.
3.8. Necklace.
Fig. 3. 33. The pearl necklace.
The pearl necklace is very easy to do because the pearls are spheres and the clasp is
composed of two Polygon Torus. What we have to do is draw the shape of the necklace
with the EP Curve tool, then create a sphere with the size of the pearl and duplicate it forty
times. Now, we select the pearls and then the curve and, we go to Modify > Snap Align
Objects > Position Along Curve. Once we have the pearls along the curve, we create a
group with all the pearls.

Modelling 64
65 TXIKIA-Report
4. Setup, Blend Shape and Skinning.
4.1. Setup.
The setup is the skeleton that will allow the character do all the movements. The skeleton
is composed of bones, each of these bones have two joints (J). A controller (CC) will be
assigned to every joint. The controller will allow us to move the character without having
to touch and modify the skeleton.
The setup of my three characters are made in the same way, they all have the same controls
so they all have the same ability to do the moves.
First of all, before we start the Setup, we need to delete the history of our model (Edit >
Delete by Type > History), and do a freeze transformation (Modify > Freeze
Transformation). To create the skeleton more comfortably, hide the eyes (Ctrl + H) and put
our model in a layer. Now, we can start the process of the skeleton’s creation.
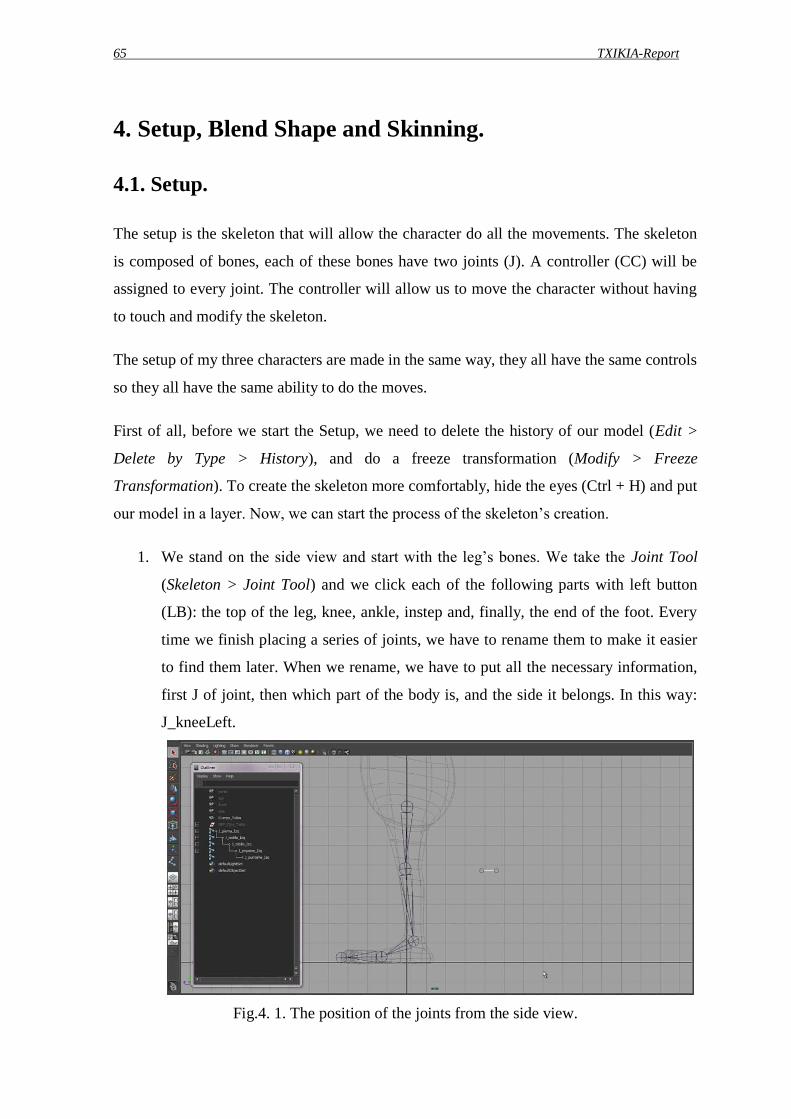
1. We stand on the side view and start with the leg’s bones. We take the Joint Tool
(Skeleton > Joint Tool) and we click each of the following parts with left button
(LB): the top of the leg, knee, ankle, instep and, finally, the end of the foot. Every
time we finish placing a series of joints, we have to rename them to make it easier
to find them later. When we rename, we have to put all the necessary information,
first J of joint, then which part of the body is, and the side it belongs. In this way:
J_kneeLeft.
Fig.4. 1. The position of the joints from the side view.
Setup, Blend Shape and Skinning 66
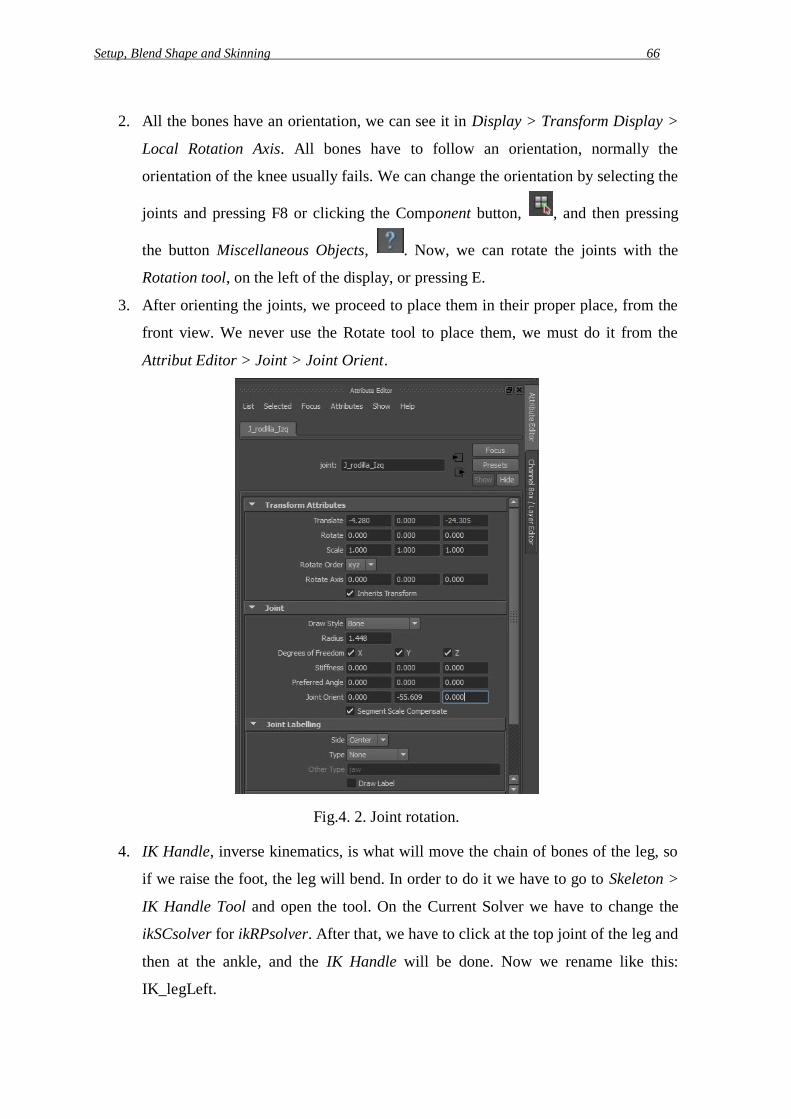
2. All the bones have an orientation, we can see it in Display > Transform Display >
Local Rotation Axis. All bones have to follow an orientation, normally the
orientation of the knee usually fails. We can change the orientation by selecting the
joints and pressing F8 or clicking the Component button, , and then pressing
the button Miscellaneous Objects, . Now, we can rotate the joints with the
Rotation tool, on the left of the display, or pressing E.
3. After orienting the joints, we proceed to place them in their proper place, from the
front view. We never use the Rotate tool to place them, we must do it from the
Attribut Editor > Joint > Joint Orient.
Fig.4. 2. Joint rotation.
4. IK Handle, inverse kinematics, is what will move the chain of bones of the leg, so
if we raise the foot, the leg will bend. In order to do it we have to go to Skeleton >
IK Handle Tool and open the tool. On the Current Solver we have to change the
ikSCsolver for ikRPsolver. After that, we have to click at the top joint of the leg and
then at the ankle, and the IK Handle will be done. Now we rename like this:
IK_legLeft.

67 TXIKIA-Report
5. RF or Reverse Foot is what will allow us do the tread move. That is, to say, lifting
the heel without moving the tip of the foot. In order to do the foot bones of the
Reverse Foot we have to go to the side view and take the Joint tool. We start
putting the first joint in the heel, and then, the tip of the foot, instep and, in the end,
the ankle. As always, we have to rename, for example, like this: RF_heelLeft. From
the perspective view, we move the RF at the height of the original foot, and then we
take the Snap Point tool or we press the (V) button, , to join each joint of the
RF with the original foot, so all the joints must match. At no time should be move
the original bones. We can see the placement of the bones in green in the image
below.
Fig.4. 3. The Reverse Foot.
6. Now we are going to proceed to do the Constraint. The Constraints enable you to
limit the position, orientation, or scale of an object to other objects. One object is
the controller and the other one is the manipulated. In our case, the RF will be the
controller. To do the Constraint we have to select first the controller and then the
manipulated.
RF_ankleLeft and IK_legLeft: Constrain > Point (without Maintain offset).
RF_instepLeft and J_ankleLeft: Constrain > Orient (with Maintain offset).
RF_TipFootLeft and J_instepLeft: Constrain > Orient (with Maintain
offset).
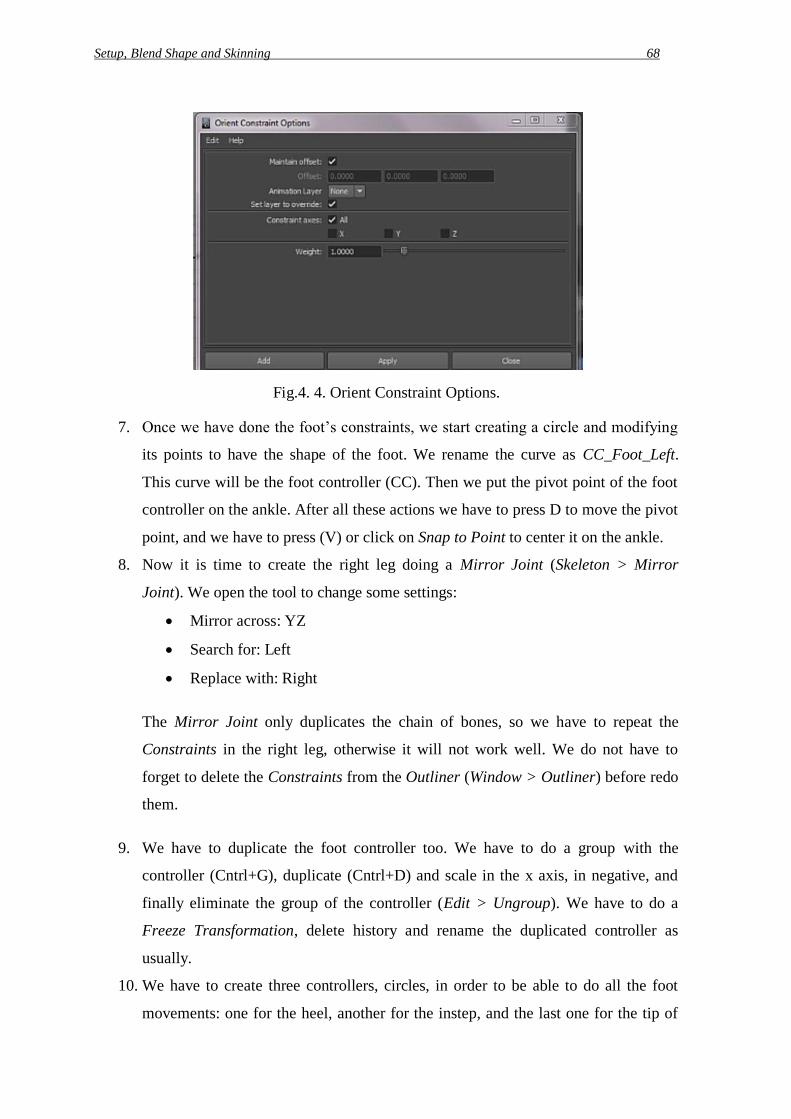
Setup, Blend Shape and Skinning 68
Fig.4. 4. Orient Constraint Options.
7. Once we have done the foot’s constraints, we start creating a circle and modifying
its points to have the shape of the foot. We rename the curve as CC_Foot_Left.
This curve will be the foot controller (CC). Then we put the pivot point of the foot
controller on the ankle. After all these actions we have to press D to move the pivot
point, and we have to press (V) or click on Snap to Point to center it on the ankle.
8. Now it is time to create the right leg doing a Mirror Joint (Skeleton > Mirror
Joint). We open the tool to change some settings:
Mirror across: YZ
Search for: Left
Replace with: Right
The Mirror Joint only duplicates the chain of bones, so we have to repeat the
Constraints in the right leg, otherwise it will not work well. We do not have to
forget to delete the Constraints from the Outliner (Window > Outliner) before redo
them.
9. We have to duplicate the foot controller too. We have to do a group with the
controller (Cntrl+G), duplicate (Cntrl+D) and scale in the x axis, in negative, and
finally eliminate the group of the controller (Edit > Ungroup). We have to do a
Freeze Transformation, delete history and rename the duplicated controller as
usually.
10. We have to create three controllers, circles, in order to be able to do all the foot
movements: one for the heel, another for the instep, and the last one for the tip of
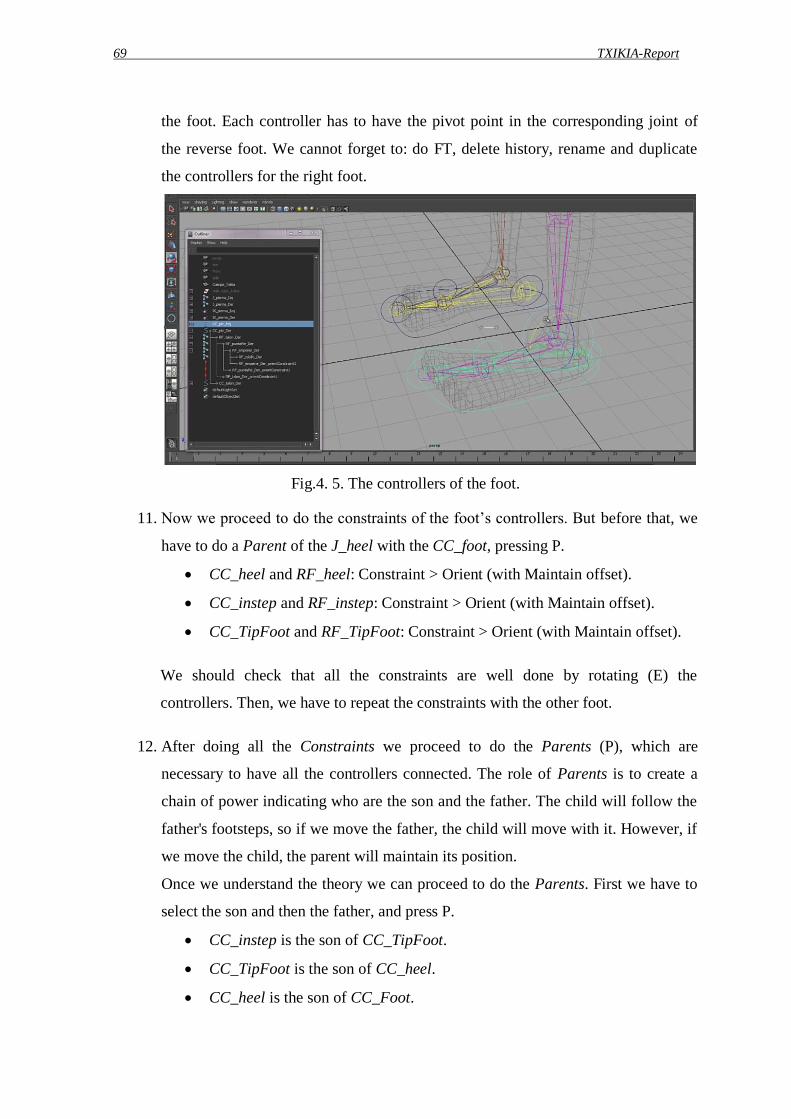
69 TXIKIA-Report
the foot. Each controller has to have the pivot point in the corresponding joint of
the reverse foot. We cannot forget to: do FT, delete history, rename and duplicate
the controllers for the right foot.
Fig.4. 5. The controllers of the foot.
11. Now we proceed to do the constraints of the foot’s controllers. But before that, we
have to do a Parent of the J_heel with the CC_foot, pressing P.
CC_heel and RF_heel: Constraint > Orient (with Maintain offset).
CC_instep and RF_instep: Constraint > Orient (with Maintain offset).
CC_TipFoot and RF_TipFoot: Constraint > Orient (with Maintain offset).
We should check that all the constraints are well done by rotating (E) the
controllers. Then, we have to repeat the constraints with the other foot.
12. After doing all the Constraints we proceed to do the Parents (P), which are
necessary to have all the controllers connected. The role of Parents is to create a
chain of power indicating who are the son and the father. The child will follow the
father's footsteps, so if we move the father, the child will move with it. However, if
we move the child, the parent will maintain its position.
Once we understand the theory we can proceed to do the Parents. First we have to
select the son and then the father, and press P.
CC_instep is the son of CC_TipFoot.
CC_TipFoot is the son of CC_heel.
CC_heel is the son of CC_Foot.
Setup, Blend Shape and Skinning 70
13. Every time that we create a controller, we should block all the controls that are not
going to be used, in the case of the foot’s controllers, the scale for example. We
have to go to Windows > General Editors > Channel Control to block any control.
14. Now we are going to do the controller for the knee. We have to position us on the
side view, then we create a circle, we do a snap to the joint knee and, we move the
circle forward with the tool Move or pressing W. We cannot forget to: do FT, delete
history and rename (CC_kneeLeft).
15. As you already know, we have to do the Constraints when we create a controller.
We select the CC_knee_Left controller and then the IK Handle IK_legLeft, and we
do a Pole Vector Constraint. After that, we should block the scale and rotation
controls of the CC_kneeLeft controller. And we do the same with the other leg.
16. Once we Setup the leg, we continue with the hip. We have to go to the side view to
create the hip right in the middle of the body. We go to Skeleton > Joint Tool and
then we click high over the leg bone. We select the top joint of the legs, then the
created joint, and we do a Parent (P). We rename the joint as J_hip.
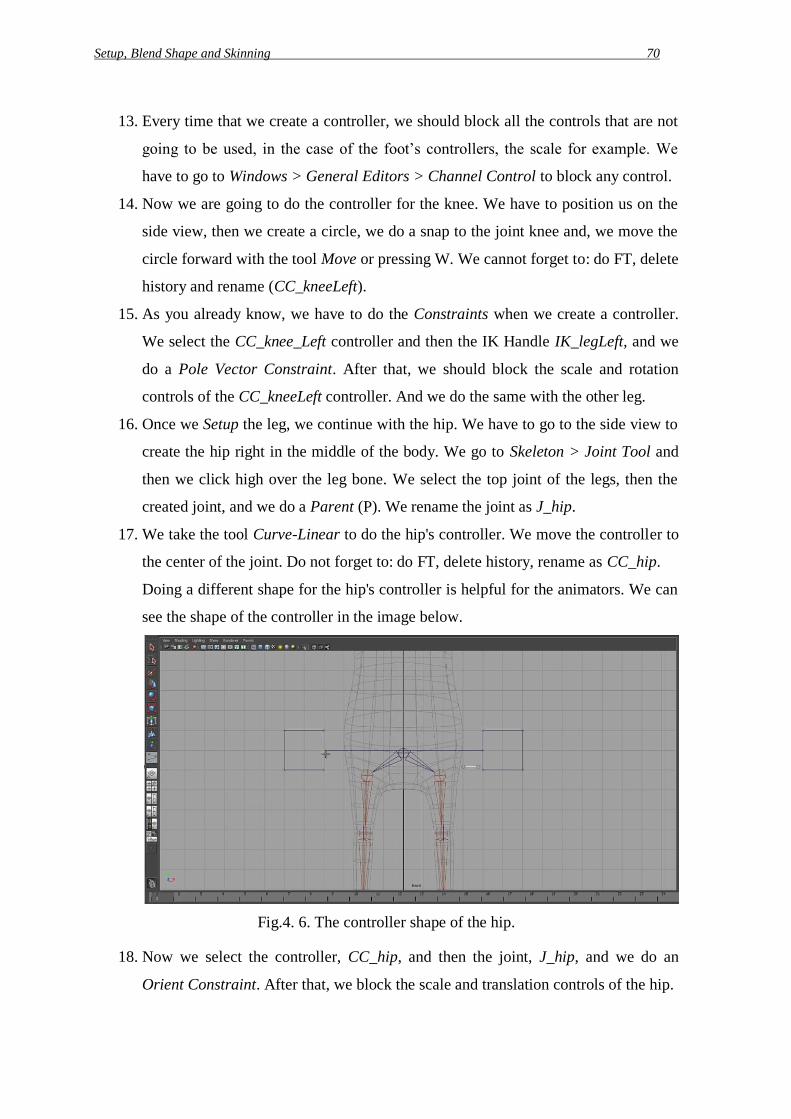
17. We take the tool Curve-Linear to do the hip's controller. We move the controller to
the center of the joint. Do not forget to: do FT, delete history, rename as CC_hip.
Doing a different shape for the hip's controller is helpful for the animators. We can
see the shape of the controller in the image below.
Fig.4. 6. The controller shape of the hip.
18. Now we select the controller, CC_hip, and then the joint, J_hip, and we do an
Orient Constraint. After that, we block the scale and translation controls of the hip.
71 TXIKIA-Report
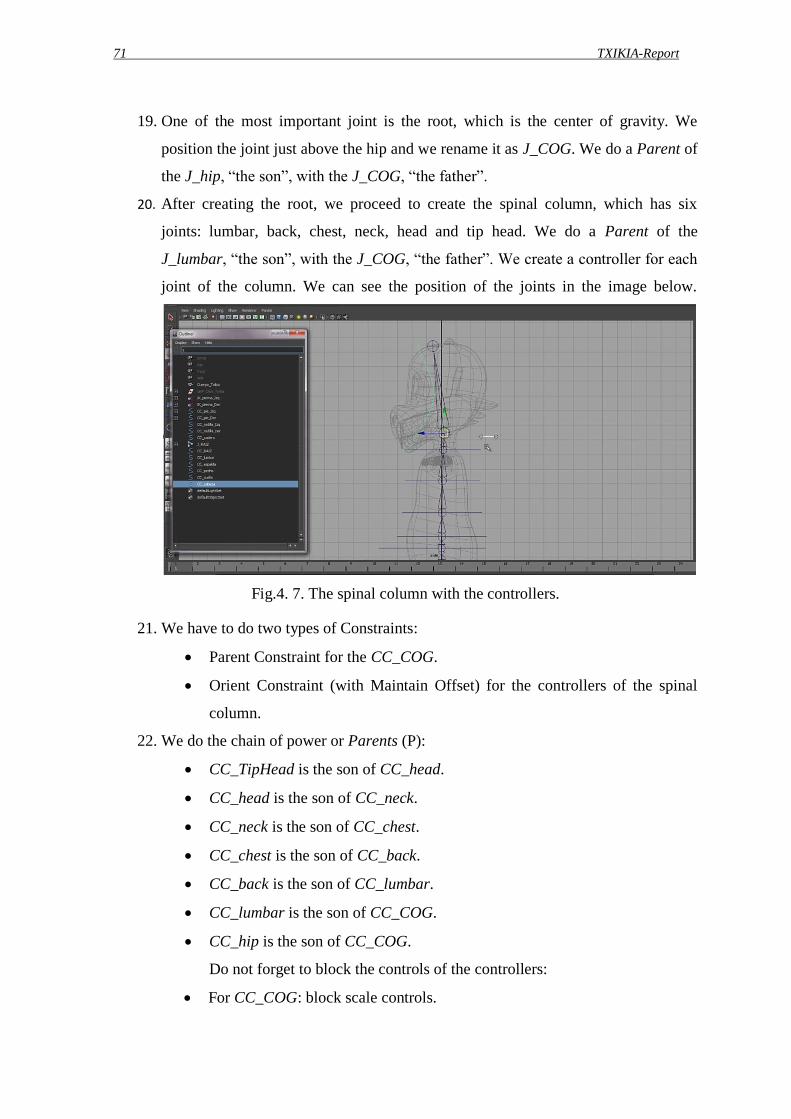
19. One of the most important joint is the root, which is the center of gravity. We
position the joint just above the hip and we rename it as J_COG. We do a Parent of
the J_hip, “the son”, with the J_COG, “the father”.
20. After creating the root, we proceed to create the spinal column, which has six
joints: lumbar, back, chest, neck, head and tip head. We do a Parent of the
J_lumbar, “the son”, with the J_COG, “the father”. We create a controller for each
joint of the column. We can see the position of the joints in the image below.
Fig.4. 7. The spinal column with the controllers.
21. We have to do two types of Constraints:
Parent Constraint for the CC_COG.
Orient Constraint (with Maintain Offset) for the controllers of the spinal
column.
22. We do the chain of power or Parents (P):
CC_TipHead is the son of CC_head.
CC_head is the son of CC_neck.
CC_neck is the son of CC_chest.
CC_chest is the son of CC_back.
CC_back is the son of CC_lumbar.
CC_lumbar is the son of CC_COG.
CC_hip is the son of CC_COG.
Do not forget to block the controls of the controllers:
For CC_COG: block scale controls.
Setup, Blend Shape and Skinning 72
For spinal column controllers: block scale and translation controls.
23. It is easier to animate a character if the drivers are in different colors. It is better to
differentiate between left and right sides. In that way, if we decide to change the
color, we go to Attribute Editor > Object Display > Drawing Overrides, and click
on Enable Overrides. Now we can change the color by moving the slider.
Fig.4. 8. Attribute Editor: Drawing Overrides.
24. Once we have finished the Setup of the spinal column, the arms are all that remains
to do. We go to the top view to do the chain of the arm, it will have three joints:
J_shoulder, J_elbow and J_wrist. We cannot forget to reorient the joints (Attribute
Editor > Joint > Orient).
25. Now it is time to create the hands. In our case we only have four fingers: pinky,
middle, index and thumb. Each one has four joints that we rename as:
J_pinkyLeft_01, J_pinkyLeft_02, J_pinkyLeft_03 and J_pinkyLeft_End. After that,
we create a joint that will be the palm. Finally we do the Parents (P):

73 TXIKIA-Report
Fingers are the sons of palm.
Palm is the son of wrist.
Shoulder is the son of chest.
Fig.4. 9. The joints of the hand.
26. As we already know, we have to do a Mirror Joint to create the other arm. First we
select the J_shoulder, and then we do the Mirror.
27. Once we have got the arms, we create three controllers for the arms: CC_shoulder,
CC_elbow and CC_wrist. We do an Orient Constraint and, we block the scale and
translation controls.
28. The controllers for the fingers are a bit more complicated. The fingers only need
one controller for each one, which we position at the beginning of the finger. Then
we block all controls except rotate, and now, we add another two controls that will
be used to bend each finger joint.
We go to Channel Box > Edit > Add Attribute. We put Float on Data Type. To
create the control we put the name of the new control on Long names and then we
press Add. We have to create two controls named Mid Z and End Z.

Setup, Blend Shape and Skinning 74
Fig.4. 10. Display: Add Attribute.
29. The new controls are already made. Now we have to do the connections of the
controllers with the joints. We have to open the Connection Editors, going to
Window > General Editors. In the display we can see two boxes: Outputs and
Inputs. In the box of Outputs, we have to put the controllers, and in the box of
Inputs, we have to put the joints. To make the connections, we have to follow these
steps:
Select the controller and click the bottom Reload Left.
Select the joint J_name_01 and click the bottom Reload Right. Now select,
on the left box, rotate and, on the right box, rotate.
Select the joint J_name_02 and click the bottom Reload Right. Now select,
on the left box, Mid Z and, on the right box, rotate z.
Select the joint J_name_03 and click the bottom Reload Right. Now select,
on the left box, End Z and, on the right box, rotate z.
We have to do the same with the other fingers.
75 TXIKIA-Report
Fig.4. 11. Connection Editor.
30. The Parents of the arms controllers:
The controllers of the fingers are the sons of CC_wrist.
CC_wrist is the son of CC_elbow.
CC_elbow is the son of CC_shoulder.
CC_shoulder is the son of CC_chest.
31. The setup is finished, we just need to create a positioner. We create a circle in the
centre surrounding our character, and we rename it as CC_father. After that, we
create another circle, we shape it and we rename as CC_positioner.

Setup, Blend Shape and Skinning 76
Fig.4. 12. The father and positioned controllers.
32. We have to do the last Parents (P):
CC_COG is the son of CC_father.
CC_foot is the son of CC_father.
CC_knee is the son of CC_father.
CC_father is the son of CC_positioner.
33. The last step we need to do is order the Outliner following these steps:
We have to create two groups: GRP_NoVisible and GRP_Visible.
We put the controllers in the GRP_Visible.
We select the two RF_heel and we hide it by pressing Cntrl+H.
We select J_COG and we do a group (Cntrl+G) named GRP_Joints.
We select the two IK_leg and we do a group named GRP_IK.
We put GRP_Joints and GRP_IK in the group GRP_NoVisible.
We put the eyes and the modeling body in the group GRP_Visible.
We create another group called GRP_SetupCharacterName, and we put the
two groups (GRP_Visible and GRP_NoVisible) inside.
If we scale the CC_positioner and the bones do not scale, it is because we
need to make a last Constraint. We select the CC_positioner and the group
GRP_Joints, and we do a Scale Constraint.
77 TXIKIA-Report
4.2. Setup faces expressions.
Facial expressions are made using blend shapes and then doing Set Driven Key. The blend
shapes allow us to change the form of one object into the shapes of other objects with the
same number of vertices. It is very common to use blend shapes in character setup, because
we can set up poses for facial animation.
Doing the facial Setup:
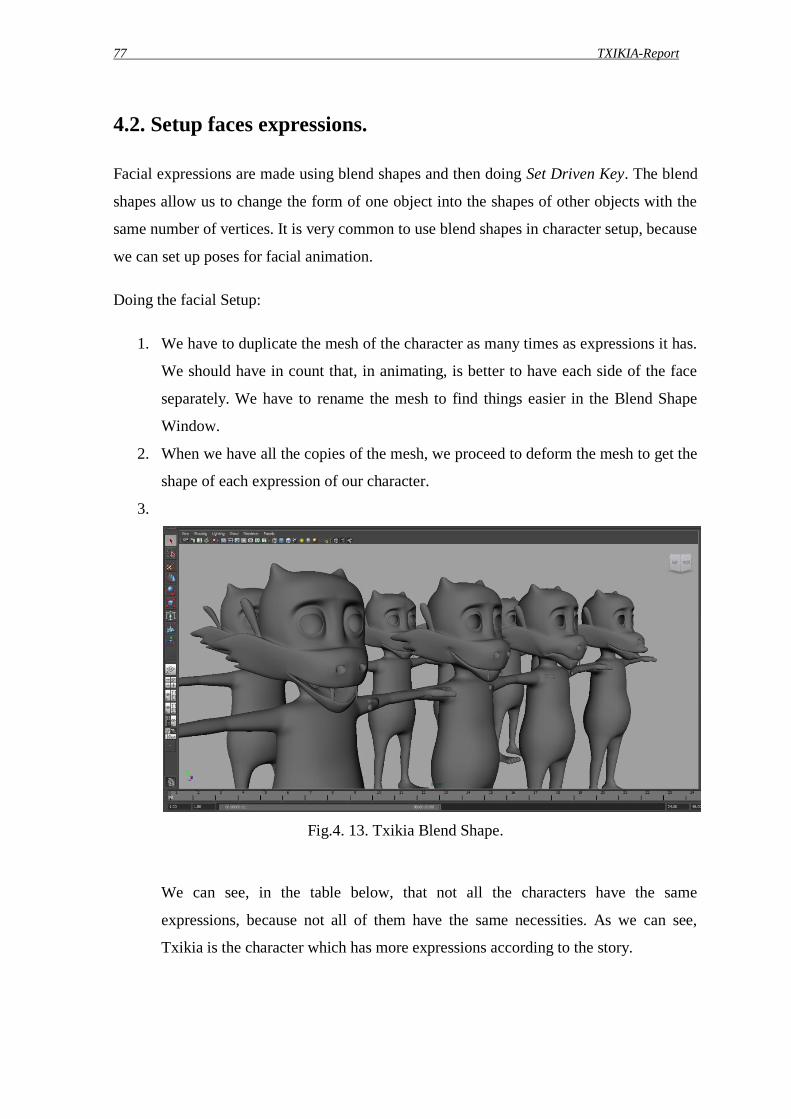
1. We have to duplicate the mesh of the character as many times as expressions it has.
We should have in count that, in animating, is better to have each side of the face
separately. We have to rename the mesh to find things easier in the Blend Shape
Window.
2. When we have all the copies of the mesh, we proceed to deform the mesh to get the
shape of each expression of our character.
3.
Fig.4. 13. Txikia Blend Shape.
We can see, in the table below, that not all the characters have the same
expressions, because not all of them have the same necessities. As we can see,
Txikia is the character which has more expressions according to the story.

Setup, Blend Shape and Skinning 78
EXPRESSIONS
TXIKIA
TARA
GOGOR
Eyes closed (separately)
X
X
X
Eyebrows up (angry)
X
X
X
Eyebrows down (sad)
X
X
X
Eyebrows down (tired)
X
-
-
Left eyebrow up
X
X
-
Right eyebrow up
X
X
-
Left eyebrow down
X
X
-
Right eyebrow down
X
X
-
Big mouth open
X
X
X
Small mouth open
X
-
-
Mouth smile
X
X
X
Mouth sad
X
X
X
Kiss
X
X
-
Antennas
X
X
X
Table. 2. Expressions.
4. We select all the modified mesh, then select the base mesh, with all this selected we
go to Window > Animation Editors > Blend Shape and select Edit > Create Blend
Shape. All the Blend Shapes must display on a single horizontal line. We can check
the Blend Shape by moving the slide bar up and down.
5. Once we have all the shapes with the expressions, we are going to create the panel
with the facial controllers. The control panel is composed of sliders. We need to
create two circles to do each slider, one serves as a guide to mark the boundaries of
the controller and the other is the controller.
We follow the next steps to do the controllers:
We create two circles (from the front view) and modify its shape to be
elongated. We create two circles and we modify its shape to be elongated.
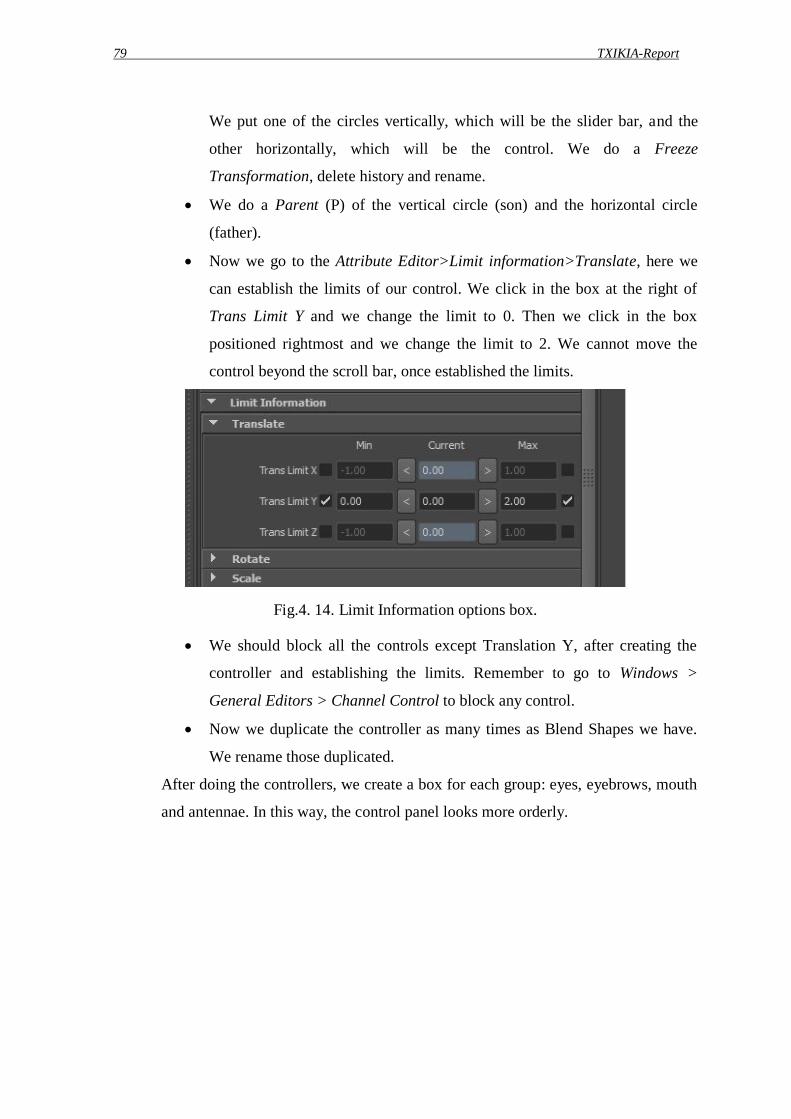
79 TXIKIA-Report
We put one of the circles vertically, which will be the slider bar, and the
other horizontally, which will be the control. We do a Freeze
Transformation, delete history and rename.
We do a Parent (P) of the vertical circle (son) and the horizontal circle
(father).
Now we go to the Attribute Editor>Limit information>Translate, here we
can establish the limits of our control. We click in the box at the right of
Trans Limit Y and we change the limit to 0. Then we click in the box
positioned rightmost and we change the limit to 2. We cannot move the
control beyond the scroll bar, once established the limits.
Fig.4. 14. Limit Information options box.
We should block all the controls except Translation Y, after creating the
controller and establishing the limits. Remember to go to Windows >
General Editors > Channel Control to block any control.
Now we duplicate the controller as many times as Blend Shapes we have.
We rename those duplicated.
After doing the controllers, we create a box for each group: eyes, eyebrows, mouth
and antennae. In this way, the control panel looks more orderly.
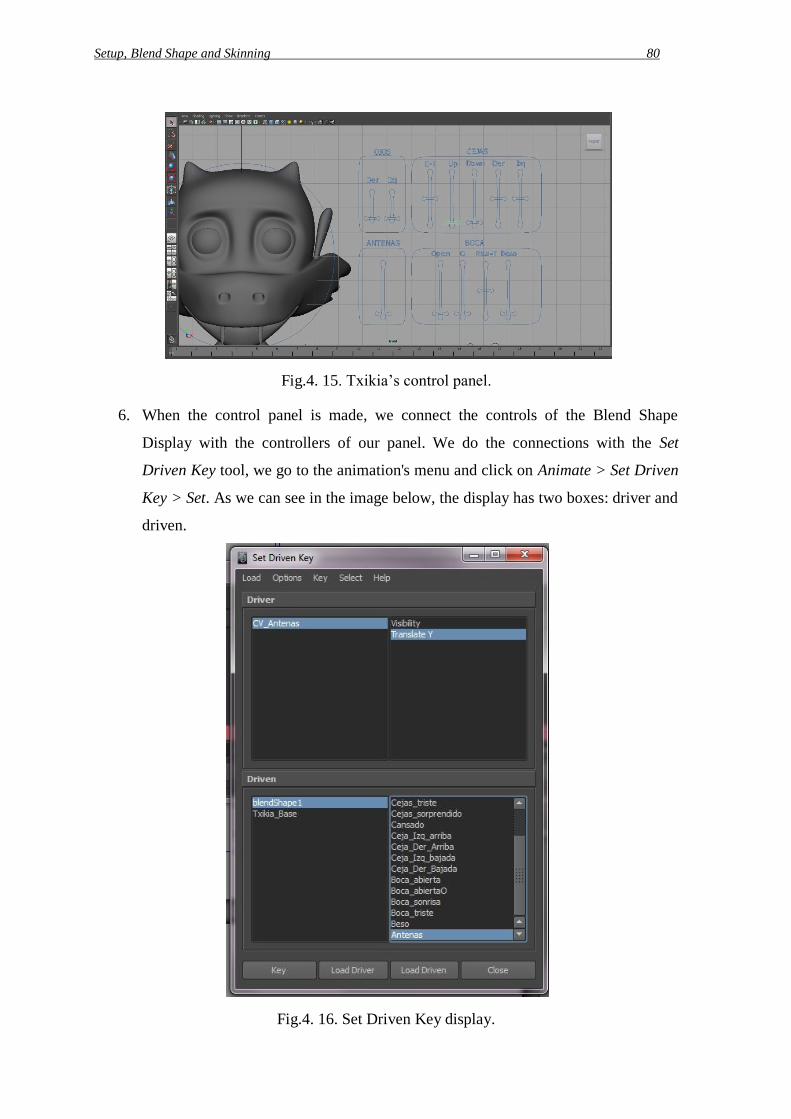
Setup, Blend Shape and Skinning 80
Fig.4. 15. Txikia’s control panel.
6. When the control panel is made, we connect the controls of the Blend Shape
Display with the controllers of our panel. We do the connections with the Set
Driven Key tool, we go to the animation's menu and click on Animate > Set Driven
Key > Set. As we can see in the image below, the display has two boxes: driver and
driven.
Fig.4. 16. Set Driven Key display.
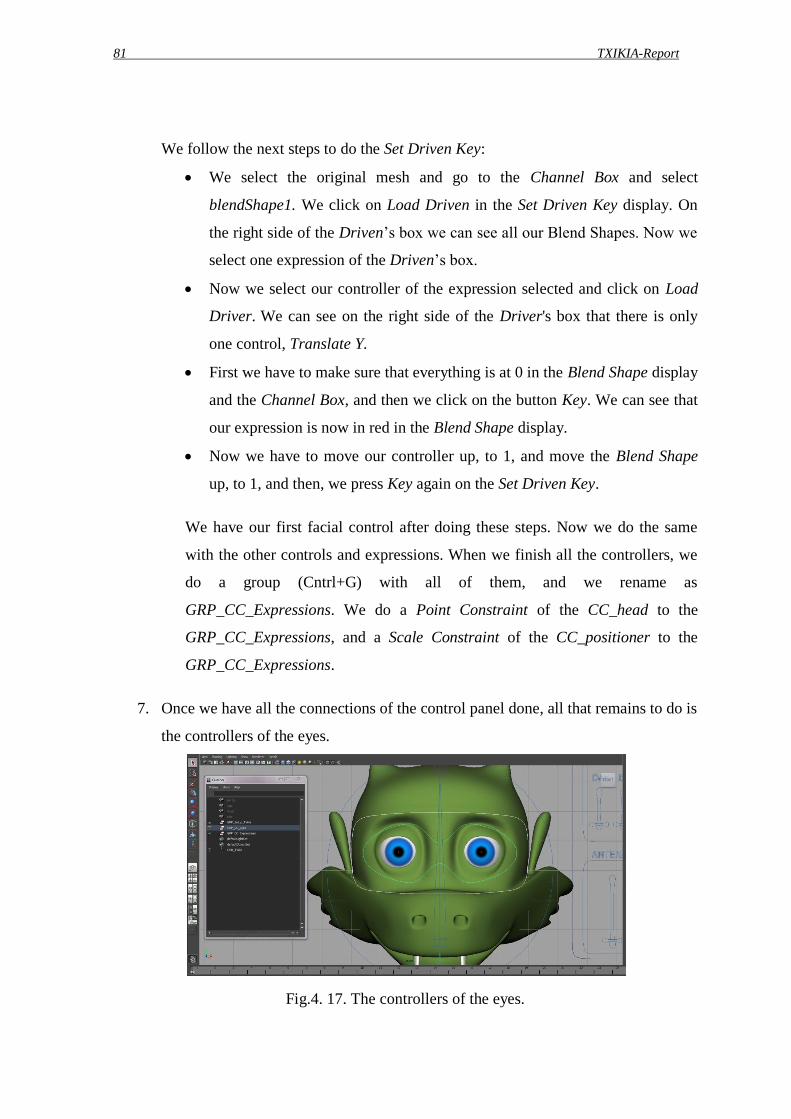
81 TXIKIA-Report
We follow the next steps to do the Set Driven Key:
We select the original mesh and go to the Channel Box and select
blendShape1. We click on Load Driven in the Set Driven Key display. On
the right side of the Driven’s box we can see all our Blend Shapes. Now we
select one expression of the Driven’s box.
Now we select our controller of the expression selected and click on Load
Driver. We can see on the right side of the Driver's box that there is only
one control, Translate Y.
First we have to make sure that everything is at 0 in the Blend Shape display
and the Channel Box, and then we click on the button Key. We can see that
our expression is now in red in the Blend Shape display.
Now we have to move our controller up, to 1, and move the Blend Shape
up, to 1, and then, we press Key again on the Set Driven Key.
We have our first facial control after doing these steps. Now we do the same
with the other controls and expressions. When we finish all the controllers, we
do a group (Cntrl+G) with all of them, and we rename as
GRP_CC_Expressions. We do a Point Constraint of the CC_head to the
GRP_CC_Expressions, and a Scale Constraint of the CC_positioner to the
GRP_CC_Expressions.
7. Once we have all the connections of the control panel done, all that remains to do is
the controllers of the eyes.
Fig.4. 17. The controllers of the eyes.
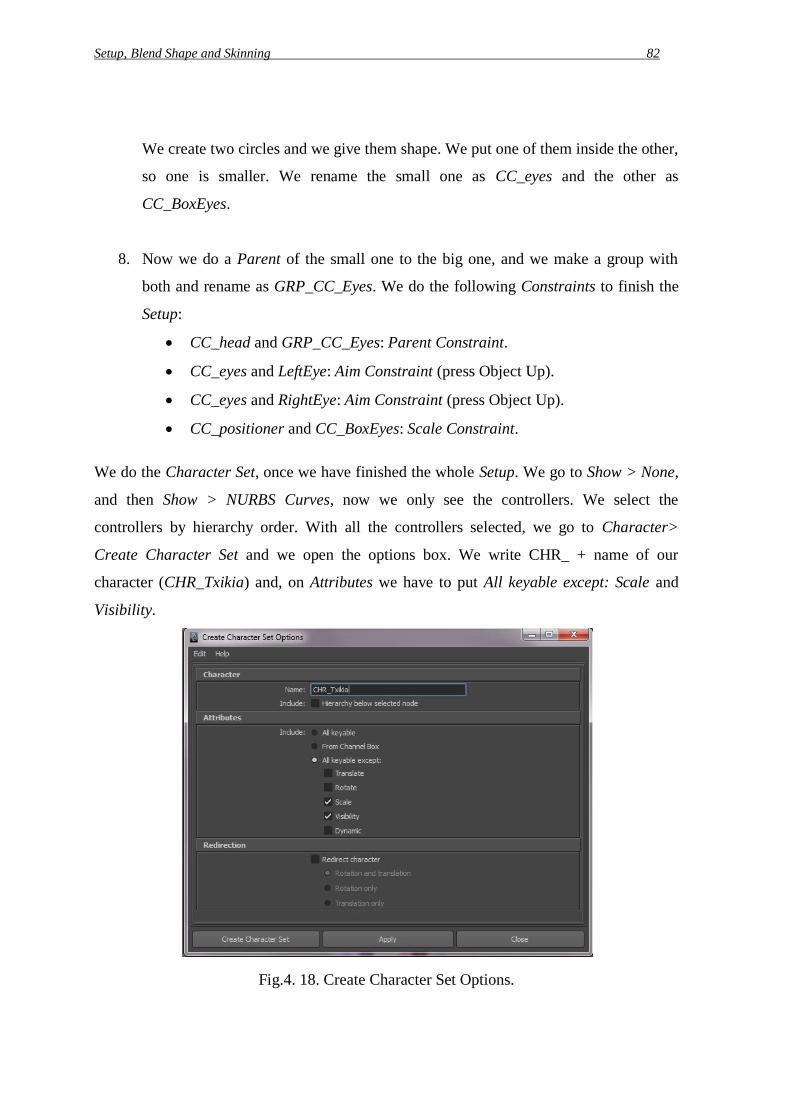
Setup, Blend Shape and Skinning 82
We create two circles and we give them shape. We put one of them inside the other,
so one is smaller. We rename the small one as CC_eyes and the other as
CC_BoxEyes.
8. Now we do a Parent of the small one to the big one, and we make a group with
both and rename as GRP_CC_Eyes. We do the following Constraints to finish the
Setup:
CC_head and GRP_CC_Eyes: Parent Constraint.
CC_eyes and LeftEye: Aim Constraint (press Object Up).
CC_eyes and RightEye: Aim Constraint (press Object Up).
CC_positioner and CC_BoxEyes: Scale Constraint.
We do the Character Set, once we have finished the whole Setup. We go to Show > None,
and then Show > NURBS Curves, now we only see the controllers. We select the
controllers by hierarchy order. With all the controllers selected, we go to Character>
Create Character Set and we open the options box. We write CHR_ + name of our
character (CHR_Txikia) and, on Attributes we have to put All keyable except: Scale and
Visibility.
Fig.4. 18. Create Character Set Options.
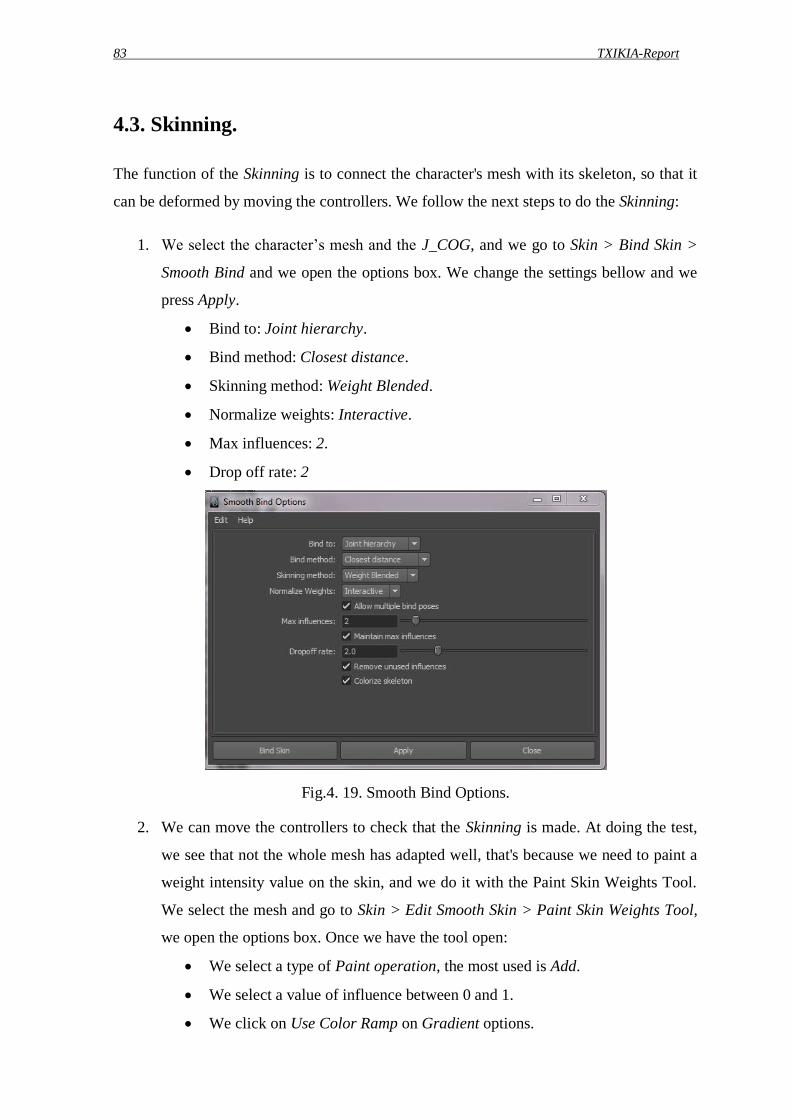
83 TXIKIA-Report
4.3. Skinning.
The function of the Skinning is to connect the character's mesh with its skeleton, so that it
can be deformed by moving the controllers. We follow the next steps to do the Skinning:
1. We select the character’s mesh and the J_COG, and we go to Skin > Bind Skin >
Smooth Bind and we open the options box. We change the settings bellow and we
press Apply.
Bind to: Joint hierarchy.
Bind method: Closest distance.
Skinning method: Weight Blended.
Normalize weights: Interactive.
Max influences: 2.
Drop off rate: 2
Fig.4. 19. Smooth Bind Options.
2. We can move the controllers to check that the Skinning is made. At doing the test,
we see that not the whole mesh has adapted well, that's because we need to paint a
weight intensity value on the skin, and we do it with the Paint Skin Weights Tool.
We select the mesh and go to Skin > Edit Smooth Skin > Paint Skin Weights Tool,
we open the options box. Once we have the tool open:
We select a type of Paint operation, the most used is Add.
We select a value of influence between 0 and 1.
We click on Use Color Ramp on Gradient options.
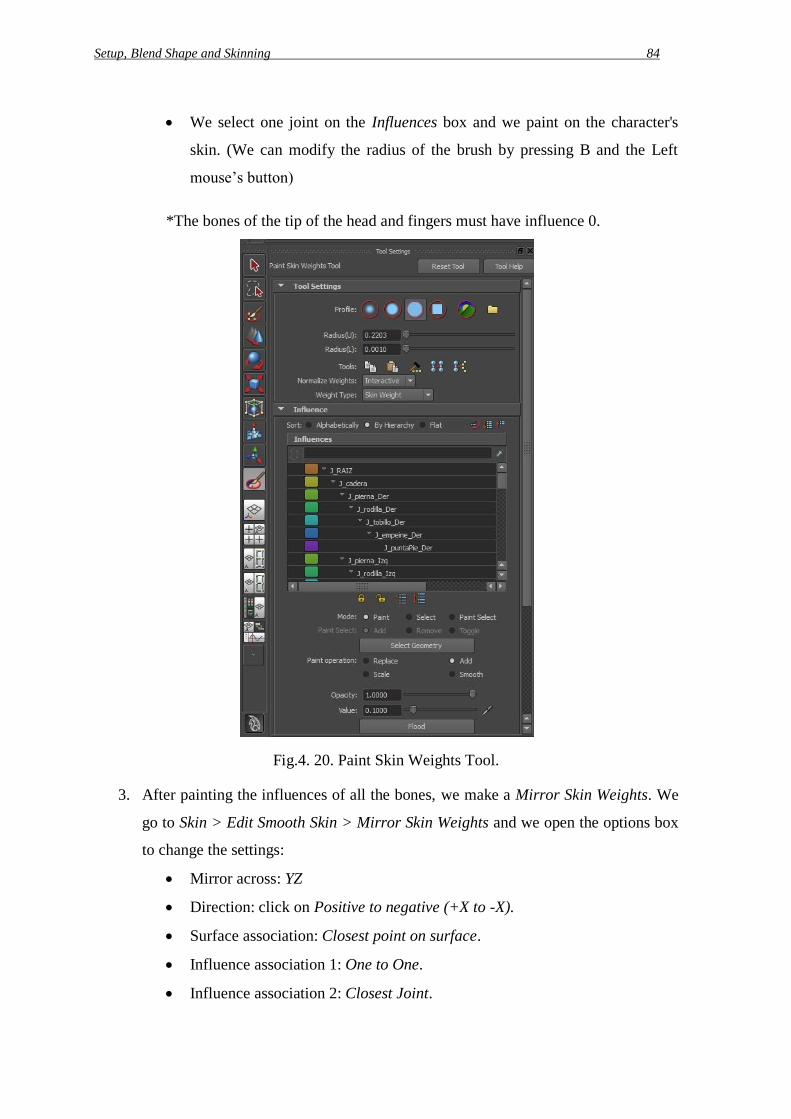
Setup, Blend Shape and Skinning 84
We select one joint on the Influences box and we paint on the character's
skin. (We can modify the radius of the brush by pressing B and the Left
mouse’s button)
*The bones of the tip of the head and fingers must have influence 0.
Fig.4. 20. Paint Skin Weights Tool.
3. After painting the influences of all the bones, we make a Mirror Skin Weights. We
go to Skin > Edit Smooth Skin > Mirror Skin Weights and we open the options box
to change the settings:
Mirror across: YZ
Direction: click on Positive to negative (+X to -X).
Surface association: Closest point on surface.
Influence association 1: One to One.
Influence association 2: Closest Joint.

85 TXIKIA-Report
Fig.4. 21. Mirror Skin Weights Options.

Lights, materials and textures 86

87 TXIKIA-Report
5. Lights, materials and textures.
5.1. Lights.
The lighting in my short animation is divided into two: the outdoor spaces and interior
spaces.
The outdoor spaces are illuminated using the Physical Sun. We follow these steps to
create the Physical Sun:
We Open the Render Settings, we press the button in the Status Line , or we go
to Window > Rendering Editors > Render Settings.
We set Render using to Mental Ray.
* If the Mental Ray option is not shown in the menu of the Render using, we go to:
Window > Settings/Preferences > Plug-in Manager and make sure the check-boxes
for Mayatomr.mll are checked.
We open the Indirect Lighting tab and we click the Create button for Physical Sun
and Sky, on the section Environment.
Fig.5. 1. Render Settings: Indirect Lighting.
We rotate the created light to determine the direction of the sun rays.
Fig.5. 2. Sun direction.
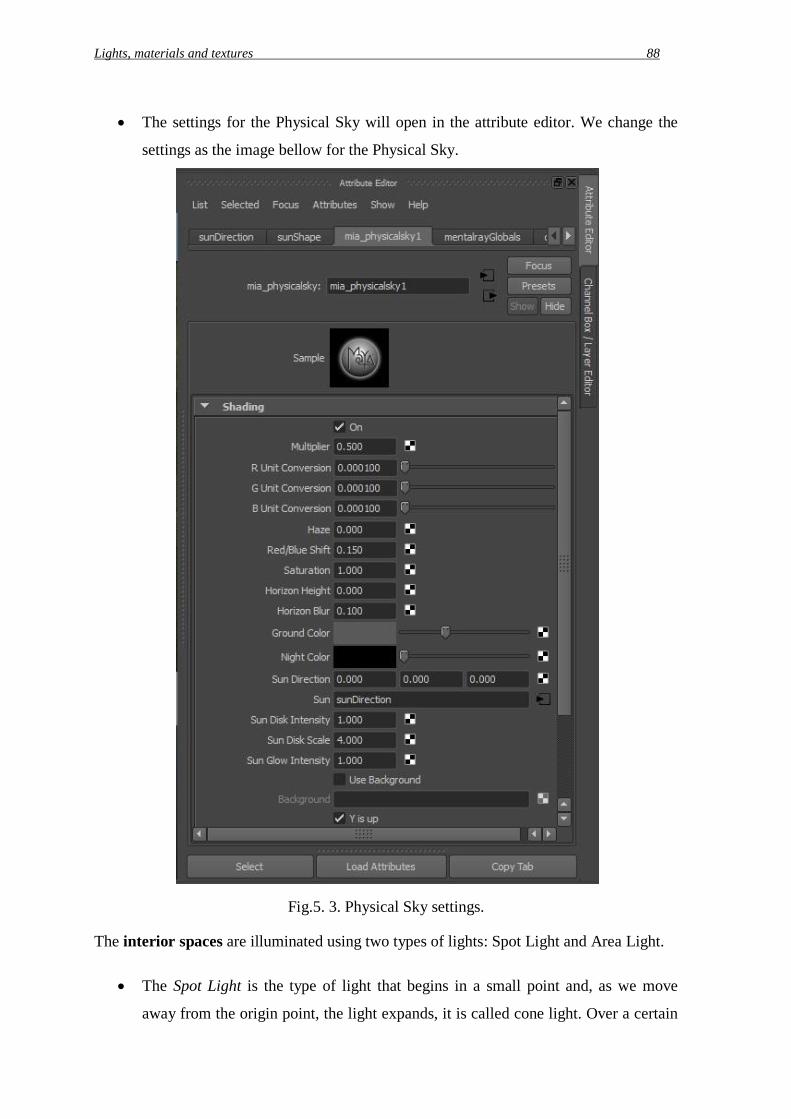
Lights, materials and textures 88
The settings for the Physical Sky will open in the attribute editor. We change the
settings as the image bellow for the Physical Sky.
Fig.5. 3. Physical Sky settings.
The interior spaces are illuminated using two types of lights: Spot Light and Area Light.
The Spot Light is the type of light that begins in a small point and, as we move
away from the origin point, the light expands, it is called cone light. Over a certain

89 TXIKIA-Report
range of the cone, the light is projected uniformly. You can cast shadows. This type
of light is used to represent reading lamps, light bulbs, headlights and flashlights.
I have used this type of light to represent the light bulbs on above the bathroom
mirror, as you can see in the image bellow.
Fig.5. 4. The bathroom lighting.
The Spot lights have some attributes changed such as Color, Intensity, Cone Angle,
Penumbra Angle and Dropoff.
Fig.5. 5. Spot Light Attributes.
The Area Light is a type of light that is emitted from a rectangular defined area.
This type of light is quite realistic, incorporating a natural effect of fading and
projecting softened shadows. It is used to simulate the rectangular reflections of
windows on surfaces.
I have used this type of light to represent the light of the windows in the living
room, and to give more light to the bathroom.
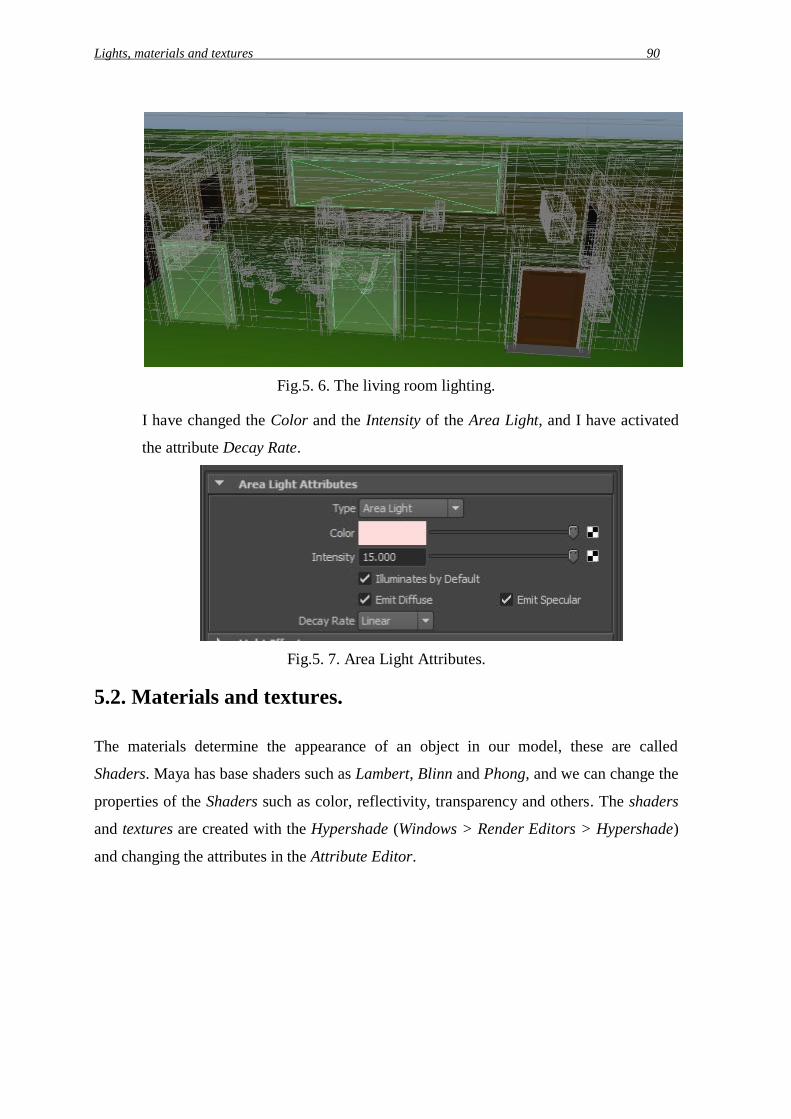
Lights, materials and textures 90
Fig.5. 6. The living room lighting.
I have changed the Color and the Intensity of the Area Light, and I have activated
the attribute Decay Rate.
Fig.5. 7. Area Light Attributes.
5.2. Materials and textures.
The materials determine the appearance of an object in our model, these are called
Shaders. Maya has base shaders such as Lambert, Blinn and Phong, and we can change the
properties of the Shaders such as color, reflectivity, transparency and others. The shaders
and textures are created with the Hypershade (Windows > Render Editors > Hypershade)
and changing the attributes in the Attribute Editor.

91 TXIKIA-Report
Fig.5. 8. Hypershade.
Fig.5. 9. Material Attributes.

Lights, materials and textures 92
All shaders and textures used in the short are described below:
Type: Blinn.
Color: R: 1,000 G: 0,943 B: 0,784
Use: Pearl necklace.
Type: Lambert.
Color: R: 0,745 G: 0,563 B: 0,307
Bump Mapping: Brick texture.
Use: Building’s ground floor.
Type: Lambert.
Color: R: 0,765 G: 0,600 B: 0, 600
Use: Mushroom stem.
Type: Lambert.
Color: R: 0,699 G: 0,666 B: 0, 590
Use: Walls of the houses.
Type: Lambert.
Color: R: 0,226 G: 0,304 B: 0,608
Use: Roof of the house of Txikia.
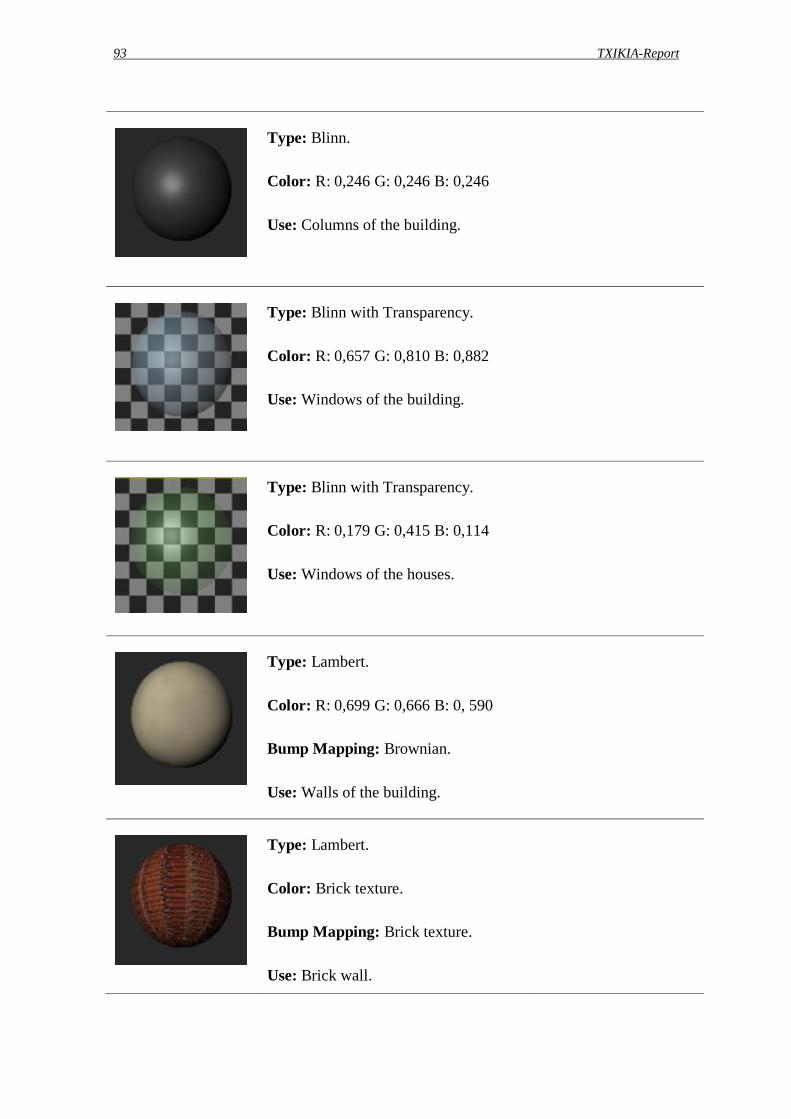
93 TXIKIA-Report
Type: Blinn.
Color: R: 0,246 G: 0,246 B: 0,246
Use: Columns of the building.
Type: Blinn with Transparency.
Color: R: 0,657 G: 0,810 B: 0,882
Use: Windows of the building.
Type: Blinn with Transparency.
Color: R: 0,179 G: 0,415 B: 0,114
Use: Windows of the houses.
Type: Lambert.
Color: R: 0,699 G: 0,666 B: 0, 590
Bump Mapping: Brownian.
Use: Walls of the building.
Type: Lambert.
Color: Brick texture.
Bump Mapping: Brick texture.
Use: Brick wall.
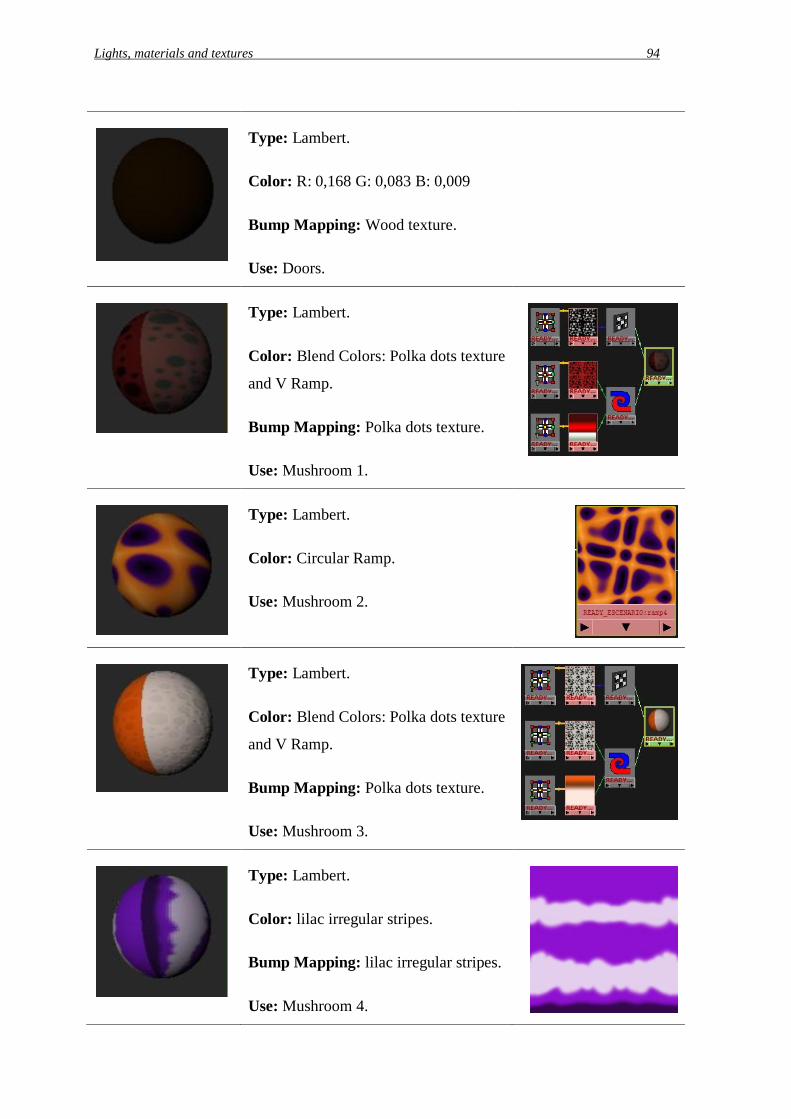
Lights, materials and textures 94
Type: Lambert.
Color: R: 0,168 G: 0,083 B: 0,009
Bump Mapping: Wood texture.
Use: Doors.
Type: Lambert.
Color: Blend Colors: Polka dots texture
and V Ramp.
Bump Mapping: Polka dots texture.
Use: Mushroom 1.
Type: Lambert.
Color: Circular Ramp.
Use: Mushroom 2.
Type: Lambert.
Color: Blend Colors: Polka dots texture
and V Ramp.
Bump Mapping: Polka dots texture.
Use: Mushroom 3.
Type: Lambert.
Color: lilac irregular stripes.
Bump Mapping: lilac irregular stripes.
Use: Mushroom 4.
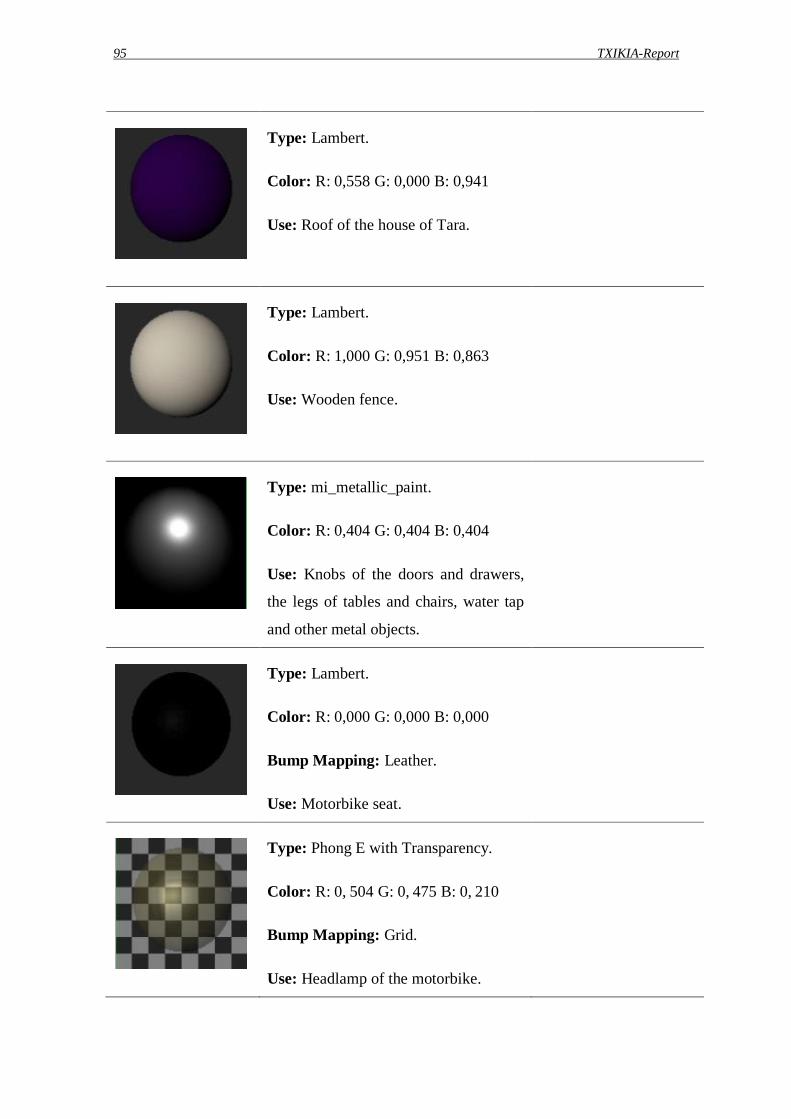
95 TXIKIA-Report
Type: Lambert.
Color: R: 0,558 G: 0,000 B: 0,941
Use: Roof of the house of Tara.
Type: Lambert.
Color: R: 1,000 G: 0,951 B: 0,863
Use: Wooden fence.
Type: mi_metallic_paint.
Color: R: 0,404 G: 0,404 B: 0,404
Use: Knobs of the doors and drawers,
the legs of tables and chairs, water tap
and other metal objects.
Type: Lambert.
Color: R: 0,000 G: 0,000 B: 0,000
Bump Mapping: Leather.
Use: Motorbike seat.
Type: Phong E with Transparency.
Color: R: 0, 504 G: 0, 475 B: 0, 210
Bump Mapping: Grid.
Use: Headlamp of the motorbike.

Lights, materials and textures 96
Type: mi_car_paint_phen_x.
Color: R: 0,341 G: 0,341 B: 0,341
Use: Metal parts of the motorbike.
Type: mi_car_paint_phen.
Color: R: 0,000 G: 0,000 B: 0,000
Use: Black metal parts of the
motorbike.
Type: Lambert.
Color: R: 0,342 G: 0,067 B: 0,067
Use: Mouth.
Type: Blinn.
Color: R: 0,852 G: 0,863 B: 0,795
Use: Fangs.
Type: Lambert.
Color: R: 0,299 G: 0,529 B: 0,052
Use: Txikia.
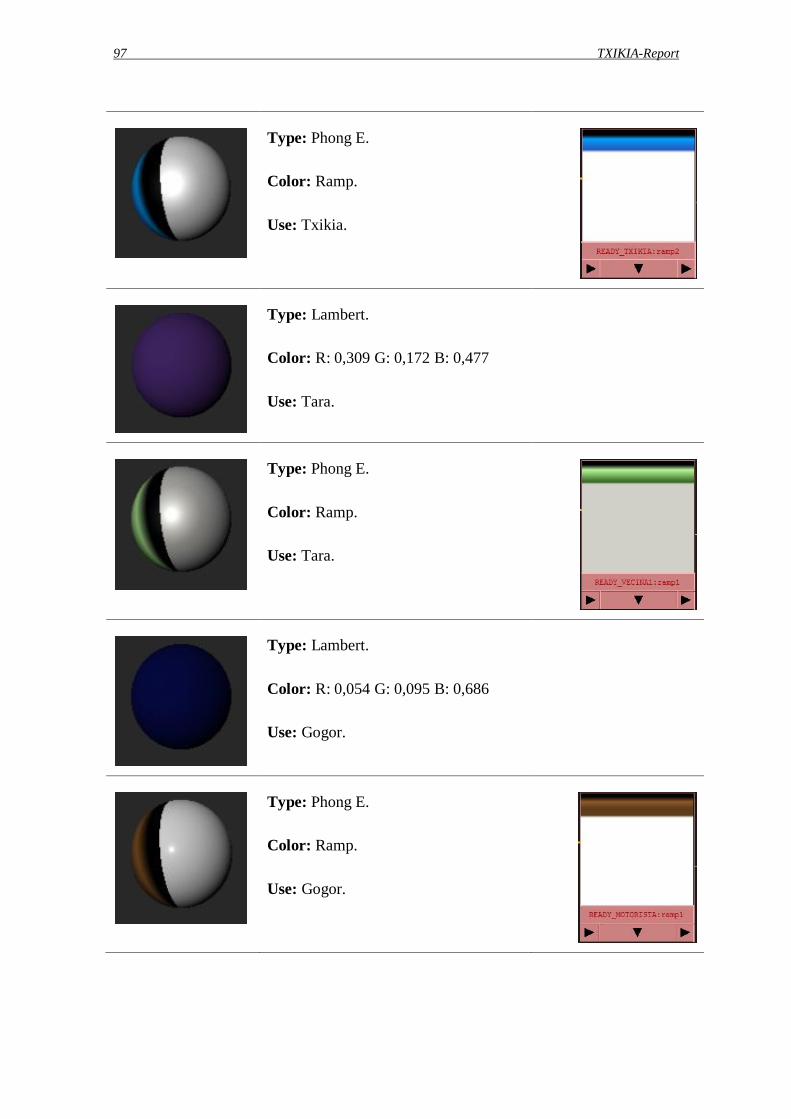
97 TXIKIA-Report
Type: Phong E.
Color: Ramp.
Use: Txikia.
Type: Lambert.
Color: R: 0,309 G: 0,172 B: 0,477
Use: Tara.
Type: Phong E.
Color: Ramp.
Use: Tara.
Type: Lambert.
Color: R: 0,054 G: 0,095 B: 0,686
Use: Gogor.
Type: Phong E.
Color: Ramp.
Use: Gogor.
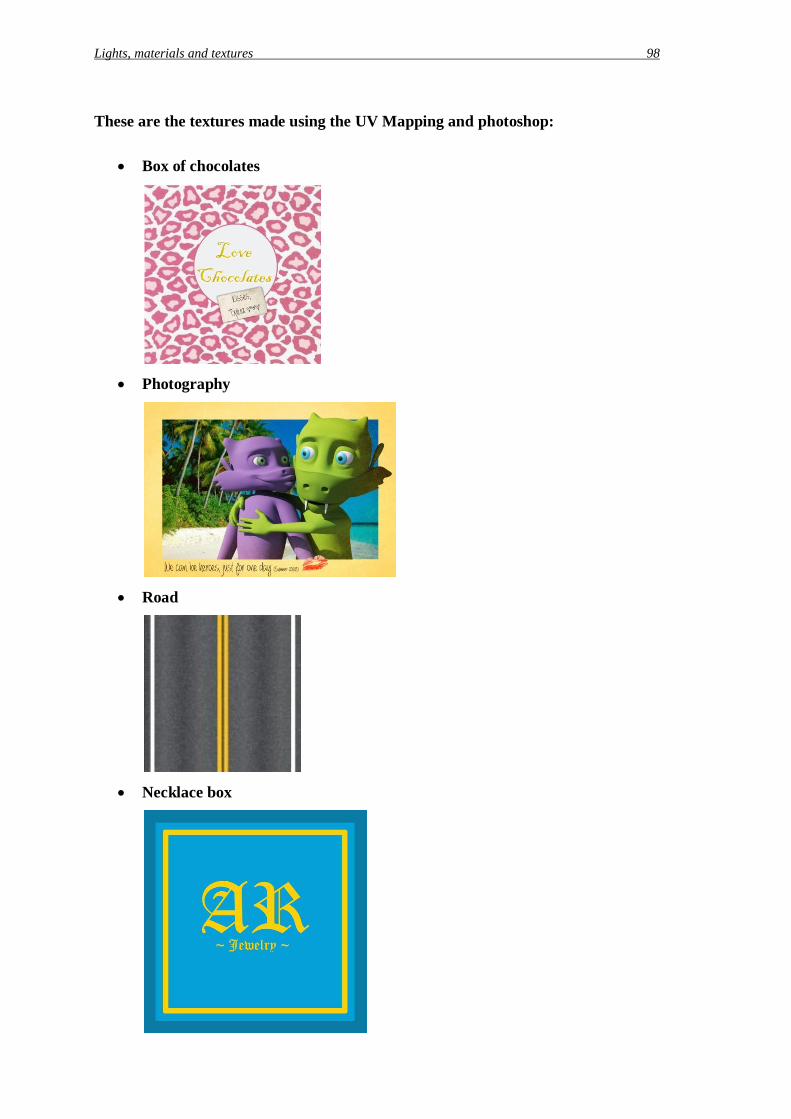
Lights, materials and textures 98
These are the textures made using the UV Mapping and photoshop:
Box of chocolates
Photography
Road
Necklace box
99 TXIKIA-Report
Wheel
Mountains
Garden

Lights, materials and textures 100
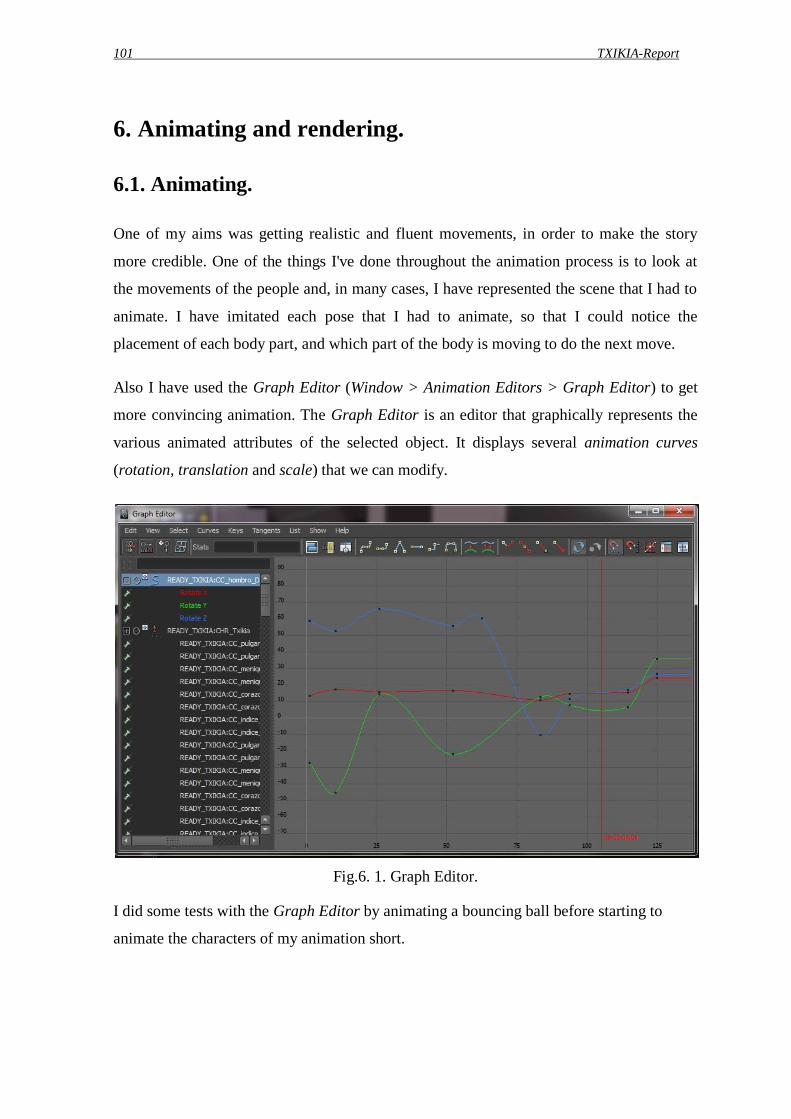
101 TXIKIA-Report
6. Animating and rendering.
6.1. Animating.
One of my aims was getting realistic and fluent movements, in order to make the story
more credible. One of the things I've done throughout the animation process is to look at
the movements of the people and, in many cases, I have represented the scene that I had to
animate. I have imitated each pose that I had to animate, so that I could notice the
placement of each body part, and which part of the body is moving to do the next move.
Also I have used the Graph Editor (Window > Animation Editors > Graph Editor) to get
more convincing animation. The Graph Editor is an editor that graphically represents the
various animated attributes of the selected object. It displays several animation curves
(rotation, translation and scale) that we can modify.
Fig.6. 1. Graph Editor.
I did some tests with the Graph Editor by animating a bouncing ball before starting to
animate the characters of my animation short.
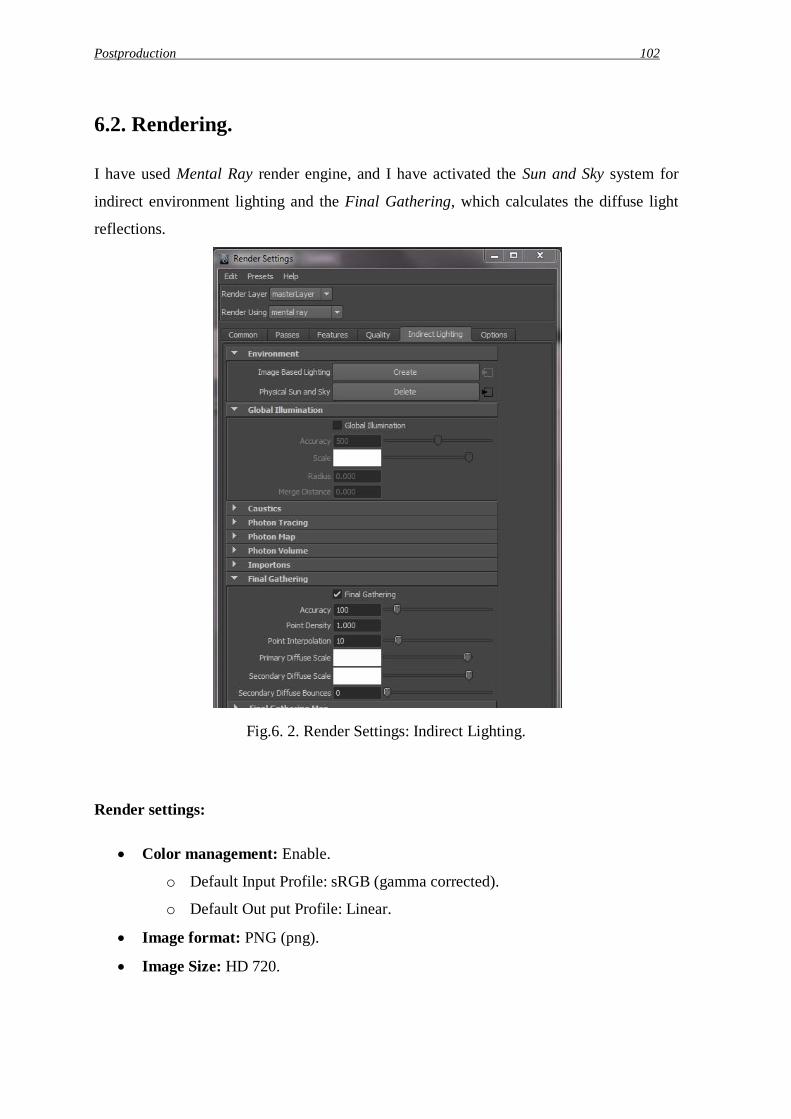
Postproduction 102
6.2. Rendering.
I have used Mental Ray render engine, and I have activated the Sun and Sky system for
indirect environment lighting and the Final Gathering, which calculates the diffuse light
reflections.
Fig.6. 2. Render Settings: Indirect Lighting.
Render settings:
Color management: Enable.
o Default Input Profile: sRGB (gamma corrected).
o Default Out put Profile: Linear.
Image format: PNG (png).
Image Size: HD 720.

103 TXIKIA-Report
Fig.6. 3. Render Settings: Quality.

Postproduction 104

105 TXIKIA-Report
7. Postproduction.
Once I had all the scenes rendered, I began the post production that consist in: editing the
images I have already rendered, recording the voices, editing the audio and color
retouching.
7.1. Video Edit.
The software that I have used in the post production is Premiere Pro CS6, which is a video
editing program.
The edition of the images was easy because I made the rendering according to the
storyboard, so I did not have to make many cuts in the scenes clips.
The voice recording was made while watching the animation short, in order to have
the voices synchronized at the time to do the edition sound. The voices were
performed by:
o Aitor Ruiz: Gogor (The handsome boy).
o Sandra Gutierrez: Tara (The neighbor).
o Amaia Sémper: Txikia (The main character).
In sound editing I have also used music and sounds of doors, ambients, birds, hits
and others, all of them without copyright. I have downloaded them from:
o Audionauti X (www.audionautix.com)
o Free SFX (www.freesfx.co.uk//soundeffects)
o Freesound (www.freesound.org)
7.1. Unforeseen problems.
I had some unexpected problems during the post production that delayed me in the editing
process. The animation's classroom did not have any video editing program. I had to wait
until the video classroom was free to use the computers there, to see if the program that I
wanted to use was avalible. Then, I began the edition from a previous I had made at home.
When I wanted to see how it was running well, I realize that the program stopped playing
after a second of playback. For that reason, I decided to do the edition in my laptop. Then I

Postproduction 106
found out it did not have enough RAM to do the render. I had to try different friend's
laptops, but the problem was to find the suitable version to do the render, and I found it at
the last moment.
107 TXIKIA-Report
6. Conclusions.
I decided to make an animated short because it was a personal challenge. It is known that
creating a short on your own is very difficult. I had never before made all the process to
create it, so I had to learn nearly all from the beginning.
First of all I had to create a story with a message, in this case was: "If you do not respect
the people, someday it will turn against you".
In this document it has been developed all the most important aspects of the creation
process of an animated short. I had described in detail the process of: modeling, Set up,
rigging, texturing, lighting, animating, rendering and editing.
I am proud with the results obtained because, I have achieved not only make an animated
short but a fluidity of movements and very expressive characters, which are the soul of my
short animation.

Conclusions 108

109 TXIKIA-Report
7. References.
[1] Franck Thomas and Ollie Johnson 1981, “The illusion of Life, Disney animation”,
Chapter 3 rd, The principles of animation, pp. 47-69, (Abbeville Press).
[2] Isaac Kerlow 2003, 2The Art of 3D Computer Animation and Effects”, 3 rd Edition
(Wiley).
[3] John Lasseter 1987, Principles of Traditional Animation Applied to 3D Computer
Animation, Vol. 21, Computer Graphics, pp. 35-44, (SIGGRAPH).
[4] Animación 2D o 3D?, 2008 <http://www.animacion2d3d.blogspot.com.es/>
[5] Animación 3D, 2009 <http://www.otaku1318.blogspot.com.es/>
[6] Animaholic <http://www.blog.animaholic.org/2006/03/los-12-4-nuevos-principios-
de-la.html>
[7] DDesign, 2006 <http://ddsign.wordpress.com/2006/05/15/los-12-principios-de-la-
animacion/
[8] Escardo <http://www.escardo.com/foros/viewtopic.php?t=75>
[9] EVL UIC <http://www.evl.uic.edu/ralph/508S99/contents.html>
[10] TUDelft <http://wiki.bk.tudelft.nl/toi-pedia/Main_Page>
Graduat en Mitjans Audiovisuals
TXIKIA
Economic study
AMAIA SÉMPER GONZÁLEZ PONENT: DAVID MINGUILLÓN
SUMMER 2013


Index.
1. Budget. ....................................................................................................................... 1
1.1. Material cost........................................................................................................... 1
1.2. Human resources. ................................................................................................... 1
1.3. Equipment and software. ....................................................................................... 2
1.4. Total project cost.................................................................................................... 2

1 TXIKIA
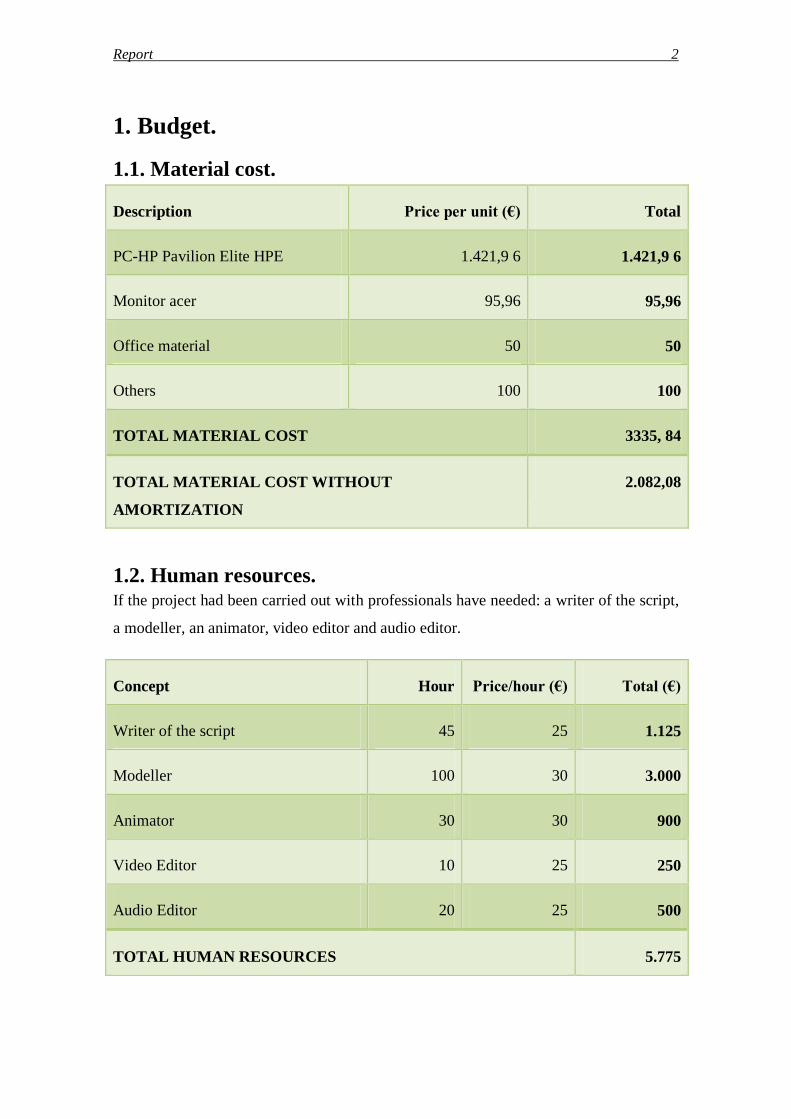
Report 2
1. Budget.
1.1. Material cost.
Description Price per unit (€) Total
PC-HP Pavilion Elite HPE 1.421,9 6 1.421,9 6
Monitor acer 95,96 95,96
Office material 50 50
Others 100 100
TOTAL MATERIAL COST 3335, 84
TOTAL MATERIAL COST WITHOUT
AMORTIZATION
2.082,08
1.2. Human resources. If the project had been carried out with professionals have needed: a writer of the script,
a modeller, an animator, video editor and audio editor.
Concept Hour Price/hour (€) Total (€)
Writer of the script 45 25 1.125
Modeller 100 30 3.000
Animator 30 30 900
Video Editor 10 25 250
Audio Editor 20 25 500
TOTAL HUMAN RESOURCES 5.775

3 TXIKIA
1.3. Equipment and software. One of the things that we have to do in the economic study is to calculate the lifespan of
our equipments and software, in order to know if they are profitable for our project.
Equipement and softward Price N (years) Euros/year
PC-HP Pavilion Elite HPE 1.421,96 5 284,39
Monitor acer 95,96 8 12
Autodesk Maya 3.900 4 975
Adobe Premiere Pro 299,4/year 1 299,4
TOTAL YEAR AMORTIZATIONS 1.570,79
1.4. Total project cost.
Material cost 2.082,08 €
Human sources cost 5.775 €
Equipment and software 1.570,79 €
TOTAL 9.427,87 €

Graduat en Mitjans Audiovisuals
TXIKIA
Annex
AMAIA SÉMPER GONZÁLEZ
PONENT: DAVID MINGUILLÓN
SUMMER 2013

GLYNDWR UNIVERSITY
THE EFFECTS OF THE ARRIVAL
OF 3D IN THE 12 PRINCIPLES OF
ANIMATION DISSERTATION
Amaia Sémper González
INDEX 1. INTRODUCTION ................................................................................................................4
2. THE ORIGINAL 12 PRINCIPLES OF ANIMATION ........................................................5
2.1. Squash and stretch .....................................................................................................5
2.2. Anticipation ...............................................................................................................5
2.3. Staging.......................................................................................................................6
2.4. Straight ahead action and pose to pose ......................................................................6
2.5. Follow through and overlapping action .....................................................................7
2.6. Slow in and slow out .................................................................................................7
2.7. Arcs ..........................................................................................................................8
2.8. Secondary action ......................................................................................................8
2.9. Timing ......................................................................................................................9
2.10. Exaggeration .............................................................................................................9
2.11. Solid drawing ...........................................................................................................9
2.12. Appeal .................................................................................................................... 10
3. FROM 2D TO 3D .............................................................................................................. 11
4. THE NEW PRINCIPLES ................................................................................................... 13
4.1. Visual styling ........................................................................................................... 13
4.2. Blend motion ........................................................................................................... 14
4.3. Cinematography ...................................................................................................... 14
4.4. Facial animation ...................................................................................................... 15
5. CONCLUSIONS ................................................................................................................ 17
6. REFERENCES ................................................................................................................... 18
7. BIBLIOGRAPHY .............................................................................................................. 19
1. INTRODUCTION The Twelve Principles of Animation were introduced by Ollie Johnston and Frank Thomas in
their book The Illusion of Life: Disney Animation in 1981. Both were animators in Walt Disney
Studios and they based these principles in the work of the animators from the 1930s and their
effort to produce more realistic animations. These principles helped to consider the animation as
a way of art, and were initially applied to animated movies that now are classics, like Snow
White (1937), Pinocchio and Fantasia (1940), Dumbo (1941), and Bambi (1942).
On the one hand, the aim of the principles is to guide the production, creative discussions, the
action, and the representation of the reality by applying real world physics. On the other hand, it
is also important to advise about other aspects, such as helping to create emotional moments and
engaging characters.
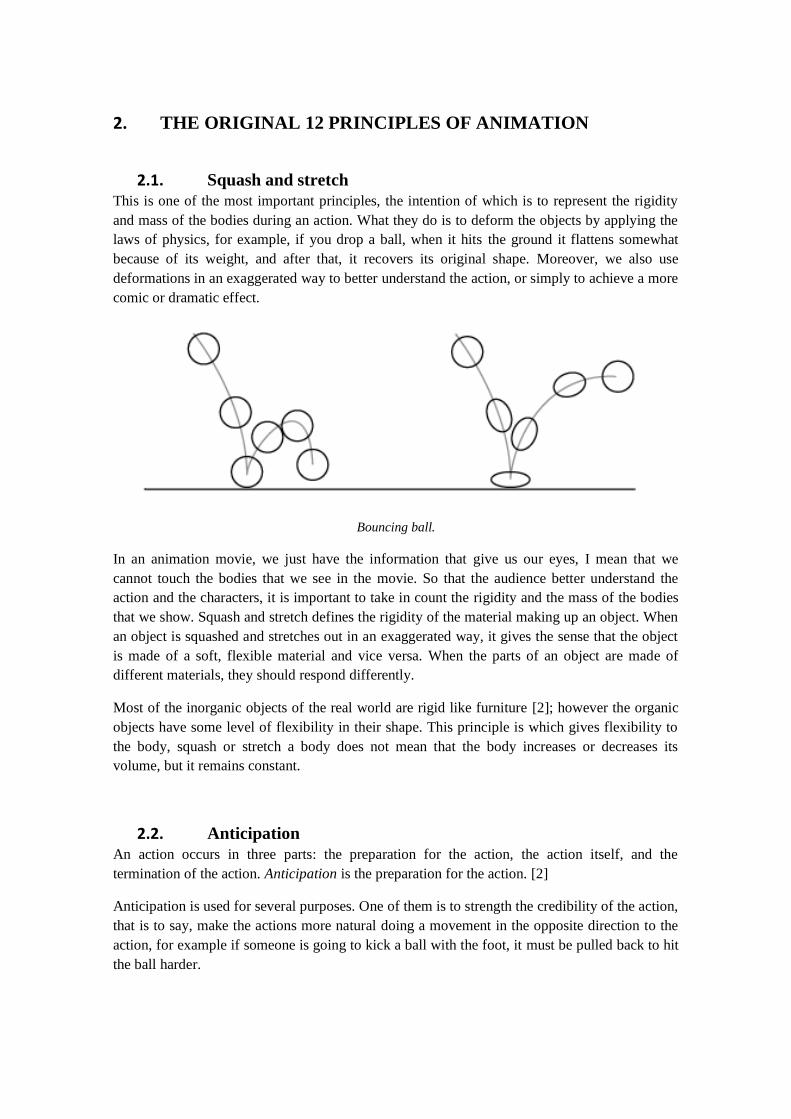
2. THE ORIGINAL 12 PRINCIPLES OF ANIMATION
2.1. Squash and stretch
This is one of the most important principles, the intention of which is to represent the rigidity
and mass of the bodies during an action. What they do is to deform the objects by applying the
laws of physics, for example, if you drop a ball, when it hits the ground it flattens somewhat
because of its weight, and after that, it recovers its original shape. Moreover, we also use
deformations in an exaggerated way to better understand the action, or simply to achieve a more
comic or dramatic effect.
Bouncing ball.
In an animation movie, we just have the information that give us our eyes, I mean that we
cannot touch the bodies that we see in the movie. So that the audience better understand the
action and the characters, it is important to take in count the rigidity and the mass of the bodies
that we show. Squash and stretch defines the rigidity of the material making up an object. When
an object is squashed and stretches out in an exaggerated way, it gives the sense that the object
is made of a soft, flexible material and vice versa. When the parts of an object are made of
different materials, they should respond differently.
Most of the inorganic objects of the real world are rigid like furniture [2]; however the organic
objects have some level of flexibility in their shape. This principle is which gives flexibility to
the body, squash or stretch a body does not mean that the body increases or decreases its
volume, but it remains constant.
2.2. Anticipation
An action occurs in three parts: the preparation for the action, the action itself, and the
termination of the action. Anticipation is the preparation for the action. [2]
Anticipation is used for several purposes. One of them is to strength the credibility of the action,
that is to say, make the actions more natural doing a movement in the opposite direction to the
action, for example if someone is going to kick a ball with the foot, it must be pulled back to hit
the ball harder.

Oliver is doing the anticipation to kick the ball. Oliver and Benji.
Anticipation is also used to direct the attention of the audience to one side of the screen in the
right moment. It is important to prepare them for an action that is going to happen, so that the
audience not miss anything. Anticipation is often used to explain what the following action is
going to be. Before an angry character closes the door, firstly he opens it slowly, letting the
public know that he will close it abruptly.
The duration of the anticipation affects the speed of the action that follows it. If the audience is
awaiting an action, anticipation can be faster. But if the public does not expect anything to
happen, the anticipation must be longer or the action slower. The anticipation is related to the
level of surprise and suspense; if it is large, you will get more suspense, but less surprise, and
vice versa.
2.3. Staging
This is one of the most important principles because it covers different areas. Staging is the
organization of the elements in the scene to present an idea clearly. When I say idea, I am
referring to an action, an expression or a feeling.
To submit an idea, it is necessary that the audience is watching the main action at the right time.
We are the ones who have to guide the public eye. It is important to present just one idea,
otherwise, if several actions happen simultaneously, the audience may be lost and the main idea
can be overlooked. We should not add elements at the scene because they are cute or funny.
Instead, we have to think that the elements of the scene are part of the idea and they have to help
the audience to understand what is happening.
In the staging, it is important to have in count the angle and the distance of the camera relative
to the idea. For example, if the main action is an expression, we must do a close shot.
2.4. Straight ahead action and pose to pose
There are two different techniques to animate. One of them is called Straight Ahead Action,
because the animator works straight ahead from his first drawing in the scene. He simply does
one drawing after the other, getting new ideas as he goes along, until he finishes the scene. This

technique helps the action to get a fresh, slightly zany look, owing to the fact that the whole
process is very creative.
Straight Ahead Action is used in high-action scenes, such as fights, where spontaneity is
important.
The other animation's technique is called Pose To Pose. Here, the animator has to plan his
actions to know what drawings are going to be needed to animate the scene. Firstly, they make
the drawings of the key poses, relating them to each other in size and action, and after that, are
made the in-betweens. With Pose To Pose, there is clarity and strength.
The two methods are still used, is chosen one or another depending on what requires action.
2.5. Follow through and overlapping action
“Just as the anticipation is the preparation of an action, follow through and overlapping action is
the termination of an action and establishing its relationship to the next action” as noted by
Frank Thomas and Ollie Johnson. [1]
The actions hardly ever stop suddenly, but are generally carried past their termination point. For
example, when someone kicks a ball, his leg does not stop suddenly after the hit, instead, the
inertia makes the leg continues after the point of release until he slows totally.
An action neither should finish abruptly nor come to a completely stop before starting another
action, and the second action has to overlap the first.
Overlapping maintains a continual flow and continuity between whole phrases of actions. [3]
2.6. Slow in and slow out
Slow in and Slow out deals with the spacing of the in-between drawings between the extreme
poses.
Usually, the elements need an acceleration to achieve a constant or a maximum velocity, and a
deceleration to stop. It is rare for something to moves from the start to the end at a constant
speed; that is because there are factors that influence the movement of bodies, like for example,
gravity.
For example, if we drop a ball, it accelerates as it falls; the force that pushes the ball to the
ground is gravity. When the ball hits the ground, it loses speed, but as it moves away from the
ground, the ball, gets speed.
Slow in and Slow out helps us to get more natural movements.
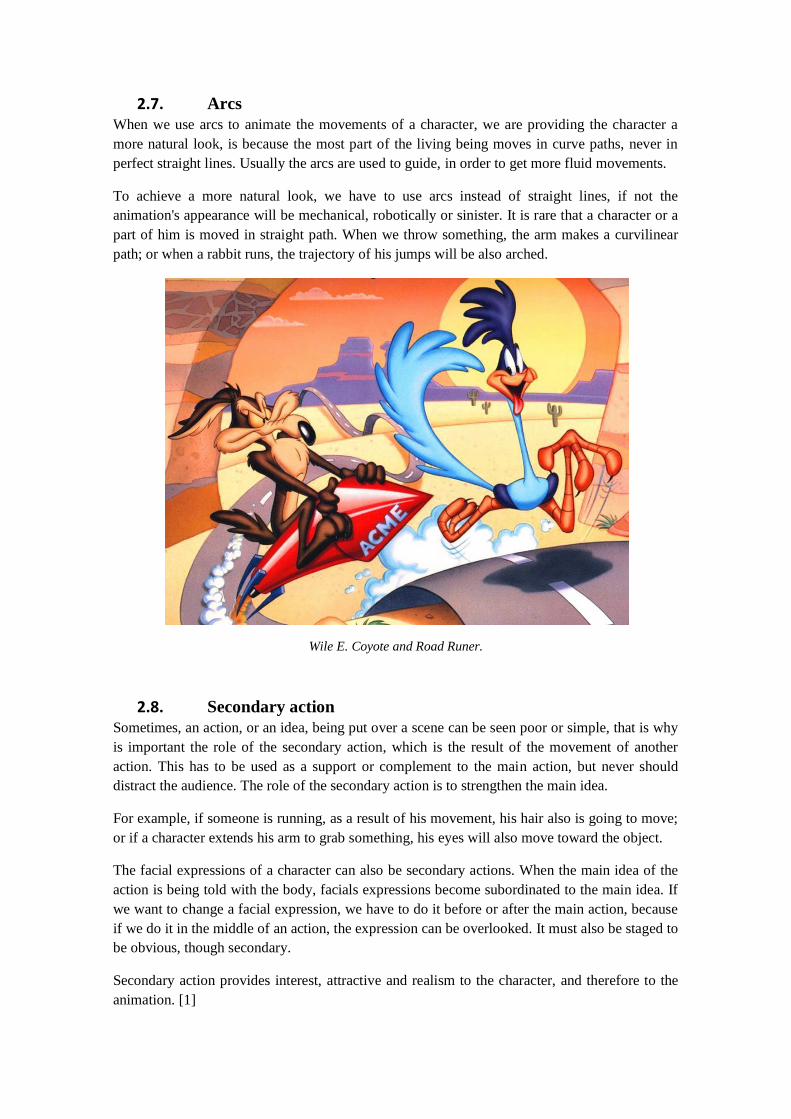
2.7. Arcs
When we use arcs to animate the movements of a character, we are providing the character a
more natural look, is because the most part of the living being moves in curve paths, never in
perfect straight lines. Usually the arcs are used to guide, in order to get more fluid movements.
To achieve a more natural look, we have to use arcs instead of straight lines, if not the
animation's appearance will be mechanical, robotically or sinister. It is rare that a character or a
part of him is moved in straight path. When we throw something, the arm makes a curvilinear
path; or when a rabbit runs, the trajectory of his jumps will be also arched.
Wile E. Coyote and Road Runer.
2.8. Secondary action
Sometimes, an action, or an idea, being put over a scene can be seen poor or simple, that is why
is important the role of the secondary action, which is the result of the movement of another
action. This has to be used as a support or complement to the main action, but never should
distract the audience. The role of the secondary action is to strengthen the main idea.
For example, if someone is running, as a result of his movement, his hair also is going to move;
or if a character extends his arm to grab something, his eyes will also move toward the object.
The facial expressions of a character can also be secondary actions. When the main idea of the
action is being told with the body, facials expressions become subordinated to the main idea. If
we want to change a facial expression, we have to do it before or after the main action, because
if we do it in the middle of an action, the expression can be overlooked. It must also be staged to
be obvious, though secondary.
Secondary action provides interest, attractive and realism to the character, and therefore to the
animation. [1]
2.9. Timing
Timing, or speed of an action, is the time that an action takes to develop. This principle can
seem very basic, but is one of the most important things that we have to take in count at the time
to animate. The time must always be present in every step we take. Timing not only defines the
time it takes to perform an action, but also help us to reveal to the audience the weight and size
of a character or an object that is animated, and can even carry emotional meaning.
On the one hand, the Timing influences the appearance of weight that has an animated object.
Two objects with identical size and shape can appear to be two different weights by changing
his timing. A heavy body is slower and need more force to accelerate or decelerate than a lighter
one. Light objects are easier to change their movements and need less time to start moving.
On the other hand, timing can also contribute in the sensation of scale or size of an object or
character. A giant will have much more weight than a tiny character, and because of that, he will
move slower, as we noted above.
Ultimately, timing plays a very important role at the time to represent the emotions of a
character. The velocity at which a character performs an action can reveal your mood, if
nervous, quiet or tired. For example, if someone blinks fast, he will seem alert and awake. If he
blinks slowly, he will seem bored and tired.
2.10. Exaggeration
The aim of this principle is emphasize certain actions that can be important to tell our story. The
animator has to find the essence of each idea, understand it and know what he wants to transmit,
in that way, the animator will make the audience to believe and get excited for the story.
It is about bringing an action to the extreme. If a character is sad, make him seem sadder; if he is
angry, make him furious; and if he is happy, make him jump for joy. Nor should we fall into the
trap of exaggerating arbitrarily without thinking about why we do it, or worse, exaggerate
everything in the scene; because the animation will go from be realistic to be violent or not
credible.
The exaggeration can be applied to any element of the scene: design, shape of the objects or
characters, action, pose, emotion, colour and even sound; but should not be used in isolation,
nor apply exaggeration to all the elements of the scene.
2.11. Solid drawing
Learn to draw is important because you have to know how to draw every character in all
possible positions and from all angles to achieve a good production. As Grim Natwick said
“You should learn to draw as well as possible before starting to animate”. The more the
animator learns to draw, the more solid his drawing will be. Therefore his characters will be
able to get more possibilities of movement and action, achieving an original product. As Marc
Davis said “Drawing is giving a performance; an artist is an actor who is not limited by his
body, only by his ability and, perhaps, experience”.

To achieve a solid drawing we should have in count the weight, the structure, the perspective
and the proportions, the balance and, the lights and shadows of the objects and the characters.
When we are animating we should have a character with a strong and consistent structure,
because if we turn the body of the character to one side, his parts such as eyes, mouth, arms,
legs, and head have to remain in place without losing coherence.
We always should have activated the sense of perspective, so that objects that are further away
from the camera have to be proportionately smaller than those that are closer.
Although our animation is going to be two dimensions, we have to think that the world we are
creating is in three dimensions, and therefore the characters have depth, weight and balance.
2.12. Appeal
If we want to excite the public with our animation, we must not only do an original and
interesting story, but we must also create characters equally original and interesting.
The appearance of a character must be seductive, with appealing, and be nice to our eyes
whether as much he is a villain as an angel. They must have charm and transmit something to
the audience. They should have independent personalities; two or more characters should not
react in the same manner, unless this feature plays an important role in the story. To avoid
creating two identical characters, we should create a story for every one of the characters. We
should know where they come from, what they have done in life, how they relate to other
characters, which are their needs, interests and desires, and where they want to go. This way we
will know how they will react to different situations that arise and without being out of place.
The animator must know well the story of a character before start to animate. Is also important
to know the character's mood at all time, considering that a character will react or move
differently depending on how they feel. If a character is sad or tired, he will walk slower than if
he is happy or nervous.
In this principle we have to apply the knowledge of all the principles that we have seen
previously, because we can create an incredible character but if we do not know how to move it,
it will have been a waste of time. To achieve an appealing character, we must remember to use
arcs, avoid the symmetry and stiffness, use exaggeration and secondary action, among others.
In summary, it's about making a character come to life and to give him a personality according
to their actions, and try to establish an emotional connection with the audience.

3. FROM 2D TO 3D
Traditional animation or two dimensional is an art form that became popular in the 19th century
with the creation of the zoetrope, which is a device that produces the illusion of motion from a
rapid succession of static pictures; and the flipbook, that is a book with a series of pictures that
vary gradually frame one page to the next, so that when the pages are turned rapidly, the
pictures appear to animate by simulating motion. Shortly after, the first animations were done,
frame by frame was drawn by hand, until it developed a system that reduced much of the work
of the animators, the celluloid, a transparent plastic in which can draw and color. This system
was used to reduce the large number of static backgrounds, 24 drawings for second were
reduced to one. Since 1920, the animation techniques began to change and evolve in order to
improve the development and realism of the animations. The rotoscope was an invention that
helped convey the naturalness and sequential pattern of movements, expressions, lights,
shadows and proportions typical of real life. The advancement of technology has enabled the
emergence of three-dimensional animation. Although 2D and 3D are animations, the
capabilities of each one and the process to create them, differ greatly.
The process of creating animations in 3D can only be done with a computer with
software such as 3D Studio Max or Maya. Although 2D animation can also be created
in a computer using programs such as Adobe Flash, or can also be done using
individual pictures on each page to simulate movement.
The 2D animation objects can only move horizontally, in x axis, for simulating
movement forward and backward, and vertical, in y axis, for movements upwards and
downwards. In 3D animations, objects can also be moved closer or farther from the
person, that is viewing the animation, along the z axis. If you want an object appear
closer to the camera in 3D animation, it has to be moved closer through the z axis, but
in 2D animation in return the object should be drawn larger to create this effect.
The characters and scenarios in 2D animation have a flat surface, as in a painting or
photograph, you can only see the front because it is the only part that exists in the
animation. The sense of depth in the 2D is achieved from the perspective, colour,
shadows and volumes of things. Instead, in 3D you don't have to draw every photogram
to see the object from another angle. What we do is to build in three-dimensional,
modelling every object, character or scene that appears in the movie. It is only need to
create each element once. Objects are as sculptures, having front, back, top and bottom,
therefore they can be seen from any angle.
3D animation programs have virtual cameras as part of the animation process. This
camera has many functions, including focal length. The camera moves like a real
camera, including zooms, pans and travelling shots. In 2D we do not have this
technology, the movements must be made through drawing.
The 3D animation programs have lights that can simulate virtual spotlights, bulbs or
even the sun. The virtual lights have several settings as graduate the intensity of light,
change the colour and several options for creating a greatly variety of special effects.
Objects that pass in front of these lights project realistic shadows on other objects in the
scene. Instead, in 2D animation, shadows and lights should be drawn by hand.
The 3D animation through the use of 3D models and realistic textures, you can create
images that are virtually indistinguishable from real life. Even the highest quality 2D,
still looks as a hand-drawn cartoon.
3D animation has a process called motion capture, used to make the animation process
easier. This involves an actor wearing a special suit with dozens of points in it. As the
actor moves, the camera uses these points as reference to animate the 3D character.
These points can be used also in the actor's face to capture facial expressions and mouth
movements for the talks. The 2D animation does not has motion capture but does have a
similar process called rotoscope, in which is drawn the characters, frame by frame, over
a live-action video, this helps the movements to be more credible and fluids.
Finally there is the issue of the special effects. In 2D animation, effects like fire, smoke,
water movement and explosions, have to be drawn carefully frame by frame by hand.
But in 3D, these effects are generated with plug-ins, which generate the effect
automatically after setting some parameters.
As we have seen, with the emergence of 3d animation, the animator has full control of the
space, the movement of the object and character, the time and the filming

4. THE NEW PRINCIPLES
The 3D has not changed the traditional animation principles but how to apply them.
Squash and stretch: We may use various techniques such as skin and muscle or direct
mesh manipulation. On the other hand, we also have dynamic simulations and IK
systems.
Anticipation: We can increase or decrease it, including motion holds or using digital
time editing tools.
Staging: A handy tool for previewing the staging is 3D Animatics.
Straight ahead action and pose to pose: It makes use of channels and layers to mix
different types of motion as motion capture and dynamic simulations.
Follow through and overlapping action: There are dynamic simulations to animate most
of the follow through such as clothes and hair.
Slow in and slow out: In 3D programs we have digital time editing to facilitate speed
changes. If we use motion capture, we have to tell the actors to do slow in and slow out.
Arcs: We can use software constrains to force all or some motion within arcs.
Secondary action: Channels and layers are used to have a control of many of the
secondary movements.
Timing: We can refine timing with non-linear time editing tools to shave-off or add
frames.
Exaggeration: We can use the techniques used in Squash and stretch. Furthermore, the
cinematography and editing also help us to increase the emotional intensity.
Solid drawing: in 3D animation is called Modelling. We should take advantage of
modelling to develop visual style. [2]
4.1. Visual styling
In 3D animation, when we talk about visual styling, we mean something else besides the mere
appearance of the things. When we produce an audiovisual piece in 3D, we have to take into
account each level of the production, the modelling, the texturing, the animation, the
illumination and the render.
The animation's production process is like a net, everything is connected, if you modify one
part, this will produce a change in another. If you modify the shape of an object, the texture,
which we have applied to it, will change in aspect. Also, the lighting of each scene influences
the look of each texture in the render. Therefore we have to think about every detail, because
one little thing can complicate the production process. For example, if our character is a lion, we

can apply a texture with fur imitation, or we have the possibility of creating a more realistic lion
by adding fur. Everything depends on the result you want to achieve or style we want to create,
and the time that we have to carry this out, because it takes much longer to render a character
with fur.
Therefore, it is important to make a good planning of the production process, think of what
visual style we want to achieve, and the level of complexity that it will have.
4.2. Blend motion
The technology has advanced greatly in recent years, there are new tools and new techniques
such as dynamic simulators, curves-editors, time-editors and motion capture. Nowadays it is
possible to blend motion from different sources, and we need to develop a clear approach for
blending cartoon with realistic motion. [2]
With the new animation techniques, it is possible to make more realistic productions.
Sometimes, when we see a movie, it is difficult to differentiate the scenes, characters or real
landscapes, of which are made by computer. It is important to think about what level of reality
do we want to create and it is necessary to define clear guidelines for a variety of motion or
animation styles including cartoon physics, realistic cartoon, realistic human motion and
rotoscoping.
4.3. Cinematography
3D computer animations give us absolute control over camera positions and movements, and
this has a huge impact on animation layout and the overall productions process. It is crucial to
consider this point as one of the most important, because stories are explained through the lens.
The diversity of shots helps the animation to be more dynamic, entertaining and transmit the
ideas better to the public. It is necessary to have knowledge about camera techniques and how
are they used. The following are the camera elements in any scene:
Camera shots: The use of different shot sizes is very important in shaping meaning in a
film. Camera shots are used to show different aspects of a landscape and characters. The
size of the subject in frame depends on two things: the distance the camera is away from
the subject and the focal length of the camera lens. Common shot sizes: Extreme close-
up, close-up, medium shot, long shot and extreme long shot.
Camera angles: It is important to not confuse camera angles and camera shots. Camera
angles are used to position the viewer, so that the audience can understand the
relationships between the characters. Eye Level is the most commonly used camera
angle in film and television because creates a sense of normality and realism, because
this is how we see the world. Other camera angles are: overshot, high angle, low angle
and undershot.
Camera movement: It helps us give the almost physical sensation of entering in the
images and 'travelling' with them. Using a virtual camera you can make almost any
move, however, it is still a good idea to use these real world moves. There are two types
of camera movements.
One type is the physical movement that includes panning and tilting, travelling and
rotation. Panning, tilting and travelling can be done with camera in hand or, with travel,
handycam, steadicam or crane, among others.
The other type is the optical movement like zoom and depth of field. On the one hand,
the zoom can be used to do camera movements without moving the camera, because a
zoom lens has a variable focal length. On the other hand, the camera have a depth of
field, that is to say, only part of the image is in focus, therefore, is used to direct
attention to one side or another in a scene. Using a virtual camera you can make almost
any move, however, it is still a good idea to use these real world moves.
Besides positions and movements of camera, it is important to treat lighting with special
attention, because it has a huge impact on the system and render finish. Lighting work
contributes as well to the emotional response that the audience has while see moving images.
Lighting in a film is created depending on the mood and atmosphere of each scene, for example,
in a scary movie, the scenes will be dark and full of shadows to create tension, mystery or scary.
4.4. Facial animation
As we know most of the animation principles are important at the time of transmit to the
audience an idea or feeling. The same as the real actors have expressions, the animation
characters should also have them. The facial animation is one of the things that give life and
increase the virtual character’s believability, since most of thoughts and emotions are expressed
through the facial and eye movement.
Even though we have a good story, illumination, cinematography, visual styling, among others,
if we do not give life to the characters through their facial expressions, the animation could
result poor or the message that we want to transmit could not be understood. It is important to
emphasise the expressions and reactions of the characters, so that the public can be touched and
come to understand how is feeling a character at a given time.
Nowadays 3D computer animation offers more facial animation control than ever before,
including the subtle motion of eyelids and eyeballs, so we have to use it to get more successful
productions. It is important to determinate early in the process, the level of facial control and
techniques to be used, so that the characters will have the same style. During production we
should start making a catalogue of facial morph targets and blend shapes for production and
reuse, it is as important as building the animation essential cycles like walk.
In facial animation there are several different ways of animating. The three primary techniques
to animate the face are:
Bone Animation / Skeletal Animation
Muscle Simulation
Blend Shapes / Morph Targets / Shape Interpolation.


5. CONCLUSIONS
The advent of 3D has changed the thinking of the animators, as it has introduced variety of
techniques and elements that did not exist in the process of creating an animation in two
dimensions. The process of creating and animating a three-dimensional character differs widely
of the process used in 2D animation.
In 2D animation, a character is created by drawing; however, in 3D consist in modeling the
objects individually. Once the elements are been modeled, we can do the texturing, but before
this, we must think about the visual style that we want to get in our animation. It is important to
plan well the whole process of creation before start to create, and therefore, to not have any fault
arises in the rendering and finishing.
In 3D, there are several techniques that help us to create more natural and believable
movements, such as motion capture, dynamic simulations and time editors. The 3D software
allows us to generate all kinds of shapes, apply textures, light up the scene and move any items,
whether an actor, a light or a camera. Since there is such a big step from the way we do and
create a three dimensional animation of a two dimensional, it have had to reinterpret and add
new principles covering all these changes and, thus, to guide the animators in the new world of
animation.
The animation serves to give free rein to our imagination, creating stories and altering reality to
create dreams. The reinterpretation of the principles of animation helps us make our creations
more credible, and improve the communication, expression and storytelling of our animation,
increasing its value and enjoyment of it.
We can say that plan and direct an animation using traditional and modern principles will make
us more effective.
6. REFERENCES
1. Franck Thomas and Ollie Johnson 1981, The illusion of Life, Disney animation, Chapter
3. The principles of animation, pp. 47-69, (Abbeville Press).
2. Isaac Kerlow 2003, The Art of 3D Computer Animation and Effects, 3rd Edition (Wiley).
3. John Lasseter 1987, Principles of Traditional Animation Applied to 3D Computer
Animation, Vol. 21, Computer Graphics, pp. 35-44, (SIGGRAPH).
7. BIBLIOGRAPHY
Animación 2D o 3D?, 2008 <http://www.animacion2d3d.blogspot.com.es/>
Animación 3D, 2009 <http://www.otaku1318.blogspot.com.es/>
Animaholic <http://www.blog.animaholic.org/2006/03/los-12-4-nuevos-principios-de-la.html>
CG Society of Digital Artists
<http://www.cgsociety.org/index.php/CGSFeatures/CGSFeatureSpecial/applying_the_12_principles_to_3
d_computer_animation_by_disneys_isaac_kerlow>
DDesign, 2006 <http://ddsign.wordpress.com/2006/05/15/los-12-principios-de-la-animacion/
Escardo <http://www.escardo.com/foros/viewtopic.php?t=75>
EVL UIC <http://www.evl.uic.edu/ralph/508S99/contents.html>
Franck Thomas and Ollie Johnson 1981, The illusion of Life, Disney animation, Chapter 3rd
, The
principles of animation, pp. 47-69, (Abbeville Press).
Isaac Kerlow 2003, The Art of 3D Computer Animation and Effects, 3rd
Edition (Wiley).
John Lasseter 1987, Principles of Traditional Animation Applied to 3D Computer Animation, Vol. 21,
Computer Graphics, pp. 35-44, (SIGGRAPH).
Minyos <http://www.minyos.its.rmit.edu.au/aim/a_notes/anim_contents.html>
Piziadas, 2011 <http://www.piziadas.com/es/2011/02/los-12-principios-de-la-animacion-estirar-y-
encoger-squash-and-stretch.html>
Red 6 Studios, 2010 <http://www.craigbowman.com/animation/principles-of-animation-part-ii>
Sabia TIC
<http://sabia.tic.udc.es/gc/Contenidos%20adicionales/trabajos/Peliculas/Animacion/TIM_04_Animacion.
html>
Squash y stretch, 2007 <http://www.squash-stretch.blogspot.com.es/2007/02/los-12-principios.html>
Wikipedia
http://es.wikipedia.org/wiki/Animacion
http://es.wikipedia.org/wiki/Cine_de_animaci%C3%B3n_en_Espa%C3%B1a
http://en.wikipedia.org/wiki/12_basic_principles_of_animation
http://es.wikipedia.org/wiki/Rotoscopio
http://es.wikipedia.org/wiki/Flipbook


