Download - Meteor IoT
Meteor로�IoT에서�시각화까지
Appsoulute�이재호

사물인터넷�개념
사물을�네트워크로�연결하여�사물간�정보를�교환하는�것
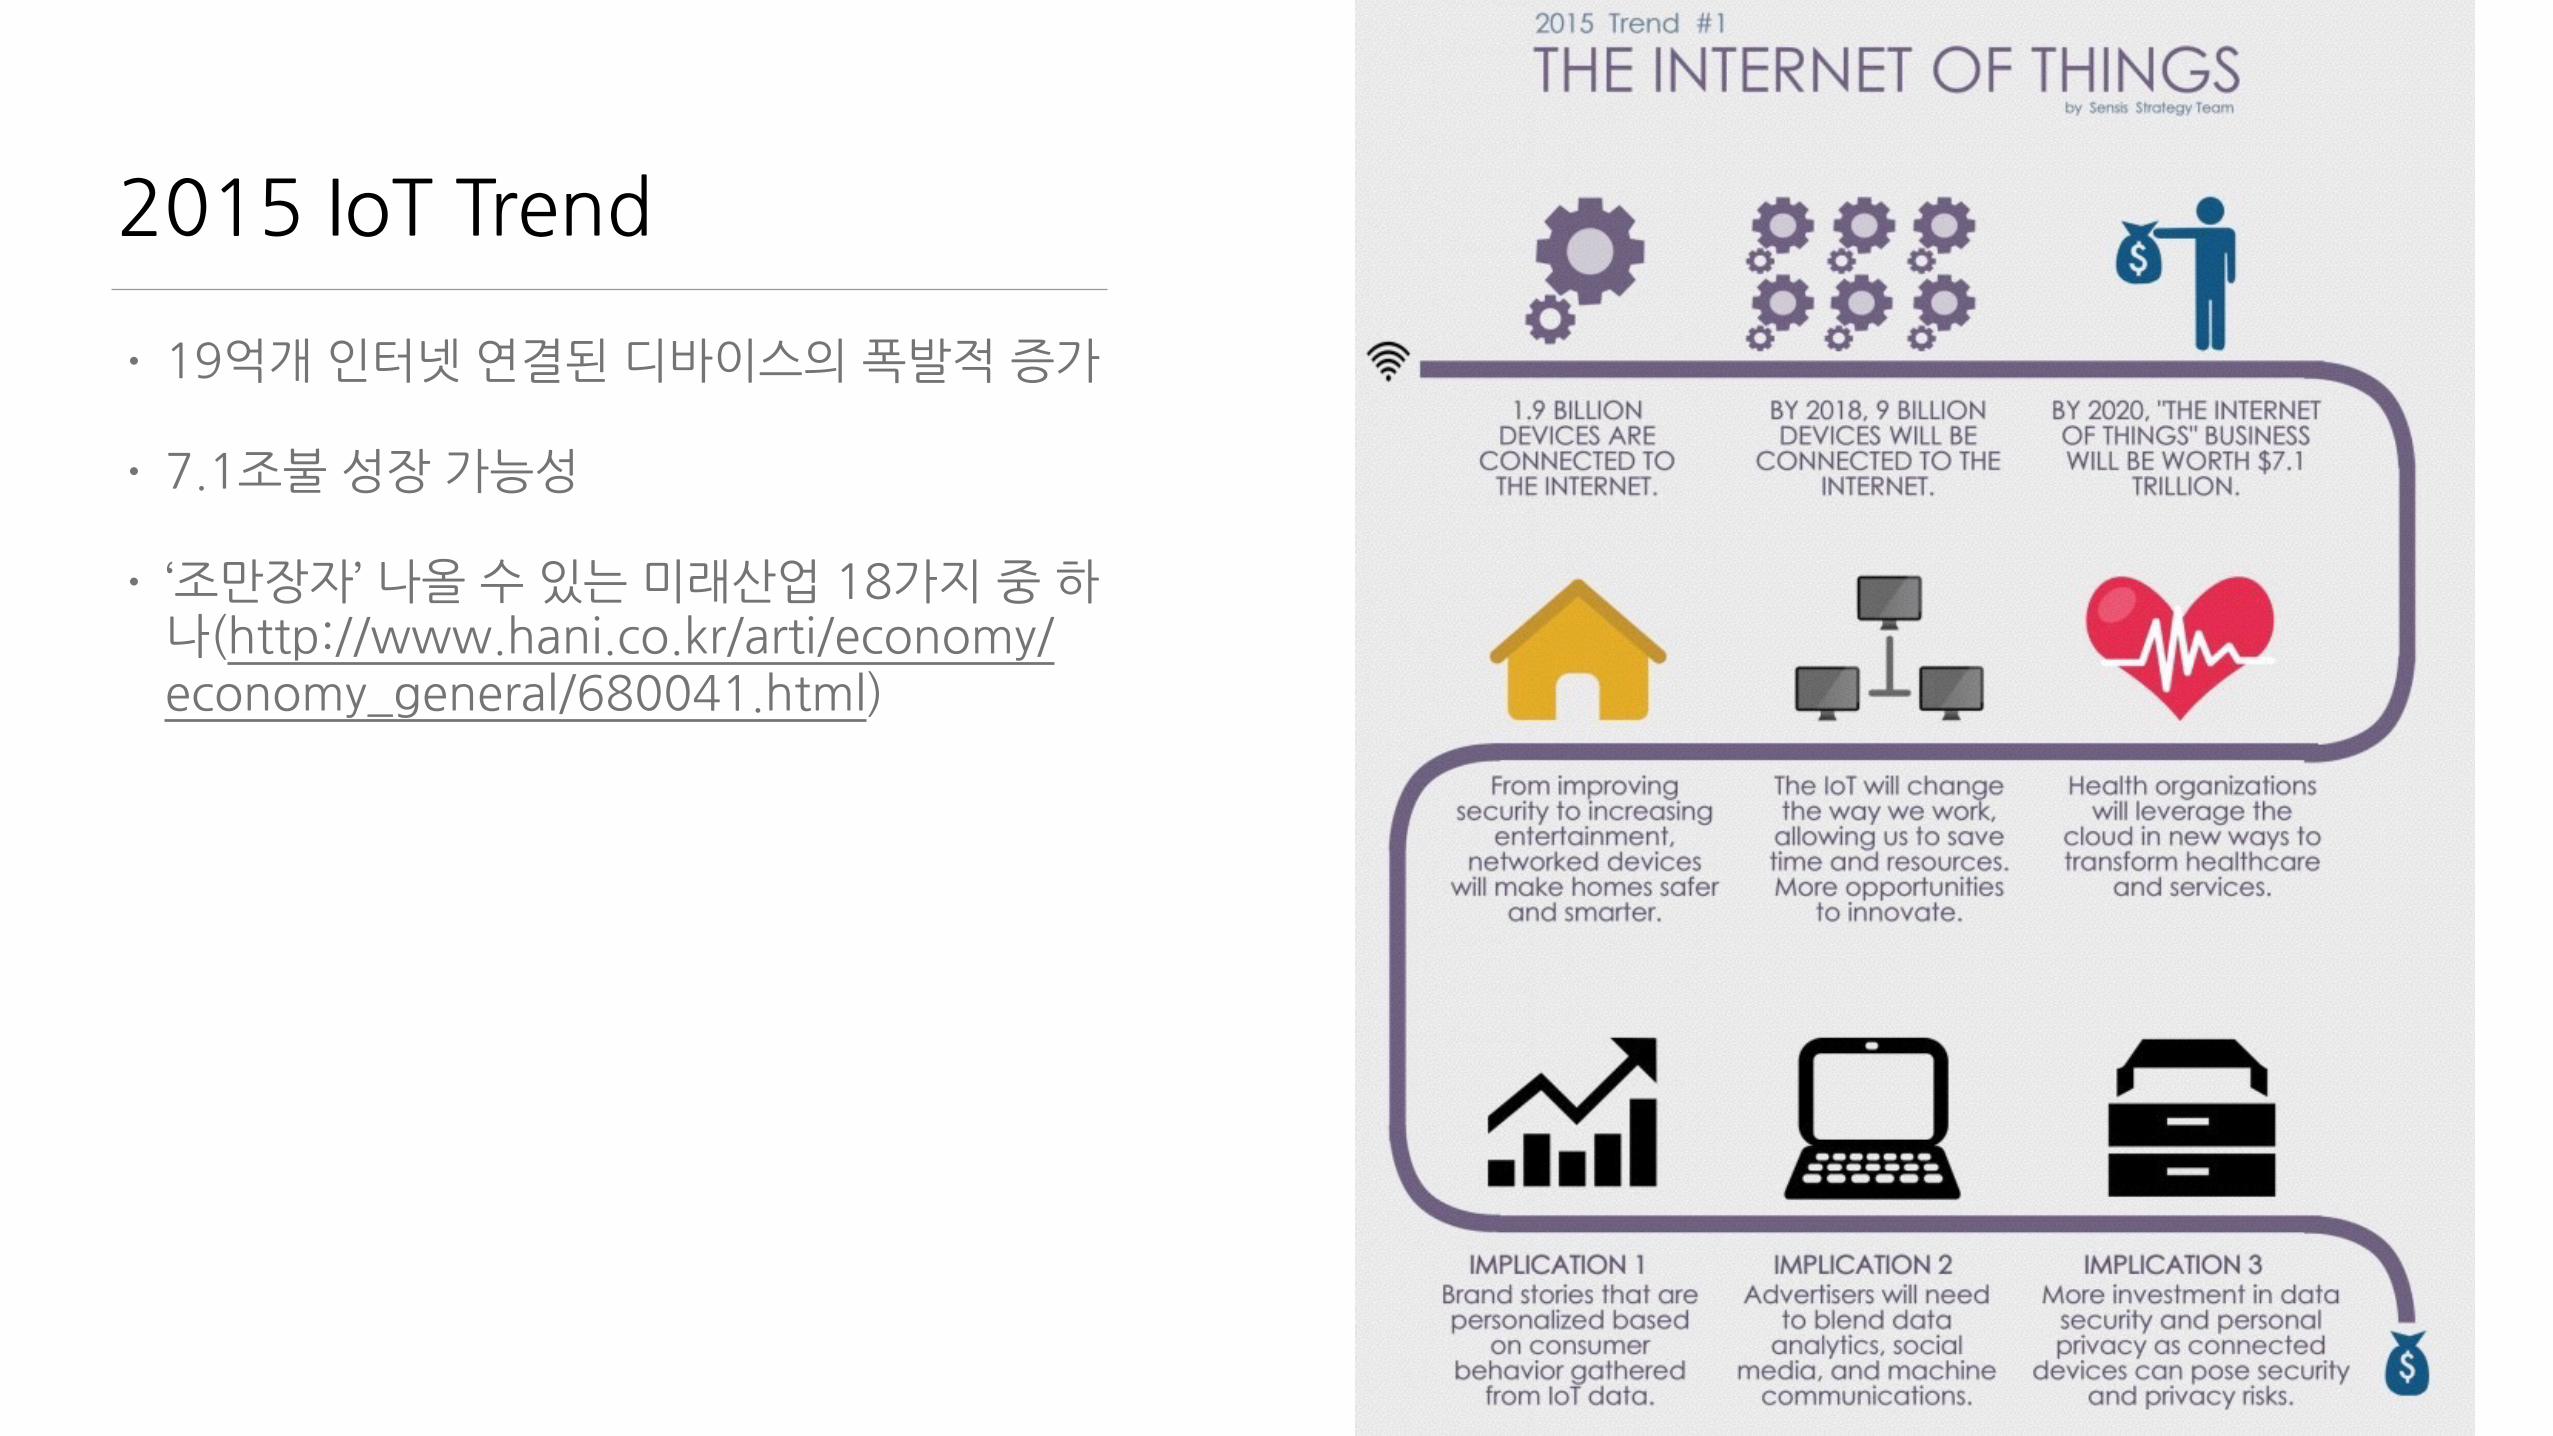
2015�IoT�Trend
• 19억개�인터넷�연결된�디바이스의�폭발적�증가�
• 7.1조불�성장�가능성�
• ‘조만장자’�나올�수�있는�미래산업�18가지�중�하나(http://www.hani.co.kr/arti/economy/economy_general/680041.html)�

Kevin�Ashton
“The�Internet�of�Things�has�the�potential�to�change�the�world,�just�as�the�Internet�did.�Maybe�even�more�so.”

IoT�를�구성하는�요소들

Sensors 현실�세계를�Data로�전환하는�것
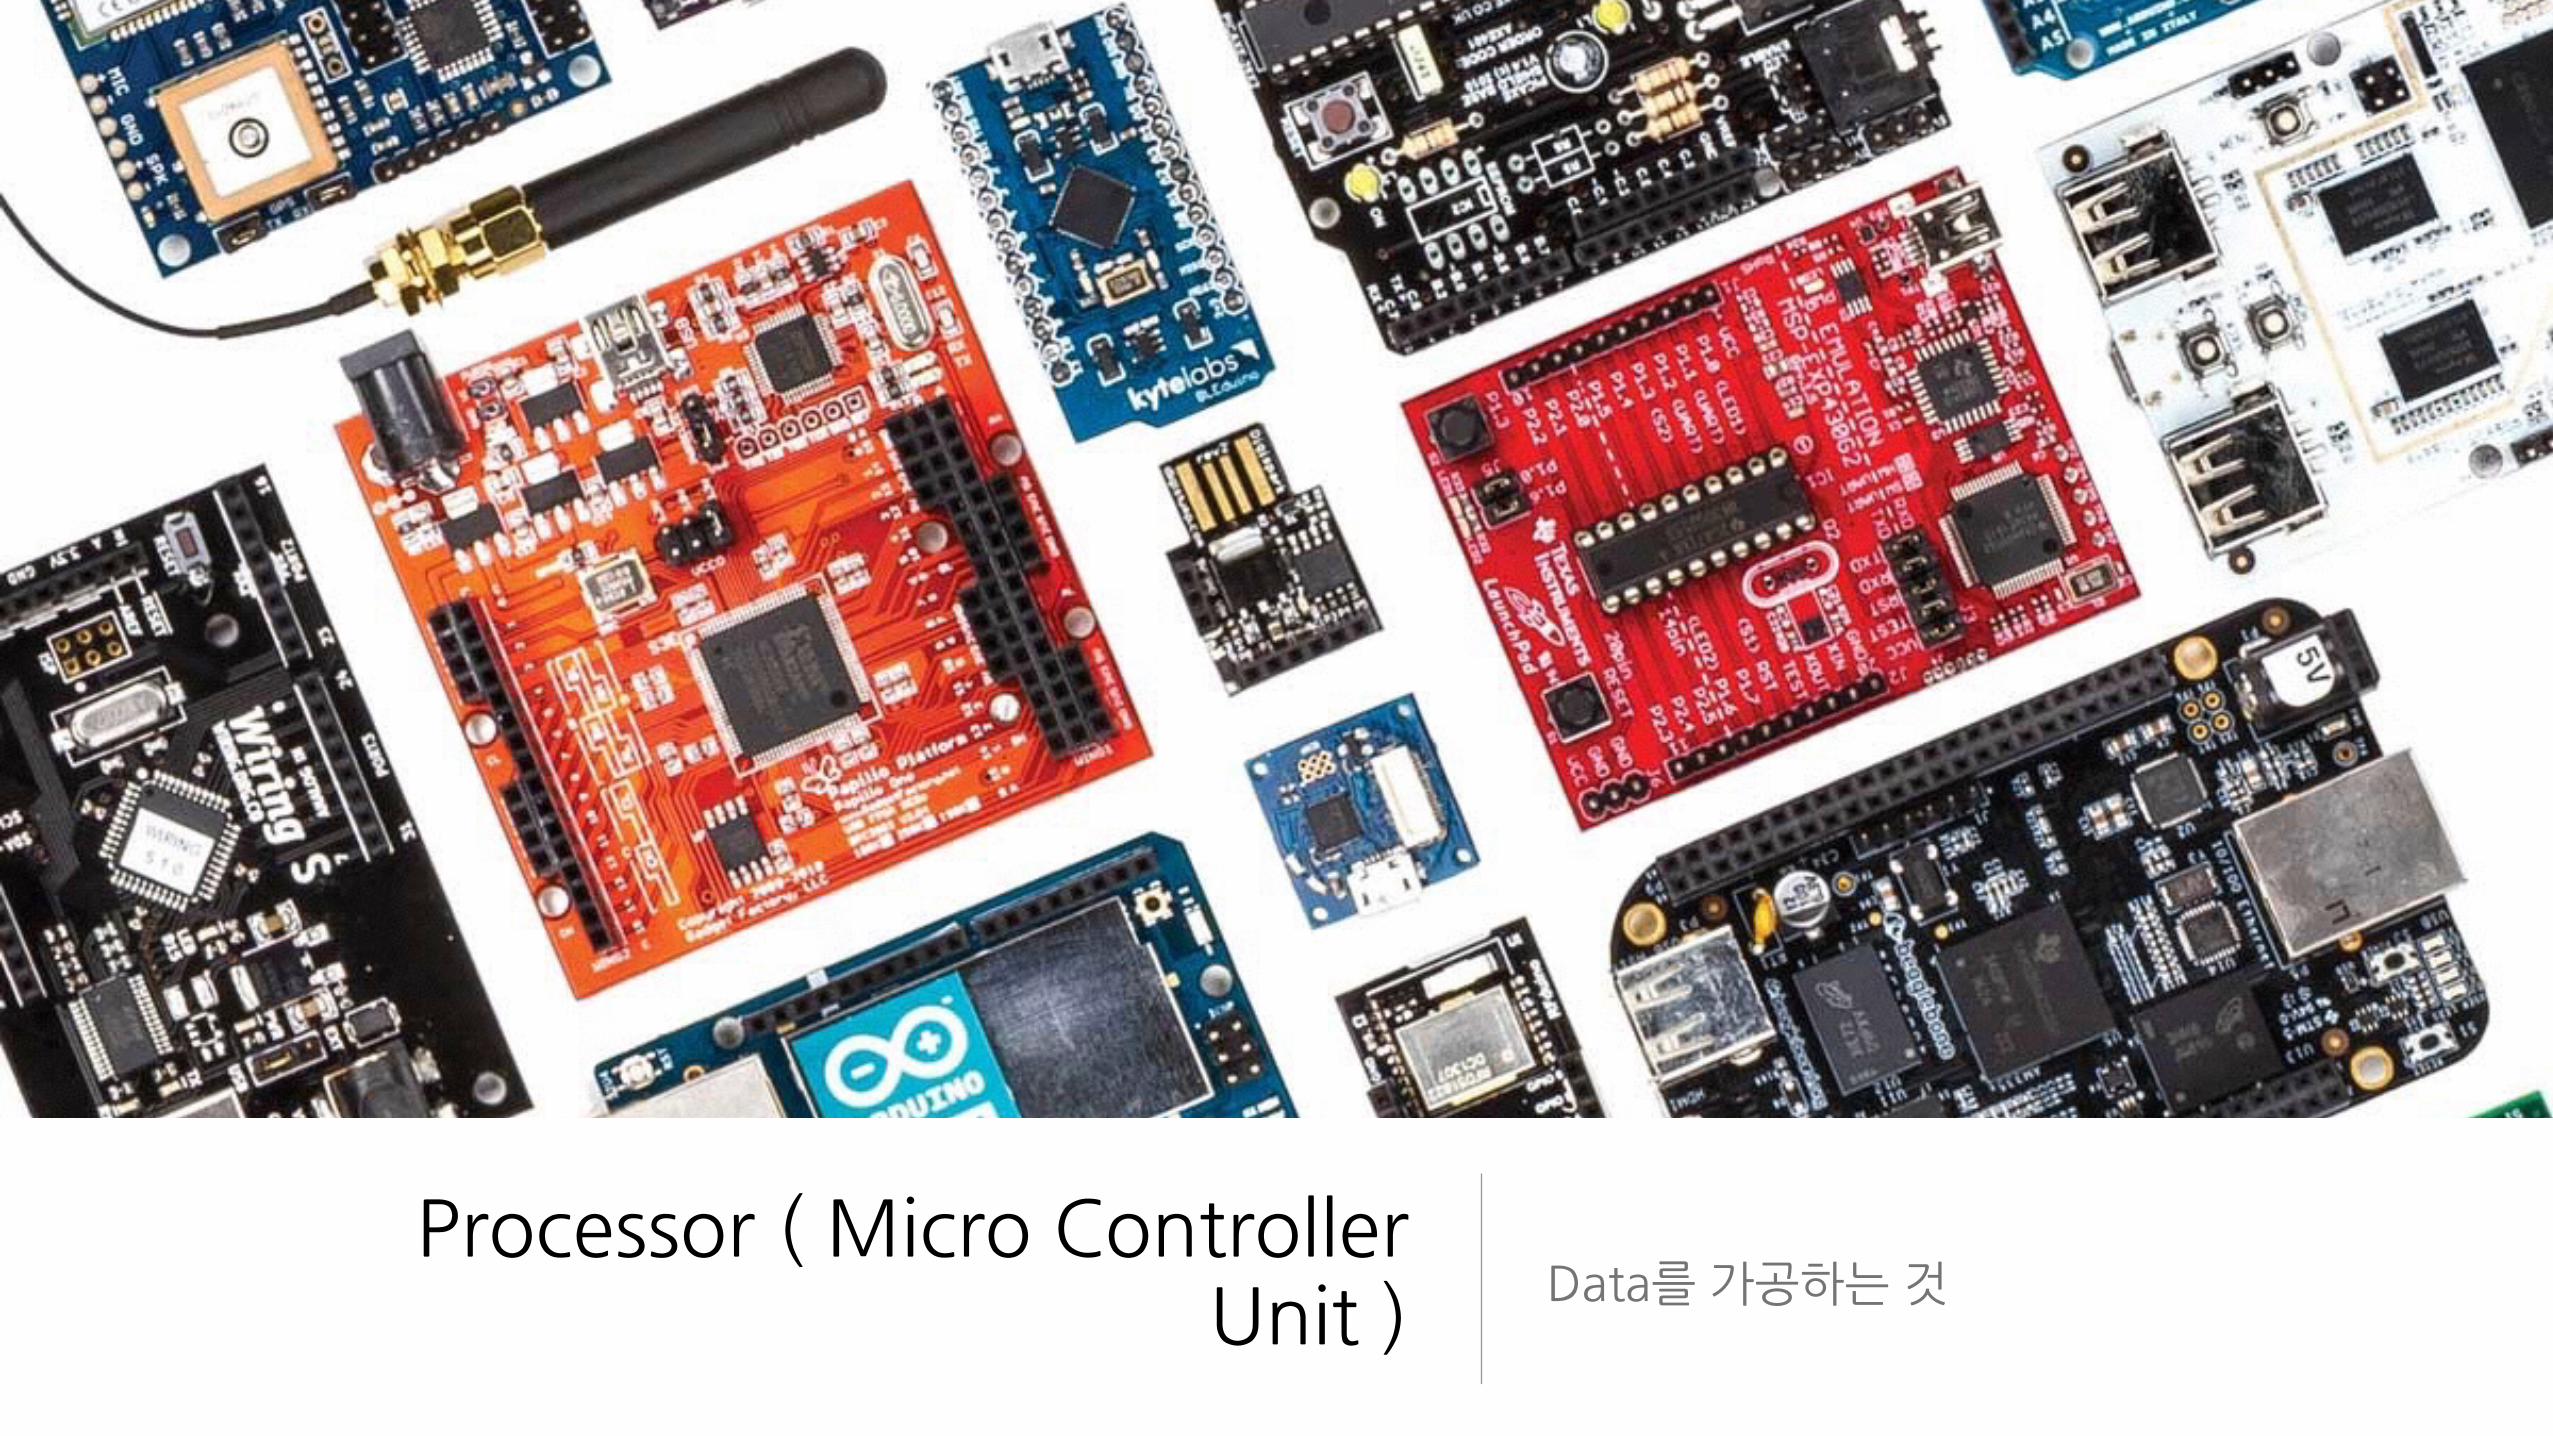
Processor�(�Micro�Controller�Unit�)
Data를�가공하는�것
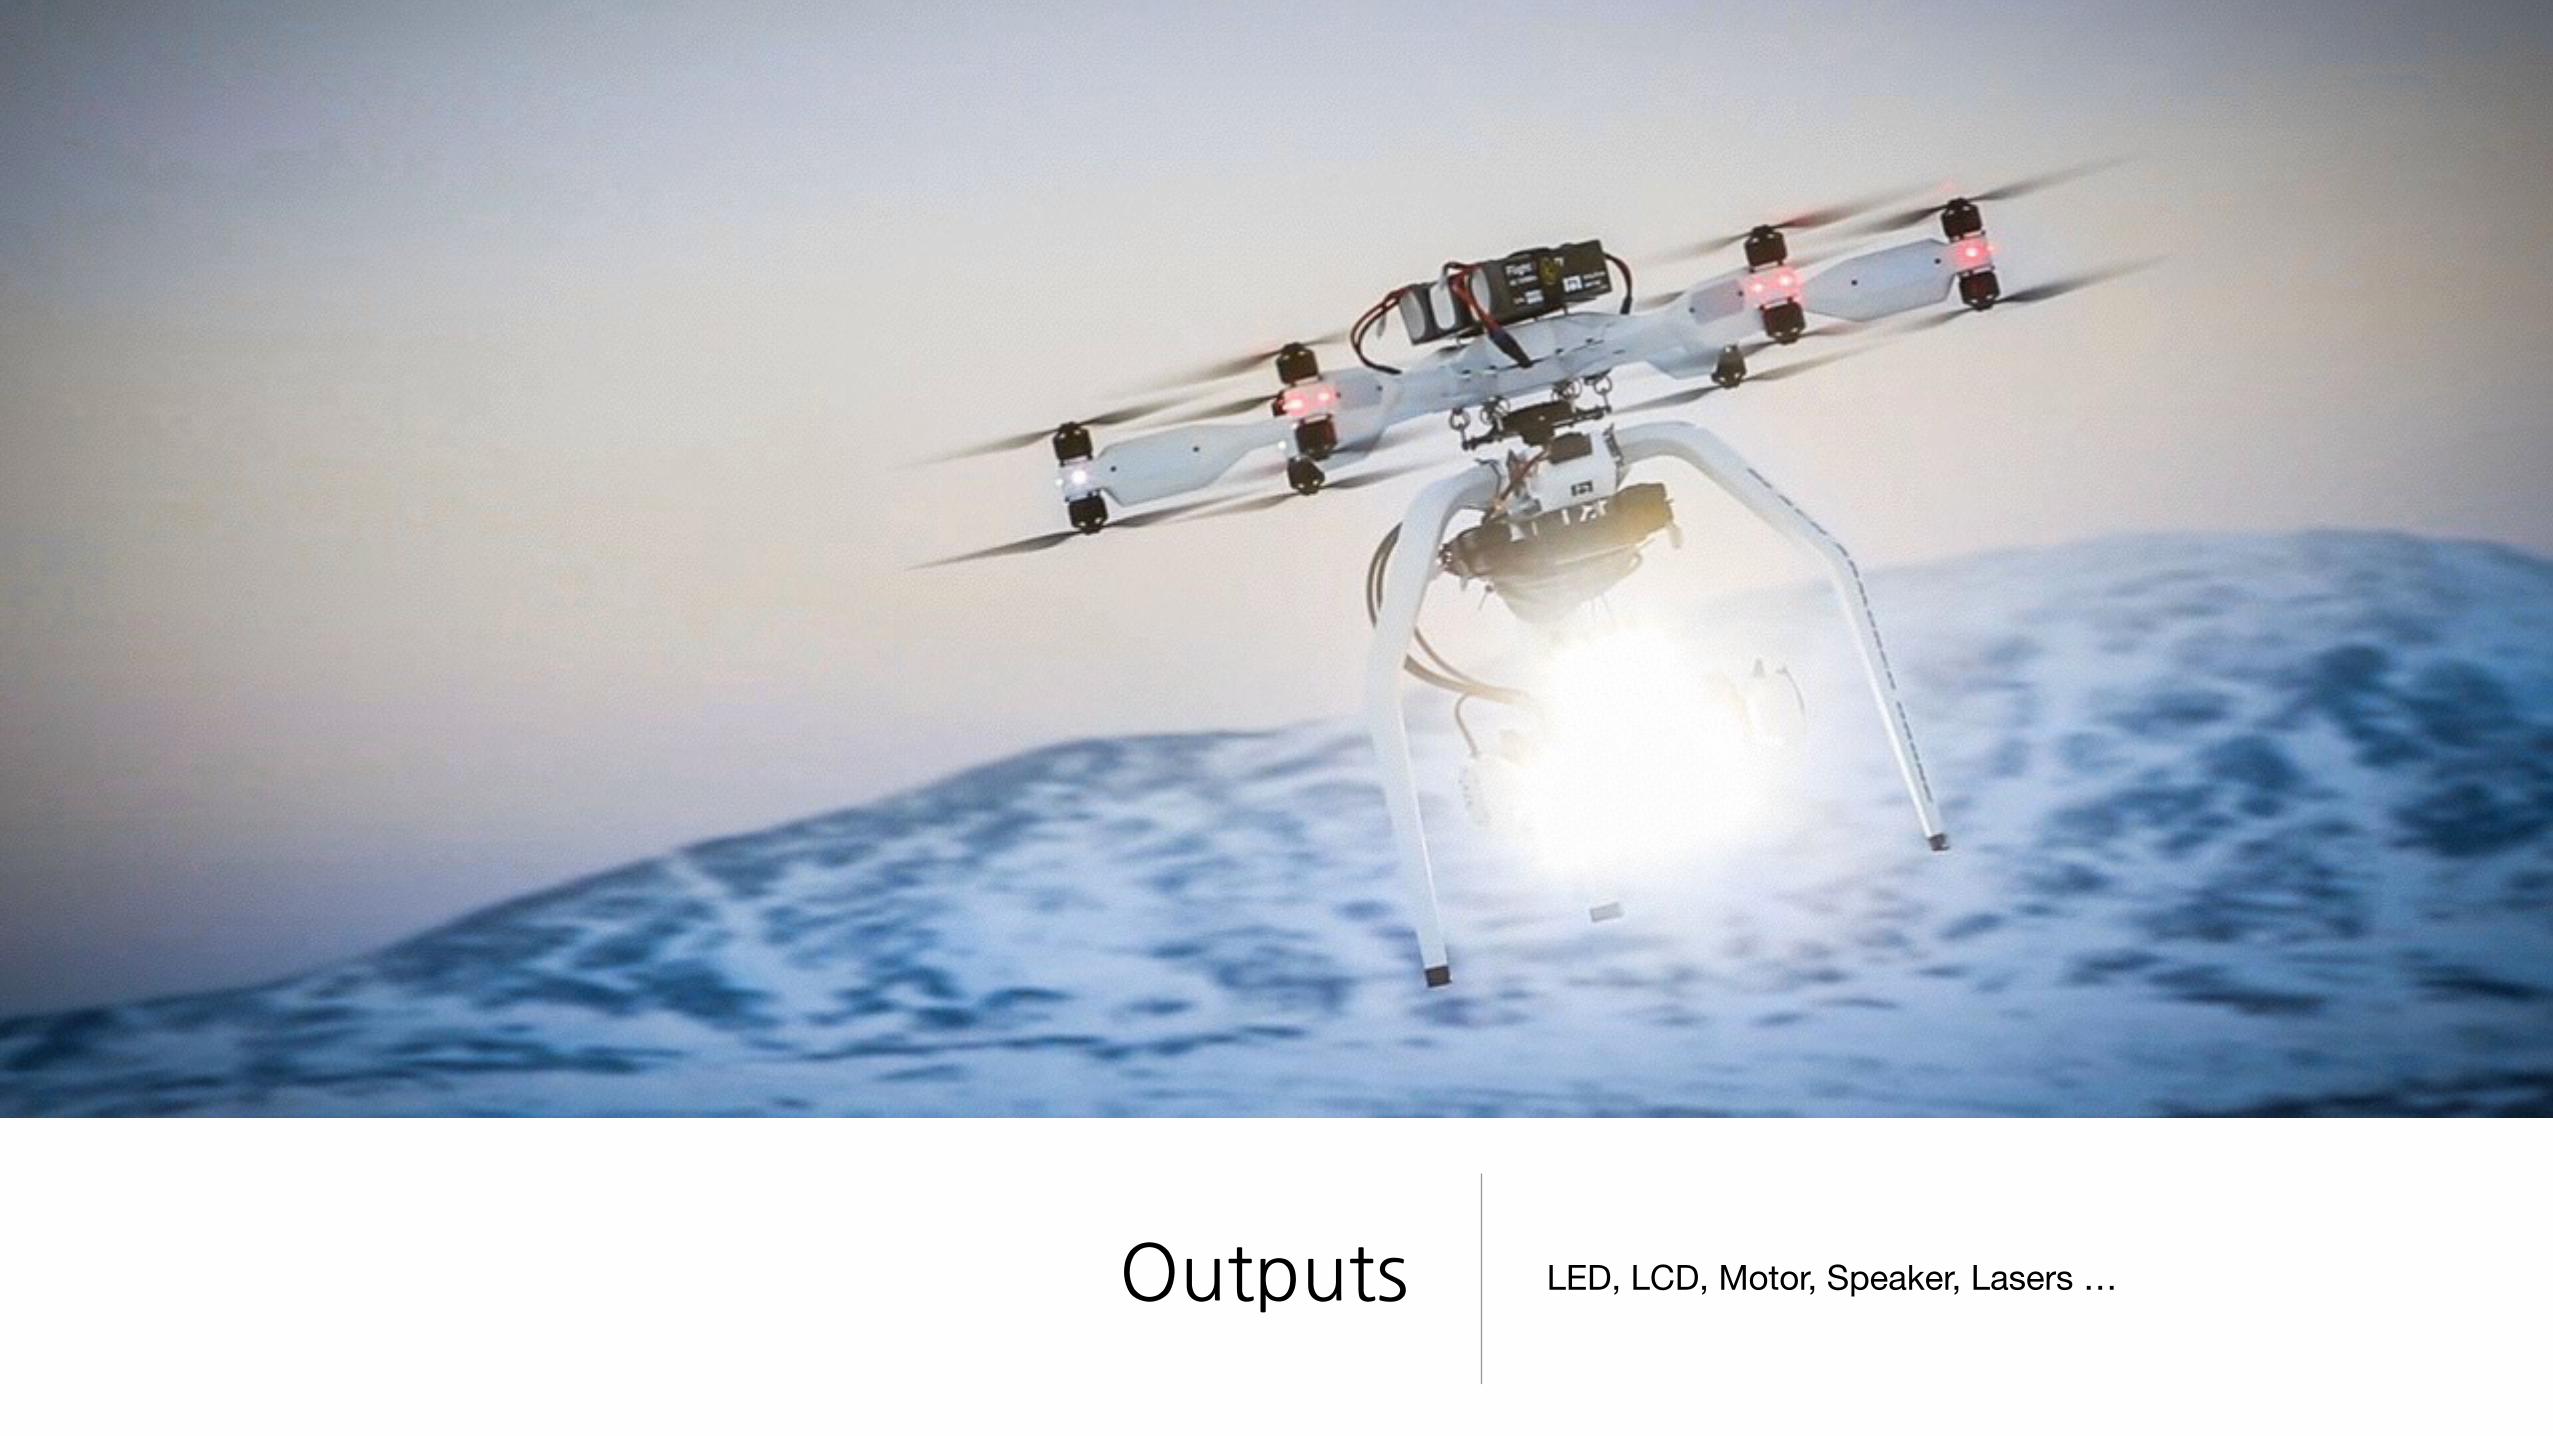
Outputs LED, LCD, Motor, Speaker, Lasers …
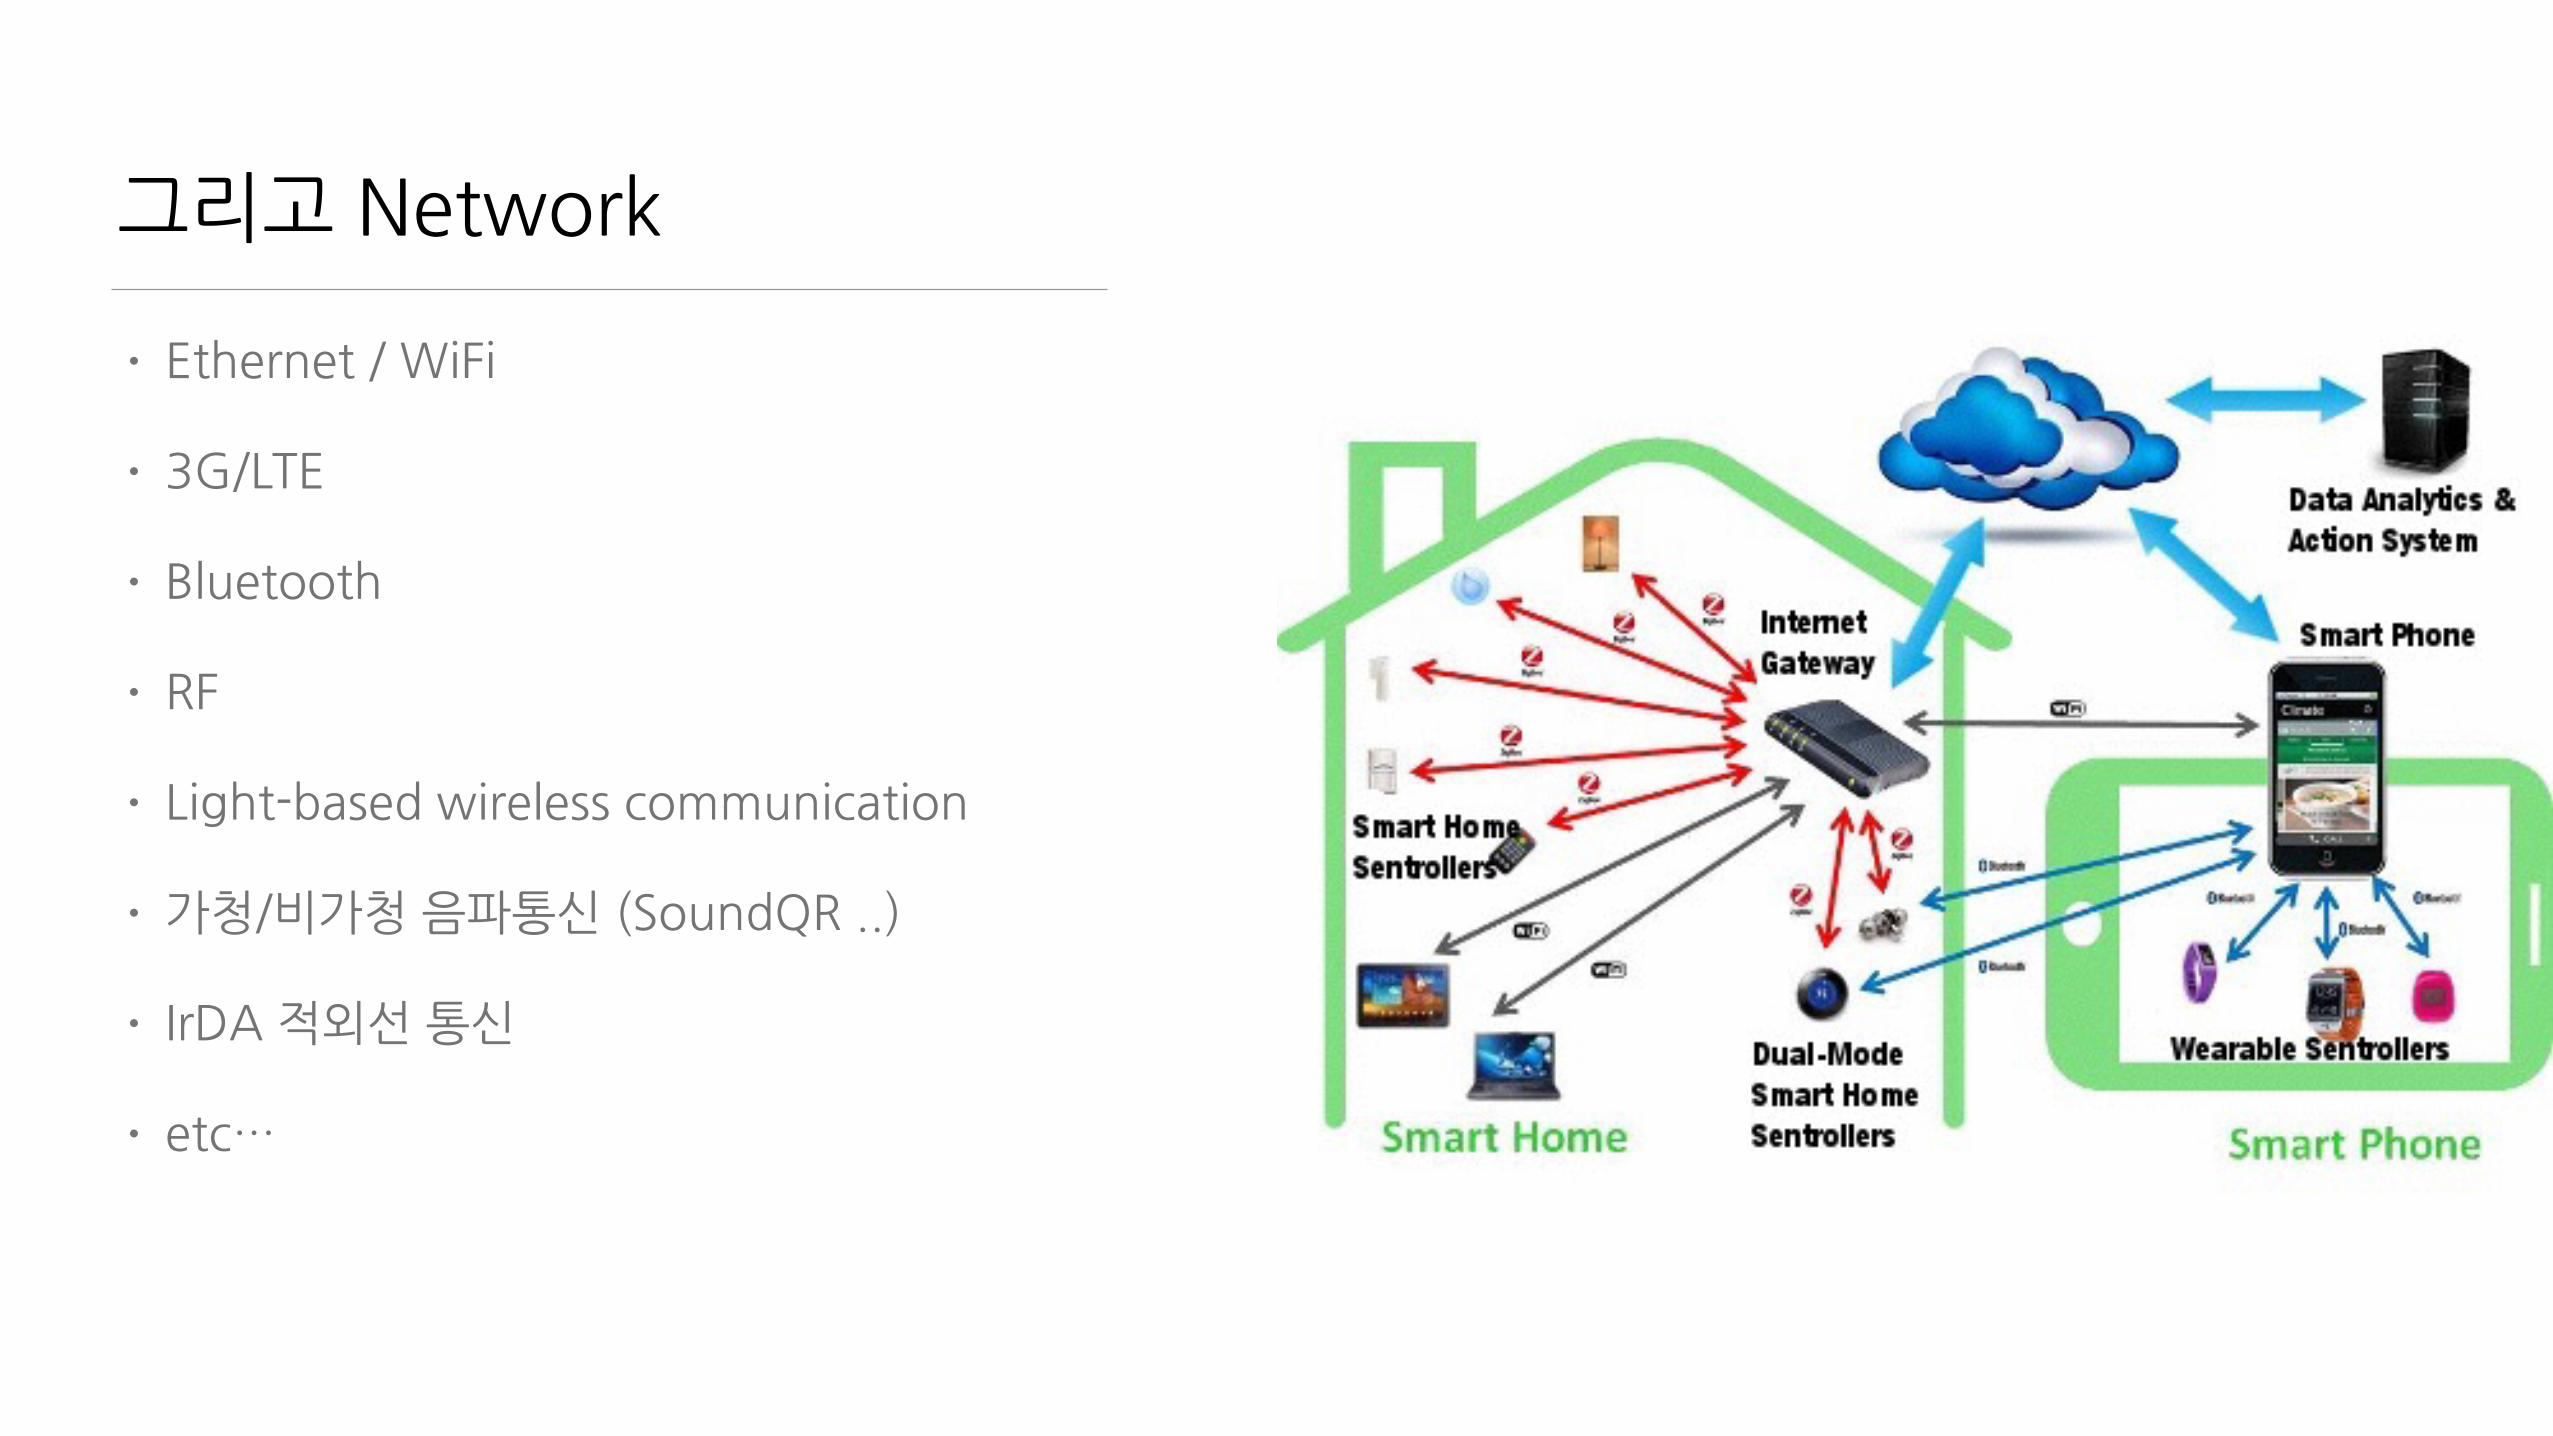
그리고�Network
• Ethernet�/�WiFi�
• 3G/LTE�
• Bluetooth�
• RF�
• Light-based�wireless�communication�
• 가청/비가청�음파통신�(SoundQR�..)�
• IrDA�적외선�통신�
• etc…

중요한�것은?

어떻게�Data를�전송하고�처리할�것인가?
Full�Stack�Engineer?
• Server�Programming�열심히�배웠는데�
• FrontEnd도�중요�
• 거기에�Mobile�App도�만들어야�
• PHP/Java/ASP�배우고�
• Javascript�배우고�
• C/C++도?�
• Database는?�SQL?�그건�뭐야?

Javascript�하나만�하세요
• Client�:�Javascript�
• Server�:�Node.js�
• Database�:�MongoDB�(�JSON�)�
• Mobile�:�Cordova�javascript
본�강좌에서�다룰�내용들
• Meteor�
• Javascript�
• Arduino�
• WiFi�Network�Module�-�ESP8266�&�Lua�
• HTML5�
• Visualization

다루지�않는�내용들
• 전자회로�이론�
• 인두질�
• 감성팔이�
• 대박사업필승법

교보재�소개
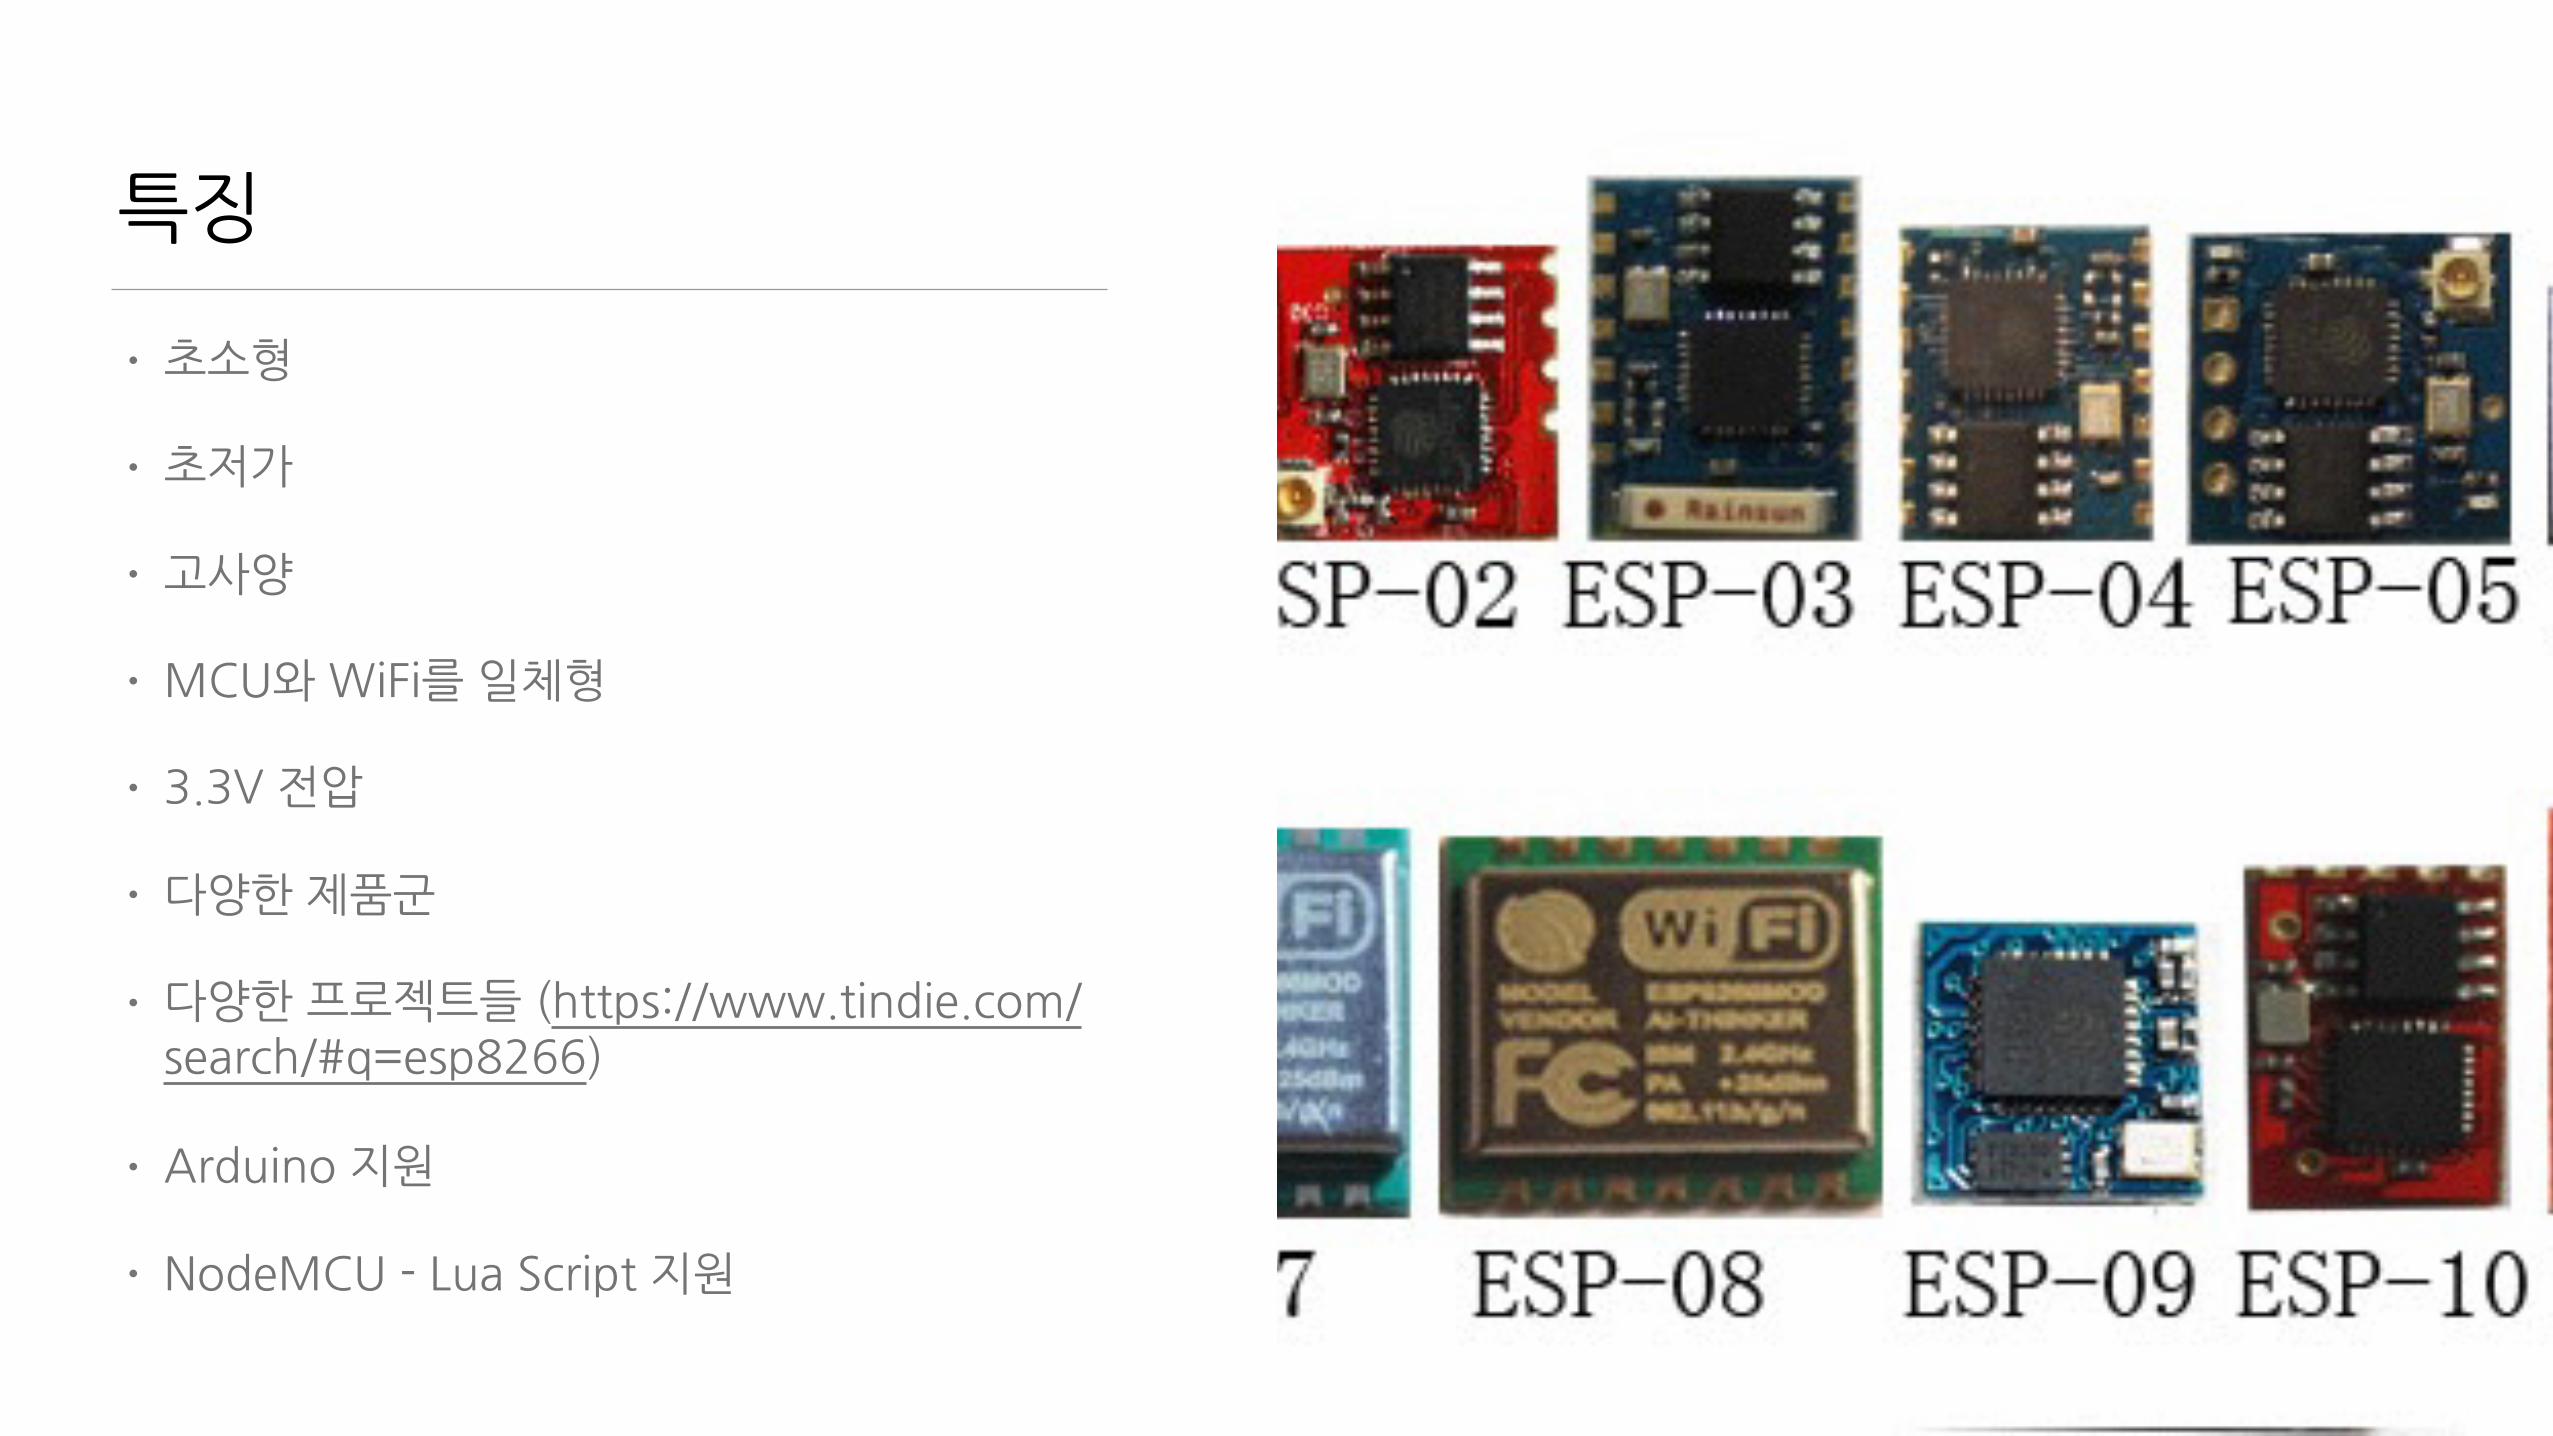
특징
• 초소형�
• 초저가�
• 고사양�
• MCU와�WiFi를�일체형�
• 3.3V�전압�
• 다양한�제품군�
• 다양한�프로젝트들�(https://www.tindie.com/search/#q=esp8266)�
• Arduino�지원�
• NodeMCU�-�Lua�Script�지원

19
• USB2TTL�장비를�통한�PC와�통신�
• Arduino�사용�업로드�
• NodeMCU�Custom�ROM�Flashing�
• Lua�기본�Scripting�
• Input/Output�
• WiFI�설정�
• 데이터�전송/수신
ESP8266�편에서�다룰�내용(http://www.slideshare.net/geekscape/nodemcu-esp8266-workshop-1)

ESP8266�-�USB�연결
• ESP8266�->�USB�
• 3.3v,�CH_PD�-�3.3v�
• GND�-�GND�
• Tx�-�Rx�
• Rx�-�Tx�
• 500mA�지원�여부를�꼭�확인

PL2303�USB�Driver�설치
• Windows�http://www.ifamilysoftware.com/news37.html(support�windows�8.1/10�공식드라이버에서는�지원안함)�
• Machttp://www.prolific.com.tw/US/ShowProduct.aspx?p_id=229&pcid=41�
• Terminal�(for�Windows�Only) PuttyCoolTerm�(http://freeware.the-meiers.org/)
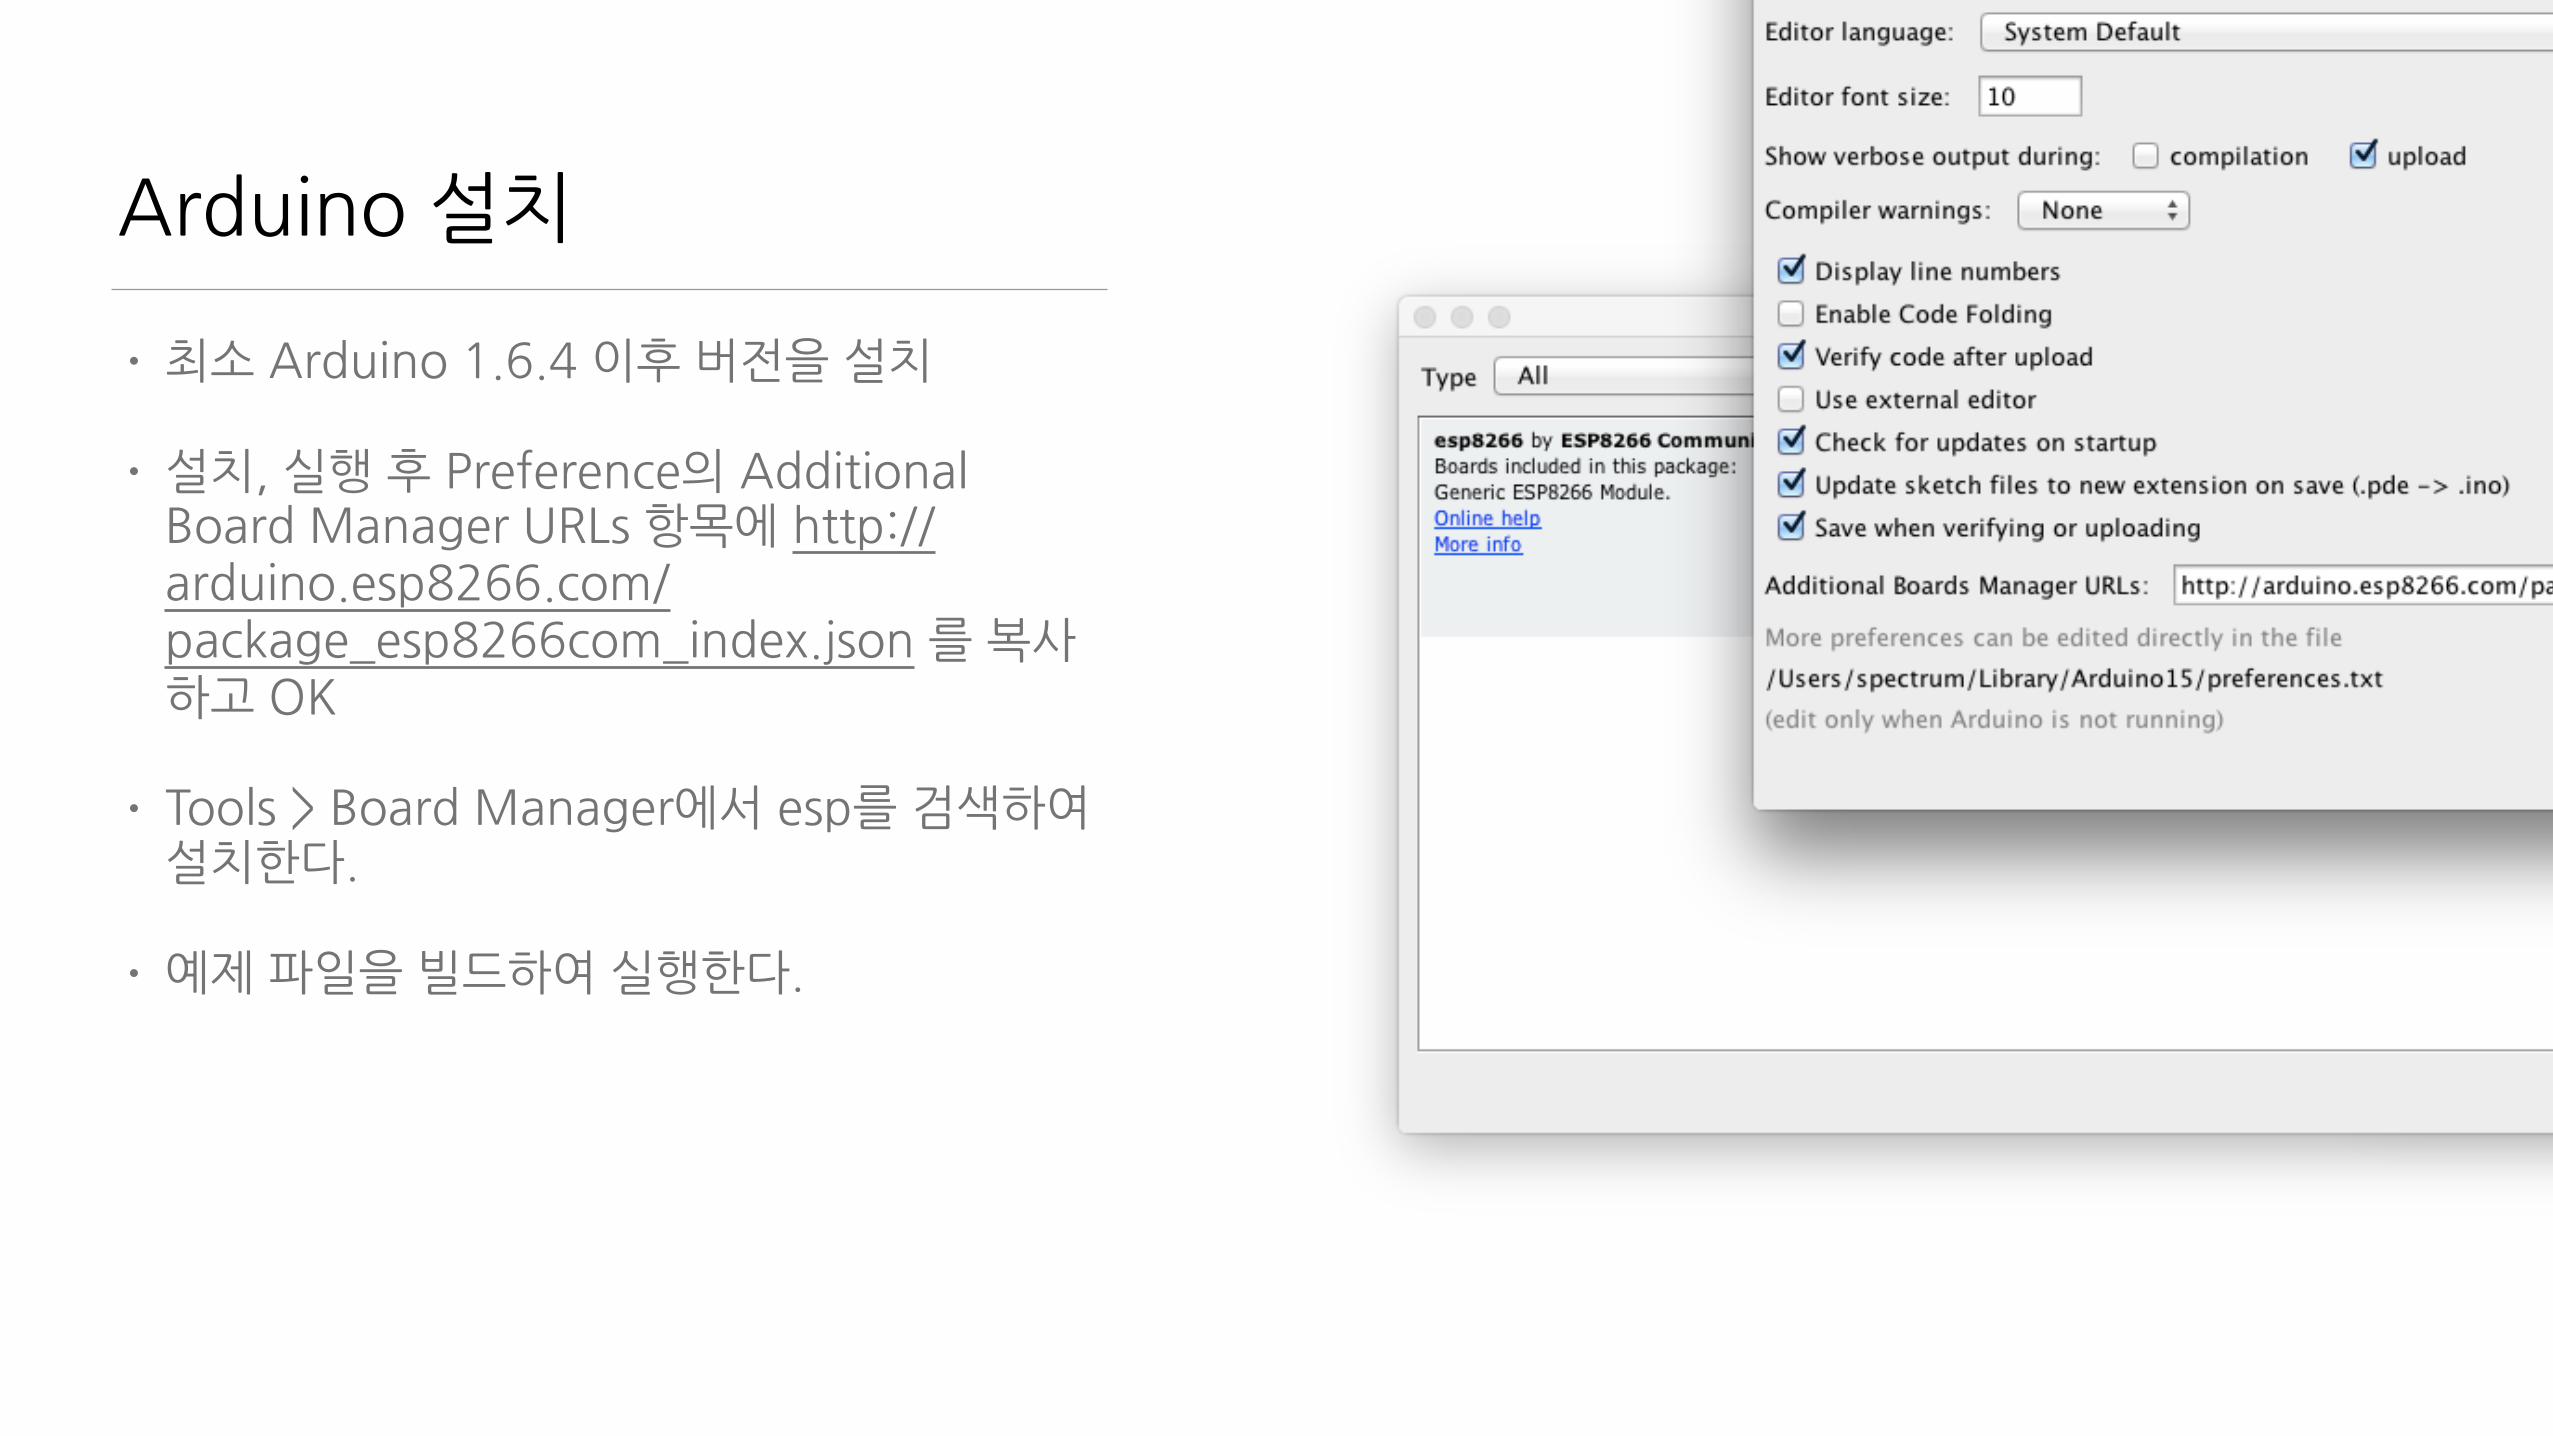
Arduino�설치
• 최소�Arduino�1.6.4�이후�버전을�설치�
• 설치,�실행�후�Preference의�Additional�Board�Manager�URLs�항목에�http://arduino.esp8266.com/package_esp8266com_index.json�를�복사하고�OK�
• Tools�>�Board�Manager에서�esp를�검색하여�설치한다.�
• 예제�파일을�빌드하여�실행한다.
NodeMCU
CustomFirmware�based�on�Lua
NodeMCU�특징
• Lua�Script�Language�
• API는�Node.js�와�유사�
• Script�Programming�기반이라�매번�Build를�하지�않고�바로�코드를�수정해볼�수�있으므로�생산성이�매우�좋다�
• File�System을�가지고�있다�
• 풍부한�API
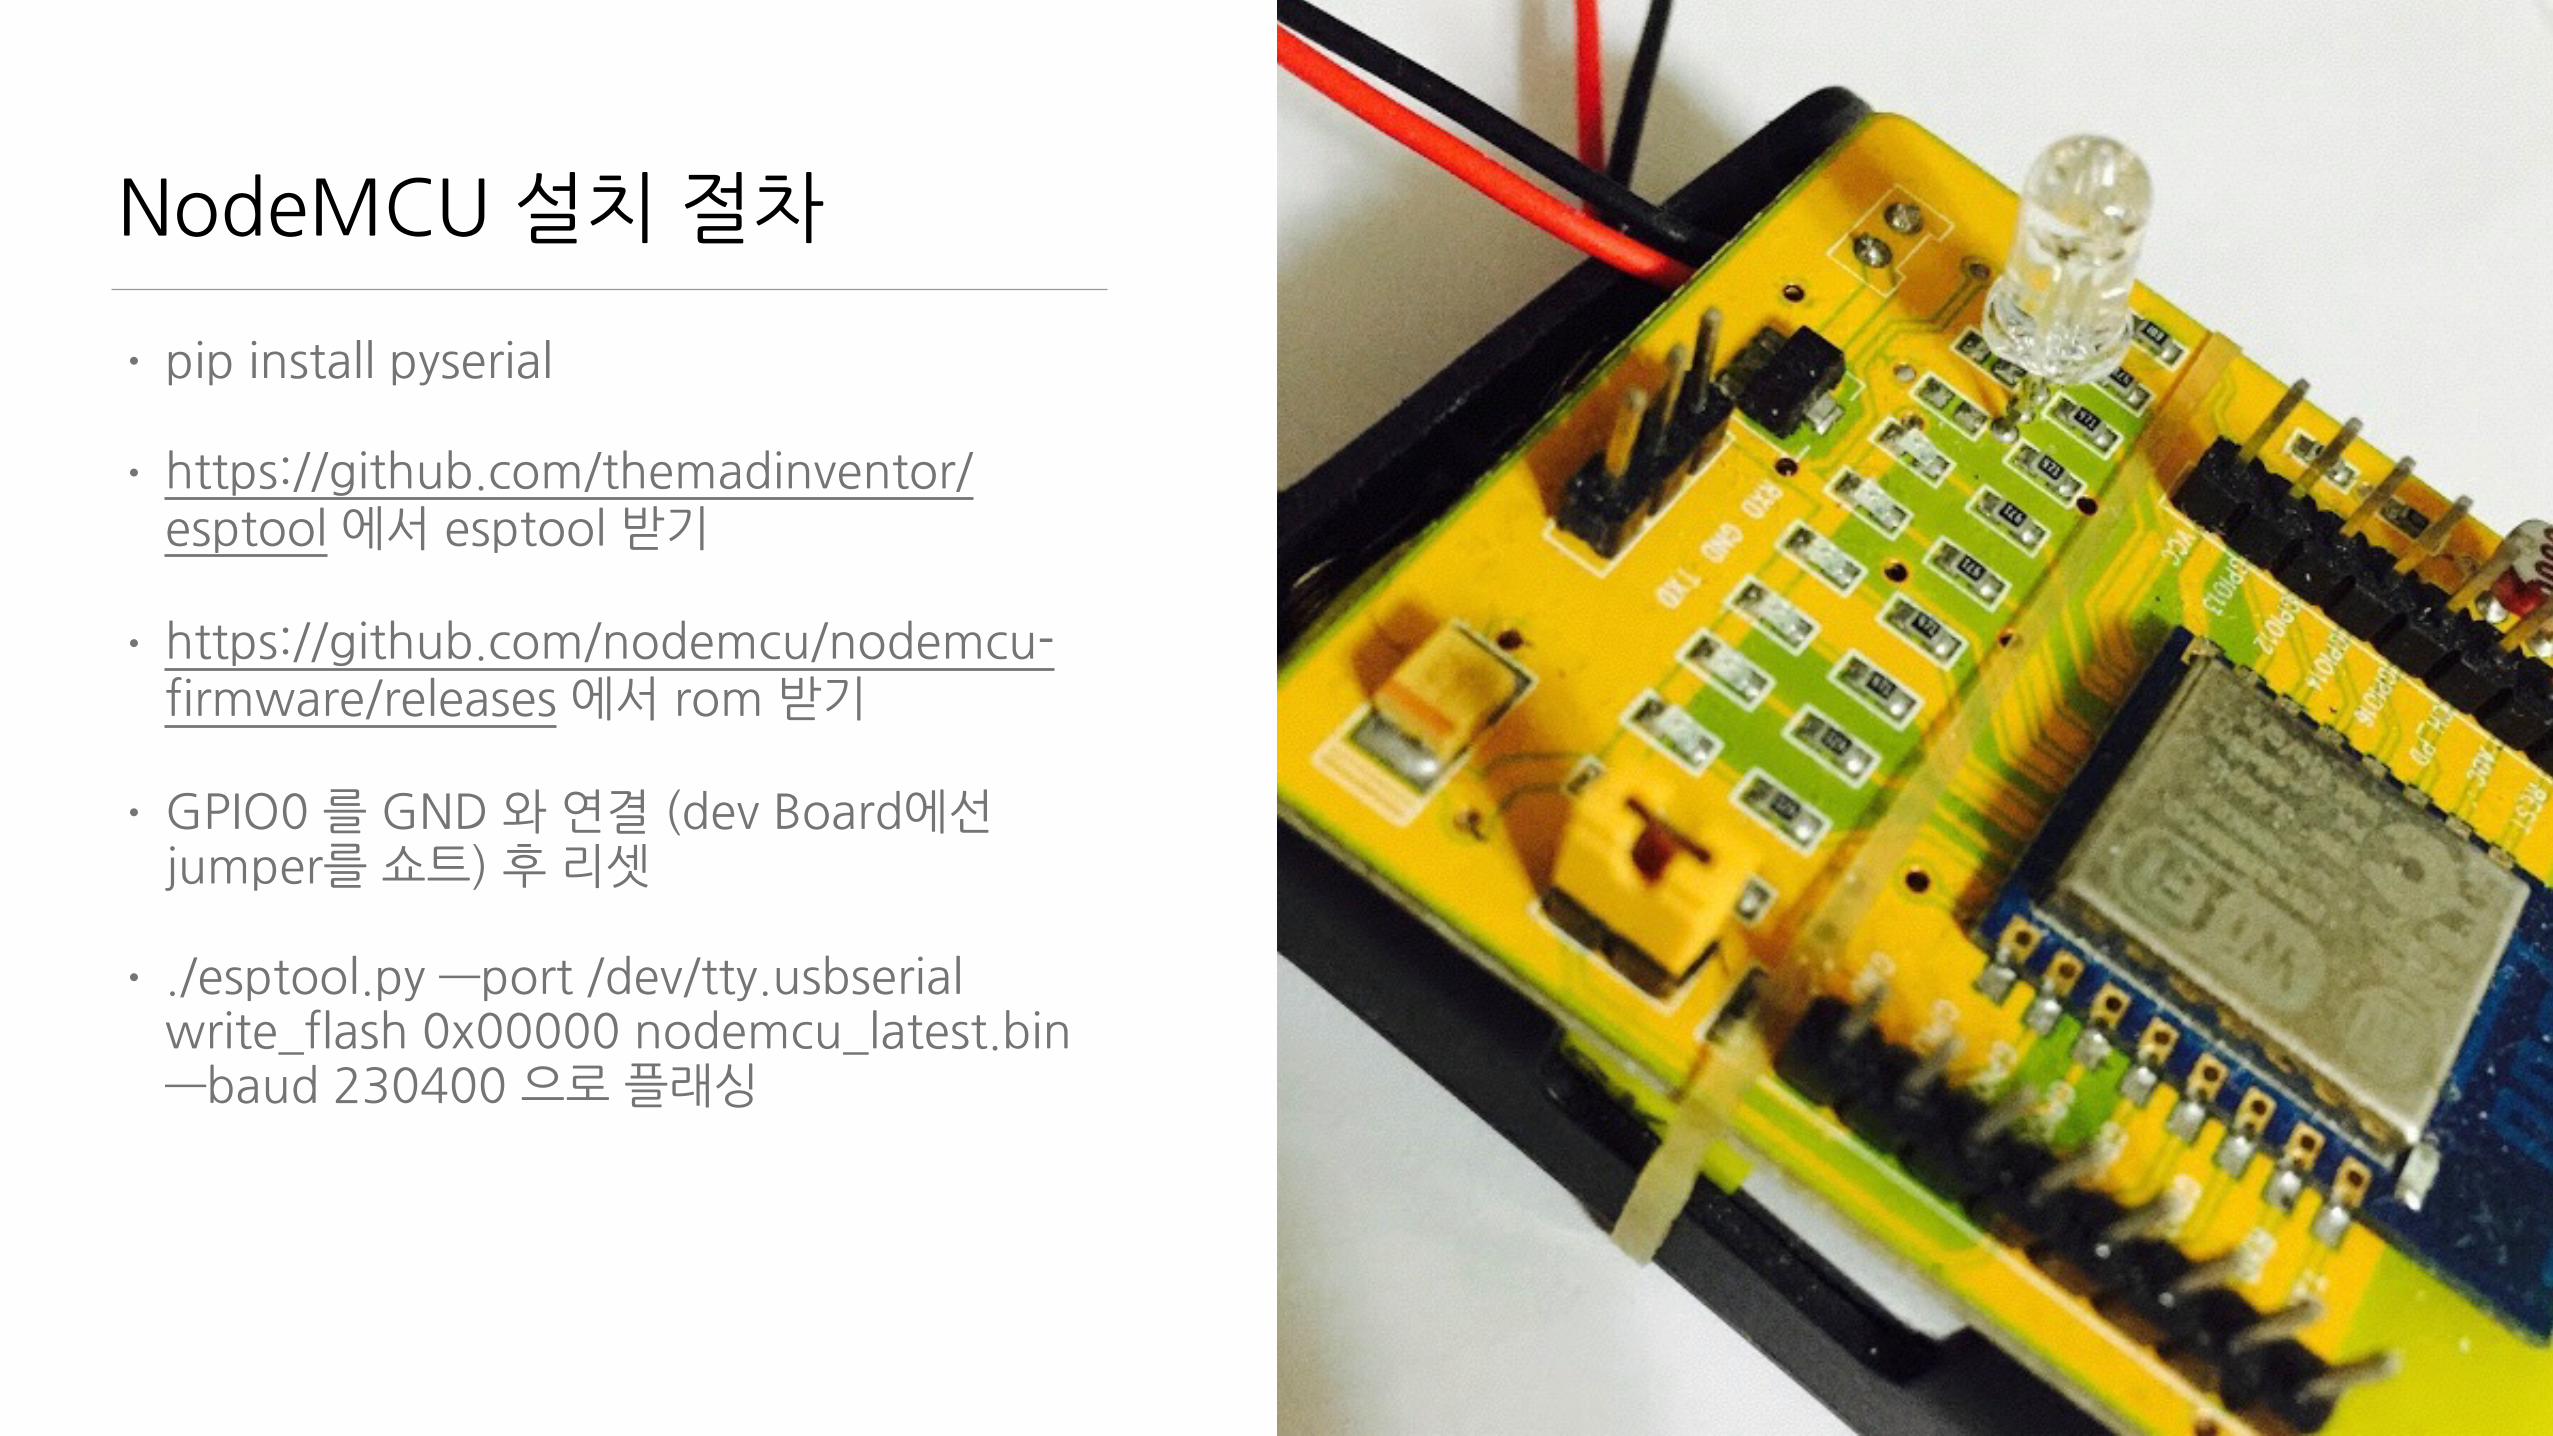
NodeMCU�설치�절차
• pip�install�pyserial�
• https://github.com/themadinventor/esptool�에서�esptool�받기�
• https://github.com/nodemcu/nodemcu-firmware/releases�에서�rom�받기�
• GPIO0�를�GND�와�연결�(dev�Board에선�jumper를�쇼트)�후�리셋�
• ./esptool.py�—port�/dev/tty.usbserial�write_flash�0x00000�nodemcu_latest.bin�—baud�230400�으로�플래싱
NodeMCU�연결
• 9600baud�/�8�/�none�/�1�설정하고�터미널로�연결�
• >�프롬프트�확인�
• WiFi�공유기�접속print(wifi.sta.getip())�—�nil�확인 wifi.setmode(wifi.STATION) wifi.sta.config("SSID","password")print(wifi.sta.getip())�—�접속�정보�확인�
• http://nodemcu.com/index_en.html�예제�실행
NodeMCU�기본�API�-�node�object
• node.restart()�재실행�
• node.heap()�남은�용량�체크�
• node.info()�기기�정보�
• node.compile(“file.lua”)�컴파일�실행.lc�확장자의�바이트�코드를�만든다.�메모리�절약효과가�있다.�
• dofile(“file.lua”)�해당�파일을�실행

NodeMCU�기본�API�-�file�object
• file.remove(“file.lua”)�삭제�
• file.list()�파일�목록�보기����l�=�file.list();����for�k,v�in�pairs(l)�do������print("name:"..k..",�size:"..v)����end�
• file.format()�파일�삭제�
• file.rename(“old.lua”,�“new.lua”)�파일명�변경

Lua�맛보기
• 브라질에서�만들었음.�자유로움이�느껴짐.�
• 매우�크기가�작아서�MCU에�적합�
• 기본�라이브러리는�적으나�C/C++로�확장하기�용이함.�
• JSON과�비슷한�table을�가지고�있음�
• js와�유사한�Function�구조 function�name(param) ��return�value end�—�{}�대신�end로�block�구성하는�점이�다름�
• for�variable�=�시작값,�마지막�값,�증가값�doend�
• https://repl.it/languages/Lua�가지고�놀아봅시다!
Javascipt�vs�Lua
• ///*�..� �*/�
• {�}�
• null�
• {a:1,�b:1}�
• [1,2,3],�a++,�a+=1,�a>b�?�a:�ba>b�&&�a�||�b�
• a=1,�b=1,�c=1�
• a+”…”+b
• ——[[]]—�
• …�end�
• nil�
• {a=1,�b=1}�
• no�Array,�no�++,�+=,�no�tenary�use�(and,�or)�
• a,b,c=1,2,3�
• a..”…”..b
Input�&�Output
하드웨어�제어의�흑과백�Input과�Output을�접근하는�법
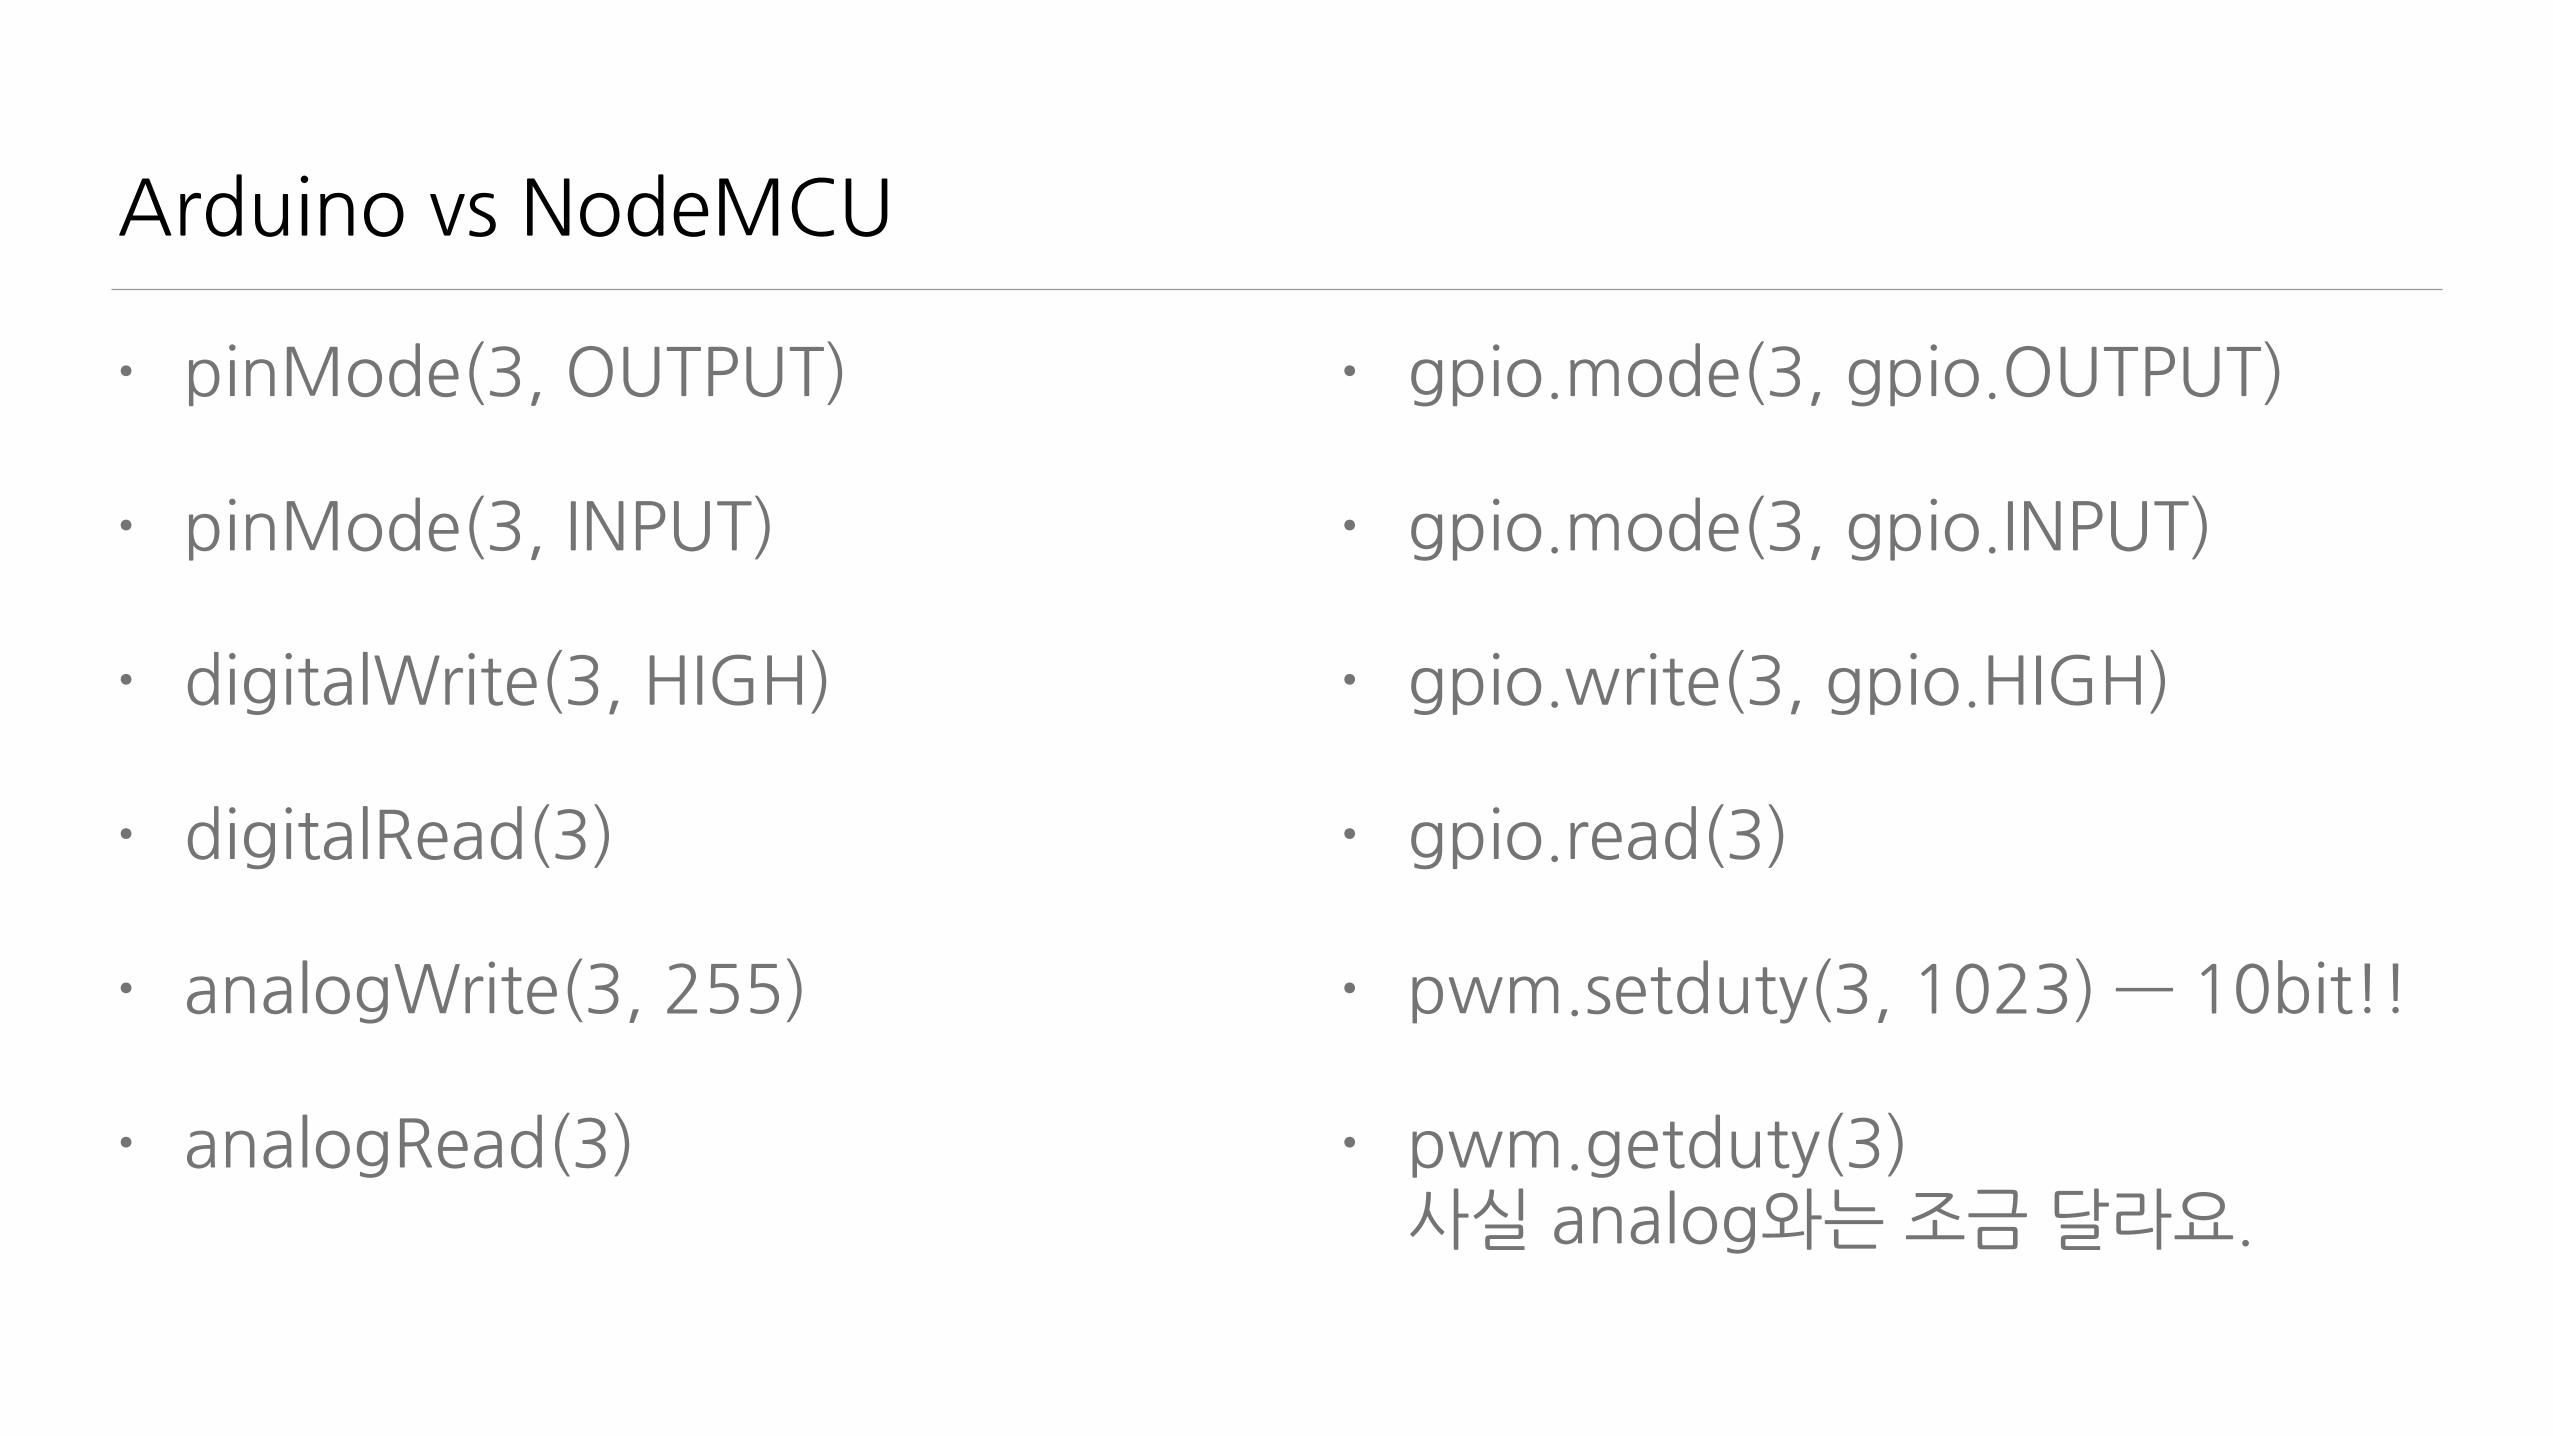
Arduino�vs�NodeMCU
• pinMode(3,�OUTPUT)�
• pinMode(3,�INPUT)�
• digitalWrite(3,�HIGH)�
• digitalRead(3)�
• analogWrite(3,�255)�
• analogRead(3)
• gpio.mode(3,�gpio.OUTPUT)�
• gpio.mode(3,�gpio.INPUT)�
• gpio.write(3,�gpio.HIGH)�
• gpio.read(3)�
• pwm.setduty(3,�1023)�—�10bit!!�
• pwm.getduty(3)�사실�analog와는�조금�달라요.

Nodemcu�실습
• 출력�
• gpio.mode(2,�gpio.OUTPUT)�
• gpio.write(2,�gpio.HIGH)�
• 입력�
• gpio.mode(1,�gpio.INT,�gpio.PULLUP)�
• =gpio.read(1)�
• 이벤트�
• gpio.trig(1,�'down',�function�()�print(“click”)�end)�
• gpio.trig(1,�'up',�function()�gpio.write(2,�1-gpio.read(2))�end)�—�Toggle�
• Serial�Out�
• gpio.mode(2,gpio.OUTPUT,gpio.PULLUP)�
• gpio.serout(2,1,{5000,995000},3,�function()�print("done")�end)
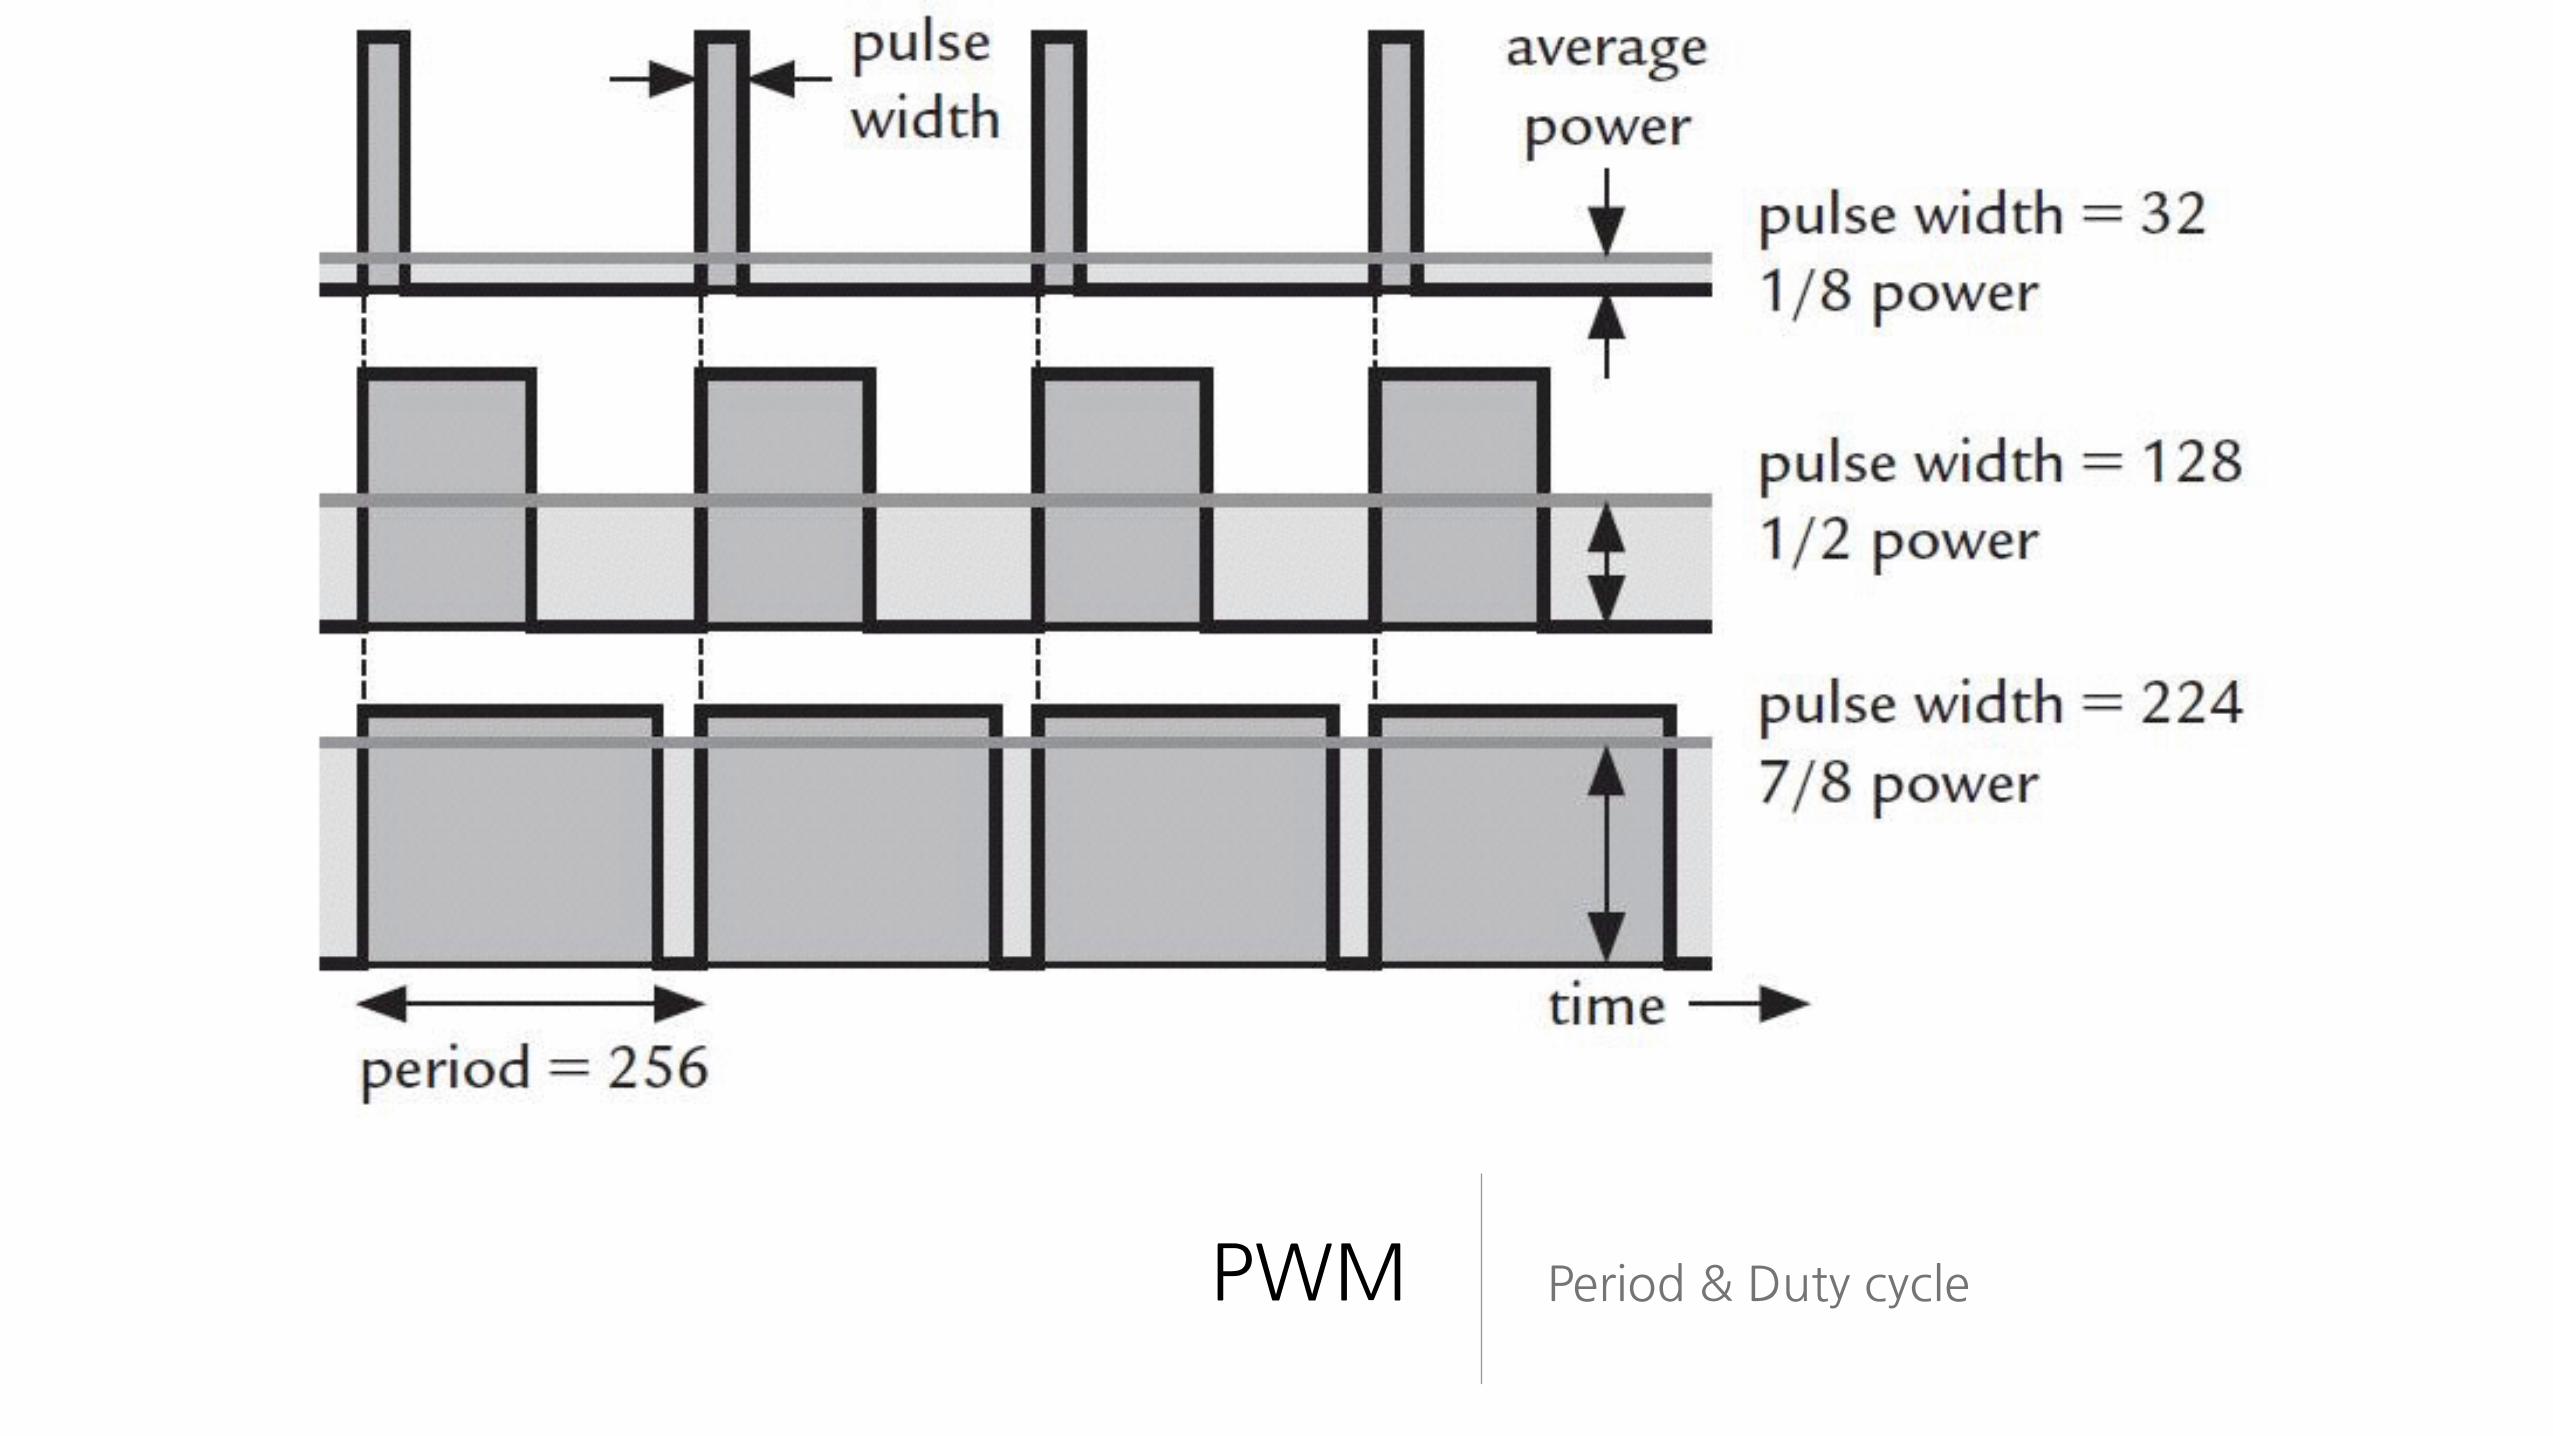
PWM Period�&�Duty�cycle
WiFi�설정 Station/AP�Mode

Station/SoftAP/StationAP
• Station�-�외부�AP에�접속하기�위한�상태,�보통�무선랜�연결을�하는�쪽�
• SoftAP�-�Station의�접속을�받는�상태.�무선�공유기.�
• StationAP�-�두개를�결합.�접속도�가능하고�접속을�받는�것도�가능.�스마트폰의�테더링과�비슷�
• 필요한�상황에�따라�세�가지를�조합/전환해가면서�사용한다.

Station�Mode�-�무선랜�접속
• wifi.setmode(wifi.STATION)�
• wifi.sta.config(ssid,�password,�<auto>,�<bssid>)wifi.sta.config("myssid",�"password")wifi.sta.config("myssid",�"mypassword",�0)wifi.sta.config("myssid",�"mypassword",�"12:34:56:78:90:12")wifi.sta.config("myssid",�"mypassword",�0,�“12:34:56:78:90:12")�
• wifi.sta.connect()�
• wifi.sta.disconnect()
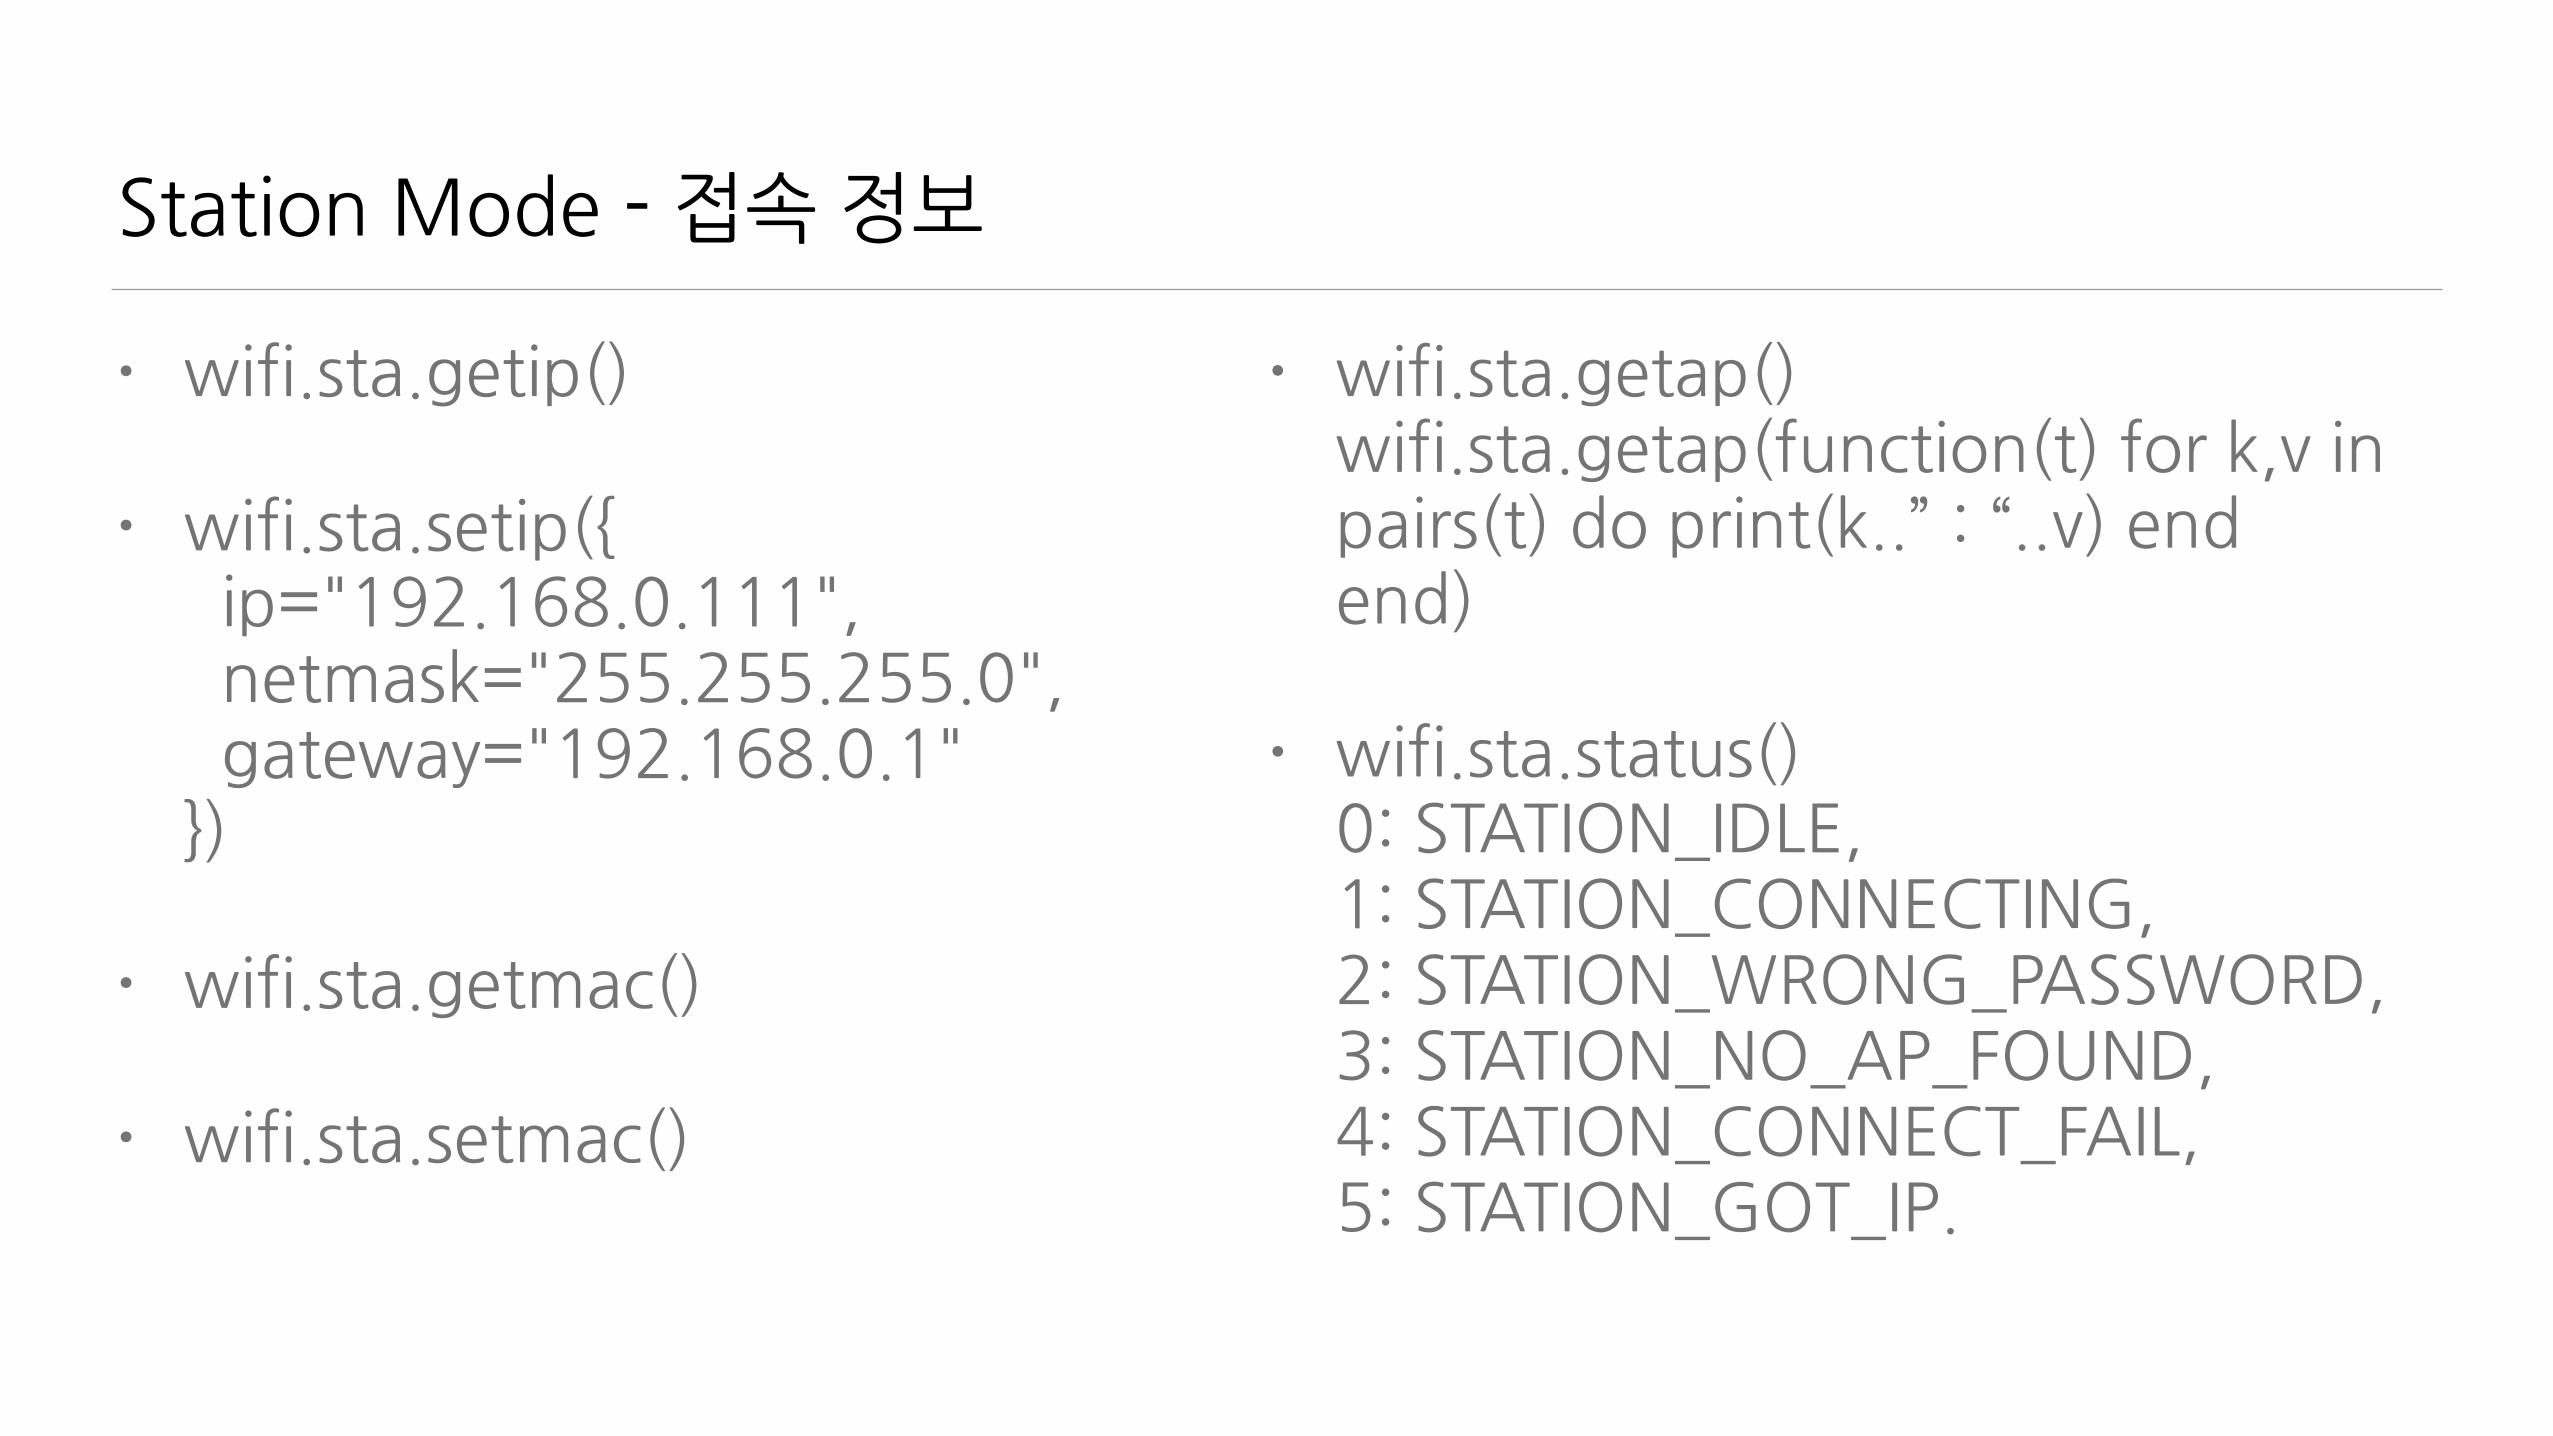
Station�Mode�-�접속�정보
• wifi.sta.getip()�
• wifi.sta.setip({ ��ip="192.168.0.111", ��netmask="255.255.255.0", ��gateway="192.168.0.1" })�
• wifi.sta.getmac()�
• wifi.sta.setmac()
• wifi.sta.getap()wifi.sta.getap(function(t)�for�k,v�in�pairs(t)�do�print(k..”�:�“..v)�end�end)�
• wifi.sta.status()0:�STATION_IDLE,1:�STATION_CONNECTING,2:�STATION_WRONG_PASSWORD, 3:�STATION_NO_AP_FOUND,4:�STATION_CONNECT_FAIL,5:�STATION_GOT_IP.
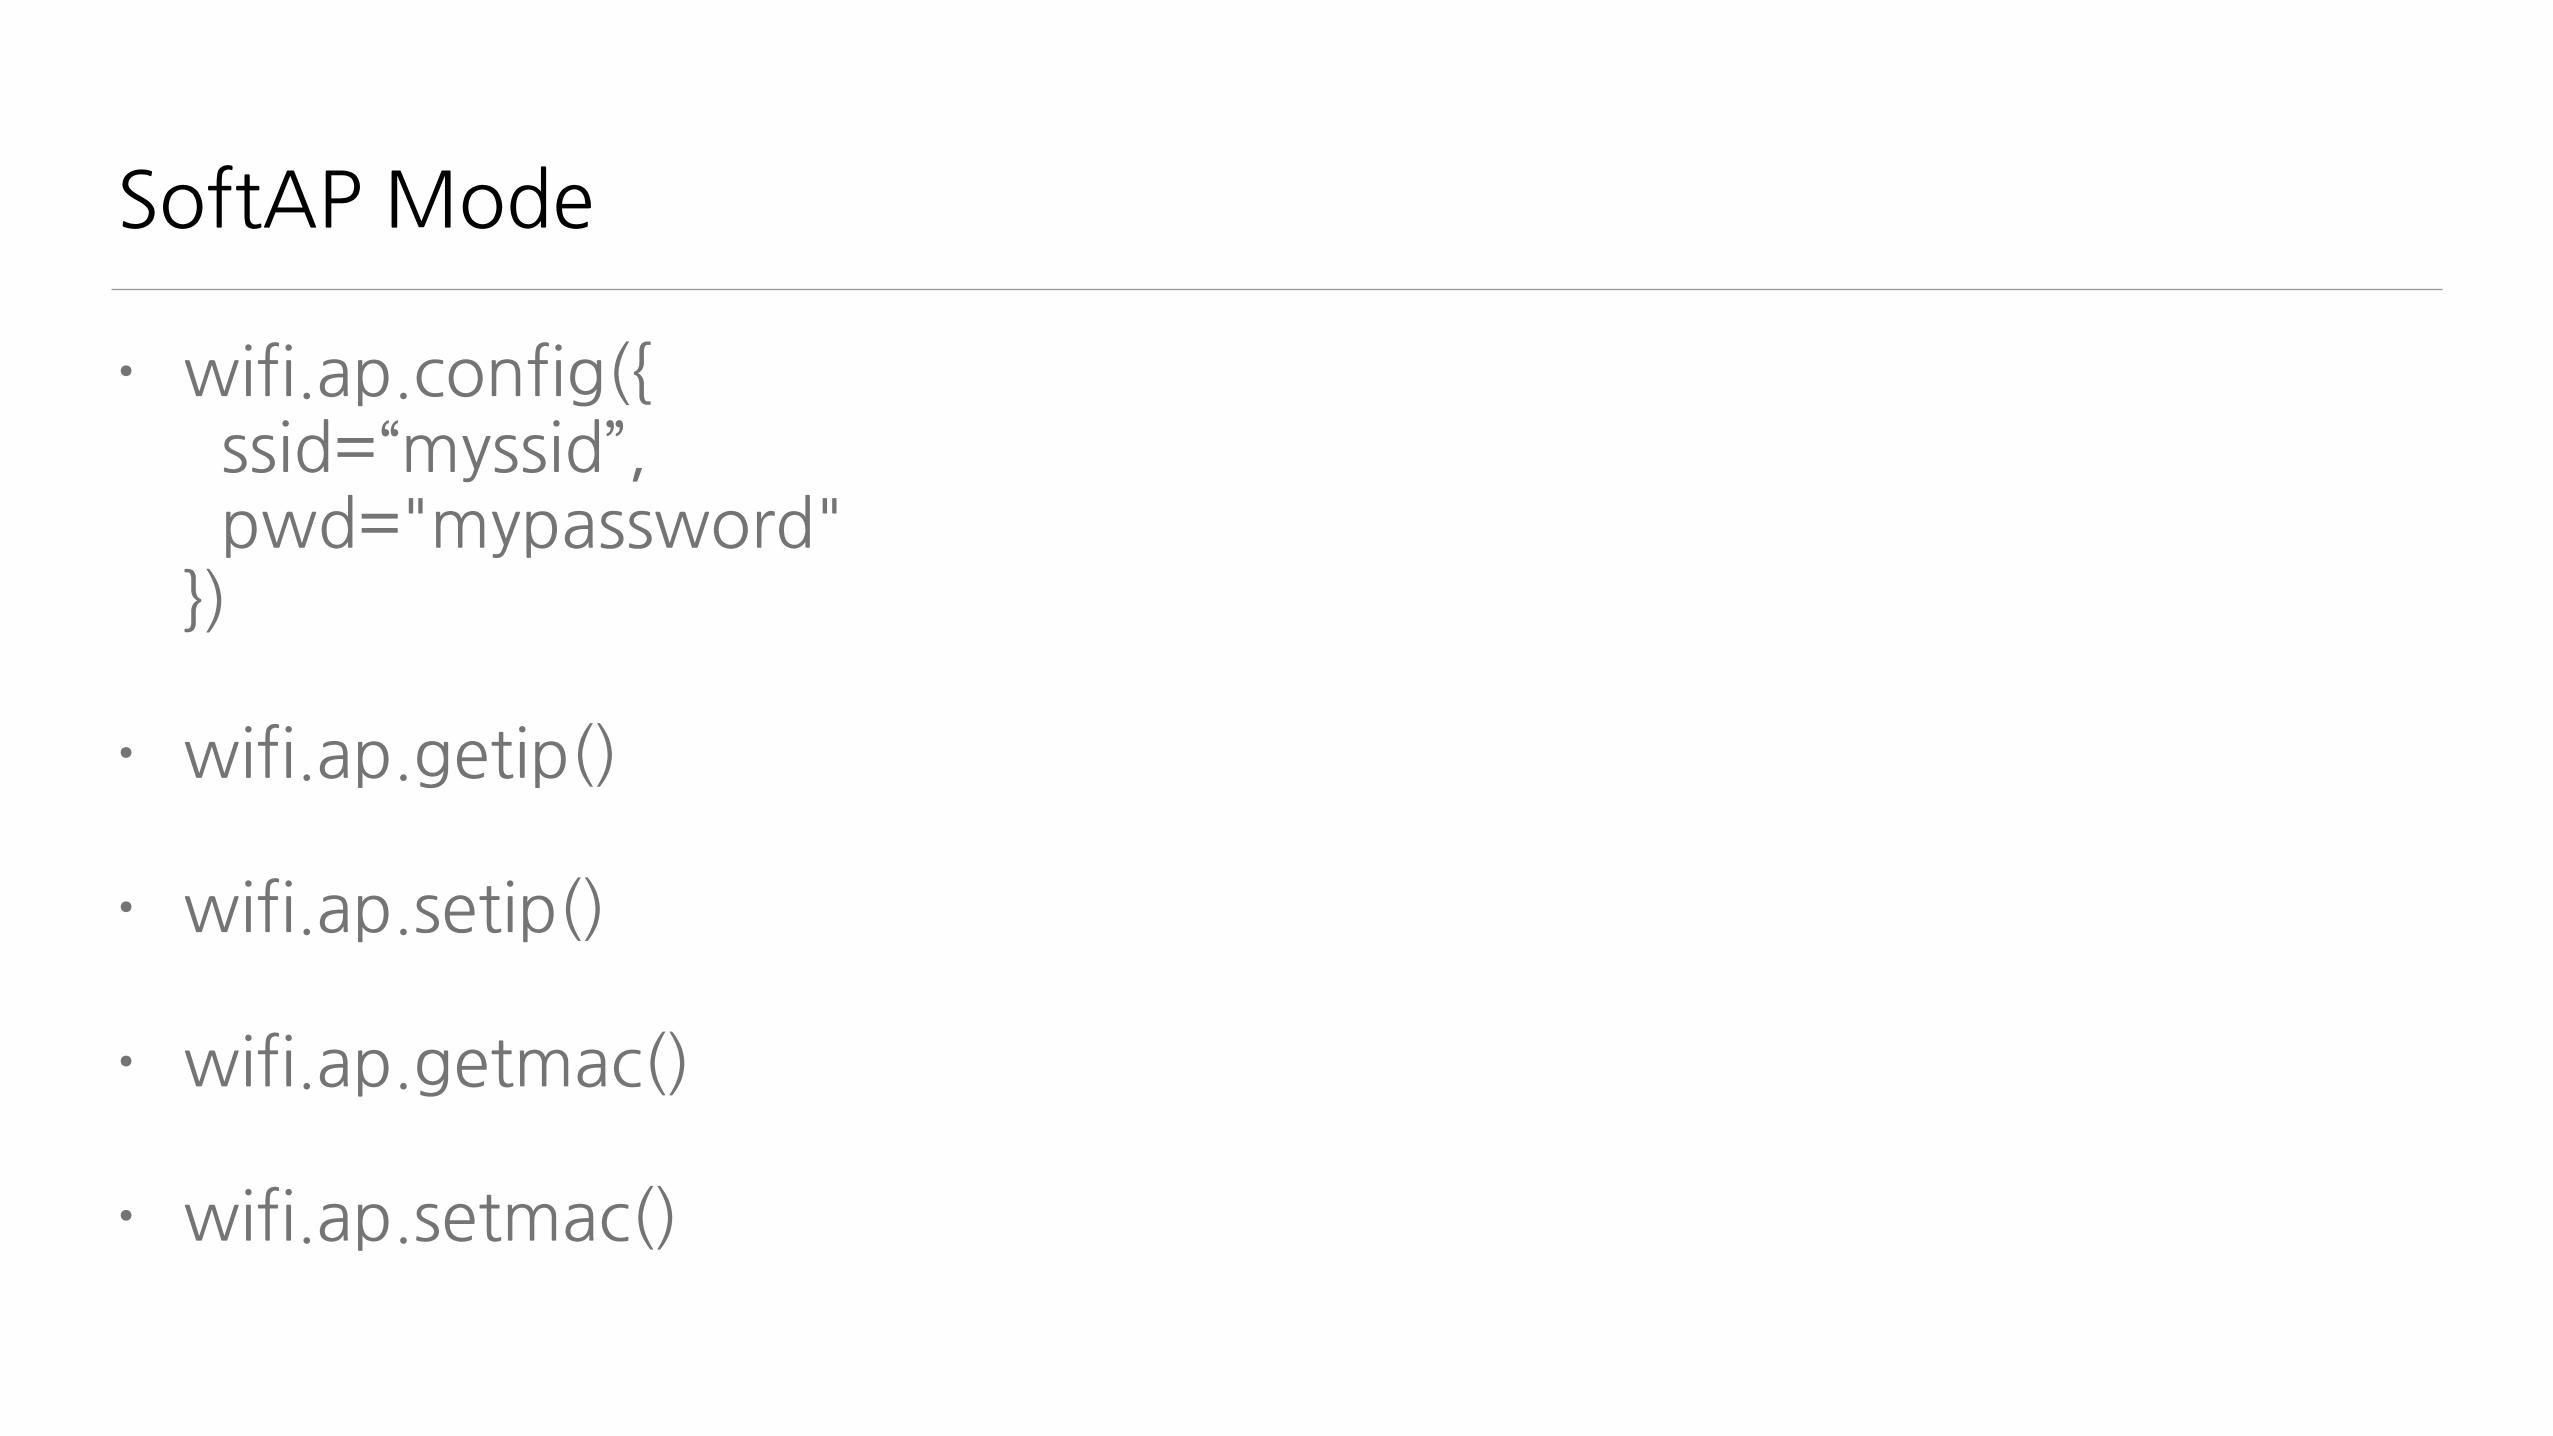
SoftAP�Mode
• wifi.ap.config({ ��ssid=“myssid”,��pwd="mypassword"})�
• wifi.ap.getip()�
• wifi.ap.setip()�
• wifi.ap.getmac()�
• wifi.ap.setmac()
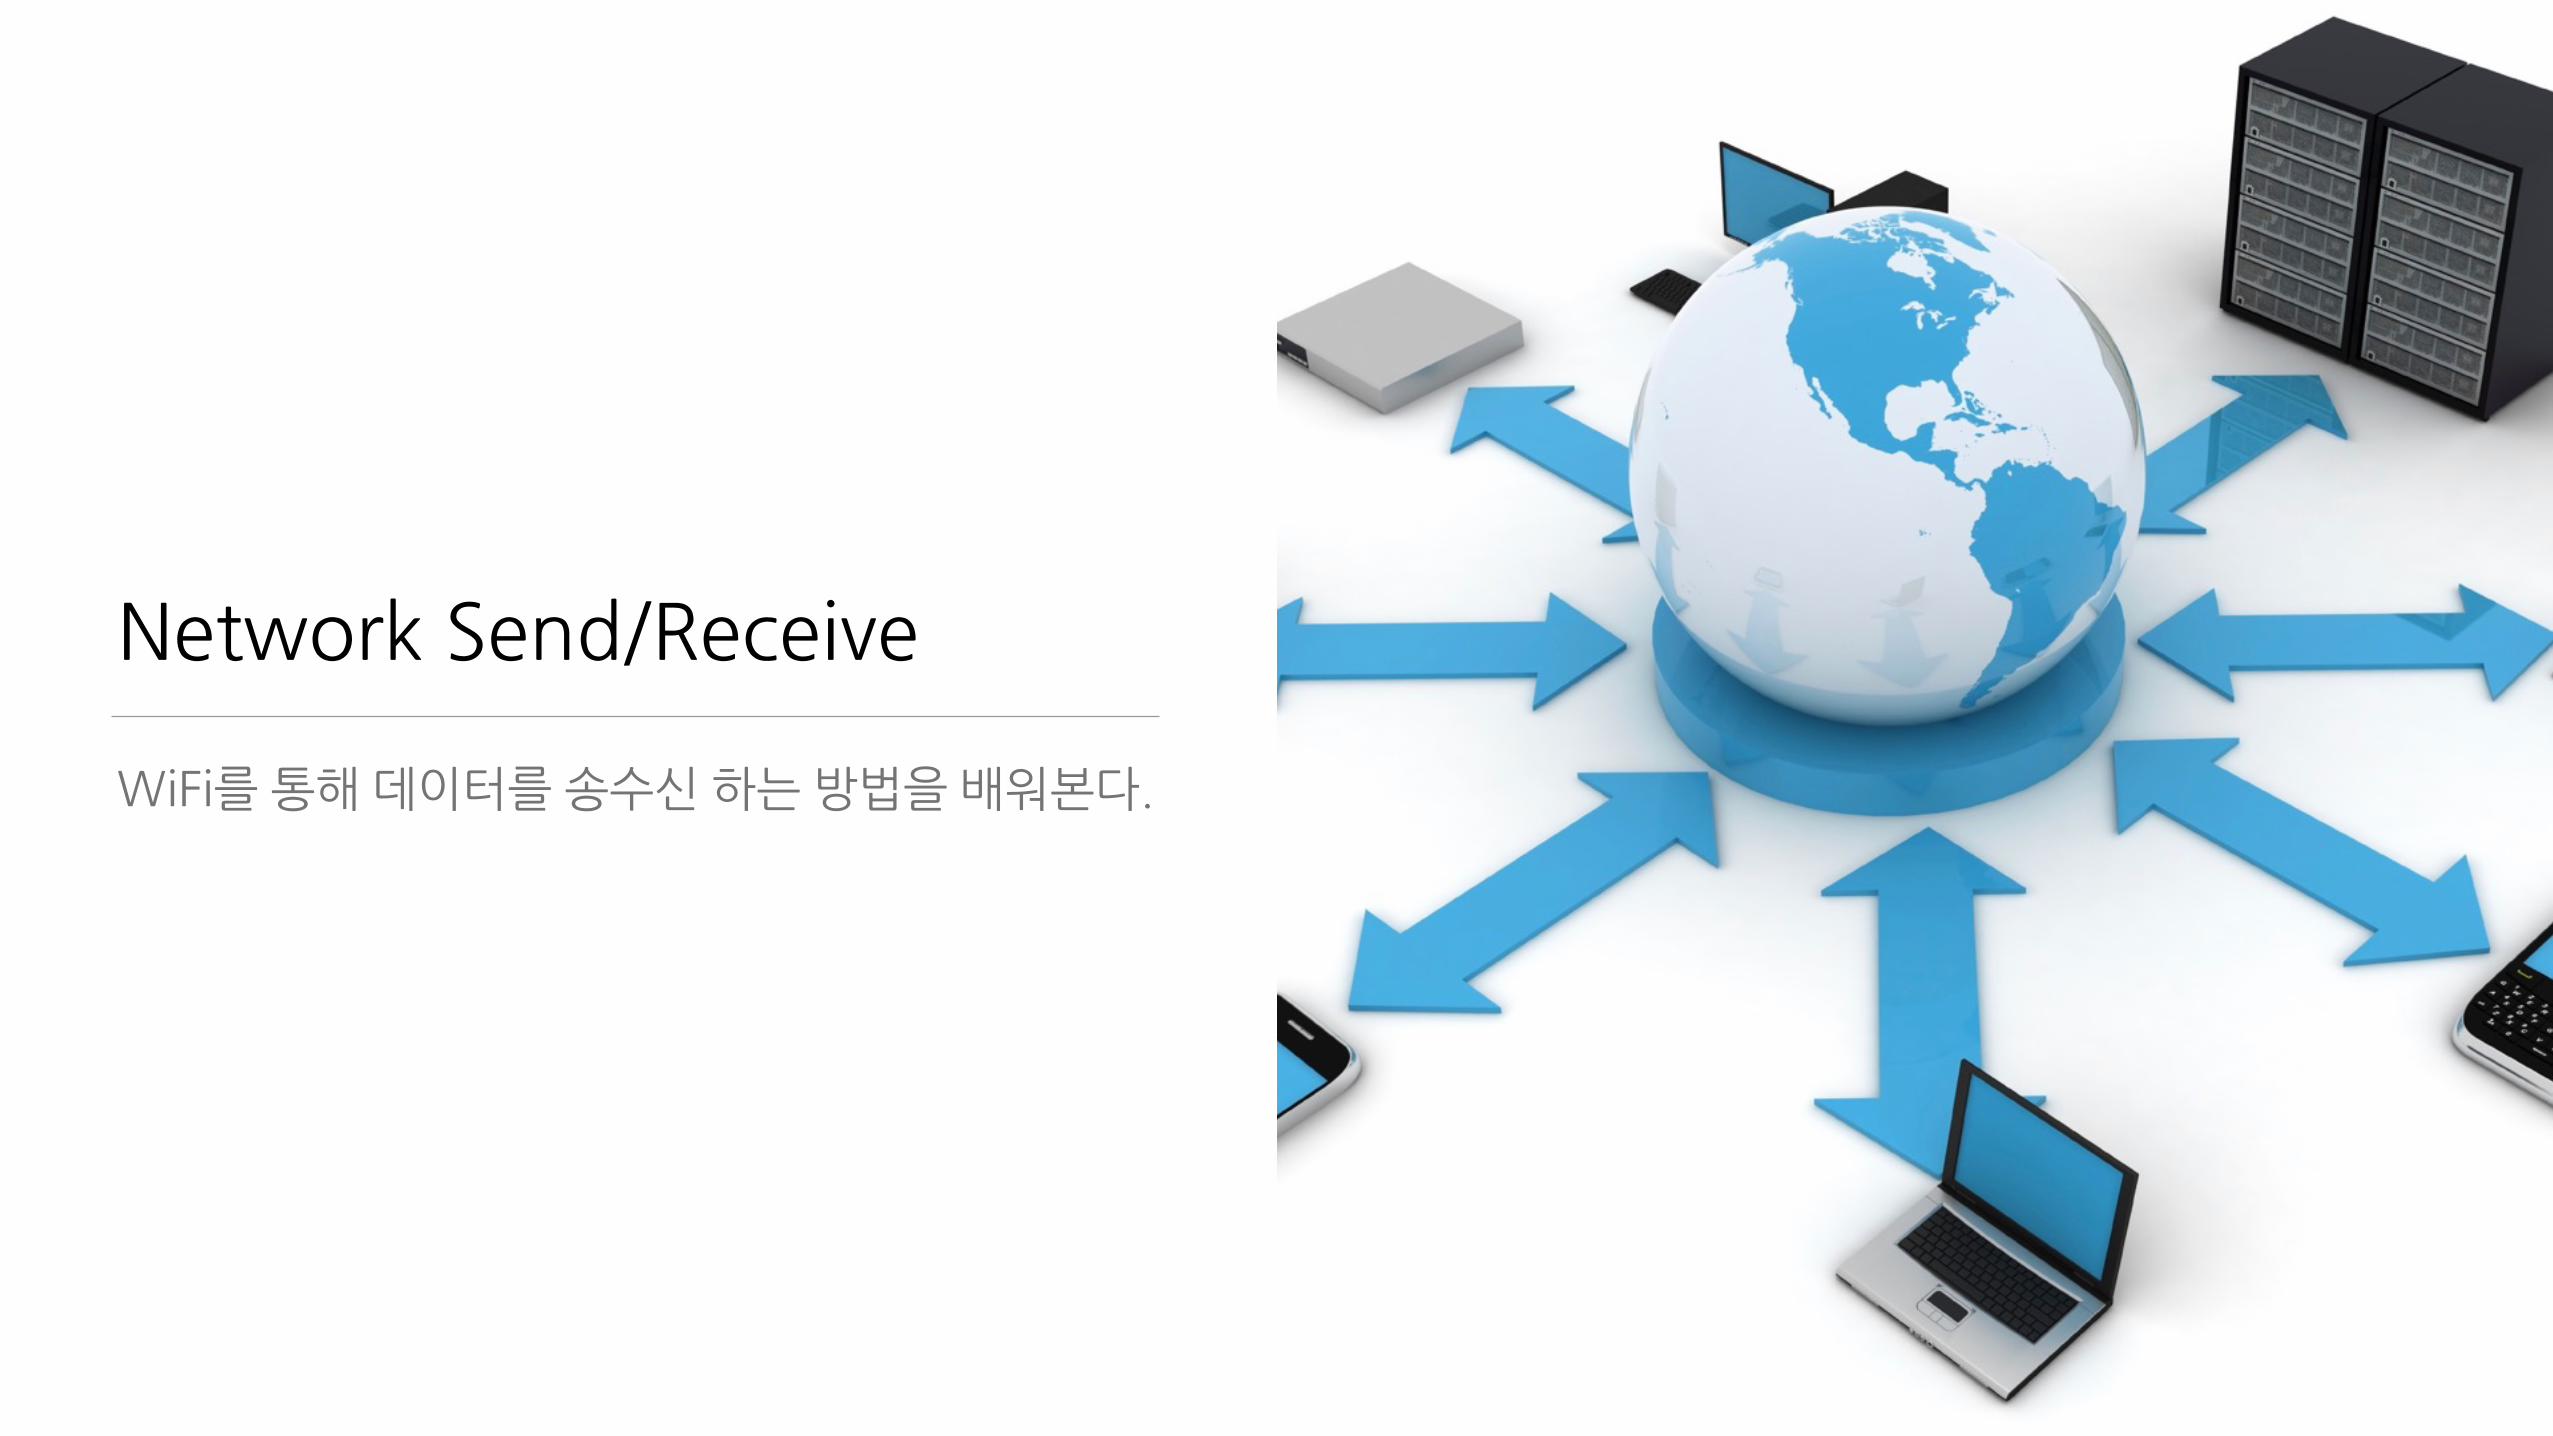
Network�Send/Receive
WiFi를�통해�데이터를�송수신�하는�방법을�배워본다.
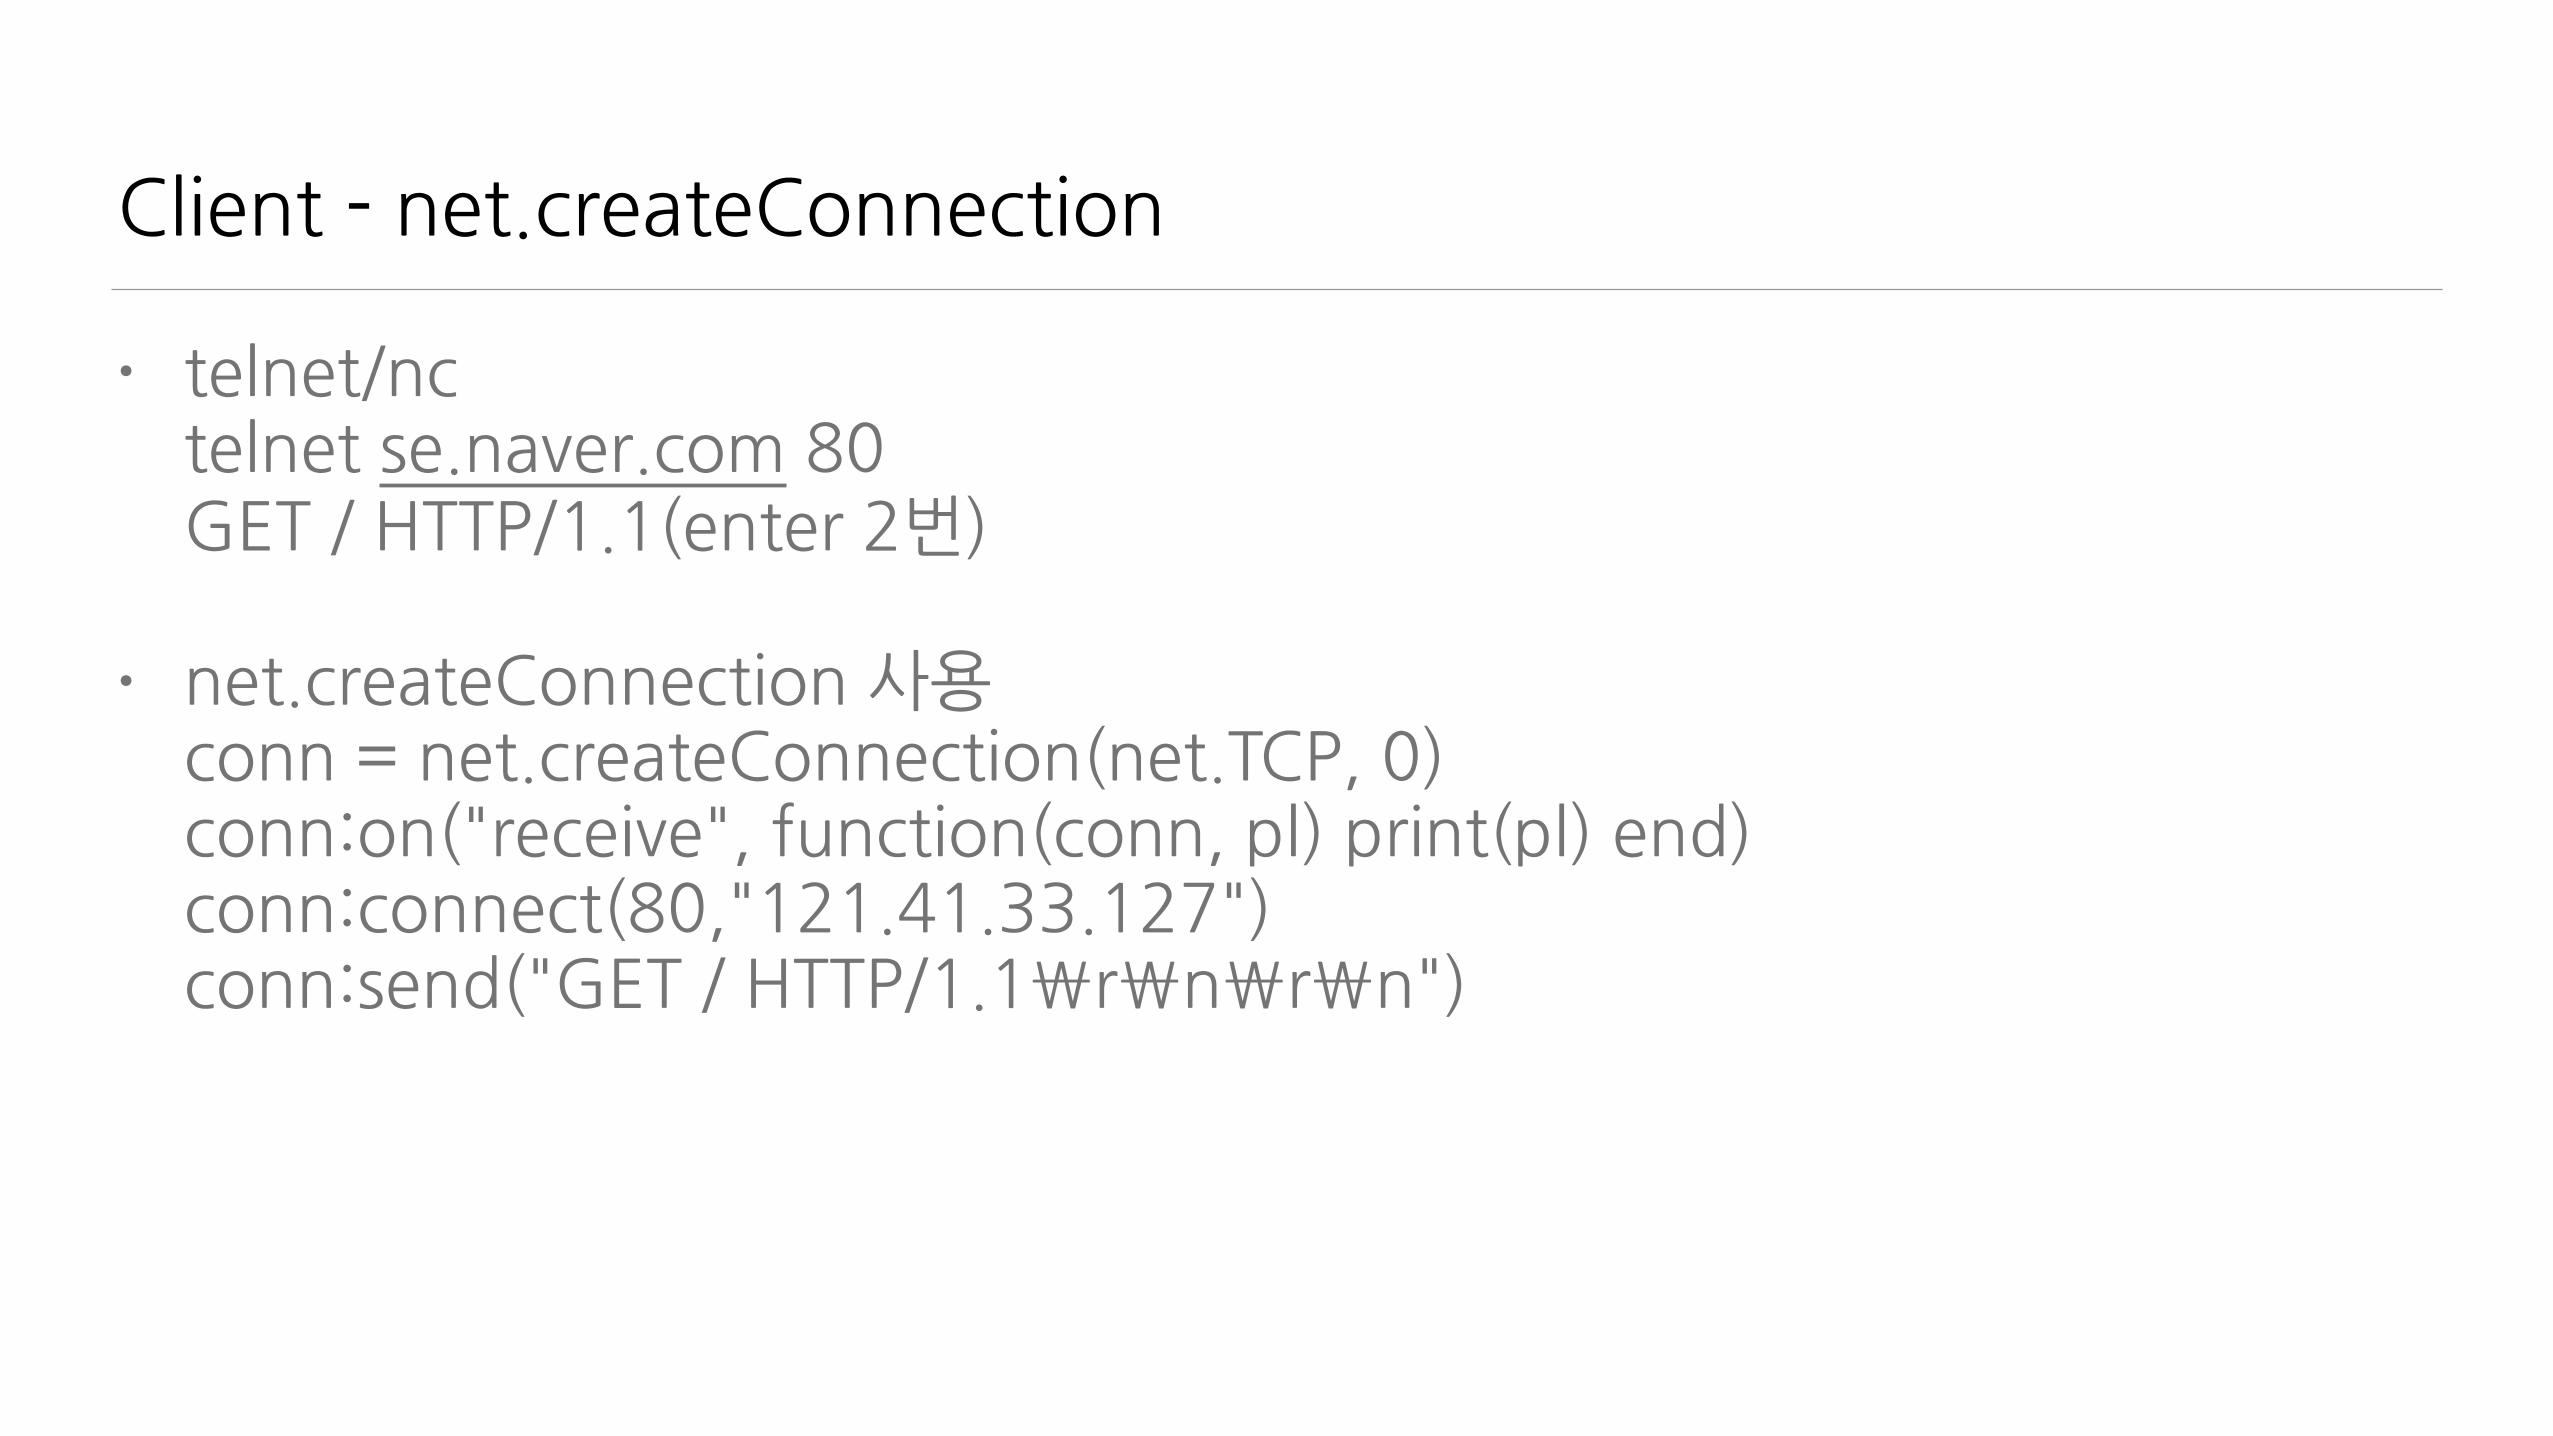
Client�-�net.createConnection
• telnet/nc�telnet�se.naver.com�80GET�/�HTTP/1.1(enter�2번)�
• net.createConnection�사용 conn�=�net.createConnection(net.TCP,�0)conn:on("receive",�function(conn,�pl)�print(pl)�end)conn:connect(80,"121.41.33.127") conn:send("GET�/�HTTP/1.1\r\n\r\n")

Server�-�net.createServer
• srv=net.createServer(net.TCP)srv:listen(80,function(conn) ����conn:on("receive",function(conn,payload)����print(payload)����conn:send("<h1>�Hello,�NodeMCU.</h1>") ����conn:close()����end)end)�
• nodemcu쪽�console을�주의깊게�볼�것
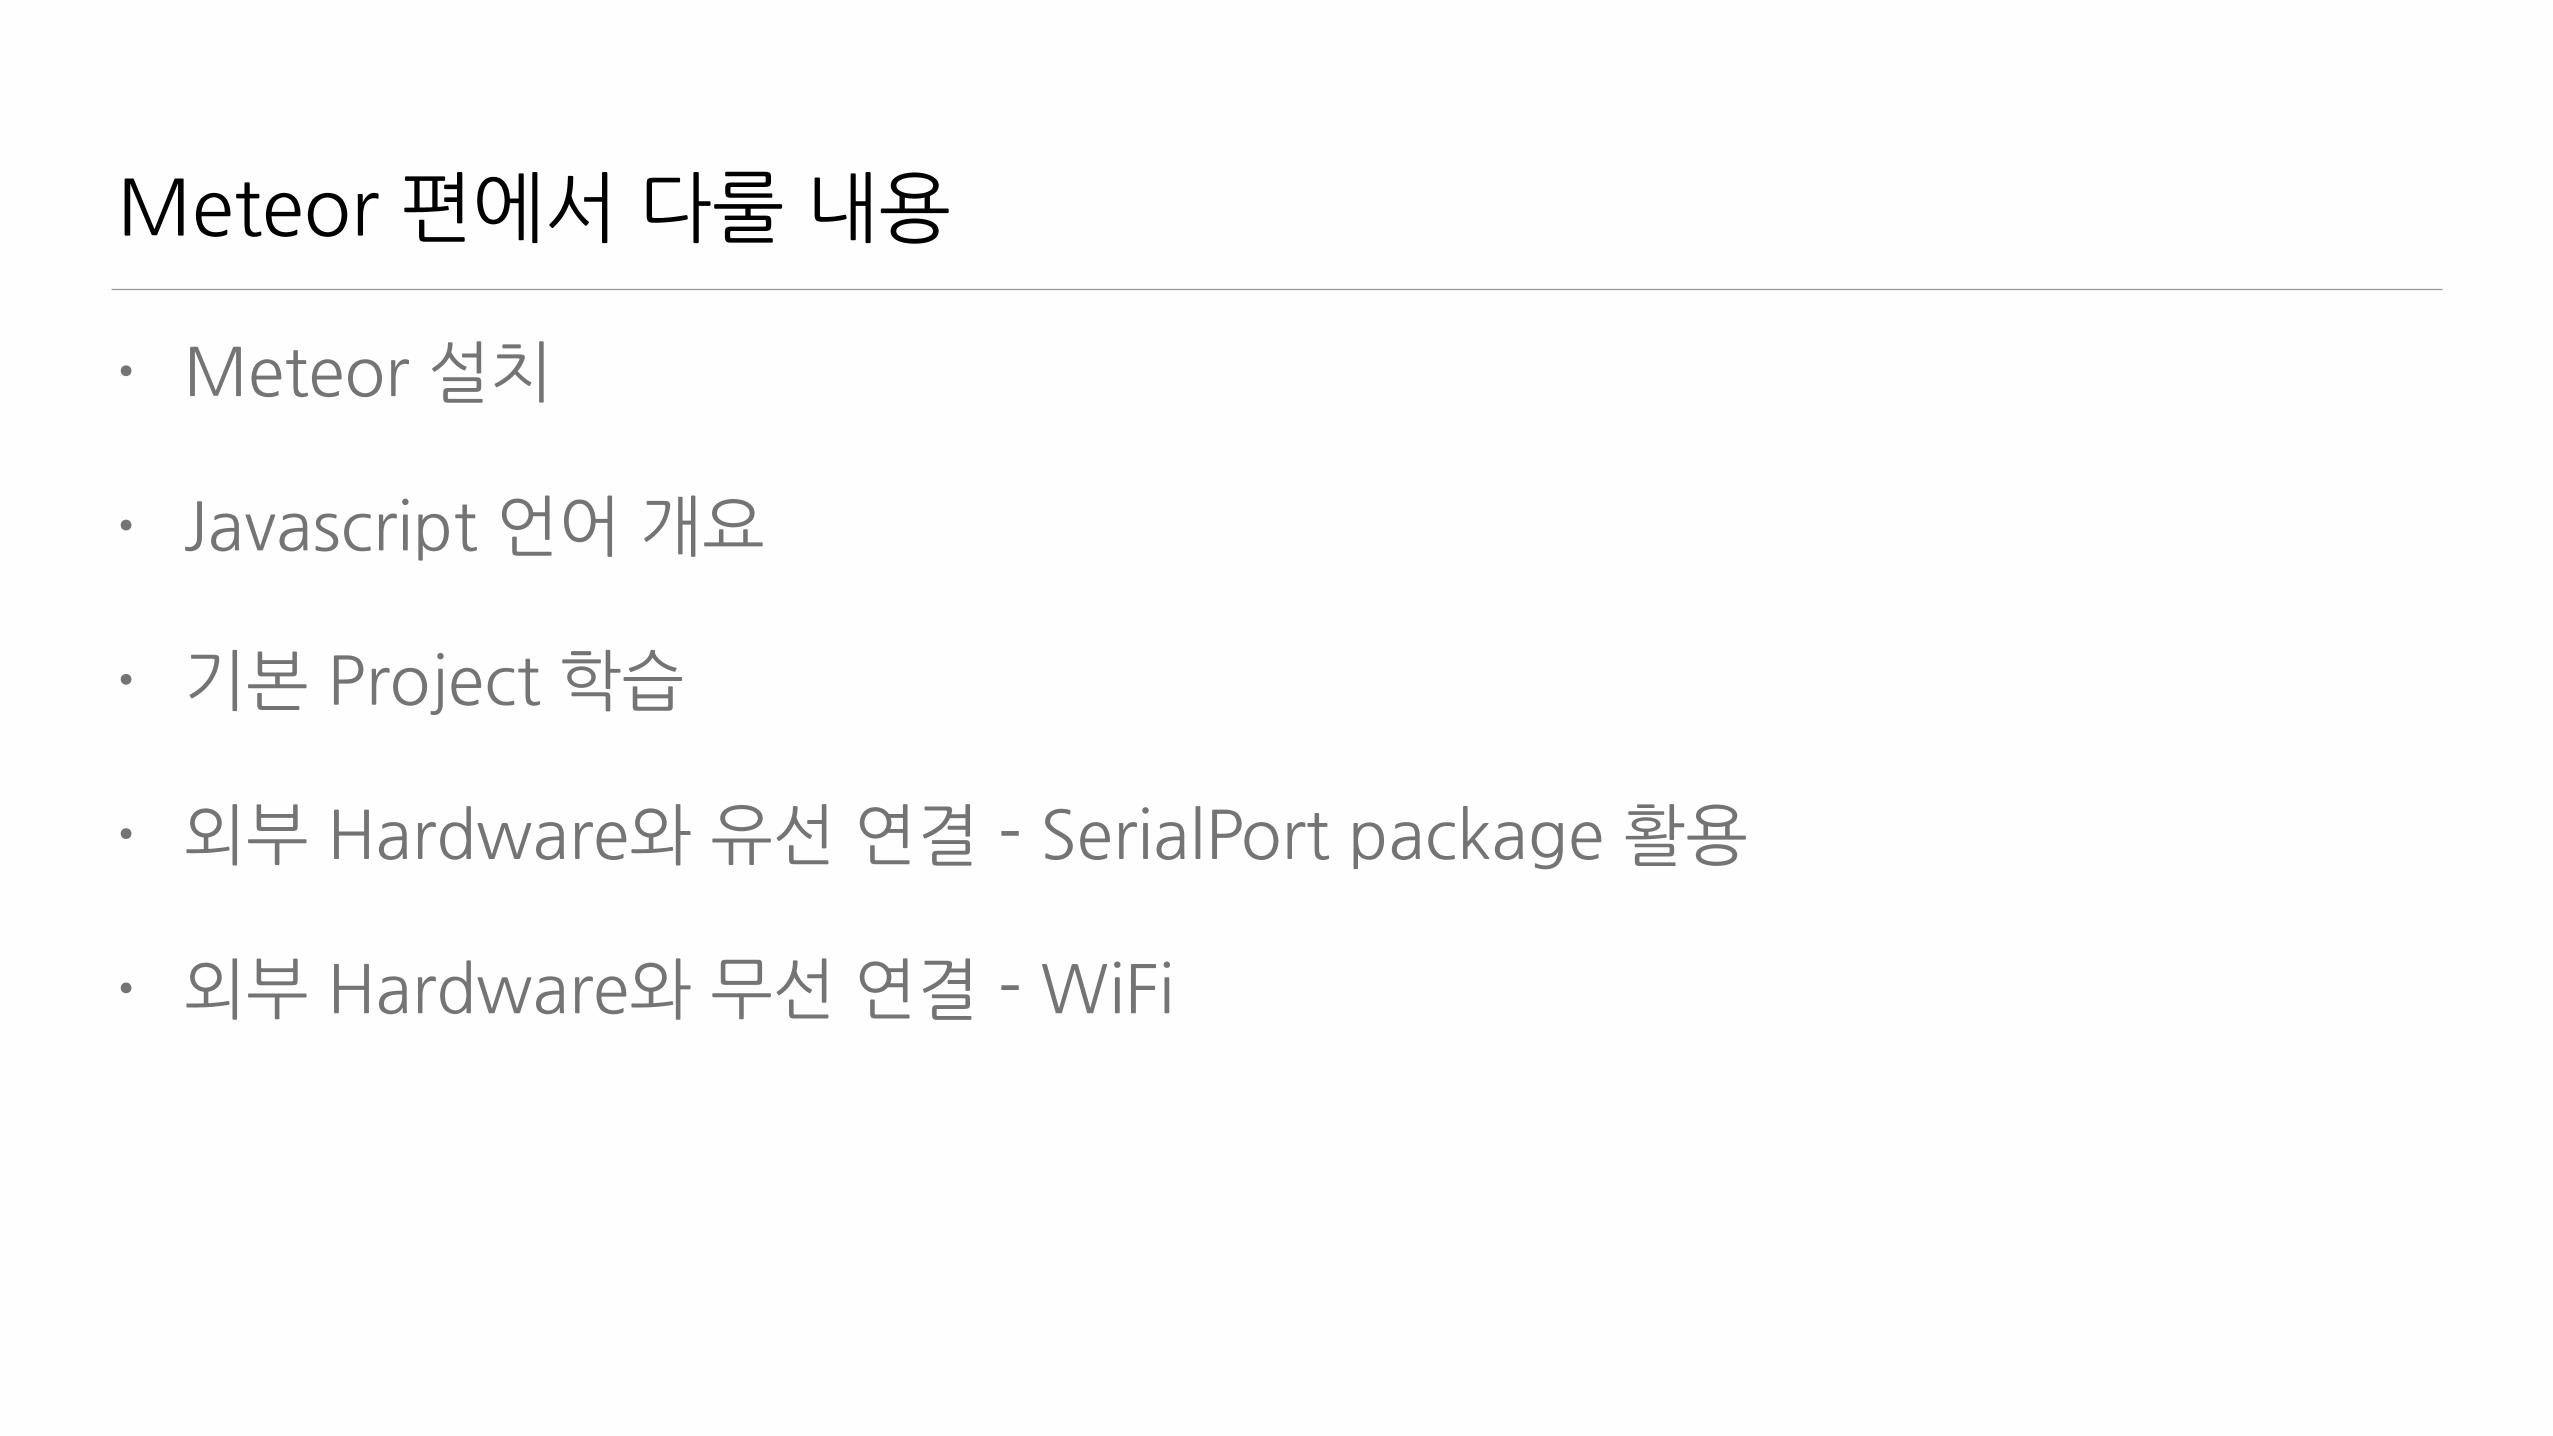
Meteor�편에서�다룰�내용
• Meteor�설치�
• Javascript�언어�개요�
• 기본�Project�학습�
• 외부�Hardware와�유선�연결�-�SerialPort�package�활용�
• 외부�Hardware와�무선�연결�-�WiFi

근데�IoT랑�뭔�상관인가요?
• IoT는�급격하게�성장하는�분야지만�여전히�UI는�이슈�• IoT는�이벤트�중심,�Web은�문서�기반.�• 실시간�UI는�어떻게?�• Meteor는�Web도�되고�실시간�• 기존에는�솔루션은?https://thingspeak.com/https://plot.lyhttp://www.nimbits.com/�
• 하지만,�내�손으로�만들어야�한다면?
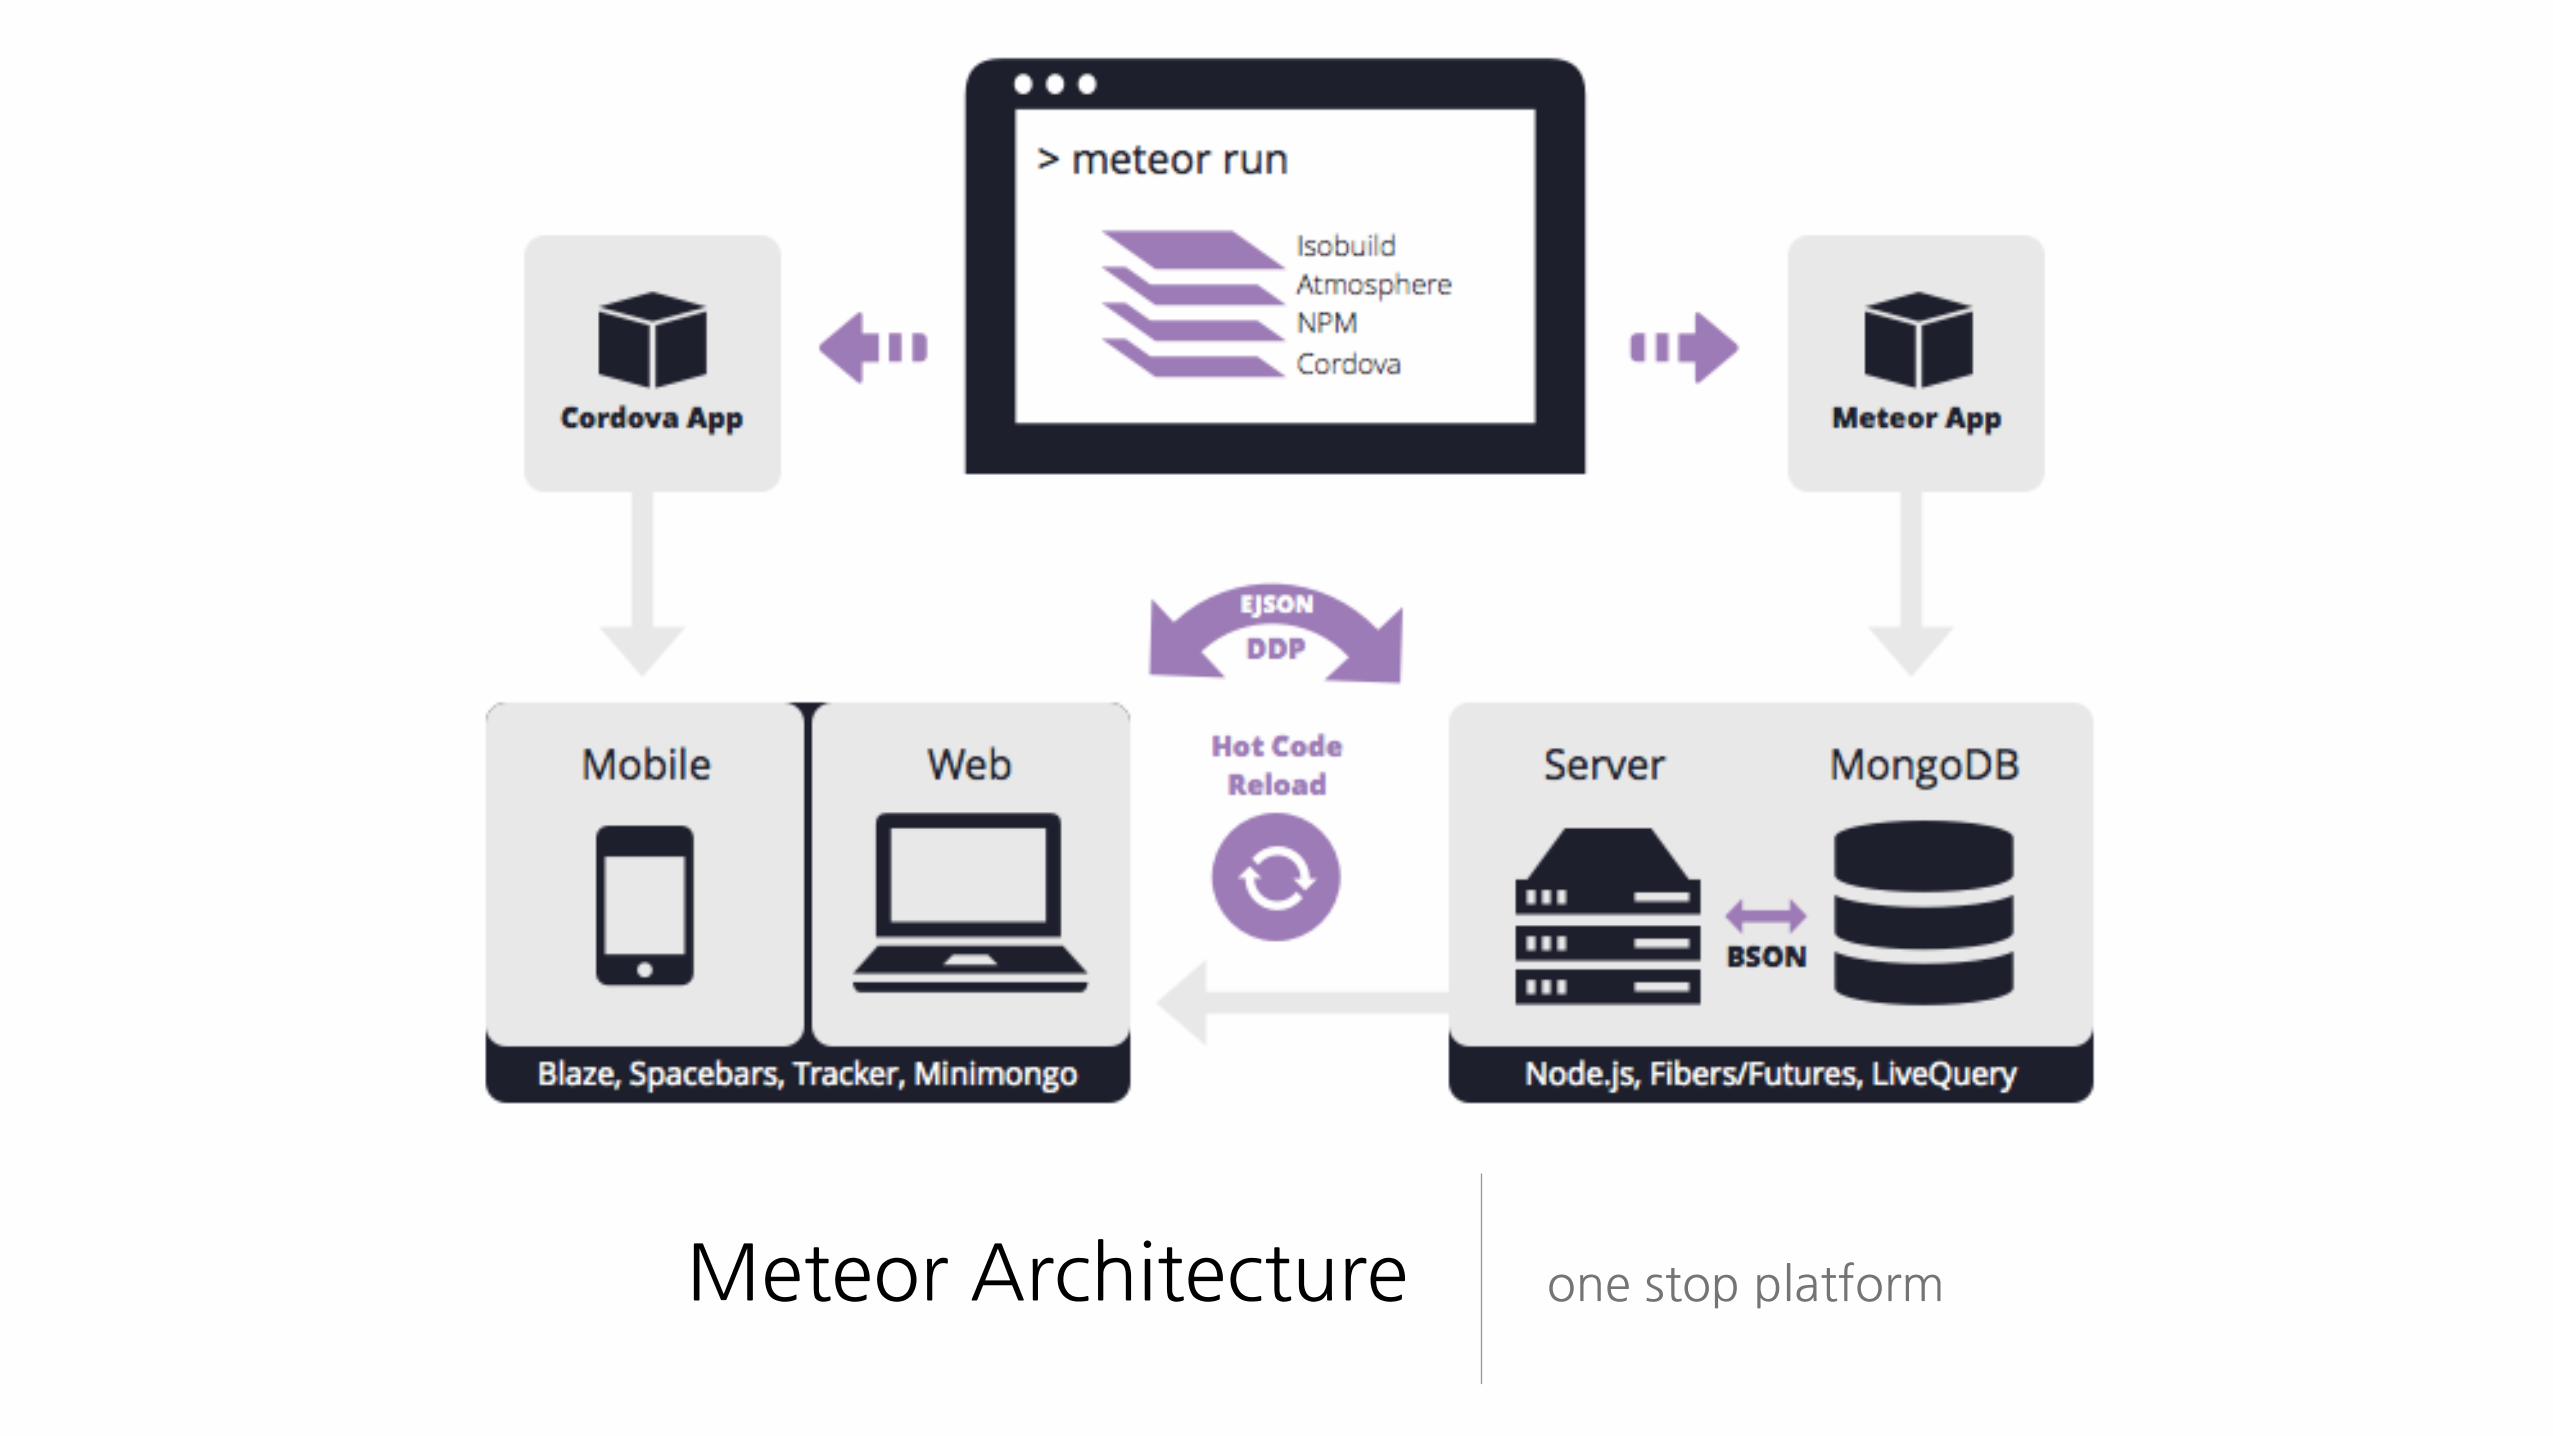
Meteor�Architecture one�stop�platform

Meteor�설치
Windows�라면?�https://install.meteor.com/windows�
Linux�/�OS�X�라면?�curl�https://install.meteor.com/�|�sh�
설치는�간단.�시간은�좀�걸려요.
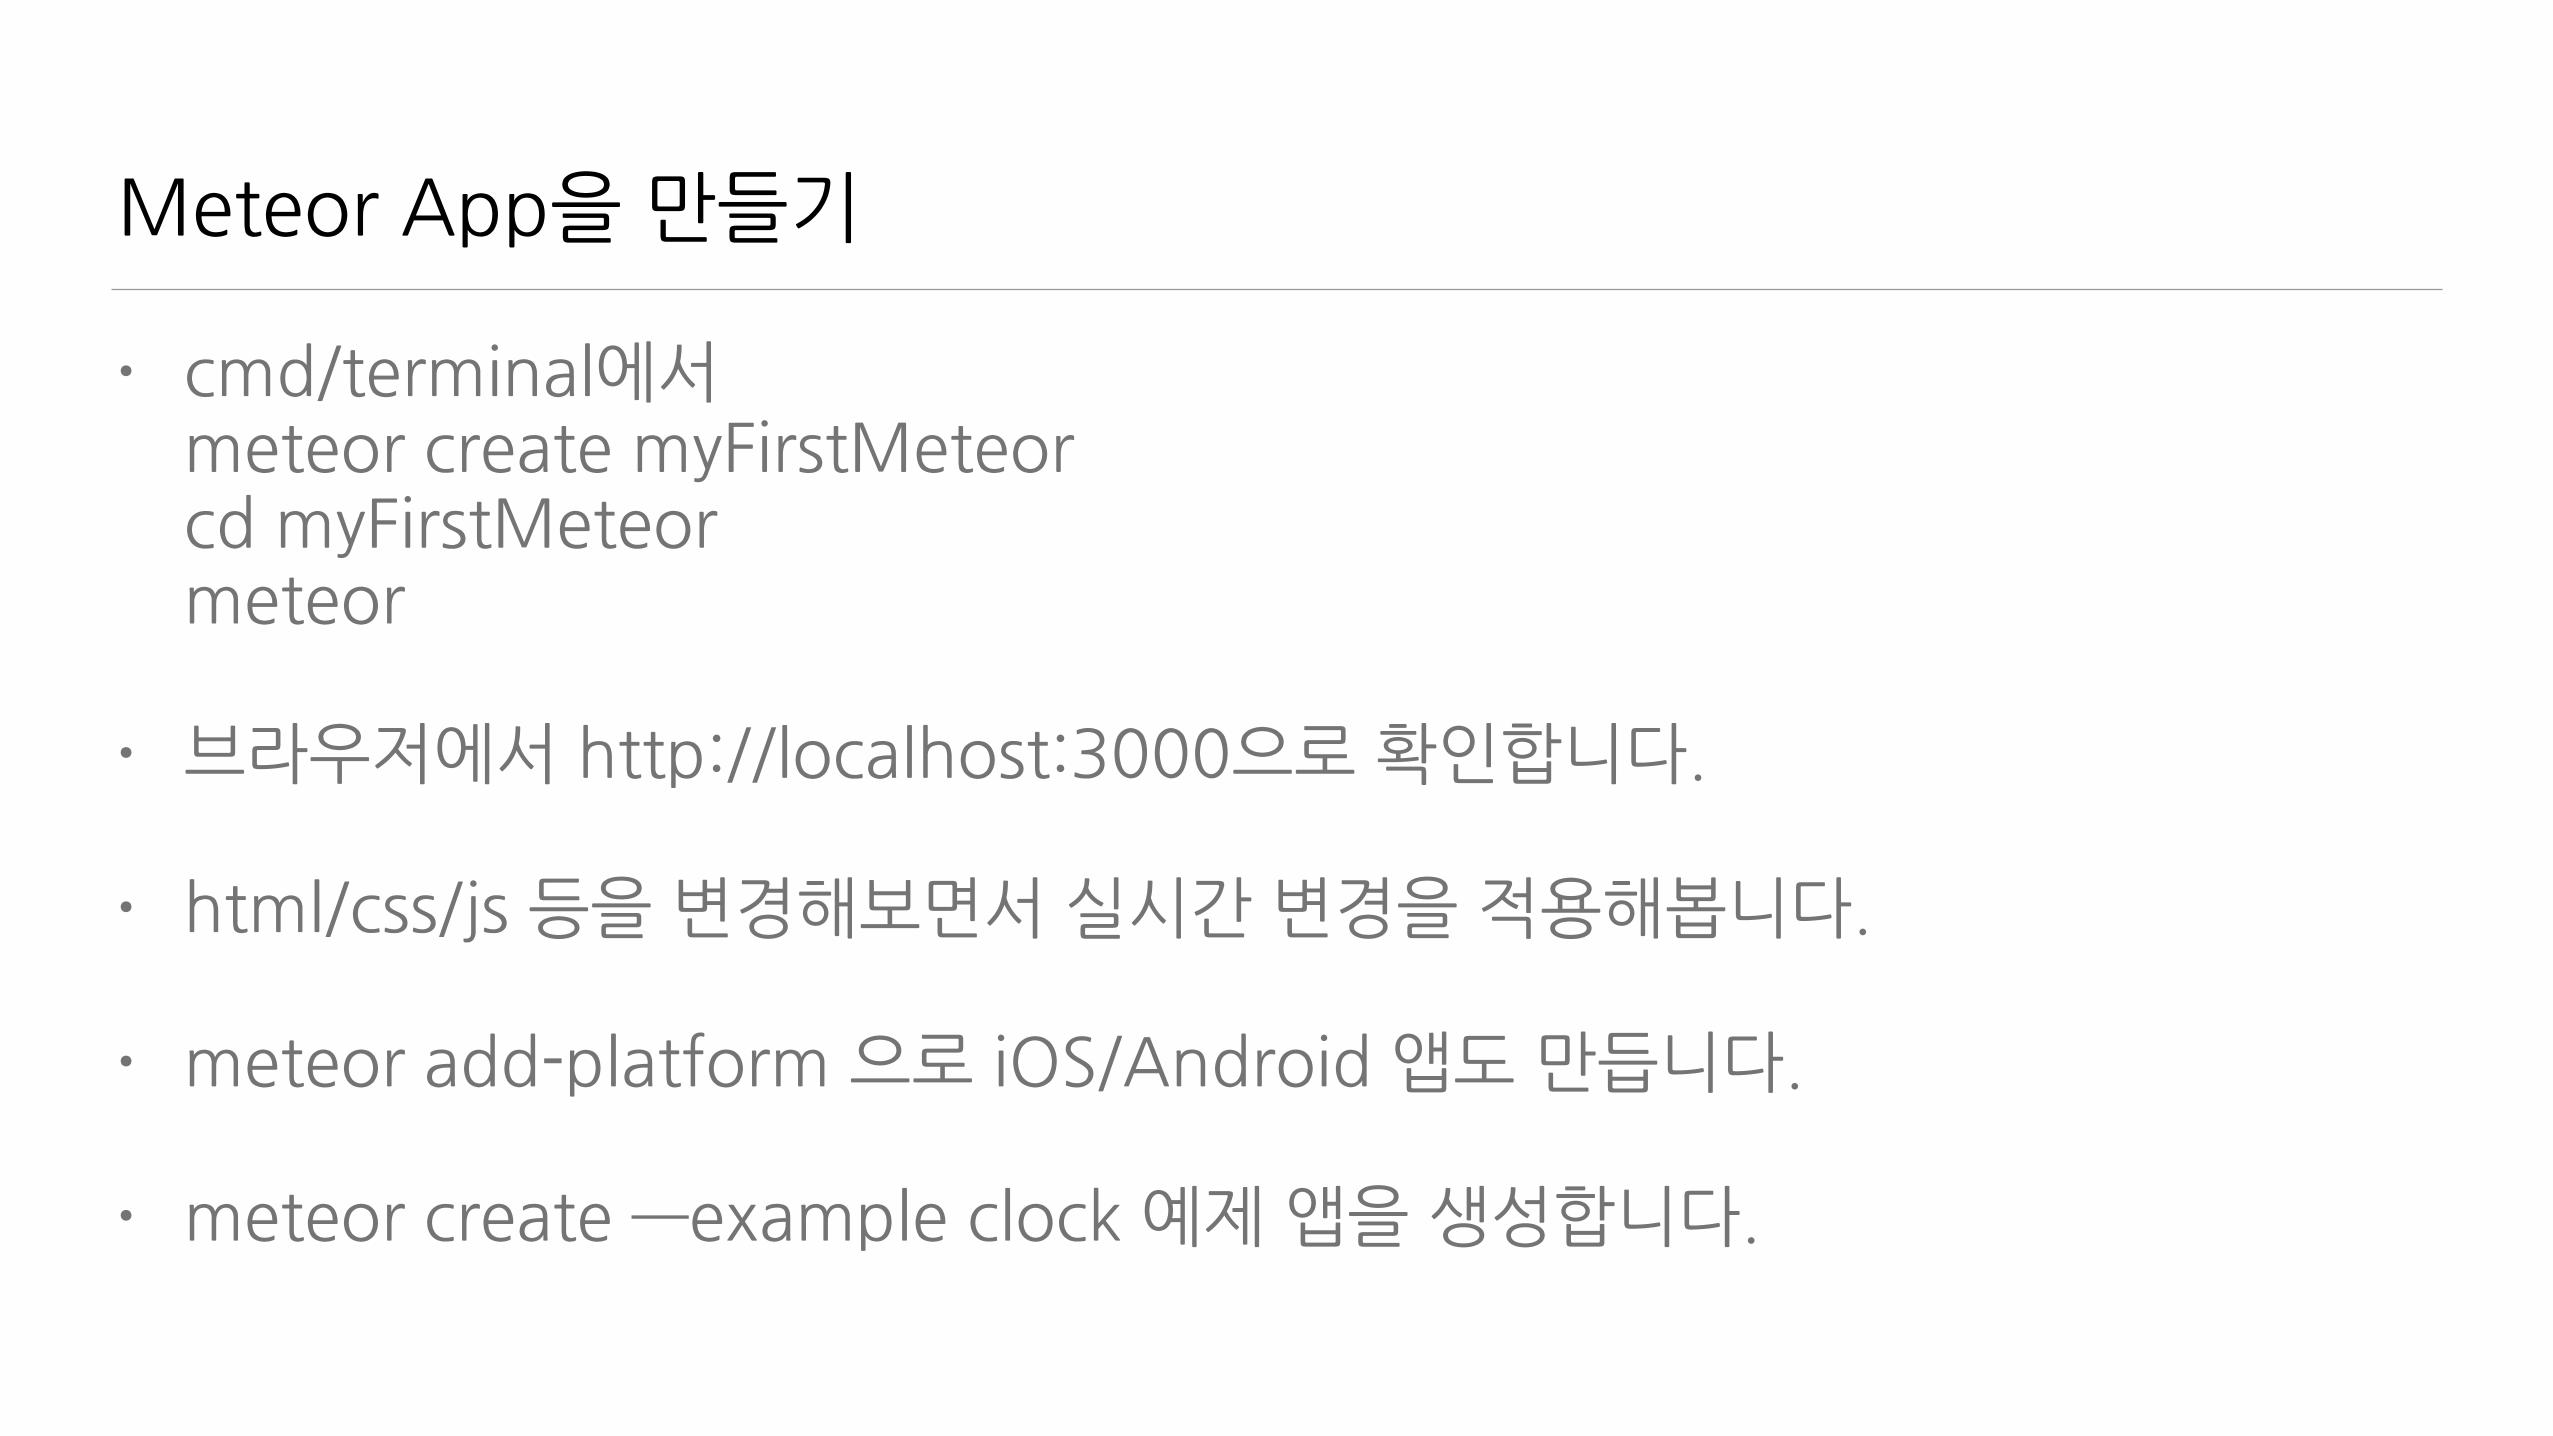
Meteor�App을�만들기
• cmd/terminal에서meteor�create�myFirstMeteorcd�myFirstMeteor meteor�
• 브라우저에서�http://localhost:3000으로�확인합니다.�
• html/css/js�등을�변경해보면서�실시간�변경을�적용해봅니다.�
• meteor�add-platform�으로�iOS/Android�앱도�만듭니다.�
• meteor�create�—example�clock�예제�앱을�생성합니다.
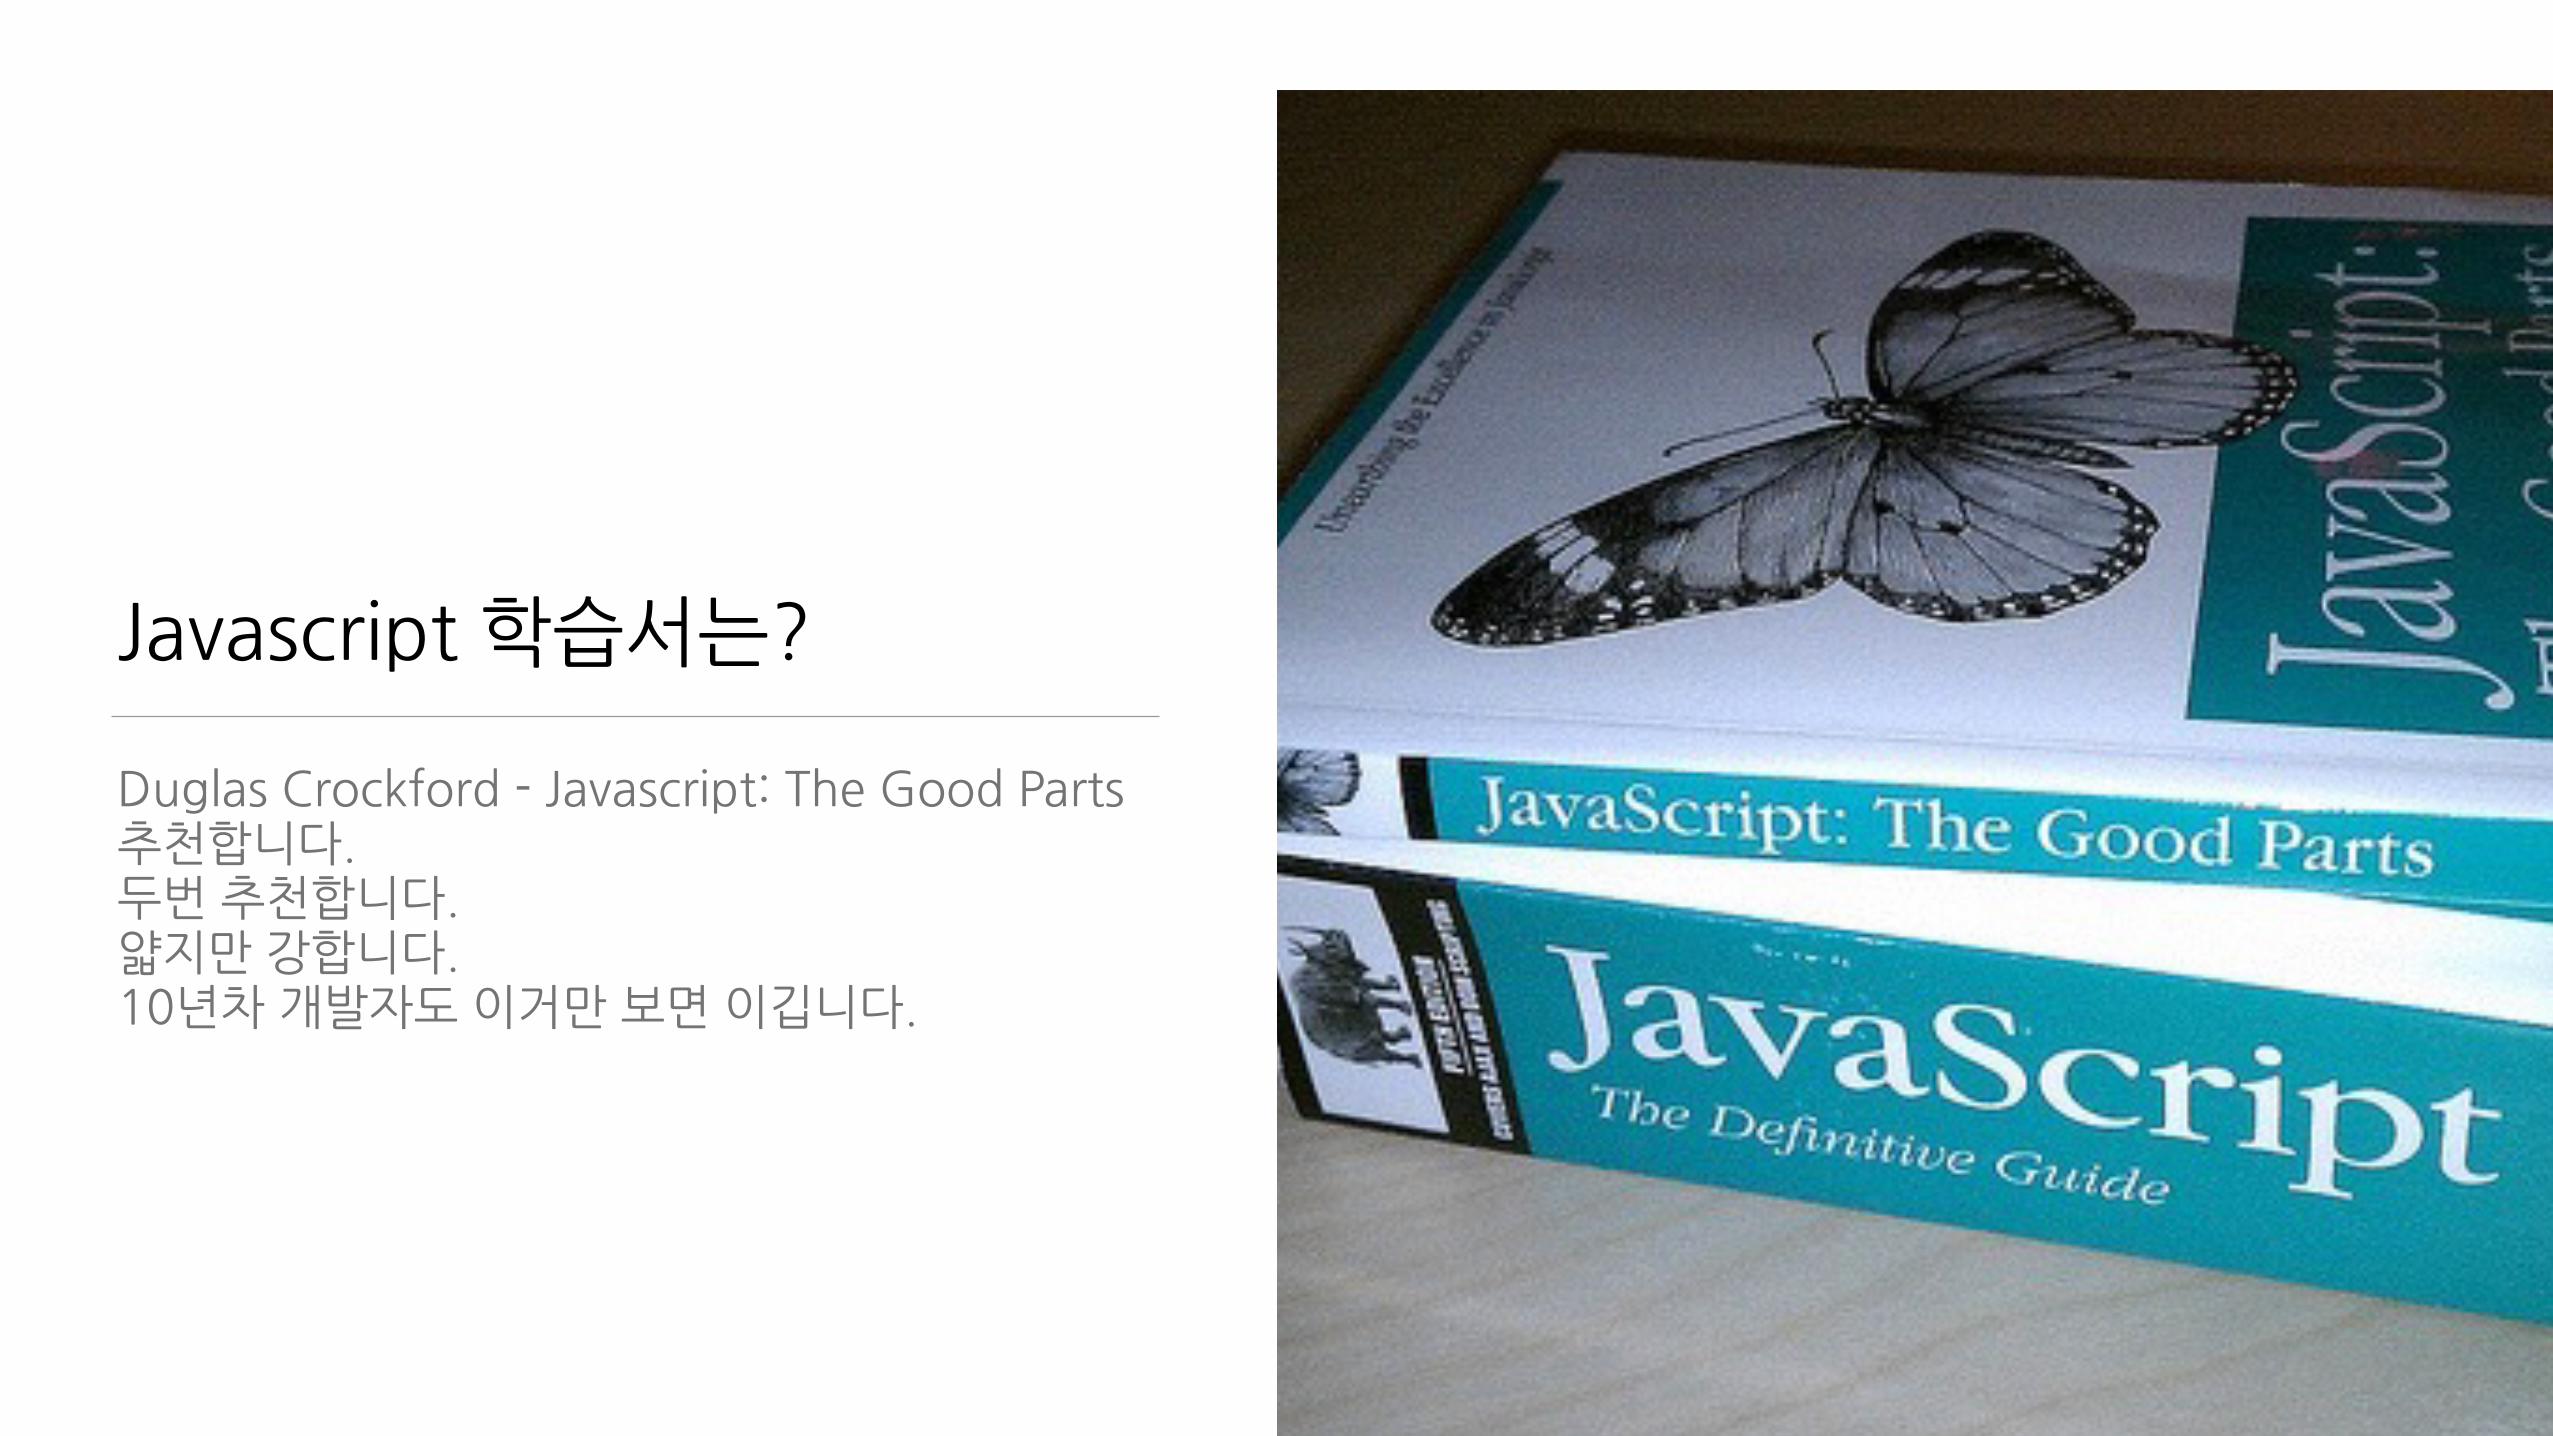
Javascript�학습서는?
Duglas�Crockford�-�Javascript:�The�Good�Parts�추천합니다.�두번�추천합니다.�얇지만�강합니다.�10년차�개발자도�이거만�보면�이깁니다.
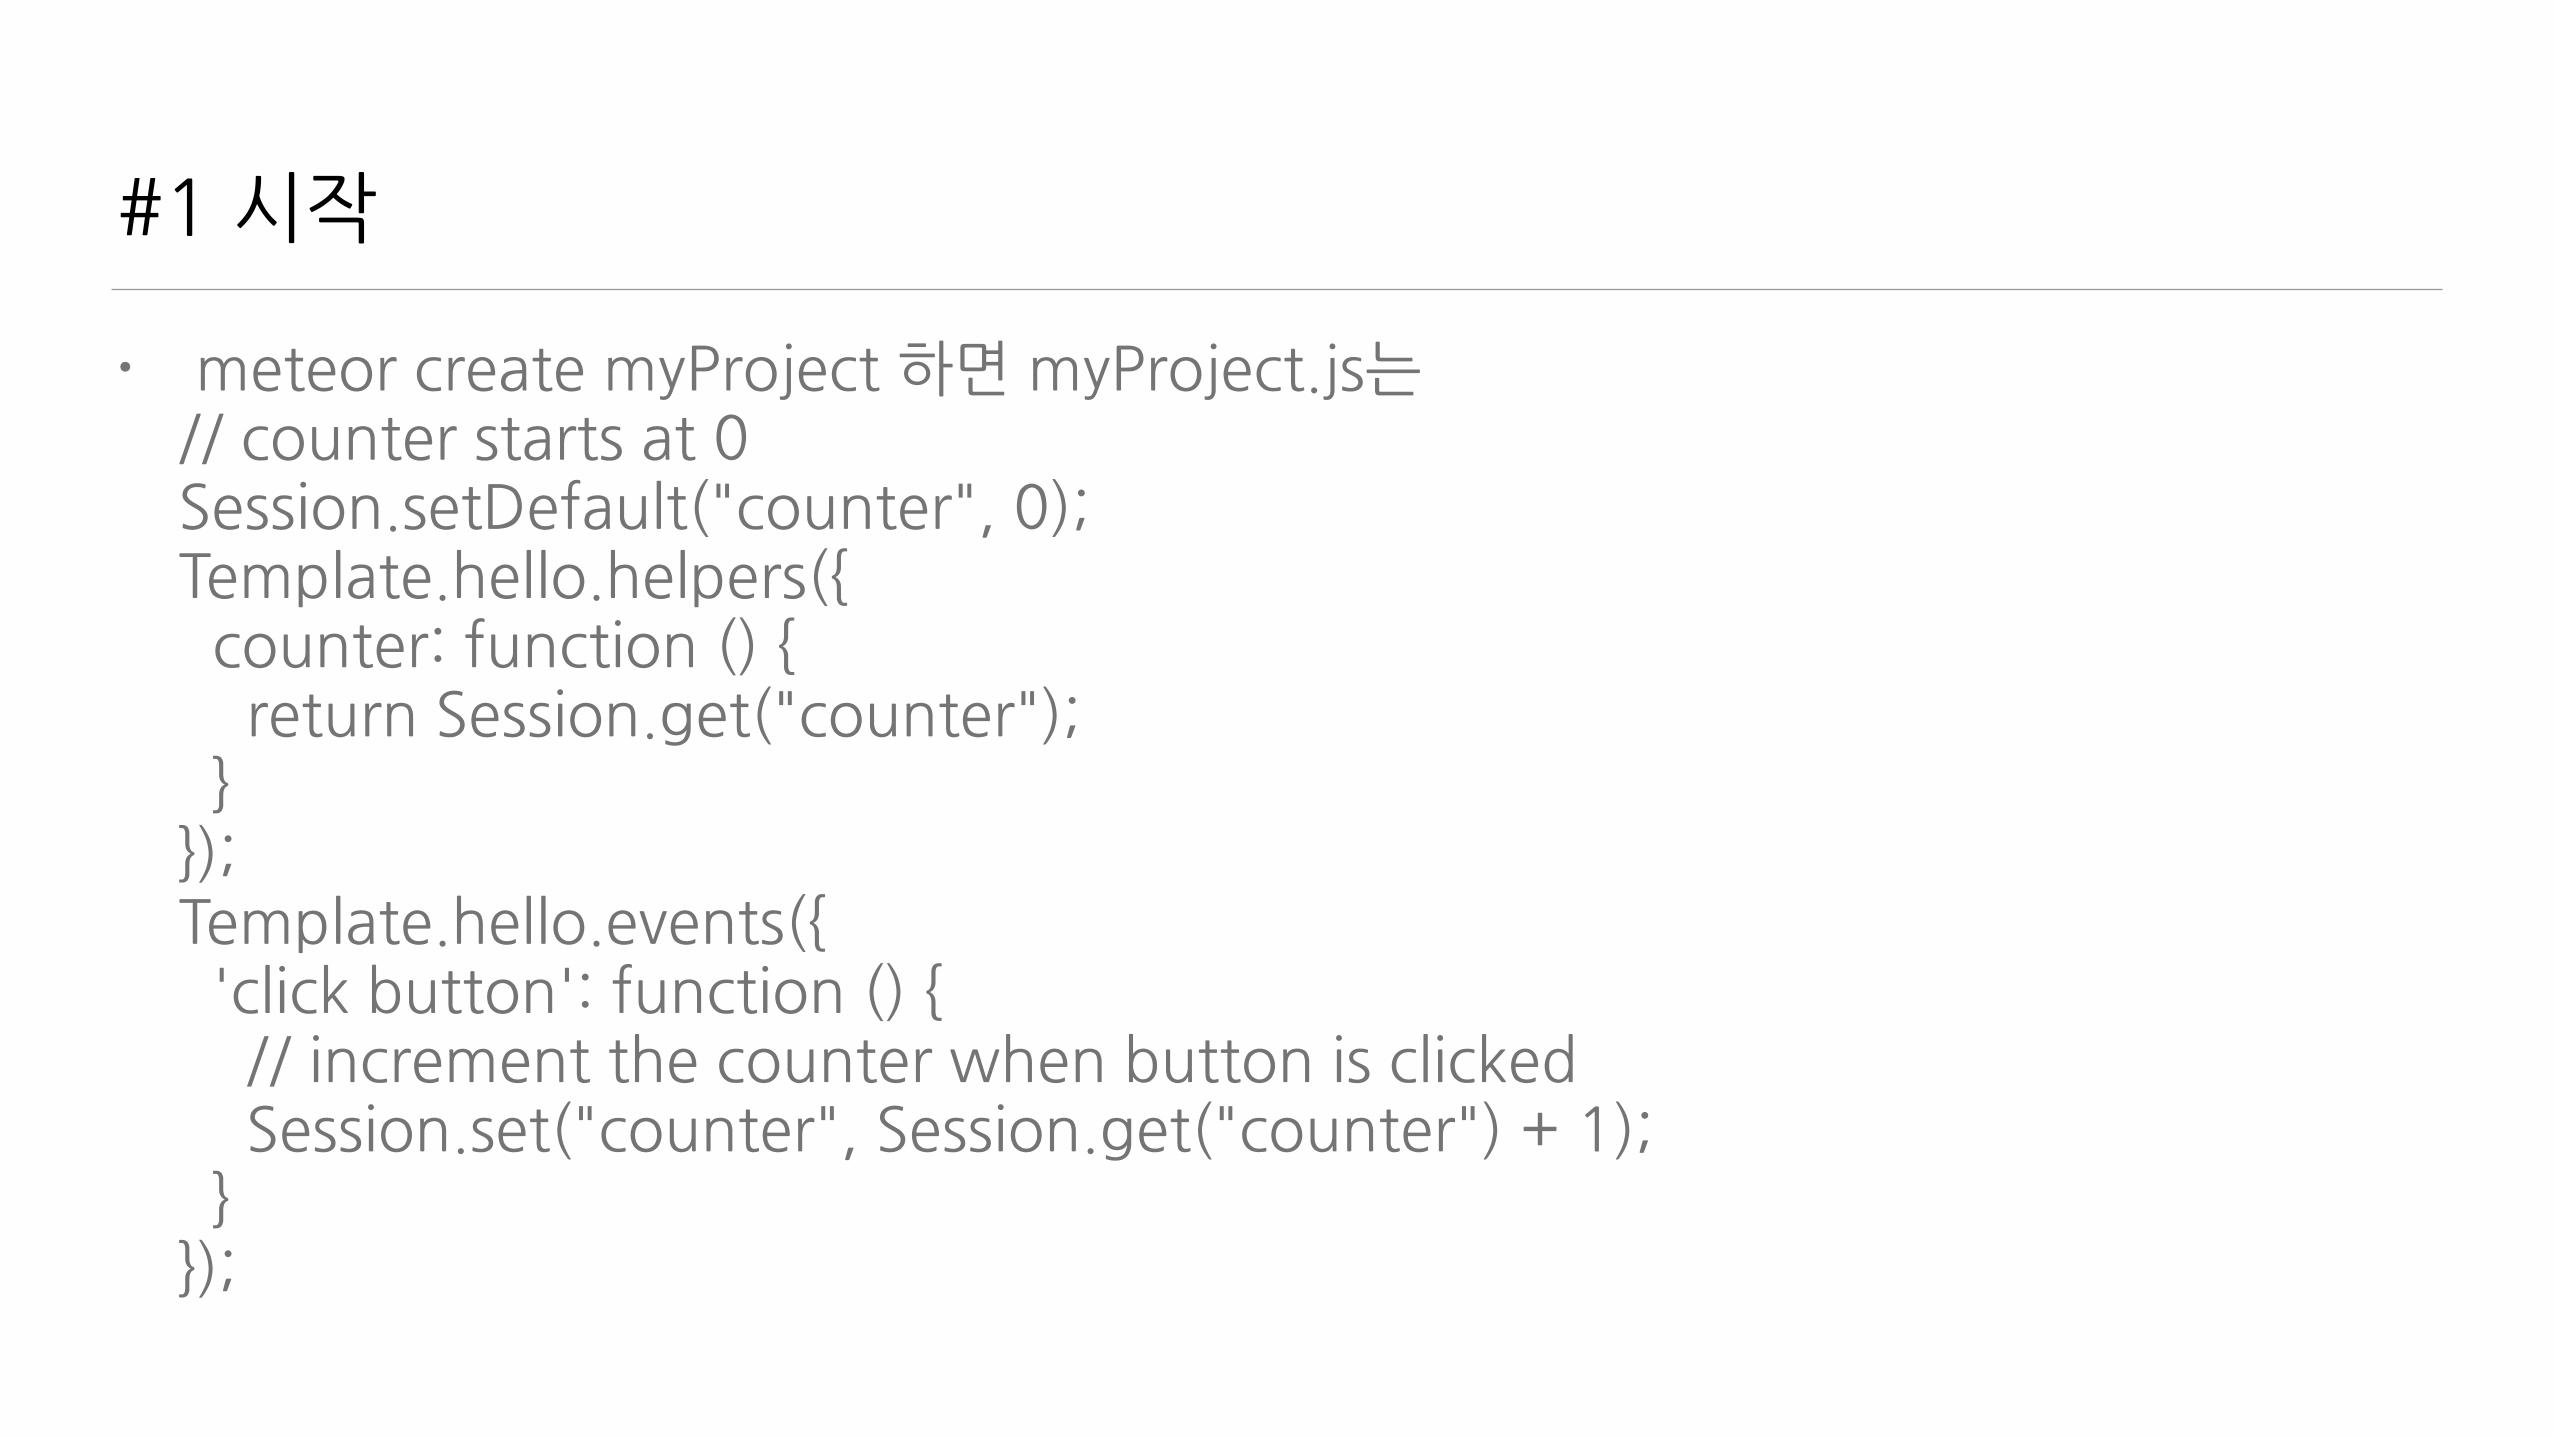
#1�시작
• �meteor�create�myProject�하면�myProject.js는//�counter�starts�at�0Session.setDefault("counter",�0); Template.hello.helpers({ ��counter:�function�()�{����return�Session.get("counter"); ��}});Template.hello.events({ ��'click�button':�function�()�{ ����//�increment�the�counter�when�button�is�clicked����Session.set("counter",�Session.get("counter")�+�1); ��}});
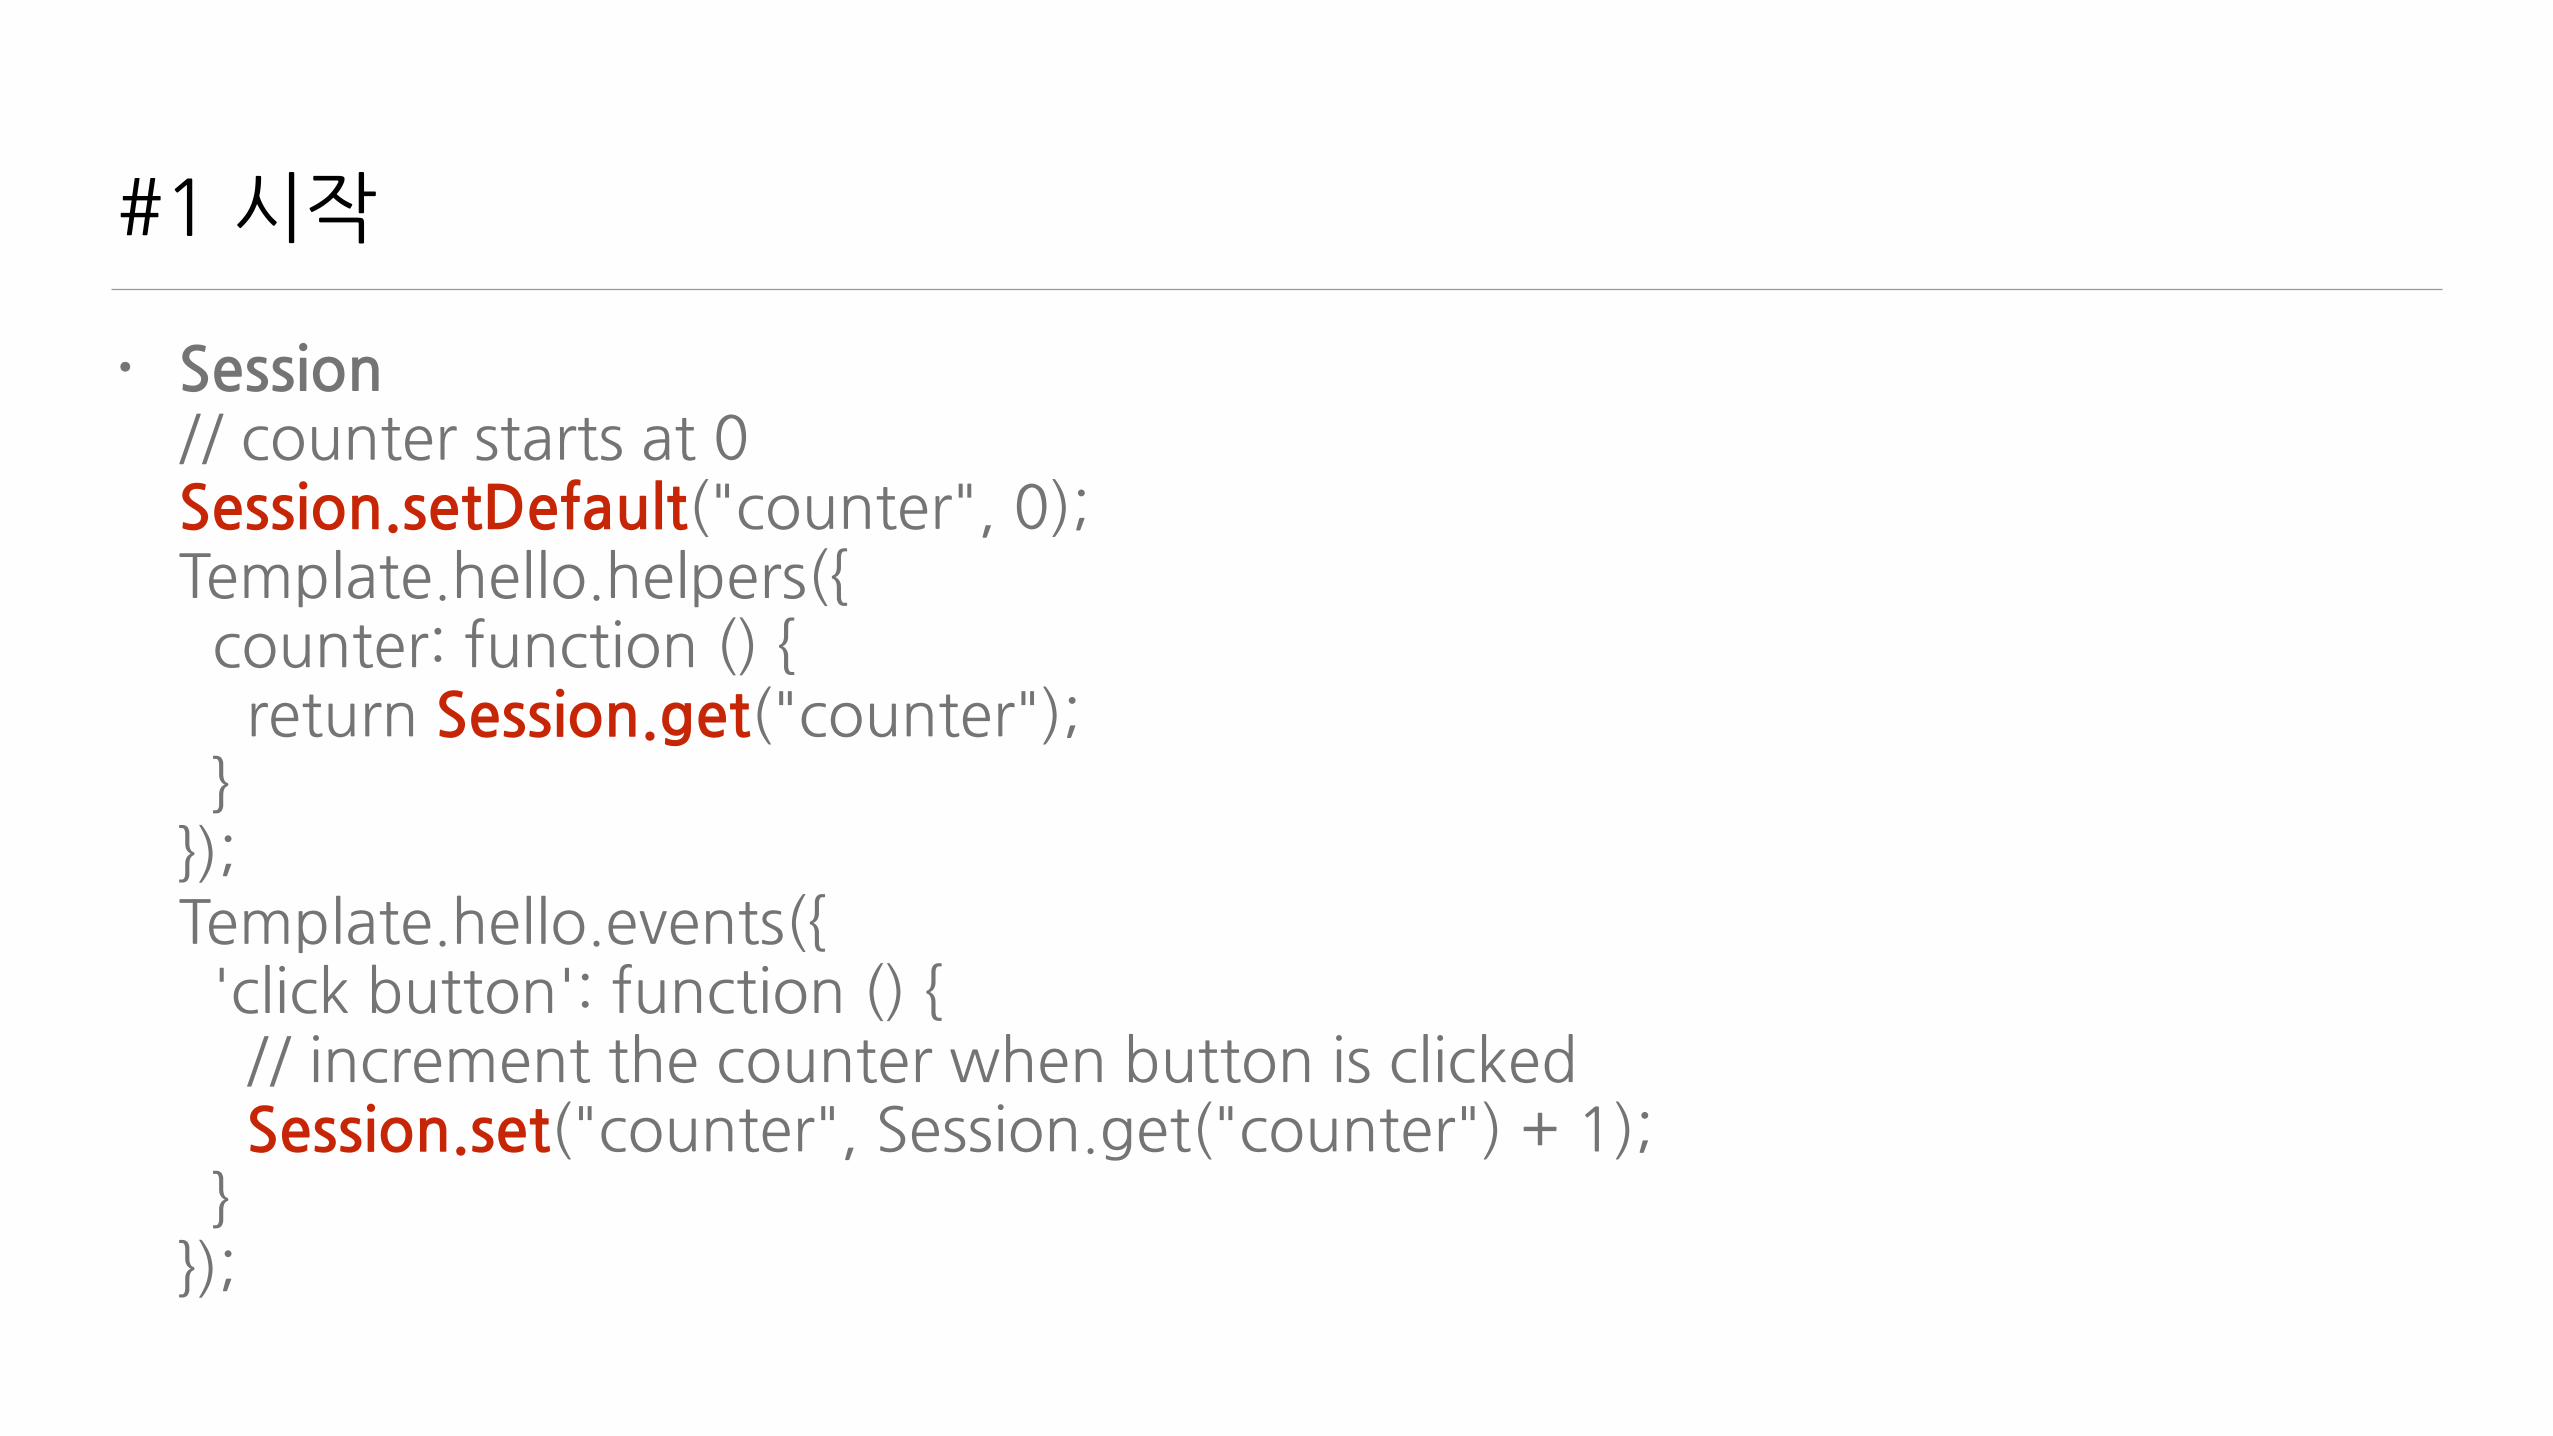
#1�시작
• Session//�counter�starts�at�0Session.setDefault("counter",�0); Template.hello.helpers({ ��counter:�function�()�{����return�Session.get("counter"); ��}});Template.hello.events({ ��'click�button':�function�()�{ ����//�increment�the�counter�when�button�is�clicked����Session.set("counter",�Session.get("counter")�+�1); ��}});

#1�시작
• Helper//�counter�starts�at�0Session.setDefault("counter",�0); Template.hello.helpers({��counter:�function�()�{����return�Session.get("counter"); ��}});Template.hello.events({ ��'click�button':�function�()�{ ����//�increment�the�counter�when�button�is�clicked����Session.set("counter",�Session.get("counter")�+�1); ��}});
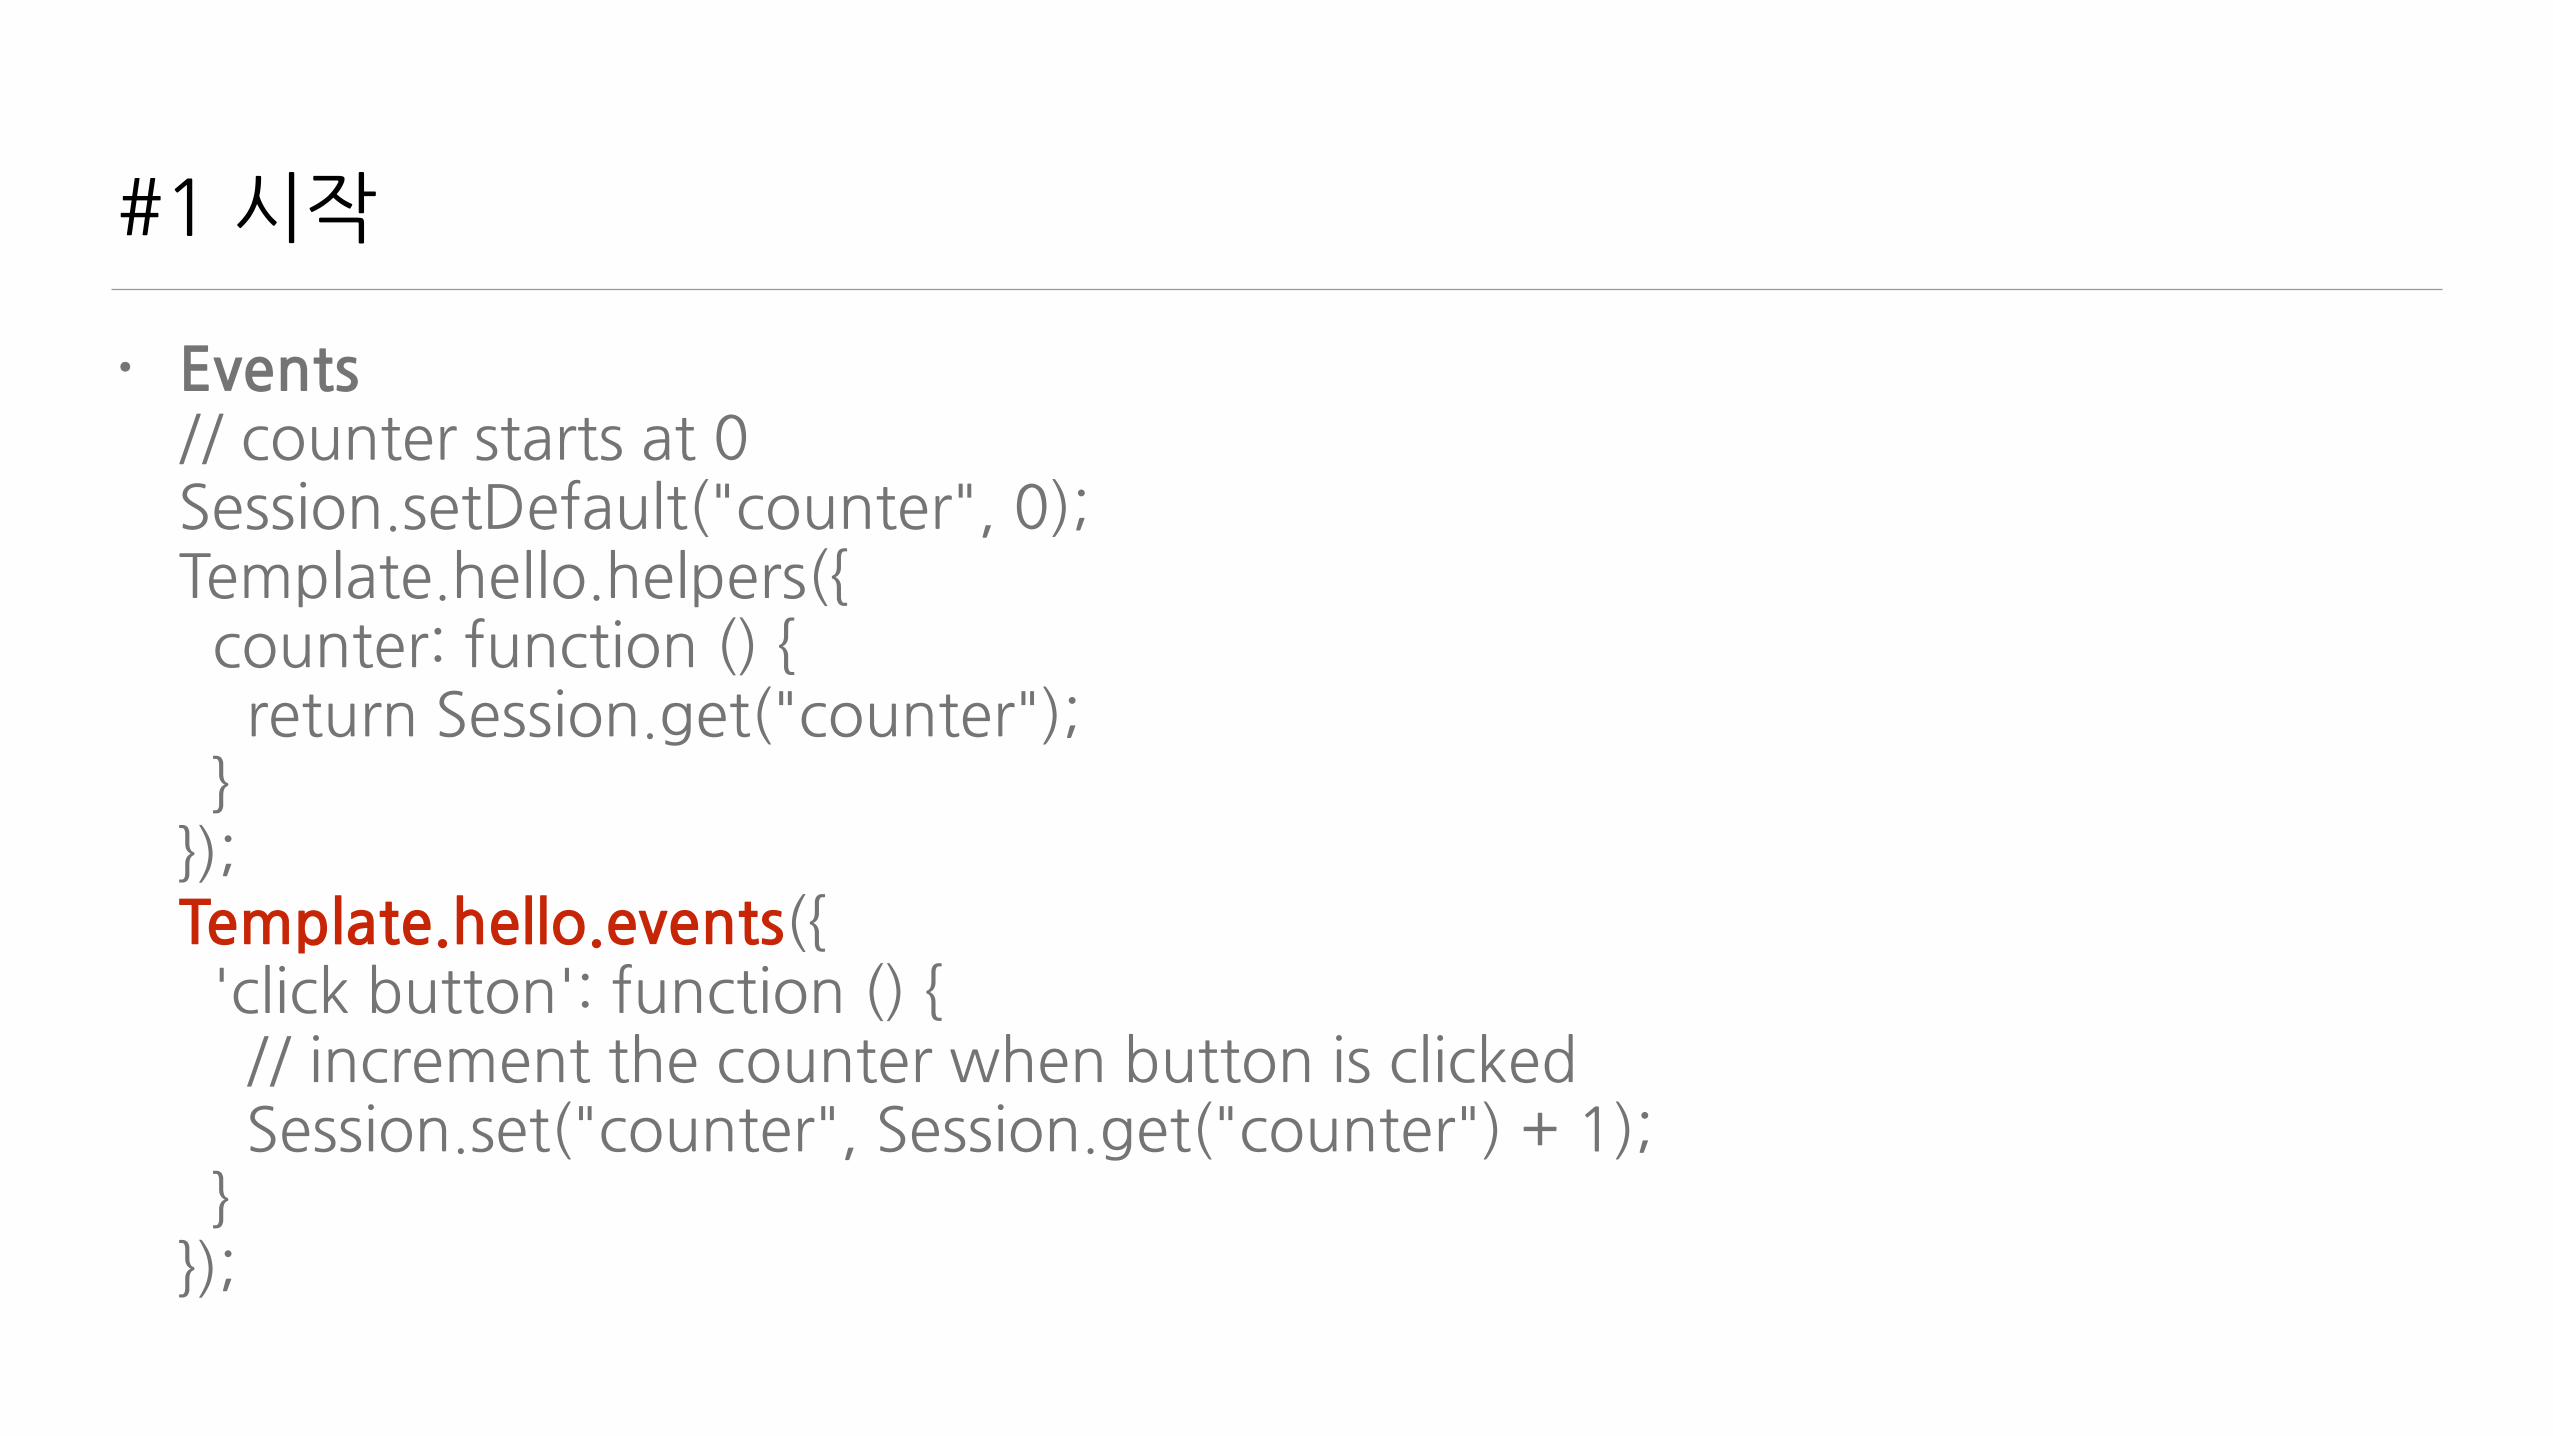
#1�시작
• Events//�counter�starts�at�0Session.setDefault("counter",�0); Template.hello.helpers({ ��counter:�function�()�{����return�Session.get("counter"); ��}});Template.hello.events({��'click�button':�function�()�{ ����//�increment�the�counter�when�button�is�clicked����Session.set("counter",�Session.get("counter")�+�1); ��}});

#1�시작
• Template�-�myProject.html<template�name="hello"> ��<button>Click�me</button>��<p>You've�pressed�the�button�{{counter}}�times.</template>�
• Console�에서Session.set("counter",�Session.get("counter")�+�1);
#2�Template
• Data�를�표현하는�문서�조각들.�서로를�참조�가능하다.�HTML형식 <template�name="yourTemplateName">��<h2>You�template�title</h2> ��<p>Lorem�ipsum�dolor...�some�text.</p></template>�
• Template�사용{{>�yourTemplateName}}�
• 데이터를�전달하기�위해�Helpers를�사용하고�상호작용을�위해�Events를�처리한다.

#3�Helpers
• Template에�Data를�전달하는�function들 Template.yourTemplateName.helpers({ ��books:�function()�{ ����return�['Discover�Meteor',�'Meteor�in�action',�'Practical�Meteor']; ��}});�
• Template에�적용<template�name="yourTemplateName">��{{#each�books}}����<p>{{this}}</p>��{{/each}}</template>

#3�Helpers
• Object�사용 Template.yourTemplateName.helpers({��books:�function()�{����return�[������{�title:�'Discover�Meteor',�pages:�300�},������{�title:�'Meteor�in�action',�pages:�250�},������{�title:�'Practical�Meteor',�pages:�199�}����];��}});�
• Template에�적용<template�name="yourTemplateName">��{{#each�books}}����<p>{{title}},�{{pages}}�pages.</p> ��{{/each}}</template>
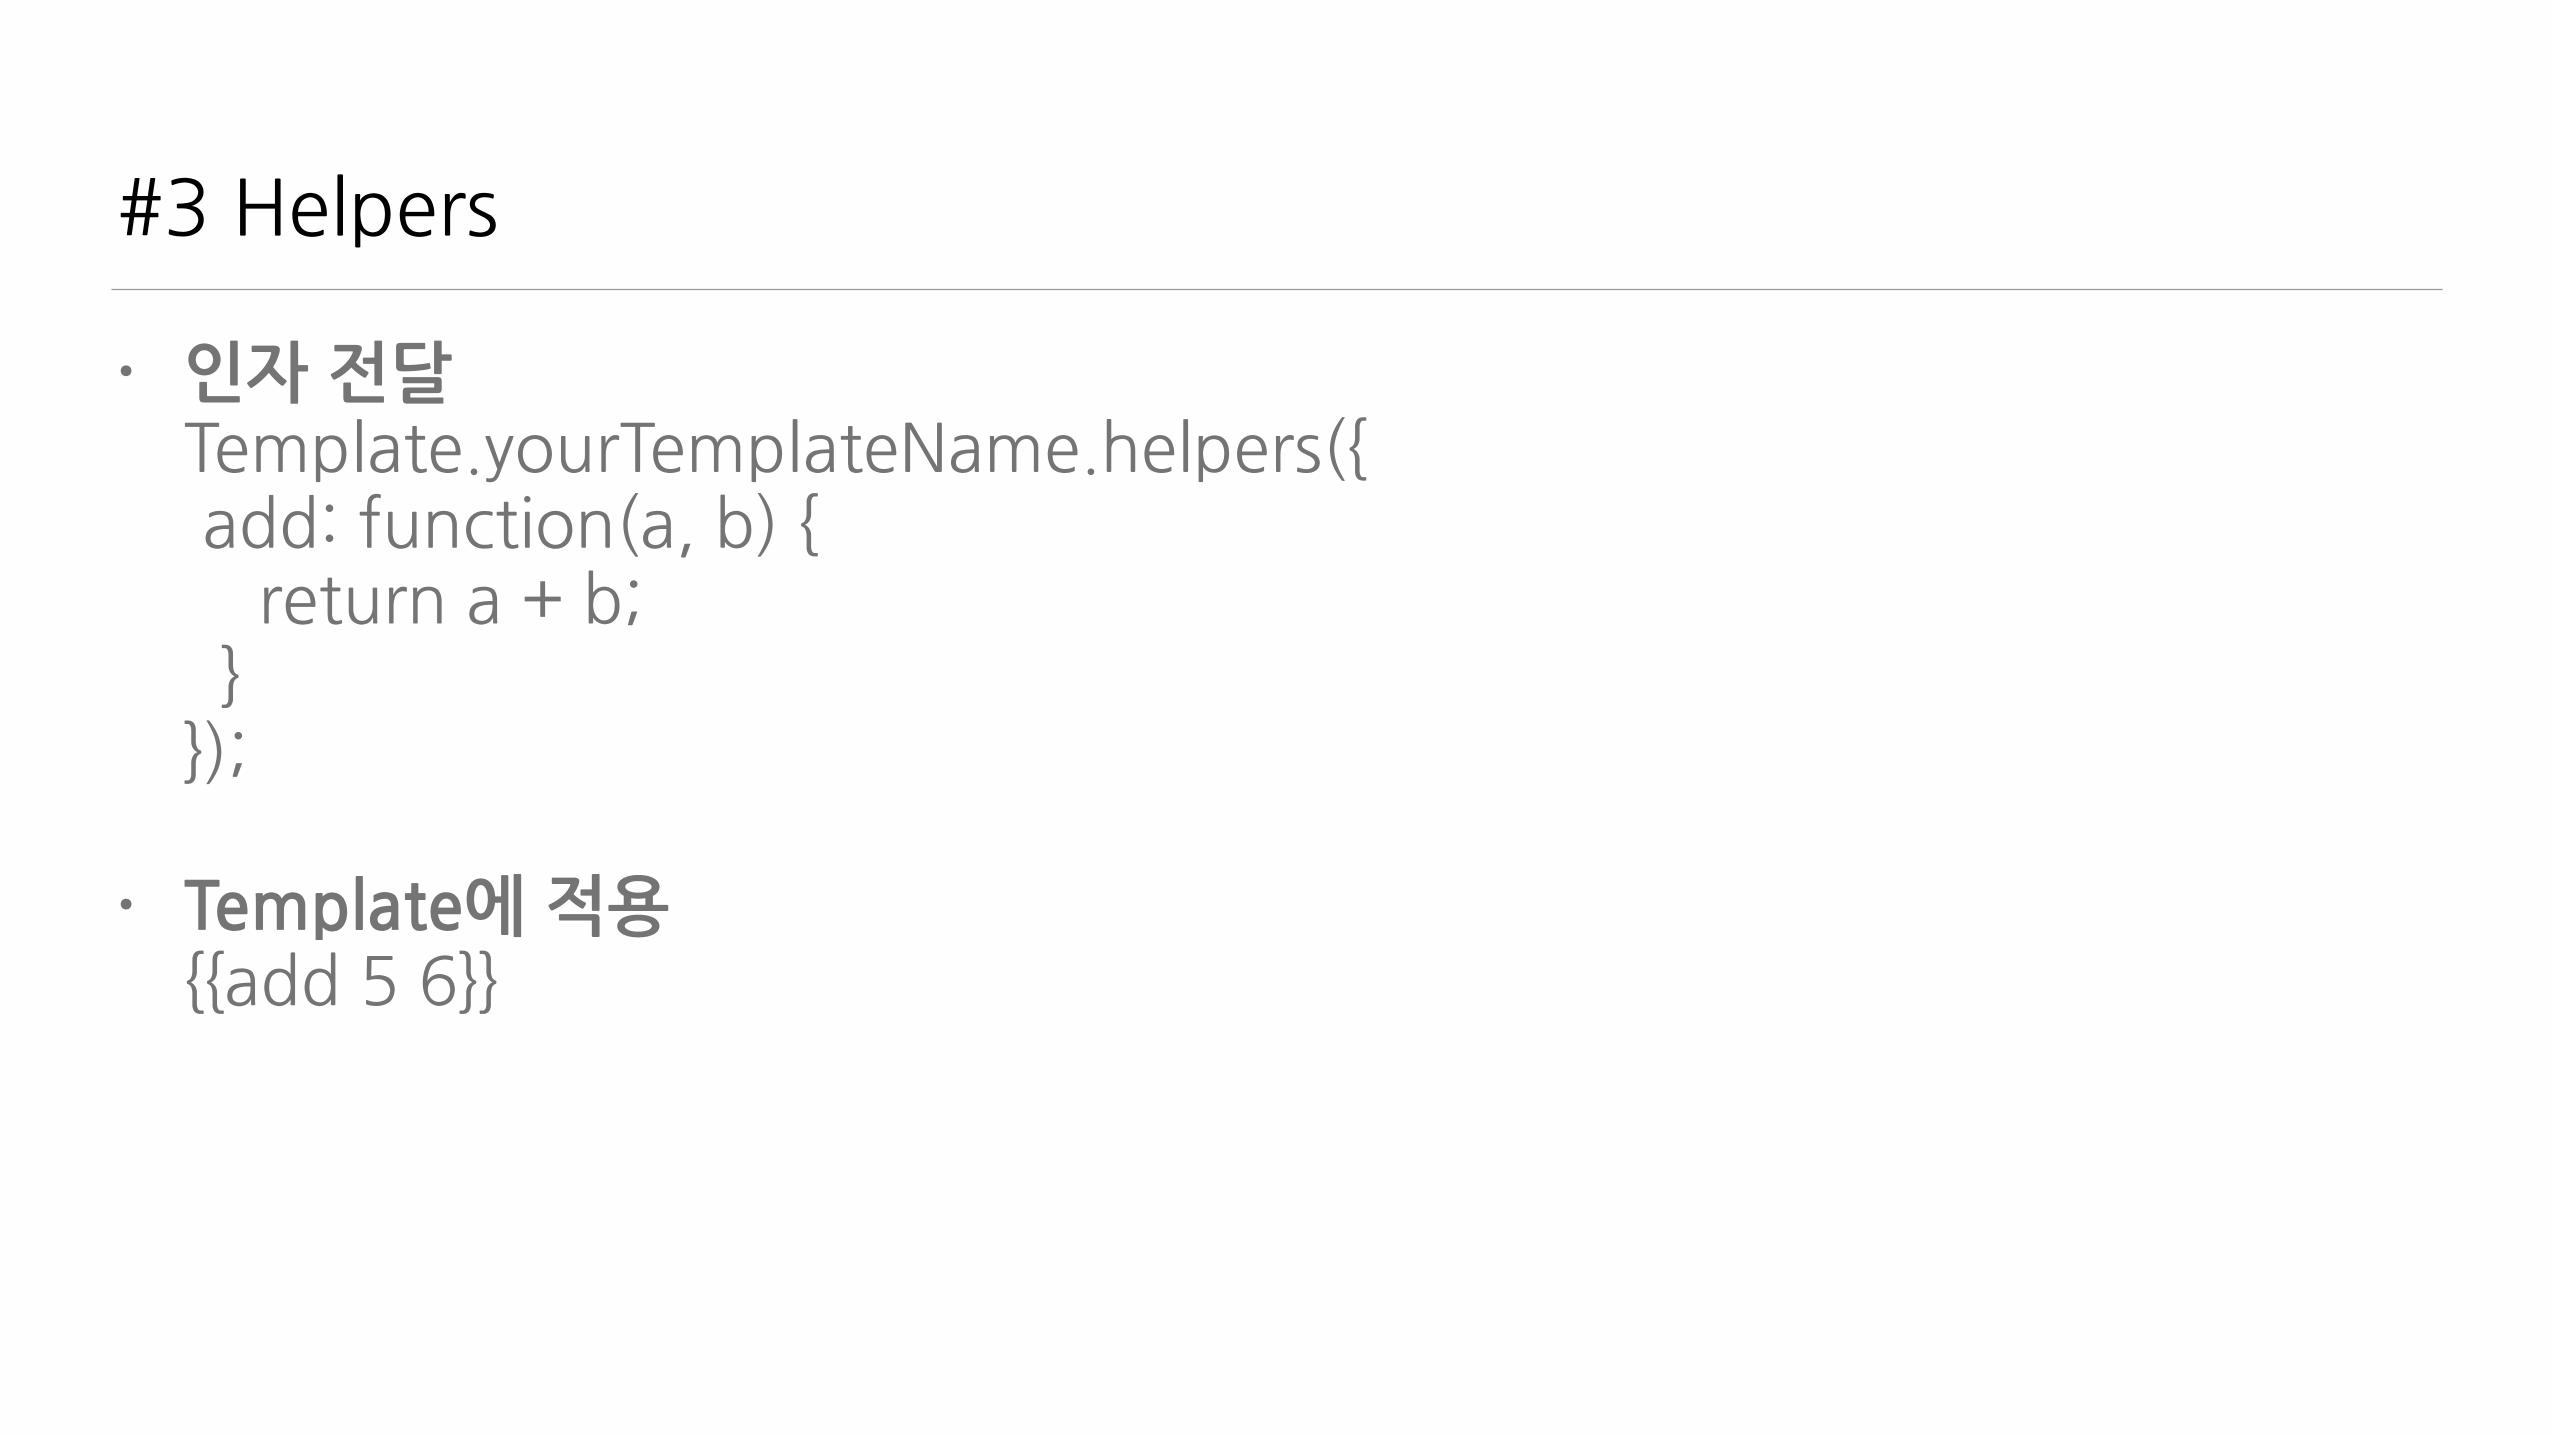
#3�Helpers
• 인자�전달Template.yourTemplateName.helpers({�add:�function(a,�b)�{ ����return�a�+�b; ��}});�
• Template에�적용{{add�5�6}}

#4�Events
• Template과�상호작용.�click의�예 Template.yourTemplateName.events({��'click�.clickable':�function()�{����return�alert('You�clicked!');��}});�
• .clickable을�눌렀을�때�처리<button�class="clickable">Click�me</button><p�class="clickable">You�can�also�click�on�me.</p>
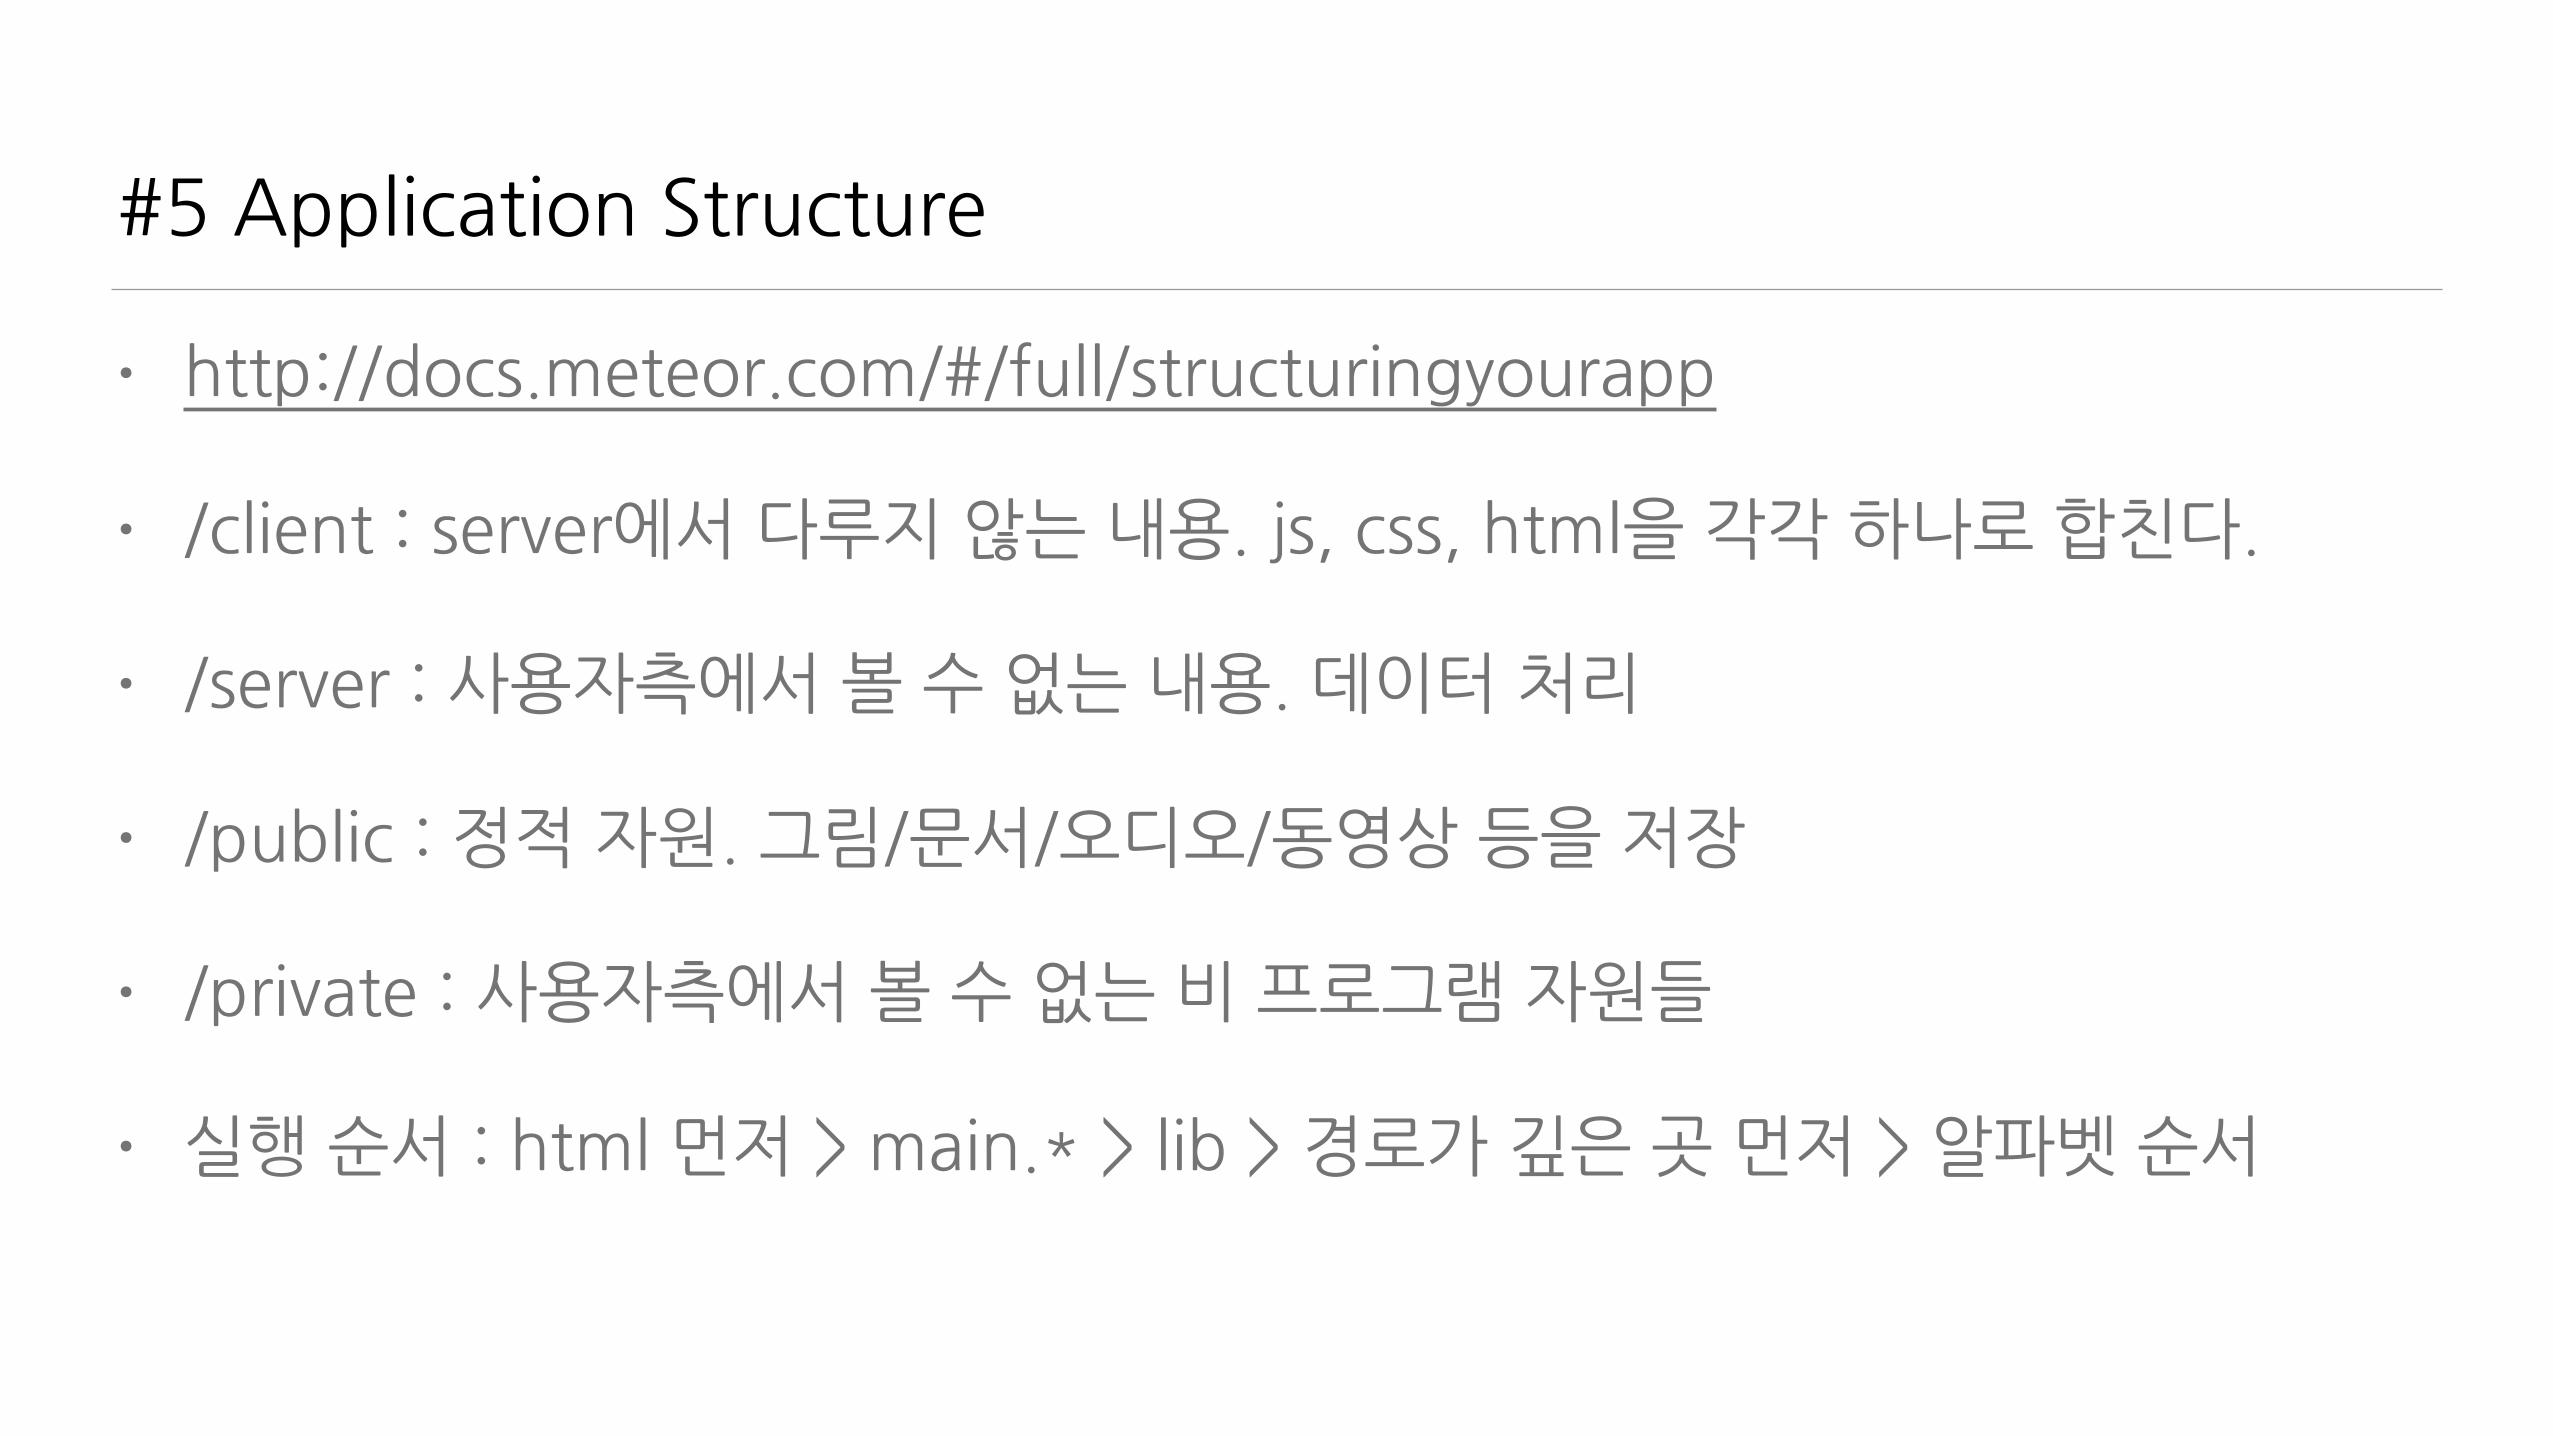
#5�Application�Structure
• http://docs.meteor.com/#/full/structuringyourapp�
• /client�:�server에서�다루지�않는�내용.�js,�css,�html을�각각�하나로�합친다.�
• /server�:�사용자측에서�볼�수�없는�내용.�데이터�처리�
• /public�:�정적�자원.�그림/문서/오디오/동영상�등을�저장�
• /private�:�사용자측에서�볼�수�없는�비�프로그램�자원들�
• 실행�순서�:�html�먼저�>�main.*�>�lib�>�경로가�깊은�곳�먼저�>�알파벳�순서
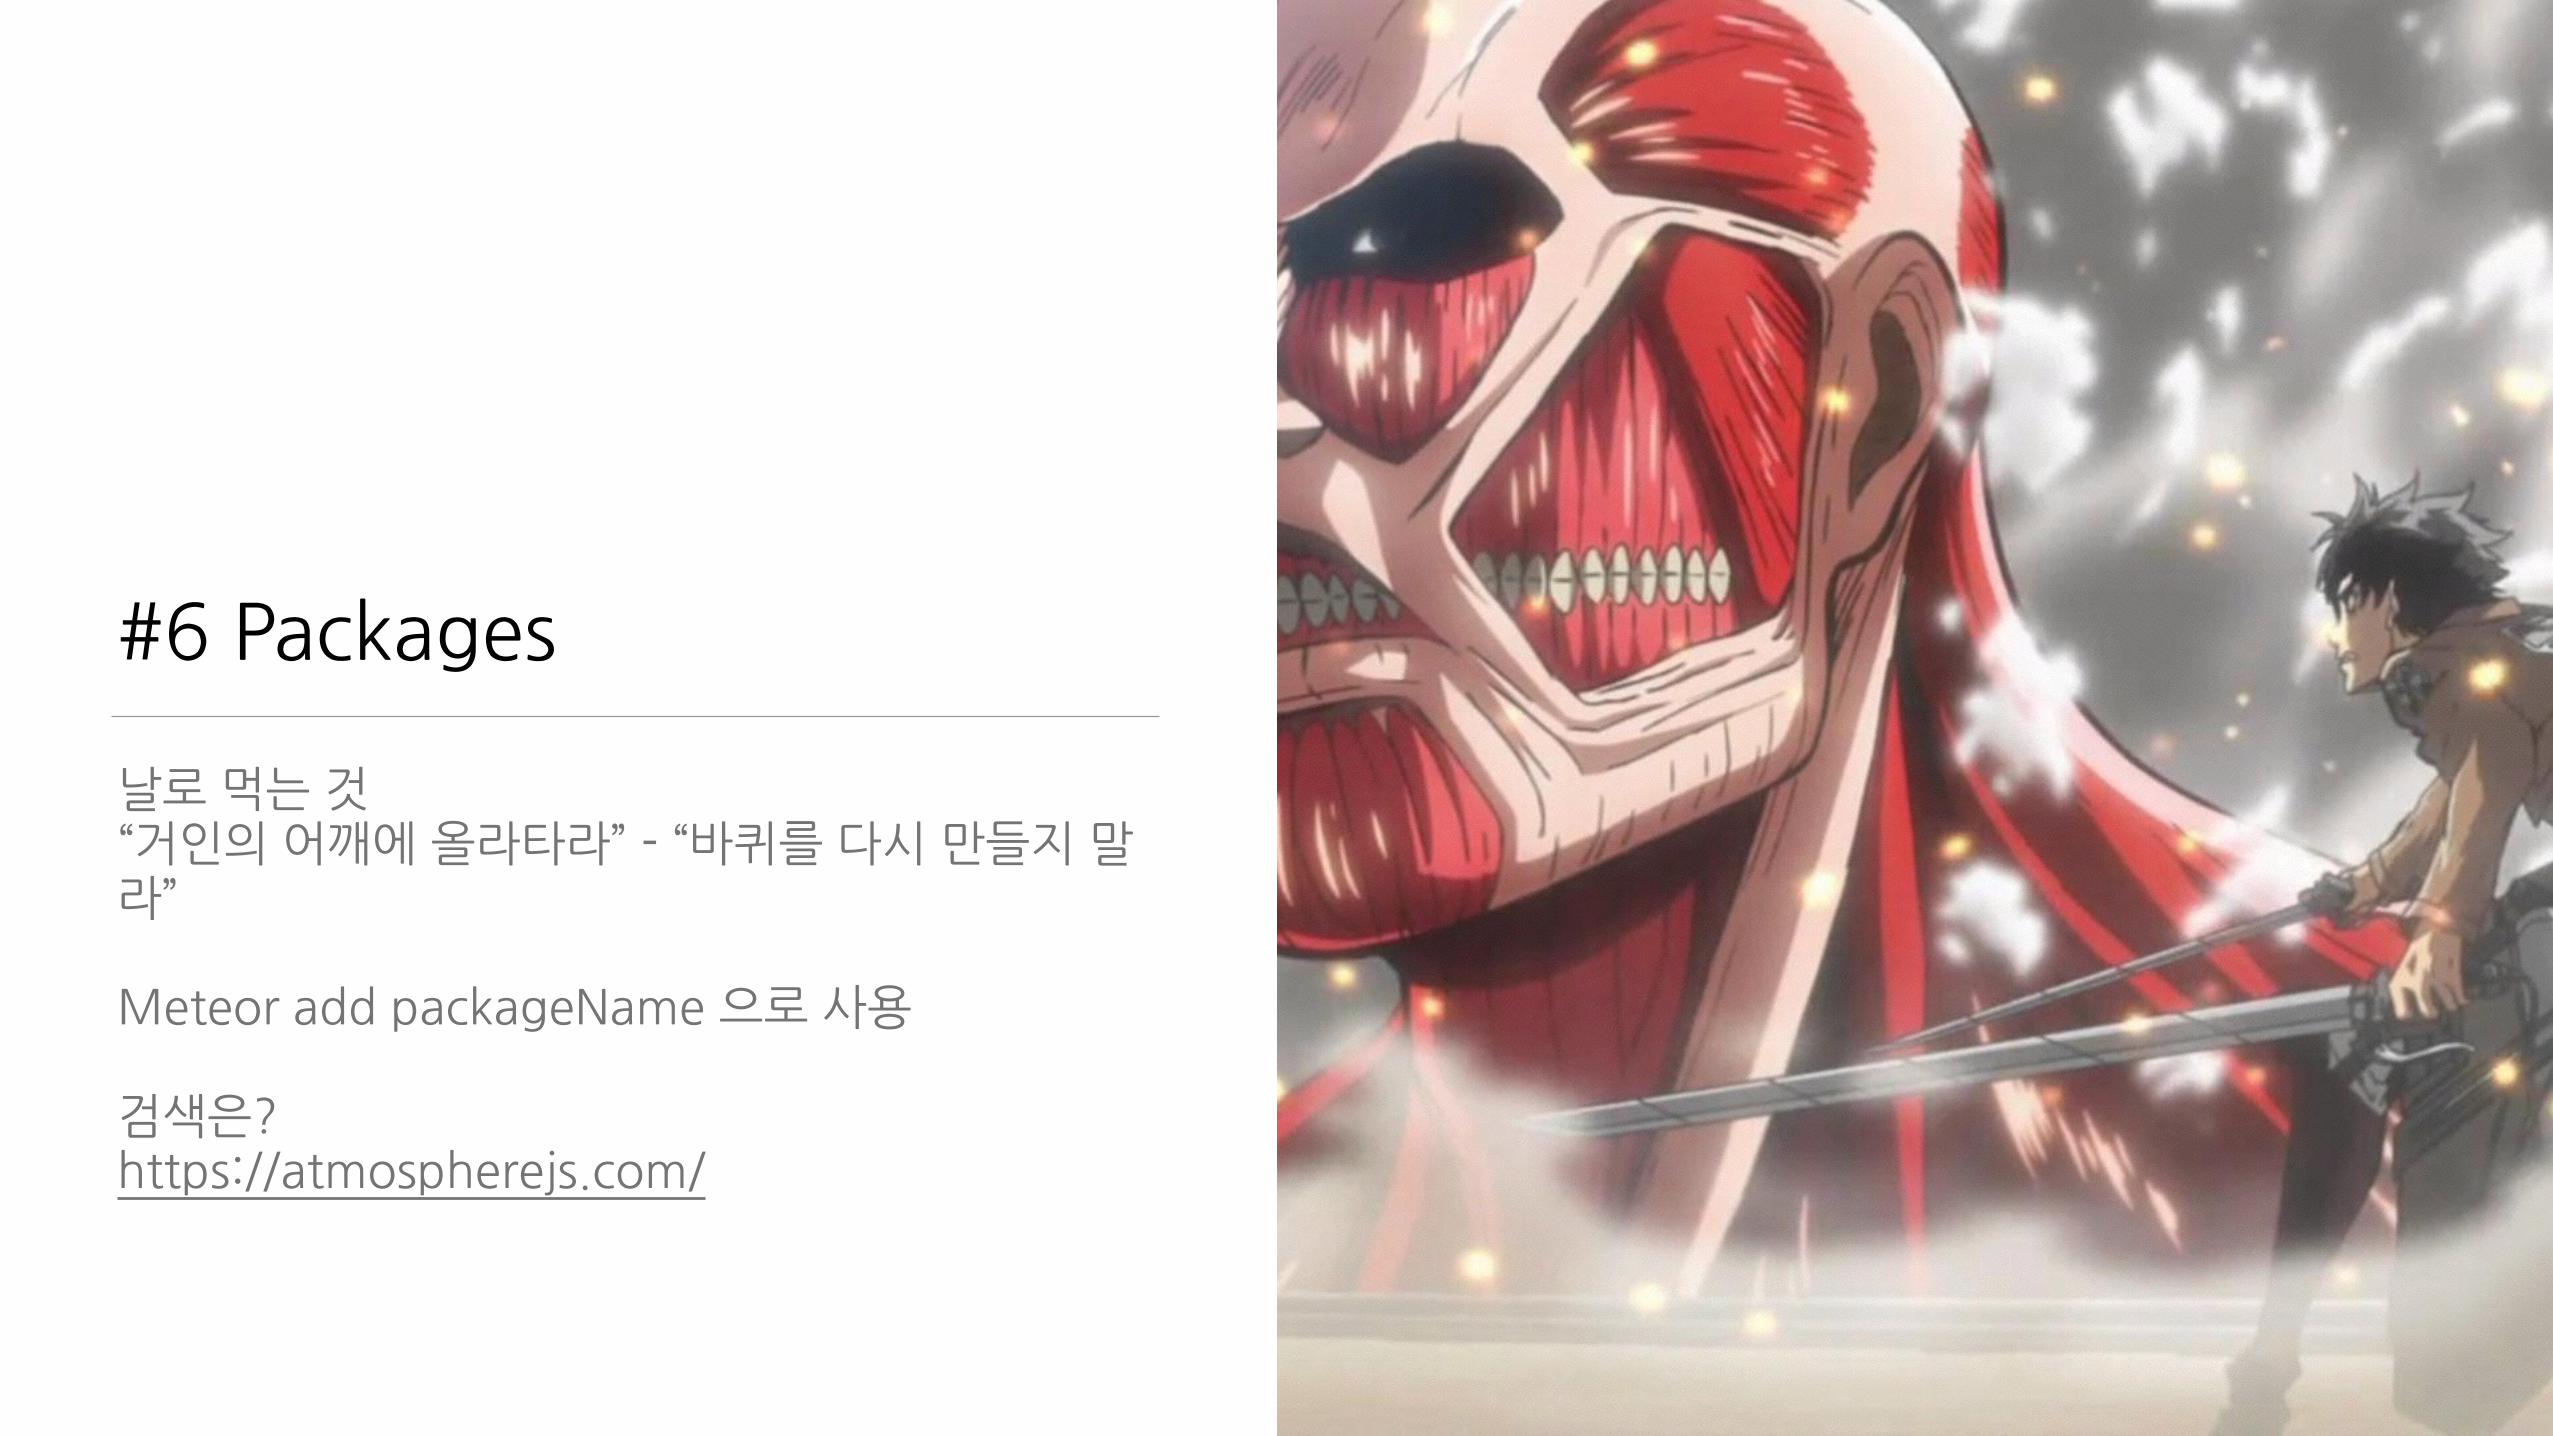
#6�Packages
날로�먹는�것�“거인의�어깨에�올라타라”�-�“바퀴를�다시�만들지�말라”�
Meteor�add�packageName�으로�사용�
검색은?�https://atmospherejs.com/
#7�Account�Package
• 서비스의�시작은�로그인이�반�
• 간편한�사용$�meteor�add�accounts-ui$�meteor�add�accounts-password�
• Template�html�파일에�적용<template�name=“main”> {{>�loginButtons}}....�
• 풍부한�SNS�지원.�facebook,�twitter,�weibo,�google,�…..
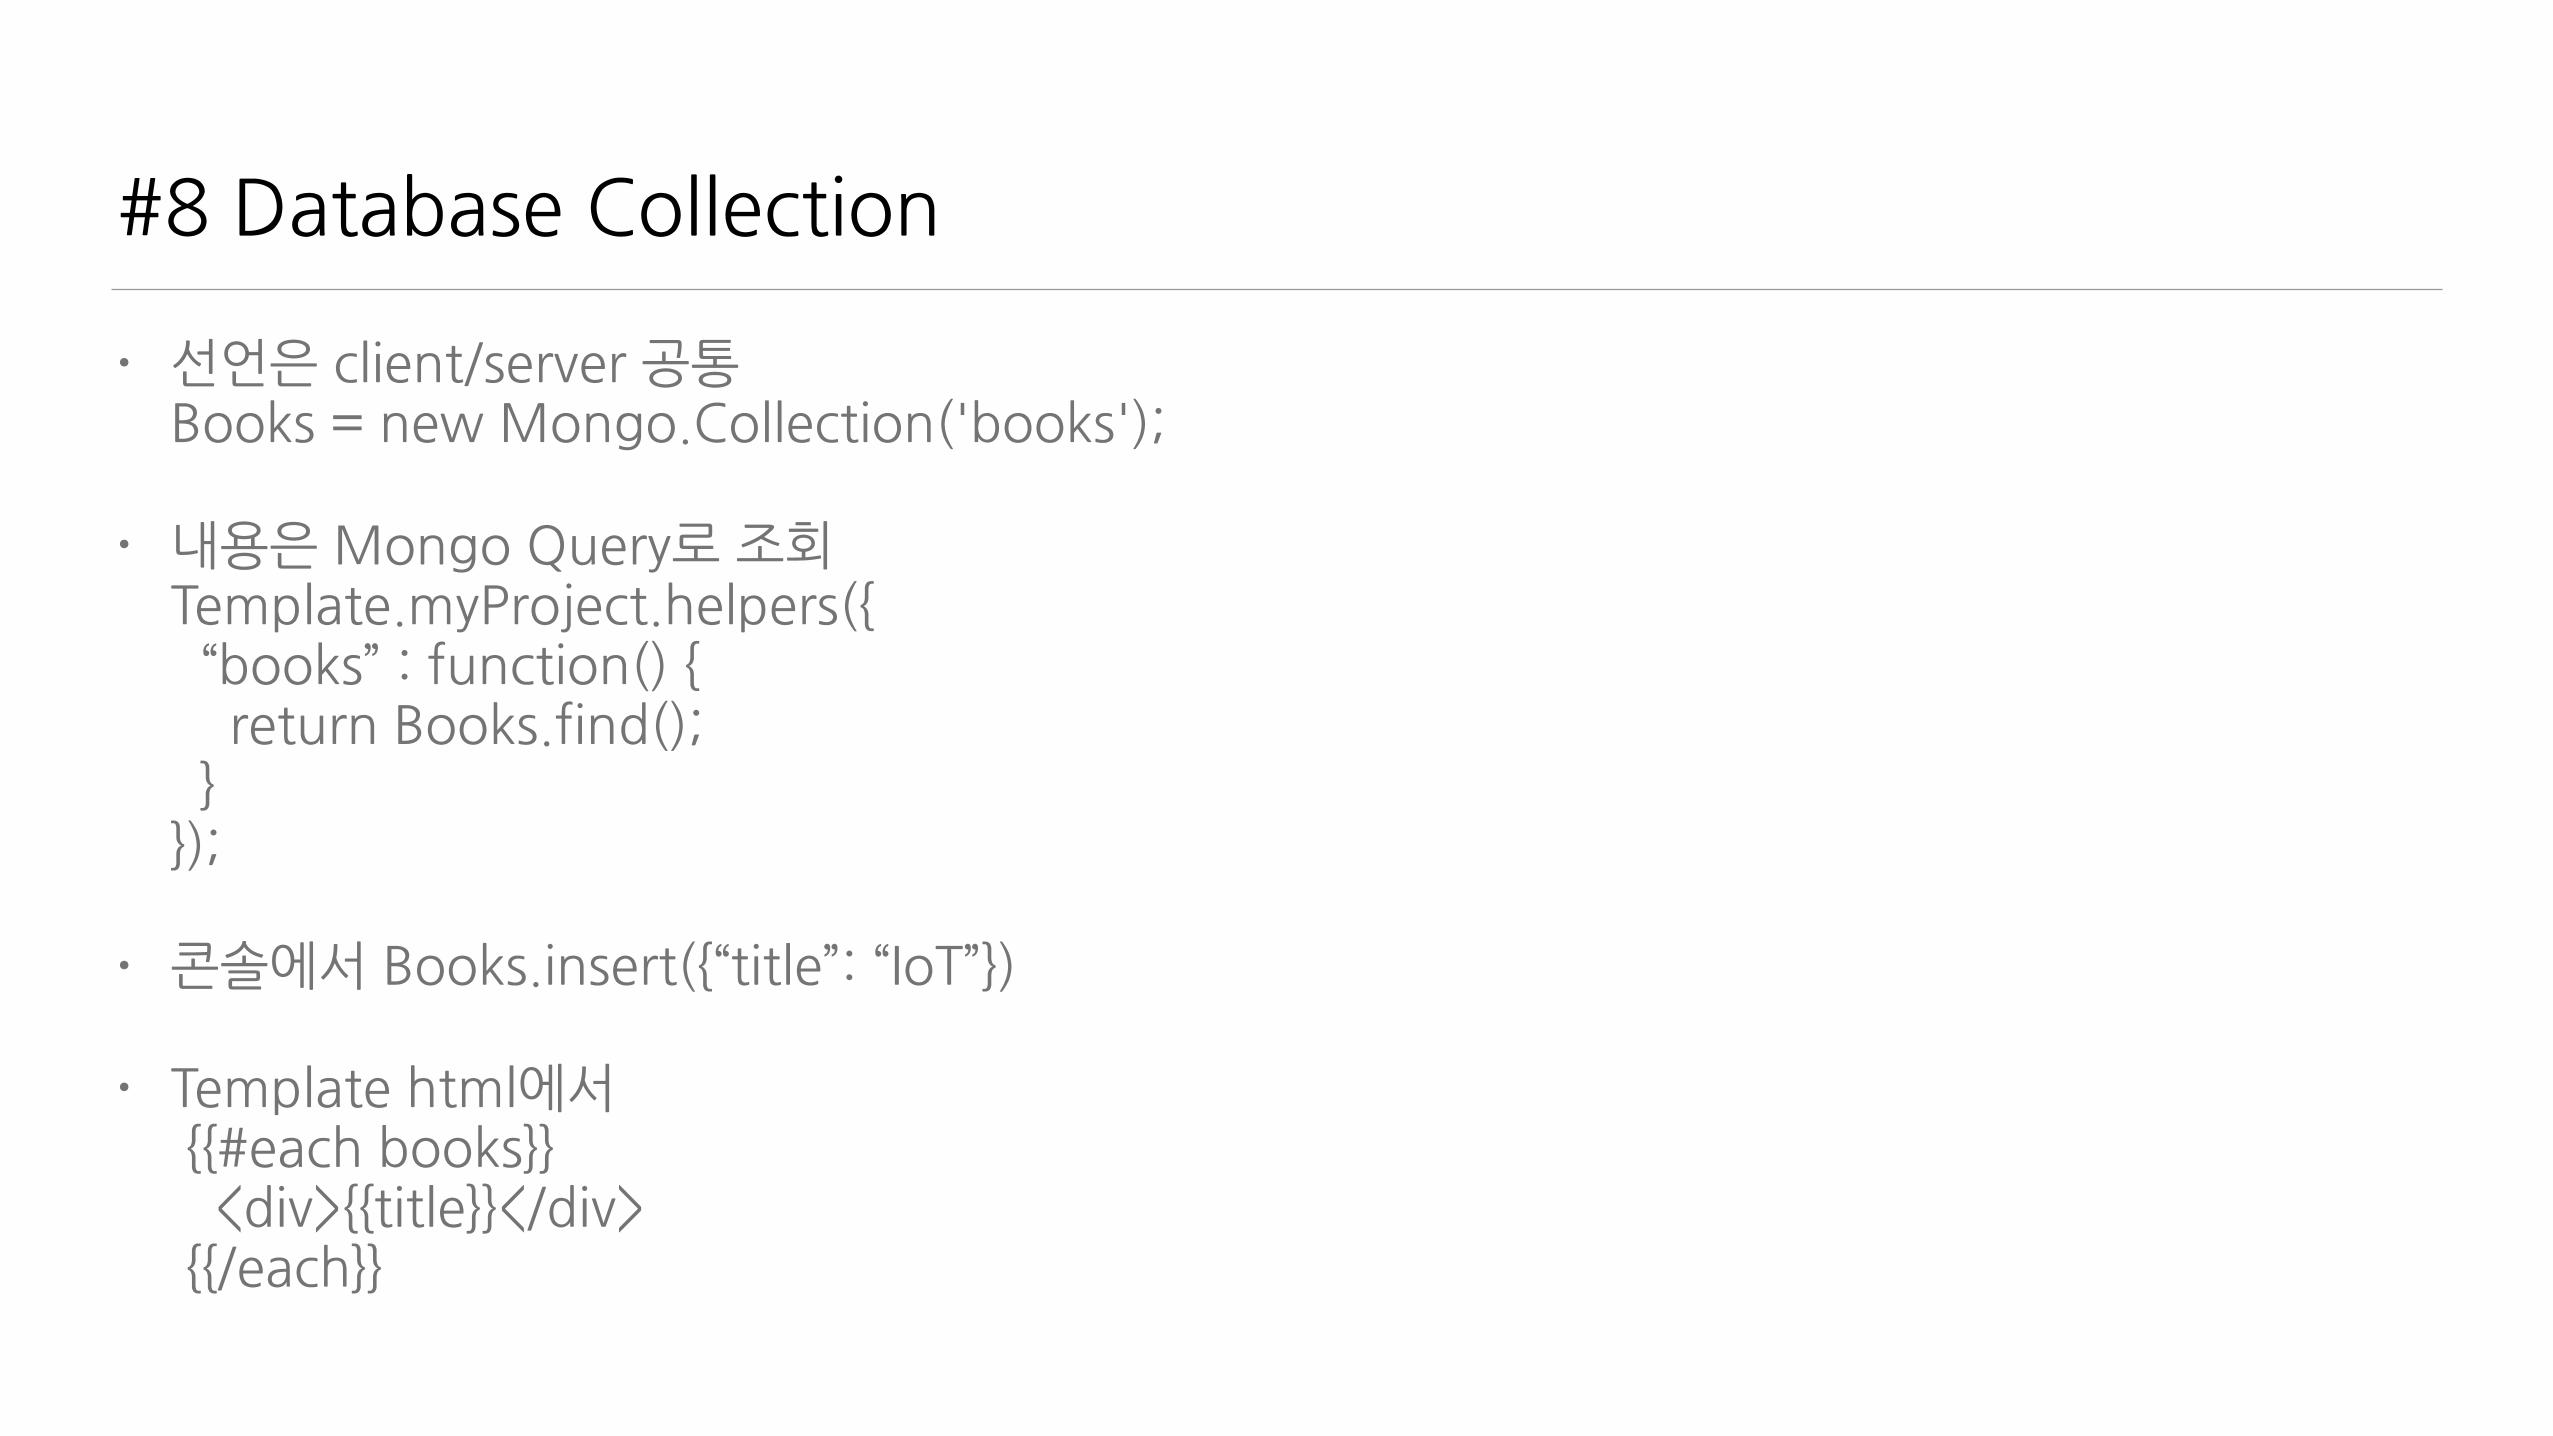
#8�Database�Collection
• 선언은�client/server�공통Books�=�new�Mongo.Collection('books');�
• 내용은�Mongo�Query로�조회Template.myProject.helpers({��“books”�:�function()�{����return�Books.find();��}});�
• 콘솔에서�Books.insert({“title”:�“IoT”})�
• Template�html에서�{{#each�books}} ���<div>{{title}}</div>�{{/each}}

#8�Database�Collection
• 추가Books.insert({“title”:�“IoT”})�
• 수정Books.update({“title”:�“IoT”},�{title:�“IoT�Meteor”})�
• 삭제Books.remove({“title”:�“IoT”})�
• 찾기�
• 하나�찾기Books.findOne({“title”:�“IoT”})�
• 모두�찾기Books.find({})
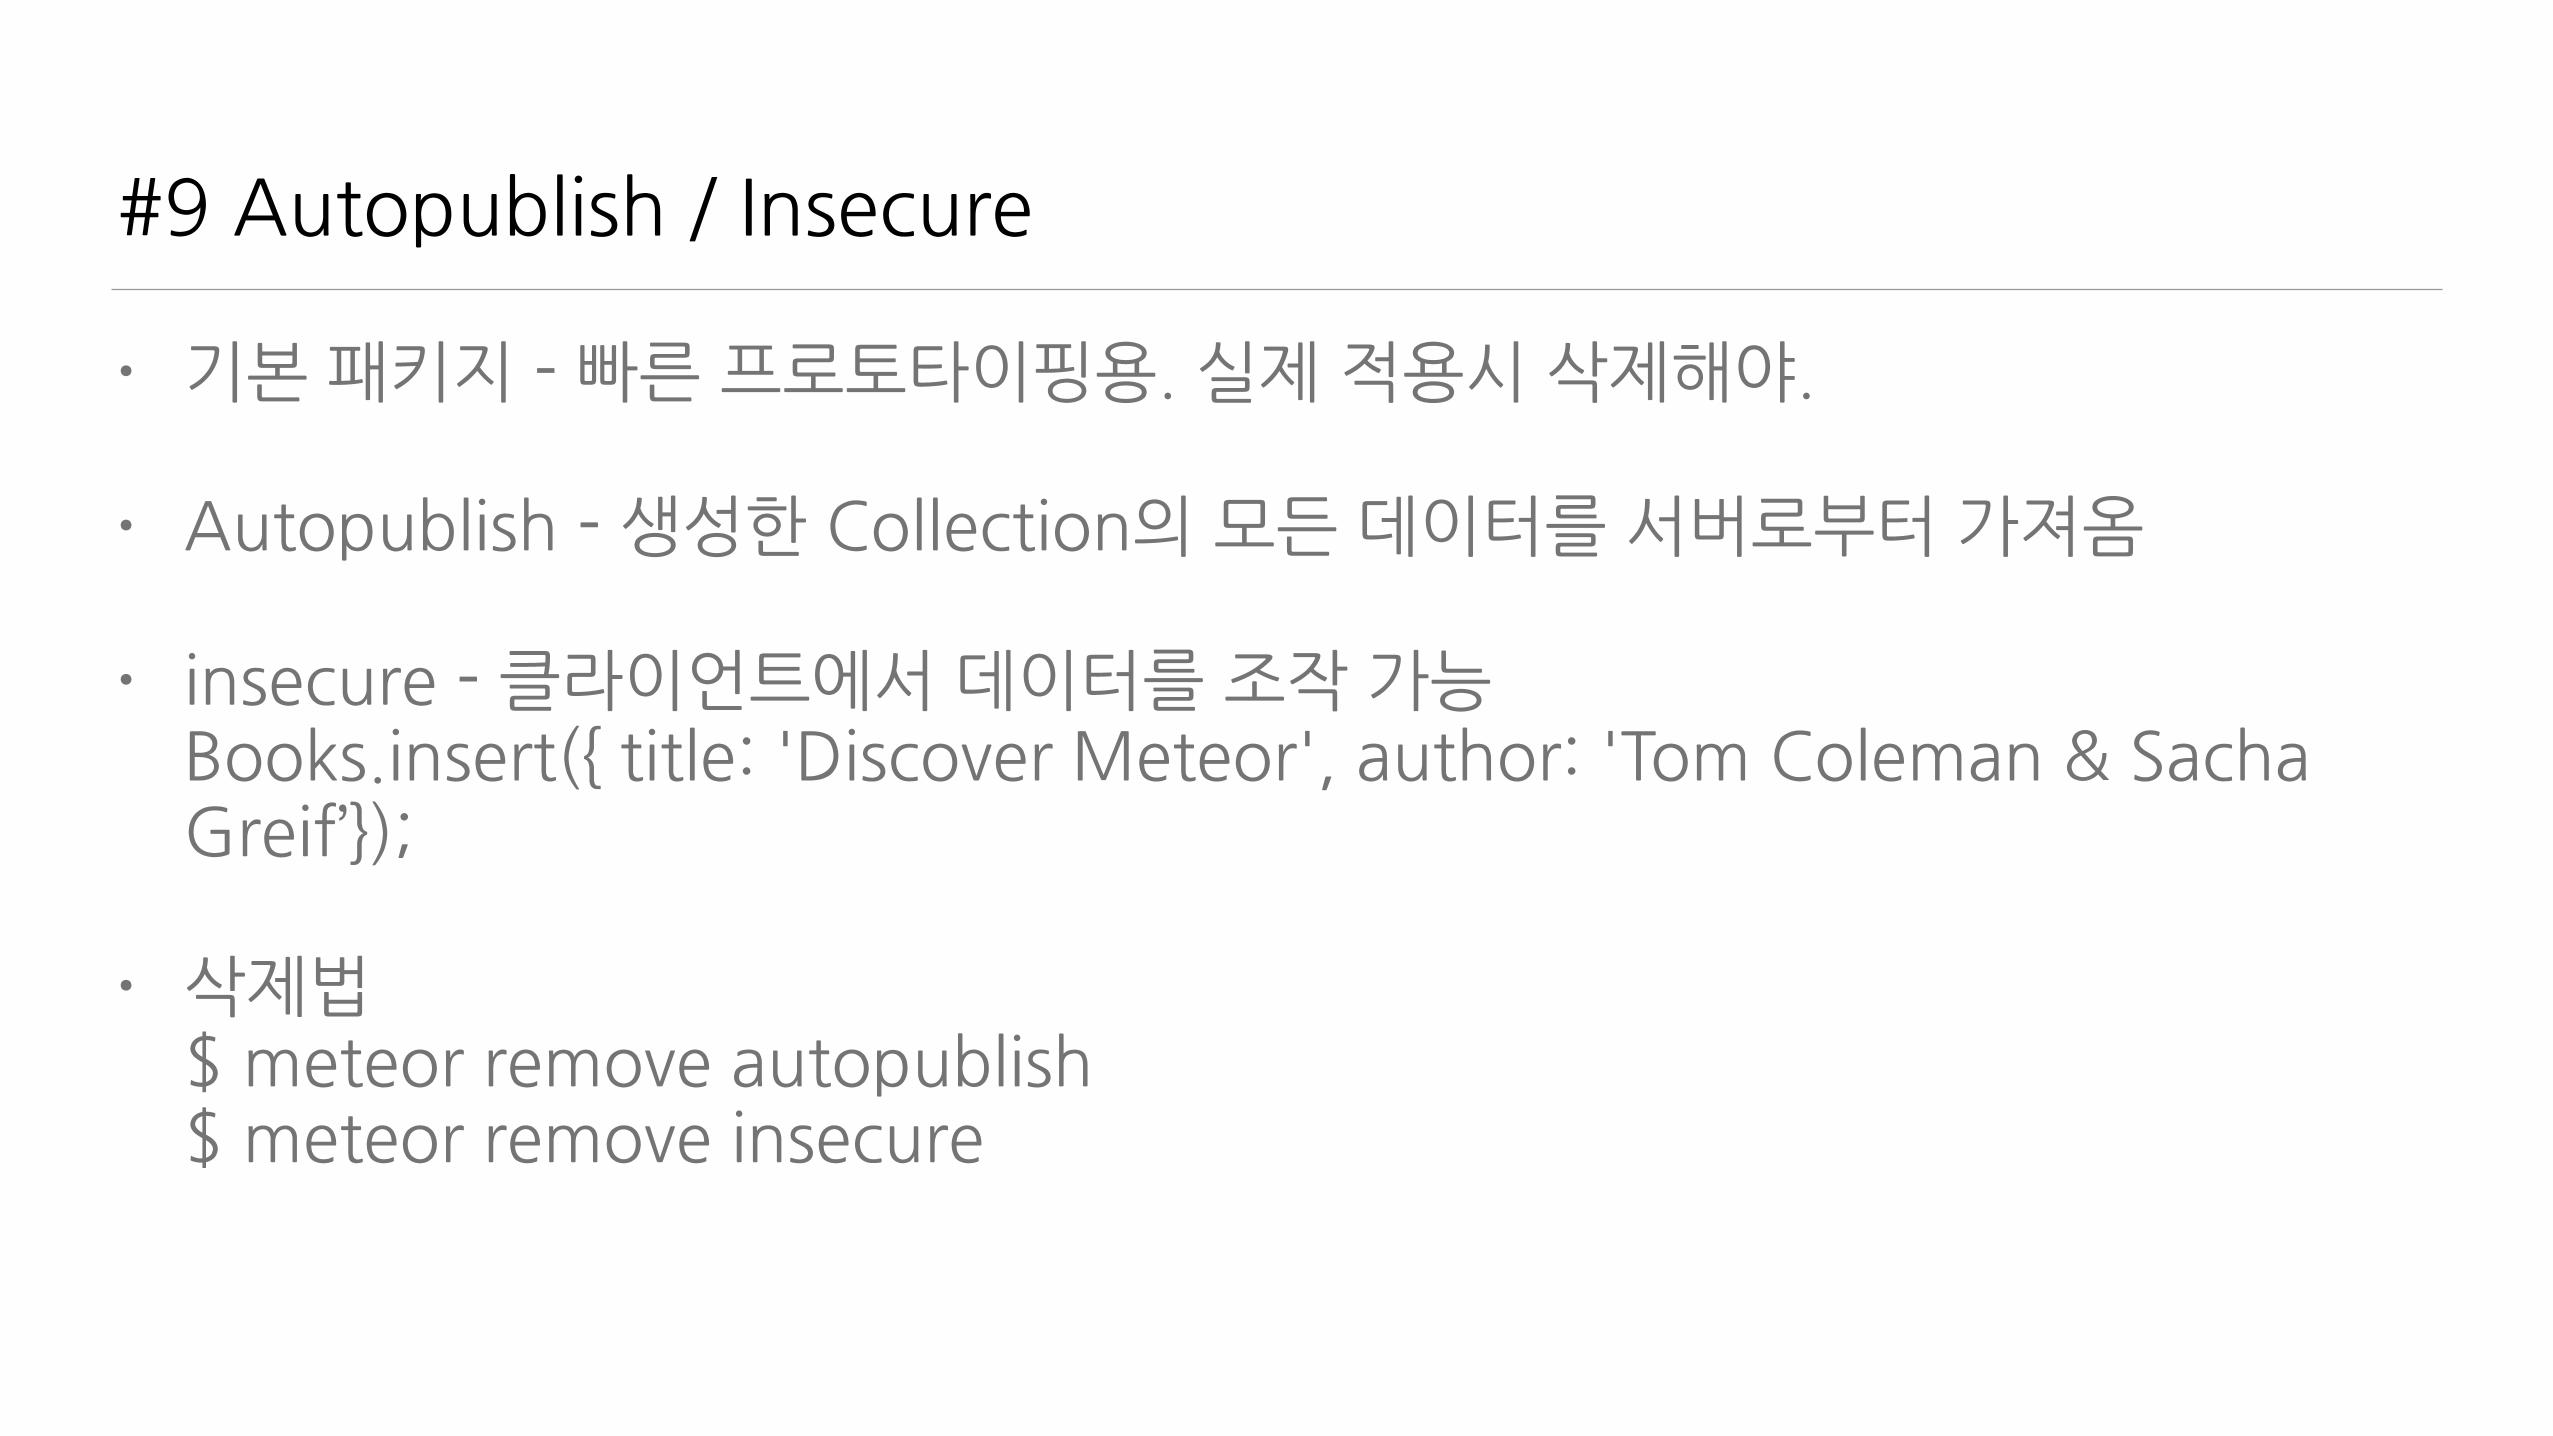
#9�Autopublish�/�Insecure
• 기본�패키지�-�빠른�프로토타이핑용.�실제�적용시�삭제해야.�
• Autopublish�-�생성한�Collection의�모든�데이터를�서버로부터�가져옴�
• insecure�-�클라이언트에서�데이터를�조작�가능Books.insert({�title:�'Discover�Meteor',�author:�'Tom�Coleman�&�Sacha�Greif’});�
• 삭제법$�meteor�remove�autopublish $�meteor�remove�insecure
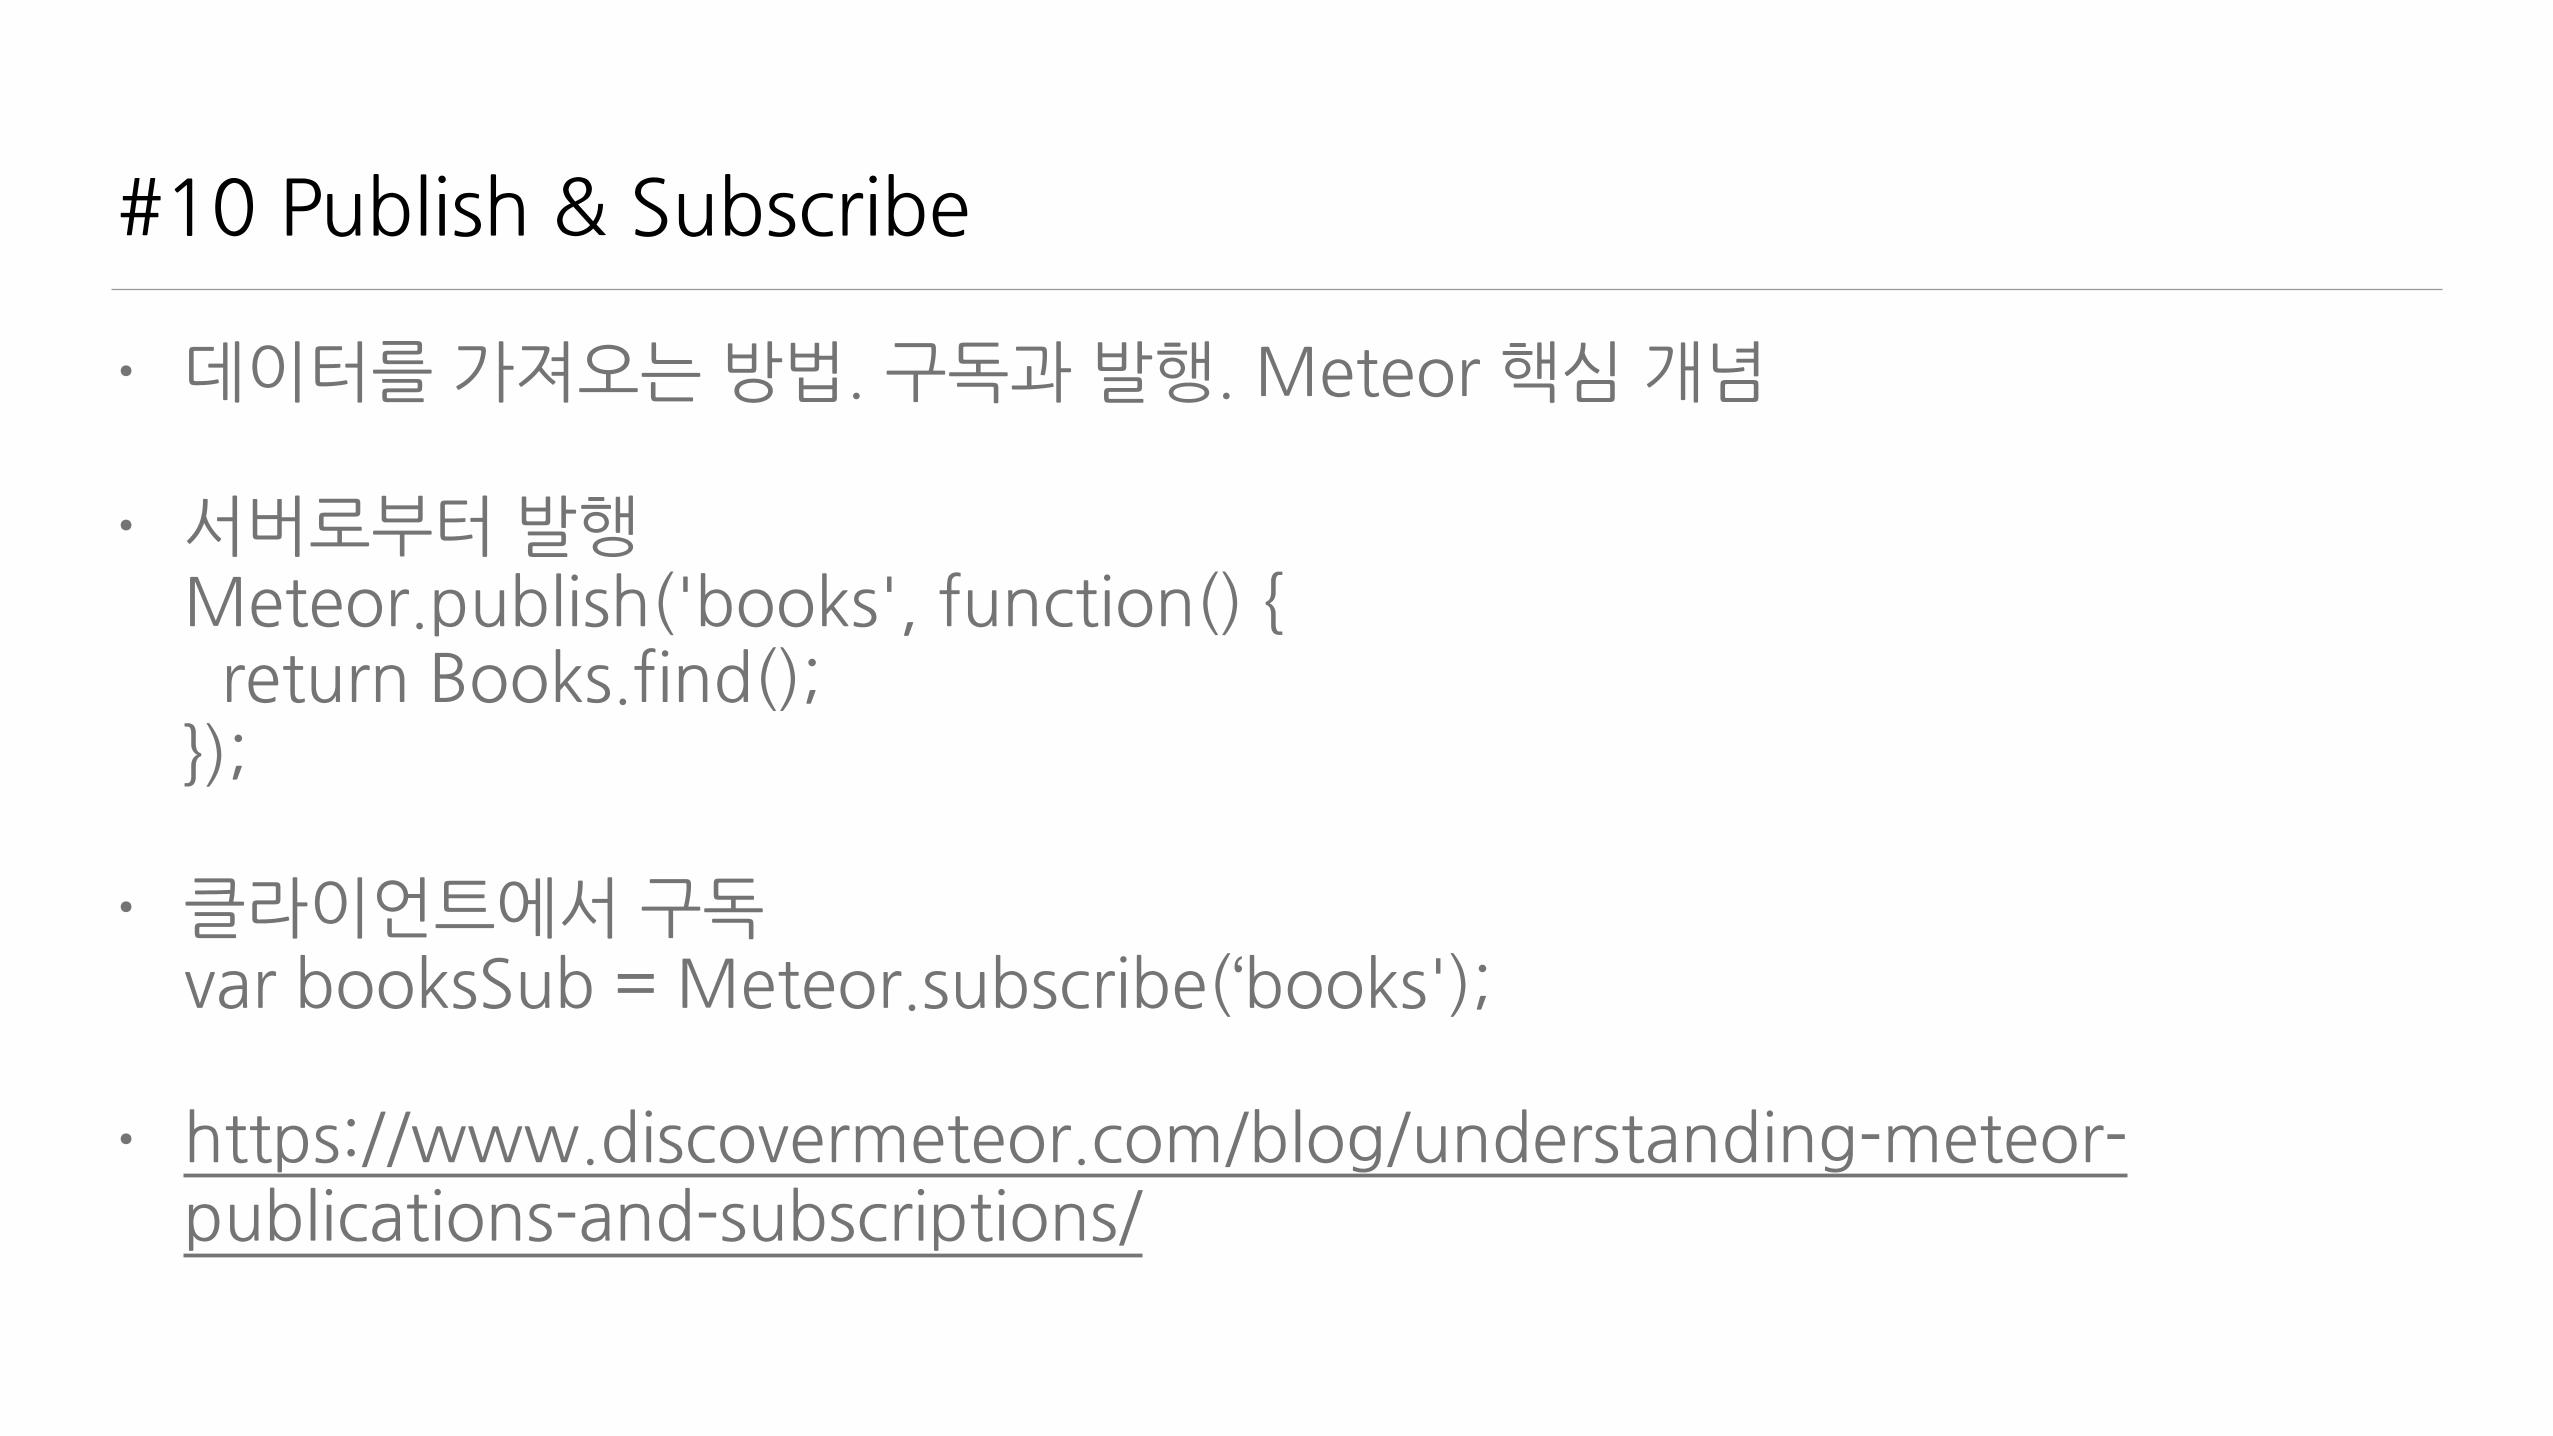
#10�Publish�&�Subscribe
• 데이터를�가져오는�방법.�구독과�발행.�Meteor�핵심�개념�
• 서버로부터�발행Meteor.publish('books',�function()�{��return�Books.find();});�
• 클라이언트에서�구독var�booksSub�=�Meteor.subscribe(‘books');�
• https://www.discovermeteor.com/blog/understanding-meteor-publications-and-subscriptions/

Meteor�Way
클라이언트가�서버로부터�데이터를�받는�방법
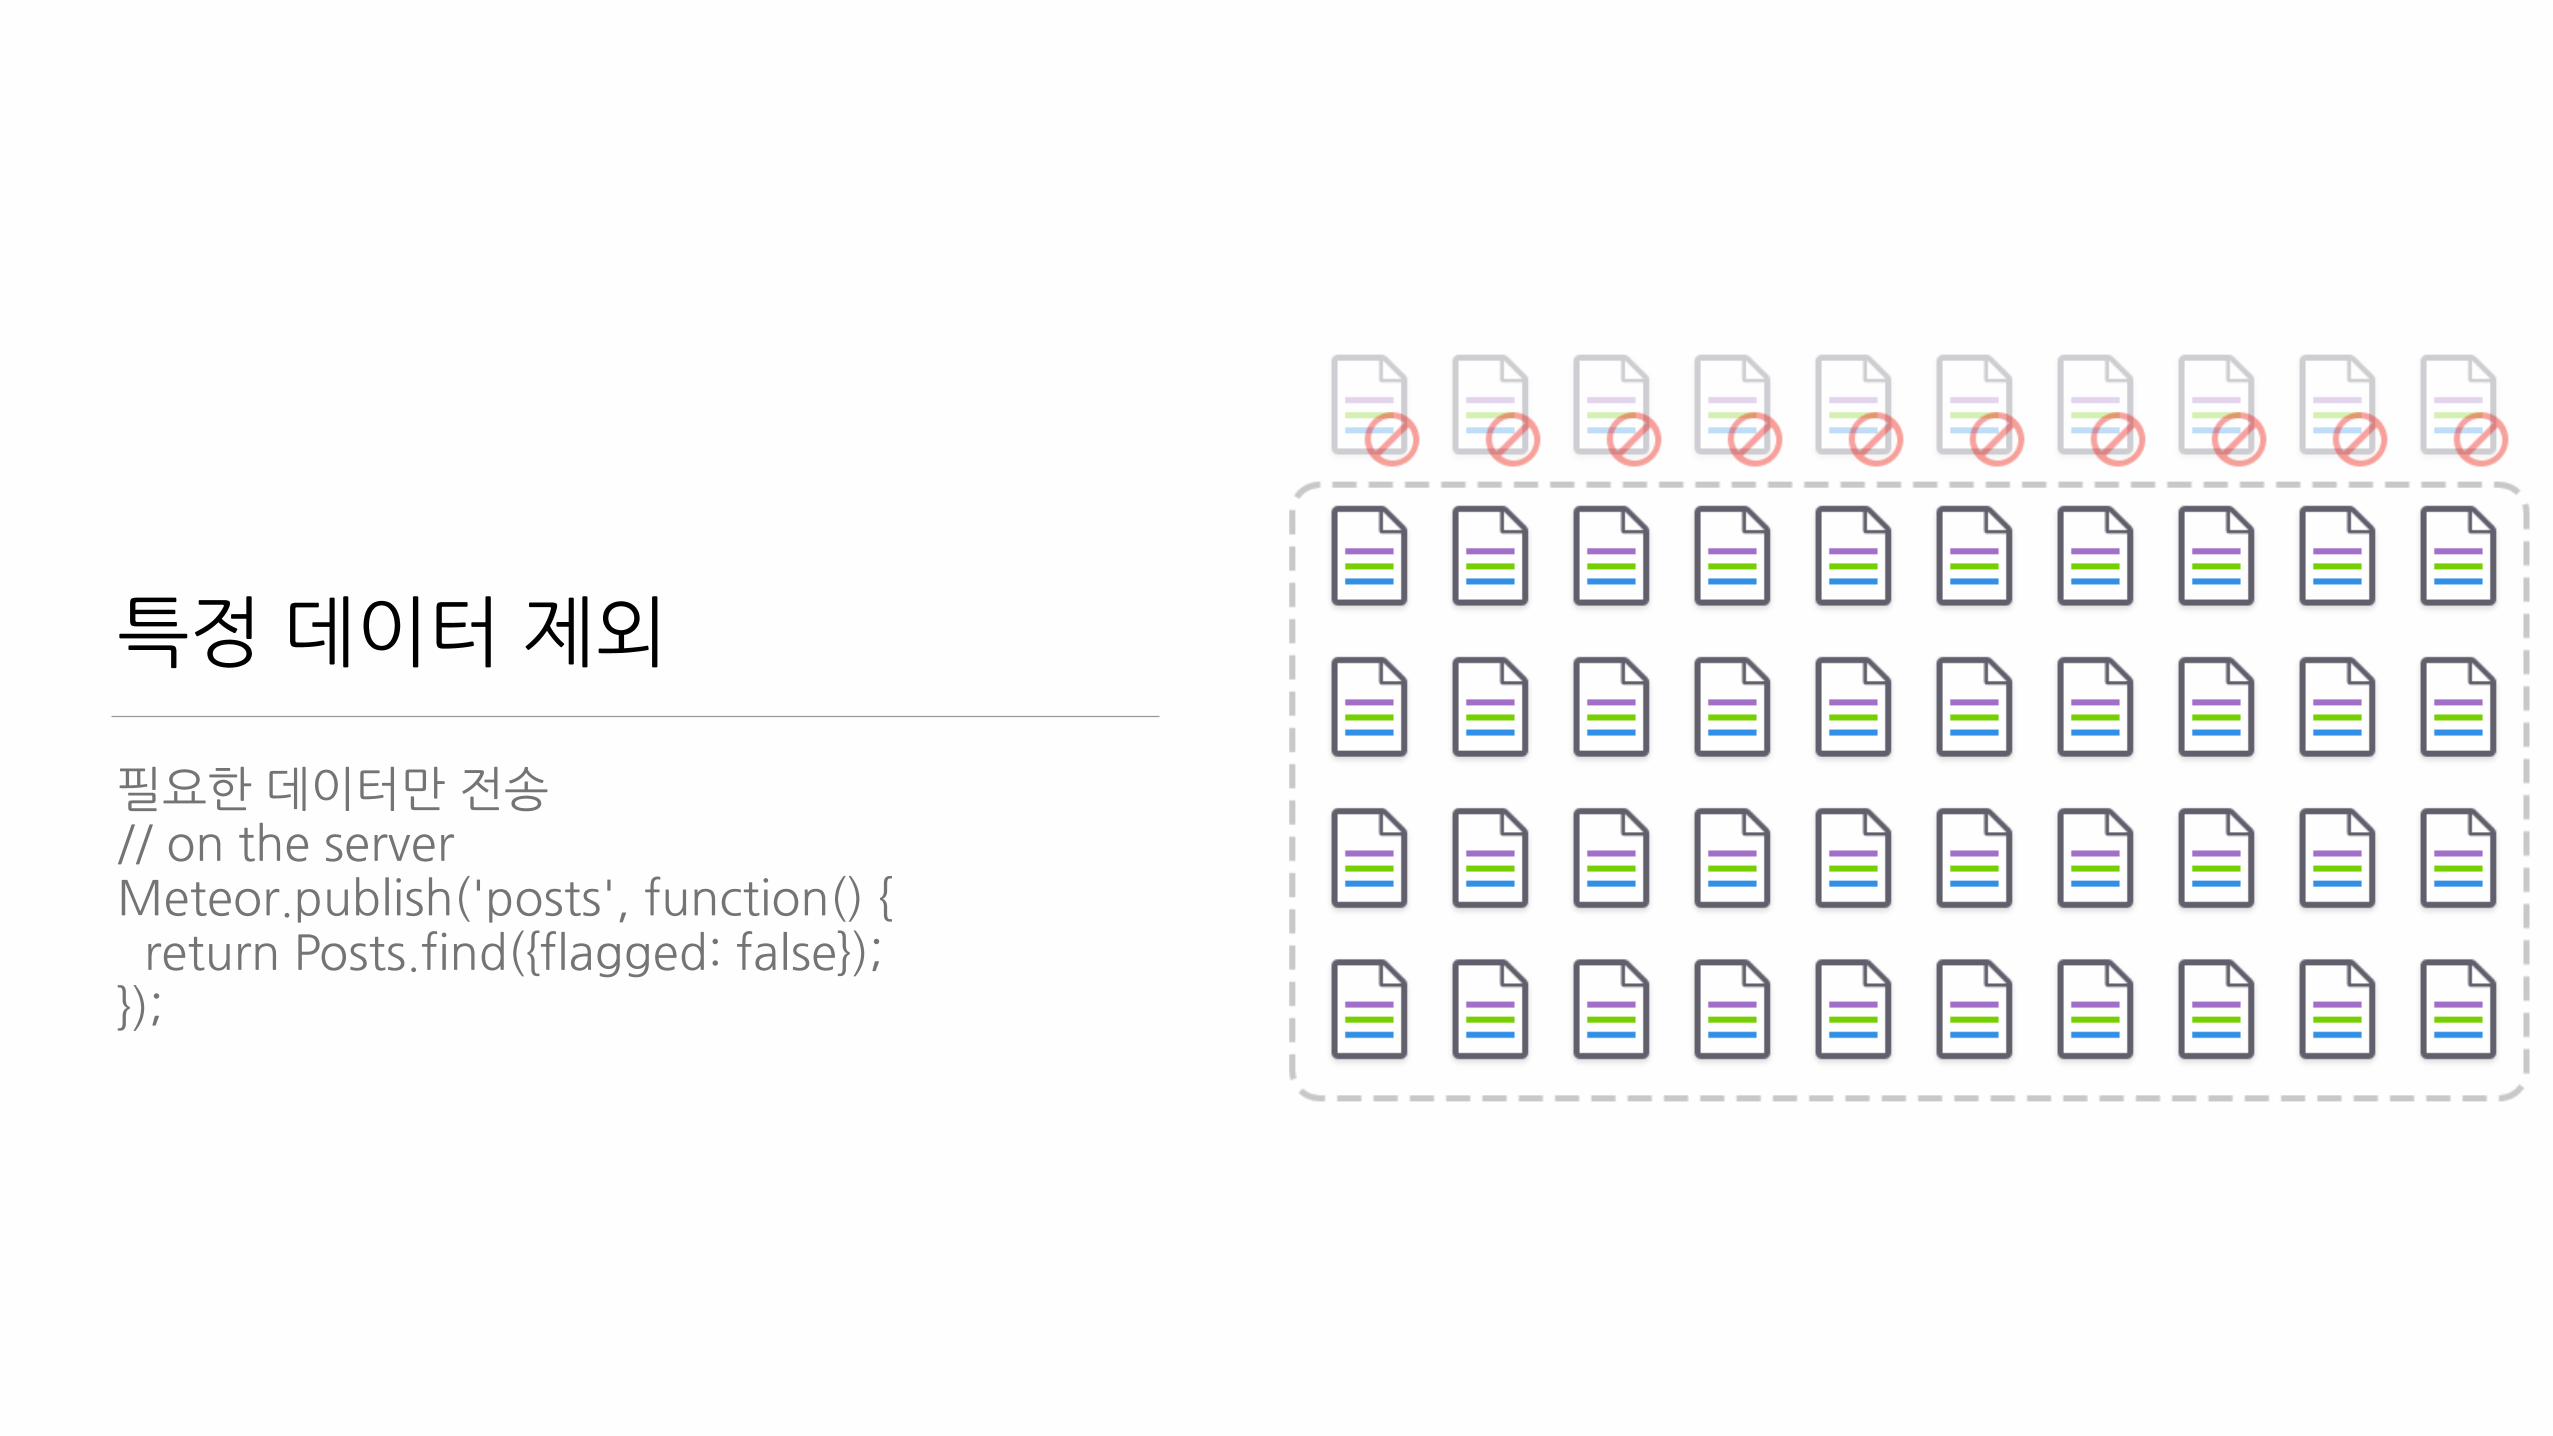
특정�데이터�제외
필요한�데이터만�전송�//�on�the�server�Meteor.publish('posts',�function()�{���return�Posts.find({flagged:�false});��});

사용자별�필터링
//�on�the�server�Meteor.publish('posts',�function(author)�{���return�Posts.find({flagged:�false,�author:�author});�});
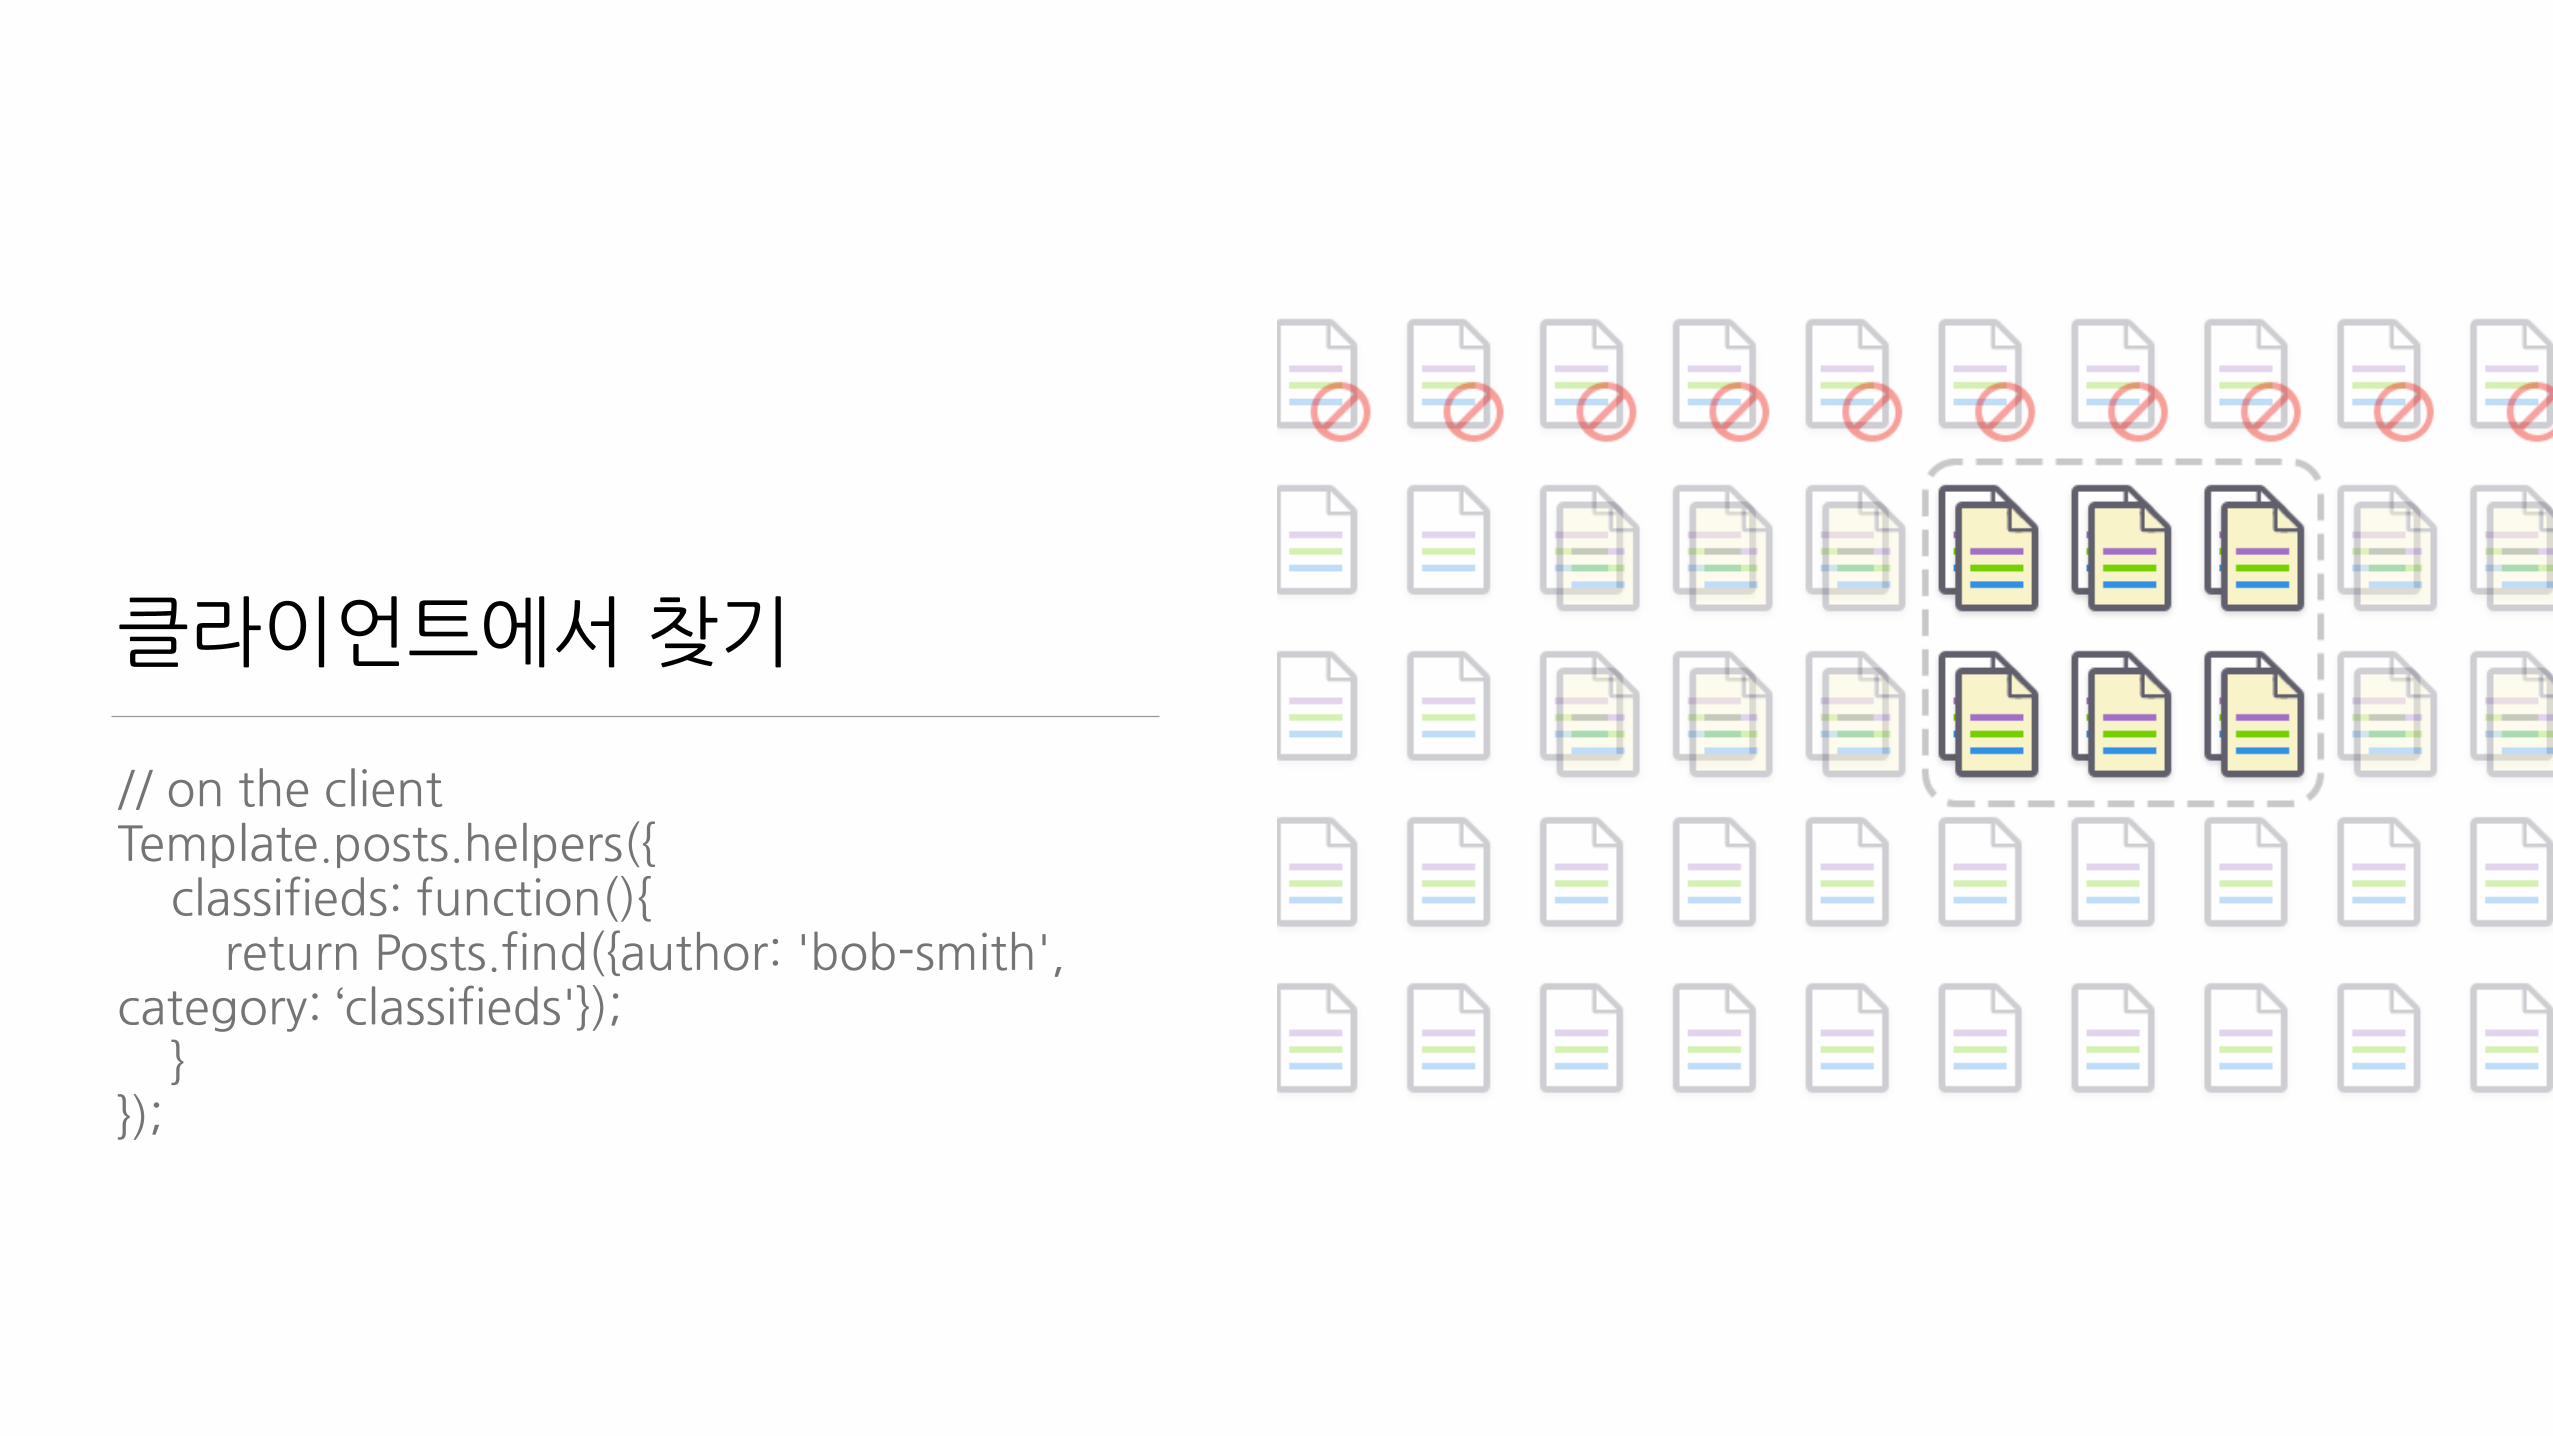
클라이언트에서�찾기
//�on�the�client�Template.posts.helpers({�����classifieds:�function(){���������return�Posts.find({author:�'bob-smith',�category:�‘classifieds'});�����}�});
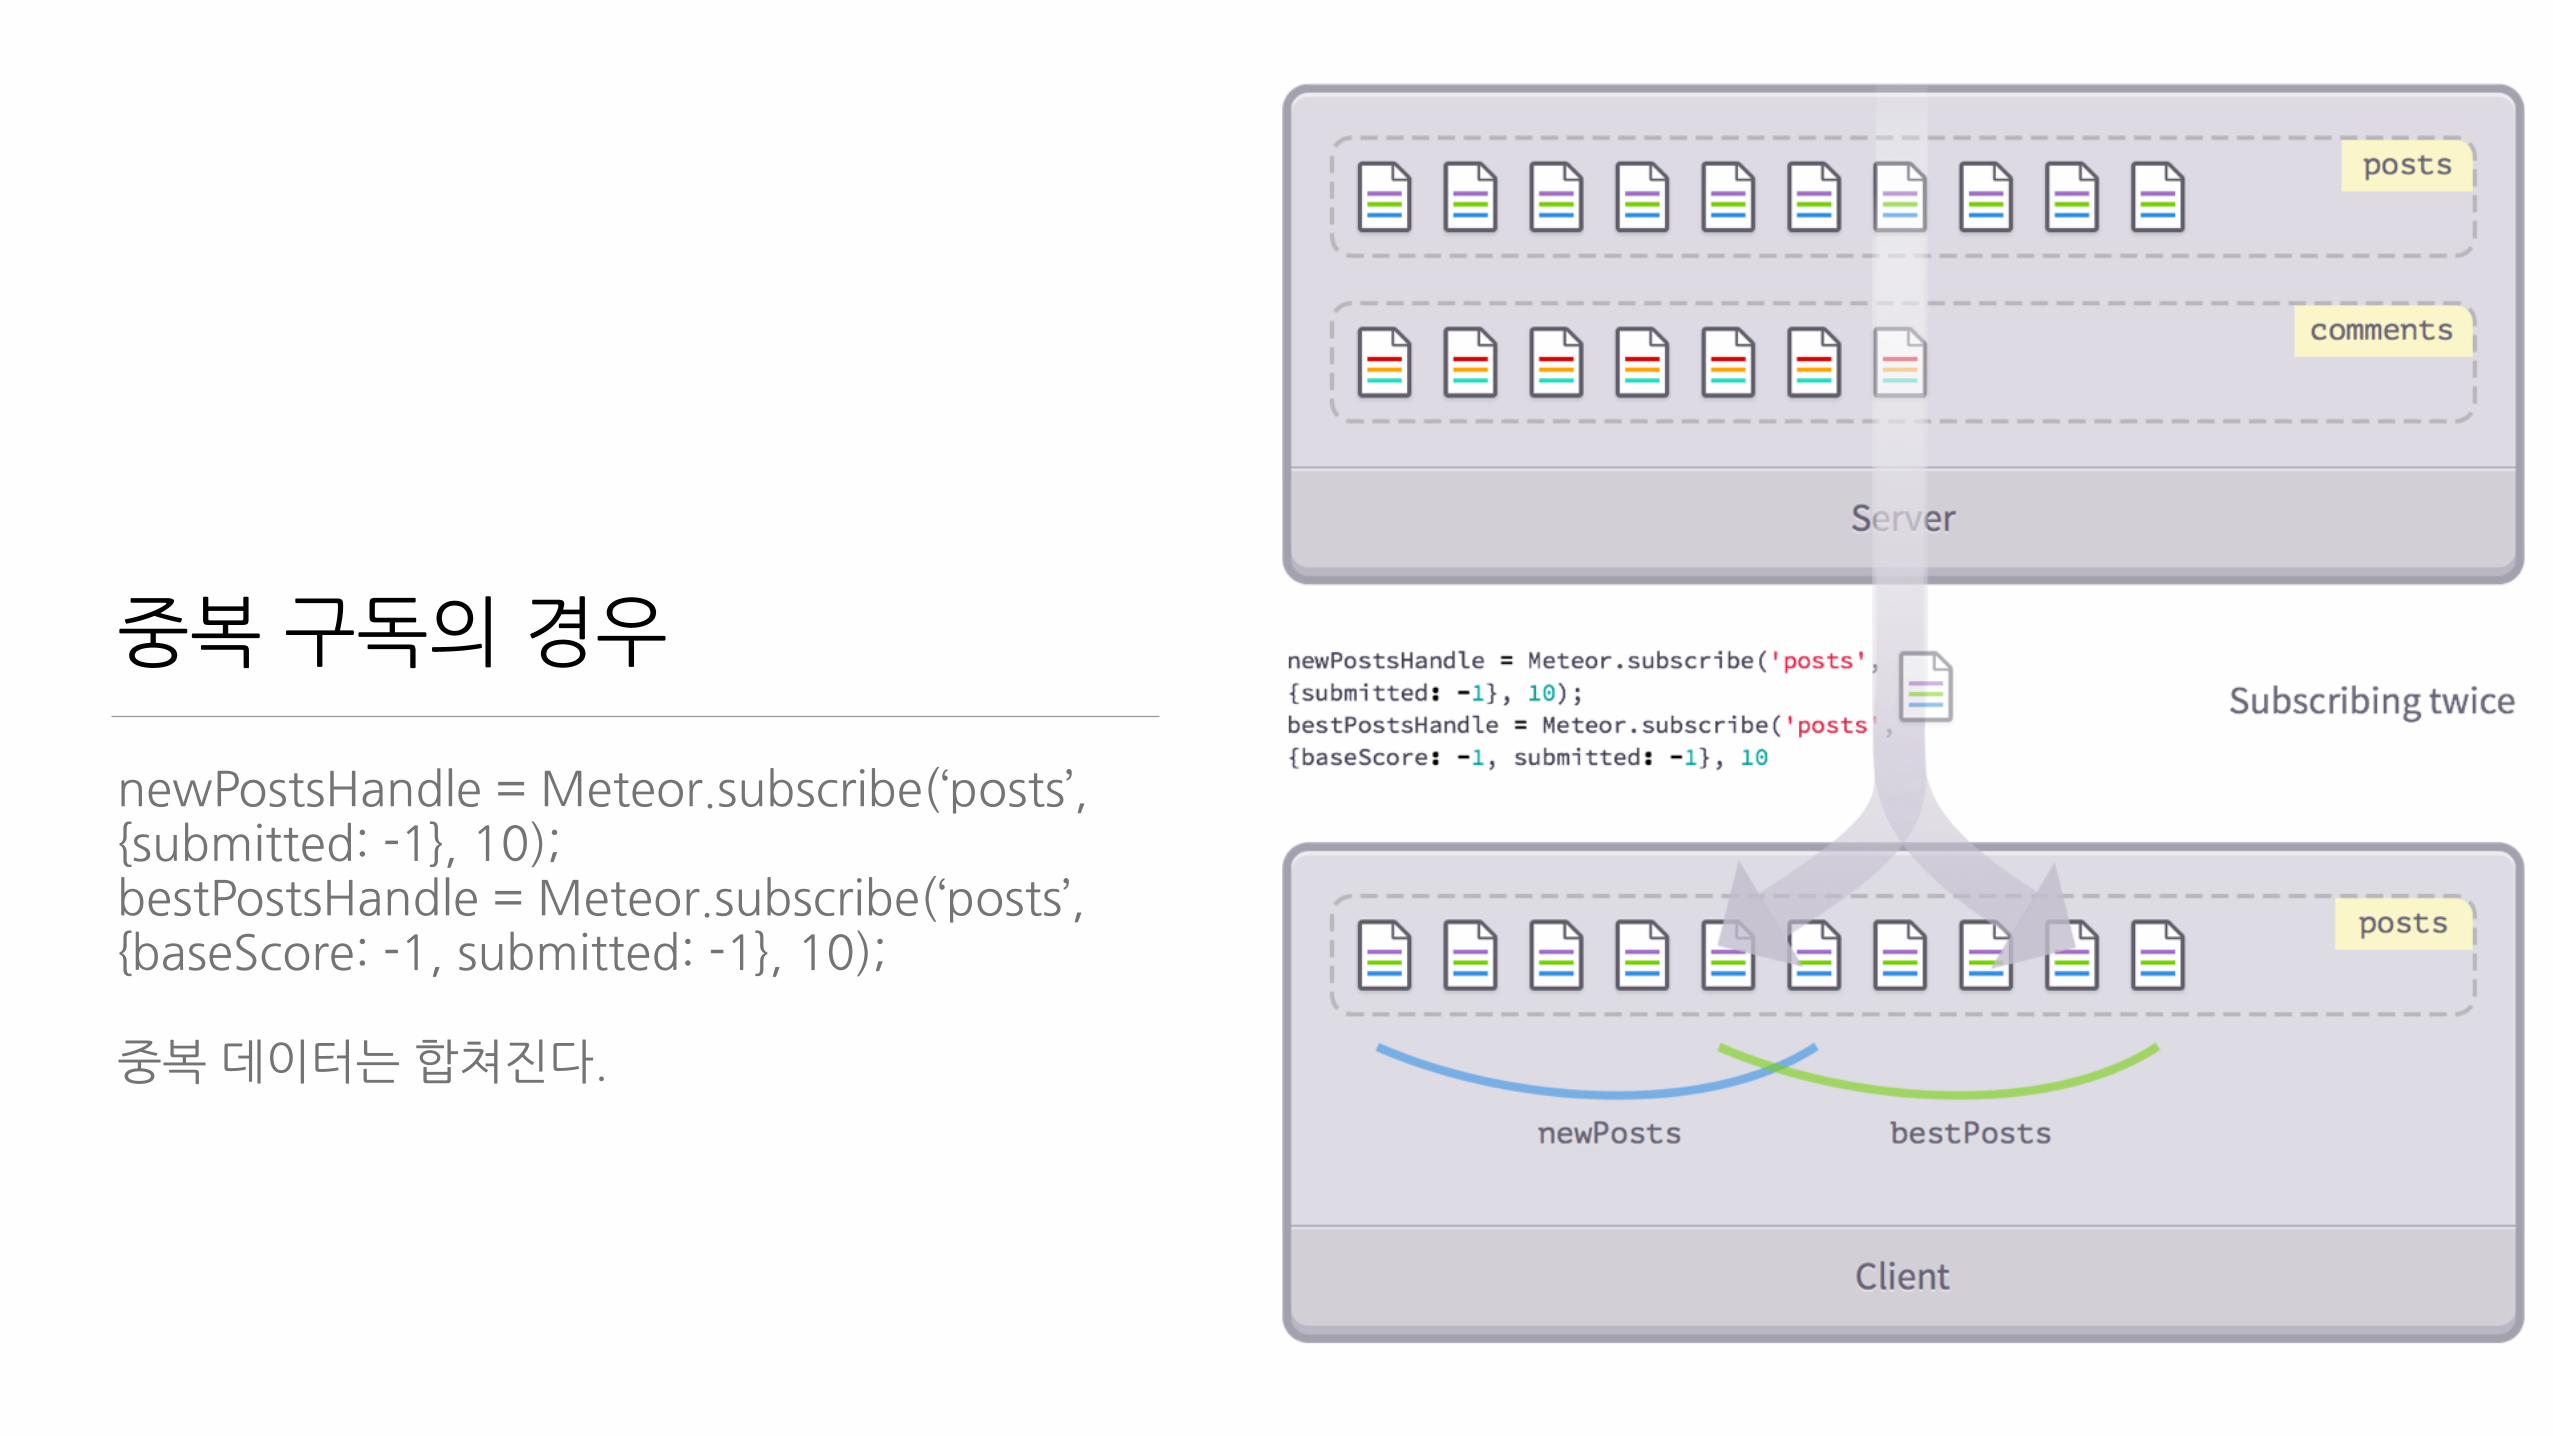
중복�구독의�경우
newPostsHandle�=�Meteor.subscribe(‘posts’,�{submitted:�-1},�10);�bestPostsHandle�=�Meteor.subscribe(‘posts’,�{baseScore:�-1,�submitted:�-1},�10);�
중복�데이터는�합쳐진다.
#11.�Reactivity
Reactive�Programming�구현은�거들�뿐�선언만�놓고�온다.�
선언을�하면�데이터가�변경될�때�스스로�변화한다.�Reactive�data�sources�안에서�Reactive�computation�이�이루어진다.�http://docs.meteor.com/#/full/reactivity
#11�Reactivity
• Template을�관찰해보자<template�name=“books”>��<ul>��{{#each�books}}����<li><span>{{title}}</span>/<span>{{author}}</span></li>��{{/each}}</template>�
• Books.insert({�title:�'Discover�Meteor',�author:�'Tom�Coleman�&�Sacha�Greif'});Books.update('insertIdHere',�{ ��$set:�{�title:�'Glofiry�Meteor',�author:�'Elfoslav'�} });Books.remove('insertIdHere');
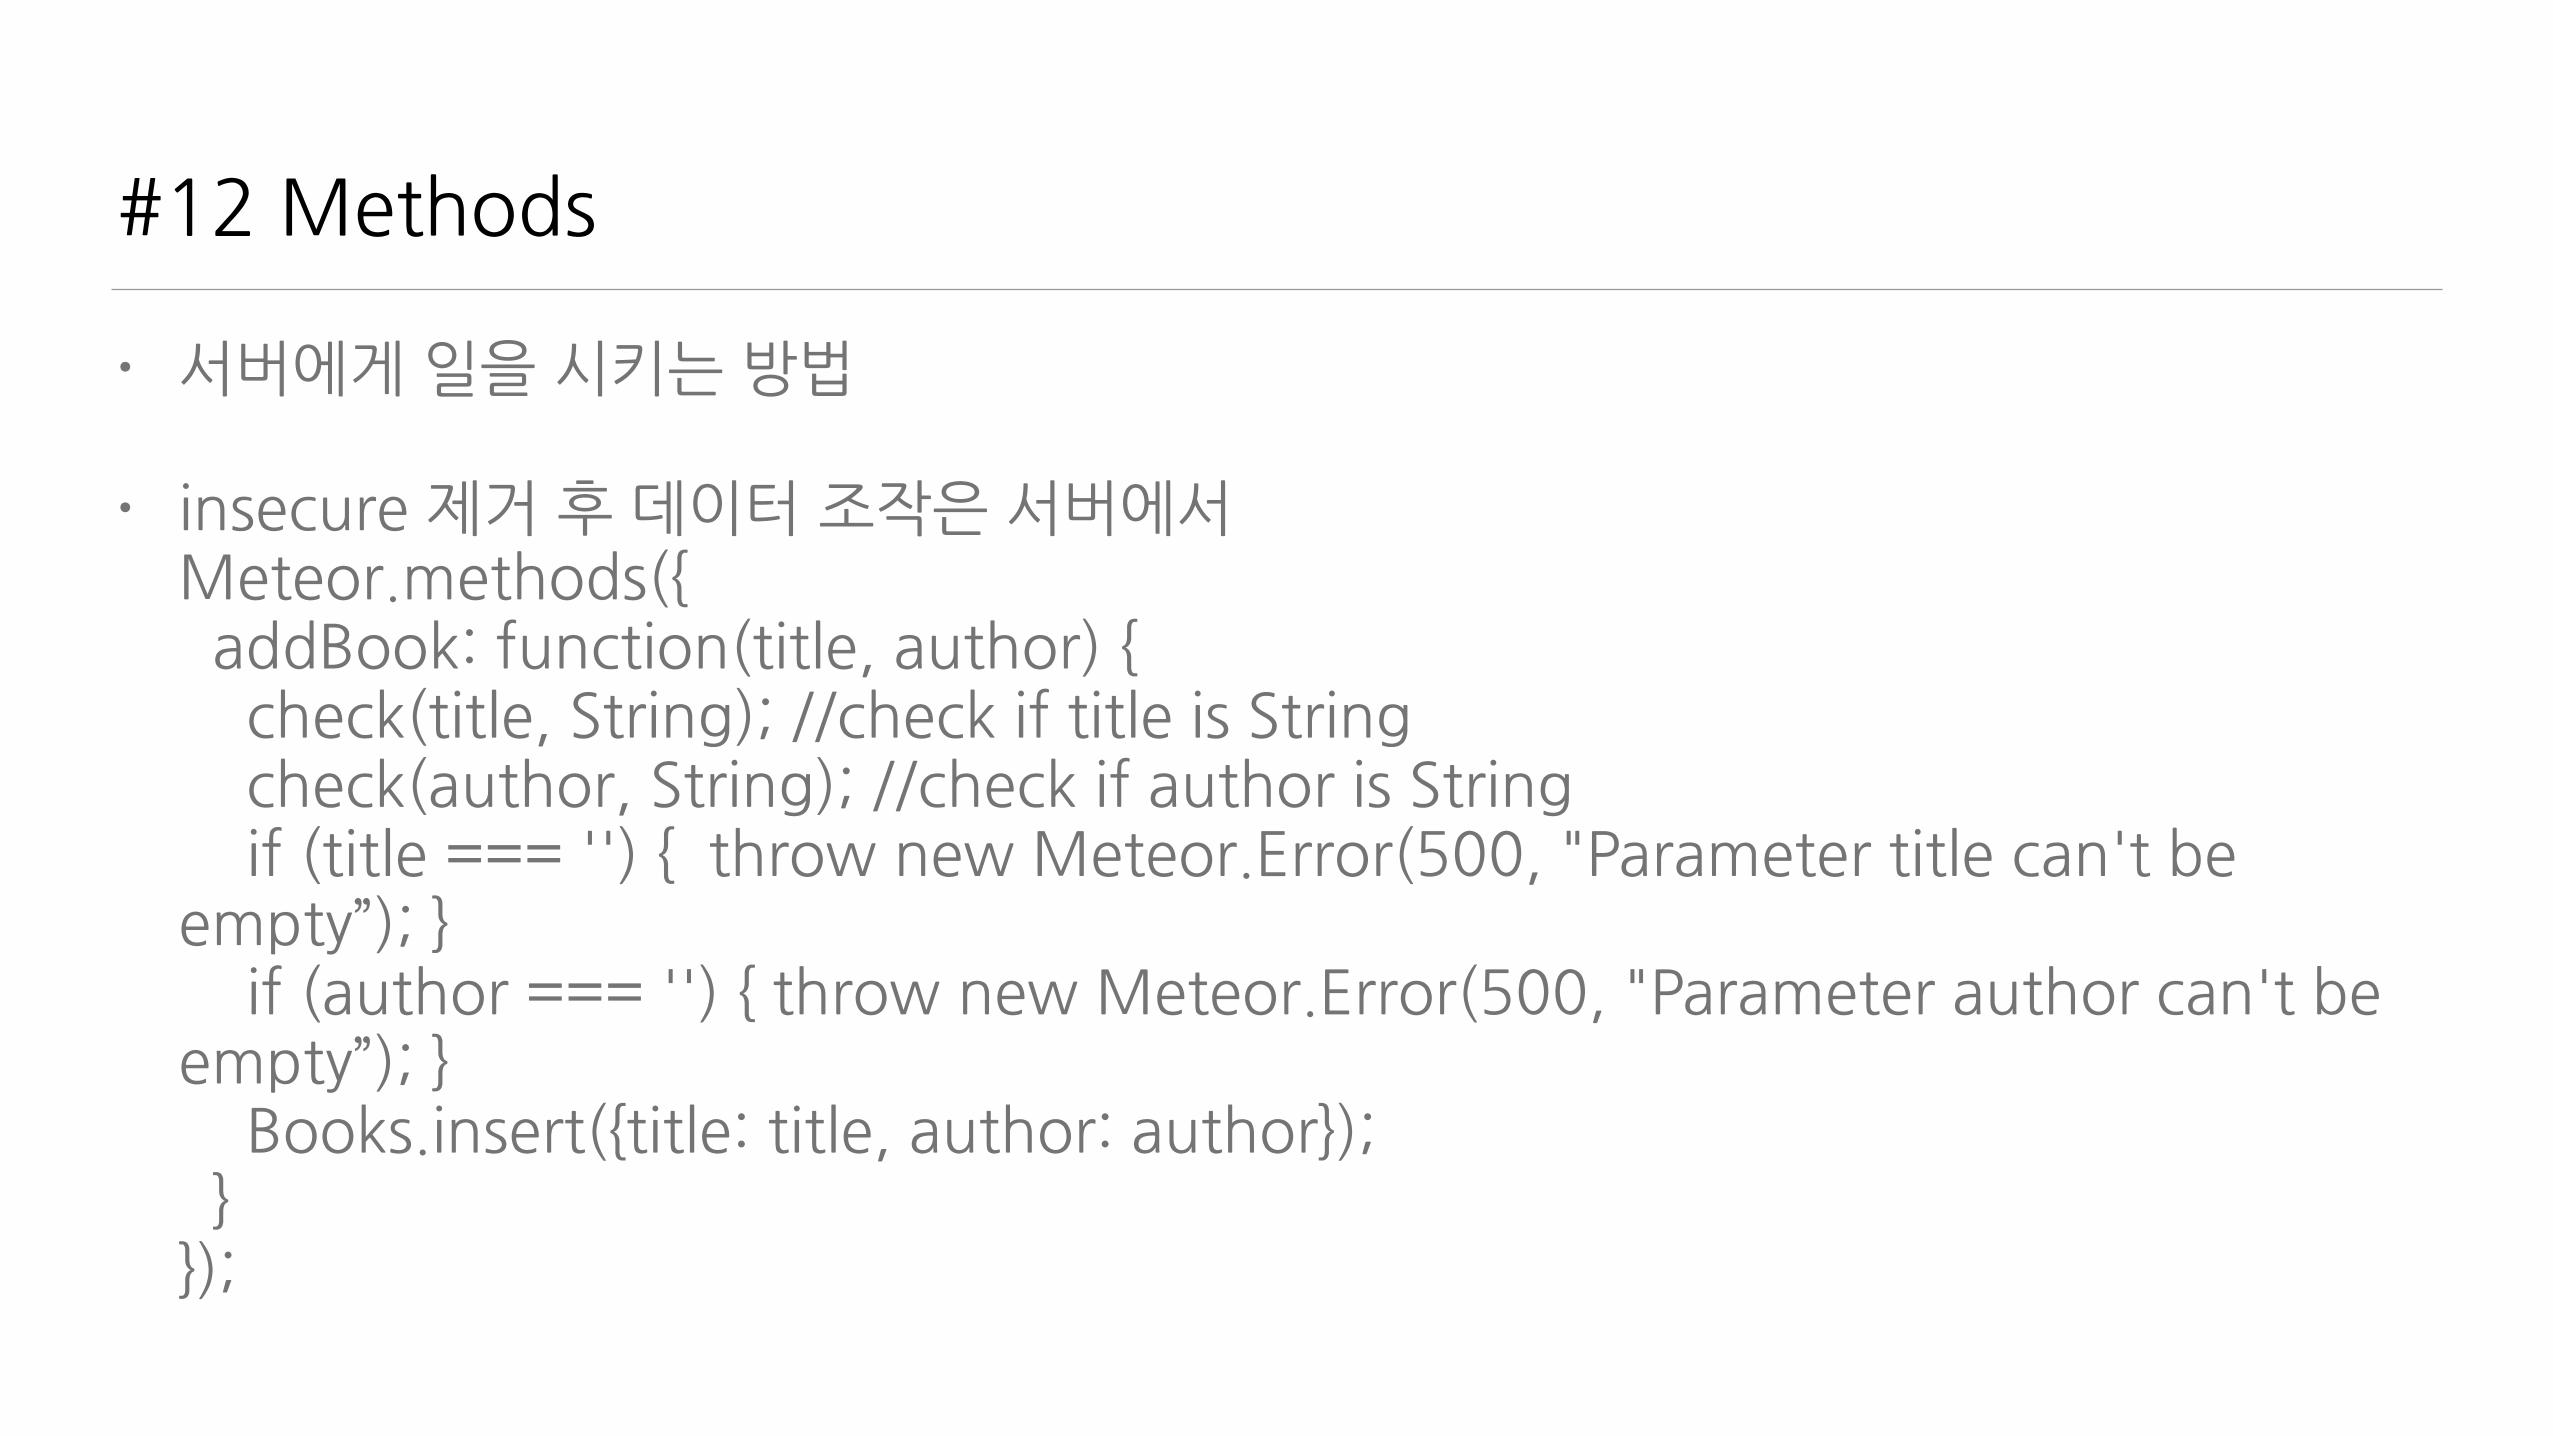
#12�Methods
• 서버에게�일을�시키는�방법�
• insecure�제거�후�데이터�조작은�서버에서Meteor.methods({ ��addBook:�function(title,�author)�{ ����check(title,�String);�//check�if�title�is�String ����check(author,�String);�//check�if�author�is�String����if�(title�===�'')�{��throw�new�Meteor.Error(500,�"Parameter�title�can't�be�empty”);�}����if�(author�===�'')�{�throw�new�Meteor.Error(500,�"Parameter�author�can't�be�empty”);�}����Books.insert({title:�title,�author:�author}); ��}});
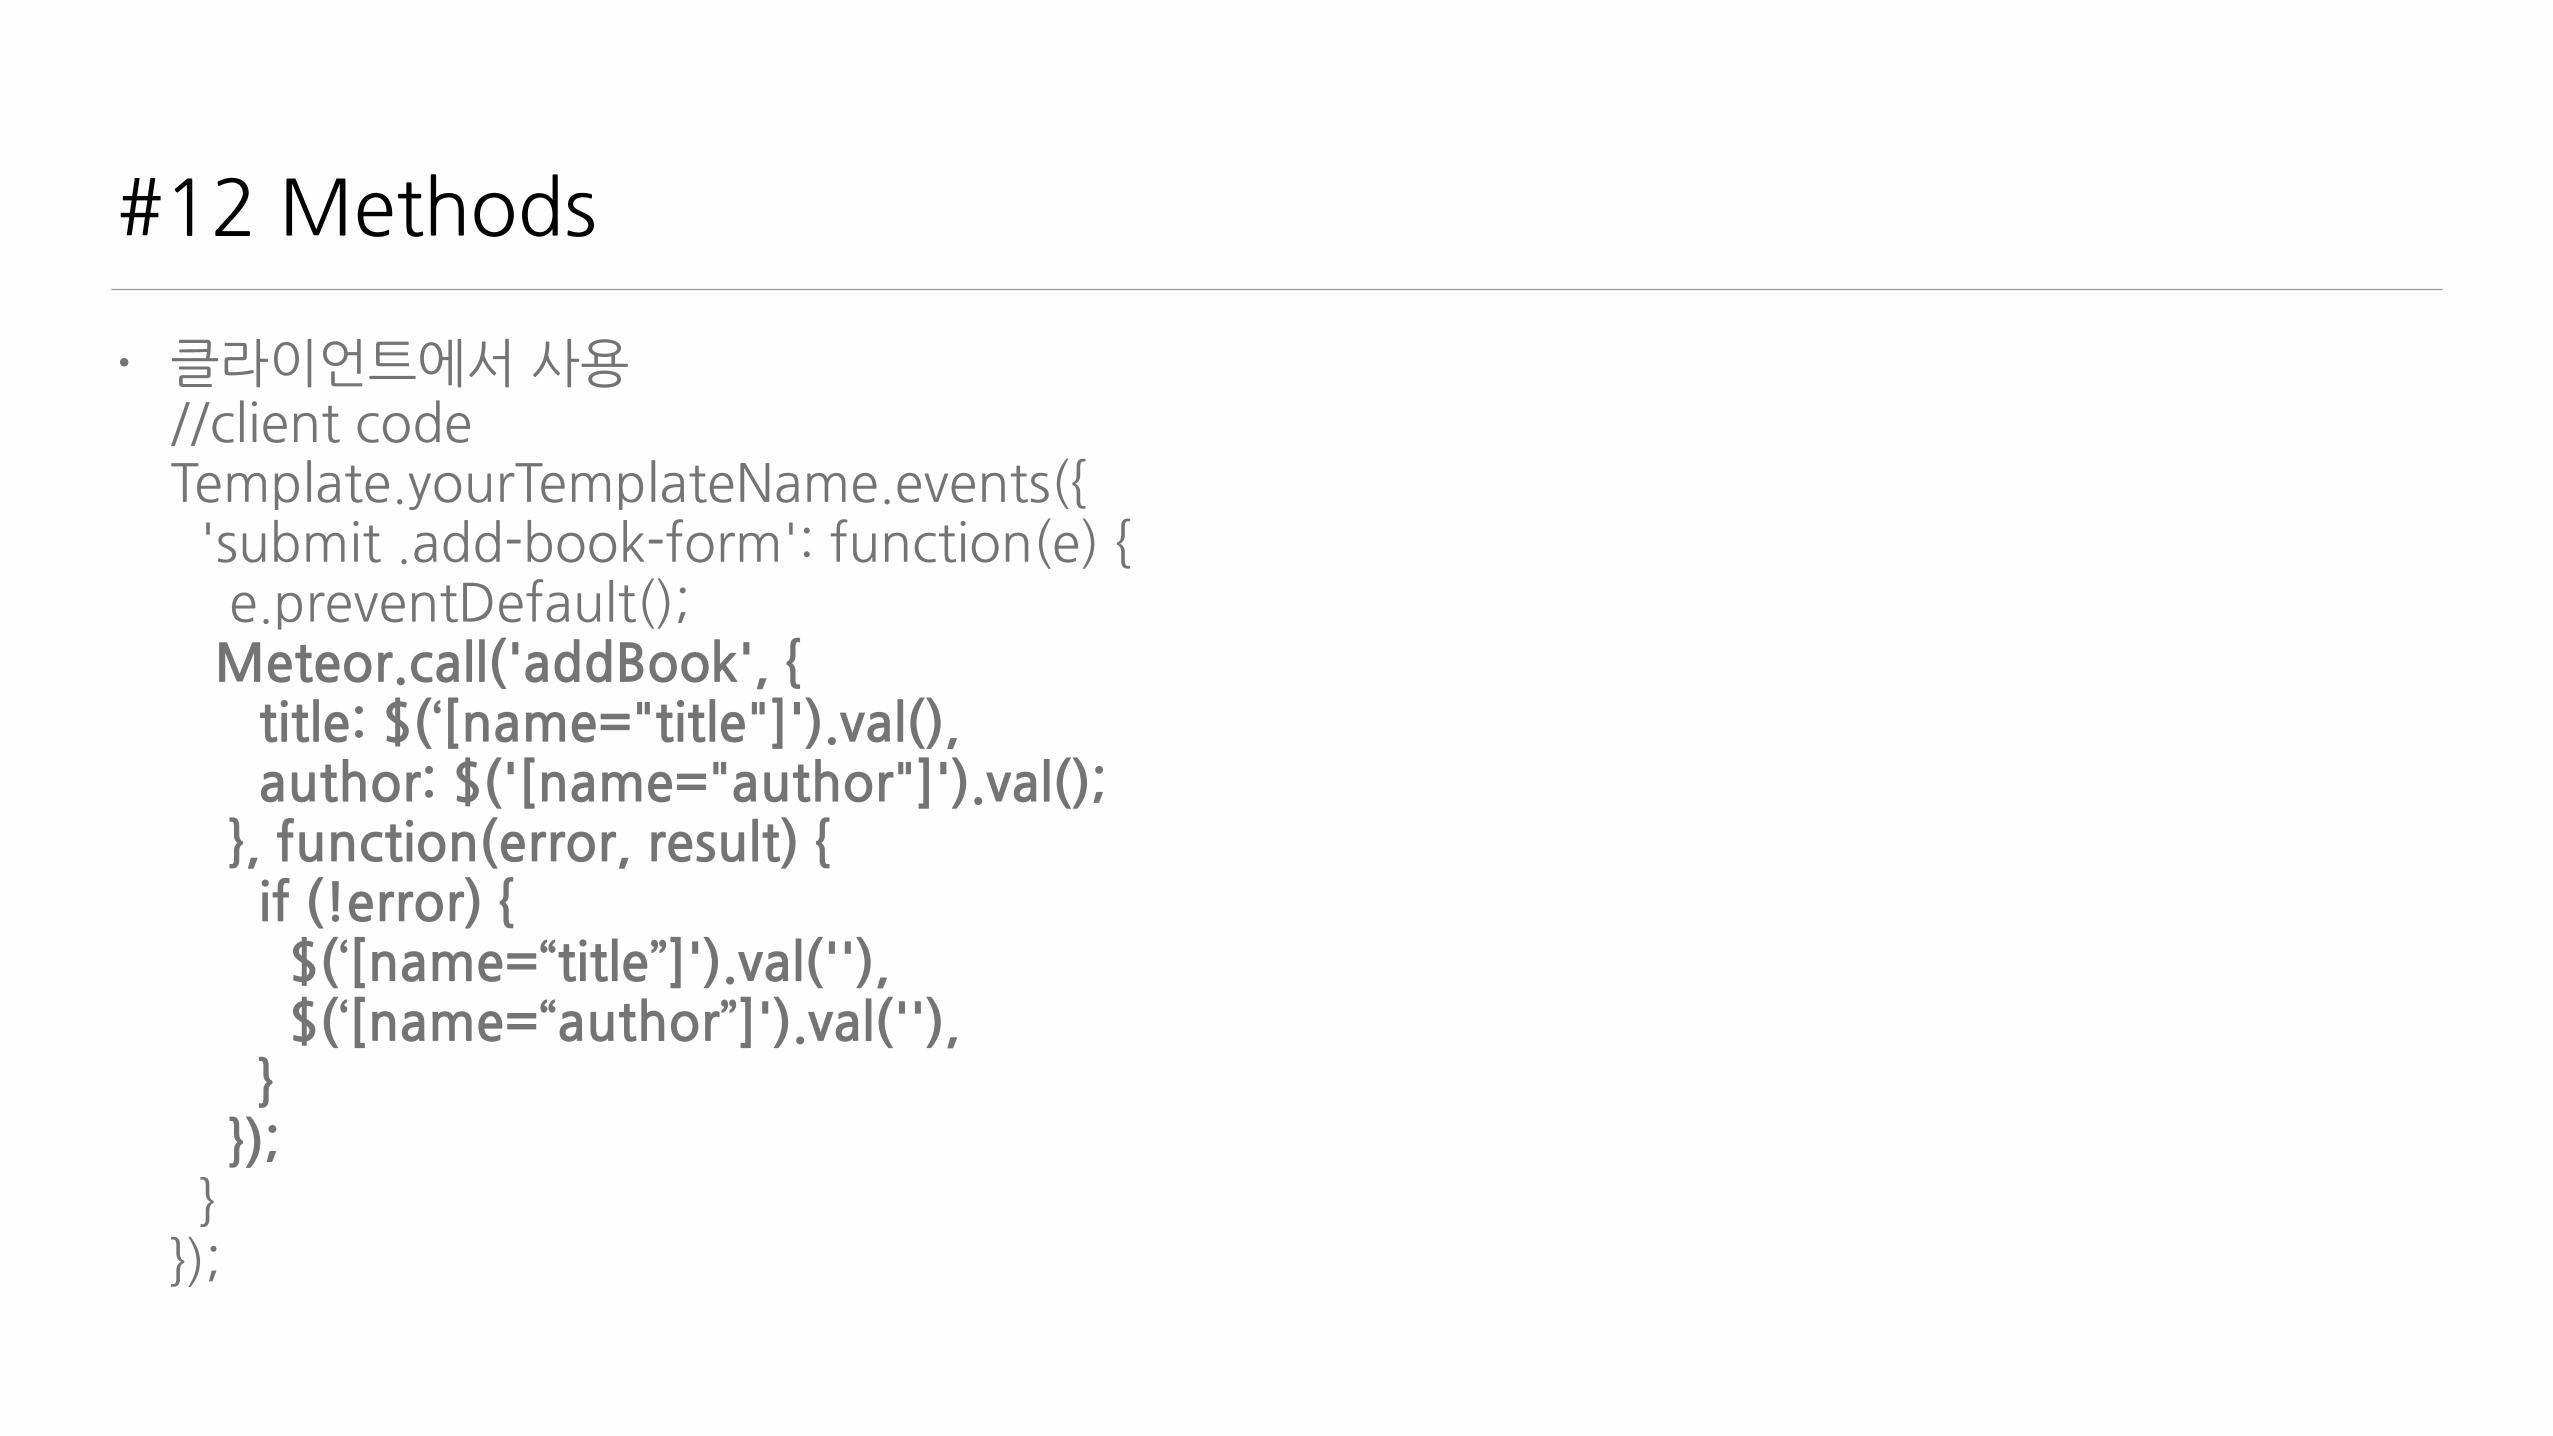
#12�Methods
• 클라이언트에서�사용//client�code Template.yourTemplateName.events({��'submit�.add-book-form':�function(e)�{����e.preventDefault();���Meteor.call('addBook',�{������title:�$(‘[name="title"]').val(),������author:�$('[name="author"]').val();����},�function(error,�result)�{������if�(!error)�{ ��������$(‘[name=“title”]').val(''),��������$(‘[name=“author”]').val(''),������}����});��}});
#13�Deploy
서버�호스팅?�
build�하거나�galaxy�(추천!)�쓰세요.�galaxy�로�Deploy�는�meteor�deploy�yourdomain.xxx�이게�전부!
참고자료
• http://meteor.com�-�공식�홈페이지(영문)�
• http://kr.discovermeteor.com/�한글�무료�번역�자료.�쉽고�체계적인�설명�
• http://www.meetup.com/Meteor-Seoul/�Meteor�Seoul�Meetup�(그리고?)�
• https://opentutorials.org/module/1406�생활코딩�Meteor�School�초급반�
• https://www.facebook.com/groups/meteorschool/�페이스북�Meteor�School�
• https://forums.meteor.com/�Meteor�포럼(영문)

Meteor에서�직접�모듈과�통신
serialport�package�
$�meteor�add�spectrum:serialport�혹은��$�meteor�add�donaldaverill:serialport�https://atmospherejs.com/donaldaverill/serialport�
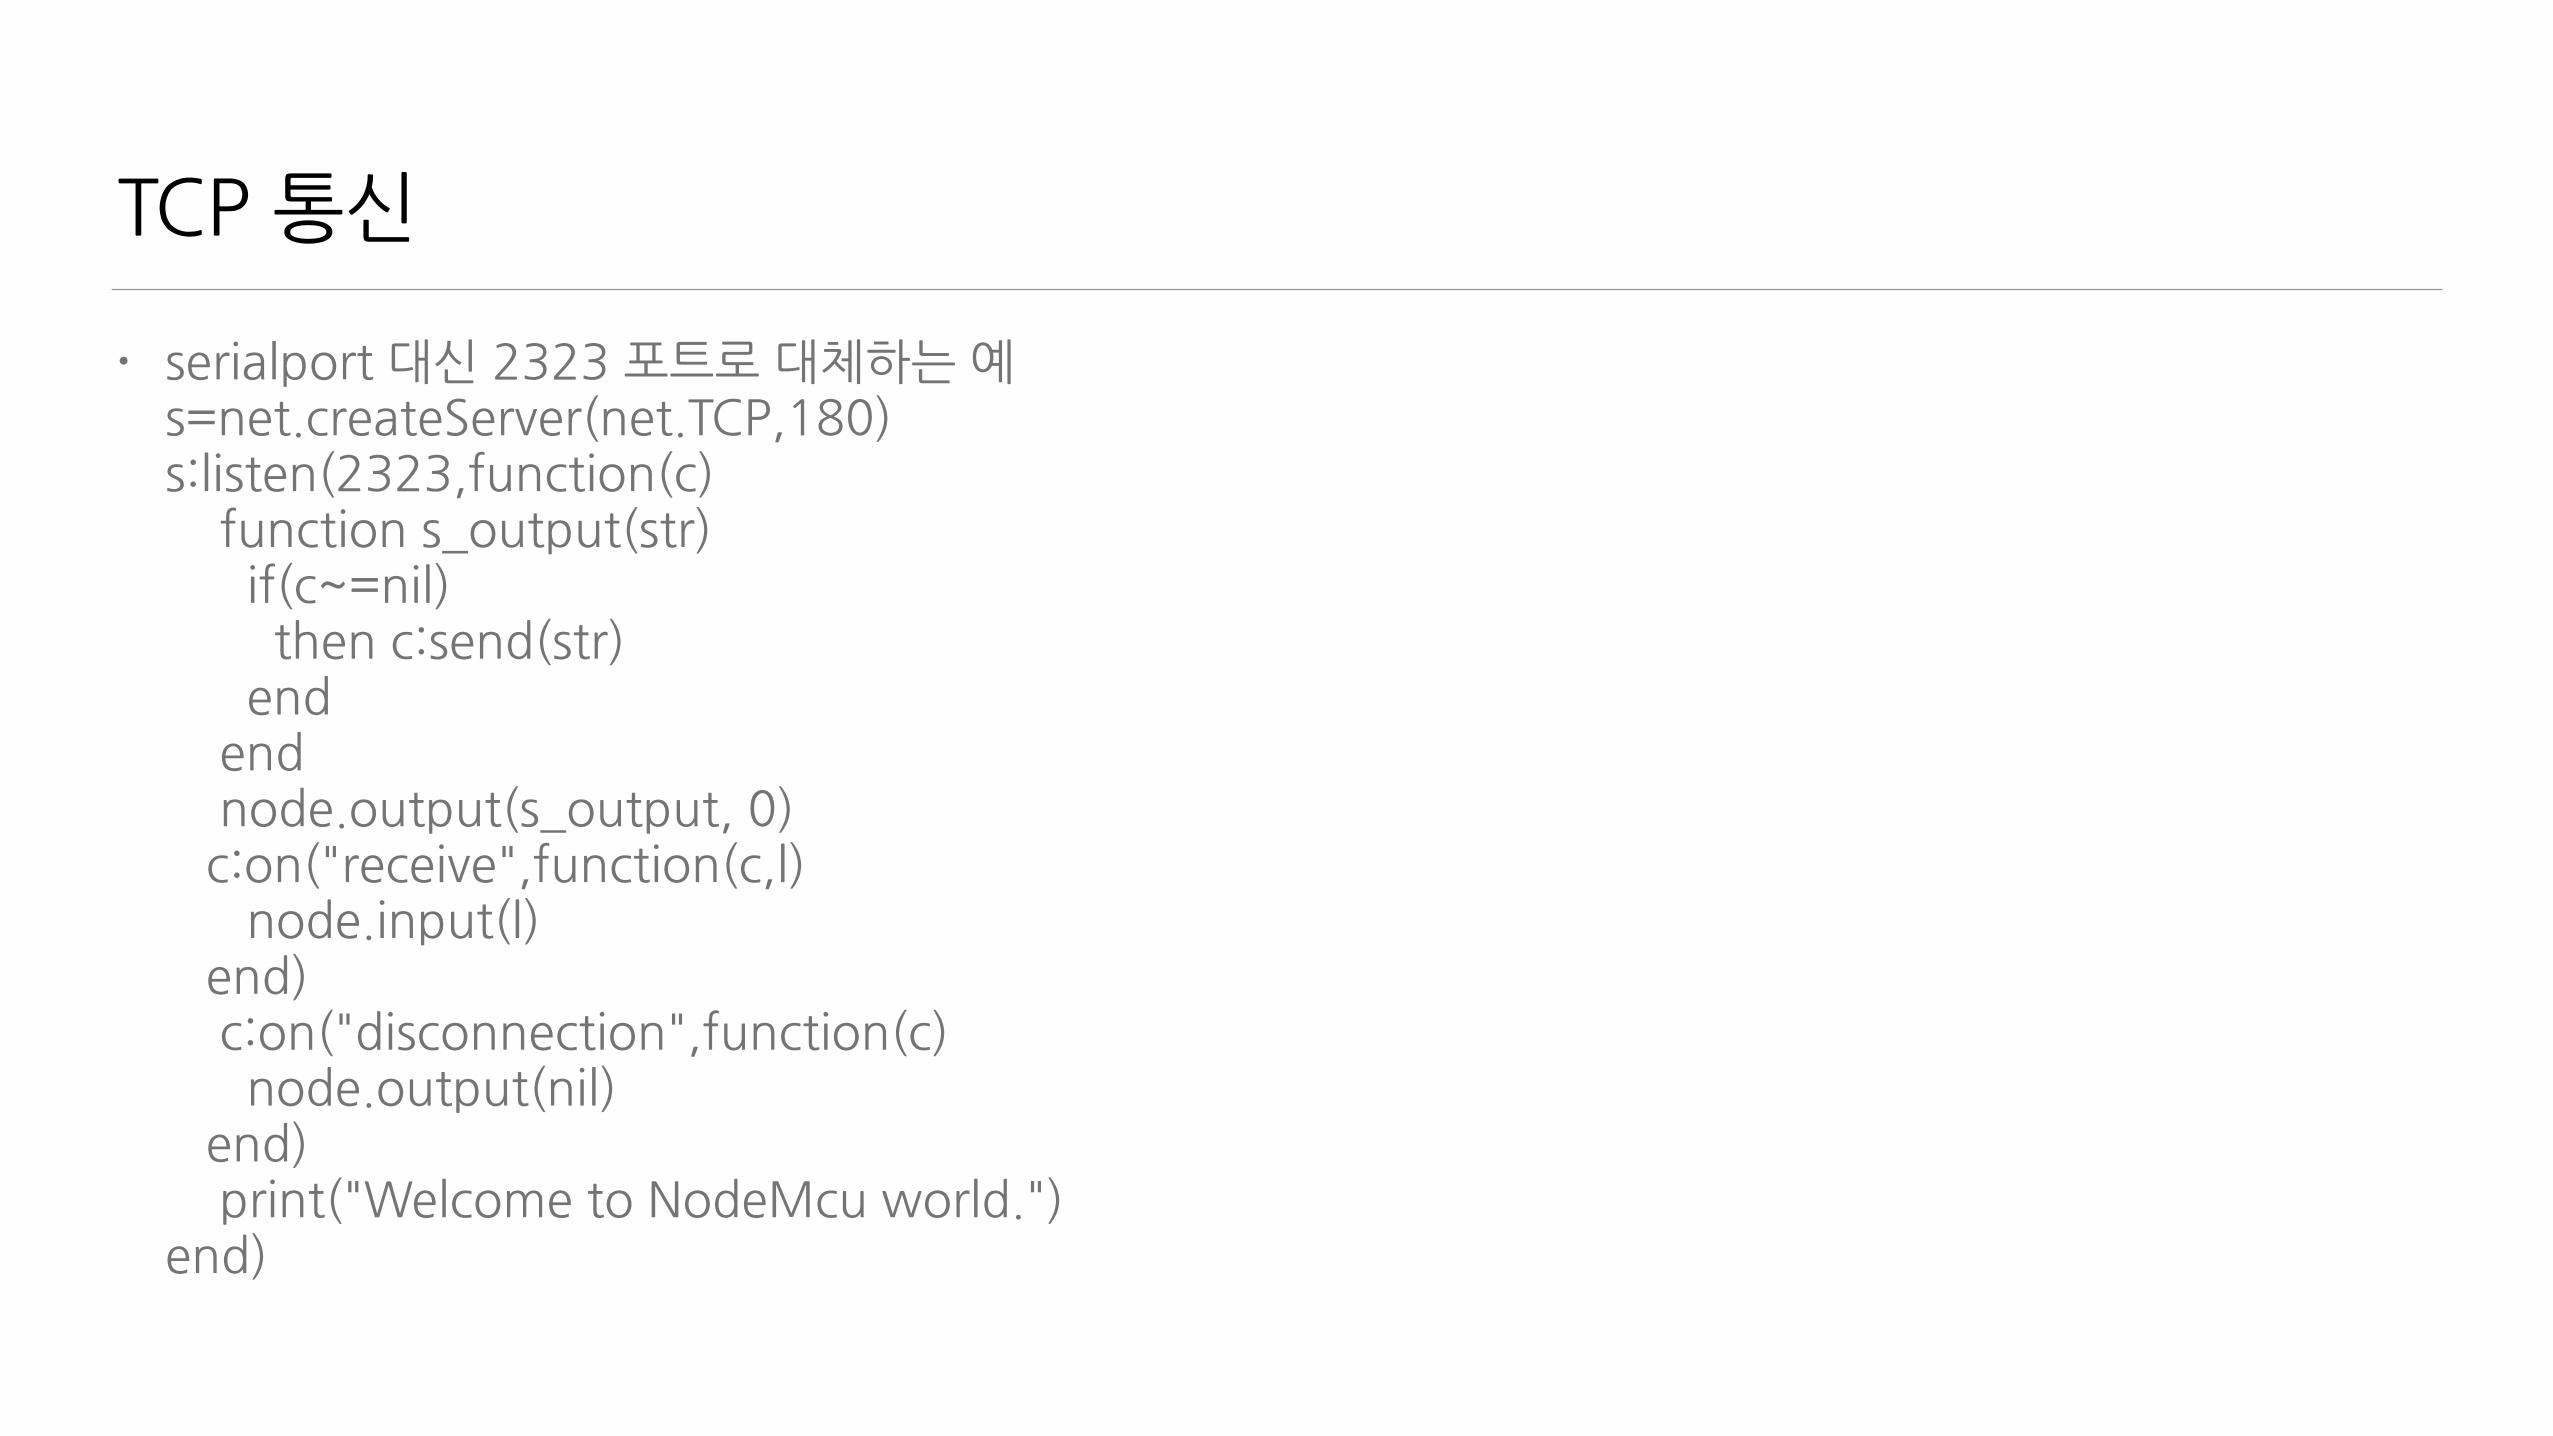
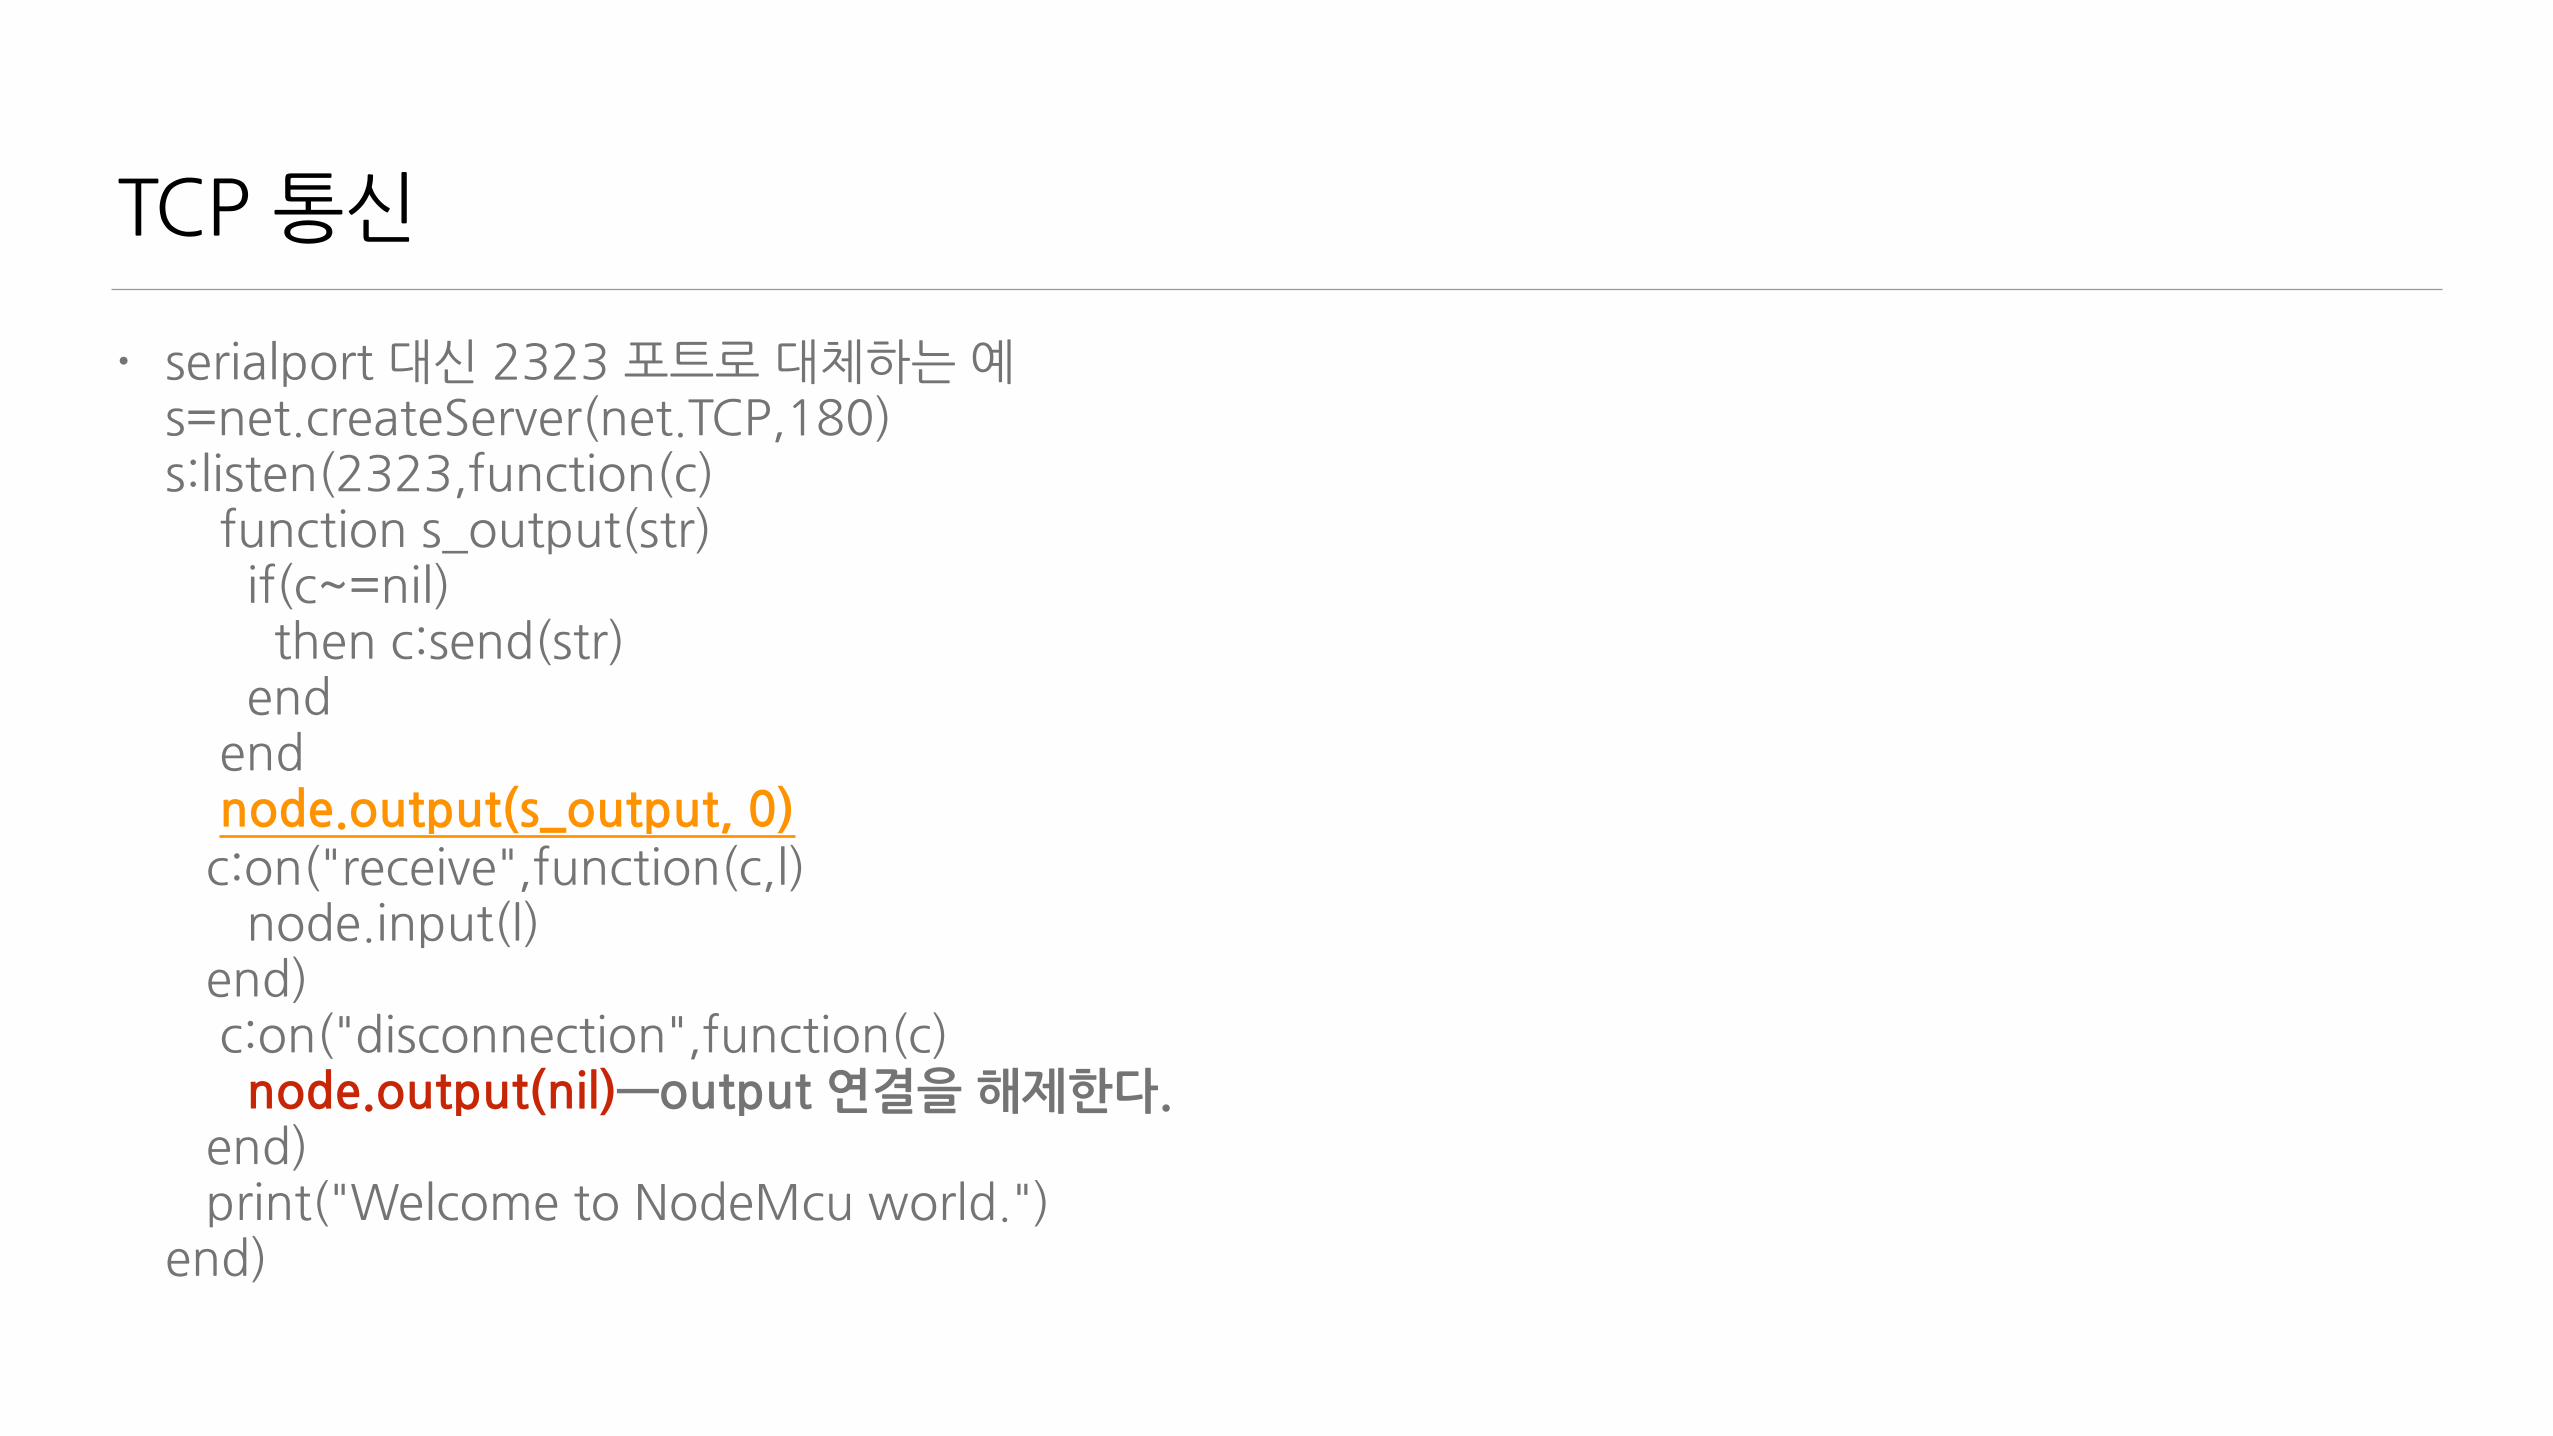
TCP�통신
• serialport�대신�2323�포트로�대체하는�예 s=net.createServer(net.TCP,180)s:listen(2323,function(c)����function�s_output(str)������if(c~=nil)��������then�c:send(str)������end����end����node.output(s_output,�0)���c:on("receive",function(c,l)������node.input(l)���end) ����c:on("disconnection",function(c)������node.output(nil)���end) ����print("Welcome�to�NodeMcu�world.")end)
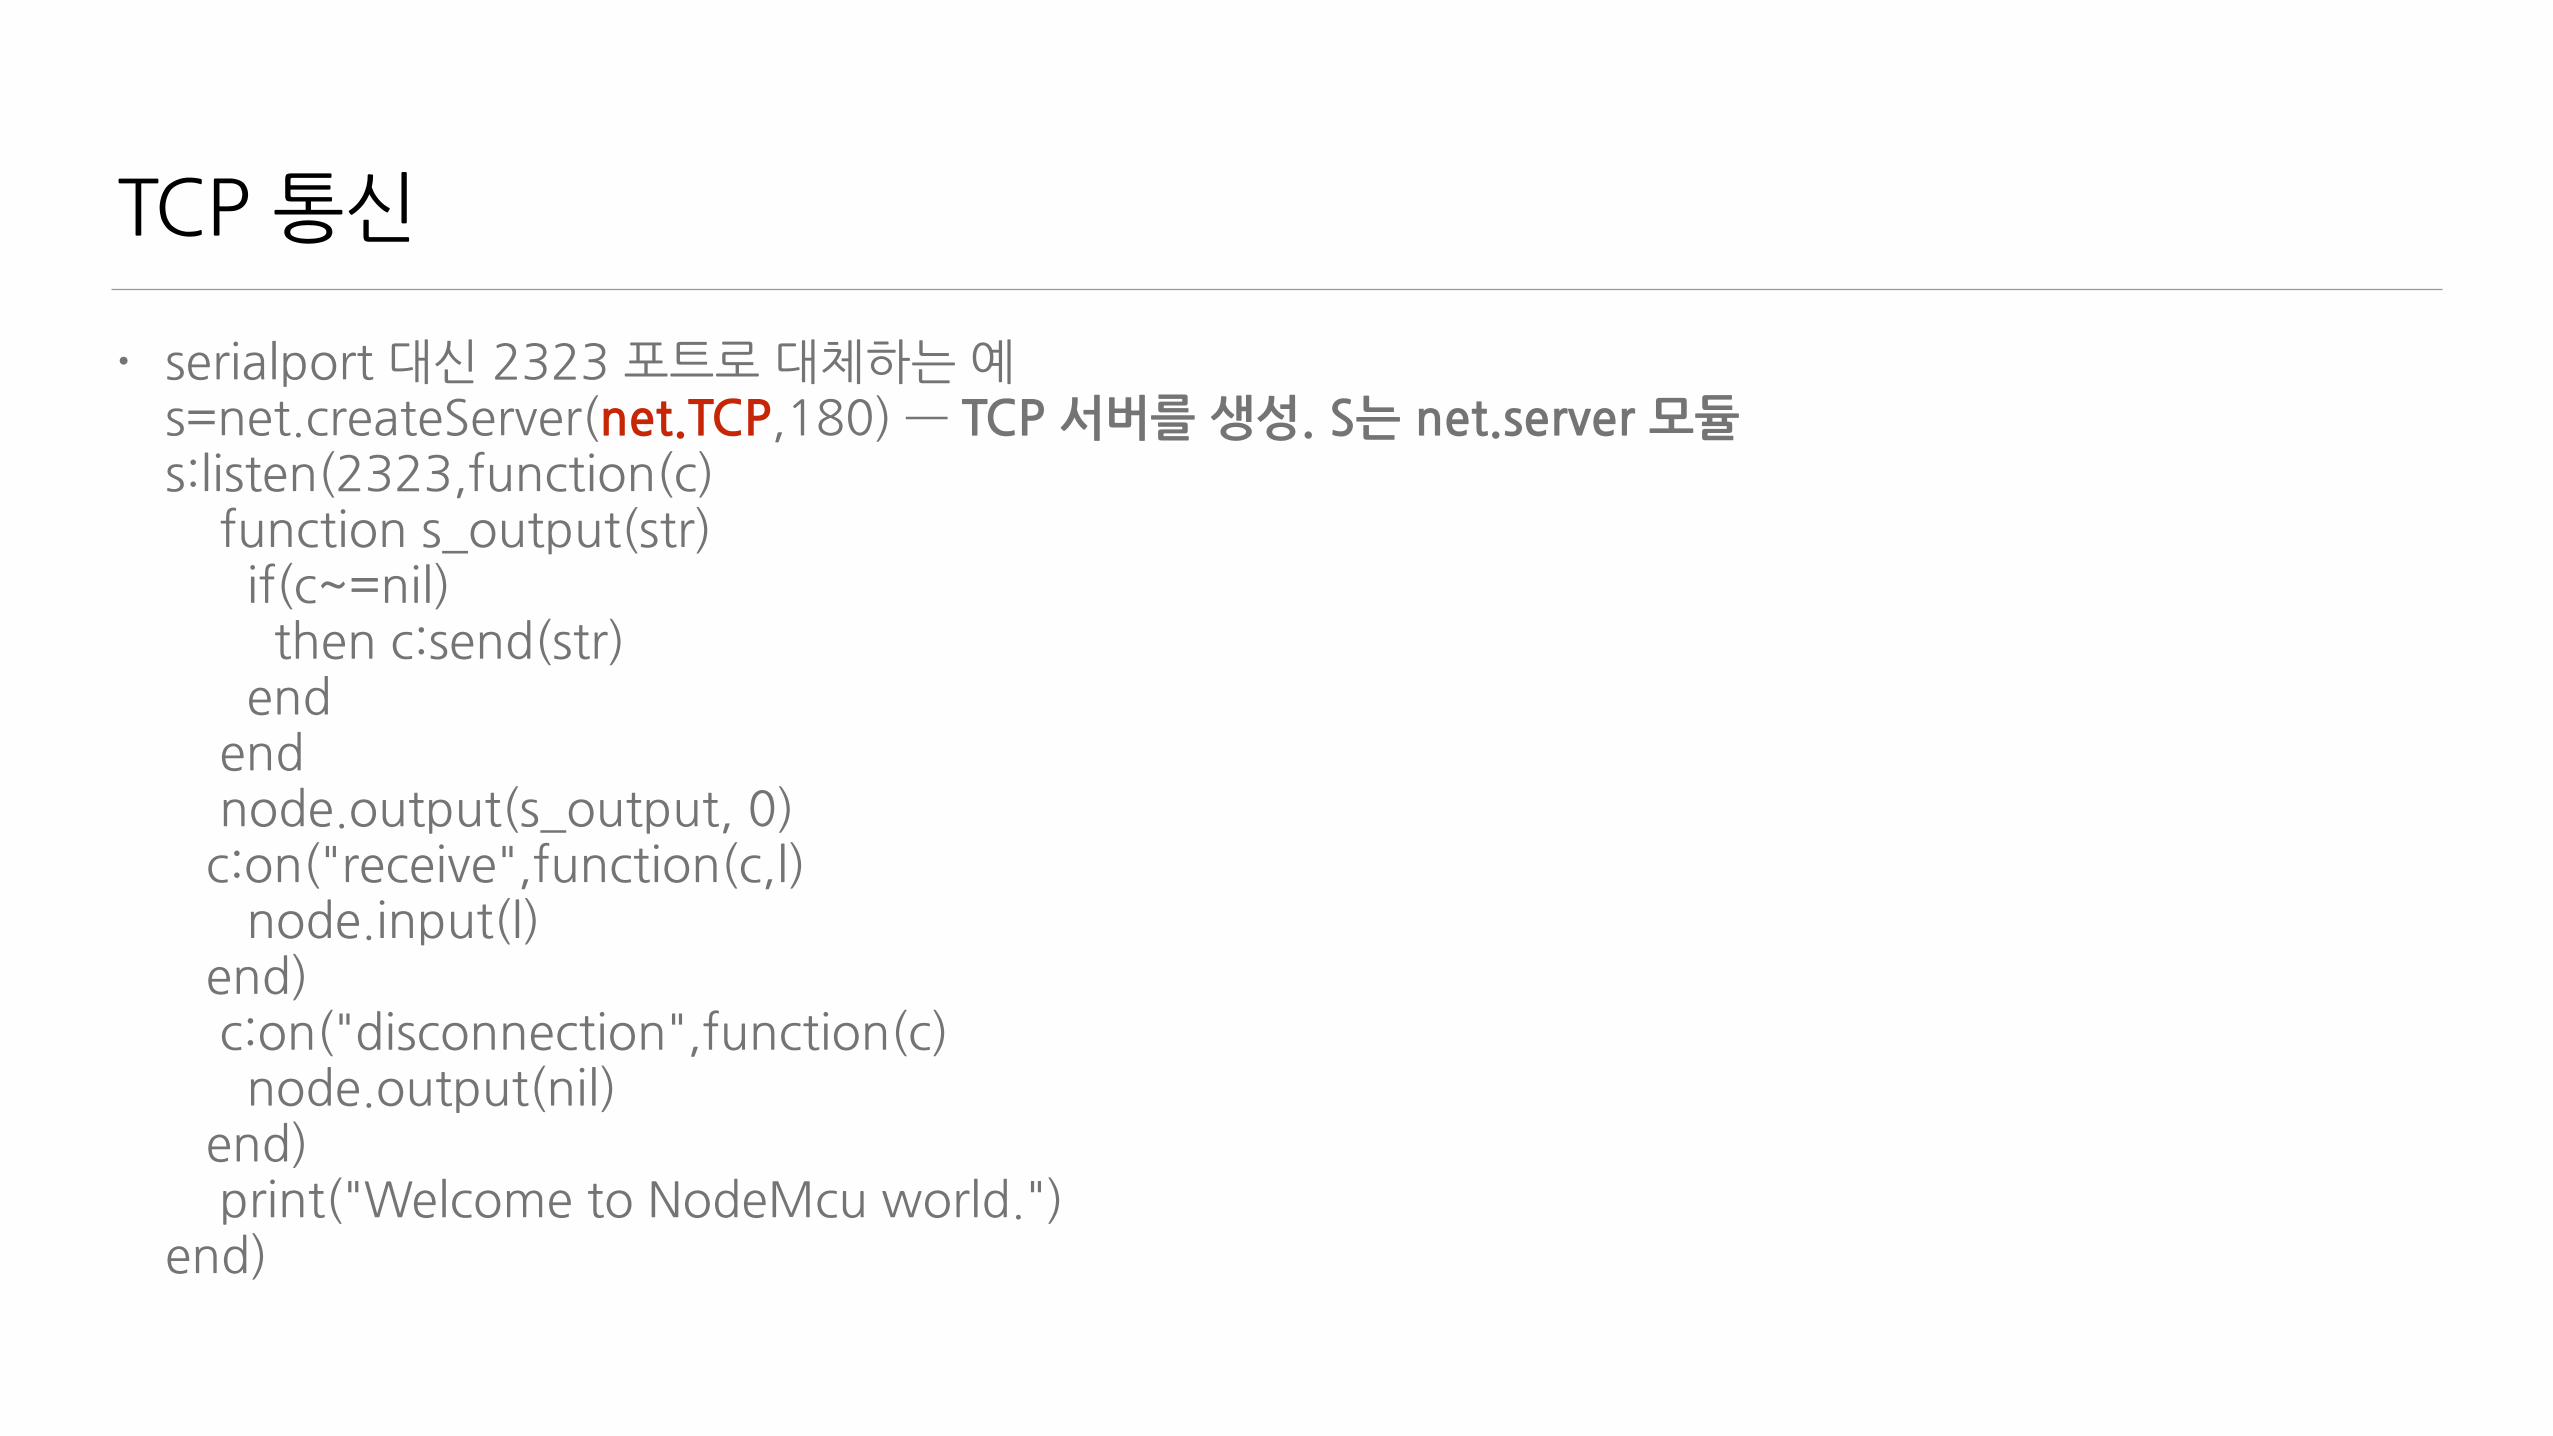
TCP�통신
• serialport�대신�2323�포트로�대체하는�예 s=net.createServer(net.TCP,180)�—�TCP�서버를�생성.�S는�net.server�모듈s:listen(2323,function(c)����function�s_output(str)������if(c~=nil)��������then�c:send(str)������end����end����node.output(s_output,�0)���c:on("receive",function(c,l)������node.input(l)���end) ����c:on("disconnection",function(c)������node.output(nil)���end) ����print("Welcome�to�NodeMcu�world.")end)
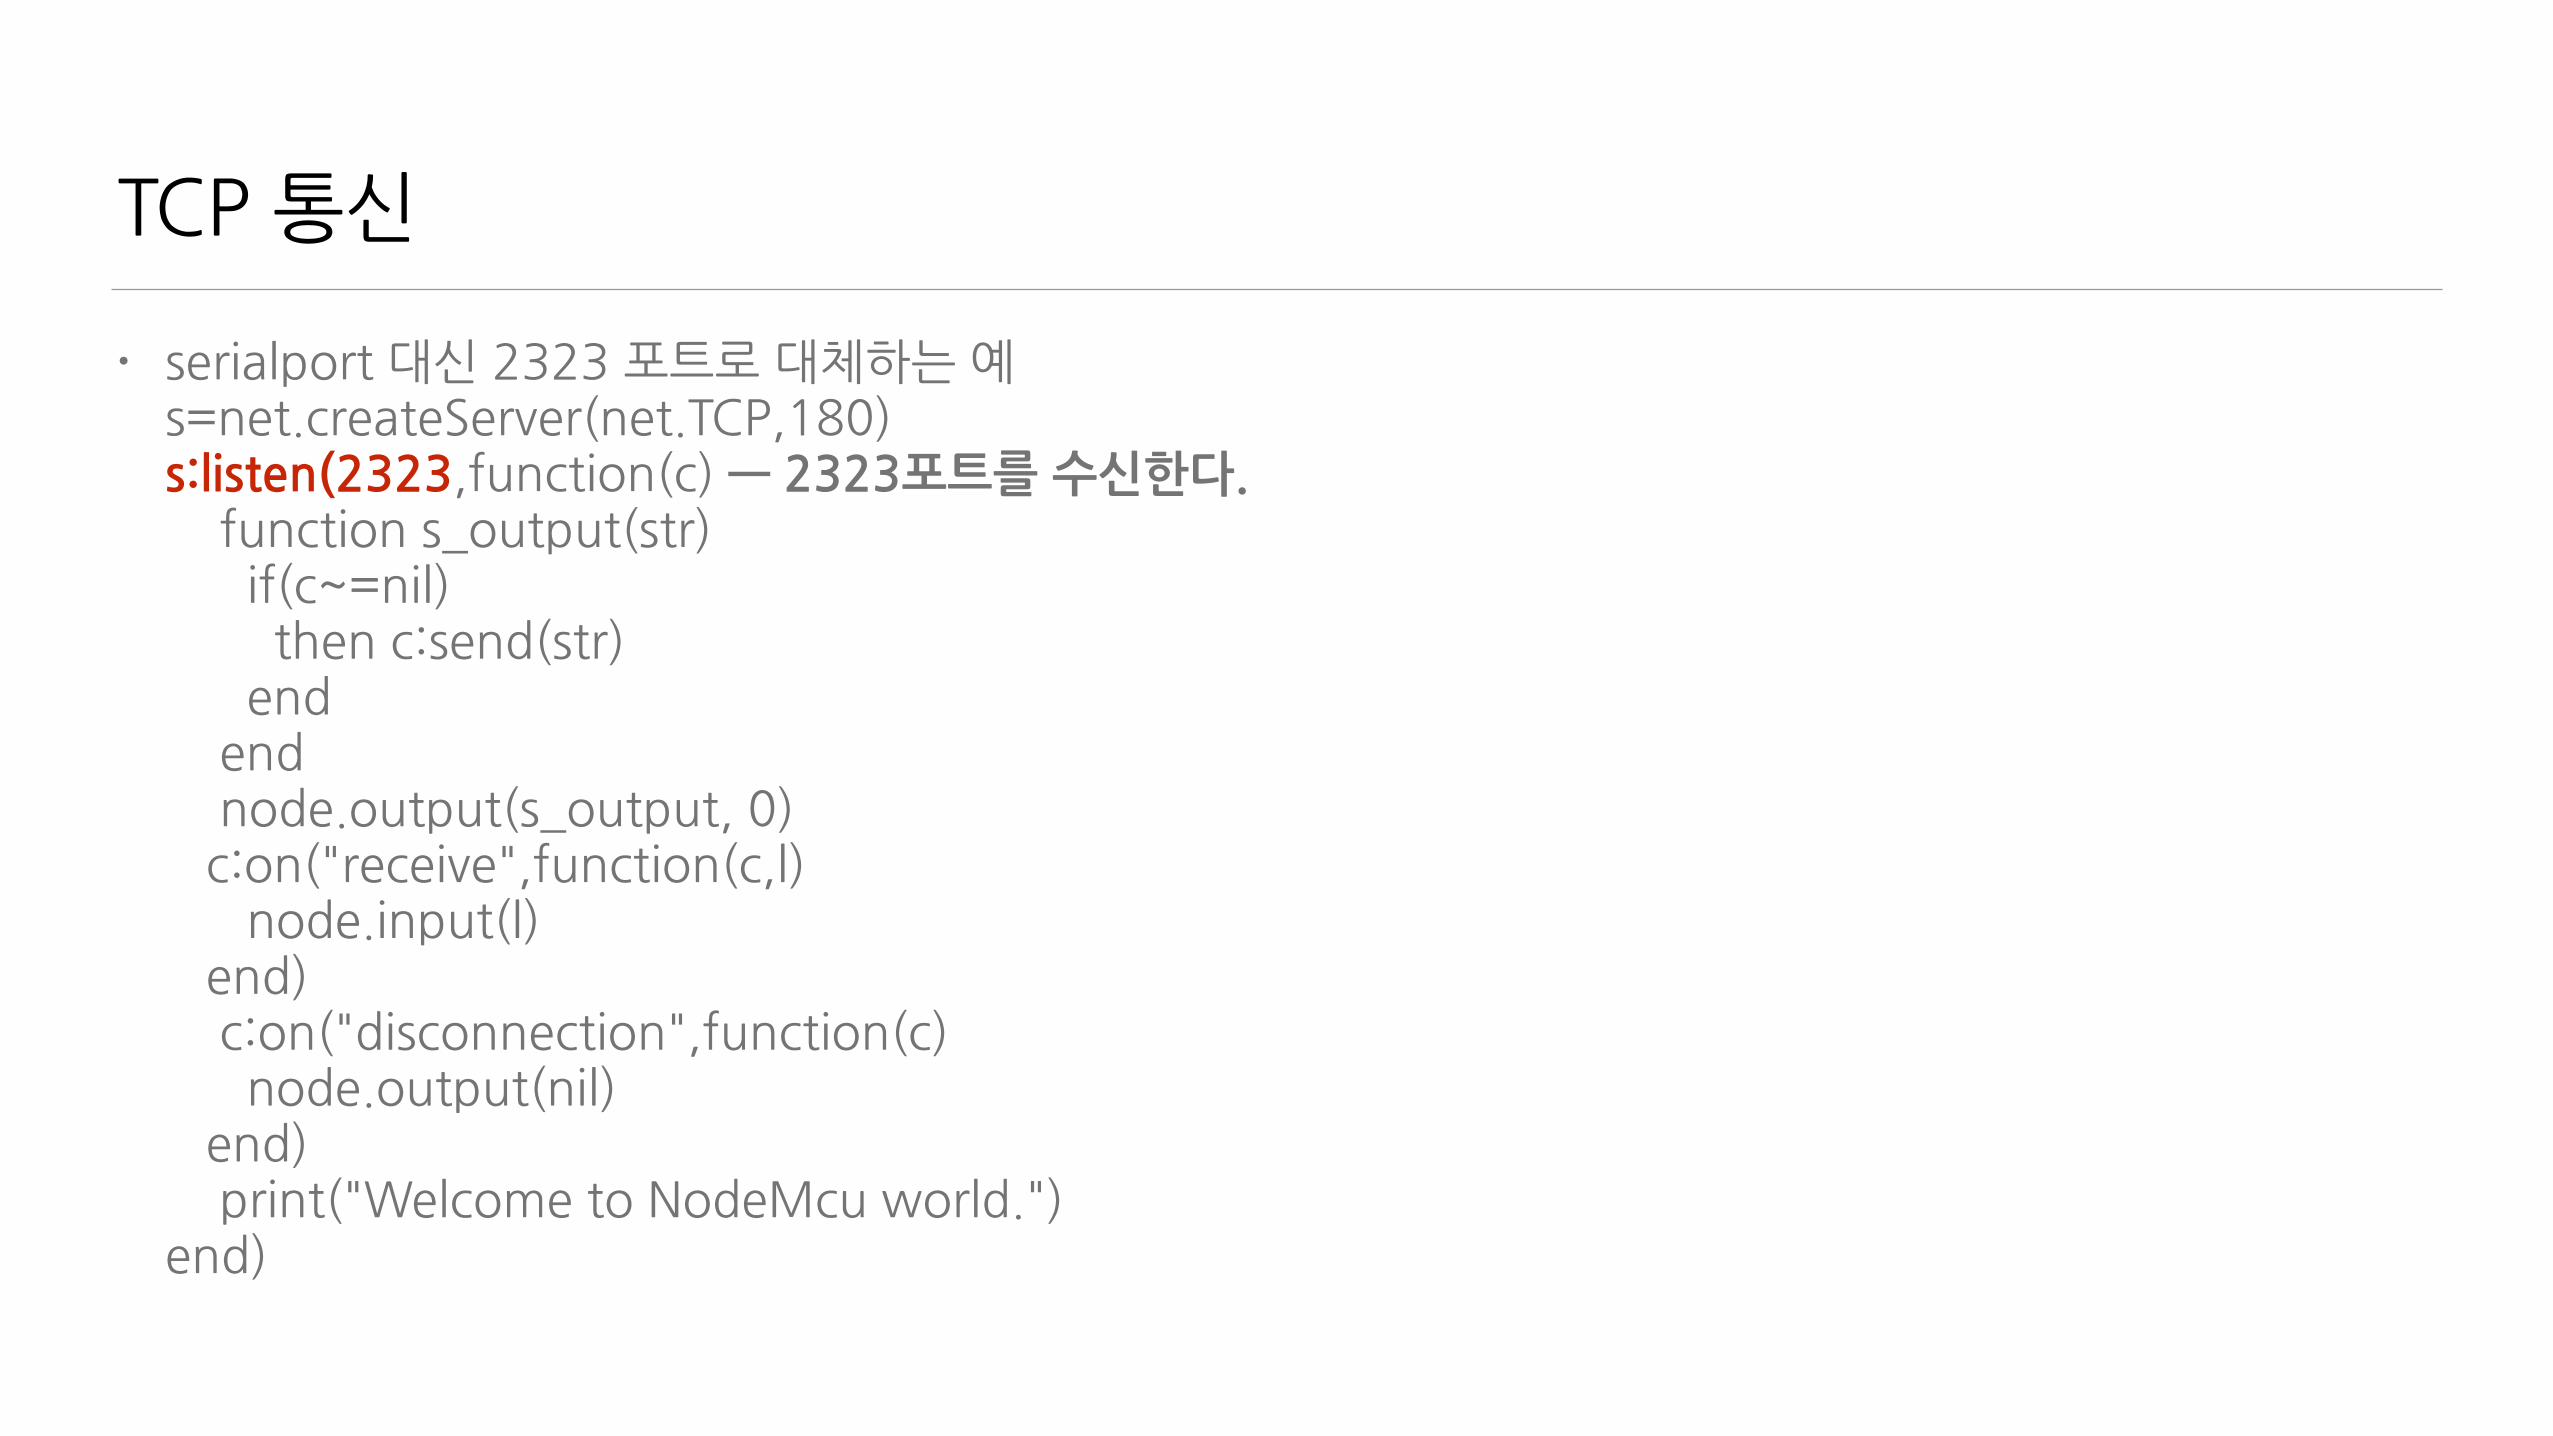
TCP�통신
• serialport�대신�2323�포트로�대체하는�예 s=net.createServer(net.TCP,180)s:listen(2323,function(c)�—�2323포트를�수신한다.����function�s_output(str)������if(c~=nil)��������then�c:send(str)������end����end����node.output(s_output,�0)���c:on("receive",function(c,l)������node.input(l)���end) ����c:on("disconnection",function(c)������node.output(nil)���end) ����print("Welcome�to�NodeMcu�world.")end)
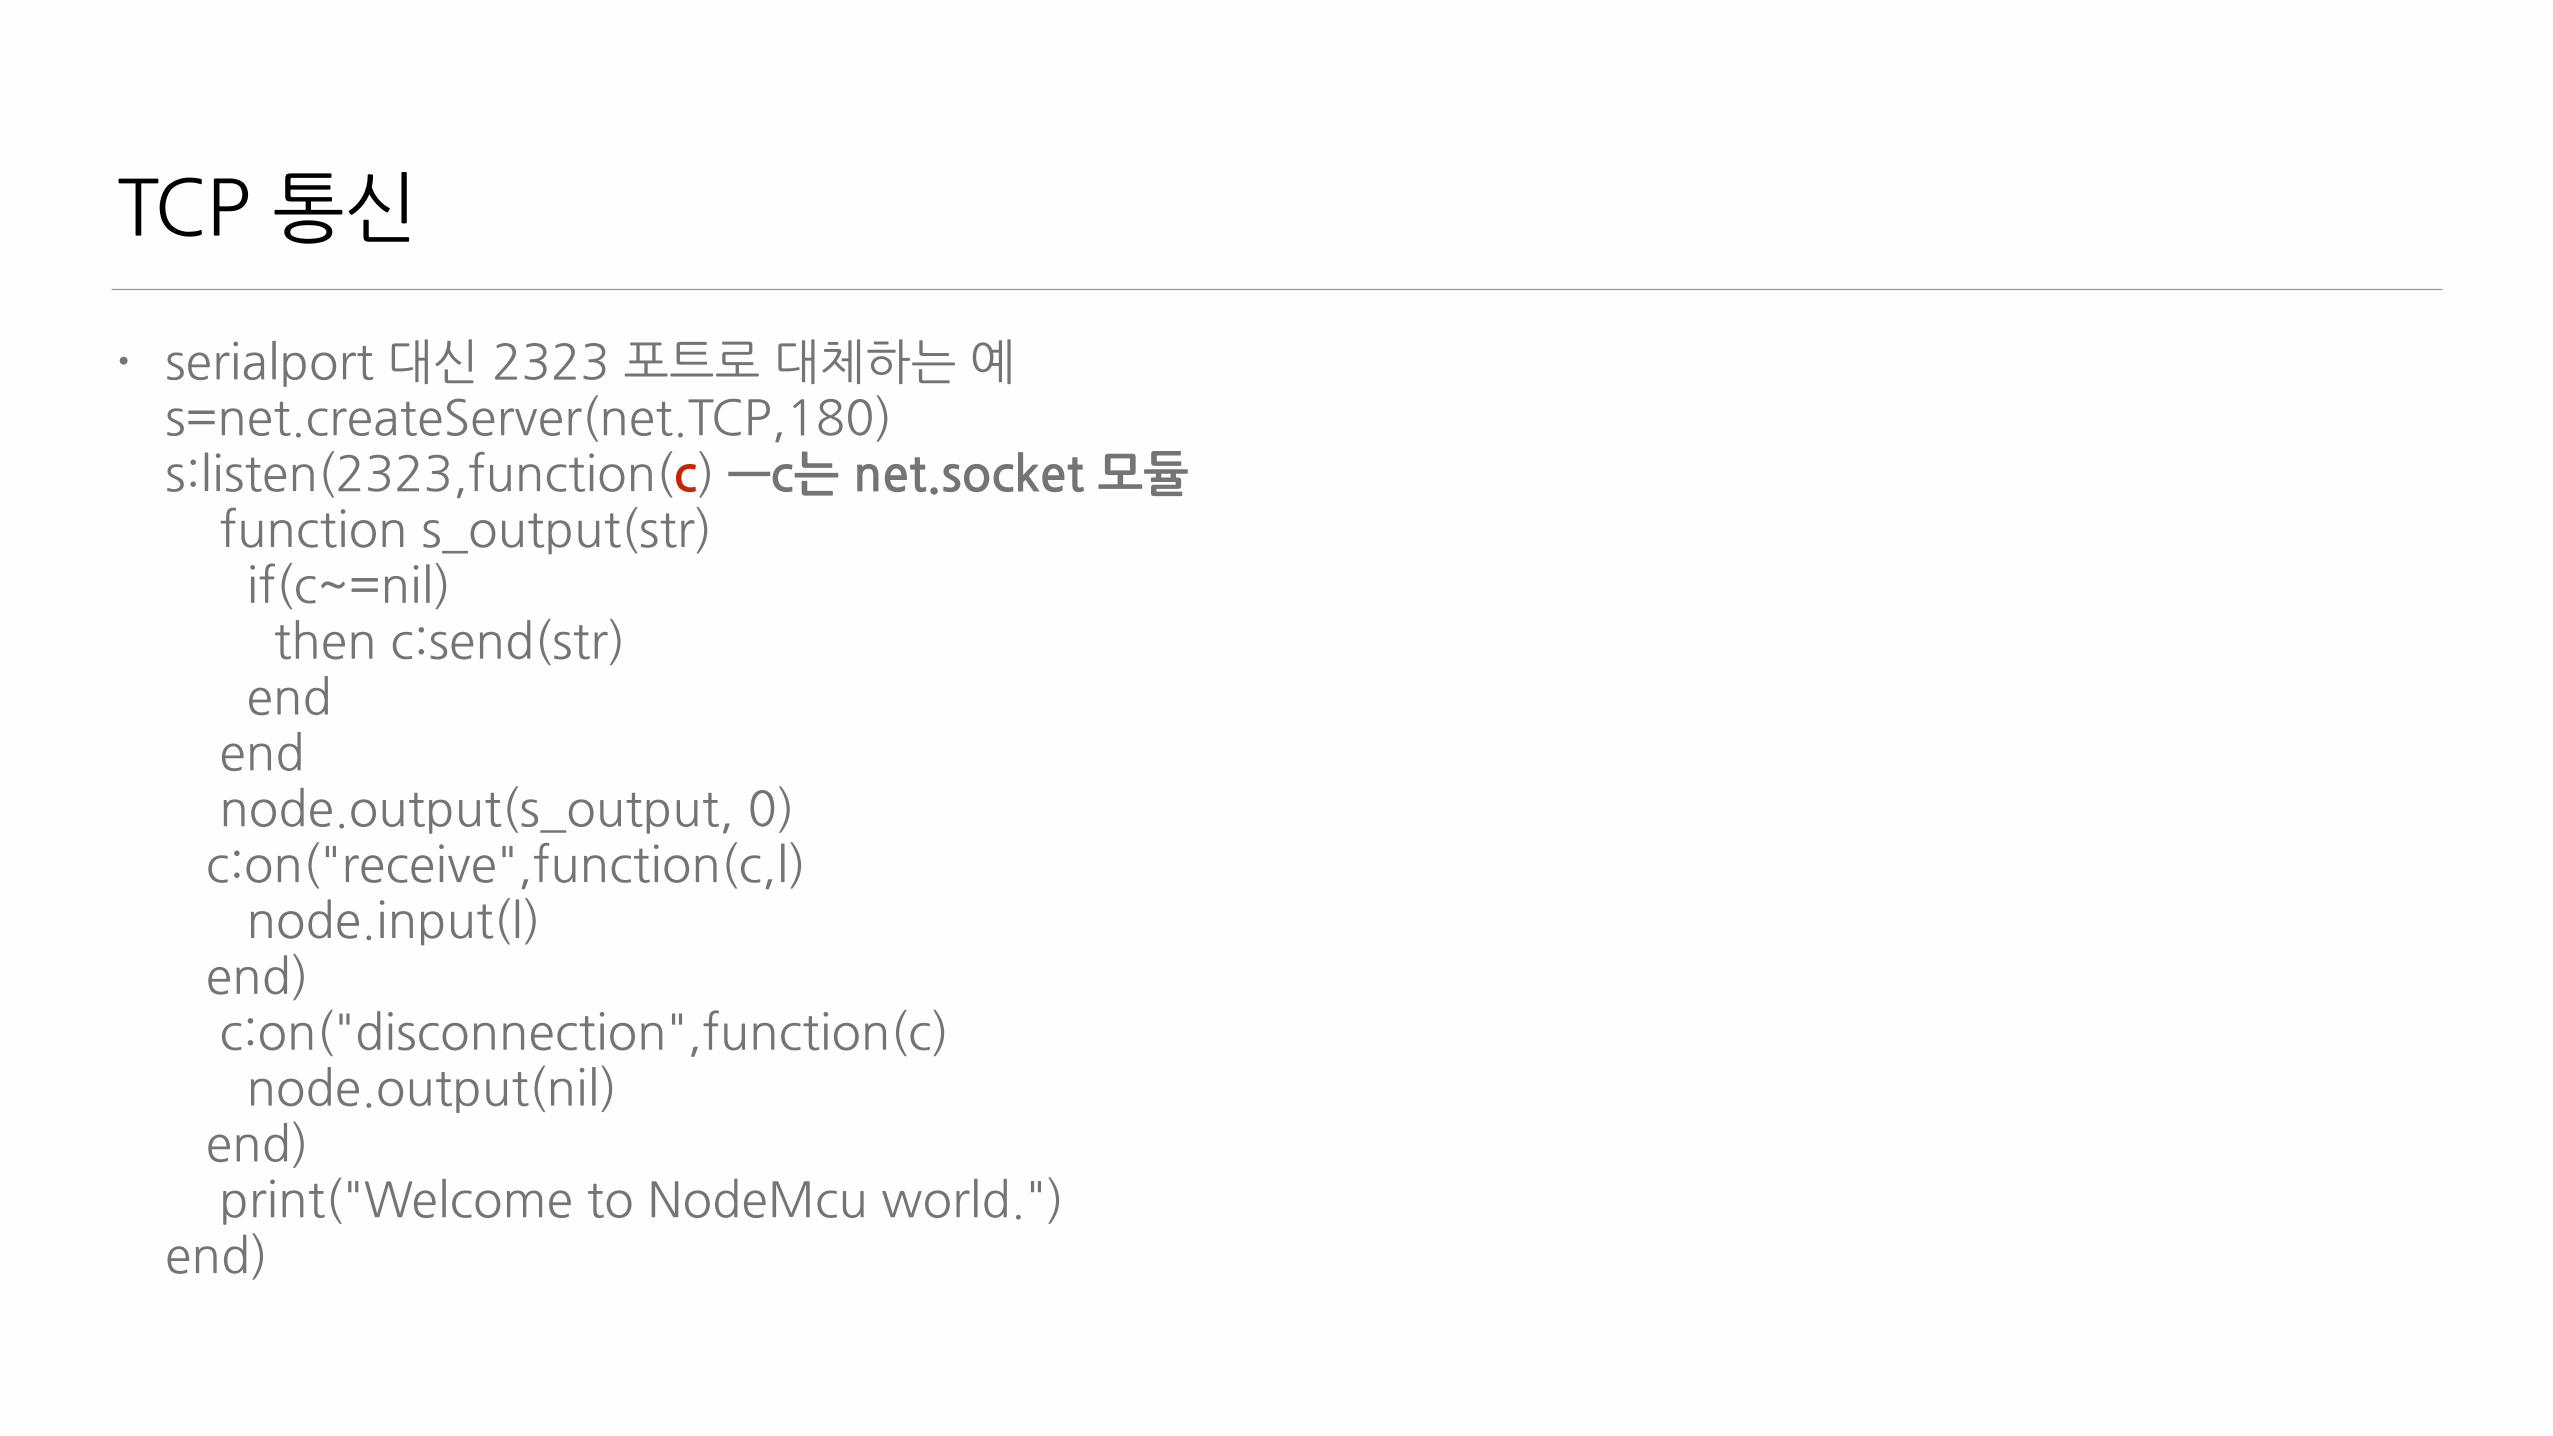
TCP�통신
• serialport�대신�2323�포트로�대체하는�예 s=net.createServer(net.TCP,180)s:listen(2323,function(c)�—c는�net.socket�모듈����function�s_output(str)������if(c~=nil)��������then�c:send(str)������end����end����node.output(s_output,�0)���c:on("receive",function(c,l)������node.input(l)���end) ����c:on("disconnection",function(c)������node.output(nil)���end) ����print("Welcome�to�NodeMcu�world.")end)
TCP�통신
• serialport�대신�2323�포트로�대체하는�예 s=net.createServer(net.TCP,180)s:listen(2323,function(c)����function�s_output(str)������if(c~=nil)��������then�c:send(str)������end����end����node.output(s_output,�0)—output�결과를�s_output으로�넘긴다.�단,�시리얼로는�보내지�않음(0)����c:on("receive",function(c,l)������node.input(l)���end) ����c:on("disconnection",function(c)������node.output(nil)���end) ����print("Welcome�to�NodeMcu�world.")end)
TCP�통신
• serialport�대신�2323�포트로�대체하는�예 s=net.createServer(net.TCP,180)s:listen(2323,function(c)����function�s_output(str)������if(c~=nil)-net.socket을�생성이�되었으면��������then�c:send(str)������end����end����node.output(s_output,�0)���c:on("receive",function(c,l)������node.input(l)���end) ����c:on("disconnection",function(c)������node.output(nil)���end) ����print("Welcome�to�NodeMcu�world.")end)

TCP�통신
• serialport�대신�2323�포트로�대체하는�예 s=net.createServer(net.TCP,180)s:listen(2323,function(c)����function�s_output(str)������if(c~=nil)��������then�c:send(str)—output으로�들어온�것을�2323포트로�보낸다.������end����end����node.output(s_output,�0)���c:on("receive",function(c,l)������node.input(l)���end) ����c:on("disconnection",function(c)������node.output(nil)���end) ����print("Welcome�to�NodeMcu�world.")end)

TCP�통신
• serialport�대신�2323�포트로�대체하는�예 s=net.createServer(net.TCP,180)s:listen(2323,function(c)����function�s_output(str)������if(c~=nil)��������then�c:send(str)������end����end����node.output(s_output,�0)���c:on(“receive",function(c,l)�—�포트에서�무언가를�받으면 ������node.input(l)���end) ����c:on("disconnection",function(c)������node.output(nil)���end) ����print("Welcome�to�NodeMcu�world.")end)
TCP�통신
• serialport�대신�2323�포트로�대체하는�예 s=net.createServer(net.TCP,180)s:listen(2323,function(c)����function�s_output(str)������if(c~=nil)��������then�c:send(str)������end����end����node.output(s_output,�0)���c:on("receive",function(c,l)������node.input(l)—받은�내용을�nodeMCU의�입력으로�보낸다.���end) ����c:on("disconnection",function(c)������node.output(nil)���end) ����print("Welcome�to�NodeMcu�world.")end)
TCP�통신
• serialport�대신�2323�포트로�대체하는�예 s=net.createServer(net.TCP,180)s:listen(2323,function(c)����function�s_output(str)������if(c~=nil)��������then�c:send(str)������end����end����node.output(s_output,�0)���c:on("receive",function(c,l)������node.input(l)���end) ����c:on(“disconnection”,function(c)—연결이�끊어지면������node.output(nil)���end) ����print("Welcome�to�NodeMcu�world.")end)
TCP�통신
• serialport�대신�2323�포트로�대체하는�예 s=net.createServer(net.TCP,180)s:listen(2323,function(c)����function�s_output(str)������if(c~=nil)��������then�c:send(str)������end����end����node.output(s_output,�0)���c:on("receive",function(c,l)������node.input(l)���end) ����c:on("disconnection",function(c)������node.output(nil)—output�연결을�해제한다.���end) ���print("Welcome�to�NodeMcu�world.")end)

MQTT a�machine-to-machine�(M2M)/"Internet�of�Things"�connectivity�protocol
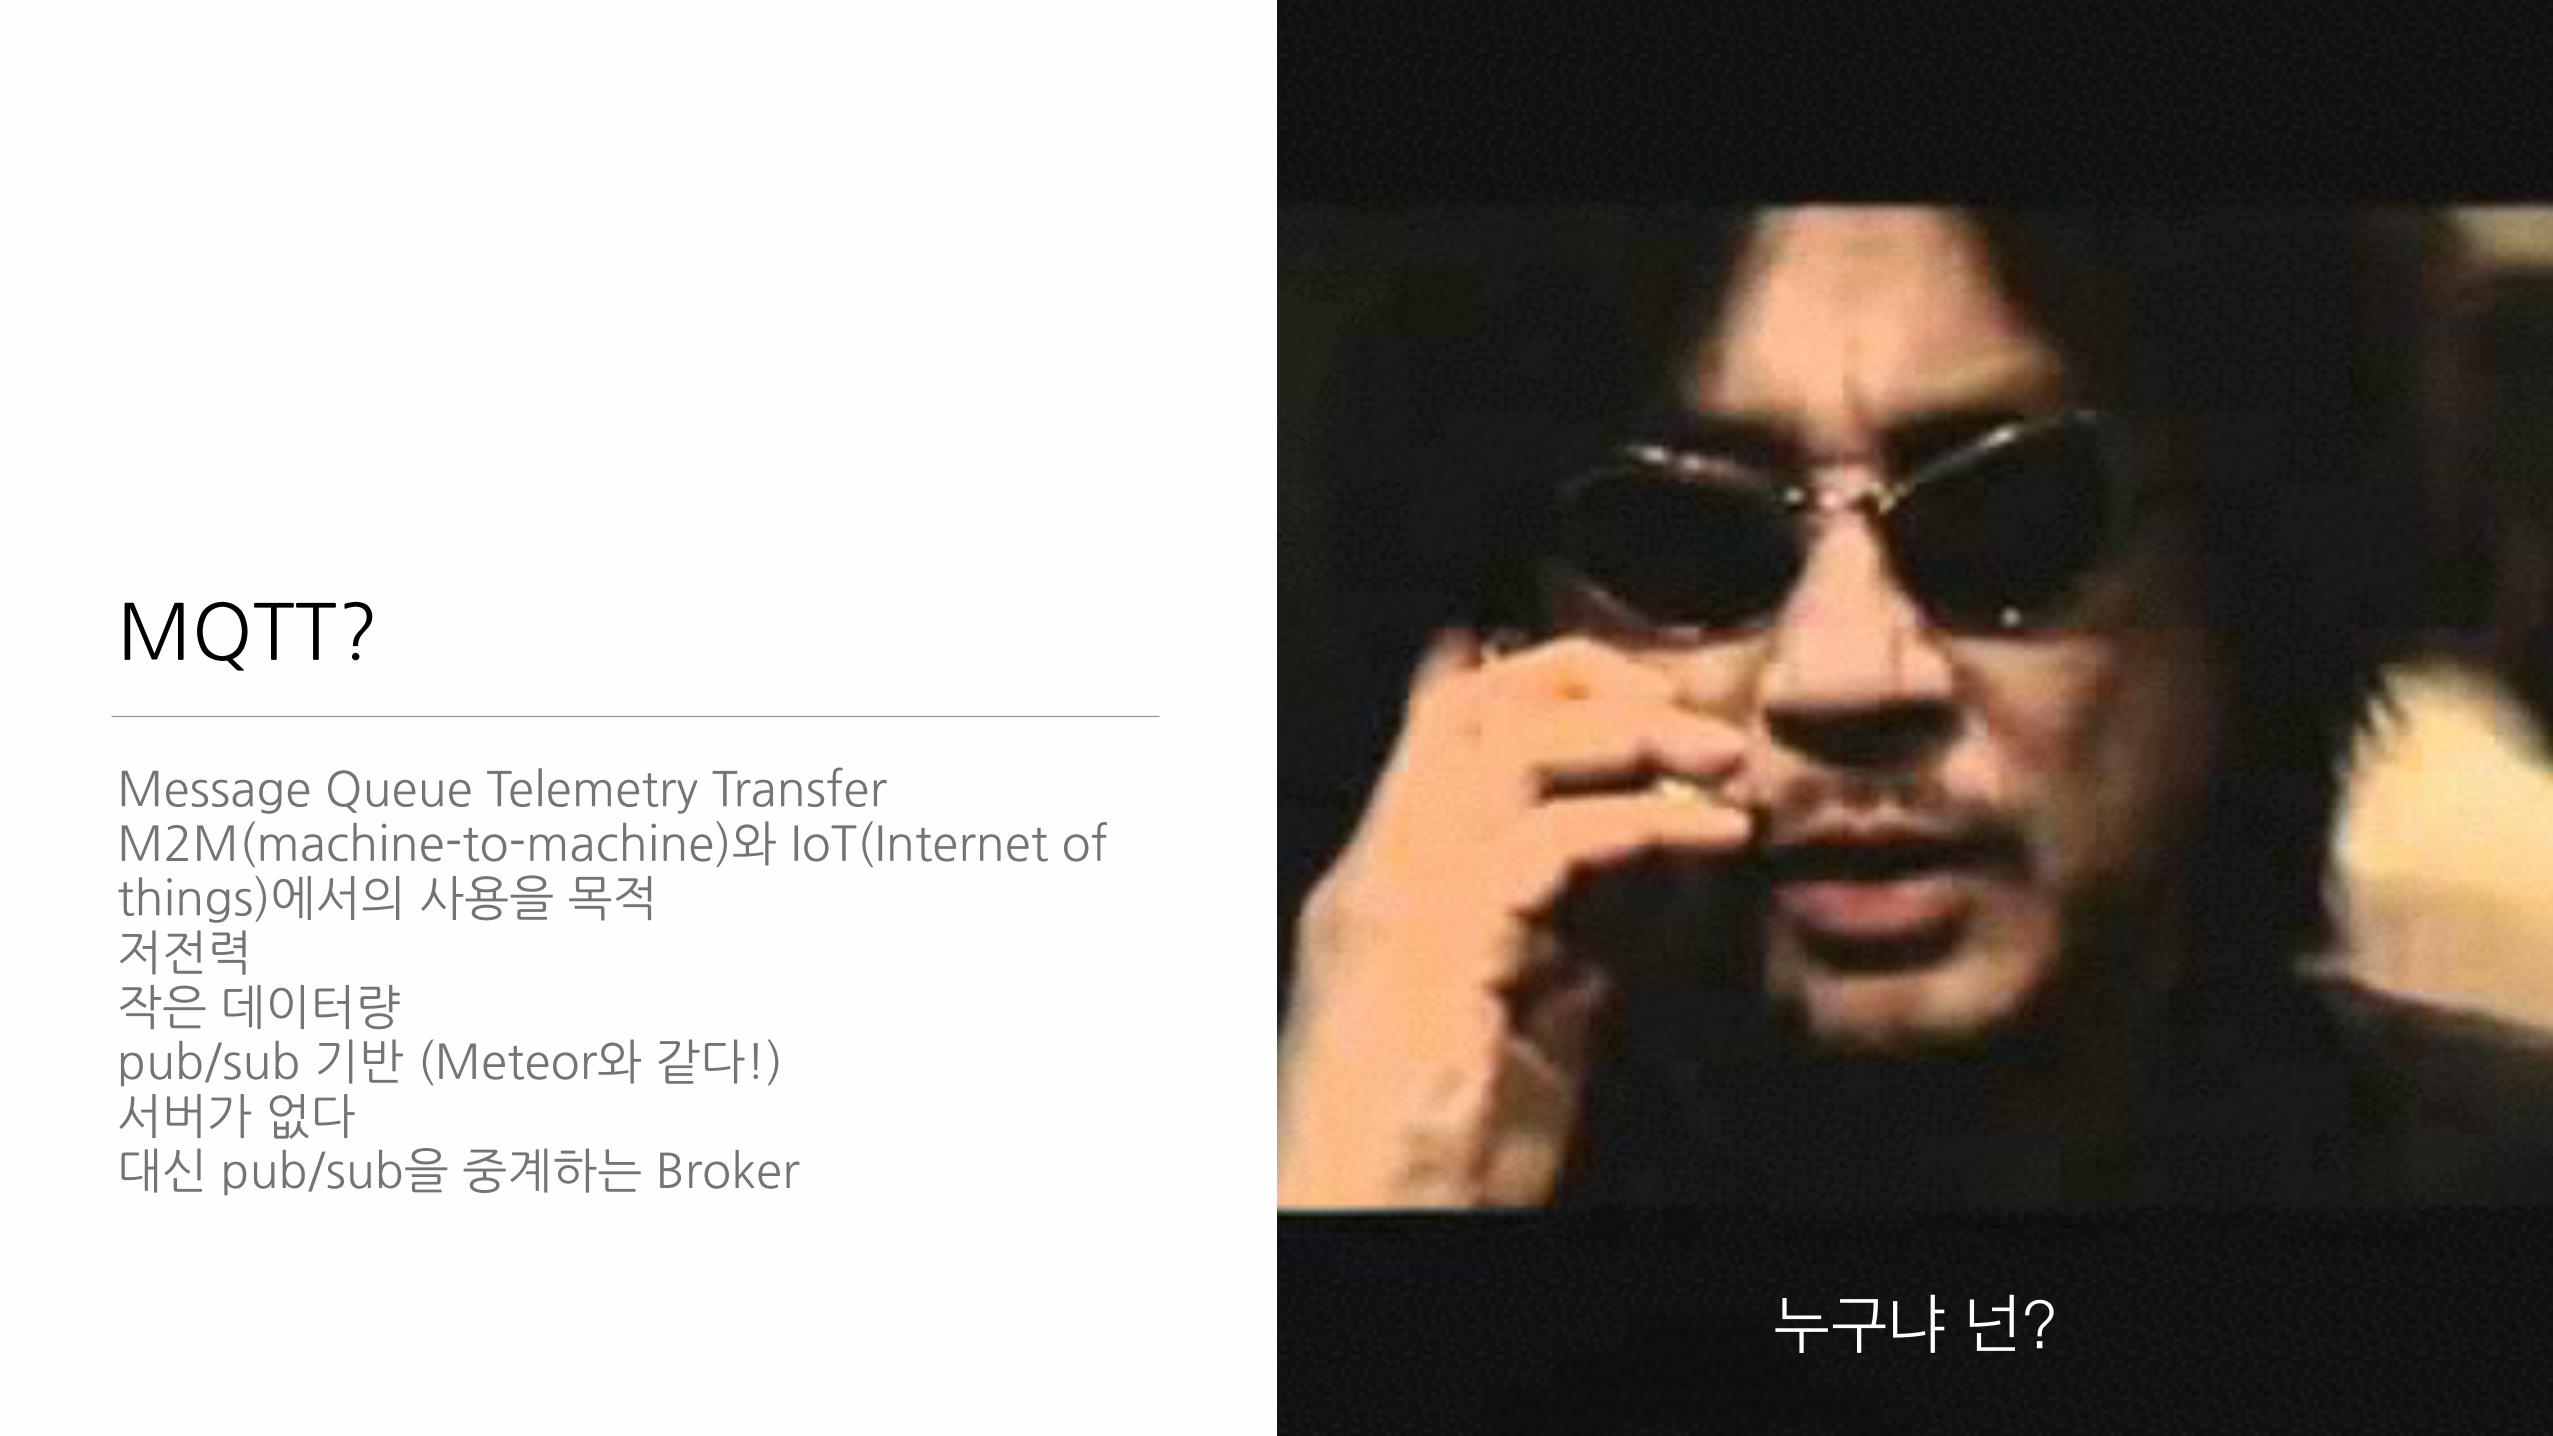
MQTT?
Message�Queue�Telemetry�Transfer�M2M(machine-to-machine)와�IoT(Internet�of�things)에서의�사용을�목적�저전력�작은�데이터량�pub/sub�기반�(Meteor와�같다!)�서버가�없다�대신�pub/sub을�중계하는�Broker
누구냐 넌?
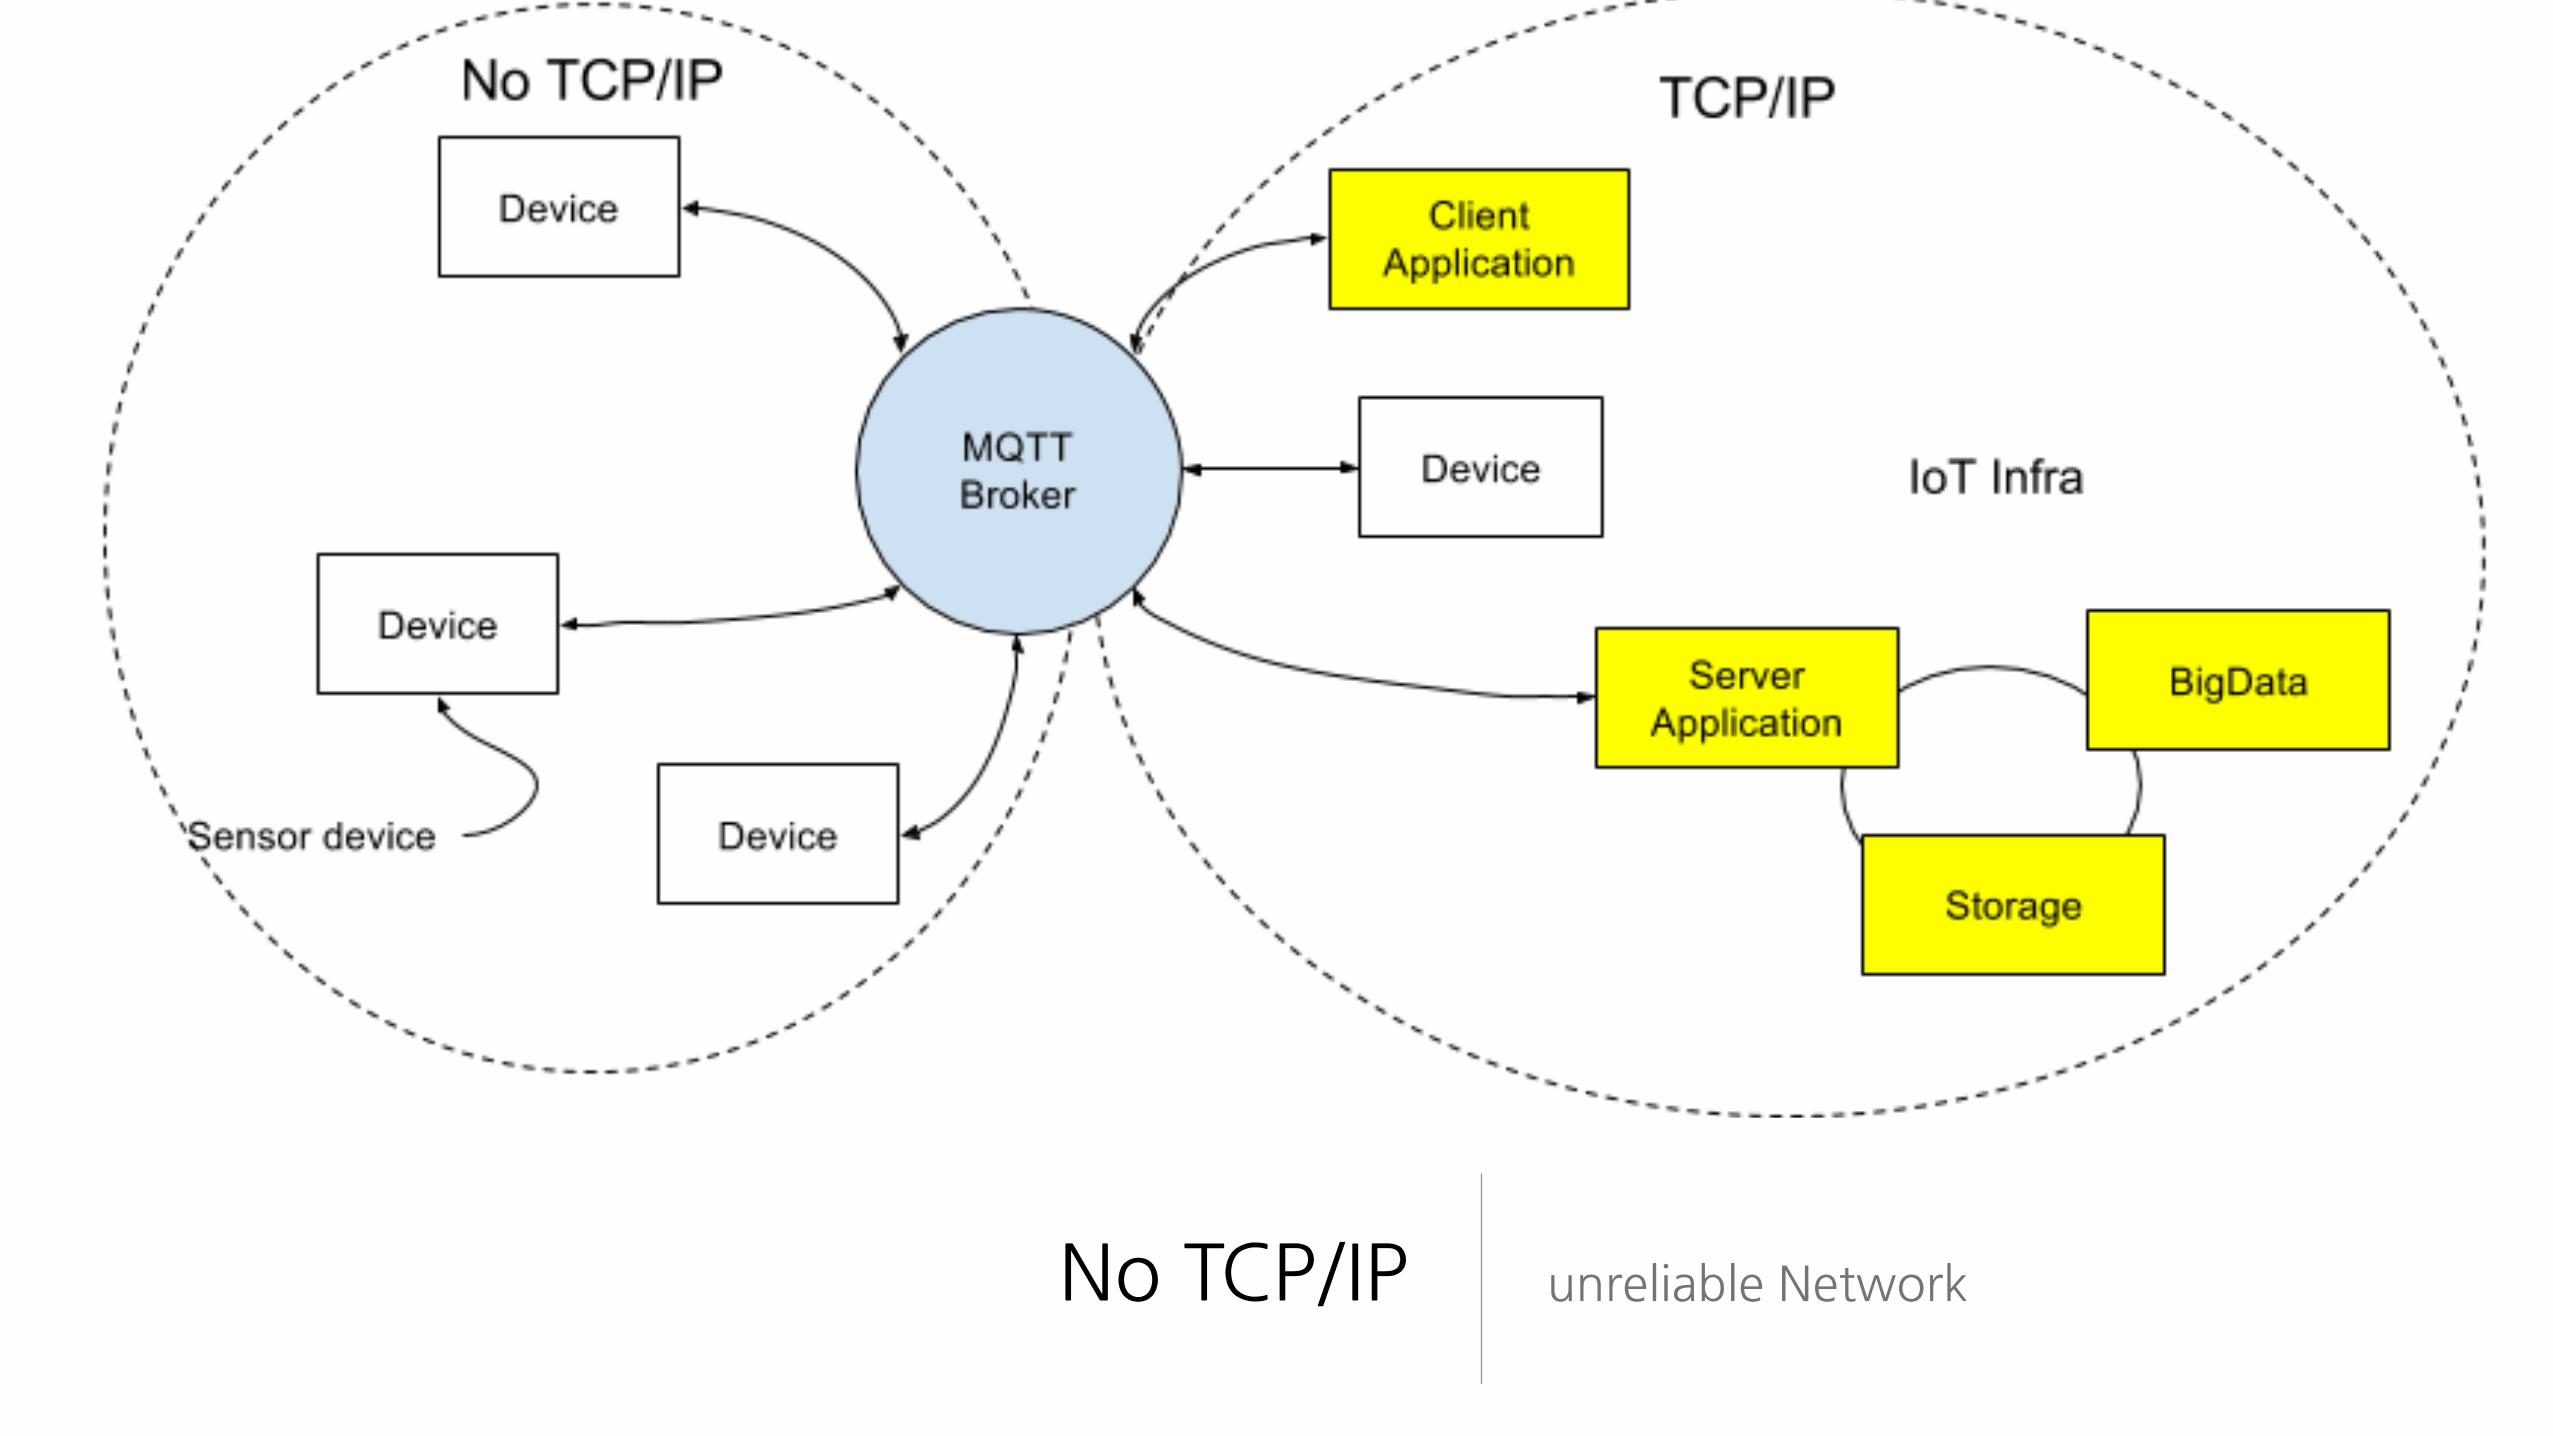
No�TCP/IP unreliable�Network

Dr.�Andy�Stanford-Clark,�IBM
How�to�do�reliable�messaging�over�unreliable�networks?
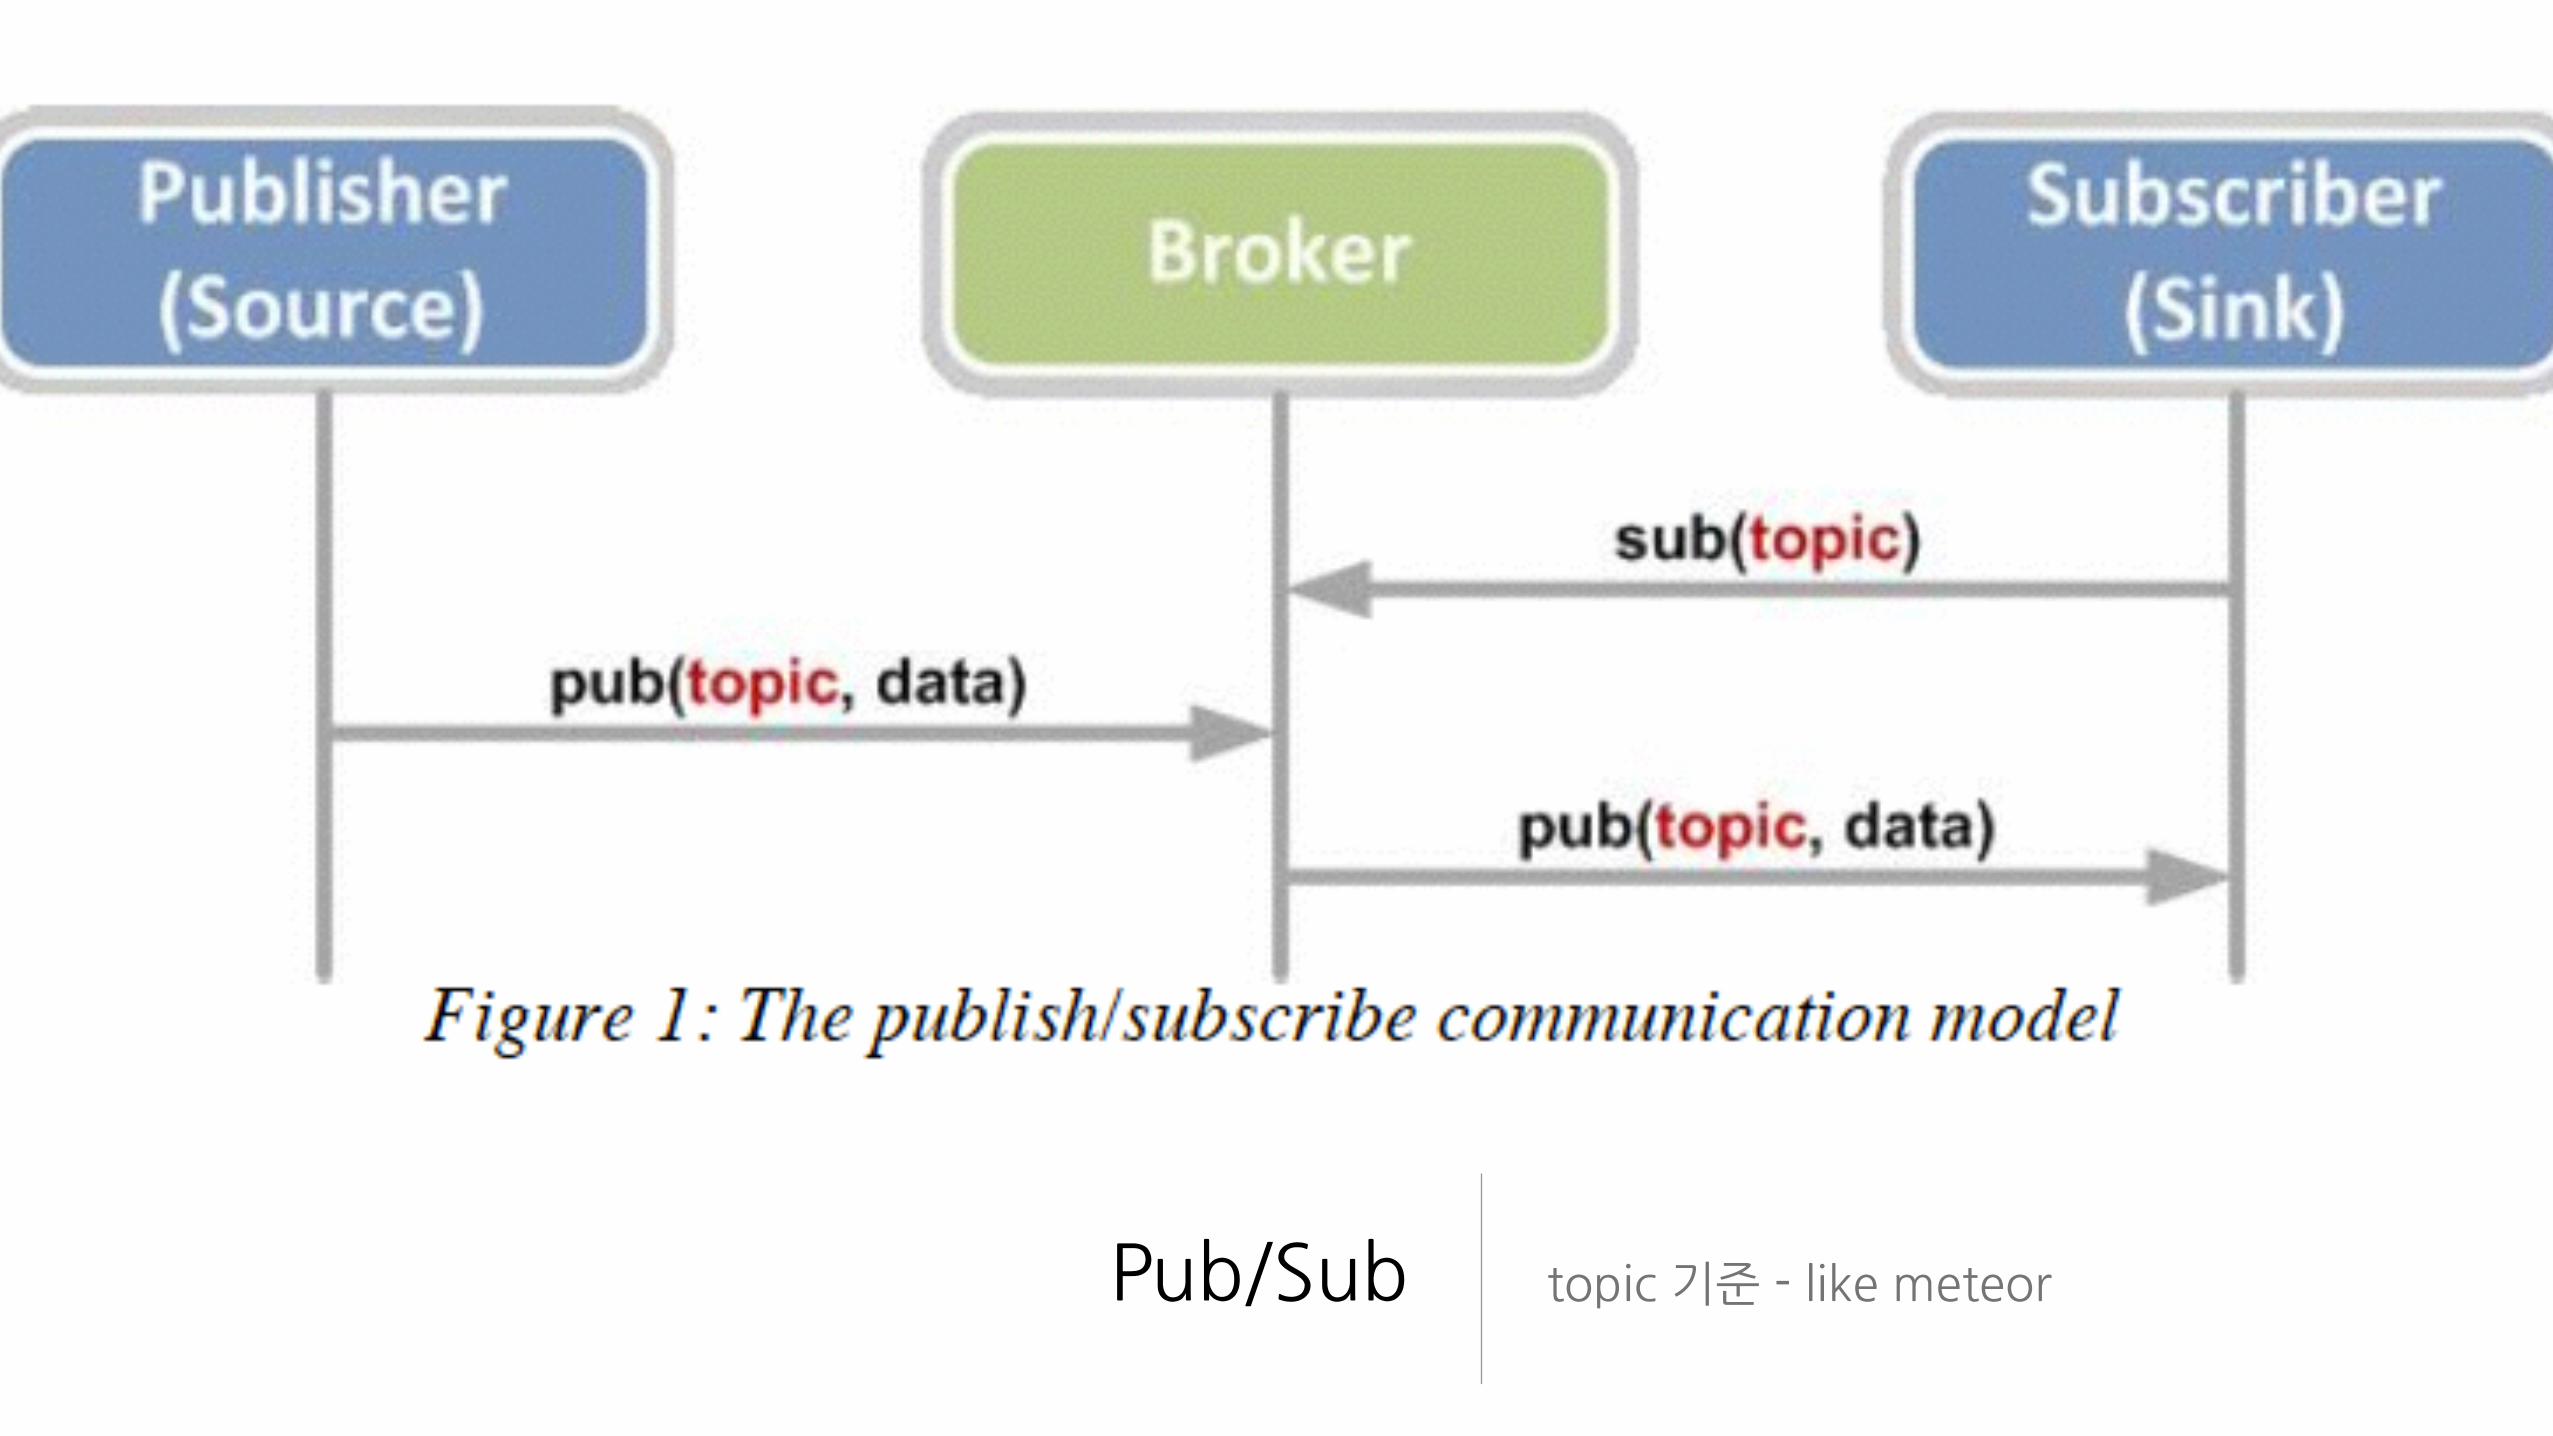
Pub/Sub topic�기준�-�like�meteor
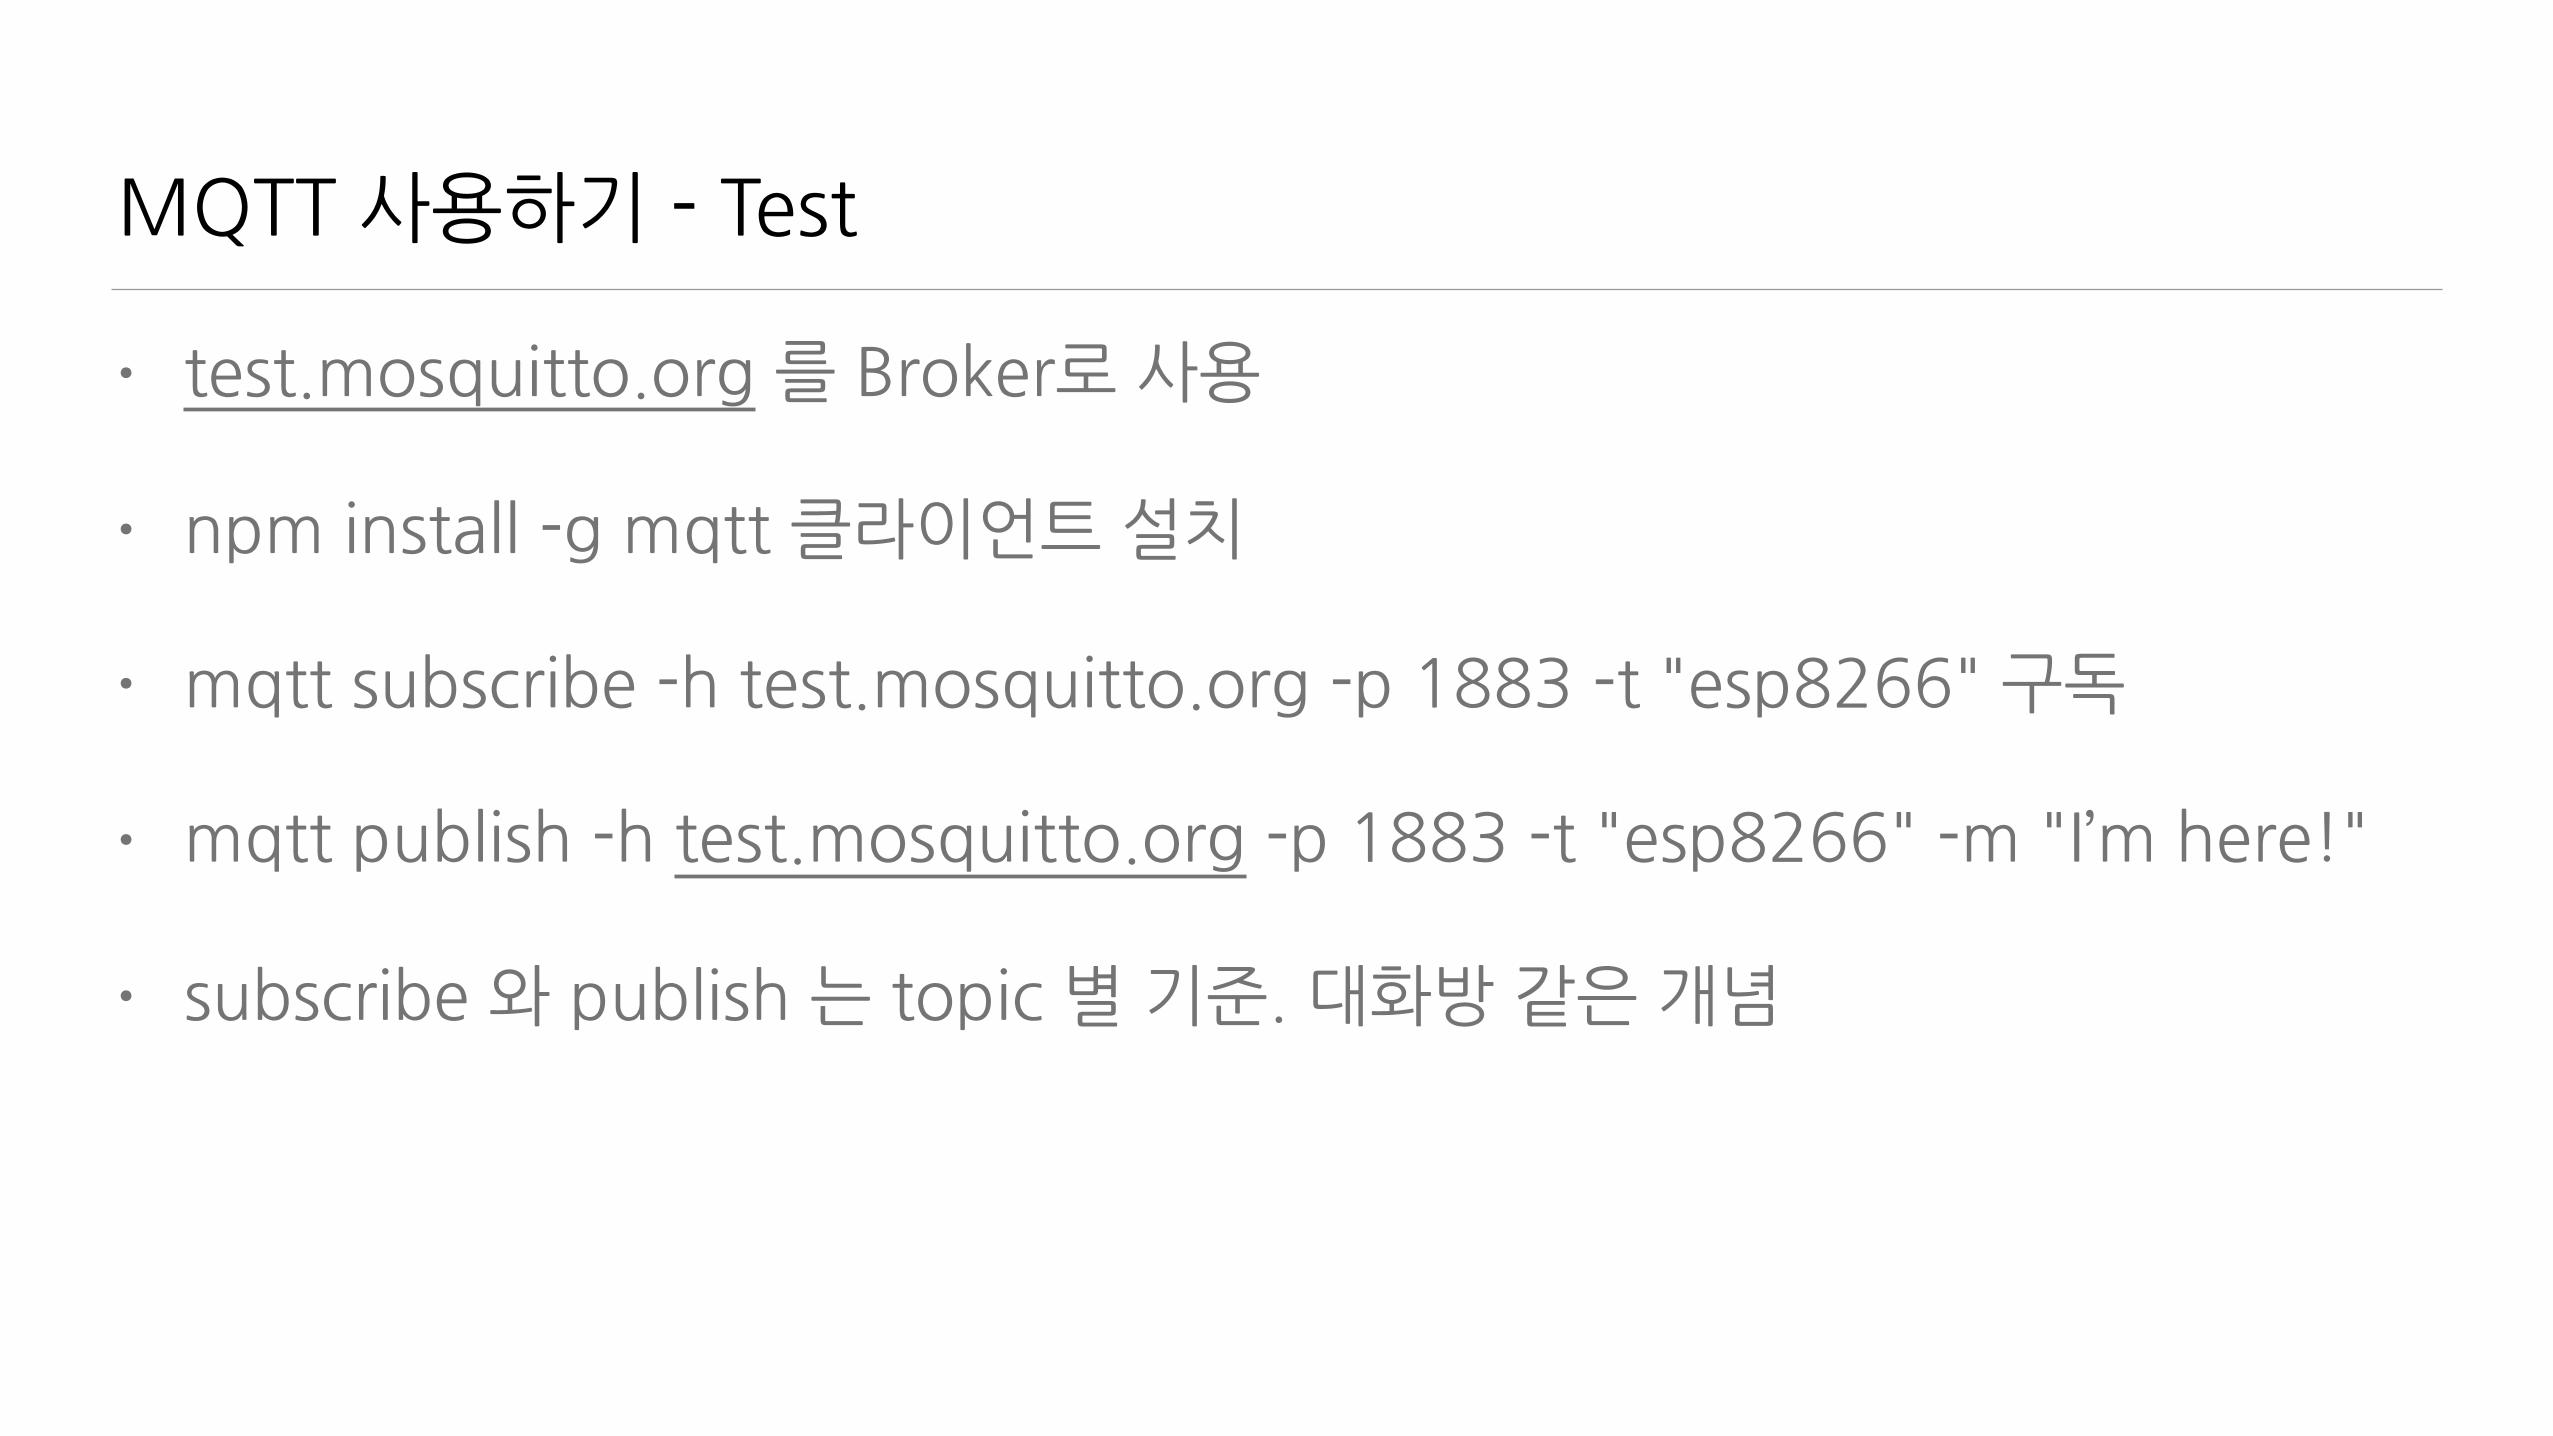
MQTT�사용하기�-�Test
• test.mosquitto.org�를�Broker로�사용�
• npm�install�-g�mqtt�클라이언트�설치�
• mqtt�subscribe�-h�test.mosquitto.org�-p�1883�-t�"esp8266"�구독�
• mqtt�publish�-h�test.mosquitto.org�-p�1883�-t�"esp8266"�-m�"I’m�here!"�
• subscribe�와�publish�는�topic�별�기준.�대화방�같은�개념
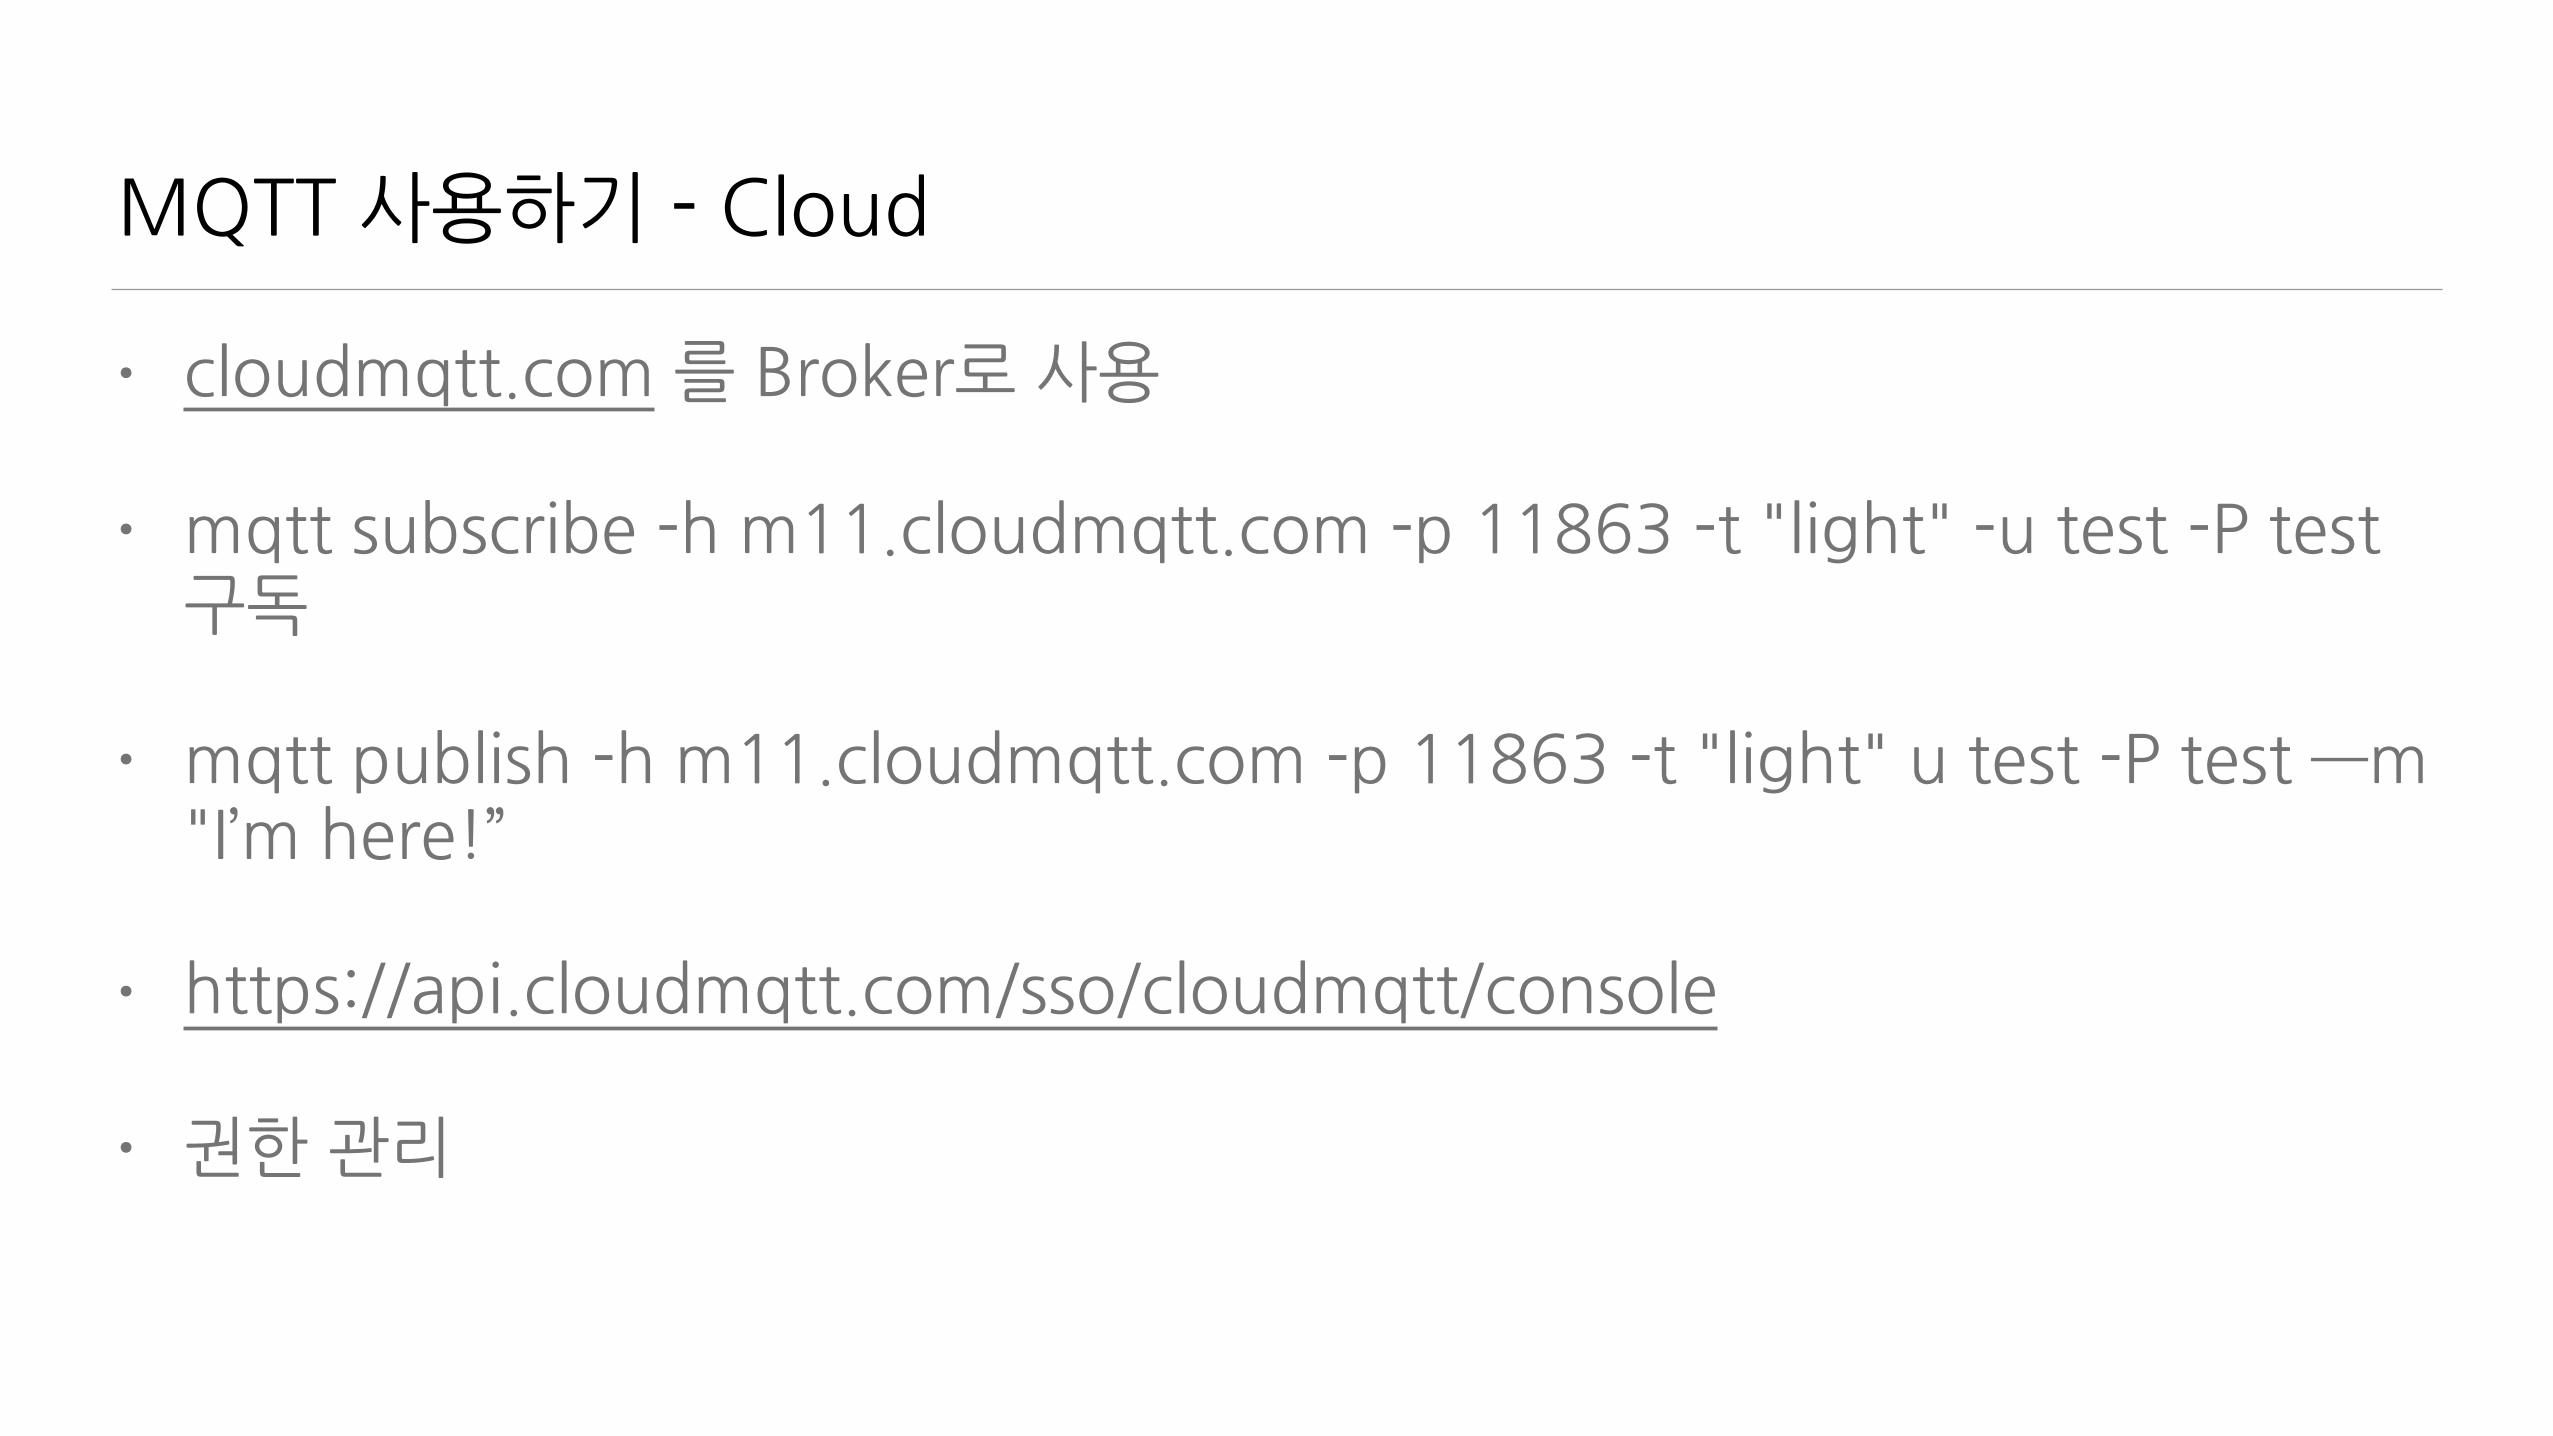
MQTT�사용하기�-�Cloud
• cloudmqtt.com�를�Broker로�사용�
• mqtt�subscribe�-h�m11.cloudmqtt.com�-p�11863�-t�"light"�-u�test�-P�test�구독�
• mqtt�publish�-h�m11.cloudmqtt.com�-p�11863�-t�"light"�u�test�-P�test�—m�"I’m�here!”�
• https://api.cloudmqtt.com/sso/cloudmqtt/console�
• 권한�관리
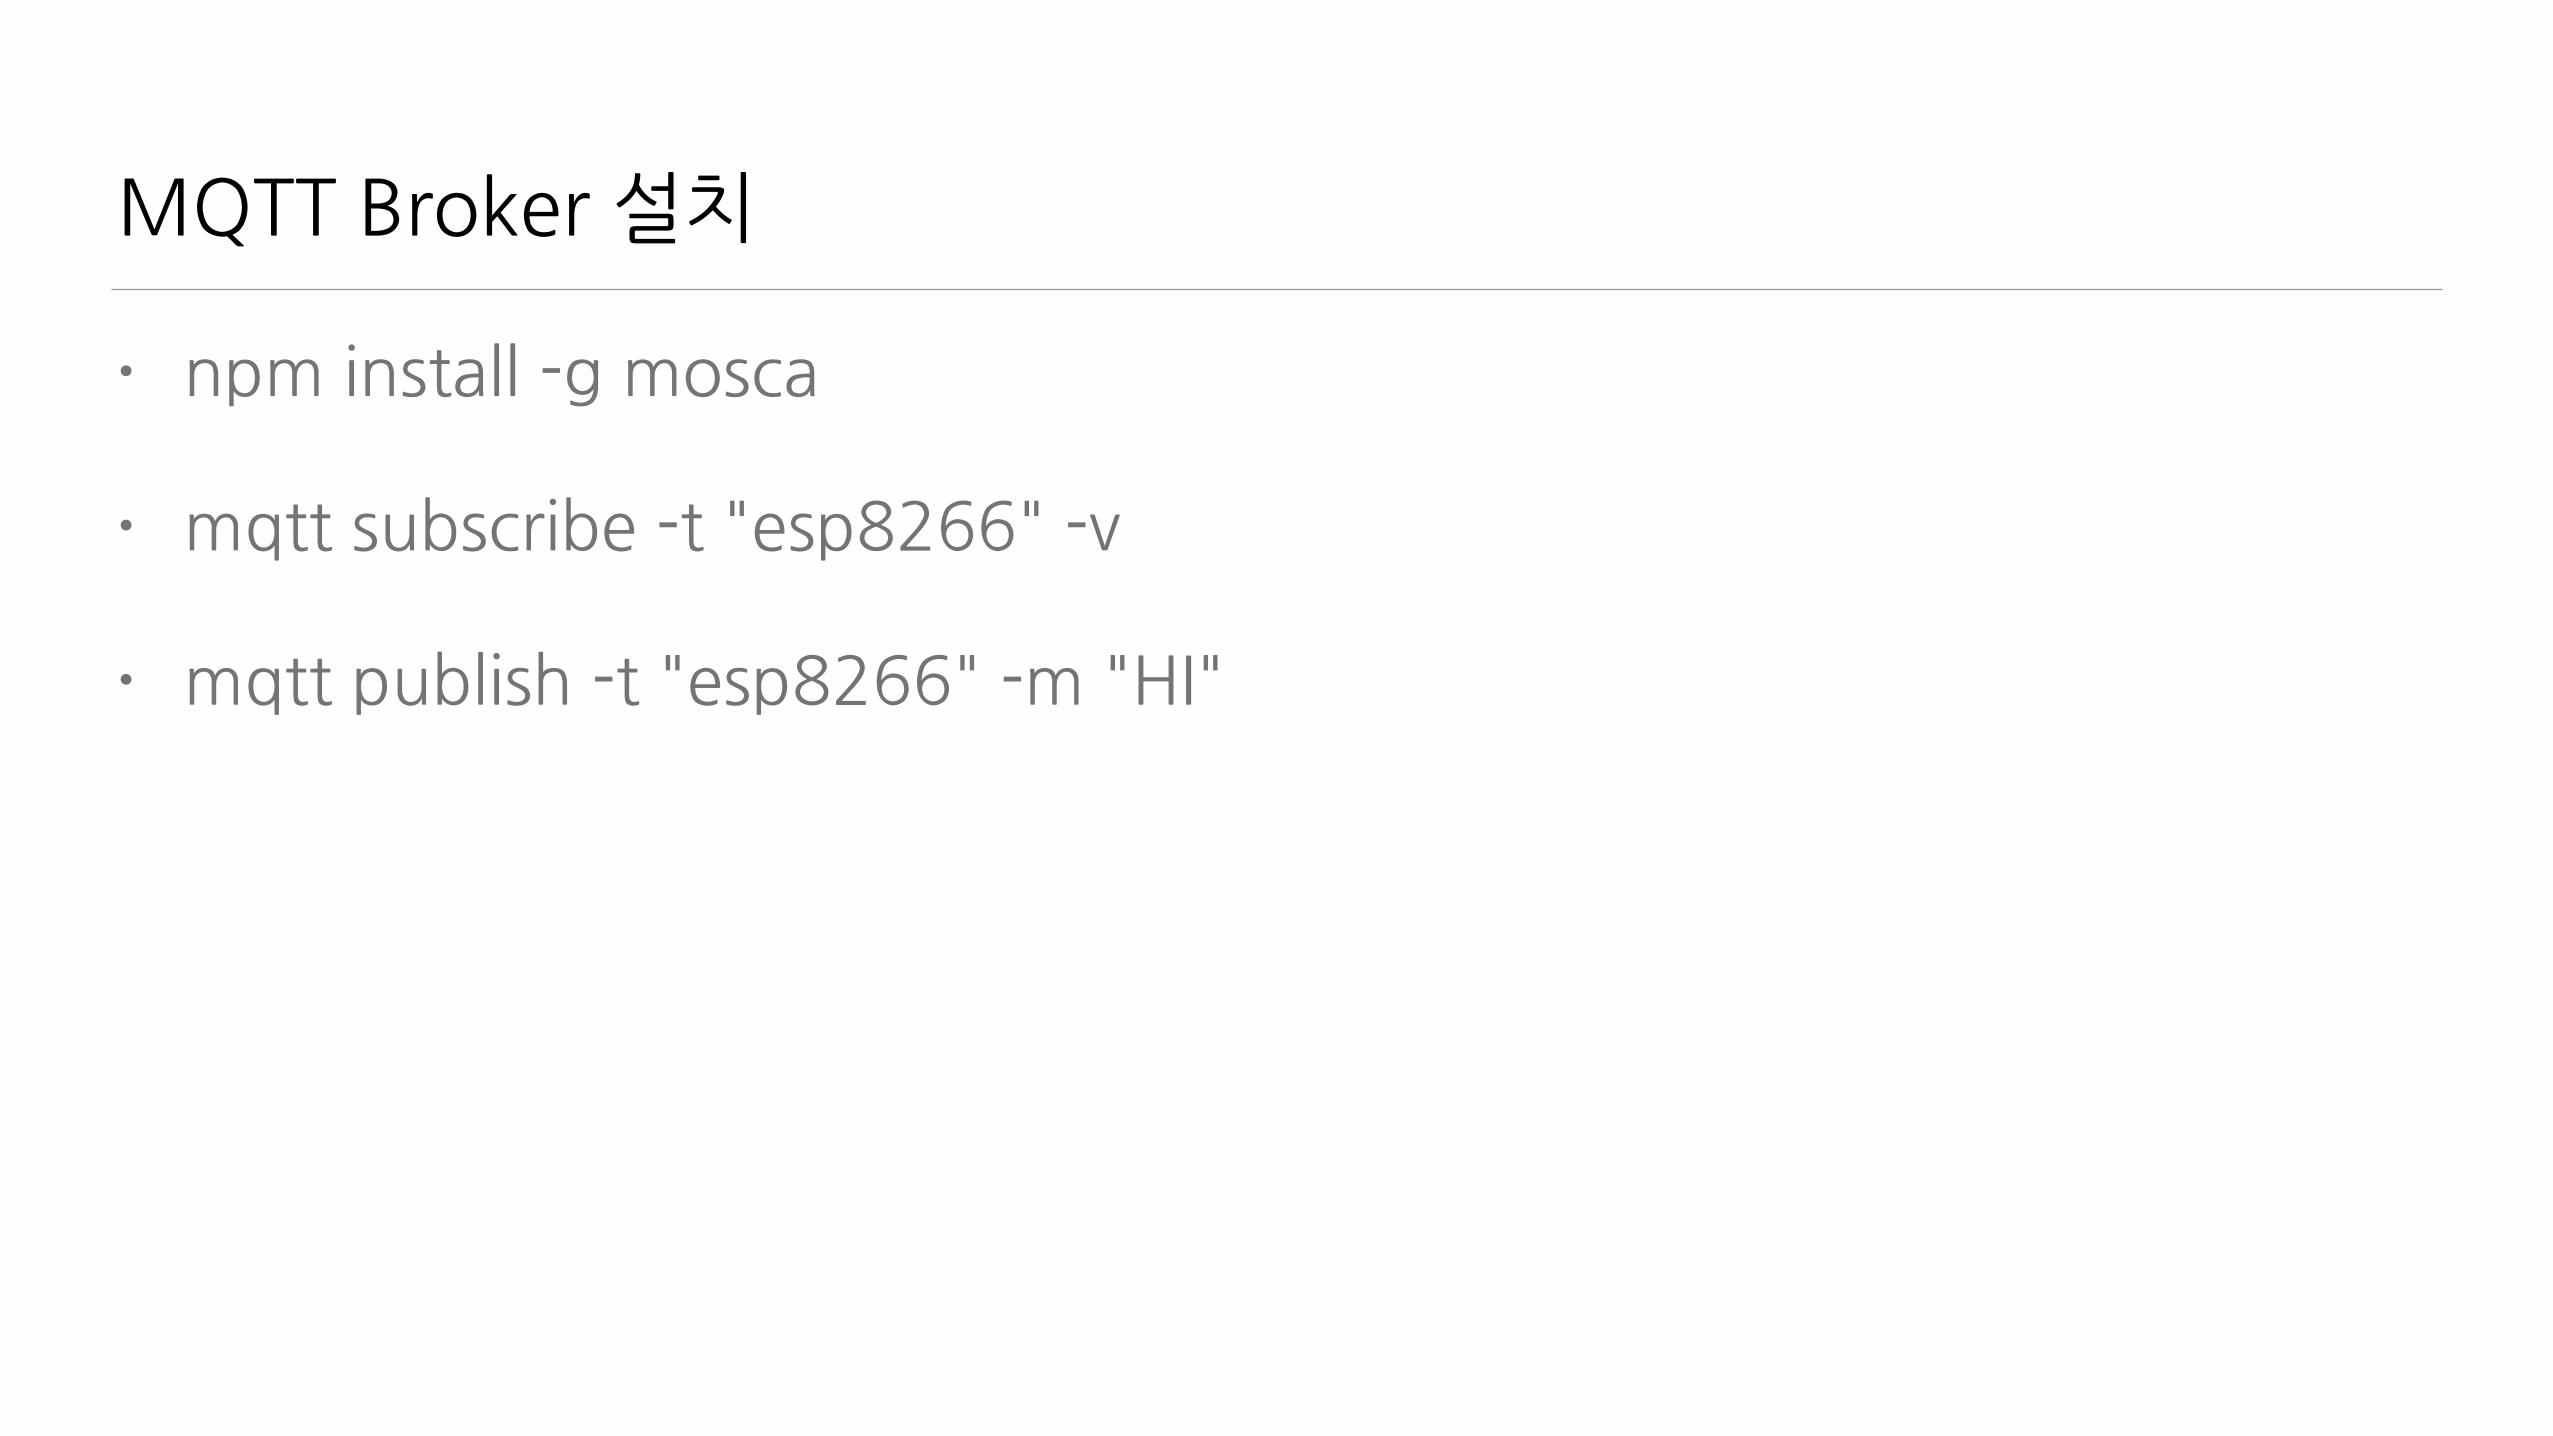
MQTT�Broker�설치
• npm�install�-g�mosca�
• mqtt�subscribe�-t�"esp8266"�-v�
• mqtt�publish�-t�"esp8266"�-m�"HI"
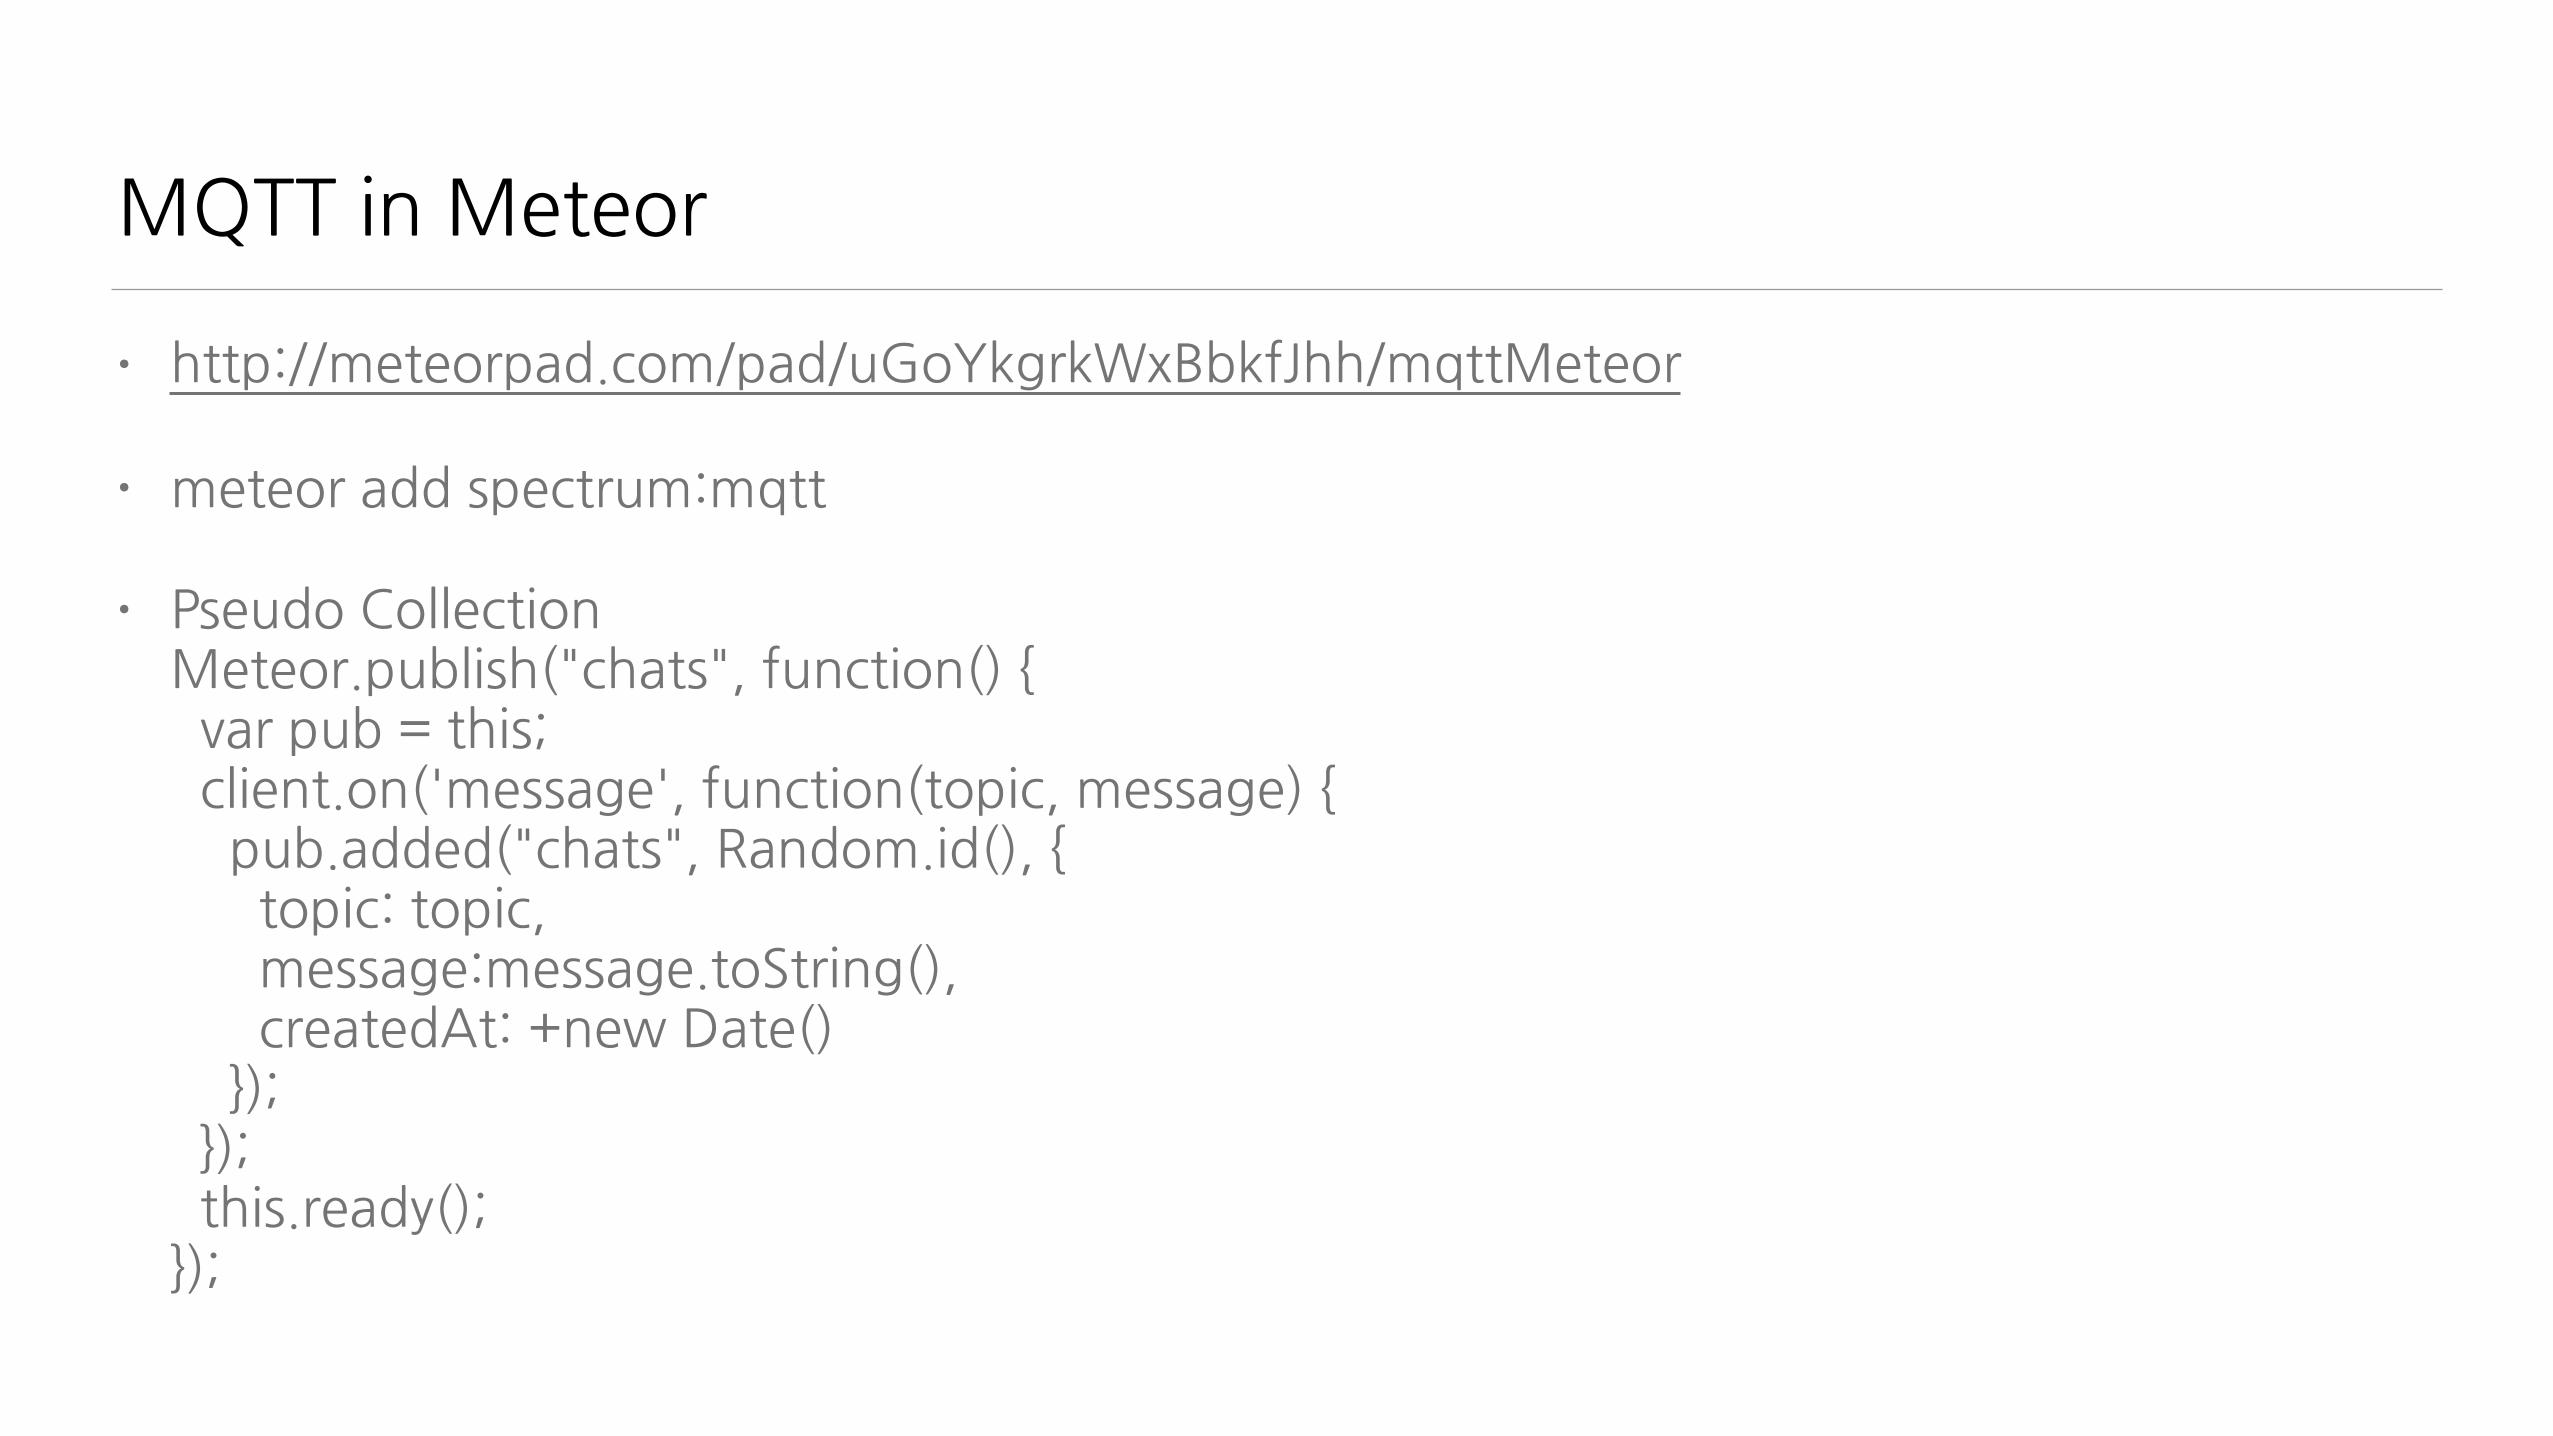
MQTT�in�Meteor�
• http://meteorpad.com/pad/uGoYkgrkWxBbkfJhh/mqttMeteor�
• meteor�add�spectrum:mqtt�
• Pseudo�CollectionMeteor.publish("chats",�function()�{��var�pub�=�this; ��client.on('message',�function(topic,�message)�{����pub.added("chats",�Random.id(),�{������topic:�topic,������message:message.toString(), ������createdAt:�+new�Date()����});��});��this.ready();});
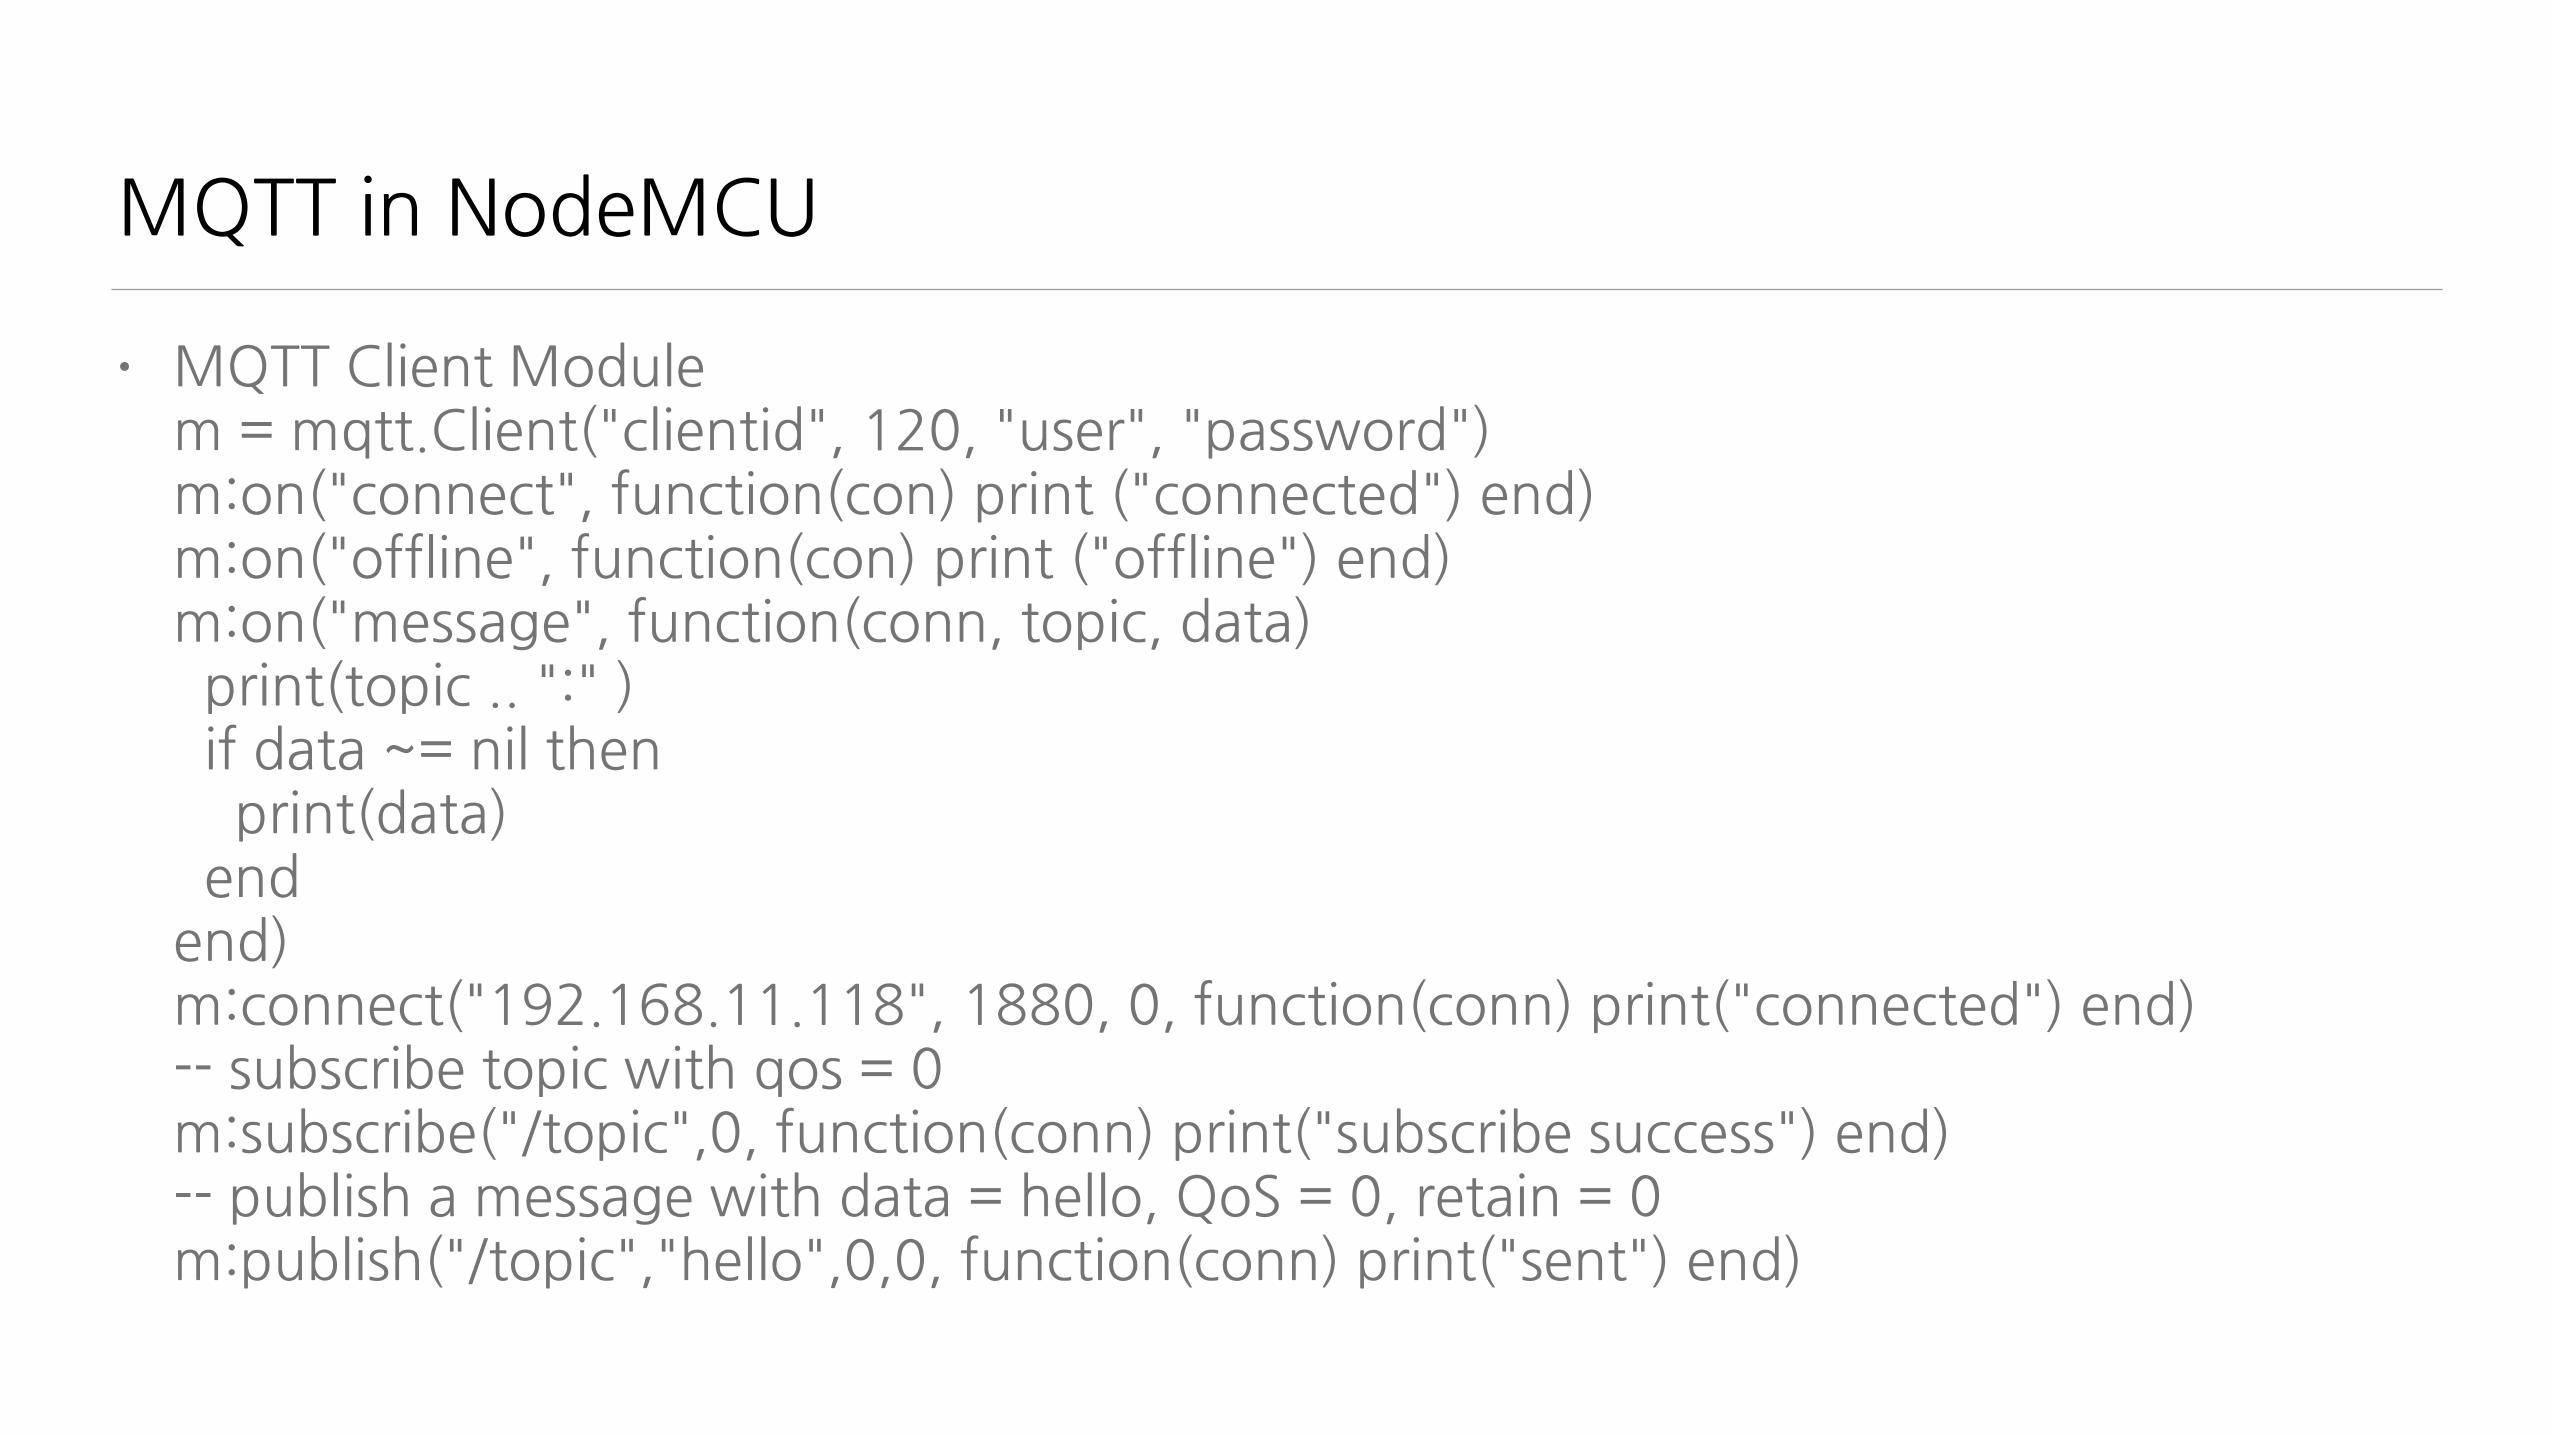
MQTT�in�NodeMCU
• MQTT�Client�Modulem�=�mqtt.Client("clientid",�120,�"user",�"password")m:on("connect",�function(con)�print�("connected")�end)m:on("offline",�function(con)�print�("offline")�end)m:on("message",�function(conn,�topic,�data)� ��print(topic�..�":"�)���if�data�~=�nil�then ����print(data)��endend)m:connect("192.168.11.118",�1880,�0,�function(conn)�print("connected")�end)--�subscribe�topic�with�qos�=�0m:subscribe("/topic",0,�function(conn)�print("subscribe�success")�end) --�publish�a�message�with�data�=�hello,�QoS�=�0,�retain�=�0m:publish("/topic","hello",0,0,�function(conn)�print("sent")�end)

Let’s�put�it�all�together! Man�2�Thing�Chatting

SVG�(Scalable�Vector�Graphic)
그림을�그려봅시다�http://www.cattocreations.com/ePub3.html�Interactive�EPUB3�Learn�SVG�Interactively�
EPUB3�Reader�(for�Windows)https://chrome.google.com/webstore/detail/readium/fepbnnnkkadjhjahcafoaglimekefifl/related?hl=en-US�http://www.bluefirereader.com/

SVG�형식
• HTML�Template�안에서<svg�xmlns="http://www.w3.org/2000/svg">��<line�x1="50"�y1="50"�x2="450"�y2="450"�/></svg>�
• 요소들을�<g>으로�묶을�수�있음<g�transform="translate(20,�-2)"�id=“plots">��<rect�id="yel"�x="40"�y="300"�width="20"�height="200"�/>��<rect�id="yel"�x="80"�y="300"�width="20"�height="200"�/>��<rect�id="yel"�x="120"�y="300"�width="20"�height="200"�/></g>

CSS�for�SVG�-�http://www.w3.org/TR/SVG/styling.html
• Shape�Properties fill,fill-opacity,fill-rule,marker,marker-start,marker-mid,marker-end,stroke,stroke-dasharray,stroke-dashoffset,�stroke-linecap,stroke-miterlimit,�stroke-opacity,�stroke-width ex)�line#axis�{�stroke-width:1px;�stroke:�#ff0000;�}�
• Text�Propertiesalignment-baseline,�baseline-shift,�dominant-baseline,�glyph-orientation-horizontal� ,�glyph-orientation-vertical,�kerningex)�text#title�{�font-family:�verdana,�sans-serif;��font-size:�570%;�� fill:�#003565;�}

Line
• <line�id="axis"�x1="0"�y1="0"�x2="0"�y2="500"�/>시작점�-�종료점까지�선으로�긋는다.�
• <polyline�points="50,250�450,250�250,50"�/> ,로�구분된�두쌍의�점을�연결한다.�
• <polygon�points="50,250�450,250�250,50"�/> ,로�구분된�두쌍의�점들과�시작점+끝점을�연결한다.
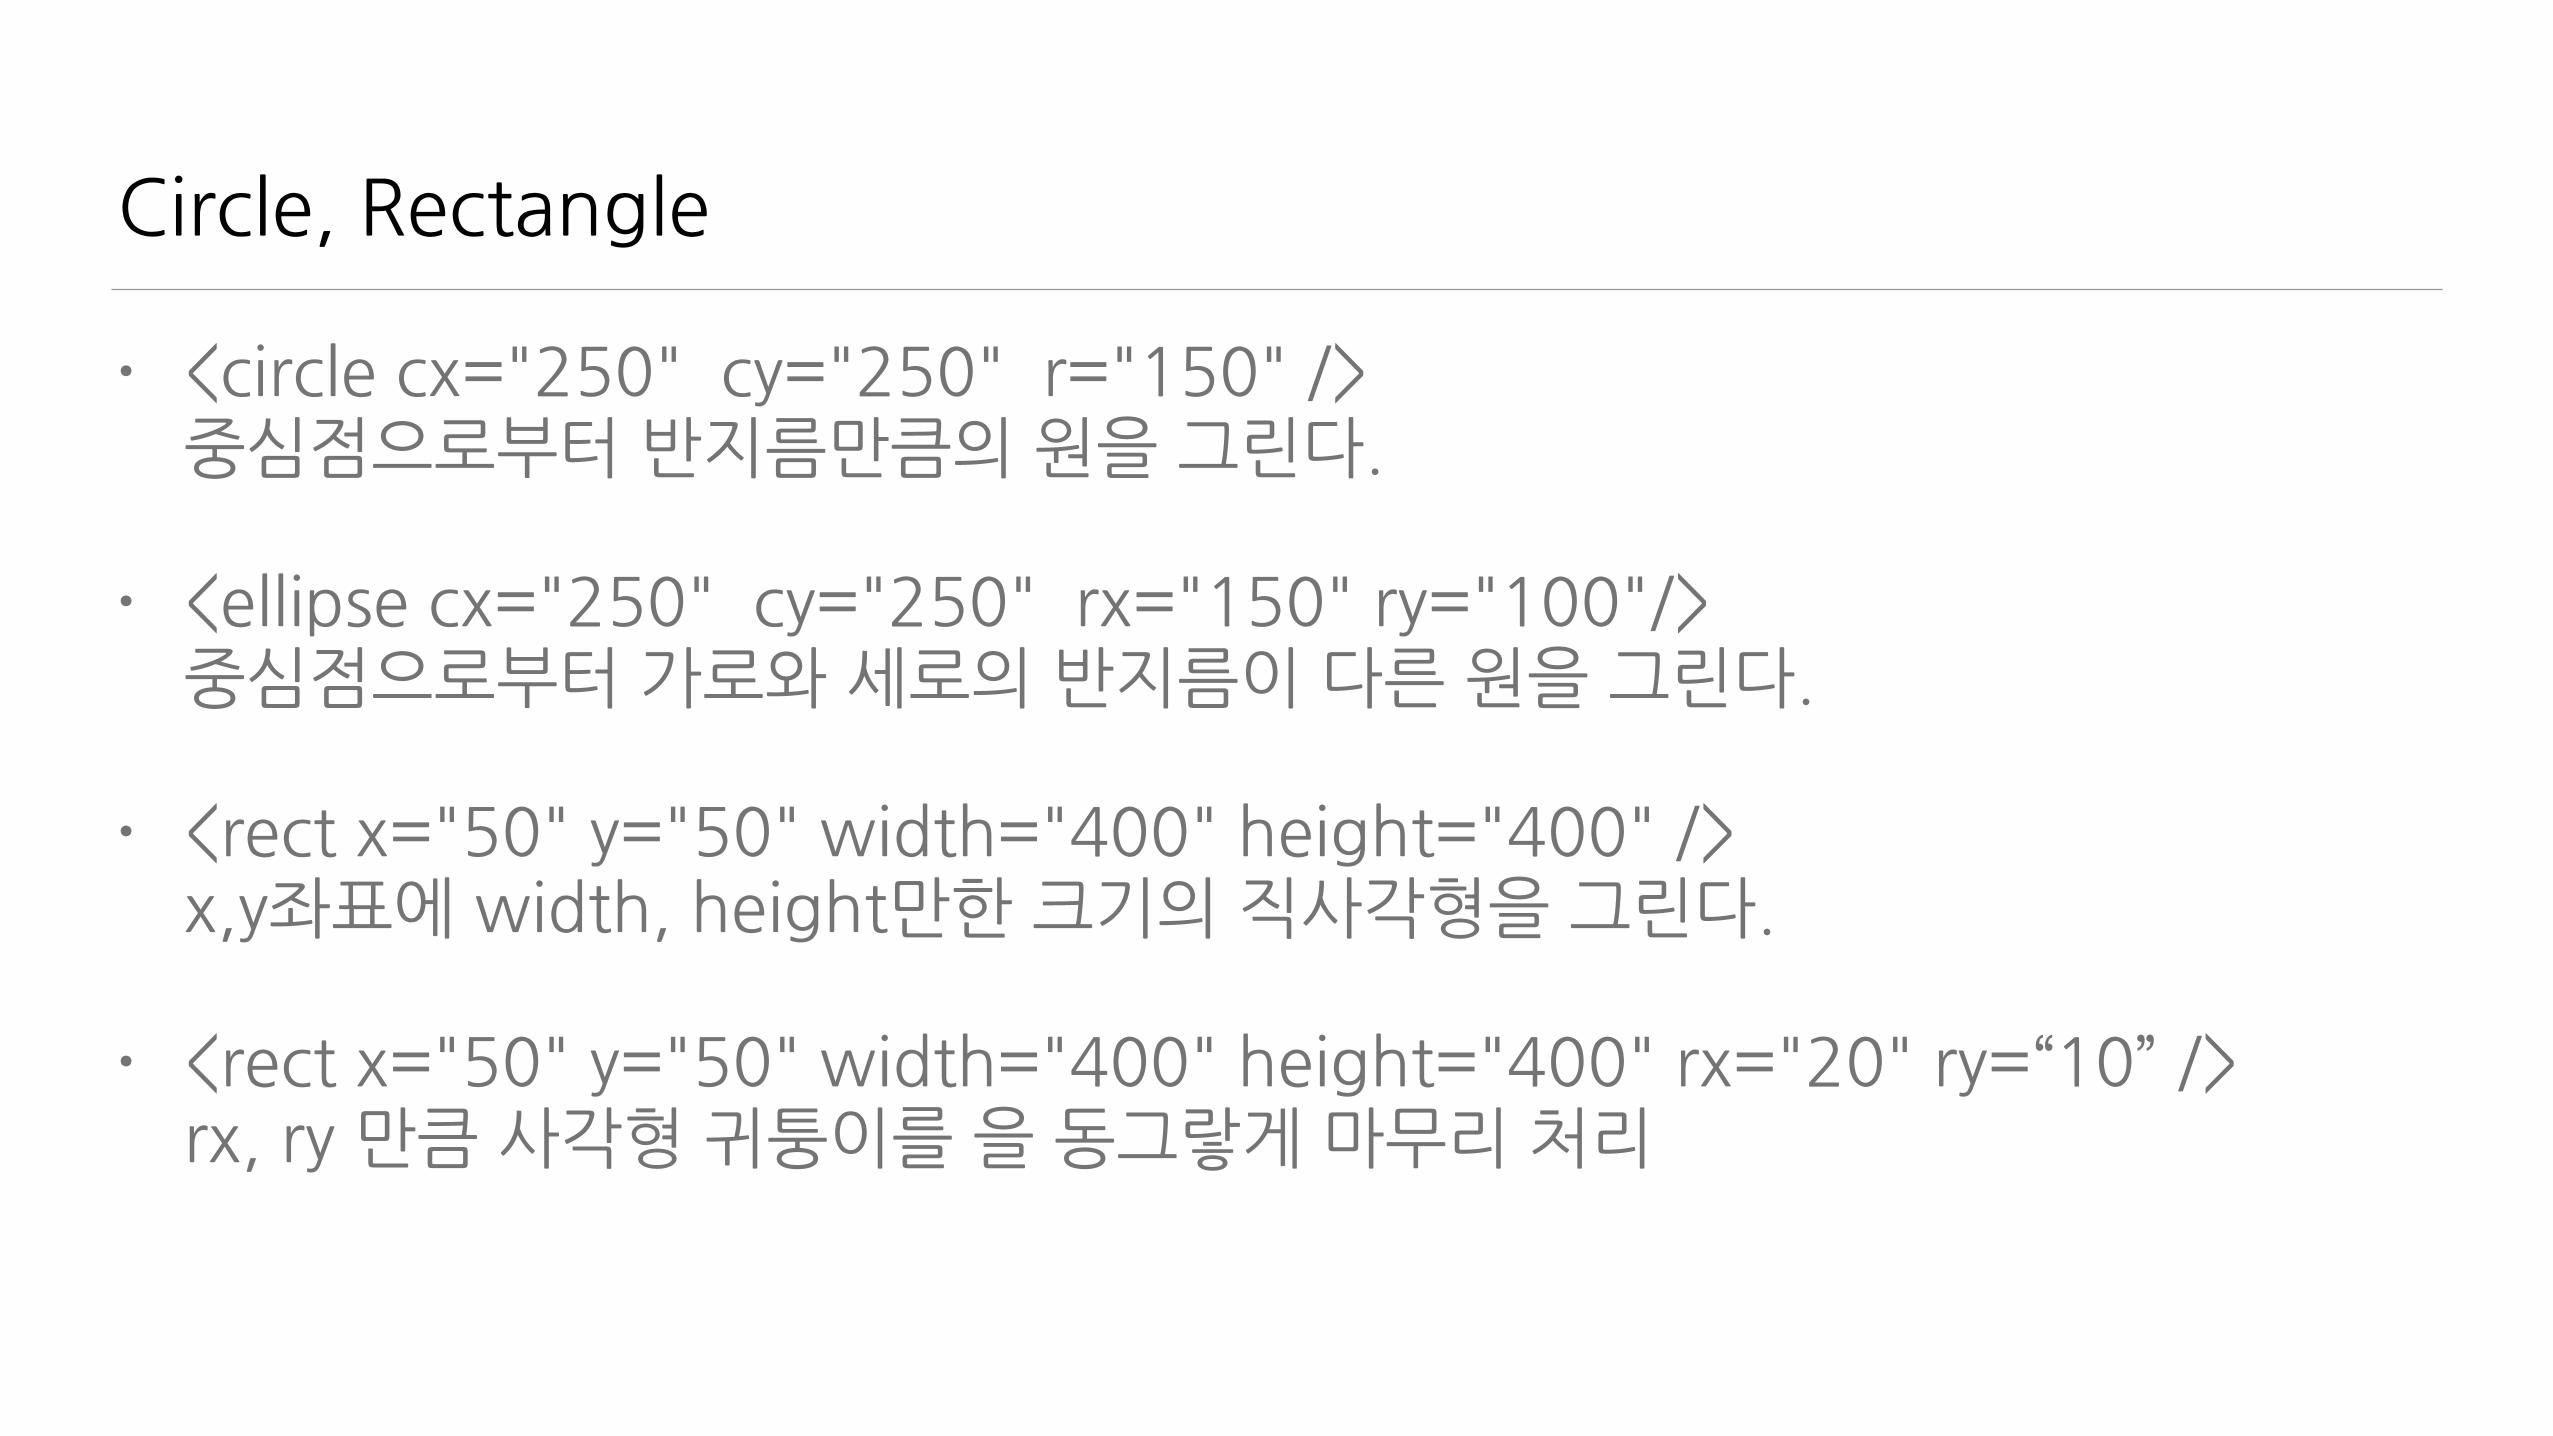
Circle,�Rectangle
• <circle�cx="250"��cy="250"��r="150"�/>중심점으로부터�반지름만큼의�원을�그린다.�
• <ellipse�cx="250"��cy="250"��rx="150"�ry="100"/>중심점으로부터�가로와�세로의�반지름이�다른�원을�그린다.�
• <rect�x="50"�y="50"�width="400"�height="400"�/>x,y좌표에�width,�height만한�크기의�직사각형을�그린다.�
• <rect�x="50"�y="50"�width="400"�height="400"�rx="20"�ry=“10”�/>rx,�ry�만큼�사각형�귀퉁이를�을�동그랗게�마무리�처리
Text
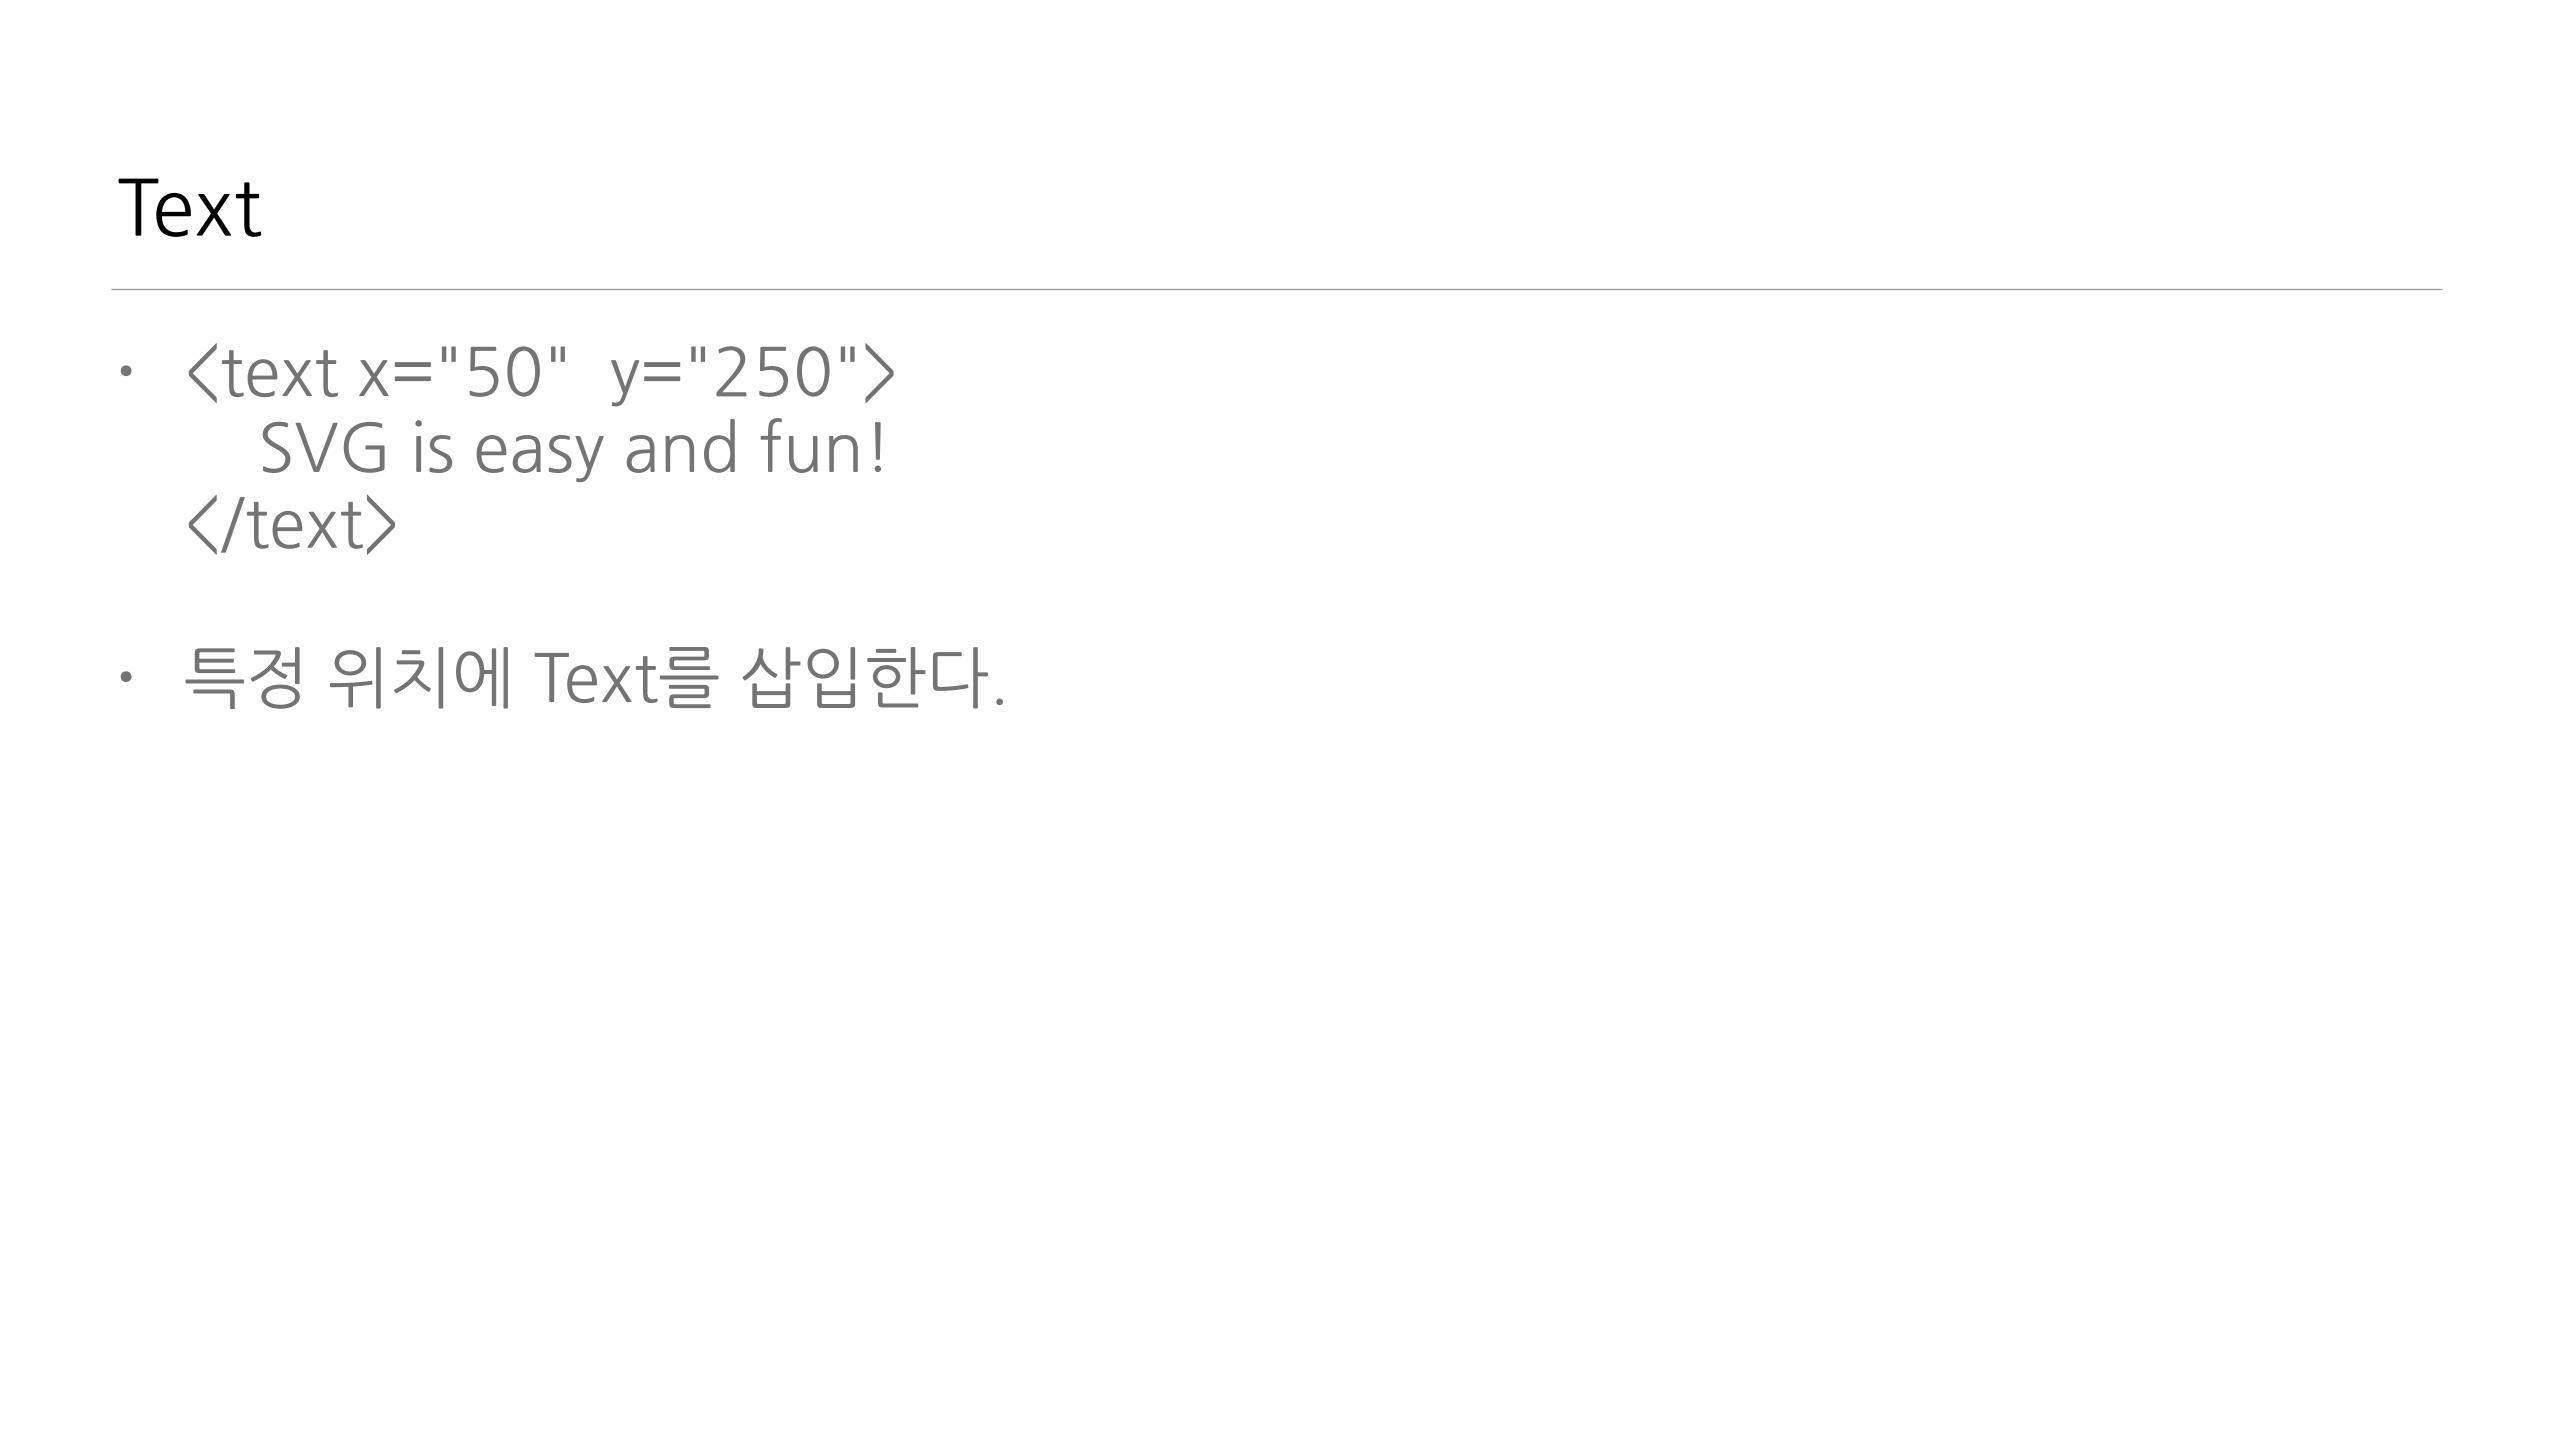
• <text�x="50"��y="250">����SVG�is�easy�and�fun! </text>�
• 특정�위치에�Text를�삽입한다.
Styling�with�CSS
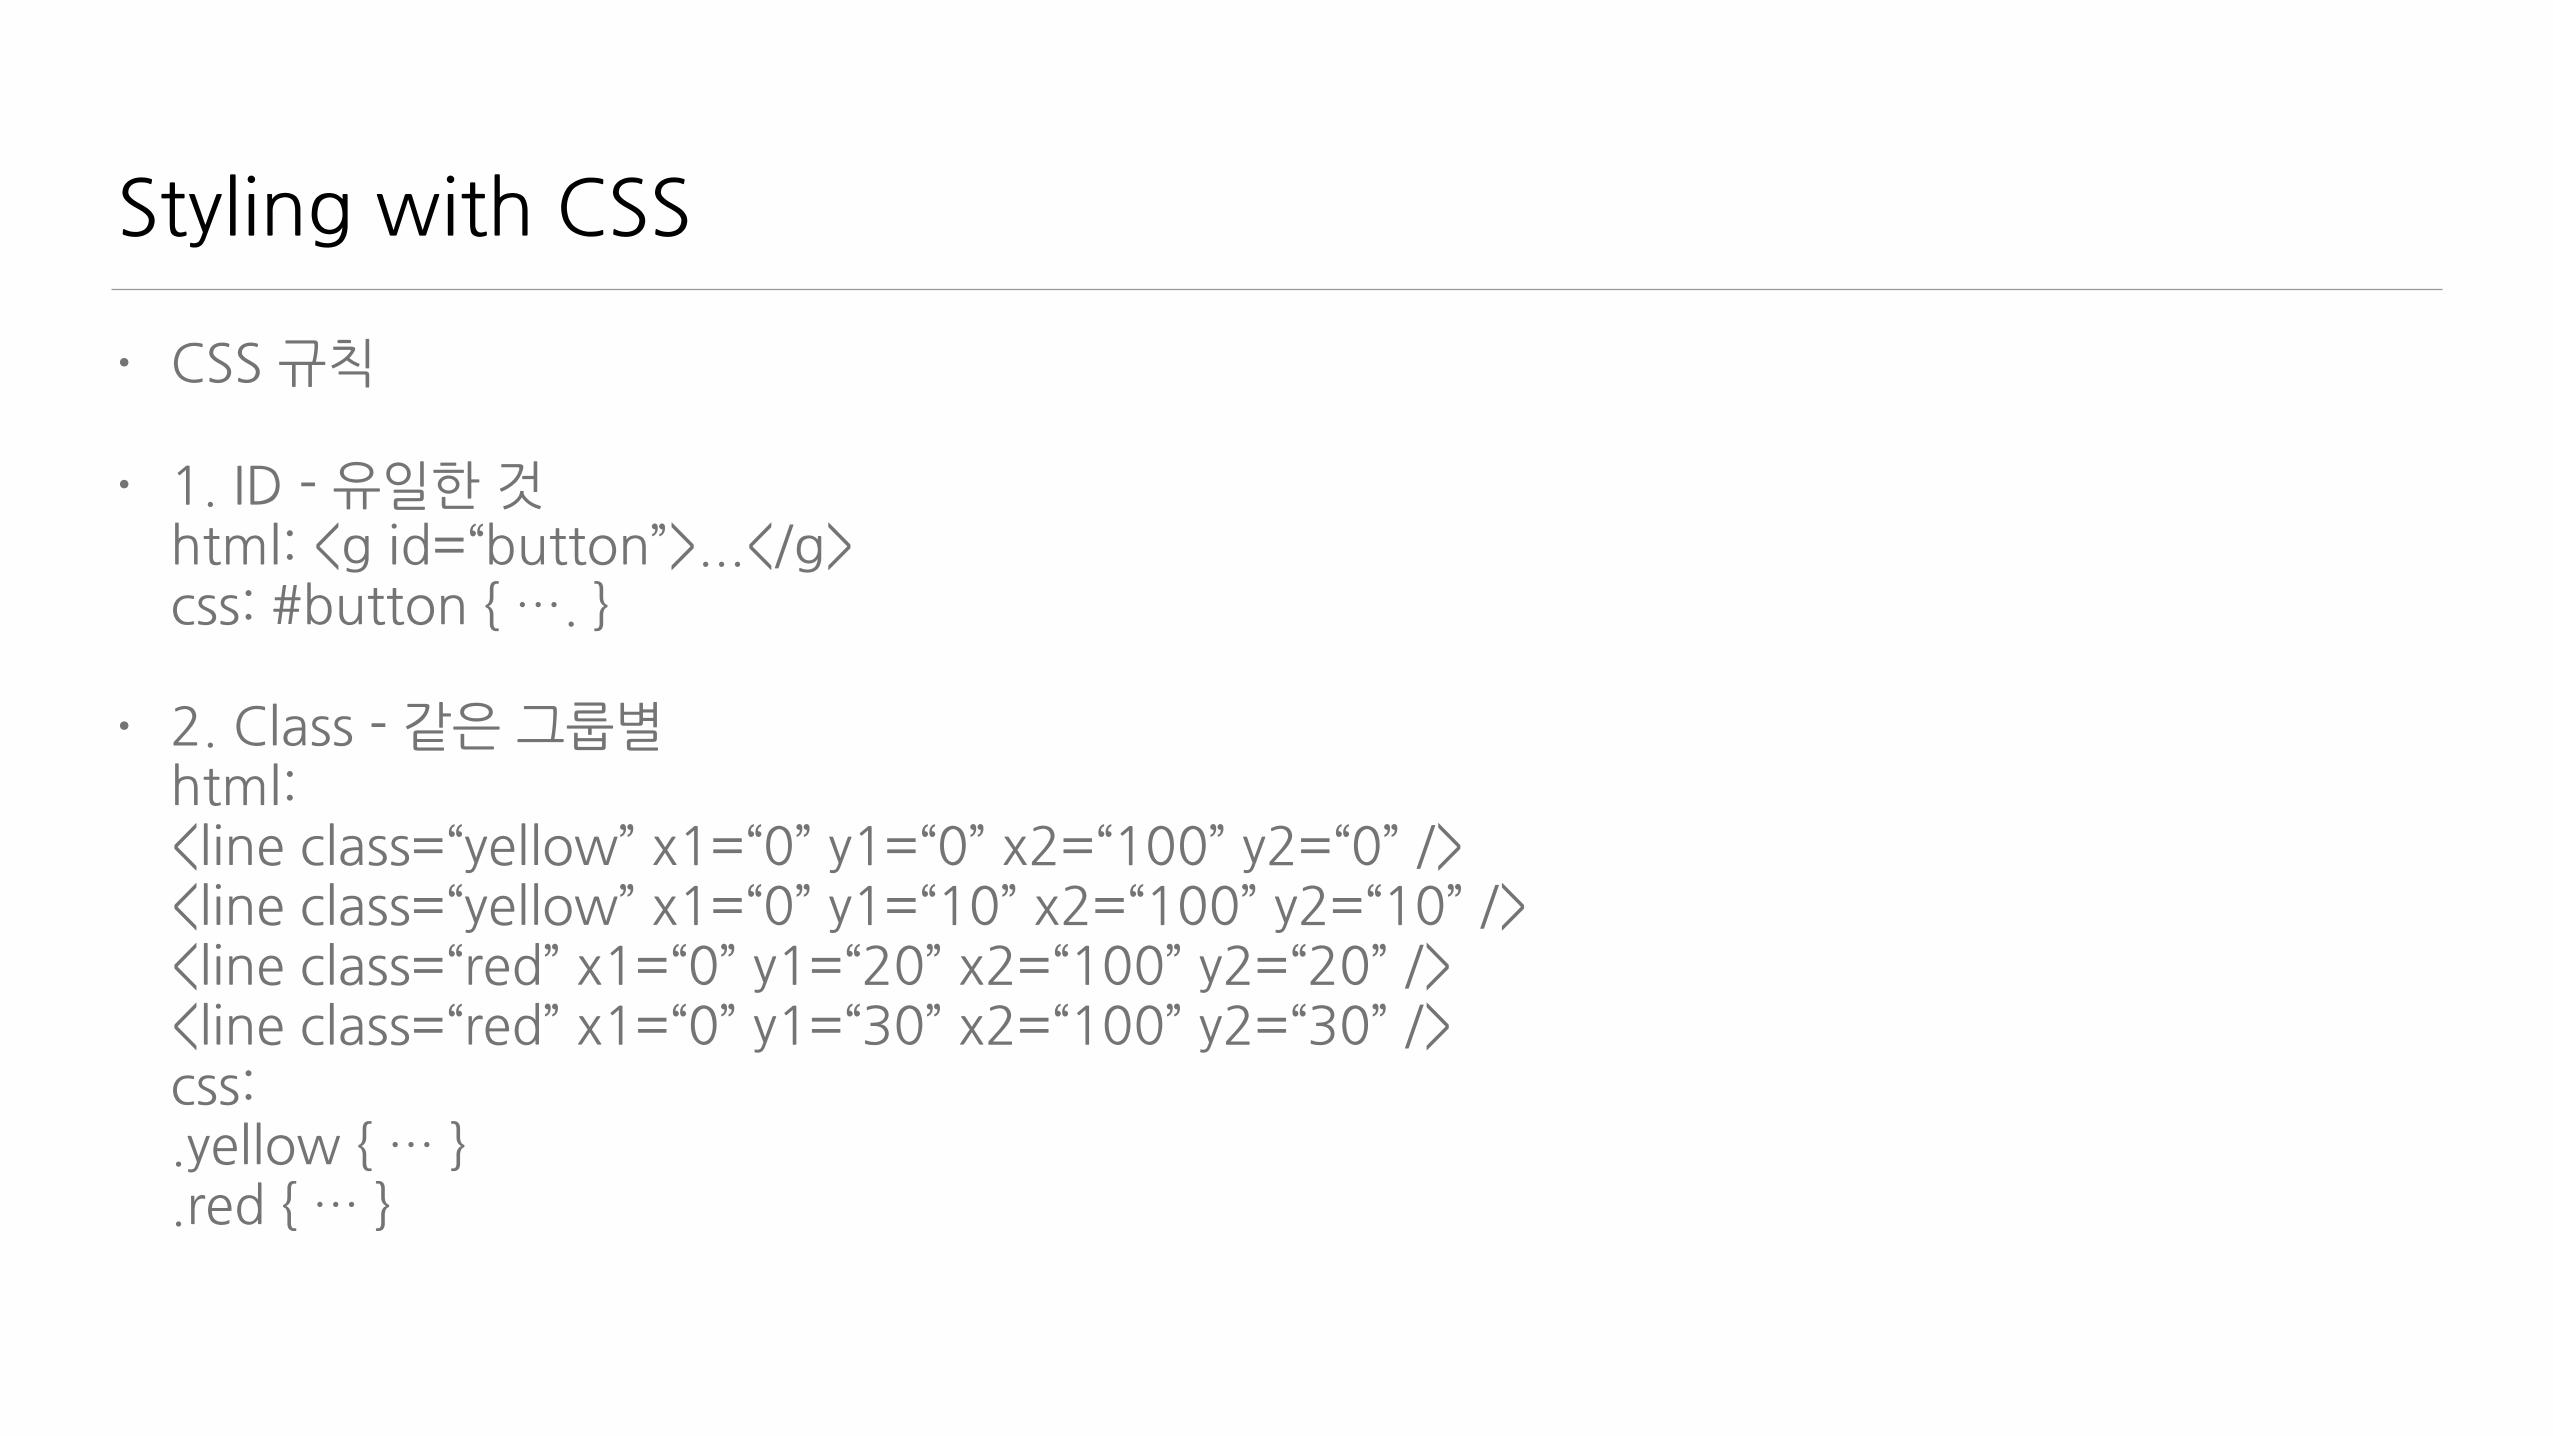
• CSS�규칙�
• 1.�ID�-�유일한�것html:�<g�id=“button”>...</g>css:�#button�{�….�}�
• 2.�Class�-�같은�그룹별html:�<line�class=“yellow”�x1=“0”�y1=“0”�x2=“100”�y2=“0”�/><line�class=“yellow”�x1=“0”�y1=“10”�x2=“100”�y2=“10”�/><line�class=“red”�x1=“0”�y1=“20”�x2=“100”�y2=“20”�/><line�class=“red”�x1=“0”�y1=“30”�x2=“100”�y2=“30”�/>css:� .yellow�{�…�}.red�{�…�}
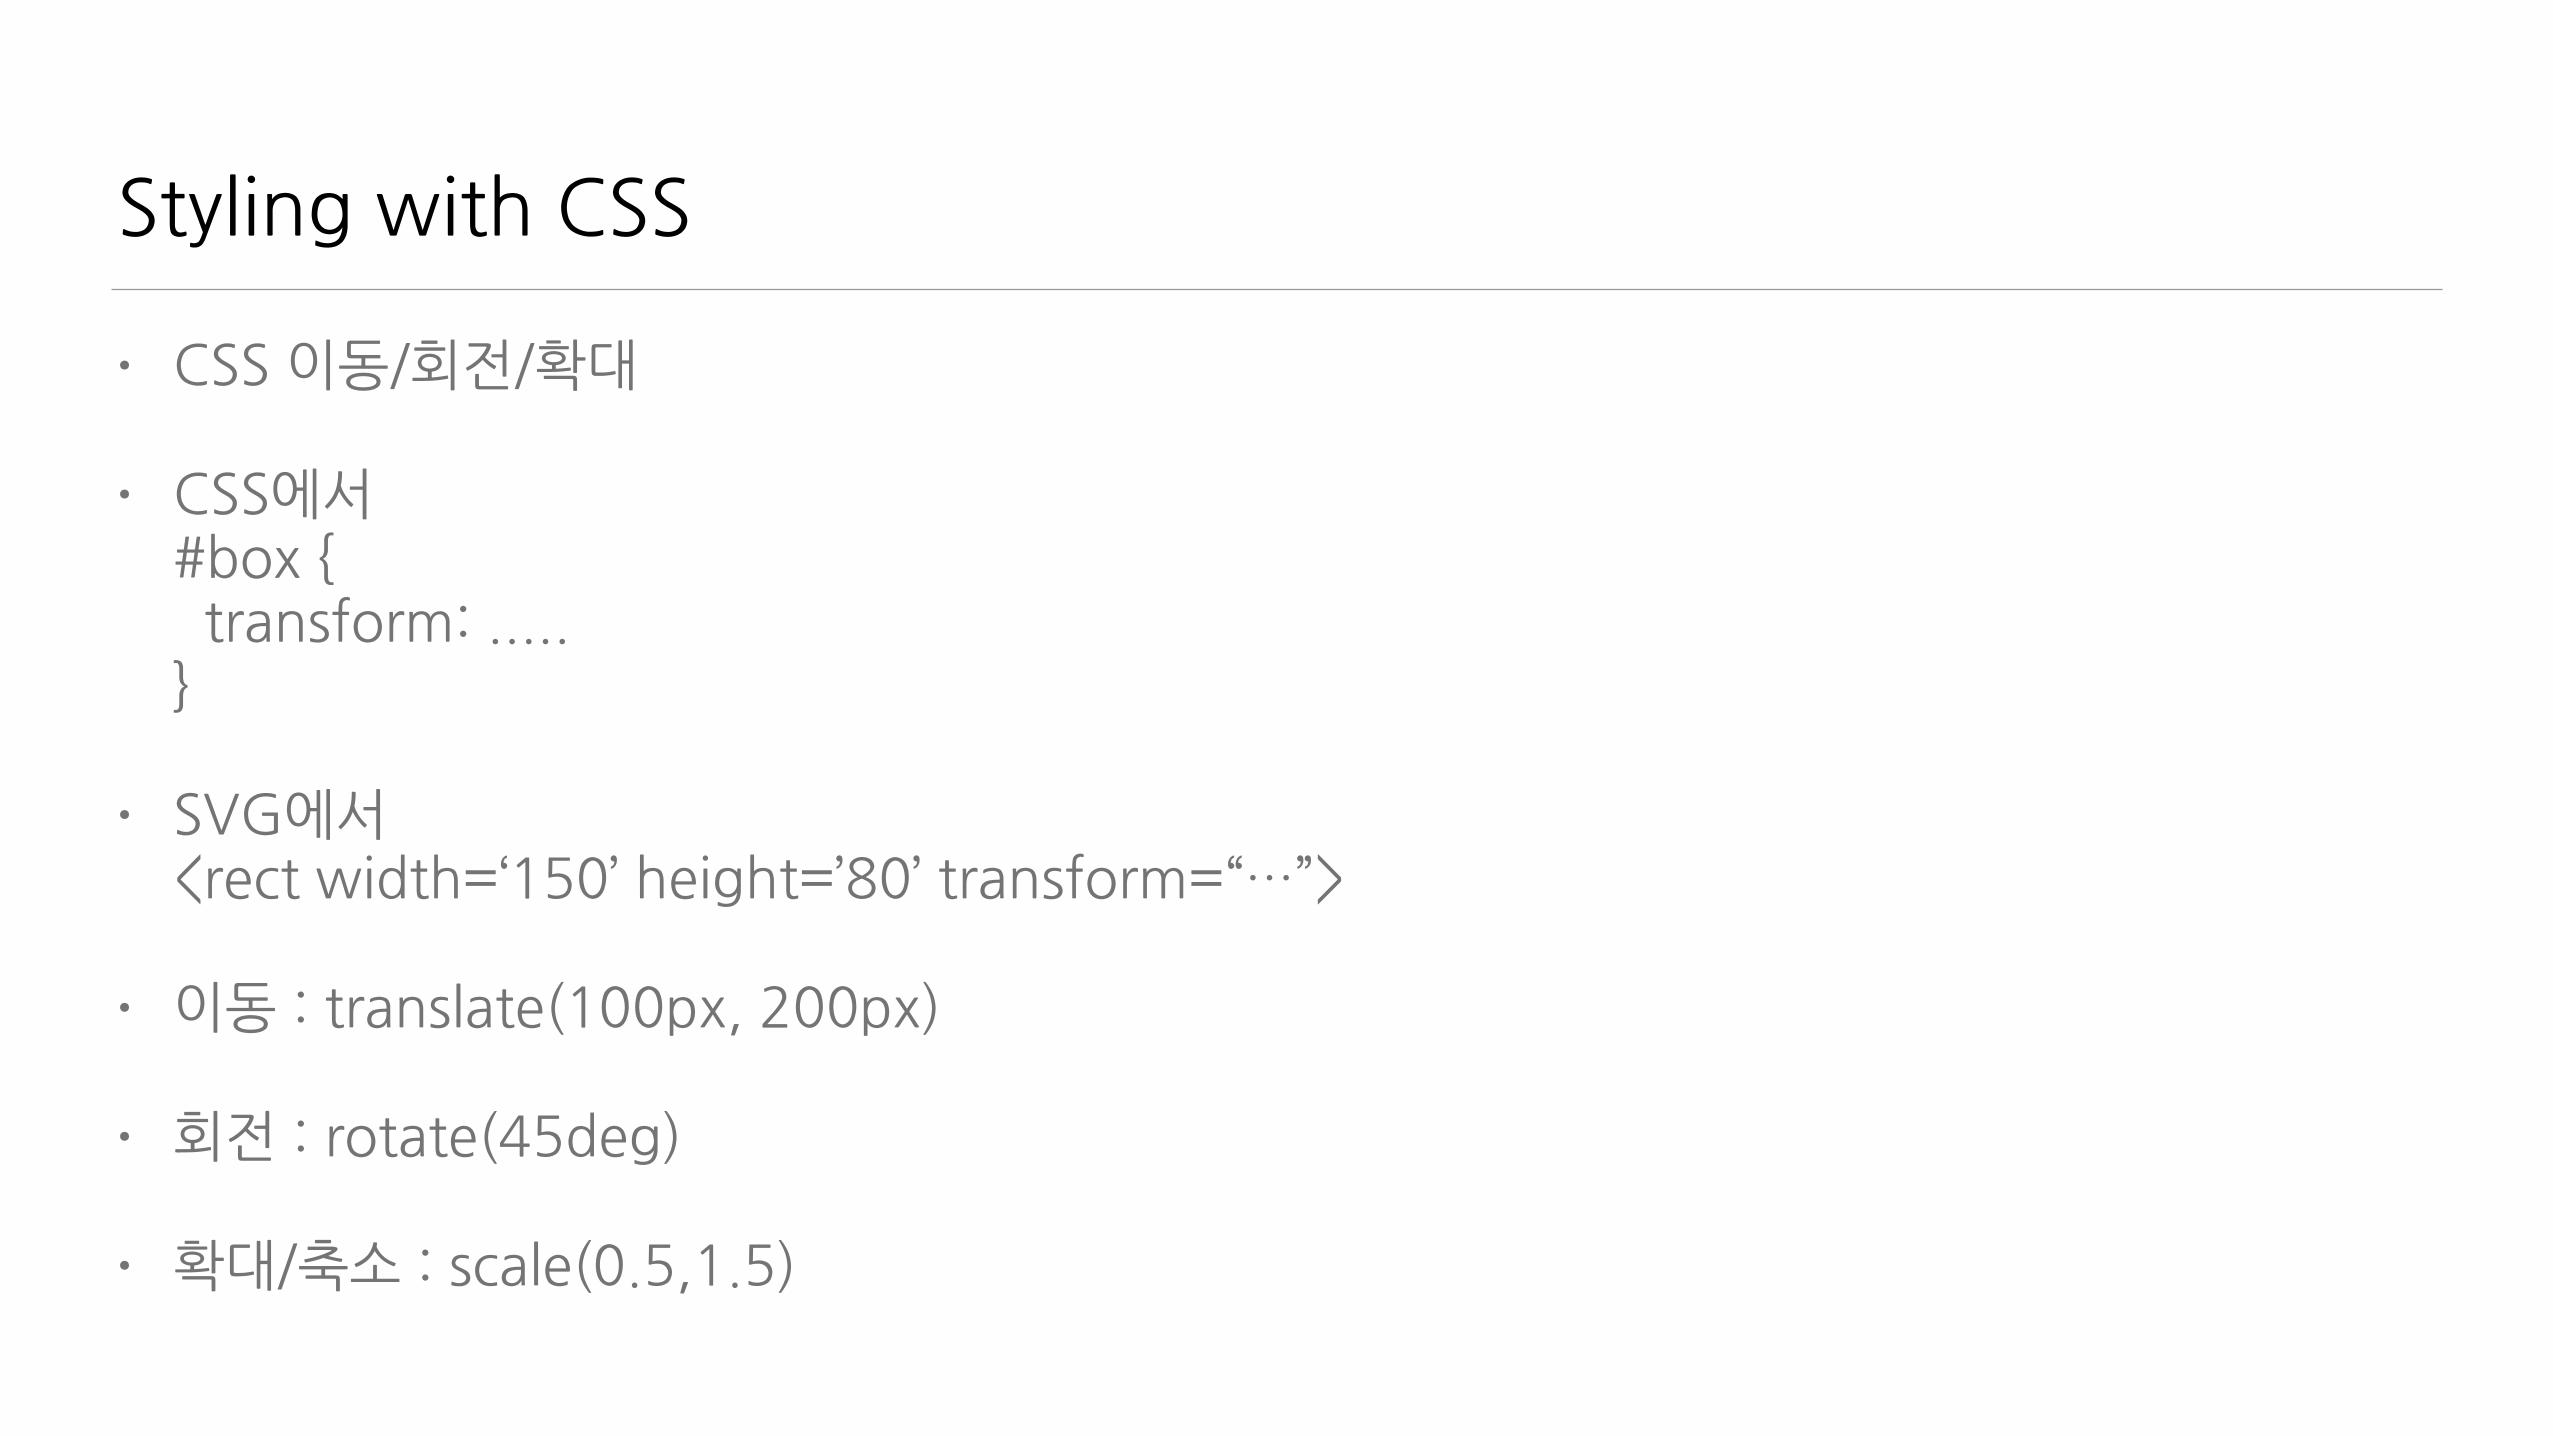
Styling�with�CSS
• CSS�이동/회전/확대�
• CSS에서#box�{��transform:�..... }�
• SVG에서<rect�width=‘150’�height=’80’�transform=“…”>�
• 이동�:�translate(100px,�200px)�
• 회전�:�rotate(45deg)�
• 확대/축소�:�scale(0.5,1.5)

UI�>�WiFi�Control�-�Connect
• event�-�connect�client“click�button#connect”:�function()�{ ��Meteor.call(“openSocket”,�“192.168.0.42”,�2323);}�
• method�-�server��Meteor.methods({����"openSocket":�function(ip,�port)�{ ������client�=�new�net.Socket(); ������client.connect(port,�ip,�function()�{ ��������console.log('Connected'); ������}); ����}��});
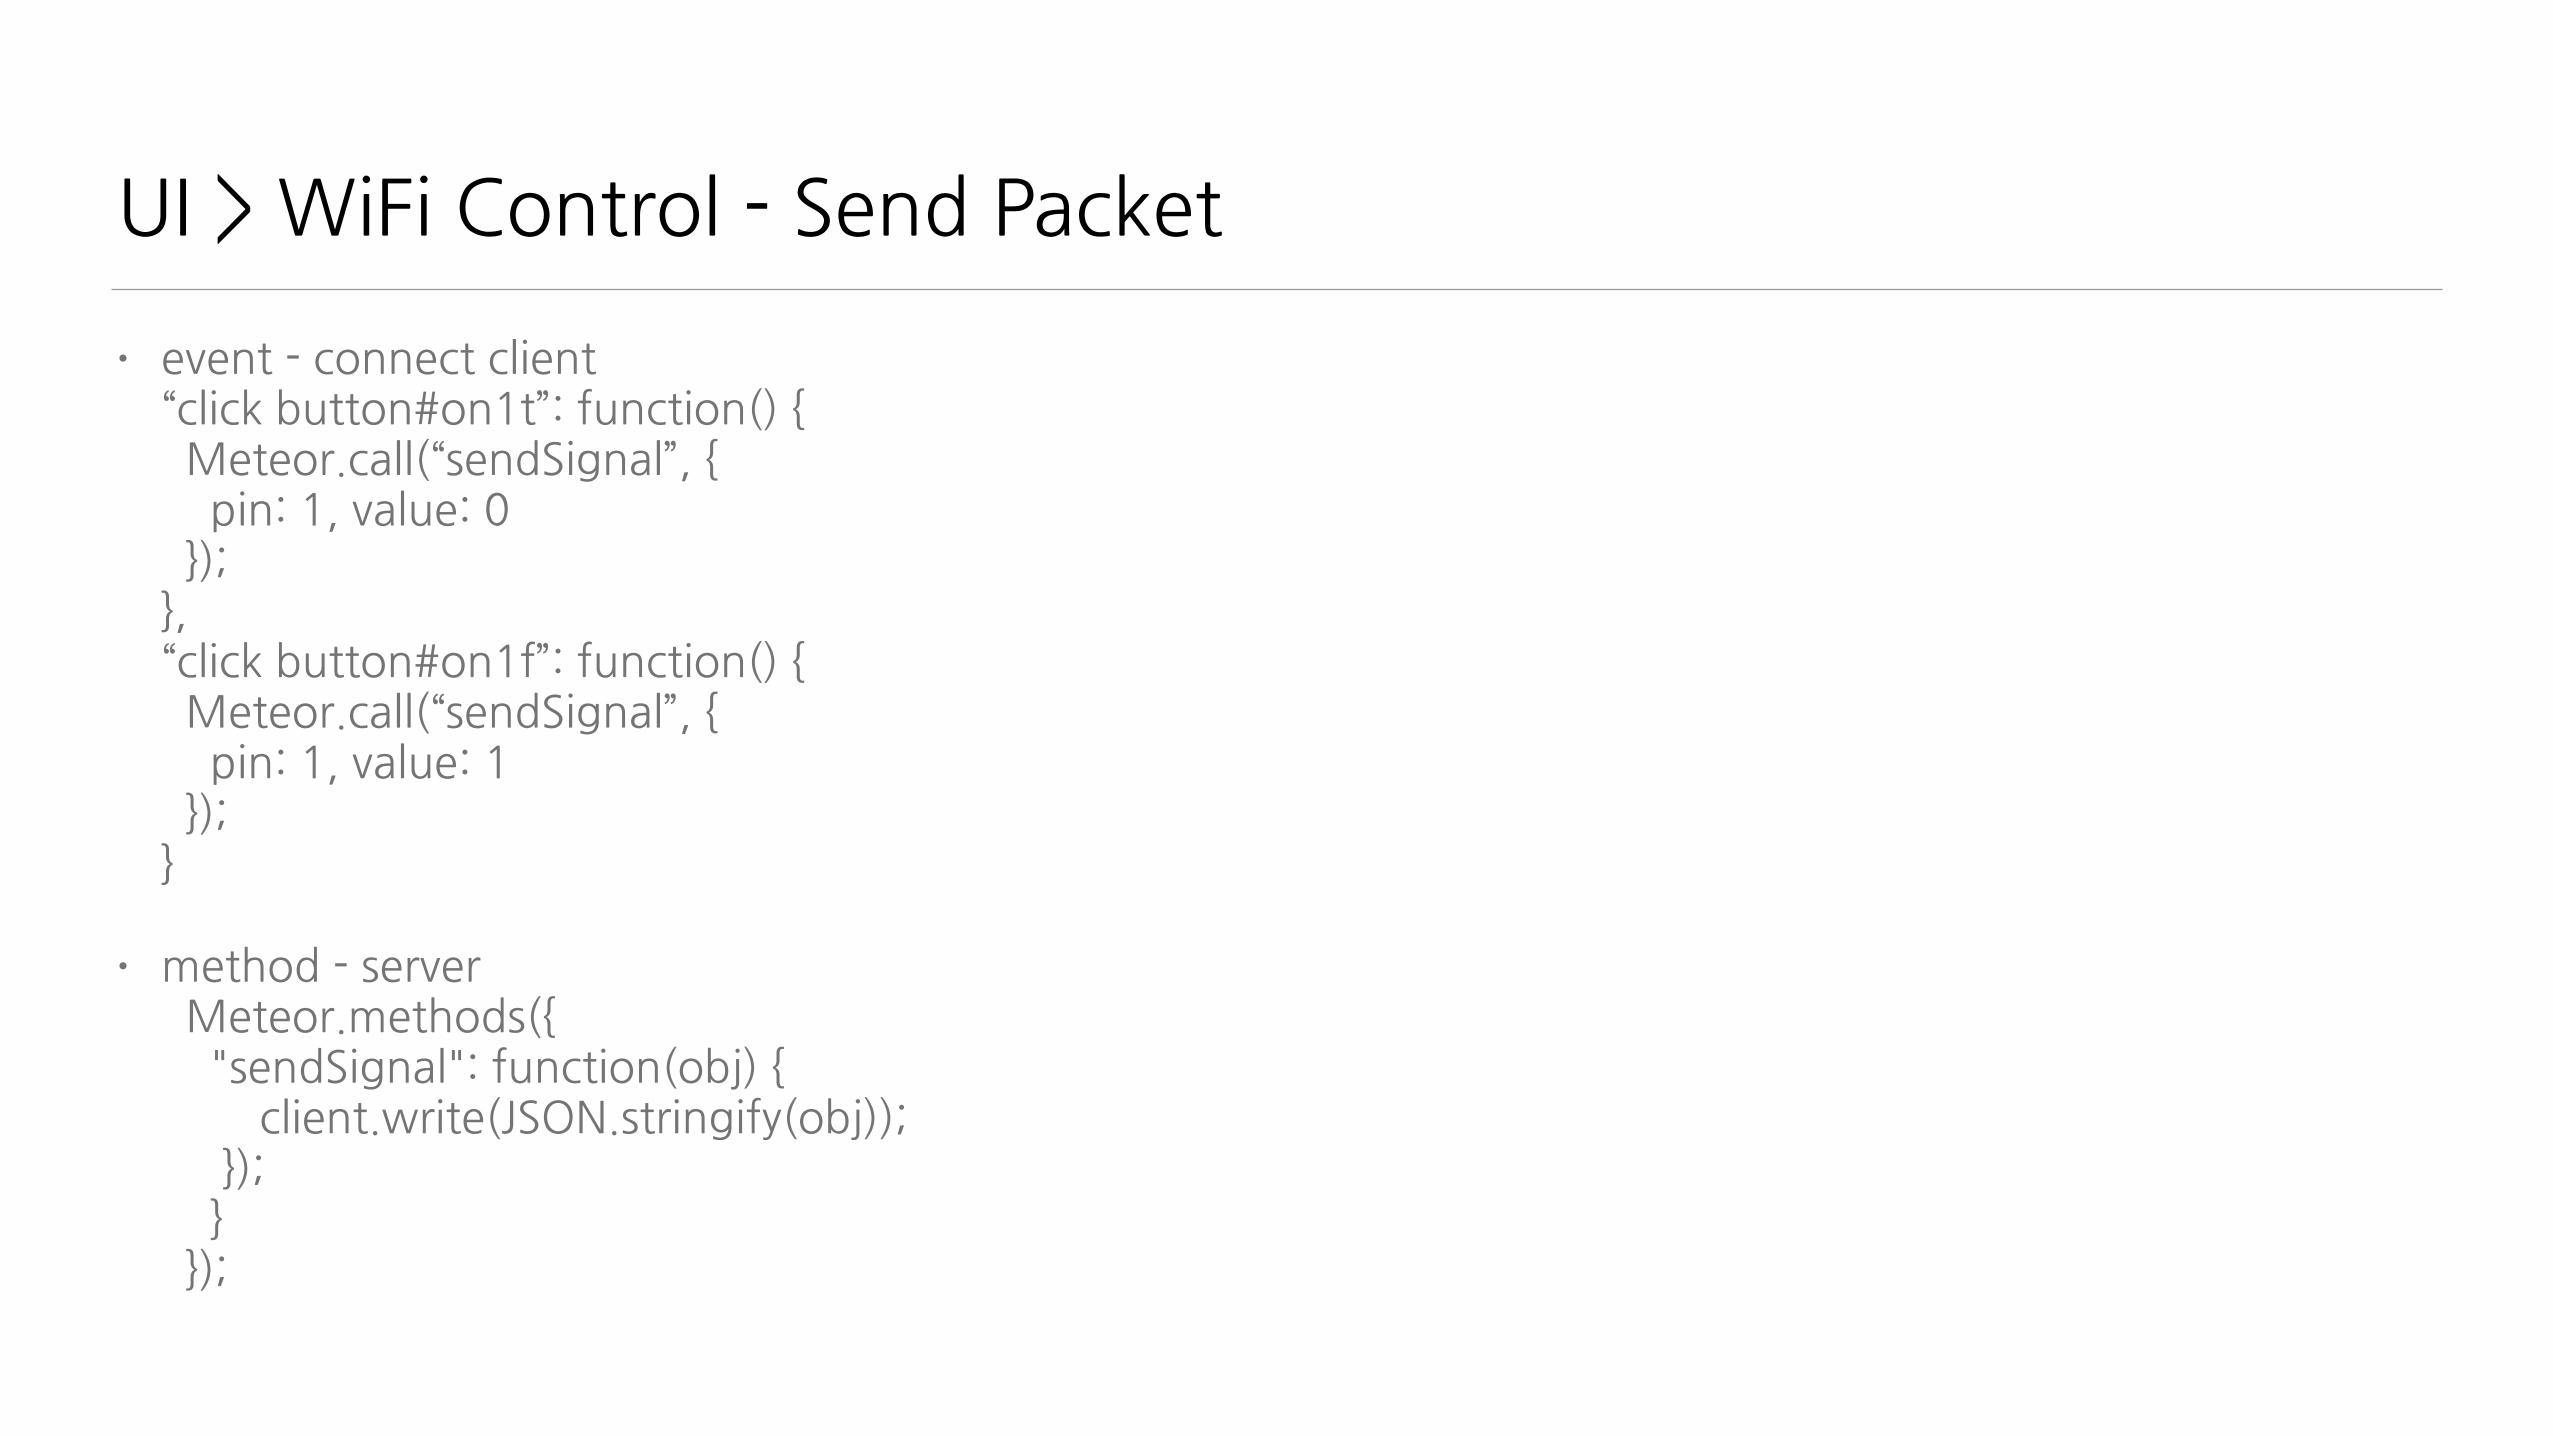
UI�>�WiFi�Control�-�Send�Packet
• event�-�connect�client “click�button#on1t”:�function()�{ ��Meteor.call(“sendSignal”,�{ ����pin:�1,�value:�0��});},“click�button#on1f”:�function()�{ ��Meteor.call(“sendSignal”,�{ ����pin:�1,�value:�1��});}�
• method�-�server��Meteor.methods({����"sendSignal":�function(obj)�{ ��������client.write(JSON.stringify(obj));�����});����}��});
ESP8266�-�Lua�Server
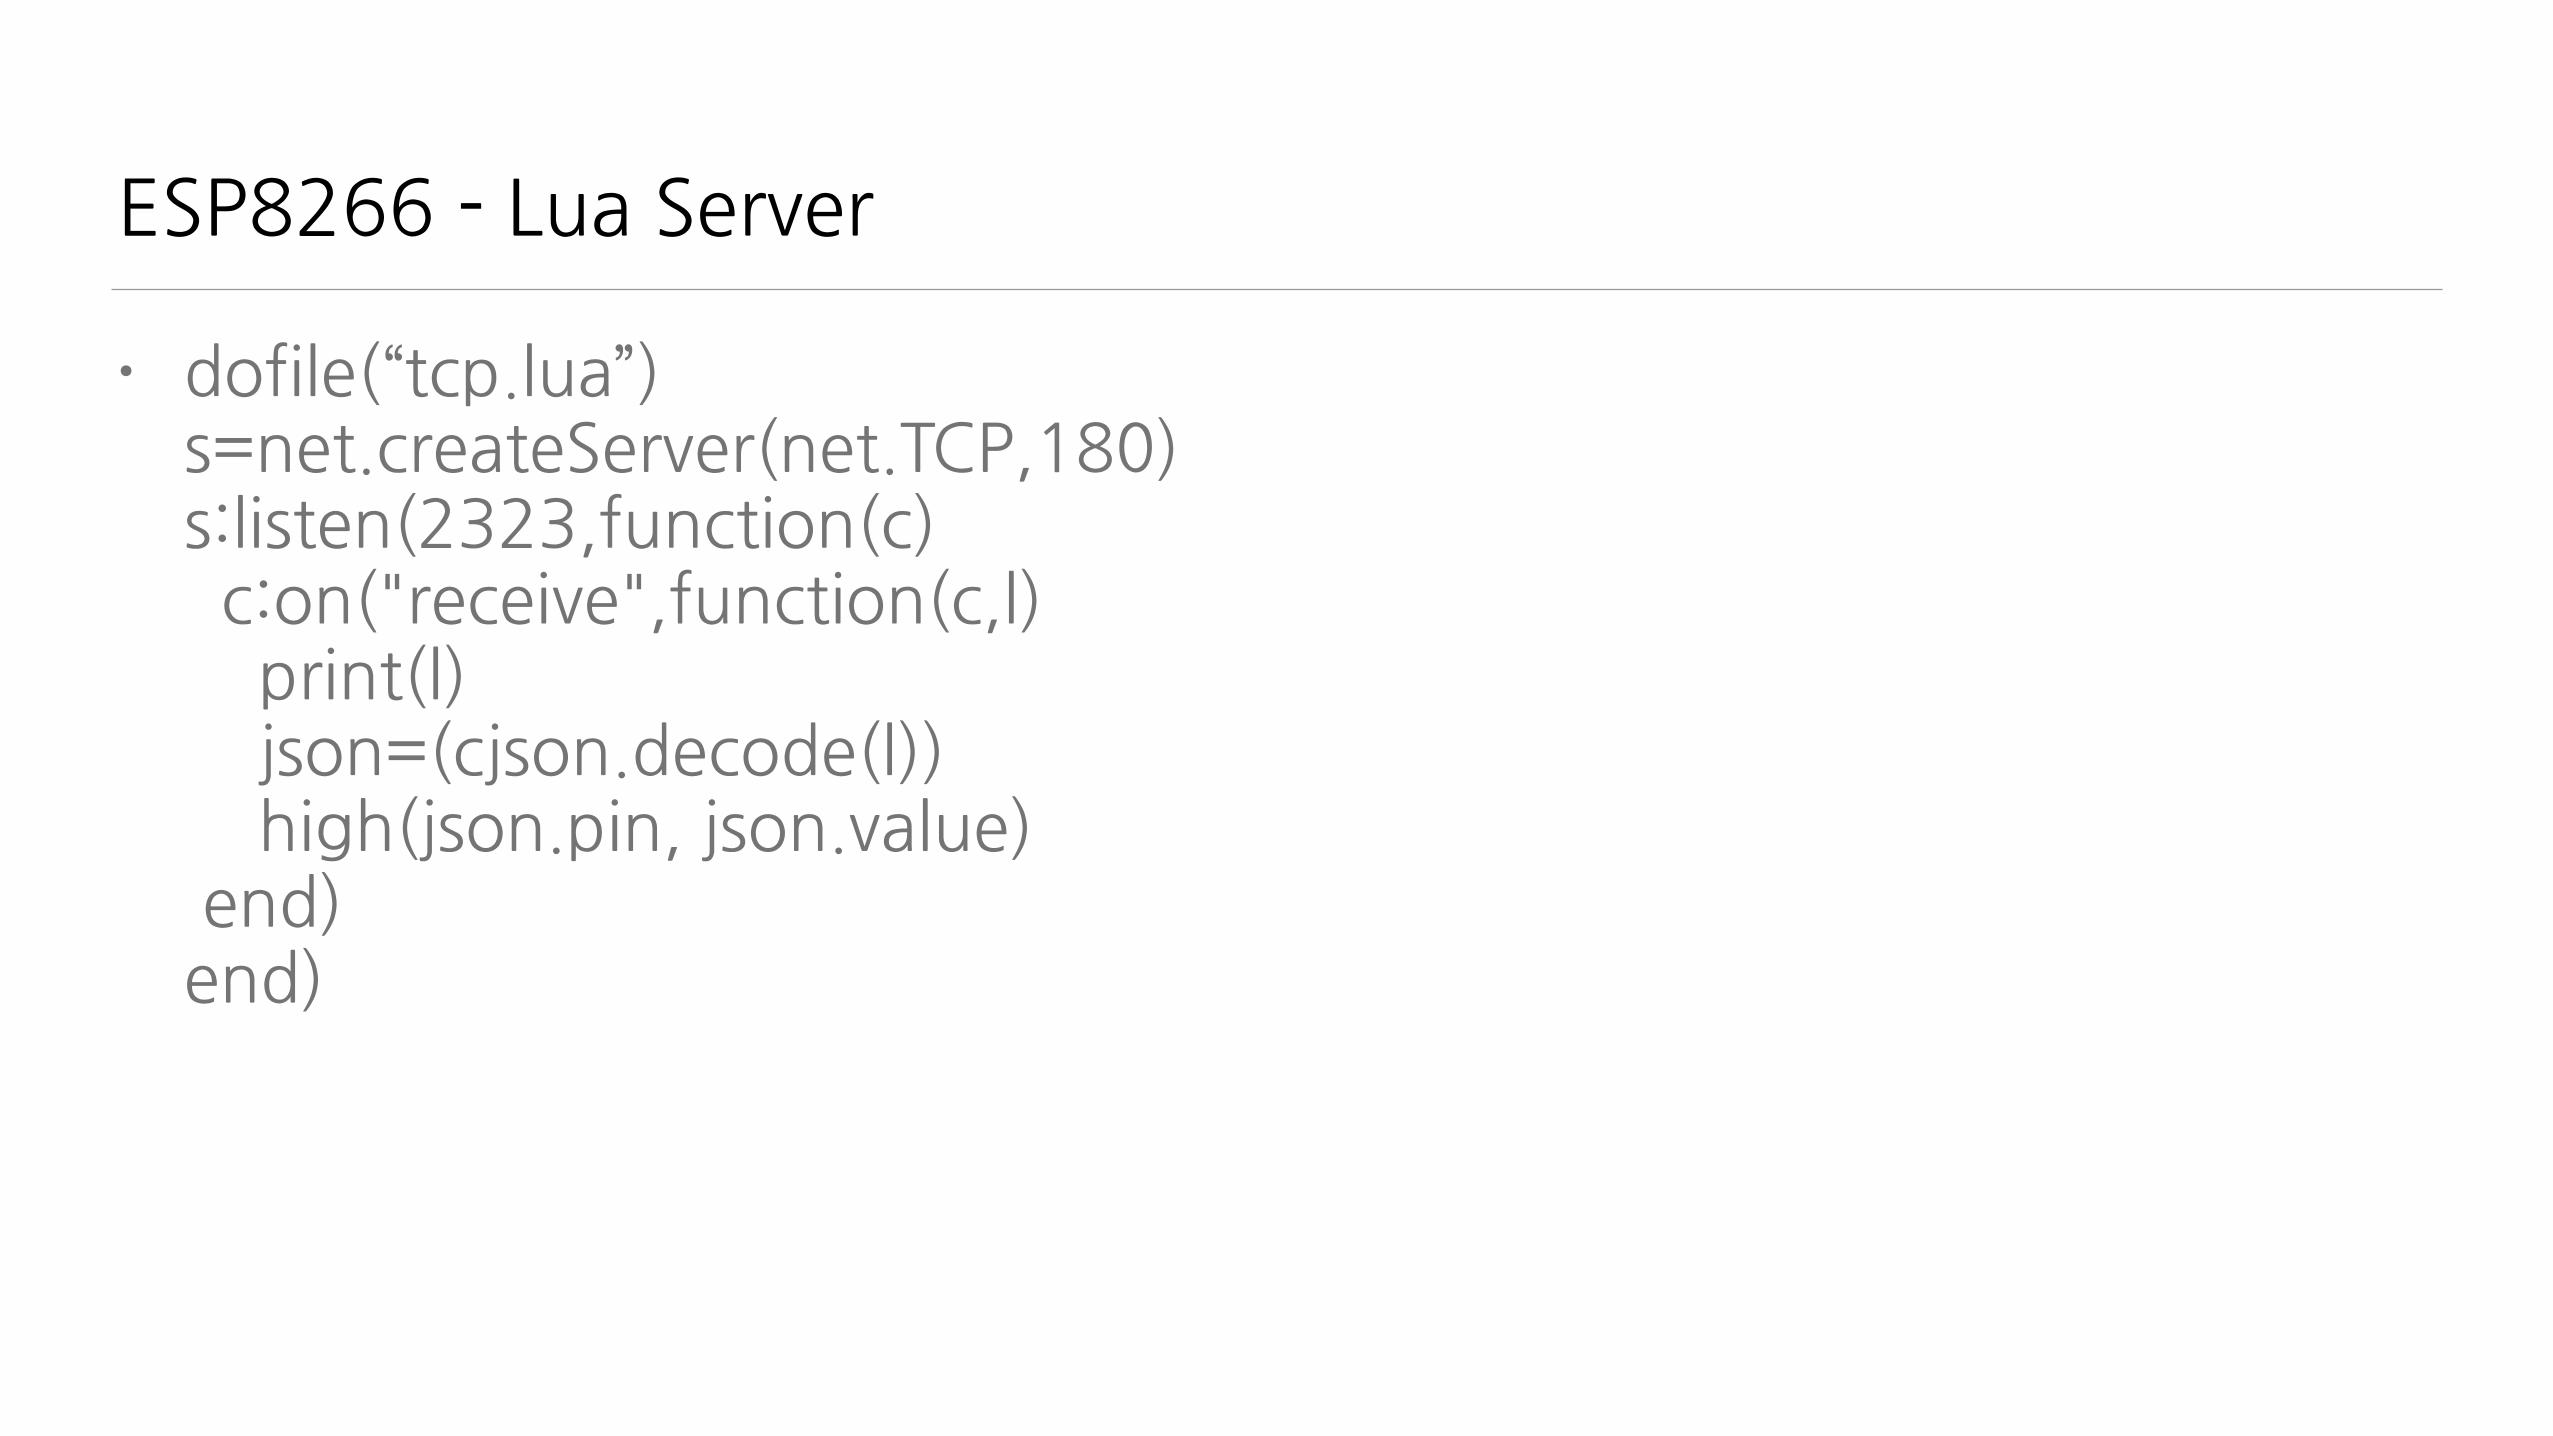
• dofile(“tcp.lua”) s=net.createServer(net.TCP,180) s:listen(2323,function(c)��c:on("receive",function(c,l)����print(l)����json=(cjson.decode(l))����high(json.pin,�json.value) �end)end)
ESP8266�References
• nodemcu.com/index_en.html�
• https://github.com/nodemcu/nodemcu-firmware�
• https://github.com/nodemcu/nodemcu-firmware/wiki/nodemcu_api_en

감사합니다.
• Appsoulute�이재호�대표�
• google�Hangouts�-�답변�잘하는�편이에요�^^;�
• 설문�링크�-�http://goo.gl/X6Ykm6


