
Technische Daten/ Technical Data:
Anschlussspannung/ : 230-250V / 50-60HzSupply Voltage
Leuchtmittel/ : LEDLight Source
Systemleistung/ : 6,4 WPower
BY
OK
GM
BH
I
ND
US
TR
IES
TR
AS
SE
17 D
25462 R
EL
LIN
GE
NT
EL
+49 4
101 5
9990
FA
X +
49 4
101 5
99955
INF
O@
BY
OK
.LIG
HT
ING
Mo
nta
gean
leit
un
g /
Mo
un
tin
g In
stru
ctio
n
Teile / Parts
A
SQ
UA
DR
INA
C
oder / or
oder / or
+
B
B C D
Fuß
Tischklemme
Wandhalter
+
B
+
90
RAL
Pflegehinweis:
Zur Reinigung und Pflege des Leuchtenkörpers empfehlen wir, diesen mit einem weichen, nicht
fusselden Tuch ohne Druck zu behandeln. Grobe Verschmutzungen können mit
handelsüblichem Spiritus oder Glasreiniger beseitigt werden.
Care instructions:
For cleaning and care of the luminaire body, we recommend to treat it with a soft, non-fuzzing
cloth without pressure. Coarse dirt can be removed with standard spirit or glass cleaner.
!!!Die Leuchtmittel bitte nicht eigenständig wechseln. Bei Bedarf wenden Sie sich bitte an den Hersteller!!!
Nur autorisiertes Fachpersonal darf die Montage und Inbetriebnahme der Leuchte/n unter
Berücksichtigung dieser Montageanleitung und aller für den jeweiligen Anwendungsbereich geltenden
Normen und Vorschriften durchführen.Dieses Qualitätsprodukt wurde mit Sorgfalt hergestellt und
verpackt. Sollte sich dennoch ein Grund zur Beanstandung ergeben, so wenden Sie sich bitte an den
Fachhändler, bei dem Sie das Produkt erworben haben. Muss das Produkt zur Reparatur eingeschickt
werden, benutzen Sie bitte ausschließlich die Originalverpackung und fügen Sie bitte unbedingt diesen
Garantieschein bei. Ohne Originalverpackung und Garantieschein kann eine eventuelle Garantie für das
Produkt nicht übernommen werden. Bei Bedarf können Sie die entsprechende Verpackung bei uns
beziehen.( Stand: April 2010)
!!!Please do not change the bulbs independently. If necessary, please contact the manufacturer!!!
Mounting and commissioning of the luminaire/s may only be performed by authorized personnel, in
accordance with this mounting instructions and any standards and regulations applicable to the respective
area of application. This quality product has been manufactured and packed with great care. Should there
still be reason for complaint, please contact the retailer where you purchased the product. If the product has
to be sent in for repairs, please only use the original box and always include this guarantee note in the box.
We cannot assume any guarantee for the product without the original box and the guarantee note. If
necessary, you can purchase the corresponding box from us (as of April 2010).
SQUADRINATISCHLEUCHTE/TABLE LAMP

BYOK GMBH INDUSTRIESTRASSE 17 D 25462 RELLINGENTEL +49 4101 59990 FAX +49 4101 599955 [email protected]
21003
4
Montageanleitung / Mounting Instruction
1 DE
EN
I
II
I
II
Packen Sie die Leuchte (A) und den Leuchtenfuß (B) aus und
legen sie diese auf eine weiche Oberfläche .
Stecken Sie die Fußaufnahme (A1) der Leuchte (A) auf die
Tischfuß (B) (Zeichnung 1) . Sichern Sie die Leuchte mit der
Rändelschraube (E) (Zeichnung 2).
Je nach Tischebene können die mitgelieferten selbstklebenden
Filzfüsse (C) unter den Leuchtenfuß (B) angebracht werden.
Unpack the luminaire (A) and the luminaire base (B) and place
them on a soft surface .
Screw the vertical base (A1) of the luminaire (A) with the base
clamp (B) (Illustration 1) . And protect the luminaire with the
knurled screw (E) (Illustration 2) .
According to the table plane you can fix the self-adhesive felt pats
(C) under the base (B) .
2
SQUADRINA
A3
III Die Position der Leuchtenkopf (A3) können Sie durch drehen und
bewegen des Leuchtenkopfes (A3) und des Leuchtenstiels (A2)
verändern (Zeichnung 3,4).
III The position of the luminaire head (A3) can be changed by
rotating and moving back and forth the luminaire head (A3) and
the luminare still (A2) (Illustration 3,4).
TISCHFUß
A3
A3
A2
A1
A1
B
B
A1
A2
E
A2
A2
BYOK GMBH INDUSTRIESTRASSE 17 D 25462 RELLINGENTEL +49 4101 59990 FAX +49 4101 599955 [email protected]
21003
4
Montageanleitung / Mounting Instruction
1 DE
EN
I
II
I
II
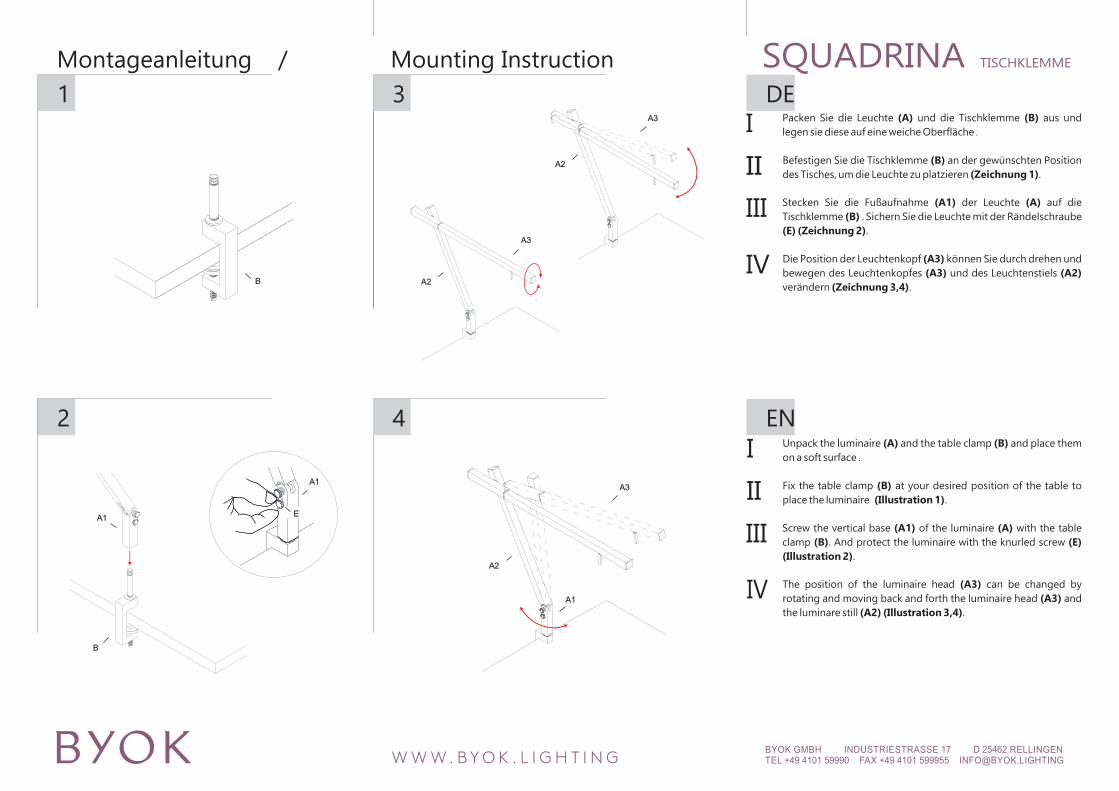
Packen Sie die Leuchte (A) und die Tischklemme (B) aus und
legen sie diese auf eine weiche Oberfläche .
Befestigen Sie die Tischklemme (B) an der gewünschten Position
des Tisches, um die Leuchte zu platzieren (Zeichnung 1).
Unpack the luminaire (A) and the table clamp (B) and place them
on a soft surface .
Fix the table clamp (B) at your desired position of the table to
place the luminaire (Illustration 1).
2
IV Die Position der Leuchtenkopf (A3) können Sie durch drehen und
bewegen des Leuchtenkopfes (A3) und des Leuchtenstiels (A2)
verändern (Zeichnung 3,4).
IV The position of the luminaire head (A3) can be changed by
rotating and moving back and forth the luminaire head (A3) and
the luminare still (A2) (Illustration 3,4).
III Stecken Sie die Fußaufnahme (A1) der Leuchte (A) auf die
Tischklemme (B) . Sichern Sie die Leuchte mit der Rändelschraube
(E) (Zeichnung 2).
III Screw the vertical base (A1) of the luminaire (A) with the table
clamp (B). And protect the luminaire with the knurled screw (E)
(Illustration 2).
B
TISCHKLEMME
A1
E
B
A1
A3
A2
A1
A3
A3
A2
A2
SQUADRINA

BYOK GMBH INDUSTRIESTRASSE 17 D 25462 RELLINGENTEL +49 4101 59990 FAX +49 4101 599955 [email protected]
21003
4
Montageanleitung / Mounting Instruction
1
2
WANDHALTER
B
B
C
CD
A1
A2
B
DE
EN
I
II
I
II
Packen Sie die Leuchte (A) und der Wandhalter (B) aus und legen
sie diese auf eine weiche Oberfläche .
Befestigen Sie den Wandhalter (B) mit der Schraube (C) und dem
Dübel (D) an der gewünschten Position der Wand, um die
Leuchte zu platzieren (Zeichnung 1).
Unpack the luminaire (A) and the wall clamp (B) and place them
on a soft surface .
Mount the wall clamp (B) with the two screw (C) and dubel (D) at
your desired position of the wall to place the luminaire
(Illustration 1).
IV Die Position der Leuchtenkopf (A3) können Sie durch bewegen
des Leuchtenkopfes (A3) und des Leuchtenstiels (A2) verändern
(Zeichnung 3,4).
IV The position of the luminaire head (A3) can be changed by
moving back and forth the luminaire head (A3) and the luminare
still (A2) (Illustration 3,4).
III Stecken Sie die Fußaufnahme (A1) der Leuchte (A) auf der
Wandhalter (B) . Sichern Sie die Leuchte mit der Rändelschraube
(E) (Zeichnung 2).
III Fix the vertical base (A1) of the luminaire (A) on the wall clamp
(B) . And protect the luminaire with the knurled screw (E)
(Illustration 2).
A3
A2
A1
A3
A3
A2
A2
A1
E
SQUADRINA


