快速入门指南 快速入門指南 빠른 시작 가이드 Краткое...
TRANSCRIPT

Quick Start GuideKurzanleitungGuide de démarrage rapideGuida rapida all’usoGuía de Inicio RápidoGuia de Início Rápido基本操作の手引き快速入门指南
快速入門指南
빠른 시작 가이드
Краткое руководство

Caution, risk of danger. LED RADIATION - DO NOT VIEW DIRECTLY WITH OPTICAL INSTRUMENTS
CLASS 1M LED PRODUCT - Viewing the LED output with instruments (for example, eye loupes, magnifiers and microscopes) within a distance of 100 mm may pose an eye hazard.
EQUIPMENT INFORMATION
Use of this equipment in a manner other than that specified by X-Rite, Incorporated may compromise design integrity and become unsafe.
WARNING: This instrument is not for use in explosive environments.
ADVERTENCIA – NO use este aparato en los ambientes explosivos.
AVVERTIMENTO – NON usare questo apparecchio in ambienti esplosivi.
WARNUNG: Das Gerät darf in einer explosiven Umgebung NICHT verwendet werden.
AVERTISSEMENT: Cet instrument ne doit pas être utilisé dans un environnement explosif.
RoHS/WEEE
X-Rite products meet the Restriction of Hazardous Substances (RoHS) Directive 2002/95/EC and European Union – Waste Electrical and Electronic Equipment (WEEE) Directive 2002/96/EC. Please refer to www.xrite.com for more information on X-Rite’s compliance with the RoHS/WEEE directives.
If this product is used in a manner not specified by the instruction, the safety protection provided by the device may be impaired or become inoperable.
Unauthorized dismantling of the i1Studio will void all warranty claims.
ENImportant Notices
CE Declaration
Manufacturer’s Name: X-Rite, IncorporatedAuthorized Representative: X-Rite, Incorporated • Siemensstraße 12b • 63263 Neu-Isenburg • GermanyPhone:+49 (0) 61 02-79 57-0 • Fax: +49 (0) 61 02 -79 57-57
Model Name: i1StudioDirective(s) Conformance: 2014/35/EU (LVD), 2011/65/EU (RoHS), 2014/30/EU (EMC)
FEDERAL COMMUNICATIONS COMMISSION NOTICE
NOTE: This equipment has been tested and found to comply with the limits for a Class B digital device, pursuant to Part 15 of the FCC Rules. These limits are designed to provide reasonable protection against harmful interference in a residential installation. This equipment generates, uses and can radiate radio frequency energy and, if not installed and used in accordance with the instructions, may cause harmful interference to radio communications. However, there is no guarantee that interference will not occur in a particular installation. If this equipment does cause harmful interference to radio or television reception, which can be determined by turning the equipment off and on, the user is encouraged to try to correct the interference by one or more of the following measures:
• Reorient or relocate the receiving antenna.
• Increase the separation between the equipment and receiver.
• Connect the equipment into an outlet on a circuit different from that to which the receiver is connected.
• Consult the dealer or an experienced radio/TV technician for help.
INDUSTRY CANADA COMPLIANCE STATEMENT
This Class B digital apparatus complies with Canadian ICES-003.Cet appareil numérique de la classe B est conforme à la norme NMB-003 du Canada.
NOTE: USB interface cable (1.8m) shipped with this device must be used in order to maintain compliance with the desired CE mark requirements, FCC Part 15 Rules, and Canadian ICES-003.
!
Safety Information
!

Contenido del paquete パッケージ内容 包装内容 包裝內容
Conteúdo da Embalagem Комплект поставки 포장 내용물
ES
JP
CS
1. i1Studio. 2. Monitor holder and protection bag. 3. USB cable. 4. Mini ColorChecker Classic target. 5. Software Download URL Cards.
1. i1Studio. 2. Monitor-und Schutztasche. 3. USB-Kabel. 4. Mini ColorChecker Classic Testchart. 5. Karte mit URL für Software-Download.
1. i1Studio. 2. Support pour moniteur et sac de protection. 3. Câble USB. 4. Charte ColorChecker Classic miniature. 5. Cartes avec l‘URL de téléchargement du logiciel.
1. i1Studio. 2. Supporto per il monitor e custodia protettiva. 3. Cavo USB. 4. Mini target ColorChecker Classic. 5. Biglietti URL per download software.
1. i1Studio. 2. Soporte para monitor y bolsa de protección. 3. Cable USB. 4. Objetivo ColorChecker Classic mini. 5. Tarjetas URL de descarga del software.
1. i1Studio. 2. Suporte do monitor e bolsa de proteção. 3. Cabo USB. 4. Alvo ColorChecker Classic Mini. 5. Cartões de Localizadores para Baixar o Programa.
i1Studio 2.モニタ専用ホルダーおよびケース 3.USBケーブル 4.ColorChecker ミニクラシック ターゲット 5.ソフトウェアダウンロードのURLカード
1.i1Studio. 2.显示器支架和保护袋。3.USB 电缆。4.小型 ColorChecker Classic 目标。 5.软件下载网址卡。
1. i1Studio。2. 顯示器支架和保護袋。3. USB 電纜。4. 小型 ColorChecker Classic 目標。5. 軟體下載網址卡。
1. i1Studio. 2. 모니터 홀더 및 보호 가방. 3. USB 케이블. 4. 미니 ColorChecker 클래식 타겟. 5. 소프트웨어 다운로드 URL 카드.
1. Инструмент i1Studio. 2. Чехол-держатель для монитора. 3. Кабель USB. 4. Мишень Mini ColorChecker Classic. 5. Карточки с URL-адресами для загрузки программного обеспечения.
EN
DE
FR
IT
Package Contents Lieferumfang Contenu du coffret Contenuto della confezione
23
54
1 PT
KO
RU
CT

ES
JP
CS
First download i1Studio software from xrite.com/geti1Studio. Make sure the software is installed before you attach the USB cable to the backside of your i1Studio and plug it into your computer.
Laden Sie zuerst i1Studio von http://xrite.com/geti1Studio herunter. Die Software muss installiert werden ehe das Gerät per USB-Kabel an Ihren Computer angeschlossen werden darf.
Commencez par télécharger le logiciel i1Studio à partir du site xrite.com/geti1Studio. Veillez à installer le logiciel avant de brancher le câble USB à l‘arrière du i1Studio et de le connecter à votre ordinateur.
In primo luogo, scaricare il software i1Studio dal sito xrite.com/geti1Studio. Il software deve essere installato prima di collegare il cavo USB al i1Studio e al computer.
En primer lugar, descargue el software i1Studio del sitio web xrite.com/geti1Studio. Asegúrese de que el software esté instalado antes de enchufar el cable USB en la parte trasera de su i1Studio y conectarlo a su computadora.
Primeiro, baixe o programa i1Studio a partir de xrite.com/geti1Studio. Certifique-se de instalar o programa antes de acoplar o cabo USB à parte traseira do i1Studio e de conectá-lo ao seu computador.
i1Studio ソフトウェアの無償ダウンロードは、www.xrite.com/geti1Studio からご利用いただけます。i1Studio 後方に USB ケーブルを接続し、コンピュータに挿入する前にソフトウェアがインストールされていることを確認してください。
首先从 xrite.cn/geti1Studio 下载 i1Studio 软件。务必先安装软件,然后将 USB 电缆连接至 i1Studio 背面并将其插入计算机。
首先從 xrite.cn/geti1Studio 下載 i1Studio 軟體。務必先安裝軟體,然後將 USB 電纜連線至 i1Studio 背面並將其插入電腦。
먼저 xrite.com/geti1Studio 에서 i1Studio 소프트웨어를 다운로드합니다. 소프트웨어가 설치되어 있는지 확인한 후에 USB 케이블을 i1Studio 뒤쪽에 부착하고 컴퓨터에 연결합니다.
Сначала загрузите программное обеспечение i1Studio с веб-сайта: xrite.com/geti1Studio. Перед тем как подключать кабель USB к разъему на задней панели инструмента i1Studio и к компьютеру, обязательно установите программное обеспечение.
EN
DE
FR
IT
Installation 1 Installation 1 Installation 1 Installazione 1 Instalación 1 Instalação 1 インストール 1 安装 1 安裝 1 설치 1 Установка 1
KO
PT
RU
CT

ES
JP
CS
1. Rotary Disk to set measurement mode. 2. Target Flag to measure small color patches. 3. Target Lock to unlock and lock Target Flag. 4. Button to trigger measurements.
1. Wahlscheibe zur Auswahl des Messmodus. 2. Zielhilfe zur Messung kleiner Felder. 3. Schalter zum Sperren und Entsperren der Zielhilfe. 4. Messtaste.
1. Disque rotatif servant à définir le mode de mesure. 2. Guide servant à mesurer les patchs de couleur de petite taille sur un nuancier. 3. Bouton d’ouverture/fermeture du guide. 4. Bouton servant à prendre une mesure.
1. Selettore rotante per impostare la modalità di misurazione. 2. Indicatore target per misurare piccoli patch di colori. 3. Blocco target per bloccare/sbloccare l‘Indicatore target. 4. Pulsante per avviare le misurazioni.
1. Disco Rotativo (para configurar el modo de medición). 2. Marca de Objetivo (para medir los parches de color pequeños). 3. Bloque de Objetivo (para desbloquear y bloquear la Marca de Objetivo). 4. Botón para hacer mediciones.
1. Disco Rotatório para configurar o modo de medição. 2. Sinalizador de Alvo para medir seções de cores pequenas. 3. Trava de Alvo para destravar e travar o Sinalizador de Alvo. 4. Botão para acionar as medições.
1. 測定モードを設定するロータリーディスク 2. 小さなカラーパッチを測定するターゲット 3. ターゲットをロックおよびロック解除するターゲットロック 4. 測定開始ボタン
1. 设置测量模式的转盘。2. 测量小色块的目标标志。3. 解锁或锁定目标标志的目标锁。
4. 触发测量的按钮。
1. 設置測量模式的轉盤。2. 測量小色塊的目標標誌。3. 解鎖或鎖定目標標誌的目標鎖。 4. 觸發測量的按鈕。
1. 측정 모드 설정을 위한 회전 디스크. 2. 작은 컬러 패치를 측정하기 위한 타겟 플래그. 3. 타겟 플래그의 잠금 해제 및 잠금에 사용하는 타겟 잠금장치. 4. 측정 트리거 버튼.
1. Поворотный селектор режима измерений. 2. Прицел для измерения небольших цветных полей. 3. Фиксатор для блокировки и разблокирования прицела. 4. Кнопка для запуска измерений.
EN
DE
FR
IT1
4
2
3
Overview 1 Übersicht 1 Présentation 1 Cenni generali 1 Visión general 1 Visão geral 1 概要 1 概览 1 概覽 1 개요 1 Обзор 1
KO
PT
RU
CT

ES
JP
CS
Choose the measurement mode you want to work with by easily turning the Rotary Disk. Please make sure you do not press the measurement button while rotating.
Wählen Sie mit der Wahlscheibe den Messmodus, den Sie verwenden möchten. Achten Sie darauf, dass Sie dabei nicht versehentlich die Messtaste drücken.
Sélectionnez le mode de mesure à utiliser en faisant simplement tourner le disque rotatif. Veillez à ne pas appuyer sur le bouton de mesure pendant la rotation.
Per scegliere la modalità di misurazione con cui lavorare è sufficiente girare il Selettore rotante. Assicurarsi di non premere il pulsante di misurazione durante la rotazione.
Gire el Disco Rotativo para seleccionar el modo de medición que desea usar. Asegúrese de no pulsar el botón de medición mientras gira el instrumento.
Gire o Disco Rotatório para escolher o modo de medição com o qual deseja trabalhar. Tenha cuidado para não pressionar o botão de medição ao girar o disco.
ロータリーディスクを回して使用する測定モードを選択します。回転中は、測定ボタンを絶対に 押さないでください。
轻松转动转盘,选择要使用的测量模式。旋转时一定不要按测量按钮。
輕鬆轉動轉盤,選取要使用的測量模式。旋轉時一定不要按測量按鈕。
간단히 회전 디스크를 돌려서 작업을 원하는 측정 모드를 선택합니다. 회전 중에 측정 버튼을 누르면 안 됩니다.
Выберите требуемый режим измерений с помощью поворотного селектора. Не нажимайте кнопку измерения во время вращения селектора.
EN
DE
FR
IT
Overview 2 Übersicht 2 Présentation 2 Cenni generali 2 Visión general 2 Visão geral 2 概要 2 概览 2 概覽 2 개요 2 Обзор 2
KO
PT
RU
CT
ES
JP
CS
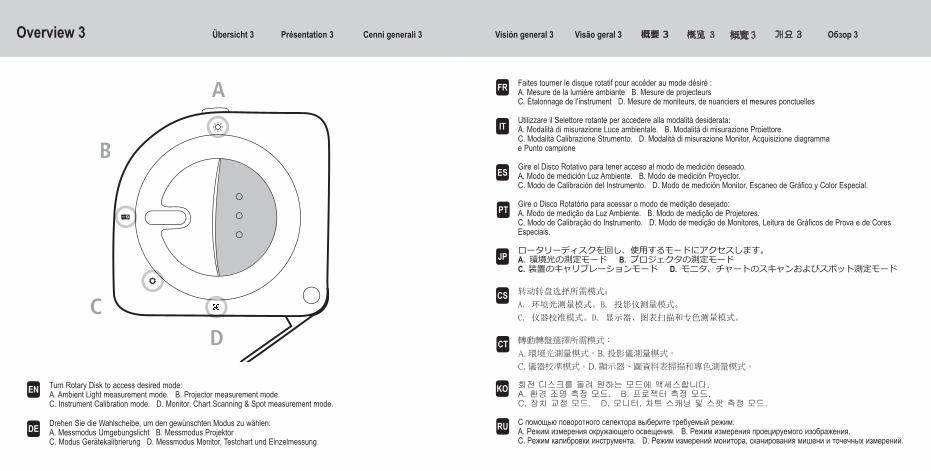
Faites tourner le disque rotatif pour accéder au mode désiré :A. Mesure de la lumière ambiante B. Mesure de projecteursC. Étalonnage de l’instrument D. Mesure de moniteurs, de nuanciers et mesures ponctuelles
Utilizzare il Selettore rotante per accedere alla modalità desiderata:A. Modalità di misurazione Luce ambientale. B. Modalità di misurazione Proiettore.C. Modalità Calibrazione Strumento. D. Modalità di misurazione Monitor, Acquisizione diagramma e Punto campione
Gire el Disco Rotativo para tener acceso al modo de medición deseado.A. Modo de medición Luz Ambiente. B. Modo de medición Proyector.C. Modo de Calibración del Instrumento. D. Modo de medición Monitor, Escaneo de Gráfico y Color Especial.
Gire o Disco Rotatório para acessar o modo de medição desejado: A. Modo de medição da Luz Ambiente. B. Modo de medição de Projetores. C. Modo de Calibração do Instrumento. D. Modo de medição de Monitores, Leitura de Gráficos de Prova e de Cores Especiais.
ロータリーディスクを回し、使用するモードにアクセスします。A. 環境光の測定モード B. プロジェクタの測定モードC. 装置のキャリブレーションモード D. モニタ、チャートのスキャンおよびスポット測定モード
转动转盘选择所需模式:
A. 环境光测量模式。B. 投影仪测量模式。
C. 仪器校准模式。D. 显示器、图表扫描和专色测量模式。
轉動轉盤選擇所需模式:
A. 環境光測量模式。B. 投影儀測量模式。
C. 儀器校準模式。D. 顯示器、圖資料表掃描和專色測量模式。
회전 디스크를 돌려 원하는 모드에 액세스합니다. A. 환경 조명 측정 모드. B. 프로젝터 측정 모드. C. 장치 교정 모드. D. 모니터, 차트 스캐닝 및 스팟 측정 모드.
С помощью поворотного селектора выберите требуемый режим: A. Режим измерения окружающего освещения. B. Режим измерения проецируемого изображения. C. Режим калибровки инструмента. D. Режим измерений монитора, сканирования мишени и точечных измерений.
EN
DE
FR
IT
A
B
CD
Overview 3 Übersicht 3 Présentation 3 Cenni generali 3 Visión general 3 Visão geral 3 概要 3 概览 3 概覽 3 개요 3 Обзор 3
Turn Rotary Disk to access desired mode: A. Ambient Light measurement mode. B. Projector measurement mode. C. Instrument Calibration mode. D. Monitor, Chart Scanning & Spot measurement mode.
Drehen Sie die Wahlscheibe, um den gewünschten Modus zu wählen:A. Messmodus Umgebungslicht B. Messmodus ProjektorC. Modus Gerätekalibrierung D. Messmodus Monitor, Testchart und Einzelmessung
KO
PT
RU
CT
ES
JP
CS
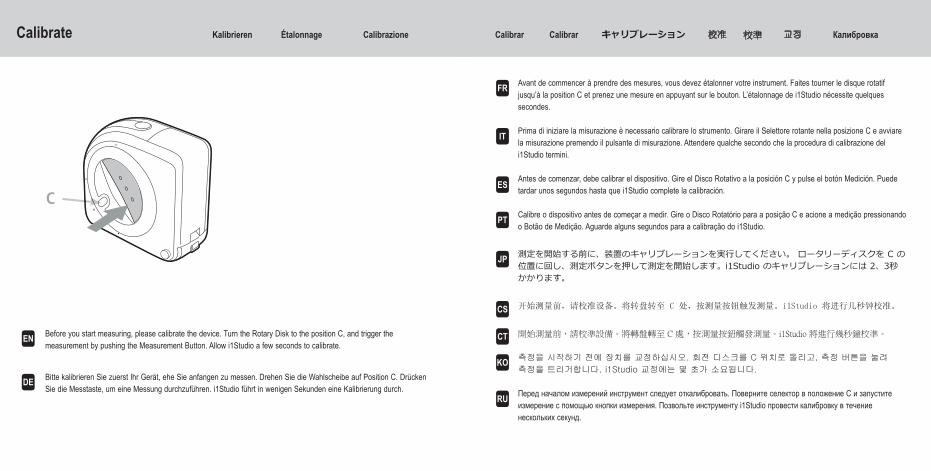
Avant de commencer à prendre des mesures, vous devez étalonner votre instrument. Faites tourner le disque rotatif jusqu’à la position C et prenez une mesure en appuyant sur le bouton. L’étalonnage de i1Studio nécessite quelques secondes.
Prima di iniziare la misurazione è necessario calibrare lo strumento. Girare il Selettore rotante nella posizione C e avviare la misurazione premendo il pulsante di misurazione. Attendere qualche secondo che la procedura di calibrazione del i1Studio termini.
Antes de comenzar, debe calibrar el dispositivo. Gire el Disco Rotativo a la posición C y pulse el botón Medición. Puede tardar unos segundos hasta que i1Studio complete la calibración.
Calibre o dispositivo antes de começar a medir. Gire o Disco Rotatório para a posição C e acione a medição pressionando o Botão de Medição. Aguarde alguns segundos para a calibração do i1Studio.
測定を開始する前に、装置のキャリブレーションを実行してください。 ロータリーディスクを C の位置に回し、測定ボタンを押して測定を開始します。i1Studio のキャリブレーションには 2、3秒かかります。
开始测量前,请校准设备。将转盘转至 C 处,按测量按钮触发测量。i1Studio 将进行几秒钟校准。
開始測量前,請校準設備。將轉盤轉至 C 處,按測量按鈕觸發測量。i1Studio 將進行幾秒鐘校準。
측정을 시작하기 전에 장치를 교정하십시오. 회전 디스크를 C 위치로 돌리고, 측정 버튼을 눌려
측정을 트리거합니다. i1Studio 교정에는 몇 초가 소요됩니다.
Перед началом измерений инструмент следует откалибровать. Поверните селектор в положение C и запустите измерение с помощью кнопки измерения. Позвольте инструменту i1Studio провести калибровку в течение нескольких секунд.
EN
DE
FR
IT
C
Calibrate Kalibrieren Étalonnage Calibrazione Calibrar Calibrar キャリブレーション 校准 校準 교정 Калибровка
Before you start measuring, please calibrate the device. Turn the Rotary Disk to the position C, and trigger the measurement by pushing the Measurement Button. Allow i1Studio a few seconds to calibrate.
Bitte kalibrieren Sie zuerst Ihr Gerät, ehe Sie anfangen zu messen. Drehen Sie die Wahlscheibe auf Position C. Drücken Sie die Messtaste, um eine Messung durchzuführen. i1Studio führt in wenigen Sekunden eine Kalibrierung durch.
KO
PT
RU
CT

ES
JP
CS
Le sac fourni vous permet de fixer le i1Studio à un moniteur.Il protège également l’appareil et sert de sac de transport.
La custodia consente di fissare il i1Studio sul monitor.Essa inoltre serve da protezione e da custodia per trasportarlo.
La bolsa le permite fijar el dispositivo i1Studio en su monitor.También protege i1Studio y sirve como bolsa de transporte.
付属ホルダーを使用して i1Studio をモニタに固定させます。またこのホルダーは i1Studio を持ち運ぶ際に保存バッグとして使用します。
保护袋可让您将 i1Studio 固定至显示器。
还可以保护 i1Studio 并用作运输袋。
保護袋可讓您將 i1Studio 固定至顯示器。
還可以保護 i1Studio 並用作運輸袋。
가방을 이용하여 i1Studio 를 모니터에 고정할 수 있습니다.또한 i1Studio를 보호하며 운반용 가방 역할도 합니다.
A bolsa permite prender o i1Studio ao monitor.Ela também protege o i1Studio e serve como bolsa de transporte.
Чехол позволяет закрепить инструмент i1Studio на мониторе.Он также защищает инструмент i1Studio и служит для его транспортировки.
EN
DE
FR
IT
Monitor measurement 1 Monitormessung 1 Mesure de moniteur 1
The bag allows you to fix i1Studio to your monitor.It also protects i1Studio and serves as transport bag.
Das Gerät wird mit der Schutztasche an Ihrem Monitor befestigt.Die Tasche wird zusätzlich zum Schutz und Transport des Geräts verwendet.
KO
PT
RU
Misurazione del monitor 1 Medición del monitor Medição de monitores 1
モニタ測定 1 显示器测量 1 顯示器測量 1 모니터 측정 1 Измерение монитора 1
CT

ES
JP
CS
Open the zipper of the bag and insert i1Studio. Be sure to insert correctly, matching shape of bag to shape of device.
Öffnen Sie den Reißverschluss der Tasche, und stecken Sie i1Studio in die Tasche. Achten Sie darauf, dass Sie das Gerät richtig herum in die Tasche stecken. Die Tasche passt formgenau.
Ouvrez la fermeture à glissière du sac et placez le i1Studio à l’intérieur en vous assurant de faire correspondre la forme du sac à celle de l’appareil.
Aprire la cerniera della custodia e inserirvi il i1Studio. Fare attenzione a inserirlo correttamente, facendo corrispondere la forma della custodia a quella dello strumento.
Abra la cremallera de la bolsa e inserte i1Studio. Asegúrese de insertarlo correctamente, igualando la forma de la bolsa a la forma del dispositivo.
Abra o zíper da bolsa e insira o i1Studio nela. Certifique-se de inseri-lo corretamente, fazendo coincidir o formato da bolsa com o formato do dispositivo.
ホルダーのチャックを開き i1Studio を挿入します。 ホルダーと装置の形状が一致するように 正しく挿入してください。
拉开保护袋拉链并插入 i1Studio。务必准确插入,使袋的形状与仪器形状吻合。
開啟保護袋拉鍊並插入 i1Studio。務必準確插入,使袋的形狀與儀器形狀吻合。
가방의 지퍼를 열고 i1Studio 를 넣습니다. 가방의 모양과 장치의 모양이 일치하도록 올바로 넣어
야 합니다.
Расстегните застежку-молнию на чехле и вставьте в него инструмент i1Studio. Вставьте инструмент в надлежащей ориентации так, чтобы форма чехла совпадала с формой инструмента.
EN
DE
FR
IT
Monitor measurement 2 Monitormessung 2 Mesure de moniteur 2
KO
PT
RU
Misurazione del monitor 2 Medición del monitor 2 Medição de monitores 2 モニタ測定 2 显示器测量 2 顯示器測量 2 모니터 측정 2 Измерение монитора 2
CT

ES
JP
CS
Connect i1Studio with the USB cable. Close the zipper of the bag. Before you start the screen calibration, please make sure you have opened the closure at the bottom of the bag.
Schließen Sie i1Studio mit dem USB-Kabel an. Schließen Sie den Reißverschluss der Tasche.Prüfen Sie, ob die Öffnung unten an der Tasche geöffnet ist, ehe Sie versuchen, Ihren Monitor zu kalibrieren.
Connectez le i1Studio à l’aide du câble USB. Fermez la fermeture à glissière du sac.Avant d’étalonner l’écran, vérifiez que vous avez bien ouvert le volet au-dessous du sac.
Collegare il i1Studio con il cavo USB. Chiudere la cerniera della custodia.Prima di iniziare la calibrazione dello schermo, assicurarsi di aver aperto la chiusura sotto alla custodia.
Conecte i1Studio con el cable USB. Cierre la cremallera de la bolsa.Antes de empezar la calibración de la pantalla, asegúrese de abrir el cierre en la parte inferior de la bolsa.
Conecte o i1Studio com o cabo USB. Feche o zíper da bolsa.Antes de começar a calibração da tela, certifique-se de abrir o fecho na parte de baixo da bolsa.
i1Studio を USB ケーブルで接続します。 ホルダーのチャックを閉じます。モニタのキャリブレーションを実行する前に、必ずホルダー底のファスナーを開けてください。
使用 USB 电缆连接 i1Studio。拉上保护袋拉链。
开始屏幕校准前,请确保已打开保护袋底部的闭合。
使用 USB 電纜連線 i1Studio。拉上保護袋拉鍊。
開始螢幕校準前,請確保已開啟保護袋底部的閉合。
USB 케이블을 통해 i1Studio 를 연결합니다. 가방의 지퍼를 닫습니다.화면 교정을 시작하기 전에 반드시 가방 바닥의 클로저를 열어야 합니다.
Подключите инструмент i1Studio с помощью кабеля USB. Застегните застежку-молнию на чехле.Перед началом калибровки экрана обязательно откройте отверстие в нижней части чехла.
EN
DE
FR
IT5
!
Monitor measurement 3 Monitormessung 3 Mesure de moniteur 3
KO
PT
RU
Misurazione del monitor 3 Medición del monitor 3 Medição de monitores 3
モニタ測定 3 显示器测量 3 显示器测量 3 모니터 측정 3 Измерение монитора 3
CT

ES
JP
CS
Use the Velcro patches on the strap of the Bag to best accommodate your screen model. Smaller screens may require strap to be folded.
Verwenden Sie den Klettverschluss an der Taschenschlaufe, um das Gerät an Ihrem Monitor zu befestigen.Für kleinere Bildschirme muss die Schlaufe eventuell umgeschlagen werden.
Utilisez les bandes velcro situées sur la sangle du sac pour régler la sangle en fonction de la taille de votre écran. Pour les écrans de petite taille, il peut être nécessaire de replier la sangle.
Utilizzare le toppe in Velcro sulla cinghia della custodia per adattarla allo schermo.Per gli schermi più piccoli può essere necessario ripiegare la cinghia
Use los parches de Velcro en la correa de la Bolsa para mejor encajar el modelo de la pantalla.Quizá se necesite plegar las correas en el caso de pantallas más pequeñas.
Use as partes de velcro na tira da bolsa para uma melhor adaptação do modelo da tela em questão.Talvez as telas menores precisem de que a tira seja dobrada.
モニタのサイズに合わせて、ホルダーのひものマジックテープを調整します。小さめのモニタにはひもを折り重ねる必要があります。
使用保护袋腕带上的自粘搭扣以最好地适应您的屏幕模式。
对于较小的屏幕可能需要折叠腕带。
使用保護袋腕帶上的自粘搭扣以最好地適應您的螢幕模式。
對於較小的螢幕可能需要折疊腕帶。
화면 모델을 가장 잘 수용하려면 가방의 스트랩에 있는 벨크로 패치를 사용합니다.작은 화면의 경우 스트랩을 접는 것이 필요할 수 있습니다.
С помощью застежек-липучек отрегулируйте ремешок чехла в соответствии с размером экрана монитора.Для небольших экранов может потребоваться сложить ремешок.
EN
DE
FR
IT
Monitor measurement 4 Monitormessung 4 Mesure de moniteur 4
KO
PT
RU
Misurazione del monitor 4 Medición del monitor 4 Medição de monitores 4
モニタ測定 4 显示器测量 4 顯示器測量 4 모니터 측정 4 Измерение монитора 4
CT

ES
JP
CS
Fix i1Studio in the middle of your display and start calibration by triggering from the software application.
Befestigen Sie i1Studio in der Mitte Ihres Monitors, und starten Sie die Kalibrierung aus Ihrer Software heraus.
Fixez le i1Studio au centre de votre écran et démarrez la procédure d’étalonnage depuis l’application.
Fissare il i1Studio nel mezzo dello schermo e avviare la calibrazione operando dall‘applicazione software.
Fije i1Studio sobre el medio de la pantalla y empiece la calibración activándola en la aplicación del software.
Prenda o i1Studio no centro da tela e comece a calibração acionando-a a partir do aplicativo do programa.
i1Studio をモニタ中央にセットし、ソフトウェア内の機能からキャリブレーションを開始します。
将 1Studio 固定于显示屏中央,触发软件应用程序开始校准。
將 1Studio 固定於顯示幕中央,觸發軟體應用程式開始校準。
i1Studio 를 디스플레이 중앙에 고정하고 소프트웨어 어플리케이션을 트리거링하여 교정을 시작합
니다.
Закрепите инструмент i1Studio в центре экрана и запустите калибровку с помощью приложения.
EN
DE
FR
IT
Monitor measurement 5 Monitormessung 5 Mesure de moniteur 5
KO
PT
RU
Misurazione del monitor 5 Medición del monitor 5 Medição de monitores 5
モニタ測定 5 显示器测量 5 顯示器測量 5 모니터 측정 5 Измерение монитора 5
CT

ES
JP
CS
To measure the ambient light, turn the Rotary Disk to the Ambient Light mode position A. Trigger the measurement by pushing the Button (indicated by arrow) or through the software application.
Drehen Sie die Wahlscheibe auf Position A, um das Umgebungslicht zu messen. Drücken Sie die Messtaste (Pfeil), um eine Messung durchzuführen, oder lösen Sie die Messung durch die Software aus.
Pour mesurer la lumière ambiante, faites tourner le disque rotatif jusqu’à la position A. Prenez une mesure en appuyant sur le bouton (indiqué par une flèche) ou depuis l’application.
Per misurare la luce ambientale, girare il Selettore rotante nella modalità Luce ambientale. A. Avviare la misurazione premendo il pulsante (indicato dalla freccia) oppure tramite l‘applicazione software.
Para medir la luz ambiente, gire el Disco Rotativo para la posición A (modo Luz Ambiente). Pulse el Botón (indicado por la flecha) o utilice la aplicación del software para hacer la medición.
Para medir a luz ambiente, gire o Disco Rotatório para a posição A do modo de Luz Ambiente. Acione a medição pressionando o Botão (indicado por uma seta) ou por meio do aplicativo do programa.
環境光を測定するにはロータリーディスクを環境光モードの「A」位置まで回します。 ボタン(矢印で表示)を押して、あるいはソフトウェア内の機能を実行して測定を開始します。
若要测量环境光,将转盘转至 A 处环境光模式。按(标有箭头)按钮或通过软件应用程序触发测量。
若要測量環境光,將轉盤轉至 A 處環境光模式。按(標有箭頭)按鈕或通過軟體應用程式觸發測量。
환경 조명을 측정하려면 회전 디스크를 돌려 환경 조명 모드 위치 A로 설정합니다. 버튼(화살표 표시)을 누르거나 소프트웨어 어플리케이션을 통해 측정을 시작합니다.
Чтобы измерить окружающее освещение, поверните селектор в позицию A. Запустите измерение, нажав кнопку измерения (показана стрелкой), или с помощью приложения.
EN
DE
FR
IT
A
Ambient light measurement Umgebungslichtmessung Mesure de la lumière ambiante
KO
PT
RU
Misurazione Luce ambientale Medición de la luz ambiente Medição da luz ambiente 環境光の測定
环境光测量 環境光測量 환경 조명 측정 Измерение окружающего освещения
CT

Minimum System Requirements PC / Macintosh
Windows® Microsoft® Windows 7®, Windows 8®, Windows 8.1® or Windows 10® 32 or 64 bit. All operating systems should have latest Service Pack installed. 512MB RAM (2GB recommended). Intel® Core 2 Duo or AMD Athlon™ XP or better CPU. Up to 500MB of available disk space (depending on components installed). Powered USB port. Monitor resolution of 1024 x 768 pixels or higher. Latest drivers for video card installed. Dual display support requires either 2 video cards or a dual head video card that supports dual video LUTs being loaded. Network adaptor installed and dri-ver loaded. High-speed internet connection required for software install, download and automatic software update. User must have Administrator rights to install and uninstall the application.
Macintosh® MacOS X 10.8.x, 10.9.x, 10.10x, 10.11x or 10.12x (with latest upgrades installed). 512MB RAM (2GB recommended). Intel® Core 2 Duo CPU or better CPU. Up to 500MB of available disk space (depending on compo-nents installed). Powered USB port. Monitor resolution of 1024 x 768 pixels or higher. Latest drivers for video card installed. High-speed internet connection required for software install, download and automatic software update. User must have Administrator rights to install and uninstall the application.
The i1Studio will not work if it is connected to the USB port on your keyboard or to a USB-Hub without external power supply. Power rating: 5VDC, 500mA.
Warranty Registration
To receive technical support, obtain warranty service, and get the latest software updates and product news, you need to register your new i1Studio: www.xrite.com
System Requirements EN
Service
Do not try to dismantle the I1Studio for any reason. Unauthorized dismantling of the equipment will void all warranty claims. Contact the X-Rite support or the nearest X-Rite Service Center, if you believe that the unit does not work anymore or does not work correctly.
Service Center
Visit www.XRITE.com to locate the nearest X-Rite Service Center or contact your X-Rite dealer for more information.
ENWarranty Conditions, Support & Service
I1Studio Warranty Conditions
X-Rite warrants this Product against defects in material and workmanship for a period of twelve (12) months from the date of retail purchase from X-Rite or an X-Rite authorized reseller, unless mandatory law provides for longer periods. The date of manufacture will be used as the beginning date of the warranty period unless you can provide proof of the date of purchase. During such time, X-Rite will at its option repair or replace with a new, recertified or refurbished product or part, any product or part determined to be defective.
X-Rite’s warranties herein do not cover failure of warranted goods resulting from: (i) damage after shipment, accident, abuse, misuse, neglect, alteration or any other use not in accordance with X-Rite’s recommendations, accompanying documentation, published specifications, and standard industry practice; (ii) using the device in an operating environment outside the recommended specifications or failure to follow the maintenance procedures in X-Rite’s accompanying documentation or published specifications; (iii) repair or service by anyone other than X-Rite or its authorized representatives; (iv) the failure of the warranted goods caused by use of any parts or consumables not manufactured, distributed, or approved by X-Rite; (v) any attachments or modifications to the warranted goods that are not manufactured, distributed or approved by X-Rite. Consumable parts and Product cleaning are also not covered by the warranty. X-Rite‘s sole and exclusive obligation for breach of the above warranties shall be the repair or replacement of any part, without charge, which within the warranty period is proven to X-Rite‘s reasonable satisfaction to have been defective.
Repairs or replacement by X-Rite shall not revive an otherwise expired warranty, nor shall the same extend the duration of a warranty. Customer shall be responsible for packaging and shipping the defective product to the service center designated by X-Rite. X-Rite shall pay for the return of the product to Customer if the shipment is to a location within the region in which the X-Rite service center is located. Customer shall be responsible for paying all shipping charges, duties, taxes, and any other charges for products returned to any other locations. Proof of purchase in the form of a bill of sale or receipted invoice which is evidence that the unit is within the Warranty period must be presented to obtain warranty service. Do not try to dismantle the Product. Unauthorized dismantling of the equipment will void all warranty claims. Contact the X-Rite Support or the nearest X-Rite Service Center, if you believe that the unit does not work anymore or does not work correctly.
THESE WARRANTIES ARE GIVEN SOLELY TO BUYER AND ARE IN LIEU OF ALL OTHER WARRANTIES, EXPRESSED OR IMPLIED, INCLUDING BUT NOT LIMITED TO THE IMPLIED WARRANTIES OF MERCHANTABILITY, FITNESS FOR A PARTICULAR PURPOSE OR APPLICATION, AND NONINFRINGEMENT. NO EMPLOYEE OR AGENT OF X-RITE, OTHER THAN AN OFFICER OF X-RITE, IS AUTHORIZED TO MAKE ANY WARRANTY IN ADDITION TO THE FOREGOING.
IN NO EVENT WILL X-RITE BE LIABLE FOR ANY OF BUYER’S MANUFACTURING COSTS, OVERHEAD, LOST PROFITS, GOODWILL, OTHER EXPENSES OR ANY INDIRECT, SPECIAL, INCIDENTAL OR CONSEQUENTIAL DAMAGES BASED UPON BREACH OF ANY WARRANTY, BREACH OF CONTRACT, NEGLIGENCE, STRICT TORT, OR ANY OTHER LEGAL THEORY. IN ANY EVENT OF LIABILITY, X-RITE’S MAXIMUM LIABILITY HEREUNDER WILL NOT EXCEED THE PRICE OF THE GOODS OR SERVICES FURNISHED BY X-RITE GIVING RISE TO THE CLAIM.

有毒有害物质或元素名称及其标识 Toxic /Hazardous Substances and Elements Table CN
表按SJ/T 11364-2014标准的编制。Table prepared in accordance with SJ/T 11364-2014 standards.
○: 表示在该部件的所有均质材料中的有害物质的浓度是低于相关阈GB/T 26572标准。
○: Indicates the concentration of the hazardous substance in all homogeneous material of the part is below the threshold GB/T 26572 standards.
X: 表示有害物质的部分中的至少一个均质材料浓度高于的GB/T 26572标准的相关阈值。
X: Indicates the concentration of hazardous substance in at least one homogeneous material of the part is above the threshold of the GB/T 26572 standards.
部件名称 有毒有害物质或元素
铅(Pb) 汞(Hg) 镉(Cd) 六价(Cr(VI)) 多溴联苯(PBB) 多溴二苯(PBDE)
印刷电路板PCB Board ○ ○ ○ ○ ○ ○主动电子件Active electrical part X ○ ○ ○ ○ ○被动电子件Passive electrical part
X ○ ○ ○ ○ ○焊接金属Solder metal ○ ○ ○ ○ ○ ○连接器,线材Connector, cable ○ ○ ○ ○ ○ ○结构件及附件Mechanical part and accessory
X ○ ○ ○ ○ ○包装材Packaging material ○ ○ ○ ○ ○ ○

Corporate Headquarters 4300 44th Street SE, Grand Rapids, Michigan 49512 Phone 1 800 248 9748 or 1 616 803 2100 Fax 1 800 292 4437 or 1 616 803 2705
European Headquarters Althardstrasse 70, 8105 Regensdorf, Switzerland Phone (+41) 44 842 24 00, Fax (+41) 44 842 22 22
Asia Pacific Suite 2801, 28th Floor, AXA Tower, Landmark East, 100 How Ming StreetHeadquarters Kwun Tong, Kowloon, Hong Kong Phone (+852) 2 568 6283, Fax (+852) 2 885 8610
Please visit www.xrite.com for a local office near you.TM Trademark of X-Rite. Part No. EOSTUDIO-QSG (10/2017)