espocketbiz – user’s manual
TRANSCRIPT
ESPocketBiz – User’s Manual
Entersoft Business Suite® | Entersoft CRM® | Entersoft Mobile Suite®
Use guide
ESPocketBiz – User’s Manual
Σελίδα: 2 / 55
Ταυτότητα
Έκδοση κειμένου 2.0
Τελ. ενημέρωση Ιούνιος 2021
Copyright
© Copyright 2011 Entersoft A.E. Με την επιφύλαξη όλων των νόμιμων δικαιωμάτων.
Δεν επιτρέπεται η αναδημοσίευση ή μετάδοση με οποιαδήποτε μορφή και για οποιοδήποτε λόγο μέρους ή όλου του παρόντος
εγχειριδίου, χωρίς τη ρητή άδεια της Entersoft Α.Ε.
Όσον αφορά το περιεχόμενο του παρόντος…
▪ Μπορεί να μεταβληθεί οποιαδήποτε στιγμή.
▪ Εξυπηρετεί αποκλειστικά πληροφοριακούς σκοπούς.
▪ Δεν παρέχεται εγγύηση για την ύπαρξη τυχόν λαθών ή για τη λανθασμένη χρήση ή για μη επιθυμητά αποτελέσματα από τη
χρήση των προτεινόμενων στο παρόν διαδικασιών.

ESPocketBiz – User’s Manual
Σελίδα: 3 / 55
Περιεχόμενα
1 Pocketbiz New Era (Mobile) ....................................................................................................................... 5
1.1 General ........................................................................................................................................................... 5
1.2 Starting the application .................................................................................................................................... 5
1.3 Login screen .................................................................................................................................................... 5
1.4 Main Screen and Dashboard ................................................................................................................. 6
1.5 Start Day ......................................................................................................................................................... 7
2 Customers ......................................................................................................................................... 8
2.1 Customer details ............................................................................................................................................. 9
2.1.1 Details ______________________________________________________________________________________ 10
2.1.2 Financial ____________________________________________________________________________________ 11
2.1.3 Notes ______________________________________________________________________________________ 11
2.1.4 Files _______________________________________________________________________________________ 11
2.1.5 More (Customer Dashboard) ____________________________________________________________________ 12
2.2 Customer editing ........................................................................................................................................... 13
2.3 Customer reports ........................................................................................................................................... 13
2.4 Map ............................................................................................................................................................... 15
2.5 New customer (request) ................................................................................................................................ 16
2.5.1 Web Service Taxis ____________________________________________________________________________ 18
2.5.2 Reverse Geocoding ___________________________________________________________________________ 18
3 Tasks ........................................................................................................................................................ 19
3.1 Start Visit ....................................................................................................................................................... 19
3.2 Sales Order ................................................................................................................................................... 20
3.2.1 Catalogue ___________________________________________________________________________________ 20
3.2.2 Shopping cart ________________________________________________________________________________ 24
3.2.3 General info _________________________________________________________________________________ 25
3.2.4 Draft Order __________________________________________________________________________________ 26
3.3 Collection ...................................................................................................................................................... 27
3.3.1 Cash _______________________________________________________________________________________ 27
3.3.2 Check ______________________________________________________________________________________ 27
3.3.3 Collection mappings with pending documents (EQUIVALENT) __________________________________________ 29
3.4 Geocoding / Location search ......................................................................................................................... 30
3.5 Stigma capturing ........................................................................................................................................... 30
3.6 Target ............................................................................................................................................................ 30
3.7 Surveys ......................................................................................................................................................... 31
3.8 Μerchandising scenarios ............................................................................................................................... 33
3.8.1 Price collection _______________________________________________________________________________ 33
3.8.2 Shelf Share measurements _____________________________________________________________________ 35
3.8.3 Availability / promotions ________________________________________________________________________ 35

ESPocketBiz – User’s Manual
Σελίδα: 4 / 55
3.8.4 Competition Points ____________________________________________________________________________ 35
3.8.5 Distribution/OOS ______________________________________________________________________________ 35
3.8.6 Extra point Photograph _________________________________________________________________________ 36
3.9 Electronic Signature ...................................................................................................................................... 37
3.10 End Visit ........................................................................................................................................................ 38
3.11 Simple Visit ................................................................................................................................................... 39
4 Reports ............................................................................................................................................. 40
4.1 General Reports ............................................................................................................................................ 40
4.1.1 Sales orders history ___________________________________________________________________________ 41
4.2 Customer Reports ......................................................................................................................................... 42
4.3 Report types .................................................................................................................................................. 43
4.3.1 Grid Reports _________________________________________________________________________________ 43
4.3.2 Drill down reports _____________________________________________________________________________ 43
4.3.3 Multiselect Drill down Reports ___________________________________________________________________ 43
4.3.4 Bar & Pie Charts ______________________________________________________________________________ 44
5 Messages ........................................................................................................................................ 44
6 Synchronization ............................................................................................................................... 45
7 Calendar – Agenda ........................................................................................................................... 46
7.1 Appointment (Monthly view) .......................................................................................................................... 48
7.2 Appointment (Weekly view) ........................................................................................................................... 49
7.3 Appointment details (weekly view) ................................................................................................................ 50
8 Photo task ................................................................................................................................................. 52
9 Printing ...................................................................................................................................................... 54

ESPocketBiz – User’s Manual
Σελίδα: 5 / 55
1 Pocketbiz New Era (Mobile)
1.1 General
This manual describes the functionality of the Pocketbiz New Era (Android version) for mobile devices (pda/tablet/phone).
1.2 Starting the application
To launch the application, from the home screen of the tablet, press the Pocketbiz icon, as shown in the picture.
1.3 Login screen
When the application starts, the user login screen is displayed. At this point we need
to type the username and the password that has given to us.
When we fill in the username and the password, the «LOGIN» button will be enabled
and by pressing it we will enter the main screen of the Pocketbiz.
We can also tick on the Show password [ ] option, to display the password we typed.
ESPocketBiz – User’s Manual
Σελίδα: 6 / 55
1.4 Main Screen and Dashboard
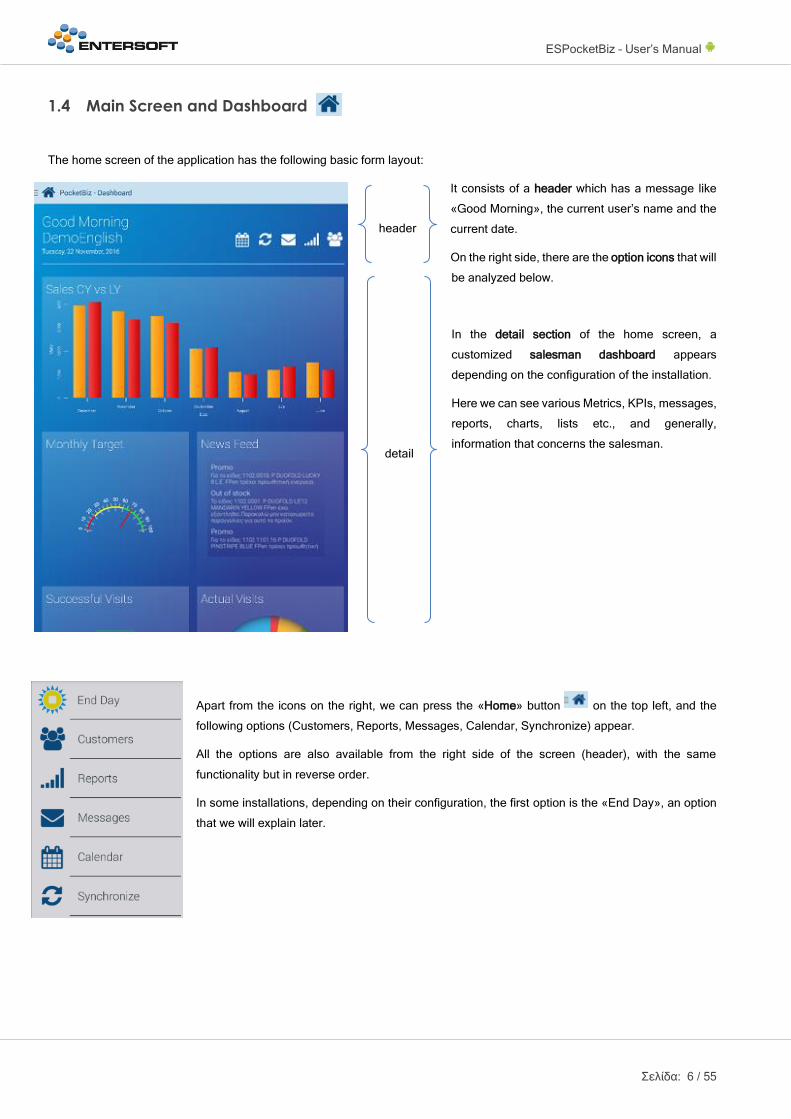
The home screen of the application has the following basic form layout:
It consists of a header which has a message like
«Good Morning», the current user’s name and the
current date.
On the right side, there are the option icons that will
be analyzed below.
In the detail section of the home screen, a
customized salesman dashboard appears
depending on the configuration of the installation.
Here we can see various Metrics, KPIs, messages,
reports, charts, lists etc., and generally,
information that concerns the salesman.
Apart from the icons on the right, we can press the «Home» button on the top left, and the
following options (Customers, Reports, Messages, Calendar, Synchronize) appear.
All the options are also available from the right side of the screen (header), with the same
functionality but in reverse order.
In some installations, depending on their configuration, the first option is the «End Day», an option
that we will explain later.
header
detail

ESPocketBiz – User’s Manual
Σελίδα: 7 / 55
1.5 Start Day
In some installations, depending on their configuration, the first step we have to do is to start our (working) day.
Usually this is done automatically and a warning is displayed about.
Then, the application prompts us to enter a proper value for the mileage (kms). This value can correspond to our vehicles
dashboard kilometers when we begin our working route.
Also inform us when it has been the last synchronization.
After entering the number of kilometers, we have to press the Start button,
and the main working screen will appears.
The button «Start day» at the Home menu then is replaced by the «End Day»
Then if we try to get out from the app without «End Day» being pressed, comes the following message

ESPocketBiz – User’s Manual
Σελίδα: 8 / 55
2 Customers
By pressing the «Customers» button, the following screen showing customers that are assigned to current salesman-user will
appears:
(The layout of this screen is depending of the configuration of the installation)
By default, it is set to show only the clients that exist on his planned route of the day. We could also change the date to see the
route of the new one.
To disable the filter and display all the customers, we press the icon with the magnifying glass (as shown below)
Then, we uncheck the «In Route» checkbox option and by using the search option above, we locate the desired customers.
The search can be done with all the available fields that appear in that list like name, customer code, VAT number, Address,
City, Phone.
ESPocketBiz – User’s Manual
Σελίδα: 9 / 55
2.1 Customer details
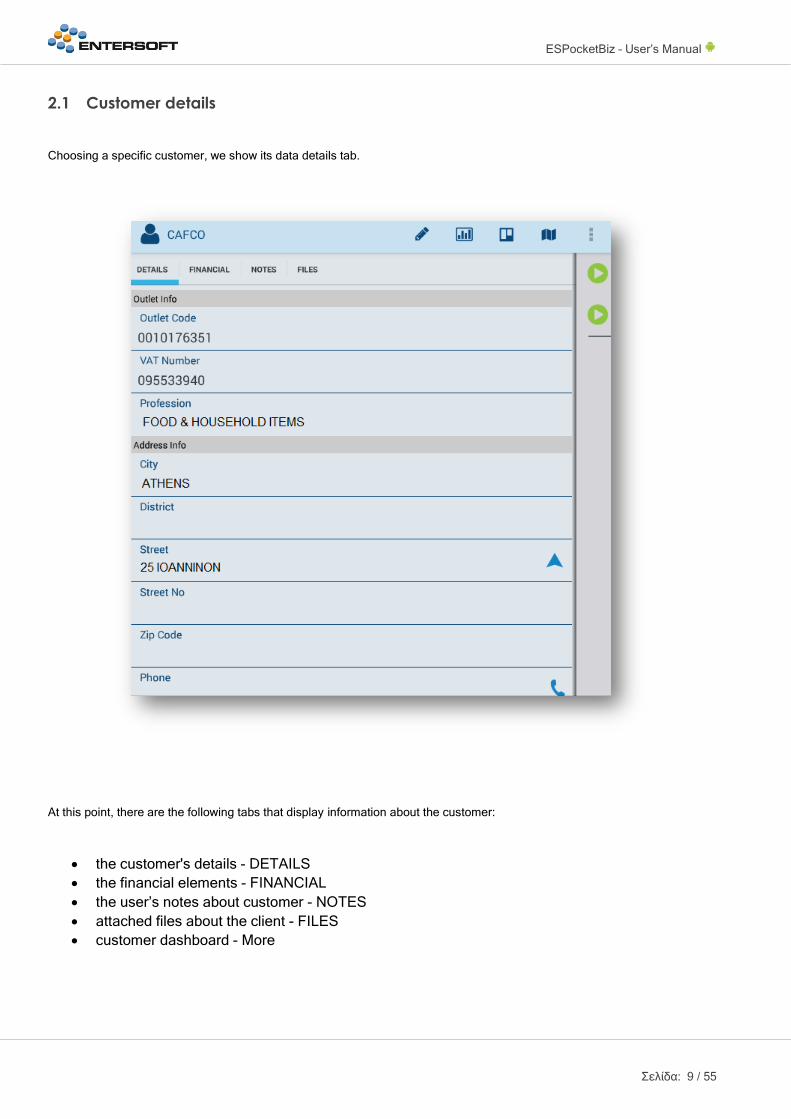
Choosing a specific customer, we show its data details tab.
At this point, there are the following tabs that display information about the customer:
• the customer's details - DETAILS
• the financial elements - FINANCIAL
• the user’s notes about customer - NOTES
• attached files about the client - FILES
• customer dashboard - More
ESPocketBiz – User’s Manual
Σελίδα: 10 / 55
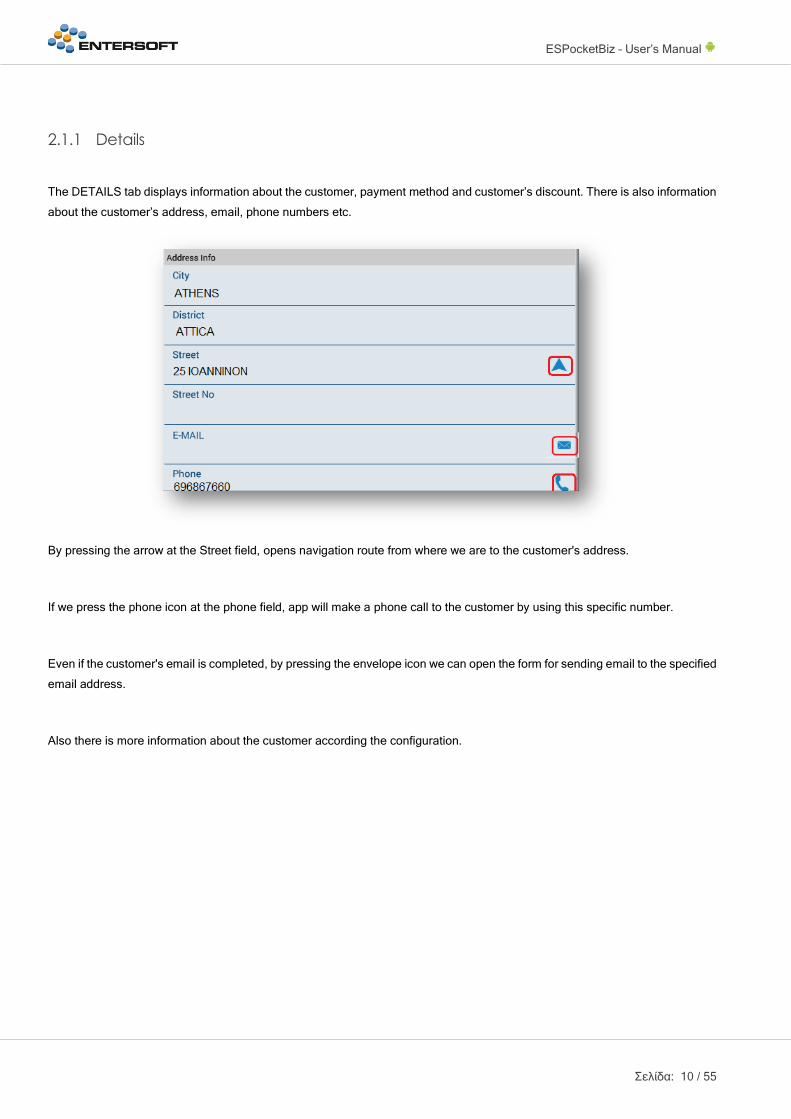
2.1.1 Details
The DETAILS tab displays information about the customer, payment method and customer’s discount. There is also information
about the customer’s address, email, phone numbers etc.
By pressing the arrow at the Street field, opens navigation route from where we are to the customer's address.
If we press the phone icon at the phone field, app will make a phone call to the customer by using this specific number.
Even if the customer's email is completed, by pressing the envelope icon we can open the form for sending email to the specified
email address.
Also there is more information about the customer according the configuration.
ESPocketBiz – User’s Manual
Σελίδα: 11 / 55
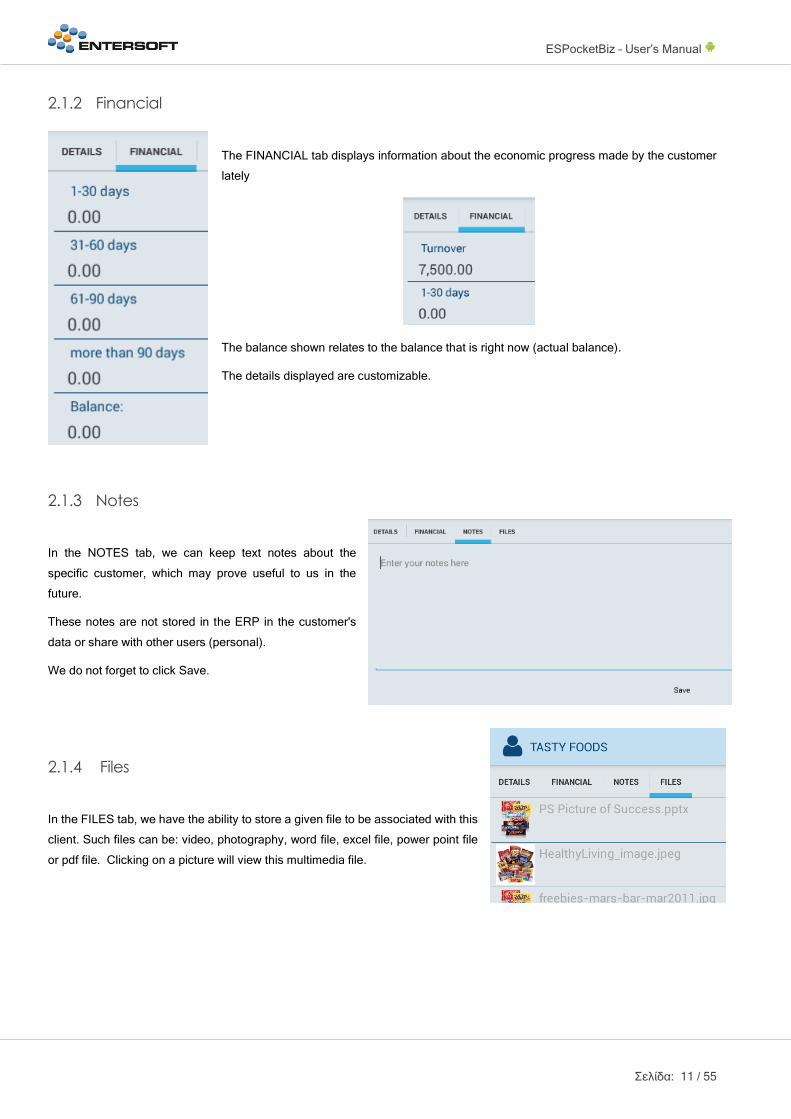
2.1.2 Financial
The FINANCIAL tab displays information about the economic progress made by the customer
lately
The balance shown relates to the balance that is right now (actual balance).
The details displayed are customizable.
2.1.3 Notes
In the NOTES tab, we can keep text notes about the
specific customer, which may prove useful to us in the
future.
These notes are not stored in the ERP in the customer's
data or share with other users (personal).
We do not forget to click Save.
2.1.4 Files
In the FILES tab, we have the ability to store a given file to be associated with this
client. Such files can be: video, photography, word file, excel file, power point file
or pdf file. Clicking on a picture will view this multimedia file.

ESPocketBiz – User’s Manual
Σελίδα: 12 / 55
2.1.5 More (Customer Dashboard)
In the MORE tab, it appears a customizable dashboard for the selected customer.
Notice in the screenshot that it has no header as the dashboard of the salesman placed at the home screen.
This dashboard contains KPI’s, charts and reports about the specific customer.

ESPocketBiz – User’s Manual
Σελίδα: 13 / 55
2.2 Customer editing
By pressing the pencil button, we are able to make changes to customer data concerning contact info details.
To save changes, we have to press the tick on the right side of the screen.
The data do not change automatically. The application creates a data change request that must be handled by the back office
users of our company.
2.3 Customer reports
By clicking on the bars button open a list of reports associated with the customer.
For example, maybe included:
Drill down reports are the reports that by clicking
in a line, led to another report that displays the details for the specific record (e.g. header, detail of document).

ESPocketBiz – User’s Manual
Σελίδα: 14 / 55
For example:
Clicking on the 7-11-2016 line, the day orders report appears for this day
Clicking on the 915002 order number, the specific document detail appears
When we reach the final report we can press for example the «Send as Attachment» and the tab is sending as a Microsoft Word
file.
ESPocketBiz – User’s Manual
Σελίδα: 15 / 55
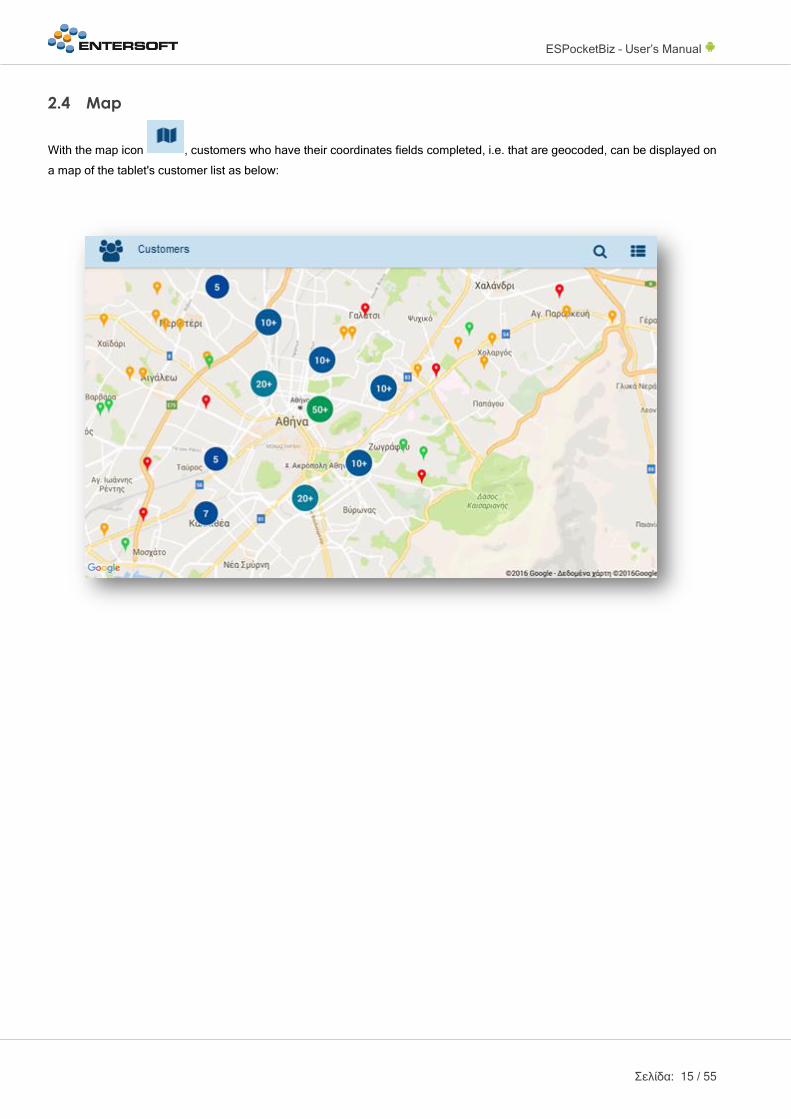
2.4 Map
With the map icon , customers who have their coordinates fields completed, i.e. that are geocoded, can be displayed on
a map of the tablet's customer list as below:

ESPocketBiz – User’s Manual
Σελίδα: 16 / 55
2.5 New customer (request)
Depending on the configuration that has been done, the options for New customer are:
0: the creation of a new customer is not allowed
1: You may create a new customer but only the request form stored in, cannot be selected and started visiting
2: You may create a new customer and then can be selected and started visiting (default)
In case that new customer creation is allowed, a tab named «NEW CUSTOMERS» appears and we select it:
In the display list of the new customer screen, appears the pending requests of new customers’ creation by back office users.
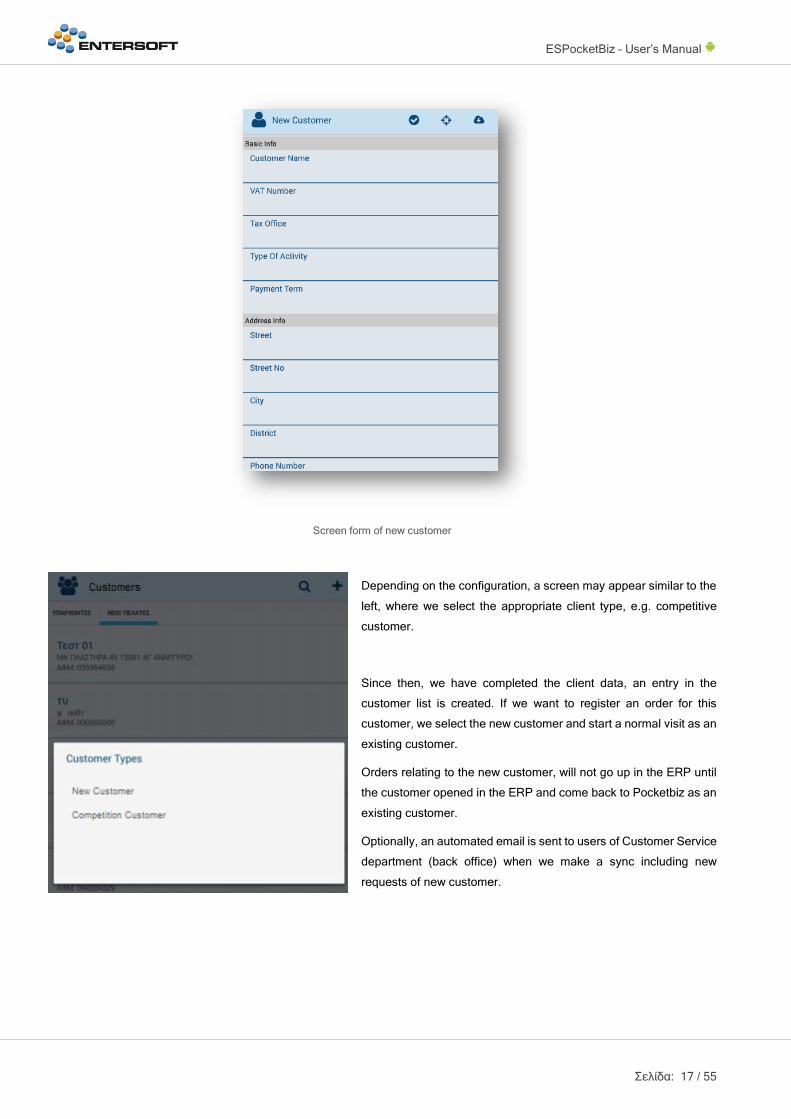
We press the + button and a form to record the details of the new customer (like below) opens.
ESPocketBiz – User’s Manual
Σελίδα: 17 / 55
Screen form of new customer
Depending on the configuration, a screen may appear similar to the
left, where we select the appropriate client type, e.g. competitive
customer.
Since then, we have completed the client data, an entry in the
customer list is created. If we want to register an order for this
customer, we select the new customer and start a normal visit as an
existing customer.
Orders relating to the new customer, will not go up in the ERP until
the customer opened in the ERP and come back to Pocketbiz as an
existing customer.
Optionally, an automated email is sent to users of Customer Service
department (back office) when we make a sync including new
requests of new customer.

ESPocketBiz – User’s Manual
Σελίδα: 18 / 55
2.5.1 Web Service Taxis
A value added tax identification number or VAT identification number (VATIN) is an identifier used in many countries, including
the countries of the European Union, for value added tax purposes.
Pocketbiz uses this number, to access Greek Revenue Service to check the validity of it via a special web service (available in
specific countries too). Except the validity of the given VAT, the service populates a lot of major fields of the form of the customer
with accurate data, automatically without any keyboarding by the salesman.
Taxis web service access button
The device needed to be connected to the internet and user have to press the icon cloud to call the web service.
2.5.2 Reverse Geocoding
It is possible to obtain positioning of the client automatically and fill in the fields of address, area, city, postal
code etc. to form, basis of the stigma that has found the customer.
To download GPS stigma and Fields, we could press
the button with the GPS icon.
The button for taking stigma and reverse geocoding

ESPocketBiz – User’s Manual
Σελίδα: 19 / 55
3 Tasks
To display all the possible actions that are available for each client (task list), we touch with a finger the right side of the screen
and drag it to the left, as shown in the following picture:
We notice that the «Start Visit» text appears.
3.1 Start Visit
Clicking the «start visit» button, begins the period of visit to count and a list (task list) appears with all the available actions
(tasks) that the user can do (or must do), during the visit in that client.
This list always is different for each type of user, e.g. Salesman, Merchandiser.
May contain mandatory and not mandatory actions.
The icons identify the type of action, e.g. the tasks for
merchandising have the symbol.

ESPocketBiz – User’s Manual
Σελίδα: 20 / 55
3.2 Sales Order
3.2.1 Catalogue
Sales order task will load the main screen of order taking, having the following format:
By default the focus is on the catalogue screen (1st tab), in order to enter items and quantities in the order. Once the form is
loaded, the application fetches automatically all the customer’s materials’ range. We can now apply filters or/and grouping to the
data rows as described later.
We can also scroll up/down on the list and also right/left and fill the desired editable cells.
Let’s explore the following options:
1. Catalogue tab option 2. Shopping cart tab option 3. Elements of Invoice Document tab option 4. The Items List with ability to record volume, stock, distribution, etc. per item row 5. The grouping menu of categories and subcategories of items (for faster and specific item mining)

ESPocketBiz – User’s Manual
Σελίδα: 21 / 55
Tapping the dark blue button named CATEGORY, the user can select a group
of items, and to display only these items belongs to the selected group.
• By clicking on the Category, a window with the available types
of categories opens.
• Clicking the right arrow of a category, we can show its
subcategories and so forth.
• After final selection, the selected value is displayed in place of the word
«category».
Clicking the X symbol, user can reset the group selection to default (none).
6. The toggle button to enable/disable the range (variety of items) of the customer (default value: OFF). Tapping on it, it toggles to ON and vice versa.
OFF returns all materials, ON returns only the materials with values already given by the user.
7. Search Filters in the corresponding fields of the headers
In the «Item» field we can look for the desired item by typing its name, and in the «Code» field based on its code, etc.
The search is dynamic and fast. This means that each letter we type it creates a text filter that
is contained in the search.
So if we type in the letter «S», will appear immediately all the items having the letter «S» in
their description. Then, if we type the letter «i», will displays immediately all the items having
in their description the text «Si», (and so on), if then we type the letter «r», e.g. so at last if we
wrote the word «Silver», it would display only the items that the word «Silver» contained in
their description.
There is also the possibility of dictionary use that accelerates our typing process.

ESPocketBiz – User’s Manual
Σελίδα: 22 / 55
8. Sort options based on the respective field of title
By clicking on a field name we sort the list based on this
field in ascending order. With a new click, the order now is
descending and the relevant arrow indicating the current
order is displayed.
9. Reports inside the order screen
Displays the Invoice reports menu, with reports related to this order.
Totals per category: a summarized order report according to the current details of the
order by Sector
Order print: a list of latest orders. Choosing one of them to print, view, and send by email or as an attachment.
Sample of final report (invoice document)

ESPocketBiz – User’s Manual
Σελίδα: 23 / 55
To add an item to our invoice document, we type the desired quantity in the cell of the item line and the column of cases.
We put in the amount we want and then we have to click «ok» or move to another cell.
: hides / shows, the bar of search filters
: displays extra information, photos and related files
for that item
: displays the following menu
With «enter Multi-choice mode» option, we can enable
the multi-choice state, which we can select / deselect
many noncontiguous items by clicking on their lines.
The selected lines are painted in a dark color. To return
to the «simple select mode» option, from the same
menu choose «Enter single choice mode».
In case we want to put a specific quantity on many items, select
«Edit» and after typing the desired value (as in the right screen),
press «OK». That will update the quantity of all the selected items
with this value.
With the «Delete» option we can immediately clean up the values
of all columns of the selected line.

ESPocketBiz – User’s Manual
Σελίδα: 24 / 55
3.2.2 Shopping cart
Once we completed the order taking with the desired items and quantities, by pressing the basket icon we move to the second
tab of the order in which we can view the summary of the order.
The screen is similar to that of the catalogue, except that the items shown are only what has become the order entry, stock etc.
Of course we can go back to the catalogue (1st tab) to modify our order.
1. Save the Order
Clicking the save order button, the following
message appears:
With the «Save» button, we save the order, with «Return to Edit»
button we return to the editing of the Order.
Saving the Order, the screen returns to the visit’s task
list having gray out the current finished task.
2. Order Summary (total quantities and values)
3. Order Cancellation menu (delete order)
Except the «delete order», there is also the «add from
pdf» option. This is an alternative more easy and visual
way to add items to our shopping cart from a pdf product
catalogue. Choosing this option and selecting the desired
item category and subcategory, a pdf catalogue (with all
available products) opens. We can scroll up & down and
after find the photo of the desired product, we tap on the item code under the photo. The app
automatically recognizes the product and asks for the quantity we want to order. We type the amount
and the app stores our input as a new order line.

ESPocketBiz – User’s Manual
Σελίδα: 25 / 55
3.2.3 General info
The 3rd tab concerns in the invoice document data, e.g. order customer, order comments, delivery date etc. (general information).
Fields with red asterisk are required to complete the order (mandatory). If it is not already filled in, must be completed.
After we save the order (order taking task is completed) we can note that the task «Order» is greyed
out. That means that we do not need to select it again. However, if we do it, a message in the form
below will appear.
By clicking the X at right and after answering the relevant
protective message, we can delete the order we have
already taken.
The app help us to find the desired order by showing the
basic order data such as date time. We could also add a new
one using the «New Document» option (another order under
the same visit).

ESPocketBiz – User’s Manual
Σελίδα: 26 / 55
3.2.4 Draft Order
You are able to set an order as draft by the Header Tab. Touch on the Draft Order selection and an option menu
will pop up.
If you wish to set the order as draft select ‘Yes’ else if you want to finalize the order select ‘No’.
There is a third blank default option.

ESPocketBiz – User’s Manual
Σελίδα: 27 / 55
3.3 Collection
To receive cash or a check from the customer, from the task list of the visit, choose the corresponding option «Collection».
In the screen that appears, there are two tabs of available collection options.
3.3.1 Cash
In the «CASH» or «HEADER» tab, fill the «Cash» field with the amount of money you want to record, while in the «Comments» field optionally add a comment. Finally, it should be completed and the Receipt Number field if applicable.
3.3.2 Check
Under «CHEQUES» or «DETAIL», press the «+» button in the upper right corner to add a new check collection.

ESPocketBiz – User’s Manual
Σελίδα: 28 / 55
In the screen that appears, fill in the fields:
• BANK (from list)
• EXPIRATION DATE
• AMOUNT CHECK
• NUMBER CHECK
• PUBLISHER
• COMMENTS (Optional)
And press the «OK» button to move on to the application.
Selecting one of the checks that have already been recorded, we have the possibility to correct the data (pencil) or deleting (X).
At the bottom of the screen we can view the total of the values per collection type.
Then, to save them, we move on the «CASH» tab and press the button with the floppy diskette .
In case of the check must also complete the Receipt Number in the cash screen.
ESPocketBiz – User’s Manual
Σελίδα: 29 / 55
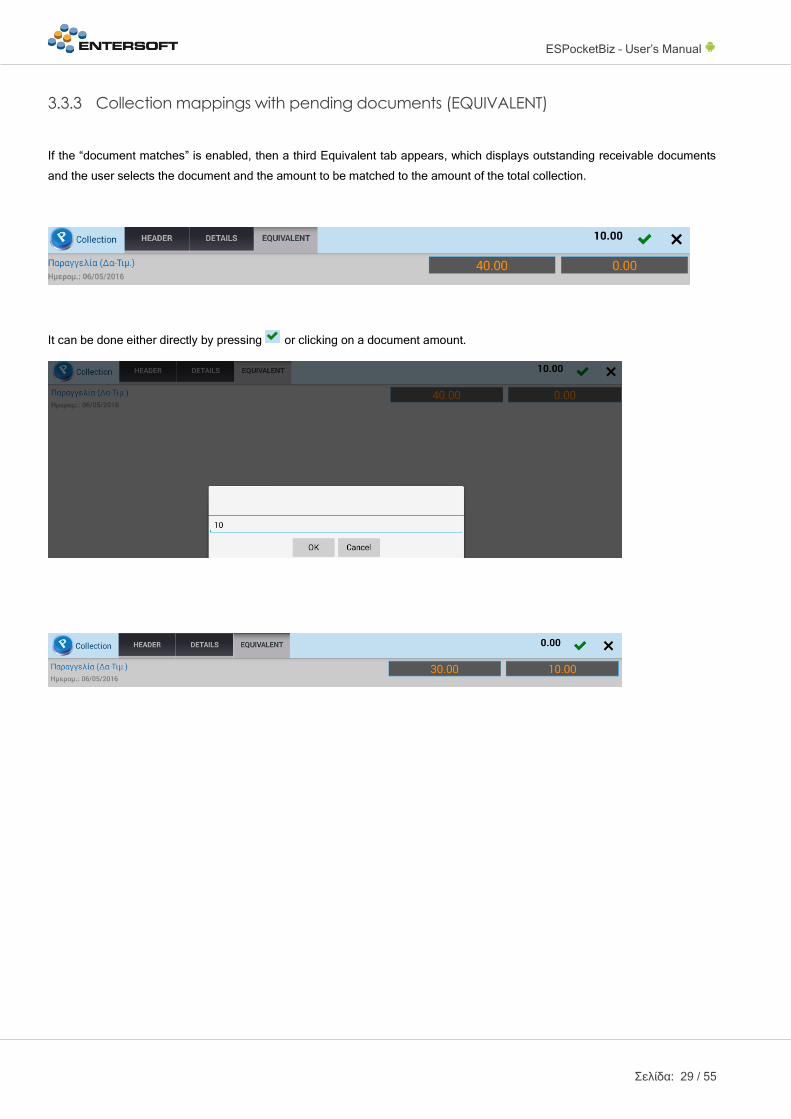
3.3.3 Collection mappings with pending documents (EQUIVALENT)
If the “document matches” is enabled, then a third Equivalent tab appears, which displays outstanding receivable documents
and the user selects the document and the amount to be matched to the amount of the total collection.
It can be done either directly by pressing or clicking on a document amount.

ESPocketBiz – User’s Manual
Σελίδα: 30 / 55
3.4 Geocoding / Location search
With the Geocoding task and with the use of GPS and
Google Maps we can register the geographical
coordinates of the actual visit point.
The screen that appears, shows in a map the actual
position we are at that moment.
The blue dot represents the stigma (our current position)
that have retrieve the tablet via GPS, at the moment we
took the action.
The red dot shows the end point that we record the data
of latitude and longitude. For greater accuracy we can
drag the map to the exact address, so that the red dot
indicates the point that we want.
At the top of the screen, the white bar shows the address
of the location of the red dot is pinned on the map.
Finally, after we have determined the preferable address
(specified by the red dot), we press the «Done» button at
the top of the screen in order to record the coordinates
of the point.
3.5 Stigma capturing
With this action and by the use of GPS, the application simply captures the stigma of our actual point – position (geographical
coordinates).
3.6 Target
In target, the comment you enter will appear in the "visitation data" of customer for our next visit.

ESPocketBiz – User’s Manual
Σελίδα: 31 / 55
3.7 Surveys
The surveys enable users to respond to predefined questions to customers.
The surveys are designed to work in conjunction with Sales and Field Service. In Sales, used by salesmen besides
ordering and gather qualitative data on their clients. In Field service, used by technicians and drivers for repair and
receipt/delivery of assets.
The functionality of the surveys is available with either the default format in the Core app versions or in the Benchmark format
in the versions of Surveys.
1. Benchmarks: It is the new interface of the surveys. Displays all questions on
one page and given the possibility of scoring (each one of these questions has
a different weight in the score).
A Benchmark type survey has the form of left screenshot and contains 6
questions with possible Yes/No answers. In the upper right corner shows the
obtained score and the max score.
2. Survey: It is the old interface of the surveys. Each question is a different
page and it is not possible score.
An example follows, where the user after having answer the questions, he should press over the tick (at the right top) to save.

ESPocketBiz – User’s Manual
Σελίδα: 32 / 55
If not answer all mandatory questions comes a relevant warning message.
By saving, the survey grayed out in the action list. But we can choose it again and the following screen will appear:
Displays a record line with date and time. We can choose it and view or edit the answers.
We can also delete it by pressing the X at right. Caution, pressing the X shows no new warning message and delete it
immediately.
There is also the possibility to record multiple surveys for the same visit if this makes sense, by pressing the + sign at the top
right.

ESPocketBiz – User’s Manual
Σελίδα: 33 / 55
3.8 Μerchandising scenarios
3.8.1 Price collection
With the «Categories» button we create specific category/sub-category filter (HPC chosen in the screenshot below).
The last price registration for the specific client is shown on the screen. And the columns that are filled is the Price, free goods
etc. (depending on the configuration).
Choosing a product/price cell in order to enter the value, after blush appears a window with the following functionality
We type a numerical value in the field. The X cancels the import, and the tick confirms it. With the arrows we change the target
cell backward, forward, right, left, without return to the previous screen grid, for more speed. The description of each cell is
updated and displayed above.
With Save&Next, store the current scenario (price collection) and automatically opens the next
With Save&Exit, store the current scenario and the user returns to the main menu where he can choose himself the next action
ESPocketBiz – User’s Manual
Σελίδα: 34 / 55
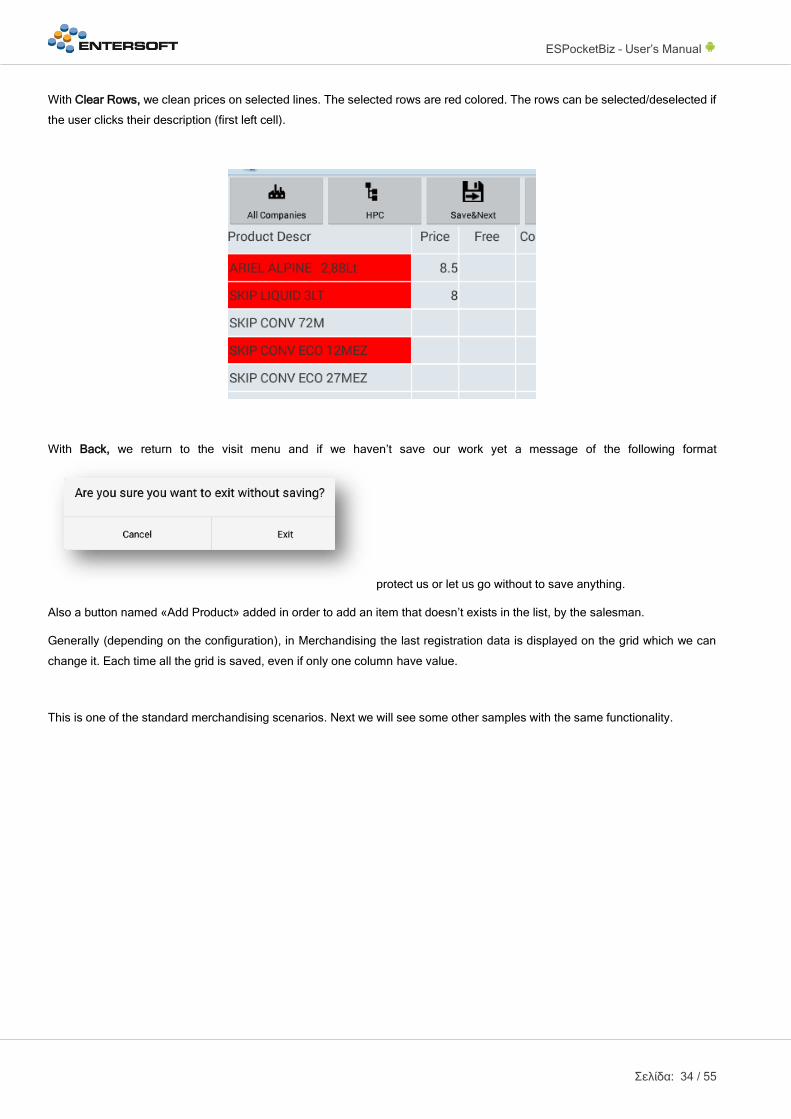
With Clear Rows, we clean prices on selected lines. The selected rows are red colored. The rows can be selected/deselected if
the user clicks their description (first left cell).
With Back, we return to the visit menu and if we haven’t save our work yet a message of the following format
protect us or let us go without to save anything.
Also a button named «Add Product» added in order to add an item that doesn’t exists in the list, by the salesman.
Generally (depending on the configuration), in Merchandising the last registration data is displayed on the grid which we can
change it. Each time all the grid is saved, even if only one column have value.
This is one of the standard merchandising scenarios. Next we will see some other samples with the same functionality.

ESPocketBiz – User’s Manual
Σελίδα: 35 / 55
3.8.2 Shelf Share measurements
3.8.3 Availability / promotions
3.8.4 Competition Points
There is no filter for items by category/subcategory. The screen first displays all the products were on the last register and the
products can be added from a separate search screen (Add product button).
3.8.5 Distribution/OOS

ESPocketBiz – User’s Manual
Σελίδα: 36 / 55
3.8.6 Extra point Photograph
In Merchandising photos except the item, the second column of the corresponding questionnaire always displayed too.
In other words, in the first and third question must be logged the item and the type of the first and second column of the
corresponding merchandising scenario, so that answers can be matched to the record for which we want to take a photo.
For example, on the extra point we have the lacta item and tie extra as type, so in the extra point photo we must have the lacta
item and the Extra point type.
The functionality of the Picture is the same in all
the questionnaires with photographic variations
on the menu options.
Just the user selects for each question one of the
proposed answers - options or typing the relevant
comment.
And after having taken a photo or video and put a description on the proper field, clicks
To display the OK button, make slide down (dragging down) the bar that says Camera.
There is also the possibility to add an existing photo from the Gallery.
ESPocketBiz – User’s Manual
Σελίδα: 37 / 55
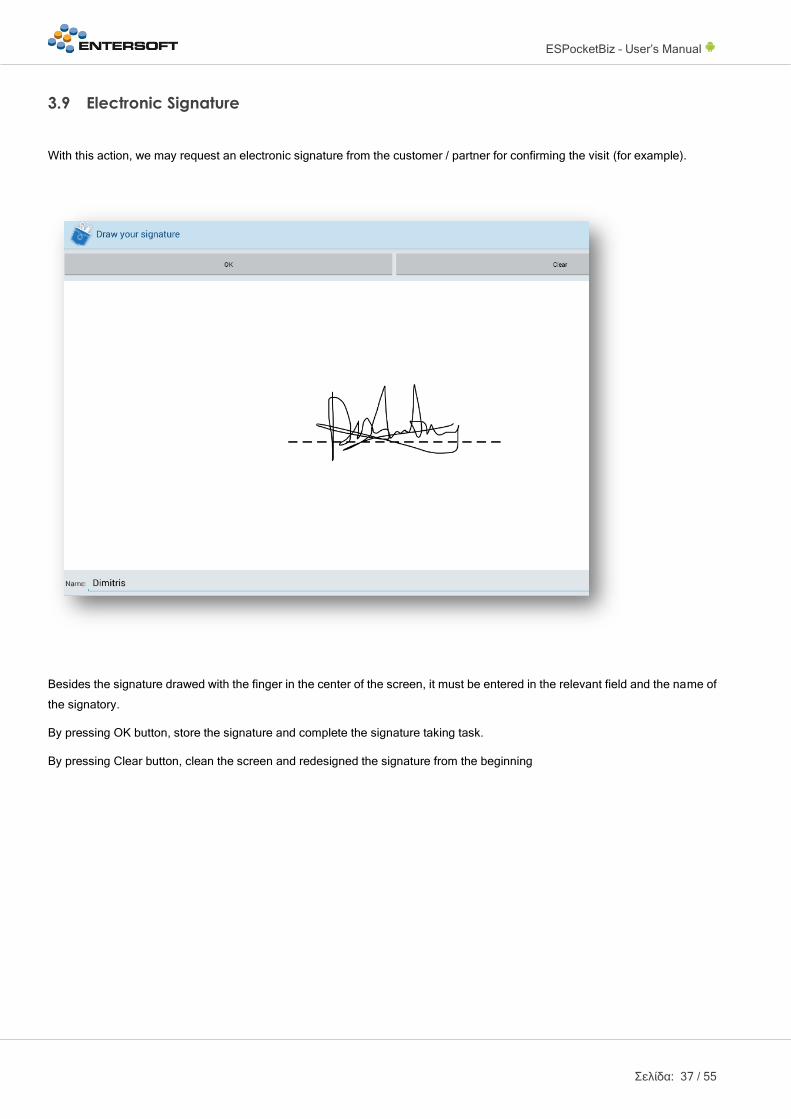
3.9 Electronic Signature
With this action, we may request an electronic signature from the customer / partner for confirming the visit (for example).
Besides the signature drawed with the finger in the center of the screen, it must be entered in the relevant field and the name of
the signatory.
By pressing OK button, store the signature and complete the signature taking task.
By pressing Clear button, clean the screen and redesigned the signature from the beginning
ESPocketBiz – User’s Manual
Σελίδα: 38 / 55
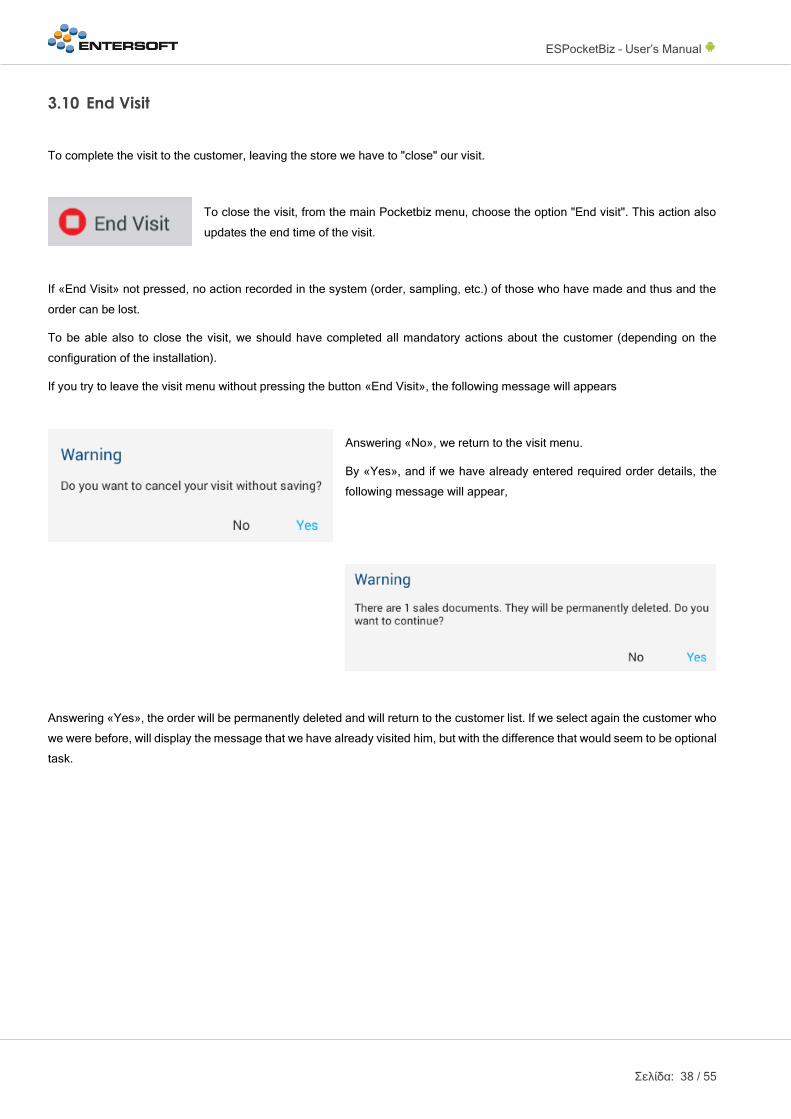
3.10 End Visit
To complete the visit to the customer, leaving the store we have to "close" our visit.
To close the visit, from the main Pocketbiz menu, choose the option "End visit". This action also
updates the end time of the visit.
If «End Visit» not pressed, no action recorded in the system (order, sampling, etc.) of those who have made and thus and the
order can be lost.
To be able also to close the visit, we should have completed all mandatory actions about the customer (depending on the
configuration of the installation).
If you try to leave the visit menu without pressing the button «End Visit», the following message will appears
Answering «No», we return to the visit menu.
By «Yes», and if we have already entered required order details, the
following message will appear,
Answering «Yes», the order will be permanently deleted and will return to the customer list. If we select again the customer who
we were before, will display the message that we have already visited him, but with the difference that would seem to be optional
task.

ESPocketBiz – User’s Manual
Σελίδα: 39 / 55
3.11 Simple Visit
Depending on the configuration, be apart from option «Start Visit» and the option «Simple Visit».
With this option, the salesman may declare that he made a simple visit to the customer (perhaps except
his route or telesales) and simply recorded the reason for the visit, as below:
For example, he made the visit and the shop was closed. If we open a normal visit might have to take mandatory action so you
could not close the visit later.
In the option Comments , may be submitted comments on this specific visit to the client.
ESPocketBiz – User’s Manual
Σελίδα: 40 / 55
4 Reports
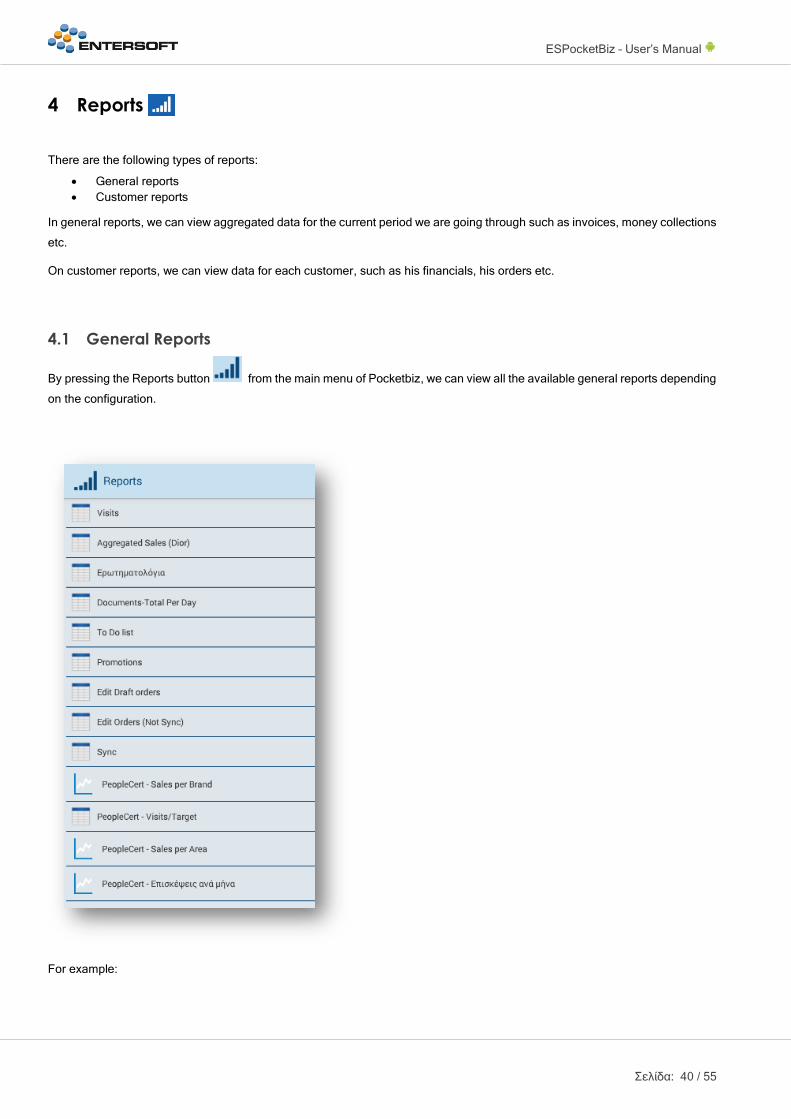
There are the following types of reports:
• General reports
• Customer reports
In general reports, we can view aggregated data for the current period we are going through such as invoices, money collections
etc.
On customer reports, we can view data for each customer, such as his financials, his orders etc.
4.1 General Reports
By pressing the Reports button from the main menu of Pocketbiz, we can view all the available general reports depending
on the configuration.
For example:
ESPocketBiz – User’s Manual
Σελίδα: 41 / 55
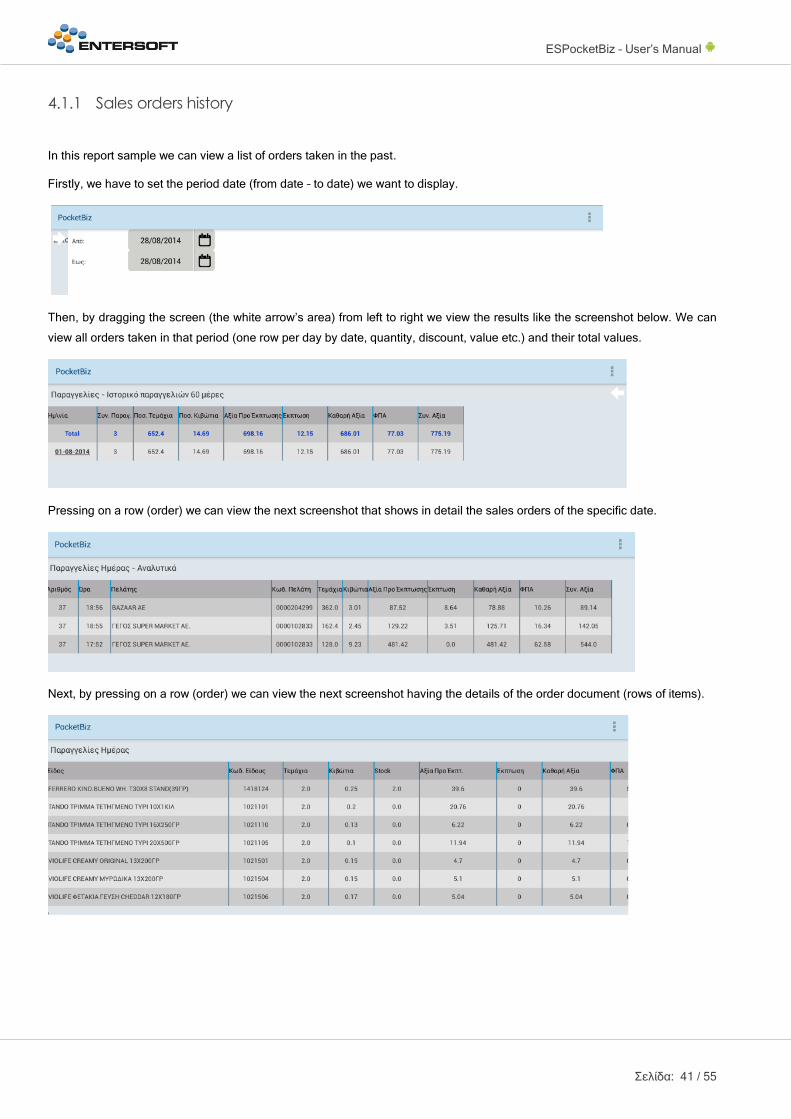
4.1.1 Sales orders history
In this report sample we can view a list of orders taken in the past.
Firstly, we have to set the period date (from date – to date) we want to display.
Then, by dragging the screen (the white arrow’s area) from left to right we view the results like the screenshot below. We can
view all orders taken in that period (one row per day by date, quantity, discount, value etc.) and their total values.
Pressing on a row (order) we can view the next screenshot that shows in detail the sales orders of the specific date.
Next, by pressing on a row (order) we can view the next screenshot having the details of the order document (rows of items).
ESPocketBiz – User’s Manual
Σελίδα: 42 / 55
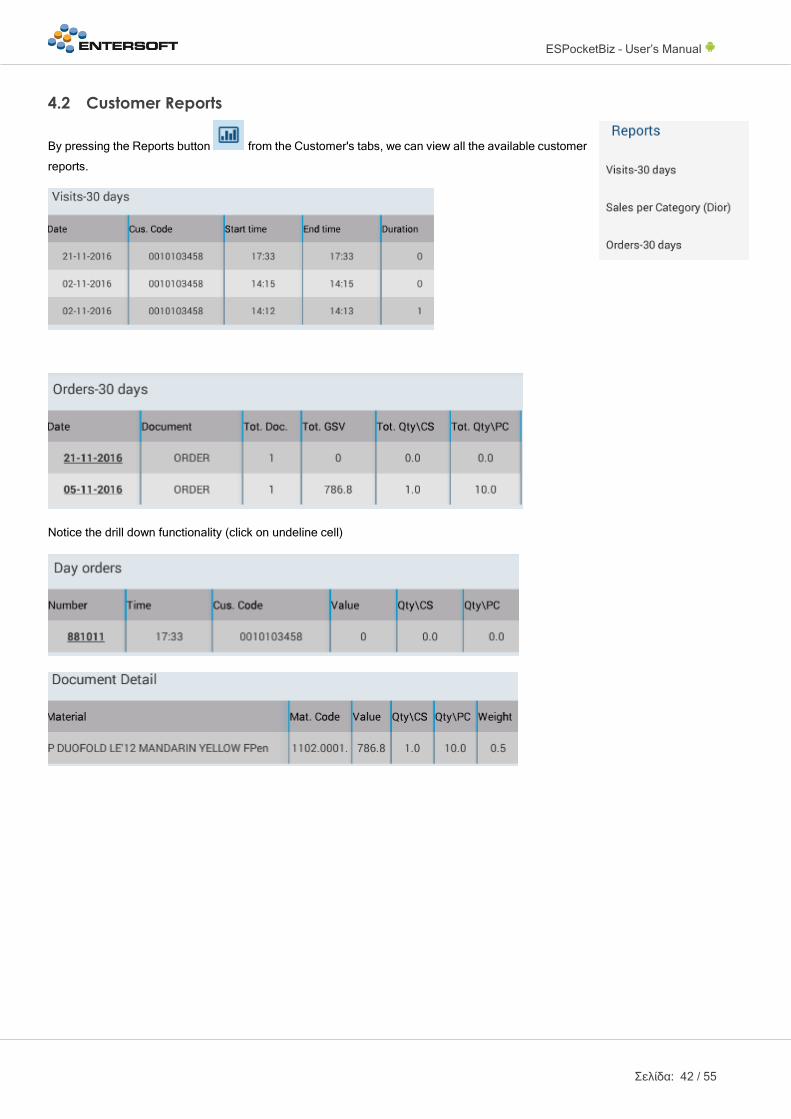
4.2 Customer Reports
By pressing the Reports button from the Customer's tabs, we can view all the available customer
reports.
Notice the drill down functionality (click on undeline cell)

ESPocketBiz – User’s Manual
Σελίδα: 43 / 55
4.3 Report types
There are also the following types of reports as to their form layouts.
4.3.1 Grid Reports
The Grid Reports show the information we want in a list format and the user has the ability to move serial in the list, moving
upwards or downwards. Also, it is possible by pressing on a line to be moved to another report, taking dynamically the information
desired at the line level (drill down). The line that is selected to move to another report, will act as a criterion for the next
The Grid type reports can be viewed:
• In the reporting menu of the main screen
• In the reporting menu in the customer tab
• In the header of the order
4.3.2 Drill down reports
Having displayed the desired information in the report, we have the ability by pressing on a record line to be transferred into
another report. In this way we can analyze the original information on what levels we want.
4.3.3 Multiselect Drill down Reports
We have a master and a detail report. In the master report we can choose one or more lines and pressing the action bar button,
the detail report opens, with contents that are filtered according to the selected master records. To select a line in the master
report, we click on it and colored in blue. If we click it again the record will be deselected.

ESPocketBiz – User’s Manual
Σελίδα: 44 / 55
4.3.4 Bar & Pie Charts
We can also embed graphics for impressive results.
5 Messages
With this option, the salesman can see the messages that send him from the back- office of the company.
ESPocketBiz – User’s Manual
Σελίδα: 45 / 55
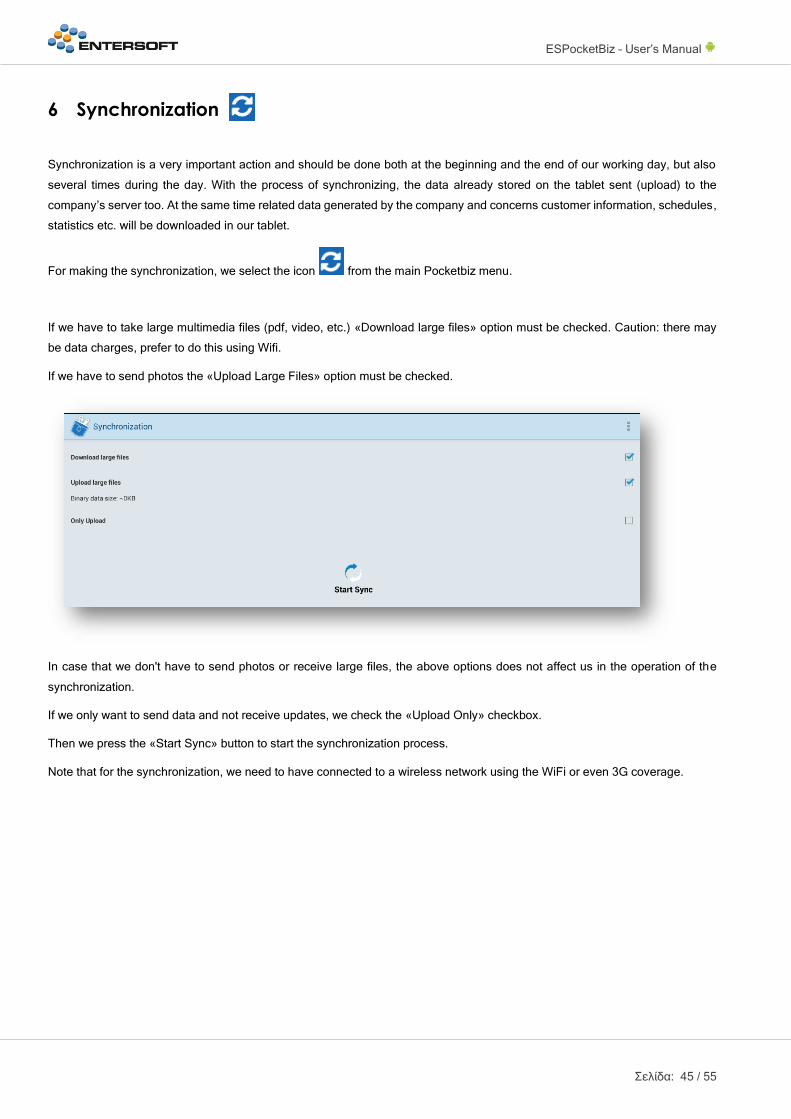
6 Synchronization
Synchronization is a very important action and should be done both at the beginning and the end of our working day, but also
several times during the day. With the process of synchronizing, the data already stored on the tablet sent (upload) to the
company’s server too. At the same time related data generated by the company and concerns customer information, schedules,
statistics etc. will be downloaded in our tablet.
For making the synchronization, we select the icon from the main Pocketbiz menu.
If we have to take large multimedia files (pdf, video, etc.) «Download large files» option must be checked. Caution: there may
be data charges, prefer to do this using Wifi.
If we have to send photos the «Upload Large Files» option must be checked.
In case that we don't have to send photos or receive large files, the above options does not affect us in the operation of the
synchronization.
If we only want to send data and not receive updates, we check the «Upload Only» checkbox.
Then we press the «Start Sync» button to start the synchronization process.
Note that for the synchronization, we need to have connected to a wireless network using the WiFi or even 3G coverage.
ESPocketBiz – User’s Manual
Σελίδα: 46 / 55
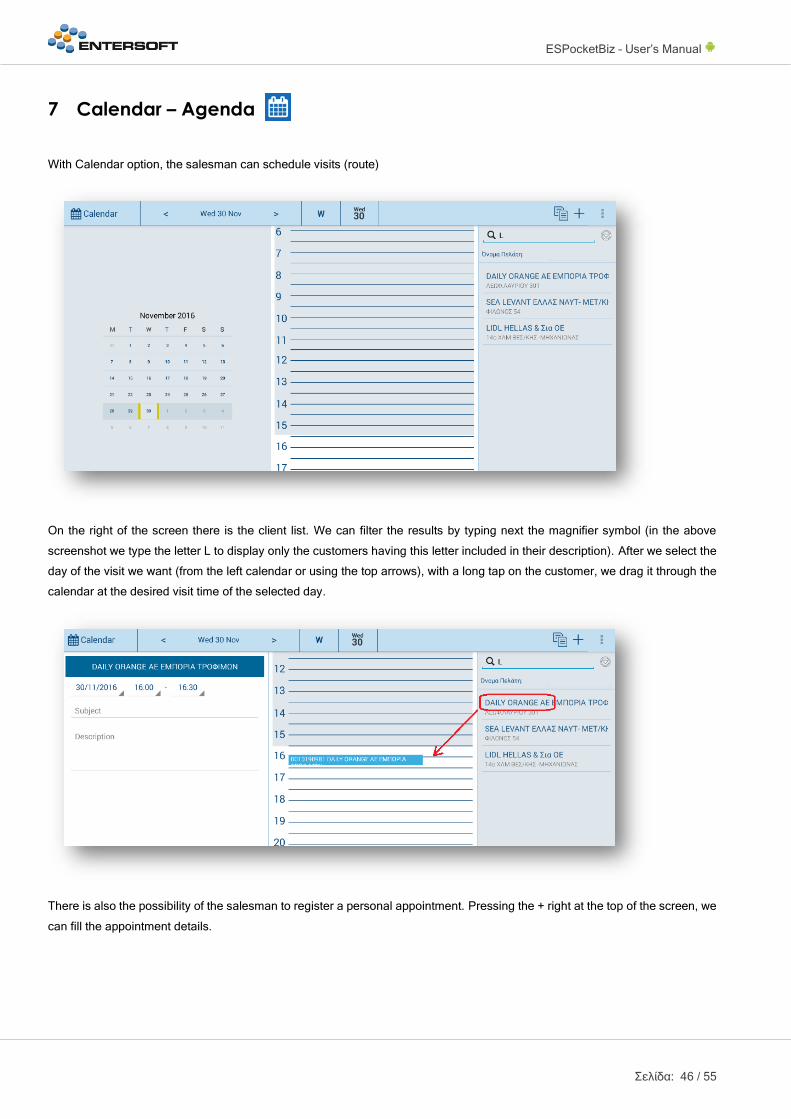
7 Calendar – Agenda
With Calendar option, the salesman can schedule visits (route)
On the right of the screen there is the client list. We can filter the results by typing next the magnifier symbol (in the above
screenshot we type the letter L to display only the customers having this letter included in their description). After we select the
day of the visit we want (from the left calendar or using the top arrows), with a long tap on the customer, we drag it through the
calendar at the desired visit time of the selected day.
There is also the possibility of the salesman to register a personal appointment. Pressing the + right at the top of the screen, we
can fill the appointment details.
ESPocketBiz – User’s Manual
Σελίδα: 47 / 55
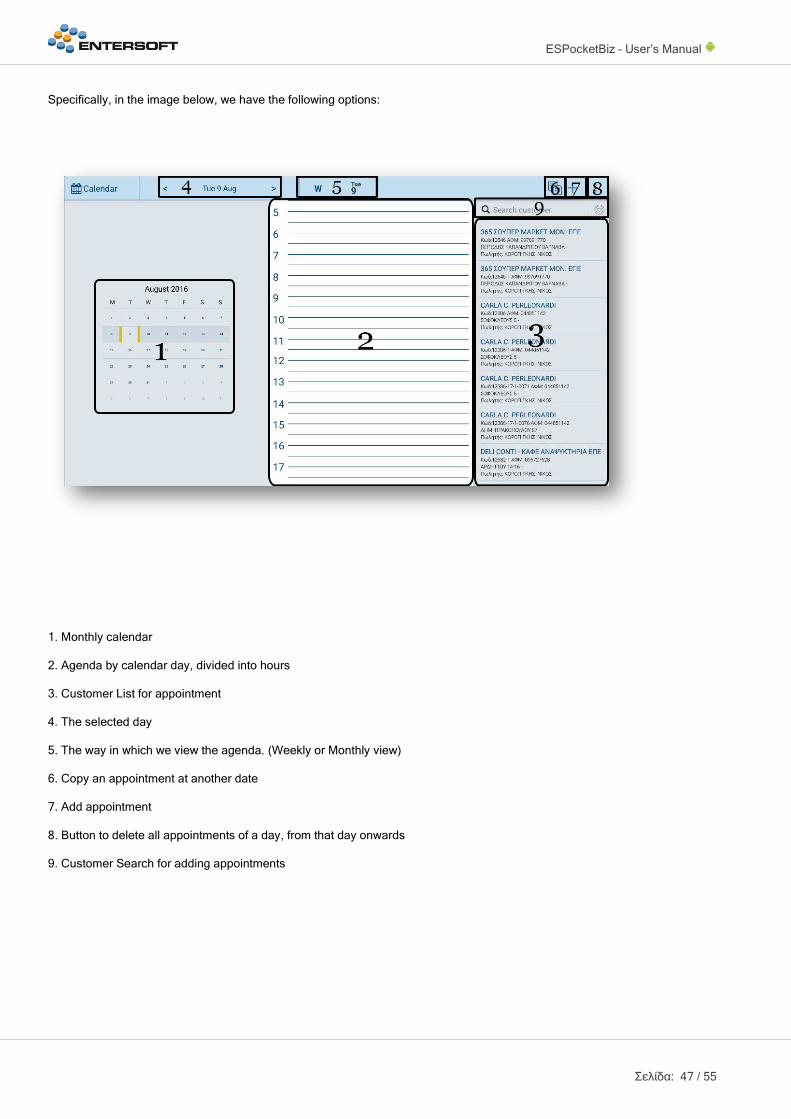
Specifically, in the image below, we have the following options:
1. Monthly calendar
2. Agenda by calendar day, divided into hours
3. Customer List for appointment
4. The selected day
5. The way in which we view the agenda. (Weekly or Monthly view)
6. Copy an appointment at another date
7. Add appointment
8. Button to delete all appointments of a day, from that day onwards
9. Customer Search for adding appointments

ESPocketBiz – User’s Manual
Σελίδα: 48 / 55
7.1 Appointment (Monthly view)
Clicking on a date, our screen is modified in the following form:
We observe that the left column where the calendar was before, now carrying the appointment information. So now we have the
following new options:
1. Customer Name
2. Date of appointment
3. The start and the end time of appointment
4. Subject of the appointment
5. Comments / description
6. Delete specific appointment
7. Cancel and return to the previous screen
8. Commit Changes

ESPocketBiz – User’s Manual
Σελίδα: 49 / 55
7.2 Appointment (Weekly view)
The home screen for the agenda on a weekly view, has the following format:
In the screenshot below, we have the following options:
1. Range of days
2. The way in which we view the agenda. (weekly selected)
3. Copy an appointment
4. Add appointment
5. Button to delete all appointments of a day, from that day onwards
6. Search customer for adding appointments
7. Customer List
8. Days of that week
9. The appointments for the specific day of the week
ESPocketBiz – User’s Manual
Σελίδα: 50 / 55
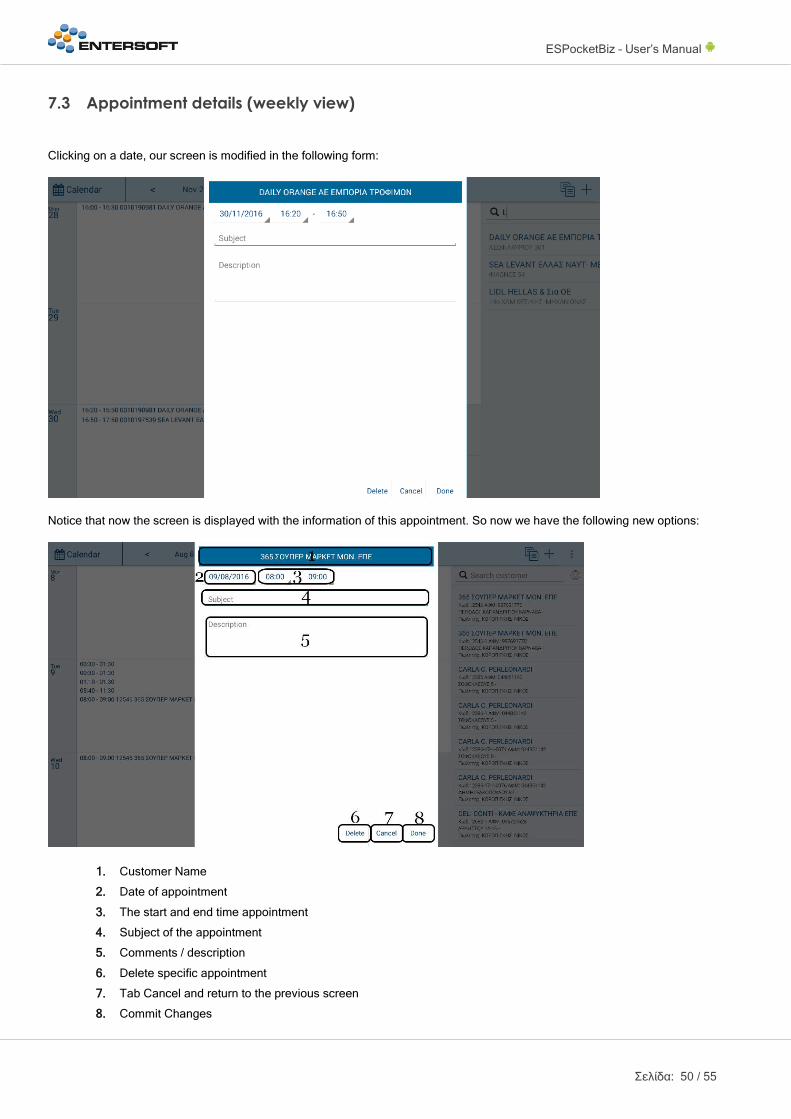
7.3 Appointment details (weekly view)
Clicking on a date, our screen is modified in the following form:
Notice that now the screen is displayed with the information of this appointment. So now we have the following new options:
1. Customer Name
2. Date of appointment
3. The start and end time appointment
4. Subject of the appointment
5. Comments / description
6. Delete specific appointment
7. Tab Cancel and return to the previous screen
8. Commit Changes
ESPocketBiz – User’s Manual
Σελίδα: 51 / 55
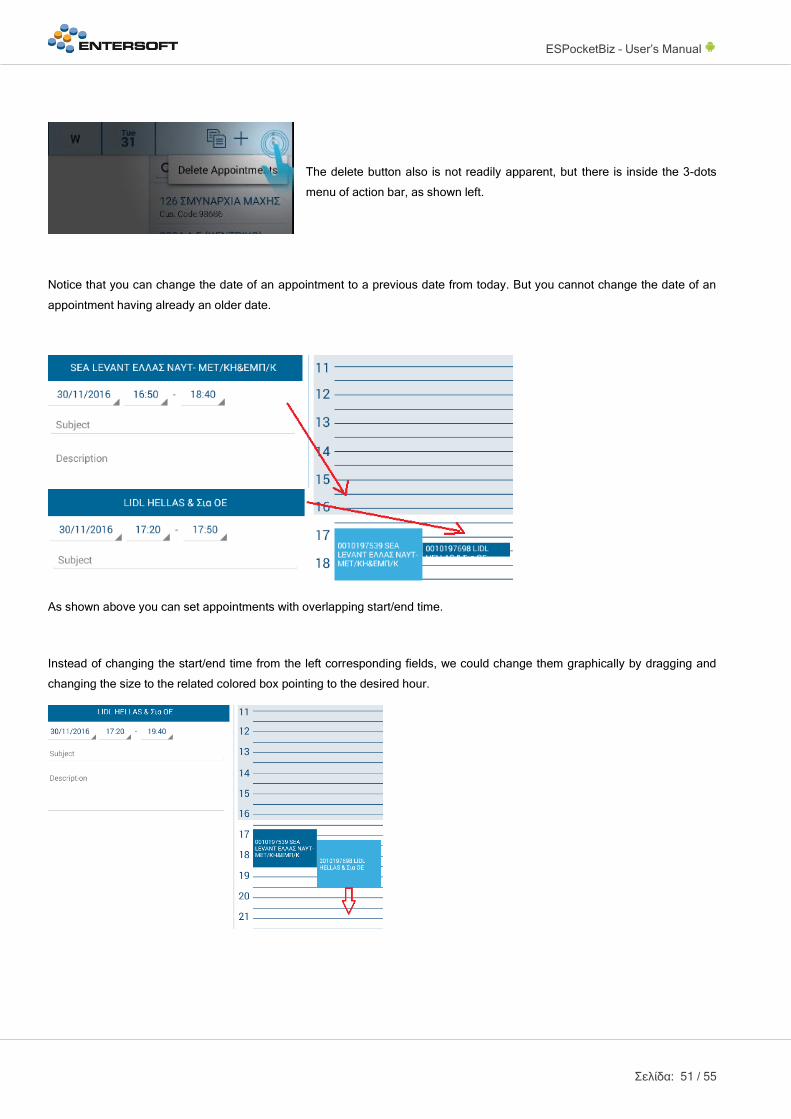
The delete button also is not readily apparent, but there is inside the 3-dots
menu of action bar, as shown left.
Notice that you can change the date of an appointment to a previous date from today. But you cannot change the date of an
appointment having already an older date.
As shown above you can set appointments with overlapping start/end time.
Instead of changing the start/end time from the left corresponding fields, we could change them graphically by dragging and
changing the size to the related colored box pointing to the desired hour.

ESPocketBiz – User’s Manual
Σελίδα: 52 / 55
8 Photo task
To take a photo when visiting a client, we select from the menu the photo task and then the following screen opens:
ESPocketBiz – User’s Manual
Σελίδα: 53 / 55
After we choose the «Camera» button (down left corner), a pop up window with two choices (take photo, take video) appears.
We choose «take photo» and the device's camera will turn on. After taking the photo, we can view it inside the frame (3).
Then we have to press the «Done» button (down right corner) for acceptance or click on to cancel and remove it.
Alternatively, we can choose an existing photo from our gallery (4).
(1) to put some predefined keywords (such as stand, shelf etc. - depending on the configuration), press «Select a comment» and select a keyword from the list.
(2) to enter our own comments, we have to press on the «write here» message.
CAUTION: The application checks for the photo size and does not allow to store large photos.
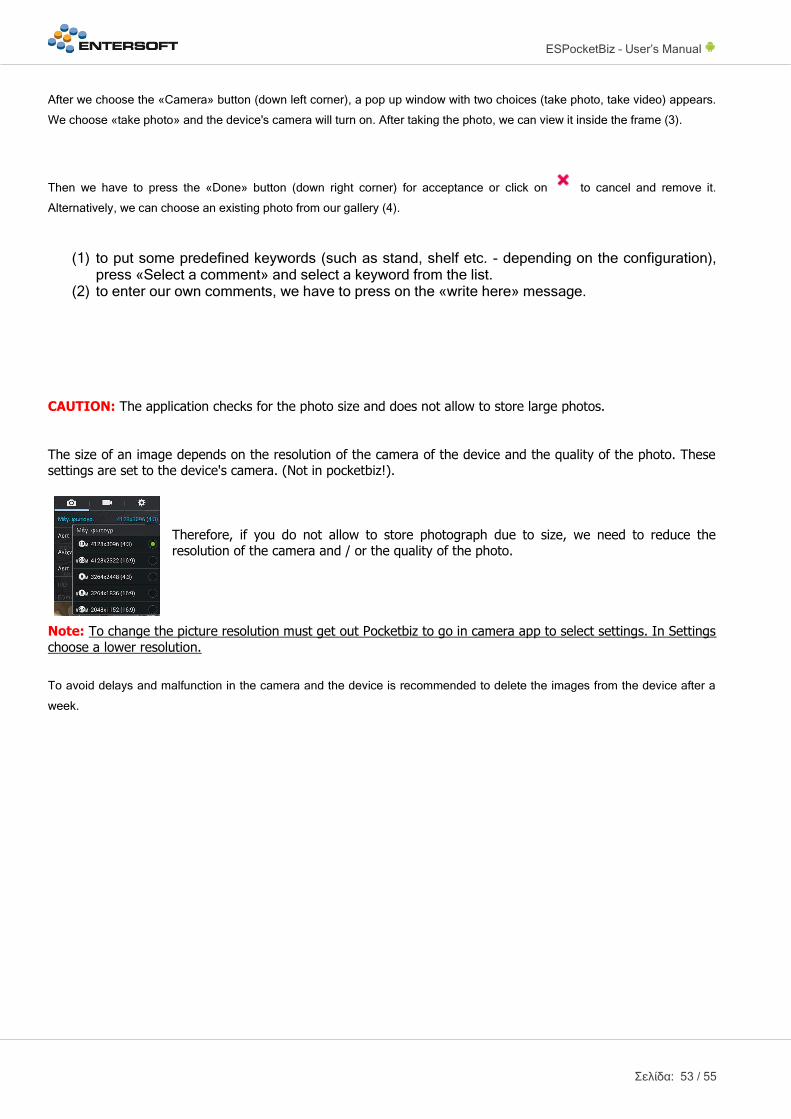
The size of an image depends on the resolution of the camera of the device and the quality of the photo. These settings are set to the device's camera. (Not in pocketbiz!).
Therefore, if you do not allow to store photograph due to size, we need to reduce the resolution of the camera and / or the quality of the photo.
Note: To change the picture resolution must get out Pocketbiz to go in camera app to select settings. In Settings
choose a lower resolution.
To avoid delays and malfunction in the camera and the device is recommended to delete the images from the device after a
week.

ESPocketBiz – User’s Manual
Σελίδα: 54 / 55
9 Printing
If the task has printing option, a question like «Do you want to print ?» will appear.
Choosing «OK», the following screen will also appear:
Select «View», to preview the printing data.
Select «Print», to proceed with printing.
And after select the «Print Text» button, starts printing.
ESPocketBiz – User’s Manual
Σελίδα: 55 / 55
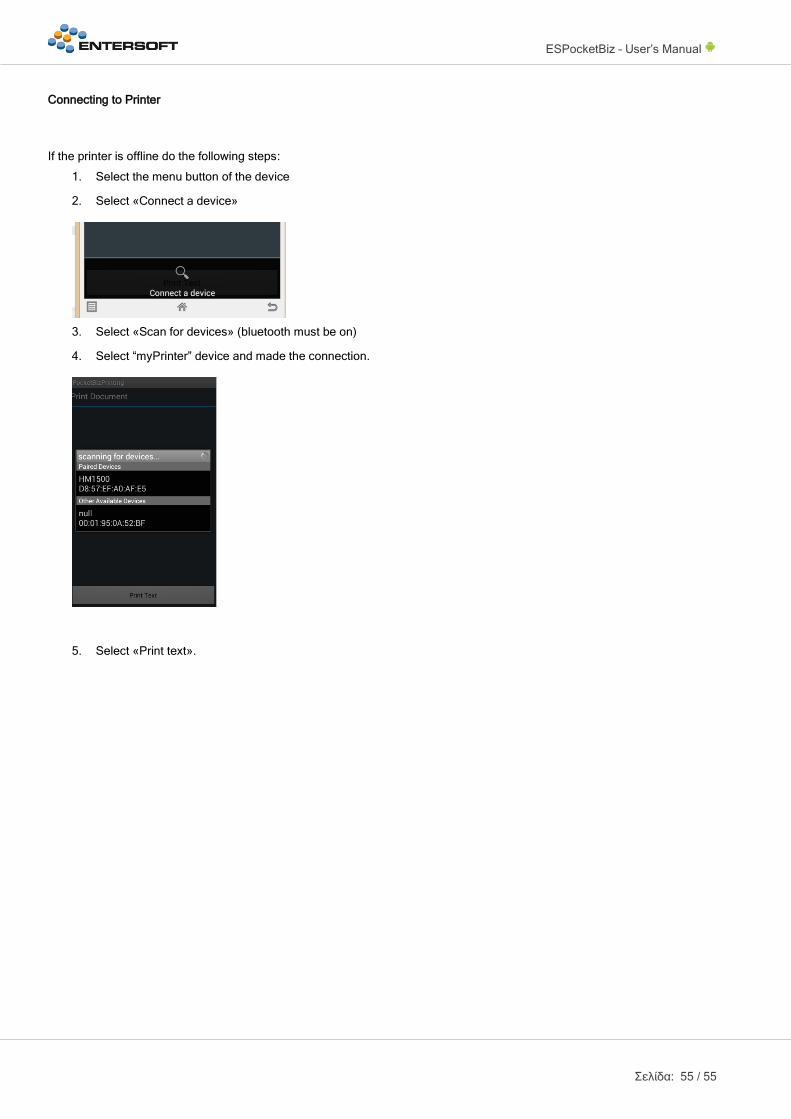
Connecting to Printer
If the printer is offline do the following steps:
1. Select the menu button of the device
2. Select «Connect a device»
3. Select «Scan for devices» (bluetooth must be on)
4. Select “myPrinter” device and made the connection.
5. Select «Print text».