full size truck & suv 1/20 chevrolet/gmc · 2020-02-12 · chevrolet/gmc full size truck &...
TRANSCRIPT

Chevrolet/GMCFULL SIZE TRUCK & SUV � 1/20
CHEVROLET/GMC� Model: Full Size Truck and SUV� Model Year: 2007-2014� Trim Level: All
Introduction
�Design and specifications are subject to change without notice for improvement.
To Ensure Safe Use, Always Follow These Precautions
�The installation of this product requires specialized skills and experience. We recommend that you have the product installed by the store that you purchased it from.
�Before you use this product, be sure to carefully read this installation manual and the separate user's manual so that you can use the product correctly. Alpine Electronics bears no responsibility for problems that arise as a result of failure to follow the instructions in the manuals.
�This manual includes a number of symbols that are intended to help you use the product safely, to prevent harm to you and others, and to protect against damage to property. These symbols and their meanings are listed below. Make sure you fully understand these symbols before you begin reading the main text.
Explanations of Injury and Damage That May Result from Incorrect Use
WarningIgnoring the content marked by this indication and using the product incorrectly is expected to lead to death or serious injury.
CautionIgnoring the content marked by this indication and using the product incorrectly is only expected to lead to injury or property damage.
CHEVROLET
Model Year
SILVERADO LTZ 2007 - 2013
AVALANCHE 2007 - 2013
SUBURBAN 2007 - 2014
TAHOE 2007 - 2014
GMC
SIERRA SLT 2007 - 2013
YUKON 2007 - 2014
YUKON XL 2007 - 2014
* The specified vehicles have been tested and have met compatibility specs at the time of testing. Compatibility is not guarantee if the manufacturer has made production changes to the listed vehicles above.

Chevrolet/GMCFULL SIZE TRUCK & SUV � 2/20
Types of Precautions
Forbidden
Indicates actions that are forbidden (must not be performed)
Mandatory
Indicates actions that are mandatory (must be performed)
Forbidden
Indicates that disassembly is forbidden.
Marks content that should receive your full attention.
Warning
Do not disassemble or modify the product. Doing so could lead to an accident, fire, or electric shock. Forbidden
Store screws and other small objects where small children cannot reach them. If one of these small objects is swallowed, consult with a doctor immediately.
When replacing fuses, be sure to use fuses with the specified current rating. Failing to do so could lead to an accident or fire. Forbidden Mandatory
Only connect the product to a 12 VDC negative ground car. Failing to do so could lead to an accident or fire. Mandatory
Before you begin wiring, remove the ground wire from the negative terminal of the battery. Failing to do so could lead to electric shock or injury.
Do not cut the insulation on a cord and take power from another device. Doing so could lead to fire or electric shock. Forbidden
Do not install the product in a location where it will obstruct the driver’s forward view; interfere with the operation of the steering wheel, gearshift, or the like; or pose a threat to passengers. Doing so could lead to an accident or injury. Forbidden
When making a hole in the vehicle body, be careful to avoid damaging pipes, the fuel tank, electrical wiring, and the like. This kind of damage could lead to an accident or fire.

Chevrolet/GMCFULL SIZE TRUCK & SUV � 3/20
When installing and grounding the product, do not use any of the bolts or nuts of the steering wheel, brakes, fuel tank, or the like. Doing so could make the brakes stop working or lead to fire. Forbidden
Do not install the product near the passenger-side airbag. Doing so could interfere with the operation of the airbag and lead to an accident or injury. Forbidden
Bundle cords so that they don’t interfere with driving. Wrapping cords around the steering wheel, gearshift, brake pedal, or the like, could lead to an accident or damage equipment.
Caution
Connect the product properly according to the instructions. Failing to do so could lead to fire or an accident. Forbidden
Do not sandwich cords between the seat railing or allow them to touch protrusions. Resulting breaks or shorts could lead to electric shock or fire.
Do not block vents or heat sinks. Doing so could lead to fire or damage equipment.
Use the accessories according to the instructions, and attach them securely. Failing to do so could lead to an accident or damage equipment. Forbidden
Do not install the product where it may be exposed to water or in a place with high levels of humidity or dust. Doing so could lead to fire or damage equipment. Forbidden
The installation and wiring of this product requires specialized skills and experience. Have the product installed and wired by the store that you purchased it from.

Chevrolet/GMCFULL SIZE TRUCK & SUV � 4/20
Accessory ListHead Unit Box Parts (X009)
Owner’s Manual Disc X009 Head Unit X009 Camera Harness
AUX/Pre Out Harness GPS Antenna USB Extension Cable
8mm x 8 Screws Quick Reference Guides Registration Cards
QRGAudio
QRGNavigation
Alpine Registration Card
NAVTEQ Registration Card
iDatalink Maestro Box Parts (ALP-MRR/ALP-HRN-GM)
Main Harness Navigation Adapter Bose Adapter Harnesses
Rear Seat A/V Harness Chime Speaker USB to Mini USB Cable
Vehicle Camera Harness iDatalink Maestro Module

Chevrolet/GMCFULL SIZE TRUCK & SUV � 5/20
Installation Kit Parts (G-KTX-009-GM)
X009-GM Key Panel Key Harnesses Side Mounting Brackets
Screws x 12 Rear Support Bracket 8mm Screw x1
Cutout Template
Optional 3rd-Party Parts (Not Included)
PAC GMRVD2*1 RCA A/V to 3.5 mm Adapter
*1 Needed with 2012-2014 Navi-equipped models.
Audio L
3.5 mm A/V
Audio RVideo
Allows front panel A/V input to be used when vehicle is equipped with factory rear seat entertainment.*2
*2 Note: To use this option, aux-3 input must be switched from iPod video to aux-3 in the “aux-3 source select” menu.

Chevrolet/GMCFULL SIZE TRUCK & SUV � 6/20
Component Locations
GPS Antenna Location
Head Unit
Chime Speaker
GPS Antenna
Maestro/Speaker Location
Maestro/Speaker Location
Top View
Front side center console driver side view
Maestro/Speaker Location

Chevrolet/GMCFULL SIZE TRUCK & SUV � 7/20
X009-GM System Wiring for All Non-Navigation Equipped Vehicles And 2007-2011 Navigation-Equipped Vehicles
Chime Speaker
X009 Camera Harness
Camera Input Back-upCamera In
HDMI Input
USB ExtensionCable
To SXM
Aux/Pre-outHarness
X009 Head Unit
To X009-GMKey Panel
GPS Antenna
Subwoofer
10-p
in G
reen
Co
nnec
tor
3.5
mm
Min
i plu
g
10-p
in B
lack
Co
nnec
tor
4-p
in B
lack
Co
nnec
tor
Mai
n H
arne
ss
18-p
in B
lack
Co
nnec
tor
To O
verh
ead
Scr
een
Cen
ter
Out
Sub
Out
Aux
Out
put
Pur
ple
Red
Gre
enW
hite
Gra
yR
ed
Whi
teW
hite
Aux
Inp
ut
Fro
nt
Rea
r
Fro
nt R
ear
A/V
Inp
ut
3-p
in B
lack
Co
nnec
tor
4-p
in D
ata
Co
nnec
tor
Blue Power Antenna(Not used)
Green/White
Blue/White Amp Turn-on
3.5 Mini plug
Speed Pulse
4-pin Data Connector
To ODB IIConnector
iDatalink MAESTRO Module
To Vehicle Connectors
Rear seat A/VHarness
Vehicle CameraHarness
Use only with aftermarket amplifiers
Co
nnec
t if
fact
ory
-eq
uip
ped
usi
ng
RC
A Y
-cab
le t
o f
ront
RC
A o
utp
uts
Co
nnec
t if
fact
ory
-eq
uip
ped
X009 Power Harness
If Bose is equipped, connect Bose adapter harness on vehicle side.

Chevrolet/GMCFULL SIZE TRUCK & SUV � 8/20
X009-GM System Wiring for 2012-14 Navigation Equipped Vehicles
To retain a pre-existing factory rearview camera• Locate the 20-pin radio plug , connect the PINK or WHITE wire located at pin 5 to the center of yellow conductor of a yellow RCA, connect
the LIGHT BLUE or BARE wire located at pin15 to the shield of the yellow RCA.
X009 Head Unit
To X009-GMKey Panel
Mai
n H
arne
ss
Chime Speaker
X009 Camera Harness
Camera Input Back-upCamera In
HDMI Input
USB ExtensionCable
To SXM
Aux/Pre-outHarness
GPS Antenna
Subwoofer
10-p
in G
reen
Co
nnec
tor
3.5
mm
Min
i plu
g
10-p
in B
lack
Co
nnec
tor
4-p
in B
lack
Co
nnec
tor
18-p
in B
lack
Co
nnec
tor
To O
verh
ead
Scr
een
Cen
ter
Out
Sub
Out
Aux
Out
put
Pur
ple
Red
Gre
enW
hite
Gra
yR
ed
Whi
teW
hite
Aux
Inp
ut
Fro
nt
Rea
r
Fro
nt R
ear
A/V
Inp
ut
3-p
in B
lack
Co
nnec
tor
4-p
in D
ata
Co
nnec
tor
Blue Power Antenna(Not used)
Green/White
Blue/White Amp Turn-on
3.5 Mini plug
Speed Pulse
4-pin Data Connector
To ODB IIConnector
iDatalink MAESTRO Module
To Vehicle Connectors
Use PAC GMRVD2 or equivalent
NavigationAdapter
Vehicle CameraHarness
Use only with aftermarket amplifiers
Co
nnec
t if
fact
ory
-eq
uip
ped
usi
ng
RC
A Y
-cab
le t
o f
ront
RC
A o
utp
uts
Co
nnec
t if
fact
ory
-eq
uip
ped
X009 Power Harness
If Bose is equipped, connect Bose adapter harness on vehicle side.

Chevrolet/GMCFULL SIZE TRUCK & SUV � 9/20
Factory unit disassembly process
1 Use a panel removal tool to carefully unsnap the trim bezel around the radio and HVAC controls.
2 Extract (8) 9/32” – 7mm screws securing the radio, HVAC and cigarette lighter panel. Disconnect and remove in the order shown.
3 Remove and disconnect by order number shown.
4 Remove driver side center console panel by unsnapping it
5 Move the factory wire harness to the back of the dash by accessing through the drivers side center console area.
3
2
1

Chevrolet/GMCFULL SIZE TRUCK & SUV � 10/20
Steps to Get Started
1 INSTALL THE WEBLINK PLUG-INGo to:idatalinkmaestro.com/plugin and follow the installation steps.
Review the System Requirements before installing.
If the plugin is already installed, the caution, “The plugin is already installed” appears. Please skip to step 2.
2 REGISTER A WEBLINK ACCOUNTGo to:idatalinkmaestro.com/register and complete the registration process.
A confirmation email will be sent to you requiring validation.For existing customers, click log in.
For existing customers, click log in.
3 CONNECT YOUR MAESTRO MODULEUse the included USB cable to connect your Maestro module to your PC.
4 LOG INTO WEBLINKGo to:idatalinkmaestro.com/login.Enter your username and password, then click OK.
5 PROGRAM YOUR MODULEFollow the programming steps for your vehicle.
6 COMPLETE INSTALLATIONProceed to the next page to complete installation.

Chevrolet/GMCFULL SIZE TRUCK & SUV � 11/20
Installation Instructions
1 Attach the Maestro module to the X009 main harness.
2 Attach the chime speaker to the side of the center console.
3 Insert the radio side of the main harness from behind the dash to the radio cavity.
4 Connect factory harness to the X009 main harness and secure it.
5 Place the GPS antenna on the top dash are as illustrated and feed the cable in between the A/C vents. Use the supplied magnetic base for the best signal strength.
5
6 Access the OBDII connector located under the driver side dashboard. Connect the BROWN /RED wire from the Alpine harness to the TAN/BLACK wire located at pin 6 of the OBDII connector. Connect the BROWN /YELLOW wire from the Alpine harness to the TAN wire located at pin 14 of the OBDII connector.
7 Connect the X009 main harness to the headunit and test all functions before snapping the headunit bezel into the dashboard.

Chevrolet/GMCFULL SIZE TRUCK & SUV � 12/20
Exploded-View DiagramParts assembly diagram for the X009-GM kit.
Switch panel assembly
X009 AVN Unit
Rear support bracket
Left spacer
Left bracket
Factory dash bezel
Right bracket
Right spacer
Factory HVAC controller (not supplied).Requires trimming for proper fit, refer to page 15.
Factory cigarette lighter panel (not supplied). Needs trimming for proper fit, refer to page 16.

Chevrolet/GMCFULL SIZE TRUCK & SUV � 13/20
Bracket Assembly ProcedureAttach pre-assembled left and right bracket assemblies to the X009 unit using 4 supplied M5x8 bolts on each side.
Left bracket assembly
M5X8
X009 AVN Unit
M5X8
Rear support bracket
M5X8
Right bracket assembly
Bracket and spacer are pre-assembled in the X009-GM package.
Clip

Chevrolet/GMCFULL SIZE TRUCK & SUV � 14/20
Wiring Installation ProcedureConnect and route wires 1 and 2 as shown in the diagrams below.
Pass through
7-pin
20-pin
12-pin
12-pin
20-pin
20-pin
20-pin
12-pin
7-pin
To X009 key panel connector
Rear View
Side ViewFront View
Bottom View
20-pin
7-pin
7-pin
12-pin

Chevrolet/GMCFULL SIZE TRUCK & SUV � 15/20
Trimming procedure for factory HVAC panelThe factory HVAC control needs to be trimmed to fit properly in the kit. Trim the top edges of the HVAC control as shown in the diagram below.
+
–
+
–
+
–
+
–+
–
+
–
Cut out
Cut out
Cut out
The included template can be used as a guide for proper trimming.

Chevrolet/GMCFULL SIZE TRUCK & SUV � 16/20
Trimming procedure for factory cigarette lighter panelThe factory cigarette lighter panel needs to be trimmed to fit properly in the kit. Trim the side and bottom edges of the cigarette lighter panel as shown in the diagram below.
–
+
–
Cut out
Cut outCut out
Cut out Cut out

Chevrolet/GMCFULL SIZE TRUCK & SUV � 17/20
Installing the X009-GM assemblyAttach the X009-GM assembly into the dash using 8 provided 4x12mm screws, 4 on each side.
Instrumental panel
Provided screws
X009 ASSY
Screw is close to the Monitor.Don’t damage the Monitor.
Attach the assembly to the vehicle’s dashboard at these 8 points using the provided screws.
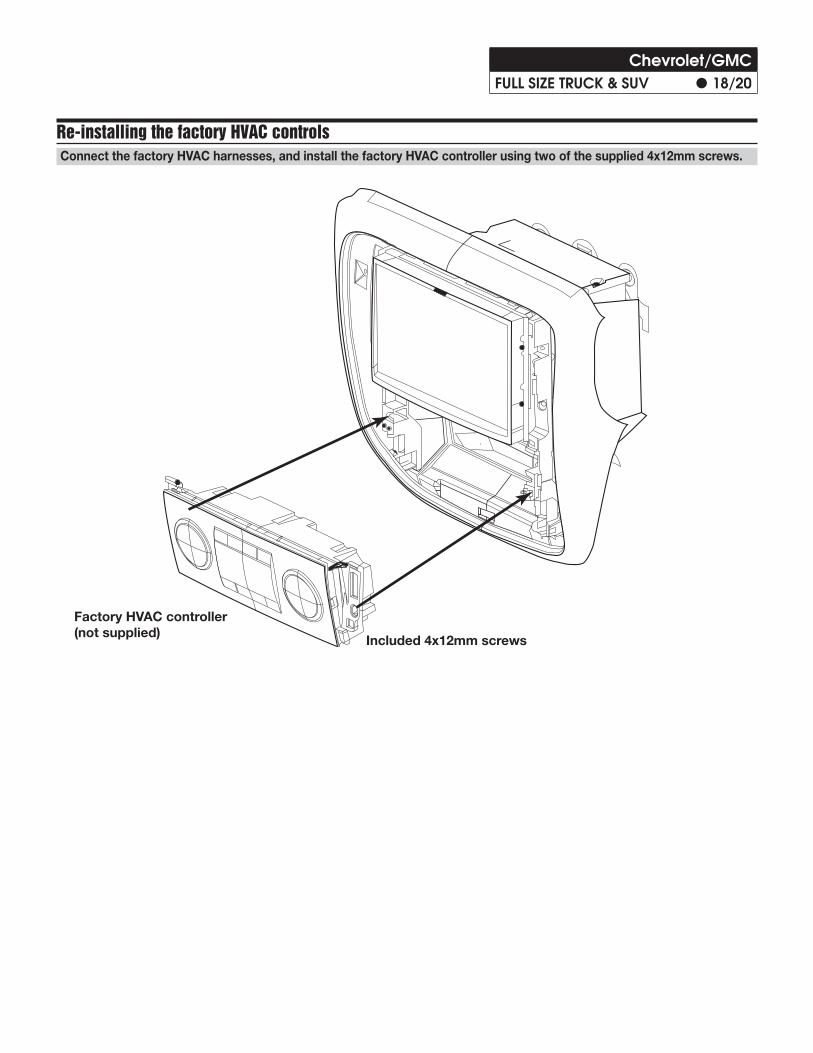
Chevrolet/GMCFULL SIZE TRUCK & SUV � 18/20
Re-installing the factory HVAC controlsConnect the factory HVAC harnesses, and install the factory HVAC controller using two of the supplied 4x12mm screws.
Factory HVAC controller (not supplied) Included 4x12mm screws

Chevrolet/GMCFULL SIZE TRUCK & SUV � 19/20
Re-install the factory cigarette lighter panelConnect the factory harnesses to the factory cigarette lighter panel, and attach it to the kit using two of the supplied 4x12mm screws.
Factory cigarette lighter panel (not supplied) Included 4x12mm
screw
Included 4x12mm screw

Chevrolet/GMCFULL SIZE TRUCK & SUV � 20/20
Install the switch panel assemblyConnect Wire 1 and Wire 2 to the switch panel assembly, and push the cables into the dash as the panel is installed. Snap the bezel into place to complete the installation.
Clips on rear side(6points)
Switch panel assembly
Wire-1
Wire-2
Wire-2
Push wires into inst panel.