gladius mini v4 user manual en(rc3手柄修改)
TRANSCRIPT


Thank you for purchasing the GLADIUS MINI underwater drone. Please read this entire document carefully before using the drone. By using this product, you hereby signify that you have read this disclaimer and all instructions carefully and that you understand and agree to abide by the terms and conditions herein.
Chasing accepts no liability for damage, injury, or any legal responsibility incurred directly or indirectly from the use of the GLADIUS MINI in the following conditions:
User Manual
1
2
3
6
3
5
3
3
6
3
4
2
ROV
1. 4K UHD Camera
2. Dimmable LED Lights
3. Thrusters (5 Total)
4. Buoyancy Weight
5. Tether Connection Socket (Used for dives and charging)
6. Drain / Vent Holes
01. Damage(s) or injuries incurred when users are drunk, taking drugs, drug anesthesia, dizziness,fatigue, nausea and any other conditions no matter physically or mentally that could impair your ability. 02. Damage(s) or injuries caused by subjective intentional operations. 03. Any mental overcompensation caused by accident. 04. Failure to follow the guidance of the manual to assemble or operate. 05. Malfunctions caused by refit or replacement with non-Chasing accessories and parts, or unauthorized modification, disassembly, or shell opening not in accordance with official instructions. 06. Damage(s) or injuries caused by using third-party products or fake Chasing products. 07. Damage(s) or injuries caused by misoperation or subjective misjudgment. 08. Damage(s) or injuries caused by mechanical failures due to erosion, aging. 09. Damage(s) or injuries caused by operating the unit with a low battery alert. 10. Damage(s) or injuries caused by operating the drone out of maximum safe range and depth. 11. Damage(s) or injuries caused by knowingly operating the product in abnormal conditions( such as the assembly is not completed, or the main components have obvious faults,obvious defect or missing accessories ). 12. Damage(s) or injuries caused by operating the drone in a sensitive zone such as a military area or private waters without official permission. 13. Damage or injury caused by using in bad water conditions (such as high winds, or turbid zone). 14. Damage or injury caused by uncontrollable external factors, including severe collision, tidal wave. swallowed by animal. 15. Damage(s) or injuries caused by infringement such as any data, photo or video material recorded by the use of the GLADIUS MINI. 16. Other losses that are not covered by the scope of Chasing's liability.
GLADIUS MINI is a small five thruster underwater drone used for real-time observation, exploration, photography, and video capture. Its body imitates that of a submarine, and its unique design lets the GLADIUS MINI move quickly with speeds up to 2m/s (3.89Knots). It has a depth-lock mode and a self stabilizing mode. The drone can move up and down vertically and can tilt +-45°. It can dive up to 100 meters (330ft) and has a high-definition camera for shooting photos and videos. The drone is easy to operate and its small size allows it to be carried in a single backpack.It has a battery life of approximately 2 hours. Whether you're diving, fishing, taking underwater photography, or yachting, the GLADIUS MINI is your best choice.

Installation & Connection
Remote controller
9. Control Sticks: Used to control the navigation of the ROV10. Video/Photo:Press to start/stop video recording or take photo11. Video/Photo Mode:Press to switch between video and photo mode12. Left Angel Adjustment: Adjust the pitch angle13. Type-c Port: Direct connection with mobile phone/tablet device14. HDMI Socket: 1080P HD image real-time output15. Tether Connection Socket/Charging socket16. Phone/ Tablet Clamp: Used to attach phone/ tablet mount to mounting bracket17. Clamp Button: Pull apart the two ends and put in the phone/t ablet, then press this button to tighten
Note: Do not put the controller in the water to avoid damaging the device, damages caused by water ingress are not covered by the warranty.
2
4
31
1
Download CHASING GO1 App1CHASING GO1 App :(To download,scan the below QR code or visit IOS App Store/Google Play.(For iOS 9.0/Android 4.4 and above)
1. Power switch: Turns controller on/off2. Power Indicator: Green (High power), Blue(Medium power), Red (Low power)3. Wi-Fi switch button: Short press to switch 5Ghz/2.4Ghz Wi-Fi4. Signal Indicator: 2.4G : 2.4Ghz Wi-Fi indicator, always on when working 5G: 5Ghz Wi-Fi indicator, always on when working ROV(drone): Indicates the communication status between the controller and the drone(Steady light indicates successful connection; Blinking light indicates disconnection.)5. One-key reset: Short press to reposition the ROV return to a horizontal state / Long press to switch control mode6. Unlock: Unlock/Lock,current state of the Thruster will show on the App7. Led Control: On/off led light (0%50%100%)8. Safety Buckle: Can be used with a safety rope to prevent the remote control from falling
Handle indicators introductionBattery: Red:10%↓ Red light flashes quickly;10-29% Red light always on.Blue:30-69% Blue light always on; Green:70-100% Green light always on;Signal Indicator:2.4G:2.4Ghz Wi-Fi indicator,always on when working.5G:5Ghz Wi-Fi indicator,always on when working.ROV:Indicates the communication status between the controller and the ROV (Steady light indicates successful connection, Blinking light indicates disconnection.)Gesture back Button:The blue light is always on when the ROV is in a non-horizontal positionUnlock Button:Locking: No lights; Unlocking: Blue light onLed Control Button:Bright light:Blue light always on;Low light: Blue light flash;No light: Blue light off.
100/200 meters Tether & WinderThe tether is used to connect the drone and the remote controller The winder is used to store the tether.
1. Tether connectors 2. Tether3. Winder 4. Fastener
1. Do not put exposed (unconnected) tether into the water or plashing liquid to the tether; 2. Check whether the O-ring on the tether connector pre-dive, make a replacement when it is missed or damaged.
1716
14
1310
15
1211
987
13
25
4
9
6

Connect remote controller to your phone/tabletMethod 1:USB Direct Cable ConnectionChoose an appropriate remote controller cable based on the type of mobile device. A Lightning connector cable, micro USB cable, and TYPE-C cable are included in the packaging. Connect the end of the cable with the mobile phone logo to the mobile device.
4
Method 2:Wi-Fi Connectiona. On the Phone/Tablet, go to Wi-Fi settings. b. Wait for 5-10 seconds and the Chasing_xxxx network will appear as an option. c. Click to connect and enter the Wi-Fi password: 12345678
Drop the ROV into Watera. Grasp the grips on both sides of the ROV with both hands and gently throw the ROV into the water.b. Unlock the Thruster(motors) to dive; c. For a better experience, it is recommended to ensure that the water depth exceeds 1 meter.
6
Connect ROV with Remote Controllera. Insert one end of the tether connector into the remote controller connector socket; b. Reserve a suitable length and hang the Buckle on the Buckle Bracket, and make it tension; c. Insert the other end of the tether connect
2
Warning: Check whether the O-ring on the tether connector pre-dive. If it is missed or damaged, please replace it in time.
Note: *It is recommended to use this kind of way to connect mobile phone/tablet and remote controller. *For iOS users, select "Auto" for IP address configuration. *If the Android device has a "USB OTG" switch, you need to turn it on. *If the connection fails, please try to turn off your phone's Wi-Fi and mobile network. If still fails, it may be a phone/tablet compatibility problem. Please select method 2----Wi-Fi connection. *The remote controller type-c port and attached remote controller cables do not support charging.
Start (turn on) the ROV3a. Turn on the remote controller power button; b. A few seconds later, the remote controller’s indicator lights up, 5G or 2.4G light will be always on. The drone LED lights will flash shortly, accompanied by two self-tests sounds; c. Check all the connectors and lights pre-dive, and unlock the ROV when everything is ready underwater.
USB 10/100 LAN
IPV4 ADDRESS
Gladius_5G_xxxxx
xxxxxxxxxx
CHOOSE A NETWORK...
6:27 89%
Ethernet
xxxxxxxxxx
xxxxxxxxxx
Configure IP Automatic
App interface IntroductionOpen the APP and enter the camera, you will see the real-time scene transmission.
5
General Settings Compass
VR Live Stream
Return
Side Menu
Depth
LightAngle Unlock/lock ROV Mode
3D Gesture
Signal StrengthBattery
White Balance Lock
Picture
Video Recording
Camera Settings
Temperature
Note:You could check more guidance videos on the website page https://www.chasing.com/,or you could contact the global support team with any questions :[email protected]
1
Video and Photo Download1)Connect the ROV with remote controller by the tether, Switch remote controller power button to on. 2)Find the chasing_xxxxxxxx Wi-Fi on the phone/tablet/ laptop Wi-Fi list.3)Input Wi-Fi Password :12345678
Connect Wi-Fi 2
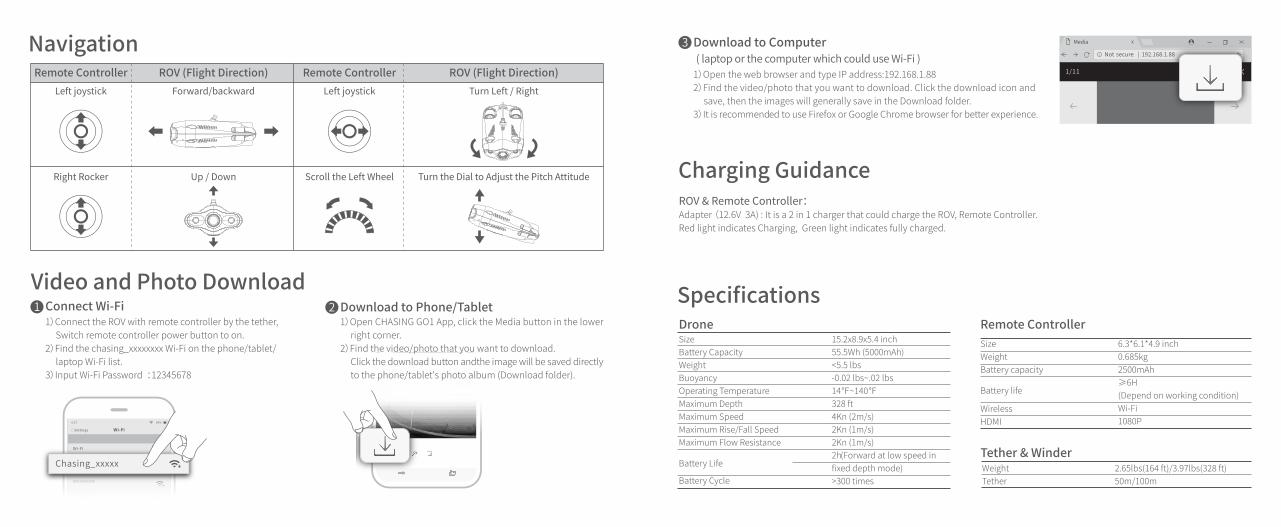
Navigation
Forward/backward Turn Left / Right
Up / Down Turn the Dial to Adjust the Pitch Attitude
Left joystick
Right Rocker
Left joystick
Scroll the Left Wheel Charging GuidanceROV & Remote Controller:Adapter (12.6V 3A) : It is a 2 in 1 charger that could charge the ROV, Remote Controller.Red light indicates Charging, Green light indicates fully charged.
2.65lbs(164 ft)/3.97lbs(328 ft)50m/100m
WeightTether
Tether & Winder
Specifications
SizeBattery CapacityWeightBuoyancyOperating TemperatureMaximum DepthMaximum SpeedMaximum Rise/Fall SpeedMaximum Flow Resistance
Battery Life
Battery Cycle
15.2x8.9x5.4 inch55.5Wh (5000mAh) <5.5 lbs-0.02 lbs~.02 lbs14℉~140℉328 ft4Kn (2m/s)2Kn (1m/s)2Kn (1m/s)2h (Forward at low speed in fixed depth mode)>300 times
Drone1)Open CHASING GO1 App, click the Media button in the lower right corner.2)Find the video/photo that you want to download. Click the download button andthe image will be saved directly to the phone/tablet's photo album (Download folder).
Download to Phone/Tablet
Media
Not secure | 192.168.1.88
1/11ROV (Flight Direction) ROV (Flight Direction)Remote Controller Remote Controller
Wi-Fi
Wi-Fi
Gladius_5G_xxxxx
xxxxxxxxxx
CHOOSE A NETWORK...
6:27 89%
Settings
xxxxxxxxxx
xxxxxxxxxx
Chasing_xxxxx
3
1)Open the web browser and type IP address:192.168.1.882)Find the video/photo that you want to download. Click the download icon and save, then the images will generally save in the Download folder. 3)It is recommended to use Firefox or Google Chrome browser for better experience.
Download to Computer ( laptop or the computer which could use Wi-Fi )
SizeWeightBattery capacity
Battery life
WirelessHDMI
6.3*6.1*4.9 inch0.685kg 2500mAh≥6H (Depend on working condition)Wi-Fi1080P
Remote Controller

Maintenance and Precautions
Other1. Do not turn on the LED lights before entering the water to avoid damages.2. Check if the Thrusters/propellers are getting stuck by seaweed or external matters, rinse the ROV with fresh water and then dry and put it back in the packing box.3. Remote control cannot be washed with water, please clean it with towel.4. The pull ring at the end of the battery can only be used to remove the battery, not to lift the ROV, otherwise it may damage the ROV.5. Do not place heavy objects on drone or accessories to avoid possible damage.6. People under the age of 16 should only use this drone under adult supervision.7. When not in use, please do not expose the drone and accessories under sunlight. Store it in a cool place orin a special box.8. Chloride or other chemicals can erode GLADIUS MINI. Do not use if the pool is under high chlorine level.
You could have the latest user manual by the http://www.chasing.com
This content is subject to change without prior notice.
CameraCMOSApertureFocal LengthISO RangeField of ViewMaximum Image ResolutionImage File Types
Video Resolution
Video Maximum StreamVideo TypeSD Card Memory
1/2.3 inchF3.04.0mm100-3200 (Still camera only)95°12M(4000*3000)JPEG/DNGFHD:1920x1080 30FpsFHD:1920x1080 60FpsFHD:1920x1080 120FpsUHD: 3840x2160(4K) 30fps60MMP464G
3A/12.6V2h (Maximum image resolution)
AdapterDrone charging time
Adapter
BrightnessColor TemperatureCRIMaximum PowerDimming
2x1200LM4000K-5000K802x10WManually adjustable
Dimmable LED Lights
Three-axis gyroscope/acceleration/compass+/- 1.64 ft+/- 35.6℉
IMUDepth SensorTemperature Sensor
Sensor
Navigation Safety1 Battery Protection2
Open seanavigation
Relatively clear water quality, no dense seaweed
No dense radio or radar signals
Do not dive more than
330 ft
330ft
Charging Protection3·Only use the Chasing standard adapter.·Red light means charging. ·Green light means fully charged.
Do not run out of battery power
Charge when power is less
than 25%
When not in use, keep battery power
at 50% - 70%
Working temperature -10 °C ~ 60 °C ( -18°F-140°F)
a. Do not touch the propellers of the Thruster b. Do not unlock the Thruster for more than 30 seconds in the air to avoid overheating c . After using the ROV in the salt water, please put it in fresh water for about 1 hour and turn it on, let the drone run for10 minutes to discharge the salt, and try out the water after cleaning with a towel.
Thruster/ Propeller5 Connector Sockets / Tether Connectors6
Check the Connector socket and tether pre-dive, keep dry and clean.Salt and moisture may cause corrosion of theconnector. Be sure to wash the socket with fresh water if the interface has water stains, and make the connectors dry after cleaning.
O-ring4
· Check whether the O-ring on the tether connector pre-dive. If it is missed or damaged, please replace it in time.
SupportAny questions about our products please contact by [email protected] or leave a message on the Chasing Website (https://www.chasing.com) chatting window.