gxv3662 hd/fhd ip camera grandstream networks, inc. · ficios de montura ( ) y martille los 3...
TRANSCRIPT

1297 Beacon Street, 2nd FloorBrookline, MA 02446, USATel : +1 (617) 566 – 9300 Fax: +1 (617) 247 – 1987
For Warranty and RMA information, please visit www.grandstream.com
GXV3662_HD/FHDIP CAMERA
Quick Start Guide
Grandstream Networks, Inc.
深圳市南山高新科技园中区 科发路2号1栋(朗峰大厦)5楼 电话: +86 755-2601-4600 传真: +86 755-2601-4601
www.grandstream.com www.grandstream.cn

Content
English.....................................................1Español.................................................. 13Français................................................. 25简体中文 ................................................37

~1~ ~2~
PRECAUTIONS
PACKAGE CONTENTS
Power Adapter
Quick Start Guide
12V
• Do not attempt to disassemble, or modify the device• Do not use a third party power adapter • Do not expose this device to temperatures outside the range of -20 °C to +60 °C• Do not expose the GXV3662_HD/FHD to environment outside of the following humidity range: 10-90% RH (non-condensing)
Terminal Block
GXV3662_HD/FHD
EN
Tool Set
Alignment Sticker
Internal Temperature Regulator
GXV3662_HD/FHD IndIcators and connectors
SD Card Slot
Reset Button
Alarm/AudioNetwork Port
Power Port
Lens
IR-CUT Filter
x3 x3

~3~ ~4~
Lens adjustment
1. Adjust the lens VERTICALLY:
- Loosen the screws on both sides of axle. - Adjust the lens to desired position. Allowed adjustment range is 0 ° ~160 °.- Tighten the screws to finish adjustment.
2. Adjust the lens HORIZONTALLY:
- Turn the lens to desired position. Allowed adjustment range is 0 ° ~ 356 °.
1
2
InstaLLatIon
Cable Cable Cable Cable
Step 1: Take out the 3 screws on the housing. Use the tool comes with the package.
Step 2: Open the cover.
Step3: Attach the alighment sticker onto the surface.
Step4: Drill 3 holes at the place where the mounting holes are ( ) and hammer the 3 plastic anchors into the holes. Then, insert the screws. Feed the cables through the cable hole. Step5: Adjust the lens (More details on page 4).
Step6: Screw back to the housing.
Step7: Complete the installtion.

~5~ ~6~
CONNECTING THE GXV3662_HD/FHD
Power Port
Network Port
Option A - Power over Ethernet (PoE)
When using a PoE switch,plug an RJ45 Ethernet cable into the network port. Insert the other end into a Power over Ethernet (PoE) switch.
Option B - Power Adaptor
Insert the power adapter into the 12V DC port on the GXV3662_HD/FHD. Plug the other end of the adapter into an AC power outlet.
Plug an RJ45 Ethernet cable into the network port. Insert the other end into a hub, switch or router.
GXV3662_HD/FHD CONFIGURATIONConfiguring the GXV3662_HD/FHD using Microsoft Internet Explorer
Connect the GXV3662_HD/FHD to the DHCP server
Step 1: Navigate your browser to: http://www.grandstream.com/products/tools/ surveillance/GS_Search.zip
Step 2: Run the Grandstream GS_Search tool.
Step 3: Click on button in order to begin device detection.
Step 4: The detected devices will appear in the Output field.

~7~ ~8~
Step 5: Open Microsoft Internet Explorer on your PC. Type in the IP in the address bar.
Step 6: A pop-up window will appear with prompts for a user name and password. The default administra- tor user name and password are both set to “admin” at the default factory configuration.
Step 7: Once you log into the GXV3662_HD/FHD web interface, Internet Explorer will indicate:
Step 8: Once the installation is complete, you will see the web page shown in the figure below. Click on the play button to view the video feed.
Install this add-on by following the instructions.

~9~ ~10~
Please download the user manual and FAQ for more detailed configuration instructions:
http://www.grandstream.com/support
Step 9: Click through the menu on the left hand side of the web UI for more advanced configurations.
Connect the GXV3662_HD/FHD using Static IP
If the camera does not get response from the DHCP server after 3 minutes, it can be accessed by the default IP:192.168.1.168.
Step 1: Connect your PC and the GXV3662_HD/FHD to the same network.
Step 2: Set the IP address of your PC to 192.168.1.X. Set the Default Gateway of your PC to 255.255.255.0.
Step 3: Open Microsoft Internet Explorer on your PC. Type 192.168.1.168 in the address bar.
Step 4-7: Please refer to Step 6-9 on Page 7-9.

~11~ ~12~
GXV3662_HD/FHD SAMPLE CONNECTION DIAGRAM
GXV3662_HD/FHD LENS SPECIFICATIONS
Lens Format 1/3-Inch
Image Sensor 1/3-Inch CMOS
Focal Length 3.3mm-12mm
Aperture Ratio F1.6-F3.2
View Angle D: 125.7°- 29.9°H: 89.8°-23.9°V: 63.6°-17.9°
IRIS DC Auto
Minimum Object Distance 50cm
IR-CUT Filter Yes

~13~ ~14~
ES PRECAUTIONS
Adaptadorde corriente
Guía de InstalaciónRápida
12V
• No intente abrir, desarmar o modificar la unidad• No use un adaptador de corriente de otra marca• No exponga esta unidad a temperaturas fuera de este rango: -20 °C to +60 °C• No exponga esta unidad a condiciones húmedas fuera del rango de 10 a 90% RH (no condensadas)
Bloque de terminales
GXV3662_HD/FHD Set de herramientas
Sticker de alineamiento
Regulador interno de temperatura
IndIcadores y conectores deLGXV3662_HD/FHD
Ranura de tarjeta SD
Boton de reset
Alarma/AudioPuerto de Red
Puerto decorriente
Lente
Filtro IR-Cut
x3 x3
CONTENIDO

~15~ ~16~
ajuste deL Lente
1. Ajustar el lente VERTICALMENTE:
- Afloje los tornillos en ambos lados del eje. - Ajuste el lente a la posición deseada. El rango permitido es 0 ° ~160 °.- Ajuste los tornillos para finalizar el ajuste.
2. Ajustar el lente HORIZONTALMENTE:
- Gire el lente a la posición deseada. El rango permitido es 0 ° ~ 356 °.
1
2
InstaLacIón
Cable Cable Cable Cable
Paso 1: Retire los 3 tornillos del chasis. Utilice la herram- ienta incluida.
Paso 2: Retire el domo.
Paso 3: Pegue el sticker de alineamiento en la superficie.
Paso 4: Taladre 3 agujeros en el lugar donde estan los ori- ficios de montura ( ) y martille los 3 tarugos de plástico en los agujeros. Luego inserte los tornil- los. Ingrese los cables por el orificio para cables. Paso 5: Ajuste el lente (Mas detalles en la página 16).
Paso 6: Atornille nuevamente al chasis.
Paso 7: Complete la instalación.

~17~ ~18~
confIguracIón deL GXV3662_HD/FHDConfigure el GXV3662_HD/FHD usando el Explorador Internet de MicrosoftConecte el GXV3662_HD/FHD al servidor DHCPPaso 1: Navegue su explorador hacia: http://www.grandstream.com/products/tools/ surveillance/GS_Search.zip
Paso 2: Ejecute la herramienta GS_Search de Grand stream que acaba de bajar.
Paso 3: Haga click en el botón de para iniciar la detección de equipos.
Paso 4: Los equipos detectados aparecerán en la pantalla.
cONEXIóN DEL GXV3662_HD/FHD
Puerto de corriente
Puerto de Red
Opción A - Corriente sobre ethernet (PoE)
Cuando use un switch PoE, inserte un cable de ethernet RJ45 al puerto de red. Inserte el otro extremo a un switch que soporte PoE.
Opción B - Adaptador de corriente
Inserte el adaptador de corriente al puero de 12V DC en el GXV3662_HD/FHD. Conecte el otro extremo del adapta-dor en un tomacorriente AC.
Conecte un cable de ethernet RJ45 al puerto de red. Inserte el otro extremo a un hub, switch o router.

~19~ ~20~
Paso 5: Abra Microsoft Internet Explorer en su PC. Ingrese la dirección IP en la barra de direcciones.
Paso 6: Una ventana aparecerá en donde deberá ingres- ar el nombre de usuario y la contraseña. De fabrica el nombre de usuario de administrador y la contraseña son ambos admin.
Paso 7: Luego de ingresar a la pagina web, su explorador le indicara que:
Paso 8: Luego de instalar el add-on con éxito, el usuario podrá ver la pagina principal mostrando las siguientes figuras. Haga Click en el botón de PLAY para ver el video.
Instale el add-on siguiendo las instrucciones.

~21~ ~22~
Por favor baje el manual de usuario y FAQ para más instrucciones de configuración:
http://www.grandstream.com/support
Paso 9: Para mas configuraciones vaya al menú principal a la izquierda.
Conecte la GXV3662_HD/FHD usando una dirección IP estática.Si la cámara no recibe respuesta del servidor DHCP después de 3 minutos, se puede ingresar usando la IP de fabrica 192.168.1.168.
Paso 1: Conecte su PC y el GXV3662_HD/FHD a la misma red.
Paso 2: Coloque la IP de su PC en 192.168.1.X. Colo que la máscara de red en 255.255.255.0.
Paso 3: Abra su explorador de Internet Microsoft. Coloque 192.168.1.168 en la barra de dirección.
Paso 4-7: Por favor referirse a los pasos 6-9 en la página 19-21.

~23~ ~24~
GXV3662_HD/FHD DIAGRAMA DE CONEXION
GXV3662_HD/FHD ESPECIFICACIONES DEL LENTE
Formato del lente 1/3-Inch
Sensor de imagen 1/3-Inch CMOS
Distancia focal 3.3mm-12mm
Radio de apertura F1.6-F3.2
Angulo de visualización D: 125.7°- 29.9°H: 89.8°-23.9°V: 63.6°-17.9°
IRIS DC Auto
Distancia mínima al objeto 50cm
Filtro IR-Cut Yes

~25~ ~26~
PRECAUTIONS
CONTENU DU PACK
FR• Ne pas tenter de désassembler ou de modifier le dispositif• Ne pas utiliser un adaptateur d’alimentation tiers• Ne pas exposer cet appareil à des températures hors de la plage de -20 °C à +60°C• Ne pas exposer le GXV3662_HD/FHD à un envi ronnement avec humidité hors de la plage de 10-90% RH (sans condensation)
Boitier d’alimentation
Guide d’installation express
12V
Adaptateur
GXV3662_HD/FHD Ensemble d’outils
Autocollant d’alignement
INDICATEURS ET CONNECTEURS DU GXV3662_HD/FHD
Régulateur de température interne
Fente pour carte SD
Bouton Reset
Alarme / AudioPort Réseau
Port d’ alimentation
Lentille
Filtre IR
x3 x3

~27~ ~28~
régLages de La LentILLe
1. Régler la lentille VERTICALEMENT:
- Desserrez les vis des deux côtés de l’axe. - Réglez la lentille à la position désirée. Plage de réglage admise est 0 ° ~ 160 °.- Serrez les vis pour terminer l’ajustement.
2. Régler la lentille HORIZONTALEMENT:
- Tournez la lentille à la position désirée. Plage de réglage admise est 0 ° ~ 356 °.
1
2
InstaLLatIon
Etape 1: Retirez les 3 vis du boîtier. Utilisez l’outil fourni avec le pack.
Etape 2: Dévissez le boîtier.
Etape 3: Fixez l’autocollant d’alignement sur la surface.
Etape 4: Percez 3 trous à l’endroit où les trous de fixation sont( ) et marteler les 3 ancrages en plas- tique dans les trous. Ensuite, insérez les vis. Passez les câbles par le trou. Etape 5: Ajustez la lentille (Plus de détails page 28).
Etape 6: Revissez le boîtier.
Etape 7: Terminez l’installation.
Câble Câble Câble Câble

~29~ ~30~
CONNEXION DU GXV3662_HD/FHD
Port d’alimentation
Port Réseau
Option A - Power over Ethernet (PoE)
Lorsque vous utilisez un switch PoE, branchez un câble Ethernet RJ45 dans le port réseau. Insérez l’autre ex-trémité dans un port Ethernet pré-alimenté du switch.
Option B- Adaptateur d’alimentation
Insérez l’adaptateur dans le port 12V DC du GXV3662_HD/FHD. Branchez l’autre extrémité de l’adaptateur dans une prise de courant.
Branchez un câble Ethernet RJ45 dans le port réseau. Insérez l’autre extrémité dans un hub, un switch ou un routeur.
La confIguratIon du GXV3662_HD/FHDConfigurer le GXV3662_HD/FHD en utilisant le navigateur Microsoft Internet ExplorerConfigurer le GXV3662_HD/FHD à un serveur DHCPEtape 1: Accédez à ce lien dans votre navigateur: http://www.grandstream.com/products/tools/ surveillance/GS_Search.zip
Etape 2: Exécutez l’outil de Grandstream GS_Search, que vous venez de télécharger.
Etape 3: Cliquez sur pour commencer la détection des appareils
Etape 4: Les appareils détectés s’afficheront dans le champ de sortie.

~31~ ~32~
Etape 5: Ouvrez Microsoft Internet Explorer sur votre PC. Saisissez l’adresse IP trouvée à l’étape 4 dans la barre d’adresse.
Etape 6: Une fenêtre pop-up apparaîtra avec invite à entrer un nom d’utilisateur et un mot de passe. Le nom d’utilisateur et le mot de passe adminis- trateur par défaut sont définis sur “admin” à la configuration d’origine par défaut.
Etape 7: Après avoir accédé à la page Web de votre GXV3662_HD/FHD, IE indique que:
Etape 8: Après l’installation du add-on avec succès, les utilisateurs pourront voir la page d’accueil indiquée dans l’image suivante. Cliquez sur le bouton de lecture pour afficher le flux vidéo.
Installez cet add-on en suivant les instructions.

~33~ ~34~
Pour les instructions de configuration détaillées, veuillez télécharger le manuel d’utilisation et la FAQ:
http://www.grandstream.com/support
Etape 9: Pour plus de paramètres, Veuillez aller sur le menu principal sur le côté gauche.
Connecter le GXV3662_HD/FHD en utilisant une adresse IP statique
Si la caméra ne reçoit pas de réponse du serveur DHCP au bout de 3 minutes, vous pouvez y accéder par l’adresse IP par défaut 192.168.1.168.
Etape 1: Connectez votre PC et le GXV3662_HD/FHD au même réseau.
Etape 2: Fixez l’adresse IP de votre PC à 192.168.1.X et le masque sous réseau à 255.255.255.0.
Etape 3: Ouvrez le navigateur Microsoft Internet Explorer et tapez 192.168.1.168 dans la barre d’adresse.
Etape 4-7: Référez-vous SVP aux étapes 6-9 à la page 31-33.

~35~ ~36~
EXEmPlE DE DiAGrAmmE DE CONNEXiON DU GXV3662_HD/FHD
SPéCiFiCATiONS DE lA lENTillE DU GXV3662_HD/FHD
Format de la lentille 1/3-Inch
French: Capteur d’image 1/3-Inch CMOS
Distance focale 3.3mm-12mm
Rapport d’ouverture F1.6-F3.2
Angle de vue D: 125.7°- 29.9°H: 89.8°-23.9°V: 63.6°-17.9°
IRIS DC Auto
Distance minimale de l’objet
50cm
Filtre IR Yes
~37~ ~38~
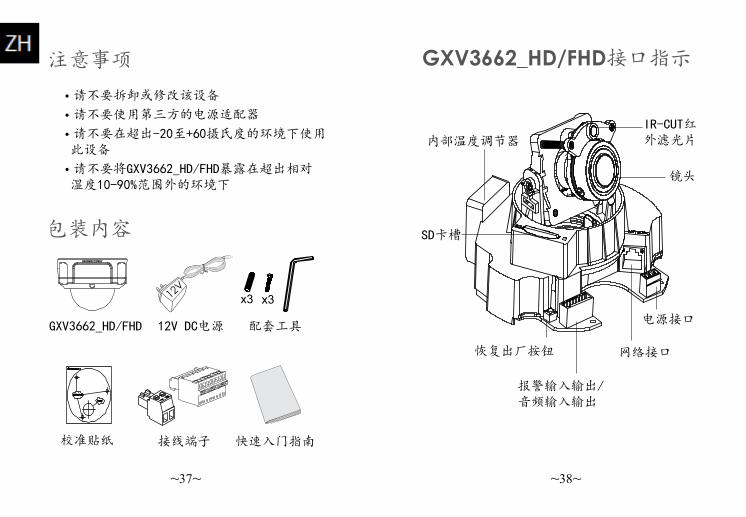
注意事项
• 请不要拆卸或修改该设备
• 请不要使用第三方的电源适配器
• 请不要在超出-20至+60摄氏度的环境下使用 此设备
• 请不要将GXV3662_HD/FHD暴露在超出相对 湿度10-90%范围外的环境下
包装内容
快速入门指南
12V DC电源
校准贴纸
GXV3662_HD/FHD接口指示
12V
接线端子
GXV3662_HD/FHD
x3 x3
配套工具
内部温度调节器
恢复出厂按钮
SD卡槽
报警输入输出/音频输入输出
镜头
网络接口
电源接口
IR-CUT红外滤光片

~39~ ~40~
1
2
步骤1:首先使用随附的螺丝 起子将三颗螺丝旋松。
步骤2:取下基座上的半球型 外壳。
步骤3:将随附的校准贴纸贴在天花板或墙上。
步骤4:依照贴纸上的三个圆圈钻出导孔,然后 将随附的塑料锚钉敲入导孔中。并以螺 丝固定底座。将电线穿过侧面或底部的 导孔。步骤5:调节镜头(参考第40页)。步骤6:以随附的三颗螺丝将半球形外壳固定在 底座上。步骤7:完成安装。
调节镜头
1.垂直调节:- 松开两侧的螺丝。- 转动镜头模块到所需的位置,允许的调整范 围为0°~160°。- 完成后,拧紧螺丝。
2.水平调节:- 转动镜头模块到所需的位置,允许的调整范 围为0°~356 °。
安装步骤

~41~ ~42~
步骤1: 通过浏览器访问地址下载IP搜索工具 http://www.grandstream.com/products/ tools/surveillance/GS_Search.zip
步骤2:运行下载的IP搜索工具。
步驟3:点击 按鈕,搜索该网段下的设 备IP地址。
步驟4:搜索到的设备IP地址及HTTP端口将显示 在以下界面。
GXV3662_HD/FHD 配置连接GXV3662_HD/FHD到DHCP服务器环境下,GXV3662_HD/FHD默认通过DHCP获取IP地址。
GXV3662_HD/FHD 连接方法
网络接口电源接口
选择A - PoE供电
当使用支持PoE的交换机时,允许电力和数据通过以太网线缆进行传输。通过以太网线缆将摄像头与PoE交换机相连接即可。
选择B - 电源适配器供电
用电源适配器将网络摄像头连接到电源插座。
使用RJ45插孔连接器将网络摄像头连接到交换机或者路由器。

~43~ ~44~
步骤7: 登录到GXV3662_HD/FHD网络界面后,IE 浏览器将提示您安装ActiveX控件。请 根据IE的指示安装;
步骤8: 安装好ActiveX插件后,网页将如下图 所示,点击播放按钮观看视频;
用户名密码提示窗口
步骤5: 打开IE浏览器,在地址栏输入搜索到 的设备IP地址。
步骤6: 界面将会跳出输入用户名及密码的验 证框, 出厂时默认的用户名和密码 均为:admin

~45~ ~46~
步骤1: 将您的PC与GXV3662_HD/FHD通过双绞 线相连,或将您的PC与GXV3662_HD/FHD 接入同一网段;
步骤9: 点击网络用户界面左侧的菜单进行更多 的高级配置。
步骤3: 打开微软的IE浏览器,在IE地址栏中 输入GXV3662_HD/FHD的出厂默认IP地址 192.168.1.168;
步骤4:请参考第43-45页中步驟6-9。
注意:请下载用户手册和常见问题解答,以取得更详细的配置说明。下载地址: http://www.grandstream.cn
通过默认的静态IP地址访问
步骤2: 将您PC的IP地址设置为192.168.1.X。 将子网掩码设置为255.255.255.0。如 下图所示:
如果将GXV3662_HD/FHD置于非DHCP环境下或者GXV3662_HD/FHD未从DHCP服务器得到响应3分钟之后,GXV3662_HD/FHD将可以使用默认的静态IP地址:192.168.1.168访问。

~47~ ~48~
GXV3662_HD/FHD连接示意图 GXV3662_HD/FHD摄像镜头参数(百万像素)
像面尺寸 1/3-Inch
感测器 1/3-Inch CMOS
焦距 3.3mm-12mm
通光孔径 F1.6-F3.2
视场角 D: 125.7°- 29.9°H: 89.8°-23.9°V: 63.6°-17.9°
光圈 DC Auto
最近物距 50cm
IR-CUT红外滤光片 Yes