installation guide for netiq secure configuration manager · pdf filenetiq secure...
TRANSCRIPT

Installation Guide
NetIQ® Secure Configuration Manager™
July 2013

Legal Notice
NetIQ Secure Configuration Manager is protected by United States Patent No(s): 5829001, 7707183.
THIS DOCUMENT AND THE SOFTWARE DESCRIBED IN THIS DOCUMENT ARE FURNISHED UNDER AND ARE SUBJECT TO THE TERMS OF A LICENSE AGREEMENT OR A NON‐DISCLOSURE AGREEMENT. EXCEPT AS EXPRESSLY SET FORTH IN SUCH LICENSE AGREEMENT OR NON‐DISCLOSURE AGREEMENT, NETIQ CORPORATION PROVIDES THIS DOCUMENT AND THE SOFTWARE DESCRIBED IN THIS DOCUMENT ʺAS ISʺ WITHOUT WARRANTY OF ANY KIND, EITHER EXPRESS OR IMPLIED, INCLUDING, BUT NOT LIMITED TO, THE IMPLIED WARRANTIES OF MERCHANTABILITY OR FITNESS FOR A PARTICULAR PURPOSE. SOME STATES DO NOT ALLOW DISCLAIMERS OF EXPRESS OR IMPLIED WARRANTIES IN CERTAIN TRANSACTIONS; THEREFORE, THIS STATEMENT MAY NOT APPLY TO YOU.
For purposes of clarity, any module, adapter or other similar material (ʺModuleʺ) is licensed under the terms and conditions of the End User License Agreement for the applicable version of the NetIQ product or software to which it relates or interoperates with, and by accessing, copying or using a Module you agree to be bound by such terms. If you do not agree to the terms of the End User License Agreement you are not authorized to use, access or copy a Module and you must destroy all copies of the Module and contact NetIQ for further instructions.
This document and the software described in this document may not be lent, sold, or given away without the prior written permission of NetIQ Corporation, except as otherwise permitted by law. Except as expressly set forth in such license agreement or non‐disclosure agreement, no part of this document or the software described in this document may be reproduced, stored in a retrieval system, or transmitted in any form or by any means, electronic, mechanical, or otherwise, without the prior written consent of NetIQ Corporation. Some companies, names, and data in this document are used for illustration purposes and may not represent real companies, individuals, or data.
This document could include technical inaccuracies or typographical errors. Changes are periodically made to the information herein. These changes may be incorporated in new editions of this document. NetIQ Corporation may make improvements in or changes to the software described in this document at any time.
U.S. Government Restricted Rights: If the software and documentation are being acquired by or on behalf of the U.S. Government or by a U.S. Government prime contractor or subcontractor (at any tier), in accordance with 48 C.F.R. 227.7202‐4 (for Department of Defense (DOD) acquisitions) and 48 C.F.R. 2.101 and 12.212 (for non‐DOD acquisitions), the government’s rights in the software and documentation, including its rights to use, modify, reproduce, release, perform, display or disclose the software or documentation, will be subject in all respects to the commercial license rights and restrictions provided in the license agreement.
© 2013 NetIQ Corporation and its affiliates. All Rights Reserved.
For information about NetIQ trademarks, see https://www.netiq.com/company/legal/.
Contents
About This Book and the Library 5About NetIQ Corporation 7
1 Introduction 91.1 Understanding the Secure Configuration Manager Components . . . . . . . . . . . . . . . . . . . . . . . . . . . . 91.2 Understanding the Secure Configuration Manager Architecture . . . . . . . . . . . . . . . . . . . . . . . . . . . . 10
2 Planning to Install Secure Configuration Manager 112.1 Implementation Checklist . . . . . . . . . . . . . . . . . . . . . . . . . . . . . . . . . . . . . . . . . . . . . . . . . . . . . . . . . . 112.2 Licensing . . . . . . . . . . . . . . . . . . . . . . . . . . . . . . . . . . . . . . . . . . . . . . . . . . . . . . . . . . . . . . . . . . . . . . 12
2.2.1 Licensing for iSeries Agents and Endpoints . . . . . . . . . . . . . . . . . . . . . . . . . . . . . . . . . . . . 122.2.2 Licensing for UNIX Agents and Endpoints. . . . . . . . . . . . . . . . . . . . . . . . . . . . . . . . . . . . . . 122.2.3 Licensing for Windows Agents and Endpoints. . . . . . . . . . . . . . . . . . . . . . . . . . . . . . . . . . . 13
2.3 Permissions Requirements . . . . . . . . . . . . . . . . . . . . . . . . . . . . . . . . . . . . . . . . . . . . . . . . . . . . . . . . 142.4 Planning to Install a Trial Environment. . . . . . . . . . . . . . . . . . . . . . . . . . . . . . . . . . . . . . . . . . . . . . . . 142.5 Planning Your Secure Configuration Manager Environment . . . . . . . . . . . . . . . . . . . . . . . . . . . . . . . 14
2.5.1 Supported Configurations . . . . . . . . . . . . . . . . . . . . . . . . . . . . . . . . . . . . . . . . . . . . . . . . . . 142.5.2 Default Ports . . . . . . . . . . . . . . . . . . . . . . . . . . . . . . . . . . . . . . . . . . . . . . . . . . . . . . . . . . . . 162.5.3 Planning to Install Your Database . . . . . . . . . . . . . . . . . . . . . . . . . . . . . . . . . . . . . . . . . . . . 172.5.4 Planning to Install Your Core Services . . . . . . . . . . . . . . . . . . . . . . . . . . . . . . . . . . . . . . . . 192.5.5 Planning to Install Secure Configuration Manager Consoles . . . . . . . . . . . . . . . . . . . . . . . 212.5.6 Planning to Install Agents . . . . . . . . . . . . . . . . . . . . . . . . . . . . . . . . . . . . . . . . . . . . . . . . . . 22
3 Installing Secure Configuration Manager 253.1 Installation Checklist . . . . . . . . . . . . . . . . . . . . . . . . . . . . . . . . . . . . . . . . . . . . . . . . . . . . . . . . . . . . . 253.2 Installing Secure Configuration Manager Components . . . . . . . . . . . . . . . . . . . . . . . . . . . . . . . . . . . 253.3 Working with Multiple Core Services . . . . . . . . . . . . . . . . . . . . . . . . . . . . . . . . . . . . . . . . . . . . . . . . . 263.4 Using Terminal Services to Install Secure Configuration Manager . . . . . . . . . . . . . . . . . . . . . . . . . . 273.5 Deploying the Standalone AutoSync Client . . . . . . . . . . . . . . . . . . . . . . . . . . . . . . . . . . . . . . . . . . . . 27
3.5.1 Installing the Standalone AutoSync Client . . . . . . . . . . . . . . . . . . . . . . . . . . . . . . . . . . . . . . 283.5.2 Configuring the Standalone AutoSync Client. . . . . . . . . . . . . . . . . . . . . . . . . . . . . . . . . . . . 28
4 Adding or Updating Security Agents 294.1 Deploying UNIX Agents . . . . . . . . . . . . . . . . . . . . . . . . . . . . . . . . . . . . . . . . . . . . . . . . . . . . . . . . . . . 294.2 Deploying iSeries Agents . . . . . . . . . . . . . . . . . . . . . . . . . . . . . . . . . . . . . . . . . . . . . . . . . . . . . . . . . . 294.3 Deploying Windows Agents . . . . . . . . . . . . . . . . . . . . . . . . . . . . . . . . . . . . . . . . . . . . . . . . . . . . . . . . 29
5 Upgrading Secure Configuration Manager 315.1 Secure Configuration Manager Upgrade Checklist . . . . . . . . . . . . . . . . . . . . . . . . . . . . . . . . . . . . . . 315.2 Upgrading a Secure Configuration Manager Environment . . . . . . . . . . . . . . . . . . . . . . . . . . . . . . . . 32
5.2.1 Preparing to Upgrade . . . . . . . . . . . . . . . . . . . . . . . . . . . . . . . . . . . . . . . . . . . . . . . . . . . . . 325.2.2 Stop Scheduled Jobs Before Upgrade . . . . . . . . . . . . . . . . . . . . . . . . . . . . . . . . . . . . . . . . 335.2.3 Upgrading Secure Configuration Manager . . . . . . . . . . . . . . . . . . . . . . . . . . . . . . . . . . . . . 33
5.3 Updating Security Knowledge . . . . . . . . . . . . . . . . . . . . . . . . . . . . . . . . . . . . . . . . . . . . . . . . . . . . . . 355.4 Agent Considerations. . . . . . . . . . . . . . . . . . . . . . . . . . . . . . . . . . . . . . . . . . . . . . . . . . . . . . . . . . . . . 36
Contents 3
4 Insta
5.4.1 Windows Agent . . . . . . . . . . . . . . . . . . . . . . . . . . . . . . . . . . . . . . . . . . . . . . . . . . . . . . . . . . 365.4.2 UNIX Agent . . . . . . . . . . . . . . . . . . . . . . . . . . . . . . . . . . . . . . . . . . . . . . . . . . . . . . . . . . . . . 365.4.3 iSeries Agent . . . . . . . . . . . . . . . . . . . . . . . . . . . . . . . . . . . . . . . . . . . . . . . . . . . . . . . . . . . . 37
6 Getting Started with Secure Configuration Manager 396.1 Configuring Windows Authentication . . . . . . . . . . . . . . . . . . . . . . . . . . . . . . . . . . . . . . . . . . . . . . . . . 396.2 Starting Core Services . . . . . . . . . . . . . . . . . . . . . . . . . . . . . . . . . . . . . . . . . . . . . . . . . . . . . . . . . . . . 406.3 Starting the Secure Configuration Manager Console. . . . . . . . . . . . . . . . . . . . . . . . . . . . . . . . . . . . . 406.4 Configuring SQL Authentication. . . . . . . . . . . . . . . . . . . . . . . . . . . . . . . . . . . . . . . . . . . . . . . . . . . . . 41
llation Guide for NetIQ Secure Configuration Manager
About This Book and the Library
The installation guide provides planning and installation information for the NetIQ Secure Configuration Manager product (Secure Configuration Manager). This book guides you through the installation process and helps you make the correct decisions for your environment.
Intended AudienceThis book provides information for individuals responsible for installing Secure Configuration Manager.
Other Information in the LibraryThe library provides the following information resources:
UNIX Agent Installation and Configuration Guide Provides conceptual information about the NetIQ Secure Configuration Manager UNIX Agent and guides you through the installation and configuration process.
Windows Agent Installation and Configuration Guide Provides conceptual information about the NetIQ Secure Configuration Manager Windows Agent and guides you through the installation and configuration process.
User Guide Provides conceptual information about Secure Configuration Manager. This book also provides an overview of the user interfaces and step‐by‐step guidance for many tasks.
Help Provides context‐sensitive information and step‐by‐step guidance for common tasks, descriptions of reports and actions you can run with the product, and definitions for fields on each window.
About This Book and the Library 5
ConventionsThe library uses consistent conventions to help you identify items throughout the documentation. The following table summarizes these conventions.
Convention Use
Bold Window and menu items
Technical terms, when introduced
Italics Book and CD-ROM titles
Variable names and values
Emphasized words
Fixed Font File and folder names
Commands and code examples
Text you must type
Text (output) displayed in the command-line interface
Brackets, such as [value] Optional parameters of a command
Braces, such as {value} Required parameters of a command
Logical OR, such asvalue1 | value2
Exclusive parameters. Choose one parameter.
6 Installation Guide for NetIQ Secure Configuration Manager
About NetIQ Corporation
NetIQ, an Attachmate business, is a global leader in systems and security management. With more than 12,000 customers in over 60 countries, NetIQ solutions maximize technology investments and enable IT process improvements to achieve measurable cost savings. The company’s portfolio includes award‐winning management products for IT Process Automation, Systems Management, Security Management, Configuration Audit and Control, Enterprise Administration, and Unified Communications Management. For more information, please visit www.netiq.com.
Contacting Sales SupportFor questions about products, pricing, and capabilities, please contact your local partner. If you cannot contact your partner, please contact our Sales Support team.
Contacting Technical SupportFor specific product issues, please contact our Technical Support team.
Contacting Documentation SupportOur goal is to provide documentation that meets your needs. If you have suggestions for improvements, please email Documentation‐[email protected]. We value your input and look forward to hearing from you.
Worldwide: www.netiq.com/about_netiq/officelocations.asp
United States and Canada: 888-323-6768
Email: [email protected]
Web Site: www.netiq.com
Worldwide: www.netiq.com/Support/contactinfo.asp
North and South America: 1-713-418-5555
Europe, Middle East, and Africa: +353 (0) 91-782 677
Email: [email protected]
Web Site: www.netiq.com/support
About NetIQ Corporation 7
Contacting the Online User CommunityQmunity, the NetIQ online community, is a collaborative network connecting you to your peers and NetIQ experts. By providing more immediate information, useful links to helpful resources, and access to NetIQ experts, Qmunity helps ensure you are mastering the knowledge you need to realize the full potential of IT investments upon which you rely. For more information, please visit http://community.netiq.com.
8 Installation Guide for NetIQ Secure Configuration Manager

1 1Introduction
NetIQ® Secure Configuration Manager™ helps IT security professionals automate compliance with regulations and internal security policies, and meet the demands of auditors. It allows you to proactively identify and prioritize the remediation of misconfigurations that could lead to security breaches, failed audits, or costly server downtime.
1.1 Understanding the Secure Configuration Manager ComponentsThe Secure Configuration Manager environment includes three primary components, as well as security agents and compliance evaluation tools. You can install the components, agents, Security Checkup Results Viewer, and Security and Compliance Dashboard on separate systems.
Secure Configuration Manager deploys agents to collect information, stores information in a central database, and displays reports in the Secure Configuration Manager console. Secure Configuration Manager Core Services manages communication among the components. Secure Configuration Manager includes the major components listed in the following table.
Component Description
Agents Receive requests from Core Services and run commands or respond by returning data, status, or results. Agents run platform-specific software locally on assets throughout your enterprise.
Database Stores product configuration data and results from security checkup reports in Microsoft SQL Server format.
Console Serves as an interface for Secure Configuration Manager so you can perform the following functions:
Add, remove, and view your IT resources
Execute security checks and run policy templates
Remediate policy exceptions
Manage jobs
Filter information
Control automatic AutoSync updates
Configure product settings
Introduction 9
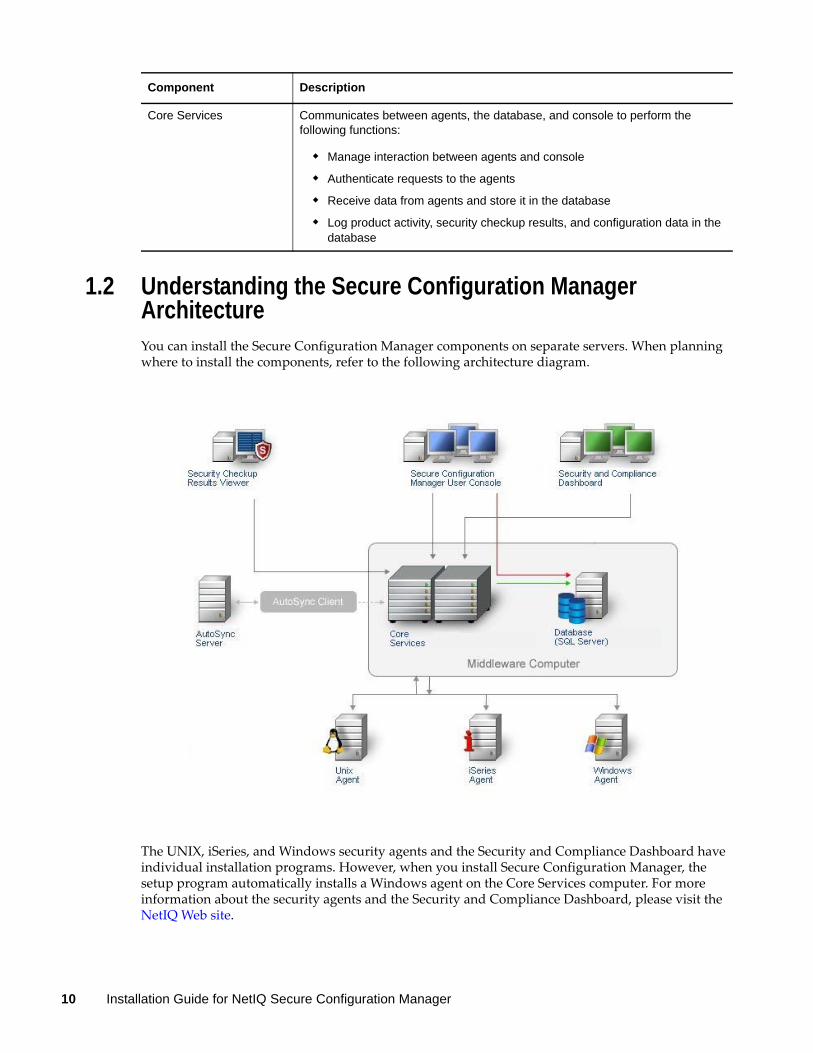
1.2 Understanding the Secure Configuration Manager ArchitectureYou can install the Secure Configuration Manager components on separate servers. When planning where to install the components, refer to the following architecture diagram.
The UNIX, iSeries, and Windows security agents and the Security and Compliance Dashboard have individual installation programs. However, when you install Secure Configuration Manager, the setup program automatically installs a Windows agent on the Core Services computer. For more information about the security agents and the Security and Compliance Dashboard, please visit the NetIQ Web site.
Core Services Communicates between agents, the database, and console to perform the following functions:
Manage interaction between agents and console
Authenticate requests to the agents
Receive data from agents and store it in the database
Log product activity, security checkup results, and configuration data in the database
Component Description
10 Installation Guide for NetIQ Secure Configuration Manager
2 2Planning to Install Secure Configuration Manager
This chapter describes the supported configuration options and requirements for each Secure Configuration Manager component. This chapter also provides links to additional information.
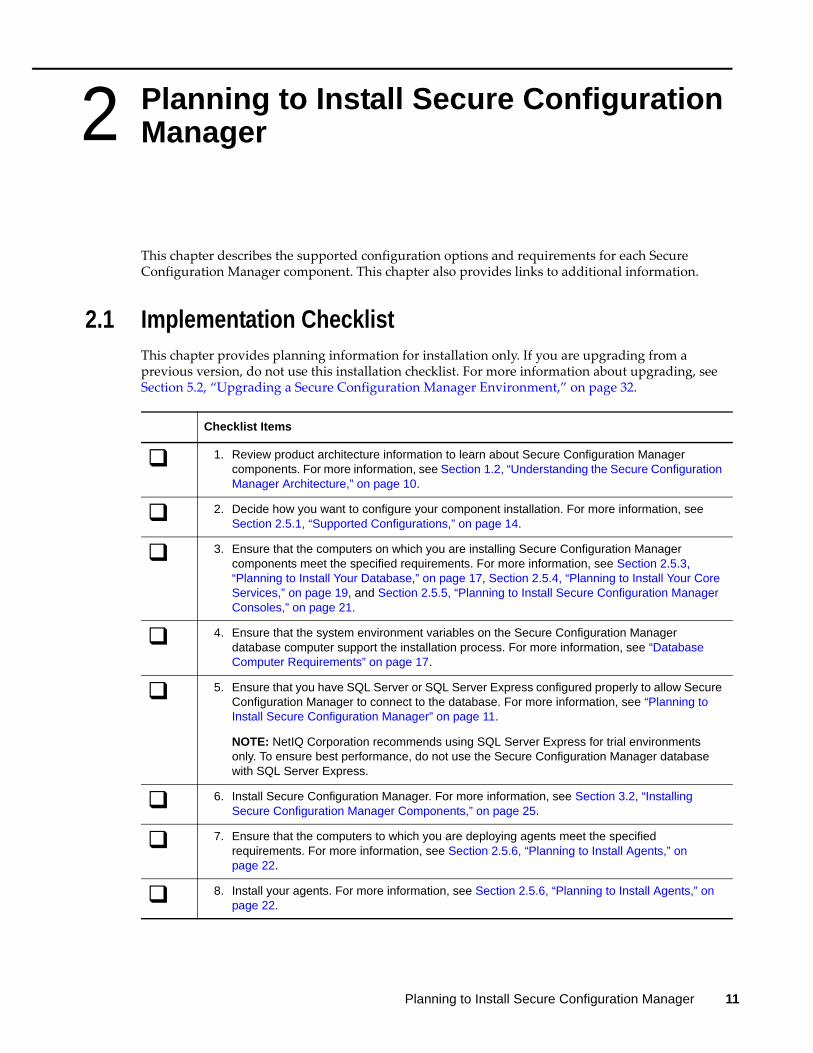
2.1 Implementation ChecklistThis chapter provides planning information for installation only. If you are upgrading from a previous version, do not use this installation checklist. For more information about upgrading, see Section 5.2, “Upgrading a Secure Configuration Manager Environment,” on page 32.
Checklist Items
1. Review product architecture information to learn about Secure Configuration Manager components. For more information, see Section 1.2, “Understanding the Secure Configuration Manager Architecture,” on page 10.
2. Decide how you want to configure your component installation. For more information, see Section 2.5.1, “Supported Configurations,” on page 14.
3. Ensure that the computers on which you are installing Secure Configuration Manager components meet the specified requirements. For more information, see Section 2.5.3, “Planning to Install Your Database,” on page 17, Section 2.5.4, “Planning to Install Your Core Services,” on page 19, and Section 2.5.5, “Planning to Install Secure Configuration Manager Consoles,” on page 21.
4. Ensure that the system environment variables on the Secure Configuration Manager database computer support the installation process. For more information, see “Database Computer Requirements” on page 17.
5. Ensure that you have SQL Server or SQL Server Express configured properly to allow Secure Configuration Manager to connect to the database. For more information, see “Planning to Install Secure Configuration Manager” on page 11.
NOTE: NetIQ Corporation recommends using SQL Server Express for trial environments only. To ensure best performance, do not use the Secure Configuration Manager database with SQL Server Express.
6. Install Secure Configuration Manager. For more information, see Section 3.2, “Installing Secure Configuration Manager Components,” on page 25.
7. Ensure that the computers to which you are deploying agents meet the specified requirements. For more information, see Section 2.5.6, “Planning to Install Agents,” on page 22.
8. Install your agents. For more information, see Section 2.5.6, “Planning to Install Agents,” on page 22.
Planning to Install Secure Configuration Manager 11
2.2 LicensingSecure Configuration Manager requires a license key that defines how many computers or endpoints you can manage with this product. You can install the license key during installation of the product or you can add the license key later using the Core Services Configuration Utility. For more information, see the Help for the Core Services Configuration Utility.
NOTE: If you do not enter a valid license key, the installation program automatically applies a 30‐day trial license.
The license key defines an expiration date and the number of computers you can manage with Secure Configuration Manager. You can use the Secure Configuration Manager console Tools menu to check the license status of Secure Configuration Manager and the agents. The License Status window shows information such as the number of available licenses, the number of licenses used by registered endpoints, and the expiration date for the licenses.
While Secure Configuration Manager does not prevent you from exceeding the number of allotted licenses, you should request an updated license key. For more information about obtaining license keys, see your NetIQ Corporation sales representative.
2.2.1 Licensing for iSeries Agents and EndpointsEvery iSeries system that you want to manage must host an iSeries security agent. When you register the iSeries agent, Secure Configuration Manager automatically creates and registers an endpoint representing the operating system on the computer. Secure Configuration Manager issues one iSeries endpoint license for the operating system endpoint.
2.2.2 Licensing for UNIX Agents and EndpointsEvery UNIX or Linux system that you want to manage must host an UNIX security agent. When you register the UNIX agent, Secure Configuration Manager automatically creates and registers an endpoint representing the operating system on the computer. Secure Configuration Manager issues one UNIX endpoint license for the operating system endpoint. Also, each instance of an Oracle database on the computer requires a separate endpoint and license. For example, a UNIX computer containing six instances of Oracle requires six Oracle endpoint licenses plus an endpoint license for the operating system, for a total of seven licenses.
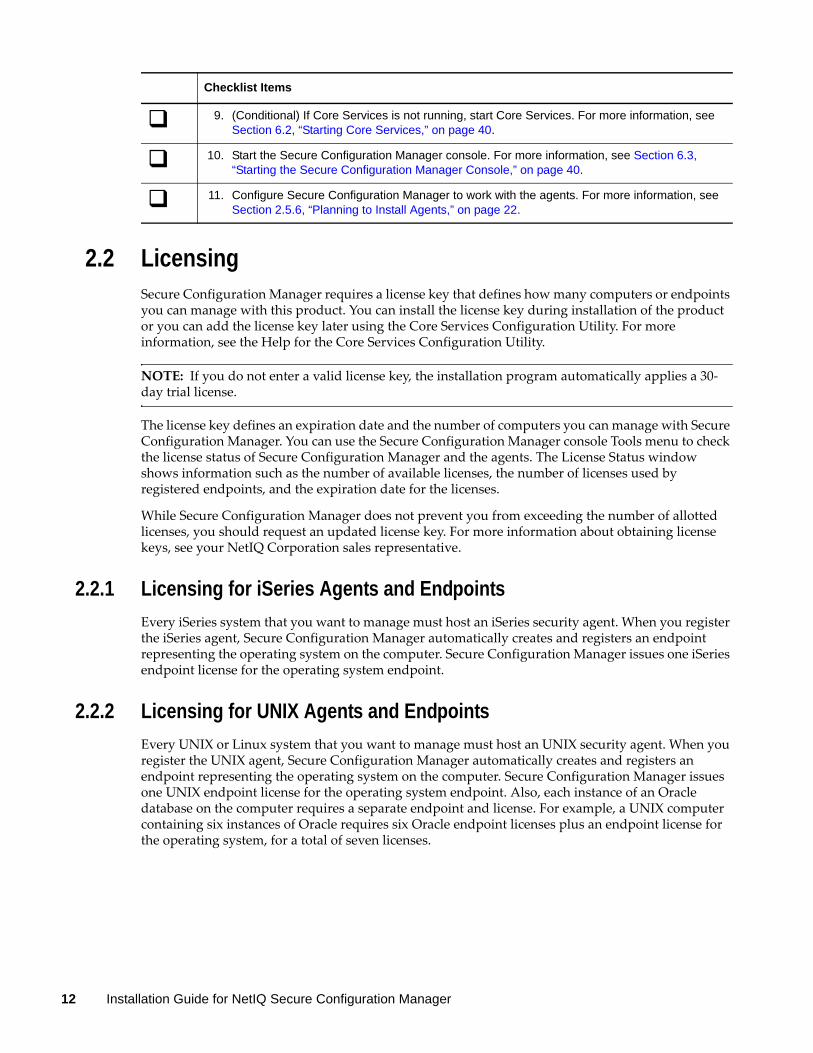
9. (Conditional) If Core Services is not running, start Core Services. For more information, see Section 6.2, “Starting Core Services,” on page 40.
10. Start the Secure Configuration Manager console. For more information, see Section 6.3, “Starting the Secure Configuration Manager Console,” on page 40.
11. Configure Secure Configuration Manager to work with the agents. For more information, see Section 2.5.6, “Planning to Install Agents,” on page 22.
Checklist Items
12 Installation Guide for NetIQ Secure Configuration Manager
2.2.3 Licensing for Windows Agents and EndpointsWhen you register a Windows agent on a computer, Secure Configuration Manager automatically creates and registers an endpoint representing the operating system on the computer. A managed Windows system can include multiple types of Windows endpoints, such as instances of Oracle and SQL Server databases. To manage Windows‐based endpoints, consider the following licensing requirements and recommendations.
Windows agent computer Requires one Windows Server endpoint license for the operating system of the computer that hosts the agent.
Active Directory Requires one Windows Server endpoint license for each managed Active Directory endpoint. NetIQ Corporation recommends only one Active Directory endpoint per domain.
Microsoft IIS Requires one license for each managed Internet Information Services (IIS) endpoint instance. For example:
A Windows computer running IIS to manage six Web sites requires one IIS endpoint license. In addition, NetIQ Corporation recommends an endpoint license for the operating system, for a total of two licenses. However, the operating system license is not a requirement.A Windows computer with one Windows proxy agent managing six remote Windows computers with 36 Web sites spread evenly across the computers requires six IIS endpoint licenses. In addition, NetIQ Corporation recommends endpoint licenses for the six operating systems, for a total of 12 licenses. However, the operating system licenses are not a requirement.
NAS Server Requires one endpoint license for each NAS device that is running a managed endpoint.
Oracle Requires one endpoint license for each managed instance of an Oracle database. For example, a Windows computer containing six instances of Oracle requires six Oracle endpoint licenses. In addition, NetIQ Corporation recommends an endpoint license for the operating system, for a total of seven licenses. However, the operating system license is not a requirement.
Microsoft SQL Server Requires one endpoint license for each managed SQL Server instance. For example:
A Windows computer containing six instances of SQL Server requires six SQL Server endpoint licenses. In addition, NetIQ Corporation recommends an endpoint license for the operating system, for a total of seven licenses. However, the operating system license is not a requirement.A Windows computer with one Windows proxy agent managing 36 instances of SQL Server spread evenly across six remote Windows computers requires 36 SQL Server endpoint licenses. In addition, NetIQ Corporation recommends endpoint licenses for the six operating systems, for a total of 42 licenses. However, the operating system licenses are not a requirement.
Planning to Install Secure Configuration Manager 13

2.3 Permissions RequirementsThe following table provides sources for permissions requirements information for the Secure Configuration Manager components and supported agents.
2.4 Planning to Install a Trial EnvironmentIf you do not have a valid license key, you can install Secure Configuration Manager for a 30‐day trial. You can upgrade a trial environment to full production mode simply by changing the license key. For more information about license keys, see Section 2.2, “Licensing,” on page 12.
As a best practice, NetIQ Corporation recommends creating a trial environment similar to your intended production one. For example, install the database on a separate computer from the Core Services and console computers. However, you can install all components on one computer to run the trial. For more information about selecting the appropriate location to install the components, see Section 2.5.1, “Supported Configurations,” on page 14. For more information about using Secure Configuration Manager in a trial environment, see the User Guide for NetIQ Secure Configuration Manager.
2.5 Planning Your Secure Configuration Manager EnvironmentThis section provides requirements, details of supported configurations, and other information necessary for planning your Secure Configuration Manager installation environment. For the most recent information about third‐party software requirements, see the Secure Configuration Manager Web page.
2.5.1 Supported ConfigurationsFor small enterprises of 50 computers or fewer, you can install all Secure Configuration Manager components on one computer. You can then install additional consoles on other computers as needed. Installing all required components on one computer is not a recommended configuration for most production networks.
NOTE: An all‐in‐one configuration is supported for Windows Server 2003, Server 2008, and Server 2008 R2. You can install Secure Configuration Manager consoles on Windows XP and Vista, but you must install Core Services and the Secure Configuration Manager database on separate computers.
For permissions information about... See...
Secure Configuration Manager database computer
“Database Computer Requirements” on page 17
Secure Configuration Manager Core Services computer
“Core Services Computer Requirements” on page 19
Secure Configuration Manager console “Console Computer Requirements” on page 21
Windows agent NetIQ Security Agent for Windows Installation and Configuration Guide
UNIX agent NetIQ UNIX Agent Guide
iSeries agent Installation Guide for NetIQ Security Solutions for iSeries
14 Installation Guide for NetIQ Secure Configuration Manager
For larger enterprises, install Core Services and the Secure Configuration Manager database on separate computers. Then install the console on multiple additional computers to manage the agents and other Secure Configuration Manager components. You can also install Secure Configuration Manager in a Microsoft cluster environment. For more information about setting up server clusters, see the appropriate Microsoft documentation.
Installing Secure Configuration Manager components on domain controllers is neither recommended nor supported for the following reasons:
When you create a local group on a domain controller, the end result is a domain group. The local group needed to handle authentication is not created.This configuration can also cause performance issues because the domain controller is very busy even if you do not install Secure Configuration Manager components on that computer.
Support for Non-English Language VersionsSecure Configuration Manager supports Microsoft Windows in English, French, German, and Spanish, and Microsoft SQL Server and Microsoft SQL Server Express in United States ‐ English. Ensure that the language version for the Microsoft Windows operating system is the same across all computers where you install the console, Core Services, and database.
Multiple Core ServicesYou also have the option to install Core Services on multiple computers. In this configuration, you must install a separate Secure Configuration Manager database for each Core Services computer.
Having multiple Core Services allows you to divide managed resources, or endpoints, into managed groups based on business units or other organizational needs. Resources managed by one Core Services computer are completely separate from resources managed by a different Core Services. This configuration may be appropriate if your organization needs to maintain a high level of internal security. For more information, see “Multiple Core Services Requirements” on page 20.
Depending on the agents you are deploying, you may be able to share registered agents between Core Services. For more information, see Section 3.3, “Working with Multiple Core Services,” on page 26.
FIPS CommunicationSecure Configuration Manager supports Federal Information Processing Standard (FIPS 140‐2) communication among the product components. FIPS 140‐2 standards regulate the implementation and communication of cryptographic software. Users working under FIPS guidelines must have Secure Configuration Manager function within a secure FIPS‐enabled environment. For more information about configuring components for FIPS communication, see the User Guide for NetIQ Secure Configuration Manager and the security agent guides.
NOTE: When you enable Secure Configuration Manager to function in a FIPS‐enabled environment, Core Services cannot communicate with iSeries security agents.
Planning to Install Secure Configuration Manager 15
AutoSync ClientThe Secure Configuration Manager AutoSync service lets you regularly download the latest security knowledge from an update service Web site to ensure that the Secure Configuration Manager agents always audit with the latest security intelligence. The Autosync client queries and receives updates from the NetIQ AutoSync server. For more information, see the User Guide for NetIQ Secure Configuration Manager.
You can install the AutoSync client on your Core Services computer, or you can install the standalone AutoSync client separately from Core Services.
Install a standalone AutoSync client when your Core Services computer is not directly connected to the Internet, or if you do not want the Core Services computer to download from the Internet. For more information about the standalone AutoSync client, see Section 3.5, “Deploying the Standalone AutoSync Client,” on page 27.
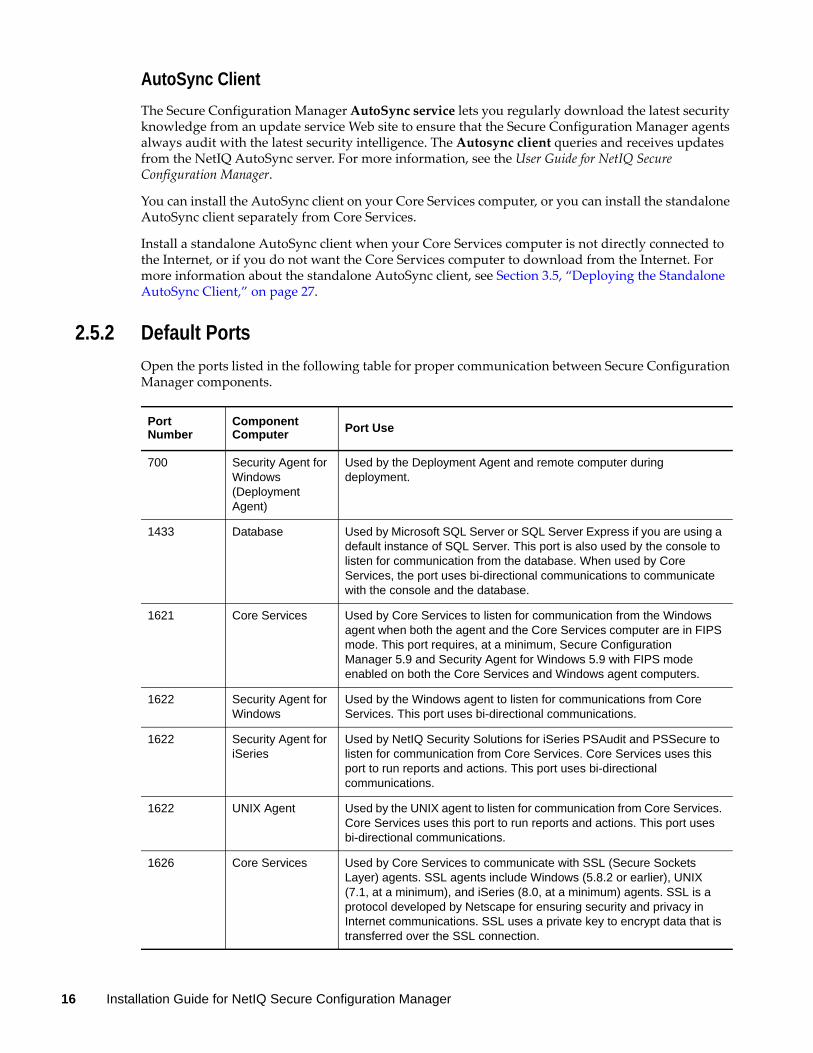
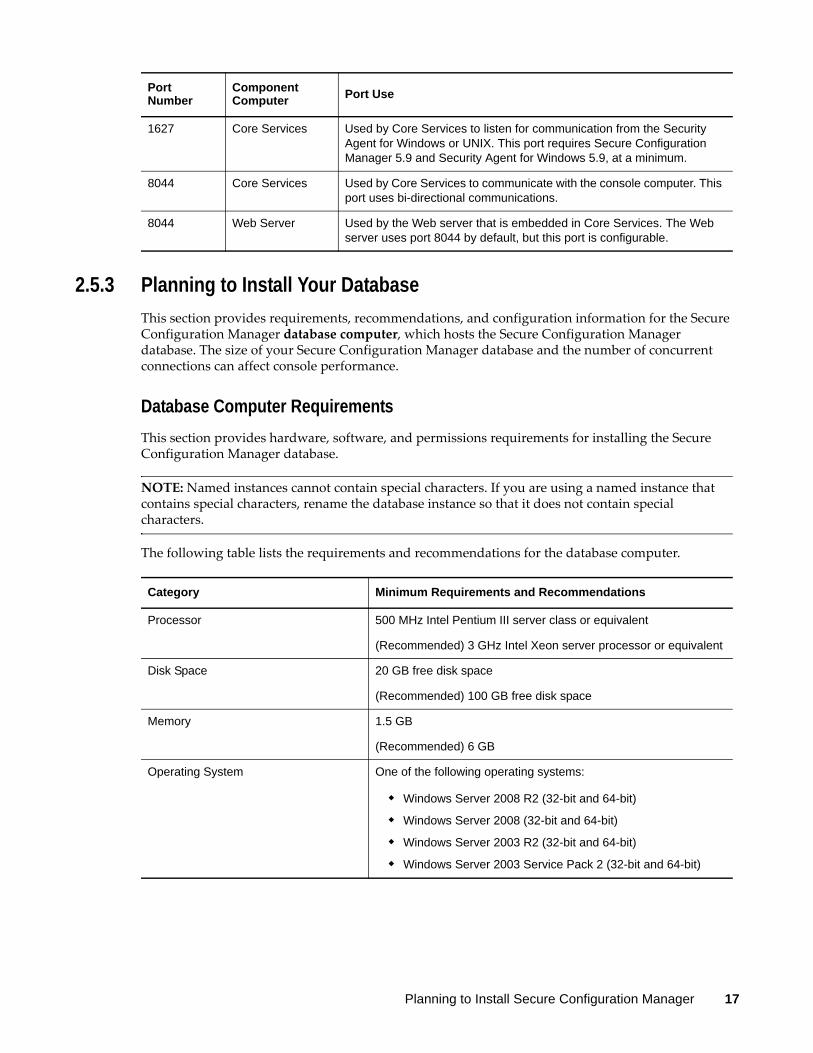
2.5.2 Default PortsOpen the ports listed in the following table for proper communication between Secure Configuration Manager components.
Port Number
Component Computer Port Use
700 Security Agent for Windows (Deployment Agent)
Used by the Deployment Agent and remote computer during deployment.
1433 Database Used by Microsoft SQL Server or SQL Server Express if you are using a default instance of SQL Server. This port is also used by the console to listen for communication from the database. When used by Core Services, the port uses bi-directional communications to communicate with the console and the database.
1621 Core Services Used by Core Services to listen for communication from the Windows agent when both the agent and the Core Services computer are in FIPS mode. This port requires, at a minimum, Secure Configuration Manager 5.9 and Security Agent for Windows 5.9 with FIPS mode enabled on both the Core Services and Windows agent computers.
1622 Security Agent for Windows
Used by the Windows agent to listen for communications from Core Services. This port uses bi-directional communications.
1622 Security Agent for iSeries
Used by NetIQ Security Solutions for iSeries PSAudit and PSSecure to listen for communication from Core Services. Core Services uses this port to run reports and actions. This port uses bi-directional communications.
1622 UNIX Agent Used by the UNIX agent to listen for communication from Core Services. Core Services uses this port to run reports and actions. This port uses bi-directional communications.
1626 Core Services Used by Core Services to communicate with SSL (Secure Sockets Layer) agents. SSL agents include Windows (5.8.2 or earlier), UNIX (7.1, at a minimum), and iSeries (8.0, at a minimum) agents. SSL is a protocol developed by Netscape for ensuring security and privacy in Internet communications. SSL uses a private key to encrypt data that is transferred over the SSL connection.
16 Installation Guide for NetIQ Secure Configuration Manager
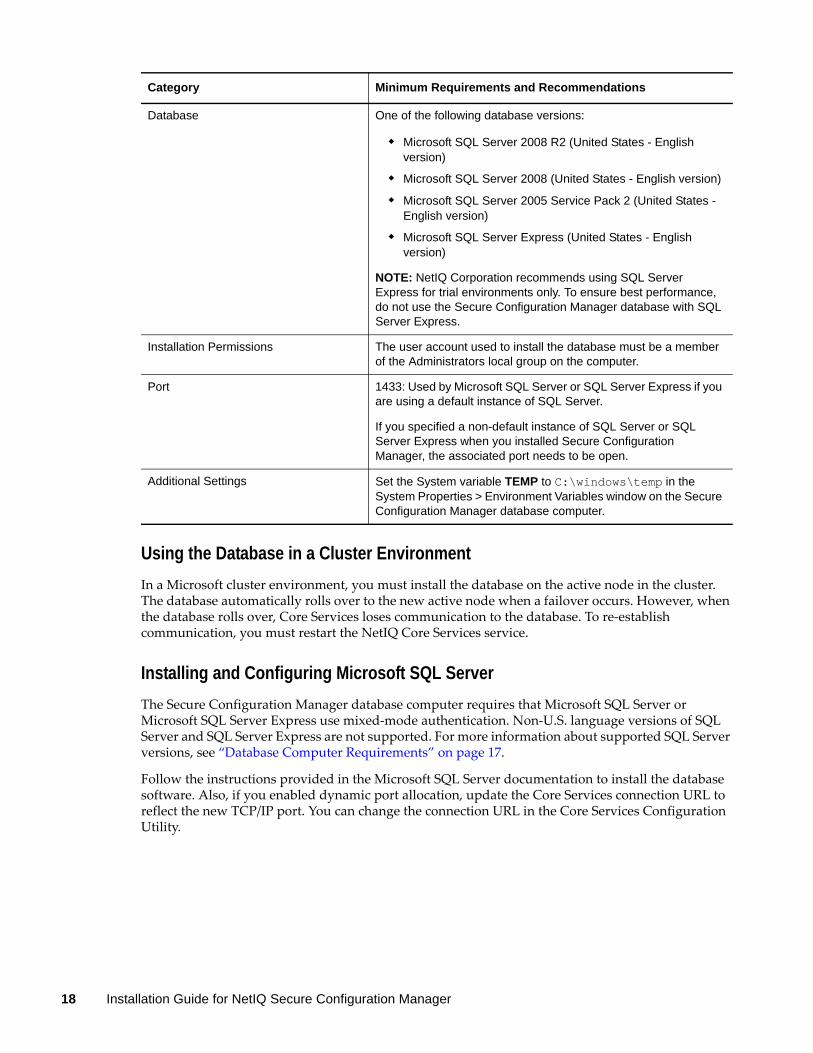
2.5.3 Planning to Install Your DatabaseThis section provides requirements, recommendations, and configuration information for the Secure Configuration Manager database computer, which hosts the Secure Configuration Manager database. The size of your Secure Configuration Manager database and the number of concurrent connections can affect console performance.
Database Computer RequirementsThis section provides hardware, software, and permissions requirements for installing the Secure Configuration Manager database.
NOTE: Named instances cannot contain special characters. If you are using a named instance that contains special characters, rename the database instance so that it does not contain special characters.
The following table lists the requirements and recommendations for the database computer.
1627 Core Services Used by Core Services to listen for communication from the Security Agent for Windows or UNIX. This port requires Secure Configuration Manager 5.9 and Security Agent for Windows 5.9, at a minimum.
8044 Core Services Used by Core Services to communicate with the console computer. This port uses bi-directional communications.
8044 Web Server Used by the Web server that is embedded in Core Services. The Web server uses port 8044 by default, but this port is configurable.
Port Number
Component Computer Port Use
Category Minimum Requirements and Recommendations
Processor 500 MHz Intel Pentium III server class or equivalent
(Recommended) 3 GHz Intel Xeon server processor or equivalent
Disk Space 20 GB free disk space
(Recommended) 100 GB free disk space
Memory 1.5 GB
(Recommended) 6 GB
Operating System One of the following operating systems:
Windows Server 2008 R2 (32-bit and 64-bit)
Windows Server 2008 (32-bit and 64-bit)
Windows Server 2003 R2 (32-bit and 64-bit)
Windows Server 2003 Service Pack 2 (32-bit and 64-bit)
Planning to Install Secure Configuration Manager 17
Using the Database in a Cluster EnvironmentIn a Microsoft cluster environment, you must install the database on the active node in the cluster. The database automatically rolls over to the new active node when a failover occurs. However, when the database rolls over, Core Services loses communication to the database. To re‐establish communication, you must restart the NetIQ Core Services service.
Installing and Configuring Microsoft SQL ServerThe Secure Configuration Manager database computer requires that Microsoft SQL Server or Microsoft SQL Server Express use mixed‐mode authentication. Non‐U.S. language versions of SQL Server and SQL Server Express are not supported. For more information about supported SQL Server versions, see “Database Computer Requirements” on page 17.
Follow the instructions provided in the Microsoft SQL Server documentation to install the database software. Also, if you enabled dynamic port allocation, update the Core Services connection URL to reflect the new TCP/IP port. You can change the connection URL in the Core Services Configuration Utility.
Database One of the following database versions:
Microsoft SQL Server 2008 R2 (United States - English version)
Microsoft SQL Server 2008 (United States - English version)
Microsoft SQL Server 2005 Service Pack 2 (United States - English version)
Microsoft SQL Server Express (United States - English version)
NOTE: NetIQ Corporation recommends using SQL Server Express for trial environments only. To ensure best performance, do not use the Secure Configuration Manager database with SQL Server Express.
Installation Permissions The user account used to install the database must be a member of the Administrators local group on the computer.
Port 1433: Used by Microsoft SQL Server or SQL Server Express if you are using a default instance of SQL Server.
If you specified a non-default instance of SQL Server or SQL Server Express when you installed Secure Configuration Manager, the associated port needs to be open.
Additional Settings Set the System variable TEMP to C:\windows\temp in the System Properties > Environment Variables window on the Secure Configuration Manager database computer.
Category Minimum Requirements and Recommendations
18 Installation Guide for NetIQ Secure Configuration Manager
Configuring the SQL Server Browser ServiceTo complete the Secure Configuration Manager installation, the Browser Service must be running in SQL Server or SQL Server Express.
To verify the SQL Server or SQL Server Express Browser Service is running:
1 Open SQL Server Configuration Manager.2 In the left pane, select the SQL Server services.3 In the right pane, ensure that SQL Server Browser is set to Running.4 (Conditional) If the SQL Server Browser is stopped, select SQL Server Browser, and on the
Action menu, click Start.
Configuring the SQL Server TCP/IP ProtocolTo complete the Secure Configuration Manager installation, the TCP/IP protocol must be enabled in SQL Server or SQL Server Express.
To verify the SQL Server TCP/IP protocol is enabled:
1 Open SQL Server Configuration Manager.2 In the left pane, expand SQL Server Network Configuration and select Protocols for MSSQLSERVER.
3 In the right pane, ensure that TCP/IP is set to Enabled.4 (Conditional) If the TCP/IP protocol is disabled, select TCP/IP, and on the Action menu, click Enable.
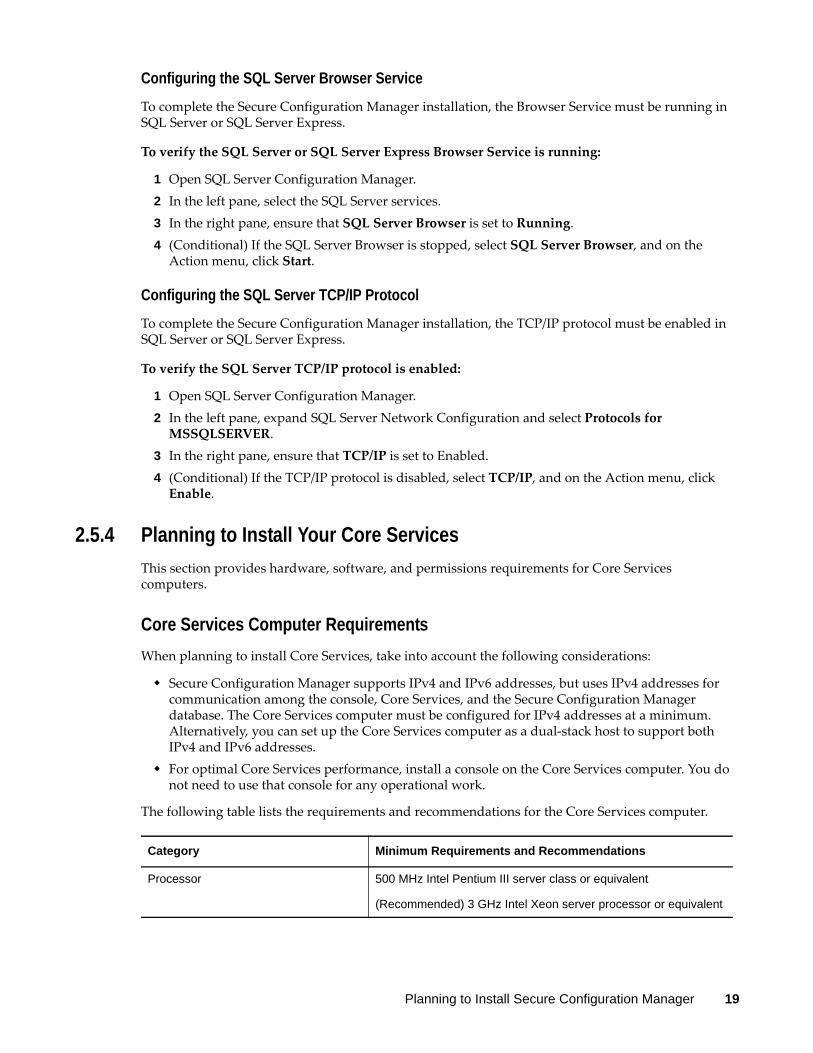
2.5.4 Planning to Install Your Core ServicesThis section provides hardware, software, and permissions requirements for Core Services computers.
Core Services Computer RequirementsWhen planning to install Core Services, take into account the following considerations:
Secure Configuration Manager supports IPv4 and IPv6 addresses, but uses IPv4 addresses for communication among the console, Core Services, and the Secure Configuration Manager database. The Core Services computer must be configured for IPv4 addresses at a minimum. Alternatively, you can set up the Core Services computer as a dual‐stack host to support both IPv4 and IPv6 addresses.For optimal Core Services performance, install a console on the Core Services computer. You do not need to use that console for any operational work.
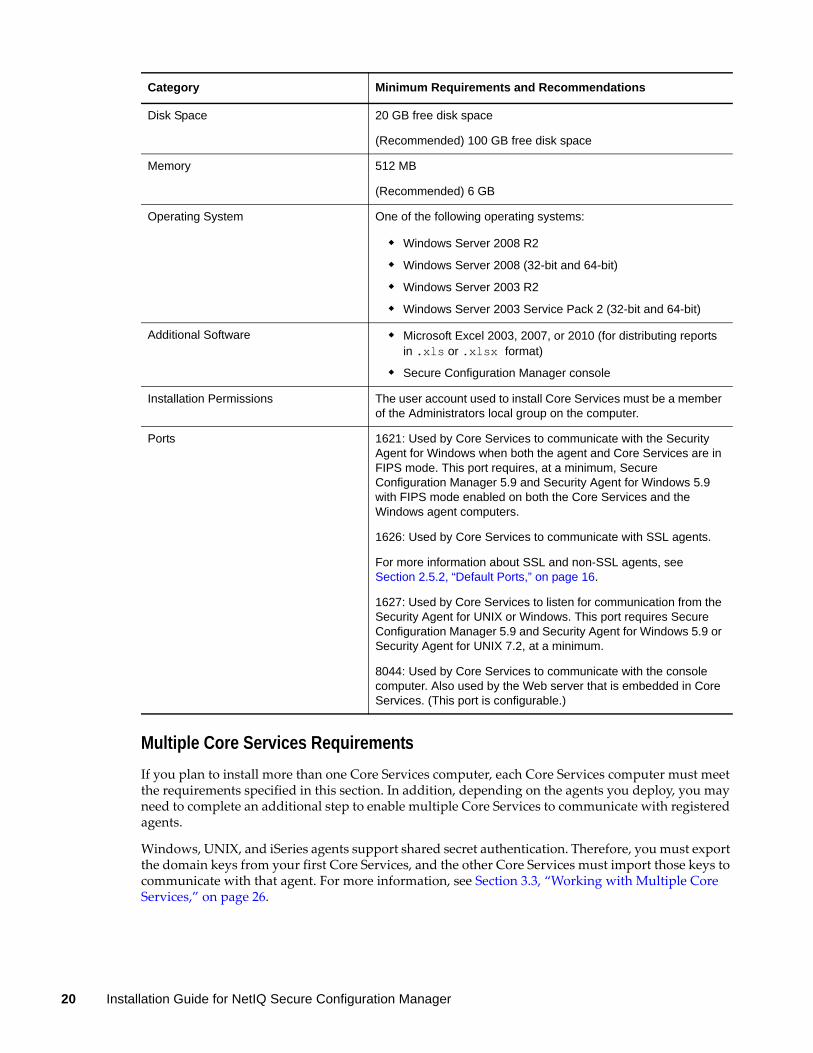
The following table lists the requirements and recommendations for the Core Services computer.
Category Minimum Requirements and Recommendations
Processor 500 MHz Intel Pentium III server class or equivalent
(Recommended) 3 GHz Intel Xeon server processor or equivalent
Planning to Install Secure Configuration Manager 19
Multiple Core Services RequirementsIf you plan to install more than one Core Services computer, each Core Services computer must meet the requirements specified in this section. In addition, depending on the agents you deploy, you may need to complete an additional step to enable multiple Core Services to communicate with registered agents.
Windows, UNIX, and iSeries agents support shared secret authentication. Therefore, you must export the domain keys from your first Core Services, and the other Core Services must import those keys to communicate with that agent. For more information, see Section 3.3, “Working with Multiple Core Services,” on page 26.
Disk Space 20 GB free disk space
(Recommended) 100 GB free disk space
Memory 512 MB
(Recommended) 6 GB
Operating System One of the following operating systems:
Windows Server 2008 R2
Windows Server 2008 (32-bit and 64-bit)
Windows Server 2003 R2
Windows Server 2003 Service Pack 2 (32-bit and 64-bit)
Additional Software Microsoft Excel 2003, 2007, or 2010 (for distributing reports in .xls or .xlsx format)
Secure Configuration Manager console
Installation Permissions The user account used to install Core Services must be a member of the Administrators local group on the computer.
Ports 1621: Used by Core Services to communicate with the Security Agent for Windows when both the agent and Core Services are in FIPS mode. This port requires, at a minimum, Secure Configuration Manager 5.9 and Security Agent for Windows 5.9 with FIPS mode enabled on both the Core Services and the Windows agent computers.
1626: Used by Core Services to communicate with SSL agents.
For more information about SSL and non-SSL agents, see Section 2.5.2, “Default Ports,” on page 16.
1627: Used by Core Services to listen for communication from the Security Agent for UNIX or Windows. This port requires Secure Configuration Manager 5.9 and Security Agent for Windows 5.9 or Security Agent for UNIX 7.2, at a minimum.
8044: Used by Core Services to communicate with the console computer. Also used by the Web server that is embedded in Core Services. (This port is configurable.)
Category Minimum Requirements and Recommendations
20 Installation Guide for NetIQ Secure Configuration Manager
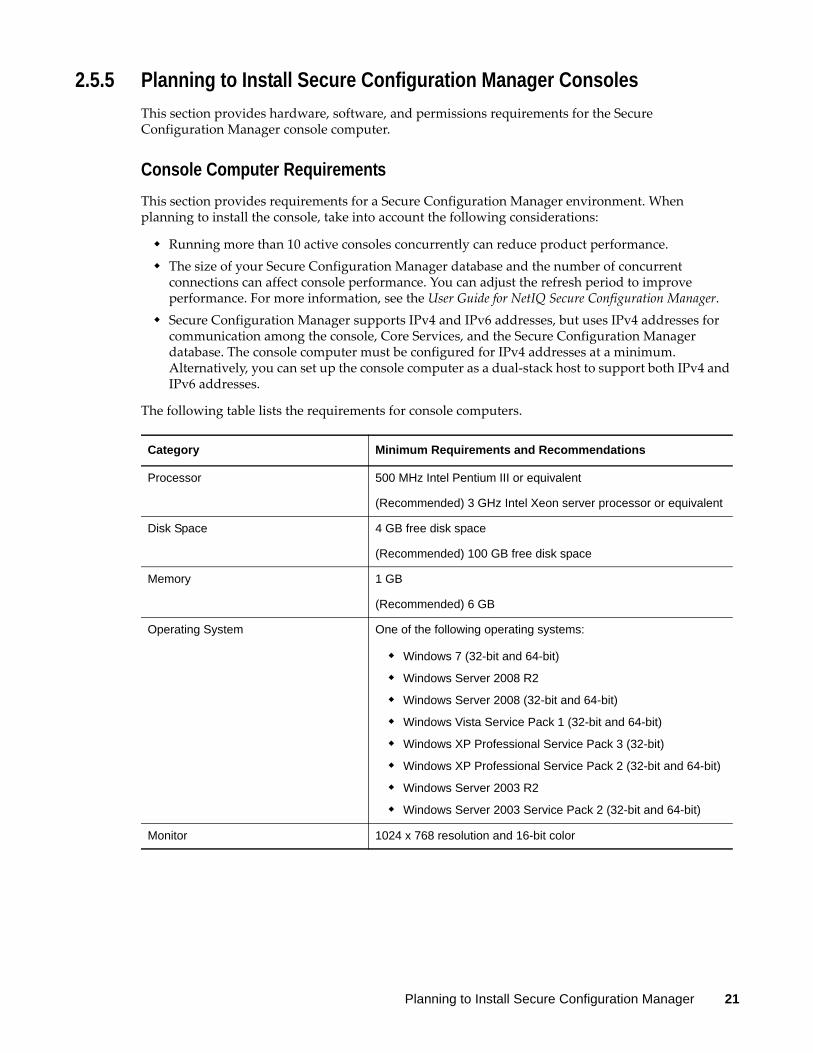
2.5.5 Planning to Install Secure Configuration Manager ConsolesThis section provides hardware, software, and permissions requirements for the Secure Configuration Manager console computer.
Console Computer RequirementsThis section provides requirements for a Secure Configuration Manager environment. When planning to install the console, take into account the following considerations:
Running more than 10 active consoles concurrently can reduce product performance.The size of your Secure Configuration Manager database and the number of concurrent connections can affect console performance. You can adjust the refresh period to improve performance. For more information, see the User Guide for NetIQ Secure Configuration Manager.Secure Configuration Manager supports IPv4 and IPv6 addresses, but uses IPv4 addresses for communication among the console, Core Services, and the Secure Configuration Manager database. The console computer must be configured for IPv4 addresses at a minimum. Alternatively, you can set up the console computer as a dual‐stack host to support both IPv4 and IPv6 addresses.
The following table lists the requirements for console computers.
Category Minimum Requirements and Recommendations
Processor 500 MHz Intel Pentium III or equivalent
(Recommended) 3 GHz Intel Xeon server processor or equivalent
Disk Space 4 GB free disk space
(Recommended) 100 GB free disk space
Memory 1 GB
(Recommended) 6 GB
Operating System One of the following operating systems:
Windows 7 (32-bit and 64-bit)
Windows Server 2008 R2
Windows Server 2008 (32-bit and 64-bit)
Windows Vista Service Pack 1 (32-bit and 64-bit)
Windows XP Professional Service Pack 3 (32-bit)
Windows XP Professional Service Pack 2 (32-bit and 64-bit)
Windows Server 2003 R2
Windows Server 2003 Service Pack 2 (32-bit and 64-bit)
Monitor 1024 x 768 resolution and 16-bit color
Planning to Install Secure Configuration Manager 21
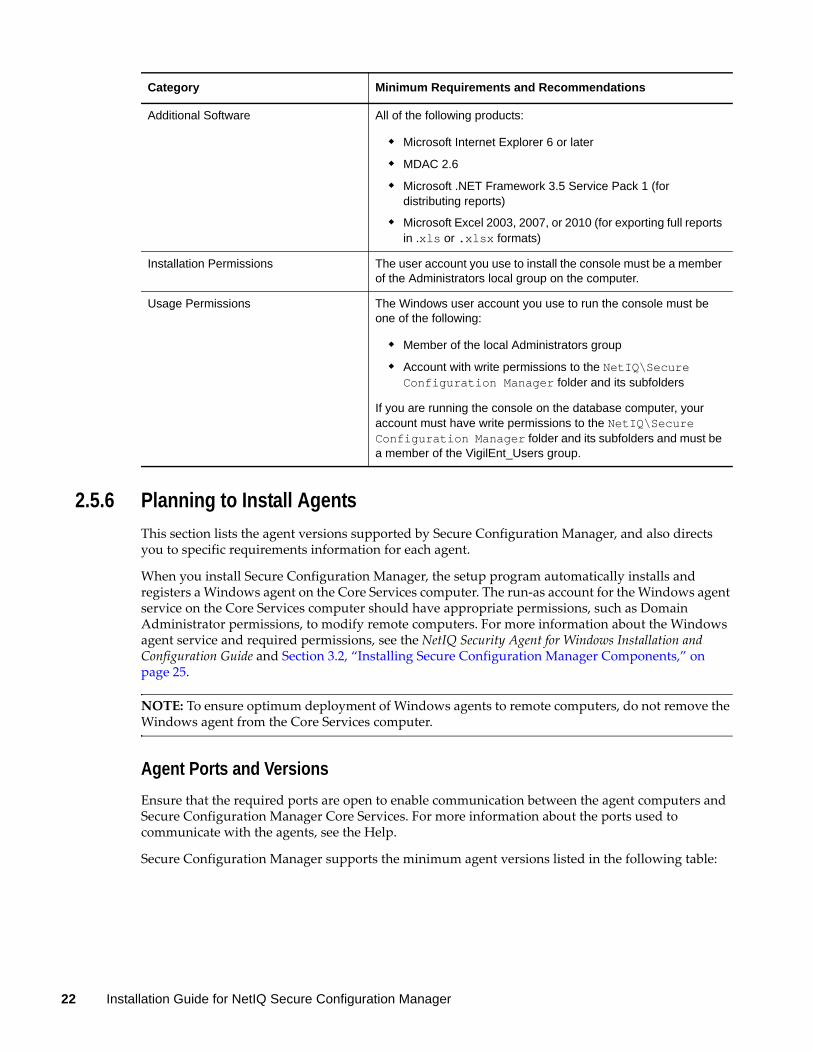
2.5.6 Planning to Install AgentsThis section lists the agent versions supported by Secure Configuration Manager, and also directs you to specific requirements information for each agent.
When you install Secure Configuration Manager, the setup program automatically installs and registers a Windows agent on the Core Services computer. The run‐as account for the Windows agent service on the Core Services computer should have appropriate permissions, such as Domain Administrator permissions, to modify remote computers. For more information about the Windows agent service and required permissions, see the NetIQ Security Agent for Windows Installation and Configuration Guide and Section 3.2, “Installing Secure Configuration Manager Components,” on page 25.
NOTE: To ensure optimum deployment of Windows agents to remote computers, do not remove the Windows agent from the Core Services computer.
Agent Ports and VersionsEnsure that the required ports are open to enable communication between the agent computers and Secure Configuration Manager Core Services. For more information about the ports used to communicate with the agents, see the Help.
Secure Configuration Manager supports the minimum agent versions listed in the following table:
Additional Software All of the following products:
Microsoft Internet Explorer 6 or later
MDAC 2.6
Microsoft .NET Framework 3.5 Service Pack 1 (for distributing reports)
Microsoft Excel 2003, 2007, or 2010 (for exporting full reports in .xls or .xlsx formats)
Installation Permissions The user account you use to install the console must be a member of the Administrators local group on the computer.
Usage Permissions The Windows user account you use to run the console must be one of the following:
Member of the local Administrators group
Account with write permissions to the NetIQ\Secure Configuration Manager folder and its subfolders
If you are running the console on the database computer, your account must have write permissions to the NetIQ\Secure Configuration Manager folder and its subfolders and must be a member of the VigilEnt_Users group.
Category Minimum Requirements and Recommendations
22 Installation Guide for NetIQ Secure Configuration Manager
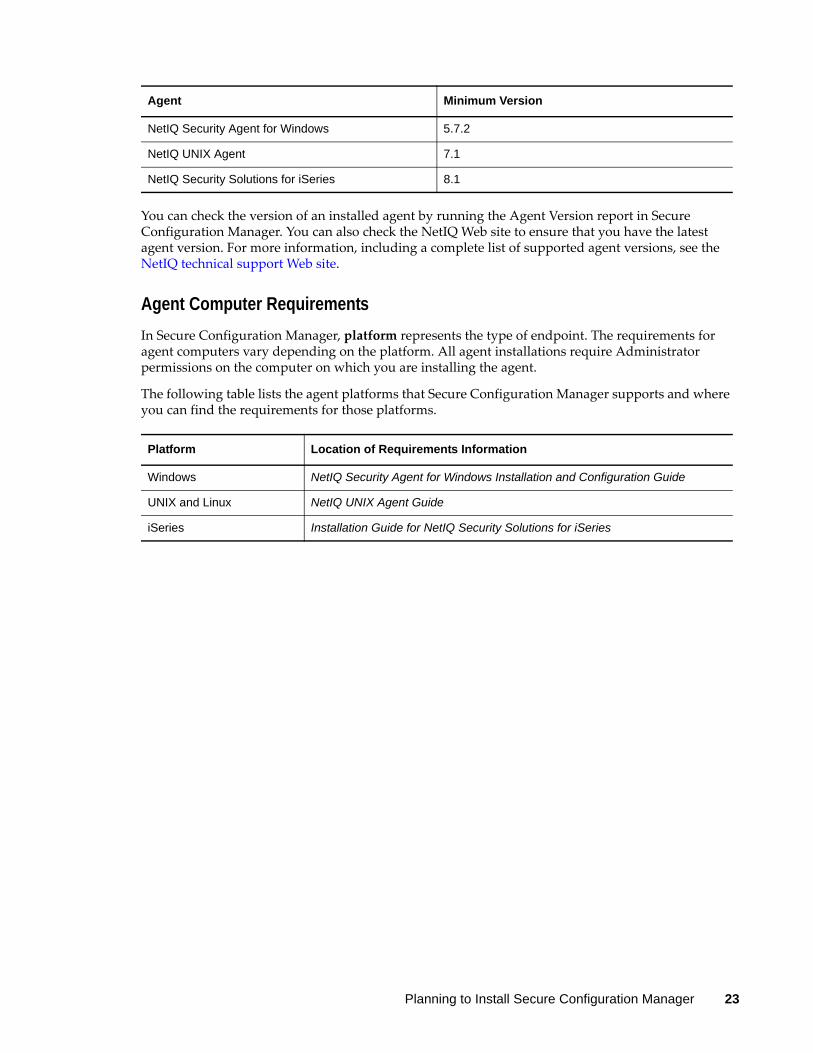
You can check the version of an installed agent by running the Agent Version report in Secure Configuration Manager. You can also check the NetIQ Web site to ensure that you have the latest agent version. For more information, including a complete list of supported agent versions, see the NetIQ technical support Web site.
Agent Computer RequirementsIn Secure Configuration Manager, platform represents the type of endpoint. The requirements for agent computers vary depending on the platform. All agent installations require Administrator permissions on the computer on which you are installing the agent.
The following table lists the agent platforms that Secure Configuration Manager supports and where you can find the requirements for those platforms.
Agent Minimum Version
NetIQ Security Agent for Windows 5.7.2
NetIQ UNIX Agent 7.1
NetIQ Security Solutions for iSeries 8.1
Platform Location of Requirements Information
Windows NetIQ Security Agent for Windows Installation and Configuration Guide
UNIX and Linux NetIQ UNIX Agent Guide
iSeries Installation Guide for NetIQ Security Solutions for iSeries
Planning to Install Secure Configuration Manager 23

24 Installation Guide for NetIQ Secure Configuration Manager

3 3Installing Secure Configuration Manager
This chapter addresses licensing and permissions requirements for Secure Configuration Manager, provides guidance for determining the appropriate installation type, and outlines the installation steps.
3.1 Installation ChecklistInstall Secure Configuration Manager in a production environment by completing the following checklist.
3.2 Installing Secure Configuration Manager ComponentsTo successfully install Secure Configuration Manager, you must install the Secure Configuration Manager database, Core Services, and at least one console. First, install the Secure Configuration Manager database (and Core Services, if appropriate) on the database computer. Then, if you did not install Core Services on the same computer as the database, install that component on a separate dedicated computer. Finally, install consoles on all computers that you want to host a user interface.
The Secure Configuration Manager setup program automatically installs and registers a Windows agent on the Core Services computer. You must specify a run‐as account for the Windows agent service. The account requires specific permissions, such as the ability to deploy agents to remote computers. For more information about the Windows agent service and permissions, see the NetIQ Security Agent for Windows Installation and Configuration Guide.
Checklist Items
1. Ensure that you have the appropriate licenses for the components you plan to install. For more information, see Section 2.2, “Licensing,” on page 12.
2. Locate the installation kit for Secure Configuration Manager and any agents that you plan to install.
3. Ensure that you have the appropriate permissions for the computers on which you will be installing components. For more information, see Section 2.3, “Permissions Requirements,” on page 14.
4. Install Secure Configuration Manager. For more information, see Section 3.2, “Installing Secure Configuration Manager Components,” on page 25.
5. Install your agents. For more information, see the appropriate chapter or guide for each agent.
6. Run the AutoSync update service to download the latest security checks and policy templates. For more information, see Section 5.3, “Updating Security Knowledge,” on page 35.
Installing Secure Configuration Manager 25
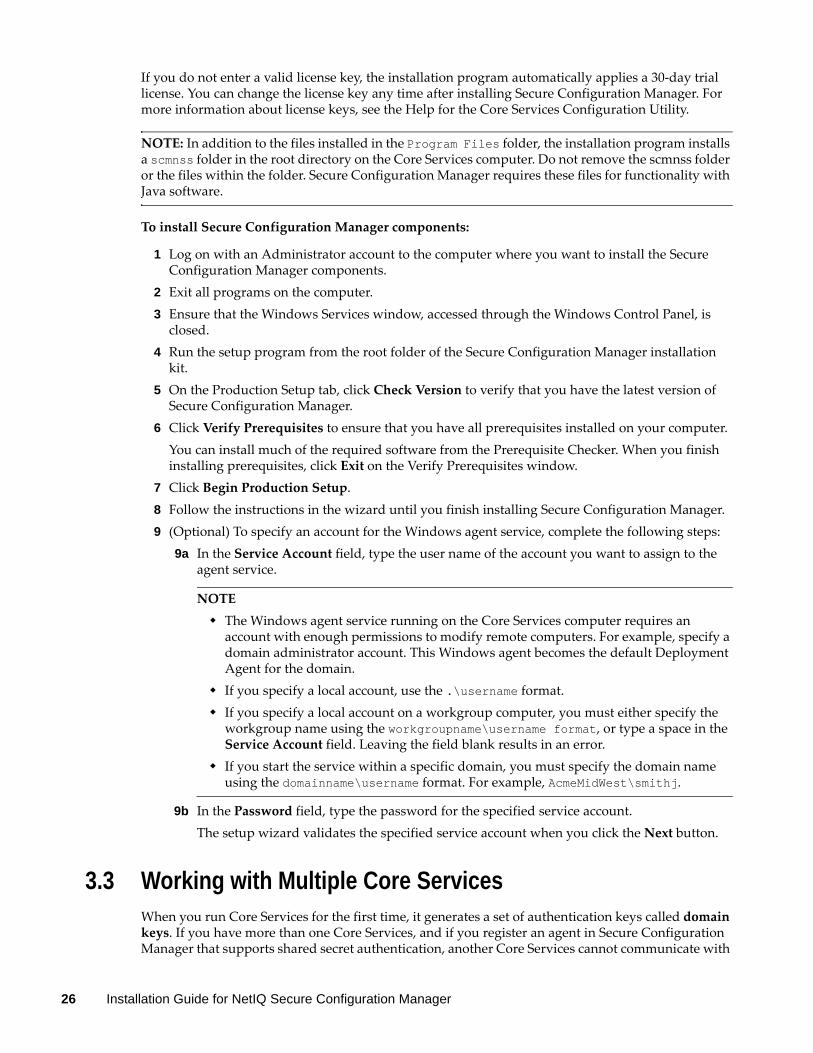
If you do not enter a valid license key, the installation program automatically applies a 30‐day trial license. You can change the license key any time after installing Secure Configuration Manager. For more information about license keys, see the Help for the Core Services Configuration Utility.
NOTE: In addition to the files installed in the Program Files folder, the installation program installs a scmnss folder in the root directory on the Core Services computer. Do not remove the scmnss folder or the files within the folder. Secure Configuration Manager requires these files for functionality with Java software.
To install Secure Configuration Manager components:
1 Log on with an Administrator account to the computer where you want to install the Secure Configuration Manager components.
2 Exit all programs on the computer.3 Ensure that the Windows Services window, accessed through the Windows Control Panel, is
closed.4 Run the setup program from the root folder of the Secure Configuration Manager installation
kit.5 On the Production Setup tab, click Check Version to verify that you have the latest version of
Secure Configuration Manager.6 Click Verify Prerequisites to ensure that you have all prerequisites installed on your computer.
You can install much of the required software from the Prerequisite Checker. When you finish installing prerequisites, click Exit on the Verify Prerequisites window.
7 Click Begin Production Setup.8 Follow the instructions in the wizard until you finish installing Secure Configuration Manager.9 (Optional) To specify an account for the Windows agent service, complete the following steps:
9a In the Service Account field, type the user name of the account you want to assign to the agent service.
NOTEThe Windows agent service running on the Core Services computer requires an account with enough permissions to modify remote computers. For example, specify a domain administrator account. This Windows agent becomes the default Deployment Agent for the domain.If you specify a local account, use the .\username format.If you specify a local account on a workgroup computer, you must either specify the workgroup name using the workgroupname\username format, or type a space in the Service Account field. Leaving the field blank results in an error.If you start the service within a specific domain, you must specify the domain name using the domainname\username format. For example, AcmeMidWest\smithj.
9b In the Password field, type the password for the specified service account.The setup wizard validates the specified service account when you click the Next button.
3.3 Working with Multiple Core ServicesWhen you run Core Services for the first time, it generates a set of authentication keys called domain keys. If you have more than one Core Services, and if you register an agent in Secure Configuration Manager that supports shared secret authentication, another Core Services cannot communicate with
26 Installation Guide for NetIQ Secure Configuration Manager
that agent unless it has those domain keys. You must export the domain keys from your first Core Services, and import them into the other Core Services to communicate with that agent. Agents that support shared secret authentication include Windows, UNIX, and iSeries agents.
To set up multiple Core Services to communicate with agents:
1 On the Core Services computer that registered the agents, open the ExportDomainKeys.bat file. By default, this file is located in the Program Files\NetIQ\Secure Configuration Manager\Core Services\bin folder.
2 At the Filename prompt, type the name of the file to store the domain keys and press Enter. You can enter just the file name, which will be saved in the same folder, or you can enter a full path and file name.
3 At the Password prompt, type a password that the other Core Services must use to access the domain keys for importing, and press Enter.
4 For each Core Services computer that needs to access the agents registered on the first Core Services, complete the following steps:4a Open the ImportDomainKeys.bat file.4b At the Filename prompt, type the name of the file where the domain keys are stored and
press Enter.4c At the Password prompt, type the password to access the domain keys and press Enter.4d Restart Core Services.
5 Open the console to see the registered agents.
3.4 Using Terminal Services to Install Secure Configuration ManagerYou can install Secure Configuration Manager using Terminal Services on a computer from any location.
To install Secure Configuration Manager using Terminal Services:
1 Copy the installation binary files to the local computer where you are running the installation. Due to a Windows installer issue, the installation will fail if you try to install from a network share.
2 Ensure that Terminal Services is running in Administrator mode.3 Install Secure Configuration Manager. For more information, see Section 3.2, “Installing Secure
Configuration Manager Components,” on page 25.
3.5 Deploying the Standalone AutoSync ClientThe Secure Configuration Manager AutoSync service lets you regularly download the latest security knowledge from an update service Web site to ensure that the Secure Configuration Manager agents always audit with the latest security intelligence. The Autosync client queries and receives updates from the NetIQ AutoSync server. For more information, see the User Guide for NetIQ Secure Configuration Manager.
You can install the AutoSync client on the same computer as Core Services, or you can install the standalone AutoSync client on a different computer so that it runs separately from Core Services.
Installing Secure Configuration Manager 27
Install a standalone AutoSync client when your Core Services computer is not directly connected to the Internet, or if you do not want the Core Services computer to download from the Internet. Ensure that the standalone AutoSync client computer has connectivity to the Internet and to Core Services.
3.5.1 Installing the Standalone AutoSync ClientComplete the following steps to install the standalone AutoSync client.
To install the standalone AutoSync client:
1 Log on with an Administrator account to the computer where you want to install the standalone AutoSync client.
2 Ensure that the Windows Services window, accessed through the Windows Control Panel, is closed.
3 Run the setup program from the root folder of the Secure Configuration Manager installation kit.
4 Click Verify Prerequisites to ensure that you have all prerequisites installed on your computer. You can install much of the required software from the Prerequisite Checker. When you finish installing prerequisites, click Exit on the Verify Prerequisites window.
5 On the Setup tab, click Begin Production Setup.6 Follow the instructions in the wizard until you reach the Component Selection window.
On the Component Selection window, select only the Standalone AutoSync Client component.7 Follow the instructions in the wizard until you finish installing the standalone AutoSync client.
3.5.2 Configuring the Standalone AutoSync ClientOnce you have installed the standalone AutoSync client, you must provide configuration information in Secure Configuration Manager so the AutoSync client can query and receive updates from the NetIQ AutoSync server. In addition to basic AutoSync settings, you can also set up a proxy Internet server. For more information about configuring the standalone AutoSync client, see the User Guide for NetIQ Secure Configuration Manager.
28 Installation Guide for NetIQ Secure Configuration Manager

4 4Adding or Updating Security Agents
When you install or upgrade to a new version of Secure Configuration Manager, the installation program automatically installs a Windows security agent on the Core Services computer. You can add or update other security agents after completing the installation process.
4.1 Deploying UNIX AgentsThe Security Agent for UNIX (UNIX agent) collects security information from one or more UNIX and Linux computers. The UNIX agent is also configured to collect information from Oracle endpoints on your UNIX and Linux computers. Secure Configuration Manager can automatically install and uninstall agents on UNIX and Linux computers as needed. For detailed information about the requirements for and capabilities of UNIX agents, see the NetIQ UNIX Agent Guide available from the UNIX agent installation kit.
4.2 Deploying iSeries AgentsNetIQ Security Solutions for iSeries is a suite of integrated products including PSAudit, PSSecure, PSDetect, PSPasswordManager, and Privilege Manager. These products simplify security auditing, vulnerability assessment, user access control, and event management for iSeries servers. NetIQ Security Solutions for iSeries includes solutions for managing user profiles and enforcing and strengthening password policies.
For detailed planning, installation, and configuration information for deploying iSeries agents, refer to the Installation Guide for NetIQ Security Solutions for iSeries available from the NetIQ Security Solutions for iSeries installation kit.
4.3 Deploying Windows AgentsThe Windows agent collects security information from one or more Windows computers in one or more domains. The agent is can also collect information from Microsoft SQL Server, Microsoft Internet Information Services (IIS), Oracle, Active Directory, and Network Attached Storage (NAS) endpoints. Secure Configuration Manager can automatically install and uninstall agents on Windows computers as needed.
For more information about deploying Windows agents, see the NetIQ Security Agent for Windows Installation and Configuration Guide available from the Secure Configuration Manager and Windows agent installation kits.
Adding or Updating Security Agents 29

30 Installation Guide for NetIQ Secure Configuration Manager

5 5Upgrading Secure Configuration Manager
This chapter addresses planning considerations and provides a checklist to help you upgrade to Secure Configuration Manager version 5.9. The upgrade process supports upgrades of the following production installations:
5.7 Service Pack 15.85.8 Service Pack 15.8 Service Pack 2
The upgrade process does not support upgrades from previous trial installations.
5.1 Secure Configuration Manager Upgrade ChecklistUpgrade your Secure Configuration Manager installation using the following checklist.
Checklist Items
1. Close all Secure Configuration Manager consoles and shut down Core Services. For more information, see Section 5.2.1, “Preparing to Upgrade,” on page 32.
2. Using Microsoft SQL Server Enterprise Manager, ensure that no users are connected to the Secure Configuration Manager database.
3. Back up your Secure Configuration Manager database. For more information, see the Microsoft SQL Server documentation.
4. Ensure that the computers on which you want to upgrade Secure Configuration Manager components meet the specified requirements. For more information, see Section 2.5, “Planning Your Secure Configuration Manager Environment,” on page 14 and Step 5 of Section 5.2.1, “Preparing to Upgrade,” on page 32.
5. Ensure that you have SQL Server configured properly to allow Secure Configuration Manager to connect to the database. For more information, see Step 6 in Section 5.2.1, “Preparing to Upgrade,” on page 32.
6. Stop all pending and scheduled jobs. For more information, see Section 5.2.2, “Stop Scheduled Jobs Before Upgrade,” on page 33.
7. Upgrade Core Services and the Secure Configuration Manager database. After the upgrade dialog box closes, Secure Configuration Manager continues to run the upgrade process. Do not stop Core Services until the upgrade fully completes. For more information, see Section 5.2.3, “Upgrading Secure Configuration Manager,” on page 33.
Upgrading Secure Configuration Manager 31
5.2 Upgrading a Secure Configuration Manager EnvironmentThis section provides requirements and instructions for upgrading your Secure Configuration Manager environment to Secure Configuration Manager 5.9.
5.2.1 Preparing to UpgradeBefore you upgrade your Secure Configuration Manager installation, complete the following steps to ensure a smooth upgrade.
To prepare your environment for upgrade:
1 Verify that the version of Secure Configuration Manager currently running in your environment is supported by the upgrade process. For more information, see Section 5.2.1, “Preparing to Upgrade,” on page 32.
2 To ensure a clean snapshot of your Secure Configuration Manager database, close all consoles and shut down Core Services. Follow these steps to shut down Core Services:2a Log on to the Core Services computer.2b Click Services in the Administrative Tools program folder, and then click NetIQ Core
Services.2c On the Action menu, click Stop.
3 Using Microsoft SQL Server Enterprise Manager, ensure no users are connected to the Secure Configuration Manager database.
4 Back up your Secure Configuration Manager database. For more information, see the Microsoft SQL Server documentation.
5 Ensure the free disk space allocated for the database upgrade is at least four times the size of the current VigilEnt.mdf file. By default, you can find the VigilEnt.mdf file at C:\Program Files\Microsoft SQL Server\MSSQL.1\MSSQL\Data.
NOTE: (Conditional) If you a upgrading from version 5.7.1, you must change the file growth parameter of the VigilEnt.mdf file to Unrestricted.
8. Upgrade each console computer. Secure Configuration Manager displays a message if you attempt to log on to the console before the database upgrade process completes. For more information, see Section 5.2.3, “Upgrading Secure Configuration Manager,” on page 33.
9. Run the AutoSync update service to download the latest security checks and policy templates. For more information, see Section 5.3, “Updating Security Knowledge,” on page 35.
10. Check the NetIQ Web site to ensure that you have the latest version for your currently installed agents. For more information, see www.netiq.com/support/vsm.
11. (Conditional) If you do not have the latest version of an agent, download the appropriate software update from the NetIQ Web site and use the instructions provided in the installation kit to upgrade the agent or see “Updating Agent Content” in the User Guide for NetIQ Secure Configuration Manager.
Checklist Items
32 Installation Guide for NetIQ Secure Configuration Manager
6 To ensure that the Browser Service is running in SQL Server, complete the following steps:6a Open SQL Server Configuration Manager.6b In the left pane, select the SQL Server services.6c In the right pane, ensure SQL Server Browser is set to Running.6d (Conditional) If the SQL Server Browser is stopped, select SQL Server Browser, and on the
Action menu, click Start.7 To ensure that the TCP/IP protocol is enabled in SQL Server, complete the following steps:
7a In the left pane, expand SQL Server 2005 Network Configuration and select Protocols for <database server name>.
7b In the right pane, ensure that TCP/IP is set to Enabled.7c (Conditional) If the TCP/IP protocol is disabled, select TCP/IP, and on the Action menu,
select Enable.8 Before you run the upgrade program, ensure that no users are connected to the database and no
Secure Configuration Manager consoles are running. The database upgrade fails if users attempt to connect to the database at any time during the upgrade process.
5.2.2 Stop Scheduled Jobs Before UpgradeYou cannot run scheduled jobs during the upgrade of Secure Configuration Manager. Scheduled jobs that complete or start during the upgrade process indicate a zero score upon completion. You must run the jobs again.
To stop pending jobs:
1 In the Pending jobs queue, right‐click the job.2 On the context menu, click Cancel.
To prevent jobs from running:
1 In the Scheduled jobs queue, right‐click the job.2 On the context menu, click Disable.3 After upgrading Secure Configuration Manager, right‐click the job in the Scheduled jobs queue.4 On the context menu, click Enable.
5.2.3 Upgrading Secure Configuration ManagerIf a Windows agent exists on the Core Services computer, the setup program upgrades the agent. Otherwise, the setup program installs and registers a new Windows agent on the computer. The new agent and the endpoint representing the computer’s operating system become a managed system in your asset map.
To upgrade Secure Configuration Manager:
1 Ensure that you have prepared your environment for upgrade. For more information, see Section 5.2.1, “Preparing to Upgrade,” on page 32.
2 Ensure that the computers on which you want to upgrade Secure Configuration Manager components meet the specified requirements. For more information, see Chapter 2, “Planning to Install Secure Configuration Manager,” on page 11 and Step 5 on page 32 of Section 5.2.1, “Preparing to Upgrade,” on page 32.
Upgrading Secure Configuration Manager 33
3 To upgrade Core Services and the Secure Configuration Manager database, complete the following steps:3a Log on to the Core Services computer with the appropriate permissions:
(Conditional) If Core Services and the database are installed on the same computer, log on as a user with local administrator rights.(Conditional) If Core Services and the database are installed on different computers, you must log on to the Core Services computer with an account that has administrator rights in SQL Server.
NOTE: If Core Services and the Secure Configuration Manager database are installed on different computers, the Secure Configuration Manager installation kit detects the database location and upgrades it along with Core Services.
3b Exit all programs open on the computer.3c Run the setup program from the root folder of the Secure Configuration Manager
installation kit.3d On the Setup tab, click Begin Setup and then click Next.3e (Conditional) If you accept the terms in the license agreement, click Accept and then click
Next.3f Select Production.
3g Select Upgrade and then click Next.3h Follow the instructions in the wizard until you have finished upgrading the product.3i (Conditional) If the upgrade process prompts you to install the Windows agent, you must
specify a run‐as account for the Windows agent service. For more information about the Windows agent service and permissions, see the NetIQ Security Agent for Windows Installation and Configuration Guide.
3j Do not stop or start Core Services until the upgrade process completes.After the upgrade window closes, Secure Configuration Manager continues to run the upgrade processes.
4 To upgrade consoles, complete the following steps on each console computer:4a Log on to the console computer with an administrator account.
NOTE: You must wait until the database upgrade completes before you can log on to a Secure Configuration Manager console.
4b Exit all programs open on the computer.4c Run the setup program from the root folder of the Secure Configuration Manager
installation kit.4d On the Setup tab, click Begin Setup and then click Next.4e (Conditional) If you accept the terms in the license agreement, click Accept and then click
Next.4f Select Upgrade and then click Next.
4g Follow the instructions in the wizard until you have finished installing the product.5 Once you have completed the upgrade, re‐run the AutoSync wizard in Secure Configuration
Manager to download the latest security knowledge. For more information about the AutoSync feature, see Section 5.3, “Updating Security Knowledge,” on page 35 and the User Guide for NetIQ Secure Configuration Manager.
34 Installation Guide for NetIQ Secure Configuration Manager
Troubleshooting Database Upgrade FailureIf your database upgrade fails due to a power outage, users connecting to the database during upgrade, or other errors, restore the database backup you made prior to upgrade and run the database upgrade again. You can find information to help you troubleshoot database issues in the log files. To access your log files, enter %TEMP% in the Windows Run command window. For information about restoring a database, see the Microsoft SQL Server documentation.
Upgrading Active Directory EndpointsSecure Configuration Manager has an endpoint type for Active Directory computers. If you currently have Active Directory endpoints configured as Windows Domain endpoints, you can save them as Active Directory endpoints once you have upgraded. However, the upgrade does not automatically convert those endpoints to Active Directory endpoints. To save an endpoint as an Active Directory endpoint, delete the original Windows Domain endpoint and re‐add the endpoint as an Active Directory endpoint. For more information about discovering and adding Windows Domain or Active Directory endpoints, see the User Guide for NetIQ Secure Configuration Manager and the Installation and Configuration Guide for NetIQ Secure Configuration Manager Windows Agent .
5.3 Updating Security Knowledge The upgrade process might not include the latest security checks and policy templates for Secure Configuration Manager. It is important to run the AutoSync update service to download and apply the latest security intelligence to keep your enterprise protected. For more information, see the User Guide for NetIQ Secure Configuration Manager.
NOTE: Secure Configuration Manager downloads, but does not update, patch level database files during this process. For more information, see Section 5.4, “Agent Considerations,” on page 36 and the User Guide for NetIQ Secure Configuration Manager.
To update security knowledge:
1 After completing the upgrade process, launch Secure Configuration Manager.2 On the Tools menu, click AutoSync Wizard.3 Click Check for Updates.4 (Optional) To download and apply all policy templates and security checks, select the check box
in the column header.5 (Optional) To download and apply specific policy templates and security checks, complete the
following steps:5a Clear the check box in the column header to deselect all items in the window.5b Select the check box next to each policy template and security check you want to download
and apply.6 Click Apply Updates. 7 Click OK.8 Click Finish when the wizard completes the download.
Upgrading Secure Configuration Manager 35
5.4 Agent ConsiderationsWhen you upgrade from Secure Configuration Manager version 5.7 or Secure Configuration Manager version 5.8 to Secure Configuration Manager version 5.9, the endpoint and agent information persists from the previous version so you can continue running reports on existing endpoints. However, in some cases, you must delete old agents and add them as new endpoints. For more information about supported agent versions, see the NetIQ technical support Web site.
5.4.1 Windows AgentWhen you install the Windows agent, Secure Configuration Manager also includes support for Active Directory, Microsoft IIS, Microsoft SQL Server, NAS, and Oracle endpoints. To manage Active Directory, Microsoft IIS, SQL Server, NAS, or Oracle endpoints with the Windows agent, you must add the endpoints in Secure Configuration Manager after you install the Windows agent.
If you previously managed Microsoft IIS endpoints using the VigilEnt Security Agent for Web Servers (VSA for Web Servers), and want to continue managing those endpoints, delete the old agents and add them as new endpoints of the Windows agent.
No upgrade path is available from the legacy Oracle agent to the new endpoint type. If you are currently managing Oracle databases with the legacy Oracle agent and want to continue managing those databases using the Windows agent, delete your old agents and add them as new endpoints of the Windows agent.
To take advantage of new features in Secure Configuration Manager, you must upgrade each agent to the latest agent versions. For more information about upgrading Windows agents, see the User Guide for NetIQ Secure Configuration Manager and the NetIQ Security Agent for Windows Installation and Configuration Guide.
5.4.2 UNIX AgentWhen you install the UNIX agent, Secure Configuration Manager also includes support for Oracle endpoints. To manage Oracle endpoints using the UNIX agent, you must add the endpoints in Secure Configuration Manager after you install the UNIX agent.
No upgrade path is available from the legacy Oracle agent to the new endpoint type supported by the UNIX agent. If you are currently managing Oracle databases with the legacy Oracle agent and want to continue managing those databases using the UNIX agent, delete your old agents and add them as new endpoints of the UNIX agent.
To take advantage of new features in Secure Configuration Manager, you must upgrade each agent to the latest agent versions. For more information, see Section 4.1, “Deploying UNIX Agents,” on page 29, and the Installation and Configuration Guide for NetIQ Secure Configuration Manager UNIX Agent.
36 Installation Guide for NetIQ Secure Configuration Manager

5.4.3 iSeries AgentYou must upgrade Secure Configuration Manager on each iSeries system. Also, you must re‐register each iSeries agent with the upgraded Core Services. To take advantage of new features in Secure Configuration Manager, update the iSeries agents to the latest agent versions.
The following table shows where you can find additional information about upgrading iSeries systems and agents to Secure Configuration Manager 5.8.
If you want to... See...
Deploy iSeries agents Installation Guide for NetIQ Security Solutions for iSeries
Update Security Knowledge for iSeries agents Section 5.3, “Updating Security Knowledge,” on page 35
Install Secure Configuration Manager on iSeries systems
Installation Guide for NetIQ Security Solutions for iSeries
Upgrading Secure Configuration Manager 37

38 Installation Guide for NetIQ Secure Configuration Manager
6 6Getting Started with Secure Configuration Manager
This chapter provides information about Windows and SQL authentication, and helps you get started with the Secure Configuration Manager console and Core Services.
6.1 Configuring Windows AuthenticationBy default, Secure Configuration Manager uses SQL authentication for communication between Core Services and the database. SQL authentication creates a user ID and password that are valid only for Microsoft SQL Server. You can also use Windows authentication.
When using Windows authentication, the database checks with the Windows domain controller to see if the user ID and password you used to log on to the computer are allowed to use the database.
To use Windows authentication:
1 (Conditional) If the database is on the same computer as Core Services, complete the following steps on this computer:1a Start the Core Services Configuration Utility in the NetIQ Secure Configuration Manager
program folder.1b On the Database tab, set the Use Windows Authentication field to True.1c Click OK to save the changes and close the Configuration Utility.1d Restart Core Services.
2 (Conditional) If the database is on a different computer from Core Services, complete the following steps on the Core Services computer:2a Start the Core Services Configuration Utility in the NetIQ Secure Configuration Manager
program folder.2b On the Database tab, set the Use Windows Authentication field to True.2c Click OK to save the changes and close the Configuration Utility.2d Browse to the Services list in Control Panel.2e Select NetIQ Core Services from the Services list.2f Change the service properties to log on with the account you specify to connect to the
database.2g Click OK.2h Click Start Service.
3 Close the Services and Administrative Tools windows.
Getting Started with Secure Configuration Manager 39
6.2 Starting Core ServicesCore Services handles communication between the console and the other Secure Configuration Manager components. Core Services must be running before you can use Secure Configuration Manager.
The Secure Configuration Manager setup program automatically starts Core Services for you. However, you can also manually start Core Services. To manually start the Core Services service, use the Services utility in the Windows Control Panel.
When you run Core Services for the first time, it generates a set of authentication keys called domain keys. If you are using a single Core Services, back up the domain keys for your Core Services to a disk or to another computer in case you need to re‐install Core Services at any point. Otherwise, when you install a new Core Services, new keys are created and you cannot access the agents you registered with the set of domain keys generated by the initial Core Services installation.
Console administrators, console users assigned to the Secure Configuration Manager Administrator’s role, can use the Core Services Configuration Utility to configure Core Services. For more information, see the Help for the Core Services Configuration Utility.
6.3 Starting the Secure Configuration Manager ConsoleWhen starting Secure Configuration Manager for the first time after installation, you must use the user account and password that you entered during installation to log on. After you set up the product and create other user and administrator accounts, you can use any of those accounts to log on to the console.
By default, Secure Configuration Manager uses Windows authentication for communication between the console and the database. When using Windows authentication, the database checks with the Windows domain controller to see if the user ID and password you used to log on to the console computer are allowed to use the database through Core Services.
You can also use SQL authentication. For more information, see Section 6.4, “Configuring SQL Authentication,” on page 41.
To start the Secure Configuration Manager console:
1 Start Secure Configuration Manager in the NetIQ Secure Configuration Manager program folder.
2 In the Core Services field, select the computer that hosts the Core Services you want to use.3 (Optional) To configure the Core Services that you are using, complete the following steps:
3a Click Configure.3b Edit the appropriate fields.3c Click OK.
4 Type the user name for your default Secure Configuration Manager administrator account in the User Name field. Type the password that you specified during installation in the Password field.
5 Click OK.
40 Installation Guide for NetIQ Secure Configuration Manager
6.4 Configuring SQL AuthenticationYou can also use SQL authentication for communication between the console and the database. SQL authentication creates a user ID and password that are valid only for SQL Server. For more information about authentication, see the Authentication article in the SQL Server Books Online, which are delivered with the full version of SQL Server.
To set up SQL authentication:
1 Set up the database in mixed‐mode security in SQL Server Enterprise Manager. For more information, see the Microsoft SQL Server documentation.
2 On the Core Services computer, complete the following steps:2a Start the Core Services Configuration Utility in the NetIQ Secure Configuration Manager
program folder.2b On the Database tab, set the Allow SQL Authentication field to True.2c Click OK to save the changes and close the Configuration Utility.2d Restart Core Services using the Windows Services utility. You can access the Windows
Services utility through Control Panel.3 Enable SQL authentication in Secure Configuration Manager by completing the following steps:
3a Start Secure Configuration Manager in the NetIQ Secure Configuration Manager program folder.
3b On the console login window, click Configure.3c Select the Enable SQL Authentication check box.3d Click OK.
4 Specify your user name and password and click OK.
Getting Started with Secure Configuration Manager 41

42 Installation Guide for NetIQ Secure Configuration Manager