installation manual - pacenr.free.fr · ov erholder følgende standard(er) eller andet/andre...
TRANSCRIPT

INSTALLATION MANUAL
EKHBH007AEKHBX007A
EKSWW150V3EKSWW200V3EKSWW300V3
EKSWW200Z2EKSWW300Z2
Indoor unit for air to water heat pump andsanitary warm water tank for air to water
heat pump system

1" MBSP
1" FBSP
46
Ø30
Ø16
65
287
487
361
80
895
97 236
600
133 43128
3
2 4
5
6
7
1
1" MBSP
144
487
461
8033
7
936
153
152 148
156
731
13
3
1
4
5
6
7
2
Ø32
4 EKHBH3 EKHBX
6 EKHBH5 EKHBX
500
≥40
0
≥200A
B
A
B
500
≥40
0
≥200
1 2
1x 1x 1x 2x2x2x 1x1x 1x 1x1x1 2 3 4 5 6 7 1 2 3 4
1 2
3 4
5 6

Zan
dvoo
rdes
traa
t 300
, B-8
400
Oos
tend
e, B
elgi
um
Dai
kin
Eu
rop
e N
.V.
EN
6033
5-2-
40,
Low
Vol
tage
73/
23/E
EC
Mac
hine
ry S
afet
y 98
/37/
EE
CE
lect
rom
agne
tic C
ompa
tibili
ty 8
9/33
6/E
EC
*
Jiro
Tom
itaD
irect
or Q
ualit
y A
ssur
ance
Ost
end,
1st
of M
arch
200
6
CE -
DECL
ARAT
ION-
OF-C
ONFO
RMIT
YCE
- KO
NFOR
MIT
ÄTSE
RKLÄ
RUNG
CE -
DECL
ARAT
ION-
DE-C
ONFO
RMIT
ECE
- CO
NFOR
MIT
EITS
VERK
LARI
NG
CE -
DECL
ARAC
ION-
DE-C
ONFO
RMID
ADCE
- DI
CHIA
RAZI
ONE-
DI-C
ONFO
RMIT
A
CE -
¢H§ø
™H ™
YMM
OPºø
™H™
CE -
DECL
ARAÇ
ÃO-D
E-CO
NFOR
MID
ADE
СЕ -
ЗАЯВ
ЛЕНИ
Е-О
-СО
ОТВ
ЕТСТ
ВИИ
CE -
OPFY
LDEL
SESE
RKLÆ
RING
CE -
FÖRS
ÄKRA
N-OM
-ÖVE
RENS
TÄMM
ELSE
CE -
ERKL
ÆRI
NG O
M-S
AMSV
ARCE
- IL
MOI
TUS-
YHDE
NMUK
AISU
UDES
TACE
-
PRO
HLÁŠ
ENÍ-O
-SHO
DĚ
CE -
IZJA
VA-O
-USK
LAĐE
NOST
ICE
- M
EGFE
LELŐ
SÉG
I-NYI
LATK
OZA
T
CE -
DEKL
ARAC
JA-Z
GO
DNO
ŚCI
CE -
DECL
ARAŢ
IE-D
E-CO
NFO
RMIT
ATE
CE -
I
ZJAV
A O
SKL
ADNO
STI
CE -
VAST
AVUS
DEKL
ARAT
SIO
ON
CE -
ДЕКЛ
АРАЦ
ИЯ-З
А-СЪ
ОТВЕ
ТСТВ
ИЕ
CE -
ATIT
IKTI
ES-D
EKLA
RACI
JA
CE -
ATBI
LSTĪ
BAS-
DEKL
ARĀC
IJA
CE -
VYHL
ÁSEN
IE-Z
HODY
CE -
UYUM
LULU
K-Bİ
LDİR
İSİ
01
are
in co
nform
ity w
ith th
e fo
llowi
ng s
tand
ard(
s) o
r oth
er n
orm
ative
doc
umen
t(s),
prov
ided
that
thes
e ar
e us
ed in
acc
orda
nce
with
our
instru
ction
s:
02
der/d
en fo
lgend
en N
orm
(en)
ode
r eine
m a
nder
en N
orm
doku
men
t ode
r -do
kum
ente
n en
tspric
ht/e
ntsp
rech
en, u
nter
der
Vor
auss
etzu
ng,
daß
sie g
emäß
uns
eren
Anw
eisun
gen
einge
setzt
wer
den:
03
sont
confo
rmes
à la/
aux n
orm
e(s)
ou au
tre(s
) doc
umen
t(s) n
orm
atif(
s), p
our a
utan
t qu'i
ls so
ient u
tilisé
s con
form
émen
t à no
s ins
tructi
ons:
04
confo
rm de
volge
nde n
orm
(en)
of éé
n of m
eer a
nder
e bind
ende
docu
men
ten z
ijn, o
p voo
rwaa
rde d
at ze
wor
den g
ebru
ikt ov
eree
nkom
stig
onze
instr
uctie
s:
05
está
n en
conf
orm
idad
con
la(s)
sigu
iente
(s) n
orm
a(s)
u o
tro(s
) doc
umen
to(s
) nor
mat
ivo(s
), sie
mpr
e qu
e se
an u
tiliza
dos d
e ac
uerd
o co
nnu
estra
s ins
trucc
iones
:
06
sono
con
form
i al(i)
seg
uent
e(i)
stand
ard(
s) o
altr
o(i)
docu
men
to(i)
a c
arat
tere
nor
mat
ivo, a
pat
to c
he v
enga
no u
sati
in co
nfor
mità
alle
nostr
e ist
ruzio
ni:
07
›ӷ
È Û‡
Ìʈӷ
ÌÂ
ÙÔ(·
) ·Î
fiÏÔ˘
ıÔ(·
) Ú
fiÙ˘
Ô(·)
‹ ¿
ÏÏÔ
¤ÁÁÚ
·ÊÔ(
·) Î
·ÓÔÓ
ÈÛÌÒ
Ó, ˘
fi Ù
ËÓ
ÚÔ¸
fiıÂÛ
Ë fiÙ
È ¯Ú
ËÛÈÌÔ
ÔÈÔ‡
ÓÙ·È
Û‡ÌÊ
ˆÓ·
ÌÂ
ÙȘ
Ô‰ËÁ
›Â˜
Ì·˜:
08
estã
o em
con
form
idade
com
a(s
) seg
uinte
(s) n
orm
a(s)
ou
outro
(s) d
ocum
ento
(s) n
orm
ativo
(s),
desd
e qu
e es
tes
sejam
utili
zado
s de
acor
do co
m a
s nos
sas i
nstru
ções
:
09
соот
ветс
твую
т сл
едую
щим
стан
дарт
ам и
ли д
руги
м но
рмат
ивны
м до
куме
нтам
, при
усл
овии
их
испо
льзо
вани
я со
глас
но н
ашим
инст
рукц
иям:
10
over
holde
r fø
lgend
e sta
ndar
d(er
) ell
er a
ndet
/and
re r
etnin
gsgiv
ende
dok
umen
t(er),
for
udsa
t at
diss
e an
vend
es i
henh
old t
il vo
reins
truks
er:
11
resp
ektiv
e ut
rustn
ing ä
r utfö
rd i
över
enss
täm
mels
e m
ed o
ch fö
ljer f
öljan
de s
tand
ard(
er) e
ller a
ndra
nor
mgiv
ande
dok
umen
t, un
der
föru
tsättn
ing a
tt an
vänd
ning
sker
i öve
rens
stäm
mels
e m
ed vå
ra in
struk
tione
r:
12
resp
ektiv
e ut
styr e
r i o
vere
nsste
mm
else
med
følge
nde
stand
ard(
er) e
ller a
ndre
nor
mgiv
ende
dok
umen
t(er),
und
er fo
rutss
etnin
g av
at
disse
bru
kes i
hen
hold
til vå
re in
struk
ser:
13
vasta
avat
seu
raav
ien s
tand
ardie
n ja
muid
en o
hjeell
isten
dok
umen
ttien
vaat
imuk
sia e
delly
ttäen
, et
tä n
iitä k
äyte
tään
ohje
idem
me
muk
aises
ti:
14
za p
ředp
oklad
u, že
jsou
využ
ívány
v so
uladu
s na
šimi p
okyn
y, o
dpov
ídají
nás
ledují
cím n
orm
ám n
ebo
norm
ativn
ím d
okum
entů
m:
15
u sk
ladu
sa sl
ijede
ćim st
anda
rdom
(ima)
ili d
rugim
nor
mat
ivnim
dok
umen
tom
(ima)
, uz u
vjet d
a se
oni
koris
te u
sklad
u s n
ašim
upu
tam
a:
16
meg
felel
nek a
z aláb
bi sz
abvá
ny(o
k)na
k vag
y egy
éb ir
ánya
dó d
okum
entu
m(o
k)na
k, ha
azo
kat e
lőírá
s sze
rint h
aszn
álják
:
17
spełn
iają
wym
ogi n
astę
pując
ych
norm
i inn
ych
doku
men
tów
norm
aliza
cyjny
ch, p
od w
arun
kiem
że
używ
ane
są z
godn
ie z
nasz
ymi
instru
kcjam
i:
18
sunt
în co
nfor
mita
te cu
urm
ător
ul (u
rmăt
oare
le) st
anda
rd(e
) sau
alt(
e) d
ocum
ent(e
) nor
mat
iv(e)
, cu
cond
iţia ca
ace
stea
să fie
utili
zate
înco
nfor
mita
te cu
instr
ucţiu
nile
noas
tre
19
sklad
ni z n
asled
njim
i sta
ndar
di in
drug
imi n
orm
ativi
, pod
pog
ojem
, da
se u
pora
bljajo
v sk
ladu
z naš
imi n
avod
ili:
20
on va
stavu
ses j
ärgm
is(t)e
stan
dard
i(te)
ga võ
i teist
e no
rmat
iivse
te d
okum
entid
ega,
kui n
eid ka
suta
taks
e va
stava
lt meie
juhe
ndite
le:
21
съот
ветс
тват
на
след
ните
ста
ндар
ти и
ли д
руги
нор
мати
вни
доку
мент
и, п
ри у
слов
ие,
че с
е из
полз
ват
съгл
асно
наш
ите
инст
рукц
ии:
22
atitin
ka že
miau
nur
odytu
s sta
ndar
tus i
r (ar
ba) k
itus n
orm
inius
dok
umen
tus s
u są
lyga,
kad
yra
naud
ojam
i pag
al m
ūsų
nuro
dym
us:
23
tad,
ja lie
toti a
tbils
toši
ražo
tāja
norā
dījum
iem, a
tbils
t sek
ojošie
m st
anda
rtiem
un
citiem
nor
mat
īviem
dok
umen
tiem
:
24
sú v
zhod
e s n
asled
ovno
u(ým
i) no
rmou
(am
i) ale
bo in
ým(i)
nor
mat
ívnym
(i) d
okum
ento
m(a
mi),
za p
redp
oklad
u, že
sa p
oužív
ajú v
súlad
es n
ašim
náv
odom
:
25
ürün
ün, t
alim
atlar
ımıza
gör
e ku
llanı
lmas
ı koş
uluyla
aşa
ğıda
ki sta
ndar
tlar v
e no
rm b
elirte
n be
lgeler
le uy
umlud
ur:
01
Dire
ctive
s, as
am
ende
d.
02
Dire
ktive
n, g
emäß
Änd
erun
g.
03
Dire
ctive
s, te
lles q
ue m
odifié
es.
04
Rich
tlijne
n, zo
als g
eam
ende
erd.
05
Dire
ctiva
s, se
gún
lo en
men
dado
.
06
Dire
ttive,
com
e da
mod
ifica.
07
√‰Ë
ÁÈÒv, fi
ˆ˜
¤¯Ô˘
Ó ÙÚ
ÔÔ
ÔÈËı
›.
08
Dire
ctiva
s, co
nform
e alt
eraç
ão e
m.
09
Дире
ктив
со в
семи
поп
равк
ами.
10
Dire
ktive
r, m
ed se
nere
ænd
ringe
r.
11
Dire
ktiv,
med
före
tagn
a än
dring
ar.
12
Dire
ktive
r, m
ed fo
reta
tte e
ndrin
ger.
13
Direk
tiivejä
, sell
aisina
kuin
ne ov
at mu
utettu
ina.
14
v plat
ném
zněn
í.
15
Smjer
nice,
kako
je iz
mije
njeno
.
16
irány
elv(e
k) és
mód
osítá
saik
rend
elkez
éseit
.
17
z póź
niejsz
ymi p
opra
wkam
i.
18
Dire
ctive
lor, c
u am
enda
men
tele
resp
ectiv
e.
19
Dire
ktive
z vs
emi s
prem
emba
mi.
20
Dire
ktiivi
d ko
os m
uuda
tuste
ga.
21
Дире
ктив
и, с
техн
ите
изме
нени
я.
22
Dire
ktyvo
se su
pap
ildym
ais.
23
Dire
ktīvā
s un
to p
apild
inājum
os.
24
Smer
nice,
v pla
tnom
znen
í.
25
Değiş
tirilm
iş ha
lleriy
le Yö
netm
elikle
r.
01
follow
ing th
e pr
ovisi
ons o
f:
02
gem
äß d
en V
orsc
hrifte
n de
r:
03
confo
rmém
ent a
ux st
ipulat
ions d
es:
04
over
eenk
omsti
g de
bep
aling
en va
n:
05
siguie
ndo
las d
ispos
icion
es d
e:
06
seco
ndo
le pr
escr
izion
i per
:
07
ÌÂ Ù
‹ÚËÛ
Ë Ùˆ
v ‰È·Ù
¿Íˆ
v Ùˆ
v:
08
de a
cord
o co
m o
pre
visto
em
:
09
в со
отве
тств
ии с
поло
жени
ями:
10
unde
r iag
ttage
lse a
f bes
tem
mels
erne
i:
11
enlig
t villk
oren
i:
12
gitt i
henh
old til
bes
tem
mels
ene
i:
13
noud
atta
en m
äärä
yksiä
:
14
za d
održ
ení u
stano
vení
pře
dpisu
:
15
prem
a od
redb
ama:
16
köve
ti a(z
):
17
zgod
nie z
posta
nowi
eniam
i Dyr
ektyw
:
18
în u
rma
prev
eder
ilor:
19
ob u
pošte
vanju
dolo
čb:
20
vasta
valt n
õuet
ele:
21
след
вайк
и кл
аузи
те н
а:
22
laika
ntis
nuos
tatų
, pat
eikiam
ų:
23
ievēr
ojot p
rasīb
as, k
as n
oteik
tas:
24
održ
iavajú
c usta
nove
nia:
25
bunu
n ko
şulla
rına
uygu
n ola
rak:
01
Note
*
as se
t out
in the
Tech
nical
Cons
tructi
on Fi
le
DAIK
IN.TC
F.015
+DAI
KIN.
TCF.0
25
and j
udge
d pos
itively
by
KEMA
acco
rding
to
the
Certi
ficate
7473
6-KRQ
/EMC
97-49
57+2
0825
43.05
51-Q
UA/E
MC
.
02
Hinw
eis *
wie i
n der
Tech
nisch
en K
onstr
uktio
nsak
te
DAIK
IN.TC
F.015
+DAI
KIN.
TCF.0
25
aufge
führt
und v
on
KEMA
posit
iv au
sgez
eichn
et ge
mäß
Zerti
fikat
7473
6-KRQ
/EMC
97-49
57+2
0825
43.05
51-Q
UA/E
MC
.
03
Rema
rque
*
tel qu
e stip
ulé da
ns le
Fich
ier de
Con
struc
tion T
echn
ique
DAIK
IN.TC
F.015
+DAI
KIN.
TCF.0
25
et ju
gé po
sitive
ment
par
KEMA
co
nform
émen
t au
Certi
ficat
7473
6-KRQ
/EMC
97-49
57+2
0825
43.05
51-Q
UA/E
MC
.
04
Beme
rk *
zoals
verm
eld in
het T
echn
isch C
onstr
uctie
doss
ier
DAIK
IN.TC
F.015
+DAI
KIN.
TCF.0
25
en in
orde
bevo
nden
door
KEMA
ov
ereen
koms
tig
Certi
ficaa
t 747
36-K
RQ/E
MC97
-4957
+208
2543
.0551
-QUA
/EMC
.
05
Nota
*
tal co
mo se
expo
ne en
el A
rchivo
de C
onstr
ucció
n Téc
nica
DAIK
IN.TC
F.015
+DAI
KIN.
TCF.0
25
y juz
gado
posit
ivame
nte po
r
KEMA
segú
n el
Certi
ficad
o 747
36-K
RQ/E
MC97
-4957
+208
2543
.0551
-QUA
/EMC
.
06
Nota
*
delin
eato
nel F
ile Te
cnico
di C
ostru
zione
DAIK
IN.TC
F.015
+DAI
KIN.
TCF.0
25
e giu
dicato
posit
ivame
nte da
KEMA
seco
ndo
il
Certi
ficato
7473
6-KRQ
/EMC
97-49
57+2
0825
43.05
51-Q
UA/E
MC
.
07
™ËÌÂ
›ˆÛË
*
fiˆ˜
ÚÔÛ
‰ÈÔÚ
›˙ÂÙ
·È Û
ÙÔ ∞
گ›Ô
∆¯Ó
È΋˜
∫·Ù
·ÛÎÂ
˘‹˜
DAIK
IN.TC
F.015
+DAI
KIN.
TCF.0
25
Î·È Î
Ú›ÓÂ
Ù·È ı
ÂÙÈο
·fi
ÙÔ
KEMA
Û‡Ì
ʈӷ
ÌÂ
ÙÔ
¶ÈÛÙ
ÔÔÈË
ÙÈÎfi
7473
6-KRQ
/EMC
97-49
57+2
0825
43.05
51-Q
UA/E
MC
.
08
Nota
*
tal co
mo es
tabele
cido n
o Fich
eiro T
écnic
o de C
onstr
ução
DAIK
IN.TC
F.015
+DAI
KIN.
TCF.0
25
e co
m o p
arece
r pos
itivo d
e
KEMA
de
acord
o com
o
Certi
ficad
o
7473
6-KRQ
/EMC
97-49
57+2
0825
43.05
51-Q
UA/E
MC
.
09
Прим
ечан
ие *
как у
каза
но в
Дось
е тех
ниче
ског
о тол
кова
ния
DAIK
IN.TC
F.015
+DAI
KIN.
TCF.0
25
и в с
оотв
етст
вии с
поло
жите
льны
м ре
шени
ем
KEMA
согл
асно
Свид
етел
ьств
у
7473
6-KRQ
/EMC
97-49
57+2
0825
43.05
51-Q
UA/E
MC
.
10
Bemæ
rk *
som
anfør
t i de
n Tek
niske
Kon
struk
tions
fil
DAIK
IN.TC
F.015
+DAI
KIN.
TCF.0
25
og po
sitivt
vurde
ret af
KEMA
i hen
hold
til
Certi
fikat
7473
6-KRQ
/EMC
97-49
57+2
0825
43.05
51-Q
UA/E
MC
.
11
Infor
matio
n *
utrus
tning
en är
utför
d i en
lighe
t med
den T
eknis
ka K
onstr
uktio
nsfile
n
DAIK
IN.TC
F.015
+DAI
KIN.
TCF.0
25
som
posit
ivt in
tygas
av
KEMA
vilke
t ock
så fra
mgår
av
Certi
fikat
7473
6-KRQ
/EMC
97-49
57+2
0825
43.05
51-Q
UA/E
MC
.
12
Merk
*
som
det fr
emko
mmer
i den
Tekn
iske K
onstr
uksjo
nsfile
n
DAIK
IN.TC
F.015
+DAI
KIN.
TCF.0
25
og gj
enno
m po
sitiv
bedø
mmels
e av
KEMA
ifølge
Serti
fikat
7473
6-KRQ
/EMC
97-49
57+2
0825
43.05
51-Q
UA/E
MC
.
13
Huom
*
jotka
on es
itetty
Tekn
isess
ä Asia
kirjas
sa
DAIK
IN.TC
F.015
+DAI
KIN.
TCF.0
25
ja jo
tka
KEMA
on hy
väks
ynyt
Serti
fikaa
tin
7473
6-KRQ
/EMC
97-49
57+2
0825
43.05
51-Q
UA/E
MC
muk
aises
ti.
14
Pozn
ámka
*
jak by
lo uv
eden
o v so
ubor
u tec
hnick
é kon
struk
ce
DAIK
IN.TC
F.015
+DAI
KIN.
TCF.0
25
a po
zitivn
ě zjiš
těno
KEMA
v so
uladu
s
osvě
dčen
ím
7473
6-KRQ
/EMC
97-49
57+2
0825
43.05
51-Q
UA/E
MC
.
15
Napo
mena
*
kako
je iz
ložen
o u D
atotec
i o te
hničk
oj ko
nstru
kciji
DAIK
IN.TC
F.015
+DAI
KIN.
TCF.0
25
i poz
itivno
ocije
njeno
od st
rane
KEMA
pr
ema
Certi
fikatu
7473
6-KRQ
/EMC
97-49
57+2
0825
43.05
51-Q
UA/E
MC
.
16
Megje
gyzé
s *
a(z)
DAIK
IN.TC
F.015
+DAI
KIN.
TCF.0
25
műs
zaki
kons
trukc
iós do
kume
ntáció
alap
ján, a
(z)
KEMA
igaz
olta a
meg
felelé
st a(
z)
7473
6-KRQ
/EMC
97-49
57+2
0825
43.05
51-Q
UA/E
MC
tanús
ítván
y
szer
int.
17
Uwag
a *
zgod
nie z
arch
iwaln
ą dok
umen
tacją
kons
trukc
yjną
DAIK
IN.TC
F.015
+DAI
KIN.
TCF.0
25
, poz
ytywn
ą opin
ią
KEMA
i
Świad
ectw
em
7473
6-KRQ
/EMC
97-49
57+2
0825
43.05
51-Q
UA/E
MC
.
18
Notă
*
confo
rm ce
lor st
abilit
e în D
osar
ul teh
nic de
cons
trucţi
e
DAIK
IN.T
CF.01
5+DA
IKIN
.TCF
.025
şi ap
recia
te po
zitiv
de
KEMA
în
confo
rmita
te cu
Certi
ficat
ul
7473
6-KR
Q/EM
C97-
4957
+208
2543
.0551
-QUA
/EMC
.
19
Opom
ba *
kot je
določ
eno v
tehn
ični m
api
DAIK
IN.TC
F.015
+DAI
KIN.
TCF.0
25
in od
obre
no s
stran
i
KEMA
v sk
ladu s
certi
fikato
m
7473
6-KRQ
/EMC
97-49
57+2
0825
43.05
51-Q
UA/E
MC
.
20
Märk
us
*
nagu
on nä
idatud
tehn
ilises
doku
menta
tsioo
nis
DAIK
IN.TC
F.015
+DAI
KIN.
TCF.0
25
ja he
aks k
iidetu
d
KEMA
järg
i vas
tavalt
serti
fikaa
dile
7473
6-KRQ
/EMC
97-49
57+2
0825
43.05
51-Q
UA/E
MC
.
21
Забе
лежк
а *
какт
о е за
ложе
но в
Акта
за те
хнич
еска
конс
трук
ция
DAIK
IN.TC
F.015
+DAI
KIN.
TCF.0
25
и оц
енен
о пол
ожит
елно
от
KEMA
съ
глас
но
Серт
ифик
ат
7473
6-KRQ
/EMC
97-49
57+2
0825
43.05
51-Q
UA/E
MC
.
22
Pasta
ba *
kaip
nuro
dyta
Tech
ninėje
kons
trukc
ijos b
yloje
DAIK
IN.TC
F.015
+DAI
KIN.
TCF.0
25
ir pa
tvirtin
ta
KEMA
paga
l
pažy
mėjim
ą
7473
6-KRQ
/EMC
97-49
57+2
0825
43.05
51-Q
UA/E
MC
.
23
Piez
īmes
*
kā no
teikts
tehn
iskajā
doku
mentā
cijā
DAIK
IN.TC
F.015
+DAI
KIN.
TCF.0
25
, atbi
lstoš
i
KEMA
pozit
īvajam
lēmu
mam
ko ap
liecin
a
serti
fikāts
7473
6-KRQ
/EMC
97-49
57+2
0825
43.05
51-Q
UA/E
MC
.
24
Pozn
ámka
*
ako j
e to s
tanov
ené v
Súb
ore t
echn
ickej
konš
trukc
ie
DAIK
IN.TC
F.015
+DAI
KIN.
TCF.0
25
a kla
dne p
osúd
ené
KEMA
podľa
Certi
fikátu
7473
6-KRQ
/EMC
97-49
57+2
0825
43.05
51-Q
UA/E
MC
.
25
Not
*
DAIK
IN.TC
F.015
+DAI
KIN.
TCF.0
25
Tekn
ik Ya
pı Do
syas
ında b
elirtil
diği g
ibi ve
7473
6-KRQ
/EMC
97-49
57+2
0825
43.05
51-Q
UA/E
MC
serti
fikas
ına
göre
KEMA
tarafı
ndan
olum
lu ola
rak d
eğer
lendir
ilmişt
ir.
3PW28897-1B
01
d
eclar
es u
nder
its so
le re
spon
sibilit
y tha
t the
equ
ipmen
t to
which
this
decla
ratio
n re
lates
:
02
e
rklär
t auf
seine
alle
inige
Ver
antw
ortu
ng, d
ass d
ie Au
srüs
tung
für d
ie die
se E
rklär
ung
besti
mm
t ist:
03
d
éclar
e so
us sa
seule
resp
onsa
bilité
que
l’équ
ipem
ent v
isé p
ar la
pré
sent
e dé
clara
tion:
04
ve
rklaa
rt hie
rbij o
p eig
en e
xclus
ieve
vera
ntwo
orde
lijkhe
id da
t de
appa
ratu
ur w
aaro
p de
ze ve
rklar
ing b
etre
kking
hee
ft:
05
d
eclar
a ba
jo su
únic
a re
spon
sabil
idad
que
el eq
uipo
al qu
e ha
ce re
fere
ncia
la de
clara
ción:
06
d
ichiar
a so
tto la
pro
pria
resp
onsa
bilità
che
gli a
ppar
ecch
i a cu
i è ri
ferita
que
sta d
ichiar
azion
e:
07
‰
ËÏÒÓÂ
È ÌÂ
·Ô
ÎÏÂÈÛÙ
È΋
Ù˘
¢ı‡
ÓË fi
ÙÈ Ô
ÂÍÔ
ÏÈÛÌfi
˜ ÛÙ
ÔÓ Ô
Ô›Ô ·
ӷʤÚ
ÂÙ·È Ë
·Ú
Ô‡Û·
‰‹Ï
ˆÛË
:
08
d
eclar
a so
b su
a ex
clusiv
a re
spon
sabil
idade
que
os e
quipa
men
tos a
que
esta
dec
laraç
ão se
refer
e:
09
за
явля
ет, и
склю
чите
льно
под
свою
отв
етст
венн
ость
, что
обо
рудо
вани
е, к
кото
рому
отн
осит
ся н
асто
ящее
заяв
лени
е:
10
e
rklæ
rer s
om e
nean
svar
lig, a
t uds
tyret
, som
er o
mfa
ttet a
f den
ne e
rklæ
ring:
11
d
eklar
erar
i ege
nska
p av
huv
udan
svar
ig, a
tt ut
rustn
ingen
som
ber
örs a
v den
na d
eklar
ation
inne
bär a
tt:
12
e
rklæ
rer e
t full
stend
ig an
svar
for a
t det
utst
yr so
m b
erør
es av
den
ne d
eklar
asjon
, inne
bære
r at:
13
ilm
oitta
a yk
sinom
aan
omall
a va
stuull
aan,
että
täm
än ilm
oituk
sen
tark
oitta
mat
laitte
et:
14
proh
lašuje
ve sv
é pln
é od
pově
dnos
ti, že
zaříz
ení,
k něm
už se
toto
pro
hláše
ní vz
tahu
je:
15
izjav
ljuje
pod
isklju
čivo
vlasti
tom
odg
ovor
nošć
u da
opr
ema
na ko
ju se
ova
izjav
a od
nosi:
16
telje
s fele
lőssé
ge tu
datá
ban
kijele
nti, h
ogy a
ber
ende
zése
k, m
elyek
re e
nyil
atko
zat v
onat
kozik
:
17
d
eklar
uje n
a wł
asną
wyłą
czną
odp
owied
zialno
ść, ż
e ur
ządz
enia,
któr
ych
ta d
eklar
acja
dotyc
zy:
18
decla
ră p
e pr
oprie
răsp
unde
re că
ech
ipam
ente
le la
care
se re
feră
ace
astă
dec
laraţ
ie:
19
z
vso
odgo
vorn
ostjo
izjav
lja, d
a je
opre
ma
napr
av, n
a ka
tero
se iz
java
nana
ša:
20
ki
nnita
b om
a tä
ieliku
l vas
tutu
sel, e
t käe
solev
a de
klara
tsioo
ni all
a ku
uluv v
arus
tus:
21
д
екла
рира
на
своя
отг
овор
ност
, че
обор
удва
нето
, за
коет
о се
отн
ася
тази
дек
лара
ция:
22
vi
siška
savo
atsa
kom
ybe
skelb
ia, ka
d įra
nga,
kuria
i taiko
ma
ši de
klara
cija:
23
a
r piln
u at
bildī
bu a
pliec
ina, k
a tā
lāk a
prak
stītā
s iek
ārta
s, uz
kurā
m a
ttieca
s šī d
eklar
ācija
:
24
vy
hlasu
je na
vlas
tnú
zodp
oved
nosť
, že
zaria
denie
, na
ktoré
sa vz
ťahu
je to
to vy
hláse
nie:
25
ta
mam
en ke
ndi s
orum
luluğ
unda
olm
ak ü
zere
bu
bildir
inin
ilgili
olduğ
u do
nanı
mın
ın a
şağı
daki
gibi o
lduğu
nu b
eyan
ede
r:
ER
YQ
005A
AV
3, E
RY
Q00
6AA
V3,
ER
YQ
007A
AV
3, E
RY
Q00
5AB
V3,
ER
YQ
006A
BV
3, E
RY
Q00
7AB
V3,
EK
HB
H00
7A**
*, E
KH
BX
007A
***,
EK
SW
W15
0V3,
EK
SW
W20
0V3,
EK
SW
W20
0Z2,
EK
SW
W30
0V3,
EK
SW
W30
0Z2,
* =
, ,
-, 1
, 2, 3
, ...,
9, A
, B, C
, ...,
Z
CONTENTS Page
Introduction ....................................................................................... 2General information.................................................................................... 2Scope of this manual.................................................................................. 2Model identification .................................................................................... 2
Accessories....................................................................................... 2Accessories supplied with the indoor unit .................................................. 2Accessories supplied with the sanitary water tank (optional)..................... 2
Typical application examples............................................................. 3Application 1 .............................................................................................. 3Application 2 .............................................................................................. 3Application 3 .............................................................................................. 4Application 4 .............................................................................................. 4
Overview of the indoor unit ............................................................... 5Opening the indoor unit.............................................................................. 5Main components....................................................................................... 6Switch box main components .................................................................... 7Functional diagram..................................................................................... 7
Installation of the indoor unit ............................................................. 8Selecting an installation location................................................................ 8Dimensions and service space .................................................................. 8Inspecting, handling and unpacking the unit .............................................. 8Mounting the indoor unit ............................................................................ 9Installation of the drain pan (only for EKHBX models) ............................... 9Refrigerant pipework ................................................................................ 10Water pipework ........................................................................................ 10Charging water......................................................................................... 11Piping insulation....................................................................................... 11Field wiring............................................................................................... 11
Sanitary water tank (optional) ......................................................... 15Main components..................................................................................... 15Outlook diagram....................................................................................... 15Installation guidelines............................................................................... 16Installing the sanitary water tank.............................................................. 16Connecting the water circuits ................................................................... 16Field wiring............................................................................................... 16
Start-up and configuration............................................................... 17DIP switch settings overview.................................................................... 17Room thermostat installation configuration.............................................. 17Pump operation configuration .................................................................. 18Sanitary water tank installation configuration........................................... 18Pre-operation checks ............................................................................... 18Powering up the indoor unit...................................................................... 19Setting the pump speed ........................................................................... 19Field settings............................................................................................ 19
Test run and final check .................................................................. 24Test run operation .................................................................................... 24Final check ............................................................................................... 24
Maintenance ................................................................................... 24
Troubleshooting............................................................................... 25General guidelines ................................................................................... 25General symptoms................................................................................... 25Error codes .............................................................................................. 26
Technical specifications .................................................................. 27General .................................................................................................... 27Electrical specifications............................................................................ 27Sanitary water tank specifications (optional)............................................ 27
EKHBH007A*** EKSWW150V3EKHBX007A*** EKSWW200V3 EKSWW200Z2
EKSWW300V3 EKSWW300Z2
Indoor unit for air to water heat pump and sanitary warm water tank for air to water heat pump system Installation manual
READ THESE INSTRUCTIONS CAREFULLY BEFOREINSTALLATION. KEEP THIS MANUAL IN A HANDYPLACE FOR FUTURE REFERENCE.
IMPROPER INSTALLATION OR ATTACHMENT OFEQUIPMENT OR ACCESSORIES COULD RESULT INELECTRIC SHOCK, SHORT-CIRCUIT, LEAKS, FIRE OROTHER DAMAGE TO THE EQUIPMENT. BE SURE ONLYTO USE ACCESSORIES MADE BY DAIKIN WHICH ARESPECIFICALLY DESIGNED FOR USE WITH THEEQUIPMENT AND HAVE THEM INSTALLED BY APROFESSIONAL.
IF UNSURE OF INSTALLATION PROCEDURES OR USE,ALWAYS CONTACT YOUR DAIKIN DEALER FORADVICE AND INFORMATION.
THE UNIT DESCRIBED IN THIS MANUAL IS DESIGNEDFOR INDOOR INSTALLATION ONLY AND FOR AMBIENTTEMPERATURES RANGING 0˚C~35˚C.
Installation manual
1EKHBH/X007A+EKSWW150-300V3/Z2
Indoor unit for air to water heat pump and sanitary warm water tank for air to water heat pump system4PW30818-1B
INTRODUCTION
General information
Thank you for purchasing this indoor unit.
The indoor unit is the indoor part of thereversible air to water Daikin ERYQ heat pumps. These units aredesigned for wall mounted indoor installation and used for bothheating and cooling applications. The units can be combined withDaikin fan coil units, floor heating applications, low temperatureradiators and sanitary water heating applications.
Heating/cooling units and heating only units
The indoor unit range consists of two mainversions: a heating/cooling (EKHBX) version and a heating only(EKHBH) version.
Both versions are delivered with an integrated backup heater foradditional heating capacity during cold outdoor temperatures. Thebackup heater also serves as a backup in case of malfunctioning ofthe outdoor unit. The backup heater models are available for aheating capacity of 3, 6 and 9 kW, and – depending on the heatingcapacity – for three different power supply specifications.
Sanitary water tank option
An optional EKSWW sanitary water tank with integrated 3kWelectrical booster heater can be connected to the indoor unit. Thesanitary water tank is available in three sizes: 150, 200 and 300 litre.All models can be floor mounted, while the 150 litre model can bewall mounted as well via option kit EKWBSWW150.
Scope of this manual
This installation manual describes the procedures for unpacking,installing and connecting all EKHBH/X indoor unit models and theoptional EKSWW sanitary water tanks.
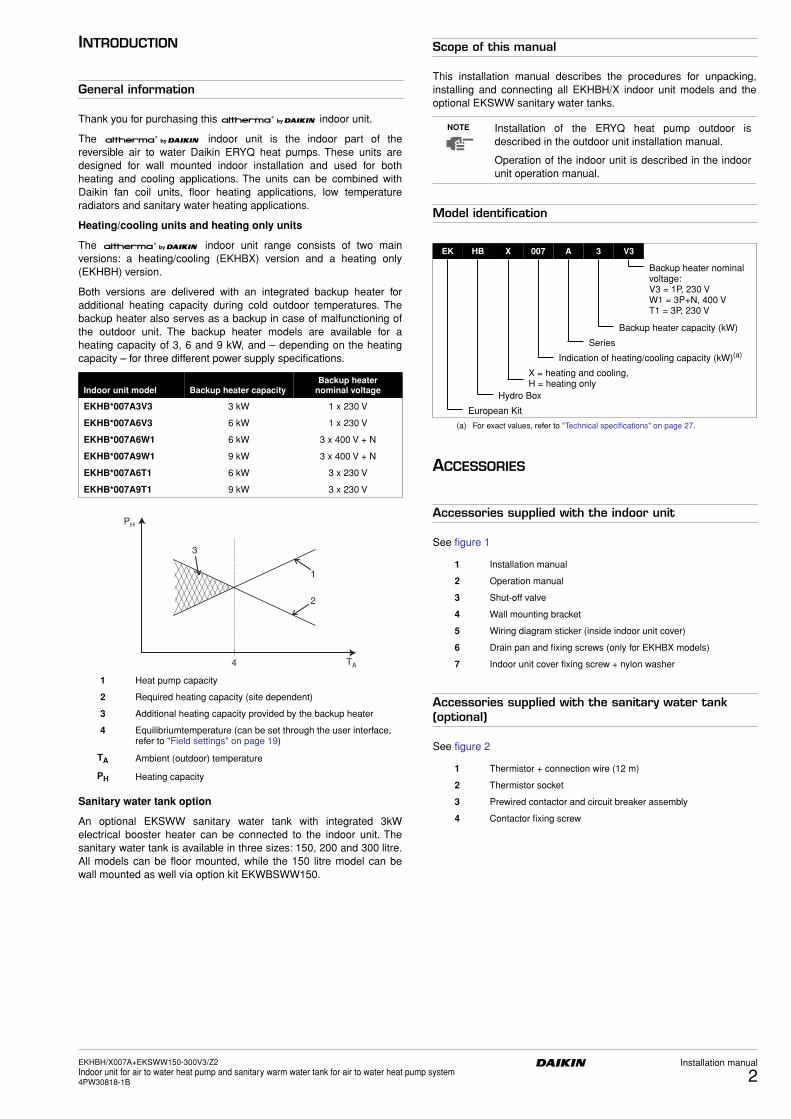
Model identification
ACCESSORIES
Accessories supplied with the indoor unit
See figure 1
Accessories supplied with the sanitary water tank (optional)
See figure 2
Indoor unit model Backup heater capacityBackup heater
nominal voltage
EKHB*007A3V3 3 kW 1 x 230 V
EKHB*007A6V3 6 kW 1 x 230 V
EKHB*007A6W1 6 kW 3 x 400 V + N
EKHB*007A9W1 9 kW 3 x 400 V + N
EKHB*007A6T1 6 kW 3 x 230 V
EKHB*007A9T1 9 kW 3 x 230 V
1 Heat pump capacity
2 Required heating capacity (site dependent)
3 Additional heating capacity provided by the backup heater
4 Equilibriumtemperature (can be set through the user interface, refer to "Field settings" on page 19)
TA Ambient (outdoor) temperature
PH Heating capacity
TA4
3
1
2
PH
NOTE Installation of the ERYQ heat pump outdoor isdescribed in the outdoor unit installation manual.
Operation of the indoor unit is described in the indoorunit operation manual.
EK HB X 007 A 3 V3
Backup heater nominal voltage:V3 = 1P, 230 VW1 = 3P+N, 400 VT1 = 3P, 230 V
Backup heater capacity (kW)
Series
Indication of heating/cooling capacity (kW)(a)
(a) For exact values, refer to "Technical specifications" on page 27.
X = heating and cooling, H = heating only
Hydro Box
European Kit
1 Installation manual
2 Operation manual
3 Shut-off valve
4 Wall mounting bracket
5 Wiring diagram sticker (inside indoor unit cover)
6 Drain pan and fixing screws (only for EKHBX models)
7 Indoor unit cover fixing screw + nylon washer
1 Thermistor + connection wire (12 m)
2 Thermistor socket
3 Prewired contactor and circuit breaker assembly
4 Contactor fixing screw
EKHBH/X007A+EKSWW150-300V3/Z2Indoor unit for air to water heat pump and sanitary warm water tank for air to water heat pump system4PW30818-1B
Installation manual
2
TYPICAL APPLICATION EXAMPLES
The application examples given below are for illustration purposesonly.
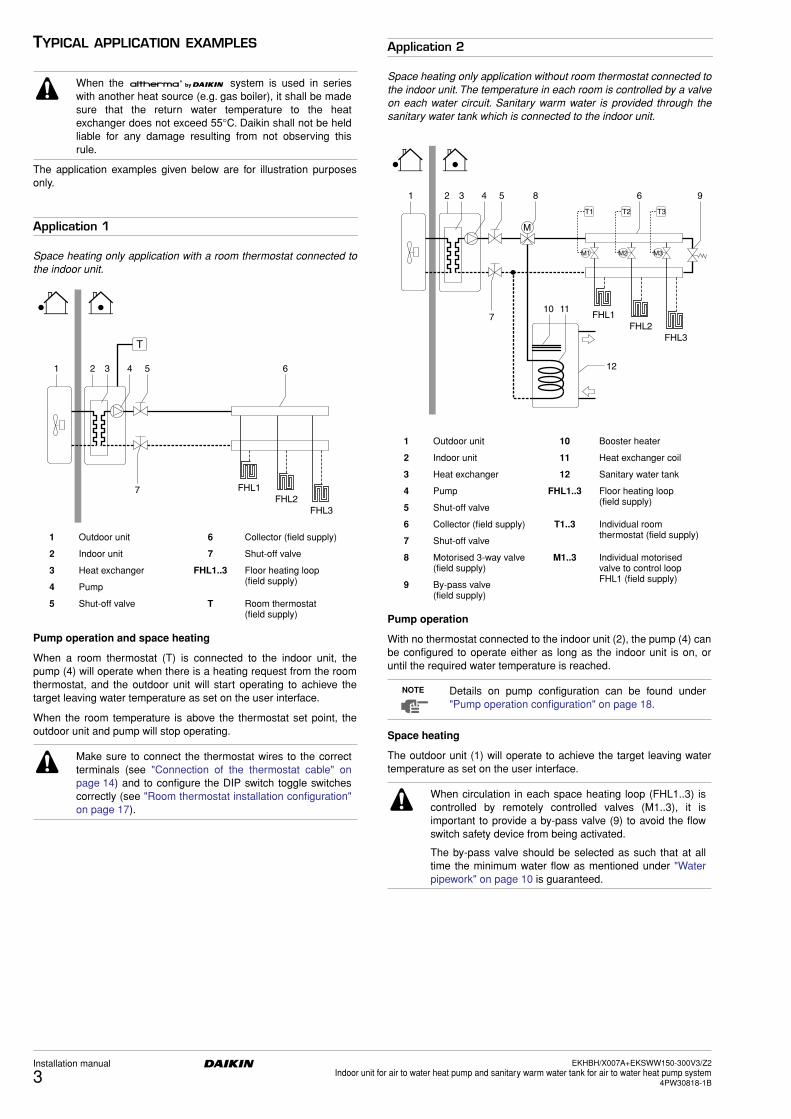
Application 1
Space heating only application with a room thermostat connected tothe indoor unit.
Pump operation and space heating
When a room thermostat (T) is connected to the indoor unit, thepump (4) will operate when there is a heating request from the roomthermostat, and the outdoor unit will start operating to achieve thetarget leaving water temperature as set on the user interface.
When the room temperature is above the thermostat set point, theoutdoor unit and pump will stop operating.
Application 2
Space heating only application without room thermostat connected tothe indoor unit. The temperature in each room is controlled by a valveon each water circuit. Sanitary warm water is provided through thesanitary water tank which is connected to the indoor unit.
Pump operation
With no thermostat connected to the indoor unit (2), the pump (4) canbe configured to operate either as long as the indoor unit is on, oruntil the required water temperature is reached.
Space heating
The outdoor unit (1) will operate to achieve the target leaving watertemperature as set on the user interface.
When the system is used in serieswith another heat source (e.g. gas boiler), it shall be madesure that the return water temperature to the heatexchanger does not exceed 55°C. Daikin shall not be heldliable for any damage resulting from not observing thisrule.
1 Outdoor unit 6 Collector (field supply)
2 Indoor unit 7 Shut-off valve
3 Heat exchanger FHL1..3 Floor heating loop (field supply)
4 Pump
5 Shut-off valve T Room thermostat (field supply)
Make sure to connect the thermostat wires to the correctterminals (see "Connection of the thermostat cable" onpage 14) and to configure the DIP switch toggle switchescorrectly (see "Room thermostat installation configuration"on page 17).
FHL1FHL2
FHL3
T
5 64321
7
1 Outdoor unit 10 Booster heater
2 Indoor unit 11 Heat exchanger coil
3 Heat exchanger 12 Sanitary water tank
4 Pump FHL1..3 Floor heating loop (field supply)
5 Shut-off valve
6 Collector (field supply) T1..3 Individual room thermostat (field supply)
7 Shut-off valve
8 Motorised 3-way valve (field supply)
M1..3 Individual motorised valve to control loop FHL1 (field supply)
9 By-pass valve (field supply)
NOTE Details on pump configuration can be found under"Pump operation configuration" on page 18.
When circulation in each space heating loop (FHL1..3) iscontrolled by remotely controlled valves (M1..3), it isimportant to provide a by-pass valve (9) to avoid the flowswitch safety device from being activated.
The by-pass valve should be selected as such that at alltime the minimum water flow as mentioned under "Waterpipework" on page 10 is guaranteed.
M
FHL1FHL2
FHL3
M1
T1
M2
T2
M3
T3
54321
11
12
107
8 6 9
Installation manual
3EKHBH/X007A+EKSWW150-300V3/Z2
Indoor unit for air to water heat pump and sanitary warm water tank for air to water heat pump system4PW30818-1B

Sanitary heating
When sanitary heating mode is enabled (either manually by the user,or automatically through a schedule timer) the target sanitary watertemperature will be achieved by a combination of the heat exchangercoil and the electrical booster heater.
When the sanitary water temperature is below the user configuredset point, the 3-way valve will be activated to heat the sanitary waterby means of the heat pump. In case of large sanitary water demandor a high sanitary water temperature setting, the booster heater (10)can provide auxiliary heating.
Application 3
Space cooling and heating application with a room thermostatsuitable for cooling/heating changeover connected to the indoorunit. Heating is provided through floor heating loops and fan coilunits. Cooling is provided through the fan coil units only.Sanitary warm water is provided through the sanitary water tankwhich is connected to the indoor unit.
Pump operation and space heating and cooling
According to the season, the customer will select cooling or heatingon the room thermostat (T). This selection is not possible byoperating the user interface.
When space cooling/heating is requested by the room thermostat(T), the pump will start operating and the indoor unit (2) will switch to“cooling mode”/”heating mode”. The outdoor unit (1) will startoperating to achieve the target leaving cold/hot water temperature.
In case of cooling mode, the motorised 2-way valve (13) will close asto prevent cold water running through the floor heating loops (FHL).
The ON/OFF setting of the heating/cooling operation is done by theroom thermostat and cannot be done by the user interface on theindoor unit.
Sanitary heating
Sanitary water heating is as described under "Application 2" onpage 3.
Application 4
Space cooling and heating application without a room thermostatconnected to the indoor unit, but with a heating only roomthermostat controlling the floor heating and a cooling/heatingthermostat controlling the fan coil units. Heating is provided throughfloor heating loops and fan coil units. Cooling is provided through thefan coil units only.
Make sure to fit the 3-way valve (8) correctly: when the3-way valve is idle (not activated), the space heatingcircuit (i.e. floor heating loops) should be selected.
NOTE The indoor unit can be configured so that at lowoutdoor temperatures the sanitary water is exclusivelyheated by the booster heater. This assures that the fullcapacity of the heat pump is available for spaceheating.
Details on sanitary water tank configuration for lowoutdoor temperatures can be found under "Fieldsettings" on page 19, field settings [5-02] to [5-04].
1 Outdoor unit 10 Booster heater
2 Indoor unit 11 Heat exchanger coil
3 Heat exchanger 12 Sanitary water tank
4 Pump 13 Motorised 2-way valve (field supply)5 Shut-off valve
6 Collector (field supply) FCU1..3 Fan coil unit (field supply)
7 Shut-off valve FHL1..3 Floor heating loop (field supply)8 Motorised 3-way valve
(field supply) T Room thermostat with cooling/heating switch (field supply)
M M
FHL1
T
FHL2FHL3
FCU1FCU2
FCU354321
6
12
7
8 13
11
12
10
Make sure to connect the thermostat wires to the correctterminals (see "Connection of the thermostat cable" onpage 14) and to configure the DIP switch toggle switchescorrectly (see "Room thermostat installation configuration"on page 17).
Wiring of the 2-way valve (13) is different for a NC (normalclosed) valve and a NO (normal open) valve! Make sure toconnect to the correct terminal numbers as detailed on thewiring diagram.
M
FCU1FCU2
FCU3
T4T5
T6
FHL1FHL2
FHL3
T
54321
6
7
13
M
14 6
9
EKHBH/X007A+EKSWW150-300V3/Z2Indoor unit for air to water heat pump and sanitary warm water tank for air to water heat pump system4PW30818-1B
Installation manual
4

Pump operation
With no thermostat connected to the indoor unit (2), the pump (4) canbe configured to operate either as long as the indoor unit is on, oruntil the required water temperature is reached.
Space heating and cooling
According to the season, the customer will select cooling or heatingthrough the user interface on the indoor unit.
The outdoor unit (1) will operate in cooling mode or heating mode toachieve the target leaving water temperature.
With the unit in heating mode, the 2-way valve (13) is open. Hot wateris provided to both the fan coil units and the floor heating loops.
With the unit in cooling mode, the motorised 2-way valve (13) isclosed to prevent cold water running through the floor heating loops(FHL).
The ON/OFF setting of the heating/cooling operation is done by theuser interface on the indoor unit.
OVERVIEW OF THE INDOOR UNIT
Opening the indoor unit
■ The front flap on the indoor unit cover gives access to themanometer and user interface, and is equipped with a push locksystem. Push to open the front flap.
■ The indoor unit cover can be removed by removing the 2 sidescrews and unhitching the cover.Model shown: EKHBX
■ To gain access to the switch box’ internals – e.g. to connect thefield wiring – the switch box service panel can be removed.Thereto, loosen the two front screws and remove the switch boxservice panel.
Model shown: EKHBX
1 Outdoor unit 14 Motorised 2-way valve for activation of the room thermostat (field supply)2 Indoor unit
3 Heat exchanger
4 Pump FCU1..3 Fan coil unit with thermostat (field supply)
5 Shut-off valve
6 Collector (field supply) FHL1..3 Floor heating loop (field supply)
7 Shut-off valve
9 By-pass valve (field supply)
T Heating only room thermostat (field supply)
13 Motorised 2-way valve to shut off the floor heating loops during cooling operation (field supply)
T4..6 Individual room thermostat for fan coil heated/cooled room (field supply)
NOTE Details on pump configuration can be found under"Pump operation configuration" on page 18.
When closing several loops in the system by remotelycontrolled valves, it might be required to install a by-passvalve (9) to avoid the flow switch safety device from beingactivated. See also "Application 2" on page 3.
Wiring of the 2-way valve (13) is different for a NC (normalclosed) valve and a NO (normal open) valve! Make sure toconnect to the correct terminal numbers as detailed on thewiring diagram.
Make sure to fix the cover with the screws and nylonwashers when installing the cover (screws and nylonwashers are delivered as accessory).
Parts inside the unit can be hot.
Switch off all power supply — i.e. outdoor unit powersupply and backup heater and sanitary water tank powersupply (if applicable) — before removing the switch boxservice panel.
Installation manual
5EKHBH/X007A+EKSWW150-300V3/Z2
Indoor unit for air to water heat pump and sanitary warm water tank for air to water heat pump system4PW30818-1B
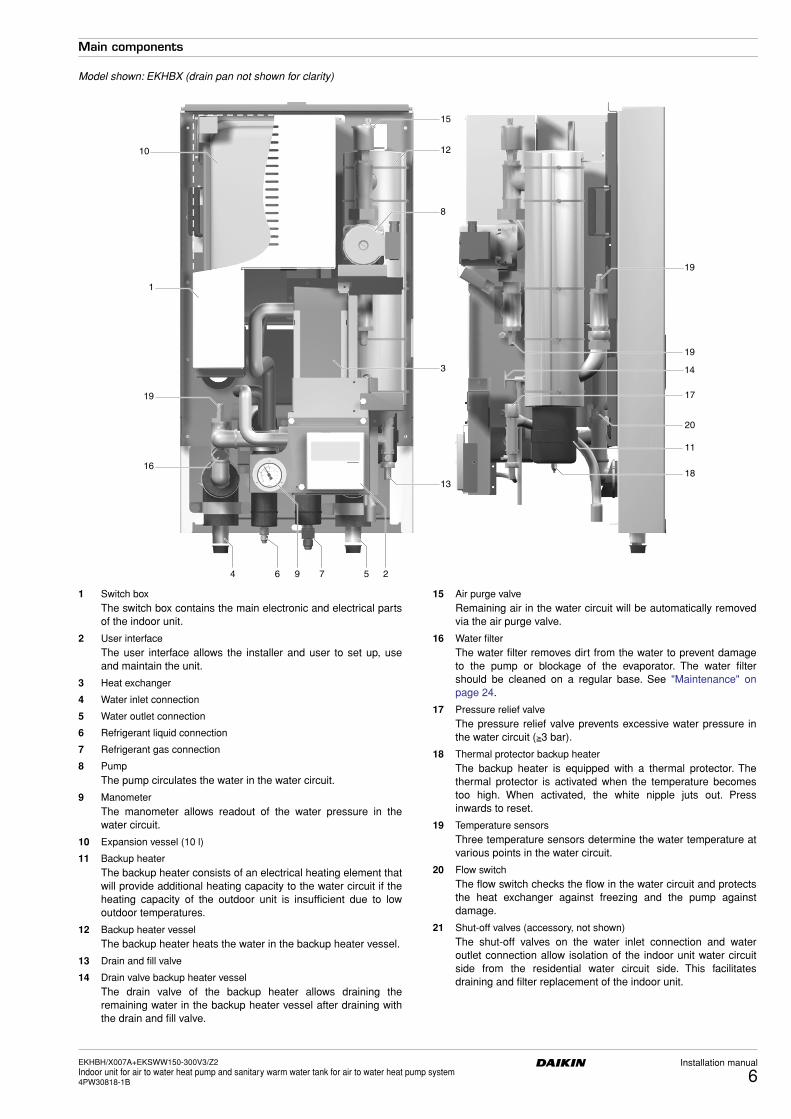
Main components
Model shown: EKHBX (drain pan not shown for clarity)
1 Switch boxThe switch box contains the main electronic and electrical partsof the indoor unit.
2 User interfaceThe user interface allows the installer and user to set up, useand maintain the unit.
3 Heat exchanger
4 Water inlet connection
5 Water outlet connection
6 Refrigerant liquid connection
7 Refrigerant gas connection
8 Pump The pump circulates the water in the water circuit.
9 ManometerThe manometer allows readout of the water pressure in thewater circuit.
10 Expansion vessel (10 l)
11 Backup heaterThe backup heater consists of an electrical heating element thatwill provide additional heating capacity to the water circuit if theheating capacity of the outdoor unit is insufficient due to lowoutdoor temperatures.
12 Backup heater vesselThe backup heater heats the water in the backup heater vessel.
13 Drain and fill valve
14 Drain valve backup heater vesselThe drain valve of the backup heater allows draining theremaining water in the backup heater vessel after draining withthe drain and fill valve.
15 Air purge valveRemaining air in the water circuit will be automatically removedvia the air purge valve.
16 Water filter The water filter removes dirt from the water to prevent damageto the pump or blockage of the evaporator. The water filtershould be cleaned on a regular base. See "Maintenance" onpage 24.
17 Pressure relief valveThe pressure relief valve prevents excessive water pressure inthe water circuit (≥3 bar).
18 Thermal protector backup heaterThe backup heater is equipped with a thermal protector. Thethermal protector is activated when the temperature becomestoo high. When activated, the white nipple juts out. Pressinwards to reset.
19 Temperature sensors Three temperature sensors determine the water temperature atvarious points in the water circuit.
20 Flow switch The flow switch checks the flow in the water circuit and protectsthe heat exchanger against freezing and the pump againstdamage.
21 Shut-off valves (accessory, not shown)The shut-off valves on the water inlet connection and wateroutlet connection allow isolation of the indoor unit water circuitside from the residential water circuit side. This facilitatesdraining and filter replacement of the indoor unit.
10
19
1
16
14
19
20
17
18
11
19
15
12
8
3
13
5 27964
EKHBH/X007A+EKSWW150-300V3/Z2Indoor unit for air to water heat pump and sanitary warm water tank for air to water heat pump system4PW30818-1B
Installation manual
6

Switch box main components
1 Backup heater contactors K1M and K2M
2 Booster heater contactor K3M (only for installations with sanitarywater tank)
3 Main PCBThe main PCB (Printed Circuit Board) controls the functioning ofthe unit.
4 X13A socketThe X13A socket receives the K3M connector (only forinstallations with sanitary water tank).
5 DIP switch SS2The DIP switch SS2 provides 4 toggle switches to configurecertain installation parameters. See "DIP switch settingsoverview" on page 17.
6 X9A socketThe X9A socket receives the thermistor connector (only forinstallations with sanitary water tank).
7 Backup heater circuit breakerThe circuit breaker protects the backup heater electrical circuitagainst overload or short circuit.
8 Booster heater circuit breaker (only for installations with sanitarywater tank)The circuit breaker protects the booster heater in the sanitarywater tank against overload or short circuit.
9 Cable tie mountingsThe cable tie mountings allow to fix the field wiring with cableties to the switch box to ensure strain relief.
10 Terminal blockThe terminal block allows easy connection of field wiring.
11a K4M contactor (for all unit types except for 3V3 unit type)
11b Backup heater terminal block (for 3V3 unit type only)
Functional diagram
K3M
X13A 4
SS2
X9A22
21
20
19
18
17
16
15
14
13
12
11
10
9
8
7
23
3 2 1
OF
FO
N
F2B
K4M
K4M
K1M K2M
2
10
13
4
5
6
9
78
F1B11a
11b
11a/11b
1 Outdoor unit 10 Shut-off valve water inlet (filed installation)
2 Indoor unit
3 Expansion vessel 11 Filter
4 Pump 12 Pressure relief valve
5 Air purge valve 13 Fill and drain valve
6 Drain valve backup heater vessel
14 Manometer
15 Heat exchanger
7 Backup heater vessel with backup heater
R1TR2TR3TR4T
Temperature sensors8 Flow switch
9 Shut-off valve water outlet (field installation)
R4T
H2O
t >
R3Tt >
R2Tt >
R1Tt >
8
9
10
32 4
11121314151
5 6 7
Installation manual
7EKHBH/X007A+EKSWW150-300V3/Z2
Indoor unit for air to water heat pump and sanitary warm water tank for air to water heat pump system4PW30818-1B
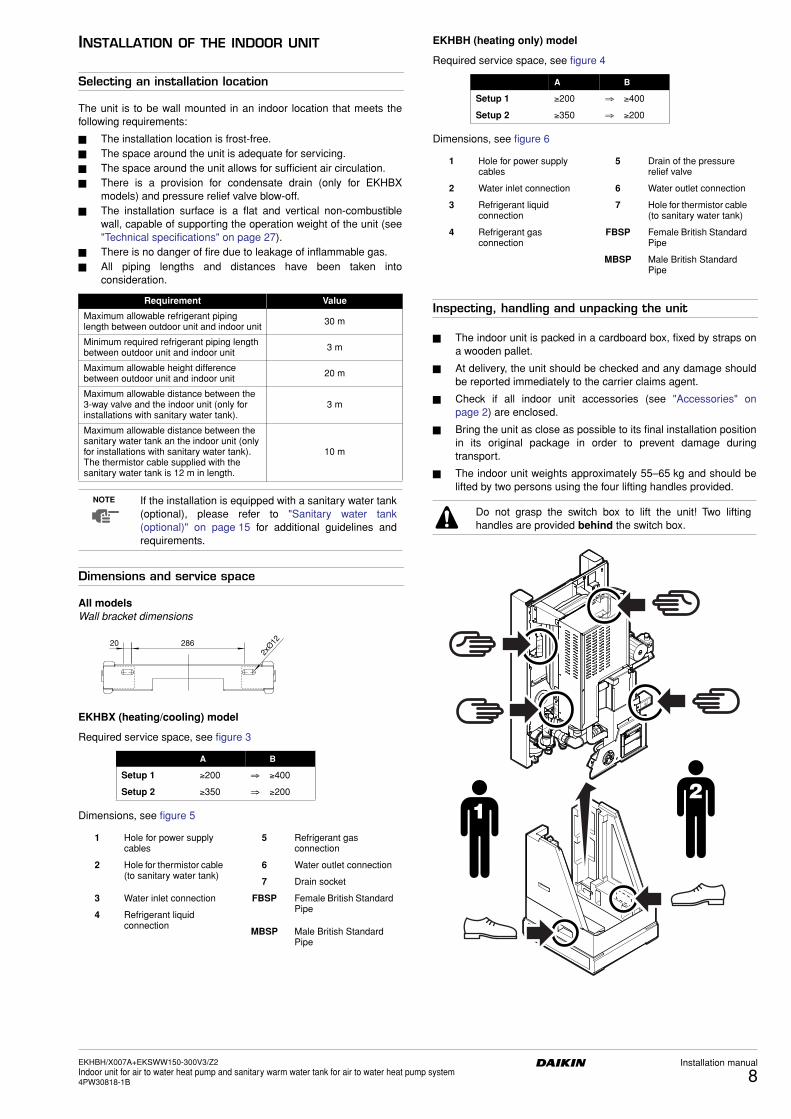
INSTALLATION OF THE INDOOR UNIT
Selecting an installation location
The unit is to be wall mounted in an indoor location that meets thefollowing requirements:
■ The installation location is frost-free.■ The space around the unit is adequate for servicing.■ The space around the unit allows for sufficient air circulation.■ There is a provision for condensate drain (only for EKHBX
models) and pressure relief valve blow-off.■ The installation surface is a flat and vertical non-combustible
wall, capable of supporting the operation weight of the unit (see"Technical specifications" on page 27).
■ There is no danger of fire due to leakage of inflammable gas.■ All piping lengths and distances have been taken into
consideration.
Dimensions and service space
All modelsWall bracket dimensions
EKHBX (heating/cooling) model
Required service space, see figure 3
Dimensions, see figure 5
EKHBH (heating only) model
Required service space, see figure 4
Dimensions, see figure 6
Inspecting, handling and unpacking the unit
■ The indoor unit is packed in a cardboard box, fixed by straps ona wooden pallet.
■ At delivery, the unit should be checked and any damage shouldbe reported immediately to the carrier claims agent.
■ Check if all indoor unit accessories (see "Accessories" onpage 2) are enclosed.
■ Bring the unit as close as possible to its final installation positionin its original package in order to prevent damage duringtransport.
■ The indoor unit weights approximately 55–65 kg and should belifted by two persons using the four lifting handles provided.
Requirement Value
Maximum allowable refrigerant piping length between outdoor unit and indoor unit 30 m
Minimum required refrigerant piping length between outdoor unit and indoor unit 3 m
Maximum allowable height difference between outdoor unit and indoor unit 20 m
Maximum allowable distance between the 3-way valve and the indoor unit (only for installations with sanitary water tank).
3 m
Maximum allowable distance between the sanitary water tank an the indoor unit (only for installations with sanitary water tank). The thermistor cable supplied with the sanitary water tank is 12 m in length.
10 m
NOTE If the installation is equipped with a sanitary water tank(optional), please refer to "Sanitary water tank(optional)" on page 15 for additional guidelines andrequirements.
A B
Setup 1 ≥200 ⇒ ≥400
Setup 2 ≥350 ⇒ ≥200
1 Hole for power supply cables
5 Refrigerant gas connection
2 Hole for thermistor cable (to sanitary water tank)
6 Water outlet connection
7 Drain socket
3 Water inlet connection FBSP Female British Standard Pipe
4 Refrigerant liquid connection
MBSP Male British Standard Pipe
2xØ1228620
A B
Setup 1 ≥200 ⇒ ≥400
Setup 2 ≥350 ⇒ ≥200
1 Hole for power supply cables
5 Drain of the pressure relief valve
2 Water inlet connection 6 Water outlet connection
3 Refrigerant liquid connection
7 Hole for thermistor cable (to sanitary water tank)
4 Refrigerant gas connection
FBSP Female British Standard Pipe
MBSP Male British Standard Pipe
Do not grasp the switch box to lift the unit! Two liftinghandles are provided behind the switch box.
EKHBH/X007A+EKSWW150-300V3/Z2Indoor unit for air to water heat pump and sanitary warm water tank for air to water heat pump system4PW30818-1B
Installation manual
8
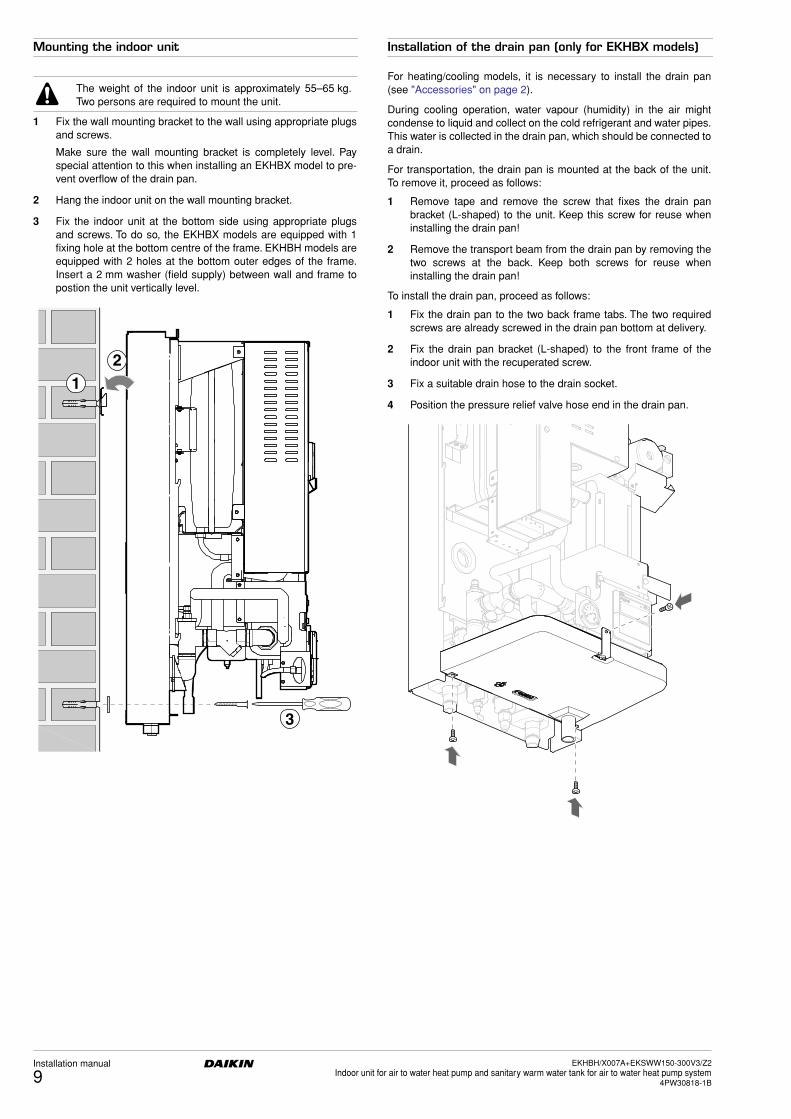
Mounting the indoor unit
1 Fix the wall mounting bracket to the wall using appropriate plugsand screws.
Make sure the wall mounting bracket is completely level. Payspecial attention to this when installing an EKHBX model to pre-vent overflow of the drain pan.
2 Hang the indoor unit on the wall mounting bracket.
3 Fix the indoor unit at the bottom side using appropriate plugsand screws. To do so, the EKHBX models are equipped with 1fixing hole at the bottom centre of the frame. EKHBH models areequipped with 2 holes at the bottom outer edges of the frame.Insert a 2 mm washer (field supply) between wall and frame topostion the unit vertically level.
Installation of the drain pan (only for EKHBX models)
For heating/cooling models, it is necessary to install the drain pan(see "Accessories" on page 2).
During cooling operation, water vapour (humidity) in the air mightcondense to liquid and collect on the cold refrigerant and water pipes.This water is collected in the drain pan, which should be connected toa drain.
For transportation, the drain pan is mounted at the back of the unit.To remove it, proceed as follows:
1 Remove tape and remove the screw that fixes the drain panbracket (L-shaped) to the unit. Keep this screw for reuse wheninstalling the drain pan!
2 Remove the transport beam from the drain pan by removing thetwo screws at the back. Keep both screws for reuse wheninstalling the drain pan!
To install the drain pan, proceed as follows:
1 Fix the drain pan to the two back frame tabs. The two requiredscrews are already screwed in the drain pan bottom at delivery.
2 Fix the drain pan bracket (L-shaped) to the front frame of theindoor unit with the recuperated screw.
3 Fix a suitable drain hose to the drain socket.
4 Position the pressure relief valve hose end in the drain pan.
The weight of the indoor unit is approximately 55–65 kg.Two persons are required to mount the unit.
21
3
Installation manual
9EKHBH/X007A+EKSWW150-300V3/Z2
Indoor unit for air to water heat pump and sanitary warm water tank for air to water heat pump system4PW30818-1B

Refrigerant pipework
For all guidelines, instructions and specifications regardingrefrigerant pipework between the indoor unit and the outdoor unit,please refer to the outdoor unit installation manual.
The location of the gas pipe and liquid pipe on the indoor unit isshown under "Main components" on page 6.
Water pipework
Checking the water circuit
The units are equipped with a water inlet and water outlet forconnection to a water circuit. This circuit must be provided by alicensed technician and must comply with all relevant European andnational regulations.
Before continuing the installation of the unit, check the followingpoints:
■ Two shut-off valves are delivered with the unit. To facilitateservice and maintenance, install one at the water inlet and oneat the water outlet of the indoor unit.
■ Drain taps must be provided at all low points of the system topermit complete drainage of the circuit during maintenance. Twodrain valves are provided to drain the water from the indoor unitwater system.
■ Air vents must be provided at all high points of the system. Thevents should be located at points which are easily accessible forservicing. An automatic air purge is provided inside the indoorunit. Check that this air purge valve is not tightened too much sothat automatic release of air in the water circuit remains possible.
■ Take care that the components installed in the field piping canwithstand the water pressure.
Checking the water volume and expansion vessel pre-pressure
The unit is equipped with an expansion vessel of 10 litre which has adefault pre-pressure of 1 bar.
To assure proper operation of the unit, the pre-pressure of theexpansion vessel might need to be adjusted and the minimum andmaximum water volume must be checked.
1 Check that the total water volume in the installation is 10 lminimum.
2 Using the table below, determine if the expansion vessel pre-pressure requires adjustment.
3 Using the table and instructions below, determine if the totalwater volume in the installation is below the maximum allowedwater volume.
Calculating the pre-pressure of the expansion vessel
The pre-pressure (Pg) to be set depends on the maximuminstallation height difference (H) and is calculated as below:
Pg=(H/10+0.3) bar
Checking the maximum allowed water volume
To determine the maximum allowed water volume in the entire circuit,proceed as follows:
1 Determine for the calculated pre-pressure (Pg) thecorresponding maximum water volume using the graph below.
2 Check that the total water volume in the entire water circuit islower than this value.
If this is not the case, the expansion vessel inside the indoor unit istoo small for the installation.
Example 1
The indoor unit is installed 5 m below the highest point in the watercircuit. The total water volume in the water circuit is 100 l.
In this example, no action or adjustment is required.
Refrigerant piping specifications Indoor unit Outdoor unit
Gas pipe outer diameter 15.9 mm(5/8 inch)
15.9 mm(5/8 inch)
Liquid pipe outer diameter 6.4 mm(1/4 inch)
6.4 mm(1/4 inch)
The unit is only to be used in a closed water system.Application in an open water circuit can lead to excessivecorrosion of the water piping.
In most air conditioning applications this minimumwater volume will have a satisfying result.
In critical processes or in rooms with a high heat loadthough, extra water volume might be required.
Installation height difference(a)
(a) Installation height difference: height difference (m) between the highest point of the water circuit and the indoor unit. If the indoor unit is located at the highest point of the installation, the installation height is considered 0 m.
Water volume
<280 l >280 l
<7 m No pre-pressure adjustment required.
Actions required:• pre-pressure must be decreased,
calculate according to "Calculating the pre-pressure of the expansion vessel"
• check if the water volume is lower than maximum allowed water volume (use graph below)
>7 m
Actions required:• pre-pressure must be increased,
calculate according to "Calculating the pre-pressure of the expansion vessel"
• check if the water volume is lower than maximum allowed water volume (use graph below)
Expansion vessel of the unit too small for the installation.
= pre-pressure
= maximum water volume
0.30.5
1
1.5
2
2.5
100500 10 150 200 250 300 350 400 450maximum water volume [l]
pre-
pres
sure
[bar
]
EKHBH/X007A+EKSWW150-300V3/Z2Indoor unit for air to water heat pump and sanitary warm water tank for air to water heat pump system4PW30818-1B
Installation manual
10

Example 2
The indoor unit is installed at the highest point in the water circuit.The total water volume in the water circuit is 350 l.
Result:
■ Since 350 l is higher than 280 l, the pre-pressure must bedecreased (see table above).
■ The required pre-pressure is: Pg = (H/10 + 0.3) bar = (0/10 + 0.3) bar = 0.3 bar
■ The corresponding maximum water volume can be read fromthe graph: approximately 410 l.
■ Since the total water volume (350 l) is below the maximum watervolume (410 l), the expansion vessel suffices for the installation.
Setting the pre-pressure of the expansion vessel
When it is required to change the default pre-pressure of theexpansion vessel (1 bar), keep in mind the following guidelines:
■ Use only dry nitrogen to set the expansion vessel pre-pressure.
■ Inappropriate setting of the expansion vessel pre-pressure willlead to malfunction of the system. Therefore, the pre-pressureshould only be adjusted by a licensed installer.
Connecting the water circuit
Water connections must be made in accordance with the outlookdiagram delivered with the unit, respecting the water in- and outlet.
If air, moisture or dust gets in the water circuit, problems may occur.Therefore, always take into account the following when connectingthe water circuit:
■ Use clean pipes only.
■ Hold the pipe end downwards when removing burrs.
■ Cover the pipe end when inserting it through a wall so that nodust and dirt enter.
■ Use a good thread sealant for the sealing of the connections.The sealing must be able to withstand the pressures andtemperatures of the system.
■ When using non-brass metallic piping, make sure to insulateboth materials from each other to prevent galvanic corrosion.
■ Because brass is a soft material, use appropriate tooling forconnecting the water circuit. Inappropriate tooling will causedamage to the pipes.
Charging water
1 Connect the water supply to the drain and fill valve (see "Maincomponents" on page 6).
2 Fill with water until the manometer indicates a pressure ofapproximately 2.0 bar. Remove air in the circuit as much aspossible using the air purge valves.
Piping insulation
The complete water circuit, inclusive all piping, must be insulated toprevent condensation during cooling operation and reduction of thecooling and heating capacity.
Field wiring
Be careful not to deform the unit piping by using excessiveforce when connecting the piping. Deformation of thepiping can cause the unit to malfunction.
The unit is only to be used in a closed water system.Application in an open water circuit can lead to excessivecorrosion of the water piping.
NOTE ■ During filling, it might not be possible to remove allair in the system. Remaining air will be removedthrough the automatic air purge valves during firstoperating hours of the system. Additional fillingwith water afterwards might be required.
■ The water pressure indicated on the manometerwill vary depending on the water temperature.(higher pressure at higher water temperature).However, at all times water pressure shouldremain above 0.3 bar to avoid air entering thecircuit.
■ The unit might dispose some excessive waterthrough the pressure relief valve.
WARNING
■ Switch off the power supply before making anyconnections.
■ All field wiring and components must be installed by alicensed electrician and must comply with relevantEuropean and national regulations.
■ The field wiring must be carried out in accordancewith the wiring diagram supplied with the unit and theinstructions given below.
■ Be sure to use a dedicated power supply. Never use apower supply shared by another appliance.
■ Be sure to establish an earth. Do not earth the unit toa utility pipe, surge absorber, or telephone earth.Incomplete earth may cause electrical shock.
■ Be sure to install an earth leakage protector. Failure todo so may cause electrical shock.
Installation manual
11EKHBH/X007A+EKSWW150-300V3/Z2
Indoor unit for air to water heat pump and sanitary warm water tank for air to water heat pump system4PW30818-1B

Overview
The illustration below gives an overview of the required field wiringbetween several parts of the installation. Refer also to "Typicalapplication examples" on page 3.
Internal wiring - Parts table
Refer to the internal wiring diagram supplied with the unit (inside theindoor unit cover). The abbreviations used are listed below.
A1P ................. Main PCB
A2P ................. Remote controller PCB (user interface)
A3P ................. Thermostat (field supply, PC= internal Power Circuit)
E1H ................. Backup heater element 1
E2H ................. Backup heater element 2
E3H ................. Backup heater element 3
E4H ......... # ..... Booster heater
F1B.................. Fuse backup heater
F2B.......... # ..... Fuse booster heater
FU1 ................. Fuse 3.15 A T 250 V
K1M................. Contactor backup heater step 1
K2M................. Contactor backup heater step 2
K3M......... # ..... Contactor booster heater
K4M................. Contactor backup heater
M1P................. Pump
M2S....... ## ..... 2-way valve for cooling mode
M3S......... # ..... 3-way valve: floor heating/sanitary warm water
Q1DI................ Earth leakage protector
Q1L ................. Thermal protector backup heater
Q2L ......... # ..... Thermal protector booster heater
R1T (A1P) ....... Outlet water heat exchanger thermistor
R1T (A2P) ....... Thermistor (air)
R2T ................. Outlet water backup heater thermistor
R3T ................. Refrigerant liquid side thermistor
R4T ................. Inlet water thermistor
R5T ......... # ..... SWW (sanitary warm water) thermistor
S1L.................. Flow switch
TR1 ................. Transformer 24 V for PCB
V1S ................. Spark suppression 1
V2S ................. Spark suppression 2
X1M................. Terminal strip (standard part)
Field wiring guidelines■ Most field wiring on the indoor unit side is to be made on the
terminal block inside the switch box. To gain access to theterminal block, remove the indoor unit cover and switch boxservice panel, see "Opening the indoor unit" on page 5.
■ Cable tie mountings are provided at the bottom of the switchbox. Fix all cables using cable ties.
■ A dedicated power circuit is required for the backup heater.
■ Installations equipped with a sanitary water tank (optional),require a dedicated power circuit for the booster heater.
Please refer to "Sanitary water tank (optional)" on page 15 for allwiring specifications.
A Dedicated power supply for outdoor unit, backup heater and booster heater (optional)
F 3-way valve for sanitary water tank (field supply, optional)
G 2-way valve for cooling mode (field supply, optional)B Outdoor unit
C Backup heater H Sanitary water tank (optional)
D Indoor unit
E Room thermostat (field supply, optional)
I Booster heater (optional)
Item Description
Required number of conductors
Maximum running current
1 Power supply cable for outdoor unit
2+GND (a)
(a) Refer to nameplate on outdoor unit
2 Indoor unit power supply and communication cable
3+GND (b)
(b) If length<10 m: cable section 1.5 mm2 , if length>10 m: cable section 2.5 mm2
3 Power supply cable for backup heater
2+GND or 3+GND
(c)
(c) See table under "Connection of the backup heater power supply" on page 14.
4 Room thermostat cable 3 or 4 100 mA
5 3-way valve control cable 2+GND 100 mA
6 2-way valve control cable 2+GND 100 mA
7 Booster heater power supply and thermal protection cable
4+GND 13 A
8 Thermistor cable 2 (d)
(d) The thermistor and connection wire (12m) are delivered with the sanitary water tank.
9 Booster heater power supply cable
2+GND 13 A
T
M
M2
B
1 3
4
C5
6
7
8
D
A 9
E
HI
G
F
# Applications with sanitary water tank only
## Heating/cooling applications only
EKHBH/X007A+EKSWW150-300V3/Z2Indoor unit for air to water heat pump and sanitary warm water tank for air to water heat pump system4PW30818-1B
Installation manual
12

Only for EKHBX (heating/cooling) models
■ The mounting plate of indoor unit is equipped with 2 holes toguide all electrical wiring out of the unit:- use the left hole (1) for all power supply cables, thermostat
cable (optional), 3-way valve cable (optional) and 2-way valve cable (optional),
- use the right hole (2) for the thermistor cable to sanitary water tank (optional).
Only for EKHBH (heating only) models
■ The bottom plate of indoor unit is equipped with 3 holes to guideall electrical wiring out of the unit:- use both bottom-left holes (1) for all power supply cables,
thermostat cable (optional), 3-way valve cable (optional) and 2-way valve cable (optional),
- use the second hole (2) for the thermistor cable to sanitary water tank (optional).
Connection of the indoor unit power supply andcommunication cable
Power circuit and cable requirements
Power supply for the indoor unit is to be provided through the outdoorunit. Data communication with the outdoor unit is provided throughthe same cable.
For all guidelines and specifications regarding field wiring betweenthe indoor unit and the outdoor unit, please refer to the outdoor unitinstallation manual.
Procedure
1 Using the appropriate cable, connect the power circuit to theappropriate terminals as shown on the wiring diagram and theillustration below.
2 Connect the earth conductor (yellow/green) to the earthingscrew on the switch box mounting plate.
3 Fix the cable with cable ties to the cable tie mountings to ensurestrain relief.
Note: only relevant field wiring is shown.
12
1 2
X13A
X9A22
21
20
19
18
17
16
15
14
13
12
11
10
9
8
7
23
4
SS2
3 2 1
OF
FO
N
K4M
1 2 3
9 1110
Installation manual
13EKHBH/X007A+EKSWW150-300V3/Z2
Indoor unit for air to water heat pump and sanitary warm water tank for air to water heat pump system4PW30818-1B

Connection of the backup heater power supply
Power circuit and cable requirements
This power circuit must be protected with the required safety devicesaccording to local and national regulations.
Select the power cable in accordance with relevant local and nationalregulations. For the maximum running current of the backup heater,refer to the table below.
Procedure
1 Using the appropriate cable, connect the power circuit to themain circuit breaker as shown on the wiring diagram and theillustration below.
2 Connect the earth conductor (yellow/green) to the earthingscrew on the switch box mounting plate.
3 Fix the cable with cable ties to the cable tie mountings to ensurestrain relief.
Note: only relevant field wiring is shown. 3-phase backup heater isshown.
Connection of the sanitary water tank field wiring(optional)
Refer to "Sanitary water tank (optional)" on page 15 for wiring details.
Connection of the thermostat cable
Connection of the thermostat cable depends on the application.
See also "Typical application examples" on page 3 and "Roomthermostat installation configuration" on page 17 for more informationand configuration options on pump operation in combination with aroom thermostat.
Thermostat requirements
■ Power supply: 230 V AC or battery operated
■ Contact voltage: 230 V.
Procedure
1 Connect the thermostat cable to the appropriate terminals asshown on the wiring diagram.
2 Fix the cable with cable ties to the cable tie mountings to ensurestrain relief.
3 Set DIP switch SS2-3 on the PCB to ON. See "Room thermostatinstallation configuration" on page 17 for more information.
Connection of the valve control cables
Valve requirements
■ Power supply: 230 V AC
■ Maximum running current: 100 mA
Wiring the 2-way valve
1 Using the appropriate cable, connect the valve control cable tothe appropriate terminals as shown on the wiring diagram.
2 Fix the cable(s) with cable ties to the cable tie mountings toensure strain relief.
Wiring the 3-way valve
1 Using the appropriate cable, connect the valvecontrol cable to the appropriate terminals as shownon the wiring diagram.
2 Fix the cable(s) with cable ties to the cable tie mountings toensure strain relief.
■ Be sure to use a dedicated power circuit for thebackup heater. Never use a power circuit shared byanother appliance.
■ Use one and same dedicated power supply for theoutdoor unit, indoor unit, backup heater and boosterheater (sanitary water tank).
Indoor unit modelBackup heater
capacityBackup heater
nominal voltageMaximum
running current
EKHB*00*A3V3 3 kW 1 x 230 V 13 A
EKHB*00*A6V3 6 kW 1 x 230 V 26 A
EKHB*00*A6W1 6 kW 3 x 400 V 8.6 A
EKHB*00*A9W1 9 kW 3 x 400 V 13 A
EKHB*00*A6T1 6 kW 3 x 230 V 15 A
EKHB*00*A9T1 9 kW 3 x 230 V 23 A
X13A
X9A22
21
20
19
18
17
16
15
14
13
12
11
10
9
8
7
23
4
SS2
3 2 1
OF
FO
N
K4M
K1M K2M
F1B
L1 L2 L3
Heating only thermostat Heating/cooling thermostat
NOTE Wiring is different for a NC (normal closed) valveand a NO (normal open) valve. Make sure toconnect to the correct terminal numbers asdetailed on the wiring diagram and illustrationsbelow.
Normal closed (NC) 2-way valve Normal open (NO) 2-way valve
The 3-way valve should be fitted as such thatwhen the 3-way valve is idle (not activated),the space heating circuit is selected.
Terminal block
H C
th
L N23 17 15 13
Terminal block
H C
H
th
C
L N23 17 15 13
NC
14 16 18
MNO
14 16 18
M
19 20
M
EKHBH/X007A+EKSWW150-300V3/Z2Indoor unit for air to water heat pump and sanitary warm water tank for air to water heat pump system4PW30818-1B
Installation manual
14

SANITARY WATER TANK (OPTIONAL)
Main components
Safety devices■ Thermal protector — The booster heater in the sanitary water
tank is equipped with a thermal protector. The thermal protectoris activated when the temperature becomes too high. Whenactivated, the protector has to be reset on the sanitary watertank by pressing the red button (for access, remove the electricalbox lid).
■ Pressure relief valve — A pressure relief valve (field supply) inaccordance with relevant local and national regulations, and withan opening pressure of maximum 10 bar must be connected tothe pressure relief valve connection.
Outlook diagram
■ The total system (indoor unit andoutdoor unit) is designed for combination with an
sanitary water tank. In caseanother tank is being used in combination with the
indoor unit, Daikin cannotguarantee neither good operation nor reliability of thesystem. For those reasons Daikin cannot givewarranty of the system in such case.
■ For safety reasons, it is not allowed to add ethyleneglycol to the water circuit. Adding ethylene glycolmight lead to contamination of the sanitary water if aleakage would occur in the heat exchanger coil.
■ The sanitary hot water at the hot water connectioncannot be used for human consumption.
1 Hot water connection
2 Pressure relief valve connection
3 Electrical box
4 Electrical box lid
5 Booster heater
6 Threaded thermistor hole
7 Flow inlet connection
8 Heat exchanger coil
9 Return outlet connection
10 Cold water connection
1H
3
2
4
7
9
10
8
56
C
R
F
The electrical box lid must only be opened by alicensed electrician.
Switch off the power supply before opening theelectrical box lid.
1 Hot water connection
2 Threaded thermistor hole
3 Flow inlet connection (see also "Installation guidelines" on page 16 regarding pipe size to use)
4 Return outlet connection (see also "Installation guidelines" on page 16 regarding pipe size to use)
5 Cold water connection
Sanitary water tank model H
EKSWW150V3 900
EKSWW200V3/Z2 1150
EKSWW300V3/Z2 1600
3/4" BSP
1/2" BSP
0~40
0
H
110
220
630
1
2
3
4
5
Ø580
3/4" BSP
3/4" BSP
3/4" BSP
Installation manual
15EKHBH/X007A+EKSWW150-300V3/Z2
Indoor unit for air to water heat pump and sanitary warm water tank for air to water heat pump system4PW30818-1B
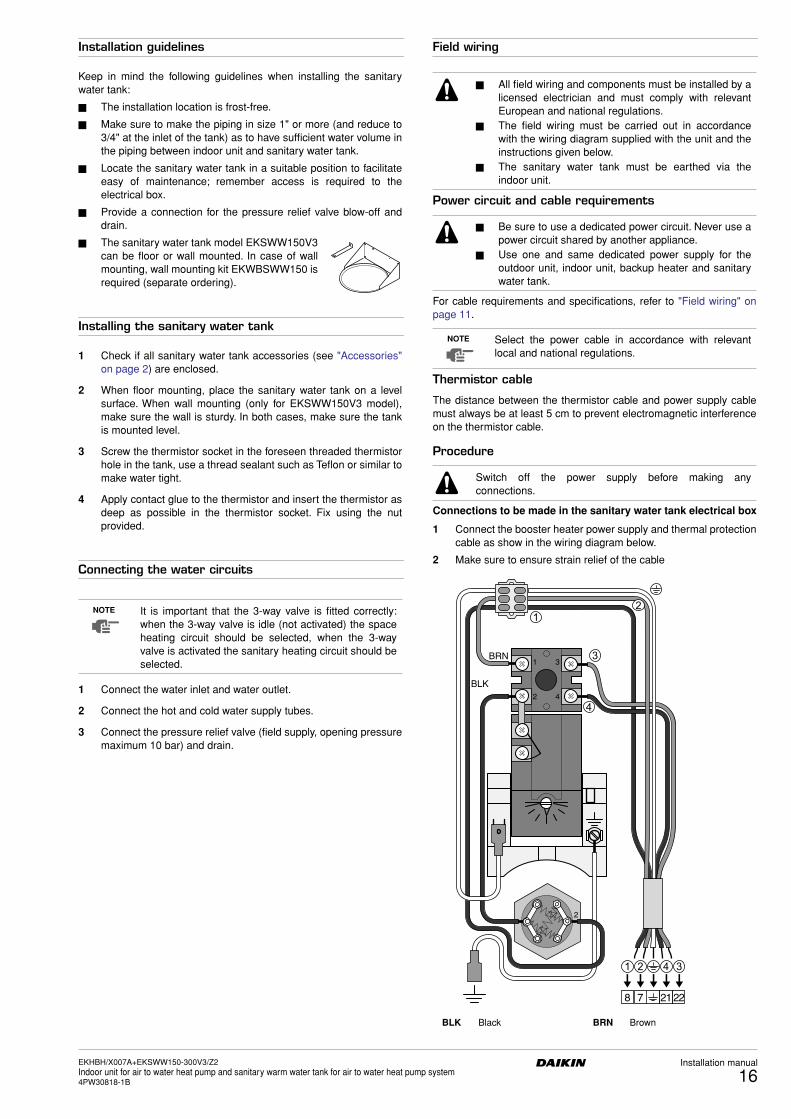
Installation guidelines
Keep in mind the following guidelines when installing the sanitarywater tank:
■ The installation location is frost-free.
■ Make sure to make the piping in size 1" or more (and reduce to3/4" at the inlet of the tank) as to have sufficient water volume inthe piping between indoor unit and sanitary water tank.
■ Locate the sanitary water tank in a suitable position to facilitateeasy of maintenance; remember access is required to theelectrical box.
■ Provide a connection for the pressure relief valve blow-off anddrain.
■ The sanitary water tank model EKSWW150V3can be floor or wall mounted. In case of wallmounting, wall mounting kit EKWBSWW150 isrequired (separate ordering).
Installing the sanitary water tank
1 Check if all sanitary water tank accessories (see "Accessories"on page 2) are enclosed.
2 When floor mounting, place the sanitary water tank on a levelsurface. When wall mounting (only for EKSWW150V3 model),make sure the wall is sturdy. In both cases, make sure the tankis mounted level.
3 Screw the thermistor socket in the foreseen threaded thermistorhole in the tank, use a thread sealant such as Teflon or similar tomake water tight.
4 Apply contact glue to the thermistor and insert the thermistor asdeep as possible in the thermistor socket. Fix using the nutprovided.
Connecting the water circuits
1 Connect the water inlet and water outlet.
2 Connect the hot and cold water supply tubes.
3 Connect the pressure relief valve (field supply, opening pressuremaximum 10 bar) and drain.
Field wiring
Power circuit and cable requirements
For cable requirements and specifications, refer to "Field wiring" onpage 11.
Thermistor cable
The distance between the thermistor cable and power supply cablemust always be at least 5 cm to prevent electromagnetic interferenceon the thermistor cable.
Procedure
Connections to be made in the sanitary water tank electrical box
1 Connect the booster heater power supply and thermal protectioncable as show in the wiring diagram below.
2 Make sure to ensure strain relief of the cable
NOTE It is important that the 3-way valve is fitted correctly:when the 3-way valve is idle (not activated) the spaceheating circuit should be selected, when the 3-wayvalve is activated the sanitary heating circuit should beselected.
■ All field wiring and components must be installed by alicensed electrician and must comply with relevantEuropean and national regulations.
■ The field wiring must be carried out in accordancewith the wiring diagram supplied with the unit and theinstructions given below.
■ The sanitary water tank must be earthed via theindoor unit.
■ Be sure to use a dedicated power circuit. Never use apower circuit shared by another appliance.
■ Use one and same dedicated power supply for theoutdoor unit, indoor unit, backup heater and sanitarywater tank.
NOTE Select the power cable in accordance with relevantlocal and national regulations.
Switch off the power supply before making anyconnections.
BLK Black BRN Brown
1
2
2
3
4
8 7 2221
BLK
BRN
EKHBH/X007A+EKSWW150-300V3/Z2Indoor unit for air to water heat pump and sanitary warm water tank for air to water heat pump system4PW30818-1B
Installation manual
16

Connections to be made in the indoor unit switch box
3 Mount the prewired contactor (K3M) and circuit breaker (F2B).The contactor should be fixed with the two screws supplied.
4 Connect the loose ends of the contactor to terminal 7 and 8 onthe terminal block and the connector in the socket X13A on thePCB.
5 Plug the thermistor cable connector in the socket X9A on thePCB.
6 Connect the booster heater power supply and thermal protectioncable (field supply) to terminal 7, 8, 21, 22 and earth on theterminal block.
7 Connect the booster heater power supply cable to the circuitbreaker (F2B) and earthing screw.
8 Fix the cables to the cable tie mountings with cable ties toensure strain relief.
9 Set DIP switch SS2-2 on the PCB to ON. See "DIP switchsettings overview" on page 17 for more information.
Note: only relevant field wiring is shown.
START-UP AND CONFIGURATION
The indoor unit should be configured by the installer to match theinstallation environment (outdoor climate, installed options, etc.) anduser expertise.
DIP switch settings overview
DIP switch SS2 is located on the switch box’ PCB (see "Switch boxmain components" on page 7) and allows configuration of sanitarywater tank installation, room thermostat connection and pumpoperation.
Room thermostat installation configuration
K3M
X13A
X9A22
21
20
19
18
17
16
15
14
13
12
11
10
9
8
7
23
4
SS2
3 2 1
OF
FO
N
F2B
K4M
>50 mm
8 7 2221L1 N
230 V AC3 kW
It is important that all information in this chapter is readsequentially by the installer and that the system isconfigured as applicable.
Switch off the power supply before opening the switch boxservice panel and making any changes to the DIP switchsettings.
DIP switch SS2 Description ON OFF
1 Not applicable for installer — (Default)
2 Sanitary water tank installation (see "Sanitary water tank installation configuration" on page 18)
Installed Not installed
3 Room thermostat connection(see "Room thermostat installation configuration" on page 17)
Room thermostat connected
No room thermostat connected
4 Not used — (Default)
■ When no room thermostat is connected tothe indoor unit, toggle switch SS2-3 should beset to OFF.
■ When a room thermostat is connected to theindoor unit, toggle switch SS2-3 should be setto ON.
NOTE ■ When a room thermostat is connected to theindoor unit, the heating and cooling scheduletimers are never available. Other schedule timersare not affected. For more information on theschedule timers, refer to the operation manual.
■ When a room thermostat is connected to theindoor unit, and the = button or o button ispressed, the centralised control indicator e willflash to indicate that the room thermostat haspriority and controls on/off operation and changeover operation.
1234OF
FO
N
1234OF
FO
N
1234OF
FO
N
Installation manual
17EKHBH/X007A+EKSWW150-300V3/Z2
Indoor unit for air to water heat pump and sanitary warm water tank for air to water heat pump system4PW30818-1B

The following table summarizes the required configuration andthermostat wiring at the terminal block in the switch box. Pumpoperation is listed in the third column. The three last columns indicatewhether the following functionality is available on the user interface(UI) or handled by the thermostat (T):
• space heating or cooling on/off (o)• heating/cooling changeover (=)• heating and cooling schedule timers (pr)
Pump operation configuration
Without room thermostat
When no thermostat is connected to the indoor unit, pump operationwill be determined by the leaving water temperature.
To force continuous pump operation when no room thermostat isconnected do the following:
- set toggle switch SS2-3 to ON,- short-circuit the terminal numbers 23-17-13 on the terminal
block in the switch box.
With room thermostat
When a thermostat is connected to the indoor unit, the pump willoperate continuously whenever there is heating or cooling demandrequested by the thermostat.
Sanitary water tank installation configuration
Pre-operation checks
Checks before initial start-up
After the installation of the unit, check the following before switchingon the circuit breaker:
1 Field wiring
Make sure that the field wiring between local supply panel andindoor unit, outdoor unit and indoor unit, indoor unit and valves(when applicable), indoor unit and room thermostat (whenapplicable), and indoor unit and sanitary water tank has beencarried out according to the instructions described in the chapter"Field wiring" on page 11, according to the wiring diagrams andaccording to European and national regulations.
2 Fuses or protection devices
Check that the fuses or the locally installed protection devicesare of the size and type specified in the chapter "Technicalspecifications" on page 27. Make sure that neither a fuse nor aprotection device has been bypassed.
3 Earth wiring
Make sure that the earth wires have been connected properlyand that the earth terminals are tightened.
4 Internal wiring
Visually check the switch box on loose connections or damagedelectrical components.
5 Fixation
Check that the unit is properly fixed, to avoid abnormal noisesand vibrations when starting up the unit.
Thermostat ConfigurationPump operation oooo ==== pppprrrr
No thermostat • SS2-3 = OFF• wiring: (non)
determined by leaving water temperature (a)
(a) The pump will stop when space heating/cooling is turned off or when the water reaches the desired water temperature as set on the user interface. With space heating/cooling turned on, the pump will then run every 5 minutes during 3 minutes
UI UI UI
• SS2-3 = ON• wiring:
on when space heating or cooling is on (o)
UI UI UI
Heating only thermostat
• SS2-3 = ON• wiring:
on when heating request by room thermostat
T — —
Thermostat with heating/cooling switch
• SS2-3 = ON• wiring:
on when heating request or cooling request by room thermostat
T T —
th = Thermostat contactC = Cooling contactH = Heating contact
L, N = 230 V AC
Terminal block
H C L N23 17 15 13
Terminal block
H C L N23 17 15 13
Terminal block
H C
th
L N23 17 15 13
Terminal block
H C
H
th
C
L N23 17 15 13
NOTE To set the pump speed, refer to "Setting the pumpspeed" on page 19.
■ When no sanitary water tank is installed,toggle switch SS2-2 should be set to OFF(default).
■ When a sanitary water tank is installed,toggle switch SS2-2 should be set to ON.
Switch off the power supply before making anyconnections.
1234OF
FO
N
1234OF
FO
N
EKHBH/X007A+EKSWW150-300V3/Z2Indoor unit for air to water heat pump and sanitary warm water tank for air to water heat pump system4PW30818-1B
Installation manual
18
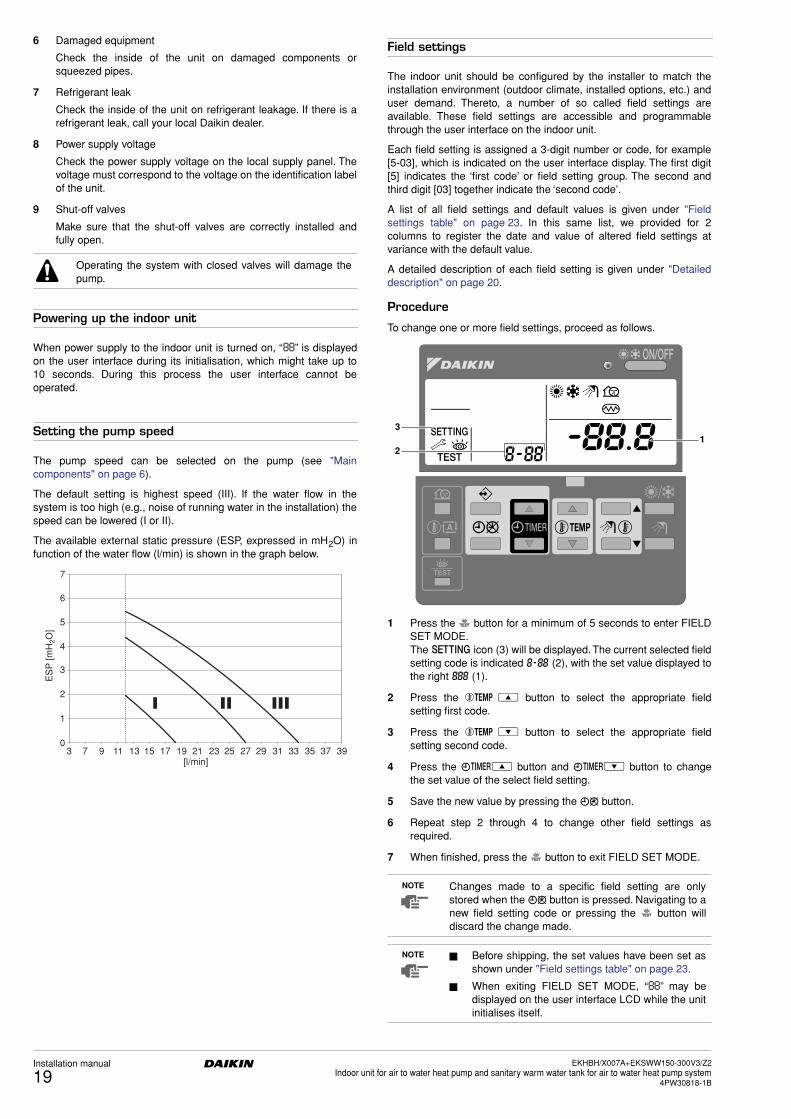
6 Damaged equipment
Check the inside of the unit on damaged components orsqueezed pipes.
7 Refrigerant leak
Check the inside of the unit on refrigerant leakage. If there is arefrigerant leak, call your local Daikin dealer.
8 Power supply voltage
Check the power supply voltage on the local supply panel. Thevoltage must correspond to the voltage on the identification labelof the unit.
9 Shut-off valves
Make sure that the shut-off valves are correctly installed andfully open.
Powering up the indoor unit
When power supply to the indoor unit is turned on, “88” is displayedon the user interface during its initialisation, which might take up to10 seconds. During this process the user interface cannot beoperated.
Setting the pump speed
The pump speed can be selected on the pump (see "Maincomponents" on page 6).
The default setting is highest speed (III). If the water flow in thesystem is too high (e.g., noise of running water in the installation) thespeed can be lowered (I or II).
The available external static pressure (ESP, expressed in mH2O) infunction of the water flow (l/min) is shown in the graph below.
Field settings
The indoor unit should be configured by the installer to match theinstallation environment (outdoor climate, installed options, etc.) anduser demand. Thereto, a number of so called field settings areavailable. These field settings are accessible and programmablethrough the user interface on the indoor unit.
Each field setting is assigned a 3-digit number or code, for example[5-03], which is indicated on the user interface display. The first digit[5] indicates the ‘first code’ or field setting group. The second andthird digit [03] together indicate the ‘second code’.
A list of all field settings and default values is given under "Fieldsettings table" on page 23. In this same list, we provided for 2columns to register the date and value of altered field settings atvariance with the default value.
A detailed description of each field setting is given under "Detaileddescription" on page 20.
Procedure
To change one or more field settings, proceed as follows.
1 Press the z button for a minimum of 5 seconds to enter FIELDSET MODE.The $ icon (3) will be displayed. The current selected fieldsetting code is indicated ; (2), with the set value displayed tothe right : (1).
2 Press the bgi button to select the appropriate fieldsetting first code.
3 Press the bgj button to select the appropriate fieldsetting second code.
4 Press the pfi button and pfj button to changethe set value of the select field setting.
5 Save the new value by pressing the pr button.
6 Repeat step 2 through 4 to change other field settings asrequired.
7 When finished, press the z button to exit FIELD SET MODE.
Operating the system with closed valves will damage thepump.
I II III
30
1
2
3
4
5
6
7
7 9 11 13 15 17 19 21 23[l/min]
ES
P [m
H2O
]
25 27 29 31 33 35 37 39
NOTE Changes made to a specific field setting are onlystored when the pr button is pressed. Navigating to anew field setting code or pressing the z button willdiscard the change made.
NOTE ■ Before shipping, the set values have been set asshown under "Field settings table" on page 23.
■ When exiting FIELD SET MODE, “88” may bedisplayed on the user interface LCD while the unitinitialises itself.
2
31
Installation manual
19EKHBH/X007A+EKSWW150-300V3/Z2
Indoor unit for air to water heat pump and sanitary warm water tank for air to water heat pump system4PW30818-1B

Detailed description
[0] User permission level
If required, certain user interface buttons can be made unavailable forthe user.
Three permission levels are defined (see the table below). Switchingbetween level 1 and level 2/3 is done by pressing the buttonspfi and pfj immediately followed by the buttons s,ba for at least 5 seconds (in normal mode). Note that no indicationon the user interface is given. When level 2/3 is selected, the actualpermission level — either level 2 or level 3 — is determined by thefield setting [0-00].
[1] Weather dependent set point (heating operation only)
The weather dependent set point field settings define the parametersfor the weather dependent operation of the unit. When weatherdependent operation is active the water temperature is determinedautomatically depending on the outdoor temperature: colder outdoortemperatures will result in warmer water and vice versa. Duringweather dependent operation, the user has the possibility to shift upor down the target water temperature by a maximum of 5°C. See theoperation manual for more details on weather dependent operation.
■ [1-00] Low ambient temperature (Lo_A): low outdoortemperature.
■ [1-01] High ambient temperature (Hi_A): high outdoortemperature.
■ [1-02] Set point at low ambient temperature (Lo_Ti): thetarget outgoing water temperature when the outdoortemperature equals or drops below the low ambienttemperature (Lo_A). Note that the Lo_Ti value should be higher than Hi_Ti, as forcolder outdoor temperatures (i.e. Lo_A) warmer water isrequired.
■ [1-03] Set point at high ambient temperature (Hi_Ti): thetarget outgoing water temperature when the outdoortemperature equals or rises above the high ambienttemperature (Hi_A). Note that the Hi_Ti value should be lower than Lo_Ti, as forwarmer outdoor temperatures (i.e. Hi_A) less warm watersuffices.
[2] Disinfection function
Applies only to installations with a sanitary water tank.
The disinfection function disinfects the sanitary water tank byperiodically heating the sanitary water to a specific temperature.
■ [2-00] Operation interval: day(s) of the week at which thesanitary water should be heated.
■ [2-01] Status: defines whether the disinfection function isturned on (1) or off (0).
■ [2-02] Start time: time of the day at which the sanitary watershould be heated.
■ [2-03] Set point: high water temperature to be reached.
■ [2-04] Interval: time period defining how long the set pointtemperature should be maintained.
[3] Auto restart
When power returns after a power supply failure, the auto restartfunction reapplies the user interface settings at the time of the powersupply failure.
Note that with the function disabled the schedule timer will not beactivated when power returns to the unit after a power supply failure.Press the pr button to enable the schedule timer again.
■ [3-00] Status: defines whether the auto restart function isturned on (0) or off (1).
[4] Backup heater operation
The operation of the backup heater can be enabled or disabled.
■ [4-00] Status: defines whether backup heater operation isenabled (1) or disabled (0).
Button
Permission level
1 2 3
Silent mode button s operable — —
Weather dependent set point button ba operable — —
Schedule timer enable/disable button pr operable operable —
Programming button < operable — —
Time adjust buttons pf
i
pf
j
operable — —
Inspection/test operation button z operable — —
Tt Target water temperature
TA Ambient (outdoor) temperature
= Shift value
Lo_Ti
Lo_A Hi_A TA
Tt
+ 05
00
– 05
Hi_Ti Shift value
The disinfection function field settings should beconfigured by the installer according to national and localregulations.
TSWW Sanitary water temperature
TU User set point temperature (as set on the user interface)
TH High set point temperature [2-03]
t Time
NOTE It is therefor recommended to leave the auto restartfunction enabled.
00.00 22.00 24.0001.00 23.00 t
TSWW
TH
TU
[2-02]
[2-03] [2-04]
EKHBH/X007A+EKSWW150-300V3/Z2Indoor unit for air to water heat pump and sanitary warm water tank for air to water heat pump system4PW30818-1B
Installation manual
20

[5] Equilibrium temperature and space heating prioritytemperature
Equilibrium temperature — The ‘equilibrium temperature’ fieldsettings apply to operation of the backup heater. When theequilibrium temperature function is enabled, operation of the backupheater is restricted to low outdoor temperatures, i.e. when theoutdoor temperature equals or drops below the specified equilibriumtemperature. When the function is disabled, operation of the backupheater is possible at all outdoor temperatures. Enabling this functionreduces the working time of the backup heater.
■ [5-00] Equilibrium temperature status: specifies whether theequilibrium temperature function is enabled (1) ordisabled (0).
■ [5-01] Equilibrium temperature: outdoor temperature belowwhich operation of the backup heater is allowed.
Space heating priority temperature (applies only to installationswith a sanitary water tank) — The ‘space heating prioritytemperature’ field settings apply to operation of the 3-way valve andthe booster heater in the sanitary water tank.When the space heating priority function is enabled, it is assured thatthe full capacity of the heat pump is used for space heating onlywhen the outdoor temperature equals or drops below the specifiedspace heating priority temperature, i.e. low outdoor temperature. Inthis case the sanitary water will only be heated by the booster heater.
■ [5-02] Space heating priority status: specifies whether spaceheating priority is enabled (1) or disabled (0).
■ [5-03] Space heating priority temperature: outdoortemperature below which the sanitary water will be heated bythe booster heater only, i.e. low outdoor temperature.
■ [5-04] Set point correction for sanitary water temperature: setpoint correction for the desired sanitary water temperature, tobe applied at low outdoor temperature when space heatingpriority is enabled. The corrected (higher) set point will makesure that the total heat capacity of the water in the tankremains approximately unchanged, by compensating for thecolder bottom water layer of the tank (because the heatexchanger coil is not operational) with a warmer top layer.
[6] DT for sanitary water heating
Applies only to installations with a sanitary water tank.
The ‘DT (delta temperature) for sanitary water heating’ field settingsdetermine the temperatures at which heating of the sanitary water bythe heat pump will be started (i.e., the heat pump ON temperature)and stopped (i.e., the heat pump OFF temperature).When the sanitary water temperature drops below the heat pump ONtemperature (THP ON), heating of the sanitary water by the heat pumpwill be started. As soon as the sanitary water temperature reachesthe heat pump OFF temperature (THP OFF) or the user set pointtemperature (TU), heating of the sanitary water by the heat pump willbe stopped (by switching the 3-way valve).
The heat pump OFF temperature, and the heat pump ONtemperature, and its relation with field settings [6-00] and [6-01] areexplained in the illustration below.
■ [6-00] Start: temperature difference determining the heatpump ON temperature (THP ON). See illustration.
■ [6-01] Stop: temperature difference determining the heatpump OFF temperature (THP OFF). See illustration.
Tset Sanitary water set point temperature
TU User set point (as set on the user interface)
TA Ambient (outdoor) temperature
Space heating priority
TA
Tset
TU
[5-03]
[5-04]
TU User set point temperature (as set on the user interface)
THP MAX Maximum heat pump temperature at sensor in sanitary water tank (50°C)
THP OFF Heat pump OFF temperature
THP ON Heat pump ON temperature
TU > THP MAX
T(°C)
70 TU
50 THP MAX
48 THP OFF
41 THP ON
[6-01]
[6-00]
TU < THP MAX
T(°C)
45 TU = THP OFF
50 THP MAX
38 THP ON
[6-00]
TU = 45°C[6-01] = 2°C[6-00] = 7°C
TU = 70°C[6-01] = 2°C[6-00] = 7°C
Installation manual
21EKHBH/X007A+EKSWW150-300V3/Z2
Indoor unit for air to water heat pump and sanitary warm water tank for air to water heat pump system4PW30818-1B

[7] Sanitary water step length
Applies only to installations with a sanitary water tank.
When the sanitary water is heated and the sanitary water set pointtemperate (as set by the user) has been reached, the booster heaterwill continue to heat the sanitary water to a temperature a fewdegrees above the set point temperature, i.e. the booster heater OFFtemperature. These extra degrees are specified by the sanitary waterstep length field setting. Correct setting prevents the booster heaterfrom repeatedly turning on and off (i.e. chattering) to maintain thesanitary water set point temperature. Note: the booster heater willturn back on when the sanitary water temperature drops 2°C (fixedvalue) below the booster heater OFF temperature.
■ [7-00] Sanitary water step length: temperature differenceabove the sanitary water set point temperature before thebooster heater is turned off.
[8] Sanitary water heating mode timer
Applies only to installations with a sanitary water tank.
The ‘sanitary water heating mode timer’ field settings defines theminimum and maximum sanitary water heating times, and minimumtime between two sanitary water heating cycli.
■ [8-00] Minimum running time: specifies the minimum timeperiod during which sanitary water heating should beactivated, even when the target sanitary water temperaturehas already been reached.
■ [8-01] Maximum running time: specifies the maximum timeperiod during which sanitary water heating can be activated,even when the target sanitary water temperature has not yetbeen reached.Note that when the unit is configured to work with a roomthermostat (refer to "Room thermostat installationconfiguration" on page 17), the maximum running timer willonly be taken into account when there is a request for spacecooling or space heating. When there is no request for roomcooling or room heating, sanitary water heating by the heatpump will continue until the “heat pump OFF temperature”(see field settings [5]) is reached. When no room thermostatis installed, the timer is always taken into account.
■ [8-02] Anti-recycling time: specifies the minimum requiredinterval between two sanitary water heating cycli.
[9] Cooling and heating set points
The purpose of this field setting is to prevent the user from selectinga wrong (i.e., too hot or too cold) leaving water temperature. Theretothe heating temperature set point range and the cooling temperatureset point range available to the user can be configured.
■ [9-00] Heating set point upper limit: maximum leaving watertemperature for heating operation.
■ [9-01] Heating set point lower limit: minimum leaving watertemperature for heating operation.
■ [9-02] Cooling set point upper limit: maximum leaving watertemperature for cooling operation.
■ [9-03] Cooling set point lower limit: minimum leaving watertemperature for cooling operation.
NOTE If the schedule timer for booster heater (see theoperation manual) is active, the booster heater will onlyoperate if allowed by this schedule timer.
BH Booster heater
HP Heat pump. If heating up time by the heat pump takes too long, auxiliary heating by the booster heater can take place
TBH OFF Booster heater OFF temperature (TU + [7-00])
TBH ON Booster heater ON temperature (TBH OFF - 2°C)
THP MAX Maximum heat pump temperature at sensor in sanitary water tank (50°C)
THP OFF Heat pump OFF temperature (THP MAX - [6-01])
THP ON Heat pump ON temperature (THP OFF - [6-00])
TSWW Sanitary water temperature
TU User set point temperature (as set on the user interface)
t Time
t
TBH ON
TSWW
THP ON
THP OFF
THP MAX
TU
TBH OFF
[6-01]
[6-00]
[7-00]
TU = 70°C[7-00] = 3°C[6-01] = 2°C[6-00] = 7°C
HP BH HP
0
10
20
30
4041
485060
7170
73
1 Sanitary water heating (I = active, 0 = not active)
2 Hot water request (I = request, 0 = no request)
t Time
■ In case of a floor heating application, it is important tolimit the maximum leaving water temperature atheating operation according to the specifications ofthe floor heating installation.
■ In case of a floor cooling application, it is important tolimit the minimum leaving water temperature atcooling operation to 16°C to prevent condensation onthe floor.
t
1
0
1
0
[8-01] [8-02]
[8-00]
EKHBH/X007A+EKSWW150-300V3/Z2Indoor unit for air to water heat pump and sanitary warm water tank for air to water heat pump system4PW30818-1B
Installation manual
22
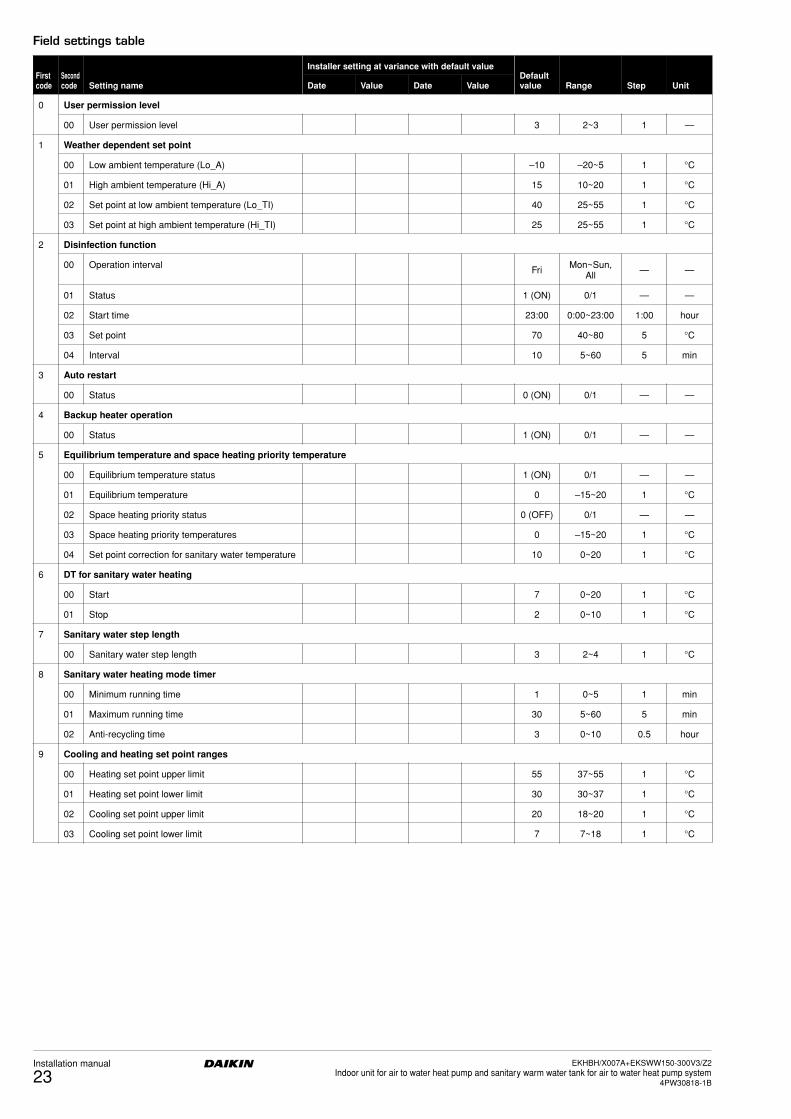
Field settings table
First code
Second code Setting name
Installer setting at variance with default valueDefault value Range Step UnitDate Value Date Value
0 User permission level
00 User permission level 3 2~3 1 —
1 Weather dependent set point
00 Low ambient temperature (Lo_A) –10 –20~5 1 °C
01 High ambient temperature (Hi_A) 15 10~20 1 °C
02 Set point at low ambient temperature (Lo_TI) 40 25~55 1 °C
03 Set point at high ambient temperature (Hi_TI) 25 25~55 1 °C
2 Disinfection function
00 Operation interval Fri Mon~Sun, All — —
01 Status 1 (ON) 0/1 — —
02 Start time 23:00 0:00~23:00 1:00 hour
03 Set point 70 40~80 5 °C
04 Interval 10 5~60 5 min
3 Auto restart
00 Status 0 (ON) 0/1 — —
4 Backup heater operation
00 Status 1 (ON) 0/1 — —
5 Equilibrium temperature and space heating priority temperature
00 Equilibrium temperature status 1 (ON) 0/1 — —
01 Equilibrium temperature 0 –15~20 1 °C
02 Space heating priority status 0 (OFF) 0/1 — —
03 Space heating priority temperatures 0 –15~20 1 °C
04 Set point correction for sanitary water temperature 10 0~20 1 °C
6 DT for sanitary water heating
00 Start 7 0~20 1 °C
01 Stop 2 0~10 1 °C
7 Sanitary water step length
00 Sanitary water step length 3 2~4 1 °C
8 Sanitary water heating mode timer
00 Minimum running time 1 0~5 1 min
01 Maximum running time 30 5~60 5 min
02 Anti-recycling time 3 0~10 0.5 hour
9 Cooling and heating set point ranges
00 Heating set point upper limit 55 37~55 1 °C
01 Heating set point lower limit 30 30~37 1 °C
02 Cooling set point upper limit 20 18~20 1 °C
03 Cooling set point lower limit 7 7~18 1 °C
Installation manual
23EKHBH/X007A+EKSWW150-300V3/Z2
Indoor unit for air to water heat pump and sanitary warm water tank for air to water heat pump system4PW30818-1B

TEST RUN AND FINAL CHECK
The installer is obliged to verify correct operation of the indoor andoutdoor unit after installation.
Test run operation
Procedure
1 Push the z button 4 times so the t icon will be displayed.
2 Depending on the indoor unit model, heating operation, coolingoperation or both must be tested as follows (when no action isperformed, the user interface will return to normal mode after 10seconds or by pressing the z button once):
• To test the heating operation push the h/c button so the h iconis displayed. To start the test run operation press the o button.
• To test the cooling operation push the h/c button so the c iconis displayed. To start the test run operation press the o button.
• To test the sanitary operation push the w button. The test runoperation will start without pressing the o button.
3 The test run operation will end automatically after 30 minutes orwhen reaching the set temperature. The test run operation canbe stopped manually by pressing the z button once. If there aremisconnections or malfunctions, an error code will be displayedon the user interface. Otherwise, the user interface will return tonormal operation.
4 To resolve the error codes, see "Error codes" on page 26.
Final check
Before switching on the unit, read following recommendations:
■ When the complete installation and all necessary settings havebeen carried out, close all front panels of the unit and refit theindoor unit cover.
■ The service panel of the switch box may only be opened by alicensed electrician for maintenance purposes.
MAINTENANCE
In order to ensure optimal availability of the unit, a number of checksand inspections on the unit and the field wiring have to be carried outat regular intervals.
The described checks must be executed at least once a year.
1 Water pressure
Check if the water pressure is above 0.3 bar. If necessary addwater.
2 Water filter
Clean the water filter.
3 Water pressure relief valve
Check for correct operation of the pressure relief valve byturning the red knob on the valve counter-clockwise:
■ If you do not hear a clacking sound, contact your local Daikindealer.
■ In case the water keeps running out of the unit, close boththe water inlet and outlet shut-off valves first and then contactyour local Daikin dealer.
4 Sanitary water tank pressure relief valve (field supply)
Applies only to installations with a sanitary water tank.Check for correct operation of the pressure relief valve on thesanitary water tank.
5 Sanitary water tank booster heater
Applies only to installations with a sanitary water tank.
It is advisable to remove lime buildup on the booster heater toextend its life span, especially in regions with hard water. To doso, drain the sanitary water tank, remove the booster heaterfrom the sanitary water tank and immerse in a bucket (or similar)with lime-removing product for 24 hours.
6 Indoor unit switch box
■ Carry out a thorough visual inspection of the switch box andlook for obvious defects such as loose connections ordefective wiring.
■ Check for correct operation of contactors K1M, K2M, K3M(appilcations with sanitary water tank only) and K4M by useof an ohmmeter. All contacts of these contactors must be inopen position.
NOTE To display the last resolved error code, push the zbutton 1 time. Push the z button again 4 times toreturn to normal mode.
NOTE It is not possible to test run if a forced operation fromthe outdoor unit is in progress. Should forced operationbe started during a test run, the test run will beaborted.
■ Before carrying out any maintenance or repair activity,always switch off the circuit breaker on the supplypanel, remove the fuses or open the protectiondevices of the unit.
■ Make sure that before starting any maintenance orrepair activity, also the power supply to the outdoorunit is switched off.
EKHBH/X007A+EKSWW150-300V3/Z2Indoor unit for air to water heat pump and sanitary warm water tank for air to water heat pump system4PW30818-1B
Installation manual
24

TROUBLESHOOTING
This section provides useful information for diagnosing andcorrecting certain troubles which may occur in the unit.
General guidelines
Before starting the troubleshooting procedure, carry out a thoroughvisual inspection of the unit and look for obvious defects such asloose connections or defective wiring.
Before contacting your local Daikin dealer, read this chapter carefully,it will save you time and money.
When a safety device was activated, stop the unit and find out whythe safety device was activated before resetting it. Under nocircumstances safety devices may be bridged or changed to a valueother than the factory setting. If the cause of the problem cannot befound, call your local Daikin dealer.
General symptoms
Symptom 1: The unit is turned on (o LED is lit) but the unit is not heating or cooling as expected
Symptom 2: The unit is turned on but the compressor is not starting (space heating or sanitary heating)
Symptom 3: Pump is making noise (cavitation)
Symptom 4: The water pressure relief valve opens
Symptom 5: The water pressure relief valve leaks
Symptom 6: The user interface displays “nnnn” when pressing certain buttons
Symptom 7: Space heating capacity shortage at low outdoor temperatures
When carrying out an inspection on the switch box of theunit, always make sure that the main switch of the unit isswitched off.
POSSIBLE CAUSES CORRECTIVE ACTION
The temperature setting is not correct.
Check the controller set point.
The water flow is too low. • Check that all shut off valves of the water circuit are completely open.
• Check if the water filter needs cleaning.• Make sure there is no air in the system
(purge air).• Check on the manometer that there is
sufficient water pressure. The water pressure must be >0.3 bar (water is cold), >>0.3 bar (water is hot).
• Check that the pump speed setting is on the highest speed (III).
• Make sure that the expansion vessel is not broken.
• Check that the resistance in the water circuit is not too high for the pump (refer to "Setting the pump speed" on page 19).
The water volume in the installation is too low.
Make sure that the water volume in the installation is above the minimum required value (refer to "Checking the water volume and expansion vessel pre-pressure" on page 10).
POSSIBLE CAUSES CORRECTIVE ACTION
The unit must start up out of its operation range (the water temperature is too low).
In case of low water temperature, the system utilizes the backup heater to reach the minimum water temperature first (15°C). • Check that the backup heater power supply
is correct.• Check that the backup heater fuse is
closed.
POSSIBLE CAUSES CORRECTIVE ACTION
There is air in the system. Purge air.
Water pressure at pump inlet is too low.
• Check on the manometer that there is sufficient water pressure. The water pressure must be >0.3 bar (water is cold), >>0.3 bar (water is hot).
• Check that the manometer is not broken.• Check that the expansion vessel is not
broken.• Check that the setting of the pre-pressure of
the expansion vessel is correct (refer to "Setting the pre-pressure of the expansion vessel" on page 11).
POSSIBLE CAUSES CORRECTIVE ACTION
The expansion vessel is broken. Replace the expansion vessel.
The water volume in the installationis too high.
Make sure that the water volume in the installation is under the maximum allowed value (refer to "Checking the water volume and expansion vessel pre-pressure" on page 10).
POSSIBLE CAUSES CORRECTIVE ACTION
Dirt is blocking the water pressurerelief valve outlet.
Check for correct operation of the pressure relief valve by turning the red knob on the valve counter clockwise:• If you do not hear a clacking sound, contact
your local Daikin dealer.• In case the water keeps running out of the
unit, close both the water inlet and outlet shut-off valves first and then contact your local Daikin dealer.
POSSIBLE CAUSES CORRECTIVE ACTION
The current permission level is set to a level that prevents using the pressed button.
Change the “user permission level” field setting ([0-00], see "Field settings" on page 19.
POSSIBLE CAUSES CORRECTIVE ACTION
Backup heater operation is not activated.
Check that the “backup heater operation status” field setting [4-00] is turned on, see "Field settings" on page 19.Check whether or not the thermal protector of the backup heater has been activated (refer to Main components, "Thermal protector backup heater" on page 6 for location of the reset button).
The backup heater equilibrium temperature has not been configured correctly.
Raise the “equilibrium temperature” field setting [5-01] to activate backup heater operation at a higher outdoor temperature.
Too much heat pump capacity is used for heating sanitary water (applies only to installations with a sanitary water tank).
Check that the “space heating priority temperature” field settings are configured appropriately:• Make sure that the “space heating priority
status” field setting [5-02] is enabled.• Raise the “space heating priority
temperature” field setting [5-03] to activate booster heater operation at a higher outdoor temperature.
Installation manual
25EKHBH/X007A+EKSWW150-300V3/Z2
Indoor unit for air to water heat pump and sanitary warm water tank for air to water heat pump system4PW30818-1B

Error codes
When a safety device is activated, the user interface LED will beflashing, and an error code will be displayed.
A list of all errors and corrective actions can be found in the tablebelow.
Reset the safety by turning the unit OFF and back ON.
In case this procedure for resetting the safety is not successful,contact your local Daikin dealer.
Instruction to turn the unit OFF
User interface mode (heating/cooling =)
Sanitary water heating mode (w)
Push theo button
Push thew button
ON ON 1 time 1 time
ON OFF 1 time —
OFF ON — 1 time
OFF OFF — —
Error code Failure cause Corrective action
81 Outlet water temperature thermistor failure (outlet water temperature sensor broken)
Contact your local Daikin dealer.
89 Water heat exchanger freeze-up failure (due water flow too low)
Refer to error code 7H.
Water heat exchanger freeze-up failure (due to refrigerant shortage)
Contact your local Daikin dealer.
7H Flow failure (water flow too low or no water flow at all, minimum required water flow is 9 l/min)
• Check that all shut off valves of the water circuit are completely open.
• Check if the water filter needs cleaning.
• Make sure there is no air in the system (purge air).
• Check on the manometer that there is sufficient water pressure. The water pressure must be >0.3 bar (water is cold), >>0.3 bar (water is hot).
• Check that the pump speed setting is on the highest speed (III).
• Make sure that the expansion vessel is not broken.
• Check that the resistance in the water circuit is not too high for the pump (refer to "Setting the pump speed" on page 19).
• If this error occurs at defrost operation (during space heating or sanitary heating), make sure that the backup heater power supply is wired correctly and that fuses are not blown.
8H Outlet water temperature of indoor unit too high (>65°C)
• Check that the contactor of the electric backup heater is not short circuited.
• Check that the outlet water thermistor is giving the correct read out.
A1 Indoor unit PCB defective Contact your local Daikin dealer.
A5 Too low (during cooling operation) or to high (during heating operation) refrigerant temperature (measured by R3T)
Contact your local Daikin dealer.
AA Booster heater thermal protector is open(applies only to installations with a sanitary water tank)
Reset the thermal protector (refer to "Safety devices" on page 15 for location of the reset button)
C0 Flow switch failure (flow switch remains closed while pump is stopped)
Check that the flow switch is not clogged with dirt.
C4 Heat exchanger thermistor failure (heat exchanger temperature sensor broken)
Contact your local Daikin dealer.
E1 Outdoor unit PCB defective Contact your local Daikin dealer.
E5 Overload activation of compressor
Check that the unit is operating within its operating range (refer to "Technical specifications" on page 27).Contact your local Daikin dealer.
E6 Compressor start-up failure Contact your local Daikin dealer.
E7 Fan lock failure (fan is locked) Check if the fan is not obstructed by dirt. If the fan is not obstructed, contact your local Daikin dealer.
E8 Overcurrent failure Check that the unit is operating within its operating range (refer to "Technical specifications" on page 27).
EA Cooling/heating switching failure (only for models with cooling and heating)
Contact your local Daikin dealer.
EC Sanitary water temperature too high (>89°C)
• Check that the contactor of the electric booster heater is not short circuited.
• Check that the sanitary water thermistor is giving the correct read out.
F3 Too high discharge temperature (e.g. due to outdoor coil blockage)
Clean the outdoor coil. If the coil is clean, contact your local Daikin dealer.
F6 Too high condensing pressure during cooling (e.g. due to outdoor coil blocked by dirt)
Clean the outdoor coil. If the coil is clean, contact your local Daikin dealer.
Too high condensing pressure during cooling (e.g. due to unit operating outside its operating range)
Check that the unit is operating within its operating range (refer to "Technical specifications" on page 27).
FA High pressure failure (due to unit operating outside its operating range)
Check that the unit is operating within its operating range (refer to "Technical specifications" on page 27).
H0 Voltage and current sensor failure (sensor broken)
Contact your local Daikin dealer.
H6 Compressor start up failure • Check that the compressor relay, compressor or PCB is not broken.
• Check that the supply voltage is not too low.
• Check that the refrigerant stop valves on the outdoor unit are open.
H8 CT failure Contact your local Daikin dealer.
H9 Outdoor temperature thermistor failure (outdoor thermistor is broken)
Contact your local Daikin dealer.
J3 Discharge pipe thermistor failure Contact your local Daikin dealer.
J6 Outdoor unit heat exchanger thermistor broken or disconnected
Contact your local Daikin dealer.
L3 Electric component failure Contact your local Daikin dealer.
L4 Electric component failure Contact your local Daikin dealer.
L5 Electric component failure Contact your local Daikin dealer.
P4 Electric component failure Contact your local Daikin dealer.
U0 Refrigerant failure (due to refrigerant leak)
Contact your local Daikin dealer.
U2 Main circuit voltage failure Contact your local Daikin dealer.
U4 Communication error failure Contact your local Daikin dealer.
U7 Communication error failure Contact your local Daikin dealer.
UA Communication error failure Contact your local Daikin dealer.
Error code Failure cause Corrective action
EKHBH/X007A+EKSWW150-300V3/Z2Indoor unit for air to water heat pump and sanitary warm water tank for air to water heat pump system4PW30818-1B
Installation manual
26

TECHNICAL SPECIFICATIONS
General
Electrical specifications
Sanitary water tank specifications (optional)
Heating/cooling models (EKHBX) Heating only models (EKHBH)
Nominal capacity
• cooling(a) Refer to the Technical Data
• heating(b) Refer to the Technical DataDimensions H x W x D 936 x 487 x 461 895 x 487 x 361Weight• machine weight 65 kg 55 kg• operation weight 80 kg 70 kg
Connections• water inlet/outlet 1” MBSP(c) 1” MBSP(c)
• water drain hose nipple hose nipple• refrigerant liquid side Ø6.4 mm (1/4 inch) Ø6.4 mm (1/4 inch)• refrigerant gas side Ø15.9 mm (5/8 inch) Ø15.9 mm (5/8 inch)
Expansion vessel• Volume 10 l 10 l• Maximum working pressure (MWP) 3 bar 3 bar
Pump• Type water cooled water cooled• no. of speed 3 3
Sound pressure level(d) 27 dBA 27 dBAInternal water volume 2 l 2 lPressure relief valve water circuit 3 bar 3 barOperation range - water side• heating +30~+55°C +30~+55°C• cooling +7~+20°C –
Operation range - air side• heating –20~+25°C –20~+25°C• cooling +15~+43°C –• sanitary water by heat pump –15~+35°C(e) –15~+35°C(e)
(a) Nominal cooling capacities are based on the following Eurovent conditions:evaporator: 12°C/7°Ccondenser: 30°C/35°C
(b) Nominal heating capacities are based on the following Eurovent conditions:ambient: 7°C DB/6°C WBcondenser: 30°C/35°C
(c) MBSP = Male British Standard Pipe(d) At 1 m in front of the unit (free field condition)(e) Down to –20°C by booster heater and up to +43°C by booster heater
Heating/cooling models (EKHBX) Heating only models (EKHBH)
Standard unit (power supply via outdoor unit)• Power supply 230 V 50 Hz 1P• Nominal running current See outdoor unit installation manual
Backup heater• Power supply See "Connection of the backup heater power supply" on page 14• Maximum running current See "Connection of the backup heater power supply" on page 14
Option sanitary water tank with booster heater• Power supply See "Sanitary water tank specifications (optional)" on page 27• Nominal running current See "Sanitary water tank specifications (optional)" on page 27
EKSWW150V3 EKSWW200V3 EKSWW200Z2 EKSWW300V3 EKSWW300Z2
Volume 150 l 200 l 200 l 300 l 300 lOverall dimensions (Ø x H) 580 x 900 mm 580 x 1150 mm 580 x 1150 mm 580 x 1600 mm 580 x 1600 mmBooster heater, power supply 230 V 50 Hz 1P 230 V 50 Hz 1P 400 V 50 Hz 2P 230 V 50 Hz 1P 400 V 50 Hz 2PBooster heater, running current 13 A 13 A 7.5 A 13 A 7.5 ABooster heater, capacity 3 kW 3 kW 3 kW 3 kW 3 kWConnections 3/4” FBSP(a) 3/4” FBSP(a) 3/4” FBSP(a) 3/4” FBSP(a) 3/4” FBSP(a)
Weight (empty) 37 kg 45 kg 45 kg 59 kg 59 kgMounting Wall or floor Floor Floor Floor Floor
(a) FBSP = Female British Standard Pipe
Installation manual
27EKHBH/X007A+EKSWW150-300V3/Z2
Indoor unit for air to water heat pump and sanitary warm water tank for air to water heat pump system4PW30818-1B

NOTES NOTES

Zandvoordestraat 300, B-8400 Oostende, Belgium
4PW30818-1B