jgc-rrmp4600_anleitung.pdf
TRANSCRIPT

RRMP-4600
BEDIENUNGSANLEITUNG USER MANUAL
CD-RADIORECORDER MP3/USB

HAZARD WARNING: TO REDUCE THE RISK OF FIRE OR ELECTRIC SHOCK, DO NOT EXPOSE THIS PRODUCT TO RAIN OR MOISTURE. ESD Hinweis: Bei Fehlfunktion des Gerätes durch elektrostatische Entladungen kann ein Reset durchgeführt werden. Dazu muß eventuell die Stromversorgung kurz unterbrochen werden.
WARNUNG
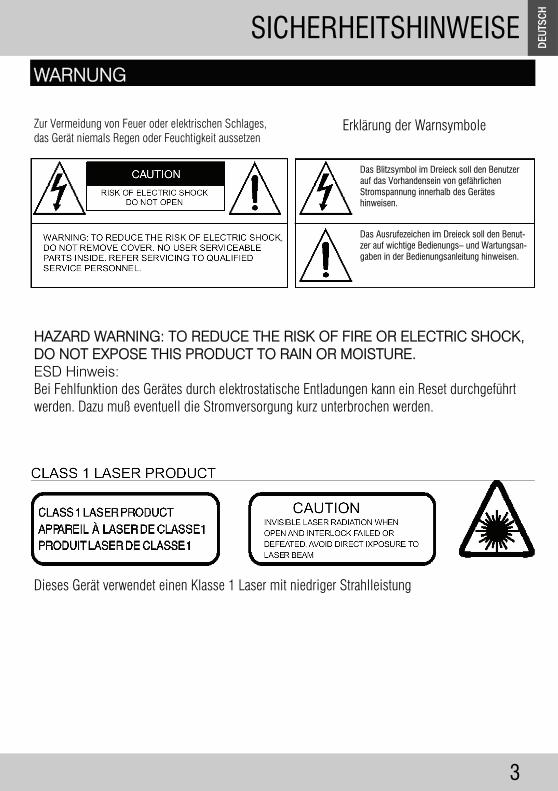
Zur Vermeidung von Feuer oder elektrischen Schlages, das Gerät niemals Regen oder Feuchtigkeit aussetzen
Erklärung der Warnsymbole
Dieses Gerät verwendet einen Klasse 1 Laser mit niedriger Strahlleistung
Das Blitzsymbol im Dreieck soll den Benutzer auf das Vorhandensein von gefährlichen Stromspannung innerhalb des Gerätes hinweisen.
Das Ausrufezeichen im Dreieck soll den Benut-zer auf wichtige Bedienungs– und Wartungsan-gaben in der Bedienungsanleitung hinweisen.
SICHERHEITSHINWEISE
3
DEUT
SCH

WICHTIGE SICHERHEITSHINWEISE Zum sicheren Gebrauch Ihres Gerätes sollten sie die folgenden Hinweise beachten: Aufstellen und Gebrauch • Verwenden Sie das Gerät nicht in Umgebungen
mit extremer Hitze oder Kälte oder in staubiger oder feuchter Umgebung.
• Stellen Sie das Gerät nur auf einer flachen, ebenen Unterlage auf.
• Stellen Sie sicher, daß ausreichende Luftzirkulation vorhanden ist. Decken Sie die Lüftungsöffnungen nicht ab, stellen Sie das Gerät nicht auf weichen Untergrund.
Stromversorgung • Prüfen Sie vor Gerbrauch des Gerätes, ob die
vorhandene Stromversorgung mit der auf dem Gerät angegebenen übereinstimmt.
Sichere Verwendung • Fassen Sie die Netzzuleitung beim Aus– oder
Einstecken immer nur am Stecker an, niemals am Kabel ziehen. Ziehen am Kabel kann die Zuleitung beschädigen.
• Trennen Sie das Gerät von der Netzsteckdose, wenn das Gerät für längere Zeit nicht verwendet wird.
• Der Ausschalter am Gerät trennt das Gerät NICHT vom Netz. Um das Gerät komplett vom Netz zu trennen, ziehen Sie bitte den Netz-Stecker.
• Verwenden Sie das Gerät nur in aufrechter Position.
Kondensation • In warmer, feuchter Umgebung kann im Gerät
Kondensation entstehen. • Bei Kondensation im Gerät wird die Funktion
stark beeinträchtigt. • Die Kondensation kann verdunsten, wenn das
Gerät für 1 bis 2 Stunden in einer warmen, trockenen Umgebung platziert wird.
Sollte ein Problem auftreten, ziehen Sie den Netzstecker und setzen Sie sich mit dem Kundendienst in Verbindung. Belüftung Dieses Gerät verfügt über Belüftungsöffnungen, welche nicht abgedeckt werden dürfen. Wichtige Sicherheitshinweise • Setzen Sie das Gerät niemals Flüssigkeiten aus,
stellen Sie keine Flüssigkeitsbehälter, z.B. Vasen auf das Gerät.
• Der Netzstecker dient dazu, das Gerät vom Netz zu trennen und sollte immer frei zugänglich sein.
• Verwenden Sie das Gerät nicht im Freien • Die Luftzirkulation des Gerätes sollte nicht
durch Gegenstände behindert werden. • Stellen Sie keine Kerzen auf das Gerät. • Beachten Sie die Umweltbestimmungen bei
der Entsorgung von Batterien. • Verwenden Sie das Gerät nur in normaler
Umgebungstemperatur.
SICHERHEITSHINWEISE
4
DEUTSCH

ÜBERSICHT
5
DEUT
SCH
1. Netzkabel 2. Teleskopantenne 3. Tragegriff 4. CD Fach 5. CD Fachöffner 6. DBBS Schalter 7. FUNCTION Schalter 8. VOLUME (Lautstärke) Regler 9. SD CARD Steckplatz 10. USB Buchse 11. F.FWD Taste 12. STOP/EJECT Taste 13. PAUSE Taste 14. STOP/CD/USB/SD/FM MODE Taste
15. PLAY MODE/MEMORY Taste 16. MEM. SET/SKIP+10/FOLDER Taste 17. BACK/TUNE-DOWN Taste 18. NEXT/TUNE-UP Taste 19. PLAY/PAUSE/BAND Taste 20. RECORD Taste 21. PLAY Taste 22. REWIND Taste 23. Lautsprecher (Höhen) 24. LCD Anzeige 25. Lautsprecher (Tiefen) 26. Kassettenfach 27. Batteriefach (unter dem Gerät) 28. Kopfhöreranschluss (Rückseite des Gerätes)
ÜBERSICHT
6
DEUTSCH
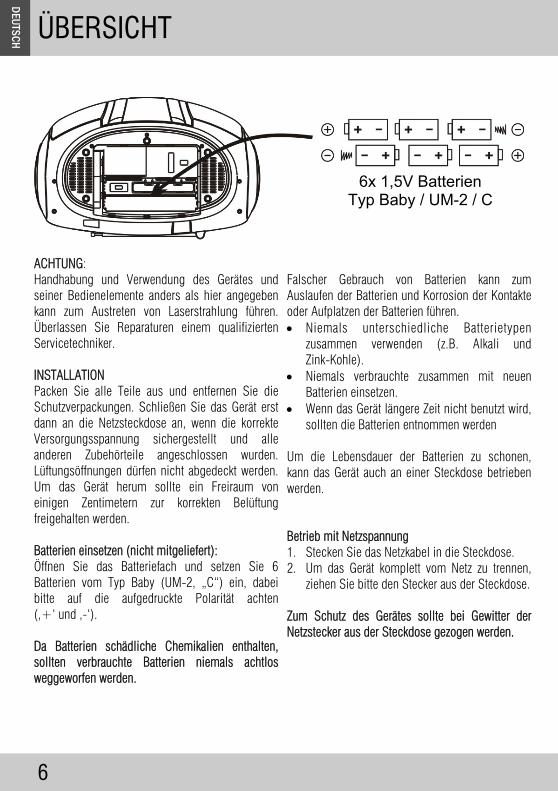
6x 1,5V Batterien Typ Baby / UM-2 / C
ACHTUNG: Handhabung und Verwendung des Gerätes und seiner Bedienelemente anders als hier angegeben kann zum Austreten von Laserstrahlung führen. Überlassen Sie Reparaturen einem qualifizierten Servicetechniker. INSTALLATION Packen Sie alle Teile aus und entfernen Sie die Schutzverpackungen. Schließen Sie das Gerät erst dann an die Netzsteckdose an, wenn die korrekte Versorgungsspannung sichergestellt und alle anderen Zubehörteile angeschlossen wurden. Lüftungsöffnungen dürfen nicht abgedeckt werden. Um das Gerät herum sollte ein Freiraum von einigen Zentimetern zur korrekten Belüftung freigehalten werden. Batterien einsetzen (nicht mitgeliefert): Öffnen Sie das Batteriefach und setzen Sie 6 Batterien vom Typ Baby (UM-2, „C“) ein, dabei bitte auf die aufgedruckte Polarität achten (‚+‘ und ‚-‘). Da Batterien schädliche Chemikalien enthalten, sollten verbrauchte Batterien niemals achtlos weggeworfen werden.
Falscher Gebrauch von Batterien kann zum Auslaufen der Batterien und Korrosion der Kontakte oder Aufplatzen der Batterien führen. • Niemals unterschiedliche Batterietypen
zusammen verwenden (z.B. Alkali und Zink-Kohle).
• Niemals verbrauchte zusammen mit neuen Batterien einsetzen.
• Wenn das Gerät längere Zeit nicht benutzt wird, sollten die Batterien entnommen werden
Um die Lebensdauer der Batterien zu schonen, kann das Gerät auch an einer Steckdose betrieben werden. Betrieb mit Netzspannung 1. Stecken Sie das Netzkabel in die Steckdose. 2. Um das Gerät komplett vom Netz zu trennen,
ziehen Sie bitte den Stecker aus der Steckdose. Zum Schutz des Gerätes sollte bei Gewitter der Netzstecker aus der Steckdose gezogen werden.
RADIO
7
DEUT
SCH
INBETRIEBNAHME 1. Den Schalter FUNCTION auf RADIO, TAPE(OFF) oder CD stellen 2. Mit dem Regler VOLUME die Lautstärke einstellen. 3. Zum Ausschalten den Schalter FUNCTION in die Position TAPE(OFF) stellen. RADIOEMPFANG 1. Den Funktionsschalter auf RADIO stellen 2. Mit der Taste BAND (AM/FM) auf die gewünschte Empfangsart stellen
(FM = UKW, AM = MW) 3. Mit den Tasten TUNE-UP oder TUNE-DOWN den gewünschten Sender einstellen.
Automatische Suche: Tasten drücken und halten, bis der Suchlauf startet. Wird ein ausreichend starker Sender gefunden, hält der Suchlauf automatisch an. Manuelle Suche: Durch kurzes drücken der Tasten kann die Frequenz manuell eingestellt werden. Dadurch können auch schwächere Sender eingestellt werden, welche vom Suchlauf nicht erkannt werden.
4. Wenn ein Sender mit Stereoton empfangen wird, leuchtet die FM ST. Anzeige auf. 5. Zum Ausschalten den Funktionsschalter auf TAPE(OFF) stellen − Bei schwachem Empfang von Sendern mit Stereoton kann der Ton verrauscht werden. Stellen
Sie in diesem Fall mit der Taste FM MODE von FM ST. auf FM, um den Empfang auf Mono-Ton umzuschalten.
− Bei UKW kann der Empfang durch Ausziehen und Verstellen der Teleskopantenne verbessert werden. Die Antenne einschieben, wenn das Signal zu stark ist (z.B. in unmittelbarer Nähe eines Senders).
− Die Antenne für den Mittelwellen-Empfang ist im Gehäuse eingebaut, der Empfang kann durch Drehen des Gerätes verbessert werden.
SENDER SPEICHERN
1. Suchen Sie den gewünschten Sender manuell oder automatisch aus. 2. Drücken Sie die MEM.SET Taste, um die Senderspeicherung aufzurufen. 3. Wählen Sie mit den Tasten TUNE-UP / TUNE-DOWN den gewünschten Speicherplatz. 4. Drücken Sie nochmals MEM.SET, um den Sender zu speichern. 5. Wiederholen Sie die Schritte 2 bis 5 zum Speichern weiterer Sender. 6. Gespeicherten Sender mit MEMORY und den TUNE-UP / TUNE-DOWN Tasten auswählen und
anhören. 7. Wenn keine Taste gedrückt wird, kehrt das Gerät in den normalen Radiobetrieb zurück. 8. Um einen Speicherplatz zu löschen, speichern Sie einfach einen neuen Sender auf die
gewünschte Position (Es können bis zu 30 Speicherplätze für UKW (FM) und 20 Speicherplätze für MW (AM) gespeichert werden)
EINE CD / MP3 WIEDERGEBEN Dieser CD-Player spielt Audio- und MP3-CD‘s ab, auch von CD-R und CD-RW. 1. Den FUNCTION Schalter auf CD stellen 2. Die CD-Fachklappe an der mit OPEN markierten Stelle aufklappen. 3. Eine geeignete CD mit der Beschriftung nach oben einlegen und die Klappe sanft
schließen. Auf dem Display erscheint READ , danach erscheint die Track/Zeit-Anzeige und die Wiedergabe startet automatisch.
4. Um die Wiedergabe anzuhalten, PLAY/PAUSE drücken. Zum Fortsetzen nochmals PLAY/PAUSE drücken.
5. Zum Beenden der Wiedergabe STOP drücken. Hinweis: Die Wiedergabe wird ebenfalls gestoppt, wenn • das CD-Fach geöffnet wird • das Gerät auf RADIO oder TAPE(OFF) geschaltet wird • das Ende der CD erreicht ist Einen beliebigen Titel abspielen Während der Wiedergabe kann mit BACK oder NEXT ein beliebiger Titel angewählt werden. • Bei angehaltener oder gestoppter Wiedergabe ausgewählten Titel mit PLAY/PAUSE
abspielen. • Drücken Sie NEXT, um zum nächsten Titel zu springen, mehrmals drücken, um weitere
nächste Titel anzuwählen. • Drücken Sie BACK, um den aktuellen Titel von vorne wiederzugeben, mehrmals drücken,
um einen der vorigen Titel anzuwählen. Position in einer MP3 suchen 1. BACK oder NEXT drücken und gedrückt halten, um in der MP3 vorwärts oder rückwärts zu
suchen. 2. Bei Erreichen der gewünschten Position Tasten einfach loslassen, die Wiedergabe wird
normal fortgesetzt. MP3 Ordnernavigation Wird eine MP3-CD abgespielt, auf der die Dateien in unterschiedlichen Ordnern abgelegt sind, so kann mit der Taste FOLDER der nächste Ordner angewählt werden. • Drücken Sie die Taste FOLDER länger als 1,5 Sekunden, die Wiedergabe springt zur
ersten Datei im nächsten Ordner. • Halten Sie die Taste weiter gedrückt, um durch die Ordner durchzublättern.
CD/MP3 PLAYER
8
DEUTSCH

CD/MP3 PLAYER
9
DEUT
SCH
SKIP Funktion • Drücken Sie die SKIP+10 Taste kurz, um 10 Titel weiter vorwärts zu springen. Beliebige Reihenfolge programmieren: Es können bis zu 60 Titel in beliebiger Reihenfolge wiedergegeben werden, dabei können Titel auch mehrfach programmiert werden. 1. Vor der Programmierung muss der Player im STOP-Modus sein. 2. MEMORY drücken, das Display zeigt 00 P-01 3. Mit BACK oder NEXT die gewünschte Titelnummer anwählen. 4. Gewünschte Titelnummer mit MEMORY speichern. 5. Weitere Titelnummern mit BACK oder NEXT und MEMORY hinzufügen. 6. Wiedergabe der programmierten Reihenfolge mit PLAY/PAUSE starten. Titelreihenfolge löschen: Die Titelreihenfolge wird gelöscht wenn • das CD-Fach geöffnet wird, • auf RADIO Funktion gewechselt oder das Gerät ausgeschaltet wird, • bei beendeter Wiedergabe 2x die Taste STOP gedrückt wird. Wiederholfunktion: Mit der PLAY MODE Taste kann zwischen folgenden Wiederholungsfunktionen gewechselt werden:
REPEAT: (Symbol Blinkt) Aktueller Titel wird wiederholt REPEAT ALL: Gesamte Disk wird wiederholt
MP3 Informationsanzeige (ID3) Das Gerät ist dazu in der Lage, die als „ID3 Tags“ in MP3 Dateien enthaltene Informationen auf dem Display anzuzeigen. Während der Wiedergabe einer MP3 Datei wechselt das Dis-play ständig zwischen den folgenden Anzeigen: TRACK-ANZEIGE FOLDER ANZEIGE ID3 TEXT ANZEIGE

Wiedergabe von USB / SD / MMC Speichermedien 1. Stellen Sie den FUNCTION Schalter auf CD. 2. Drücken Sie die Taste STOP/CD/USB/SD länger als 2 Sekunden, um von CD– auf
USB–Modus zu wechseln, nochmaliges Drücken (länger als 2 Sekunden) wechselt in den SD-Modus. Noch einmal länger als 2 Sekunden drücken wechselt wieder in den CD-Modus. Im Display wird USB READ bzw. SD READ angezeigt.
3. Stecken Sie einen USB-Speicherstick in den USB-Anschluss bzw. eine SD oder MMC Speicherkarte mit der Beschriftung nach oben in den Kartenschlitz.
4. Nach dem Einlesen zeigt das Display die Anzahl der Titel auf dem Speichermedium an.
5. Die Wiedergabe wird automatisch gestartet. 6. Mit BACK oder NEXT einen gewünschten Titel anwählen. 7. Weitere Bedienfunktionen siehe „CD/MP3 Player“. 8. Mit STOP wird die Wiedergabe beendet. HINWEIS: Aufgrund von stetigen Neuerungen kann es vorkommen, daß bestimmte USB-Speichermedien oder SD/MMC-Karten nicht kompatibel mit diesem Gerät sind. • Dieser USB-Port entspricht der Spezifikation USB V1.1 / V2.0 • Verwenden Sie SD-Karten nur von 256MB bis 2GB. Andere Kapazitäten werden
nicht unterstützt • USB Speicher werden nur bis 2GB unterstützt.
USB / SD
10
DEUTSCH

TAPE DECK
11
DEUT
SCH
Bedienfeld (von links nach rechts): PAUSE Unterbricht die Wiedergabe oder Aufnahme. STOP/EJECT Beendet alle Funktionen, nochmaliges Drücken öffnet das Kassettenfach. F.FWD Spult das Band schnell vorwärts. REWIND Spult das Band schnell rückwärts. PLAY Startet die Wiedergabe. RECORD Zusammen mit PLAY betätigen, um die Aufnahme zu beginnen. Wiedergabe 1. Schieben Sie den FUNCTION Schalter in Position TAPE. 2. Legen Sie eine bespielte Kassette ein. 3. Drücken Sie PLAY, um die Wiedergabe zu starten. 4. Stellen Sie die Lautstärke auf den gewünschten Pegel. 5. Die Wiedergabe kann mit PAUSE angehalten und wieder fortgesetzt werden. 6. Drücken Sie STOP/EJECT zum Beenden der Wiedergabe. Aufnahme von Radio 1. Schieben Sie den Funktionsschalter in Position RADIO. 2. Wählen Sie den gewünschten Sender und legen Sie eine unbespielte Kassette ein. 3. Drücken Sie RECORD und PLAY gleichzeitig, um die Aufnahme zu starten. 4. Drücken Sie PAUSE zum Anhalten oder STOP/EJECT zum Beenden der Aufnahme. Aufnahme von CD/MP3/USB/SD 1. Schieben Sie den Funktionsschalter in Position CD. 2. Legen Sie eine unbespielte Kassette ein. 3. Drücken Sie PAUSE, dann RECORD und PLAY. Das Gerät ist jetzt aufnahmebereit. 4. Starten Sie die Wiedergabe der CD oder des USB/SD Speichers und drücken Sie
PAUSE zum Start der Aufnahme. 5. Drücken Sie PAUSE zum Anhalten oder STOP/EJECT zum Beenden der Aufnahme
und dann STOP am CD Player.
TAPE DECK
12
DEUTSCH
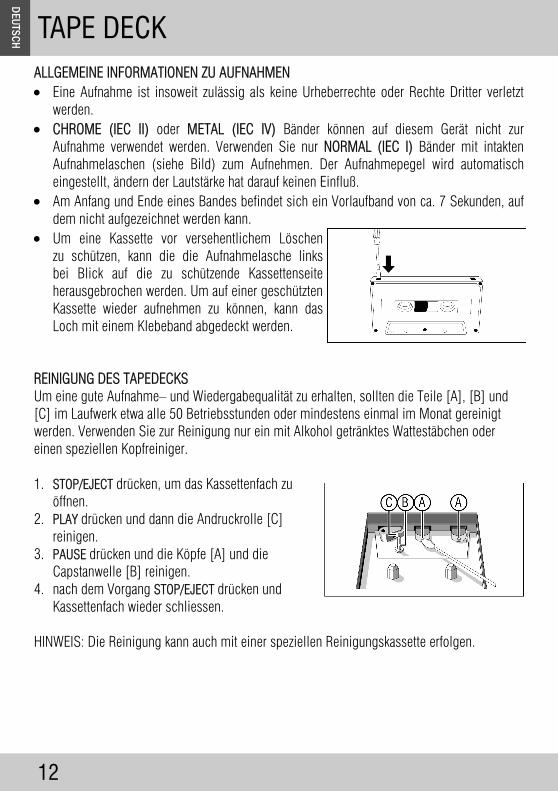
ALLGEMEINE INFORMATIONEN ZU AUFNAHMEN • Eine Aufnahme ist insoweit zulässig als keine Urheberrechte oder Rechte Dritter verletzt
werden. • CHROME (IEC II) oder METAL (IEC IV) Bänder können auf diesem Gerät nicht zur
Aufnahme verwendet werden. Verwenden Sie nur NORMAL (IEC I) Bänder mit intakten Aufnahmelaschen (siehe Bild) zum Aufnehmen. Der Aufnahmepegel wird automatisch eingestellt, ändern der Lautstärke hat darauf keinen Einfluß.
• Am Anfang und Ende eines Bandes befindet sich ein Vorlaufband von ca. 7 Sekunden, auf dem nicht aufgezeichnet werden kann.
• Um eine Kassette vor versehentlichem Löschen zu schützen, kann die die Aufnahmelasche links bei Blick auf die zu schützende Kassettenseite herausgebrochen werden. Um auf einer geschützten Kassette wieder aufnehmen zu können, kann das Loch mit einem Klebeband abgedeckt werden.
REINIGUNG DES TAPEDECKS Um eine gute Aufnahme– und Wiedergabequalität zu erhalten, sollten die Teile [A], [B] und [C] im Laufwerk etwa alle 50 Betriebsstunden oder mindestens einmal im Monat gereinigt werden. Verwenden Sie zur Reinigung nur ein mit Alkohol getränktes Wattestäbchen oder einen speziellen Kopfreiniger. 1. STOP/EJECT drücken, um das Kassettenfach zu
öffnen. 2. PLAY drücken und dann die Andruckrolle [C]
reinigen. 3. PAUSE drücken und die Köpfe [A] und die
Capstanwelle [B] reinigen. 4. nach dem Vorgang STOP/EJECT drücken und
Kassettenfach wieder schliessen. HINWEIS: Die Reinigung kann auch mit einer speziellen Reinigungskassette erfolgen.
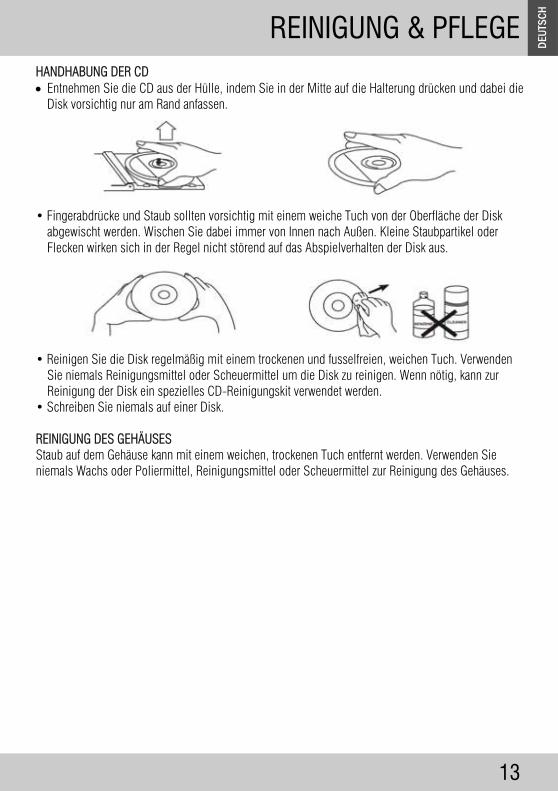
HANDHABUNG DER CD • Entnehmen Sie die CD aus der Hülle, indem Sie in der Mitte auf die Halterung drücken und dabei die
Disk vorsichtig nur am Rand anfassen. • Fingerabdrücke und Staub sollten vorsichtig mit einem weiche Tuch von der Oberfläche der Disk
abgewischt werden. Wischen Sie dabei immer von Innen nach Außen. Kleine Staubpartikel oder Flecken wirken sich in der Regel nicht störend auf das Abspielverhalten der Disk aus.
• Reinigen Sie die Disk regelmäßig mit einem trockenen und fusselfreien, weichen Tuch. Verwenden
Sie niemals Reinigungsmittel oder Scheuermittel um die Disk zu reinigen. Wenn nötig, kann zur Reinigung der Disk ein spezielles CD-Reinigungskit verwendet werden.
• Schreiben Sie niemals auf einer Disk. REINIGUNG DES GEHÄUSES Staub auf dem Gehäuse kann mit einem weichen, trockenen Tuch entfernt werden. Verwenden Sie niemals Wachs oder Poliermittel, Reinigungsmittel oder Scheuermittel zur Reinigung des Gehäuses.
REINIGUNG & PFLEGE
13
DEUT
SCH
SERVICE & SUPPORT
14
DEUTSCH
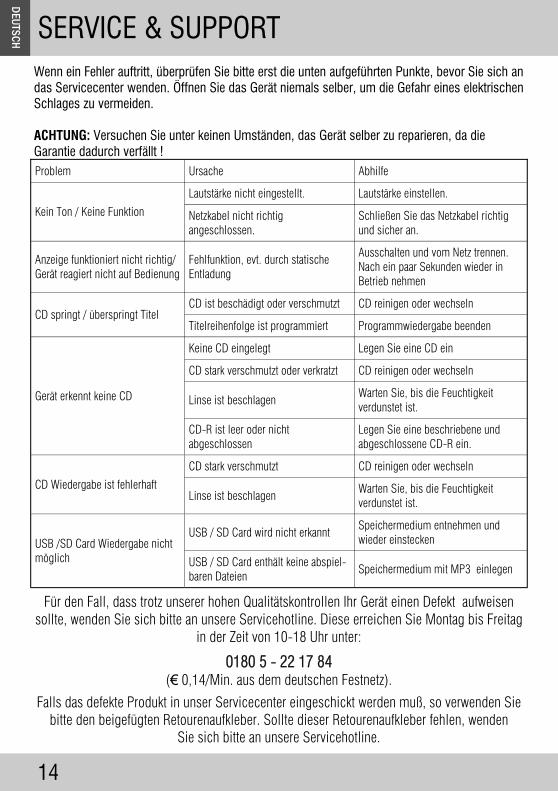
Wenn ein Fehler auftritt, überprüfen Sie bitte erst die unten aufgeführten Punkte, bevor Sie sich an das Servicecenter wenden. Öffnen Sie das Gerät niemals selber, um die Gefahr eines elektrischen Schlages zu vermeiden. ACHTUNG: Versuchen Sie unter keinen Umständen, das Gerät selber zu reparieren, da die Garantie dadurch verfällt !
Für den Fall, dass trotz unserer hohen Qualitätskontrollen Ihr Gerät einen Defekt aufweisen sollte, wenden Sie sich bitte an unsere Servicehotline. Diese erreichen Sie Montag bis Freitag
in der Zeit von 10-18 Uhr unter:
0180 5 - 22 17 84 (€ 0,14/Min. aus dem deutschen Festnetz).
Falls das defekte Produkt in unser Servicecenter eingeschickt werden muß, so verwenden Sie bitte den beigefügten Retourenaufkleber. Sollte dieser Retourenaufkleber fehlen, wenden
Sie sich bitte an unsere Servicehotline.
Problem Ursache Abhilfe
Kein Ton / Keine Funktion
Lautstärke nicht eingestellt. Lautstärke einstellen.
Netzkabel nicht richtig angeschlossen.
Anzeige funktioniert nicht richtig/ Gerät reagiert nicht auf Bedienung
Fehlfunktion, evt. durch statische Entladung
Ausschalten und vom Netz trennen. Nach ein paar Sekunden wieder in Betrieb nehmen
CD springt / überspringt Titel CD ist beschädigt oder verschmutzt CD reinigen oder wechseln
Titelreihenfolge ist programmiert Programmwiedergabe beenden
Gerät erkennt keine CD
Keine CD eingelegt Legen Sie eine CD ein
CD stark verschmutzt oder verkratzt CD reinigen oder wechseln
Linse ist beschlagen Warten Sie, bis die Feuchtigkeit verdunstet ist.
CD-R ist leer oder nicht abgeschlossen
Legen Sie eine beschriebene und abgeschlossene CD-R ein.
CD Wiedergabe ist fehlerhaft
CD stark verschmutzt CD reinigen oder wechseln
Linse ist beschlagen Warten Sie, bis die Feuchtigkeit verdunstet ist.
USB /SD Card Wiedergabe nicht möglich
USB / SD Card wird nicht erkannt Speichermedium entnehmen und wieder einstecken
USB / SD Card enthält keine abspiel-baren Dateien
Speichermedium mit MP3 einlegen
Schließen Sie das Netzkabel richtig und sicher an.

TECHNISCHE DATEN
15
DEUT
SCH
ALLGEMEIN Stromversorgung: 230V~ 50Hz Batteriebetrieb: DC 9V (6x 1,5V Typ Baby / UM-2 / C ) Laistungsaufnahme: 15W Frequenzbereich: UKW 88 - 108 MHz MW 530 - 1600 kHz Antenne: UKW: Teleskopantenne MW: Ferritantenne (intern) Ausgangsleistung: 50W Musikspitzenleistung COMPACT DISC Laufwerk: Toplader CD Laufwerk, 8cm & 12cm kompatibel Laser Typ CLASS 1 LASER 790nm Disk Kompatibilität CD-R / CD-RW Frequenzumfang: 100Hz - 20kHz (+/- 6dB) MP3 PLAYER Format: ISO9660 / JOLIET Bitrate: max 320 kBit/s CBR/VBR Sampling Rate: 8 - 48 kHz LAUTSPRECHERSYSTEM Lautsprecher: 2 Wege, 2 Lautsprecher
TAPE DECK Frequenzumfang: 125Hz - 6,3kHz (+/- 6dB)
TECHNISCHE ÄNDERUNGEN JEDERZEIT OHNE ANKÜNDIGUNG VORBEHALTEN
Entsorgung von Elektrogeräten Die Europäische Richtlinie 2002/96/EC bezüglich zu Elektro- und Elektronikmüll (Waste Electrical and Electronic Equipment, WEEE), verbietet die Entsorgung von Elektro– und Elektronikgerät über den normalen Hausmüll. Altgeräte müssen separat gesammelt werden, um die Wiederverwertung dem enthaltenen Materialien zu optimieren und die Belastung von Umwelt und Gesundheit zu minimieren. Das hier abgebildete Symbol soll den Benutzer an die Verpflichtung erinnern, das Gerät nicht über den normalen Hausmüll zu entsorgen. Weitere Informationen über die korrekte Entsorgung des Gerätes kann bei der Örtlichen Verwaltung oder Ihrem Händler eingeholt werden.

16

HAZARD WARNING: TO REDUCE THE RISK OF FIRE OR ELECTRIC SHOCK, DO NOT EXPOSE THIS PRODUCT TO RAIN OR MOISTURE. ESD Remark: In case of malfunction due to electrostatic discharge just reset the product (reconnect of power source may be required) to resume normal operation
WARNINGS
To reduce the risk of fire or electric shock, do not expose this appliance to rain or moisture
EXPLANATION OF GRAPHIC SYMBOLS
This product contains a low-power laser emitter
SAFETY INSTRUCTIONS
17
ENGL
ISH
PRECAUTIONS FOR USE To ensure safe, appropriate use of your product, please follow the advice below: Location • Do not use the product in extremely hot,
cold, dusty or damp conditions. • Place the product on a smooth, flat surface. • Ensure that air is free to circulate through
the product. Do not use it in a poorly ventilated place, cover it with a cloth or place it on carpet.
Power supply • Before using the product, check that its
rated voltage is suitable for your mains supply.
Safety precautions • When you plug in or unplug the power cord,
always Hold the plug rather than the cable. Pulling the cord could damage it and create a hazard.
• Always unplug the product from the mains if you do not intend to use it for an extended period.
• The On/Off button does not disconnect the product from the mains power supply. To disconnect the product from the power supply, you must unplug the power cord.
• This product should only be used in a horizontal position.
Condensation • Water droplets or condensation may form
inside the CD player if it is left in a warm, damp atmosphere.
• The product may not operate correctly if condensation forms inside it.
• Leave the product in a warm, dry room for 1 to 2 hours to allow the condensation to evaporate.
In the event of a problem, unplug the power cord and contact a qualified repair technician. Warning: Ventilation Your personal CD player has ventilation holes, which should never be obstructed. Liquid warning: Never allow liquids to splash or drip onto the product. Never place a liquid-filled container (e.g. vase, jar, etc.) above it. • The apparatus shall not be exposed to
dripping or splashing and that no objects filled with liquids, such as vases, shall be placed on apparatus
• The mains plug is used as the disconnect device and it shall remain readily operable. To be completely disconnect the power input, the mains plug of apparatus shall be disconnected from the mains.
• The apparatus will be use in open area • The ventilation should not be impeded by
covering the ventilation openings with items such as newspaper, table-cloths, curtains etc
• No naked flame sources such as lighted candles should be placed on the apparatus;
• Attention should be drawn to the environmental aspects of battery disposal;
• The use of apparatus in moderate climates.
SAFETY INSTRUCTIONS
18
ENGLISH
OVERVIEW
19
ENGL
ISH
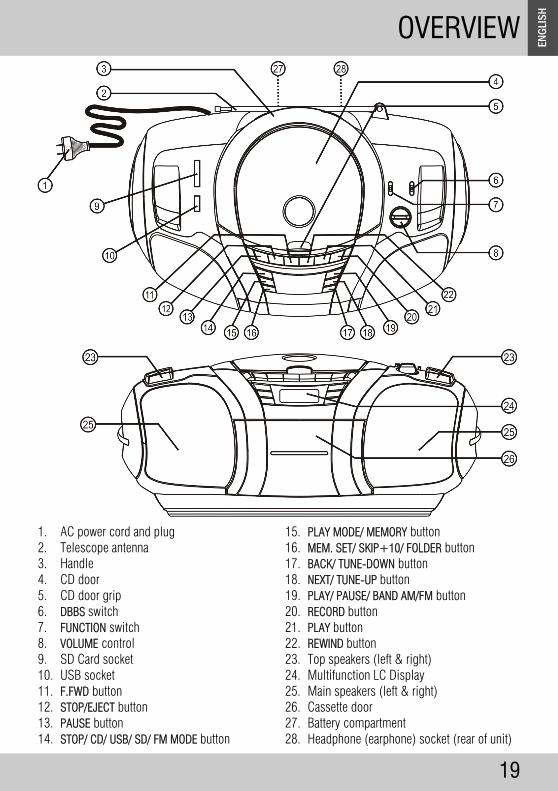
1. AC power cord and plug 2. Telescope antenna 3. Handle 4. CD door 5. CD door grip 6. DBBS switch 7. FUNCTION switch 8. VOLUME control 9. SD Card socket 10. USB socket 11. F.FWD button 12. STOP/EJECT button 13. PAUSE button 14. STOP/ CD/ USB/ SD/ FM MODE button
15. PLAY MODE/ MEMORY button 16. MEM. SET/ SKIP+10/ FOLDER button 17. BACK/ TUNE-DOWN button 18. NEXT/ TUNE-UP button 19. PLAY/ PAUSE/ BAND AM/FM button 20. RECORD button 21. PLAY button 22. REWIND button 23. Top speakers (left & right) 24. Multifunction LC Display 25. Main speakers (left & right) 26. Cassette door 27. Battery compartment 28. Headphone (earphone) socket (rear of unit)

CAUTION: Usage of controls, adjustments, performance or procedures other than those specified herein may result in hazardous radiation exposure. This unit should not be adjusted or repaired by anyone except a qualified service person. INSTALLATION Unpack all parts and remove protective material. Do not connect the unit to the power outlet before checking the voltage and before all other connections have been made. Do not cover any vents and make sure that there is a space of several inches/centimeters around the unit for ventilation. INSERT BATTERIES (not included): Open the battery compartment and insert six (6) batteries, type Baby (UM-2, C-Cell), preferably Alkaline, with the correct polarity as indicated by the „+“ and „-“ symbols inside the compartment. Batteries contain chemical substances, so they should be disposed of properly. Incorrect use of batteries can cause electrolyte leakage and will corrode the compartment or cause the batteries to burst. Therefore:
• Do not mix battery types: e.g. alkaline with carbon zinc. Only use batteries of the same type for the set.
• When inserting new batteries, do not try to mix old batteries with the new ones.
• Remove the batteries if the set is not to be used for a long time.
Whenever convenient, use the power supply if you want to conserve battery life. Make sure you remove the plug from the set and wall outlet before inserting batteries. Using AC Power 1. Check if the power voltage, as shown on the
type plate located on the bottom of the set corresponds to your local AC power supply. If it does not, consult your dealer or service centre.
2. Connect the power cord to the AC MAINS inlet and the wall outlet. The power supply is now connected and ready for use.
3. To switch off completely, unplug the power cord from the wall outlet.
Unplug the power cord from the wall outlet to protect your set during heavy thunderstorms.
OVERVIEW
20
ENGLISH
RADIO
21
ENGL
ISH
OPERATION 1. To select your sound source, adjust the FUNCTION selector to CD/MP3/USB/SD, TAPE(OFF) or
RADIO. 2. Adjust the sound with VOLUME. 3. To switch off the power, set the FUNCTION selector to TAPE(OFF) position. RADIO RECEPTION 1. Set FUNCTION switch to RADIO position 2. Select your desired broadcasting band (AM or FM) by pressing the BAND button. The symbol of
the selected band is displayed. 3. Use the TUNE-UP or TUNE-DOWN button to adjust the frequency and select the desired radio
station. Automatic tuning: Press and hold the buttons until the scanning starts. If a strong enough station is found, the scanning will automatically stop. Manual tuning: Briefly press the buttons to manually adjust the frequency. This way you can tune into weaker stations not found by automatic tuning.
4. If the tuned station is broadcasting in stereo, the FM ST. indicator will light up. 5. When you have finished listening, slide the FUNCTION selector to the TAPE(OFF) position. − If FM reception is weak, stereo may be indicated but the sound may not be good. In this case,
switch the FM MODE button to receive in mono only. − For FM, pull out the telescopic antenna. Incline and turn the antenna. Reduce its length if the
signal is too strong (very close to a transmitter). − For AM the set is provided with a built-in antenna so the telescopic antenna is not needed.
Direct the antenna by turning the set itself. RADIO MEMORY (STATION PRESET MEMORY STORAGE) • To store a desired station into a specific memory position, first tune in the desired station as
described above. • Press MEM. SET button once. • Press NEXT or BACK to select desired memory position. • Press MEM.SET button again once to save the selected station into the selected memory
position. • To recall any memorized station, simply press MEMORY key and then press BACK or NEXT to
select the desired station memory. The saved station will be recalled. • To clear the memory of any positions, simply save a new station to the same memory position. (There are 30 memory positions for FM and 20 memory positions for AM).
CD/MP3 PLAYER
22
ENGLISH
This CD-player can play Audio and MP3, also from CD-R and CD-RW. 1. Slide the FUNCTION selector to CD, the display becomes active. 2. To open the CD door, lift the CD door at the edge marked OPEN. 3. Insert a CD, CD-R or CD-RW with the label side facing up and gently close the CD
door. 4. The display will show READ , then the track and time is shown. Playback will start
automatically. 5. To pause playback, press PLAY/PAUSE. To resume, press PLAY/PAUSE again. 6. To stop playback, press STOP. NOTE: playback will also stop when • you open the CD compartment, • you select RADIO or TAPE(OFF) function, • the CD has reached the end. Selecting a different track During playback you can use BACK or NEXT to select a particular track. • If you have selected a track number in the stop or pause mode, press PLAY/PAUSE to
start playback. • Press NEXT once briefly to advance forward to the next track, press repeatedly until
the desired track number is shown in the display. • Press BACK once briefly to return to the beginning of the current track. • Press repeatedly to select a previous track. Fast finding track position 1. Press and hold down BACK or NEXT, the track will skip forward or backward. 2. When you recognize the passage you want to listen to, release BACK or NEXT to
resume normal playback. MP3 File and Folder navigation MP3 files can be organized into folders on the CD or flash memory. Using the FOLDER button, you can select each folder on the media. • Press FOLDER longer than 1,5 seconds to skip to the next folder. Playback of the first file
in stat folder will start automatically. • Press and hold the FOLDER button to sequentially browse through all the folders.
CD / MP3 PLAYER
23
ENGL
ISH
SKIP Funktion • Briefly press the SKIP+10 button to advance 10 tracks. Programming track numbers You may program up to 60 tracks to play in the desired sequence. If you like, store any track more than once. 1. Before programming, make sure the player is in STOP mode. 2. Press the MEMORY button, the display will show 00 P-01 3. use BACK or NEXT to select a track. 4. When your chosen track number appears, press MEMORY once to store the track.
The display shows your selected track number. 5. Repeat steps 3 and 4 to select and store more tracks this way. 6. To play your program, press PLAY/PAUSE Erasing a program You can erase the contents of the memory by • opening the CD door; • selecting RADIO or TAPE(OFF) function; • in STOP mode, press the STOP button twice. Repeat Mode Press the PLAY MODE button to select the repeat playback mode: REPEAT: (icon flashing) Repeat the current track. REPEAT ALL: Repeat all tracks (and folders) on the disk MP3 Information Display (ID3) The player can show ID3 Tag information embedded in MP3 files on the LC Display. During playback, the display sequentially shows the following information: TRACK/TIME FOLDER/TIME ID3 TEXT (SCROLLING) Notice for CD-R/CD-RW users: Depending on the type of CD writer, disc brand and writing speed, some reading problems may occur.

FLASH MEMORY
24
ENGLISH
USB / SD / MMC Flash Memory playback 1. Set the FUNCTION switch to CD. 2. Press the STOP/CD/USB/SD button longer than 2 seconds to select USB Mode.
Press again for more than 2 seconds to select SD Mode. Press the button yet again for more than 2 seconds to switch back to CD Mode. USB READ or SD READ will be shown in the display
3. Plug in USB Memory Stick into USB Port or insert SD or MMC card in card slot 4. After reading the content, the display will show total track number 5. Playback will start automatically. 6. Press BACK or NEXT to select tracks 7. More operation, see „CD/MP3 Player“ section of this manual. 8. Press STOP to end playback Note : Due to fast changing IT technology, this unit may not be compatible with some USB or SD/MMC flash storage device. • USB support Specification : USB V1.1/V2.0 • Only use SD cards in capacity range of 256MB to 2GB. Lower or higher capacities
are not supported by this player. • USB Memory maximum support 2GB.
TAPE DECK
25
ENGL
ISH
General operation (Keys from left to right) PAUSE Press to interrupt recording or playback. STOP/EJECT Press to stop all cassette play operation. Press again to open the cassette door. F.FWD Press to start the tape winding in a forward direction. REWIND Press to start the tape winding in a reverse direction. PLAY Press to start playing tape. RECORD Press together with PLAY button to start tape recording. Playback 1. Slide the FUNCTION switch to TAPE. 2. Insert a pre-recorded cassette tape. 3. Press PLAY button to start playback. 4. Adjust the volume control to the desired listening level. 5. Press PAUSE button when you want to stop playback temporarily. 6. Press STOP/EJECT button to terminate the playing. Record from Radio 1. Slide the FUNCTION switch to RADIO. 2. Tune to the desired station and insert a blank cassette tape. 3. Press RECORD and PLAY button to start recording. 4. Press PAUSE button to interrupt the recording or the STOP/EJECT button when
finished recording. Record from CD/MP3/USB/SD 1. Slide the FUNCTION switch to CD. 2. Insert a blank cassette tape for recording. 3. Press PAUSE and RECORD buttons together. The recording function is now on
standby mode. 4. Activate the CD player, and then press the PAUSE button to start recording. 5. To stop recording, press the PAUSE button first and then press the STOP button on
the CD player. Press STOP/EJECT button on the tape deck to stop the recording.
TAPE DECK
26
ENGLISH
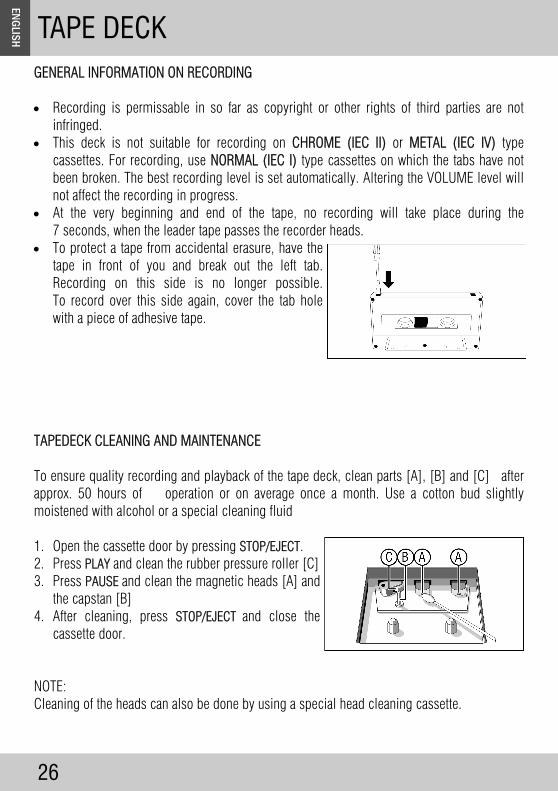
GENERAL INFORMATION ON RECORDING • Recording is permissable in so far as copyright or other rights of third parties are not
infringed. • This deck is not suitable for recording on CHROME (IEC II) or METAL (IEC IV) type
cassettes. For recording, use NORMAL (IEC I) type cassettes on which the tabs have not been broken. The best recording level is set automatically. Altering the VOLUME level will not affect the recording in progress.
• At the very beginning and end of the tape, no recording will take place during the 7 seconds, when the leader tape passes the recorder heads.
• To protect a tape from accidental erasure, have the tape in front of you and break out the left tab. Recording on this side is no longer possible. To record over this side again, cover the tab hole with a piece of adhesive tape.
TAPEDECK CLEANING AND MAINTENANCE To ensure quality recording and playback of the tape deck, clean parts [A], [B] and [C] after approx. 50 hours of operation or on average once a month. Use a cotton bud slightly moistened with alcohol or a special cleaning fluid 1. Open the cassette door by pressing STOP/EJECT. 2. Press PLAY and clean the rubber pressure roller [C] 3. Press PAUSE and clean the magnetic heads [A] and
the capstan [B] 4. After cleaning, press STOP/EJECT and close the
cassette door. NOTE: Cleaning of the heads can also be done by using a special head cleaning cassette.

CARE & MAINTENANCE
27
ENGL
ISH
CARE OF THE COMPACT DISC • To remove a disc from its storage case, press down on the center of the case and lift the
disc out, holding it carefully by the edges.
• Fingerprints and dust should be carefully wiped off the disc’s surface with a soft cloth. Unlike conventional records, compact discs have no grooves to collect dust and microscopic debris. Wiping with a soft cloth should remove most particles. Wipe in a straight line from the inside to the outside of the disc. Small dust particles and light stains will have absolutely no effect on reproduction quality.
• Clean the disc periodically with a soft, lint-free, dry cloth. Never use detergents or abrasive cleaners to clean the disc. If necessary, use a CD cleaning kit.
• Never write on or affix labels to the surface of compact discs. CARE OF THE CABINET If the cabinet becomes dusty wipe it with a soft dry dust cloth. Do not use any wax,polish sprays, or abrasive cleaners on the cabinet. CAUTION: Never allow any water or other liquids to get inside the unit while cleaning.
SERVICE & SUPPORT
28
ENGLISH
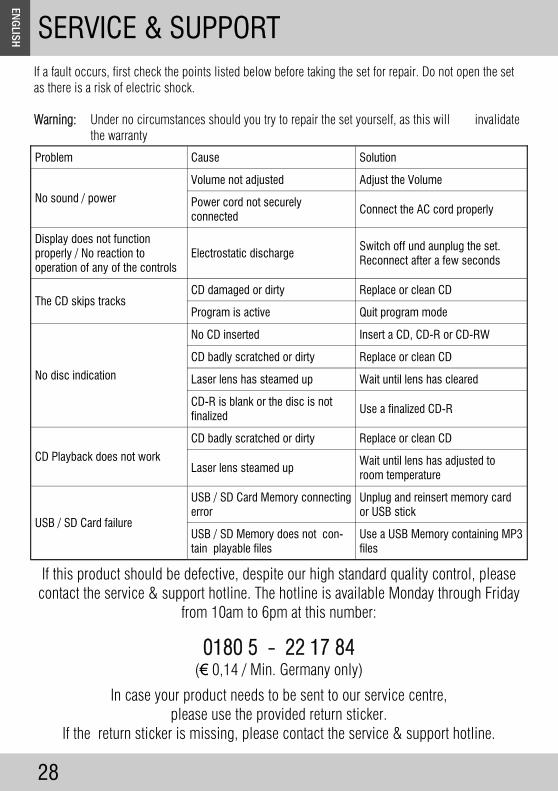
If a fault occurs, first check the points listed below before taking the set for repair. Do not open the set as there is a risk of electric shock. Warning: Under no circumstances should you try to repair the set yourself, as this will invalidate
the warranty
If this product should be defective, despite our high standard quality control, please contact the service & support hotline. The hotline is available Monday through Friday
from 10am to 6pm at this number:
0180 5 - 22 17 84 (€ 0,14 / Min. Germany only)
In case your product needs to be sent to our service centre, please use the provided return sticker.
If the return sticker is missing, please contact the service & support hotline.
Problem Cause Solution
No sound / power
Volume not adjusted Adjust the Volume
Connect the AC cord properly
Display does not function properly / No reaction to operation of any of the controls
Electrostatic discharge Switch off und aunplug the set. Reconnect after a few seconds
The CD skips tracks CD damaged or dirty Replace or clean CD
Program is active Quit program mode
No disc indication
No CD inserted Insert a CD, CD-R or CD-RW
CD badly scratched or dirty Replace or clean CD
Laser lens has steamed up Wait until lens has cleared
CD-R is blank or the disc is not finalized
Use a finalized CD-R
CD Playback does not work
CD badly scratched or dirty Replace or clean CD
Laser lens steamed up Wait until lens has adjusted to room temperature
USB / SD Card failure
USB / SD Card Memory connecting error
Unplug and reinsert memory card or USB stick
USB / SD Memory does not con-tain playable files
Use a USB Memory containing MP3 files
Power cord not securely connected
SPECIFICATIONS
29
ENGL
ISH
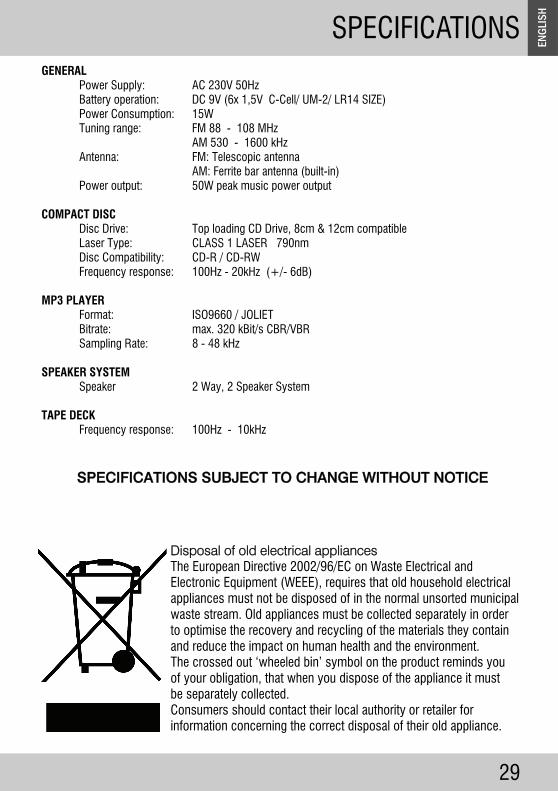
GENERAL Power Supply: AC 230V 50Hz Battery operation: DC 9V (6x 1,5V C-Cell/ UM-2/ LR14 SIZE) Power Consumption: 15W Tuning range: FM 88 - 108 MHz AM 530 - 1600 kHz Antenna: FM: Telescopic antenna AM: Ferrite bar antenna (built-in) Power output: 50W peak music power output COMPACT DISC Disc Drive: Top loading CD Drive, 8cm & 12cm compatible Laser Type: CLASS 1 LASER 790nm Disc Compatibility: CD-R / CD-RW Frequency response: 100Hz - 20kHz (+/- 6dB) MP3 PLAYER Format: ISO9660 / JOLIET Bitrate: max. 320 kBit/s CBR/VBR Sampling Rate: 8 - 48 kHz SPEAKER SYSTEM Speaker 2 Way, 2 Speaker System TAPE DECK Frequency response: 100Hz - 10kHz
SPECIFICATIONS SUBJECT TO CHANGE WITHOUT NOTICE
Disposal of old electrical appliances The European Directive 2002/96/EC on Waste Electrical and Electronic Equipment (WEEE), requires that old household electrical appliances must not be disposed of in the normal unsorted municipal waste stream. Old appliances must be collected separately in order to optimise the recovery and recycling of the materials they contain and reduce the impact on human health and the environment. The crossed out ‘wheeled bin’ symbol on the product reminds you of your obligation, that when you dispose of the appliance it must be separately collected. Consumers should contact their local authority or retailer for information concerning the correct disposal of their old appliance.

30


JGC BLACK SERIES RRMP 4600 VERSION SW/FN01-2008 REV A JGC-RRMP4600-DE-A5.PDF (C) 2007