kılavuz -...
TRANSCRIPT
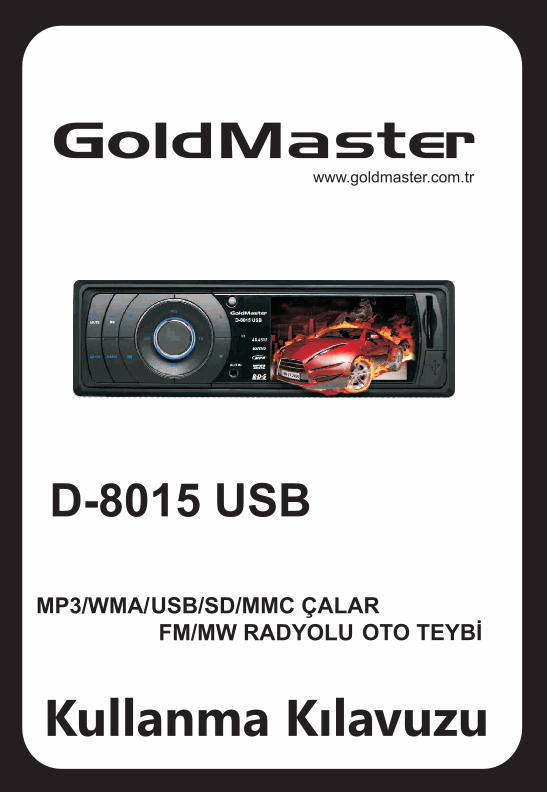
D-8015 USB
MP3/WMA/

1
UYARILAR
UYARILAR
Güç Kaynaðý
Boyutlar
Bass (100 Hzde)
Treble (10 kHzde)
Maksimum Çýkýþ Gücü
Güvenlik sigortasý
DC 12 Volts,
Negatif toprak
178x 92x 50 mm
+ 10 dB / 10 dB
+ 10 dB / 10 dB
4 x 45W
15 Amper (maks.)
87.5 to 108.0 Mhz
10.7 Mhz
10dB
30 dB
Frekans
IF
Hassasiyet(S/N=30dB)
Stereo ayýrýmý
522 to 1620 kHz
450 kHz
32 dBu
Frekans
IF
Hassasiyet(S/N=20dB)
GENEL
FM STEREO RADYO
MW STEREO RADYO
TEKNÝK ÖZELLÝKLER
ÝÇERÝK
UYARILAR .......................................................1TEKNÝK ÖZELLÝKLER......................................1ÖN PANEL........................................................2KUMANDA........................................................3MP4/5 ÇALIÞMASI...........................................5KURULUM........................................................6PRATÝK ÇÖZÜMLER........................................7
- 12 Volt DC negatif topraklý sistemi kullanýn
- Bütün baðlantýlarýn kitapçýkta anlatýldýðý gibi renklere uygun þekilde baðlandýðýndan emin olun Yanlýþ baðlantýlar cihazda arýzaya neden olabilir ya da araca zarar verebilir.
- Hoparlörlerin - uçlarýnýn - terminallere baðlandýðýndan emin olunuz.
- Cihazý açmadan önce bütün baðlantýlarýn doðru bir þekilde yapýldýðýný kontrol edin ve cihazý daha sonra çalýþtýrýn
- Yüksek amperli sigorta kullanýmý cihaza zarar verebilir
-Cihazý, ýsýnmasýný saðlayacak herhangi bir ýsýtýcý cihaza maruz býrakmayýn, bu durumdalarda cihaz aþýrý ýsýnabilir ve yangýn çýkabilir
- Cihazýn içerisine herhangi bir objenin sokulmasýný ya da girmesini öneleyiniz, bu durumlar cihaz üzerinde arýzaya neden olabilir.
- Cihazýn ses seviyesini her zaman normal deðerde tutunuz. Böylece dýþarýdan gelen uyarý seslerini rahatlýkla duyabilirsiniz.
- Teyp ile ilgili yaptýðýnýz herhangi bir iþlem sürüþünüzü kýsýtlayacak þekilde ise, lütfen aracý durdurun ve iþlemlerinizi bu þekilde tamamlayýn.
- Tavsiye edilenden düþük ya da yüksek sýcaklýklarda cihazý kullanmamaya özen gösteriniz. +60 ve - 10 derece sýcaklýk aralýðý dýþýnda cihazý hemen çalýþtýrmayýnýz.
NOT: Cihaza ait teknik donanýmlar haber verilmeksizin deðiþtirilebilir, telif haklarýsaklýdýr.Kullanma kýlavuzunda bulunan görsellerve bazý anlatýmlar farklýlýk gösterebilir, bubilgiler sadece referans içindir.
2
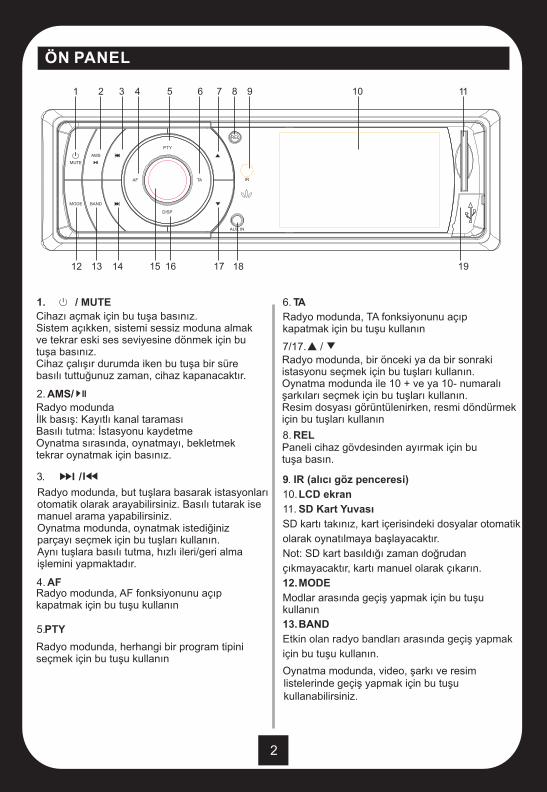
1. / MUTE
.
2. AMS/
3 /
4.
5.
AF
PTY
TA
12.
13.
6.
7/17. /
8.
SD kartý takýnýz, kart içerisindeki dosyalar otomatik
olarak oynatýlmaya baþlayacaktýr.
Not: SD kart basýldýðý zaman doðrudan
çýkmayacaktýr, kartý manuel olarak çýkarýn.
Modlar arasýnda geçiþ yapmak için bu tuþu
BAND
için bu tuþu kullanýn.
Oynatma modunda, video, þarký ve resim
REL
9. IR (alýcý göz penceresi)
10. LCD ekran
11. SD Kart Yuvasý
MODE
Etkin olan radyo bandlarý arasýnda geçiþ yapmak
ÖN PANEL
1 2 876543 9 10 11
151312 14 16 17 18 19
AUX IN
IR
REL
MUTE
AMS
BANDMODE
PTY
DISP
AF TA
Cihazý açmak için bu tuþa basýnýz.Sistem açýkken, sistemi sessiz moduna almakve tekrar eski ses seviyesine dönmek için bu tuþa basýnýz.Cihaz çalýþýr durumda iken bu tuþa bir süre basýlý tuttuðunuz zaman, cihaz kapanacaktýr.
Radyo modundaÝlk basýþ: Kayýtlý kanal taramasýBasýlý tutma: Ýstasyonu kaydetmeOynatma sýrasýnda, oynatmayý, bekletmek tekrar oynatmak için basýnýz.
Radyo modunda, but tuþlara basarak istasyonlarýotomatik olarak arayabilirsiniz. Basýlý tutarak isemanuel arama yapabilirsiniz.Oynatma modunda, oynatmak istediðiniz parçayý seçmek için bu tuþlarý kullanýn.Ayný tuþlara basýlý tutma, hýzlý ileri/geri almaiþlemini yapmaktadýr.
Radyo modunda, AF fonksiyonunu açýpkapatmak için bu tuþu kullanýn
Radyo modunda, TA fonksiyonunu açýpkapatmak için bu tuþu kullanýn
Paneli cihaz gövdesinden ayýrmak için butuþa basýn.
Radyo modunda, bir önceki ya da bir sonrakiistasyonu seçmek için bu tuþlarý kullanýn.Oynatma modunda ile 10 + ve ya 10- numaralýþarkýlarý seçmek için bu tuþlarý kullanýn.Resim dosyasý görüntülenirken, resmi döndürmekiçin bu tuþlarý kullanýn
Radyo modunda, herhangi bir program tipini seçmek için bu tuþu kullanýn
listelerinde geçiþ yapmak için bu tuþu kullanabilirsiniz.
kullanýn
.
. AUX IN
19USB insert slot
15. VOL
16. DISP
18
3
ÖN PANEL
MUTE
AF TA PTY
EQ SCANSTMODE
LOUD
DISP
V-
V+
SEL
23
RPT
5F-
6F+
8BAND
9AMS
1
4RDM
7LOC
0 REG EON CLEAR
SETUP
GOTO
12
34
56
7
8
1112
1314
1516
17
1819
910
20
1. /MUTE
2. AF
3. MODE
Modlar arasýnda geçiþ yapmak için bu tuþu kullanýn.4. EQ
Ekolayzer modlarýnýn seçimi
CLASS, POP, ROCK, JAZZ, VOCAL ve BoÞ
5/16. >>I / I<<
6. SETUP/ >II
UZAKTAN KUMANDA
Döndürme: Ses seviyesini ayarlamak için döndürün.Bir kez basýþ: Saðlanabilen fonksiyonlara ulaþmak için basýp döndürünüz.Ses düðmesine basýp, döndürdükten sonrasýrasý ile aþaðýdaki fonksiyonlara ulaþabilirsiniz:Volume Bass Treble Balance Fader
Ses düðmesini çevirerek seçilen fonksiyonunayarýný yapabilirsiniz.Bass ve treble seçimleri sadece Ekolayzer OFF (kapalý) konumda iken aktif olacaktýr.
Radyo modunda, sistem ayarlarýna girmek için tuþa basýlý tutunuz.
Tuþ sesi,saat modu, saat modu, radyo modu,ve TFT parlaklýðý ayarlarýndan birini seçmek için I<< / >>I tuþlarýný kullanýnýz ve onaylamakiçin VOL tuþuna basýnýz.Tuþ sesi modunda, tuþ sesini açmak ve kapatmakiçin I<< / >>I tuþlarýný kullanýnýz.Saat ayarlarý modunda, saat ve dakika ayarýiçin I<< / >>I tuþlarýný kullanýn. Saat modunda, 12 ya da 24 saat modunu seçmek için I<< / >>I tuþlarýný kullanýn.Radyo bölge modunda, bölgeyi seçmek için I<< / >>I tuþlarýný kullanýn.
TFT parlaklýðý modunda, ekran parlaklýðýný(0-20) deðerleri arasýnda ayarlamak için I<< / >>I tuþlarýný kullanýn, varsayýlan ayar10 dur.Yukarýdaki ayarlarýn herbirinde onaylamak içinVOL tuþuna yine çýkmak için VOL tuþuna basýn.
Geçerli zamaný ekranda görüntülemek için bu tuþa basýnýz. Radyo modunda, FM modu ve RDS moduarasýnda geçiþ yapmak için bu tuþa basýlý tutunuz
Geçerli zamaný ekranda görüntülemek için bu Ses kablosunu takýn, MOD tuþuna basýnýz.
USB cihazýnýzý takýn, USB disk içerisindeki dosyalar otomatik oynatýlacaktýr.
Cihazý açmak için bu tuþa basýnýz.Cihaz çalýþýr durumda iken bu tuþa bir süre basýlý tuttuðunuz zaman, cihaz kapanacaktýr.
Sistem açýkken, sessiz fonksiyonunu aktif vepasif duruma getirmek için bu tuþa basýn.
Radyo modunda, AF fonksiyonunu açýp kapatmak için bu tuþu kullanýn
Radyo modunda, istasyon aramasýný otomatik yapmak için bu tuþlara basýn, aramayý manuel yapmak için bu tuþlarý kullanýn.
Oynatma modunda, oynatmak istediðiniz parçayý seçmek için bu tuþlarý kullanýn.Hýzlý ileri ve geri oynatma iþlemleri için bu tuþa uzun basýnýz.
Oynatmayý bekletmek için bu tuþa basýnýz. Radyo modunda, sistem ayarlarýný açmak için bu tuþa uzun süreli basýnýz.Detaylar için ön panel VOL butonu iþlemlerinebakýnýz.

4
7. SAYI TUÞLARI
SAYILAR 1-6 (Radyo modunda)
3/RPT
Oynatma modunda,tekrar oynatma için basýn
4/RDM
Karýþýk sýra ile oynatmak için bu tuþa basýn.
5 / F-
6 / F+
7/LOC
8/BAND
8. REG
9. DISP
10.
.PTY
9/AMS
Oynatma sýrasýnda, oynatmayý durdurma
11
UZAKTAN KUMANDA
20. GOTO
12. TA
13. SCAN
14. ST
15. LOUD
17. V-, SEL, V+
18. CLEAR
19. EON
Bu tuþlara basarak önceden kaydedilmiþ istasyonlarý doðrudan seçebilirsiniz.Geçerli istasyonu istediðiniz sýraya kaydetmekiçin o tuþa bir süre basýlý tutunuz.
10- sýralý þarkýlara gitmek için basýn( MP3/WMA dosyalarý oynatýlýrken)Bu tuþla oynatýlan bir resim dosyasý döndürülebilr.
10+ sýralý þarkýlara gitmek için basýn( MP3/WMA dosyalarý oynatýlýrken)Bu tuþla oynatýlan bir resim dosyasý döndürülebilr.
Bu tuþa basarak güçlü ya da zayýf radyo alýmýnýseçebilirsiniz.
Radyo bandlarý arasýnda geçiþ yapmak için butuþu kullanýn.
Kayýtlý istasyon aramasý yapmak için bu tuþa basýn.Basýlý tutuþ: Sinyalleri güçlüden zayýfa doðru hafýzaya kaydetme.
Radyo modunda, REG fonksiyonunu açmakya da kapatmak için bu tuþa basýn.
Geçerli zamaný görüntülemek için bu tuþa basýn.Radyo modunda, FM ve RDS modlarý arasýndageçiþ iþin bu tuþa bir süre basýlý tutun.
Radyo modunda, program tipini seçmek için PTY tuþuna basýnýz.
Radyo modunda, TA fonksiyonunu açýp kapatmakiçin tuþuna basýnýz.
Radyo modunda, istasyon aramasý için bu tuþa basýn.Tarama sýrasýnda her bir istasyon 10 sn yayýnlanacak ve yeni istasyon aramasýna geçilecektir. Oynatma modunda, þarkýlarý taramak için bu tuþa basýn her bir þarký 10 sn oynatýlacaktýr.
Radyo modunda, Stereo ve mono modlar arasýnda geçiþ için bu tuþa basýnýz.
LOUD (yüksek ses) fonksiyonunu aktif etmekiçin bu tuþu kullanýn.
Hatalý giriþleri silmek için bu tuþu kullanýn.
Radyo modunda EON fonksiyonu açmak vekapatmak için bu tuþu kullanýn.
Oynatma modunda, belirli bir þarký sýrasýna gitmek için bu tuþu kullanýn.Örneðin, oynatma modundayken, ilk olarak GOTO tuþuna basýn, daha sonra istediðiniz sayýya basýn, 20 için 2 ve 0 gibi.
Ses seviyesini ayarlamak iiçin V+/V- tuþlarýný kullanýn.Ayrýca bazý ayarlarda deðerler bu tuþlar ile belirlenir. Bazý özel iþlemleri seçmek için SEL tuþunu kullanýn: VOL, BASS, TREB, BAK, FAD ve SUBW.

5
MP4/MP5 ÇALIÞMASI
MP4/MP5 DOSYASI YÜKLEME
MODLARIN SEÇÝMÝ
OYNATMAYI DURDURMA
RESÝM GÖRÜNTÜLEME
Resim Görüntüleme
Otomatik/manuel resim görüntüleme
Sonraki ve önceki resmin görüntülenmesi
USB/SD ÝÇÝN NOTLAR
Seçim
Oynatmayý bekletme
Oynatma taramasý
Oynatmayý tekrarlama
Karýþýk Oynatma
Oynatmayý durdurma
SES/VIDEO OYNATMA
UYARI
Ýçinde ses ve video dosyasý bulunan USB/SD kartý cihaza takýnýz, cihaz aþaðýdaki formatlarýdesteklemektedir,1- Ses formatlarý: Mp3, WMA, APE, OGG, FLAC, WAV2- Resim formatlarý: JPEG, BMP3- Video formatlarýÇ AVI, RMVB/RM, 3GP,Mp4, FLV, DAT, MPG
Paneldeki BAND tuþuna basarak seçim menüsüne gelin, tekrar BAND tuþuna bastýðýnýzda mümkün olan kaynaklara geçebilirsiniz, ses, resim ve video. >II tuþuna basarak seçimlerinizi onaylayabilirsiniz.
Sonraki ya da önceki öðe seçimleri için I<</>>Ituþlarýný kullanýn.Önceki 10- öðeyi seçmek için kumandadaki F-, sonraki 10+ öðeyi seçmek için kumandadaki F+ tuþuna basýnýz.Hýzlý geri ve ileri alma iþlemleri için I<</>>I tuþlarýna, iptal etmek için >II tuþuna basýn.
Oynatma modunda, oynatmayý durdurmak için>II tuþuna basýn.Oynatmaya tekrar devam etmek için yine aynýtuþa basýn.
Oynatma modunda, bütün parçalarýn ilk 10 saniyesini dinlemeniz için scan fonksiyonunu kullanabilirsiniz.Tarama fonksiyonunu aktif ya da pasif yapmakiçin SCAN tuþuna basýnýz.
Oynatma modunda, tekrar modlarýndan birini seçmek için 3/RPT tuþuna sürekli olarak basýn;BÝRÝ TEKRAR, TÜMÜ TEKRARFonksiyonu iptal etmek için tekrar basýn.
Oynatma modunda, parçalarý karýþýk sýradaoynatmak için 4/RDM tuþuna basýn.Fonksiyonu iptal etmek için tekrar basýn.
Video izleme ve resim görüntüleme yalnýzcapark modunda izlenmelidir.
Oynatma modunda, oynatmayý durdurmak içinkumandadan tuþuna basýn, oynatmaya devam etmek için >II tuþuna basýn.
Resim görüntüleme modunda, resmi saat yönünde ya da tersi yönde döndürmek için kumandadan F+/F- ya da panelden / tuþlarýna basýn. Not: Otomatik oynatmada bu fonksiyon aktif deðildir.
Resim görüntüleme modunda, otomatik ve manuelgörüntüleme modlarý arasýnda geçiþ için >II tuþunabasýnýz.
Resim görüntüleme modunda, otomatik ve manuelManuel oynatma modunda, önceki ya da sonraki resmi görüntülemek için I<</>>I tuþlarýný kullanýn.Not: Otomatik oynatmada bu fonksiyon aktif deðildir.
Oynatma modunda, oynatmayý durdurmak içinkumandadan tuþuna , oynatmaya devam etmek için >II tuþuna basýnýz.
USB diski ya da SD kartý takýn.
1- Kýsa bir süre bekledikten sonra, USB ya da SD kart içindeki ses dosyalarý otomatik oynatýlacaktýr. Oynatma esnasýnda, USB ya da M-CARD simgesi ön panelde yanýp sönecektir.2- Cihazda USB disk ve SD kart birlikte takýlý iken,MODE tuþuna basarak USB ya da SD kaynak seçimi yapabilirsiniz.3- Oynatma sýrasýnda USB ya da SD kart taktýðýnýzzaman en son takýlan cihaz otomatik oynatýlacaktýr.

6
Cihazýn yan kýsýmlarýndaki boþluklara vidalarý
sabitleyiniz.
182
35
3. Cihazýn çýkarýlmadý
KURULUM TALÝMATLARI ARKA MONTAJ
CÝHAZ KURULUMU
ÖN PANELÝ ÇIKARMA VE TAKMA
KURULUM
KABLO BAÐLANTILARI
1 2 3 4
LINE OUT ARKA SaÐ
LINE OUT ARKA SOL
LINE OUT ÖN SaÐ
LINE OUT ÖN SOL1
SUB WOOFER OUT2
4
3
A1 PARKING BRAKE
A3 GERÝ VÝTES
A6 NC
A4 (+)BATARYA
A5 ANTEN GÜCÜ+
A7 IGNITION KEY
A2 NC
A8 TOPRAK
B1 ARKA SOL HOPARLÖR+
B3 ÖN SaÐ HOPARLÖR+
B6 -ÖN SOL HOPARLÖR
B4 -ÖN SaÐ HOPARLÖR
B5 +ÖN SOL HOPARLÖR
B7 +ARKA SAÐ HOPARLÖR
B2 ARKA SaÐ HOPARLÖR-
B8 ARKA SOL HOPARLÖR-
SUB WOOFER OUT
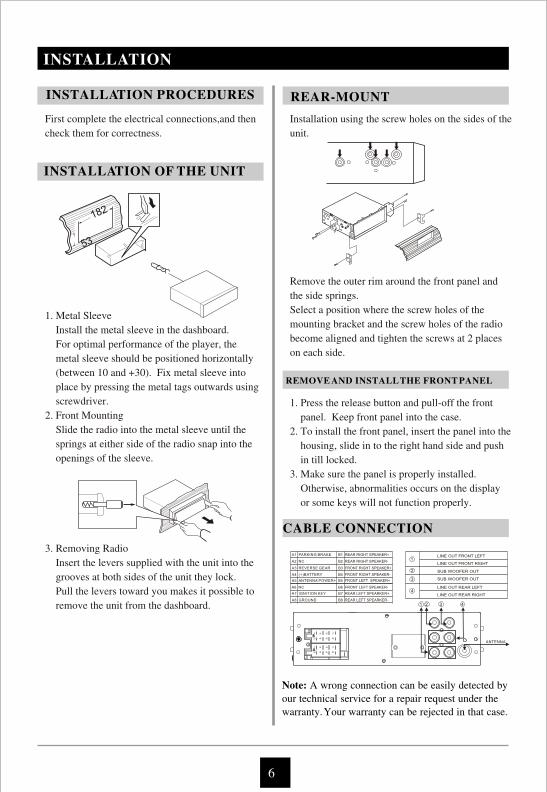
Ýlk olarak tüm elektriksel baðlantýlarý yapýnýz vedoðruluklarýný kontrol ediniz.
1- Yarým kýzakÝlk olarak yarým kýzaðý araç konsolundaki oto teyp kýsmýna yatay olarak yerleþtirin.Yarým kýzak üzerindeki metal çýkýntýlarý tornavida yardýmýyla,dýþa doðru itin ve yarým kýzaðýn konsola yerleþmesini saðlayýn.2- Ön panel yerleþimiCihazý yerleþtirilen yarým kýzaðýn içine iterek sabitleyin.Cihaz kasasý üzerindeki çýkýntýlar, yarým kýzaktaki boþluklara yerleþecek ve cihaz sabitlenecektir.
Paket içeriðinde bulunan T anahtarlarýný cihazýn her iki yanýnda içeriye sokarak kilitleyin. Daha sonra, cihazýnda çýkacaðý þekilde T anahtarlarýný kendinize doðru kuvvetlice çekin.
Panelin etrafýndaki metal çerçeveyi ve yan yaylarý çýkarýn.Montaj desteðinin vida deliklerinin pozisyonunuseçin ve radyonun vida delikleri ile hizalayýn, daha sonra her iki taraftaki 2 adet vidayý sýkýn.
1- Panel serbest býrakma tuþuna basýn ve ön paneliçýkarýn. Paneli koruma kutusuna koyun.2- Panel tekrar takmak için, paneli yuvasýna yerleþtirin saða doðru kaydýrarak kilitleninceye kadar itin.3- Panel normal bir þekilde yerleþtiðinden emin olunuz.Aksi durumda, ekranda anormal durumlar oluþabilir ya da tuþlar uygun fonksiyonlarýný yerine getiremez
Not: Yanlýþ yapýlan baðlantýlar sonucu oluþabilecek arýzalar garanti kapsamý içerisinde deðildir.
BAKIM
1- Cihazý kuru tutunuz, herhangi bir sebeple ýslandýðý zaman hemen kurulayýnýz. Sývý materyaller cihazýn içersindeki komponentlere zarar verecektir.2- Cihazý toz ve kirden uzak tutunuz.3- Cihazý nazik bir þekilde kullanýn, herhangi bir sebeple yere düþürülmesi durumda iç kompoonentler zarar göreceði için, cihaz anormal çalýþabilir.4- Cihazý temizlerken hafif nemli bir bez kullanýnýz, deterjan ya da alkol içerikli temizleyiciler cihaza zarar verebilir.5- Cihazý normal sýcaklýklar altýnda çalýþtýrmaya gayret gösteriniz, çok yüksek sýcaklýk cihazýn çalýþmasýnda anormalliklere sebep olabilir.
7
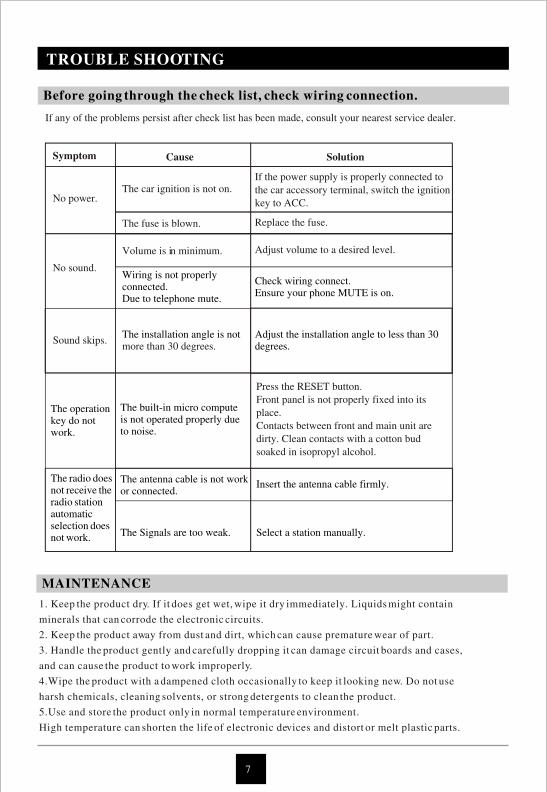
Karþýlaþtýðýnýz basit sorunlarda bu listeyi kontrol ediniz, çözüm bulamazsanýz yetkili bir servise danýþýnýz.
Sorun Sebep Çözüm
Güç yokAraç çalýþmamýþtýr
Eðer baðlantýlar doðru uçlara yapýlmýþsaaracý çalýþtýrýn.
Sigorta patlamýþtýr Sigortayý deðiþtirin
Ses yok
Seviye minimumdur Ses seviyesini ayarlayýn
Baðlantýlar doðruyapýlmamýþ olabilirCihaz sessiz modundadýr
Kablolarý kontrol edinSessiz modunu kontrol edin.
Ses AtlýyorCihazýn kurulum açýsý 30 dereceden fazla olabilir.
Cihazýn kurulum açýsýný 30 derecedendaha düþük yapýn
Tuþlarçalýþmýyor
Ön panel iþlemleri normalçalýþmýyor
RESET tuþuna basýn.Ön paneli iyi bir þekilde yerleþtirin
Cihazýn ön kýsmý ile arka ünite arasýndakiiletkenler kirli olabilir. Kontaklarýn saf alkol ile temizlenmesini saðlayýn.
Anten kablosu düzgüntakýlmamýþ olabilir.
Radyo yayýnalmýyorOtomatikseçim çalýþmýyor
Sinyal zayýf olabilir
Anten kablosunu düzgün bir þekilde takýn.
Ýstasyonu manuel seçin.
Bu listeyi kontrol etmeden önce baðlantýlarýn doðrulundan emin olunuz.
PRATÝK ÇÖZÜMLER
EEE Yönetmeliðine uygundur.PCB (Poliklorlu bifenil) madde içermez.
8
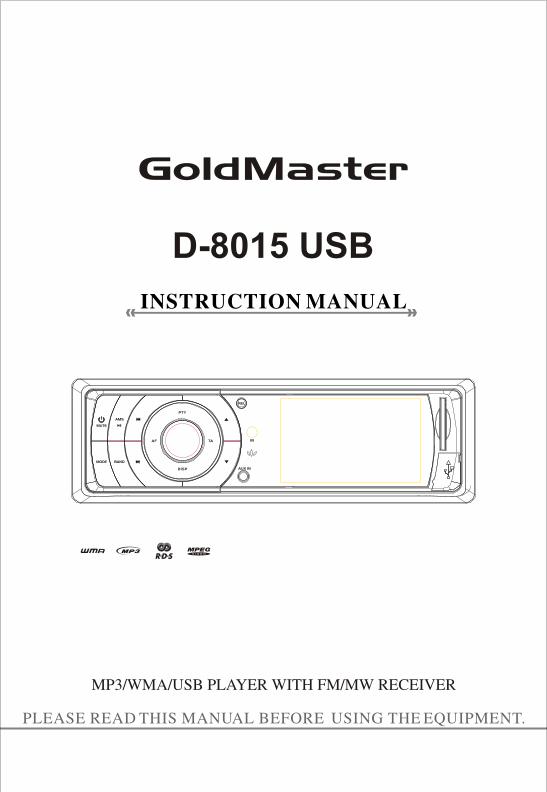
PLEASE READ THIS MANUAL BEFORE USING THE EQUIPMENT.
INSTRUCTION MANUAL
MP3/WMA/USB PLAYER WITH FM/MW RECEIVER
AUX IN
IR
REL
MUTE
AMS
BANDMODE
PTY
DISP
AF TA
Use only in a 12-volt DC negative-ground electric-al system. Be sure to connect the colour coded leads according to the diagram.Incorrect connections may cause the unit to mal-function or damage the vehicles, electrical system. Be sure to connect the speaker (-) leads to the speaker (-) terminal. Never connect the left and right channel speaker cables each other or to the vehicle body.Make sure all the connections are completely correct before turning on your unit.Using a fuse with a higher amperage rating may cause serious damage to the unit.DO NOT attempt to disassemble the unit. Laser beams from the optical pick up are dangerous to the eyes.Do NOT block vents or radiator panels. Doing so many cause heat to build up inside and may result in fire.Make sure those pins or other foreign objects do not get inside the unit; they may cause malfunctions, or create safety hazards such as electrical shockor laser beam exposure.Keep the volume at a level at which you can hear outside warning sounds (horns sirens, etc.).Stop the vehicle before carrying out any operation that could interfere with your driving.Do NOT work in extremely high or low temperature.Be sure the temperature inside the vehicle is between +60 and -10 before turning on your unit.
1
PRECAUTION
PRECAUTIONS
Power Supply Requirements
Chassis DimensionsBass (at 100 Hz)Treble (at 10 kHz)Maximum Output PowerSafety fuse
DC 12 Volts, Negative Ground178x 92x 50 mm+ 10 dB / 10 dB+ 10 dB / 10 dB4 x 45W15 Ampere (max.)
87.5 to 108.0 Mhz10.7 Mhz10dB30 dB
Frequency CoverageIFSensitivity(S/N=30dB)Stereo Separation
522 to 1620 kHz450 kHz32 dBu
Frequency CoverageIFSensitivity(S/N=20dB)
11112111
Mounting Bracket(Half Sleeve) Trim plateMounting Screw M5RubberRelease keyUser manual Wire connector Remote control
Note: Due to continuous product improvement, specifications and design are subject to change without prior notice.
GENERAL
ACCESSORIES
FM STEREO RADIO
MW STEREO RADIO
SPECIFICATION
CONTENTS
PRECAUTION ........................................................ 1SPECIFICATION .................................................... 1FRONT PANEL ....................................................... 2REMOTE CONTROL .............................................. 3 MP4/MP5 OPERATION .......................................... 5 INSTALLATION ...................................................... 6TROUBLE SHOOTING ........................................... 7
2
1. /MUTE Press this button to switch on the unit. When the system is on, press this button to shut off the sound output and press again to resume. When the system is on, press and hold this button to turn off the unit.
In radio mode, press once: to scan the preset stations; p
/14.
In radio mode, p
In radio mode, p
2. AMS/
ress and hold : To store the station intothe memory in the descending order of the instantaneous signal strength.In playback mode, press the button to pause/play play.3 /In radio mode, press the keys to search for a station automatically, press and hold to search for a station manually.In playback mode, press these keys to select the track you want to play. Long press to active fast forward or fast rewind search .4.
ress this button to turn on or off AF function.5.
ress this button to select one of theprogram types.
AF
PTY
TA
12.
13.
6. ress this button to turn on or off
TA function.7/17. / In radio mode, press the buttons to select the previousor next preset stations.In playback mode, press the buttons to select a 10+or 10- song.A Picture viewing can be rotated by pressing the button.8.
Insert SD card, it will play the files of SD card automatically.Note: Once the SD cards could not eject after pressing, just take it out manually.
Press the button to switch between the input modes.BAND
to switch between the radio bands available.In playback mode, press this button to switchamong audio list, video list and picture list.
In radio mode, p
RELPress this button to release the front panel.9. IR windows10. LCD display11. SD Card slot
MODE
Press
FRONT PANEL
1 2 876543 9 10 11
151312 14 16 17 18 19
AUX IN
IR
REL
MUTE
AMS
BANDMODE
PTY
DISP
AF TA
.
. AUX INInsert audio cord, press MODE button on the unitto AUX mode. 19 USB insert slotInsert USB device, it will play the files of USB automatically.
15. VOLRotating: Rotate to adjust the volume level. Press once: Press and rotate to select the functions provided.Following functions can be accessed by press the volume control knob; in the order specified :Volume Bass Treble Balance Fader
Rotate the volume control to change the setting of these functions.The Bass and Treble selections are active only in EQ OFF mode.In radio mode, press and hold to enter system setup. Press I<< / >>I button to select the BEEP, CLO ADJ , CLO MODE, RADIO AREA and TFT BRIGHT settings and press VOL button to confirm. In BEEP mode, press the I<< / >>I button to selectturn ON the BEEP function, press again to resume.In CLO ADJ mode, press I<< / >>I button to start the hour setting or minute setting.In CLO MODE mode, press I<< / >>I button to select 12H or 24 H mode.In AREA mode, press I<</>>I button to select one of the following areas: EUROPE, USA, OIRT, JAPAN,M-EAST, AUSTRALIA, LATIN and ASIA.In TFT BRIGHT mode, press I<< / >>I button to adjust the TFT brightness (0~20), the defaulted is 10.In the above setting, press VOL button to confirm then press VOL button again to exit.16. DISPPress the button to display the current time.In radio mode, press and hold this button to switchbetween the FM mode and RDS mode.18
3
FRONT PANEL
MUTE
AF TA PTY
EQ SCANSTMODE
LOUD
DISP
V-
V+
SEL
23
RPT
5F-
6F+
8BAND
9AMS
1
4RDM
7LOC
0 REG EON CLEAR
SETUP
GOTO
12
34
56
7
8
1112
1314
1516
17
1819
910
20
1. /MUTEWhen the unit is off, press the button to switch on the unit. When the system is on, press and hold PWR button to turn off the unit. In power on, press the button to function MUTE on/off.2. AFIn radio mode, press AF button to turn on/off theAF function. 3. MODEPress the button to switch between the input modes.4. EQTo select between the available DSP model viz. CLASS, POP, ROCK, JAZZ, VOCAL and NULL.5/16. >>I / I<< In radio mode, press the keys to search for a station automatically, press and hold to search for a station manually.In playback mode, press these keys to select the track you want to play. Long press to active fast forward or fast rewind search .6. SETUP/ >II
Press this button to pause the playback. In radio mode, press and hold this button to start the system setup.Please refer to the VOL button operation about thefront panel for details.
REMOTE CONTROL
4
7. NUMBER BUTTONSNUMERALS 1-6 (in radio mode)Press the keys to select a preset station directly.Press and hold the keys to store the current stationin preset memory band.3/RPTIn playback mode, press to repeat playing.4/RDMPress to play the songs in random order.5 / F-Press the button to go to the 10- song.(when an MP3 / WMA is being played).A Picture viewing can be rotated by pressing the button.6 / F+Press the button to go to the 10+ song.(when an MP3 / WMA is being played).A Picture viewing can be rotated by pressing the button.7/LOCPress this button to select a strong or weak radio reception.8/BANDPress this button to switch between the radio bands available.
8. REGIn radio mode, press this button to function REG ON/OFF.9. DISPPress this button to display the current time.In radio mode, press and hold this button to switchbetween the FM mode and RDS mode.10.
.PTYIn radio mode, press PTY button to select one ofthe programme type.
9/AMSPress this button to scan the preset stations.Press and hold : To store the station intothe memory in the descending order of the instantaneous signal strength.
In playback mode, press this button stop play.11
REMOTE CONTROL
In radio mode, p
In playback mode, press this button to scan the songs and the first 10 seconds of each song will be played.
Press SEL button t
ress this button to function EON on or off.20. GOTOIn playback mode, press the button to goto theexact track number.For example, in playing mode, press GOTO button firstly then press number button 2 and 0, the 20th one will be played.
12. TAIn radio mode, press TA button to turn on/off the TA function.13. SCAN
ress this button to search stations,when a station is searched, the program will be broadcast for 10 seconds then new stations will be searched continually and circlely.
14. ST In radio mode, press this button to switch output mode between STEREO and MONO .15. LOUDPress this button to function LOUD on/off.17. V-, SEL, V+Press V+/V- button to adjust the volume.The individual settings can be adjusted by V+/V- button.
o select special features : VOL, BASS, TREB, BAL, FAD and SUBW .18. CLEARPress the button to clear the false enter.19. EONIn radio mode, p

5
Insert a USB/SD with audio and/or video files, the unit supports files with following formats.1. Audio formats: MP3,WMA,APE, OGG, FLAC, WAV.2. Picture format : JPEG, BMP.3. Video formats: AVI, RMVB/RM, 3GP, MP4, FLV, DAT, MPG.
MP4/MP5 OPERATION
LOADING AN MP4/MP5 FILE
MODES SELECTIONPress BAND button on the panel to be back to theselection menu then press BAND button again toswitch the available sources: audio, picture and video.Press >II button to confirm the selection.
STOP PLAYING
In playback mode, press button on the remotecontrol to stop playing and press >II button toresume playing.
PICTURE VIEWING
Picture viewingIn picture viewing mode, press F+/F- button on the remote control OR / button on the panel torotate the picture clockwise/counterclockwise 90 .Note: It is not available in automatic viewing mode.
Automatic/manual viewing a pictureIn picture viewing mode, press >II button to switchbetween automatic and manual viewing picture mode.
Next/previous picture viewingIn manual viewing mode, press I<</>>I button to view a previous/next picture. Note: It is not available in automatic viewing mode.
Insert USB device or SD card.1. Wait for several seconds the audio files in USB or SD will play automatically with the USB or M-CARD flag on the front panel flashing.2. When there are USB, SD in the unit, press MODE button to select USB or SD source.3. When playing, insert a USB device or SD card, the last insert device will play automatically.
NOTES ON USB/SD
Selection
Pause playingIn playback mode, press >II button to pause playing.Press it again to resume playing.Scan playingIn playback mode, the
In playback mode, p
In playback mode,
Press I<< / >>I button to select a previous/next item.Press F- button on the remote control to select the previous 10- item while press F+ button on the remote control to select the next 10+ item.Press and hold I<< / >>I button to play fast rewindor fast forward and press >II to cancel it.
scan function enables you to listen to the first 10 seconds of the song.Press SCAN button to activate / de-activate scanfunction.Repeat playing
ress 3/RPT button to repeatedlyselect one of the repeat modes: REPEAT ONE, REPEAT ALL.Press again to cancel repeat function.Random playing
press 4/RDM button to play in random order.Press again to cancel the function.Stop playingIn playback mode, press button on the remotecontrol to stop playing and press >II button toresume playing.
AUDIO/VIDEO PLAYING
The video watching and the picture viewing canonly be succeeded in car braking mode.
WARNING
6
Installation using the screw holes on the sides of theunit.
First complete the electrical connections,and then check them for correctness.
182
53
1. Metal Sleeve Install the metal sleeve in the dashboard. For optimal performance of the player, the metal sleeve should be positioned horizontally (between 10 and +30). Fix metal sleeve into place by pressing the metal tags outwards using screwdriver.2. Front Mounting Slide the radio into the metal sleeve until the springs at either side of the radio snap into the openings of the sleeve.
3. Removing Radio Insert the levers supplied with the unit into the
grooves at both sides of the unit they lock. Pull the levers toward you makes it possible to remove the unit from the dashboard.
Remove the outer rim around the front panel and the side springs. Select a position where the screw holes of the mounting bracket and the screw holes of the radio become aligned and tighten the screws at 2 places on each side.
1. Press the release button and pull-off the front panel. Keep front panel into the case. 2. To install the front panel, insert the panel into the housing, slide in to the right hand side and push in till locked.3. Make sure the panel is properly installed. Otherwise, abnormalities occurs on the display or some keys will not function properly.
INSTALLATION PROCEDURES REAR-MOUNT
INSTALLATION OF THE UNIT
REMOVE AND INSTALL THE FRONT PANEL
INSTALLATION
CABLE CONNECTION
Note: A wrong connection can be easily detected by our technical service for a repair request under the warranty. Your warranty can be rejected in that case.
1 2 3 4
LINE OUT REAR RIGHT
LINE OUT REAR LEFT
LINE OUT FRONT RIGHT
LINE OUT FRONT LEFT 1
SUB WOOFER OUT2
4
3
A1 PARKING BRAKE
A3 REVERSE GEAR
A6 NC
A4 (+)BATTERY
A5 ANTENNA POWER+
A7 IGNITION KEY
A2 NC
A8 GROUND
B1 REAR RIGHT SPEAKER+
B3 FRONT RIGHT SPEAKER+
B6 FRONT LEFT SPEAKER-
B4 FRONT RIGHT SPEAKER-
B5 FRONT LEFT SPEAKER+
B7 REAR LEFT SPEARKER+
B2 REAR RIGHT SPEAKER-
B8 REAR LEFT SPEARKER-
SUB WOOFER OUT
7
If any of the problems persist after check list has been made, consult your nearest service dealer.
Symptom Cause Solution
No power.The car ignition is not on.
If the power supply is properly connected to the car accessory terminal, switch the ignitionkey to ACC.
The fuse is blown. Replace the fuse.
No sound.
Volume is in minimum. Adjust volume to a desired level.
Wiring is not properly connected.Due to telephone mute.
Check wiring connect.Ensure your phone MUTE is on.
Sound skips.The installation angle is not more than 30 degrees.
Adjust the installation angle to less than 30degrees.
The operationkey do not work.
The built-in micro computeis not operated properly dueto noise.
Press the RESET button.Front panel is not properly fixed into its place.Contacts between front and main unit are dirty. Clean contacts with a cotton bud soaked in isopropyl alcohol.
The antenna cable is not workor connected.
The radio doesnot receive the radio stationautomaticselection does not work. The Signals are too weak.
Insert the antenna cable firmly.
Select a station manually.
Before going through the check list, check wiring connection.
TROUBLE SHOOTING
1. Keep the product dry. If it does get wet, wipe it dry immediately. Liquids might contain
minerals that can corrode the electronic circuits.
2. Keep the product away from dust and dirt, which can cause premature wear of part.
3. Handle the product gently and carefully dropping it can damage circuit boards and cases,
and can cause the product to work improperly.
4.Wipe the product with a dampened cloth occasionally to keep it looking new. Do not use
harsh chemicals, cleaning solvents, or strong detergents to clean the product.
5.Use and store the product only in normal temperature environment.
High temperature can shorten the life of electronic devices and distort or melt plastic parts.
MAINTENANCE