manual de usuario - aviso de copyright · nota: si se usa un pedalier / rodamiento diferente, ......
TRANSCRIPT

ES
EN
1
MANUAL DE USUARIO - AVISO DE COPYRIGHT
AVISO DE COPYRIGHT
Todos los derechos reservados.
Ninguna parte de este manual se podrá reproducir, copiar, transmitir, difundir, descargar o almacenar en cualquier medio de almacenamiento para ningún propósito, sin el previo consentimiento expreso por escrito de ROTOR.
ROTOR autoriza la descarga de una sola copia de este manual en una unidad de disco duro o en otro medio de almacenamiento electrónico para su visualización y la impresión de una copia de este manual o de cualquiera de sus revisiones, siempre y cuando dicha copia electrónica o impresa contenga el texto completo de este aviso de copyright y se indique que cualquier distribución comercial no autorizada de este manual o cualquiera de sus revisiones está estrictamente prohibida.
La información de este documento está sujeta a cambios sin previo aviso. ROTOR se reserva el derecho a cambiar o mejorar sus productos y a realizar modificaciones en su contenido sin la obligación de comunicar a ninguna persona u organización tales modificaciones o mejoras.
Visite la página web de ROTOR (www.rotorbike.com) para consultar actualizaciones e información adicional más reciente respecto al uso y funcionamiento de éste y otros productos ROTOR.
Este manual fue publicado el: 09/12Model#: ROT112IC: 10992A-ROT112 FCC ID:R3A-RPM1
FCC ID: R3A-RPM1
ROTOR RPM1
IC: 10992A-ROT112MODEL#: ROT112
R 201-
135085
201-135085

2
MANUAL DE USUARIO - CONTENIDOS
CONTENIDOS
Descripción del producto ............................................................................................................................................................ 5
Instalación de las bielas ................................................................................................................................................................ 6
Vinculación .................................................................................................................................................................................... 12
Calibración / Puesta a cero ....................................................................................................................................................... 14
Comenzando con ROTOR Power ............................................................................................................................................ 15
Remplazo de las pilas ................................................................................................................................................................ 16
Entrenando con su ROTOR Power .......................................................................................................................................... 17
User Software ............................................................................................................................................................................... 18
Mantenimiento ............................................................................................................................................................................ 22
Específicaciones Técnicas ......................................................................................................................................................... 23
Política de Seguridad ................................................................................................................................................................. 24
Preguntas frecuentes .................................................................................................................................................................. 26

ES
EN
3
MANUAL DE USUARIO - DESCRIPCION DEL PRODUCTO
Los brazos de las bielas no son intercambiables.
Ambos brazos funcionan en conjunto como un único medidor de potencia y poseen números de identificación específicos.
Conjunto biela izquierdaATENCIÓN: NO DESMONTAR
Conjunto biela derechaATENCIÓN: NO DESMONTAR
Medidor de potencia IZQUIERDO
Medidor de potencia DERECHO
Araña MAS
DESCRIPCION DEL PRODUCTO

4
MANUAL DE USUARIO - INSTALACIÓN DE LAS BIELAS
COMpAtIbILIDAD
ROTOR Power es compatible con cuadros BB30, Pressfit30, BBright, BBright Direct fit, BSA, ITA, BB86 y 386.
Para más información consulte su proveedor de ROTOR autorizado o el proveedor de su bicicleta para asegurar la correcta compatibilidad del ROTOR Power con su cuadro.
Visite nuestro sitio Web: www.rotorbike.com
Siga las instrucciones de este manual para instalar y calibrar su ROTOR Power.
Cuando instale su ROTOR Power por primera vez, complete los siguientes pasos:
1. Verificación de los espaciadores para Carretera / Montaña (pág. 7 y 8).
2. Instalación del conjunto biela izquierda (pág. 9).
3. Instalación del conjunto biela derecha (pág. 9).
4. Fijación del conjunto biela derecha (pág. 10)
5. Ajuste de la precarga y ajuste fino (pág. 10).
Lea y comprenda en su totalidad este manual antes de la instalación de sus bielas.
Las especificaciones actuales del producto pueden variar debido a mejoras sin previo aviso.
Compruebe que no hay interferencia entre sus bielas y el cuadro, o cualquier otro componente.
INSTALACIÓN DE LAS BIELAS¡ATENCIÓN!
¡ATENCIÓN!

ES
EN
5
MANUAL DE USUARIO - INSTALACIÓN DE BIELAS DE CARRETERA
W 68mm 68mm 79mm 68mm 70mm 86,5mm 86mm
Di 42mm 46mm 42mm (Direct fit) / 46mm (PressFit) BSA ITA 41mm 46mm
“D”Di
W
1.a) VERIFICACIÓN DE ESpACIADORES pARA bIELAS DE CARREtERA
Para un correcto uso de sus bielas de carretera ROTOR Power es necesario seleccionar los espaciadores apropiados para su cuadro.
NOtA: Si se usa un pedalier / rodamiento diferente, puede que el espaciado varíe.
Selecciones su cuadro y espaciadores de la lista siguiente:
1. Cuadro bb30: Sitúe un espaciador “D” (11,5 mm) en el lado derecho y un espaciador “D” en el lado izquierdo.
2. Cuadro pressfit30: Sitúe un espaciador “D” (11,5mm) en el lado derecho y un espaciador “D” en el lado izquierdo.
3. Cuadro bbright: Sitúe un espaciador “D” (11,5 mm) en el lado derecho.
4. Cuadro bSA: Sitúe una cazoleta BSA30 (L) en el lado izquierdo y una cazoleta BSA30 (R) en el lado derecho.
5. Cuadro ItA: Sitúe una cazoleta ITA30 en el lado derecho y una cazoleta ITA30 en el lado izquierdo.
6. Cuadro bb86: Sitúe una cazoleta PF4130 en el lado izquierdo y una cazoleta PF4130 en el lado derecho.
7. Cuadro 386: Sitúe una cazoleta PF4630 con un espaciador “A” (2,5 mm) en el lado izquierdo y una cazoleta PF4630 con un espaciador “A” en el lado derecho del cuadro. (Espaciadores “A” no incluidos, visite su punto de venta ROTOR)
Lea el manual de su pedalier para verificar la compatibilidad con su cuadro.

6
MANUAL DE USUARIO - INSTALACIÓN BIELAS DE MONTAÑA
W 68/73mm 68/73mm 84mm 68/73mm 89,5mm 92mm
Di 42mm 46mm 46mm BSA 41mm 41mm
“D”“C”
“B”
Di
W
1.b) VERIFICACIÓN DE ESpACIADORES pARA LAS bIELAS DE MONtAÑA
Para un correcto uso de sus bielas de montaña ROTOR Power es necesario seleccionar los espaciadores apropiados para su cuadro.
NOtA: Si se usa un pedalier / rodamiento diferente, puede que el espaciado varíe.
Seleccione su cuadro y espaciadores de la lista siguiente:
1. Cuadros de 68 mm bb30 y pressfit30: Sitúe un espaciador “C” (8,5mm) con un espaciador “D” (11,5 mm) en el lado derecho y en el lado izquierdo.
2. Cuadros de 73 mm bb30 y pressfit30: Sitúe un espaciador “b” (5,5 mm) con un espaciador “D” (11,5 mm) en el lado derecho y en el lado izquierdo.
3. Cuadro bbright: Sitúe una cazoleta PF4630 con un espaciador “b” (5,5 mm) en el lado izquierdo y una cazoleta PF4630 con un espaciador “D” (11,5 mm) y un espaciador “b” (5,5 mm) en el lado derecho.
4. Caudro bSA 68 mm: Sitúe una cazoleta BSA30 con un espaciador “C” (8,5mm) en ambos lados del cuadro.
5. Cuadro bSA 73 mm: Sitúe una cazoleta BSA30 con un espaciador “b” (5,5mm) en ambos lados del cuadro.
6. Cuadro bb89 y bb92: Sitúe ambas cazoletas PF4130 con un espaciador “b” (5,5mm) en ambos lados del cuadro.
Lea el manual de su pedalier para verificar la compatibilidad con su cuadro.

ES
EN
7
MANUAL DE USUARIO - INSTALACIÓN DE LAS BIELAS
2. INStALACIÓN DEL CONJUNtO IZQUIERDO
2.1. Sitúe una arandela de plástico 0,5 mm en el eje.
2.2. Seleccione el espaciador adecuado para el lado izquierdo de la pág 7 (carretera) o 8 (montaña) e introdúzcalo en el eje a continuación de la arandela de plástico 0,5 mm.
2.3. Introduzca el conjunto biela izquierda a través de los rodamientos y cuadro.
3. INStALACIÓN DEL CONJUNtO DERECHO
3.1. Engrase el extremo derecho del eje.
3.2. Seleccione el espaciador adecuado para el lado derecho de la pág. 7 (carretera) o 8 (montaña) y sitúelo entre el cuadro y la biela derecha.
Espaciador seleccionado en la pág. 7-8
Espaciador seleccionadoen la pág. 7-80,5 mm arandela de
plástico

8
MANUAL DE USUARIO - INSTALACIÓN DE LAS BIELAS
4. FIJACIÓN DEL CONJUNtO bIELA DERECHA
4.1. Apriete el tornillo de la biela derecha a 35 Nm usando una llave allen dinamométrica de 8 mm.
5. AJUStE DE LA pRECARGA
5.1. Eliminar el juego lateral girando la tuerca de precarga con la mano en sentido antihorario.
5.2. Cierre la tuerca de precarga apretando el tornillo en sentido horario con una llave allen de 2 mm.
6. AJUStE FINO
6.1. Si las bielas giran con demasiada fricción sustraiga una arandela de plástico 0,5 mm del lado izquierdo y repita los pasos de “ajuste de la precarga” 5.1 y 5.2.
6.2. Si continua habiendo juego lateral use una arandela de plástico adicional de 0,5mm en el lado izquierdo y repita los pasos de “ajuste de precarga” 5.1 y 5.2.
No sobreapriete el tornillo.
Asegúrese que la tuerca de precarga sigue roscando en la biela izquierda.
35 Nm
¡ATENCIÓN!
¡ATENCIÓN!

ES
EN
9
MANUAL DE USUARIO - DESMONTAJE DE LAS BIELAS
DESMONtAJE DE LAS bIELAS
1. Desmonte el tornillo del conjunto biela derecha.
2. Desmonte la tuerca de acero del conjunto biela derecha usando una llave de cassette (Shimano TL-LR 15 ó similar).
3. Enrosque el tornillo de biela derecha en sentido horario en el eje.
4. Dé la vuelta a la tuerca del conjunto biela derecha y enrósquela en sentido horario en el brazo de la biela para usarla como extractor. Debe estar a ras con la cara exterior del brazo de la biela y estar roscados todos los filetes.
5. Desenrosque el tornillo de la biela derecha en sentido antihorario usando una llave allen de 8 mm hasta que el conjunto biela derecha se desmonte del eje.
INStALACIÓN DEL ROtOR pOWER
Una vez que las bielas están montadas no hay necesidad de instalar cualquier otro componente para el uso del medidor de potencia.
Todos los sensores y partes electrónicas están montados con el conjunto de las bielas.
TL-LR15

10
MANUAL DE USUARIO - VINCULACIÓN
Conecte su ROTOR Power con cualquier dispositivo que sea sensor ANT+TM para mostrar valores de salida.
Para un completo listado de Productos Certificados ANT+TM y su interoperatividad específica, visite la url de Productos ANT+TM: http://www.thisisant.com/directory/
Lea el manual del dispositivo ANT+TM para más información.
Antes de vincular el ROTOR Power con un monitor, asegúrese de que está al menos 10 metros alejado de cualquier otro sensor de potencia ANT+TM.
Esto prevendrá la vinculación por error con cualquier otro sensor de Potencia.
El ROTOR Power mantiene su “sensor ID” y permanecerá vinculado aunque cambie sus pilas.
pROCESO DE VINCULACIÓN
Para vincular el ROTOR Power con cualquier dispositivo ANT+TM:
1. Para evitar activaciones indeseadas el sistema se activa al aplicar en los pedales una fuerza de al menos 1,5 kg. Es suficiente con enganchar la zapatilla al pedal automático y recorrer unos metros. Cuando la biela se activa el LED rojo comienza a parpadear.
2. Espere hasta que el LED rojo en la biela pare de parpadear. El ROTOR Power ha comenzado a emitir la señal de radio y está listo para medir información.
Medidor de potencia
LED
VINCULACIÓN

ES
EN
11
MANUAL DE USUARIO - VINCULACIÓN/CALIBRACIÓN
VINCULACIÓN AUtOMÁtICA
3. Pulse el botón “EXPLORAR” en su dispositivo ANT+TM en la pantalla de Potencia. El botón “EXPLORAR” normalmente se sitúa en el menu: Ajustes\Configuración de bicicleta\Perfiles de bicicleta\”Tu perfil”\Potencia ANT+.
La razón principal para calibrar / poner a cero su ROTOR Power es asegurar una medición precisa de la potencia.
Calibrando el medidor de potencia se compensa cualquier cambio mecánico que pueda influenciar a la medida desde la última calibración / puesta a cero.
Realice la calibración de sus bielas ROTOR Power una vez montadas en la bicicleta con todos sus accesorios, con pedales incluidos.
El ROTOR Power debería de ser calibrado tras cualquier cambio de platos, cuadro o pedales. Tras cada proceso de calibración el LED rojo del ROTOR Power se iluminará durante un segundo.
SENSORID_ 02310
PRODUCT ID CARD
www.rotorbike.com
QC DATE
SENSOR ID
Register your ROTOR Power at power.rotorbike.com/registration
02310para un ahorro de energía el comando “CALIBRAR” es admitido sólo los 60 segundos siguientes al inicio o a la última lectura de potencia.
VINCULACIÓN MANUAL
Si posee más de un medidor de potencia ANT+TM introduzca el “sensor ID” del ROTOR Power en el dispositivo ANT+TM; el “sensor ID” se puede observar en la parte interior de la biela derecha como los últimos 5 dígitos del número mostrado o en su “Product Identity Card” incluido en el embalaje. p. Ej.: SENSOR ID_ 02310
CALIBRACIÓN / PUESTA A CERO
¡ATENCIÓN!

12
MANUAL DE USUARIO - CALIBRACIÓN/PUESTA A CERO
pROCESO DE pUEStA A CERO
Para poner a cero su ROTOR Power:
1. Enganche las zapatillas a los pedales automáticos y recorra unos metros para activar el potenciómetro y sitúe la biela derecha en posición vertical hacia abajo tal y como se muestra en la imagen.
Realice la calibración con los pedales instalados en sus bielas.
No coloque ningún otro peso en las bielas hasta que el proceso de puesta a cero finalice.
No mueva sus bielas durante los pasos 2, 3, 5 y 6.
2. Siga las instrucciones específicas de su dispositivo ANT+™ para enviar la señal de “CALIbRAR”.
El botón “CALIBRAR” normalmente está situado en el menú:Ajustes\Configuración de bicicleta\Perfiles de bicicleta\”Tu perfil”\
Potencia ANT+ Power.
3. Lea el valor entregado de vuelta por su dispositivo para la biela derecha. Para una correcta puesta a cero el valor debería de estar entre: 100-3900.
4. Active de nuevo sus bielas.
5. Repita el paso 2 para enviar la señal de “CALIBRAR”.
6. Lea el valor entregado de vuelta por su dispositivo para la biela izquierda. Para una correcta puesta a cero el valor debería de estar entre: 4200-8100.
No hay necesidad de poner a cero su ROTOR Power cada vez que usted monte en bicicleta.
Es recomendable repetir la calibración tras un periodo de rodaje de aproximadamente 30 horas de uso.
Para más información sobre el proceso de puesta a punto, utilidades de usuario y opciones de entrenamiento visite nuestra web: www.power.rotorbike.com

ES
EN
13
LED
MANUAL DE USUARIO - COMENZANDO/PILAS
El dispositivo posee un LED (de luz roja) observable en la parte exterior del ROTOR Power.
Cada vez que se comienza, el LED parpadeará (desde 1 a 10 parpadeos de luz roja) dependiendo de la carga de las pilas.
Si el LED parpadea 10 veces la batería está LLENA 100%.
Si el LED parpadea 3 veces la batería está AGOTADA 10%.
El ROTOR Power entra en un estado de inactividad y permanece en estado de reposo tras 2 minutos de inactividad.
El ROTOR Power está alimentado por dos pilas estándar de litio: CR2477B.
Tiempo estimado de uso en pedaleo: 300 horas.
Las pilas deben de ser instaladas de forma correcta (con el lado positivo “+” de cara al exterior) y deben de poseer la carga suficiente para su uso. La carga de las pilas puede ser comprobada por cualquier ordenador o dispositivo compatible con ANT+TM
La tapa de las pilas solo debe de ser desmontada cuando se cambian las pilas. La apertura de forma repetitiva puede dañar el sello interno.
No quite ninguna de las partes que componen la tapa de la batería.
Los componentes de la tapa de la batería deben seguir el orden de montaje mostrado a continuación:
Sea cuidadoso cuando rosque la tapa de las pilas para prevenir cualquier daño en su rosca.
COMENZANDO CON SU ROTOR POWER PILAS

14
MANUAL DE USUARIO - REEMPLAZO DE LAS PILAS
No es necesaria herramienta alguna para reemplazar las pilas. Es recomendado que ambas pilas sean cambiadas al mismo tiempo.
Proceso de reemplazo:
1. Abra la tapa de las pilas a mano girándola en sentido antihorario.
2. Extraiga la pila antigua de su alojamiento.Truco:Si no puede desmontar la pila a mano fácilmente use un imán para extraerla.
No use herramienta alguna u objeto afilado.Alojamientode la pila
Tapa
REEMPLAZO DE LAS PILAS
No tire a un contenedor normal las pilas gastadas, las pilas deben de ser dispuestas según la normativa local en contenedores acondicionados especialmente para dicho material.
¡ATENCIÓN!
Nunca retire la espuma blanca del interior de la tapa de la batería. puede crear fallos de conectividad con la pila.
¡ATENCIÓN!
3. Sitúe una pila nueva en el alojamiento de la pila con el lado positivo “+” de cara al exterior.
4. Rosque a mano la tapa de la pila en sentido horario.

ES
EN
15
MANUAL DE USUARIO - ENTRENANDO CON SU ROTOR POWER
Tras vincular su ROTOR Power siga las opciones de configuración de su dispositivo ANT+TM para seleccionar las medidas que desee mostrar en el dispositivo.
Consulte a su entrenador para que evalúe de manera adecuada los valores de las mediciones proporcionadas por el ROtOR power para maximizar su rendimiento.
MEDICIONES DEL ROtOR pOWER
El ROTOR Power comienza a medir de forma automática tras mover las bielas. En uso normal, el muestreo de datos se realiza cada 2ms (500 veces por segundo) y es enviado por señal de radio a su dispositivo ANT+TM.
El ROTOR Power envía los siguientes datos al dispositivo ANT+TM:
pOtENCIA: Potencia total medida en vatios para ambas piernas.
EQUILIbRIO: Contribución en porcentaje de la potencia realizada por las piernas izquierda - derecha.
pAR EFECtIVO (IZQUIERDA/DERECHA):Contribución positiva a la potencia total en un ciclo de pedaleo. Medido como un porcentaje; con el 100% no hay potencia negativa.
UNIFORMIDAD DE LA pEDALADA (IZQUIERDA/DERECHA):Proporción entre la potencia media y el pico de potencia en un ciclo de pedaleo. Medido como un porcentaje.
CADENCIA: medido en RPM (vueltas por minuto).
Desconecte cualquier sensor ANt+tM de cadencia de su bicicleta, no es necesario y puede causar interferencias con el sensor interno de cadencia del ROtOR power.
P-
P+
ENTRENANDO CON SU ROTOR POWER
¡ATENCIÓN!

16
MANUAL DE USUARIO - USER SOFTWARE
En esta sección encontrará los principales enlaces web de acceso a la información técnica asociada al ROTOR Power.
1. http://power.rotorbike.com/Website dedicado exclusivamente al producto ROTOR Power.
2. http://rotorbike.com/Web oficial de ROTOR donde encontrará información técnicade todos sus productos.
3. http://www.thisisant.com/directory/rotor-power/Web específica de ANT+ donde se muestra la compatibilidadcon los diferentes dispositivos del mercado.
USER SOFTWARE - DOCUMENTATIONUSER SOFTWARE - INTRODUCCIÓN
El user software es una herramienta que puede ser usada por el usuario y consta de 4 apartados desglosados a continuación; se recomienda visitar nuestra web y descargar el software y su manual de uso.
El user software es provisto de forma gratuita y no se garantiza la compatibilidad ni funcionamiento apropiado en equipo alguno.
ROTOR nunca sera responsable del fallo en su equipo debido a este software.
En caso de cualquier duda o consulta contacte con el servicio tecnico de ROTOR:
O visite nuestra web oficial donde se muestran todos nuestros productos:
www.rotorbike.com
www.power.rotorbike.com

ES
EN
17
MANUAL DE USUARIO - USER SOFTWARE
En esta sección encontrará el software especialmente diseñado para el entrenamiento con sus ROTOR Power.
SECCIONES tRAINING MODE
Muestra los valores instantáneos de cadencia (Cadence).
Muestra los valores instantáneos y las medias en 3s/10s/30s de la potencia (Power), equilibrio (Balance), par efectivo (Torque Effectiveness) y suavidez de pedaleo (Pedal Smoothness).
Esta pestaña se puede ocultar a convenencia del usuario.
pEStAÑA LAtERAL “GRApHIC”
Muestra una gráfica de los valores de potencia (mostrada en rojo) y cadencia (mostrada en azul) en función del tiempo.
La resolución de la gráfica puede cambiarse con la pestaña desplegable inferior derecha que delimita el tiempo de medición mostrado.
Esta pestaña se puede ocultar a convenencia del usuario.
USER SOFTWARE - TRAINING MODE
18
MANUAL DE USUARIO - USER SOFTWARE
En esta sección encontrará las herramientas para actualizar y calibrar sus bielas ROTOR Power.
USER SOFTWARE - SERVICE MODE
Siga los pasos descritos en el manual del user software para realizar las siguientes operaciones:
1. Actualizar el software de cada una de sus bielas.
2. Calibrar su ROTOR Power para poner a cero sus bielas.
3. Realizar una prueba estática para verificar el correcto funcionamiento de su potenciómetro.
4. Exportar una imagen de cualquier problema en cualquiera de los procesos anteriores.
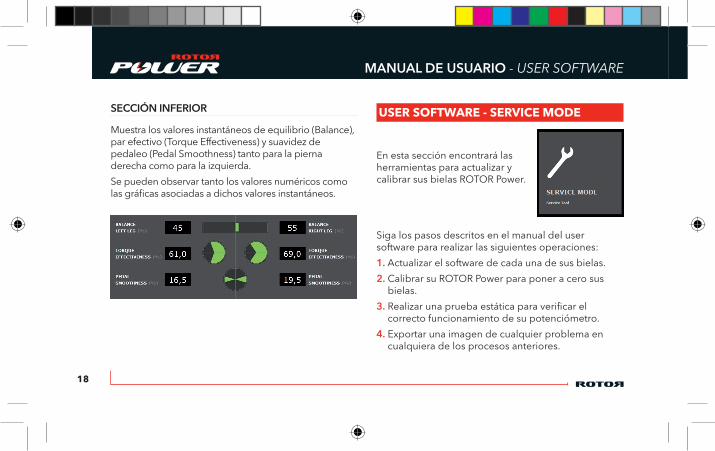
SECCIÓN INFERIOR
Muestra los valores instantáneos de equilibrio (Balance), par efectivo (Torque Effectiveness) y suavidez de pedaleo (Pedal Smoothness) tanto para la pierna derecha como para la izquierda.
Se pueden observar tanto los valores numéricos como las gráficas asociadas a dichos valores instantáneos.

ES
EN
19
MANUAL DE USUARIO - USER SOFTWARE
En esta sección encontrará las herramientas necesarias para la gestión de los archivos de entrenamiento obtenidos de su ROTOR Power con formato “.FIT”.
USER SOFTWARE - UTILITIES
Captura de pantalla del service mode en el user software.

20
MANUAL DE USUARIO - MANTENIMIENTO
Inspeccione sus componentes ROTOR en busca de impactos, fisuras, perdida de piezas o deformaciones antes de cada uso, así como tras el caso hipotético de una caída.
Si hay presencia de algunas de las circunstancias previamente mencionadas, no use sus componentes hasta que no hayan sido sustituidos.
El ciclista debe inspeccionar la bicicleta, así como sus componentes, con frecuencia para localizar daños producidos por el uso normal o abusivo.
Revise, por favor, estos daños después de cada salida. Controle también periódicamente el apriete correcto de la tornillería, pero no sobreapriete los tornillos.
Nunca use equipos de limpieza de alta presión o productos químicos para lavar el ROtOR power.
“Resistencia al agua: IPX7”.
No trate de desmontar ninguna de las partes electrónicas del ROtOR power, el sellado puede dañarse con la consecuente anulación de la garantía.
No desmonte los tornillos de la tapa inferior, puede producir un fallo electrónico.
En caso de fallo electrónico, la reparación debe de ser realizada por un centro de servicio técnico autorizado por ROtOR.
El uso continuado de piezas dañadas, puede ocasionar perdida de control de la bicicleta, así como daños severos e incluso la muerte.
MANTENIMIENTO ¡ATENCIÓN!

ES
EN
21
MANUAL DE USUARIO - ESPECIFICACIONES TÉCNICAS
ESPECIFICACIONES TÉCNICAS Temperatura óptima de funcionamiento: -5 to 55 C Humedad máxima de funcionamiento: 90% Especificaciones de las pilas: 3.0 V (1000 mA CR2477B bateria de litio) Vida estimada de las pilas: 300 horas de tiempo de uso Voltaje de alimentación: 1.9 V Consumo medio estándar de trabajo: 2.1 mA Consumo medio estándar en reposo: 3.2 μA Sensor: Galgas extensiométricas Frecuencia de trabajo: ANT+ 2.4 Ghz Máxima banda de frecuencia para la potencia: -5 dB Peso total añadido: 36 g Datos transmitidos: Potencia, cadencia, equilibrio, par efectivo, suavidad de pedaleo Precisión en la potencia: +/- 1 W Precisión en la cadencia: +/- 0,5 rpm Precisión en el equilibio: +/- 0,5% Precisión en par efectivo: +/- 0,5% Precisión en la suavidad de pedaleo: +/- 0,5%

22
MANUAL DE USUARIO - POLITICA DE SEGURIDAD
El manual de usuario contiene información muy útil e importante acerca de la correcta instalación, uso y mantenimiento de su producto ROTOR. Debe leer, comprender y seguir cuidadosamente las instrucciones que aparecen en dicho manual. Mantenga el manual en un lugar seguro para futuras consultas.No realice ninguna modificación o ajuste que no esté explícitamente descrita en el manual. Si tuviera alguna duda sobre su capacidad para llevar a cabo la instalación o mantenimiento, por favor, acuda a un taller autorizado por ROTOR.Una instalación u operación de mantenimiento incorrecta puede reducir drásticamente el rendimiento del producto y podría provocar un accidente con resultado de lesiones o incluso la muerte. Cualquier componente que se encuentre en mal estado por exceso de uso, fatiga, rotura, deformación o impactos ha de ser reemplazado inmediatamente.Por favor, lleve su bicicleta regularmente a un taller cualificado para inspeccionar cualquier signo de fatiga, rotura, deformación o exceso de uso.No llevar a cabo un mantenimiento adecuado reduce drásticamente la vida útil del producto así como su rendimiento.Si tiene cualquier duda, comuníquela en su punto de venta ROTOR más cercano o contacte con mecánico profesional de bicicletas.
Los productos ROTOR y todos sus componentes están garantizados durante 2 años contra cualquier fallo de fabricación o material defectuoso. En el caso de existir alguna avería durante el periodo de garantía, Rotor Componentes Tecnológicos se compromete a reparar o sustituir el componente o producto defectuoso sin cargo para el cliente. Además, en algunos países, ROTOR está obligado a asegurar cualquier garantía legal, definida por la ley de cada país, para la protección del usuario. Los componentes con una vida útil limitada por el uso y las roturas no achacables a defectos de fabricación no están cubiertos por esta garantía. Fallos o roturas causadas por un uso inapropiado, instalación defectuosa o un mantenimiento inadecuado (según se indica en el manual de usuario) no están cubiertos por esta garantía. Conserve su factura de compra, pues le permitirá ejercer su derecho como comprador a la garantía. La garantía será anulada en los siguientes casos:
Incumplimiento de los requisitos anteriormente mencionados.
Instalación inadecuada.
Uso negligente o instalación de piezas inadecuadas.Servicio de Garantía: El comprador original debe de enviar su producto ROTOR junto con la factura original, recibo de tarjeta de crédito u otra prueba satisfactoria donde sea mostrada la fecha de compra del producto.
CONDICIONES DE GARANTÍA ROTORPOLITICA DE SEGURIDAD

ES
EN
23
MANUAL DE USUARIO - DECLARACIÓN NORMATIVA
Declaración de conformidad con la la FCC y la Industria de Canadá.Este dispositivo cumple las estipulaciones establecidas por la Industria de Canadá y en la Parte 15 de la normativa de la FCC de Estados Unidos.Su funcionamiento quedará sujeto a las dos condiciones siguientes: (1) Este dispositivo no podrá causar interferencias dañinas, y (2) este dispositivo debe aceptar cualquier interferencia recibida, incluidas las interferencias que puedan causar un funcionamiento no deseado.El término “IC:” antes del número de la certificación por radio sólo significa que las especificaciones técnicas de la Industria de Canadá fueron cumplidas.Los cambios o modificaciones realizados en la unidad que no hayan sido aprobados de forma expresa por la parte responsable de garantizar su seguridad podrían invalidar el derecho del usuario a utilizar este equipo.NOtA: Tras realizar las pruebas correspondientes, se ha determinado que este equipo cumple los límites establecidos para dispositivos digitales de clase B de conformidad con el apartado 15 de la Normativa de la FCC.Estos límites se han establecido con el objetivo de aportar una protección razonable contra interferencias perjudiciales cuando el equipo se utiliza en el hogar.Este equipo genera, utiliza y puede emitir energía de radiofrecuencia y, a menos que se instale y se utilice de acuerdo con el manual de instrucciones, puede ocasionar interferencias perjudiciales en las comunicaciones por radio.
Sin embargo, no existe garantía de que estas no se produzcan en determinadas instalaciones.Si el equipo produce interferencias perjudiciales en la recepción de radio o televisión, lo cual puede probarse encendiendo y apagando el equipo, se recomienda al usuario corregir dichas interferencias tomando una o varias de las siguientes medidas:
Modificar la orientación o ubicación de la antena de recepción. Aumentar la separación entre el equipo y el receptor. Conectar el equipo a una toma de corriente o circuito diferente al del receptor. Consultar al distribuidor o a un técnico especialista de radio o TV.
Este producto no contiene partes que puedan ser reparadas o remplazadas por el usuario.Las reparaciones deberán de ser realizadas sólo por distribuidores ROTOR.Cualquier reparación o modificación no autorizada puede dañar de forma permanente el equipo, resultar en la suspensión de la garantía y la autorización de para usar este equipo conforme a lo estipulado en las normas de la sección 15. Este producto cumple con la Directiva 93/42/EEC.
ROtOR RpM1FCC ID: R3A-RPM1IC: 10992A-ROT112
201-135085
REGLAMENTO CEE
DECLARACIÓN NORMATIVA

24
MANUAL DE USUARIO - PREGUNTAS FRECUENTES
¿Con qué dispositivos ANT+ es compatible el ROTOR Power?Vaya al link de ANT+: http://www.thisisant.com/directory
¿Qué programa puedo usar para analizar mis datos?http://home.trainingpeaks.comhttp://goldencheetah.org/http://www.o-synce.com/en/software/training-software.htmlhttp://www.garmin.com/en-US
¿Porque mi ordenador no se vincula con el potenciómetro?Para vincular el ROTOR Power con cualquier dispositivo ANT+:Inicie el sistema del medidor de potencia girando las bielas 2-3 veces hasta que el LED rojo comience a parpadear.Espere hasta que el LED rojo en la biela pare de parpadear, el ROTOR Power ha comenzado a emitir la señal de radio y está listo para medir información.Pulse el botón “EXPLORAR” en su dispositivo ANT+ en la pantalla de potencia. El botón “EXPLORAR” normalmente se sitúa en el menú: Ajustes/Configuración de bicicleta/Perfiles de bicicleta/”Tu perfil”/Potencia ANT+.
¿Que son las lecturas de potencia izquierda y derecha?El ROTOR Power comienza a medir de forma automática tras mover sus bielas. En un uso normal, el muestreo de datos se realiza cada 2ms (500 veces por segundo) y es enviado por señal de radio a su dispositivo ANT+. El ROTOR Power envía los datos siguientes al dispositivo ANT+:POTENCIA: Potencia total medida en vatios para ambas piernas.EQUILIBRIO: Contribución en porcentaje de la potencia realizada por las piernas izquierda – derecha.PAR EFECTIVO (Izquierda/Derecha): Contribución positiva a la potencia total en un ciclo de pedaleo. Medido como un porcentaje; con el 100% no hay potencia negativa.UNIFORMIDAD DE LA PEDALADA (Izquierda/Derecha): Proporción entre la potencia media y pico de potencia en un ciclo de pedaleo. Medido como un porcentaje.CADENCIA: medido en RPM (revoluciones por minuto)
¿Como consigo piezas de recambio?Por favor, contacte con su tienda o distribuidor local.
¿Como contacto si necesito asistencia en garantía?Por favor, contacte con su tienda o distribuidor local.
PREGUNTAS FRECUENTES

ES
EN
25
MANUAL DE USUARIO - PREGUNTAS FRECUENTES
¿Cual es el rango de temperatura de funcionamiento para las bielas?El rango óptimo de temperatura de funcionamiento es de -5º a +55º Celsius. Fuera de este rango, algunos componentes electrónicos pueden producir una medición imprecisa de la señal o incluso una falta de la misma.
No puedo ver la opción de equilibrio en mi dispositivo.El ROTOR Power es capaz de funcionar con potenciómetros dobles, pero no todos los dispositivos del mercado lo son. Asegúrese que utiliza el último software de su dispositivo y verifique que es capaz de funcionar con potenciómetros dobles.Compruebe que está usando al menos el software 2.40 para el Garmin Edge 800 y el 3.00 para el Garmin Edge 500 o consulte al fabricante de su dispositivo para mayor información.
El dispositivo me muestra valores de 100%-0% en el campo equilibrio mientras no pedaleo.En algunos potenciometros se ha detectado esta funcionamiento anómalo. Sólo sucede cuando se muestran promedios de equilibrio, cada 3, 10 o 30 segundos. Estos promedios son calculados por el dispositivo, no por el ROTOR Power. En todo momento el valor instantáneo y en los valores guardados de equilibrio cuando no se pedalea es de 50%-50%. Siempre puede seleccionar qué valor de equilibrio mostrar en su monitor (instantáneo o promediado).
No se muestran los valores de equilibrio guardados cuando trato de analizarlos en mi ordenador.Asegúrese de que su dispositivo está actualizado con el último software compatible con potenciómetros dobles. Compruebe que está usando al menos el software 2.40 para el Garmin Edge 800 y el 3.00 para el Garmin Edge 500 o consulte al fabricante de su dispositivo para mayor información. De todas formas, aunque esté montando con un dispositivo compatible con potenciómetros dobles, algunas extensiones de los archivos de entreno no almacenan valores para equilibrio; por ejemplo, los archivos nativos de Garmin “.FIT” los almacenan, pero los “.TCX” no. Contacte con el fabricante de su dispositivo para verificar que extensiones de archivo almacenan valores de equilibrio.
Se muestran valores en el equilibrio de 100%-0% o 0%-100% pero no he estado pedaleando con una sola pierna.Es frecuente experimentar algunos picos en el equilibrio mientras se monta. El valor de equilibrio representa la contribución de cada pierna a la potencia total por ciclo, si comienza el ciclo con una pierna y para de forma abrupta (en giros bruscos, descendiendo…) sin aplicar potencia con la otra pierna, el equilibrio en la potencia será de 100%-0% (o 0%-100% dependiendo de la pierna que comienza el ciclo).

26
¿Con qué frecuencia se graban los datos de POTENCIA?La actualización y almacenamiento depende del modelo de dispositivo. La frecuencia de muestreo del ROTOR Power es de 500 Hz (500 veces por segundo), tras ello los datos son gestionados y almacenados, y enviados al monitor según el protocolo de comunicación ANT+.Normalmente la actualización tiene lugar cada segundo. La frecuencia de almacenamiento de datos puede ser elegida en el monitor, normalmente se da a elegir entre las opciones de 1 segundo, mayores periodos de tiempo, o almacenamiento inteligente.
Hay retrasos en la actualización de los datos del monitor en el comienzo y al parar.Es un comportamiento esperado y depende de la cadencia y la estabilidad de la señal, no tiene un efecto significativo en el total de los datos almacenados. Por ejemplo, si nuestra intención es mantener un pedaleo constante a 30 rpm, esto significa que un ciclo será de 2 segundos y algo de tiempo es necesario para gestionar la información.
¿Cada cuanto necesito calibrar mi ROTOR Power?Para garantizar una medición precisa sólo es necesario calibrar y poner a cero su ROTOR Power tras la primera instalación en su bicicleta. De todas formas, una calibración previa se realiza de todo ROTOR Power desde fábrica.
Es recomendable una calibración de su potenciómetro tras la instalación o sustitución de sus pilas (tras aproximadamente 30 horas de uso).
He intentado calibrar mi ROTOR Power pero sólo me devuelve valores de calibración para una pierna.Siga el proceso detallado de calibración / puesta a cero descrito en el manual.En algunos casos, el problema persiste incluso tras el proceso de calibración; en estos casos, después de que el primer valor de calibración sea mostrado, gire sus bielas algunas vueltas, deje las bielas en posición vertical y pulse de nuevo el botón de calibración. El monitor debería de mostrarle el valor para la otra pierna.Si el fallo persiste compruebe que ambas bielas poseen pilas instaladas y tienen carga suficiente para el proceso de calibración.
¿Cómo puedo ver los nuevos valores de par efectivo y uniformidad de pedalada?El protocolo ANT+ para estos nuevos valores está actualmente en fase de prueba y los fabricantes de los monitores son los responsables de desarrollar nuevos programas que sean compatibles. El ROTOR Power gestiona dichos valores y se puede descargar el programa de ROTOR desde: http://power.rotorbike.com/downloads/
MANUAL DE USUARIO - PREGUNTAS FRECUENTES


ES
EN
29
USER MANUAL - COPYRIGHT NOTICE
COPYRIGHT NOTICE
All rights reserved.
No part of this manual may be reproduced, copied, transmitted, disseminated, downloaded or stored in any storage medium, for any purpose without the express prior written consent provided by ROTOR.
ROTOR grants permission to download a single copy of this manual onto a hard drive or other electronic storage medium to be viewed and to print one copy of this manual or of any revision, provided that such electronic or printed copy of this manual must contain the complete text of this copyright notice and provided further that any unauthorized commercial distribution of this manual or any revision is strictly prohibited.
Information in this document is subject to change without any prior notice. ROTOR reserves the right to carry out any change or improve of its products and to make changes in the content without obligation to notify any person, organization of such changes or improvements.
Visit the ROTOR website (www.rotorbike.com) for current updates and supplemental information concerning the use and operation of this and other ROTOR products.
This manual was published: 09/12Model#: ROT112IC: 10992A-ROT112 FCC ID:R3A-RPM1
FCC ID: R3A-RPM1
ROTOR RPM1
IC: 10992A-ROT112MODEL#: ROT112
R 201-
135085
201-135085

30
USER MANUAL - CONTENTS
CONTENTS
Product Description .................................................................................................................................................................... 33
Cranks Installation ....................................................................................................................................................................... 34
Pairing ............................................................................................................................................................................................ 40
Calibration/Zeroing ................................................................................................................................................................... 42
ROTOR Power Start Up .............................................................................................................................................................. 43
Battery Replacement .................................................................................................................................................................. 44
ROTOR Power Training Use ...................................................................................................................................................... 45
User Software ............................................................................................................................................................................... 46
Maintenance ................................................................................................................................................................................. 50
Technical Specifications ............................................................................................................................................................. 51
Warranty Policy ............................................................................................................................................................................ 52
Frequent Asked Questions ....................................................................................................................................................... 54

ES
EN
31
USER MANUAL - PRODUCT DESCRIPTION
Crank arms are not interchangeable.
Both arms work together as one power meter unit and have specific-sensors ID.
Non Drive Side Crank AssemblyWARNING: DO NOT DISASSEMBLE
Drive Side Crank AssemblyWARNING: DO NOT DISASSEMBLE
Power Meter LEFT
Power Meter RIGHT
MAS Spider
PRODUCT DESCRIPTION
32
USER MANUAL - CRANK INSTALLATION
COMpAtIbILIty
ROTOR Power is compatible with BB30, Pressfit30, BBright, BBright Direct fit, BSA, ITA, BB86 and 386 frames.
For more information consult your ROTOR Authorized Dealer or bike dealer to ensure correct compatibility of ROTOR Power with your frame.
Visit our website: www.rotorbike.com
Follow the instructions in this manual to install and calibrate your ROTOR Power.
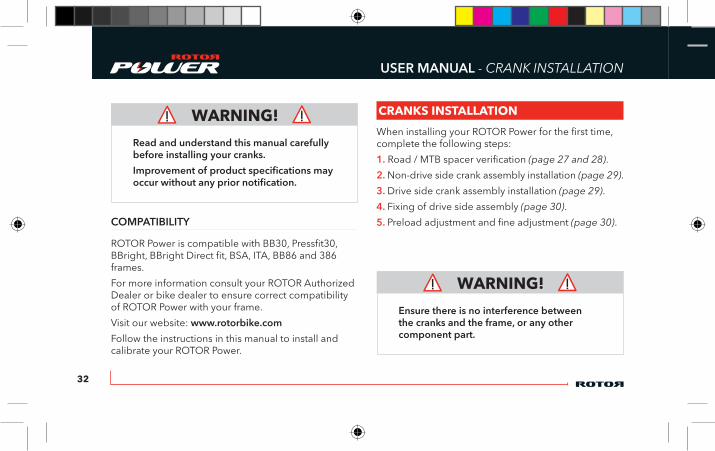
WARNING!When installing your ROTOR Power for the first time, complete the following steps:
1. Road / MTB spacer verification (page 27 and 28).
2. Non-drive side crank assembly installation (page 29).
3. Drive side crank assembly installation (page 29).
4. Fixing of drive side assembly (page 30).
5. Preload adjustment and fine adjustment (page 30).
Read and understand this manual carefully before installing your cranks.
Improvement of product specifications may occur without any prior notification.
WARNING!
Ensure there is no interference between the cranks and the frame, or any other component part.
CRANkS INSTALLATION
ES
EN
33
USER MANUAL - ROAD CRANK INSTALLATION
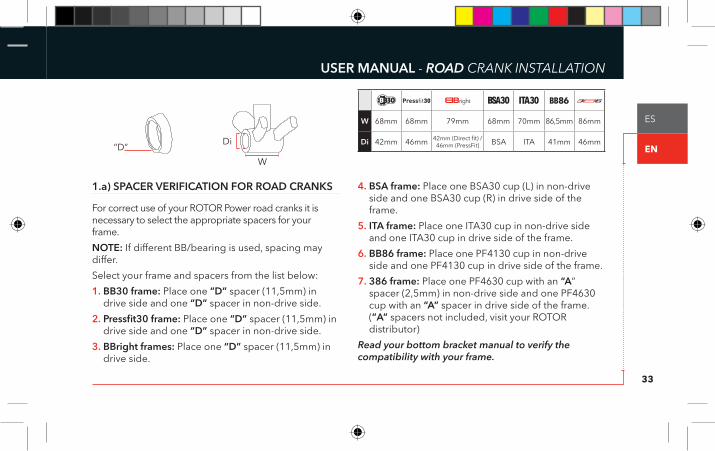
W 68mm 68mm 79mm 68mm 70mm 86,5mm 86mm
Di 42mm 46mm 42mm (Direct fit) / 46mm (PressFit) BSA ITA 41mm 46mm
“D”Di
W
1.a) SpACER VERIFICAtION FOR ROAD CRANKS
For correct use of your ROTOR Power road cranks it is necessary to select the appropriate spacers for your frame.
NOtE: If different BB/bearing is used, spacing may differ.
Select your frame and spacers from the list below:
1. bb30 frame: Place one “D” spacer (11,5mm) in drive side and one “D” spacer in non-drive side.
2. pressfit30 frame: Place one “D” spacer (11,5mm) in drive side and one “D” spacer in non-drive side.
3. bbright frames: Place one “D” spacer (11,5mm) in drive side.
4. bSA frame: Place one BSA30 cup (L) in non-drive side and one BSA30 cup (R) in drive side of the frame.
5. ItA frame: Place one ITA30 cup in non-drive side and one ITA30 cup in drive side of the frame.
6. bb86 frame: Place one PF4130 cup in non-drive side and one PF4130 cup in drive side of the frame.
7. 386 frame: Place one PF4630 cup with an “A” spacer (2,5mm) in non-drive side and one PF4630 cup with an “A” spacer in drive side of the frame. (”A” spacers not included, visit your ROTOR distributor)
Read your bottom bracket manual to verify the compatibility with your frame.

34
USER MANUAL - MTB CRANK INSTALLATION
W 68/73mm 68/73mm 84mm 68/73mm 89,5mm 92mm
Di 42mm 46mm 46mm BSA 41mm 41mm
“D”“C”
“B”
Di
W
1.b) SpACER VERIFICAtION FOR Mtb CRANKS
For correct use of your ROTOR Power MTB cranks it is necessary to select the appropriate spacers for your frame.
NOtE: If different BB/bearing is used, spacing may differ.
Select your frame and spacers from the list below:
1. bb30 and pressfit30 68mm frames: Place one “C” (8,5mm) spacer with one “D” (11,5mm) spacer in drive side and non-drive side.
2. bb30 and pressfit30 73mm frames: Place one “b” (5,5mm) spacer with one “D” (11,5mm) spacer in drive side and non-drive side.
3. bbright frame: Place one PF4630 cup with one “b” (5,5mm) spacer in non-drive side and one PF4630 cup with one “D” spacer (11,5mm) and one “b” (5,5mm) spacer in drive side.
4. bSA 68mm frame: Place one BSA30 cup with one “C” (8,5mm) spacer in both sides of the frame.
5. bSA 73mm frame: Place one BSA30 cup with one “b” (5,5mm) spacer in both sides of the frame.
6. bb89 and bb92 frames: Place both PF4130 cups with one “b” (5,5mm) spacer in both sides of the frame.
Read your bottom bracket manual to verify the compatibility with your frame.

ES
EN
35
USER MANUAL - CRANK INSTALLATION
2. NON-DRIVE SIDE INStALLAtION
2.1. Place a 0,5mm plastic washer onto the axle.
2.2. Select the appropriate spacer(s) for the non-drive side in page 27 (road) or 28 (MTB) and place them into the axle following the 0,5mm plastic washer.
2.3. Introduce the non-drive assembly into the frame through the bearing and frame.
3. DRIVE SIDE INStALLAtION
3.1. Grease the right end of the axle.
3.2. Select the appropriate spacer(s) for the drive side in page 27 (road) or 28 (MTB) and place it between the frame and the drive side crank.
Spacer selected in page 27-28
Spacer selected in page 27-28
0,5mm Plastic washer

36
USER MANUAL - CRANK INSTALLATION
4. FIXING OF NON-DRIVE SIDE ASSEMbLy
4.1. Tighten drive side alloy bolt to 35 Nm using an 8mm allen torque wrench.
5. pRELOAD ADJUStMENt
5.1. Eliminate lateral play by tightening counterclockwise the preload nut by hand.
5.2. Lock the preload nut by tightening the pinch bolt clockwise with a 2 mm allen wrench.
6. FINE tUNE ADJUStMENt
6.1. If the crank does not turn smoothly, remove the 0,5mm plastic washer in non-drive side and repeat the “preload adjustment” steps 5.1 and 5.2.
6.2. If there is lateral play, use an additional 0,5mm plastic washer in the non-drive side and repeat the “preload adjustment” steps 5.1 and 5.2.
WARNING! Do not overtighten the bolt
WARNING!
Ensure preload nut is still threaded in non-drive side arm.
35 Nm

ES
EN
37
USER MANUAL - CRANK REMOVAL
CRANKSEt REMOVAL
1. Remove drive side bolt.
2. Remove drive side steel nut using a cassette lockring tool (Shimano TL-LR15 or similar).
3. Screw the drive side alloy bolt clockwise into the spindle.
4. Flip the drive side nut over and screw it clockwise into the crank arm to be used as a selfextracting cap. It must be flush with the outer face of the arm and all of its threads must be engaged.
5. Unscrew the drive side alloy bolt counterclockwise using an 8mm allen wrench until the drive side assembly disengages from the spindle.
ROtOR pOWER INStALLAtION
Once the cranks are assembled there is no need for any other installation to use the Power meter.
All sensors and electronic parts are already mounted with the cranks.
TL-LR15

38
USER MANUAL - PAIRING
Connect your ROTOR Power to any ANT+TM sensor device to display output values.
For a complete listing of ANT+TM Certified Products and their specific interoperability, visit the ANT+TM Product Directory: http://www.thisisant.com/directory/
Read the ANT+TM device manual for further instructions.
Before pairing ROTOR Power with a monitor, make sure you are at least 10 meters (30 feet) away from any other ANT+TM Power sensor. This will prevent accidentally pairing to another Power sensor.
The ROTOR Power retains its “SENSOR ID” throughout battery replacements and will remain properly paired.
pAIRING pROCESS
To pair the ROTOR Power with any ANT+TM device:
1. Start the power meter system by riding a few meters until the red LED starts flashing. The system turns on when a 1,5 kg force is applied to the cranks.
2. Wait until red LED on crank stops flashing. The ROTOR Power starts sending the radio signal and is ready for measuring information.
Power meter
PAIRING
LED

ES
EN
39
USER MANUAL - PAIRING/CALIBRATION
AUtOMAtIC pAIRING
3. Push the “SCAN” button in your ANT+TM device at the ANT+TM Power screen. The “SCAN” button is usually placed in the menu: Settings\Bike settings\Bike profiles\”Your profile”\ANT+ Power.
The main reason to calibrate / zero your ROTOR Power is to secure an exact power measurement.
Calibrating the power meter compensates for any mechanical change that influences the measurement since the last calibration/zeroing.
Calibrate your ROTOR Power cranks after the assembly process in your bicycle with all its accessories, pedals included.
ROTOR Power should be calibrated after any chainring, frame, or pedal changes. After every calibration process ROTOR Power shows one second flash at the red light LED.
MANUAL pAIRING
If you have more than one ANT+TM Power sensor introduce the “SENSOR ID” of the ROTOR Power into the ANT+TM device; “SENSOR ID” can be found at the inner side of the drive side crank as the last 5 digits of the shown number or in your Identity Card included into the package. I.E.: SENSOR ID_ 02310
CALIBRATION/ZEROING
SENSORID_ 02310
PRODUCT ID CARD
www.rotorbike.com
QC DATE
SENSOR ID
Register your ROTOR Power at power.rotorbike.com/registration
02310In order to save energy the “CALIBRATE” command is admitted only within 60 seconds from startup or last valid power readings.
WARNING

40
USER MANUAL - CALIBRATION/ZEROING
ZEROING pROCESS
To zero your ROTOR Power:
1. Activate the system and place the right crank in a 6 o’clock vertical position as shown in the picture.
Calibrate your ROTOR Power with your pedals mounted in the cranks.
Do not place any other weight in your cranks until zeroing process is finished.
Do not move your cranks during steps 2, 3, 5 and 6.
2. Follow the specific instructions of your ANT+™ computer device to send the “CALIbRAtE” signal.
The “CALIBRATE” button is usually placed in the menu:
Settings\Bike settings\Bike profiles\”Your profile”\ANT+Power.
3. Read the feedback value for the drive side crank from your device. For correct zeroing the value should be between: 100-3900.
4. Repeat step 1 for left crank.
5. Repeat step 2 to send the “CALIBRATE” signal.
6. Read the feedback value for the non-drive side crank from our device. For a correct zeroing the value should be between: 4200-8100.
There is no need to zero your ROTOR Power every time you ride.
It is recommended to repeat the calibration process after an adjustment period of 30 hours riding aprox.
For more information about the zeroing process, user utilities and training options visit our web: www.power.rotorbike.com
ES
EN
41
USER MANUAL - STARTING UP/BATTERY
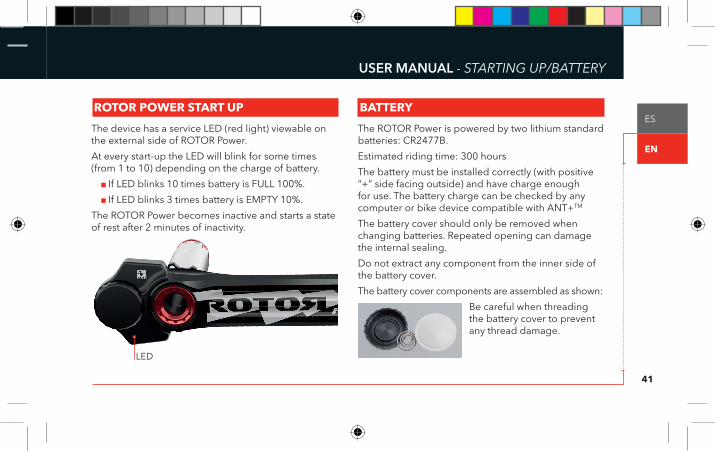
The device has a service LED (red light) viewable on the external side of ROTOR Power.
At every start-up the LED will blink for some times (from 1 to 10) depending on the charge of battery.
If LED blinks 10 times battery is FULL 100%.
If LED blinks 3 times battery is EMPTY 10%.
The ROTOR Power becomes inactive and starts a state of rest after 2 minutes of inactivity.
LED
ROTOR POWER START UP BATTERY
The ROTOR Power is powered by two lithium standard batteries: CR2477B.
Estimated riding time: 300 hours
The battery must be installed correctly (with positive “+” side facing outside) and have charge enough for use. The battery charge can be checked by any computer or bike device compatible with ANT+TM
The battery cover should only be removed when changing batteries. Repeated opening can damage the internal sealing.
Do not extract any component from the inner side of the battery cover.
The battery cover components are assembled as shown:
Be careful when threading the battery cover to prevent any thread damage.

42
USER MANUAL - BATTERY REPLACEMENT
No tools are required to replace the batteries. It is recommended that you change both batteries at the same time.
Replacement process:
1. Open the cover of the battery cover turning it counter-clockwise by hand.
2. Extract the old battery from the housing.Trick:
If you cannot remove the battery easily by hand use a magnet to take it out.
Do not use any tool or sharp object.
Battery housing
Cover
BATTERY REPLACEMENT
Do not throw the old batteries away with normal waste, batteries should be disposed of properly according to local regulations.
WARNING
Do not extract the white foam from the inner side of the battery cover. It can produce connectivity failures with the battery.
WARNING
3. Place a new battery into the housing with the positive “+” side facing out.
4. Thread the battery cover screwing it clockwise by hand.

ES
EN
43
USER MANUAL - ROTOR POWER TRAINING USE
After pairing ROTOR Power follow the configuration options of your ANT+TM computer device to select the measures you would like to display on your device.
Consult your trainer in order to evaluate which of the measured values provided by ROtOR power are optimal to maximize your performance.
ROtOR pOWER MEASUREMENt
ROTOR Power starts measuring automatically after moving the crank. In normal use, sampling is done every 2ms (500 times per second) and sent by radio emissions to your ANT+TM device.
ROTOR Power sends the following data to the ANT+TM device:
pOWER: Total power output measured in watts for both legs.
bALANCE: Left - Right leg percentage contribution to power.
tORQUE EFFECtIVENESS (LEFt/RIGHt):Positive power contribution to total power in a pedaling cycle. Measured as a percentage; 100% means no negative power.
pEDAL SMOOtHNESS (LEFt/RIGHt):Ratio between average power and peak power in a pedaling cycle. Measured as a percentage.
CADENCE: measured in RPM (revolutions per minute).
WARNING!Disable any ANt+tM cadence sensor from your bike, there is no need for it and it may cause interferences with the internal ROtOR power cadence sensor.
P-
P+
ROTOR POWER TRAINING USE

44
USER MANUAL - USER SOFTWARE
In this section you will find the main web links to access the technical information regarding the ROTOR Power.
1. http://power.rotorbike.com/Exclusive website dedicated to ROTOR Power cranks.
2. http://rotorbike.com/Official Rotor Website with technical information about everyROTOR Product.
3. http://www.thisisant.com/directory/rotor-power/Specific ANT+ website showing the compatibility betweendevices within the Market.
USER SOFTWARE - DOCUMENTATIONUSER SOFTWARE - INTRODUCTION
The user software has been designed for a customer use and is divided into 4 sections as explained follows; it is recommended to visit our website and download the user manual, user software is provided free of charge by ROTOR and software compatibility or proper functioning is not granted in any computer or device.
ROTOR will not be responsible for any failure of your computer related to this software.
For any question or querie contact ROTOR technical service at:
Or visit our Official web for a description of the technical products.
www.rotorbike.com
www.power.rotorbike.com
ES
EN
45
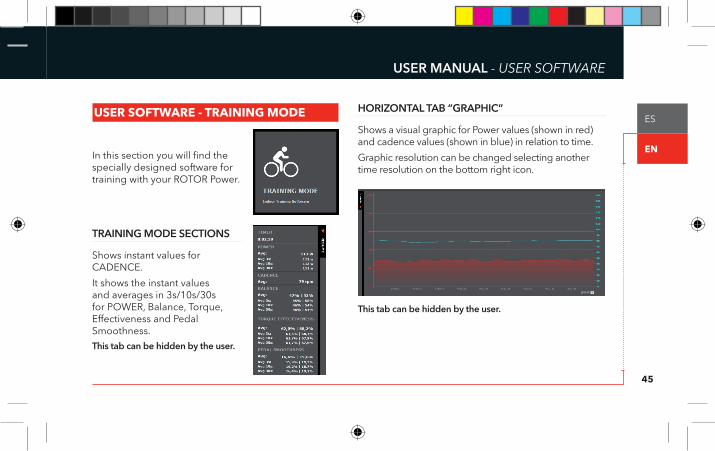
USER MANUAL - USER SOFTWARE
In this section you will find the specially designed software for training with your ROTOR Power.
tRAINING MODE SECtIONS
Shows instant values for CADENCE.
It shows the instant values and averages in 3s/10s/30s for POWER, Balance, Torque, Effectiveness and Pedal Smoothness.
this tab can be hidden by the user.
HORIZONtAL tAb “GRApHIC”
Shows a visual graphic for Power values (shown in red) and cadence values (shown in blue) in relation to time.
Graphic resolution can be changed selecting another time resolution on the bottom right icon.
this tab can be hidden by the user.
USER SOFTWARE - TRAINING MODE

46
USER MANUAL - USER SOFTWARE
In this section you will find the tools to update and calibrate your ROTOR power cranks.
USER SOFTWARE - SERVICE MODE
Follow the steps shown in the user software manual to accomplish the following duties:
1. Upgrade the firmware for your ROTOR Power.
2. Calibrate and zeroing your ROTOR Power cranks.
3. Make a static test to verify the functionability of your ROTOR Power.
4. Take a screenshot for showing any issue using the user software.
bOttOM SECtION
Shows real time values for balance, torque effectiveness and pedal smoothness for both legs.
The numerical instant values or their associated graphics can be seen in the bottom section.

ES
EN
47
USER MANUAL - USER SOFTWARE
In this section you will find the tools needed to manage the training data obtained from your ROTOR Power with format “.FIT”
USER SOFTWARE - UTILITIES
Screenshot for the service mode in the user software

48
USER MANUAL - MAINTENANCE
Inspect your ROTOR product for wear, looseness or damage including cracks, dents and serious scratches, before each ride and after every fall or crash.
Do not use your ROTOR product until it has been thoroughly inspected, repaired or replaced.
Cyclists should inspect their whole bicycle and parts on a regular basis or consult with a professional bicycle mechanic, to determine the need for service, or replacement and to detect damage that may have occurred from normal use.
Check all parts for damage and wear before every use.
Check the bolts and other fasteners periodically for tightness. Ensure they are tightened to the correct torque values.
WARNING!Never use high pressure cleaning equipment or chemical products to clean the ROtOR power.
“Waterproof level: IPX7”.
Do not try to disassemble any electronic ROtOR power part, the sealing could be damaged and this invalidates the warranty.
Do not disassemble the metal bolts of the bottom cover, it can produce an electronic failure.
In case of any electronic failure, service must be performed at an authorized ROtOR technical service center.
Continuing to use damaged parts may lead to loss of control and cause serious injury or death.
MAINTENANCE

ES
EN
49
USER MANUAL - TECHNICAL SPECIFICATIONS
TECHNICAL SPECIFICATIONS Optimal operating temperature: -5 to 55 C Max. humidity for optimal use: 90% Battery specifications: 3.0 V (1000 mA CR2477B lithium battery) Estimated battery life: 300 hours using time Voltage supply: 1.9 V Standard averaged work consumption: 2.1 mA Standard averaged standby consumption: 3.2 μA Reading sensor: Strain Gauges Working frequency: ANT+ 2.4 Ghz Max RF Power output: -5 dB Total added weight: 36 g Data transmitted: Power, cadence, balance, torque efficiency, pedal smoothness Power precision: +/- 1 W Cadence precision: +/- 0,5 rpm Balance precision: +/- 0,5% Torque effectiveness precision: +/- 0,5% Pedal smoothness precision: +/- 0,5%
50
USER MANUAL - WARRANTY POLICY
This owners manual contains important and useful information regarding the proper installation, operation, care, and maintenance of your ROTOR product. Carefully read, follow and understand the instructions as detailed in this owner’s manual. Keep this manual in a safe place for future reference.If you have any doubt whatsoever regarding your ability to install or service this product, please consult your ROTOR dealer and seek the assistance of a professional bicycle mechanic. Do not perform any modifications or adjustments that are not outlined in this manual.Incorrect installation or servicing may impair performance, and could result in a dangerous situation leading to serious injury or death. Components that have experienced excessive wear, deformations or impacts or other damage need immediate professional inspection or replacement.Please have this product regularly inspected by a qualified mechanic for any signs of wear or damage.Failure to perform necessary and essential maintenance could drastically reduce the service life of your ROTOR product and reduce its performance.If you have any questions, please contact a professional bike mechanic or your nearest ROTOR dealer for additional information.
The ROTOR products and its components are guaranteed for 2 YEARS against any manufacturer defects or defective materials. In the event of a warranty defect, Rotor´s sole obligation under this warranty is to repair or replace, at its option, the defective part or product at no charge. Moreover, in some countries, ROTOR is obliged to ensure any legal warranty defined by law for the customer’s protection. Elements subject to wear and breakdowns that the manufacturer is not responsible for, are not covered by this warranty. Failures or breakdowns caused by improper use, poor assembly or inadequate maintenance as declared in the supplied instructions or the user manual are not covered by this warranty. Always keep your receipt or invoice. The following acts void this warranty:
Failure to fulfil the requirements above.
Improper installation.
Improper use or installation of inadequate parts.Warranty Service: Original purchaser must send their Rotor product along with the retailer’s original bill, credit card receipt or other satisfactory proof of date of purchase of the product.
ROTOR WARRANTY POLICYSAFETY WARNING

ES
EN
51
USER MANUAL - REGULATORY STATEMENTS
This device complies with part 15 of the FFC Rules and with Industry Canada licence-exempt RSS standard(s).Operation is subject to the following two conditions: (1) This device may not cause harmful interference, and (2) this device must accept any interference received, including interference that may cause undesired operation.Modifications not expressly approved by this company could void the user´s authority to operate the equipment.NOtE: This equipment has been tested and found to comply with the limits for a Class B digital device, pursuant to Part 15 of the FCC Rules and with Industry Canada licence-exempt RSS standard(s).The letters “IC” have no other meaning or purpose than to identify the Industry Canada certification number/registration number.These limits are designed to provide reasonable protection against harmful interference in a residential installation.This equipment generates, uses and can radiate radio frequency energy and, if not installed and used in accordance with the instructions, may cause harmful interference to radio comunications.However, there is no guarantee that interference will not ocurr in a particular installation.
If this equipment does cause harmful interference to radio or television reception, which can be determined by turning the equipment off and on, the user is encouraged to try to correct the interference by one or more of the following measures:
Reorient or relocate the receiving antenna. Increase the separation between the equipment and receiver. Connect the equipment into an outlet on a circuit different from that to which the receiver is connected. Consult the dealer or an experienced radio/TV technician for help.
This product does not contain any user-serviceable parts.Repairs should only be made by ROTOR distributors.Unauthorized repairs or modifications could result in permanent damage to the equipment, and void your warraty and your authority to operate this device under Part 15 regulations. This product is compliant with Directive 93/42/EEC.
CEE REGULATION
REGULATORY STATEMENTS
ROtOR RpM1FCC ID: R3A-RPM1IC: 10992A-ROT112
201-135085

52
USER MANUAL - FREqUENT ASKED qUESTIONS
What ANT+™ devices is ROTOR Power compatible with?Go to the ANT+™ link: http://www.thisisant.com/directory
What software can I use to analyze my data?http://home.trainingpeaks.comhttp://goldencheetah.org/http://www.o-synce.com/en/software/training-software.htmlhttp://www.garmin.com/en-US
Why isn’t my computer pairing the power meter?To pair the ROTOR Power with any ANT+™ device:Start the power meter system by turning cranks 2-3 times until the red LED on crank starts flashing.Wait until red LED on crank stops flashing.The ROTOR Power starts sending the radio signal and is ready for measuring information.Push the “SCAN” button in your ANT+™ device at the ANT+™ Power screen. The “SCAN” button is usually placed in the menu: Settings/Bike settings/ Bike profiles/ “Your profile”/ANT+ Power.
What are the left & right power readings?ROTOR Power starts measuring automatically after moving the crank. In normal use, sampling is done every 2ms (500 times per second) and sent by radio emissions to your ANT+™ device.ROTOR Power sends the following data to the ANT+™ device:POWER: Total power output measured in watts for both legs.BALANCE: Left – Right leg percentage contribution to power.TORQUE EFFECTIVENESS (Left/Right): Positive power contribution to total power in a pedaling cycle. Measured as a percentage; 100% means no negative power.PEDAL SMOOTHNESS (Left/Right): Ratio between average power and peak power in pedaling cycle. Measured as percentage.CADENCE: measured in RPM (revolutions per minute).
How do I get spare parts?Please contact your shop or local distributor.
Who do I contact for warranty issues?Please contact your shop or local distributor.
What is the working temperature range for the cranks?The optimal operating temperature range is from -5º to +55º Celsius. Out of this range, some electrical components may cause an inaccurate measurement signal or even a lack of it.
FREQUENT ASkED QUESTIONS

ES
EN
53
USER MANUAL - FREqUENT ASKED qUESTIONS
I cannot see balance at my bike displayROTOR POWER is able to fully work with dual sided power meter, but not all the displays available on the market are. Ensure that you are running the latest software available for your display model and make sure that it is suitable to work with dual sided power meters.Ensure you are running at least SW 2.40 for Garmin Edge 800 and 3.00 for Garmin Edge 500 or consult your display manufacturer for further information.
I can see balance values of 100%-0% displayed while I am not pedalling.We have noticed that this unexpected value is displayed sometimes at certain display models. It only happens when displaying average balance values like 3, 10 or 30 seconds. These averages are handled and calculated by the displays, not by the ROTOR POWER. Anyway, in every case the instant balance value when not pedalling is correct, 50%-50%, as well as the recordings. You can easily check it by selecting instant balance value (not averaged) to be displayed at your monitor.
I cannot see balance recordings when trying to analyse my rides at the computer.Ensure that your bike display is updated with the last software release compatible with dual sided power meters. Ensure you are running at last SW 2.40 for Garmin Edge 800 and 3.00 for Garmin Edge 500 or
consult your display manufacturer for further information.Anyway, although you are running on a display already suitable for dual sided power meters, some ride file extensions do not carry balance information, for example Garmin proprietary files. FIT do, but .TCX files do not. Contact your monitor manufacturer to ensure about the right file extensions that are able to carry balance recordings.
I can see some balance spikes of 100%-0% or 0%-100% but I have not ridden with just one leg.It is common to experience some balance spikes during a ride. Balance value is the contribution of each leg to the total power per cycle, if you start the cycle with one leg and suddenly stop pedalling (while cornering, descending…) without applying power with the other leg, power balance will be 100%-0% (or 0%-100% depending the leg that starts the cycle).
How often is the POWER value recorded?Refreshing and recording depend on displays models. The ROTOR POWER sampling rate is 500 Hz (500 times per second), data is stored and managed then, and sent to the monitor following ANT+™ protocols.Display refreshing takes place usually about every second.Recording rate can be chosen at the monitor, displays usually offer the possibility of choosing between 1 second, longer time periods, or smart recording.

54
USER MANUAL - FREqUENT ASKED qUESTIONS
There are some delays in refreshing the display during the start and the stop.This is an expected behaviour and depends on the cadence and the stability of the signal and has no remarkable effect on the overall recordings.For example, if we intend to manage a pedal cycle at 30 rpm, that means that the cycle would last 2 seconds and some time is needed to manage and send the information.Also initial and final signal is sometimes filtered for a better recording stability.
How often do I need to calibrate my ROTOR POWER?To ensure an accurate measurement, a calibration or zeroing is advised only after installing ROTOR POWER on a bike. Anyway a factory calibration is performed on every crank.It is recommended to calibrate your power meter after installing or replace your batteries (30 hours riding approx.).
I tried to calibrate my ROTOR power but it only comes back with the calibration value for just one leg.Follow carefully calibration/zeroing procedure described at the user manual.Sometimes, the issue persists even following the procedure, in these cases, after the display returns the first calibration message,
spin the crankset backwards a few turns, leave the arms vertical and push calibration button again. The display should show a value corresponding to the other arm.If the issue persist ensure that both arms have batteries installed and they are charged enough to perform calibration process.
How can I see the new Torque Effectiveness and Pedal Smoothness metrics?ANT+™ protocol for the new metrics is right now in its beta phase and the displays manufacturers are responsible to develop new software releases that work with TE and PS. ROTOR POWER is already managing these messages and you can download the ROTOR software for indoor training from: http://power.rotorbike.com/downloads/In some software upgrades for some monitors the compatibility with Torque Effectiveness and Pedal Smoothness is granted, as in the Garmin monitor models 510 and 810 with the 08/13 upgrade.

ES
EN
55
NOtAS - NOTES
