max bone rig

8
::Written by Joai Thong Tan 2007:: 1 Skeleton Rigging with Skin in 3D Studio MAX Introduction In 3D Studio MAX, there are a few ways to setup skeletal rigs, namely, Biped, and Bones. Most professionals prefer bones to set up rigs as they are much more customizable and flexible. Most ri gs are set up for specific animation. However, there are also generic rigs that are used to perform common animations. Bone Riggi ng  Before working on any skeletal set up, i t is always good to refer to anatomy books to get an idea o f the bones’ location and how they work. However, skeletal setup in 3D appli cation always differs slightly from real skeletal posi tions due to the limitations of the software. If more precision is needed, the complexity level of the setup wil l increase. The reference picture to the right reflects a full skeletal system of a humanoid. There are a couple of joints that needs some attention before setting the rig. The shoulders, pelvis, wrists, foot, and hips have always been an issue to some 3D artists who are new to rigging. Depending on the character model, certain rigs need to be tweak to compromise with the flexibility of the movement. Some examples of forming bone rigs are (not mandatory)  Having 2 bones between wrist and elbow.  Additional bones to create flexibility for foot rolls.  Pelvis as a central or master bone.  Rib bones can be added for breathe animation.  Additional bones can be added to the shoulders for shoulder shaking animation. Most 3D applications have similar workflows when it comes to skeletal rigging. Although, with a skeletal rig, it is possible to animate the character, however, very inflexible since it i s keyed base on rotational values and selected bones. This type of animation is termed Forward Kinematics (FK). The other form of rig is Inverse Kinematics (IK). To illustrate it simply, imagine a piece of rope that is tied at one end, with you holding the other. Now you can move your end of the rope freely without changing the position of the tied end. This form of rig is very useful since it doesn’t require you to key every bone to animate it. It will be more obvious when we setup the rig.  A good way to determine where additional bones are needed is to look at how muscles move according to our body. It will give you a better idea why certain areas needed more bones or why certain areas do not require any or less bones.

Upload: sunilkumar-dubey

Post on 04-Jun-2018

216 views

Category:

Documents


0 download

TRANSCRIPT

8/13/2019 MAX Bone Rig

http://slidepdf.com/reader/full/max-bone-rig 1/8

8/13/2019 MAX Bone Rig

http://slidepdf.com/reader/full/max-bone-rig 2/8

8/13/2019 MAX Bone Rig

http://slidepdf.com/reader/full/max-bone-rig 3/8

8/13/2019 MAX Bone Rig

http://slidepdf.com/reader/full/max-bone-rig 4/8

::Written by Joai Thong Tan 2007:: 4

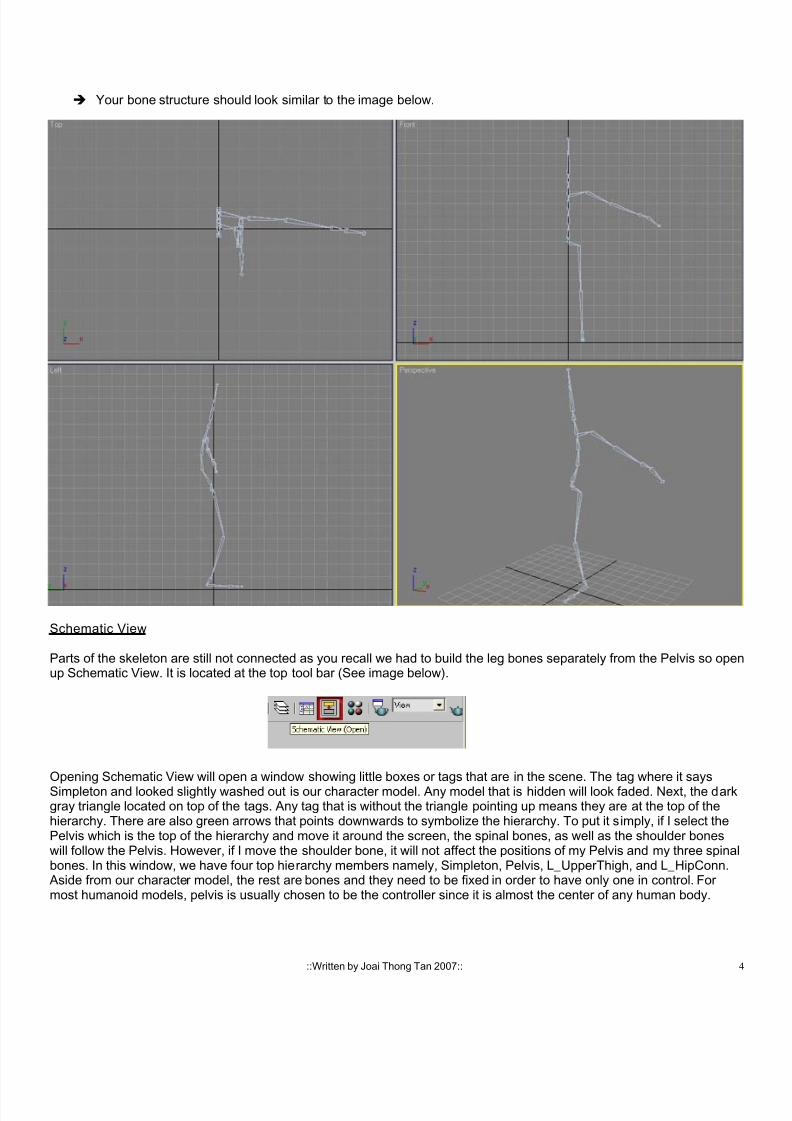
  Your bone structure should look similar to the image below.
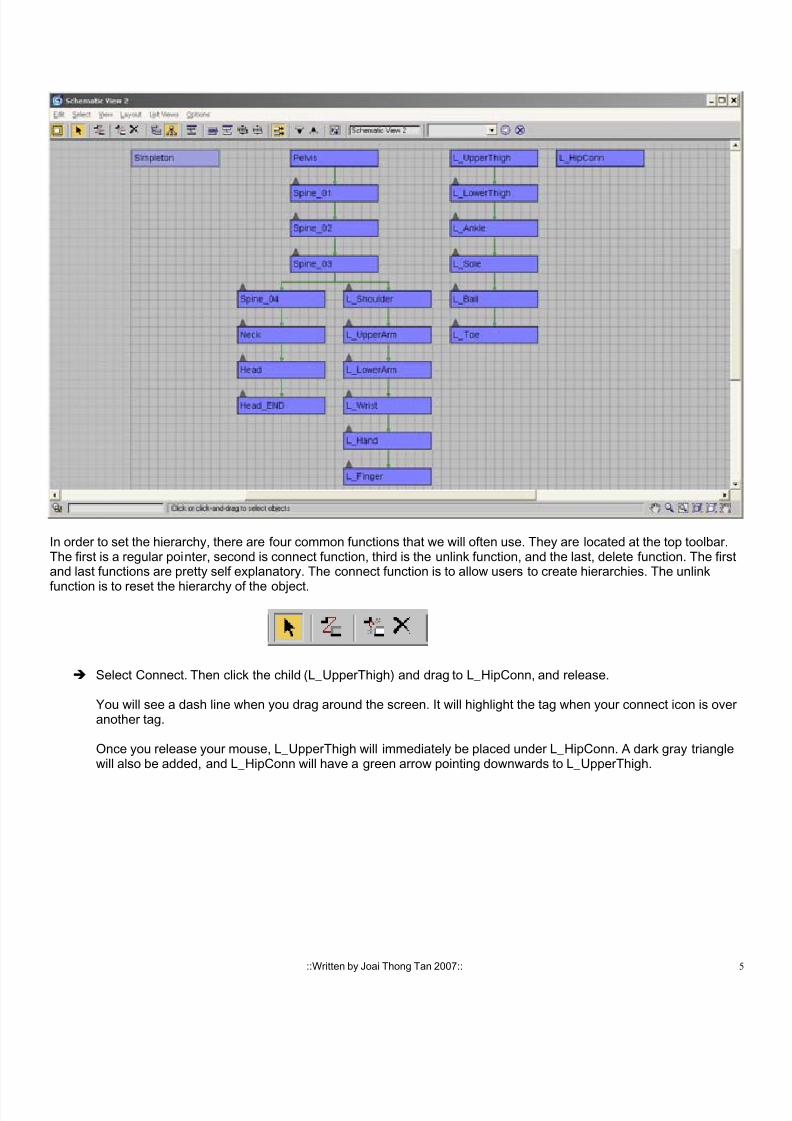
Schematic View

Parts of the skeleton are still not connected as you recall we had to build the leg bones separately from the Pelvis so openup Schematic View. It is located at the top tool bar (See image below).

Opening Schematic View will open a window showing little boxes or tags that are in the scene. The tag where it saysSimpleton and looked slightly washed out is our character model. Any model that is hidden will look faded. Next, the darkgray triangle located on top of the tags. Any tag that is without the triangle pointing up means they are at the top of thehierarchy. There are also green arrows that points downwards to symbolize the hierarchy. To put it simply, if I select thePelvis which is the top of the hierarchy and move it around the screen, the spinal bones, as well as the shoulder boneswill follow the Pelvis. However, if I move the shoulder bone, it will not affect the positions of my Pelvis and my three spinalbones. In this window, we have four top hierarchy members namely, Simpleton, Pelvis, L_UpperThigh, and L_HipConn.

 Aside from our character model, the rest are bones and they need to be fixed in order to have only one in control. Formost humanoid models, pelvis is usually chosen to be the controller since it is almost the center of any human body.

8/13/2019 MAX Bone Rig

http://slidepdf.com/reader/full/max-bone-rig 5/8

8/13/2019 MAX Bone Rig

http://slidepdf.com/reader/full/max-bone-rig 6/8

::Written by Joai Thong Tan 2007:: 6

Your hierarchy setup should look similar to the image below.

  Move the Pelvis in the viewport to make sure all the bones move together.

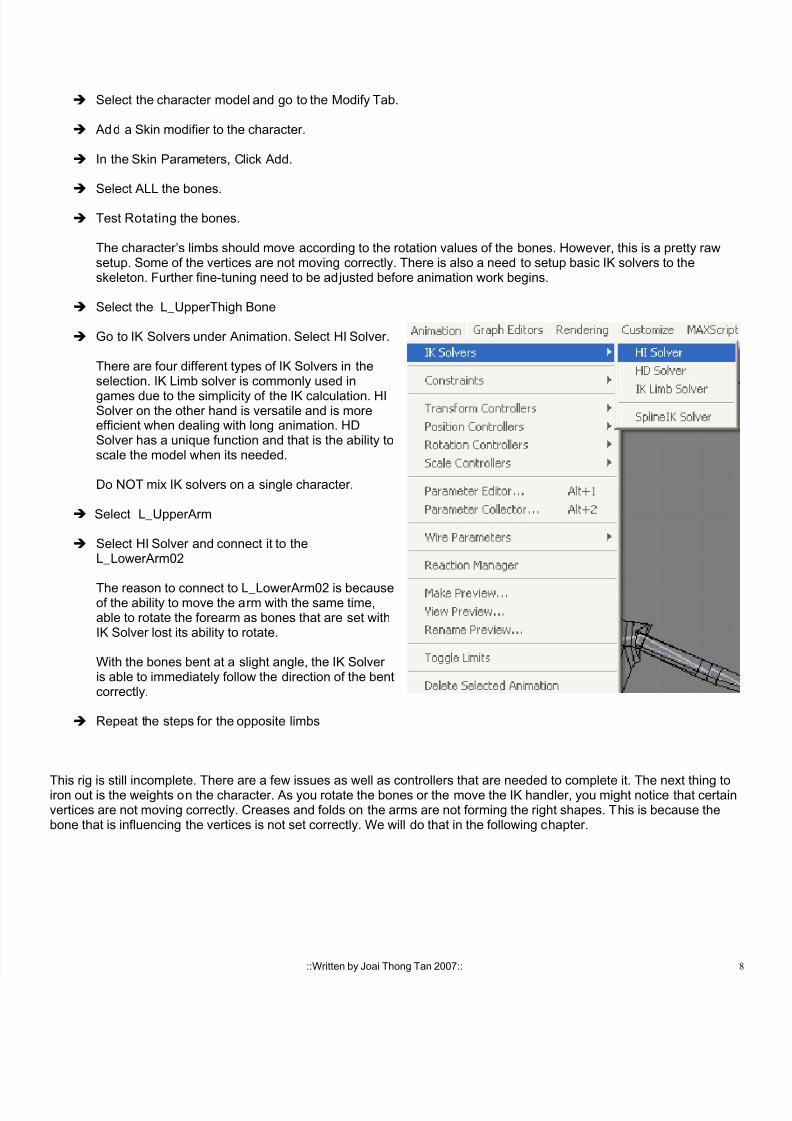
  In Character menu, select Bone Tools.

Bone Tools allows riggers to have more control over bone creation.

Up till this point, we have created bones for the spinal as well as an arm and leg.We will need additional tool to help us correctly mirror the arm and leg to the otherside.

We also need to create refinement to the arm to allow the wrist to twist correctly.

8/13/2019 MAX Bone Rig

http://slidepdf.com/reader/full/max-bone-rig 7/8

8/13/2019 MAX Bone Rig

http://slidepdf.com/reader/full/max-bone-rig 8/8