mbp20 ifu booklet us en - contentful€¦ · welcome... to your new motorola baby monitor! thank...
TRANSCRIPT
User�s GuideMBP20
Baby Monitor
The features described in this user'sguide are subject to modifications
without prior notice.
Weto yThan nother room or you can monitPleas ur Motorola product, you will ne ration is not required for warraFor p
This need to get the mosBefo tery in the parent unit it continues to wor nother location. Plea tall the units.Got � 1 � 1 � 1 � 1 � 1 � 1 � 1
lcome...our new Motorola Baby Monitor!
k you for purchasing the MBP20. Now you can see and hear your baby sleeping in aor your older children in their play room.e retain your original dated sales receipt for your records. For warranty service of yoed to provide a copy of your dated sales receipt to confirm warranty status. Registnty coverage.roduct-related questions, please call:
US and Canada 1-888-331-3383On the Web: www.motorola.com
User's Guide provides you with all the information yout from your product.re you can use the baby monitor, you MUST insert the bat
, and we recommend you fully charge the battery so that k if you disconnect it from the mains power to carry it to ase read the Safety Instructions on page 8 before you inseverything?x Parent unit (MBP20PU)x Baby unit (MBP20BU)x Rechargeable Ni-MH battery pack for the Parent unitx Belt clip / stand for parent unit (already attached)x Battery door for parent unit (already attached)x Power adapter for the parent unitx Power adapter for the baby unit
o increase the speaker volume.s to move up the menu list.
access the main menu. to access the sub-menu, or
o decrease the speaker volume. to move down the menu list.
k back through the baby unit. lk mode.
ctivate the video feed and turn y.
: Press and hold to power on/off
to cancel settings or go back to
charging mode.ttery is detected.
k is not installed, even if the nected.
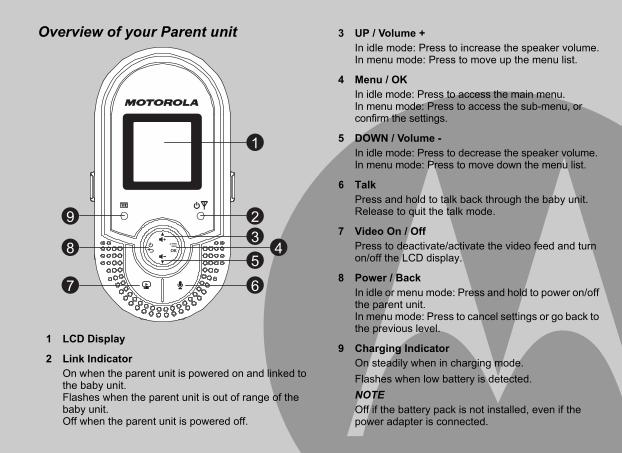
Overview of your Parent unit
1 LCD Display
2 Link IndicatorOn when the parent unit is powered on and linked to the baby unit.Flashes when the parent unit is out of range of the baby unit.Off when the parent unit is powered off.
7
8
9
6
54
32
1
3 UP / Volume +In idle mode: Press tIn menu mode: Pres
4 Menu / OKIn idle mode: Press toIn menu mode: Pressconfirm the settings.
5 DOWN / Volume -In idle mode: Press tIn menu mode: Press
6 TalkPress and hold to talRelease to quit the ta
7 Video On / OffPress to deactivate/aon/off the LCD displa
8 Power / BackIn idle or menu modethe parent unit.In menu mode: Pressthe previous level.
9 Charging IndicatorOn steadily when in Flashes when low baNOTEOff if the battery pacpower adapter is con
t unit or baby unit is playing
alarm is activated.und alert is set on.arging.
e internal bars mean high
n in cycle. Battery is in .
RT TONES RESET Battery
Link
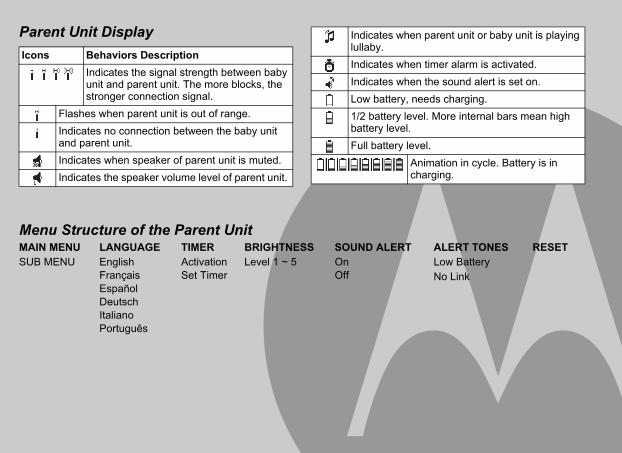
Parent Unit Display
Menu Structure of the Parent Unit
Icons Behaviors DescriptionIndicates the signal strength between baby unit and parent unit. The more blocks, the stronger connection signal.
Flashes when parent unit is out of range.Indicates no connection between the baby unit and parent unit.Indicates when speaker of parent unit is muted.Indicates the speaker volume level of parent unit.
Indicates when parenlullaby.Indicates when timer Indicates when the soLow battery, needs ch1/2 battery level. Morbattery level.Full battery level.
Animatiocharging
MAIN MENU LANGUAGE TIMER BRIGHTNESS SOUND ALERT ALESUB MENU English
FrançaisEspañolDeutschItalianoPortuguês
ActivationSet Timer
Level 1 ~ 5 OnOff
LowNo
night vision illumination
it is switched on. it is switched off.
speaker volume.
er on/off the baby unit.
speaker volume.
by playing.
the selected lullaby.
the selected lullaby., press to select and play the
when night vision required.
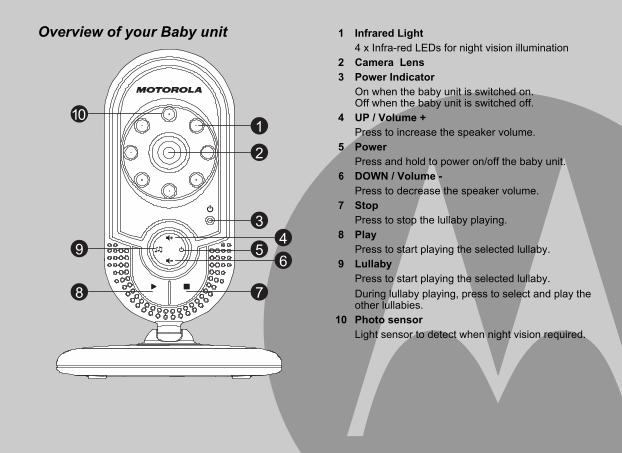
Overview of your Baby unit
65
4
8
9
10
2
7
3
1
1 Infrared Light4 x Infra-red LEDs for
2 Camera Lens3 Power Indicator
On when the baby unOff when the baby un
4 UP / Volume +Press to increase the
5 PowerPress and hold to pow
6 DOWN / Volume -Press to decrease the
7 StopPress to stop the lulla
8 PlayPress to start playing
9 LullabyPress to start playingDuring lullaby playingother lullabies.
10 Photo sensorLight sensor to detect
tween them, and the range
ced concrete, between the
electrical equipment, such
rooms.
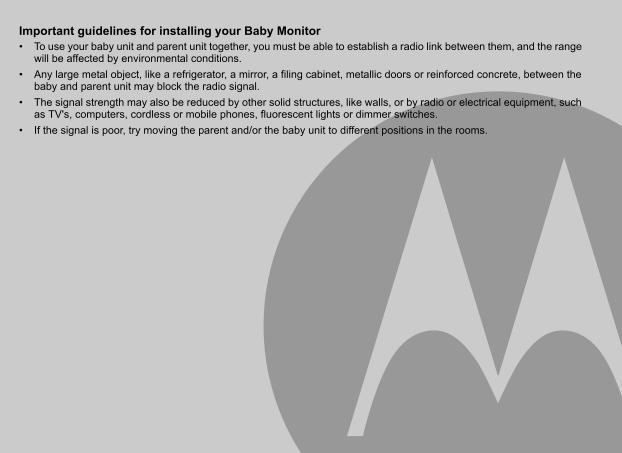
Important guidelines for installing your Baby Monitor� To use your baby unit and parent unit together, you must be able to establish a radio link be
will be affected by environmental conditions.� Any large metal object, like a refrigerator, a mirror, a filing cabinet, metallic doors or reinfor
baby and parent unit may block the radio signal.� The signal strength may also be reduced by other solid structures, like walls, or by radio or
as TV's, computers, cordless or mobile phones, fluorescent lights or dimmer switches.� If the signal is poor, try moving the parent and/or the baby unit to different positions in the
7
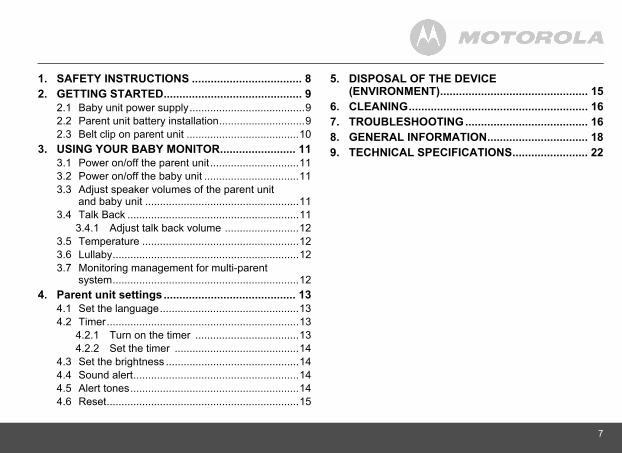
1. SAFETY INSTRUCTIONS ................................... 82. GETTING STARTED............................................ 9
2.1 Baby unit power supply.......................................92.2 Parent unit battery installation.............................92.3 Belt clip on parent unit ......................................10
3. USING YOUR BABY MONITOR........................ 113.1 Power on/off the parent unit..............................113.2 Power on/off the baby unit ................................113.3 Adjust speaker volumes of the parent unit
and baby unit ....................................................113.4 Talk Back ..........................................................11
3.4.1 Adjust talk back volume .........................123.5 Temperature .....................................................123.6 Lullaby...............................................................123.7 Monitoring management for multi-parent
system...............................................................124. Parent unit settings .......................................... 13
4.1 Set the language...............................................134.2 Timer.................................................................13
4.2.1 Turn on the timer ...................................134.2.2 Set the timer ..........................................14
4.3 Set the brightness .............................................144.4 Sound alert........................................................144.5 Alert tones.........................................................144.6 Reset.................................................................15
5. DISPOSAL OF THE DEVICE (ENVIRONMENT)............................................... 15
6. CLEANING......................................................... 167. TROUBLESHOOTING....................................... 168. GENERAL INFORMATION................................ 189. TECHNICAL SPECIFICATIONS........................ 22
8 SAFETY INSTRUCTIONS
1. SAF
STRANGout of theNEVER pSecure thNever usthe AC ACAMERA� Determ
the bes� Place th
bureaukeyhole
� NEVER� Secure
baby�s This babyregardingdescribedalways rebefore us
red. Keep small parts away from ing.y. Don't allow children to play
t a substitute for responsible
for future reference.onitor with a towel or blanket.
rds with power adapters. Only provided.l its functions so that you are ctual use.nitor near water.
monitor near a heat source.nd power adapters provided. Do or power adapters as this may battery pack.ck of the same type.ontacts with sharp or metal
is replaced by an incorrect type. according to the instructions. ith rating: 2.4V 600mAh.
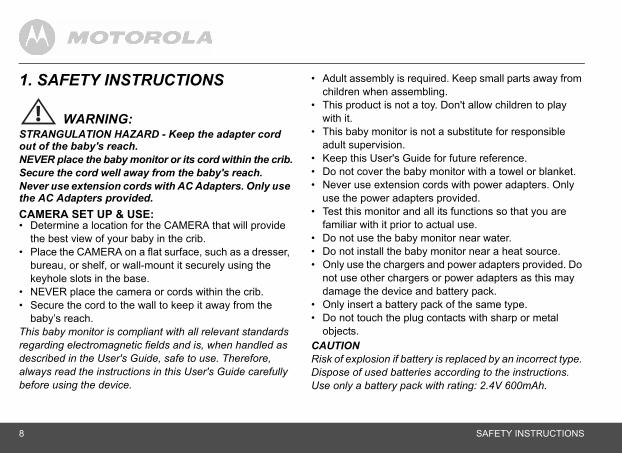
ETY INSTRUCTIONS
WARNING:ULATION HAZARD - Keep the adapter cord baby's reach.
lace the baby monitor or its cord within the crib.e cord well away from the baby's reach.
e extension cords with AC Adapters. Only use dapters provided. SET UP & USE:
ine a location for the CAMERA that will provide t view of your baby in the crib.e CAMERA on a flat surface, such as a dresser,
, or shelf, or wall-mount it securely using the slots in the base. place the camera or cords within the crib.
the cord to the wall to keep it away from the reach. monitor is compliant with all relevant standards electromagnetic fields and is, when handled as in the User's Guide, safe to use. Therefore, ad the instructions in this User's Guide carefully ing the device.
� Adult assembly is requichildren when assembl
� This product is not a towith it.
� This baby monitor is noadult supervision.
� Keep this User's Guide� Do not cover the baby m� Never use extension co
use the power adapters� Test this monitor and al
familiar with it prior to a� Do not use the baby mo� Do not install the baby � Only use the chargers a
not use other chargers damage the device and
� Only insert a battery pa� Do not touch the plug c
objects.CAUTIONRisk of explosion if batteryDispose of used batteriesUse only a battery pack w
GETT 9
2. G2.1
1. InsDCas
2. Cosu
NOTEOnly
t battery installationy pack is supplied and MUST be it in order for the parent unit to work. t before you use it for the first time or ndicates that the battery is low.
ip / stand.y compartment cover.
ING STARTED
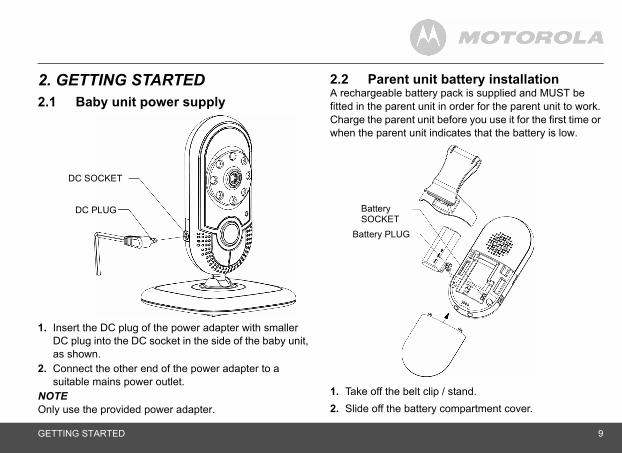
ETTING STARTEDBaby unit power supply
ert the DC plug of the power adapter with smaller plug into the DC socket in the side of the baby unit,
shown.nnect the other end of the power adapter to a itable mains power outlet.
use the provided power adapter.
2.2 Parent uniA rechargeable batterfitted in the parent unCharge the parent uniwhen the parent unit i
1. Take off the belt cl2. Slide off the batter
DC SOCKET
DC PLUG Battery SOCKET
Battery PLUG
10 GETTING STARTED
3. Insert the bathe co
4. Replacthe be
5. Insert DC plu
6. Connesuitabl
7. The CNOTEOnly use
arent unit
aches to the back of the parent locking slots on each side.he accessory fitted in belt clip
stand mode by pulling the clip otating it by half a turn, as shown.
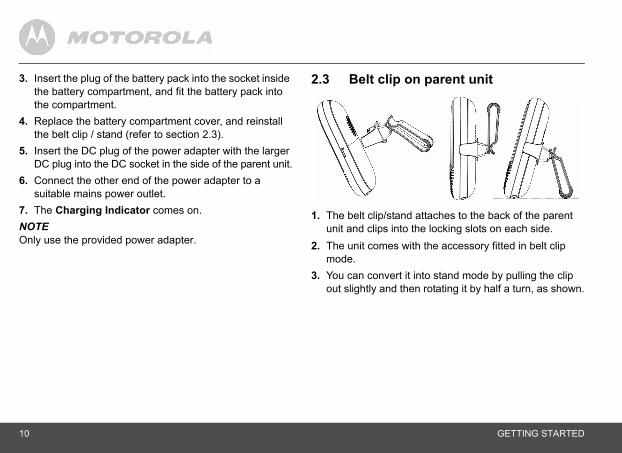
the plug of the battery pack into the socket inside ttery compartment, and fit the battery pack into mpartment.e the battery compartment cover, and reinstall
lt clip / stand (refer to section 2.3).the DC plug of the power adapter with the larger g into the DC socket in the side of the parent unit.ct the other end of the power adapter to a e mains power outlet.harging Indicator comes on.
the provided power adapter.
2.3 Belt clip on p
1. The belt clip/stand attunit and clips into the
2. The unit comes with tmode.
3. You can convert it intoout slightly and then r
USING 11
3. UPleasthis bsubst
3.11. W
Linon
2. WLinpose
3.21. W
Po2. W
Pooff
NOTEDo noor youThe uapart,
aker volumes of the parent by unitls on the baby unit, and 6 levels on the UME OFF. The volume level of parent unit tus bar when you adjust the volume. the parent unit or > or < on just the respective volume level.layed if the volume of the parent unit
emitted if you try to adjust beyond st volume level.setting on the baby unit affects the it when you use the Talk Back g a lullaby.
ack feature to comfort and reassure
you will not be able to hear your the button.n the parent unit to speak to your isplayed on the parent unit.ur baby again.
YOUR BABY MONITOR
SING YOUR BABY MONITORe read these instructions carefully, and be aware that aby monitor is only intended as an aid. It is not a itute for responsible, correct parental supervision.
Power on/off the parent unithen the parent unit is off, press and hold 3 until the
k Indicator is on. The parent unit is now powered and will search for and link itself to the baby unit.hen the parent unit is on, press and hold 3 until the
k Indicator turns off. The parent unit is now wered off, although the display may take a few conds to go off fully.
Power on/off the baby unithen the baby unit is off, press and hold 0 until the wer Indicator is on. The baby unit is now powered on.
hen the baby unit is on, press and hold 0 until the wer Indicator turns off. The baby unit is now powered .
t place the parent and baby units too close together, may hear a high pitched noise. This is not a fault. nits are designed to be operated at some distance e.g. in separate rooms.
3.3 Adjust speunit and ba
There are 5 volume leveparent unit, including VOLwill be shown on the sta1. Press + or - on
the baby unit to ad2. The will be disp
is turned off. An audible alert is the highest or lowe
Changing the volume volume at the baby unfeature or when playin
3.4 Talk BackYou can use the Talk Byour baby. Whilst using Talk Backbaby until you release1. Press and hold 7 o
baby. Talk will be d2. Release to hear yo
12 USING YOUR BABY MONITOR
3.4.1 AThe babyPress >the volumNOTEIf a lullabyrestart fro
3.5 TThe babybaby's roo57ºF), by message higher thaAlthough small diffeactual temsuch an aNoteThe curreparent un
ilable to play for your baby, either repeating through all three
y unit to select the lullaby and
s 2 to step between different
unit to start playing the selected
s 9 to stop playing.
anagement for multi-mg up to two parent units to a baby arent unit can receive video switch the video feed between
ent unit will connect to the baby e next powered up parent unit will PU IS VIDEO MONITORING! for around 30 lank. Press once the 6 to turn
djust talk back volume unit has 5 volume levels from Level 1 to Level 5. or < on the baby unit to increase or decrease
e respectively.
is playing, it will stop during Talk Back, but will m the beginning when the Talk Back ends.
emperature unit constantly monitors the temperature in your m and alerts you if it gets lower than 14ºC (or emitting a warning beep and showing the alert "Too cold!" on the parent unit screen, or if it gets n 39ºC (or 102ºF), it will show "Too hot!". this is for reference only, and there may be a rence between the baby monitor reading and the perature, please check your baby immediately if lert message is triggered.
nt temperature at the baby unit is shown on the it status bar whenever it is displayed.
3.6 Lullaby There are 3 lullabies avarepeating one melody ormelodies.1. Press 2 on the bab
start playing. 2. During playback, pres
lullabies. OR Press 8 on the babylullaby.
3. During playback, pres
3.7 Monitoring mparent syste
The system allows pairinunit. However, only one pimage at a time. You canthese two parent units.The first powered up parunit automatically, and thturn up on screen ANOTHERseconds and then goes boff the screen.

Paren 13
NOTEThe pvideoTo swunit tomode1. Pr
the2. Pr
vidtra
nit settings languageccess the main menu.
to select LANGUAGE.nter the sub-menu.
to select the desired language.onfirm.
serves as an alarm to remind you of e baby such as feeding, or medication.
the timerccess the main menu.
to select TIMER.nter the sub-menu.
to select ACTIVATION. then + or - to select ON or OFF. then if ON was selected, press + or - er mode
onfirm.
t unit settings
arent unit still carries on audio monitoring even if the capture is turned off.itch the video feed from the current monitoring parent the other parent unit which is not in video monitoring :ess 6 on the current video monitoring parent unit, screen will be blank without video image received.
ess 6 on the other parent unit which is NOT in eo monitoring mode, the video feed will be nsferred to that parent unit.
4. Parent u4.1 Set the1. Press 1 to a2. Press + or -3. Press 1 to e4. Press + or -5. Press 1 to c
4.2 TimerThe timer functionthings-to-do for th
4.2.1 Turn on 1. Press 1 to a2. Press + or -3. Press 1 to e4. Press + or -5. Press 1 and6. Press 1, and
to select the tim7. Press 1 to c
14 Parent unit settings
4.2.2 S1. Repea2. Press 3. Press
using t4. Press
using t5. Press NOTEWhen thebeep andto stop thtimer will bstart anot
4.3 S1. Press 2. Press 3. Press 4. Press
screen5. Press NOTEA lower br
et ON, and the parent unit speaker the parent unit to beep and flash lay, whenever the sound at the reset threshold.
he main menu.lect SOUND ALERT. sub-menu.lect ON or OFF.
nit to give a warning when the radio link to the baby unit is lost.
screen will be displayed on the one emitted simultaneously.he main menu.lect ALERT TONES.
to select LOW BATTERY or NO LINK. to select ON or OFF for the alert
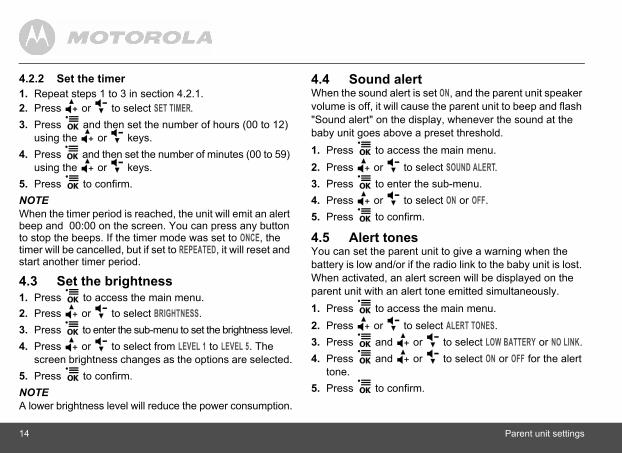
et the timert steps 1 to 3 in section 4.2.1.+ or - to select SET TIMER.1 and then set the number of hours (00 to 12) he + or - keys.1 and then set the number of minutes (00 to 59) he + or - keys.1 to confirm.
timer period is reached, the unit will emit an alert 00:00 on the screen. You can press any button e beeps. If the timer mode was set to ONCE, the e cancelled, but if set to REPEATED, it will reset and
her timer period.
et the brightness1 to access the main menu.+ or - to select BRIGHTNESS.1 to enter the sub-menu to set the brightness level.+ or - to select from LEVEL 1 to LEVEL 5. The brightness changes as the options are selected.1 to confirm.
ightness level will reduce the power consumption.
4.4 Sound alertWhen the sound alert is svolume is off, it will cause"Sound alert" on the dispbaby unit goes above a p1. Press 1 to access t2. Press + or - to se3. Press 1 to enter the4. Press + or - to se5. Press 1 to confirm.
4.5 Alert tonesYou can set the parent ubattery is low and/or if theWhen activated, an alertparent unit with an alert t1. Press 1 to access t2. Press + or - to se3. Press 1 and + or -4. Press 1 and + or -
tone.5. Press 1 to confirm.
DISPO 15
4.6You corigin1. Pr2. Pr3. Pr4. Pr
OF THE DEVICE ENT)
ct lifecycle, you should duct with normal this product to a
recycling of electrical nt. The symbol on the nd/or box indicates this.aterials can be re-used if you take
int. By reusing some parts or raw oducts you make an important ection of the environment.cal authorities in case you need e collection points in your area.pack in an environmentally-friendly our local regulations.
SAL OF THE DEVICE (ENVIRONMENT)
Resetan restore all the adjustable settings back to their al factory settings.ess 1 to access the main menu.ess + or - to select RESET.ess 1 to display CONFIRM?. ess 1 to confirm the reset.
5. DISPOSAL (ENVIRONM
At the end of the produnot dispose of this prohousehold waste. Takecollection point for the and electronic equipmeproduct, user's guide aSome of the product mthem to a recycling pomaterials from used prcontribution to the protPlease contact your lomore information on thDispose of the battery manner according to y
16 CLEANING
6. CLEClean youanti-staticsolvents.
Cleanin� Do not
other spermanby the w
� Keep ystrong
� Every ereliabiligo wronCustom
OTINGt unit does not come onnt unit is powered on.
plied battery pack is correctly re not drained. the parent unit by connecting it
t unit flashes baby unit may be out of range the distance between the units, t.
witched off. Press and hold the to switch on the baby unit. on the parent unit screen
nt unit is running low. Connect ains power with the supplied rging.
baby unit. Reduce the distance and the baby unit, but not
witched off. Press and hold the to switch on the baby unit.
ANINGr MBP20 with a slightly damp cloth or with an cloth. Never use cleaning agents or abrasive
g and careclean any part of the product with thinners or olvents and chemicals - this may cause ent damage to the product which is not covered arranty.
our MBP20 away from hot, humid areas or sunlight, and do not let it get wet.ffort has been made to ensure high standards of ty for your MBP20. However, if something does g, please do not try to repair it yourself - contact er Service for assistance.
7. TROUBLESHOLink light on the paren� Check whether the pare� Check whether the sup
installed and that they a� Recharge the battery in
to the power supply.Link light on the paren� The parent unit and the
with each other. Reducebut not closer than 5 fee
� The baby unit may be s0 key on the baby unit
Low battery light or flashes� Battery pack in the pare
the parent unit to the mpower adaptor for recha
The parent unit beeps� Lost connection with the
between the parent unitcloser than 5 feet.
� The baby unit may be s0 key on the baby unit
TROU 17
� Batthepow
Cannparen� Vid
pre� The
withbut
� Batparada
Cann� The
incsec
� Thewithbut
ystem produces a high-pitched
the baby unit are too close to each e parent unit and baby unit are at m each other.
e of the parent unit maybe set too volume of the parent unit.parent unit is running low
l of the parent unit screen may be consumes more power. Reduce the he screen - see section 4.3. the parent unit may be set too high wer. Decrease the volume level of
fer to section 3.3 for volume level
not working unit is powered on, and the link unit and baby unit is normal.me is loud enough at the baby unit,
BLESHOOTING
tery pack in parent unit may be running low. Connect parent unit to the mains power with the supplied er adaptor for recharging.ot view the video image of baby from the t unit
eo feed maybe turned off. Activate the video feed by ssing 6. parent unit and the baby unit may be out of range each other. Reduce the distance between the units,
not closer than 5 feet.tery pack in parent unit may be drained. Connect the ent unit to the mains power with the supplied power ptor for recharging.ot hear sound or baby cry from the parent unit volume level in the parent unit may be set too low,
rease the volume level of the parent unit. Refer to tion 3.3 for volume level settings. parent unit and the baby unit may be out of range each other. Reduce the distance between the units,
not closer than 5 feet.
The baby monitor snoise� The parent unit and
other. Make sure thleast 5 feet away fro
� The speaker volumhigh. Decrease the
Battery pack in the quickly� The brightness leve
set too high, which brightness level of t
� The volume level ofwhich consumes pothe parent unit. Resettings.
Talk back feature is� Make sure the baby
between the parent� Check that the volu
refer to section 3.4.
18 GENERAL INFORMATION
8. GENIf your 1. Read 2. Visit o3. Conta
USTo order acontact cu
ConsumLimitedThank yomanufactInternatioWhat DoSubject towarrants tcertified aproduct thmaterials for the peexclusiveWho is cThis Warrpurchase
o?ed distributor at its option and sonable time, will at no charge ucts or Accessories that does not We may use functionally refurbished/ pre-owned or new parts.s Are There?IES, INCLUDING WITHOUT D WARRANTIES OF FITNESS FOR A PARTICULAR ITED TO THE DURATION OF
Y, OTHERWISE THE REPAIR VIDED UNDER THIS EXPRESS
THE EXCLUSIVE REMEDY OF PROVIDED IN LIEU OF ALL
XPRESS OR IMPLIED. IN NO LA OR BINATONE BE LIABLE, T OR TORT (INCLUDING AGES IN EXCESS OF THE E PRODUCT OR ACCESSORY,
INCIDENTAL, SPECIAL OR GES OF ANY KIND, OR LOSS TS, LOSS OF BUSINESS, LOSS THER FINANCIAL LOSS CONNECTION WITH THE
ERAL INFORMATIONproduct is not working properly...this User's Guide.ur website: www.motorola.comct Customer Service at and Canada 1-888-331-3383 replacement battery pack for the parent unit, stomer service.
er Products and Accessories Warranty ("Warranty")
u for purchasing this Motorola branded product ured under license by Binatone Electronics nal LTD ("BINATONE").es this Warranty Cover? the exclusions contained below, BINATONE hat this Motorola branded product ("Product") or ccessory ("Accessory") sold for use with this at it manufactured to be free from defects in and workmanship under normal consumer usage riod outlined below. This Warranty is your warranty and is not transferable.overed?anty extends only to the first consumer r, and is not transferable.
What will BINATONE dBINATONE or its authorizwithin a commercially rearepair or replace any Prodconform to this Warranty.equivalent reconditioned/Products, Accessories orWhat Other LimitationANY IMPLIED WARRANTLIMITATION THE IMPLIEMERCHANTABILITY ANDPURPOSE, SHALL BE LIMTHIS LIMITED WARRANTOR REPLACEMENT PROLIMITED WARRANTY IS THE CONSUMER, AND ISOTHER WARRANTIES, EEVENT SHALL MOTOROWHETHER IN CONTRACNEGLIGENCE) FOR DAMPURCHASE PRICE OF THOR FOR ANY INDIRECT,CONSEQUENTIAL DAMAOF REVENUE OR PROFIOF INFORMATION OR OARISING OUT OF OR IN
GENE 19
ABILIACCEDAMASomeof inclengthexcluspecithat v
ar. Periodic maintenance, repair and due to normal wear and tear are age. ries whose fully charged capacity falls ted capacity and batteries that leak arranty.
efects or damage that result from: (a) torage, misuse or abuse, accident or ical damage (cracks, scratches, etc.)
product resulting from misuse; (b) ater, rain, extreme humidity or heavy rt or the like, extreme heat, or food; (c) r Accessories for commercial g the Product or Accessory to
onditions; or (d) other acts which are ROLA or BINATONE, are excluded
la branded Products and ts or damage that result from the use ded or certified Products or
peripheral equipment are excluded
ProdConsProd
ConsAcce
ConsProdAcceare RRepla
RAL INFORMATION
TY OR INABILITY TO USE THE PRODUCTS OR SSORIES TO THE FULL EXTENT THESE GES MAY BE DISCLAIMED BY LAW. jurisdictions do not allow the limitation or exclusion
idental or consequential damages, or limitation on the of an implied warranty, so the above limitations or
sions may not apply to you. This Warranty gives you fic legal rights, and you may also have other rights ary from one jurisdiction to another.
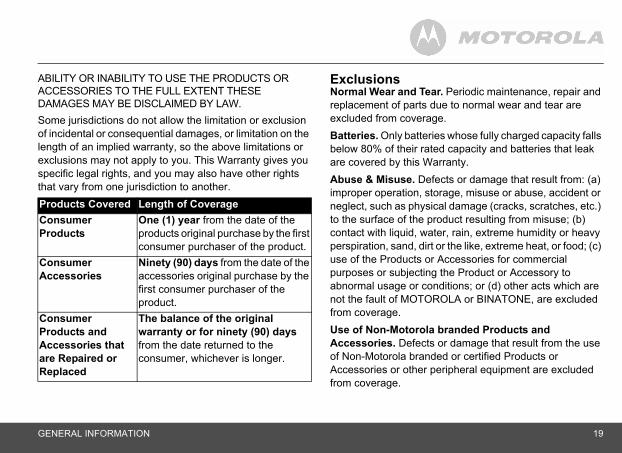
ExclusionsNormal Wear and Tereplacement of partsexcluded from coverBatteries. Only battebelow 80% of their raare covered by this WAbuse & Misuse. Dimproper operation, sneglect, such as physto the surface of the contact with liquid, wperspiration, sand, diuse of the Products opurposes or subjectinabnormal usage or cnot the fault of MOTOfrom coverage. Use of Non-MotoroAccessories. Defecof Non-Motorola branAccessories or otherfrom coverage.
ucts Covered Length of Coverageumer ucts
One (1) year from the date of the products original purchase by the first consumer purchaser of the product.
umer ssories
Ninety (90) days from the date of the accessories original purchase by the first consumer purchaser of the product.
umer ucts and ssories that epaired or ced
The balance of the original warranty or for ninety (90) days from the date returned to the consumer, whichever is longer.
20 GENERAL INFORMATION
Unauthordamagesinstallatioway by soits authoriAltered Pnumbers obliteratetamperingnonconfoparts, areCommunfailure of communicuse with tcoverage
How to OInformatTo obtainUS and CYou will reAccessorAuthorize
ust include: (a) the Product or al proof of purchase (receipt) place and seller of the Product; (c) cluded in your box, a completed e serial number of the Product; (d) e problem; and, most importantly; phone number.
ons constitute the complete een you and BINATONE
r Accessories purchased by you, agreement or representations, made in any literature al materials issued by
ations made by any agent, TONE, that may have been made id purchase.
dustry Canada (IC)
odifications to this equipment not e party responsible for e user's authority to operate the
as been tested and found to a Class B digital device, pursuant
ized Service or Modification. Defects or resulting from service, testing, adjustment, n, maintenance, alteration, or modification in any meone other than MOTOROLA, BINATONE or zed service centers, are excluded from coverage. roducts. Products or Accessories with (a) serial or date tags that have been removed, altered or d; (b) broken seals or that show evidence of ; (c) mismatched board serial numbers; or (d)
rming or non-Motorola branded housings, or excluded from coverage. ication Services. Defects, damages, or the Products or Accessories due to any ation service or signal you may subscribe to or
he Products or Accessories is excluded from .
btain Warranty Service or Other ion? service or information, please call:anada 1-888-331-3383 ceive instructions on how to ship the Products or
ies at your expense and risk, to a BINATONE d Repair Center.
To obtain service, you mAccessory; (b) the originwhich includes the date, if a warranty card was inwarranty card showing tha written description of th(e) your address and teleThese terms and conditiwarranty agreement betwregarding the Products oand supersede any priorincluding representationspublications or promotionBINATONE or representemployee or staff of BINAin connection with the sa
FCC, ACTA and InRegulations Warning: Changes or mexpressly approved by thcompliance could void thequipment.NOTE: This equipment hcomply with the limits for
GENE 21
to Parprovidin a reuses instalcauseHoweoccurcausewhichon, thby on� Re� Inc
rec� Co
diff� Co
tecThis dOperaThis dthis dinclud
with Industry Canada licence-exempt eration is subject to the following two vice may not cause interference, and ccept any interference, including cause undesired operation of the
pparatus complies with Canadian
n the compliance with the FCC's RF lace the baby unit at least 20 cm from
tion, the parent unit has been tested F exposure guidelines when used
plied or designated for this product. ries may not ensure compliance with idelines.
RAL INFORMATION
t 15 of the FCC Rules. These limits are designed to e reasonable protection against harmful interference sidential installation. This equipment generates,
and can radiate radio frequency energy and, if not led and used in accordance with the instructions, may harmful interference to radio communications.ver, there is no guarantee that interference will not in a particular installation. If this equipment does harmful interference to radio or television reception, can be determined by turning the equipment off and e user is encouraged to try to correct the interference e or more of the following measures:orient or relocate the receiving antenna.rease the separation between the equipment and eiver.nnect the equipment into an outlet on a circuit erent from that to which the receiver is connected.nsult the dealer or an experienced radio/TV hnician for help.evice complies with part 15 of the FCC Rules. tion is subject to the following two conditions: (1) evice may not cause harmful interference, and (2)
evice must accept any interference received, ing interference that may cause undesired operation.
This device compliesRSS standard(s). Opconditions: (1) this de(2) this device must ainterference that maydevice.This Class B digital aICES-003Caution: To maintaiexposure guideline, pnearby persons.For body worn operaand meets the FCC Rwith the belt clip supUse of other accessoFCC RF exposure gu
22 TECHNICAL SPECIFICATIONS
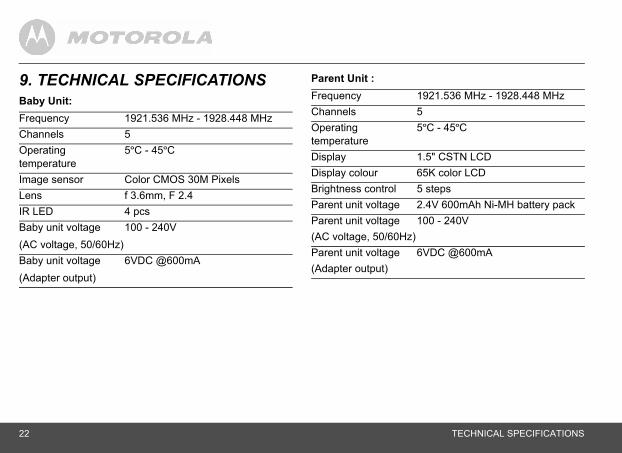
9. TECBaby UniFrequencChannelsOperatingtemperatuImage seLensIR LEDBaby unit(AC voltaBaby unit(Adapter
21.536 MHz - 1928.448 MHz
C - 45ºC
" CSTN LCDK color LCDstepsV 600mAh Ni-MH battery pack0 - 240V
DC @600mA
HNICAL SPECIFICATIONSt:
Parent Unit :
y 1921.536 MHz - 1928.448 MHz5
re
5ºC - 45ºC
nsor Color CMOS 30M Pixelsf 3.6mm, F 2.44 pcs
voltagege, 50/60Hz)
100 - 240V
voltageoutput)
6VDC @600mA
Frequency 19Channels 5Operating temperature
5º
Display 1.5Display colour 65Brightness control 5 Parent unit voltage 2.4Parent unit voltage(AC voltage, 50/60Hz)
10
Parent unit voltage(Adapter output)
6V

Manufactured, distributed or sold by Binatone Electronics International LTD., official licensee for this product. MOTOROLA and the Stylized M Logo are trademarks or registered trademarks of Motorola Trademark Holdings, LLC. and are used under license. All other trademarks are the property of their respective owners.© 2011 Motorola Mobility, Inc. All rights reserved.
Version 2.0
Printed in China