mf 1100 a - mwf | the latest detectors in the world … · mf 1100 a this metal-finder electronic...
TRANSCRIPT

MF 1100 A
USERMANUAL
+90 ( 212 ) 222 0946+90 ( 212 ) 222 0947
[email protected] : Fax :
Email : www.mwf.com.trWebsite :

Contents User’s Maual
قراءة دليل االستخدامجيد� قبل بدأ البحث .
Page 1
Contents
Overview
Important Notes
Main Unit
Parts
Assembly
Setup
Getting Started
1
2
3
5
7
8
9
12
Con�rm Target 18
Metal and Water Finder

Important Notes User’s Manual
Read & Understand The User's manual
before using this device
The operating in high voltage areas would
limit the results and performance
Don't operate two devices with same
method of search at the same place
The operator Must remove any metals
that might affect the opreatin
eg:Rings,watch, belt....
Any attempt to tamper the device or
unapproved maintenance would void
the warrantyFor best power endurance and reliability.
use heavy duty and high quality batteries
The user must practice before starting the detecting operations and discoveries
Store in Cool and dry place 15-40 C 5%-75% humidity
Don't store in high temperature or high
humidity
The cell signal interferes with the device
signal, so turn off the cell while operating
Disconnect the batteries before long
time storage
Page 2
MF 1100 A
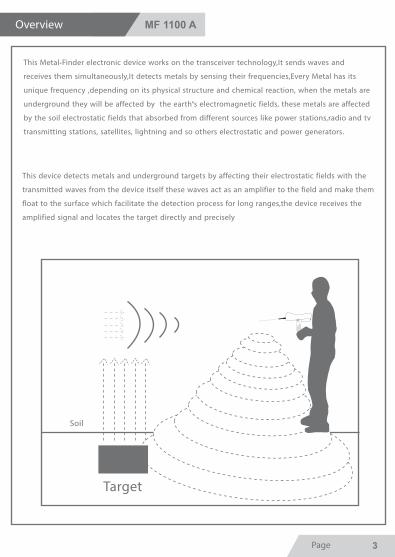
This Metal-Finder electronic device works on the transceiver technology,It sends waves and
receives them simultaneously,It detects metals by sensing their frequencies,Every Metal has its
unique frequency ,depending on its physical structure and chemical reaction, when the metals are
underground they will be affected by the earth's electromagnetic fields, these metals are affected
by the soil electrostatic fields that absorbed from different sources like power stations,radio and tv
transmitting stations, satellites, lightning and so others electrostatic and power generators.
This device detects metals and underground targets by affecting their electrostatic fields with the
transmitted waves from the device itself these waves act as an amplifier to the field and make them
float to the surface which facilitate the detection process for long ranges,the device receives the
amplified signal and locates the target directly and precisely
Page 3
Soil
Target
Overview

After great experiments we've reached to the concept of controlling the wave length and width
besides the transmitted frequencies from the device to the ground , Therefore the user could
select the specified search distance and depth easily and precisely up to 90 %.
This technology works for the first time now with MWF Products .
Search Operation: Search for Gold, Metals , Treasures, and Voids
Search System: Receiving the Electrostatic Fields of the Buried Target
Operating Processor: Microcontroller
Processor Frequency: 20.000 MHz
Processing Type: Digital Signal Processing ( DSP )
Operating Frequency: 1-30 KHz
Search Depth Program: 20m with depth control function
Searc Distance Program: 1500m Radius with Level Control Function
Power Consumption 120mA
Battery Endurance: 4 hours
Output Power: 12v Which allows fast and accurate scans
Display: 128x64 Graphical LCD Display
Overview MF 1100 A
Page 4
A notification appears on the display when the primary battery is low
when the secondary battery is low the switch led goes off
Battery Note

Main Unit MF 1100 A
1
45
6
3
2
Front View
Page 5
Scanning Antennas plugs1Display2
Power Switch3
Navigation And selecting Button (Move)4Confirm And Enter (Enter)5Escape And Restart Button ( ESC ) 6

Main Unit MF 1100 A
8
9
10
7
Back View
Page 6
Primary Battery Cover7Grip Socket8Secondary Battery Cover9Secondary Battery Power Switch10

Transmitting Antennas In Both Ends
Receiving Antennas In The Middle
Parts MF 1100 A
Transceiver Antennas
Page 7
Plug The Grip And Secure It In Place To Carry And Navigate The Device
Easily With The Rotaion Ability
Grip
Connect this unit to the device and plant it to the ground before
heading towards target. This unit sends and reinforces the waves in the
ground especially in the rocky and mountain areas.
Ground Transmitter Unit
Filters The Signals and Checks the target validity after being located
Filter Unit

Connect the antennas to the plugs in the front (figure 1)1
Connect the grip to the socket in the bottom of the device (figure2]0)2
Connect the power supply which is 9v battery in the battery housing (figure 3)Don't mix Different volts and types of batteries
3
Assembly MF 1100 A
Page 8
1
32

Pull the left and right antennas to the limit.
Setup MF 1100 A
Page 9
Switch the secondary batter switch on.
Turn the device on By the ON/OFF Switch.
Then the Main Menu would appear:
Metal Tupe
Search Distance
Seatch Depth
After the boot screen the language list would appear the user must specify the system language
by navigating to the chosen language pressing (MOVE) then selecting the language pressing
(ENTER)
EnglishSelect metalSelect distanceSelect depth
As Shown Below
The User must set all the settings

Select MetalGoldSilverBronz
Then the Main Menu will appear again
Metal Type
Search Distance
Search Depth
Select distance1- 100 m2- 500 m3- 1000 m
Setup MF 1100 A
Page 10
Select the metal type by navigating to metal type on screen pressing(MOVE) then selecting by
pressing (ENTER) then a list with the searchable metal types would appears on the screen,which is
Gold, silver, Bronze diamond and raw gold navigate to the desired metal pressing (MOVE) Then
(select By pressing (ENTER
1st Step
Then navigate to the second setting from the main menu ,search distance, by pressing (MOVE) and
select by pressing (ENTER) the distance list will appear select the distance by pressing (MOVE)
Select pressing (ENTER)
2nd Step

Metal Type
Search Distance
Search Depth
After Confirming the distance, the screen will automatically return to the Main Menu
The Search will start automatically As shown in the figure below.
Setup MF 1100 A
Page 11
Select depth4- 10 m5- 15 m6- 20 m
Searching
in order to start the search the last setting must be configured ,which is the search depth, by
pressing (MOVE). navigate to the desired depth then select and confirm by pressing (ENTER)
3rd Step

Then the device is ready to scan and search
GoldMetal:
depth :
distance 100 500 1000 1500
1 3 5 10 15 20
In the meantime, the user must move the device towards the soil to be automatically configure the soil as shown in the figure below
Until the configured options menu appears as shown in the figure below
To reset the settings again , or to change the metal type, distance , or depth press (Esc) to reset the
settings and initialize
MF 1100 AGetting Started
Page 12
Soil
Important Note

Page 13
Use this unit in the rocky and mountain areas to facilitate the waves distribution faster and more
precise,after the assembly and the setup connect it to one of the middle antennas plugs and plant it
to the ground for a period of 2-1 minutes then disconnect it and reconnect the antenna and
complete the search operation as explained
This operation takes place after finishing the setup
Ground Transmitter
Soil
Getting Started MF 1100 A

Getting Started MF 1100 A
Page 14
Soil
The user must carry the device by grip horizontally slightly sloped towards ground as shown in the figure below
Then stimulate the device’s waves and output fields by moving the device right and left slowly then stop the device.
Moving sideways

In the case of a located target , the device will receive signal and a reading that will divert the device from the normal track to another track which is the target point track,then the device will steady at the same direction ,in the meantime rotate fully around the direction that the device went toward until reaching the opposite and notice the track change once more and go toward the target.then get 30 m sideway from the first reading point and stimulate the device’s waves and steady the device and wait for the result if the target is legit the device will rotate towards the same point again therefore the target have been confirmedFor more accurate reading and determining repeat the step from different points , and if all the tracks intersect in a point then it is the target point
Getting Started MF 1100 A
Page 15
the user can know and estimate the target distance from the search location. to do so escape to
the main menu by pressing (ESC) or restarting the device. configure the settings as mentioned
earlier. first the language then from the main menu select the metal type then the distance menu
,if you have selected in the first search a ١٥٠٠ m search distance then decrease it to ٥٠٠ m and then
select the same depth as the same first search. when the device start the search do the same
previous steps. meanwhile hold the device and wait for the reading result,if a reading received then
the target is ٥٠٠ m away from the search location.
Repeat the step with the same settings and decrease the distance again for more accurate result.
Next is the target location determination step
Target Intersection
Point
1st Reading
User
2nd Reading
3rd Reading User
User

At first the user must bend the middle antennas towards the ground
How to Locate Target
After ensuring multiple readings towards the target. start walking in the same direction holding
the device normally . until you reach the passing point you will notice that the device rotates
around the normal track towards the point. Rotate with device slowly and start walking towards
the target slowly until you reach the point where the device rotates right and left then you have
located the target point.
Getting Started MF 1100 A
Page 16
Soil
Target
Device rotates around the track when passes the target point

There is another way to locate the target point more accurately, (Square method) take ٤
different readings for the target from ٤ angles forming a square ٣ m from target point the
intersection point of the for readings is the target point
Target
Device Direction
User
Device Direction
User
Dev
ice
Dire
ctio
nUser
Device D
irection
User
The user can know the approximate target depth by returning to main menu and select search
settings all again and change the depth level from depth menu. for example if the first selected
m away form the target hold the 20 m and reenter the infos and get 3 m decrease it to 5 depth was
device and wait for the target reading if there was a positive reading then the target depth is up to
.3m repeat the operation again by decreasing to get more accurate depth
Getting Started MF 1100 A
Page 17

Con�rm Target MF 1100 A
Page 18
after locating the target and the digging point switch on the filter and plant it to the ground in a 20m
distance then move with device to the midpoint between the designated target and the filter which
is 10m each way meanwhile the device is on and wait for the device reaction , if the device moves
towards the target then it is %100 legit and if the device moves towards the filter then it is a natural
ore in the target point and not a burial therefore you can disregard the target
Usage
This unit is designed to ensure the validity of the target
it filters all the interfering signals that might mix with the device signal especially in the rocky areas
and mountains
by absorbing the interfering signals the might appear like the desired metal frequency
Filter Unit
Operates on Disposable 9v Battery With a Power Switch

Valid Operation
Con�rm Target MF 1100 A
Page 19
Soil
Natural Ore
Invalid Operation
Soil
Real Target

Metal and Water Finder