my phly registration process and user guide agents phly registration process and user... · my phly...
TRANSCRIPT

My PHLY Registration Process and User Guide
Create a new My PHLY account:
From the PHLY.com home page, select one of the following methods to begin the registration process:
Hover over the Log In or Register section and click Register
Result: The My PHLY Registration page appears.
Or, click MY PHLY at the top of the page.
Result: The Log In to MYPHL page appears. Click Create a new account.
The My PHLY Registration page appears.
My PHLY Registration Process and User Guide
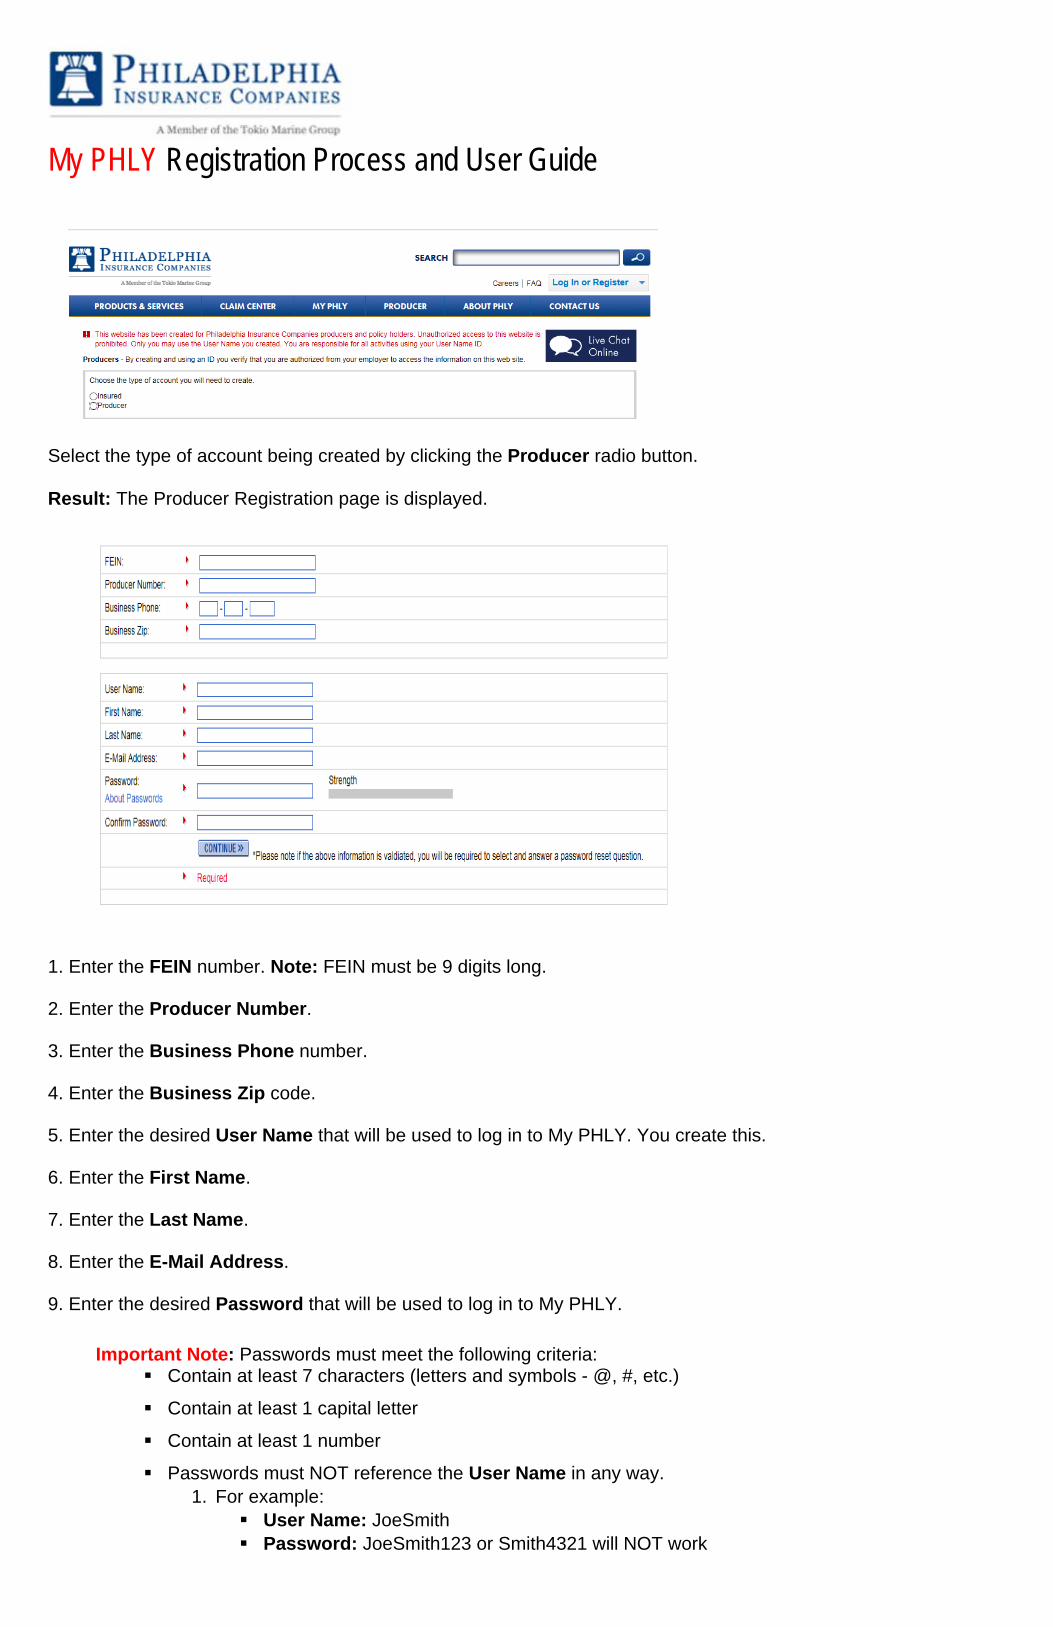
Select the type of account being created by clicking the Producer radio button. Result: The Producer Registration page is displayed.
1. Enter the FEIN number. Note: FEIN must be 9 digits long.
2. Enter the Producer Number.
3. Enter the Business Phone number.
4. Enter the Business Zip code.
5. Enter the desired User Name that will be used to log in to My PHLY. You create this.
6. Enter the First Name.
7. Enter the Last Name.
8. Enter the E-Mail Address.
9. Enter the desired Password that will be used to log in to My PHLY.
Important Note: Passwords must meet the following criteria: Contain at least 7 characters (letters and symbols - @, #, etc.)
Contain at least 1 capital letter
Contain at least 1 number
Passwords must NOT reference the User Name in any way. 1. For example:
User Name: JoeSmith Password: JoeSmith123 or Smith4321 will NOT work
My PHLY Registration Process and User Guide
Click the About Passwords link to learn more information about password format.
10. Confirm the desired Password by entering it again in the Confirm Password field.
11. Click Continue. 12. On the next page, re-enter the password you just created and set up a password reset question. 13. If you forget your password, we will ask you this security question and you will enter the answer you have selected. Please note that your answer is case sensitive.
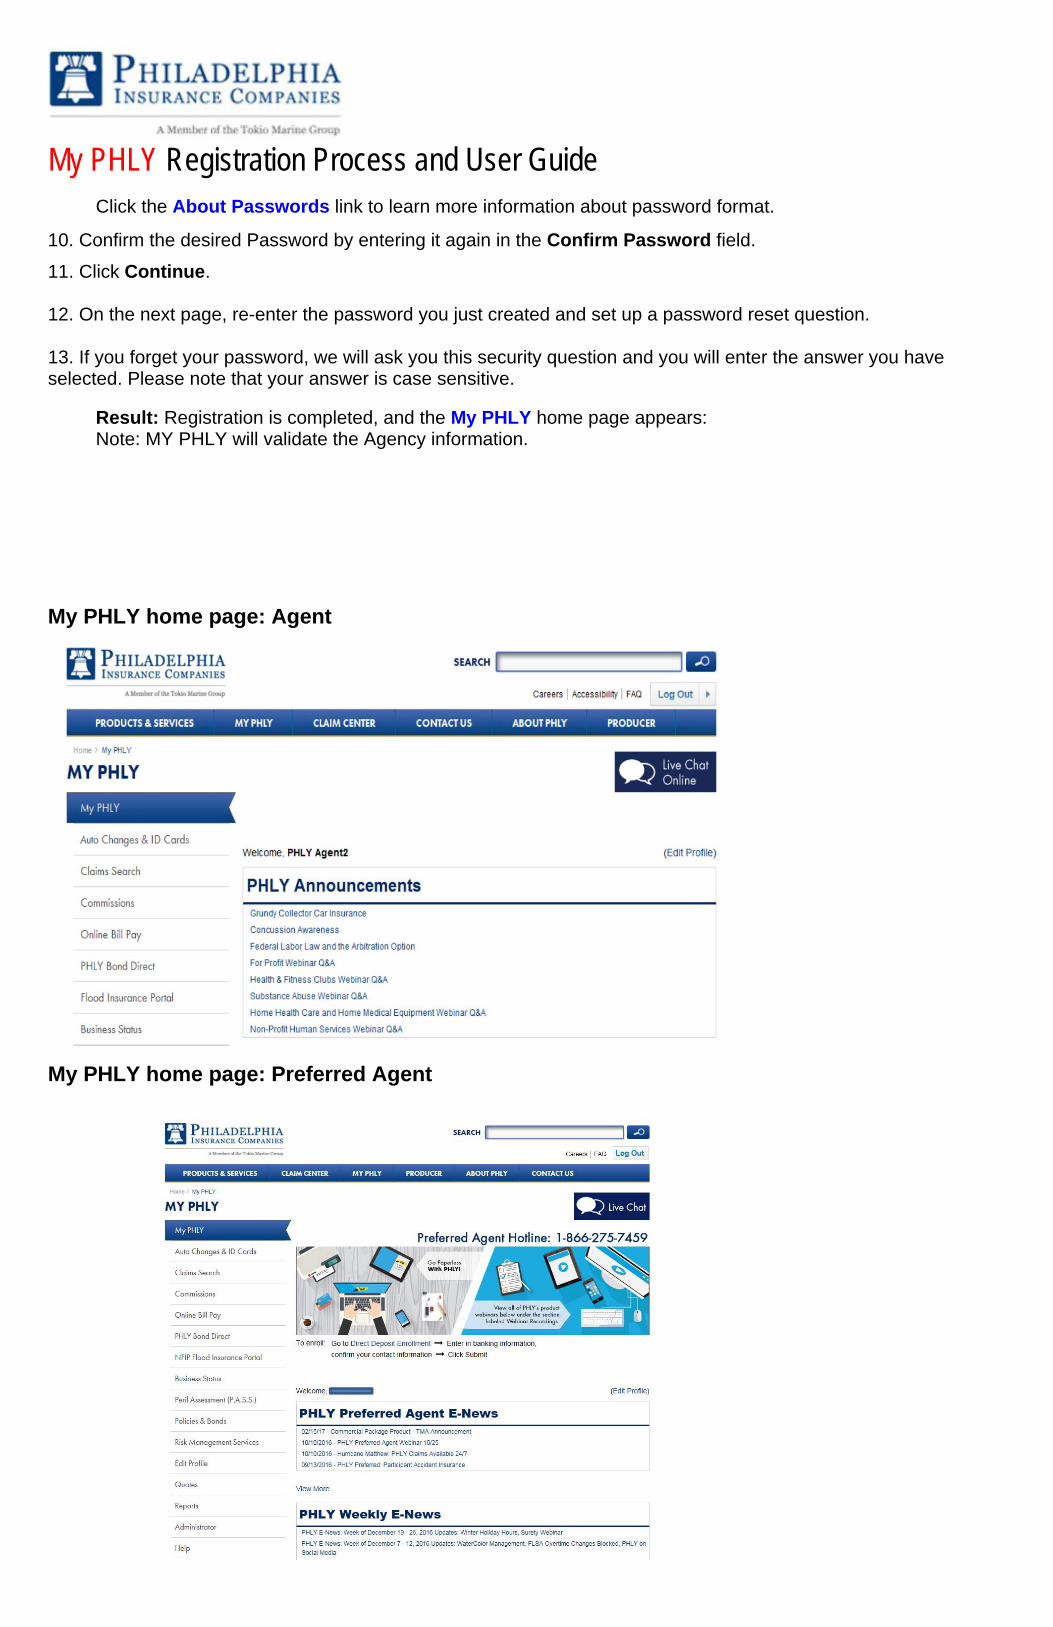
Result: Registration is completed, and the My PHLY home page appears: Note: MY PHLY will validate the Agency information.
My PHLY home page: Agent
My PHLY home page: Preferred Agent

My PHLY Registration Process and User Guide
From the My PHLY home page, agents can view Auto ID cards, view and report claims, utilize Online Bill Pay, view Business Status, view and search Policies, edit their profile, and view various reports. Preferred Agents can also view their messages and Links for You from their My PHLY home page.
My PHLY Registration Process and User Guide
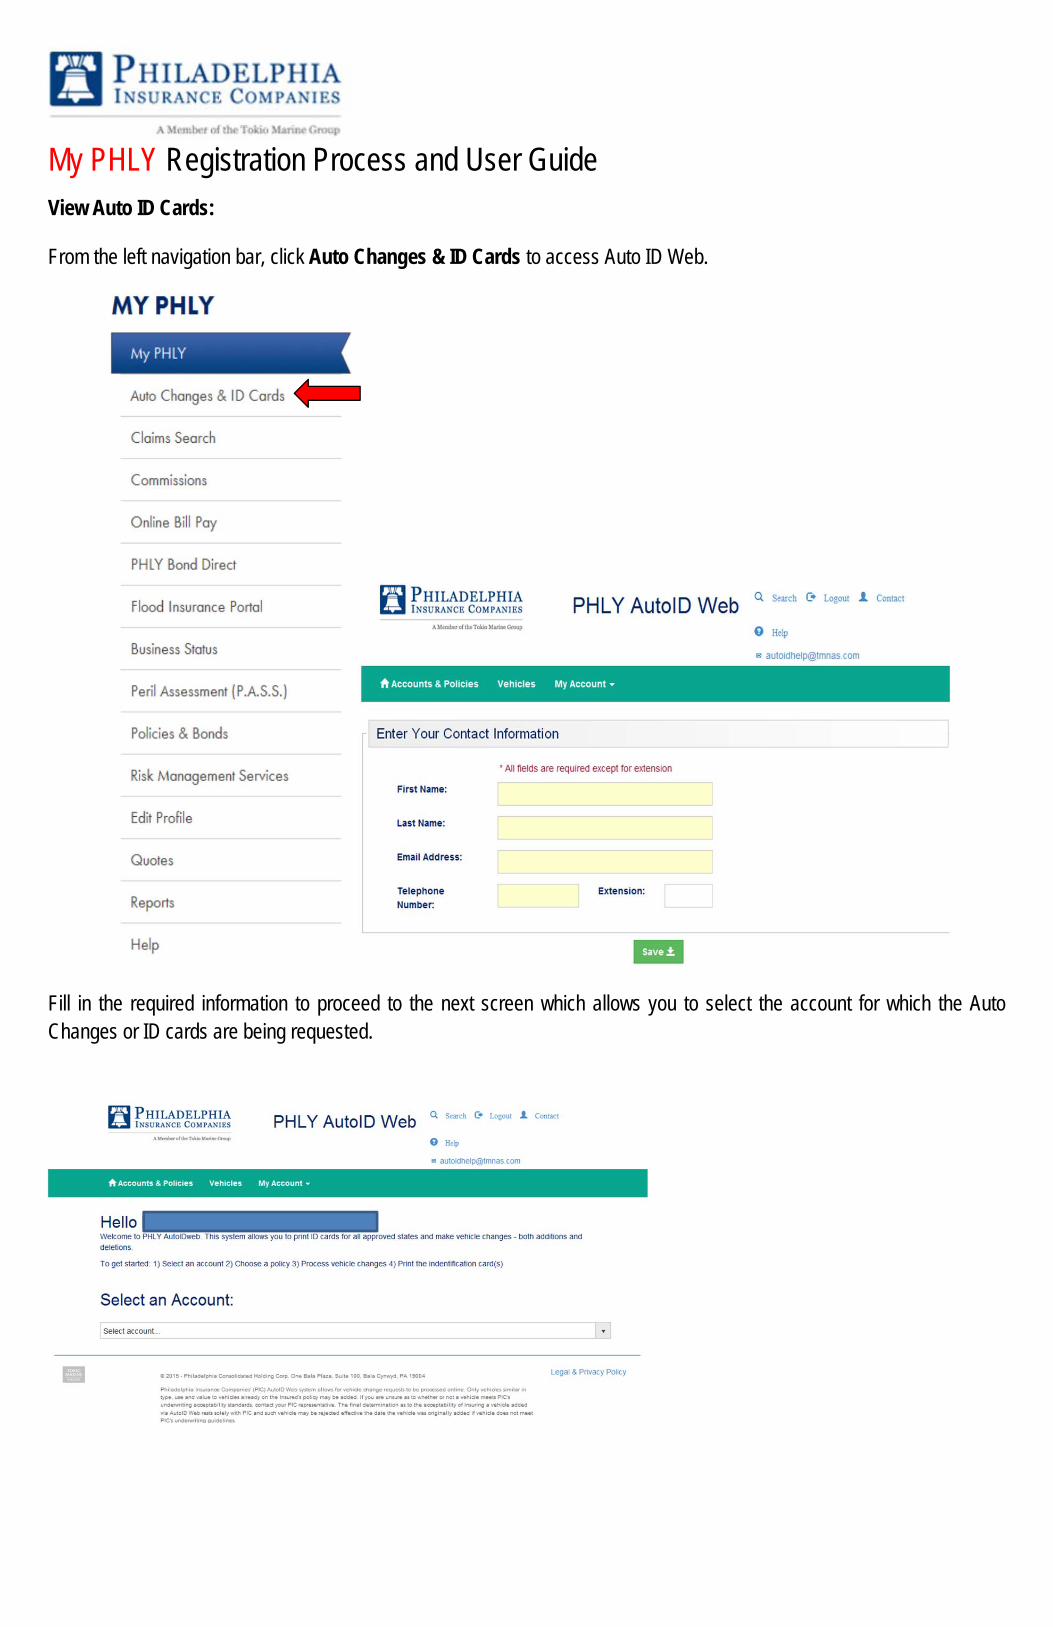
View Auto ID Cards: From the left navigation bar, click Auto Changes & ID Cards to access Auto ID Web.
Fill in the required information to proceed to the next screen which allows you to select the account for which the Auto Changes or ID cards are being requested.

My PHLY Registration Process and User Guide
Report Claims: From the top navigation bar, click Claim Center or from the left navigation bar, select Claims Search, Report a Claim form to submit a claim.
My PHLY Registration Process and User Guide
Use Online Bill Pay:
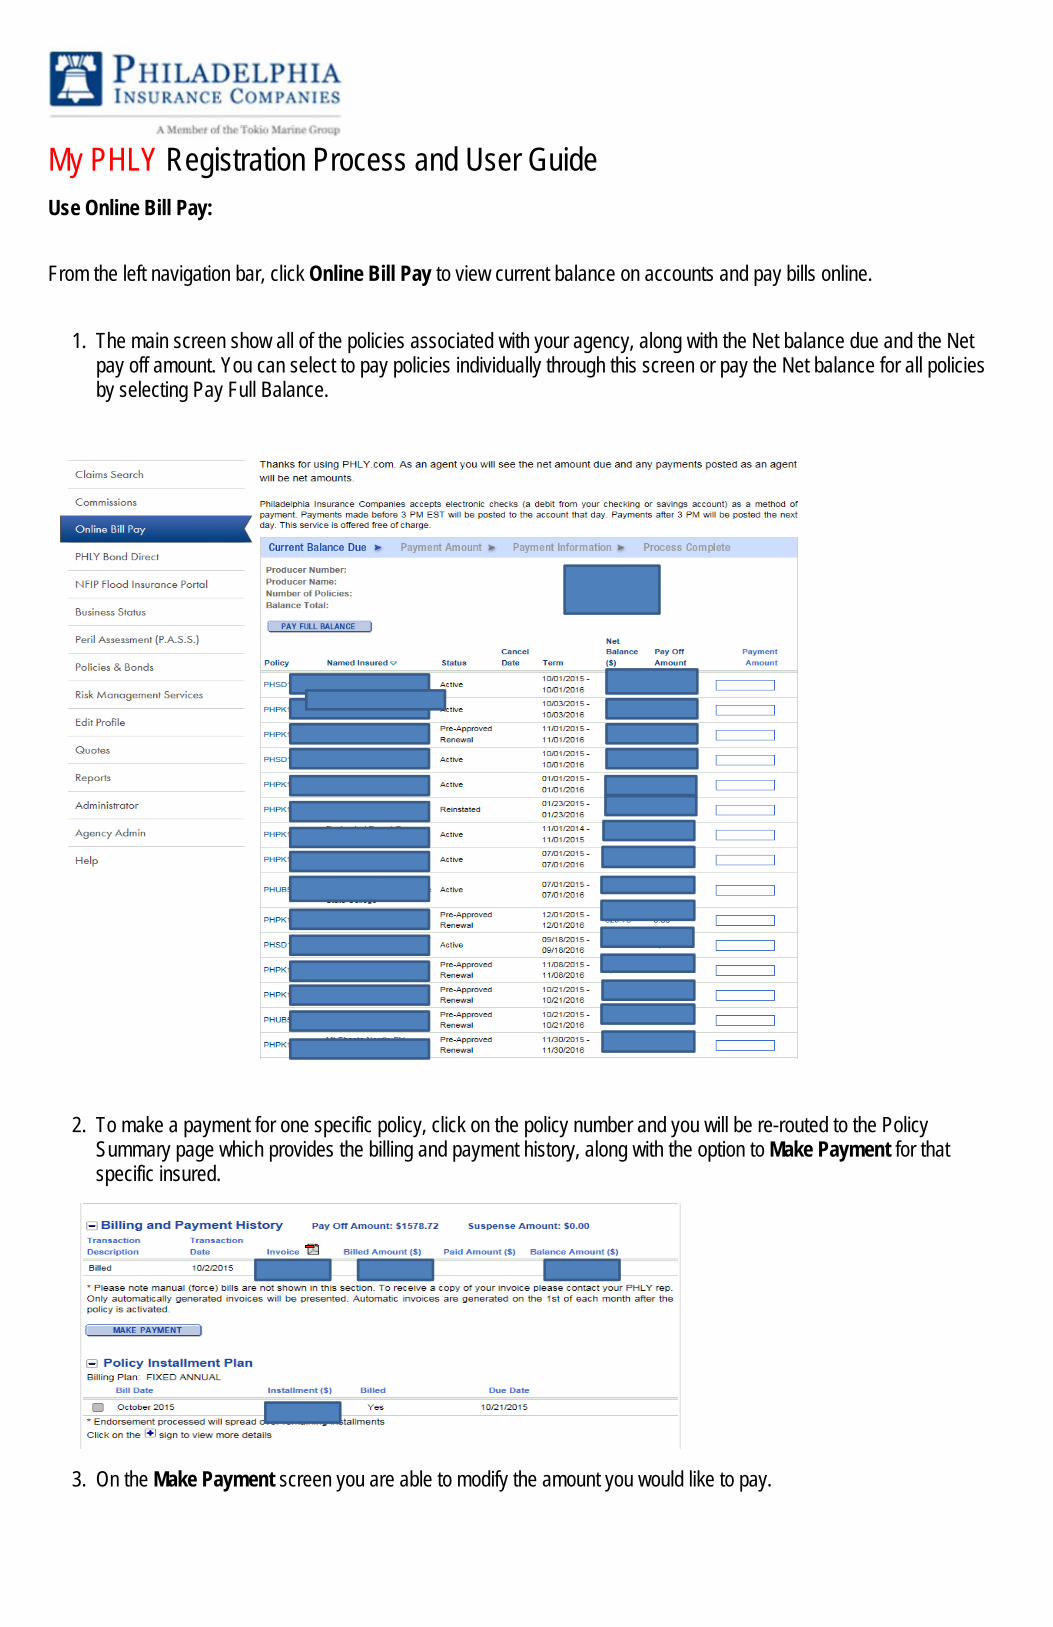
From the left navigation bar, click Online Bill Pay to view current balance on accounts and pay bills online.
1. The main screen show all of the policies associated with your agency, along with the Net balance due and the Net pay off amount. You can select to pay policies individually through this screen or pay the Net balance for all policies by selecting Pay Full Balance.
2. To make a payment for one specific policy, click on the policy number and you will be re-routed to the Policy Summary page which provides the billing and payment history, along with the option to Make Payment for that specific insured.
3. On the Make Payment screen you are able to modify the amount you would like to pay.

My PHLY Registration Process and User Guide
4. Once you select “Next Step” this will allow you to enter in your information and the Bank Account information for the payment.
Enroll in Recurring Payments (Feature available only to Insured online users): 1. Login to PHLY.com
2. Click “Online Bill Pay” under MY PHLY on the left side. A pop-up window will appear. Note: Your browser may prompt you to change your pop-up settings before continuing to our new online bill pay features. 3. Click “My Payments” on the left menu. 4. Click “Add Bank Account”.
5. Add Bank Account information.
6. Click “Add.”
7. Click “Recurring Payments” Tab.
8. Click “Add” next to the Payment Timing Field.
9. Choose to pay your bill when the bill is received or when the payment is due. Select your payment account preference and click “Add”.
My PHLY Registration Process and User Guide
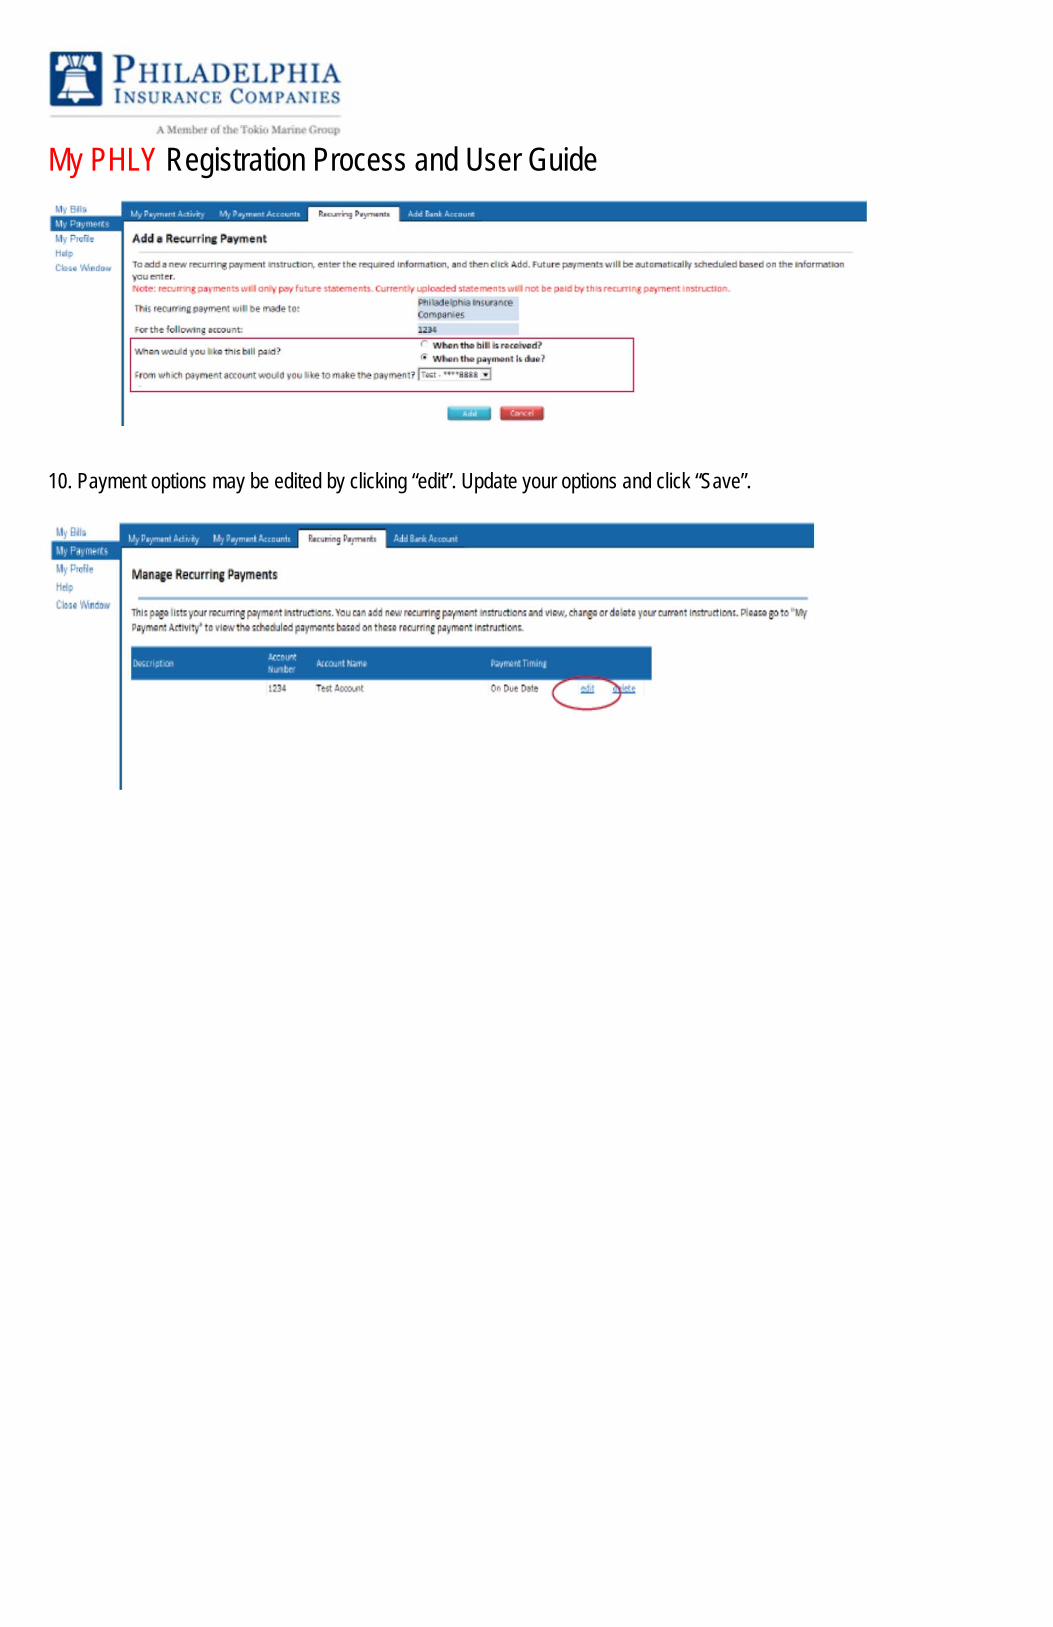
10. Payment options may be edited by clicking “edit”. Update your options and click “Save”.

My PHLY Registration Process and User Guide
View Policies: From the left navigation bar, click Policies & Bonds to perform a Policy Search by policy number, and to view a list of Your Policies.
View Pending Business Report: From the left navigation bar, click Business Status to create a pending business report.
This will allow you to search for the status of new busienss, renewal, endorsement and cancellation transactions.

My PHLY Registration Process and User Guide
Edit Profile: From the left navigation bar, click Profile to access Profile information and to change your Password.

My PHLY Registration Process and User Guide
View Reports: From the left navigation bar, click Reports to view Year to Date, Loss Control and other reports.
Commissions: 1. Direct deposit of commissions: From the left navigation bar, click Commissions to view enrollment page.
My PHLY Registration Process and User Guide
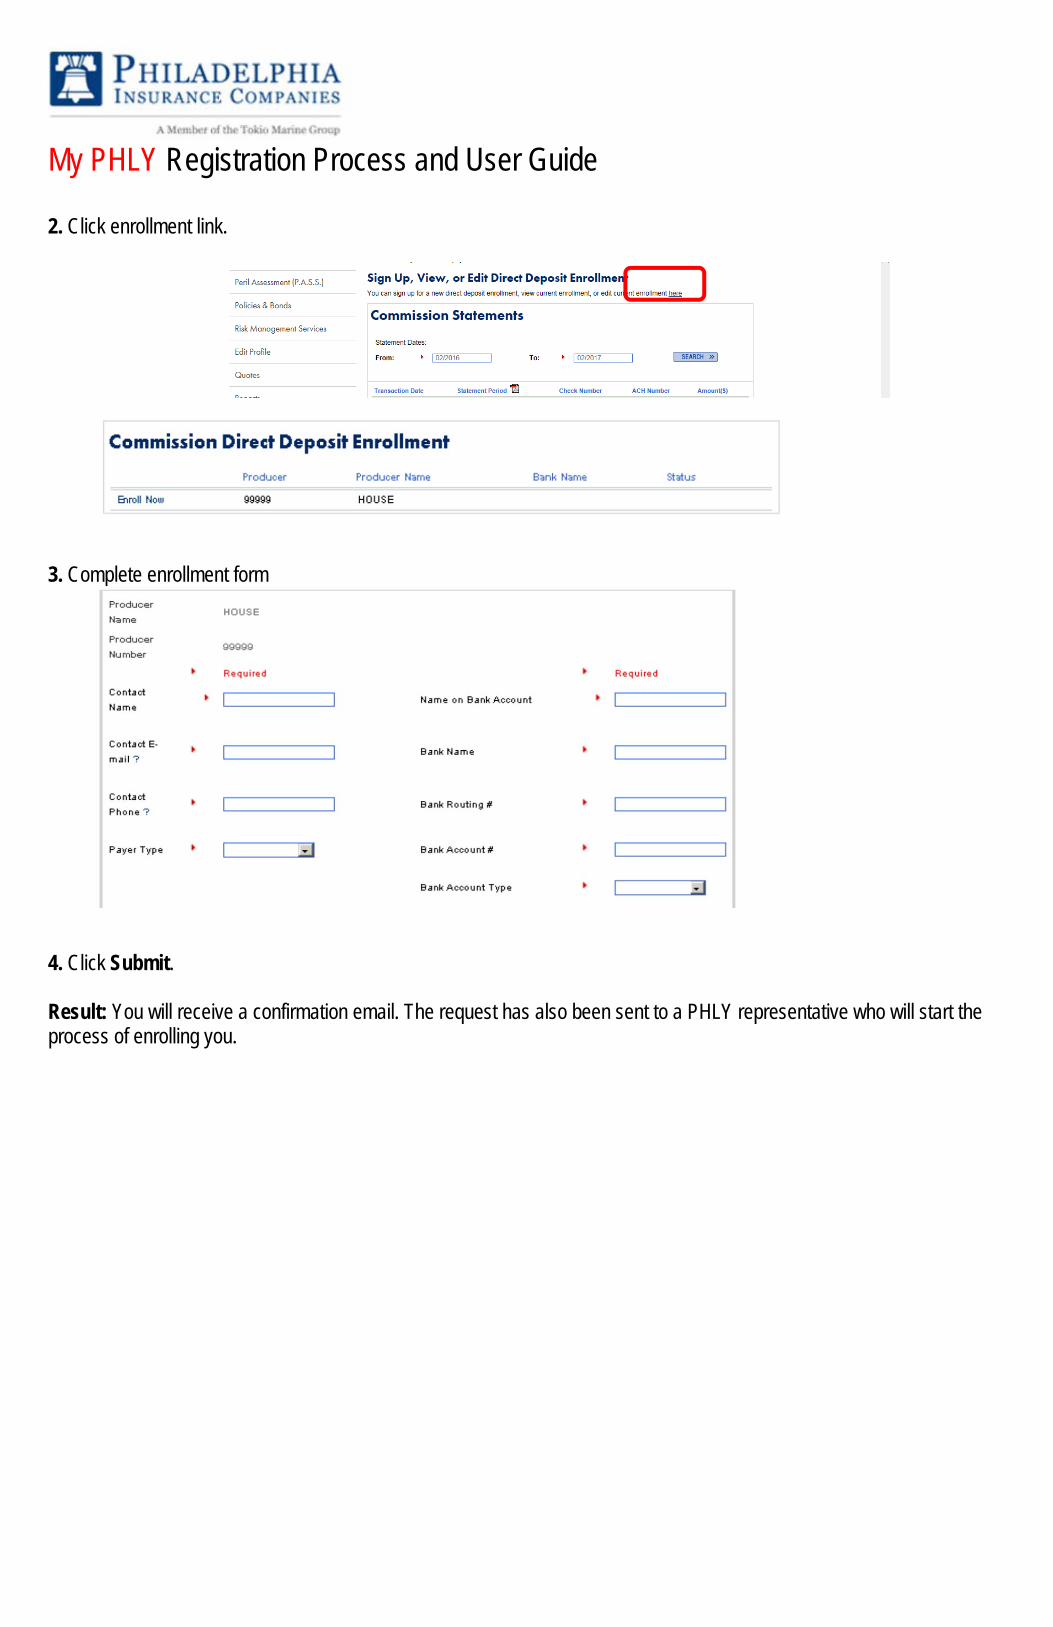
2. Click enrollment link.
3. Complete enrollment form
4. Click Submit. Result: You will receive a confirmation email. The request has also been sent to a PHLY representative who will start the process of enrolling you.
My PHLY Registration Process and User Guide
Quotes:
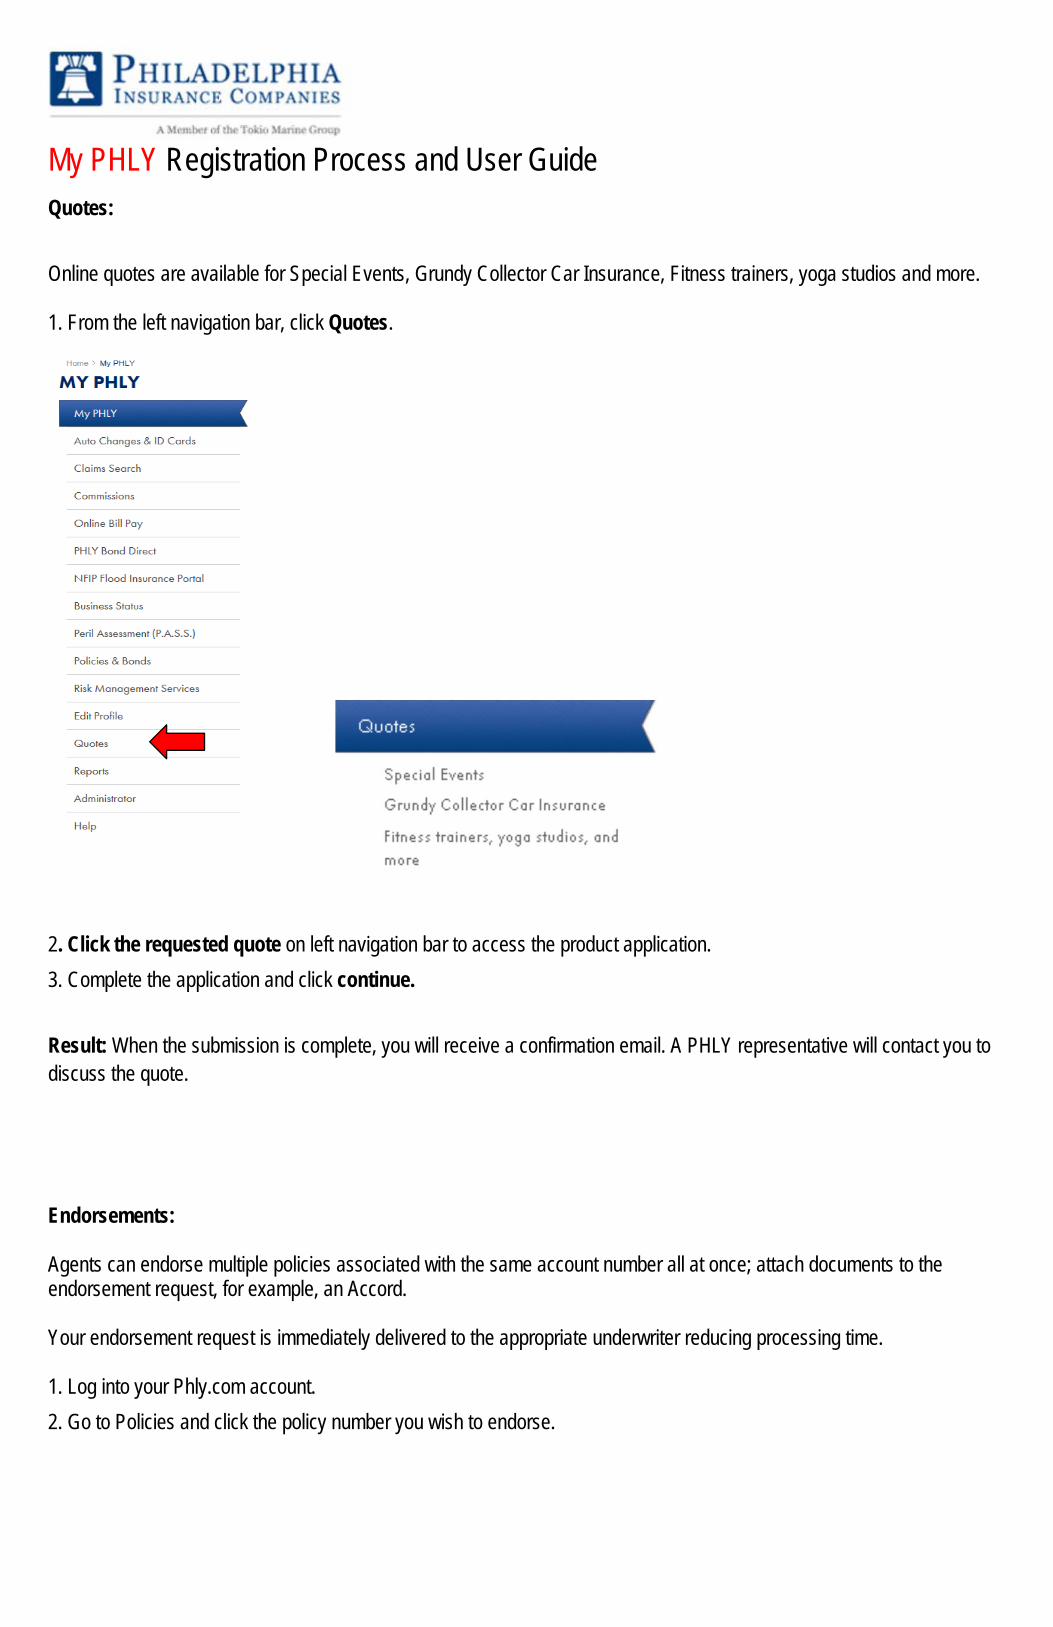
Online quotes are available for Special Events, Grundy Collector Car Insurance, Fitness trainers, yoga studios and more. 1. From the left navigation bar, click Quotes.
2. Click the requested quote on left navigation bar to access the product application.
3. Complete the application and click continue.
Result: When the submission is complete, you will receive a confirmation email. A PHLY representative will contact you to discuss the quote.
Endorsements: Agents can endorse multiple policies associated with the same account number all at once; attach documents to the endorsement request, for example, an Accord. Your endorsement request is immediately delivered to the appropriate underwriter reducing processing time. 1. Log into your Phly.com account.
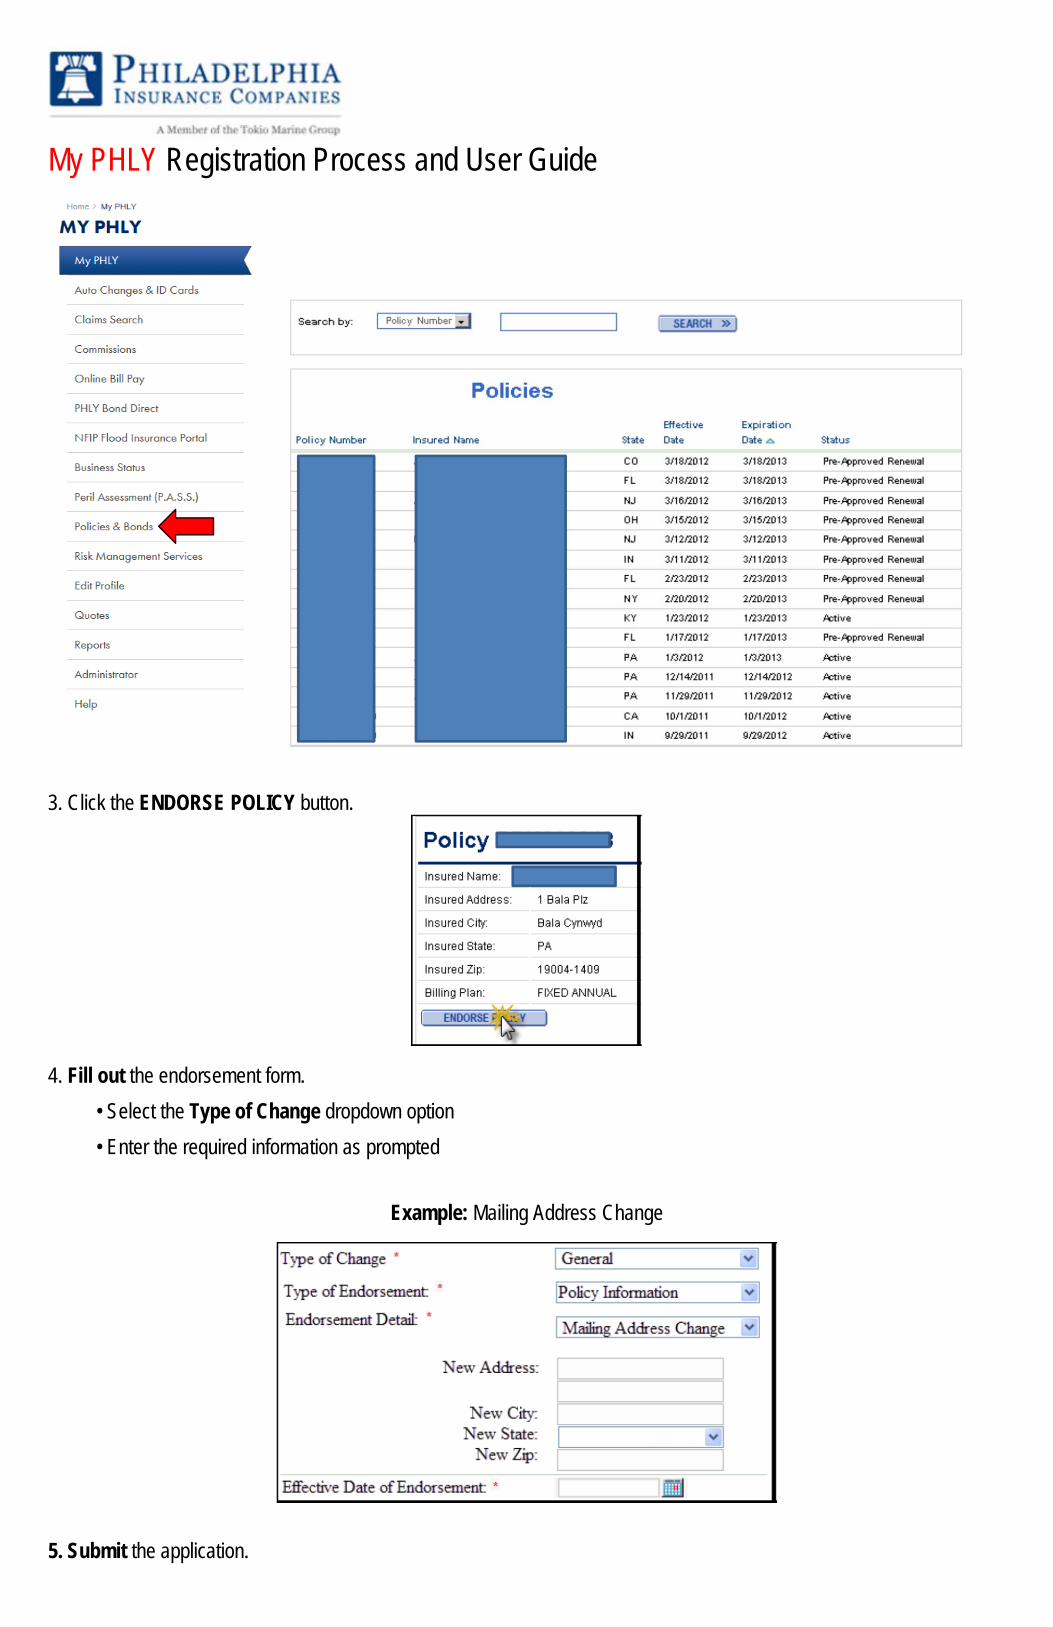
2. Go to Policies and click the policy number you wish to endorse.
My PHLY Registration Process and User Guide
3. Click the ENDORSE POLICY button.
4. Fill out the endorsement form.
• Select the Type of Change dropdown option
• Enter the required information as prompted
Example: Mailing Address Change
5. Submit the application.

My PHLY Registration Process and User Guide
Result: You will receive a confirmation email and your endorsement will be submitted directly to our internal system. Logout:
Click Logout to log out of My PHLY.com.
Result: The following page appears, and the user is successfully logged out of PHLY.com.