network load-testing system manual...
TRANSCRIPT

Manual for Creating a Network Load-Testing System
Created by: Spencer Morse Paul Ethridge
Manual for Creating a Network Load-Testing System 2
TABLE OF CONTENTS PAGE No.
Materials Required………………………………………………………………………………… 3 (I) Configuring the HP2910 Series Switch for SNMP Monitoring……………………………….. 4 - 6
(II) Installing the Ubuntu Operating System onto a Workstation…………………………………. 6 - 8
(III) Assigning a Static IP Address to an Ubuntu Workstation …………………………………… 9 - 10
(IV) Installing iperf onto an Ubuntu Workstation…………………………………………………. 10 - 11
(V) Running iperf on the 5 Designated iperf Server Workstations………………………………... 12
(VI) Running iperf on the 5 Designated iperf Client Workstations……………………………….. 12 - 13
(VII) Using PRTG with the Data Generated by iperf ………..……………………………………. 14 - 18
(VIII) Understanding PRTG’s Results ………………………………….………………………… 18 - 19
APPENDIX (A) (How to reset a HP 2910 switch)………………………………………………… 20
APPENDIX (B) (IP Address Table)……………………………………………………………….. 21
APPENDIX (C) (Possible iperf errors)……………………………………………………………. 22

Manual for Creating a Network Load-Testing System 3
Materials Required:
• 1 HP ProCurve 2900 Series Switch 24 port
• 1 HP Console Cable
• 10 stock, fully operational Dell 755s (or greater), each with a standard 1 Gigabit per second Network Interface Card (NIC)
• 1 stock, fully operational Dell Latitude 6410 Laptop (or greater), standard with a 1Gbit/s NIC, and 1 Dell power adapter
• 10 Dell 17” Monitors (or greater)
• 10 Dell Video Graphics Array (VGA) cables
• 20, 124v standard power cables (10 workstations, 10 monitors)
• 1 notched HP ProCurve 2900 Series Switch power cable
• 11 Cat 5e cables (two 9-feet cables; two 7-feet cables; seven 5-feet cables)
• 1 1-Gigabyte Flash Drive (or greater), with iperf_2.0.5-3 i386.deb installation package
• 1 Ubuntu 32-bit, version 12.10, Operating System (OS) Installation CD

Manual for Creating a Network Load-Testing System 4
(I) Configuring the HP2910 Series Switch for SNMP Monitoring: NOTE: If using a previously configured switch, see section, “Appendix (A)” Step 1) Connect the USB HP Switch Console Cable to the upper left USB port on the Monitoring Laptop, and with the other end connect to the console port on the front of the HP 2910 switch. Step 2) Open Tera Term ( icon on the doc), or a different SSH software, to connect to the switch, via “Serial” connection (Picture 1). Step 3) Power on the switch and let it boot up. Step 4) In the SSH window, on the Monitoring Laptop, type “config,” and press enter on the keyboard (Picture 2). If the command was entered correctly, the SSH Client Session should look as it does in Picture 2. Step 5) Enter the following configuration information into window: hostname "NLTSwitch" <cr> time timezone -300 <cr> time daylight-time-rule Continental-US-and-Canada <cr> module 1 type J9146A <cr> ip default-gateway 192.168.1.1 <cr> vlan 1 <cr>
name "DEFAULT_VLAN" <cr>
Picture 1
Picture 2

Manual for Creating a Network Load-Testing System 5
untagged 1-24 <cr> ip address dhcp-bootp <cr> exit <cr> snmp-server community "public" operator unrestricted <cr> snmp-server community "C0n4n!" operator unrestricted <cr> snmp-server host 192.168.1.2 "community" <cr> Step 6) When complete, type in the command “write memory,” and then press enter on the keyboard. For verification, type in the command, “show config.” The screen should now look as it does in Picture 3:
Picture 3

Manual for Creating a Network Load-Testing System 6
If the configuration matches the information above, the switch has been successfully configured and the console cable may be discon-nected from the switch and the Monitoring Laptop. (II) Installing the Ubuntu Operating System onto a Workstation: Step 1) Plug the appropriate cables/components into the work-station (Power, VGA, CAT5e or 6, Keyboard, Mouse, Monitor). Step 2) Power on the workstation and its monitor. Step 3) Immediately following the BIOS screen (Picture 4), re-peatedly press the “F12” key on the keyboard, until the “Boot Device Menu” appears (Picture 5). Step 4) Insert the Ubuntu 12.10 32-bit Installer CD into the CD-ROM drive of the workstation. Step 5) Using the arrow keys on the keyboard, scroll-down to the option, “Onboard or USB CD-ROM Drive” (Picture 5) and hit “Enter” on the keyboard. Step 6) Allow for a few seconds to pass as the Ubuntu Splash-Screen begins to load…
Picture 4
Picture 5

Manual for Creating a Network Load-Testing System 7
Step 7) The first window to appear is the, “Welcome” window. Be sure “English” is selected, and then click the button “Install Ubuntu.” Step 8) On the “Preparing to install Ubuntu” window, click the button “Continue.” Step 9) On the “Installation type” window, click the radio-button for “Replace Microsoft… With Ubuntu,” (Picture 6) and then click the button “Continue.” Step 10) On the “Where are you?” window, click the button “Continue.” Step 11) On the “Keyboard layout” window, make sure that English (on both sides of the window) is se-lected (Picture 7). Test to see that the keyboard is working, and then click the button “Continue.”
Picture 6
Picture 7

Manual for Creating a Network Load-Testing System 8
Step 12) On the “Who are you?” window, enter the following information (Picture 8): - Your name: Arcadia - Your computer’s name: [capital] NLT (this stands for “Network Load Tester”) and the workstation # (already labeled on the outside of each workstation) - Pick a username: [lowercase] nlt# (the workstation number) - Choose a password: (For all workstations, it will be the following: C0n4n! - Confirm the password: C0n4n! - Checkmark the radio-button “Require my password to log in,” and then click the button “Continue.”
Step 13) Ubuntu will begin the installation process. Allow for several minutes to pass… Step 14) When the installation is complete, click the “Restart Now” button.
Picture 8

Manual for Creating a Network Load-Testing System 9
(III) Assigning a Static IP Address to an Ubuntu Workstation: Step 1) With the Ubuntu desktop in the foreground, go to the upper-right corner of the screen, to this icon . Click the icon (which is a pull-down menu) and select, “Edit Connections…” Step 2) The “Network Connections” window will appear. Click the “Add” button, making sure that the top tab selected is “Wired” (Picture 9). Step 3) The “Editing Wired connection 2” window will appear. Click the “IPv4 Settings” tab at the top of the window (Picture 10). Step 4) In the IPv4 Settings tab, change the “Method” pull-down to “Man-ual,” and then click the “Add” button—to the right of the “Addresses” field (Picture 10). Step 5) Enter the following information (Picture 11):
• In the “Address” field, enter the IP address for the work-
station (see “Appendix (B)” for full listings) • In the “Netmask” field, enter the Subnet Mask of the network
[255.255.255.0]
• In the “Gateway” field, enter the Gateway Address of the
switch [192.168.1.1]
Picture 9
Picture 10

Manual for Creating a Network Load-Testing System 10
Step 6) At the bottom of the window click the “Save” button (Picture 11). Step 7) To verify that the changes have been saved, the “Network Connections” window will appear (Picture 9) if a successful “save” has been completed. Click the “Edit…” button. As stated, for Step 3), click the “IPv4 Settings” tab, at the top of the window. The newly assigned static IP address should be in the win-dow, and look similar to Picture 11. (IV) Installing iperf onto an Ubuntu Workstation: Step 1) If the workstation is not already on, power it on and log into the machine with the provided username and password (see, “(II) Installing the Ubuntu Operating System onto a Workstation,” Step 12). Step 2) Insert the labeled “iperf” USB flash-drive into an open USB port on the workstation.
Picture 11

Manual for Creating a Network Load-Testing System 11
Step 3) In the window that appears (Picture 12), right-click on the file iperf 2.0.5-3 i386.deb and select the top option, to, “Open with Ubuntu Software Center.” Step 4) In the new window that appears, click the “Install” button, towards the top-right corner (Picture 13). Step 5) Authenticate the installation with the password of the work-station (C0n4n!), and then click the “Authenticate” button (Picture 14). Step 6) The installation will complete. It is now safe to eject the USB flash-drive.
Picture 12 Picture 13
Picture 14

Manual for Creating a Network Load-Testing System 12
(V) Running iperf on the 5 Designated Server Workstations: NOTE: See “Appendix (B)” for a full listing of the IP addresses, currently assigned to each of the server workstations. Step 1) With the workstations on and logged into, press the following keys (on each of the 5 designated server-workstation keyboards) to open the Ubuntu Terminal: “CTRL” + “ALT” + “T” Step 2) Once each of the server terminals have opened, type the following command in each terminal window: iperf [space] –s [and then press “Enter” on the keyboard] Step 3) If successful, the terminal window should look as it does in Picture 15. Be sure Steps 1 – 2 have been performed on each of the designated server-workstations (See “Appendix (B)” for the full designated servers listing) before proceeding forward. (VI) Running iperf on the 5 Designated Client Workstations: NOTE: See “Appendix (B)” for a full listing of the IP addresses, currently assigned to each of the client workstations. Step 1) With the workstations on, and logged into, press the following keys (on each of the 5 designated client-workstation keyboards) to open the Ubuntu Terminal:
Picture 15
Manual for Creating a Network Load-Testing System 13
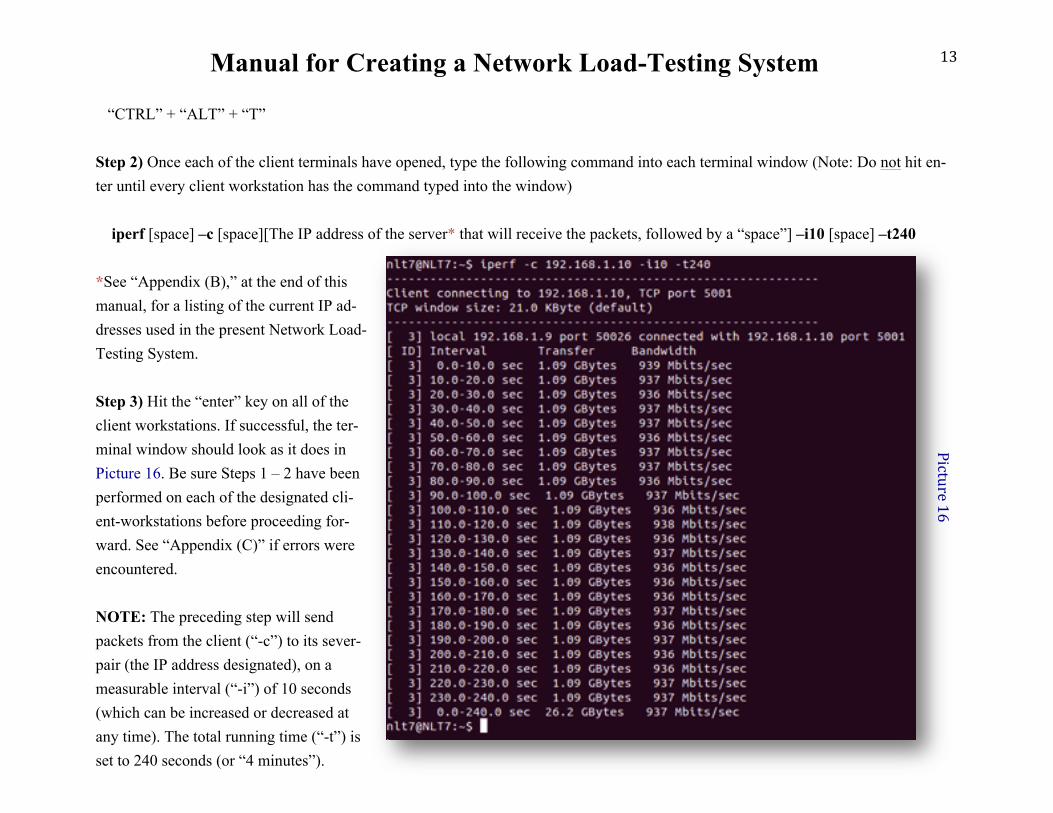
“CTRL” + “ALT” + “T” Step 2) Once each of the client terminals have opened, type the following command into each terminal window (Note: Do not hit en-ter until every client workstation has the command typed into the window) iperf [space] –c [space][The IP address of the server* that will receive the packets, followed by a “space”] –i10 [space] –t240 *See “Appendix (B),” at the end of this manual, for a listing of the current IP ad-dresses used in the present Network Load-Testing System. Step 3) Hit the “enter” key on all of the client workstations. If successful, the ter-minal window should look as it does in Picture 16. Be sure Steps 1 – 2 have been performed on each of the designated cli-ent-workstations before proceeding for-ward. See “Appendix (C)” if errors were encountered. NOTE: The preceding step will send packets from the client (“-c”) to its sever-pair (the IP address designated), on a measurable interval (“-i”) of 10 seconds (which can be increased or decreased at any time). The total running time (“-t”) is set to 240 seconds (or “4 minutes”).
Picture 16

Manual for Creating a Network Load-Testing System 14
After careful testing, this command line (under Step 2) can guarantee a constant transfer-rate at the NICs maximum capability (which was 1.09 Gigabytes, measured every 10 seconds). The command line above also indicates that a blast of packets will be sent from the client to its connected server, at a bandwidth between 931 – 941 Megabits per second (equal to a theoretical 1Gigabit per second, for monitoring purposes). The end result will be a spike on the PRTG graph, to be explained in the proceeding section. (VII) Using PRTG with the Data Generated by iperf: Step 1) Turn on the Network Load Testing (NLT) Monitor Laptop, and from the startup screen boot into Windows. Step 2) At the login screen, enter the following information:
o Username: 2053-E6410-PAUL\NLTAdmin o Password: C0n4n!!
Step 3) After Windows has loaded, look to bottom-left of the Windows Taskbar. There should be an icon that looks like a speedometer (Picture 17). Move the cursor over the icon labeled, “PRTG Network Monitor,” and click once on it. Step 4) If a “Perform Network Auto-Discovery” scan (Pic-ture 18) has already been conducted with the same hard-ware setup—using PRTG— please skip to Step 8. Step 5) If a Network Auto-Discovery scan has not been conducted, please make sure all of the workstations (clients
Picture 17 Picture 18
Manual for Creating a Network Load-Testing System 15
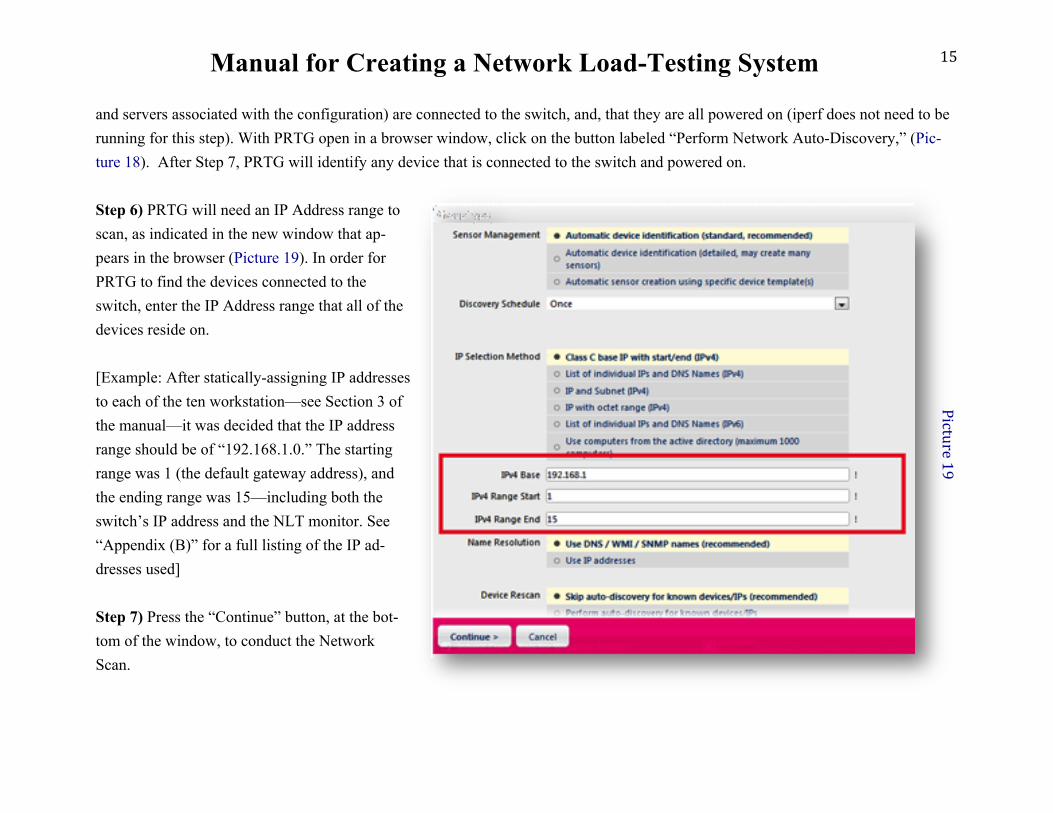
and servers associated with the configuration) are connected to the switch, and, that they are all powered on (iperf does not need to be running for this step). With PRTG open in a browser window, click on the button labeled “Perform Network Auto-Discovery,” (Pic-ture 18). After Step 7, PRTG will identify any device that is connected to the switch and powered on. Step 6) PRTG will need an IP Address range to scan, as indicated in the new window that ap-pears in the browser (Picture 19). In order for PRTG to find the devices connected to the switch, enter the IP Address range that all of the devices reside on. [Example: After statically-assigning IP addresses to each of the ten workstation—see Section 3 of the manual—it was decided that the IP address range should be of “192.168.1.0.” The starting range was 1 (the default gateway address), and the ending range was 15—including both the switch’s IP address and the NLT monitor. See “Appendix (B)” for a full listing of the IP ad-dresses used] Step 7) Press the “Continue” button, at the bot-tom of the window, to conduct the Network Scan.
Picture 19

Manual for Creating a Network Load-Testing System 16
Step 8) Once the Network Auto-Discovery scan has been conduct-ed, it is time to add a “sensor” to PRTG, for the Simple Network Management Protocol (SNMP). Click the button labeled “Review Results,” (Picture 20). If an SNMP sensor has already been added, proceed to Step 13. Step 9) Near the top of the browser window are various menu op-tions (Home, Devices, Libraries, Sensors, etc…). To add a sensor, start by clicking the “Sensors” menu (Picture 21), and then “Add Sensor.” Step 10) In the “Add Sensor” field of the new window, click the ra-dio-button labeled, “Add sensor to an existing device.” In the window below, select the switch’s name (NLTSwitch), and then click the “Continue” button at the bottom of the window (Picture 22).
Picture 20
Picture 21
Picture 22

Manual for Creating a Network Load-Testing System 17
Step 11) For the new sensor to know what to monitor, be sure to add the following items to the sensor on the “Add Sensor” page (Pic-ture 16):
• Under “Monitor What?”, click the radio-button “Bandwidth / Traffic.” • Under “Technology Used?”, click the radio-button “SNMP.”
Step 12) The final step is to add what has just been selected to the sensor. Towards the middle of the “Add Sensor” page, where it says, “SNMP Traffic,” select the “Add This” button (Picture 23). A new window will load.
Picture 23

Manual for Creating a Network Load-Testing System 18
Step 13) Re-run the iperf-client workstation procedure (See “(VI) Running iperf on the 5 Designated Client Workstations”) for at least 4 minutes (240 seconds), with 10-second intervals. Allow for 4-5 minutes to pass as PRTG collects the data generated by iperf. (VIII) Understanding PRTG’s Results: - In the Browser window, there are a multitude of different items that were monitored during PRTG’s run time (De-vice Names, Status, Traffic, etc…). In order to view both the packet sizes and the total bandwidth per second moni-tored, hover the mouse over a port number (on the “Sen-sor” menu), as shown in Picture 24. - The pop-up window to appear (Picture 25, next page) will show detailed information for that specific port (Downtime, Traffic Total, Traffic In, Traffic Out). After iperf has collected the data, each individual workstation will display its traffic in this area (measured in Kilobits per second) NOTE: 1,048,576 Kilobits = 1 Gigabit. Since 1 Gigabit is a “theoretical limit,” expect real-world measurements to be between 950,000 - 991,000 Kbitp/s.
Hover the mouse here
Picture 24

Manual for Creating a Network Load-Testing System 19
- Knowing the expected real-world measurement (see previous note), it stands to reason that traffic generated between 4,740,000 – 4,955,000 Kbit/s will be generated with the product of the five machines, or theoretically, 5 Gbp/s.
Picture 25

Manual for Creating a Network Load-Testing System 20
APPENDIX (A) How to reset a HP 2910 switch: Materials Needed:
• Two small objects to fit into the ‘reset’ and ‘clear’ button holes (paper clips, push pins, etc.) • HP 2910 switch • Power cable for HP2910 switch • Console Cable • Computer
Step 1) Insert the two small objects (hereon referred to as “paper clips”) into both the ‘reset’ and ‘clear’ holes, simultaneously, making sure to depress the buttons that are within. Step 2) Release the paper clip pressed to ‘reset,’ but continue to hold the one pressed to the ‘clear’ hole. It is OK to release the paper-clip pressed to ‘clear” when the ‘Test’ light emitting diode (LED)—directly above the two holes—begin to flash. Step 3) Log into the switch with a console cable. Be sure that the console cable is attached to both the switch and the computer being used to configure the switch. If successful, the default “hostname” will display both the switch make and model number upon login. Step 4) Begin the setup configuration of the switch.

Manual for Creating a Network Load-Testing System 21
APPENDIX (B) IP Address Table: Device Name IP Address Client or Server
(C/S) Client-Server Pair # (1-10)
NLT Switch 192.168.1.1 N/A N/A NLT Monitor 192.168.1.2 N/A N/A NLT1 192.168.1.3 Client 1 NLT2 192.168.1.4 Server 1 NLT3 192.168.1.5 Client 2 NLT4 192.168.1.6 Server 2 NLT5 192.168.1.7 Client 3 NLT6 192.168.1.8 Server 3 NLT7 192.168.1.9 Client 4 NLT8 192.168.1.10 Server 4 NLT9 192.168.1.11 Client 5 NLT10 192.168.1.12 Server 5 The IP range of the solution provided is from 192.168.1.1 to 192.168.1.12, with a subnet mask of 255.255.255.0 and a default gateway of 192.168.1.1.

Manual for Creating a Network Load-Testing System 22
APPENDIX (C) Possible iperf Errors:
Error: Typing “-d” instead of “-c.”
Result: iperf will not proceed forward, and will prompt the user to reenter the correct command.
Error: Typing “-j” instead of “–i”
Result: iperf will run, but it will not add the “interval” argument to the test. The default interval (every 8k, iperf will generate
results) will be used instead.
Error: Typing “-p,” after typing “-c” or “-s”
Result: Technically this is not an error, as “-p” specifies the default port used by iperf (5001). To change the port, simply type
the number required after the “-p” argument (example: -c 192.168.1.2 -p 8000)
Error: Typing “-w” instead of “-t”
Result: Technically this is not an error, as “-w” specifies the TCP window size for the packets being sent. To change the size,
simply type the Kilobyte window-size (default is 1024k) after the “-t” argument (example: -c 192.168.1.2 –w 600k –t240)
Error: Output: “Broken Pipe”
Result: This message usually indicates that the client is unable to connect to the server. If iperf is working on both work-
stations, and iperf is running on both hosts (check both ends) the first step is to examine the IP addresses on both hosts. If they
both share the same IP address, that is the problem; they need to differ, or, a variation of the error above will result. If the error
still results, be sure that packet filtering is not enabled on the switch or router.