ns-2250シリーズ 取扱説明書-01
TRANSCRIPT
コンソールサーバ
NS-2250
ご使用の前に、この取扱説明書をよくお読みの上、
正しくお取り扱いください。
また、お読みになった後も、必要なときにすぐに
見られるよう、大切に保管してください。
取扱説明書
U00135005500 2015 年 9 月 U00135005501 2016 年 5 月
©セイコーソリューションズ株式会社 2015
無断転載を禁じます。 本書の内容は、断りなく変更することがあります。
「SEIKO」はセイコーホールディングス株式会社の登録商標です。 イーサネットは富士ゼロックス株式会社の登録商標です。
本書および本書に記載された製品の使用によって発生した損害 およびその回復に要する費用に対し、当社は一切責任を負いません。
本装置を海外で利用する場合は法規制に適合している国でのみご利用ください。製品安全を確保でき
ない危険があるうえ、法制違反に問われる場合があります。(本製品の海外法規制適合についてはお
問い合わせください。)
本装置を廃棄する場合は、地方自治体の条例に従って処理するようお願いいたします。詳しくは各地
方自治体にお問い合わせください。
この装置は、クラス A 情報技術装置です。この装置を家庭環境で使用すると電波妨害を引き起こすこ
とがあります。この場合には使用者が適切な対策を講ずるよう要求されることがあります。 VCCI-A
i
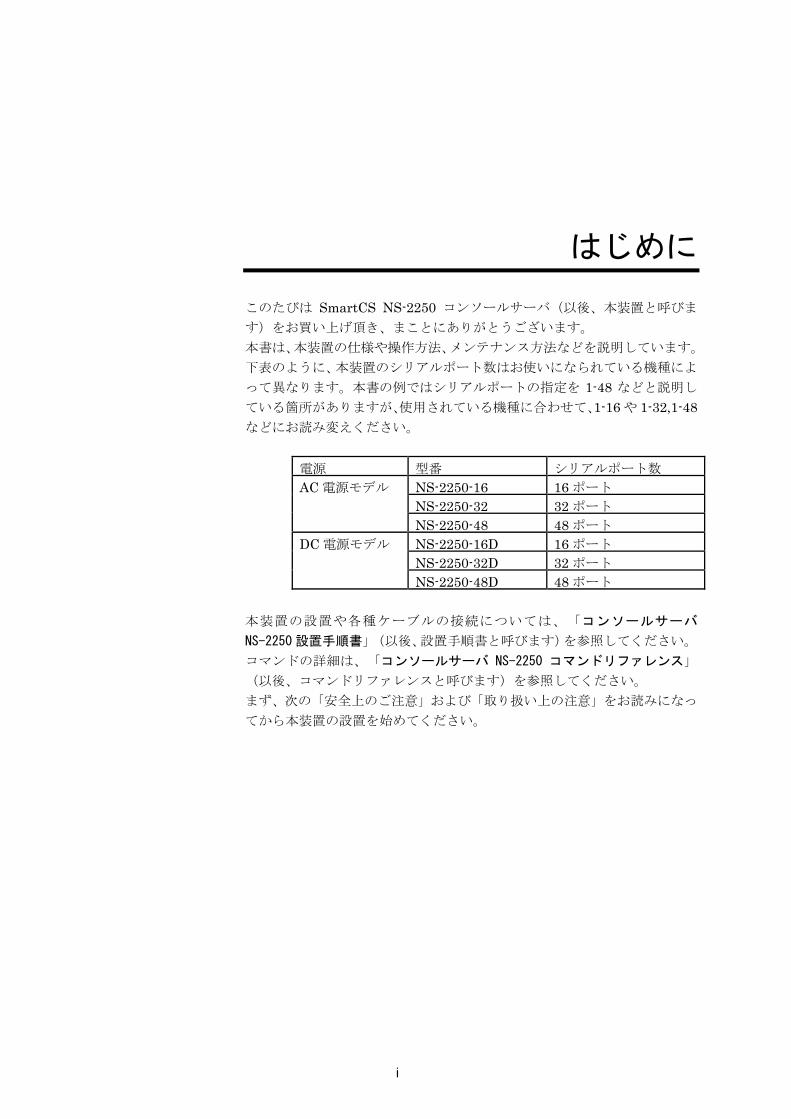
はじめに このたびは SmartCS NS-2250 コンソールサーバ(以後、本装置と呼びま
す)をお買い上げ頂き、まことにありがとうございます。 本書は、本装置の仕様や操作方法、メンテナンス方法などを説明しています。 下表のように、本装置のシリアルポート数はお使いになられている機種によ
って異なります。本書の例ではシリアルポートの指定を 1-48 などと説明し
ている箇所がありますが、使用されている機種に合わせて、1-16 や 1-32,1-48などにお読み変えください。
電源 型番 シリアルポート数 AC 電源モデル NS-2250-16 16 ポート
NS-2250-32 32 ポート NS-2250-48 48 ポート
DC 電源モデル NS-2250-16D 16 ポート NS-2250-32D 32 ポート NS-2250-48D 48 ポート
本装置の設置や各種ケーブルの接続については、「コンソールサーバ
NS-2250 設置手順書」(以後、設置手順書と呼びます)を参照してください。
コマンドの詳細は、「コンソールサーバ NS-2250 コマンドリファレンス」
(以後、コマンドリファレンスと呼びます)を参照してください。 まず、次の「安全上のご注意」および「取り扱い上の注意」をお読みになっ
てから本装置の設置を始めてください。
ii
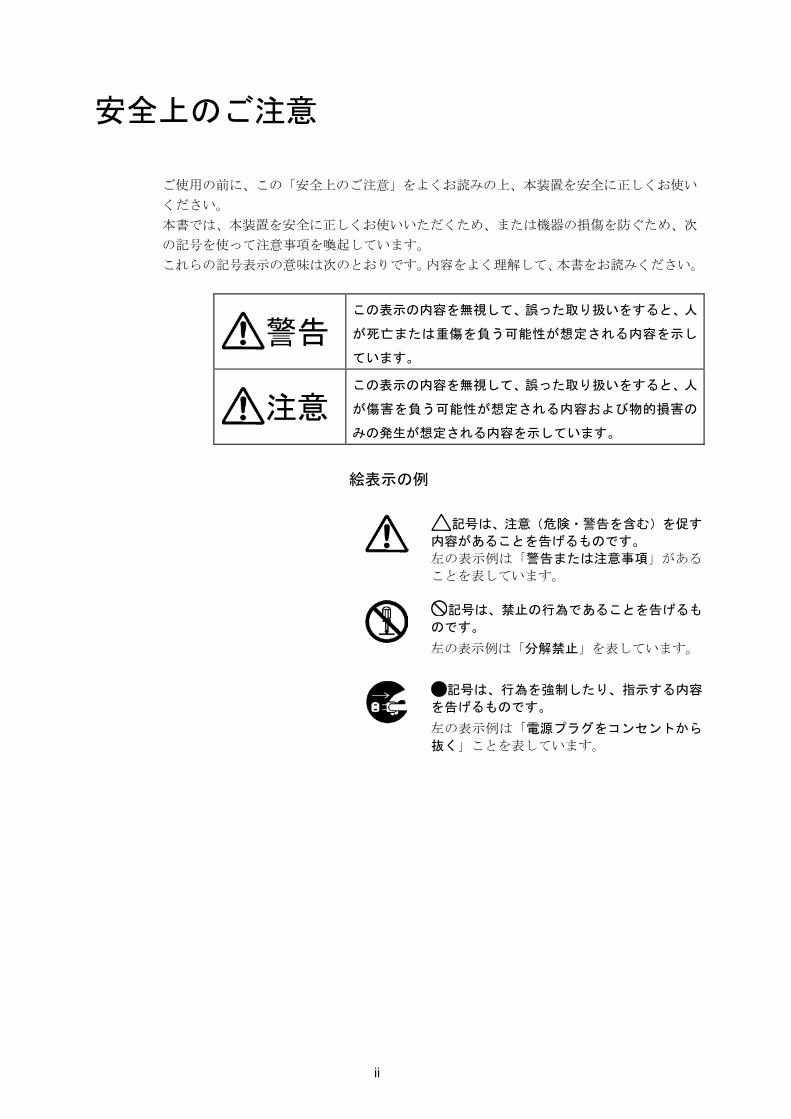
安全上のご注意 ご使用の前に、この「安全上のご注意」をよくお読みの上、本装置を安全に正しくお使い
ください。 本書では、本装置を安全に正しくお使いいただくため、または機器の損傷を防ぐため、次
の記号を使って注意事項を喚起しています。 これらの記号表示の意味は次のとおりです。内容をよく理解して、本書をお読みください。
警告
この表示の内容を無視して、誤った取り扱いをすると、人
が死亡または重傷を負う可能性が想定される内容を示し
ています。
注意 この表示の内容を無視して、誤った取り扱いをすると、人
が傷害を負う可能性が想定される内容および物的損害の
みの発生が想定される内容を示しています。
絵表示の例
記号は、注意(危険・警告を含む)を促す
内容があることを告げるものです。
左の表示例は「警告または注意事項」がある
ことを表しています。
記号は、禁止の行為であることを告げるも
のです。
左の表示例は「分解禁止」を表しています。
記号は、行為を強制したり、指示する内容
を告げるものです。
左の表示例は「電源プラグをコンセントから
抜く」ことを表しています。

iii
本装置を分解したり、改造したりしないでください。
発熱・発火・感電や故障の原因になります。
湿気の異常に多い場所や水などの液体のかかる場所では、絶対に使用
しないでください。
火災や感電、故障の原因になります。
本装置の内部やすき間に、金属片を落としたり、水などの液体を
こぼさないでください。
火災や感電、故障の原因になります。
濡れた手で、電源ケーブルなどを接続したり、はずしたりしないで
ください。
感電の原因になります。
本装置の放熱口をふさがないでください。
発熱などにより、火災や感電、故障の原因になります。
次のような場合は、電源を切り、電源プラグをコンセントから抜いて
ください。
異常状態のまま使用すると、事故や火災の原因になります。
◆お手入れするときや異常時の処置を行うとき
◆異臭がする、煙が出た、または異常音が発生したとき
◆本装置の内部やすき間に、金属片や水などの液体が入ったとき
◆本装置を落したり、装置の外面が破損したとき
警告
iv
次のようなことは、絶対に行わないでください。
守らないと、火災や感電、事故または故障の原因になります。
◆ 本装置の上に物を置かないでください。
◆ 本装置をたたいたりなどして、衝撃を与えないでください。
◆ 不安定な場所には置かないでください。
◆ ケーブルの上に物を乗せたり、ケーブルをねじったり、強く
引っ張ったりしないでください。
次のような場所には設置しないでください。
故障の原因になります。
◆ 直射日光の当たる場所
◆ 温度、湿度の変化の激しい場所
◆ ほこりの多い場所
◆ 振動のある場所
◆ 冷暖房機器の近く
次のことは、必ずお守りください。
守らないと、火災や感電、事故または故障の原因になります。
◆ 必ず指定の電源電圧で使用してください。
本装置の電源電圧は、装置底面の装置銘板および AC インレット、
DC 電源コネクタの近傍に表示されています。
◆ 本装置と接続相手機器との間には、設置環境によっては電位差を
生じる場合があります。ケーブルを接続する際にはコネクタ部の
端子に触れないでください。感電する恐れがあります。
◆ 本装置の近傍に電源コンセントがあり、容易に人がアクセスでき
るようにしてください。
電源ケーブルは、必ず接地してください。
接地しないと、火災や感電の原因になります。
このほか、各項で示す警告/注意事項についてもお守りください。
注意

v
取り扱い上の注意
● 次のようなことは、絶対に行わないでください。 本装置や USB メモリの故障またはメモリの内容が破壊される原因になります。
・ STATUS 4 ランプ点灯中は USB メモリを抜かないでください。 点灯中に USB メモリを抜いた場合は、本装置の動作の保証外となります。
・ 本装置が動作中に、本装置の電源スイッチを OFF にしたり電源ケーブルを抜去する
等して電源 OFF 状態にしたり、RESET スイッチを押したりしないでください。 電源を OFF にする場合は、shutdown コマンドを実行してシステムソフトウェアを
終了させ、コンソールに MON>プロンプトが表示されるのを確認するか、または本
装置前面の STATUS2 ランプが点灯するのを待ってから、電源を OFF にしてくださ
い。 ・ USB メモリのコネクタ部に、手や金属で直接触れないでください。
● RESETスイッチを押すときはボールペンの先など、先の細いもので押してください。
ただし、シャープペンシルは使用しないでください。シャープペンシルの芯が折れて
中に入ると、故障の原因となります。 ● 本装置の電源スイッチを OFF にしたり電源ケーブルを抜去する等して電源 OFF 状態
にした後、再度電源スイッチを ON にしたり電源ケーブルを挿入する等して電源 ON状態にする場合には、10 秒以上経過してから電源 ON 状態にしてください。 あまりはやく電源 ON 状態にすると、正常に本装置がリセットされない場合がありま
す。 なお、AC 二重化電源モデルの場合、電源を OFF にするには 2 系統の電源の両方を
OFF にする必要があります。 ● 放熱口は、約 2 ヶ月に 1 回は掃除機などで清掃してください。 ● 本装置の外装が汚れたときは、水で薄めた中性洗剤に柔らかい布を浸し、
よくしぼってから拭き取り、さらに乾いた布で拭いてください。
vi
第三者ソフトウェアライセンス
本装置のソフトウェアの一部は下記のソフトウェアを利用しています。下記のソフトウ
ェアのライセンスの詳細は、「付録 F 第三者ソフトウェアライセンス」をご覧ください。
SysVinit SysVinit-tools bootlogd busybox dropbear e2fsprogs eglibc ethtool freeradius ftp kernel libcap libgcc libpcap linux logrotate net-snmp net-snmp-libs openssh openssh-server pam pam_tacplus procps proftpd rsyslog strace tcl tclx tcpdump tcp_wrappers telnet-server udev u-boot xinetd zlib

目次-1
目 次
1 章 本装置の概要 1-1
1.1 特長および主な機能 1-2 1.1.1 特長 1-2 1.1.2 主な機能 1-7
1.2 各部の名称 1-9 1.2.1 本体前面 1-9 1.2.2 本体背面 1-11
1.3 インタフェース仕様 1-13
2 章 機能 2-1
2.1 ポートサーバ機能 2-2 2.1.1 ポートサーバ機能の概要 2-2 2.1.2 ポートサーバへの接続(ダイレクトモード) 2-4 2.1.3 ポートサーバへの接続(セレクトモード) 2-6 2.1.4 ポートセレクトメニュー 2-8 2.1.5 ポートサーバメニュー 2-13 2.1.6 ポートユーザ認証 2-17 2.1.7 その他のポートサーバ機能 2-20
2.2 ポートログ機能 2-21 2.2.1 ポートログ機能の概要 2-21 2.2.2 ポートログ保存機能 2-22 2.2.3 タイムスタンプ機能 2-23 2.2.4 ログインスタンプ機能 2-24 2.2.5 ポートログ表示機能 2-24 2.2.6 ポートログ送信機能(SYSLOG/NFS/FTP/メール) 2-26
2.3 セキュリティ機能 2-28 2.3.1 ユーザ管理/認証機能 2-28 2.3.2 RADIUS 認証機能/RADIUS アカウント機能 2-30 2.3.3 RADIUS によるユーザグループの識別とシリアルポートのアクセス
制限 2-35 2.3.4 TACACS+機能 2-37 2.3.5 TACACS+によるユーザグループの識別とシリアルポートのアクセ
ス制限 2-42 2.3.6 各種サーバのアクセス制限 2-43
2.4 運用管理機能 2-44
目次-2
3 章 設定の流れ 3-1
3.1 起動/確認/停止 3-2 3.1.1 USB メモリの挿入 3-2 3.1.2 装置管理端末の接続 3-3 3.1.3 起動 3-5 3.1.4 確認 3-6 3.1.5 停止 3-8
3.2 セットアップ手順 3-9 3.2.1 ログイン/ログアウト 3-10 3.2.2 CLI の使用方法 3-12 3.2.3 設定コマンド群の流し込み 3-14 3.2.4 設定の読み込みと保存 3-15 3.2.5 再起動 3-17
4 章 各種設定 4-1
4.1 ネットワークの設定 4-3 4.1.1 本装置のホスト名/IP アドレスの変更 4-3 4.1.2 スタティックルーティングの設定 4-5 4.1.3 DNS クライアントの設定 4-6
4.2 CONSOLE ポートの設定 4-7 4.3 シリアルポートの設定 4-8 4.4 ポートサーバの設定 4-10
4.4.1 接続モードの設定(セレクトモード/ダイレクトモード) 4-10 4.4.2 ポートサーバメニューの表示 4-11 4.4.3 ポートサーバのユーザ認証(ポートユーザ認証) 4-12 4.4.4 ポートサーバのアクセス制限(接続プロトコルと接続モード) 4-12 4.4.5 ポートサーバの複数セッション接続 4-12 4.4.6 ポートサーバ(ダイレクトモード)の受信ポート番号の変更 4-13 4.4.7 ポートユーザの追加 4-14 4.4.8 シリアルポートのラベリング設定 4-15 4.4.9 ポートサーバのセッション自動切断機能の設定 4-16 4.4.10 その他のポートサーバ機能の設定 4-16
4.5 ポートログの設定 4-19 4.5.1 ポートログ機能の実行と停止 4-19 4.5.2 ポートログ容量の設定 4-20 4.5.3 タイムスタンプの設定 4-20 4.5.4 ログインスタンプの設定 4-21 4.5.5 メール送信の設定 4-22 4.5.6 FTP 送信の設定 4-23 4.5.7 SYSLOG 送信の設定 4-24 4.5.8 NFS 送信の設定 4-26 4.5.9 ポートログ設定の確認 4-27
4.6 セキュリティの設定 4-28 4.6.1 ユーザの登録と削除 4-28 4.6.2 ユーザパスワードの設定 4-29
目次-3
4.6.3 RADIUS 認証機能/RADIUS アカウント機能の設定 4-30 4.6.4 TACACS+機能の設定 4-38 4.6.5 TELNET サーバの設定 4-41 4.6.6 SSH サーバの設定 4-42 4.6.7 各種サーバのアクセス制限 4-44
4.7 運用管理の設定 4-45 4.7.1 SNTP クライアントの設定 4-45 4.7.2 SNMP エージェントの設定 4-46 4.7.3 SYSLOG クライアントの設定 4-49 4.7.4 温度センサの設定 4-50 4.7.5 タイムゾーンの設定 4-51
4.8 設定事例 4-52 4.8.1 基本設定 4-52 4.8.2 各種サービスの設定 4-54 4.8.3 ポートログの転送設定 4-56 4.8.4 ポートログ保存先と保存容量の変更 4-60 4.8.5 ポートログ保存機能の停止とポートサーバメニューの表示の抑止
4-62 4.8.6 ポートユーザ認証 4-63 4.8.7 SSH パスワード(Basic)認証 4-65 4.8.8 SSH 公開鍵(Public)認証 4-68 4.8.9 ポートセレクト機能 (ポートサーバのセレクトモード)の設定 4-72 4.8.10 RADIUS 機能の設定(基本設定) 4-74 4.8.11 RADIUS 機能の設定(応用設定 1: filter_id_head) 4-78 4.8.12 RADIUS 機能の設定(応用設定 2:アクセスグルーピング機能) 4-84 4.8.13 TACACS+機能の設定(基本設定) 4-89 4.8.14 TACACS+機能の設定(応用設定:アクセスグルーピング機能) 4-94 4.8.15 LAN 冗長構成(2 つの LAN ポートを異なるセグメントで利用) 4-100 4.8.16 LAN 冗長構成(ボンディング機能) 4-101
5 章 管理と保守 5-1
5.1 装置情報の表示 5-2 5.1.1 ハードウェア情報/ソフトウェア情報の表示 5-2 5.1.2 装置情報の一括表示 5-3
5.2 コンフィグの管理 5-8 5.2.1 スタートアップファイルの一覧表示 5-8 5.2.2 スタートアップファイルの中身の表示 5-10 5.2.3 起動時に読み込むスタートアップファイルの変更 5-11 5.2.4 スタートアップファイルのコピー 5-12 5.2.5 スタートアップファイルの中身のクリア 5-12 5.2.6 ランニングコンフィグの表示 5-13 5.2.7 スタートアップファイルの転送(FTP サーバ) 5-14 5.2.8 スタートアップファイルの転送(FTP クライアント) 5-18 5.2.9 スタートアップファイルの転送(TFTP クライアント) 5-20
5.3 コンソールログの見方 5-21 5.4 SNMP による本装置の管理 5-22
目次-4
5.5 システムソフトウェアの管理 5-23 5.5.1 起動するシステムソフトウェアの切り替え 5-23 5.5.2 システムソフトウェアのコピー 5-26 5.5.3 システムソフトウェアの復旧 5-26 5.5.4 差分ファイルによるバージョンアップ/バージョンダウン 5-27 5.5.5 システムソフトウェアの入れ替え 5-32 5.5.6 システムソフトウェアのバックアップ 5-36
5.6 手動によるポートログの保存と取得手順 5-39 5.7 設定を工場出荷時に戻す方法 5-42
6 章 トラブルシューティング 6-1
6.1 トラブル処理の概要 6-2 6.2 本装置のハードウェアに関連するトラブル 6-3
6.2.1 電源が入らない場合の対処 6-3 6.2.2 STATUS ランプが点灯または点滅している場合の対処 6-4
6.3 通信に関連するトラブルの対処 6-5 6.3.1 コンソールログの確認 6-5 6.3.2 設定の確認 6-6 6.3.3 ネットワーク通信の接続トラブルの対処 6-7 6.3.4 シリアル通信の接続トラブルの対処 6-10 6.3.5 RADIUS 認証機能/RADIUS アカウント機能のトラブルの対処 6-14 6.3.6 TACACS+機能のトラブルの対処 6-20
6.4 その他のトラブル 6-24 6.4.1 装置管理ユーザのパスワードを忘れた場合の対処 6-24
目次-5
付録 A ユーザ権限 A-1
A.1 ユーザ権限一覧 A-2
付録 B SSH クライアントソフトの使用例 B-1
B.1 SSH クライアントソフトと認証方式 B-2 B.2 パスワード(Basic)認証の接続手順例 B-3
B.2.1 TeraTerm の接続手順(パスワード認証) B-4 B.2.2 Poderosa の接続手順(パスワード認証) B-6
B.3 公開鍵(Public)認証の接続手順例 B-9 B.3.2 TeraTerm の接続手順(公開鍵認証) B-14 B.3.3 Poderosa の事前設定(公開鍵認証) B-16 B.3.4 Poderosa の接続手順(公開鍵認証) B-22
付録 C アトリビュートと RADIUS 認証/アカウントサーバ設定 C-1
C.1 RADIUS 認証機能/RADIUS アカウント機能 C-2 C.2 RADIUS 認証サーバに送信するアトリビュート C-3 C.3 本装置が処理する RADIUS 認証サーバのアトリビュート C-4 C.4 RADIUS アカウントサーバに送信するアトリビュート C-6 C.5 RADIUS 認証/アカウントサーバ側の設定例 C-7
C.5.1 クライアントの登録 C-7 C.5.2 ユーザの登録 C-7
C.6 RADIUS アカウントサーバのアカウントログ C-10
付録 D ROM モニタ D-1
D.1 ROM モニタ D-2
付録 E NS-2240 からの設定移行時の注意点 E-1
E.1 NS-2240 からの設定移行時の注意点 E-2
付録 F 第三者ソフトウェアライセンス F-1
F.1 第三者ソフトウェアライセンス F-2

1-1
1 章 本装置の概要
1章では、本装置の主な機能と各部の名称について説明しています。 作業を始める前に必ずお読みください。
本章の内容
1.1 特長および主な機能
1.1.1 特長
1.1.2 主な機能
1.2 各部の名称
1.2.1 本体前面
1.2.2 本体背面
1.3 インタフェース仕様
1-2
1.1 特長および主な機能
この章では、本装置の特長と主な機能の概要を説明します。各機能の詳細は「2 章 機能」
を参照してください。
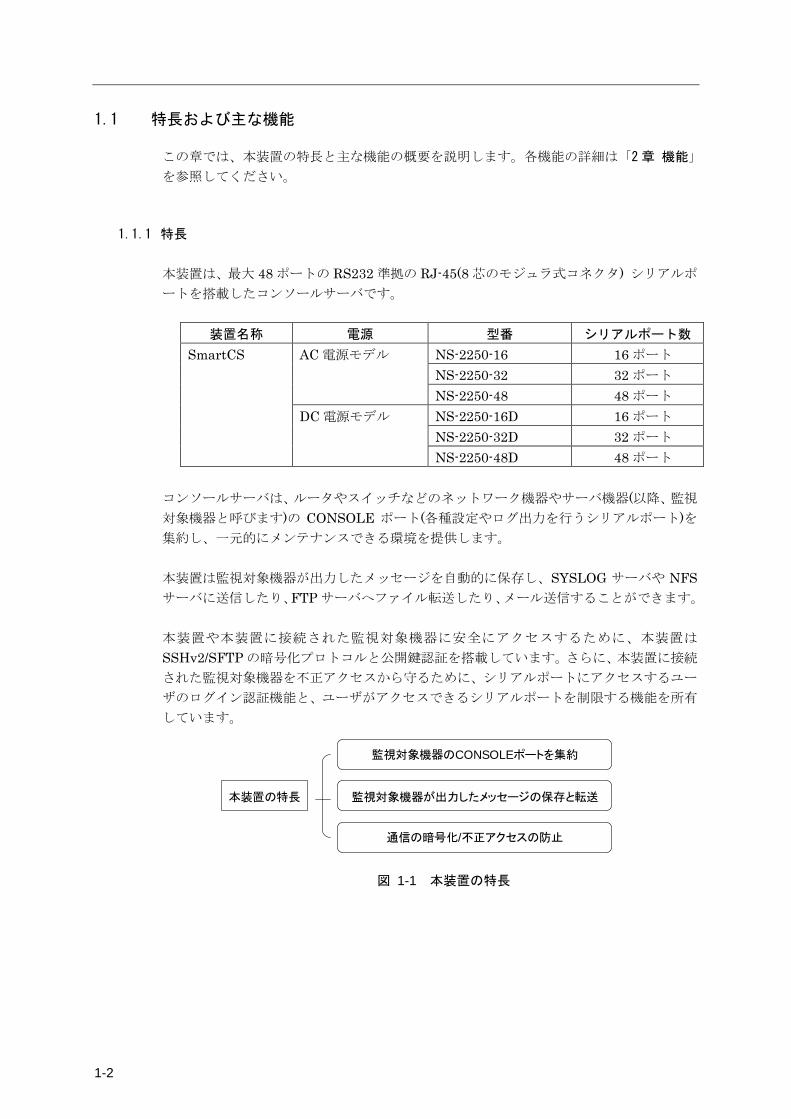
1.1.1 特長 本装置は、最大 48 ポートの RS232 準拠の RJ-45(8 芯のモジュラ式コネクタ) シリアルポ
ートを搭載したコンソールサーバです。
装置名称 電源 型番 シリアルポート数
SmartCS AC 電源モデル NS-2250-16 16 ポート NS-2250-32 32 ポート NS-2250-48 48 ポート
DC 電源モデル NS-2250-16D 16 ポート NS-2250-32D 32 ポート NS-2250-48D 48 ポート
コンソールサーバは、ルータやスイッチなどのネットワーク機器やサーバ機器(以降、監視
対象機器と呼びます)の CONSOLE ポート(各種設定やログ出力を行うシリアルポート)を集約し、一元的にメンテナンスできる環境を提供します。 本装置は監視対象機器が出力したメッセージを自動的に保存し、SYSLOG サーバや NFSサーバに送信したり、FTP サーバへファイル転送したり、メール送信することができます。 本装置や本装置に接続された監視対象機器に安全にアクセスするために、本装置は
SSHv2/SFTP の暗号化プロトコルと公開鍵認証を搭載しています。さらに、本装置に接続
された監視対象機器を不正アクセスから守るために、シリアルポートにアクセスするユー
ザのログイン認証機能と、ユーザがアクセスできるシリアルポートを制限する機能を所有
しています。
本装置の特長
監視対象機器のCONSOLEポートを集約
監視対象機器が出力したメッセージの保存と転送
通信の暗号化/不正アクセスの防止
図 1-1 本装置の特長
1 章 本装置の概要
1-3
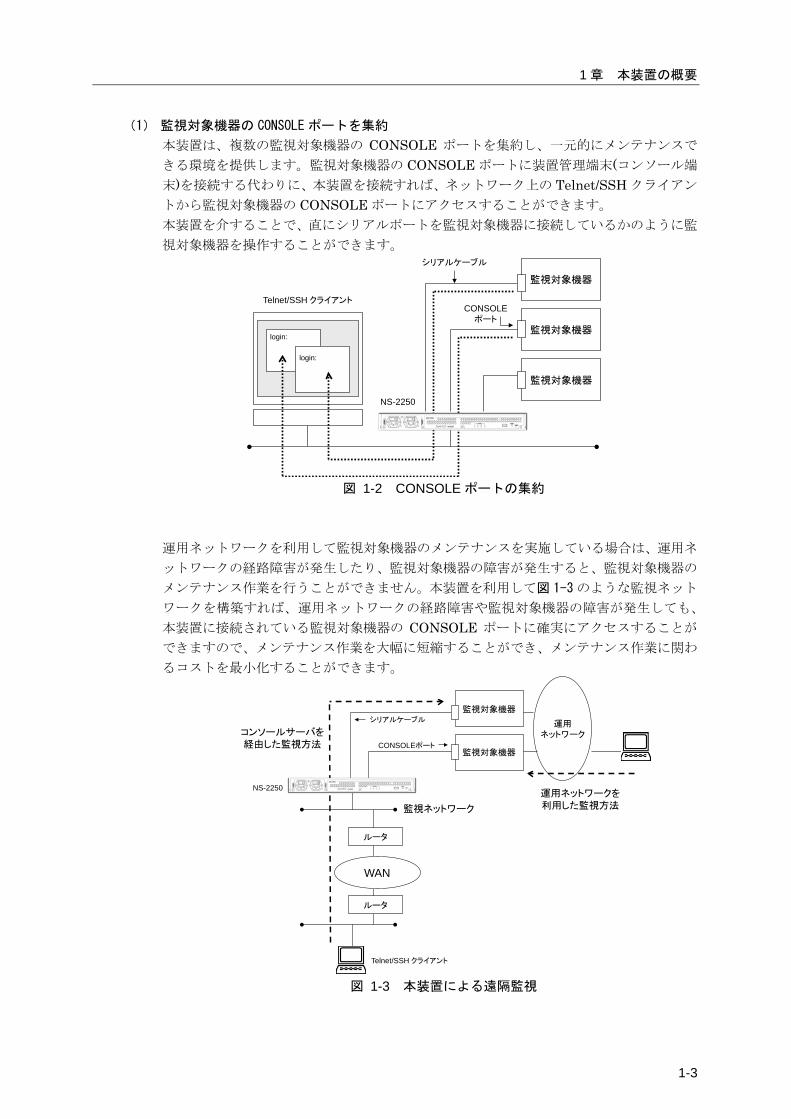
(1) 監視対象機器の CONSOLE ポートを集約
本装置は、複数の監視対象機器の CONSOLE ポートを集約し、一元的にメンテナンスで
きる環境を提供します。監視対象機器の CONSOLE ポートに装置管理端末(コンソール端
末)を接続する代わりに、本装置を接続すれば、ネットワーク上の Telnet/SSH クライアン
トから監視対象機器の CONSOLE ポートにアクセスすることができます。 本装置を介することで、直にシリアルポートを監視対象機器に接続しているかのように監
視対象機器を操作することができます。
監視対象機器
監視対象機器
Telnet/SSH クライアント
login:
login:
シリアルケーブル
監視対象機器
CONSOLEポート
NS-2250
図 1-2 CONSOLE ポートの集約
運用ネットワークを利用して監視対象機器のメンテナンスを実施している場合は、運用ネ
ットワークの経路障害が発生したり、監視対象機器の障害が発生すると、監視対象機器の
メンテナンス作業を行うことができません。本装置を利用して図 1-3 のような監視ネット
ワークを構築すれば、運用ネットワークの経路障害や監視対象機器の障害が発生しても、
本装置に接続されている監視対象機器の CONSOLE ポートに確実にアクセスすることが
できますので、メンテナンス作業を大幅に短縮することができ、メンテナンス作業に関わ
るコストを最小化することができます。
監視対象機器
監視対象機器シリアルケーブル
CONSOLEポート
WAN
Telnet/SSH クライアント
ルータ
ルータ
運用ネットワーク
監視ネットワーク
運用ネットワークを利用した監視方法
コンソールサーバを経由した監視方法
NS-2250
図 1-3 本装置による遠隔監視

1-4
また、本装置は監視対象機器を一覧表示しているメニューから番号を選択するだけで、簡
単に監視対象機器にアクセスすることができるポートセレクト機能を搭載しています。本
機能を利用すれば監視対象機器を一元管理することができます
図 1-4 監視対象機器の一元管理
さらに、本装置は、本装置のシリアルポートに接続された監視対象機器に、複数の
Telnet/SSH クライアントから同時にアクセスできる環境を提供します。例えば 2 台の
Telnet/SSH クライアントから同じ監視対象機器を操作したり、ある Telnet/SSH クライア
ントから監視対象機器の操作を行いながら、同時に別の Telnet/SSH クライアントからそ
のシリアルポートに接続されている監視対象機器をモニタリングできます。監視対象機器
へ設定コマンドを投入する前に読み合わせ確認を実施する環境など、複数人で同一の監視
対象機器を管理/運用する場合には、本機能を活用することでより効率的な運用ができま
す。
監視対象機器
Telnet/SSH クライアント(操作端末)
login:
Telnet/SSH クライアント
(モニタリング専用)
login:
監視対象機器の操作
監視対象機器のモニタリング
NS-2250
図 1-5 監視対象機器の操作とモニタリング
監視対象機器
監視対象機器
Telnet/SSH クライアント
telnet SmartCS-------------------1: Swicth-A2: Server-X
-------------------> 2
シリアルケーブル
監視対象機器
CONSOLEポート
NS-2250
1 章 本装置の概要
1-5
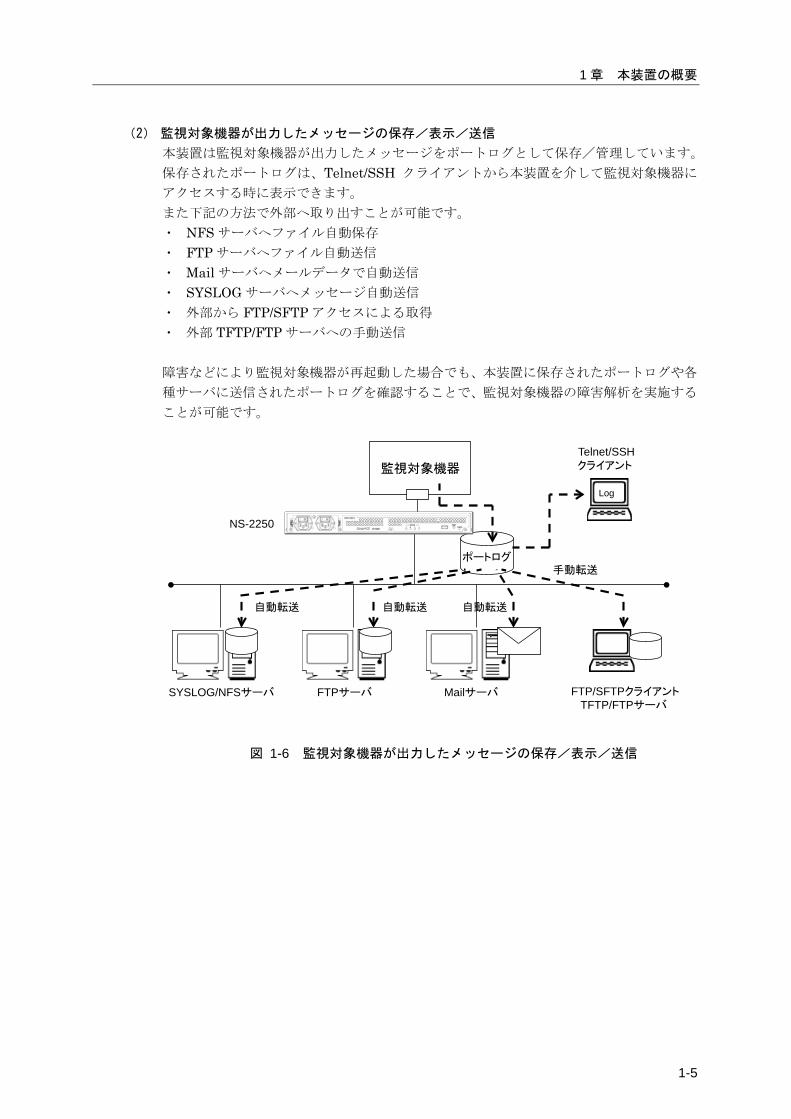
(2) 監視対象機器が出力したメッセージの保存/表示/送信
本装置は監視対象機器が出力したメッセージをポートログとして保存/管理しています。 保存されたポートログは、Telnet/SSH クライアントから本装置を介して監視対象機器に
アクセスする時に表示できます。 また下記の方法で外部へ取り出すことが可能です。 ・ NFS サーバへファイル自動保存 ・ FTP サーバへファイル自動送信 ・ Mail サーバへメールデータで自動送信 ・ SYSLOG サーバへメッセージ自動送信 ・ 外部から FTP/SFTP アクセスによる取得 ・ 外部 TFTP/FTP サーバへの手動送信 障害などにより監視対象機器が再起動した場合でも、本装置に保存されたポートログや各
種サーバに送信されたポートログを確認することで、監視対象機器の障害解析を実施する
ことが可能です。
監視対象機器
SYSLOG/NFSサーバ FTPサーバ Mailサーバ
ポートログ
FTP/SFTPクライアントTFTP/FTPサーバ
NS-2250
自動転送 自動転送 自動転送
手動転送
Log
Telnet/SSHクライアント
図 1-6 監視対象機器が出力したメッセージの保存/表示/送信

1-6
(3) 通信の暗号化/不正アクセスの防止
本装置や本装置に接続された監視対象機器に安全にアクセスするために、本装置は
SSHv2(Secure Shell version2)/SFTP(Secure File Transfer Protocol)の暗号化プロトコル
と公開鍵認証を搭載しています。通信自体の秘匿化により、セキュリティ面でも安心して
本装置を利用することができます。 また、本装置内管理サービス(Telnet サーバや SSH サーバなど)ごとに、アクセスを許可
するクライアントのネットワークアドレスを指定し、本装置内管理サービスへのアクセス
を制限することもできます。 また、パスワードや公開鍵を使ったユーザ認証に加えて、そのユーザがアクセス可能なシ
リアルポートを設定することで、より細かなセキュリティ制御が可能になります。
監視対象機器監視対象機器
User Access Port
suzuki 1,2,3
tanaka 1,5,6
sato 7
Telnet/SSHクライアント
NS-2250
図 1-7 シリアルポートのアクセス制限
1 章 本装置の概要
1-7
1.1.2 主な機能
本装置が提供する主な機能の概要について説明します。
(1) ポートサーバ機能
ポートサーバ機能は、Telnet/SSH クライアントからの接続要求を受け、指定されたシリ
アルポートに Telnet/SSH セッションを接続する機能です。 ポートサーバ機能に搭載されたポートサーバメニューを通じて、シリアルポートに接続し
た監視対象機器のログを参照したり、Break 信号を監視対象機器に送出する操作を行うこ
とができます。 ポートサーバ機能は2種類の接続モードを搭載しています。 ご利用のネットワーク環境にあわせて、2つの接続モードのいずれかを選択して本装置を
ご利用ください。 ・ ダイレクトモード
本装置のシリアルポートにマッピングされた TCP ポート番号を、Telnet/SSH クラ
イアントのオプションに指定して、ダイレクトに監視対象機器へアクセスするモード
です。 ・ セレクトモード(ポートセレクト機能)
Telnet/SSH クライアントの標準ポート番号を使って本装置にログインし、監視対象
装置が一覧表示されているポートセレクトメニューからアクセスしたいシリアルポ
ートの番号を選択して監視対象機器へアクセスするモードです。
また、ポートサーバ機能は、シリアルポートに接続された監視対象機器の操作を行うノー
マルモードと、監視対象機器のモニタリングのみを行うモニターモードの 2 種類をサポー
トしています。ひとつのシリアルポートに対して 2 台の Telnet/SSH クライアントからノ
ーマルモードでアクセスして監視対象機器を操作したり、ノーマルモードとモニターモー
ドの両方を動作させ、監視対象機器の操作と監視を同時に行うことができます。 詳細は「2.1 ポートサーバ機能」を参照してください。
(2) ポートログ機能
ポートログ機能は、本装置のシリアルポートに接続されている監視対象機器から受信した
データをポートログとして保存する機能です。ポートサーバを通じてアクセスした
Telnet/SSH クライアントへ保存したポートログを表示させたり、そのポートログを
SYSLOG サーバや NFS サーバにリアルタイムに保存したり、各ポートに指定された FTPサーバやメールアドレスに送信することができます。 ポートログ機能は下記の機能を搭載しています。
・ポートログ保存機能
・タイムスタンプ機能 ・ログインスタンプ機能 ・ポートログ表示機能 ・ポートログ送信機能(SYSLOG/FTP/メール)
詳細は「2.2 ポートログ機能」を参照してください。
1-8
(3) セキュリティ機能
セキュリティ機能では、本装置にログインするユーザを制限したり、ユーザ毎にアクセス
可能なシリアルポートを設定することができます。また、本装置は RADIUS/TACACS+機能を搭載しておりますので、本装置にログインするユーザや本装置のシリアルポートに
アクセスするユーザを RADIUS/TACACS+サーバで一元管理したり、RADIUS/TACACS+サーバにアカウントログを保存することができます。 また、ポートサーバなど本装置で動作している各種サーバへアクセスできるネットワーク
やホストを制限することでセキュリティを強化することができます。 詳細は「2.3 セキュリティ機能」を参照してください。
(4) 運用管理機能
運用管理機能は、下記に示す本装置の設定や監視機能を行う機能です。 ・DNS クライアント機能
・SNTP クライアント機能
・スタティックルーティング機能
・SNMP エージェント機能
・SYSLOG クライアント機能
・Telnet/SSH サーバ機能
・FTP サーバ機能
・FTP/TFTP クライアント機能
・バージョンアップ/バージョンダウン機能
・システムソフトウェアのリストア/バックアップ機能
・自動復帰機能
・温度センサ機能
・タイムゾーン機能
・ボンディング機能
詳細は「2.4 運用管理機能」を参照してください。
1 章 本装置の概要
1-9
1.2 各部の名称
本装置の各部の名称と機能について説明します。 ハードウェアの仕様詳細やコネクタの結線などは「設置手順書」を参照してください。
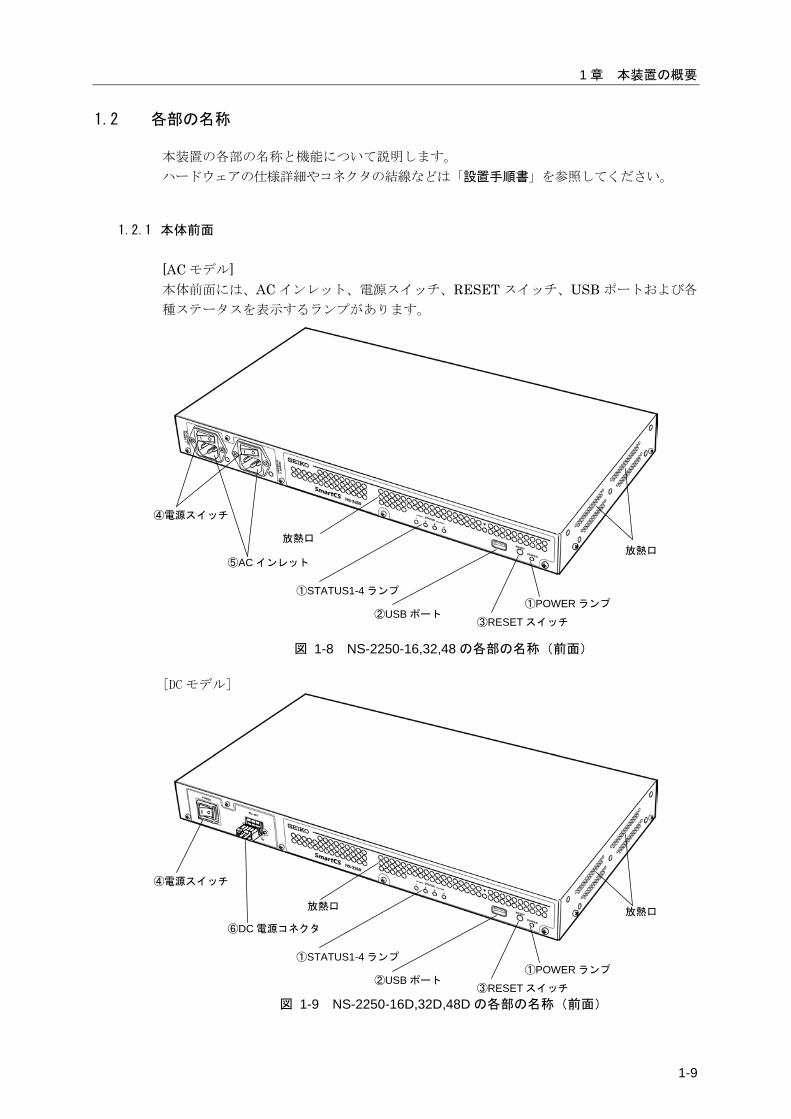
1.2.1 本体前面 [AC モデル] 本体前面には、AC インレット、電源スイッチ、RESET スイッチ、USB ポートおよび各
種ステータスを表示するランプがあります。
図 1-8 NS-2250-16,32,48 の各部の名称(前面)
[DC モデル]
図 1-9 NS-2250-16D,32D,48D の各部の名称(前面)
①POWER ランプ ③RESET スイッチ
①STATUS1-4 ランプ
②USB ポート
⑤AC インレット
④電源スイッチ
放熱口 放熱口
放熱口
①POWER ランプ ③RESET スイッチ
放熱口
①STATUS1-4 ランプ
②USB ポート
⑥DC 電源コネクタ
④電源スイッチ
1-10
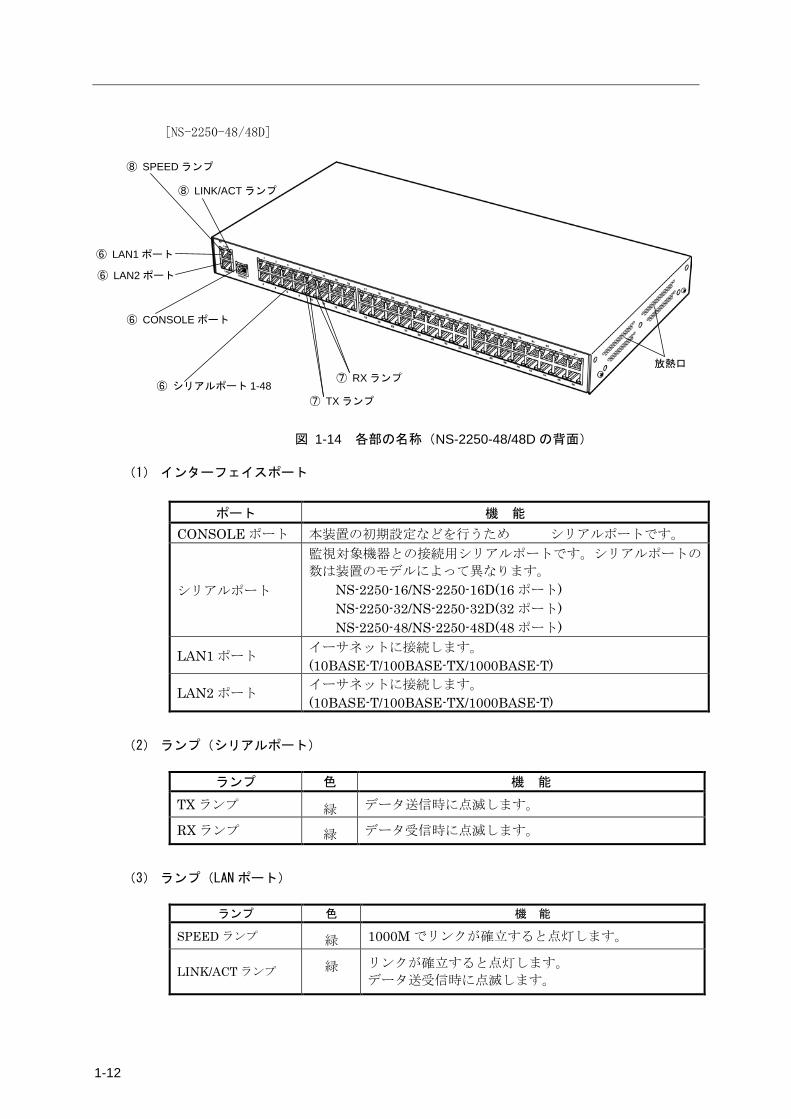
(1) ランプ (POWER/STATUS)
ランプ名称 色 機 能
POWER ランプ 緑 電源が ON の時に点灯します。
STATUS1 ランプ 緑 自己診断テスト(POC)実行中に点灯します。 システム起動中は STATUS3 ランプと同時に点灯しま
す。 STATUS2 ランプ 緑 ROM モニタ実行中に点灯します。 STATUS3 ランプ 緑 システム起動中に点灯します。 STATUS4 ランプ 緑 USB アクセス中に点灯します。
(2) USB ポート
添付品の USB メモリを挿入します。
(3) RESET スイッチ
本装置をリセットするときに使用します。
(4)電源スイッチ
本装置の電源を ON/OFF します。 |と表示されている側を押し込むと ON、○と表示されている側を押し込むと OFF になり
ます。電源を OFF にする場合は shutdown コマンドを実行してシステムソフトウェアを
終了させ、コンソールに MON>プロンプトが表示されるのを確認するか、または本装置前
面の STATUS2 ランプが点灯するのを待ってから電源を OFF にしてください。
(5)AC インレット
AC モデルは AC 電源ケーブルを接続します。 電源ケーブルを抜く場合は shutdown コマンドを実行してシステムソフトウェアを終了さ
せ、コンソールに MON>プロンプトが表示されるのを確認するか、または本装置前面の
STATUS2 ランプが点灯するのを待ってから、電源ケーブルを抜いてください。
(6)DC 電源コネクタ
DC モデルは DC 電源ケーブルを接続します。 電源ケーブルを抜く場合は shutdown コマンドを実行してシステムソフトウェアを終了さ
せ、コンソールに MON>プロンプトが表示されるのを確認するか、または本装置前面の
STATUS2 ランプが点灯するのを待ってから、電源ケーブルを抜いてください。
1 章 本装置の概要
1-11
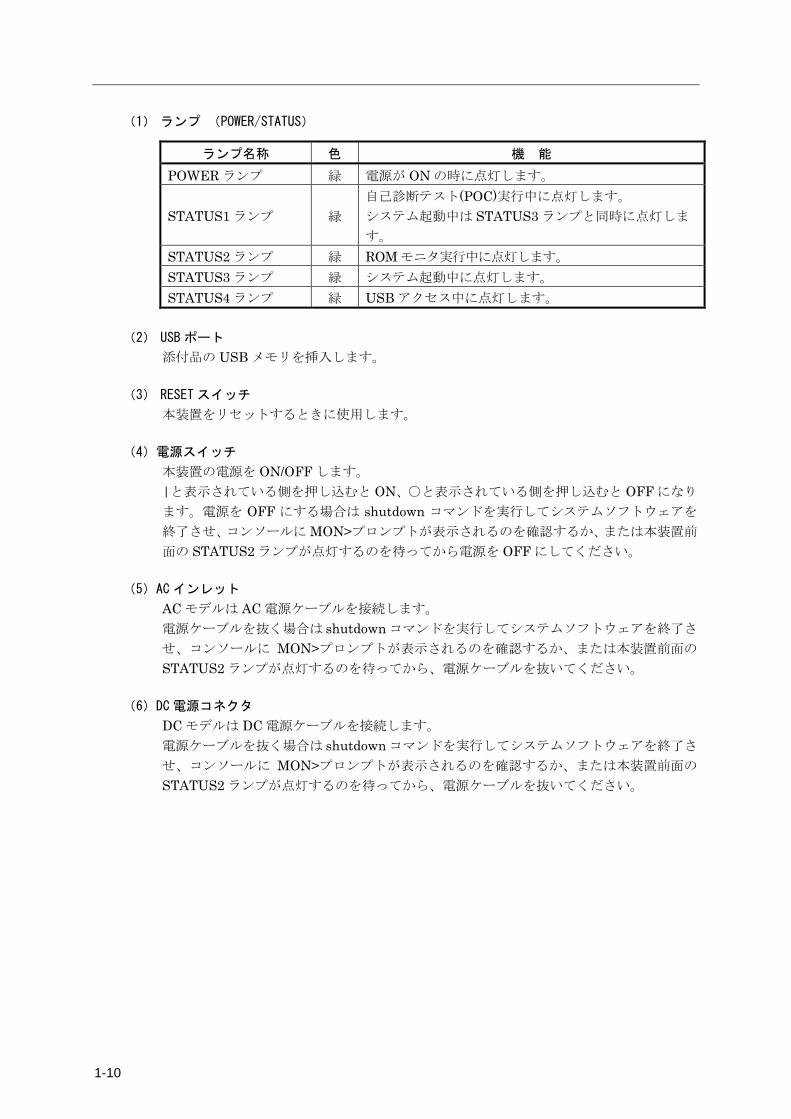
1.2.2 本体背面 本体背面には CONSOLE ポート、シリアルポート、LAN ポートが実装されています。
[NS-2250-16/16D]
図 1-12 各部の名称(NS-2250-16/16D の背面)
[NS-2250-32/32D]
図 1-13 各部の名称(NS-2250-32/32D の背面)
放熱口
⑥ CONSOLE ポート
⑥ シリアルポート 1-16
⑧ SPEED ランプ ⑧ LINK/ACT ランプ
⑦ TX ランプ
⑥ LAN1 ポート
⑥ LAN2 ポート
⑦ RX ランプ
放熱口
⑥ CONSOLE ポート
⑥ シリアルポート 1-32
⑧ SPEED ランプ ⑧ LINK/ACT ランプ
⑦ TX ランプ
⑥ LAN1 ポート
⑥ LAN2 ポート
⑦ RX ランプ
1-12
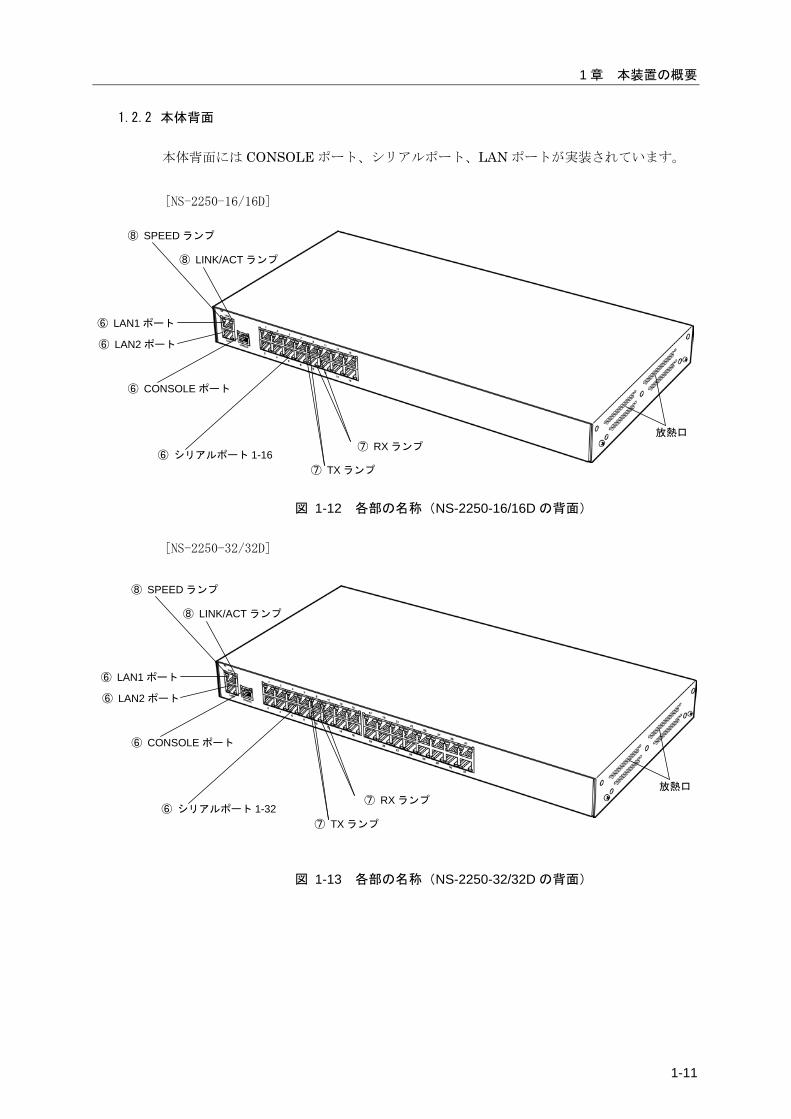
[NS-2250-48/48D]
図 1-14 各部の名称(NS-2250-48/48D の背面)
(1) インターフェイスポート
ポート 機 能
CONSOLE ポート 本装置の初期設定などを行うためのシリアルポートです。
シリアルポート
監視対象機器との接続用シリアルポートです。シリアルポートの
数は装置のモデルによって異なります。 NS-2250-16/NS-2250-16D(16 ポート) NS-2250-32/NS-2250-32D(32 ポート) NS-2250-48/NS-2250-48D(48 ポート)
LAN1 ポート イーサネットに接続します。 (10BASE-T/100BASE-TX/1000BASE-T)
LAN2 ポート イーサネットに接続します。 (10BASE-T/100BASE-TX/1000BASE-T)
(2) ランプ(シリアルポート)
ランプ 色 機 能
TX ランプ 緑
データ送信時に点滅します。
RX ランプ 緑
データ受信時に点滅します。
(3) ランプ(LAN ポート)
ランプ 色 機 能
SPEED ランプ 緑
1000M でリンクが確立すると点灯します。
LINK/ACT ランプ 緑
リンクが確立すると点灯します。 データ送受信時に点滅します。
放熱口
⑥ CONSOLE ポート
⑥ シリアルポート 1-48
⑧ SPEED ランプ ⑧ LINK/ACT ランプ
⑦ TX ランプ ⑦ RX ランプ
⑥ LAN1 ポート
⑥ LAN2 ポート
1 章 本装置の概要
1-13
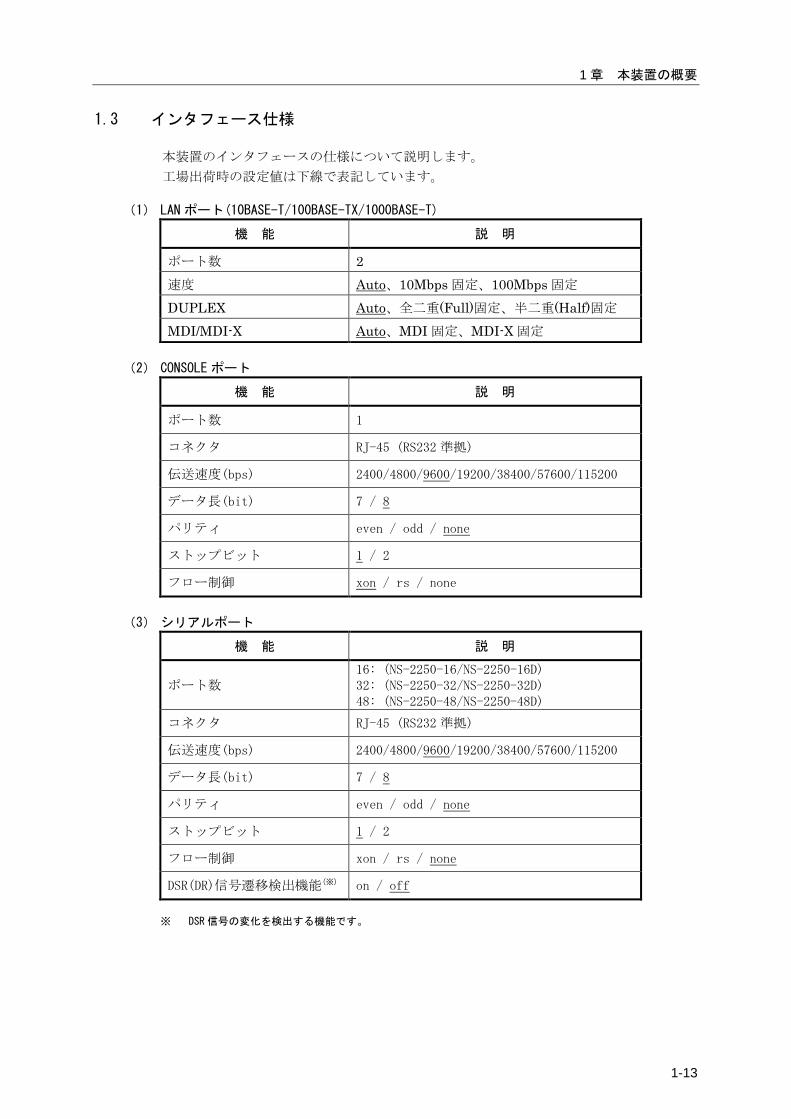
1.3 インタフェース仕様
本装置のインタフェースの仕様について説明します。 工場出荷時の設定値は下線で表記しています。
(1) LAN ポート(10BASE-T/100BASE-TX/1000BASE-T)
機 能 説 明
ポート数 2 速度 Auto、10Mbps 固定、100Mbps 固定 DUPLEX Auto、全二重(Full)固定、半二重(Half)固定 MDI/MDI-X Auto、MDI 固定、MDI-X 固定
(2) CONSOLE ポート
機 能 説 明
ポート数 1
コネクタ RJ-45 (RS232 準拠)
伝送速度(bps) 2400/4800/9600/19200/38400/57600/115200
データ長(bit) 7 / 8
パリティ even / odd / none
ストップビット 1 / 2
フロー制御 xon / rs / none
(3) シリアルポート
機 能 説 明
ポート数 16: (NS-2250-16/NS-2250-16D) 32: (NS-2250-32/NS-2250-32D) 48: (NS-2250-48/NS-2250-48D)
コネクタ RJ-45 (RS232 準拠)
伝送速度(bps) 2400/4800/9600/19200/38400/57600/115200
データ長(bit) 7 / 8
パリティ even / odd / none
ストップビット 1 / 2
フロー制御 xon / rs / none
DSR(DR)信号遷移検出機能(※) on / off
※ DSR 信号の変化を検出する機能です。

2-1
2 章 機能
2 章では、本装置の機能の詳細について説明しています。 作業を始める前に必ずお読みください。
本章の内容
2.1 ポートサーバ機能
2.1.1 ポートサーバ機能の概要
2.1.2 ポートサーバへの接続(ダイレクトモード)
2.1.3 ポートサーバへの接続(セレクトモード)
2.1.4 ポートセレクトメニュー
2.1.5 ポートサーバメニュー
2.1.6 ポートユーザ認証
2.1.7 その他のポートサーバ機能
2.2 ポートログ機能
2.2.1 ポートログ機能の概要
2.2.2 ポートログ保存機能
2.2.3 タイムスタンプ機能
2.2.4 ログインスタンプ機能
2.2.5 ポートログ表示機能
2.2.6 ポートログ送信機能(SYSLOG/FTP/メール)
2.3 セキュリティ機能
2.3.1 ユーザ管理/認証機能
2.3.2 RADIUS 認証機能/RADIUS アカウント機能
2.3.3 RADIUS によるユーザグループの識別とシリア
ルポートのアクセス制限
2.3.4 TACACS+機能
2.3.5 TACACS+によるユーザグループの識別とシリア
ルポートのアクセス制限
2.3.6 各種サーバのアクセス制限
2.4 運用管理機能
2-2
2.1 ポートサーバ機能
2.1.1 ポートサーバ機能の概要
ポートサーバ機能は、Telnet/SSH クライアントからの接続要求を受け、指定されたシリ
アルポートに Telnet/SSH セッションを接続する機能です。Telnet/SSH クライアントを監
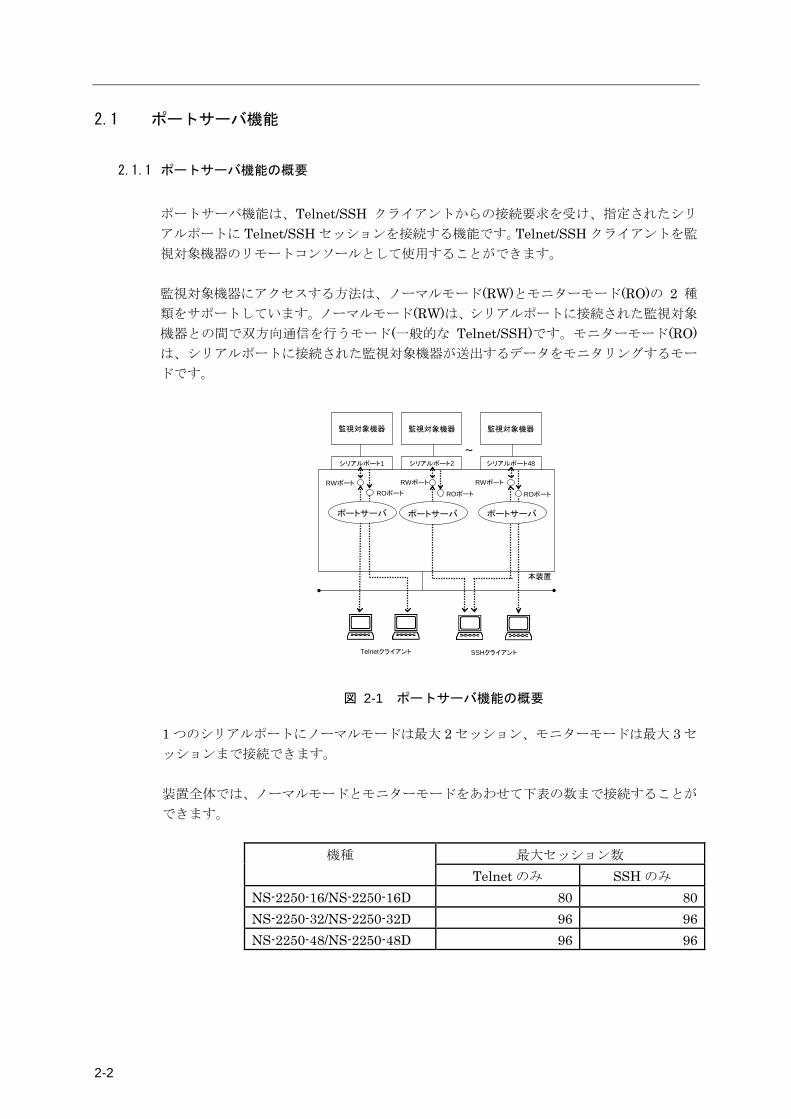
視対象機器のリモートコンソールとして使用することができます。 監視対象機器にアクセスする方法は、ノーマルモード(RW)とモニターモード(RO)の 2 種
類をサポートしています。ノーマルモード(RW)は、シリアルポートに接続された監視対象
機器との間で双方向通信を行うモード(一般的な Telnet/SSH)です。モニターモード(RO)は、シリアルポートに接続された監視対象機器が送出するデータをモニタリングするモー
ドです。
監視対象機器 監視対象機器
Telnetクライアント
シリアルポート1
SSHクライアント
シリアルポート2
監視対象機器
シリアルポート48
RWポート
ROポート
RWポート RWポート
~
本装置
ポートサーバポートサーバ
ROポート ROポート
ポートサーバ
図 2-1 ポートサーバ機能の概要
1 つのシリアルポートにノーマルモードは最大 2 セッション、モニターモードは最大 3 セ
ッションまで接続できます。 装置全体では、ノーマルモードとモニターモードをあわせて下表の数まで接続することが
できます。
機種 最大セッション数 Telnet のみ SSH のみ
NS-2250-16/NS-2250-16D 80 80 NS-2250-32/NS-2250-32D 96 96 NS-2250-48/NS-2250-48D 96 96
2 章 機 能
2-3
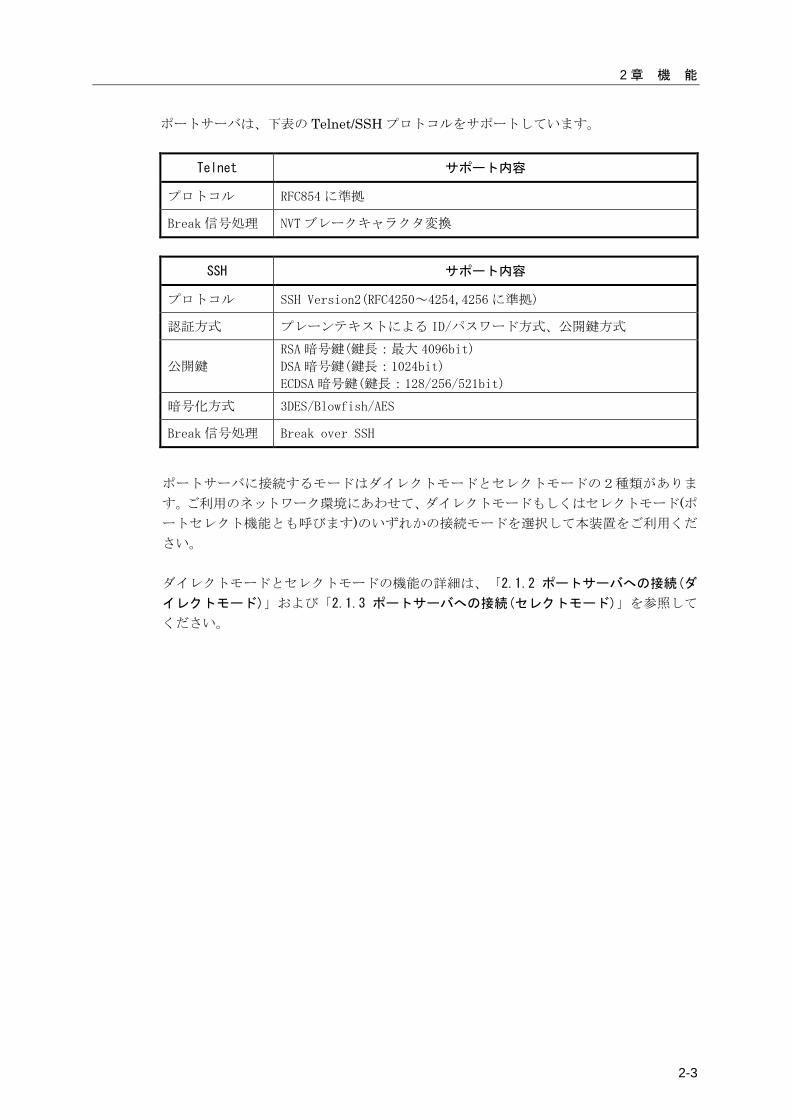
ポートサーバは、下表の Telnet/SSH プロトコルをサポートしています。
Telnet サポート内容
プロトコル RFC854 に準拠
Break 信号処理 NVT ブレークキャラクタ変換
SSH サポート内容
プロトコル SSH Version2(RFC4250~4254,4256 に準拠)
認証方式 プレーンテキストによる ID/パスワード方式、公開鍵方式
公開鍵
RSA 暗号鍵(鍵長:最大 4096bit)
DSA 暗号鍵(鍵長:1024bit)
ECDSA 暗号鍵(鍵長:128/256/521bit)
暗号化方式 3DES/Blowfish/AES
Break 信号処理 Break over SSH
ポートサーバに接続するモードはダイレクトモードとセレクトモードの2種類がありま
す。ご利用のネットワーク環境にあわせて、ダイレクトモードもしくはセレクトモード(ポートセレクト機能とも呼びます)のいずれかの接続モードを選択して本装置をご利用くだ
さい。 ダイレクトモードとセレクトモードの機能の詳細は、「2.1.2 ポートサーバへの接続(ダ
イレクトモード)」および「2.1.3 ポートサーバへの接続(セレクトモード)」を参照して
ください。
2-4
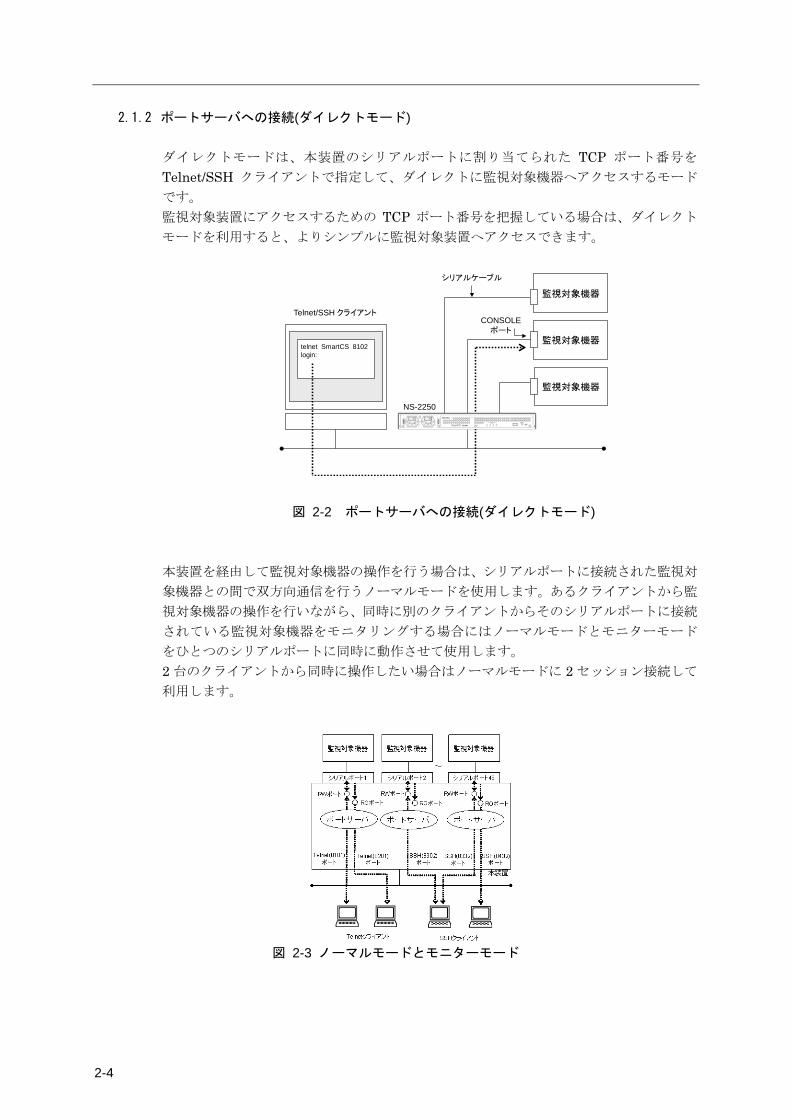
2.1.2 ポートサーバへの接続(ダイレクトモード)
ダイレクトモードは、本装置のシリアルポートに割り当てられた TCP ポート番号を
Telnet/SSH クライアントで指定して、ダイレクトに監視対象機器へアクセスするモード
です。 監視対象装置にアクセスするための TCP ポート番号を把握している場合は、ダイレクト
モードを利用すると、よりシンプルに監視対象装置へアクセスできます。
監視対象機器
監視対象機器
Telnet/SSH クライアント
telnet SmartCS 8102login:
シリアルケーブル
監視対象機器
CONSOLEポート
NS-2250
図 2-2 ポートサーバへの接続(ダイレクトモード)
本装置を経由して監視対象機器の操作を行う場合は、シリアルポートに接続された監視対
象機器との間で双方向通信を行うノーマルモードを使用します。あるクライアントから監
視対象機器の操作を行いながら、同時に別のクライアントからそのシリアルポートに接続
されている監視対象機器をモニタリングする場合にはノーマルモードとモニターモード
をひとつのシリアルポートに同時に動作させて使用します。 2 台のクライアントから同時に操作したい場合はノーマルモードに 2 セッション接続して
利用します。
図 2-3 ノーマルモードとモニターモード
2 章 機 能
2-5
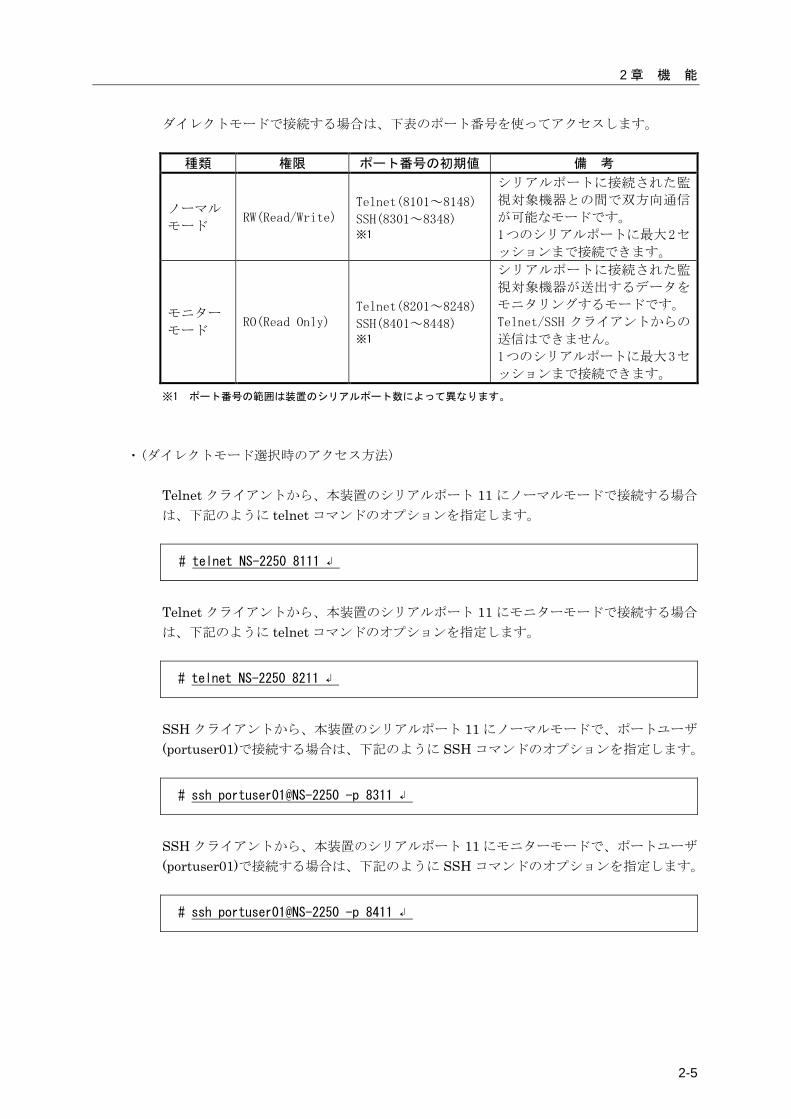
ダイレクトモードで接続する場合は、下表のポート番号を使ってアクセスします。
種類 権限 ポート番号の初期値 備 考
ノーマル
モード RW(Read/Write)
Telnet(8101~8148)
SSH(8301~8348) ※1
シリアルポートに接続された監
視対象機器との間で双方向通信
が可能なモードです。
1つのシリアルポートに最大2セ
ッションまで接続できます。
モニター
モード RO(Read Only)
Telnet(8201~8248)
SSH(8401~8448) ※1
シリアルポートに接続された監
視対象機器が送出するデータを
モニタリングするモードです。
Telnet/SSH クライアントからの
送信はできません。
1つのシリアルポートに最大3セ
ッションまで接続できます。
※1 ポート番号の範囲は装置のシリアルポート数によって異なります。
・(ダイレクトモード選択時のアクセス方法)
Telnet クライアントから、本装置のシリアルポート 11 にノーマルモードで接続する場合
は、下記のように telnet コマンドのオプションを指定します。
# telnet NS-2250 8111 ↲
Telnet クライアントから、本装置のシリアルポート 11 にモニターモードで接続する場合
は、下記のように telnet コマンドのオプションを指定します。
# telnet NS-2250 8211 ↲
SSH クライアントから、本装置のシリアルポート 11 にノーマルモードで、ポートユーザ
(portuser01)で接続する場合は、下記のように SSH コマンドのオプションを指定します。
# ssh portuser01@NS-2250 -p 8311 ↲
SSH クライアントから、本装置のシリアルポート 11 にモニターモードで、ポートユーザ
(portuser01)で接続する場合は、下記のように SSH コマンドのオプションを指定します。
# ssh portuser01@NS-2250 -p 8411 ↲
2-6
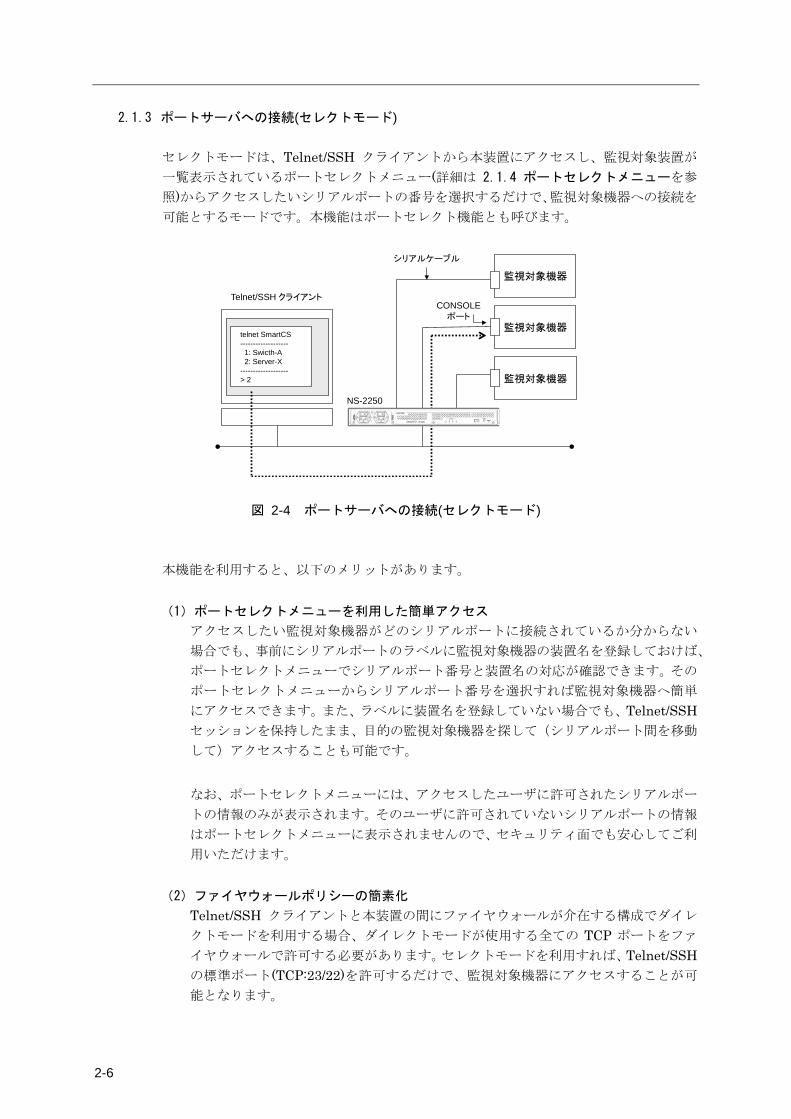
2.1.3 ポートサーバへの接続(セレクトモード)
セレクトモードは、Telnet/SSH クライアントから本装置にアクセスし、監視対象装置が
一覧表示されているポートセレクトメニュー(詳細は 2.1.4 ポートセレクトメニューを参
照)からアクセスしたいシリアルポートの番号を選択するだけで、監視対象機器への接続を
可能とするモードです。本機能はポートセレクト機能とも呼びます。
監視対象機器
監視対象機器
Telnet/SSH クライアント
telnet SmartCS-------------------1: Swicth-A2: Server-X
-------------------> 2
シリアルケーブル
監視対象機器
CONSOLEポート
NS-2250
図 2-4 ポートサーバへの接続(セレクトモード)
本機能を利用すると、以下のメリットがあります。
(1)ポートセレクトメニューを利用した簡単アクセス
アクセスしたい監視対象機器がどのシリアルポートに接続されているか分からない
場合でも、事前にシリアルポートのラベルに監視対象機器の装置名を登録しておけば、
ポートセレクトメニューでシリアルポート番号と装置名の対応が確認できます。その
ポートセレクトメニューからシリアルポート番号を選択すれば監視対象機器へ簡単
にアクセスできます。また、ラベルに装置名を登録していない場合でも、Telnet/SSHセッションを保持したまま、目的の監視対象機器を探して(シリアルポート間を移動
して)アクセスすることも可能です。
なお、ポートセレクトメニューには、アクセスしたユーザに許可されたシリアルポー
トの情報のみが表示されます。そのユーザに許可されていないシリアルポートの情報
はポートセレクトメニューに表示されませんので、セキュリティ面でも安心してご利
用いただけます。
(2)ファイヤウォールポリシーの簡素化
Telnet/SSH クライアントと本装置の間にファイヤウォールが介在する構成でダイレ
クトモードを利用する場合、ダイレクトモードが使用する全ての TCP ポートをファ
イヤウォールで許可する必要があります。セレクトモードを利用すれば、Telnet/SSHの標準ポート(TCP:23/22)を許可するだけで、監視対象機器にアクセスすることが可
能となります。

2 章 機 能
2-7
なお、セレクトモードでは、監視対象機器へのアクセスと本装置へのログインは、同じ
Telnet サーバ(TCP:23)/SSH サーバ(TCP:22)を使用しております。 セレクトモードでは、アクセスを要求したユーザが一般ユーザの場合には、本装置へのロ
グインと判断します。アクセスを要求したユーザがポートユーザの場合には、監視対象機
器へアクセスと判断しポートセレクトメニューを表示します。 ユーザは表示されたポートセレクトメニューからアクセスしたいシリアルポートと接続
方式(ノーマルモード/モニターモード)を選択することにより、シリアルポートにアクセ
スできます。
監視対象機器 監視対象機器
シリアルポート1 シリアルポート2
監視対象機器
シリアルポート48
RWポート
ROポート
RWポート RWポート
~
本装置
ポートサーバポートサーバ
ROポート ROポート
Telnet(23)ポートにポートユーザでログイン
Telnet(23)ポートに一般ユーザでログイン
ポートサーバ
ポートセレクトメニュー本装置ログイン
SSH(22)ポートにポートユーザでログイン
図 2-5 本装置ログインと監視対象装置へのアクセスの振り分け
上記のように、セレクトモードではアクセスするユーザ名で動作を変更しますので、ポー
トセレクト機能を利用する場合はポートサーバ認証機能を ON にする必要があります。
2-8
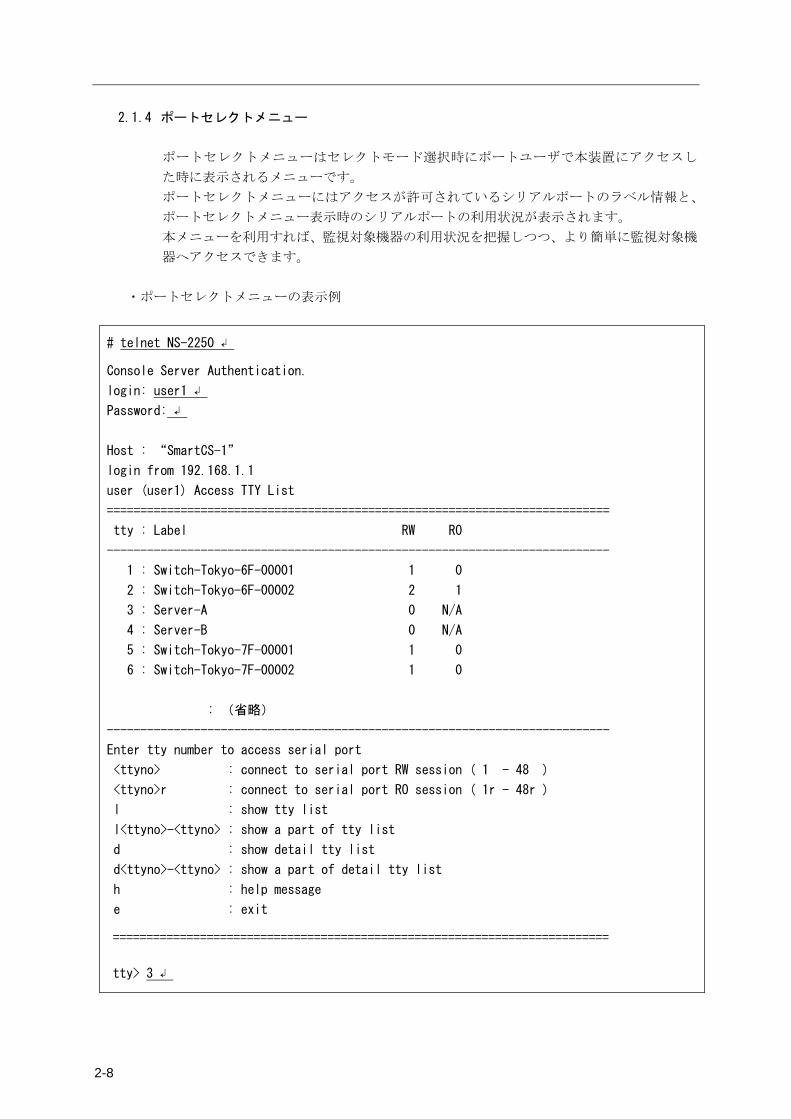
2.1.4 ポートセレクトメニュー
ポートセレクトメニューはセレクトモード選択時にポートユーザで本装置にアクセスし
た時に表示されるメニューです。 ポートセレクトメニューにはアクセスが許可されているシリアルポートのラベル情報と、
ポートセレクトメニュー表示時のシリアルポートの利用状況が表示されます。 本メニューを利用すれば、監視対象機器の利用状況を把握しつつ、より簡単に監視対象機
器へアクセスできます。
・ポートセレクトメニューの表示例
# telnet NS-2250 ↲
Console Server Authentication.
login: user1 ↲
Password: ↲
Host : “SmartCS-1”
login from 192.168.1.1
user (user1) Access TTY List
===========================================================================
tty : Label RW RO
---------------------------------------------------------------------------
1 : Switch-Tokyo-6F-00001 1 0
2 : Switch-Tokyo-6F-00002 2 1
3 : Server-A 0 N/A
4 : Server-B 0 N/A
5 : Switch-Tokyo-7F-00001 1 0
6 : Switch-Tokyo-7F-00002 1 0
: (省略)
---------------------------------------------------------------------------
Enter tty number to access serial port
<ttyno> : connect to serial port RW session ( 1 - 48 )
<ttyno>r : connect to serial port RO session ( 1r - 48r )
l : show tty list
l<ttyno>-<ttyno> : show a part of tty list
d : show detail tty list
d<ttyno>-<ttyno> : show a part of detail tty list
h : help message
e : exit
==========================================================================
tty> 3 ↲
2 章 機 能
2-9
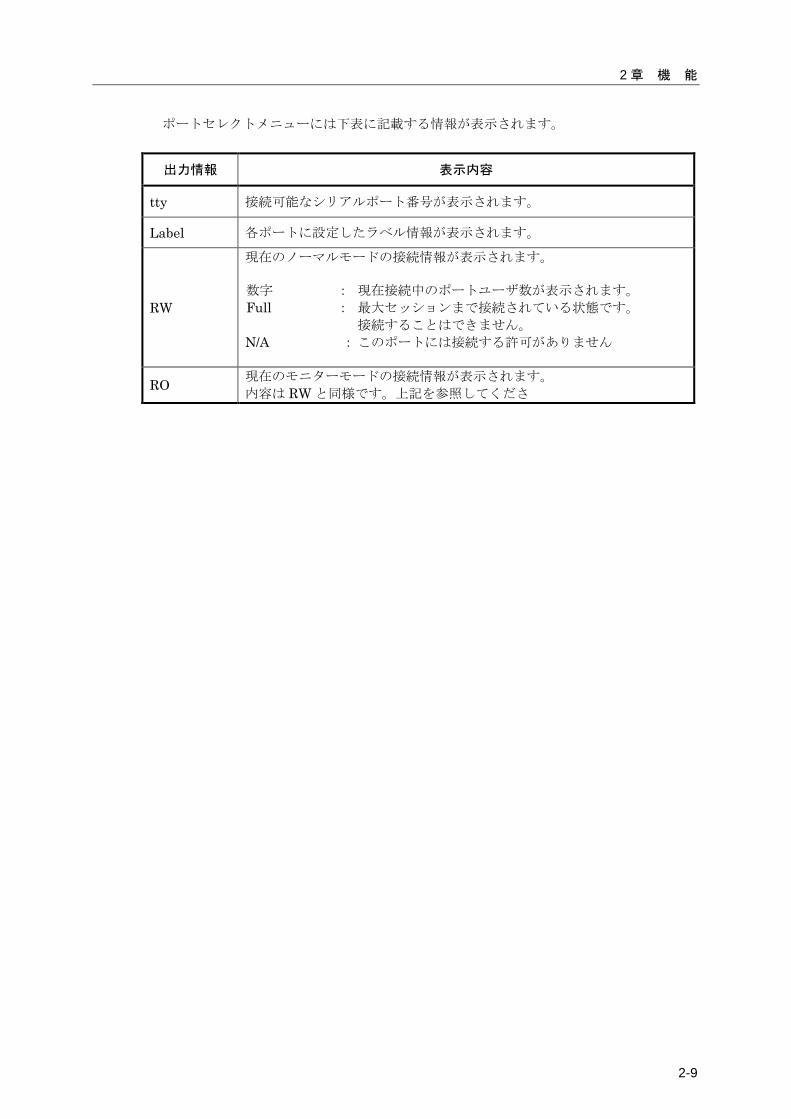
ポートセレクトメニューには下表に記載する情報が表示されます。
出力情報 表示内容
tty 接続可能なシリアルポート番号が表示されます。
Label 各ポートに設定したラベル情報が表示されます。
RW
現在のノーマルモードの接続情報が表示されます。 数字 : 現在接続中のポートユーザ数が表示されます。 Full : 最大セッションまで接続されている状態です。
接続することはできません。 N/A : このポートには接続する許可がありません
RO 現在のモニターモードの接続情報が表示されます。 内容は RW と同様です。上記を参照してください。
2-10
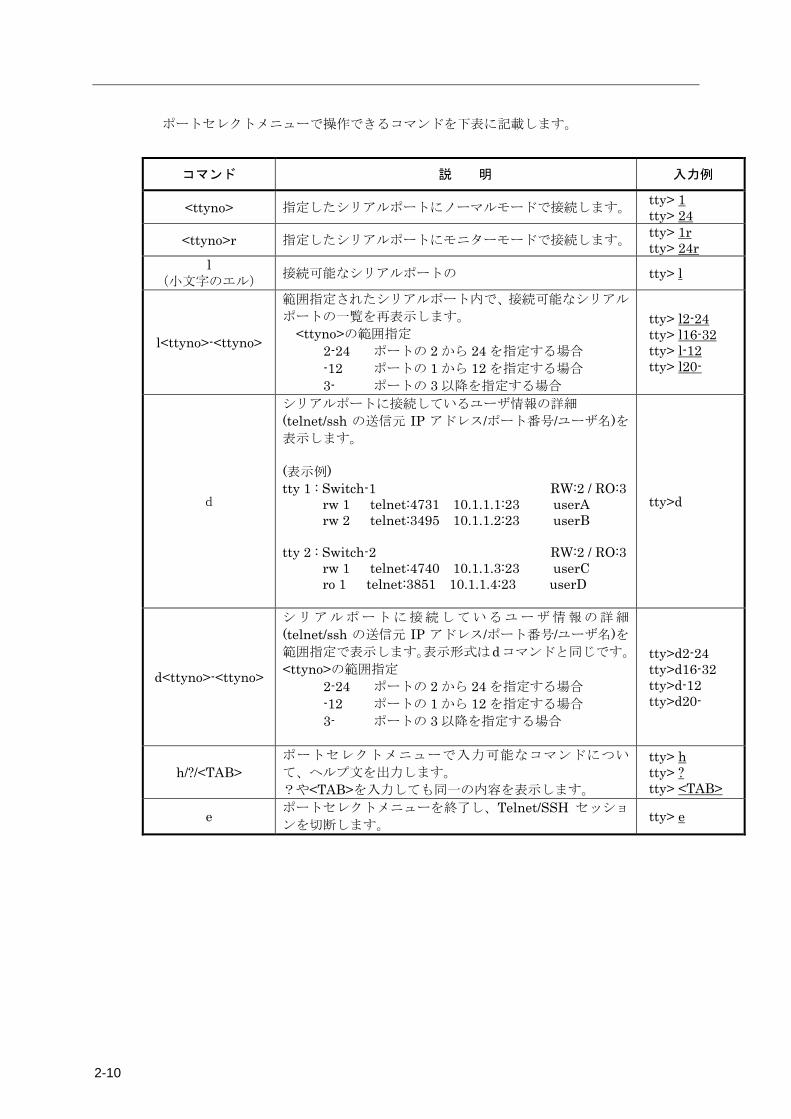
ポートセレクトメニューで操作できるコマンドを下表に記載します。
コマンド 説 明 入力例
<ttyno> 指定したシリアルポートにノーマルモードで接続します。 tty> 1 tty> 24
<ttyno>r 指定したシリアルポートにモニターモードで接続します。 tty> 1r tty> 24r
l (小文字のエル) 接続可能なシリアルポートの一覧を再表示します。 tty> l
l<ttyno>-<ttyno>
範囲指定されたシリアルポート内で、接続可能なシリアル
ポートの一覧を再表示します。 <ttyno>の範囲指定
2-24 ポートの 2 から 24 を指定する場合 -12 ポートの 1 から 12 を指定する場合 3- ポートの 3 以降を指定する場合
tty> l2-24 tty> l16-32 tty> l-12 tty> l20-
d
シリアルポートに接続しているユーザ情報の詳細 (telnet/ssh の送信元 IP アドレス/ポート番号/ユーザ名)を表示します。 (表示例) tty 1 : Switch-1 RW:2 / RO:3 rw 1 telnet:4731 10.1.1.1:23 userA rw 2 telnet:3495 10.1.1.2:23 userB tty 2 : Switch-2 RW:2 / RO:3 rw 1 telnet:4740 10.1.1.3:23 userC ro 1 telnet:3851 10.1.1.4:23 userD
tty>d
d<ttyno>-<ttyno>
シリアルポートに接続しているユーザ情報の詳細
(telnet/ssh の送信元 IP アドレス/ポート番号/ユーザ名)を範囲指定で表示します。表示形式はdコマンドと同じです。
<ttyno>の範囲指定 2-24 ポートの 2 から 24 を指定する場合 -12 ポートの 1 から 12 を指定する場合 3- ポートの 3 以降を指定する場合
tty>d2-24 tty>d16-32 tty>d-12 tty>d20-
h/?/<TAB> ポートセレクトメニューで入力可能なコマンドについ
て、ヘルプ文を出力します。 ?や<TAB>を入力しても同一の内容を表示します。
tty> h tty> ? tty> <TAB>
e ポートセレクトメニューを終了し、Telnet/SSH セッショ
ンを切断します。 tty> e
2 章 機 能
2-11
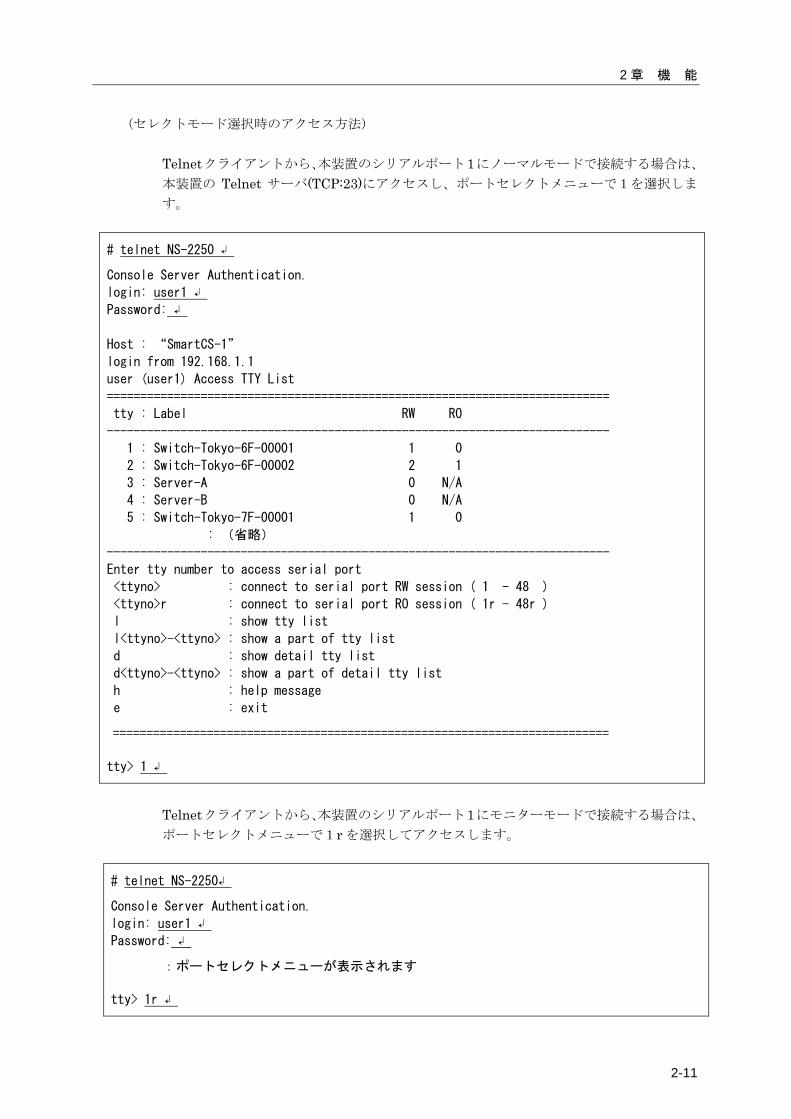
(セレクトモード選択時のアクセス方法)
Telnetクライアントから、本装置のシリアルポート1にノーマルモードで接続する場合は、
本装置の Telnet サーバ(TCP:23)にアクセスし、ポートセレクトメニューで1を選択しま
す。
# telnet NS-2250 ↲
Console Server Authentication.
login: user1 ↲
Password: ↲
Host : “SmartCS-1”
login from 192.168.1.1
user (user1) Access TTY List
===========================================================================
tty : Label RW RO
---------------------------------------------------------------------------
1 : Switch-Tokyo-6F-00001 1 0
2 : Switch-Tokyo-6F-00002 2 1
3 : Server-A 0 N/A
4 : Server-B 0 N/A
5 : Switch-Tokyo-7F-00001 1 0
: (省略)
---------------------------------------------------------------------------
Enter tty number to access serial port
<ttyno> : connect to serial port RW session ( 1 - 48 )
<ttyno>r : connect to serial port RO session ( 1r - 48r )
l : show tty list
l<ttyno>-<ttyno> : show a part of tty list
d : show detail tty list
d<ttyno>-<ttyno> : show a part of detail tty list
h : help message
e : exit
==========================================================================
tty> 1 ↲
Telnetクライアントから、本装置のシリアルポート1にモニターモードで接続する場合は、
ポートセレクトメニューで1r を選択してアクセスします。
# telnet NS-2250↲
Console Server Authentication.
login: user1 ↲
Password: ↲
:ポートセレクトメニューが表示されます
tty> 1r ↲
2-12
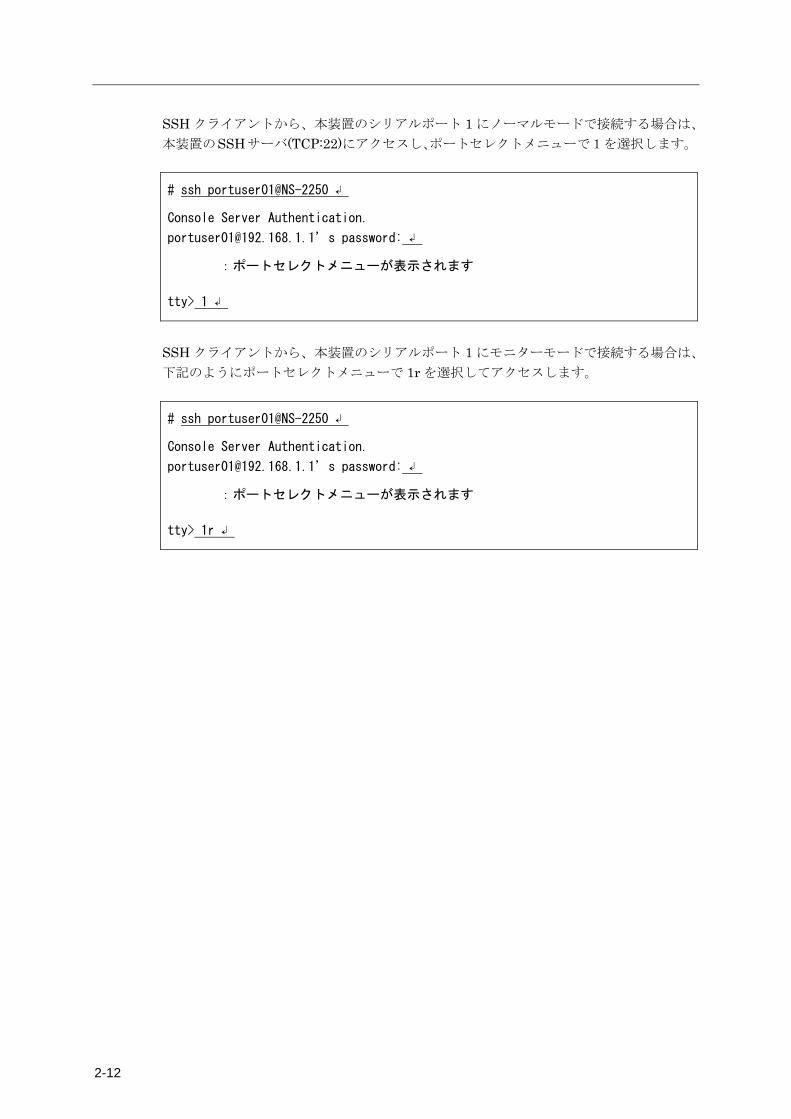
SSH クライアントから、本装置のシリアルポート 1 にノーマルモードで接続する場合は、
本装置のSSHサーバ(TCP:22)にアクセスし、ポートセレクトメニューで1を選択します。
# ssh portuser01@NS-2250 ↲
Console Server Authentication.
[email protected]’s password: ↲
:ポートセレクトメニューが表示されます
tty> 1 ↲
SSH クライアントから、本装置のシリアルポート 1 にモニターモードで接続する場合は、
下記のようにポートセレクトメニューで 1r を選択してアクセスします。
# ssh portuser01@NS-2250 ↲
Console Server Authentication.
[email protected]’s password: ↲
:ポートセレクトメニューが表示されます
tty> 1r ↲
2 章 機 能
2-13
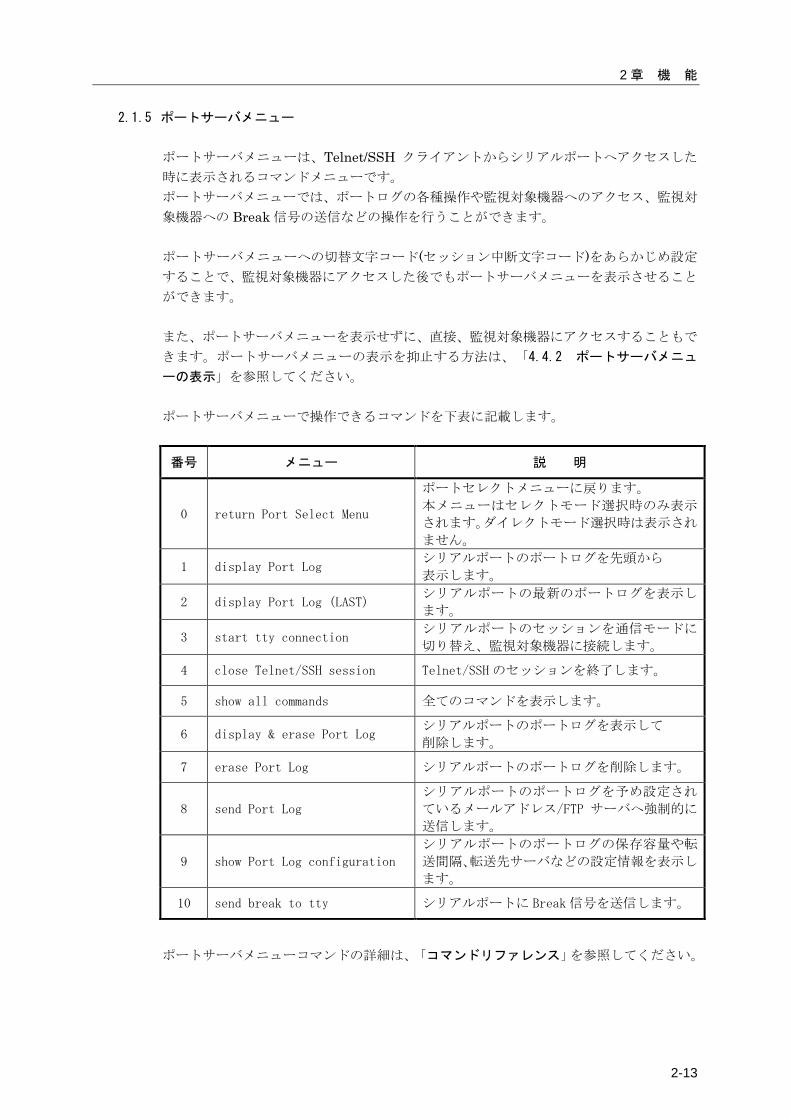
2.1.5 ポートサーバメニュー ポートサーバメニューは、Telnet/SSH クライアントからシリアルポートへアクセスした
時に表示されるコマンドメニューです。 ポートサーバメニューでは、ポートログの各種操作や監視対象機器へのアクセス、監視対
象機器への Break 信号の送信などの操作を行うことができます。 ポートサーバメニューへの切替文字コード(セッション中断文字コード)をあらかじめ設定
することで、監視対象機器にアクセスした後でもポートサーバメニューを表示させること
ができます。 また、ポートサーバメニューを表示せずに、直接、監視対象機器にアクセスすることもで
きます。ポートサーバメニューの表示を抑止する方法は、「4.4.2 ポートサーバメニュ
ーの表示」を参照してください。 ポートサーバメニューで操作できるコマンドを下表に記載します。
番号 メニュー 説 明
0 return Port Select Menu
ポートセレクトメニューに戻ります。
本メニューはセレクトモード選択時のみ表示
されます。ダイレクトモード選択時は表示され
ません。
1 display Port Log シリアルポートのポートログを先頭から
表示します。
2 display Port Log (LAST) シリアルポートの最新のポートログを表示し
ます。
3 start tty connection シリアルポートのセッションを通信モードに
切り替え、監視対象機器に接続します。
4 close Telnet/SSH session Telnet/SSH のセッションを終了します。
5 show all commands 全てのコマンドを表示します。
6 display & erase Port Log シリアルポートのポートログを表示して
削除します。
7 erase Port Log シリアルポートのポートログを削除します。
8 send Port Log
シリアルポートのポートログを予め設定され
ているメールアドレス/FTP サーバへ強制的に
送信します。
9 show Port Log configuration
シリアルポートのポートログの保存容量や転
送間隔、転送先サーバなどの設定情報を表示し
ます。
10 send break to tty シリアルポートに Break 信号を送信します。
ポートサーバメニューコマンドの詳細は、「コマンドリファレンス」を参照してください。
2-14
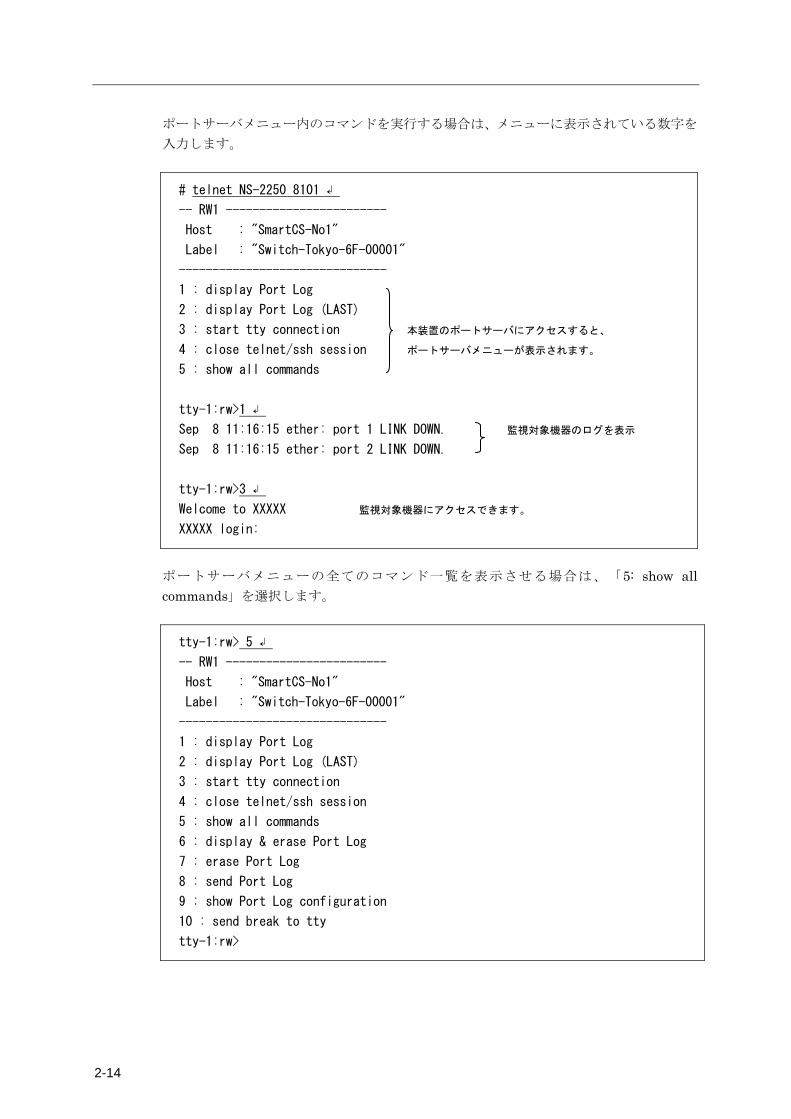
ポートサーバメニュー内のコマンドを実行する場合は、メニューに表示されている数字を
入力します。
# telnet NS-2250 8101 ↲
-- RW1 ------------------------
Host : "SmartCS-No1"
Label : "Switch-Tokyo-6F-00001"
-------------------------------
1 : display Port Log
2 : display Port Log (LAST)
3 : start tty connection 本装置のポートサーバにアクセスすると、
4 : close telnet/ssh session ポートサーバメニューが表示されます。
5 : show all commands
tty-1:rw>1 ↲
Sep 8 11:16:15 ether: port 1 LINK DOWN. 監視対象機器のログを表示
Sep 8 11:16:15 ether: port 2 LINK DOWN.
tty-1:rw>3 ↲
Welcome to XXXXX 監視対象機器にアクセスできます。
XXXXX login:
ポートサーバメニューの全てのコマンド一覧を表示させる場合は、「5: show all commands」を選択します。
tty-1:rw> 5 ↲
-- RW1 ------------------------
Host : "SmartCS-No1"
Label : "Switch-Tokyo-6F-00001"
-------------------------------
1 : display Port Log
2 : display Port Log (LAST)
3 : start tty connection
4 : close telnet/ssh session
5 : show all commands
6 : display & erase Port Log
7 : erase Port Log
8 : send Port Log
9 : show Port Log configuration
10 : send break to tty
tty-1:rw>

2 章 機 能
2-15
ポートサーバメニューを再表示させる場合は「?」または「TAB」を入力します。
tty-1:rw> ?
-- RW1 ------------------------
Host : "SmartCS-No1"
Label : "Switch-Tokyo-6F-00001"
-------------------------------
1 : display Port Log
2 : display Port Log (LAST)
3 : start tty connection
4 : close telnet/ssh session
5 : show all commands
6 : display & erase Port Log
7 : erase Port Log
8 : send Port Log
9 : show Port Log configuration
10 : send break to tty
tty-1:rw>
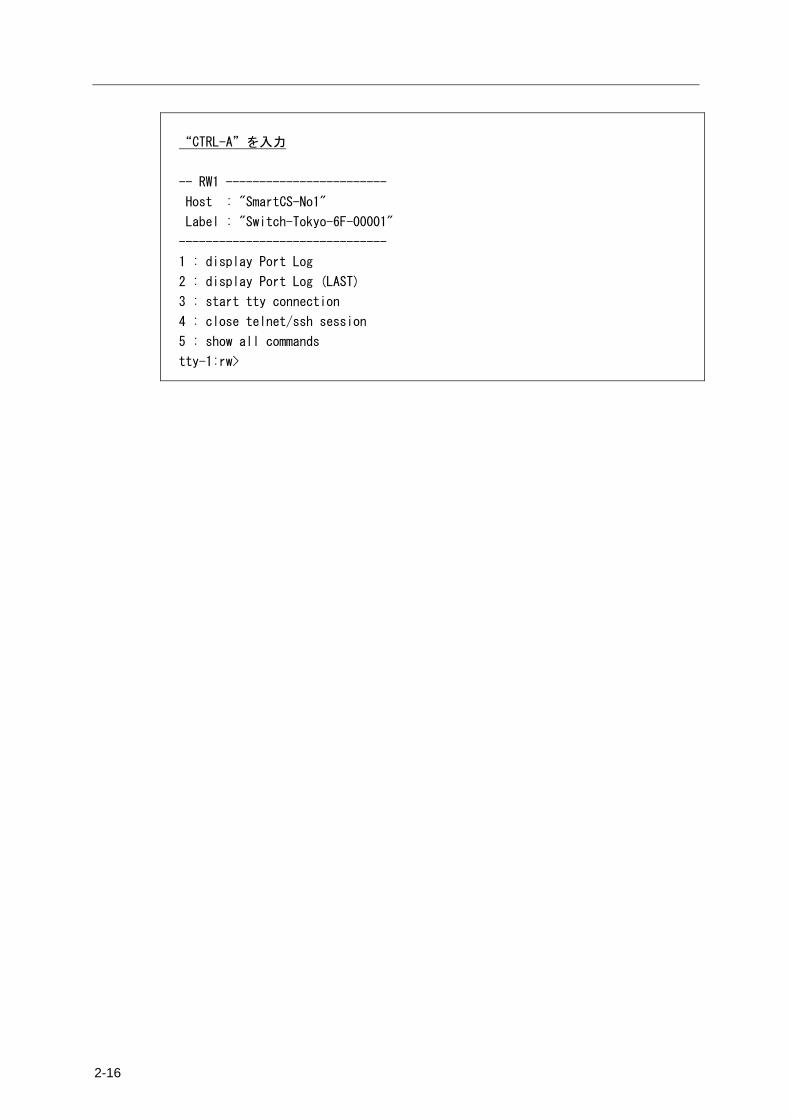
監視対象機器にアクセスした後でもポートサーバメニューへ戻ることもできます。 ポートサーバメニューの切替文字コード (セッション中断文字コード)として”Ctrl-A”など
をあらかじめ登録しておけば、監視対象機器にアクセスした後でも“Ctrl-A”を入力して
ポートサーバメニューに戻ることができます。
# telnet NS-2250 8101 ↲
-- RW1 ------------------------
Host : "SmartCS-No1"
Label : "Switch-Tokyo-6F-00001"
-------------------------------
1 : display Port Log
2 : display Port Log (LAST)
3 : start tty connection
4 : close telnet/ssh session
5 : show all commands
tty-1:rw>3 ↲
Press "CTRL-A" to return this MENU.
Welcome to XXXXX
XXXXX login: ****** ↲
Password: ****** ↲
#
2-16
“CTRL-A”を入力
-- RW1 ------------------------
Host : "SmartCS-No1"
Label : "Switch-Tokyo-6F-00001"
-------------------------------
1 : display Port Log
2 : display Port Log (LAST)
3 : start tty connection
4 : close telnet/ssh session
5 : show all commands
tty-1:rw>
2 章 機 能
2-17
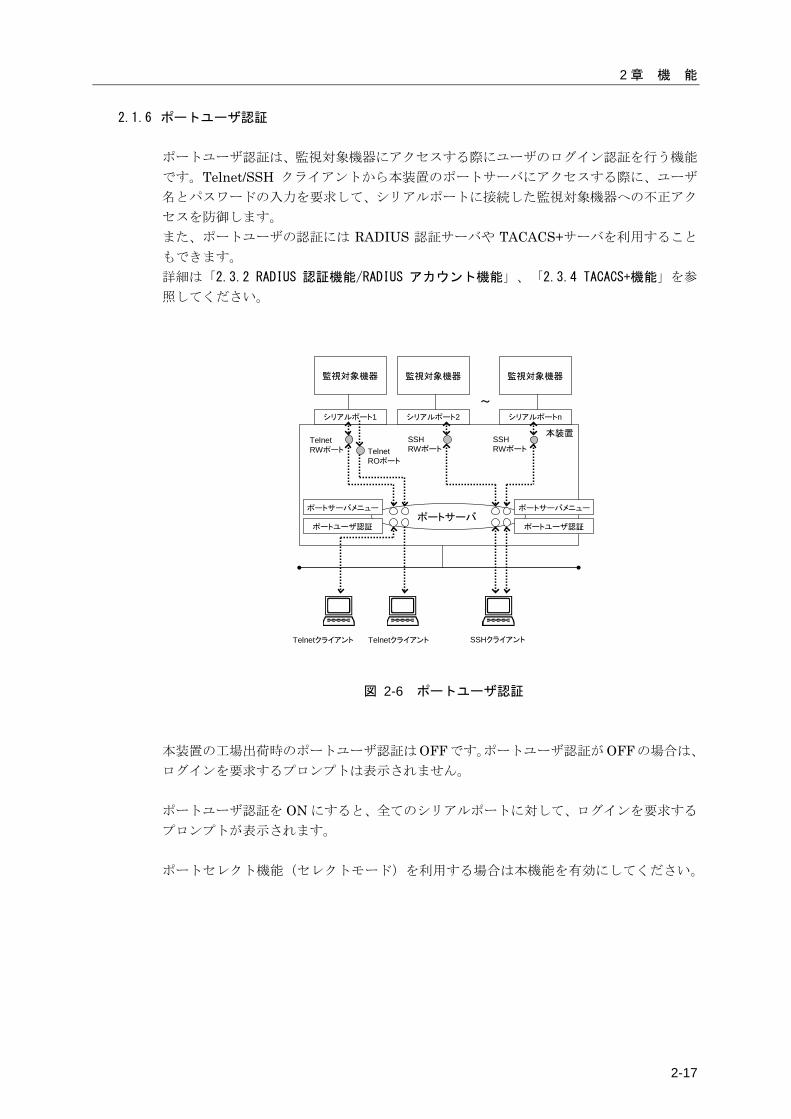
2.1.6 ポートユーザ認証 ポートユーザ認証は、監視対象機器にアクセスする際にユーザのログイン認証を行う機能
です。Telnet/SSH クライアントから本装置のポートサーバにアクセスする際に、ユーザ
名とパスワードの入力を要求して、シリアルポートに接続した監視対象機器への不正アク
セスを防御します。 また、ポートユーザの認証には RADIUS 認証サーバや TACACS+サーバを利用すること
もできます。 詳細は「2.3.2 RADIUS 認証機能/RADIUS アカウント機能」、「2.3.4 TACACS+機能」を参
照してください。
監視対象機器 監視対象機器
Telnetクライアント Telnetクライアント
シリアルポート1
SSHクライアント
ポートサーバ
シリアルポート2
監視対象機器
シリアルポートn
TelnetRWポート Telnet
ROポート
SSHRWポート
SSHRWポート
~
本装置
ポートユーザ認証
ポートサーバメニュー
ポートユーザ認証
ポートサーバメニュー
図 2-6 ポートユーザ認証
本装置の工場出荷時のポートユーザ認証はOFFです。ポートユーザ認証がOFFの場合は、
ログインを要求するプロンプトは表示されません。 ポートユーザ認証を ON にすると、全てのシリアルポートに対して、ログインを要求する
プロンプトが表示されます。 ポートセレクト機能(セレクトモード)を利用する場合は本機能を有効にしてください。
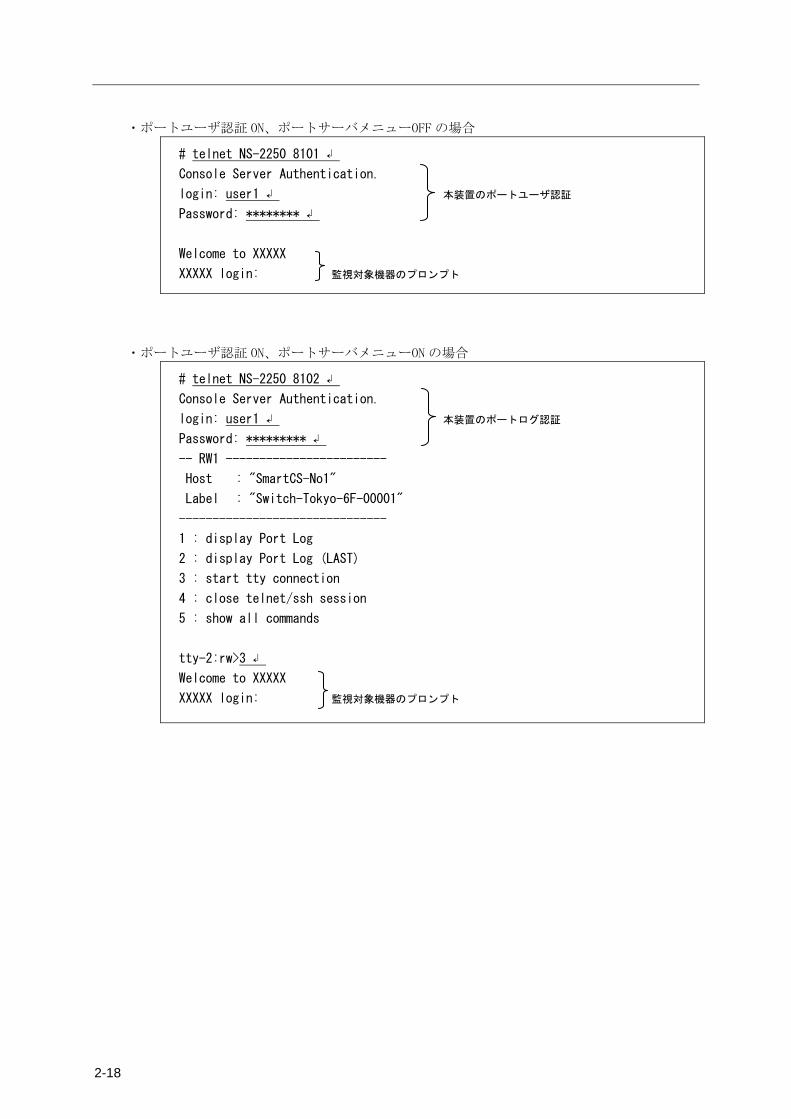
2-18
・ポートユーザ認証 ON、ポートサーバメニューOFF の場合
# telnet NS-2250 8101 ↲
Console Server Authentication.
login: user1 ↲ 本装置のポートユーザ認証
Password: ******** ↲
Welcome to XXXXX
XXXXX login: 監視対象機器のプロンプト
・ポートユーザ認証 ON、ポートサーバメニューON の場合
# telnet NS-2250 8102 ↲
Console Server Authentication.
login: user1 ↲ 本装置のポートログ認証
Password: ********* ↲
-- RW1 ------------------------
Host : "SmartCS-No1"
Label : "Switch-Tokyo-6F-00001"
-------------------------------
1 : display Port Log
2 : display Port Log (LAST)
3 : start tty connection
4 : close telnet/ssh session
5 : show all commands
tty-2:rw>3 ↲
Welcome to XXXXX
XXXXX login: 監視対象機器のプロンプト
2 章 機 能
2-19
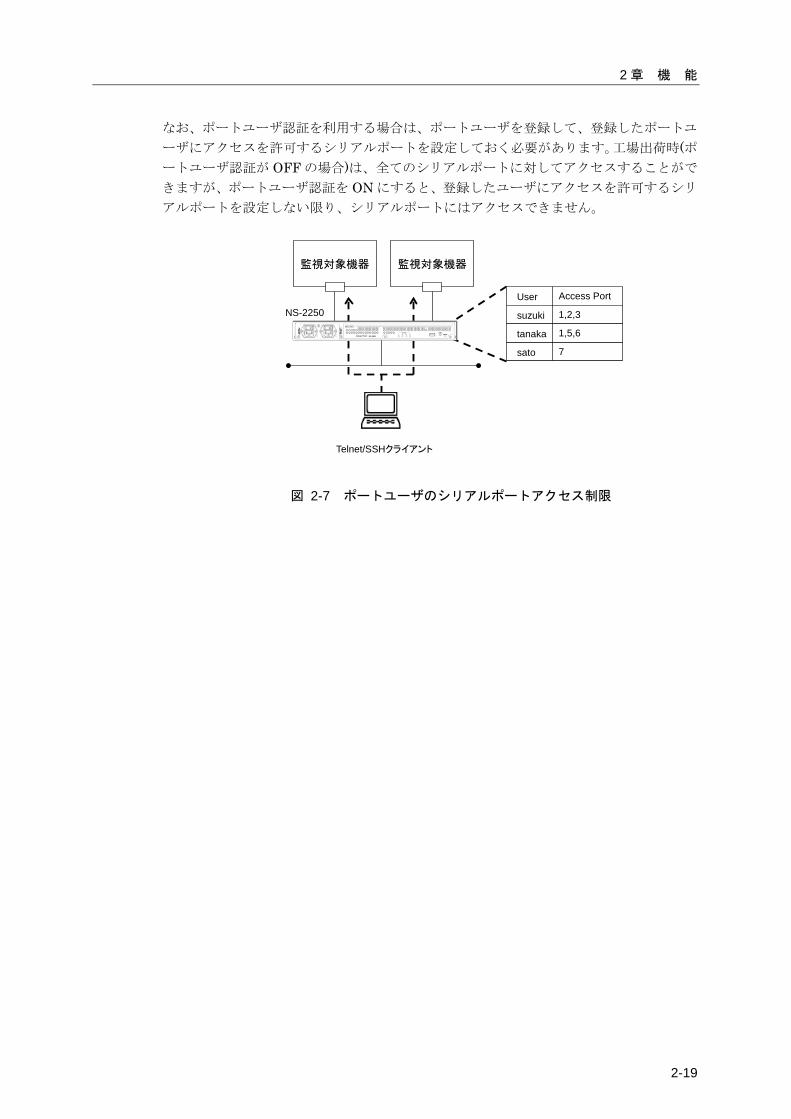
なお、ポートユーザ認証を利用する場合は、ポートユーザを登録して、登録したポートユ
ーザにアクセスを許可するシリアルポートを設定しておく必要があります。工場出荷時(ポートユーザ認証が OFF の場合)は、全てのシリアルポートに対してアクセスすることがで
きますが、ポートユーザ認証を ON にすると、登録したユーザにアクセスを許可するシリ
アルポートを設定しない限り、シリアルポートにはアクセスできません。
監視対象機器監視対象機器
User Access Port
suzuki 1,2,3
tanaka 1,5,6
sato 7
Telnet/SSHクライアント
NS-2250
図 2-7 ポートユーザのシリアルポートアクセス制限
2-20
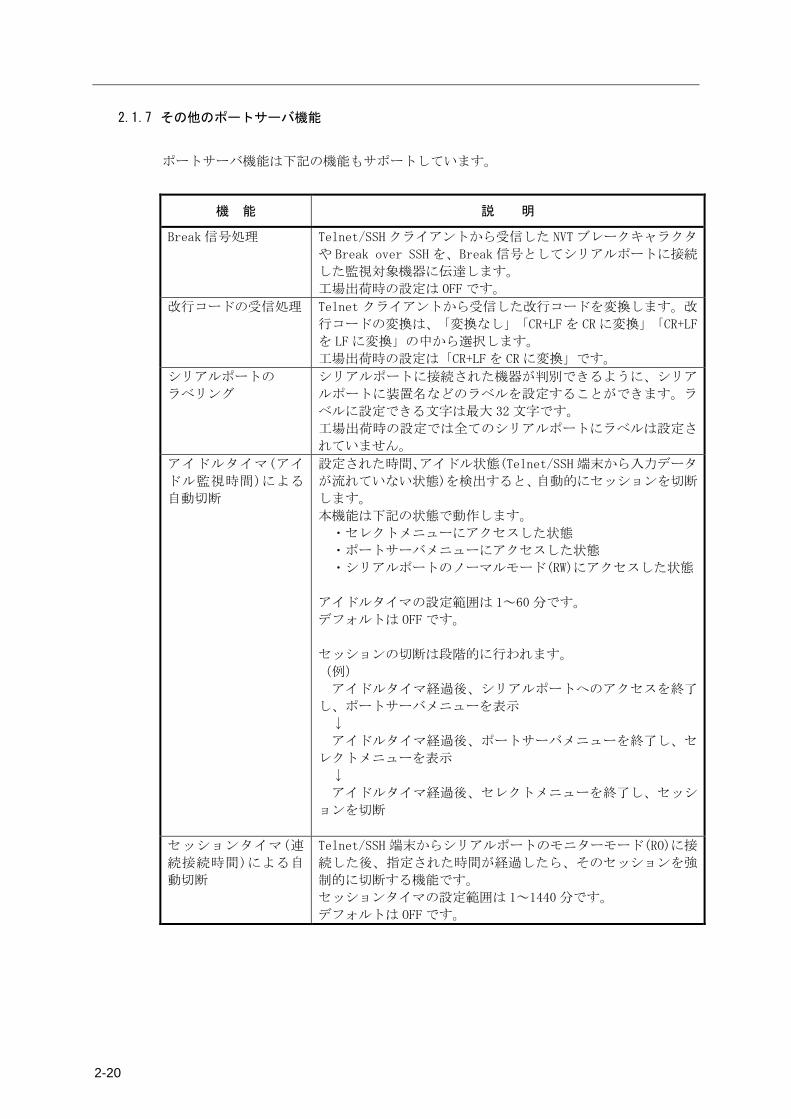
2.1.7 その他のポートサーバ機能
ポートサーバ機能は下記の機能もサポートしています。
機 能 説 明
Break 信号処理 Telnet/SSH クライアントから受信した NVT ブレークキャラクタ
や Break over SSH を、Break 信号としてシリアルポートに接続
した監視対象機器に伝達します。
工場出荷時の設定は OFF です。
改行コードの受信処理 Telnet クライアントから受信した改行コードを変換します。改
行コードの変換は、「変換なし」「CR+LF を CR に変換」「CR+LF
を LF に変換」の中から選択します。
工場出荷時の設定は「CR+LF を CR に変換」です。
シリアルポートの
ラベリング
シリアルポートに接続された機器が判別できるように、シリア
ルポートに装置名などのラベルを設定することができます。ラ
ベルに設定できる文字は最大 32 文字です。
工場出荷時の設定では全てのシリアルポートにラベルは設定さ
れていません。
アイドルタイマ(アイ
ドル監視時間)による
自動切断
設定された時間、アイドル状態(Telnet/SSH 端末から入力データ
が流れていない状態)を検出すると、自動的にセッションを切断
します。
本機能は下記の状態で動作します。
・セレクトメニューにアクセスした状態
・ポートサーバメニューにアクセスした状態
・シリアルポートのノーマルモード(RW)にアクセスした状態
アイドルタイマの設定範囲は 1~60 分です。
デフォルトは OFF です。
セッションの切断は段階的に行われます。
(例)
アイドルタイマ経過後、シリアルポートへのアクセスを終了
し、ポートサーバメニューを表示
↓
アイドルタイマ経過後、ポートサーバメニューを終了し、セ
レクトメニューを表示
↓
アイドルタイマ経過後、セレクトメニューを終了し、セッシ
ョンを切断
セッションタイマ(連
続接続時間)による自
動切断
Telnet/SSH 端末からシリアルポートのモニターモード(RO)に接
続した後、指定された時間が経過したら、そのセッションを強
制的に切断する機能です。
セッションタイマの設定範囲は 1~1440 分です。
デフォルトは OFF です。
2 章 機 能
2-21
2.2 ポートログ機能
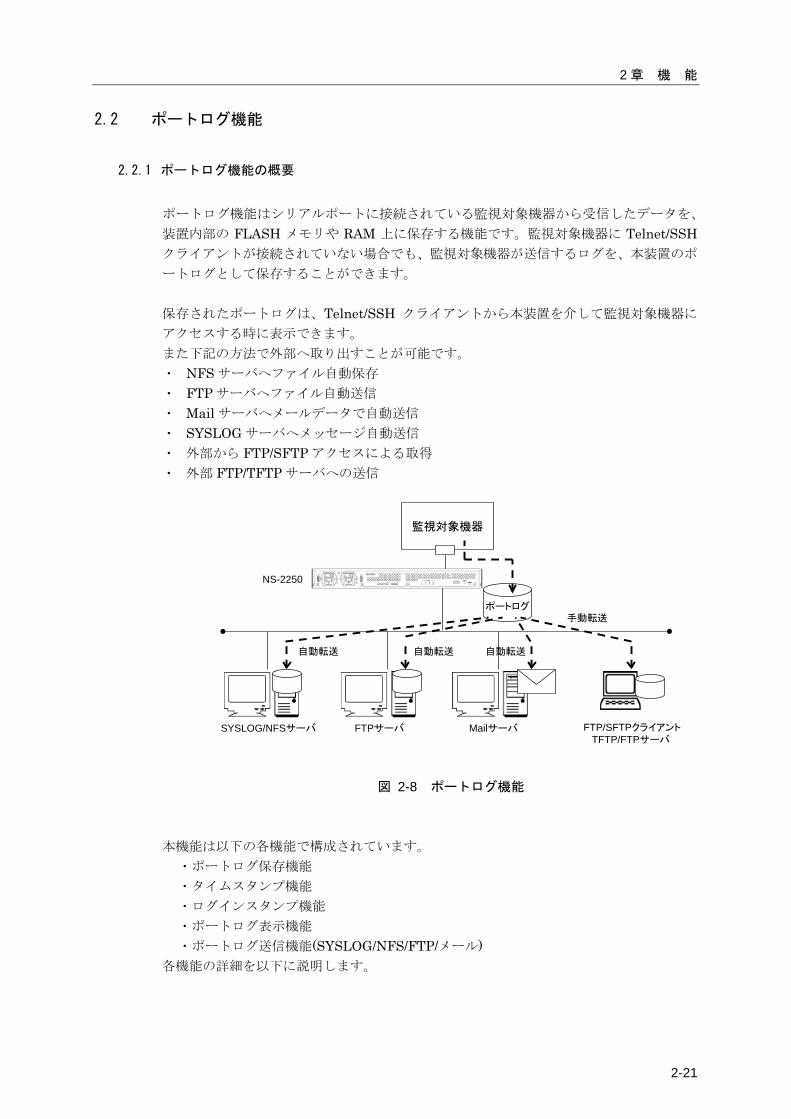
2.2.1 ポートログ機能の概要
ポートログ機能はシリアルポートに接続されている監視対象機器から受信したデータを、
装置内部の FLASH メモリや RAM 上に保存する機能です。監視対象機器に Telnet/SSHクライアントが接続されていない場合でも、監視対象機器が送信するログを、本装置のポ
ートログとして保存することができます。 保存されたポートログは、Telnet/SSH クライアントから本装置を介して監視対象機器に
アクセスする時に表示できます。 また下記の方法で外部へ取り出すことが可能です。 ・ NFS サーバへファイル自動保存 ・ FTP サーバへファイル自動送信 ・ Mail サーバへメールデータで自動送信 ・ SYSLOG サーバへメッセージ自動送信 ・ 外部から FTP/SFTP アクセスによる取得 ・ 外部 FTP/TFTP サーバへの送信
監視対象機器
SYSLOG/NFSサーバ FTPサーバ Mailサーバ
ポートログ
FTP/SFTPクライアントTFTP/FTPサーバ
NS-2250
自動転送 自動転送 自動転送
手動転送
図 2-8 ポートログ機能
本機能は以下の各機能で構成されています。
・ポートログ保存機能 ・タイムスタンプ機能 ・ログインスタンプ機能 ・ポートログ表示機能 ・ポートログ送信機能(SYSLOG/NFS/FTP/メール)
各機能の詳細を以下に説明します。

2-22
2.2.2 ポートログ保存機能
ポートログ保存機能は、監視対象機器が出力するログを本装置に搭載している FLASH メ
モリや RAM に保存する機能です。 本装置に保存できるポートログの容量は、ご利用の機種により変わります。本装置に保存
できるポートログ容量の最大値やシリアルポートに設定できるポートログ容量の設定範
囲は次表を参照してください。ポートログを保存する容量は、シリアルポートごとに設定
したポートログ容量の合計が、本装置に保存できるポートログ容量の最大値を超えないよ
うに計算して設定してください。
ポートログ保存先 本装置に保存できる
ポートログ容量の最大値
シリアルポート毎に
保存できるポートログ
容量の設定範囲
本装置内部の
FLASH メモリ保存時
NS-2250-16/NS-2250-16D 48MByte
NS-2250-32/NS-2250-32D 96MByte
NS-2250-48/NS-2250-48D 144MByte
100KByte~8MByte
(Default:3MByte)
本装置内部の
RAM 保存時
NS-2250-16/NS-2250-16D 8MByte
NS-2250-32/NS-2250-32D 16MByte
NS-2250-48/NS-2250-48D 24MByte
100KByte~2MByte
(Default:500KByte)
設定したポートログの保存容量を超えるポートログを受信した場合は、古い情報から上書
きされます。 また、手動でポートログを内部 FLASH メモリに保存し、FTP/SFTP クライアントを使用
してポートログを取得したり、FTP/TFTP サーバに手動で送信することもできます。詳細
は、「5.6 手動によるポートログの保存と取得手順」を参照してください。

2 章 機 能
2-23
2.2.3 タイムスタンプ機能
ポートログのタイムスタンプ機能は、ポートログに時刻を刻印する機能です。タイムスタ
ンプ機能が ON の場合、各ポートで設定されたタイムスタンプ間隔に従って、ポートログ
に時刻が刻印されます。 監視対象機器からログが連続して出力されている場合は、設定されたタイムスタンプ間隔
で時刻が刻印されます。本装置にログが出力された最後の時間から、タイムスタンプ間隔
の時刻が過ぎても新しいログが本装置に出力されない場合は、監視対象機器から新しいロ
グが出力された時に時刻が刻印されます。 なお、本機能を有効にすると、刻印されたタイムスタンプのデータ量だけ保存できるポー
トログ容量が少なくなります。
タイムスタンプ機能 設定値 備考
タイムスタンプ機能の動作 ON/OFF Default: OFF
タイムスタンプ間隔 3 秒~65535 秒 Default: 60 秒
タイムスタンプの形式は<曜日 月 日 時間 TIMEZONE 年>です。
<Mon Aug 10 17:42:38 JST 2015> ←タイムスタンプ
ether: port 1 LINK DOWN.
ether: port 2 LINK DOWN.
ether: port 1 LINK UP 100M FULL.
ether: port 2 LINK UP 100M FULL.
ether: port 3 LINK DOWN. 監視対象機器のログ
ether: port 4 LINK DOWN.
ether: port 3 LINK UP 100M FULL.
ether: port 4 LINK UP 100M FULL.
<Mon Aug 10 17:43:38 JST 2015> ←タイムスタンプ
ether: port 1 LINK DOWN.
ether: port 2 LINK DOWN.
ether: port 1 LINK UP 100M FULL. 監視対象機器のログ
ether: port 2 LINK UP 100M FULL.
2-24
2.2.4 ログインスタンプ機能
ポートログのログインスタンプ機能は、シリアルポートにアクセスしたユーザのログイン
とログアウトの時刻をポートログに刻印する機能です。 本機能はシリアルポート毎に設定でき、デフォルトは OFF です。ログインスタンプ機能
を有効にすると、下記のようなログインスタンプがポートログに刻印されます。 なお、刻印されたログインスタンプのデータ量だけ保存できるポートログ容量が少なくな
ります。
<Mon Aug 10 13:00:26 JST 2015 login RW1:userA 10.1.1.1>
<Mon Aug 10 13:05:30 JST 2015 logout RW1:userA 10.1.1.1>
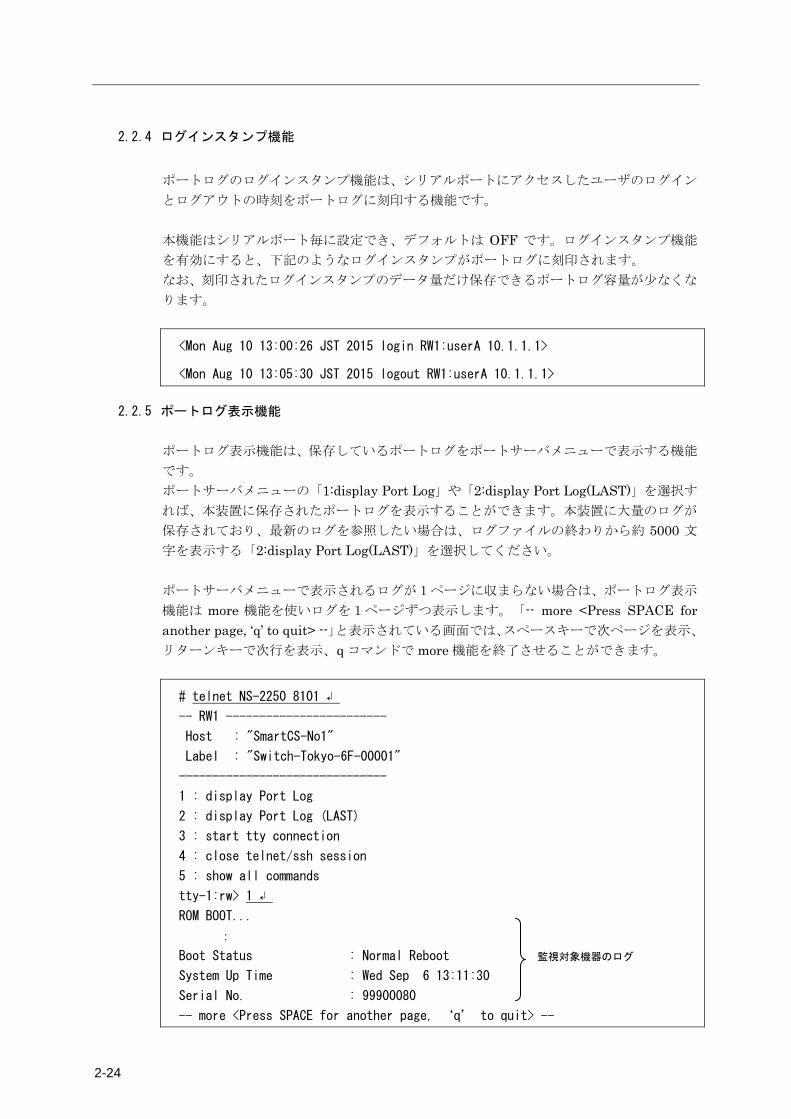
2.2.5 ポートログ表示機能
ポートログ表示機能は、保存しているポートログをポートサーバメニューで表示する機能
です。 ポートサーバメニューの「1:display Port Log」や「2:display Port Log(LAST)」を選択す
れば、本装置に保存されたポートログを表示することができます。本装置に大量のログが
保存されており、最新のログを参照したい場合は、ログファイルの終わりから約 5000 文
字を表示する「2:display Port Log(LAST)」を選択してください。 ポートサーバメニューで表示されるログが1ページに収まらない場合は、ポートログ表示
機能は more 機能を使いログを1ページずつ表示します。「-- more <Press SPACE for another page, ‘q’ to quit> --」と表示されている画面では、スペースキーで次ページを表示、
リターンキーで次行を表示、q コマンドで more 機能を終了させることができます。
# telnet NS-2250 8101 ↲
-- RW1 ------------------------
Host : "SmartCS-No1"
Label : "Switch-Tokyo-6F-00001"
-------------------------------
1 : display Port Log
2 : display Port Log (LAST)
3 : start tty connection
4 : close telnet/ssh session
5 : show all commands
tty-1:rw> 1 ↲
ROM BOOT...
:
Boot Status : Normal Reboot 監視対象機器のログ
System Up Time : Wed Sep 6 13:11:30
Serial No. : 99900080
-- more <Press SPACE for another page, ‘q’ to quit> --

2 章 機 能
2-25
ポートログメニューで表示されるポートログを削除する場合は、「6 : display & erase Port Log」もしくは「7 : erase Port Log」を選択します。 この操作を行っても、実際に USB メモリや本装置内部に保存されたポートログが削除さ
れるわけではありません。この操作は「1: display Port Log」で既に表示されたログを非
表示にするだけです。
tty-1:rw> 5 ↲ ←ポートログを削除するコマンドを表示するために 5 を選択
-- RW1 ------------------------
Host : "SmartCS-No1"
Label : "Switch-Tokyo-6F-00001"
-------------------------------
1 : display Port Log
2 : display Port Log (LAST)
3 : start tty connection
4 : close telnet/ssh session
5 : show all commands
6 : display & erase Port Log ←ポートログを表示して削除します
7 : erase Port Log ←ポートログを削除します
8 : send Port Log
9 : show Port Log configuration
10 : send break to tty
tty-1:rw> 7 ↲ ←ポートログを削除する場合は 7 を選択
tty-1:rw>
2-26
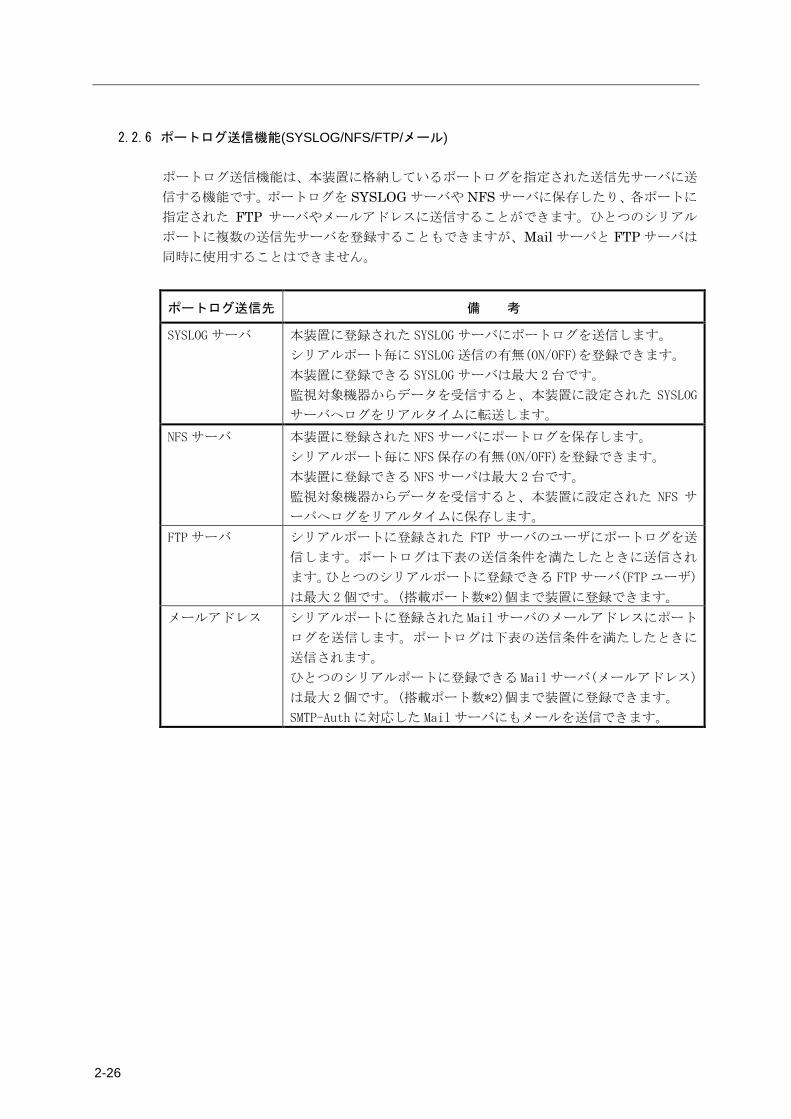
2.2.6 ポートログ送信機能(SYSLOG/NFS/FTP/メール)
ポートログ送信機能は、本装置に格納しているポートログを指定された送信先サーバに送
信する機能です。ポートログを SYSLOG サーバや NFS サーバに保存したり、各ポートに
指定された FTP サーバやメールアドレスに送信することができます。ひとつのシリアル
ポートに複数の送信先サーバを登録することもできますが、Mail サーバと FTP サーバは
同時に使用することはできません。
ポートログ送信先 備 考
SYSLOG サーバ 本装置に登録された SYSLOG サーバにポートログを送信します。
シリアルポート毎に SYSLOG 送信の有無(ON/OFF)を登録できます。
本装置に登録できる SYSLOG サーバは最大 2 台です。
監視対象機器からデータを受信すると、本装置に設定された SYSLOG
サーバへログをリアルタイムに転送します。
NFS サーバ 本装置に登録された NFS サーバにポートログを保存します。
シリアルポート毎に NFS 保存の有無(ON/OFF)を登録できます。
本装置に登録できる NFS サーバは最大 2 台です。
監視対象機器からデータを受信すると、本装置に設定された NFS サ
ーバへログをリアルタイムに保存します。
FTP サーバ シリアルポートに登録された FTP サーバのユーザにポートログを送
信します。ポートログは下表の送信条件を満たしたときに送信され
ます。ひとつのシリアルポートに登録できる FTP サーバ(FTP ユーザ)
は最大 2 個です。(搭載ポート数*2)個まで装置に登録できます。
メールアドレス シリアルポートに登録された Mailサーバのメールアドレスにポート
ログを送信します。ポートログは下表の送信条件を満たしたときに
送信されます。
ひとつのシリアルポートに登録できる Mailサーバ(メールアドレス)
は最大 2 個です。(搭載ポート数*2)個まで装置に登録できます。
SMTP-Auth に対応した Mail サーバにもメールを送信できます。
2 章 機 能
2-27
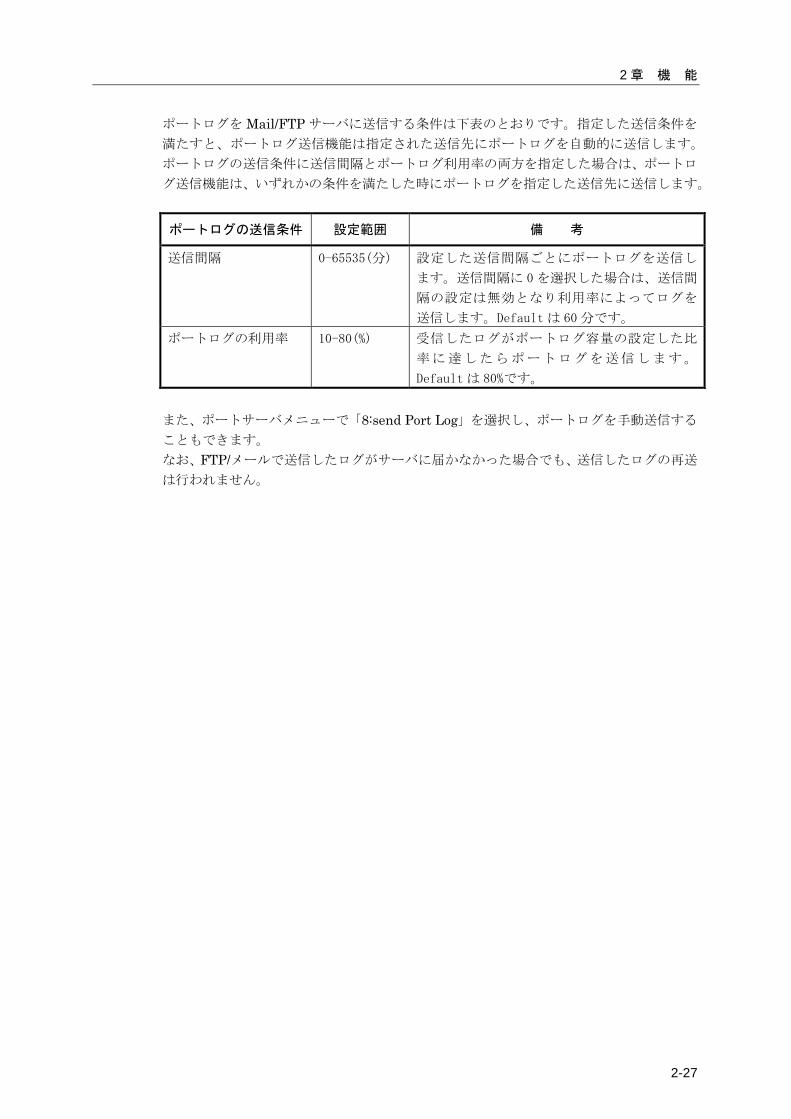
ポートログを Mail/FTP サーバに送信する条件は下表のとおりです。指定した送信条件を
満たすと、ポートログ送信機能は指定された送信先にポートログを自動的に送信します。
ポートログの送信条件に送信間隔とポートログ利用率の両方を指定した場合は、ポートロ
グ送信機能は、いずれかの条件を満たした時にポートログを指定した送信先に送信します。
ポートログの送信条件 設定範囲 備 考
送信間隔 0-65535(分) 設定した送信間隔ごとにポートログを送信し
ます。送信間隔に 0 を選択した場合は、送信間
隔の設定は無効となり利用率によってログを
送信します。Default は 60 分です。
ポートログの利用率 10-80(%) 受信したログがポートログ容量の設定した比
率に達したらポートログを送信します。
Default は 80%です。
また、ポートサーバメニューで「8:send Port Log」を選択し、ポートログを手動送信する
こともできます。 なお、FTP/メールで送信したログがサーバに届かなかった場合でも、送信したログの再送
は行われません。
2-28
2.3 セキュリティ機能
本装置は、セキュリティ機能として、ユーザ管理/認証機能と各種サーバのアクセス制限
機能を搭載しています。
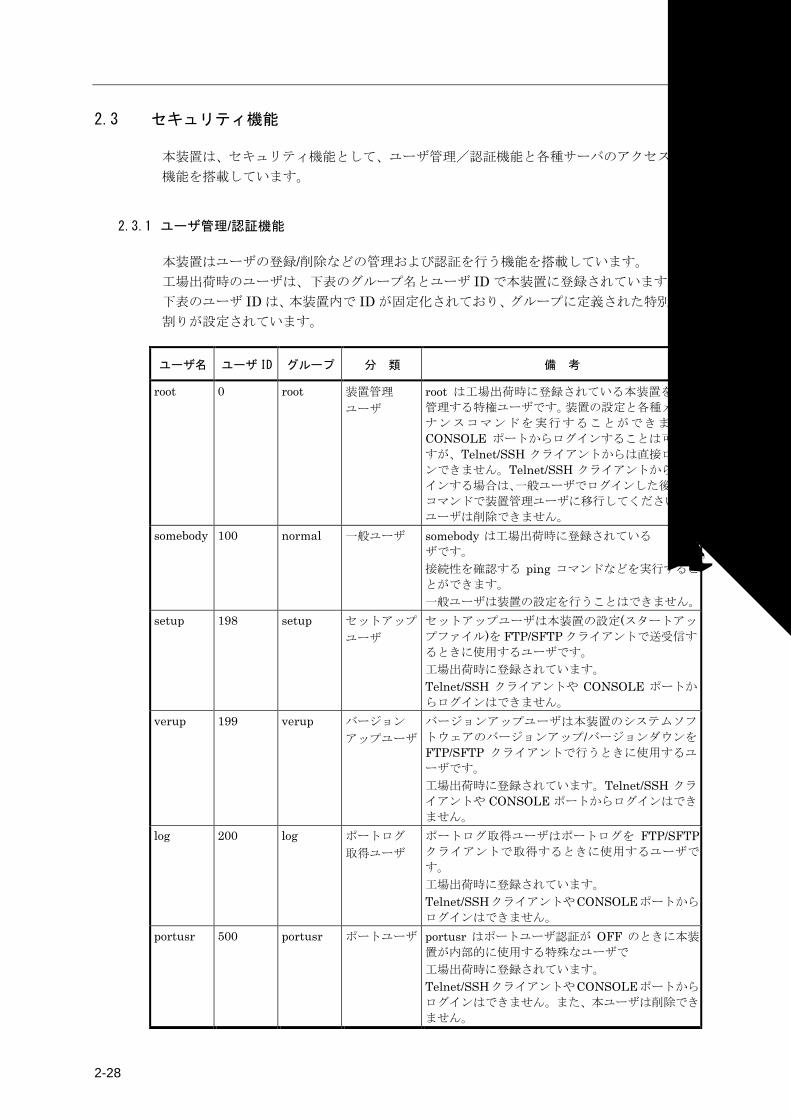
2.3.1 ユーザ管理/認証機能 本装置はユーザの登録/削除などの管理および認証を行う機能を搭載しています。 工場出荷時のユーザは、下表のグループ名とユーザ ID で本装置に登録されています。 下表のユーザ ID は、本装置内で ID が固定化されており、グループに定義された特別な役
割りが設定されています。
ユーザ名 ユーザ ID グループ 分 類 備 考
root 0 root 装置管理 ユーザ
root は工場出荷時に登録されている本装置を運用
管理する特権ユーザです。装置の設定と各種メンテ
ナンスコマンドを実行することができます。
CONSOLE ポートからログインすることは可能で
すが、Telnet/SSH クライアントからは直接ログイ
ンできません。Telnet/SSH クライアントからログ
インする場合は、一般ユーザでログインした後に suコマンドで装置管理ユーザに移行してください。本
ユーザは削除できません。 somebody 100 normal 一般ユーザ somebody は工場出荷時に登録されている一般ユー
ザです。 接続性を確認する ping コマンドなどを実行するこ
とができます。 一般ユーザは装置の設定を行うことはできません。
setup 198 setup セットアップ ユーザ
セットアップユーザは本装置の設定(スタートアッ
プファイル)を FTP/SFTP クライアントで送受信す
るときに使用するユーザです。 工場出荷時に登録されています。 Telnet/SSH クライアントや CONSOLE ポートか
らログインはできません。 verup 199 verup バージョン
アップユーザ バージョンアップユーザは本装置のシステムソフ
トウェアのバージョンアップ/バージョンダウンを
FTP/SFTP クライアントで行うときに使用するユ
ーザです。 工場出荷時に登録されています。Telnet/SSH クラ
イアントや CONSOLE ポートからログインはでき
ません。 log 200 log ポートログ
取得ユーザ ポートログ取得ユーザはポートログを FTP/SFTPクライアントで取得するときに使用するユーザで
す。 工場出荷時に登録されています。 Telnet/SSHクライアントやCONSOLEポートから
ログインはできません。 portusr 500 portusr ポートユーザ portusr はポートユーザ認証が OFF のときに本装
置が内部的に使用する特殊なユーザです。 工場出荷時に登録されています。 Telnet/SSHクライアントやCONSOLEポートから
ログインはできません。また、本ユーザは削除でき
ません。
2 章 機 能
2-29
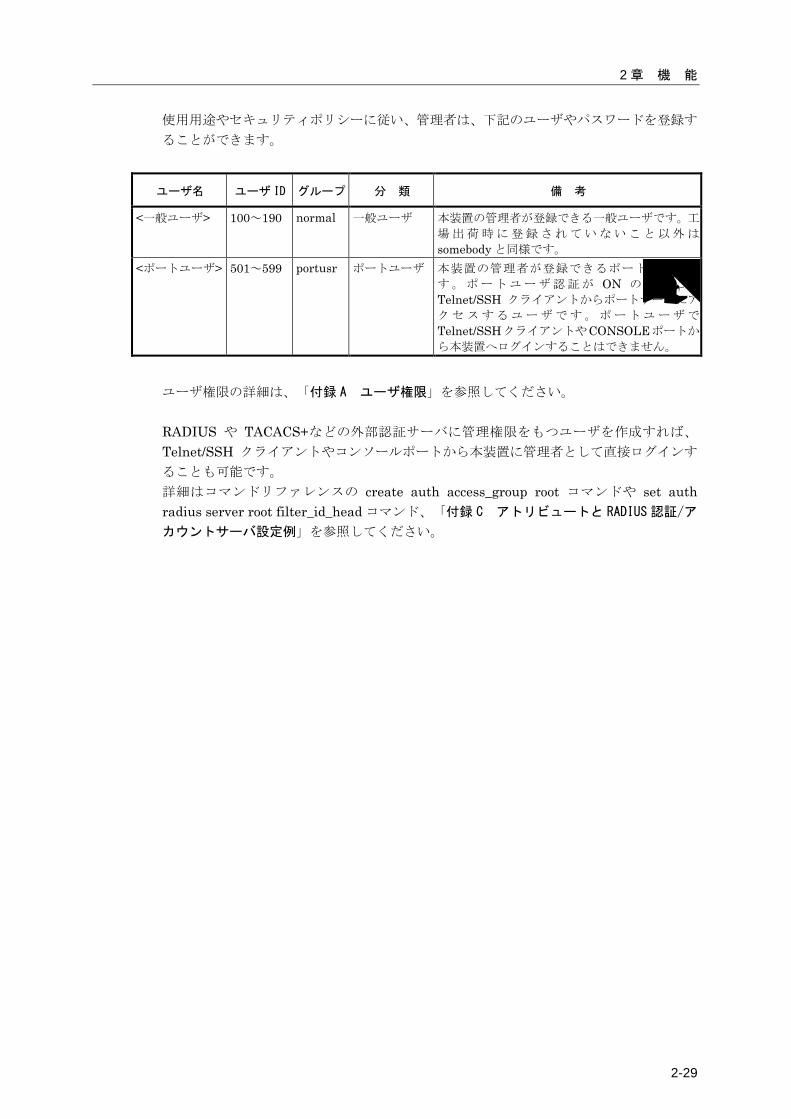
使用用途やセキュリティポリシーに従い、管理者は、下記のユーザやパスワードを登録す
ることができます。
ユーザ名 ユーザ ID グループ 分 類 備 考
<一般ユーザ> 100~190 normal 一般ユーザ 本装置の管理者が登録できる一般ユーザです。工
場出荷時に登録されていないこと以外は
somebody と同様です。 <ポートユーザ> 501~599 portusr ポートユーザ 本装置の管理者が登録できるポートユーザで
す。ポートユーザ認証が ON のときに、
Telnet/SSH クライアントからポートサーバにア
クセスするユーザです。ポートユーザで
Telnet/SSHクライアントやCONSOLEポートか
ら本装置へログインすることはできません。
ユーザ権限の詳細は、「付録 A ユーザ権限」を参照してください。 RADIUS や TACACS+などの外部認証サーバに管理権限をもつユーザを作成すれば、
Telnet/SSH クライアントやコンソールポートから本装置に管理者として直接ログインす
ることも可能です。 詳細はコマンドリファレンスの create auth access_group root コマンドや set auth radius server root filter_id_head コマンド、「付録 C アトリビュートと RADIUS 認証/ア
カウントサーバ設定例」を参照してください。
2-30
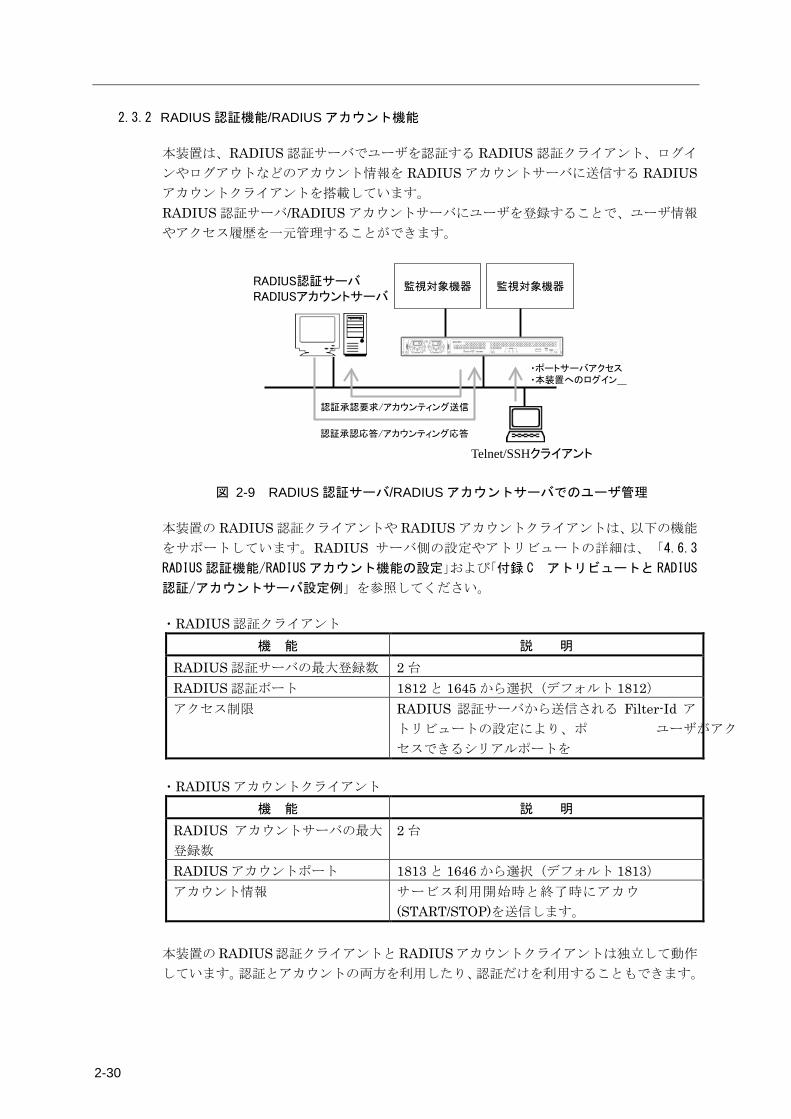
2.3.2 RADIUS 認証機能/RADIUS アカウント機能
本装置は、RADIUS 認証サーバでユーザを認証する RADIUS 認証クライアント、ログイ
ンやログアウトなどのアカウント情報を RADIUS アカウントサーバに送信する RADIUSアカウントクライアントを搭載しています。 RADIUS 認証サーバ/RADIUS アカウントサーバにユーザを登録することで、ユーザ情報
やアクセス履歴を一元管理することができます。
図 2-9 RADIUS 認証サーバ/RADIUS アカウントサーバでのユーザ管理
本装置の RADIUS 認証クライアントや RADIUS アカウントクライアントは、以下の機能
をサポートしています。RADIUS サーバ側の設定やアトリビュートの詳細は、「4.6.3
RADIUS認証機能/RADIUSアカウント機能の設定」および「付録 C アトリビュートと RADIUS
認証/アカウントサーバ設定例」を参照してください。
・RADIUS 認証クライアント 機 能 説 明
RADIUS 認証サーバの最大登録数 2 台 RADIUS 認証ポート 1812 と 1645 から選択(デフォルト 1812) アクセス制限 RADIUS 認証サーバから送信される Filter-Id ア
トリビュートの設定により、ポートユーザがアク
セスできるシリアルポートを制限できます。
・RADIUS アカウントクライアント 機 能 説 明
RADIUS アカウントサーバの最大
登録数 2 台
RADIUS アカウントポート 1813 と 1646 から選択(デフォルト 1813) アカウント情報 サービス利用開始時と終了時にアカウント情報
(START/STOP)を送信します。 本装置の RADIUS 認証クライアントと RADIUS アカウントクライアントは独立して動作
しています。認証とアカウントの両方を利用したり、認証だけを利用することもできます。
RADIUS認証サーバRADIUSアカウントサーバ
認証承認要求/アカウンティング送信
監視対象機器 監視対象機器
認証承認応答/アカウンティング応答
Telnet/SSHクライアント
・ポートサーバアクセス・本装置へのログイン
2 章 機 能
2-31
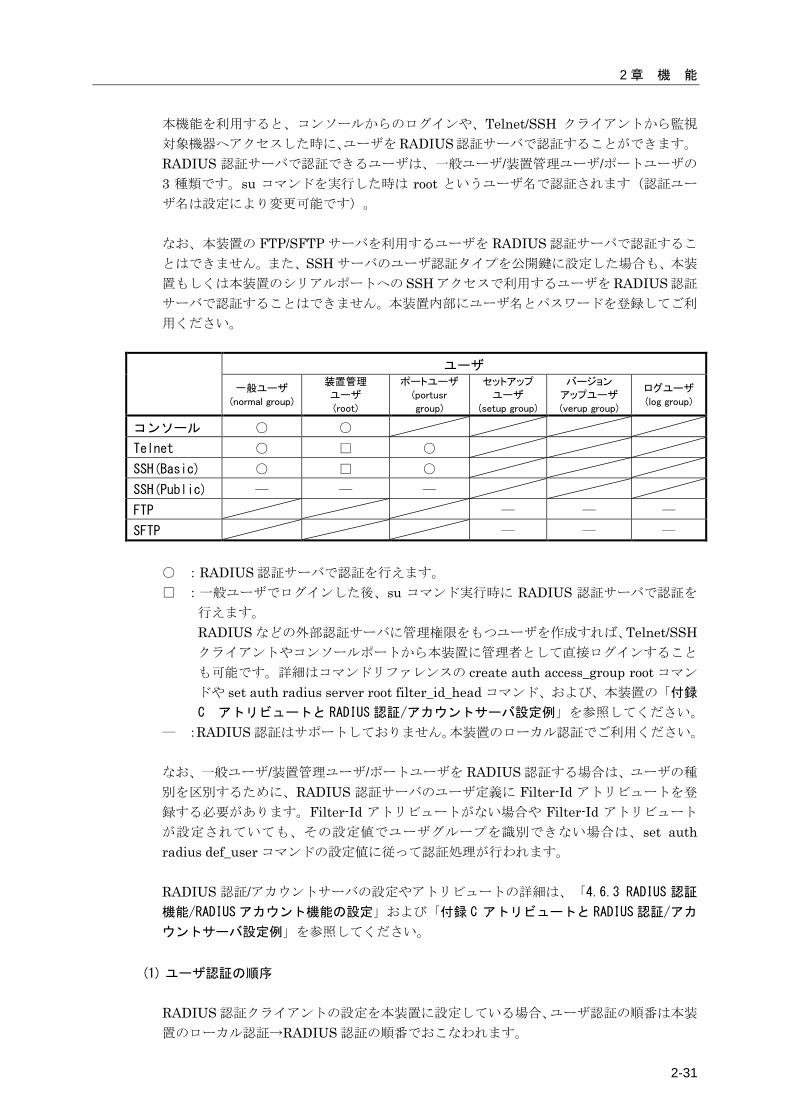
本機能を利用すると、コンソールからのログインや、Telnet/SSH クライアントから監視
対象機器へアクセスした時に、ユーザをRADIUS認証サーバで認証することができます。
RADIUS 認証サーバで認証できるユーザは、一般ユーザ/装置管理ユーザ/ポートユーザの
3 種類です。su コマンドを実行した時は root というユーザ名で認証されます(認証ユー
ザ名は設定により変更可能です)。 なお、本装置の FTP/SFTP サーバを利用するユーザを RADIUS 認証サーバで認証するこ
とはできません。また、SSH サーバのユーザ認証タイプを公開鍵に設定した場合も、本装
置もしくは本装置のシリアルポートへの SSH アクセスで利用するユーザを RADIUS 認証
サーバで認証することはできません。本装置内部にユーザ名とパスワードを登録してご利
用ください。
ユーザ
一般ユーザ
(normal group)
装置管理
ユーザ
(root)
ポートユーザ
(portusr
group)
セットアップ
ユーザ
(setup group)
バージョン
アップユーザ
(verup group)
ログユーザ
(log group)
コンソール ○ ○ Telnet ○ □ ○ SSH(Basic) ○ □ ○ SSH(Public) ― ― ― FTP ― ― ― SFTP ― ― ―
○ :RADIUS 認証サーバで認証を行えます。 □ :一般ユーザでログインした後、su コマンド実行時に RADIUS 認証サーバで認証を
行えます。 RADIUS などの外部認証サーバに管理権限をもつユーザを作成すれば、Telnet/SSHクライアントやコンソールポートから本装置に管理者として直接ログインすること
も可能です。詳細はコマンドリファレンスの create auth access_group root コマン
ドや set auth radius server root filter_id_head コマンド、および、本装置の「付録
C アトリビュートと RADIUS 認証/アカウントサーバ設定例」を参照してください。 ― :RADIUS 認証はサポートしておりません。本装置のローカル認証でご利用ください。 なお、一般ユーザ/装置管理ユーザ/ポートユーザを RADIUS 認証する場合は、ユーザの種
別を区別するために、RADIUS 認証サーバのユーザ定義に Filter-Id アトリビュートを登
録する必要があります。Filter-Id アトリビュートがない場合や Filter-Id アトリビュート
が設定されていても、その設定値でユーザグループを識別できない場合は、set auth radius def_user コマンドの設定値に従って認証処理が行われます。 RADIUS 認証/アカウントサーバの設定やアトリビュートの詳細は、「4.6.3 RADIUS 認証
機能/RADIUS アカウント機能の設定」および「付録 C アトリビュートと RADIUS 認証/アカ
ウントサーバ設定例」を参照してください。
(1) ユーザ認証の順序
RADIUS 認証クライアントの設定を本装置に設定している場合、ユーザ認証の順番は本装
置のローカル認証→RADIUS 認証の順番でおこなわれます。
2-32
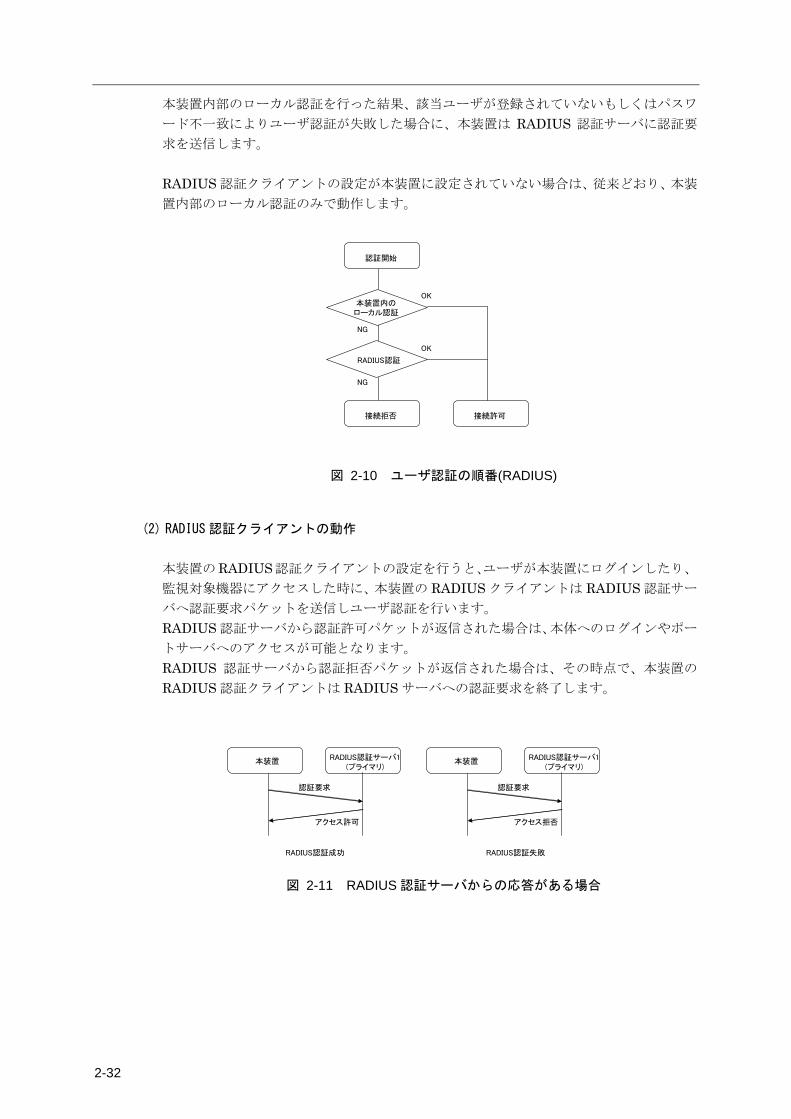
本装置内部のローカル認証を行った結果、該当ユーザが登録されていないもしくはパスワ
ード不一致によりユーザ認証が失敗した場合に、本装置は RADIUS 認証サーバに認証要
求を送信します。 RADIUS 認証クライアントの設定が本装置に設定されていない場合は、従来どおり、本装
置内部のローカル認証のみで動作します。
図 2-10 ユーザ認証の順番(RADIUS)
(2) RADIUS 認証クライアントの動作
本装置のRADIUS認証クライアントの設定を行うと、ユーザが本装置にログインしたり、
監視対象機器にアクセスした時に、本装置の RADIUS クライアントは RADIUS 認証サー
バへ認証要求パケットを送信しユーザ認証を行います。 RADIUS 認証サーバから認証許可パケットが返信された場合は、本体へのログインやポー
トサーバへのアクセスが可能となります。 RADIUS 認証サーバから認証拒否パケットが返信された場合は、その時点で、本装置の
RADIUS 認証クライアントは RADIUS サーバへの認証要求を終了します。
図 2-11 RADIUS 認証サーバからの応答がある場合
本装置 RADIUS認証サーバ1(プライマリ)
認証要求
アクセス許可
本装置 RADIUS認証サーバ1(プライマリ)
認証要求
アクセス拒否
RADIUS認証成功 RADIUS認証失敗
本装置内のローカル認証
接続拒否 接続許可
認証開始
NG
NG
OK
OK
RADIUS認証

2 章 機 能
2-33
本装置の RADIUS 認証クライアントが RADIUS 認証サーバに認証要求パケットを送信し、
RADIUS 認証サーバから何も応答がない場合は、本装置の RADIUS 認証クライアントは
設定されたタイムアウト時間まで待機し、設定された回数分のリトライを行います。 RADIUS 認証クライアントのリトライ回数のデフォルトは 3 回、タイムアウト時間のデフ
ォルトは 5 秒です。タイムアウト時間およびリトライ回数は変更することができます。 RADIUS アカウントクライアントが RADIUS アカウントサーバに送信するアカウント
START パケットおよびアカウント STOP パケットも同様の再送処理を行います。
図 2-12 RADIUS 認証サーバからの応答がない場合
2 台の RADIUS 認証サーバを使用する設定が本装置に行われている場合は、本装置の
RADIUS 認証クライアントは RADIUS 認証サーバ 1(識別番号 1 の RADIUS 認証サーバ)に認証要求を送信します。RADIUS 認証サーバ 1 の応答がない場合には、RADIUS 認証
サーバ 2(識別番号 2 の RADIUS 認証サーバ)に認証要求を送信します。RADIUS 認証サー
バ 1 の状態に関係なく、最初の認証要求は必ず RADIUS 認証サーバ 1 に送信されます。 RADIUS アカウントクライアントが RADIUS アカウントサーバに送信するアカウント
START パケットおよびアカウント STOP パケットも同様の再送処理を行います。
図 2-13 2 台の RADIUS 認証サーバ登録時の認証動作
本装置 RADIUS認証サーバ1(プライマリ)
Timeout時間経過
認証要求
認証要求
Retry = 1
Timeout時間経過
認証要求
Retry = 2
Timeout時間経過
認証要求
Retry = 3
本装置 RADIUS認証サーバ1(プライマリ)
RADIUS認証サーバ2(セカンダリ)
Timeout時間経過
認証要求
認証要求
Retry = 1
アクセス許可
2-34
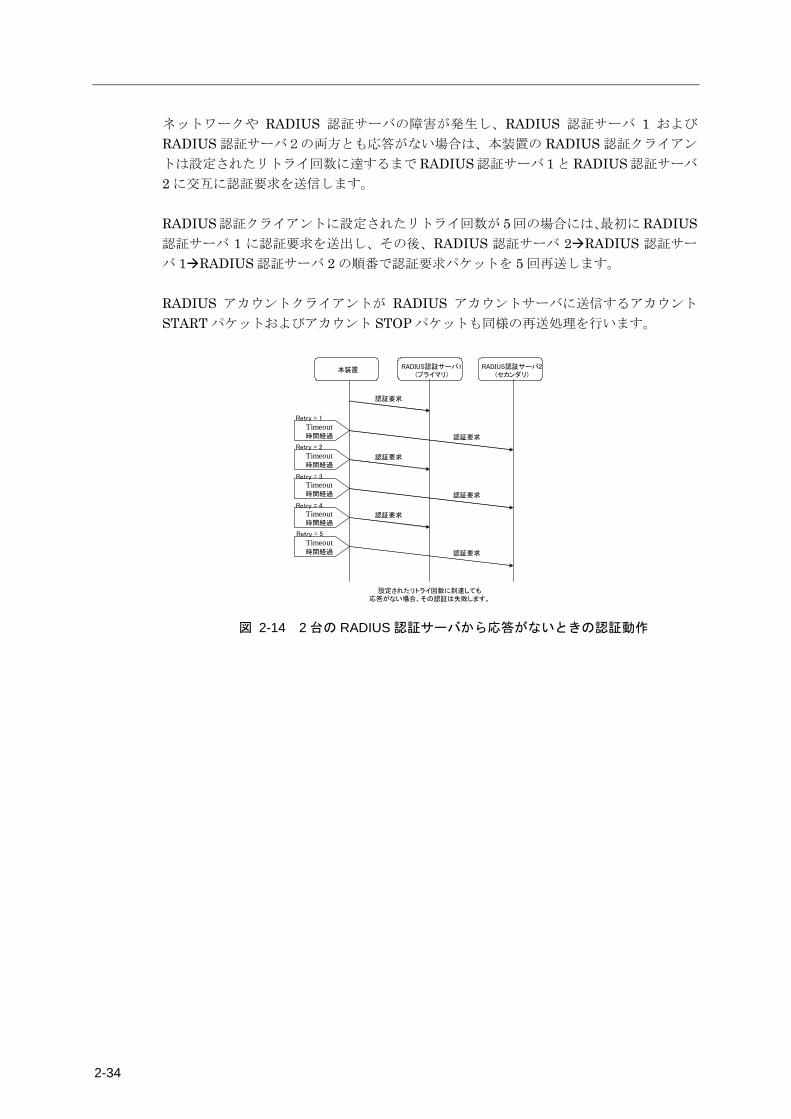
ネットワークや RADIUS 認証サーバの障害が発生し、RADIUS 認証サーバ 1 および
RADIUS 認証サーバ2の両方とも応答がない場合は、本装置の RADIUS 認証クライアン
トは設定されたリトライ回数に達するまで RADIUS 認証サーバ 1 と RADIUS 認証サーバ
2 に交互に認証要求を送信します。 RADIUS認証クライアントに設定されたリトライ回数が 5回の場合には、最初に RADIUS認証サーバ 1 に認証要求を送出し、その後、RADIUS 認証サーバ 2RADIUS 認証サー
バ 1RADIUS 認証サーバ 2 の順番で認証要求パケットを 5 回再送します。 RADIUS アカウントクライアントが RADIUS アカウントサーバに送信するアカウント
START パケットおよびアカウント STOP パケットも同様の再送処理を行います。
図 2-14 2 台の RADIUS 認証サーバから応答がないときの認証動作
本装置 RADIUS認証サーバ1(プライマリ)
RADIUS認証サーバ2(セカンダリ)
Timeout時間経過
認証要求
認証要求
Timeout時間経過
Timeout時間経過
Timeout時間経過
Timeout時間経過
認証要求
認証要求
認証要求
認証要求
Retry = 1
Retry = 2
Retry = 3
Retry = 4
Retry = 5
設定されたリトライ回数に到達しても応答がない場合、その認証は失敗します。
2 章 機 能
2-35
2.3.3 RADIUS によるユーザグループの識別とシリアルポートのアクセス制限
本装置では、RADIUS 認証サーバを利用して、装置管理ユーザ/一般ユーザ/ポートユーザ
などのユーザグループを識別したり、ポートユーザのシリアルポートへのアクセス制限を
一元管理することができます。設定方法には以下の 2 つの方法があります。
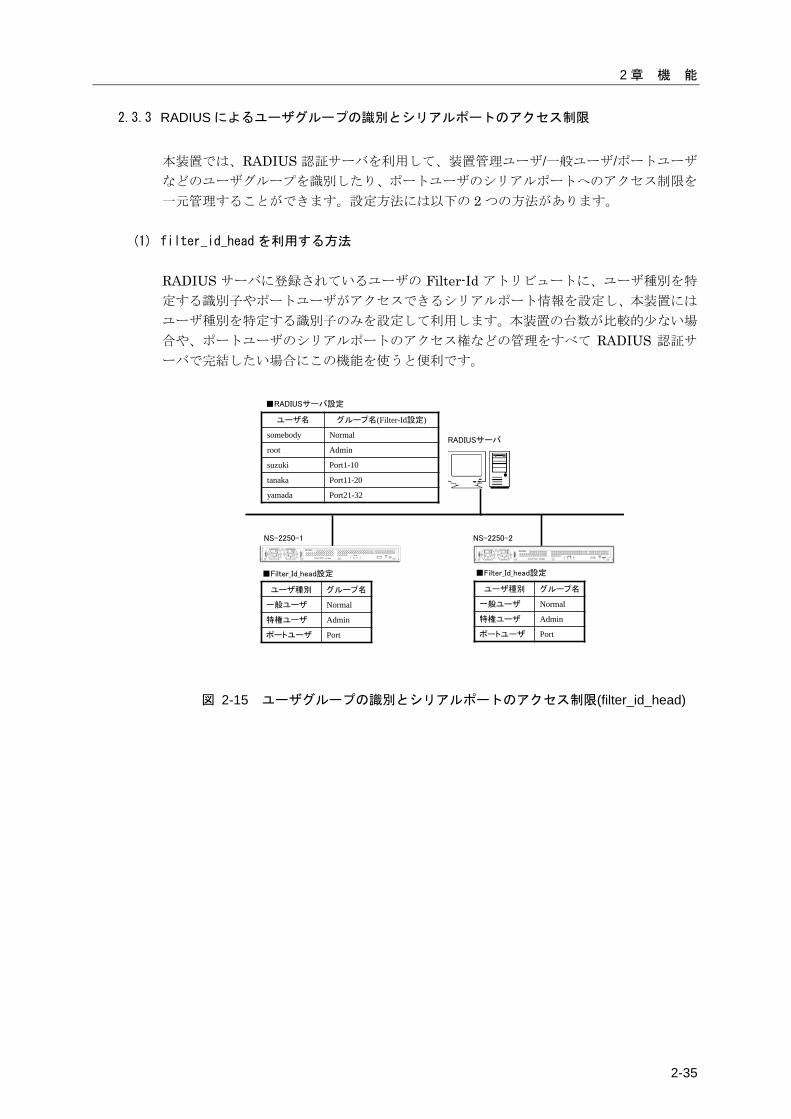
(1) filter_id_head を利用する方法
RADIUS サーバに登録されているユーザの Filter-Id アトリビュートに、ユーザ種別を特
定する識別子やポートユーザがアクセスできるシリアルポート情報を設定し、本装置には
ユーザ種別を特定する識別子のみを設定して利用します。本装置の台数が比較的少ない場
合や、ポートユーザのシリアルポートのアクセス権などの管理をすべて RADIUS 認証サ
ーバで完結したい場合にこの機能を使うと便利です。
図 2-15 ユーザグループの識別とシリアルポートのアクセス制限(filter_id_head)
RADIUSサーバ
ユーザ名 グループ名(Filter-Id設定)
somebody Normal
root Admin
suzuki Port1-10
tanaka Port11-20
yamada Port21-32
ユーザ種別 グループ名
一般ユーザ Normal
特権ユーザ Admin
ポートユーザ Port
■Filter_Id_head設定
NS-2250-1 NS-2250-2
■RADIUSサーバ設定
ユーザ種別 グループ名
一般ユーザ Normal
特権ユーザ Admin
ポートユーザ Port
■Filter_Id_head設定
2-36
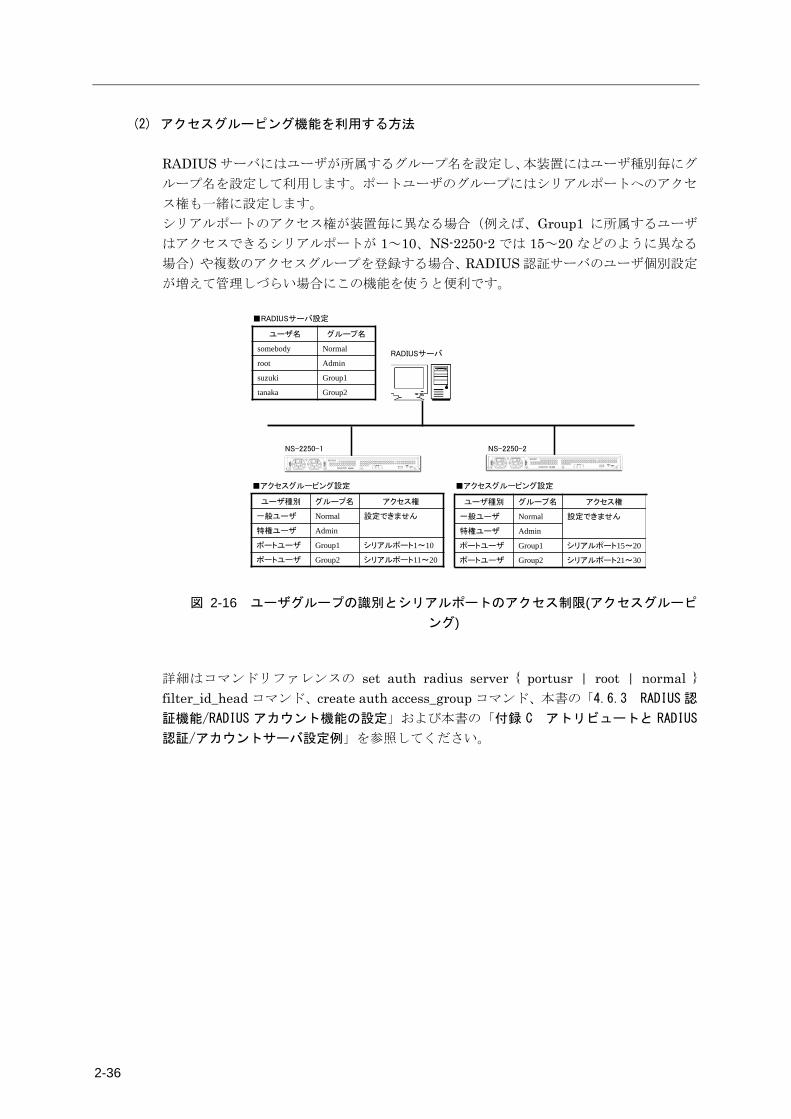
(2) アクセスグルーピング機能を利用する方法
RADIUS サーバにはユーザが所属するグループ名を設定し、本装置にはユーザ種別毎にグ
ループ名を設定して利用します。ポートユーザのグループにはシリアルポートへのアクセ
ス権も一緒に設定します。 シリアルポートのアクセス権が装置毎に異なる場合(例えば、Group1 に所属するユーザ
はアクセスできるシリアルポートが 1~10、NS-2250-2 では 15~20 などのように異なる
場合)や複数のアクセスグループを登録する場合、RADIUS 認証サーバのユーザ個別設定
が増えて管理しづらい場合にこの機能を使うと便利です。
図 2-16 ユーザグループの識別とシリアルポートのアクセス制限(アクセスグルーピ
ング)
詳細はコマンドリファレンスの set auth radius server { portusr | root | normal } filter_id_head コマンド、create auth access_group コマンド、本書の「4.6.3 RADIUS 認
証機能/RADIUS アカウント機能の設定」および本書の「付録 C アトリビュートと RADIUS
認証/アカウントサーバ設定例」を参照してください。
RADIUSサーバ
ユーザ名 グループ名
somebody Normal
root Admin
suzuki Group1
tanaka Group2
ユーザ種別 グループ名 アクセス権
一般ユーザ Normal 設定できません
特権ユーザ Admin
ポートユーザ Group1 シリアルポート1~10
ポートユーザ Group2 シリアルポート11~20
ユーザ種別 グループ名 アクセス権
一般ユーザ Normal 設定できません
特権ユーザ Admin
ポートユーザ Group1 シリアルポート15~20
ポートユーザ Group2 シリアルポート21~30
■アクセスグルーピング設定 ■アクセスグルーピング設定
NS-2250-1 NS-2250-2
■RADIUSサーバ設定
2 章 機 能
2-37
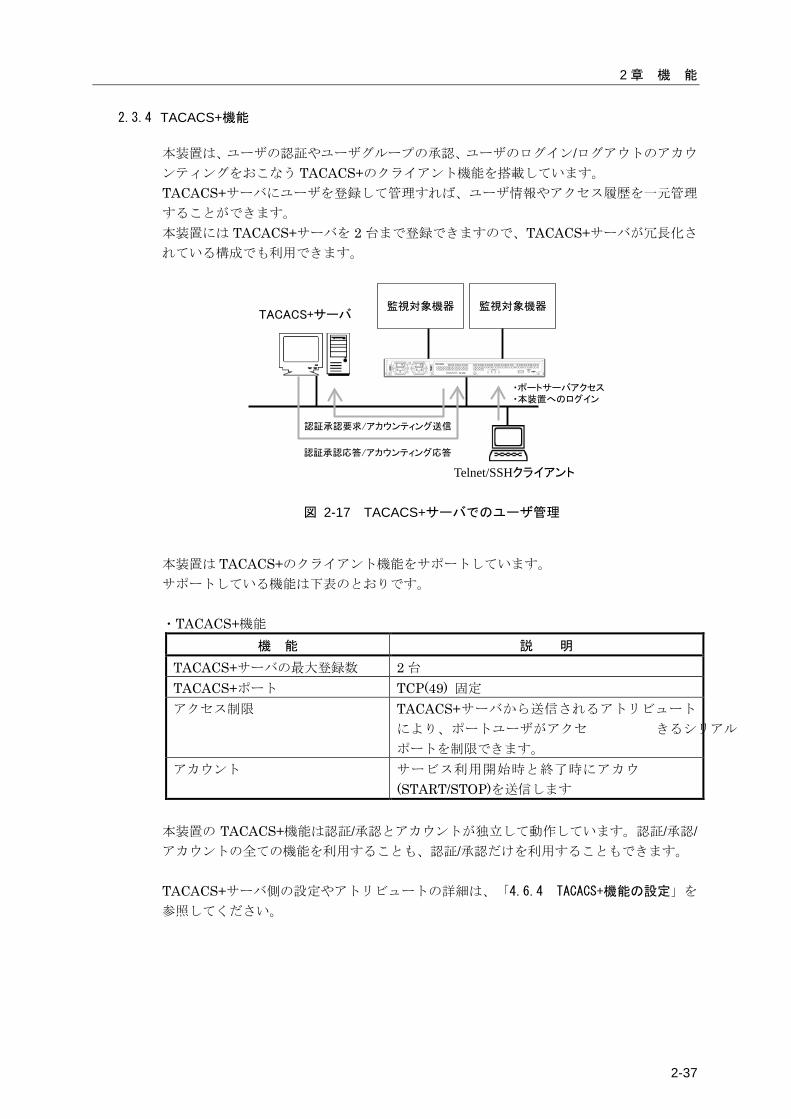
2.3.4 TACACS+機能
本装置は、ユーザの認証やユーザグループの承認、ユーザのログイン/ログアウトのアカウ
ンティングをおこなう TACACS+のクライアント機能を搭載しています。 TACACS+サーバにユーザを登録して管理すれば、ユーザ情報やアクセス履歴を一元管理
することができます。 本装置には TACACS+サーバを 2 台まで登録できますので、TACACS+サーバが冗長化さ
れている構成でも利用できます。
図 2-17 TACACS+サーバでのユーザ管理
本装置は TACACS+のクライアント機能をサポートしています。 サポートしている機能は下表のとおりです。 ・TACACS+機能
機 能 説 明
TACACS+サーバの最大登録数 2 台 TACACS+ポート TCP(49) 固定 アクセス制限 TACACS+サーバから送信されるアトリビュート
により、ポートユーザがアクセスできるシリアル
ポートを制限できます。 アカウント サービス利用開始時と終了時にアカウント情報
(START/STOP)を送信します 本装置の TACACS+機能は認証/承認とアカウントが独立して動作しています。認証/承認/アカウントの全ての機能を利用することも、認証/承認だけを利用することもできます。 TACACS+サーバ側の設定やアトリビュートの詳細は、「4.6.4 TACACS+機能の設定」を
参照してください。
TACACS+サーバ
認証承認要求/アカウンティング送信
監視対象機器 監視対象機器
認証承認応答/アカウンティング応答
Telnet/SSHクライアント
・ポートサーバアクセス・本装置へのログイン
2-38
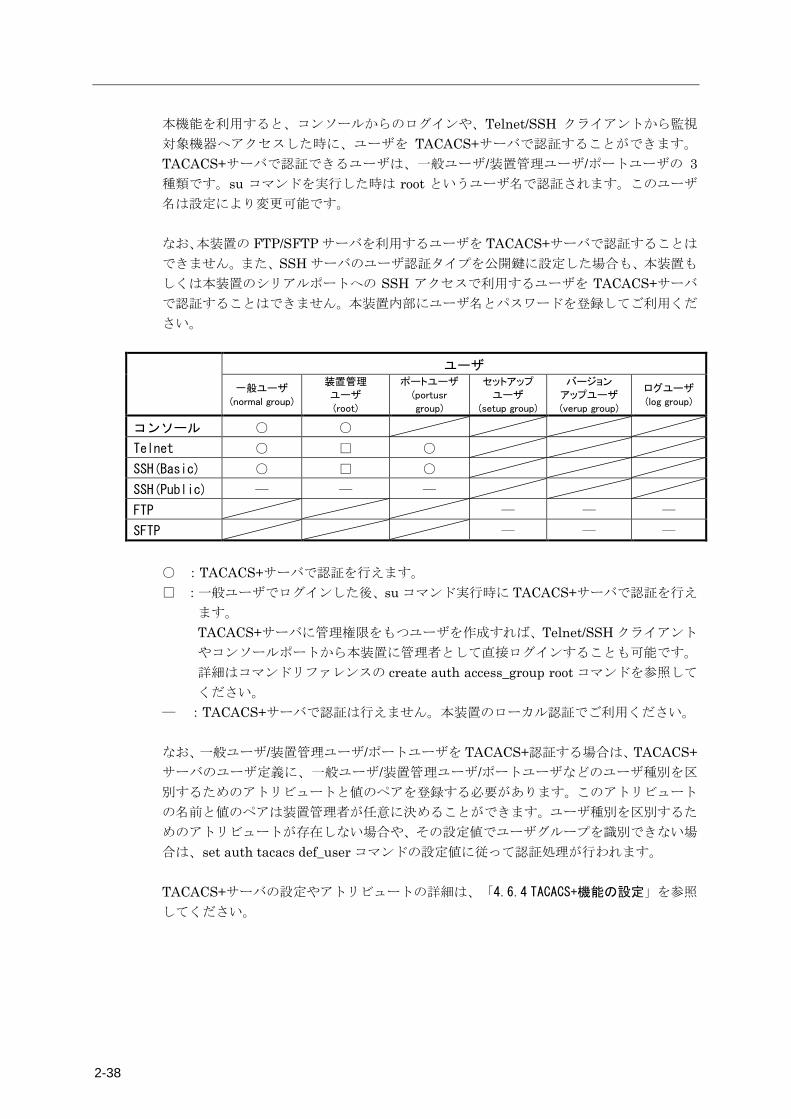
本機能を利用すると、コンソールからのログインや、Telnet/SSH クライアントから監視
対象機器へアクセスした時に、ユーザを TACACS+サーバで認証することができます。
TACACS+サーバで認証できるユーザは、一般ユーザ/装置管理ユーザ/ポートユーザの 3種類です。su コマンドを実行した時は root というユーザ名で認証されます。このユーザ
名は設定により変更可能です。 なお、本装置の FTP/SFTP サーバを利用するユーザを TACACS+サーバで認証することは
できません。また、SSH サーバのユーザ認証タイプを公開鍵に設定した場合も、本装置も
しくは本装置のシリアルポートへの SSH アクセスで利用するユーザを TACACS+サーバ
で認証することはできません。本装置内部にユーザ名とパスワードを登録してご利用くだ
さい。
ユーザ
一般ユーザ
(normal group)
装置管理
ユーザ
(root)
ポートユーザ
(portusr
group)
セットアップ
ユーザ
(setup group)
バージョン
アップユーザ
(verup group)
ログユーザ
(log group)
コンソール ○ ○ Telnet ○ □ ○ SSH(Basic) ○ □ ○ SSH(Public) ― ― ― FTP ― ― ― SFTP ― ― ―
○ :TACACS+サーバで認証を行えます。 □ :一般ユーザでログインした後、su コマンド実行時に TACACS+サーバで認証を行え
ます。 TACACS+サーバに管理権限をもつユーザを作成すれば、Telnet/SSH クライアント
やコンソールポートから本装置に管理者として直接ログインすることも可能です。
詳細はコマンドリファレンスの create auth access_group root コマンドを参照して
ください。 ― :TACACS+サーバで認証は行えません。本装置のローカル認証でご利用ください。 なお、一般ユーザ/装置管理ユーザ/ポートユーザを TACACS+認証する場合は、TACACS+サーバのユーザ定義に、一般ユーザ/装置管理ユーザ/ポートユーザなどのユーザ種別を区
別するためのアトリビュートと値のペアを登録する必要があります。このアトリビュート
の名前と値のペアは装置管理者が任意に決めることができます。ユーザ種別を区別するた
めのアトリビュートが存在しない場合や、その設定値でユーザグループを識別できない場
合は、set auth tacacs def_user コマンドの設定値に従って認証処理が行われます。 TACACS+サーバの設定やアトリビュートの詳細は、「4.6.4 TACACS+機能の設定」を参照
してください。
2 章 機 能
2-39
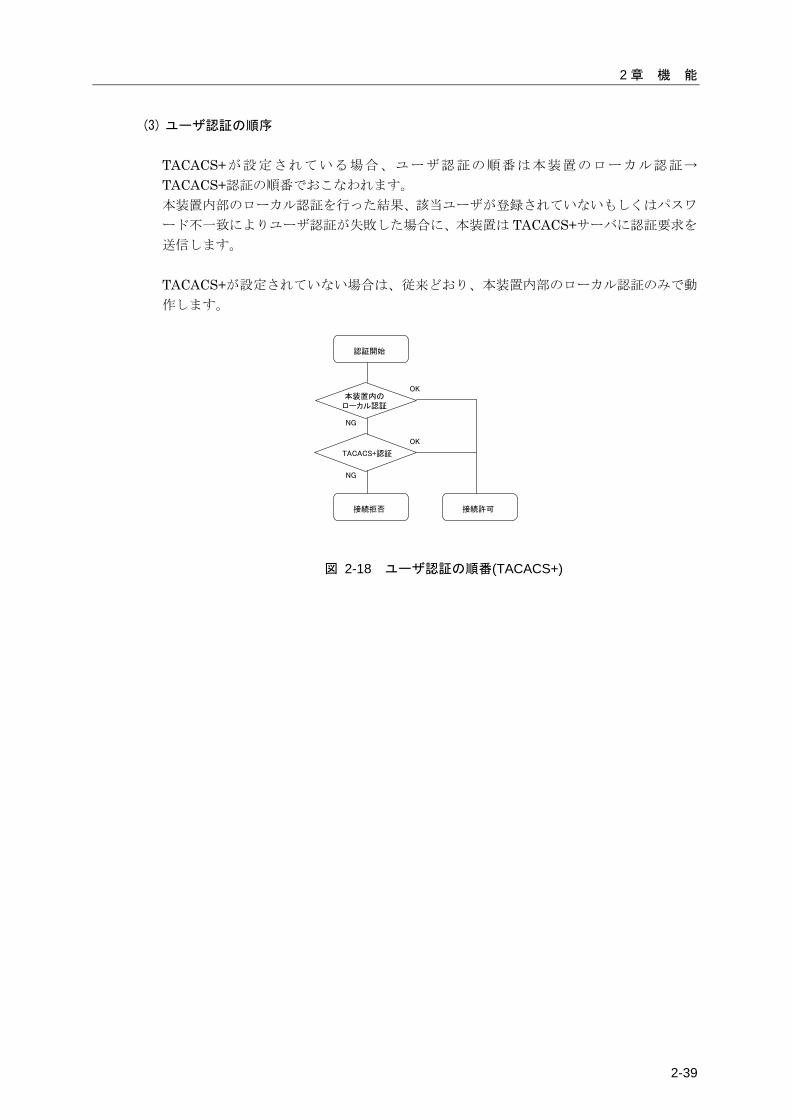
(3) ユーザ認証の順序
TACACS+が設定されている場合、ユーザ認証の順番は本装置のローカル認証→
TACACS+認証の順番でおこなわれます。 本装置内部のローカル認証を行った結果、該当ユーザが登録されていないもしくはパスワ
ード不一致によりユーザ認証が失敗した場合に、本装置は TACACS+サーバに認証要求を
送信します。 TACACS+が設定されていない場合は、従来どおり、本装置内部のローカル認証のみで動
作します。
図 2-18 ユーザ認証の順番(TACACS+)
本装置内のローカル認証
接続拒否 接続許可
認証開始
NG
NG
OK
OK
TACACS+認証
2-40
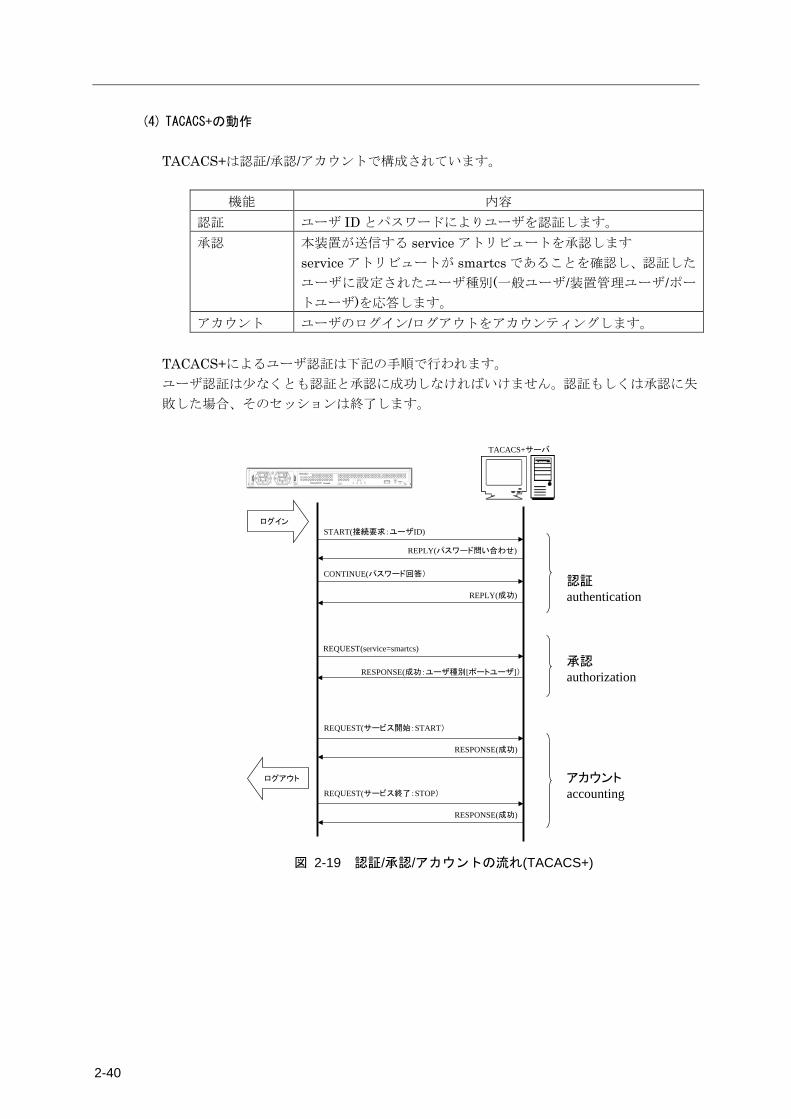
(4) TACACS+の動作
TACACS+は認証/承認/アカウントで構成されています。
機能 内容 認証 ユーザ ID とパスワードによりユーザを認証します。 承認 本装置が送信する service アトリビュートを承認します。
service アトリビュートが smartcs であることを確認し、認証した
ユーザに設定されたユーザ種別(一般ユーザ/装置管理ユーザ/ポー
トユーザ)を応答します。 アカウント ユーザのログイン/ログアウトをアカウンティングします。
TACACS+によるユーザ認証は下記の手順で行われます。 ユーザ認証は少なくとも認証と承認に成功しなければいけません。認証もしくは承認に失
敗した場合、そのセッションは終了します。
図 2-19 認証/承認/アカウントの流れ(TACACS+)
START(接続要求:ユーザID)
REPLY(パスワード問い合わせ)
CONTINUE(パスワード回答)
REPLY(成功)認証authentication
REQUEST(service=smartcs)
RESPONSE(成功:ユーザ種別[ポートユーザ])
REQUEST(サービス開始:START)
RESPONSE(成功)
REQUEST(サービス終了:STOP)
RESPONSE(成功)
承認authorization
アカウントaccounting
TACACS+サーバ
ログイン
ログアウト

2 章 機 能
2-41
本装置に TACACS+サーバを 1 台登録している場合、タイムアウト時間内に TACACS+サーバの応答が無ければその接続要求は失敗します。 TACACS+サーバを 2 台登録している場合、TACACS+サーバ 1(識別番号 1 の TACACS+サーバ)に認証要求を送信します。 TACACS+サーバ 1 の応答がない場合には、TACACS+サーバ 2(識別番号 2 の TACACS+サーバ)に認証要求を送信します。 最初の認証要求は、必ず TACACS+サーバ 1 に送信されます。 承認は認証が成功したサーバに REQUEST パケットを送信します。 タイムアウト時間内にサーバから応答がない場合、承認は終了します。 アカウントは認証と同様の動作を行います。
図 2-20 2 台の TACACS+サーバ登録時の認証動作
START(接続要求:ユーザID)
REPLY(パスワード問い合わせ)
タイムアウト時間 応答なし ×
本装置
(省略)
REPLY(成功)
START(接続要求:ユーザID)
CONTINUE(パスワード回答)
認証authentication
承認authorization
アカウントaccounting
RESPONSE(成功:ユーザ種別[ポートユーザ])
RESPONSE(成功)
REQUEST(service=smartcs)
応答なし ×
TACACS+サーバ1(プライマリ)
TACACS+サーバ2(セカンダリ)
タイムアウト時間
REQUEST(サービス開始:START)
REQUEST(サービス開始:START)
2-42
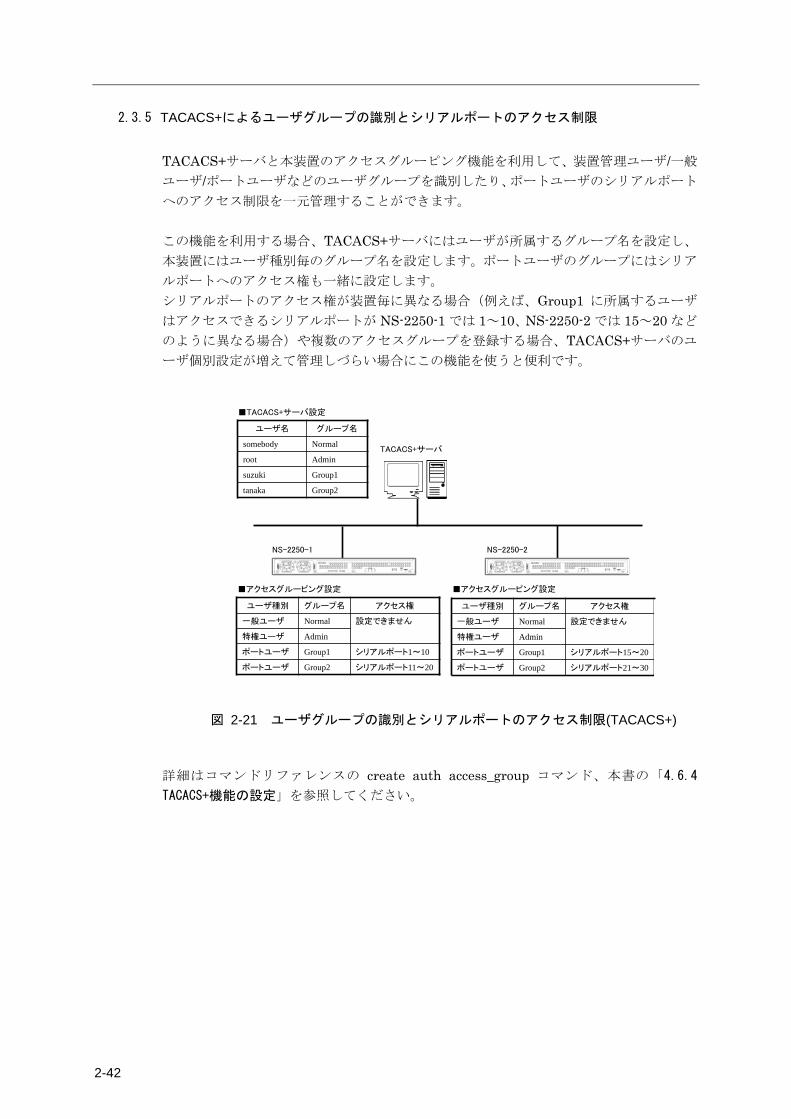
2.3.5 TACACS+によるユーザグループの識別とシリアルポートのアクセス制限
TACACS+サーバと本装置のアクセスグルーピング機能を利用して、装置管理ユーザ/一般
ユーザ/ポートユーザなどのユーザグループを識別したり、ポートユーザのシリアルポート
へのアクセス制限を一元管理することができます。 この機能を利用する場合、TACACS+サーバにはユーザが所属するグループ名を設定し、
本装置にはユーザ種別毎のグループ名を設定します。ポートユーザのグループにはシリア
ルポートへのアクセス権も一緒に設定します。 シリアルポートのアクセス権が装置毎に異なる場合(例えば、Group1 に所属するユーザ
はアクセスできるシリアルポートが NS-2250-1 では 1~10、NS-2250-2 では 15~20 など
のように異なる場合)や複数のアクセスグループを登録する場合、TACACS+サーバのユ
ーザ個別設定が増えて管理しづらい場合にこの機能を使うと便利です。
図 2-21 ユーザグループの識別とシリアルポートのアクセス制限(TACACS+)
詳細はコマンドリファレンスの create auth access_group コマンド、本書の「4.6.4
TACACS+機能の設定」を参照してください。
TACACS+サーバ
ユーザ名 グループ名
somebody Normal
root Admin
suzuki Group1
tanaka Group2
ユーザ種別 グループ名 アクセス権
一般ユーザ Normal 設定できません
特権ユーザ Admin
ポートユーザ Group1 シリアルポート1~10
ポートユーザ Group2 シリアルポート11~20
ユーザ種別 グループ名 アクセス権
一般ユーザ Normal 設定できません
特権ユーザ Admin
ポートユーザ Group1 シリアルポート15~20
ポートユーザ Group2 シリアルポート21~30
■アクセスグルーピング設定 ■アクセスグルーピング設定
NS-2250-1 NS-2250-2
■TACACS+サーバ設定

2 章 機 能
2-43
2.3.6 各種サーバのアクセス制限
本装置のサーバごとに、接続を許可するネットワークアドレスとマスクを登録することが
できます。 アクセスを制限することができる本装置のサーバは下表のとおりです。
サーバ 説 明
Telnet サーバのアクセス制限 本装置の Telnet サーバにアクセスするクライアントを
制限します。
SSH サーバのアクセス制限 本装置のSSHサーバにアクセスするクライアントを制限
します。
FTP サーバのアクセス制限
本装置の FTP サーバ(バージョンアップやセットアップ
ファイル、ポートログの操作で使用しています)にアク
セスするクライアントを制限します。
ポートサーバのアクセス制限
ポートサーバにアクセスするクライアントを制限しま
す。通信方式(Telnet/SSH)や接続モード(ノーマルモー
ド/モニターモード)ごとに設定することができます。
工場出荷時の本装置の設定は、本装置にアクセスできるクライアント端末が下記の条件に
制限されています。
制限項目 設定値
接続を許可するネットワーク ALL 接続を許可するサービス Telnet/ポートサーバ シリアルポートの接続制限 Telnet ノーマルモード
2-44
2.4 運用管理機能
本装置は下記の運用管理機能をサポートしています。
(1) DNS クライアント機能
本装置の ping や telnet コマンドなどのアプリケーションが DNS サーバに問い合わせし
て名前解決をおこなう機能です。本装置に登録できる DNS サーバは 2 台です。
(2) SNTP クライアント機能
本装置の時刻を NTP サーバの時刻に同期させる機能です。 本装置に登録できる NTP サーバ数は 2 台です。
(3) スタティックルーティング機能
ネットワーク経路情報をスタティックルーティングで管理します。本装置には最大 99 個
のスタティックルーティングが登録できます。
(4) SNMP エージェント機能
SNMP エージェント機能を使用し、外部から本装置の死活監視を行うことができます。本
装置は SNMP Version1/Version2c をサポートしています。 SNMP エージェント機能を有効にすれば、外部の SNMP サーバからの MIB アクセスに応
答します。SNMP サーバから Version1 形式の Get 要求を受信した場合は Version1 で、
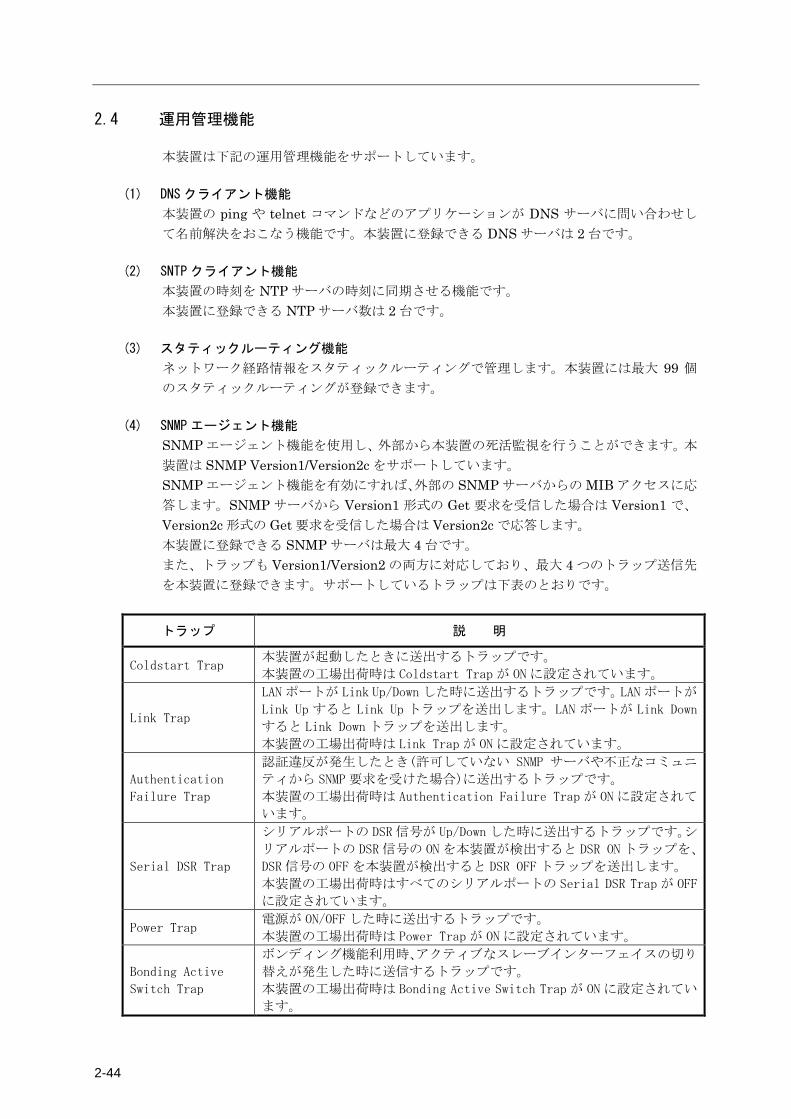
Version2c 形式の Get 要求を受信した場合は Version2c で応答します。 本装置に登録できる SNMP サーバは最大 4 台です。 また、トラップも Version1/Version2 の両方に対応しており、最大 4 つのトラップ送信先
を本装置に登録できます。サポートしているトラップは下表のとおりです。
トラップ 説 明
Coldstart Trap 本装置が起動したときに送出するトラップです。
本装置の工場出荷時は Coldstart Trap が ON に設定されています。
Link Trap
LAN ポートが Link Up/Down した時に送出するトラップです。LAN ポートが
Link Up すると Link Up トラップを送出します。LAN ポートが Link Down
すると Link Down トラップを送出します。
本装置の工場出荷時は Link Trap が ON に設定されています。
Authentication
Failure Trap
認証違反が発生したとき(許可していない SNMP サーバや不正なコミュニ
ティから SNMP 要求を受けた場合)に送出するトラップです。
本装置の工場出荷時は Authentication Failure Trap が ON に設定されて
います。
Serial DSR Trap
シリアルポートの DSR 信号が Up/Down した時に送出するトラップです。シ
リアルポートの DSR 信号の ON を本装置が検出すると DSR ON トラップを、
DSR 信号の OFF を本装置が検出すると DSR OFF トラップを送出します。
本装置の工場出荷時はすべてのシリアルポートの Serial DSR Trap が OFF
に設定されています。
Power Trap 電源が ON/OFF した時に送出するトラップです。
本装置の工場出荷時は Power Trap が ON に設定されています。
Bonding Active
Switch Trap
ボンディング機能利用時、アクティブなスレーブインターフェイスの切り
替えが発生した時に送信するトラップです。
本装置の工場出荷時は Bonding Active Switch Trap が ON に設定されてい
ます。
2 章 機 能
2-45
(5) SYSLOG クライアント機能
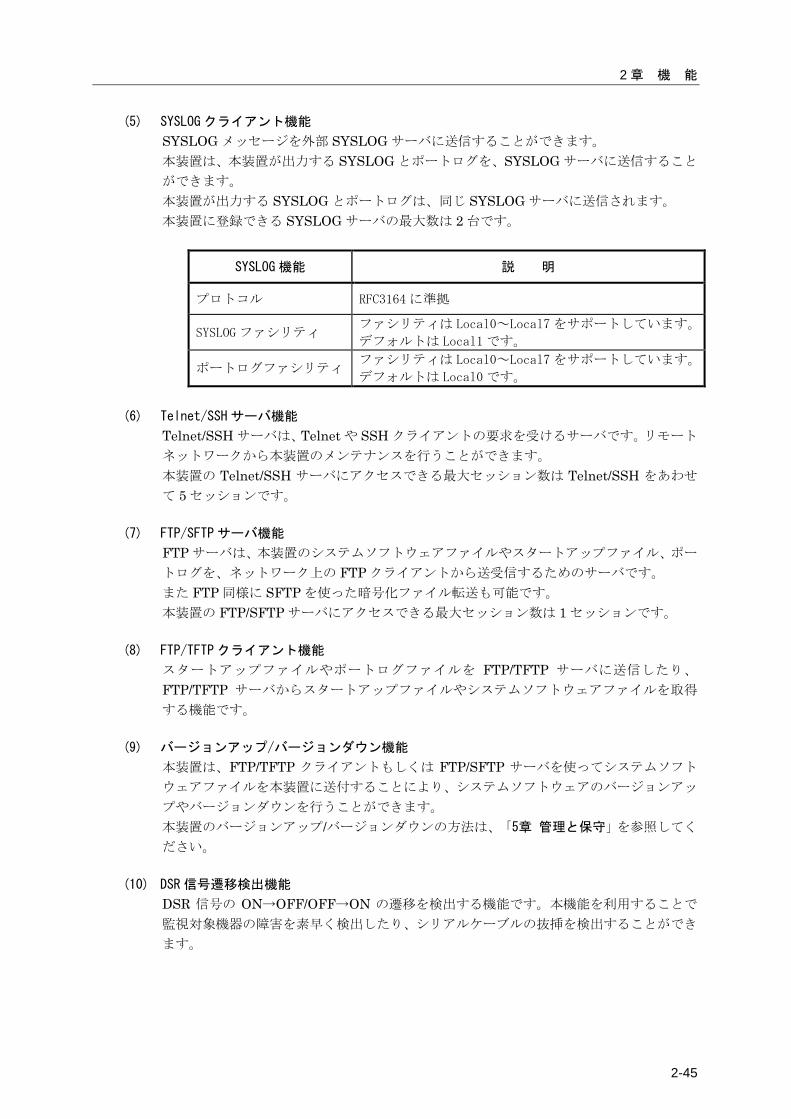
SYSLOG メッセージを外部 SYSLOG サーバに送信することができます。 本装置は、本装置が出力する SYSLOG とポートログを、SYSLOG サーバに送信すること
ができます。 本装置が出力する SYSLOG とポートログは、同じ SYSLOG サーバに送信されます。 本装置に登録できる SYSLOG サーバの最大数は 2 台です。
SYSLOG 機能 説 明
プロトコル RFC3164 に準拠
SYSLOG ファシリティ ファシリティは Local0~Local7 をサポートしています。
デフォルトは Local1 です。
ポートログファシリティ ファシリティは Local0~Local7 をサポートしています。
デフォルトは Local0 です。
(6) Telnet/SSH サーバ機能
Telnet/SSH サーバは、Telnet や SSH クライアントの要求を受けるサーバです。リモート
ネットワークから本装置のメンテナンスを行うことができます。 本装置の Telnet/SSH サーバにアクセスできる最大セッション数は Telnet/SSH をあわせ
て 5 セッションです。
(7) FTP/SFTP サーバ機能
FTP サーバは、本装置のシステムソフトウェアファイルやスタートアップファイル、ポー
トログを、ネットワーク上の FTP クライアントから送受信するためのサーバです。 また FTP 同様に SFTP を使った暗号化ファイル転送も可能です。 本装置の FTP/SFTP サーバにアクセスできる最大セッション数は 1 セッションです。
(8) FTP/TFTP クライアント機能
スタートアップファイルやポートログファイルを FTP/TFTP サーバに送信したり、
FTP/TFTP サーバからスタートアップファイルやシステムソフトウェアファイルを取得
する機能です。
(9) バージョンアップ/バージョンダウン機能
本装置は、FTP/TFTP クライアントもしくは FTP/SFTP サーバを使ってシステムソフト
ウェアファイルを本装置に送付することにより、システムソフトウェアのバージョンアッ
プやバージョンダウンを行うことができます。 本装置のバージョンアップ/バージョンダウンの方法は、「5章 管理と保守」を参照してく
ださい。
(10) DSR 信号遷移検出機能
DSR 信号の ON→OFF/OFF→ON の遷移を検出する機能です。本機能を利用することで
監視対象機器の障害を素早く検出したり、シリアルケーブルの抜挿を検出することができ
ます。

2-46
(11) 自動復帰機能
万一、本装置内部に障害が発生した場合でも、ウォッチドッグタイマによりこれらの障害
を監視し、自動的にリブートする機能です。
(12) 温度センサ機能
温度センサで装置内部の温度を計測する機能です。
(13) タイムゾーン機能
本装置が所属するタイムゾーンを設定する機能です。
(14) ボンディング機能
2 つの LAN ポートを仮想の 1 ポートとして動作させる機能です。 送受信用に使用するポートをアクティブポート、待機ポートをバックアップポートと呼び
ます。バックアップポートから受信したパケットは装置内部で廃棄されます。 ボンディング機能を有効にすると、bond1 という仮想ポートができ、その仮想ポートに実
ポートの eth1/eth2 が所属します。仮想ポートをマスターインターフェイス、所属する物
理ポートをスレーブインターフェイスと呼びます。 ボンディング機能が有効な場合は、IP アドレスは実ポートの eth1/eth2 ではなく bond1に設定します。
図 2-22 ボンディング機能
eth1(Active)
eth2(Backup)
IP
bond1Master I/F
LAN1障害
eth1(Backup)
eth2(Active)
IP
bond1
Slave I/F
LAN1 LAN2 LAN1 LAN2
2 章 機 能
2-47
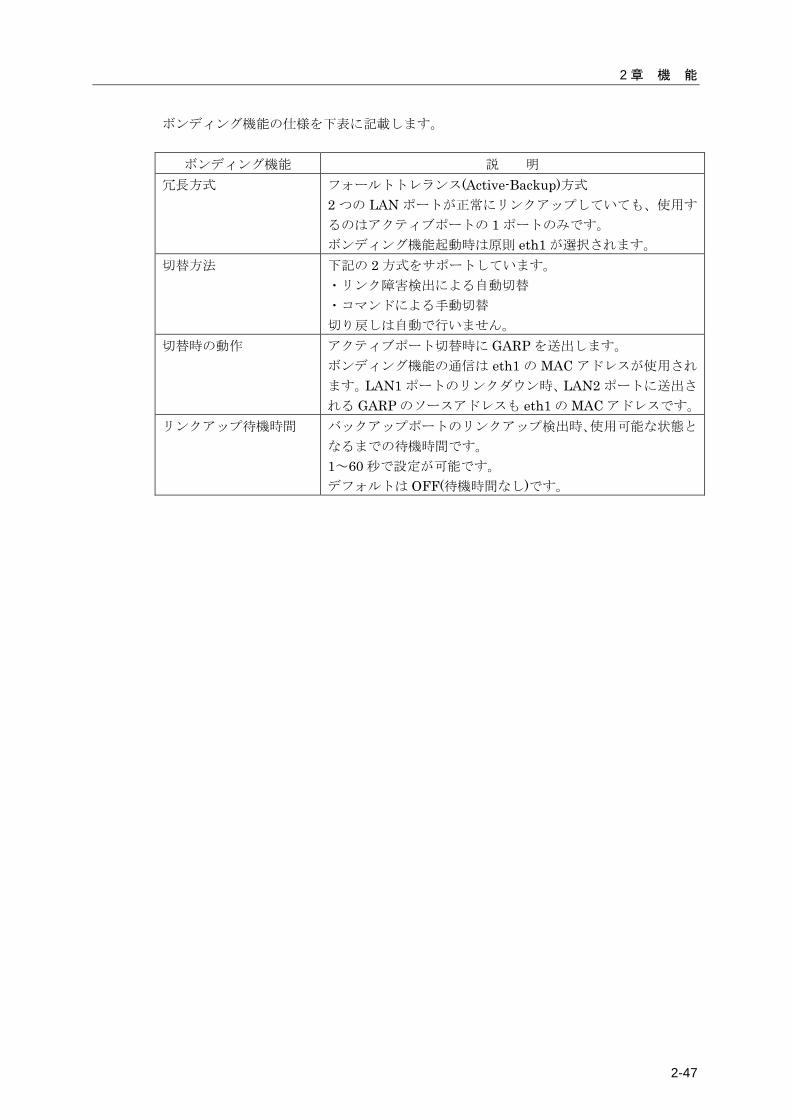
ボンディング機能の仕様を下表に記載します。
ボンディング機能 説 明 冗長方式 フォールトトレランス(Active-Backup)方式
2 つの LAN ポートが正常にリンクアップしていても、使用す
るのはアクティブポートの 1 ポートのみです。 ボンディング機能起動時は原則 eth1 が選択されます。
切替方法 下記の 2 方式をサポートしています。 ・リンク障害検出による自動切替 ・コマンドによる手動切替 切り戻しは自動で行いません。
切替時の動作 アクティブポート切替時に GARP を送出します。 ボンディング機能の通信は eth1 の MAC アドレスが使用され
ます。LAN1 ポートのリンクダウン時、LAN2 ポートに送出さ
れる GARP のソースアドレスも eth1 の MAC アドレスです。 リンクアップ待機時間 バックアップポートのリンクアップ検出時、使用可能な状態と
なるまでの待機時間です。 1~60 秒で設定が可能です。 デフォルトは OFF(待機時間なし)です。

3-1
3 章 設定の流れ
3章では、起動方法や停止方法、セットアップ手順などの操作に関する概要を説明してい
ます。 作業を始める前に必ずお読みください。
本章の内容
3.1 起動/確認/停止
3.1.1 USB メモリの挿入
3.1.2 装置管理端末の接続
3.1.3 起動
3.1.4 確認
3.1.5 停止
3.2 セットアップ手順
3.2.1 ログイン/ログアウト
3.2.2 CLI のモード
3.2.3 CLI の使用方法
3.2.4 設定コマンド群の流し込み
3.2.5 設定の保存
3.2.6 再起動
3-2
3.1 起動/確認/停止
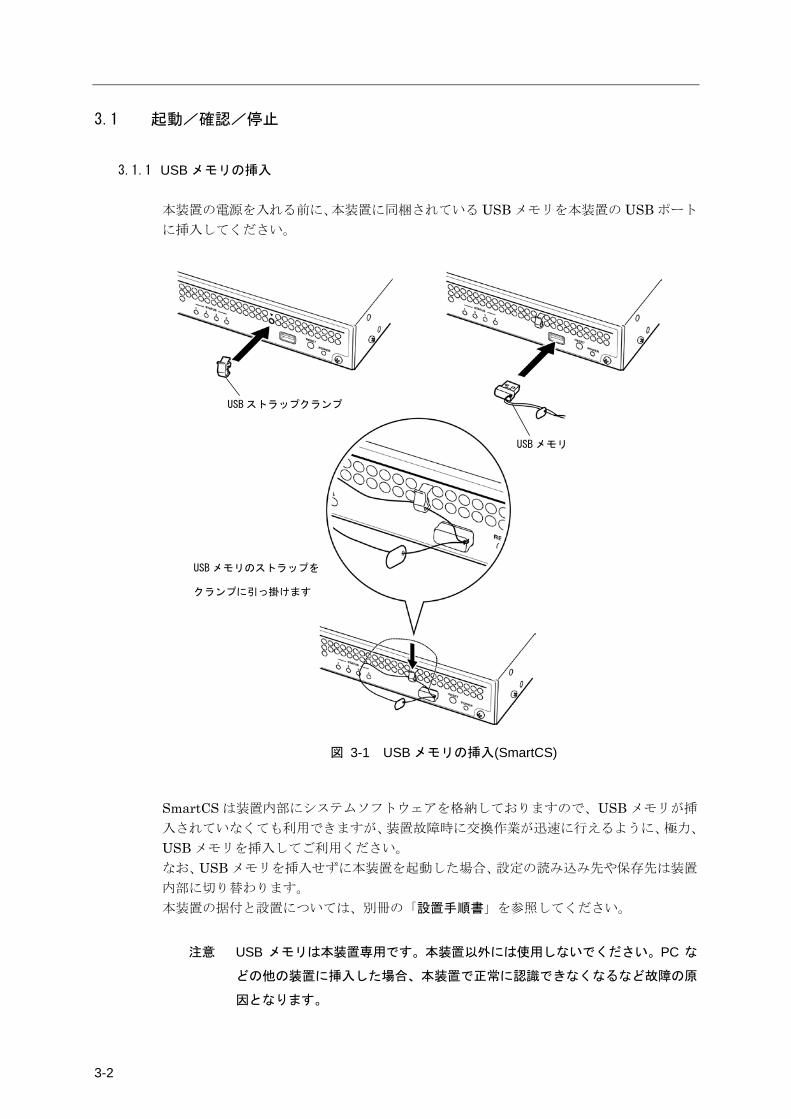
3.1.1 USB メモリの挿入 本装置の電源を入れる前に、本装置に同梱されている USB メモリを本装置の USB ポート
に挿入してください。
図 3-1 USB メモリの挿入(SmartCS)
SmartCS は装置内部にシステムソフトウェアを格納しておりますので、USB メモリが挿
入されていなくても利用できますが、装置故障時に交換作業が迅速に行えるように、極力、
USB メモリを挿入してご利用ください。 なお、USB メモリを挿入せずに本装置を起動した場合、設定の読み込み先や保存先は装置
内部に切り替わります。 本装置の据付と設置については、別冊の「設置手順書」を参照してください。
注意 USB メモリは本装置専用です。本装置以外には使用しないでください。PC な
どの他の装置に挿入した場合、本装置で正常に認識できなくなるなど故障の原
因となります。
USB ストラップクランプ
USB メモリ
USB メモリのストラップを
クランプに引っ掛けます
3 章 設定の流れ
3-3
3.1.2 装置管理端末の接続 装置を運用するには、事前に本装置の機能を設定する必要があります。本装置の機能の設
定は、装置管理端末から行いますので、本装置の電源を入れる前に、装置管理端末を接続
してください。 装置管理端末は、本装置の CONSOLE ポートに接続する方法と、本装置の LAN1 ポート
にネットワークを介して接続する方法があります。 装置管理端末を CONSOLE ポートに接続する場合は、本装置のブート中のメッセージが
装置管理端末に表示されますが、ネットワークを介して接続する場合は表示されません。
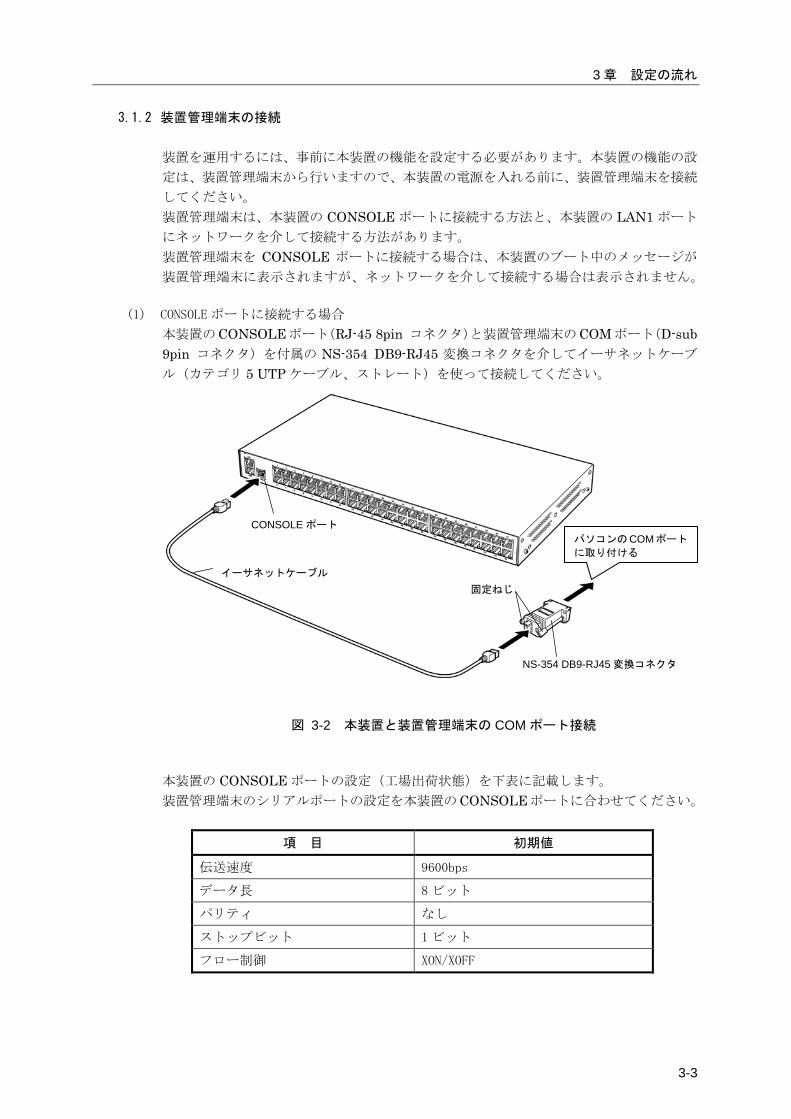
(1) CONSOLE ポートに接続する場合
本装置のCONSOLEポート(RJ-45 8pin コネクタ)と装置管理端末のCOMポート(D-sub 9pin コネクタ)を付属の NS-354 DB9-RJ45 変換コネクタを介してイーサネットケーブ
ル(カテゴリ 5 UTP ケーブル、ストレート)を使って接続してください。
図 3-2 本装置と装置管理端末の COM ポート接続
本装置の CONSOLE ポートの設定(工場出荷状態)を下表に記載します。 装置管理端末のシリアルポートの設定を本装置のCONSOLEポートに合わせてください。
項 目 初期値
伝送速度 9600bps
データ長 8 ビット
パリティ なし
ストップビット 1 ビット
フロー制御 XON/XOFF
固定ねじ
NS-354 DB9-RJ45 変換コネクタ
パソコンのCOMポート
に取り付ける
イーサネットケーブル
CONSOLE ポート
3-4
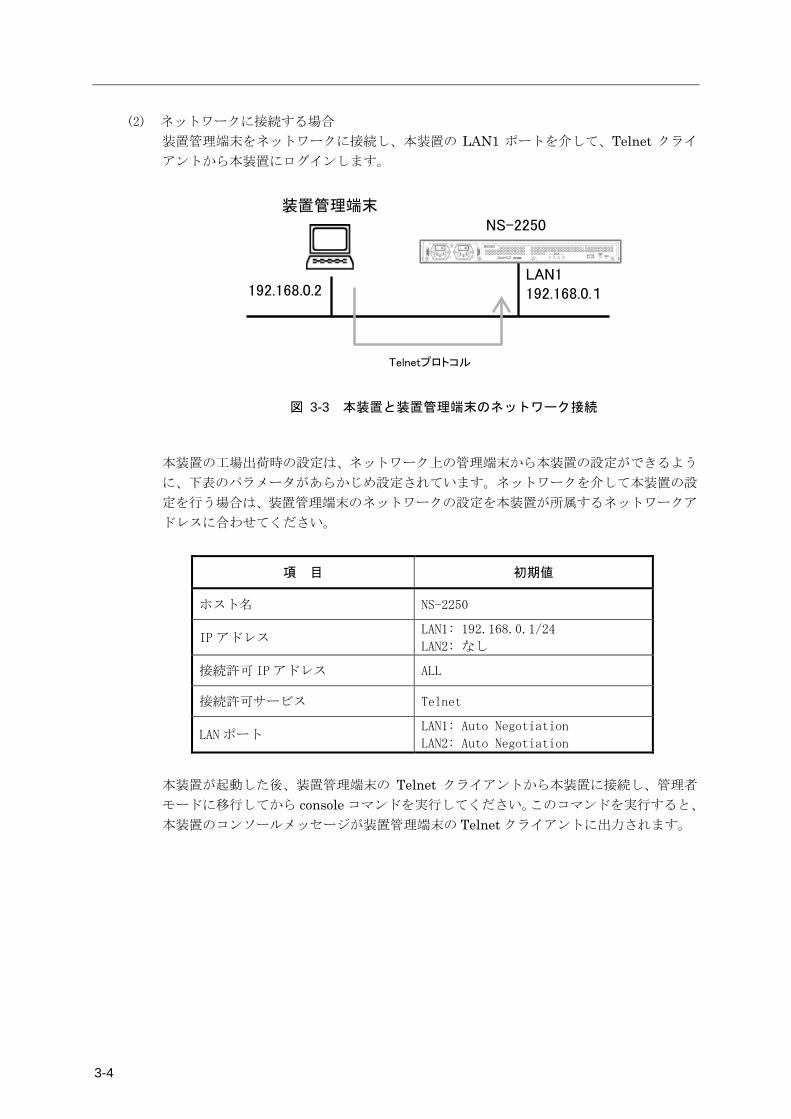
(2) ネットワークに接続する場合
装置管理端末をネットワークに接続し、本装置の LAN1 ポートを介して、Telnet クライ
アントから本装置にログインします。
NS-2250装置管理端末
192.168.0.2
Telnetプロトコル
LAN1192.168.0.1
図 3-3 本装置と装置管理端末のネットワーク接続
本装置の工場出荷時の設定は、ネットワーク上の管理端末から本装置の設定ができるよう
に、下表のパラメータがあらかじめ設定されています。ネットワークを介して本装置の設
定を行う場合は、装置管理端末のネットワークの設定を本装置が所属するネットワークア
ドレスに合わせてください。
項 目 初期値
ホスト名 NS-2250
IP アドレス LAN1: 192.168.0.1/24
LAN2: なし
接続許可 IP アドレス ALL
接続許可サービス Telnet
LAN ポート LAN1: Auto Negotiation
LAN2: Auto Negotiation
本装置が起動した後、装置管理端末の Telnet クライアントから本装置に接続し、管理者
モードに移行してから console コマンドを実行してください。このコマンドを実行すると、
本装置のコンソールメッセージが装置管理端末の Telnet クライアントに出力されます。
3 章 設定の流れ
3-5
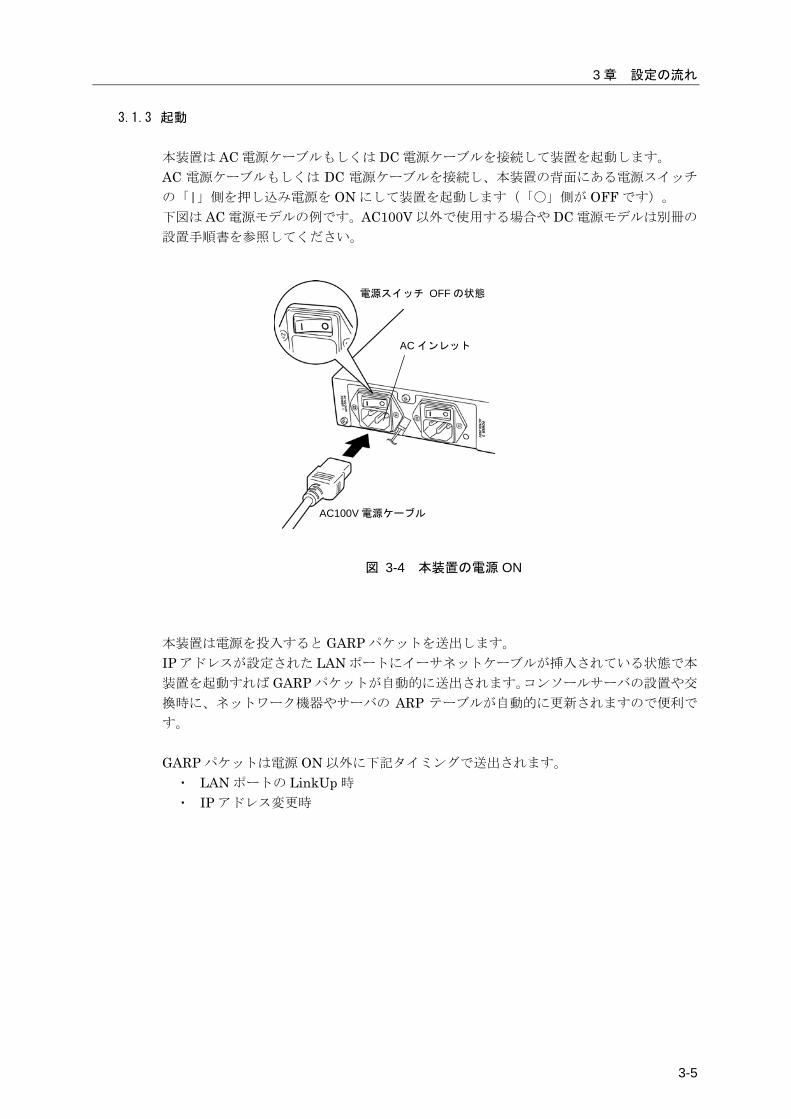
3.1.3 起動 本装置は AC 電源ケーブルもしくは DC 電源ケーブルを接続して装置を起動します。 AC 電源ケーブルもしくは DC 電源ケーブルを接続し、本装置の背面にある電源スイッチ
の「|」側を押し込み電源を ON にして装置を起動します(「〇」側が OFF です)。 下図は AC 電源モデルの例です。AC100V 以外で使用する場合や DC 電源モデルは別冊の
設置手順書を参照してください。
図 3-4 本装置の電源 ON
本装置は電源を投入すると GARP パケットを送出します。 IP アドレスが設定された LAN ポートにイーサネットケーブルが挿入されている状態で本
装置を起動すれば GARP パケットが自動的に送出されます。コンソールサーバの設置や交
換時に、ネットワーク機器やサーバの ARP テーブルが自動的に更新されますので便利で
す。 GARP パケットは電源 ON 以外に下記タイミングで送出されます。
・ LAN ポートの LinkUp 時 ・ IP アドレス変更時
電源スイッチ OFF の状態
AC100V 電源ケーブル
AC インレット
3-6
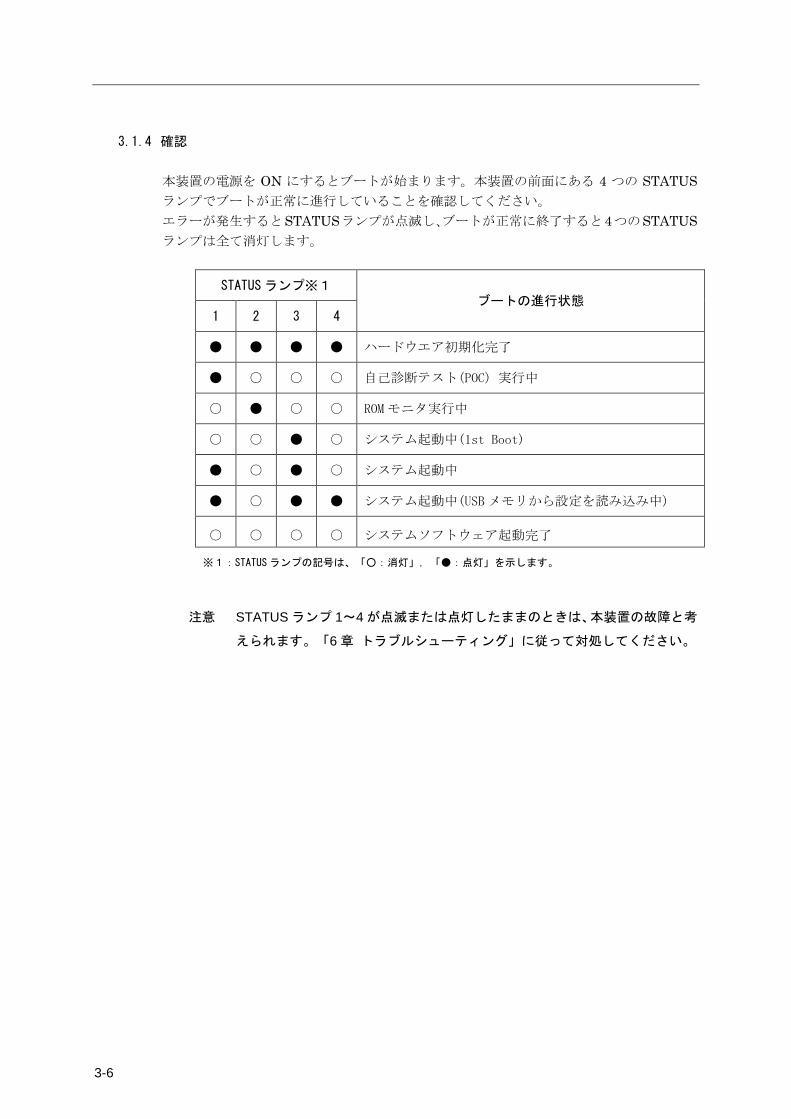
3.1.4 確認 本装置の電源を ON にするとブートが始まります。本装置の前面にある 4 つの STATUSランプでブートが正常に進行していることを確認してください。 エラーが発生するとSTATUSランプが点滅し、ブートが正常に終了すると4つのSTATUSランプは全て消灯します。
STATUS ランプ※1 ブートの進行状態
1 2 3 4
● ● ● ● ハードウエア初期化完了
● ○ ○ ○ 自己診断テスト(POC) 実行中
○ ● ○ ○ ROM モニタ実行中
○ ○ ● ○ システム起動中(1st Boot)
● ○ ● ○ システム起動中
● ○ ● ● システム起動中(USB メモリから設定を読み込み中)
○ ○ ○ ○ システムソフトウェア起動完了
※1:STATUS ランプの記号は、「○:消灯」,「●:点灯」を示します。
注意 STATUS ランプ 1~4 が点滅または点灯したままのときは、本装置の故障と考
えられます。「6 章 トラブルシューティング」に従って対処してください。
3 章 設定の流れ
3-7
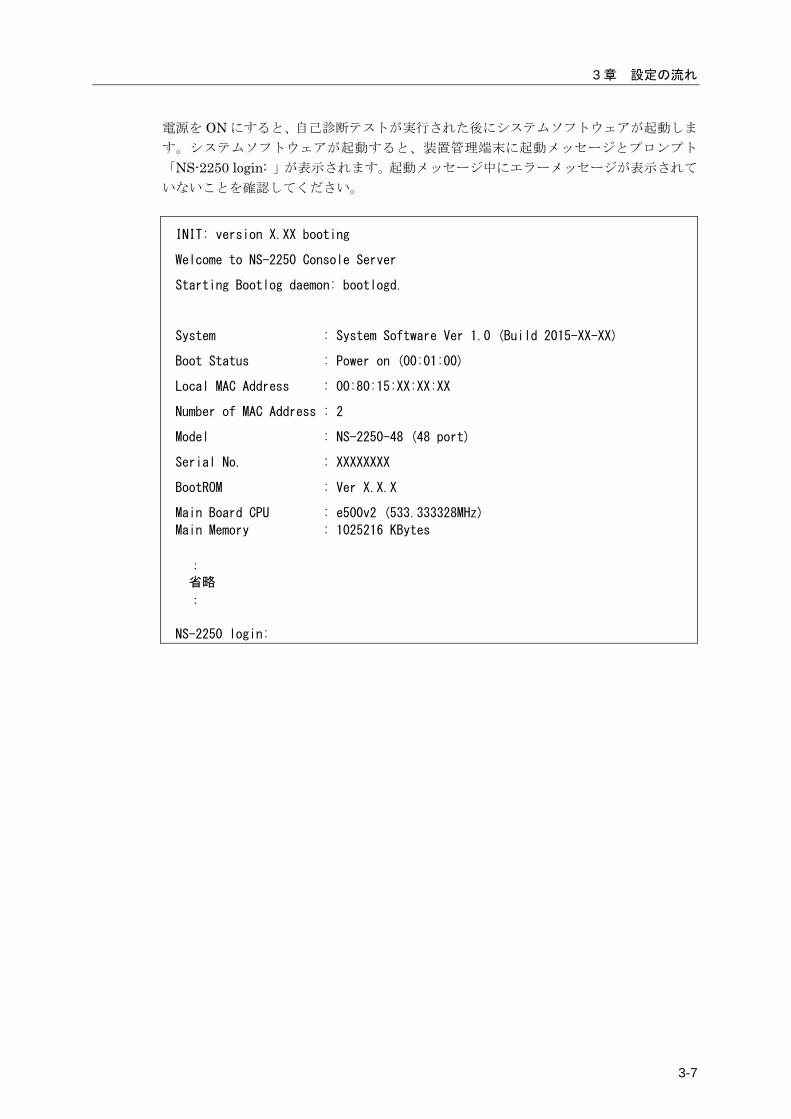
電源を ON にすると、自己診断テストが実行された後にシステムソフトウェアが起動しま
す。システムソフトウェアが起動すると、装置管理端末に起動メッセージとプロンプト
「NS-2250 login: 」が表示されます。起動メッセージ中にエラーメッセージが表示されて
いないことを確認してください。
INIT: version X.XX booting
Welcome to NS-2250 Console Server
Starting Bootlog daemon: bootlogd.
System : System Software Ver 1.0 (Build 2015-XX-XX)
Boot Status : Power on (00:01:00)
Local MAC Address : 00:80:15:XX:XX:XX
Number of MAC Address : 2
Model : NS-2250-48 (48 port)
Serial No. : XXXXXXXX
BootROM : Ver X.X.X
Main Board CPU : e500v2 (533.333328MHz)
Main Memory : 1025216 KBytes
:
省略
:
NS-2250 login:
3-8
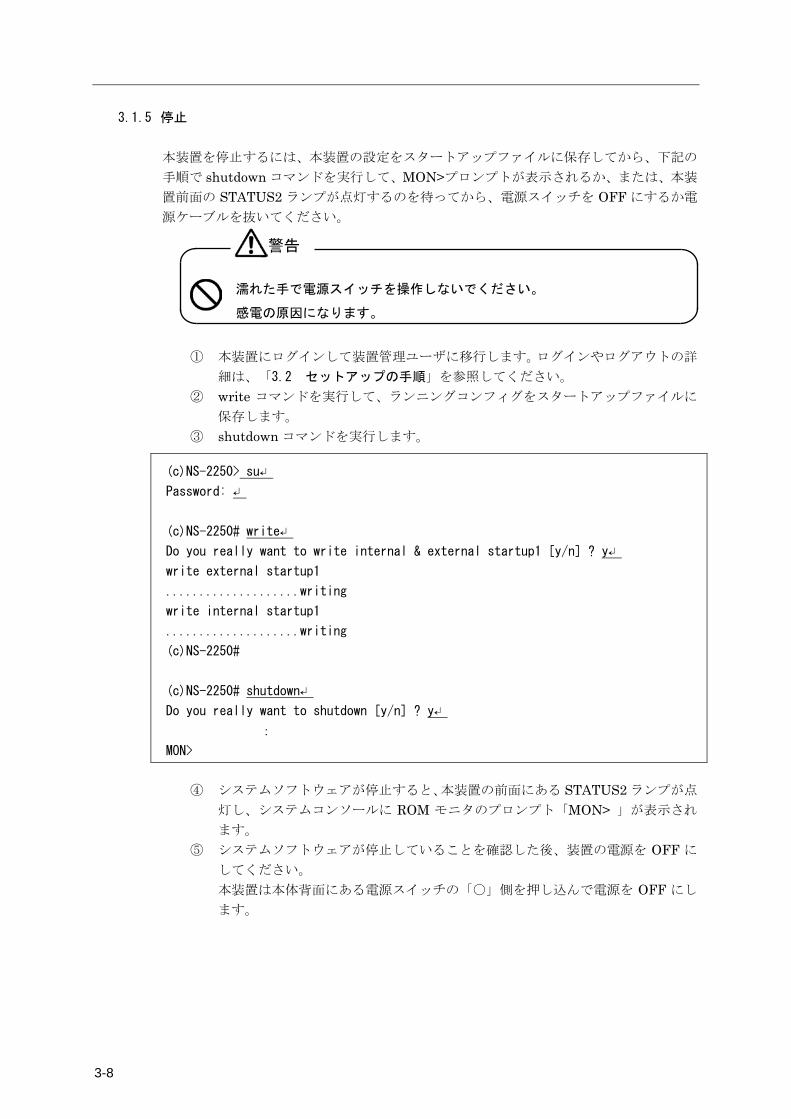
3.1.5 停止 本装置を停止するには、本装置の設定をスタートアップファイルに保存してから、下記の
手順で shutdown コマンドを実行して、MON>プロンプトが表示されるか、または、本装
置前面の STATUS2 ランプが点灯するのを待ってから、電源スイッチを OFF にするか電
源ケーブルを抜いてください。
濡れた手で電源スイッチを操作しないでください。
感電の原因になります。
① 本装置にログインして装置管理ユーザに移行します。ログインやログアウトの詳
細は、「3.2 セットアップの手順」を参照してください。 ② write コマンドを実行して、ランニングコンフィグをスタートアップファイルに
保存します。 ③ shutdown コマンドを実行します。
(c)NS-2250> su↵
Password: ↵
(c)NS-2250# write↵
Do you really want to write internal & external startup1 [y/n] ? y↵
write external startup1
....................writing
write internal startup1
....................writing
(c)NS-2250#
(c)NS-2250# shutdown↵
Do you really want to shutdown [y/n] ? y↵
:
MON>
④ システムソフトウェアが停止すると、本装置の前面にある STATUS2 ランプが点
灯し、システムコンソールに ROM モニタのプロンプト「MON> 」が表示され
ます。 ⑤ システムソフトウェアが停止していることを確認した後、装置の電源を OFF に
してください。 本装置は本体背面にある電源スイッチの「〇」側を押し込んで電源を OFF にし
ます。
警告
3 章 設定の流れ
3-9
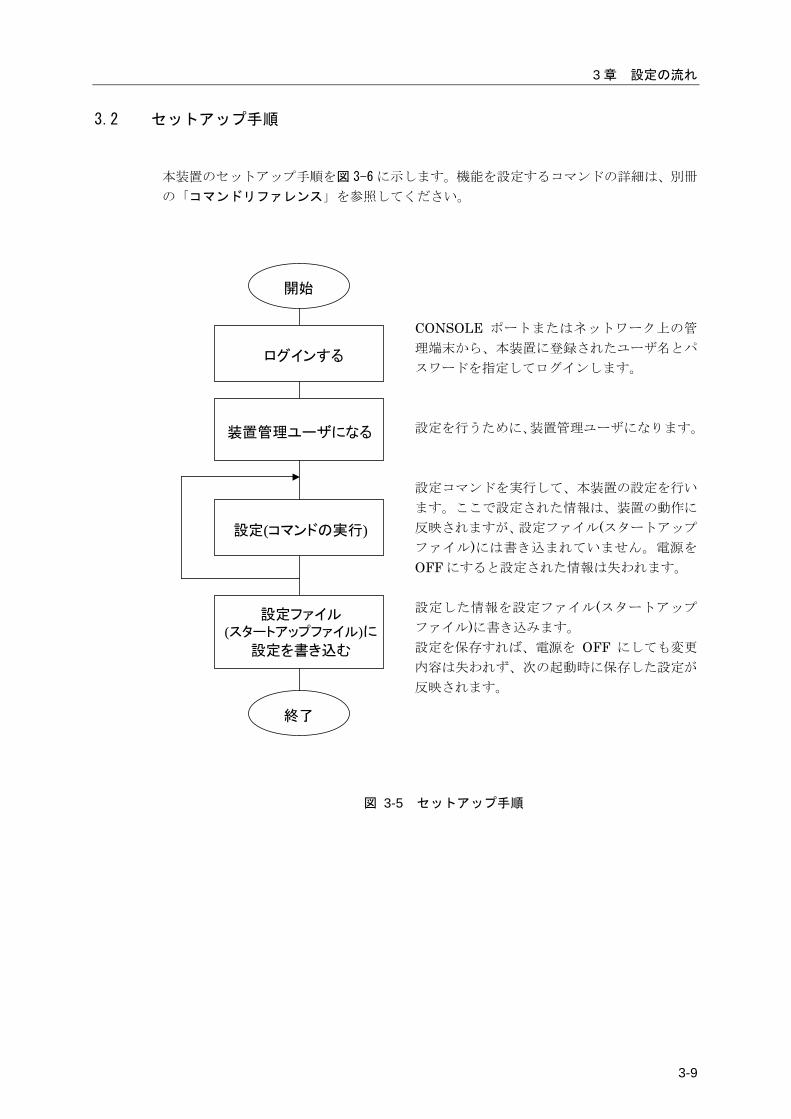
3.2 セットアップ手順
本装置のセットアップ手順を図 3-6 に示します。機能を設定するコマンドの詳細は、別冊
の「コマンドリファレンス」を参照してください。
CONSOLE ポートまたはネットワーク上の管
理端末から、本装置に登録されたユーザ名とパ
スワードを指定してログインします。 設定を行うために、装置管理ユーザになります。
設定コマンドを実行して、本装置の設定を行い
ます。ここで設定された情報は、装置の動作に
反映されますが、設定ファイル(スタートアップ
ファイル)には書き込まれていません。電源を
OFF にすると設定された情報は失われます。 設定した情報を設定ファイル(スタートアップ
ファイル)に書き込みます。 設定を保存すれば、電源を OFF にしても変更
内容は失われず、次の起動時に保存した設定が
反映されます。
図 3-5 セットアップ手順
ログインする
装置管理ユーザになる
設定(コマンドの実行)
設定ファイル(スタートアップファイル)に
設定を書き込む
開始
終了
3-10
3.2.1 ログイン/ログアウト CONSOLE ポートに接続した装置管理端末またはネットワーク上のクライアント端末か
ら本装置にログイン/ログアウトする方法を説明します。
(1) ログイン可能なユーザ
工場出荷時に本装置にログインできるユーザには、一般ユーザ「somebody」と装置管理
ユーザ「root」が登録されています。なお、両ユーザのパスワードは設定されていません。
ユーザ名 グループ名 分類 備 考
root root 装置管理ユーザ 工場出荷時に登録されています。(パスワー
ドは未設定)
装置の設定やメンテナンスのコマンドが実
行できます。
本ユーザは削除できません。
somebody normal 一般ユーザ 工場出荷時に登録されています。(パスワー
ドは未設定)
接続性を確認する ping コマンドなどを実行
することができます。
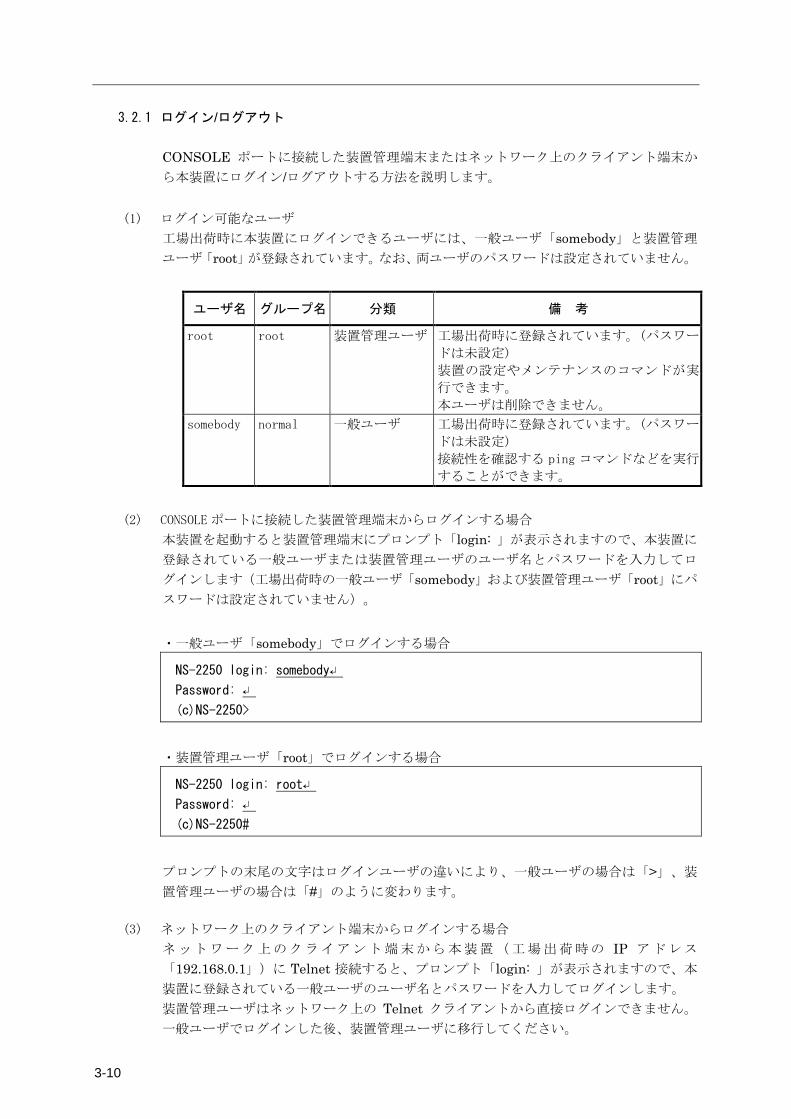
(2) CONSOLE ポートに接続した装置管理端末からログインする場合
本装置を起動すると装置管理端末にプロンプト「login: 」が表示されますので、本装置に
登録されている一般ユーザまたは装置管理ユーザのユーザ名とパスワードを入力してロ
グインします(工場出荷時の一般ユーザ「somebody」および装置管理ユーザ「root」にパ
スワードは設定されていません)。
・一般ユーザ「somebody」でログインする場合
NS-2250 login: somebody↵
Password: ↵
(c)NS-2250>
・装置管理ユーザ「root」でログインする場合
NS-2250 login: root↵
Password: ↵
(c)NS-2250#
プロンプトの末尾の文字はログインユーザの違いにより、一般ユーザの場合は「>」、装
置管理ユーザの場合は「#」のように変わります。
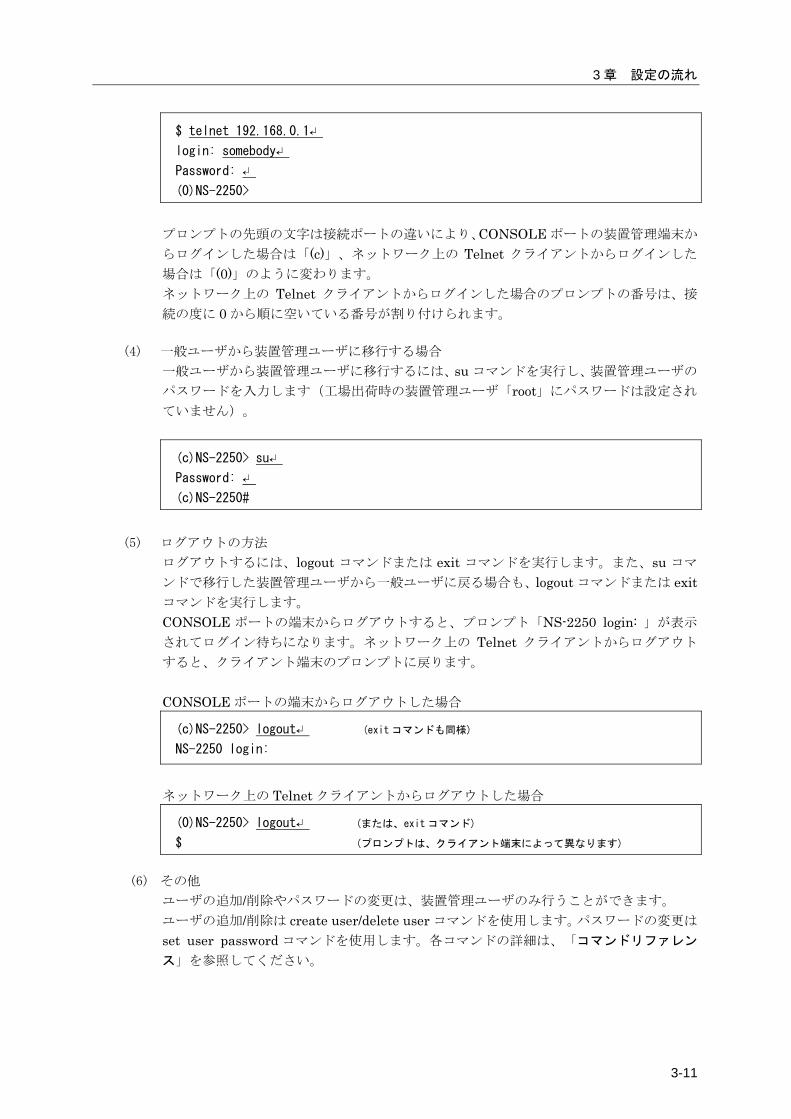
(3) ネットワーク上のクライアント端末からログインする場合
ネットワーク上のクライアント端末から本装置(工場出荷時の IP アドレス
「192.168.0.1」)に Telnet 接続すると、プロンプト「login: 」が表示されますので、本
装置に登録されている一般ユーザのユーザ名とパスワードを入力してログインします。 装置管理ユーザはネットワーク上の Telnet クライアントから直接ログインできません。
一般ユーザでログインした後、装置管理ユーザに移行してください。
3 章 設定の流れ
3-11
$ telnet 192.168.0.1↵
login: somebody↵
Password: ↵
(0)NS-2250>
プロンプトの先頭の文字は接続ポートの違いにより、CONSOLE ポートの装置管理端末か
らログインした場合は「(c)」、ネットワーク上の Telnet クライアントからログインした
場合は「(0)」のように変わります。 ネットワーク上の Telnet クライアントからログインした場合のプロンプトの番号は、接
続の度に 0 から順に空いている番号が割り付けられます。
(4) 一般ユーザから装置管理ユーザに移行する場合
一般ユーザから装置管理ユーザに移行するには、su コマンドを実行し、装置管理ユーザの
パスワードを入力します(工場出荷時の装置管理ユーザ「root」にパスワードは設定され
ていません)。
(c)NS-2250> su↵
Password: ↵
(c)NS-2250#
(5) ログアウトの方法
ログアウトするには、logout コマンドまたは exit コマンドを実行します。また、su コマ
ンドで移行した装置管理ユーザから一般ユーザに戻る場合も、logout コマンドまたは exitコマンドを実行します。 CONSOLE ポートの端末からログアウトすると、プロンプト「NS-2250 login: 」が表示
されてログイン待ちになります。ネットワーク上の Telnet クライアントからログアウト
すると、クライアント端末のプロンプトに戻ります。 CONSOLE ポートの端末からログアウトした場合
(c)NS-2250> logout↵ (exit コマンドも同様)
NS-2250 login:
ネットワーク上の Telnet クライアントからログアウトした場合
(0)NS-2250> logout↵ (または、exit コマンド)
$ (プロンプトは、クライアント端末によって異なります)
(6) その他
ユーザの追加/削除やパスワードの変更は、装置管理ユーザのみ行うことができます。 ユーザの追加/削除は create user/delete user コマンドを使用します。パスワードの変更は
set user password コマンドを使用します。各コマンドの詳細は、「コマンドリファレン
ス」を参照してください。
3-12
3.2.2 CLI の使用方法 本装置の CLI の使用方法を以下に示します。
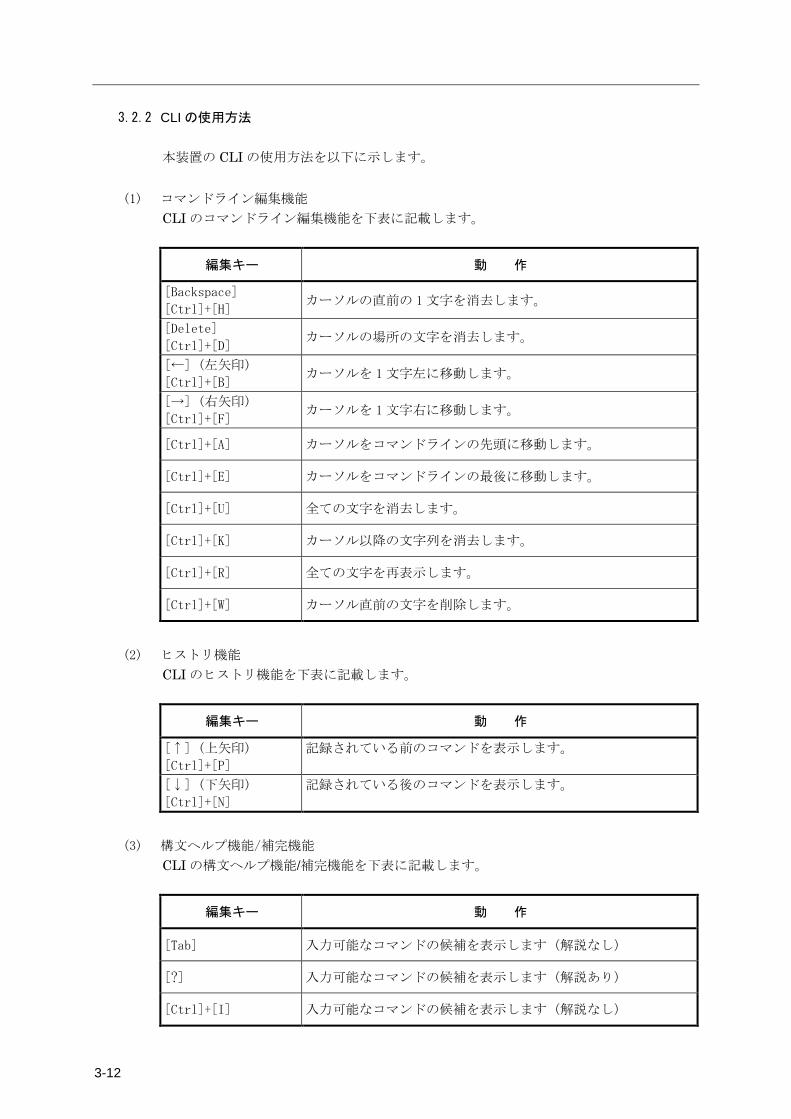
(1) コマンドライン編集機能
CLI のコマンドライン編集機能を下表に記載します。
編集キー 動 作
[Backspace]
[Ctrl]+[H] カーソルの直前の 1 文字を消去します。
[Delete]
[Ctrl]+[D] カーソルの場所の文字を消去します。
[←] (左矢印)
[Ctrl]+[B] カーソルを 1 文字左に移動します。
[→] (右矢印)
[Ctrl]+[F] カーソルを 1 文字右に移動します。
[Ctrl]+[A] カーソルをコマンドラインの先頭に移動します。
[Ctrl]+[E] カーソルをコマンドラインの最後に移動します。
[Ctrl]+[U] 全ての文字を消去します。
[Ctrl]+[K] カーソル以降の文字列を消去します。
[Ctrl]+[R] 全ての文字を再表示します。
[Ctrl]+[W] カーソル直前の文字を削除します。
(2) ヒストリ機能
CLI のヒストリ機能を下表に記載します。
編集キー 動 作
[↑] (上矢印)
[Ctrl]+[P]
記録されている前のコマンドを表示します。
[↓] (下矢印)
[Ctrl]+[N]
記録されている後のコマンドを表示します。
(3) 構文ヘルプ機能/補完機能
CLI の構文ヘルプ機能/補完機能を下表に記載します。
編集キー 動 作
[Tab] 入力可能なコマンドの候補を表示します(解説なし)
[?] 入力可能なコマンドの候補を表示します(解説あり)
[Ctrl]+[I] 入力可能なコマンドの候補を表示します(解説なし)
3 章 設定の流れ
3-13
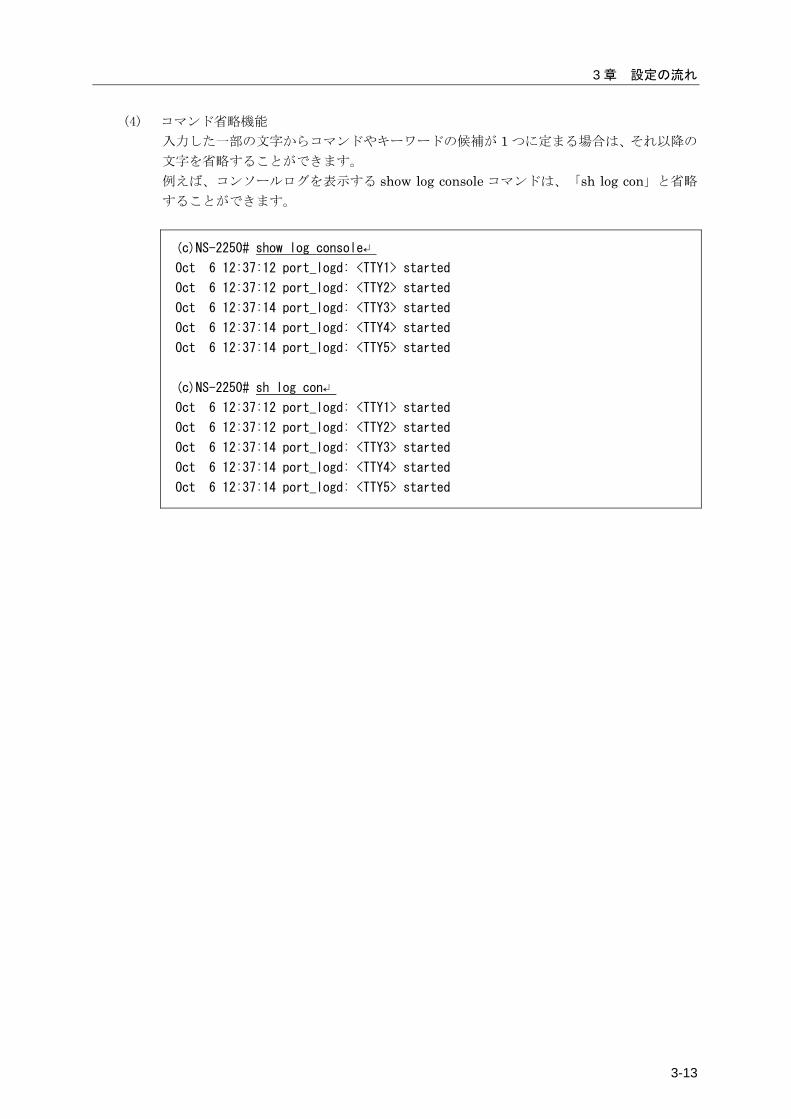
(4) コマンド省略機能
入力した一部の文字からコマンドやキーワードの候補が 1 つに定まる場合は、それ以降の
文字を省略することができます。 例えば、コンソールログを表示する show log console コマンドは、「sh log con」と省略
することができます。
(c)NS-2250# show log console↵
Oct 6 12:37:12 port_logd: <TTY1> started
Oct 6 12:37:12 port_logd: <TTY2> started
Oct 6 12:37:14 port_logd: <TTY3> started
Oct 6 12:37:14 port_logd: <TTY4> started
Oct 6 12:37:14 port_logd: <TTY5> started
(c)NS-2250# sh log con↵
Oct 6 12:37:12 port_logd: <TTY1> started
Oct 6 12:37:12 port_logd: <TTY2> started
Oct 6 12:37:14 port_logd: <TTY3> started
Oct 6 12:37:14 port_logd: <TTY4> started
Oct 6 12:37:14 port_logd: <TTY5> started
3-14
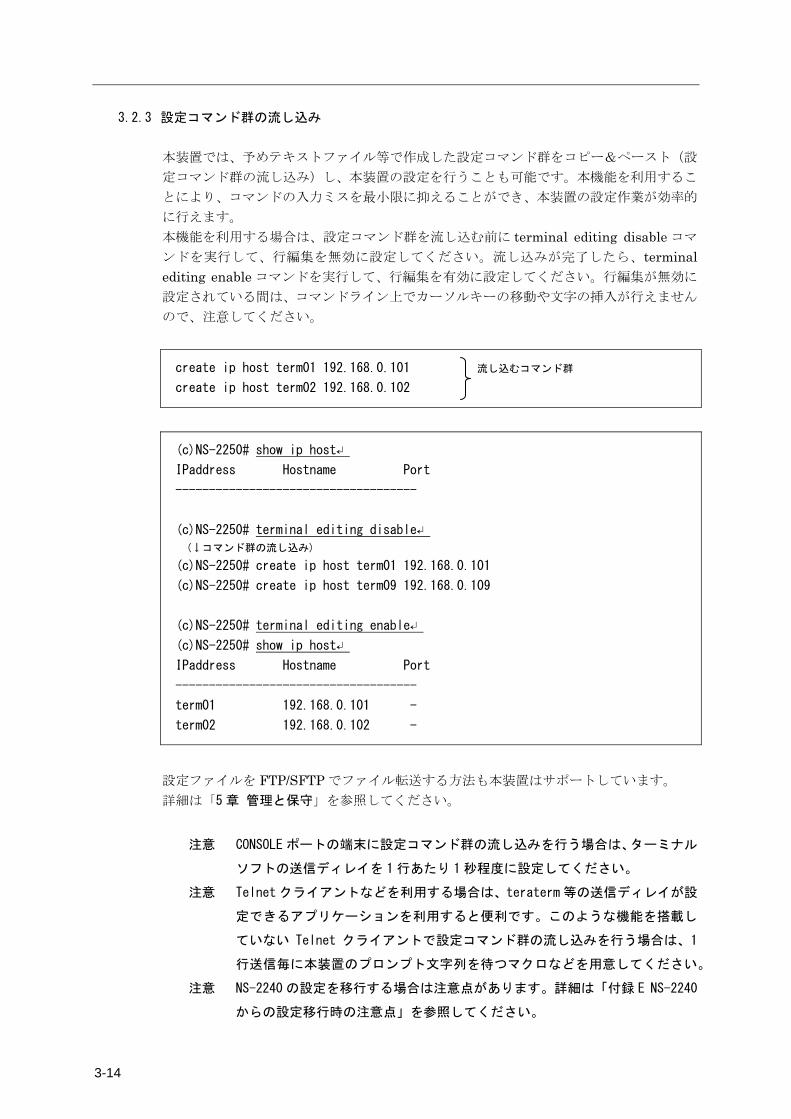
3.2.3 設定コマンド群の流し込み 本装置では、予めテキストファイル等で作成した設定コマンド群をコピー&ペースト(設
定コマンド群の流し込み)し、本装置の設定を行うことも可能です。本機能を利用するこ
とにより、コマンドの入力ミスを最小限に抑えることができ、本装置の設定作業が効率的
に行えます。 本機能を利用する場合は、設定コマンド群を流し込む前に terminal editing disable コマ
ンドを実行して、行編集を無効に設定してください。流し込みが完了したら、terminal editing enable コマンドを実行して、行編集を有効に設定してください。行編集が無効に
設定されている間は、コマンドライン上でカーソルキーの移動や文字の挿入が行えません
ので、注意してください。
create ip host term01 192.168.0.101 流し込むコマンド群
create ip host term02 192.168.0.102
(c)NS-2250# show ip host↵
IPaddress Hostname Port
------------------------------------
(c)NS-2250# terminal editing disable↵
(↓コマンド群の流し込み)
(c)NS-2250# create ip host term01 192.168.0.101
(c)NS-2250# create ip host term09 192.168.0.109
(c)NS-2250# terminal editing enable↵
(c)NS-2250# show ip host↵
IPaddress Hostname Port
------------------------------------
term01 192.168.0.101 -
term02 192.168.0.102 -
設定ファイルを FTP/SFTP でファイル転送する方法も本装置はサポートしています。 詳細は「5 章 管理と保守」を参照してください。
注意 CONSOLE ポートの端末に設定コマンド群の流し込みを行う場合は、ターミナル
ソフトの送信ディレイを 1 行あたり 1 秒程度に設定してください。
注意 Telnet クライアントなどを利用する場合は、teraterm 等の送信ディレイが設
定できるアプリケーションを利用すると便利です。このような機能を搭載し
ていない Telnet クライアントで設定コマンド群の流し込みを行う場合は、1
行送信毎に本装置のプロンプト文字列を待つマクロなどを用意してください。
注意 NS-2240 の設定を移行する場合は注意点があります。詳細は「付録 E NS-2240
からの設定移行時の注意点」を参照してください。
3 章 設定の流れ
3-15
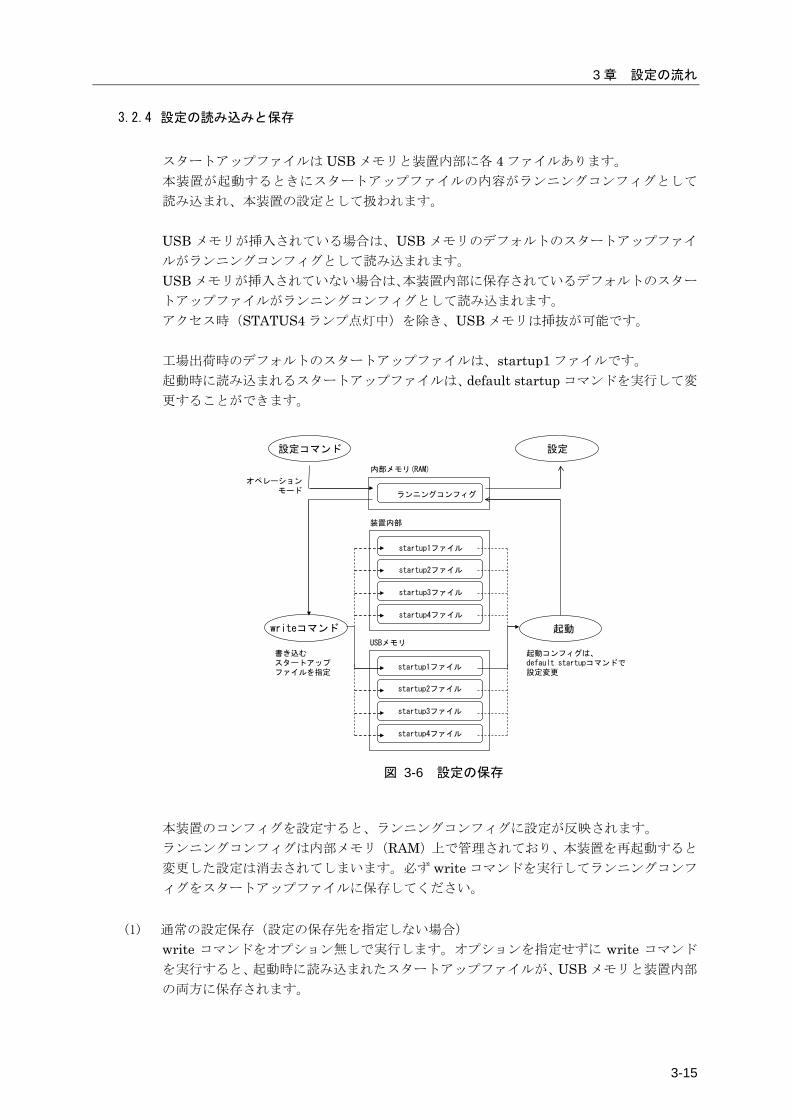
3.2.4 設定の読み込みと保存
スタートアップファイルは USB メモリと装置内部に各 4 ファイルあります。 本装置が起動するときにスタートアップファイルの内容がランニングコンフィグとして
読み込まれ、本装置の設定として扱われます。 USB メモリが挿入されている場合は、USB メモリのデフォルトのスタートアップファイ
ルがランニングコンフィグとして読み込まれます。 USB メモリが挿入されていない場合は、本装置内部に保存されているデフォルトのスター
トアップファイルがランニングコンフィグとして読み込まれます。 アクセス時(STATUS4 ランプ点灯中)を除き、USB メモリは挿抜が可能です。 工場出荷時のデフォルトのスタートアップファイルは、startup1 ファイルです。 起動時に読み込まれるスタートアップファイルは、default startup コマンドを実行して変
更することができます。
設定コマンド
ランニングコンフィグ
内部メモリ(RAM)
writeコマンド
設定
startup1ファイル
startup2ファイル
startup3ファイル
startup4ファイル
起動
オペレーションモード
書き込むスタートアップファイルを指定
装置内部
USBメモリ
起動コンフィグは、default startupコマンドで設定変更
startup1ファイル
startup2ファイル
startup3ファイル
startup4ファイル
図 3-6 設定の保存
本装置のコンフィグを設定すると、ランニングコンフィグに設定が反映されます。 ランニングコンフィグは内部メモリ(RAM)上で管理されており、本装置を再起動すると
変更した設定は消去されてしまいます。必ず write コマンドを実行してランニングコンフ
ィグをスタートアップファイルに保存してください。
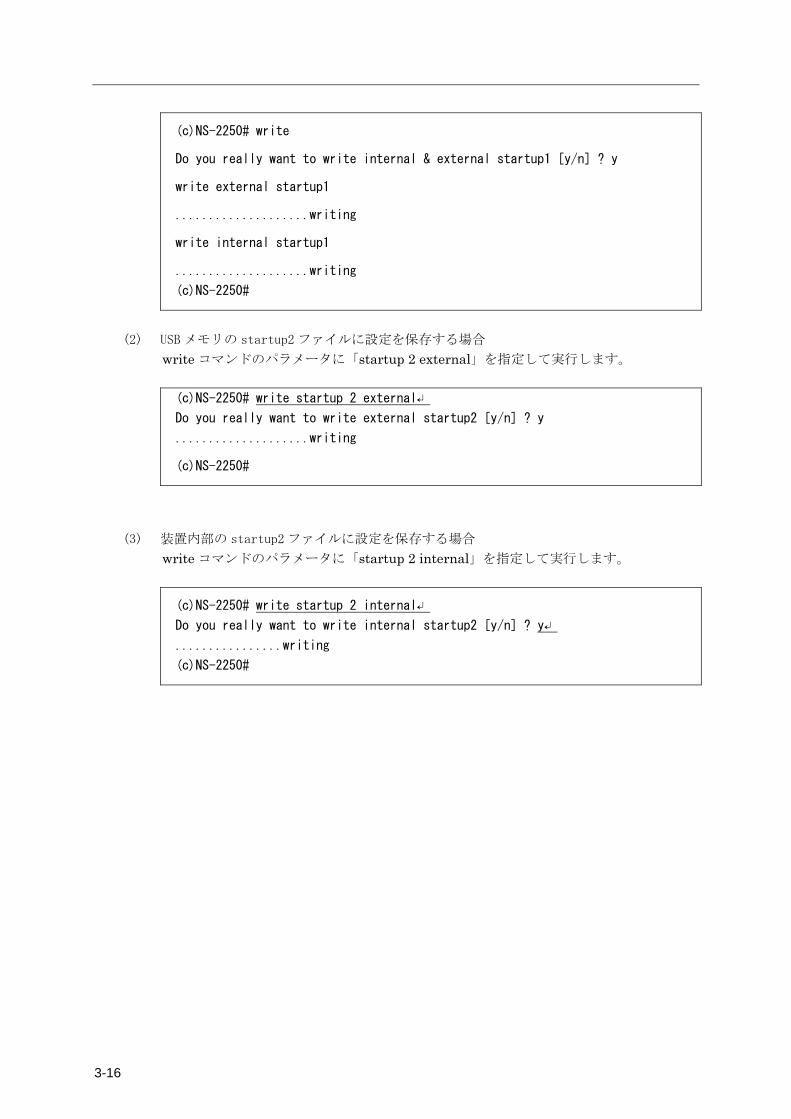
(1) 通常の設定保存(設定の保存先を指定しない場合)
write コマンドをオプション無しで実行します。オプションを指定せずに write コマンド
を実行すると、起動時に読み込まれたスタートアップファイルが、USB メモリと装置内部
の両方に保存されます。
3-16
(c)NS-2250# write
Do you really want to write internal & external startup1 [y/n] ? y
write external startup1
....................writing
write internal startup1
....................writing
(c)NS-2250#
(2) USB メモリの startup2 ファイルに設定を保存する場合
write コマンドのパラメータに「startup 2 external」を指定して実行します。
(c)NS-2250# write startup 2 external↵
Do you really want to write external startup2 [y/n] ? y
....................writing
(c)NS-2250#
(3) 装置内部の startup2 ファイルに設定を保存する場合
write コマンドのパラメータに「startup 2 internal」を指定して実行します。
(c)NS-2250# write startup 2 internal↵
Do you really want to write internal startup2 [y/n] ? y↵
................writing
(c)NS-2250#
3 章 設定の流れ
3-17
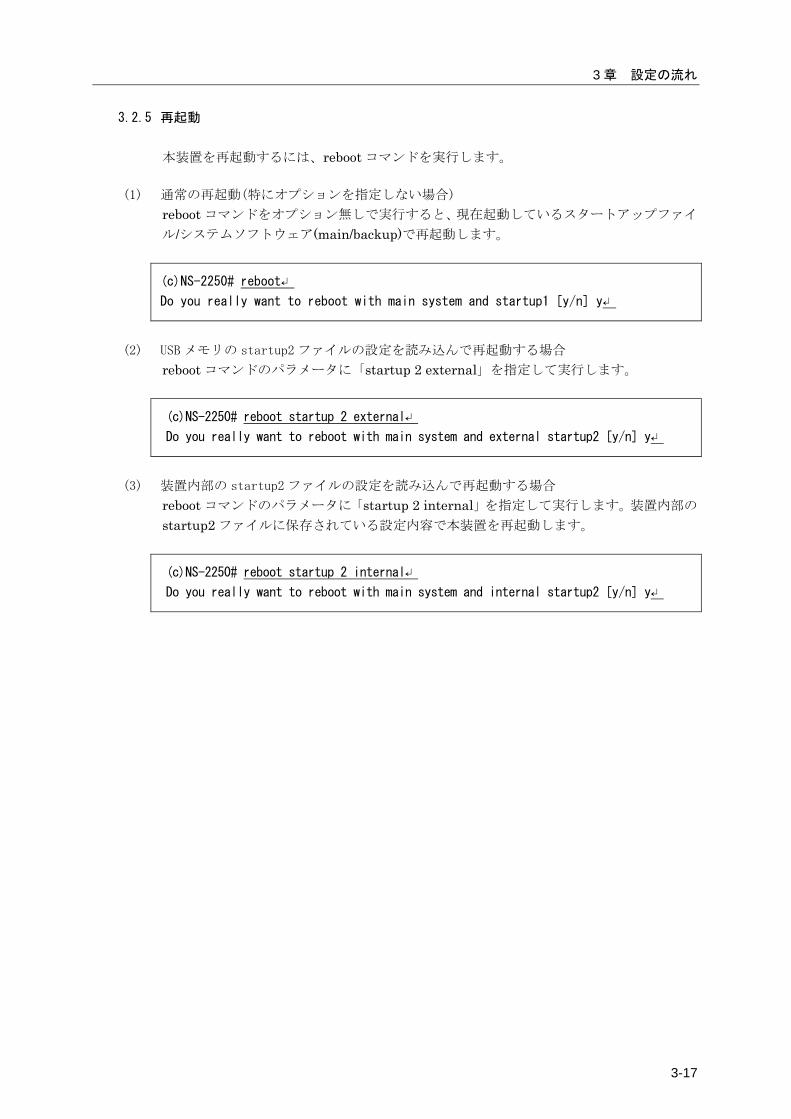
3.2.5 再起動 本装置を再起動するには、reboot コマンドを実行します。
(1) 通常の再起動(特にオプションを指定しない場合)
reboot コマンドをオプション無しで実行すると、現在起動しているスタートアップファイ
ル/システムソフトウェア(main/backup)で再起動します。
(c)NS-2250# reboot↵
Do you really want to reboot with main system and startup1 [y/n] y↵
(2) USB メモリの startup2 ファイルの設定を読み込んで再起動する場合
reboot コマンドのパラメータに「startup 2 external」を指定して実行します。
(c)NS-2250# reboot startup 2 external↵
Do you really want to reboot with main system and external startup2 [y/n] y↵
(3) 装置内部の startup2 ファイルの設定を読み込んで再起動する場合
reboot コマンドのパラメータに「startup 2 internal」を指定して実行します。装置内部の
startup2 ファイルに保存されている設定内容で本装置を再起動します。
(c)NS-2250# reboot startup 2 internal↵
Do you really want to reboot with main system and internal startup2 [y/n] y↵


4-1
4 章 各種設定
4 章では、本装置の機能の設定について説明しています。 作業を始める前に必ずお読みください。 本章の内容
4.1 ネットワークの設定
4.1.1 本装置のホスト名/IP アドレスの変更
4.1.2 スタティックルーティングの設定
4.1.3 DNS クライアントの設定
4.2 CONSOLE ポートの設定
4.3 シリアルポートの設定
4.4 ポートサーバの設定
4.4.1 接続モードの設定(セレクトモード/ダイレクトモード)
4.4.2 ポートサーバメニューの表示
4.4.3 ポートサーバのユーザ認証(ポートユーザ認証)
4.4.4 ポートサーバのアクセス制限(接続プロトコルと接続モード)
4.4.5 ポートサーバの複数セッション接続
4.4.6 ポートサーバ(ダイレクトモード)の受信ポート番号の変更
4.4.7 ポートユーザの追加
4.4.8 シリアルポートのラベリング設定
4.4.9 ポートサーバのセッション自動切断機能の設定
4.4.10 その他のポートサーバ機能の設定
4.5 ポートログの設定
4.5.1 ポートログ機能の実行と停止
4.5.2 ポートログ容量の設定
4.5.3 タイムスタンプの設定
4.5.4 ログインスタンプの設定
4.5.5 メール送信の設定
4.5.6 FTP 送信の設定
4.5.7 SYSLOG 送信の設定
4.5.8 NFS 送信の設定
4.5.9 ポートログ設定の確認
4.6 セキュリティの設定
4-2
4.6.1 ユーザの登録と削除
4.6.2 ユーザパスワードの設定
4.6.3 RADIUS 認証機能/RADIUS アカウント機能の設定
4.6.4 TACACS+機能の設定
4.6.5 TELNET サーバの設定
4.6.6 SSH サーバの設定
4.6.7 各種サーバのアクセス制限
4.7 運用管理の設定
4.7.1 SNTP クライアントの設定
4.7.2 SNMP エージェントの設定
4.7.3 SYSLOG クライアントの設定
4.7.4 温度センサの設定
4.7.5 タイムゾーンの設定
4.8 設定事例
4.8.1 基本設定
4.8.2 各種サービスの設定
4.8.3 ポートログの転送設定
4.8.4 ポートログ保存先と保存容量の変更
4.8.5 ポートログの保存機能の停止とポートサーバメニュー表示の抑止
4.8.6 ポートユーザ認証
4.8.7 SSH パスワード(Basic)認証
4.8.8 SSH 公開鍵(Public)認証
4.8.9 ポートセレクト機能(ポートサーバのセレクトモード)の設定
4.8.10 RADIUS 機能の設定(基本設定)
4.8.11 RADIUS 機能の設定(応用設定 1:filter_id_head)
4.8.12 RADIUS 機能の設定(応用設定 2:アクセスグルーピング機能)
4.8.13 TACACS+機能の設定(基本設定)
4.8.14 TACACS+機能の設定(応用設定:アクセスグルーピング機能)
4.8.15 LAN 冗長機能の設定(2 つの LAN ポートを異なるセグメントで利用)
4.8.16 LAN 冗長機能の設定(ボンディング機能)
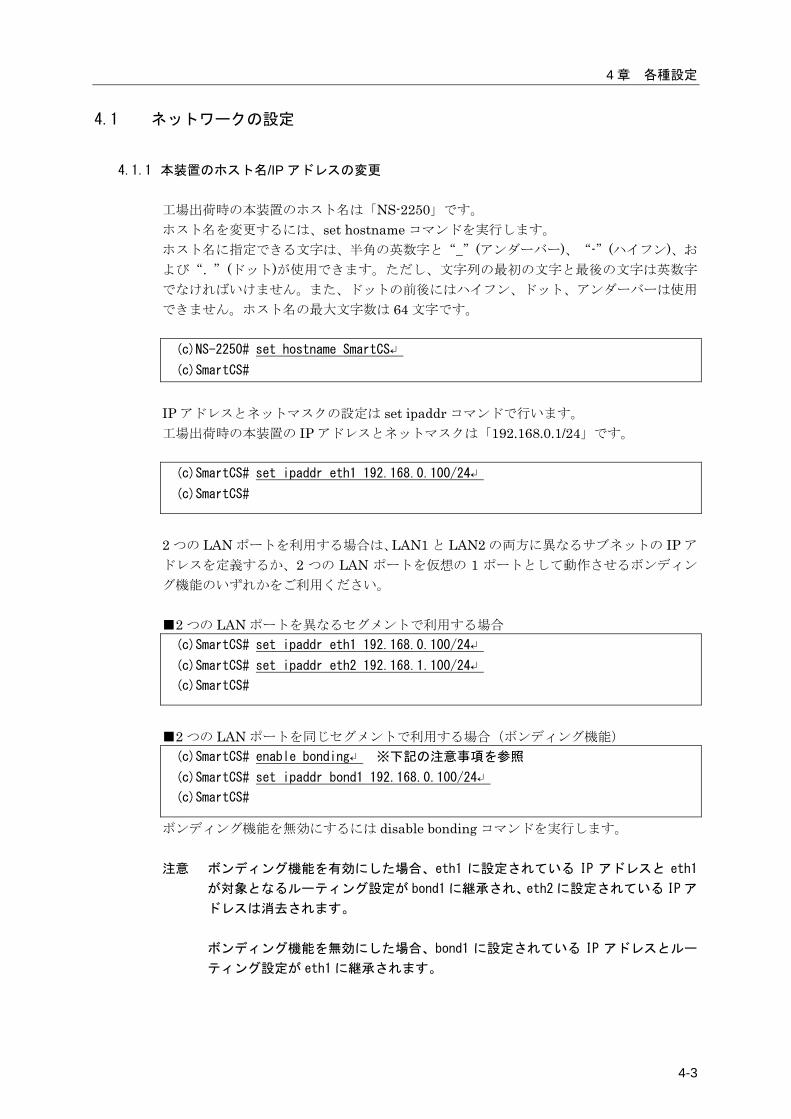
4 章 各種設定
4-3
4.1 ネットワークの設定
4.1.1 本装置のホスト名/IP アドレスの変更 工場出荷時の本装置のホスト名は「NS-2250」です。 ホスト名を変更するには、set hostname コマンドを実行します。 ホスト名に指定できる文字は、半角の英数字と“_”(アンダーバー)、“-”(ハイフン)、お
よび“. ”(ドット)が使用できます。ただし、文字列の最初の文字と最後の文字は英数字
でなければいけません。また、ドットの前後にはハイフン、ドット、アンダーバーは使用
できません。ホスト名の最大文字数は 64 文字です。 (c)NS-2250# set hostname SmartCS↵
(c)SmartCS#
IP アドレスとネットマスクの設定は set ipaddr コマンドで行います。 工場出荷時の本装置の IP アドレスとネットマスクは「192.168.0.1/24」です。 (c)SmartCS# set ipaddr eth1 192.168.0.100/24↵
(c)SmartCS#
2 つの LAN ポートを利用する場合は、LAN1 と LAN2 の両方に異なるサブネットの IP ア
ドレスを定義するか、2 つの LAN ポートを仮想の 1 ポートとして動作させるボンディン
グ機能のいずれかをご利用ください。 ■2 つの LAN ポートを異なるセグメントで利用する場合 (c)SmartCS# set ipaddr eth1 192.168.0.100/24↵
(c)SmartCS# set ipaddr eth2 192.168.1.100/24↵
(c)SmartCS#
■2 つの LAN ポートを同じセグメントで利用する場合(ボンディング機能) (c)SmartCS# enable bonding↵ ※下記の注意事項を参照
(c)SmartCS# set ipaddr bond1 192.168.0.100/24↵
(c)SmartCS#
ボンディング機能を無効にするには disable bonding コマンドを実行します。 注意 ボンディング機能を有効にした場合、eth1 に設定されている IP アドレスと eth1
が対象となるルーティング設定が bond1 に継承され、eth2 に設定されている IP ア
ドレスは消去されます。
ボンディング機能を無効にした場合、bond1 に設定されている IP アドレスとルー
ティング設定が eth1 に継承されます。
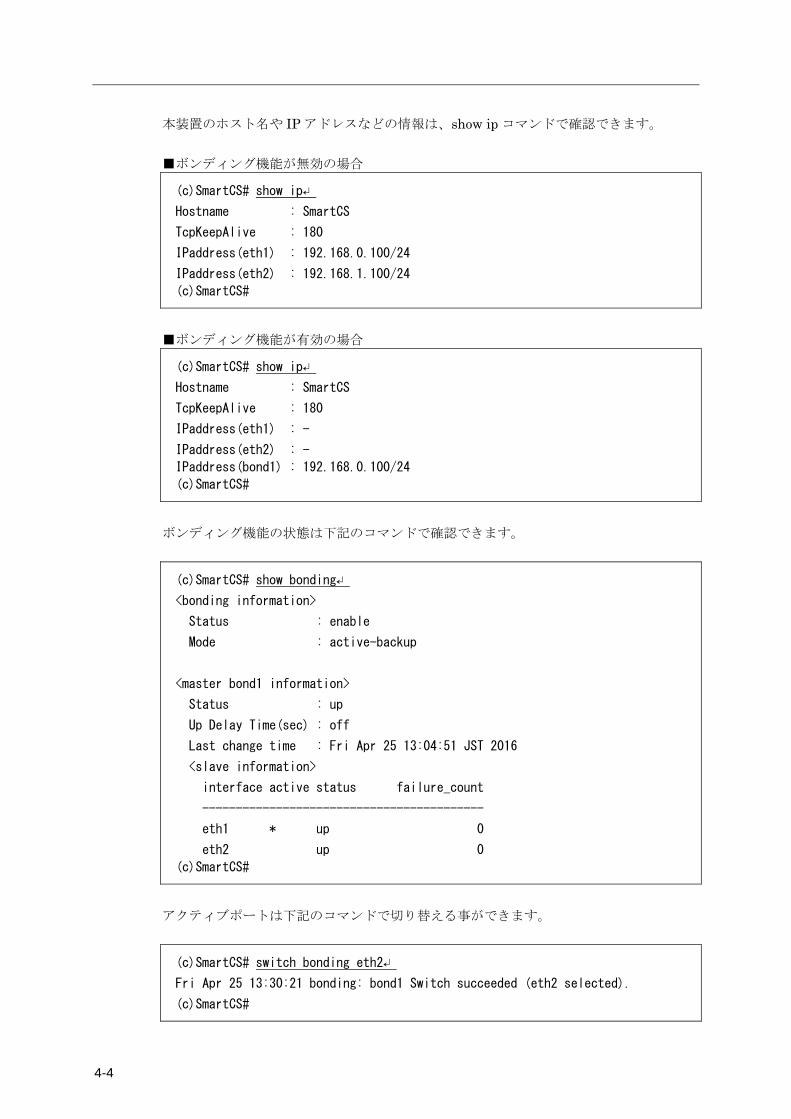
4-4
本装置のホスト名や IP アドレスなどの情報は、show ip コマンドで確認できます。 ■ボンディング機能が無効の場合
(c)SmartCS# show ip↵
Hostname : SmartCS
TcpKeepAlive : 180
IPaddress(eth1) : 192.168.0.100/24
IPaddress(eth2) : 192.168.1.100/24
(c)SmartCS#
■ボンディング機能が有効の場合
(c)SmartCS# show ip↵
Hostname : SmartCS
TcpKeepAlive : 180
IPaddress(eth1) : -
IPaddress(eth2) : -
IPaddress(bond1) : 192.168.0.100/24
(c)SmartCS#
ボンディング機能の状態は下記のコマンドで確認できます。
(c)SmartCS# show bonding↵
<bonding information>
Status : enable
Mode : active-backup
<master bond1 information>
Status : up
Up Delay Time(sec) : off
Last change time : Fri Apr 25 13:04:51 JST 2016
<slave information>
interface active status failure_count
------------------------------------------
eth1 * up 0
eth2 up 0
(c)SmartCS#
アクティブポートは下記のコマンドで切り替える事ができます。
(c)SmartCS# switch bonding eth2↵
Fri Apr 25 13:30:21 bonding: bond1 Switch succeeded (eth2 selected).
(c)SmartCS#
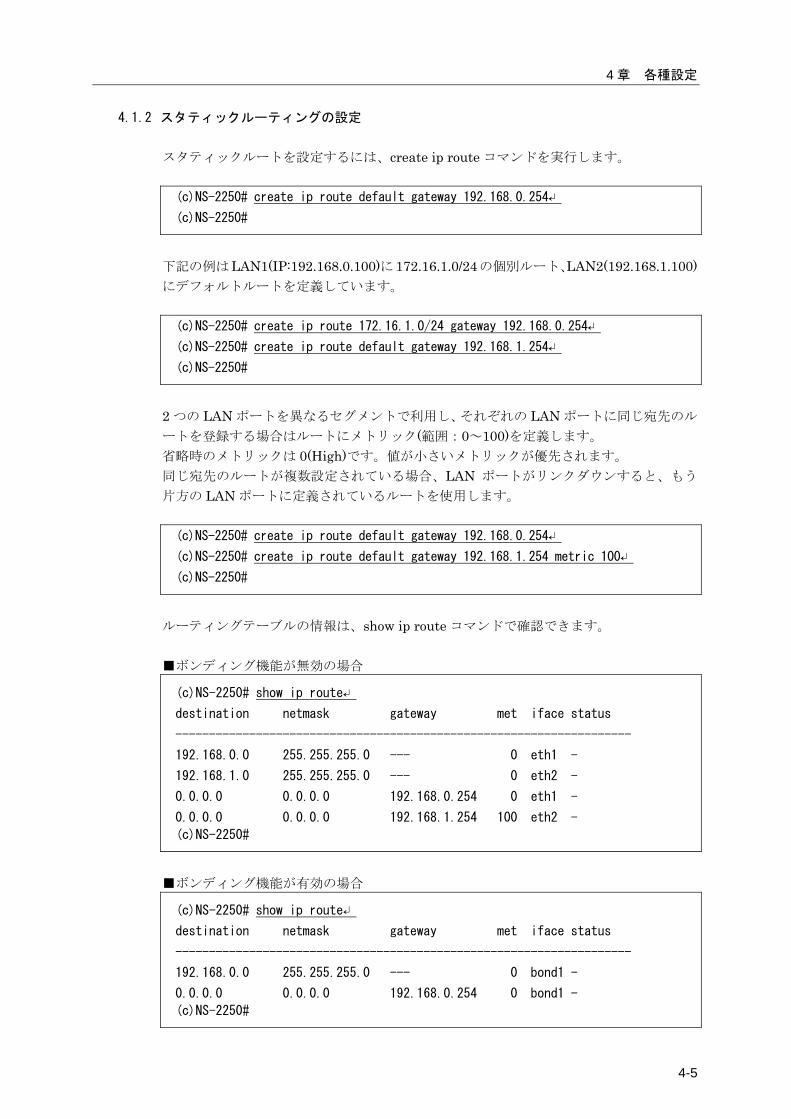
4 章 各種設定
4-5
4.1.2 スタティックルーティングの設定 スタティックルートを設定するには、create ip route コマンドを実行します。 (c)NS-2250# create ip route default gateway 192.168.0.254↵
(c)NS-2250#
下記の例はLAN1(IP:192.168.0.100)に172.16.1.0/24の個別ルート、LAN2(192.168.1.100)にデフォルトルートを定義しています。 (c)NS-2250# create ip route 172.16.1.0/24 gateway 192.168.0.254↵
(c)NS-2250# create ip route default gateway 192.168.1.254↵
(c)NS-2250#
2 つの LAN ポートを異なるセグメントで利用し、それぞれの LAN ポートに同じ宛先のル
ートを登録する場合はルートにメトリック(範囲:0~100)を定義します。 省略時のメトリックは 0(High)です。値が小さいメトリックが優先されます。 同じ宛先のルートが複数設定されている場合、LAN ポートがリンクダウンすると、もう
片方の LAN ポートに定義されているルートを使用します。 (c)NS-2250# create ip route default gateway 192.168.0.254↵
(c)NS-2250# create ip route default gateway 192.168.1.254 metric 100↵
(c)NS-2250#
ルーティングテーブルの情報は、show ip route コマンドで確認できます。 ■ボンディング機能が無効の場合
(c)NS-2250# show ip route↵
destination netmask gateway met iface status
--------------------------------------------------------------------
192.168.0.0 255.255.255.0 --- 0 eth1 -
192.168.1.0 255.255.255.0 --- 0 eth2 -
0.0.0.0 0.0.0.0 192.168.0.254 0 eth1 -
0.0.0.0 0.0.0.0 192.168.1.254 100 eth2 -
(c)NS-2250#
■ボンディング機能が有効の場合
(c)NS-2250# show ip route↵
destination netmask gateway met iface status
--------------------------------------------------------------------
192.168.0.0 255.255.255.0 --- 0 bond1 -
0.0.0.0 0.0.0.0 192.168.0.254 0 bond1 -
(c)NS-2250#

4-6
4.1.3 DNS クライアントの設定 DNS クライアントを設定するには、set dns コマンド、set dns localdomain コマンドを実
行します。 (c)NS-2250# set dns 1 192.168.0.21↵
(c)NS-2250# set dns localdomain example.co.jp↵
(c)NS-2250#
DNS クライアントの情報は、show dns コマンドで確認することができます。
(c)NS-2250# show dns↵
Local Domain:example.co.jp
No. DNS Server
--------------------
1 192.168.0.21
2 -
(c)NS-2250#
注意 DNS クライアントの設定を行うと、DNS サーバの状態によってはパフォーマンス
が低下することがあります。ポートログ転送が頻繁に行われる環境では、各種サー
バ(Mail/FTP/Syslog)の名前を DNS サーバで解決させずに、IP アドレスを指定して
設定されることを推奨いたします。
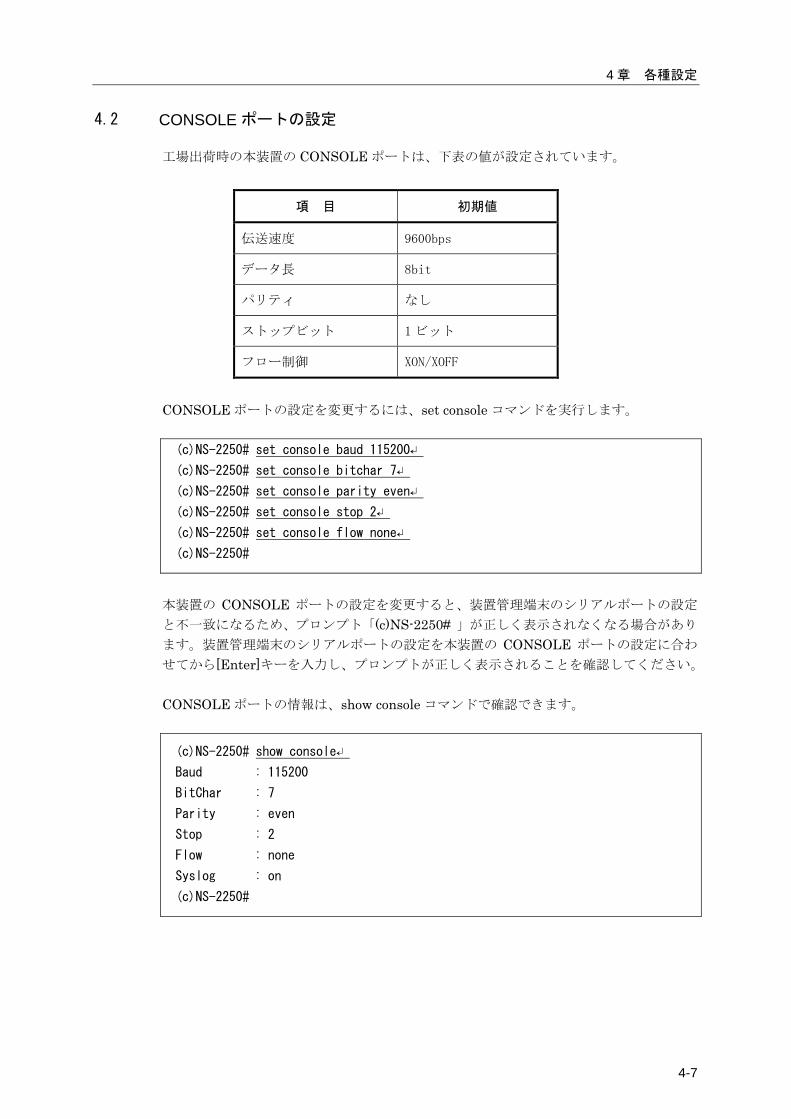
4 章 各種設定
4-7
4.2 CONSOLE ポートの設定
工場出荷時の本装置の CONSOLE ポートは、下表の値が設定されています。
項 目 初期値
伝送速度 9600bps
データ長 8bit
パリティ なし
ストップビット 1 ビット
フロー制御 XON/XOFF
CONSOLE ポートの設定を変更するには、set console コマンドを実行します。 (c)NS-2250# set console baud 115200↵
(c)NS-2250# set console bitchar 7↵
(c)NS-2250# set console parity even↵
(c)NS-2250# set console stop 2↵
(c)NS-2250# set console flow none↵
(c)NS-2250#
本装置の CONSOLE ポートの設定を変更すると、装置管理端末のシリアルポートの設定
と不一致になるため、プロンプト「(c)NS-2250# 」が正しく表示されなくなる場合があり
ます。装置管理端末のシリアルポートの設定を本装置の CONSOLE ポートの設定に合わ
せてから[Enter]キーを入力し、プロンプトが正しく表示されることを確認してください。 CONSOLE ポートの情報は、show console コマンドで確認できます。
(c)NS-2250# show console↵
Baud : 115200
BitChar : 7
Parity : even
Stop : 2
Flow : none
Syslog : on
(c)NS-2250#
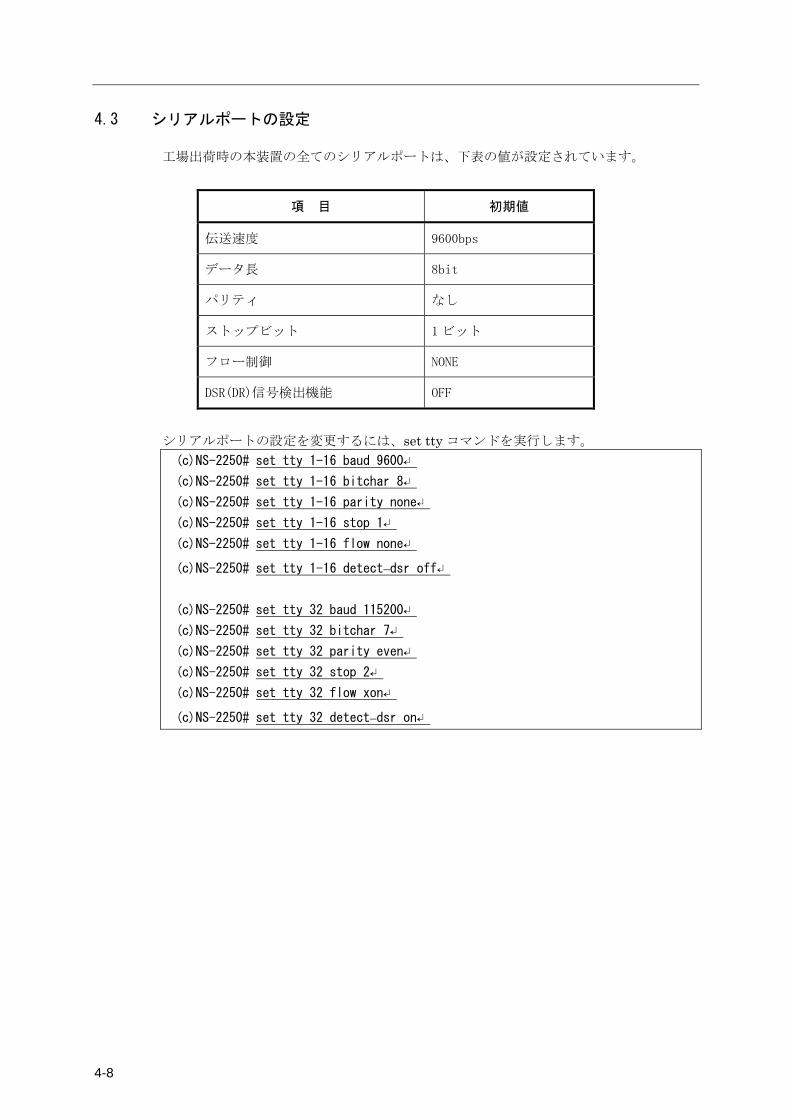
4-8
4.3 シリアルポートの設定
工場出荷時の本装置の全てのシリアルポートは、下表の値が設定されています。
項 目 初期値
伝送速度 9600bps
データ長 8bit
パリティ なし
ストップビット 1 ビット
フロー制御 NONE
DSR(DR)信号検出機能 OFF
シリアルポートの設定を変更するには、set tty コマンドを実行します。 (c)NS-2250# set tty 1-16 baud 9600↵
(c)NS-2250# set tty 1-16 bitchar 8↵
(c)NS-2250# set tty 1-16 parity none↵
(c)NS-2250# set tty 1-16 stop 1↵
(c)NS-2250# set tty 1-16 flow none↵
(c)NS-2250# set tty 1-16 detect_dsr off↵
(c)NS-2250# set tty 32 baud 115200↵
(c)NS-2250# set tty 32 bitchar 7↵
(c)NS-2250# set tty 32 parity even↵
(c)NS-2250# set tty 32 stop 2↵
(c)NS-2250# set tty 32 flow xon↵
(c)NS-2250# set tty 32 detect_dsr on↵
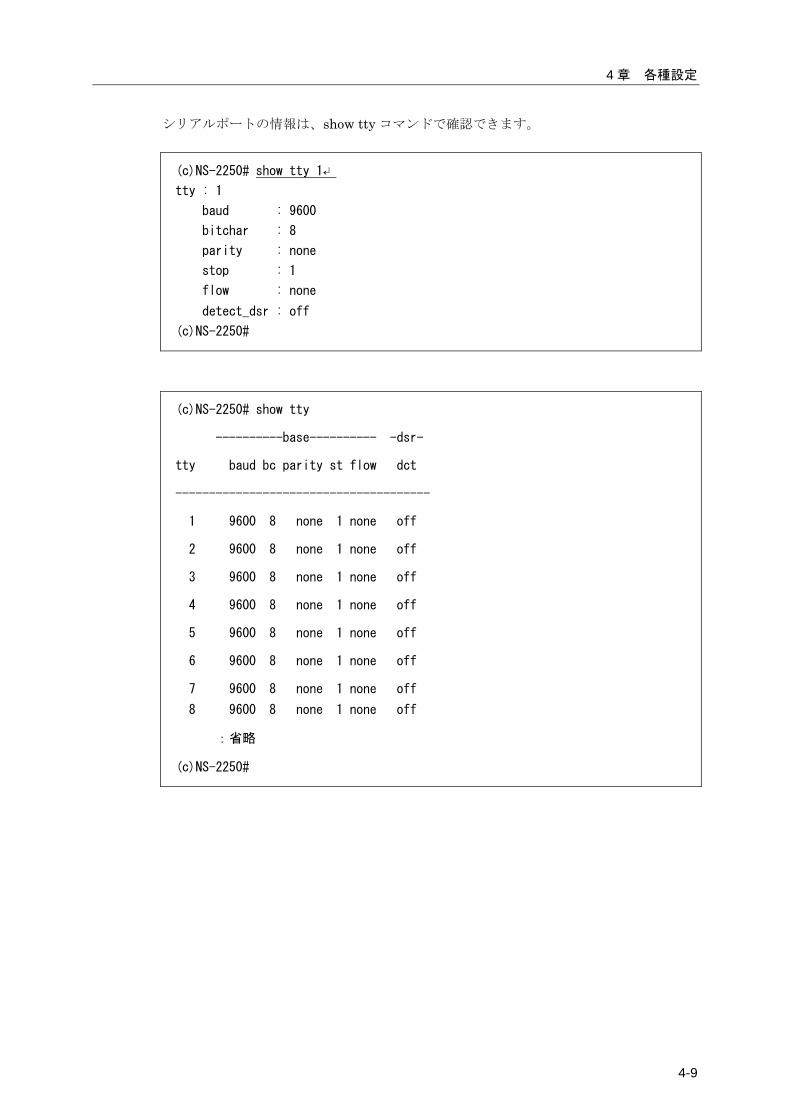
4 章 各種設定
4-9
シリアルポートの情報は、show tty コマンドで確認できます。
(c)NS-2250# show tty 1↵
tty : 1
baud : 9600
bitchar : 8
parity : none
stop : 1
flow : none
detect_dsr : off
(c)NS-2250#
(c)NS-2250# show tty
----------base---------- -dsr-
tty baud bc parity st flow dct
--------------------------------------
1 9600 8 none 1 none off
2 9600 8 none 1 none off
3 9600 8 none 1 none off
4 9600 8 none 1 none off
5 9600 8 none 1 none off
6 9600 8 none 1 none off
7 9600 8 none 1 none off
8 9600 8 none 1 none off
:省略
(c)NS-2250#
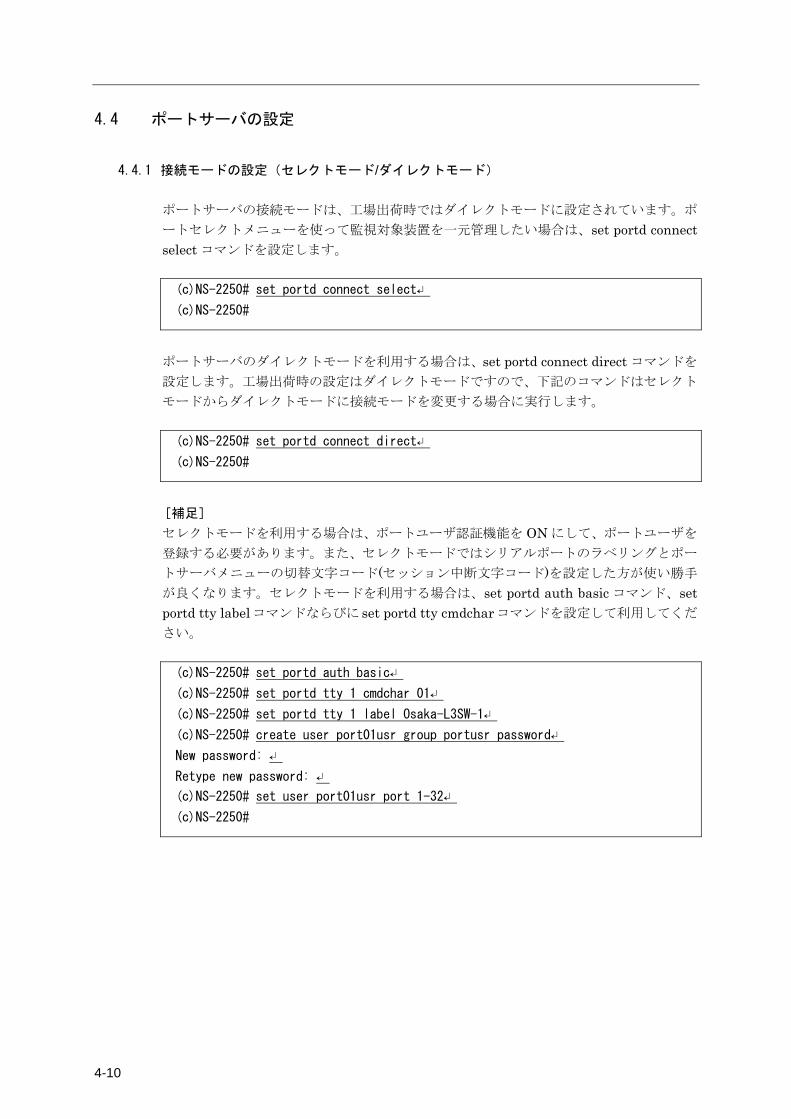
4-10
4.4 ポートサーバの設定
4.4.1 接続モードの設定(セレクトモード/ダイレクトモード) ポートサーバの接続モードは、工場出荷時ではダイレクトモードに設定されています。ポ
ートセレクトメニューを使って監視対象装置を一元管理したい場合は、set portd connect select コマンドを設定します。 (c)NS-2250# set portd connect select↵
(c)NS-2250#
ポートサーバのダイレクトモードを利用する場合は、set portd connect direct コマンドを
設定します。工場出荷時の設定はダイレクトモードですので、下記のコマンドはセレクト
モードからダイレクトモードに接続モードを変更する場合に実行します。 (c)NS-2250# set portd connect direct↵
(c)NS-2250#
[補足]
セレクトモードを利用する場合は、ポートユーザ認証機能を ON にして、ポートユーザを
登録する必要があります。また、セレクトモードではシリアルポートのラベリングとポー
トサーバメニューの切替文字コード(セッション中断文字コード)を設定した方が使い勝手
が良くなります。セレクトモードを利用する場合は、set portd auth basic コマンド、set portd tty labelコマンドならびに set portd tty cmdcharコマンドを設定して利用してくだ
さい。 (c)NS-2250# set portd auth basic↵
(c)NS-2250# set portd tty 1 cmdchar 01↵
(c)NS-2250# set portd tty 1 label Osaka-L3SW-1↵
(c)NS-2250# create user port01usr group portusr password↵
New password: ↵
Retype new password: ↵
(c)NS-2250# set user port01usr port 1-32↵
(c)NS-2250#
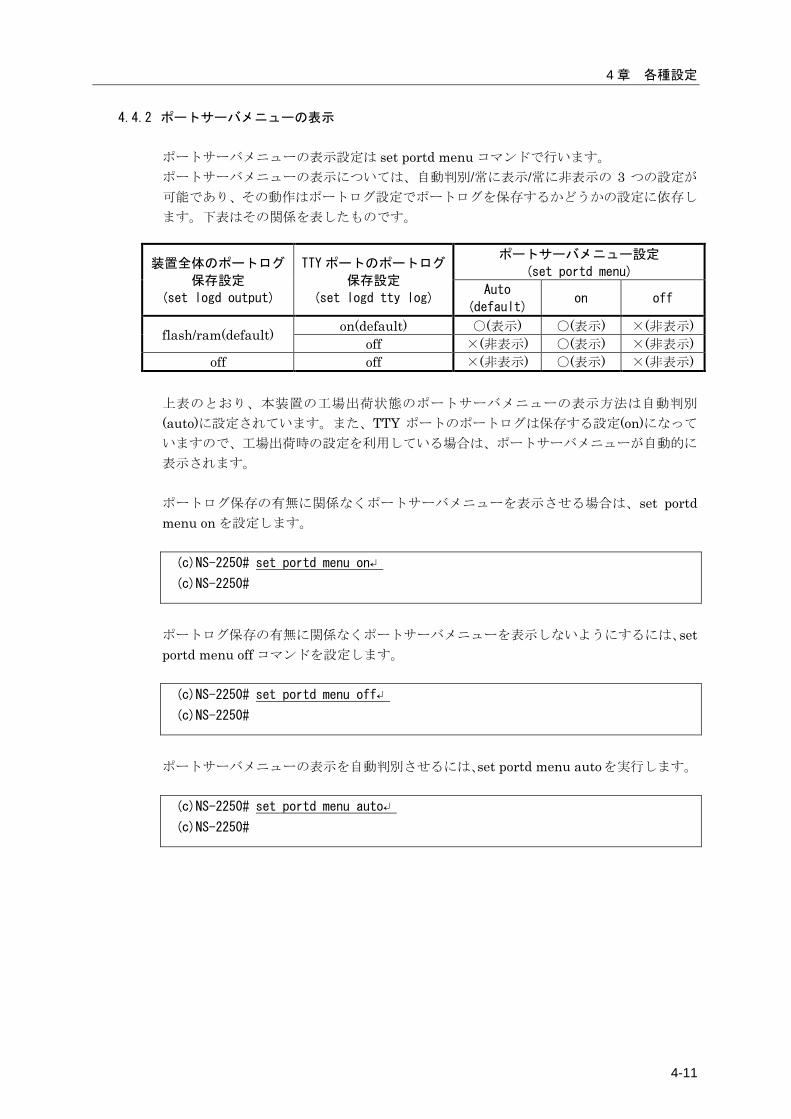
4 章 各種設定
4-11
4.4.2 ポートサーバメニューの表示 ポートサーバメニューの表示設定は set portd menu コマンドで行います。 ポートサーバメニューの表示については、自動判別/常に表示/常に非表示の 3 つの設定が
可能であり、その動作はポートログ設定でポートログを保存するかどうかの設定に依存し
ます。下表はその関係を表したものです。
装置全体のポートログ
保存設定
(set logd output)
TTY ポートのポートログ
保存設定
(set logd tty log)
ポートサーバメニュー設定
(set portd menu)
Auto
(default) on off
flash/ram(default) on(default) ○(表示) ○(表示) ×(非表示) off ×(非表示) ○(表示) ×(非表示)
off off ×(非表示) ○(表示) ×(非表示) 上表のとおり、本装置の工場出荷状態のポートサーバメニューの表示方法は自動判別
(auto)に設定されています。また、TTY ポートのポートログは保存する設定(on)になって
いますので、工場出荷時の設定を利用している場合は、ポートサーバメニューが自動的に
表示されます。
ポートログ保存の有無に関係なくポートサーバメニューを表示させる場合は、set portd menu on を設定します。
(c)NS-2250# set portd menu on↵
(c)NS-2250#
ポートログ保存の有無に関係なくポートサーバメニューを表示しないようにするには、set portd menu off コマンドを設定します。 (c)NS-2250# set portd menu off↵
(c)NS-2250#
ポートサーバメニューの表示を自動判別させるには、set portd menu autoを実行します。
(c)NS-2250# set portd menu auto↵
(c)NS-2250#

4-12
4.4.3 ポートサーバのユーザ認証(ポートユーザ認証) Telnet クライアントから本装置のポートサーバにアクセスした際に動作するポートユー
ザ認証は、工場出荷時では「認証無し」に設定されています。ポートユーザ認証を「認証
あり」に変更するには、set portd auth コマンドを実行します。 ポートユーザ認証を「認証あり」に設定すると、本装置の全てのシリアルポートでポート
ユーザ認証機能が動作します。 (c)NS-2250# set portd auth basic↵
(c)NS-2250#
SSH クライアントを利用する場合は、「4.6.4 SSH サーバの設定」を参照してください。
4.4.4 ポートサーバのアクセス制限(接続プロトコルと接続モード) 工場出荷時のポートサーバのアクセス制限(接続プロトコルと接続モード)には
Telnet/SSH のノーマルモード(RW)のみが許可されています。 Telnet/SSH のノーマルモードとモニターモード(RO)の両方を利用できるようにポートサ
ーバのアクセス制限を変更する場合は下記のコマンドを実行します。
(c)NS-2250# set portd tty 1-32 session telnet both↵
(c)NS-2250# set portd tty 1-32 session ssh both↵
もしくは、
(c)NS-2250# set portd tty 1-32 session both both↵
(c)NS-2250#
4.4.5 ポートサーバの複数セッション接続 1つのシリアルポートに対してノーマルモードが最大 2 セッション、モニターモードが最
大 3 セッションまで接続できます。 接続可能なセッション数を増やす場合は下記のコマンドを実行します。
(c)NS-2250# set portd tty 1-32 limit rw 2 ro 3↵
(c)NS-2250#
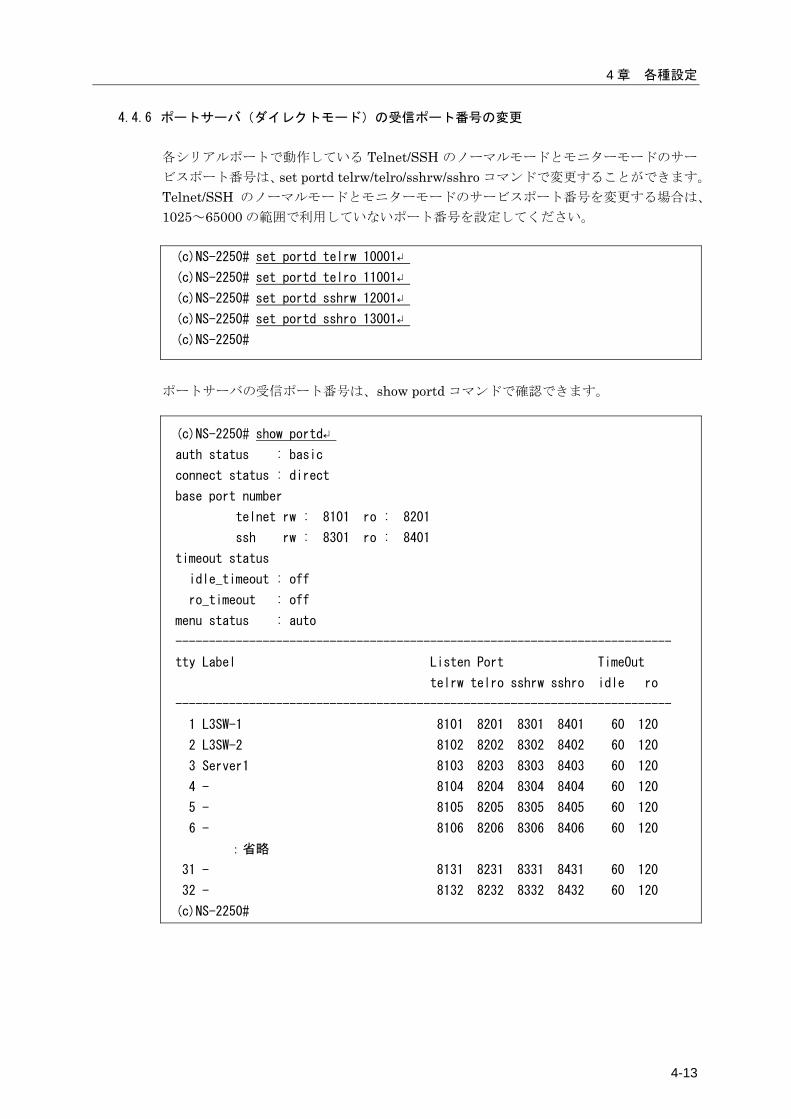
4 章 各種設定
4-13
4.4.6 ポートサーバ(ダイレクトモード)の受信ポート番号の変更 各シリアルポートで動作している Telnet/SSH のノーマルモードとモニターモードのサー
ビスポート番号は、set portd telrw/telro/sshrw/sshro コマンドで変更することができます。
Telnet/SSH のノーマルモードとモニターモードのサービスポート番号を変更する場合は、
1025~65000 の範囲で利用していないポート番号を設定してください。 (c)NS-2250# set portd telrw 10001↵
(c)NS-2250# set portd telro 11001↵
(c)NS-2250# set portd sshrw 12001↵
(c)NS-2250# set portd sshro 13001↵
(c)NS-2250#
ポートサーバの受信ポート番号は、show portd コマンドで確認できます。
(c)NS-2250# show portd↵
auth status : basic
connect status : direct
base port number
telnet rw : 8101 ro : 8201
ssh rw : 8301 ro : 8401
timeout status
idle_timeout : off
ro_timeout : off
menu status : auto
--------------------------------------------------------------------------
tty Label Listen Port TimeOut
telrw telro sshrw sshro idle ro
--------------------------------------------------------------------------
1 L3SW-1 8101 8201 8301 8401 60 120
2 L3SW-2 8102 8202 8302 8402 60 120
3 Server1 8103 8203 8303 8403 60 120
4 - 8104 8204 8304 8404 60 120
5 - 8105 8205 8305 8405 60 120
6 - 8106 8206 8306 8406 60 120
:省略
31 - 8131 8231 8331 8431 60 120
32 - 8132 8232 8332 8432 60 120
(c)NS-2250#
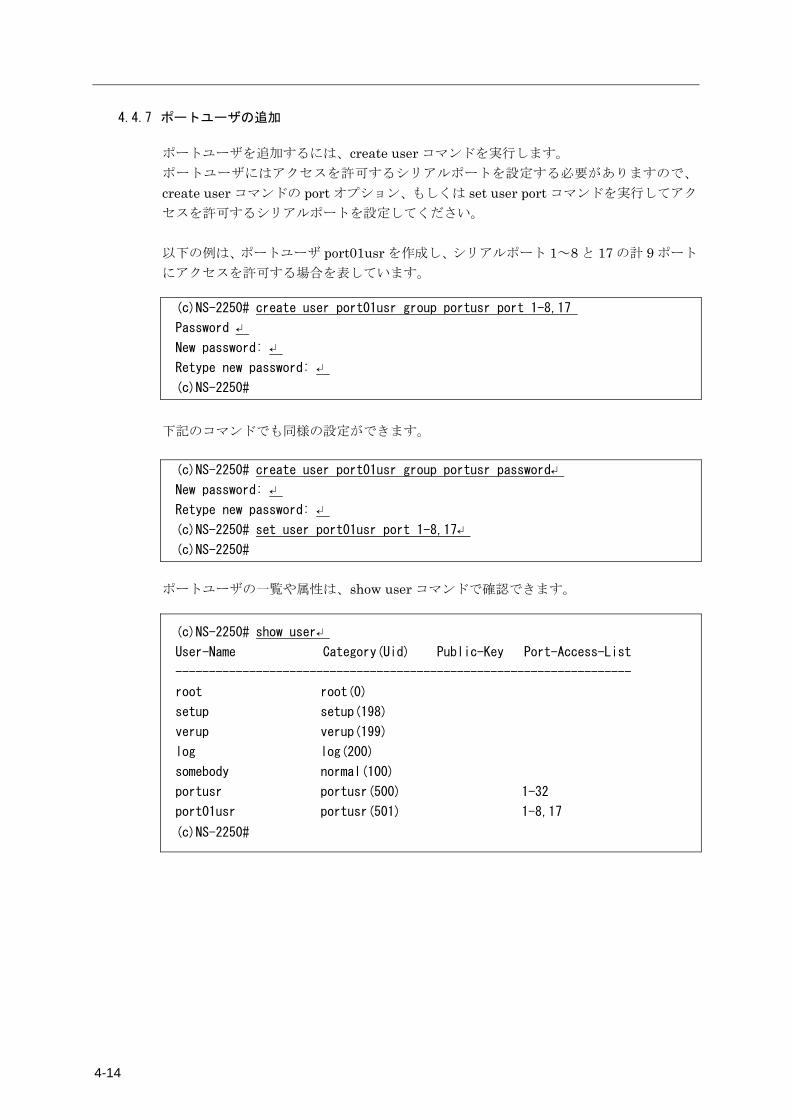
4-14
4.4.7 ポートユーザの追加 ポートユーザを追加するには、create user コマンドを実行します。 ポートユーザにはアクセスを許可するシリアルポートを設定する必要がありますので、
create user コマンドの port オプション、もしくは set user port コマンドを実行してアク
セスを許可するシリアルポートを設定してください。 以下の例は、ポートユーザ port01usr を作成し、シリアルポート 1~8 と 17 の計 9 ポート
にアクセスを許可する場合を表しています。 (c)NS-2250# create user port01usr group portusr port 1-8,17
Password ↵
New password: ↵
Retype new password: ↵
(c)NS-2250#
下記のコマンドでも同様の設定ができます。 (c)NS-2250# create user port01usr group portusr password↵
New password: ↵
Retype new password: ↵
(c)NS-2250# set user port01usr port 1-8,17↵
(c)NS-2250#
ポートユーザの一覧や属性は、show user コマンドで確認できます。
(c)NS-2250# show user↵
User-Name Category(Uid) Public-Key Port-Access-List
--------------------------------------------------------------------
root root(0)
setup setup(198)
verup verup(199)
log log(200)
somebody normal(100)
portusr portusr(500) 1-32
port01usr portusr(501) 1-8,17
(c)NS-2250#
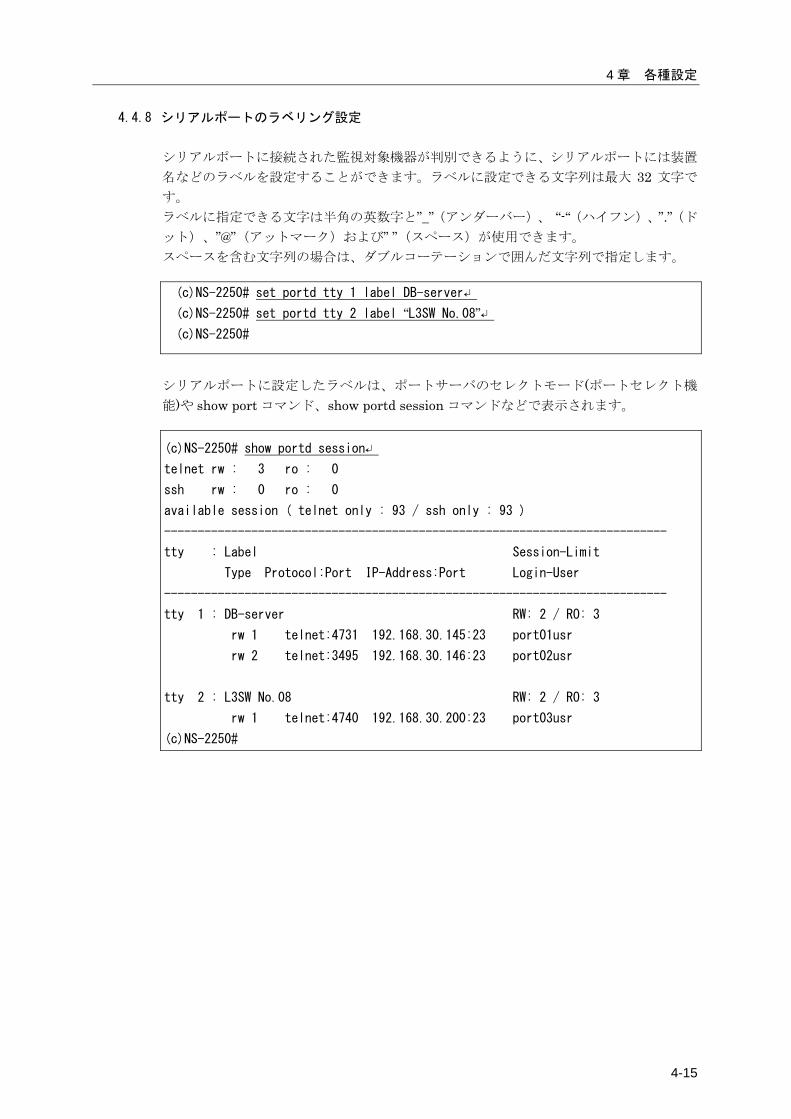
4 章 各種設定
4-15
4.4.8 シリアルポートのラベリング設定 シリアルポートに接続された監視対象機器が判別できるように、シリアルポートには装置
名などのラベルを設定することができます。ラベルに設定できる文字列は最大 32 文字で
す。 ラベルに指定できる文字は半角の英数字と”_”(アンダーバー)、 “-“(ハイフン)、”.”(ド
ット)、”@”(アットマーク)および” ”(スペース)が使用できます。 スペースを含む文字列の場合は、ダブルコーテーションで囲んだ文字列で指定します。 (c)NS-2250# set portd tty 1 label DB-server↵
(c)NS-2250# set portd tty 2 label “L3SW No.08”↵
(c)NS-2250#
シリアルポートに設定したラベルは、ポートサーバのセレクトモード(ポートセレクト機
能)や show port コマンド、show portd session コマンドなどで表示されます。
(c)NS-2250# show portd session↵
telnet rw : 3 ro : 0
ssh rw : 0 ro : 0
available session ( telnet only : 93 / ssh only : 93 )
---------------------------------------------------------------------------
tty : Label Session-Limit
Type Protocol:Port IP-Address:Port Login-User
---------------------------------------------------------------------------
tty 1 : DB-server RW: 2 / RO: 3
rw 1 telnet:4731 192.168.30.145:23 port01usr
rw 2 telnet:3495 192.168.30.146:23 port02usr
tty 2 : L3SW No.08 RW: 2 / RO: 3
rw 1 telnet:4740 192.168.30.200:23 port03usr
(c)NS-2250#

4-16
4.4.9 ポートサーバのセッション自動切断機能の設定 本装置はアイドルタイマ(アイドル監視時間)によるセッションの自動切断機能と、セッシ
ョンタイマ(連続接続時間)による自動切断機能を搭載しています。 本機能を有効にするには下記のコマンドを実行します。 アイドルタイマ(idle_timeout)を設定した場合は、セレクトメニューやポートサーバメニ
ュー表示時、および、シリアルポートのノーマルモード(RW)接続において、設定された時
間アイドル状態(Telnet/SSH 端末から入力データが流れていない状態)を検出すると、その
セッションを強制的に切断します。アイドルタイマの設定範囲は 1~60 分、デフォルトは
OFF です。 セッションの切断は段階的に行われます。 (例)
アイドルタイマ経過後、シリアルポートへのアクセスを終了し、ポートサーバメニュー
を表示 ↓ アイドルタイマ経過後、ポートサーバメニューを終了し、セレクトメニューを表示 ↓ アイドルタイマ経過後、セレクトメニューを終了し、セッションを切断
セッションタイマ(ro_timeout)を設定した場合は、Telnet/SSH 端末からシリアルポートの
モニターモード(RO)に接続し指定した時間が経過すると、そのセッションを強制的に切断
します。セッションタイマの設定範囲は 1~1440 分、デフォルト OFF です。 (c)NS-2250# set portd idle_timeout on 30↵
(c)NS-2250# set portd ro_timeout on 180
(c)NS-2250# set portd tty 1-32_timeout on
(c)NS-2250#
4.4.10 その他のポートサーバ機能の設定
(1) Break 信号の処理方法の変更
本装置は Telnet/SSH クライアントから受信した NVT ブレークキャラクタや Break over SSH を、Break 信号としてシリアルポートに接続した監視対象機器に伝達させることがで
きます。工場出荷時の本機能は OFF です。設定が brk_char none の場合は、ターミナル
から NVT ブレークキャラクタや Break over SSH を送信したり、ポートメニューから
“10:send break to tty”を実行しても、シリアルポートに Break 信号は送信されません。 本機能をシリアルポート 1~16 と 32 に設定するには、下記のコマンドを実行します。 (c)NS-2250# set portd tty 1-16 brk_char brk↵
(c)NS-2250# set portd tty 32 brk_char brk↵
(c)NS-2250#
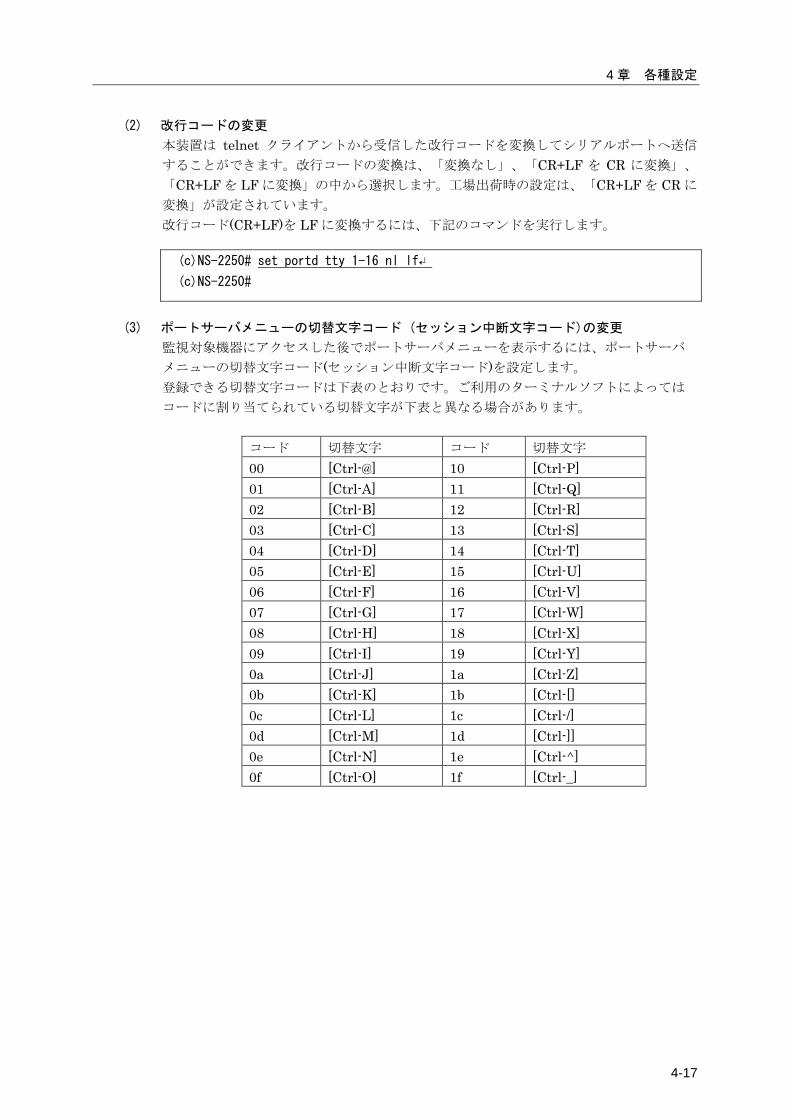
4 章 各種設定
4-17
(2) 改行コードの変更
本装置は telnet クライアントから受信した改行コードを変換してシリアルポートへ送信
することができます。改行コードの変換は、「変換なし」、「CR+LF を CR に変換」、
「CR+LF を LF に変換」の中から選択します。工場出荷時の設定は、「CR+LF を CR に
変換」が設定されています。 改行コード(CR+LF)を LF に変換するには、下記のコマンドを実行します。
(c)NS-2250# set portd tty 1-16 nl lf↵
(c)NS-2250#
(3) ポートサーバメニューの切替文字コード (セッション中断文字コード)の変更
監視対象機器にアクセスした後でポートサーバメニューを表示するには、ポートサーバ メニューの切替文字コード(セッション中断文字コード)を設定します。 登録できる切替文字コードは下表のとおりです。ご利用のターミナルソフトによっては コードに割り当てられている切替文字が下表と異なる場合があります。
コード 切替文字 コード 切替文字 00 [Ctrl-@] 10 [Ctrl-P] 01 [Ctrl-A] 11 [Ctrl-Q] 02 [Ctrl-B] 12 [Ctrl-R] 03 [Ctrl-C] 13 [Ctrl-S] 04 [Ctrl-D] 14 [Ctrl-T] 05 [Ctrl-E] 15 [Ctrl-U] 06 [Ctrl-F] 16 [Ctrl-V] 07 [Ctrl-G] 17 [Ctrl-W] 08 [Ctrl-H] 18 [Ctrl-X] 09 [Ctrl-I] 19 [Ctrl-Y] 0a [Ctrl-J] 1a [Ctrl-Z] 0b [Ctrl-K] 1b [Ctrl-[] 0c [Ctrl-L] 1c [Ctrl-/] 0d [Ctrl-M] 1d [Ctrl-]] 0e [Ctrl-N] 1e [Ctrl-^] 0f [Ctrl-O] 1f [Ctrl-_]
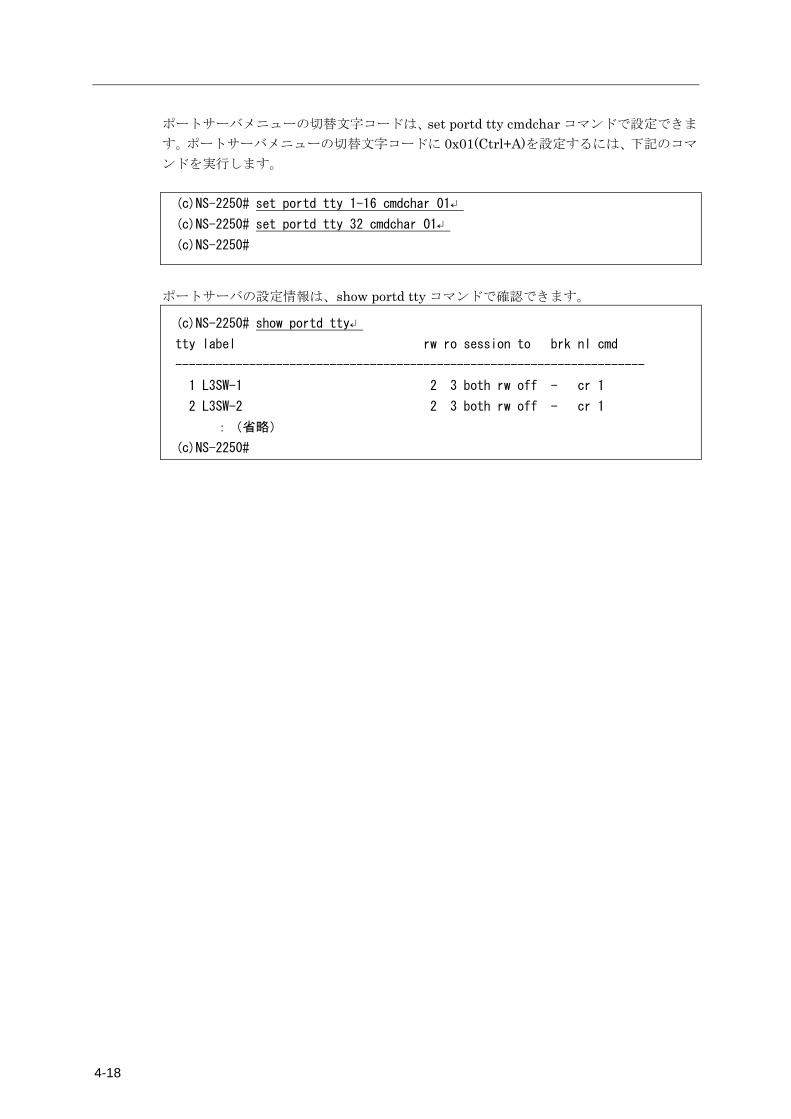
4-18
ポートサーバメニューの切替文字コードは、set portd tty cmdchar コマンドで設定できま
す。ポートサーバメニューの切替文字コードに 0x01(Ctrl+A)を設定するには、下記のコマ
ンドを実行します。 (c)NS-2250# set portd tty 1-16 cmdchar 01↵
(c)NS-2250# set portd tty 32 cmdchar 01↵
(c)NS-2250#
ポートサーバの設定情報は、show portd tty コマンドで確認できます。
(c)NS-2250# show portd tty↵
tty label rw ro session to brk nl cmd
----------------------------------------------------------------------
1 L3SW-1 2 3 both rw off - cr 1
2 L3SW-2 2 3 both rw off - cr 1
:(省略)
(c)NS-2250#
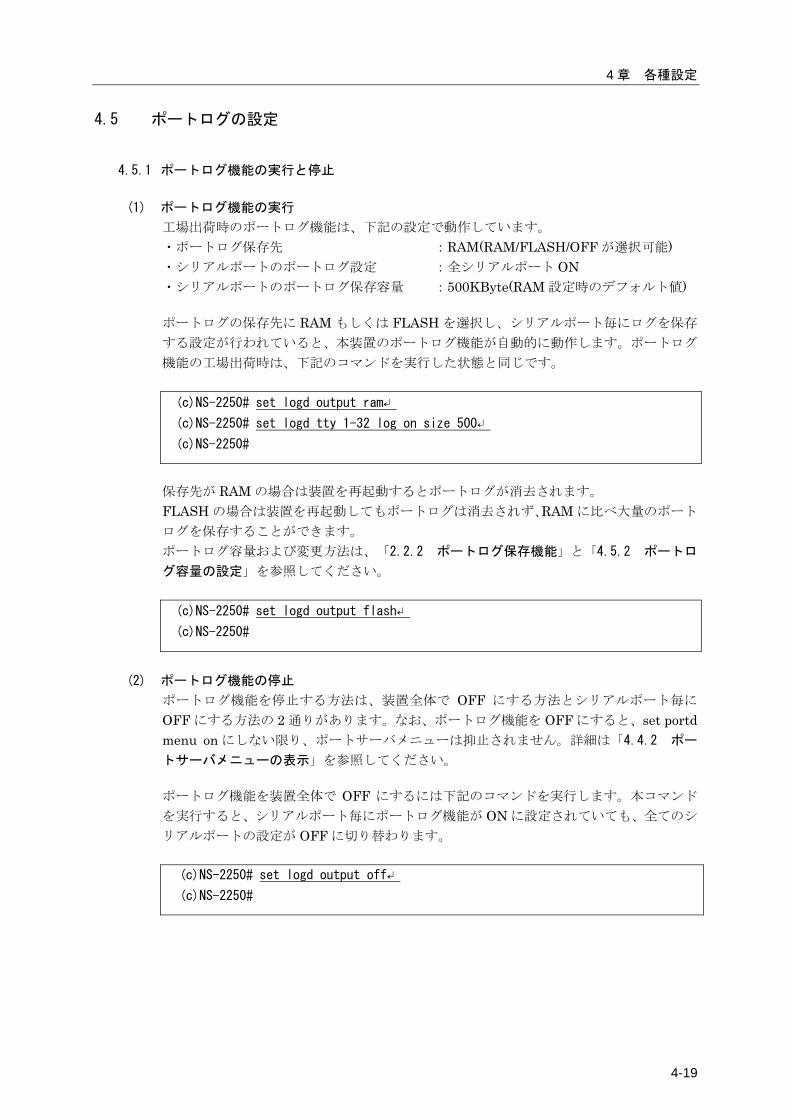
4 章 各種設定
4-19
4.5 ポートログの設定
4.5.1 ポートログ機能の実行と停止
(1) ポートログ機能の実行
工場出荷時のポートログ機能は、下記の設定で動作しています。 ・ポートログ保存先 :RAM(RAM/FLASH/OFF が選択可能) ・シリアルポートのポートログ設定 :全シリアルポート ON ・シリアルポートのポートログ保存容量 :500KByte(RAM 設定時のデフォルト値) ポートログの保存先に RAM もしくは FLASH を選択し、シリアルポート毎にログを保存
する設定が行われていると、本装置のポートログ機能が自動的に動作します。ポートログ
機能の工場出荷時は、下記のコマンドを実行した状態と同じです。 (c)NS-2250# set logd output ram↵
(c)NS-2250# set logd tty 1-32 log on size 500↵
(c)NS-2250#
保存先が RAM の場合は装置を再起動するとポートログが消去されます。 FLASH の場合は装置を再起動してもポートログは消去されず、RAM に比べ大量のポート
ログを保存することができます。 ポートログ容量および変更方法は、「2.2.2 ポートログ保存機能」と「4.5.2 ポートロ
グ容量の設定」を参照してください。 (c)NS-2250# set logd output flash↵
(c)NS-2250#
(2) ポートログ機能の停止
ポートログ機能を停止する方法は、装置全体で OFF にする方法とシリアルポート毎に
OFF にする方法の 2 通りがあります。なお、ポートログ機能を OFF にすると、set portd menu on にしない限り、ポートサーバメニューは抑止されません。詳細は「4.4.2 ポー
トサーバメニューの表示」を参照してください。 ポートログ機能を装置全体で OFF にするには下記のコマンドを実行します。本コマンド
を実行すると、シリアルポート毎にポートログ機能が ON に設定されていても、全てのシ
リアルポートの設定が OFF に切り替わります。
(c)NS-2250# set logd output off↵
(c)NS-2250#
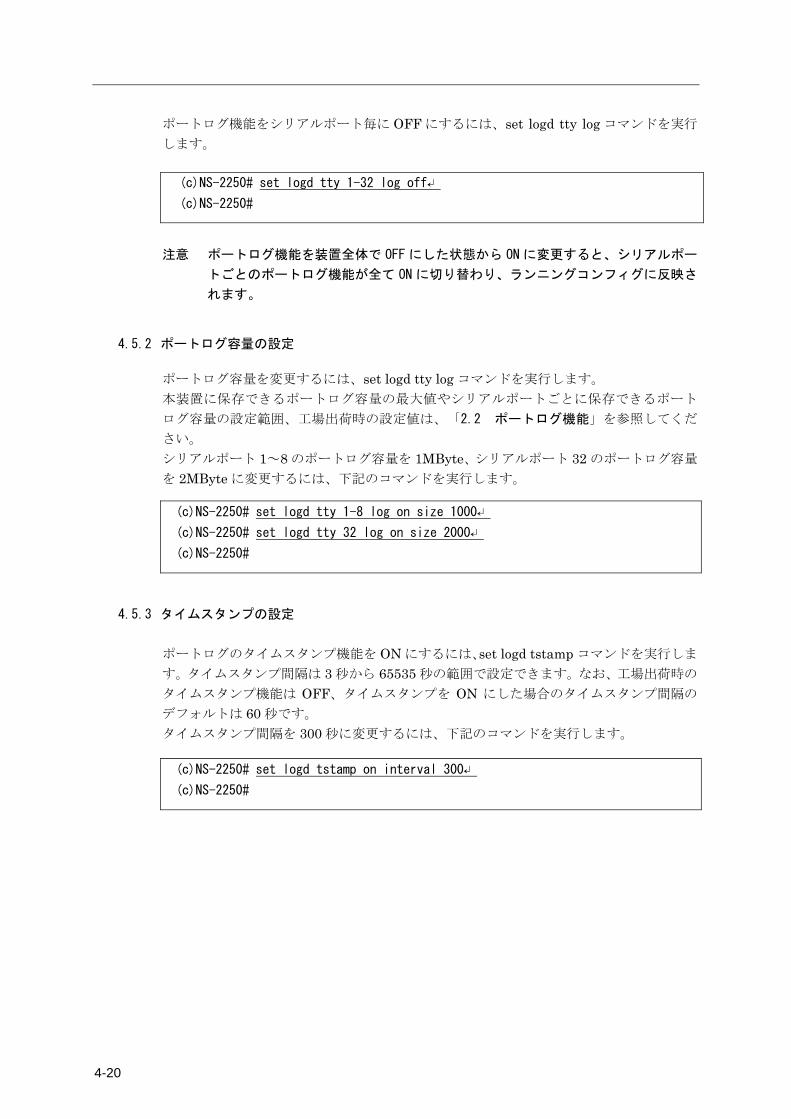
4-20
ポートログ機能をシリアルポート毎に OFF にするには、set logd tty log コマンドを実行
します。
(c)NS-2250# set logd tty 1-32 log off↵
(c)NS-2250#
注意 ポートログ機能を装置全体で OFF にした状態から ON に変更すると、シリアルポー
トごとのポートログ機能が全て ON に切り替わり、ランニングコンフィグに反映さ
れます。
4.5.2 ポートログ容量の設定
ポートログ容量を変更するには、set logd tty log コマンドを実行します。 本装置に保存できるポートログ容量の最大値やシリアルポートごとに保存できるポート
ログ容量の設定範囲、工場出荷時の設定値は、「2.2 ポートログ機能」を参照してくだ
さい。 シリアルポート 1~8 のポートログ容量を 1MByte、シリアルポート 32 のポートログ容量
を 2MByte に変更するには、下記のコマンドを実行します。 (c)NS-2250# set logd tty 1-8 log on size 1000↵
(c)NS-2250# set logd tty 32 log on size 2000↵
(c)NS-2250#
4.5.3 タイムスタンプの設定 ポートログのタイムスタンプ機能を ON にするには、set logd tstamp コマンドを実行しま
す。タイムスタンプ間隔は 3 秒から 65535 秒の範囲で設定できます。なお、工場出荷時の
タイムスタンプ機能は OFF、タイムスタンプを ON にした場合のタイムスタンプ間隔の
デフォルトは 60 秒です。 タイムスタンプ間隔を 300 秒に変更するには、下記のコマンドを実行します。 (c)NS-2250# set logd tstamp on interval 300↵
(c)NS-2250#
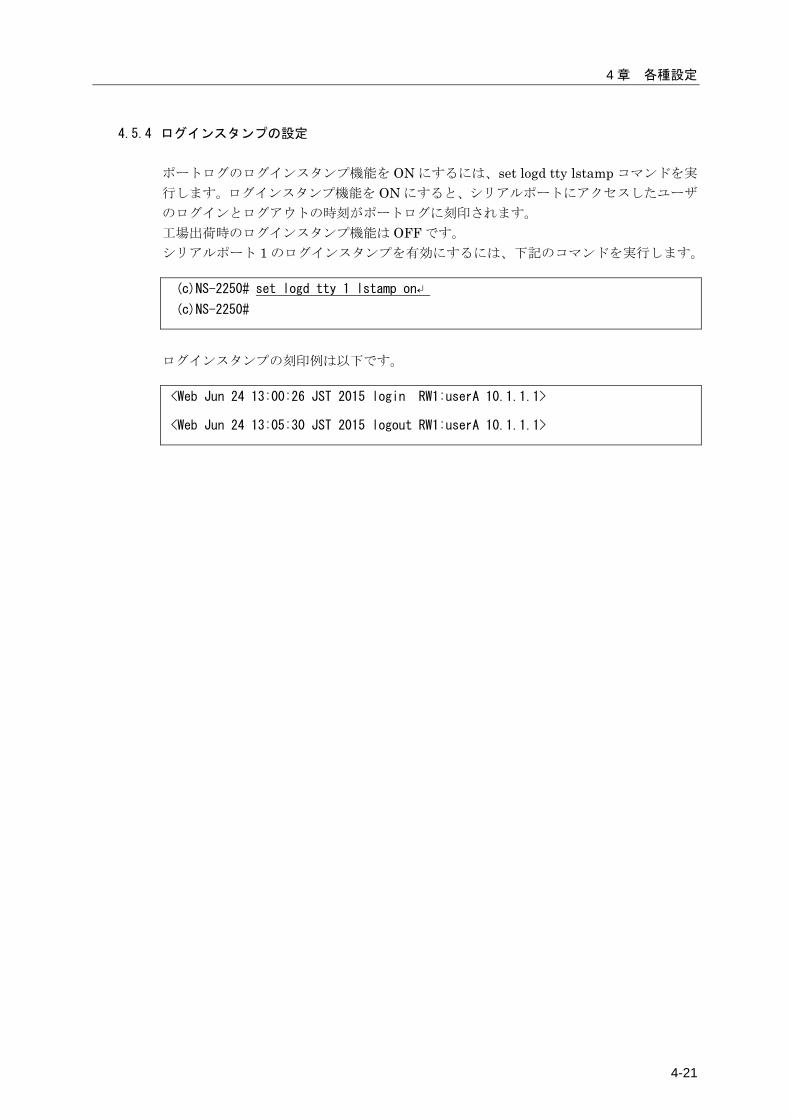
4 章 各種設定
4-21
4.5.4 ログインスタンプの設定 ポートログのログインスタンプ機能を ON にするには、set logd tty lstamp コマンドを実
行します。ログインスタンプ機能を ON にすると、シリアルポートにアクセスしたユーザ
のログインとログアウトの時刻がポートログに刻印されます。 工場出荷時のログインスタンプ機能は OFF です。 シリアルポート 1 のログインスタンプを有効にするには、下記のコマンドを実行します。
(c)NS-2250# set logd tty 1 lstamp on↵
(c)NS-2250#
ログインスタンプの刻印例は以下です。
<Web Jun 24 13:00:26 JST 2015 login RW1:userA 10.1.1.1>
<Web Jun 24 13:05:30 JST 2015 logout RW1:userA 10.1.1.1>
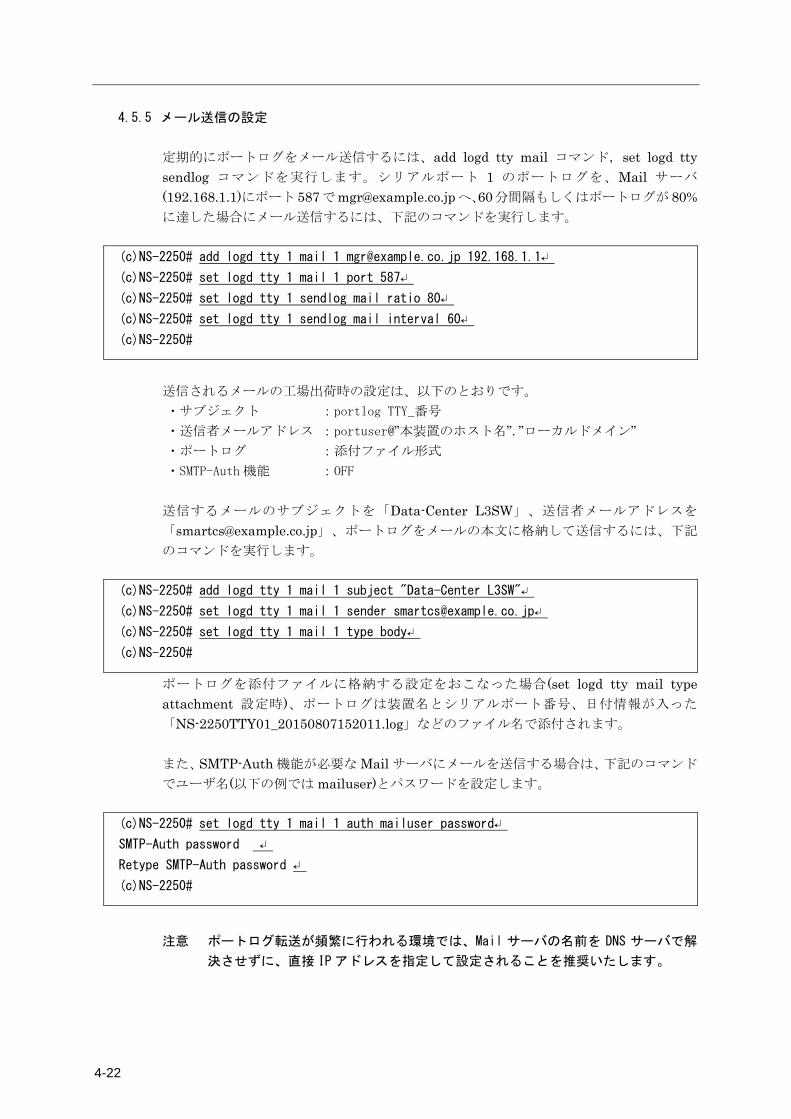
4-22
4.5.5 メール送信の設定 定期的にポートログをメール送信するには、add logd tty mail コマンド,set logd tty sendlog コマンドを実行します。シリアルポート 1 のポートログを、Mail サーバ
(192.168.1.1)にポート 587で[email protected]へ、60分間隔もしくはポートログが 80%に達した場合にメール送信するには、下記のコマンドを実行します。
(c)NS-2250# add logd tty 1 mail 1 [email protected] 192.168.1.1↵
(c)NS-2250# set logd tty 1 mail 1 port 587↵
(c)NS-2250# set logd tty 1 sendlog mail ratio 80↵
(c)NS-2250# set logd tty 1 sendlog mail interval 60↵
(c)NS-2250#
送信されるメールの工場出荷時の設定は、以下のとおりです。 ・サブジェクト :portlog TTY_番号
・送信者メールアドレス :portuser@”本装置のホスト名”.”ローカルドメイン” ・ポートログ :添付ファイル形式
・SMTP-Auth 機能 :OFF
送信するメールのサブジェクトを「Data-Center L3SW」、送信者メールアドレスを
「[email protected]」、ポートログをメールの本文に格納して送信するには、下記
のコマンドを実行します。
(c)NS-2250# add logd tty 1 mail 1 subject "Data-Center L3SW"↵
(c)NS-2250# set logd tty 1 mail 1 sender [email protected]↵
(c)NS-2250# set logd tty 1 mail 1 type body↵
(c)NS-2250#
ポートログを添付ファイルに格納する設定をおこなった場合(set logd tty mail type attachment 設定時)、ポートログは装置名とシリアルポート番号、日付情報が入った
「NS-2250TTY01_20150807152011.log」などのファイル名で添付されます。 また、SMTP-Auth 機能が必要な Mail サーバにメールを送信する場合は、下記のコマンド
でユーザ名(以下の例では mailuser)とパスワードを設定します。
(c)NS-2250# set logd tty 1 mail 1 auth mailuser password↵
SMTP-Auth password ↵
Retype SMTP-Auth password ↵
(c)NS-2250#
注意 ポートログ転送が頻繁に行われる環境では、Mail サーバの名前を DNS サーバで解
決させずに、直接 IP アドレスを指定して設定されることを推奨いたします。
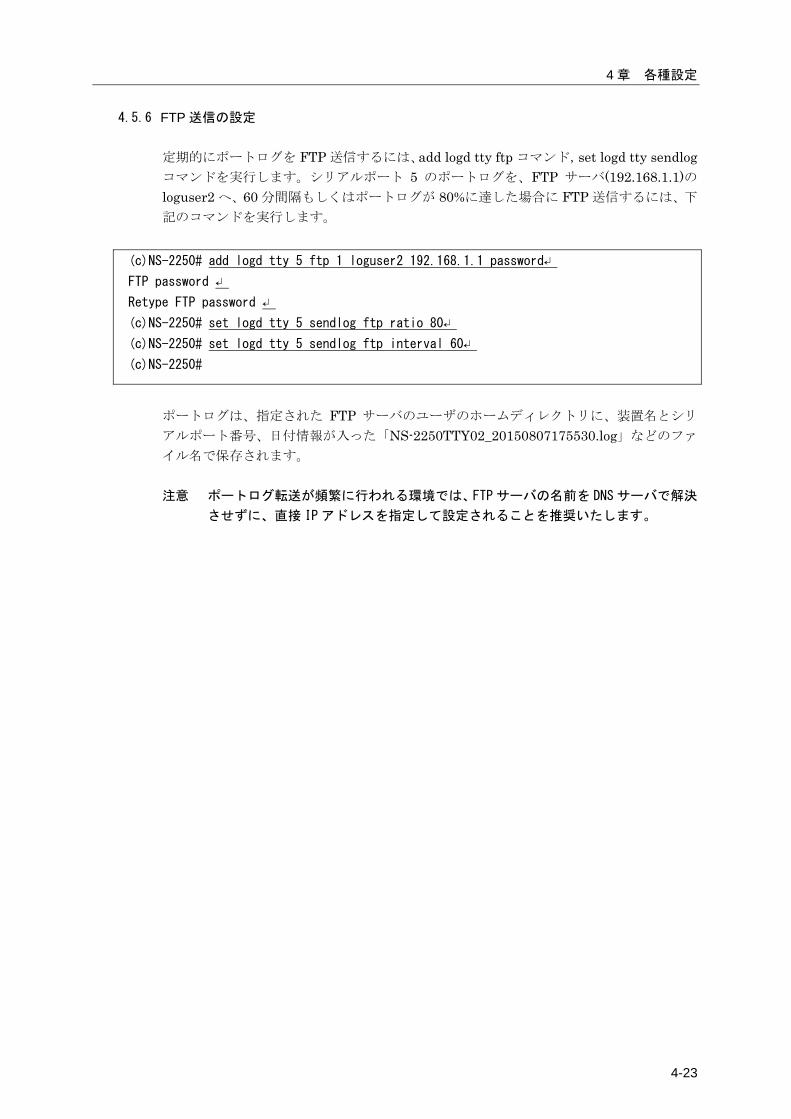
4 章 各種設定
4-23
4.5.6 FTP 送信の設定 定期的にポートログを FTP 送信するには、add logd tty ftp コマンド,set logd tty sendlogコマンドを実行します。シリアルポート 5 のポートログを、FTP サーバ(192.168.1.1)のloguser2 へ、60 分間隔もしくはポートログが 80%に達した場合に FTP 送信するには、下
記のコマンドを実行します。
(c)NS-2250# add logd tty 5 ftp 1 loguser2 192.168.1.1 password↵
FTP password ↵
Retype FTP password ↵
(c)NS-2250# set logd tty 5 sendlog ftp ratio 80↵
(c)NS-2250# set logd tty 5 sendlog ftp interval 60↵
(c)NS-2250#
ポートログは、指定された FTP サーバのユーザのホームディレクトリに、装置名とシリ
アルポート番号、日付情報が入った「NS-2250TTY02_20150807175530.log」などのファ
イル名で保存されます。 注意 ポートログ転送が頻繁に行われる環境では、FTP サーバの名前を DNS サーバで解決
させずに、直接 IP アドレスを指定して設定されることを推奨いたします。
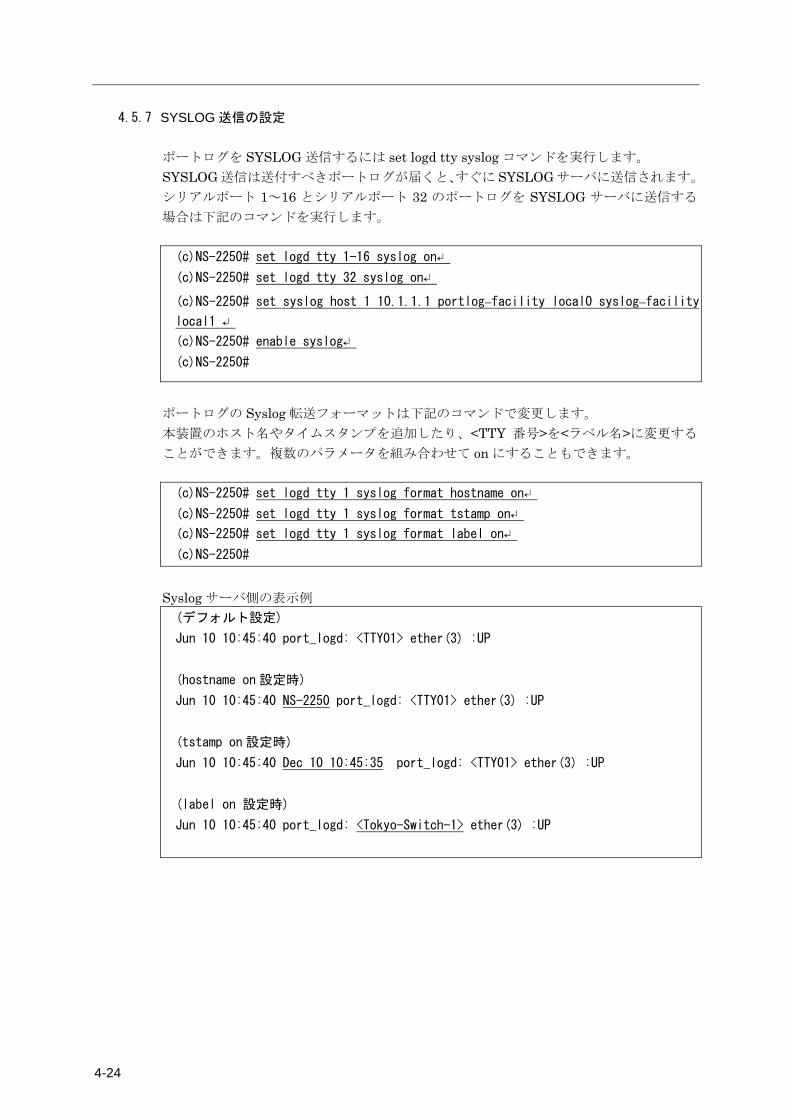
4-24
4.5.7 SYSLOG 送信の設定 ポートログを SYSLOG 送信するには set logd tty syslog コマンドを実行します。 SYSLOG 送信は送付すべきポートログが届くと、すぐに SYSLOG サーバに送信されます。 シリアルポート 1~16 とシリアルポート 32 のポートログを SYSLOG サーバに送信する
場合は下記のコマンドを実行します。 (c)NS-2250# set logd tty 1-16 syslog on↵
(c)NS-2250# set logd tty 32 syslog on↵
(c)NS-2250# set syslog host 1 10.1.1.1 portlog_facility local0 syslog_facility
local1 ↵
(c)NS-2250# enable syslog↵
(c)NS-2250#
ポートログの Syslog 転送フォーマットは下記のコマンドで変更します。 本装置のホスト名やタイムスタンプを追加したり、<TTY 番号>を<ラベル名>に変更する
ことができます。複数のパラメータを組み合わせて on にすることもできます。 (c)NS-2250# set logd tty 1 syslog format hostname on↵
(c)NS-2250# set logd tty 1 syslog format tstamp on↵
(c)NS-2250# set logd tty 1 syslog format label on↵
(c)NS-2250#
Syslog サーバ側の表示例 (デフォルト設定)
Jun 10 10:45:40 port_logd: <TTY01> ether(3) :UP
(hostname on 設定時)
Jun 10 10:45:40 NS-2250 port_logd: <TTY01> ether(3) :UP
(tstamp on 設定時)
Jun 10 10:45:40 Dec 10 10:45:35 port_logd: <TTY01> ether(3) :UP
(label on 設定時)
Jun 10 10:45:40 port_logd: <Tokyo-Switch-1> ether(3) :UP
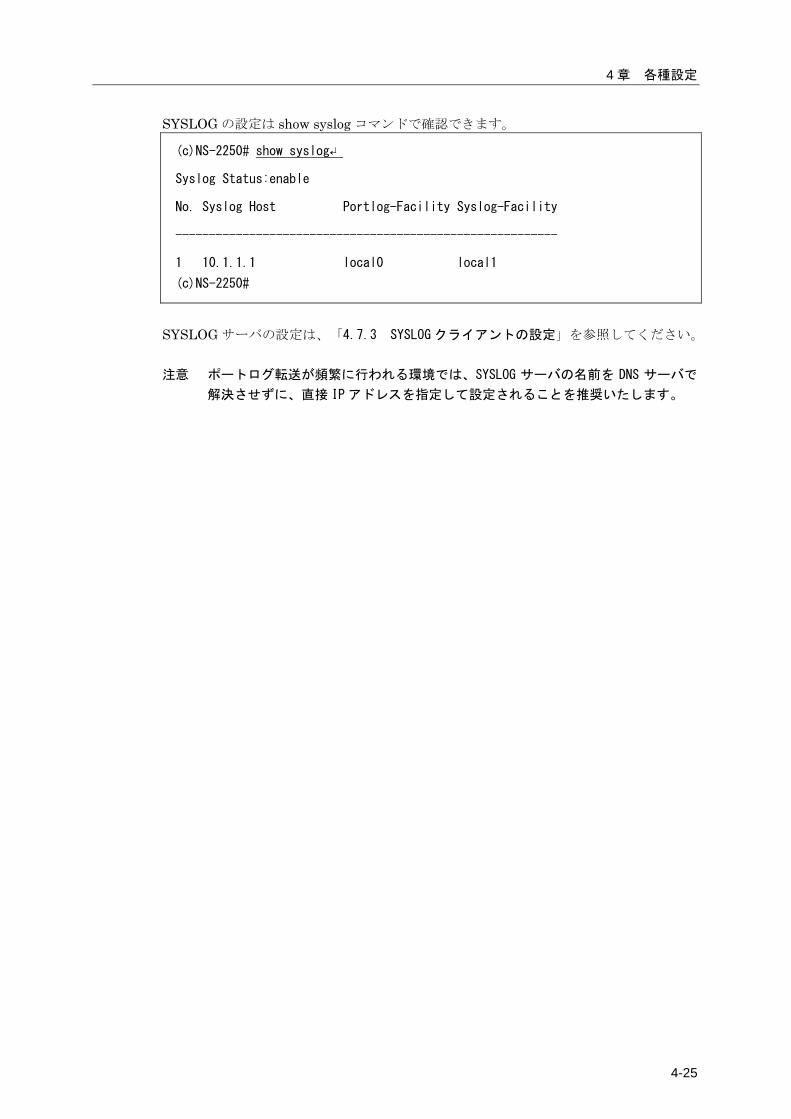
4 章 各種設定
4-25
SYSLOG の設定は show syslog コマンドで確認できます。
(c)NS-2250# show syslog↵
Syslog Status:enable
No. Syslog Host Portlog-Facility Syslog-Facility
---------------------------------------------------------
1 10.1.1.1 local0 local1
(c)NS-2250#
SYSLOG サーバの設定は、「4.7.3 SYSLOG クライアントの設定」を参照してください。 注意 ポートログ転送が頻繁に行われる環境では、SYSLOG サーバの名前を DNS サーバで
解決させずに、直接 IP アドレスを指定して設定されることを推奨いたします。
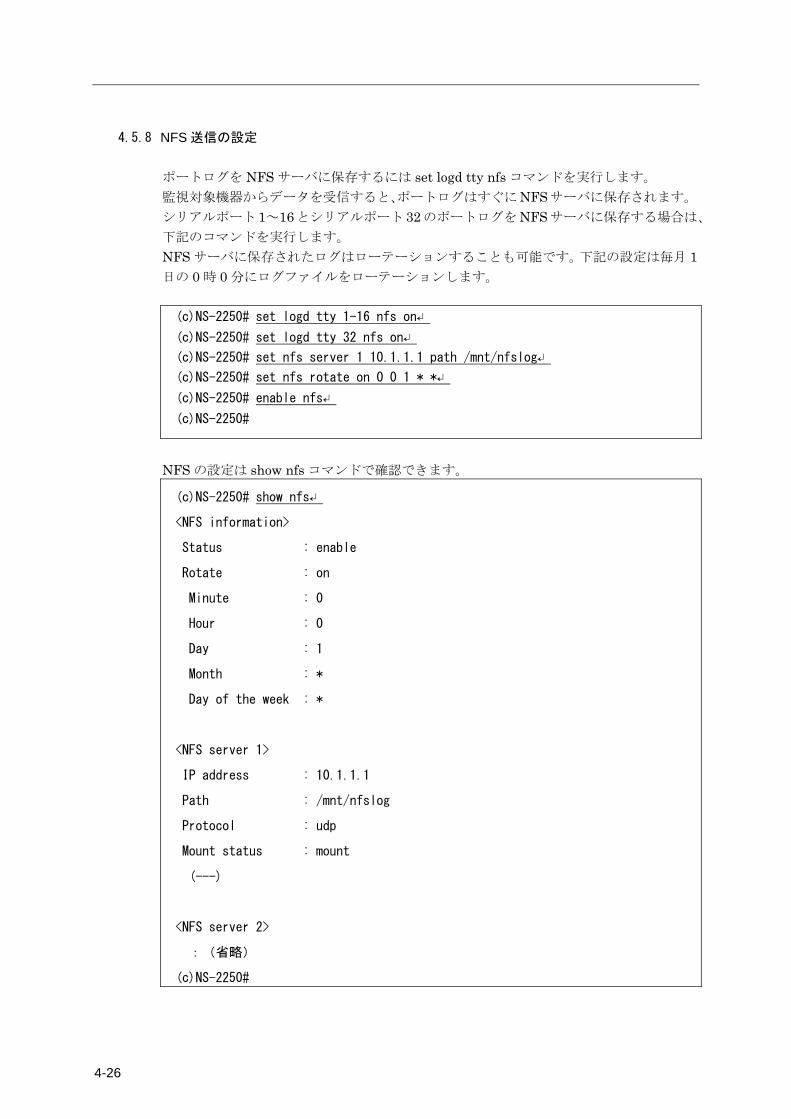
4-26
4.5.8 NFS 送信の設定 ポートログを NFS サーバに保存するには set logd tty nfs コマンドを実行します。 監視対象機器からデータを受信すると、ポートログはすぐにNFSサーバに保存されます。 シリアルポート 1~16とシリアルポート 32のポートログをNFSサーバに保存する場合は、
下記のコマンドを実行します。 NFS サーバに保存されたログはローテーションすることも可能です。下記の設定は毎月 1日の 0 時 0 分にログファイルをローテーションします。 (c)NS-2250# set logd tty 1-16 nfs on↵
(c)NS-2250# set logd tty 32 nfs on↵
(c)NS-2250# set nfs server 1 10.1.1.1 path /mnt/nfslog↵
(c)NS-2250# set nfs rotate on 0 0 1 * *↵
(c)NS-2250# enable nfs↵
(c)NS-2250#
NFS の設定は show nfs コマンドで確認できます。
(c)NS-2250# show nfs↵
<NFS information>
Status : enable
Rotate : on
Minute : 0
Hour : 0
Day : 1
Month : *
Day of the week : *
<NFS server 1>
IP address : 10.1.1.1
Path : /mnt/nfslog
Protocol : udp
Mount status : mount
(---)
<NFS server 2>
:(省略)
(c)NS-2250#
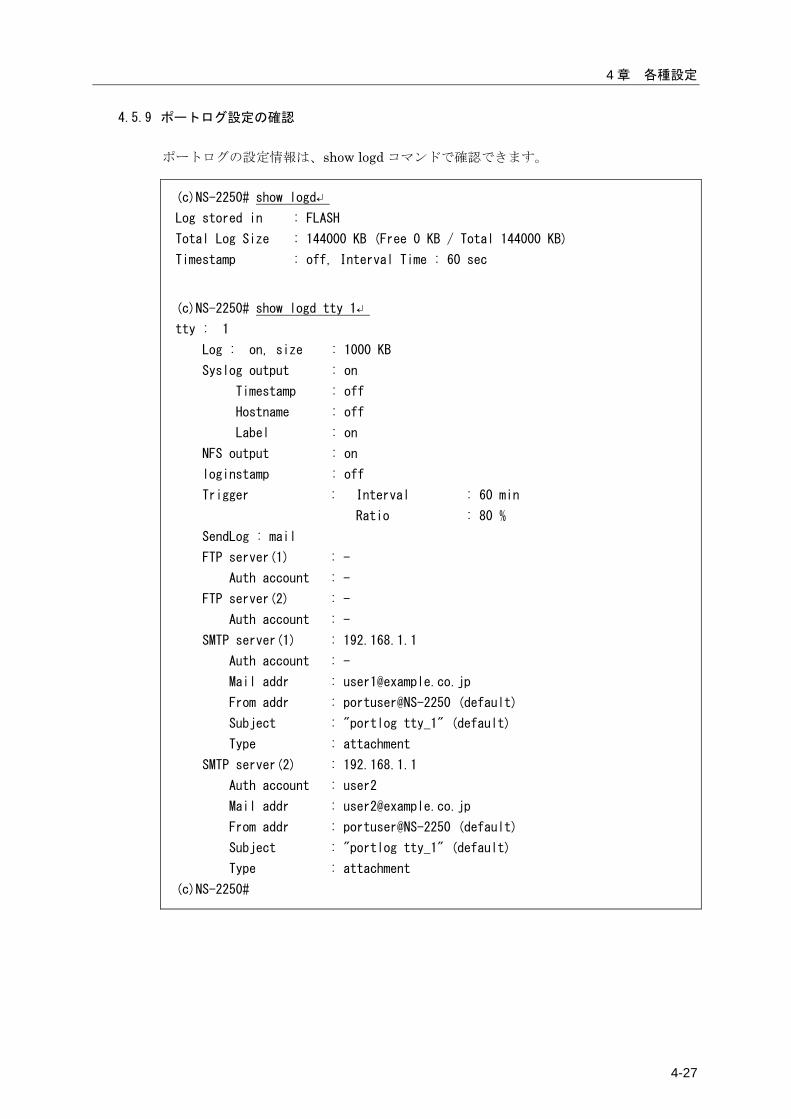
4 章 各種設定
4-27
4.5.9 ポートログ設定の確認 ポートログの設定情報は、show logd コマンドで確認できます。
(c)NS-2250# show logd↵
Log stored in : FLASH
Total Log Size : 144000 KB (Free 0 KB / Total 144000 KB)
Timestamp : off, Interval Time : 60 sec
(c)NS-2250# show logd tty 1↵
tty : 1
Log : on, size : 1000 KB
Syslog output : on
Timestamp : off
Hostname : off
Label : on
NFS output : on
loginstamp : off
Trigger : Interval : 60 min
Ratio : 80 %
SendLog : mail
FTP server(1) : -
Auth account : -
FTP server(2) : -
Auth account : -
SMTP server(1) : 192.168.1.1
Auth account : -
Mail addr : [email protected]
From addr : portuser@NS-2250 (default)
Subject : "portlog tty_1" (default)
Type : attachment
SMTP server(2) : 192.168.1.1
Auth account : user2
Mail addr : [email protected]
From addr : portuser@NS-2250 (default)
Subject : "portlog tty_1" (default)
Type : attachment
(c)NS-2250#

4-28
4.6 セキュリティの設定
4.6.1 ユーザの登録と削除 本装置では目的にあわせてユーザを追加したり、削除することができます。 本装置に一般ユーザ(user1)とポートユーザ(port1)を登録するには、create user コマンド
を実行します。create user コマンドの詳細は「コマンドリファレンス」を参照してくださ
い。 (c)NS-2250# create user user1 group normal password↵
New password: ↵
Retype new password: ↵
(c)NS-2250# create user port1 group portusr port 1-16 password↵
New password: ↵
Retype new password: ↵
(c)NS-2250#
本装置の一般ユーザ(user1)とポートユーザ(port1)を削除するには、delete user コマンド
を実行します。 (c)NS-2250# delete user user1↵
(c)NS-2250# delete user port1↵
(c)NS-2250#
本装置に登録されているユーザ一覧は、show user コマンドで確認することができます。
(c)NS-2250# show user↵
User-Name Category(Uid) Public-Key Port-Access-List
---------------------------------------------------------------
root root(0)
setup setup(198)
verup verup(199)
log log(200)
somebody normal(100)
portusr portusr(500) 1-32
port01usr portusr(501) 1-32
(c)NS-2250#
ユーザ情報(機能/ユーザ ID/グループ名)の詳細は、「2.3.1 ユーザ管理/認証機能」を参
照してください。
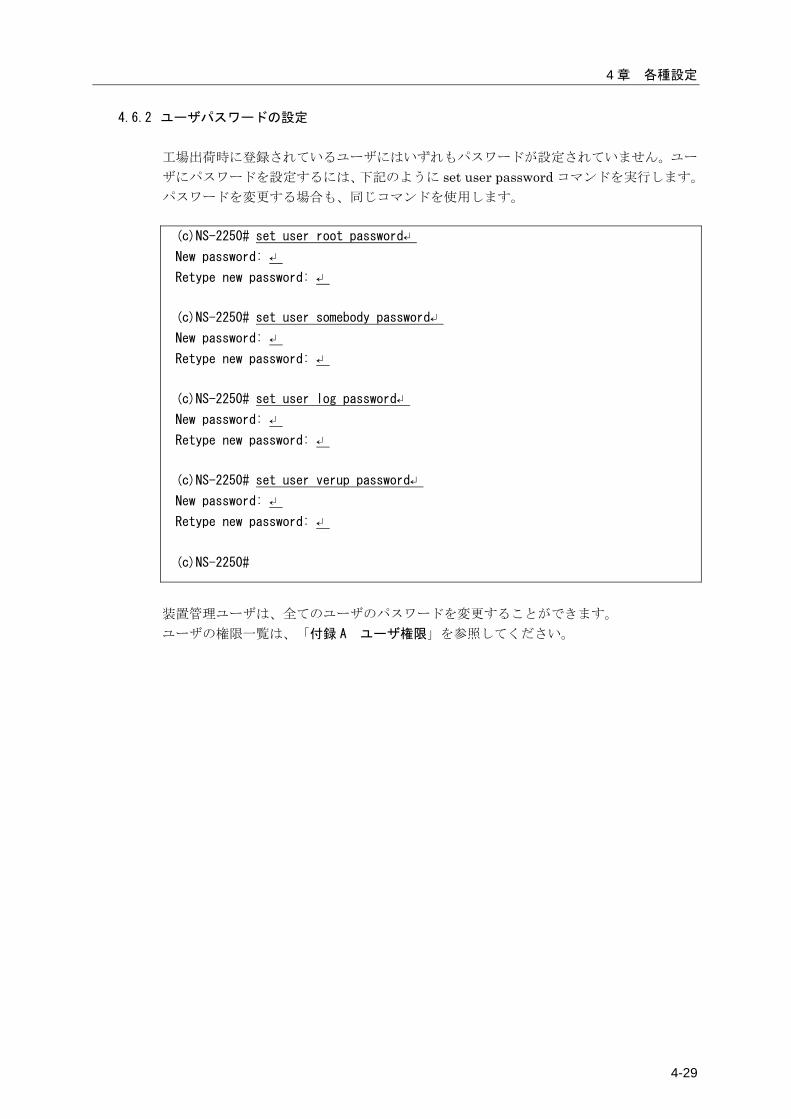
4 章 各種設定
4-29
4.6.2 ユーザパスワードの設定 工場出荷時に登録されているユーザにはいずれもパスワードが設定されていません。ユー
ザにパスワードを設定するには、下記のように set user password コマンドを実行します。 パスワードを変更する場合も、同じコマンドを使用します。 (c)NS-2250# set user root password↵
New password: ↵
Retype new password: ↵
(c)NS-2250# set user somebody password↵
New password: ↵
Retype new password: ↵
(c)NS-2250# set user log password↵
New password: ↵
Retype new password: ↵
(c)NS-2250# set user verup password↵
New password: ↵
Retype new password: ↵
(c)NS-2250#
装置管理ユーザは、全てのユーザのパスワードを変更することができます。 ユーザの権限一覧は、「付録 A ユーザ権限」を参照してください。
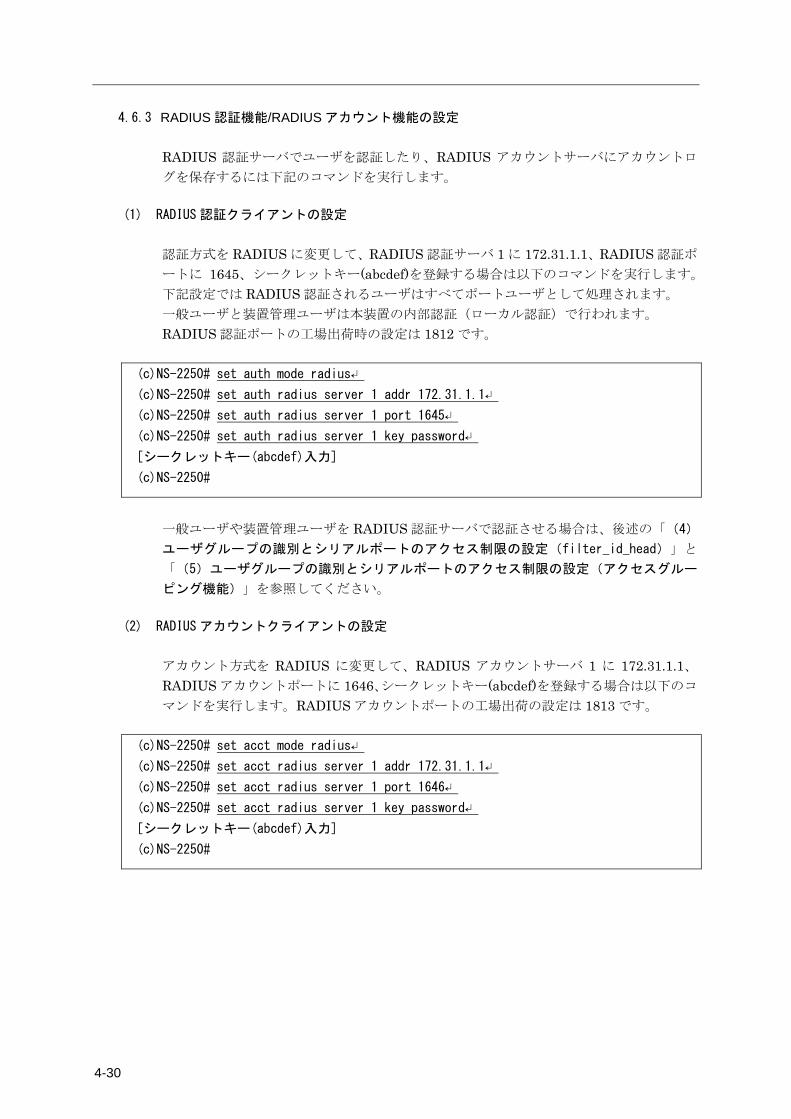
4-30
4.6.3 RADIUS 認証機能/RADIUS アカウント機能の設定 RADIUS 認証サーバでユーザを認証したり、RADIUS アカウントサーバにアカウントロ
グを保存するには下記のコマンドを実行します。
(1) RADIUS 認証クライアントの設定
認証方式を RADIUS に変更して、RADIUS 認証サーバ 1 に 172.31.1.1、RADIUS 認証ポ
ートに 1645、シークレットキー(abcdef)を登録する場合は以下のコマンドを実行します。
下記設定では RADIUS 認証されるユーザはすべてポートユーザとして処理されます。 一般ユーザと装置管理ユーザは本装置の内部認証(ローカル認証)で行われます。 RADIUS 認証ポートの工場出荷時の設定は 1812 です。
(c)NS-2250# set auth mode radius↵
(c)NS-2250# set auth radius server 1 addr 172.31.1.1↵
(c)NS-2250# set auth radius server 1 port 1645↵
(c)NS-2250# set auth radius server 1 key password↵
[シークレットキー(abcdef)入力]
(c)NS-2250#
一般ユーザや装置管理ユーザを RADIUS 認証サーバで認証させる場合は、後述の「(4)
ユーザグループの識別とシリアルポートのアクセス制限の設定(filter_id_head)」と
「(5)ユーザグループの識別とシリアルポートのアクセス制限の設定(アクセスグルー
ピング機能)」を参照してください。
(2) RADIUS アカウントクライアントの設定
アカウント方式を RADIUS に変更して、RADIUS アカウントサーバ 1 に 172.31.1.1、RADIUS アカウントポートに 1646、シークレットキー(abcdef)を登録する場合は以下のコ
マンドを実行します。RADIUS アカウントポートの工場出荷の設定は 1813 です。
(c)NS-2250# set acct mode radius↵
(c)NS-2250# set acct radius server 1 addr 172.31.1.1↵
(c)NS-2250# set acct radius server 1 port 1646↵
(c)NS-2250# set acct radius server 1 key password↵
[シークレットキー(abcdef)入力]
(c)NS-2250#
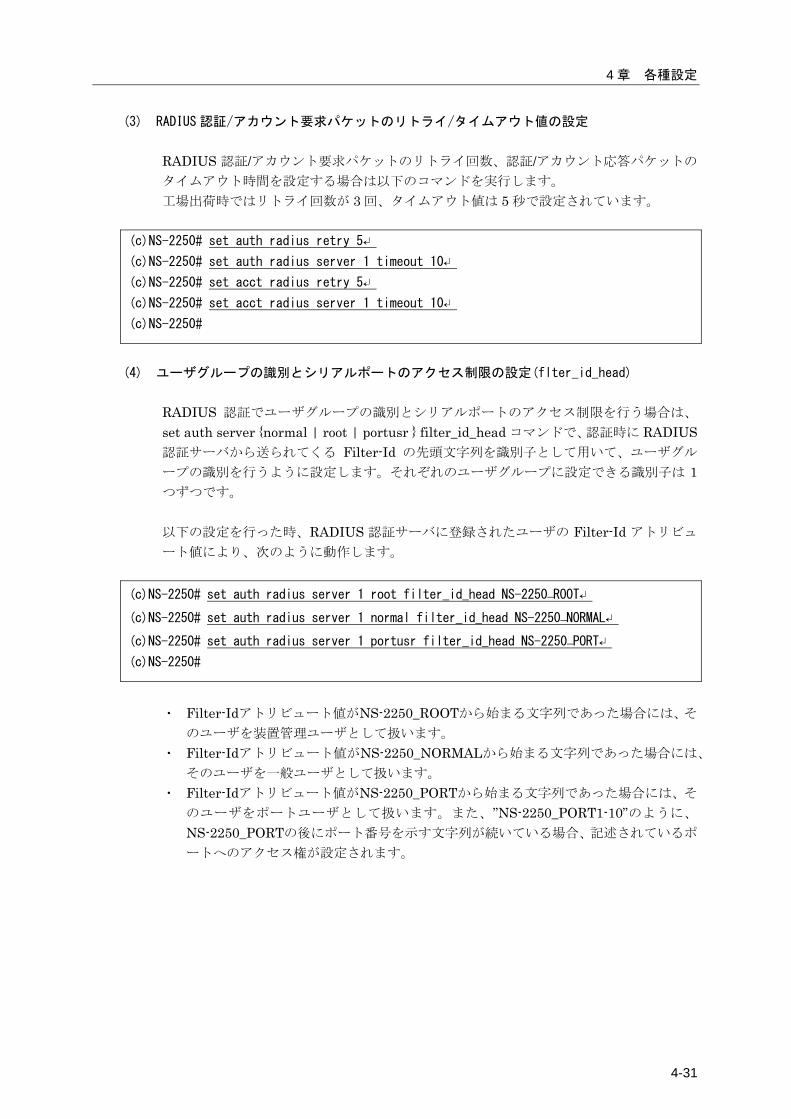
4 章 各種設定
4-31
(3) RADIUS 認証/アカウント要求パケットのリトライ/タイムアウト値の設定
RADIUS 認証/アカウント要求パケットのリトライ回数、認証/アカウント応答パケットの
タイムアウト時間を設定する場合は以下のコマンドを実行します。 工場出荷時ではリトライ回数が 3 回、タイムアウト値は 5 秒で設定されています。
(c)NS-2250# set auth radius retry 5↵
(c)NS-2250# set auth radius server 1 timeout 10↵
(c)NS-2250# set acct radius retry 5↵
(c)NS-2250# set acct radius server 1 timeout 10↵
(c)NS-2250#
(4) ユーザグループの識別とシリアルポートのアクセス制限の設定(flter_id_head)
RADIUS 認証でユーザグループの識別とシリアルポートのアクセス制限を行う場合は、
set auth server {normal | root | portusr } filter_id_head コマンドで、認証時に RADIUS認証サーバから送られてくる Filter-Id の先頭文字列を識別子として用いて、ユーザグル
ープの識別を行うように設定します。それぞれのユーザグループに設定できる識別子は 1つずつです。 以下の設定を行った時、RADIUS 認証サーバに登録されたユーザの Filter-Id アトリビュ
ート値により、次のように動作します。
(c)NS-2250# set auth radius server 1 root filter_id_head NS-2250_ROOT↵
(c)NS-2250# set auth radius server 1 normal filter_id_head NS-2250_NORMAL↵
(c)NS-2250# set auth radius server 1 portusr filter_id_head NS-2250_PORT↵
(c)NS-2250#
・ Filter-Idアトリビュート値がNS-2250_ROOTから始まる文字列であった場合には、そ
のユーザを装置管理ユーザとして扱います。 ・ Filter-Idアトリビュート値がNS-2250_NORMALから始まる文字列であった場合には、
そのユーザを一般ユーザとして扱います。 ・ Filter-Idアトリビュート値がNS-2250_PORTから始まる文字列であった場合には、そ
のユーザをポートユーザとして扱います。また、”NS-2250_PORT1-10”のように、
NS-2250_PORTの後にポート番号を示す文字列が続いている場合、記述されているポ
ートへのアクセス権が設定されます。

4-32
図 4-1 ユーザグループの識別とシリアルポートのアクセス制限(filter_id_head)
RADIUS 認証が成功してもユーザグループが特定されない場合の動作は「(6)ユーザグ
ループが特定できないユーザのアクセス方法の設定」を参照してください。 ログイン時の優先順は、①装置管理ユーザ(root)、②一般ユーザ(normal)、③ポートユー
ザ (portusr)です。ダイレクトモードの場合には、本体ログインではアクセス権限①②の
うち優先度の高いものでログインし、ポートサーバへのアクセスは③のアクセス権がある
場合のみログインできます。セレクトモードのログイン時には、そのユーザの持つアクセ
ス権限①②③のうちもっとも優先度の高いものでログインします。
・RADIUS サーバの Filter-Id 設定内容 ・set auth radius server {normal | root |
portusr }filter_id_head コマンドの設定
内容
ダイレクトモード セレクトモード 本体アクセス ポートアクセス
装置管理ユーザ 装置管理ユーザ ×(アクセス不可) 装置管理ユーザ 一般ユーザ 一般ユーザ ×(アクセス不可) 一般ユーザ ポートユーザ ×(アクセス不可) ポートユーザ ポートユーザ 装置管理ユーザ/一般ユーザ 装置管理ユーザ ×(アクセス不可) 装置管理ユーザ 装置管理ユーザ/ポートユーザ 装置管理ユーザ ポートユーザ 装置管理ユーザ 一般ユーザ/ポートユーザ 一般ユーザ ポートユーザ 一般ユーザ 装置管理ユーザ/一般ユーザ/ポートユーザ 装置管理ユーザ ポートユーザ 装置管理ユーザ
本機能は、NS-2250 の台数が少ない場合やユーザ管理を RADIUS サーバだけで完結させ
たい場合に有効です。例えば、NS-2250 の台数が少なく、ポートユーザ毎にアクセスでき
るシリアルポートが固定できる場合(user1 はシリアルポート 1~10 に、user2 はシリアル
ポート 20~30 にアクセス可など)に利用します。
注意 本装置は本装置内のローカル認証→RADIUS 認証の順番でユーザ認証を行います。 一般ユーザを RADIUS 認証する場合は本装置内に登録されている一般ユーザを削
除するか、もしくは、RADIUS サーバに登録したパスワードと異なるパスワードを
設定してください。一般ユーザのパスワードが登録されていない場合は、パスワー
ドにリターンキーを入れるだけで本装置内のローカル認証で成功しログインが可
能となりますのでご注意ください。
RADIUSサーバ
ユーザ名 アトリビュート設定
somebody Filter-Id = NS2250_NORMAL
root Filter-Id = NS2250_ROOT
suzuki Filter-Id = NS2250_PORT1-10
tanaka Filter-Id = NS2250_PORT11-20
yamada Filter-Id = NS2250_PORT30-32
ユーザ種別 filter_id_head設定
装置管理ユーザ NS2250_ROOT
一般ユーザ NS2250_NORMAL
ポートユーザ NS2250_PORT
■filter_id_head設定NS-2250
■RADIUSサーバ設定
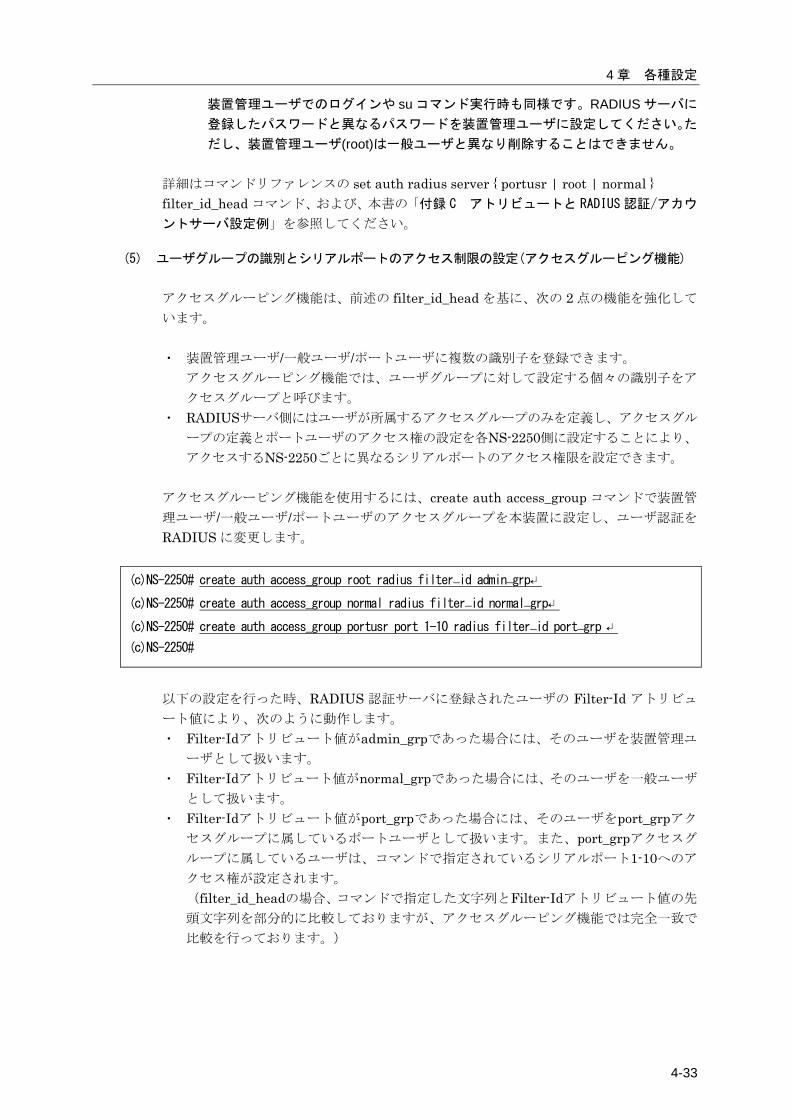
4 章 各種設定
4-33
装置管理ユーザでのログインや su コマンド実行時も同様です。RADIUS サーバに
登録したパスワードと異なるパスワードを装置管理ユーザに設定してください。た
だし、装置管理ユーザ(root)は一般ユーザと異なり削除することはできません。 詳細はコマンドリファレンスの set auth radius server { portusr | root | normal } filter_id_head コマンド、および、本書の「付録 C アトリビュートと RADIUS 認証/アカウ
ントサーバ設定例」を参照してください。
(5) ユーザグループの識別とシリアルポートのアクセス制限の設定(アクセスグルーピング機能)
アクセスグルーピング機能は、前述の filter_id_head を基に、次の 2 点の機能を強化して
います。 ・ 装置管理ユーザ/一般ユーザ/ポートユーザに複数の識別子を登録できます。
アクセスグルーピング機能では、ユーザグループに対して設定する個々の識別子をア
クセスグループと呼びます。 ・ RADIUSサーバ側にはユーザが所属するアクセスグループのみを定義し、アクセスグル
ープの定義とポートユーザのアクセス権の設定を各NS-2250側に設定することにより、
アクセスするNS-2250ごとに異なるシリアルポートのアクセス権限を設定できます。
アクセスグルーピング機能を使用するには、create auth access_group コマンドで装置管
理ユーザ/一般ユーザ/ポートユーザのアクセスグループを本装置に設定し、ユーザ認証を
RADIUS に変更します。
(c)NS-2250# create auth access_group root radius filter_id admin_grp↵
(c)NS-2250# create auth access_group normal radius filter_id normal_grp↵
(c)NS-2250# create auth access_group portusr port 1-10 radius filter_id port_grp ↵
(c)NS-2250#
以下の設定を行った時、RADIUS 認証サーバに登録されたユーザの Filter-Id アトリビュ
ート値により、次のように動作します。 ・ Filter-Idアトリビュート値がadmin_grpであった場合には、そのユーザを装置管理ユ
ーザとして扱います。 ・ Filter-Idアトリビュート値がnormal_grpであった場合には、そのユーザを一般ユーザ
として扱います。 ・ Filter-Idアトリビュート値がport_grpであった場合には、そのユーザをport_grpアク
セスグループに属しているポートユーザとして扱います。また、port_grpアクセスグ
ループに属しているユーザは、コマンドで指定されているシリアルポート1-10へのア
クセス権が設定されます。 (filter_id_headの場合、コマンドで指定した文字列とFilter-Idアトリビュート値の先
頭文字列を部分的に比較しておりますが、アクセスグルーピング機能では完全一致で
比較を行っております。)
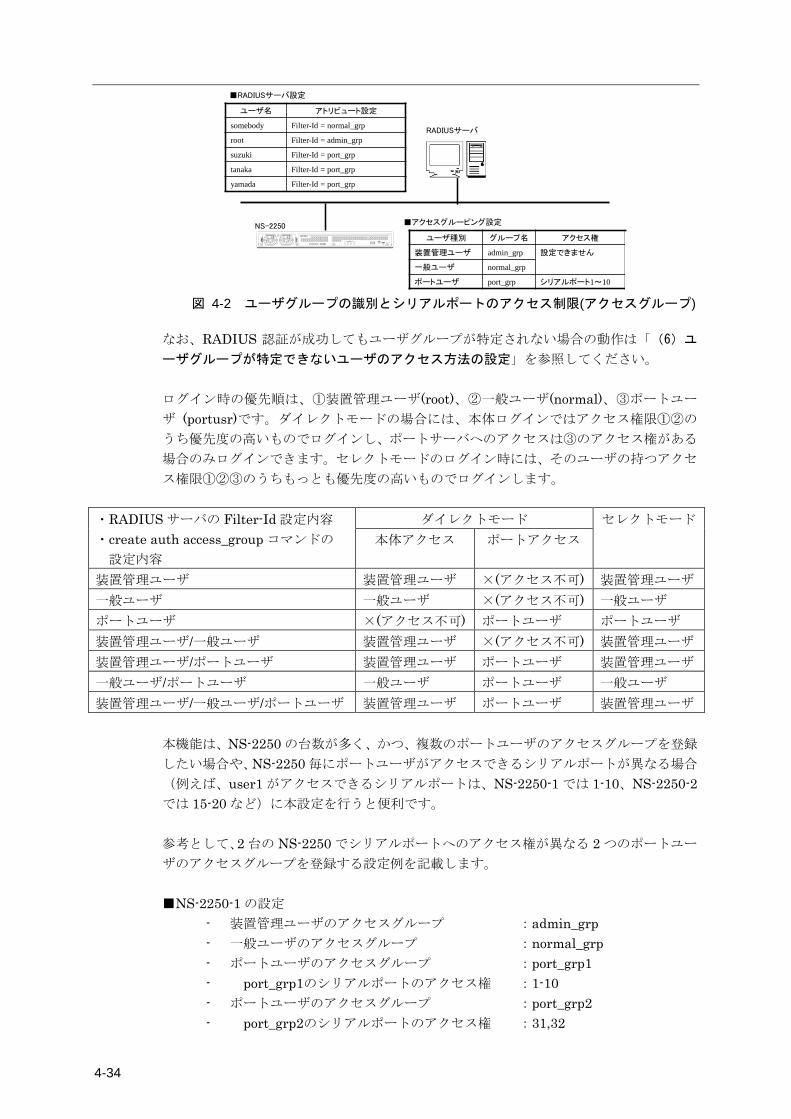
4-34
図 4-2 ユーザグループの識別とシリアルポートのアクセス制限(アクセスグループ)
なお、RADIUS 認証が成功してもユーザグループが特定されない場合の動作は「(6)ユ
ーザグループが特定できないユーザのアクセス方法の設定」を参照してください。 ログイン時の優先順は、①装置管理ユーザ(root)、②一般ユーザ(normal)、③ポートユー
ザ (portusr)です。ダイレクトモードの場合には、本体ログインではアクセス権限①②の
うち優先度の高いものでログインし、ポートサーバへのアクセスは③のアクセス権がある
場合のみログインできます。セレクトモードのログイン時には、そのユーザの持つアクセ
ス権限①②③のうちもっとも優先度の高いものでログインします。
・RADIUS サーバの Filter-Id 設定内容 ・create auth access_group コマンドの
設定内容
ダイレクトモード セレクトモード 本体アクセス ポートアクセス
装置管理ユーザ 装置管理ユーザ ×(アクセス不可) 装置管理ユーザ 一般ユーザ 一般ユーザ ×(アクセス不可) 一般ユーザ ポートユーザ ×(アクセス不可) ポートユーザ ポートユーザ 装置管理ユーザ/一般ユーザ 装置管理ユーザ ×(アクセス不可) 装置管理ユーザ 装置管理ユーザ/ポートユーザ 装置管理ユーザ ポートユーザ 装置管理ユーザ 一般ユーザ/ポートユーザ 一般ユーザ ポートユーザ 一般ユーザ 装置管理ユーザ/一般ユーザ/ポートユーザ 装置管理ユーザ ポートユーザ 装置管理ユーザ
本機能は、NS-2250 の台数が多く、かつ、複数のポートユーザのアクセスグループを登録
したい場合や、NS-2250 毎にポートユーザがアクセスできるシリアルポートが異なる場合
(例えば、user1 がアクセスできるシリアルポートは、NS-2250-1 では 1-10、NS-2250-2では 15-20 など)に本設定を行うと便利です。 参考として、2 台の NS-2250 でシリアルポートへのアクセス権が異なる 2 つのポートユー
ザのアクセスグループを登録する設定例を記載します。 ■NS-2250-1 の設定
- 装置管理ユーザのアクセスグループ :admin_grp - 一般ユーザのアクセスグループ :normal_grp - ポートユーザのアクセスグループ :port_grp1 - port_grp1のシリアルポートのアクセス権 :1-10 - ポートユーザのアクセスグループ :port_grp2 - port_grp2のシリアルポートのアクセス権 :31,32
RADIUSサーバ
ユーザ名 アトリビュート設定
somebody Filter-Id = normal_grp
root Filter-Id = admin_grp
suzuki Filter-Id = port_grp
tanaka Filter-Id = port_grp
yamada Filter-Id = port_grp
ユーザ種別 グループ名 アクセス権
装置管理ユーザ admin_grp 設定できません
一般ユーザ normal_grp
ポートユーザ port_grp シリアルポート1~10
■アクセスグルーピング設定NS-2250
■RADIUSサーバ設定
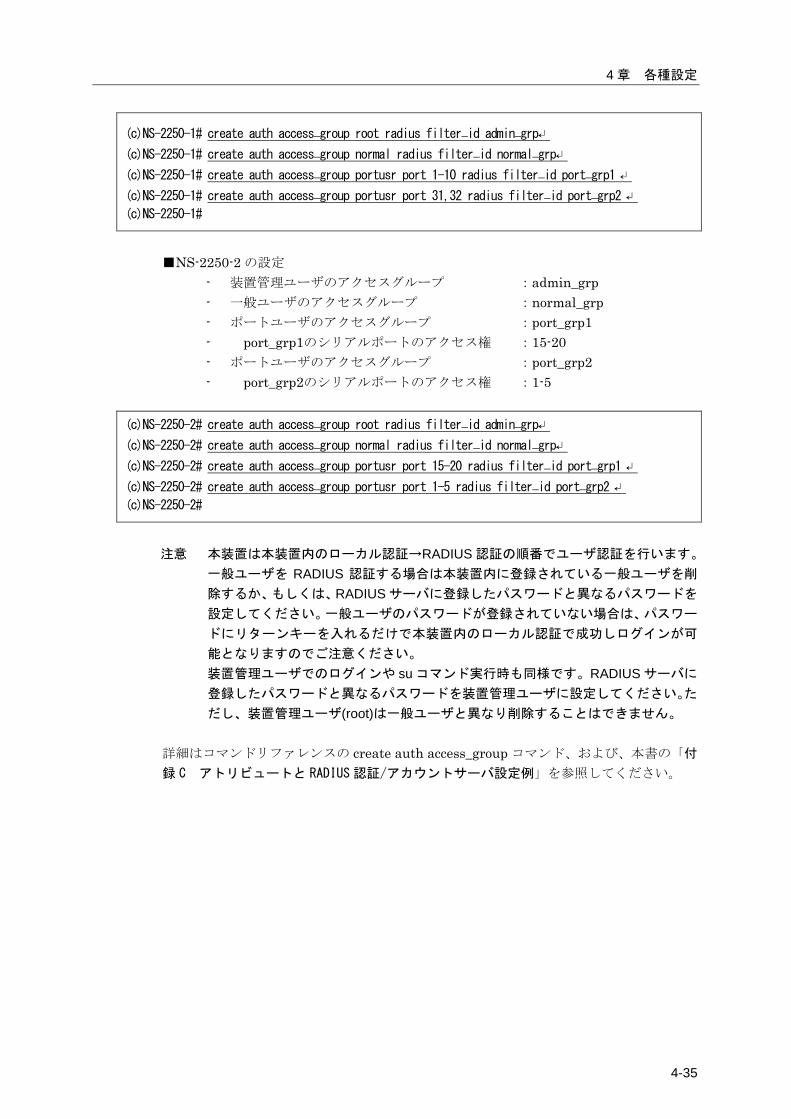
4 章 各種設定
4-35
(c)NS-2250-1# create auth access_group root radius filter_id admin_grp↵
(c)NS-2250-1# create auth access_group normal radius filter_id normal_grp↵
(c)NS-2250-1# create auth access_group portusr port 1-10 radius filter_id port_grp1 ↵
(c)NS-2250-1# create auth access_group portusr port 31,32 radius filter_id port_grp2 ↵
(c)NS-2250-1#
■NS-2250-2 の設定
- 装置管理ユーザのアクセスグループ :admin_grp - 一般ユーザのアクセスグループ :normal_grp - ポートユーザのアクセスグループ :port_grp1 - port_grp1のシリアルポートのアクセス権 :15-20 - ポートユーザのアクセスグループ :port_grp2 - port_grp2のシリアルポートのアクセス権 :1-5
(c)NS-2250-2# create auth access_group root radius filter_id admin_grp↵
(c)NS-2250-2# create auth access_group normal radius filter_id normal_grp↵
(c)NS-2250-2# create auth access_group portusr port 15-20 radius filter_id port_grp1 ↵
(c)NS-2250-2# create auth access_group portusr port 1-5 radius filter_id port_grp2 ↵
(c)NS-2250-2#
注意 本装置は本装置内のローカル認証→RADIUS 認証の順番でユーザ認証を行います。
一般ユーザを RADIUS 認証する場合は本装置内に登録されている一般ユーザを削
除するか、もしくは、RADIUS サーバに登録したパスワードと異なるパスワードを
設定してください。一般ユーザのパスワードが登録されていない場合は、パスワー
ドにリターンキーを入れるだけで本装置内のローカル認証で成功しログインが可
能となりますのでご注意ください。 装置管理ユーザでのログインや su コマンド実行時も同様です。RADIUS サーバに
登録したパスワードと異なるパスワードを装置管理ユーザに設定してください。た
だし、装置管理ユーザ(root)は一般ユーザと異なり削除することはできません。 詳細はコマンドリファレンスの create auth access_group コマンド、および、本書の「付
録 C アトリビュートと RADIUS 認証/アカウントサーバ設定例」を参照してください。
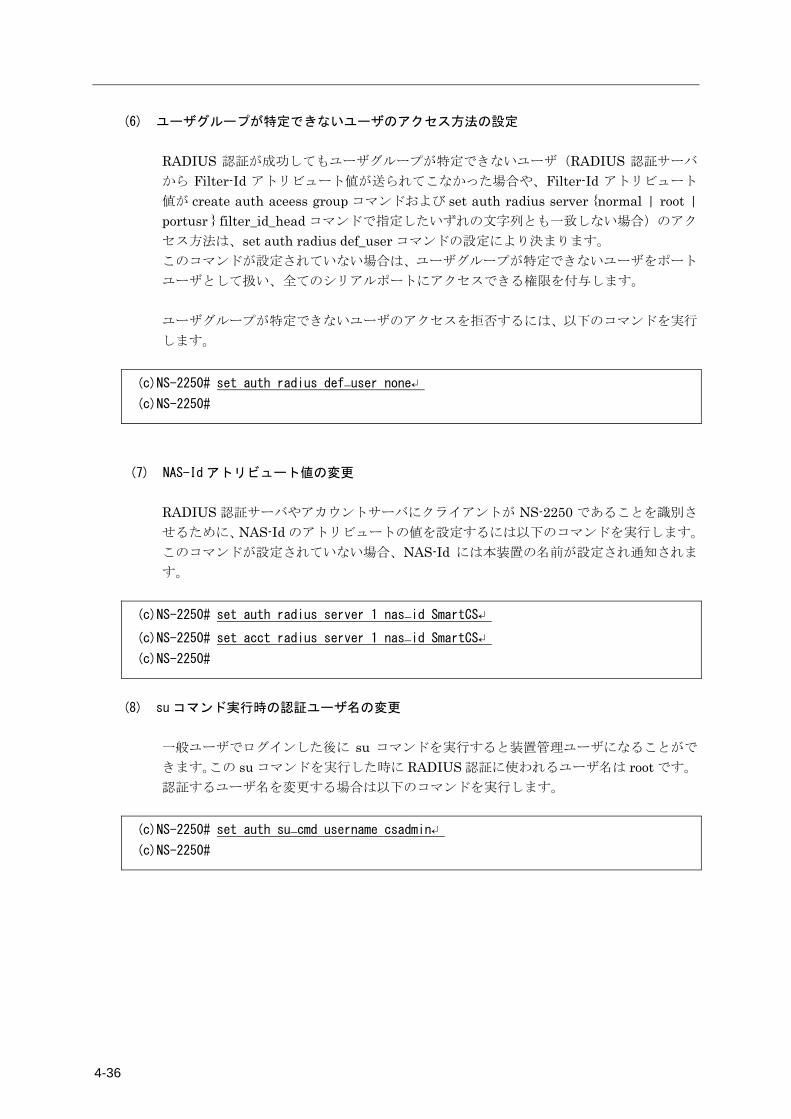
4-36
(6) ユーザグループが特定できないユーザのアクセス方法の設定
RADIUS 認証が成功してもユーザグループが特定できないユーザ(RADIUS 認証サーバ
から Filter-Id アトリビュート値が送られてこなかった場合や、Filter-Id アトリビュート
値が create auth aceess group コマンドおよび set auth radius server {normal | root | portusr } filter_id_head コマンドで指定したいずれの文字列とも一致しない場合)のアク
セス方法は、set auth radius def_user コマンドの設定により決まります。 このコマンドが設定されていない場合は、ユーザグループが特定できないユーザをポート
ユーザとして扱い、全てのシリアルポートにアクセスできる権限を付与します。 ユーザグループが特定できないユーザのアクセスを拒否するには、以下のコマンドを実行
します。
(c)NS-2250# set auth radius def_user none↵
(c)NS-2250#
(7) NAS-Id アトリビュート値の変更
RADIUS 認証サーバやアカウントサーバにクライアントが NS-2250 であることを識別さ
せるために、NAS-Id のアトリビュートの値を設定するには以下のコマンドを実行します。
このコマンドが設定されていない場合、NAS-Id には本装置の名前が設定され通知されま
す。
(c)NS-2250# set auth radius server 1 nas_id SmartCS↵
(c)NS-2250# set acct radius server 1 nas_id SmartCS↵
(c)NS-2250#
(8) su コマンド実行時の認証ユーザ名の変更
一般ユーザでログインした後に su コマンドを実行すると装置管理ユーザになることがで
きます。この su コマンドを実行した時に RADIUS 認証に使われるユーザ名は root です。 認証するユーザ名を変更する場合は以下のコマンドを実行します。
(c)NS-2250# set auth su_cmd username csadmin↵
(c)NS-2250#

4 章 各種設定
4-37
(9) ユーザ認証失敗時のアカウント STOP パケットの送出方法の設定
ユーザ認証失敗時のアカウント STOP パケットの送出方法は set acct radius auth_deny_stop コマンドで設定します。下記のように off を設定すると、認証に失敗して
もアカウント STOP パケットの送出は行いません。工場出荷時の設定は remote(RADIUS認証失敗時にのみアカウント STOP パケットを送出する)です。
(c)NS-2250# set acct radius auth_deny_stop off↵
(c)NS-2250#
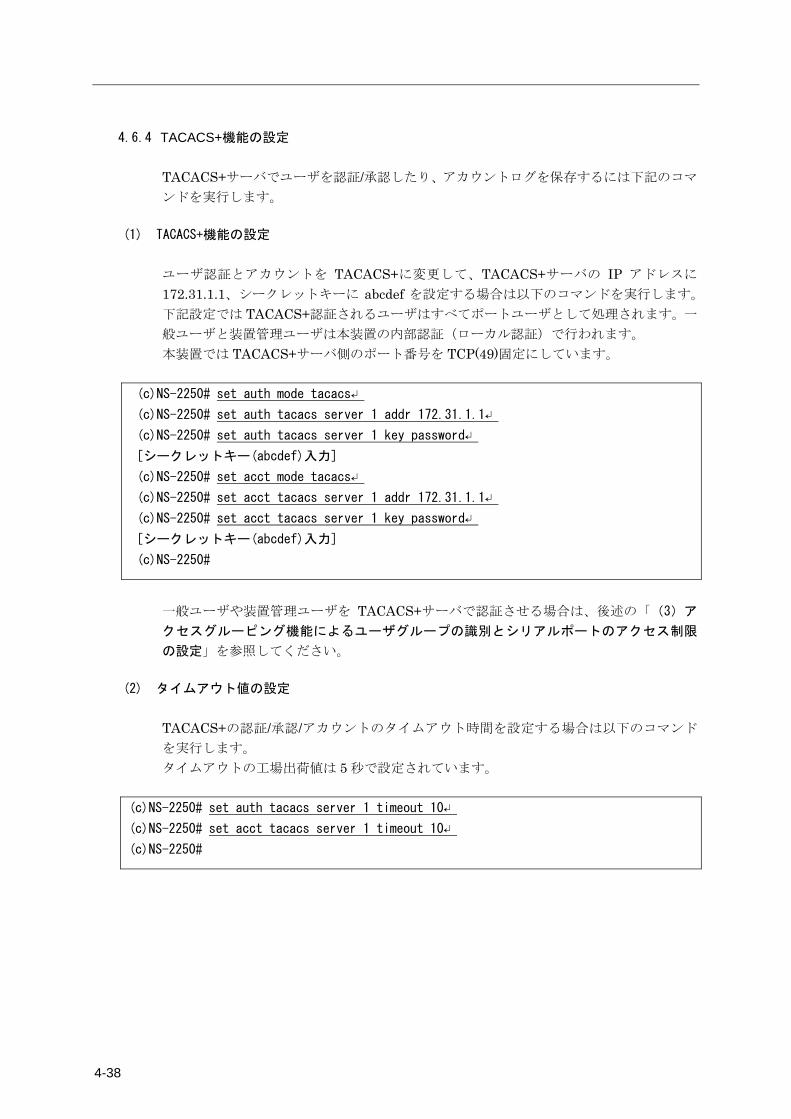
4-38
4.6.4 TACACS+機能の設定 TACACS+サーバでユーザを認証/承認したり、アカウントログを保存するには下記のコマ
ンドを実行します。
(1) TACACS+機能の設定
ユーザ認証とアカウントを TACACS+に変更して、TACACS+サーバの IP アドレスに
172.31.1.1、シークレットキーに abcdef を設定する場合は以下のコマンドを実行します。
下記設定では TACACS+認証されるユーザはすべてポートユーザとして処理されます。一
般ユーザと装置管理ユーザは本装置の内部認証(ローカル認証)で行われます。 本装置では TACACS+サーバ側のポート番号を TCP(49)固定にしています。
(c)NS-2250# set auth mode tacacs↵
(c)NS-2250# set auth tacacs server 1 addr 172.31.1.1↵
(c)NS-2250# set auth tacacs server 1 key password↵
[シークレットキー(abcdef)入力]
(c)NS-2250# set acct mode tacacs↵
(c)NS-2250# set acct tacacs server 1 addr 172.31.1.1↵
(c)NS-2250# set acct tacacs server 1 key password↵
[シークレットキー(abcdef)入力]
(c)NS-2250#
一般ユーザや装置管理ユーザを TACACS+サーバで認証させる場合は、後述の「(3)ア
クセスグルーピング機能によるユーザグループの識別とシリアルポートのアクセス制限
の設定」を参照してください。
(2) タイムアウト値の設定
TACACS+の認証/承認/アカウントのタイムアウト時間を設定する場合は以下のコマンド
を実行します。 タイムアウトの工場出荷値は 5 秒で設定されています。
(c)NS-2250# set auth tacacs server 1 timeout 10↵
(c)NS-2250# set acct tacacs server 1 timeout 10↵
(c)NS-2250#

4 章 各種設定
4-39
(3) ユーザグループの識別とシリアルポートのアクセス制限の設定(アクセスグルーピング)
アクセスグルーピング機能は、create auth access_group コマンドで装置管理ユーザ/一般
ユーザ/ポートユーザを識別するためのアトリビュートと値のペアを本装置に登録して使
用します。ポートユーザにはアクセスを許可するシリアルポートのリストも一緒に設定し
ます。 このアトリビュートの名前(この例では grp)と値(この例では grp=admin_grp など)のペア
は装置管理者が任意に決めることができます。TACACS+サーバのユーザ定義にも、この
コマンドで設定したアトリビュートと値のペアを設定してください。
図 4-3 ユーザグループの識別とシリアルポートのアクセス制限の設定(TACACS+)
本装置に以下の設定を行った時、TACACS+サーバに登録されたユーザのアトリビュート
により、次のようにユーザ種別が決定されます。
(c)NS-2250# create auth access_group root tacacs attr grp val admin_grp↵
(c)NS-2250# create auth access_group normal tacacs attr grp val normal_grp↵
(c)NS-2250# create auth access_group portusr port 1-10 tacacs attr grp val port_grp1 ↵
(c)NS-2250# create auth access_group portusr port 11-20 tacacs attr grp val port_grp2 ↵
(c)NS-2250#
・ grpアトリビュート値がadmin_grpであった場合には、そのユーザを装置管理ユーザと
して扱います。 ・ grpアトリビュート値がnormal_grpであった場合には、そのユーザを一般ユーザとし
て扱います ・ grpアトリビュート値がport_grp1もしくはport_grp2であった場合には、そのユーザを
portアクセスグループに属しているポートユーザとして扱います。また、portアクセ
スグループに属しているユーザにはコマンドで指定されているシリアルポートへのア
クセス権を設定します。
TACACS+サーバ
ユーザ名 アトリビュートと値のペア
somebody grp = normal_grp
root grp = admin_grp
suzuki grp = port_grp1
tanaka grp = port_grp2
ユーザ種別 アトリビュートと値のペア
シリアルポートのアクセス権
装置管理ユーザ grp = admin_grp 設定不可
一般ユーザ grp = normal_grp
ポートユーザ grp = port_grp1 1~10
grp = port_grp2 11~20
■アクセスグルーピング設定
NS-2250-1 NS-2250-2
■TACACS+サーバ設定
ユーザ種別 アトリビュートと値のペア
シリアルポートのアクセス権
装置管理ユーザ grp = admin_grp 設定不可
一般ユーザ grp = normal_grp
ポートユーザ grp = port_grp1 15~20
grp = port_grp2 20~30
■アクセスグルーピング設定

4-40
TACACS+の認証/承認が成功してもユーザグループが特定されない場合の動作は「(6)
ユーザグループが特定できないユーザのアクセス方法の設定」を参照してください。 ユーザに複数グループが設定されている場合のログイン時の優先順は、①装置管理ユーザ
(root)、②一般ユーザ(normal)、③ポートユーザ (portusr)です。ダイレクトモードの場合
には、本体ログインではアクセス権限①②のうち優先度の高いものでログインし、ポート
サーバへのアクセスは③のアクセス権がある場合のみログインできます。セレクトモード
のログイン時には、そのユーザの持つアクセス権限①②③のうちもっとも優先度の高いも
のでログインします。
create auth access_group コマンドの設定 ダイレクトモード セレクトモード 本体アクセス ポートアクセス
装置管理ユーザ 装置管理ユーザ ×(アクセス不可) 装置管理ユーザ 一般ユーザ 一般ユーザ ×(アクセス不可) 一般ユーザ ポートユーザ ×(アクセス不可) ポートユーザ ポートユーザ 装置管理ユーザ/一般ユーザ 装置管理ユーザ ×(アクセス不可) 装置管理ユーザ 装置管理ユーザ/ポートユーザ 装置管理ユーザ ポートユーザ 装置管理ユーザ 一般ユーザ/ポートユーザ 一般ユーザ ポートユーザ 一般ユーザ 装置管理ユーザ/一般ユーザ/ポートユーザ 装置管理ユーザ ポートユーザ 装置管理ユーザ
アクセスグルーピング機能は、本装置の台数が多い場合、複数のポートユーザのアクセス
グループを登録したい場合、装置毎にポートユーザがアクセスできるシリアルポートが異
なる場合(例えば、user1 がアクセスできるシリアルポートは、NS-2250-1 では 1-10、NS-2250-2 では 15-20 など)に利用すると便利です。
(4) ユーザグループが特定できないユーザのアクセス方法の設定
TACACS+認証/承認が成功してもユーザグループが特定できないユーザ(TACACS+サー
バからユーザ種別を識別するアトリビュートが送られてこなかった場合や、アトリビュー
トと値のペアが create auth aceess group コマンドで指定したいずれの文字列とも一致し
ない場合)のアクセス方法は、set auth tacacs def_user コマンドの設定により決まります。 このコマンドが設定されていない場合は、ユーザグループが特定できないユーザをポート
ユーザとして扱い、全てのシリアルポートにアクセスできる権限を付与します。 ユーザグループが特定できないユーザのアクセスを拒否するには、以下のコマンドを実行
します。
(c)NS-2250# set auth tacacs def_user none↵
(c)NS-2250#
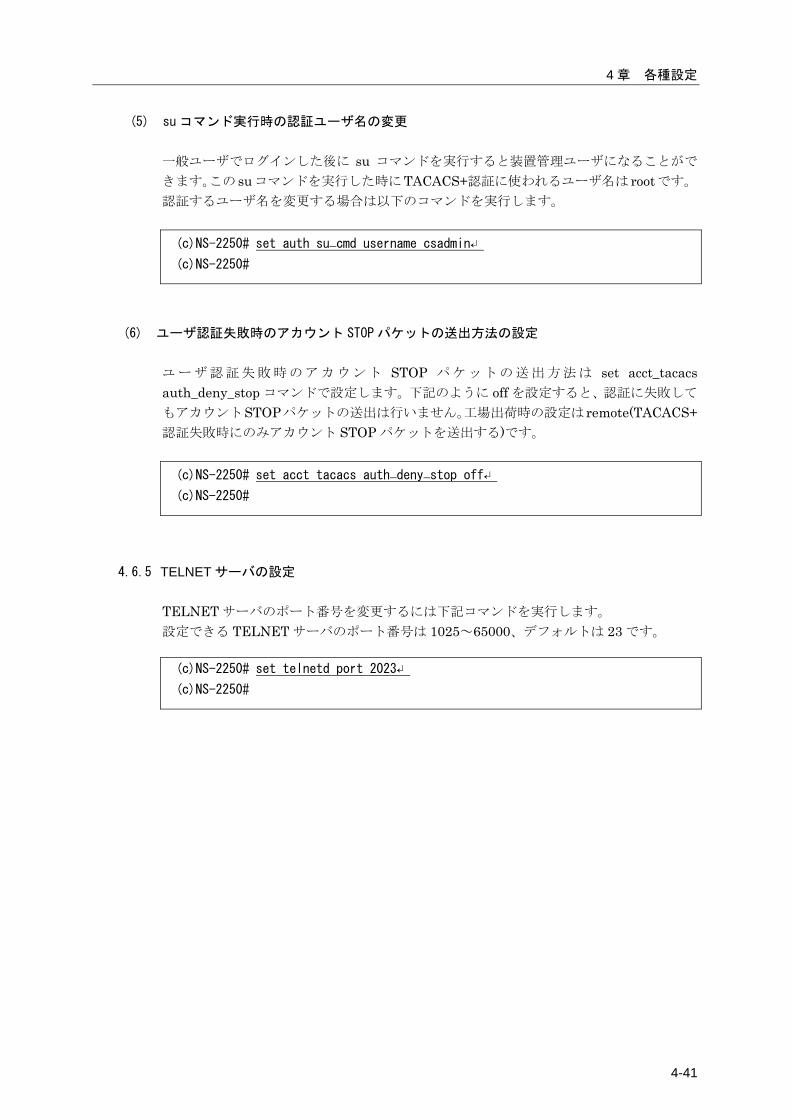
4 章 各種設定
4-41
(5) su コマンド実行時の認証ユーザ名の変更
一般ユーザでログインした後に su コマンドを実行すると装置管理ユーザになることがで
きます。この suコマンドを実行した時にTACACS+認証に使われるユーザ名は rootです。 認証するユーザ名を変更する場合は以下のコマンドを実行します。
(c)NS-2250# set auth su_cmd username csadmin↵
(c)NS-2250#
(6) ユーザ認証失敗時のアカウント STOP パケットの送出方法の設定
ユーザ認証失敗時のアカウント STOP パケットの送出方法は set acct_tacacs auth_deny_stop コマンドで設定します。下記のように off を設定すると、認証に失敗して
もアカウントSTOPパケットの送出は行いません。工場出荷時の設定は remote(TACACS+認証失敗時にのみアカウント STOP パケットを送出する)です。
(c)NS-2250# set acct tacacs auth_deny_stop off↵
(c)NS-2250#
4.6.5 TELNET サーバの設定 TELNET サーバのポート番号を変更するには下記コマンドを実行します。 設定できる TELNET サーバのポート番号は 1025~65000、デフォルトは 23 です。
(c)NS-2250# set telnetd port 2023↵
(c)NS-2250#
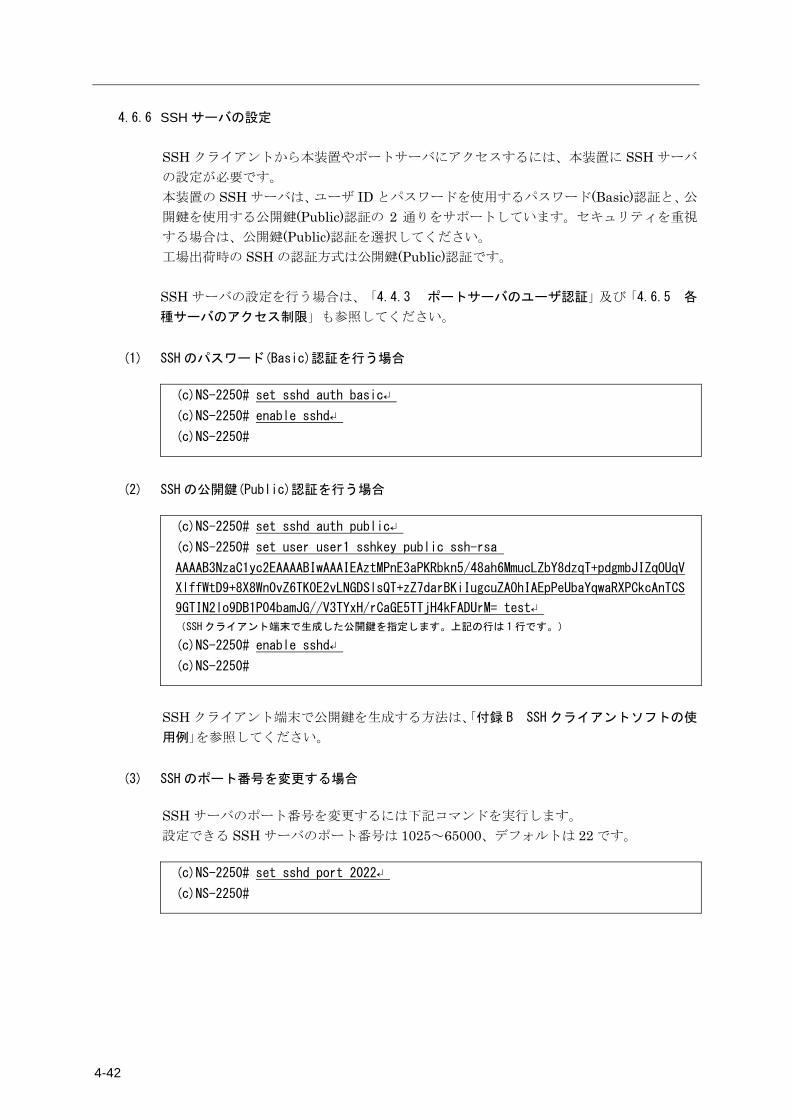
4-42
4.6.6 SSH サーバの設定 SSH クライアントから本装置やポートサーバにアクセスするには、本装置に SSH サーバ
の設定が必要です。 本装置の SSH サーバは、ユーザ ID とパスワードを使用するパスワード(Basic)認証と、公
開鍵を使用する公開鍵(Public)認証の 2 通りをサポートしています。セキュリティを重視
する場合は、公開鍵(Public)認証を選択してください。 工場出荷時の SSH の認証方式は公開鍵(Public)認証です。 SSH サーバの設定を行う場合は、「4.4.3 ポートサーバのユーザ認証」及び「4.6.5 各
種サーバのアクセス制限」も参照してください。
(1) SSH のパスワード(Basic)認証を行う場合
(c)NS-2250# set sshd auth basic↵
(c)NS-2250# enable sshd↵
(c)NS-2250#
(2) SSH の公開鍵(Public)認証を行う場合
(c)NS-2250# set sshd auth public↵
(c)NS-2250# set user user1 sshkey public ssh-rsa
AAAAB3NzaC1yc2EAAAABIwAAAIEAztMPnE3aPKRbkn5/48ah6MmucLZbY8dzqT+pdgmbJIZqOUqV
XlffWtD9+8X8Wn0vZ6TK0E2vLNGDSlsQT+zZ7darBKiIugcuZAOhIAEpPeUbaYqwaRXPCkcAnTCS
9GTIN2lo9DB1P04bamJG//V3TYxH/rCaGE5TTjH4kFADUrM= test↵
(SSH クライアント端末で生成した公開鍵を指定します。上記の行は 1 行です。)
(c)NS-2250# enable sshd↵
(c)NS-2250#
SSH クライアント端末で公開鍵を生成する方法は、「付録 B SSH クライアントソフトの使
用例」を参照してください。
(3) SSH のポート番号を変更する場合
SSH サーバのポート番号を変更するには下記コマンドを実行します。 設定できる SSH サーバのポート番号は 1025~65000、デフォルトは 22 です。
(c)NS-2250# set sshd port 2022↵
(c)NS-2250#
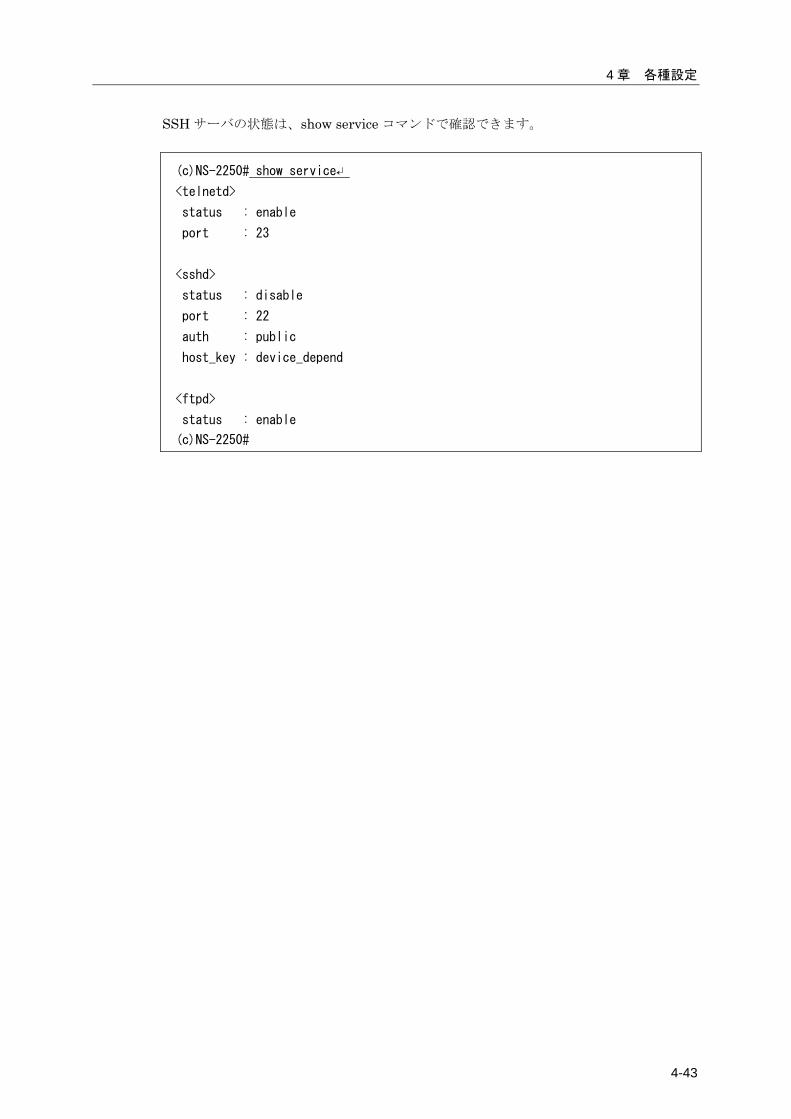
4 章 各種設定
4-43
SSH サーバの状態は、show service コマンドで確認できます。
(c)NS-2250# show service↵
<telnetd>
status : enable
port : 23
<sshd>
status : disable
port : 22
auth : public
host_key : device_depend
<ftpd>
status : enable
(c)NS-2250#
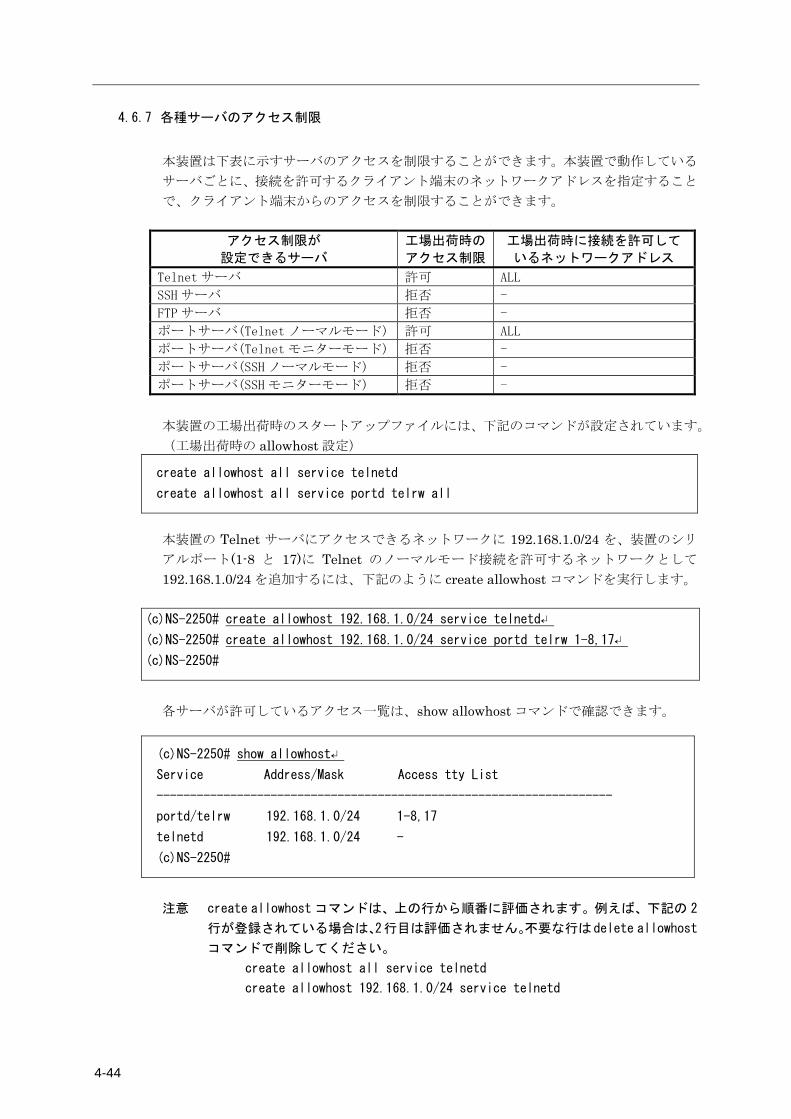
4-44
4.6.7 各種サーバのアクセス制限
本装置は下表に示すサーバのアクセスを制限することができます。本装置で動作している
サーバごとに、接続を許可するクライアント端末のネットワークアドレスを指定すること
で、クライアント端末からのアクセスを制限することができます。
アクセス制限が
設定できるサーバ
工場出荷時の
アクセス制限
工場出荷時に接続を許可して
いるネットワークアドレス
Telnet サーバ 許可 ALL
SSH サーバ 拒否 -
FTP サーバ 拒否 -
ポートサーバ(Telnet ノーマルモード) 許可 ALL
ポートサーバ(Telnet モニターモード) 拒否 -
ポートサーバ(SSH ノーマルモード) 拒否 -
ポートサーバ(SSH モニターモード) 拒否 -
本装置の工場出荷時のスタートアップファイルには、下記のコマンドが設定されています。 (工場出荷時の allowhost 設定)
create allowhost all service telnetd
create allowhost all service portd telrw all
本装置の Telnet サーバにアクセスできるネットワークに 192.168.1.0/24 を、装置のシリ
アルポート(1-8 と 17)に Telnet のノーマルモード接続を許可するネットワークとして
192.168.1.0/24 を追加するには、下記のように create allowhost コマンドを実行します。
(c)NS-2250# create allowhost 192.168.1.0/24 service telnetd↵
(c)NS-2250# create allowhost 192.168.1.0/24 service portd telrw 1-8,17↵
(c)NS-2250#
各サーバが許可しているアクセス一覧は、show allowhost コマンドで確認できます。
(c)NS-2250# show allowhost↵
Service Address/Mask Access tty List
--------------------------------------------------------------------
portd/telrw 192.168.1.0/24 1-8,17
telnetd 192.168.1.0/24 -
(c)NS-2250#
注意 create allowhost コマンドは、上の行から順番に評価されます。例えば、下記の 2
行が登録されている場合は、2行目は評価されません。不要な行は delete allowhost
コマンドで削除してください。
create allowhost all service telnetd
create allowhost 192.168.1.0/24 service telnetd

4 章 各種設定
4-45
4.7 運用管理の設定
4.7.1 SNTP クライアントの設定 SNTP クライアントを設定するには、下記のように set sntp server コマンド,set sntp polltime コマンドを実行します。SNTP サーバ(172.16.1.1)にポーリングタイマ 900 秒で
本装置の時刻を同期させる場合は、下記のコマンドを実行します。 SNTP サーバは最大 2 台まで登録できます。 (c)NS-2250# set sntp server 172.16.1.1↵
(c)NS-2250# set sntp polltime 900↵
(c)NS-2250# enable sntp↵
(c)NS-2250#
SNTP クライアントの状態は、show sntp コマンドで確認することができます。
(c)NS-2250# show sntp↵
<sntp information>
status : enable
poll interval : 600
last sync server : 172.16.1.1
<primary server>
server address : 172.16.1.1
last access time : 2015/06/05 20:17:10
access result : OK
<secondary server>
server address : ---
last access time : ---
access result : ---
(c)NS-2250#
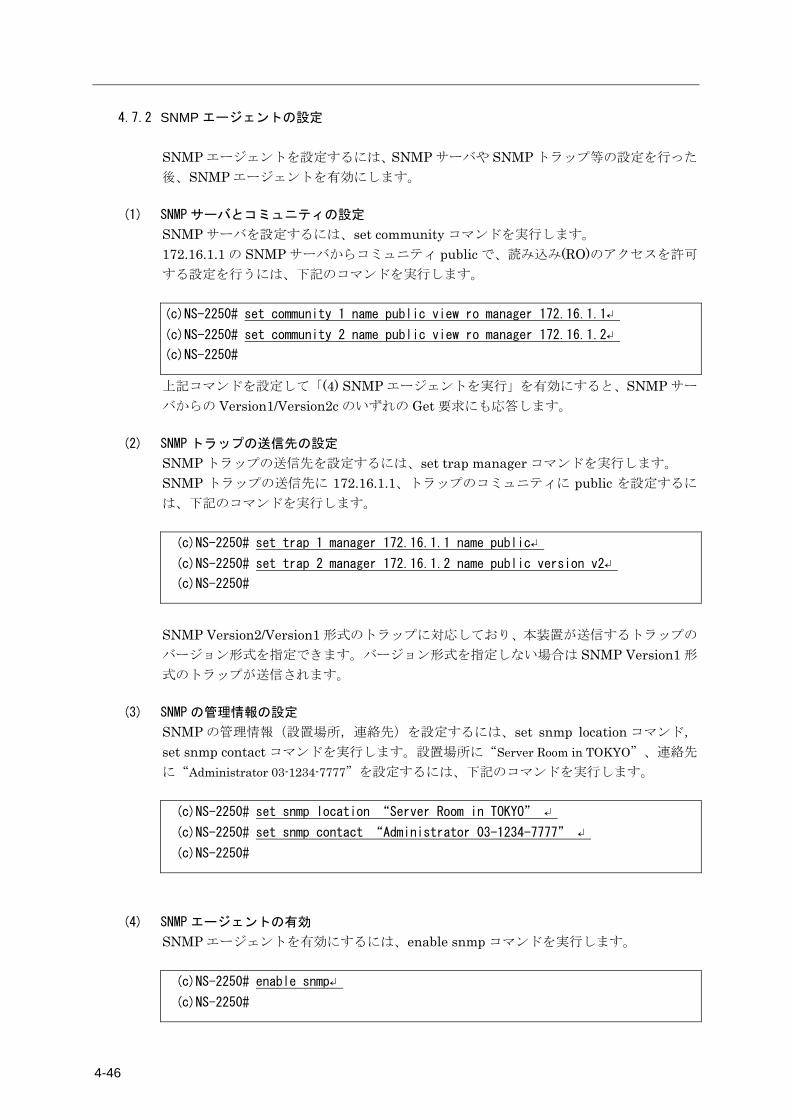
4-46
4.7.2 SNMP エージェントの設定 SNMP エージェントを設定するには、SNMP サーバや SNMP トラップ等の設定を行った
後、SNMP エージェントを有効にします。
(1) SNMP サーバとコミュニティの設定
SNMP サーバを設定するには、set community コマンドを実行します。 172.16.1.1 の SNMP サーバからコミュニティ public で、読み込み(RO)のアクセスを許可
する設定を行うには、下記のコマンドを実行します。 (c)NS-2250# set community 1 name public view ro manager 172.16.1.1↵
(c)NS-2250# set community 2 name public view ro manager 172.16.1.2↵
(c)NS-2250#
上記コマンドを設定して「(4) SNMP エージェントを実行」を有効にすると、SNMP サー
バからの Version1/Version2c のいずれの Get 要求にも応答します。
(2) SNMP トラップの送信先の設定
SNMP トラップの送信先を設定するには、set trap manager コマンドを実行します。 SNMP トラップの送信先に 172.16.1.1、トラップのコミュニティに public を設定するに
は、下記のコマンドを実行します。 (c)NS-2250# set trap 1 manager 172.16.1.1 name public↵
(c)NS-2250# set trap 2 manager 172.16.1.2 name public version v2↵
(c)NS-2250#
SNMP Version2/Version1 形式のトラップに対応しており、本装置が送信するトラップの
バージョン形式を指定できます。バージョン形式を指定しない場合は SNMP Version1 形
式のトラップが送信されます。
(3) SNMP の管理情報の設定
SNMP の管理情報(設置場所,連絡先)を設定するには、set snmp location コマンド,
set snmp contact コマンドを実行します。設置場所に“Server Room in TOKYO”、連絡先
に“Administrator 03-1234-7777”を設定するには、下記のコマンドを実行します。 (c)NS-2250# set snmp location “Server Room in TOKYO” ↵
(c)NS-2250# set snmp contact “Administrator 03-1234-7777” ↵
(c)NS-2250#
(4) SNMP エージェントの有効
SNMP エージェントを有効にするには、enable snmp コマンドを実行します。 (c)NS-2250# enable snmp↵
(c)NS-2250#
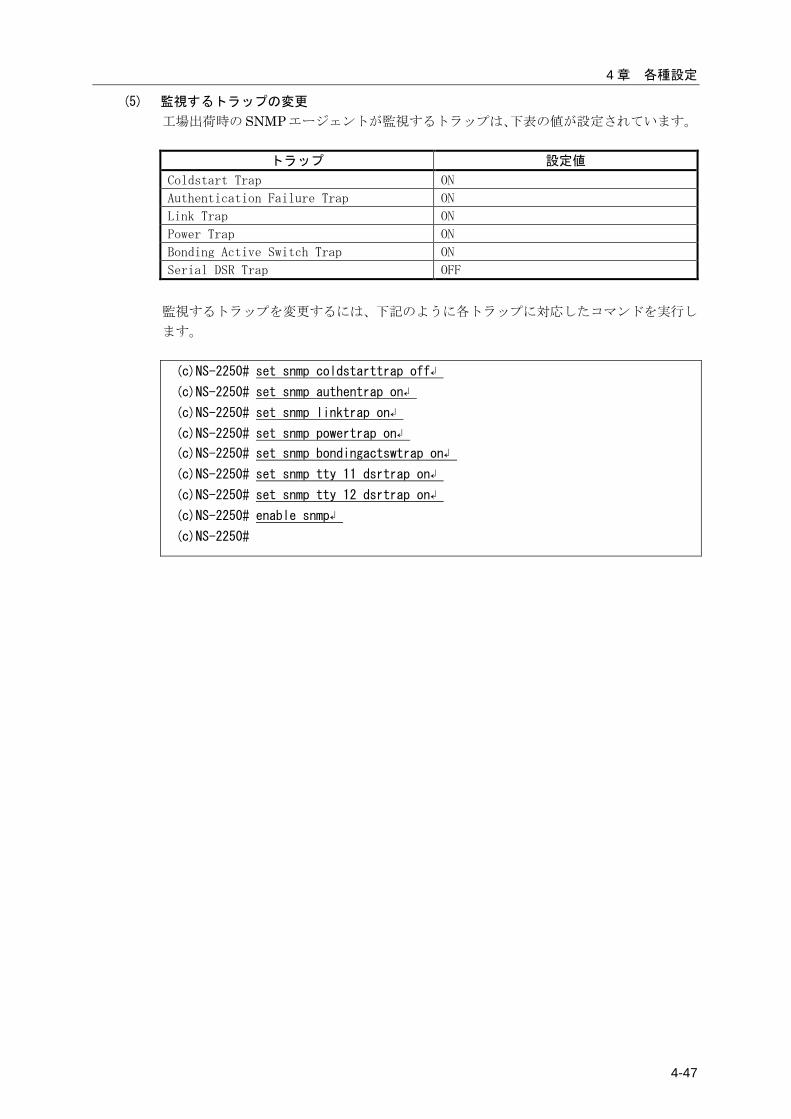
4 章 各種設定
4-47
(5) 監視するトラップの変更
工場出荷時の SNMP エージェントが監視するトラップは、下表の値が設定されています。
トラップ 設定値
Coldstart Trap ON
Authentication Failure Trap ON
Link Trap ON
Power Trap ON
Bonding Active Switch Trap ON
Serial DSR Trap OFF
監視するトラップを変更するには、下記のように各トラップに対応したコマンドを実行し
ます。 (c)NS-2250# set snmp coldstarttrap off↲
(c)NS-2250# set snmp authentrap on↲
(c)NS-2250# set snmp linktrap on↲
(c)NS-2250# set snmp powertrap on↲
(c)NS-2250# set snmp bondingactswtrap on↲
(c)NS-2250# set snmp tty 11 dsrtrap on↲
(c)NS-2250# set snmp tty 12 dsrtrap on↲
(c)NS-2250# enable snmp↲
(c)NS-2250#
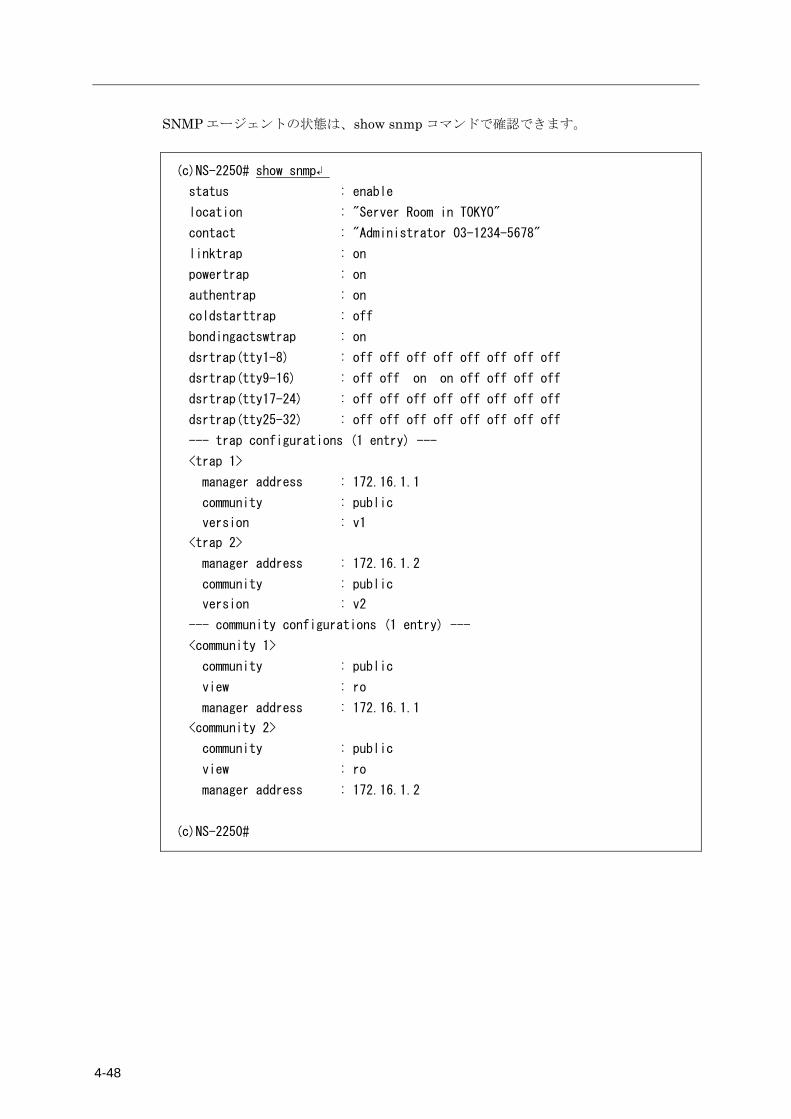
4-48
SNMP エージェントの状態は、show snmp コマンドで確認できます。
(c)NS-2250# show snmp↲
status : enable
location : "Server Room in TOKYO"
contact : "Administrator 03-1234-5678"
linktrap : on
powertrap : on
authentrap : on
coldstarttrap : off
bondingactswtrap : on
dsrtrap(tty1-8) : off off off off off off off off
dsrtrap(tty9-16) : off off on on off off off off
dsrtrap(tty17-24) : off off off off off off off off
dsrtrap(tty25-32) : off off off off off off off off
--- trap configurations (1 entry) ---
<trap 1>
manager address : 172.16.1.1
community : public
version : v1
<trap 2>
manager address : 172.16.1.2
community : public
version : v2
--- community configurations (1 entry) ---
<community 1>
community : public
view : ro
manager address : 172.16.1.1
<community 2>
community : public
view : ro
manager address : 172.16.1.2
(c)NS-2250#
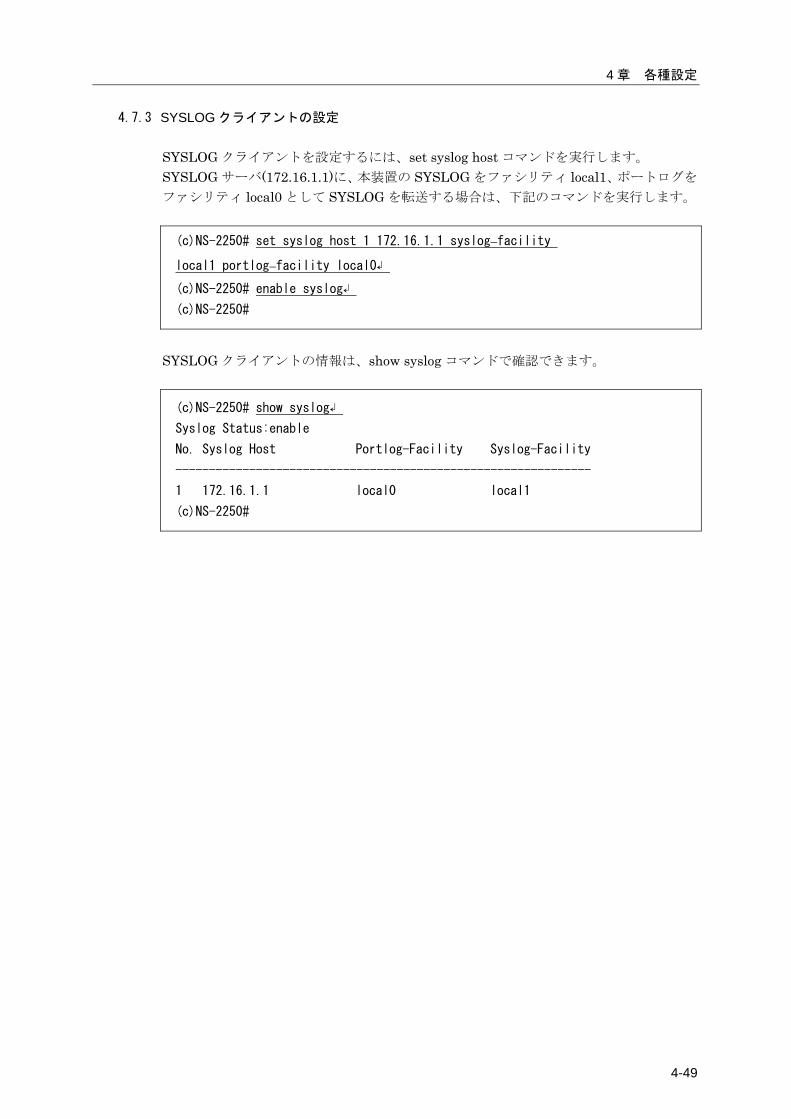
4 章 各種設定
4-49
4.7.3 SYSLOG クライアントの設定 SYSLOG クライアントを設定するには、set syslog host コマンドを実行します。 SYSLOG サーバ(172.16.1.1)に、本装置の SYSLOG をファシリティ local1、ポートログを
ファシリティ local0 として SYSLOG を転送する場合は、下記のコマンドを実行します。 (c)NS-2250# set syslog host 1 172.16.1.1 syslog_facility
local1 portlog_facility local0↲
(c)NS-2250# enable syslog↲
(c)NS-2250#
SYSLOG クライアントの情報は、show syslog コマンドで確認できます。
(c)NS-2250# show syslog↲
Syslog Status:enable
No. Syslog Host Portlog-Facility Syslog-Facility
--------------------------------------------------------------
1 172.16.1.1 local0 local1
(c)NS-2250#

4-50
4.7.4 温度センサの設定 温度センサで装置内の温度を取得できます。 おおよその外気温を測定する目的で温度センサに補正値を設定する場合は、set temperature adjust コマンドに減算する補正値を指定します。 補正値は 0~20 の範囲で指定でき、工場出荷値は 0 です。 以下の例は補正値に-10℃を設定する場合の例です。 (c)NS-2250# set temperature adjust 10↲
(c)NS-2250#
温度センサの温度や補正値の設定は、show environment コマンドで確認できます。
(c)NS-2250# show environment↲
<Environment status>
Power information
Power unit : AC
Power 1 : ON
Power 2 : OFF
Temperature information
Current temp : 39 deg C
Sensor : 39 deg C
Adjust : 0
(c)NS-2250#
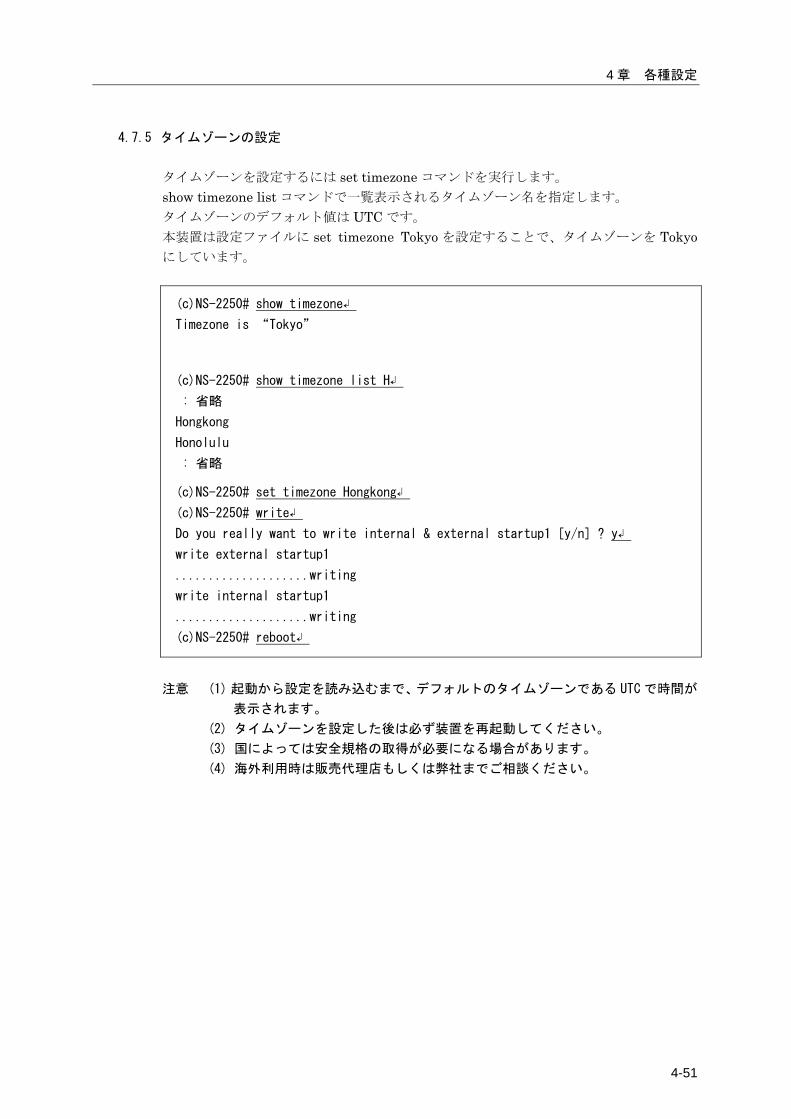
4 章 各種設定
4-51
4.7.5 タイムゾーンの設定 タイムゾーンを設定するには set timezone コマンドを実行します。 show timezone list コマンドで一覧表示されるタイムゾーン名を指定します。 タイムゾーンのデフォルト値は UTC です。 本装置は設定ファイルに set timezone Tokyo を設定することで、タイムゾーンを Tokyoにしています。
(c)NS-2250# show timezone↲
Timezone is “Tokyo”
(c)NS-2250# show timezone list H↲
: 省略
Hongkong
Honolulu
: 省略
(c)NS-2250# set timezone Hongkong↲
(c)NS-2250# write↲
Do you really want to write internal & external startup1 [y/n] ? y↲
write external startup1
....................writing
write internal startup1
....................writing
(c)NS-2250# reboot↲
注意 (1) 起動から設定を読み込むまで、デフォルトのタイムゾーンである UTC で時間が
表示されます。
(2) タイムゾーンを設定した後は必ず装置を再起動してください。
(3) 国によっては安全規格の取得が必要になる場合があります。
(4) 海外利用時は販売代理店もしくは弊社までご相談ください。
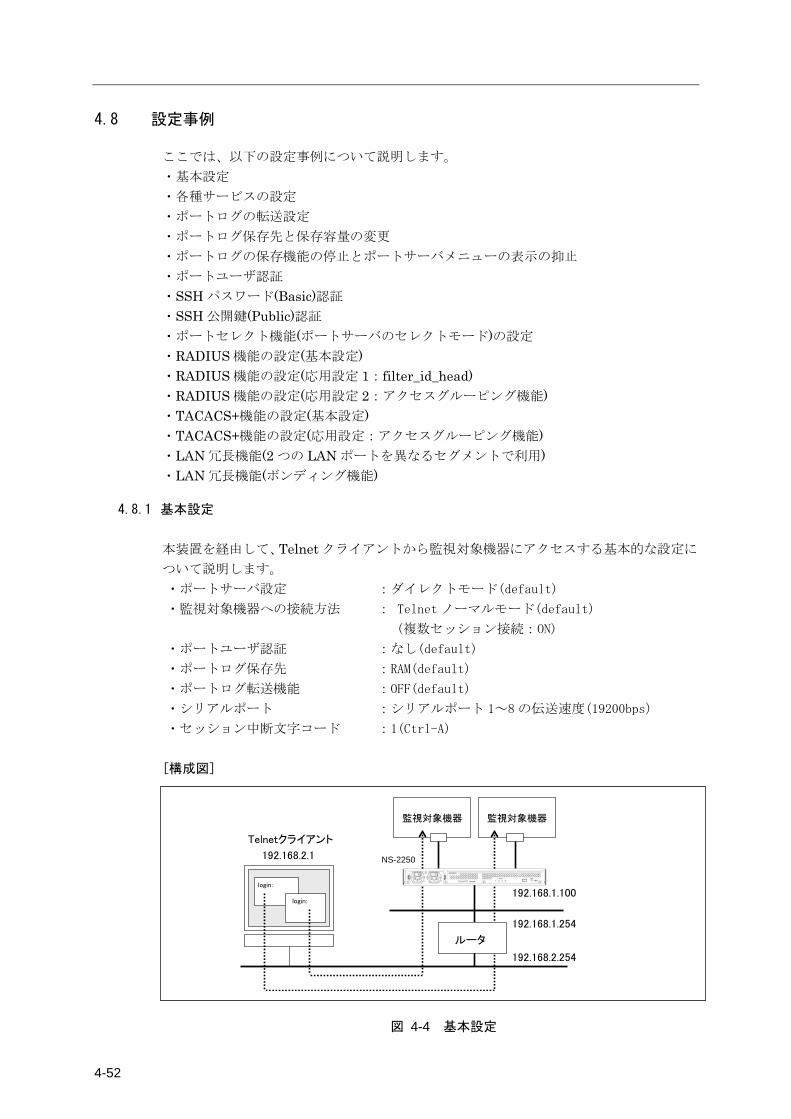
4-52
4.8 設定事例
ここでは、以下の設定事例について説明します。 ・基本設定 ・各種サービスの設定 ・ポートログの転送設定 ・ポートログ保存先と保存容量の変更 ・ポートログの保存機能の停止とポートサーバメニューの表示の抑止 ・ポートユーザ認証 ・SSH パスワード(Basic)認証 ・SSH 公開鍵(Public)認証 ・ポートセレクト機能(ポートサーバのセレクトモード)の設定 ・RADIUS 機能の設定(基本設定) ・RADIUS 機能の設定(応用設定 1:filter_id_head) ・RADIUS 機能の設定(応用設定 2:アクセスグルーピング機能) ・TACACS+機能の設定(基本設定) ・TACACS+機能の設定(応用設定:アクセスグルーピング機能) ・LAN 冗長機能(2 つの LAN ポートを異なるセグメントで利用) ・LAN 冗長機能(ボンディング機能)
4.8.1 基本設定 本装置を経由して、Telnet クライアントから監視対象機器にアクセスする基本的な設定に
ついて説明します。 ・ポートサーバ設定 :ダイレクトモード(default)
・監視対象機器への接続方法 : Telnet ノーマルモード(default)
(複数セッション接続:ON)
・ポートユーザ認証 :なし(default)
・ポートログ保存先 :RAM(default)
・ポートログ転送機能 :OFF(default)
・シリアルポート :シリアルポート 1~8 の伝送速度(19200bps)
・セッション中断文字コード :1(Ctrl-A)
[構成図]
Telnetクライアント
192.168.2.1
192.168.1.100
監視対象機器監視対象機器
login:
login:
ルータ
192.168.1.254
192.168.2.254
NS-2250
図 4-4 基本設定
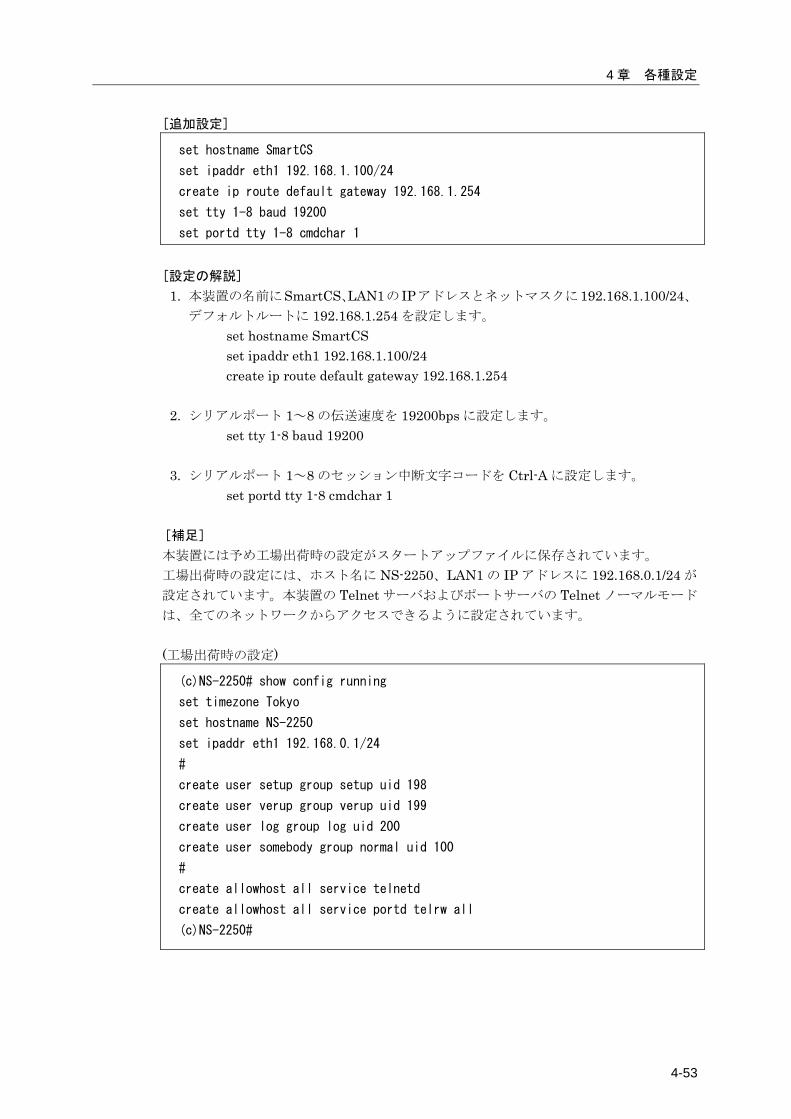
4 章 各種設定
4-53
[追加設定]
set hostname SmartCS
set ipaddr eth1 192.168.1.100/24
create ip route default gateway 192.168.1.254
set tty 1-8 baud 19200
set portd tty 1-8 cmdchar 1
[設定の解説]
1. 本装置の名前にSmartCS、LAN1の IPアドレスとネットマスクに192.168.1.100/24、デフォルトルートに 192.168.1.254 を設定します。
set hostname SmartCS set ipaddr eth1 192.168.1.100/24 create ip route default gateway 192.168.1.254
2. シリアルポート 1~8 の伝送速度を 19200bps に設定します。 set tty 1-8 baud 19200
3. シリアルポート 1~8 のセッション中断文字コードを Ctrl-A に設定します。 set portd tty 1-8 cmdchar 1
[補足]
本装置には予め工場出荷時の設定がスタートアップファイルに保存されています。 工場出荷時の設定には、ホスト名に NS-2250、LAN1 の IP アドレスに 192.168.0.1/24 が
設定されています。本装置の Telnet サーバおよびポートサーバの Telnet ノーマルモード
は、全てのネットワークからアクセスできるように設定されています。 (工場出荷時の設定)
(c)NS-2250# show config running
set timezone Tokyo
set hostname NS-2250
set ipaddr eth1 192.168.0.1/24
#
create user setup group setup uid 198
create user verup group verup uid 199
create user log group log uid 200
create user somebody group normal uid 100
#
create allowhost all service telnetd
create allowhost all service portd telrw all
(c)NS-2250#
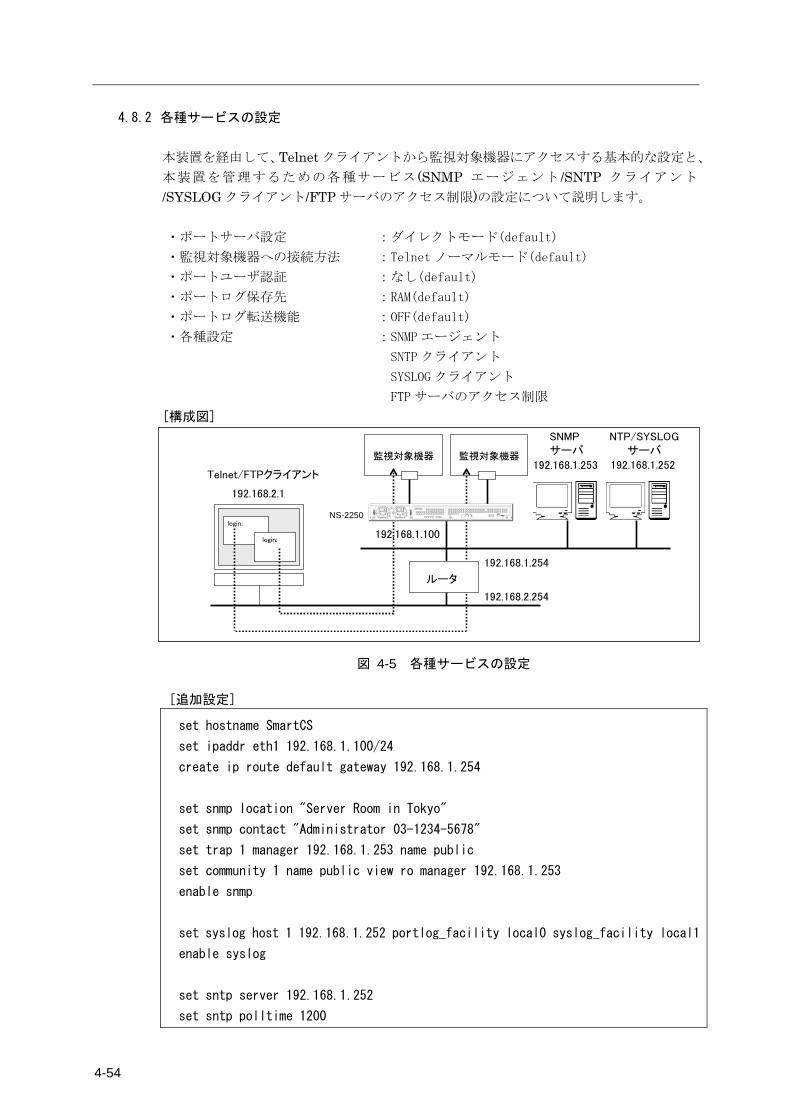
4-54
4.8.2 各種サービスの設定 本装置を経由して、Telnet クライアントから監視対象機器にアクセスする基本的な設定と、
本装置を管理するための各種サービス (SNMP エージェント /SNTP クライアント
/SYSLOG クライアント/FTP サーバのアクセス制限)の設定について説明します。 ・ポートサーバ設定 :ダイレクトモード(default)
・監視対象機器への接続方法 :Telnet ノーマルモード(default)
・ポートユーザ認証 :なし(default)
・ポートログ保存先 :RAM(default)
・ポートログ転送機能 :OFF(default)
・各種設定 :SNMP エージェント
SNTP クライアント
SYSLOG クライアント
FTP サーバのアクセス制限
[構成図]
Telnet/FTPクライアント
192.168.2.1
192.168.1.100
監視対象機器監視対象機器
login:
login:
ルータ
192.168.1.254
192.168.2.254
SNMPサーバ
NTP/SYSLOGサーバ
192.168.1.253 192.168.1.252
NS-2250
図 4-5 各種サービスの設定
[追加設定]
set hostname SmartCS
set ipaddr eth1 192.168.1.100/24
create ip route default gateway 192.168.1.254
set snmp location "Server Room in Tokyo"
set snmp contact "Administrator 03-1234-5678"
set trap 1 manager 192.168.1.253 name public
set community 1 name public view ro manager 192.168.1.253
enable snmp
set syslog host 1 192.168.1.252 portlog_facility local0 syslog_facility local1
enable syslog
set sntp server 192.168.1.252
set sntp polltime 1200
4 章 各種設定
4-55
enable sntp
create allowhost 192.168.2.0/24 service ftpd
[設定の解説]
1. 本装置の名前にSmartCS、LAN1の IPアドレスとネットマスクに192.168.1.100/24、デフォルトルートに 192.168.1.254 を設定します。
set hostname SmartCS set ipaddr eth1 192.168.1.100/24 create ip route default gateway 192.168.1.254
2. 本装置の SNMP エージェントを設定します。 本装置の SNMP エージェントに、設置場所として「Server Room in Tokyo」、連絡
先に「Administrator 03-1234-5678」を設定します。 本装置の SNMP エージェントにアクセスできる SNMP サーバを、IP アドレス
192.168.1.253、コミュニティ public、アクセス権を Read Only に限定します。 本装置から送信する SNMP トラップは、コミュニティを public として、SNMP サー
バ(192.168.1.253)に送信します。 SNMP エージェントの設定を実施した後で、enable snmp コマンドで SNMP エージ
ェントを有効にします。 set snmp location "Server Room in Tokyo" set snmp contact "Administrator 03-1234-5678" set community 1 name public view ro manager 192.168.1.253 set trap 1 manager 192.168.1.253 name public enable snmp
3. 本装置の SYSLOG クライアントを設定します。
ポートログファシリティは local0、本装置が出力する SYSLOG のファシリティを
local1 で、SYSLOG サーバ(192.168.1.253)に送信します。 SYSLOG クライアントの設定を実施した後で、enable syslog コマンドで SYSLOG ク
ライアントを有効にします。 set syslog host 1 192.168.1.252 portlog_facility local0 syslog_facility local1 enable syslog
4. 本装置の SNTP クライアント機能を設定します。
NTP サーバ(192.168.1.252)に、1200 秒毎に時刻を同期させます。 SNTP クライアントの設定を実施した後で、enable sntp コマンドで SNTP 機能を有
効にします。 set sntp server 192.168.1.252 set sntp polltime 1200 enable sntp
5. 本装置の FTP サーバを有効にしてアクセス制限を設定します。
192.168.2.0/24 のネットワークからのみ、本装置の FTP サーバにアクセスを許可しま
す。 enable ftpd create allowhost 192.168.2.0/24 service ftpd
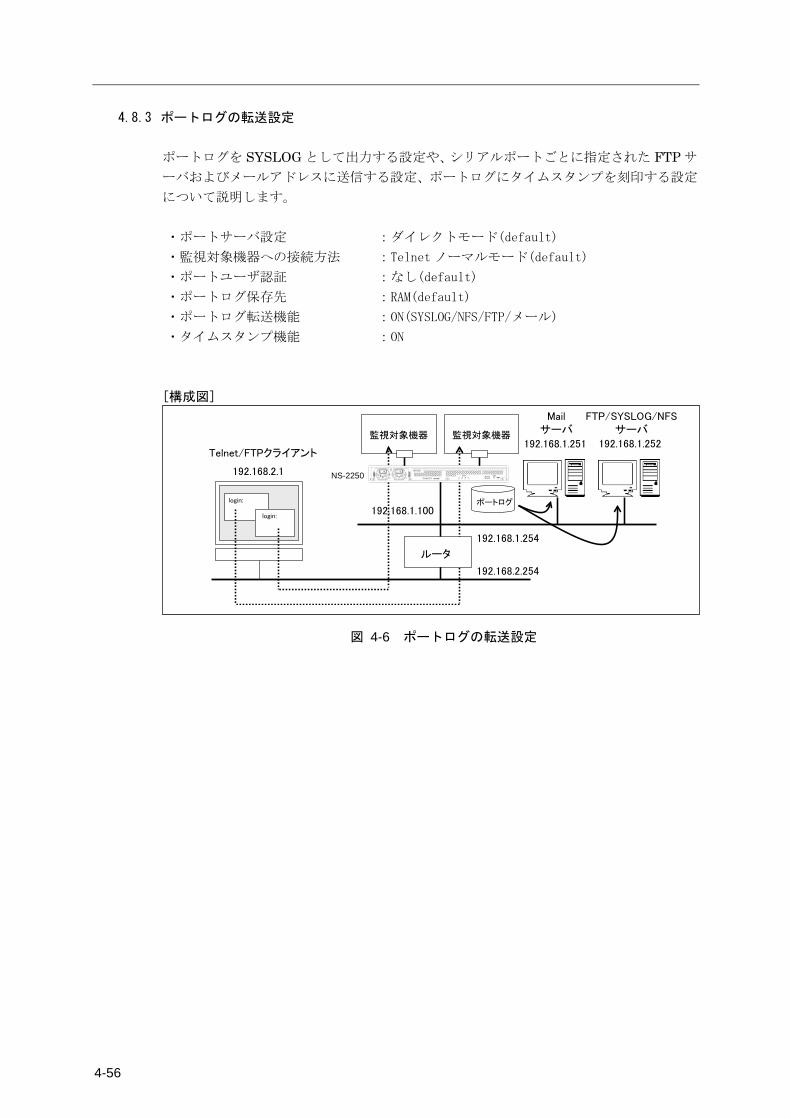
4-56
4.8.3 ポートログの転送設定 ポートログを SYSLOG として出力する設定や、シリアルポートごとに指定された FTP サ
ーバおよびメールアドレスに送信する設定、ポートログにタイムスタンプを刻印する設定
について説明します。 ・ポートサーバ設定 :ダイレクトモード(default)
・監視対象機器への接続方法 :Telnet ノーマルモード(default)
・ポートユーザ認証 :なし(default)
・ポートログ保存先 :RAM(default)
・ポートログ転送機能 :ON(SYSLOG/NFS/FTP/メール)
・タイムスタンプ機能 :ON
[構成図]
Telnet/FTPクライアント
192.168.2.1
192.168.1.100
監視対象機器監視対象機器
login:
login:
ルータ
192.168.1.254
192.168.2.254
Mailサーバ
FTP/SYSLOG/NFSサーバ
192.168.1.251 192.168.1.252
ポートログ
NS-2250
図 4-6 ポートログの転送設定
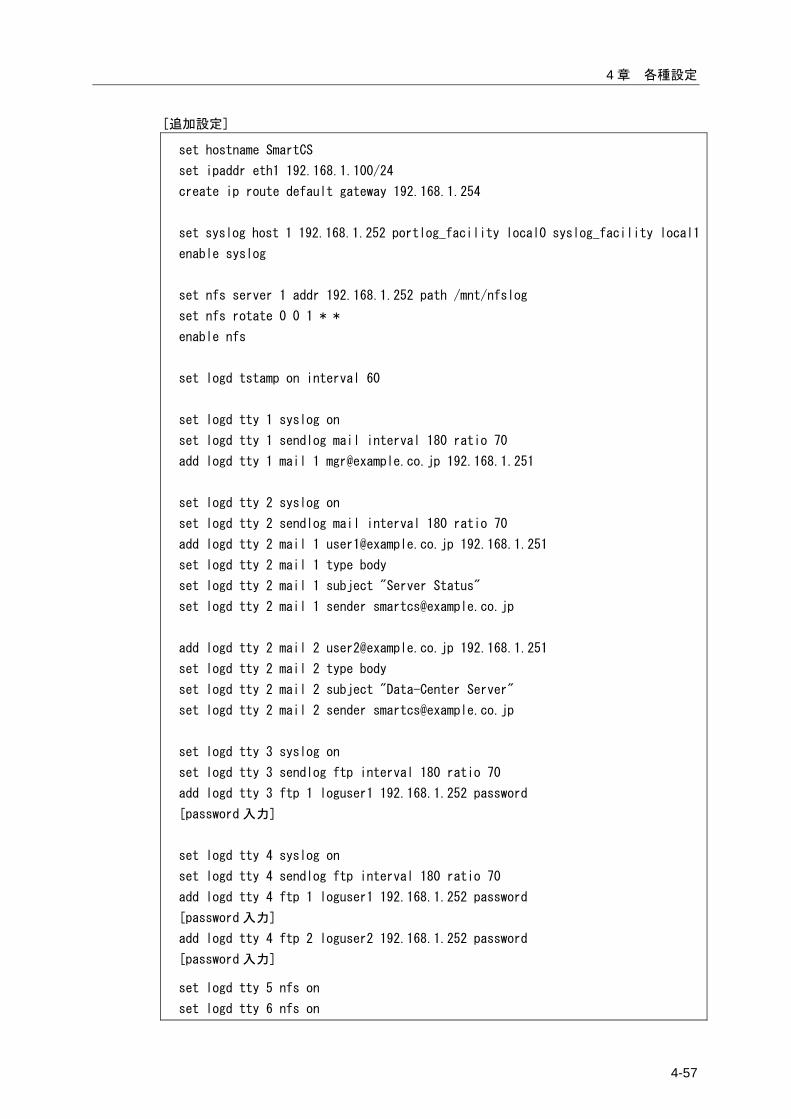
4 章 各種設定
4-57
[追加設定]
set hostname SmartCS
set ipaddr eth1 192.168.1.100/24
create ip route default gateway 192.168.1.254
set syslog host 1 192.168.1.252 portlog_facility local0 syslog_facility local1
enable syslog
set nfs server 1 addr 192.168.1.252 path /mnt/nfslog
set nfs rotate 0 0 1 * *
enable nfs
set logd tstamp on interval 60
set logd tty 1 syslog on
set logd tty 1 sendlog mail interval 180 ratio 70
add logd tty 1 mail 1 [email protected] 192.168.1.251
set logd tty 2 syslog on
set logd tty 2 sendlog mail interval 180 ratio 70
add logd tty 2 mail 1 [email protected] 192.168.1.251
set logd tty 2 mail 1 type body
set logd tty 2 mail 1 subject "Server Status"
set logd tty 2 mail 1 sender [email protected]
add logd tty 2 mail 2 [email protected] 192.168.1.251
set logd tty 2 mail 2 type body
set logd tty 2 mail 2 subject "Data-Center Server"
set logd tty 2 mail 2 sender [email protected]
set logd tty 3 syslog on
set logd tty 3 sendlog ftp interval 180 ratio 70
add logd tty 3 ftp 1 loguser1 192.168.1.252 password
[password 入力]
set logd tty 4 syslog on
set logd tty 4 sendlog ftp interval 180 ratio 70
add logd tty 4 ftp 1 loguser1 192.168.1.252 password
[password 入力]
add logd tty 4 ftp 2 loguser2 192.168.1.252 password
[password 入力]
set logd tty 5 nfs on
set logd tty 6 nfs on

4-58
[設定の解説]
1. 本装置の名前にSmartCS、LAN1のIPアドレスとネットマスクに192.168.1.100/24、デ
フォルトルートに192.168.1.254を設定します。 set hostname SmartCS set ipaddr eth1 192.168.1.100/24 create ip route default gateway 192.168.1.254
2. 本装置のSYSLOGクライアントを設定します。
ポートログファシリティはlocal0、本装置が出力するSYSLOGのファシリティをlocal1で、SYSLOGサーバ(192.168.1.252)に送信します。
SYSLOGの設定を実施した後で、enable syslogコマンドでSYSLOGクライアントを有
効にします。 set syslog host 1 192.168.1.252 portlog_facility local0 syslog_facility local1 enable syslog
3. 本装置のNFSクライアントを設定します。
NFSサーバは192.168.1.252、NFSサーバのマウントパスは/mnt/nfslog、NFSサーバに
保存するログを毎月1日0時0分にローテーションします。 set nfs server 1 addr 192.168.1.252 path /mnt/nfslog set nfs rotate 0 0 1 * * enable nfs
4.タイムスタンプ機能をONにし、ポートログにタイムスタンプを60秒間隔で刻印します。
set logd tstamp on interval 60 5. シリアルポート1のSYSLOG出力をONに設定し、監視対象機器のメッセージが出力さ
れる度にSYSLOGサーバに送信されるように設定します。さらに、ポートログを定期
的にメール送信する設定を行います。 下記の設定では、180分間隔もしくはポートログサイズの70%に達した場合に、Mailサーバ(192.168.1.251)を経由してポートログを[email protected]に送信します。
送信されるメールのサブジェクトや送信者メールアドレス、ポートログの送信方法は、
工場出荷時の設定が反映されます。メールのサブジェクトにはportlog TTY_番号、送信
者メールアドレスにはportusr@“本装置のホスト名”.“ローカルドメイン”、ポート
ログはメールの添付ファイルとして送信されます。 set logd tty 1 syslog on set logd tty 1 sendlog mail interval 180 ratio 70 add logd tty 1 mail 1 [email protected] 192.168.1.251
6. シリアルポート2のSYSLOG出力をONに設定し、監視対象機器のメッセージが出力さ
れる度にSYSLOGサーバに送信されるように設定します。さらに、ポートログを定期
的にメール送信する設定を行います。 下記の設定では、180分間隔もしくはポートログサイズの70%に達した場合に、Mailサーバ(192.168.1.251)を経由してポートログを[email protected]と[email protected]に送信します。
[email protected]に送信するメールは、サブジェクトを“Server Status”、メール
送信者を[email protected]とします。 [email protected]に送信するメールは、サブジェクトを“Data-Center Server”、

4 章 各種設定
4-59
メール送信者を[email protected]とします。 ポートログはメールの本文に格納して送信します。
set logd tty 2 syslog on set logd tty 2 sendlog mail interval 180 ratio 70 add logd tty 2 mail 1 [email protected] 192.168.1.251 set logd tty 2 mail 1 type body set logd tty 2 mail 1 subject "Server Status" set logd tty 2 mail 1 sender [email protected] add logd tty 2 mail 2 [email protected] 192.168.1.251 set logd tty 2 mail 2 type body set logd tty 2 mail 2 subject "Data-Center Server" set logd tty 2 mail 2 sender [email protected]
7. シリアルポート3のSYSLOG出力をONに設定し、監視対象機器のメッセージが出力さ
れる度にSYSLOGサーバに送信されるように設定します。さらに、ポートログを定期
的にFTP送信する設定を行います。 下記の設定では、180分間隔もしくはポートログサイズの70%に達した場合に、FTPサーバ(192.168.1.252)のloguser1にFTP送信します。
set logd tty 3 syslog on set logd tty 3 sendlog ftp interval 180 ratio 70 add logd tty 3 ftp 1 loguser1 192.168.1.252 password [password 入力]
8. シリアルポート4のSYSLOG出力をONに設定し、監視対象機器のメッセージが出力さ
れる度にSYSLOGサーバに送信されるように設定します。さらに、ポートログを定期
的にFTP送信する設定を行います。 下記の設定では、180分間隔もしくはポートログサイズの70%に達した場合に、FTPサーバ(192.168.1.252)のloguser1とloguser2にFTP送信します。
set logd tty 4 syslog on set logd tty 4 sendlog ftp interval 180 ratio 70 add logd tty 4 ftp 1 loguser1 192.168.1.252 password [password 入力] add logd tty 4 ftp 2 loguser2 192.168.1.252 password [password 入力]
9. シリアルポート5と6のNFSをONに設定し、監視対象機器のメッセージが出力される度
にNFSサーバに保存されるように設定します。 set logd tty 5 nfs on set logd tty 6 nfs on
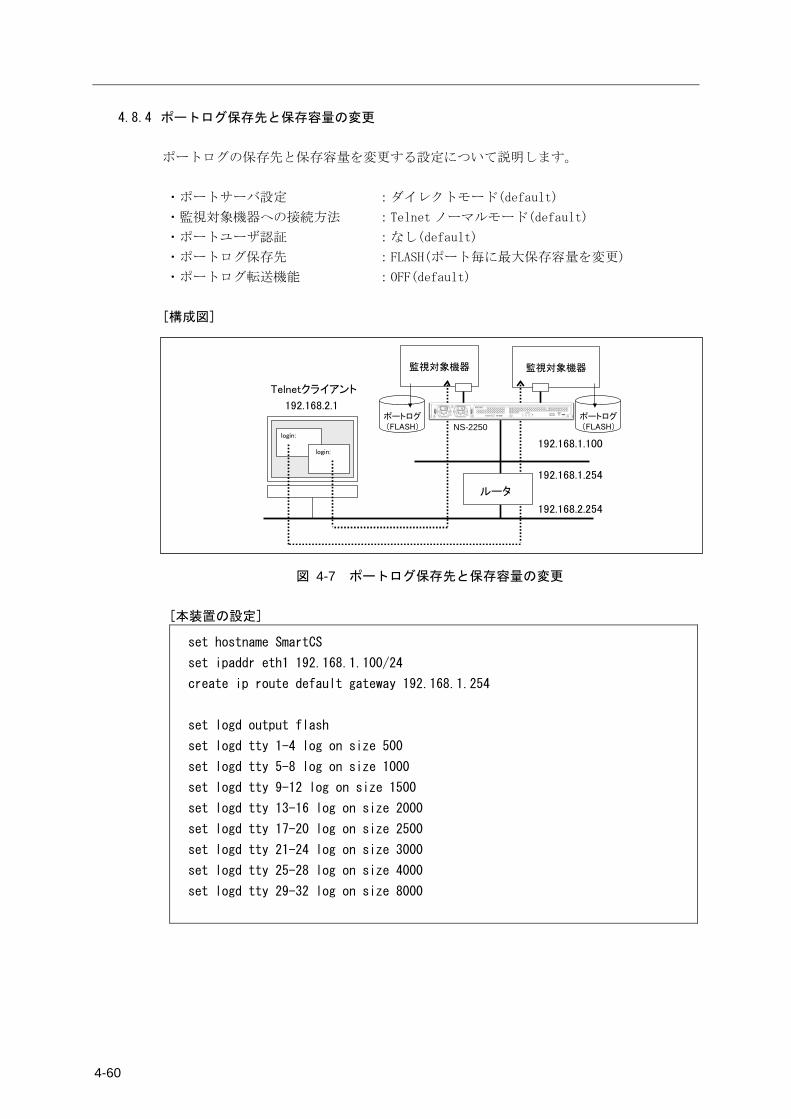
4-60
4.8.4 ポートログ保存先と保存容量の変更 ポートログの保存先と保存容量を変更する設定について説明します。 ・ポートサーバ設定 :ダイレクトモード(default)
・監視対象機器への接続方法 :Telnet ノーマルモード(default)
・ポートユーザ認証 :なし(default)
・ポートログ保存先 :FLASH(ポート毎に最大保存容量を変更)
・ポートログ転送機能 :OFF(default)
[構成図]
Telnetクライアント
192.168.2.1
192.168.1.100
監視対象機器監視対象機器
login:
login:
ルータ
192.168.1.254
192.168.2.254
ポートログ(FLASH)
ポートログ(FLASH)NS-2250
図 4-7 ポートログ保存先と保存容量の変更
[本装置の設定]
set hostname SmartCS
set ipaddr eth1 192.168.1.100/24
create ip route default gateway 192.168.1.254
set logd output flash
set logd tty 1-4 log on size 500
set logd tty 5-8 log on size 1000
set logd tty 9-12 log on size 1500
set logd tty 13-16 log on size 2000
set logd tty 17-20 log on size 2500
set logd tty 21-24 log on size 3000
set logd tty 25-28 log on size 4000
set logd tty 29-32 log on size 8000
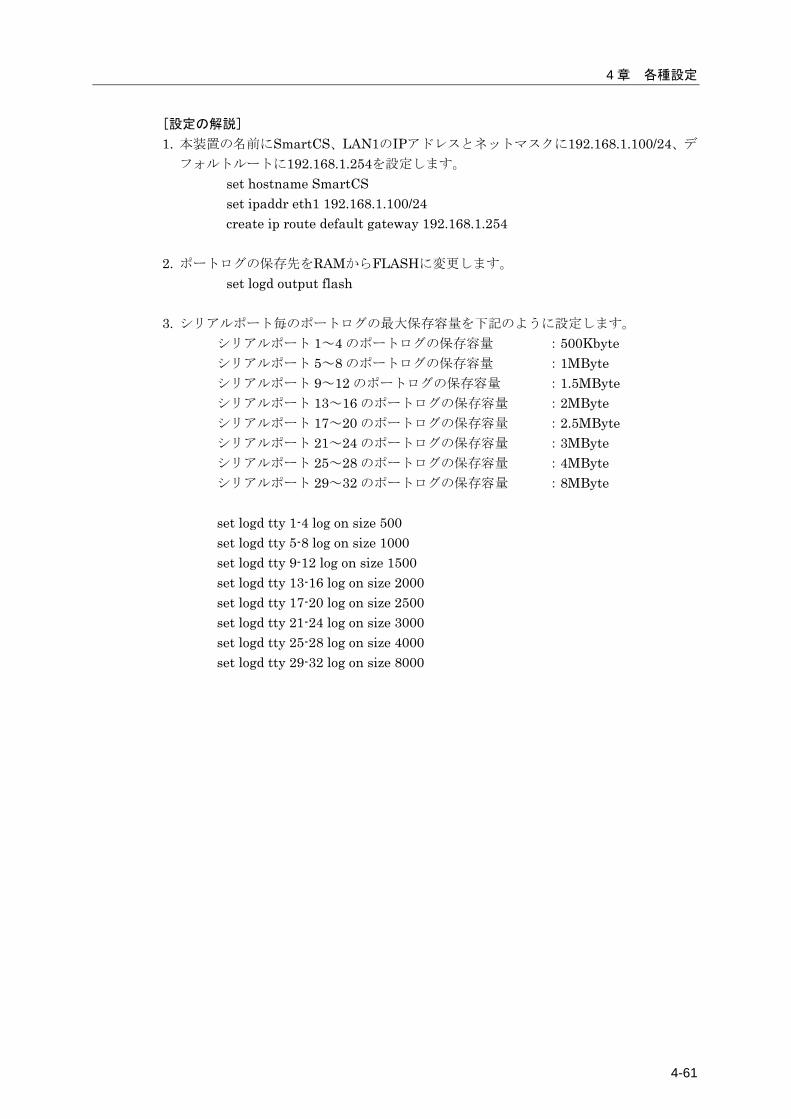
4 章 各種設定
4-61
[設定の解説]
1. 本装置の名前にSmartCS、LAN1のIPアドレスとネットマスクに192.168.1.100/24、デ
フォルトルートに192.168.1.254を設定します。 set hostname SmartCS set ipaddr eth1 192.168.1.100/24 create ip route default gateway 192.168.1.254
2. ポートログの保存先をRAMからFLASHに変更します。
set logd output flash
3. シリアルポート毎のポートログの最大保存容量を下記のように設定します。 シリアルポート 1~4 のポートログの保存容量 :500Kbyte シリアルポート 5~8 のポートログの保存容量 :1MByte シリアルポート 9~12 のポートログの保存容量 :1.5MByte シリアルポート 13~16 のポートログの保存容量 :2MByte シリアルポート 17~20 のポートログの保存容量 :2.5MByte シリアルポート 21~24 のポートログの保存容量 :3MByte シリアルポート 25~28 のポートログの保存容量 :4MByte シリアルポート 29~32 のポートログの保存容量 :8MByte set logd tty 1-4 log on size 500 set logd tty 5-8 log on size 1000 set logd tty 9-12 log on size 1500 set logd tty 13-16 log on size 2000 set logd tty 17-20 log on size 2500 set logd tty 21-24 log on size 3000 set logd tty 25-28 log on size 4000 set logd tty 29-32 log on size 8000

4-62
4.8.5 ポートログ保存機能の停止とポートサーバメニューの表示の抑止 ポートログ保存機能の停止とポートサーバメニューの表示を抑止する設定について説明
します。 ・ポートサーバ設定 :ダイレクトモード(default)
・監視対象機器への接続方法 :Telnet ノーマルモード(default)
・ポートサーバメニュー :OFF
・ポートユーザ認証 :なし(default)
・ポートログ保存先 :なし
・ポートログ転送機能 :OFF(default)
[構成図]
Telnetクライアント
192.168.2.1
192.168.1.100
監視対象機器監視対象機器
login:
login:
ルータ
192.168.1.254
192.168.2.254
NS-2250
図 4-8 ポートログ保存機能の停止とポートサーバメニューの表示の抑止
[追加設定]
set hostname SmartCS
set ipaddr eth1 192.168.1.100/24
create ip route default gateway 192.168.1.254
set portd menu off
set logd output off
[設定の解説]
1. 本装置の名前にSmartCS、LAN1のIPアドレスとネットマスクに192.168.1.100/24、デ
フォルトルートに192.168.1.254を設定します。 set hostname SmartCS set ipaddr eth1 192.168.1.100/24 create ip route default gateway 192.168.1.254
2. ポートサーバメニューの表示を抑止します。
set portd menu off 3. ポートログ機能をOFFにします。
set logd output off
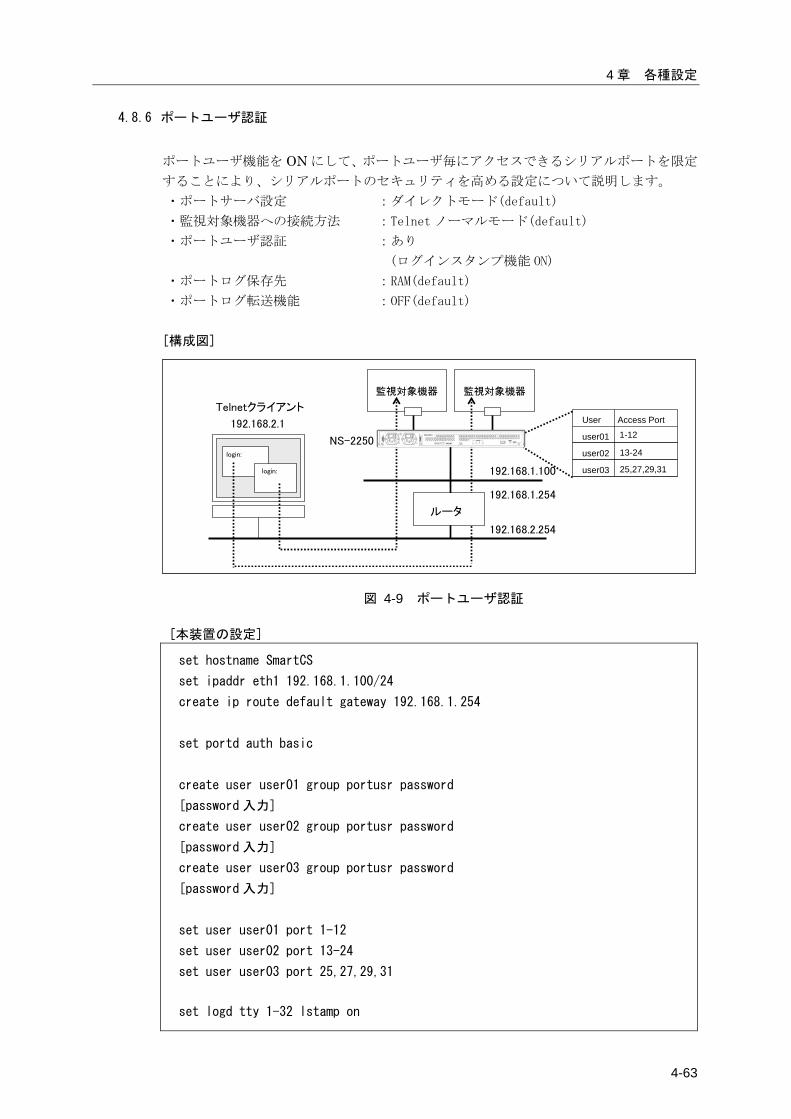
4 章 各種設定
4-63
4.8.6 ポートユーザ認証
ポートユーザ機能を ON にして、ポートユーザ毎にアクセスできるシリアルポートを限定
することにより、シリアルポートのセキュリティを高める設定について説明します。 ・ポートサーバ設定 :ダイレクトモード(default)
・監視対象機器への接続方法 :Telnet ノーマルモード(default)
・ポートユーザ認証 :あり
(ログインスタンプ機能 ON)
・ポートログ保存先 :RAM(default)
・ポートログ転送機能 :OFF(default)
[構成図]
Telnetクライアント
192.168.2.1
192.168.1.100
監視対象機器監視対象機器
login:
login:
ルータ
192.168.1.254
192.168.2.254
User Access Port
user01 1-12
user02 13-24
user03 25,27,29,31
NS-2250
図 4-9 ポートユーザ認証
[本装置の設定]
set hostname SmartCS
set ipaddr eth1 192.168.1.100/24
create ip route default gateway 192.168.1.254
set portd auth basic
create user user01 group portusr password
[password 入力]
create user user02 group portusr password
[password 入力]
create user user03 group portusr password
[password 入力]
set user user01 port 1-12
set user user02 port 13-24
set user user03 port 25,27,29,31
set logd tty 1-32 lstamp on
4-64
[設定の解説]
1. 本装置の名前にSmartCS、LAN1のIPアドレスとネットマスクに192.168.1.100/24、デ
フォルトルートに192.168.1.254を設定します。 set hostname SmartCS set ipaddr eth1 192.168.1.100/24 create ip route default gateway 192.168.1.254
2. ポートユーザ認証をONにします。 set portd auth basic
3. ポートユーザ認証で使用するポートユーザ(user01~user03)を作成します。 create user user01 group portusr password [password 入力] create user user02 group portusr password [password 入力] create user user03 group portusr password [password 入力]
4. ポートユーザがアクセスできるシリアルポートを設定します。 user01はシリアルポートの1-12、user02はシリアルポートの13-24、user03はシリアル
ポートの25,27,29,31にアクセスできる権限を設定します。 set user user01 port 1-12 set user user02 port 13-24 set user user03 port 25,27,29,31
5. シリアルポート1~32へのポートユーザのログイン/ログアウトをポートログに刻印す
るログインスタンプを有効にします。 set logd tty 1-32 lstamp on
create user コマンドで port オプションを指定すると、ユーザの作成とシリアルポート制
限が1つのコマンドで行えます。
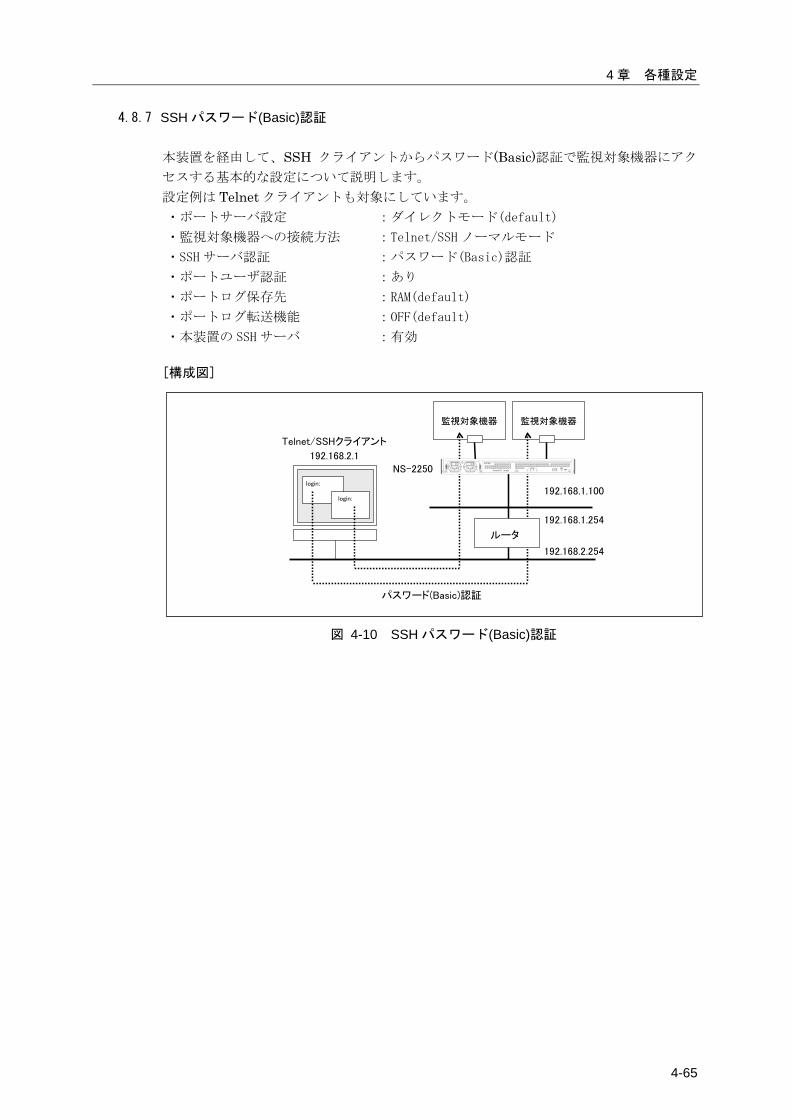
4 章 各種設定
4-65
4.8.7 SSH パスワード(Basic)認証 本装置を経由して、SSH クライアントからパスワード(Basic)認証で監視対象機器にアク
セスする基本的な設定について説明します。 設定例は Telnet クライアントも対象にしています。 ・ポートサーバ設定 :ダイレクトモード(default)
・監視対象機器への接続方法 :Telnet/SSH ノーマルモード
・SSH サーバ認証 :パスワード(Basic)認証
・ポートユーザ認証 :あり
・ポートログ保存先 :RAM(default)
・ポートログ転送機能 :OFF(default)
・本装置の SSH サーバ :有効
[構成図]
NS-2250
Telnet/SSHクライアント
192.168.2.1
192.168.1.100
監視対象機器監視対象機器
login:
login:
ルータ
192.168.1.254
192.168.2.254
パスワード(Basic)認証
図 4-10 SSH パスワード(Basic)認証
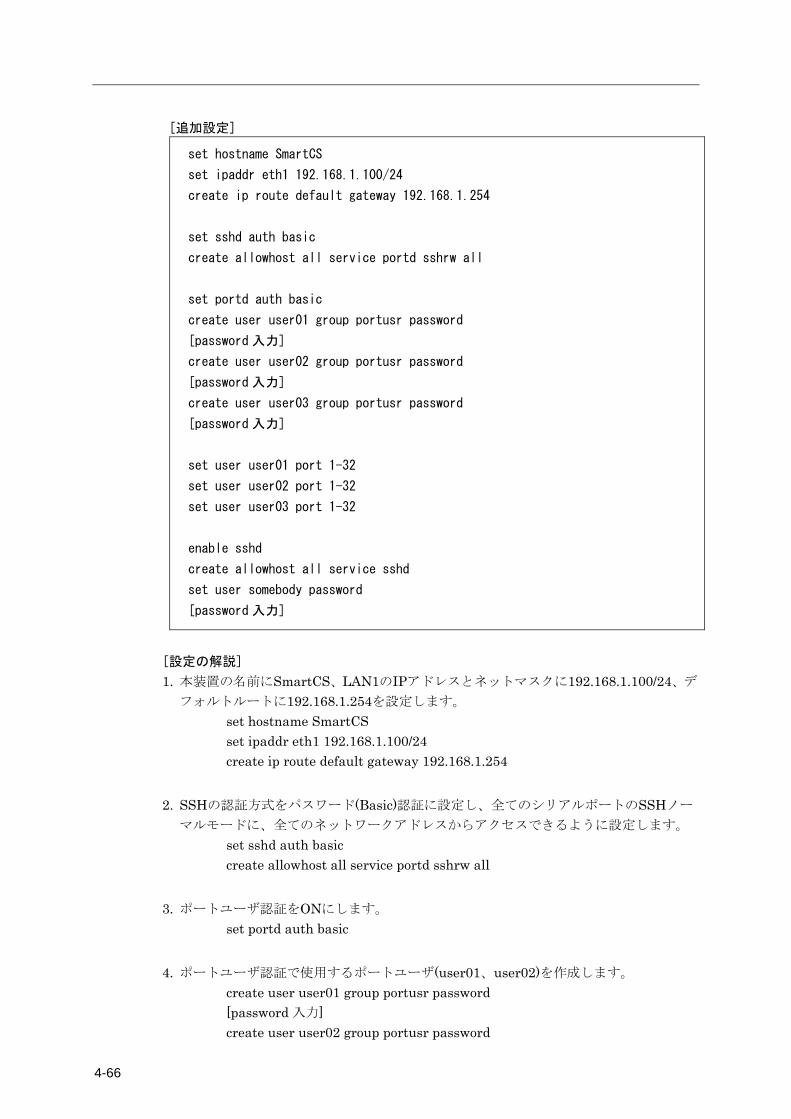
4-66
[追加設定]
set hostname SmartCS
set ipaddr eth1 192.168.1.100/24
create ip route default gateway 192.168.1.254
set sshd auth basic
create allowhost all service portd sshrw all
set portd auth basic
create user user01 group portusr password
[password 入力]
create user user02 group portusr password
[password 入力]
create user user03 group portusr password
[password 入力]
set user user01 port 1-32
set user user02 port 1-32
set user user03 port 1-32
enable sshd
create allowhost all service sshd
set user somebody password
[password 入力]
[設定の解説]
1. 本装置の名前にSmartCS、LAN1のIPアドレスとネットマスクに192.168.1.100/24、デ
フォルトルートに192.168.1.254を設定します。 set hostname SmartCS set ipaddr eth1 192.168.1.100/24 create ip route default gateway 192.168.1.254
2. SSHの認証方式をパスワード(Basic)認証に設定し、全てのシリアルポートのSSHノー
マルモードに、全てのネットワークアドレスからアクセスできるように設定します。 set sshd auth basic create allowhost all service portd sshrw all
3. ポートユーザ認証をONにします。
set portd auth basic
4. ポートユーザ認証で使用するポートユーザ(user01、user02)を作成します。
create user user01 group portusr password [password 入力] create user user02 group portusr password
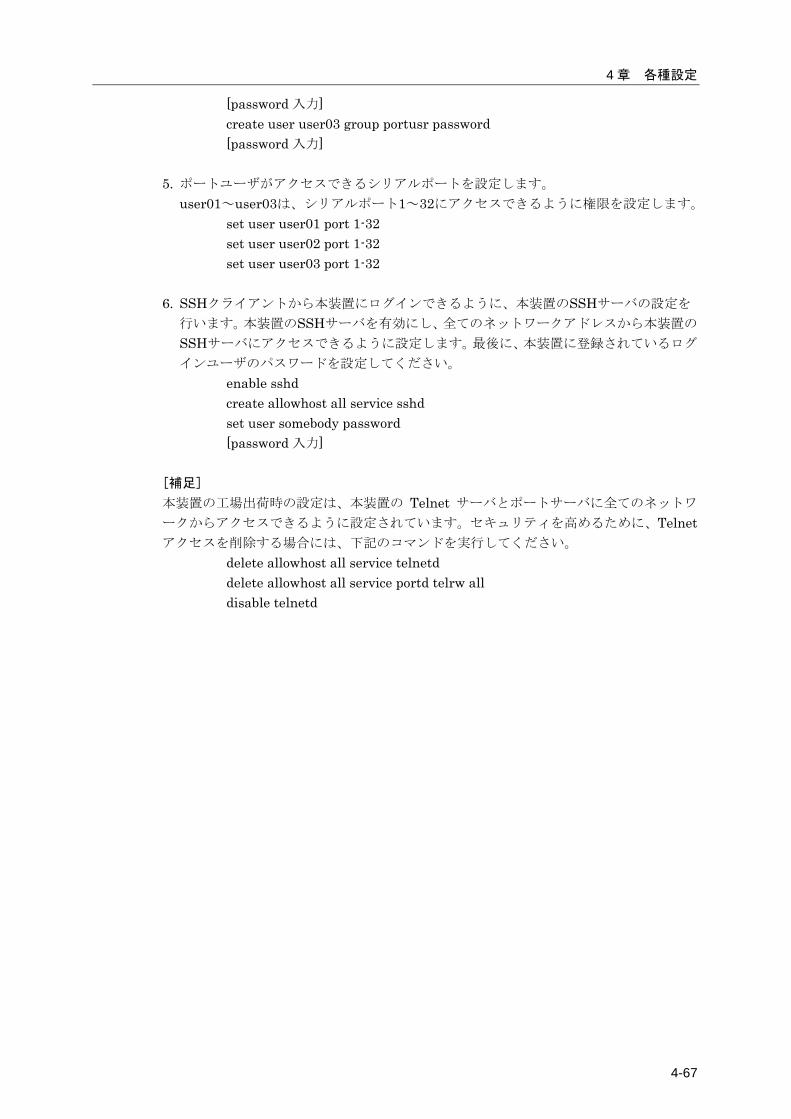
4 章 各種設定
4-67
[password 入力] create user user03 group portusr password [password 入力]
5. ポートユーザがアクセスできるシリアルポートを設定します。 user01~user03は、シリアルポート1~32にアクセスできるように権限を設定します。
set user user01 port 1-32 set user user02 port 1-32 set user user03 port 1-32
6. SSHクライアントから本装置にログインできるように、本装置のSSHサーバの設定を
行います。本装置のSSHサーバを有効にし、全てのネットワークアドレスから本装置の
SSHサーバにアクセスできるように設定します。最後に、本装置に登録されているログ
インユーザのパスワードを設定してください。 enable sshd create allowhost all service sshd set user somebody password [password 入力]
[補足]
本装置の工場出荷時の設定は、本装置の Telnet サーバとポートサーバに全てのネットワ
ークからアクセスできるように設定されています。セキュリティを高めるために、Telnetアクセスを削除する場合には、下記のコマンドを実行してください。
delete allowhost all service telnetd delete allowhost all service portd telrw all disable telnetd
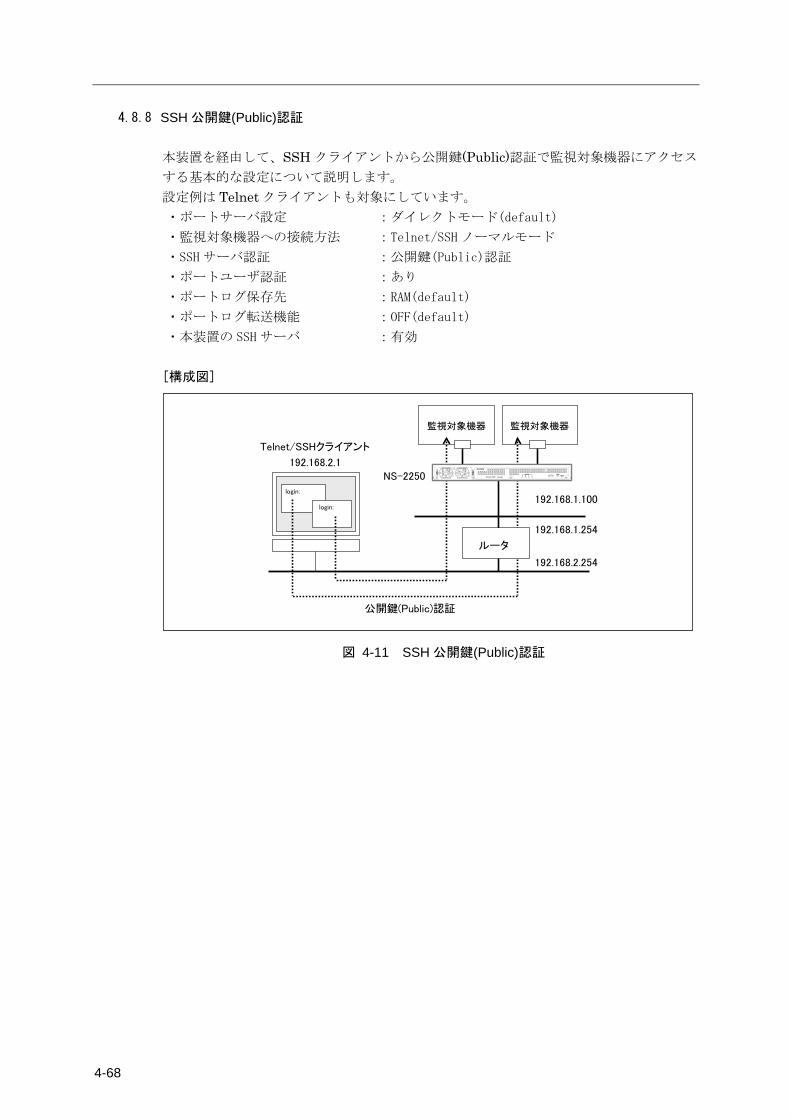
4-68
4.8.8 SSH 公開鍵(Public)認証 本装置を経由して、SSH クライアントから公開鍵(Public)認証で監視対象機器にアクセス
する基本的な設定について説明します。 設定例は Telnet クライアントも対象にしています。 ・ポートサーバ設定 :ダイレクトモード(default)
・監視対象機器への接続方法 :Telnet/SSH ノーマルモード
・SSH サーバ認証 :公開鍵(Public)認証
・ポートユーザ認証 :あり
・ポートログ保存先 :RAM(default)
・ポートログ転送機能 :OFF(default)
・本装置の SSH サーバ :有効
[構成図]
NS-2250
Telnet/SSHクライアント
192.168.2.1
192.168.1.100
監視対象機器監視対象機器
login:
login:
ルータ
192.168.1.254
192.168.2.254
公開鍵(Public)認証
図 4-11 SSH 公開鍵(Public)認証
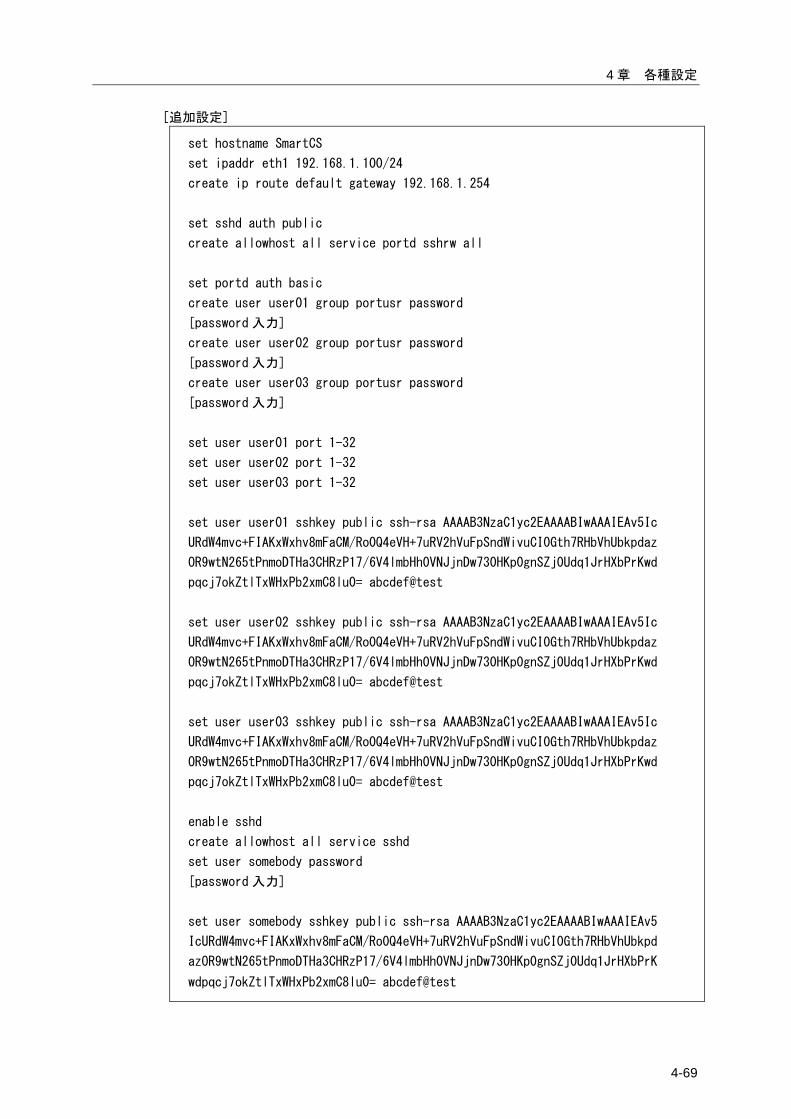
4 章 各種設定
4-69
[追加設定]
set hostname SmartCS
set ipaddr eth1 192.168.1.100/24
create ip route default gateway 192.168.1.254
set sshd auth public
create allowhost all service portd sshrw all
set portd auth basic
create user user01 group portusr password
[password 入力]
create user user02 group portusr password
[password 入力]
create user user03 group portusr password
[password 入力]
set user user01 port 1-32
set user user02 port 1-32
set user user03 port 1-32
set user user01 sshkey public ssh-rsa AAAAB3NzaC1yc2EAAAABIwAAAIEAv5Ic
URdW4mvc+FIAKxWxhv8mFaCM/Ro0Q4eVH+7uRV2hVuFpSndWivuCI0Gth7RHbVhUbkpdaz
OR9wtN265tPnmoDTHa3CHRzP17/6V4lmbHh0VNJjnDw730HKp0gnSZj0Udq1JrHXbPrKwd
pqcj7okZtlTxWHxPb2xmC8lu0= abcdef@test
set user user02 sshkey public ssh-rsa AAAAB3NzaC1yc2EAAAABIwAAAIEAv5Ic
URdW4mvc+FIAKxWxhv8mFaCM/Ro0Q4eVH+7uRV2hVuFpSndWivuCI0Gth7RHbVhUbkpdaz
OR9wtN265tPnmoDTHa3CHRzP17/6V4lmbHh0VNJjnDw730HKp0gnSZj0Udq1JrHXbPrKwd
pqcj7okZtlTxWHxPb2xmC8lu0= abcdef@test
set user user03 sshkey public ssh-rsa AAAAB3NzaC1yc2EAAAABIwAAAIEAv5Ic
URdW4mvc+FIAKxWxhv8mFaCM/Ro0Q4eVH+7uRV2hVuFpSndWivuCI0Gth7RHbVhUbkpdaz
OR9wtN265tPnmoDTHa3CHRzP17/6V4lmbHh0VNJjnDw730HKp0gnSZj0Udq1JrHXbPrKwd
pqcj7okZtlTxWHxPb2xmC8lu0= abcdef@test
enable sshd
create allowhost all service sshd
set user somebody password
[password 入力]
set user somebody sshkey public ssh-rsa AAAAB3NzaC1yc2EAAAABIwAAAIEAv5
IcURdW4mvc+FIAKxWxhv8mFaCM/Ro0Q4eVH+7uRV2hVuFpSndWivuCI0Gth7RHbVhUbkpd
azOR9wtN265tPnmoDTHa3CHRzP17/6V4lmbHh0VNJjnDw730HKp0gnSZj0Udq1JrHXbPrK
wdpqcj7okZtlTxWHxPb2xmC8lu0= abcdef@test
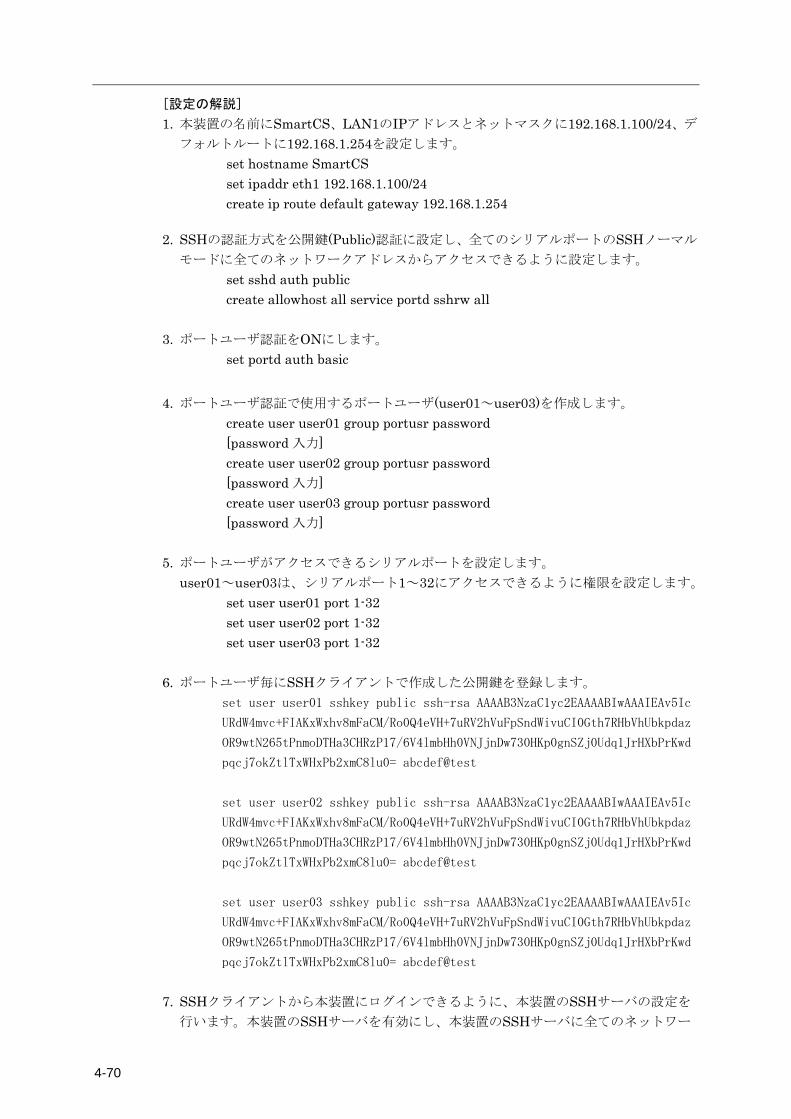
4-70
[設定の解説]
1. 本装置の名前にSmartCS、LAN1のIPアドレスとネットマスクに192.168.1.100/24、デ
フォルトルートに192.168.1.254を設定します。 set hostname SmartCS set ipaddr eth1 192.168.1.100/24 create ip route default gateway 192.168.1.254
2. SSHの認証方式を公開鍵(Public)認証に設定し、全てのシリアルポートのSSHノーマル
モードに全てのネットワークアドレスからアクセスできるように設定します。 set sshd auth public create allowhost all service portd sshrw all
3. ポートユーザ認証をONにします。 set portd auth basic
4. ポートユーザ認証で使用するポートユーザ(user01~user03)を作成します。
create user user01 group portusr password [password 入力] create user user02 group portusr password [password 入力] create user user03 group portusr password [password 入力]
5. ポートユーザがアクセスできるシリアルポートを設定します。 user01~user03は、シリアルポート1~32にアクセスできるように権限を設定します。
set user user01 port 1-32 set user user02 port 1-32 set user user03 port 1-32
6. ポートユーザ毎にSSHクライアントで作成した公開鍵を登録します。
set user user01 sshkey public ssh-rsa AAAAB3NzaC1yc2EAAAABIwAAAIEAv5Ic
URdW4mvc+FIAKxWxhv8mFaCM/Ro0Q4eVH+7uRV2hVuFpSndWivuCI0Gth7RHbVhUbkpdaz
OR9wtN265tPnmoDTHa3CHRzP17/6V4lmbHh0VNJjnDw730HKp0gnSZj0Udq1JrHXbPrKwd
pqcj7okZtlTxWHxPb2xmC8lu0= abcdef@test
set user user02 sshkey public ssh-rsa AAAAB3NzaC1yc2EAAAABIwAAAIEAv5Ic
URdW4mvc+FIAKxWxhv8mFaCM/Ro0Q4eVH+7uRV2hVuFpSndWivuCI0Gth7RHbVhUbkpdaz
OR9wtN265tPnmoDTHa3CHRzP17/6V4lmbHh0VNJjnDw730HKp0gnSZj0Udq1JrHXbPrKwd
pqcj7okZtlTxWHxPb2xmC8lu0= abcdef@test
set user user03 sshkey public ssh-rsa AAAAB3NzaC1yc2EAAAABIwAAAIEAv5Ic
URdW4mvc+FIAKxWxhv8mFaCM/Ro0Q4eVH+7uRV2hVuFpSndWivuCI0Gth7RHbVhUbkpdaz
OR9wtN265tPnmoDTHa3CHRzP17/6V4lmbHh0VNJjnDw730HKp0gnSZj0Udq1JrHXbPrKwd
pqcj7okZtlTxWHxPb2xmC8lu0= abcdef@test
7. SSHクライアントから本装置にログインできるように、本装置のSSHサーバの設定を
行います。本装置のSSHサーバを有効にし、本装置のSSHサーバに全てのネットワー
4 章 各種設定
4-71
クアドレスからアクセスできるように設定します。最後に、本装置に登録されているロ
グインユーザのパスワードを設定してください。 enable sshd create allowhost all service sshd set user somebody password [password 入力]
8. 本装置のユーザ(somebody)にSSHクライアントで作成した公開鍵を登録します。 set user somebody sshkey public ssh-rsa AAAAB3NzaC1yc2EAAAABIwAAAIEAv5Ic URdW4mvc+FIAKxWxhv8mFaCM/Ro0Q4eVH+7uRV2hVuFpSndWivuCI0Gth7RHbVhUbkpdaz OR9wtN265tPnmoDTHa3CHRzP17/6V4lmbHh0VNJjnDw730HKp0gnSZj0Udq1JrHXbPrKwd pqcj7okZtlTxWHxPb2xmC8lu0= abcdef@test
[補足]
本装置の工場出荷時の設定は、本装置の Telnet サーバとポートサーバに全てのネットワ
ークアドレスからアクセスできるように設定されています。セキュリティを高めるために、
Telnet アクセスを削除する場合には、下記のコマンドを実行してください。 delete allowhost all service telnetd delete allowhost all service portd telrw all disable telnetd
SSH クライアント端末で公開鍵を生成する方法は、「付録 B SSH クライアントソフトの
使用例」を参照してください。
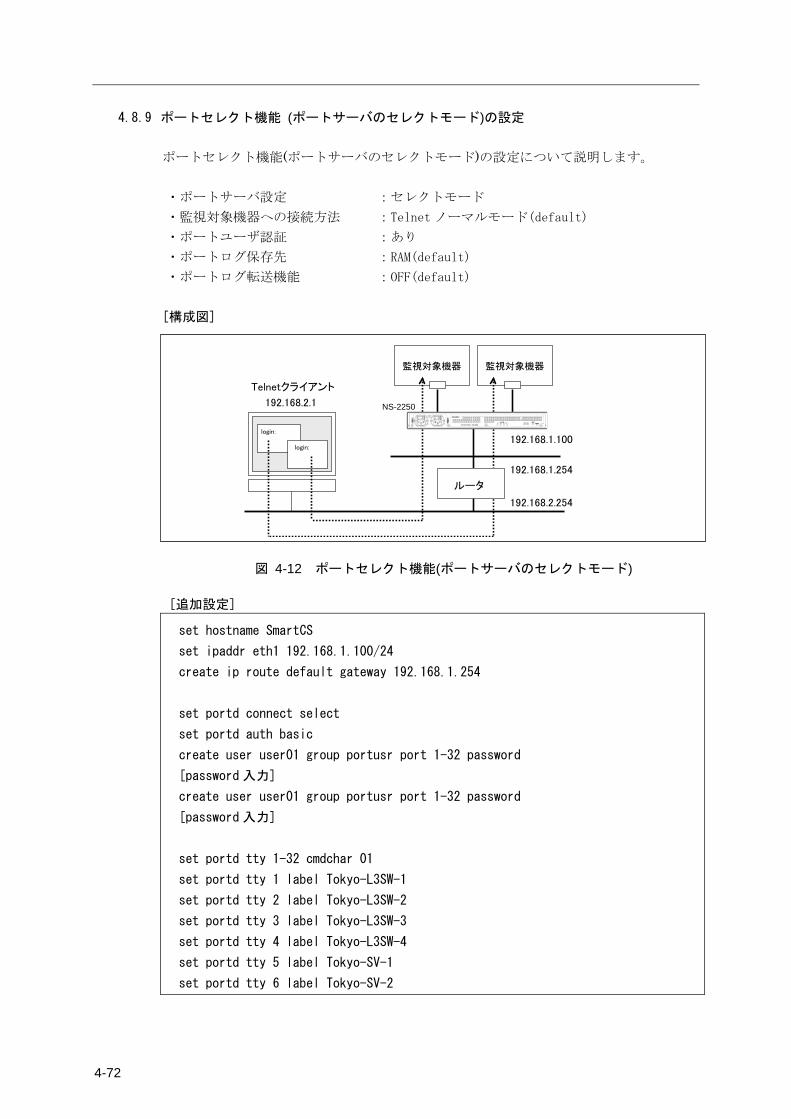
4-72
4.8.9 ポートセレクト機能 (ポートサーバのセレクトモード)の設定 ポートセレクト機能(ポートサーバのセレクトモード)の設定について説明します。
・ポートサーバ設定 :セレクトモード
・監視対象機器への接続方法 :Telnet ノーマルモード(default)
・ポートユーザ認証 :あり
・ポートログ保存先 :RAM(default)
・ポートログ転送機能 :OFF(default)
[構成図]
Telnetクライアント
192.168.2.1
192.168.1.100
監視対象機器監視対象機器
login:
login:
ルータ
192.168.1.254
192.168.2.254
NS-2250
図 4-12 ポートセレクト機能(ポートサーバのセレクトモード)
[追加設定]
set hostname SmartCS
set ipaddr eth1 192.168.1.100/24
create ip route default gateway 192.168.1.254
set portd connect select
set portd auth basic
create user user01 group portusr port 1-32 password
[password 入力]
create user user01 group portusr port 1-32 password
[password 入力]
set portd tty 1-32 cmdchar 01
set portd tty 1 label Tokyo-L3SW-1
set portd tty 2 label Tokyo-L3SW-2
set portd tty 3 label Tokyo-L3SW-3
set portd tty 4 label Tokyo-L3SW-4
set portd tty 5 label Tokyo-SV-1
set portd tty 6 label Tokyo-SV-2
4 章 各種設定
4-73
[設定の解説]
1. 本装置の名前にSmartCS、LAN1の IPアドレスとネットマスクに192.168.1.100/24、デフォルトルートに 192.168.1.254 を設定します。
set hostname SmartCS set ipaddr eth1 192.168.1.100/24 create ip route default gateway 192.168.1.254
2. ポートセレクト機能を有効にします。ポートサーバの接続モードを select に変更しま
す。 set portd connect select
3. ポートユーザ認証を ON にします。 set portd auth basic
4. ポートユーザ認証で使用するポートユーザ(user01 と user02)を作成します。 ポートユーザにはシリアルポート 1~32 のアクセス権を設定します。
create user user01 group portusr port 1-32 password [password 入力] create user user02 group portusr port 1-32 password [password 入力]
5. シリアルポート 1~32 にポートサーバメニューの切替文字コード(セッション中断文
字コード)として 0x01[Ctrl-A]を登録します。 set portd tty 1-32 cmdchar 01
6. 各シリアルポートにラベルを登録します。
set portd tty 1 label Tokyo-L3SW-1 set portd tty 2 label Tokyo-L3SW-2 set portd tty 3 label Tokyo-L3SW-3 set portd tty 4 label Tokyo-L3SW-4 set portd tty 5 label Tokyo-SV-1 set portd tty 6 label Tokyo-SV-2
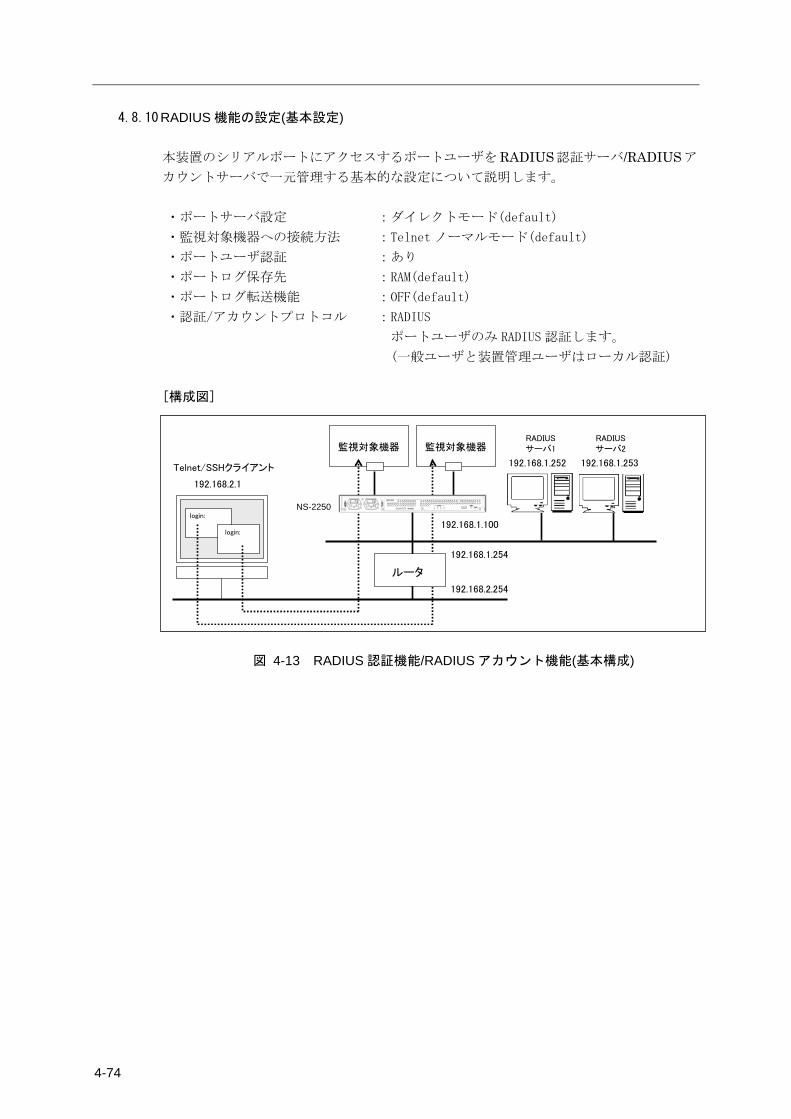
4-74
4.8.10 RADIUS 機能の設定(基本設定) 本装置のシリアルポートにアクセスするポートユーザをRADIUS認証サーバ/RADIUSア
カウントサーバで一元管理する基本的な設定について説明します。
・ポートサーバ設定 :ダイレクトモード(default)
・監視対象機器への接続方法 :Telnet ノーマルモード(default)
・ポートユーザ認証 :あり
・ポートログ保存先 :RAM(default)
・ポートログ転送機能 :OFF(default)
・認証/アカウントプロトコル :RADIUS
ポートユーザのみ RADIUS 認証します。
(一般ユーザと装置管理ユーザはローカル認証)
[構成図]
Telnet/SSHクライアント
192.168.2.1
192.168.1.100
監視対象機器監視対象機器
login:
login:
ルータ
192.168.1.254
192.168.2.254
NS-2250
RADIUSサーバ1
RADIUSサーバ2
192.168.1.252 192.168.1.253
図 4-13 RADIUS 認証機能/RADIUS アカウント機能(基本構成)
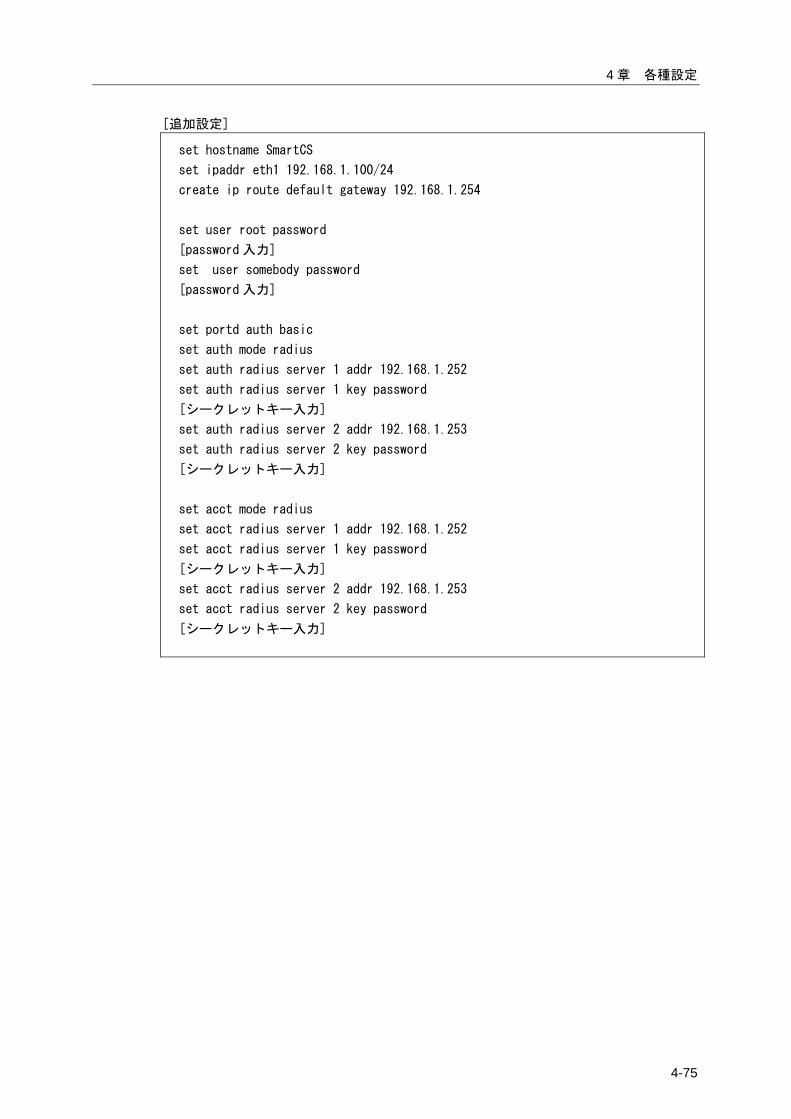
4 章 各種設定
4-75
[追加設定]
set hostname SmartCS
set ipaddr eth1 192.168.1.100/24
create ip route default gateway 192.168.1.254
set user root password
[password 入力]
set user somebody password
[password 入力]
set portd auth basic
set auth mode radius
set auth radius server 1 addr 192.168.1.252
set auth radius server 1 key password
[シークレットキー入力]
set auth radius server 2 addr 192.168.1.253
set auth radius server 2 key password
[シークレットキー入力]
set acct mode radius
set acct radius server 1 addr 192.168.1.252
set acct radius server 1 key password
[シークレットキー入力]
set acct radius server 2 addr 192.168.1.253
set acct radius server 2 key password
[シークレットキー入力]
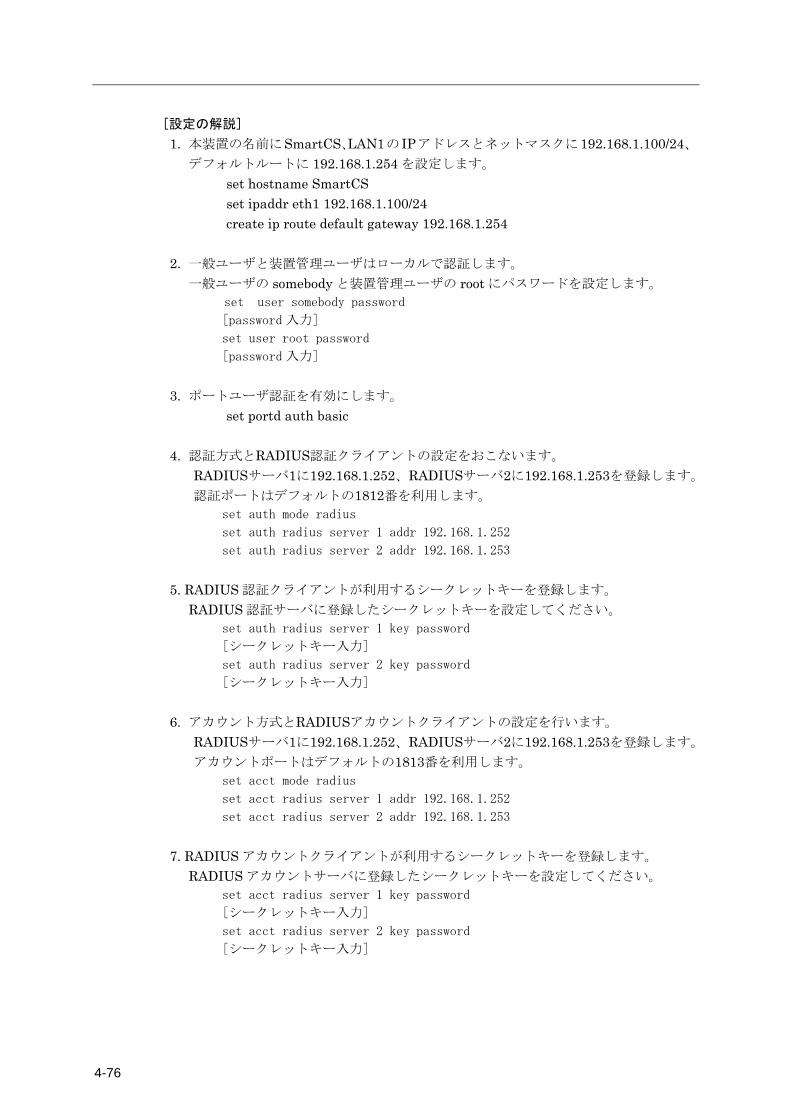
4-76
[設定の解説]
1. 本装置の名前にSmartCS、LAN1の IPアドレスとネットマスクに192.168.1.100/24、デフォルトルートに 192.168.1.254 を設定します。
set hostname SmartCS set ipaddr eth1 192.168.1.100/24 create ip route default gateway 192.168.1.254
2. 一般ユーザと装置管理ユーザはローカルで認証します。 一般ユーザの somebody と装置管理ユーザの root にパスワードを設定します。
set user somebody password
[password 入力]
set user root password
[password 入力]
3. ポートユーザ認証を有効にします。
set portd auth basic
4. 認証方式とRADIUS認証クライアントの設定をおこないます。 RADIUSサーバ1に192.168.1.252、RADIUSサーバ2に192.168.1.253を登録します。
認証ポートはデフォルトの1812番を利用します。 set auth mode radius
set auth radius server 1 addr 192.168.1.252
set auth radius server 2 addr 192.168.1.253
5. RADIUS 認証クライアントが利用するシークレットキーを登録します。
RADIUS 認証サーバに登録したシークレットキーを設定してください。 set auth radius server 1 key password
[シークレットキー入力]
set auth radius server 2 key password
[シークレットキー入力]
6. アカウント方式とRADIUSアカウントクライアントの設定を行います。
RADIUSサーバ1に192.168.1.252、RADIUSサーバ2に192.168.1.253を登録します。
アカウントポートはデフォルトの1813番を利用します。 set acct mode radius
set acct radius server 1 addr 192.168.1.252
set acct radius server 2 addr 192.168.1.253
7. RADIUS アカウントクライアントが利用するシークレットキーを登録します。
RADIUS アカウントサーバに登録したシークレットキーを設定してください。 set acct radius server 1 key password
[シークレットキー入力]
set acct radius server 2 key password
[シークレットキー入力]
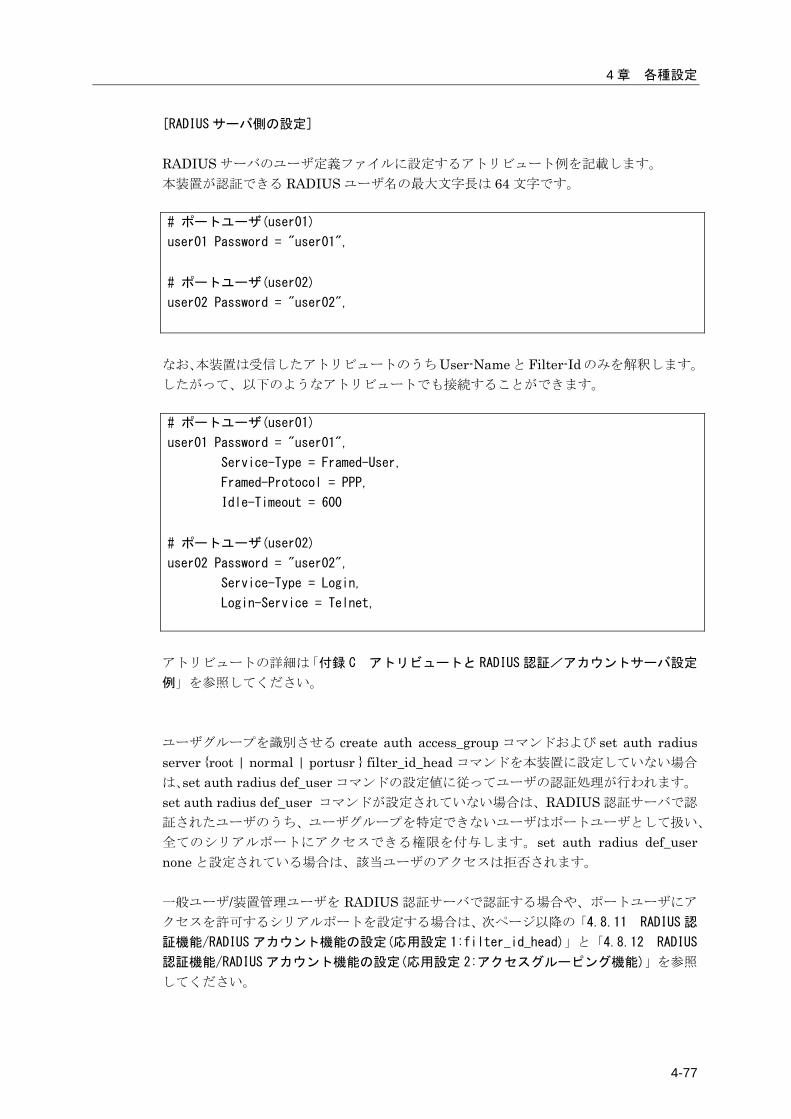
4 章 各種設定
4-77
[RADIUS サーバ側の設定]
RADIUS サーバのユーザ定義ファイルに設定するアトリビュート例を記載します。 本装置が認証できる RADIUS ユーザ名の最大文字長は 64 文字です。
# ポートユーザ(user01)
user01 Password = "user01",
# ポートユーザ(user02)
user02 Password = "user02",
なお、本装置は受信したアトリビュートのうちUser-NameとFilter-Idのみを解釈します。
したがって、以下のようなアトリビュートでも接続することができます。
# ポートユーザ(user01)
user01 Password = "user01",
Service-Type = Framed-User,
Framed-Protocol = PPP,
Idle-Timeout = 600
# ポートユーザ(user02)
user02 Password = "user02",
Service-Type = Login,
Login-Service = Telnet,
アトリビュートの詳細は「付録 C アトリビュートと RADIUS 認証/アカウントサーバ設定
例」を参照してください。
ユーザグループを識別させる create auth access_group コマンドおよび set auth radius server {root | normal | portusr } filter_id_head コマンドを本装置に設定していない場合
は、set auth radius def_user コマンドの設定値に従ってユーザの認証処理が行われます。
set auth radius def_user コマンドが設定されていない場合は、RADIUS 認証サーバで認
証されたユーザのうち、ユーザグループを特定できないユーザはポートユーザとして扱い、
全てのシリアルポートにアクセスできる権限を付与します。set auth radius def_user none と設定されている場合は、該当ユーザのアクセスは拒否されます。 一般ユーザ/装置管理ユーザを RADIUS 認証サーバで認証する場合や、ポートユーザにア
クセスを許可するシリアルポートを設定する場合は、次ページ以降の「4.8.11 RADIUS 認
証機能/RADIUS アカウント機能の設定(応用設定 1:filter_id_head)」と「4.8.12 RADIUS
認証機能/RADIUS アカウント機能の設定(応用設定 2:アクセスグルーピング機能)」を参照
してください。
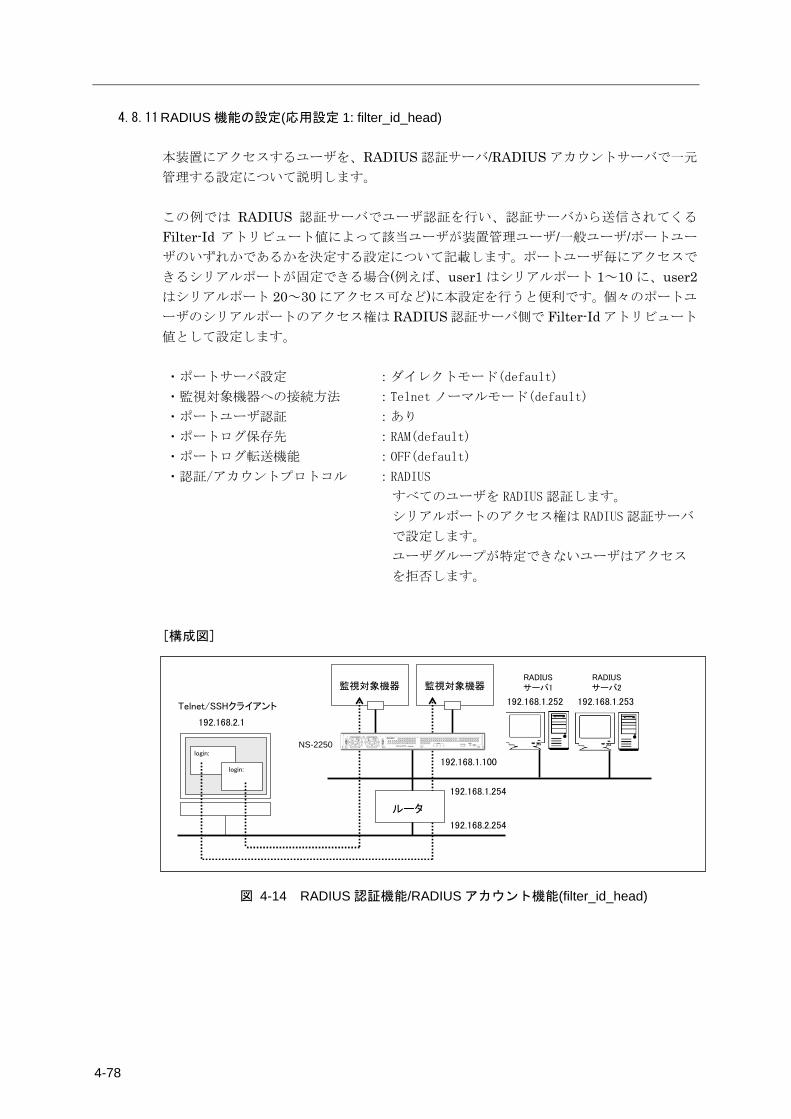
4-78
4.8.11 RADIUS 機能の設定(応用設定 1: filter_id_head) 本装置にアクセスするユーザを、RADIUS 認証サーバ/RADIUS アカウントサーバで一元
管理する設定について説明します。 この例では RADIUS 認証サーバでユーザ認証を行い、認証サーバから送信されてくる
Filter-Id アトリビュート値によって該当ユーザが装置管理ユーザ/一般ユーザ/ポートユー
ザのいずれかであるかを決定する設定について記載します。ポートユーザ毎にアクセスで
きるシリアルポートが固定できる場合(例えば、user1 はシリアルポート 1~10 に、user2はシリアルポート 20~30 にアクセス可など)に本設定を行うと便利です。個々のポートユ
ーザのシリアルポートのアクセス権は RADIUS 認証サーバ側で Filter-Id アトリビュート
値として設定します。
・ポートサーバ設定 :ダイレクトモード(default)
・監視対象機器への接続方法 :Telnet ノーマルモード(default)
・ポートユーザ認証 :あり
・ポートログ保存先 :RAM(default)
・ポートログ転送機能 :OFF(default)
・認証/アカウントプロトコル :RADIUS
すべてのユーザを RADIUS 認証します。
シリアルポートのアクセス権は RADIUS 認証サーバ
で設定します。
ユーザグループが特定できないユーザはアクセス
を拒否します。
[構成図]
Telnet/SSHクライアント
192.168.2.1
192.168.1.100
監視対象機器監視対象機器
login:
login:
ルータ
192.168.1.254
192.168.2.254
NS-2250
RADIUSサーバ1
RADIUSサーバ2
192.168.1.252 192.168.1.253
図 4-14 RADIUS 認証機能/RADIUS アカウント機能(filter_id_head)
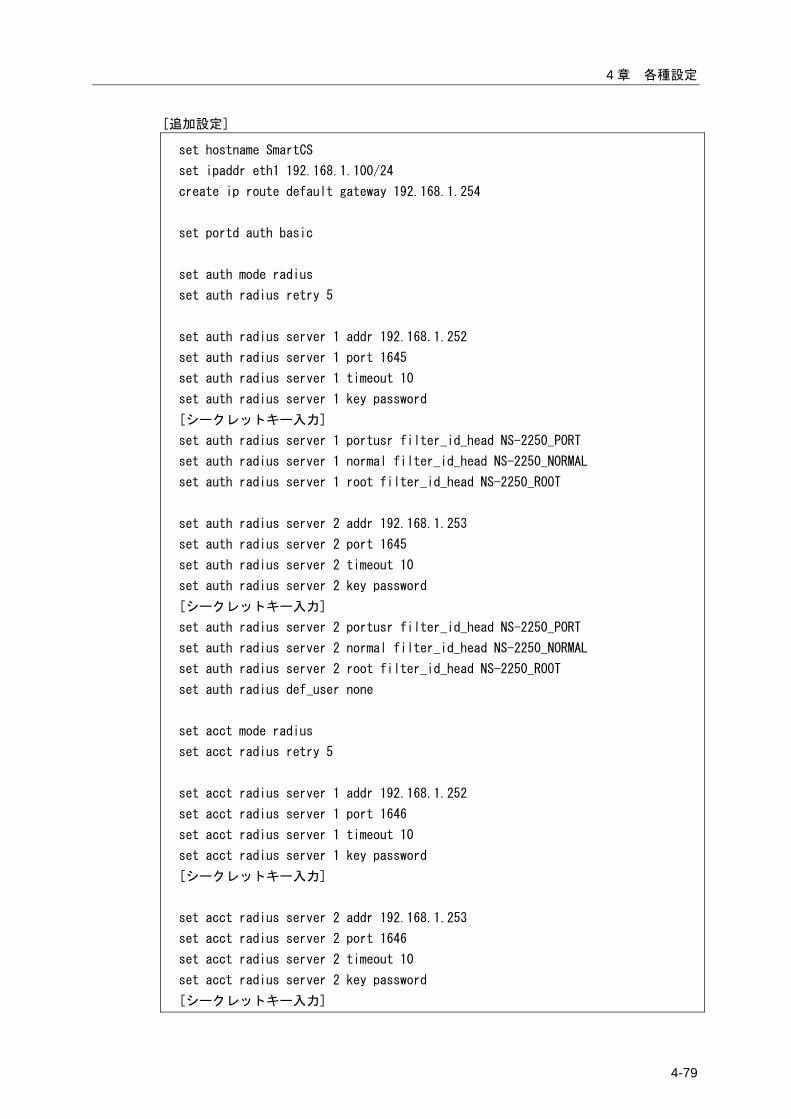
4 章 各種設定
4-79
[追加設定]
set hostname SmartCS
set ipaddr eth1 192.168.1.100/24
create ip route default gateway 192.168.1.254
set portd auth basic
set auth mode radius
set auth radius retry 5
set auth radius server 1 addr 192.168.1.252
set auth radius server 1 port 1645
set auth radius server 1 timeout 10
set auth radius server 1 key password
[シークレットキー入力]
set auth radius server 1 portusr filter_id_head NS-2250_PORT
set auth radius server 1 normal filter_id_head NS-2250_NORMAL
set auth radius server 1 root filter_id_head NS-2250_ROOT
set auth radius server 2 addr 192.168.1.253
set auth radius server 2 port 1645
set auth radius server 2 timeout 10
set auth radius server 2 key password
[シークレットキー入力]
set auth radius server 2 portusr filter_id_head NS-2250_PORT
set auth radius server 2 normal filter_id_head NS-2250_NORMAL
set auth radius server 2 root filter_id_head NS-2250_ROOT
set auth radius def_user none
set acct mode radius
set acct radius retry 5
set acct radius server 1 addr 192.168.1.252
set acct radius server 1 port 1646
set acct radius server 1 timeout 10
set acct radius server 1 key password
[シークレットキー入力]
set acct radius server 2 addr 192.168.1.253
set acct radius server 2 port 1646
set acct radius server 2 timeout 10
set acct radius server 2 key password
[シークレットキー入力]
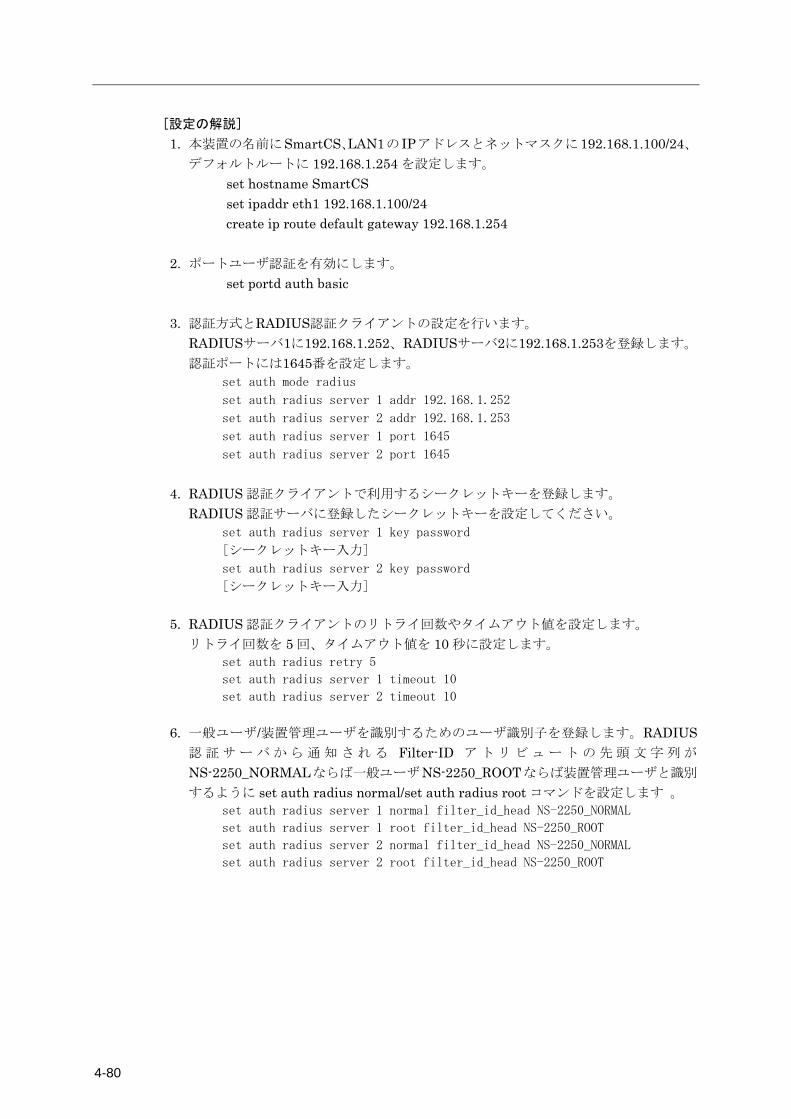
4-80
[設定の解説]
1. 本装置の名前にSmartCS、LAN1の IPアドレスとネットマスクに192.168.1.100/24、デフォルトルートに 192.168.1.254 を設定します。
set hostname SmartCS set ipaddr eth1 192.168.1.100/24 create ip route default gateway 192.168.1.254
2. ポートユーザ認証を有効にします。 set portd auth basic
3. 認証方式とRADIUS認証クライアントの設定を行います。
RADIUSサーバ1に192.168.1.252、RADIUSサーバ2に192.168.1.253を登録します。
認証ポートには1645番を設定します。 set auth mode radius
set auth radius server 1 addr 192.168.1.252
set auth radius server 2 addr 192.168.1.253
set auth radius server 1 port 1645
set auth radius server 2 port 1645
4. RADIUS 認証クライアントで利用するシークレットキーを登録します。
RADIUS 認証サーバに登録したシークレットキーを設定してください。 set auth radius server 1 key password
[シークレットキー入力]
set auth radius server 2 key password
[シークレットキー入力]
5. RADIUS 認証クライアントのリトライ回数やタイムアウト値を設定します。 リトライ回数を 5 回、タイムアウト値を 10 秒に設定します。
set auth radius retry 5
set auth radius server 1 timeout 10
set auth radius server 2 timeout 10
6. 一般ユーザ/装置管理ユーザを識別するためのユーザ識別子を登録します。RADIUS
認 証 サ ー バ か ら 通 知 さ れ る Filter-ID ア ト リ ビ ュ ー ト の 先 頭 文 字 列 が
NS-2250_NORMALならば一般ユーザNS-2250_ROOTならば装置管理ユーザと識別
するように set auth radius normal/set auth radius root コマンドを設定します 。 set auth radius server 1 normal filter_id_head NS-2250_NORMAL
set auth radius server 1 root filter_id_head NS-2250_ROOT
set auth radius server 2 normal filter_id_head NS-2250_NORMAL
set auth radius server 2 root filter_id_head NS-2250_ROOT
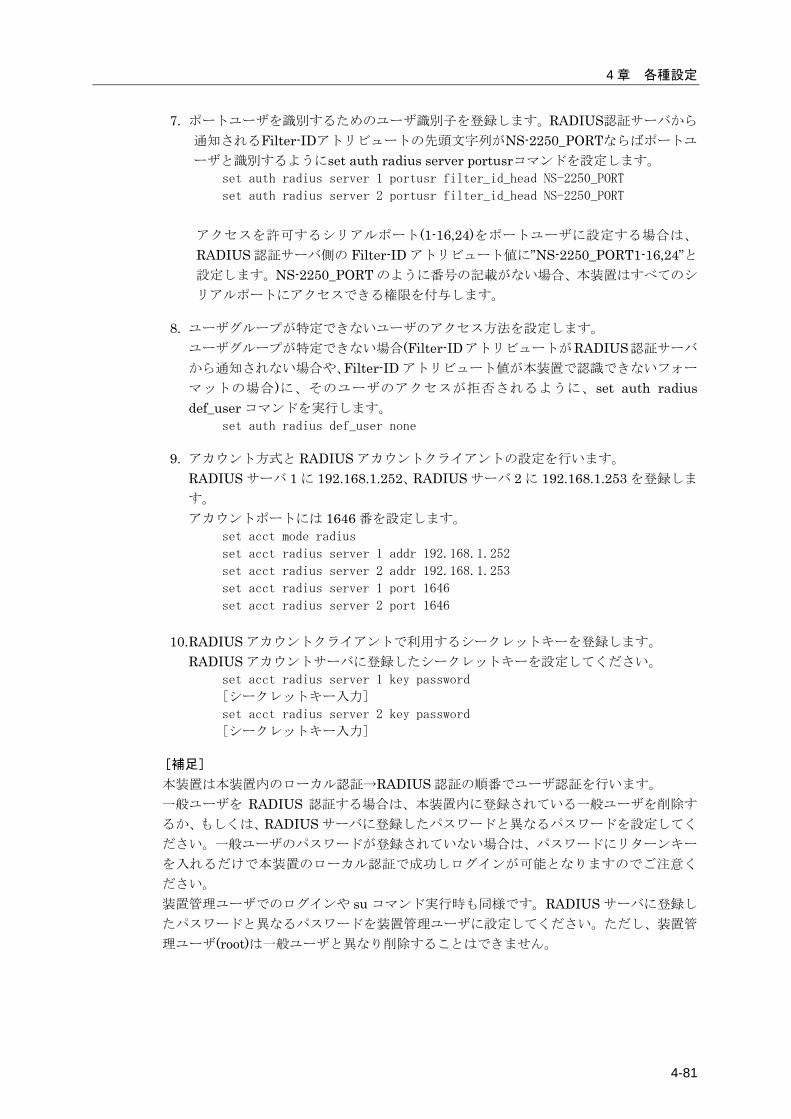
4 章 各種設定
4-81
7. ポートユーザを識別するためのユーザ識別子を登録します。RADIUS認証サーバから
通知されるFilter-IDアトリビュートの先頭文字列がNS-2250_PORTならばポートユ
ーザと識別するようにset auth radius server portusrコマンドを設定します。 set auth radius server 1 portusr filter_id_head NS-2250_PORT
set auth radius server 2 portusr filter_id_head NS-2250_PORT
アクセスを許可するシリアルポート(1-16,24)をポートユーザに設定する場合は、
RADIUS 認証サーバ側の Filter-ID アトリビュート値に”NS-2250_PORT1-16,24”と設定します。NS-2250_PORT のように番号の記載がない場合、本装置はすべてのシ
リアルポートにアクセスできる権限を付与します。
8. ユーザグループが特定できないユーザのアクセス方法を設定します。 ユーザグループが特定できない場合(Filter-IDアトリビュートがRADIUS認証サーバ
から通知されない場合や、Filter-ID アトリビュート値が本装置で認識できないフォー
マットの場合)に、そのユーザのアクセスが拒否されるように、set auth radius def_user コマンドを実行します。
set auth radius def_user none
9. アカウント方式と RADIUS アカウントクライアントの設定を行います。 RADIUS サーバ 1 に 192.168.1.252、RADIUS サーバ 2 に 192.168.1.253 を登録しま
す。 アカウントポートには 1646 番を設定します。
set acct mode radius
set acct radius server 1 addr 192.168.1.252
set acct radius server 2 addr 192.168.1.253
set acct radius server 1 port 1646
set acct radius server 2 port 1646
10. RADIUS アカウントクライアントで利用するシークレットキーを登録します。
RADIUS アカウントサーバに登録したシークレットキーを設定してください。 set acct radius server 1 key password
[シークレットキー入力]
set acct radius server 2 key password
[シークレットキー入力]
[補足]
本装置は本装置内のローカル認証→RADIUS 認証の順番でユーザ認証を行います。 一般ユーザを RADIUS 認証する場合は、本装置内に登録されている一般ユーザを削除す
るか、もしくは、RADIUS サーバに登録したパスワードと異なるパスワードを設定してく
ださい。一般ユーザのパスワードが登録されていない場合は、パスワードにリターンキー
を入れるだけで本装置のローカル認証で成功しログインが可能となりますのでご注意く
ださい。 装置管理ユーザでのログインや su コマンド実行時も同様です。RADIUS サーバに登録し
たパスワードと異なるパスワードを装置管理ユーザに設定してください。ただし、装置管
理ユーザ(root)は一般ユーザと異なり削除することはできません。

4-82
[RADIUS サーバ側の設定]
RADIUS 認証サーバのユーザ定義ファイルに設定するアトリビュート例を記載します。 本装置が認証できる RADIUS ユーザ名の最大文字長は 64 文字です。
# ポートユーザの登録
portuser01 Password = "portuser01",
Filter-Id = “NS-2250_PORT1-16”,
# ↑シリアルポート(1-16)にアクセス可能
portuser02 Password = "portuser02",
Filter-Id = “NS-2250_PORT5-9,20,24”,
# ↑シリアルポート(5-9,20,24)にアクセス可能
portuser03 Password = "portuser03",
# ↑この場合、本装置の設定が set auth radius def_user none であり、かつ、
# ユーザ種別が特定できないので、このユーザのアクセスは拒否されます。
# 一般ユーザの登録
somebody Password = "network",
Filter-Id = “NS-2250_NORMAL”,
abc01 Password = "abcdef",
Filter-Id = “NS-2250_NORMAL”,
# 装置管理ユーザの登録
root Password = "admin",
Filter-Id = “NS-2250_ROOT”,
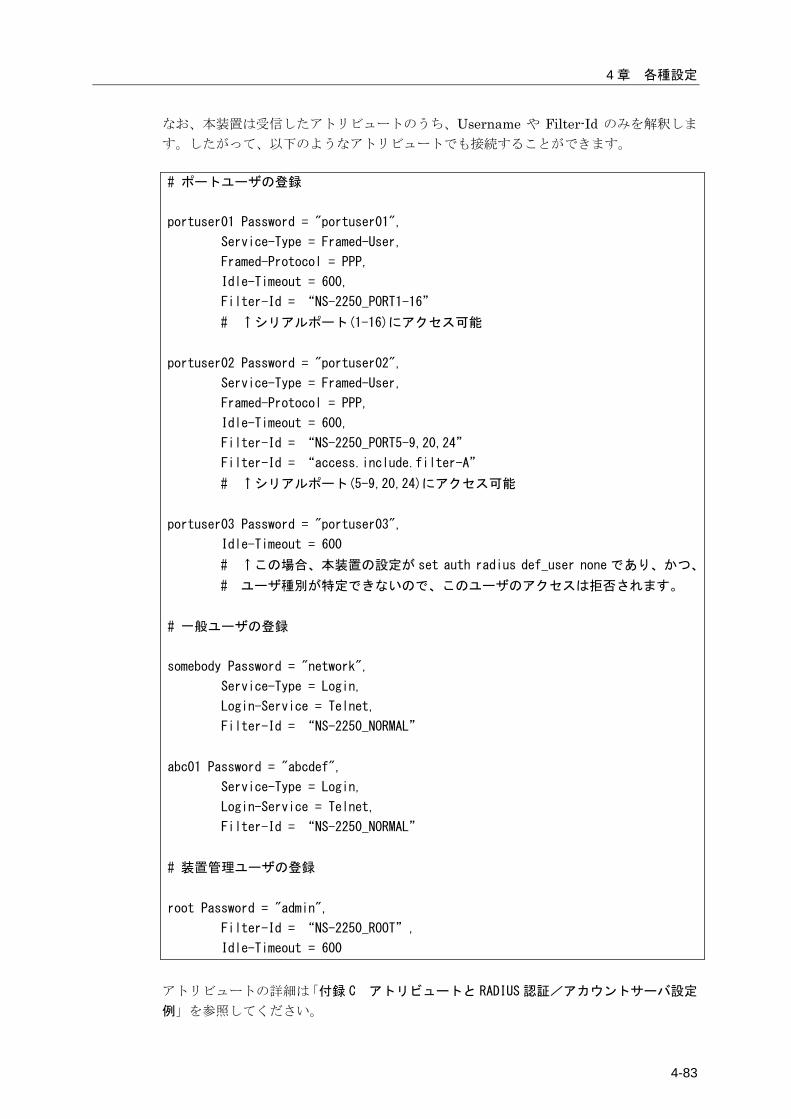
4 章 各種設定
4-83
なお、本装置は受信したアトリビュートのうち、Username や Filter-Id のみを解釈しま
す。したがって、以下のようなアトリビュートでも接続することができます。
# ポートユーザの登録
portuser01 Password = "portuser01",
Service-Type = Framed-User,
Framed-Protocol = PPP,
Idle-Timeout = 600,
Filter-Id = “NS-2250_PORT1-16”
# ↑シリアルポート(1-16)にアクセス可能
portuser02 Password = "portuser02",
Service-Type = Framed-User,
Framed-Protocol = PPP,
Idle-Timeout = 600,
Filter-Id = “NS-2250_PORT5-9,20,24”
Filter-Id = “access.include.filter-A”
# ↑シリアルポート(5-9,20,24)にアクセス可能
portuser03 Password = "portuser03",
Idle-Timeout = 600
# ↑この場合、本装置の設定が set auth radius def_user none であり、かつ、
# ユーザ種別が特定できないので、このユーザのアクセスは拒否されます。
# 一般ユーザの登録
somebody Password = "network",
Service-Type = Login,
Login-Service = Telnet,
Filter-Id = “NS-2250_NORMAL”
abc01 Password = "abcdef",
Service-Type = Login,
Login-Service = Telnet,
Filter-Id = “NS-2250_NORMAL”
# 装置管理ユーザの登録
root Password = "admin",
Filter-Id = “NS-2250_ROOT”,
Idle-Timeout = 600
アトリビュートの詳細は「付録 C アトリビュートと RADIUS 認証/アカウントサーバ設定
例」を参照してください。
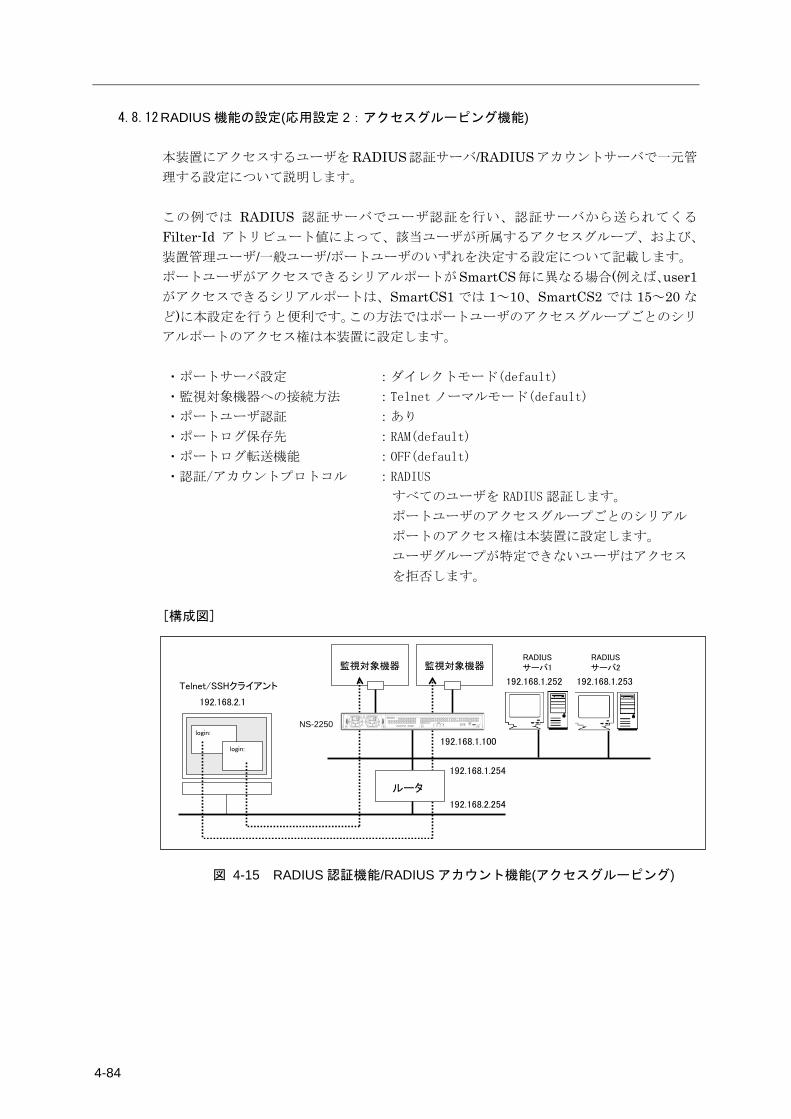
4-84
4.8.12 RADIUS 機能の設定(応用設定 2:アクセスグルーピング機能) 本装置にアクセスするユーザをRADIUS認証サーバ/RADIUSアカウントサーバで一元管
理する設定について説明します。 この例では RADIUS 認証サーバでユーザ認証を行い、認証サーバから送られてくる
Filter-Id アトリビュート値によって、該当ユーザが所属するアクセスグループ、および、
装置管理ユーザ/一般ユーザ/ポートユーザのいずれを決定する設定について記載します。 ポートユーザがアクセスできるシリアルポートがSmartCS毎に異なる場合(例えば、user1がアクセスできるシリアルポートは、SmartCS1 では 1~10、SmartCS2 では 15~20 な
ど)に本設定を行うと便利です。この方法ではポートユーザのアクセスグループごとのシリ
アルポートのアクセス権は本装置に設定します。
・ポートサーバ設定 :ダイレクトモード(default)
・監視対象機器への接続方法 :Telnet ノーマルモード(default)
・ポートユーザ認証 :あり
・ポートログ保存先 :RAM(default)
・ポートログ転送機能 :OFF(default)
・認証/アカウントプロトコル :RADIUS
すべてのユーザを RADIUS 認証します。
ポートユーザのアクセスグループごとのシリアル
ポートのアクセス権は本装置に設定します。
ユーザグループが特定できないユーザはアクセス
を拒否します。
[構成図]
Telnet/SSHクライアント
192.168.2.1
192.168.1.100
監視対象機器監視対象機器
login:
login:
ルータ
192.168.1.254
192.168.2.254
NS-2250
RADIUSサーバ1
RADIUSサーバ2
192.168.1.252 192.168.1.253
図 4-15 RADIUS 認証機能/RADIUS アカウント機能(アクセスグルーピング)
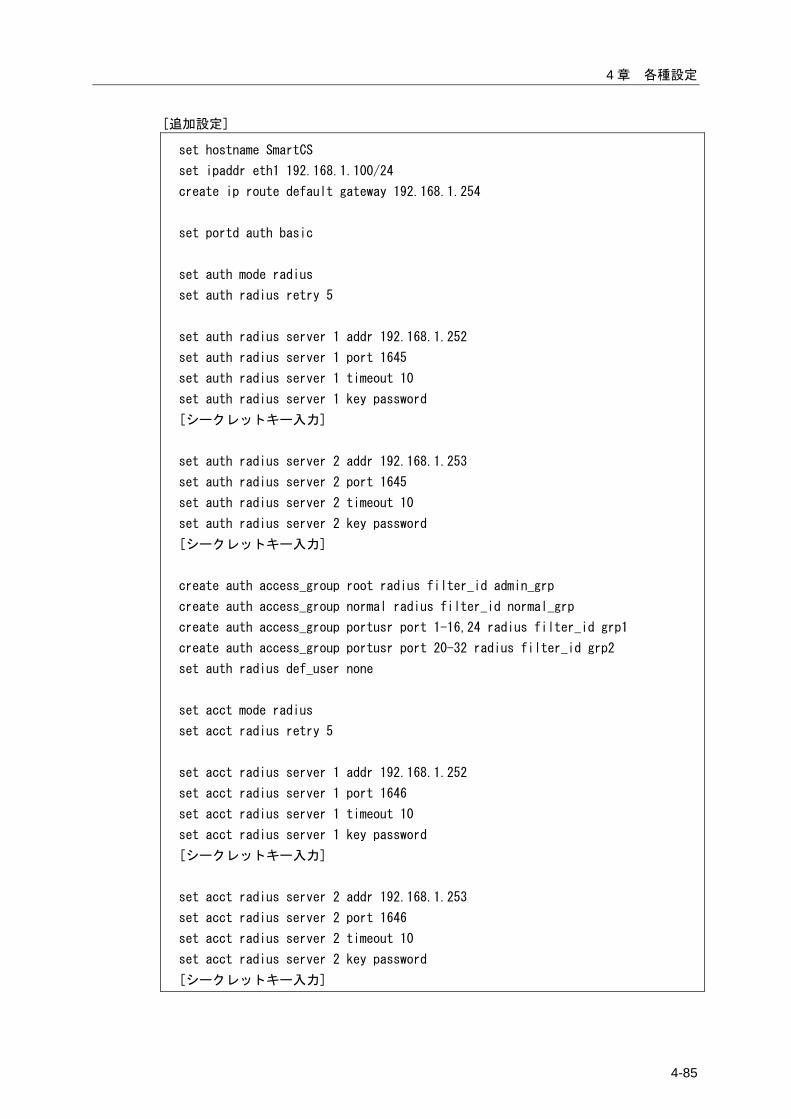
4 章 各種設定
4-85
[追加設定]
set hostname SmartCS
set ipaddr eth1 192.168.1.100/24
create ip route default gateway 192.168.1.254
set portd auth basic
set auth mode radius
set auth radius retry 5
set auth radius server 1 addr 192.168.1.252
set auth radius server 1 port 1645
set auth radius server 1 timeout 10
set auth radius server 1 key password
[シークレットキー入力]
set auth radius server 2 addr 192.168.1.253
set auth radius server 2 port 1645
set auth radius server 2 timeout 10
set auth radius server 2 key password
[シークレットキー入力]
create auth access_group root radius filter_id admin_grp
create auth access_group normal radius filter_id normal_grp
create auth access_group portusr port 1-16,24 radius filter_id grp1
create auth access_group portusr port 20-32 radius filter_id grp2
set auth radius def_user none
set acct mode radius
set acct radius retry 5
set acct radius server 1 addr 192.168.1.252
set acct radius server 1 port 1646
set acct radius server 1 timeout 10
set acct radius server 1 key password
[シークレットキー入力]
set acct radius server 2 addr 192.168.1.253
set acct radius server 2 port 1646
set acct radius server 2 timeout 10
set acct radius server 2 key password
[シークレットキー入力]
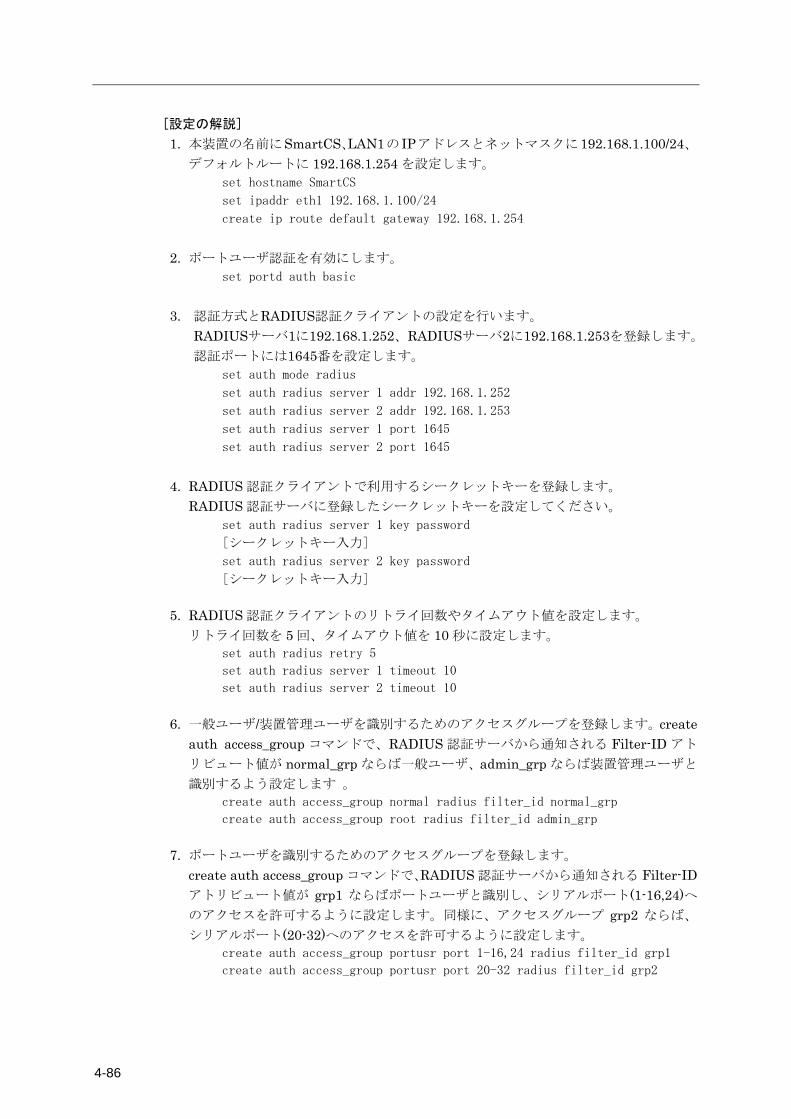
4-86
[設定の解説]
1. 本装置の名前にSmartCS、LAN1の IPアドレスとネットマスクに192.168.1.100/24、デフォルトルートに 192.168.1.254 を設定します。
set hostname SmartCS
set ipaddr eth1 192.168.1.100/24
create ip route default gateway 192.168.1.254
2. ポートユーザ認証を有効にします。
set portd auth basic
3. 認証方式とRADIUS認証クライアントの設定を行います。
RADIUSサーバ1に192.168.1.252、RADIUSサーバ2に192.168.1.253を登録します。 認証ポートには1645番を設定します。
set auth mode radius
set auth radius server 1 addr 192.168.1.252
set auth radius server 2 addr 192.168.1.253
set auth radius server 1 port 1645
set auth radius server 2 port 1645
4. RADIUS 認証クライアントで利用するシークレットキーを登録します。
RADIUS 認証サーバに登録したシークレットキーを設定してください。 set auth radius server 1 key password
[シークレットキー入力]
set auth radius server 2 key password
[シークレットキー入力]
5. RADIUS 認証クライアントのリトライ回数やタイムアウト値を設定します。
リトライ回数を 5 回、タイムアウト値を 10 秒に設定します。 set auth radius retry 5
set auth radius server 1 timeout 10
set auth radius server 2 timeout 10
6. 一般ユーザ/装置管理ユーザを識別するためのアクセスグループを登録します。create
auth access_group コマンドで、RADIUS 認証サーバから通知される Filter-ID アト
リビュート値が normal_grp ならば一般ユーザ、admin_grp ならば装置管理ユーザと
識別するよう設定します 。 create auth access_group normal radius filter_id normal_grp
create auth access_group root radius filter_id admin_grp
7. ポートユーザを識別するためのアクセスグループを登録します。
create auth access_group コマンドで、RADIUS 認証サーバから通知される Filter-IDアトリビュート値が grp1 ならばポートユーザと識別し、シリアルポート(1-16,24)へのアクセスを許可するように設定します。同様に、アクセスグループ grp2 ならば、
シリアルポート(20-32)へのアクセスを許可するように設定します。 create auth access_group portusr port 1-16,24 radius filter_id grp1
create auth access_group portusr port 20-32 radius filter_id grp2
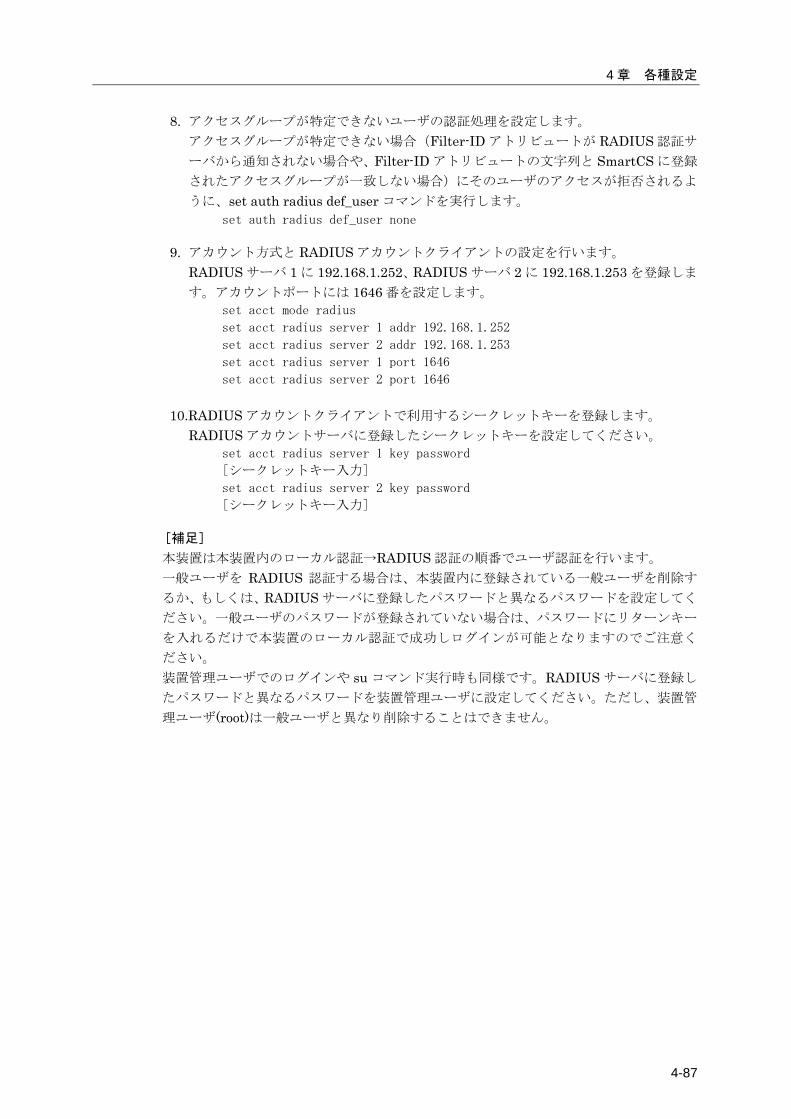
4 章 各種設定
4-87
8. アクセスグループが特定できないユーザの認証処理を設定します。 アクセスグループが特定できない場合(Filter-ID アトリビュートが RADIUS 認証サ
ーバから通知されない場合や、Filter-ID アトリビュートの文字列と SmartCS に登録
されたアクセスグループが一致しない場合)にそのユーザのアクセスが拒否されるよ
うに、set auth radius def_user コマンドを実行します。 set auth radius def_user none
9. アカウント方式と RADIUS アカウントクライアントの設定を行います。
RADIUS サーバ 1 に 192.168.1.252、RADIUS サーバ 2 に 192.168.1.253 を登録しま
す。アカウントポートには 1646 番を設定します。 set acct mode radius
set acct radius server 1 addr 192.168.1.252
set acct radius server 2 addr 192.168.1.253
set acct radius server 1 port 1646
set acct radius server 2 port 1646
10.RADIUS アカウントクライアントで利用するシークレットキーを登録します。
RADIUS アカウントサーバに登録したシークレットキーを設定してください。 set acct radius server 1 key password
[シークレットキー入力]
set acct radius server 2 key password
[シークレットキー入力]
[補足]
本装置は本装置内のローカル認証→RADIUS 認証の順番でユーザ認証を行います。 一般ユーザを RADIUS 認証する場合は、本装置内に登録されている一般ユーザを削除す
るか、もしくは、RADIUS サーバに登録したパスワードと異なるパスワードを設定してく
ださい。一般ユーザのパスワードが登録されていない場合は、パスワードにリターンキー
を入れるだけで本装置のローカル認証で成功しログインが可能となりますのでご注意く
ださい。 装置管理ユーザでのログインや su コマンド実行時も同様です。RADIUS サーバに登録し
たパスワードと異なるパスワードを装置管理ユーザに設定してください。ただし、装置管
理ユーザ(root)は一般ユーザと異なり削除することはできません。
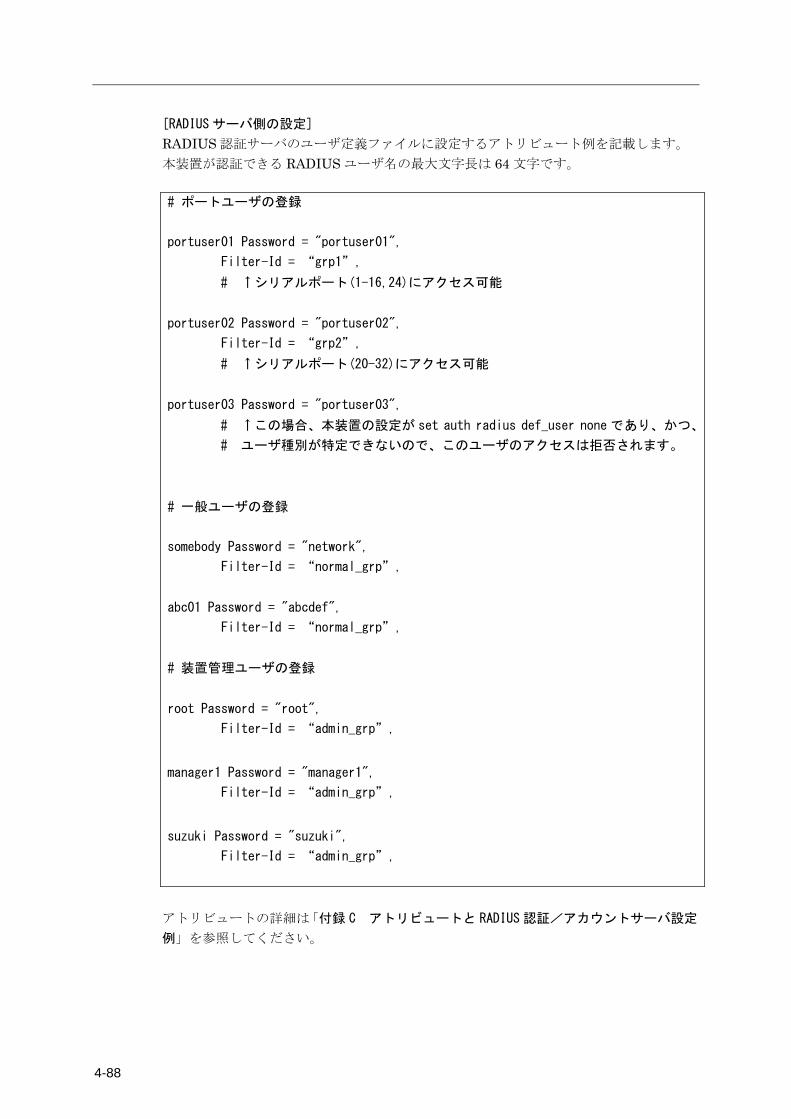
4-88
[RADIUS サーバ側の設定]
RADIUS 認証サーバのユーザ定義ファイルに設定するアトリビュート例を記載します。 本装置が認証できる RADIUS ユーザ名の最大文字長は 64 文字です。
# ポートユーザの登録
portuser01 Password = "portuser01",
Filter-Id = “grp1”,
# ↑シリアルポート(1-16,24)にアクセス可能
portuser02 Password = "portuser02",
Filter-Id = “grp2”,
# ↑シリアルポート(20-32)にアクセス可能
portuser03 Password = "portuser03",
# ↑この場合、本装置の設定が set auth radius def_user none であり、かつ、
# ユーザ種別が特定できないので、このユーザのアクセスは拒否されます。
# 一般ユーザの登録
somebody Password = "network",
Filter-Id = “normal_grp”,
abc01 Password = "abcdef",
Filter-Id = “normal_grp”,
# 装置管理ユーザの登録
root Password = "root",
Filter-Id = “admin_grp”,
manager1 Password = "manager1",
Filter-Id = “admin_grp”,
suzuki Password = "suzuki",
Filter-Id = “admin_grp”,
アトリビュートの詳細は「付録 C アトリビュートと RADIUS 認証/アカウントサーバ設定
例」を参照してください。
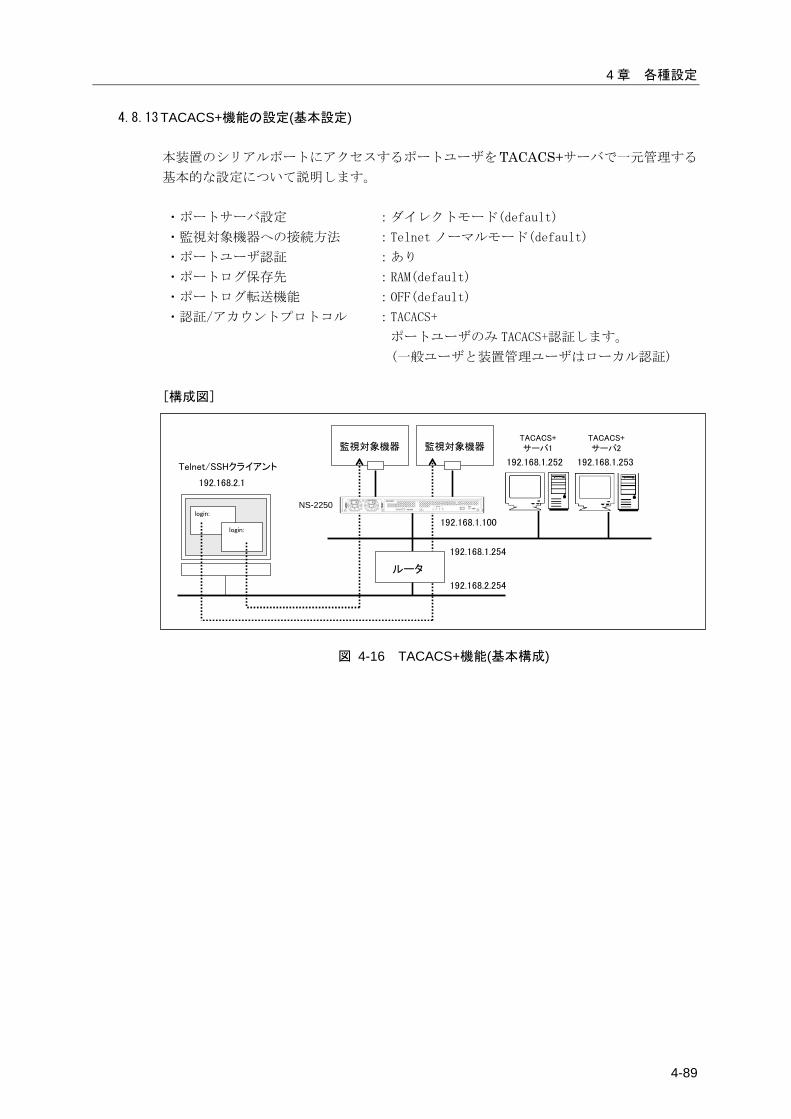
4 章 各種設定
4-89
4.8.13 TACACS+機能の設定(基本設定) 本装置のシリアルポートにアクセスするポートユーザをTACACS+サーバで一元管理する
基本的な設定について説明します。
・ポートサーバ設定 :ダイレクトモード(default)
・監視対象機器への接続方法 :Telnet ノーマルモード(default)
・ポートユーザ認証 :あり
・ポートログ保存先 :RAM(default)
・ポートログ転送機能 :OFF(default)
・認証/アカウントプロトコル :TACACS+
ポートユーザのみ TACACS+認証します。
(一般ユーザと装置管理ユーザはローカル認証)
[構成図]
Telnet/SSHクライアント
192.168.2.1
192.168.1.100
監視対象機器監視対象機器
login:
login:
ルータ
192.168.1.254
192.168.2.254
NS-2250
TACACS+サーバ1
TACACS+サーバ2
192.168.1.252 192.168.1.253
図 4-16 TACACS+機能(基本構成)
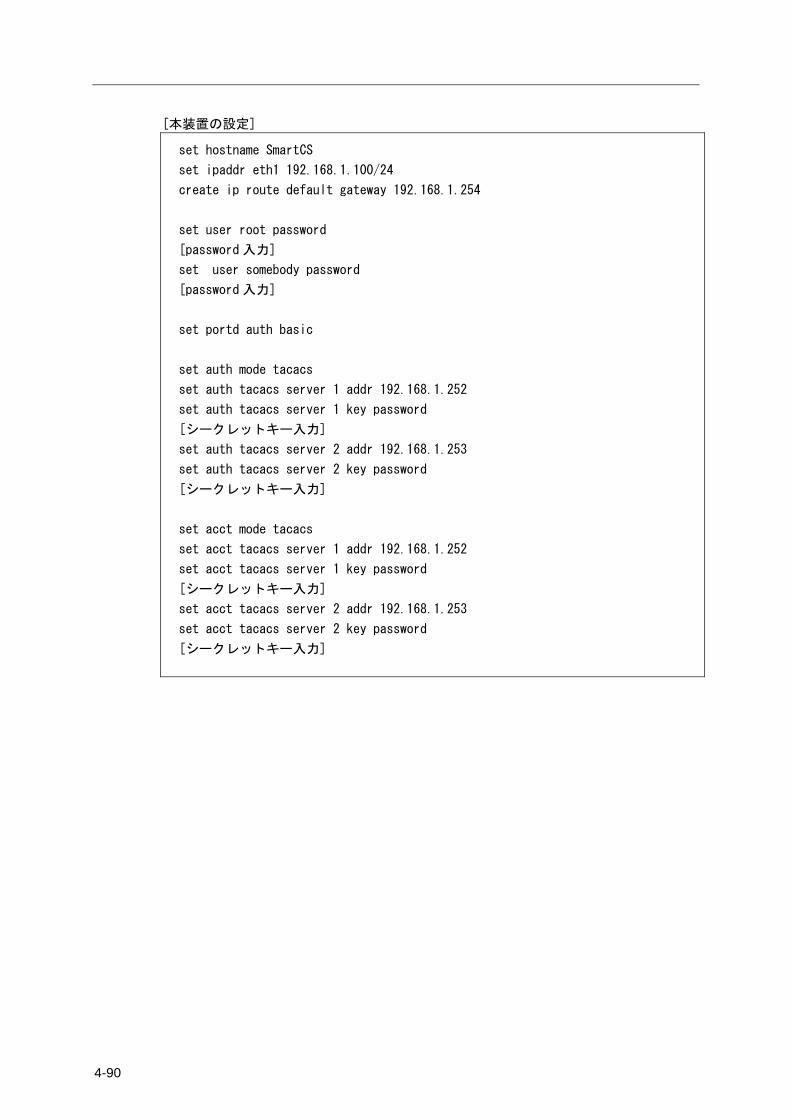
4-90
[本装置の設定]
set hostname SmartCS
set ipaddr eth1 192.168.1.100/24
create ip route default gateway 192.168.1.254
set user root password
[password 入力]
set user somebody password
[password 入力]
set portd auth basic
set auth mode tacacs
set auth tacacs server 1 addr 192.168.1.252
set auth tacacs server 1 key password
[シークレットキー入力]
set auth tacacs server 2 addr 192.168.1.253
set auth tacacs server 2 key password
[シークレットキー入力]
set acct mode tacacs
set acct tacacs server 1 addr 192.168.1.252
set acct tacacs server 1 key password
[シークレットキー入力]
set acct tacacs server 2 addr 192.168.1.253
set acct tacacs server 2 key password
[シークレットキー入力]
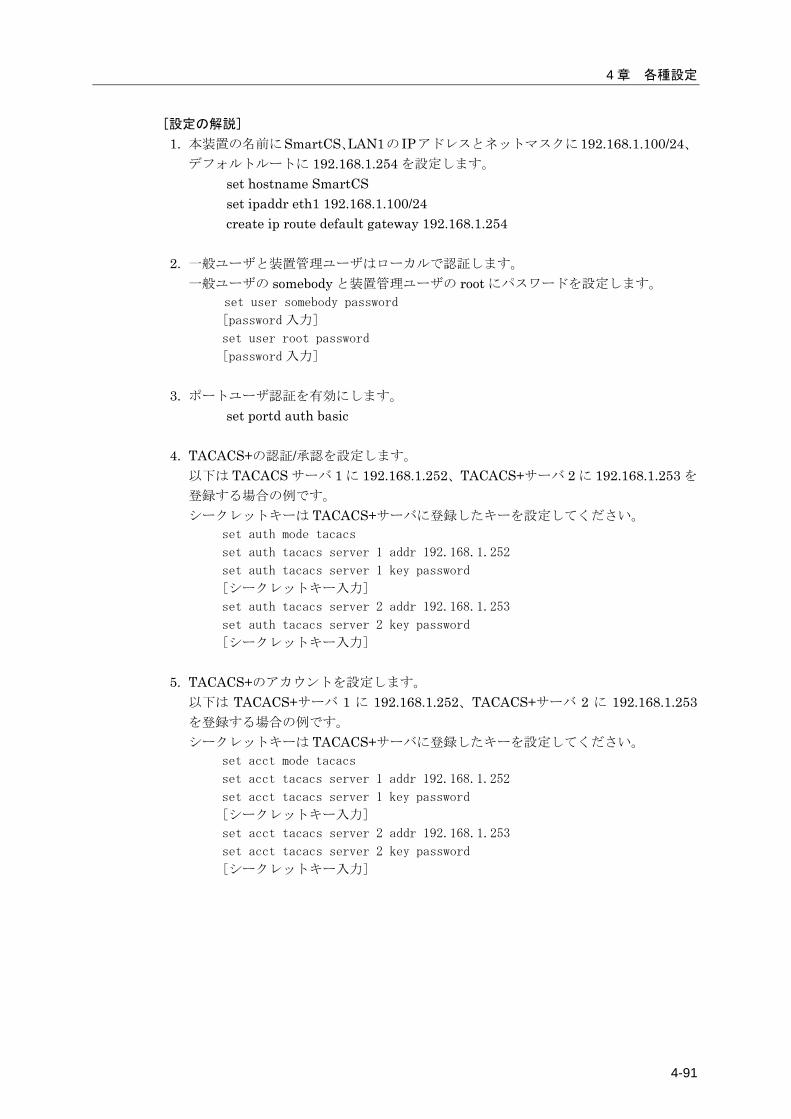
4 章 各種設定
4-91
[設定の解説]
1. 本装置の名前にSmartCS、LAN1の IPアドレスとネットマスクに192.168.1.100/24、デフォルトルートに 192.168.1.254 を設定します。
set hostname SmartCS set ipaddr eth1 192.168.1.100/24 create ip route default gateway 192.168.1.254
2. 一般ユーザと装置管理ユーザはローカルで認証します。 一般ユーザの somebody と装置管理ユーザの root にパスワードを設定します。
set user somebody password
[password 入力]
set user root password
[password 入力]
3. ポートユーザ認証を有効にします。
set portd auth basic
4. TACACS+の認証/承認を設定します。 以下は TACACS サーバ 1 に 192.168.1.252、TACACS+サーバ 2 に 192.168.1.253 を
登録する場合の例です。 シークレットキーは TACACS+サーバに登録したキーを設定してください。
set auth mode tacacs
set auth tacacs server 1 addr 192.168.1.252
set auth tacacs server 1 key password
[シークレットキー入力]
set auth tacacs server 2 addr 192.168.1.253
set auth tacacs server 2 key password
[シークレットキー入力]
5. TACACS+のアカウントを設定します。
以下は TACACS+サーバ 1 に 192.168.1.252、TACACS+サーバ 2 に 192.168.1.253を登録する場合の例です。 シークレットキーは TACACS+サーバに登録したキーを設定してください。
set acct mode tacacs
set acct tacacs server 1 addr 192.168.1.252
set acct tacacs server 1 key password
[シークレットキー入力]
set acct tacacs server 2 addr 192.168.1.253
set acct tacacs server 2 key password
[シークレットキー入力]
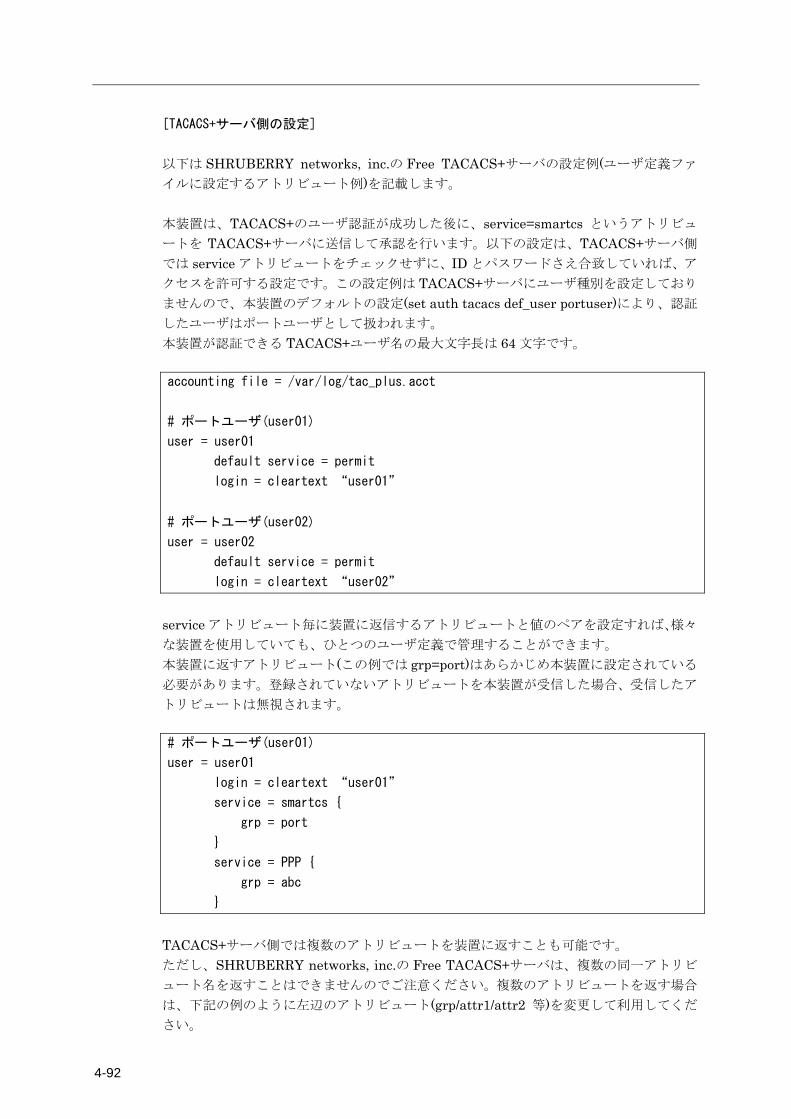
4-92
[TACACS+サーバ側の設定]
以下は SHRUBERRY networks, inc.の Free TACACS+サーバの設定例(ユーザ定義ファ
イルに設定するアトリビュート例)を記載します。 本装置は、TACACS+のユーザ認証が成功した後に、service=smartcs というアトリビュ
ートを TACACS+サーバに送信して承認を行います。以下の設定は、TACACS+サーバ側
では service アトリビュートをチェックせずに、ID とパスワードさえ合致していれば、ア
クセスを許可する設定です。この設定例は TACACS+サーバにユーザ種別を設定しており
ませんので、本装置のデフォルトの設定(set auth tacacs def_user portuser)により、認証
したユーザはポートユーザとして扱われます。 本装置が認証できる TACACS+ユーザ名の最大文字長は 64 文字です。
accounting file = /var/log/tac_plus.acct
# ポートユーザ(user01)
user = user01
default service = permit
login = cleartext “user01”
# ポートユーザ(user02)
user = user02
default service = permit
login = cleartext “user02”
service アトリビュート毎に装置に返信するアトリビュートと値のペアを設定すれば、様々
な装置を使用していても、ひとつのユーザ定義で管理することができます。 本装置に返すアトリビュート(この例では grp=port)はあらかじめ本装置に設定されている
必要があります。登録されていないアトリビュートを本装置が受信した場合、受信したア
トリビュートは無視されます。
# ポートユーザ(user01)
user = user01
login = cleartext “user01”
service = smartcs {
grp = port
}
service = PPP {
grp = abc
}
TACACS+サーバ側では複数のアトリビュートを装置に返すことも可能です。 ただし、SHRUBERRY networks, inc.の Free TACACS+サーバは、複数の同一アトリビ
ュート名を返すことはできませんのでご注意ください。複数のアトリビュートを返す場合
は、下記の例のように左辺のアトリビュート(grp/attr1/attr2 等)を変更して利用してくだ
さい。
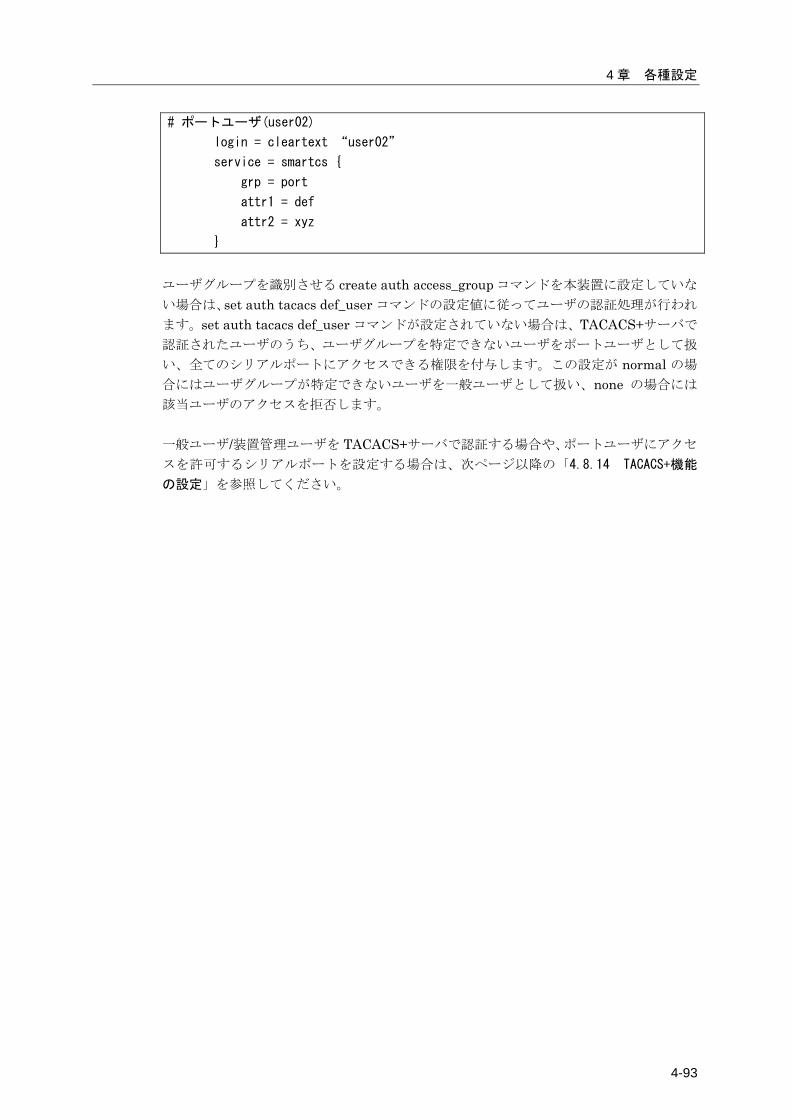
4 章 各種設定
4-93
# ポートユーザ(user02)
login = cleartext “user02”
service = smartcs {
grp = port
attr1 = def
attr2 = xyz
}
ユーザグループを識別させる create auth access_group コマンドを本装置に設定していな
い場合は、set auth tacacs def_user コマンドの設定値に従ってユーザの認証処理が行われ
ます。set auth tacacs def_user コマンドが設定されていない場合は、TACACS+サーバで
認証されたユーザのうち、ユーザグループを特定できないユーザをポートユーザとして扱
い、全てのシリアルポートにアクセスできる権限を付与します。この設定が normal の場
合にはユーザグループが特定できないユーザを一般ユーザとして扱い、none の場合には
該当ユーザのアクセスを拒否します。 一般ユーザ/装置管理ユーザを TACACS+サーバで認証する場合や、ポートユーザにアクセ
スを許可するシリアルポートを設定する場合は、次ページ以降の「4.8.14 TACACS+機能
の設定」を参照してください。

4-94
4.8.14 TACACS+機能の設定(応用設定:アクセスグルーピング機能) 本装置にアクセスするユーザをTACACS+サーバで一元管理する設定について説明します。 この例では TACACS+サーバでユーザ認証を行い、TACACS+サーバから送られてくるア
トリビュートと値のペアによって、該当ユーザが所属するアクセスグループ(装置管理ユー
ザ/一般ユーザ/ポートユーザ)およびポートユーザのシリアルポートへのアクセス権を決定
する設定について記載します。 ポートユーザがアクセスできるシリアルポートがSmartCS毎に異なる場合(例えば、user1がアクセスできるシリアルポートは、SmartCS1 では 1~10、SmartCS2 では 15~20 な
ど)に本設定を行うと便利です。この方法ではポートユーザのアクセスグループごとのシリ
アルポートのアクセス権は本装置に設定します。
・ポートサーバ設定 :ダイレクトモード(default)
・監視対象機器への接続方法 :Telnet ノーマルモード(default)
・ポートユーザ認証 :あり
・ポートログ保存先 :RAM(default)
・ポートログ転送機能 :OFF(default)
・認証/アカウントプロトコル :TACACS+
すべてのユーザを TACACS+認証します。
ポートユーザのアクセスグループごとのシリアル
ポートのアクセス権は本装置に設定します。
ユーザグループが特定できないユーザはアクセス
を拒否します。
[構成図]
Telnet/SSHクライアント
192.168.2.1
192.168.1.100
監視対象機器監視対象機器
login:
login:
ルータ
192.168.1.254
192.168.2.254
NS-2250
TACACS+サーバ1
TACACS+サーバ2
192.168.1.252 192.168.1.253
図 4-17 TACACS+機能(アクセスグルーピング)

4 章 各種設定
4-95
[追加設定]
set hostname SmartCS
set ipaddr eth1 192.168.1.100/24
create ip route default gateway 192.168.1.254
set portd auth basic
set auth mode tacacs
set auth su_cmd username admin
set auth tacacs server 1 addr 192.168.1.252
set auth tacacs server 1 timeout 10
set auth tacacs server 1 key password
[シークレットキー入力]
set auth tacacs server 2 addr 192.168.1.253
set auth tacacs server 2 timeout 10
set auth tacacs server 2 key password
[シークレットキー入力]
set acct mode tacacs
set acct tacacs server 1 addr 192.168.1.252
set acct tacacs server 1 timeout 10
set acct tacacs server 1 key password
[シークレットキー入力]
set acct tacacs server 2 addr 192.168.1.253
set acct tacacs server 2 timeout 10
set acct tacacs server 2 key password
[シークレットキー入力]
create auth access_group root tacacs attr grp val admin_grp
create auth access_group normal tacacs attr grp val normal_grp
create auth access_group portusr port 1-16,24 tacacs attr grp val grp1
create auth access_group portusr port 20-32 tacacs attr grp val grp2
set auth tacacs def_user none
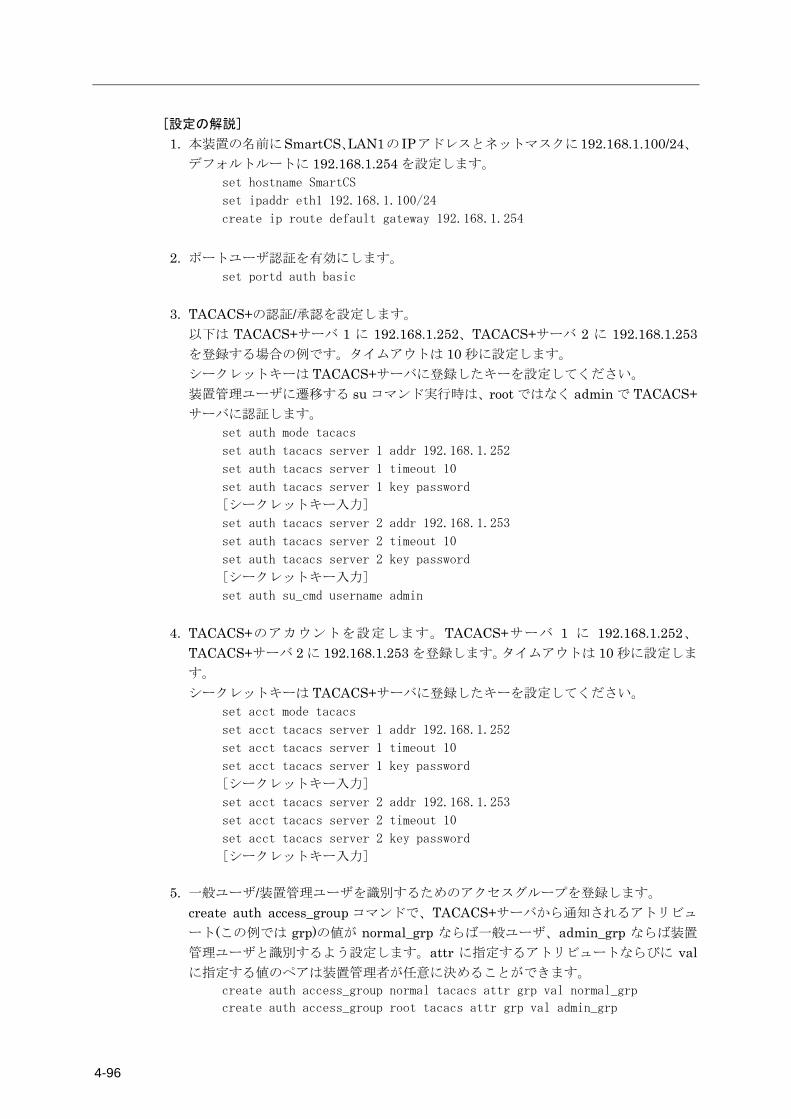
4-96
[設定の解説]
1. 本装置の名前にSmartCS、LAN1の IPアドレスとネットマスクに192.168.1.100/24、デフォルトルートに 192.168.1.254 を設定します。
set hostname SmartCS
set ipaddr eth1 192.168.1.100/24
create ip route default gateway 192.168.1.254
2. ポートユーザ認証を有効にします。
set portd auth basic
3. TACACS+の認証/承認を設定します。 以下は TACACS+サーバ 1 に 192.168.1.252、TACACS+サーバ 2 に 192.168.1.253を登録する場合の例です。タイムアウトは 10 秒に設定します。 シークレットキーは TACACS+サーバに登録したキーを設定してください。 装置管理ユーザに遷移する su コマンド実行時は、root ではなく admin で TACACS+サーバに認証します。
set auth mode tacacs
set auth tacacs server 1 addr 192.168.1.252
set auth tacacs server 1 timeout 10
set auth tacacs server 1 key password
[シークレットキー入力]
set auth tacacs server 2 addr 192.168.1.253
set auth tacacs server 2 timeout 10
set auth tacacs server 2 key password
[シークレットキー入力]
set auth su_cmd username admin
4. TACACS+のアカウントを設定します。TACACS+サーバ 1 に 192.168.1.252、TACACS+サーバ 2 に 192.168.1.253 を登録します。タイムアウトは 10 秒に設定しま
す。 シークレットキーは TACACS+サーバに登録したキーを設定してください。
set acct mode tacacs
set acct tacacs server 1 addr 192.168.1.252
set acct tacacs server 1 timeout 10
set acct tacacs server 1 key password
[シークレットキー入力]
set acct tacacs server 2 addr 192.168.1.253
set acct tacacs server 2 timeout 10
set acct tacacs server 2 key password
[シークレットキー入力]
5. 一般ユーザ/装置管理ユーザを識別するためのアクセスグループを登録します。
create auth access_group コマンドで、TACACS+サーバから通知されるアトリビュ
ート(この例では grp)の値が normal_grp ならば一般ユーザ、admin_grp ならば装置
管理ユーザと識別するよう設定します。attr に指定するアトリビュートならびに valに指定する値のペアは装置管理者が任意に決めることができます。
create auth access_group normal tacacs attr grp val normal_grp
create auth access_group root tacacs attr grp val admin_grp
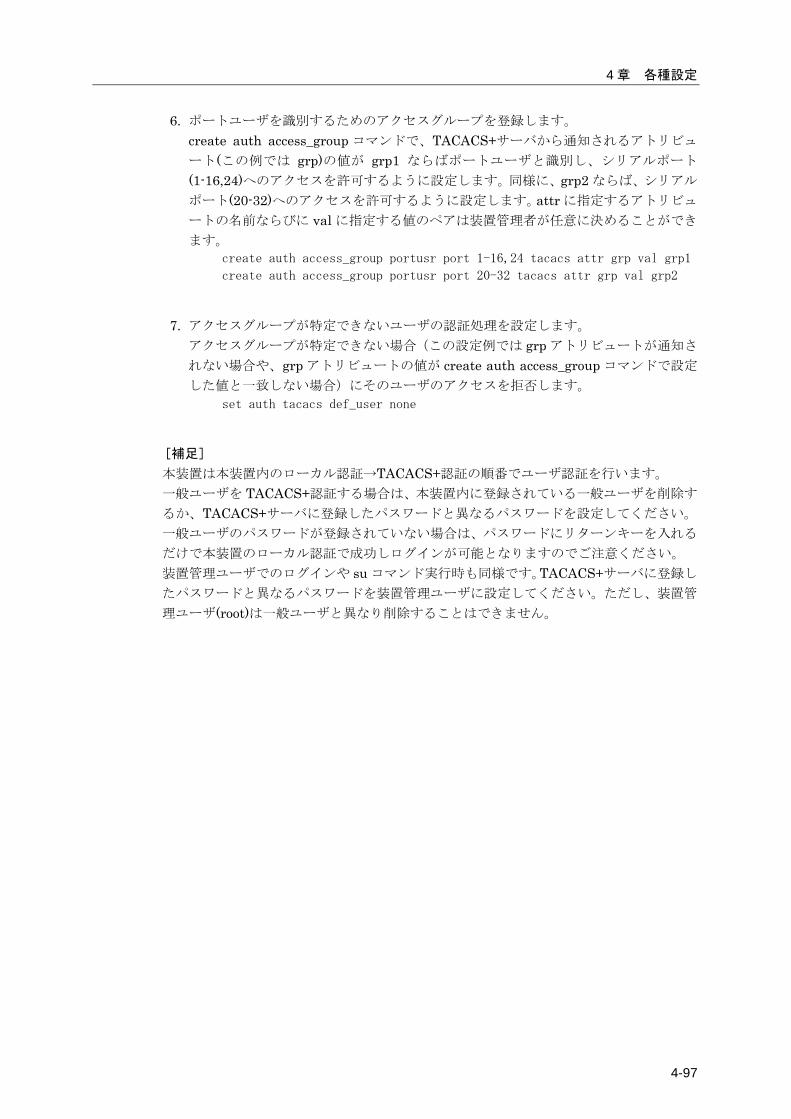
4 章 各種設定
4-97
6. ポートユーザを識別するためのアクセスグループを登録します。
create auth access_group コマンドで、TACACS+サーバから通知されるアトリビュ
ート(この例では grp)の値が grp1 ならばポートユーザと識別し、シリアルポート
(1-16,24)へのアクセスを許可するように設定します。同様に、grp2 ならば、シリアル
ポート(20-32)へのアクセスを許可するように設定します。attr に指定するアトリビュ
ートの名前ならびに val に指定する値のペアは装置管理者が任意に決めることができ
ます。 create auth access_group portusr port 1-16,24 tacacs attr grp val grp1
create auth access_group portusr port 20-32 tacacs attr grp val grp2
7. アクセスグループが特定できないユーザの認証処理を設定します。 アクセスグループが特定できない場合(この設定例では grp アトリビュートが通知さ
れない場合や、grp アトリビュートの値が create auth access_group コマンドで設定
した値と一致しない場合)にそのユーザのアクセスを拒否します。 set auth tacacs def_user none
[補足]
本装置は本装置内のローカル認証→TACACS+認証の順番でユーザ認証を行います。 一般ユーザを TACACS+認証する場合は、本装置内に登録されている一般ユーザを削除す
るか、TACACS+サーバに登録したパスワードと異なるパスワードを設定してください。
一般ユーザのパスワードが登録されていない場合は、パスワードにリターンキーを入れる
だけで本装置のローカル認証で成功しログインが可能となりますのでご注意ください。 装置管理ユーザでのログインや su コマンド実行時も同様です。TACACS+サーバに登録し
たパスワードと異なるパスワードを装置管理ユーザに設定してください。ただし、装置管
理ユーザ(root)は一般ユーザと異なり削除することはできません。

4-98
[TACACS+サーバ側の設定]
TACACS+サーバのユーザ定義ファイルに設定するアトリビュート例を記載します。 本装置が認証できる TACACS+ユーザ名の最大文字長は 64 文字です。
accounting file = /var/log/tac_plus.acct
# 一般ユーザの登録
user = somebody
login = cleartext “network”
service = smartcs {
grp = normal_grp
}
user = abc01
login = cleartext “abcdef”
service = smartcs {
grp = normal_grp
}
# 装置管理ユーザの登録
user = admin
login = cleartext “network”
service = smartcs {
grp = admin_grp
}
user = manager1
login = cleartext “manager1”
service = smartcs {
grp = admin_grp
}
# ポートユーザの登録
user = portuser01
login = cleartext “portuser01”
service = smartcs {
grp = grp1
}
# ↑シリアルポート(1-16,24)にアクセス可能
user = portuser02
login = cleartext “portuser02”
service = smartcs {
grp = grp2
}
# ↑シリアルポート(20-32)にアクセス可能
user = portuser03
login = cleartext “portuser03”
default service = permit
# ↑この場合、本装置の設定が set auth tacacs def_user none であり、かつ、
# ユーザ種別が特定できないので、このユーザのアクセスは拒否されます。
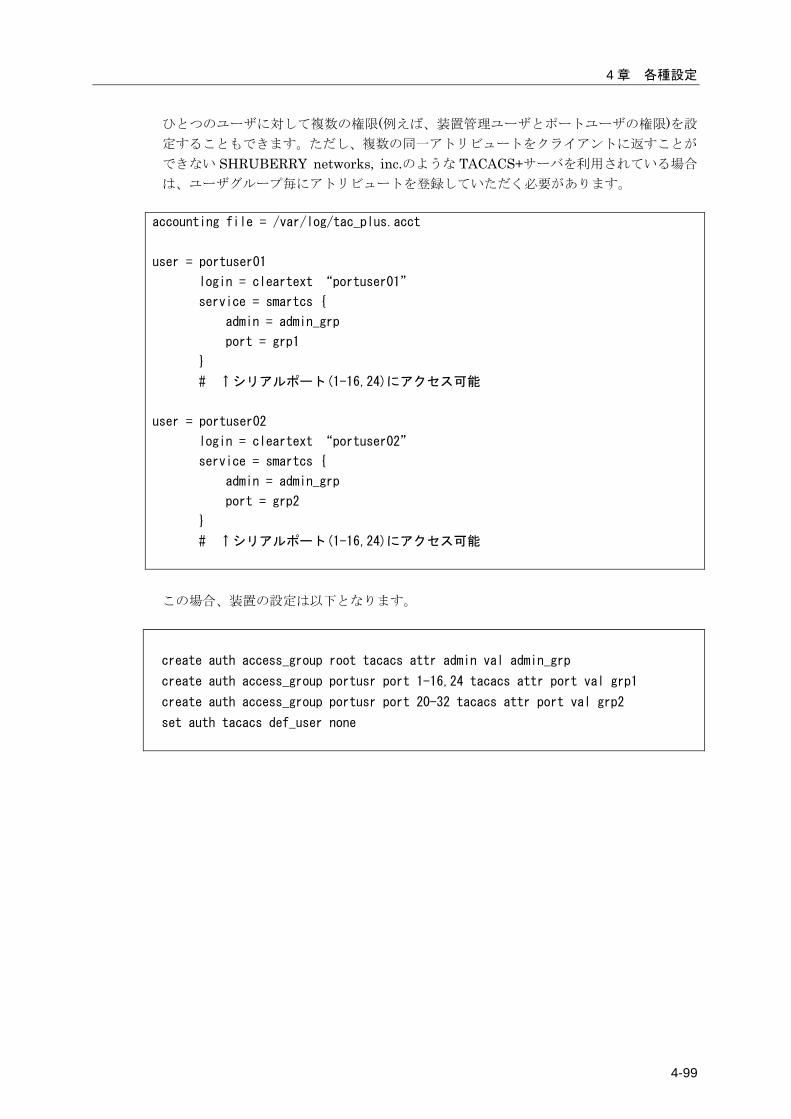
4 章 各種設定
4-99
ひとつのユーザに対して複数の権限(例えば、装置管理ユーザとポートユーザの権限)を設
定することもできます。ただし、複数の同一アトリビュートをクライアントに返すことが
できない SHRUBERRY networks, inc.のような TACACS+サーバを利用されている場合
は、ユーザグループ毎にアトリビュートを登録していただく必要があります。
accounting file = /var/log/tac_plus.acct
user = portuser01
login = cleartext “portuser01”
service = smartcs {
admin = admin_grp
port = grp1
}
# ↑シリアルポート(1-16,24)にアクセス可能
user = portuser02
login = cleartext “portuser02”
service = smartcs {
admin = admin_grp
port = grp2
}
# ↑シリアルポート(1-16,24)にアクセス可能
この場合、装置の設定は以下となります。
create auth access_group root tacacs attr admin val admin_grp
create auth access_group portusr port 1-16,24 tacacs attr port val grp1
create auth access_group portusr port 20-32 tacacs attr port val grp2
set auth tacacs def_user none
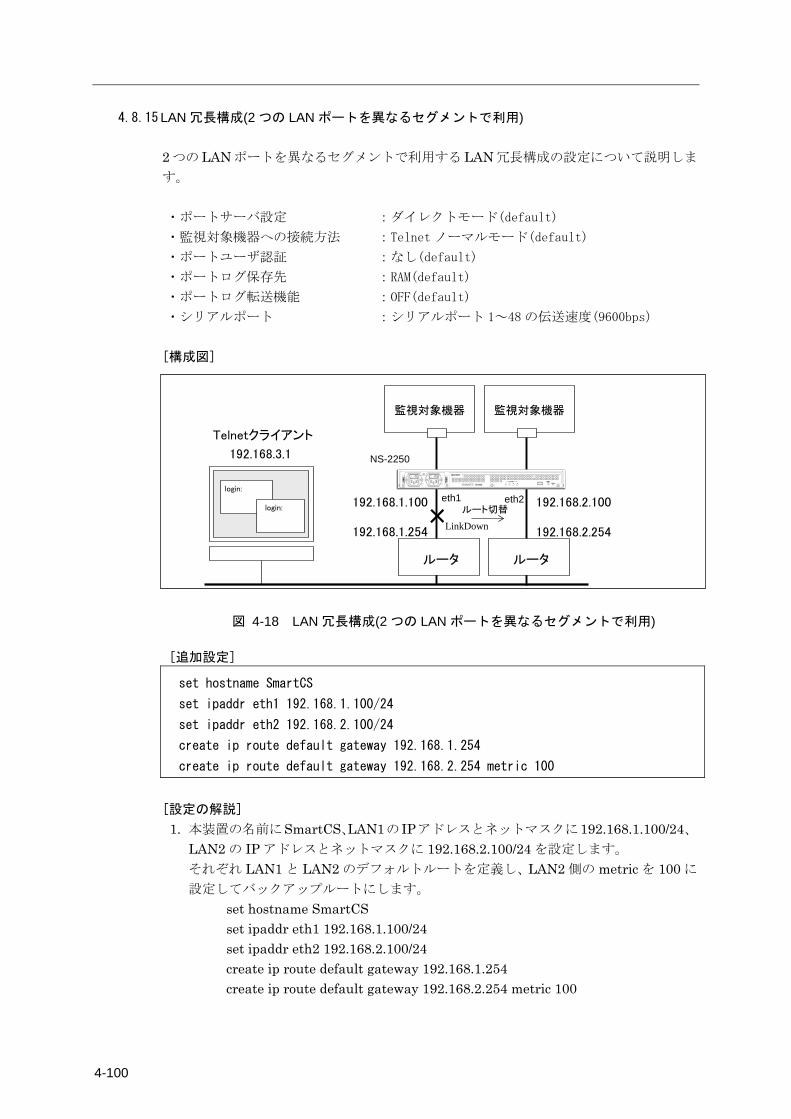
4-100
4.8.15 LAN 冗長構成(2 つの LAN ポートを異なるセグメントで利用) 2 つの LAN ポートを異なるセグメントで利用する LAN 冗長構成の設定について説明しま
す。 ・ポートサーバ設定 :ダイレクトモード(default)
・監視対象機器への接続方法 :Telnet ノーマルモード(default)
・ポートユーザ認証 :なし(default)
・ポートログ保存先 :RAM(default)
・ポートログ転送機能 :OFF(default)
・シリアルポート :シリアルポート 1~48 の伝送速度(9600bps)
[構成図]
Telnetクライアント
192.168.3.1
192.168.1.100
監視対象機器監視対象機器
login:
login:
ルータ
192.168.1.254
NS-2250
ルータ
192.168.2.100
192.168.2.254×LinkDown
ルート切替eth1 eth2
図 4-18 LAN 冗長構成(2 つの LAN ポートを異なるセグメントで利用)
[追加設定]
set hostname SmartCS
set ipaddr eth1 192.168.1.100/24
set ipaddr eth2 192.168.2.100/24
create ip route default gateway 192.168.1.254
create ip route default gateway 192.168.2.254 metric 100
[設定の解説]
1. 本装置の名前にSmartCS、LAN1の IPアドレスとネットマスクに192.168.1.100/24、LAN2 の IP アドレスとネットマスクに 192.168.2.100/24 を設定します。 それぞれ LAN1 と LAN2 のデフォルトルートを定義し、LAN2 側の metric を 100 に
設定してバックアップルートにします。 set hostname SmartCS set ipaddr eth1 192.168.1.100/24 set ipaddr eth2 192.168.2.100/24 create ip route default gateway 192.168.1.254 create ip route default gateway 192.168.2.254 metric 100
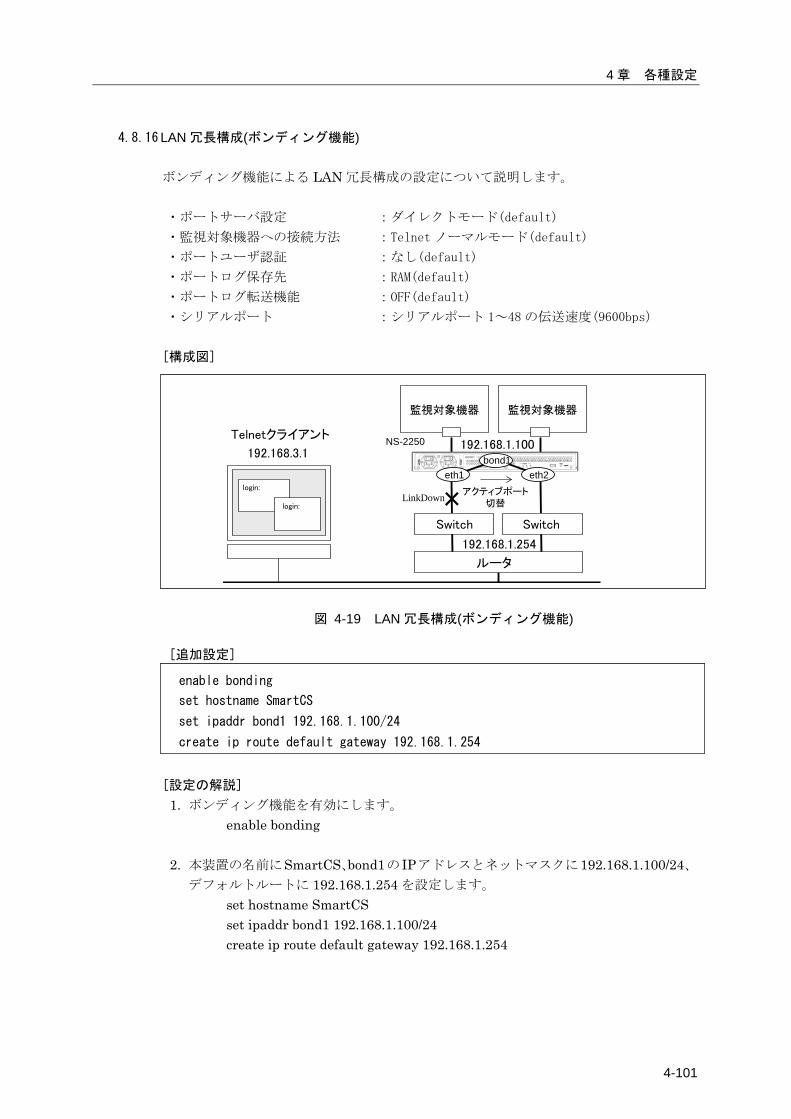
4 章 各種設定
4-101
4.8.16 LAN 冗長構成(ボンディング機能) ボンディング機能による LAN 冗長構成の設定について説明します。 ・ポートサーバ設定 :ダイレクトモード(default)
・監視対象機器への接続方法 :Telnet ノーマルモード(default)
・ポートユーザ認証 :なし(default)
・ポートログ保存先 :RAM(default)
・ポートログ転送機能 :OFF(default)
・シリアルポート :シリアルポート 1~48 の伝送速度(9600bps)
[構成図]
Telnetクライアント
192.168.3.1
監視対象機器監視対象機器
login:
login:
NS-2250
ルータ
×LinkDown アクティブポート切替
Switch Switch
bond1eth1 eth2
192.168.1.100
192.168.1.254
図 4-19 LAN 冗長構成(ボンディング機能)
[追加設定]
enable bonding
set hostname SmartCS
set ipaddr bond1 192.168.1.100/24
create ip route default gateway 192.168.1.254
[設定の解説]
1. ボンディング機能を有効にします。 enable bonding
2. 本装置の名前にSmartCS、bond1の IPアドレスとネットマスクに192.168.1.100/24、デフォルトルートに 192.168.1.254 を設定します。
set hostname SmartCS set ipaddr bond1 192.168.1.100/24 create ip route default gateway 192.168.1.254


5-1
5 章 管理と保守
5 章では、本装置の管理と保守について説明しています。
本章の内容
5.1 装置情報の表示 5.1.1 ハードウェア情報/ソフトウェア情報の表示 5.1.2 装置情報の一括表示 5.2 コンフィグの管理 5.2.1 スタートアップファイルの一覧表示 5.2.2 スタートアップファイルの中身の表示 5.2.3 起動時に読み込むスタートアップファイルの変更 5.2.4 スタートアップファイルのコピー 5.2.5 スタートアップファイルの中身のクリア 5.2.6 ランニングコンフィグの表示 5.2.7 FTP によるスタートアップファイルの管理 5.2.8 TFTP によるスタートアップファイルの管理 5.3 コンソールログの見方 5.4 SNMP による本装置の管理 5.5 システムソフトウェアの管理 5.5.1 起動するシステムソフトウェアの切り替え 5.5.2 システムソフトウェアのコピー 5.5.3 システムソフトウェアの復旧 5.5.4 FTP によるシステムソフトウェアの バージョンアップ/バージョンダウン 5.5.5 TFTP によるシステムソフトウェアの バージョンアップ/バージョンダウン 5.6 手動によるポートログの保存と取得手順 5.7 設定を工場出荷時に戻す方法
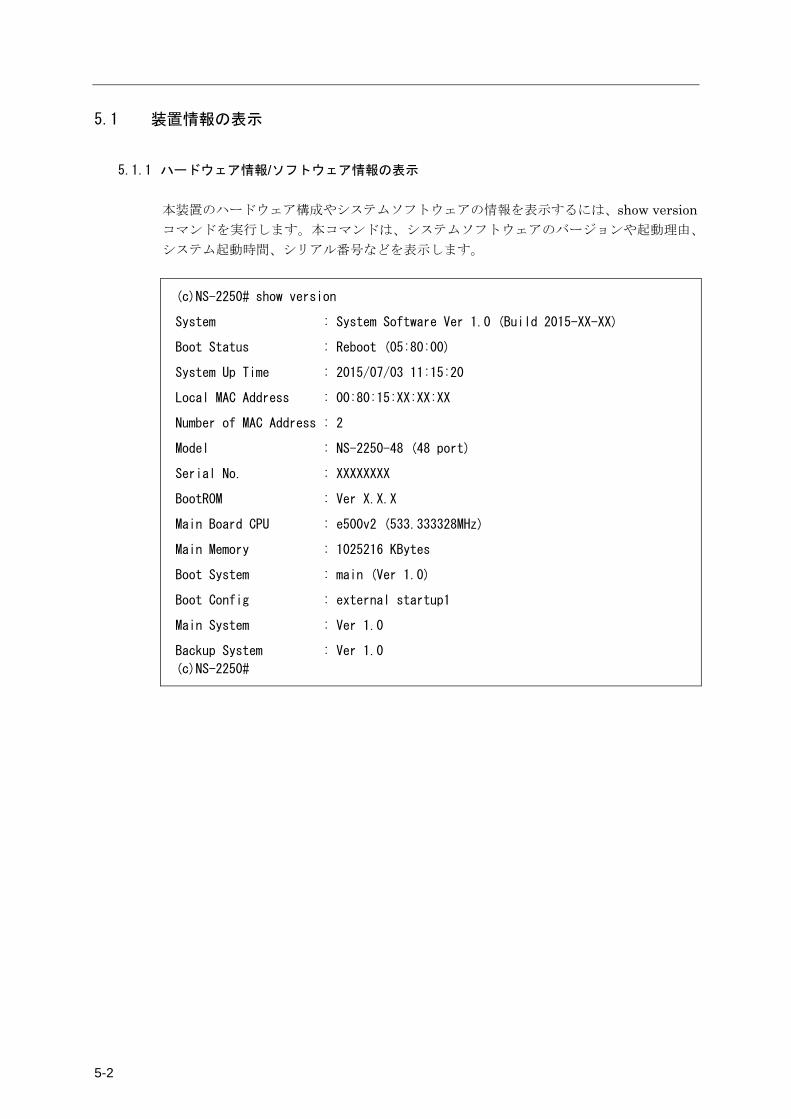
5-2
5.1 装置情報の表示
5.1.1 ハードウェア情報/ソフトウェア情報の表示 本装置のハードウェア構成やシステムソフトウェアの情報を表示するには、show versionコマンドを実行します。本コマンドは、システムソフトウェアのバージョンや起動理由、
システム起動時間、シリアル番号などを表示します。
(c)NS-2250# show version
System : System Software Ver 1.0 (Build 2015-XX-XX)
Boot Status : Reboot (05:80:00)
System Up Time : 2015/07/03 11:15:20
Local MAC Address : 00:80:15:XX:XX:XX
Number of MAC Address : 2
Model : NS-2250-48 (48 port)
Serial No. : XXXXXXXX
BootROM : Ver X.X.X
Main Board CPU : e500v2 (533.333328MHz)
Main Memory : 1025216 KBytes
Boot System : main (Ver 1.0)
Boot Config : external startup1
Main System : Ver 1.0
Backup System : Ver 1.0
(c)NS-2250#
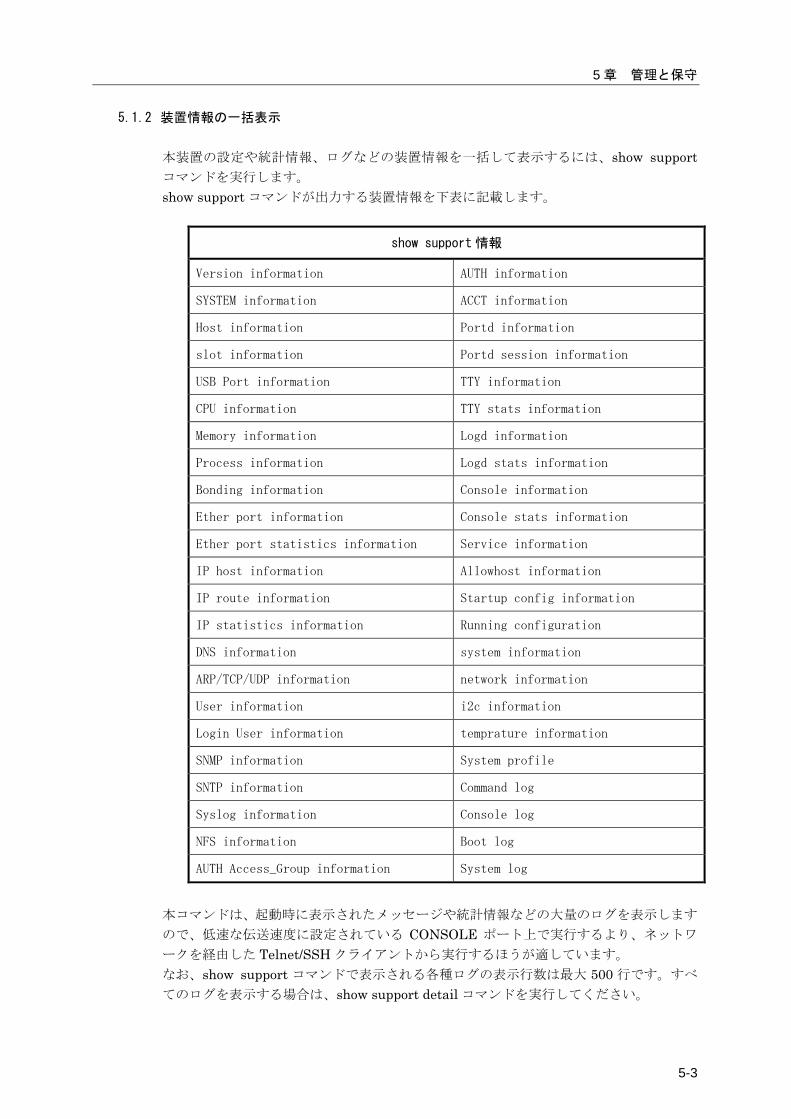
5 章 管理と保守
5-3
5.1.2 装置情報の一括表示 本装置の設定や統計情報、ログなどの装置情報を一括して表示するには、show supportコマンドを実行します。 show support コマンドが出力する装置情報を下表に記載します。
show support 情報
Version information AUTH information
SYSTEM information ACCT information
Host information Portd information
slot information Portd session information
USB Port information TTY information
CPU information TTY stats information
Memory information Logd information
Process information Logd stats information
Bonding information Console information
Ether port information Console stats information
Ether port statistics information Service information
IP host information Allowhost information
IP route information Startup config information
IP statistics information Running configuration
DNS information system information
ARP/TCP/UDP information network information
User information i2c information
Login User information temprature information
SNMP information System profile
SNTP information Command log
Syslog information Console log
NFS information Boot log
AUTH Access_Group information System log
本コマンドは、起動時に表示されたメッセージや統計情報などの大量のログを表示します
ので、低速な伝送速度に設定されている CONSOLE ポート上で実行するより、ネットワ
ークを経由した Telnet/SSH クライアントから実行するほうが適しています。 なお、show support コマンドで表示される各種ログの表示行数は最大 500 行です。すべ
てのログを表示する場合は、show support detail コマンドを実行してください。

5-4
このコマンドの出力内容は、弊社サポート時に使用するもので内容に関してはお答えでき
ません。
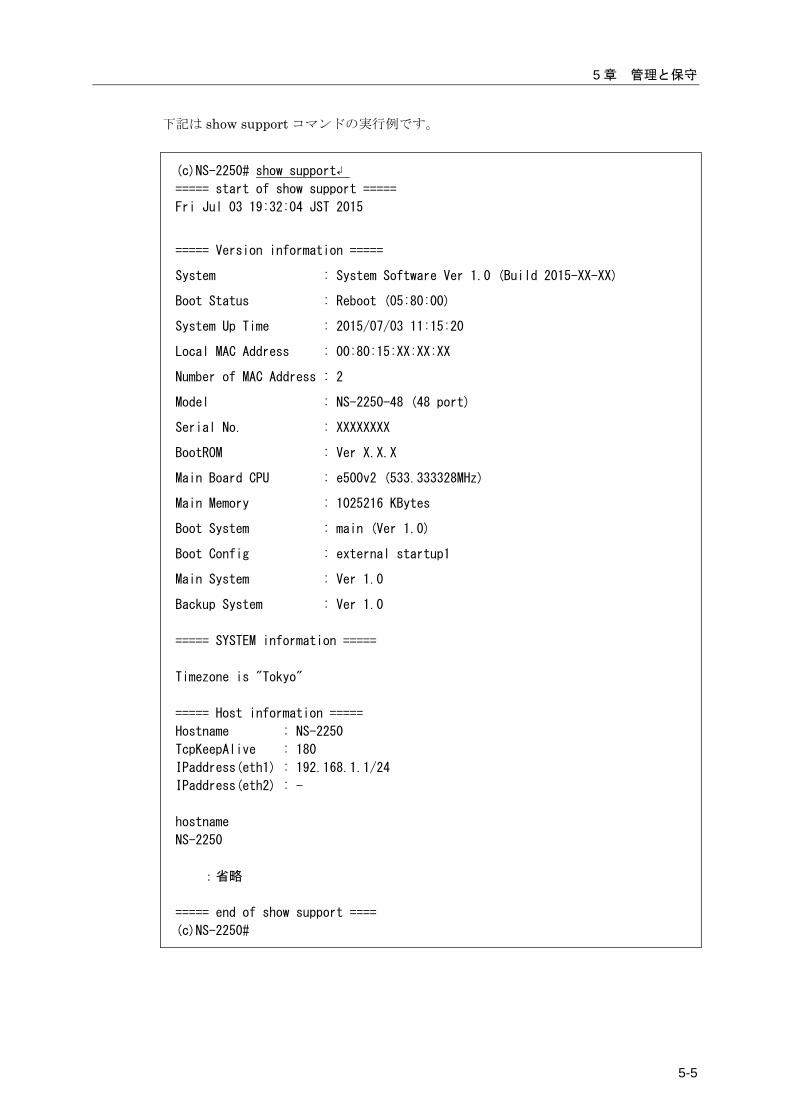
5 章 管理と保守
5-5
下記は show support コマンドの実行例です。
(c)NS-2250# show support↲
===== start of show support =====
Fri Jul 03 19:32:04 JST 2015
===== Version information =====
System : System Software Ver 1.0 (Build 2015-XX-XX)
Boot Status : Reboot (05:80:00)
System Up Time : 2015/07/03 11:15:20
Local MAC Address : 00:80:15:XX:XX:XX
Number of MAC Address : 2
Model : NS-2250-48 (48 port)
Serial No. : XXXXXXXX
BootROM : Ver X.X.X
Main Board CPU : e500v2 (533.333328MHz)
Main Memory : 1025216 KBytes
Boot System : main (Ver 1.0)
Boot Config : external startup1
Main System : Ver 1.0
Backup System : Ver 1.0
===== SYSTEM information =====
Timezone is "Tokyo"
===== Host information =====
Hostname : NS-2250
TcpKeepAlive : 180
IPaddress(eth1) : 192.168.1.1/24
IPaddress(eth2) : -
hostname
NS-2250
:省略
===== end of show support ====
(c)NS-2250#
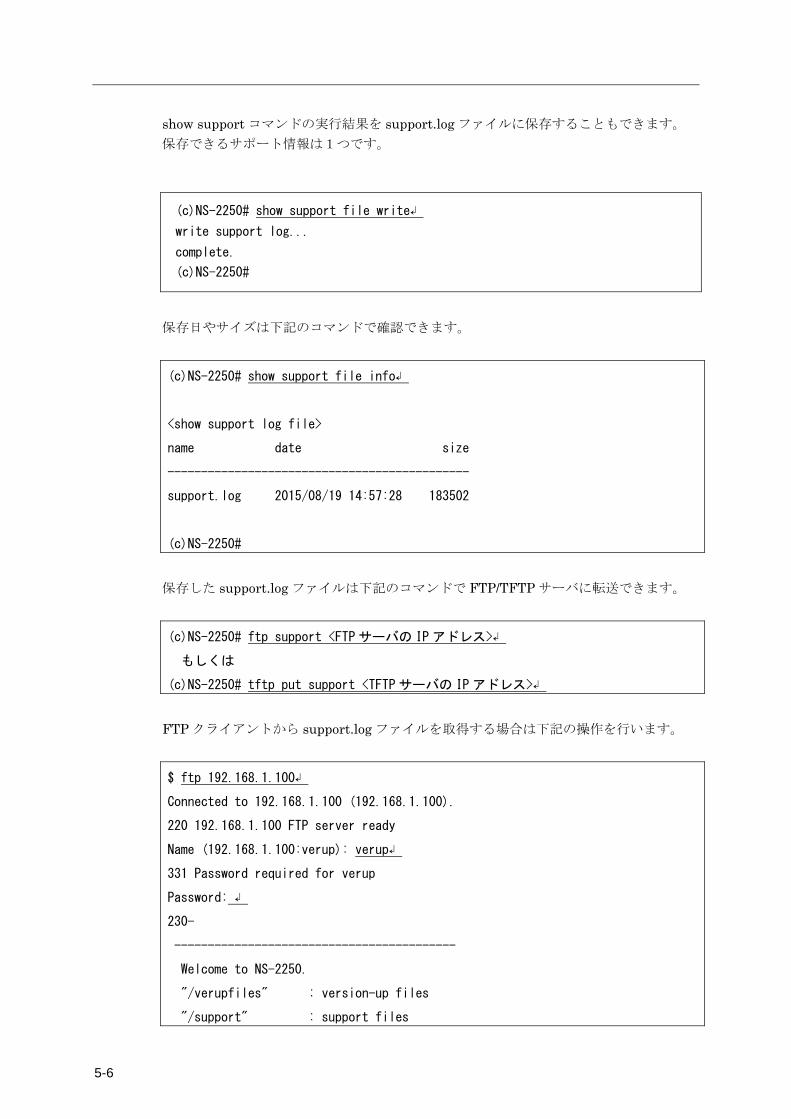
5-6
show support コマンドの実行結果を support.log ファイルに保存することもできます。 保存できるサポート情報は1つです。
(c)NS-2250# show support file write↲
write support log...
complete.
(c)NS-2250#
保存日やサイズは下記のコマンドで確認できます。
(c)NS-2250# show support file info↲
<show support log file>
name date size
---------------------------------------------
support.log 2015/08/19 14:57:28 183502
(c)NS-2250# 保存した support.log ファイルは下記のコマンドで FTP/TFTP サーバに転送できます。
(c)NS-2250# ftp support <FTP サーバの IP アドレス>↲
もしくは
(c)NS-2250# tftp put support <TFTP サーバの IP アドレス>↲
FTP クライアントから support.log ファイルを取得する場合は下記の操作を行います。
$ ftp 192.168.1.100↲
Connected to 192.168.1.100 (192.168.1.100).
220 192.168.1.100 FTP server ready
Name (192.168.1.100:verup): verup↲
331 Password required for verup
Password: ↲
230-
------------------------------------------
Welcome to NS-2250.
"/verupfiles" : version-up files
"/support" : support files
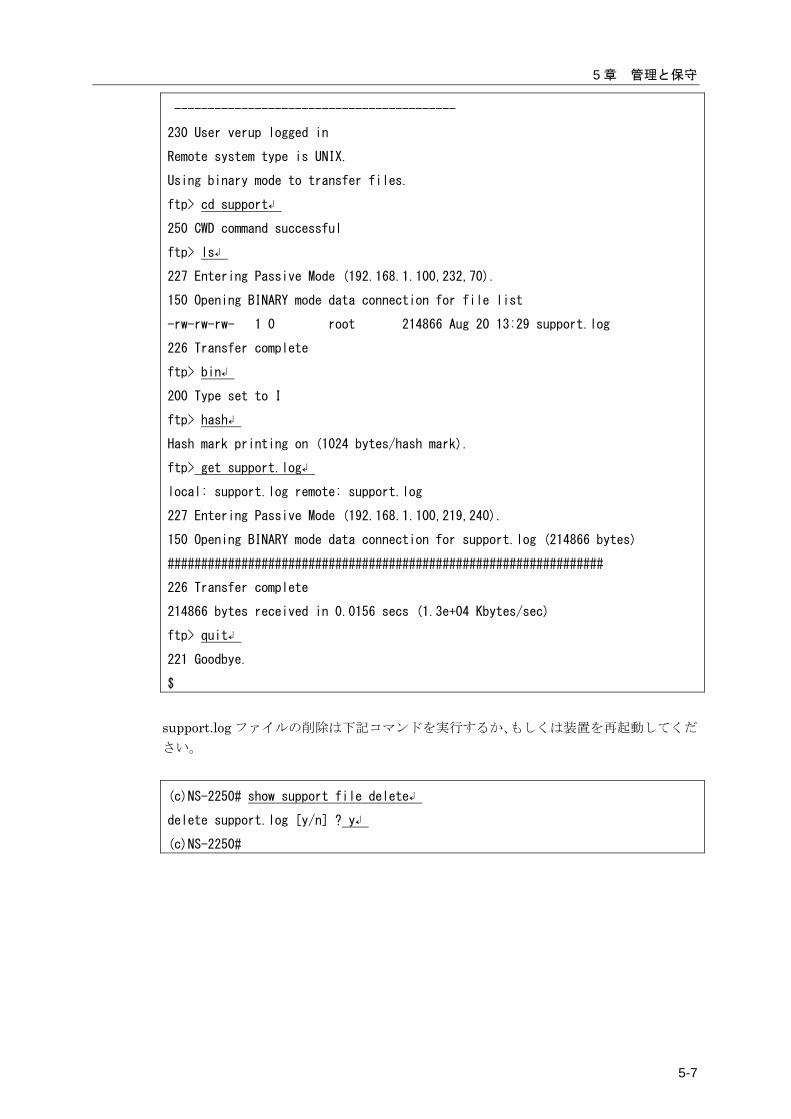
5 章 管理と保守
5-7
------------------------------------------
230 User verup logged in
Remote system type is UNIX.
Using binary mode to transfer files.
ftp> cd support↲
250 CWD command successful
ftp> ls↲
227 Entering Passive Mode (192.168.1.100,232,70).
150 Opening BINARY mode data connection for file list
-rw-rw-rw- 1 0 root 214866 Aug 20 13:29 support.log
226 Transfer complete
ftp> bin↲
200 Type set to I
ftp> hash↲
Hash mark printing on (1024 bytes/hash mark).
ftp> get support.log↲
local: support.log remote: support.log
227 Entering Passive Mode (192.168.1.100,219,240).
150 Opening BINARY mode data connection for support.log (214866 bytes)
#################################################################
226 Transfer complete
214866 bytes received in 0.0156 secs (1.3e+04 Kbytes/sec)
ftp> quit↲
221 Goodbye.
$
support.log ファイルの削除は下記コマンドを実行するか、もしくは装置を再起動してくだ
さい。
(c)NS-2250# show support file delete↲
delete support.log [y/n] ? y↲
(c)NS-2250#
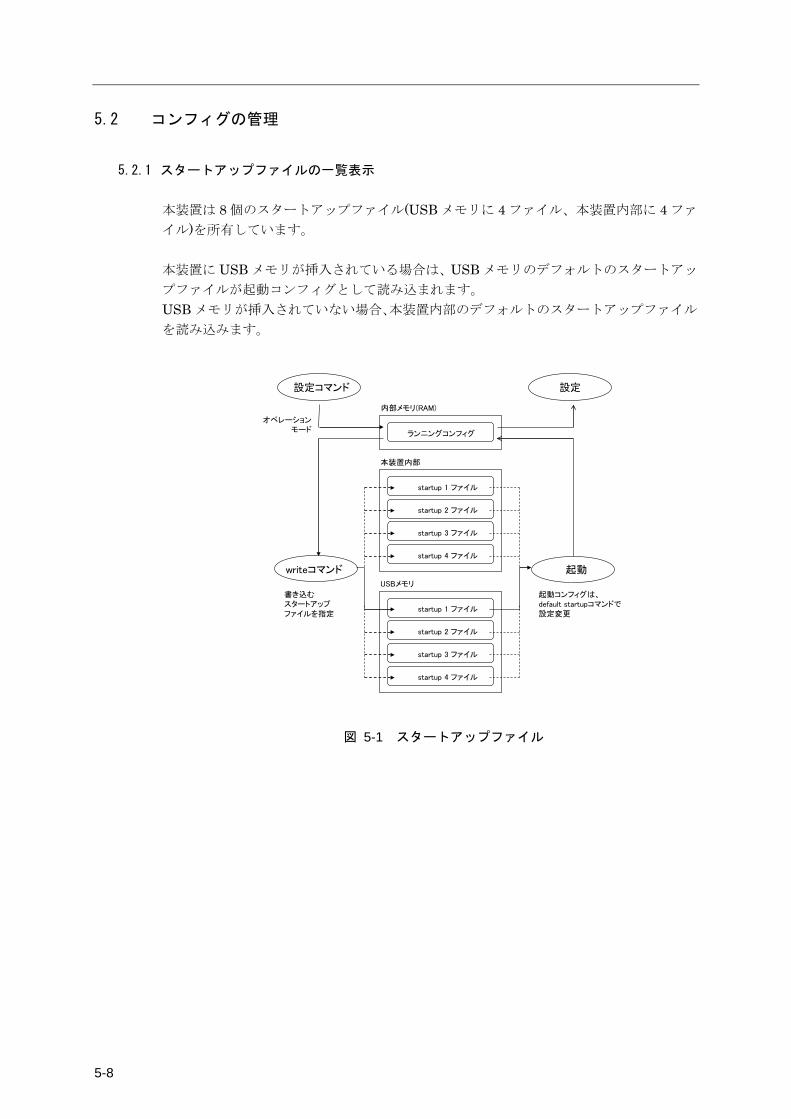
5-8
5.2 コンフィグの管理
5.2.1 スタートアップファイルの一覧表示 本装置は 8 個のスタートアップファイル(USB メモリに 4 ファイル、本装置内部に 4 ファ
イル)を所有しています。 本装置に USB メモリが挿入されている場合は、USB メモリのデフォルトのスタートアッ
プファイルが起動コンフィグとして読み込まれます。 USB メモリが挿入されていない場合、本装置内部のデフォルトのスタートアップファイル
を読み込みます。
設定コマンド
ランニングコンフィグ
内部メモリ(RAM)
writeコマンド
設定
startup 1 ファイル
startup 2 ファイル
startup 3 ファイル
startup 4 ファイル
startup 1 ファイル
startup 2 ファイル
startup 3 ファイル
startup 4 ファイル
起動
オペレーションモード
書き込むスタートアップファイルを指定
本装置内部
USBメモリ
起動コンフィグは、default startupコマンドで設定変更
図 5-1 スタートアップファイル
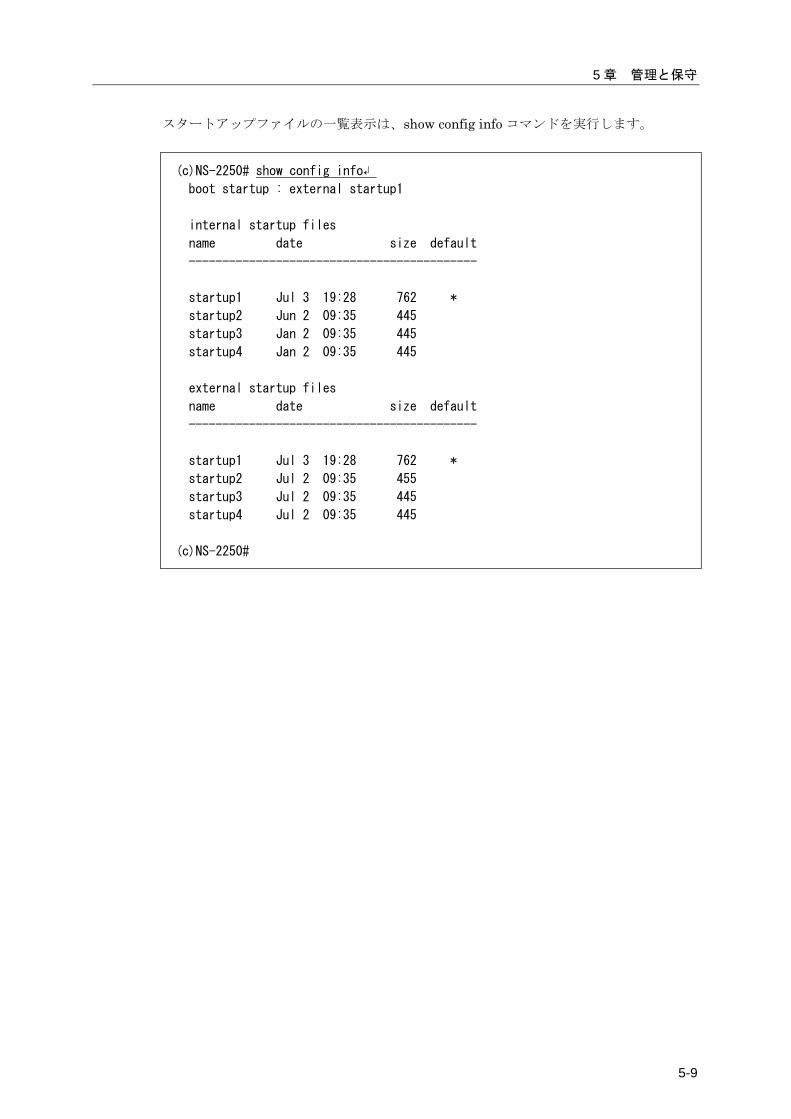
5 章 管理と保守
5-9
スタートアップファイルの一覧表示は、show config info コマンドを実行します。
(c)NS-2250# show config info↲
boot startup : external startup1
internal startup files
name date size default
-------------------------------------------
startup1 Jul 3 19:28 762 *
startup2 Jun 2 09:35 445
startup3 Jan 2 09:35 445
startup4 Jan 2 09:35 445
external startup files
name date size default
-------------------------------------------
startup1 Jul 3 19:28 762 *
startup2 Jul 2 09:35 455
startup3 Jul 2 09:35 445
startup4 Jul 2 09:35 445
(c)NS-2250#
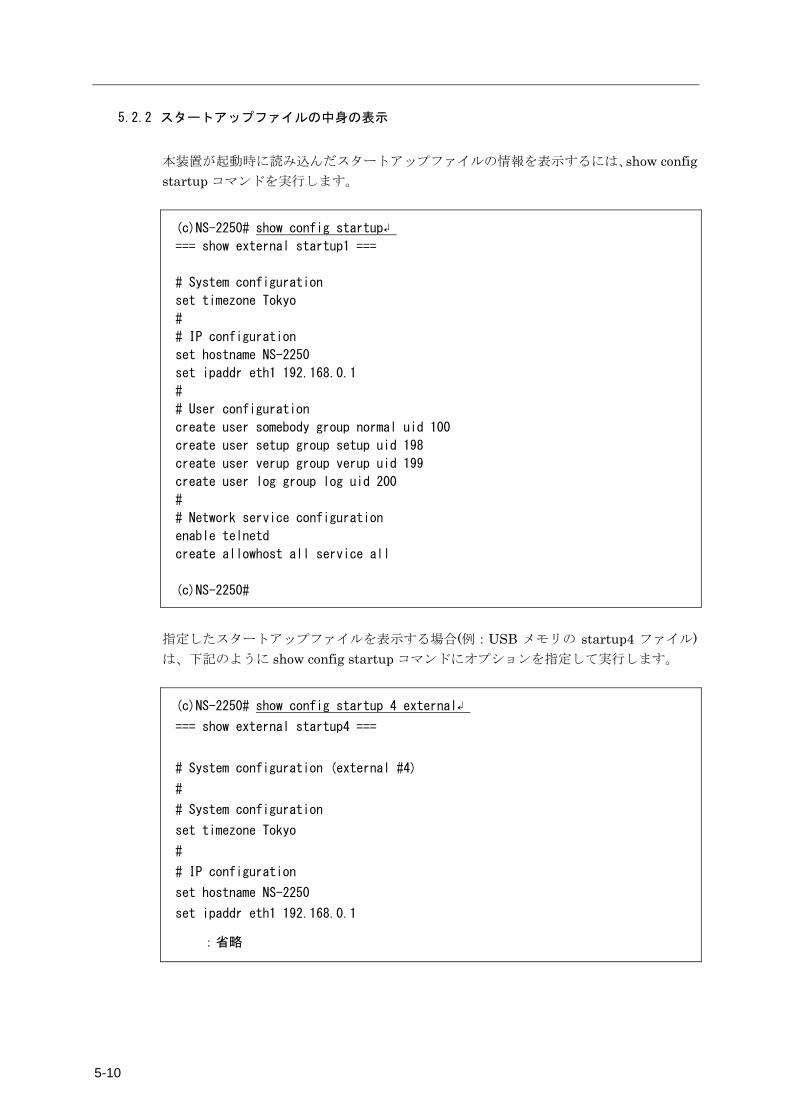
5-10
5.2.2 スタートアップファイルの中身の表示
本装置が起動時に読み込んだスタートアップファイルの情報を表示するには、show config startup コマンドを実行します。
(c)NS-2250# show config startup↲
=== show external startup1 ===
# System configuration
set timezone Tokyo
#
# IP configuration
set hostname NS-2250
set ipaddr eth1 192.168.0.1
#
# User configuration
create user somebody group normal uid 100
create user setup group setup uid 198
create user verup group verup uid 199
create user log group log uid 200
#
# Network service configuration
enable telnetd
create allowhost all service all
(c)NS-2250#
指定したスタートアップファイルを表示する場合(例:USB メモリの startup4 ファイル)は、下記のように show config startup コマンドにオプションを指定して実行します。
(c)NS-2250# show config startup 4 external↲
=== show external startup4 ===
# System configuration (external #4)
#
# System configuration
set timezone Tokyo
#
# IP configuration
set hostname NS-2250
set ipaddr eth1 192.168.0.1
:省略

5 章 管理と保守
5-11
5.2.3 起動時に読み込むスタートアップファイルの変更 起動時に読み込まれるスタートアップファイルは、USB メモリと本装置内部の両方にあり、
工場出荷時はいずれも startup1 ファイルがデフォルトのスタートアップファイルとして
設定されています。 本装置に USB メモリが挿入されている場合は、必ず USB メモリのデフォルトのスタート
アップファイルが読み込まれます。USB メモリが挿入されていない場合、本装置内部のデ
フォルトのスタートアップファイルが読み込まれます。 デフォルトのスタートアップファイルを変更するには、default startup コマンドを実行し
ます。例えば、USB メモリのデフォルトのスタートアップファイルを startup3 ファイル
に変更する場合は、下記のように default startup コマンドにオプションを指定して実行
します。
(c)NS-2250# default startup 3 external↲
(c)NS-2250#
デフォルトのスタートアップファイルは、show config info コマンドで確認できます。 デフォルトのスタートアップファイルには default 欄に「*」が表示されます。
(c)NS-2250# show config info↲
boot startup : external startup1
internal startup files
name date size default
-------------------------------------------
startup1 Jul 3 19:28 762 *
startup2 Jun 2 09:35 445
startup3 Jan 2 09:35 445
startup4 Jan 2 09:35 445
external startup files
name date size default
-------------------------------------------
startup1 Jul 3 19:28 762 *
startup2 Jul 2 09:35 455
startup3 Jul 2 09:35 445
startup4 Jul 2 09:35 445
(c)NS-2250#
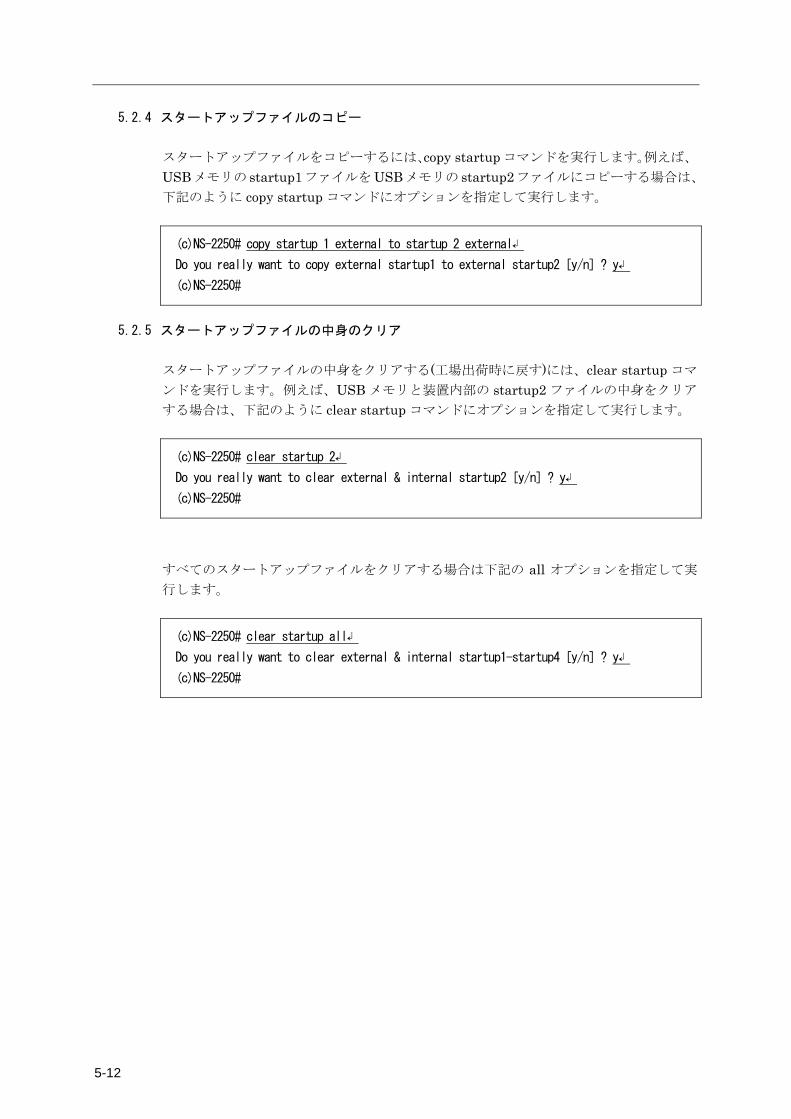
5-12
5.2.4 スタートアップファイルのコピー スタートアップファイルをコピーするには、copy startup コマンドを実行します。例えば、
USBメモリの startup1ファイルをUSBメモリの startup2ファイルにコピーする場合は、
下記のように copy startup コマンドにオプションを指定して実行します。
(c)NS-2250# copy startup 1 external to startup 2 external↲
Do you really want to copy external startup1 to external startup2 [y/n] ? y↲
(c)NS-2250#
5.2.5 スタートアップファイルの中身のクリア スタートアップファイルの中身をクリアする(工場出荷時に戻す)には、clear startup コマ
ンドを実行します。例えば、USB メモリと装置内部の startup2 ファイルの中身をクリア
する場合は、下記のように clear startup コマンドにオプションを指定して実行します。
(c)NS-2250# clear startup 2↲
Do you really want to clear external & internal startup2 [y/n] ? y↲
(c)NS-2250#
すべてのスタートアップファイルをクリアする場合は下記の all オプションを指定して実
行します。
(c)NS-2250# clear startup all↲
Do you really want to clear external & internal startup1-startup4 [y/n] ? y↲
(c)NS-2250#
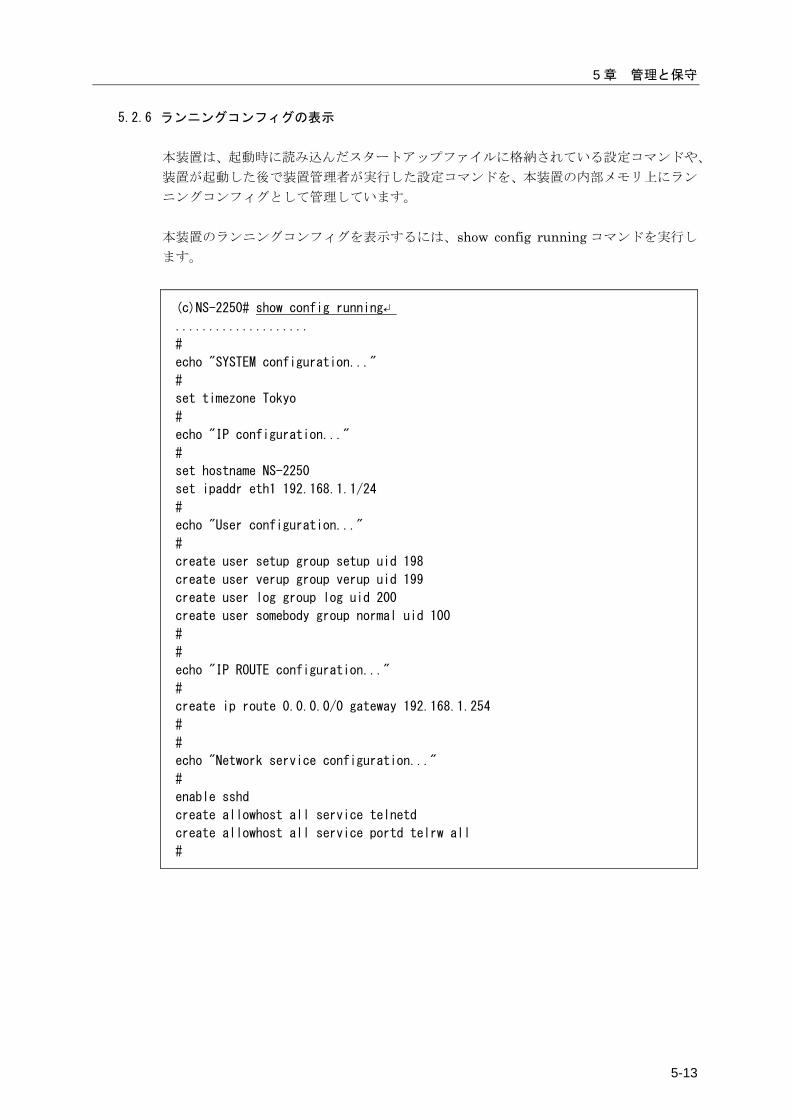
5 章 管理と保守
5-13
5.2.6 ランニングコンフィグの表示 本装置は、起動時に読み込んだスタートアップファイルに格納されている設定コマンドや、
装置が起動した後で装置管理者が実行した設定コマンドを、本装置の内部メモリ上にラン
ニングコンフィグとして管理しています。 本装置のランニングコンフィグを表示するには、show config running コマンドを実行し
ます。
(c)NS-2250# show config running↵
....................
#
echo "SYSTEM configuration..."
#
set timezone Tokyo
#
echo "IP configuration..."
#
set hostname NS-2250
set ipaddr eth1 192.168.1.1/24
#
echo "User configuration..."
#
create user setup group setup uid 198
create user verup group verup uid 199
create user log group log uid 200
create user somebody group normal uid 100
#
#
echo "IP ROUTE configuration..."
#
create ip route 0.0.0.0/0 gateway 192.168.1.254
#
#
echo "Network service configuration..."
#
enable sshd
create allowhost all service telnetd
create allowhost all service portd telrw all
#
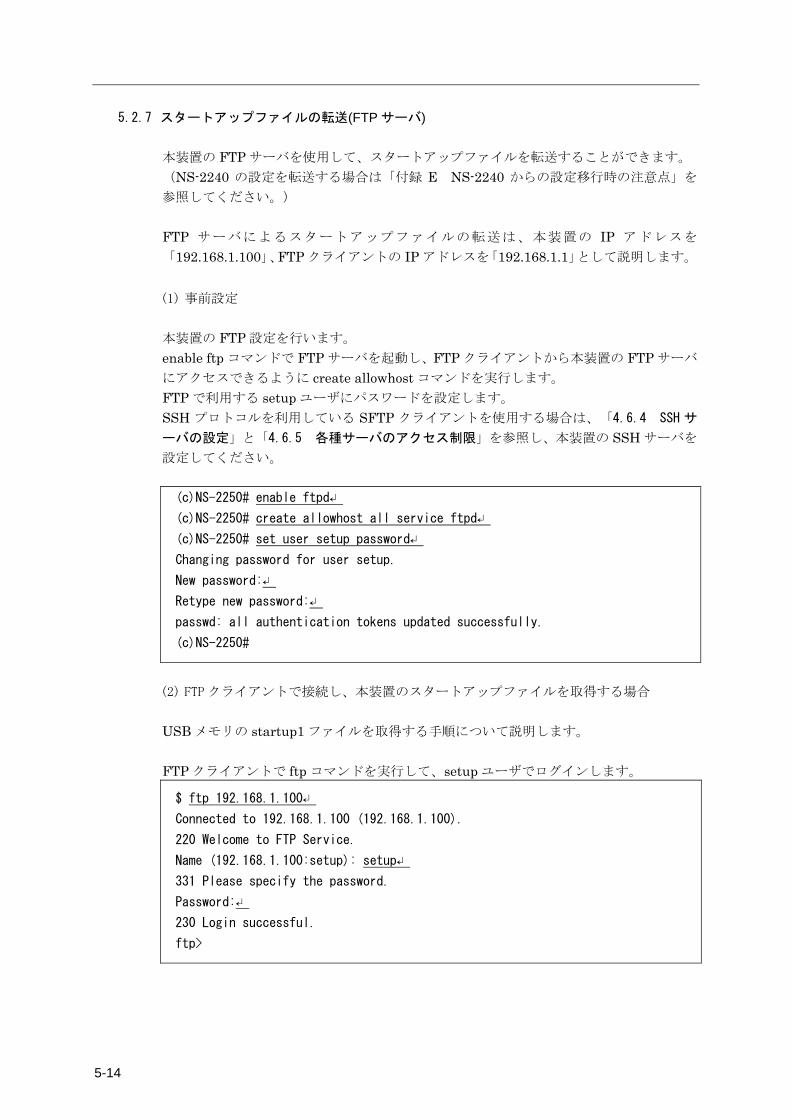
5-14
5.2.7 スタートアップファイルの転送(FTP サーバ) 本装置の FTP サーバを使用して、スタートアップファイルを転送することができます。 (NS-2240 の設定を転送する場合は「付録 E NS-2240 からの設定移行時の注意点」を
参照してください。) FTP サーバによるスタートアップファイルの転送は、本装置の IP アドレスを
「192.168.1.100」、FTP クライアントの IP アドレスを「192.168.1.1」として説明します。
(1) 事前設定
本装置の FTP 設定を行います。 enable ftp コマンドで FTP サーバを起動し、FTP クライアントから本装置の FTP サーバ
にアクセスできるように create allowhost コマンドを実行します。 FTP で利用する setup ユーザにパスワードを設定します。 SSH プロトコルを利用している SFTP クライアントを使用する場合は、「4.6.4 SSH サ
ーバの設定」と「4.6.5 各種サーバのアクセス制限」を参照し、本装置の SSH サーバを
設定してください。 (c)NS-2250# enable ftpd↵
(c)NS-2250# create allowhost all service ftpd↵
(c)NS-2250# set user setup password↵
Changing password for user setup.
New password:↵
Retype new password:↵
passwd: all authentication tokens updated successfully.
(c)NS-2250#
(2) FTP クライアントで接続し、本装置のスタートアップファイルを取得する場合
USB メモリの startup1 ファイルを取得する手順について説明します。 FTP クライアントで ftp コマンドを実行して、setup ユーザでログインします。
$ ftp 192.168.1.100↵
Connected to 192.168.1.100 (192.168.1.100).
220 Welcome to FTP Service.
Name (192.168.1.100:setup): setup↵
331 Please specify the password.
Password:↵
230 Login successful.
ftp>

5 章 管理と保守
5-15
FTP で本装置にログインしたら、ls コマンドを実行してスタートアップファイルを確認し
ます。本装置内部のスタートアップファイルは internalfiles ディレクトリに、USB メモ
リのスタートアップファイルは externalfiles ディレクトリの下に保管されています。 cd コマンドで externalfiles に移動し、再度、ls コマンドでスタートアップファイルを確
認します。他のディレクトリやファイルの操作は行わないでください。
ftp> ls↵
227 Entering Passive Mode (192.168.1.100,83,33)
150 Here comes the directory listing.
lrwxrwxrwx 1 0 0 10 Oct 06 07:51 externalfiles
lrwxrwxrwx 1 0 0 10 Oct 06 07:51 internalfiles
226 Directory send OK.
ftp> cd externalfiles↵
250 Directory successfully changed.
ftp> ls↵
227 Entering Passive Mode (192.168.1.100,43,110)
150 Here comes the directory listing.
-rw-rw-r-- 1 0 198 720 Oct 08 12:52 startup1
-rw-rw-r-- 1 0 198 534 Oct 06 10:33 startup2
-rw-rw-r-- 1 0 198 534 Oct 06 10:34 startup3
-rw-rw-r-- 1 0 198 534 Oct 06 10:34 startup4
-rw-rw-r-- 1 0 198 2 Jun 25 10:21 startup_number
226 Directory send OK.
ftp>
USB メモリの startup1 ファイルを CS1-startup1 というファイル名で取得し、FTP を終
了します。
ftp> get startup1 CS1-startup1↵
local: startup1 remote: CS1-startup1
227 Entering Passive Mode (192.168.1.100,191,54)
150 Opening ASCII mode data connection for startup1 (720 bytes).
226 File send OK.
720 bytes received in 0.00026 secs (2.7e+03 Kbytes/sec)
ftp> quit↵
221 Goodbye.
$
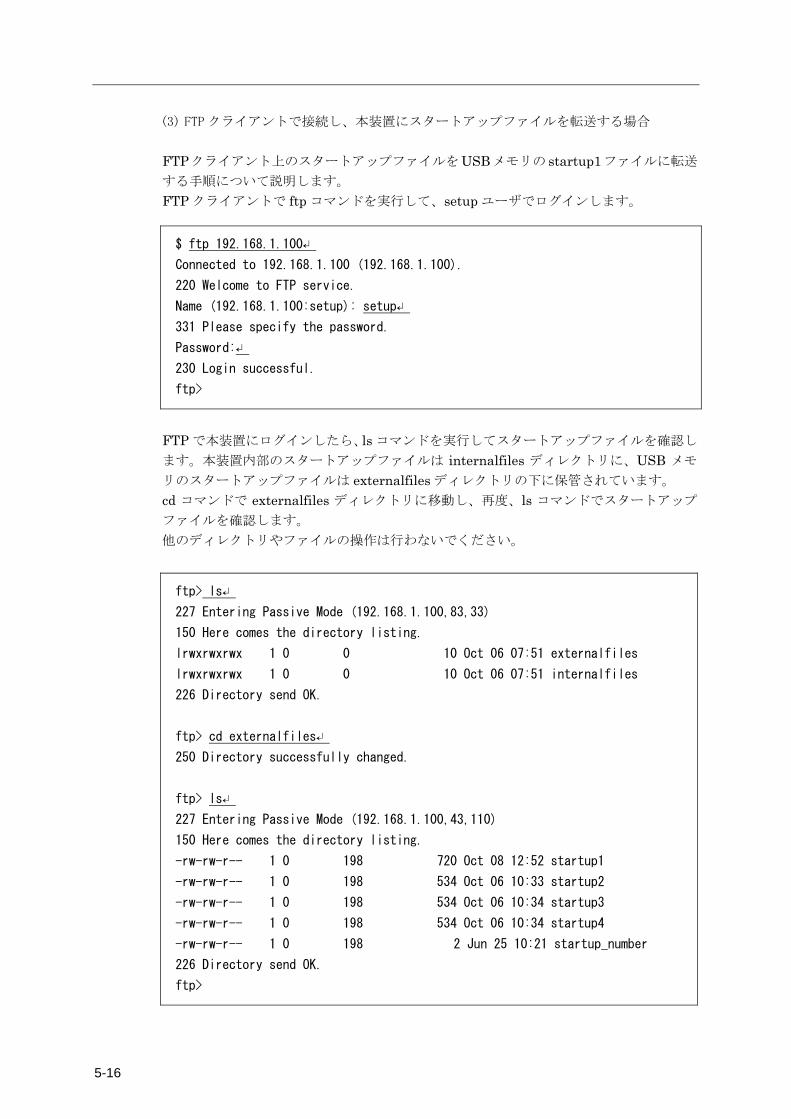
5-16
(3) FTP クライアントで接続し、本装置にスタートアップファイルを転送する場合
FTPクライアント上のスタートアップファイルをUSBメモリの startup1ファイルに転送
する手順について説明します。 FTP クライアントで ftp コマンドを実行して、setup ユーザでログインします。
$ ftp 192.168.1.100↵
Connected to 192.168.1.100 (192.168.1.100).
220 Welcome to FTP service.
Name (192.168.1.100:setup): setup↵
331 Please specify the password.
Password:↵
230 Login successful.
ftp>
FTP で本装置にログインしたら、ls コマンドを実行してスタートアップファイルを確認し
ます。本装置内部のスタートアップファイルは internalfiles ディレクトリに、USB メモ
リのスタートアップファイルは externalfiles ディレクトリの下に保管されています。 cd コマンドで externalfiles ディレクトリに移動し、再度、ls コマンドでスタートアップ
ファイルを確認します。 他のディレクトリやファイルの操作は行わないでください。
ftp> ls↵
227 Entering Passive Mode (192.168.1.100,83,33)
150 Here comes the directory listing.
lrwxrwxrwx 1 0 0 10 Oct 06 07:51 externalfiles
lrwxrwxrwx 1 0 0 10 Oct 06 07:51 internalfiles
226 Directory send OK.
ftp> cd externalfiles↵
250 Directory successfully changed.
ftp> ls↵
227 Entering Passive Mode (192.168.1.100,43,110)
150 Here comes the directory listing.
-rw-rw-r-- 1 0 198 720 Oct 08 12:52 startup1
-rw-rw-r-- 1 0 198 534 Oct 06 10:33 startup2
-rw-rw-r-- 1 0 198 534 Oct 06 10:34 startup3
-rw-rw-r-- 1 0 198 534 Oct 06 10:34 startup4
-rw-rw-r-- 1 0 198 2 Jun 25 10:21 startup_number
226 Directory send OK.
ftp>
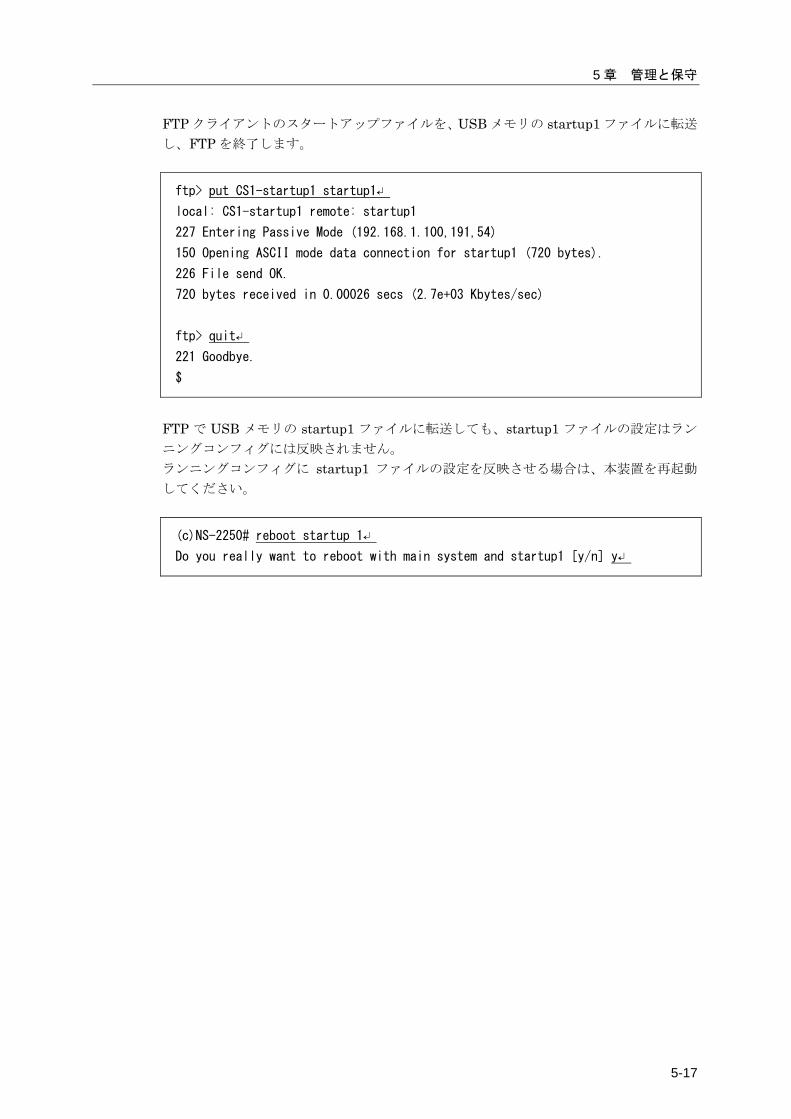
5 章 管理と保守
5-17
FTP クライアントのスタートアップファイルを、USB メモリの startup1 ファイルに転送
し、FTP を終了します。
ftp> put CS1-startup1 startup1↵
local: CS1-startup1 remote: startup1
227 Entering Passive Mode (192.168.1.100,191,54)
150 Opening ASCII mode data connection for startup1 (720 bytes).
226 File send OK.
720 bytes received in 0.00026 secs (2.7e+03 Kbytes/sec)
ftp> quit↵
221 Goodbye.
$
FTP で USB メモリの startup1 ファイルに転送しても、startup1 ファイルの設定はラン
ニングコンフィグには反映されません。 ランニングコンフィグに startup1 ファイルの設定を反映させる場合は、本装置を再起動
してください。
(c)NS-2250# reboot startup 1↵
Do you really want to reboot with main system and startup1 [y/n] y↵

5-18
5.2.8 スタートアップファイルの転送(FTP クライアント) 本装置の FTP クライアントを使用して、スタートアップファイルを転送することができ
ます。 (NS-2240 の設定を転送する場合は「付録 E NS-2240 からの設定移行時の注意点」を
参照してください。) FTP クライアントによるスタートアップファイルの転送は、本装置の IP アドレスを
「192.168.1.100」、FTP サーバの IP アドレスを「192.168.1.1」として説明します。
(1) 本装置のスタートアップファイルを FTP サーバに保存する場合
本装置の USB メモリの startup1 ファイルを、CS1-startup1 というファイル名で FTP サ
ーバに保存する手順について説明します。
(c)NS-2250# ftp setup external 192.168.1.1↲
220 FTP Server ready.
Name (192.168.1.1:user1): user1↲
331 Password required for user1
Password:
230 User user1 logged in.
ftp> put startup1 CS1-startup1↲
local: startup1 remote: CS1-startup1
227 Entering Passive Mode (192.168.1.1,170,246).
150 Opening BINARY mode data connection for CS1-startup1
ftp> quit↲
221 Goodbye.
(c)NS-2250#
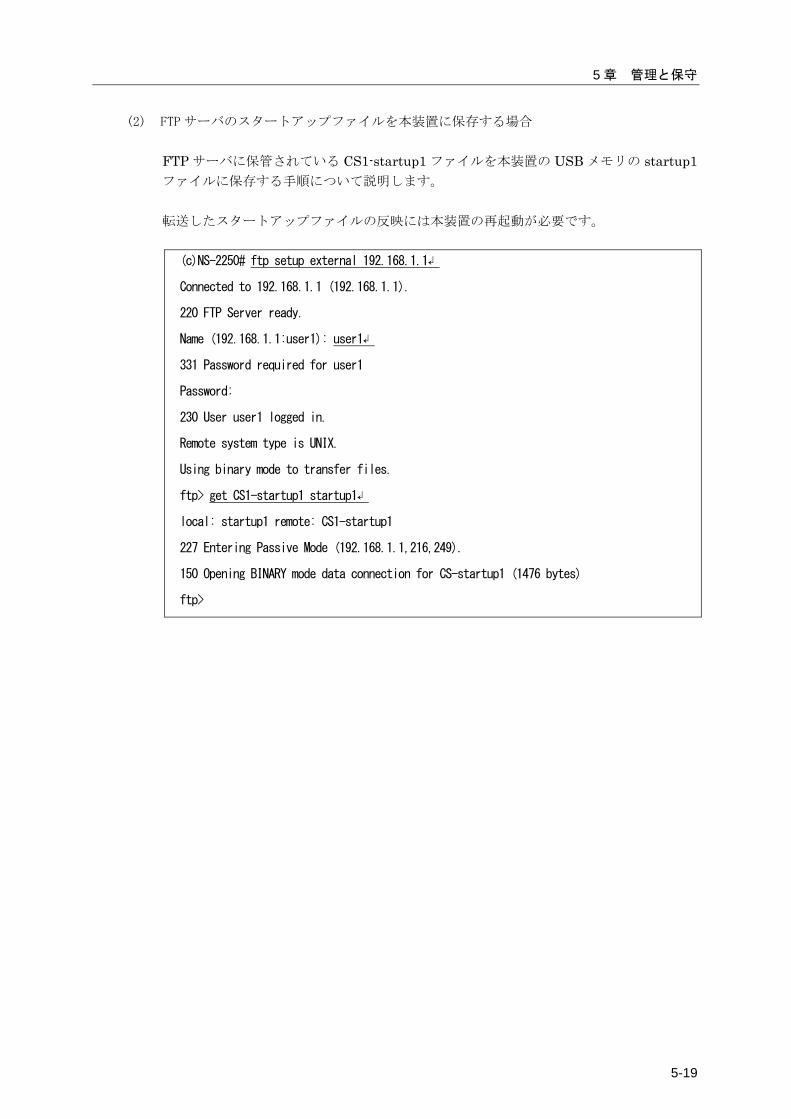
5 章 管理と保守
5-19
(2) FTP サーバのスタートアップファイルを本装置に保存する場合
FTP サーバに保管されている CS1-startup1 ファイルを本装置の USB メモリの startup1ファイルに保存する手順について説明します。 転送したスタートアップファイルの反映には本装置の再起動が必要です。
(c)NS-2250# ftp setup external 192.168.1.1↲
Connected to 192.168.1.1 (192.168.1.1).
220 FTP Server ready.
Name (192.168.1.1:user1): user1↲
331 Password required for user1
Password:
230 User user1 logged in.
Remote system type is UNIX.
Using binary mode to transfer files.
ftp> get CS1-startup1 startup1↲
local: startup1 remote: CS1-startup1
227 Entering Passive Mode (192.168.1.1,216,249).
150 Opening BINARY mode data connection for CS-startup1 (1476 bytes)
ftp>
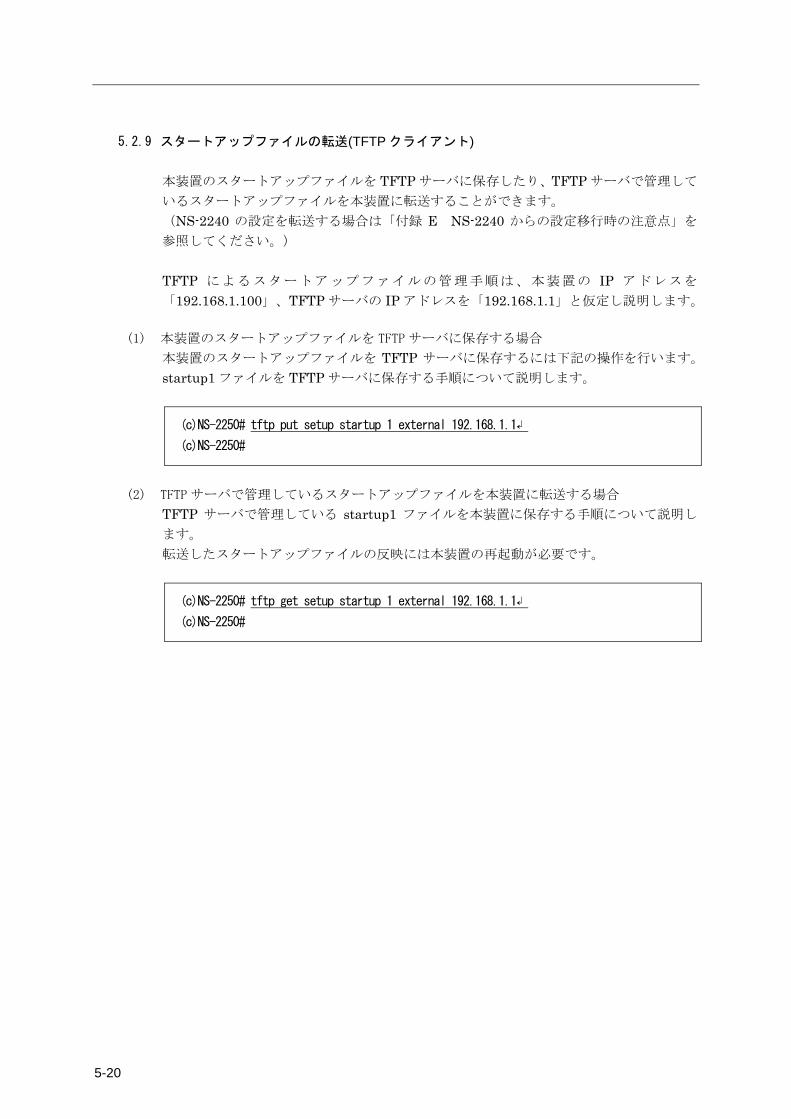
5-20
5.2.9 スタートアップファイルの転送(TFTP クライアント) 本装置のスタートアップファイルを TFTP サーバに保存したり、TFTP サーバで管理して
いるスタートアップファイルを本装置に転送することができます。 (NS-2240 の設定を転送する場合は「付録 E NS-2240 からの設定移行時の注意点」を
参照してください。) TFTP によるスタートアップファイルの管理手順は、本装置の IP アドレスを
「192.168.1.100」、TFTP サーバの IP アドレスを「192.168.1.1」と仮定し説明します。
(1) 本装置のスタートアップファイルを TFTP サーバに保存する場合
本装置のスタートアップファイルを TFTP サーバに保存するには下記の操作を行います。
startup1 ファイルを TFTP サーバに保存する手順について説明します。
(c)NS-2250# tftp put setup startup 1 external 192.168.1.1↲
(c)NS-2250#
(2) TFTP サーバで管理しているスタートアップファイルを本装置に転送する場合
TFTP サーバで管理している startup1 ファイルを本装置に保存する手順について説明し
ます。 転送したスタートアップファイルの反映には本装置の再起動が必要です。
(c)NS-2250# tftp get setup startup 1 external 192.168.1.1↲
(c)NS-2250#
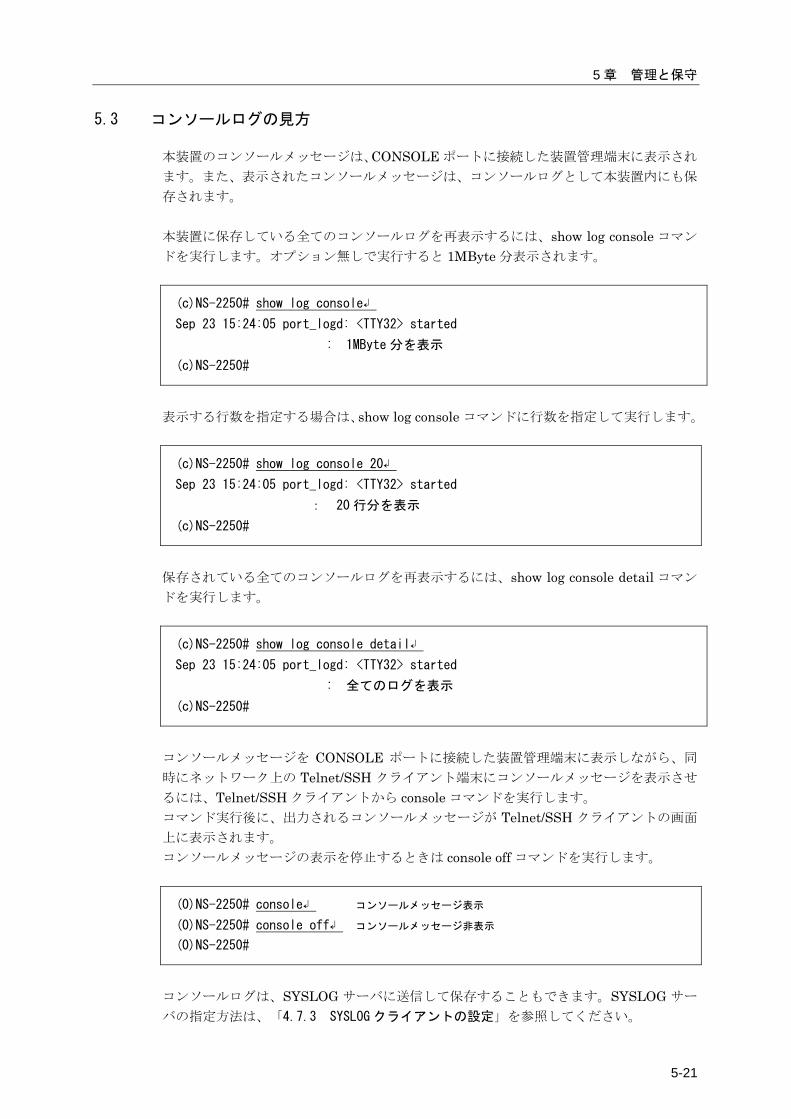
5 章 管理と保守
5-21
5.3 コンソールログの見方
本装置のコンソールメッセージは、CONSOLE ポートに接続した装置管理端末に表示され
ます。また、表示されたコンソールメッセージは、コンソールログとして本装置内にも保
存されます。 本装置に保存している全てのコンソールログを再表示するには、show log console コマン
ドを実行します。オプション無しで実行すると 1MByte 分表示されます。
(c)NS-2250# show log console↲
Sep 23 15:24:05 port_logd: <TTY32> started
: 1MByte 分を表示
(c)NS-2250#
表示する行数を指定する場合は、show log console コマンドに行数を指定して実行します。
(c)NS-2250# show log console 20↲
Sep 23 15:24:05 port_logd: <TTY32> started
: 20 行分を表示
(c)NS-2250#
保存されている全てのコンソールログを再表示するには、show log console detail コマン
ドを実行します。
(c)NS-2250# show log console detail↲
Sep 23 15:24:05 port_logd: <TTY32> started
: 全てのログを表示
(c)NS-2250#
コンソールメッセージを CONSOLE ポートに接続した装置管理端末に表示しながら、同
時にネットワーク上の Telnet/SSH クライアント端末にコンソールメッセージを表示させ
るには、Telnet/SSH クライアントから console コマンドを実行します。 コマンド実行後に、出力されるコンソールメッセージが Telnet/SSH クライアントの画面
上に表示されます。 コンソールメッセージの表示を停止するときは console off コマンドを実行します。
(0)NS-2250# console↲ コンソールメッセージ表示
(0)NS-2250# console off↲ コンソールメッセージ非表示
(0)NS-2250#
コンソールログは、SYSLOG サーバに送信して保存することもできます。SYSLOG サー
バの指定方法は、「4.7.3 SYSLOG クライアントの設定」を参照してください。
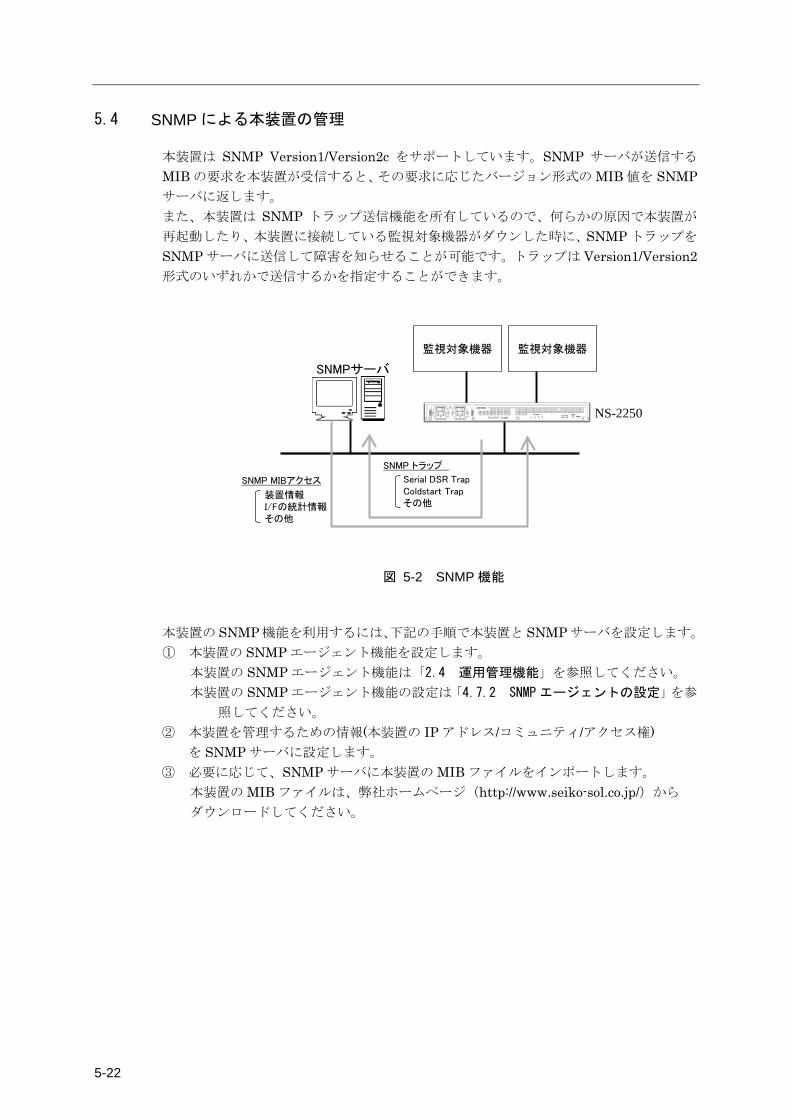
5-22
5.4 SNMP による本装置の管理
本装置は SNMP Version1/Version2c をサポートしています。SNMP サーバが送信する
MIB の要求を本装置が受信すると、その要求に応じたバージョン形式の MIB 値を SNMPサーバに返します。 また、本装置は SNMP トラップ送信機能を所有しているので、何らかの原因で本装置が
再起動したり、本装置に接続している監視対象機器がダウンした時に、SNMP トラップを
SNMP サーバに送信して障害を知らせることが可能です。トラップは Version1/Version2形式のいずれかで送信するかを指定することができます。
NS-2250
SNMPサーバ
SNMP MIBアクセス
SNMP トラップ
装置情報I/Fの統計情報その他
Serial DSR TrapColdstart Trapその他
監視対象機器 監視対象機器
図 5-2 SNMP 機能
本装置の SNMP 機能を利用するには、下記の手順で本装置と SNMP サーバを設定します。
① 本装置の SNMP エージェント機能を設定します。 本装置の SNMP エージェント機能は「2.4 運用管理機能」を参照してください。 本装置の SNMP エージェント機能の設定は「4.7.2 SNMP エージェントの設定」を参
照してください。 ② 本装置を管理するための情報(本装置の IP アドレス/コミュニティ/アクセス権) を SNMP サーバに設定します。 ③ 必要に応じて、SNMP サーバに本装置の MIB ファイルをインポートします。
本装置の MIB ファイルは、弊社ホームページ(http://www.seiko-sol.co.jp/)から ダウンロードしてください。
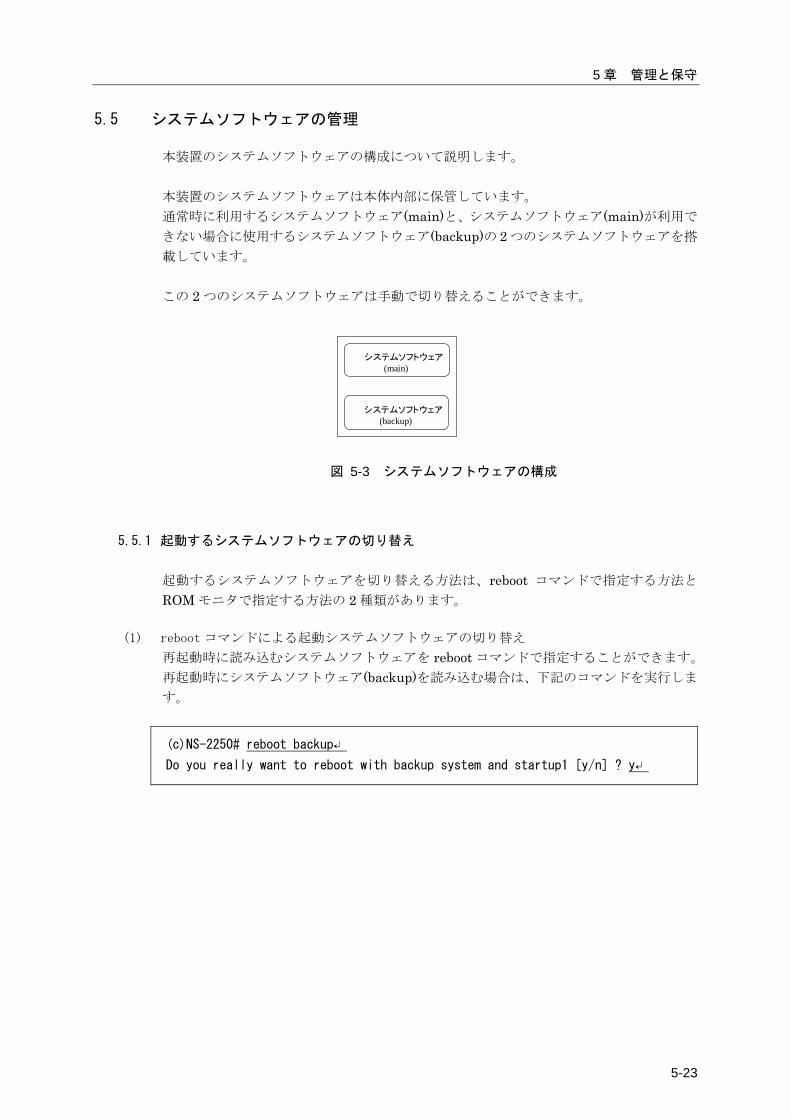
5 章 管理と保守
5-23
5.5 システムソフトウェアの管理
本装置のシステムソフトウェアの構成について説明します。 本装置のシステムソフトウェアは本体内部に保管しています。 通常時に利用するシステムソフトウェア(main)と、システムソフトウェア(main)が利用で
きない場合に使用するシステムソフトウェア(backup)の 2 つのシステムソフトウェアを搭
載しています。 この 2 つのシステムソフトウェアは手動で切り替えることができます。
システムソフトウェア(main)
システムソフトウェア(backup)
図 5-3 システムソフトウェアの構成
5.5.1 起動するシステムソフトウェアの切り替え 起動するシステムソフトウェアを切り替える方法は、reboot コマンドで指定する方法と
ROM モニタで指定する方法の 2 種類があります。
(1) reboot コマンドによる起動システムソフトウェアの切り替え
再起動時に読み込むシステムソフトウェアを reboot コマンドで指定することができます。 再起動時にシステムソフトウェア(backup)を読み込む場合は、下記のコマンドを実行しま
す。
(c)NS-2250# reboot backup↵
Do you really want to reboot with backup system and startup1 [y/n] ? y↵

5-24
(2) ROM モニタによる起動システムソフトウェアの切り替え
装置の電源 ON 時もしくは shutdown コマンド実行後に読み込むシステムソフトウェアを
ROM モニタで指定することができます。 システムソフトウェア(main)が何らかの理由により起動できない場合は、ROM モニタで、
boot –b コマンドを実行して、システムソフトウェア(backup)で起動してください。 ROM モニタによる起動システムソフトウェアの切り替え手順を以下に説明します。
①本装置の CONSOLE ポートに装置管理端末を接続します。
②本装置の電源を ON にして、装置管理端末に“Hit Enter key to stop autoboot:”が
表示されたら、すぐにリターンキーを押下し、ROM モニタの MON>プロンプトを表
示させます。
Hit Enter key to stop autoboot:
MON>
③boot コマンドに-b オプションを指定して、システムソフトウェア(backup)を 起動します。
MON> boot -b↵
ROM Boot
:
ROM モニタの詳細は「付録 D ROM モニタ」を参照してください。
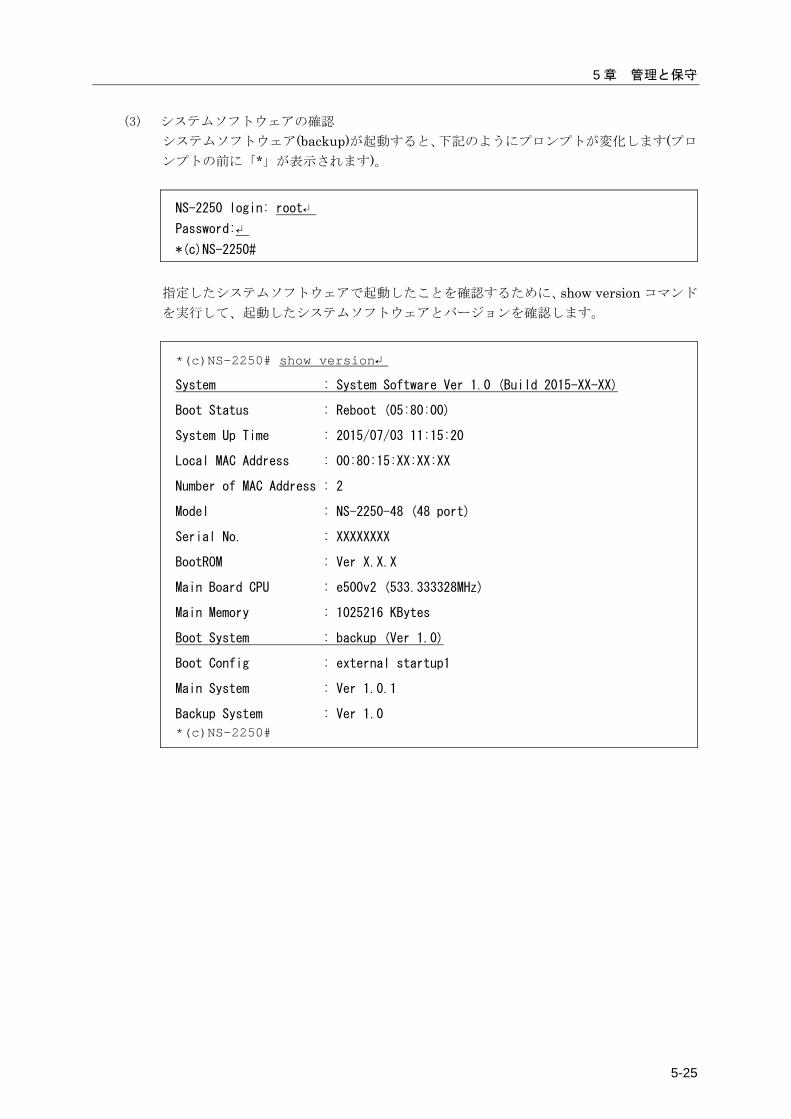
5 章 管理と保守
5-25
(3) システムソフトウェアの確認
システムソフトウェア(backup)が起動すると、下記のようにプロンプトが変化します(プロ
ンプトの前に「*」が表示されます)。
NS-2250 login: root↵
Password:↵
*(c)NS-2250#
指定したシステムソフトウェアで起動したことを確認するために、show version コマンド
を実行して、起動したシステムソフトウェアとバージョンを確認します。
*(c)NS-2250# show version↵
System : System Software Ver 1.0 (Build 2015-XX-XX)
Boot Status : Reboot (05:80:00)
System Up Time : 2015/07/03 11:15:20
Local MAC Address : 00:80:15:XX:XX:XX
Number of MAC Address : 2
Model : NS-2250-48 (48 port)
Serial No. : XXXXXXXX
BootROM : Ver X.X.X
Main Board CPU : e500v2 (533.333328MHz)
Main Memory : 1025216 KBytes
Boot System : backup (Ver 1.0)
Boot Config : external startup1
Main System : Ver 1.0.1
Backup System : Ver 1.0
*(c)NS-2250#

5-26
5.5.2 システムソフトウェアのコピー 本装置のシステムソフトウェアは、main と backup 間でコピーすることができます。 システムソフトウェア(main)をシステムソフトウェア(backup)にコピーするには、下記の
ように copy system コマンドを実行します。
(c)NS-2250# copy system main to backup↲
Do you copy main system to backup system [y/n] ? y↲
Please wait a few minutes...done.
copy successful
(c)NS-2250#
5.5.3 システムソフトウェアの復旧 万が一、システムソフトウェア(main)が壊れて起動できない状態に陥っても、システムソ
フトウェアのコピー機能を利用すれば、システムソフトウェア(backup)をシステムソフト
ウェア(main)にコピーして、システムソフトウェア(main)を復旧することが可能です。 システムソフトウェア(backup)をシステムソフトウェア(main)にコピーする場合は、シス
テムソフトウェア(backup)で起動した後で、下記のように copy system コマンドを実行し
ます。
MON> boot -b↲
ROM Boot
:
NS-2250 login: root↲
Password: ↲
*(c)NS-2250# copy system backup to main↲
Do you copy backup system to main system [y/n] ? y↲
Please wait a few minutes...done.
copy successful
*(c)NS-2250#
ROM モニタの詳細は「付録 D ROM モニタ」を参照してください。
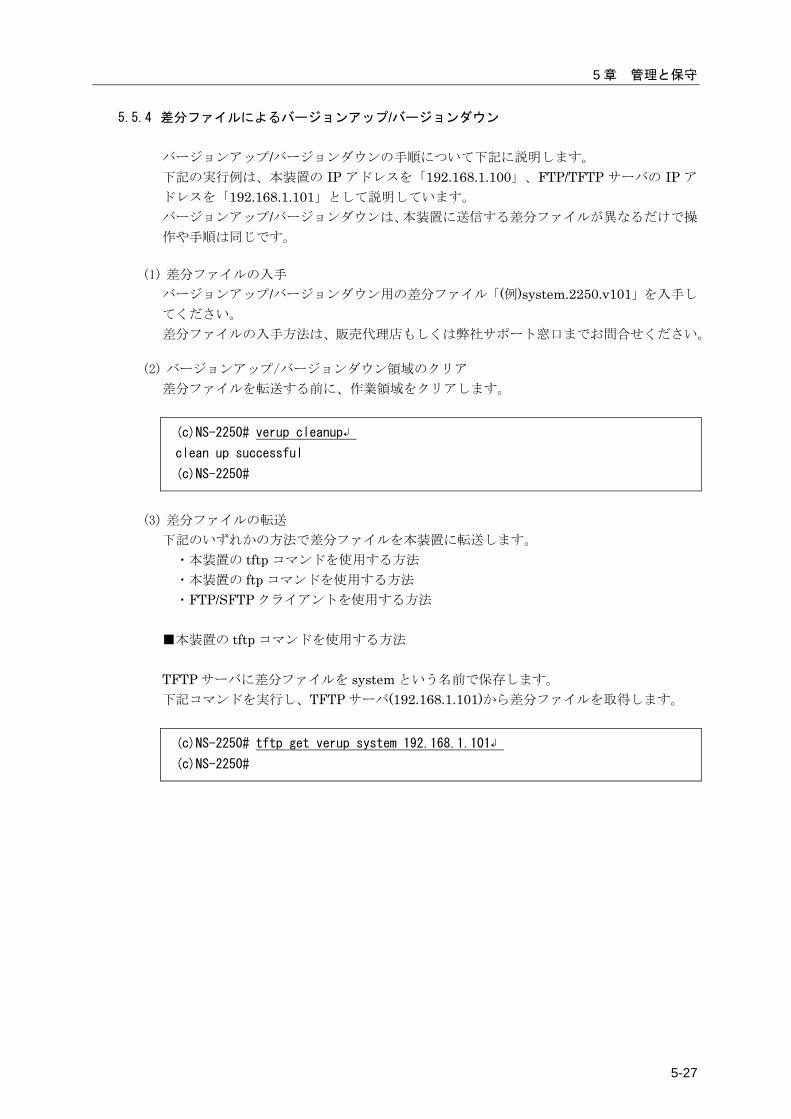
5 章 管理と保守
5-27
5.5.4 差分ファイルによるバージョンアップ/バージョンダウン バージョンアップ/バージョンダウンの手順について下記に説明します。 下記の実行例は、本装置の IP アドレスを「192.168.1.100」、FTP/TFTP サーバの IP ア
ドレスを「192.168.1.101」として説明しています。 バージョンアップ/バージョンダウンは、本装置に送信する差分ファイルが異なるだけで操
作や手順は同じです。
(1) 差分ファイルの入手
バージョンアップ/バージョンダウン用の差分ファイル「(例)system.2250.v101」を入手し
てください。 差分ファイルの入手方法は、販売代理店もしくは弊社サポート窓口までお問合せください。
(2) バージョンアップ/バージョンダウン領域のクリア
差分ファイルを転送する前に、作業領域をクリアします。 (c)NS-2250# verup cleanup↲
clean up successful
(c)NS-2250#
(3) 差分ファイルの転送
下記のいずれかの方法で差分ファイルを本装置に転送します。 ・本装置の tftp コマンドを使用する方法 ・本装置の ftp コマンドを使用する方法 ・FTP/SFTP クライアントを使用する方法 ■本装置の tftp コマンドを使用する方法 TFTP サーバに差分ファイルを system という名前で保存します。 下記コマンドを実行し、TFTP サーバ(192.168.1.101)から差分ファイルを取得します。 (c)NS-2250# tftp get verup system 192.168.1.101↲
(c)NS-2250#
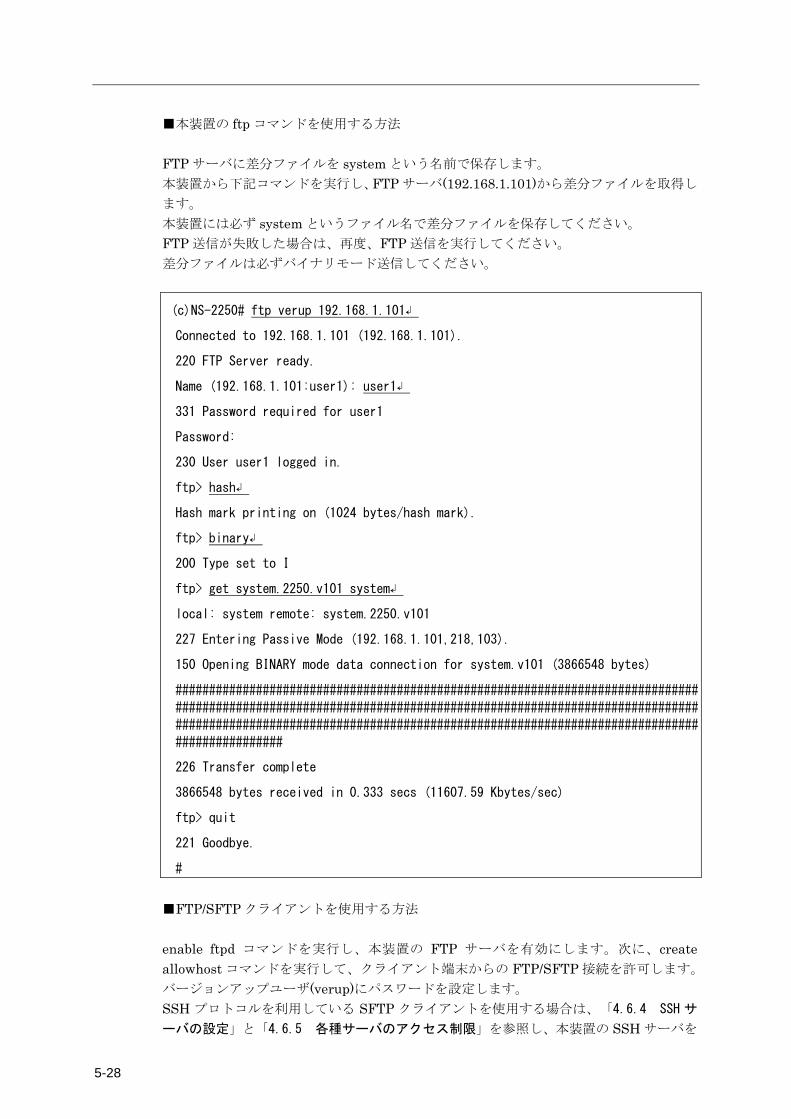
5-28
■本装置の ftp コマンドを使用する方法 FTP サーバに差分ファイルを system という名前で保存します。 本装置から下記コマンドを実行し、FTP サーバ(192.168.1.101)から差分ファイルを取得し
ます。 本装置には必ず system というファイル名で差分ファイルを保存してください。 FTP 送信が失敗した場合は、再度、FTP 送信を実行してください。 差分ファイルは必ずバイナリモード送信してください。
(c)NS-2250# ftp verup 192.168.1.101↲
Connected to 192.168.1.101 (192.168.1.101).
220 FTP Server ready.
Name (192.168.1.101:user1): user1↲
331 Password required for user1
Password:
230 User user1 logged in.
ftp> hash↲
Hash mark printing on (1024 bytes/hash mark).
ftp> binary↲
200 Type set to I
ftp> get system.2250.v101 system↲
local: system remote: system.2250.v101
227 Entering Passive Mode (192.168.1.101,218,103).
150 Opening BINARY mode data connection for system.v101 (3866548 bytes)
##############################################################################
##############################################################################
##############################################################################
################
226 Transfer complete
3866548 bytes received in 0.333 secs (11607.59 Kbytes/sec)
ftp> quit
221 Goodbye.
#
■FTP/SFTP クライアントを使用する方法 enable ftpd コマンドを実行し、本装置の FTP サーバを有効にします。次に、create allowhost コマンドを実行して、クライアント端末からの FTP/SFTP 接続を許可します。 バージョンアップユーザ(verup)にパスワードを設定します。 SSH プロトコルを利用している SFTP クライアントを使用する場合は、「4.6.4 SSH サ
ーバの設定」と「4.6.5 各種サーバのアクセス制限」を参照し、本装置の SSH サーバを

5 章 管理と保守
5-29
設定してください。 (c)NS-2250# enable ftpd↵
(c)NS-2250# create allowhost 192.168.1.0/24 service ftpd↵
(c)NS-2250# set user verup password↵
Changing password for user verup.
New password: ↵
Retype new password: ↵
Password for verup changed
(c)NS-2250#
FTP/SFTP クライアントから本装置に差分ファイルを転送します。 本装置には必ず NS-2250.sys というファイル名でフルイメージを保存してください。 FTP/SFTP 送信が失敗した場合は、再度、FTP/SFTP 送信を実行してください。 フルイメージは必ずバイナリモード送信してください。 $ ftp 192.168.1.100↲
Connected to 192.168.1.100 (192.168.1.100).
220 192.168.1.100 FTP server ready
Name (192.168.1.100:verup): verup↲
Password: ↲
------------------------------------------
Welcome to NS-2250.
"/verupfiles" : version-up files
"/support" : support files
------------------------------------------
230 User verup logged in
ftp> hash↲
Hash mark printing on (1024 bytes/hash mark).
ftp> binary↲
200 Type set to I
ftp> cd verupfiles↲
250 CWD command successful
ftp> put system.2250.v101 system↲
local: system.2250.v101 remote: system
227 Entering Passive Mode (192,168,1,100,179,8).
150 Opening BINARY mode data connection for system.2250.v101
#####################
ftp> quit↲
221 Goodbye.
$
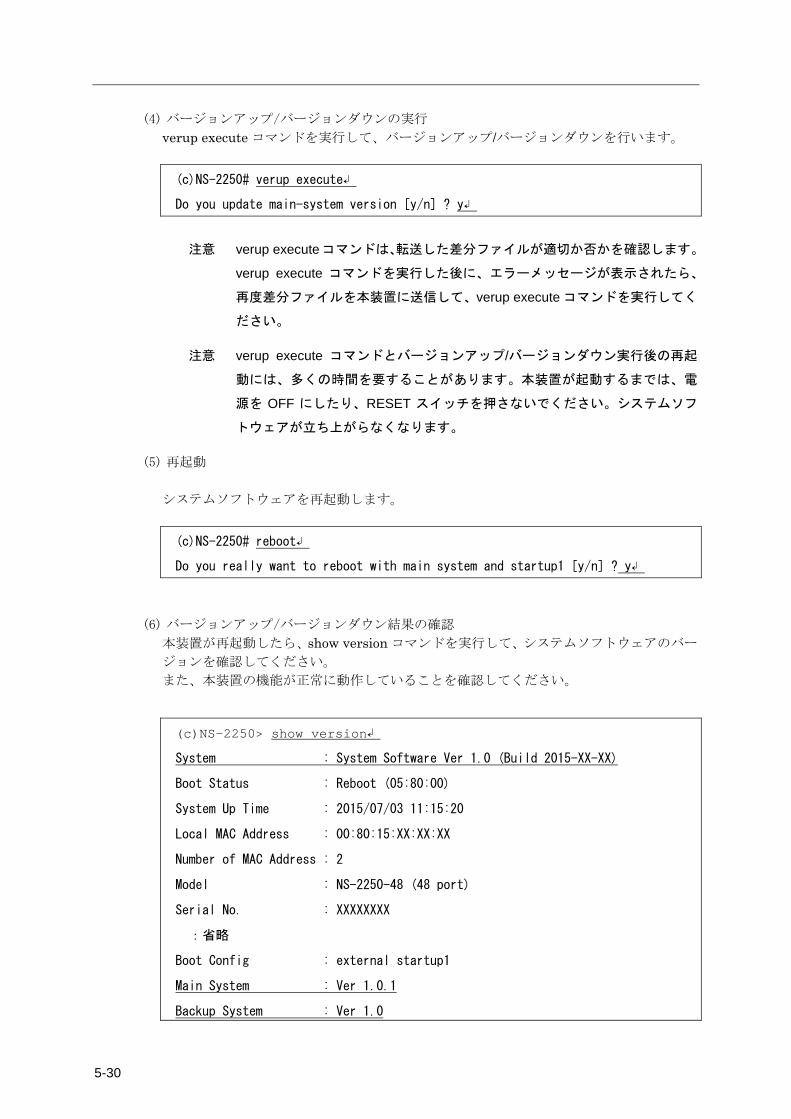
5-30
(4) バージョンアップ/バージョンダウンの実行
verup execute コマンドを実行して、バージョンアップ/バージョンダウンを行います。 (c)NS-2250# verup execute↲
Do you update main-system version [y/n] ? y↲
注意 verup executeコマンドは、転送した差分ファイルが適切か否かを確認します。
verup execute コマンドを実行した後に、エラーメッセージが表示されたら、
再度差分ファイルを本装置に送信して、verup execute コマンドを実行してく
ださい。
注意 verup execute コマンドとバージョンアップ/バージョンダウン実行後の再起
動には、多くの時間を要することがあります。本装置が起動するまでは、電
源を OFF にしたり、RESET スイッチを押さないでください。システムソフ
トウェアが立ち上がらなくなります。
(5) 再起動
システムソフトウェアを再起動します。 (c)NS-2250# reboot↲
Do you really want to reboot with main system and startup1 [y/n] ? y↲
(6) バージョンアップ/バージョンダウン結果の確認
本装置が再起動したら、show version コマンドを実行して、システムソフトウェアのバー
ジョンを確認してください。 また、本装置の機能が正常に動作していることを確認してください。 (c)NS-2250> show version↲
System : System Software Ver 1.0 (Build 2015-XX-XX)
Boot Status : Reboot (05:80:00)
System Up Time : 2015/07/03 11:15:20
Local MAC Address : 00:80:15:XX:XX:XX
Number of MAC Address : 2
Model : NS-2250-48 (48 port)
Serial No. : XXXXXXXX
:省略
Boot Config : external startup1
Main System : Ver 1.0.1
Backup System : Ver 1.0
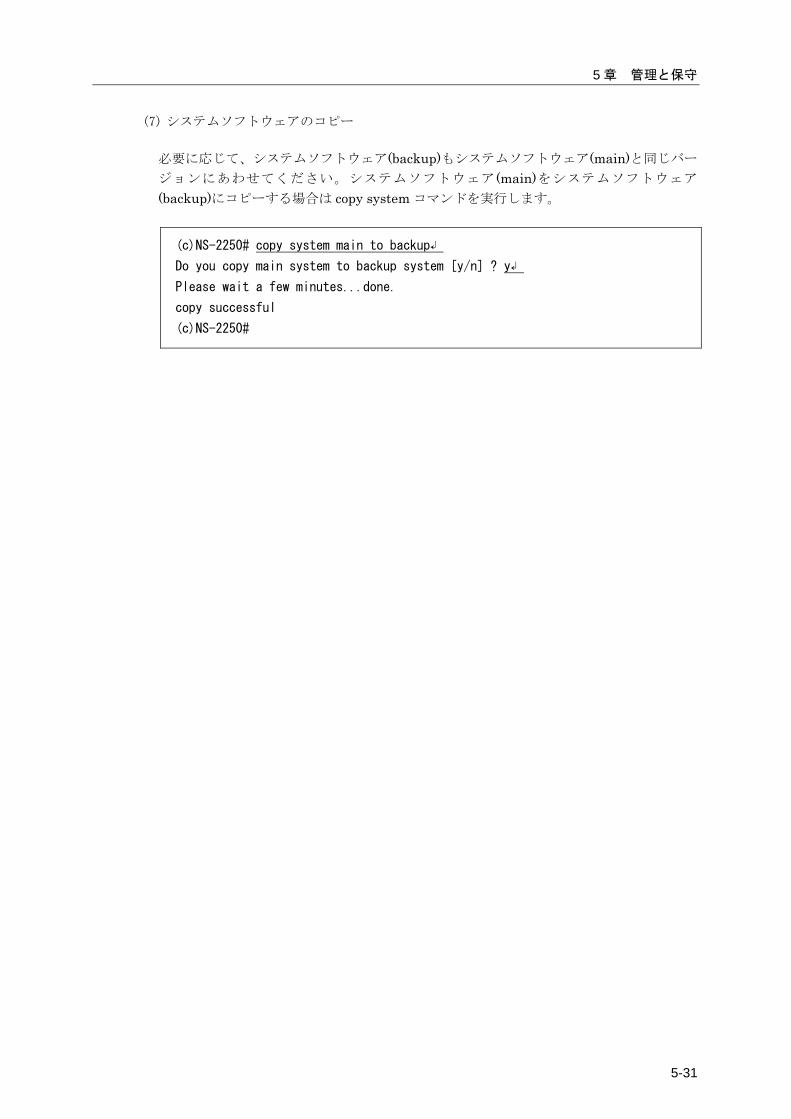
5 章 管理と保守
5-31
(7) システムソフトウェアのコピー
必要に応じて、システムソフトウェア(backup)もシステムソフトウェア(main)と同じバー
ジョンにあわせてください。システムソフトウェア (main)をシステムソフトウェア
(backup)にコピーする場合は copy system コマンドを実行します。
(c)NS-2250# copy system main to backup↲
Do you copy main system to backup system [y/n] ? y↲
Please wait a few minutes...done.
copy successful
(c)NS-2250#
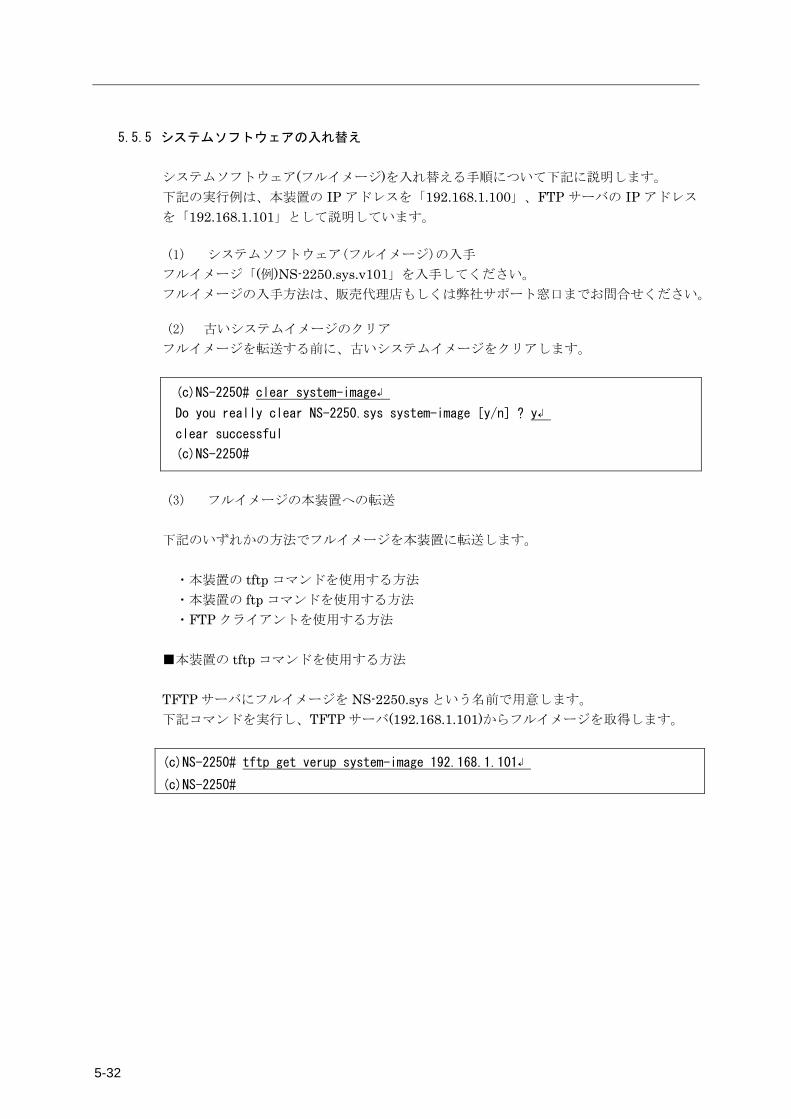
5-32
5.5.5 システムソフトウェアの入れ替え システムソフトウェア(フルイメージ)を入れ替える手順について下記に説明します。 下記の実行例は、本装置の IP アドレスを「192.168.1.100」、FTP サーバの IP アドレス
を「192.168.1.101」として説明しています。 (1) システムソフトウェア(フルイメージ)の入手
フルイメージ「(例)NS-2250.sys.v101」を入手してください。 フルイメージの入手方法は、販売代理店もしくは弊社サポート窓口までお問合せください。
(2) 古いシステムイメージのクリア
フルイメージを転送する前に、古いシステムイメージをクリアします。 (c)NS-2250# clear system-image↲
Do you really clear NS-2250.sys system-image [y/n] ? y↲
clear successful
(c)NS-2250#
(3) フルイメージの本装置への転送
下記のいずれかの方法でフルイメージを本装置に転送します。 ・本装置の tftp コマンドを使用する方法 ・本装置の ftp コマンドを使用する方法 ・FTP クライアントを使用する方法 ■本装置の tftp コマンドを使用する方法 TFTP サーバにフルイメージを NS-2250.sys という名前で用意します。 下記コマンドを実行し、TFTP サーバ(192.168.1.101)からフルイメージを取得します。 (c)NS-2250# tftp get verup system-image 192.168.1.101↲
(c)NS-2250#
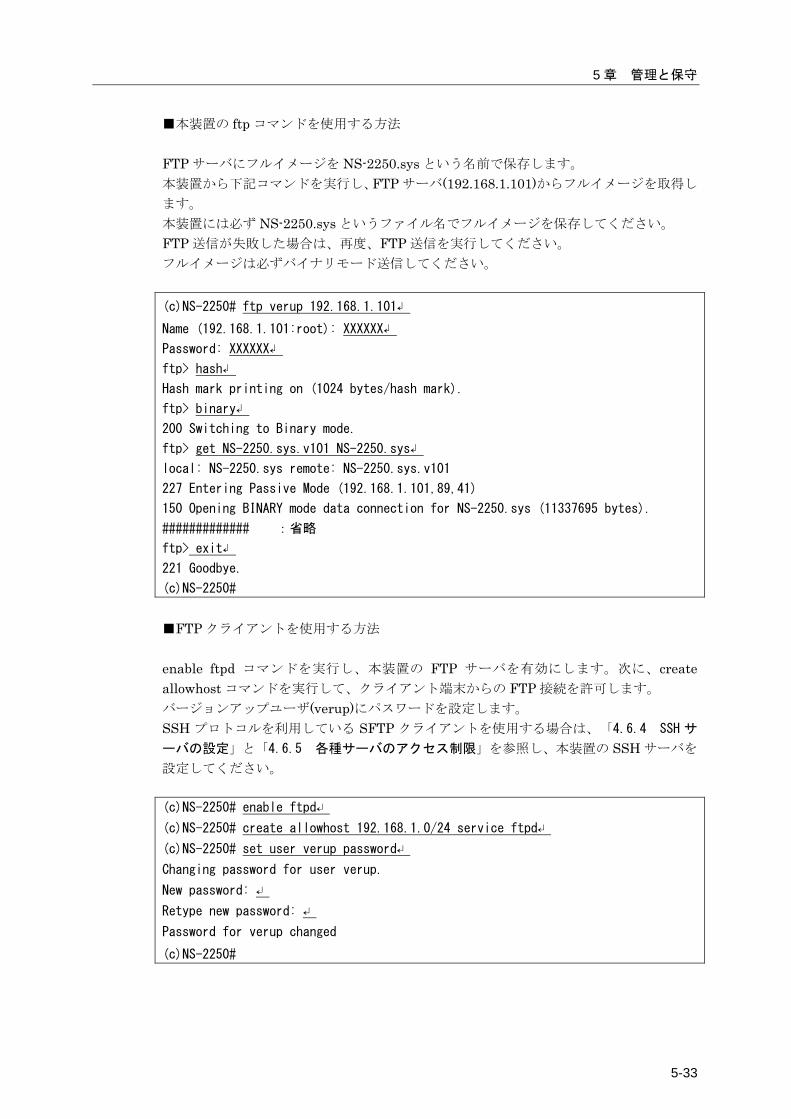
5 章 管理と保守
5-33
■本装置の ftp コマンドを使用する方法 FTP サーバにフルイメージを NS-2250.sys という名前で保存します。 本装置から下記コマンドを実行し、FTP サーバ(192.168.1.101)からフルイメージを取得し
ます。 本装置には必ず NS-2250.sys というファイル名でフルイメージを保存してください。 FTP 送信が失敗した場合は、再度、FTP 送信を実行してください。 フルイメージは必ずバイナリモード送信してください。 (c)NS-2250# ftp verup 192.168.1.101↲
Name (192.168.1.101:root): XXXXXX↲
Password: XXXXXX↲
ftp> hash↲
Hash mark printing on (1024 bytes/hash mark).
ftp> binary↲
200 Switching to Binary mode.
ftp> get NS-2250.sys.v101 NS-2250.sys↲
local: NS-2250.sys remote: NS-2250.sys.v101
227 Entering Passive Mode (192.168.1.101,89,41)
150 Opening BINARY mode data connection for NS-2250.sys (11337695 bytes).
############# :省略
ftp> exit↲
221 Goodbye.
(c)NS-2250# ■FTP クライアントを使用する方法 enable ftpd コマンドを実行し、本装置の FTP サーバを有効にします。次に、create allowhost コマンドを実行して、クライアント端末からの FTP 接続を許可します。 バージョンアップユーザ(verup)にパスワードを設定します。 SSH プロトコルを利用している SFTP クライアントを使用する場合は、「4.6.4 SSH サ
ーバの設定」と「4.6.5 各種サーバのアクセス制限」を参照し、本装置の SSH サーバを
設定してください。 (c)NS-2250# enable ftpd↵
(c)NS-2250# create allowhost 192.168.1.0/24 service ftpd↵
(c)NS-2250# set user verup password↵
Changing password for user verup.
New password: ↵
Retype new password: ↵
Password for verup changed
(c)NS-2250#

5-34
FTP クライアントから本装置にフルイメージを転送します。 本装置には必ず NS-2250.sys というファイル名でフルイメージを保存してください。 FTP 送信に失敗した場合は、再度、実行してください。 フルイメージは必ずバイナリモード送信してください。 $ ftp 192.168.1.100↲
Connected to 192.168.1.100 (192.168.1.100).
220 192.168.1.100 FTP server ready
Name (192.168.1.100:verup): verup↲
331 Password required for verup
Password: ↲
230-
------------------------------------------
Welcome to NS-2250.
"/verupfiles" : version-up files
"/support" : support files
------------------------------------------
230 User verup logged in
Remote system type is UNIX.
Using binary mode to transfer files.
ftp> hash↲
Hash mark printing on (1024 bytes/hash mark).
ftp> binary↲
200 Type set to I
ftp> cd verupfiles↲
250 CWD command successful
ftp> put NS-2250.sys.v101 NS-2250.sys↲
local: NS-2250.sys.v101 remote: NS-2250.sys
227 Entering Passive Mode (192,168,1,100,179,8).
150 Opening BINARY mode data connection for NS-2250.sys
#####################
ftp> quit↲
221 Goodbye.
$ (4) 転送したフルイメージのバージョン確認
転送したフルイメージのバージョンを確認します。
(c)NS-2250# show system-image↲
System Image Name : NS-2250.sys
Product : NS-2250
Version : 1.0.1
Date : 2015-XX-XX
Status : available
(c)NS-2250#
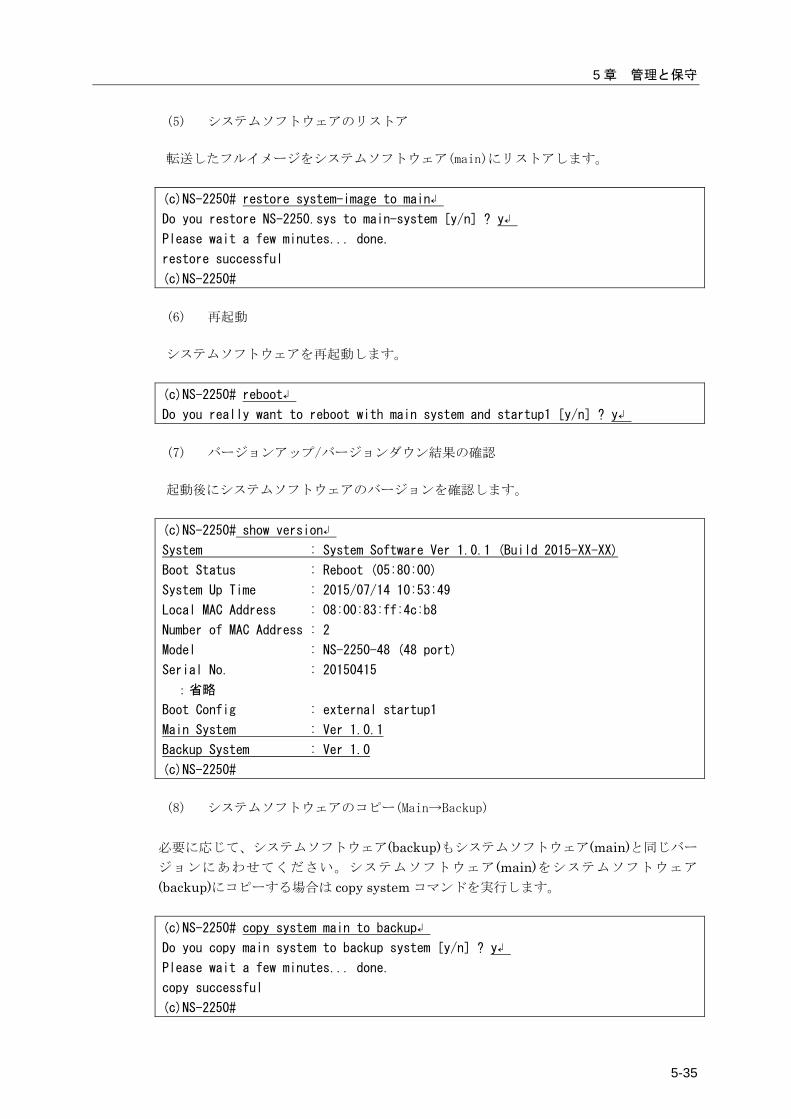
5 章 管理と保守
5-35
(5) システムソフトウェアのリストア
転送したフルイメージをシステムソフトウェア(main)にリストアします。
(c)NS-2250# restore system-image to main↲
Do you restore NS-2250.sys to main-system [y/n] ? y↲
Please wait a few minutes... done.
restore successful
(c)NS-2250# (6) 再起動
システムソフトウェアを再起動します。
(c)NS-2250# reboot↲
Do you really want to reboot with main system and startup1 [y/n] ? y↲ (7) バージョンアップ/バージョンダウン結果の確認
起動後にシステムソフトウェアのバージョンを確認します。
(c)NS-2250# show version↲
System : System Software Ver 1.0.1 (Build 2015-XX-XX)
Boot Status : Reboot (05:80:00)
System Up Time : 2015/07/14 10:53:49
Local MAC Address : 08:00:83:ff:4c:b8
Number of MAC Address : 2
Model : NS-2250-48 (48 port)
Serial No. : 20150415
:省略
Boot Config : external startup1
Main System : Ver 1.0.1
Backup System : Ver 1.0
(c)NS-2250# (8) システムソフトウェアのコピー(Main→Backup)
必要に応じて、システムソフトウェア(backup)もシステムソフトウェア(main)と同じバー
ジョンにあわせてください。システムソフトウェア (main)をシステムソフトウェア
(backup)にコピーする場合は copy system コマンドを実行します。 (c)NS-2250# copy system main to backup↲
Do you copy main system to backup system [y/n] ? y↲
Please wait a few minutes... done.
copy successful
(c)NS-2250#
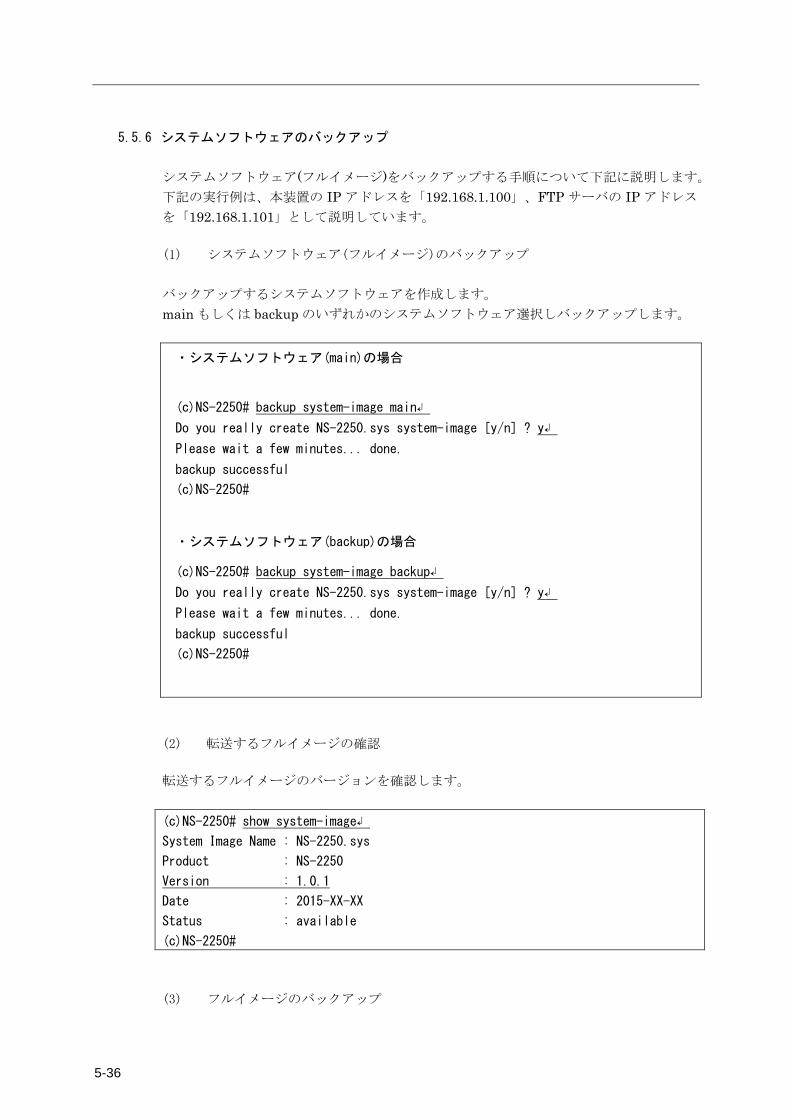
5-36
5.5.6 システムソフトウェアのバックアップ システムソフトウェア(フルイメージ)をバックアップする手順について下記に説明します。 下記の実行例は、本装置の IP アドレスを「192.168.1.100」、FTP サーバの IP アドレス
を「192.168.1.101」として説明しています。 (1) システムソフトウェア(フルイメージ)のバックアップ
バックアップするシステムソフトウェアを作成します。 main もしくは backup のいずれかのシステムソフトウェア選択しバックアップします。 ・システムソフトウェア(main)の場合
(c)NS-2250# backup system-image main↲
Do you really create NS-2250.sys system-image [y/n] ? y↲
Please wait a few minutes... done.
backup successful
(c)NS-2250#
・システムソフトウェア(backup)の場合
(c)NS-2250# backup system-image backup↲
Do you really create NS-2250.sys system-image [y/n] ? y↲
Please wait a few minutes... done.
backup successful
(c)NS-2250#
(2) 転送するフルイメージの確認
転送するフルイメージのバージョンを確認します。 (c)NS-2250# show system-image↲
System Image Name : NS-2250.sys
Product : NS-2250
Version : 1.0.1
Date : 2015-XX-XX
Status : available
(c)NS-2250# (3) フルイメージのバックアップ
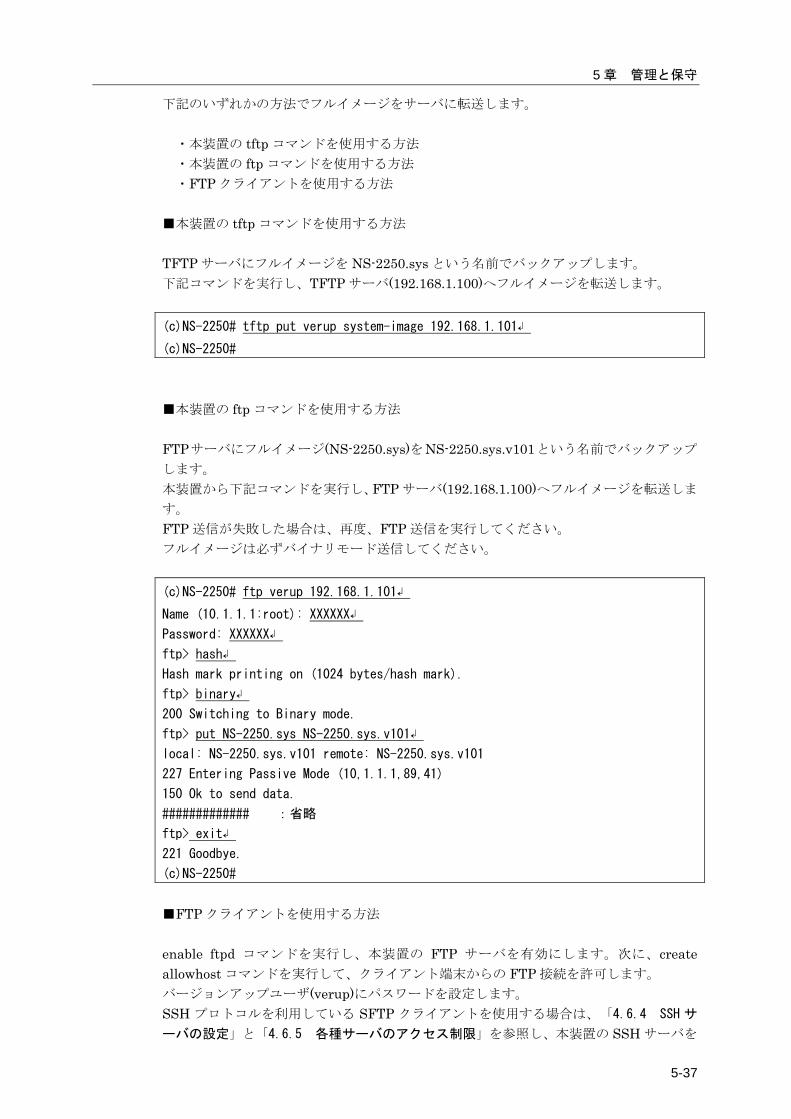
5 章 管理と保守
5-37
下記のいずれかの方法でフルイメージをサーバに転送します。 ・本装置の tftp コマンドを使用する方法 ・本装置の ftp コマンドを使用する方法 ・FTP クライアントを使用する方法 ■本装置の tftp コマンドを使用する方法 TFTP サーバにフルイメージを NS-2250.sys という名前でバックアップします。 下記コマンドを実行し、TFTP サーバ(192.168.1.100)へフルイメージを転送します。 (c)NS-2250# tftp put verup system-image 192.168.1.101↲
(c)NS-2250# ■本装置の ftp コマンドを使用する方法 FTPサーバにフルイメージ(NS-2250.sys)をNS-2250.sys.v101という名前でバックアップ
します。 本装置から下記コマンドを実行し、FTP サーバ(192.168.1.100)へフルイメージを転送しま
す。 FTP 送信が失敗した場合は、再度、FTP 送信を実行してください。 フルイメージは必ずバイナリモード送信してください。 (c)NS-2250# ftp verup 192.168.1.101↲
Name (10.1.1.1:root): XXXXXX↲
Password: XXXXXX↲
ftp> hash↲
Hash mark printing on (1024 bytes/hash mark).
ftp> binary↲
200 Switching to Binary mode.
ftp> put NS-2250.sys NS-2250.sys.v101↲
local: NS-2250.sys.v101 remote: NS-2250.sys.v101
227 Entering Passive Mode (10,1.1.1,89,41)
150 Ok to send data.
############# :省略
ftp> exit↲
221 Goodbye.
(c)NS-2250# ■FTP クライアントを使用する方法 enable ftpd コマンドを実行し、本装置の FTP サーバを有効にします。次に、create allowhost コマンドを実行して、クライアント端末からの FTP 接続を許可します。 バージョンアップユーザ(verup)にパスワードを設定します。 SSH プロトコルを利用している SFTP クライアントを使用する場合は、「4.6.4 SSH サ
ーバの設定」と「4.6.5 各種サーバのアクセス制限」を参照し、本装置の SSH サーバを
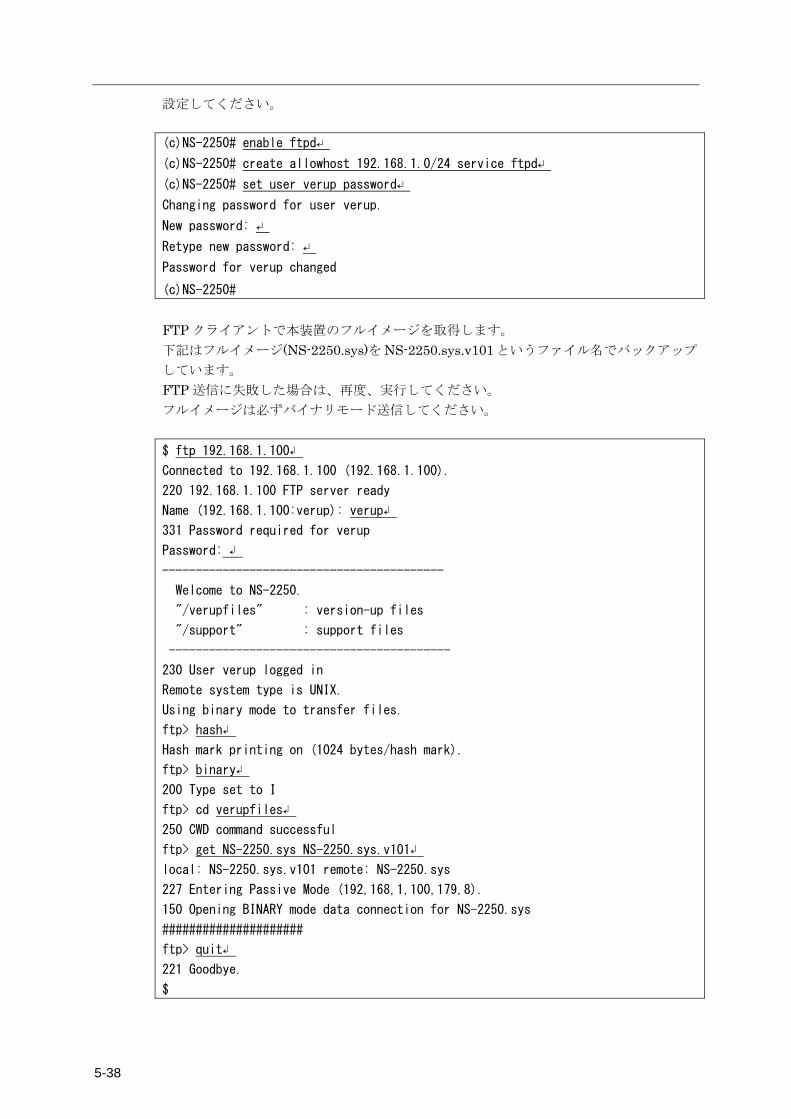
5-38
設定してください。 (c)NS-2250# enable ftpd↵
(c)NS-2250# create allowhost 192.168.1.0/24 service ftpd↵
(c)NS-2250# set user verup password↵
Changing password for user verup.
New password: ↵
Retype new password: ↵
Password for verup changed
(c)NS-2250# FTP クライアントで本装置のフルイメージを取得します。 下記はフルイメージ(NS-2250.sys)をNS-2250.sys.v101というファイル名でバックアップ
しています。 FTP 送信に失敗した場合は、再度、実行してください。 フルイメージは必ずバイナリモード送信してください。 $ ftp 192.168.1.100↲
Connected to 192.168.1.100 (192.168.1.100).
220 192.168.1.100 FTP server ready
Name (192.168.1.100:verup): verup↲
331 Password required for verup
Password: ↲
------------------------------------------
Welcome to NS-2250.
"/verupfiles" : version-up files
"/support" : support files
------------------------------------------
230 User verup logged in
Remote system type is UNIX.
Using binary mode to transfer files.
ftp> hash↲
Hash mark printing on (1024 bytes/hash mark).
ftp> binary↲
200 Type set to I
ftp> cd verupfiles↲
250 CWD command successful
ftp> get NS-2250.sys NS-2250.sys.v101↲
local: NS-2250.sys.v101 remote: NS-2250.sys
227 Entering Passive Mode (192,168,1,100,179,8).
150 Opening BINARY mode data connection for NS-2250.sys
#####################
ftp> quit↲
221 Goodbye.
$
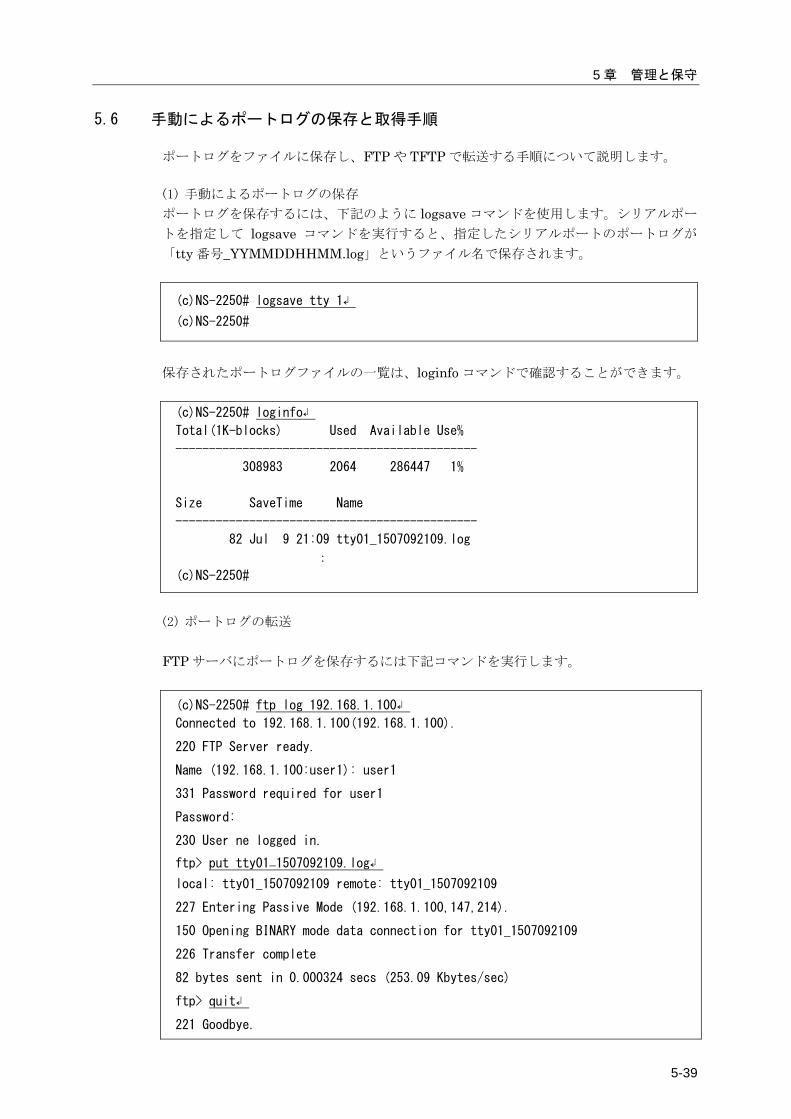
5 章 管理と保守
5-39
5.6 手動によるポートログの保存と取得手順
ポートログをファイルに保存し、FTP や TFTP で転送する手順について説明します。 (1) 手動によるポートログの保存
ポートログを保存するには、下記のように logsave コマンドを使用します。シリアルポー
トを指定して logsave コマンドを実行すると、指定したシリアルポートのポートログが
「tty 番号_YYMMDDHHMM.log」というファイル名で保存されます。
(c)NS-2250# logsave tty 1↲
(c)NS-2250#
保存されたポートログファイルの一覧は、loginfo コマンドで確認することができます。 (c)NS-2250# loginfo↲
Total(1K-blocks) Used Available Use%
---------------------------------------------
308983 2064 286447 1%
Size SaveTime Name
---------------------------------------------
82 Jul 9 21:09 tty01_1507092109.log
:
(c)NS-2250#
(2) ポートログの転送
FTP サーバにポートログを保存するには下記コマンドを実行します。 (c)NS-2250# ftp log 192.168.1.100↲
Connected to 192.168.1.100(192.168.1.100).
220 FTP Server ready.
Name (192.168.1.100:user1): user1
331 Password required for user1
Password:
230 User ne logged in.
ftp> put tty01_1507092109.log↲
local: tty01_1507092109 remote: tty01_1507092109
227 Entering Passive Mode (192.168.1.100,147,214).
150 Opening BINARY mode data connection for tty01_1507092109
226 Transfer complete
82 bytes sent in 0.000324 secs (253.09 Kbytes/sec)
ftp> quit↲
221 Goodbye.

5-40
TFTP サーバにポートログを保存するには下記コマンドを実行します。
(c)NS-2250# tftp put log tty01_1507092109.log 192.168.1.100↲
(c)NS-2250#
FTP クライアントからポートログを取得する場合は下記の作業を実行します。 FTP クライアントからポートログを取得する前に、FTP クライアントから本装置にログ
取得ユーザ(log)でアクセスできるように設定します。 SSH プロトコルを利用している SFTP クライアントを使用する場合は、「4.6.4 SSH サ
ーバの設定」と「4.6.5 各種サーバのアクセス制限」 を参照し、本装置の SSH サーバ
を設定してください。 (c)NS-2250# enable ftp↲
(c)NS-2250# create allowhost all service ftpd↲
(c)NS-2250# set user log password↲
Changing password for user log.
New password: ↲
Retype new password: ↲
Password for log changed
(c)NS-2250#
FTP クライアントから本装置にログ取得ユーザ(log)でログインし、保存したポートログが
あることを確認します。(他のディレクトリやファイルの操作は行わないでください。)
$ ftp 192.168.1.100↲
Connected to 192.168.1.100
220 (Welcome to FTP service.)
530 Please login with USER and PASS.
Name (192.168.1.100:log): log↲
331 Please specify the password.
Password: ↲
230 Login successful.
ftp> ls↲
227 Entering Passive Mode (192.168.1.100,222,247)
150 Here comes the directory listing.
drwxr-xr-x 3 200 0 1024 Oct 16 12:02 logfiles
226 Directory send OK.
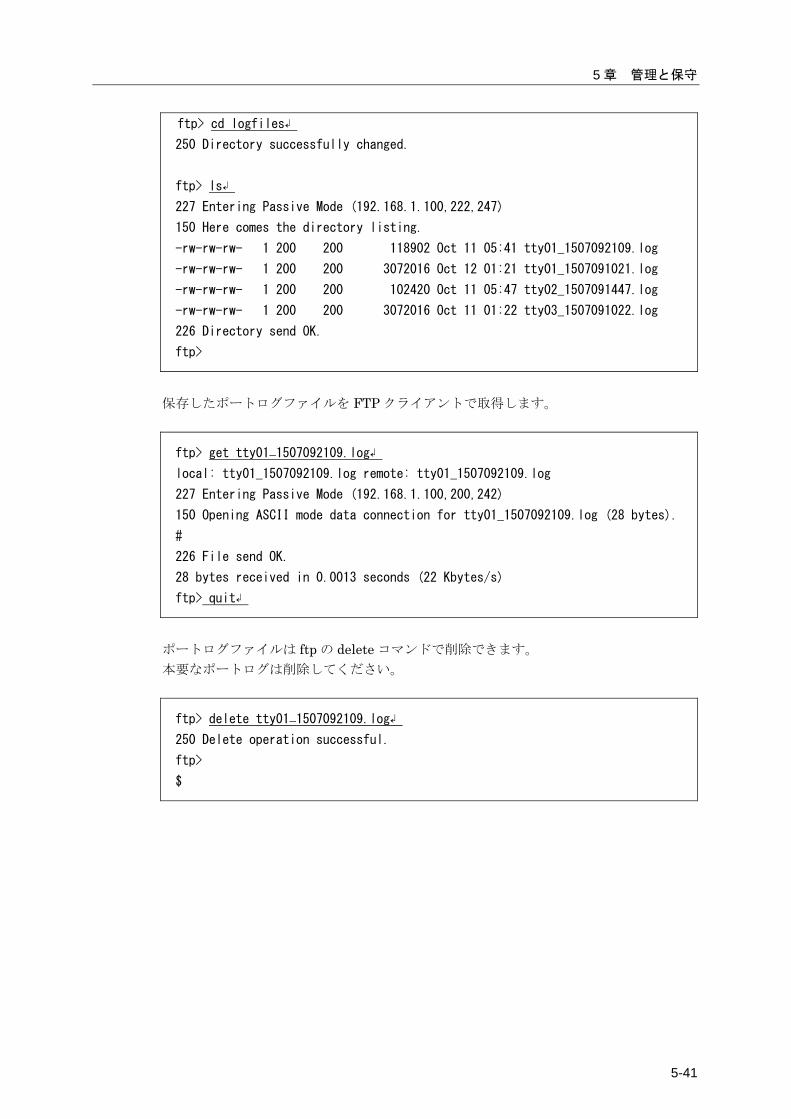
5 章 管理と保守
5-41
ftp> cd logfiles↲
250 Directory successfully changed.
ftp> ls↲
227 Entering Passive Mode (192.168.1.100,222,247)
150 Here comes the directory listing.
-rw-rw-rw- 1 200 200 118902 Oct 11 05:41 tty01_1507092109.log
-rw-rw-rw- 1 200 200 3072016 Oct 12 01:21 tty01_1507091021.log
-rw-rw-rw- 1 200 200 102420 Oct 11 05:47 tty02_1507091447.log
-rw-rw-rw- 1 200 200 3072016 Oct 11 01:22 tty03_1507091022.log
226 Directory send OK.
ftp>
保存したポートログファイルを FTP クライアントで取得します。
ftp> get tty01_1507092109.log↲
local: tty01_1507092109.log remote: tty01_1507092109.log
227 Entering Passive Mode (192.168.1.100,200,242)
150 Opening ASCII mode data connection for tty01_1507092109.log (28 bytes).
#
226 File send OK.
28 bytes received in 0.0013 seconds (22 Kbytes/s)
ftp> quit↲
ポートログファイルは ftp の delete コマンドで削除できます。 本要なポートログは削除してください。
ftp> delete tty01_1507092109.log↲
250 Delete operation successful.
ftp>
$
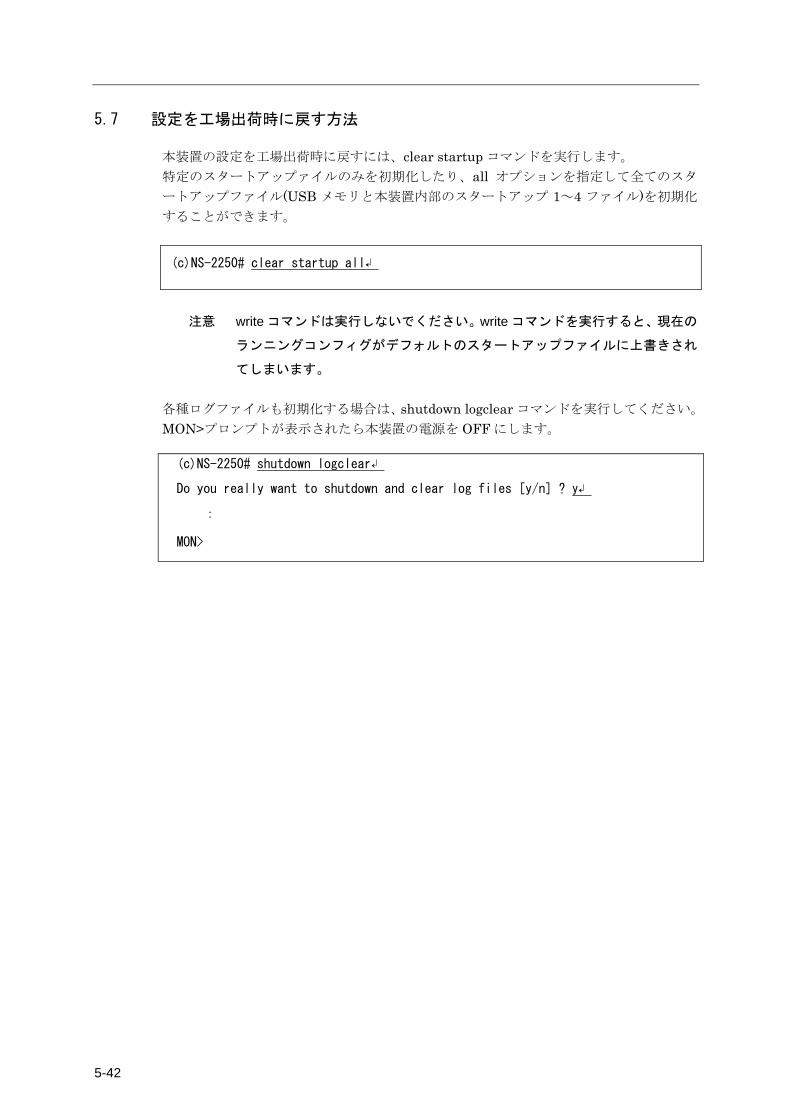
5-42
5.7 設定を工場出荷時に戻す方法
本装置の設定を工場出荷時に戻すには、clear startup コマンドを実行します。 特定のスタートアップァイルのみを初期化したり、all オプションを指定して全てのスタ
ートアップファイル(USB メモリと本装置内部のスタートアップ 1~4 ファイル)を初期化
することができます。
(c)NS-2250# clear startup all↲
注意 write コマンドは実行しないでください。write コマンドを実行すると、現在の
ランニングコンフィグがデフォルトのスタートアップファイルに上書きされ
てしまいます。 各種ログファイルも初期化する場合は、shutdown logclear コマンドを実行してください。
MON>プロンプトが表示されたら本装置の電源を OFF にします。
(c)NS-2250# shutdown logclear↲
Do you really want to shutdown and clear log files [y/n] ? y↲
:
MON>
6-1
6 章 トラブルシューティング
6 章では、本装置のトラブルシューティングについて説明しています。
本章の内容
6-2
6.1 トラブル処理の概要
本装置のトラブルは、本装置のハードウェア異常、ネットワーク通信の接続トラブル、シ
リアル通信の接続トラブルなどに切り分けられます。 本装置に何らかのトラブルが発生した場合は、その症状あるいは現象を把握し、本章を参
照して対処してください。 また、弊社ホームページの「技術情報」には、本装置の FAQ や技術情報などが掲載され
ていますので、以下の URL も参照してください。 http://www.seiko-sol.co.jp/ 弊社もしくは販売代理店へ問い合わせする場合は、設定や統計、エラー情報などを表示す
る show support コマンドの実行結果も送付してください。 詳細は「5.1.2 章 装置情報の一括表示」をご参照ください。
6 章 トラブルシューティング
6-3
6.2 本装置のハードウェアに関連するトラブル
ここでは本装置のハードウェアに関連するトラブルの対処方法について説明します。
6.2.1 電源が入らない場合の対処 下記の確認をしても本装置の電源が入らない(POWER ランプが点灯しない)場合は、本装
置の故障と考えられます。速やかに本装置の電源を OFF にして、電源ケーブルをはずし、
修理を依頼してください。
・電源ケーブルは、接続されていますか?
・電源スイッチは、ON になっていますか?(NS-2250-16/32/48/16D/32D/48D)
・コンセントに電源が供給されていますか?
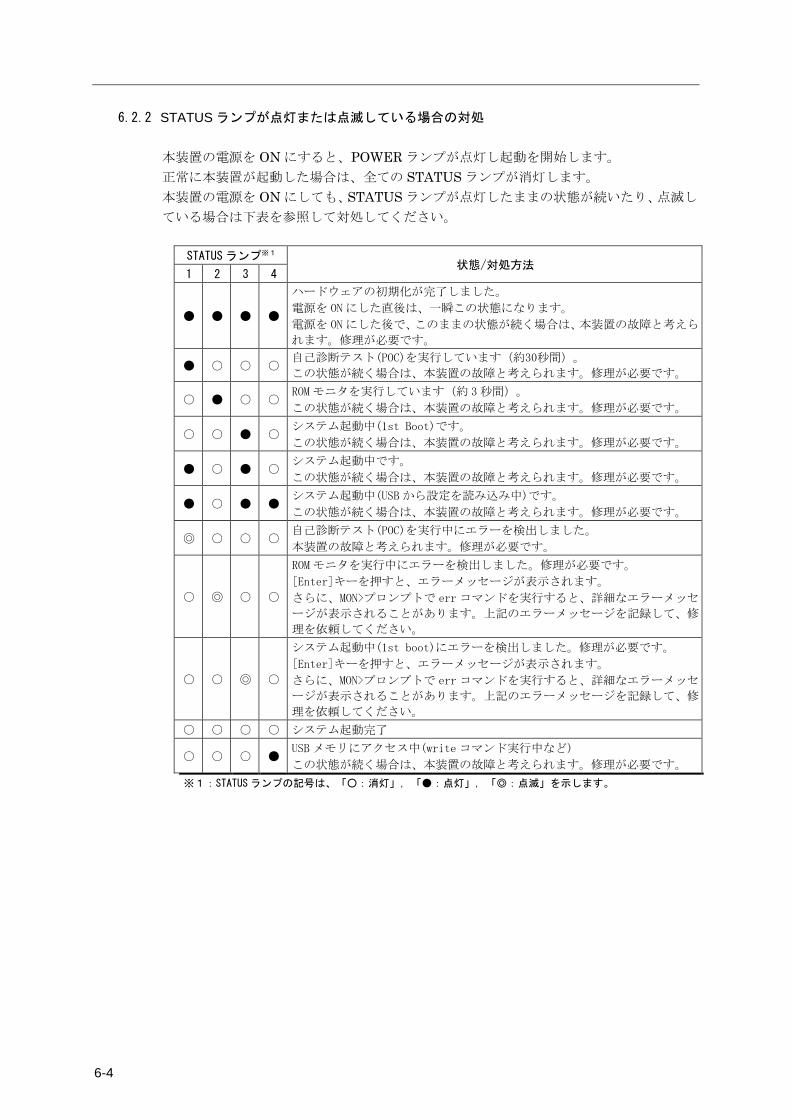
6-4
6.2.2 STATUS ランプが点灯または点滅している場合の対処 本装置の電源を ON にすると、POWER ランプが点灯し起動を開始します。 正常に本装置が起動した場合は、全ての STATUS ランプが消灯します。 本装置の電源を ON にしても、STATUS ランプが点灯したままの状態が続いたり、点滅し
ている場合は下表を参照して対処してください。
STATUSランプ※1 状態/対処方法
1 2 3 4
● ● ● ●
ハードウェアの初期化が完了しました。
電源を ONにした直後は、一瞬この状態になります。
電源を ONにした後で、このままの状態が続く場合は、本装置の故障と考えら
れます。修理が必要です。
● ○ ○ ○ 自己診断テスト(POC)を実行しています(約30秒間)。
この状態が続く場合は、本装置の故障と考えられます。修理が必要です。
○ ● ○ ○ ROMモニタを実行しています(約 3秒間)。
この状態が続く場合は、本装置の故障と考えられます。修理が必要です。
○ ○ ● ○ システム起動中(1st Boot)です。
この状態が続く場合は、本装置の故障と考えられます。修理が必要です。
● ○ ● ○ システム起動中です。
この状態が続く場合は、本装置の故障と考えられます。修理が必要です。
● ○ ● ● システム起動中(USBから設定を読み込み中)です。
この状態が続く場合は、本装置の故障と考えられます。修理が必要です。
◎ ○ ○ ○ 自己診断テスト(POC)を実行中にエラーを検出しました。
本装置の故障と考えられます。修理が必要です。
○ ◎ ○ ○
ROMモニタを実行中にエラーを検出しました。修理が必要です。
[Enter]キーを押すと、エラーメッセージが表示されます。
さらに、MON>プロンプトで err コマンドを実行すると、詳細なエラーメッセ
ージが表示されることがあります。上記のエラーメッセージを記録して、修
理を依頼してください。
○ ○ ◎ ○
システム起動中(1st boot)にエラーを検出しました。修理が必要です。
[Enter]キーを押すと、エラーメッセージが表示されます。
さらに、MON>プロンプトで err コマンドを実行すると、詳細なエラーメッセ
ージが表示されることがあります。上記のエラーメッセージを記録して、修
理を依頼してください。
○ ○ ○ ○ システム起動完了
○ ○ ○ ● USBメモリにアクセス中(writeコマンド実行中など)
この状態が続く場合は、本装置の故障と考えられます。修理が必要です。
※1:STATUS ランプの記号は、「○:消灯」,「●:点灯」,「◎:点滅」を示します。
6 章 トラブルシューティング
6-5
6.3 通信に関連するトラブルの対処
通信に関するトラブルは、下記の方法で切り分けることができます。
・コンソールログに保存されているエラーメッセージの確認
本装置の起動時あるいは通信中にエラーメッセージが表示されると、そのエラーメッ
セージはコンソールログに保存されます。トラブルが発生した場合は、コンソール
ログに保存されているエラーメッセージを確認することで対処することができます。
・設定の確認
本装置が意図したとおりに動作しない場合は、設定を確認することで対処できる場合
があります。
・本装置のランプの状態によるケーブル接続/通信状態の確認
ケーブルが正しく接続されているかどうか、あるいは物理的な障害が発生しているか
どうかの基本的な確認が行えます。
・コマンドによる通信状態の確認
本装置の通信状態あるいは統計情報を確認することができます。
トラブルシューティングに使用するコマンドの詳細は、次項以降または別冊の「コマンド
リファレンス」を参照してください。
6.3.1 コンソールログの確認 本装置が表示するメッセージ(コンソールメッセージ)は、CONSOLE ポートに出力される
と同時に、コンソールログにも保存されます。障害が発生した場合は、コンソールログを
参照してエラーの有無を確認してください。
本装置のコンソールメッセージをリアルタイムに確認したい場合は、本装置の CONSOLEポートに装置管理端末(ターミナルソフトを搭載したパソコンなど)を接続してください。
Telnet クライアントを使用してネットワーク上の端末から本装置にログインしている場
合は、su コマンドで装置管理ユーザに移行した後、console コマンドを実行して、コンソ
ールメッセージを Telnet クライアントにも表示されるようにしてください。 なお、su コマンドで装置管理ユーザになった後に、show log コマンドを実行すると、コ
ンソールログを再表示することができます。 全てのコンソールログを表示する場合
(c)NS-2250# show log console↲
最新の 20 行のコンソールログを表示する場合
(c)NS-2250# show log console 20↲
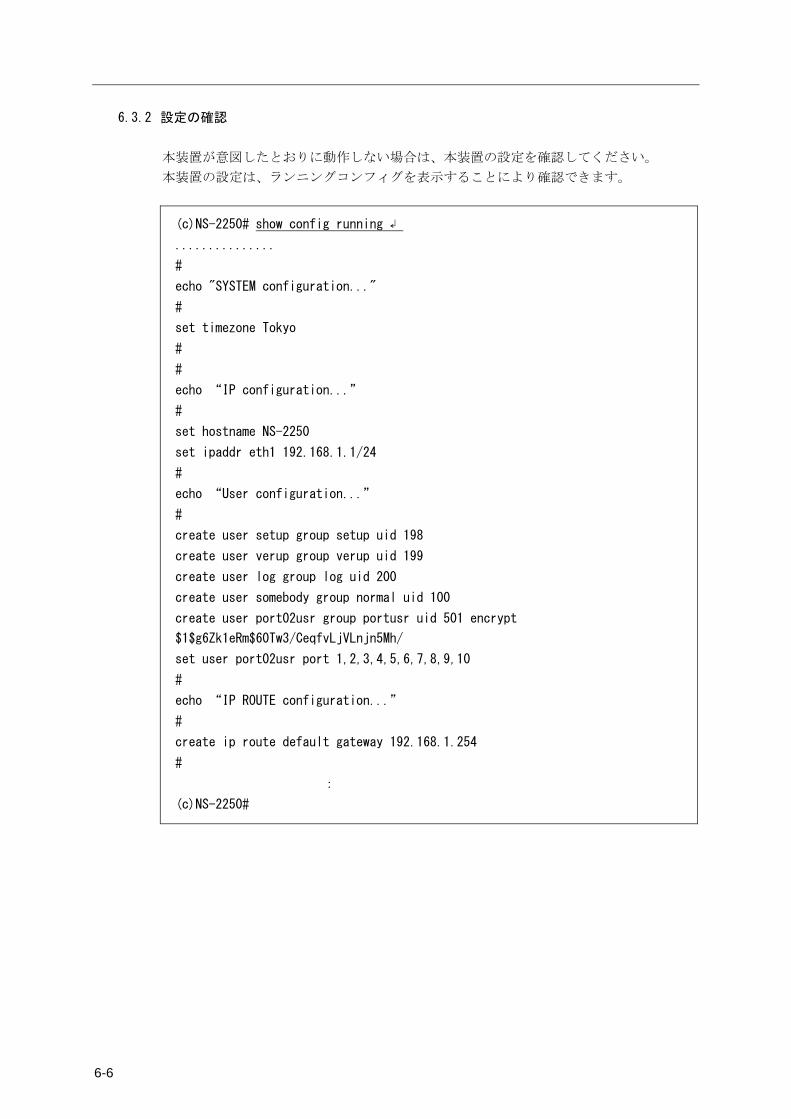
6-6
6.3.2 設定の確認 本装置が意図したとおりに動作しない場合は、本装置の設定を確認してください。 本装置の設定は、ランニングコンフィグを表示することにより確認できます。
(c)NS-2250# show config running ↲
...............
#
echo "SYSTEM configuration..."
#
set timezone Tokyo
#
#
echo “IP configuration...”
#
set hostname NS-2250
set ipaddr eth1 192.168.1.1/24
#
echo “User configuration...”
#
create user setup group setup uid 198
create user verup group verup uid 199
create user log group log uid 200
create user somebody group normal uid 100
create user port02usr group portusr uid 501 encrypt
$1$g6Zk1eRm$60Tw3/CeqfvLjVLnjn5Mh/
set user port02usr port 1,2,3,4,5,6,7,8,9,10
#
echo “IP ROUTE configuration...”
#
create ip route default gateway 192.168.1.254
#
:
(c)NS-2250#
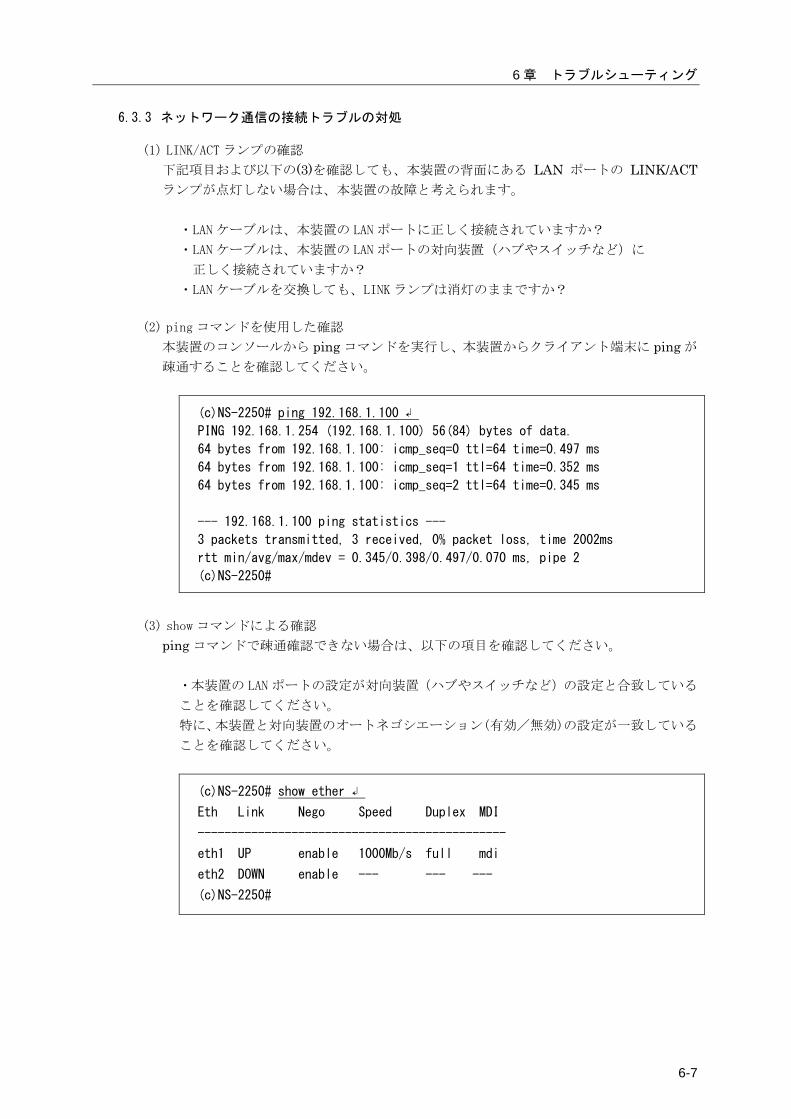
6 章 トラブルシューティング
6-7
6.3.3 ネットワーク通信の接続トラブルの対処
(1) LINK/ACT ランプの確認
下記項目および以下の(3)を確認しても、本装置の背面にある LAN ポートの LINK/ACTランプが点灯しない場合は、本装置の故障と考えられます。
・LAN ケーブルは、本装置の LAN ポートに正しく接続されていますか?
・LAN ケーブルは、本装置の LAN ポートの対向装置(ハブやスイッチなど)に
正しく接続されていますか?
・LAN ケーブルを交換しても、LINK ランプは消灯のままですか?
(2) ping コマンドを使用した確認
本装置のコンソールから ping コマンドを実行し、本装置からクライアント端末に ping が
疎通することを確認してください。
(c)NS-2250# ping 192.168.1.100 ↲
PING 192.168.1.254 (192.168.1.100) 56(84) bytes of data.
64 bytes from 192.168.1.100: icmp_seq=0 ttl=64 time=0.497 ms
64 bytes from 192.168.1.100: icmp_seq=1 ttl=64 time=0.352 ms
64 bytes from 192.168.1.100: icmp_seq=2 ttl=64 time=0.345 ms
--- 192.168.1.100 ping statistics ---
3 packets transmitted, 3 received, 0% packet loss, time 2002ms
rtt min/avg/max/mdev = 0.345/0.398/0.497/0.070 ms, pipe 2
(c)NS-2250#
(3) show コマンドによる確認
ping コマンドで疎通確認できない場合は、以下の項目を確認してください。
・本装置の LAN ポートの設定が対向装置(ハブやスイッチなど)の設定と合致している
ことを確認してください。
特に、本装置と対向装置のオートネゴシエーション(有効/無効)の設定が一致している
ことを確認してください。
(c)NS-2250# show ether ↲
Eth Link Nego Speed Duplex MDI
----------------------------------------------
eth1 UP enable 1000Mb/s full mdi
eth2 DOWN enable --- --- ---
(c)NS-2250#
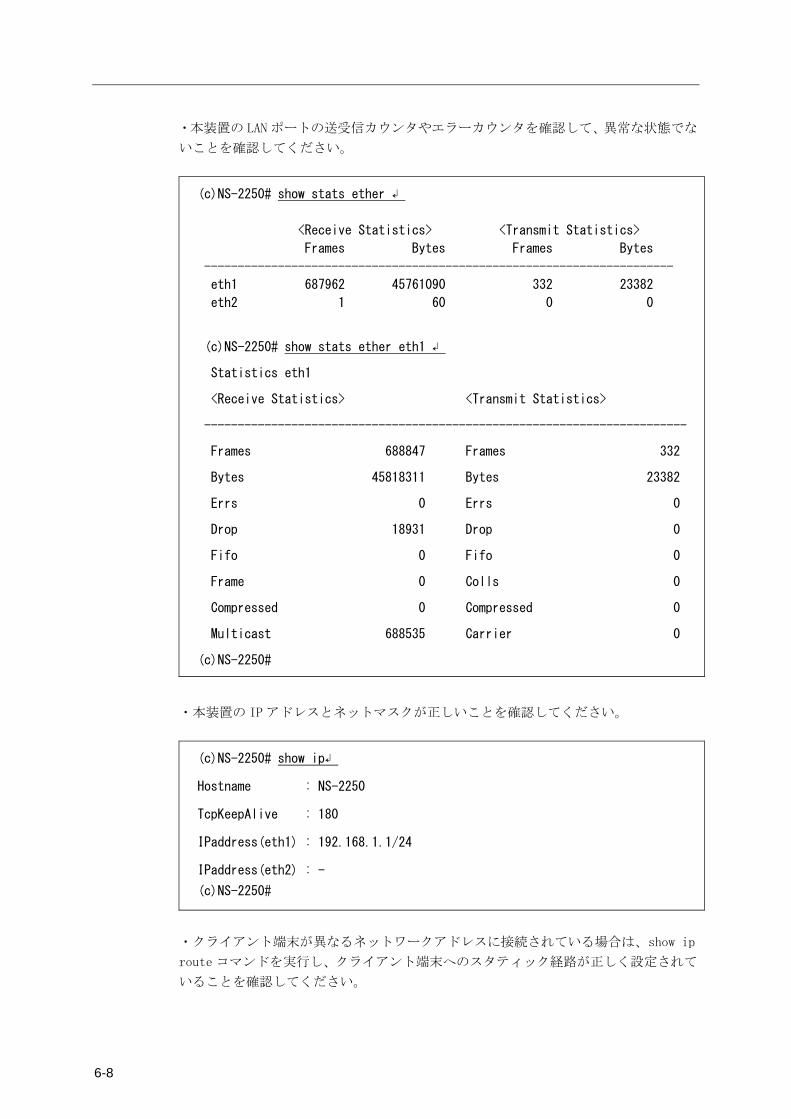
6-8
・本装置の LAN ポートの送受信カウンタやエラーカウンタを確認して、異常な状態でな
いことを確認してください。
(c)NS-2250# show stats ether ↲
<Receive Statistics> <Transmit Statistics>
Frames Bytes Frames Bytes
----------------------------------------------------------------------
eth1 687962 45761090 332 23382
eth2 1 60 0 0
(c)NS-2250# show stats ether eth1 ↲
Statistics eth1
<Receive Statistics> <Transmit Statistics>
------------------------------------------------------------------------
Frames 688847 Frames 332
Bytes 45818311 Bytes 23382
Errs 0 Errs 0
Drop 18931 Drop 0
Fifo 0 Fifo 0
Frame 0 Colls 0
Compressed 0 Compressed 0
Multicast 688535 Carrier 0
(c)NS-2250#
・本装置の IP アドレスとネットマスクが正しいことを確認してください。
(c)NS-2250# show ip↲
Hostname : NS-2250
TcpKeepAlive : 180
IPaddress(eth1) : 192.168.1.1/24
IPaddress(eth2) : -
(c)NS-2250#
・クライアント端末が異なるネットワークアドレスに接続されている場合は、show ip
route コマンドを実行し、クライアント端末へのスタティック経路が正しく設定されて
いることを確認してください。
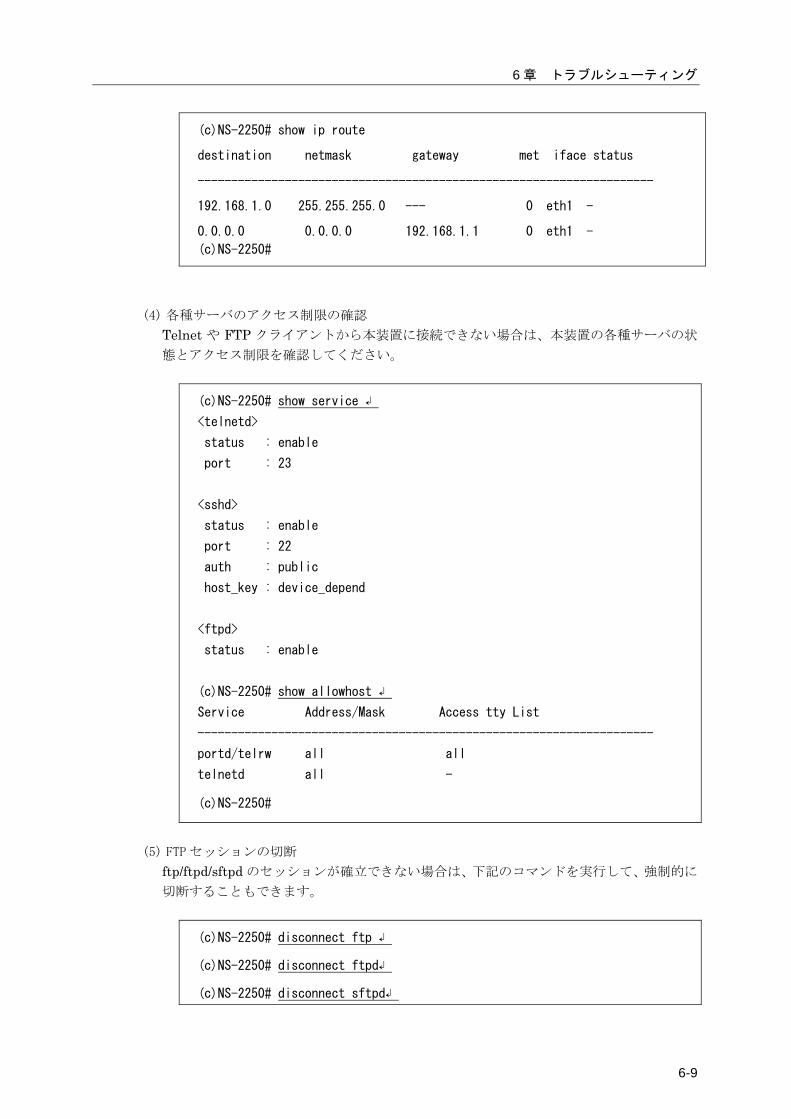
6 章 トラブルシューティング
6-9
(c)NS-2250# show ip route
destination netmask gateway met iface status
--------------------------------------------------------------------
192.168.1.0 255.255.255.0 --- 0 eth1 -
0.0.0.0 0.0.0.0 192.168.1.1 0 eth1 -
(c)NS-2250#
(4) 各種サーバのアクセス制限の確認
Telnet や FTP クライアントから本装置に接続できない場合は、本装置の各種サーバの状
態とアクセス制限を確認してください。
(c)NS-2250# show service ↲
<telnetd>
status : enable
port : 23
<sshd>
status : enable
port : 22
auth : public
host_key : device_depend
<ftpd>
status : enable
(c)NS-2250# show allowhost ↲
Service Address/Mask Access tty List
--------------------------------------------------------------------
portd/telrw all all
telnetd all -
(c)NS-2250#
(5) FTP セッションの切断
ftp/ftpd/sftpd のセッションが確立できない場合は、下記のコマンドを実行して、強制的に
切断することもできます。
(c)NS-2250# disconnect ftp ↲
(c)NS-2250# disconnect ftpd↲
(c)NS-2250# disconnect sftpd↲

6-10
6.3.4 シリアル通信の接続トラブルの対処
(1) シリアルケーブルの確認
下記項目を確認してもシリアル通信ができない場合は、本装置の故障と考えられます。
・シリアルケーブルは、本装置のシリアルポートに正しく接続されていますか?
・シリアルケーブルは、監視対象機器に正しく接続されていますか?
・シリアルケーブルの結線は正しく接続されていますか?
・シリアルケーブルの変換コネクタ(NS-354 DB9-RJ45 変換コネクタ/NS-490
DB9-RJ45 変換コネクタ(クロス)は間違っていませんか?
シリアルポートや変換コネクタの結線は、別冊の「設置手順書」を参照してください。 弊社ホームページに掲載している接続実績表もご確認ください。
(2) show コマンドによる確認
show コマンドを実行し、シリアルポートやポートサーバ、各種サービスの状態を確認し
てください。
・シリアルポートの設定が正しいことを確認してください。
(c)NS-2250# show tty 3 ↲
tty : 3 "Tokyo-Switch-3"
baud : 19200
bitchar : 8
parity : none
stop : 1
flow : none
detect_dsr : off
(c)NS-2250#
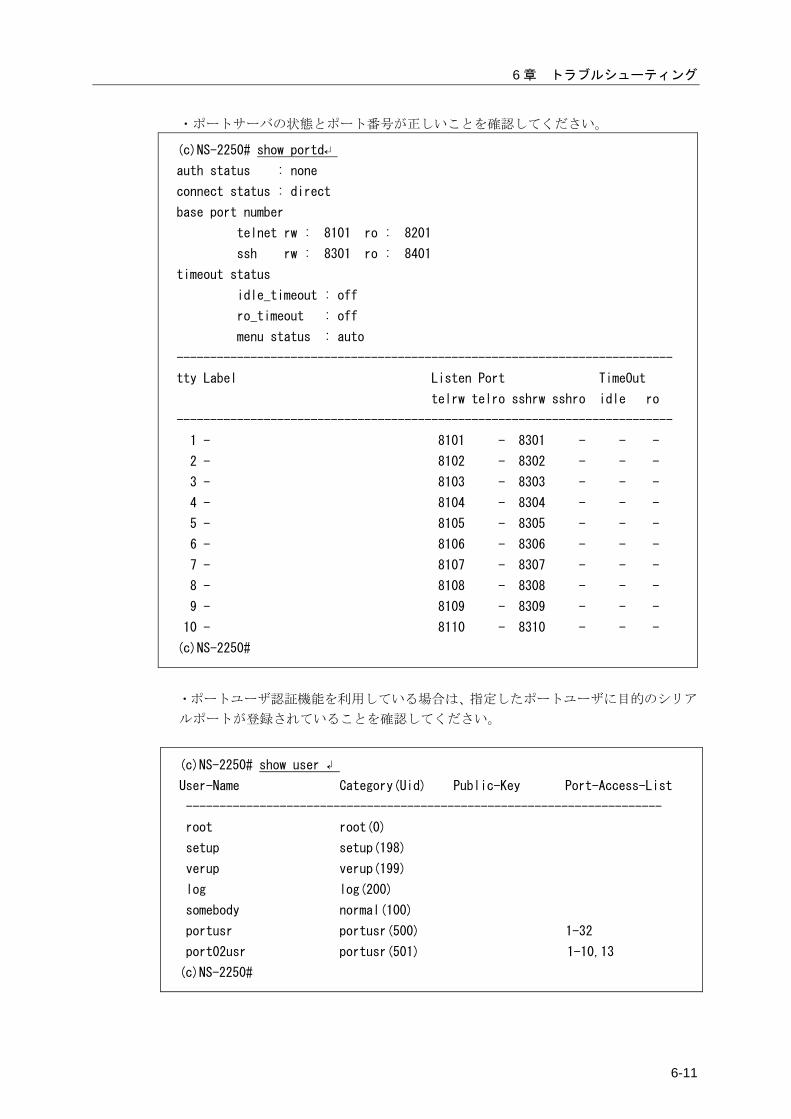
6 章 トラブルシューティング
6-11
・ポートサーバの状態とポート番号が正しいことを確認してください。
(c)NS-2250# show portd↵
auth status : none
connect status : direct
base port number
telnet rw : 8101 ro : 8201
ssh rw : 8301 ro : 8401
timeout status
idle_timeout : off
ro_timeout : off
menu status : auto
--------------------------------------------------------------------------
tty Label Listen Port TimeOut
telrw telro sshrw sshro idle ro
--------------------------------------------------------------------------
1 - 8101 - 8301 - - -
2 - 8102 - 8302 - - -
3 - 8103 - 8303 - - -
4 - 8104 - 8304 - - -
5 - 8105 - 8305 - - -
6 - 8106 - 8306 - - -
7 - 8107 - 8307 - - -
8 - 8108 - 8308 - - -
9 - 8109 - 8309 - - -
10 - 8110 - 8310 - - -
(c)NS-2250#
・ポートユーザ認証機能を利用している場合は、指定したポートユーザに目的のシリア
ルポートが登録されていることを確認してください。
(c)NS-2250# show user ↲
User-Name Category(Uid) Public-Key Port-Access-List
-----------------------------------------------------------------------
root root(0)
setup setup(198)
verup verup(199)
log log(200)
somebody normal(100)
portusr portusr(500) 1-32
port02usr portusr(501) 1-10,13
(c)NS-2250#
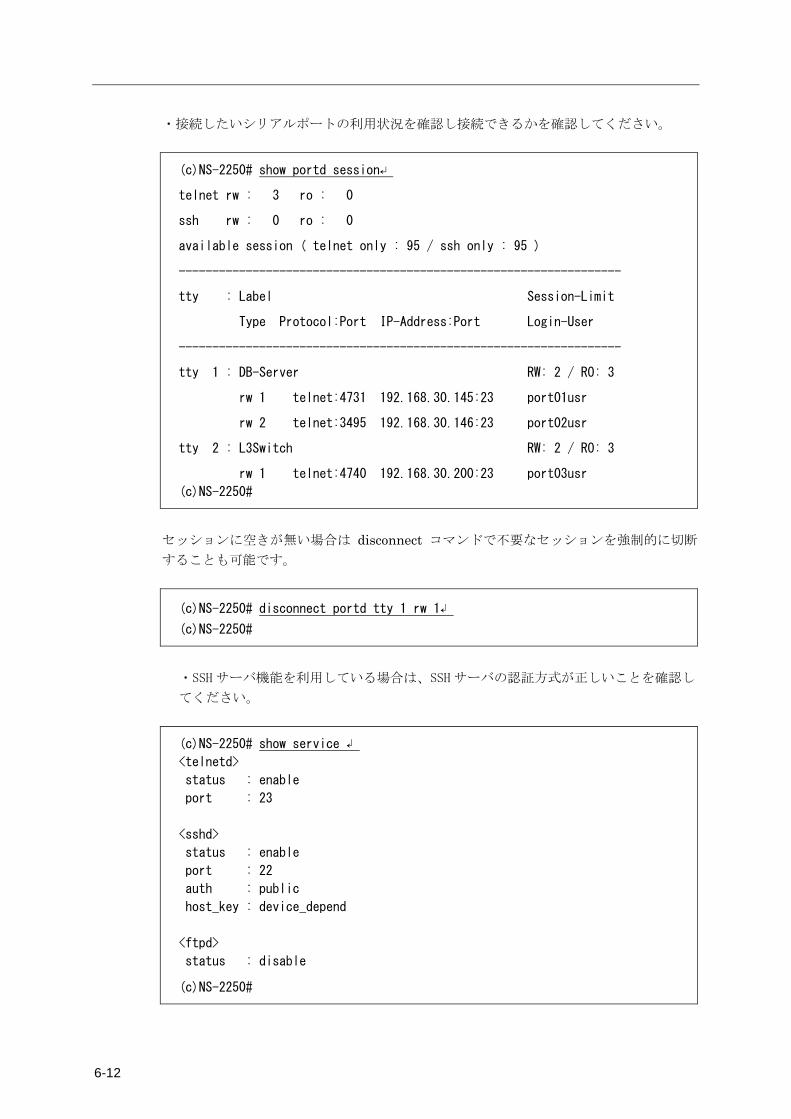
6-12
・接続したいシリアルポートの利用状況を確認し接続できるかを確認してください。
(c)NS-2250# show portd session↵
telnet rw : 3 ro : 0
ssh rw : 0 ro : 0
available session ( telnet only : 95 / ssh only : 95 )
------------------------------------------------------------------
tty : Label Session-Limit
Type Protocol:Port IP-Address:Port Login-User
------------------------------------------------------------------
tty 1 : DB-Server RW: 2 / RO: 3
rw 1 telnet:4731 192.168.30.145:23 port01usr
rw 2 telnet:3495 192.168.30.146:23 port02usr
tty 2 : L3Switch RW: 2 / RO: 3
rw 1 telnet:4740 192.168.30.200:23 port03usr
(c)NS-2250#
セッションに空きが無い場合は disconnect コマンドで不要なセッションを強制的に切断
することも可能です。
(c)NS-2250# disconnect portd tty 1 rw 1↲
(c)NS-2250#
・SSH サーバ機能を利用している場合は、SSH サーバの認証方式が正しいことを確認し
てください。
(c)NS-2250# show service ↲
<telnetd>
status : enable
port : 23
<sshd>
status : enable
port : 22
auth : public
host_key : device_depend
<ftpd>
status : disable
(c)NS-2250#
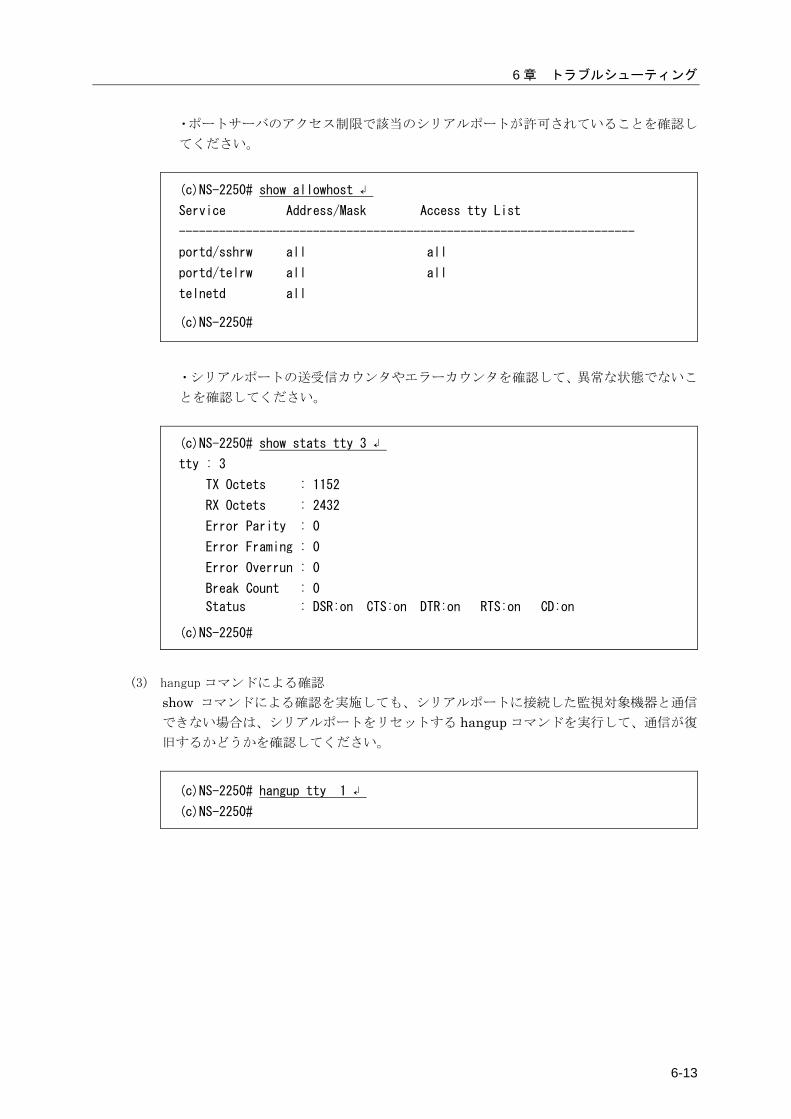
6 章 トラブルシューティング
6-13
・ポートサーバのアクセス制限で該当のシリアルポートが許可されていることを確認し
てください。
(c)NS-2250# show allowhost ↲
Service Address/Mask Access tty List
--------------------------------------------------------------------
portd/sshrw all all
portd/telrw all all
telnetd all
(c)NS-2250#
・シリアルポートの送受信カウンタやエラーカウンタを確認して、異常な状態でないこ
とを確認してください。
(c)NS-2250# show stats tty 3 ↲
tty : 3
TX Octets : 1152
RX Octets : 2432
Error Parity : 0
Error Framing : 0
Error Overrun : 0
Break Count : 0
Status : DSR:on CTS:on DTR:on RTS:on CD:on
(c)NS-2250#
(3) hangup コマンドによる確認
show コマンドによる確認を実施しても、シリアルポートに接続した監視対象機器と通信
できない場合は、シリアルポートをリセットする hangup コマンドを実行して、通信が復
旧するかどうかを確認してください。
(c)NS-2250# hangup tty 1 ↲
(c)NS-2250#
6-14
6.3.5 RADIUS 認証機能/RADIUS アカウント機能のトラブルの対処 本装置の RADIUS 認証機能/RADIUS アカウント機能が正しく動作しない場合は、以下の
切り分けを実施してください。
(1) RADIUS 認証サーバ/RADIUS アカウントサーバの確認
RADIUS 認証サーバ/RADIUS アカウントサーバが起動していること、および、RADIUS認証サーバ/RADIUS アカウントサーバが正しく設定されていることを確認してください。
・本装置から RADIUS 認証サーバ/RADIUS アカウントサーバに Ping は届きますか?
・RADIUS 認証サーバ/RADIUS アカウントサーバで RADIUS サーバプログラムが
起動していますか?
・RADIUS 認証サーバの認証ポート、RADIUS アカウントサーバのアカウントポート
は本装置の設定とあっていますか?
・RADIUS 認証サーバ/RADIUS アカウントサーバと本装置のシークレットキーは一致
していますか?
・RADIUS 認証サーバにユーザは正しく登録されていますか?

6 章 トラブルシューティング
6-15
(2) show コマンドによる RADIUS 認証機能/RADIUS アカウント機能の確認
下記の show コマンドを実行し、認証/アカウント方式と、本装置の RADIUS 認証クライ
アント/RADIUS アカウントクライアントの設定、アクセスグループ設定が正しいことを
確認してください。
・認証方式と RADIUS 認証クライアント設定の確認 (show auth/show auth radius/show auth access_group コマンド) (c)NS-2250# show auth ↲
<auth information>
Mode : radius
su_cmd username : root
(c)NS-2250# show auth radius ↲
<auth radius information>
Retry : 3
Default User : none
<radius server 1>
IP address : 192.168.1.1
Port number : 1812
Password : stored
Timeout : 3
NAS_ID : SmartCS
Attribute of portusr : ---
Attribute of normal : ---
Attribute of root : ---
<radius server 2>
IP address : 192.168.1.2
Port number : 1812
Password : stored
Timeout : 3
NAS_ID : SmartCS
Attribute of portusr : ---
Attribute of normal : ---
Attribute of root : ---
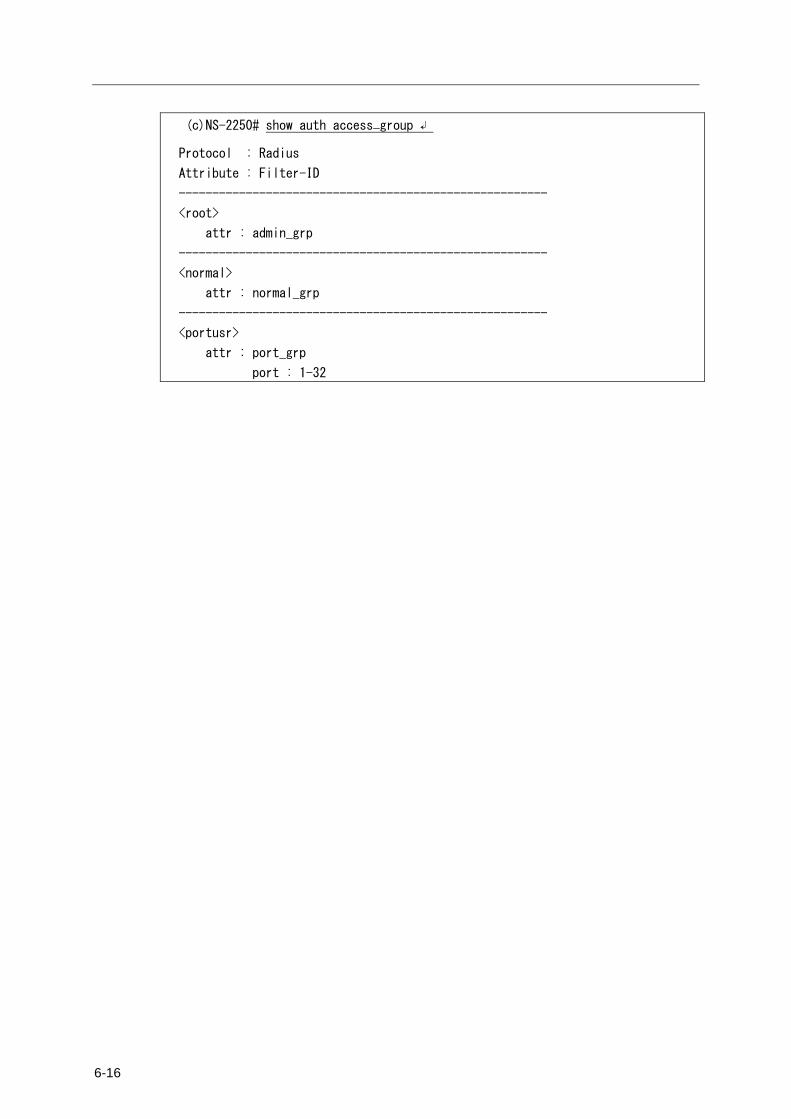
6-16
(c)NS-2250# show auth access_group ↲
Protocol : Radius
Attribute : Filter-ID
-------------------------------------------------------
<root>
attr : admin_grp
-------------------------------------------------------
<normal>
attr : normal_grp
-------------------------------------------------------
<portusr>
attr : port_grp
port : 1-32
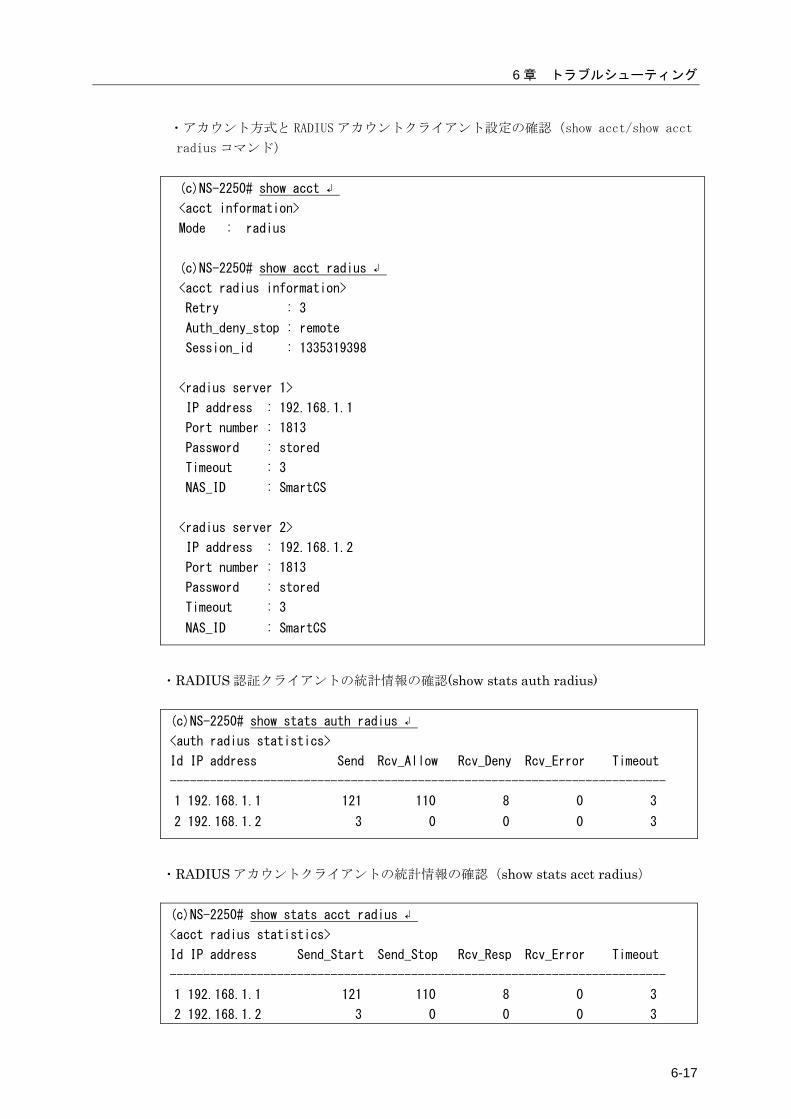
6 章 トラブルシューティング
6-17
・アカウント方式と RADIUS アカウントクライアント設定の確認(show acct/show acct
radius コマンド)
(c)NS-2250# show acct ↲
<acct information>
Mode : radius
(c)NS-2250# show acct radius ↲
<acct radius information>
Retry : 3
Auth_deny_stop : remote
Session_id : 1335319398
<radius server 1>
IP address : 192.168.1.1
Port number : 1813
Password : stored
Timeout : 3
NAS_ID : SmartCS
<radius server 2>
IP address : 192.168.1.2
Port number : 1813
Password : stored
Timeout : 3
NAS_ID : SmartCS
・RADIUS 認証クライアントの統計情報の確認(show stats auth radius) (c)NS-2250# show stats auth radius ↲
<auth radius statistics>
Id IP address Send Rcv_Allow Rcv_Deny Rcv_Error Timeout
--------------------------------------------------------------------------
1 192.168.1.1 121 110 8 0 3
2 192.168.1.2 3 0 0 0 3
・RADIUS アカウントクライアントの統計情報の確認(show stats acct radius) (c)NS-2250# show stats acct radius ↲
<acct radius statistics>
Id IP address Send_Start Send_Stop Rcv_Resp Rcv_Error Timeout
--------------------------------------------------------------------------
1 192.168.1.1 121 110 8 0 3
2 192.168.1.2 3 0 0 0 3
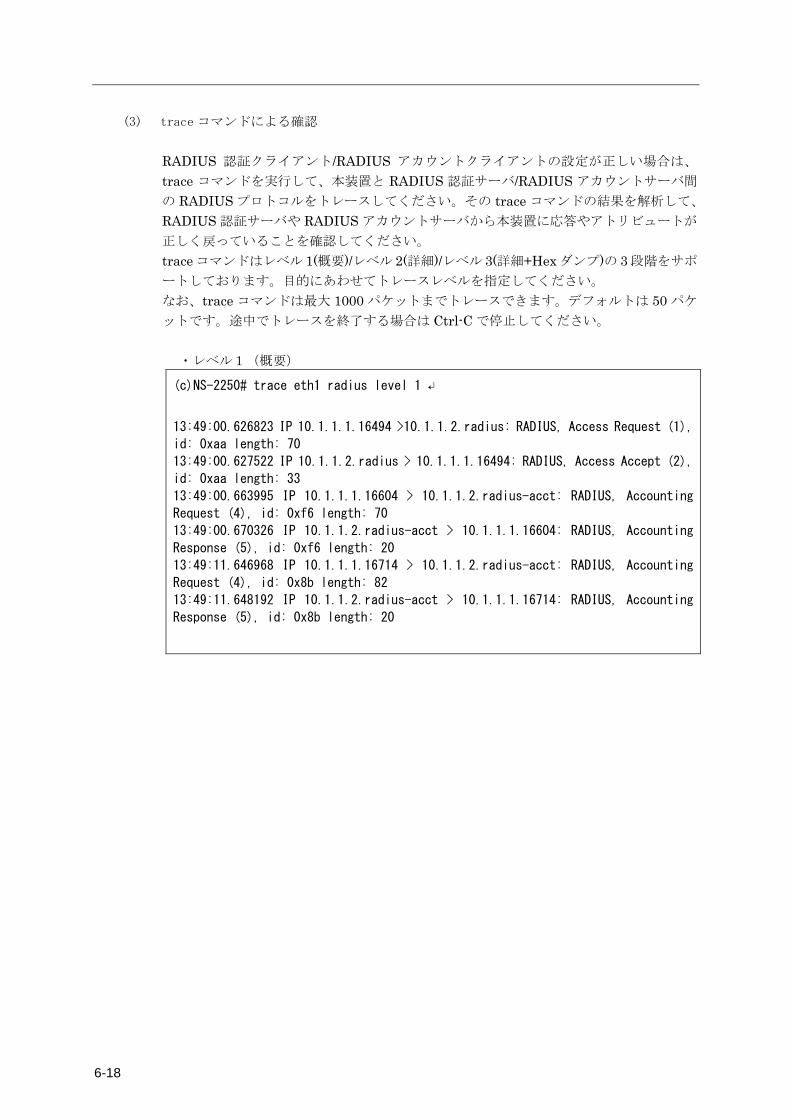
6-18
(3) trace コマンドによる確認
RADIUS 認証クライアント/RADIUS アカウントクライアントの設定が正しい場合は、
trace コマンドを実行して、本装置と RADIUS 認証サーバ/RADIUS アカウントサーバ間
の RADIUS プロトコルをトレースしてください。その trace コマンドの結果を解析して、
RADIUS 認証サーバや RADIUS アカウントサーバから本装置に応答やアトリビュートが
正しく戻っていることを確認してください。 trace コマンドはレベル 1(概要)/レベル 2(詳細)/レベル 3(詳細+Hex ダンプ)の 3 段階をサポ
ートしております。目的にあわせてトレースレベルを指定してください。 なお、trace コマンドは最大 1000 パケットまでトレースできます。デフォルトは 50 パケ
ットです。途中でトレースを終了する場合は Ctrl-C で停止してください。
・レベル1(概要)
(c)NS-2250# trace eth1 radius level 1 ↵
13:49:00.626823 IP 10.1.1.1.16494 >10.1.1.2.radius: RADIUS, Access Request (1),
id: 0xaa length: 70
13:49:00.627522 IP 10.1.1.2.radius > 10.1.1.1.16494: RADIUS, Access Accept (2),
id: 0xaa length: 33
13:49:00.663995 IP 10.1.1.1.16604 > 10.1.1.2.radius-acct: RADIUS, Accounting
Request (4), id: 0xf6 length: 70
13:49:00.670326 IP 10.1.1.2.radius-acct > 10.1.1.1.16604: RADIUS, Accounting
Response (5), id: 0xf6 length: 20
13:49:11.646968 IP 10.1.1.1.16714 > 10.1.1.2.radius-acct: RADIUS, Accounting
Request (4), id: 0x8b length: 82
13:49:11.648192 IP 10.1.1.2.radius-acct > 10.1.1.1.16714: RADIUS, Accounting
Response (5), id: 0x8b length: 20
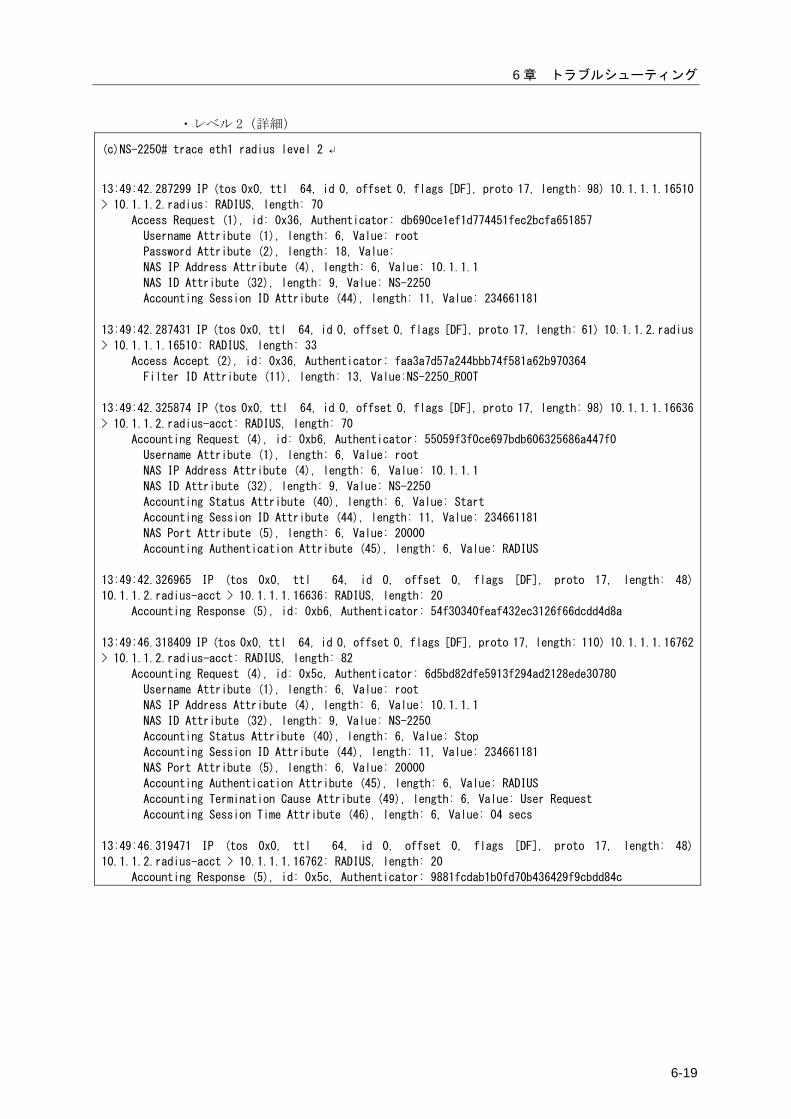
6 章 トラブルシューティング
6-19
・レベル 2(詳細)
(c)NS-2250# trace eth1 radius level 2 ↵
13:49:42.287299 IP (tos 0x0, ttl 64, id 0, offset 0, flags [DF], proto 17, length: 98) 10.1.1.1.16510
> 10.1.1.2.radius: RADIUS, length: 70
Access Request (1), id: 0x36, Authenticator: db690ce1ef1d774451fec2bcfa651857
Username Attribute (1), length: 6, Value: root
Password Attribute (2), length: 18, Value:
NAS IP Address Attribute (4), length: 6, Value: 10.1.1.1
NAS ID Attribute (32), length: 9, Value: NS-2250
Accounting Session ID Attribute (44), length: 11, Value: 234661181
13:49:42.287431 IP (tos 0x0, ttl 64, id 0, offset 0, flags [DF], proto 17, length: 61) 10.1.1.2.radius
> 10.1.1.1.16510: RADIUS, length: 33
Access Accept (2), id: 0x36, Authenticator: faa3a7d57a244bbb74f581a62b970364
Filter ID Attribute (11), length: 13, Value:NS-2250_ROOT
13:49:42.325874 IP (tos 0x0, ttl 64, id 0, offset 0, flags [DF], proto 17, length: 98) 10.1.1.1.16636
> 10.1.1.2.radius-acct: RADIUS, length: 70
Accounting Request (4), id: 0xb6, Authenticator: 55059f3f0ce697bdb606325686a447f0
Username Attribute (1), length: 6, Value: root
NAS IP Address Attribute (4), length: 6, Value: 10.1.1.1
NAS ID Attribute (32), length: 9, Value: NS-2250
Accounting Status Attribute (40), length: 6, Value: Start
Accounting Session ID Attribute (44), length: 11, Value: 234661181
NAS Port Attribute (5), length: 6, Value: 20000
Accounting Authentication Attribute (45), length: 6, Value: RADIUS
13:49:42.326965 IP (tos 0x0, ttl 64, id 0, offset 0, flags [DF], proto 17, length: 48)
10.1.1.2.radius-acct > 10.1.1.1.16636: RADIUS, length: 20
Accounting Response (5), id: 0xb6, Authenticator: 54f30340feaf432ec3126f66dcdd4d8a
13:49:46.318409 IP (tos 0x0, ttl 64, id 0, offset 0, flags [DF], proto 17, length: 110) 10.1.1.1.16762
> 10.1.1.2.radius-acct: RADIUS, length: 82
Accounting Request (4), id: 0x5c, Authenticator: 6d5bd82dfe5913f294ad2128ede30780
Username Attribute (1), length: 6, Value: root
NAS IP Address Attribute (4), length: 6, Value: 10.1.1.1
NAS ID Attribute (32), length: 9, Value: NS-2250
Accounting Status Attribute (40), length: 6, Value: Stop
Accounting Session ID Attribute (44), length: 11, Value: 234661181
NAS Port Attribute (5), length: 6, Value: 20000
Accounting Authentication Attribute (45), length: 6, Value: RADIUS
Accounting Termination Cause Attribute (49), length: 6, Value: User Request
Accounting Session Time Attribute (46), length: 6, Value: 04 secs
13:49:46.319471 IP (tos 0x0, ttl 64, id 0, offset 0, flags [DF], proto 17, length: 48)
10.1.1.2.radius-acct > 10.1.1.1.16762: RADIUS, length: 20
Accounting Response (5), id: 0x5c, Authenticator: 9881fcdab1b0fd70b436429f9cbdd84c
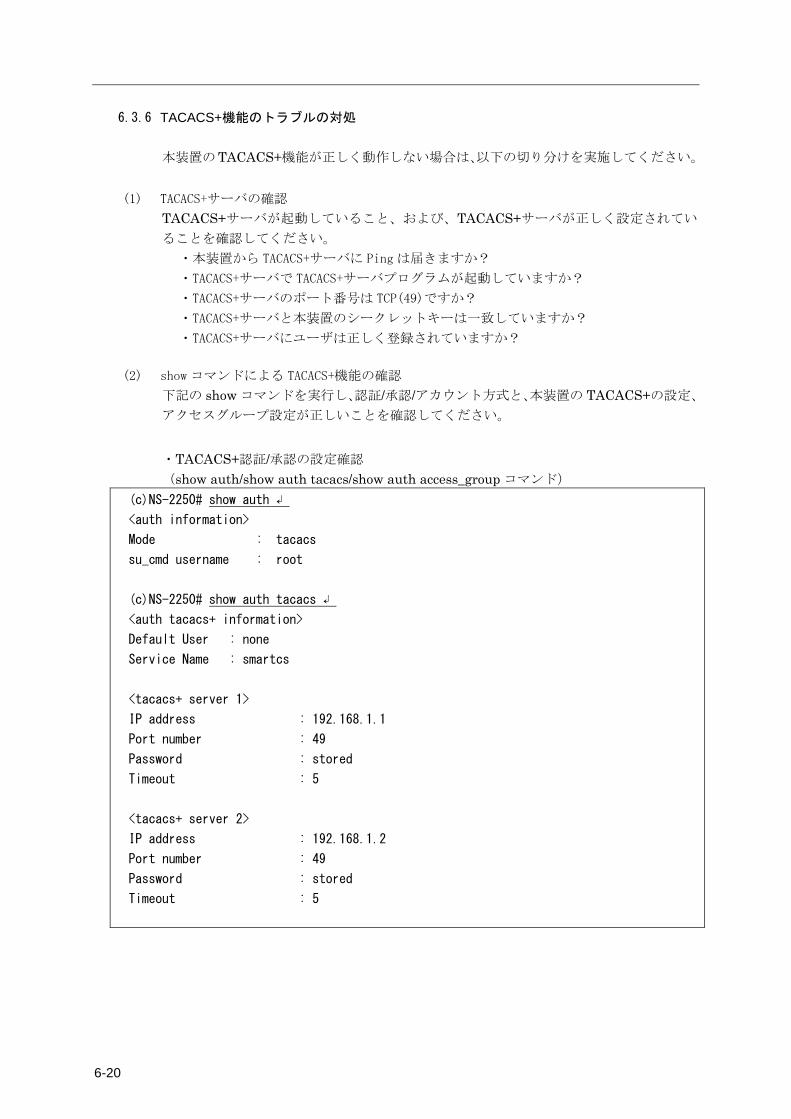
6-20
6.3.6 TACACS+機能のトラブルの対処 本装置のTACACS+機能が正しく動作しない場合は、以下の切り分けを実施してください。
(1) TACACS+サーバの確認
TACACS+サーバが起動していること、および、TACACS+サーバが正しく設定されてい
ることを確認してください。 ・本装置から TACACS+サーバに Ping は届きますか?
・TACACS+サーバで TACACS+サーバプログラムが起動していますか?
・TACACS+サーバのポート番号は TCP(49)ですか?
・TACACS+サーバと本装置のシークレットキーは一致していますか?
・TACACS+サーバにユーザは正しく登録されていますか?
(2) show コマンドによる TACACS+機能の確認
下記の show コマンドを実行し、認証/承認/アカウント方式と、本装置の TACACS+の設定、
アクセスグループ設定が正しいことを確認してください。
・TACACS+認証/承認の設定確認 (show auth/show auth tacacs/show auth access_group コマンド)
(c)NS-2250# show auth ↲
<auth information>
Mode : tacacs
su_cmd username : root
(c)NS-2250# show auth tacacs ↲
<auth tacacs+ information>
Default User : none
Service Name : smartcs
<tacacs+ server 1>
IP address : 192.168.1.1
Port number : 49
Password : stored
Timeout : 5
<tacacs+ server 2>
IP address : 192.168.1.2
Port number : 49
Password : stored
Timeout : 5
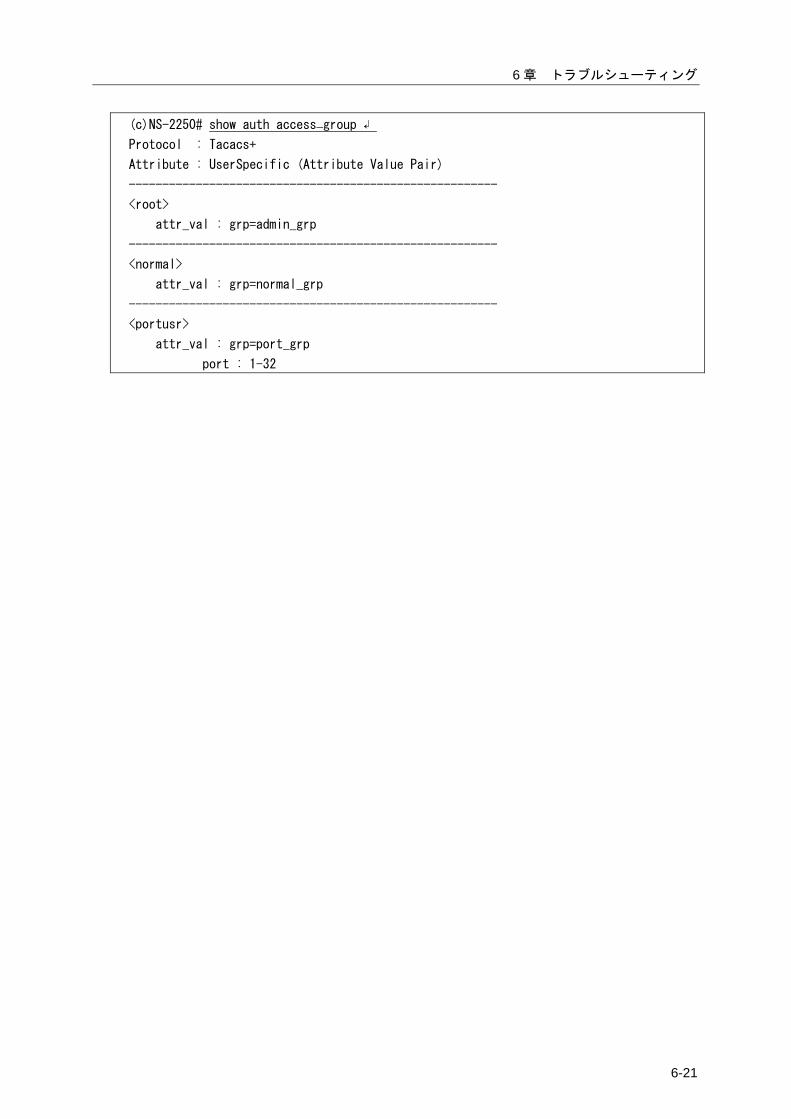
6 章 トラブルシューティング
6-21
(c)NS-2250# show auth access_group ↲
Protocol : Tacacs+
Attribute : UserSpecific (Attribute Value Pair)
-------------------------------------------------------
<root>
attr_val : grp=admin_grp
-------------------------------------------------------
<normal>
attr_val : grp=normal_grp
-------------------------------------------------------
<portusr>
attr_val : grp=port_grp
port : 1-32
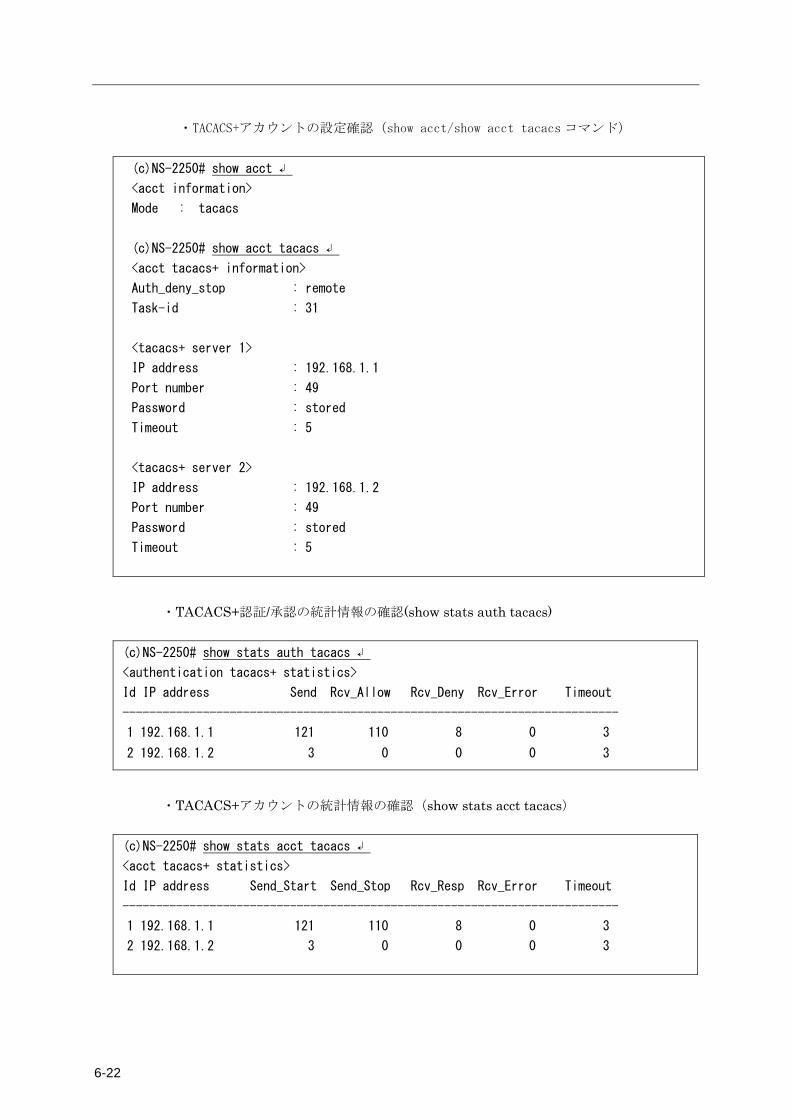
6-22
・TACACS+アカウントの設定確認(show acct/show acct tacacs コマンド)
(c)NS-2250# show acct ↲
<acct information>
Mode : tacacs
(c)NS-2250# show acct tacacs ↲
<acct tacacs+ information>
Auth_deny_stop : remote
Task-id : 31
<tacacs+ server 1>
IP address : 192.168.1.1
Port number : 49
Password : stored
Timeout : 5
<tacacs+ server 2>
IP address : 192.168.1.2
Port number : 49
Password : stored
Timeout : 5
・TACACS+認証/承認の統計情報の確認(show stats auth tacacs)
(c)NS-2250# show stats auth tacacs ↲
<authentication tacacs+ statistics>
Id IP address Send Rcv_Allow Rcv_Deny Rcv_Error Timeout
--------------------------------------------------------------------------
1 192.168.1.1 121 110 8 0 3
2 192.168.1.2 3 0 0 0 3
・TACACS+アカウントの統計情報の確認(show stats acct tacacs)
(c)NS-2250# show stats acct tacacs ↲
<acct tacacs+ statistics>
Id IP address Send_Start Send_Stop Rcv_Resp Rcv_Error Timeout
--------------------------------------------------------------------------
1 192.168.1.1 121 110 8 0 3
2 192.168.1.2 3 0 0 0 3
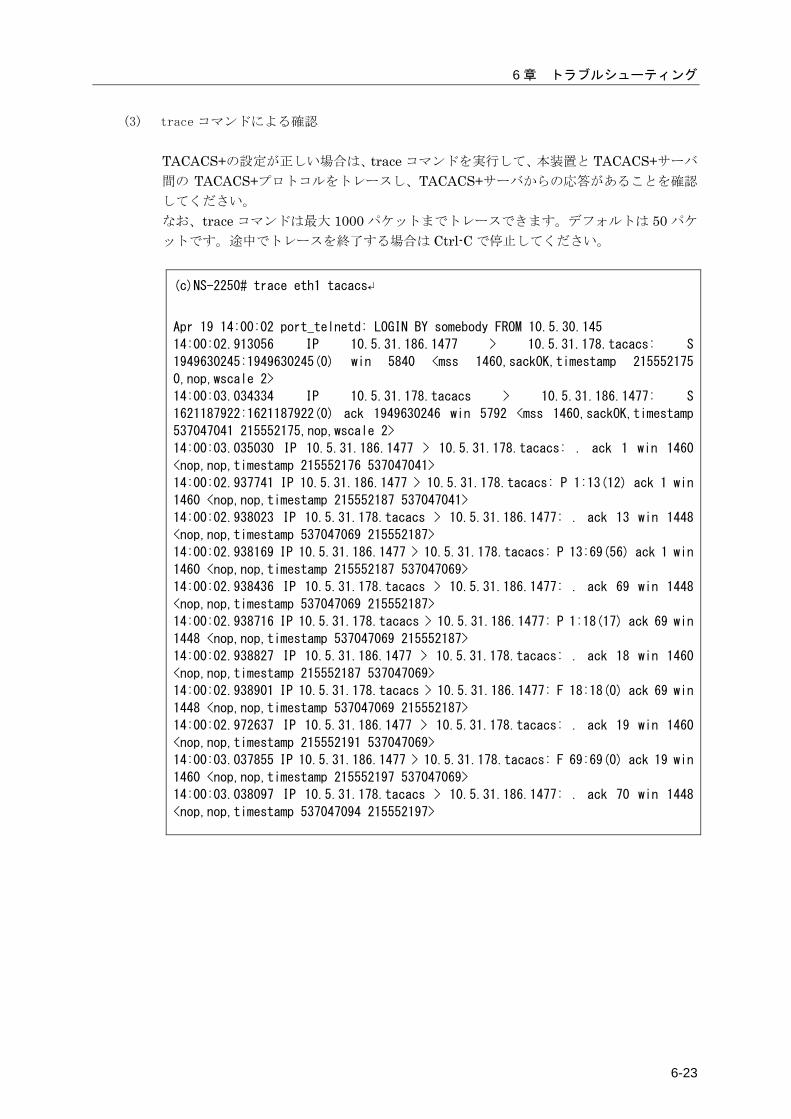
6 章 トラブルシューティング
6-23
(3) trace コマンドによる確認
TACACS+の設定が正しい場合は、trace コマンドを実行して、本装置と TACACS+サーバ
間の TACACS+プロトコルをトレースし、TACACS+サーバからの応答があることを確認
してください。 なお、trace コマンドは最大 1000 パケットまでトレースできます。デフォルトは 50 パケ
ットです。途中でトレースを終了する場合は Ctrl-C で停止してください。
(c)NS-2250# trace eth1 tacacs↵
Apr 19 14:00:02 port_telnetd: LOGIN BY somebody FROM 10.5.30.145
14:00:02.913056 IP 10.5.31.186.1477 > 10.5.31.178.tacacs: S
1949630245:1949630245(0) win 5840 <mss 1460,sackOK,timestamp 215552175
0,nop,wscale 2>
14:00:03.034334 IP 10.5.31.178.tacacs > 10.5.31.186.1477: S
1621187922:1621187922(0) ack 1949630246 win 5792 <mss 1460,sackOK,timestamp
537047041 215552175,nop,wscale 2>
14:00:03.035030 IP 10.5.31.186.1477 > 10.5.31.178.tacacs: . ack 1 win 1460
<nop,nop,timestamp 215552176 537047041>
14:00:02.937741 IP 10.5.31.186.1477 > 10.5.31.178.tacacs: P 1:13(12) ack 1 win
1460 <nop,nop,timestamp 215552187 537047041>
14:00:02.938023 IP 10.5.31.178.tacacs > 10.5.31.186.1477: . ack 13 win 1448
<nop,nop,timestamp 537047069 215552187>
14:00:02.938169 IP 10.5.31.186.1477 > 10.5.31.178.tacacs: P 13:69(56) ack 1 win
1460 <nop,nop,timestamp 215552187 537047069>
14:00:02.938436 IP 10.5.31.178.tacacs > 10.5.31.186.1477: . ack 69 win 1448
<nop,nop,timestamp 537047069 215552187>
14:00:02.938716 IP 10.5.31.178.tacacs > 10.5.31.186.1477: P 1:18(17) ack 69 win
1448 <nop,nop,timestamp 537047069 215552187>
14:00:02.938827 IP 10.5.31.186.1477 > 10.5.31.178.tacacs: . ack 18 win 1460
<nop,nop,timestamp 215552187 537047069>
14:00:02.938901 IP 10.5.31.178.tacacs > 10.5.31.186.1477: F 18:18(0) ack 69 win
1448 <nop,nop,timestamp 537047069 215552187>
14:00:02.972637 IP 10.5.31.186.1477 > 10.5.31.178.tacacs: . ack 19 win 1460
<nop,nop,timestamp 215552191 537047069>
14:00:03.037855 IP 10.5.31.186.1477 > 10.5.31.178.tacacs: F 69:69(0) ack 19 win
1460 <nop,nop,timestamp 215552197 537047069>
14:00:03.038097 IP 10.5.31.178.tacacs > 10.5.31.186.1477: . ack 70 win 1448
<nop,nop,timestamp 537047094 215552197>

6-24
6.4 その他のトラブル
その他のトラブルを対処する方法について説明します。
6.4.1 装置管理ユーザのパスワードを忘れた場合の対処 装置管理ユーザのパスワードを忘れた場合は、本装置のシリアルポートに管理端末を接続
して、ROM モニタを起動します。次に設定していないスタートアップファイルを読み込
んで、システムソフトウェアを起動し設定を初期化します。 装置管理ユーザのパスワードだけを初期化することはできません。スタートアップファイ
ルの全てを初期化することでパスワードを初期化します。 初期化の手順は下記を参照してください。
① 本装置の電源を ON にして、“Hit Enter key to stop autoboot...”が表示されたら、
リターンキーを押下し、MON>プロンプトを表示させます。
Hit Enter key to stop autoboot:
MON>
② boot コマンドの fileno オプションを指定して、設定を保存していないもしくは、
管理者パスワードの判明しているスタートアップファイルを読み込みます。下記
の例は、起動時に参照される USB メモリの startup4 ファイルを読み込んでいま
す。
MON> boot fileno=4 ↲
Welcome to NS-2250 Console Server
Starting Bootlog daemon: bootlogd.
: 起動メッセージが表示されます
NS-2250 login:
③ 本装置にログインして起動時に読み込まれるスタートアップファイルを表示し、フ
ァイルにペーストし保管します。
(c)NS-2250# show config startup 1 external ↲
:
④ 起動時に読み込まれるスタートアップファイル(例:USB メモリの startup1 ファ
イル)を初期化します。
(c)NS-2250# clear startup 1 external ↲
:

6 章 トラブルシューティング
6-25
⑤ 本装置を再起動します。
(c)NS-2250# reboot ↲
Do you really want to reboot with main system and startup1 [y/n] ? y ↲

A-1
付録 A ユーザ権限
付録 A では、ユーザの権限について説明しています。
本章の内容 A.1 ユーザ権限一覧
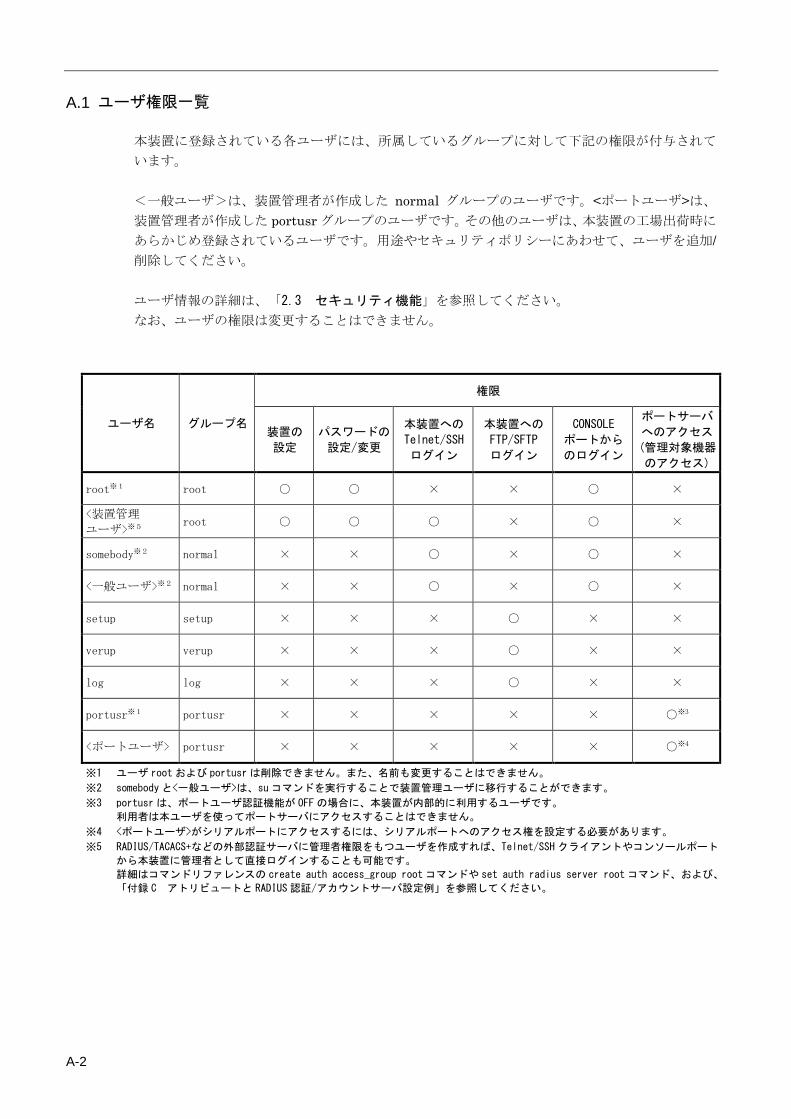
A-2
A.1 ユーザ権限一覧
本装置に登録されている各ユーザには、所属しているグループに対して下記の権限が付与されて
います。 <一般ユーザ>は、装置管理者が作成した normal グループのユーザです。<ポートユーザ>は、
装置管理者が作成した portusr グループのユーザです。その他のユーザは、本装置の工場出荷時に
あらかじめ登録されているユーザです。用途やセキュリティポリシーにあわせて、ユーザを追加/削除してください。 ユーザ情報の詳細は、「2.3 セキュリティ機能」を参照してください。 なお、ユーザの権限は変更することはできません。
ユーザ名 グループ名
権限
装置の
設定
パスワードの
設定/変更
本装置への
Telnet/SSH
ログイン
本装置への
FTP/SFTP
ログイン
CONSOLE
ポートから
のログイン
ポートサーバ
へのアクセス
(管理対象機器
のアクセス)
root※1 root ○ ○ × × ○ ×
<装置管理
ユーザ>※5 root ○ ○ ○ × ○ ×
somebody※2 normal × × ○ × ○ ×
<一般ユーザ>※2 normal × × ○ × ○ ×
setup setup × × × ○ × ×
verup verup × × × ○ × ×
log log × × × ○ × ×
portusr※1 portusr × × × × × ○※3
<ポートユーザ> portusr × × × × × ○※4
※1 ユーザ root および portusrは削除できません。また、名前も変更することはできません。
※2 somebodyと<一般ユーザ>は、su コマンドを実行することで装置管理ユーザに移行することができます。
※3 portusr は、ポートユーザ認証機能が OFF の場合に、本装置が内部的に利用するユーザです。
利用者は本ユーザを使ってポートサーバにアクセスすることはできません。
※4 <ポートユーザ>がシリアルポートにアクセスするには、シリアルポートへのアクセス権を設定する必要があります。
※5 RADIUS/TACACS+などの外部認証サーバに管理者権限をもつユーザを作成すれば、Telnet/SSH クライアントやコンソールポート
から本装置に管理者として直接ログインすることも可能です。
詳細はコマンドリファレンスの create auth access_group rootコマンドや set auth radius server rootコマンド、および、
「付録 C アトリビュートと RADIUS 認証/アカウントサーバ設定例」を参照してください。
付録 B SSH クライアントソフトの使用例
B-1
付録 B SSH クライアントソフトの使用例
付録 B では、本装置にアクセスする代表的な SSH クライアントソフトの使用例について
説明しています。
本章の内容
B.1 SSH クライアントソフトと認証方式 B.2 パスワード(Basic)認証の接続手順例 B.2.1 TeraTerm の接続手順(パスワード認証) B.2.2 Poderosa の接続手順(パスワード認証) B-3 公開鍵(Public)認証の接続手順例 B.3.1 TeraTerm の事前設定(公開鍵認証) B.3.2 TeraTerm の接続手順(公開鍵認証) B.3.3 Poderosa の事前設定(公開鍵認証) B.3.4 Poderosa の接続手順(公開鍵認証)

B-2
B.1 SSH クライアントソフトと認証方式
セキュリティ機能を強化している本装置は、Telnet サーバに加えて、SSHv2 (Secure Shell Version 2)サーバを搭載しています。通信内容が暗号化されている SSH プロトコルは、
Telnet プロトコルよりも安全な通信を行うことができますので、セキュリティを考慮して
いるネットワークでよく利用されています。 本章では、本装置の SSH サーバ機能を利用する下記の SSH クライアントソフトの使用方
法について説明します。 ・UTF-8 TeraTerm Pro with TTSSH2
UTF-8 TeraTerm Pro with TTSSH2(以下「TeraTerm」と呼びます)は、TeraTerm Projectにより修正BSDライセンスの下で配布されているフリーソフトウェアです。 詳しくは下記のホームページをご参照ください。
http:// osdn.jp/projects/ttssh2/ ・Poderosa
Poderosa は Poderosa プロジェクトにより、Apache ライセンスの下で配布されて
いるフリーソフトウェアです。 詳しくは下記のホームページをご参照ください。
http:// osdn.jp/projects/sfnet_poderosa/ また、本装置の SSH サーバは 2 種類の認証方式をサポートしています。 ・パスワード(Basic)認証 ・公開鍵(Public)認証
それぞれの認証方式で接続するための SSH クライアントソフトの接続手順を、ソフトウ
ェア毎に次項で紹介します。
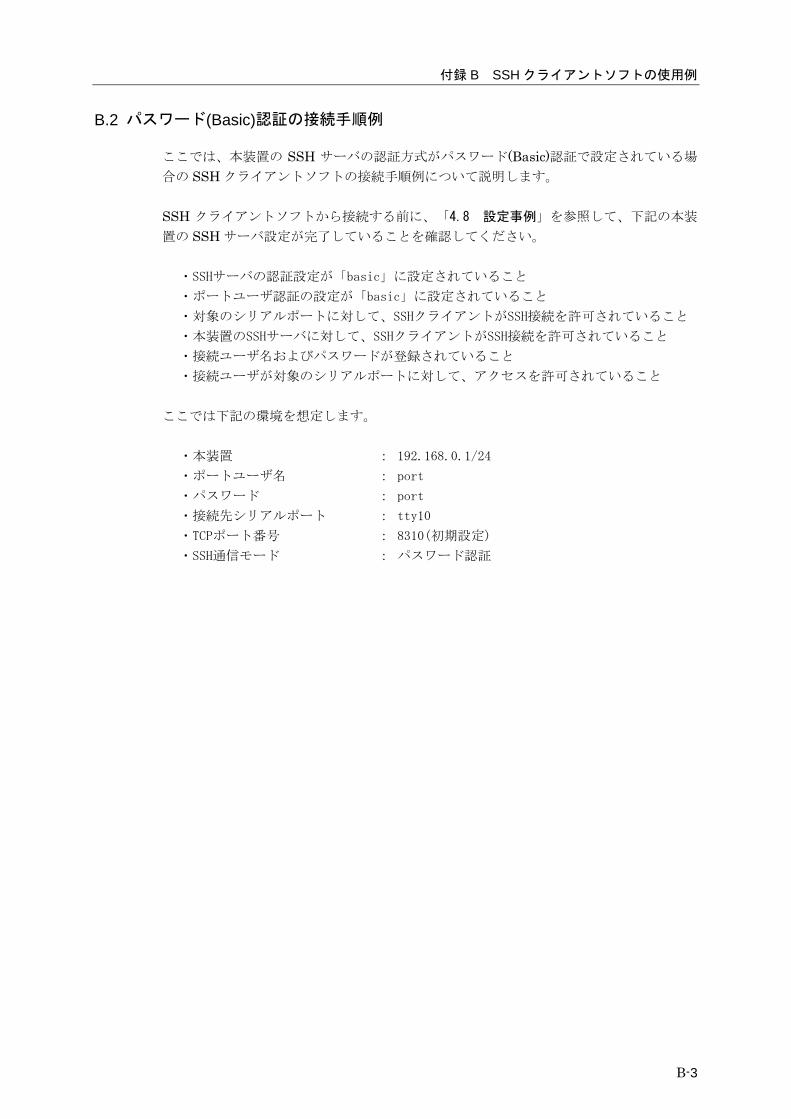
付録 B SSH クライアントソフトの使用例
B-3
B.2 パスワード(Basic)認証の接続手順例
ここでは、本装置の SSH サーバの認証方式がパスワード(Basic)認証で設定されている場
合の SSH クライアントソフトの接続手順例について説明します。 SSH クライアントソフトから接続する前に、「4.8 設定事例」を参照して、下記の本装
置の SSH サーバ設定が完了していることを確認してください。
・SSHサーバの認証設定が「basic」に設定されていること
・ポートユーザ認証の設定が「basic」に設定されていること
・対象のシリアルポートに対して、SSHクライアントがSSH接続を許可されていること
・本装置のSSHサーバに対して、SSHクライアントがSSH接続を許可されていること
・接続ユーザ名およびパスワードが登録されていること
・接続ユーザが対象のシリアルポートに対して、アクセスを許可されていること
ここでは下記の環境を想定します。
・本装置 : 192.168.0.1/24
・ポートユーザ名 : port
・パスワード : port
・接続先シリアルポート : tty10
・TCPポート番号 : 8310(初期設定)
・SSH通信モード : パスワード認証
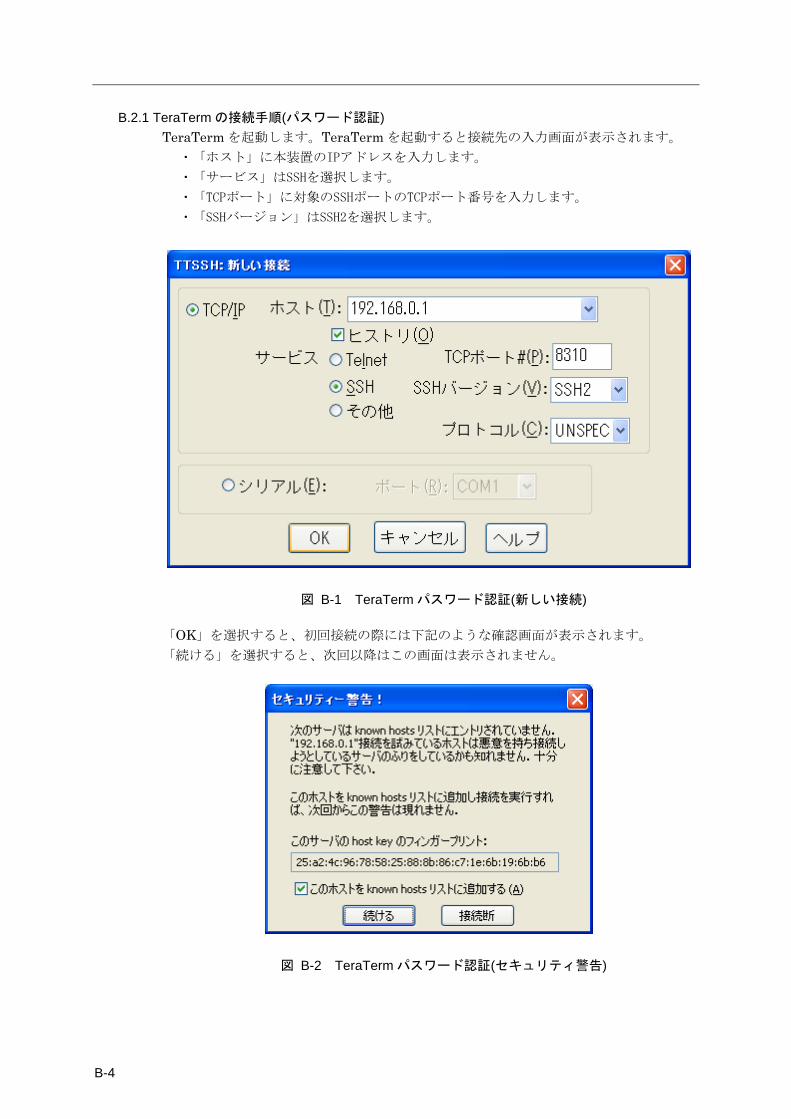
B-4
B.2.1 TeraTerm の接続手順(パスワード認証) TeraTerm を起動します。TeraTerm を起動すると接続先の入力画面が表示されます。
・「ホスト」に本装置のIPアドレスを入力します。
・「サービス」はSSHを選択します。
・「TCPポート」に対象のSSHポートのTCPポート番号を入力します。
・「SSHバージョン」はSSH2を選択します。
図 B-1 TeraTerm パスワード認証(新しい接続)
「OK」を選択すると、初回接続の際には下記のような確認画面が表示されます。 「続ける」を選択すると、次回以降はこの画面は表示されません。
図 B-2 TeraTerm パスワード認証(セキュリティ警告)
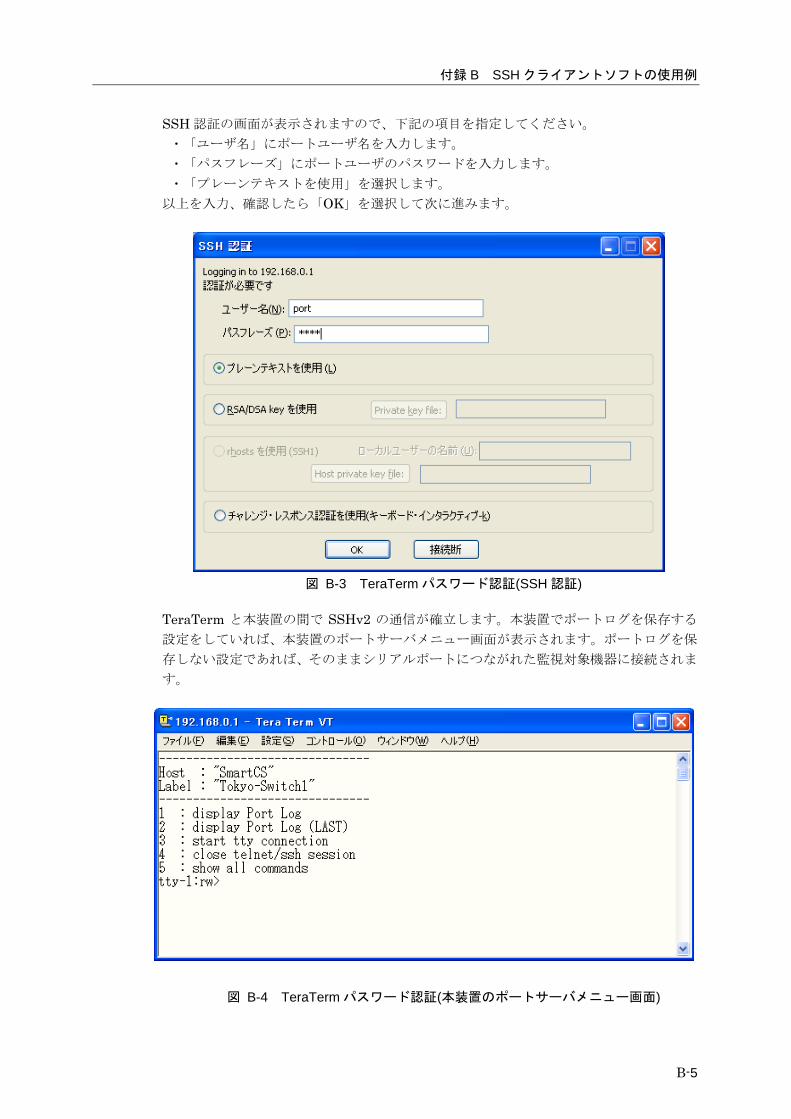
付録 B SSH クライアントソフトの使用例
B-5
SSH 認証の画面が表示されますので、下記の項目を指定してください。 ・「ユーザ名」にポートユーザ名を入力します。
・「パスフレーズ」にポートユーザのパスワードを入力します。
・「プレーンテキストを使用」を選択します。
以上を入力、確認したら「OK」を選択して次に進みます。
図 B-3 TeraTerm パスワード認証(SSH 認証)
TeraTerm と本装置の間で SSHv2 の通信が確立します。本装置でポートログを保存する
設定をしていれば、本装置のポートサーバメニュー画面が表示されます。ポートログを保
存しない設定であれば、そのままシリアルポートにつながれた監視対象機器に接続されま
す。
図 B-4 TeraTerm パスワード認証(本装置のポートサーバメニュー画面)
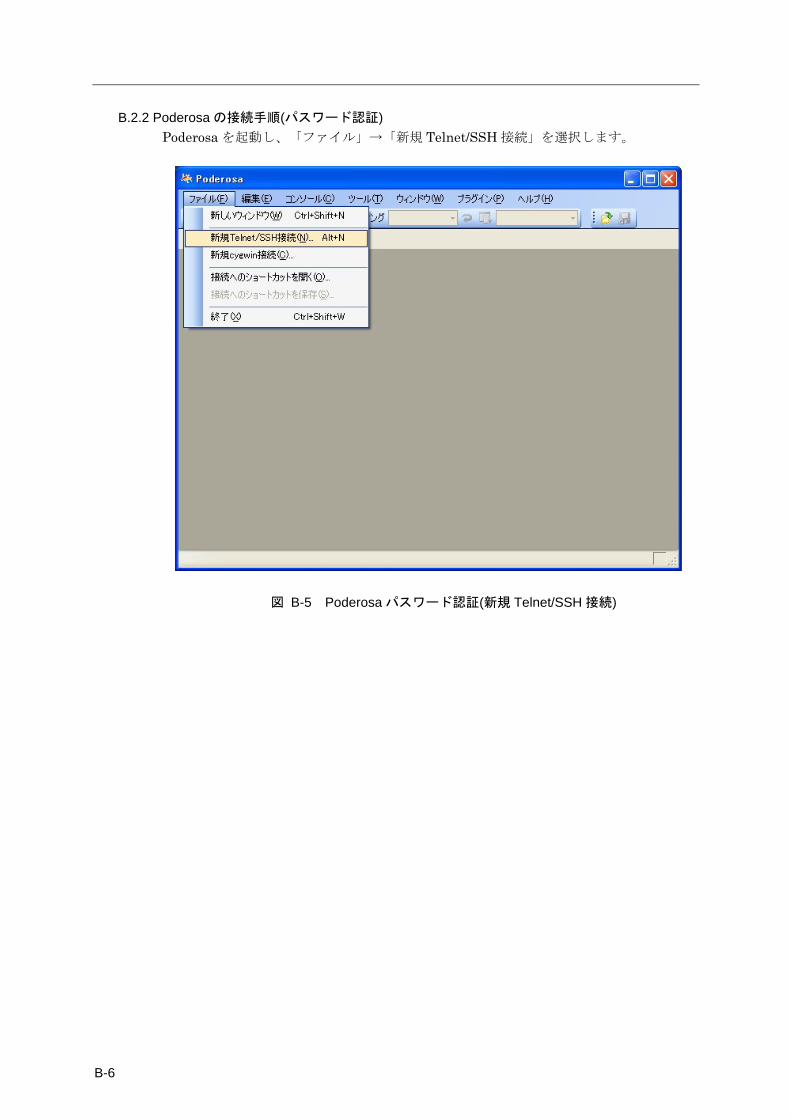
B-6
B.2.2 Poderosa の接続手順(パスワード認証) Poderosa を起動し、「ファイル」→「新規 Telnet/SSH 接続」を選択します。
図 B-5 Poderosa パスワード認証(新規 Telnet/SSH 接続)
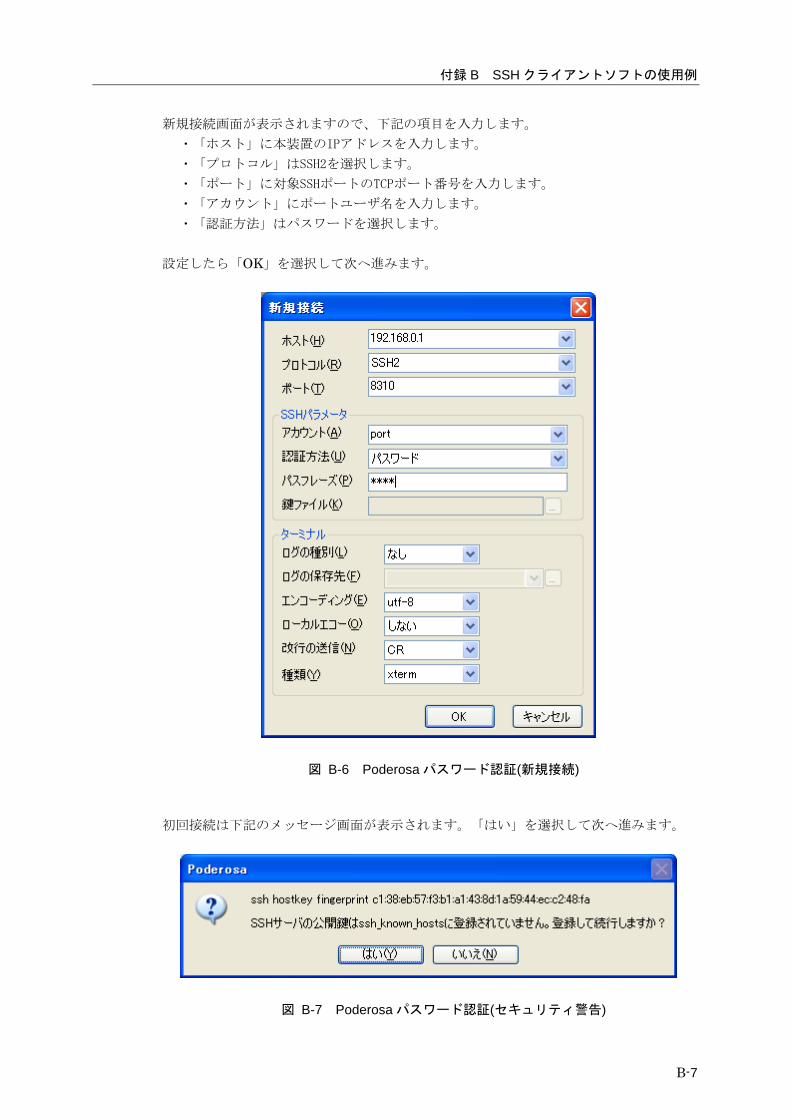
付録 B SSH クライアントソフトの使用例
B-7
新規接続画面が表示されますので、下記の項目を入力します。
・「ホスト」に本装置のIPアドレスを入力します。
・「プロトコル」はSSH2を選択します。
・「ポート」に対象SSHポートのTCPポート番号を入力します。
・「アカウント」にポートユーザ名を入力します。
・「認証方法」はパスワードを選択します。
設定したら「OK」を選択して次へ進みます。
図 B-6 Poderosa パスワード認証(新規接続)
初回接続は下記のメッセージ画面が表示されます。「はい」を選択して次へ進みます。
図 B-7 Poderosa パスワード認証(セキュリティ警告)

B-8
Poderosa と本装置の間で SSHv2 の通信が確立します。本装置でポートログを保存する設
定をしていれば、本装置のポートサーバメニュー画面が表示されます。ポートログを保存
しない設定であれば、そのままシリアルポートにつながれた監視対象機器に接続されます。
図 B-8 Poderosa パスワード認証(本装置のポートサーバメニュー画面)
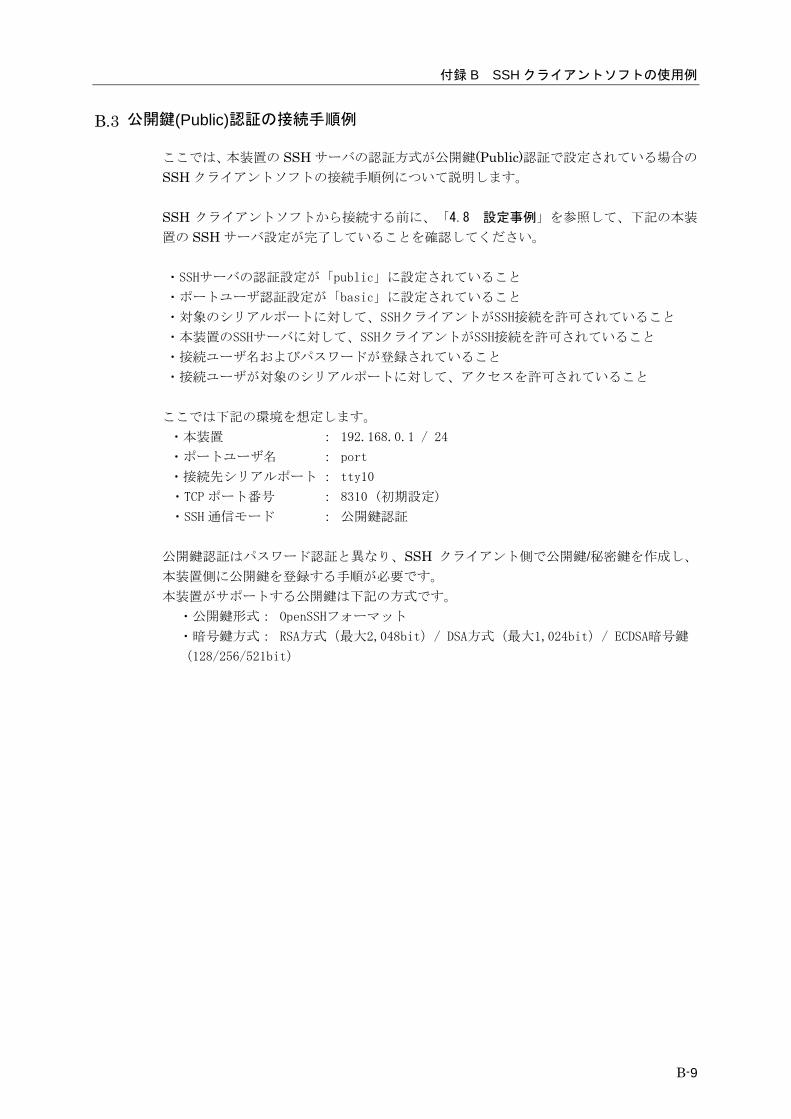
付録 B SSH クライアントソフトの使用例
B-9
B.3 公開鍵(Public)認証の接続手順例
ここでは、本装置の SSH サーバの認証方式が公開鍵(Public)認証で設定されている場合の
SSH クライアントソフトの接続手順例について説明します。 SSH クライアントソフトから接続する前に、「4.8 設定事例」を参照して、下記の本装
置の SSH サーバ設定が完了していることを確認してください。 ・SSHサーバの認証設定が「public」に設定されていること
・ポートユーザ認証設定が「basic」に設定されていること
・対象のシリアルポートに対して、SSHクライアントがSSH接続を許可されていること
・本装置のSSHサーバに対して、SSHクライアントがSSH接続を許可されていること
・接続ユーザ名およびパスワードが登録されていること
・接続ユーザが対象のシリアルポートに対して、アクセスを許可されていること
ここでは下記の環境を想定します。 ・本装置 : 192.168.0.1 / 24
・ポートユーザ名 : port
・接続先シリアルポート : tty10
・TCP ポート番号 : 8310 (初期設定)
・SSH 通信モード : 公開鍵認証
公開鍵認証はパスワード認証と異なり、SSH クライアント側で公開鍵/秘密鍵を作成し、
本装置側に公開鍵を登録する手順が必要です。 本装置がサポートする公開鍵は下記の方式です。
・公開鍵形式: OpenSSHフォーマット
・暗号鍵方式: RSA方式(最大2,048bit)/ DSA方式(最大1,024bit)/ ECDSA暗号鍵
(128/256/521bit)
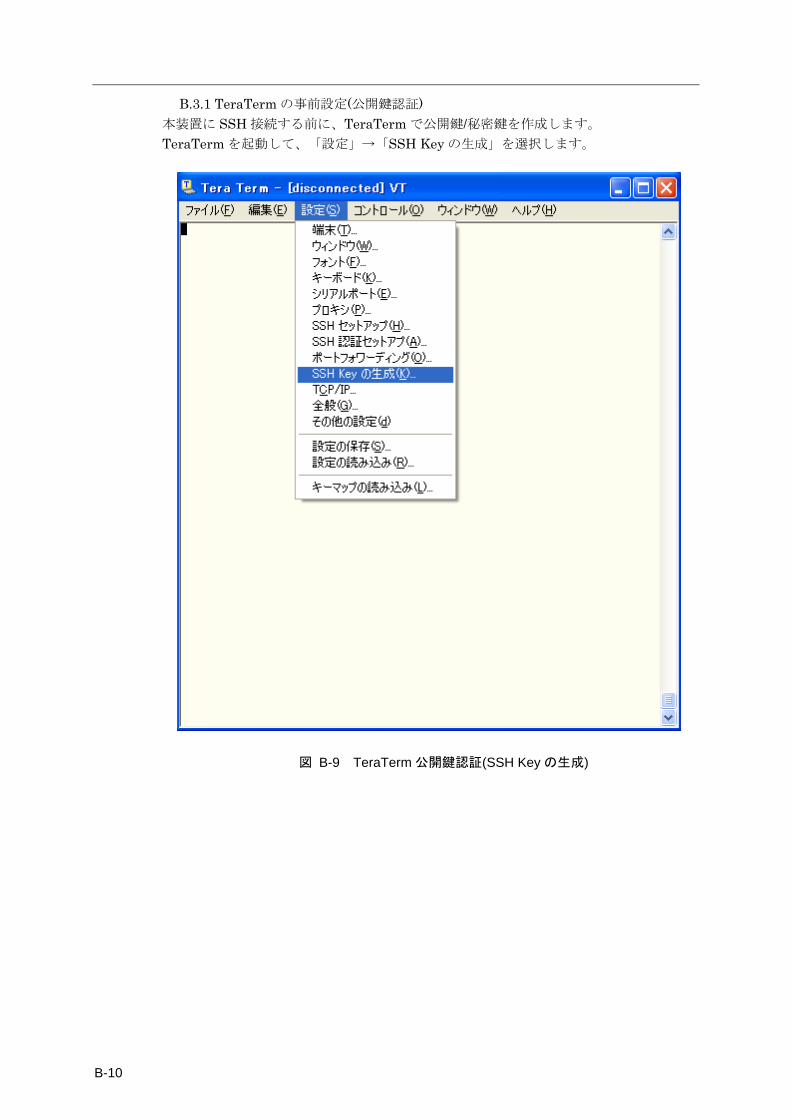
B-10
B.3.1 TeraTerm の事前設定(公開鍵認証) 本装置に SSH 接続する前に、TeraTerm で公開鍵/秘密鍵を作成します。 TeraTerm を起動して、「設定」→「SSH Key の生成」を選択します。
図 B-9 TeraTerm 公開鍵認証(SSH Key の生成)
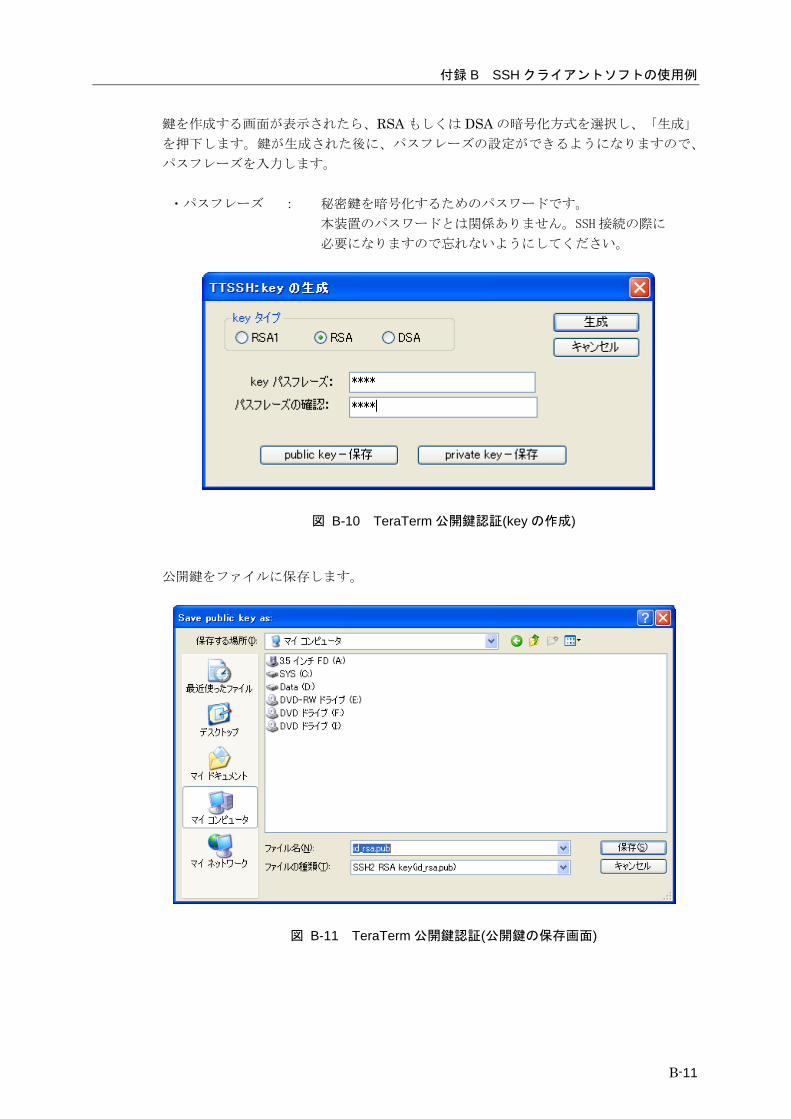
付録 B SSH クライアントソフトの使用例
B-11
鍵を作成する画面が表示されたら、RSA もしくは DSA の暗号化方式を選択し、「生成」
を押下します。鍵が生成された後に、パスフレーズの設定ができるようになりますので、
パスフレーズを入力します。 ・パスフレーズ : 秘密鍵を暗号化するためのパスワードです。
本装置のパスワードとは関係ありません。SSH 接続の際に
必要になりますので忘れないようにしてください。
図 B-10 TeraTerm 公開鍵認証(key の作成)
公開鍵をファイルに保存します。
図 B-11 TeraTerm 公開鍵認証(公開鍵の保存画面)
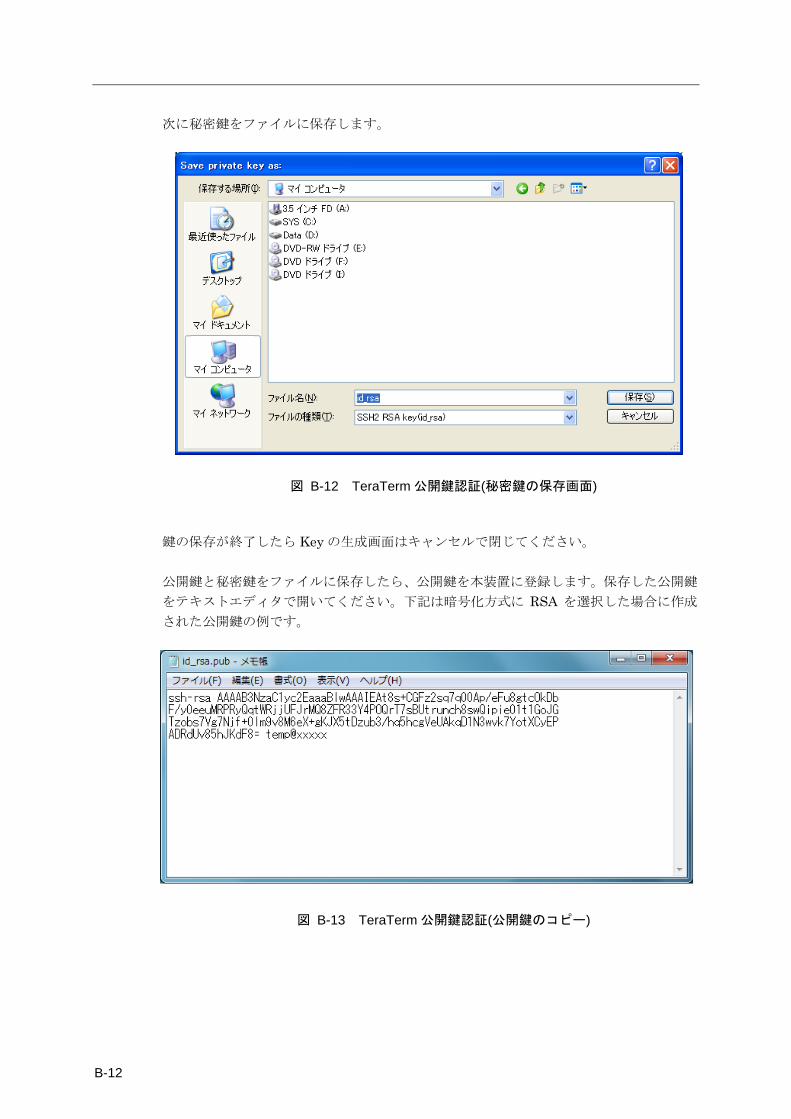
B-12
次に秘密鍵をファイルに保存します。
図 B-12 TeraTerm 公開鍵認証(秘密鍵の保存画面)
鍵の保存が終了したら Key の生成画面はキャンセルで閉じてください。 公開鍵と秘密鍵をファイルに保存したら、公開鍵を本装置に登録します。保存した公開鍵
をテキストエディタで開いてください。下記は暗号化方式に RSA を選択した場合に作成
された公開鍵の例です。
図 B-13 TeraTerm 公開鍵認証(公開鍵のコピー)

付録 B SSH クライアントソフトの使用例
B-13
本装置にログインして、set user sshkey コマンドでコピーした公開鍵を登録します。 途中に改行を入れないことに注意してください。
(c)NS-2250# set user port sshkey public ssh-rsa
AAAAB3NzaC1yc2EaaaBlwAAAIEAt8s+CGFz2sq7q00Ap/eFu8gtcOkDbF/y0eeuM
RPRyQqtWRjjUFJrMQ8ZFR33Y4POQrT7sBUtrunch8swQipie01t1GoJGTzobs7Vg
7Njf+0lm9v8M6eX+gKJX5tDzub3/hq5hcgVeUAkqD1N3wvk7YotXCyEPADRdUv85
hJKdF8= temp@xxxxx↲
(c)NS-2250# write↲
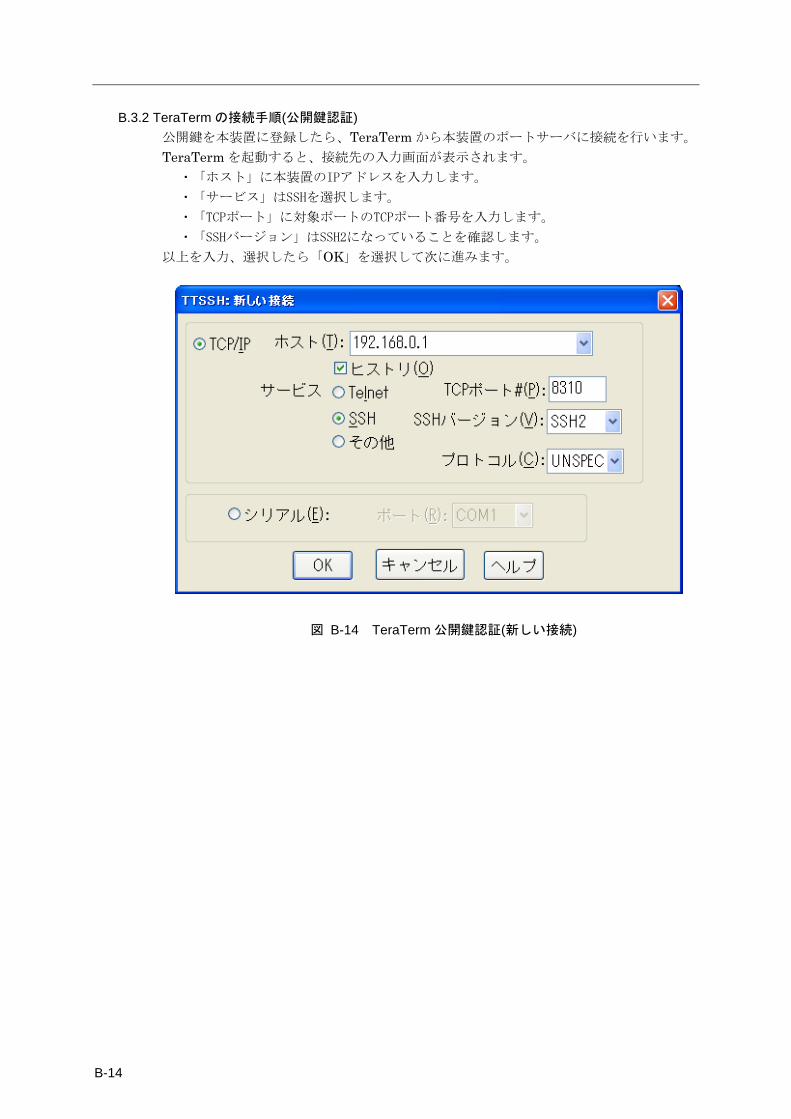
B-14
B.3.2 TeraTerm の接続手順(公開鍵認証) 公開鍵を本装置に登録したら、TeraTerm から本装置のポートサーバに接続を行います。 TeraTerm を起動すると、接続先の入力画面が表示されます。
・「ホスト」に本装置のIPアドレスを入力します。
・「サービス」はSSHを選択します。
・「TCPポート」に対象ポートのTCPポート番号を入力します。
・「SSHバージョン」はSSH2になっていることを確認します。
以上を入力、選択したら「OK」を選択して次に進みます。
図 B-14 TeraTerm 公開鍵認証(新しい接続)

付録 B SSH クライアントソフトの使用例
B-15
SSH 認証画面が表示されますので、下記の項目を設定します。
・「ユーザ名」にポートユーザ名を入力します。
・「パスフレーズ」に鍵作成時に使用したパスフレーズを入力します。
・「RSA/DSA keyを使用」を選択し、秘密鍵のファイル名を指定します。
上記が設定されたら「OK」を選択し、接続を開始します。
図 B-15 TeraTerm 公開鍵認証(SSH 認証)
認証に成功すると、TeraTerm と本装置の間で SSHv2 の通信が確立します。本装置でポ
ートログを保存する設定をしていれば、本装置のポートサーバメニュー画面が表示されま
す。ポートログを保存しない設定であれば、そのままシリアルポートにつながれた監視対
象機器に接続されます。
図 B-16 TeraTerm 公開鍵認証(本装置のポートサーバメニュー画面)
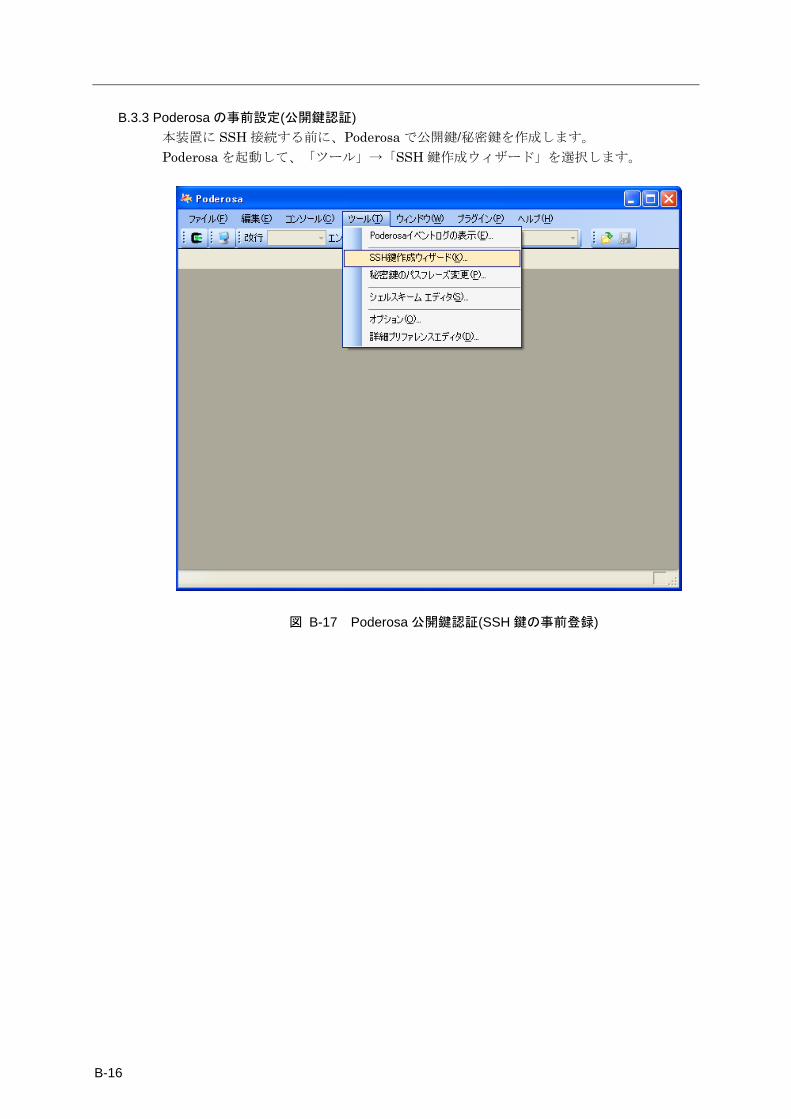
B-16
B.3.3 Poderosa の事前設定(公開鍵認証) 本装置に SSH 接続する前に、Poderosa で公開鍵/秘密鍵を作成します。 Poderosa を起動して、「ツール」→「SSH 鍵作成ウィザード」を選択します。
図 B-17 Poderosa 公開鍵認証(SSH 鍵の事前登録)
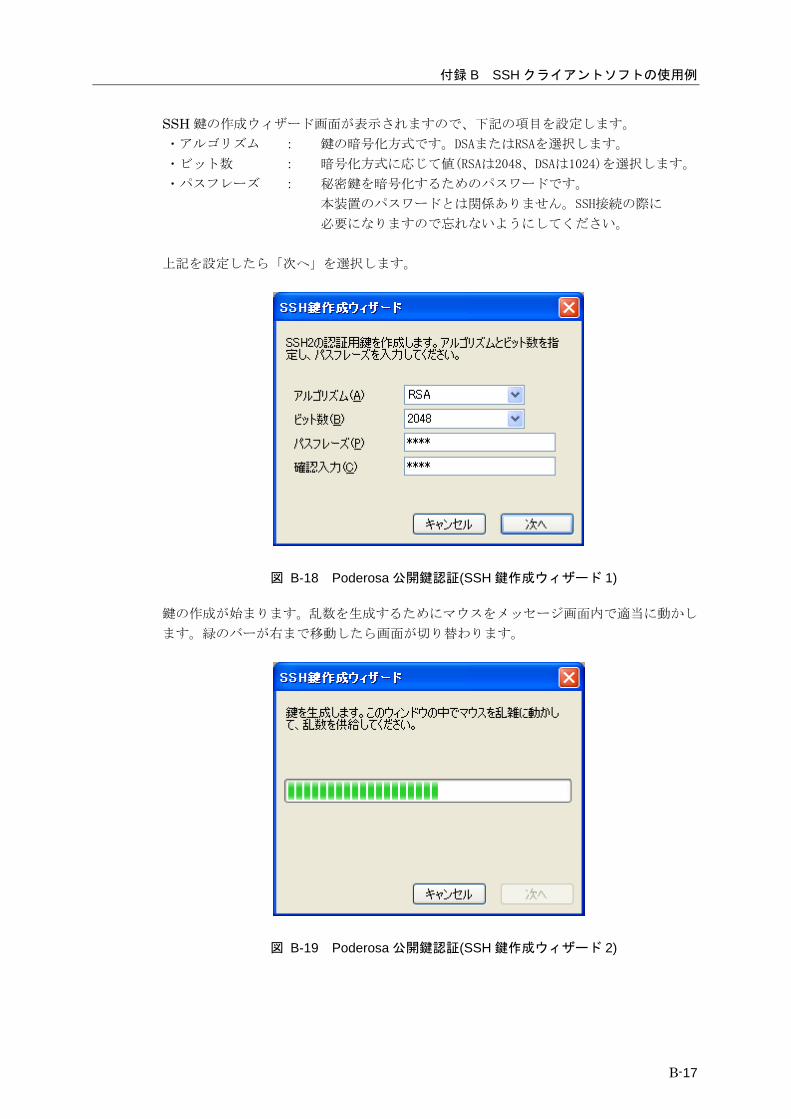
付録 B SSH クライアントソフトの使用例
B-17
SSH 鍵の作成ウィザード画面が表示されますので、下記の項目を設定します。 ・アルゴリズム : 鍵の暗号化方式です。DSAまたはRSAを選択します。
・ビット数 : 暗号化方式に応じて値(RSAは2048、DSAは1024)を選択します。
・パスフレーズ : 秘密鍵を暗号化するためのパスワードです。
本装置のパスワードとは関係ありません。SSH接続の際に
必要になりますので忘れないようにしてください。
上記を設定したら「次へ」を選択します。
図 B-18 Poderosa 公開鍵認証(SSH 鍵作成ウィザード 1)
鍵の作成が始まります。乱数を生成するためにマウスをメッセージ画面内で適当に動かし
ます。緑のバーが右まで移動したら画面が切り替わります。
図 B-19 Poderosa 公開鍵認証(SSH 鍵作成ウィザード 2)
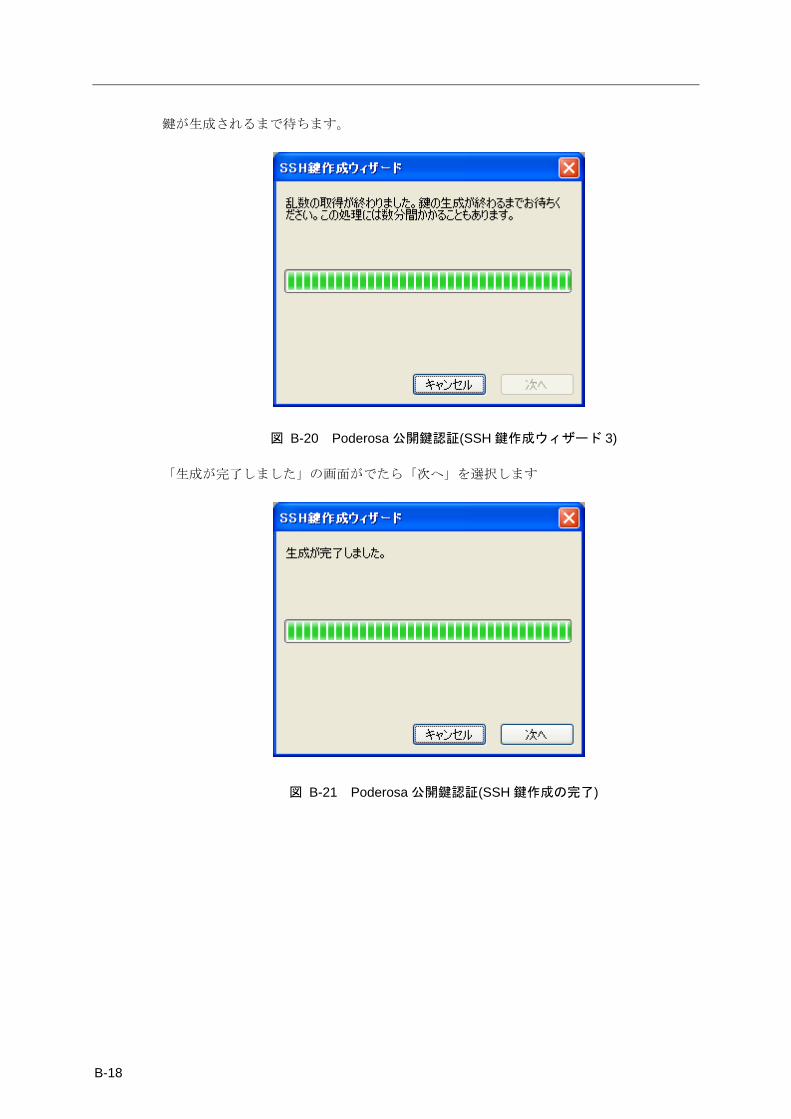
B-18
鍵が生成されるまで待ちます。
図 B-20 Poderosa 公開鍵認証(SSH 鍵作成ウィザード 3)
「生成が完了しました」の画面がでたら「次へ」を選択します
図 B-21 Poderosa 公開鍵認証(SSH 鍵作成の完了)
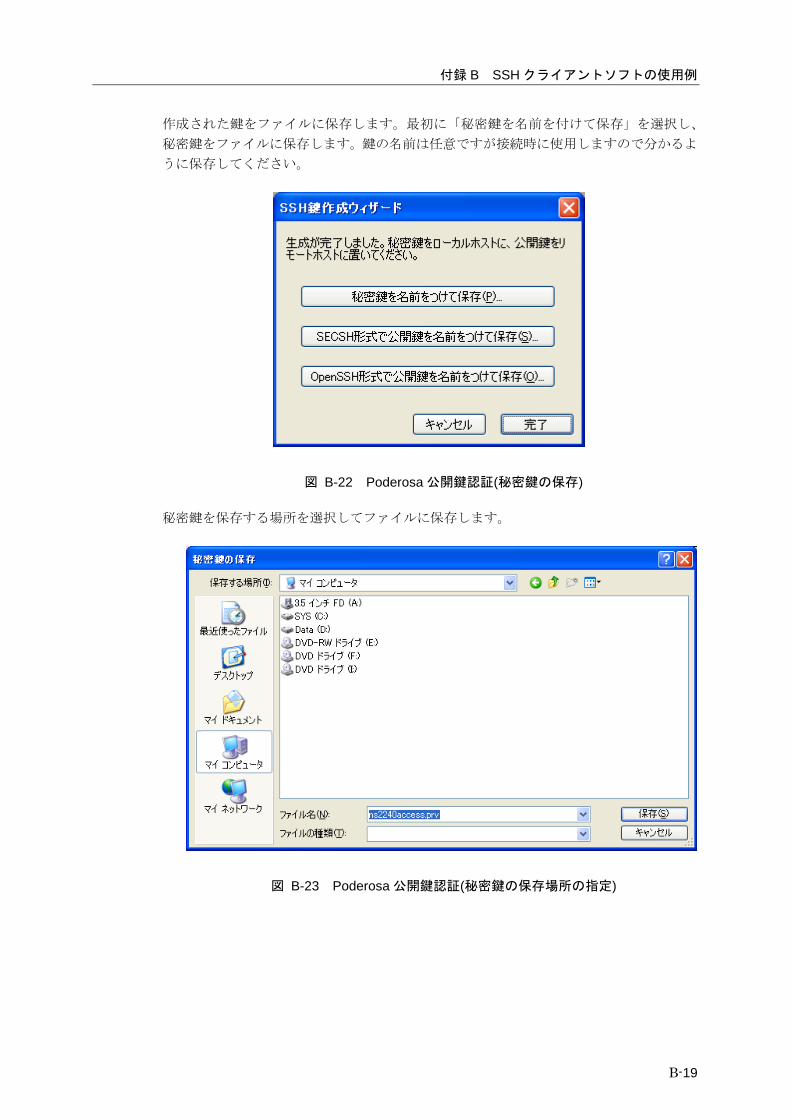
付録 B SSH クライアントソフトの使用例
B-19
作成された鍵をファイルに保存します。最初に「秘密鍵を名前を付けて保存」を選択し、
秘密鍵をファイルに保存します。鍵の名前は任意ですが接続時に使用しますので分かるよ
うに保存してください。
図 B-22 Poderosa 公開鍵認証(秘密鍵の保存)
秘密鍵を保存する場所を選択してファイルに保存します。
図 B-23 Poderosa 公開鍵認証(秘密鍵の保存場所の指定)
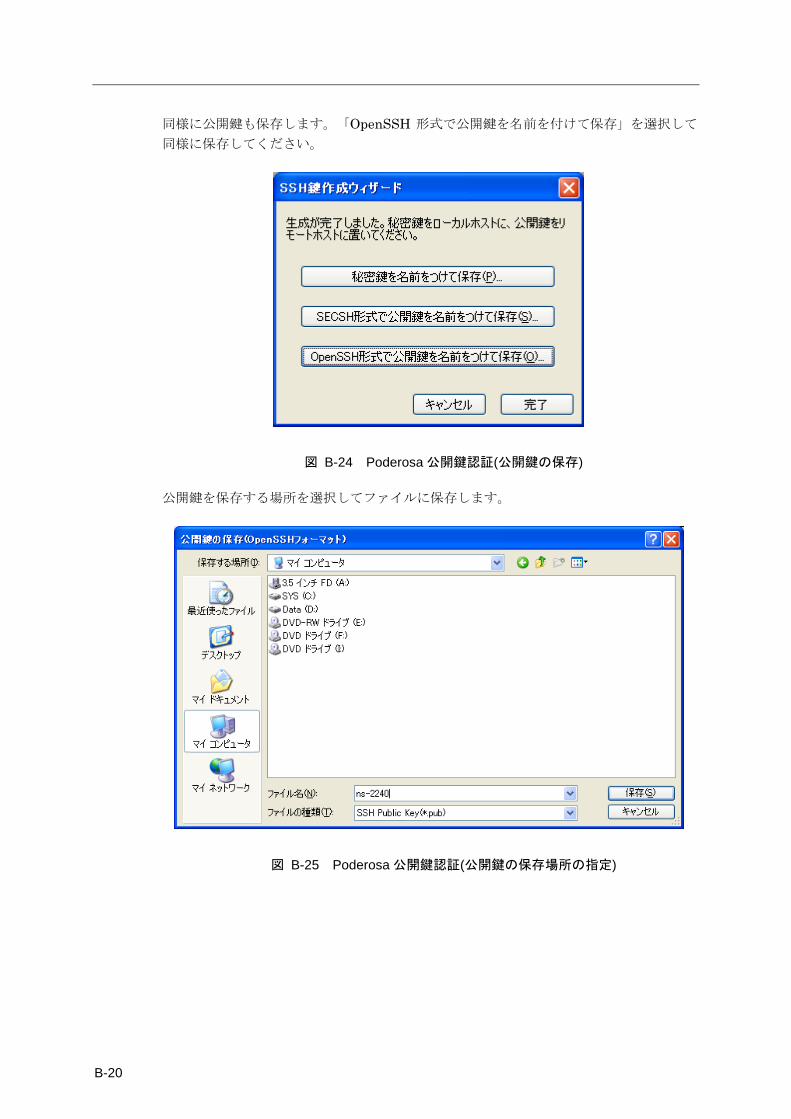
B-20
同様に公開鍵も保存します。「OpenSSH 形式で公開鍵を名前を付けて保存」を選択して
同様に保存してください。
図 B-24 Poderosa 公開鍵認証(公開鍵の保存)
公開鍵を保存する場所を選択してファイルに保存します。
図 B-25 Poderosa 公開鍵認証(公開鍵の保存場所の指定)
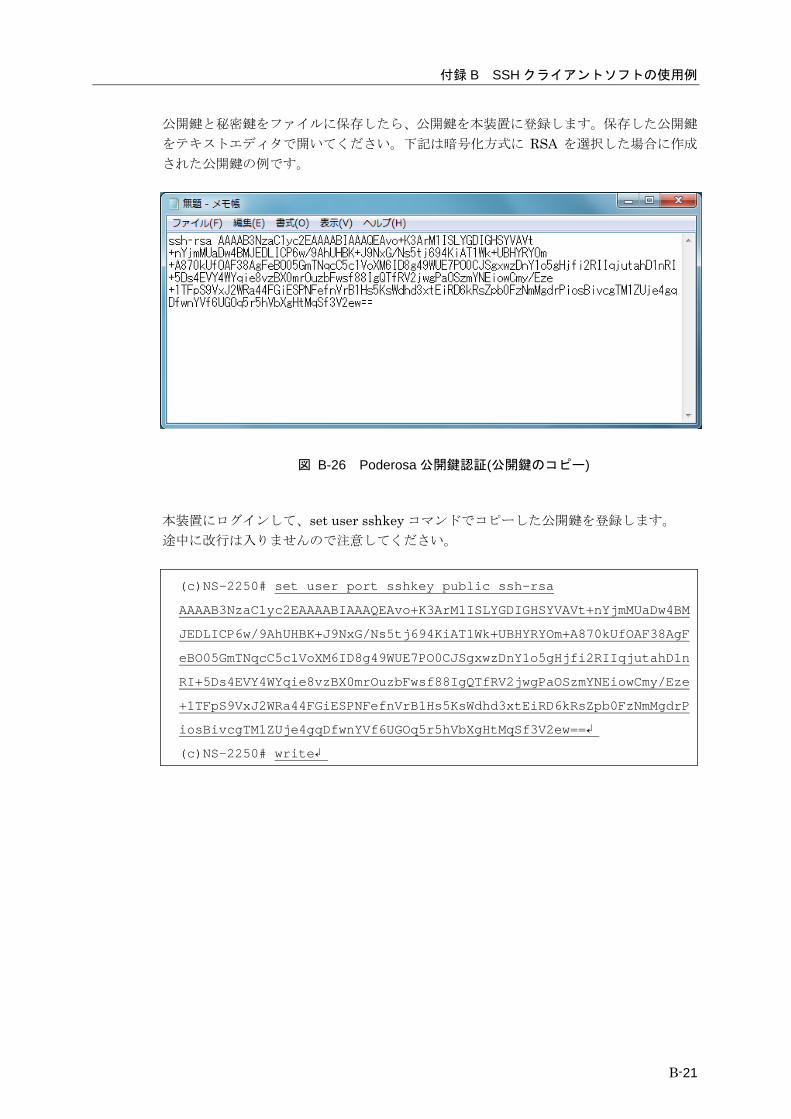
付録 B SSH クライアントソフトの使用例
B-21
公開鍵と秘密鍵をファイルに保存したら、公開鍵を本装置に登録します。保存した公開鍵
をテキストエディタで開いてください。下記は暗号化方式に RSA を選択した場合に作成
された公開鍵の例です。
図 B-26 Poderosa 公開鍵認証(公開鍵のコピー)
本装置にログインして、set user sshkey コマンドでコピーした公開鍵を登録します。 途中に改行は入りませんので注意してください。
(c)NS-2250# set user port sshkey public ssh-rsa
AAAAB3NzaC1yc2EAAAABIAAAQEAvo+K3ArM1ISLYGDIGHSYVAVt+nYjmMUaDw4BM
JEDLICP6w/9AhUHBK+J9NxG/Ns5tj694KiAT1Wk+UBHYRYOm+A870kUfOAF38AgF
eBO05GmTNqcC5c1VoXM6ID8g49WUE7PO0CJSgxwzDnY1o5gHjfi2RIIqjutahD1n
RI+5Ds4EVY4WYqie8vzBX0mrOuzbFwsf88IgQTfRV2jwgPaOSzmYNEiowCmy/Eze
+1TFpS9VxJ2WRa44FGiESPNFefnVrB1Hs5KsWdhd3xtEiRD6kRsZpb0FzNmMgdrP
iosBivcgTM1ZUje4gqDfwnYVf6UGOq5r5hVbXgHtMqSf3V2ew==↲
(c)NS-2250# write↲
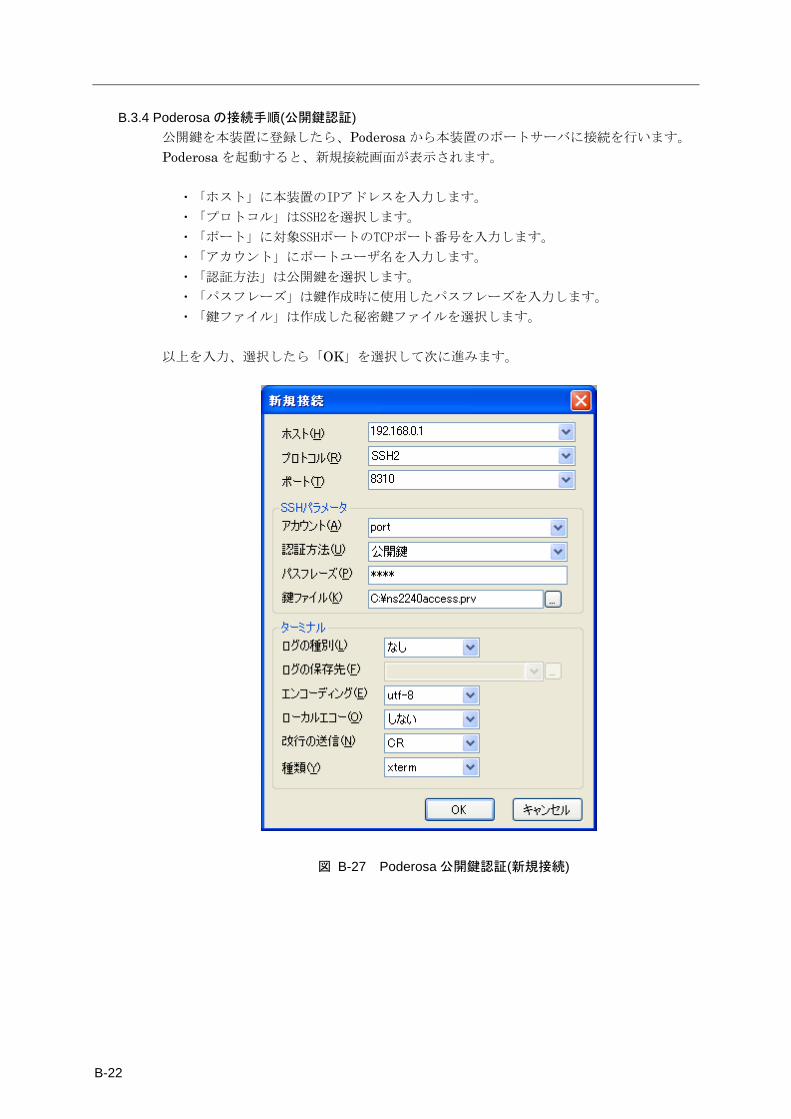
B-22
B.3.4 Poderosa の接続手順(公開鍵認証) 公開鍵を本装置に登録したら、Poderosa から本装置のポートサーバに接続を行います。 Poderosa を起動すると、新規接続画面が表示されます。
・「ホスト」に本装置のIPアドレスを入力します。
・「プロトコル」はSSH2を選択します。
・「ポート」に対象SSHポートのTCPポート番号を入力します。
・「アカウント」にポートユーザ名を入力します。
・「認証方法」は公開鍵を選択します。
・「パスフレーズ」は鍵作成時に使用したパスフレーズを入力します。
・「鍵ファイル」は作成した秘密鍵ファイルを選択します。
以上を入力、選択したら「OK」を選択して次に進みます。
図 B-27 Poderosa 公開鍵認証(新規接続)
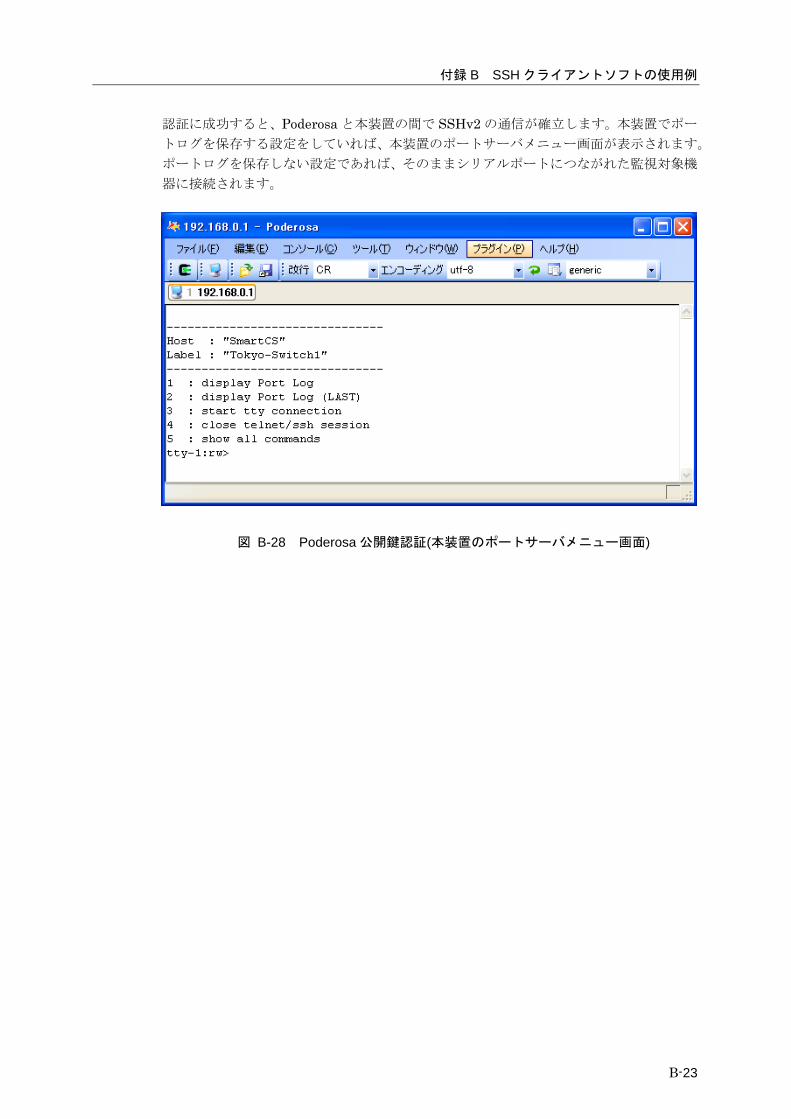
付録 B SSH クライアントソフトの使用例
B-23
認証に成功すると、Poderosa と本装置の間で SSHv2 の通信が確立します。本装置でポー
トログを保存する設定をしていれば、本装置のポートサーバメニュー画面が表示されます。
ポートログを保存しない設定であれば、そのままシリアルポートにつながれた監視対象機
器に接続されます。
図 B-28 Poderosa 公開鍵認証(本装置のポートサーバメニュー画面)

C-1
付録 C アトリビュートと
RADIUS 認証/アカウントサーバ設定例
付録 Cでは、アトリビュートと RADIUS 認証/アカウントサーバ設定例について説明しています。
本章の内容 C.1 RADIUS 認証機能/RADIUS アカウント機能 C.2 RADIUS 認証サーバに送信するアトリビュート C.3 本装置が処理する RADIUS 認証サーバのアトリビュート C.4 RADIUS アカウントサーバに送信するアトリビュート C.5 RADIUS 認証/アカウントサーバ側の設定例
C.5.1 クライアントの登録 C.5.2 ユーザの登録
C.6 RADIUS アカウントサーバのアカウントログ
C-2
C.1 RADIUS 認証機能/RADIUS アカウント機能
本装置に RADIUS 認証機能の設定を行うと、本装置にログインした時や本装置のシリアルポート
へアクセスした時に、本装置の RADIUS 認証クライアントは指定された RADIUS 認証サーバへ
認証要求(Access Request パケット)を送信してユーザの認証を行います。 RADIUS 認証サーバでユーザの認証が成功すると、RADIUS 認証サーバは認証成功のパケット
(Access Accept パケット)を本装置に送信します。本装置は受信した認証成功パケットに含まれて
いるアトリビュート情報に基づいて動作します。 RADIUS 認証サーバでユーザの認証に失敗すると、RADIUS 認証サーバは認証拒否のパケット
(Access Reject パケット)を本装置に送信します。
本装置に RADIUS アカウント機能の設定を行うと、ユーザのログインやログアウトのアカウ
ント情報を RADIUS アカウントサーバに送信してアカウント情報を保存します。 RADIUS 認証サーバで認証に成功すると、本装置の RADIUS アカウントクライアントは
RADIUS アカウントサーバにアカウント START パケットを送信します。 ユーザが本装置の利用を終了(ログアウト)したり、RADIUS認証サーバで認証に失敗すると、
本装置の RADIUS アカウントクライアントは RADIUS アカウントサーバにアカウント
STOP パケットを送信します。
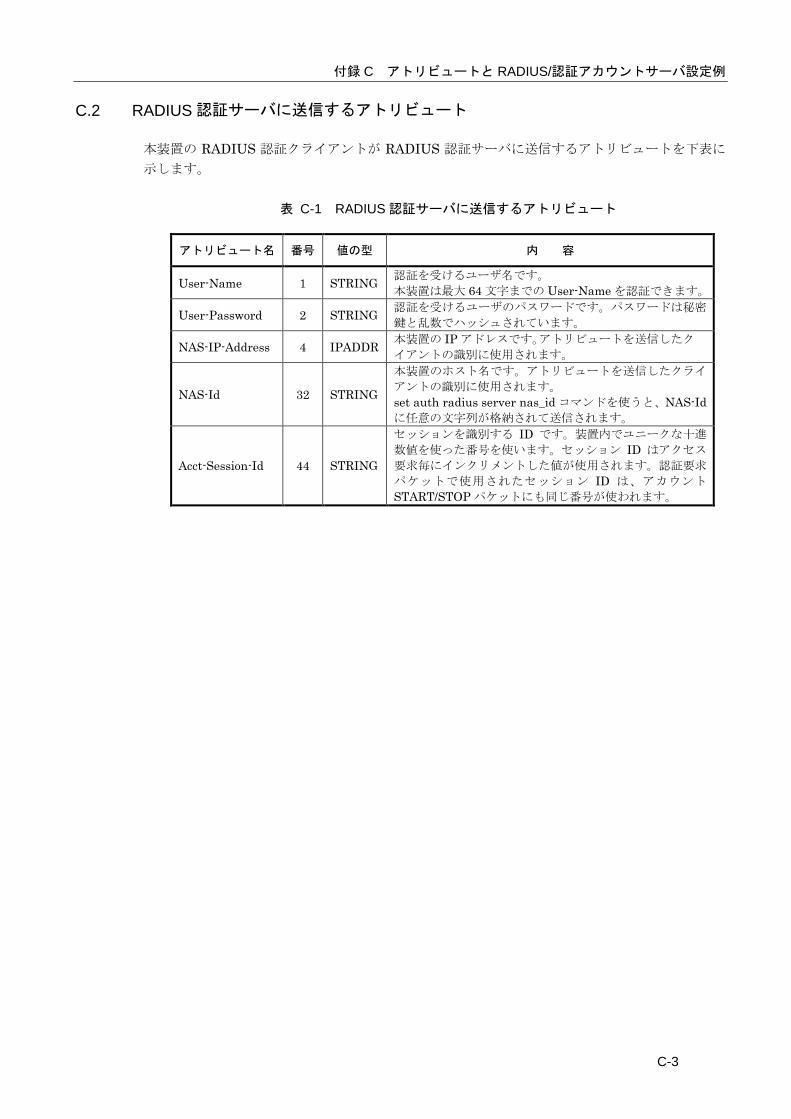
付録 C アトリビュートと RADIUS/認証アカウントサーバ設定例
C-3
C.2 RADIUS 認証サーバに送信するアトリビュート
本装置の RADIUS 認証クライアントが RADIUS 認証サーバに送信するアトリビュートを下表に
示します。
表 C-1 RADIUS 認証サーバに送信するアトリビュート
アトリビュート名 番号 値の型 内 容
User-Name 1 STRING 認証を受けるユーザ名です。 本装置は最大 64 文字までの User-Name を認証できます。
User-Password 2 STRING 認証を受けるユーザのパスワードです。パスワードは秘密
鍵と乱数でハッシュされています。
NAS-IP-Address 4 IPADDR 本装置の IP アドレスです。アトリビュートを送信したクラ
イアントの識別に使用されます。
NAS-Id 32 STRING
本装置のホスト名です。アトリビュートを送信したクライ
アントの識別に使用されます。 set auth radius server nas_id コマンドを使うと、NAS-Idに任意の文字列が格納されて送信されます。
Acct-Session-Id 44 STRING
セッションを識別する ID です。装置内でユニークな十進
数値を使った番号を使います。セッション ID はアクセス
要求毎にインクリメントした値が使用されます。認証要求
パケットで使用されたセッション ID は、アカウント
START/STOP パケットにも同じ番号が使われます。
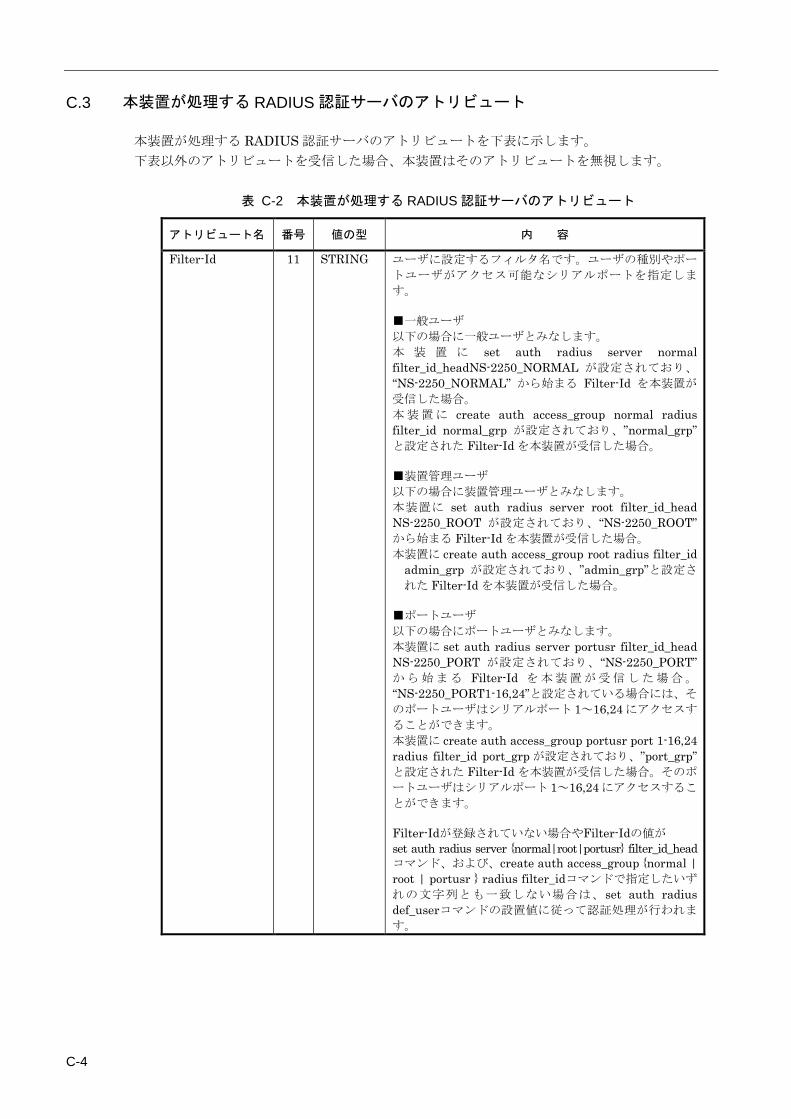
C-4
C.3 本装置が処理する RADIUS 認証サーバのアトリビュート
本装置が処理する RADIUS 認証サーバのアトリビュートを下表に示します。 下表以外のアトリビュートを受信した場合、本装置はそのアトリビュートを無視します。
表 C-2 本装置が処理する RADIUS 認証サーバのアトリビュート
アトリビュート名 番号 値の型 内 容
Filter-Id 11 STRING ユーザに設定するフィルタ名です。ユーザの種別やポー
トユーザがアクセス可能なシリアルポートを指定しま
す。 ■一般ユーザ 以下の場合に一般ユーザとみなします。 本 装 置 に set auth radius server normal filter_id_headNS-2250_NORMAL が設定されており、
“NS-2250_NORMAL” から始まる Filter-Id を本装置が
受信した場合。 本装置に create auth access_group normal radius filter_id normal_grp が設定されており、”normal_grp”と設定された Filter-Id を本装置が受信した場合。 ■装置管理ユーザ 以下の場合に装置管理ユーザとみなします。 本装置に set auth radius server root filter_id_head NS-2250_ROOT が設定されており、“NS-2250_ROOT” から始まる Filter-Id を本装置が受信した場合。 本装置に create auth access_group root radius filter_id
admin_grp が設定されており、”admin_grp”と設定さ
れた Filter-Id を本装置が受信した場合。 ■ポートユーザ 以下の場合にポートユーザとみなします。 本装置に set auth radius server portusr filter_id_head NS-2250_PORT が設定されており、“NS-2250_PORT” から始まる Filter-Id を本装置が受信した場合。
“NS-2250_PORT1-16,24”と設定されている場合には、そ
のポートユーザはシリアルポート 1~16,24 にアクセスす
ることができます。 本装置に create auth access_group portusr port 1-16,24 radius filter_id port_grp が設定されており、”port_grp”と設定された Filter-Id を本装置が受信した場合。そのポ
ートユーザはシリアルポート 1~16,24 にアクセスするこ
とができます。 Filter-Idが登録されていない場合やFilter-Idの値が set auth radius server {normal|root|portusr} filter_id_headコマンド、および、create auth access_group {normal | root | portusr } radius filter_idコマンドで指定したいず
れの文字列とも一致しない場合は、set auth radius def_userコマンドの設置値に従って認証処理が行われま
す。
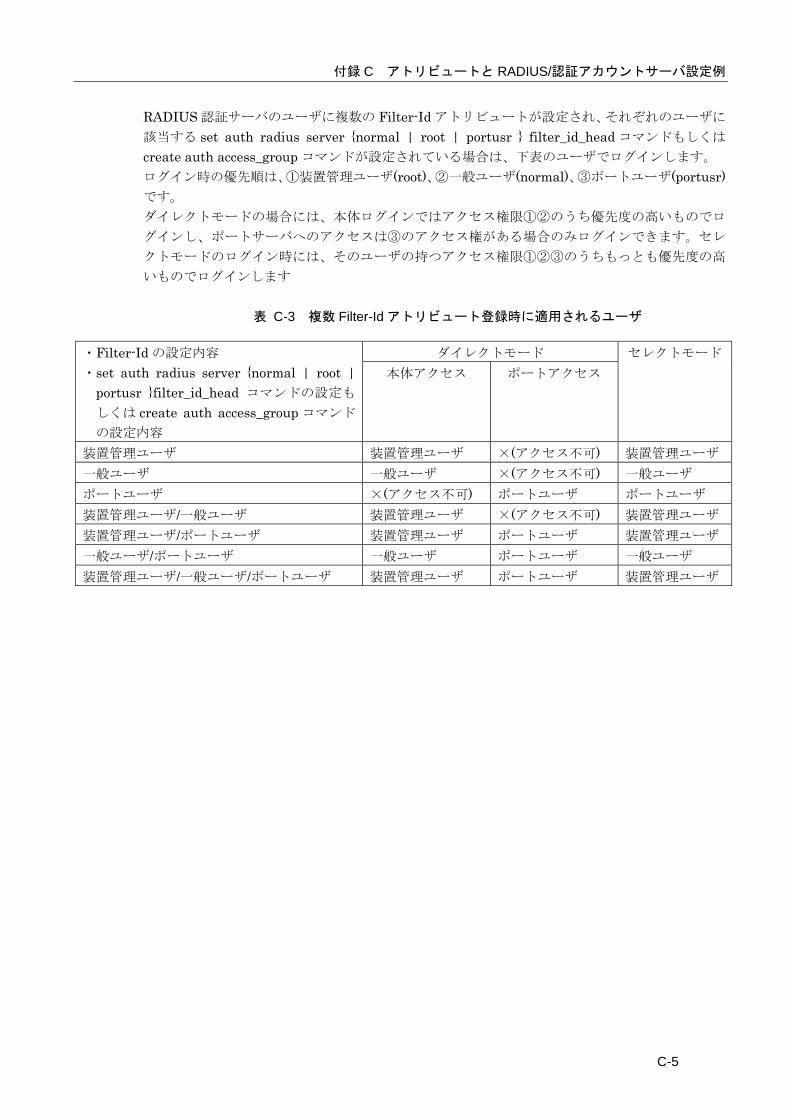
付録 C アトリビュートと RADIUS/認証アカウントサーバ設定例
C-5
RADIUS 認証サーバのユーザに複数の Filter-Id アトリビュートが設定され、それぞれのユーザに
該当する set auth radius server {normal | root | portusr } filter_id_head コマンドもしくは
create auth access_group コマンドが設定されている場合は、下表のユーザでログインします。 ログイン時の優先順は、①装置管理ユーザ(root)、②一般ユーザ(normal)、③ポートユーザ(portusr)です。 ダイレクトモードの場合には、本体ログインではアクセス権限①②のうち優先度の高いものでロ
グインし、ポートサーバへのアクセスは③のアクセス権がある場合のみログインできます。セレ
クトモードのログイン時には、そのユーザの持つアクセス権限①②③のうちもっとも優先度の高
いものでログインします
表 C-3 複数 Filter-Id アトリビュート登録時に適用されるユーザ
・Filter-Id の設定内容 ・set auth radius server {normal | root |
portusr }filter_id_head コマンドの設定も
しくは create auth access_group コマンド
の設定内容
ダイレクトモード セレクトモード 本体アクセス ポートアクセス
装置管理ユーザ 装置管理ユーザ ×(アクセス不可) 装置管理ユーザ 一般ユーザ 一般ユーザ ×(アクセス不可) 一般ユーザ ポートユーザ ×(アクセス不可) ポートユーザ ポートユーザ 装置管理ユーザ/一般ユーザ 装置管理ユーザ ×(アクセス不可) 装置管理ユーザ 装置管理ユーザ/ポートユーザ 装置管理ユーザ ポートユーザ 装置管理ユーザ 一般ユーザ/ポートユーザ 一般ユーザ ポートユーザ 一般ユーザ 装置管理ユーザ/一般ユーザ/ポートユーザ 装置管理ユーザ ポートユーザ 装置管理ユーザ

C-6
C.4 RADIUS アカウントサーバに送信するアトリビュート
本装置の RADIUS アカウントクライアントが RADIUS アカウントサーバに送信するアトリビュ
ートを下表に示します。 START に○がついているアトリビュートはアカウント START パケットに格納されます。 STOP に○がついているアトリビュートはアカウント STOP パケットに格納されます。
表 C-4 RADIUS アカウントサーバに送信するアトリビュート
アトリビュート名 番号 値の型 START STOP 内 容
User-Name 1 STRING ○ ○ 認証を受けるユーザ名です。 本装置は最大 64 文字の User-Name を認証できます。
NAS-IP-Address 4 IPADDR ○ ○ 本装置の IP アドレスです。アトリビュートを送信した
クライアントの識別に使用されます。 NAS-Id 32 STRING ○ ○ 本装置のホスト名です。アトリビュートを送信したクラ
イアントの識別に使用されます。 set auth radius server nas_id コマンドを使うと、
NAS-Id に任意の文字列が格納されて送信されます。 NAS-Port 5 INTEGER ○ ○ 本装置の tty 番号です。
ダイレクトモードのポートユーザ:tty 番号(1~48) セレクトモードのポートユーザ:0 コンソールの一般/特権ユーザ:10000 telnet/ssh の一般/特権ユーザ:20000+装置内 pty 番号
Acct-Status-Type 40 ENUM ○ ○ アカウントログの種別です。 アカウント START パケットには 1(START)、アカウン
ト STOP パケットには 2(STOP)が格納されます。 1:START 2:STOP
Acct-Session-Id 44 STRING ○ ○ アカウントのセッション ID です。アクセス要求毎にイ
ンクリメントした値(ユニークな 10 進数値の番号)が使
用されます。 Acct-Authentic 45 ENUM ○ ○ ユーザの認証の方式です。
1: RADIUS 認証 2: LOCAL 認証
Acct-Session-Time 46 INTEGER × ○ ユーザがサービスを受けた時間(sec)です。 Acct-Terminate- Cause
49 ENUM × ○ セッション切断理由です。 1: User-Request ユーザからの切断要求による切断 15: Service-Unavailable ユーザが要求するサービスを本装置が提供できない
ために切断(例:認証失敗、TTY ポートのアクセス権限
がない場合など)
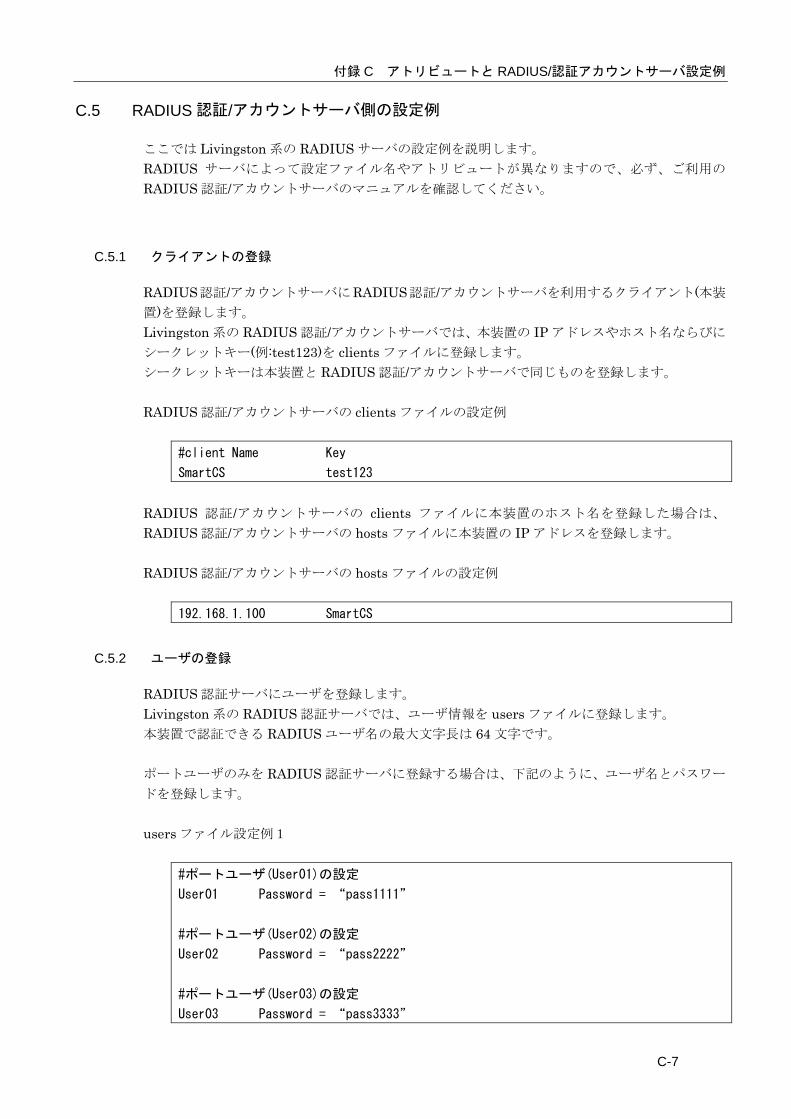
付録 C アトリビュートと RADIUS/認証アカウントサーバ設定例
C-7
C.5 RADIUS 認証/アカウントサーバ側の設定例
ここでは Livingston 系の RADIUS サーバの設定例を説明します。 RADIUS サーバによって設定ファイル名やアトリビュートが異なりますので、必ず、ご利用の
RADIUS 認証/アカウントサーバのマニュアルを確認してください。
C.5.1 クライアントの登録
RADIUS認証/アカウントサーバにRADIUS認証/アカウントサーバを利用するクライアント(本装
置)を登録します。 Livingston 系の RADIUS 認証/アカウントサーバでは、本装置の IP アドレスやホスト名ならびに
シークレットキー(例:test123)を clients ファイルに登録します。 シークレットキーは本装置と RADIUS 認証/アカウントサーバで同じものを登録します。 RADIUS 認証/アカウントサーバの clients ファイルの設定例
#client Name Key
SmartCS test123 RADIUS 認証/アカウントサーバの clients ファイルに本装置のホスト名を登録した場合は、
RADIUS 認証/アカウントサーバの hosts ファイルに本装置の IP アドレスを登録します。 RADIUS 認証/アカウントサーバの hosts ファイルの設定例
192.168.1.100 SmartCS
C.5.2 ユーザの登録
RADIUS 認証サーバにユーザを登録します。 Livingston 系の RADIUS 認証サーバでは、ユーザ情報を users ファイルに登録します。 本装置で認証できる RADIUS ユーザ名の最大文字長は 64 文字です。 ポートユーザのみを RADIUS 認証サーバに登録する場合は、下記のように、ユーザ名とパスワー
ドを登録します。 users ファイル設定例1
#ポートユーザ(User01)の設定
User01 Password = “pass1111”
#ポートユーザ(User02)の設定
User02 Password = “pass2222”
#ポートユーザ(User03)の設定
User03 Password = “pass3333”
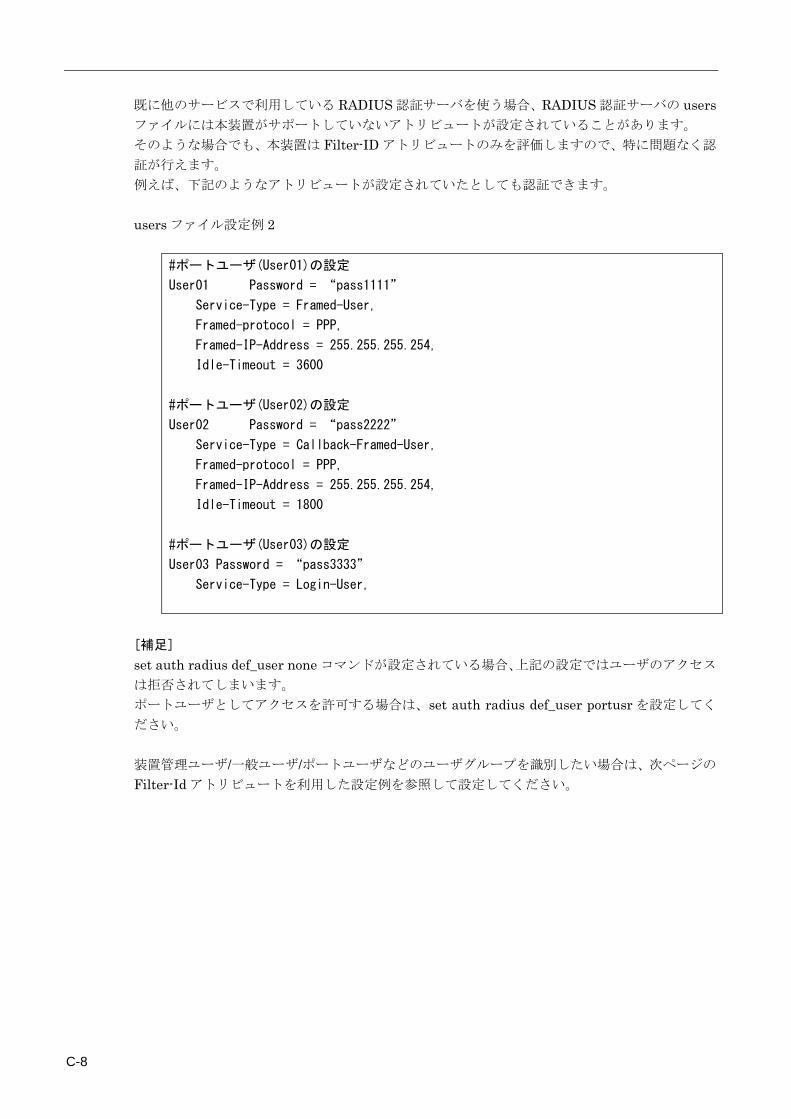
C-8
既に他のサービスで利用している RADIUS 認証サーバを使う場合、RADIUS 認証サーバの usersファイルには本装置がサポートしていないアトリビュートが設定されていることがあります。 そのような場合でも、本装置は Filter-ID アトリビュートのみを評価しますので、特に問題なく認
証が行えます。 例えば、下記のようなアトリビュートが設定されていたとしても認証できます。 users ファイル設定例 2
#ポートユーザ(User01)の設定
User01 Password = “pass1111”
Service-Type = Framed-User,
Framed-protocol = PPP,
Framed-IP-Address = 255.255.255.254,
Idle-Timeout = 3600
#ポートユーザ(User02)の設定
User02 Password = “pass2222”
Service-Type = Callback-Framed-User,
Framed-protocol = PPP,
Framed-IP-Address = 255.255.255.254,
Idle-Timeout = 1800
#ポートユーザ(User03)の設定
User03 Password = “pass3333”
Service-Type = Login-User,
[補足]
set auth radius def_user none コマンドが設定されている場合、上記の設定ではユーザのアクセス
は拒否されてしまいます。 ポートユーザとしてアクセスを許可する場合は、set auth radius def_user portusr を設定してく
ださい。 装置管理ユーザ/一般ユーザ/ポートユーザなどのユーザグループを識別したい場合は、次ページの
Filter-Id アトリビュートを利用した設定例を参照して設定してください。
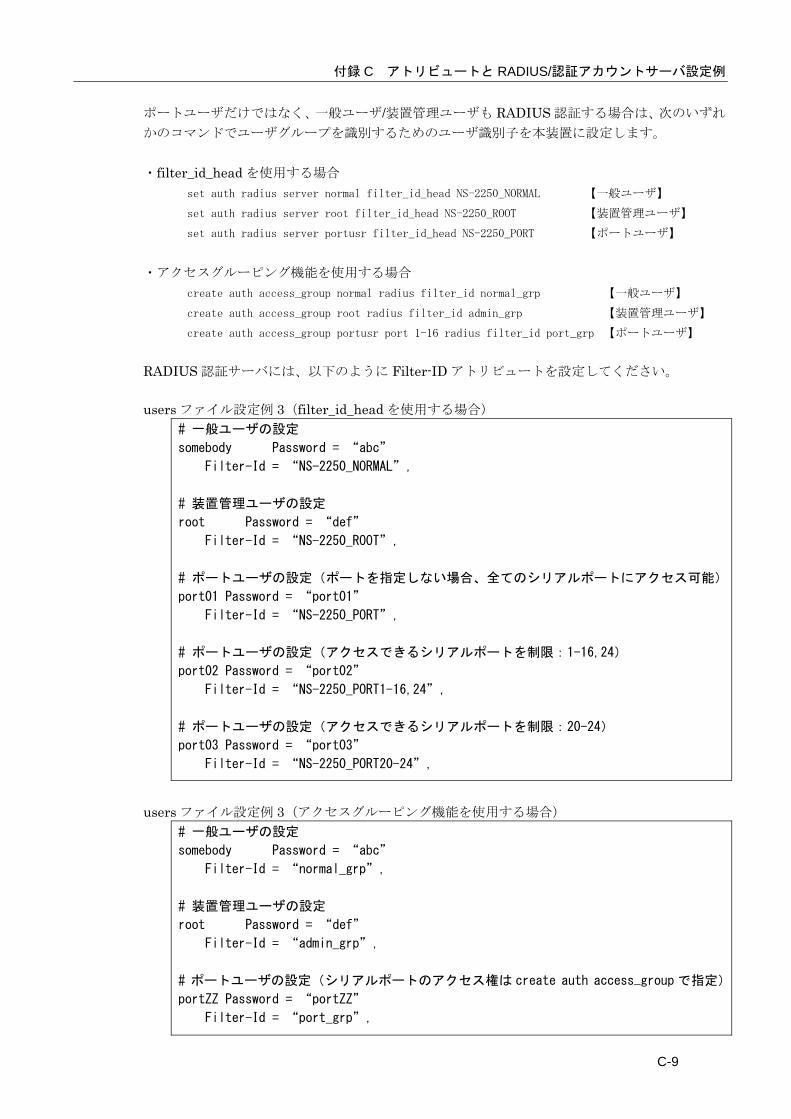
付録 C アトリビュートと RADIUS/認証アカウントサーバ設定例
C-9
ポートユーザだけではなく、一般ユーザ/装置管理ユーザも RADIUS 認証する場合は、次のいずれ
かのコマンドでユーザグループを識別するためのユーザ識別子を本装置に設定します。 ・filter_id_head を使用する場合
set auth radius server normal filter_id_head NS-2250_NORMAL 【一般ユーザ】 set auth radius server root filter_id_head NS-2250_ROOT 【装置管理ユーザ】 set auth radius server portusr filter_id_head NS-2250_PORT 【ポートユーザ】
・アクセスグルーピング機能を使用する場合 create auth access_group normal radius filter_id normal_grp 【一般ユーザ】 create auth access_group root radius filter_id admin_grp 【装置管理ユーザ】 create auth access_group portusr port 1-16 radius filter_id port_grp 【ポートユーザ】
RADIUS 認証サーバには、以下のように Filter-ID アトリビュートを設定してください。 users ファイル設定例 3(filter_id_head を使用する場合)
# 一般ユーザの設定
somebody Password = “abc”
Filter-Id = “NS-2250_NORMAL”,
# 装置管理ユーザの設定
root Password = “def”
Filter-Id = “NS-2250_ROOT”,
# ポートユーザの設定(ポートを指定しない場合、全てのシリアルポートにアクセス可能)
port01 Password = “port01”
Filter-Id = “NS-2250_PORT”,
# ポートユーザの設定(アクセスできるシリアルポートを制限:1-16,24)
port02 Password = “port02”
Filter-Id = “NS-2250_PORT1-16,24”,
# ポートユーザの設定(アクセスできるシリアルポートを制限:20-24)
port03 Password = “port03”
Filter-Id = “NS-2250_PORT20-24”,
users ファイル設定例 3(アクセスグルーピング機能を使用する場合)
# 一般ユーザの設定
somebody Password = “abc”
Filter-Id = “normal_grp”,
# 装置管理ユーザの設定
root Password = “def”
Filter-Id = “admin_grp”,
# ポートユーザの設定(シリアルポートのアクセス権は create auth access_group で指定)
portZZ Password = “portZZ”
Filter-Id = “port_grp”,
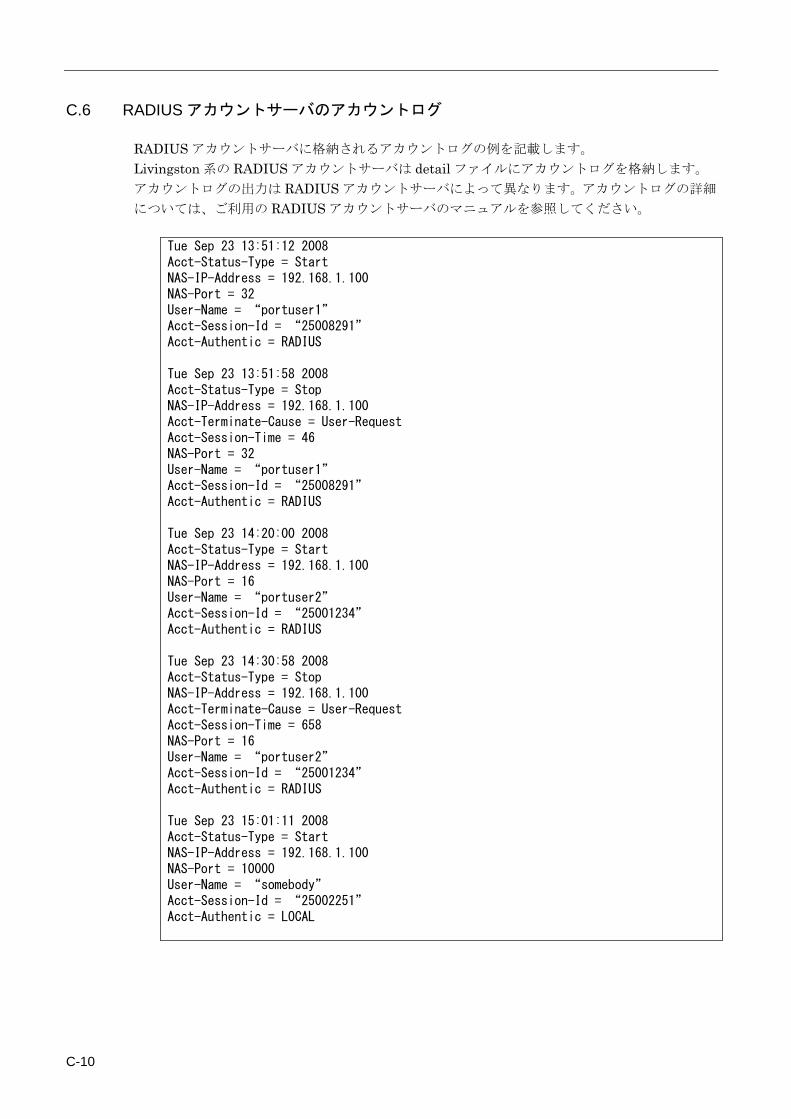
C-10
C.6 RADIUS アカウントサーバのアカウントログ
RADIUS アカウントサーバに格納されるアカウントログの例を記載します。 Livingston 系の RADIUS アカウントサーバは detail ファイルにアカウントログを格納します。 アカウントログの出力は RADIUS アカウントサーバによって異なります。アカウントログの詳細
については、ご利用の RADIUS アカウントサーバのマニュアルを参照してください。
Tue Sep 23 13:51:12 2008 Acct-Status-Type = Start NAS-IP-Address = 192.168.1.100 NAS-Port = 32 User-Name = “portuser1” Acct-Session-Id = “25008291” Acct-Authentic = RADIUS Tue Sep 23 13:51:58 2008 Acct-Status-Type = Stop NAS-IP-Address = 192.168.1.100 Acct-Terminate-Cause = User-Request Acct-Session-Time = 46 NAS-Port = 32 User-Name = “portuser1” Acct-Session-Id = “25008291” Acct-Authentic = RADIUS Tue Sep 23 14:20:00 2008 Acct-Status-Type = Start NAS-IP-Address = 192.168.1.100 NAS-Port = 16 User-Name = “portuser2” Acct-Session-Id = “25001234” Acct-Authentic = RADIUS Tue Sep 23 14:30:58 2008 Acct-Status-Type = Stop NAS-IP-Address = 192.168.1.100 Acct-Terminate-Cause = User-Request Acct-Session-Time = 658 NAS-Port = 16 User-Name = “portuser2” Acct-Session-Id = “25001234” Acct-Authentic = RADIUS Tue Sep 23 15:01:11 2008 Acct-Status-Type = Start NAS-IP-Address = 192.168.1.100 NAS-Port = 10000 User-Name = “somebody” Acct-Session-Id = “25002251” Acct-Authentic = LOCAL
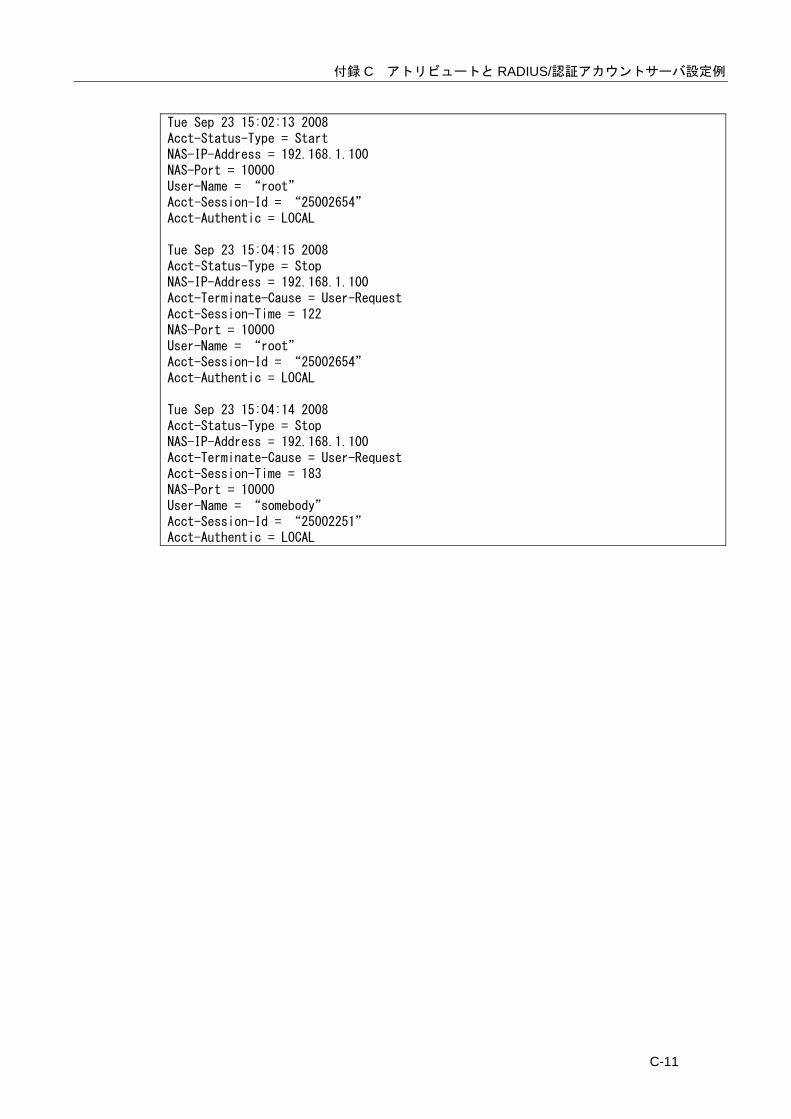
付録 C アトリビュートと RADIUS/認証アカウントサーバ設定例
C-11
Tue Sep 23 15:02:13 2008 Acct-Status-Type = Start NAS-IP-Address = 192.168.1.100 NAS-Port = 10000 User-Name = “root” Acct-Session-Id = “25002654” Acct-Authentic = LOCAL Tue Sep 23 15:04:15 2008 Acct-Status-Type = Stop NAS-IP-Address = 192.168.1.100 Acct-Terminate-Cause = User-Request Acct-Session-Time = 122 NAS-Port = 10000 User-Name = “root” Acct-Session-Id = “25002654” Acct-Authentic = LOCAL Tue Sep 23 15:04:14 2008 Acct-Status-Type = Stop NAS-IP-Address = 192.168.1.100 Acct-Terminate-Cause = User-Request Acct-Session-Time = 183 NAS-Port = 10000 User-Name = “somebody” Acct-Session-Id = “25002251” Acct-Authentic = LOCAL

D-1
付録 D ROM モニタ
付録 D では、本装置の ROM モニタについて説明しています。
本章の内容 D.1 ROM モニタ
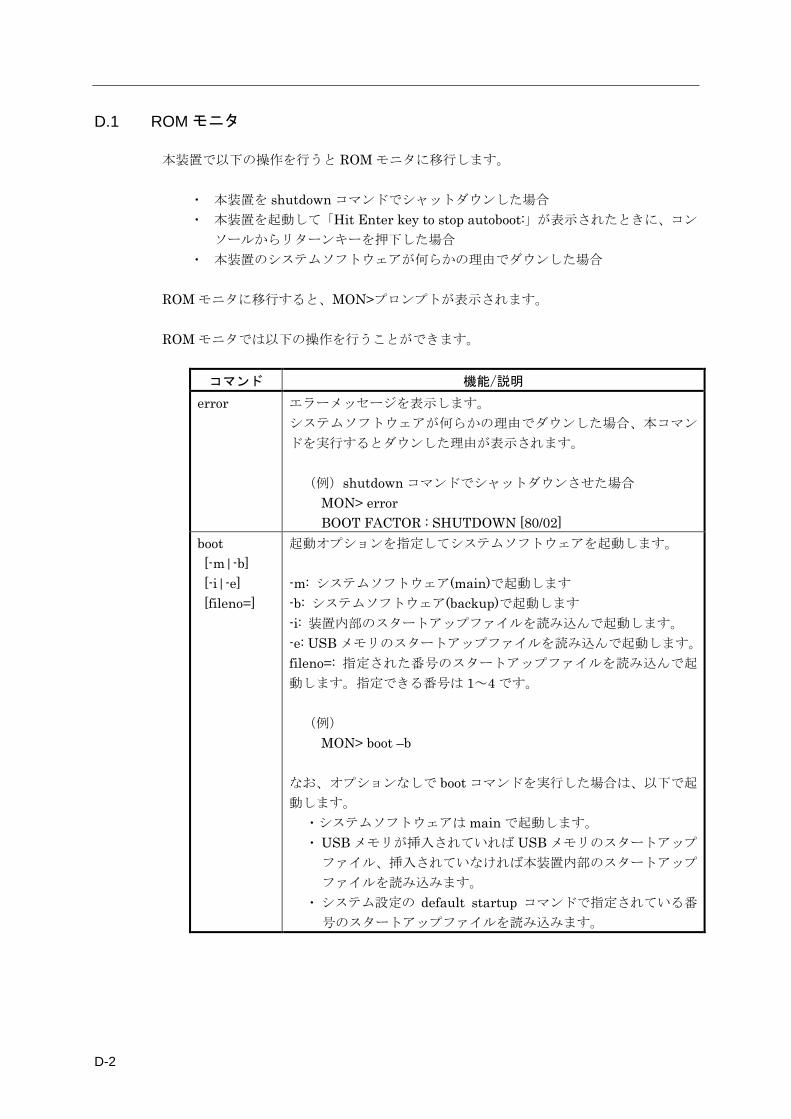
D-2
D.1 ROM モニタ
本装置で以下の操作を行うと ROM モニタに移行します。
・ 本装置を shutdown コマンドでシャットダウンした場合 ・ 本装置を起動して「Hit Enter key to stop autoboot:」が表示されたときに、コン
ソールからリターンキーを押下した場合 ・ 本装置のシステムソフトウェアが何らかの理由でダウンした場合
ROM モニタに移行すると、MON>プロンプトが表示されます。 ROM モニタでは以下の操作を行うことができます。
コマンド 機能/説明
error エラーメッセージを表示します。 システムソフトウェアが何らかの理由でダウンした場合、本コマン
ドを実行するとダウンした理由が表示されます。
(例)shutdown コマンドでシャットダウンさせた場合 MON> error BOOT FACTOR : SHUTDOWN [80/02]
boot [-m|-b] [-i|-e] [fileno=]
起動オプションを指定してシステムソフトウェアを起動します。 -m: システムソフトウェア(main)で起動します -b: システムソフトウェア(backup)で起動します -i: 装置内部のスタートアップファイルを読み込んで起動します。 -e: USB メモリのスタートアップファイルを読み込んで起動します。 fileno=: 指定された番号のスタートアップファイルを読み込んで起
動します。指定できる番号は 1~4 です。 (例)
MON> boot –b なお、オプションなしで boot コマンドを実行した場合は、以下で起
動します。 ・システムソフトウェアは main で起動します。 ・ USB メモリが挿入されていれば USB メモリのスタートアップ
ファイル、挿入されていなければ本装置内部のスタートアップ
ファイルを読み込みます。 ・ システム設定の default startup コマンドで指定されている番
号のスタートアップファイルを読み込みます。

E-1
付録 E NS-2240 からの設定移行時の注意点
付録 E では、NS-2240 からの設定移行時の注意点について説明しています。
本章の内容 E.1 NS-2240 からの設定移行時の注意点
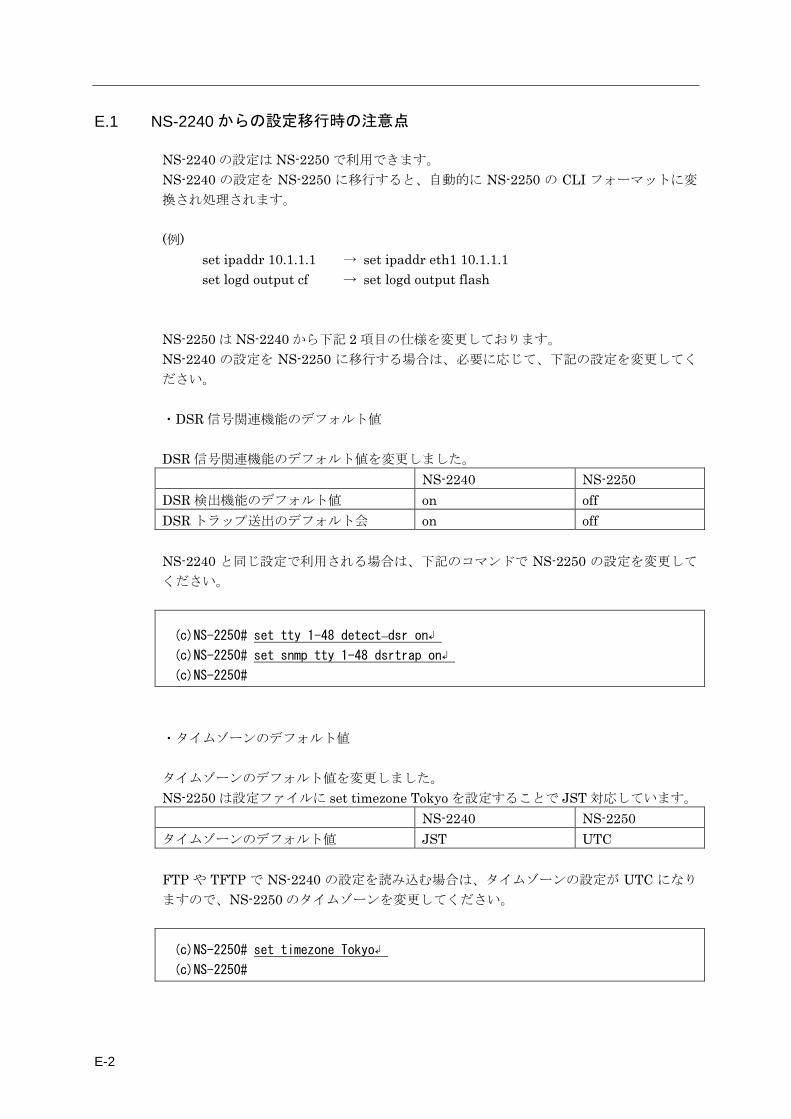
E-2
E.1 NS-2240 からの設定移行時の注意点
NS-2240 の設定は NS-2250 で利用できます。 NS-2240 の設定を NS-2250 に移行すると、自動的に NS-2250 の CLI フォーマットに変
換され処理されます。 (例)
set ipaddr 10.1.1.1 → set ipaddr eth1 10.1.1.1 set logd output cf → set logd output flash
NS-2250 は NS-2240 から下記 2 項目の仕様を変更しております。 NS-2240 の設定を NS-2250 に移行する場合は、必要に応じて、下記の設定を変更してく
ださい。 ・DSR 信号関連機能のデフォルト値 DSR 信号関連機能のデフォルト値を変更しました。 NS-2240 NS-2250 DSR 検出機能のデフォルト値 on off DSR トラップ送出のデフォルト値 on off NS-2240 と同じ設定で利用される場合は、下記のコマンドで NS-2250 の設定を変更して
ください。
(c)NS-2250# set tty 1-48 detect_dsr on↲
(c)NS-2250# set snmp tty 1-48 dsrtrap on↲
(c)NS-2250#
・タイムゾーンのデフォルト値 タイムゾーンのデフォルト値を変更しました。 NS-2250 は設定ファイルに set timezone Tokyo を設定することで JST 対応しています。 NS-2240 NS-2250 タイムゾーンのデフォルト値 JST UTC FTP や TFTP で NS-2240 の設定を読み込む場合は、タイムゾーンの設定が UTC になり
ますので、NS-2250 のタイムゾーンを変更してください。
(c)NS-2250# set timezone Tokyo↲
(c)NS-2250#
F-1
付録 F 第三者ソフトウェアライセンス
付録 F では、本装置で利用している第三者ソフトウェアライセンスについて説明しています。
本章の内容 F.1 第三者ソフトウェアライセンス
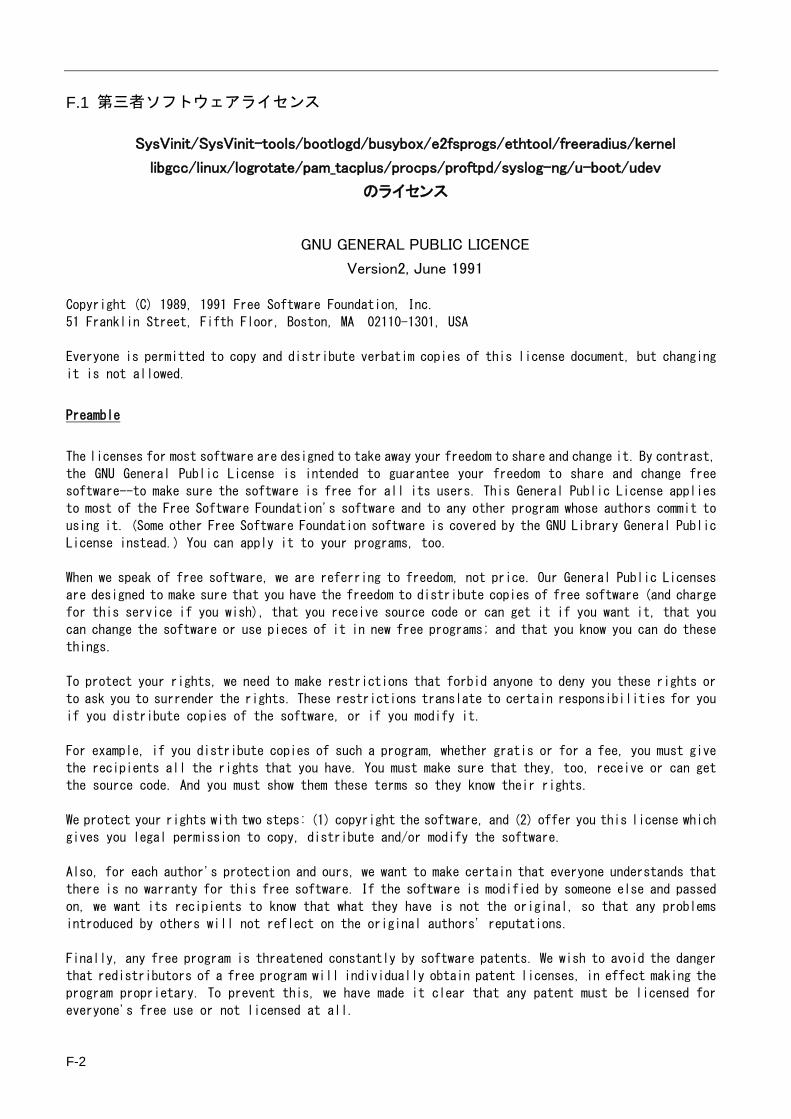
F-2
F.1 第三者ソフトウェアライセンス
SysVinit/SysVinit-tools/bootlogd/busybox/e2fsprogs/ethtool/freeradius/kernel
libgcc/linux/logrotate/pam_tacplus/procps/proftpd/syslog-ng/u-boot/udev
のライセンス
GNU GENERAL PUBLIC LICENCE
Version2, June 1991
Copyright (C) 1989, 1991 Free Software Foundation, Inc.
51 Franklin Street, Fifth Floor, Boston, MA 02110-1301, USA
Everyone is permitted to copy and distribute verbatim copies of this license document, but changing
it is not allowed.
Preamble
The licenses for most software are designed to take away your freedom to share and change it. By contrast,
the GNU General Public License is intended to guarantee your freedom to share and change free
software--to make sure the software is free for all its users. This General Public License applies
to most of the Free Software Foundation's software and to any other program whose authors commit to
using it. (Some other Free Software Foundation software is covered by the GNU Library General Public
License instead.) You can apply it to your programs, too.
When we speak of free software, we are referring to freedom, not price. Our General Public Licenses
are designed to make sure that you have the freedom to distribute copies of free software (and charge
for this service if you wish), that you receive source code or can get it if you want it, that you
can change the software or use pieces of it in new free programs; and that you know you can do these
things.
To protect your rights, we need to make restrictions that forbid anyone to deny you these rights or
to ask you to surrender the rights. These restrictions translate to certain responsibilities for you
if you distribute copies of the software, or if you modify it.
For example, if you distribute copies of such a program, whether gratis or for a fee, you must give
the recipients all the rights that you have. You must make sure that they, too, receive or can get
the source code. And you must show them these terms so they know their rights.
We protect your rights with two steps: (1) copyright the software, and (2) offer you this license which
gives you legal permission to copy, distribute and/or modify the software.
Also, for each author's protection and ours, we want to make certain that everyone understands that
there is no warranty for this free software. If the software is modified by someone else and passed
on, we want its recipients to know that what they have is not the original, so that any problems
introduced by others will not reflect on the original authors' reputations.
Finally, any free program is threatened constantly by software patents. We wish to avoid the danger
that redistributors of a free program will individually obtain patent licenses, in effect making the
program proprietary. To prevent this, we have made it clear that any patent must be licensed for
everyone's free use or not licensed at all.

F-3
The precise terms and conditions for copying, distribution and modification follow.
TERMS AND CONDITIONS FOR COPYING, DISTRIBUTION AND MODIFICATION
0. This License applies to any program or other work which contains a notice placed by the copyright
holder saying it may be distributed under the terms of this General Public License. The "Program",
below, refers to any such program or work, and a "work based on the Program" means either the Program
or any derivative work under copyright law: that is to say, a work containing the Program or a portion
of it, either verbatim or with modifications and/or translated into another language. (Hereinafter,
translation is included without limitation in the term "modification".) Each licensee is addressed
as "you".
Activities other than copying, distribution and modification are not covered by this License; they
are outside its scope. The act of running the Program is not restricted, and the output from the
Program is covered only if its contents constitute a work based on the Program (independent of having
been made by running the Program). Whether that is true depends on what the Program does.
1. You may copy and distribute verbatim copies of the Program's source code as you receive it, in any
medium, provided that you conspicuously and appropriately publish on each copy an appropriate
copyright notice and disclaimer of warranty; keep intact all the notices that refer to this License
and to the absence of any warranty; and give any other recipients of the Program a copy of this
License along with the Program.
You may charge a fee for the physical act of transferring a copy, and you may at your option offer
warranty protection in exchange for a fee.
2. You may modify your copy or copies of the Program or any portion of it, thus forming a work based
on the Program, and copy and distribute such modifications or work under the terms of Section 1
above, provided that you also meet all of these conditions:
• a) You must cause the modified files to carry prominent notices stating that you changed the
files and the date of any change.
• b) You must cause any work that you distribute or publish, that in whole or in part contains
or is derived from the Program or any part thereof, to be licensed as a whole at no charge
to all third parties under the terms of this License.
• c) If the modified program normally reads commands interactively when run, you must cause it,
when started running for such interactive use in the most ordinary way, to print or display
an announcement including an appropriate copyright notice and a notice that there is no warranty
(or else, saying that you provide a warranty) and that users may redistribute the program under
these conditions, and telling the user how to view a copy of this License. (Exception: if the
Program itself is interactive but does not normally print such an announcement, your work based
on the Program is not required to print an announcement.)
These requirements apply to the modified work as a whole. If identifiable sections of that work
are not derived from the Program, and can be reasonably considered independent and separate works
in themselves, then this License, and its terms, do not apply to those sections when you distribute
them as separate works. But when you distribute the same sections as part of a whole which is a
work based on the Program, the distribution of the whole must be on the terms of this License, whose
permissions for other licensees extend to the entire whole, and thus to each and every part regardless
of who wrote it.
Thus, it is not the intent of this section to claim rights or contest your rights to work written
entirely by you; rather, the intent is to exercise the right to control the distribution of derivative
or collective works based on the Program.
F-4
In addition, mere aggregation of another work not based on the Program with the Program (or with
a work based on the Program) on a volume of a storage or distribution medium does not bring the
other work under the scope of this License.
3. You may copy and distribute the Program (or a work based on it, under Section 2) in object code
or executable form under the terms of Sections 1 and 2 above provided that you also do one of the
following:
• a) Accompany it with the complete corresponding machine-readable source code, which must be
distributed under the terms of Sections 1 and 2 above on a medium customarily used for software
interchange; or,
• b) Accompany it with a written offer, valid for at least three years, to give any third party,
for a charge no more than your cost of physically performing source distribution, a complete
machine-readable copy of the corresponding source code, to be distributed under the terms of
Sections 1 and 2 above on a medium customarily used for software interchange; or,
• c) Accompany it with the information you received as to the offer to distribute corresponding
source code. (This alternative is allowed only for noncommercial distribution and only if you
received the program in object code or executable form with such an offer, in accord with
Subsection b above.)
The source code for a work means the preferred form of the work for making modifications to it.
For an executable work, complete source code means all the source code for all modules it contains,
plus any associated interface definition files, plus the scripts used to control compilation and
installation of the executable. However, as a special exception, the source code distributed need
not include anything that is normally distributed (in either source or binary form) with the major
components (compiler, kernel, and so on) of the operating system on which the executable runs, unless
that component itself accompanies the executable.
If distribution of executable or object code is made by offering access to copy from a designated
place, then offering equivalent access to copy the source code from the same place counts as
distribution of the source code, even though third parties are not compelled to copy the source
along with the object code.
4. You may not copy, modify, sublicense, or distribute the Program except as expressly provided under
this License. Any attempt otherwise to copy, modify, sublicense or distribute the Program is void,
and will automatically terminate your rights under this License. However, parties who have received
copies, or rights, from you under this License will not have their licenses terminated so long as
such parties remain in full compliance.
5. You are not required to accept this License, since you have not signed it. However, nothing else
grants you permission to modify or distribute the Program or its derivative works. These actions
are prohibited by law if you do not accept this License. Therefore, by modifying or distributing
the Program (or any work based on the Program), you indicate your acceptance of this License to
do so, and all its terms and conditions for copying, distributing or modifying the Program or works
based on it.
6. Each time you redistribute the Program (or any work based on the Program), the recipient
automatically receives a license from the original licensor to copy, distribute or modify the Program
subject to these terms and conditions. You may not impose any further restrictions on the recipients'
exercise of the rights granted herein. You are not responsible for enforcing compliance by third
parties to this License.
7. If, as a consequence of a court judgment or allegation of patent infringement or for any other reason
(not limited to patent issues), conditions are imposed on you (whether by court order, agreement
F-5
or otherwise) that contradict the conditions of this License, they do not excuse you from the
conditions of this License. If you cannot distribute so as to satisfy simultaneously your obligations
under this License and any other pertinent obligations, then as a consequence you may not distribute
the Program at all. For example, if a patent license would not permit royalty-free redistribution
of the Program by all those who receive copies directly or indirectly through you, then the only
way you could satisfy both it and this License would be to refrain entirely from distribution of
the Program.
If any portion of this section is held invalid or unenforceable under any particular circumstance,
the balance of the section is intended to apply and the section as a whole is intended to apply
in other circumstances.
It is not the purpose of this section to induce you to infringe any patents or other property right
claims or to contest validity of any such claims; this section has the sole purpose of protecting
the integrity of the free software distribution system, which is implemented by public license
practices. Many people have made generous contributions to the wide range of software distributed
through that system in reliance on consistent application of that system; it is up to the author/donor
to decide if he or she is willing to distribute software through any other system and a licensee
cannot impose that choice.
This section is intended to make thoroughly clear what is believed to be a consequence of the rest
of this License.
8. If the distribution and/or use of the Program is restricted in certain countries either by patents
or by copyrighted interfaces, the original copyright holder who places the Program under this License
may add an explicit geographical distribution limitation excluding those countries, so that
distribution is permitted only in or among countries not thus excluded. In such case, this License
incorporates the limitation as if written in the body of this License.
9. The Free Software Foundation may publish revised and/or new versions of the General Public License
from time to time. Such new versions will be similar in spirit to the present version, but may differ
in detail to address new problems or concerns.
Each version is given a distinguishing version number. If the Program specifies a version number
of this License which applies to it and "any later version", you have the option of following the
terms and conditions either of that version or of any later version published by the Free Software
Foundation. If the Program does not specify a version number of this License, you may choose any
version ever published by the Free Software Foundation.
10. If you wish to incorporate parts of the Program into other free programs whose distribution
conditions are different, write to the author to ask for permission. For software which is
copyrighted by the Free Software Foundation, write to the Free Software Foundation; we sometimes
make exceptions for this. Our decision will be guided by the two goals of preserving the free status
of all derivatives of our free software and of promoting the sharing and reuse of software generally.
NO WARRANTY
11. BECAUSE THE PROGRAM IS LICENSED FREE OF CHARGE, THERE IS NO WARRANTY FOR THE PROGRAM, TO THE EXTENT
PERMITTED BY APPLICABLE LAW. EXCEPT WHEN OTHERWISE STATED IN WRITING THE COPYRIGHT HOLDERS AND/OR
OTHER PARTIES PROVIDE THE PROGRAM "AS IS" WITHOUT WARRANTY OF ANY KIND, EITHER EXPRESSED OR IMPLIED,
INCLUDING, BUT NOT LIMITED TO, THE IMPLIED WARRANTIES OF MERCHANTABILITY AND FITNESS FOR A PARTICULAR
PURPOSE. THE ENTIRE RISK AS TO THE QUALITY AND PERFORMANCE OF THE PROGRAM IS WITH YOU. SHOULD THE
PROGRAM PROVE DEFECTIVE, YOU ASSUME THE COST OF ALL NECESSARY SERVICING, REPAIR OR CORRECTION.
12. IN NO EVENT UNLESS REQUIRED BY APPLICABLE LAW OR AGREED TO IN WRITING WILL ANY COPYRIGHT HOLDER,

F-6
OR ANY OTHER PARTY WHO MAY MODIFY AND/OR REDISTRIBUTE THE PROGRAM AS PERMITTED ABOVE, BE LIABLE
TO YOU FOR DAMAGES, INCLUDING ANY GENERAL, SPECIAL, INCIDENTAL OR CONSEQUENTIAL DAMAGES ARISING
OUT OF THE USE OR INABILITY TO USE THE PROGRAM (INCLUDING BUT NOT LIMITED TO LOSS OF DATA OR DATA
BEING RENDERED INACCURATE OR LOSSES SUSTAINED BY YOU OR THIRD PARTIES OR A FAILURE OF THE PROGRAM
TO OPERATE WITH ANY OTHER PROGRAMS), EVEN IF SUCH HOLDER OR OTHER PARTY HAS BEEN ADVISED OF THE
POSSIBILITY OF SUCH DAMAGES.
F-7
Linux-PAM/rsyslog のライセンス
GNU GENERAL PUBLIC LICENSE
Version 3, 29 June 2007
Copyright (C) 2007 Free Software Foundation, Inc. <http://fsf.org/>
Everyone is permitted to copy and distribute verbatim copies of this license document, but changing it is not
allowed.
Preamble
The GNU General Public License is a free, copyleft license for software and other kinds of works.
The licenses for most software and other practical works are designed to take away your freedom to share and
change the works. By contrast, the GNU General Public License is intended to guarantee your freedom to share
and change all versions of a program--to make sure it remains free software for all its users. We, the Free
Software Foundation, use the GNU General Public License for most of our software; it applies also to any other
work released this way by its authors. You can apply it to your programs, too.
When we speak of free software, we are referring to freedom, not price. Our General Public Licenses are
designed to make sure that you have the freedom to distribute copies of free software (and charge for them if you
wish), that you receive source code or can get it if you want it, that you can change the software or use pieces of it
in new free programs, and that you know you can do these things.
To protect your rights, we need to prevent others from denying you these rights or asking you to surrender the
rights. Therefore, you have certain responsibilities if you distribute copies of the software, or if you modify it:
responsibilities to respect the freedom of others.
For example, if you distribute copies of such a program, whether gratis or for a fee, you must pass on to the
recipients the same freedoms that you received. You must make sure that they, too, receive or can get the source
code. And you must show them these terms so they know their rights.
Developers that use the GNU GPL protect your rights with two steps:
(1) assert copyright on the software, and (2) offer you this License giving you legal permission to copy, distribute
and/or modify it.
For the developers' and authors' protection, the GPL clearly explains that there is no warranty for this free
software. For both users' and authors' sake, the GPL requires that modified versions be marked as changed, so
that their problems will not be attributed erroneously to authors of previous versions.
Some devices are designed to deny users access to install or run modified versions of the software inside them,
although the manufacturer can do so. This is fundamentally incompatible with the aim of protecting users' freedom
to change the software. The systematic pattern of such abuse occurs in the area of products for individuals to
use, which is precisely where it is most unacceptable. Therefore, we have designed this version of the GPL to
prohibit the practice for those products. If such problems arise substantially in other domains, we stand ready to
extend this provision to those domains in future versions of the GPL, as needed to protect the freedom of users.
Finally, every program is threatened constantly by software patents. States should not allow patents to restrict
development and use of software on general-purpose computers, but in those that do, we wish to avoid the special
danger that patents applied to a free program could make it effectively proprietary. To prevent this, the GPL
assures that patents cannot be used to render the program non-free.
The precise terms and conditions for copying, distribution and modification follow.
F-8
TERMS AND CONDITIONS
0. Definitions.
"This License" refers to version 3 of the GNU General Public License.
"Copyright" also means copyright-like laws that apply to other kinds of works, such as semiconductor masks.
"The Program" refers to any copyrightable work licensed under this License. Each licensee is addressed as
"you". "Licensees" and "recipients" may be individuals or organizations.
To "modify" a work means to copy from or adapt all or part of the work in a fashion requiring copyright
permission, other than the making of an exact copy. The resulting work is called a "modified version" of the earlier
work or a work "based on" the earlier work.
A "covered work" means either the unmodified Program or a work based on the Program.
To "propagate" a work means to do anything with it that, without permission, would make you directly or
secondarily liable for infringement under applicable copyright law, except executing it on a computer or modifying a
private copy. Propagation includes copying, distribution (with or without modification), making available to the
public, and in some countries other activities as well.
To "convey" a work means any kind of propagation that enables other parties to make or receive copies. Mere
interaction with a user through a computer network, with no transfer of a copy, is not conveying.
An interactive user interface displays "Appropriate Legal Notices" to the extent that it includes a convenient and
prominently visible feature that (1) displays an appropriate copyright notice, and (2) tells the user that there is no
warranty for the work (except to the extent that warranties are provided), that licensees may convey the work
under this License, and how to view a copy of this License. If the interface presents a list of user commands or
options, such as a menu, a prominent item in the list meets this criterion.
1. Source Code.
The "source code" for a work means the preferred form of the work for making modifications to it. "Object
code" means any non-source form of a work.
A "Standard Interface" means an interface that either is an official standard defined by a recognized standards
body, or, in the case of interfaces specified for a particular programming language, one that is widely used among
developers working in that language.
The "System Libraries" of an executable work include anything, other than the work as a whole, that (a) is
included in the normal form of packaging a Major Component, but which is not part of that Major Component, and (b)
serves only to enable use of the work with that Major Component, or to implement a Standard Interface for which
an implementation is available to the public in source code form. A "Major Component", in this context, means a
major essential component (kernel, window system, and so on) of the specific operating system (if any) on which the
executable work runs, or a compiler used to produce the work, or an object code interpreter used to run it.
The "Corresponding Source" for a work in object code form means all the source code needed to generate,
install, and (for an executable work) run the object code and to modify the work, including scripts to control those
activities. However, it does not include the work's System Libraries, or general-purpose tools or generally available
free programs which are used unmodified in performing those activities but which are not part of the work. For
example, Corresponding Source includes interface definition files associated with source files for the work, and the
source code for shared libraries and dynamically linked subprograms that the work is specifically designed to require,
such as by intimate data communication or control flow between those subprograms and other parts of the work.
F-9
The Corresponding Source need not include anything that users can regenerate automatically from other parts of
the Corresponding Source.
The Corresponding Source for a work in source code form is that same work.
2. Basic Permissions.
All rights granted under this License are granted for the term of copyright on the Program, and are irrevocable
provided the stated conditions are met. This License explicitly affirms your unlimited permission to run the
unmodified Program. The output from running a covered work is covered by this License only if the output, given
its content, constitutes a covered work. This License acknowledges your rights of fair use or other equivalent, as
provided by copyright law.
You may make, run and propagate covered works that you do not convey, without conditions so long as your
license otherwise remains in force. You may convey covered works to others for the sole purpose of having them
make modifications exclusively for you, or provide you with facilities for running those works, provided that you
comply with the terms of this License in conveying all material for which you do not control copyright. Those thus
making or running the covered works for you must do so exclusively on your behalf, under your direction and control,
on terms that prohibit them from making any copies of your copyrighted material outside their relationship with you.
Conveying under any other circumstances is permitted solely under the conditions stated below. Sublicensing is
not allowed; section 10 makes it unnecessary.
3. Protecting Users' Legal Rights From Anti-Circumvention Law.
No covered work shall be deemed part of an effective technological measure under any applicable law fulfilling
obligations under article 11 of the WIPO copyright treaty adopted on 20 December 1996, or similar laws prohibiting
or restricting circumvention of such measures.
When you convey a covered work, you waive any legal power to forbid circumvention of technological measures to
the extent such circumvention is effected by exercising rights under this License with respect to the covered work,
and you disclaim any intention to limit operation or modification of the work as a means of enforcing, against the
work's users, your or third parties' legal rights to forbid circumvention of technological measures.
4. Conveying Verbatim Copies.
You may convey verbatim copies of the Program's source code as you receive it, in any medium, provided that
you conspicuously and appropriately publish on each copy an appropriate copyright notice; keep intact all notices
stating that this License and any non-permissive terms added in accord with section 7 apply to the code; keep
intact all notices of the absence of any warranty; and give all recipients a copy of this License along with the
Program.
You may charge any price or no price for each copy that you convey, and you may offer support or warranty
protection for a fee.
5. Conveying Modified Source Versions.
You may convey a work based on the Program, or the modifications to produce it from the Program, in the form
of source code under the terms of section 4, provided that you also meet all of these conditions:
a) The work must carry prominent notices stating that you modified it, and giving a relevant date.
b) The work must carry prominent notices stating that it is released under this License and any conditions
added under section 7. This requirement modifies the requirement in section 4 to "keep intact all notices".
F-10
c) You must license the entire work, as a whole, under this License to anyone who comes into possession of a
copy. This License will therefore apply, along with any applicable section 7 additional terms, to the whole of the
work, and all its parts, regardless of how they are packaged. This License gives no permission to license the work
in any other way, but it does not invalidate such permission if you have separately received it.
d) If the work has interactive user interfaces, each must display Appropriate Legal Notices; however, if the
Program has interactive interfaces that do not display Appropriate Legal Notices, your work need not make them do
so.
A compilation of a covered work with other separate and independent works, which are not by their nature
extensions of the covered work, and which are not combined with it such as to form a larger program, in or on a
volume of a storage or distribution medium, is called an "aggregate" if the compilation and its resulting copyright are
not used to limit the access or legal rights of the compilation's users beyond what the individual works permit.
Inclusion of a covered work in an aggregate does not cause this License to apply to the other parts of the
aggregate.
6. Conveying Non-Source Forms.
You may convey a covered work in object code form under the terms
of sections 4 and 5, provided that you also convey the
machine-readable Corresponding Source under the terms of this License,
in one of these ways:
a) Convey the object code in, or embodied in, a physical product (including a physical distribution medium),
accompanied by the Corresponding Source fixed on a durable physical medium customarily used for software
interchange.
b) Convey the object code in, or embodied in, a physical product (including a physical distribution medium),
accompanied by a written offer, valid for at least three years and valid for as long as you offer spare parts or
customer support for that product model, to give anyone who possesses the object code either (1) a copy of the
Corresponding Source for all the software in the product that is covered by this License, on a durable physical
medium customarily used for software interchange, for a price no more than your reasonable cost of physically
performing this conveying of source, or (2) access to copy the Corresponding Source from a network server at no
charge.
c) Convey individual copies of the object code with a copy of the written offer to provide the Corresponding
Source. This alternative is allowed only occasionally and noncommercially, and only if you received the object code
with such an offer, in accord with subsection 6b.
d) Convey the object code by offering access from a designated place (gratis or for a charge), and offer
equivalent access to the Corresponding Source in the same way through the same place at no further charge. You
need not require recipients to copy the Corresponding Source along with the object code. If the place to copy the
object code is a network server, the Corresponding Source may be on a different server (operated by you or a third
party) that supports equivalent copying facilities, provided you maintain clear directions next to the object code
saying where to find the Corresponding Source. Regardless of what server hosts the Corresponding Source, you
remain obligated to ensure that it is available for as long as needed to satisfy these requirements.
e) Convey the object code using peer-to-peer transmission, provided you inform other peers where the object
code and Corresponding Source of the work are being offered to the general public at no charge under subsection
6d.
A separable portion of the object code, whose source code is excluded from the Corresponding Source as a
System Library, need not be included in conveying the object code work.
F-11
A "User Product" is either (1) a "consumer product", which means any tangible personal property which is
normally used for personal, family, or household purposes, or (2) anything designed or sold for incorporation into a
dwelling. In determining whether a product is a consumer product, doubtful cases shall be resolved in favor of
coverage. For a particular product received by a particular user, "normally used" refers to a typical or common
use of that class of product, regardless of the status of the particular user or of the way in which the particular
user
actually uses, or expects or is expected to use, the product. A product is a consumer product regardless of
whether the product has substantial commercial, industrial or non-consumer uses, unless such uses represent the
only significant mode of use of the product.
"Installation Information" for a User Product means any methods, procedures, authorization keys, or other
information required to install and execute modified versions of a covered work in that User Product from a modified
version of its Corresponding Source. The information must suffice to ensure that the continued functioning of the
modified object code is in no case prevented or interfered with solely because modification has been made.
If you convey an object code work under this section in, or with, or specifically for use in, a User Product, and the
conveying occurs as part of a transaction in which the right of possession and use of the User Product is
transferred to the recipient in perpetuity or for a fixed term (regardless of how the transaction is characterized), the
Corresponding Source conveyed under this section must be accompanied by the Installation Information. But this
requirement does not apply if neither you nor any third party retains the ability to install modified object code on the
User Product (for example, the work has been installed in ROM).
The requirement to provide Installation Information does not include a requirement to continue to provide support
service, warranty, or updates for a work that has been modified or installed by the recipient, or for the User Product
in which it has been modified or installed. Access to a network may be denied when the modification itself
materially and adversely affects the operation of the network or violates the rules and protocols for communication
across the network.
Corresponding Source conveyed, and Installation Information provided, in accord with this section must be in a
format that is publicly documented (and with an implementation available to the public in source code form), and
must require no special password or key for unpacking, reading or copying.
7. Additional Terms.
"Additional permissions" are terms that supplement the terms of this License by making exceptions from one or
more of its conditions. Additional permissions that are applicable to the entire Program shall be treated as though
they were included in this License, to the extent that they are valid under applicable law. If additional permissions
apply only to part of the Program, that part may be used separately under those permissions, but the entire
Program remains governed by this License without regard to the additional permissions.
When you convey a copy of a covered work, you may at your option remove any additional permissions from that
copy, or from any part of it. (Additional permissions may be written to require their own removal in certain cases
when you modify the work.) You may place additional permissions on material, added by you to a covered work, for
which you have or can give appropriate copyright permission.
Notwithstanding any other provision of this License, for material you add to a covered work, you may (if
authorized by the copyright holders of that material) supplement the terms of this License with terms:
a) Disclaiming warranty or limiting liability differently from the terms of sections 15 and 16 of this License; or
b) Requiring preservation of specified reasonable legal notices or author attributions in that material or in the
Appropriate Legal Notices displayed by works containing it; or
c) Prohibiting misrepresentation of the origin of that material, or requiring that modified versions of such
material be marked in reasonable ways as different from the original version; or
F-12
d) Limiting the use for publicity purposes of names of licensors or authors of the material; or
e) Declining to grant rights under trademark law for use of some trade names, trademarks, or service marks; or
f) Requiring indemnification of licensors and authors of that material by anyone who conveys the material (or
modified versions of it) with contractual assumptions of liability to the recipient, for any liability that these
contractual assumptions directly impose on those licensors and authors.
All other non-permissive additional terms are considered "further restrictions" within the meaning of section 10.
If the Program as you received it, or any part of it, contains a notice stating that it is governed by this License along
with a term that is a further restriction, you may remove that term. If a license document contains a further
restriction but permits relicensing or conveying under this License, you may add to a covered work material
governed by the terms of that license document, provided that the further restriction does not survive such
relicensing or conveying.
If you add terms to a covered work in accord with this section, you must place, in the relevant source files, a
statement of the additional terms that apply to those files, or a notice indicating where to find the applicable terms.
Additional terms, permissive or non-permissive, may be stated in the form of a separately written license, or
stated as exceptions; the above requirements apply either way.
8. Termination.
You may not propagate or modify a covered work except as expressly provided under this License. Any attempt
otherwise to propagate or modify it is void, and will automatically terminate your rights under this License (including
any patent licenses granted under the third paragraph of section 11).
However, if you cease all violation of this License, then your license from a particular copyright holder is
reinstated (a) provisionally, unless and until the copyright holder explicitly and finally terminates your license, and (b)
permanently, if the copyright holder fails to notify you of the violation by some reasonable means prior to 60 days
after the cessation.
Moreover, your license from a particular copyright holder is reinstated permanently if the copyright holder notifies
you of the violation by some reasonable means, this is the first time you have received notice of violation of this
License (for any work) from that copyright holder, and you cure the violation prior to 30 days after your receipt of
the notice.
Termination of your rights under this section does not terminate the licenses of parties who have received copies
or rights from you under this License. If your rights have been terminated and not permanently reinstated, you do
not qualify to receive new licenses for the same material under section 10.
9. Acceptance Not Required for Having Copies.
You are not required to accept this License in order to receive or run a copy of the Program. Ancillary
propagation of a covered work occurring solely as a consequence of using peer-to-peer transmission to receive a
copy likewise does not require acceptance. However, nothing other than this License grants you permission to
propagate or modify any covered work. These actions infringe copyright if you do not accept this License.
Therefore, by modifying or propagating a covered work, you indicate your acceptance of this License to do so.
10. Automatic Licensing of Downstream Recipients.
Each time you convey a covered work, the recipient automatically receives a license from the original licensors,
to run, modify and propagate that work, subject to this License. You are not responsible for enforcing compliance
by third parties with this License.
F-13
An "entity transaction" is a transaction transferring control of an organization, or substantially all assets of one,
or subdividing an organization, or merging organizations. If propagation of a covered work results from an entity
transaction, each party to that transaction who receives a copy of the work also receives whatever licenses to the
work the party's predecessor in interest had or could give under the previous paragraph, plus a right to possession
of the Corresponding Source of the work from the predecessor in interest, if the predecessor has it or can get it
with reasonable efforts.
You may not impose any further restrictions on the exercise of the rights granted or affirmed under this License.
For example, you may not impose a license fee, royalty, or other charge for exercise of rights granted under this
License, and you may not initiate litigation (including a cross-claim or counterclaim in a lawsuit) alleging that any
patent claim is infringed by making, using, selling, offering for sale, or importing the Program or any portion of it.
11. Patents.
A "contributor" is a copyright holder who authorizes use under this License of the Program or a work on which
the Program is based. The work thus licensed is called the contributor's "contributor version".
A contributor's "essential patent claims" are all patent claims owned or controlled by the contributor, whether
already acquired or hereafter acquired, that would be infringed by some manner, permitted by this License, of
making, using, or selling its contributor version, but do not include claims that would be infringed only as a
consequence of further modification of the contributor version. For purposes of this definition, "control" includes
the right to grant patent sublicenses in a manner consistent with the requirements of this License.
Each contributor grants you a non-exclusive, worldwide, royalty-free patent license under the contributor's
essential patent claims, to make, use, sell, offer for sale, import and otherwise run, modify and propagate the
contents of its contributor version.
In the following three paragraphs, a "patent license" is any express agreement or commitment, however
denominated, not to enforce a patent (such as an express permission to practice a patent or covenant not to sue
for patent infringement). To "grant" such a patent license to a party means to make such an agreement or
commitment not to enforce a patent against the party.
If you convey a covered work, knowingly relying on a patent license, and the Corresponding Source of the work is
not available for anyone to copy, free of charge and under the terms of this License, through a publicly available
network server or other readily accessible means, then you must either (1) cause the Corresponding Source to be
so available, or (2) arrange to deprive yourself of the benefit of the patent license for this particular work, or (3)
arrange, in a manner consistent with the requirements of this License, to extend the patent license to downstream
recipients. "Knowingly relying" means you have actual knowledge that, but for the patent license, your conveying
the covered work in a country, or your recipient's use of the covered work in a country, would infringe one or more
identifiable patents in that country that you have reason to believe are valid.
If, pursuant to or in connection with a single transaction or arrangement, you convey, or propagate by procuring
conveyance of, a covered work, and grant a patent license to some of the parties receiving the covered work
authorizing them to use, propagate, modify or convey a specific copy of the covered work, then the patent license
you grant is automatically extended to all recipients of the covered work and works based on it.
A patent license is "discriminatory" if it does not include within the scope of its coverage, prohibits the exercise
of, or is conditioned on the non-exercise of one or more of the rights that are specifically granted under this
License. You may not convey a covered work if you are a party to an arrangement with a third party that is in the
business of distributing software, under which you make payment to the third party based on the extent of your
activity of conveying the work, and under which the third party grants, to any of the parties who would receive the
covered work from you, a discriminatory patent license (a) in connection with copies of the covered work conveyed
by you (or copies made from those copies), or (b) primarily for and in connection with specific products or
compilations that contain the covered work, unless you entered into that arrangement, or that patent license was

F-14
granted, prior to 28 March 2007.
Nothing in this License shall be construed as excluding or limiting any implied license or other defenses to
infringement that may otherwise be available to you under applicable patent law.
12. No Surrender of Others' Freedom.
If conditions are imposed on you (whether by court order, agreement or otherwise) that contradict the conditions
of this License, they do not excuse you from the conditions of this License. If you cannot convey a covered work
so as to satisfy simultaneously your obligations under this License and any other pertinent obligations, then as a
consequence you may not convey it at all. For example, if you agree to terms that obligate you to collect a royalty
for further conveying from those to whom you convey the Program, the only way you could satisfy both those terms
and this License would be to refrain entirely from conveying the Program.
13. Use with the GNU Affero General Public License.
Notwithstanding any other provision of this License, you have permission to link or combine any covered work
with a work licensed under version 3 of the GNU Affero General Public License into a single combined work, and to
convey the resulting work. The terms of this License will continue to apply to the part which is the covered work,
but the special requirements of the GNU Affero General Public License, section 13, concerning interaction through a
network will apply to the combination as such.
14. Revised Versions of this License.
The Free Software Foundation may publish revised and/or new versions of the GNU General Public License from
time to time. Such new versions will be similar in spirit to the present version, but may differ in detail to address
new problems or concerns.
Each version is given a distinguishing version number. If the Program specifies that a certain numbered version
of the GNU General Public License "or any later version" applies to it, you have the option of following the terms
and conditions either of that numbered version or of any later version published by the Free Software Foundation.
If the Program does not specify a version number of the GNU General Public License, you may choose any version
ever published by the Free Software Foundation.
If the Program specifies that a proxy can decide which future versions of the GNU General Public License can be
used, that proxy's public statement of acceptance of a version permanently authorizes you to choose that version
for the Program.
Later license versions may give you additional or different permissions. However, no additional obligations are
imposed on any author or copyright holder as a result of your choosing to follow a later version.
15. Disclaimer of Warranty.
THERE IS NO WARRANTY FOR THE PROGRAM, TO THE EXTENT PERMITTED BY APPLICABLE LAW.
EXCEPT WHEN OTHERWISE STATED IN WRITING THE COPYRIGHT HOLDERS AND/OR OTHER PARTIES
PROVIDE THE PROGRAM "AS IS" WITHOUT WARRANTY OF ANY KIND, EITHER EXPRESSED OR IMPLIED,
INCLUDING, BUT NOT LIMITED TO, THE IMPLIED WARRANTIES OF MERCHANTABILITY AND FITNESS FOR A
PARTICULAR PURPOSE. THE ENTIRE RISK AS TO THE QUALITY AND PERFORMANCE OF THE PROGRAM IS
WITH YOU. SHOULD THE PROGRAM PROVE DEFECTIVE, YOU ASSUME THE COST OF ALL NECESSARY
SERVICING, REPAIR OR CORRECTION.
16. Limitation of Liability.
IN NO EVENT UNLESS REQUIRED BY APPLICABLE LAW OR AGREED TO IN WRITING WILL ANY COPYRIGHT
HOLDER, OR ANY OTHER PARTY WHO MODIFIES AND/OR CONVEYS THE PROGRAM AS PERMITTED ABOVE,

F-15
BE LIABLE TO YOU FOR DAMAGES, INCLUDING ANY GENERAL, SPECIAL, INCIDENTAL OR CONSEQUENTIAL
DAMAGES ARISING OUT OF THE USE OR INABILITY TO USE THE PROGRAM (INCLUDING BUT NOT LIMITED
TO LOSS OF DATA OR DATA BEING RENDERED INACCURATE OR LOSSES SUSTAINED BY YOU OR THIRD
PARTIES OR A FAILURE OF THE PROGRAM TO OPERATE WITH ANY OTHER PROGRAMS), EVEN IF SUCH
HOLDER OR OTHER PARTY HAS BEEN ADVISED OF THE POSSIBILITY OF SUCH DAMAGES.
17. Interpretation of Sections 15 and 16.
If the disclaimer of warranty and limitation of liability provided above cannot be given local legal effect according
to their terms, reviewing courts shall apply local law that most closely approximates an absolute waiver of all civil
liability in connection with the Program, unless a warranty or assumption of liability accompanies a copy of the
Program in return for a fee.
F-16
eglibc/u-boot のライセンス
GNU LESSER GENERAL PUBLIC LICENSE
Version 2.1, February 1999
Copyright (C) 1991, 1999 Free Software Foundation, Inc.
51 Franklin St, Fifth Floor, Boston, MA 02110-1301 USA
Everyone is permitted to copy and distribute verbatim copies of this license document, but changing it is not allowed.
[This is the first released version of the Lesser GPL. It also counts as the successor of the GNU Library Public
License, version 2, hence the version number 2.1.]
Preamble
The licenses for most software are designed to take away your freedom to share and change it. By contrast,
the GNU General Public Licenses are intended to guarantee your freedom to share and change free
software--to make sure the software is free for all its users.
This license, the Lesser General Public License, applies to some specially designated software
packages--typically libraries--of the Free Software Foundation and other authors who decide to use
it. You can use it too, but we suggest you first think carefully about whether this license or the
ordinary General Public License is the better strategy to use in any particular case, based on the
explanations below.
When we speak of free software, we are referring to freedom of use, not price. Our General Public Licenses are designed to make sure that you have the freedom to distribute copies of free software (and charge for this service if you wish); that you receive source code or can get it if you want it; that you can change the software and use pieces of it in new free programs; and that you are informed that you can do these things. To protect your rights, we need to make restrictions that forbid distributors to deny you these rights or to ask you to surrender these rights. These restrictions translate to certain responsibilities for you if you distribute copies of the library or if you modify it. For example, if you distribute copies of the library, whether gratis or for a fee, you must give the recipients all the rights that we gave you. You must make sure that they, too, receive or can get the source code. If you link other code with the library, you must provide complete object files to the recipients, so that they can relink them with the library after making changes to the library and recompiling it. And you must show them these terms so they know their rights. We protect your rights with a two-step method: (1) we copyright the library, and (2) we offer you this license, which gives you legal permission to copy, distribute and/or modify the library. To protect each distributor, we want to make it very clear that there is no warranty for the free library. Also, if the library is modified by someone else and passed on, the recipients should know that what they have is not the original version, so that the original author's reputation will not be affected by problems that might be introduced by others. Finally, software patents pose a constant threat to the existence of any free program. We wish to make sure that a company cannot effectively restrict the users of a free program by obtaining a restrictive license from a patent holder. Therefore, we insist that any patent license obtained for a version of the library must be consistent with the full freedom of use specified in this license. Most GNU software, including some libraries, is covered by the ordinary GNU General Public License. This license, the GNU Lesser General Public License, applies to certain designated libraries, and is quite different from the ordinary General Public License. We use this license for certain libraries in order to permit linking those libraries into non-free programs. When a program is linked with a library, whether statically or using a shared library, the combination of the two is legally speaking a combined work, a derivative of the original library. The ordinary

F-17
General Public License therefore permits such linking only if the entire combination fits its criteria of freedom. The Lesser General Public License permits more lax criteria for linking other code with the library. We call this license the "Lesser" General Public License because it does Less to protect the user's freedom than the ordinary General Public License. It also provides other free software developers Less of an advantage over competing non-free programs. These disadvantages are the reason we use the ordinary General Public License for many libraries. However, the Lesser license provides advantages in certain special circumstances. For example, on rare occasions, there may be a special need to encourage the widest possible use of a certain library, so that it becomes a de-facto standard. To achieve this, non-free programs must be allowed to use the library. A more frequent case is that a free library does the same job as widely used non-free libraries. In this case, there is little to gain by limiting the free library to free software only, so we use the Lesser General Public License. In other cases, permission to use a particular library in non-free programs enables a greater number of people to use a large body of free software. For example, permission to use the GNU C Library in non-free programs enables many more people to use the whole GNU operating system, as well as its variant, the GNU/Linux operating system. Although the Lesser General Public License is Less protective of the users' freedom, it does ensure that the user of a program that is linked with the Library has the freedom and the wherewithal to run that program using a modified version of the Library. The precise terms and conditions for copying, distribution and modification follow. Pay close attention to the difference between a "work based on the library" and a "work that uses the library". The former contains code derived from the library, whereas the latter must be combined with the library in order to run. TERMS AND CONDITIONS FOR COPYING, DISTRIBUTION AND MODIFICATION 0. This License Agreement applies to any software library or other program which contains a notice
placed by the copyright holder or other authorized party saying it may be distributed under the terms of this Lesser General Public License (also called "this License"). Each licensee is addressed as "you".
A "library" means a collection of software functions and/or data prepared so as to be conveniently linked with application programs (which use some of those functions and data) to form executables.
The "Library", below, refers to any such software library or work which has been distributed under these terms. A "work based on the Library" means either the Library or any derivative work under copyright law: that is to say, a work containing the Library or a portion of it, either verbatim or with modifications and/or translated straightforwardly into another language. (Hereinafter, translation is included without limitation in the term "modification".)
"Source code" for a work means the preferred form of the work for making modifications to it. For a library, complete source code means all the source code for all modules it contains, plus any associated interface definition files, plus the scripts used to control compilation and installation of the library.
Activities other than copying, distribution and modification are not covered by this License; they are outside its scope. The act of running a program using the Library is not restricted, and output from such a program is covered only if its contents constitute a work based on the Library (independent of the use of the Library in a tool for writing it). Whether that is true depends on what the Library does and what the program that uses the Library does.
1. You may copy and distribute verbatim copies of the Library's complete source code as you receive it, in any medium, provided that you conspicuously and appropriately publish on each copy an appropriate copyright notice and disclaimer of warranty; keep intact all the notices that refer to this License and to the absence of any warranty; and distribute a copy of this License along with the Library.
You may charge a fee for the physical act of transferring a copy, and you may at your option offer warranty protection in exchange for a fee.
2. You may modify your copy or copies of the Library or any portion of it, thus forming a work based

F-18
on the Library, and copy and distribute such modifications or work under the terms of Section 1 above, provided that you also meet all of these conditions:
* a) The modified work must itself be a software library. * b) You must cause the files modified to carry prominent notices stating that you changed the
files and the date of any change. * c) You must cause the whole of the work to be licensed at no charge to all third parties under
the terms of this License. * d) If a facility in the modified Library refers to a function or a table of data to be supplied
by an application program that uses the facility, other than as an argument passed when the facility is invoked, then you must make a good faith effort to ensure that, in the event an application does not supply such function or table, the facility still operates, and performs whatever part of its purpose remains meaningful.
(For example, a function in a library to compute square roots has a purpose that is entirely well-defined independent of the application. Therefore, Subsection 2d requires that any application-supplied function or table used by this function must be optional: if the application does not supply it, the square root function must still compute square roots.)
These requirements apply to the modified work as a whole. If identifiable sections of that work are not derived from the Library, and can be reasonably considered independent and separate works in themselves, then this License, and its terms, do not apply to those sections when you distribute them as separate works. But when you distribute the same sections as part of a whole which is a work based on the Library, the distribution of the whole must be on the terms of this License, whose permissions for other licensees extend to the entire whole, and thus to each and every part regardless of who wrote it.
Thus, it is not the intent of this section to claim rights or contest your rights to work written entirely by you; rather, the intent is to exercise the right to control the distribution of derivative or collective works based on the Library.
In addition, mere aggregation of another work not based on the Library with the Library (or with a work based on the Library) on a volume of a storage or distribution medium does not bring the other work under the scope of this License.
3. You may opt to apply the terms of the ordinary GNU General Public License instead of this License to a given copy of the Library. To do this, you must alter all the notices that refer to this License, so that they refer to the ordinary GNU General Public License, version 2, instead of to this License. (If a newer version than version 2 of the ordinary GNU General Public License has appeared, then you can specify that version instead if you wish.) Do not make any other change in these notices.
Once this change is made in a given copy, it is irreversible for that copy, so the ordinary GNU General Public License applies to all subsequent copies and derivative works made from that copy.
This option is useful when you wish to copy part of the code of the Library into a program that is not a library.
4. You may copy and distribute the Library (or a portion or derivative of it, under Section 2) in object code or executable form under the terms of Sections 1 and 2 above provided that you accompany it with the complete corresponding machine-readable source code, which must be distributed under the terms of Sections 1 and 2 above on a medium customarily used for software interchange.
If distribution of object code is made by offering access to copy from a designated place, then offering equivalent access to copy the source code from the same place satisfies the requirement to distribute the source code, even though third parties are not compelled to copy the source along with the object code.
5. A program that contains no derivative of any portion of the Library, but is designed to work with
the Library by being compiled or linked with it, is called a "work that uses the Library". Such a work, in isolation, is not a derivative work of the Library, and therefore falls outside the scope of this License.
However, linking a "work that uses the Library" with the Library creates an executable that is a derivative of the Library (because it contains portions of the Library), rather than a "work that uses the library". The executable is therefore covered by this License. Section 6 states terms for distribution of such executables.
F-19
When a "work that uses the Library" uses material from a header file that is part of the Library, the object code for the work may be a derivative work of the Library even though the source code is not. Whether this is true is especially significant if the work can be linked without the Library, or if the work is itself a library. The threshold for this to be true is not precisely defined by law.
If such an object file uses only numerical parameters, data structure layouts and accessors, and small macros and small inline functions (ten lines or less in length), then the use of the object file is unrestricted, regardless of whether it is legally a derivative work. (Executables containing this object code plus portions of the Library will still fall under Section 6.)
Otherwise, if the work is a derivative of the Library, you may distribute the object code for the work under the terms of Section 6. Any executables containing that work also fall under Section 6, whether or not they are linked directly with the Library itself.
6. As an exception to the Sections above, you may also combine or link a "work that uses the Library" with the Library to produce a work containing portions of the Library, and distribute that work under terms of your choice, provided that the terms permit modification of the work for the customer's own use and reverse engineering for debugging such modifications.
You must give prominent notice with each copy of the work that the Library is used in it and that the Library and its use are covered by this License. You must supply a copy of this License. If the work during execution displays copyright notices, you must include the copyright notice for the Library among them, as well as a reference directing the user to the copy of this License. Also, you must do one of these things:
* a) Accompany the work with the complete corresponding machine-readable source code for the Library including whatever changes were used in the work (which must be distributed under Sections 1 and 2 above); and, if the work is an executable linked with the Library, with the complete machine-readable "work that uses the Library", as object code and/or source code, so that the user can modify the Library and then relink to produce a modified executable containing the modified Library. (It is understood that the user who changes the contents of definitions files in the Library will not necessarily be able to recompile the application to use the modified definitions.)
* b) Use a suitable shared library mechanism for linking with the Library. A suitable mechanism is one that (1) uses at run time a copy of the library already present on the user's computer system, rather than copying library functions into the executable, and (2) will operate properly with a modified version of the library, if the user installs one, as long as the modified version is interface-compatible with the version that the work was made with.
* c) Accompany the work with a written offer, valid for at least three years, to give the same user the materials specified in Subsection 6a, above, for a charge no more than the cost of performing this distribution.
* d) If distribution of the work is made by offering access to copy from a designated place, offer equivalent access to copy the above specified materials from the same place.
* e) Verify that the user has already received a copy of these materials or that you have already sent this user a copy.
For an executable, the required form of the "work that uses the Library" must include any data and
utility programs needed for reproducing the executable from it. However, as a special exception, the materials to be distributed need not include anything that is normally distributed (in either source or binary form) with the major components (compiler, kernel, and so on) of the operating system on which the executable runs, unless that component itself accompanies the executable.
It may happen that this requirement contradicts the license restrictions of other proprietary libraries that do not normally accompany the operating system. Such a contradiction means you cannot use both them and the Library together in an executable that you distribute.
7. You may place library facilities that are a work based on the Library side-by-side in a single library together with other library facilities not covered by this License, and distribute such a combined library, provided that the separate distribution of the work based on the Library and of the other library facilities is otherwise permitted, and provided that you do these two things:
F-20
* a) Accompany the combined library with a copy of the same work based on the Library, uncombined
with any other library facilities. This must be distributed under the terms of the Sections above.
* b) Give prominent notice with the combined library of the fact that part of it is a work based on the Library, and explaining where to find the accompanying uncombined form of the same work.
8. You may not copy, modify, sublicense, link with, or distribute the Library except as expressly provided under this License. Any attempt otherwise to copy, modify, sublicense, link with, or distribute the Library is void, and will automatically terminate your rights under this License. However, parties who have received copies, or rights, from you under this License will not have their licenses terminated so long as such parties remain in full compliance.
9. You are not required to accept this License, since you have not signed it. However, nothing else grants you permission to modify or distribute the Library or its derivative works. These actions are prohibited by law if you do not accept this License. Therefore, by modifying or distributing the Library (or any work based on the Library), you indicate your acceptance of this License to do so, and all its terms and conditions for copying, distributing or modifying the Library or works based on it.
10. Each time you redistribute the Library (or any work based on the Library), the recipient automatically receives a license from the original licensor to copy, distribute, link with or modify the Library subject to these terms and conditions. You may not impose any further restrictions on the recipients' exercise of the rights granted herein. You are not responsible for enforcing compliance by third parties with this License.
11. If, as a consequence of a court judgment or allegation of patent infringement or for any other reason (not limited to patent issues), conditions are imposed on you (whether by court order, agreement or otherwise) that contradict the conditions of this License, they do not excuse you from the conditions of this License. If you cannot distribute so as to satisfy simultaneously your obligations under this License and any other pertinent obligations, then as a consequence you may not distribute the Library at all. For example, if a patent license would not permit royalty-free redistribution of the Library by all those who receive copies directly or indirectly through you, then the only way you could satisfy both it and this License would be to refrain entirely from distribution of the Library.
If any portion of this section is held invalid or unenforceable under any particular circumstance, the balance of the section is intended to apply, and the section as a whole is intended to apply in other circumstances.
It is not the purpose of this section to induce you to infringe any patents or other property right claims or to contest validity of any such claims; this section has the sole purpose of protecting the integrity of the free software distribution system which is implemented by public license practices. Many people have made generous contributions to the wide range of software distributed through that system in reliance on consistent application of that system; it is up to the author/donor to decide if he or she is willing to distribute software through any other system and a licensee cannot impose that choice.
This section is intended to make thoroughly clear what is believed to be a consequence of the rest of this License.
12. If the distribution and/or use of the Library is restricted in certain countries either by patents
or by copyrighted interfaces, the original copyright holder who places the Library under this License may add an explicit geographical distribution limitation excluding those countries, so that distribution is permitted only in or among countries not thus excluded. In such case, this License incorporates the limitation as if written in the body of this License.
13. The Free Software Foundation may publish revised and/or new versions of the Lesser General Public License from time to time. Such new versions will be similar in spirit to the present version, but may differ in detail to address new problems or concerns.
Each version is given a distinguishing version number. If the Library specifies a version number of this License which applies to it and "any later version", you have the option of following the terms and conditions either of that version or of any later version published by the Free Software
F-21
Foundation. If the Library does not specify a license version number, you may choose any version ever published by the Free Software Foundation.
14. If you wish to incorporate parts of the Library into other free programs whose distribution conditions are incompatible with these, write to the author to ask for permission. For software which is copyrighted by the Free Software Foundation, write to the Free Software Foundation; we sometimes make exceptions for this. Our decision will be guided by the two goals of preserving the free status of all derivatives of our free software and of promoting the sharing and reuse of software generally.
NO WARRANTY 15. BECAUSE THE LIBRARY IS LICENSED FREE OF CHARGE, THERE IS NO WARRANTY FOR THE LIBRARY, TO THE EXTENT
PERMITTED BY APPLICABLE LAW. EXCEPT WHEN OTHERWISE STATED IN WRITING THE COPYRIGHT HOLDERS AND/OR OTHER PARTIES PROVIDE THE LIBRARY "AS IS" WITHOUT WARRANTY OF ANY KIND, EITHER EXPRESSED OR IMPLIED, INCLUDING, BUT NOT LIMITED TO, THE IMPLIED WARRANTIES OF MERCHANTABILITY AND FITNESS FOR A PARTICULAR PURPOSE. THE ENTIRE RISK AS TO THE QUALITY AND PERFORMANCE OF THE LIBRARY IS WITH YOU. SHOULD THE LIBRARY PROVE DEFECTIVE, YOU ASSUME THE COST OF ALL NECESSARY SERVICING, REPAIR OR CORRECTION.
16. IN NO EVENT UNLESS REQUIRED BY APPLICABLE LAW OR AGREED TO IN WRITING WILL ANY COPYRIGHT HOLDER, OR ANY OTHER PARTY WHO MAY MODIFY AND/OR REDISTRIBUTE THE LIBRARY AS PERMITTED ABOVE, BE LIABLE TO YOU FOR DAMAGES, INCLUDING ANY GENERAL, SPECIAL, INCIDENTAL OR CONSEQUENTIAL DAMAGES ARISING OUT OF THE USE OR INABILITY TO USE THE LIBRARY (INCLUDING BUT NOT LIMITED TO LOSS OF DATA OR DATA BEING RENDERED INACCURATE OR LOSSES SUSTAINED BY YOU OR THIRD PARTIES OR A FAILURE OF THE LIBRARY TO OPERATE WITH ANY OTHER SOFTWARE), EVEN IF SUCH HOLDER OR OTHER PARTY HAS BEEN ADVISED OF THE POSSIBILITY OF SUCH DAMAGES.

F-22
u-boot のライセンス
GNU LIBRARY GENERAL PUBLIC LICENSE
Version 2, June 1991
Copyright (C) 1991 Free Software Foundation, Inc. 59 Temple Place - Suite 330, Boston, MA 02111-1307, USA Everyone is permitted to copy and distribute verbatim copies of this license document, but changing it is not allowed.
[This is the first released version of the library GPL. It is numbered 2 because it goes with version 2 of the ordinary GPL.] Preamble The licenses for most software are designed to take away your freedom to share and change it. By contrast, the GNU General Public Licenses are intended to guarantee your freedom to share and change free software--to make sure the software is free for all its users. This license, the Library General Public License, applies to some specially designated Free Software Foundation software, and to any other libraries whose authors decide to use it. You can use it for your libraries, too. When we speak of free software, we are referring to freedom, not price. Our General Public Licenses are designed to make sure that you have the freedom to distribute copies of free software (and charge for this service if you wish), that you receive source code or can get it if you want it, that you can change the software or use pieces of it in new free programs; and that you know you can do these things. To protect your rights, we need to make restrictions that forbid anyone to deny you these rights or to ask you to surrender the rights. These restrictions translate to certain responsibilities for you if you distribute copies of the library, or if you modify it. For example, if you distribute copies of the library, whether gratis or for a fee, you must give the recipients all the rights that we gave you. You must make sure that they, too, receive or can get the source code. If you link a program with the library, you must provide complete object files to the recipients so that they can relink them with the library, after making changes to the library and recompiling it. And you must show them these terms so they know their rights. Our method of protecting your rights has two steps: (1) copyright the library, and (2) offer you this license which gives you legal permission to copy, distribute and/or modify the library. Also, for each distributor's protection, we want to make certain that everyone understands that there is no warranty for this free library. If the library is modified by someone else and passed on, we want its recipients to know that what they have is not the original version, so that any problems introduced by others will not reflect on the original authors' reputations. Finally, any free program is threatened constantly by software patents. We wish to avoid the danger that companies distributing free software will individually obtain patent licenses, thus in effect transforming the program into proprietary software. To prevent this, we have made it clear that any patent must be licensed for everyone's free use or not licensed at all.
F-23
Most GNU software, including some libraries, is covered by the ordinary GNU General Public License, which was designed for utility programs. This license, the GNU Library General Public License, applies to certain designated libraries. This license is quite different from the ordinary one; be sure to read it in full, and don't assume that anything in it is the same as in the ordinary license. The reason we have a separate public license for some libraries is that they blur the distinction we usually make between modifying or adding to a program and simply using it. Linking a program with a library, without changing the library, is in some sense simply using the library, and is analogous to running a utility program or application program. However, in a textual and legal sense, the linked executable is a combined work, a derivative of the original library, and the ordinary General Public License treats it as such. Because of this blurred distinction, using the ordinary General Public License for libraries did not effectively promote software sharing, because most developers did not use the libraries. We concluded that weaker conditions might promote sharing better. However, unrestricted linking of non-free programs would deprive the users of those programs of all benefit from the free status of the libraries themselves. This Library General Public License is intended to permit developers of non-free programs to use free libraries, while preserving your freedom as a user of such programs to change the free libraries that are incorporated in them. (We have not seen how to achieve this as regards changes in header files, but we have achieved it as regards changes in the actual functions of the Library.) The hope is that this will lead to faster development of free libraries. The precise terms and conditions for copying, distribution and modification follow. Pay close attention to the difference between a "work based on the library" and a "work that uses the library". The former contains code derived from the library, while the latter only works together with the library. Note that it is possible for a library to be covered by the ordinary General Public License rather than by this special one.
GNU LIBRARY GENERAL PUBLIC LICENSE
TERMS AND CONDITIONS FOR COPYING, DISTRIBUTION AND MODIFICATION
0. This License Agreement applies to any software library which contains a notice placed by the
copyright holder or other authorized party saying it may be distributed under the terms of this Library General Public License (also called "this License"). Each licensee is addressed as "you".
A "library" means a collection of software functions and/or data prepared so as to be conveniently
linked with application programs (which use some of those functions and data) to form executables.
The "Library", below, refers to any such software library or work which has been distributed under these terms. A "work based on the Library" means either the Library or any derivative work under copyright law: that is to say, a work containing the Library or a portion of it, either verbatim or with modifications and/or translated straightforwardly into another language. (Hereinafter, translation is included without limitation in the term "modification".)
"Source code" for a work means the preferred form of the work for making modifications to it. For a library, complete source code means all the source code for all modules it contains, plus any associated interface definition files, plus the scripts used to control compilation and installation of the library.
Activities other than copying, distribution and modification are not covered by this License; they are outside its scope. The act of running a program using the Library is not restricted, and output from such a program is covered only if its contents constitute a work based on the Library (independent of the use of the Library in a tool for writing it). Whether that is true depends on what the Library does and what the program that uses the Library does.
1. You may copy and distribute verbatim copies of the Library's complete source code as you receive
it, in any medium, provided that you conspicuously and appropriately publish on each copy an appropriate copyright notice and disclaimer of warranty; keep intact all the notices that refer to this License and to the absence of any warranty; and distribute a copy of this License along

F-24
with the Library.
You may charge a fee for the physical act of transferring a copy, and you may at your option offer warranty protection in exchange for a fee.
2. You may modify your copy or copies of the Library or any portion of it, thus forming a work based on the Library, and copy and distribute such modifications or work under the terms of Section 1 above, provided that you also meet all of these conditions:
a) The modified work must itself be a software library.
b) You must cause the files modified to carry prominent notices stating that you changed the files and the date of any change.
c) You must cause the whole of the work to be licensed at no charge to all third parties under the terms of this License.
d) If a facility in the modified Library refers to a function or a table of data to be supplied by an application program that uses the facility, other than as an argument passed when the facility is invoked, then you must make a good faith effort to ensure that, in the event an application does not supply such function or table, the facility still operates, and performs whatever part of its purpose remains meaningful.
(For example, a function in a library to compute square roots has a purpose that is entirely well-defined independent of the application. Therefore, Subsection 2d requires that any application-supplied function or table used by this function must be optional: if the application does not supply it, the square root function must still compute square roots.)
These requirements apply to the modified work as a whole. If identifiable sections of that work are not derived from the Library, and can be reasonably considered independent and separate works in themselves, then this License, and its terms, do not apply to those sections when you distribute them as separate works. But when you distribute the same sections as part of a whole which is a work based on the Library, the distribution of the whole must be on the terms of this License, whose permissions for other licensees extend to the entire whole, and thus to each and every part regardless of who wrote it.
Thus, it is not the intent of this section to claim rights or contest your rights to work written entirely by you; rather, the intent is to exercise the right to control the distribution of derivative or collective works based on the Library.
In addition, mere aggregation of another work not based on the Library with the Library (or with a work based on the Library) on a volume of a storage or distribution medium does not bring the other work under the scope of this License.
3. You may opt to apply the terms of the ordinary GNU General Public License instead of this License to a given copy of the Library. To do this, you must alter all the notices that refer to this License, so that they refer to the ordinary GNU General Public License, version 2, instead of to this License. (If a newer version than version 2 of the ordinary GNU General Public License has appeared, then you can specify that version instead if you wish.) Do not make any other change in these notices.
Once this change is made in a given copy, it is irreversible for that copy, so the ordinary GNU General Public License applies to all subsequent copies and derivative works made from that copy.
This option is useful when you wish to copy part of the code of the Library into a program that is not a library.
F-25
4. You may copy and distribute the Library (or a portion or derivative of it, under Section 2) in object
code or executable form under the terms of Sections 1 and 2 above provided that you accompany it with the complete corresponding machine-readable source code, which must be distributed under the terms of Sections 1 and 2 above on a medium customarily used for software interchange.
If distribution of object code is made by offering access to copy from a designated place, then offering equivalent access to copy the source code from the same place satisfies the requirement to distribute the source code, even though third parties are not compelled to copy the source along with the object code.
5. A program that contains no derivative of any portion of the Library, but is designed to work with the Library by being compiled or linked with it, is called a "work that uses the Library". Such a work, in isolation, is not a derivative work of the Library, and therefore falls outside the scope of this License.
However, linking a "work that uses the Library" with the Library creates an executable that is a derivative of the Library (because it contains portions of the Library), rather than a "work that uses the library". The executable is therefore covered by this License. Section 6 states terms for distribution of such executables.
When a "work that uses the Library" uses material from a header file that is part of the Library, the object code for the work may be a derivative work of the Library even though the source code is not. Whether this is true is especially significant if the work can be linked without the Library, or if the work is itself a library. The threshold for this to be true is not precisely defined by law.
If such an object file uses only numerical parameters, data structure layouts and accessors, and small macros and small inline functions (ten lines or less in length), then the use of the object file is unrestricted, regardless of whether it is legally a derivative work. (Executables containing this object code plus portions of the Library will still fall under Section 6.)
Otherwise, if the work is a derivative of the Library, you may distribute the object code for the work under the terms of Section 6. Any executables containing that work also fall under Section 6, whether or not they are linked directly with the Library itself.
6. As an exception to the Sections above, you may also compile or link a "work that uses the Library" with the Library to produce a work containing portions of the Library, and distribute that work under terms of your choice, provided that the terms permit modification of the work for the customer's own use and reverse engineering for debugging such modifications.
You must give prominent notice with each copy of the work that the Library is used in it and that the Library and its use are covered by this License. You must supply a copy of this License. If the work during execution displays copyright notices, you must include the copyright notice for the Library among them, as well as a reference directing the user to the copy of this License. Also, you must do one of these things:
a) Accompany the work with the complete corresponding machine-readable source code for the Library including whatever changes were used in the work (which must be distributed under Sections 1 and 2 above); and, if the work is an executable linked with the Library, with the complete machine-readable "work that uses the Library", as object code and/or source code, so that the user can modify the Library and then relink to produce a modified executable containing the modified Library. (It is understood that the user who changes the contents of definitions files in the Library will not necessarily be able to recompile the application to use the modified definitions.)
b) Accompany the work with a written offer, valid for at least three years, to give the same user the materials specified in Subsection 6a, above, for a charge no more than the cost of performing this distribution.
c) If distribution of the work is made by offering access to copy from a designated place, offer equivalent access to copy the above specified materials from the same place.
d) Verify that the user has already received a copy of these materials or that you have already sent this user a copy.
F-26
For an executable, the required form of the "work that uses the Library" must include any data and utility programs needed for reproducing the executable from it. However, as a special exception, the source code distributed need not include anything that is normally distributed (in either source or binary form) with the major components (compiler, kernel, and so on) of the operating system on which the executable runs, unless that component itself accompanies the executable.
It may happen that this requirement contradicts the license restrictions of other proprietary libraries that do not normally accompany the operating system. Such a contradiction means you cannot use both them and the Library together in an executable that you distribute.
7. You may place library facilities that are a work based on the Library side-by-side in a single library together with other library facilities not covered by this License, and distribute such a combined library, provided that the separate distribution of the work based on the Library and of the other library facilities is otherwise permitted, and provided that you do these two things:
a) Accompany the combined library with a copy of the same work based on the Library, uncombined with any other library facilities. This must be distributed under the terms of the Sections above.
b) Give prominent notice with the combined library of the fact that part of it is a work based on the Library, and explaining where to find the accompanying uncombined form of the same work.
8. You may not copy, modify, sublicense, link with, or distribute the Library except as expressly provided under this License. Any attempt otherwise to copy, modify, sublicense, link with, or distribute the Library is void, and will automatically terminate your rights under this License. However, parties who have received copies, or rights, from you under this License will not have their licenses terminated so long as such parties remain in full compliance.
9. You are not required to accept this License, since you have not signed it. However, nothing else grants you permission to modify or distribute the Library or its derivative works. These actions are prohibited by law if you do not accept this License. Therefore, by modifying or distributing the Library (or any work based on the Library), you indicate your acceptance of this License to do so, and all its terms and conditions for copying, distributing or modifying the Library or works based on it.
10. Each time you redistribute the Library (or any work based on the Library), the recipient automatically receives a license from the original licensor to copy, distribute, link with or modify the Library subject to these terms and conditions. You may not impose any further restrictions on the recipients' exercise of the rights granted herein.
You are not responsible for enforcing compliance by third parties to this License.
11. If, as a consequence of a court judgment or allegation of patent infringement or for any other reason (not limited to patent issues), conditions are imposed on you (whether by court order, agreement or otherwise) that contradict the conditions of this License, they do not excuse you from the conditions of this License. If you cannot distribute so as to satisfy simultaneously your obligations under this License and any other pertinent obligations, then as a consequence you may not distribute the Library at all. For example, if a patent license would not permit royalty-free redistribution of the Library by all those who receive copies directly or indirectly through you, then the only way you could satisfy both it and this License would be to refrain entirely from distribution of the Library.
If any portion of this section is held invalid or unenforceable under any particular circumstance, the balance of the section is intended to apply, and the section as a whole is intended to apply in other circumstances.
It is not the purpose of this section to induce you to infringe any patents or other property right claims or to contest validity of any such claims; this section has the sole purpose of protecting the integrity of the free software distribution system which is implemented by public license practices. Many people have made generous contributions to the wide range of software distributed through that system in reliance on consistent application of that system; it is up to the author/donor to decide if he or she is willing to distribute software through any other system and a licensee cannot impose that choice.
This section is intended to make thoroughly clear what is believed to be a consequence of the rest
of this License.
F-27
12. If the distribution and/or use of the Library is restricted in certain countries either by patents
or by copyrighted interfaces, the original copyright holder who places the Library under this License may add an explicit geographical distribution limitation excluding those countries, so that distribution is permitted only in or among countries not thus excluded. In such case, this License incorporates the limitation as if written in the body of this License.
13. The Free Software Foundation may publish revised and/or new versions of the Library General Public License from time to time. Such new versions will be similar in spirit to the present version, but may differ in detail to address new problems or concerns.
Each version is given a distinguishing version number. If the Library specifies a version number of this License which applies to it and "any later version", you have the option of following the terms and conditions either of that version or of any later version published by the Free Software Foundation. If the Library does not specify a license version number, you may choose any version ever published by the Free Software Foundation.
14. If you wish to incorporate parts of the Library into other free programs whose distribution conditions are incompatible with these, write to the author to ask for permission. For software which is copyrighted by the Free Software Foundation, write to the Free Software Foundation; we sometimes make exceptions for this. Our decision will be guided by the two goals of preserving the free status of all derivatives of our free software and of promoting the sharing and reuse of software generally.
NO WARRANTY
15. BECAUSE THE LIBRARY IS LICENSED FREE OF CHARGE, THERE IS NO WARRANTY FOR THE LIBRARY, TO THE EXTENT
PERMITTED BY APPLICABLE LAW. EXCEPT WHEN OTHERWISE STATED IN WRITING THE COPYRIGHT HOLDERS AND/OR OTHER PARTIES PROVIDE THE LIBRARY "AS IS" WITHOUT WARRANTY OF ANY KIND, EITHER EXPRESSED OR IMPLIED, INCLUDING, BUT NOT LIMITED TO, THE IMPLIED WARRANTIES OF MERCHANTABILITY AND FITNESS FOR A PARTICULAR PURPOSE. THE ENTIRE RISK AS TO THE QUALITY AND PERFORMANCE OF THE LIBRARY IS WITH YOU. SHOULD THE LIBRARY PROVE DEFECTIVE, YOU ASSUME THE COST OF ALL NECESSARY SERVICING, REPAIR OR CORRECTION.
16. IN NO EVENT UNLESS REQUIRED BY APPLICABLE LAW OR AGREED TO IN WRITING WILL ANY COPYRIGHT HOLDER, OR ANY OTHER PARTY WHO MAY MODIFY AND/OR REDISTRIBUTE THE LIBRARY AS PERMITTED ABOVE, BE LIABLE TO YOU FOR DAMAGES, INCLUDING ANY GENERAL, SPECIAL, INCIDENTAL OR CONSEQUENTIAL DAMAGES ARISING OUT OF THE USE OR INABILITY TO USE THE LIBRARY (INCLUDING BUT NOT LIMITED TO LOSS OF DATA OR DATA BEING RENDERED INACCURATE OR LOSSES SUSTAINED BY YOU OR THIRD PARTIES OR A FAILURE OF THE LIBRARY TO OPERATE WITH ANY OTHER SOFTWARE), EVEN IF SUCH HOLDER OR OTHER PARTY HAS BEEN ADVISED OF THE POSSIBILITY OF SUCH DAMAGES.
F-28
u-boot/xinetd のライセンス
Berkeley-based copyrights:
Redistribution and use in source and binary forms, with or without modification, are permitted provided that the following conditions are met: 1. Redistributions of source code must retain the above copyright notice, this list of conditions and the following disclaimer. 2. Redistributions in binary form must reproduce the above copyright notice, this list of conditions and the following disclaimer in the documentation and/or other materials provided with the distribution. THIS SOFTWARE IS PROVIDED BY THE COPYRIGHT HOLDERS AND CONTRIBUTORS "AS IS" AND ANY EXPRESS OR IMPLIED WARRANTIES, INCLUDING, BUT NOT LIMITED TO, THE IMPLIED WARRANTIES OF MERCHANTABILITY AND FITNESS FOR A PARTICULAR PURPOSE ARE DISCLAIMED. IN NO EVENT SHALL THE COPYRIGHT OWNER OR CONTRIBUTORS BE LIABLE FOR ANY DIRECT, INDIRECT, INCIDENTAL, SPECIAL, EXEMPLARY, OR CONSEQUENTIAL DAMAGES (INCLUDING, BUT NOT LIMITED TO, PROCUREMENT OF SUBSTITUTE GOODS OR SERVICES; LOSS OF USE, DATA, OR PROFITS; OR BUSINESS INTERRUPTION) HOWEVER CAUSED AND ON ANY THEORY OF LIABILITY, WHETHER IN CONTRACT, STRICT LIABILITY, OR TORT (INCLUDING NEGLIGENCE OR OTHERWISE) ARISING IN ANY WAY OUT OF THE USE OF THIS SOFTWARE, EVEN IF ADVISED OF THE POSSIBILITY OF SUCH DAMAGE.
libpcap/ftp/strace/telnet-server/tcpdump/u-boot のライセンス
Berkeley-based copyrights:
Redistribution and use in source and binary forms, with or without modification, are permitted provided
that the following conditions are met:
1. Redistributions of source code must retain the above copyright notice, this list of conditions and the following disclaimer.
2. Redistributions in binary form must reproduce the above copyright notice, this list of conditions and the following disclaimer in the documentation and/or other materials provided with the distribution.
3. The name of the author may not be used to endorse or promote products derived from this software without specific prior written permission.
THIS SOFTWARE IS PROVIDED BY THE AUTHOR ``AS IS'' AND ANY EXPRESS OR IMPLIED WARRANTIES, INCLUDING,
BUT NOT LIMITED TO, THE IMPLIED WARRANTIES OF MERCHANTABILITY AND FITNESS FOR A PARTICULAR PURPOSE
ARE DISCLAIMED. IN NO EVENT SHALL THE AUTHOR BE LIABLE FOR ANY DIRECT, INDIRECT, INCIDENTAL, SPECIAL,
EXEMPLARY, OR CONSEQUENTIAL DAMAGES (INCLUDING, BUT NOT LIMITED TO, PROCUREMENT OF SUBSTITUTE GOODS
OR SERVICES; LOSS OF USE, DATA, OR PROFITS; OR BUSINESS INTERRUPTION) HOWEVER CAUSED AND ON ANY THEORY
OF LIABILITY, WHETHER IN CONTRACT, STRICT LIABILITY, OR TORT (INCLUDING NEGLIGENCE OR OTHERWISE)
ARISING IN ANY WAY OUT OF THE USE OF THIS SOFTWARE, EVEN IF ADVISED OF THE POSSIBILITY OF SUCH DAMAGE.
F-29
dropbear のライセンス
The MIT License
Copyright (c) <year> <copyright holders>
Permission is hereby granted, free of charge, to any person obtaining a copy of this software and
associated documentation files (the "Software"), to deal in the Software without restriction, including
without limitation the rights to use, copy, modify, merge, publish, distribute, sublicense, and/or
sell copies of the Software, and to permit persons to whom the Software is furnished to do so, subject
to the following conditions:
The above copyright notice and this permission notice shall be included in all copies or substantial
portions of the Software.
THE SOFTWARE IS PROVIDED "AS IS", WITHOUT WARRANTY OF ANY KIND, EXPRESS OR IMPLIED, INCLUDING BUT NOT
LIMITED TO THE WARRANTIES OF MERCHANTABILITY, FITNESS FOR A PARTICULAR PURPOSE AND NONINFRINGEMENT.
IN NO EVENT SHALL THE AUTHORS OR COPYRIGHT HOLDERS BE LIABLE FOR ANY CLAIM, DAMAGES OR OTHER LIABILITY,
WHETHER IN AN ACTION OF CONTRACT, TORT OR OTHERWISE, ARISING FROM, OUT OF OR IN CONNECTION WITH THE
SOFTWARE OR THE USE OR OTHER DEALINGS IN THE SOFTWARE.
F-30
libcap のライセンス Redistribution and use in source and binary forms of libcap, with or without modification, are permitted provided that the following conditions are met: 1. Redistributions of source code must retain any existing copyright notice, and this entire permission
notice in its entirety, including the disclaimer of warranties. 2. Redistributions in binary form must reproduce all prior and current copyright notices, this list
of conditions, and the following disclaimer in the documentation and/or other materials provided with the distribution.
3. The name of any author may not be used to endorse or promote products derived from this software
without their specific prior written permission. ALTERNATIVELY, this product may be distributed under the terms of the GNU General Public License, in which case the provisions of the GNU GPL are required INSTEAD OF the above restrictions. (This clause is necessary due to a potential conflict between the GNU GPL and the restrictions contained in a BSD-style copyright.) THIS SOFTWARE IS PROVIDED ̀ `AS IS'' AND ANY EXPRESS OR IMPLIED WARRANTIES, INCLUDING, BUT NOT LIMITED TO, THE IMPLIED WARRANTIES OF MERCHANTABILITY AND FITNESS FOR A PARTICULAR PURPOSE ARE DISCLAIMED. IN NO EVENT SHALL THE AUTHOR(S) BE LIABLE FOR ANY DIRECT, INDIRECT, INCIDENTAL, SPECIAL, EXEMPLARY, OR CONSEQUENTIAL DAMAGES (INCLUDING, BUT NOT LIMITED TO, PROCUREMENT OF SUBSTITUTE GOODS OR SERVICES; LOSS OF USE, DATA, OR PROFITS; OR BUSINESS INTERRUPTION) HOWEVER CAUSED AND ON ANY THEORY OF LIABILITY, WHETHER IN CONTRACT, STRICT LIABILITY, OR TORT (INCLUDING NEGLIGENCE OR OTHERWISE) ARISING IN ANY WAY OUT OF THE USE OF THIS SOFTWARE, EVEN IF ADVISED OF THE POSSIBILITY OF SUCH DAMAGE.
F-31
net-snmp/net-snmp-libs のライセンス
---- Part 1: CMU/UCD copyright notice: (BSD like) ----- Copyright 1989, 1991, 1992 by Carnegie Mellon University Derivative Work - 1996, 1998-2000 Copyright 1996, 1998-2000 The Regents of the University of California
All Rights Reserved Permission to use, copy, modify and distribute this software and its documentation for any purpose and without fee is hereby granted, provided that the above copyright notice appears in all copies and that both that copyright notice and this permission notice appear in supporting documentation, and that the name of CMU and The Regents of the University of California not be used in advertising or publicity pertaining to distribution of the software without specific written permission. CMU AND THE REGENTS OF THE UNIVERSITY OF CALIFORNIA DISCLAIM ALL WARRANTIES WITH REGARD TO THIS SOFTWARE, INCLUDING ALL IMPLIED WARRANTIES OF MERCHANTABILITY AND FITNESS. IN NO EVENT SHALL CMU OR THE REGENTS OF THE UNIVERSITY OF CALIFORNIA BE LIABLE FOR ANY SPECIAL, INDIRECT OR CONSEQUENTIAL DAMAGES OR ANY DAMAGES WHATSOEVER RESULTING FROM THE LOSS OF USE, DATA OR PROFITS, WHETHER IN AN ACTION OF CONTRACT, NEGLIGENCE OR OTHER TORTIOUS ACTION, ARISING OUT OF OR IN CONNECTION WITH THE USE OR PERFORMANCE OF THIS SOFTWARE. ---- Part 2: Networks Associates Technology, Inc copyright notice (BSD) ----- Copyright (c) 2001-2003, Networks Associates Technology, Inc All rights reserved. Redistribution and use in source and binary forms, with or without modification, are permitted provided that the following conditions are met: * Redistributions of source code must retain the above copyright notice, this list of conditions and
the following disclaimer. * Redistributions in binary form must reproduce the above copyright notice, this list of conditions
and the following disclaimer in the documentation and/or other materials provided with the distribution.
* Neither the name of the Networks Associates Technology, Inc nor the names of its contributors may be used to endorse or promote products derived from this software without specific prior written permission.
THIS SOFTWARE IS PROVIDED BY THE COPYRIGHT HOLDERS AND CONTRIBUTORS ̀ `AS IS'' AND ANY EXPRESS OR IMPLIED WARRANTIES, INCLUDING, BUT NOT LIMITED TO, THE IMPLIED WARRANTIES OF MERCHANTABILITY AND FITNESS FOR A PARTICULAR PURPOSE ARE DISCLAIMED. IN NO EVENT SHALL THE COPYRIGHT HOLDERS OR CONTRIBUTORS BE LIABLE FOR ANY DIRECT, INDIRECT, INCIDENTAL, SPECIAL, EXEMPLARY, OR CONSEQUENTIAL DAMAGES (INCLUDING, BUT NOT LIMITED TO, PROCUREMENT OF SUBSTITUTE GOODS OR SERVICES; LOSS OF USE, DATA, OR PROFITS; OR BUSINESS INTERRUPTION) HOWEVER CAUSED AND ON ANY THEORY OF LIABILITY; WHETHER IN CONTRACT, STRICT LIABILITY, OR TORT (INCLUDING NEGLIGENCE OR OTHERWISE) ARISING IN ANY WAY OUT OF THE USE OF THIS SOFTWARE, EVEN IF ADVISED OF THE POSSIBILITY OF SUCH DAMAGE.
F-32
---- Part 3: Cambridge Broadband Ltd. copyright notice (BSD) ----- Portions of this code are copyright (c) 2001-2003, Cambridge Broadband Ltd. All rights reserved. Redistribution and use in source and binary forms, with or without modification, are permitted provided that the following conditions are met: * Redistributions of source code must retain the above copyright notice, this list of conditions and
the following disclaimer. * Redistributions in binary form must reproduce the above copyright notice, this list of conditions
and the following disclaimer in the documentation and/or other materials provided with the distribution.
* The name of Cambridge Broadband Ltd. may not be used to endorse or promote products derived from this software without specific prior written permission.
THIS SOFTWARE IS PROVIDED BY THE COPYRIGHT HOLDER ``AS IS'' AND ANY EXPRESS OR IMPLIED WARRANTIES, INCLUDING, BUT NOT LIMITED TO, THE IMPLIED WARRANTIES OF MERCHANTABILITY AND FITNESS FOR A PARTICULAR PURPOSE ARE DISCLAIMED. IN NO EVENT SHALL THE COPYRIGHT HOLDER BE LIABLE FOR ANY DIRECT, INDIRECT, INCIDENTAL, SPECIAL, EXEMPLARY, OR CONSEQUENTIAL DAMAGES (INCLUDING, BUT NOT LIMITED TO, PROCUREMENT OF SUBSTITUTE GOODS OR SERVICES; LOSS OF USE, DATA, OR PROFITS; OR BUSINESS INTERRUPTION) HOWEVER CAUSED AND ON ANY THEORY OF LIABILITY, WHETHER IN CONTRACT, STRICT LIABILITY, OR TORT (INCLUDING NEGLIGENCE OR OTHERWISE) ARISING IN ANY WAY OUT OF THE USE OF THIS SOFTWARE, EVEN IF ADVISED OF THE POSSIBILITY OF SUCH DAMAGE. ---- Part 4: Sun Microsystems, Inc. copyright notice (BSD) ----- Copyright (c) 2003 Sun Microsystems, Inc., 4150 Network Circle, Santa Clara, California 95054, U.S.A. All rights reserved. Use is subject to license terms below. This distribution may include materials developed by third parties. Sun, Sun Microsystems, the Sun logo and Solaris are trademarks or registered trademarks of Sun Microsystems, Inc. in the U.S. and other countries. Redistribution and use in source and binary forms, with or without modification, are permitted provided that the following conditions are met: * Redistributions of source code must retain the above copyright notice, this list of conditions and
the following disclaimer. * Redistributions in binary form must reproduce the above copyright notice, this list of conditions
and the following disclaimer in the documentation and/or other materials provided with the distribution.
* Neither the name of the Sun Microsystems, Inc. nor the names of its contributors may be used to endorse or promote products derived from this software without specific prior written permission.
THIS SOFTWARE IS PROVIDED BY THE COPYRIGHT HOLDERS AND CONTRIBUTORS ̀ `AS IS'' AND ANY EXPRESS OR IMPLIED WARRANTIES, INCLUDING, BUT NOT LIMITED TO, THE IMPLIED WARRANTIES OF MERCHANTABILITY AND FITNESS FOR A PARTICULAR PURPOSE ARE DISCLAIMED. IN NO EVENT SHALL THE COPYRIGHT HOLDERS OR CONTRIBUTORS BE LIABLE FOR ANY DIRECT, INDIRECT, INCIDENTAL, SPECIAL, EXEMPLARY, OR CONSEQUENTIAL DAMAGES (INCLUDING, BUT NOT LIMITED TO, PROCUREMENT OF SUBSTITUTE GOODS OR SERVICES; LOSS OF USE, DATA, OR PROFITS; OR BUSINESS INTERRUPTION) HOWEVER CAUSED AND ON ANY THEORY OF LIABILITY, WHETHER IN CONTRACT, STRICT LIABILITY, OR TORT (INCLUDING NEGLIGENCE OR OTHERWISE) ARISING IN ANY WAY OUT OF THE USE OF THIS SOFTWARE, EVEN IF ADVISED OF THE POSSIBILITY OF SUCH DAMAGE.
F-33
---- Part 5: Sparta, Inc copyright notice (BSD) ----- Copyright (c) 2003-2004, Sparta, Inc All rights reserved. Redistribution and use in source and binary forms, with or without modification, are permitted provided that the following conditions are met: * Redistributions of source code must retain the above copyright notice, this list of conditions and
the following disclaimer. * Redistributions in binary form must reproduce the above copyright notice, this list of conditions
and the following disclaimer in the documentation and/or other materials provided with the distribution.
* Neither the name of Sparta, Inc nor the names of its contributors may be used to endorse or promote products derived from this software without specific prior written permission.
THIS SOFTWARE IS PROVIDED BY THE COPYRIGHT HOLDERS AND CONTRIBUTORS ̀ `AS IS'' AND ANY EXPRESS OR IMPLIED WARRANTIES, INCLUDING, BUT NOT LIMITED TO, THE IMPLIED WARRANTIES OF MERCHANTABILITY AND FITNESS FOR A PARTICULAR PURPOSE ARE DISCLAIMED. IN NO EVENT SHALL THE COPYRIGHT HOLDERS OR CONTRIBUTORS BE LIABLE FOR ANY DIRECT, INDIRECT, INCIDENTAL, SPECIAL, EXEMPLARY, OR CONSEQUENTIAL DAMAGES (INCLUDING, BUT NOT LIMITED TO, PROCUREMENT OF SUBSTITUTE GOODS OR SERVICES; LOSS OF USE, DATA, OR PROFITS; OR BUSINESS INTERRUPTION) HOWEVER CAUSED AND ON ANY THEORY OF LIABILITY, WHETHER IN CONTRACT, STRICT LIABILITY, OR TORT (INCLUDING NEGLIGENCE OR OTHERWISE) ARISING IN ANY WAY OUT OF THE USE OF THIS SOFTWARE, EVEN IF ADVISED OF THE POSSIBILITY OF SUCH DAMAGE.
F-34
openssh/openssh-server のライセンス 1) * Copyright (c) 1995 Tatu Ylonen <[email protected]>, Espoo, Finland * All rights reserved * * As far as I am concerned, the code I have written for this software * can be used freely for any purpose. Any derived versions of this * software must be clearly marked as such, and if the derived work is * incompatible with the protocol description in the RFC file, it must be * called by a name other than "ssh" or "Secure Shell". [Tatu continues] * However, I am not implying to give any licenses to any patents or * copyrights held by third parties, and the software includes parts that * are not under my direct control. As far as I know, all included * source code is used in accordance with the relevant license agreements * and can be used freely for any purpose (the GNU license being the most * restrictive); see below for details. [However, none of that term is relevant at this point in time. All of these restrictively licenced software components which he talks about have been removed from OpenSSH, i.e., - RSA is no longer included, found in the OpenSSL library - IDEA is no longer included, its use is deprecated - DES is now external, in the OpenSSL library - GMP is no longer used, and instead we call BN code from OpenSSL - Zlib is now external, in a library - The make-ssh-known-hosts script is no longer included - TSS has been removed - MD5 is now external, in the OpenSSL library - RC4 support has been replaced with ARC4 support from OpenSSL - Blowfish is now external, in the OpenSSL library [The licence continues] Note that any information and cryptographic algorithms used in this software are publicly available on the Internet and at any major bookstore, scientific library, and patent office worldwide. More information can be found e.g. at "http://www.cs.hut.fi/crypto". The legal status of this program is some combination of all these permissions and restrictions. Use only at your own responsibility. You will be responsible for any legal consequences yourself; I am not making any claims whether possessing or using this is legal or not in your country, and I am not taking any responsibility on your behalf.
F-35
NO WARRANTY BECAUSE THE PROGRAM IS LICENSED FREE OF CHARGE, THERE IS NO WARRANTY FOR THE PROGRAM, TO THE EXTENT PERMITTED BY APPLICABLE LAW. EXCEPT WHEN OTHERWISE STATED IN WRITING THE COPYRIGHT HOLDERS AND/OR OTHER PARTIES PROVIDE THE PROGRAM "AS IS" WITHOUT WARRANTY OF ANY KIND, EITHER EXPRESSED OR IMPLIED, INCLUDING, BUT NOT LIMITED TO, THE IMPLIED WARRANTIES OF MERCHANTABILITY AND FITNESS FOR A PARTICULAR PURPOSE. THE ENTIRE RISK AS TO THE QUALITY AND PERFORMANCE OF THE PROGRAM IS WITH YOU. SHOULD THE PROGRAM PROVE DEFECTIVE, YOU ASSUME THE COST OF ALL NECESSARY SERVICING, REPAIR OR CORRECTION. IN NO EVENT UNLESS REQUIRED BY APPLICABLE LAW OR AGREED TO IN WRITING WILL ANY COPYRIGHT HOLDER, OR ANY OTHER PARTY WHO MAY MODIFY AND/OR REDISTRIBUTE THE PROGRAM AS PERMITTED ABOVE, BE LIABLE TO YOU FOR DAMAGES, INCLUDING ANY GENERAL, SPECIAL, INCIDENTAL OR CONSEQUENTIAL DAMAGES ARISING OUT OF THE USE OR INABILITY TO USE THE PROGRAM (INCLUDING BUT NOT LIMITED TO LOSS OF DATA OR DATA BEING RENDERED INACCURATE OR LOSSES SUSTAINED BY YOU OR THIRD PARTIES OR A FAILURE OF THE PROGRAM TO OPERATE WITH ANY OTHER PROGRAMS), EVEN IF SUCH HOLDER OR OTHER PARTY HAS BEEN ADVISED OF THE POSSIBILITY OF SUCH DAMAGES. 2)
The 32-bit CRC compensation attack detector in deattack.c was contributed by CORE SDI S.A. under a BSD-style license.
* Cryptographic attack detector for ssh - source code * * Copyright (c) 1998 CORE SDI S.A., Buenos Aires, Argentina. * * All rights reserved. Redistribution and use in source and binary * forms, with or without modification, are permitted provided that * this copyright notice is retained. * * THIS SOFTWARE IS PROVIDED ``AS IS'' AND ANY EXPRESS OR IMPLIED * WARRANTIES ARE DISCLAIMED. IN NO EVENT SHALL CORE SDI S.A. BE * LIABLE FOR ANY DIRECT, INDIRECT, INCIDENTAL, SPECIAL, EXEMPLARY OR * CONSEQUENTIAL DAMAGES RESULTING FROM THE USE OR MISUSE OF THIS * SOFTWARE. * * Ariel Futoransky <[email protected]> * <http://www.core-sdi.com> 3)
ssh-keygen was contributed by David Mazieres under a BSD-style license. * Copyright 1995, 1996 by David Mazieres <[email protected]>. * * Modification and redistribution in source and binary forms is * permitted provided that due credit is given to the author and the * OpenBSD project by leaving this copyright notice intact.
F-36
4)
The Rijndael implementation by Vincent Rijmen, Antoon Bosselaers and Paulo Barreto is in the public domain and distributed with the following license:
* @version 3.0 (December 2000) * * Optimised ANSI C code for the Rijndael cipher (now AES) * * @author Vincent Rijmen <[email protected]> * @author Antoon Bosselaers <[email protected]> * @author Paulo Barreto <[email protected]> * * This code is hereby placed in the public domain. * * THIS SOFTWARE IS PROVIDED BY THE AUTHORS ''AS IS'' AND ANY EXPRESS * OR IMPLIED WARRANTIES, INCLUDING, BUT NOT LIMITED TO, THE IMPLIED * WARRANTIES OF MERCHANTABILITY AND FITNESS FOR A PARTICULAR PURPOSE * ARE DISCLAIMED. IN NO EVENT SHALL THE AUTHORS OR CONTRIBUTORS BE * LIABLE FOR ANY DIRECT, INDIRECT, INCIDENTAL, SPECIAL, EXEMPLARY, OR * CONSEQUENTIAL DAMAGES (INCLUDING, BUT NOT LIMITED TO, PROCUREMENT * OF SUBSTITUTE GOODS OR SERVICES; LOSS OF USE, DATA, OR PROFITS; OR * BUSINESS INTERRUPTION) HOWEVER CAUSED AND ON ANY THEORY OF * LIABILITY, WHETHER IN CONTRACT, STRICT LIABILITY, OR TORT (INCLUDING * NEGLIGENCE OR OTHERWISE) ARISING IN ANY WAY OUT OF THE USE OF THIS * SOFTWARE, EVEN IF ADVISED OF THE POSSIBILITY OF SUCH DAMAGE. 5)
One component of the ssh source code is under a 3-clause BSD license, held by the University of California, since we pulled these parts from original Berkeley code.
* Copyright (c) 1983, 1990, 1992, 1993, 1995 * The Regents of the University of California. All rights reserved. * * Redistribution and use in source and binary forms, with or without * modification, are permitted provided that the following conditions * are met: * 1.Redistributions of source code must retain the above copyright * notice, this list of conditions and the following disclaimer. * 2.Redistributions in binary form must reproduce the above copyright * notice, this list of conditions and the following disclaimer in the * documentation and/or other materials provided with the distribution. * 3.Neither the name of the University nor the names of its contributors * may be used to endorse or promote products derived from this software * without specific prior written permission. * * THIS SOFTWARE IS PROVIDED BY THE REGENTS AND CONTRIBUTORS ``AS IS'' AND * ANY EXPRESS OR IMPLIED WARRANTIES, INCLUDING, BUT NOT LIMITED TO, THE * IMPLIED WARRANTIES OF MERCHANTABILITY AND FITNESS FOR A PARTICULAR PURPOSE * ARE DISCLAIMED. IN NO EVENT SHALL THE REGENTS OR CONTRIBUTORS BE LIABLE * FOR ANY DIRECT, INDIRECT, INCIDENTAL, SPECIAL, EXEMPLARY, OR CONSEQUENTIAL * DAMAGES (INCLUDING, BUT NOT LIMITED TO, PROCUREMENT OF SUBSTITUTE GOODS * OR SERVICES; LOSS OF USE, DATA, OR PROFITS; OR BUSINESS INTERRUPTION) * HOWEVER CAUSED AND ON ANY THEORY OF LIABILITY, WHETHER IN CONTRACT, STRICT * LIABILITY, OR TORT (INCLUDING NEGLIGENCE OR OTHERWISE) ARISING IN ANY WAY * OUT OF THE USE OF THIS SOFTWARE, EVEN IF ADVISED OF THE POSSIBILITY OF * SUCH DAMAGE.
F-37
6)
Remaining components of the software are provided under a standard 2-term BSD licence with the following names as copyright holders:
Markus Friedl Theo de Raadt Niels Provos Dug Song Aaron Campbell Damien Miller Kevin Steves Daniel Kouril Wesley Griffin Per Allansson Nils Nordman Simon Wilkinson 7) Portable OpenSSH additionally includes code from the following copyright holders, also under the 2-term BSD license: Ben Lindstrom Tim Rice Andre Lucas Chris Adams Corinna Vinschen Cray Inc. Denis Parker Gert Doering Jakob Schlyter Jason Downs Juha Yrj Michael Stone Networks Associates Technology, Inc. Solar Designer Todd C. Miller Wayne Schroeder William Jones Darren Tucker * Redistribution and use in source and binary forms, with or without * modification, are permitted provided that the following conditions * are met: * 1.Redistributions of source code must retain the above copyright * notice, this list of conditions and the following disclaimer. * 2.Redistributions in binary form must reproduce the above copyright * notice, this list of conditions and the following disclaimer in the * documentation and/or other materials provided with the distribution. * * THIS SOFTWARE IS PROVIDED BY THE AUTHOR ``AS IS'' AND ANY EXPRESS OR * IMPLIED WARRANTIES, INCLUDING, BUT NOT LIMITED TO, THE IMPLIED WARRANTIES * OF MERCHANTABILITY AND FITNESS FOR A PARTICULAR PURPOSE ARE DISCLAIMED. * IN NO EVENT SHALL THE AUTHOR BE LIABLE FOR ANY DIRECT, INDIRECT, * INCIDENTAL, SPECIAL, EXEMPLARY, OR CONSEQUENTIAL DAMAGES (INCLUDING, BUT * NOT LIMITED TO, PROCUREMENT OF SUBSTITUTE GOODS OR SERVICES; LOSS OF USE, * DATA, OR PROFITS; OR BUSINESS INTERRUPTION) HOWEVER CAUSED AND ON ANY * THEORY OF LIABILITY, WHETHER IN CONTRACT, STRICT LIABILITY, OR TORT * (INCLUDING NEGLIGENCE OR OTHERWISE) ARISING IN ANY WAY OUT OF THE USE OF * THIS SOFTWARE, EVEN IF ADVISED OF THE POSSIBILITY OF SUCH DAMAGE.
F-38
8) Portable OpenSSH contains the following additional licenses: a) md5crypt.c, md5crypt.h * "THE BEER-WARE LICENSE" (Revision 42): * <[email protected]> wrote this file. As long as you retain this * notice you can do whatever you want with this stuff. If we meet * some day, and you think this stuff is worth it, you can buy me a * beer in return. Poul-Henning Kamp b) snprintf replacement * Copyright Patrick Powell 1995 * This code is based on code written by Patrick Powell * ([email protected]) It may be used for any purpose as long as this * notice remains intact on all source code distributions c) Compatibility code (openbsd-compat) Apart from the previously mentioned licenses, various pieces of code in the openbsd-compat/ subdirectory are licensed as follows: Some code is licensed under a 3-term BSD license, to the following copyright holders: Todd C. Miller Theo de Raadt Damien Miller Eric P. Allman The Regents of the University of California * Redistribution and use in source and binary forms, with or without * modification, are permitted provided that the following conditions * are met: * 1. Redistributions of source code must retain the above copyright * notice, this list of conditions and the following disclaimer. * 2. Redistributions in binary form must reproduce the above copyright * notice, this list of conditions and the following disclaimer in the * documentation and/or other materials provided with the distribution. * 3. Neither the name of the University nor the names of its contributors * may be used to endorse or promote products derived from this software * without specific prior written permission. * * THIS SOFTWARE IS PROVIDED BY THE REGENTS AND CONTRIBUTORS ``AS IS'' AND * ANY EXPRESS OR IMPLIED WARRANTIES, INCLUDING, BUT NOT LIMITED TO, THE * IMPLIED WARRANTIES OF MERCHANTABILITY AND FITNESS FOR A PARTICULAR PURPOSE * ARE DISCLAIMED. IN NO EVENT SHALL THE REGENTS OR CONTRIBUTORS BE LIABLE * FOR ANY DIRECT, INDIRECT, INCIDENTAL, SPECIAL, EXEMPLARY, OR CONSEQUENTIAL * DAMAGES (INCLUDING, BUT NOT LIMITED TO, PROCUREMENT OF SUBSTITUTE GOODS * OR SERVICES; LOSS OF USE, DATA, OR PROFITS; OR BUSINESS INTERRUPTION) * HOWEVER CAUSED AND ON ANY THEORY OF LIABILITY, WHETHER IN CONTRACT, STRICT * LIABILITY, OR TORT (INCLUDING NEGLIGENCE OR OTHERWISE) ARISING IN ANY WAY * OUT OF THE USE OF THIS SOFTWARE, EVEN IF ADVISED OF THE POSSIBILITY OF * SUCH DAMAGE.
F-39
Some code is licensed under an ISC-style license, to the following copyright holders: Internet Software Consortium. Todd C. Miller * Permission to use, copy, modify, and distribute this software for any * purpose with or without fee is hereby granted, provided that the above * copyright notice and this permission notice appear in all copies. * * THE SOFTWARE IS PROVIDED "AS IS" AND TODD C. MILLER DISCLAIMS ALL * WARRANTIES WITH REGARD TO THIS SOFTWARE INCLUDING ALL IMPLIED WARRANTIES * OF MERCHANTABILITY AND FITNESS. IN NO EVENT SHALL TODD C. MILLER BE LIABLE * FOR ANY SPECIAL, DIRECT, INDIRECT, OR CONSEQUENTIAL DAMAGES OR ANY DAMAGES * WHATSOEVER RESULTING FROM LOSS OF USE, DATA OR PROFITS, WHETHER IN AN ACTION * OF CONTRACT, NEGLIGENCE OR OTHER TORTIOUS ACTION, ARISING OUT OF OR IN * CONNECTION WITH THE USE OR PERFORMANCE OF THIS SOFTWARE. Some code is licensed under a MIT-style license to the following copyright holders: Free Software Foundation, Inc. * Permission is hereby granted, free of charge, to any person obtaining a * * copy of this software and associated documentation files (the * * "Software"), to deal in the Software without restriction, including * * without limitation the rights to use, copy, modify, merge, publish, * * distribute, distribute with modifications, sublicense, and/or sell * * copies of the Software, and to permit persons to whom the Software is * * furnished to do so, subject to the following conditions: * * * * The above copyright notice and this permission notice shall be included * * in all copies or substantial portions of the Software. * * * * THE SOFTWARE IS PROVIDED "AS IS", WITHOUT WARRANTY OF ANY KIND, EXPRESS * * OR IMPLIED, INCLUDING BUT NOT LIMITED TO THE WARRANTIES OF * * MERCHANTABILITY, FITNESS FOR A PARTICULAR PURPOSE AND NONINFRINGEMENT. * * IN NO EVENT SHALL THE ABOVE COPYRIGHT HOLDERS BE LIABLE FOR ANY CLAIM, * * DAMAGES OR OTHER LIABILITY, WHETHER IN AN ACTION OF CONTRACT, TORT OR * * OTHERWISE, ARISING FROM, OUT OF OR IN CONNECTION WITH THE SOFTWARE OR * * THE USE OR OTHER DEALINGS IN THE SOFTWARE. * * * * Except as contained in this notice, the name(s) of the above copyright * * holders shall not be used in advertising or otherwise to promote the * * sale, use or other dealings in this Software without prior written * * authorization. *
F-40
tcl のライセンス
This software is copyrighted by the Regents of the University of California, Sun Microsystems, Inc., Scriptics Corporation, ActiveState Corporation and other parties. The following terms apply to all files associated with the software unless explicitly disclaimed in individual files. The authors hereby grant permission to use, copy, modify, distribute, and license this software and its documentation for any purpose, provided that existing copyright notices are retained in all copies and that this notice is included verbatim in any distributions. No written agreement, license, or royalty fee is required for any of the authorized uses. Modifications to this software may be copyrighted by their authors and need not follow the licensing terms described here, provided that the new terms are clearly indicated on the first page of each file where they apply. IN NO EVENT SHALL THE AUTHORS OR DISTRIBUTORS BE LIABLE TO ANY PARTY FOR DIRECT, INDIRECT, SPECIAL, INCIDENTAL, OR CONSEQUENTIAL DAMAGES ARISING OUT OF THE USE OF THIS SOFTWARE, ITS DOCUMENTATION, OR ANY DERIVATIVES THEREOF, EVEN IF THE AUTHORS HAVE BEEN ADVISED OF THE POSSIBILITY OF SUCH DAMAGE. THE AUTHORS AND DISTRIBUTORS SPECIFICALLY DISCLAIM ANY WARRANTIES, INCLUDING, BUT NOT LIMITED TO, THE IMPLIED WARRANTIES OF MERCHANTABILITY, FITNESS FOR A PARTICULAR PURPOSE, AND NON-INFRINGEMENT. THIS SOFTWARE IS PROVIDED ON AN "AS IS" BASIS, AND THE AUTHORS AND DISTRIBUTORS HAVE NO OBLIGATION TO PROVIDE MAINTENANCE, SUPPORT, UPDATES, ENHANCEMENTS, OR MODIFICATIONS. GOVERNMENT USE: If you are acquiring this software on behalf of the U.S. government, the Government shall have only "Restricted Rights" in the software and related documentation as defined in the Federal Acquisition Regulations (FARs) in Clause 52.227.19 (c) (2). If you are acquiring the software on behalf of the Department of Defense, the software shall be classified as "Commercial Computer Software" and the Government shall have only "Restricted Rights" as defined in Clause 252.227-7013 (c) (1) of DFARs. Notwithstanding the foregoing, the authors grant the U.S. Government and others acting in its behalf permission to use and distribute the software in accordance with the terms specified in this license.
tclx のライセンス
Copyright 1992-1999 Karl Lehenbauer and Mark Diekhans. Permission to use, copy, modify, and distribute this software and its documentation for any purpose and without fee is hereby granted, provided that the above copyright notice appear in all copies. Karl Lehenbauer and Mark Diekhans make no representations about the suitability of this software for any purpose. It is provided "as is" without express or implied warranty.
tcp_wrappers のライセンス Copyright 1995 by Wietse Venema. All rights reserved. Some individual files may be covered by other copyrights. This material was originally written and compiled by Wietse Venema at Eindhoven University of Technology, The Netherlands, in 1990, 1991, 1992, 1993, 1994 and 1995. Redistribution and use in source and binary forms are permitted provided that this entire copyright notice is duplicated in all such copies. This software is provided "as is" and without any expressed or implied warranties, including, without limitation, the implied warranties of merchantibility and fitness for any particular purpose.
F-41
u-boot のライセンス
The eCos license version 2.0
This file is part of eCos, the Embedded Configurable Operating System.
Copyright (C) 1998, 1999, 2000, 2001, 2002 Red Hat, Inc.
eCos is free software; you can redistribute it and/or modify it under the terms of the GNU
General Public License as published by the Free Software Foundation; either version 2 or (at
your option) any later version.
eCos is distributed in the hope that it will be useful, but WITHOUT ANY WARRANTY; without
even the implied warranty of MERCHANTABILITY or FITNESS FOR A PARTICULAR PURPOSE. See the
GNU General Public License for more details.
You should have received a copy of the GNU General Public License along with eCos; if not,
write to the Free Software Foundation, Inc., 51 Franklin St, Fifth Floor, Boston, MA 02110-1301
USA.
As a special exception, if other files instantiate templates or use macros or inline functions
from this file, or you compile this file and link it with other works to produce a work based
on this file, this file does not by itself cause the resulting work to be covered by the GNU
General Public License. However the source code for this file must still be made available
in accordance with section (3) of the GNU General Public License.
This exception does not invalidate any other reasons why a work based on this file might be
covered by the GNU General Public License.
Alternative licenses for eCos may be arranged by contacting Red Hat, Inc. at
http://sources.redhat.com/ecos/ecos-license/
-------------------------------------------
####ECOSGPLCOPYRIGHTEND####
References
1. http://www.gnu.org/licenses/license-list.html
This source code has been made available to you by IBM on an AS-IS basis. Anyone
receiving this source is licensed under IBM copyrights to use it in any way he or she deems
fit, including copying it, modifying it, compiling it, and redistributing it either with or
without modifications. No license under IBM patents or patent applications is to be implied
by the copyright license.
Any user of this software should understand that IBM cannot provide technical support for
this software and will not be responsible for any consequences resulting from the use of this
software.
Any person who transfers this source code or any derivative work must include the IBM copyright
notice, this paragraph, and the preceding two paragraphs in the transferred software.
COPYRIGHT I B M CORPORATION 1995
LICENSED MATERIAL - PROGRAM PROPERTY OF I B M
F-42
zlib のライセンス This software is provided 'as-is', without any express or implied warranty. In no event will the authors
be held liable for any damages arising from the use of this software.
Permission is granted to anyone to use this software for any purpose, including commercial applications,
and to alter it and redistribute it freely, subject to the following restrictions:
1. The origin of this software must not be misrepresented; you must not claim that you wrote the
original software. If you use this software in a product, an acknowledgment in the product
documentation would be appreciated but is not required.
2. Altered source versions must be plainly marked as such, and must not be misrepresented as being
the original software.
3. This notice may not be removed or altered from any source distribution.

〒261-8507 千葉県千葉市美浜区中瀬 1-8 tel 043-273-3184 http://www.seiko-sol.co.jp