oracle data integrator r12.2.1.1 studio及びrepositoryセットアップガイド
Post on 14-Apr-2017
172 views
TRANSCRIPT
Copyright © 2016, Oracle and/or its affiliates. All rights reserved. |
Oracle Data Integrator 12c Studioインストール及び Repository作成 for ODI 12.2.1.1
Ver 1.0
2016年10月 日本オラクル株式会社 クラウド&テクノロジー事業統括
Copyright © 2016, Oracle and/or its affiliates. All rights reserved. |
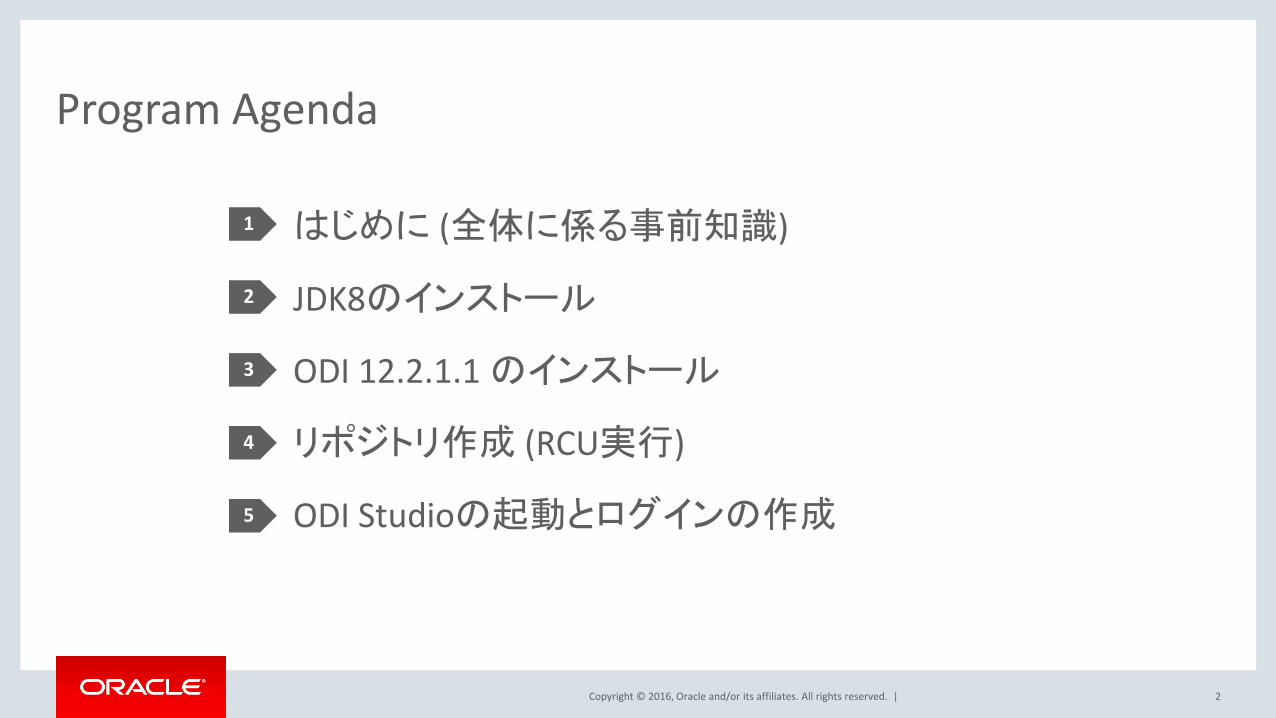
Program Agenda
2
1
2
3
4
5
はじめに (全体に係る事前知識)
JDK8のインストール
ODI 12.2.1.1 のインストール
リポジトリ作成 (RCU実行)
ODI Studioの起動とログインの作成

Copyright © 2016, Oracle and/or its affiliates. All rights reserved. |
1. はじめに
3
Copyright © 2016, Oracle and/or its affiliates. All rights reserved. |
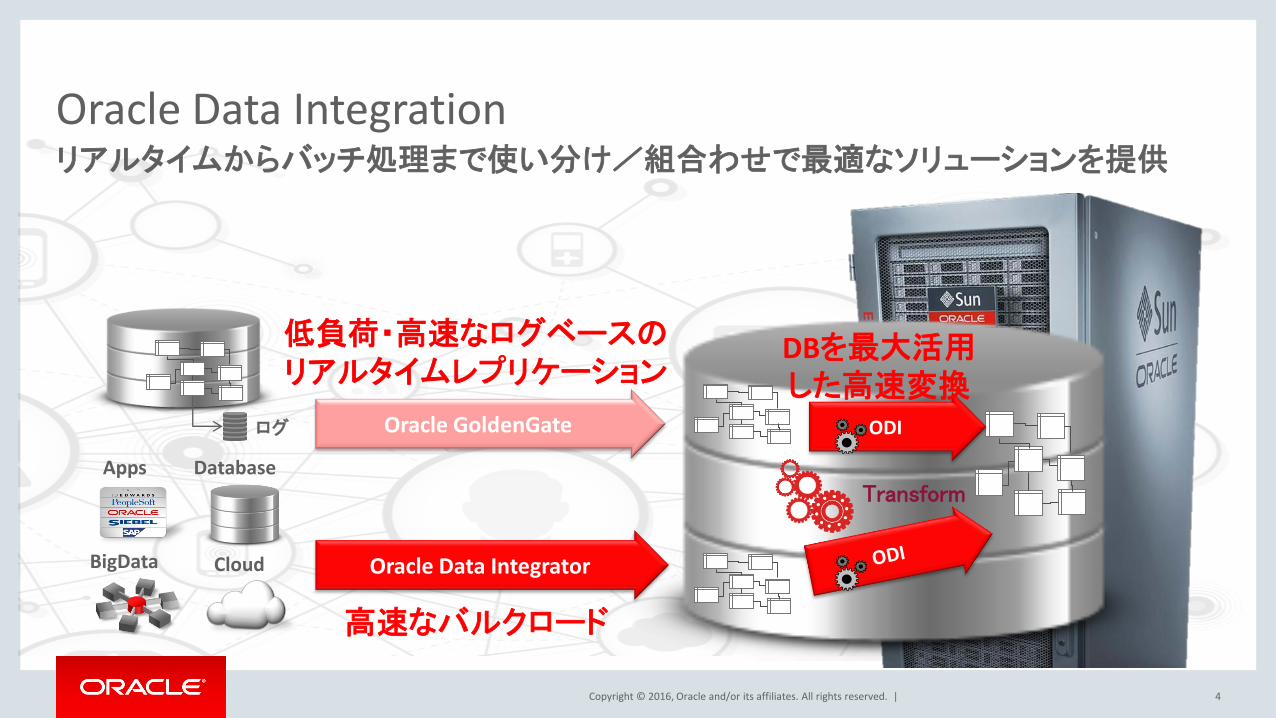
Oracle Data Integration リアルタイムからバッチ処理まで使い分け/組合わせで最適なソリューションを提供
4
Oracle GoldenGate
Oracle Data Integrator
ODI
Transform
高速なバルクロード
低負荷・高速なログベースの リアルタイムレプリケーション
Apps Database
BigData Cloud
ログ
DBを最大活用 した高速変換

Copyright © 2016, Oracle and/or its affiliates. All rights reserved. |
Oracle Data Integration リアルタイムからバッチ処理まで使い分け/組合わせで最適なソリューションを提供
5
•低負荷、高速、高柔軟性、高信頼性を特徴とする ログベースのDatabaseレプリケーションツール
•幅広い用途に利用可能 (リアルタイム参照系DB構築、データ切出し、負荷分散、データ保護、移行/バージョンアップ、システム統合)
•Databaseをエンジンとする高速ETLツール (DBアプライアンスに最適なソリューション)
•高速なE-LTアーキテクチャと、異機種DBに最適化された開発テンプレートを特徴とし、 大規模データウェアハウス向けデータ連携に最適
+
連携元
Database
GoldenGate
Database
GoldenGate
データ複製
連携先
更新情報の 高速転送
SQL ログ
Load Extract Transform E L T Apps Database
BigData Cloud
Oracle GoldenGate (リアルタイム) Oracle Data Integrator (バッチ)

Copyright © 2016, Oracle and/or its affiliates. All rights reserved. |
Oracle Data Integrator のE-LTアーキテクチャ DBMSをエンジンとし「高速」「シンプル」「高い生産性」を実現するE-LT
6
Staging Area (データ変換領域) ODI Agent
Flat File/XML
Database
リポジトリ スキーマ
ODI Studio (開発ツール)
メタデータ 管理ツール
ODI Agent
ジョブ管理ツール連携 (sh/bat, Webサービス)
Excel
DBs DBs
Target Tablel JDBCやDBLINK等を内部利用
BigData
Cloud
Apps ODI Agent
– ETL処理自体は主にDB内で行い、Agentは 指揮者的役割。リスナー(外部(OSコマンドや Webサービス)からシナリオを起動する際に リクエストを受け付ける)兼スケジューラー
– 軽量なStandaloneのJavaプロセス。 Weblogic Serverへデプロイする構成も可能
ODIリポジトリスキーマ – 接続先システム情報、開発資産、ログ等を格納
Staging Area – データ変換領域(ODIが自動生成) – デフォルトではターゲットに配置
Copyright © 2016, Oracle and/or its affiliates. All rights reserved. |
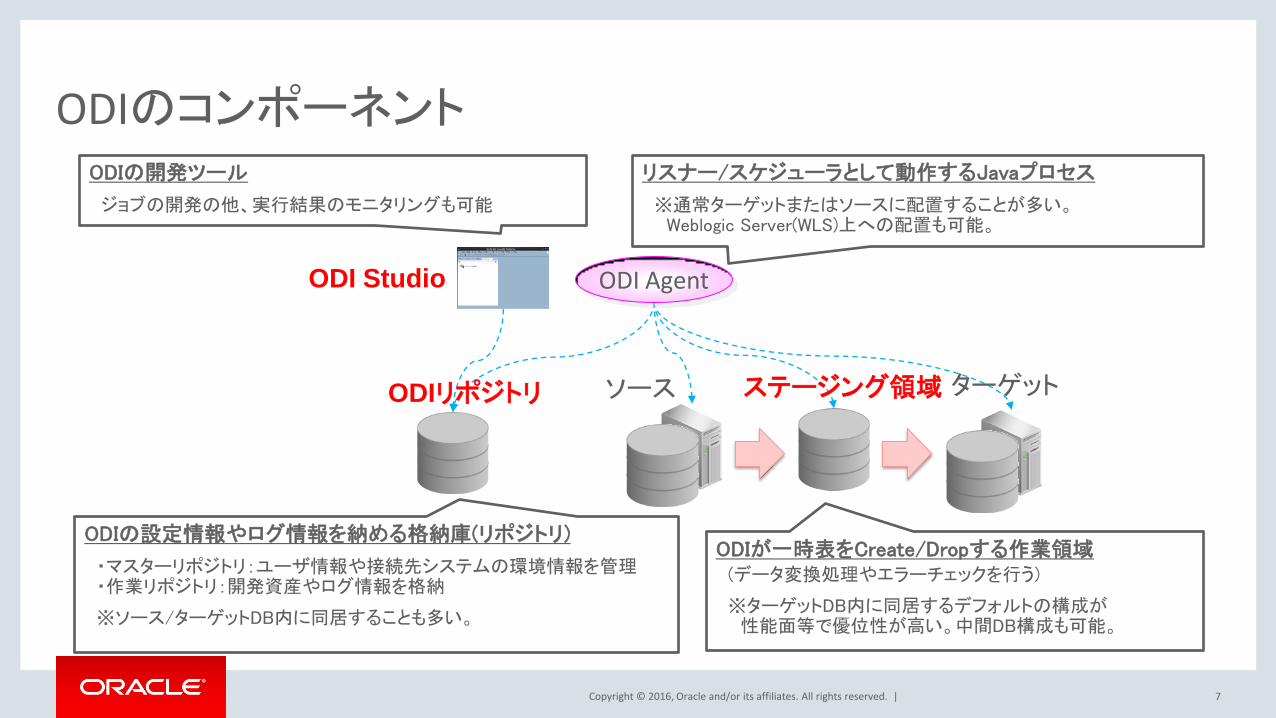
ODIのコンポーネント
7
ODI Studio
ODIの開発ツール
ジョブの開発の他、実行結果のモニタリングも可能
ODIの設定情報やログ情報を納める格納庫(リポジトリ)
・マスターリポジトリ:ユーザ情報や接続先システムの環境情報を管理 ・作業リポジトリ:開発資産やログ情報を格納
※ソース/ターゲットDB内に同居することも多い。
ODIが一時表をCreate/Dropする作業領域 (データ変換処理やエラーチェックを行う)
※ターゲットDB内に同居するデフォルトの構成が 性能面等で優位性が高い。中間DB構成も可能。
ODI Agent
ソース ODIリポジトリ ターゲット ステージング領域
リスナー/スケジューラとして動作するJavaプロセス
※通常ターゲットまたはソースに配置することが多い。 Weblogic Server(WLS)上への配置も可能。
Copyright © 2016, Oracle and/or its affiliates. All rights reserved. |
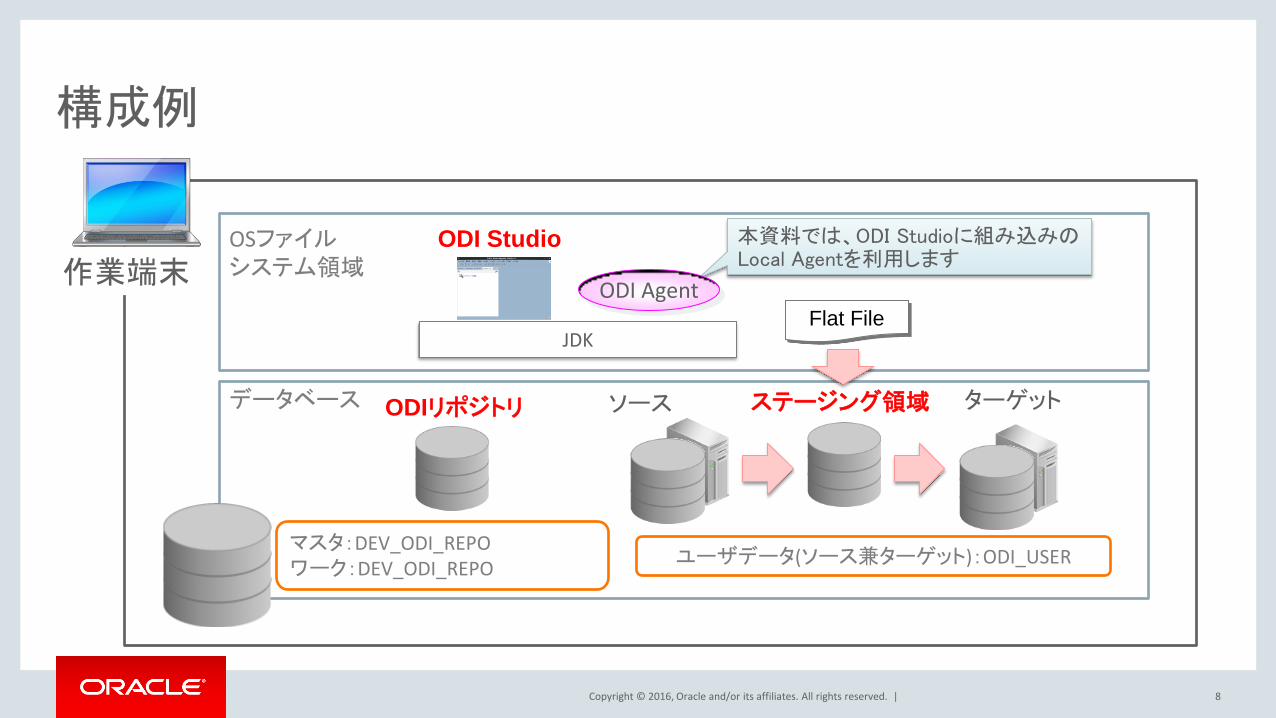
構成例
8
Flat File
マスタ:DEV_ODI_REPO ワーク:DEV_ODI_REPO
ユーザデータ(ソース兼ターゲット):ODI_USER
JDK
本資料では、ODI Studioに組み込みのLocal Agentを利用します
ソース ODIリポジトリ ターゲット
ODI Studio
ステージング領域
ODI Agent
OSファイル システム領域
データベース
作業端末
Copyright © 2016, Oracle and/or its affiliates. All rights reserved. |
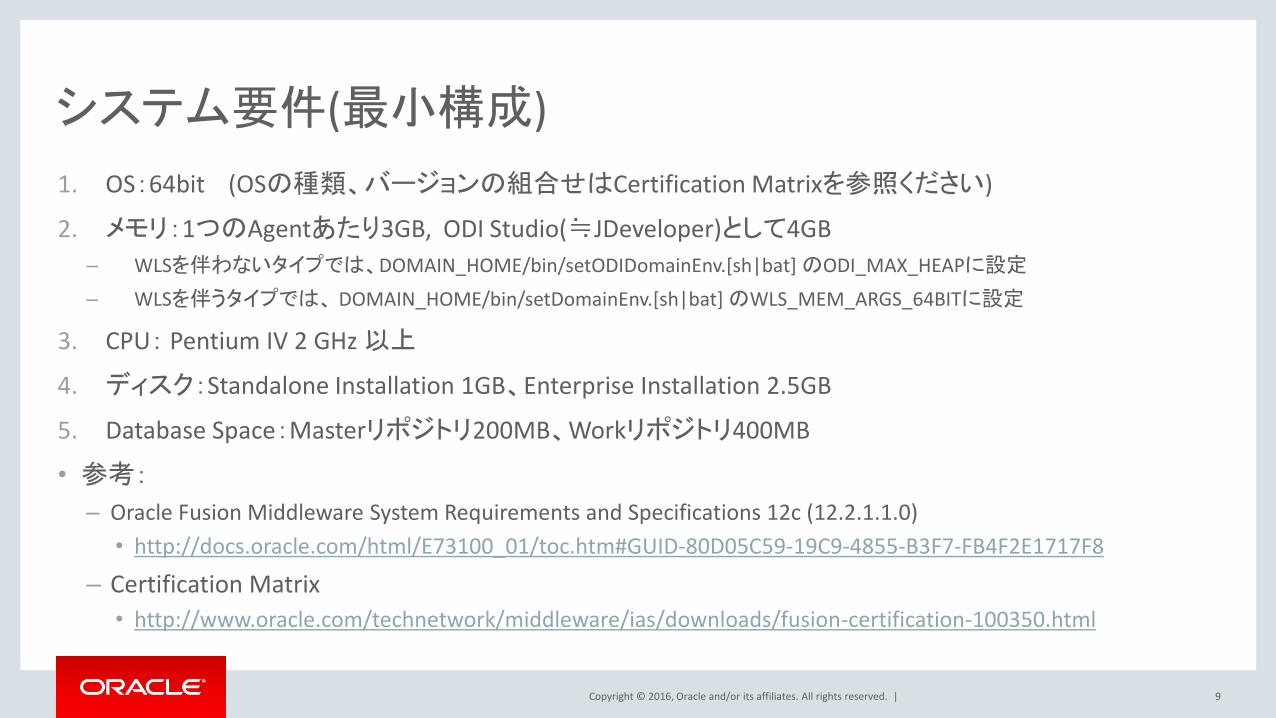
システム要件(最小構成)
1. OS:64bit (OSの種類、バージョンの組合せはCertification Matrixを参照ください)
2. メモリ:1つのAgentあたり3GB, ODI Studio(≒JDeveloper)として4GB
– WLSを伴わないタイプでは、DOMAIN_HOME/bin/setODIDomainEnv.[sh|bat] のODI_MAX_HEAPに設定
– WLSを伴うタイプでは、 DOMAIN_HOME/bin/setDomainEnv.[sh|bat] のWLS_MEM_ARGS_64BITに設定
3. CPU: Pentium IV 2 GHz 以上
4. ディスク:Standalone Installation 1GB、Enterprise Installation 2.5GB
5. Database Space:Masterリポジトリ200MB、Workリポジトリ400MB
• 参考:
– Oracle Fusion Middleware System Requirements and Specifications 12c (12.2.1.1.0)
• http://docs.oracle.com/html/E73100_01/toc.htm#GUID-80D05C59-19C9-4855-B3F7-FB4F2E1717F8
– Certification Matrix
• http://www.oracle.com/technetwork/middleware/ias/downloads/fusion-certification-100350.html
9
Copyright © 2016, Oracle and/or its affiliates. All rights reserved. |
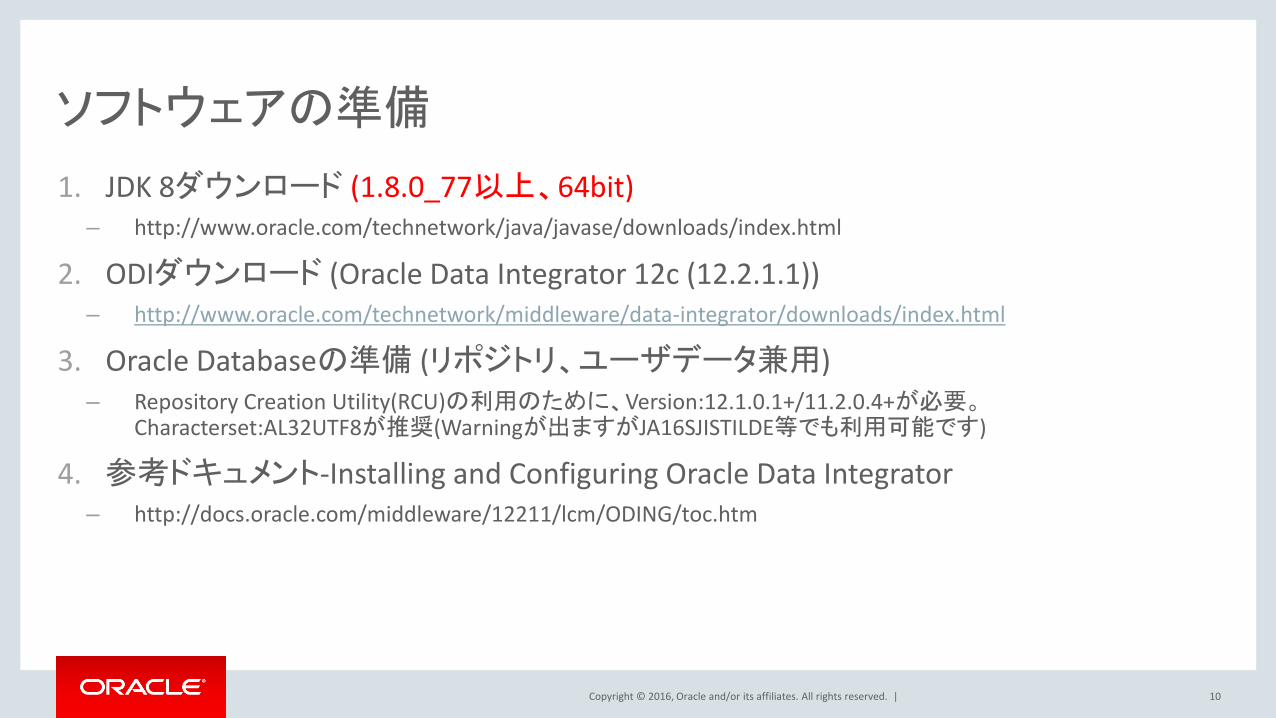
ソフトウェアの準備
1. JDK 8ダウンロード (1.8.0_77以上、64bit) – http://www.oracle.com/technetwork/java/javase/downloads/index.html
2. ODIダウンロード (Oracle Data Integrator 12c (12.2.1.1)) – http://www.oracle.com/technetwork/middleware/data-integrator/downloads/index.html
3. Oracle Databaseの準備 (リポジトリ、ユーザデータ兼用) – Repository Creation Utility(RCU)の利用のために、Version:12.1.0.1+/11.2.0.4+が必要。
Characterset:AL32UTF8が推奨(Warningが出ますがJA16SJISTILDE等でも利用可能です)
4. 参考ドキュメント‐Installing and Configuring Oracle Data Integrator – http://docs.oracle.com/middleware/12211/lcm/ODING/toc.htm
10

Copyright © 2016, Oracle and/or its affiliates. All rights reserved. |
2. JDK8のインストール
11
Copyright © 2016, Oracle and/or its affiliates. All rights reserved. |
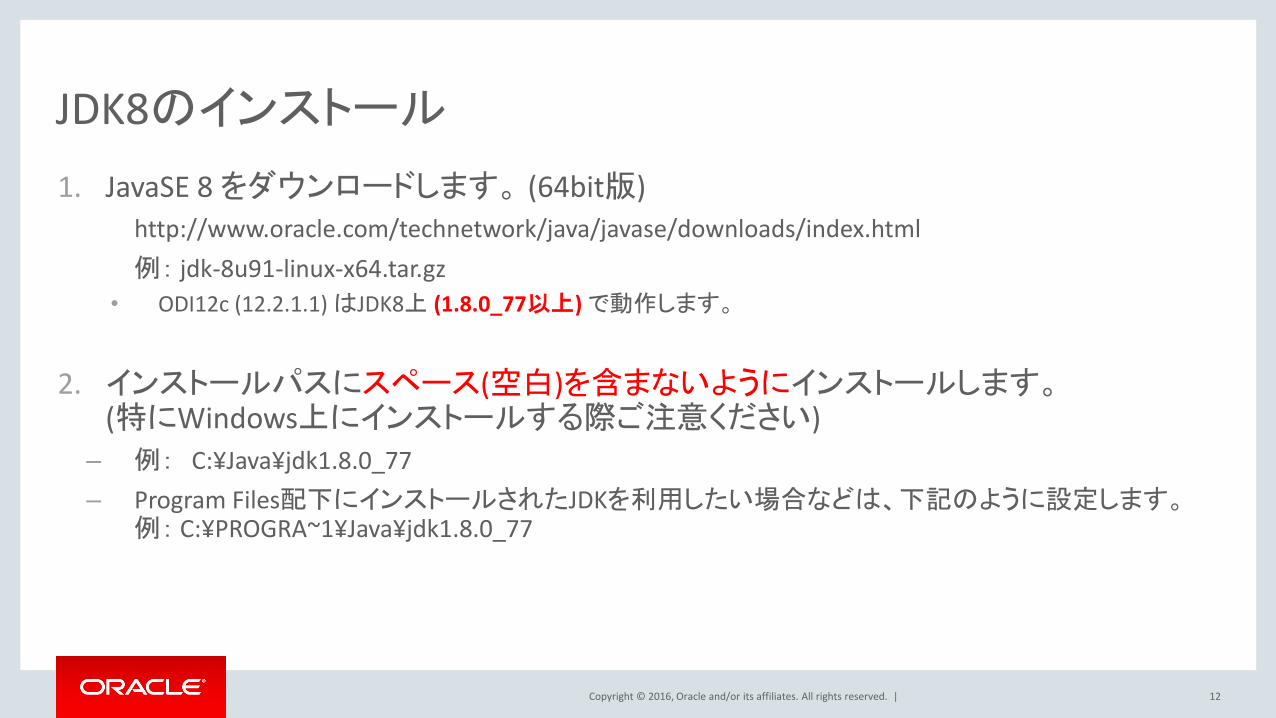
JDK8のインストール
1. JavaSE 8 をダウンロードします。 (64bit版)
http://www.oracle.com/technetwork/java/javase/downloads/index.html
例: jdk-8u91-linux-x64.tar.gz
• ODI12c (12.2.1.1) はJDK8上 (1.8.0_77以上) で動作します。
2. インストールパスにスペース(空白)を含まないようにインストールします。 (特にWindows上にインストールする際ご注意ください)
– 例: C:¥Java¥jdk1.8.0_77
– Program Files配下にインストールされたJDKを利用したい場合などは、下記のように設定します。 例: C:¥PROGRA~1¥Java¥jdk1.8.0_77
12
Copyright © 2016, Oracle and/or its affiliates. All rights reserved. |
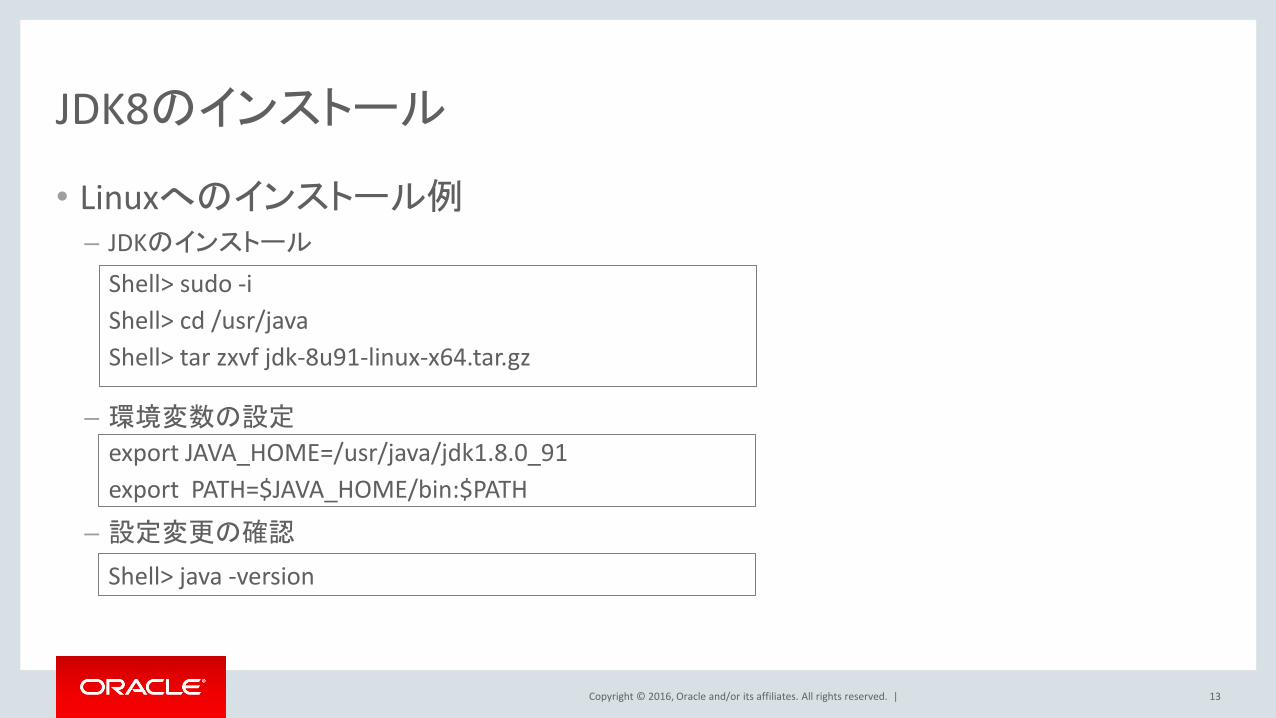
JDK8のインストール
• Linuxへのインストール例 – JDKのインストール
– 環境変数の設定
– 設定変更の確認
13
Shell> sudo -i
Shell> cd /usr/java
Shell> tar zxvf jdk-8u91-linux-x64.tar.gz
export JAVA_HOME=/usr/java/jdk1.8.0_91
export PATH=$JAVA_HOME/bin:$PATH
Shell> java -version
Copyright © 2016, Oracle and/or its affiliates. All rights reserved. |
2. ODI 12.2.1.1 のインストール
14

Copyright © 2016, Oracle and/or its affiliates. All rights reserved. |
ODIインストール・ステップ 1/9 メディアをダウンロードし、インストーラを起動します
• Oracle Software Delivery CouldよりメディアをDownload
– http://edelivery.oracle.com/
• メディア(zip)を展開し、インストーラ(fmw_12.2.1.1.0_odi.jar)を起動
• 「次へ」ボタンをクリックする。
15
Shell>java -jar fmw_12.2.1.1.0_odi.jar
Copyright © 2016, Oracle and/or its affiliates. All rights reserved. |
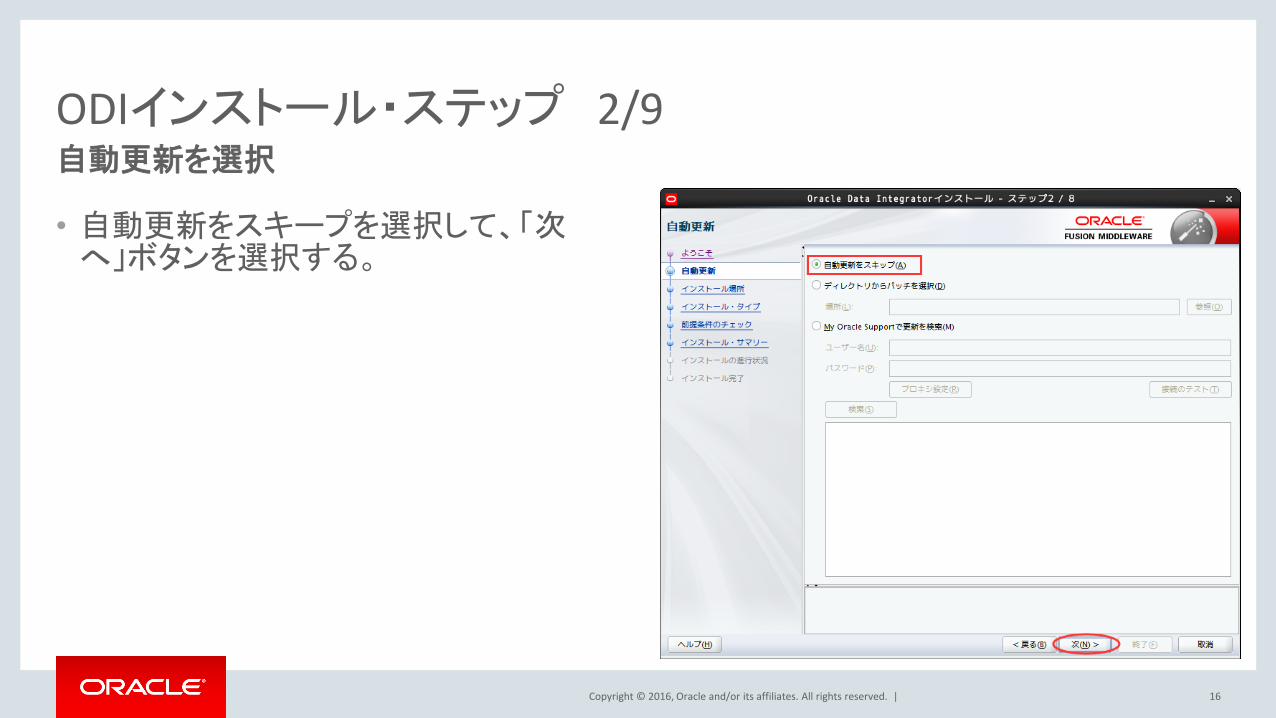
ODIインストール・ステップ 2/9 自動更新を選択
16
• 自動更新をスキープを選択して、「次へ」ボタンを選択する。
Copyright © 2016, Oracle and/or its affiliates. All rights reserved. |
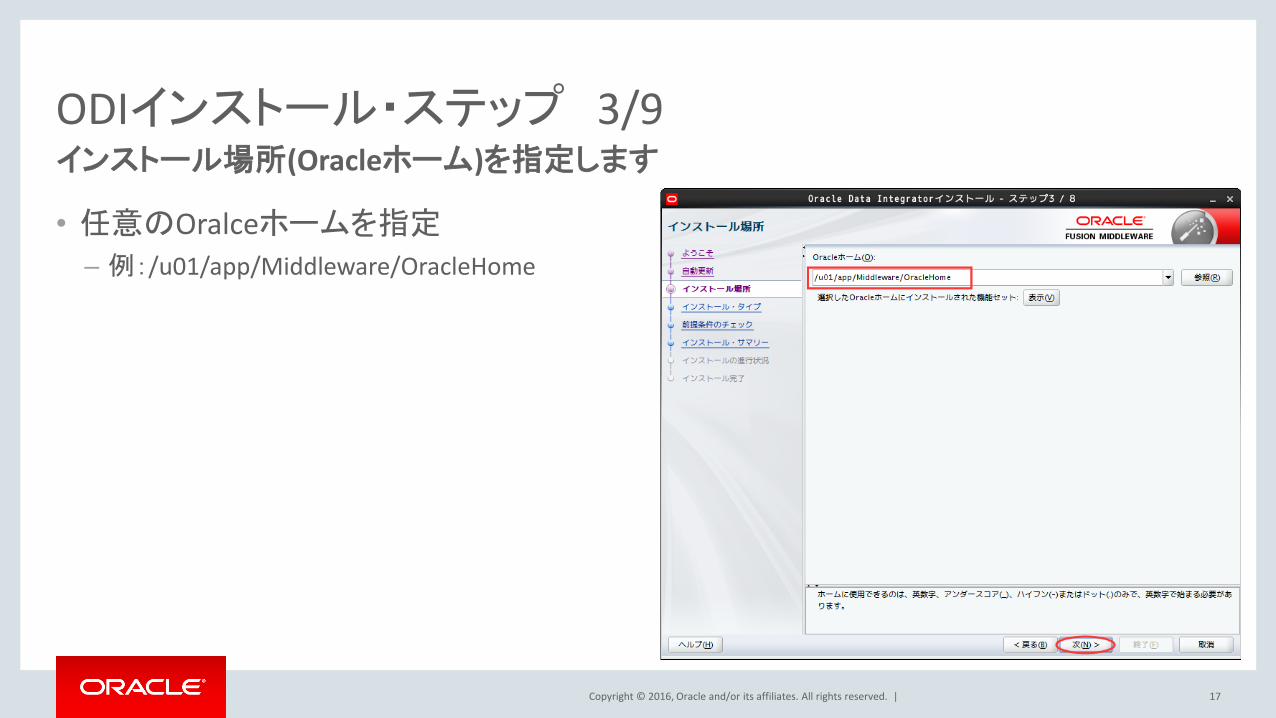
ODIインストール・ステップ 3/9 インストール場所(Oracleホーム)を指定します
17
• 任意のOralceホームを指定
– 例:/u01/app/Middleware/OracleHome
Copyright © 2016, Oracle and/or its affiliates. All rights reserved. |
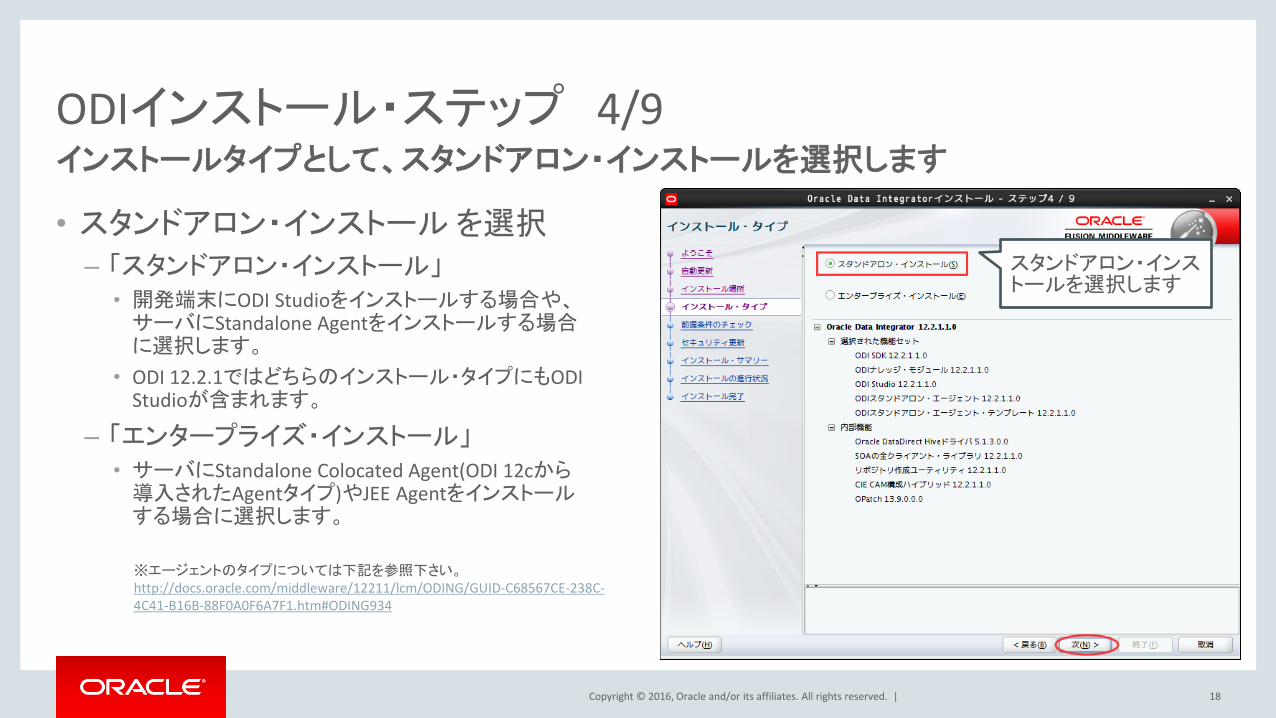
ODIインストール・ステップ 4/9 インストールタイプとして、スタンドアロン・インストールを選択します
18
• スタンドアロン・インストール を選択
– 「スタンドアロン・インストール」 • 開発端末にODI Studioをインストールする場合や、サーバにStandalone Agentをインストールする場合に選択します。
• ODI 12.2.1ではどちらのインストール・タイプにもODI Studioが含まれます。
– 「エンタープライズ・インストール」 • サーバにStandalone Colocated Agent(ODI 12cから導入されたAgentタイプ)やJEE Agentをインストールする場合に選択します。
※エージェントのタイプについては下記を参照下さい。 http://docs.oracle.com/middleware/12211/lcm/ODING/GUID-C68567CE-238C-4C41-B16B-88F0A0F6A7F1.htm#ODING934
スタンドアロン・インストールを選択します
Copyright © 2016, Oracle and/or its affiliates. All rights reserved. |
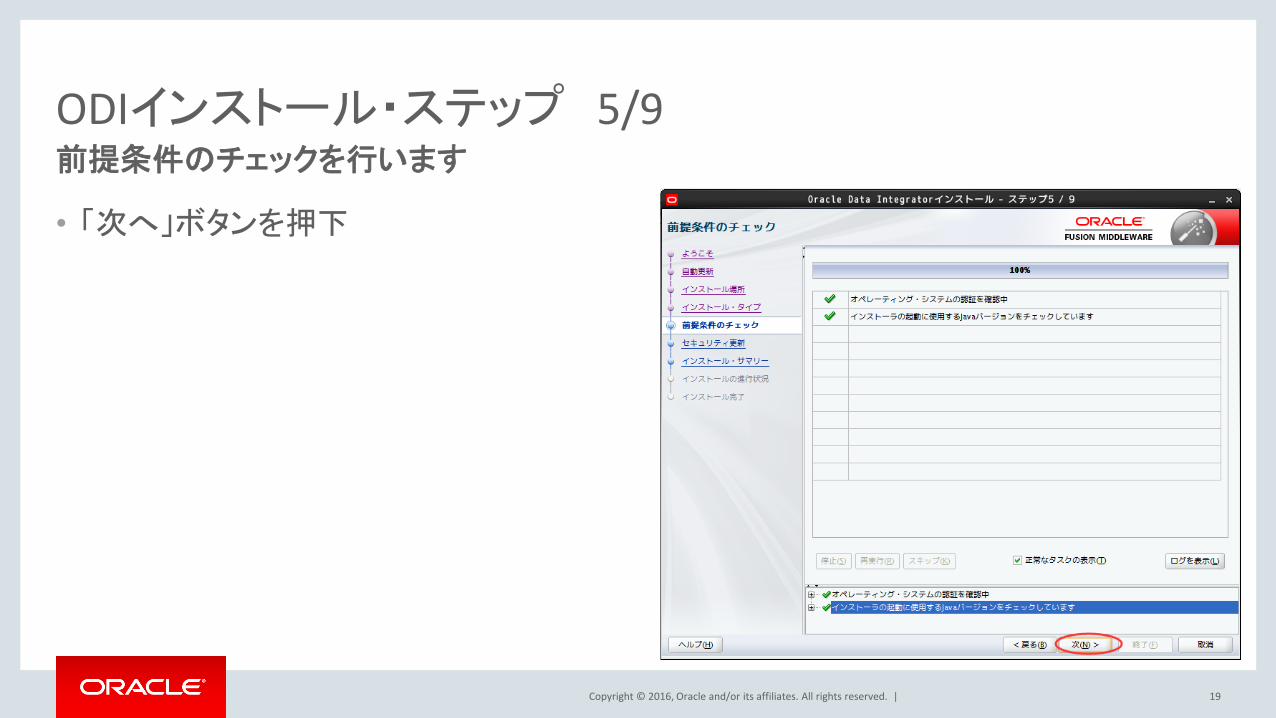
ODIインストール・ステップ 5/9 前提条件のチェックを行います
19
• 「次へ」ボタンを押下
Copyright © 2016, Oracle and/or its affiliates. All rights reserved. |
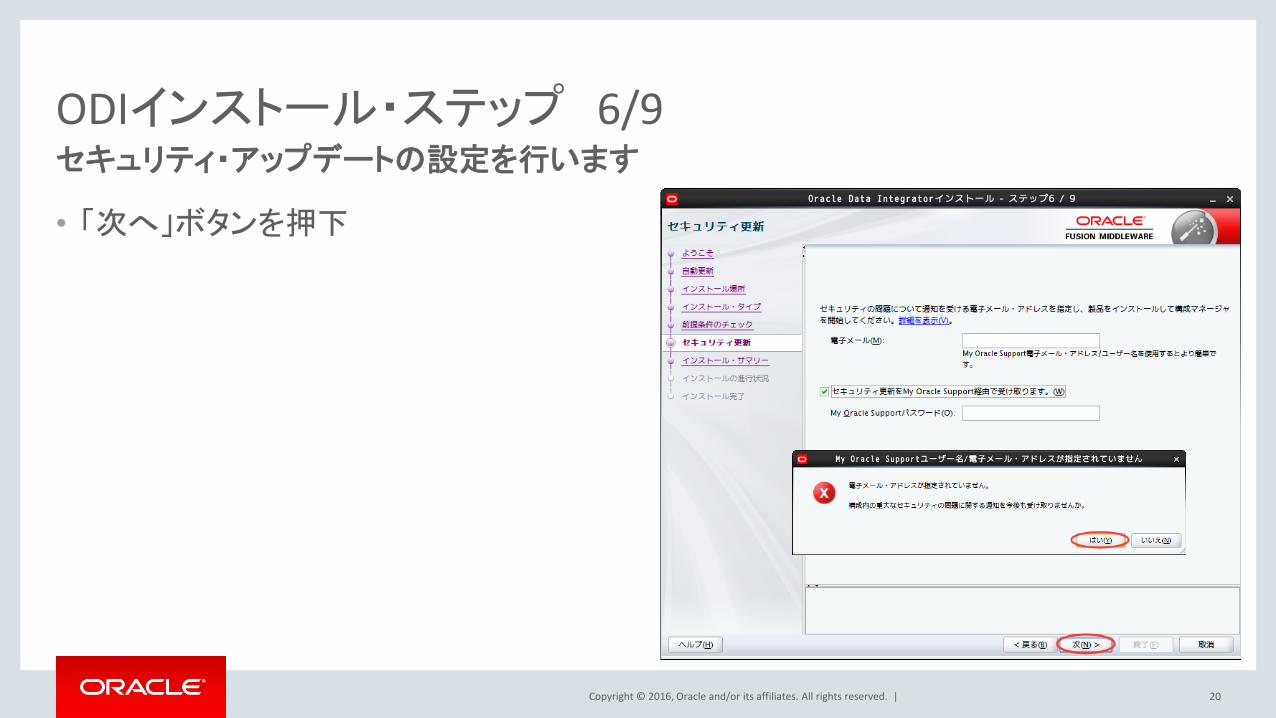
ODIインストール・ステップ 6/9 セキュリティ・アップデートの設定を行います
20
• 「次へ」ボタンを押下
Copyright © 2016, Oracle and/or its affiliates. All rights reserved. |
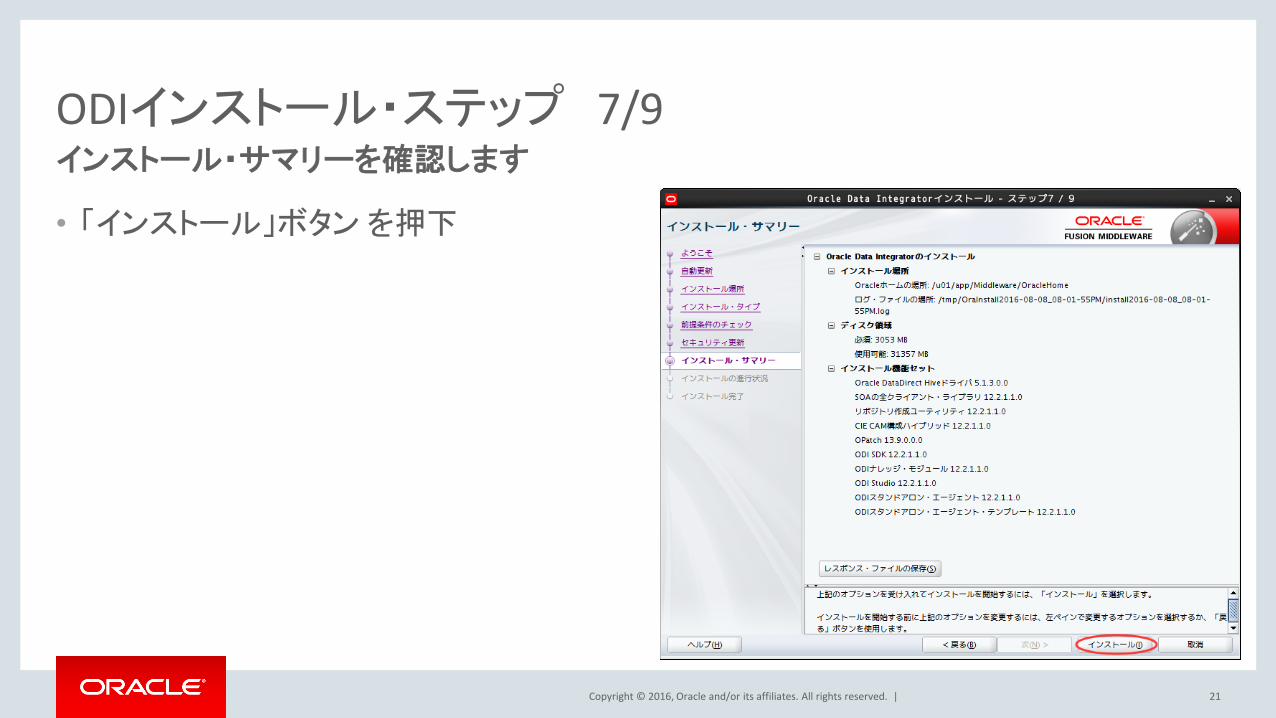
ODIインストール・ステップ 7/9 インストール・サマリーを確認します
21
• 「インストール」ボタン を押下
Copyright © 2016, Oracle and/or its affiliates. All rights reserved. |
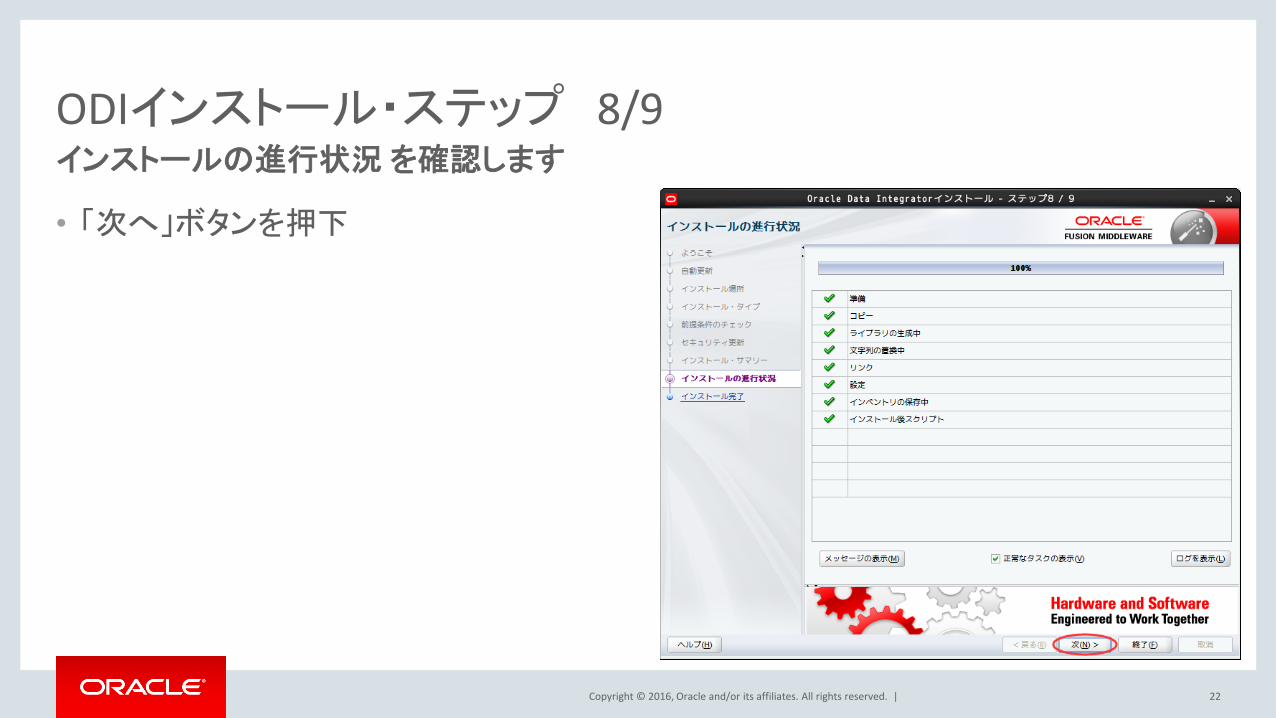
ODIインストール・ステップ 8/9 インストールの進行状況 を確認します
22
• 「次へ」ボタンを押下
Copyright © 2016, Oracle and/or its affiliates. All rights reserved. |
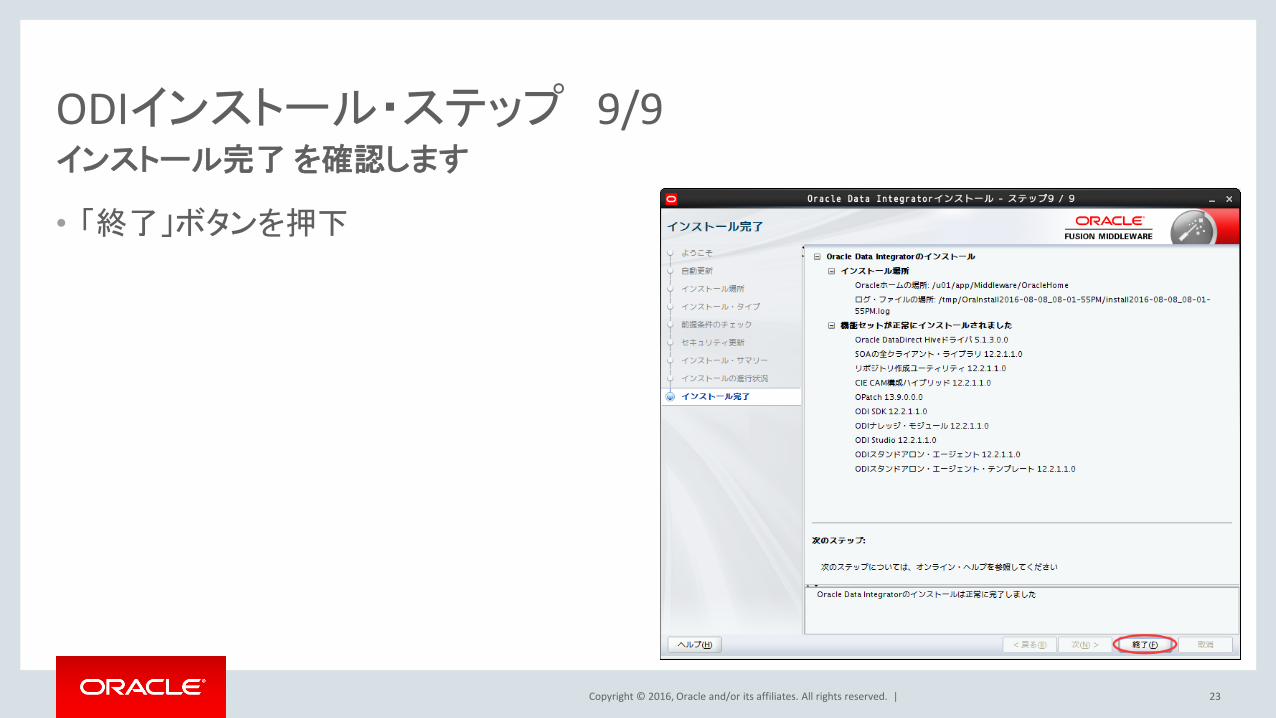
ODIインストール・ステップ 9/9 インストール完了 を確認します
23
• 「終了」ボタンを押下

Copyright © 2016, Oracle and/or its affiliates. All rights reserved. |
3. リポジトリ作成 (RCU実行)
24
Copyright © 2016, Oracle and/or its affiliates. All rights reserved. |
リポジトリ作成の注意点 RCU(Repository Creation Utility)を利用して、ODIリポジトリを作成します
25
• リポジトリ・スキーマ: ODIの各種メタデータ(ユーザ情報、設定情報、ログ等)を納める格納庫です。
• リポジトリ作成の方法として以下の2種類がありますが、ODI 12cではRCU(Repository Creation Utility)の利用を推奨します。
1. RCUを利用してリポジトリを作成する方法
2. ODI Studioからリポジトリを作成する方法
• これはFM12c製品全般で幾つかの管理スキーマが共通的に利用されるようになり、ODI12cのAgentを構成する上でも必要なのですが、 RCUを利用して作成されるためです。
– Services Tableスキーマ (STBスキーマ すべてのタイプのODI Agentで必要)
– セキュリティ/監査スキーマ (OPSS, IAU, IAU_APPEND, IAU_VIEWERスキーマ JEE Agent及びStandalone Colocated Agentで必要)
• RCUを実行すると、ODIリポジトリ用のDBスキーマ作成と、メタデータ(開発資産やログ等)を管理するための一連の管理テーブルが作成されます。
Copyright © 2016, Oracle and/or its affiliates. All rights reserved. |
リポジトリ作成 (RCU実行) RCU(Repository Creation Utility)を利用して、ODIリポジトリを作成します
26
• Repository Creation Utility(RCU) のシステム要件を確認します。
http://docs.oracle.com/html/E73100_01/toc.htm#GUID-80D05C59-19C9-4855-B3F7-FB4F2E1717F8
• Database Version:11.2.0.4+ ; 12.1.0.1+
• Character set : AL32UTF8 (AL32UTF8 でない場合、下記エラーが発生しますが無視可能です)
– The database you are connecting is with non-AL32UTF8 character set. Oracle strongly recommends using AL32UTF8 as the database character set.
• 環境変数を設定して、RCUを実行します。(未設定の場合)
– JAVA_HOMEを設定 (ORACLE_HOMEはODIのOracle_Homeを指定するかUnsetします)
• export JAVA_HOME=/usr/java/jdk1.8.0_91
• export ORACLE_HOME=
– RCUユーティリティを実行し、リポジトリ作成ウィザードを起動します。
• /u01/app/Middleware/OracleHome/oracle_common/bin/rcu
Copyright © 2016, Oracle and/or its affiliates. All rights reserved. |
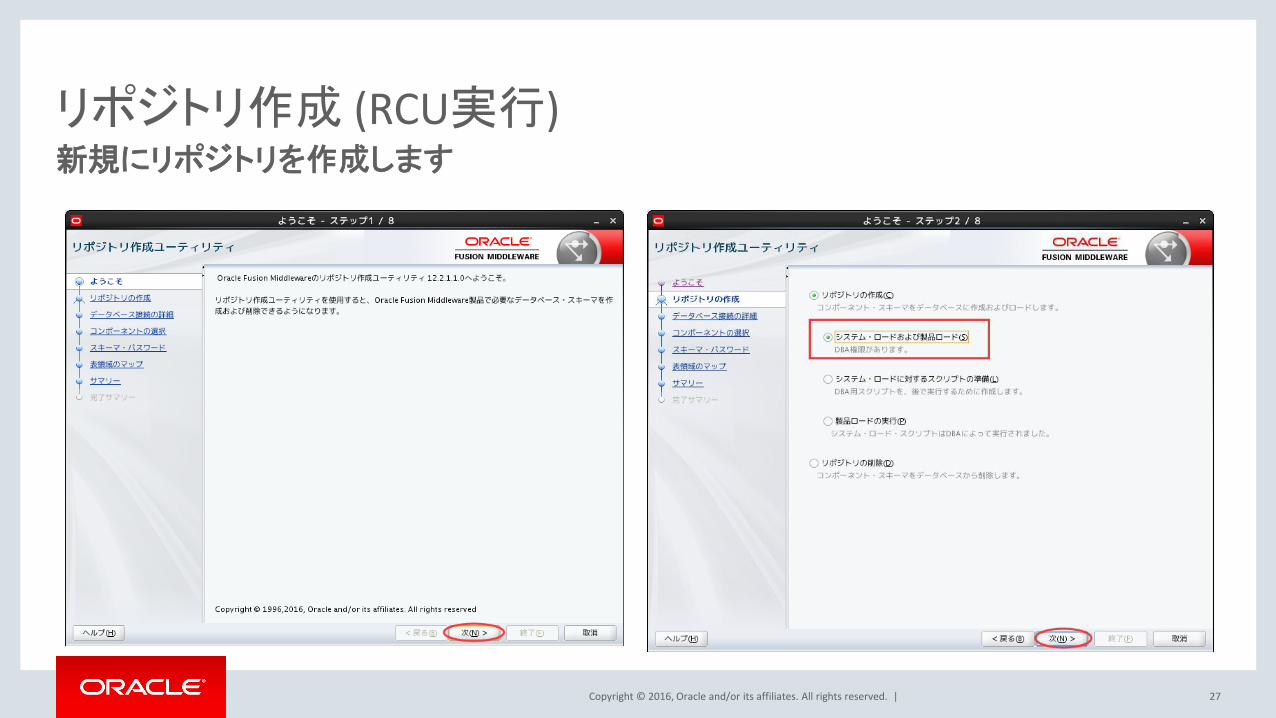
リポジトリ作成 (RCU実行) 新規にリポジトリを作成します
27
Copyright © 2016, Oracle and/or its affiliates. All rights reserved. |
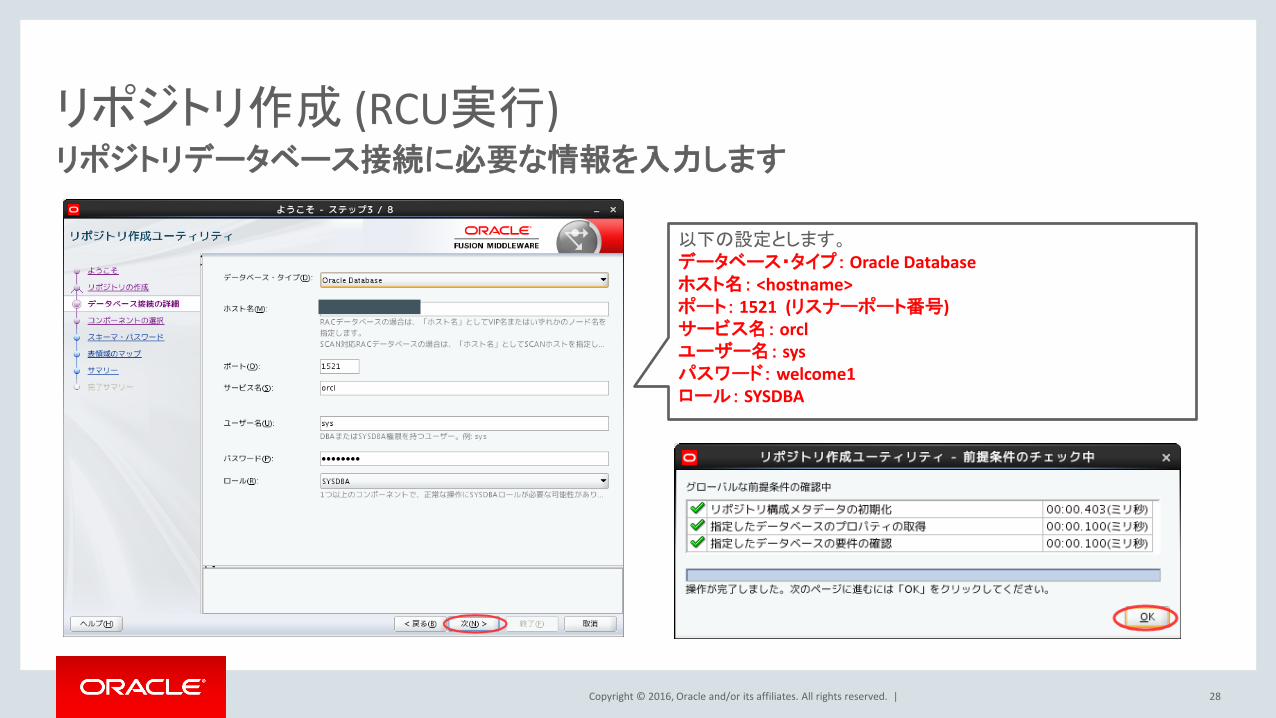
リポジトリ作成 (RCU実行) リポジトリデータベース接続に必要な情報を入力します
28
以下の設定とします。 データベース・タイプ: Oracle Database ホスト名: <hostname> ポート: 1521 (リスナーポート番号) サービス名: orcl ユーザー名: sys パスワード: welcome1 ロール: SYSDBA

Copyright © 2016, Oracle and/or its affiliates. All rights reserved. |
リポジトリ作成 (RCU実行) Oracle Data Integratorにチェックを入れて作業を進めます
29
Oracle Data Integrator (マスターおよび作業リポジトリ) にチェックを入れます。 また、Common Infrastructure Services (STB)にデフォルトでチェックが有効となっていることを確認します。
本資料では、接頭辞の設定をDEV2で設定、デフォルト設定は(DEV)とします。接頭辞はスキーマ名、表領域名などに利用されます。
Copyright © 2016, Oracle and/or its affiliates. All rights reserved. |
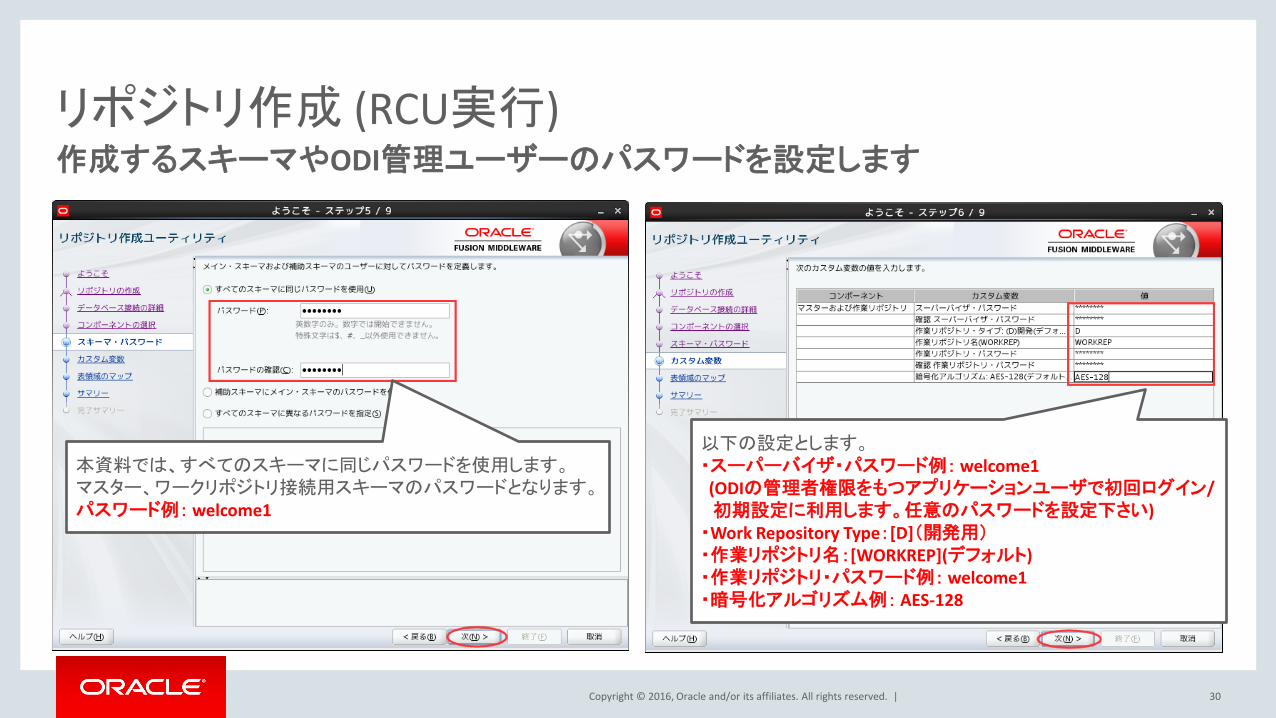
リポジトリ作成 (RCU実行) 作成するスキーマやODI管理ユーザーのパスワードを設定します
30
本資料では、すべてのスキーマに同じパスワードを使用します。 マスター、ワークリポジトリ接続用スキーマのパスワードとなります。 パスワード例: welcome1
以下の設定とします。 ・スーパーバイザ・パスワード例: welcome1 (ODIの管理者権限をもつアプリケーションユーザで初回ログイン/ 初期設定に利用します。任意のパスワードを設定下さい) ・Work Repository Type:[D](開発用) ・作業リポジトリ名:[WORKREP](デフォルト) ・作業リポジトリ・パスワード例: welcome1 ・暗号化アルゴリズム例: AES-128
Copyright © 2016, Oracle and/or its affiliates. All rights reserved. |
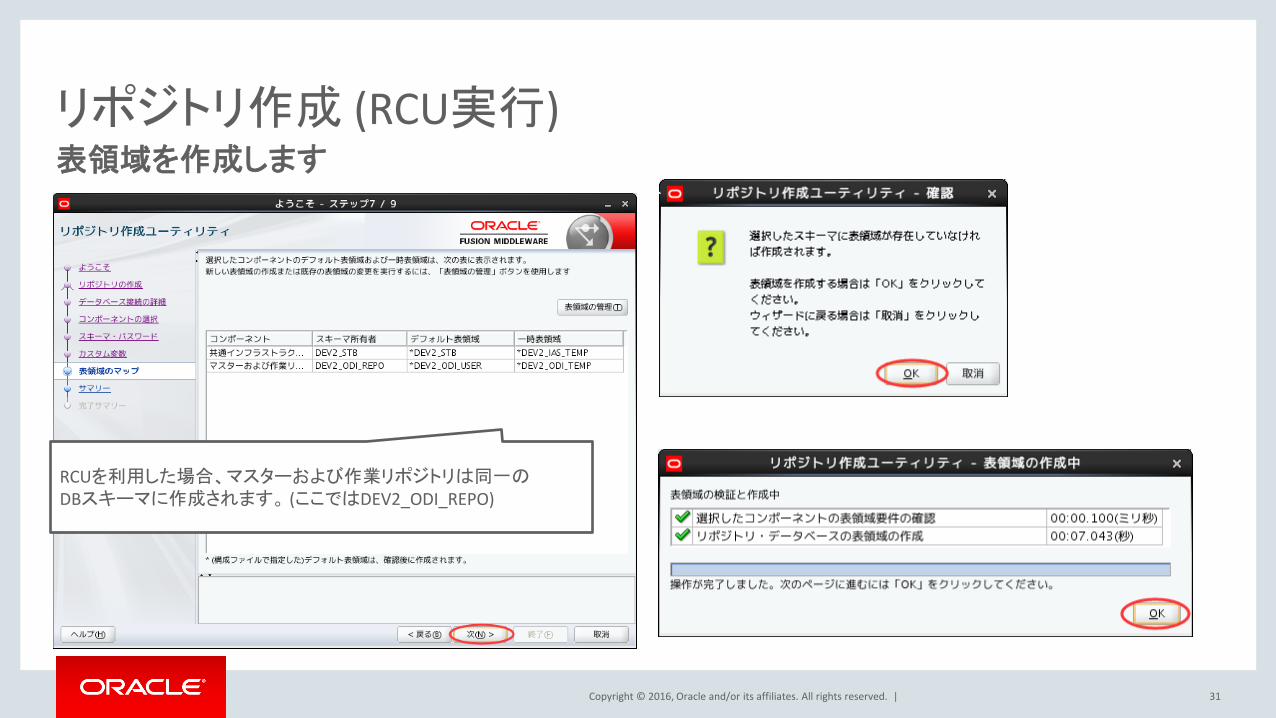
リポジトリ作成 (RCU実行) 表領域を作成します
31
RCUを利用した場合、マスターおよび作業リポジトリは同一の DBスキーマに作成されます。 (ここではDEV2_ODI_REPO)
Copyright © 2016, Oracle and/or its affiliates. All rights reserved. |
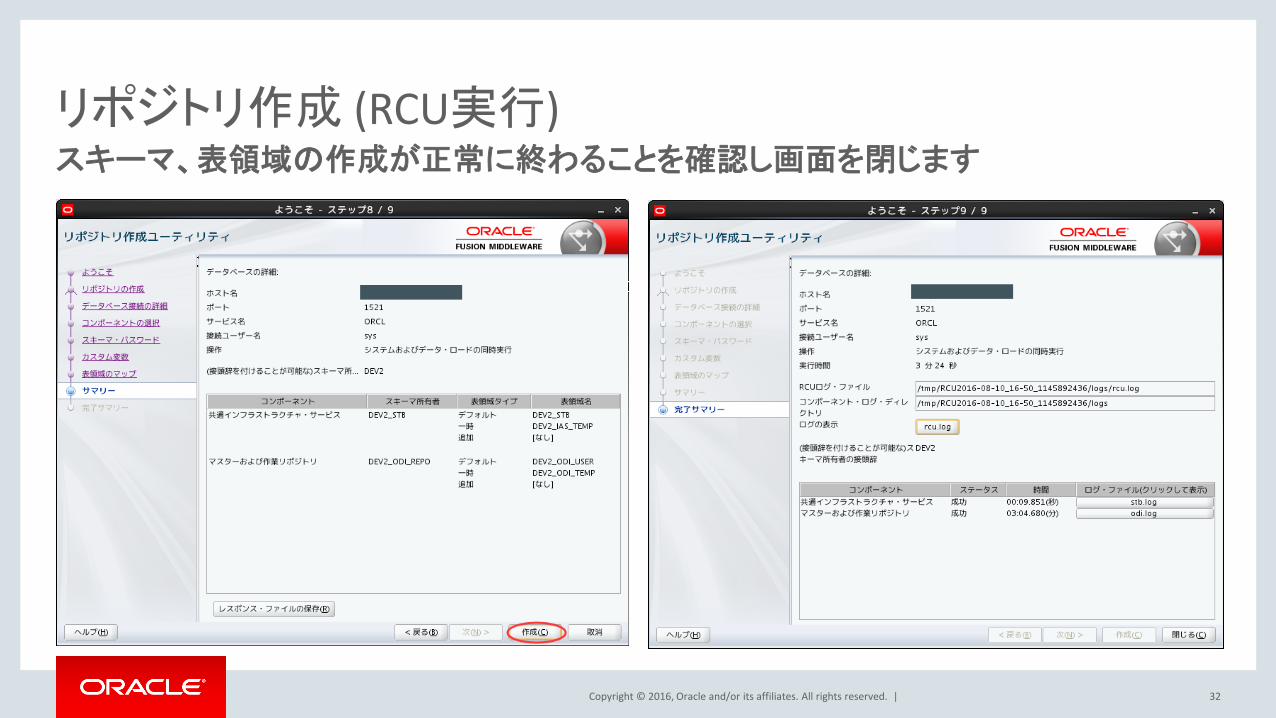
リポジトリ作成 (RCU実行)
32
スキーマ、表領域の作成が正常に終わることを確認し画面を閉じます
Copyright © 2016, Oracle and/or its affiliates. All rights reserved. |
4. ODI Studioの起動とログインの作成
33
Copyright © 2016, Oracle and/or its affiliates. All rights reserved. |
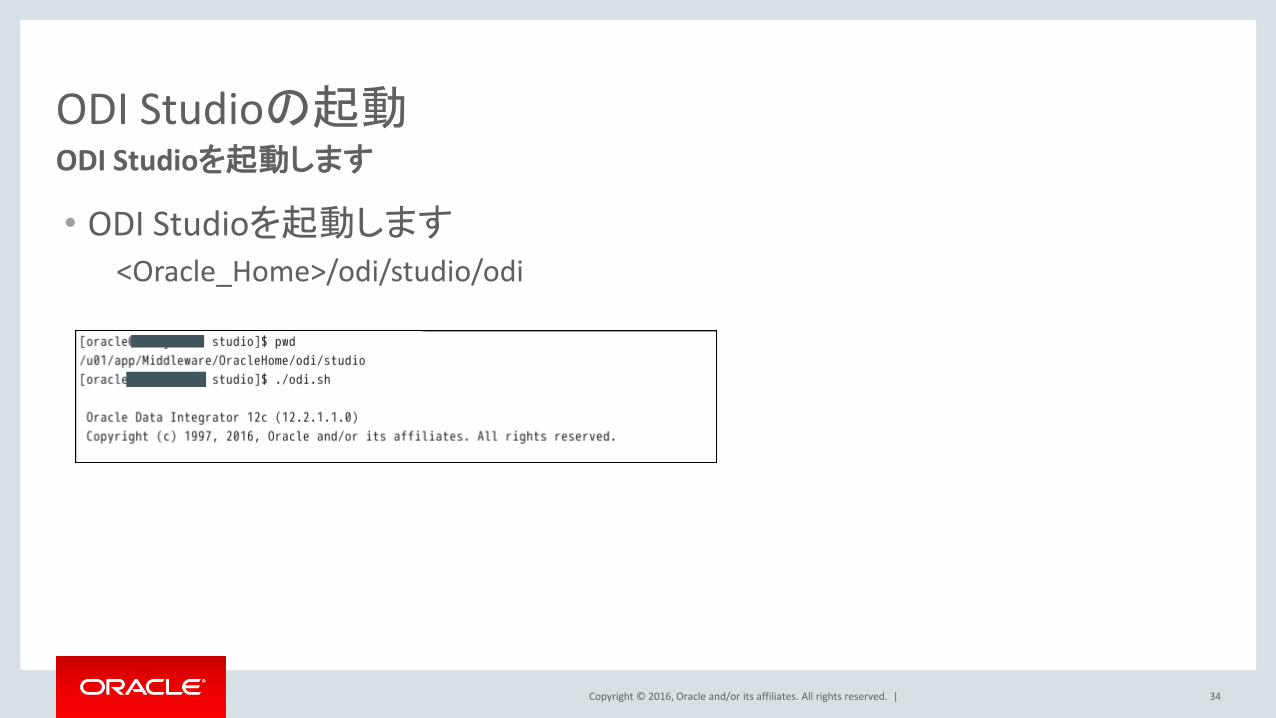
ODI Studioの起動 ODI Studioを起動します
34
• ODI Studioを起動します <Oracle_Home>/odi/studio/odi
Copyright © 2016, Oracle and/or its affiliates. All rights reserved. |
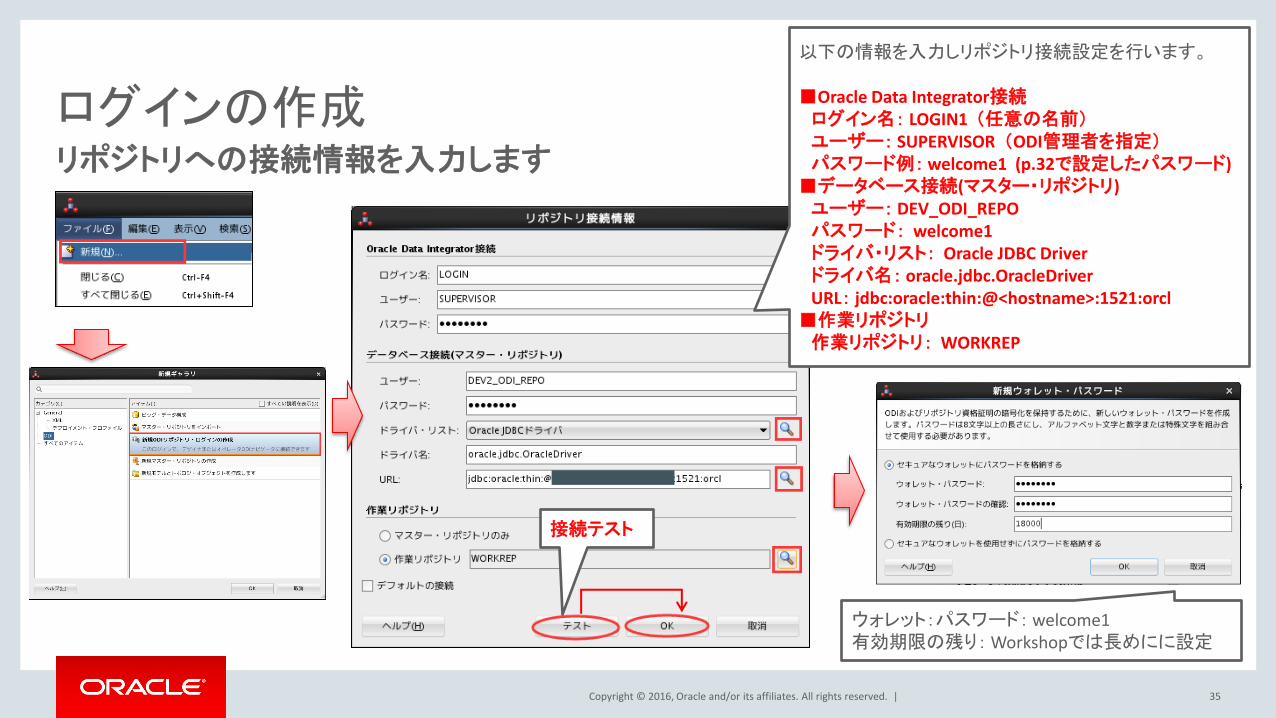
ログインの作成 リポジトリへの接続情報を入力します
35
以下の情報を入力しリポジトリ接続設定を行います。 ■Oracle Data Integrator接続 ログイン名: LOGIN1 (任意の名前) ユーザー: SUPERVISOR (ODI管理者を指定) パスワード例: welcome1 (p.32で設定したパスワード) ■データベース接続(マスター・リポジトリ) ユーザー: DEV_ODI_REPO パスワード: welcome1 ドライバ・リスト: Oracle JDBC Driver ドライバ名: oracle.jdbc.OracleDriver URL: jdbc:oracle:thin:@<hostname>:1521:orcl ■作業リポジトリ 作業リポジトリ: WORKREP
ウォレット:パスワード: welcome1 有効期限の残り: Workshopでは長めにに設定
接続テスト
Copyright © 2016, Oracle and/or its affiliates. All rights reserved. |
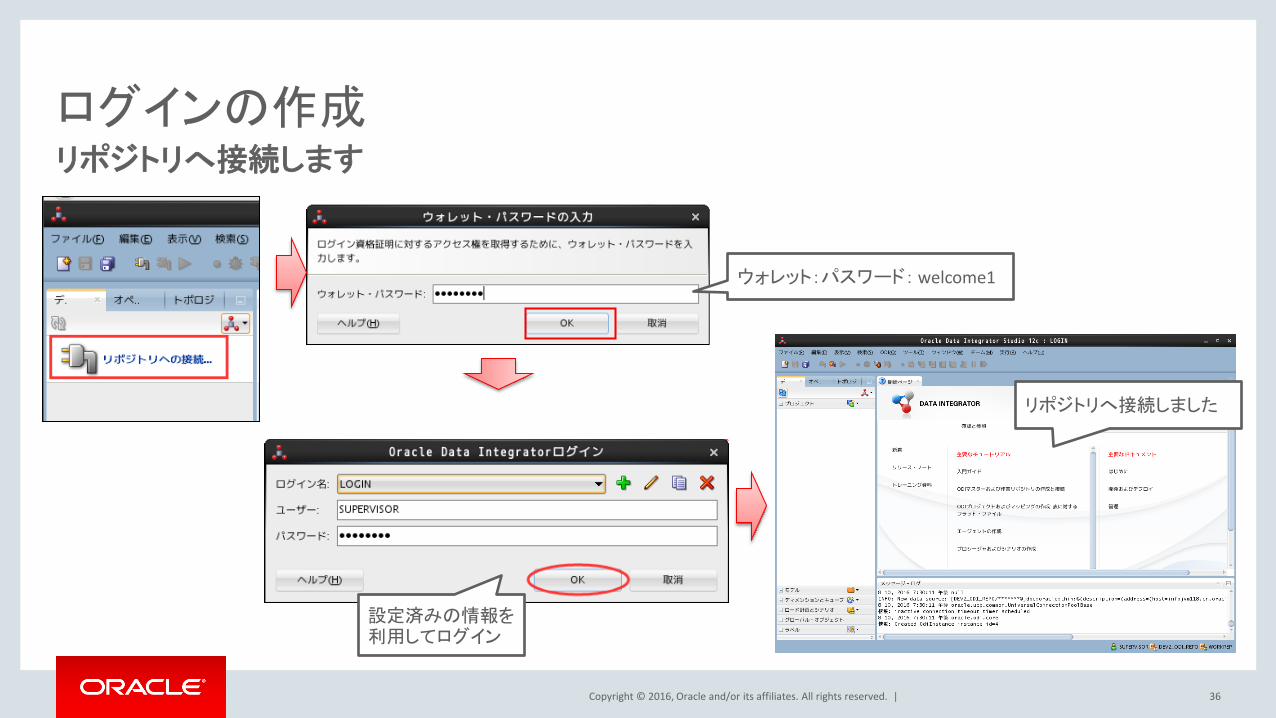
ログインの作成 リポジトリへ接続します
36
ウォレット:パスワード: welcome1
設定済みの情報を利用してログイン
リポジトリへ接続しました
Copyright © 2016, Oracle and/or its affiliates. All rights reserved. |
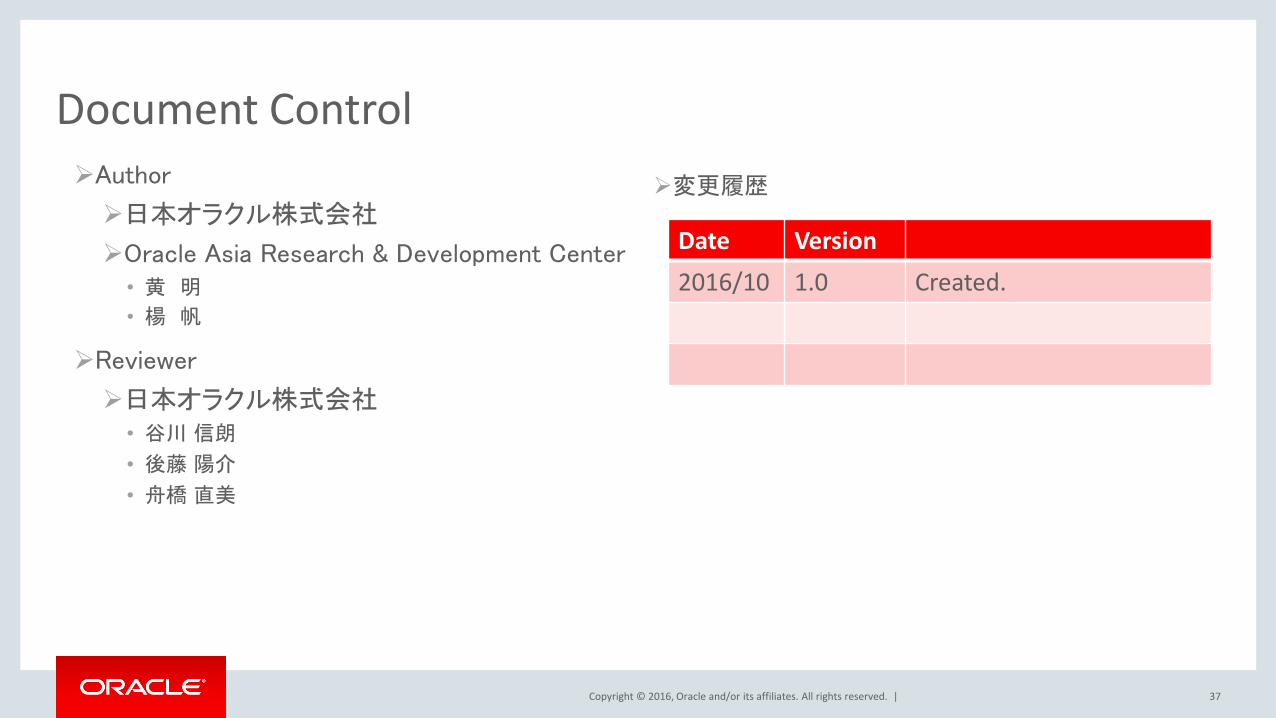
Document Control Author
日本オラクル株式会社
Oracle Asia Research & Development Center • 黄 明
• 楊 帆
Reviewer
日本オラクル株式会社 • 谷川 信朗
• 後藤 陽介
• 舟橋 直美
37
変更履歴
Date Version
2016/10 1.0 Created.

Copyright © 2016, Oracle and/or its affiliates. All rights reserved. |
Safe Harbor Statement
The preceding is intended to outline our general product direction. It is intended for information purposes only, and may not be incorporated into any contract. It is not a commitment to deliver any material, code, or functionality, and should not be relied upon in making purchasing decisions. The development, release, and timing of any features or functionality described for Oracle’s products remains at the sole discretion of Oracle.
38
Copyright © 2016, Oracle and/or its affiliates. All rights reserved. | 39