ostc mk2 anleitung en
TRANSCRIPT

Open Source Dive ComputerO S TC
Mk.2
Owner’s Manual

Die Produkte der heinrichs weikamp GbR entsprechen den An-forderungen der Richtlinie des EU-Rates 89/336/EEC (EMV) und 2004/108/EC (EMV), ggf. ergänzt in der Angleichung der Rechtsvorschriften der Mitgliedstaaten in Bezug auf die elektromagnetische Verträglichkeit.
CE Declaration of conformityProducts by heinrichs weikamp comply with the requirements of the Council Directives 89/336/EEC (EMV) and 2004/108/EC (EMV), as amended where applicable on the approxima-tion of the laws of the member states relating to Electromag-netic Compatibility.
heinrichs weikamp GbR, 79098 Freiburg Freiburg, 2010
Christian Weikamp Matthias Heinrichs
D CE Konformitätserklärung
GB
RoHS KonformitätserklärungDie heinrichs weikamp GbR erklärt hiermit, dass alle von uns ab Januar 2006 hergestellten Produkte RoHS-konform sind gemäss EU Richtlinie 2002/95/EG bezüglich folgender Substanzen:
Blei (Pb) Cadmium(Cd) sechswertiges Chrom(Cr(VI)) Quecksilber(Hg) Polybromierte Biphenyle (PBB) Polybromierte Diphenylether (PBDE)
Declaration of RoHS Complianceheinrichs weikamp GbR herewith declares that as of January 2006, all our products are manufactured RoHS conformal, fully complying with EU Directive 2002/95/EC with respect to the following substances:
Lead (Pb) Cadmium(Cd) Hexalvalent Chromium(Cr(VI)) Mercury(Hg) Polybrominated biphenyls (PBB) Polybrominated diphenylethers (PBDE)
heinrichs weikamp GbR, 79098 Freiburg Freiburg, 2010
Christian Weikamp Matthias Heinrichs
D
GB

Your OSTC Mk.2
3
Thank you for choosing a heinrichs weikamp dive computer.
Using open source software for full transparency, combined with state-of-the-art hardware and robust design, OSTC Mk.2 is your instrument of choice for technical diving.
We hope you enjoy diving with your new OSTC Mk.2 dive computer.
To become familiar with the functions of OSTC Mk.2 and to use it correctly, it is recommended that you read this man-ual carefully.
Functions Overview
The Open Source Dive Computer OSTC Mk.2 assists you with the following functions:
Display• Diving depth and duration according
to EN 13119• Maximum diving depth • Ambient temperature • Ambient pressure• Bottom time• Duration and depth of planned
decostops• Time to desaturation based on diving
depth and duration
Planning• Set and retrieve gas mixtures match-
ing the scuba set• Calculate a decoplan in the simulator
Record • Time, duration, depth profile, tem-
perature, reference pressure and time to desaturation
Contacting us
If you have any questions regarding the OSTC Mk.2, you can reach us • on the Internet forum
www.heinrichsweikamp.net• via e-mail:
Postal Address
Heinrichs Weikamp GbR Adlerstraße 7 79098 Freiburg im Breisgau Germany
Your OSTC Mk.2

Contents
4
Your OSTC Mk.2 ........................................... 3Functions Overview .............................. 3Contacting us ......................................... 3
Contents......................................................... 4
Device Overview ......................................... 6Left/Front/Top View ............................. 6Right/Bottom View ............................... 7
General Notes .............................................. 8Technical Status ..................................... 8User Settings........................................... 8About this Manual ................................ 8
Warnings and Safety Advice ................... 9Precautions .............................................. 9Before Every Dive ................................... 9While Diving .........................................10Safe use of OSTC Mk.2 .......................11Environmental Conditions ...............11
Basics ............................................................12Preparations for first use ..................12Control Elements and Menus .........12Status Indicators..................................13Charging the Battery ..........................13OSTC Mk.2 Modes of Operation .....14OSTC Mk.2 Dive Settings ...................15
Display in Surfacemode ..........................17Main Display .........................................17Desaturation Diagram .......................18Gaslist .....................................................18Setpoints ................................................18Dive Setting Display ...........................19
Menu Functions in Surfacemode ........20
Logbook .......................................................21
Gas Setup ....................................................22
Reset Menu .................................................24
Setup .............................................................25Custom Functions ...............................25Salinity ....................................................26Decotype – Mode of Operation ......27Date Format ..........................................27Debug ......................................................27Show License ........................................27
Time and Date Settings ..........................28Set Time .................................................28
Contents
Contents
5
CCR SetPoint Menu – Settings for Closed Circuit Rebreathers ....................29
Battery Information – Information about the Battery Status .......................30
Simulator .....................................................31
Display in Divemode ................................33Display in CCR mode ..........................33Display in Open Circuit mode .........34Display in Gauge/Apnoe mode ......35
Menu Functions in Divemode ..............36Gaslist .....................................................37Set Gas ...................................................38SetPoint ..................................................38Bailout .....................................................38Graphs .....................................................38Display ....................................................39Lead Tis....................................................39Stopwatch ..............................................39
Cleaning and care .....................................40
USB-Interface .............................................41Installing the Driver ............................41Transfering Data and Settings ........41Update Firmware ...............................41
Technical specifications ..........................42

Device Overview
6
Left/Front/Top View
4
6
5
3
1
2
1 Display2 Left status indicator (blue LED)3 USB connector with protective cap4 SET/MENU button (contact switch)5 Right status indicator (red LED)6 ENTER button (contact switch)
Device Overview
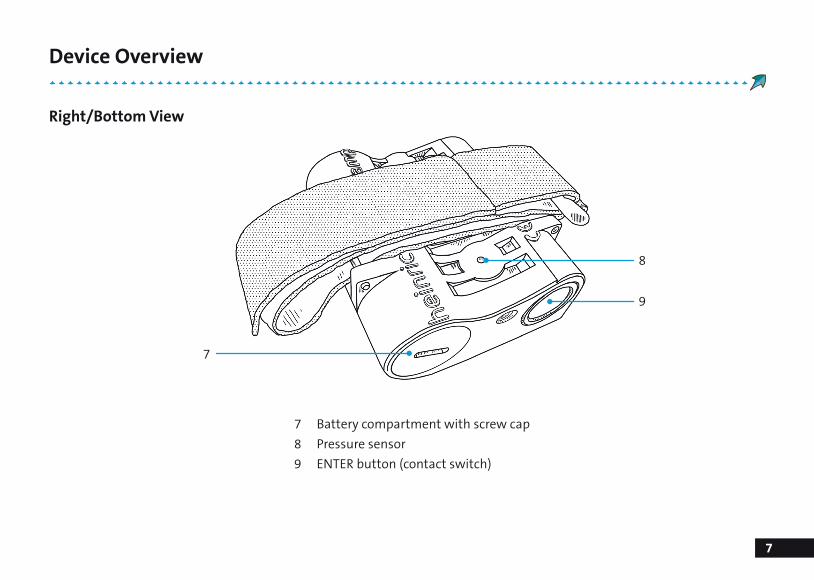
Device Overview
7
Right/Bottom View
7
9
8
7 Battery compartment with screw cap8 Pressure sensor9 ENTER button (contact switch)

General Notes
8
Technical Status
This manual corresponds to the techni-cal status of OSTC Mk.2 and its firmware as of July, 2010.
OSTC Mk.2, its firmware and the docu-mentation are subject to technical changes without notice.
OSTC Mk.2 firmware (integrated soft-ware) is being continually enhanced. To make the best use of OSTC Mk.2, we advise you to use the latest stable firm-ware available on the heinrichs weikamp website:
http://www.heinrichsweikamp.net/ostc
When updating the firmware, please refer to section USB Interface: Updating the Firmware.
User Settings
Unless noted differently, the informa-tion in this manual refers to OSTC Mk.2 standard settings.
Values, formats, units and display set-tings which can be adjusted by the user are marked with an asterisk * in this manual.
About this Manual
Special Markings
WARNING:indicates a situation that carries a significant risk of injury.
CAUTION: Indicates a situation that car-ries a risk of damage to the device.
Terms of Use
Copyright © heinrichs weikamp GbR.
Copying or reusing this manual, or parts of this manual, is not allowed without the written permission of heinrichs weikamp GbR.
Illustrations: Copyright © Susanne von Poblotzki, nocolours.de
General Notes
Warnings and Safety Advice
9
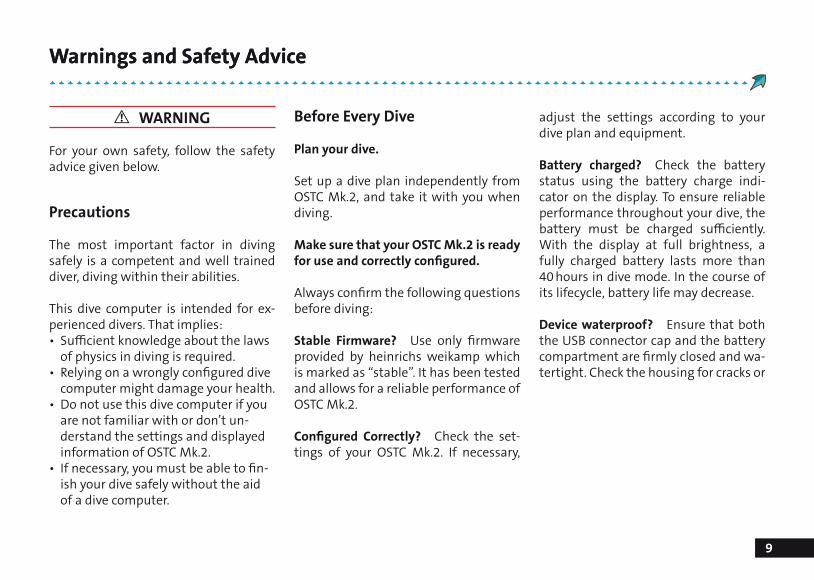
! WARNING
For your own safety, follow the safety advice given below.
Precautions
The most important factor in diving safely is a competent and well trained diver, diving within their abilities.
This dive computer is intended for ex-perienced divers. That implies: • Sufficient knowledge about the laws
of physics in diving is required.• Relying on a wrongly configured dive
computer might damage your health. • Do not use this dive computer if you
are not familiar with or don’t un-derstand the settings and displayed information of OSTC Mk.2.
• If necessary, you must be able to fin-ish your dive safely without the aid of a dive computer.
Before Every Dive
Plan your dive.
Set up a dive plan independently from OSTC Mk.2, and take it with you when diving.
Make sure that your OSTC Mk.2 is ready for use and correctly configured.
Always confirm the following questions before diving:
Stable Firmware? Use only firmware provided by heinrichs weikamp which is marked as “stable”. It has been tested and allows for a reliable performance of OSTC Mk.2.
Configured Correctly? Check the set-tings of your OSTC Mk.2. If necessary,
adjust the settings according to your dive plan and equipment.
Battery charged? Check the battery status using the battery charge indi-cator on the display. To ensure reliable performance throughout your dive, the battery must be charged sufficiently. With the display at full brightness, a fully charged battery lasts more than 40 hours in dive mode. In the course of its lifecycle, battery life may decrease.
Device waterproof? Ensure that both the USB connector cap and the battery compartment are firmly closed and wa-tertight. Check the housing for cracks or
Warnings and Safety Advice

Warnings and Safety Advice
10
damages which might allow water to intrude.
Functioning pressure sensor? Ensure that the opening of the pressure sensor is neither clogged nor soiled
Safely attached? Make sure OSTC Mk.2 can be fastened safely using either the wristband or a suitable alternative.
Display messages? Check the display of OSTC Mk.2 for warnings or other sig-nals. Do not dive if the OSTC displays a warning, e.g. the warning symbol. Check the cause for the warning.
While Diving
Take a backup system with you.
While diving, always carry a backup system to measure duration and diving depth independently from OSTC Mk.2
Take OSTC Mk.2 with you on every re-peat dive – don’t lend it to anyone.
A correct calculation of tissue satura-tion requires that OSTC Mk.2 • is configured correctly • is used on every dive• is only used to record data during
your own dives (and not shared with other divers)
Take a sufficiently long surface break before diving again.
OSTC Mk.2 does not explicitly indicate how long to wait before the next dive. Please adhere to the guidelines you
were taught during your diver’s train-ing.
CAUTION Saturation data is lost when updating the OSTC Mk.2 firmware or in the unlikely event of a failure. In these cases, do not dive any further until tis-sue saturation has returned to normal.

Warnings and Safety Advice
11
Safe Use of OSTC Mk.2
Do not modify the hardware.
Modifications to the hardware of OSTC Mk.2 can negatively impact its reliability and the leak tightness of its housing.
Only the caps of the battery compart-ment and of the USB connector can be removed. There is no other way to open the housing without damaging the de-vice.
It is imperative that the o-rings on the USB cap are kept clean and free of hair, grit, dirt, lint etc.
Open the battery compartment only when the battery has to be replaced.
Keep your OSTC Mk.2 out of children’s reach
Small parts such as the USB connector cap may represent a choking hazard and configuration may be indadvertedly al-tered without the divers knowledge.
Environmental Conditions
Store the OSTC Mk.2 in a cool, dry place.
Permissible temperature range for use and storage: 0 °C to 40 °C
Maximum water depth: 120 m
CAUTION• Surpassing the maximum water
depth may cause malfunctioning or permanent damage of the device.
• The ZH-L16 calculation model is valid only up to a depth of 120 m.

Basics
12
Preparations for first use
You receive your new OSTC Mk.2 ready-for-use from heinrichs weikamp. If the OSTC Mk.2 has not been used for a pro-longed period of time, it may be neces-sary to recharge the battery first.
Before diving, you need to adjust some settings as described in this manual.
Familiarize yourself with the OSTC Mk.2. It is recommended that you read this manual carefully and entirely.
Control Elements and Menus
Buttons Operate the OSTC Mk.2 using the two red buttons SET/MENU and EN-TER on the left and right side, respec-tively. The buttons are contact switches which respond to short finger pressure. You don’t need to hold the buttons down.
Menus The basic principles of opera-tion that are described below apply to most functions of the OSTC Mk.2. If necessary, the documentation indicates when to use these buttons differently.
To display the menu, press SET/MENU. The display shows the pre-menu Menu?. Press ENTER to confirm.
To select a menu entry, press SET/MENU repeatedly until the cursor marks the required menu item. From the item on
the bottom, the cursor jumps back to the top.
In some menus, you will find a More en-try. Select this entry to access the next menu page with more menu items.
To change the setting of a menu item, press ENTER repeatedly until the re-quired value is displayed. Note that for some numerical settings, you have to adjust the direction and increment of change separately.
NOTE The pre-menu Menu? avoids that the menu is displayed by mistake. Confirm the pre-menu by pressing ENTER within 5 seconds, otherwise the OSTC Mk.2 will return to the normal dis-play.
.
Basics

Basics
13
Status Indicators
There are LED status indicators to the left and to the right of the display.
In Surface and Sleep Mode• Right indicator flashes red once per
second: Battery is being charged.• Right indicator flashes red twice per
second: Battery charge is finished.• Left indicator flashes blue: No-fly
period. See the remaining no-fly time on the display.
In Dive Mode• Right indicator flashes red: Warning.
See additional information on the display.
Im Simulation Mode• Right indicator flashes red: Decoplan
is being calculated, please wait.
Charging the Battery
The battery of the OSTC Mk.2 is charged using the USB connector. The delivery includes a USB cable.
Your OSTC Mk.2 must be charged in a dry environment to avoid damages caused by corrosion or a short circuit..
1. Remove the protective lid from the USB connector.
2. Connect the USB connector to a computer or a standard USB char-ger.
3. The OSTC Mk.2 is being charged while the connected computer or USB charger is in operation.
4. While the battery is being charged, the right LED status indicator flash-es once per second.
When the right LED status indicator flashes twice per second, charging is complete (i.e. the battery is charged at least 95%).
Once charging is completed, disconnect the USB cable and firmly replace the lid on the USB connector to make it water-tight. To allow the air behind the cap to escape, firmly twist the USB cap back into position.
If you do not use the OSTC Mk.2 for an extended period of time, you can leave it connected to the USB charger until next use.
NOTE The OSTC Mk.2 comes with an integrated magnetic reset switch. When charging, do not place the OSTC Mk.2 near a magnet that might trigger the magnetic switch.

Basics
14
OSTC Mk.2 Modes of Operation
OSTC Mk.2 has three modes of opera-tion and switches automatically be-tween them:
Surface Mode
To wake up the OSTC Mk.2, press SET/MENU or ENTER.
When in surface mode, the display shows general information – current time, date, temperature, ambient pres-sure and battery charging status. After a dive, the display also shows tissue saturation and remaining time in the no-fly period.
In surface mode, you can adjust the set-tings in preparation for the next dive, read recorded dive data and adjust the base settings of the OSTC Mk.2.
Dive Mode
The OSTC Mk.2 automatically switches into dive mode when it is at least 1.6 m* below the surface for five seconds.
In dive mode, the display shows current diving depth, elapsed time since start-ing the dive, maximum depth since starting the dive, the currently selected breathing gas and decompression infor-mation.
NOTE It is not possible to switch un-derwater from dive mode to surface mode; hence you cannot change the base settings while diving. Note that exceptions apply to the Apnoe setting.
TIP The integrated simulator allows you to get acquainted with the func-tions of the dive mode.
Sleep Mode
When the OSTC Mk.2 is not operated at the surface, it switches into sleep mode after 2 minutes* to save battery.
In sleep mode, the display is turned off. Ambient pressure is measured at regu-lar intervals. After a dive, decompression calculation continues in sleep mode.
Basics
15
OSTC Mk.2 Dive Settings
You can configure the OSTC Mk.2 to match your equipment and how you intend to use it. Furthermore, you can select a model for decompression cal-culation.
To select a dive setting, select Setup > Decotype, then choose one of the dive settings described below.
NOTE The displayed information is adapted according to the chosen dive setting. In dive mode, menu items are adapted as well.
Dive settings with decompression calculation
ZH-L16 OC, L16-GF OC Use these dive settings with regular (open circuit) dive equipment.
The decompression calculation model is Bühlmann ZH-L16 for open circuit with or without gradient factors.
ZH-L16 CC, L16-GF CC Use these dive settings with a closed circuit rebreather.
The decompression calculation model is Bühlmann ZH-L16 for closed circuit with or without gradient factors.
Dive settings without decompression calculation
Gauge Use this dive setting if you do not use the OSTC Mk.2 for decompres-sion calculation.
With this dive setting, OSTC Mk.2 serves as a depth gauge. Additionally displayed and recorded are ambient temperature and elapsed time since starting the dive. Decompression and saturation calcula-tion are switched off.
Apnoe Use this setting for apnea div-ing or snorkeling.
With this dive setting, the OSTC Mk.2 serves as a depth gauge. Additionally displayed and recorded are ambient temperature and elapsed time since starting the dive. Decompression and saturation calculation are switched off. Dive time is displayed in minutes*.
Basics
16
With the Apnoe setting, the OSTC Mk.2 remains in dive mode even when div-ing at low depths. You can switch into surface mode at any time by pressing SET/MENU?. Press ENTER to confirm the Quit? alert.
Above a defined depth* and after a de-fined delay*, the OSTC Mk.2 switches automatically into surface mode.

Display in Surface Mode
17
Main Display
OSTC 508 V1.601012mbar11:10:5901/05/1022.4°CNoFly 0:00 ODesat 0:00 C
Custom Text line 23char
N280%He
Air
1 Installed firmware version (Serial number, version number)
2 Ambient pressure3 Time4 Date5 Ambient temperature6 Remaining no-fly time
(hours:minutes).
7 Remaining desaturation time (hours:minutes).
8 Battery charge indicator / battery voltage*
9 Custom text (up to 23 characters)10 10 Desaturation diagram, gas list
(OC) or setpoints (CC), depending on the dive setting
11 First gas mix (OC) or oxygen partial pressure at setpoint 1 (CC), depen-ding on the dive setting.
12 Dive setting: OC, CC, CF, Gauge or Apnoe
23456
89
7
1
10
1112
Display in Surface Mode

Display in Surface Mode
18
Desaturation diagram
When using a dive setting with decom-pression calculation, a desaturation dia-gram is available.
Press ENTER to switch between desatu-ration diagram and gas list (OC) or set-points (CC).
N280%He
After a dive, you can see the approxi-mate tissue saturation in the desatura-tion diagram.
The lines in the upper section represent nitrogen saturation, the lines in the lower section helium saturation of the 16 types of tissue according the Bühl-mann model.
The numeric value is the lead tissue sat-uration percentage.
The first scale division marks a satura-tion of 80%. Each following division cor-responds approximately to the decrease over the half-life for the respective type of tissue.
TIP The same desaturation diagram is also available in the dive mode (More > Graphs).
Gaslist
When using an open circuit dive set-ting, the list of available gas mixes can be shown on the display at position 10.
Press ENTER to switch between gas list and desaturation diagram.
The first gas mix used when starting your dive is displayed at position 11. Air means compressed air (21% oxygen,
no helium). For any other gas mix, the respective percentages of oxygen and helium fractions are displayed.
Gaslist contains the other four preset gas mixes with their respective percent-ages of oxygen and helium fractions.
If the sum of oxygen and helium frac-tions is less than 21%, the gas list shows ERR indicating an unusual gas mix.
Setpoints
When using a closed circuit dive set-ting, the list of available setpoints can be shown on the display at position 10.
Press ENTER to switch between set-points list and desaturation diagram.
The setpoints list shows the oxygen par-tial pressure for the three setpoints (SP) and the oxygen and helium fractions of

Display in Surface Mode
19
the diluent. The first setpoint is perma-nently displayed at position 11.
Dive Setting Display
In surface mode, the dive setting (pos. 11) is displayed like this:• O/C: ZH-L16 OC• C/C: ZH-L16 CC• G/F and first gas: L16-GF OC • G/F and oxygen partial pressure:
L16-GF CC• Gauge: Gauge dive setting• Apnoe: Apnoe dive setting
Example: Dive setting is ZH-L16 OC
NoFly 0:00 GDesat 0:00 F
Air
Example: Dive setting is ZH-L16 CC
NoFly 0:00 CDesat 0:00 C
1.00Bar
Example: Dive setting is L16-GF OC
NoFly 0:00 GDesat 0:00 F
22|0
Example: Dive setting is L16-GF CC
NoFly 0:00 GDesat 0:00 F
1.00Bar
Example: Dive setting is Gauge
Gauge
Example: Dive setting is Apnoe
Apnoe

Menu Functions in Surface Mode
20
You can adjust the settings to prepare the next dive, read recorded dive data and adjust the base settings of OSTC Mk.2.
Press SET/MENU in order to access the menu in surface mode. The display shows the pre-menu Menu?. Press ENTER to confirm.
Logbook Gas Setup Reset Menu Setup More Exit Logbook
Menu:
Logbook Look up recorded data from recent dives
Gas Setup Set gas mixes matching the scuba set
Reset Menu Reset the OSTC Mk.2 set-tings to their default values; stop de-compression calculation; delete record-ed data; restart the OSTC Mk.2
Setup Inspect and modify base set-tings for OSTC Mk.2 functions
Choose More for the following entries:
Set Time Set date and time
CCR SetPoint Menu Inspect and modi-fy closed circuit rebreather settings
Battery Info Display Battery charge status
Simulator Simulate dive mode; calcu-late decostops
See the following sections for more de-tails.
Menu Functions in Surface Mode

Logbook – Recorded Dive Data
21
Logbook – Recorded Dive Data
The OSTC Mk.2 records data during ev-ery dive. It can be retrieved from the Logbook.
01 10/11 15.5m 34’ 02 10/05 25.2m 18’ 03 10/04 23.0m 22’ 04 10/04 16.2m 24’
Exit
Logbook
Memory
Logbook entries are sorted in chronological order, starting with the most recent entry. Every entry shows: • Position index
(01 = most recent), • Date (month/day), • Maximum dive depth • Dive duration (minutes)
OSTC Mk.2 stores data of approximately 20 to 30 typical dives. The actual num-ber of records depends on the overall size of data. If the memory is full, exist-ing records will be overwritten, starting with the oldest.
TIP If you want to secure your record-ed dive data, you can connect the OSTC Mk.2 to a computer and read out the data.
Displaying details
The details page also shows:• 1st line – position index, date• 2nd line – maximum diving depth,
duration, minimum ambient tem-perature
• 3rd line – ambient pressure above water (used as reference for depth measurement), desaturation time (hours:minutes)
#01 10/03/12 25.00m 4’29” 24.7°C 1030mbar Desat 0:59
TIP To display the actual number of dives instead of the position index, you can configure Custom Function 28.
Gas Setup – Adapting Scuba Gas Mixes
22
Gas Setup – Adapting Scuba Gas Mixes
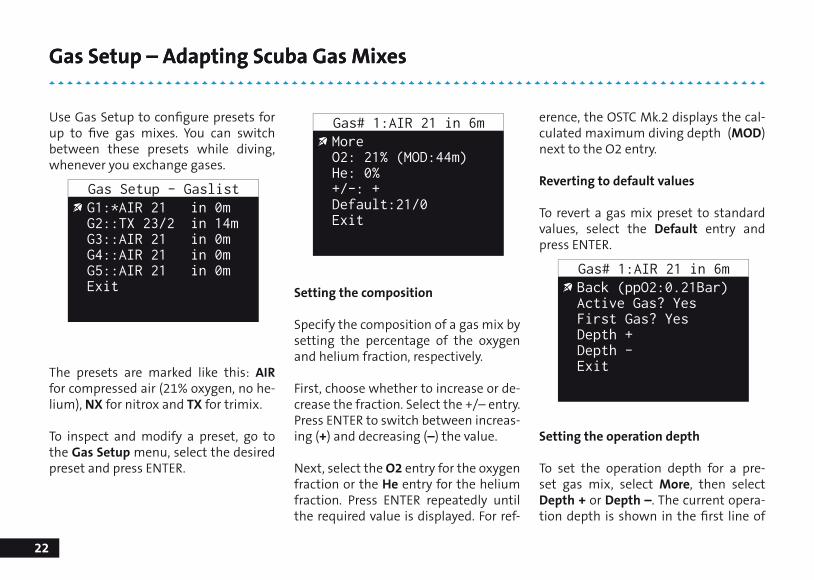
Use Gas Setup to configure presets for up to five gas mixes. You can switch between these presets while diving, whenever you exchange gases.
G1:*AIR 21 in 0m G2::TX 23/2 in 14m G3::AIR 21 in 0m G4::AIR 21 in 0m G5::AIR 21 in 0m Exit Logbook
Gas Setup - Gaslist
The presets are marked like this: AIR for compressed air (21% oxygen, no he-lium), NX for nitrox and TX for trimix.
To inspect and modify a preset, go to the Gas Setup menu, select the desired preset and press ENTER.
More O2: 21% (MOD:44m) He: 0% +/-: + Default:21/0 Exit Logbook
Gas# 1:AIR 21 in 6m
Setting the composition
Specify the composition of a gas mix by setting the percentage of the oxygen and helium fraction, respectively.
First, choose whether to increase or de-crease the fraction. Select the +/– entry. Press ENTER to switch between increas-ing (+) and decreasing (–) the value.
Next, select the O2 entry for the oxygen fraction or the He entry for the helium fraction. Press ENTER repeatedly until the required value is displayed. For ref-
erence, the OSTC Mk.2 displays the cal-culated maximum diving depth (MOD) next to the O2 entry.
Reverting to default values
To revert a gas mix preset to standard values, select the Default entry and press ENTER.
Back (ppO2:0.21Bar) Active Gas? Yes First Gas? Yes Depth + Depth - Exit Logbook
Gas# 1:AIR 21 in 6m
Setting the operation depth
To set the operation depth for a pre-set gas mix, select More, then select Depth + or Depth –. The current opera-tion depth is shown in the first line of

Gas Setup – Adapting Scuba Gas Mixes
23
the display, the calculated correspond-ing oxygen partial pressure (ppO2) in the second line, next to the Back entry.
Configure usage
To use a gas mix right at the start, set First Gas? to Yes. On the Gas List, the first gas mix is marked with an asterisk (Gn:*), all other gas mixes are marked Gn::.
NOTE A gas mix with an operation depth of 0 m is used only when First Gas? is set to Yes.
If a certain gas mix is not available, you can disable the respective entry on the gas list. To do this, set Active Gas? to No. Deactivated entries are dimmed out on the display (text turns dark blue).
Reset Menu
24
Reset Menu
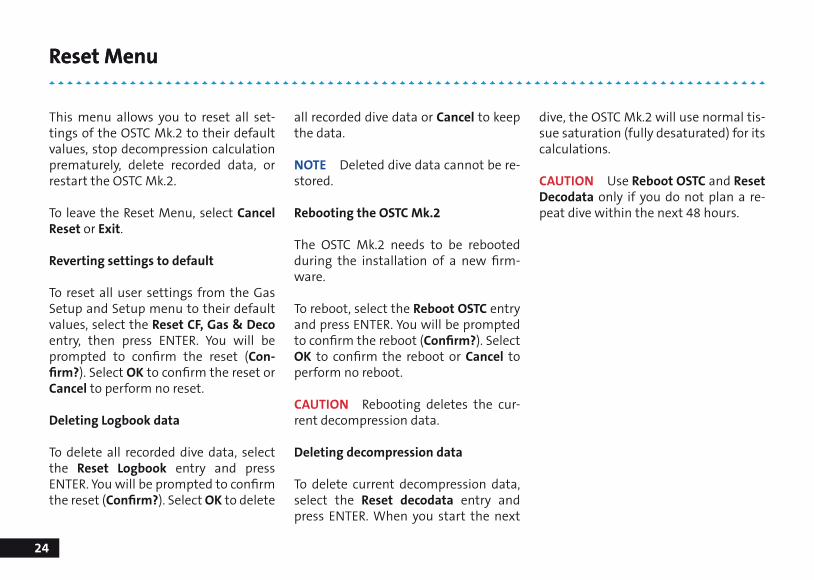
This menu allows you to reset all set-tings of the OSTC Mk.2 to their default values, stop decompression calculation prematurely, delete recorded data, or restart the OSTC Mk.2.
To leave the Reset Menu, select Cancel Reset or Exit.
Reverting settings to default
To reset all user settings from the Gas Setup and Setup menu to their default values, select the Reset CF, Gas & Deco entry, then press ENTER. You will be prompted to confirm the reset (Con-firm?). Select OK to confirm the reset or Cancel to perform no reset.
Deleting Logbook data
To delete all recorded dive data, select the Reset Logbook entry and press ENTER . You will be prompted to confirm the reset (Confirm?). Select OK to delete
all recorded dive data or Cancel to keep the data.
NOTE Deleted dive data cannot be re-stored.
Rebooting the OSTC Mk.2
The OSTC Mk.2 needs to be rebooted during the installation of a new firm-ware.
To reboot, select the Reboot OSTC entry and press ENTER. You will be prompted to confirm the reboot (Confirm?). Select OK to confirm the reboot or Cancel to perform no reboot.
CAUTION Rebooting deletes the cur-rent decompression data.
Deleting decompression data
To delete current decompression data, select the Reset decodata entry and press ENTER. When you start the next
dive, the OSTC Mk.2 will use normal tis-sue saturation (fully desaturated) for its calculations.
CAUTION Use Reboot OSTC and Reset Decodata only if you do not plan a re-peat dive within the next 48 hours.
Setup – Adjusting Base Settings
25
Setup – Adjusting Base Settings
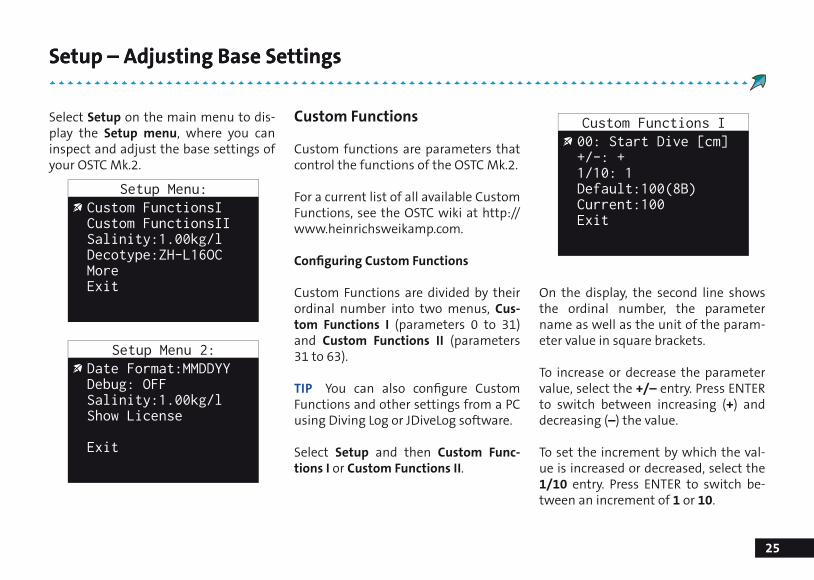
Select Setup on the main menu to dis-play the Setup menu, where you can inspect and adjust the base settings of your OSTC Mk.2.
Custom FunctionsI Custom FunctionsII Salinity:1.00kg/l Decotype:ZH-L16OC More Exit Logbook
Setup Menu:
Date Format:MMDDYY Debug: OFF Salinity:1.00kg/l Show License
Exit Logbook
Setup Menu 2:
Custom Functions
Custom functions are parameters that control the functions of the OSTC Mk.2.
For a current list of all available Custom Functions, see the OSTC wiki at http://www.heinrichsweikamp.com.
Configuring Custom Functions
Custom Functions are divided by their ordinal number into two menus, Cus-tom Functions I (parameters 0 to 31) and Custom Functions II (parameters 31 to 63).
TIP You can also configure Custom Functions and other settings from a PC using Diving Log or JDiveLog software.
Select Setup and then Custom Func-tions I or Custom Functions II.
00: Start Dive [cm] +/-: + 1/10: 1 Default:100(8B) Current:100 Exitok
Custom Functions I
On the display, the second line shows the ordinal number, the parameter name as well as the unit of the param-eter value in square brackets.
To increase or decrease the parameter value, select the +/– entry. Press ENTER to switch between increasing (+) and decreasing (–) the value.
To set the increment by which the val-ue is increased or decreased, select the 1/10 entry. Press ENTER to switch be-tween an increment of 1 or 10.

Setup – Adjusting Base Settings
26
Next, select the Current entry and press ENTER repeatedly until the required value is displayed. You can change the direction and increment at any time.
NOTE For technical reasons, the pos-sible numeric range for parameter val-ues is • 0 to 255, for entries marked with 8B
(8 bit word size)• 0 bis 32767, for entries marked with
15B (15 bit word size)
Note that the possible numeric range includes unsuitable or even dangerous values.
! WARNING
Keep to the value range that is recom-mended for the respective Custom Function. Some Custom Functions im-pact critical safety-related functions and displays.
To reset a particular parameter to its de-fault value, select the Default entry and press ENTER.
NOTE All Custom Functions are ad-justed to a tested value suitable for this
application.
Salinity
This setting allows you to adjust salini-ty, used for calculating both current and maximum depths.
The default salinity is 1.00 kg/l. To in-crease this value, select the Salinity en-try and press ENTER repeatedly until the required value is displayed. The value range is 1.00 kg/l to 1.04 kg/l.
NOTE Decompression information is based upon absolute pressure and not relative pressure and therefore salinity does not effect this calculation.

Setup – Adjusting Base Settings
27
Decotype – OSTC Mk.2 Dive Setting
Select the required dive setting and the type of decompression calculation.
ZH-L16 OC Decompression calculation for open circuit (normal scuba gear) us-ing the Bühlmann ZH-L16 model
ZH-L16 CC Decompression calculation for closed circuit rebreather using the Bühlmann ZH-L16 model
Gauge Disables decompression/satu-ration calculation and no-fly warning. The OSTC Mk.2 records diving depth, time and temperature.
Apnoe Disables decompression/satu-ration calculation and no-fly warning.
The OSTC Mk.2 records diving depth, time and temperature.
L16-GF OC Decompression calculation for open circuit (normal scuba gear) us-ing the Bühlmann ZH-L16 model with gradient factors
L16-GF CC Decompression calculation for closed circuit rebreather using the Bühlmann ZH-L16 model with gradient factors
Choose More to access the following entries:
Date Format
Set the displayed date format:• YYMMDD: year, month, day• DDMMYY: day, month, year• MMDDYY: month, day, year
Debug
To display additional information for the analysis of errors, set Debug to ON. This setting is intended to assist pro-grammers and developers and is not required for normal operation.
Show License
Select this entry to display the terms of license for the firmware.
Set Time and Date
28
Set Time and Date
Set Time
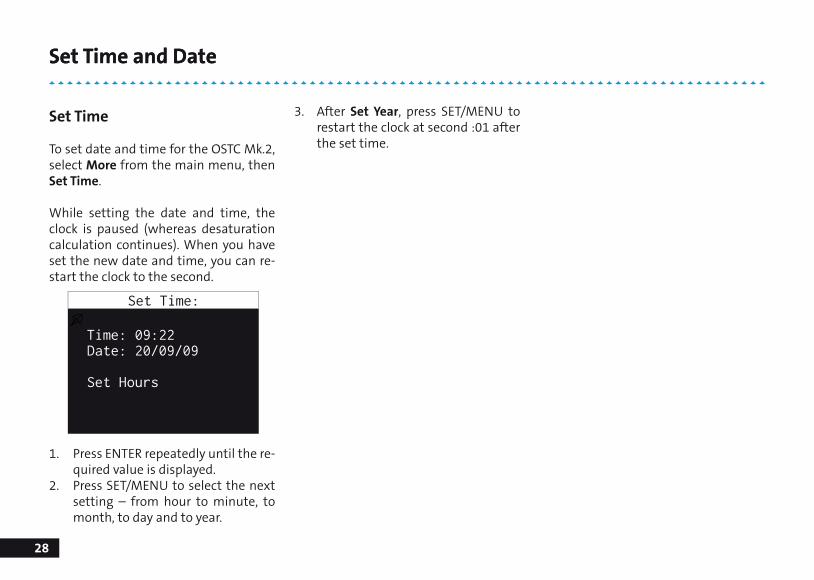
To set date and time for the OSTC Mk.2, select More from the main menu, then Set Time.
While setting the date and time, the clock is paused (whereas desaturation calculation continues). When you have set the new date and time, you can re-start the clock to the second.
Time: 09:22 Date: 20/09/09
Set Hours
Logbook
Set Time:
1. Press ENTER repeatedly until the re-quired value is displayed.
2. Press SET/MENU to select the next setting – from hour to minute, to month, to day and to year.
3. After Set Year, press SET/MENU to restart the clock at second :01 after the set time.

CCR SetPoint Menu – Closed Circuit Rebreather Settings
29
CCR SetPoint Menu – Closed Circuit Rebreather Settings
When using a closed circuit rebreather, you can set the OSTC Mk.2 to the corre-sponding CCR setpoint. You can specify setpoints in the CCR SetPoint Menu.
NOTE The OSTC MKII does not dis-play the PPo2 of the breathing loop and therefore you cannot use it as a PPo2 display. In the context of CCR diving the OSTC MKII can only serve a constant PPo2 decompression computer and not as PPo2 display or a setpoint controller..
SP#1 (Dil. 21/0) Current:1.00Bar ppO2 + ppO2 - Default:1.00 Exit
CCR SetPoint Menu
Select the first menu entry and press ENTER to select setpoint 1, 2 or 3 (SP#1, SP#2, SP#3).
To increase oxygen partial pressure for the selected setpoint, select ppO2 + and press ENTER repeatedly. The value increases in steps of 0.01 bar.
To decrease oxygen partial pressure for the selected setpoint, select ppO2 – and press ENTER repeatedly. The value de-creases in steps of 0.01 bar.
To revert to the default value for oxygen partial pressure, select Default:1.00 and press ENTER.
If required, repeat these steps for the other setpoints.

Battery Information
30
Battery Information
Select Battery Informtion to display de-tailed information about the battery.
Cycles:11(2) Last Complete:09/03/03Lowest Vbatt:3.130VLowest at:08/05/09Tmin:15.1° (08/23/09)Tmax:28.9° (09/05/09) Logbook
Battery Information
• Cycles: Number of complete charge cycles (battery charged up to at least 95% of its capacity)
• Last Complete: Date of the last com-plete charge
• Lowest Vbatt: Minimum battery voltage
• Lowest at: Date of minimum battery voltage
• Tmin: Minimum ambient tempera-ture with date
• Tmax: Maximum ambient tempera-ture with date
Press ENTER to exit Battery Information and return to the menu.
Simulator
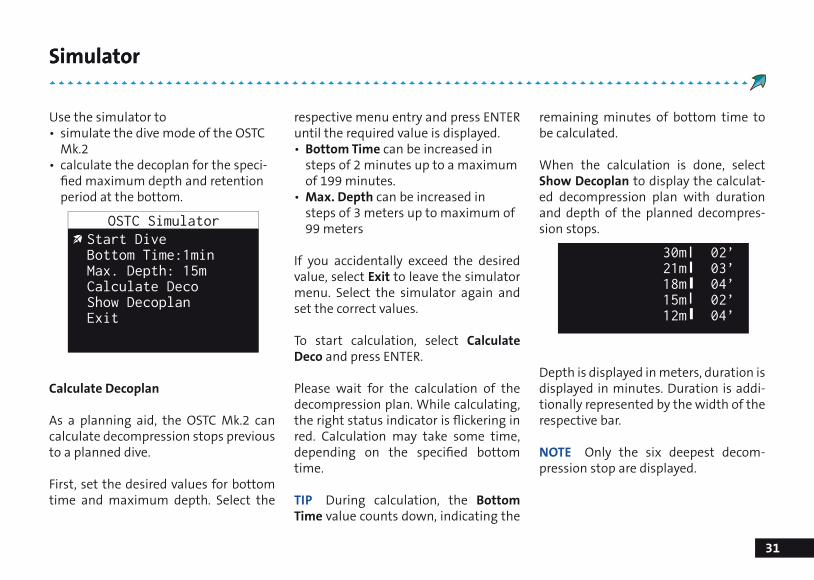
31
Use the simulator to • simulate the dive mode of the OSTC
Mk.2• calculate the decoplan for the speci-
fied maximum depth and retention period at the bottom.
Start Dive Bottom Time:1min Max. Depth: 15m Calculate Deco Show Decoplan Exit
OSTC Simulator
Calculate Decoplan
As a planning aid, the OSTC Mk.2 can calculate decompression stops previous to a planned dive.
First, set the desired values for bottom time and maximum depth. Select the
respective menu entry and press ENTER until the required value is displayed. • Bottom Time can be increased in
steps of 2 minutes up to a maximum of 199 minutes.
• Max. Depth can be increased in steps of 3 meters up to maximum of 99 meters
If you accidentally exceed the desired value, select Exit to leave the simulator menu. Select the simulator again and set the correct values.
To start calculation, select Calculate Deco and press ENTER.
Please wait for the calculation of the decompression plan. While calculating, the right status indicator is flickering in red. Calculation may take some time, depending on the specified bottom time.
TIP During calculation, the Bottom Time value counts down, indicating the
remaining minutes of bottom time to be calculated.
When the calculation is done, select Show Decoplan to display the calculat-ed decompression plan with duration and depth of the planned decompres-sion stops.
30m 02’21m 03’18m 04’15m 02’12m 04’
Depth is displayed in meters, duration is displayed in minutes. Duration is addi-tionally represented by the width of the respective bar.
NOTE Only the six deepest decom-pression stop are displayed.
Simulator
Simulator
32
Simulating Dive Mode
The simulator allows you to simulate the diving mode in order to become fa-miliar with its functions above the sur-face.
Tauchmodus starten Select Start Dive to start the simulator. The value speci-fied for Max. Depth is adapted as cur-rent diving depth.
Changing diving depth Unlike the dive mode, the simulator has an additional menu for diving depth, where you can set the simulated diving depth. Press ENTER to display the depth menu. Use SET/MENU to select the desired change in depth, then press ENTER to confirm:• +1m, +10m: descend 1 m or 10 m• -1m, -10m: descend 1 m or 10 m
Quitting dive mode To quit the dive mode, simulate an ascent. In the depth menu, select -10m and press ENTER repeatedly until the displayed diving
depth has reached 0 m. The dive mode simulation will stop after a short delay.
NOTE Both in dive mode and during a simulation, the OSTC Mk.2 cannot switch to sleep mode. Remember to quit the dive mode simulation when you’re done, otherwise you might ex-haust the capacity of both battery and logbook memory.
All other available functions are similar to the ones in dive mode and are de-scribed there.

Display in Dive Mode
33
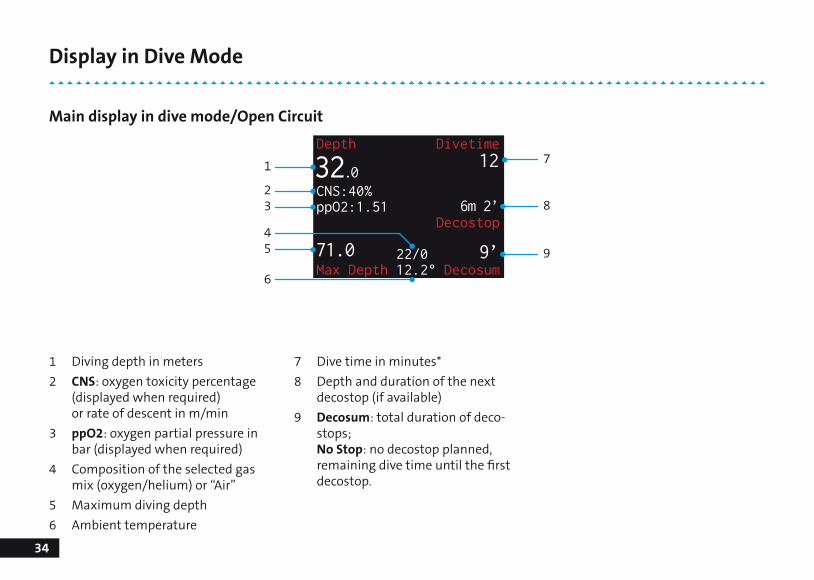
Display in Dive Mode
Depth Divetime
CNS:40%ppO2:1.51 Decostop 1.06 22/0Max Depth 12.2° Decosum
32.012
9’
6m 2’
71.0
1 Diving depth in meters2 CNS: oxygen toxicity percentage
(displayed when required) or rate of descent in m/min
3 ppO2: oxygen partial pressure in bar (displayed when required)
4 Oxygen partial pressure for the selected setpoint; Bail for bailout
5 Composition of the selected dilu-ent or bailout gas (oxygen/helium)
6 Maximum diving depth7 Ambient temperature8 Dive time in minutes* 9 Depth and duration of the next
decostop (if available)
10 Decosum: total duration of deco-stops; No Stop: no decostop planned, remaining dive time until the first decostop.
1
23
6
7
54
8
10
9
Main display in dive mode/Closed Circuit
Display in Dive Mode
34
Depth Divetime
CNS:40%ppO2:1.51 Decostop 22/0Max Depth 12.2° Decosum
32.012
9’
6m 2’
71.0
1 Diving depth in meters2 CNS: oxygen toxicity percentage
(displayed when required) or rate of descent in m/min
3 ppO2: oxygen partial pressure in bar (displayed when required)
4 Composition of the selected gas mix (oxygen/helium) or “Air”
5 Maximum diving depth6 Ambient temperature
7 Dive time in minutes* 8 Depth and duration of the next
decostop (if available)9 Decosum: total duration of deco-
stops; No Stop: no decostop planned, remaining dive time until the first decostop.
1
23
5
6
4
7
9
8
Main display in dive mode/Open Circuit
Display in Dive Mode
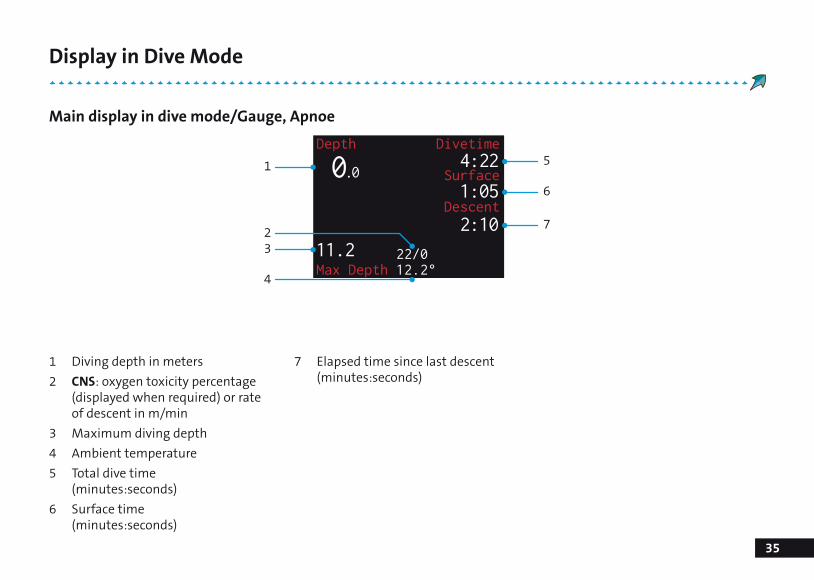
35
Depth Divetime
Surface
Descent 22/0Max Depth 12.2°
0.0 4:22
11.2
1 Diving depth in meters2 CNS: oxygen toxicity percentage
(displayed when required) or rate of descent in m/min
3 Maximum diving depth4 Ambient temperature5 Total dive time
(minutes:seconds)6 Surface time
(minutes:seconds)
7 Elapsed time since last descent (minutes:seconds)
1
3
4
2
Main display in dive mode/Gauge, Apnoe
2:10
1:05
5
6
7

Menu Functions in Dive Mode
36
When the computer is in dive mode and set to OC, CC or Gauge, you may use the menu to • select a preset gas mix (OC, Gauge)
or setpoints and bailout gases (CC)• display additional information
NOTE The Apnoe dive mode does not have a menu.
To display the menu in dive mode, press SET/MENU. The display shows the pre-menu Menu?. Press ENTER to confirm.
Decompression data
Decoplan (OC, CC) shows the decom-pression plan as a list of decompres-sion stages. The current decompression stage is also shown on the main dis-play.
Selecting a breathing gas
Gas List (OC, Gauge) allows you to switch between the five preset gas mixes.
Set Gas (OC, Gauge) allows you to mod-ify the current composition of the gas mix during the dive.
SetPoint (CC) allows you to switch be-tween the three preset setpoints.
Bailout (CC) allows you to select one of the three preset bailout gases.
Saturation information
Select More > Graphs to display a dia-gram showing the calculated nitrogen and helium saturation.
N280%He
The diagram visualises the approximate saturation values during the dive.
The lines in the upper section represent nitrogen saturation, the lines in the lower section show the helium satura-tion of the 16 types of tissue according the Bühlmann model.
The numeric value is the saturation per-centage of the lead tissue.
The first scale division marks a satura-tion of 80%. Each following division cor-responds approximately to the decrease
Menu Functions in Dive Mode

Menu Functions in Dive Mode
37
over the half-life for the respective type of tissue.
Select More > Lead Tis (OC, CC) to dis-play the index of the current lead tissue and its saturation.
Additional displays
Select More > Display to switch be-tween maximum display brightness (default) and reduced brightness.
Select More > Stopwatch to start or stop an additional timer (minutes:seconds).
Decoplan
Select Decoplan to display the list of cur-rently planned decompression stops.
30m 02’21m 03’18m 04’15m 02’12m 04’
For each planned decompression stop, depth in meters and duration in min-utes are displayed. Duration is addition-ally represented by the width of the re-spective bar.
If no decompression stops are required, No Deco is displayed.
Press ENTER to hide the list.
If required, the next decompression stop is permanently shown on the main display.
Gas List
For Open Circuit, Gauge
This setting allows you to select the currently used gas mix. You may choose between the presets made in Gas Setup (in surface mode). Oxygen and helium fractions of the current gas mix are dis-played on the main display.

Menu Functions in Dive Mode
38
Set Gas
For Open Circuit, Gauge
This setting allows you to select the currently used gas mix. You may choose between the presets made in Gas Setup (in surface mode). Oxygen and helium fractions of the current gas mix are dis-played on the main display.
Sel21/ 0O2 +O2 - He +He -
Select O2 + or O2 –, to increase or de-crease the oxygen fraction.
Select He + oder He – to increase or de-crease the helium fraction.
Press ENTER repeatedly until the re-quired value is displayed.
The new value is displayed in the first line, next to Sel.
In order to apply the new setting select the first entry Sel and press ENTER.
In order to revert to the preset gas mix, select it again from the Gas List.
SetPoint
For Closed Circuit
Choose between the three setpoints that have been configured in Gas Setup (surface mode). Oxygen and helium fraction of the current gas mix are dis-played on the main screen.
Bailout
For Closed Circuit
Select the current bailout gas mix. You can choose between five preset gas
mixes already configured in Gas Setup (surface mode). Oxygen and helium fraction of the current gas mix are dis-played on the main screen.
Graphs
Select More and then Graphs to display the diagram for nitrogen and helium tissue saturation.
Once a few seconds have passed, the additional diagram is automatically hidden. To hide it immediately, press SET/MENU or ENTER.
Display
Select More and then Display to switch between full (default) and reduced brightness of the display. At full bright-ness, text appears in white; at reduced brightness, it appears in a yellowish shade.

Menu Functions in Dive Mode
39
NOTE The display brightness setting applies only to dive mode; the setting is retained for the next dive.
Lead Tis
Select Lead Tis to display the type of tissue with the most significant satura-tion.
Lead Tis#15 (N2)80%
After a few seconds, the additional dia-gram disappears automatically. To hide it immediately, press SET/MENU or EN-TER.
Stopwatch
Select More > Stopwat. to start an addi-tional stopwatch timer. The stopwatch counts seconds and minutes.
The value left of the stopwatch is the average depth since starting the stop-watch.
Depth Divetime
StopwatchCNS:40% 15.0m 2:59ppO2:1.51 Decostop
36/0Max Depth 12.2° Decosum
32.012
9’
6m 2’
71.0
To stop and hide the stopwatch, select More > Stopwat. once again.

Cleaning and Care
40
Housing
Use freshwater to rinse OSTC Mk.2 after every dive, particularly after diving in seawater.
If necessary, dissolve dirt by immers-ing OSTC Mk.2 into freshwater for some hours. Do not use cleaning agents or solvents.
CAUTION Never insert pointed ob-jects into the opening of the pressure sensor.
Wristband
The wristband can be detached after the two metal pins have been pushed out. The wristband is hand washable and can be replaced, if necessary.
Changing the battery
Open the battery compartment only when the battery has to be replaced.
The screw cap can be unscrewed using a coin.
After the new battery has been inserted, firmly close the battery compartment again to make it waterproof.
Spares
Replacement wristbands and batteries can be ordered from heinrichs weikamp or your local dealer.
Cleaning and Care

USB Interface
41
The USB interface can be used for charg-ing the battery, for data exchange be-tween the OSTC Mk.2 and a connected computer, and for installing new firm-ware for the OSTC Mk.2.
While the OSTC Mk.2 is connected to a suitable USB port or a standard USB charger, the battery charges. For details see the section Basics: Charging the Battery.
Once charging is completed, disconnect the USB cable and firmly replace the lid on the USB connector to make it water-tight. To allow the air behind the cap to escape, firmly twist the USB cap back into position.
NOTE Links to all mentioned software resources can be found at http://www.heinrichsweikamp.net
Installing the Driver
When connecting a computer to your OSTC Mk.2 for the first time, you will need to install a device driver, which is available for Windows, Mac OS X and Linux.1. Download the FT232R interface
driver.2. Unpack the zip archive to a direc-
tory.3. Connect the USB interface of the
OSTC Mk.2 to your computer. Win-dows will automatically recognize the OSTC Mk.2 as a new device.
4. When Windows asks for a driver medium, point to the directory con-taining the unpacked driver soft-ware.
After installation has completed, the OSTC Mk.2 interface becomes part of the “Ports” branch in the Windows De-vice Manager; it is listed as “USB Serial Port (COM x)”.
Transferring data and settings
Data transfer with the OSTC Mk.2 is supported by two software applications – DivingLog and JDiveLog. Both applica-tions provide easy-to-operate functions for transferring recorded dive data, and for configuring and remotely control-ling your OSTC Mk2.
Updating the firmware
The OSTC Mk.2 firmware (integrated software) is in the constant process of improvement. To make the most of your OSTC Mk.2, it is advisable to use the lat-est stable firmware that is available at the heinrichs weikamp website:
http://www.heinrichsweikamp.net/ostc
NOTE Linux and Macintosh users can install firmware updates using the JDiveLog application.
USB Interface
Technical Specifications
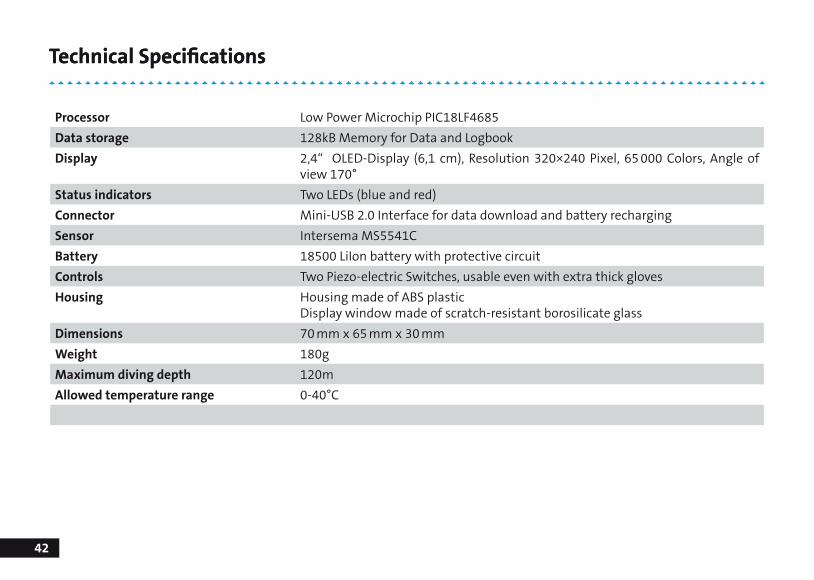
42
Processor Low Power Microchip PIC18LF4685Data storage 128kB Memory for Data and LogbookDisplay 2,4“ OLED-Display (6,1 cm), Resolution 320×240 Pixel, 65 000 Colors, Angle of
view 170° Status indicators Two LEDs (blue and red)Connector Mini-USB 2.0 Interface for data download and battery rechargingSensor Intersema MS5541CBattery 18500 LiIon battery with protective circuitControls Two Piezo-electric Switches, usable even with extra thick glovesHousing Housing made of ABS plastic
Display window made of scratch-resistant borosilicate glassDimensions 70 mm x 65 mm x 30 mmWeight 180gMaximum diving depth 120mAllowed temperature range 0-40°C
Technical Specifications

