pg100 series - c.r. laurence the body of these instructions "fastening" means any method...
TRANSCRIPT

11M0311
INSTALLATION INSTRUCTIONS
PG100 SERIESCURTAIN WALL
ALUMINUM
Phone: (800) 262-5151 Ext. 7700• Fax: (866) 262-3299crlaurence.com • usalum.com • crl-arch.com

PG100 SERIES CURTAIN WALL
02crlaurence.com | usalum.com
TABLE OF CONTENTS HANDLING, STORAGE, AND PROTECTION OF MATERIALS � � � � � � � � � � � � � � � � � � � � � � � � � � � � � � � � � � � � � � � � � � � � � 03
GENERAL INSTALLATION NOTES � � � � � � � � � � � � � � � � � � � � � � � � � � � � � � � � � � � � � � � � � � � � � � � � � � � � � � � � � � � � � � � � � � � � � � � 04
STRUCTURAL SILICONE GLAZING � � � � � � � � � � � � � � � � � � � � � � � � � � � � � � � � � � � � � � � � � � � � � � � � � � � � � � � � � � � � � � � � � � � � � 05
HORIZONTAL PROFILES AND VERTICAL PROFILES � � � � � � � � � � � � � � � � � � � � � � � � � � � � � � � � � � � � � � � � � � � � � � � � � � � � 06
FRAME INSTALLATION � � � � � � � � � � � � � � � � � � � � � � � � � � � � � � � � � � � � � � � � � � � � � � � � � � � � � � � � � � � � � � � � � � � � � � � � � � � � � � � 07-11
FRAME PREPARATION � � � � � � � � � � � � � � � � � � � � � � � � � � � � � � � � � � � � � � � � � � � � � � � � � � � � � � � � � � � � � � � � � � � � � � � � � � � � � � � 12-13
GLAZING INSTALLATION � � � � � � � � � � � � � � � � � � � � � � � � � � � � � � � � � � � � � � � � � � � � � � � � � � � � � � � � � � � � � � � � � � � � � � � � � � � � � 14-17
SEALING THE PERIMETER � � � � � � � � � � � � � � � � � � � � � � � � � � � � � � � � � � � � � � � � � � � � � � � � � � � � � � � � � � � � � � � � � � � � � � � � � � � � � � 18

PG100 SERIES CURTAIN WALL
03crlaurence.com | usalum.com
HANDLING, STORAGE, AND PROTECTION OF MATERIALSThe following precautions are recommended to protect the materials against damage� Following these precautions will help ensure early acceptance of your products and workmanship�
A. HANDLE CAREFULLY. AII materials at job site must be stored in a safe place, well removed from possible damage by other trades� Cardboard wrapped or paper interleaved materials must be kept dry�
B. CHECK ARRIVING MATERIALS. Check for quantities and keep records of where various materials are stored�
C. KEEP MATERIALS AWAY FROM WATER, MUD, AND SPRAY. Prevent cement, plaster, or other materials from damaging the finish.
D. PROTECT THE MATERIALS AFTER ERECTION. Protect erected frame with polyethylene or canvas splatter screen� Cement, plaster, terrazzo, other alkaline solutions, and acid based materials used to clean masonry are harmful to the finish. If any of these materials come in contact with the material, immediately remove with water and mild soap.
The rapidly changing technology within the architectural products industry demands that C�R� Laurence reserve the right to revise, discontinue or change any product line, specification or electronic media without prior written notice.
NOTE: Dimensions in parentheses ( ) are millimeters unless otherwise noted�

PG100 SERIES CURTAIN WALL
04crlaurence.com | usalum.com
GENERAL INSTALLATION NOTESRECOMMENDED GUIDELINES FOR ALL INSTALLATIONS:
1� REVIEW CONTRACT DOCUMENTS. Check shop drawings, installation instructions, architectural drawings, and shipping lists to become thoroughly familiar with the project. The shop drawings take precedence and include specific details for the project. Note any field verified notes on the shop drawings prior to installing� The installation instructions are of a general nature and cover most conditions�
2� INSTALLATION. All materials are to be installed plumb, level, square, and true�
3� BENCH MARKS. All work should start from bench marks and/or column lines as established by the architectural drawings and the general contractor with guaranteed accuracy� Working from these datum points and lines determine: a) The plane of the wall in reference to offset lines provided on each floor. b) The finish floor lines in reference to bench marks on the outer building columns. c) Mullion spacing from both ends of masonry opening to prevent dimensional build-up of daylight opening�
4� STEEL ANCHORS. Steel anchors that weld to steel structure are normally line set before mullions are hung� Outstanding leg of anchors must be at 90° to offset lines� Mullion space should be held to ±1/32" (0�8)� Anchor clips vary per job conditions� Follow approved shop drawings for size and location of clips�
5� FIELD WELDING. All field welding must be adequately shielded to avoid any splatter on glass or finished steel surfaces. Results will be unsightly and/or structurally unsound. Advise general contractor and other trades accordingly. All field welds of steel anchors must receive touch-up paint (zinc chromate) to avoid rust�
6� SURROUNDING CONDITIONS. Make certain that construction which will receive your materials is in accordance with the contract documents� If not, notify the general contractor in writing and resolve differences before proceeding with work�
7� SEALANTS. Sealants must be compatible with all materials with which they have contact, including other sealant surfaces� Consult with sealant manufacturer for recommendations relative to joint size, shelf life, compatibility, cleaning/priming, tooling, adhesion, etc� It is the responsibility of the Glazing Contractor to submit a statement from the sealant manufacturer indicating that glass and glazing materials have been tested for compatibility and adhesion with glazing sealants, and interpreting test results relative to material performance, including recommendations for primers and substrate preparation required to obtain adhesion� The chemical compatibility of all glazing materials and framing sealants with each other and with like materials used in glass fabrication must be established� This is required on every project.
8� FASTENING. Within the body of these instructions "fastening" means any method of securing one part to another or to adjacent materials� Only those fasteners used within the system are specified in these instructions. Due to the varying perimeter conditions and performance requirements, perimeter and anchor fasteners are not specified in these instructions. For perimeter and anchor fasteners refer to the shop drawings or consult the fastener supplier�
9� BUILDING CODES. Due to the diversity in state/provincial, local, and federal laws and codes that govern the design and application of architectural products, it is the responsibility of the individual architect, owner, and installer to assure that products selected for use on projects comply with all the applicable building codes and laws� C�R� Laurence exercises no control over the use or application of its products, glazing materials, and operating hardware, and assumes no responsibility thereof�
10� EXPANSION JOlNTS. Expansion joints and perimeter seals shown in these instructions and in the shop drawings are shown at normal size� Actual dimensions may vary due to perimeter conditions and/or difference in metal temperature between the time of fabrication and the time of installation� Gap between expansion members should be based on temperature at time of installation�
11� WATER HOSE TEST. As soon as a representative amount of the wall has been glazed (500 square feet or 46�5 m2) a water hose test should be conducted in accordance with AAMA 501.2 specifications to check the installation. On all jobs the hose test should be repeated every 500 square feet (46�5 m2) during the glazing operation�
12� COORDINATION WITH OTHER TRADES. Coordinate with the general contractor any sequence with other trades which offset curtain wall installation (i.e. fire proofing, back-up walls, partitions, ceilings, mechanical ducts, converters, etc.).
13� CARE AND MAINTENANCE. Final cleaning of finished surfaces should be done in accordance with AAMA 609.1 for anodized aluminum and 610�1 for painted aluminum�

PG100 SERIES CURTAIN WALL
05crlaurence.com | usalum.com
STRUCTURAL SILICONE GLAZING1. SEALANTS. All sealants referenced in these instructions must be a one part elastomeric silicone and must be applied
according to the silicone manufacturer's recommendations�
2. APPLICATION. Structural silicone must be applied from the interior and weatherseal from the exterior after the interior structural silicone has fully cured�
3. MAXIMUM ALLOWABLE STRESS ON SILICONE. The maximum allowable size of the glass lite is controlled by the width and depth of the silicone joint combined with the specified design windload (PSF or Pa). The stress on the structural silicone must not exceed 20 PSI (137 KPa) for a 6:1 safety factor� Check Structural Silicone Chart in the Architectural Design Manual for this product series�
4. ARCHITECT. It is the responsibility of the architect to secure approval of the system and request from the Glazing Contractor the compatibility and adhesion test reports described below�
5. GLAZING CONTRACTOR. It is the responsibility of the glazing contractor to submit a statement from the sealant manufacturer indicating that glass and glazing materials have been tested for compatibility and adhesion with glazing sealants and interpreting test results relative to material performance, including recommendations for primers and substrate preparation required to obtain adhesion� The chemical compatibility of all glazing materials and framing sealants with each other, and with like materials used in glass fabrication must be established� This is required on every project�

PG100 SERIES CURTAIN WALL
06crlaurence.com | usalum.com
HORIZONTAL PROFILES
VERTICAL PROFILES
SILL HORIZONTAL INTERMEDIATE HORIZONTAL
DOOR HEADER HORIZONTAL HEAD HORIZONTAL
SIDE VERTICAL INTERMEDIATE VERTICAL DOOR JAMB VERTICAL
Horizontal Filler
Horizontal Filler Horizontal Filler
Horizontal Filler

PG100 SERIES CURTAIN WALL
07crlaurence.com | usalum.com
FRAME INSTALLATIONNOTE: ANCHOR TYPE AND SIZES VARY PER JOB REQUIREMENTS. DETAILS SHOWN ARE TO BE USED AS A GUIDE ONLY. SEE APPROVED SHOP DRAWINGS FOR ACTUAL CONDITIONS.
1� Mark the centerline of each vertical member at the rough opening per the shop drawings�
2� Place each vertical into the opening and center on the marks starting from one side and working to the other�Verify the distance between each vertical center, top and bottom, as you plumb and anchor the plates to the structure� (Perimeter anchors are supplied by installer�)
3� Center each anchor in the plate slots to allow for minor adjustments� Shim bottom plates as necessary�
4� DO NOT fully tighten the perimeter anchor bolts� They may require loosening for horizontal member insertion�
SINGLE SPAN CONDITION
Bottom Plate
Top Plate
Vertical Member
Top Plate
Vertical Member
Bottom Plate
SIDE VERTICAL
INTERMEDIATE VERTICAL
NOTE: CHECK ALL DIMENSIONS AND MAKE SURE ALL MEMBERS ARE LEVEL�
MAKE SURE ALL ANCHORS AND BOLTS ARE FULLY TIGHTENED AND SECURED WITH CRL CAT� NO� 24221 BLUE LOCTITE
NOTE: ●All profiles are cut to size and pre-fabricated per the shop drawings. ●All fasteners within the system are included, all anchors to the structure are excluded and to be provided by the installer. ●Top and bottom plates are welded onto the vertical members.
PG100 SERIES CURTAIN WALL
08crlaurence.com | usalum.com
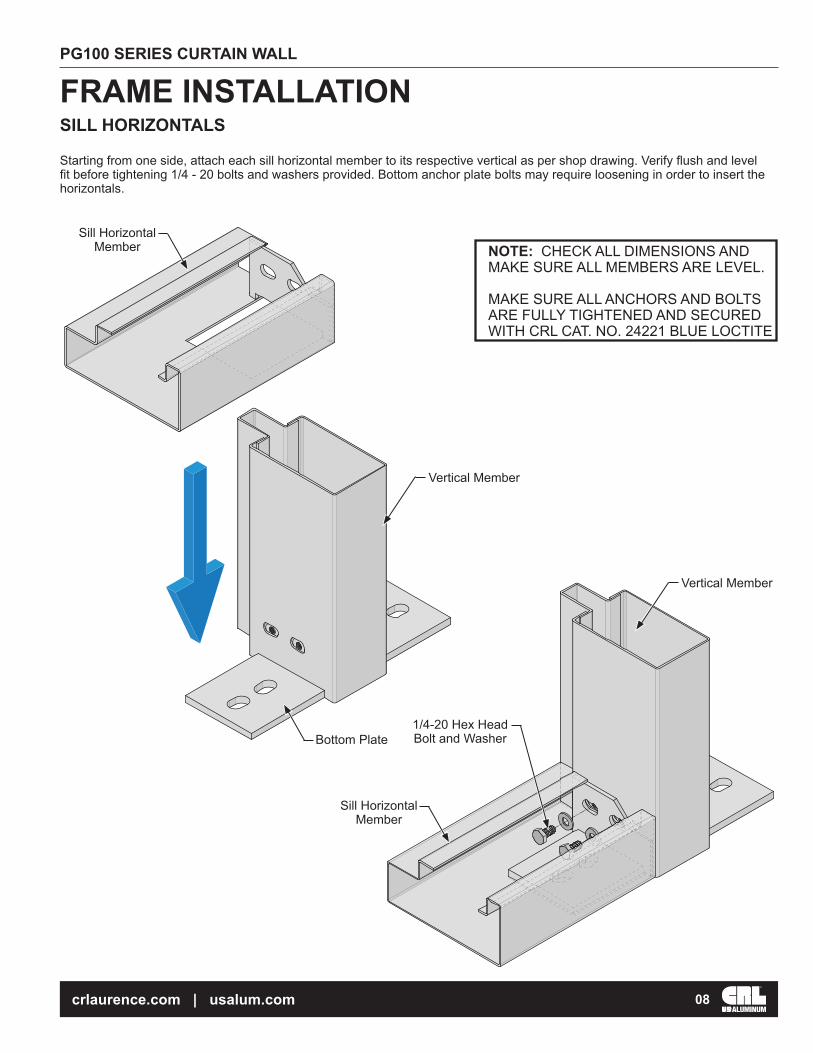
Starting from one side, attach each sill horizontal member to its respective vertical as per shop drawing. Verify flush and level fit before tightening 1/4 - 20 bolts and washers provided. Bottom anchor plate bolts may require loosening in order to insert the horizontals�
SILL HORIZONTALSFRAME INSTALLATION
Bottom Plate
Vertical Member
Sill Horizontal Member
Sill Horizontal Member
Vertical Member
1/4-20 Hex Head Bolt and Washer
NOTE: CHECK ALL DIMENSIONS AND MAKE SURE ALL MEMBERS ARE LEVEL�
MAKE SURE ALL ANCHORS AND BOLTS ARE FULLY TIGHTENED AND SECURED WITH CRL CAT� NO� 24221 BLUE LOCTITE

PG100 SERIES CURTAIN WALL
09crlaurence.com | usalum.com
Attach the head horizontals�
HEAD HORIZONTALSFRAME INSTALLATION
Head Horizontal Member
Vertical Member
Top Plate
Head Horizontal Member
1/4-20 Hex Head Bolt and Washer
Vertical Member
NOTE: CHECK ALL DIMENSIONS AND MAKE SURE ALL MEMBERS ARE LEVEL�
MAKE SURE ALL ANCHORS AND BOLTS ARE FULLY TIGHTENED AND SECURED WITH CRL CAT� NO� 24221 BLUE LOCTITE

PG100 SERIES CURTAIN WALL
10crlaurence.com | usalum.com
Attach the intermediate horizontals plumb and level between the verticals using the pre tapped holes on the verticals with the1/4-20 bolts and washers provided�
INTERMEDIATE HORIZONTALSFRAME INSTALLATION
Vertical Member
Intermediate Horizontal member
Vertical Member
1/4-20 Hex Head Bolt and Washer
Intermediate Horizontal Member
NOTE: Intermediate horizontals above 72" must be installed with the open side up
Slightly Recessed in the Rear
Align Intersection in Front
NOTE: CHECK ALL DIMENSIONS AND MAKE SURE ALL MEMBERS ARE LEVEL�
MAKE SURE ALL ANCHORS AND BOLTS ARE FULLY TIGHTENED AND SECURED WITH CRL CAT� NO� 24221 BLUE LOCTITE

PG100 SERIES CURTAIN WALL
11crlaurence.com | usalum.com
1. Hook each horizontal filler onto the horizontal member flanged edge and close as shown below.
2� Drill a through-hole at each end, and through both parts, as shown below and secure with the supplied rivets� Check shop drawings for spacing if required�
INTERMEDIATE HORIZONTALSFRAME INSTALLATION
Vertical Member
Horizontal Member
Vertical Member
Horizontal Filler
Horizontal Member
Pop Rivet
Horizontal Filler
Align Mullions in Front

PG100 SERIES CURTAIN WALL
12crlaurence.com | usalum.com
SEALING THE VERTICAL AND HORIZONTAL JOINTSFRAME PREPARATION
Apply CRL Cat. No. 995BL or 995W Dow Corning Structural Adhesive at all pop rivets, vertical and horizontal joints, and allow it to cure per the detail shown below�
NOTE: Consult sealant manufacturer for proper cleaning and priming recommendations
CRITICAL SEALSeal 1" at vertical and horizontal joints using Cat.No. 995BL or 995W Dow Corning Structural Adhesive
CRITICAL SEALSeal over all pop rivets using Cat. No. 995BL or 995W Dow Corning Structural Adhesive

PG100 SERIES CURTAIN WALL
13crlaurence.com | usalum.com
1� Apply Cat. No. V210812 Thermalbond® Structural Glazing Spacer Tape to the vertical members as shown below�
GLAZING PREPARATIONFRAME PREPARATION
2� Apply Cat. No. V210838 Thermalbond® Structural Glazing Spacer Tape to the vertical pressure bars as shown�
Apply the tape butted to the edge
Cat. No. V210812 1/2" x 1/4" Structural Glazing Spacer Tape
Apply the tape butted to the edge
Cat No. V210838 3/8" x 1/4" Structural Glazing Spacer Tape Apply tape 3/16"
from edgeApply tape 3/16" from edge
Cat. No. V210812 1/2" x 1/4" Structural Glazing Spacer Tape

PG100 SERIES CURTAIN WALL
14crlaurence.com | usalum.com
2� Install the glass and center in the frame� Use Cat. No. CW368 Temporary Glass Retainers on the horizontal members to hold the glass in place until the pressure bars are installed�
GLAZING INSTALLATION1� Position two Cat. No. SB575 1/4" x 3/4" x 4" Neoprene Setting Blocks for each glass lite as directed by the deadload charts or shop drawings�
Cat. No. SB575 1/4" x 3/4" x 4" Neoprene setting blocks, two for each glass lite
Cat. No. CW368Temporary Glass Retainer

PG100 SERIES CURTAIN WALL
15crlaurence.com | usalum.com
3. Install the vertical pressure bars first, leaving 1/8" gaps at the top and bottom.
4� Torque each bolt evenly to 60 Inch Pounds�
5� Install all of the vertical face covers before moving on to the horizontals�
6� Remove all Cat. No. CW368 Temporary Glass Retainers once all the vertical pressure bars are in place� Apply Cat. No. V210812 Thermalbond® Structural Glazing Spacer Tape to the horizontal members as shown below�
GLAZING INSTALLATION

PG100 SERIES CURTAIN WALL
16crlaurence.com | usalum.com
7� Install the snap-in vertical face covers�
GLAZING INSTALLATION
8� Install the horizontal pressure bars, leaving 1/8" gaps at each end�
9� Torque each bolt to 60 Inch Pounds�
10� Seal all gaps�
Cat. No. V2108383/8" x 1/4" StructuralGlazing Spacer Tapeshould not cover weep slot
Apply tape 3/16" from edge
Apply tape 3/16" from edge
Weep slot
Weep slot
Weep slot
Weep slot
CRITICAL SEALSeal all gaps at vertical and horizontal joints using Cat.No. 995BL or 995W Dow Corning Structural Adhesive

PG100 SERIES CURTAIN WALL
17crlaurence.com | usalum.com
12� Seal all the gaps around all vertical and horizontal intersections and at the top and bottom and sides of all pressure bars using Cat. No. 995BL or 995W Dow Corning Structural Adhesive�
11� Install the snap-in horizontal face covers, make sure the weep slots are facing down�
GLAZING INSTALLATION
Weep slot
Weep slot

PG100 SERIES CURTAIN WALL
18crlaurence.com | usalum.com
SEALING THE PERIMETERSeal all around the perimeter using CRL Cat. No. 995BL or 995W Dow Corning Structural Adhesive� Ensure the perimeter sealant has a smooth transition across the vertical and horizontal joints�
PerimeterCaulking Cat. No. 995BL or 995WDow Corning Structural Adhesive
PerimeterCaulking Cat. No. 995BL or 995WDow Corning Structural Adhesive
THIS COMPLETES THE CURTAIN WALL INSTALLATION, MAKE SURE TO WIPE DOWN AND CLEAN THE CURTAIN WALL WITH CAT. NO. CRL18X ALL PURPOSE CLEANER.