planning and configuration guide - ibmpublib.boulder.ibm.com/tividd/td/itabarfzos/sc23... ·...
TRANSCRIPT
IBM Tivoli Advanced Backup and Recovery for z/OS
Planning and Configuration Guide
Version 2.1.0
SC23-9732-00IBM Confidential
���


IBM Tivoli Advanced Backup and Recovery for z/OS
Planning and Configuration Guide
Version 2.1.0
SC23-9732-00IBM Confidential
���

Note
Before using this information and the product it supports, read the information in “Notices” on page 149.
This edition applies to Version 2, Release 1, Modification 0 of IBM Tivoli Advanced Backup and Recovery for z/OS
(product number 5698-B17) and to all subsequent releases and modifications until otherwise indicated in new
editions.
© Copyright Rocket Software Inc., 2008
IBM Confidential
Contents
Figures . . . . . . . . . . . . . . . . . . . . . . . . . . . vii
Tables . . . . . . . . . . . . . . . . . . . . . . . . . . . . ix
About this guide . . . . . . . . . . . . . . . . . . . . . . . . xi
Intended audience for this guide . . . . . . . . . . . . . . . . . . . xi
Publications . . . . . . . . . . . . . . . . . . . . . . . . . . xi
Advanced Backup and Recovery for z/OS publications . . . . . . . . . xi
IBM Tivoli Monitoring publications . . . . . . . . . . . . . . . . . xii
Accessing publications online . . . . . . . . . . . . . . . . . . . xii
Ordering publications . . . . . . . . . . . . . . . . . . . . . xiii
Accessing terminology online . . . . . . . . . . . . . . . . . . . xiii
Tivoli technical training . . . . . . . . . . . . . . . . . . . . . . xiii
Support information . . . . . . . . . . . . . . . . . . . . . . . xiv
Conventions used in this publication . . . . . . . . . . . . . . . . . xiv
Typeface conventions . . . . . . . . . . . . . . . . . . . . . xiv
Operating system-dependent variables and paths . . . . . . . . . . . xv
Part 1. Planning your deployment . . . . . . . . . . . . . . . . . . . . . . . 1
Chapter 1. Introduction to the Advanced Backup and Recovery for z/OS
product . . . . . . . . . . . . . . . . . . . . . . . . . . . 3
Components of Advanced Backup and Recovery for z/OS . . . . . . . . . 4
Features of Advanced Backup and Recovery for z/OS . . . . . . . . . . . 4
Standards supported . . . . . . . . . . . . . . . . . . . . . . . 5
Interoperability with other products . . . . . . . . . . . . . . . . . . 5
Chapter 2. Planning your Advanced Backup and Recovery for z/OS
configuration . . . . . . . . . . . . . . . . . . . . . . . . . 7
Designing your Advanced Backup and Recovery for z/OS configuration . . . . 7
Tivoli Enterprise Monitoring Servers - hub and remote . . . . . . . . . . 9
Tivoli Data Warehouse and the warehouse proxy . . . . . . . . . . . 10
Advanced Backup and Recovery for z/OS monitoring agent . . . . . . . 11
Tivoli Enterprise Portal client and Tivoli Enterprise Portal Server . . . . . . 12
Understanding runtime environments . . . . . . . . . . . . . . . . 13
Worksheets for Advanced Backup and Recovery for z/OS configuration . . . . 20
Worksheet: Your overall configuration . . . . . . . . . . . . . . . 20
Worksheets: Information to gather when you put your hub monitoring server
on a distributed system . . . . . . . . . . . . . . . . . . . . 22
Worksheets: Information to gather when you put your hub monitoring server
on a z/OS system . . . . . . . . . . . . . . . . . . . . . . 28
Worksheet: Information for configuring your runtime environment . . . . . 36
A road map for installation and configuration of Advanced Backup and Recovery
for z/OS . . . . . . . . . . . . . . . . . . . . . . . . . . 37
Chapter 3. Planning for prerequisites, packaging, and tools . . . . . . . 39
Understanding software and hardware prerequisites for installation . . . . . . 39
Requirements for historical data collection . . . . . . . . . . . . . . 39
Requirements for TCP/IP communication protocols . . . . . . . . . . 40
Prerequisite for Take Action command forwarding . . . . . . . . . . . 41
Checking for fixes . . . . . . . . . . . . . . . . . . . . . . . 41
Understanding product packaging . . . . . . . . . . . . . . . . . . 41
Understanding Advanced Backup and Recovery for z/OS installation . . . . . 42
IBM Confidential
iii
Installing Advanced Backup and Recovery for z/OS from the Web download
package . . . . . . . . . . . . . . . . . . . . . . . . . 42
Using SMP/E to install Advanced Backup and Recovery for z/OS . . . . . 42
Understanding the Configuration Tool . . . . . . . . . . . . . . . . . 43
Using the Configuration Tool . . . . . . . . . . . . . . . . . . . 43
Part 2. Installation and configuration . . . . . . . . . . . . . . . . . . . . . 45
Chapter 4. Beginning the installation and configuration . . . . . . . . 47
First steps: Installing the z/OS components and beginning the configuration 47
Step 1. Perform the SMP/E installation of the z/OS-based components . . . . 47
Step 2. Set up the Configuration Tool . . . . . . . . . . . . . . . . . 47
If you use a CSI in which the Configuration Tool is already installed . . . . 48
If you use a new CSI . . . . . . . . . . . . . . . . . . . . . 48
Step 3. Start the Configuration Tool . . . . . . . . . . . . . . . . . 48
Step 4. Set up the Configuration Tool environment . . . . . . . . . . . . 50
Setting up the work environment . . . . . . . . . . . . . . . . . 50
Setting up the configuration environment . . . . . . . . . . . . . . 51
Continuing the configuration procedure . . . . . . . . . . . . . . . . 52
Chapter 5. Configuring the hub monitoring server on a Windows system
and the monitoring agent on a z/OS image . . . . . . . . . . . . . 53
Configuration steps . . . . . . . . . . . . . . . . . . . . . . . 54
Step 1. Install the Tivoli Enterprise Monitoring Server, Tivoli Enterprise Portal
Server, and Tivoli Enterprise Portal desktop client . . . . . . . . . . . 54
Installing the DB2 Universal Database software . . . . . . . . . . . . 54
Installing and configuring Tivoli Enterprise Monitoring Server, Tivoli Enterprise
Portal Server, and Tivoli Enterprise Portal desktop client . . . . . . . . 57
Step 2. Install Advanced Backup and Recovery for z/OS application support 60
Step 3. Define the runtime environment . . . . . . . . . . . . . . . . 61
Step 4. Build the runtime libraries . . . . . . . . . . . . . . . . . . 65
Step 5. Configure the monitoring agent . . . . . . . . . . . . . . . . 66
Step 6. Load the runtime libraries . . . . . . . . . . . . . . . . . . 71
Step 7. Complete the configuration of the monitoring agent . . . . . . . . 72
Step 8. Verify the configuration . . . . . . . . . . . . . . . . . . . 73
Setting up security . . . . . . . . . . . . . . . . . . . . . . . 73
Expanding this configuration . . . . . . . . . . . . . . . . . . . . 73
Chapter 6. Configuring the hub monitoring server and the monitoring
agent on a z/OS image . . . . . . . . . . . . . . . . . . . . 75
Configuration steps . . . . . . . . . . . . . . . . . . . . . . . 75
Step 1. Define the runtime environment . . . . . . . . . . . . . . . . 76
Step 2. Build the runtime libraries . . . . . . . . . . . . . . . . . . 80
Step 3. Configure the hub Tivoli Enterprise Monitoring Server . . . . . . . . 80
Beginning the configuration . . . . . . . . . . . . . . . . . . . 80
Creating a logmode . . . . . . . . . . . . . . . . . . . . . . 82
Specifying configuration values . . . . . . . . . . . . . . . . . . 82
Specifying communication protocols . . . . . . . . . . . . . . . . 85
Creating the runtime members . . . . . . . . . . . . . . . . . . 89
Step 4. Configure the monitoring agent . . . . . . . . . . . . . . . . 89
Step 5. Load the runtime libraries . . . . . . . . . . . . . . . . . . 93
Step 6. Complete the configuration of the Tivoli Enterprise Monitoring Server
and the monitoring agent . . . . . . . . . . . . . . . . . . . . 93
Step 7. Install Tivoli Enterprise Portal Server and client on a Windows
workstation . . . . . . . . . . . . . . . . . . . . . . . . . 95
Installing the DB2 Universal Database software . . . . . . . . . . . . 95
IBM Confidential
iv IBM Tivoli Advanced Backup and Recovery for z/OS Planning and Configuration Guide
Installing and configuring Tivoli Enterprise Portal Server and desktop client 97
Step 8. Install Advanced Backup and Recovery for z/OS application support 100
Step 9. Verify the configuration . . . . . . . . . . . . . . . . . . 101
Setting up security . . . . . . . . . . . . . . . . . . . . . . . 102
Expanding this configuration . . . . . . . . . . . . . . . . . . . 102
Batch mode processing . . . . . . . . . . . . . . . . . . . . 103
Chapter 7. Setting up security . . . . . . . . . . . . . . . . . . 105
Configuring user security . . . . . . . . . . . . . . . . . . . . . 105
Setting up user security if the hub Tivoli Enterprise Monitoring Server is
running on a z/OS system . . . . . . . . . . . . . . . . . . 105
Setting up security for a hub Tivoli Enterprise Monitoring Server running on
a Windows, Linux, or UNIX system . . . . . . . . . . . . . . . 109
Advanced Backup and Recovery security considerations . . . . . . . . . 110
OMVS segment . . . . . . . . . . . . . . . . . . . . . . . 110
Setting up NetView authentication of Take Action commands . . . . . . . 110
Step 1. Configure NetView authentication in the Configuration Tool . . . . 111
Step 2. Add the NetView CNMLINK data set to the Tivoli Enterprise
Monitoring Server started task . . . . . . . . . . . . . . . . . 112
Step 3. Enable NetView to authorize Take Action commands . . . . . . 112
Chapter 8. Enabling system variable support . . . . . . . . . . . . 115
Sample usage scenario . . . . . . . . . . . . . . . . . . . . . 115
Enabling system variable support . . . . . . . . . . . . . . . . . . 116
Creating the system variable parameter member . . . . . . . . . . . . 118
Creating the VTAM major node rename job . . . . . . . . . . . . . . 119
Creating one VTAM major node for all monitoring agents in the runtime
environment . . . . . . . . . . . . . . . . . . . . . . . . . 119
Chapter 9. Using batch mode processing . . . . . . . . . . . . . . 121
Planning your runtime environment replication . . . . . . . . . . . . . 122
Creating batch mode parameters . . . . . . . . . . . . . . . . . . 123
Transporting the runtime environment . . . . . . . . . . . . . . . . 124
Define a runtime environment on a local z/OS image using shared DASD 124
Transport a runtime environment from a local z/OS image to a remote
image . . . . . . . . . . . . . . . . . . . . . . . . . . 125
Transport runtime environment batch jobs from a local z/OS image to a
remote image equipped with the Configuration Tool . . . . . . . . . 126
Transport runtime environment batch mode parameters from a local z/OS
image to a remote image . . . . . . . . . . . . . . . . . . . 127
Part 3. Appendixes . . . . . . . . . . . . . . . . . . . . . . . . . . . . . 129
Appendix A. Configuration services and utilities . . . . . . . . . . . 131
Services: unlocking runtime high-level qualifiers . . . . . . . . . . . . 131
Services: creating the Configuration Tool batch mode job . . . . . . . . . 131
Utilities: specifying DEBUG options . . . . . . . . . . . . . . . . . 132
Utilities: displaying an ISPF table . . . . . . . . . . . . . . . . . . 132
Utilities: running a CLIST in the TKANCUS library . . . . . . . . . . . 132
Utilities: preparing user libraries . . . . . . . . . . . . . . . . . . 133
Appendix B. Configuration Tool batch utilities . . . . . . . . . . . . 135
KCISETUP: setting up the environment . . . . . . . . . . . . . . . 135
KCICFKEY: managing PF keys . . . . . . . . . . . . . . . . . . 135
KCICPGHP: displaying help for batch parameters . . . . . . . . . . . 137
IBM Confidential
Contents v
Appendix C. TEDA Server Operator Commands . . . . . . . . . . . 139
Starting the TEDA server . . . . . . . . . . . . . . . . . . . . . 139
Stopping the TEDA server . . . . . . . . . . . . . . . . . . . . 139
Quiescing Agent Activity . . . . . . . . . . . . . . . . . . . . . 139
Resuming Agent Activity . . . . . . . . . . . . . . . . . . . . . 139
Dynamically Changing Agent Settings . . . . . . . . . . . . . . . . 139
Display Commands . . . . . . . . . . . . . . . . . . . . . . . 139
Appendix D. TEDA Server PARMLIB Statements . . . . . . . . . . . 141
Global . . . . . . . . . . . . . . . . . . . . . . . . . . . . 141
Keywords . . . . . . . . . . . . . . . . . . . . . . . . . 141
Resources . . . . . . . . . . . . . . . . . . . . . . . . . . 141
Keywords . . . . . . . . . . . . . . . . . . . . . . . . . 142
Agents . . . . . . . . . . . . . . . . . . . . . . . . . . . 142
Keywords . . . . . . . . . . . . . . . . . . . . . . . . . 143
Sharing a common KppSHR00 member when multiple products are installed 144
Support information . . . . . . . . . . . . . . . . . . . . . . 145
Using IBM Support Assistant . . . . . . . . . . . . . . . . . . . 145
Obtaining fixes . . . . . . . . . . . . . . . . . . . . . . . . 145
Contacting IBM Software Support . . . . . . . . . . . . . . . . . 146
Determining the business impact . . . . . . . . . . . . . . . . . 147
Describing problems and gathering information . . . . . . . . . . . 147
Submitting problems . . . . . . . . . . . . . . . . . . . . . 147
Notices . . . . . . . . . . . . . . . . . . . . . . . . . . . 149
Trademarks . . . . . . . . . . . . . . . . . . . . . . . . . . 150
Index . . . . . . . . . . . . . . . . . . . . . . . . . . . . 151
IBM Confidential
vi IBM Tivoli Advanced Backup and Recovery for z/OS Planning and Configuration Guide
Figures
1. Tivoli Management Services architecture . . . . . . . . . . . . . . . . . . . . . . 8
2. Full runtime environment on a single system . . . . . . . . . . . . . . . . . . . . 15
3. Full runtime environments on several systems . . . . . . . . . . . . . . . . . . . . 16
4. Base runtime environment . . . . . . . . . . . . . . . . . . . . . . . . . . . 17
5. Sharing-with-base runtime environment . . . . . . . . . . . . . . . . . . . . . . 18
6. Sharing-with-full runtime environment . . . . . . . . . . . . . . . . . . . . . . . 19
7. Sharing-with-SMP/E runtime environment . . . . . . . . . . . . . . . . . . . . . . 20
8. Main Menu: Configuration Tool . . . . . . . . . . . . . . . . . . . . . . . . . . 49
9. Specify Options panel: Configuration Tool . . . . . . . . . . . . . . . . . . . . . . 50
10. Set Up Configuration Environment panel: Configuration Tool . . . . . . . . . . . . . . . 51
11. Hub Tivoli Enterprise Monitoring Server on a distributed system and monitoring agent on a z/OS
system . . . . . . . . . . . . . . . . . . . . . . . . . . . . . . . . . . 53
12. Configure Products panel: Configuration Tool . . . . . . . . . . . . . . . . . . . . 62
13. Product Selection Menu: Configuration Tool . . . . . . . . . . . . . . . . . . . . . 62
14. Runtime Environments (RTEs) panel: Configuration Tool . . . . . . . . . . . . . . . . 62
15. Add Runtime Environment (1 of 2) panel: Configuration Tool . . . . . . . . . . . . . . . 64
16. Add Runtime Environment (2 of 2) panel: Configuration Tool . . . . . . . . . . . . . . . 64
17. Product Component Selection Menu: Configuration Tool . . . . . . . . . . . . . . . . 66
18. Configure IBM Tivoli Advanced Backup and Recovery for z/OS menu: Configuration Tool . . . . 67
19. Specify Agent Parameters panel: Configuration Tool . . . . . . . . . . . . . . . . . . 67
20. Specify Agent Address Space Parameters panel: Configuration Tool . . . . . . . . . . . . 68
21. Specify Agent Primary TEMS Values panel: Configuration Tool . . . . . . . . . . . . . . 69
22. Specify Advanced Agent Configuration Values panel: Configuration Tool . . . . . . . . . . 70
23. RTE Utility menu: Configuration Tool . . . . . . . . . . . . . . . . . . . . . . . 72
24. Hub Tivoli Enterprise Monitoring Server and monitoring agent in separate address spaces of a
single z/OS image . . . . . . . . . . . . . . . . . . . . . . . . . . . . . . 75
25. Configure Products panel: Configuration Tool . . . . . . . . . . . . . . . . . . . . 76
26. Product Selection Menu: Configuration Tool . . . . . . . . . . . . . . . . . . . . . 76
27. Runtime Environments (RTEs) panel: Configuration Tool . . . . . . . . . . . . . . . . 77
28. Add Runtime Environment (1 of 2) panel: Configuration Tool . . . . . . . . . . . . . . . 78
29. Add Runtime Environment (2 of 2) panel: Configuration Tool . . . . . . . . . . . . . . . 79
30. Product Component Selection Menu: Configuration Tool . . . . . . . . . . . . . . . . 81
31. Configure the TEMS menu: Configuration Tool . . . . . . . . . . . . . . . . . . . . 81
32. Create LU6.2 Logmode panel: Configuration Tool . . . . . . . . . . . . . . . . . . . 82
33. Specify Configuration Values panel: Configuration Tool . . . . . . . . . . . . . . . . . 83
34. Specify Advanced Configuration Values panel: Configuration Tool . . . . . . . . . . . . . 85
35. Specify Communication Protocols panel: Configuration Tool . . . . . . . . . . . . . . . 86
36. Specify IP.PIPE Communication Protocol panel: Configuration Tool . . . . . . . . . . . . 86
37. SOAP Server KSHXHUBS List panel: Configuration Tool . . . . . . . . . . . . . . . . 88
38. Specify SNA Communication Protocol panel: Configuration Tool . . . . . . . . . . . . . 88
39. Configure IBM Tivoli Advanced Backup and Recovery for z/OS menu: Configuration Tool . . . . 90
40. Specify Agent Parameters panel: Configuration Tool . . . . . . . . . . . . . . . . . . 90
41. Specify Agent Address Space Parameters panel: Configuration Tool . . . . . . . . . . . . 91
42. Specify Advanced Agent Configuration Values panel: Configuration Tool . . . . . . . . . . 92
43. RTE Utility Menu: Configuration Tool . . . . . . . . . . . . . . . . . . . . . . . 94
44. CNMSTYLE member after editing . . . . . . . . . . . . . . . . . . . . . . . . 113
45. Batch parameter help example . . . . . . . . . . . . . . . . . . . . . . . . . 138
IBM Confidential
vii

IBM Confidential
viii IBM Tivoli Advanced Backup and Recovery for z/OS Planning and Configuration Guide
Tables
1. Configuration Tool abbreviations . . . . . . . . . . . . . . . . . . . . . . . . . xiv
2. Types of libraries . . . . . . . . . . . . . . . . . . . . . . . . . . . . . . . 13
3. Types of runtime environments . . . . . . . . . . . . . . . . . . . . . . . . . . 13
4. Worksheet for designing your overall configuration . . . . . . . . . . . . . . . . . . 21
5. Configuration worksheet if the hub monitoring server is on a distributed system . . . . . . . . 22
6. Configuration worksheet for communication protocols if the hub monitoring server is on a
distributed system . . . . . . . . . . . . . . . . . . . . . . . . . . . . . . 24
7. Configuration worksheet if the monitoring server is on a z/OS system . . . . . . . . . . . 29
8. Configuration worksheet for communication protocols if the monitoring server is on a z/OS system 31
9. Worksheet for defining runtime environments . . . . . . . . . . . . . . . . . . . . 36
10. Advanced Backup and Recovery for z/OS packaging . . . . . . . . . . . . . . . . . 41
11. User security configuration methods . . . . . . . . . . . . . . . . . . . . . . . 105
12. System variable values . . . . . . . . . . . . . . . . . . . . . . . . . . . . 117
13. Add runtime environment values . . . . . . . . . . . . . . . . . . . . . . . . . 117
14. Runtime environment transport methods . . . . . . . . . . . . . . . . . . . . . . 122
IBM Confidential
ix

IBM Confidential
x IBM Tivoli Advanced Backup and Recovery for z/OS Planning and Configuration Guide
About this guide
The Advanced Backup and Recovery product collects information about backup
events and reports the information in the Tivoli Enterprise Portal graphical user
interface. The product workspaces provide two types of information:
v Information collected by Advanced Backup and Recovery
v Historical information
The user interface contains expert advice on alerts and corrective actions.
This book tells how to plan your deployment of the Advanced Backup and Recovery
software, and how to install and configure the software in your environment.
Intended audience for this guide
This guide is intended for the system programmer or administrator responsible for
installing and configuring new programs on z/OS® systems. The procedures in this
guide require familiarity with the following topics:
v The z/OS operating system
v The Microsoft® Windows® operating system
Publications
This section lists publications in the IBM® Advanced Backup and Recovery for z/OS
and IBM Tivoli Monitoring libraries. The section also describes how to access Tivoli®
publications online and how to order publications.
Advanced Backup and Recovery for z/OS publications
The following publications are included in the Advanced Backup and Recovery for
z/OS library:
v IBM Tivoli Advanced Backup and Recovery for z/OS Program Directory,
GI11-8886
Provides hardware and software prerequisites and instructions for the Advanced
Backup and Recovery for z/OS SMP/E installation.
v IBM Tivoli Advanced Backup and Recovery for z/OS User's Guide, SC23-9730
Provides instructions for using Advanced Backup and Recovery for z/OS.
v IBM Tivoli Advanced Backup and Recovery for z/OS Monitoring Agent Planning
and Configuration Guide, SC23-9732
Provides instructions for planning, installing, and configuring Advanced Backup
and Recovery for z/OS. This publication includes the following types of
information:
– Information and worksheets to help you plan your configuration
– A list of prerequisite steps to complete before configuring the product
– Instructions for configuring the monitoring server and monitoring agent on a
z/OS system
– Instructions for installing and setting up the distributed components of the
product
– Information about using system variables and batch processing to expand a
configuration across the enterprise
– Security considerations and advice
v IBM Tivoli Advanced Backup and Recovery for z/OS Monitoring Agent User's
Guide, SC23-9733
IBM Confidential
xi
Provides instructions for using Advanced Backup and Recovery for z/OS to
monitor z/OS system and sysplex resources, and product-specific monitoring
scenarios.
v IBM Tivoli Advanced Backup and Recovery for z/OS Messages, GC23-9731
Lists and explains Advanced Backup and Recovery for z/OS messages.
IBM Tivoli Monitoring publications
Basic instructions for installing and setting up the IBM Tivoli Monitoring (also called
Tivoli Monitoring Services or Tivoli Management Services) components of the
product are provided in this guide. You can find more detailed information about the
IBM Tivoli Monitoring components in the following publications:
v IBM Tivoli Monitoring Installation and Setup Guide, GC32-9407
Provides information on installing and setting up the Tivoli Enterprise Monitoring
Server and the Tivoli Enterprise Portal Server and client.
v Configuring IBM Tivoli Enterprise Monitoring Server on z/OS, SC32-9463
Describes how to configure and customize the Tivoli Enterprise Monitoring Server
on z/OS. The book also contains platform planning information and information
about setting up security on your monitoring server.
v Introducing IBM Tivoli Monitoring, GI11-4071
Gives a basic introduction to the features of IBM Tivoli Monitoring.
v IBM Tivoli Monitoring Administrator’s Guide, SC32-9408
Describes how to perform administrative tasks associated with the Tivoli
Enterprise Portal Server and client.
v IBM Tivoli Monitoring User’s Guide, SC32-9409
Describes how to use the Tivoli Enterprise Portal client interface. This book
includes a monitoring tutorial that covers workspaces, navigation, views, and
responding to alerts. Different types of views and situations for event-based
monitoring are also included, as well as information on automation policies.
v IBM Tivoli Monitoring Problem Determination Guide, GC32-9458.
Lists and explains IBM Tivoli Monitoring messages, and offers troubleshooting
guidance.
v IBM Tivoli Monitoring z/OS Messages, SC23-6065
Lists and explains messages for z/OS-based Tivoli Monitoring Services
components, such as the Tivoli Enterprise Monitoring Server on z/OS and the
OMEGAMON® base components.
You can also find useful information about setting up and deploying the IBM Tivoli
Monitoring components in the following IBM Redbooks®:
v Deployment Guide Series: IBM Tivoli Monitoring, SG24-7188
v Getting Started with IBM Tivoli Monitoring 6.1 on Distributed Environments,
SG24-7143
Accessing publications online
The documentation CD contains the product publications in PDF and HTML
formats. Refer to the readme file on the CD for instructions on how to access the
documentation.
IBM posts publications for this and all other Tivoli products, as they become
available and whenever they are updated, to the Tivoli Information Center Web site
at http://www.ibm.com/software/tivoli/library/.
IBM Confidential
xii IBM Tivoli Advanced Backup and Recovery for z/OS Planning and Configuration Guide
In the Tivoli Information Center window, click Tivoli product manuals. Click the
letter that matches the first letter of your product name to access your product
library. For example, click M to access the IBM Tivoli Monitoring library or click O
to access the IBM Tivoli OMEGAMON library.
Note: If you print PDF documents on other than letter-sized paper, set the option in
the File > Print window that allows Adobe® Reader to print letter-sized
pages on your local paper.
Reading CCR2 online
IBM publishes CCR2™, a useful monthly e-newsletter for the System z™ and
zSeries® software community. You can find the latest issue of CCR2 at
http://www-306.ibm.com/software/tivoli/features/ccr2/info.html.
Ordering publications
You can order many Tivoli publications online at the following Web site:
http://www.elink.ibmlink.ibm.com/public/applications/ publications/cgibin/pbi.cgi.
You can also order by telephone by calling one of these numbers:
v In the United States: 800-879-2755
v In Canada: 800-426-4968
In other countries, contact your software account representative to order Tivoli
publications. To locate the telephone number of your local representative, perform
the following steps:
1. Go to http://www.elink.ibmlink.ibm.com/public/applications/ publications/cgibin/pbi.cgi.
2. Select your country from the list and click Go.
3. Click About this site in the main panel to see an information page that includes
the telephone number of your local representative.
Accessing terminology online
The Tivoli Software Glossary includes definitions for many of the technical terms
related to Tivoli software. The Tivoli Software Glossary is available at the following
Tivoli software library Web site:
http://publib.boulder.ibm.com/tividd/glossary/tivoliglossarymst.htm
The IBM Terminology Web site consolidates the terminology from IBM product
libraries in one convenient location. You can access the Terminology Web site at the
following Web address:
http://www-306.ibm.com/software/globalization/terminology
Tivoli technical training
For Tivoli technical training information, refer to the following IBM Tivoli Education
Web site:
http://www.ibm.com/software/tivoli/education
IBM Confidential
About this guide xiii
Support information
If you have a problem with your IBM software, you want to resolve it quickly. IBM
provides the following ways for you to obtain the support you need:
v IBM Support Assistant: You can search across a large collection of known
problems and workarounds, Technotes, and other information at
http://www.ibm.com/software/support/isa.
v Obtaining fixes: You can locate the latest fixes that are already available for your
product.
v Contacting IBM Software Support: If you still cannot solve your problem, and you
need to work with someone from IBM, you can use a variety of ways to contact
IBM Software Support.
For more information about resolving problems, see “Support information” on page
145.
Conventions used in this publication
This guide uses several conventions for special terms and actions and for operating
system-dependent commands and paths.
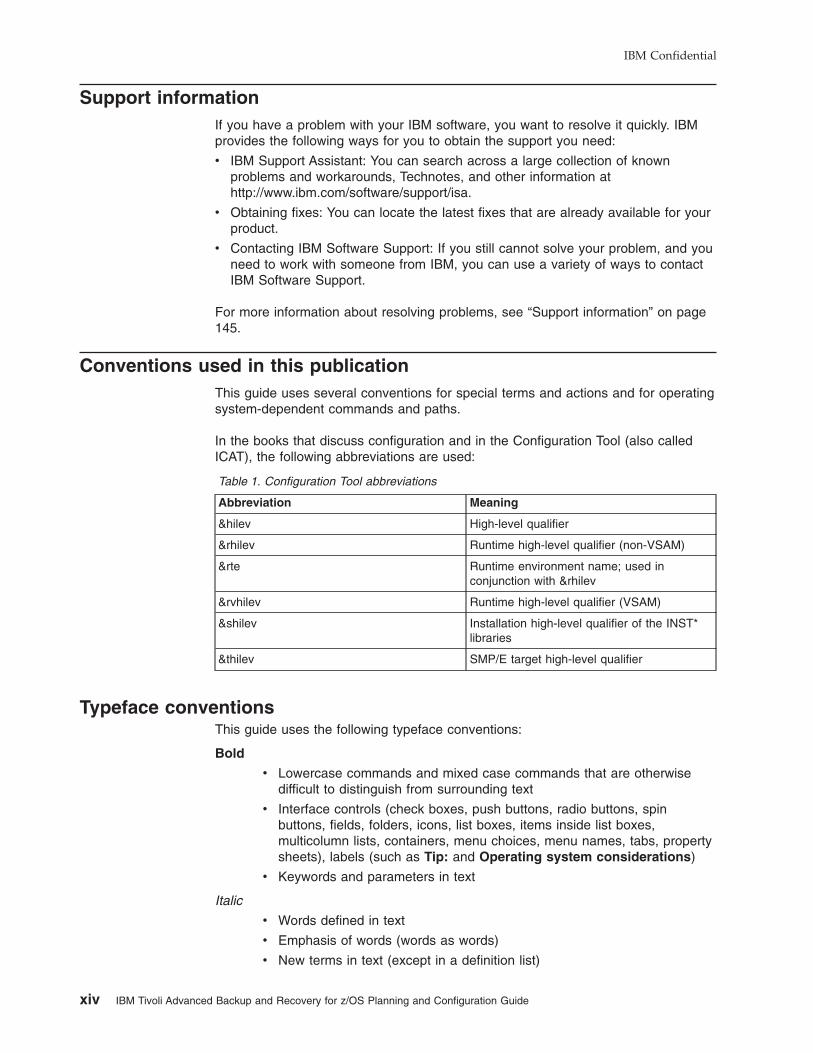
In the books that discuss configuration and in the Configuration Tool (also called
ICAT), the following abbreviations are used:
Table 1. Configuration Tool abbreviations
Abbreviation Meaning
&hilev High-level qualifier
&rhilev Runtime high-level qualifier (non-VSAM)
&rte Runtime environment name; used in
conjunction with &rhilev
&rvhilev Runtime high-level qualifier (VSAM)
&shilev Installation high-level qualifier of the INST*
libraries
&thilev SMP/E target high-level qualifier
Typeface conventions
This guide uses the following typeface conventions:
Bold
v Lowercase commands and mixed case commands that are otherwise
difficult to distinguish from surrounding text
v Interface controls (check boxes, push buttons, radio buttons, spin
buttons, fields, folders, icons, list boxes, items inside list boxes,
multicolumn lists, containers, menu choices, menu names, tabs, property
sheets), labels (such as Tip: and Operating system considerations)
v Keywords and parameters in text
Italic
v Words defined in text
v Emphasis of words (words as words)
v New terms in text (except in a definition list)
IBM Confidential
xiv IBM Tivoli Advanced Backup and Recovery for z/OS Planning and Configuration Guide
v Variables and values you must provide
Monospace
v Examples and code examples
v File names, programming keywords, and other elements that are difficult
to distinguish from surrounding text
v Message text and prompts addressed to the user
v Text that the user must type
v Values for arguments or command options
Operating system-dependent variables and paths
This guide uses the UNIX® convention for specifying environment variables and for
directory notation.
When using the Windows command line, replace $variable with %variable% for
environment variables and replace each forward slash (/) with a backslash (\) in
directory paths. The names of environment variables are not always the same in
Windows and UNIX. For example, %TEMP% in Windows is equivalent to $tmp in
UNIX.
Note: If you are using the bash shell on a Windows system, you can use the UNIX
conventions.
IBM Confidential
About this guide xv

IBM Confidential
xvi IBM Tivoli Advanced Backup and Recovery for z/OS Planning and Configuration Guide
Part 1. Planning your deployment
Chapter 1. Introduction to the Advanced Backup and Recovery for z/OS
product . . . . . . . . . . . . . . . . . . . . . . . . . . . 3
Components of Advanced Backup and Recovery for z/OS . . . . . . . . . 4
Features of Advanced Backup and Recovery for z/OS . . . . . . . . . . . 4
Standards supported . . . . . . . . . . . . . . . . . . . . . . . 5
Interoperability with other products . . . . . . . . . . . . . . . . . . 5
Chapter 2. Planning your Advanced Backup and Recovery for z/OS
configuration . . . . . . . . . . . . . . . . . . . . . . . . . 7
Designing your Advanced Backup and Recovery for z/OS configuration . . . . 7
Tivoli Enterprise Monitoring Servers - hub and remote . . . . . . . . . . 9
Tivoli Data Warehouse and the warehouse proxy . . . . . . . . . . . 10
Advanced Backup and Recovery for z/OS monitoring agent . . . . . . . 11
Tivoli Enterprise Portal client and Tivoli Enterprise Portal Server . . . . . . 12
Understanding runtime environments . . . . . . . . . . . . . . . . 13
Possible configurations using runtime environments . . . . . . . . . 14
Worksheets for Advanced Backup and Recovery for z/OS configuration . . . . 20
Worksheet: Your overall configuration . . . . . . . . . . . . . . . 20
Worksheets: Information to gather when you put your hub monitoring server
on a distributed system . . . . . . . . . . . . . . . . . . . . 22
Configuration worksheet if the hub monitoring server is on a distributed
system . . . . . . . . . . . . . . . . . . . . . . . . . 22
Configuration worksheet for communication protocols if the hub monitoring
server is on a distributed system . . . . . . . . . . . . . . . 23
Worksheets: Information to gather when you put your hub monitoring server
on a z/OS system . . . . . . . . . . . . . . . . . . . . . . 28
Configuration worksheet if the monitoring server is on a z/OS system . . . 29
Configuration worksheet for communication protocols if the monitoring
server is on a z/OS system . . . . . . . . . . . . . . . . . 31
Worksheet: Information for configuring your runtime environment . . . . . 36
A road map for installation and configuration of Advanced Backup and Recovery
for z/OS . . . . . . . . . . . . . . . . . . . . . . . . . . 37
Chapter 3. Planning for prerequisites, packaging, and tools . . . . . . . 39
Understanding software and hardware prerequisites for installation . . . . . . 39
Requirements for historical data collection . . . . . . . . . . . . . . 39
Requirements for TCP/IP communication protocols . . . . . . . . . . 40
Default OMVS segment . . . . . . . . . . . . . . . . . . . . 40
Using the IP.PIPE communication protocol . . . . . . . . . . . . . 40
Configuring domain name resolution . . . . . . . . . . . . . . . 40
Prerequisite for Take Action command forwarding . . . . . . . . . . . 41
Checking for fixes . . . . . . . . . . . . . . . . . . . . . . . 41
Understanding product packaging . . . . . . . . . . . . . . . . . . 41
Understanding Advanced Backup and Recovery for z/OS installation . . . . . 42
Installing Advanced Backup and Recovery for z/OS from the Web download
package . . . . . . . . . . . . . . . . . . . . . . . . . 42
Using SMP/E to install Advanced Backup and Recovery for z/OS . . . . . 42
Understanding the Configuration Tool . . . . . . . . . . . . . . . . . 43
Using the Configuration Tool . . . . . . . . . . . . . . . . . . . 43
Display requirements in ISPF . . . . . . . . . . . . . . . . . 43
Restrictions . . . . . . . . . . . . . . . . . . . . . . . . 43
Commands and function . . . . . . . . . . . . . . . . . . . 44
Online help for the Configuration Tool . . . . . . . . . . . . . . 44
IBM Confidential
1

IBM Confidential
2 IBM Tivoli Advanced Backup and Recovery for z/OS Planning and Configuration Guide
Chapter 1. Introduction to the Advanced Backup and
Recovery for z/OS product
The Advanced Backup and Recovery product collects information about backup
events and reports the information in the Tivoli Enterprise Portal graphical user
interface. The Advanced Backup and Recovery for z/OS product is a member of the
IBM Tivoli Monitoring Services (also called Tivoli Management Services) family of
mainframe monitoring products.
Advanced Backup and Recovery for z/OS displays the following types of z/OS data:
v Information collected by Advanced Backup and Recovery
v Historical information
Advanced Backup and Recovery for z/OS has a Java-based interface called the
Tivoli Enterprise Portal, which transforms systems data into the business knowledge
that you can use to run your enterprise. With Advanced Backup and Recovery for
z/OS, you can also set threshold levels and flags as desired to alert you when the
systems reach critical points.
The Tivoli Enterprise Portal presents information in a single window comprising a
Navigator and a workspace:
v The Navigator shows the hierarchy of your monitored enterprise, from the top
level (Enterprise) down to the nodes that represent the systems in the enterprise,
and then to the subnodes that represent groupings of information collected by the
monitoring agents. The Navigator lights up with critical, warning, and
informational alerts so you can instantly identify problems as they occur. When
you click an item in the Navigator, the default workspace for that item is
displayed in the Tivoli Enterprise Portal window.
v Workspaces can be divided into multiple views containing reports in the form of
tables and charts, TN3270 emulator views, Web browsers, text boxes, graphic
views, and event message logs.
You can use Advanced Backup and Recovery for z/OS features to accomplish many
system-management tasks:
v Monitor all systems and resources from a single, integrated browser-based
interface that you can customize with filters to display only the data you want to
see.
v Create comprehensive online reports about system conditions.
v Define your own queries, using the attributes provided by a monitoring agent, to
monitor conditions and data and customize workspaces.
v Create situations, which let you set up monitoring for particular conditions and
flag the condition with an alert when detected.
v Trace the causes leading up to an alert.
v Create and send commands to systems in your managed enterprise by means of
the Take Action feature.
v Embed information about problem resolution in the product interface using Expert
Advice, which can be edited to include knowledge and solutions specific to your
environment.
IBM Confidential
3
Components of Advanced Backup and Recovery for z/OS
Advanced Backup and Recovery for z/OS is considered a client-server-agent
implementation. For information about the Advanced Backup and Recovery for z/OS
components, see “Designing your Advanced Backup and Recovery for z/OS
configuration” on page 7.
Features of Advanced Backup and Recovery for z/OS
The following features are available with Advanced Backup and Recovery for z/OS
and the Tivoli Enterprise Portal:
v Customized workspaces for each information group: Tivoli Enterprise Portal
retrieves data from the monitoring agent and displays the results in the
workspace in the form of charts and tables. You can start monitoring activity and
system status immediately with the predefined workspaces and tailor your own
workspaces to look at specific conditions, display critical threshold values in red,
and filter incoming data according to your needs.
v Workspace views: Each workspace consists of one or more views. There are
several types of views:
– Table views display data in table format where rows represent monitored
resources and columns represent data collected for each resource.
– Chart views allow you to view data in graphical formats. Pie, bar, and plot
charts and a gauge format are supported.
– Take action view lets you enter a command or select a predefined command,
and run it on any system in your managed network.
– Message log view shows the status of the situations running on your
managed network.
– Notepad view opens a simple text editor for writing text that can be saved with
the workspace.
– Terminal view starts a 3270 or 5250 session for working with z/OS
applications.
– Browser view opens the integrated Web browser.
v Navigator views or navigators provide hierarchical views of the systems,
resources, and applications you are monitoring. Navigators help you structure
your enterprise information to reflect the interests and responsibilities of the user.
The Tivoli Enterprise Portal comes with a default navigator called the physical
navigator. The monitoring agent, which can be ordered separately, comes with
the same default navigator, but allows you to create additional navigators for
viewing enterprise information representing your business systems.
v Linked workspaces: If you often go from one workspace to another, you can
build a link between them to speed the transition. You can also build links that
originate from a table or from a bar or pie chart, and use relevant data from the
source table or graph to determine the target workspace.
v Custom queries: Every monitoring agent comes with a set of predefined
queries. These queries tell the monitoring server what monitoring data to retrieve
from the agent for the chart or table view. You can create your own queries to
specify exactly which attributes to retrieve, thus saving valuable resources. For
example, you can build a filter into the Connections query to retrieve only records
from a particular remote port. Additionally, you can write SQL queries to ODBC
data sources and display the results in any chart or table. This enables you to
show monitoring data and data from other sources (such as third-party
databases) in a single workspace.
IBM Confidential
4 IBM Tivoli Advanced Backup and Recovery for z/OS Planning and Configuration Guide
v Interaction with systems from your console: The Take Action feature lets you
enter a command or select a predefined command, and run it on any system in
your managed network.
v Monitor system conditions and send alerts: You can use the situation editor to
create situations. A situation notifies you when an event occurs on a managed
system. The monitoring server sends an alert when the conditions in a situation
are evaluated to be true. The alert is displayed on the portal client with visual
and sound indicators.
v Managed system lists: You can create and maintain named lists of managed
systems that can be applied to:
– Situation distribution lists
– Policies correlated by business application group
– Queries
– Customer Navigator-managed system assignments
v User administration: The Tivoli Enterprise Portal provides a user administration
feature for adding new user IDs, complete with selectable permissions for the
major features and specific managed systems.
Standards supported
Monitoring agents provide a number of integration facilities and adhere to a range
of industry standards to make integration with other applications easier for you.
These products use industry-standard languages and protocols to facilitate
integration with third-party components and tools. The products also use the
following strategic IBM and Tivoli tools and platforms:
v A Web-based user interface implemented with industry-standard Web content
languages, such as Java™, XML, and HTML
v Simple Network Management Protocol
v Web Services and Web Management Interface (WMI) standard
v TCP/IP-based communication between components and systems
v Support for the DB2® product, an industry-standard relational database
v Use of Structured Query Language (SQL '92, ISO/IEC 9075:1992), the standard
interface for relational database access
v Use of standard shell scripts and SMP/E to assist in installation
Interoperability with other products
Interoperability is the capability of an application to integrate with other IBM and
non-IBM applications that are used in the same customer environment.
Monitoring agents are compatible with each other and can coexist in a single
monitoring agent environment (that is, with a common Tivoli Enterprise Monitoring
Server). These products, including the Advanced Backup and Recovery for z/OS,
also interoperate with Tivoli Enterprise Monitoring Agents running on distributed
systems and communicating through the same monitoring server.
For more information on possible deployments of the monitoring products, see the
following publications:
v IBM Tivoli Monitoring: IBM Tivoli Monitoring Installation and Setup Guide
v IBM Tivoli Monitoring: Configuring IBM Tivoli Enterprise Monitoring Server on
z/OS
v IBM Redbooks: Deployment Guide Series: IBM Tivoli Monitoring
IBM Confidential
Chapter 1. Introduction to the Advanced Backup and Recovery for z/OS product 5

IBM Confidential
6 IBM Tivoli Advanced Backup and Recovery for z/OS Planning and Configuration Guide
Chapter 2. Planning your Advanced Backup and Recovery for
z/OS configuration
In this chapter, you will learn about the components of Advanced Backup and
Recovery for z/OS, and gather the information you need to make decisions about
your configuration.
Before you begin the tasks of installing and configuring Advanced Backup and
Recovery for z/OS, be sure to complete these prerequisite steps covered in this
chapter:
1. Read the IBM Tivoli Advanced Backup and Recovery for z/OS Program
Directory and complete all the installation requirements listed there.
2. Read “Designing your Advanced Backup and Recovery for z/OS configuration”
to determine how you want your Advanced Backup and Recovery for z/OS
configuration to look. For example, you must decide:
v Where you want to deploy Tivoli Enterprise Monitoring Servers and Advanced
Backup and Recovery for z/OS monitoring agents
v What kind and how many runtime environments you need for your
configuration
3. To get ready for configuration, make all the decisions called out in decision
points in “Designing your Advanced Backup and Recovery for z/OS
configuration” and fill out the worksheets in “Worksheets for Advanced Backup
and Recovery for z/OS configuration” on page 20.
4. When you have designed your configuration and filled out the work sheets, see
“A road map for installation and configuration of Advanced Backup and
Recovery for z/OS” on page 37 to determine your next step in installation and
configuration.
Designing your Advanced Backup and Recovery for z/OS configuration
The Advanced Backup and Recovery for z/OS product uses the Tivoli Monitoring
Services infrastructure (also referred to as IBM Tivoli Monitoring, or Tivoli
Management Services). The Tivoli Monitoring Services infrastructure provides
security, data transfer and storage, notification mechanisms, user interface
presentation, and communication services for products in the IBM Tivoli Monitoring
and monitoring agents in an agent-server-client architecture (see Figure 1 on page
8).
IBM Confidential
7
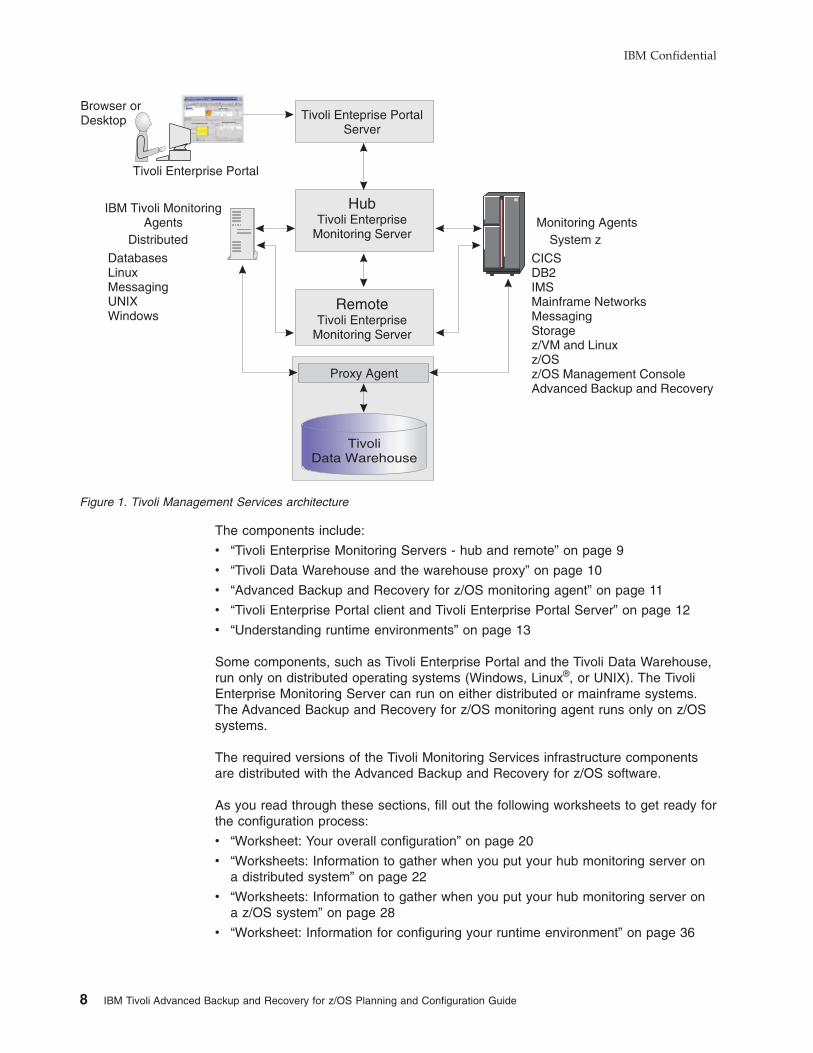
The components include:
v “Tivoli Enterprise Monitoring Servers - hub and remote” on page 9
v “Tivoli Data Warehouse and the warehouse proxy” on page 10
v “Advanced Backup and Recovery for z/OS monitoring agent” on page 11
v “Tivoli Enterprise Portal client and Tivoli Enterprise Portal Server” on page 12
v “Understanding runtime environments” on page 13
Some components, such as Tivoli Enterprise Portal and the Tivoli Data Warehouse,
run only on distributed operating systems (Windows, Linux®, or UNIX). The Tivoli
Enterprise Monitoring Server can run on either distributed or mainframe systems.
The Advanced Backup and Recovery for z/OS monitoring agent runs only on z/OS
systems.
The required versions of the Tivoli Monitoring Services infrastructure components
are distributed with the Advanced Backup and Recovery for z/OS software.
As you read through these sections, fill out the following worksheets to get ready for
the configuration process:
v “Worksheet: Your overall configuration” on page 20
v “Worksheets: Information to gather when you put your hub monitoring server on
a distributed system” on page 22
v “Worksheets: Information to gather when you put your hub monitoring server on
a z/OS system” on page 28
v “Worksheet: Information for configuring your runtime environment” on page 36
HubTivoli Enterprise
Monitoring Server
Tivoli Enterprise Portal
RemoteTivoli Enterprise
Monitoring Server
Monitoring Agents
CICSDB2IMSMainframe NetworksMessagingStoragez/VM and Linuxz/OSz/OS Management ConsoleAdvanced Backup and Recovery
System zDistributed
TivoliData Warehouse
Proxy Agent
Tivoli Enteprise PortalServer
DatabasesLinuxMessagingUNIXWindows
IBM Tivoli MonitoringAgents
Browser orDesktop
Figure 1. Tivoli Management Services architecture
IBM Confidential
8 IBM Tivoli Advanced Backup and Recovery for z/OS Planning and Configuration Guide
Tivoli Enterprise Monitoring Servers - hub and remote
All requests and data for monitoring agents, such as Advanced Backup and
Recovery for z/OS agent, flow through a hub Tivoli Enterprise Monitoring Server
(monitoring server). The monitoring server component performs the following tasks:
v Retrieves data from the monitoring agents and delivers data to the portal server.
v Sends alerts to the portal server when conditions specified in situations are met.
v Receives commands from the portal client and passes them to the appropriate
monitoring agents.
You can install this component on a z/OS, Windows, and some UNIX and Linux
operating system. See the IBM Tivoli Monitoring: IBM Tivoli Monitoring Installation
and Setup Guide for a complete list of supported platforms.
Decision point:
Should you install a monitoring server on a z/OS, Windows, UNIX, or
Linux system?
Many organizations prefer the reliability and availability characteristics of the
z/OS platform for the monitoring server.
On the other hand, if your installation runs monitoring agents for other
platforms, you might prefer a distributed platform such as Windows or Linux
for your for your hub monitoring server. If you install the hub monitoring server
on Windows or Linux, you have the option of deploying the portal server on
the same system, which can shorten the communications path.
This decision influences the way you configure the Advanced Backup and
Recovery for z/OS:
v If you choose to install the monitoring server on a distributed system, you fill
out “Worksheets: Information to gather when you put your hub monitoring
server on a distributed system” on page 22.
v If you choose to install the monitoring server on z/OS, you fill out
“Worksheets: Information to gather when you put your hub monitoring
server on a z/OS system” on page 28.
The two basic types of monitoring servers are hub and remote:
v The hub monitoring server is the focal point for managing your environment. You
can configure only one hub monitoring server. It communicates with the portal
server, with monitoring agents, and optionally with monitoring servers running
remotely.
v You can optionally configure a remote monitoring server to distribute the
workload of the hub monitoring server, but it is not required.
Each remote monitoring server must be installed on its own system or
workstation. A remote monitoring server communicates with the hub monitoring
server and with monitoring agents running on the same or different systems.
Note that a remote monitoring server is remote only with respect to the hub
monitoring server, not necessarily with respect to the monitoring agents. A
monitoring agent can be installed on the same system as a remote monitoring
server. The monitoring server is then local to the monitoring agent, but it is still a
remote monitoring server. See “Advanced Backup and Recovery for z/OS
monitoring agent” on page 11.
IBM Confidential
Chapter 2. Planning your Advanced Backup and Recovery for z/OS configuration 9
The configuration scenarios in this guide assume that the monitoring server being
configured with the Advanced Backup and Recovery monitoring agent is a hub
monitoring server. For instructions on configuring remote monitoring servers, see
the IBM Tivoli Monitoring: Configuring IBM Tivoli Enterprise Monitoring Server on
z/OS and IBM Tivoli Monitoring: IBM Tivoli Monitoring Installation and Setup
Guide.
Decision point:
Should you configure a remote monitoring server or servers for your
environment?
A remote monitoring server is designed to offload work from the hub.
Whether or not your hub gets overloaded enough to slow down hub
processing of situations and other data depends on the complexity of your
environment. The following factors tend to boost strain on the hub and
increase the likelihood that you might want a remote server to help out the
hub:
– Monitoring many z/OS images. The more monitoring agents you have
installed on z/OS systems, the more work for the hub.
– Monitoring many situations. Advanced Backup and Recovery for z/OS
does not come with a great many situations to consume hub cycles, so
unless you have other monitoring agents with lots of situations, this is
probably not the deciding factor.
Configuring a remote monitoring server can also give you scalability
potential and failover protection, which might be especially important when
you add Advanced Backup and Recovery for z/OS to an environment with
many monitoring agents. For more information on these issues, see the IBM
Redbooks: Deployment Guide Series: IBM Tivoli Monitoring at the following
Web site:
http://www.redbooks.ibm.com/Redbooks.nsf/RedbookAbstracts/sg247188.html?Open
Look for the following topics:
– Small/medium installation
– Scalability
Tivoli Data Warehouse and the warehouse proxy
The Tivoli Data Warehouse, an optional component of Tivoli Monitoring Services, is
a long-term data store for the performance and analysis data collected by the
monitoring agents. The warehouse proxy is a process that periodically moves data
from the Advanced Backup and Recovery for z/OS monitoring agent to the Tivoli
Data Warehouse. The short-term history files are maintained in the persistent data
store at the location of the monitoring agent. The warehouse proxy agent retrieves
the short-term history data and stores it in the warehouse.
The Tivoli Data Warehouse and warehouse proxy are available on Windows, UNIX,
and Linux. For instructions on installing and configuring the Tivoli Data Warehouse
and warehouse proxy, see IBM Tivoli Monitoring: IBM Tivoli Monitoring Installation
and Setup Guide, GC32-9407 and IBM Tivoli Monitoring: IBM Tivoli Monitoring
Administrator’s Guide, SC32-9408.
IBM Confidential
10 IBM Tivoli Advanced Backup and Recovery for z/OS Planning and Configuration Guide

Advanced Backup and Recovery for z/OS monitoring agent
The Advanced Backup and Recovery for z/OS monitoring agent, like all Tivoli
Enterprise Monitoring Agents, monitors and collects data from a managed system.
Monitoring agents are installed on the systems or subsystems you want to monitor.
They pass data to monitoring servers (remote or hub), receive instructions from the
monitoring servers, and issue commands to the managed systems.
IBM Confidential
Chapter 2. Planning your Advanced Backup and Recovery for z/OS configuration 11
Tivoli Enterprise Portal client and Tivoli Enterprise Portal Server
The Tivoli Enterprise Portal client (portal client) is the user interface for Advanced
Backup and Recovery for z/OS. The portal client is a thin Java application that
communicates with the Tivoli Enterprise Portal Server to send requests and retrieve
data.
Tip
These components require IBM Java Runtime Environment (JRE) V1.4.2. You
do not need to install this JRE ahead of time, because the installation program
for the Tivoli Monitoring Services components includes the JRE.
You can access all portal client function through either a desktop client or an
Internet Explorer browser connected to an embedded Web server in the Tivoli
Enterprise Portal Server.
v The desktop portal client allows access to portal client function and is required
for configuration. In the operations environment, you must install the portal client
on at least one desktop. Then individual Advanced Backup and Recovery for
z/OS users can either install the portal client on their desktops, or use the
browser portal client to access the portal client function. The desktop client can
run on Windows or Linux (RedHat or SUSE Intel® Linux only).
v The browser portal client allows individual Advanced Backup and Recovery for
z/OS users to leverage an existing deployment of Internet Explorer without
installing the client component on every user's workstation. The browser client
can run on Windows only, with Internet Explorer 6 as the only supported browser.
See the IBM Tivoli Monitoring: IBM Tivoli Monitoring Installation and Setup Guide
for complete information about supported operating system version support.
The Tivoli Enterprise Portal Server (portal server) is a Java application server that
enables retrieval, manipulation, and analysis of data from agents. The portal server
holds all the information needed to format the workspaces viewed in the portal
client. The portal server communicates with the portal clients (default port is 1920)
and with the hub monitoring server (default port is 1918).
You can install the portal server on a Windows, Linux for Intel, 31-bit Linux for z/OS,
or AIX® system.
Decision point:
How do you choose among Windows, Linux, and AIX for installation of
the portal server, and between Windows and Linux for installation of the
portal desktop client?
Base this decision on conditions and preferences at your site, such as:
v The operating systems already in use in the existing environment
v Familiarity and comfort level with each operating system
v Whether you want to bring additional operating systems into your site’s
current configuration
Note that you can run with mixed portal server and desktop client components.
For example, you can have a desktop client on Linux and a portal server on
AIX, or a desktop client on Windows and a portal server on Linux.
IBM Confidential
12 IBM Tivoli Advanced Backup and Recovery for z/OS Planning and Configuration Guide
The portal server requires that you have already installed DB2® Universal
Database™ (DB2 UDB) Express or Enterprise. The DB2 UDB Express or Enterprise
is provided in the Advanced Backup and Recovery for z/OS installation package. If
you already have DB2 UDB version 8 or higher on the workstation where you plan
to install the portal server, you do not need to install it again for Advanced Backup
and Recovery for z/OS.
Understanding runtime environments
Your next planning task is to decide what types of runtime environments to set up
for the components you plan to deploy on your z/OS images.
Fill out the “Worksheet: Information for configuring your runtime environment” on
page 36 as you read this section.
A runtime environment is a logical grouping of runtime libraries that are referenced
by started tasks as they run on a z/OS image. When you run the Configuration Tool
to configure the Advanced Backup and Recovery for z/OS monitoring agent, you
start this process by defining a runtime environment of a certain type, which
determines the number and types of runtime libraries required.
Table 2 summarizes the types of libraries created during installation and
configuration of the Advanced Backup and Recovery for z/OS product.
Table 2. Types of libraries
Type of Library Description
Runtime libraries General term for libraries referenced by started task procedures.
Includes SMP/E target, base, and LPAR-specific libraries.
SMP/E target libraries
Abbreviated &thilev.
SMP/E maintained target libraries.
Base libraries
Abbreviated &rhilev or &rhilev.&rte.
Read-only runtime libraries that the configuration process does not alter
and that are shareable between systems. These libraries physically
exist in a full or base runtime environment, or as SMP/E target libraries
(if a runtime environment shares with SMP/E).
The base libraries can contain the actual data sets maintained by
SMP/E, or a copy of them. Use a clone or copy of the SMP/E
installation libraries for a production environment.
LPAR-specific libraries
Abbreviated &rhilev.&rte.
Runtime libraries that are built during configuration to run on a specific
logical partition (LPAR). These libraries contain the unique elements
required for a particular LPAR and cannot be shared among z/OS
images.
Table 3 explains the types of runtime environments that you can create during
product configuration.
Table 3. Types of runtime environments
Type of runtime environment Description
Full (self-contained) runtime environment Runtime environment containing a full set of dedicated libraries,
consisting of both LPAR-specific libraries and a copy of the SMP/E
installation read-only base libraries eligible for sharing with other
runtime environments.
See “Example 1. Full (self-contained) runtime environment” on page 14.
IBM Confidential
Chapter 2. Planning your Advanced Backup and Recovery for z/OS configuration 13
Table 3. Types of runtime environments (continued)
Type of runtime environment Description
Base runtime environment Runtime environment containing exclusively read-only, shareable base
libraries, which are a subset of the libraries needed to run monitoring
agents. Therefore, they must be shared by another runtime
environment.
See “Example 2. Base runtime environment” on page 16.
Sharing-with-base runtime environment Runtime environment containing LPAR-specific libraries and referencing
the base libraries configured in a base runtime environment.
See “Example 3. Sharing-with-base runtime environment” on page 17.
Sharing-with-full runtime environment Runtime environment containing LPAR-specific libraries and referencing
the base libraries configured in a full runtime environment.
See “Example 4. Sharing-with-full runtime environment” on page 18.
Sharing-with-SMP/E runtime environment Runtime environment containing LPAR-specific libraries and referencing
the libraries managed by SMP/E.
See “Example 5. Sharing-with-SMP/E runtime environment” on page
19.
The distinction among library types allows you to optimize your product
environment. For example, by allocating common base libraries to a single runtime
environment that can be shared by other runtime environments, you can
substantially reduce the amount of disk space required, as well as simplify the
application of product maintenance across remote z/OS images.
Quick start suggestion for a runtime environment configuration
There are many variables and lots of information to consider when deciding on
a runtime environment configuration for your installation. To get you started
quickly, here are a couple of suggestions:
v In most cases, when you're monitoring multiple z/OS images, you can get
good results with a sharing-with-base or sharing-with-SMP/E type of runtime
environment.
v If you want to test Advanced Backup and Recovery on an isolated test
system, use a full, self-contained type of runtime environment.
Possible configurations using runtime environments
The following five examples show different types of runtime environment
configurations. The way you choose to set up your runtime environments depends
on your site requirements and maintenance procedures.
Tip
The data set name (DSN) is composed of the high-level qualifier (&hilev),
followed by the mid-level qualifier (&rte), followed by the low-level qualifier.
The field settings and library names shown are for illustrative purposes only.
Example 1. Full (self-contained) runtime environment: The full runtime
environment contains all libraries required by a particular IBM product and is the
IBM Confidential
14 IBM Tivoli Advanced Backup and Recovery for z/OS Planning and Configuration Guide
easiest runtime environment to create. This type of runtime environment can be
defined in any situation but is most suitable if at least one of the following
statements is true:
v Your installation comprises only a single z/OS image.
v You want each z/OS image to be independent.
v You are creating a runtime environment for a specific combination of monitoring
agents that does not exist in any other runtime environment.
The following example represents a full runtime environment called RTE1 that is
completely self-contained. All base libraries and LPAR-specific libraries are
allocated within RTE1. The base libraries in a full runtime environment are a copy of
the SMP/E installation libraries.
RTE Name: RTE1
Type: FULL
Hilev: IBM.OMXE
Midlev: RTE1
Shares with: (none)
LPAR-specific library DD DSNAME resolution:
//RKANPARU DD DSN=IBM.OMXE.RTE1.RKANPAR
DD DSN=IBM.OMXE.RTE1.RKANPARU
Base library DD DSNAME resolution:
//RKANMODL DD DSN=IBM.OMXE.RTE1.RKANMODL
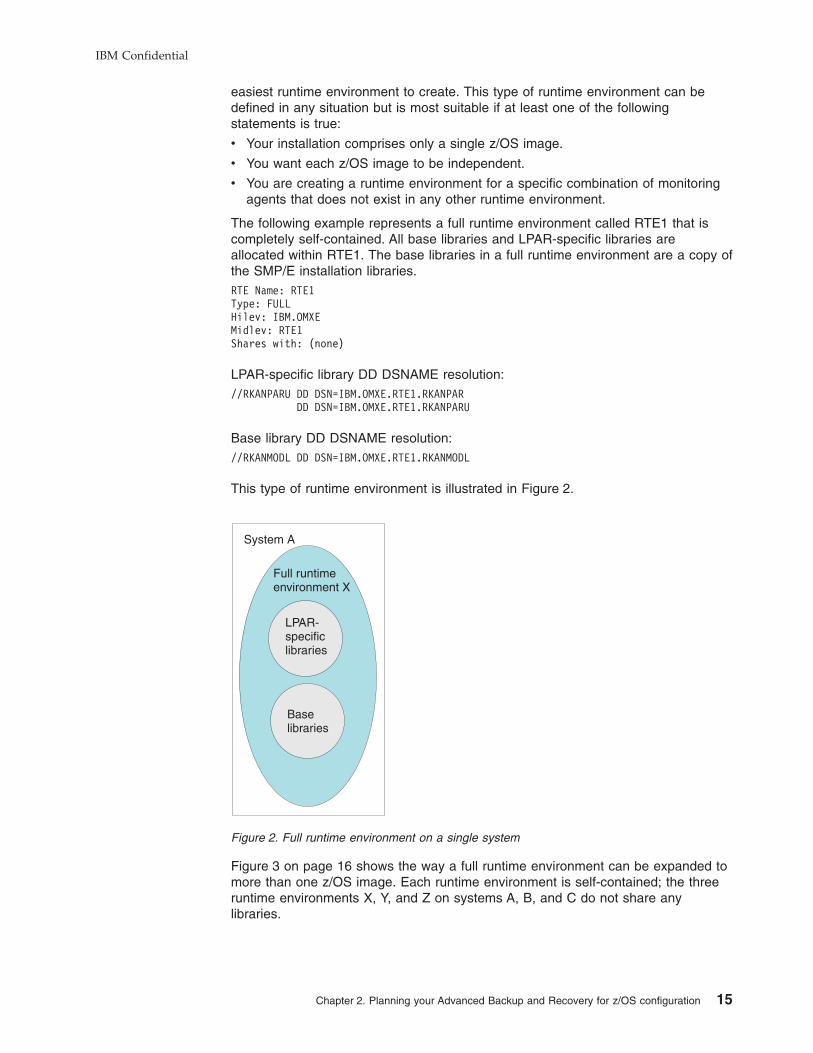
This type of runtime environment is illustrated in Figure 2.
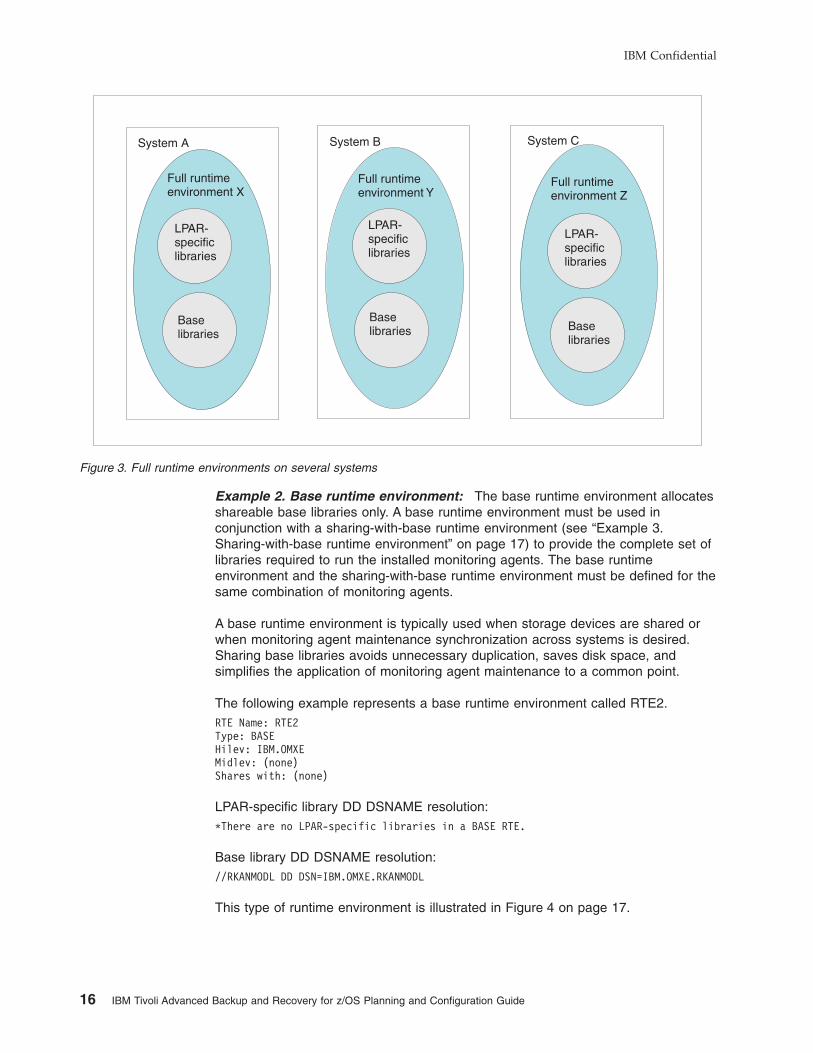
Figure 3 on page 16 shows the way a full runtime environment can be expanded to
more than one z/OS image. Each runtime environment is self-contained; the three
runtime environments X, Y, and Z on systems A, B, and C do not share any
libraries.
Full runtimeenvironment X
System A
Baselibraries
LPAR-specificlibraries
Figure 2. Full runtime environment on a single system
IBM Confidential
Chapter 2. Planning your Advanced Backup and Recovery for z/OS configuration 15
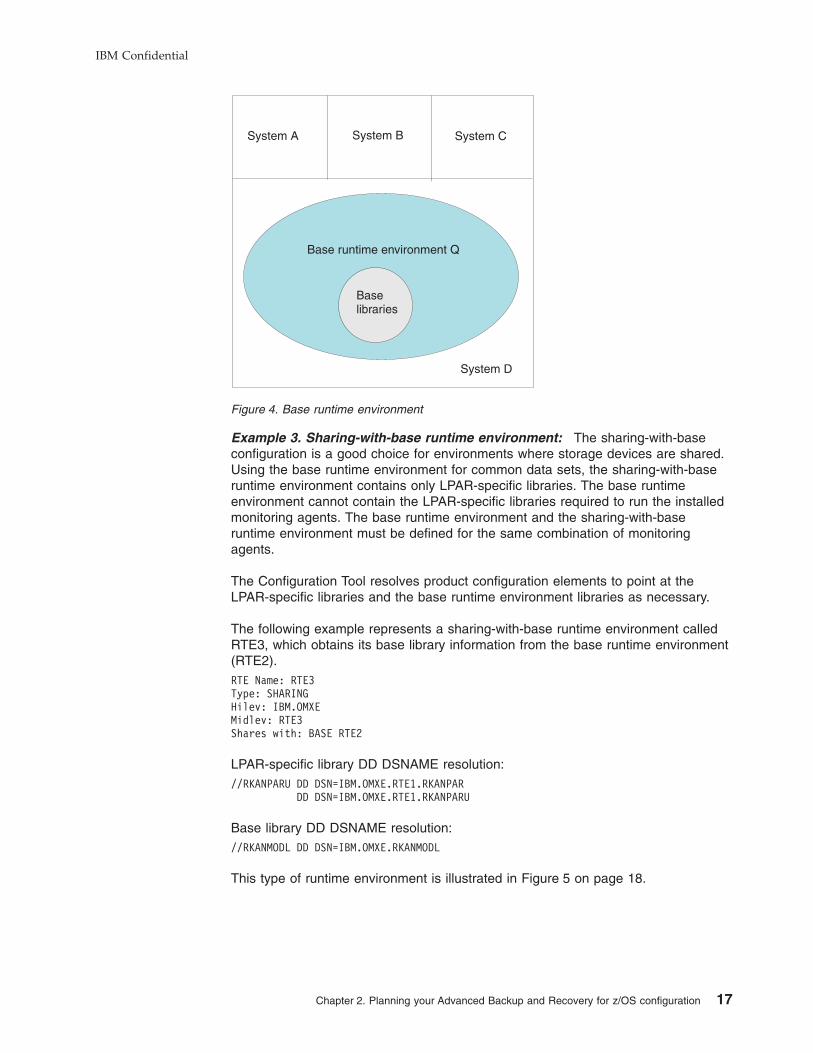
Example 2. Base runtime environment: The base runtime environment allocates
shareable base libraries only. A base runtime environment must be used in
conjunction with a sharing-with-base runtime environment (see “Example 3.
Sharing-with-base runtime environment” on page 17) to provide the complete set of
libraries required to run the installed monitoring agents. The base runtime
environment and the sharing-with-base runtime environment must be defined for the
same combination of monitoring agents.
A base runtime environment is typically used when storage devices are shared or
when monitoring agent maintenance synchronization across systems is desired.
Sharing base libraries avoids unnecessary duplication, saves disk space, and
simplifies the application of monitoring agent maintenance to a common point.
The following example represents a base runtime environment called RTE2.
RTE Name: RTE2
Type: BASE
Hilev: IBM.OMXE
Midlev: (none)
Shares with: (none)
LPAR-specific library DD DSNAME resolution:
*There are no LPAR-specific libraries in a BASE RTE.
Base library DD DSNAME resolution:
//RKANMODL DD DSN=IBM.OMXE.RKANMODL
This type of runtime environment is illustrated in Figure 4 on page 17.
Full runtimeenvironment X
Full runtimeenvironment Y
Full runtimeenvironment Z
System A System B
Baselibraries
LPAR-specificlibraries
LPAR-specificlibraries
LPAR-specificlibraries
Baselibraries Base
libraries
System C
Figure 3. Full runtime environments on several systems
IBM Confidential
16 IBM Tivoli Advanced Backup and Recovery for z/OS Planning and Configuration Guide
Example 3. Sharing-with-base runtime environment: The sharing-with-base
configuration is a good choice for environments where storage devices are shared.
Using the base runtime environment for common data sets, the sharing-with-base
runtime environment contains only LPAR-specific libraries. The base runtime
environment cannot contain the LPAR-specific libraries required to run the installed
monitoring agents. The base runtime environment and the sharing-with-base
runtime environment must be defined for the same combination of monitoring
agents.
The Configuration Tool resolves product configuration elements to point at the
LPAR-specific libraries and the base runtime environment libraries as necessary.
The following example represents a sharing-with-base runtime environment called
RTE3, which obtains its base library information from the base runtime environment
(RTE2).
RTE Name: RTE3
Type: SHARING
Hilev: IBM.OMXE
Midlev: RTE3
Shares with: BASE RTE2
LPAR-specific library DD DSNAME resolution:
//RKANPARU DD DSN=IBM.OMXE.RTE1.RKANPAR
DD DSN=IBM.OMXE.RTE1.RKANPARU
Base library DD DSNAME resolution:
//RKANMODL DD DSN=IBM.OMXE.RKANMODL
This type of runtime environment is illustrated in Figure 5 on page 18.
Baselibraries
Base runtime environment Q
System A System B System C
System D
Figure 4. Base runtime environment
IBM Confidential
Chapter 2. Planning your Advanced Backup and Recovery for z/OS configuration 17
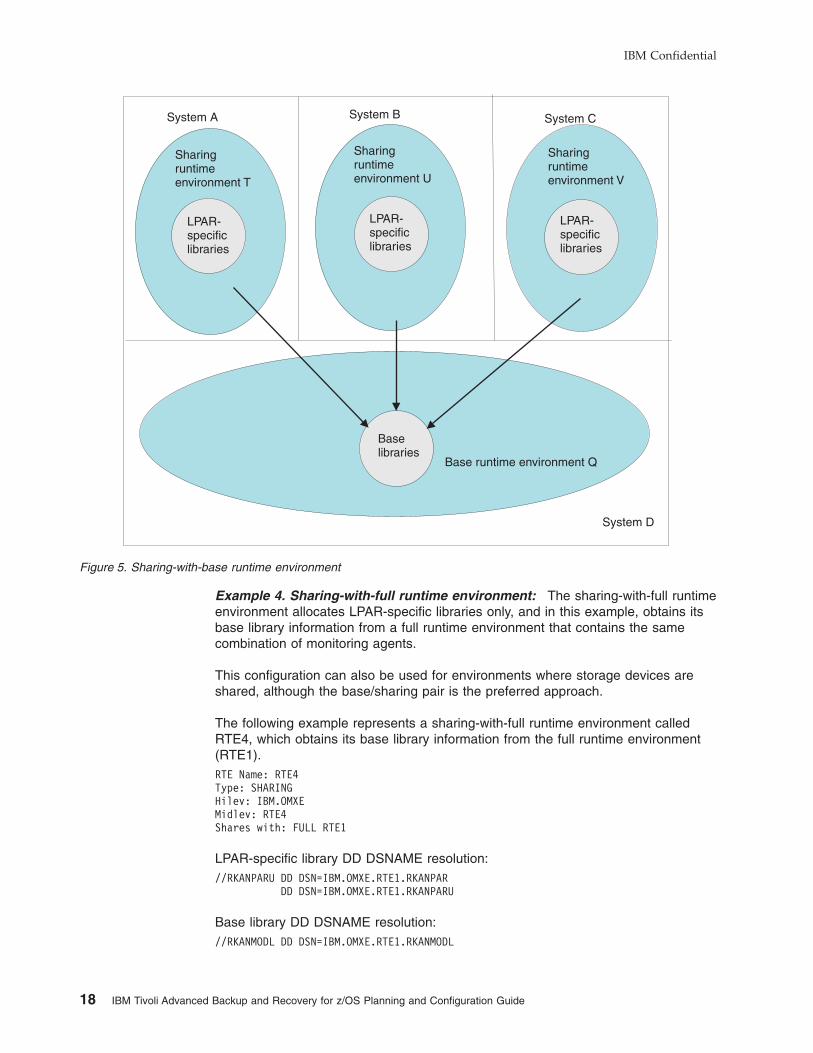
Example 4. Sharing-with-full runtime environment: The sharing-with-full runtime
environment allocates LPAR-specific libraries only, and in this example, obtains its
base library information from a full runtime environment that contains the same
combination of monitoring agents.
This configuration can also be used for environments where storage devices are
shared, although the base/sharing pair is the preferred approach.
The following example represents a sharing-with-full runtime environment called
RTE4, which obtains its base library information from the full runtime environment
(RTE1).
RTE Name: RTE4
Type: SHARING
Hilev: IBM.OMXE
Midlev: RTE4
Shares with: FULL RTE1
LPAR-specific library DD DSNAME resolution:
//RKANPARU DD DSN=IBM.OMXE.RTE1.RKANPAR
DD DSN=IBM.OMXE.RTE1.RKANPARU
Base library DD DSNAME resolution:
//RKANMODL DD DSN=IBM.OMXE.RTE1.RKANMODL
Baselibraries
Base runtime environment Q
System A System B System C
Sharingruntimeenvironment T
Sharingruntimeenvironment U
Sharingruntimeenvironment V
LPAR-specificlibraries
LPAR-specificlibraries
LPAR-specificlibraries
System D
Figure 5. Sharing-with-base runtime environment
IBM Confidential
18 IBM Tivoli Advanced Backup and Recovery for z/OS Planning and Configuration Guide

This type of runtime environment is illustrated in Figure 6.
Example 5. Sharing-with-SMP/E runtime environment: The sharing-with-SMP/E
runtime environment allocates LPAR-specific libraries only and obtains its base
library information from target libraries managed by SMP/E. Note that the target
SMP/E libraries must be copies (cloned) rather than the system libraries. See the
appendix on making a copy of your system software (cloning) in z/OS and z/OS.e
Planning for Installation.
Use the sharing-with-SMP/E configuration if at least one of the following statements
is true:
v Space is limited on storage devices. This configuration method does not allocate
base libraries in the runtime environment, thereby reducing storage requirements.
v You want to activate SMP/E applied monitoring agent maintenance immediately.
The following example represents a sharing-with-SMP/E runtime environment called
RTE5, which obtains its base library information from SMP/E target libraries.
RTE Name: RTE5
Type: SHARING
Hilev: IBM.OMXE
Midlev: RTE5
Shares with: SMP/E Target Libraries
Hilev (SMP): INSTALL.SMPE
LPAR-specific library DD DSNAME resolution:
//RKANPARU DD DSN=IBM.OMXE.RTE1.RKANPAR
DD DSN=IBM.OMXE.RTE1.RKANPARU
Base library DD DSNAME resolution:
//RKANMODL DD DSN=IBM.OMXE.SMPE.TKANMODL
Fullruntimeenvironment X
Sharingruntimeenvironment Y
Sharingruntimeenvironment Z
System A System B
Baselibraries
LPAR-specificlibraries
LPAR-specificlibraries
LPAR-specificlibraries
System C
Figure 6. Sharing-with-full runtime environment
IBM Confidential
Chapter 2. Planning your Advanced Backup and Recovery for z/OS configuration 19
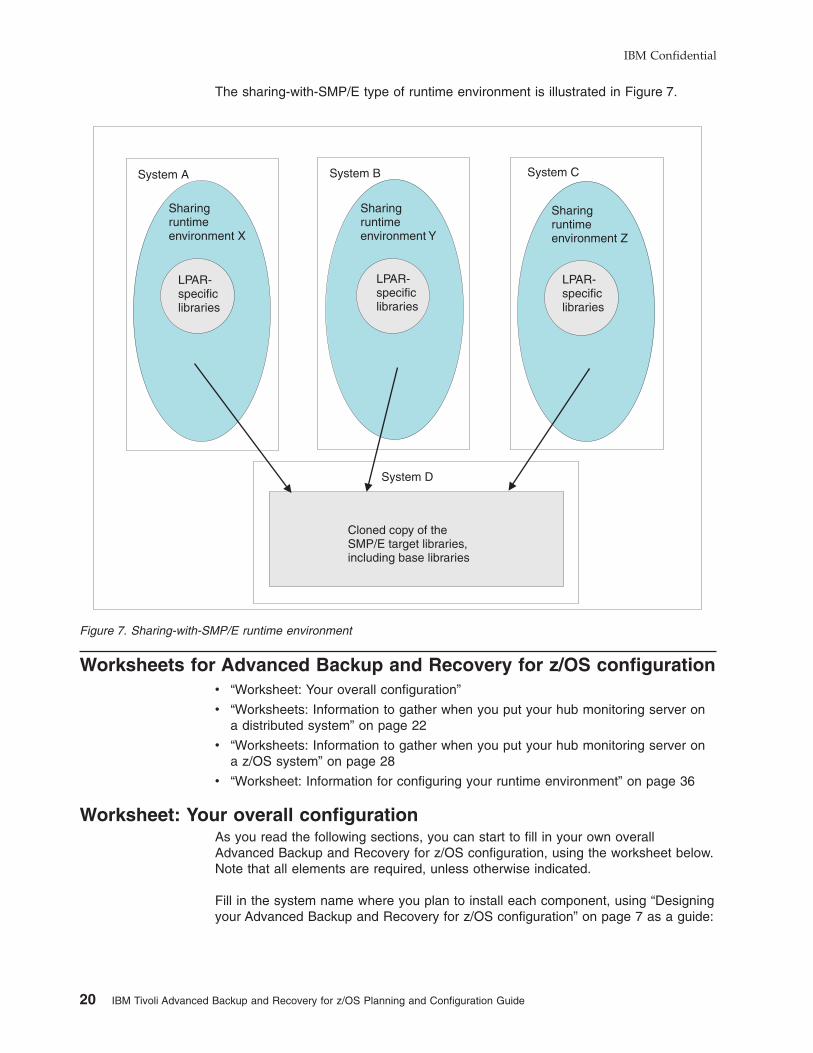
The sharing-with-SMP/E type of runtime environment is illustrated in Figure 7.
Worksheets for Advanced Backup and Recovery for z/OS configuration
v “Worksheet: Your overall configuration”
v “Worksheets: Information to gather when you put your hub monitoring server on
a distributed system” on page 22
v “Worksheets: Information to gather when you put your hub monitoring server on
a z/OS system” on page 28
v “Worksheet: Information for configuring your runtime environment” on page 36
Worksheet: Your overall configuration
As you read the following sections, you can start to fill in your own overall
Advanced Backup and Recovery for z/OS configuration, using the worksheet below.
Note that all elements are required, unless otherwise indicated.
Fill in the system name where you plan to install each component, using “Designing
your Advanced Backup and Recovery for z/OS configuration” on page 7 as a guide:
Sharingruntimeenvironment X
Sharingruntimeenvironment Y
Sharingruntimeenvironment Z
System A System B
LPAR-specificlibraries
LPAR-specificlibraries
LPAR-specificlibraries
System C
Cloned copy of theSMP/E target libraries,including base libraries
System D
Figure 7. Sharing-with-SMP/E runtime environment
IBM Confidential
20 IBM Tivoli Advanced Backup and Recovery for z/OS Planning and Configuration Guide
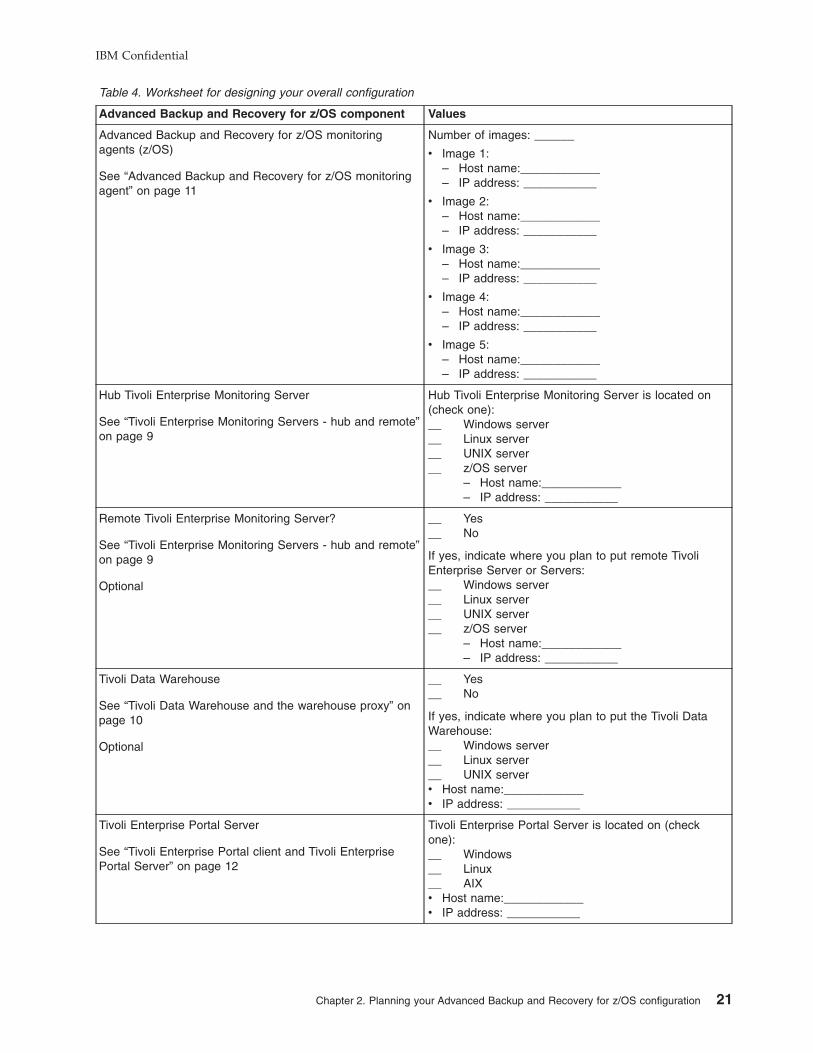
Table 4. Worksheet for designing your overall configuration
Advanced Backup and Recovery for z/OS component Values
Advanced Backup and Recovery for z/OS monitoring
agents (z/OS)
See “Advanced Backup and Recovery for z/OS monitoring
agent” on page 11
Number of images: ______
v Image 1:
– Host name:____________
– IP address: ___________
v Image 2:
– Host name:____________
– IP address: ___________
v Image 3:
– Host name:____________
– IP address: ___________
v Image 4:
– Host name:____________
– IP address: ___________
v Image 5:
– Host name:____________
– IP address: ___________
Hub Tivoli Enterprise Monitoring Server
See “Tivoli Enterprise Monitoring Servers - hub and remote”
on page 9
Hub Tivoli Enterprise Monitoring Server is located on
(check one):
__ Windows server
__ Linux server
__ UNIX server
__ z/OS server
– Host name:____________
– IP address: ___________
Remote Tivoli Enterprise Monitoring Server?
See “Tivoli Enterprise Monitoring Servers - hub and remote”
on page 9
Optional
__ Yes
__ No
If yes, indicate where you plan to put remote Tivoli
Enterprise Server or Servers:
__ Windows server
__ Linux server
__ UNIX server
__ z/OS server
– Host name:____________
– IP address: ___________
Tivoli Data Warehouse
See “Tivoli Data Warehouse and the warehouse proxy” on
page 10
Optional
__ Yes
__ No
If yes, indicate where you plan to put the Tivoli Data
Warehouse:
__ Windows server
__ Linux server
__ UNIX serverv Host name:____________
v IP address: ___________
Tivoli Enterprise Portal Server
See “Tivoli Enterprise Portal client and Tivoli Enterprise
Portal Server” on page 12
Tivoli Enterprise Portal Server is located on (check
one):
__ Windows
__ Linux
__ AIXv Host name:____________
v IP address: ___________
IBM Confidential
Chapter 2. Planning your Advanced Backup and Recovery for z/OS configuration 21
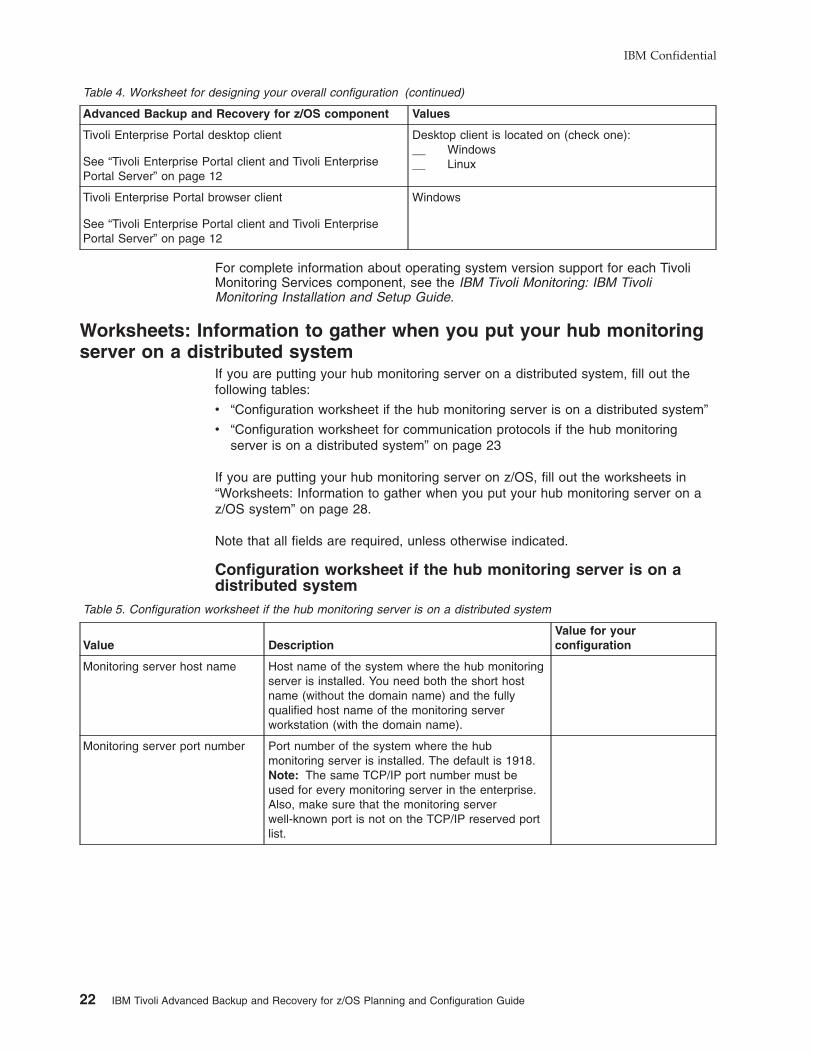
Table 4. Worksheet for designing your overall configuration (continued)
Advanced Backup and Recovery for z/OS component Values
Tivoli Enterprise Portal desktop client
See “Tivoli Enterprise Portal client and Tivoli Enterprise
Portal Server” on page 12
Desktop client is located on (check one):
__ Windows
__ Linux
Tivoli Enterprise Portal browser client
See “Tivoli Enterprise Portal client and Tivoli Enterprise
Portal Server” on page 12
Windows
For complete information about operating system version support for each Tivoli
Monitoring Services component, see the IBM Tivoli Monitoring: IBM Tivoli
Monitoring Installation and Setup Guide.
Worksheets: Information to gather when you put your hub monitoring
server on a distributed system
If you are putting your hub monitoring server on a distributed system, fill out the
following tables:
v “Configuration worksheet if the hub monitoring server is on a distributed system”
v “Configuration worksheet for communication protocols if the hub monitoring
server is on a distributed system” on page 23
If you are putting your hub monitoring server on z/OS, fill out the worksheets in
“Worksheets: Information to gather when you put your hub monitoring server on a
z/OS system” on page 28.
Note that all fields are required, unless otherwise indicated.
Configuration worksheet if the hub monitoring server is on a
distributed system
Table 5. Configuration worksheet if the hub monitoring server is on a distributed system
Value Description
Value for your
configuration
Monitoring server host name Host name of the system where the hub monitoring
server is installed. You need both the short host
name (without the domain name) and the fully
qualified host name of the monitoring server
workstation (with the domain name).
Monitoring server port number Port number of the system where the hub
monitoring server is installed. The default is 1918.
Note: The same TCP/IP port number must be
used for every monitoring server in the enterprise.
Also, make sure that the monitoring server
well-known port is not on the TCP/IP reserved port
list.
IBM Confidential
22 IBM Tivoli Advanced Backup and Recovery for z/OS Planning and Configuration Guide
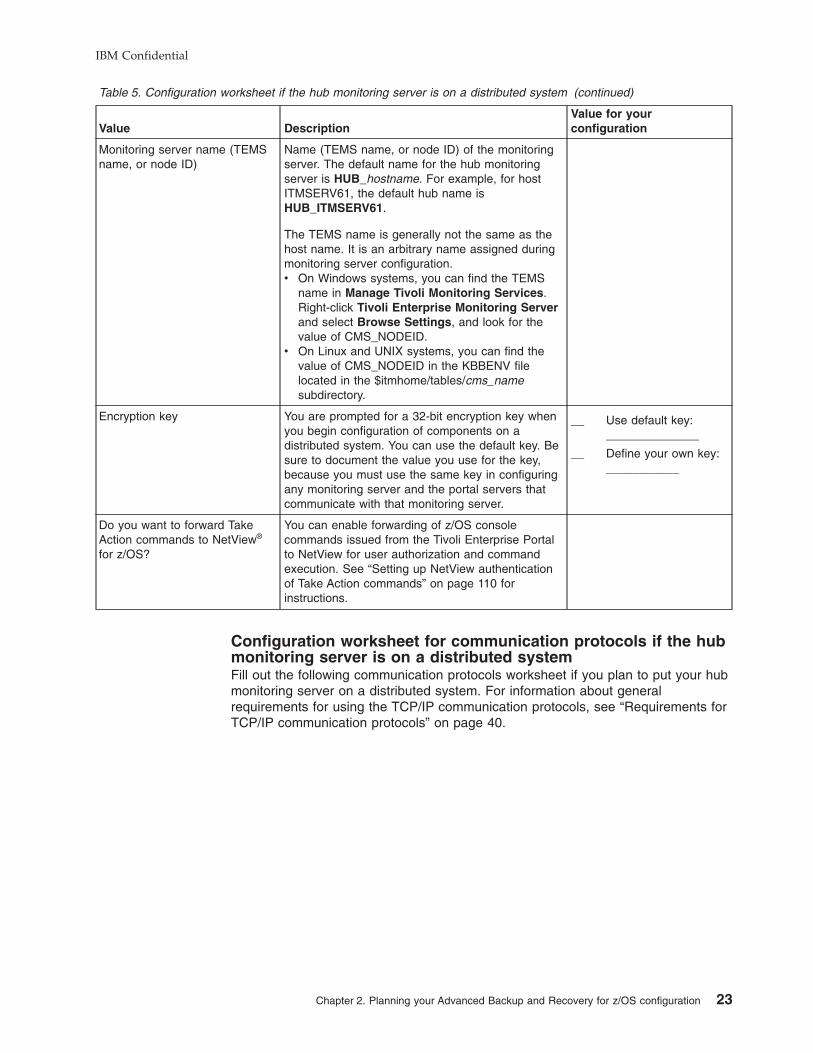
Table 5. Configuration worksheet if the hub monitoring server is on a distributed system (continued)
Value Description
Value for your
configuration
Monitoring server name (TEMS
name, or node ID)
Name (TEMS name, or node ID) of the monitoring
server. The default name for the hub monitoring
server is HUB_hostname. For example, for host
ITMSERV61, the default hub name is
HUB_ITMSERV61.
The TEMS name is generally not the same as the
host name. It is an arbitrary name assigned during
monitoring server configuration.
v On Windows systems, you can find the TEMS
name in Manage Tivoli Monitoring Services.
Right-click Tivoli Enterprise Monitoring Server
and select Browse Settings, and look for the
value of CMS_NODEID.
v On Linux and UNIX systems, you can find the
value of CMS_NODEID in the KBBENV file
located in the $itmhome/tables/cms_name
subdirectory.
Encryption key You are prompted for a 32-bit encryption key when
you begin configuration of components on a
distributed system. You can use the default key. Be
sure to document the value you use for the key,
because you must use the same key in configuring
any monitoring server and the portal servers that
communicate with that monitoring server.
__ Use default key:
______________
__ Define your own key:
___________
Do you want to forward Take
Action commands to NetView®
for z/OS?
You can enable forwarding of z/OS console
commands issued from the Tivoli Enterprise Portal
to NetView for user authorization and command
execution. See “Setting up NetView authentication
of Take Action commands” on page 110 for
instructions.
Configuration worksheet for communication protocols if the hub
monitoring server is on a distributed system
Fill out the following communication protocols worksheet if you plan to put your hub
monitoring server on a distributed system. For information about general
requirements for using the TCP/IP communication protocols, see “Requirements for
TCP/IP communication protocols” on page 40.
IBM Confidential
Chapter 2. Planning your Advanced Backup and Recovery for z/OS configuration 23
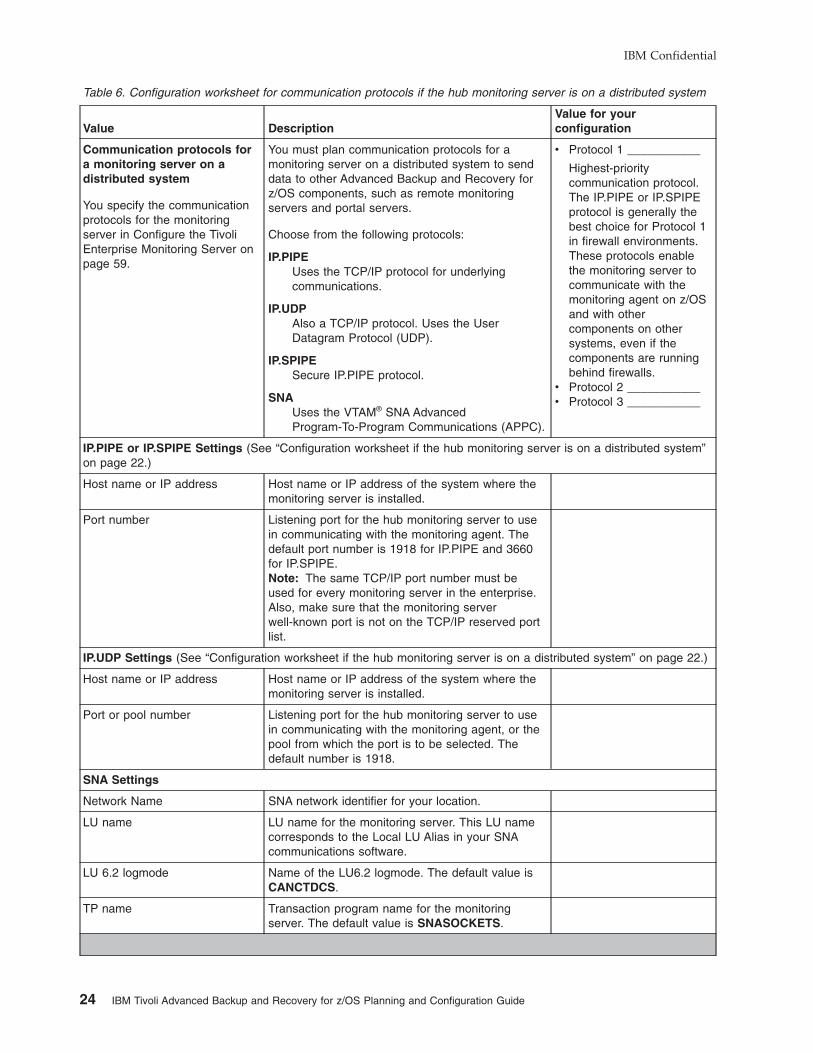
Table 6. Configuration worksheet for communication protocols if the hub monitoring server is on a distributed system
Value Description
Value for your
configuration
Communication protocols for
a monitoring server on a
distributed system
You specify the communication
protocols for the monitoring
server in Configure the Tivoli
Enterprise Monitoring Server on
page 59.
You must plan communication protocols for a
monitoring server on a distributed system to send
data to other Advanced Backup and Recovery for
z/OS components, such as remote monitoring
servers and portal servers.
Choose from the following protocols:
IP.PIPE
Uses the TCP/IP protocol for underlying
communications.
IP.UDP
Also a TCP/IP protocol. Uses the User
Datagram Protocol (UDP).
IP.SPIPE
Secure IP.PIPE protocol.
SNA
Uses the VTAM® SNA Advanced
Program-To-Program Communications (APPC).
v Protocol 1 ___________
Highest-priority
communication protocol.
The IP.PIPE or IP.SPIPE
protocol is generally the
best choice for Protocol 1
in firewall environments.
These protocols enable
the monitoring server to
communicate with the
monitoring agent on z/OS
and with other
components on other
systems, even if the
components are running
behind firewalls.
v Protocol 2 ___________
v Protocol 3 ___________
IP.PIPE or IP.SPIPE Settings (See “Configuration worksheet if the hub monitoring server is on a distributed system”
on page 22.)
Host name or IP address Host name or IP address of the system where the
monitoring server is installed.
Port number Listening port for the hub monitoring server to use
in communicating with the monitoring agent. The
default port number is 1918 for IP.PIPE and 3660
for IP.SPIPE.
Note: The same TCP/IP port number must be
used for every monitoring server in the enterprise.
Also, make sure that the monitoring server
well-known port is not on the TCP/IP reserved port
list.
IP.UDP Settings (See “Configuration worksheet if the hub monitoring server is on a distributed system” on page 22.)
Host name or IP address Host name or IP address of the system where the
monitoring server is installed.
Port or pool number Listening port for the hub monitoring server to use
in communicating with the monitoring agent, or the
pool from which the port is to be selected. The
default number is 1918.
SNA Settings
Network Name SNA network identifier for your location.
LU name LU name for the monitoring server. This LU name
corresponds to the Local LU Alias in your SNA
communications software.
LU 6.2 logmode Name of the LU6.2 logmode. The default value is
CANCTDCS.
TP name Transaction program name for the monitoring
server. The default value is SNASOCKETS.
IBM Confidential
24 IBM Tivoli Advanced Backup and Recovery for z/OS Planning and Configuration Guide
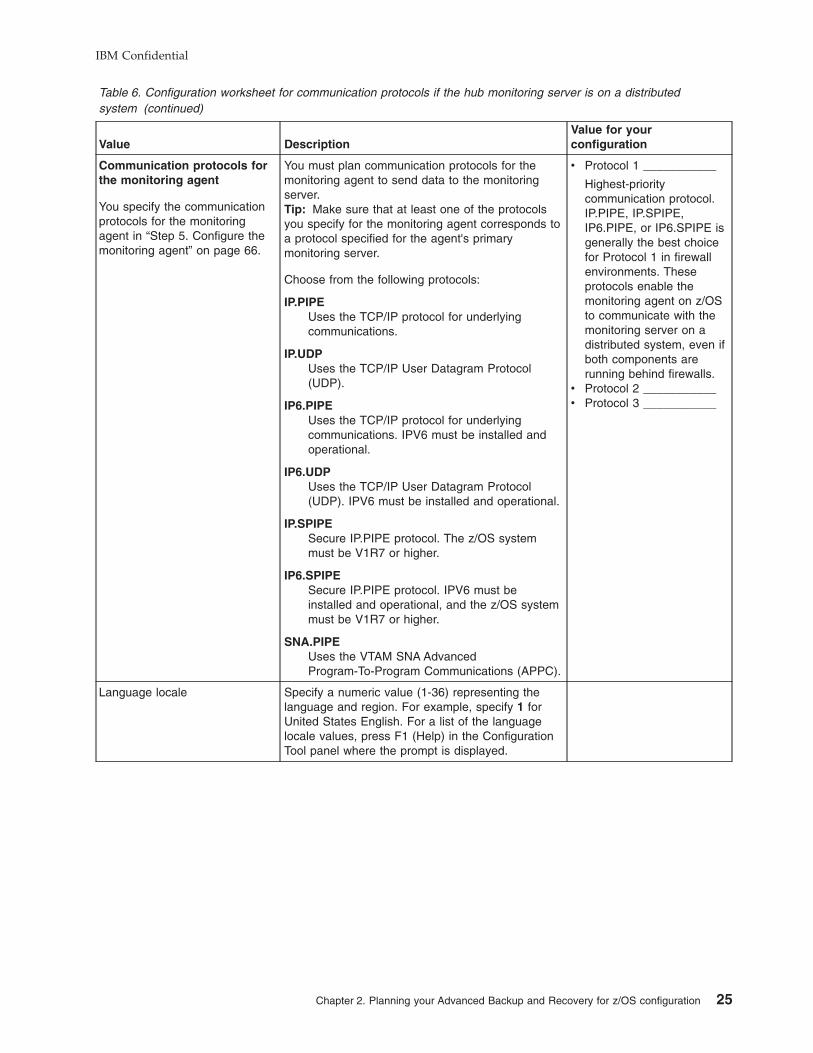
Table 6. Configuration worksheet for communication protocols if the hub monitoring server is on a distributed
system (continued)
Value Description
Value for your
configuration
Communication protocols for
the monitoring agent
You specify the communication
protocols for the monitoring
agent in “Step 5. Configure the
monitoring agent” on page 66.
You must plan communication protocols for the
monitoring agent to send data to the monitoring
server.
Tip: Make sure that at least one of the protocols
you specify for the monitoring agent corresponds to
a protocol specified for the agent's primary
monitoring server.
Choose from the following protocols:
IP.PIPE
Uses the TCP/IP protocol for underlying
communications.
IP.UDP
Uses the TCP/IP User Datagram Protocol
(UDP).
IP6.PIPE
Uses the TCP/IP protocol for underlying
communications. IPV6 must be installed and
operational.
IP6.UDP
Uses the TCP/IP User Datagram Protocol
(UDP). IPV6 must be installed and operational.
IP.SPIPE
Secure IP.PIPE protocol. The z/OS system
must be V1R7 or higher.
IP6.SPIPE
Secure IP.PIPE protocol. IPV6 must be
installed and operational, and the z/OS system
must be V1R7 or higher.
SNA.PIPE
Uses the VTAM SNA Advanced
Program-To-Program Communications (APPC).
v Protocol 1 ___________
Highest-priority
communication protocol.
IP.PIPE, IP.SPIPE,
IP6.PIPE, or IP6.SPIPE is
generally the best choice
for Protocol 1 in firewall
environments. These
protocols enable the
monitoring agent on z/OS
to communicate with the
monitoring server on a
distributed system, even if
both components are
running behind firewalls.
v Protocol 2 ___________
v Protocol 3 ___________
Language locale Specify a numeric value (1-36) representing the
language and region. For example, specify 1 for
United States English. For a list of the language
locale values, press F1 (Help) in the Configuration
Tool panel where the prompt is displayed.
IBM Confidential
Chapter 2. Planning your Advanced Backup and Recovery for z/OS configuration 25
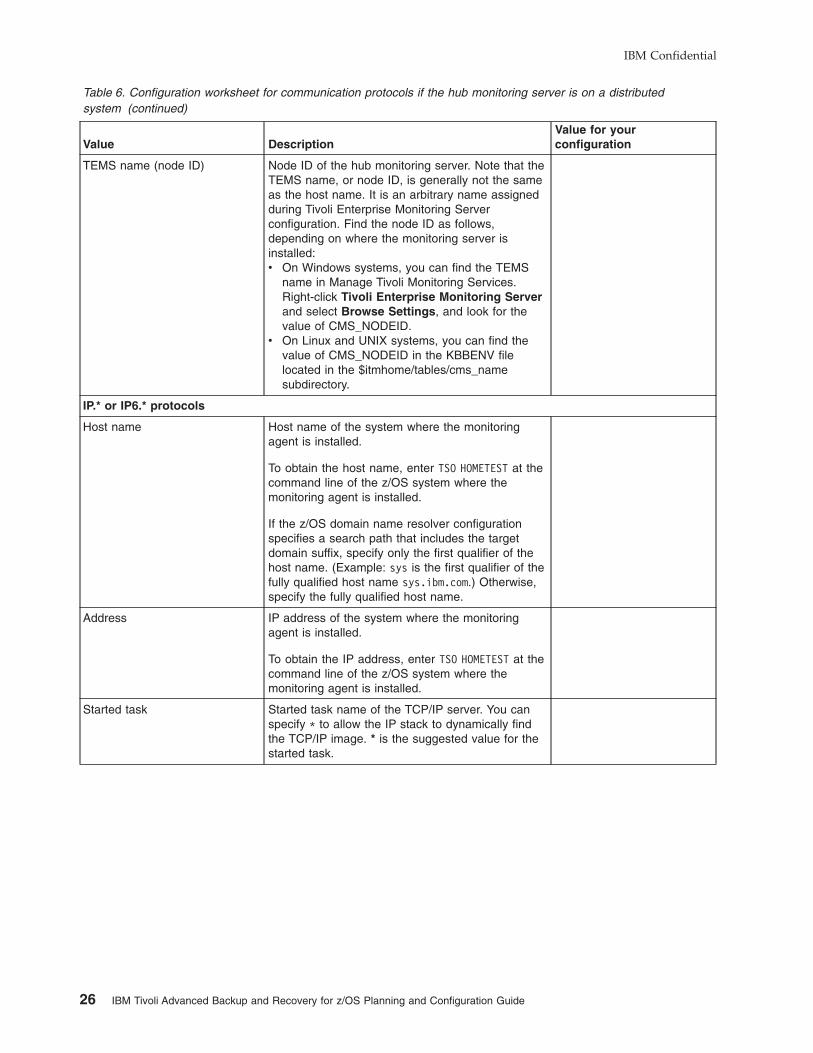
Table 6. Configuration worksheet for communication protocols if the hub monitoring server is on a distributed
system (continued)
Value Description
Value for your
configuration
TEMS name (node ID) Node ID of the hub monitoring server. Note that the
TEMS name, or node ID, is generally not the same
as the host name. It is an arbitrary name assigned
during Tivoli Enterprise Monitoring Server
configuration. Find the node ID as follows,
depending on where the monitoring server is
installed:
v On Windows systems, you can find the TEMS
name in Manage Tivoli Monitoring Services.
Right-click Tivoli Enterprise Monitoring Server
and select Browse Settings, and look for the
value of CMS_NODEID.
v On Linux and UNIX systems, you can find the
value of CMS_NODEID in the KBBENV file
located in the $itmhome/tables/cms_name
subdirectory.
IP.* or IP6.* protocols
Host name Host name of the system where the monitoring
agent is installed.
To obtain the host name, enter TSO HOMETEST at the
command line of the z/OS system where the
monitoring agent is installed.
If the z/OS domain name resolver configuration
specifies a search path that includes the target
domain suffix, specify only the first qualifier of the
host name. (Example: sys is the first qualifier of the
fully qualified host name sys.ibm.com.) Otherwise,
specify the fully qualified host name.
Address IP address of the system where the monitoring
agent is installed.
To obtain the IP address, enter TSO HOMETEST at the
command line of the z/OS system where the
monitoring agent is installed.
Started task Started task name of the TCP/IP server. You can
specify * to allow the IP stack to dynamically find
the TCP/IP image. * is the suggested value for the
started task.
IBM Confidential
26 IBM Tivoli Advanced Backup and Recovery for z/OS Planning and Configuration Guide
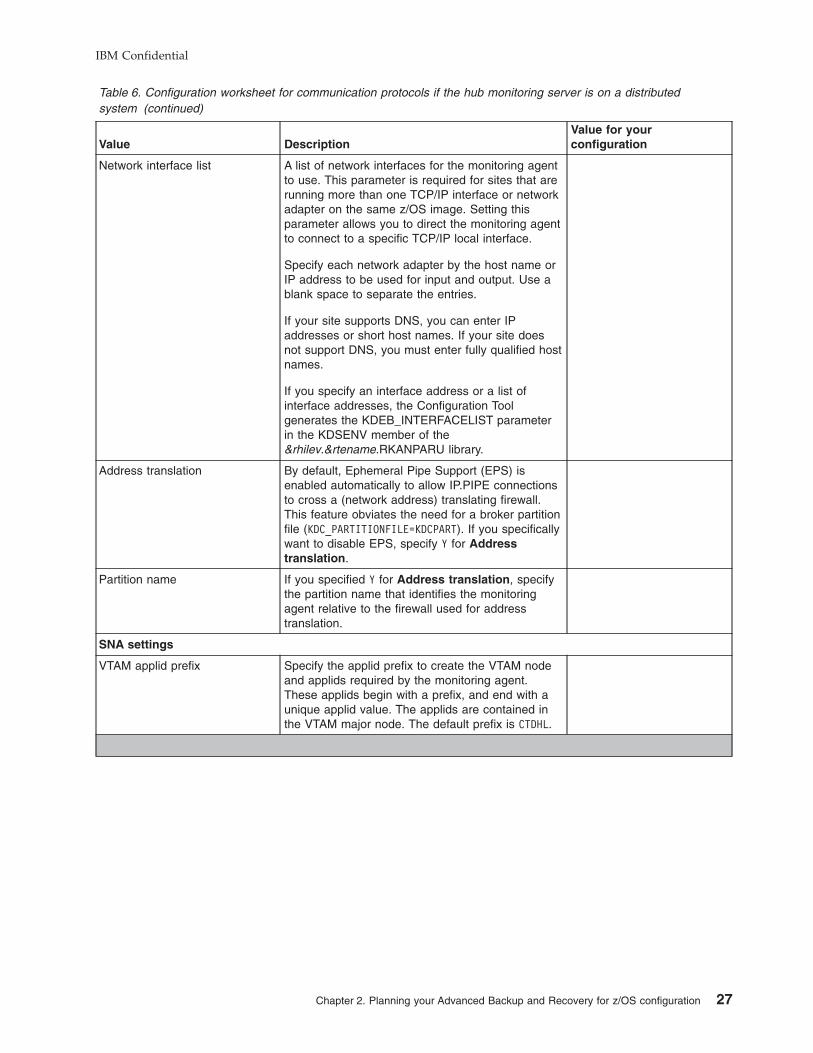
Table 6. Configuration worksheet for communication protocols if the hub monitoring server is on a distributed
system (continued)
Value Description
Value for your
configuration
Network interface list A list of network interfaces for the monitoring agent
to use. This parameter is required for sites that are
running more than one TCP/IP interface or network
adapter on the same z/OS image. Setting this
parameter allows you to direct the monitoring agent
to connect to a specific TCP/IP local interface.
Specify each network adapter by the host name or
IP address to be used for input and output. Use a
blank space to separate the entries.
If your site supports DNS, you can enter IP
addresses or short host names. If your site does
not support DNS, you must enter fully qualified host
names.
If you specify an interface address or a list of
interface addresses, the Configuration Tool
generates the KDEB_INTERFACELIST parameter
in the KDSENV member of the
&rhilev.&rtename.RKANPARU library.
Address translation By default, Ephemeral Pipe Support (EPS) is
enabled automatically to allow IP.PIPE connections
to cross a (network address) translating firewall.
This feature obviates the need for a broker partition
file (KDC_PARTITIONFILE=KDCPART). If you specifically
want to disable EPS, specify Y for Address
translation.
Partition name If you specified Y for Address translation, specify
the partition name that identifies the monitoring
agent relative to the firewall used for address
translation.
SNA settings
VTAM applid prefix Specify the applid prefix to create the VTAM node
and applids required by the monitoring agent.
These applids begin with a prefix, and end with a
unique applid value. The applids are contained in
the VTAM major node. The default prefix is CTDHL.
IBM Confidential
Chapter 2. Planning your Advanced Backup and Recovery for z/OS configuration 27
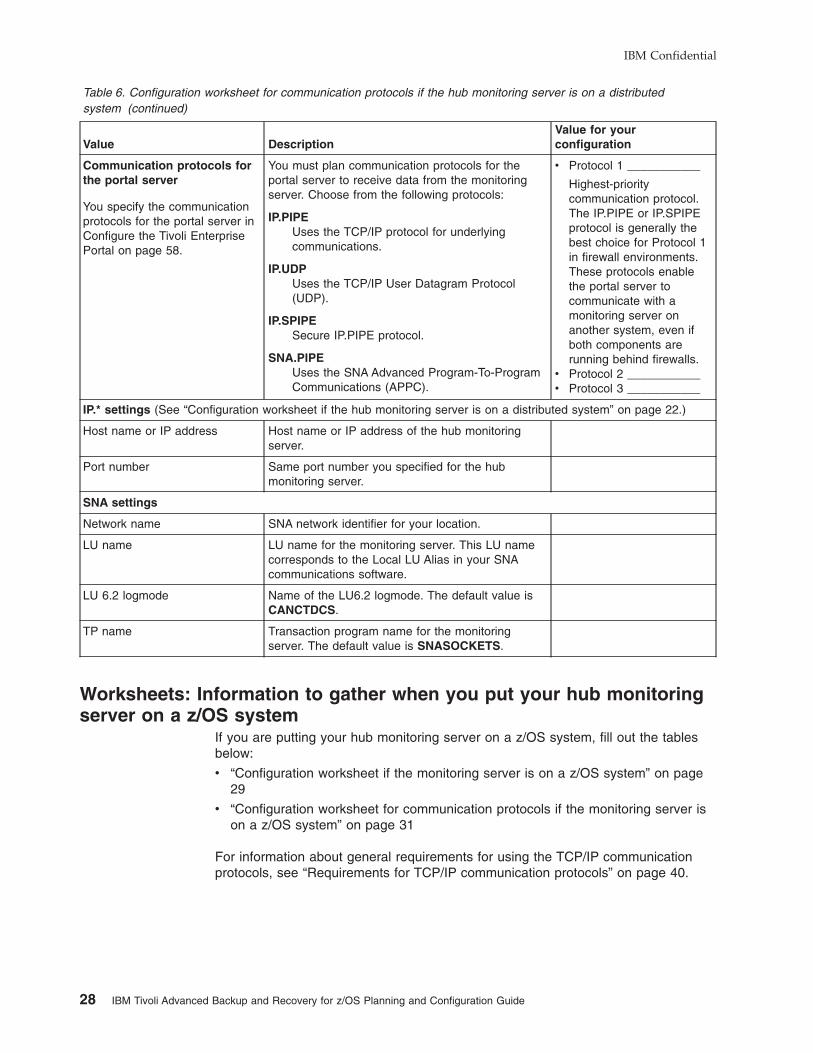
Table 6. Configuration worksheet for communication protocols if the hub monitoring server is on a distributed
system (continued)
Value Description
Value for your
configuration
Communication protocols for
the portal server
You specify the communication
protocols for the portal server in
Configure the Tivoli Enterprise
Portal on page 58.
You must plan communication protocols for the
portal server to receive data from the monitoring
server. Choose from the following protocols:
IP.PIPE
Uses the TCP/IP protocol for underlying
communications.
IP.UDP
Uses the TCP/IP User Datagram Protocol
(UDP).
IP.SPIPE
Secure IP.PIPE protocol.
SNA.PIPE
Uses the SNA Advanced Program-To-Program
Communications (APPC).
v Protocol 1 ___________
Highest-priority
communication protocol.
The IP.PIPE or IP.SPIPE
protocol is generally the
best choice for Protocol 1
in firewall environments.
These protocols enable
the portal server to
communicate with a
monitoring server on
another system, even if
both components are
running behind firewalls.
v Protocol 2 ___________
v Protocol 3 ___________
IP.* settings (See “Configuration worksheet if the hub monitoring server is on a distributed system” on page 22.)
Host name or IP address Host name or IP address of the hub monitoring
server.
Port number Same port number you specified for the hub
monitoring server.
SNA settings
Network name SNA network identifier for your location.
LU name LU name for the monitoring server. This LU name
corresponds to the Local LU Alias in your SNA
communications software.
LU 6.2 logmode Name of the LU6.2 logmode. The default value is
CANCTDCS.
TP name Transaction program name for the monitoring
server. The default value is SNASOCKETS.
Worksheets: Information to gather when you put your hub monitoring
server on a z/OS system
If you are putting your hub monitoring server on a z/OS system, fill out the tables
below:
v “Configuration worksheet if the monitoring server is on a z/OS system” on page
29
v “Configuration worksheet for communication protocols if the monitoring server is
on a z/OS system” on page 31
For information about general requirements for using the TCP/IP communication
protocols, see “Requirements for TCP/IP communication protocols” on page 40.
IBM Confidential
28 IBM Tivoli Advanced Backup and Recovery for z/OS Planning and Configuration Guide
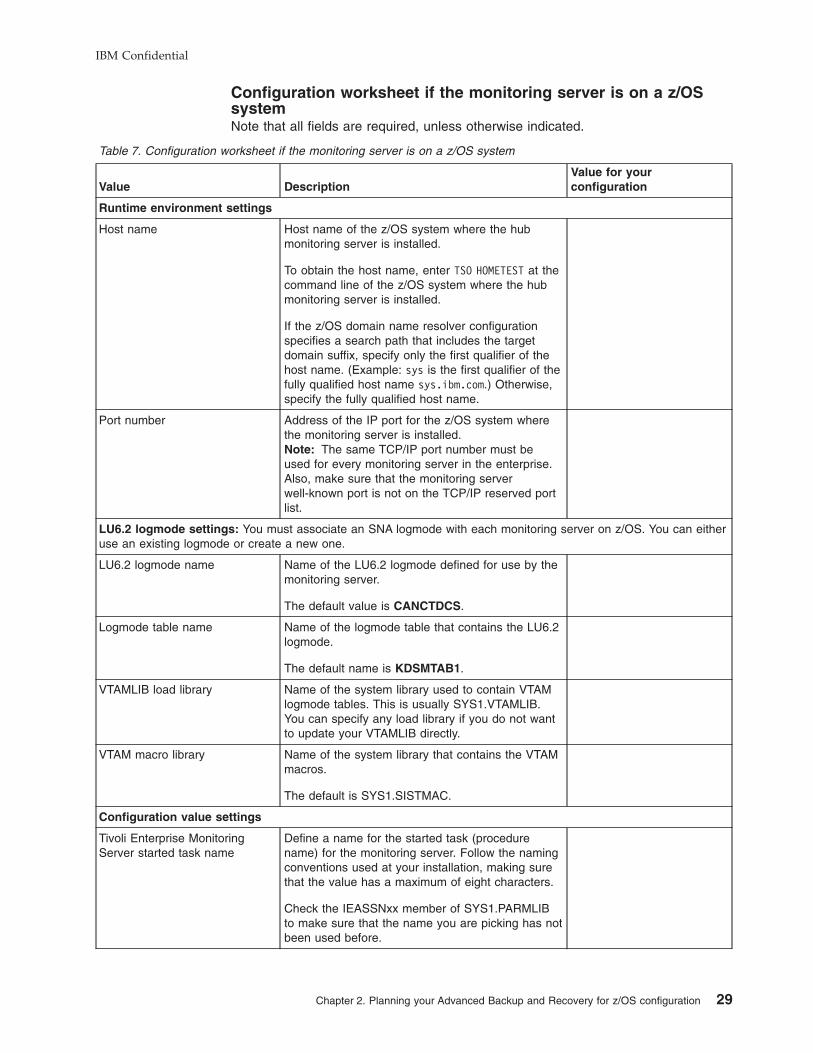
Configuration worksheet if the monitoring server is on a z/OS
system
Note that all fields are required, unless otherwise indicated.
Table 7. Configuration worksheet if the monitoring server is on a z/OS system
Value Description
Value for your
configuration
Runtime environment settings
Host name Host name of the z/OS system where the hub
monitoring server is installed.
To obtain the host name, enter TSO HOMETEST at the
command line of the z/OS system where the hub
monitoring server is installed.
If the z/OS domain name resolver configuration
specifies a search path that includes the target
domain suffix, specify only the first qualifier of the
host name. (Example: sys is the first qualifier of the
fully qualified host name sys.ibm.com.) Otherwise,
specify the fully qualified host name.
Port number Address of the IP port for the z/OS system where
the monitoring server is installed.
Note: The same TCP/IP port number must be
used for every monitoring server in the enterprise.
Also, make sure that the monitoring server
well-known port is not on the TCP/IP reserved port
list.
LU6.2 logmode settings: You must associate an SNA logmode with each monitoring server on z/OS. You can either
use an existing logmode or create a new one.
LU6.2 logmode name Name of the LU6.2 logmode defined for use by the
monitoring server.
The default value is CANCTDCS.
Logmode table name Name of the logmode table that contains the LU6.2
logmode.
The default name is KDSMTAB1.
VTAMLIB load library Name of the system library used to contain VTAM
logmode tables. This is usually SYS1.VTAMLIB.
You can specify any load library if you do not want
to update your VTAMLIB directly.
VTAM macro library Name of the system library that contains the VTAM
macros.
The default is SYS1.SISTMAC.
Configuration value settings
Tivoli Enterprise Monitoring
Server started task name
Define a name for the started task (procedure
name) for the monitoring server. Follow the naming
conventions used at your installation, making sure
that the value has a maximum of eight characters.
Check the IEASSNxx member of SYS1.PARMLIB
to make sure that the name you are picking has not
been used before.
IBM Confidential
Chapter 2. Planning your Advanced Backup and Recovery for z/OS configuration 29
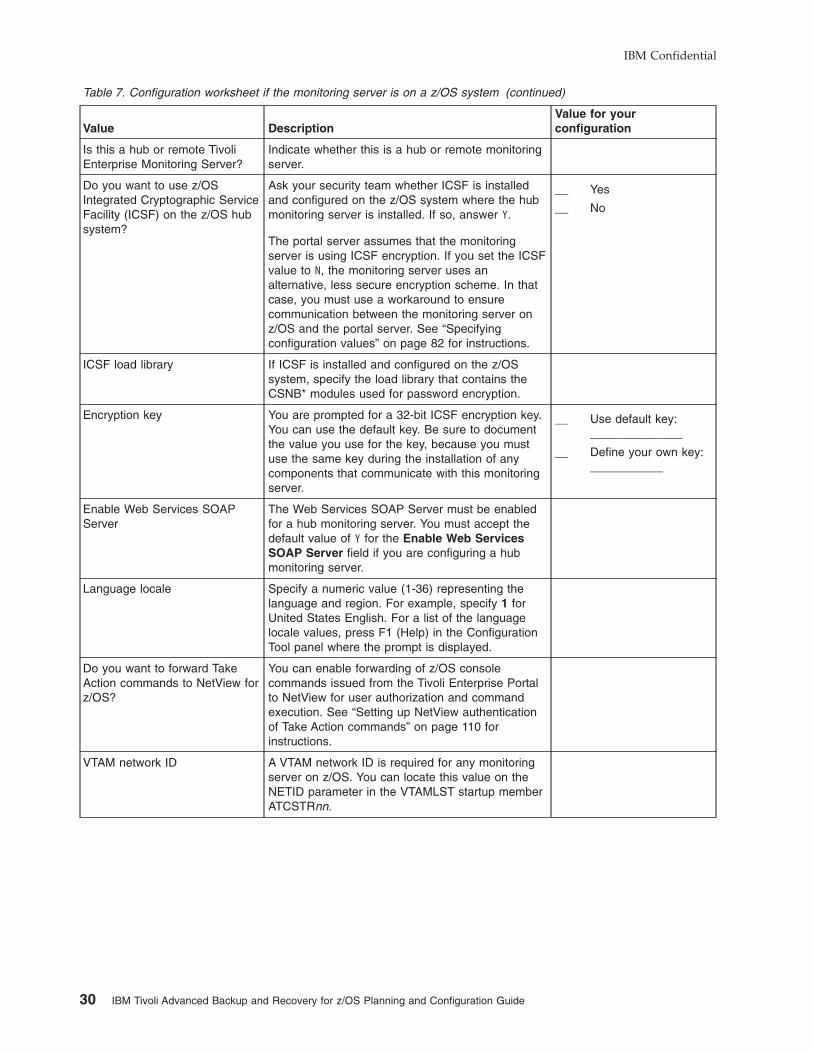
Table 7. Configuration worksheet if the monitoring server is on a z/OS system (continued)
Value Description
Value for your
configuration
Is this a hub or remote Tivoli
Enterprise Monitoring Server?
Indicate whether this is a hub or remote monitoring
server.
Do you want to use z/OS
Integrated Cryptographic Service
Facility (ICSF) on the z/OS hub
system?
Ask your security team whether ICSF is installed
and configured on the z/OS system where the hub
monitoring server is installed. If so, answer Y.
The portal server assumes that the monitoring
server is using ICSF encryption. If you set the ICSF
value to N, the monitoring server uses an
alternative, less secure encryption scheme. In that
case, you must use a workaround to ensure
communication between the monitoring server on
z/OS and the portal server. See “Specifying
configuration values” on page 82 for instructions.
__ Yes
__ No
ICSF load library If ICSF is installed and configured on the z/OS
system, specify the load library that contains the
CSNB* modules used for password encryption.
Encryption key You are prompted for a 32-bit ICSF encryption key.
You can use the default key. Be sure to document
the value you use for the key, because you must
use the same key during the installation of any
components that communicate with this monitoring
server.
__ Use default key:
______________
__ Define your own key:
___________
Enable Web Services SOAP
Server
The Web Services SOAP Server must be enabled
for a hub monitoring server. You must accept the
default value of Y for the Enable Web Services
SOAP Server field if you are configuring a hub
monitoring server.
Language locale Specify a numeric value (1-36) representing the
language and region. For example, specify 1 for
United States English. For a list of the language
locale values, press F1 (Help) in the Configuration
Tool panel where the prompt is displayed.
Do you want to forward Take
Action commands to NetView for
z/OS?
You can enable forwarding of z/OS console
commands issued from the Tivoli Enterprise Portal
to NetView for user authorization and command
execution. See “Setting up NetView authentication
of Take Action commands” on page 110 for
instructions.
VTAM network ID A VTAM network ID is required for any monitoring
server on z/OS. You can locate this value on the
NETID parameter in the VTAMLST startup member
ATCSTRnn.
IBM Confidential
30 IBM Tivoli Advanced Backup and Recovery for z/OS Planning and Configuration Guide
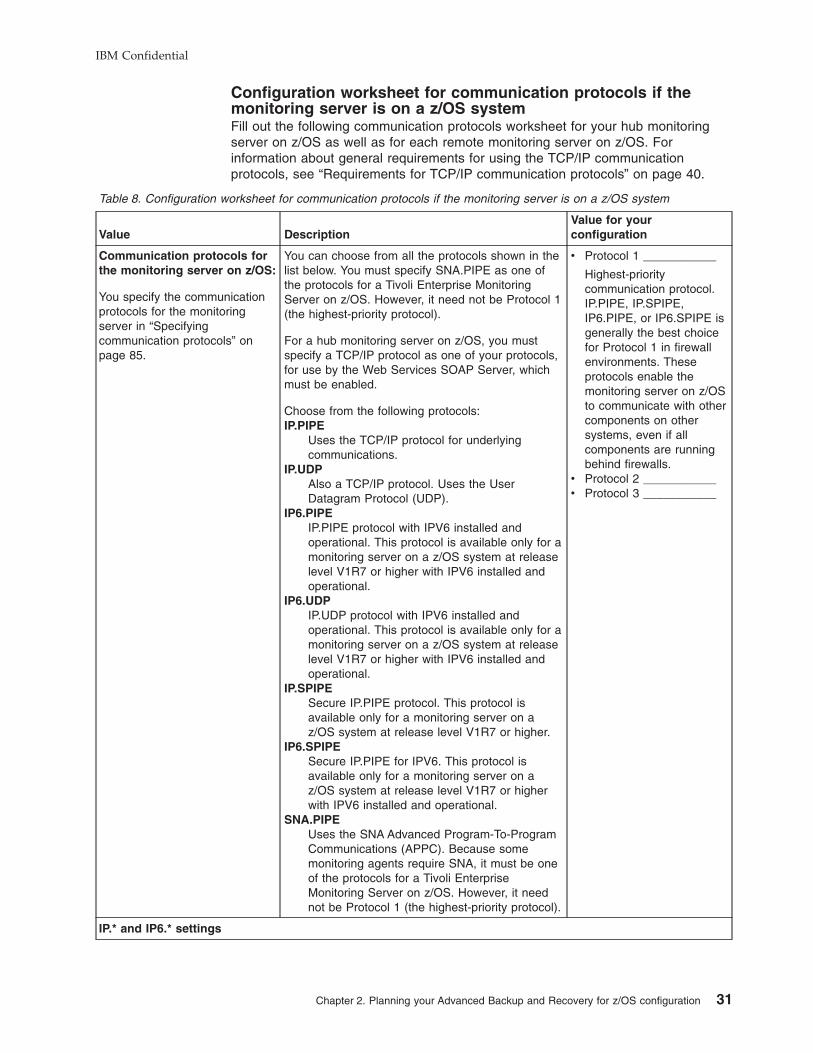
Configuration worksheet for communication protocols if the
monitoring server is on a z/OS system
Fill out the following communication protocols worksheet for your hub monitoring
server on z/OS as well as for each remote monitoring server on z/OS. For
information about general requirements for using the TCP/IP communication
protocols, see “Requirements for TCP/IP communication protocols” on page 40.
Table 8. Configuration worksheet for communication protocols if the monitoring server is on a z/OS system
Value Description
Value for your
configuration
Communication protocols for
the monitoring server on z/OS:
You specify the communication
protocols for the monitoring
server in “Specifying
communication protocols” on
page 85.
You can choose from all the protocols shown in the
list below. You must specify SNA.PIPE as one of
the protocols for a Tivoli Enterprise Monitoring
Server on z/OS. However, it need not be Protocol 1
(the highest-priority protocol).
For a hub monitoring server on z/OS, you must
specify a TCP/IP protocol as one of your protocols,
for use by the Web Services SOAP Server, which
must be enabled.
Choose from the following protocols:
IP.PIPE
Uses the TCP/IP protocol for underlying
communications.
IP.UDP
Also a TCP/IP protocol. Uses the User
Datagram Protocol (UDP).
IP6.PIPE
IP.PIPE protocol with IPV6 installed and
operational. This protocol is available only for a
monitoring server on a z/OS system at release
level V1R7 or higher with IPV6 installed and
operational.
IP6.UDP
IP.UDP protocol with IPV6 installed and
operational. This protocol is available only for a
monitoring server on a z/OS system at release
level V1R7 or higher with IPV6 installed and
operational.
IP.SPIPE
Secure IP.PIPE protocol. This protocol is
available only for a monitoring server on a
z/OS system at release level V1R7 or higher.
IP6.SPIPE
Secure IP.PIPE for IPV6. This protocol is
available only for a monitoring server on a
z/OS system at release level V1R7 or higher
with IPV6 installed and operational.
SNA.PIPE
Uses the SNA Advanced Program-To-Program
Communications (APPC). Because some
monitoring agents require SNA, it must be one
of the protocols for a Tivoli Enterprise
Monitoring Server on z/OS. However, it need
not be Protocol 1 (the highest-priority protocol).
v Protocol 1 ___________
Highest-priority
communication protocol.
IP.PIPE, IP.SPIPE,
IP6.PIPE, or IP6.SPIPE is
generally the best choice
for Protocol 1 in firewall
environments. These
protocols enable the
monitoring server on z/OS
to communicate with other
components on other
systems, even if all
components are running
behind firewalls.
v Protocol 2 ___________
v Protocol 3 ___________
IP.* and IP6.* settings
IBM Confidential
Chapter 2. Planning your Advanced Backup and Recovery for z/OS configuration 31
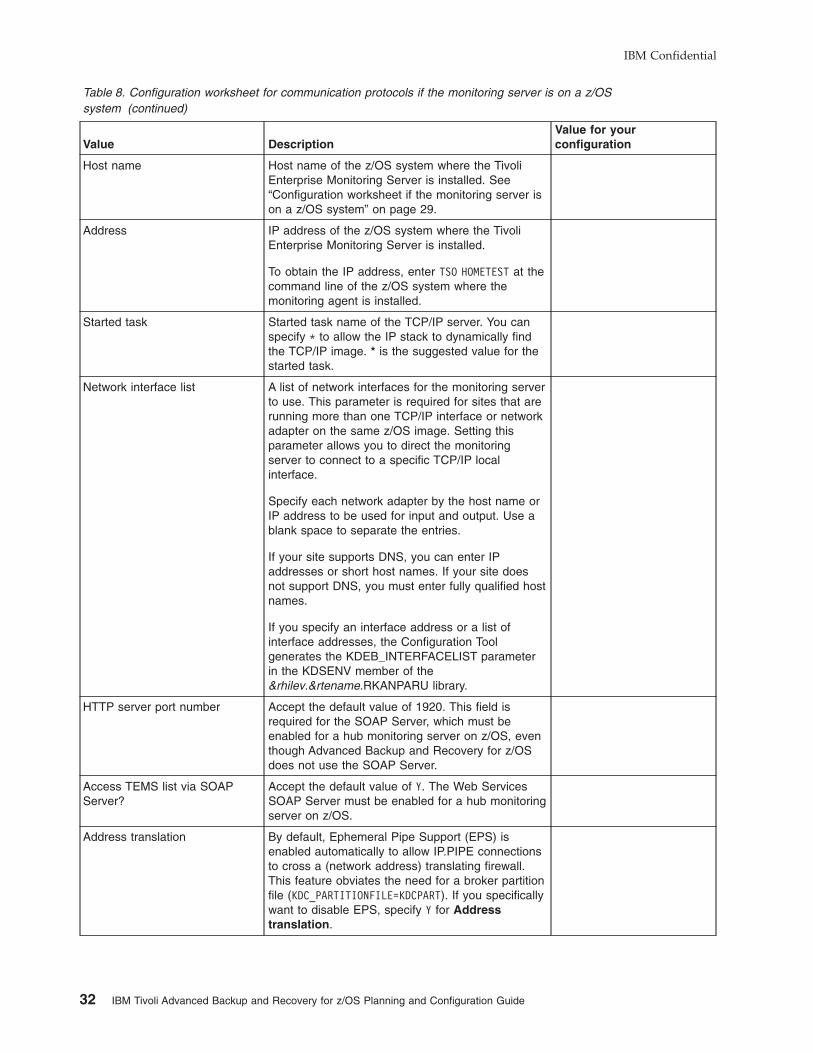
Table 8. Configuration worksheet for communication protocols if the monitoring server is on a z/OS
system (continued)
Value Description
Value for your
configuration
Host name Host name of the z/OS system where the Tivoli
Enterprise Monitoring Server is installed. See
“Configuration worksheet if the monitoring server is
on a z/OS system” on page 29.
Address IP address of the z/OS system where the Tivoli
Enterprise Monitoring Server is installed.
To obtain the IP address, enter TSO HOMETEST at the
command line of the z/OS system where the
monitoring agent is installed.
Started task Started task name of the TCP/IP server. You can
specify * to allow the IP stack to dynamically find
the TCP/IP image. * is the suggested value for the
started task.
Network interface list A list of network interfaces for the monitoring server
to use. This parameter is required for sites that are
running more than one TCP/IP interface or network
adapter on the same z/OS image. Setting this
parameter allows you to direct the monitoring
server to connect to a specific TCP/IP local
interface.
Specify each network adapter by the host name or
IP address to be used for input and output. Use a
blank space to separate the entries.
If your site supports DNS, you can enter IP
addresses or short host names. If your site does
not support DNS, you must enter fully qualified host
names.
If you specify an interface address or a list of
interface addresses, the Configuration Tool
generates the KDEB_INTERFACELIST parameter
in the KDSENV member of the
&rhilev.&rtename.RKANPARU library.
HTTP server port number Accept the default value of 1920. This field is
required for the SOAP Server, which must be
enabled for a hub monitoring server on z/OS, even
though Advanced Backup and Recovery for z/OS
does not use the SOAP Server.
Access TEMS list via SOAP
Server?
Accept the default value of Y. The Web Services
SOAP Server must be enabled for a hub monitoring
server on z/OS.
Address translation By default, Ephemeral Pipe Support (EPS) is
enabled automatically to allow IP.PIPE connections
to cross a (network address) translating firewall.
This feature obviates the need for a broker partition
file (KDC_PARTITIONFILE=KDCPART). If you specifically
want to disable EPS, specify Y for Address
translation.
IBM Confidential
32 IBM Tivoli Advanced Backup and Recovery for z/OS Planning and Configuration Guide
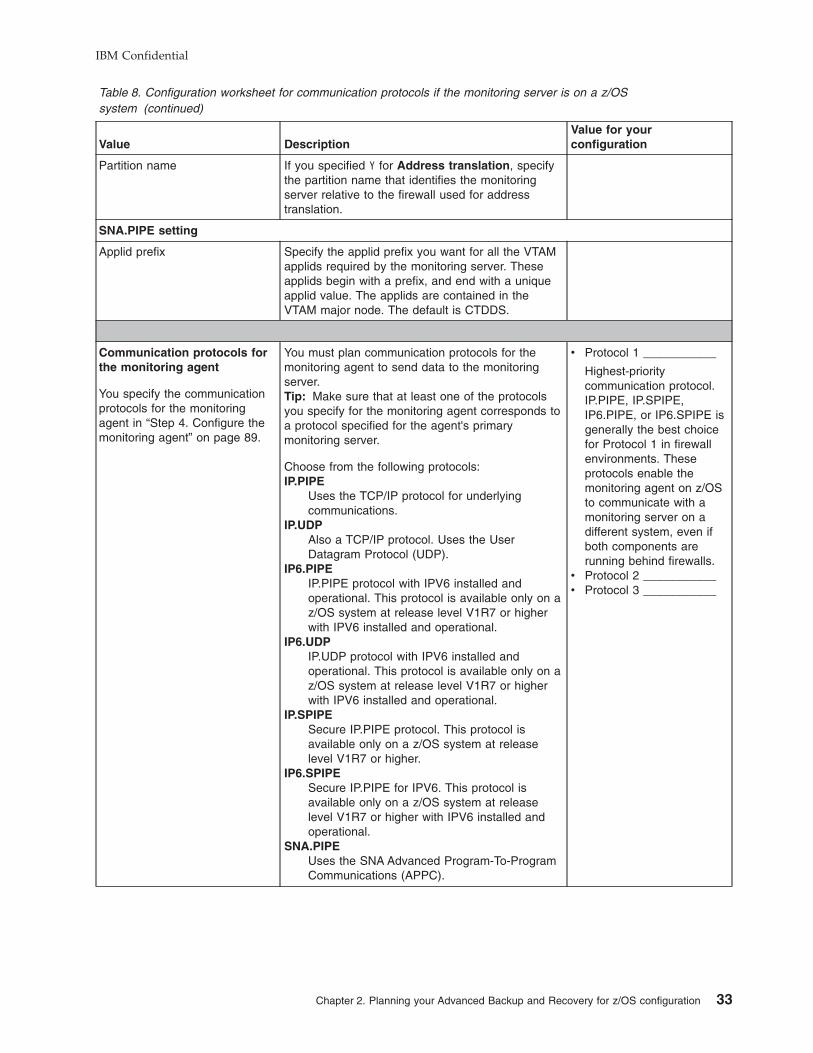
Table 8. Configuration worksheet for communication protocols if the monitoring server is on a z/OS
system (continued)
Value Description
Value for your
configuration
Partition name If you specified Y for Address translation, specify
the partition name that identifies the monitoring
server relative to the firewall used for address
translation.
SNA.PIPE setting
Applid prefix Specify the applid prefix you want for all the VTAM
applids required by the monitoring server. These
applids begin with a prefix, and end with a unique
applid value. The applids are contained in the
VTAM major node. The default is CTDDS.
Communication protocols for
the monitoring agent
You specify the communication
protocols for the monitoring
agent in “Step 4. Configure the
monitoring agent” on page 89.
You must plan communication protocols for the
monitoring agent to send data to the monitoring
server.
Tip: Make sure that at least one of the protocols
you specify for the monitoring agent corresponds to
a protocol specified for the agent's primary
monitoring server.
Choose from the following protocols:
IP.PIPE
Uses the TCP/IP protocol for underlying
communications.
IP.UDP
Also a TCP/IP protocol. Uses the User
Datagram Protocol (UDP).
IP6.PIPE
IP.PIPE protocol with IPV6 installed and
operational. This protocol is available only on a
z/OS system at release level V1R7 or higher
with IPV6 installed and operational.
IP6.UDP
IP.UDP protocol with IPV6 installed and
operational. This protocol is available only on a
z/OS system at release level V1R7 or higher
with IPV6 installed and operational.
IP.SPIPE
Secure IP.PIPE protocol. This protocol is
available only on a z/OS system at release
level V1R7 or higher.
IP6.SPIPE
Secure IP.PIPE for IPV6. This protocol is
available only on a z/OS system at release
level V1R7 or higher with IPV6 installed and
operational.
SNA.PIPE
Uses the SNA Advanced Program-To-Program
Communications (APPC).
v Protocol 1 ___________
Highest-priority
communication protocol.
IP.PIPE, IP.SPIPE,
IP6.PIPE, or IP6.SPIPE is
generally the best choice
for Protocol 1 in firewall
environments. These
protocols enable the
monitoring agent on z/OS
to communicate with a
monitoring server on a
different system, even if
both components are
running behind firewalls.
v Protocol 2 ___________
v Protocol 3 ___________
IBM Confidential
Chapter 2. Planning your Advanced Backup and Recovery for z/OS configuration 33
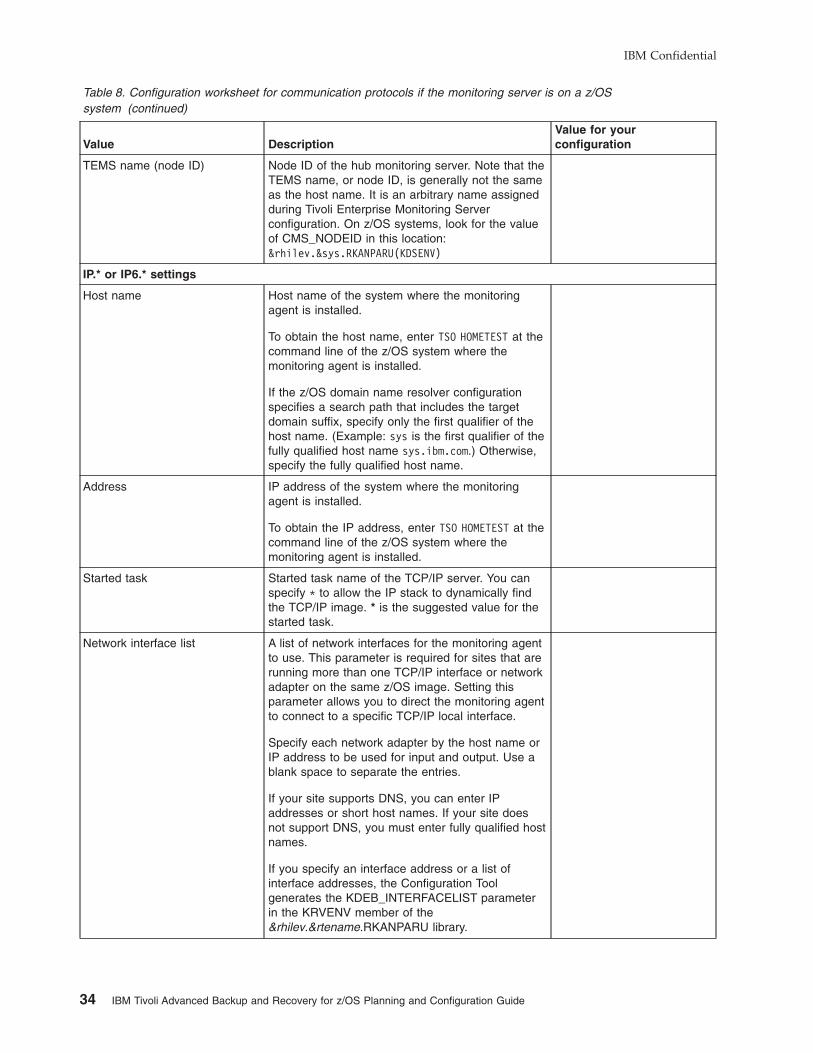
Table 8. Configuration worksheet for communication protocols if the monitoring server is on a z/OS
system (continued)
Value Description
Value for your
configuration
TEMS name (node ID) Node ID of the hub monitoring server. Note that the
TEMS name, or node ID, is generally not the same
as the host name. It is an arbitrary name assigned
during Tivoli Enterprise Monitoring Server
configuration. On z/OS systems, look for the value
of CMS_NODEID in this location:
&rhilev.&sys.RKANPARU(KDSENV)
IP.* or IP6.* settings
Host name Host name of the system where the monitoring
agent is installed.
To obtain the host name, enter TSO HOMETEST at the
command line of the z/OS system where the
monitoring agent is installed.
If the z/OS domain name resolver configuration
specifies a search path that includes the target
domain suffix, specify only the first qualifier of the
host name. (Example: sys is the first qualifier of the
fully qualified host name sys.ibm.com.) Otherwise,
specify the fully qualified host name.
Address IP address of the system where the monitoring
agent is installed.
To obtain the IP address, enter TSO HOMETEST at the
command line of the z/OS system where the
monitoring agent is installed.
Started task Started task name of the TCP/IP server. You can
specify * to allow the IP stack to dynamically find
the TCP/IP image. * is the suggested value for the
started task.
Network interface list A list of network interfaces for the monitoring agent
to use. This parameter is required for sites that are
running more than one TCP/IP interface or network
adapter on the same z/OS image. Setting this
parameter allows you to direct the monitoring agent
to connect to a specific TCP/IP local interface.
Specify each network adapter by the host name or
IP address to be used for input and output. Use a
blank space to separate the entries.
If your site supports DNS, you can enter IP
addresses or short host names. If your site does
not support DNS, you must enter fully qualified host
names.
If you specify an interface address or a list of
interface addresses, the Configuration Tool
generates the KDEB_INTERFACELIST parameter
in the KRVENV member of the
&rhilev.&rtename.RKANPARU library.
IBM Confidential
34 IBM Tivoli Advanced Backup and Recovery for z/OS Planning and Configuration Guide
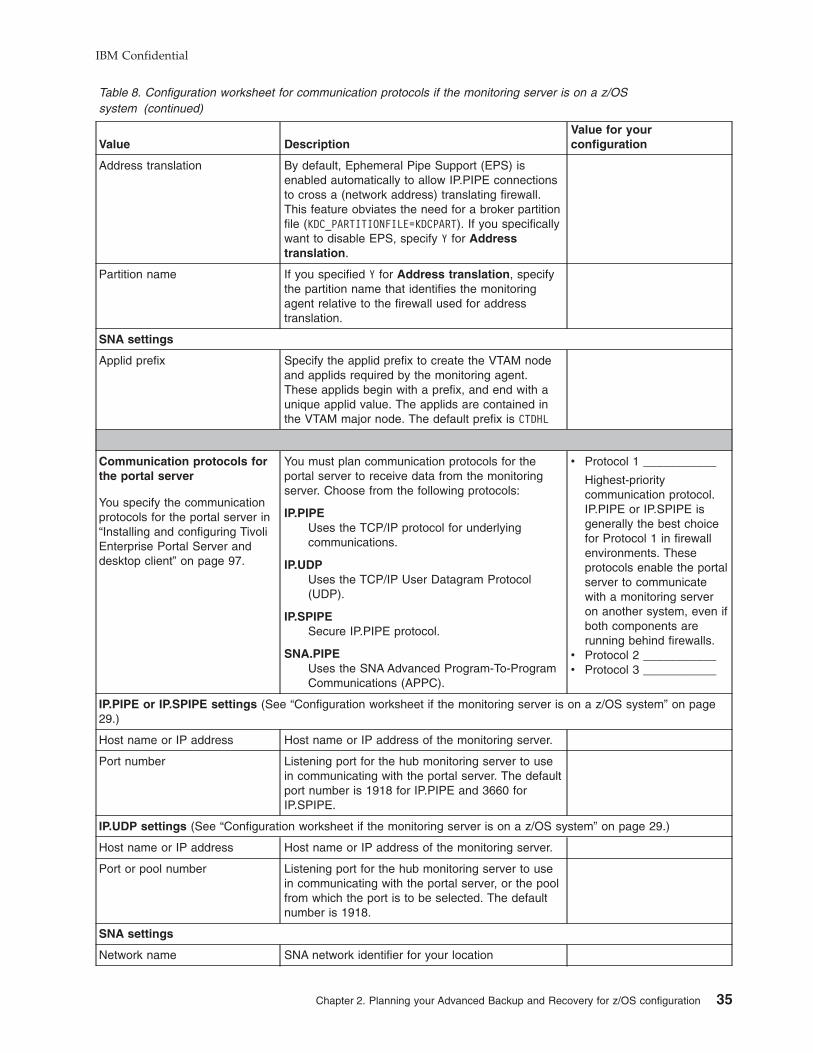
Table 8. Configuration worksheet for communication protocols if the monitoring server is on a z/OS
system (continued)
Value Description
Value for your
configuration
Address translation By default, Ephemeral Pipe Support (EPS) is
enabled automatically to allow IP.PIPE connections
to cross a (network address) translating firewall.
This feature obviates the need for a broker partition
file (KDC_PARTITIONFILE=KDCPART). If you specifically
want to disable EPS, specify Y for Address
translation.
Partition name If you specified Y for Address translation, specify
the partition name that identifies the monitoring
agent relative to the firewall used for address
translation.
SNA settings
Applid prefix Specify the applid prefix to create the VTAM node
and applids required by the monitoring agent.
These applids begin with a prefix, and end with a
unique applid value. The applids are contained in
the VTAM major node. The default prefix is CTDHL
Communication protocols for
the portal server
You specify the communication
protocols for the portal server in
“Installing and configuring Tivoli
Enterprise Portal Server and
desktop client” on page 97.
You must plan communication protocols for the
portal server to receive data from the monitoring
server. Choose from the following protocols:
IP.PIPE
Uses the TCP/IP protocol for underlying
communications.
IP.UDP
Uses the TCP/IP User Datagram Protocol
(UDP).
IP.SPIPE
Secure IP.PIPE protocol.
SNA.PIPE
Uses the SNA Advanced Program-To-Program
Communications (APPC).
v Protocol 1 ___________
Highest-priority
communication protocol.
IP.PIPE or IP.SPIPE is
generally the best choice
for Protocol 1 in firewall
environments. These
protocols enable the portal
server to communicate
with a monitoring server
on another system, even if
both components are
running behind firewalls.
v Protocol 2 ___________
v Protocol 3 ___________
IP.PIPE or IP.SPIPE settings (See “Configuration worksheet if the monitoring server is on a z/OS system” on page
29.)
Host name or IP address Host name or IP address of the monitoring server.
Port number Listening port for the hub monitoring server to use
in communicating with the portal server. The default
port number is 1918 for IP.PIPE and 3660 for
IP.SPIPE.
IP.UDP settings (See “Configuration worksheet if the monitoring server is on a z/OS system” on page 29.)
Host name or IP address Host name or IP address of the monitoring server.
Port or pool number Listening port for the hub monitoring server to use
in communicating with the portal server, or the pool
from which the port is to be selected. The default
number is 1918.
SNA settings
Network name SNA network identifier for your location
IBM Confidential
Chapter 2. Planning your Advanced Backup and Recovery for z/OS configuration 35

Table 8. Configuration worksheet for communication protocols if the monitoring server is on a z/OS
system (continued)
Value Description
Value for your
configuration
LU name LU name for the monitoring server. This LU name
corresponds to the Local LU Alias in your SNA
communications software.
LU 6.2 logmode The name of the LU6.2 logmode. The default value
is CANCTDCS.
TP name Transaction program name for the monitoring
server. The default value is SNASOCKETS.
Worksheet: Information for configuring your runtime environment
Using the information about runtime environments above, you can decide what type
of runtime environment configuration you need for your Advanced Backup and
Recovery for z/OS configuration. You must define a runtime environment on each
z/OS system you monitor. In most cases, you start with one full or base type and
sharing types (that share either the full or base runtime environment) for
subsequent z/OS images you monitor. For each runtime environment, gather the
information shown in Table 9.
Table 9. Worksheet for defining runtime environments
Value Description
Value for your
configuration
Runtime environment name Unique identifier of up to 8 characters.
Tip: If you specify a runtime environment name no
more than 4 characters long, you can specify the same
name for the JCL suffix. This setup makes it easy to
associate the jobs in INSTJOBS with the runtime
environment.
Runtime environment type Explained above in “Understanding runtime
environments” on page 13
The base or full runtime
environment associated with
a sharing runtime
environment
For a sharing runtime environment type, list the name
of the base or full runtime environment from which the
sharing runtime environment obtains its base library
information.
Runtime environment
description
Information for your installation's use.
Security system for the
runtime environment
For each runtime environment, the Configuration Tool
prompts you for a security system. You can specify
None, RACF, TSS, or NAM.
Specifying a security system here does not enable
security validation of users signing on to the Tivoli
Enterprise Portal. Security validation of users is enabled
in a Tivoli Enterprise Monitoring Server configuration
panel.
VTAM network ID VTAM network ID for the monitoring server on z/OS
identified in “Worksheets: Information to gather when
you put your hub monitoring server on a z/OS system”
on page 28. This is optional for a monitoring server on
a distributed system, see “Worksheets: Information to
gather when you put your hub monitoring server on a
distributed system” on page 22.
IBM Confidential
36 IBM Tivoli Advanced Backup and Recovery for z/OS Planning and Configuration Guide
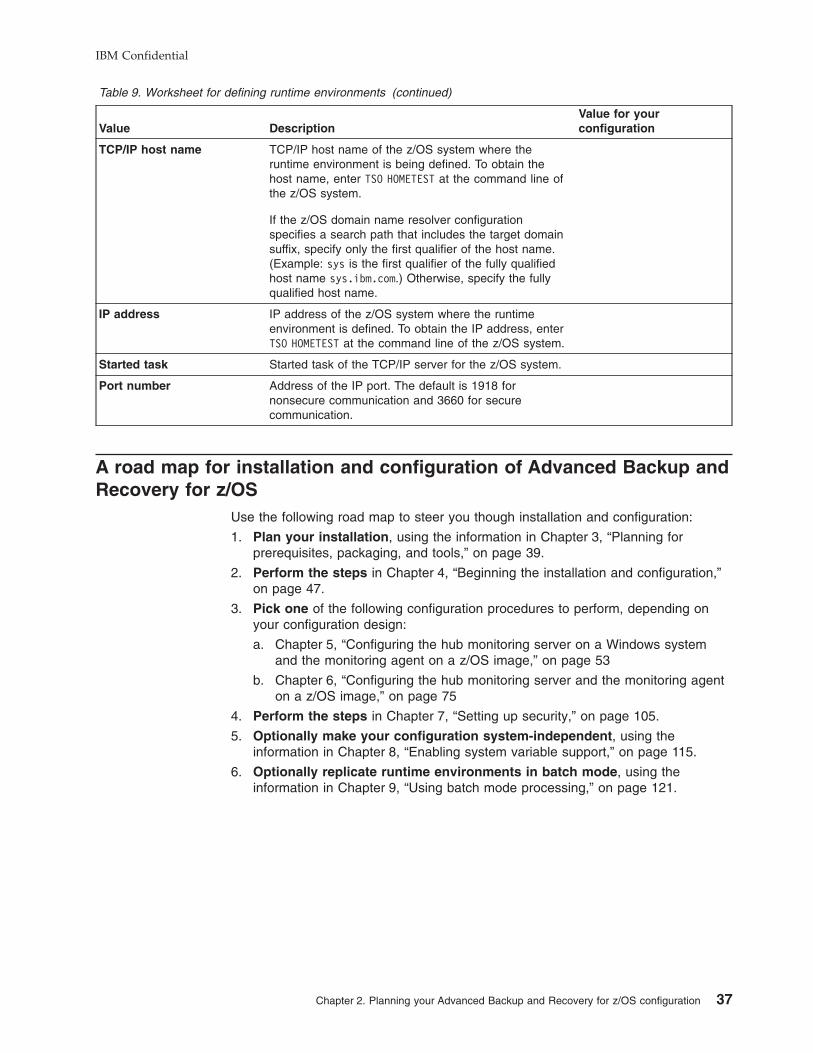
Table 9. Worksheet for defining runtime environments (continued)
Value Description
Value for your
configuration
TCP/IP host name TCP/IP host name of the z/OS system where the
runtime environment is being defined. To obtain the
host name, enter TSO HOMETEST at the command line of
the z/OS system.
If the z/OS domain name resolver configuration
specifies a search path that includes the target domain
suffix, specify only the first qualifier of the host name.
(Example: sys is the first qualifier of the fully qualified
host name sys.ibm.com.) Otherwise, specify the fully
qualified host name.
IP address IP address of the z/OS system where the runtime
environment is defined. To obtain the IP address, enter
TSO HOMETEST at the command line of the z/OS system.
Started task Started task of the TCP/IP server for the z/OS system.
Port number Address of the IP port. The default is 1918 for
nonsecure communication and 3660 for secure
communication.
A road map for installation and configuration of Advanced Backup and
Recovery for z/OS
Use the following road map to steer you though installation and configuration:
1. Plan your installation, using the information in Chapter 3, “Planning for
prerequisites, packaging, and tools,” on page 39.
2. Perform the steps in Chapter 4, “Beginning the installation and configuration,”
on page 47.
3. Pick one of the following configuration procedures to perform, depending on
your configuration design:
a. Chapter 5, “Configuring the hub monitoring server on a Windows system
and the monitoring agent on a z/OS image,” on page 53
b. Chapter 6, “Configuring the hub monitoring server and the monitoring agent
on a z/OS image,” on page 75
4. Perform the steps in Chapter 7, “Setting up security,” on page 105.
5. Optionally make your configuration system-independent, using the
information in Chapter 8, “Enabling system variable support,” on page 115.
6. Optionally replicate runtime environments in batch mode, using the
information in Chapter 9, “Using batch mode processing,” on page 121.
IBM Confidential
Chapter 2. Planning your Advanced Backup and Recovery for z/OS configuration 37

IBM Confidential
38 IBM Tivoli Advanced Backup and Recovery for z/OS Planning and Configuration Guide
Chapter 3. Planning for prerequisites, packaging, and tools
This chapter covers the following information:
v “Understanding software and hardware prerequisites for installation”
v “Understanding product packaging” on page 41
v “Understanding Advanced Backup and Recovery for z/OS installation” on page
42
v “Understanding the Configuration Tool” on page 43
You need to understand this information before beginning the installation process in
Part 2, “Installation and configuration,” on page 45.
Understanding software and hardware prerequisites for installation
Versions of all the required products are provided in the Advanced Backup and
Recovery for z/OS product package.
v A complete list of Advanced Backup and Recovery for z/OS hardware and
software prerequisites is located in the IBM Tivoli Advanced Backup and
Recovery for z/OS: IBM Tivoli Advanced Backup and Recovery for z/OS Program
Directory.
v Prerequisites for the distributed IBM Tivoli Monitoring Services components are
located in the IBM Tivoli Monitoring: IBM Tivoli Monitoring Installation and Setup
Guide.
Requirements for historical data collection
You can configure historical reporting of health check data for any z/OS system on
which a monitoring agent is installed and running.
Configuration of historical data collection requires that you configure the following
components:
v Persistent data store in the z/OS runtime environment where the Advanced
Backup and Recovery monitoring agent is installed.
The persistent data store is the repository for short-term historical data, which is
kept for 24 hours. A Tivoli Monitoring Services warehouse proxy periodically
queries the persistent data store and retrieves any short-term historical data
stored there.
The location of historical data collection is set in two places:
– Configuration Tool
– History Collection Configuration window in the Tivoli Enterprise Portal
Tip
Both the Configuration Tool and Tivoli Enterprise Portal allow you to
configure historical data collection either at the location of the monitoring
agent (called TEMA, or Tivoli Enterprise Monitoring Agent, in the Tivoli
Enterprise Portal) or at the location of the monitoring server to which the
monitoring agent reports. However, Advanced Backup and Recovery
requires that historical data collection be configured at the location of the
monitoring agent.
v Tivoli Data Warehouse on a Windows, UNIX, or Linux system.
IBM Confidential
39
The Tivoli Data Warehouse is the repository for long-term historical data. It stores
the historical data that the warehouse proxy agent retrieves from the persistent
data store.
For instructions on installing and configuring the Tivoli Data Warehouse, see IBM
Tivoli Monitoring: IBM Tivoli Monitoring Installation and Setup Guide, GC32-9407
and IBM Tivoli Monitoring: IBM Tivoli Monitoring Administrator’s Guide,
SC32-9408.
Requirements for TCP/IP communication protocols
Review the following TCP-related requirements before you configure Advanced
Backup and Recovery for z/OS.
Default OMVS segment
To use the TCP/IP communication protocols, a Tivoli Enterprise Monitoring Server
on z/OS requires a default OMVS segment. See the z/OS Communications Server
IP Configuration Guide for an explanation of how to provide an OMVS segment.
Using the IP.PIPE communication protocol
IP.PIPE is the default protocol for product components. If you choose IP.PIPE as a
protocol for the monitoring server and monitoring agent, be aware of the following
limitations:
v The maximum number of IP.PIPE processes per host is 16.
v IP.IPIPE uses only one physical port per process. Port numbers are allocated
using a well-known port allocation algorithm. The first process for a host is
assigned port 1918, which is the default.
Important
The same TCP/IP port number must be used on every monitoring server in
the enterprise. Also, the monitoring server well-known port cannot be on the
TCP/IP reserved port list.
Configuring domain name resolution
If the monitoring server and monitoring agent on a z/OS system are using any IP.*
or IP6.* communication protocols for connection, but the IP domain name resolution
is not fully configured on the system, you must specify the SYSTCPD DDNAME in
the CANSDSST started task (the monitoring server started task).
The Configuration Tool generates the CANSDSST started task with the following
commented out lines. Customize the SYSTCPD DDNAME to your environment.
//*SYSTCPD explicitly identifies which data set to use to obtain
//*the parameters defined by TCPIP.DATA when no GLOBALTCPIPDATA
//*statement is configured. Refer to the IP Configuration Guide
//*for information on the TCPIP.DATA search order. The data set
//*can be any sequential data set or a member of a partitioned
//*data set. TCPIP.SEZAINST(TCPDATA) is the default sample file.
//* TCPIP.TCPPARMS(TCPDATA) is another sample and is created as
//*part of the Installation Verification Program for TCP/IP.
//*Note: Uncomment out this DDNAME and point to your appropriate
//* TCPDATA library name supported at your site if domain
//* name resolution is not fully configured.
//*SYSTCPD DD DISP=SHR,
>//* DSN=TCPIO.SEZAINST(TCPDATA)
After you finish, copy the procedures to PROCLIB.
IBM Confidential
40 IBM Tivoli Advanced Backup and Recovery for z/OS Planning and Configuration Guide
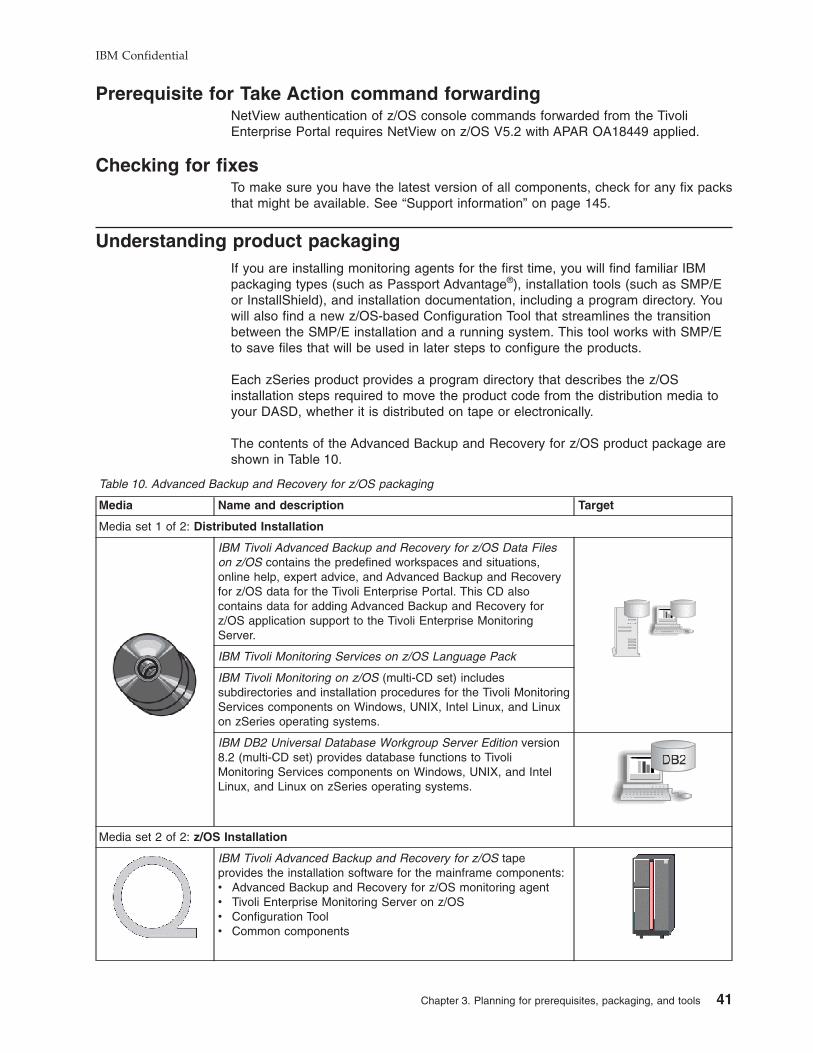
Prerequisite for Take Action command forwarding
NetView authentication of z/OS console commands forwarded from the Tivoli
Enterprise Portal requires NetView on z/OS V5.2 with APAR OA18449 applied.
Checking for fixes
To make sure you have the latest version of all components, check for any fix packs
that might be available. See “Support information” on page 145.
Understanding product packaging
If you are installing monitoring agents for the first time, you will find familiar IBM
packaging types (such as Passport Advantage®), installation tools (such as SMP/E
or InstallShield), and installation documentation, including a program directory. You
will also find a new z/OS-based Configuration Tool that streamlines the transition
between the SMP/E installation and a running system. This tool works with SMP/E
to save files that will be used in later steps to configure the products.
Each zSeries product provides a program directory that describes the z/OS
installation steps required to move the product code from the distribution media to
your DASD, whether it is distributed on tape or electronically.
The contents of the Advanced Backup and Recovery for z/OS product package are
shown in Table 10.
Table 10. Advanced Backup and Recovery for z/OS packaging
Media Name and description Target
Media set 1 of 2: Distributed Installation
IBM Tivoli Advanced Backup and Recovery for z/OS Data Files
on z/OS contains the predefined workspaces and situations,
online help, expert advice, and Advanced Backup and Recovery
for z/OS data for the Tivoli Enterprise Portal. This CD also
contains data for adding Advanced Backup and Recovery for
z/OS application support to the Tivoli Enterprise Monitoring
Server.
IBM Tivoli Monitoring Services on z/OS Language Pack
IBM Tivoli Monitoring on z/OS (multi-CD set) includes
subdirectories and installation procedures for the Tivoli Monitoring
Services components on Windows, UNIX, Intel Linux, and Linux
on zSeries operating systems.
IBM DB2 Universal Database Workgroup Server Edition version
8.2 (multi-CD set) provides database functions to Tivoli
Monitoring Services components on Windows, UNIX, and Intel
Linux, and Linux on zSeries operating systems.
Media set 2 of 2: z/OS Installation
IBM Tivoli Advanced Backup and Recovery for z/OS tape
provides the installation software for the mainframe components:
v Advanced Backup and Recovery for z/OS monitoring agent
v Tivoli Enterprise Monitoring Server on z/OS
v Configuration Tool
v Common components
IBM Confidential
Chapter 3. Planning for prerequisites, packaging, and tools 41
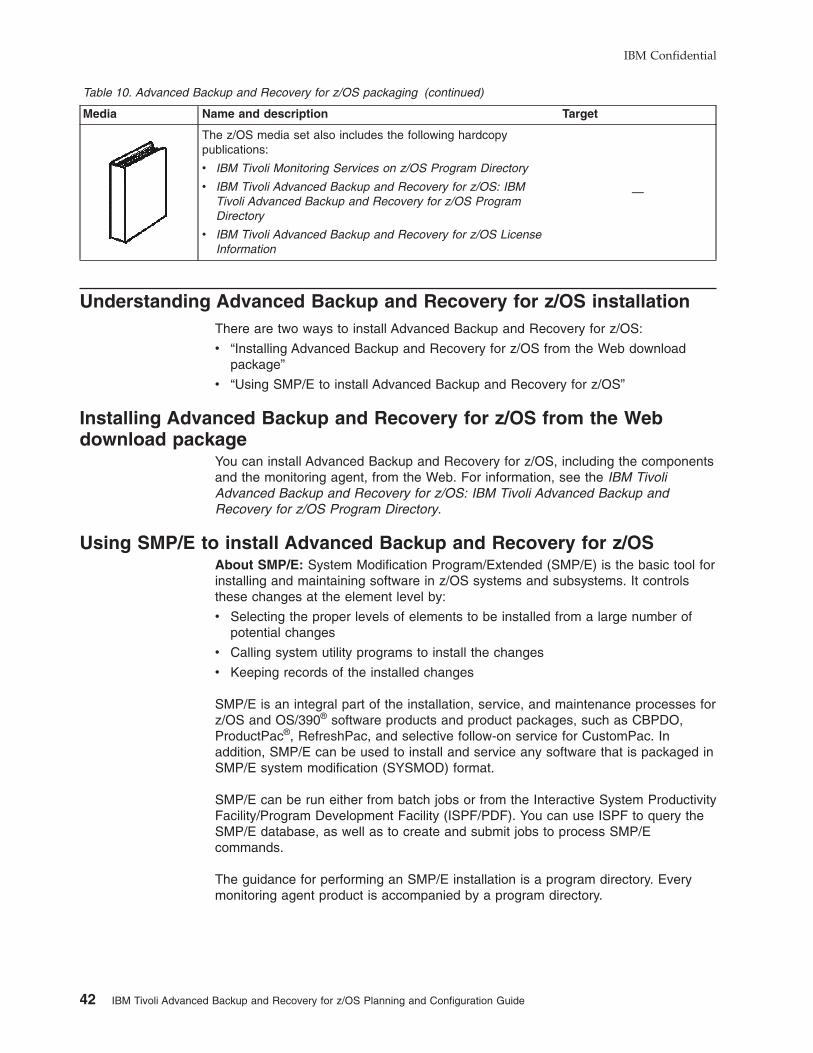
Table 10. Advanced Backup and Recovery for z/OS packaging (continued)
Media Name and description Target
The z/OS media set also includes the following hardcopy
publications:
v IBM Tivoli Monitoring Services on z/OS Program Directory
v IBM Tivoli Advanced Backup and Recovery for z/OS: IBM
Tivoli Advanced Backup and Recovery for z/OS Program
Directory
v IBM Tivoli Advanced Backup and Recovery for z/OS License
Information
—
Understanding Advanced Backup and Recovery for z/OS installation
There are two ways to install Advanced Backup and Recovery for z/OS:
v “Installing Advanced Backup and Recovery for z/OS from the Web download
package”
v “Using SMP/E to install Advanced Backup and Recovery for z/OS”
Installing Advanced Backup and Recovery for z/OS from the Web
download package
You can install Advanced Backup and Recovery for z/OS, including the components
and the monitoring agent, from the Web. For information, see the IBM Tivoli
Advanced Backup and Recovery for z/OS: IBM Tivoli Advanced Backup and
Recovery for z/OS Program Directory.
Using SMP/E to install Advanced Backup and Recovery for z/OS
About SMP/E: System Modification Program/Extended (SMP/E) is the basic tool for
installing and maintaining software in z/OS systems and subsystems. It controls
these changes at the element level by:
v Selecting the proper levels of elements to be installed from a large number of
potential changes
v Calling system utility programs to install the changes
v Keeping records of the installed changes
SMP/E is an integral part of the installation, service, and maintenance processes for
z/OS and OS/390® software products and product packages, such as CBPDO,
ProductPac®, RefreshPac, and selective follow-on service for CustomPac. In
addition, SMP/E can be used to install and service any software that is packaged in
SMP/E system modification (SYSMOD) format.
SMP/E can be run either from batch jobs or from the Interactive System Productivity
Facility/Program Development Facility (ISPF/PDF). You can use ISPF to query the
SMP/E database, as well as to create and submit jobs to process SMP/E
commands.
The guidance for performing an SMP/E installation is a program directory. Every
monitoring agent product is accompanied by a program directory.
IBM Confidential
42 IBM Tivoli Advanced Backup and Recovery for z/OS Planning and Configuration Guide

Understanding the Configuration Tool
About the Installation and Configuration Assistance Tool (Configuration Tool):
You perform the bulk of the configuration for Advanced Backup and Recovery for
z/OS using the Installation and Configuration Assistance Tool (also known as the
Configuration Tool). The Configuration Tool was formerly named the Candle®
Installation and Configuration Assistance Tool, or CICAT. However, for current
releases of zSeries monitoring agents (including the Advanced Backup and
Recovery for z/OS product), the tool is used for configuration only. These products
are now installed by SMP/E.
The Configuration Tool creates and customizes all the runtime data sets, and
creates the JCL to support the Advanced Backup and Recovery for z/OS software.
If the Tivoli Enterprise Monitoring Server is installed on a z/OS system or if you
select SNA as one of your communications protocols, the Configuration Tool also
creates the VTAM major node member in SYS1.VTAMLST. The members have the
started task name and major node name you specify during the configuration
process.
If you restart the Configuration Tool, you can continue from the point of interruption.
If you have an earlier version of CICAT on your z/OS system, it is automatically
replaced by the IBM Configuration Tool version 3.1.0 during SMP/E installation. For
information about supported levels of the SMP/E program and other related
installation software, refer to the IBM Tivoli Advanced Backup and Recovery for
z/OS: IBM Tivoli Advanced Backup and Recovery for z/OS Program Directory.
The Configuration Tool provides defaults wherever possible. These defaults are
sufficient to complete the installation of products and maintenance. Change the
defaults to reflect the needs of your enterprise. The tool operates in two modes:
v Interactive mode where an ISPF panel-driven facility assists you in specifying
parameters and tailoring jobs for configuring new products and new versions of
products
v A Batch facility that creates a single batch job that you can use to build,
configure, and load a runtime environment (RTE). This single job performs all of
the same RTE processing as the interactive Configuration Tool. Batch mode is a
simple and useful way of replicating RTEs to other z/OS systems.
Using the Configuration Tool
The Configuration Tool provides defaults for most fields and options. The defaults
can be changed to values specific to your site.
Whenever possible, the Configuration Tool checks the values you specify and
verifies that you have specified the required values. If the Configuration Tool detects
an error or omission, it displays a short message.
Display requirements in ISPF
If you are using a 3270 Model 2 (24 x 80) display, you must turn off the predefined
function (PF) keys so that the Configuration Tool panels are not truncated. To turn
off the predefined function keys, type PFSHOW on any ISPF command line and press
Enter until the function keys are no longer displayed.
Restrictions
The following restrictions apply to the Configuration Tool:
v The length of the high-level qualifier for the runtime libraries must be 26
characters or less.
IBM Confidential
Chapter 3. Planning for prerequisites, packaging, and tools 43
v You cannot use the ISPF feature for edit recovery. If you enter the ISPF RECOVERY
ON command, edits produce a recovery error message. Enter the RECOVERY OFF
command to suppress the error messages.
Commands and function
You can use the following commands for navigation and display control in the
Configuration Tool:
End key
Returns to the previous panel.
Enter key
Accepts the values you have specified and displays the next panel in the
process.
HELP Displays information about a panel or the extended description for a
message.
README
Displays the README for the Configuration Tool.
README APP
Displays information about VTAM applids.
README ERR
Displays a list of CLIST error codes and descriptions (for both interactive
and batch mode).
README SYS
Displays information about system variable support.
UTIL Displays the Installation Services and Utilities menu.
Online help for the Configuration Tool
Online help contains detailed information about using the Configuration Tool panels.
To display help from any Configuration Tool panel, press the Help key (F1) or enter
HELP on the command line.
You can also display help for the help. For example, you can display information
about the command to use to return to the previous topic in the help system. To
display the help for help from any help panel, press the Help key (F1) or enter HELP
on the command line.
IBM Confidential
44 IBM Tivoli Advanced Backup and Recovery for z/OS Planning and Configuration Guide
Part 2. Installation and configuration
Chapter 4. Beginning the installation and configuration . . . . . . . . 47
First steps: Installing the z/OS components and beginning the configuration 47
Step 1. Perform the SMP/E installation of the z/OS-based components . . . . 47
Step 2. Set up the Configuration Tool . . . . . . . . . . . . . . . . . 47
If you use a CSI in which the Configuration Tool is already installed . . . . 48
If you use a new CSI . . . . . . . . . . . . . . . . . . . . . 48
Step 3. Start the Configuration Tool . . . . . . . . . . . . . . . . . 48
Step 4. Set up the Configuration Tool environment . . . . . . . . . . . . 50
Setting up the work environment . . . . . . . . . . . . . . . . . 50
Setting up the configuration environment . . . . . . . . . . . . . . 51
Continuing the configuration procedure . . . . . . . . . . . . . . . . 52
Chapter 5. Configuring the hub monitoring server on a Windows system
and the monitoring agent on a z/OS image . . . . . . . . . . . . . 53
Configuration steps . . . . . . . . . . . . . . . . . . . . . . . 54
Step 1. Install the Tivoli Enterprise Monitoring Server, Tivoli Enterprise Portal
Server, and Tivoli Enterprise Portal desktop client . . . . . . . . . . . 54
Installing the DB2 Universal Database software . . . . . . . . . . . . 54
Installing and configuring Tivoli Enterprise Monitoring Server, Tivoli Enterprise
Portal Server, and Tivoli Enterprise Portal desktop client . . . . . . . . 57
Step 2. Install Advanced Backup and Recovery for z/OS application support 60
Step 3. Define the runtime environment . . . . . . . . . . . . . . . . 61
Step 4. Build the runtime libraries . . . . . . . . . . . . . . . . . . 65
Step 5. Configure the monitoring agent . . . . . . . . . . . . . . . . 66
Step 6. Load the runtime libraries . . . . . . . . . . . . . . . . . . 71
Step 7. Complete the configuration of the monitoring agent . . . . . . . . 72
Step 8. Verify the configuration . . . . . . . . . . . . . . . . . . . 73
Setting up security . . . . . . . . . . . . . . . . . . . . . . . 73
Expanding this configuration . . . . . . . . . . . . . . . . . . . . 73
Chapter 6. Configuring the hub monitoring server and the monitoring
agent on a z/OS image . . . . . . . . . . . . . . . . . . . . 75
Configuration steps . . . . . . . . . . . . . . . . . . . . . . . 75
Step 1. Define the runtime environment . . . . . . . . . . . . . . . . 76
Step 2. Build the runtime libraries . . . . . . . . . . . . . . . . . . 80
Step 3. Configure the hub Tivoli Enterprise Monitoring Server . . . . . . . . 80
Beginning the configuration . . . . . . . . . . . . . . . . . . . 80
Creating a logmode . . . . . . . . . . . . . . . . . . . . . . 82
Specifying configuration values . . . . . . . . . . . . . . . . . . 82
Specifying communication protocols . . . . . . . . . . . . . . . . 85
Creating the runtime members . . . . . . . . . . . . . . . . . . 89
Step 4. Configure the monitoring agent . . . . . . . . . . . . . . . . 89
Step 5. Load the runtime libraries . . . . . . . . . . . . . . . . . . 93
Step 6. Complete the configuration of the Tivoli Enterprise Monitoring Server
and the monitoring agent . . . . . . . . . . . . . . . . . . . . 93
Step 7. Install Tivoli Enterprise Portal Server and client on a Windows
workstation . . . . . . . . . . . . . . . . . . . . . . . . . 95
Installing the DB2 Universal Database software . . . . . . . . . . . . 95
Installing and configuring Tivoli Enterprise Portal Server and desktop client 97
Step 8. Install Advanced Backup and Recovery for z/OS application support 100
Step 9. Verify the configuration . . . . . . . . . . . . . . . . . . 101
Setting up security . . . . . . . . . . . . . . . . . . . . . . . 102
Expanding this configuration . . . . . . . . . . . . . . . . . . . 102
IBM Confidential
45

Batch mode processing . . . . . . . . . . . . . . . . . . . . 103
Chapter 7. Setting up security . . . . . . . . . . . . . . . . . . 105
Configuring user security . . . . . . . . . . . . . . . . . . . . . 105
Setting up user security if the hub Tivoli Enterprise Monitoring Server is
running on a z/OS system . . . . . . . . . . . . . . . . . . 105
Steps to perform before turning on security validation . . . . . . . . 107
Activating user security . . . . . . . . . . . . . . . . . . . 107
Defining security for RACF . . . . . . . . . . . . . . . . . . 108
Defining security for Network Access Method (NAM) . . . . . . . . 108
Defining security for CA-ACF2 . . . . . . . . . . . . . . . . . 108
Defining security for CA-TOP SECRET . . . . . . . . . . . . . 108
Setting up security for a hub Tivoli Enterprise Monitoring Server running on
a Windows, Linux, or UNIX system . . . . . . . . . . . . . . . 109
Steps to perform before turning on security validation . . . . . . . . 109
Activating user security . . . . . . . . . . . . . . . . . . . 110
Advanced Backup and Recovery security considerations . . . . . . . . . 110
OMVS segment . . . . . . . . . . . . . . . . . . . . . . . 110
Setting up NetView authentication of Take Action commands . . . . . . . 110
Step 1. Configure NetView authentication in the Configuration Tool . . . . 111
Step 2. Add the NetView CNMLINK data set to the Tivoli Enterprise
Monitoring Server started task . . . . . . . . . . . . . . . . . 112
Step 3. Enable NetView to authorize Take Action commands . . . . . . 112
Chapter 8. Enabling system variable support . . . . . . . . . . . . 115
Sample usage scenario . . . . . . . . . . . . . . . . . . . . . 115
Enabling system variable support . . . . . . . . . . . . . . . . . . 116
Creating the system variable parameter member . . . . . . . . . . . . 118
Creating the VTAM major node rename job . . . . . . . . . . . . . . 119
Creating one VTAM major node for all monitoring agents in the runtime
environment . . . . . . . . . . . . . . . . . . . . . . . . . 119
Chapter 9. Using batch mode processing . . . . . . . . . . . . . . 121
Planning your runtime environment replication . . . . . . . . . . . . . 122
Creating batch mode parameters . . . . . . . . . . . . . . . . . . 123
Transporting the runtime environment . . . . . . . . . . . . . . . . 124
Define a runtime environment on a local z/OS image using shared DASD 124
Transport a runtime environment from a local z/OS image to a remote
image . . . . . . . . . . . . . . . . . . . . . . . . . . 125
Transport runtime environment batch jobs from a local z/OS image to a
remote image equipped with the Configuration Tool . . . . . . . . . 126
Transport runtime environment batch mode parameters from a local z/OS
image to a remote image . . . . . . . . . . . . . . . . . . . 127
IBM Confidential
46 IBM Tivoli Advanced Backup and Recovery for z/OS Planning and Configuration Guide
Chapter 4. Beginning the installation and configuration
If you are installing the Advanced Backup and Recovery for z/OS software for the
first time, follow the instructions in this chapter, which describes the first steps of
installing and configuring Advanced Backup and Recovery for z/OS V2.1.0:
v “First steps: Installing the z/OS components and beginning the configuration”
v “Step 1. Perform the SMP/E installation of the z/OS-based components”
v “Step 2. Set up the Configuration Tool”
v “Step 3. Start the Configuration Tool” on page 48
v “Step 4. Set up the Configuration Tool environment” on page 50
v “Continuing the configuration procedure” on page 52
First steps: Installing the z/OS components and beginning the
configuration
For any deployment you choose, you must complete the first steps in the same
way:
__ “Step 1. Perform the SMP/E installation of the z/OS-based components”
__ “Step 2. Set up the Configuration Tool”
__ “Step 3. Start the Configuration Tool” on page 48
__ “Step 4. Set up the Configuration Tool environment” on page 50
The rest of this chapter gives instructions for those steps.
Step 1. Perform the SMP/E installation of the z/OS-based components
Follow the instructions in the IBM Tivoli Advanced Backup and Recovery for z/OS:
IBM Tivoli Advanced Backup and Recovery for z/OS Program Directory to install the
following components:
v Configuration Tool
v Advanced Backup and Recovery for z/OS monitoring agent
v Tivoli Enterprise Monitoring Server on z/OS (if your planned deployment includes
a hub Tivoli Enterprise Monitoring Server on z/OS)
v Common components
This product includes several common components that are also included in
other monitoring agents. If you install into an existing environment, you might
need to delete the function modification identifiers (FMIDs) for the common
components from the SMP/E installation jobs to avoid errors. See the IBM Tivoli
Advanced Backup and Recovery for z/OS: IBM Tivoli Advanced Backup and
Recovery for z/OS Program Directory for a list of the common components.
If an earlier version of a product component is installed in the same consolidated
software inventory (CSI), the earlier version is automatically replaced by the new
version provided with the product.
Step 2. Set up the Configuration Tool
Your first step after installing the contents of the product tape is to copy the
contents from one of the target libraries into the appropriate Configuration Tool work
library. If you are using an existing CSI that already has the Configuration Tool
installed, you copy the contents of the target library into your existing Configuration
IBM Confidential
47
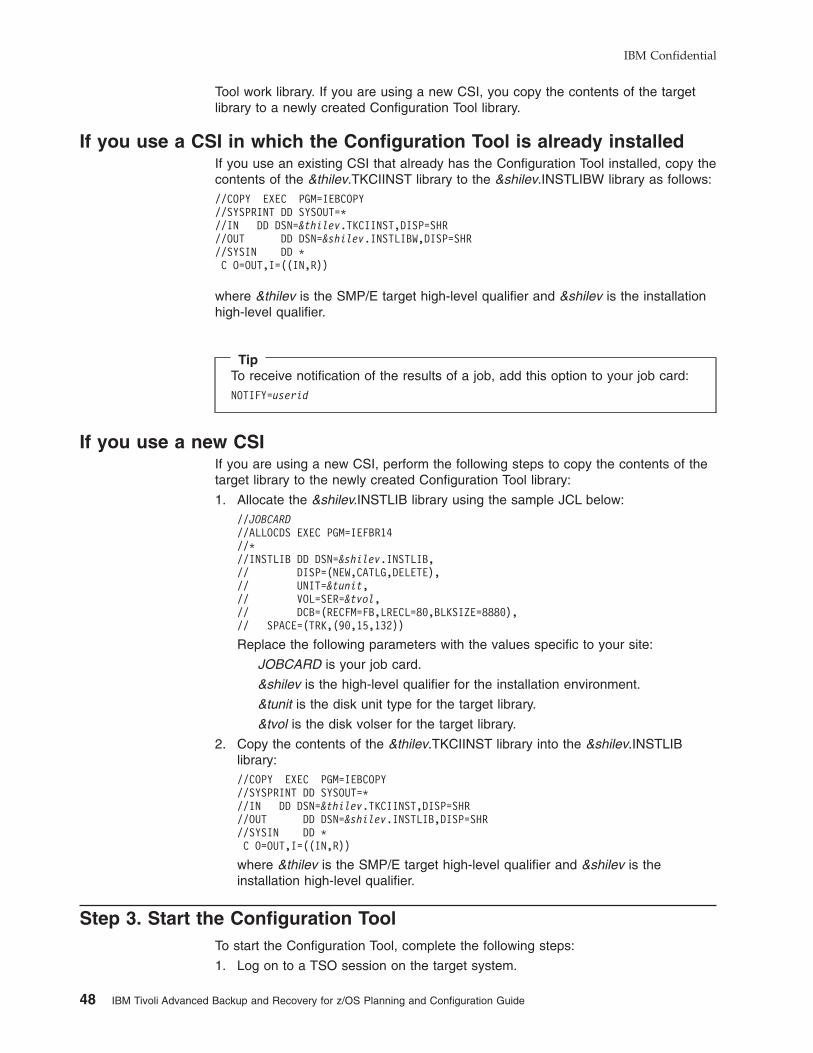
Tool work library. If you are using a new CSI, you copy the contents of the target
library to a newly created Configuration Tool library.
If you use a CSI in which the Configuration Tool is already installed
If you use an existing CSI that already has the Configuration Tool installed, copy the
contents of the &thilev.TKCIINST library to the &shilev.INSTLIBW library as follows:
//COPY EXEC PGM=IEBCOPY
//SYSPRINT DD SYSOUT=*
//IN DD DSN=&thilev.TKCIINST,DISP=SHR
//OUT DD DSN=&shilev.INSTLIBW,DISP=SHR
//SYSIN DD *
C O=OUT,I=((IN,R))
where &thilev is the SMP/E target high-level qualifier and &shilev is the installation
high-level qualifier.
Tip
To receive notification of the results of a job, add this option to your job card:
NOTIFY=userid
If you use a new CSI
If you are using a new CSI, perform the following steps to copy the contents of the
target library to the newly created Configuration Tool library:
1. Allocate the &shilev.INSTLIB library using the sample JCL below:
//JOBCARD
//ALLOCDS EXEC PGM=IEFBR14
//*
//INSTLIB DD DSN=&shilev.INSTLIB,
// DISP=(NEW,CATLG,DELETE),
// UNIT=&tunit,
// VOL=SER=&tvol,
// DCB=(RECFM=FB,LRECL=80,BLKSIZE=8880),
// SPACE=(TRK,(90,15,132))
Replace the following parameters with the values specific to your site:
JOBCARD is your job card.
&shilev is the high-level qualifier for the installation environment.
&tunit is the disk unit type for the target library.
&tvol is the disk volser for the target library.
2. Copy the contents of the &thilev.TKCIINST library into the &shilev.INSTLIB
library:
//COPY EXEC PGM=IEBCOPY
//SYSPRINT DD SYSOUT=*
//IN DD DSN=&thilev.TKCIINST,DISP=SHR
//OUT DD DSN=&shilev.INSTLIB,DISP=SHR
//SYSIN DD *
C O=OUT,I=((IN,R))
where &thilev is the SMP/E target high-level qualifier and &shilev is the
installation high-level qualifier.
Step 3. Start the Configuration Tool
To start the Configuration Tool, complete the following steps:
1. Log on to a TSO session on the target system.
IBM Confidential
48 IBM Tivoli Advanced Backup and Recovery for z/OS Planning and Configuration Guide
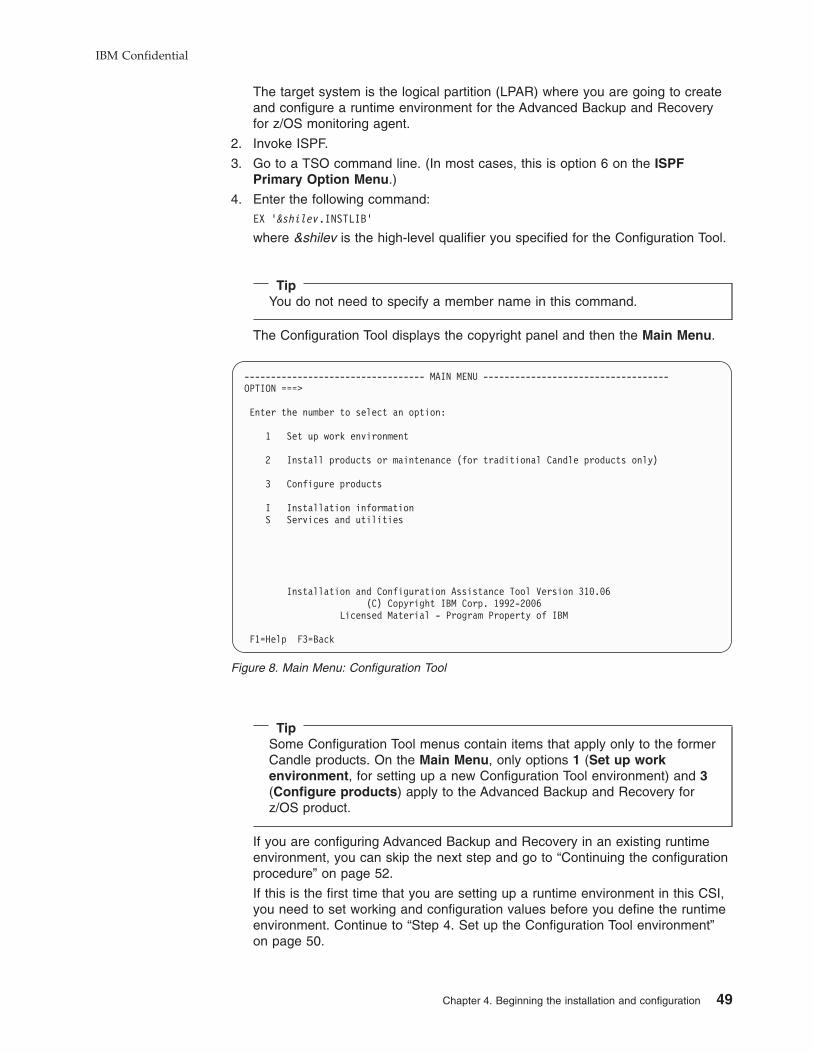
The target system is the logical partition (LPAR) where you are going to create
and configure a runtime environment for the Advanced Backup and Recovery
for z/OS monitoring agent.
2. Invoke ISPF.
3. Go to a TSO command line. (In most cases, this is option 6 on the ISPF
Primary Option Menu.)
4. Enter the following command:
EX ‘&shilev.INSTLIB’
where &shilev is the high-level qualifier you specified for the Configuration Tool.
Tip
You do not need to specify a member name in this command.
The Configuration Tool displays the copyright panel and then the Main Menu.
Tip
Some Configuration Tool menus contain items that apply only to the former
Candle products. On the Main Menu, only options 1 (Set up work
environment, for setting up a new Configuration Tool environment) and 3
(Configure products) apply to the Advanced Backup and Recovery for
z/OS product.
If you are configuring Advanced Backup and Recovery in an existing runtime
environment, you can skip the next step and go to “Continuing the configuration
procedure” on page 52.
If this is the first time that you are setting up a runtime environment in this CSI,
you need to set working and configuration values before you define the runtime
environment. Continue to “Step 4. Set up the Configuration Tool environment”
on page 50.
---------------------------------- MAIN MENU -----------------------------------
OPTION ===>
Enter the number to select an option:
1 Set up work environment
2 Install products or maintenance (for traditional Candle products only)
3 Configure products
I Installation information
S Services and utilities
Installation and Configuration Assistance Tool Version 310.06
(C) Copyright IBM Corp. 1992-2006
Licensed Material - Program Property of IBM
F1=Help F3=Back
Figure 8. Main Menu: Configuration Tool
IBM Confidential
Chapter 4. Beginning the installation and configuration 49

Step 4. Set up the Configuration Tool environment
Setting up the Configuration Tool environment involves two short procedures:
1. Setting up the work environment, by specifying the allocation and processing
values that the tool uses to create the work data sets it needs and to allocate its
work libraries.
2. Setting up the configuration environment, by specifying the values the tool uses
to customize the JCL it creates.
Setting up the work environment
To set up the work environment, complete the following steps:
1. From the Configuration Tool Main Menu, enter 1 (Set up work environment).
The Set Up Work Environment menu is displayed.
a. Select Specify options to specify allocation and processing values that are
used to create the work data sets needed by the Configuration Tool. These
settings provide operational values for generating batch jobs.
b. Select Allocate work libraries to allocate the Configuration Tool work
libraries. The initial library, INSTLIB, contains both the operational code and
the tables and jobs created by the installer. This job creates additional
libraries and populates them with the data initially stored in INSTLIB.
2. From the Set Up Work Environment menu, enter 1 (Specify Options).
The Specify Options panel shows the defaults for your system. Edit these
values as needed.
Tip
To receive notification of the results of the job, add this option to your job
card:
NOTIFY=userid
For details of the parameters, press F1 (Help).
------------------------------- SPECIFY OPTIONS -------------------------------
COMMAND ===>
Specify allocation and processing options:
SMP/E JCL REGION value ==> 0M (Specify K/M suffix)
Unit/ Storclas/
VolSer Mgmtclas PDSE
Installation work datasets ................ 3390 N
name
Specify the job statement for Installer-generated JCL:
==> //useridA JOB (ACCT),’NAME’,CLASS=A
==> //* DEFAULT JCL
==> //*
==> //*
Enter=Next F1=Help F3=Back
Figure 9. Specify Options panel: Configuration Tool
IBM Confidential
50 IBM Tivoli Advanced Backup and Recovery for z/OS Planning and Configuration Guide

3. When you have entered the relevant information, press Enter to return to the
Set Up Work Environment menu.
4. From the Set Up Work Environment menu, enter 2 (Allocate Work Libraries).
The JCL is displayed for you to review, edit if necessary, and submit.
Tip
The default space allocations for the INSTDATA and INSTJOBS libraries
are sufficient for typical installations. However, the size of the libraries
grows with increases in the number of runtime environments and the
number of applications configured in them. If you are planning to have
dozens of runtime environments, each of which contains several products,
increase the space allocations.
5. After submitting the job, exit the Configuration Tool and allow the job to run. (It
will not run while you are in the tool.) Verify that the job completes successfully.
All return codes must be zero.
Setting up the configuration environment
When the Allocate Work Libraries job completes, perform the following steps:
1. Start the Configuration Tool:
EX ‘&shilev.INSTLIB’
2. From the Main Menu of the Configuration Tool (Figure 8 on page 49), enter 3
(Configure products), and then enter 1 (Set up configuration environment).
The Set Up Configuration Environment panel is displayed. On this panel,
specify values for the JCL created by the Configuration Tool. For details of the
parameters, press F1 (Help).
3. Press Enter to accept the values.
----------------------- SET UP CONFIGURATION ENVIRONMENT ----------------------
COMMAND ===>
*** High-level qualifiers are locked.
RTE allocation routine ==> IKJEFT01 (IKJEFT01/IEFBR14)
Runtime Unit/ Storclas/
Datasets High-Level Qualifier VolSer Mgmtclas PDSE
VSAM hilev 3390 NONSMS
name
Non-VSAM hilev 3390 NONSMS N
name
Work ................................ 3390
SMP/E
Datasets High-Level Qualifier
Target hilev
Enter=Next F1=Help F3=Back
. . . . . . . . . . . . . . . . . . . . . . . . . . .
Figure 10. Set Up Configuration Environment panel: Configuration Tool
IBM Confidential
Chapter 4. Beginning the installation and configuration 51
Tip
If you enter the Set Up Configuration Environment panel again after
specifying values, the high-level qualifiers are locked and cannot be
modified. If you need to modify these values, you can unlock them by
selecting Unlock runtime high-level qualifiers on the Configuration
Services and Utilities menu.
Continuing the configuration procedure
The rest of your configuration procedure depends on the deployment you have
planned, based on the information in Part 1, “Planning your deployment.” Go to the
chapter that contains instructions for the configuration you want:
v Chapter 5, “Configuring the hub monitoring server on a Windows system and the
monitoring agent on a z/OS image,” on page 53
v Chapter 6, “Configuring the hub monitoring server and the monitoring agent on a
z/OS image,” on page 75
IBM Confidential
52 IBM Tivoli Advanced Backup and Recovery for z/OS Planning and Configuration Guide
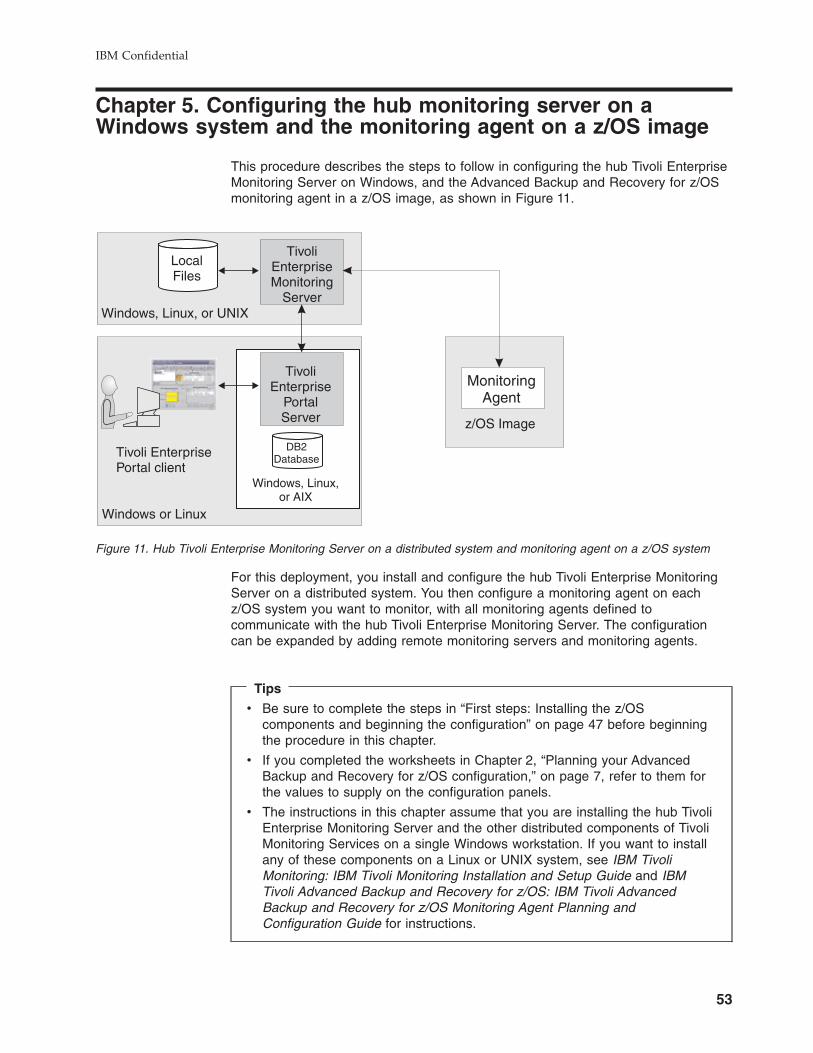
Chapter 5. Configuring the hub monitoring server on a
Windows system and the monitoring agent on a z/OS image
This procedure describes the steps to follow in configuring the hub Tivoli Enterprise
Monitoring Server on Windows, and the Advanced Backup and Recovery for z/OS
monitoring agent in a z/OS image, as shown in Figure 11.
For this deployment, you install and configure the hub Tivoli Enterprise Monitoring
Server on a distributed system. You then configure a monitoring agent on each
z/OS system you want to monitor, with all monitoring agents defined to
communicate with the hub Tivoli Enterprise Monitoring Server. The configuration
can be expanded by adding remote monitoring servers and monitoring agents.
Tips
v Be sure to complete the steps in “First steps: Installing the z/OS
components and beginning the configuration” on page 47 before beginning
the procedure in this chapter.
v If you completed the worksheets in Chapter 2, “Planning your Advanced
Backup and Recovery for z/OS configuration,” on page 7, refer to them for
the values to supply on the configuration panels.
v The instructions in this chapter assume that you are installing the hub Tivoli
Enterprise Monitoring Server and the other distributed components of Tivoli
Monitoring Services on a single Windows workstation. If you want to install
any of these components on a Linux or UNIX system, see IBM Tivoli
Monitoring: IBM Tivoli Monitoring Installation and Setup Guide and IBM
Tivoli Advanced Backup and Recovery for z/OS: IBM Tivoli Advanced
Backup and Recovery for z/OS Monitoring Agent Planning and
Configuration Guide for instructions.
Figure 11. Hub Tivoli Enterprise Monitoring Server on a distributed system and monitoring agent on a z/OS system
IBM Confidential
53
Configuration steps
To configure the product, complete the following steps in order:
__ “Step 1. Install the Tivoli Enterprise Monitoring Server, Tivoli Enterprise Portal
Server, and Tivoli Enterprise Portal desktop client”
__ “Step 2. Install Advanced Backup and Recovery for z/OS application support”
on page 60
__ “Step 3. Define the runtime environment” on page 61
__ “Step 4. Build the runtime libraries” on page 65
__ “Step 5. Configure the monitoring agent” on page 66
__ “Step 6. Load the runtime libraries” on page 71
__ “Step 7. Complete the configuration of the monitoring agent” on page 72
__ “Step 8. Verify the configuration” on page 73
Step 1. Install the Tivoli Enterprise Monitoring Server, Tivoli Enterprise
Portal Server, and Tivoli Enterprise Portal desktop client
In this step, you install the hub Tivoli Enterprise Monitoring Server, Tivoli Enterprise
Portal Server, and Tivoli Enterprise Portal desktop client on a distributed system.
These instructions assume that the operating system on the workstation is Windows
XP Professional Edition with Service Pack 1. For complete information about
hardware and software requirements for the Tivoli Monitoring Services components,
and for instructions for installing and configuring the components on a Linux or
UNIX system, see the IBM Tivoli Monitoring: IBM Tivoli Monitoring Installation and
Setup Guide.
This procedure installs a Tivoli Enterprise Monitoring Server, a Tivoli Enterprise
Portal Server, and a Tivoli Enterprise Portal desktop client on a single Windows
workstation. If you decide to install these components on different workstations,
install them in this order:
1. Tivoli Enterprise Monitoring Server
2. Tivoli Enterprise Portal Server
3. Tivoli Enterprise Portal desktop client
Installing the DB2 Universal Database software
Tivoli Enterprise Portal Server requires DB2 Universal Database (DB2 UDB). DB2
UDB version 8.2 is provided in the Advanced Backup and Recovery for z/OS
installation package. If DB2 UDB version 8 or higher is already installed on the
workstation where you plan to install a Tivoli Enterprise Portal Server, you can skip
this procedure and go directly to “Installing and configuring Tivoli Enterprise
Monitoring Server, Tivoli Enterprise Portal Server, and Tivoli Enterprise Portal
desktop client” on page 57.
1. On the Windows system where you plan to install the Tivoli Enterprise Portal
Server, log on with a local ID that has Administrator authority. The DB2
Universal Database installation adds a local db2admin user account to
Windows, and local Administrator authority is required for creating this account.
Without the db2admin ID, DB2 UDB is unable to create the Tivoli Enterprise
Portal Server database, and the Tivoli Enterprise Portal Server cannot start.
2. Insert the DB2 Universal Database Workgroup Server Edition CD to start the
installer.
3. Select Install Products. Read and accept the license agreement, and proceed
through the installer windows until you reach the Installation Type window.
IBM Confidential
54 IBM Tivoli Advanced Backup and Recovery for z/OS Planning and Configuration Guide
4. On the Installation Type window, accept the defaults. Do not select Data
warehousing.
5. On the Select the installation folder window, change the installation drive if
necessary.
6. Set user information for the DB2 Administration Server:
a. You can either accept the user name of db2admin or use a different name.
b. Enter a password.
Important
DB2 UDB requires the user name and password for all administrative
tasks, including installation and configuration of the Tivoli Enterprise
Portal Server.
v If the Local Security Settings on the Windows system require
complex passwords, use a password that fits the system
requirements:
– Not containing the user's account name.
– Being at least six characters in length.
– Containing characters from three of the following categories:
- English uppercase characters (A through Z)
- English lowercase characters (a through z)
- Base 10 digits (0 through 9)
- Non-alphanumeric characters (Examples: !, $, #, %)
For information about Local Security Settings and password
complexity, see the Windows system help.
v If you change the db2admin password after DB2 UDB installation,
you receive error messages when you try to install the Tivoli
Enterprise Portal Server. If your Local Security Settings require you
to change the password, wait to do so until you finish installing the
Tivoli Enterprise Portal Server. See IBM Tivoli Advanced Backup
and Recovery for z/OS: IBM Tivoli Advanced Backup and Recovery
for z/OS Monitoring Agent Planning and Configuration Guide and
IBM Tivoli Monitoring: IBM Tivoli Monitoring Problem Determination
Guide for troubleshooting information.
c. Do not enter a domain name in the drop-down list.
7. On the remaining windows, select the defaults.
8. Click Install to start copying the files.
9. After the DB2 UDB installation is complete, restart Windows before installing
the Tivoli Enterprise Portal Server. Do this even if the DB2 UDB installer does
not ask you to.
10. If the Local Security Settings on the Windows system require complex
passwords, you must create a new Windows user account for the Tivoli
Enterprise Portal Server before you begin installing it. The default database
user account name of the Tivoli Enterprise Portal Server is TEPS, but you can
assign any name no longer than eight characters that meets your site's
requirements for user IDs. Use a password that fits the Windows system
requirements for complex passwords:
v Not containing the user account name.
v Being at least six characters long.
v Containing characters from three of the following categories:
– English uppercase characters (A through Z)
– English lowercase characters (a through z)
IBM Confidential
Chapter 5. Configuring the hub monitoring server on a Windows system and the monitoring agent on a z/OS image 55

– Base 10 digits (0 through 9)
– Non-alphanumeric characters (Examples: !, $, #, %)
For information about Local Security Settings and password complexity, see
the Windows system help.
IBM Confidential
56 IBM Tivoli Advanced Backup and Recovery for z/OS Planning and Configuration Guide

Installing and configuring Tivoli Enterprise Monitoring Server, Tivoli
Enterprise Portal Server, and Tivoli Enterprise Portal desktop client
Complete the following steps to install Tivoli Enterprise Monitoring Server, Tivoli
Enterprise Portal Server, and Tivoli Enterprise Portal desktop client on a Windows
workstation where DB2 UDB is already installed:
1. Begin the installation.
a. Log on to Windows with an ID that has local Administrator authority, and
close any running applications.
b. Insert the IBM Tivoli Monitoring Services on z/OS CD into the CD-ROM
drive.
Installation begins automatically. If the installer does not start, go to the
Windows directory on your CD-ROM drive and run setup.exe. If setup.exe
initialization fails, you might not have enough free disk space to extract the
setup files.
c. Read the text that welcomes you to the installation, and click Next to
continue.
d. On the Install Prerequisites window, read the information about the
required levels of IBM Global Security Kit and IBM Java.
The check box for each prerequisite is cleared if the correct level of the
software is already installed on the workstation. Otherwise, the check box is
selected to indicate that the software is to be installed.
e. Click Next to continue.
If Global Security Kit or Java is selected for installation, it is installed now.
After installation of the prerequisite software is complete, you might be
prompted to reboot the computer. In that case, you receive an abort
message with a Severe error heading. This is normal and does not indicate
a problem.
If you are prompted to reboot, do the following:
1) Click OK on the window prompting you to reboot.
2) Click No on the window asking whether you want to view the abort log.
3) Restart the computer.
4) Restart the installation program.
f. Read the software license agreement and click Accept.
The Choose Destination Location window is displayed. The default is
C:\IBM\ITM.
g. Accept the default and click Next.
h. On the User Data Encryption Key window, type a 32-bit encryption key.
You can use the default key.
Note: Be sure to record the value you use for the key. You must use the
same key during the installation of any components that
communicate with this monitoring server.
i. Click Next and then click OK to confirm the encryption key.
2. Select the components to install.
a. On the Select Features window, expand the list of features and select the
following:
v Tivoli Enterprise Monitoring Agent Framework
v Tivoli Enterprise Monitoring Server
v Tivoli Enterprise Portal Server Framework
IBM Confidential
Chapter 5. Configuring the hub monitoring server on a Windows system and the monitoring agent on a z/OS image 57
v Tivoli Enterprise Portal Desktop Client
v IBM Eclipse Help Server
Tips
v If you want to enable historical reporting select both Tivoli
Enterprise Monitoring Agent Framework and Warehouse Proxy
from the list of features under Tivoli Enterprise Monitoring
Agents. Otherwise, select only Tivoli Enterprise Monitoring Agent
Framework. Even though the Advanced Backup and Recovery for
z/OS monitoring agent is installed on z/OS, the Tivoli Enterprise
Monitoring Agent Framework must be selected here to enable
installation of application support on the distributed Tivoli Monitoring
Services components (see “Step 2. Install Advanced Backup and
Recovery for z/OS application support” on page 60).
v Do not select any agents or support features that are not in the list
shown above.
b. Click Next.
c. On the Agent Deployment window, clear the check boxes for both
Universal Agent and Monitoring Agent for Windows OS. These
selections do not apply to the Advanced Backup and Recovery for z/OS
product.
Click Next.
d. On the Select Program Folder window, accept the default and click Next.
3. On the TEPS Desktop and Browser Signon ID and Password window,
provide and confirm a password to be used by the Tivoli Enterprise Portal
desktop or browser client for initial access to the Tivoli Enterprise Portal Server.
The initial user ID sysadmin cannot be changed. You can add other user IDs
after installation. For instructions, see the Tivoli Enterprise Portal online help or
the IBM Tivoli Monitoring: IBM Tivoli Monitoring Administrator’s Guide.
4. Click Next and review the installation summary details. This summary identifies
what you are installing and where you chose to install it. Click Next to install the
components.
5. On the Setup Type window, select these items:
v Configure Tivoli Enterprise Portal
v Configure Tivoli Enterprise Monitoring Server
v Launch Manage Tivoli Monitoring Services
Click Next.
6. Configure the Tivoli Enterprise Portal.
a. On the TEPS Hostname window, make sure that the host name of the Tivoli
Enterprise Portal Server is correct and does not include the domain name.
Click Next.
b. On the TEPS Data Source Config Parameters window, enter the
db2admin account password and a password for the Tivoli Enterprise Portal
Server database user.
IBM Confidential
58 IBM Tivoli Advanced Backup and Recovery for z/OS Planning and Configuration Guide
Tip
To have one less password to remember, you can use the same
password for the db2admin account and the Tivoli Enterprise Portal
Server database user account (default user account name TEPS, or
the account name you set in 10 on page 55). If the Local Security
Settings on the Windows system require complex passwords, use a
password that fits the system requirements:
v Not containing the user account name.
v Being at least six characters in length.
v Containing characters from three of the following categories:
– English uppercase characters (A through Z)
– English lowercase characters (a through z)
– Base 10 digits (0 through 9)
– Non-alphanumeric characters (Examples: !, $, #, %)
For more information about Local Security Settings and password
complexity, see the Windows system help. See IBM Tivoli Monitoring:
IBM Tivoli Monitoring Problem Determination Guide for Tivoli Enterprise
Portal Server troubleshooting information.
c. Click OK.
This step takes a few moments to complete while it populates the database.
d. On the Success window, click OK.
e. If you want to enable historical reporting, supply a user ID and password for
use by the Tivoli Enterprise Portal Server to access the Tivoli Data
Warehouse, and click Next. Otherwise, click Next without specifying any
values on the Warehouse ID and Password for TEP Server window.
f. On the TEP Server Configuration window, click OK to accept IP.PIPE (the
default) as the protocol for communication with the hub Tivoli Enterprise
Monitoring Server installed on the same workstation.
g. On the next TEP Server Configuration window, enter the host name of the
workstation where the hub Tivoli Enterprise Monitoring Server is installed. In
this case it is the name of your workstation without the domain name. Also
enter the port number for the Tivoli Enterprise Monitoring Server. Because
IBM Tivoli Monitoring is case-sensitive, select Convert to upper case to
reduce the chance of user error. Click OK.
h. When you are prompted to reconfigure the warehouse connection
information, click Yes if you are enabling historical data collection.
Otherwise, click No and go on to Configure the Tivoli Enterprise Monitoring
Server.
If you clicked Yes, follow these steps:
1) On the Warehouse Proxy Database Selection window, select the type
of database you want to use for the warehouse data source and click
OK.
2) Provide the values required for the selected database type and click OK.
For detailed instructions, see IBM Tivoli Monitoring: IBM Tivoli
Monitoring Installation and Setup Guide, GC32-9407 and IBM Tivoli
Monitoring: IBM Tivoli Monitoring Administrator’s Guide, SC32-9408.
3) Click OK on the Successfully configured warehouse data source
window.
7. Configure the Tivoli Enterprise Monitoring Server.
IBM Confidential
Chapter 5. Configuring the hub monitoring server on a Windows system and the monitoring agent on a z/OS image 59
a. On the Tivoli Enterprise Monitoring Server Configuration window, select
the type of monitoring server you are configuring: Hub or Remote. For this
procedure, select Hub.
For complete information on this configuration window and its values, see
the IBM Tivoli Monitoring: IBM Tivoli Monitoring Installation and Setup
Guide.
b. Make a note of the value shown for the TEMS name. You will need to
specify it later, when you configure the monitoring agent on z/OS. A good
place to record it is “Configuration worksheet if the hub monitoring server is
on a distributed system” on page 22. The TEMS name parameter is
case-sensitive on all platforms.
The default name is HUB_hostname.
c. Identify up to three communication protocols for the monitoring server to use
in communicating with the other components. When communication with
another component is initiated, the monitoring server tries Protocol 1 first
and goes to Protocol 2 and then to Protocol 3 in case of failure.
IP.PIPE (the default) or IP.SPIPE is generally the best choice for Protocol 1
in firewall environments. These protocols enable the monitoring server to
communicate with the monitoring agent on z/OS and with other components
on other systems, even if the components are running behind firewalls. At
least one of the protocols chosen must match a protocol that you intend to
specify for the Advanced Backup and Recovery monitoring agent (see
Table 6 on page 24).
d. Click OK.
e. On the Hub TEMS Configuration window, complete the settings for
communications with the monitoring agent. Use the values you established
in Table 5 on page 22.
f. Because the Tivoli Monitoring Services components are case-sensitive,
select Convert to upper case to reduce the chance of user error. Click OK.
g. On the Configuration Defaults for Connecting to a TEMS windows, select
the same communication protocols and values you specified for the
monitoring server to use in communicating with the other components.
8. On the InstallShield Wizard Complete window, select Display the README
file and click Finish.
Step 2. Install Advanced Backup and Recovery for z/OS application
support
The IBM Tivoli Advanced Backup and Recovery for z/OS Data Files for z/OS CD
contains the product-specific application support data required by distributed
components and by the hub Tivoli Enterprise Monitoring Server (on any platform).
To install Advanced Backup and Recovery for z/OS application support, follow this
procedure:
1. Insert the IBM Tivoli Advanced Backup and Recovery for z/OS Data Files for
z/OS CD into the CD-ROM drive of the Windows workstation that hosts the
Tivoli Enterprise Portal Server and desktop client.
Installation begins automatically. If the installer does not start, go to the
Windows directory on your CD-ROM drive and run setup.exe. If setup.exe
initialization fails, you might not have enough free disk space to extract the
setup files.
2. Read the text that welcomes you to the installation, and click Next to continue.
IBM Confidential
60 IBM Tivoli Advanced Backup and Recovery for z/OS Planning and Configuration Guide
3. On the Install Prerequisites window, both check boxes are cleared, to
indicate that the required software is already installed. Click Next to continue.
4. Read the software license agreement and click Accept.
5. On the Select Features window, select IBM Tivoli Advanced Backup and
Recovery for z/OS for these components:
v Tivoli Enterprise Monitoring Server
v Tivoli Enterprise Portal Server
v Tivoli Enterprise Portal Desktop Client
6. Click Next to continue.
7. On the Start Copying Files window, read the list of actions to be performed,
and click Next.
Application support for Advanced Backup and Recovery is installed on the IBM
Tivoli Monitoring components you selected.
8. On the Setup Type window, select Configure Tivoli Enterprise Portal and
Install application support for a local/remote Tivoli Enterprise Monitoring
Server, and clear the check boxes for any other items. Click Next.
9. On the TEPS Hostname window, make sure that the host name of the Tivoli
Enterprise Portal Server is correct and does not include the domain name.
Click Next.
10. On the two Tivoli Enterprise Monitoring Server configuration windows that are
displayed, make sure the information is correct and click Next.
11. On the Add application support to the TEMS window, select On this
computer and click OK.
12. On the Select the application support to add to the TEMS window, select
IBM Tivoli Advanced Backup and Recovery for z/OS and click OK.
13. On the Application support addition complete window, click Next.
14. On the InstallShield Wizard Complete window, select Display the README
file and click Finish.
Step 3. Define the runtime environment
In this step you define the runtime environment for configuring the Advanced
Backup and Recovery monitoring agent.
Tip
Be sure you have completed the steps in “First steps: Installing the z/OS
components and beginning the configuration” on page 47 before beginning this
procedure.
v If you installed the Advanced Backup and Recovery software onto a z/OS image
that contains no other monitoring agents, you must add the runtime environment
and then build its libraries. This procedure is described immediately below.
v If you installed the Advanced Backup and Recovery software onto a z/OS image
that already contains another monitoring agent, and if you want to use an
existing runtime environment (rather than creating a new one) for configuring the
Advanced Backup and Recovery product, you do not need to add a runtime
environment. Go directly to “Step 4. Build the runtime libraries” on page 65 and
continue from there.
To define the runtime environment for the Advanced Backup and Recovery
monitoring agent, complete the following procedure:
IBM Confidential
Chapter 5. Configuring the hub monitoring server on a Windows system and the monitoring agent on a z/OS image 61
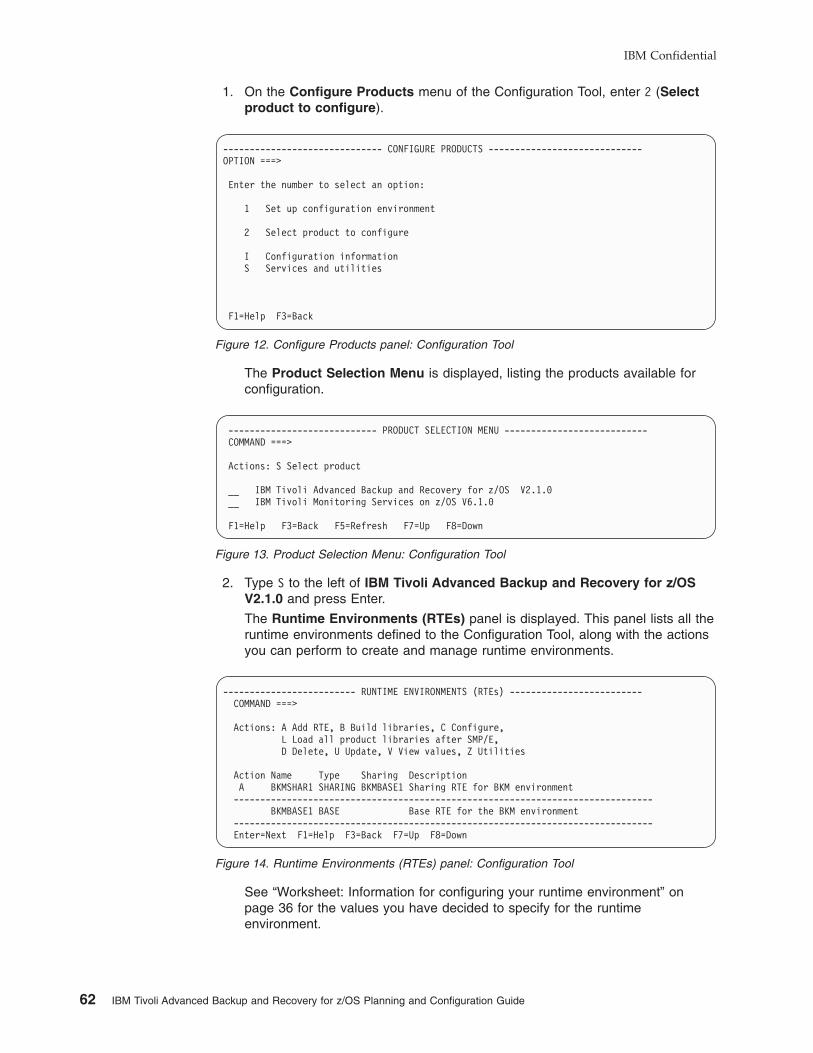
1. On the Configure Products menu of the Configuration Tool, enter 2 (Select
product to configure).
The Product Selection Menu is displayed, listing the products available for
configuration.
2. Type S to the left of IBM Tivoli Advanced Backup and Recovery for z/OS
V2.1.0 and press Enter.
The Runtime Environments (RTEs) panel is displayed. This panel lists all the
runtime environments defined to the Configuration Tool, along with the actions
you can perform to create and manage runtime environments.
See “Worksheet: Information for configuring your runtime environment” on
page 36 for the values you have decided to specify for the runtime
environment.
------------------------------ CONFIGURE PRODUCTS -----------------------------
OPTION ===>
Enter the number to select an option:
1 Set up configuration environment
2 Select product to configure
I Configuration information
S Services and utilities
F1=Help F3=Back
Figure 12. Configure Products panel: Configuration Tool
---------------------------- PRODUCT SELECTION MENU ---------------------------
COMMAND ===>
Actions: S Select product
__ IBM Tivoli Advanced Backup and Recovery for z/OS V2.1.0
__ IBM Tivoli Monitoring Services on z/OS V6.1.0
F1=Help F3=Back F5=Refresh F7=Up F8=Down
Figure 13. Product Selection Menu: Configuration Tool
------------------------- RUNTIME ENVIRONMENTS (RTEs) -------------------------
COMMAND ===>
Actions: A Add RTE, B Build libraries, C Configure,
L Load all product libraries after SMP/E,
D Delete, U Update, V View values, Z Utilities
Action Name Type Sharing Description
A BKMSHAR1 SHARING BKMBASE1 Sharing RTE for BKM environment
-------------------------------------------------------------------------------
BKMBASE1 BASE Base RTE for the BKM environment
-------------------------------------------------------------------------------
Enter=Next F1=Help F3=Back F7=Up F8=Down
Figure 14. Runtime Environments (RTEs) panel: Configuration Tool
IBM Confidential
62 IBM Tivoli Advanced Backup and Recovery for z/OS Planning and Configuration Guide
3. On the Runtime Environments (RTEs) panel, type A (Add RTE) in the
Action field beside the first (empty) row and type a Name for your new
runtime environment.
The runtime environment name is a unique identifier of up to 8 characters. It is
automatically used as the mid-level qualifier for full and sharing runtime
environments. You can optionally specify a mid-level qualifier for base runtime
environments.
Tip
If you specify a runtime environment name no more than 4 characters
long, you can specify the same name for the JCL suffix. This setup
makes it easy to associate the jobs in INSTJOBS with the runtime
environment.
4. Specify the type of runtime environment being created. In this case, start by
creating either a base or full type, which is essential if you intend to add
sharing runtime environments later on.
Tip
A base runtime environment is not configurable. For information about the
different types of runtime environments, see “Understanding runtime
environments” on page 13.
5. (For sharing runtime environments only) Type the name of the base or full
runtime environment from which this runtime environment obtains its base
library information. If SMP/E target libraries are to be shared, type SMP.
6. Type a description for this runtime environment.
The description can be any information that is useful for you and others at your
site.
7. When you have specified all required values on the Runtime Environments
(RTEs) panel, press Enter.
The first of two Add Runtime Environment panels is displayed. This panel
shows the defaults for your system.
a. Specify a JCL suffix no more than 4 characters long, to be used as the
suffix of the name of the member containing the JCL in the INSTJOBS
dataset.
If possible, specify the runtime environment name as the JCL suffix, to
make the output of your Configuration Tool batch jobs easier to find in the
SDSF queue.
b. You can change the started task (STC) prefix to avoid confusion with
others at your site.
c. Type N for Will this RTE have a Tivoli Enterprise Monitoring Server
(because Tivoli Enterprise Monitoring Server is installed on a different
system).
For details of the parameters, press F1 (Help).
IBM Confidential
Chapter 5. Configuring the hub monitoring server on a Windows system and the monitoring agent on a z/OS image 63
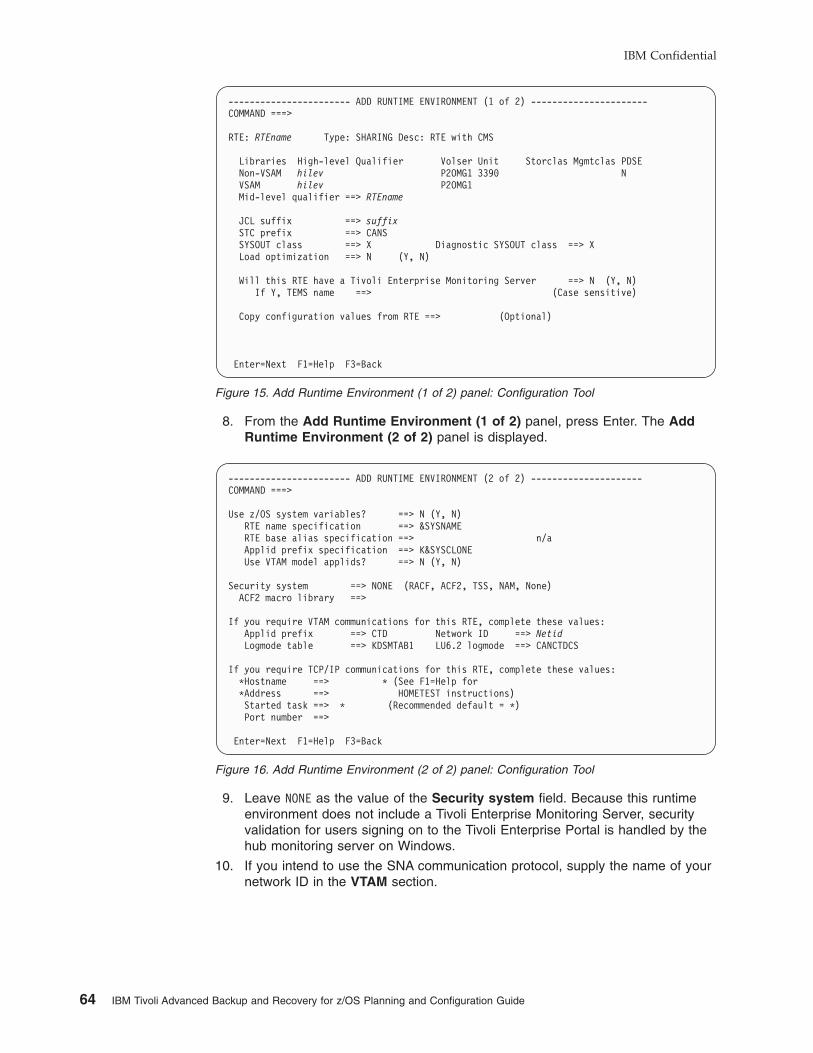
8. From the Add Runtime Environment (1 of 2) panel, press Enter. The Add
Runtime Environment (2 of 2) panel is displayed.
9. Leave NONE as the value of the Security system field. Because this runtime
environment does not include a Tivoli Enterprise Monitoring Server, security
validation for users signing on to the Tivoli Enterprise Portal is handled by the
hub monitoring server on Windows.
10. If you intend to use the SNA communication protocol, supply the name of your
network ID in the VTAM section.
----------------------- ADD RUNTIME ENVIRONMENT (1 of 2) ----------------------
COMMAND ===>
RTE: RTEname Type: SHARING Desc: RTE with CMS
Libraries High-level Qualifier Volser Unit Storclas Mgmtclas PDSE
Non-VSAM hilev P2OMG1 3390 N
VSAM hilev P2OMG1
Mid-level qualifier ==> RTEname
JCL suffix ==> suffix
STC prefix ==> CANS
SYSOUT class ==> X Diagnostic SYSOUT class ==> X
Load optimization ==> N (Y, N)
Will this RTE have a Tivoli Enterprise Monitoring Server ==> N (Y, N)
If Y, TEMS name ==> (Case sensitive)
Copy configuration values from RTE ==> (Optional)
Enter=Next F1=Help F3=Back
Figure 15. Add Runtime Environment (1 of 2) panel: Configuration Tool
----------------------- ADD RUNTIME ENVIRONMENT (2 of 2) ---------------------
COMMAND ===>
Use z/OS system variables? ==> N (Y, N)
RTE name specification ==> &SYSNAME
RTE base alias specification ==> n/a
Applid prefix specification ==> K&SYSCLONE
Use VTAM model applids? ==> N (Y, N)
Security system ==> NONE (RACF, ACF2, TSS, NAM, None)
ACF2 macro library ==>
If you require VTAM communications for this RTE, complete these values:
Applid prefix ==> CTD Network ID ==> Netid
Logmode table ==> KDSMTAB1 LU6.2 logmode ==> CANCTDCS
If you require TCP/IP communications for this RTE, complete these values:
*Hostname ==> * (See F1=Help for
*Address ==> HOMETEST instructions)
Started task ==> * (Recommended default = *)
Port number ==>
Enter=Next F1=Help F3=Back
Figure 16. Add Runtime Environment (2 of 2) panel: Configuration Tool
IBM Confidential
64 IBM Tivoli Advanced Backup and Recovery for z/OS Planning and Configuration Guide
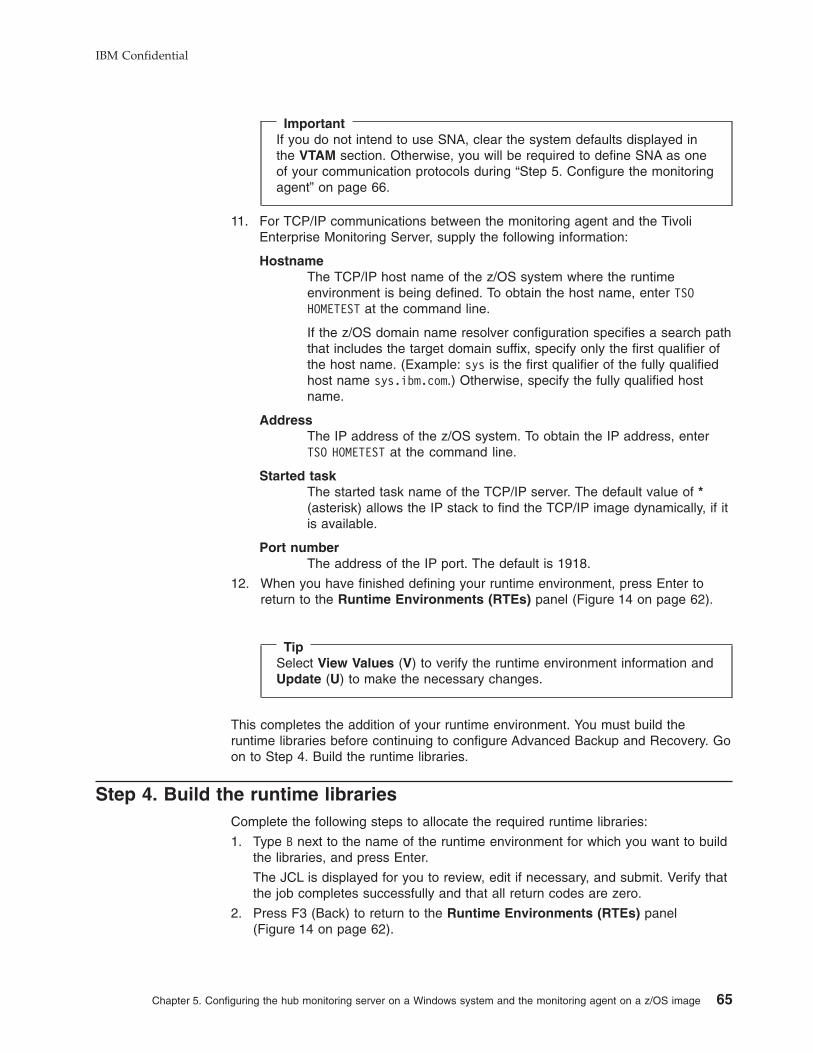
Important
If you do not intend to use SNA, clear the system defaults displayed in
the VTAM section. Otherwise, you will be required to define SNA as one
of your communication protocols during “Step 5. Configure the monitoring
agent” on page 66.
11. For TCP/IP communications between the monitoring agent and the Tivoli
Enterprise Monitoring Server, supply the following information:
Hostname
The TCP/IP host name of the z/OS system where the runtime
environment is being defined. To obtain the host name, enter TSO
HOMETEST at the command line.
If the z/OS domain name resolver configuration specifies a search path
that includes the target domain suffix, specify only the first qualifier of
the host name. (Example: sys is the first qualifier of the fully qualified
host name sys.ibm.com.) Otherwise, specify the fully qualified host
name.
Address
The IP address of the z/OS system. To obtain the IP address, enter
TSO HOMETEST at the command line.
Started task
The started task name of the TCP/IP server. The default value of *
(asterisk) allows the IP stack to find the TCP/IP image dynamically, if it
is available.
Port number
The address of the IP port. The default is 1918.
12. When you have finished defining your runtime environment, press Enter to
return to the Runtime Environments (RTEs) panel (Figure 14 on page 62).
Tip
Select View Values (V) to verify the runtime environment information and
Update (U) to make the necessary changes.
This completes the addition of your runtime environment. You must build the
runtime libraries before continuing to configure Advanced Backup and Recovery. Go
on to Step 4. Build the runtime libraries.
Step 4. Build the runtime libraries
Complete the following steps to allocate the required runtime libraries:
1. Type B next to the name of the runtime environment for which you want to build
the libraries, and press Enter.
The JCL is displayed for you to review, edit if necessary, and submit. Verify that
the job completes successfully and that all return codes are zero.
2. Press F3 (Back) to return to the Runtime Environments (RTEs) panel
(Figure 14 on page 62).
IBM Confidential
Chapter 5. Configuring the hub monitoring server on a Windows system and the monitoring agent on a z/OS image 65
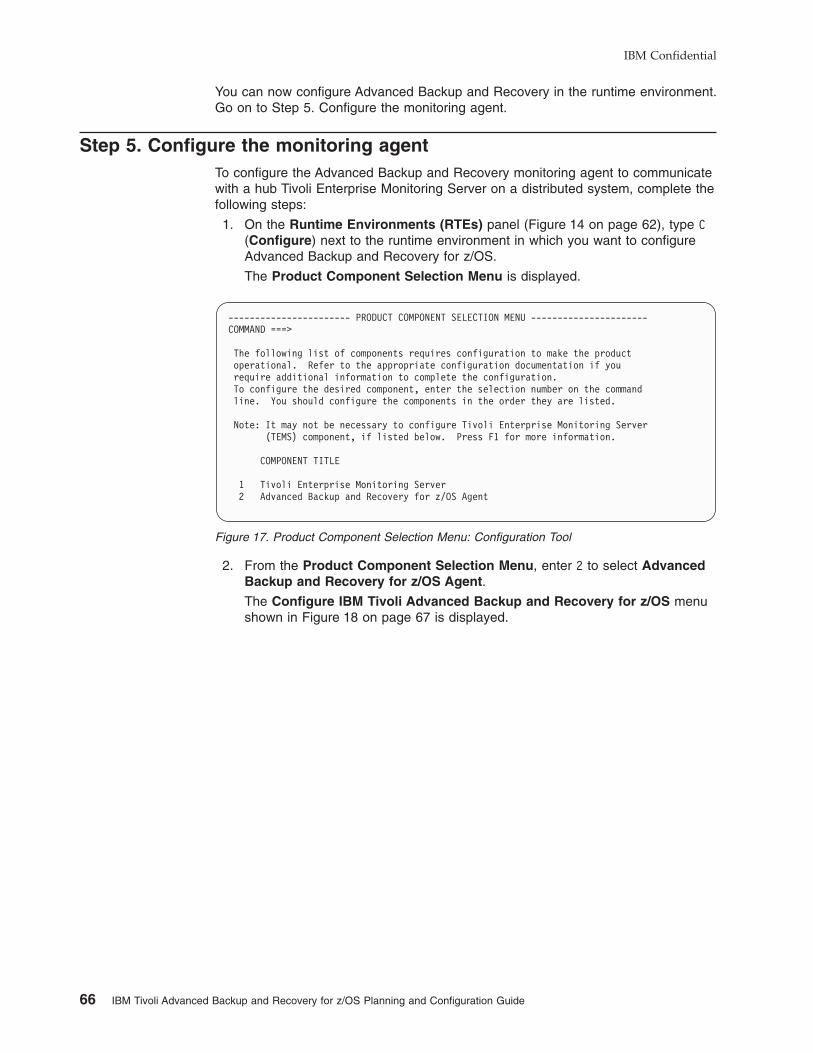
You can now configure Advanced Backup and Recovery in the runtime environment.
Go on to Step 5. Configure the monitoring agent.
Step 5. Configure the monitoring agent
To configure the Advanced Backup and Recovery monitoring agent to communicate
with a hub Tivoli Enterprise Monitoring Server on a distributed system, complete the
following steps:
1. On the Runtime Environments (RTEs) panel (Figure 14 on page 62), type C
(Configure) next to the runtime environment in which you want to configure
Advanced Backup and Recovery for z/OS.
The Product Component Selection Menu is displayed.
2. From the Product Component Selection Menu, enter 2 to select Advanced
Backup and Recovery for z/OS Agent.
The Configure IBM Tivoli Advanced Backup and Recovery for z/OS menu
shown in Figure 18 on page 67 is displayed.
----------------------- PRODUCT COMPONENT SELECTION MENU ----------------------
COMMAND ===>
The following list of components requires configuration to make the product
operational. Refer to the appropriate configuration documentation if you
require additional information to complete the configuration.
To configure the desired component, enter the selection number on the command
line. You should configure the components in the order they are listed.
Note: It may not be necessary to configure Tivoli Enterprise Monitoring Server
(TEMS) component, if listed below. Press F1 for more information.
COMPONENT TITLE
1 Tivoli Enterprise Monitoring Server
2 Advanced Backup and Recovery for z/OS Agent
Figure 17. Product Component Selection Menu: Configuration Tool
IBM Confidential
66 IBM Tivoli Advanced Backup and Recovery for z/OS Planning and Configuration Guide
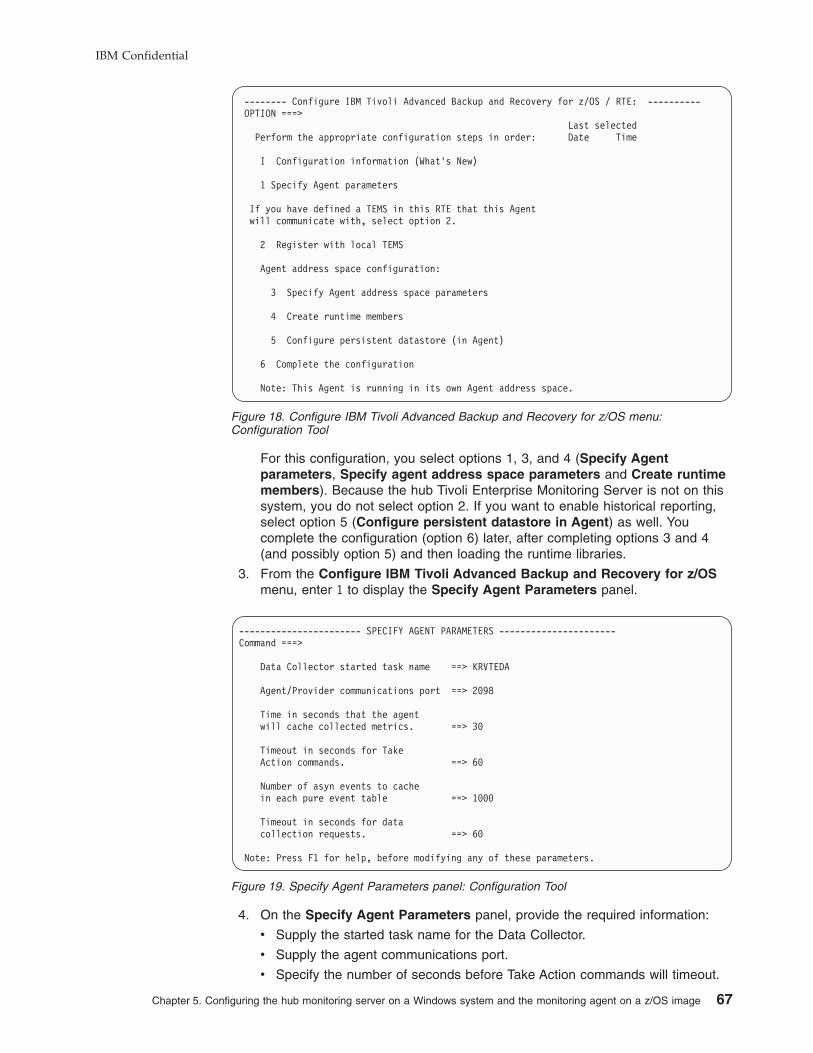
For this configuration, you select options 1, 3, and 4 (Specify Agent
parameters, Specify agent address space parameters and Create runtime
members). Because the hub Tivoli Enterprise Monitoring Server is not on this
system, you do not select option 2. If you want to enable historical reporting,
select option 5 (Configure persistent datastore in Agent) as well. You
complete the configuration (option 6) later, after completing options 3 and 4
(and possibly option 5) and then loading the runtime libraries.
3. From the Configure IBM Tivoli Advanced Backup and Recovery for z/OS
menu, enter 1 to display the Specify Agent Parameters panel.
4. On the Specify Agent Parameters panel, provide the required information:
v Supply the started task name for the Data Collector.
v Supply the agent communications port.
v Specify the number of seconds before Take Action commands will timeout.
-------- Configure IBM Tivoli Advanced Backup and Recovery for z/OS / RTE: ----------
OPTION ===>
Last selected
Perform the appropriate configuration steps in order: Date Time
I Configuration information (What’s New)
1 Specify Agent parameters
If you have defined a TEMS in this RTE that this Agent
will communicate with, select option 2.
2 Register with local TEMS
Agent address space configuration:
3 Specify Agent address space parameters
4 Create runtime members
5 Configure persistent datastore (in Agent)
6 Complete the configuration
Note: This Agent is running in its own Agent address space.
Figure 18. Configure IBM Tivoli Advanced Backup and Recovery for z/OS menu:
Configuration Tool
----------------------- SPECIFY AGENT PARAMETERS ----------------------
Command ===>
Data Collector started task name ==> KRVTEDA
Agent/Provider communications port ==> 2098
Time in seconds that the agent
will cache collected metrics. ==> 30
Timeout in seconds for Take
Action commands. ==> 60
Number of asyn events to cache
in each pure event table ==> 1000
Timeout in seconds for data
collection requests. ==> 60
Note: Press F1 for help, before modifying any of these parameters.
Figure 19. Specify Agent Parameters panel: Configuration Tool
IBM Confidential
Chapter 5. Configuring the hub monitoring server on a Windows system and the monitoring agent on a z/OS image 67
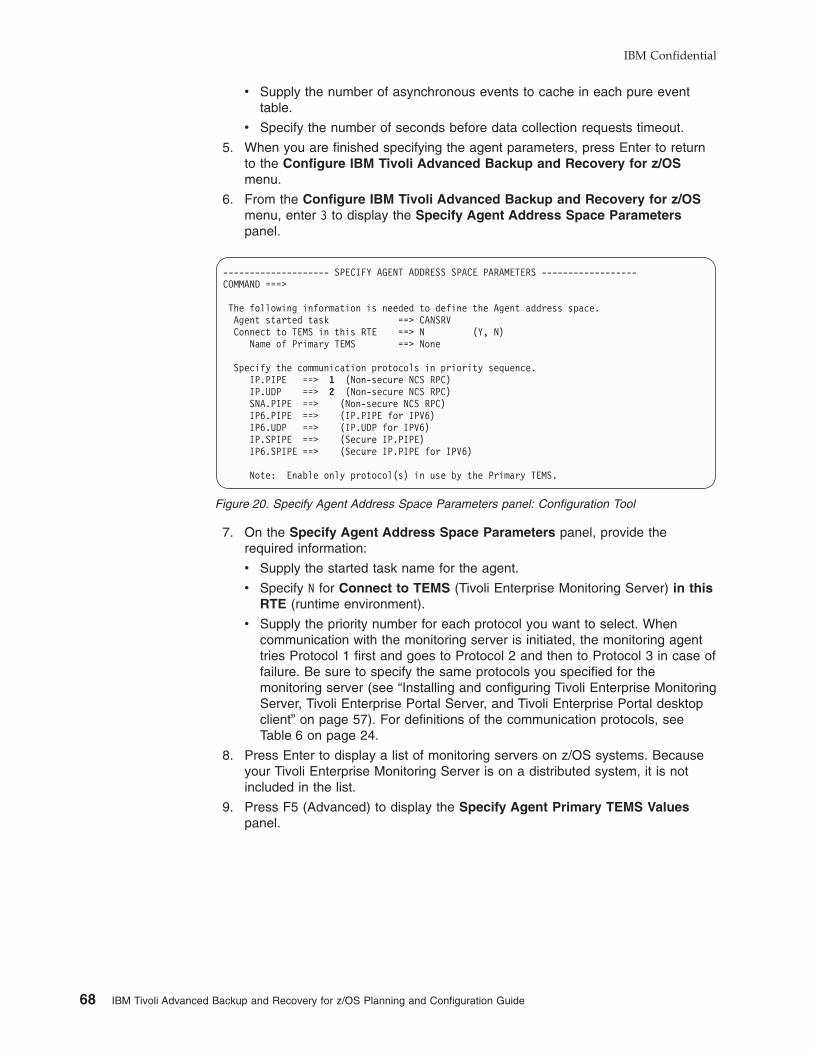
v Supply the number of asynchronous events to cache in each pure event
table.
v Specify the number of seconds before data collection requests timeout.
5. When you are finished specifying the agent parameters, press Enter to return
to the Configure IBM Tivoli Advanced Backup and Recovery for z/OS
menu.
6. From the Configure IBM Tivoli Advanced Backup and Recovery for z/OS
menu, enter 3 to display the Specify Agent Address Space Parameters
panel.
7. On the Specify Agent Address Space Parameters panel, provide the
required information:
v Supply the started task name for the agent.
v Specify N for Connect to TEMS (Tivoli Enterprise Monitoring Server) in this
RTE (runtime environment).
v Supply the priority number for each protocol you want to select. When
communication with the monitoring server is initiated, the monitoring agent
tries Protocol 1 first and goes to Protocol 2 and then to Protocol 3 in case of
failure. Be sure to specify the same protocols you specified for the
monitoring server (see “Installing and configuring Tivoli Enterprise Monitoring
Server, Tivoli Enterprise Portal Server, and Tivoli Enterprise Portal desktop
client” on page 57). For definitions of the communication protocols, see
Table 6 on page 24.
8. Press Enter to display a list of monitoring servers on z/OS systems. Because
your Tivoli Enterprise Monitoring Server is on a distributed system, it is not
included in the list.
9. Press F5 (Advanced) to display the Specify Agent Primary TEMS Values
panel.
-------------------- SPECIFY AGENT ADDRESS SPACE PARAMETERS ------------------
COMMAND ===>
The following information is needed to define the Agent address space.
Agent started task ==> CANSRV
Connect to TEMS in this RTE ==> N (Y, N)
Name of Primary TEMS ==> None
Specify the communication protocols in priority sequence.
IP.PIPE ==> 1 (Non-secure NCS RPC)
IP.UDP ==> 2 (Non-secure NCS RPC)
SNA.PIPE ==> (Non-secure NCS RPC)
IP6.PIPE ==> (IP.PIPE for IPV6)
IP6.UDP ==> (IP.UDP for IPV6)
IP.SPIPE ==> (Secure IP.PIPE)
IP6.SPIPE ==> (Secure IP.PIPE for IPV6)
Note: Enable only protocol(s) in use by the Primary TEMS.
Figure 20. Specify Agent Address Space Parameters panel: Configuration Tool
IBM Confidential
68 IBM Tivoli Advanced Backup and Recovery for z/OS Planning and Configuration Guide

v Supply the TEMS name (node ID) of the hub Tivoli Enterprise Monitoring
Server.
Tip
The TEMS name (node ID) is generally not the same as the host
name. It is an arbitrary name assigned during Tivoli Enterprise
Monitoring Server configuration. If you made a note of the TEMS name
during configuration of the Tivoli Monitoring Services distributed
components, find it now. You might have recorded it in “Configuration
worksheet if the hub monitoring server is on a distributed system” on
page 22. Otherwise, you can find it in one of the following locations:
– On Windows systems, you can find the TEMS name in Manage
Tivoli Monitoring Services. Right-click the Tivoli Enterprise
Monitoring Server and select Browse Settings, and look for the
value of CMS_NODEID.
– On Linux and UNIX systems, you can find the value of
CMS_NODEID in the KBBENV file located in the
$CANDLEHOME/tables/cms_name subdirectory.
v If SNA is one of the protocols you selected for the Tivoli Enterprise
Monitoring Server, complete the SNA section of the panel.
LU6.2 logmode
Name of the LU6.2 logmode defined for use by the monitoring
server. The default name is CANCTDCS.
Logmode table name
Name of the logmode table that contains the LU6.2 logmode. The
default name is KDSMTAB1.
Local location broker applid
Local location broker applid of the monitoring server the agent
communicates with.
Network ID
Identifier of the VTAM network where the monitoring server is
--------------------- SPECIFY AGENT PRIMARY TEMS VALUES ---------------
COMMAND ===>
TEMS name (case sensitive) ==>
Complete this section if the primary TEMS requires SNA support.
LU6.2 logmode ==>
Logmode table name ==>
Local location broker applid ==>
Network ID ==>
Complete this section if the primary TEMS requires TCP support.
* Hostname ==>
* Address ==>
Primary TEMS port number based on protocol in use:
IP.PIPE port number ==> 1918 (Non-secure NCS RPC)
IP6.PIPE port number ==> (IP.PIPE for IPV6)
IP.SPIPE port number ==> (Secure IP.PIPE)
IP6.SPIPE port number ==> (Secure IP.PIPE for IPV6)
IP.UDP port number ==> 1918 (Non-secure NCS RPC)
IP6.UDP port number ==> (IP.UDP for IPV6)
* Note: See F1=Help for TSO HOMETEST command instructions.
Figure 21. Specify Agent Primary TEMS Values panel: Configuration Tool
IBM Confidential
Chapter 5. Configuring the hub monitoring server on a Windows system and the monitoring agent on a z/OS image 69
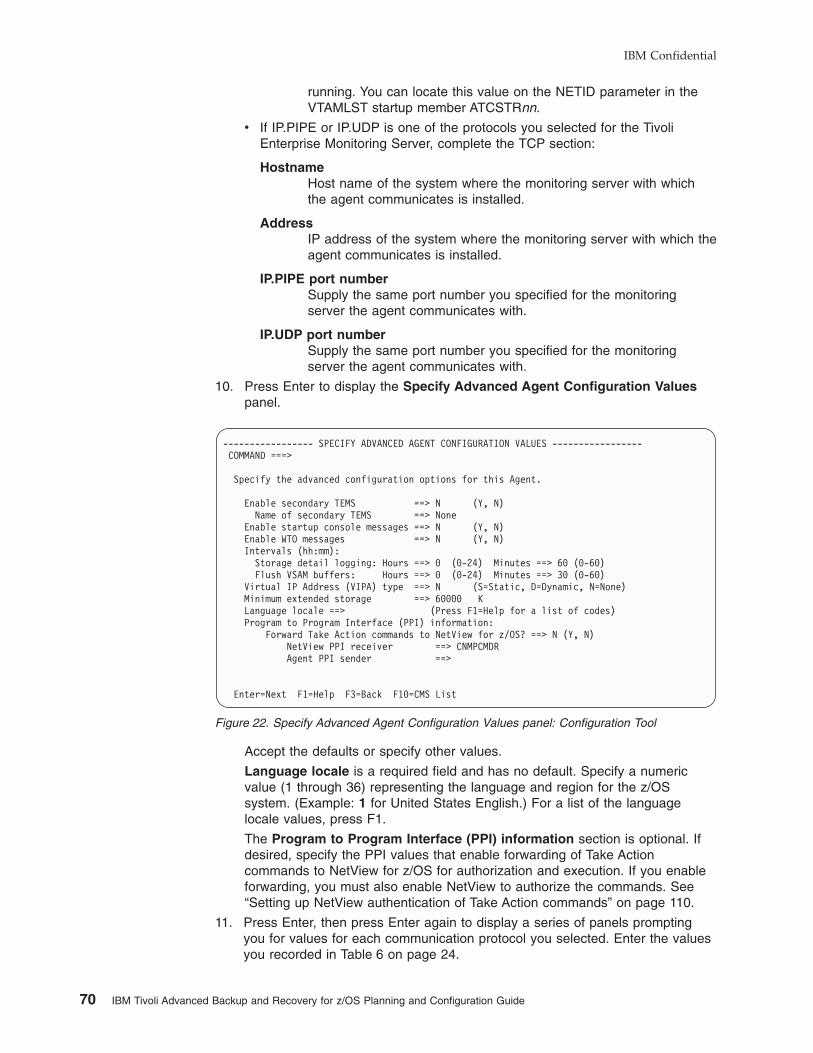
running. You can locate this value on the NETID parameter in the
VTAMLST startup member ATCSTRnn.
v If IP.PIPE or IP.UDP is one of the protocols you selected for the Tivoli
Enterprise Monitoring Server, complete the TCP section:
Hostname
Host name of the system where the monitoring server with which
the agent communicates is installed.
Address
IP address of the system where the monitoring server with which the
agent communicates is installed.
IP.PIPE port number
Supply the same port number you specified for the monitoring
server the agent communicates with.
IP.UDP port number
Supply the same port number you specified for the monitoring
server the agent communicates with.
10. Press Enter to display the Specify Advanced Agent Configuration Values
panel.
Accept the defaults or specify other values.
Language locale is a required field and has no default. Specify a numeric
value (1 through 36) representing the language and region for the z/OS
system. (Example: 1 for United States English.) For a list of the language
locale values, press F1.
The Program to Program Interface (PPI) information section is optional. If
desired, specify the PPI values that enable forwarding of Take Action
commands to NetView for z/OS for authorization and execution. If you enable
forwarding, you must also enable NetView to authorize the commands. See
“Setting up NetView authentication of Take Action commands” on page 110.
11. Press Enter, then press Enter again to display a series of panels prompting
you for values for each communication protocol you selected. Enter the values
you recorded in Table 6 on page 24.
----------------- SPECIFY ADVANCED AGENT CONFIGURATION VALUES -----------------
COMMAND ===>
Specify the advanced configuration options for this Agent.
Enable secondary TEMS ==> N (Y, N)
Name of secondary TEMS ==> None
Enable startup console messages ==> N (Y, N)
Enable WTO messages ==> N (Y, N)
Intervals (hh:mm):
Storage detail logging: Hours ==> 0 (0-24) Minutes ==> 60 (0-60)
Flush VSAM buffers: Hours ==> 0 (0-24) Minutes ==> 30 (0-60)
Virtual IP Address (VIPA) type ==> N (S=Static, D=Dynamic, N=None)
Minimum extended storage ==> 60000 K
Language locale ==> (Press F1=Help for a list of codes)
Program to Program Interface (PPI) information:
Forward Take Action commands to NetView for z/OS? ==> N (Y, N)
NetView PPI receiver ==> CNMPCMDR
Agent PPI sender ==>
Enter=Next F1=Help F3=Back F10=CMS List
Figure 22. Specify Advanced Agent Configuration Values panel: Configuration Tool
IBM Confidential
70 IBM Tivoli Advanced Backup and Recovery for z/OS Planning and Configuration Guide
12. Press Enter to return to the Configure IBM Tivoli Advanced Backup and
Recovery for z/OS menu (Figure 18 on page 67).
13. Enter 4 (Create runtime members) to open JCL that you can review, edit, and
submit. Check to make sure the return code is zero.
14. After the job completes, press F3 (Back) to return to the Configure IBM Tivoli
Advanced Backup and Recovery for z/OS menu.
15. If you want to enable historical reporting, select option 5 to configure the
persistent data store. Otherwise, skip this step.
For instructions on configuring the persistent data store, see IBM Tivoli
Monitoring: Configuring IBM Tivoli Enterprise Monitoring Server on z/OS and
IBM Tivoli Monitoring: IBM Tivoli Monitoring Administrator’s Guide.
Important
Both the Configuration Tool and Tivoli Enterprise Portal allow you to
configure historical data collection either at the location of the monitoring
agent (called TEMA, or Tivoli Enterprise Monitoring Agent, in the Tivoli
Enterprise Portal) or at the location of the monitoring server to which the
monitoring agent reports. However, Advanced Backup and Recovery
requires that historical data collection be configured at the location of the
monitoring agent.
16. Go on to “Step 6. Load the runtime libraries.”
Tip
Even though Complete the configuration is an option on the Configure IBM
Tivoli Advanced Backup and Recovery for z/OS menu, you must load the
runtime libraries from the SMP/E target libraries before you perform the tasks
required to complete the configuration. If you select Complete the
configuration (option 6 on the Configure IBM Tivoli Advanced Backup and
Recovery for z/OS menu), the Configuration Tool displays a list of the steps
you must take outside the Configuration Tool. You can examine and print the
list now.
Step 6. Load the runtime libraries
Before you complete the configuration of the product outside the Configuration Tool,
you must load the runtime libraries from the SMP/E target libraries. The load job
requires shared access to the runtime libraries.
1. From the Configure IBM Tivoli Advanced Backup and Recovery for z/OS
menu (Figure 18 on page 67), press F3 (Back) to return to the Product
Component Selection Menu and then press F3 again to return to the Runtime
Environments (RTEs) panel (Figure 14 on page 62).
2. Type L in the Action field to the left of the runtime environment in which you
have just configured Advanced Backup and Recovery, and press Enter.
3. Review the JCL and submit the job. Verify that the job completes successfully
and that the return code is 04 or less.
4. When you finish loading the libraries, press F3 (Back) to return to the Runtime
Environments (RTEs) panel.
IBM Confidential
Chapter 5. Configuring the hub monitoring server on a Windows system and the monitoring agent on a z/OS image 71
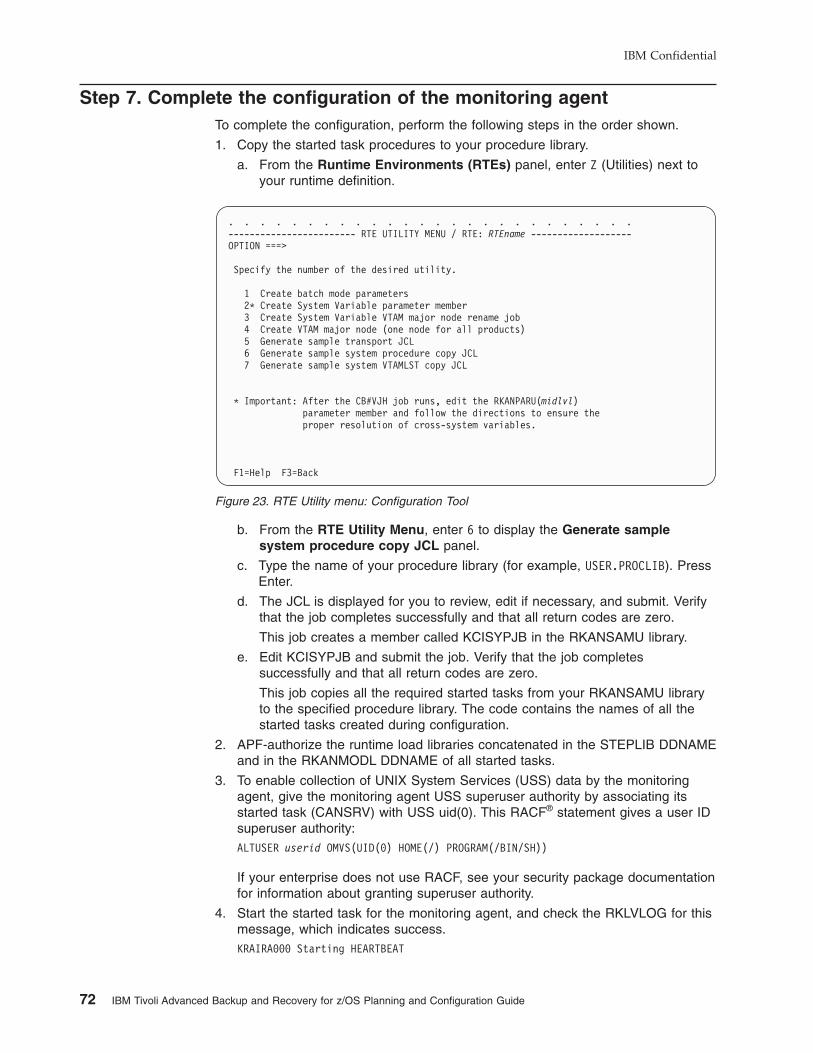
Step 7. Complete the configuration of the monitoring agent
To complete the configuration, perform the following steps in the order shown.
1. Copy the started task procedures to your procedure library.
a. From the Runtime Environments (RTEs) panel, enter Z (Utilities) next to
your runtime definition.
b. From the RTE Utility Menu, enter 6 to display the Generate sample
system procedure copy JCL panel.
c. Type the name of your procedure library (for example, USER.PROCLIB). Press
Enter.
d. The JCL is displayed for you to review, edit if necessary, and submit. Verify
that the job completes successfully and that all return codes are zero.
This job creates a member called KCISYPJB in the RKANSAMU library.
e. Edit KCISYPJB and submit the job. Verify that the job completes
successfully and that all return codes are zero.
This job copies all the required started tasks from your RKANSAMU library
to the specified procedure library. The code contains the names of all the
started tasks created during configuration.
2. APF-authorize the runtime load libraries concatenated in the STEPLIB DDNAME
and in the RKANMODL DDNAME of all started tasks.
3. To enable collection of UNIX System Services (USS) data by the monitoring
agent, give the monitoring agent USS superuser authority by associating its
started task (CANSRV) with USS uid(0). This RACF® statement gives a user ID
superuser authority:
ALTUSER userid OMVS(UID(0) HOME(/) PROGRAM(/BIN/SH))
If your enterprise does not use RACF, see your security package documentation
for information about granting superuser authority.
4. Start the started task for the monitoring agent, and check the RKLVLOG for this
message, which indicates success.
KRAIRA000 Starting HEARTBEAT
. . . . . . . . . . . . . . . . . . . . . . . . . .
------------------------ RTE UTILITY MENU / RTE: RTEname -------------------
OPTION ===>
Specify the number of the desired utility.
1 Create batch mode parameters
2* Create System Variable parameter member
3 Create System Variable VTAM major node rename job
4 Create VTAM major node (one node for all products)
5 Generate sample transport JCL
6 Generate sample system procedure copy JCL
7 Generate sample system VTAMLST copy JCL
* Important: After the CB#VJH job runs, edit the RKANPARU(midlvl)
parameter member and follow the directions to ensure the
proper resolution of cross-system variables.
F1=Help F3=Back
Figure 23. RTE Utility menu: Configuration Tool
IBM Confidential
72 IBM Tivoli Advanced Backup and Recovery for z/OS Planning and Configuration Guide
If you do not see message KRAIRA000, review the steps performed and look
for errors. If you need assistance, see “Support information” on page 145.
5. Start the started task for the data collection agent.
Step 8. Verify the configuration
Now that you have completed the configuration, you can verify that it is successful.
Verification involves starting these components through Manage Tivoli Monitoring
Services on your workstation:
v Tivoli Enterprise Monitoring Server
v Tivoli Enterprise Portal Server
v Tivoli Enterprise Portal desktop client
To do this, complete the following procedure:
1. On your workstation, select Start > Programs (or All Programs) > IBM Tivoli
Monitoring > Manage Tivoli Monitoring Services.
2. To start the Tivoli Enterprise Monitoring Server, right-click its entry in Manage
Tivoli Monitoring Services and click Start.
3. To start the Tivoli Enterprise Portal Server, right-click its entry in Manage Tivoli
Monitoring Services and click Start.
4. To start the Tivoli Enterprise Portal desktop client, right-click its entry in Manage
Tivoli Monitoring Services and click Start.
5. When prompted, supply the user ID sysadmin and the password you specified
for initial access to the Tivoli Enterprise Portal Server.
6. When Tivoli Enterprise Portal opens, you can expand the navigator pane to see
the Advanced Backup and Recovery workspaces.
For information about using the Advanced Backup and Recovery workspaces
and situations to monitor your sysplex resources and z/OS systems, see the
online help and IBM Tivoli Advanced Backup and Recovery for z/OS User's
Guide.
Setting up security
Now you can set up security for the product components. See Chapter 7, “Setting
up security,” on page 105.
Expanding this configuration
You can add monitoring agents to other z/OS images that you want to monitor, and
configure them to communicate with the hub Tivoli Enterprise Monitoring Server or
with a remote monitoring server that reports to the hub. To add a monitoring agent,
repeat Steps 5-8 in this chapter. Alternatively, you can use batch mode processing
to replicate the monitoring agent runtime environment in other z/OS images. See
Chapter 9, “Using batch mode processing,” on page 121.
IBM Confidential
Chapter 5. Configuring the hub monitoring server on a Windows system and the monitoring agent on a z/OS image 73

IBM Confidential
74 IBM Tivoli Advanced Backup and Recovery for z/OS Planning and Configuration Guide
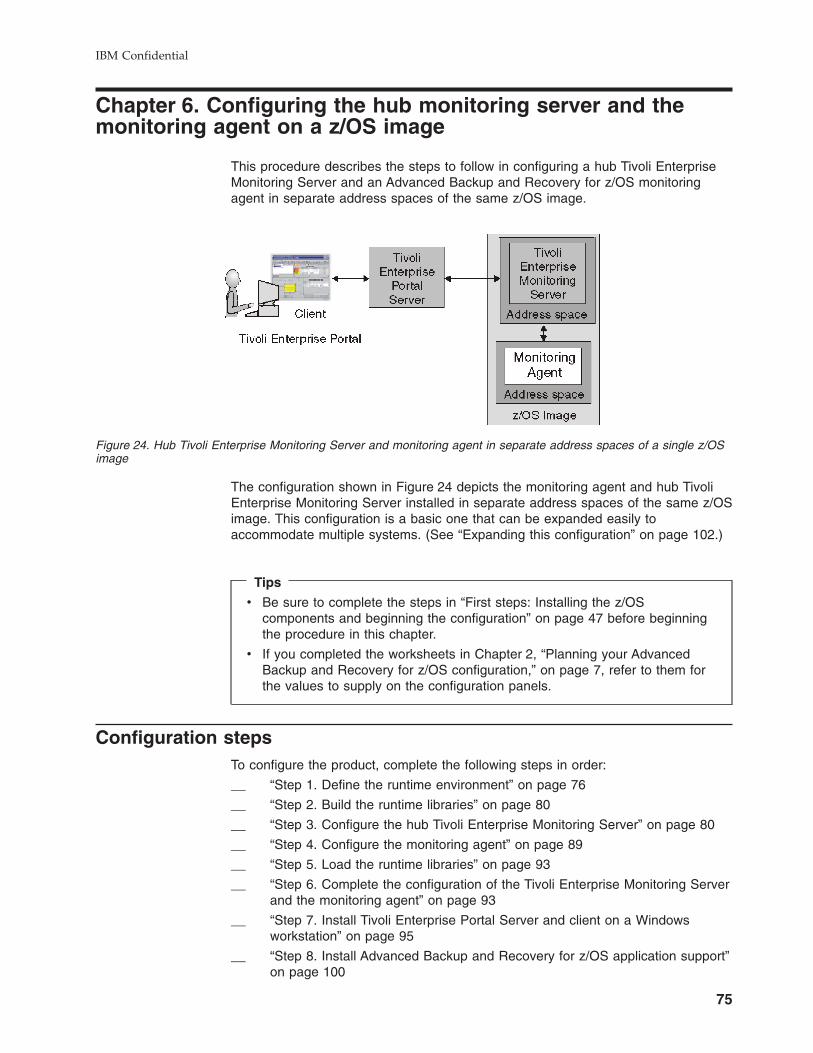
Chapter 6. Configuring the hub monitoring server and the
monitoring agent on a z/OS image
This procedure describes the steps to follow in configuring a hub Tivoli Enterprise
Monitoring Server and an Advanced Backup and Recovery for z/OS monitoring
agent in separate address spaces of the same z/OS image.
The configuration shown in Figure 24 depicts the monitoring agent and hub Tivoli
Enterprise Monitoring Server installed in separate address spaces of the same z/OS
image. This configuration is a basic one that can be expanded easily to
accommodate multiple systems. (See “Expanding this configuration” on page 102.)
Tips
v Be sure to complete the steps in “First steps: Installing the z/OS
components and beginning the configuration” on page 47 before beginning
the procedure in this chapter.
v If you completed the worksheets in Chapter 2, “Planning your Advanced
Backup and Recovery for z/OS configuration,” on page 7, refer to them for
the values to supply on the configuration panels.
Configuration steps
To configure the product, complete the following steps in order:
__ “Step 1. Define the runtime environment” on page 76
__ “Step 2. Build the runtime libraries” on page 80
__ “Step 3. Configure the hub Tivoli Enterprise Monitoring Server” on page 80
__ “Step 4. Configure the monitoring agent” on page 89
__ “Step 5. Load the runtime libraries” on page 93
__ “Step 6. Complete the configuration of the Tivoli Enterprise Monitoring Server
and the monitoring agent” on page 93
__ “Step 7. Install Tivoli Enterprise Portal Server and client on a Windows
workstation” on page 95
__ “Step 8. Install Advanced Backup and Recovery for z/OS application support”
on page 100
Figure 24. Hub Tivoli Enterprise Monitoring Server and monitoring agent in separate address spaces of a single z/OS
image
IBM Confidential
75
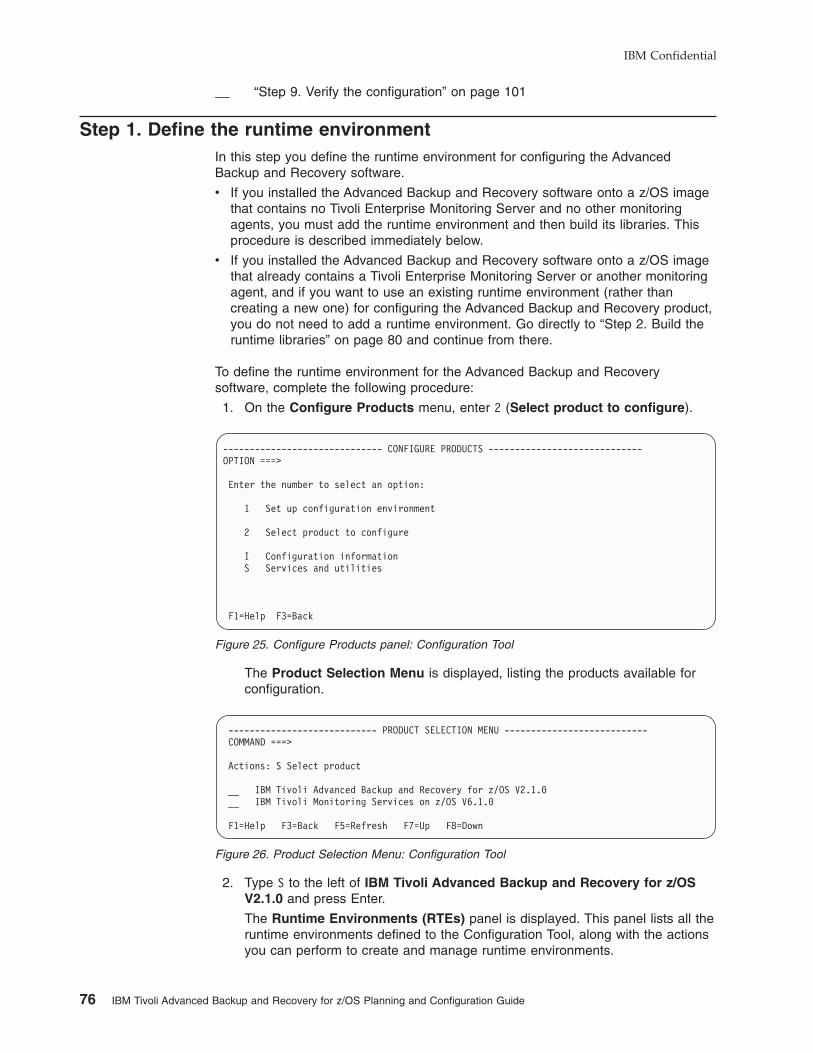
__ “Step 9. Verify the configuration” on page 101
Step 1. Define the runtime environment
In this step you define the runtime environment for configuring the Advanced
Backup and Recovery software.
v If you installed the Advanced Backup and Recovery software onto a z/OS image
that contains no Tivoli Enterprise Monitoring Server and no other monitoring
agents, you must add the runtime environment and then build its libraries. This
procedure is described immediately below.
v If you installed the Advanced Backup and Recovery software onto a z/OS image
that already contains a Tivoli Enterprise Monitoring Server or another monitoring
agent, and if you want to use an existing runtime environment (rather than
creating a new one) for configuring the Advanced Backup and Recovery product,
you do not need to add a runtime environment. Go directly to “Step 2. Build the
runtime libraries” on page 80 and continue from there.
To define the runtime environment for the Advanced Backup and Recovery
software, complete the following procedure:
1. On the Configure Products menu, enter 2 (Select product to configure).
The Product Selection Menu is displayed, listing the products available for
configuration.
2. Type S to the left of IBM Tivoli Advanced Backup and Recovery for z/OS
V2.1.0 and press Enter.
The Runtime Environments (RTEs) panel is displayed. This panel lists all the
runtime environments defined to the Configuration Tool, along with the actions
you can perform to create and manage runtime environments.
------------------------------ CONFIGURE PRODUCTS -----------------------------
OPTION ===>
Enter the number to select an option:
1 Set up configuration environment
2 Select product to configure
I Configuration information
S Services and utilities
F1=Help F3=Back
Figure 25. Configure Products panel: Configuration Tool
---------------------------- PRODUCT SELECTION MENU ---------------------------
COMMAND ===>
Actions: S Select product
__ IBM Tivoli Advanced Backup and Recovery for z/OS V2.1.0
__ IBM Tivoli Monitoring Services on z/OS V6.1.0
F1=Help F3=Back F5=Refresh F7=Up F8=Down
Figure 26. Product Selection Menu: Configuration Tool
IBM Confidential
76 IBM Tivoli Advanced Backup and Recovery for z/OS Planning and Configuration Guide

See “Worksheet: Information for configuring your runtime environment” on
page 36 for the values you have decided to specify for the runtime
environment.
3. On the Runtime Environments (RTEs) panel, type A (Add RTE) in the
Action field beside the first (empty) row and type a Name for your new
runtime environment.
The runtime environment name is a unique identifier of up to 8 characters. It is
automatically used as the mid-level qualifier for full and sharing runtime
environments. You can optionally specify a mid-level qualifier for base runtime
environments.
Tips
v If you specify a runtime environment name no more than 4 characters
long, you can specify the same name for the JCL suffix (used as the
suffix of the name of the member containing the JCL in the INSTJOBS
dataset). This setup makes it easy to associate the jobs in INSTJOBS
with the runtime environment.
v When you enter a C (Configure), B (Build), or L (Load) next to a
runtime environment that has a previous version of the Tivoli
Enterprise Monitoring Server installed, the Configuration Tool prompts
you to confirm that you want to migrate to the newer version. A batch
migration job completes the upgrade and retains all previously
configured values for the Configuration Tool.
4. Specify the type of runtime environment being created. In this case, start by
creating either a base or full type, which is essential if you intend to add
sharing runtime environments later on.
Tip
A base runtime environment is not configurable. For information about the
different types of runtime environments, see “Understanding runtime
environments” on page 13.
5. (For sharing runtime environments only) Type the name of the base or full
runtime environment from which this runtime environment obtains its base
library information. If SMP/E target libraries are to be shared, type SMP.
6. Type a description for this runtime environment.
The description can be any information that is useful for you and others at your
site.
------------------------- RUNTIME ENVIRONMENTS (RTEs) -------------------------
COMMAND ===>
Actions: A Add RTE, B Build libraries, C Configure,
L Load all product libraries after SMP/E,
D Delete, U Update, V View values, Z Utilities
Action Name Type Sharing Description
A SHAR1 SHARING BASE1 Sharing RTE for the BKM environment
-------------------------------------------------------------------------------
BASE1 BASE Base RTE for the BKM environment
-------------------------------------------------------------------------------
Enter=Next F1=Help F3=Back F7=Up F8=Down
Figure 27. Runtime Environments (RTEs) panel: Configuration Tool
IBM Confidential
Chapter 6. Configuring the hub monitoring server and the monitoring agent on a z/OS image 77
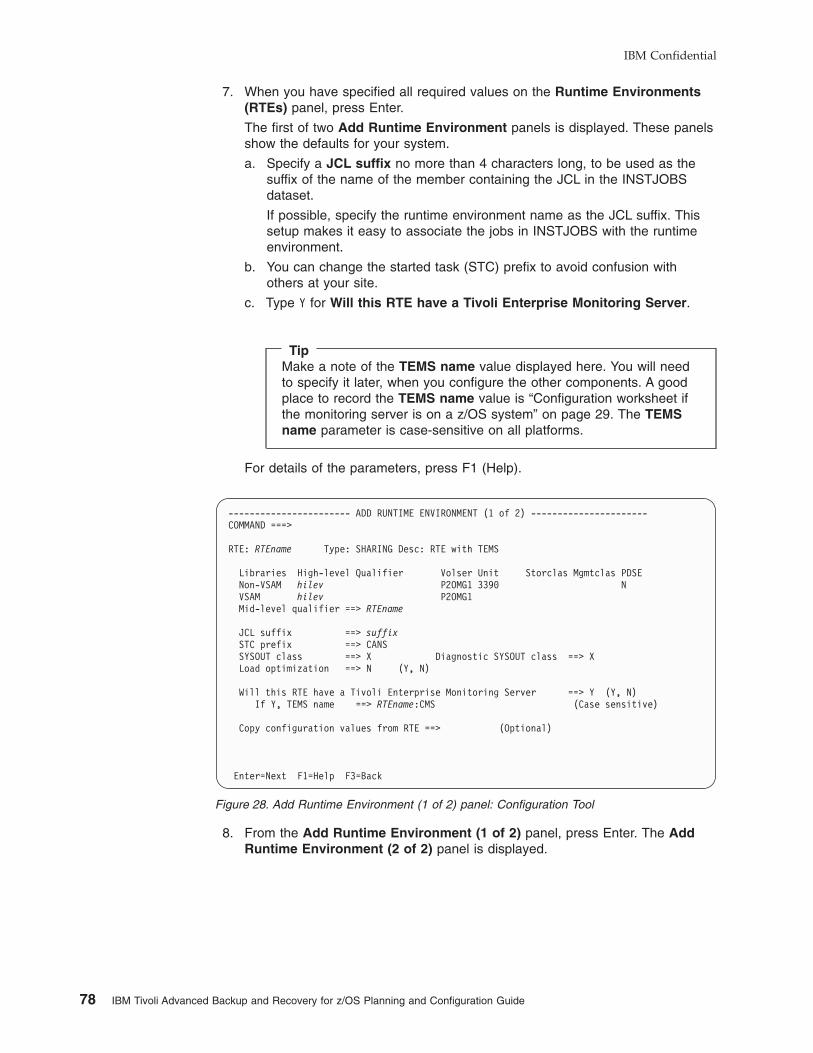
7. When you have specified all required values on the Runtime Environments
(RTEs) panel, press Enter.
The first of two Add Runtime Environment panels is displayed. These panels
show the defaults for your system.
a. Specify a JCL suffix no more than 4 characters long, to be used as the
suffix of the name of the member containing the JCL in the INSTJOBS
dataset.
If possible, specify the runtime environment name as the JCL suffix. This
setup makes it easy to associate the jobs in INSTJOBS with the runtime
environment.
b. You can change the started task (STC) prefix to avoid confusion with
others at your site.
c. Type Y for Will this RTE have a Tivoli Enterprise Monitoring Server.
Tip
Make a note of the TEMS name value displayed here. You will need
to specify it later, when you configure the other components. A good
place to record the TEMS name value is “Configuration worksheet if
the monitoring server is on a z/OS system” on page 29. The TEMS
name parameter is case-sensitive on all platforms.
For details of the parameters, press F1 (Help).
8. From the Add Runtime Environment (1 of 2) panel, press Enter. The Add
Runtime Environment (2 of 2) panel is displayed.
----------------------- ADD RUNTIME ENVIRONMENT (1 of 2) ----------------------
COMMAND ===>
RTE: RTEname Type: SHARING Desc: RTE with TEMS
Libraries High-level Qualifier Volser Unit Storclas Mgmtclas PDSE
Non-VSAM hilev P2OMG1 3390 N
VSAM hilev P2OMG1
Mid-level qualifier ==> RTEname
JCL suffix ==> suffix
STC prefix ==> CANS
SYSOUT class ==> X Diagnostic SYSOUT class ==> X
Load optimization ==> N (Y, N)
Will this RTE have a Tivoli Enterprise Monitoring Server ==> Y (Y, N)
If Y, TEMS name ==> RTEname:CMS (Case sensitive)
Copy configuration values from RTE ==> (Optional)
Enter=Next F1=Help F3=Back
Figure 28. Add Runtime Environment (1 of 2) panel: Configuration Tool
IBM Confidential
78 IBM Tivoli Advanced Backup and Recovery for z/OS Planning and Configuration Guide
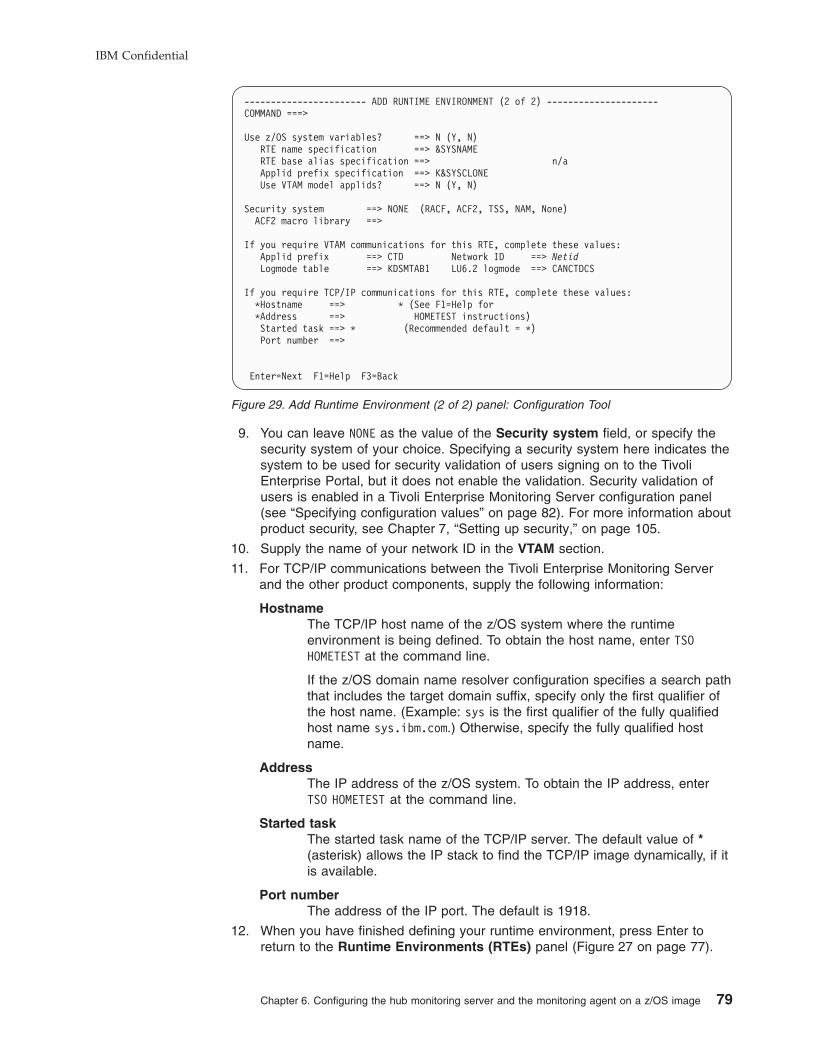
9. You can leave NONE as the value of the Security system field, or specify the
security system of your choice. Specifying a security system here indicates the
system to be used for security validation of users signing on to the Tivoli
Enterprise Portal, but it does not enable the validation. Security validation of
users is enabled in a Tivoli Enterprise Monitoring Server configuration panel
(see “Specifying configuration values” on page 82). For more information about
product security, see Chapter 7, “Setting up security,” on page 105.
10. Supply the name of your network ID in the VTAM section.
11. For TCP/IP communications between the Tivoli Enterprise Monitoring Server
and the other product components, supply the following information:
Hostname
The TCP/IP host name of the z/OS system where the runtime
environment is being defined. To obtain the host name, enter TSO
HOMETEST at the command line.
If the z/OS domain name resolver configuration specifies a search path
that includes the target domain suffix, specify only the first qualifier of
the host name. (Example: sys is the first qualifier of the fully qualified
host name sys.ibm.com.) Otherwise, specify the fully qualified host
name.
Address
The IP address of the z/OS system. To obtain the IP address, enter
TSO HOMETEST at the command line.
Started task
The started task name of the TCP/IP server. The default value of *
(asterisk) allows the IP stack to find the TCP/IP image dynamically, if it
is available.
Port number
The address of the IP port. The default is 1918.
12. When you have finished defining your runtime environment, press Enter to
return to the Runtime Environments (RTEs) panel (Figure 27 on page 77).
----------------------- ADD RUNTIME ENVIRONMENT (2 of 2) ---------------------
COMMAND ===>
Use z/OS system variables? ==> N (Y, N)
RTE name specification ==> &SYSNAME
RTE base alias specification ==> n/a
Applid prefix specification ==> K&SYSCLONE
Use VTAM model applids? ==> N (Y, N)
Security system ==> NONE (RACF, ACF2, TSS, NAM, None)
ACF2 macro library ==>
If you require VTAM communications for this RTE, complete these values:
Applid prefix ==> CTD Network ID ==> Netid
Logmode table ==> KDSMTAB1 LU6.2 logmode ==> CANCTDCS
If you require TCP/IP communications for this RTE, complete these values:
*Hostname ==> * (See F1=Help for
*Address ==> HOMETEST instructions)
Started task ==> * (Recommended default = *)
Port number ==>
Enter=Next F1=Help F3=Back
Figure 29. Add Runtime Environment (2 of 2) panel: Configuration Tool
IBM Confidential
Chapter 6. Configuring the hub monitoring server and the monitoring agent on a z/OS image 79
Tip
Select View Values (V) to verify the runtime environment information and
Update (U) to make the necessary changes.
This completes the addition of your runtime environment. You must build the
runtime libraries before continuing to configure Advanced Backup and Recovery. Go
on to “Step 2. Build the runtime libraries” on page 80.
Step 2. Build the runtime libraries
Complete the following steps to allocate the required runtime libraries:
1. Type B next to the name of the runtime environment for which you want to build
the libraries, and press Enter.
The JCL is displayed for you to review, edit if necessary, and submit. Verify that
the job completes successfully and that all return codes are zero.
2. Press F3 (Back) to return to the Runtime Environments (RTEs) panel
(Figure 27 on page 77).
You can now configure the hub Tivoli Enterprise Monitoring Server and the
Advanced Backup and Recovery monitoring agent in the runtime environment. Go
on to “Step 3. Configure the hub Tivoli Enterprise Monitoring Server” on page 80.
Step 3. Configure the hub Tivoli Enterprise Monitoring Server
Before you configure Advanced Backup and Recovery, configure the hub Tivoli
Enterprise Monitoring Server.
Tip
If you completed the worksheets in Chapter 2, “Planning your Advanced
Backup and Recovery for z/OS configuration,” on page 7, refer to them for the
values to supply on the configuration panels.
Beginning the configuration
Perform the following steps to begin the configuration:
1. On the Runtime Environments (RTEs) panel (Figure 27 on page 77), type C
(Configure) next to the runtime environment in which you want to configure
Advanced Backup and Recovery for z/OS.
The Product Component Selection Menu is displayed.
IBM Confidential
80 IBM Tivoli Advanced Backup and Recovery for z/OS Planning and Configuration Guide
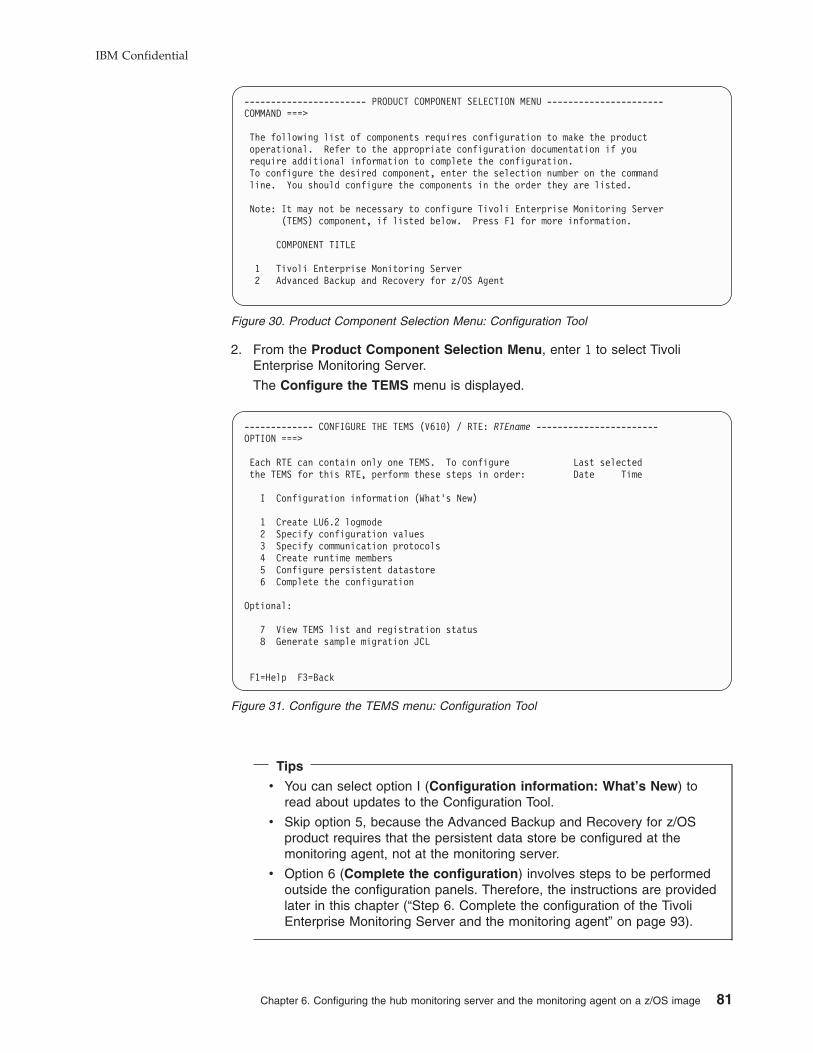
2. From the Product Component Selection Menu, enter 1 to select Tivoli
Enterprise Monitoring Server.
The Configure the TEMS menu is displayed.
Tips
v You can select option I (Configuration information: What’s New) to
read about updates to the Configuration Tool.
v Skip option 5, because the Advanced Backup and Recovery for z/OS
product requires that the persistent data store be configured at the
monitoring agent, not at the monitoring server.
v Option 6 (Complete the configuration) involves steps to be performed
outside the configuration panels. Therefore, the instructions are provided
later in this chapter (“Step 6. Complete the configuration of the Tivoli
Enterprise Monitoring Server and the monitoring agent” on page 93).
----------------------- PRODUCT COMPONENT SELECTION MENU ----------------------
COMMAND ===>
The following list of components requires configuration to make the product
operational. Refer to the appropriate configuration documentation if you
require additional information to complete the configuration.
To configure the desired component, enter the selection number on the command
line. You should configure the components in the order they are listed.
Note: It may not be necessary to configure Tivoli Enterprise Monitoring Server
(TEMS) component, if listed below. Press F1 for more information.
COMPONENT TITLE
1 Tivoli Enterprise Monitoring Server
2 Advanced Backup and Recovery for z/OS Agent
Figure 30. Product Component Selection Menu: Configuration Tool
------------- CONFIGURE THE TEMS (V610) / RTE: RTEname -----------------------
OPTION ===>
Each RTE can contain only one TEMS. To configure Last selected
the TEMS for this RTE, perform these steps in order: Date Time
I Configuration information (What’s New)
1 Create LU6.2 logmode
2 Specify configuration values
3 Specify communication protocols
4 Create runtime members
5 Configure persistent datastore
6 Complete the configuration
Optional:
7 View TEMS list and registration status
8 Generate sample migration JCL
F1=Help F3=Back
Figure 31. Configure the TEMS menu: Configuration Tool
IBM Confidential
Chapter 6. Configuring the hub monitoring server and the monitoring agent on a z/OS image 81
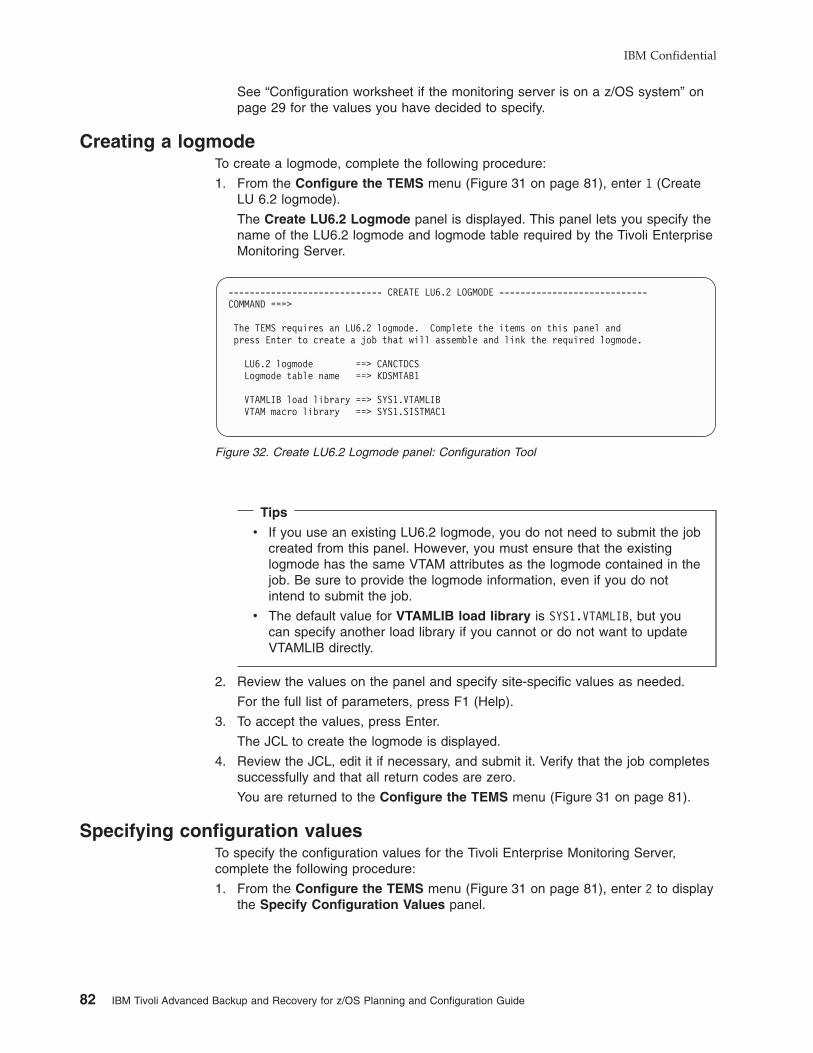
See “Configuration worksheet if the monitoring server is on a z/OS system” on
page 29 for the values you have decided to specify.
Creating a logmode
To create a logmode, complete the following procedure:
1. From the Configure the TEMS menu (Figure 31 on page 81), enter 1 (Create
LU 6.2 logmode).
The Create LU6.2 Logmode panel is displayed. This panel lets you specify the
name of the LU6.2 logmode and logmode table required by the Tivoli Enterprise
Monitoring Server.
Tips
v If you use an existing LU6.2 logmode, you do not need to submit the job
created from this panel. However, you must ensure that the existing
logmode has the same VTAM attributes as the logmode contained in the
job. Be sure to provide the logmode information, even if you do not
intend to submit the job.
v The default value for VTAMLIB load library is SYS1.VTAMLIB, but you
can specify another load library if you cannot or do not want to update
VTAMLIB directly.
2. Review the values on the panel and specify site-specific values as needed.
For the full list of parameters, press F1 (Help).
3. To accept the values, press Enter.
The JCL to create the logmode is displayed.
4. Review the JCL, edit it if necessary, and submit it. Verify that the job completes
successfully and that all return codes are zero.
You are returned to the Configure the TEMS menu (Figure 31 on page 81).
Specifying configuration values
To specify the configuration values for the Tivoli Enterprise Monitoring Server,
complete the following procedure:
1. From the Configure the TEMS menu (Figure 31 on page 81), enter 2 to display
the Specify Configuration Values panel.
----------------------------- CREATE LU6.2 LOGMODE ----------------------------
COMMAND ===>
The TEMS requires an LU6.2 logmode. Complete the items on this panel and
press Enter to create a job that will assemble and link the required logmode.
LU6.2 logmode ==> CANCTDCS
Logmode table name ==> KDSMTAB1
VTAMLIB load library ==> SYS1.VTAMLIB
VTAM macro library ==> SYS1.SISTMAC1
Figure 32. Create LU6.2 Logmode panel: Configuration Tool
IBM Confidential
82 IBM Tivoli Advanced Backup and Recovery for z/OS Planning and Configuration Guide
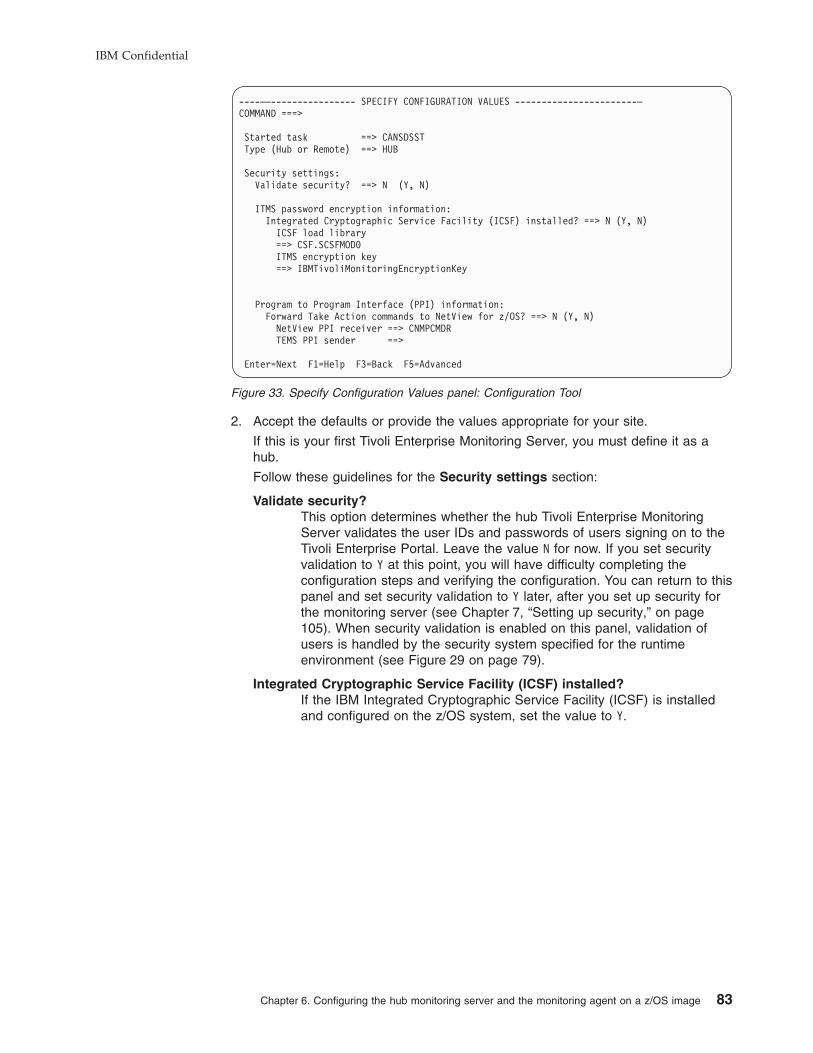
2. Accept the defaults or provide the values appropriate for your site.
If this is your first Tivoli Enterprise Monitoring Server, you must define it as a
hub.
Follow these guidelines for the Security settings section:
Validate security?
This option determines whether the hub Tivoli Enterprise Monitoring
Server validates the user IDs and passwords of users signing on to the
Tivoli Enterprise Portal. Leave the value N for now. If you set security
validation to Y at this point, you will have difficulty completing the
configuration steps and verifying the configuration. You can return to this
panel and set security validation to Y later, after you set up security for
the monitoring server (see Chapter 7, “Setting up security,” on page
105). When security validation is enabled on this panel, validation of
users is handled by the security system specified for the runtime
environment (see Figure 29 on page 79).
Integrated Cryptographic Service Facility (ICSF) installed?
If the IBM Integrated Cryptographic Service Facility (ICSF) is installed
and configured on the z/OS system, set the value to Y.
----–—---------------- SPECIFY CONFIGURATION VALUES -----------------------–
COMMAND ===>
Started task ==> CANSDSST
Type (Hub or Remote) ==> HUB
Security settings:
Validate security? ==> N (Y, N)
ITMS password encryption information:
Integrated Cryptographic Service Facility (ICSF) installed? ==> N (Y, N)
ICSF load library
==> CSF.SCSFMOD0
ITMS encryption key
==> IBMTivoliMonitoringEncryptionKey
Program to Program Interface (PPI) information:
Forward Take Action commands to NetView for z/OS? ==> N (Y, N)
NetView PPI receiver ==> CNMPCMDR
TEMS PPI sender ==>
Enter=Next F1=Help F3=Back F5=Advanced
Figure 33. Specify Configuration Values panel: Configuration Tool
IBM Confidential
Chapter 6. Configuring the hub monitoring server and the monitoring agent on a z/OS image 83
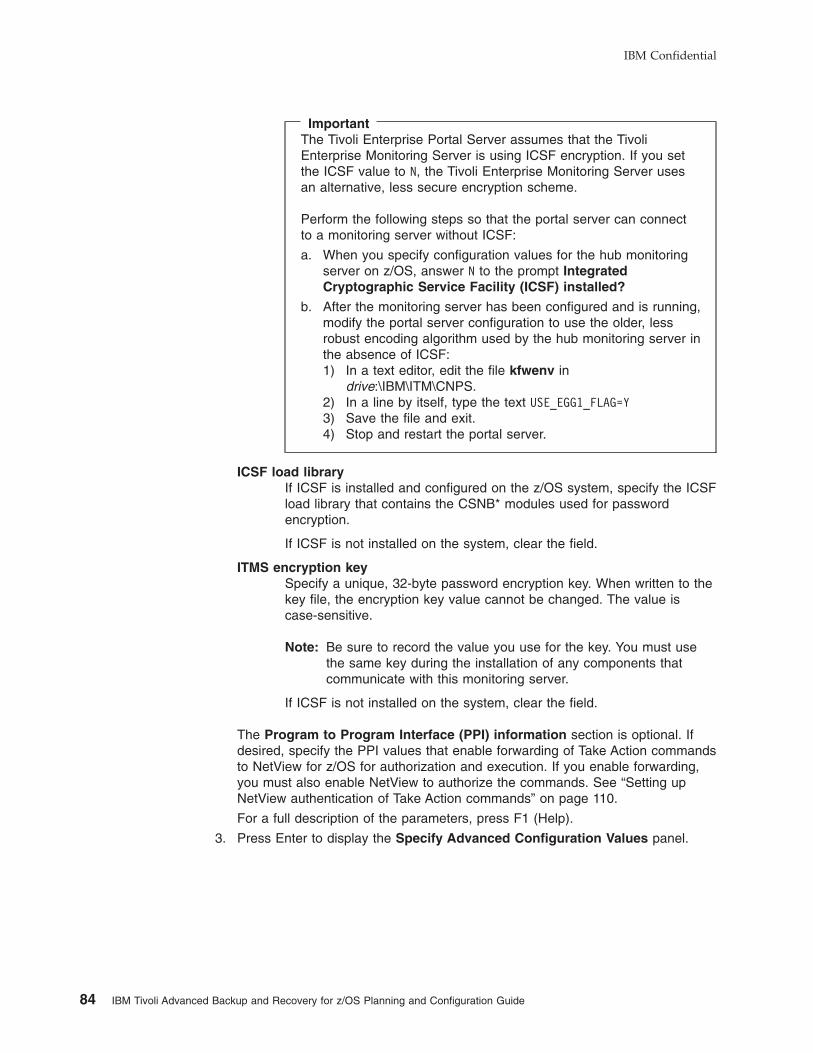
Important
The Tivoli Enterprise Portal Server assumes that the Tivoli
Enterprise Monitoring Server is using ICSF encryption. If you set
the ICSF value to N, the Tivoli Enterprise Monitoring Server uses
an alternative, less secure encryption scheme.
Perform the following steps so that the portal server can connect
to a monitoring server without ICSF:
a. When you specify configuration values for the hub monitoring
server on z/OS, answer N to the prompt Integrated
Cryptographic Service Facility (ICSF) installed?
b. After the monitoring server has been configured and is running,
modify the portal server configuration to use the older, less
robust encoding algorithm used by the hub monitoring server in
the absence of ICSF:
1) In a text editor, edit the file kfwenv in
drive:\IBM\ITM\CNPS.
2) In a line by itself, type the text USE_EGG1_FLAG=Y
3) Save the file and exit.
4) Stop and restart the portal server.
ICSF load library
If ICSF is installed and configured on the z/OS system, specify the ICSF
load library that contains the CSNB* modules used for password
encryption.
If ICSF is not installed on the system, clear the field.
ITMS encryption key
Specify a unique, 32-byte password encryption key. When written to the
key file, the encryption key value cannot be changed. The value is
case-sensitive.
Note: Be sure to record the value you use for the key. You must use
the same key during the installation of any components that
communicate with this monitoring server.
If ICSF is not installed on the system, clear the field.
The Program to Program Interface (PPI) information section is optional. If
desired, specify the PPI values that enable forwarding of Take Action commands
to NetView for z/OS for authorization and execution. If you enable forwarding,
you must also enable NetView to authorize the commands. See “Setting up
NetView authentication of Take Action commands” on page 110.
For a full description of the parameters, press F1 (Help).
3. Press Enter to display the Specify Advanced Configuration Values panel.
IBM Confidential
84 IBM Tivoli Advanced Backup and Recovery for z/OS Planning and Configuration Guide

Accept the defaults or specify other values.
v Accept the default value of Y for Enable Web Services SOAP Server. The
Web Services SOAP Server is required to be enabled for a hub monitoring
server. Press F1 for information about the SOAP Server.
v Language locale is a required field and has no default. Specify a numeric
value (1 through 36) representing the language and region for the z/OS
system. (Example: 1 for United States English.) For a list of the language
locale values, press F1.
v The first two parameters in the Persistent datastore parameters section of
the panel are required, even though Advanced Backup and Recovery for
z/OS requires that historical data collection be configured at the location of
the monitoring agent rather than at the location of the monitoring server.
Accept the default values.
4. Press Enter twice to return to the Configure the TEMS menu (Figure 31 on
page 81).
Specifying communication protocols
To specify protocols for communications between the Tivoli Enterprise Monitoring
Server and the other components of Advanced Backup and Recovery for z/OS,
complete the following procedure:
1. From the Configure the TEMS menu, enter 3 to display the Specify
Communication Protocols panel.
-------------------- SPECIFY ADVANCED CONFIGURATION VALUES --------------------
COMMAND ===>
Enable Web Services SOAP Server ==> Y (Y, N)
Enable startup console messages ==> Y (Y, N)
Enable communications trace ==> N (Y, N, D, M, A)
Enable storage detail logging ==> Y (Y, N)
Storage detail logging: Hours ==> 0 (0-24) Minutes ==> 60 (0-60)
Flush VSAM buffers: Hours ==> 0 (0-24) Minutes ==> 30 (0-60)
Virtual IP Address (VIPA) type ==> N (S=Static, D=Dynamic, N=None)
Minimum extended storage ==> 150000 K
Maximum storage request size ==> 16 (Primary) ==> 23 (Extended)
Language locale ==> 1 (Press F1=Help for a list of codes)
Persistent datastore parameters:
Maintenance procedure prefix ==> KPDPROC
Datastore file high-level prefix ==> hilev
Volume ==> PRI140 Storclas ==>
Unit ==> 3390 Mgmtclas ==>
Enter=Next F1=Help F3=Back F10=CMS List
Figure 34. Specify Advanced Configuration Values panel: Configuration Tool
IBM Confidential
Chapter 6. Configuring the hub monitoring server and the monitoring agent on a z/OS image 85
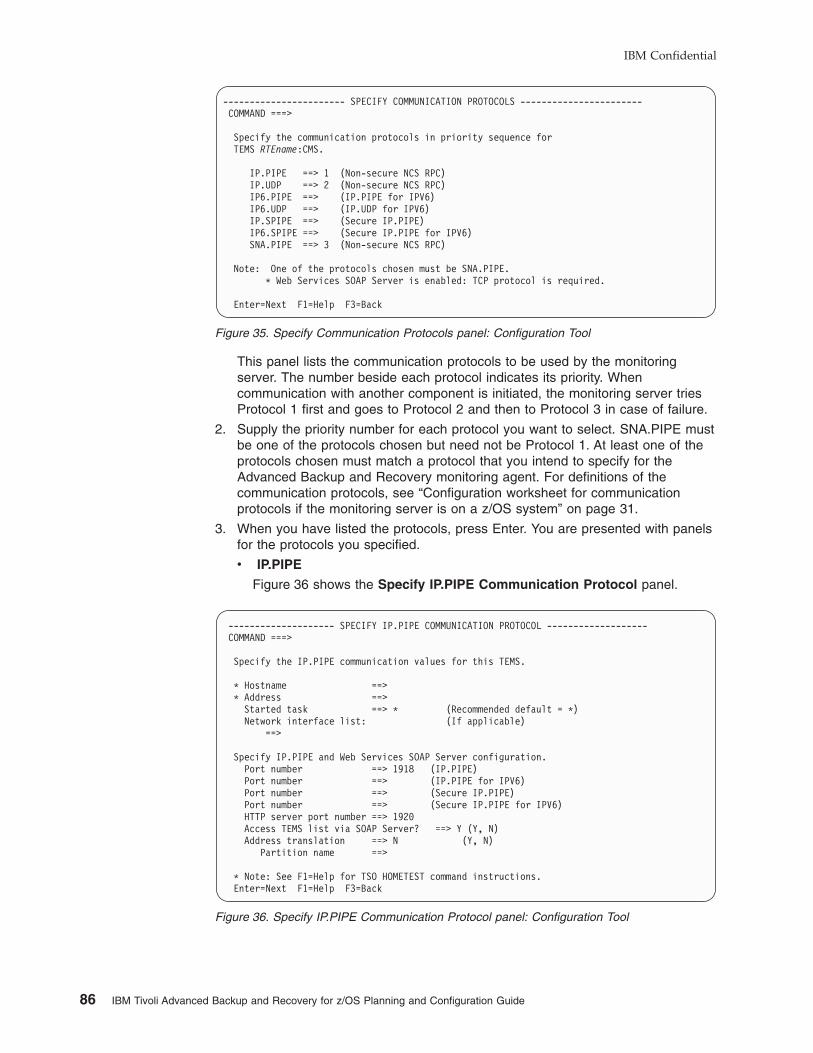
This panel lists the communication protocols to be used by the monitoring
server. The number beside each protocol indicates its priority. When
communication with another component is initiated, the monitoring server tries
Protocol 1 first and goes to Protocol 2 and then to Protocol 3 in case of failure.
2. Supply the priority number for each protocol you want to select. SNA.PIPE must
be one of the protocols chosen but need not be Protocol 1. At least one of the
protocols chosen must match a protocol that you intend to specify for the
Advanced Backup and Recovery monitoring agent. For definitions of the
communication protocols, see “Configuration worksheet for communication
protocols if the monitoring server is on a z/OS system” on page 31.
3. When you have listed the protocols, press Enter. You are presented with panels
for the protocols you specified.
v IP.PIPE
Figure 36 shows the Specify IP.PIPE Communication Protocol panel.
----------------------- SPECIFY COMMUNICATION PROTOCOLS -----------------------
COMMAND ===>
Specify the communication protocols in priority sequence for
TEMS RTEname:CMS.
IP.PIPE ==> 1 (Non-secure NCS RPC)
IP.UDP ==> 2 (Non-secure NCS RPC)
IP6.PIPE ==> (IP.PIPE for IPV6)
IP6.UDP ==> (IP.UDP for IPV6)
IP.SPIPE ==> (Secure IP.PIPE)
IP6.SPIPE ==> (Secure IP.PIPE for IPV6)
SNA.PIPE ==> 3 (Non-secure NCS RPC)
Note: One of the protocols chosen must be SNA.PIPE.
* Web Services SOAP Server is enabled: TCP protocol is required.
Enter=Next F1=Help F3=Back
Figure 35. Specify Communication Protocols panel: Configuration Tool
-------------------- SPECIFY IP.PIPE COMMUNICATION PROTOCOL -------------------
COMMAND ===>
Specify the IP.PIPE communication values for this TEMS.
* Hostname ==>
* Address ==>
Started task ==> * (Recommended default = *)
Network interface list: (If applicable)
==>
Specify IP.PIPE and Web Services SOAP Server configuration.
Port number ==> 1918 (IP.PIPE)
Port number ==> (IP.PIPE for IPV6)
Port number ==> (Secure IP.PIPE)
Port number ==> (Secure IP.PIPE for IPV6)
HTTP server port number ==> 1920
Access TEMS list via SOAP Server? ==> Y (Y, N)
Address translation ==> N (Y, N)
Partition name ==>
* Note: See F1=Help for TSO HOMETEST command instructions.
Enter=Next F1=Help F3=Back
Figure 36. Specify IP.PIPE Communication Protocol panel: Configuration Tool
IBM Confidential
86 IBM Tivoli Advanced Backup and Recovery for z/OS Planning and Configuration Guide
Hostname
The TCP/IP host name of the z/OS system where the hub monitoring
server is installed. To obtain the host name, enter TSO HOMETEST at
the command line.
If the z/OS domain name resolver configuration specifies a search
path that includes the target domain suffix, specify only the first
qualifier of the host name. (Example: sys is the first qualifier of the
fully qualified host name sys.ibm.com.) Otherwise, specify the fully
qualified host name.
Address
The IP address of the z/OS system where the Tivoli Enterprise
Monitoring Server is installed. To obtain the IP address, enter TSO
HOMETEST at the command line.
Started task
The started task name of the TCP/IP server. The default value of *
(asterisk) allows the IP stack to find the TCP/IP image dynamically, if
it is available.
Network interface list
A list of network interfaces for the monitoring server to use. This
parameter is required for sites that are running more than one TCP/IP
interface or network adapter on the same z/OS image. Setting this
parameter allows you to direct the monitoring server to connect to a
specific TCP/IP local interface.
Specify each network adapter by the host name or IP address to be
used for input and output. Use a blank space to separate the entries.
If your site supports DNS, you can enter IP addresses or short host
names. If your site does not support DNS, you must enter fully
qualified host names.
If you specify an interface address or a list of interface addresses,
the Configuration Tool generates the KDEB_INTERFACELIST
parameter in the KDSENV member of the &rhilev.&rtename.RKANPARU library.
Port number
The address of the IP port. The default port number is 1918 for
nonsecure IP protocols and 3660 for secure IP protocols.
Note: The same TCP/IP port number must be used for every
monitoring server in the enterprise. Also, make sure that the
monitoring server well-known port is not on the TCP/IP
reserved port list.
HTTP server port number
Accept the default value of 1920. This field is required for the SOAP
Server.
Access TEMS list via SOAP Server?
Accept the default value of Y, The Web Services SOAP Server is
required to be enabled for a hub monitoring server. Press F1 for
information about the SOAP Server.
Address translation
By default, Ephemeral Pipe Support (EPS) is enabled automatically
to allow IP.PIPE connections to cross a (network address) translating
IBM Confidential
Chapter 6. Configuring the hub monitoring server and the monitoring agent on a z/OS image 87
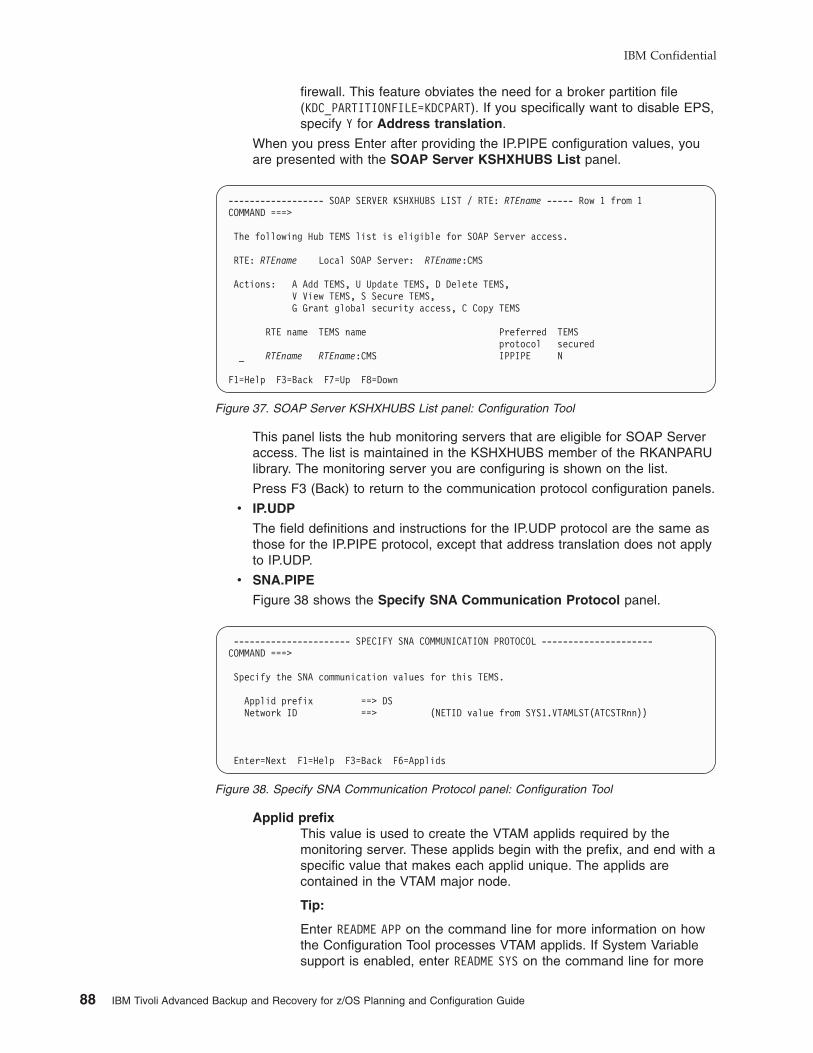
firewall. This feature obviates the need for a broker partition file
(KDC_PARTITIONFILE=KDCPART). If you specifically want to disable EPS,
specify Y for Address translation.
When you press Enter after providing the IP.PIPE configuration values, you
are presented with the SOAP Server KSHXHUBS List panel.
This panel lists the hub monitoring servers that are eligible for SOAP Server
access. The list is maintained in the KSHXHUBS member of the RKANPARU
library. The monitoring server you are configuring is shown on the list.
Press F3 (Back) to return to the communication protocol configuration panels.
v IP.UDP
The field definitions and instructions for the IP.UDP protocol are the same as
those for the IP.PIPE protocol, except that address translation does not apply
to IP.UDP.
v SNA.PIPE
Figure 38 shows the Specify SNA Communication Protocol panel.
Applid prefix
This value is used to create the VTAM applids required by the
monitoring server. These applids begin with the prefix, and end with a
specific value that makes each applid unique. The applids are
contained in the VTAM major node.
Tip:
Enter README APP on the command line for more information on how
the Configuration Tool processes VTAM applids. If System Variable
support is enabled, enter README SYS on the command line for more
------------------ SOAP SERVER KSHXHUBS LIST / RTE: RTEname ----- Row 1 from 1
COMMAND ===>
The following Hub TEMS list is eligible for SOAP Server access.
RTE: RTEname Local SOAP Server: RTEname:CMS
Actions: A Add TEMS, U Update TEMS, D Delete TEMS,
V View TEMS, S Secure TEMS,
G Grant global security access, C Copy TEMS
RTE name TEMS name Preferred TEMS
protocol secured
_ RTEname RTEname:CMS IPPIPE N
F1=Help F3=Back F7=Up F8=Down
Figure 37. SOAP Server KSHXHUBS List panel: Configuration Tool
---------------------- SPECIFY SNA COMMUNICATION PROTOCOL ---------------------
COMMAND ===>
Specify the SNA communication values for this TEMS.
Applid prefix ==> DS
Network ID ==> (NETID value from SYS1.VTAMLST(ATCSTRnn))
Enter=Next F1=Help F3=Back F6=Applids
Figure 38. Specify SNA Communication Protocol panel: Configuration Tool
IBM Confidential
88 IBM Tivoli Advanced Backup and Recovery for z/OS Planning and Configuration Guide
information on how the Configuration Tool processes VTAM applids
using z/OS system symbols. Press F6 (Applids) for a list of the VTAM
major node and applid values.
Network ID
The identifier of your VTAM network. You can locate this value on the
NETID parameter in the VTAMLST startup member ATCSTRnn.
For detailed help about the required values, press F1.
When you press Enter on the last panel, you are returned to the Configure
the TEMS menu.
Creating the runtime members
To create the runtime members required by Tivoli Enterprise Monitoring Server,
complete the following procedure:
1. From the Configure the TEMS menu, enter 4 to display the job that creates the
runtime members required by Tivoli Enterprise Monitoring Server. These
members are created in the runtime libraries for this runtime environment.
2. Review the JCL, edit if necessary, and submit. Verify that the job completes
successfully and that all return codes are zero.
3. When the job finishes, return to the Configure the TEMS menu and then to the
Product Component Selection Menu.
Tip
Even though Configure persistent datastore and Complete the
configuration are included in the list of required steps on the Configure the
TEMS menu, you do not need to perform them now. The Advanced Backup
and Recovery for z/OS product requires that the persistent data store be
configured at the monitoring agent, not at the monitoring server. Option 6
(Complete the configuration) involves steps to be performed outside the
configuration panels. Therefore, the instructions are provided later in this
chapter (see “Step 6. Complete the configuration of the Tivoli Enterprise
Monitoring Server and the monitoring agent” on page 93).
Step 4. Configure the monitoring agent
In this step, you register the Advanced Backup and Recovery monitoring agent with
the hub Tivoli Enterprise Monitoring Server, specify parameters for the agent
address space, and create runtime members for the agent address space.
1. From the Product Component Selection Menu (Figure 30 on page 81), enter
2 to select Advanced Backup and Recovery for z/OS Agent.
The Configure IBM Tivoli Advanced Backup and Recovery for z/OS menu
is displayed.
IBM Confidential
Chapter 6. Configuring the hub monitoring server and the monitoring agent on a z/OS image 89
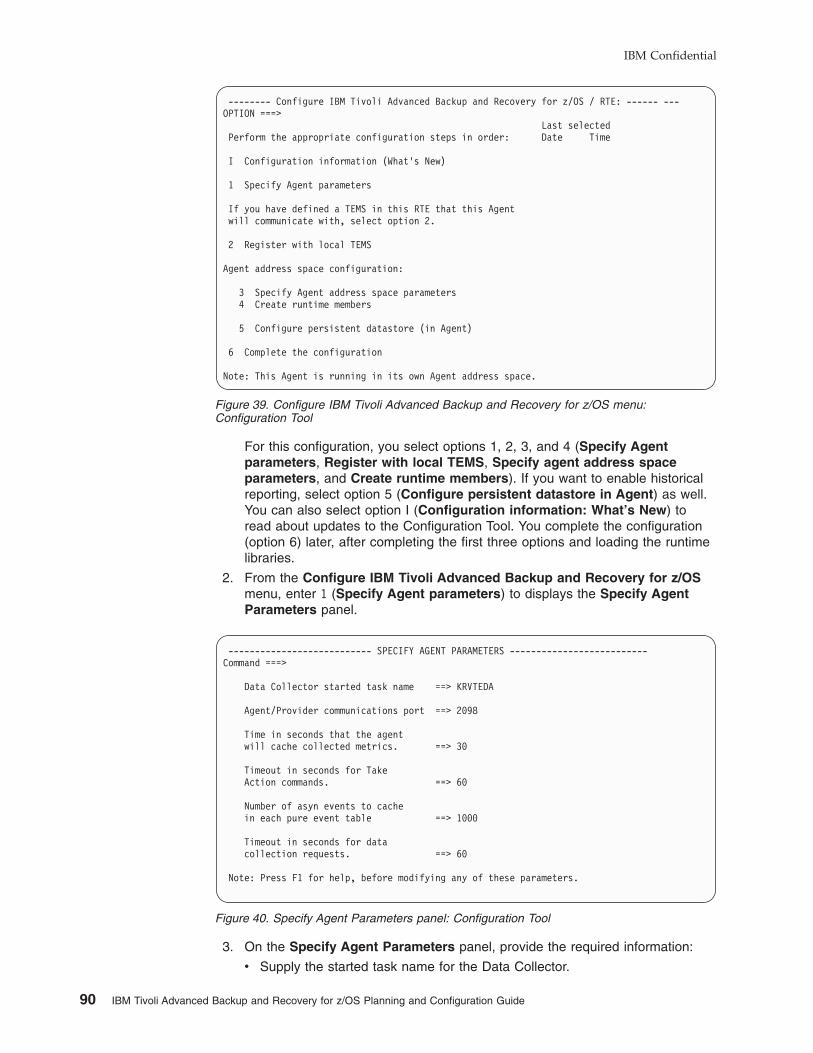
For this configuration, you select options 1, 2, 3, and 4 (Specify Agent
parameters, Register with local TEMS, Specify agent address space
parameters, and Create runtime members). If you want to enable historical
reporting, select option 5 (Configure persistent datastore in Agent) as well.
You can also select option I (Configuration information: What’s New) to
read about updates to the Configuration Tool. You complete the configuration
(option 6) later, after completing the first three options and loading the runtime
libraries.
2. From the Configure IBM Tivoli Advanced Backup and Recovery for z/OS
menu, enter 1 (Specify Agent parameters) to displays the Specify Agent
Parameters panel.
3. On the Specify Agent Parameters panel, provide the required information:
v Supply the started task name for the Data Collector.
-------- Configure IBM Tivoli Advanced Backup and Recovery for z/OS / RTE: ------ ---
OPTION ===>
Last selected
Perform the appropriate configuration steps in order: Date Time
I Configuration information (What’s New)
1 Specify Agent parameters
If you have defined a TEMS in this RTE that this Agent
will communicate with, select option 2.
2 Register with local TEMS
Agent address space configuration:
3 Specify Agent address space parameters
4 Create runtime members
5 Configure persistent datastore (in Agent)
6 Complete the configuration
Note: This Agent is running in its own Agent address space.
Figure 39. Configure IBM Tivoli Advanced Backup and Recovery for z/OS menu:
Configuration Tool
--------------------------- SPECIFY AGENT PARAMETERS --------------------------
Command ===>
Data Collector started task name ==> KRVTEDA
Agent/Provider communications port ==> 2098
Time in seconds that the agent
will cache collected metrics. ==> 30
Timeout in seconds for Take
Action commands. ==> 60
Number of asyn events to cache
in each pure event table ==> 1000
Timeout in seconds for data
collection requests. ==> 60
Note: Press F1 for help, before modifying any of these parameters.
Figure 40. Specify Agent Parameters panel: Configuration Tool
IBM Confidential
90 IBM Tivoli Advanced Backup and Recovery for z/OS Planning and Configuration Guide
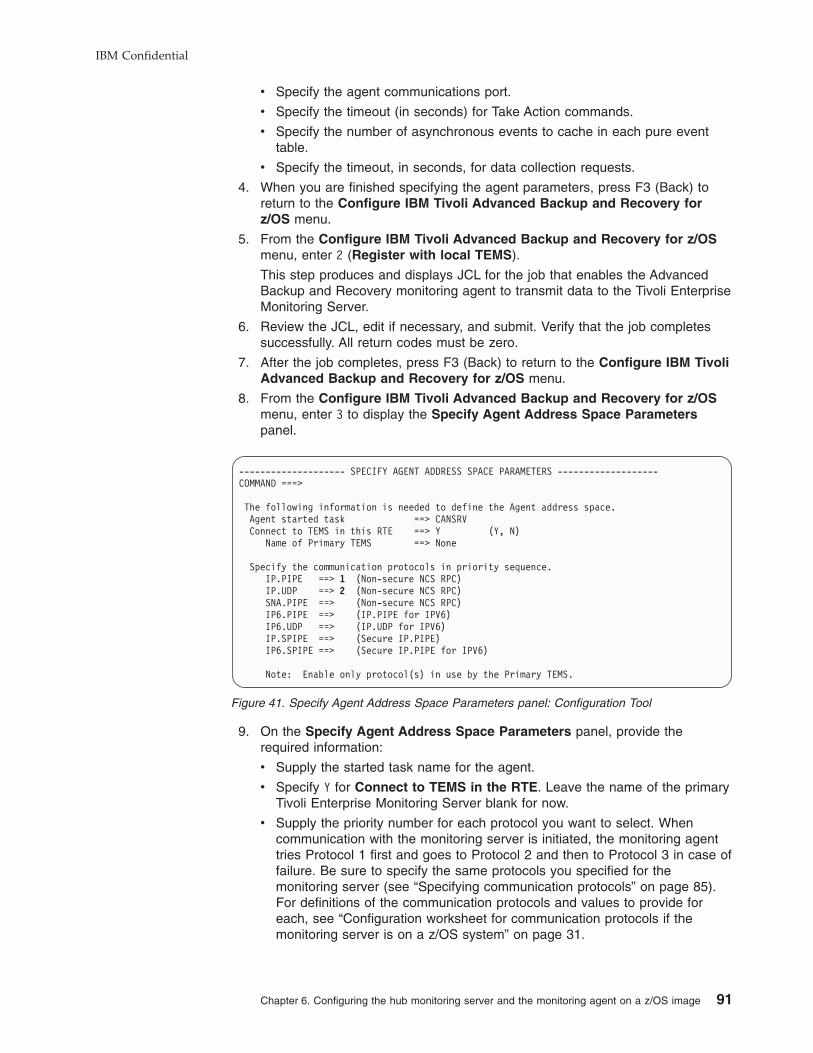
v Specify the agent communications port.
v Specify the timeout (in seconds) for Take Action commands.
v Specify the number of asynchronous events to cache in each pure event
table.
v Specify the timeout, in seconds, for data collection requests.
4. When you are finished specifying the agent parameters, press F3 (Back) to
return to the Configure IBM Tivoli Advanced Backup and Recovery for
z/OS menu.
5. From the Configure IBM Tivoli Advanced Backup and Recovery for z/OS
menu, enter 2 (Register with local TEMS).
This step produces and displays JCL for the job that enables the Advanced
Backup and Recovery monitoring agent to transmit data to the Tivoli Enterprise
Monitoring Server.
6. Review the JCL, edit if necessary, and submit. Verify that the job completes
successfully. All return codes must be zero.
7. After the job completes, press F3 (Back) to return to the Configure IBM Tivoli
Advanced Backup and Recovery for z/OS menu.
8. From the Configure IBM Tivoli Advanced Backup and Recovery for z/OS
menu, enter 3 to display the Specify Agent Address Space Parameters
panel.
9. On the Specify Agent Address Space Parameters panel, provide the
required information:
v Supply the started task name for the agent.
v Specify Y for Connect to TEMS in the RTE. Leave the name of the primary
Tivoli Enterprise Monitoring Server blank for now.
v Supply the priority number for each protocol you want to select. When
communication with the monitoring server is initiated, the monitoring agent
tries Protocol 1 first and goes to Protocol 2 and then to Protocol 3 in case of
failure. Be sure to specify the same protocols you specified for the
monitoring server (see “Specifying communication protocols” on page 85).
For definitions of the communication protocols and values to provide for
each, see “Configuration worksheet for communication protocols if the
monitoring server is on a z/OS system” on page 31.
-------------------- SPECIFY AGENT ADDRESS SPACE PARAMETERS -------------------
COMMAND ===>
The following information is needed to define the Agent address space.
Agent started task ==> CANSRV
Connect to TEMS in this RTE ==> Y (Y, N)
Name of Primary TEMS ==> None
Specify the communication protocols in priority sequence.
IP.PIPE ==> 1 (Non-secure NCS RPC)
IP.UDP ==> 2 (Non-secure NCS RPC)
SNA.PIPE ==> (Non-secure NCS RPC)
IP6.PIPE ==> (IP.PIPE for IPV6)
IP6.UDP ==> (IP.UDP for IPV6)
IP.SPIPE ==> (Secure IP.PIPE)
IP6.SPIPE ==> (Secure IP.PIPE for IPV6)
Note: Enable only protocol(s) in use by the Primary TEMS.
Figure 41. Specify Agent Address Space Parameters panel: Configuration Tool
IBM Confidential
Chapter 6. Configuring the hub monitoring server and the monitoring agent on a z/OS image 91
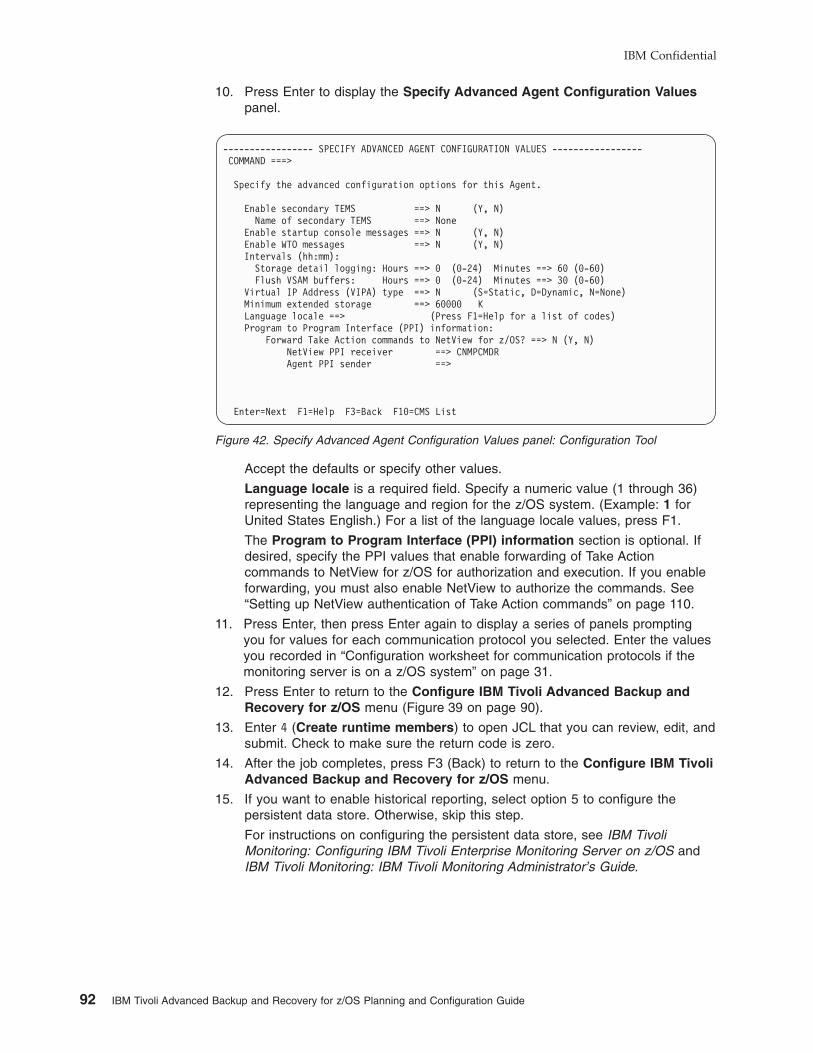
10. Press Enter to display the Specify Advanced Agent Configuration Values
panel.
Accept the defaults or specify other values.
Language locale is a required field. Specify a numeric value (1 through 36)
representing the language and region for the z/OS system. (Example: 1 for
United States English.) For a list of the language locale values, press F1.
The Program to Program Interface (PPI) information section is optional. If
desired, specify the PPI values that enable forwarding of Take Action
commands to NetView for z/OS for authorization and execution. If you enable
forwarding, you must also enable NetView to authorize the commands. See
“Setting up NetView authentication of Take Action commands” on page 110.
11. Press Enter, then press Enter again to display a series of panels prompting
you for values for each communication protocol you selected. Enter the values
you recorded in “Configuration worksheet for communication protocols if the
monitoring server is on a z/OS system” on page 31.
12. Press Enter to return to the Configure IBM Tivoli Advanced Backup and
Recovery for z/OS menu (Figure 39 on page 90).
13. Enter 4 (Create runtime members) to open JCL that you can review, edit, and
submit. Check to make sure the return code is zero.
14. After the job completes, press F3 (Back) to return to the Configure IBM Tivoli
Advanced Backup and Recovery for z/OS menu.
15. If you want to enable historical reporting, select option 5 to configure the
persistent data store. Otherwise, skip this step.
For instructions on configuring the persistent data store, see IBM Tivoli
Monitoring: Configuring IBM Tivoli Enterprise Monitoring Server on z/OS and
IBM Tivoli Monitoring: IBM Tivoli Monitoring Administrator’s Guide.
----------------- SPECIFY ADVANCED AGENT CONFIGURATION VALUES -----------------
COMMAND ===>
Specify the advanced configuration options for this Agent.
Enable secondary TEMS ==> N (Y, N)
Name of secondary TEMS ==> None
Enable startup console messages ==> N (Y, N)
Enable WTO messages ==> N (Y, N)
Intervals (hh:mm):
Storage detail logging: Hours ==> 0 (0-24) Minutes ==> 60 (0-60)
Flush VSAM buffers: Hours ==> 0 (0-24) Minutes ==> 30 (0-60)
Virtual IP Address (VIPA) type ==> N (S=Static, D=Dynamic, N=None)
Minimum extended storage ==> 60000 K
Language locale ==> (Press F1=Help for a list of codes)
Program to Program Interface (PPI) information:
Forward Take Action commands to NetView for z/OS? ==> N (Y, N)
NetView PPI receiver ==> CNMPCMDR
Agent PPI sender ==>
Enter=Next F1=Help F3=Back F10=CMS List
Figure 42. Specify Advanced Agent Configuration Values panel: Configuration Tool
IBM Confidential
92 IBM Tivoli Advanced Backup and Recovery for z/OS Planning and Configuration Guide
Important
Both the Configuration Tool and Tivoli Enterprise Portal allow you to
configure historical data collection either at the location of the monitoring
agent (called TEMA, or Tivoli Enterprise Monitoring Agent, in the Tivoli
Enterprise Portal) or at the location of the monitoring server to which the
monitoring agent reports. However, Advanced Backup and Recovery
requires that historical data collection be configured at the location of the
monitoring agent.
16. Go on to “Step 5. Load the runtime libraries.”
Tip
Even though Complete the configuration is an option on the Configure IBM
Tivoli Advanced Backup and Recovery for z/OS menu, you must load the
runtime libraries from the SMP/E target libraries before you perform the tasks
required to complete the configuration. If you select Complete the
configuration (option 6 on the Configure IBM Tivoli Advanced Backup and
Recovery for z/OS menu), the Configuration Tool displays a list of the steps
you must take outside the Configuration Tool. You can examine and print the
list now.
Step 5. Load the runtime libraries
Before you complete the configuration of the product outside the Configuration Tool,
you must load the runtime libraries from the SMP/E target libraries. The load job
requires exclusive access to the runtime libraries.
1. From the Configure Advanced Backup and Recovery for z/OS menu, return
to the Runtime Environments (RTEs) panel (Figure 27 on page 77).
2. Type L in the Action field to the left of the runtime environment in which you
have just configured Advanced Backup and Recovery, and press Enter.
3. Review the JCL and submit the job. Verify that the job completes successfully
and that the return code is 04 or less.
4. When you finish loading the libraries, press F3 (Back) to return to the Runtime
Environments (RTEs) panel.
Step 6. Complete the configuration of the Tivoli Enterprise Monitoring
Server and the monitoring agent
To complete the configuration, perform the following steps in the order shown.
1. Copy the started task procedures to your procedure library.
a. From the Runtime Environments (RTEs) panel (Figure 27 on page 77),
enter Z (Utilities) next to your runtime definition to open the RTE Utility
Menu.
IBM Confidential
Chapter 6. Configuring the hub monitoring server and the monitoring agent on a z/OS image 93
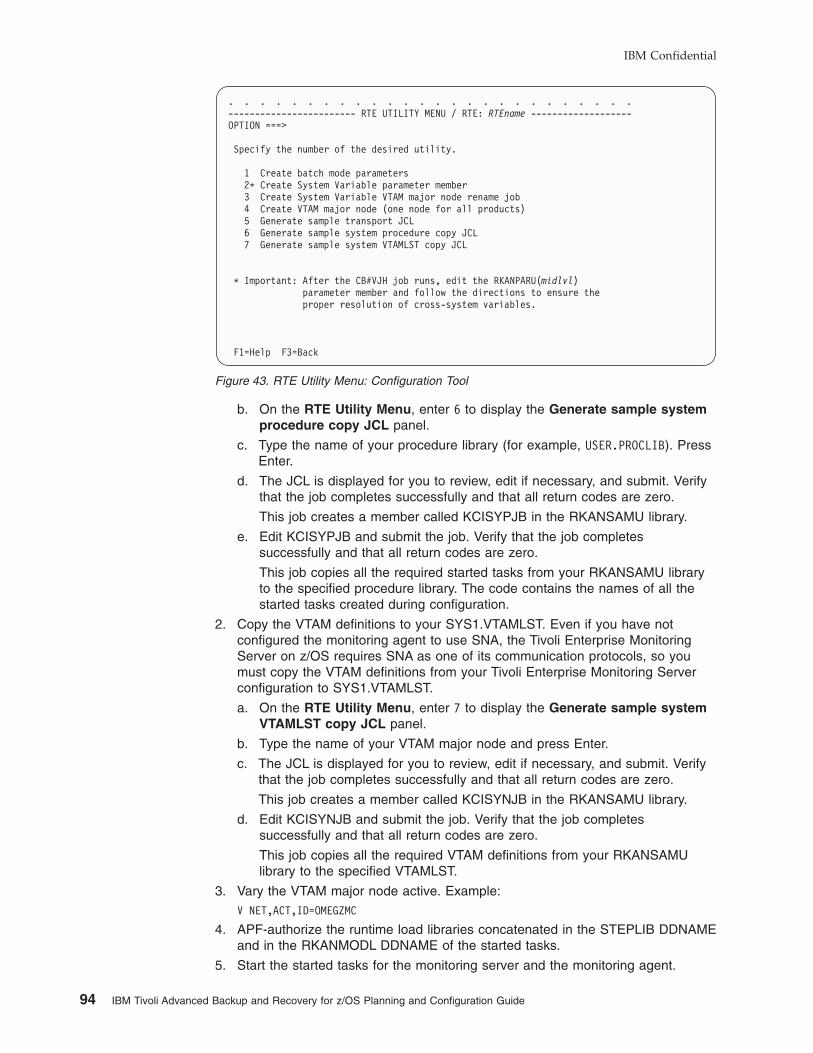
b. On the RTE Utility Menu, enter 6 to display the Generate sample system
procedure copy JCL panel.
c. Type the name of your procedure library (for example, USER.PROCLIB). Press
Enter.
d. The JCL is displayed for you to review, edit if necessary, and submit. Verify
that the job completes successfully and that all return codes are zero.
This job creates a member called KCISYPJB in the RKANSAMU library.
e. Edit KCISYPJB and submit the job. Verify that the job completes
successfully and that all return codes are zero.
This job copies all the required started tasks from your RKANSAMU library
to the specified procedure library. The code contains the names of all the
started tasks created during configuration.
2. Copy the VTAM definitions to your SYS1.VTAMLST. Even if you have not
configured the monitoring agent to use SNA, the Tivoli Enterprise Monitoring
Server on z/OS requires SNA as one of its communication protocols, so you
must copy the VTAM definitions from your Tivoli Enterprise Monitoring Server
configuration to SYS1.VTAMLST.
a. On the RTE Utility Menu, enter 7 to display the Generate sample system
VTAMLST copy JCL panel.
b. Type the name of your VTAM major node and press Enter.
c. The JCL is displayed for you to review, edit if necessary, and submit. Verify
that the job completes successfully and that all return codes are zero.
This job creates a member called KCISYNJB in the RKANSAMU library.
d. Edit KCISYNJB and submit the job. Verify that the job completes
successfully and that all return codes are zero.
This job copies all the required VTAM definitions from your RKANSAMU
library to the specified VTAMLST.
3. Vary the VTAM major node active. Example:
V NET,ACT,ID=OMEGZMC
4. APF-authorize the runtime load libraries concatenated in the STEPLIB DDNAME
and in the RKANMODL DDNAME of the started tasks.
5. Start the started tasks for the monitoring server and the monitoring agent.
. . . . . . . . . . . . . . . . . . . . . . . . . .
------------------------ RTE UTILITY MENU / RTE: RTEname -------------------
OPTION ===>
Specify the number of the desired utility.
1 Create batch mode parameters
2* Create System Variable parameter member
3 Create System Variable VTAM major node rename job
4 Create VTAM major node (one node for all products)
5 Generate sample transport JCL
6 Generate sample system procedure copy JCL
7 Generate sample system VTAMLST copy JCL
* Important: After the CB#VJH job runs, edit the RKANPARU(midlvl)
parameter member and follow the directions to ensure the
proper resolution of cross-system variables.
F1=Help F3=Back
Figure 43. RTE Utility Menu: Configuration Tool
IBM Confidential
94 IBM Tivoli Advanced Backup and Recovery for z/OS Planning and Configuration Guide
6. Verify successful startup.
a. In the RKLVLOG for the monitoring server address space, look for the
following messages to indicate successful startup:
KO4SRV032 Tivoli Enterprise Monitoring Server (TEMS) startup complete.
b. Look also for the following messages to indicate successful establishment of
a communications path by local and global location brokers:
KDSNC004 Bind of local location broker complete= protocol_name:address
KDSNC005 Bind of global location broker complete= protocol_name:address
The number of messages depends on the number of protocols defined.
c. In the RKLVLOG for the monitoring agent address space, look for the
following message to indicate successful startup:
KRAIRA000 Starting HEARTBEAT
If you do not find the messages shown, review the steps performed and look for
errors. If you need assistance, see “Support information” on page 145.
Step 7. Install Tivoli Enterprise Portal Server and client on a Windows
workstation
Install at least one Tivoli Enterprise Portal Server for each hub Tivoli Enterprise
Monitoring Server. You can connect more than one Tivoli Enterprise Portal Server to
a hub Tivoli Enterprise Monitoring Server, for example, to provide a test
environment and a production environment.
The instructions in this step assume that the operating system on the workstation is
Windows XP Professional Edition with Service Pack 1. For complete information
about hardware and software requirements for the Tivoli Monitoring Services
components, and for instructions for installing and configuring the components on a
Linux or UNIX system, see the IBM Tivoli Monitoring: IBM Tivoli Monitoring
Installation and Setup Guide.
Tip
Install only the Tivoli Enterprise Portal Server and desktop client components.
You do not need to install the hub Tivoli Enterprise Monitoring Server on the
Windows system, because you already installed and configured it on a z/OS
system. If you plan to install the hub Tivoli Enterprise Monitoring Server on
Windows, UNIX, or Linux, see Chapter 5, “Configuring the hub monitoring
server on a Windows system and the monitoring agent on a z/OS image,” on
page 53.
Installing the DB2 Universal Database software
Tivoli Enterprise Portal Server requires DB2 Universal Database (DB2 UDB)
Workgroup Server Edition. DB2 UDB version 8.2 is provided in the Advanced
Backup and Recovery for z/OS installation package. If DB2 UDB version 8 or higher
is already installed on the workstation where you plan to install a Tivoli Enterprise
Portal Server, you can skip this procedure and go directly to “Installing and
configuring Tivoli Enterprise Portal Server and desktop client” on page 97.
1. On the Windows system where you plan to install the Tivoli Enterprise Portal
Server, log on with a local ID that has Administrator authority. The DB2
Universal Database installation adds a local db2admin user account to
Windows, and local Administrator authority is required for creating this account.
IBM Confidential
Chapter 6. Configuring the hub monitoring server and the monitoring agent on a z/OS image 95
Without the db2admin ID, DB2 UDB is unable to create the Tivoli Enterprise
Portal Server database, and the Tivoli Enterprise Portal Server cannot start.
2. Insert the DB2 Universal Database Workgroup Server Edition CD to start the
installer.
3. Select Install Products. Read and accept the license agreement, and proceed
through the installer windows until you reach the Installation Type window.
4. On the Installation Type window, accept the defaults. Do not select Data
warehousing.
5. On the Select the installation folder window, change the installation drive if
necessary.
6. Set user information for the DB2 Administration Server:
a. You can either accept the user name of db2admin or use a different name.
b. Enter a password.
Important
DB2 UDB requires the user name and password for all administrative
tasks, including installation and configuration of the Tivoli Enterprise
Portal Server.
v If the Local Security Settings on the Windows system require
complex passwords, use a password that fits the system
requirements:
– Not containing the user's account name.
– Being at least six characters in length.
– Containing characters from three of the following categories:
- English uppercase characters (A through Z)
- English lowercase characters (a through z)
- Base 10 digits (0 through 9)
- Non-alphanumeric characters (Examples: !, $, #, %)
For information about Local Security Settings and password
complexity, see the Windows system help.
v If you change the db2admin password after DB2 UDB installation,
you receive error messages when you try to install the Tivoli
Enterprise Portal Server. If your Local Security Settings require you
to change the password, wait to do so until you finish installing the
Tivoli Enterprise Portal Server. See IBM Tivoli Monitoring: IBM
Tivoli Monitoring Problem Determination Guide for troubleshooting
information.
c. Do not enter a domain name in the drop-down list.
7. On the remaining windows, select the defaults.
8. Click Install to start copying the files.
9. After the DB2 UDB installation is complete, restart Windows before installing
the Tivoli Enterprise Portal Server. Do this even if the DB2 UDB installer does
not ask you to.
10. If the Local Security Settings on the Windows system require complex
passwords, you must create a new Windows user account for the Tivoli
Enterprise Portal Server before you begin installing it. The default database
user account name of the Tivoli Enterprise Portal Server is TEPS, but you can
assign any name no longer than eight characters that meets your site's
requirements for user IDs. Use a password that fits the Windows system
requirements for complex passwords:
IBM Confidential
96 IBM Tivoli Advanced Backup and Recovery for z/OS Planning and Configuration Guide
v Not containing the user account name.
v Being at least six characters long.
v Containing characters from three of the following categories:
– English uppercase characters (A through Z)
– English lowercase characters (a through z)
– Base 10 digits (0 through 9)
– Non-alphanumeric characters (Examples: !, $, #, %)
For information about Local Security Settings and password complexity, see
the Windows system help.
Installing and configuring Tivoli Enterprise Portal Server and desktop
client
Complete the following steps to install Tivoli Enterprise Portal Server and desktop
client on a Windows workstation where DB2 UDB is already installed:
1. Begin the installation.
a. Log on to Windows with an ID that has local Administrator authority, and
close any running applications.
b. Insert the IBM Tivoli Monitoring Services on z/OS CD into the CD-ROM
drive.
Installation begins automatically. If the installer does not start, go to the
Windows directory on your CD-ROM drive and run setup.exe. If setup.exe
initialization fails, you might not have enough free disk space to extract the
setup files.
c. Read the text that welcomes you to the installation, and click Next to
continue.
d. On the Install Prerequisites window, read the information about the
required levels of IBM Global Security Kit and IBM Java.
The check box for each prerequisite is cleared if the correct level of the
software is already installed on the workstation. Otherwise, the check box is
selected to indicate that the software is to be installed.
e. Click Next to continue.
If Global Security Kit or Java is selected for installation, it is installed now.
After installation of the prerequisite software is complete, you might be
prompted to reboot the computer. In that case, you receive an abort
message with a Severe error heading. This is normal and does not indicate
a problem.
If you are prompted to reboot, do the following:
1) Click OK on the window prompting you to reboot.
2) Click No on the window asking whether you want to view the abort log.
3) Restart the computer.
4) Restart the installation program.
f. Read the software license agreement and click Accept.
The Choose Destination Location window is displayed. The default is
c:\IBM\ITM.
g. Accept the default and click Next.
h. On the User Data Encryption Key window, type the same 32-bit encryption
key you set for the monitoring server on z/OS (see “Specifying configuration
values” on page 82), and click Next, then click OK to confirm the encryption
key.
2. Select the components to install.
IBM Confidential
Chapter 6. Configuring the hub monitoring server and the monitoring agent on a z/OS image 97
a. On the Select Features window, expand the list of features and select the
following:
v Tivoli Enterprise Monitoring Agent Framework
v Tivoli Enterprise Portal Server Framework
v Tivoli Enterprise Portal Desktop Client
v IBM Eclipse Help Server
Tips
v Do not select Tivoli Enterprise Monitoring Server. You have
installed the hub monitoring server on a z/OS system.
v If you want to enable historical reporting, select both Tivoli
Enterprise Monitoring Agent Framework and Warehouse Proxy
from the list of features under Tivoli Enterprise Monitoring
Agents. Otherwise, select only Tivoli Enterprise Monitoring Agent
Framework. Even though the Advanced Backup and Recovery for
z/OS monitoring agent is installed on z/OS, the Tivoli Enterprise
Monitoring Agent Framework must be selected here to enable
installation of application support on the distributed Tivoli Monitoring
Services components (see “Step 8. Install Advanced Backup and
Recovery for z/OS application support” on page 100).
v Do not select any agents or support features that are not in the list
shown above.
b. Click Next.
c. On the Agent Deployment window, clear the check boxes for both
Universal Agent and Monitoring Agent for Windows OS. These
selections do not apply to the Advanced Backup and Recovery for z/OS
product.
Click Next.
d. On the Select Program Folder window, accept the default and click Next.
3. On the TEPS Desktop and Browser Signon ID and Password window,
provide and confirm a password to be used by the Tivoli Enterprise Portal
desktop or browser client for initial access to the Tivoli Enterprise Portal Server.
The initial user ID sysadmin cannot be changed. You can add other user IDs
after installation. For instructions, see the Tivoli Enterprise Portal online help or
the IBM Tivoli Monitoring: IBM Tivoli Monitoring Administrator’s Guide.
4. Click Next and review the installation summary details. This summary identifies
what you are installing and where you chose to install it. Click Next to begin the
installation of components.
5. On the Setup Type window, clear the Launch Manage Tivoli Monitoring
Services check box, and make sure that Configure Tivoli Enterprise Portal is
selected. Click Next.
6. Configure the Tivoli Enterprise Portal.
a. On the TEPS Hostname window, make sure that the host name of the Tivoli
Enterprise Portal Server is correct and does not include the domain name.
Click Next.
b. On the TEPS Data Source Config Parameters window, enter the
db2admin account password and a password for the Tivoli Enterprise Portal
Server database user.
IBM Confidential
98 IBM Tivoli Advanced Backup and Recovery for z/OS Planning and Configuration Guide
Tip
To have one less password to remember, you can use the same
password for the db2admin account and the Tivoli Enterprise Portal
Server database user account (default user account name TEPS, or
the account name you set in 10 on page 96). If the Local Security
Settings on the Windows system require complex passwords, use a
password that fits the system requirements:
v Not containing the user account name.
v Being at least six characters in length.
v Containing characters from three of the following categories:
– English uppercase characters (A through Z)
– English lowercase characters (a through z)
– Base 10 digits (0 through 9)
– Non-alphanumeric characters (Examples: !, $, #, %)
For more information about Local Security Settings and password
complexity, see the Windows system help. See IBM Tivoli Advanced
Backup and Recovery for z/OS: Problem Determination Guide and IBM
Tivoli Monitoring: IBM Tivoli Monitoring Problem Determination Guide
for Tivoli Enterprise Portal troubleshooting information.
c. Click OK.
This step takes a few moments to complete while it populates the database.
d. On the Success window, click OK.
e. If you want to enable historical reporting, supply a user ID and password for
use by the Tivoli Enterprise Portal Server to access the Tivoli Data
Warehouse, and click Next. Otherwise, click Next without specifying any
values on the Warehouse ID and Password for TEP Server window.
f. On the TEP Server Configuration window, select the same communication
protocols you specified for the monitoring server to use in communicating
with the other components. Click OK.
g. On the next TEP Server Configuration window, enter the fully qualified
host name of the z/OS system where the hub Tivoli Enterprise Monitoring
Server is installed. Also enter the port number you specified when
configuring the hub Tivoli Enterprise Monitoring Server. Supply any other
values required for the selected communication protocols. Use the values
you established in “Configuration worksheet for communication protocols if
the monitoring server is on a z/OS system” on page 31. Because IBM Tivoli
Monitoring is case-sensitive, select Convert to upper case to reduce the
chance of user error. Click OK.
h. When you are prompted to reconfigure the warehouse connection
information, click Yes if you are enabling historical data collection.
Otherwise, click No and skip the rest of this step.
If you clicked Yes, follow these steps:
1) On the Warehouse Proxy Database Selection window, select the type
of database you want to use for the warehouse data source and click
OK.
2) Provide the values required for the selected database type and click OK.
For detailed instructions, see IBM Tivoli Monitoring: IBM Tivoli
Monitoring Installation and Setup Guide, GC32-9407 and IBM Tivoli
Monitoring: IBM Tivoli Monitoring Administrator’s Guide, SC32-9408.
IBM Confidential
Chapter 6. Configuring the hub monitoring server and the monitoring agent on a z/OS image 99
3) Click OK on the Successfully configured warehouse data source
window.
7. On the InstallShield Wizard Complete window, select Display the README
file and click Finish.
Step 8. Install Advanced Backup and Recovery for z/OS application
support
The IBM Tivoli Advanced Backup and Recovery for z/OS Data Files for z/OS CD
contains the product-specific application support data required by distributed
components and by the hub Tivoli Enterprise Monitoring Server (on any platform).
To install Advanced Backup and Recovery for z/OS application support, follow this
procedure:
1. Insert the IBM Tivoli Advanced Backup and Recovery for z/OS Data Files for
z/OS CD into the CD-ROM drive of the Windows workstation that hosts the
Tivoli Enterprise Portal Server and desktop client.
Installation begins automatically. If the installer does not start, go to the
Windows directory on your CD-ROM drive and run setup.exe. If setup.exe
initialization fails, you might not have enough free disk space to extract the
setup files.
2. Read the text that welcomes you to the installation, and click Next to continue.
3. On the Install Prerequisites window, both check boxes are cleared, to
indicate that the required software is already installed. Click Next to continue.
4. Read the software license agreement and click Accept.
5. On the Select Features window, select Advanced Backup and Recovery for
z/OS Support for these components:
v Tivoli Enterprise Portal Server
v Tivoli Enterprise Portal Desktop Client
6. Click Next to continue.
7. On the Start Copying Files window, read the list of actions to be performed,
and click Next.
Application support for Advanced Backup and Recovery is installed on the
components you selected.
8. On the Setup Type window, select Configure Tivoli Enterprise Portal and
clear the check boxes for the other items. Click Next.
9. On the TEPS Hostname window, make sure that the host name of the Tivoli
Enterprise Portal Server is correct and does not include the domain name.
Click Next.
10. On the InstallShield Wizard Complete window, select Display the README
file and click Finish.
11. Add application support to the hub Tivoli Enterprise Monitoring Server on z/OS.
a. Ensure that the hub Tivoli Enterprise Monitoring Server is running.
b. On the Windows workstation, select Start > Programs (or All Programs)
> IBM Tivoli Monitoring > Manage Tivoli Monitoring Services.
c. Select Actions > Advanced > Add TEMS application support.
d. On the Add application support to the TEMS window, select On a
different computer and click OK.
e. When you are prompted to ensure that the Tivoli Enterprise Monitoring
Server is configured and running, click OK.
IBM Confidential
100 IBM Tivoli Advanced Backup and Recovery for z/OS Planning and Configuration Guide
f. On the Non-Resident TEMS Connection window, provide the hub
monitoring server TEMS name (node ID) and select the communication
protocol to use in sending the application support to the hub monitoring
server on z/OS.
If you made a note of the TEMS name displayed in the Add Runtime
Environment (1 of 2) panel (Figure 28 on page 78), find it now. You might
have recorded it in “Configuration worksheet if the monitoring server is on a
z/OS system” on page 29. Otherwise, you can find the TEMS name as the
value of the CMS_NODEID variable in this location:
&rhilev.&sys.RKANPARU(KDSENV)
g. On the next window, provide any values required by the communication
protocol.
For example, if the protocol is IP.PIPE, you are prompted for the fully
qualified TCP/IP host name and port number of the z/OS system where the
hub Tivoli Enterprise Monitoring Server is installed. See “Configuration
worksheet if the monitoring server is on a z/OS system” on page 29 for the
values you recorded during installation planning.
h. On the Select the application support to add to the TEMS window,
select Advanced Backup and Recovery for z/OS Support and click OK.
i. When the application support has been added to the monitoring server (this
might take several minutes), a window gives you information about the
status and location of the application support (also called seeding or seed
data). Click Save As if you want to save the information in a text file. Click
Close to close the window.
j. Stop and restart the hub Tivoli Enterprise Monitoring Server.
Step 9. Verify the configuration
Now that you have completed the configuration, you can verify that it is successful.
Verification involves starting these components:
v Tivoli Enterprise Monitoring Server and monitoring agent started tasks on your
z/OS system.
v Tivoli Enterprise Portal Server through Manage Tivoli Monitoring Services on your
workstation.
v Tivoli Enterprise Portal desktop client through Manage Tivoli Monitoring Services
on your workstation.
To do this, complete the following procedure:
1. Start the started tasks for the monitoring server, the monitoring agent, and the
data collection agent.
2. Verify successful startup.
a. In the RKLVLOG for the monitoring server address space, look for the
following messages to indicate successful startup:
KO4SRV032 Tivoli Enterprise Monitoring Server (TEMS) startup complete.
b. Look also for the following messages to indicate successful establishment of
a communications path by local and global location brokers:
KDSNC004 Bind of local location broker complete= protocol_name:address
KDSNC005 Bind of global location broker complete= protocol_name:address
The number of messages depends on the number of protocols defined.
c. In the RKLVLOG for the monitoring agent address space, look for the
following message to indicate successful startup:
IBM Confidential
Chapter 6. Configuring the hub monitoring server and the monitoring agent on a z/OS image 101
KRAIRA000 Starting HEARTBEAT
d. In the JOBLOG for the data collection agent address space, look for the
following message to indicate successful startup:
KRV0008I KRV Agent KRVSYNC connected to TEMA.
If you do not find the messages shown, review the steps performed and look for
errors. If you need assistance, see “Support information” on page 145.
3. On your workstation, select Start > Programs (or All Programs) > IBM Tivoli
Monitoring > Manage Tivoli Monitoring Services.
4. To start the Tivoli Enterprise Portal Server, right-click its entry in Manage Tivoli
Monitoring Services and click Start.
5. To start the Tivoli Enterprise Portal desktop client, right-click its entry in Manage
Tivoli Monitoring Services and click Start.
6. When prompted, supply the user ID sysadmin and the password you specified
for initial access to the Tivoli Enterprise Portal Server
7. When Tivoli Enterprise Portal opens, you can expand the navigator pane to see
the Advanced Backup and Recovery workspaces.
For information about using the Advanced Backup and Recovery workspaces
and situations to monitor your sysplex resources and z/OS systems, see the
online help and IBM Tivoli Advanced Backup and Recovery for z/OS User's
Guide.
Setting up security
Now you can set up security for the product components. See Chapter 7, “Setting
up security,” on page 105.
Expanding this configuration
After you configure the hub Tivoli Enterprise Monitoring Server and an Advanced
Backup and Recovery monitoring agent in different address spaces of the same
z/OS image, you can add agents in other z/OS images that you want to monitor.
These additional agents are called remote agents because they are not on the
same z/OS image as the hub Tivoli Enterprise Monitoring Server. To add remote
monitoring agents, complete the following steps:
__ “Step 1. Define the runtime environment” on page 76
In this step, answer N for this RTE have a Tivoli Enterprise Monitoring
Server on the Add Runtime Environment panel.
__ “Step 2. Build the runtime libraries” on page 80
You can skip Step 3 (Configure the hub Tivoli Enterprise Monitoring Server)
because all the Advanced Backup and Recovery monitoring agents can
communicate with the same hub Tivoli Enterprise Monitoring Server.
__ “Step 4. Configure the monitoring agent” on page 89
1. Register the remote monitoring agents with the hub Tivoli Enterprise
Monitoring Server on the z/OS image where the hub is installed, not on
the z/OS image where the monitoring agent is installed.
2. To configure a remote monitoring agent, follow the instructions in “Step 5.
Configure the monitoring agent” on page 66.
__ “Step 5. Load the runtime libraries” on page 93
__ “Step 6. Complete the configuration of the Tivoli Enterprise Monitoring Server
and the monitoring agent” on page 93
IBM Confidential
102 IBM Tivoli Advanced Backup and Recovery for z/OS Planning and Configuration Guide
You can skip Steps 7 and 8 (Install Tivoli Enterprise Portal Server and
client on a Windows workstation, and Install Advanced Backup and
Recovery for z/OS application support) because you performed these
steps during configuration of the first monitoring agent.
__ “Step 9. Verify the configuration” on page 101
Batch mode processing
The Configuration Tool offers batch mode processing for several configuration
scenarios. You can use the batch mode processing utility to configure runtime
environments and monitoring agents without going through the ISPF panels and
filling in parameter values there. After you establish and configure a runtime
environment in a z/OS image, you can use the batch mode processing utility to
replicate your runtime environment in other z/OS images. See Chapter 9, “Using
batch mode processing,” on page 121.
IBM Confidential
Chapter 6. Configuring the hub monitoring server and the monitoring agent on a z/OS image 103

IBM Confidential
104 IBM Tivoli Advanced Backup and Recovery for z/OS Planning and Configuration Guide
Chapter 7. Setting up security
This chapter explains three aspects of product security:
v Configuring user security
v “Advanced Backup and Recovery security considerations” on page 110
v “Setting up NetView authentication of Take Action commands” on page 110
Configuring user security
You can control who has access to the Tivoli Enterprise Portal through
authentication of user IDs and passwords. Initially, the Tivoli Enterprise Portal has
only one valid user ID, sysadmin. You use this user ID to log on and create other
users.
How you configure user security depends on the operating system where the hub
Tivoli Enterprise Monitoring Server is installed.
Table 11. User security configuration methods
Operating system of the hub monitoring
server
Method of Tivoli Enterprise Portal user
authentication
z/OS Security product specified in the
Configuration Tool
Windows User accounts
Linux and UNIX Password files
For complete information about user security issues in the Tivoli Monitoring
Services environment, see the Tivoli Enterprise Portal online help and the following
IBM Tivoli Monitoring publications:
v IBM Tivoli Monitoring Installation and Setup Guide
v Configuring IBM Tivoli Enterprise Monitoring Server on z/OS
v IBM Tivoli Monitoring Administrator’s Guide
Setting up user security if the hub Tivoli Enterprise Monitoring Server
is running on a z/OS system
If your hub Tivoli Enterprise Monitoring Server is running on z/OS, you need to
configure RACF or another supported security product to authenticate your Tivoli
Enterprise Portal users. User IDs must also be defined on any Linux, UNIX, and
Windows systems where distributed components are installed.
After you specify a security product and activate security validation by the hub
monitoring server in the Configuration Tool, user access to the Tivoli Enterprise
Portal is controlled by user ID and password validation at the monitoring server,
using the selected security product.
IBM Confidential
105

Important
The first time you configure the Tivoli Enterprise Monitoring Server, you can
select a security system for the runtime environment if desired, but be sure to
leave security turned off in the Security validation field of the Specify
Configuration Values panel (Figure 33 on page 83) for the monitoring server.
Security validation? ==> N (Y, N)
IBM Confidential
106 IBM Tivoli Advanced Backup and Recovery for z/OS Planning and Configuration Guide
Steps to perform before turning on security validation
Before turning on security validation, perform the following steps:
1. Configure and start the Tivoli Enterprise Monitoring Server, Advanced Backup
and Recovery for z/OS monitoring agent, and Tivoli Enterprise Portal Server,
following the instructions in Chapter 6, “Configuring the hub monitoring server
and the monitoring agent on a z/OS image,” on page 75.
2. Use the sysadmin user ID to log on to the Tivoli Enterprise Portal, and create
other user accounts with different levels of permissions. Be sure to create at
least one Tivoli Enterprise Portal user account with administrator authority. All
user accounts need valid TSO user IDs and passwords, for signing on to the
Tivoli Enterprise Portal after security validation is turned on at the hub Tivoli
Enterprise Monitoring Server on z/OS.
To create an administrator user account in the Tivoli Enterprise Portal, follow
these steps:
a. Click
Administer Users.
b. On the Administer Users window, select the sysadmin user account and
click
Create Another User.
c. Create a user account with the same user ID as a valid TSO user ID. The
new user account is based on the sysadmin account and therefore has
administrator authority in the Tivoli Enterprise Portal.
For further instructions on managing user accounts, see the Tivoli Enterprise
Portal online help or the IBM Tivoli Monitoring: IBM Tivoli Monitoring
Administrator’s Guide.
3. Verify that your security product is installed and configured correctly.
Activating user security
After you have performed all the steps listed above, you can turn on user security
at the Tivoli Enterprise Monitoring Server.
1. If you have already specified a security system for the runtime environment
where the hub Tivoli Enterprise Monitoring Server is installed and configured,
skip to step 3. Otherwise, navigate in the Configuration Tool to the Runtime
Environments (RTEs) panel (Figure 27 on page 77) and enter U (Update) in
the Action field beside the name of the runtime environment where the hub
Tivoli Enterprise Monitoring Server is installed and configured.
2. On the Update Runtime Environment panel, specify the security system you
want to use, and press Enter. This example specifies RACF:
Security system ==> RACF (RACF, ACF2, TSS, NAM, None)
If you select ACF2, you must also specify the ACF2 macro library in the next
field.
3. On the Product Component Selection Menu (Figure 30 on page 81), enter 1
to select Tivoli Enterprise Monitoring Server.
4. On the Configure the TEMS menu (Figure 31 on page 81), select option 2
(Specify configuration values).
5. On the Specify Configuration Values panel (Figure 33 on page 83), specify Y
in the Security validation? field:
Security validation? ==> Y (Y, N)
6. Press Enter to return to the Configure the TEMS menu.
7. On the Configure the TEMS menu, select option 4 (Create runtime
members) to open JCL that you can review, edit, and submit. Check to make
sure the return code is zero.
IBM Confidential
Chapter 7. Setting up security 107
8. After the job completes, press F3 (Back) repeatedly to exit the Configuration
Tool.
9. Locate the section for the security system you are using and follow the
instructions:
v “Defining security for RACF”
v “Defining security for Network Access Method (NAM)”
v “Defining security for CA-ACF2”
v “Defining security for CA-TOP SECRET”
10. Verify that the user account you created, using a TSO user ID, can log on to
the Tivoli Enterprise Portal.
Defining security for RACF
To implement RACF security, recycle the Tivoli Enterprise Monitoring Server started
task.
Defining security for Network Access Method (NAM)
You can use the product-provided security feature NAM (Network Access Method)
to secure your Tivoli Enterprise Monitoring Server. Complete the following steps to
implement NAM security.
1. Access the z/OS system console.
2. Define a password for each user who accesses the Tivoli Enterprise Monitoring
Server:
F taskname,NAM SET user_id PASSWORD=password
where taskname is the name of your Tivoli Enterprise Monitoring Server started
task, user_id is the user ID, and password is the NAM password you want to
define for that user.
3. Recycle the Tivoli Enterprise Monitoring Server started task.
Defining security for CA-ACF2
Complete the following steps to install an exit for CA-AF2 security validation.
1. Stop the Tivoli Enterprise Monitoring Server started task.
2. Follow the instructions in KLVA2NEV to assemble and link KLVA2NEV. Change
the variables as directed. Member KLVA2NEV in &hilev.&rte.TKANSAM is the
product-supplied interface to CA-ACF2. The product-supplied member
KLV@ASM, in &hilev.&rte.RKANSAM, contains sample assembly JCL, which is
assembled into the RKANMODU data set for the specific runtime environment..
3. Define the Tivoli Enterprise Monitoring Server started task as a MUSASS to
CA-ACF2:
v Log on to TSO. At the READY prompt, type ACF and press Enter.
v At the ACF prompt, type SET LID and press Enter.
v At the LID prompt, type
CH ctaskname MUSASS
where taskname is the name of the Tivoli Enterprise Monitoring Server
started task. Press Enter.
v At the LID prompt, type END and press Enter.
4. Start the Tivoli Enterprise Monitoring Server started task.
Defining security for CA-TOP SECRET
Complete the following steps to implement CA-TOP SECRET security.
1. Stop the Tivoli Enterprise Monitoring Server started task.
IBM Confidential
108 IBM Tivoli Advanced Backup and Recovery for z/OS Planning and Configuration Guide
2. Define the Tivoli Enterprise Monitoring Server as a started task in the STC
record and relate it to a master facility accessor identifier. For example:
TSS ADD(STC) PROC(taskname) ACID(master_facility_acid)
where taskname is the name of your Tivoli Enterprise Monitoring Server started
task. The value for master_facility_acid might be the same as taskname.
3. Define the name of your Tivoli Enterprise Monitoring Server started task as a
FACILITY in the CA-TOP SECRET Facility Matrix Table. Set the SIGN
parameter as SIGN(M) and set MODE to MODE=FAIL. Make sure the name of
your Tivoli Enterprise Monitoring Server started task and the FACILITY name
match.
Example: This example shows FACILITY statements for a site that uses
CA-TOP SECRET. Some statements might not be relevant to your site or might
need to be modified to fit the standards and configuration of your site.
FACILITY(USER3=NAME=task) &#SPACE
FACILITY(task=MODE=FAIL,ACTIVE,SHRPRF) &#SPACE
FACILITY(task=PGM=KLV,NOASUBM,NOABEND,NOXDEF)&#SPACE
FACILITY(task=ID=3,MULTIUSER,RES,WARNPW,SIGN(M))&#SPACE
FACILITY(task=NOINSTDATA,NORNDPW,AUTHINIT,NOPROMPT,NOAUDIT,NOMRO)
FACILITY(task=NOTSOC,LOG(INIT,SMF,MSG,SEC9)) &#SPACE
4. Start the Tivoli Enterprise Monitoring Server started task.
Setting up security for a hub Tivoli Enterprise Monitoring Server
running on a Windows, Linux, or UNIX system
When you install and configure the hub Tivoli Enterprise Monitoring Server on a
Windows, Linux, or UNIX system, do not turn on security validation immediately.
Make sure the Security: Validate User check box is cleared. To see this setting in
Manage Tivoli Monitoring Services, right-click Tivoli Enterprise Monitoring
Server and click Reconfigure.
Steps to perform before turning on security validation
Before turning on security validation, perform the following steps:
1. Configure and start the Tivoli Enterprise Monitoring Server, Advanced Backup
and Recovery for z/OS monitoring agent, and Tivoli Enterprise Portal Server,
following the instructions in Chapter 5, “Configuring the hub monitoring server
on a Windows system and the monitoring agent on a z/OS image,” on page 53.
2. Use the sysadmin user ID to log on to the Tivoli Enterprise Portal, and create
other user accounts with different levels of permissions. Be sure to create at
least one Tivoli Enterprise Portal user account with administrator authority and
with the same user ID as one already set up in your network domain user
accounts or in the operating system where the hub Tivoli Enterprise Monitoring
Server is installed.
To create an administrator user account in the Tivoli Enterprise Portal, follow
these steps:
a. Click
Administer Users.
b. On the Administer Users window, select the sysadmin user account and
click
Create Another User.
c. Create a user account with the same user ID as one already set up in your
network domain user accounts or in the operating system where the hub
Tivoli Enterprise Monitoring Server is installed. The new user account is
based on the sysadmin account and therefore has administrator authority in
the Tivoli Enterprise Portal.
IBM Confidential
Chapter 7. Setting up security 109
For further instructions on managing user accounts, see the Tivoli Enterprise
Portal online help or the IBM Tivoli Monitoring: IBM Tivoli Monitoring
Administrator’s Guide.
Activating user security
After you have performed the steps listed above, you can activate user security
validation by the hub Tivoli Enterprise Monitoring Server:
1. In Manage Tivoli Monitoring Services, right-click Tivoli Enterprise
Monitoring Server and click Reconfigure.
2. Select Security: Validate User.
3. Click OK twice.
4. Recycle the Tivoli Enterprise Monitoring Server.
5. Verify that the user account you created can log on to the Tivoli Enterprise
Portal.
Advanced Backup and Recovery security considerations
Access to the Advanced Backup and Recovery for z/OS workspaces and authority
to perform various functions with the product are controlled through password
validation. Administrative users of the Tivoli Enterprise Portal can set permissions
for specific product features. It is important to provide access to the product only to
users who can be trusted with the information and capabilities the product provides.
For information about user administration, see IBM Tivoli Monitoring: IBM Tivoli
Monitoring Administrator’s Guide.
Advanced Backup and Recovery for z/OS does not provide user-based security with
respect to z/OS information displayed. All users of the product have access to the
same z/OS reports. If you configure forwarding of Take Action commands to
NetView on z/OS, then NetView performs user authorization and command
execution. Otherwise, all users have the same Take Action command authority. See
“Setting up NetView authentication of Take Action commands.”
OMVS segment
To use the TCP/IP communication protocols, a Tivoli Enterprise Monitoring Server
on z/OS requires a default OMVS segment. See the z/OS Communications Server
IP Configuration Guide for an explanation of how to provide an OMVS segment.
Setting up NetView authentication of Take Action commands
You can configure a monitoring server or monitoring agent address space to
redirect z/OS Take Action commands to NetView through the Program to Program
Interface (PPI). Take Action commands issued in NetView make full System
Authorization Facility (SAF) calls for authorization. NetView uses the Tivoli
Enterprise Portal user ID to determine the NetView operator on which the command
authorization is performed. If command authorization passes, the command is
executed on the NetView operator. Messages are written to the NetView log to
provide an audit trail of the commands and the users that issued them.
If you enable NetView command authorization on the monitoring server, you must
also enable NetView to execute the commands.
Take Action forwarding requires NetView on z/OS V5.2 with APAR OA18449
applied.
IBM Confidential
110 IBM Tivoli Advanced Backup and Recovery for z/OS Planning and Configuration Guide
To set up NetView authentication of Take Action commands, complete the steps
below:
1. “Step 1. Configure NetView authentication in the Configuration Tool”
2. “Step 2. Add the NetView CNMLINK data set to the Tivoli Enterprise Monitoring
Server started task” on page 112
3. “Step 3. Enable NetView to authorize Take Action commands” on page 112
Step 1. Configure NetView authentication in the Configuration Tool
You configure NetView authentication of Take Action commands on the following
Configuration Tool panels:
v Tivoli Enterprise Monitoring Server: The Specify Configuration Values panel
(Figure 33 on page 83).
v Advanced Backup and Recovery for z/OS monitoring agent: The Specify
Advanced Agent Configuration Values panel (Figure 42 on page 92).
The parameters for the monitoring server and the monitoring agent are the same.
Forward Take Action commands to NetView for z/OS?
Indicate whether you want z/OS console commands issued as Take Action
commands to be forwarded to NetView for authorization and execution.
NetView PPI receiver
Specify the name of the PPI receiver on NetView that is to receive Take
Action commands. This name is required if you answer Y to Forward Take
Action commands to NetView for z/OS? and must match the receiver
name specified on the NetView APSERV command. (The default name is
CNMPCMDR.) If the specified name is incorrect or the receiver is not active
on NetView for z/OS, default (MGCR) command routing is performed. The
Configuration Tool generates the KGLHC_PPI_RECEIVER parameter in the
KppENV member of the &rhilev.&rtename.RKANPARU library (where pp is
DS for the monitoring server or HL for the Advanced Backup and Recovery
for z/OS monitoring agent).
The receiver name must be a unique identifier, up to 8 characters in length.
It can contain alphabetic characters A-Z or a-z, numeric characters 0-9, and
the following special characters: dollar sign ($), percent sign (%),
ampersand (&), at sign (@), and number sign (#). This value must match
the value specified in the NetView DSIPARM initialization member,
CNMSTYLE (see “Step 3. Enable NetView to authorize Take Action
commands” on page 112).
The value for the monitoring agent defaults to the value set for the
monitoring server, if one is configured in the same runtime environment.
Otherwise, the default is CNMPCMDR.
TEMS PPI sender
Optionally, specify the name of the PPI sender. The value must be a unique
identifier, up to 8 characters in length. It can contain alphabetic characters
A-Z or a-z, numeric characters 0-9, and the following special characters:
dollar sign ($), percent sign (%), ampersand (&), at sign (@), and number
sign (#). This name must not conflict with any NetView for z/OS domain
name, as it is used in logging the command and command response in the
NetView log. If a value is specified, the Configuration Tool generates the
KGLHC_PPI_SENDER parameter in the KppENV member of the
IBM Confidential
Chapter 7. Setting up security 111
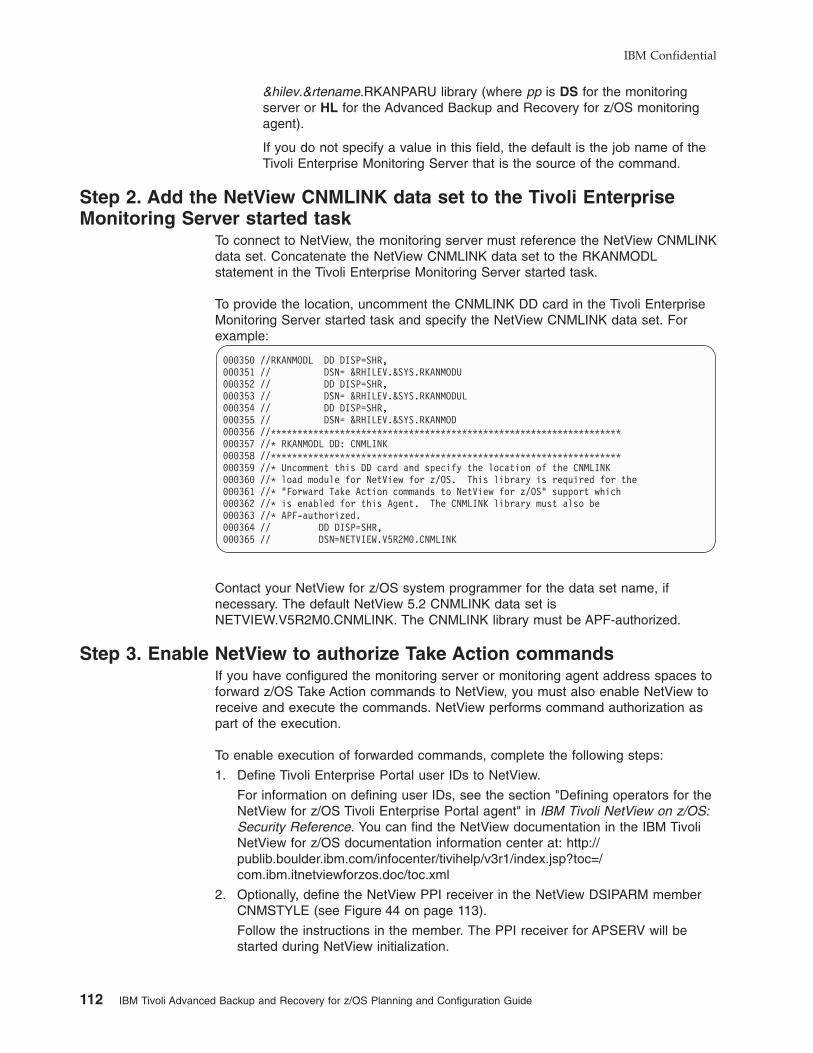
&hilev.&rtename.RKANPARU library (where pp is DS for the monitoring
server or HL for the Advanced Backup and Recovery for z/OS monitoring
agent).
If you do not specify a value in this field, the default is the job name of the
Tivoli Enterprise Monitoring Server that is the source of the command.
Step 2. Add the NetView CNMLINK data set to the Tivoli Enterprise
Monitoring Server started task
To connect to NetView, the monitoring server must reference the NetView CNMLINK
data set. Concatenate the NetView CNMLINK data set to the RKANMODL
statement in the Tivoli Enterprise Monitoring Server started task.
To provide the location, uncomment the CNMLINK DD card in the Tivoli Enterprise
Monitoring Server started task and specify the NetView CNMLINK data set. For
example:
000350 //RKANMODL DD DISP=SHR,
000351 // DSN= &RHILEV.&SYS.RKANMODU
000352 // DD DISP=SHR,
000353 // DSN= &RHILEV.&SYS.RKANMODUL
000354 // DD DISP=SHR,
000355 // DSN= &RHILEV.&SYS.RKANMOD
000356 //******************************************************************
000357 //* RKANMODL DD: CNMLINK
000358 //******************************************************************
000359 //* Uncomment this DD card and specify the location of the CNMLINK
000360 //* load module for NetView for z/OS. This library is required for the
000361 //* "Forward Take Action commands to NetView for z/OS" support which
000362 //* is enabled for this Agent. The CNMLINK library must also be
000363 //* APF-authorized.
000364 // DD DISP=SHR,
000365 // DSN=NETVIEW.V5R2M0.CNMLINK
Contact your NetView for z/OS system programmer for the data set name, if
necessary. The default NetView 5.2 CNMLINK data set is
NETVIEW.V5R2M0.CNMLINK. The CNMLINK library must be APF-authorized.
Step 3. Enable NetView to authorize Take Action commands
If you have configured the monitoring server or monitoring agent address spaces to
forward z/OS Take Action commands to NetView, you must also enable NetView to
receive and execute the commands. NetView performs command authorization as
part of the execution.
To enable execution of forwarded commands, complete the following steps:
1. Define Tivoli Enterprise Portal user IDs to NetView.
For information on defining user IDs, see the section "Defining operators for the
NetView for z/OS Tivoli Enterprise Portal agent" in IBM Tivoli NetView on z/OS:
Security Reference. You can find the NetView documentation in the IBM Tivoli
NetView for z/OS documentation information center at: http://publib.boulder.ibm.com/infocenter/tivihelp/v3r1/index.jsp?toc=/com.ibm.itnetviewforzos.doc/toc.xml
2. Optionally, define the NetView PPI receiver in the NetView DSIPARM member
CNMSTYLE (see Figure 44 on page 113).
Follow the instructions in the member. The PPI receiver for APSERV will be
started during NetView initialization.
IBM Confidential
112 IBM Tivoli Advanced Backup and Recovery for z/OS Planning and Configuration Guide
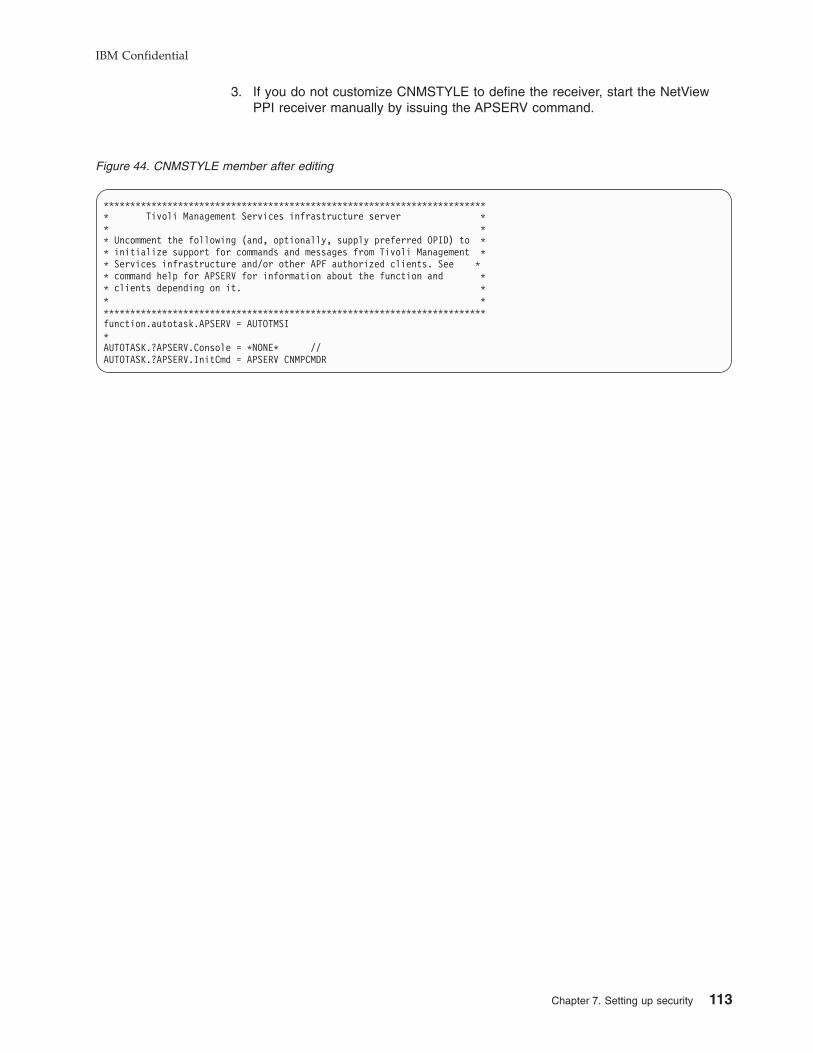
3. If you do not customize CNMSTYLE to define the receiver, start the NetView
PPI receiver manually by issuing the APSERV command.
Figure 44. CNMSTYLE member after editing
************************************************************************
* Tivoli Management Services infrastructure server *
* *
* Uncomment the following (and, optionally, supply preferred OPID) to *
* initialize support for commands and messages from Tivoli Management *
* Services infrastructure and/or other APF authorized clients. See *
* command help for APSERV for information about the function and *
* clients depending on it. *
* *
************************************************************************
function.autotask.APSERV = AUTOTMSI
*
AUTOTASK.?APSERV.Console = *NONE* //
AUTOTASK.?APSERV.InitCmd = APSERV CNMPCMDR
IBM Confidential
Chapter 7. Setting up security 113

IBM Confidential
114 IBM Tivoli Advanced Backup and Recovery for z/OS Planning and Configuration Guide
Chapter 8. Enabling system variable support
This chapter provides detailed instructions for enabling system variable support and
using it to run your monitoring agents on any z/OS system. With system variables,
the software becomes z/OS system-independent. The software can then be ported
and started on any z/OS system without extensive Configuration Tool
reconfiguration.
Tips
v The system variables discussed in this chapter are not the same as JCL
system symbols.
v For additional information, you can access the README file for system
variable support by issuing the README SYS command from any
Configuration Tool panel.
By using system variable support, the components inherit the system values for the
system on which they are started (the host z/OS system). These system-specific
values are then automatically loaded into dynamic in-memory parameter members
that exist only while the component runs. The result is that the software runs
correctly using the system-specific parameter values for the host z/OS system.
Using system variable support includes the following benefits:
v You can deploy the same software unit, consisting of any or all monitoring
agents, on any system without modification. LPAR-specific values are
automatically resolved and substituted at product startup.
v The number of unique runtime environments required is smaller. This feature
saves storage space, CPU, and labor.
v The same started task JCL and the same VTAM node can be used on any
system without modification.
v You can choose to use a single VTAM major node in place of the individual
product major nodes. When generated, a single VTAM major node contains all
VTAM applids for all monitoring agents you have configured in the runtime
environment.
When using system variable support, consider the following facts:
v Product started tasks (STCs) contain a new preprocessing step (STEP1 in the
STC JCL). This new step resolves all system variable specifications in the
product parameter members.
v Product parameter members contain many variables, instead of values, that are
resolved when the STC starts. For example, the members contain &SVXDSNV
instead of the VSAM high-level qualifier value.
Sample usage scenario
The following steps describe the process for enabling and using system variable
support.
1. Define and configure a runtime environment. During runtime environment
configuration, specify the values to enable system variable support. See
Chapter 5 for details on configuring a runtime environment.
IBM Confidential
115
Note: Multiple runtime environments might be required depending on the
runtime environment structure (full, sharing, base, or SMP/E), the CMS
type (hub or remote), and variations in product mixtures.
2. Create the system variable parameter member.
After configuring a runtime environment, you can create the system variable
parameter member. Each runtime environment contains one user system
variable parameter member named RKANPARU(rtename), which contains all
system-specific values.
See “Creating the system variable parameter member” on page 118 for
information on creating the rtename system variable parameter member in the
RKANPARU library.
3. Create the VTAM major node rename job.
After configuring a runtime environment, you can create the VTAM major node
rename job. This job creates VTAM major nodes on remote systems with names
that are resolved from your system variable specification.
See “Creating the VTAM major node rename job” on page 119 for information
on creating a VTAM major node rename job.
4. Create the runtime environment transport job by using the RTE Utility option
Generate sample transport JCL.
5. Copy the runtime environment to a remote system by using the runtime
environment transport job (or any other copy utility).
6. After the copy completes, edit the system variable parameter member
RKANPARU (rtename). If necessary, set values for components running on
other systems. For example, set values for a hub CMS running on a different
LPAR.
7. Perform other remote system setup tasks as required.
v Copy the new started tasks to your system procedure library. These started
tasks have been enabled for system variables.
v If you are not using an existing system variable for the runtime environment
name on the LPAR, set the &SYSNAME system variable to the name of the
runtime environment. This is set in SYS1.PARMLIB(IEASYMxx).
v If you are using VTAM system variable support, you must run the VTAM
major node rename job. This job creates new major nodes that are named
according to your system variable specifications. After the new nodes are
created, copy them to SYS1.VTAMLST.
v VSAM file allocation and seeding are required on every system.
8. Start the components.
Enabling system variable support
You enable system variable support from the Add Runtime Environment panel. In
an existing runtime environment, use the Update (U) command to enable system
variable support.
Some older versions of monitoring agents might not support the system variable
feature. These monitoring agents can exist in the same runtime environment, and
you need not reconfigure them in the runtime environment.
Complete the following steps to enable system variable support.
1. From the Main Menu, select Configure products > Select product to
configure and select the product you are configuring.
The Configuration Tool displays the Runtime Environments (RTEs) panel.
IBM Confidential
116 IBM Tivoli Advanced Backup and Recovery for z/OS Planning and Configuration Guide
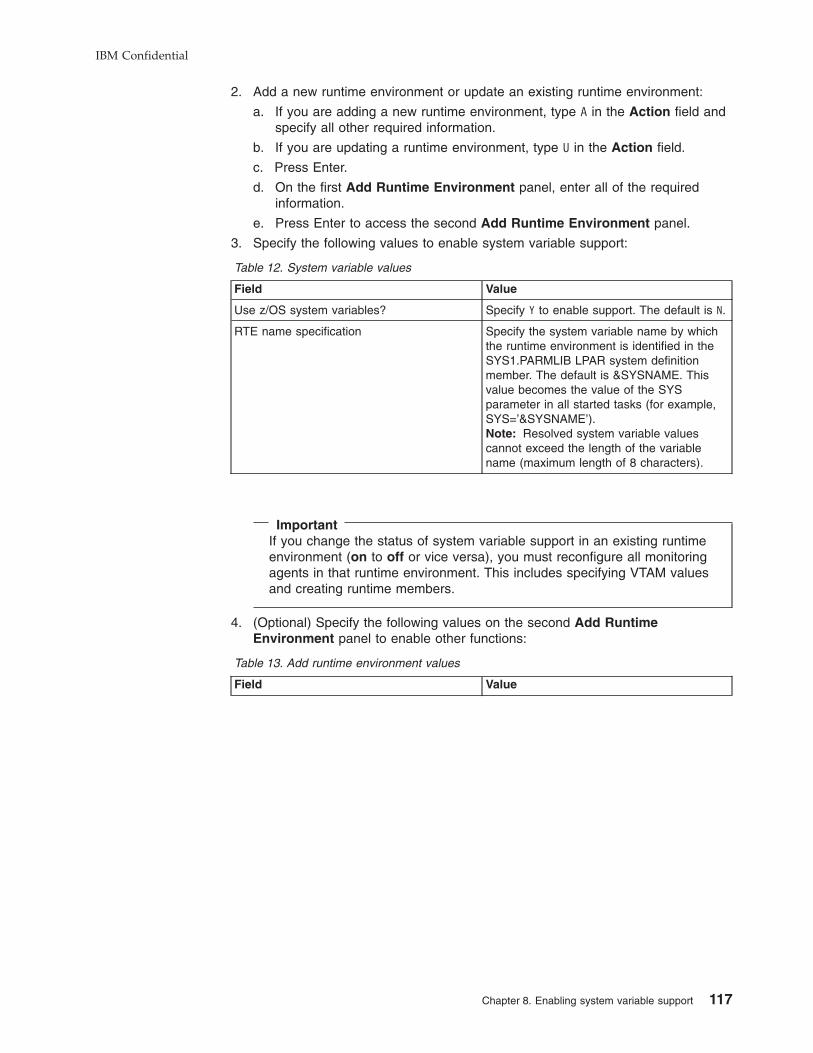
2. Add a new runtime environment or update an existing runtime environment:
a. If you are adding a new runtime environment, type A in the Action field and
specify all other required information.
b. If you are updating a runtime environment, type U in the Action field.
c. Press Enter.
d. On the first Add Runtime Environment panel, enter all of the required
information.
e. Press Enter to access the second Add Runtime Environment panel.
3. Specify the following values to enable system variable support:
Table 12. System variable values
Field Value
Use z/OS system variables? Specify Y to enable support. The default is N.
RTE name specification Specify the system variable name by which
the runtime environment is identified in the
SYS1.PARMLIB LPAR system definition
member. The default is &SYSNAME. This
value becomes the value of the SYS
parameter in all started tasks (for example,
SYS=’&SYSNAME’).
Note: Resolved system variable values
cannot exceed the length of the variable
name (maximum length of 8 characters).
Important
If you change the status of system variable support in an existing runtime
environment (on to off or vice versa), you must reconfigure all monitoring
agents in that runtime environment. This includes specifying VTAM values
and creating runtime members.
4. (Optional) Specify the following values on the second Add Runtime
Environment panel to enable other functions:
Table 13. Add runtime environment values
Field Value
IBM Confidential
Chapter 8. Enabling system variable support 117
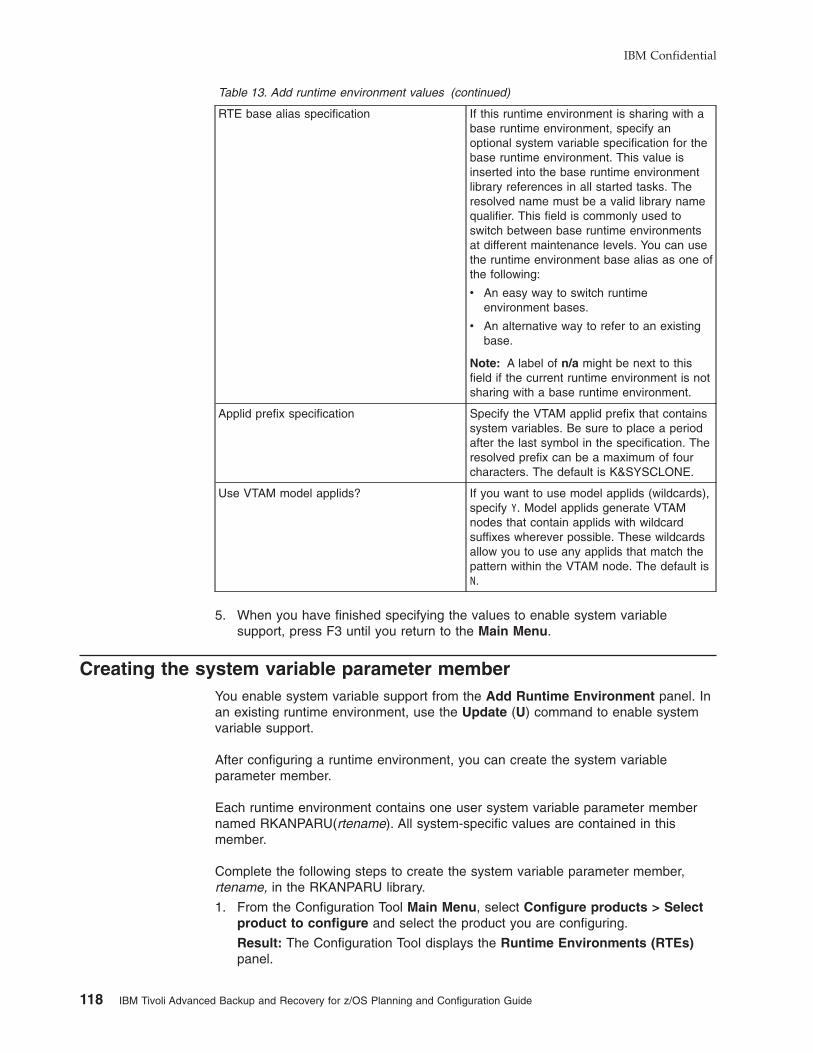
Table 13. Add runtime environment values (continued)
RTE base alias specification If this runtime environment is sharing with a
base runtime environment, specify an
optional system variable specification for the
base runtime environment. This value is
inserted into the base runtime environment
library references in all started tasks. The
resolved name must be a valid library name
qualifier. This field is commonly used to
switch between base runtime environments
at different maintenance levels. You can use
the runtime environment base alias as one of
the following:
v An easy way to switch runtime
environment bases.
v An alternative way to refer to an existing
base.
Note: A label of n/a might be next to this
field if the current runtime environment is not
sharing with a base runtime environment.
Applid prefix specification Specify the VTAM applid prefix that contains
system variables. Be sure to place a period
after the last symbol in the specification. The
resolved prefix can be a maximum of four
characters. The default is K&SYSCLONE.
Use VTAM model applids? If you want to use model applids (wildcards),
specify Y. Model applids generate VTAM
nodes that contain applids with wildcard
suffixes wherever possible. These wildcards
allow you to use any applids that match the
pattern within the VTAM node. The default is
N.
5. When you have finished specifying the values to enable system variable
support, press F3 until you return to the Main Menu.
Creating the system variable parameter member
You enable system variable support from the Add Runtime Environment panel. In
an existing runtime environment, use the Update (U) command to enable system
variable support.
After configuring a runtime environment, you can create the system variable
parameter member.
Each runtime environment contains one user system variable parameter member
named RKANPARU(rtename). All system-specific values are contained in this
member.
Complete the following steps to create the system variable parameter member,
rtename, in the RKANPARU library.
1. From the Configuration Tool Main Menu, select Configure products > Select
product to configure and select the product you are configuring.
Result: The Configuration Tool displays the Runtime Environments (RTEs)
panel.
IBM Confidential
118 IBM Tivoli Advanced Backup and Recovery for z/OS Planning and Configuration Guide
2. Create the system variable parameter member:
a. Type Z next to the name of the runtime environment you have configured
and press Enter.
b. On the RTE Utility Menu, select Create System Variable parameter
member and press Enter.
Result: The JCL that creates the system variable parameter member
(CB#Vxxxx) job is displayed.
c. Review the JCL and submit the job. Verify that the job completes
successfully and that all return codes are zero.
d. Edit the RKANPARU(rtename) parameter member. Follow the directions to
ensure proper resolution of cross-system variables.
3. When you have finished creating the system variable parameter member, press
F3 until you return to the Main Menu.
Creating the VTAM major node rename job
After configuring a runtime environment, you can create the VTAM major node
rename job. This job creates VTAM major nodes on remote systems with names
that are resolved from your system variable specification.
Complete the following steps to create a VTAM major node rename job in the
INSTJOBS library.
1. From the Configuration Tool Main Menu, select Configure products > Select
product to configure and select the product you are configuring.
Result: The Configuration Tool displays the Runtime Environments (RTEs)
panel.
2. Create the VTAM major node rename job:
a. Type Z next to the name of the runtime environment you have configured
and press Enter.
b. On the RTE Utility Menu, select Create System Variable VTAM major
node rename job, and then press Enter. Result: The JCL that renames the
VTAM major node (CB#7xxxx) job is displayed.
c. Review the JCL. Do not submit the job yet.
Note: You must submit this job on each remote system where the
monitoring software is to run. The job is in the RKANSAMU library.
3. When you have finished creating the VTAM major node rename job, press F3
until you return to the Main Menu.
Creating one VTAM major node for all monitoring agents in the
runtime environment
A single VTAM major node can contain all the VTAM applids for all of the monitoring
agents you have configured in the runtime environment. This single major node is
then used in place of the individual product major nodes.
If you choose to use a single VTAM major node, you must create it after all
monitoring agents have been configured in the runtime environment. After the node
is created and copied to your system VTAM system library (SYS1.VTAMLST), you
vary it active and then start all of the components (started tasks).
IBM Confidential
Chapter 8. Enabling system variable support 119

Complete the following steps to create a single VTAM major node in the
RKANSAMU library.
1. From the Configuration Tool Main Menu, select Configure products > Select
product to configure and select the product you are configuring.
Result: The Configuration Tool displays the Runtime Environments (RTEs)
panel.
2. Create the VTAM major node:
a. Type Z next to the name of the runtime environment you have configured
and press Enter.
b. On the RTE Utility Menu, select Create VTAM major node(one node for
all products) and press Enter.
c. On the Create VTAM Major Node panel, type the name you want to use for
the single node and press Enter.
The JCL that creates the single node is displayed.
d. Review the JCL and submit the job. Verify that the job completed
successfully and that all return codes are zero.
3. When you have finished creating a single VTAM major node, press F3 until you
return to the Configuration Tool Main Menu.
IBM Confidential
120 IBM Tivoli Advanced Backup and Recovery for z/OS Planning and Configuration Guide
Chapter 9. Using batch mode processing
The Configuration Tool offers batch mode processing for several configuration
scenarios. You can use the batch mode processing utility to configure runtime
environments and monitoring agents without going through the ISPF panels and
filling in the required parameter values. After you establish and configure a runtime
environment in a z/OS image or address space, you can use the batch mode
processing utility to replicate your runtime environment in other z/OS images or
address spaces.
This chapter provides instructions on using batch mode processing to perform these
tasks:
v Create a new runtime environment by running a single batch job
v Replicate an existing runtime environment
v Transport a replicated runtime environment to other z/OS images
Batch mode processing using the Configuration Tool is an alternative way of
building and configuring a runtime environment. Instead of using the interactive
Configuration Tool to build and configure a runtime environment, you can submit a
single batch job that performs the same processing.
Batch mode processing in the Configuration Tool includes the following
components:
Configuration Tool batch job (CICATB)
CICATB is a new job that is generated into the INSTJOBS library. You
submit this job to build and configure a runtime environment.
Configuration Tool batch parameter member
This is a single member in INSTJOBS, containing all of the configuration
values for all monitoring agents to be configured in the runtime
environment.
RTE Utility to create Configuration Tool batch parameter member
This utility creates the batch parameter member for an existing runtime
environment, which can then be used for running subsequent CICATB jobs.
The name of the parameter member is the runtime environment name.
You create the Configuration Tool batch job only once on an image and then use it
for all subsequent batch mode processing on that image.
Tips
v You must recreate the Configuration Tool batch job if your ISPF
environment has changed.
v When the SUBMIT parameter is set to YES, the generated runtime
environment configuration jobs are submitted automatically if the job names
do not currently exist in the INSTJOBS library. If the generated jobs already
exist, then the jobs are regenerated but not automatically submitted.
v The JCL suffix must be unique for each runtime environment, because
when the Configuration Tool batch job runs, it is used in every member
name that is generated in INSTJOBS. If the suffix is not unique, the jobs
that are generated conflict with other runtime environment jobs that might
already exist in INSTJOBS.
IBM Confidential
121
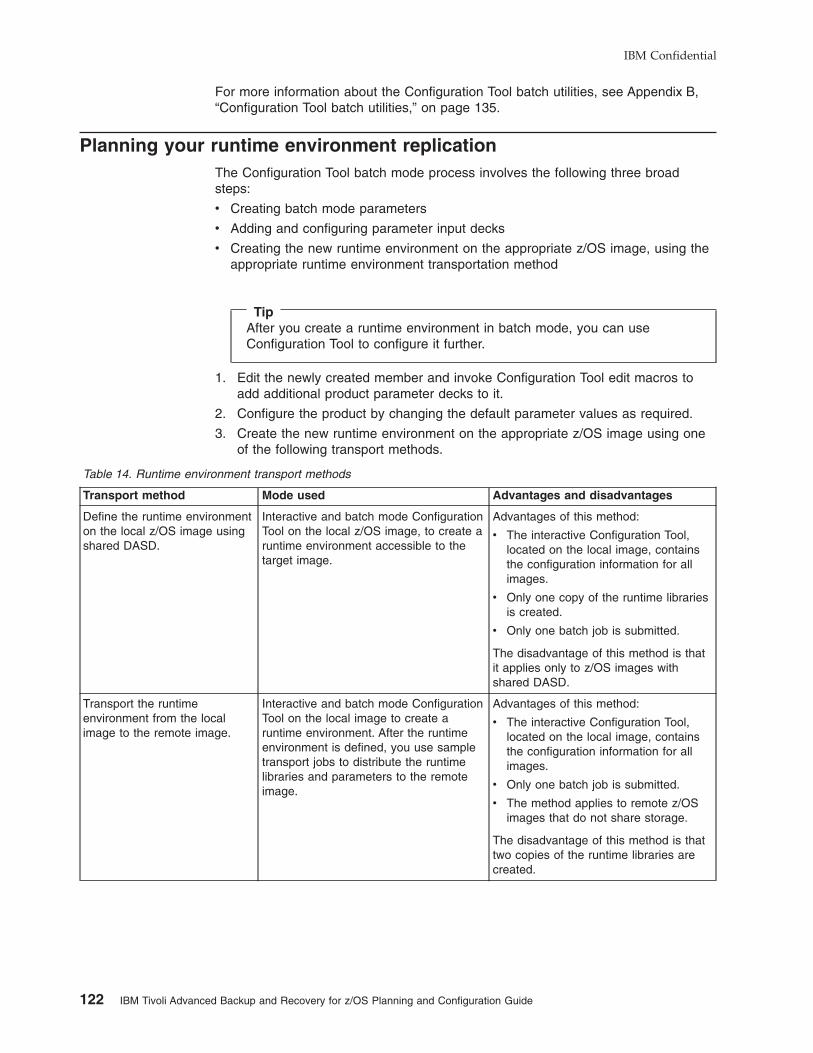
For more information about the Configuration Tool batch utilities, see Appendix B,
“Configuration Tool batch utilities,” on page 135.
Planning your runtime environment replication
The Configuration Tool batch mode process involves the following three broad
steps:
v Creating batch mode parameters
v Adding and configuring parameter input decks
v Creating the new runtime environment on the appropriate z/OS image, using the
appropriate runtime environment transportation method
Tip
After you create a runtime environment in batch mode, you can use
Configuration Tool to configure it further.
1. Edit the newly created member and invoke Configuration Tool edit macros to
add additional product parameter decks to it.
2. Configure the product by changing the default parameter values as required.
3. Create the new runtime environment on the appropriate z/OS image using one
of the following transport methods.
Table 14. Runtime environment transport methods
Transport method Mode used Advantages and disadvantages
Define the runtime environment
on the local z/OS image using
shared DASD.
Interactive and batch mode Configuration
Tool on the local z/OS image, to create a
runtime environment accessible to the
target image.
Advantages of this method:
v The interactive Configuration Tool,
located on the local image, contains
the configuration information for all
images.
v Only one copy of the runtime libraries
is created.
v Only one batch job is submitted.
The disadvantage of this method is that
it applies only to z/OS images with
shared DASD.
Transport the runtime
environment from the local
image to the remote image.
Interactive and batch mode Configuration
Tool on the local image to create a
runtime environment. After the runtime
environment is defined, you use sample
transport jobs to distribute the runtime
libraries and parameters to the remote
image.
Advantages of this method:
v The interactive Configuration Tool,
located on the local image, contains
the configuration information for all
images.
v Only one batch job is submitted.
v The method applies to remote z/OS
images that do not share storage.
The disadvantage of this method is that
two copies of the runtime libraries are
created.
IBM Confidential
122 IBM Tivoli Advanced Backup and Recovery for z/OS Planning and Configuration Guide
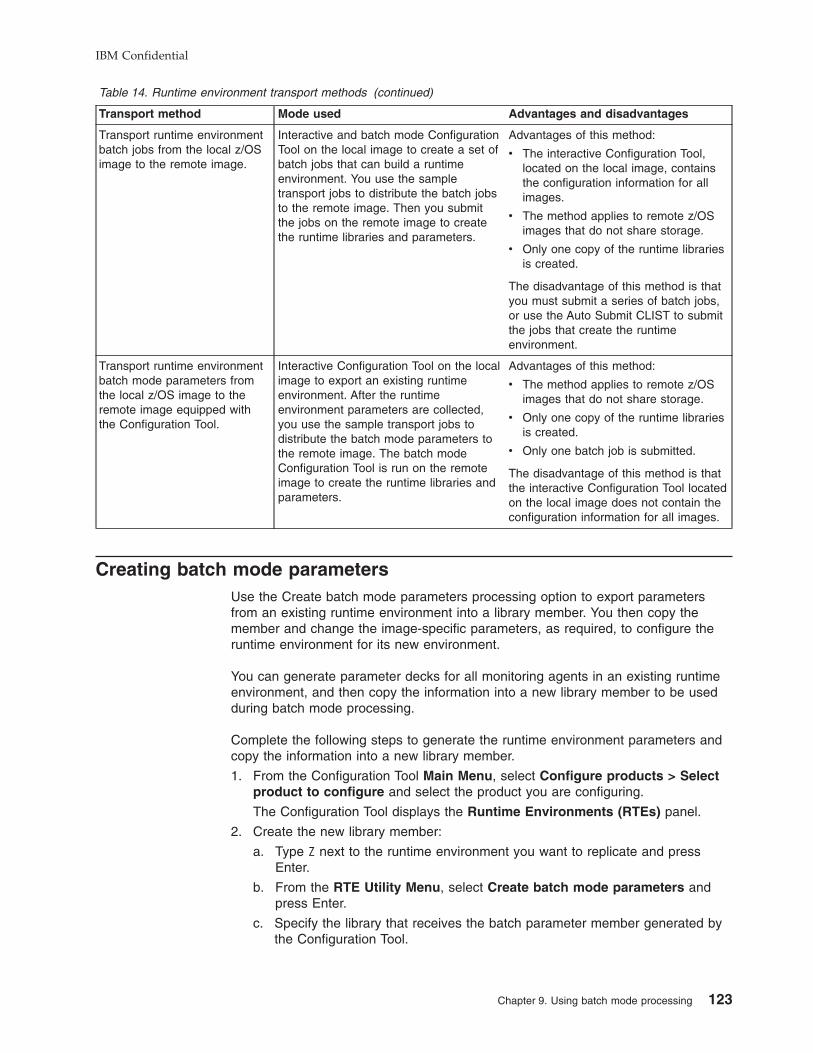
Table 14. Runtime environment transport methods (continued)
Transport method Mode used Advantages and disadvantages
Transport runtime environment
batch jobs from the local z/OS
image to the remote image.
Interactive and batch mode Configuration
Tool on the local image to create a set of
batch jobs that can build a runtime
environment. You use the sample
transport jobs to distribute the batch jobs
to the remote image. Then you submit
the jobs on the remote image to create
the runtime libraries and parameters.
Advantages of this method:
v The interactive Configuration Tool,
located on the local image, contains
the configuration information for all
images.
v The method applies to remote z/OS
images that do not share storage.
v Only one copy of the runtime libraries
is created.
The disadvantage of this method is that
you must submit a series of batch jobs,
or use the Auto Submit CLIST to submit
the jobs that create the runtime
environment.
Transport runtime environment
batch mode parameters from
the local z/OS image to the
remote image equipped with
the Configuration Tool.
Interactive Configuration Tool on the local
image to export an existing runtime
environment. After the runtime
environment parameters are collected,
you use the sample transport jobs to
distribute the batch mode parameters to
the remote image. The batch mode
Configuration Tool is run on the remote
image to create the runtime libraries and
parameters.
Advantages of this method:
v The method applies to remote z/OS
images that do not share storage.
v Only one copy of the runtime libraries
is created.
v Only one batch job is submitted.
The disadvantage of this method is that
the interactive Configuration Tool located
on the local image does not contain the
configuration information for all images.
Creating batch mode parameters
Use the Create batch mode parameters processing option to export parameters
from an existing runtime environment into a library member. You then copy the
member and change the image-specific parameters, as required, to configure the
runtime environment for its new environment.
You can generate parameter decks for all monitoring agents in an existing runtime
environment, and then copy the information into a new library member to be used
during batch mode processing.
Complete the following steps to generate the runtime environment parameters and
copy the information into a new library member.
1. From the Configuration Tool Main Menu, select Configure products > Select
product to configure and select the product you are configuring.
The Configuration Tool displays the Runtime Environments (RTEs) panel.
2. Create the new library member:
a. Type Z next to the runtime environment you want to replicate and press
Enter.
b. From the RTE Utility Menu, select Create batch mode parameters and
press Enter.
c. Specify the library that receives the batch parameter member generated by
the Configuration Tool.
IBM Confidential
Chapter 9. Using batch mode processing 123
d. The INSTJOBS library is specified by default, and the member name is the
same as that of the current runtime environment.
e. Press Enter.
3. Exit the Configuration Tool.
4. Edit the INSTJOBS library and copy the exported library member to a new
member name. This new member name is also used as the name of the new
runtime environment.
5. Using ISPF Option 2, edit the new library member to reflect the settings specific
to the z/OS image of the new runtime environment.
Transporting the runtime environment
Use any of the following methods to transport the new runtime environment to the
appropriate z/OS image.
v “Define a runtime environment on a local z/OS image using shared DASD”
v “Transport a runtime environment from a local z/OS image to a remote image” on
page 125
v “Transport runtime environment batch jobs from a local z/OS image to a remote
image equipped with the Configuration Tool” on page 126
v “Transport runtime environment batch mode parameters from a local z/OS image
to a remote image” on page 127
Before using the transport methods within this section, make sure that sufficient
space and library security authorizations exist.
For a list of the advantages and disadvantages for each transport method, see
Table 14 on page 122.
Define a runtime environment on a local z/OS image using shared
DASD
Complete the following steps to define a runtime environment on a local z/OS
image using shared DASD.
1. Start the Configuration Tool on your local image.
2. Create the Configuration Tool batch mode job:
Starting from the Main Menu, select Configure products > Services and
utilities > Create batch mode job. Press Enter.
3. Exit the Configuration Tool.
4. Perform a scan on your runtime environment parameters:
a. Edit CICATB, updating the BATCHLIB and BATCHMEM parameters as
required, and setting the SUBMIT parameter to SCAN.
b. Submit the CICATB job to scan your runtime environment parameters.
c. Verify that the job completes successfully; review the parameter report;
correct any errors in the parameter member; repeat the scan until a clean
report is generated.
5. Create a new runtime environment that is accessible to the target image:
a. Edit CICATB again, setting the SUBMIT parameter to YES. This submits the
runtime environment configuration jobs that allocate and populate runtime
libraries.
b. Submit the CICATB job to create the runtime environment.
c. Verify that the job completes successfully.
IBM Confidential
124 IBM Tivoli Advanced Backup and Recovery for z/OS Planning and Configuration Guide
6. Perform the following manual configuration steps on the target image:
v Copying procedures to PROCLIB.
v Copying VTAM definitions to VTAMLST.
v APF-authorizing libraries.
Transport a runtime environment from a local z/OS image to a remote
image
Complete the following steps to transport a runtime environment from a local z/OS
image to a remote image:
1. Start the Configuration Tool on your local image.
2. Create the Configuration Tool batch mode job:
a. Starting from the Main Menu, select Configure products > Services and
utilities > Create batch mode job.
b. Press Enter.
3. Exit the Configuration Tool.
4. Perform a scan on your runtime environment parameters:
a. Edit CICATB, updating the BATCHLIB and BATCHMEM parameters as
required, and setting the SUBMIT parameter to SCAN.
b. Submit the CICATB job to scan your runtime environment parameters.
c. Verify that the job completes successfully; review the parameter report;
correct any errors in the parameter member; repeat the scan until a clean
report is generated.
5. Create a new runtime environment that is accessible to the target image runtime
environment:
a. Edit CICATB again, setting the SUBMIT parameter to YES. This submits the
runtime environment configuration jobs that allocate and populate runtime
libraries.
b. Submit the CICATB job to create the runtime environment.
c. Verify that the job completes successfully.
6. Start the Configuration Tool again.
7. Select the runtime environment you want to transport:
a. Access the Runtime Environments (RTEs) panel. (From the Main Menu,
select Configure products > Select product to configure, and then select
a product.)
b. Type Z next to the runtime environment you want to transport and press
Enter.
8. On the RTE Utility Menu, select Generate sample transport JCL and press
Enter. This action generates several sample transport jobs in the RKANSAMU
library. Member $XPRTNDX provides a description of all generated members.
For example, to use DFDSS to transport the runtime libraries to the target
image, use the following sample jobs:
v XDFDMP01 on the master image to dump the runtime libraries.
v XDFRST01 on the target image to restore the runtime libraries.
9. Perform the following manual configuration steps on the target image:
v Copying procedures to PROCLIB.
v Copying VTAM definitions to VTAMLST.
v APF-authorizing libraries.
IBM Confidential
Chapter 9. Using batch mode processing 125

Transport runtime environment batch jobs from a local z/OS image to
a remote image equipped with the Configuration Tool
Complete the following steps to transport runtime environment batch jobs from a
local z/OS image to a remote image that is equipped with the Configuration Tool.
1. Start the Configuration Tool on your local image.
2. Create the Configuration Tool batch mode job:
a. Starting from the Main Menu, select Configure products > Services and
utilities > Create batch mode job.
b. Press Enter.
3. Exit the Configuration Tool.
4. Perform a scan on your runtime environment parameters:
a. Edit CICATB, updating the BATCHLIB and BATCHMEM parameters as
required, and setting the SUBMIT parameter to SCAN.
b. Submit the CICATB job to scan your runtime environment parameters.
c. Verify that the job completes successfully; review the parameter report;
correct any errors in the parameter member; repeat the scan until a clean
report is generated.
5. Create the runtime environment generation jobs:
a. Edit CICATB again, setting the SUBMIT parameter to NO. This creates the
runtime environment configuration jobs that allocate and populate runtime
libraries.
b. Submit the CICATB job to create the runtime environment generation jobs.
c. Verify that the job completes successfully.
6. Start the Configuration Tool again.
7. Select the runtime environment you want to transport:
a. Access the Runtime Environments (RTEs) panel. (From the Main Menu,
select Configure products > Select product to configure, and then
select a product.)
b. Type Z next to the runtime environment you want to transport and press
Enter.
8. On the RTE Utility Menu, select Generate sample transport JCL and press
Enter. This action generates several sample transport jobs in the RKANSAMU
library. Member $XPRTNDX provides a description of all generated members.
For example, to use DFDSS to transport the targets, INSTLIB, INSTDATA, and
INSTJOBS to the remote image, use the following sample jobs:
v XDFDMP03 on the master image to dump the batch jobs.
v XDFRST03 on the target image to restore the batch jobs.
9. Submit the batch jobs on the target image in the order listed in the Jobs
Sorted By Generation Sequence section of the Configuration Tool Batch
Mode job report.
You can submit each job manually or use the Auto Submit CLIST to
automatically submit the Configuration Tool jobs on the target image. To use
the Auto Submit CLIST, complete the following steps:
a. Verify that the SMP/E target libraries are available on the image where the
CLIST is to run.
b. Edit the member named SUB#jclsuffix in INSTJOBS, where jclsuffix
identifies the JCL suffix for the new runtime environment.
c. Run the CLIST to submit the Configuration Tool jobs that create the runtime
environment.
IBM Confidential
126 IBM Tivoli Advanced Backup and Recovery for z/OS Planning and Configuration Guide
10. Perform the following manual configuration steps on the target image:
v Copying procedures to PROCLIB
v Copying VTAM definitions to VTAMLST
v APF-authorizing libraries
Transport runtime environment batch mode parameters from a local
z/OS image to a remote image
Complete the following steps to transport runtime environment batch mode
parameters from a local z/OS image to a remote image.
1. Start the Configuration Tool on your local image.
2. Select the runtime environment you want to transport:
a. Access the Runtime Environments (RTEs) panel. (From the Main Menu,
select Configure products > Select product to configure, and then select
a product.)
b. Type Z next to the runtime environment you want to transport and press
Enter.
3. On the RTE Utility Menu, select Generate sample transport JCL and press
Enter. Several sample transport jobs are generated in the RKANSAMU library.
Member $XPRTNDX provides a description of all generated members.
For example, to use DFDSS to transport the targets, INSTLIB, INSTDATA, and
INSTJOBS to the remote image, use the following sample jobs:
v XDFDMP03 on the master image to dump the batch jobs.
v XDFRST03 on the target image to restore the batch jobs.
4. Create the Configuration Tool batch mode job:
a. Starting from the Main Menu, select Configure products > Services and
utilities > Create batch mode job.
b. Press Enter.
5. Exit the Configuration Tool.
6. Perform a scan on your runtime environment parameters:
a. Edit CICATB, updating the BATCHLIB and BATCHMEM parameters as
required, and setting the SUBMIT parameter to SCAN.
b. Submit the CICATB job to scan your runtime environment parameters.
c. Verify that the job completes successfully; review the parameter report;
correct any errors in the parameter member; repeat the scan until a clean
report is generated.
7. Create the runtime environment on the target image:
a. Edit CICATB again, setting the SUBMIT parameter to YES. This submits the
runtime environment configuration jobs that allocate and populate runtime
libraries.
b. Submit the CICATB job to create the runtime environment.
c. Verify that the job completes successfully.
8. Perform the following manual configuration steps on the target image:
v Copying procedures to PROCLIB.
v Copying VTAM definitions to VTAMLST.
v APF-authorizing libraries.
IBM Confidential
Chapter 9. Using batch mode processing 127

IBM Confidential
128 IBM Tivoli Advanced Backup and Recovery for z/OS Planning and Configuration Guide

Part 3. Appendixes
IBM Confidential
129

IBM Confidential
130 IBM Tivoli Advanced Backup and Recovery for z/OS Planning and Configuration Guide
Appendix A. Configuration services and utilities
You can use the configuration services and utilities to perform various services on
the runtime environment and specify diagnostic information. Some of the services
can modify the Configuration Tool values stored in ISPF tables.
Note: Do not modify any values unless you are told to do so in the documentation
or by IBM Software Support personnel. If the Configuration Tool values are
modified incorrectly, the Configuration Tool can stop functioning or produce
unpredictable results.
To access the configuration services and utilities,
1. From the Configuration Tool Main Menu, select Configure products.
2. Select Services and utilities.
Services: unlocking runtime high-level qualifiers
You can use this option to unlock the high-level qualifier values that you specified
when you set up your configuration environment. If you need to modify these
values, you must first unlock them.
Warning: If you unlock and change the high-level qualifiers, the Configuration Tool
does not automatically delete and reallocate the existing libraries. The
jobs generated by the Configuration Tool fail if they are pointing at
incorrect libraries.
Complete the following steps to unlock and modify runtime high-level qualifiers.
1. From the Main Menu, select Configure products > Services and utilities >
Unlock runtime high-level qualifiers.
2. Unlock and modify the high-level qualifiers:
a. On the Unlock Runtime High-Level Qualifiers panel, specify Y.
b. On the Set Up Configuration Environment panel, make your modifications
to the high-level qualifiers and press Enter
3. Press F3 until you return to the Main Menu.
Services: creating the Configuration Tool batch mode job
You can use this option to generate the JCL that runs the Configuration Tool steps
under batch.
This option also creates the KCISETUP REXX™ exec. Invoking KCISETUP enables
your ISPF environment to use the ISPF macros provided with the Configuration
Tool. You can use these macros to compose and manage the parameter members
used for the Configuration Tool batch mode process.
Complete the following steps to create the Configuration Tool batch mode job.
1. From the Main Menu, select Configure products > Services and utilities
>Create batch mode job.
Result: The Configuration Tool displays a message at the top of the panel
indicating the job has been created.
To view additional information about this job press F1.
2. Press F3 until you return to the Main Menu.
IBM Confidential
131
Utilities: specifying DEBUG options
Complete the following steps to specify or modify DEBUG parameter values.
1. From the Configuration Tool Main Menu, select Configure products >
Services and utilities > DEBUG options.
Result: The Configuration Tool displays the Debug Options panel with all of
the existing DEBUG values that you entered when invoking the Configuration
Tool.
2. Contact IBM Software Support.
Note: IBM Software Support personnel direct you in specifying or modifying the
DEBUG parameter values.
3. Press F3 until you return to the Main Menu.
Utilities: displaying an ISPF table
You can use this option to specify the contents of an ISPF table located in the data
library.
Complete the following steps to display an ISPF table.
1. From the Configuration Tool Main Menu, select Configure products >
Services and utilities > Display an ISPF table.
2. Specify and view an ISPF table:
a. Specify the name of the ISPF table you want to display. You can limit the
information displayed for an ISPF table by specifying one to three sets of
display criteria under Optional section parameters. For each set you must
specify the variable name and matching value.
b. Press Enter to view the ISPF table you specified. You can take the following
actions:
Action Result
END (PF3) Go to the previous record.
ENTER Go to the next record.
CANCEL Go back to the previous panel.
UP/DOWN Use scroll variables.
3. Press F3 until you return to the Main Menu.
Utilities: running a CLIST in the TKANCUS library
Complete the following steps to run a specific CLIST/REXX exec in the TKANCUS
library.
1. From the Configuration Tool Main Menu, select Configure products >
Services and utilities > Execute a CLIST in the TKANCUS library.
2. Contact IBM Software Support.
Note: Software Support personnel direct you in selecting and running a CLIST
in the TKANCUS library.
3. Press F3 until you return to the Main Menu.
IBM Confidential
132 IBM Tivoli Advanced Backup and Recovery for z/OS Planning and Configuration Guide

Utilities: preparing user libraries
The Configuration Tool supports the allocation of the following user libraries
required for product operation:
v &rhilev.&rte.RKANCMDU
v &rhilev.&rte.RKANMODU
v &rhilev.&rte.RKANPARU
v &rhilev.&rte.RKANSAMU
v &rhilev.&rte.RKANSQLU (applicable to the Tivoli Enterprise Monitoring Server
only)
The Prepare user libraries utility generates a batch job to create, from the existing
target libraries, the necessary user libraries.
1. From the Configuration Tool Main Menu, select Configure products >
Services and utilities > Prepare user libraries.
The Runtime Environments (RTEs) for Conversion panel lists all the runtime
environments whose libraries are eligible for conversion to user libraries.
2. On the Runtime Environments (RTEs) for Conversion panel, you can accept
the default (all runtime environments listed) or delete from the list any runtime
environments you want to exclude from conversion.
3. When you finish reviewing the list, press Enter to generate the KCIJSP01 batch
job.
4. Edit the job as needed, then submit it.
IBM Confidential
Appendix A. Configuration services and utilities 133

IBM Confidential
134 IBM Tivoli Advanced Backup and Recovery for z/OS Planning and Configuration Guide
Appendix B. Configuration Tool batch utilities
Several Configuration Tool utilities are available for batch mode processing. These
utilities are designed to run outside the Configuration Tool, but can also be used
while in the Configuration Tool.
KCISETUP
Sets up the environment that is required to use the Configuration Tool batch
utilities.
KCICFKEY
Manages the PF keys that are used for the Configuration Tool batch
utilities.
KCICPGHP
Displays help information for parameters in a batch parameter deck
member.
KCISETUP: setting up the environment
You use the KCISETUP utility to set up the environment that is required for using
the other Configuration Tool batch utilities. This utility must be run after starting your
TSO ISPF session and can be run only from an ISPF session.
Before using the KCISETUP utility, you must generate the KCISETUP member in
your INSTLIB. KCISETUP can be run only once per session. There is no
confirmation message issued to indicate successful completion of KCISETUP.
Complete the following steps to generate KCISETUP.
1. Start the Configuration Tool on your master image.
2. From the Main Menu, select Configure products > Services and utilities >
Create batch mode job.
Result: The Configuration Tool generates member KCISETUP in your INSTLIB.
3. Press F3 until you return to the Main Menu.
Note: KCISETUP must be created on an image and can be used for all
subsequent parameter deck processing on that image. If your ISPF
environment changes or you split your INSTLIB, you must recreate
KCISETUP.
You can invoke the environment setup utility, using either of the following methods.
Location Command
ISPF command line TSO EXEC ‘shilev.INSTLIB(KCISETUP)’
ISPF Primary Option Menu
> Enter TSO or Workstation
commands
EXEC ‘shilev.INSTLIB(KCISETUP)’
where shilev is the high-level qualifier of the INSTLIB.
KCICFKEY: managing PF keys
You use the KCICFKEY utility to manage ISPF session PF keys that are used for
batch utilities. This includes turning the PF keys on and off, and toggling which set
of keys display. This utility can be run only under an ISPF session.
IBM Confidential
135
Note: If you are using KCICFKEY to manage the ISPF session PF keys for the
batch utilities, you must turn on the predefined function keys. To do this,
issue the PFSHOW command from either the ISPF command line or any of
the Configuration Tool panel command lines.
Before using this Configuration Tool batch utility, you must use the KCISETUP utility
to set up the environment.
To use the KCICFKEY utility, the ISPF session must support 24 PF keys. Complete
the following steps to set up the ISPF session to support 24 PF keys.
1. From the ISPF Primary Option Menu, select Terminal and user parameters >
Function keys > Non-Keylist PF Key settings.
2. Type 24 for Number of PF Keys.
3. Press F3 to return to the ISPF Primary Option Menu.
If the ISPF session is not set up to support 24 PF keys, the KCICFKEY utility runs
but issues the following ISPF warning message:
“PFKEYS COUNT ERROR”, “Number
of PF Keys must be 24. See ISPF Settings.”
When setting PF keys, the Configuration Tool PF Key Manager owns PF keys
13–24. On keyboards that do not support 24 PF keys, PF keys 13–24 are enabled
by holding the Shift key and pressing a function key. While the Shift key is pressed,
function keys 1–12 become 13–24.
When the Configuration Tool PF keys are active, any change in the PF Key Show
State is preserved. If you have set the PF Key Show State to Show All and then
turned off the PF keys, when you turn the PF keys back on, the PF Key Show State
is restored to Show All.
While using the Configuration Tool PF Key Manager, all of your original PF key and
Show State settings are preserved. After exiting the PF Key Manager, all of your
original PF key and Show State settings are restored.
You invoke the PF Key Manager utility using one of the following methods.
Method Command
ISPF edit From the Edit command line, enter
KCICFKEY state
Note: To use this method you must be running under an ISPF
session, editing a member or data set.
TSO command From the ISPF command line, enter
TSO KCICFKEY state
The state is the desired state of the Configuration Tool PF keys. Valid states are:
ON Turn on the PF keys.
OFF Turn off the PF keys.
SHOW
If the PF keys are active, then toggle the PF keys between All (1–24),
Alternate (13–24), and Primary (1–12).
HELP Display the PF Key Manager help information.
IBM Confidential
136 IBM Tivoli Advanced Backup and Recovery for z/OS Planning and Configuration Guide
If state is not specified, the Configuration Tool PF keys toggle between ON and
OFF.
KCICPGHP: displaying help for batch parameters
You use the KCICPGHP utility to display help information for parameters in a batch
parameter deck member. The detailed help information for each of the batch
parameters is provided to help you modify or construct a batch parameter deck.
This utility must be run from an ISPF Edit session.
Before using this batch utility, you must use the KCISETUP utility to set up the
environment.
You invoke the Batch Parameter Deck Help utility using either of the following
methods:
v From an ISPF Edit command line, enter the command KCICPGHP, position the
cursor on the row that contains a batch parameter, and then press Enter.
v Position your cursor on the row that contains a batch parameter and then select
the PF key assigned by the Configuration Tool PF Key Manager.
Note: This is the preferred method for invoking Batch Parameter Deck Help. The
PF Key Manager assigns a PF key to invoke this function.
With either method, you must position the cursor on the row that contains the batch
parameter. The utility then isolates the parameter, looks it up, and displays detailed
help information.
The batch parameter online help contains the following sections:
Description Area
The detailed help information for the parameter. This area is scrollable, as
indicated by the (+) indicator on the bottom right. PF7 and PF8 are
assigned to scroll this area.
Attribute Area
The attributes of the parameter. This information can help you determine
what type of data is expected for this parameter.
PF Key Area
The PF key assignments that apply only to the dialog box.
Note: PF5 (Show All) displays the help information for all parameters that
make up this product.
Following is an example of a batch parameter help:
IBM Confidential
Appendix B. Configuration Tool batch utilities 137
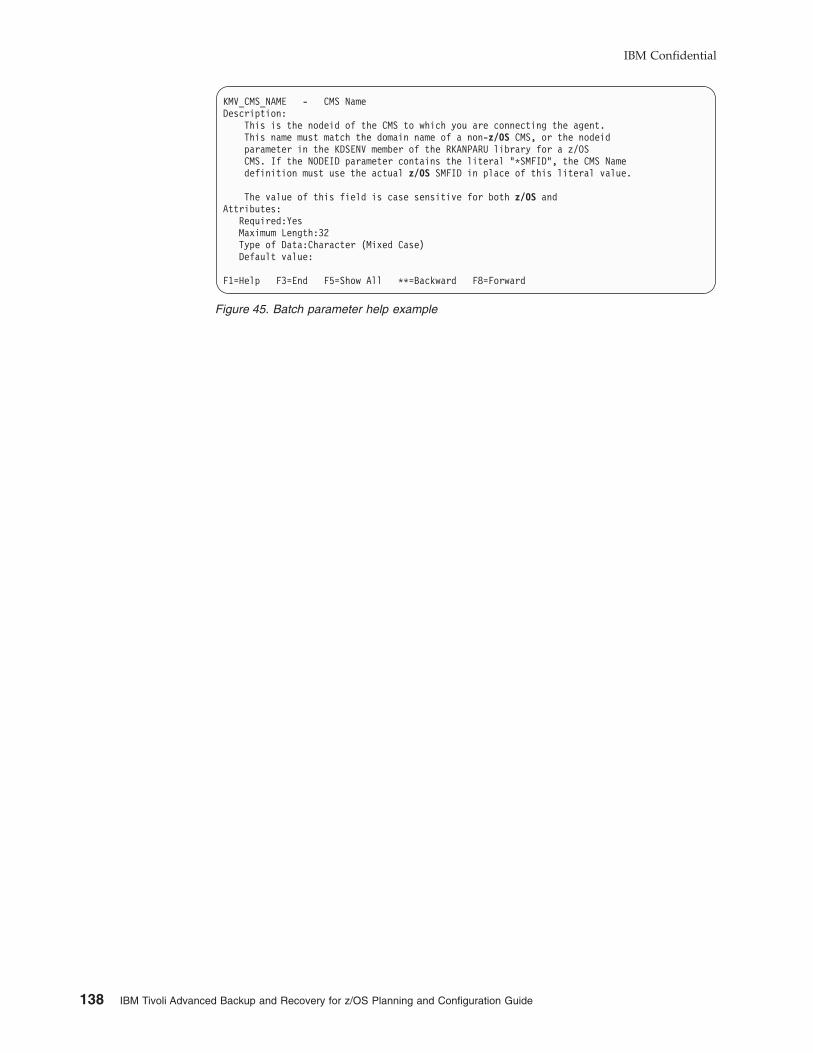
KMV_CMS_NAME - CMS Name
Description:
This is the nodeid of the CMS to which you are connecting the agent.
This name must match the domain name of a non-z/OS CMS, or the nodeid
parameter in the KDSENV member of the RKANPARU library for a z/OS
CMS. If the NODEID parameter contains the literal “*SMFID”, the CMS Name
definition must use the actual z/OS SMFID in place of this literal value.
The value of this field is case sensitive for both z/OS and
Attributes:
Required:Yes
Maximum Length:32
Type of Data:Character (Mixed Case)
Default value:
F1=Help F3=End F5=Show All **=Backward F8=Forward
Figure 45. Batch parameter help example
IBM Confidential
138 IBM Tivoli Advanced Backup and Recovery for z/OS Planning and Configuration Guide
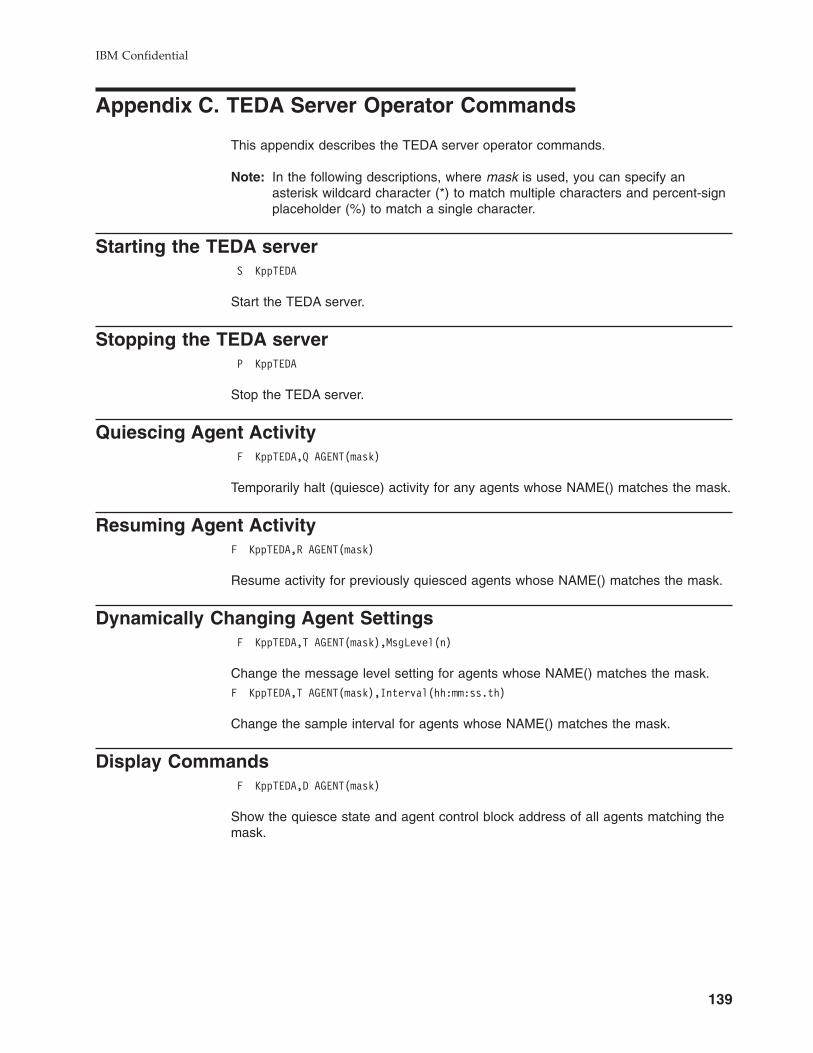
Appendix C. TEDA Server Operator Commands
This appendix describes the TEDA server operator commands.
Note: In the following descriptions, where mask is used, you can specify an
asterisk wildcard character (*) to match multiple characters and percent-sign
placeholder (%) to match a single character.
Starting the TEDA server
S KppTEDA
Start the TEDA server.
Stopping the TEDA server
P KppTEDA
Stop the TEDA server.
Quiescing Agent Activity
F KppTEDA,Q AGENT(mask)
Temporarily halt (quiesce) activity for any agents whose NAME() matches the mask.
Resuming Agent Activity
F KppTEDA,R AGENT(mask)
Resume activity for previously quiesced agents whose NAME() matches the mask.
Dynamically Changing Agent Settings
F KppTEDA,T AGENT(mask),MsgLevel(n)
Change the message level setting for agents whose NAME() matches the mask.
F KppTEDA,T AGENT(mask),Interval(hh:mm:ss.th)
Change the sample interval for agents whose NAME() matches the mask.
Display Commands
F KppTEDA,D AGENT(mask)
Show the quiesce state and agent control block address of all agents matching the
mask.
IBM Confidential
139

IBM Confidential
140 IBM Tivoli Advanced Backup and Recovery for z/OS Planning and Configuration Guide
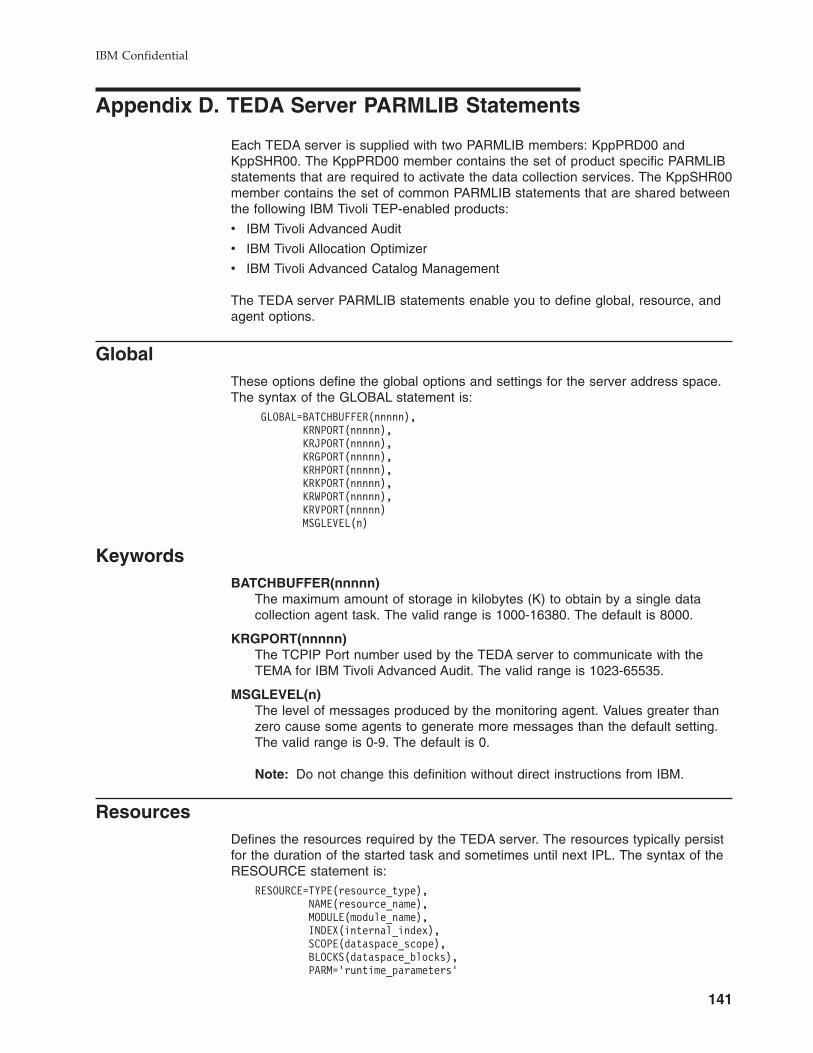
Appendix D. TEDA Server PARMLIB Statements
Each TEDA server is supplied with two PARMLIB members: KppPRD00 and
KppSHR00. The KppPRD00 member contains the set of product specific PARMLIB
statements that are required to activate the data collection services. The KppSHR00
member contains the set of common PARMLIB statements that are shared between
the following IBM Tivoli TEP-enabled products:
v IBM Tivoli Advanced Audit
v IBM Tivoli Allocation Optimizer
v IBM Tivoli Advanced Catalog Management
The TEDA server PARMLIB statements enable you to define global, resource, and
agent options.
Global
These options define the global options and settings for the server address space.
The syntax of the GLOBAL statement is:
GLOBAL=BATCHBUFFER(nnnnn),
KRNPORT(nnnnn),
KRJPORT(nnnnn),
KRGPORT(nnnnn),
KRHPORT(nnnnn),
KRKPORT(nnnnn),
KRWPORT(nnnnn),
KRVPORT(nnnnn)
MSGLEVEL(n)
Keywords
BATCHBUFFER(nnnnn)
The maximum amount of storage in kilobytes (K) to obtain by a single data
collection agent task. The valid range is 1000-16380. The default is 8000.
KRGPORT(nnnnn)
The TCPIP Port number used by the TEDA server to communicate with the
TEMA for IBM Tivoli Advanced Audit. The valid range is 1023-65535.
MSGLEVEL(n)
The level of messages produced by the monitoring agent. Values greater than
zero cause some agents to generate more messages than the default setting.
The valid range is 0-9. The default is 0.
Note: Do not change this definition without direct instructions from IBM.
Resources
Defines the resources required by the TEDA server. The resources typically persist
for the duration of the started task and sometimes until next IPL. The syntax of the
RESOURCE statement is:
RESOURCE=TYPE(resource_type),
NAME(resource_name),
MODULE(module_name),
INDEX(internal_index),
SCOPE(dataspace_scope),
BLOCKS(dataspace_blocks),
PARM=’runtime_parameters’
IBM Confidential
141
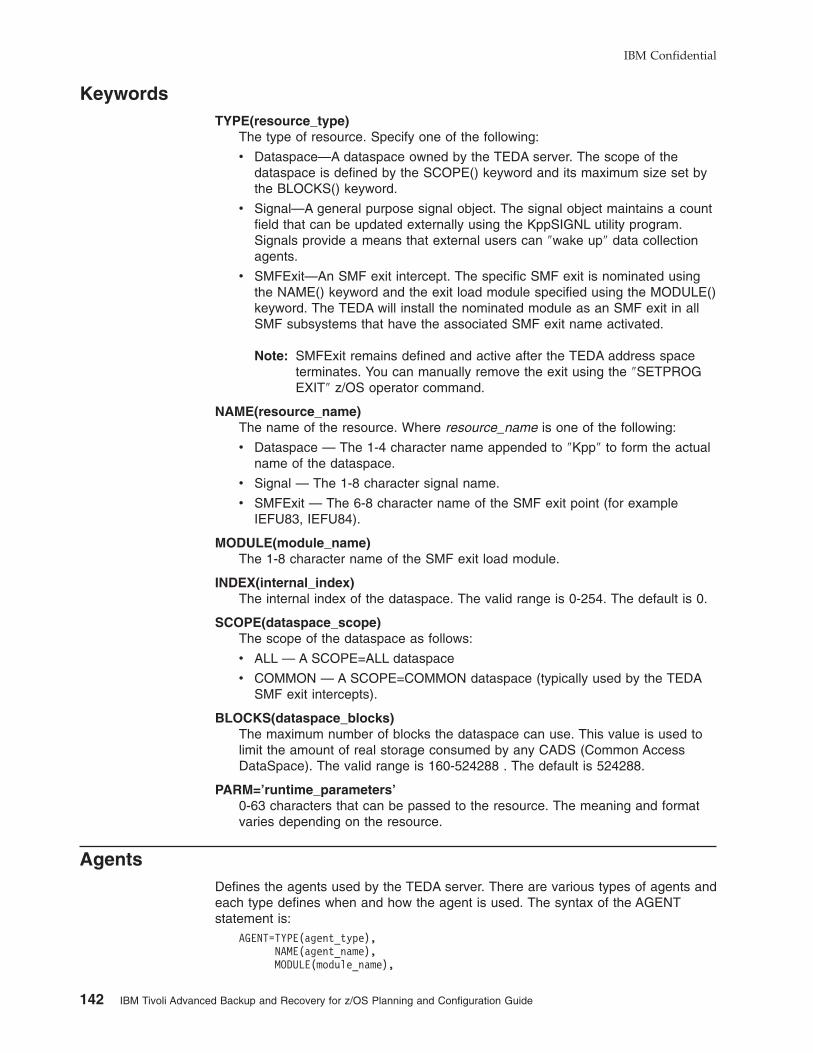
Keywords
TYPE(resource_type)
The type of resource. Specify one of the following:
v Dataspace—A dataspace owned by the TEDA server. The scope of the
dataspace is defined by the SCOPE() keyword and its maximum size set by
the BLOCKS() keyword.
v Signal—A general purpose signal object. The signal object maintains a count
field that can be updated externally using the KppSIGNL utility program.
Signals provide a means that external users can ″wake up″ data collection
agents.
v SMFExit—An SMF exit intercept. The specific SMF exit is nominated using
the NAME() keyword and the exit load module specified using the MODULE()
keyword. The TEDA will install the nominated module as an SMF exit in all
SMF subsystems that have the associated SMF exit name activated.
Note: SMFExit remains defined and active after the TEDA address space
terminates. You can manually remove the exit using the ″SETPROG
EXIT″ z/OS operator command.
NAME(resource_name)
The name of the resource. Where resource_name is one of the following:
v Dataspace — The 1-4 character name appended to ″Kpp″ to form the actual
name of the dataspace.
v Signal — The 1-8 character signal name.
v SMFExit — The 6-8 character name of the SMF exit point (for example
IEFU83, IEFU84).
MODULE(module_name)
The 1-8 character name of the SMF exit load module.
INDEX(internal_index)
The internal index of the dataspace. The valid range is 0-254. The default is 0.
SCOPE(dataspace_scope)
The scope of the dataspace as follows:
v ALL — A SCOPE=ALL dataspace
v COMMON — A SCOPE=COMMON dataspace (typically used by the TEDA
SMF exit intercepts).
BLOCKS(dataspace_blocks)
The maximum number of blocks the dataspace can use. This value is used to
limit the amount of real storage consumed by any CADS (Common Access
DataSpace). The valid range is 160-524288 . The default is 524288.
PARM=’runtime_parameters’
0-63 characters that can be passed to the resource. The meaning and format
varies depending on the resource.
Agents
Defines the agents used by the TEDA server. There are various types of agents and
each type defines when and how the agent is used. The syntax of the AGENT
statement is:
AGENT=TYPE(agent_type),
NAME(agent_name),
MODULE(module_name),
IBM Confidential
142 IBM Tivoli Advanced Backup and Recovery for z/OS Planning and Configuration Guide
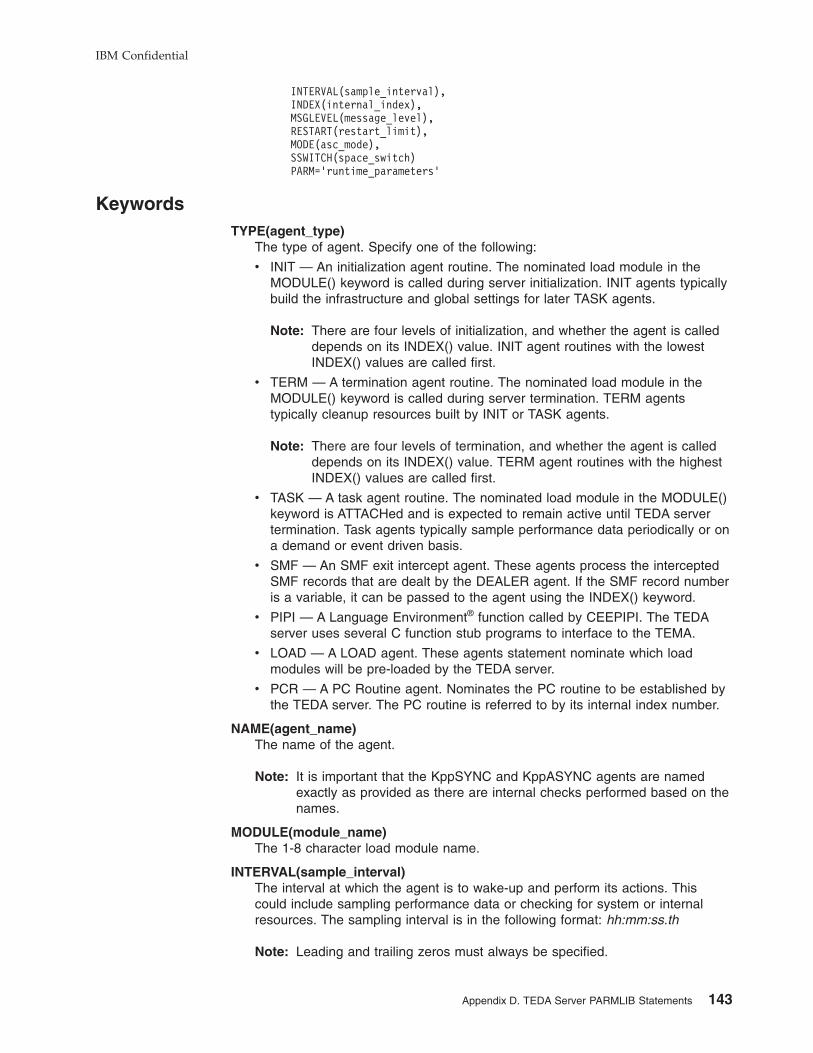
INTERVAL(sample_interval),
INDEX(internal_index),
MSGLEVEL(message_level),
RESTART(restart_limit),
MODE(asc_mode),
SSWITCH(space_switch)
PARM=’runtime_parameters’
Keywords
TYPE(agent_type)
The type of agent. Specify one of the following:
v INIT — An initialization agent routine. The nominated load module in the
MODULE() keyword is called during server initialization. INIT agents typically
build the infrastructure and global settings for later TASK agents.
Note: There are four levels of initialization, and whether the agent is called
depends on its INDEX() value. INIT agent routines with the lowest
INDEX() values are called first.
v TERM — A termination agent routine. The nominated load module in the
MODULE() keyword is called during server termination. TERM agents
typically cleanup resources built by INIT or TASK agents.
Note: There are four levels of termination, and whether the agent is called
depends on its INDEX() value. TERM agent routines with the highest
INDEX() values are called first.
v TASK — A task agent routine. The nominated load module in the MODULE()
keyword is ATTACHed and is expected to remain active until TEDA server
termination. Task agents typically sample performance data periodically or on
a demand or event driven basis.
v SMF — An SMF exit intercept agent. These agents process the intercepted
SMF records that are dealt by the DEALER agent. If the SMF record number
is a variable, it can be passed to the agent using the INDEX() keyword.
v PIPI — A Language Environment® function called by CEEPIPI. The TEDA
server uses several C function stub programs to interface to the TEMA.
v LOAD — A LOAD agent. These agents statement nominate which load
modules will be pre-loaded by the TEDA server.
v PCR — A PC Routine agent. Nominates the PC routine to be established by
the TEDA server. The PC routine is referred to by its internal index number.
NAME(agent_name)
The name of the agent.
Note: It is important that the KppSYNC and KppASYNC agents are named
exactly as provided as there are internal checks performed based on the
names.
MODULE(module_name)
The 1-8 character load module name.
INTERVAL(sample_interval)
The interval at which the agent is to wake-up and perform its actions. This
could include sampling performance data or checking for system or internal
resources. The sampling interval is in the following format: hh:mm:ss.th
Note: Leading and trailing zeros must always be specified.
IBM Confidential
Appendix D. TEDA Server PARMLIB Statements 143
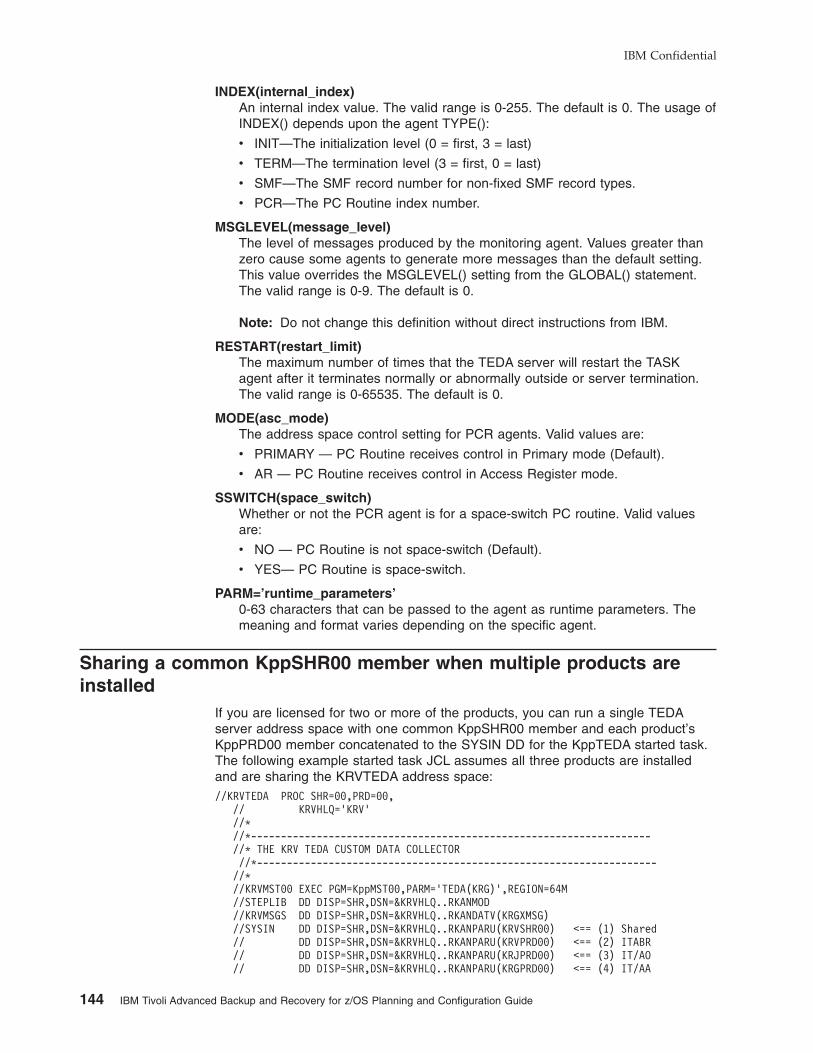
INDEX(internal_index)
An internal index value. The valid range is 0-255. The default is 0. The usage of
INDEX() depends upon the agent TYPE():
v INIT—The initialization level (0 = first, 3 = last)
v TERM—The termination level (3 = first, 0 = last)
v SMF—The SMF record number for non-fixed SMF record types.
v PCR—The PC Routine index number.
MSGLEVEL(message_level)
The level of messages produced by the monitoring agent. Values greater than
zero cause some agents to generate more messages than the default setting.
This value overrides the MSGLEVEL() setting from the GLOBAL() statement.
The valid range is 0-9. The default is 0.
Note: Do not change this definition without direct instructions from IBM.
RESTART(restart_limit)
The maximum number of times that the TEDA server will restart the TASK
agent after it terminates normally or abnormally outside or server termination.
The valid range is 0-65535. The default is 0.
MODE(asc_mode)
The address space control setting for PCR agents. Valid values are:
v PRIMARY — PC Routine receives control in Primary mode (Default).
v AR — PC Routine receives control in Access Register mode.
SSWITCH(space_switch)
Whether or not the PCR agent is for a space-switch PC routine. Valid values
are:
v NO — PC Routine is not space-switch (Default).
v YES— PC Routine is space-switch.
PARM=’runtime_parameters’
0-63 characters that can be passed to the agent as runtime parameters. The
meaning and format varies depending on the specific agent.
Sharing a common KppSHR00 member when multiple products are
installed
If you are licensed for two or more of the products, you can run a single TEDA
server address space with one common KppSHR00 member and each product’s
KppPRD00 member concatenated to the SYSIN DD for the KppTEDA started task.
The following example started task JCL assumes all three products are installed
and are sharing the KRVTEDA address space:
//KRVTEDA PROC SHR=00,PRD=00,
// KRVHLQ=’KRV’
//*
//*-------------------------------------------------------------------
//* THE KRV TEDA CUSTOM DATA COLLECTOR
//*-------------------------------------------------------------------
//*
//KRVMST00 EXEC PGM=KppMST00,PARM=’TEDA(KRG)’,REGION=64M
//STEPLIB DD DISP=SHR,DSN=&KRVHLQ..RKANMOD
//KRVMSGS DD DISP=SHR,DSN=&KRVHLQ..RKANDATV(KRGXMSG)
//SYSIN DD DISP=SHR,DSN=&KRVHLQ..RKANPARU(KRVSHR00) <== (1) Shared
// DD DISP=SHR,DSN=&KRVHLQ..RKANPARU(KRVPRD00) <== (2) ITABR
// DD DISP=SHR,DSN=&KRVHLQ..RKANPARU(KRJPRD00) <== (3) IT/AO
// DD DISP=SHR,DSN=&KRVHLQ..RKANPARU(KRGPRD00) <== (4) IT/AA
IBM Confidential
144 IBM Tivoli Advanced Backup and Recovery for z/OS Planning and Configuration Guide
Support information
If you have a problem with your IBM software, you want to resolve it quickly. This
section describes the following options for obtaining support for IBM software
products:
v “Using IBM Support Assistant”
v “Obtaining fixes”
v “Contacting IBM Software Support” on page 146
Tip
Before using the resources listed below, look for troubleshooting information in
IBM Tivoli Monitoring: IBM Tivoli Monitoring Problem Determination Guide.
Using IBM Support Assistant
The IBM Support Assistant is a free, stand-alone application that you can install on
any workstation. You can then enhance the application by installing product-specific
plug-in modules for the IBM products you use.
The IBM Support Assistant saves you time searching product, support, and
educational resources. The IBM Support Assistant helps you gather support
information when you need to open a problem management record (PMR) or
Electronic Tracking Record (ETR), which you can then use to track the problem.
Tip
The Log and Trace Analyzer tool can help you prepare logs to submit with a
PMR.
The product-specific plug-in modules of the IBM Support Assistant provide you with
the following resources:
v Support links
v Education links
v Ability to submit problem management reports
For more information and to download the IBM Support Assistant, see
http://www.ibm.com/software/support/isa/.
Obtaining fixes
A product fix might be available to resolve your problem. To determine which fixes
are available for your Tivoli software product, follow these steps:
1. Go to the IBM Software Support Web site at http://www.ibm.com/software/support.
2. Under Select a brand and/or product, select Tivoli.
3. Under Select a product, select a product and click Go.
4. Under Download, click the name of a fix to read its description and, optionally,
to download it.
IBM Confidential
145
If there is no Download heading for your product, supply a search term, error
code, or APAR number in the field provided under Search Support (this
product), and click Search.
For more information about the types of fixes that are available, see the IBM
Software Support Handbook at http://techsupport.services.ibm.com/guides/handbook.html.
Contacting IBM Software Support
IBM Software Support provides assistance with product defects. The easiest way to
obtain that assistance is to open a PMR or ETR directly from the IBM Support
Assistant (see “Using IBM Support Assistant” on page 145), and attach the logs you
prepare with the help of the Log and Trace Analyzer Tool (see IBM Tivoli Advanced
Backup and Recovery for z/OS: Problem Determination Guide).
Before contacting IBM Software Support, your company must have an active IBM
software maintenance contract, and you must be authorized to submit problems to
IBM. The type of software maintenance contract that you need depends on the type
of product you have:
v For IBM distributed software products (including, but not limited to, Tivoli, Lotus®,
and Rational® products, as well as DB2 and WebSphere® products that run on
Windows, or UNIX operating systems), enroll in Passport Advantage in one of the
following ways:
Online
Go to the Passport Advantage Web site at http://www-306.ibm.com/software/howtobuy/passportadvantage/pao_customers.htm and click How
to Enroll.
By phone
For the phone number to call in your country, go to the IBM Software
Support Web site at http://techsupport.services.ibm.com/guides/contacts.html and click the name of your geographic region.
v For customers with Subscription and Support (S & S) contracts, go to the
Software Service Request Web site at https://techsupport.services.ibm.com/ssr/login.
v For customers with IBMLink™, CATIA, Linux, S/390®, iSeries®, pSeries®, zSeries,
and other support agreements, go to the IBM Support Line Web site at
http://www.ibm.com/services/us/index.wss/so/its/a1000030/dt006.
v For IBM eServer™ software products (including, but not limited to, DB2 and
WebSphere products that run in zSeries, pSeries, and iSeries environments), you
can purchase a software maintenance agreement by working directly with an IBM
sales representative or an IBM Business Partner. For more information about
support for eServer software products, go to the IBM Technical Support
Advantage Web site at http://www.ibm.com/servers/eserver/techsupport.html.
If you are not sure what type of software maintenance contract you need, call
1-800-IBMSERV (1-800-426-7378) in the United States. From other countries, go to
the contacts page of the IBM Software Support Handbook on the Web at
http://techsupport.services.ibm.com/guides/contacts.html and click the name of your
geographic region for phone numbers of people who provide support for your
location.
IBM Confidential
146 IBM Tivoli Advanced Backup and Recovery for z/OS Planning and Configuration Guide
If you prefer to contact IBM Software support without the help of the IBM Support
Assistant, complete the following steps:
1. “Determining the business impact”
2. “Describing problems and gathering information”
3. “Submitting problems”
Determining the business impact
When you report a problem to IBM, you are asked to supply a severity level.
Therefore, you need to understand and assess the business impact of the problem
that you are reporting. Use the following criteria:
Severity 1
The problem has a critical business impact. You are unable to use the
program, resulting in a critical impact on operations. This condition requires
an immediate solution.
Severity 2
The problem has a significant business impact. The program is usable, but
it is severely limited.
Severity 3
The problem has some business impact. The program is usable, but less
significant features (not critical to operations) are unavailable.
Severity 4
The problem has minimal business impact. The problem causes little impact
on operations, or a reasonable circumvention to the problem was
implemented.
Describing problems and gathering information
When describing a problem to IBM, be as specific as possible. Include all relevant
background information so that IBM Software Support specialists can help you
solve the problem efficiently. To save time, know the answers to these questions:
v What software versions were you running when the problem occurred?
v Do you have logs, traces, and messages that are related to the problem
symptoms? IBM Software Support is likely to ask for this information. See IBM
Tivoli Advanced Backup and Recovery for z/OS: Problem Determination Guide.
v Can you re-create the problem? If so, what steps were performed to re-create
the problem?
v Did you make any changes to the system? For example, did you make changes
to the hardware, operating system, networking software, and so on.
v Are you currently using a workaround for the problem? If so, be prepared to
explain the workaround when you report the problem.
Submitting problems
You can submit your problem to IBM Software Support in one of two ways:
Online
Click Submit and track problems on the IBM Software Support site at
http://www.ibm.com/software/support/probsub.html. Type your information
into the appropriate problem submission form.
By phone
For the phone number to call in your country, go to the contacts page of the
IBM Confidential
Support information 147

IBM Software Support Handbook at http://techsupport.services.ibm.com/guides/contacts.html and click the name of your geographic region.
If the problem you submit is for a software defect or for missing or inaccurate
documentation, IBM Software Support creates an Authorized Program Analysis
Report (APAR). The APAR describes the problem in detail. Whenever possible, IBM
Software Support provides a workaround that you can implement until the APAR is
resolved and a fix is delivered. IBM publishes resolved APARs on the Software
Support Web site daily, so that other users who experience the same problem can
benefit from the same resolution.
IBM Confidential
148 IBM Tivoli Advanced Backup and Recovery for z/OS Planning and Configuration Guide

Notices
This information was developed for products and services offered in the U.S.A.
IBM may not offer the products, services, or features discussed in this document in
other countries. Consult your local IBM representative for information on the
products and services currently available in your area. Any reference to an IBM
product, program, or service is not intended to state or imply that only that IBM
product, program, or service may be used. Any functionally equivalent product,
program, or service that does not infringe any IBM intellectual property right may be
used instead. However, it is the user’s responsibility to evaluate and verify the
operation of any non-IBM product, program, or service.
IBM may have patents or pending patent applications covering subject matter
described in this document. The furnishing of this document does not give you any
license to these patents. You can send license inquiries, in writing, to:
IBM Director of Licensing
IBM Corporation
North Castle Drive
Armonk, NY 10504-1785
U.S.A.
For license inquiries regarding double-byte (DBCS) information, contact the IBM
Intellectual Property Department in your country or send inquiries, in writing, to:
IBM World Trade Asia Corporation Licensing
2-31 Roppongi 3-chome, Minato-ku Tokyo 106, Japan
The following paragraph does not apply to the United Kingdom or any other country
where such provisions are inconsistent with local law: INTERNATIONAL BUSINESS
MACHINES CORPORATION PROVIDES THIS PUBLICATION ″AS IS″ WITHOUT
WARRANTY OF ANY KIND, EITHER EXPRESS OR IMPLIED, INCLUDING, BUT
NOT LIMITED TO, THE IMPLIED WARRANTIES OF NON-INFRINGEMENT,
MERCHANTABILITY OR FITNESS FOR A PARTICULAR PURPOSE. Some states
do not allow disclaimer of express or implied warranties in certain transactions,
therefore, this statement may not apply to you.
This information could include technical inaccuracies or typographical errors.
Changes are periodically made to the information herein; these changes be
incorporated in new editions of the publication. IBM may make improvements and/or
changes in the product(s) and/or the program(s) described in this publication at any
time without notice.
Any references in this information to non-IBM Web sites are provided for
convenience only and do not in any manner serve as an endorsement of those
Web sites. The materials at those Web sites are not part of the materials for this
IBM product and use of those Web sites is at your own risk.
IBM may use or distribute any of the information you supply in any way it believes
appropriate without incurring any obligation to you.
Information concerning non-IBM products was obtained from the suppliers of those
products, their published announcements or other publicly available sources. IBM
has not tested those products and cannot confirm the accuracy of performance,
IBM Confidential
149

compatibility or any other claims related to non-IBM products. Questions on the
capabilities of non-IBM products should be addressed to the suppliers of those
products.
Trademarks
IBM, the IBM logo, and ibm.com are trademarks or registered trademarks of
International Business Machines Corporation in the United States, other countries,
or both. These and other IBM trademarked terms are marked on their first
occurrence in this information with the appropriate symbol (® or
™), indicating US
registered or common law trademarks owned by IBM at the time this information
was published. Such trademarks may also be registered or common law trademarks
in other countries. A complete and current list of IBM trademarks is available on the
Web at http://www.ibm.com/legal/copytrade.shtml.
Adobe, Acrobat, and all Adobe-based trademarks are either registered trademarks
or trademarks of Adobe Systems Incorporated in the United States, other countries,
or both.
Intel is a trademark or registered trademark of Intel Corporation or its subsidiaries in
the United States and other countries.
Linux is a trademark of Linus Torvalds in the United States, other countries, or both.
Microsoft, Windows, Windows NT, and the Windows logo are trademarks of
Microsoft Corporation in the Unites States, other countries, or both.
UNIX is a registered trademark of The Open Group in the United States and other
countries.
Java and all Java-based trademarks are trademarks of Sun Microsystems, Inc. in
the United States, other countries, or both.
Other company, product, and service names may be trademarks or service marks
of others.
IBM Confidential
150 IBM Tivoli Advanced Backup and Recovery for z/OS Planning and Configuration Guide
Index
Aabbreviations
Configuration Tool xiv
qualifiers xiv
Add Runtime EnvironmentConfiguration Tool panels 116
Main Menu 116, 118, 119
Add Runtime Environment panel, Configuration
Tool 63, 78
Administrator authority, Windows 54, 95
Advanced Backup and Recovery for z/OSSee also Advanced Backup and Recovery for z/OS
application support 60, 100
audience, intended xi
components 4, 7
configurationdesigning 7
configuration planning 7
data files 60, 100
download 42
features 4
fix packs 41
installation road map 37
introduction 3
library xi
packaging 41
permissions for product features 110
publications xi
security considerations 110
OMVS segment 110
tasks 3
Web download 42
worksheets, planning 7
Advanced Backup and Recovery for z/OS monitoring
agentdecisions 11
permissions for product features 110
security considerations 110
started task 73
starting 73, 101
Advanced Backup and Recovery monitoring agentconfiguring 66, 89
registering with hub Tivoli Enterprise Monitoring
Server 66, 89
started task 91, 101
agent activityquiescing 139
resuming 139
agent settingsdynamically changing 139
agent, monitoringpermissions for product features 110
security considerations 110
started task 68, 73, 91
starting 101
agentsTEDA server 142
APF authorization 72, 94
application support 60, 100
Bbase libraries 13
base runtime environment 14, 16
batch modeConfiguration Tool 121
creating batch mode parameters 123
parameters 124
planning runtime environment replication 122
transport methods 122
transporting the runtime environment 124
utilities 135
Batch Parameter Deck Help utility 137
bookssee publications xi, xii
browser client 12
browser view 4
Cchart views 4
CICATSee Configuration Tool
CMS_NODEID variable 69
communication protocolsspecifying 85
components, product 4, 7
configurationadding monitoring agents 73, 102
Advanced Backup and Recovery for z/OS
security 110
Advanced Backup and Recovery monitoring
agent 66, 89
batch mode processing 103
Configuration Tool environment 50
expanding 73, 102
monitoring agent security 110
NetView authentication 110
overall 20
planning 7
road map 37
runtime environments 14
securityAdvanced Backup and Recovery for z/OS 110
monitoring agent 110
NetView authentication 110
runtime environment 64, 79
Tivoli Enterprise Monitoring Server 83, 105
setting up Configuration Tool 47
Tivoli Enterprise Monitoring Server on Windows 54,
57
Tivoli Enterprise Monitoring Server on z/OS 80
Tivoli Enterprise Monitoring Server security 83, 105
Tivoli Enterprise Portal Server and client 54, 57, 97
IBM Confidential
151

configuration (continued)verifying 73, 101
worksheets 7
configuration scenarioshub Tivoli Enterprise Monitoring Server on
Windows 53
separate address spaces 75
Configuration Toolabbreviations xiv
batch mode 43, 121, 124, 135
creating batch mode parameters 123
planning runtime environment replication 122
commands 44
defined 43
display requirements 43
errors 43
interactive mode 43
online help 44
requirements 43
services 131
setting up 47, 50
starting 48
system variable support 115
creating the system variable parameter
member 118
creating the VTAM major node rename job 119
enabling 116
sample usage 115
transporting the runtime environment 124
using 43
utilities 131
DEBUG options utility 132
display ISPF table utility 132
prepare user libraries utility 133
run a CLIST in the TKANCUS library utility 132
work environment 50
Configuration Tool panelsAdd Runtime Environment 63, 78, 116
Main Menu 116, 118, 119
Configure IBM Tivoli Advanced Backup and
Recovery for z/OS menu 66, 89
Configure Products 62, 76
Configure the TEMS menu 81
Create LU6.2 Logmode 82
Main Menu 49
Product Component Selection Menu 66, 80
Product Selection Menu 62, 76
RTE Utility Menu 72, 93
Runtime Environments (RTEs) 62, 76
Set Up Configuration Environment 51
SOAP Server KSHXHUBS List 88
Specify Advanced Agent Configuration Values 70,
92
Specify Advanced Configuration Values 84
Specify Agent Address Space Parameters 68, 91
Specify Agent Parameters 67
Specify Agent Primary TEMS Values 68
Specify Communication Protocols 85
Specify Configuration Values 82
Specify IP.PIPE Communication Protocol 86
Specify Options 50
Configuration Tool panels (continued)Specify SNA Communication Protocol 88
Configure IBM Tivoli Advanced Backup and Recovery
for z/OS menu, Configuration Tool 66, 89
Configure Products panel, Configuration Tool 62, 76
Configure the TEMS menu, Configuration Tool 81
conventionsabbreviations xiv
typeface xiv
Create LU6.2 Logmode panel, Configuration Tool 82
CSIexisting 48
new 48
customer supportSee Software Support
Ddata files, installing 60, 100
DB2 Universal Databaseinstalling 54, 95
password requirements 55, 56, 96, 97
required by Tivoli Enterprise Portal Server 54, 95
security 55, 96
db2admin user account 54, 95
desktop client 12
directory names, notation xv
display commands 139
downloading Advanced Backup and Recovery for
z/OS 42
Eeducation 145
see Tivoli technical training xiii
encryption 57, 84, 97
environment variables xv
Ephemeral Pipe Support (EPS) 87
errorsConfiguration Tool 43
installation, Tivoli Enterprise Portal Server 55, 96
Ffeatures
product 4
firewallsaddress translation 87
Ephemeral Pipe Support (EPS) 87
with IP.PIPE protocol 87
fix packs 145
full runtime environment 13, 14
Gglobal options
TEDA server 141
glossary, accessing online xiii
IBM Confidential
152 IBM Tivoli Advanced Backup and Recovery for z/OS Planning and Configuration Guide
Hhelp, Configuration Tool 44
host namefully qualified 99
hub Tivoli Enterprise Monitoring Server 59
monitoring agent 87
runtime environment 65, 79
TCP/IP 87
hub Tivoli Enterprise Monitoring Serverdefined 9
installing application support 60, 100
registering monitoring agent 66, 89
requirements 85, 87
seeding 60, 100
Web Services SOAP Server 85, 87
IIBM Health Checker for z/OS
historical data collection 39
requirementTCP/IP protocols 40
IBM Redbooks 145
IBM Support Assistant 145
IBM Tivoli Monitoringlibrary xii
publications xii
ICATSee Configuration Tool
installationapplication support 60, 100
data files 60, 100
DB2 Universal Database 54, 95
errors 55, 96
road map 37
SMP/E 42
Tivoli Enterprise Monitoring Server on Windows 54,
57
Tivoli Enterprise Portal Server and client 54, 57, 95,
97
Integrated Cryptographic Service Facility (ICSF) 84
interoperability 5
IP.PIPE protocoladdress translation 87
Ephemeral Pipe Support (EPS) 87
with firewalls 87
KKCICFKEY utility 135
KCICPGHP utility 135, 137
KCISETUP utility 135
KCISYNJB member 94
KCISYPJB member 72, 94
KDEB_INTERFACELIST parameter 27, 32, 34
KDSENV member 32
KHLENV member 27, 34
KppPRD00 141
KppSHR00 141
Llanguage locale 70, 85, 92
librariesbase 13
LPAR-specific 13
procedure 72, 93
RKANSAMU 72, 94
runtimebuilding 65, 80
defined 13
loading 71, 93
SMP/E target 13
target 13
types 13
Local Security Settings, Windows 55, 56, 96, 97
logmodecreating 82
LU6.2 82
LPAR-specific libraries 13
LU6.2 logmode 82
MMain Menu, Configuration Tool 49
managed system list 5
managing ISPF session PF keys 135
manualssee publications xi, xii
message log view 4
monitoring agentadding 73, 102
decisions 11
expanding configuration 73, 102
permissions for product features 110
security considerations 110
started task 68, 73, 91
starting 101
monitoring serverdecisions 9
hub 9
on a distributed system 22
on a z/OS system 29
remote 9
Nnavigation tree 3, 4
NetView 110
network interface list 27, 32, 34, 87
node ID 60, 69, 101
notationenvironment variables xv
path names xv
typeface xv
notepad view 4
OOMVS segment
Advanced Backup and Recovery for z/OS 110
IBM Confidential
Index 153
online help, Configuration Tool 44
online publications xii
overview, product 3
Ppackaging
download 42
explained 41
Web download 42
panels, Configuration ToolAdd Runtime Environment 63, 78, 116
Configure IBM Tivoli Advanced Backup and
Recovery for z/OS menu 66, 89
Configure Products 62, 76
Configure the TEMS menu 81
Create LU6.2 Logmode 82
Main Menu 49
Product Component Selection Menu 66, 80
Product Selection Menu 62, 76
RTE Utility Menu 72, 93
Runtime Environments (RTEs) 62, 76
Set Up Configuration Environment 51
SOAP Server KSHXHUBS List 88
Specify Advanced Agent Configuration Values 70,
92
Specify Advanced Configuration Values 84
Specify Agent Address Space Parameters 68, 91
Specify Agent Parameters 67
Specify Agent Primary TEMS Values 68
Specify Communication Protocols 85
Specify Configuration Values 82
Specify IP.PIPE Communication Protocol 86
Specify Options 50
Specify SNA Communication Protocol 88
password problems 55, 96
password requirements, DB2 Universal Database 55,
56, 96, 97
path names, notation xv
permissions for product features 110
PF Key Manager 136
planning 7
portal clientbrowser 12
decisions 12
desktop 12
portal serverdecisions 12
prerequisitesencryption 84
experience xi
hardware 39
ICSF 84
knowledge xi
software 39
preventive service planning (PSP) maintenance 61, 76
problem determinationdescribing problems 147
determining business impact 147
submitting problems 147
problem resolution 145
problems, password 55, 96
Product Component Selection Menu, Configuration
Tool 66, 80
Product Selection Menu, Configuration Tool 62, 76
Program to Program Interface (PPI) 110
publicationsaccessing online xii
Advanced Backup and Recovery for z/OS xi
IBM Tivoli Monitoring xii
ordering xiii
Qqualifiers, Configuration Tool xiv
queries 4
RRedbooks, IBM 145
remote Tivoli Enterprise Monitoring Server 9
requirementsConfiguration Tool 43
encryption 84
hardware 39
IBM Health Checker for z/OShistorical data collection 39
TCP/IP protocols 40
ICSF 84
software 39
Web Services SOAP Server 85, 87
resourcesTEDA server 141
RKANSAMU libraryKCISYNJB member 94
KCISYPJB member 72, 94
RTESee runtime environment
RTE Utility Menu, Configuration Tool 72, 93
runtime environmentsadding 61, 76
base 14, 16
configuration worksheet 36
configuring 14
creating 61, 76
defining 61, 76
existing 61, 76
full 13, 14
libraries 13
new 61, 76
overview 13
security 64, 79
self-contained 13, 14
sharing with base 14, 17
sharing with full 14, 18
sharing with SMP/E 14, 19
types 13
worksheet 36
Runtime Environments (RTEs) panel, Configuration
Tool 62, 76
runtime librariesbuilding 65, 80
IBM Confidential
154 IBM Tivoli Advanced Backup and Recovery for z/OS Planning and Configuration Guide
runtime libraries (continued)defined 13
loading 71, 93
runtime membersTivoli Enterprise Monitoring Server on z/OS
creating 89
Ssecurity
Advanced Backup and Recovery for z/OS monitoring
agent 110
APF authorization 72, 94
command authorization 110
DB2 Universal Database 55, 96
monitoring agent 110
NetView authentication 110
runtime environment 64, 79
Take Action commands 110
Tivoli Enterprise Monitoring Server 83, 105
on a distributed system 109
on z/OS 105
Windows Local Security Settings 55, 96
Windows Local Security System 56, 97
z/OS console commands 110
seeding Tivoli Enterprise Monitoring Server 60, 100
Set Up Configuration Environment panel, Configuration
Tool 51
sharing runtime environmentsbase 14, 17
full 14, 18
SMP/E 14, 19
situation editor 5
SMP/Edefined 42
sharing target libraries 14, 19
target libraries 13
SMP/E installationz/OS components 47
SOAP Server 85, 87
SOAP Server KSHXHUBS List panel, Configuration
Tool 88
Software Support 145
contacting 146
describing problems 147
determining business impact 147
submitting problems 147
Specify Advanced Agent Configuration Values panel,
Configuration Tool 70, 92
Specify Advanced Configuration Values panel,
Configuration Tool 84
Specify Agent Address Space Parameters panel,
Configuration Tool 68, 91
Specify Agent Parameters panel, Configuration Tool 67
Specify Agent Primary TEMS Values panel,
Configuration Tool 68
Specify Communication Protocols panel, Configuration
Tool 85
Specify Configuration Values panel, Configuration
Tool 82
Specify IP.PIPE Communication Protocol panel,
Configuration Tool 86
Specify Options panel, Configuration Tool 50
Specify SNA Communication Protocol panel,
Configuration Tool 88
standards supported 5
started taskmonitoring agent 68, 73, 91, 101
procedures 72, 93
TCP/IP server 65, 79, 87
Tivoli Enterprise Monitoring Server 83
startingAdvanced Backup and Recovery for z/OS monitoring
agent 73, 101
Configuration Tool 48
monitoring agent 73, 101
Tivoli Enterprise Monitoring Server 73, 101
Tivoli Enterprise Portal Server and client 73, 101
support 145
support assistant 145
SYS1.VTAMLST 94
system variable support 115
changing in a runtime environment 117
creating the system variable parameter
member 118
creating the VTAM major node rename job 119
enabling 116
sample usage 115
values 117
system variable values 117
Ttable views 4
Take Action commands, security 110
Take action view 4
target libraries, SMP/E 13, 14, 19
TCP/IPhost name 65, 79, 87, 99
interface list 27, 32, 34, 87
network interfaces 27, 32, 34, 87
server started task 65, 79, 87
TEDA serveragents 142
global options 141
PARMLIB statements 141
resources 141
starting 139
stopping 139
TEMS name 60, 69, 101
terminal view 4
terminology xiii
Tivoli Data Warehouse 10
Tivoli Enterprise Monitoring Serverconfiguring on Windows 54, 57
configuring on z/OS 80
decisions 9
encryption 57, 84
hubconfiguring on Windows 54, 57
configuring on z/OS 80
IBM Confidential
Index 155

Tivoli Enterprise Monitoring Server (continued)hub (continued)
defined 9
installing application support 60, 100
installing on Windows 54
node ID 60, 69, 101
on Windows 53
on z/OSruntime members 89
registering monitoring agent 66, 89
requirements 85, 87
security 83, 105
on a distributed system 109
on z/OS 105
seeding 60, 100
started task 83, 101
startingon Windows 73
on z/OS 101
TEMS name 60, 69, 101
Web Services SOAP Server 85, 87
Tivoli Enterprise Portal 3
Tivoli Enterprise Portal clientbrowser 12
decisions 12
desktop 12
Tivoli Enterprise Portal Serverconfiguring 54, 57, 97
DB2 Universal Database requirement 54, 95
decisions 12
encryption 57, 97
errors during installation 55, 96
installation problems 55, 96
installing 54, 57, 95, 97
starting 73, 101
Tivoli Software Information Center xii
Tivoli technical training xiii
training, Tivoli technical xiii
typeface conventions xiv
Uuser administration 5
Vvariables
environment xv
system 115
creating the system variable parameter
member 118
creating the VTAM major node rename job 119
enabling 116
sample usage 115
values 117
viewsbrowser 4
chart 4
message log 4
notepad 4
table 4
views (continued)Take action 4
terminal 4
VTAMdefinitions 94
major node 94
Wwarehouse proxy 10
Web download 42
Web Services 85, 87
Windowslocal Administrator authority 54, 95
Local Security Settings 55, 56, 96, 97
work environment, Configuration Tool 50
worksheetshub monitoring server on a distributed system 22
communications protocols 23
hub monitoring server on a z/OS system 29
communications protocols 31
overall configuration 20
runtime environment 36
workspacesdefined 3
views 4
Zz/OS components
SMP/E installation 47
IBM Confidential
156 IBM Tivoli Advanced Backup and Recovery for z/OS Planning and Configuration Guide


����
Program Number: 5698–B17
IBM Confidential
Printed in USA
SC23-9732-00