polycom realpresence content sharing suite quick user guide
TRANSCRIPT
1
Polycom®
RealPresence® Content Sharing Suite
Quick User Guide Version 1.1 | 3725-03261-001 Rev.C | June 2013
In this guide, you’ll learn how to share and view content during a conference call when the
Polycom® RealPresence® Content Sharing Suite (CSS) is deployed. You can choose to share
and view content from Microsoft Lync 2010 or 2013, or—if you don’t have Lync—by entering a
URL in your browser and accessing content over the Web.
The topics include:
Using Microsoft Lync to View and Share Content
Viewing and Sharing Content over the Web
Web Info: Where Do I Find More Information About CSS?
For detailed information about the Polycom RealPresence Content Sharing Suite, see the Polycom RealPresence Content Sharing Suite Support page.
Using Microsoft Lync to View and Share Content
This section describes how to use Microsoft Lync 2010 and 2013 when the RealPresence
Content Sharing Suite is deployed. After reading this section, you’ll understand how to use Lync
to view and share content from your Lync Client.
Before you can use Microsoft Lync to share and view content, you need to determine if your
computer is set up to work with CSS. If it’s not set up to work with CSS, you need to install the
Polycom RealPresence Content Add-on for Lync—a key CSS component—on your machine.
Then, you can start viewing and sharing content.
In this section, you’ll learn about:
Setting Up Your Computer to Work with CSS
Viewing and Sharing Content from Lync
Polycom® RealPresence® Content Sharing Suite Quick User Guide
2
Setting Up Your Computer to Work with CSS
Your system administrator will have set up the solution for your environment. However, your
administrator may not have installed a key component of CSS—the Polycom RealPresence
Content Add-on for Lync—on your computer. If it isn’t installed on your computer, you’ll need to
install it, so that you’ll be able to use the solution from Microsoft Lync. After CSS software is
installed on your computer, you’re ready to start viewing and sharing content from Lync
(see Viewing and Sharing Content from Lync).
This section describes the following:
Determining if CSS Software is on Your Computer
Installing CSS Software
Determining if CSS Software is on Your Computer
Determine if CSS software is on your computer. If it’s already installed on your computer, you
can skip the installation procedure and start sharing and viewing content. If it isn’t on your
computer, complete the steps outlined in Installing CSS Software.
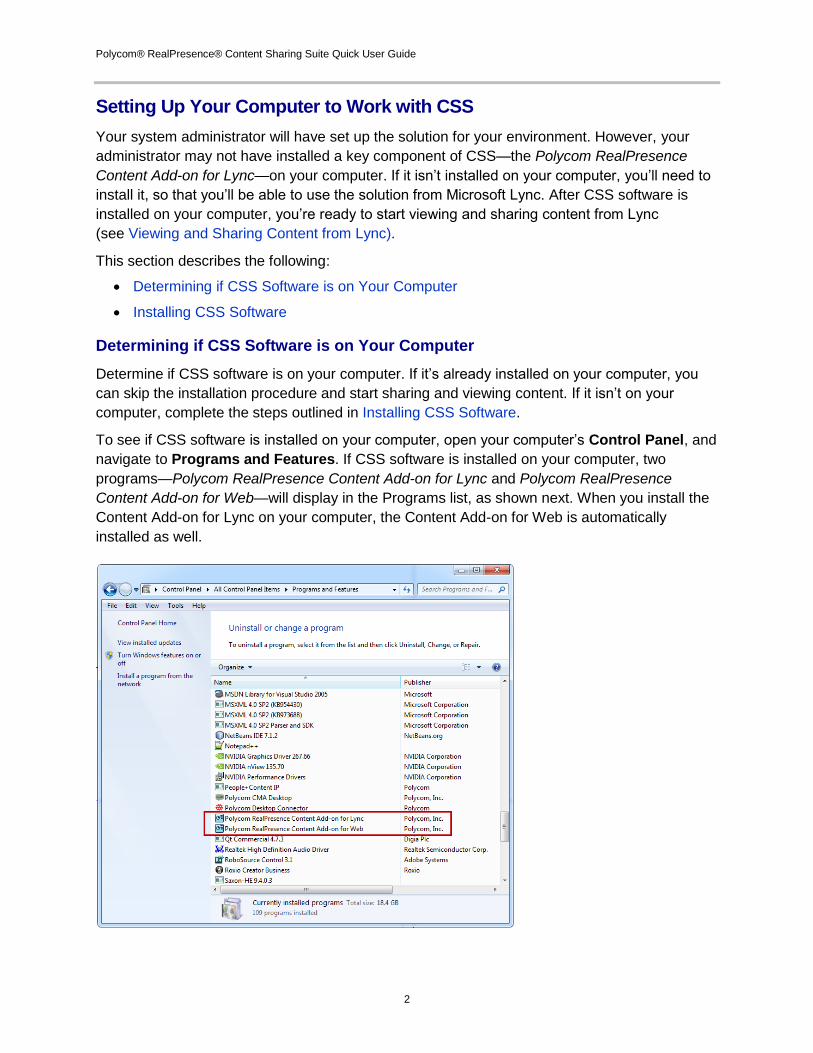
To see if CSS software is installed on your computer, open your computer’s Control Panel, and
navigate to Programs and Features. If CSS software is installed on your computer, two
programs—Polycom RealPresence Content Add-on for Lync and Polycom RealPresence
Content Add-on for Web—will display in the Programs list, as shown next. When you install the
Content Add-on for Lync on your computer, the Content Add-on for Web is automatically
installed as well.
Polycom® RealPresence® Content Sharing Suite Quick User Guide
3
Installing CSS Software
If your administrator hasn’t already installed CSS software on your computer, you’ll need to
install the RealPresence Content Add-on for Lync on your computer.
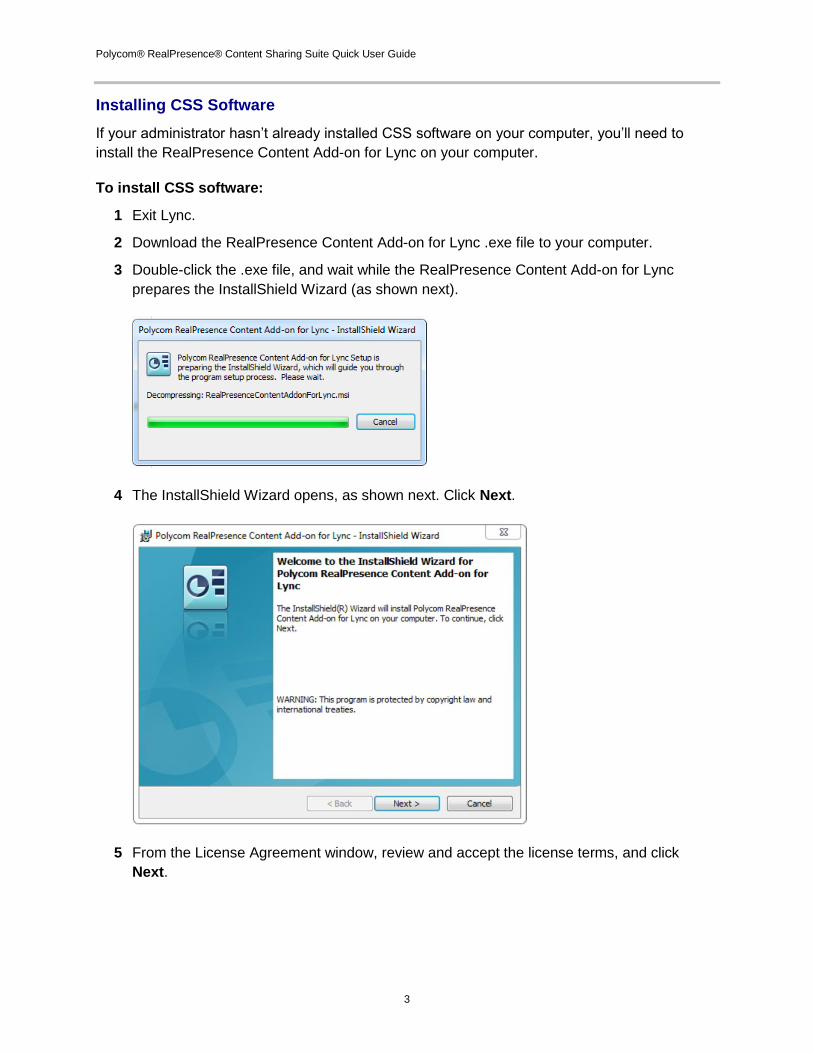
To install CSS software:
1 Exit Lync.
2 Download the RealPresence Content Add-on for Lync .exe file to your computer.
3 Double-click the .exe file, and wait while the RealPresence Content Add-on for Lync
prepares the InstallShield Wizard (as shown next).
4 The InstallShield Wizard opens, as shown next. Click Next.
5 From the License Agreement window, review and accept the license terms, and click
Next.

Polycom® RealPresence® Content Sharing Suite Quick User Guide
4
6 From the Destination Folder window (shown next), accept the default location to install the
RealPresence Content Add-on for Lync (or change the location), and click Next.
7 From the Ready to Install the Program window (shown next), click Install.

Polycom® RealPresence® Content Sharing Suite Quick User Guide
5
8 An ‘Installing’ window displays (as shown next), together with a message on your task bar
that indicates the RealPresence Content Add-on for Lync is loading. Wait while the
installation completes.
9 When the installation completes, the InstallShield Wizard Completed window displays,
(as shown next). Click Finish.
CSS software is now installed on your machine. To check, see if the Polycom RealPresence
Content Add-on for Lync and Polycom RealPresence Content Add-on for Web display in your
computer’s Programs list (see Determining if CSS Software is on Your Computer). If the CSS
software displays, you’re ready to start viewing and sharing content.
Polycom® RealPresence® Content Sharing Suite Quick User Guide
6
Viewing and Sharing Content from Lync
You can share your desktop or a program with other Lync users, and endpoints that receive
content from Polycom® RealPresence® Collaboration Server (RMX). To view and share
content with other endpoints, you must be in a RealPresence Collaboration Server
(RMX)/Polycom® RealPresence® Distributed Media Application (DMA) Virtual Meeting Room
(VMR) call.
Note: Successfully Sharing Content
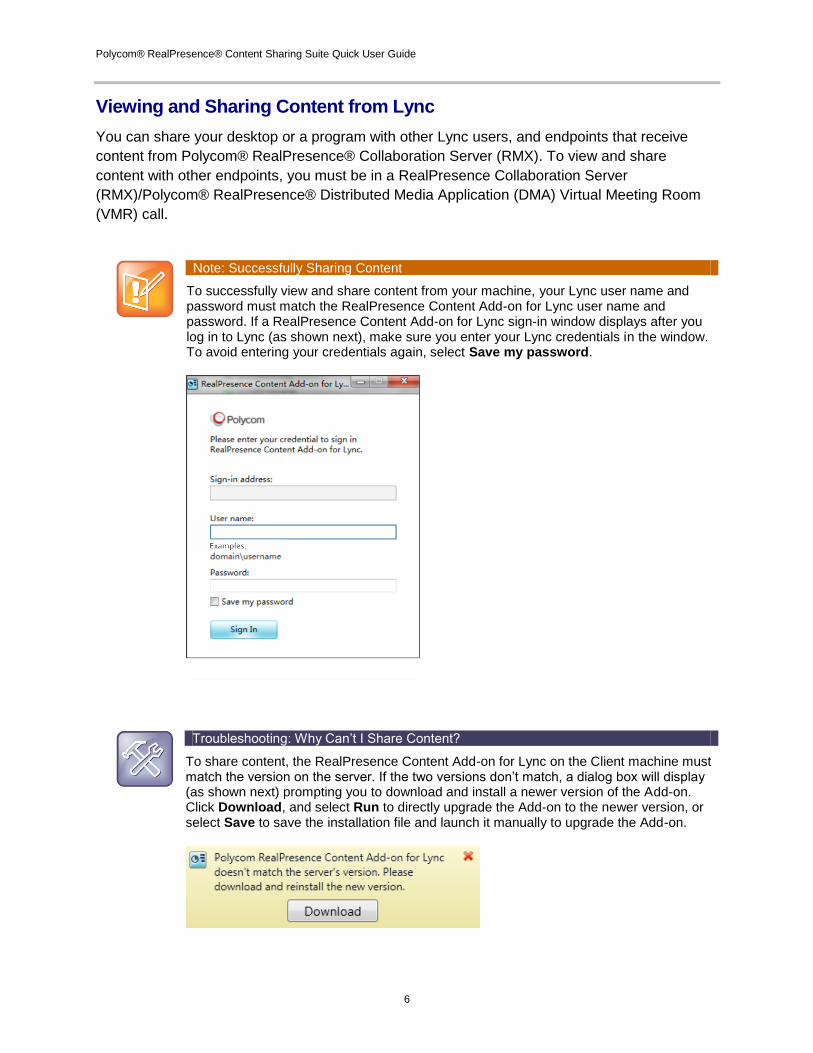
To successfully view and share content from your machine, your Lync user name and password must match the RealPresence Content Add-on for Lync user name and password. If a RealPresence Content Add-on for Lync sign-in window displays after you log in to Lync (as shown next), make sure you enter your Lync credentials in the window. To avoid entering your credentials again, select Save my password.
Troubleshooting: Why Can’t I Share Content?
To share content, the RealPresence Content Add-on for Lync on the Client machine must match the version on the server. If the two versions don’t match, a dialog box will display (as shown next) prompting you to download and install a newer version of the Add-on. Click Download, and select Run to directly upgrade the Add-on to the newer version, or select Save to save the installation file and launch it manually to upgrade the Add-on.
Polycom® RealPresence® Content Sharing Suite Quick User Guide
7
Starting a VMR Call
To view and share content, a Lync conversation window must be open, and you must be in an
active VMR call.
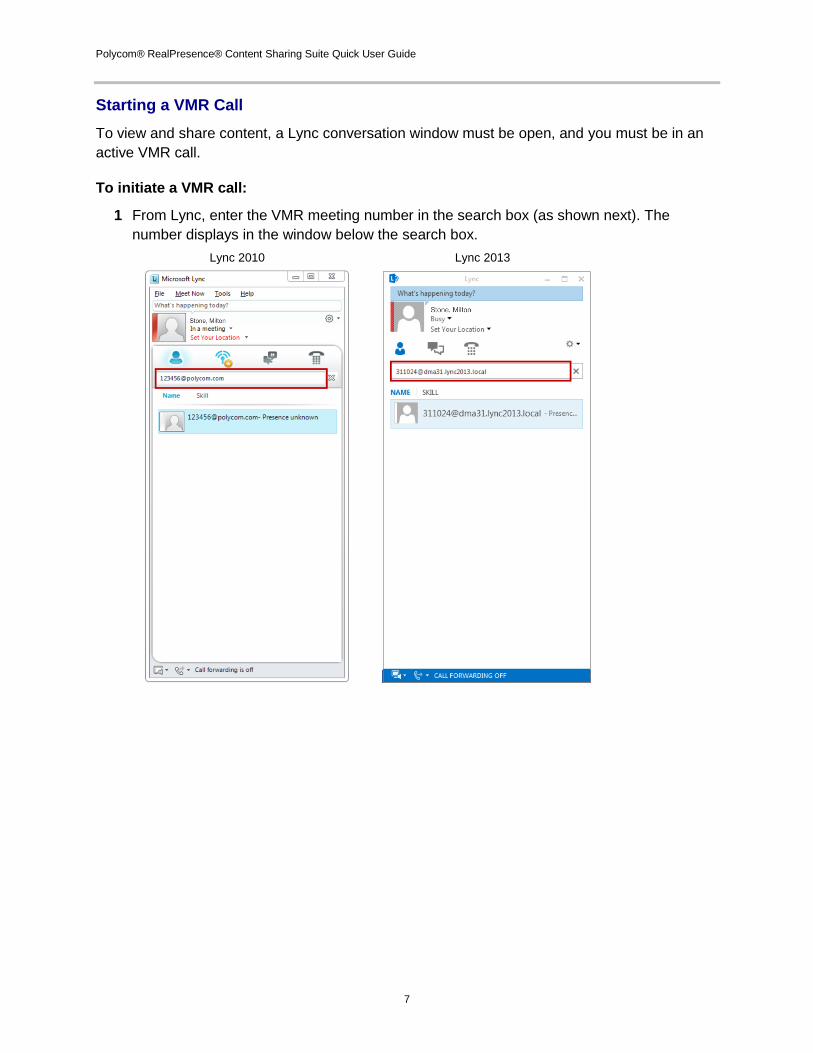
To initiate a VMR call:
1 From Lync, enter the VMR meeting number in the search box (as shown next). The
number displays in the window below the search box.
Lync 2010 Lync 2013
Polycom® RealPresence® Content Sharing Suite Quick User Guide
8
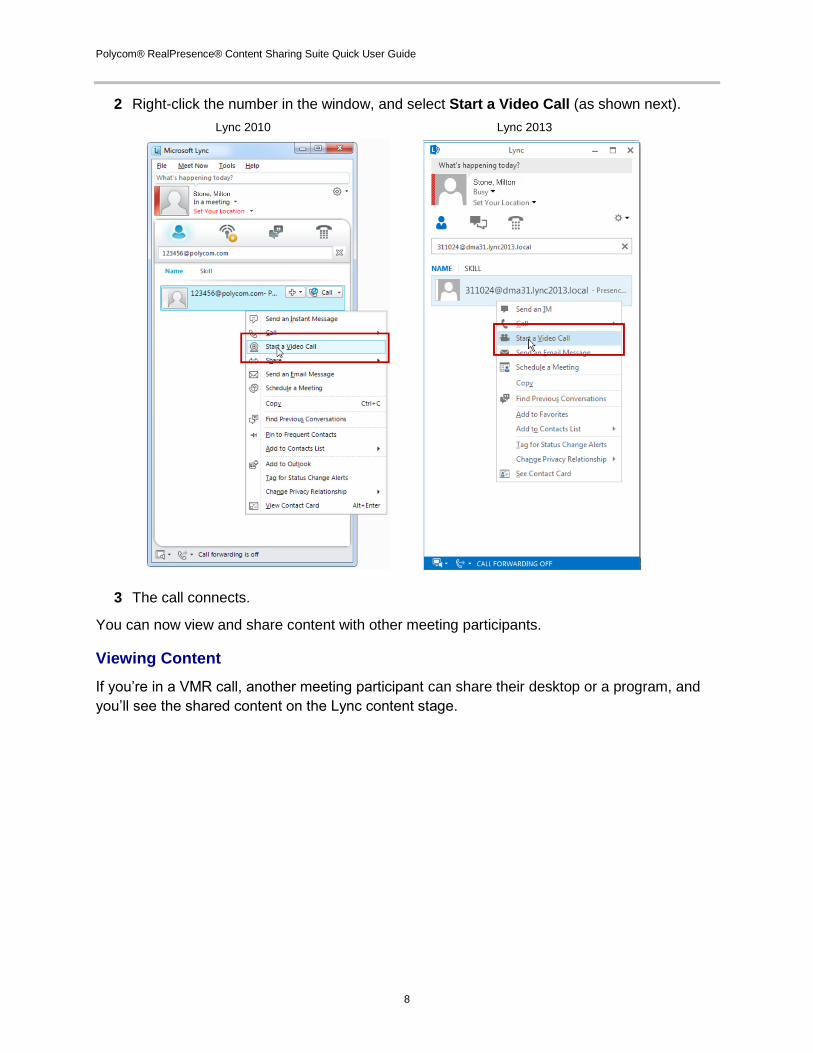
2 Right-click the number in the window, and select Start a Video Call (as shown next).
Lync 2010 Lync 2013
3 The call connects.
You can now view and share content with other meeting participants.
Viewing Content
If you’re in a VMR call, another meeting participant can share their desktop or a program, and
you’ll see the shared content on the Lync content stage.
Polycom® RealPresence® Content Sharing Suite Quick User Guide
9
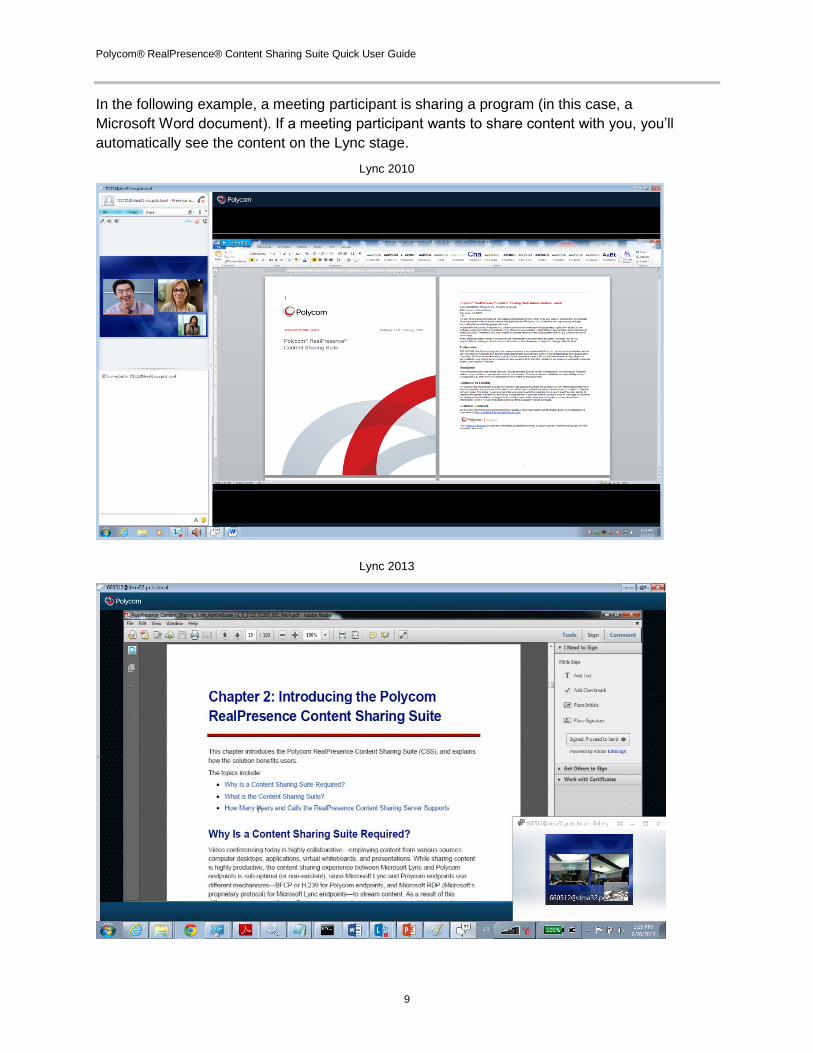
In the following example, a meeting participant is sharing a program (in this case, a
Microsoft Word document). If a meeting participant wants to share content with you, you’ll
automatically see the content on the Lync stage.
Lync 2010
Lync 2013
Polycom® RealPresence® Content Sharing Suite Quick User Guide
10
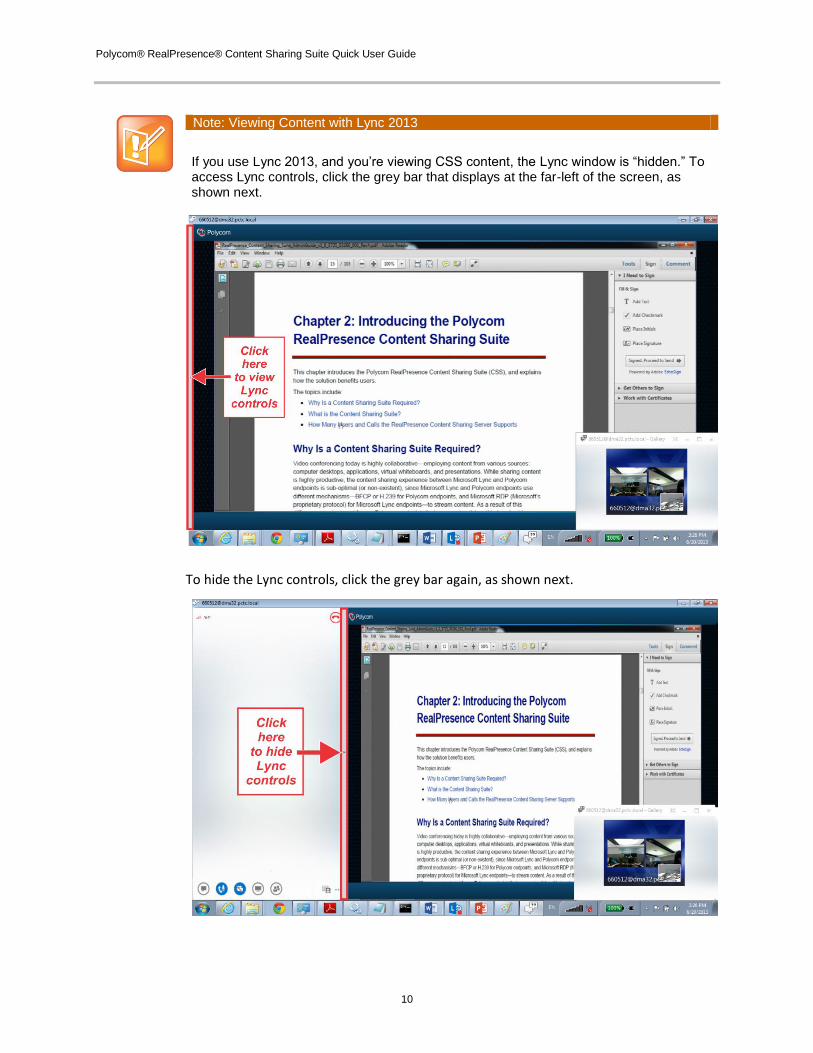
Note: Viewing Content with Lync 2013
If you use Lync 2013, and you’re viewing CSS content, the Lync window is “hidden.” To access Lync controls, click the grey bar that displays at the far-left of the screen, as shown next.
To hide the Lync controls, click the grey bar again, as shown next.
Polycom® RealPresence® Content Sharing Suite Quick User Guide
11
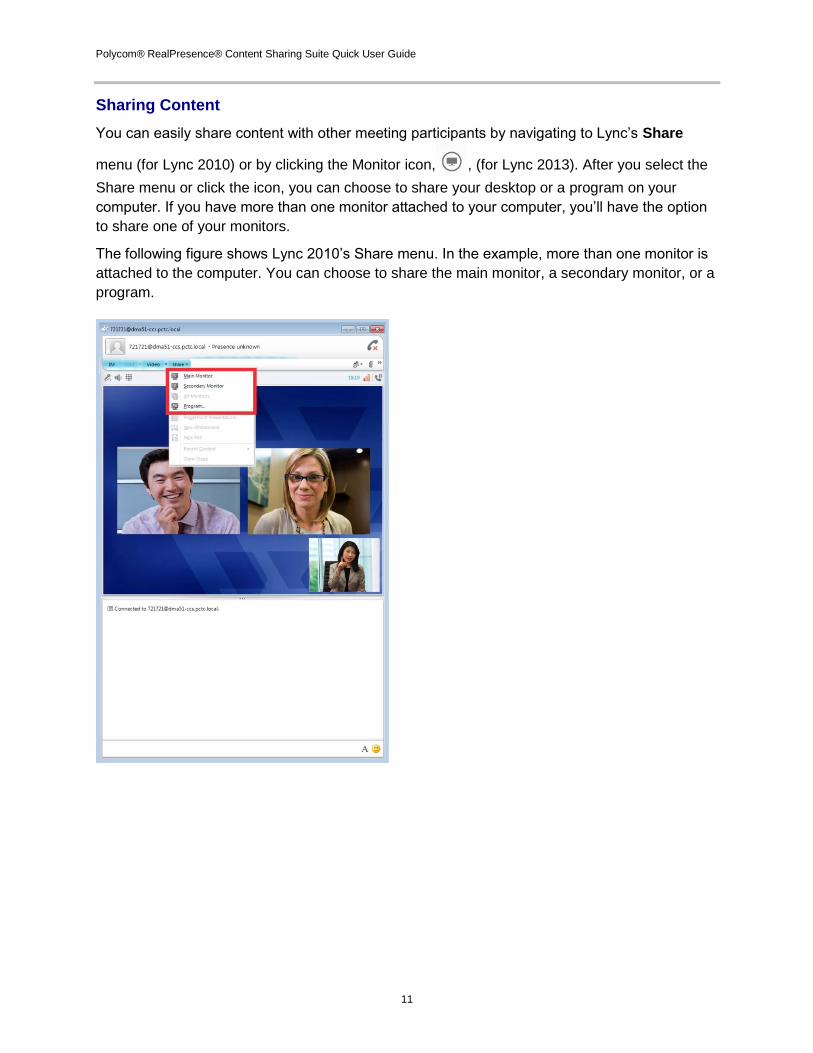
Sharing Content
You can easily share content with other meeting participants by navigating to Lync’s Share
menu (for Lync 2010) or by clicking the Monitor icon, , (for Lync 2013). After you select the
Share menu or click the icon, you can choose to share your desktop or a program on your
computer. If you have more than one monitor attached to your computer, you’ll have the option
to share one of your monitors.
The following figure shows Lync 2010’s Share menu. In the example, more than one monitor is
attached to the computer. You can choose to share the main monitor, a secondary monitor, or a
program.
Polycom® RealPresence® Content Sharing Suite Quick User Guide
12
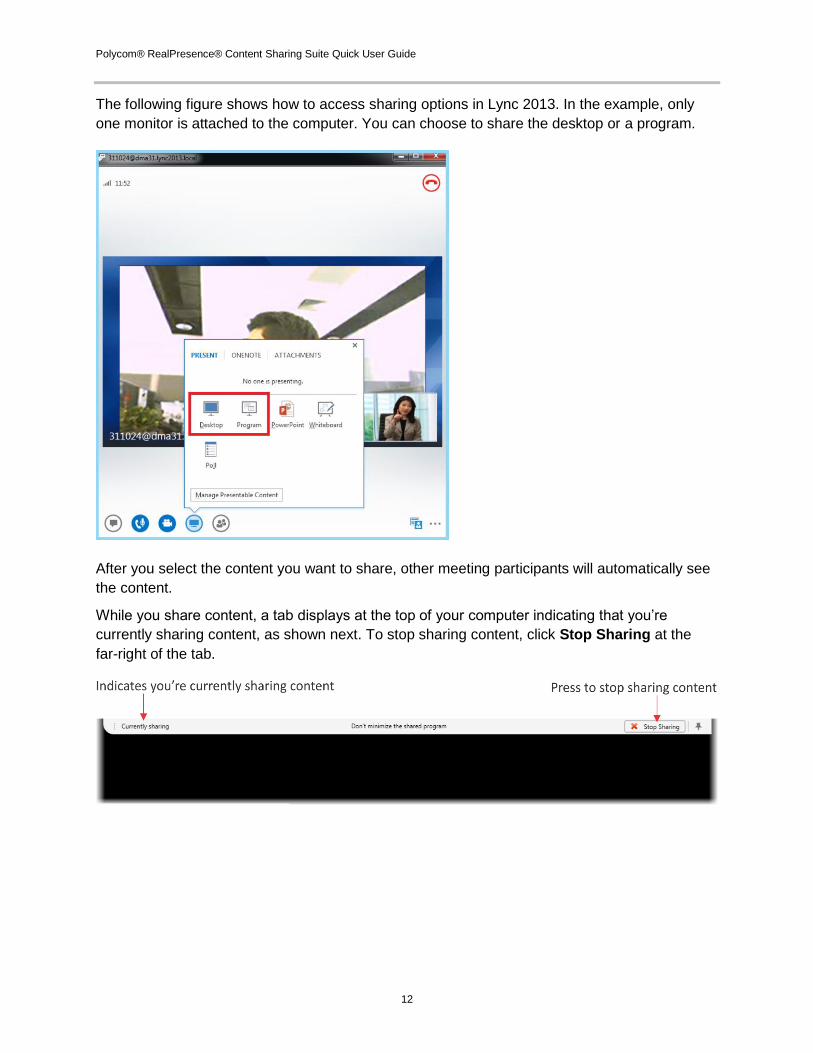
The following figure shows how to access sharing options in Lync 2013. In the example, only
one monitor is attached to the computer. You can choose to share the desktop or a program.
After you select the content you want to share, other meeting participants will automatically see
the content.
While you share content, a tab displays at the top of your computer indicating that you’re
currently sharing content, as shown next. To stop sharing content, click Stop Sharing at the
far-right of the tab.
Polycom® RealPresence® Content Sharing Suite Quick User Guide
13
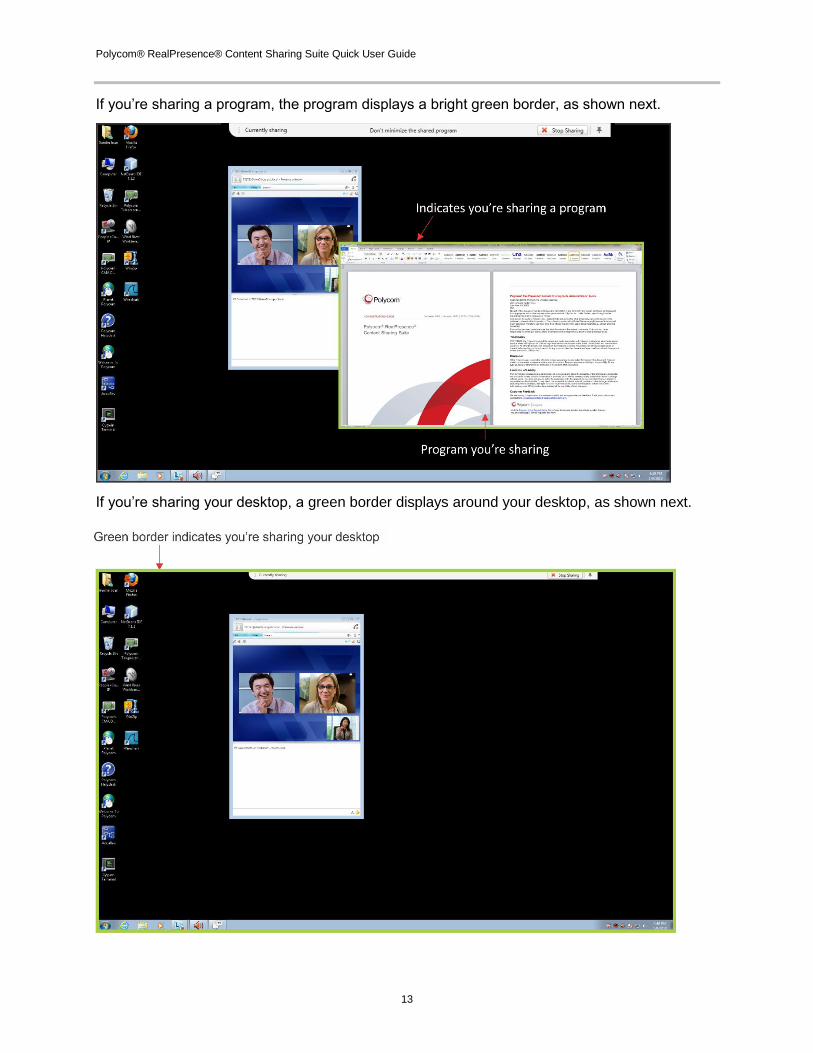
If you’re sharing a program, the program displays a bright green border, as shown next.
If you’re sharing your desktop, a green border displays around your desktop, as shown next.
Polycom® RealPresence® Content Sharing Suite Quick User Guide
14
To share your desktop:
If you have Lync 2010, select Share > Desktop. Or, if you have Lync 2013, click , and
then select Desktop. If you have more than one monitor attached to your computer,
choose Main Monitor or Secondary Monitor instead.
A green border displays around your desktop. Other meeting participants will automatically see
your desktop.
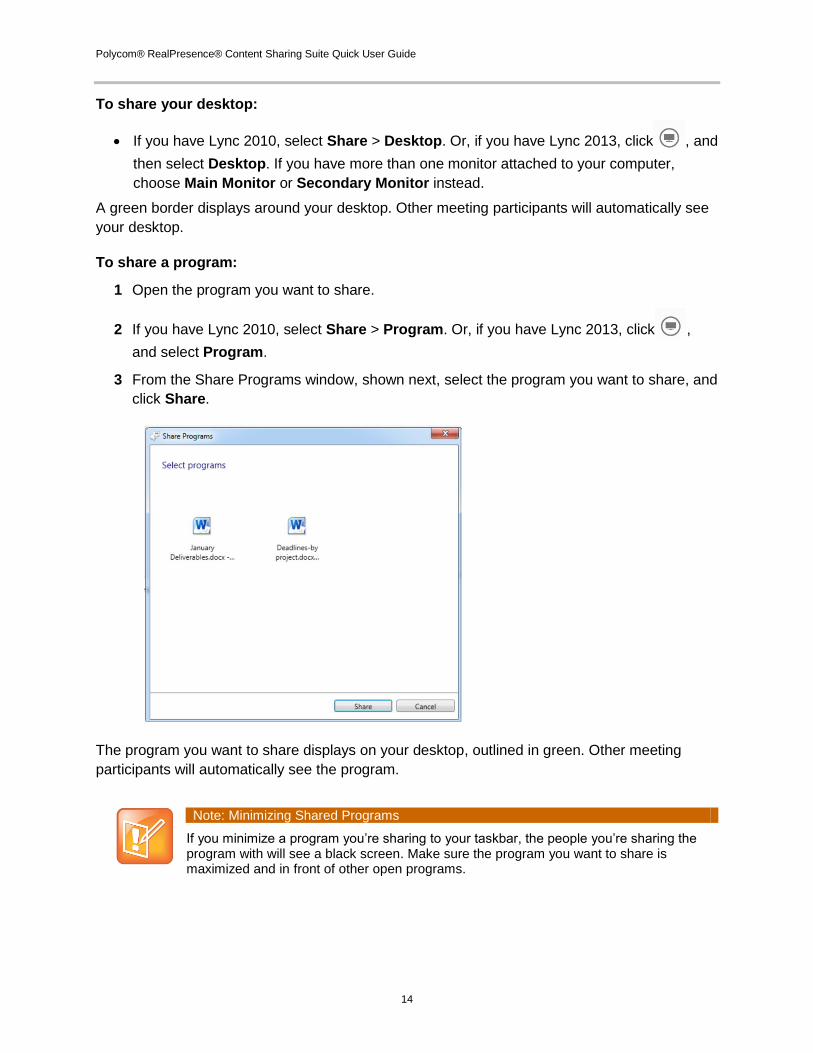
To share a program:
1 Open the program you want to share.
2 If you have Lync 2010, select Share > Program. Or, if you have Lync 2013, click ,
and select Program.
3 From the Share Programs window, shown next, select the program you want to share, and
click Share.
The program you want to share displays on your desktop, outlined in green. Other meeting
participants will automatically see the program.
Note: Minimizing Shared Programs
If you minimize a program you’re sharing to your taskbar, the people you’re sharing the program with will see a black screen. Make sure the program you want to share is maximized and in front of other open programs.

Polycom® RealPresence® Content Sharing Suite Quick User Guide
15
Viewing and Sharing Content over the Web
If you don’t have access to Lync, you can access CSS content over the Web by entering a
special URL—https://<server IP>/css/—in a Web browser. The URL will be specified in the
meeting request. After you enter the URL in your Web browser, you can use the onscreen
dialpad to dial the VMR, or you’ll be prompted to install or upgrade (if required) CSS software on
your machine so you can dial the VMR and view and share content.
When you view and share content over the Web, you won’t have access to audio or video.
You can access Web-based content from X86/Windows machines running Windows XP (SP3+),
Windows 7 (SP1+), and Windows 8 with Internet Explorer 8, Internet Explorer 9,
Internet Explorer 10 (Metro), Google Chrome (26) or Mozilla Firefox (18).
To view and share content over the Web:
1 From a Web browser, enter the URL specified in the meeting request and press Enter.
The URL will have the following format: https://<server IP>/css/
(for example: https://172.21.125.152/css/).
2 One of the following happens:
A dialpad screen displays, as shown next. Go to step 3.
Polycom® RealPresence® Content Sharing Suite Quick User Guide
16
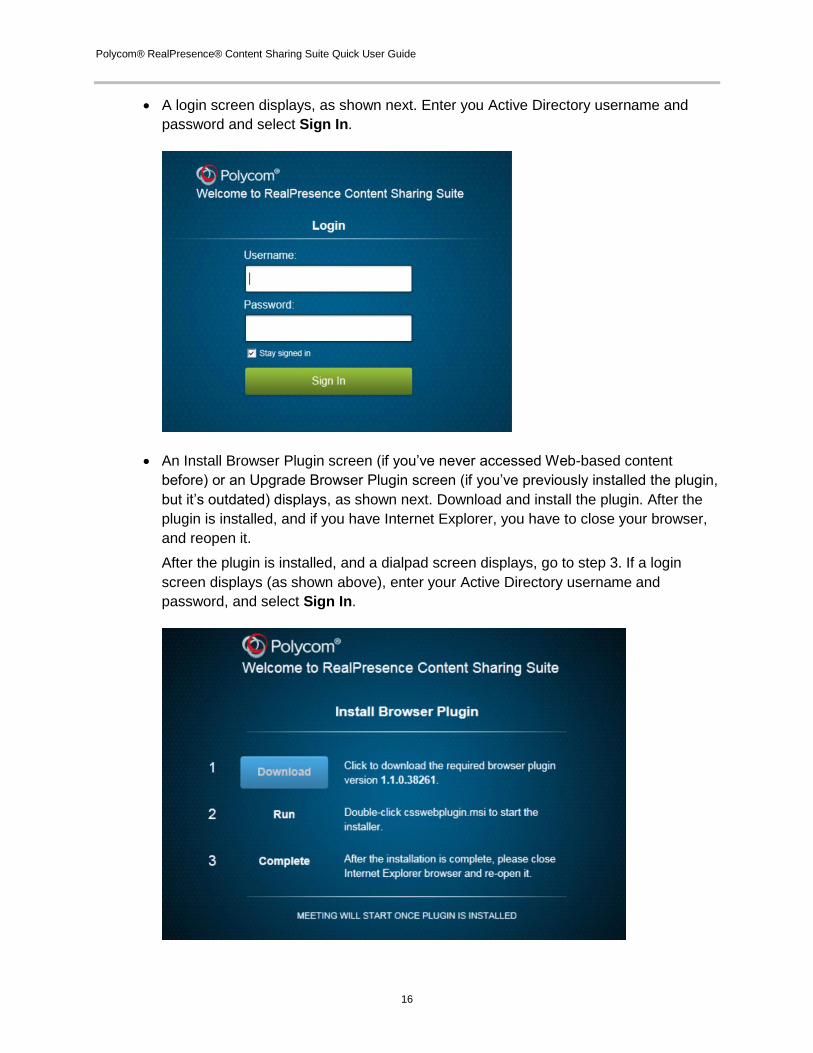
A login screen displays, as shown next. Enter you Active Directory username and
password and select Sign In.
An Install Browser Plugin screen (if you’ve never accessed Web-based content
before) or an Upgrade Browser Plugin screen (if you’ve previously installed the plugin,
but it’s outdated) displays, as shown next. Download and install the plugin. After the
plugin is installed, and if you have Internet Explorer, you have to close your browser,
and reopen it.
After the plugin is installed, and a dialpad screen displays, go to step 3. If a login
screen displays (as shown above), enter your Active Directory username and
password, and select Sign In.
Polycom® RealPresence® Content Sharing Suite Quick User Guide
17
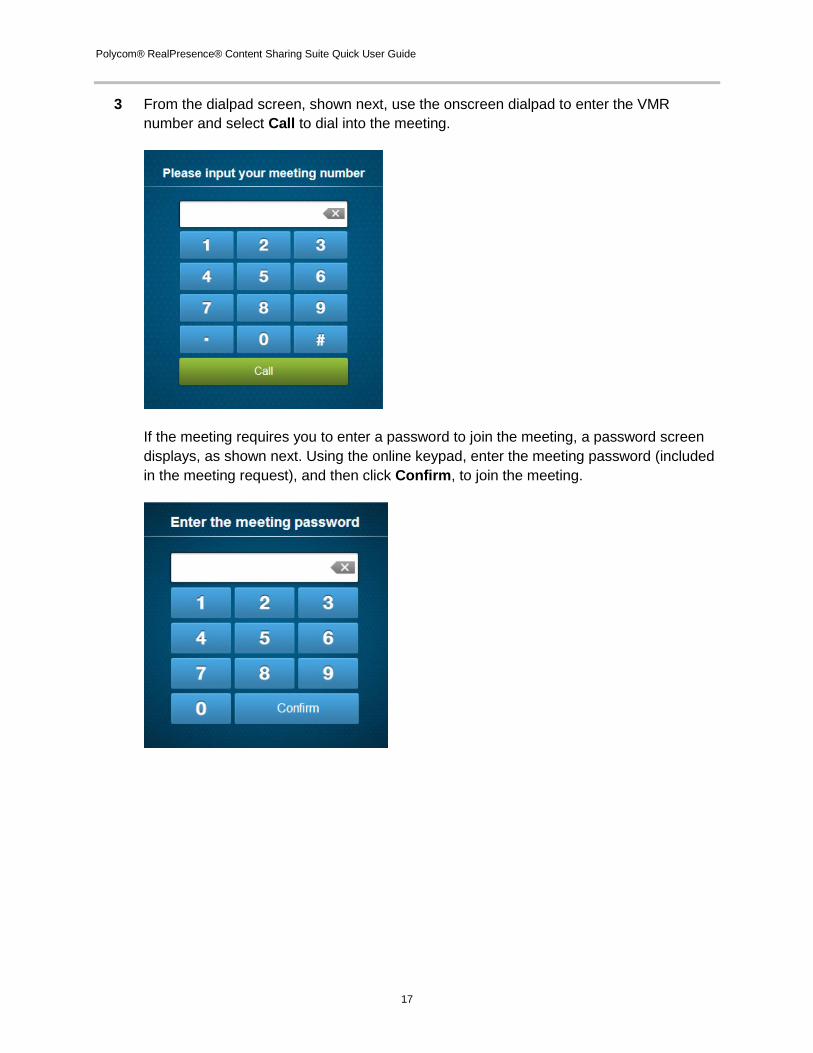
3 From the dialpad screen, shown next, use the onscreen dialpad to enter the VMR
number and select Call to dial into the meeting.
If the meeting requires you to enter a password to join the meeting, a password screen
displays, as shown next. Using the online keypad, enter the meeting password (included
in the meeting request), and then click Confirm, to join the meeting.
Polycom® RealPresence® Content Sharing Suite Quick User Guide
18
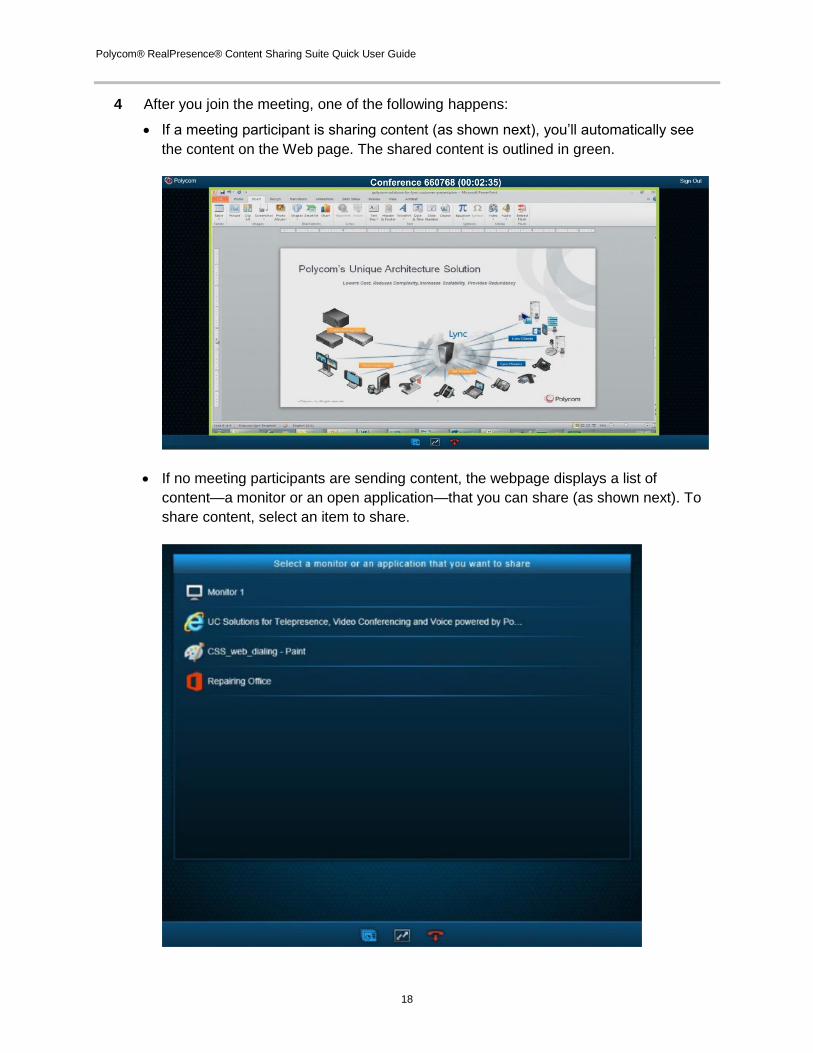
4 After you join the meeting, one of the following happens:
If a meeting participant is sharing content (as shown next), you’ll automatically see
the content on the Web page. The shared content is outlined in green.
If no meeting participants are sending content, the webpage displays a list of
content—a monitor or an open application—that you can share (as shown next). To
share content, select an item to share.

Polycom® RealPresence® Content Sharing Suite Quick User Guide
19
At the bottom of the Web page is a toolbar with three icons, as shown next.
Select an icon to do one of the following:
To toggle between sharing and not sharing content, select .
To toggle between showing content on the full screen, or in a smaller window, select
.
To exit the meeting, select .
Note: Entering a URL That Dials Directly into the VMR
The meeting request may contain a URL that contains the VMR (for example: https:// 172.21.115.134/css/?id=661920, where 172.21.115.134 is the server IP address and 661920 is the VMR number). If you enter this URL in your Web browser, you’ll dial directly into the VMR (after completing any required steps, such as logging in, installing the plugin, or entering a meeting password) without having to enter a VMR using the dialpad.
Copyright Information www.polycom.com | 3725-03261-001 Rev.C | June 2013
© 2013, Polycom, Inc. All rights reserved. POLYCOM®, the Polycom logo and the names and
marks associated with Polycom’s products are trademarks and/or service marks of Polycom,
Inc. and are registered and/or common law marks in the United States and various other
countries. All other trademarks are property of their respective owners. No portion hereof may
be reproduced or transmitted in any form or by any means, for any purpose other than the
recipient’s personal use, without the express written permission of Polycom.