rj654 - media.s-bol.com
TRANSCRIPT
RJ654 54 Keys Multi-Function Keyboard User Guide
Clavier multifonction 54 touches Guide utilisateur
54 Tasten Multifunktions-Keyboard Bedienungsanleitung
Tastiera multifunzione a 54 tasti Guida per l'utente
Wielofunkcyjny instrument klawiszowy 54 klawisze Podręcznik użytkownika
Teclado Multifunción de 54 teclas Manual de instrucciones
54 Keys Multi-Function
Keyboard
User Guide

Page | 1
Important Information
Be sure to obey the following information so as not to harm yourself or others or damage this
instrument or other external equipment.
Power adapter: • Please use only the specified AC adapter supplied with the product. An incorrect
or faulty adapter can cause damage to the electronic keyboard.
• Do not place the AC adapter or power cord near to any source of heat such as
radiators or other heaters.
• To avoid damaging the power cord, please ensure that heavy objects are not
placed on it and that it is not subject to stress or over bending.
• Check the power plug regularly and ensure it is free from surface dirt. Do not
insert or unplug the power cord with wet hands.
Do not open the body of the electronic keyboard: • Do not open the electronic keyboard or try to disassemble any part of it. If the
device is not functioning correctly, please stop using it and send it to a qualified
service agent for repair.
Use of the electronic keyboard: • To avoid damaging the appearance of the electronic keyboard or damaging the
internal parts please do not place the electronic keyboard in a dusty environment, in
direct sunlight or in places where there are very high or very low temperatures.
• Do not place the electronic keyboard on an uneven surface. To avoid damaging
internal parts do not place any vessel holding liquid onto the electronic keyboard as
spillage may occur.
Maintenance: • To clean the body of the electronic keyboard wipe it with a dry, soft cloth only.
Connection: • In order to prevent damage to the speaker of the electronic keyboard please adjust
the volume of any peripheral device to the lowest setting and gradually adjust the
volume accordingly to an appropriate level once the music is playing.
During operation: • Do not use the keyboard at the loudest volume level for a long period of time.
• Do not place heavy objects onto the keyboard or press the keyboard with undue
force.
• The packaging should be opened by a responsible adult only and any plastic
packaging should be stored or disposed of appropriately.
Specification • Specifications are subject to change without notice.
Page | 2
Contents
Front Panel and External Connections ............................................................................ 4
Front Panel .................................................................................................................. 4
External Connections ................................................................................................... 4
LCD Display .................................................................................................................. 5
Preparation Before First Use ........................................................................................... 5
Power ........................................................................................................................... 5
Use of AC/DC power adapter: ................................................................................. 5
Battery operation: ................................................................................................... 6
Auto Power Off: ....................................................................................................... 6
Jacks and Accessories .................................................................................................. 6
Using headphones or external speakers: ................................................................ 6
Connecting a microphone: ...................................................................................... 6
Basic Operation ............................................................................................................... 7
Power and Volume ...................................................................................................... 7
Power control: ......................................................................................................... 7
Adjustment of the Master Volume: ......................................................................... 7
Tone ............................................................................................................................. 7
Tone Selection: ........................................................................................................ 7
Effect & Control ........................................................................................................... 8
Sustain: .................................................................................................................... 8
Vibrato: .................................................................................................................... 8
Transpose: ............................................................................................................... 8
Panel Percussion Instruments: ................................................................................ 9
Rhythm ........................................................................................................................ 9
Selecting the rhythm: .............................................................................................. 9
Start / Stop: ............................................................................................................. 9
Sync:....................................................................................................................... 10
Fill in: ..................................................................................................................... 10
Rhythm Volume Adjustment: ................................................................................ 10

Page | 3
Tempo Adjustment: ............................................................................................... 11
Chord Accompaniment .............................................................................................. 11
Single Finger Chords: ............................................................................................. 11
Fingered Chords: ................................................................................................... 11
Chord Off: .............................................................................................................. 12
Recording Function .................................................................................................... 12
Demo Song Playback ................................................................................................. 13
Teaching Modes ........................................................................................................ 13
LEARN 1: ................................................................................................................ 13
LEARN 2: ................................................................................................................ 13
Appendix I. Rhythm Table ............................................................................................. 14
Appendix II. Tone Table ................................................................................................. 15
Appendix III. Demo Song Table ...................................................................................... 16
Appendix IV. Troubleshooting ....................................................................................... 16
Appendix V. Chord Tables ............................................................................................. 17
Single Finger Chords .................................................................................................. 17
Fingered Chords ......................................................................................................... 18
Appendix VI. Technical Specification ............................................................................. 19
Product Disposal Instructions ........................................................................................ 20

Page | 4
Front Panel and External Connections
Front Panel
1. Speaker
2. Power Switch
3. Master Volume
4. Rhythm Volume
5. Tempo
6. Transpose
7. Tone
8. Rhythm
9. Number Buttons
10. LCD Display
11. Sync
12. Fill In
13. Select
14. Demo
External Connections
15. Start / Stop
16. Single Finger Chord
17. Fingered Chord
18. Chord Off
19. Vibrato
20. Sustain
21. Learn 2
22. Learn 1
23. Program
24. Playback
25. Record
26. Percussion
27. Chord Keyboard Area
DC 9V - Power Input
OUT – Headphones/ External Speaker Output
OK - Microphone Input

Page | 5
LCD Display
1. Speed value of rhythm and song (bpm)
2. Digital display of song, rhythm and tone number
3. TONE, RHYTHM or DEMO song
4. Volume level display
5. Staff display
Preparation Before First Use
Power
Use of AC/DC power adapter:
Please use the special AC/DC power adapter that came with the electronic keyboard
or a power adapter with DC9V output voltage and 500mA output current with a centre
positive plug. Connect the DC plug of the power adapter into the DC9V power socket on the
rear of the keyboard and then connect the other end into the mains wall socket and switch on.
Caution: When the keyboard is not in use you should unplug the power adapter from the
mains power socket.

Page | 6
Battery operation:
Open the battery lid on the underneath of the electronic keyboard and insert 6 x 1.5V
Size D alkaline batteries. Ensure the batteries are inserted the correct way round and replace
the battery lid.
Caution: Do not mix old and new batteries. Do not leave batteries in the keyboard if the
keyboard is not going to be used for any length of time. This will avoid possible damage caused
by leaking batteries.
Auto Power Off:
The amplifier section of the keyboard will go into a low power standby mode if no key
is pressed for 3 minutes. Press any key to come out of the low power mode. Note the
keyboard will not enter the low power mode during demo song or rhythm playback.
Jacks and Accessories
Using headphones or external speakers:
Connect the 3.5mm headphone or external speaker plug into the [OUT] jack on the
rear of the keyboard. The keyboard internal speakers will cut out. Note: Headphones and
external speaker not supplied.
Connecting a microphone:
Connect the 3.5mm microphone plug into the [OK] jack on the rear of the keyboard.
Sing along in time with the music. Note: Microphone not supplied.

Page | 7
Basic Operation
Power and Volume
Power control:
Press the [POWER] button to turn the power on and again to turn the power off.
Adjustment of the Master Volume:
The keyboard has 10 levels of volume from 1 -10. The default volume level when
powered on is set to level 7. To change the volume, press the [MASTER VOLUME +/-] buttons.
The volume level is indicated by the bars on the LCD display. Pressing both the [MASTER
VOLUME +/-] buttons at the same time will make the master volume return to the default
level.
Tone
Tone Selection:
When the keyboard is first switched on the default status is TONE. To change the
tone you can either press the + or - buttons on the numerical keypad or directly input the
number of the tone you require by pressing the corresponding digits 0-9.
Page | 8
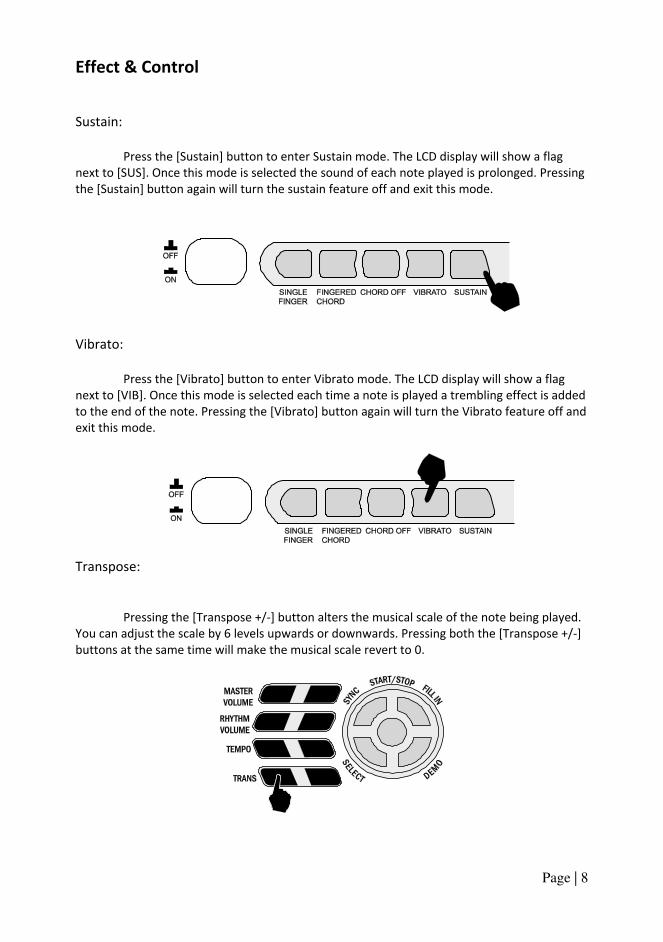
Effect & Control
Sustain:
Press the [Sustain] button to enter Sustain mode. The LCD display will show a flag
next to [SUS]. Once this mode is selected the sound of each note played is prolonged. Pressing
the [Sustain] button again will turn the sustain feature off and exit this mode.
Vibrato:
Press the [Vibrato] button to enter Vibrato mode. The LCD display will show a flag
next to [VIB]. Once this mode is selected each time a note is played a trembling effect is added
to the end of the note. Pressing the [Vibrato] button again will turn the Vibrato feature off and
exit this mode.
Transpose:
Pressing the [Transpose +/-] button alters the musical scale of the note being played.
You can adjust the scale by 6 levels upwards or downwards. Pressing both the [Transpose +/-]
buttons at the same time will make the musical scale revert to 0.

Page | 9
Panel Percussion Instruments:
There are 8 kinds of percussion instruments to choose from. Press the corresponding
button to sound the required instrument. You can use the percussion instruments to fill in
your music and enhance the performance.
Rhythm
Selecting the rhythm:
You can choose from any of the 100 built in rhythms. Please refer to the appendix for
the detailed rhythm table. Press the [RHYTHM] button to enter the rhythm selection function.
The LCD display will show the current rhythm number. You can select the rhythm you require
by pressing the corresponding digits on the numerical keypad or by pressing the + / - buttons.
Start / Stop:
Press the [START / STOP] button to play the rhythm. Press the [START / STOP] button
again to stop the rhythm playback.
Page | 10
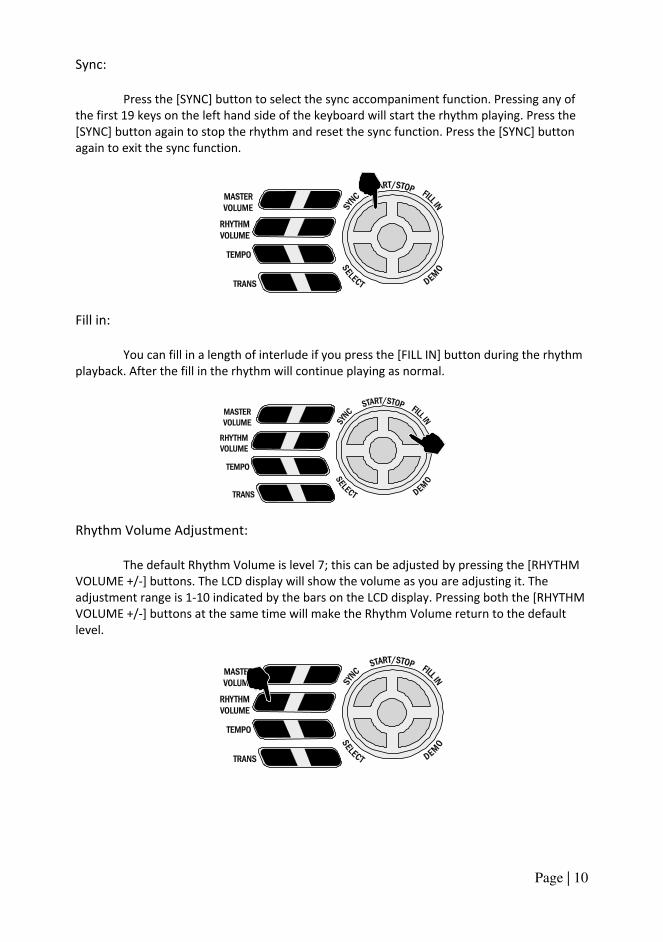
Sync:
Press the [SYNC] button to select the sync accompaniment function. Pressing any of
the first 19 keys on the left hand side of the keyboard will start the rhythm playing. Press the
[SYNC] button again to stop the rhythm and reset the sync function. Press the [SYNC] button
again to exit the sync function.
Fill in:
You can fill in a length of interlude if you press the [FILL IN] button during the rhythm
playback. After the fill in the rhythm will continue playing as normal.
Rhythm Volume Adjustment:
The default Rhythm Volume is level 7; this can be adjusted by pressing the [RHYTHM
VOLUME +/-] buttons. The LCD display will show the volume as you are adjusting it. The
adjustment range is 1-10 indicated by the bars on the LCD display. Pressing both the [RHYTHM
VOLUME +/-] buttons at the same time will make the Rhythm Volume return to the default
level.

Page | 11
Tempo Adjustment:
Press the [TEMPO +/-] buttons to adjust the playing tempo of the rhythm,
metronome and demo song. The adjustment range is 40-240 bpm in 15 steps. Pressing both
the [TEMPO +/-] buttons at the same time will make the tempo revert to 120 bpm.
Chord Accompaniment
Single Finger Chords:
Press the [SINGLE FINGER] button to enter the single finger auto chord mode. A flag is
displayed on the LCD next to SINGLE. Chords are played by pressing certain keys in the chord
area on the left hand side of the keyboard (keys 1-19). The finger patterns required are shown
in Appendix V. The played chord is displayed in the top left corner of the LCD display. Press the
[START / STOP] button to start or stop the chord accompaniment.
Fingered Chords:
Press the [FINGERED CHORD] button to enter the fingered auto chord mode. A flag is
displayed on the LCD next to FINGER. By pressing certain keys in the chord area on the left
hand side of the keyboard (keys 1-19) you can hear different chord accompaniments. The
finger patterns required are shown in Appendix V. The played chord is displayed in the top left
corner of the LCD display. Press the [START / STOP] button to start or stop the chord
accompaniment.
Page | 12
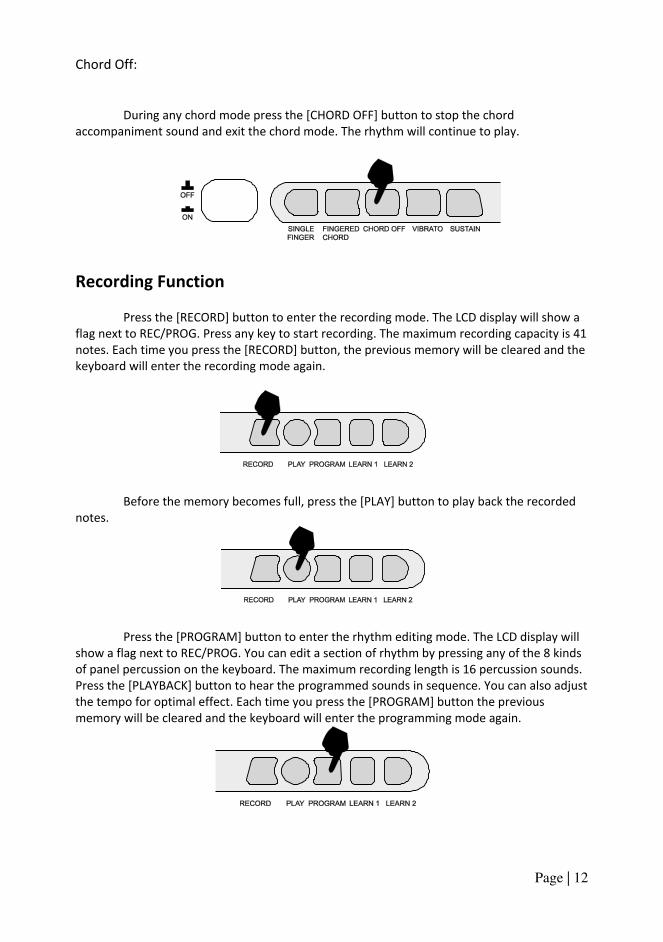
Chord Off:
During any chord mode press the [CHORD OFF] button to stop the chord
accompaniment sound and exit the chord mode. The rhythm will continue to play.
Recording Function
Press the [RECORD] button to enter the recording mode. The LCD display will show a
flag next to REC/PROG. Press any key to start recording. The maximum recording capacity is 41
notes. Each time you press the [RECORD] button, the previous memory will be cleared and the
keyboard will enter the recording mode again.
Before the memory becomes full, press the [PLAY] button to play back the recorded
notes.
Press the [PROGRAM] button to enter the rhythm editing mode. The LCD display will
show a flag next to REC/PROG. You can edit a section of rhythm by pressing any of the 8 kinds
of panel percussion on the keyboard. The maximum recording length is 16 percussion sounds.
Press the [PLAYBACK] button to hear the programmed sounds in sequence. You can also adjust
the tempo for optimal effect. Each time you press the [PROGRAM] button the previous
memory will be cleared and the keyboard will enter the programming mode again.

Page | 13
Demo Song Playback
Press the [DEMO] button to play a demo song. The LCD display will show SONG [XX]
where xx is the number of the demo song. By pressing the [SELECT] button repeatedly you can
choose the demo song you require. There are 8 songs to choose from in total. The keyboard
will finish playing the chosen song and then start to play the next song. Press the [DEMO]
button again to exit the demo mode.
Teaching Modes
LEARN 1:
Press the [LEARN 1] button to enter the Single Key teaching mode. A flag next to
GUIDE 1 will be displayed on the LCD. This mode is suitable for beginners to familiarise
themselves with the rhythm and tempo of the song. The LCD display will show SONG [XX]
where xx is the number of the demo song selected. Select a different song using [SELECT] key.
The beat point will flash on the LCD display to indicate the tempo. The keyboard will then play
the main melody automatically. The LCD will indicate which keys should be pressed.
LEARN 2:
Press the [LEARN 2] button to enter the Synchronised teaching mode. A flag next to
GUIDE 2 will be displayed on the LCD. This mode is suitable for more advanced users. The LCD
display will show SONG [XX] where xx is the number of the demo song selected. Select a
different song using the [SELECT] key. The beat point will flash on the LCD display to indicate
the tempo. The correct key to press is displayed on the LCD display. Play along in time making
sure to press the correct keys.

Page | 14
Appendix I. Rhythm Table
No. Name of
Rhythm
No. Name of
Rhythm
No. Name of
Rhythm
No. Name of
Rhythm
00 Rumba 25 Classic Polka 50 Brazil Mambo 75 Jazz Rumba
01 Samba 26 Country Bossa
nova
51 Europe 8 Beat 76 Jazz Samba
02 Disco 27 Hot Salsa 52 Country Cha Cha 77 Classic Disco
03 Tango 28 Pop 16 Beat 53 India blue Grass 78 Brazil Tango
04 Rock 29 Blue Leigui 54 Blue slow Rock 79 Europe Rock
05 Swing 30 Pop Mambo 55 Europe Rumba 80 Jazz Swing
06 Country 31 Pop 8 Beat 56 Rock Samba 81 Blue Country
07 waltz 32 Jazz Cha Cha 57 Rock Disco 82 Pop Waltz
08 Beguine 33 Emotion Pop 58 Classic Tango 83 Jazz Beguine
09 Latin 34 Country Rock 59 Unitary Rock 84 Pattern Latin
10 March polka 35 Blue Rumba 60 Europe Swing 85 Jazz Polka
11 Bossa nova 36 Classic Samba 61 Classic Country 86 Jazz Bossa nova
12 Salsa 37 Europe Disco 62 Argentina Waltz 87 Latin Salsa
13 16 Beat 38 Blue Tango 63 Rock Beguine 88 Jazz 16 Beat
14 Leigui 39 Emotion Rock 64 Jazz Latin 89 Pop Leigui
15 Mambo 40 Classic Swing 65 South Africa Polka 90 Jazz Mambo
16 8 Beat 41 South Africa
Country
66 Pattern Bossa
nova
91 Classic 8 Beat
17 Cha Cha 42 Country Waltz 67 Blue Salsa 92 Brazil Cha-Cha
18 Pop 43 Classic Beguine 68 16 Beat Swing 93 Blue Grass
19 Slow Rock 44 Brazil Latin 69 Europe Leigui 94 Jazz slow Rock
20 Blue Swing 45 Blue Polka 70 Pattern Mambo 95 Classic Rumba
21 Country Jazz 46 Mix Bossa nova 71 Jazz 8 Beat 96 Europe Samba
22 Classic Waltz 47 Rock Salsa 72 Blue Cha Cha 97 Jazz Disco
23 Blue Beguine 48 Unitary 16 Beat 73 Indonesia Dance 98 Jazz Tango
24 Rock Latin 49 Classic Leigui 74 Classic slow Rock 99 Blue Rock

Page | 15
Appendix II. Tone Table
No. Name of
Tone
No. Name of
Tone
No. Name of
Tone
No. Name of
Tone
00 Acoustic Grand
Piano
25 Short E-Guitar 50 Sustain Harp 75 Bassoon
01 Electric Grand
Piano
26 Fx 2 51 String Ensemble
3
76 Lead 4
02 Celesta 27 Fx 3 52 Tuba 77 Pad 4
03 Vibraphone 28 Synth Bass 2 53 Synth Brass 3 78 Fx 7
04 Jazz E-Guitar 29 Sustain Ocarina 54 Middle Sax 79 Lead 5
05 Muted E-Guitar 30 Vib Harp 55 Sustain Clarinet 80 Echo Piano
06 Acoustic Bass 31 String Ensemble 2 56 Lead 3 81 Bright Piano
07 Electric Guitar 32 Trombone 57 Pad 3 82 Short Celesta
08 Synth Bass 1 33 Synth Brass 2 58 Sustain Koto 83 Bright
Vibraphone
09 Ocarina 34 Soprano Sax 59 Kalimba 84 Jazz Guitar 2
10 Harp 35 Vib Clarinet 60 Fx 4 85 Clean E-Guitar
11 String Ensemble 1 36 Lead 2 61 Sustain E-Piano 86 Acoustic
Bass(finger)
12 Trumpet 37 Pad 2 62 Echo Celesta 87 Vib E-Bass
13 Synth Brass 1 38 Sitar 63 Fx 5 88 Synth Bass 5
14 Alto Sax 39 Short Shanai 64 Fretless Bass 89 Short Ocarina
15 Clarinet 40 Echo Violin 65 Baritone E-
Guitar
90 Bright Harp
16 Lead 1 41 Vib E-Piano 66 Acoustic
Bass(pick)
91 String Ensemble
5
17 Pad 1 42 Bright Celesta 67 Baritone E-Bass 92 Echo Trumpet
18 Koto 43 Sustain
Vibraphone
68 Synth Bass 4 93 Synth Brass 5
19 Shanai 44 Wood Bass 69 Fx 6 94 Tenor Sax
20 Violin 45 Sustain E-Guitar 70 Echo Harp 95 Fx 8
21 Piccolo 46 Echo Acoustic
Bass
71 String Ensemble
4
96 Lead 6
22 Sustain Celesta 47 Sustain E-Bass 72 French Horn 97 Pad 5
23 Fx 1 48 Synth Bass 3 73 Synth Brass 4 98 Banjo
24 Vib Viola 49 Whistle 74 Baritone Sax 99 Vib Shanai

Page | 16
Appendix III. Demo Song Table
No. Name of Song No. Name of Song
01 Horse Race 05 My Heart Must Go On
02 Flying Song on the Earth 06 Unchained Melody
03 The Girls from TianZhu 07 Roundabout Moon
04 Toasting Song 08 Hang with Hand
Appendix IV. Troubleshooting
Trouble Possible Reason / Solution
A slight noise is heard when turning the
power on or off.
This is normal and nothing to worry
about.
After turning the power on to the
keyboard there was no sound when the
keys were pressed.
Check the master volume is set to the
correct volume. Check that headphones
or any other equipment are not
plugged into the keyboard as these will
cause the built-in speaker system to cut
off automatically.
Sound is distorted or interrupted and
the keyboard is not working properly.
Use of incorrect power adapter. Use
the power adapter supplied or the
batteries may need replacing.
There is a slight difference in timbre of
some notes.
This is normal and is caused by the
many different voice sampling ranges
of the keyboard.
When using the sustain function some
tones have long sustain and some short
sustain.
This is normal. The best length of
sustain for different tones has been
pre-set.
The master volume or accompaniment
volume is not right.
Check that the master volume and
accompaniment volume are set
correctly.
In SYNC status the auto
accompaniment does not work.
Check to make sure Single Finger or
Fingered mode has been selected and
then play a note from the first 19 keys
on the left hand side of the keyboard.
The pitch of the note is not correct. Check that the transpose is set to 00.
The keyboard appears to switch itself
off.
This is the power saving feature in
operation. See page 6.

Page | 17
Appendix V. Chord Tables
Single Finger Chords

Page | 18
Fingered Chords
Page | 19
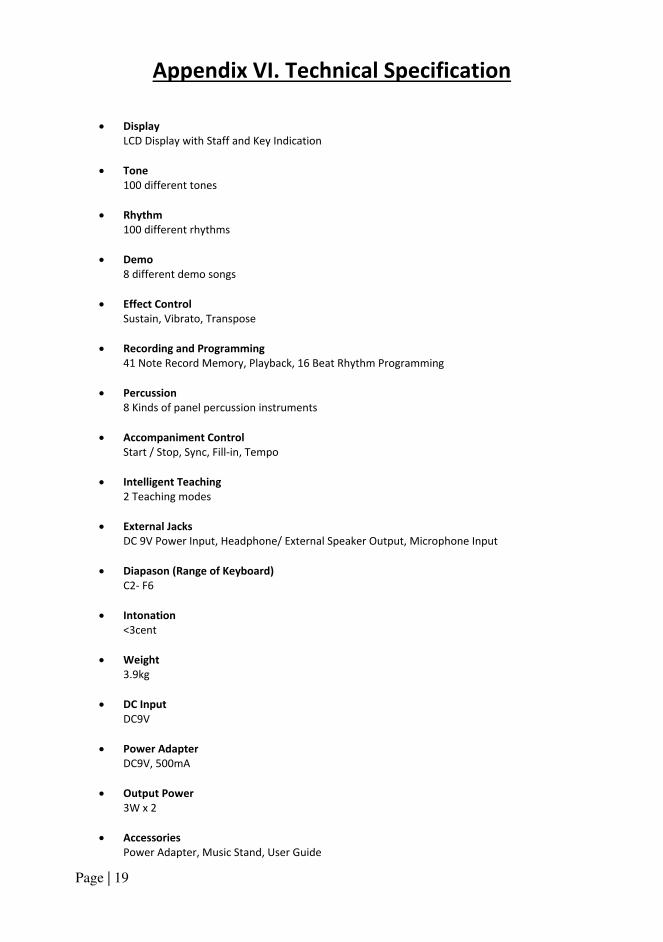
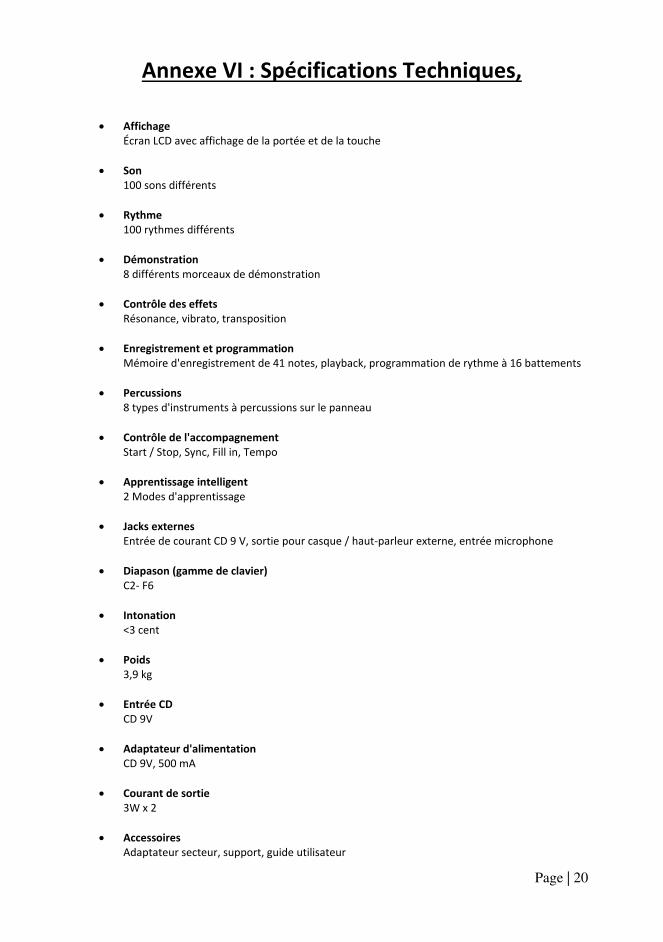
Appendix VI. Technical Specification
• Display
LCD Display with Staff and Key Indication
• Tone
100 different tones
• Rhythm
100 different rhythms
• Demo
8 different demo songs
• Effect Control
Sustain, Vibrato, Transpose
• Recording and Programming
41 Note Record Memory, Playback, 16 Beat Rhythm Programming
• Percussion
8 Kinds of panel percussion instruments
• Accompaniment Control
Start / Stop, Sync, Fill-in, Tempo
• Intelligent Teaching
2 Teaching modes
• External Jacks
DC 9V Power Input, Headphone/ External Speaker Output, Microphone Input
• Diapason (Range of Keyboard)
C2- F6
• Intonation
<3cent
• Weight
3.9kg
• DC Input
DC9V
• Power Adapter
DC9V, 500mA
• Output Power
3W x 2
• Accessories
Power Adapter, Music Stand, User Guide

Page | 20
Product Disposal Instructions
The symbol shown here and on the product means that the product is
classed as Electrical or Electronic Equipment and should not be disposed
with other household or commercial waste at the end of its working life.
The Waste Electrical and Electronic Equipment (WEEE) Directive
(2012/19/EU) has been put in place to encourage the recycling of
products using best available recovery and recycling techniques to
minimise the impact on the environment, treat any hazardous substances and avoid the
increase of landfill.
When you have no further use for this product, please dispose of it using your local authority’s recycling processes. For more information please contact your local authority or the retailer
where the product was purchased.
PDT Ltd.
Unit 4B Greengate Industrial Estate,
White Moss View,
Middleton,
Manchester
M24 1UN
Copyright PDT Ltd. © 2020

Clavier multifonction 54
touches
Guide utilisateur

Page | 1
Informations importantes
Assurez-vous de respecter les informations suivantes afin de ne pas vous blesser ou de blesser autrui ou d'endommager cet instrument ou d'autres équipements externes.
Adaptateur d'alimentation : • Utilisez uniquement l'adaptateur CA spécifié fourni avec le produit. Un adaptateur
inapproprié ou défectueux peut provoquer des dégâts au clavier électronique.
• Ne placez pas l'adaptateur CA ou le câble d'alimentation près d'une source de chaleur telle que des radiateurs ou autres chauffages.
• Afin d'éviter d'endommager le câble d'alimentation, veillez à ce qu’aucun objet lourd ne soit placé dessus et qu'il ne soit pas soumis à des tensions ou des torsions.
• Vérifiez régulièrement la fiche secteur et assurez-vous que sa surface soit exempte de saletés. Ne pas brancher ou débrancher le câble d'alimentation avec les mains mouillées.
N'ouvrez pas le corps du clavier électronique : • N'ouvrez pas le clavier électronique et n'essayez pas de démonter les parties qui le
composent. Si l'appareil ne fonctionne pas correctement, cessez de l'utiliser et envoyez-le à un agent de maintenance qualifié pour le faire réparer.
Utilisation du clavier électronique : • Afin d'éviter d'endommager l'apparence du clavier électronique ou d'endommager les
pièces internes, ne placez pas le clavier électronique dans un environnement poussiéreux, à la lumière directe du soleil ou à un endroit où la température est très haute ou très basse.
• Ne placez pas le clavier électronique sur une surface irrégulière. Afin d'éviter d'endommager des pièces internes, ne placez pas de récipient contenant du liquide sur le clavier électronique pour éviter tout risque de déversement.
Maintenance : • Pour nettoyer le corps du clavier électronique, essuyez-le avec un chiffon doux et sec.
Raccordement : • Afin d'éviter tout dommage du haut-parleur du clavier électronique, veuillez ajuster le
volume de tout appareil périphérique à un niveau approprié une fois que la musique a commencé.
Lors du fonctionnement : • N'utilisez pas le clavier au niveau sonore le plus élevé pour une période prolongée.
• Ne placez pas d'objets lourds sur le clavier et n'appuyez pas sur le clavier avec une force inappropriée.
• L'emballage ne doit être ouvert que par un adulte responsable et tout emballage plastique doit être stocké ou mis au rebut de façon conforme.
Spécification • Les spécifications sont sujettes à changement sans avertissement préalable.

Page | 2
Contenu
Face avant et connexions externes ................................................................................. 4
Face avant .................................................................................................................... 4
Connexions externes ................................................................................................... 4
Écran LCD ..................................................................................................................... 5
Préparation avant la première utilisation ....................................................................... 5
Courant ........................................................................................................................ 5
Utilisation d'un adaptateur de courant CA/CD :...................................................... 5
Fonctionnement avec piles : .................................................................................... 6
Mise hors tension automatique : ............................................................................ 6
Jacks et accessoires ..................................................................................................... 6
Utiliser un casque ou des haut-parleurs externes : ................................................. 6
Connecter un microphone : ..................................................................................... 6
Fonctionnement de base ................................................................................................. 7
Mise sous tension et volume ....................................................................................... 7
Contrôle de la tension ............................................................................................. 7
Ajustement du volume maître :............................................................................... 7
Son ............................................................................................................................... 7
Sélection du son : .................................................................................................... 7
Effets et contrôle ......................................................................................................... 8
Résonance : ............................................................................................................. 8
Vibrato : ................................................................................................................... 8
Transposition : ......................................................................................................... 8
Instruments à percussion du panneau : .................................................................. 9
Rythme ........................................................................................................................ 9
Sélectionner le rythme : .......................................................................................... 9
Start/Stop : ............................................................................................................ 10
Synchronisation : ................................................................................................... 10
Fill In : .................................................................................................................... 10
Réglage du volume du rythme : ............................................................................ 10

Page | 3
Réglage du tempo : ................................................................................................ 11
Accompagnement par accords .................................................................................. 11
Accords à un doigt : ............................................................................................... 11
Accords à plusieurs doigts : ................................................................................... 12
Désactiver les accords : ......................................................................................... 12
Fonction d'enregistrement ........................................................................................ 12
Écouter un morceau de démonstration .................................................................... 13
Modes d'apprentissage ............................................................................................. 13
Apprentissage 1 : ................................................................................................... 13
Apprentissage 2 : ................................................................................................... 14
Annexe I : Tableau des rythmes .................................................................................... 15
Annexe II : Tableau des sons ......................................................................................... 16
Annexe III : Tableau des morceaux de démonstration .................................................. 17
Annexe IV : Dépannage ................................................................................................. 17
Annexe V : Tableau des accords .................................................................................... 18
Accords à un doigt ..................................................................................................... 18
Accords à plusieurs doigts ......................................................................................... 19
Annexe VI : Spécifications Techniques, ......................................................................... 20
Instructions pour la mise au rebut du produit .............................................................. 21
Page | 4
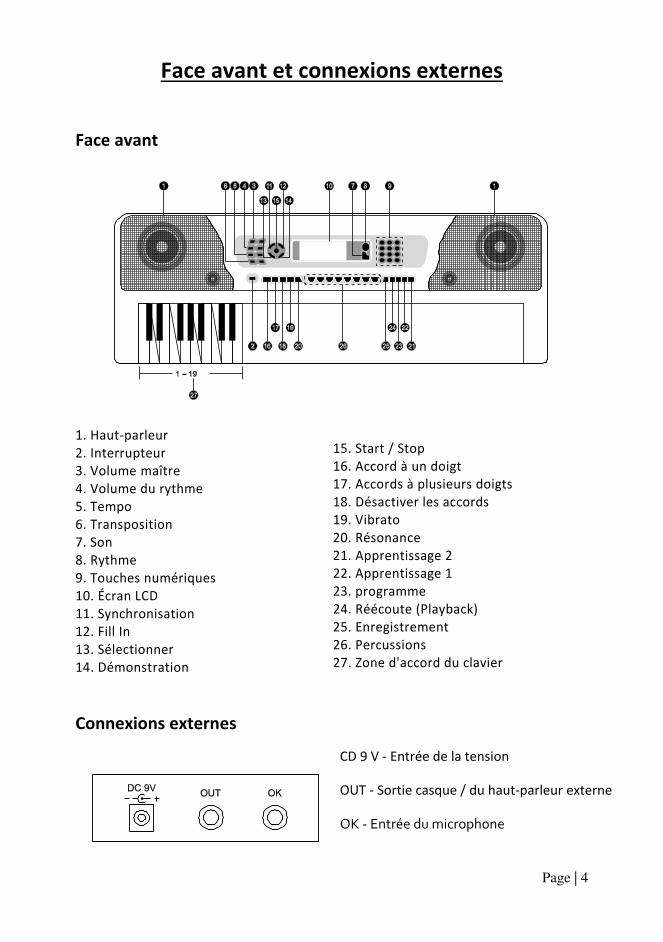
Face avant et connexions externes
Face avant
1. Haut-parleur 2. Interrupteur 3. Volume maître 4. Volume du rythme 5. Tempo 6. Transposition 7. Son 8. Rythme 9. Touches numériques 10. Écran LCD 11. Synchronisation 12. Fill In 13. Sélectionner 14. Démonstration
Connexions externes
15. Start / Stop 16. Accord à un doigt 17. Accords à plusieurs doigts 18. Désactiver les accords 19. Vibrato 20. Résonance 21. Apprentissage 2 22. Apprentissage 1 23. programme 24. Réécoute (Playback) 25. Enregistrement 26. Percussions 27. Zone d'accord du clavier
CD 9 V - Entrée de la tension
OUT - Sortie casque / du haut-parleur externe
OK - Entrée du microphone

Page | 5
Écran LCD
1. Vitesse du rythme et du morceau (BPM) 2. Affichage numérique du morceau, du rythme et numéro du son 3. SON, RYTHME ou morceau de DEMONSTRATION 4. Affichage du niveau sonore 5. Affichage de la portée
Préparation avant la première utilisation Courant
Utilisation d'un adaptateur de courant CA/CD : Veuillez utiliser l'adaptateur d'alimentation CA/CD fourni avec le clavier numérique ou un adaptateur d'alimentation avec une tension de sortie CD 9V et une intensité de sortie de 500 mA et une tension positive à la fiche centrale. Connectez la fiche CD de l'adaptateur d'alimentation à la douille d'alimentation CD9V à l'arrière du clavier, puis connectez l'autre bout à la prise de courant et allumez le clavier.
Attention : Lorsque le clavier n'est pas utilisé, vous devez débrancher l'adaptateur
d'alimentation de la prise de courant.

Page | 6
Fonctionnement avec piles : Ouvrez le couvercle du compartiment à piles sur le dessous du clavier électronique et insérez 6 piles alcalines 1,5 V de taille D. Assurez-vous que les piles sont insérées dans le bon sens et remettez le couvercle du compartiment à piles en place.
Attention : Ne mélangez pas des piles neuves et des piles usées. Ne laissez pas de piles dans
le clavier si le clavier n'est pas utilisé pour une période de temps prolongée. Cela permettra d'éviter des dommages liés à des fuites de piles. Mise hors tension automatique : La section amplificateur du clavier se met en mode veille économie d'énergie si aucune touche n'est appuyée pendant 3 minutes. Appuyez sur n'importe quelle touche pour quitter le mode économie d'énergie. Notez que le clavier ne se mettra pas en mode économie d'énergie lors de la lecture d'un morceau de démonstration ou d'un rythme.
Jacks et accessoires
Utiliser un casque ou des haut-parleurs externes :
Connectez la fiche 3,5 mm du casque ou du haut-parleur externe dans la prise jack [OUT] à l'arrière du clavier. Le haut-parleur interne du clavier sera désactivé. Remarque : Casque et haut-parleur externe non fournis.
Connecter un microphone :
Connectez la fiche 3,5 mm du microphone dans le jack [OK] à l'arrière du clavier. Chantez en rythme avec la musique. Remarque : Microphone non fourni.

Page | 7
Fonctionnement de base Mise sous tension et volume
Contrôle de la tension Appuyez sur le bouton [POWER] afin de mettre sous tension, appuyez de nouveau pour mettre hors tension
Ajustement du volume maître : Le clavier a 10 niveaux de volume de 1 à 10. Le niveau de volume par défaut lors de la mise sous tension est à 7. Afin de modifier le volume, appuyez sur les boutons [MASTER VOLUME +/-]. Le niveau de volume est indiqué par les barres sur l'écran LCD. Si vous appuyez en même temps sur les boutons [MASTER VOLUME +/-], le volume maître est réinitialisé au niveau par défaut.
Son
Sélection du son : Lors de l'allumage du clavier, le statut par défaut est TONE (SON). Afin de modifier le son, vous pouvez soit appuyer sur les boutons + ou - sur le clavier numérique ou directement entrer le numéro du son souhaité en appuyant sur les numéros correspondants de 0 à 9.
Page | 8
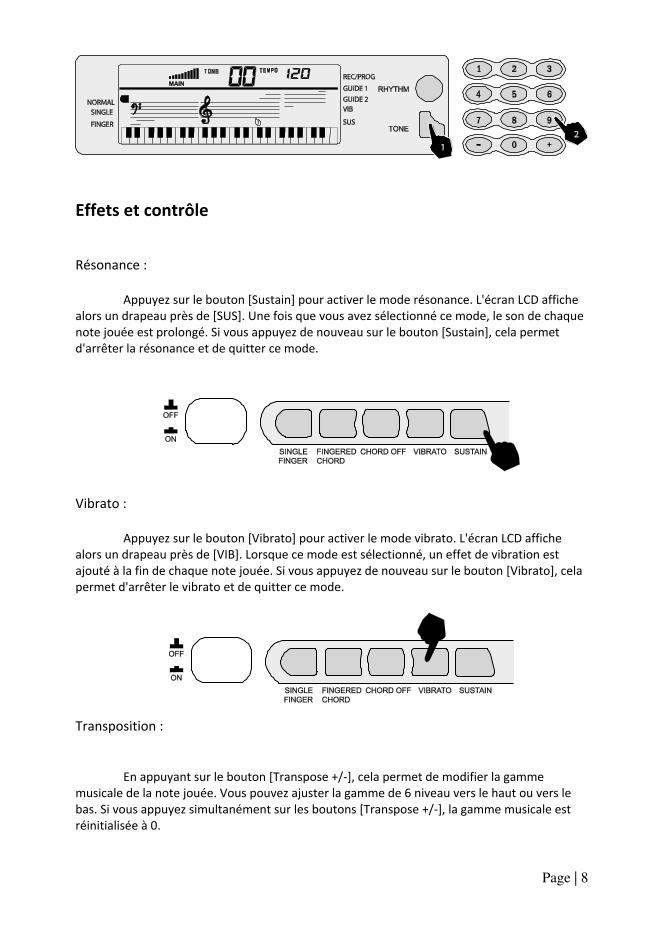
Effets et contrôle
Résonance : Appuyez sur le bouton [Sustain] pour activer le mode résonance. L'écran LCD affiche alors un drapeau près de [SUS]. Une fois que vous avez sélectionné ce mode, le son de chaque note jouée est prolongé. Si vous appuyez de nouveau sur le bouton [Sustain], cela permet d'arrêter la résonance et de quitter ce mode.
Vibrato : Appuyez sur le bouton [Vibrato] pour activer le mode vibrato. L'écran LCD affiche alors un drapeau près de [VIB]. Lorsque ce mode est sélectionné, un effet de vibration est ajouté à la fin de chaque note jouée. Si vous appuyez de nouveau sur le bouton [Vibrato], cela permet d'arrêter le vibrato et de quitter ce mode.
Transposition :
En appuyant sur le bouton [Transpose +/-], cela permet de modifier la gamme musicale de la note jouée. Vous pouvez ajuster la gamme de 6 niveau vers le haut ou vers le bas. Si vous appuyez simultanément sur les boutons [Transpose +/-], la gamme musicale est réinitialisée à 0.
Page | 9
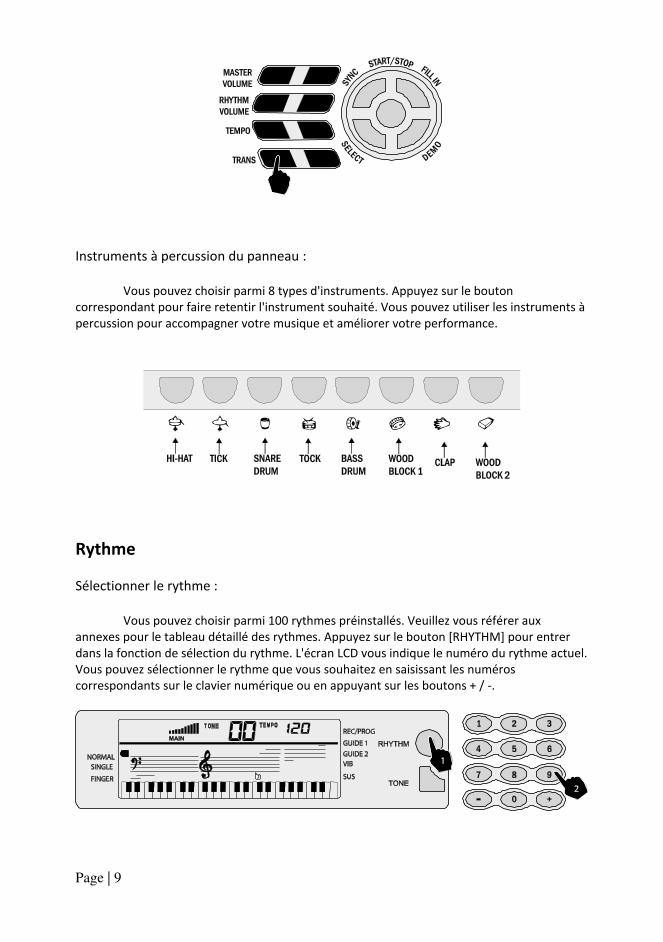
Instruments à percussion du panneau : Vous pouvez choisir parmi 8 types d'instruments. Appuyez sur le bouton correspondant pour faire retentir l'instrument souhaité. Vous pouvez utiliser les instruments à percussion pour accompagner votre musique et améliorer votre performance.
Rythme
Sélectionner le rythme : Vous pouvez choisir parmi 100 rythmes préinstallés. Veuillez vous référer aux annexes pour le tableau détaillé des rythmes. Appuyez sur le bouton [RHYTHM] pour entrer dans la fonction de sélection du rythme. L'écran LCD vous indique le numéro du rythme actuel. Vous pouvez sélectionner le rythme que vous souhaitez en saisissant les numéros correspondants sur le clavier numérique ou en appuyant sur les boutons + / -.

Page | 10
Start/Stop : Appuyez sur le bouton [START / STOP] pour jouer le rythme. Appuyez de nouveau sur le bouton [START / STOP] pour arrêter le rythme.
Synchronisation : Appuyez sur le bouton [SYNC] pour sélectionner la fonction d'accompagnement sync. Si vous appuyez sur l'une des 19 premières touches du côté gauche du clavier, le rythme
commencera à jouer. Appuyez sur le bouton [SYNC] pour arrêter le rythme et réinitialiser la fonction de synchronisation. Appuyez de nouveau sur le bouton [SYNC] pour quitter le mode synchronisation.
Fill In : Vous pouvez remplir la durée d'un interlude en appuyant sur la touche [FILL IN] pendant que le rythme est joué. Après le Fill in, le rythme se remet à jouer normalement.
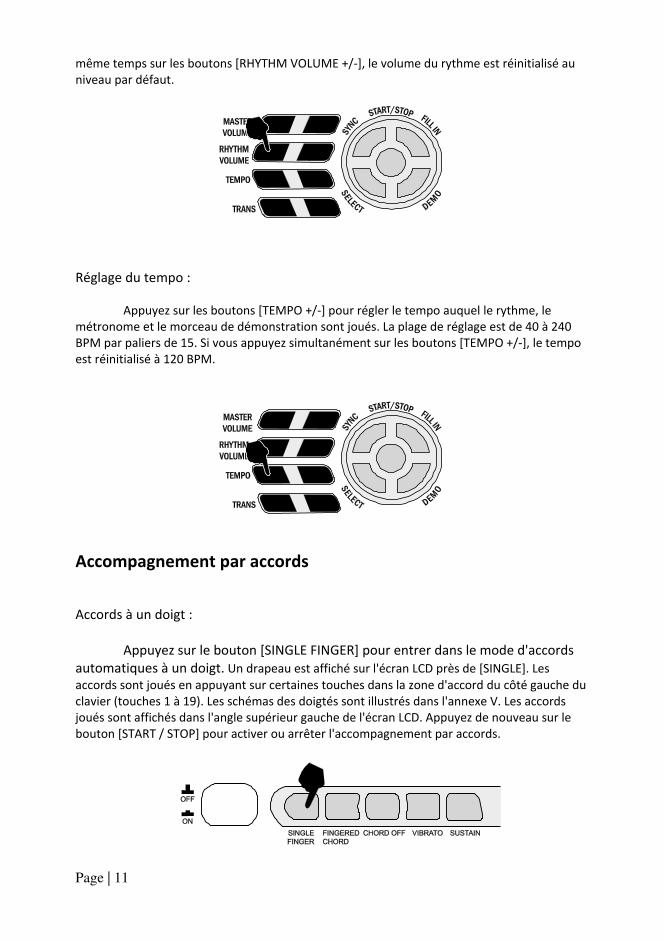
Réglage du volume du rythme : Le volume par défaut du rythme est au niveau 7, il peut être réglé en appuyant sur les boutons [RHYTHM VOLUME +/-]. L'écran LCD affiche le volume pendant que vous le réglez. La plage de réglage est de 1 à 10 et indiquée par les barres sur l'écran LCD. Si vous appuyez en
Page | 11
même temps sur les boutons [RHYTHM VOLUME +/-], le volume du rythme est réinitialisé au niveau par défaut.
Réglage du tempo :
Appuyez sur les boutons [TEMPO +/-] pour régler le tempo auquel le rythme, le métronome et le morceau de démonstration sont joués. La plage de réglage est de 40 à 240 BPM par paliers de 15. Si vous appuyez simultanément sur les boutons [TEMPO +/-], le tempo est réinitialisé à 120 BPM.
Accompagnement par accords
Accords à un doigt : Appuyez sur le bouton [SINGLE FINGER] pour entrer dans le mode d'accords automatiques à un doigt. Un drapeau est affiché sur l'écran LCD près de [SINGLE]. Les accords sont joués en appuyant sur certaines touches dans la zone d'accord du côté gauche du clavier (touches 1 à 19). Les schémas des doigtés sont illustrés dans l'annexe V. Les accords joués sont affichés dans l'angle supérieur gauche de l'écran LCD. Appuyez de nouveau sur le bouton [START / STOP] pour activer ou arrêter l'accompagnement par accords.
Page | 12
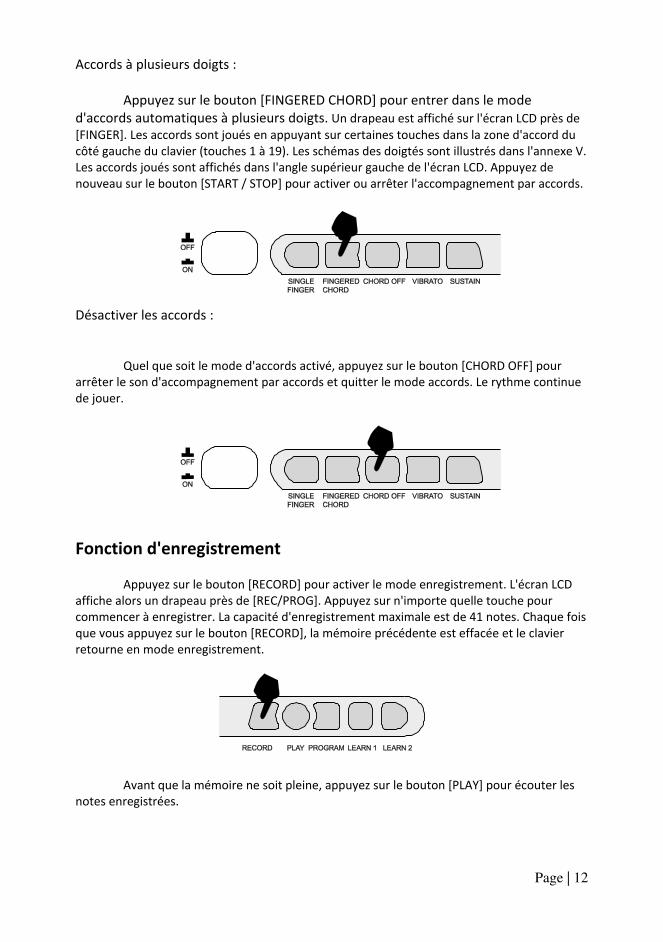
Accords à plusieurs doigts : Appuyez sur le bouton [FINGERED CHORD] pour entrer dans le mode d'accords automatiques à plusieurs doigts. Un drapeau est affiché sur l'écran LCD près de [FINGER]. Les accords sont joués en appuyant sur certaines touches dans la zone d'accord du côté gauche du clavier (touches 1 à 19). Les schémas des doigtés sont illustrés dans l'annexe V. Les accords joués sont affichés dans l'angle supérieur gauche de l'écran LCD. Appuyez de nouveau sur le bouton [START / STOP] pour activer ou arrêter l'accompagnement par accords.
Désactiver les accords :
Quel que soit le mode d'accords activé, appuyez sur le bouton [CHORD OFF] pour arrêter le son d'accompagnement par accords et quitter le mode accords. Le rythme continue de jouer.
Fonction d'enregistrement
Appuyez sur le bouton [RECORD] pour activer le mode enregistrement. L'écran LCD affiche alors un drapeau près de [REC/PROG]. Appuyez sur n'importe quelle touche pour commencer à enregistrer. La capacité d'enregistrement maximale est de 41 notes. Chaque fois que vous appuyez sur le bouton [RECORD], la mémoire précédente est effacée et le clavier retourne en mode enregistrement.
Avant que la mémoire ne soit pleine, appuyez sur le bouton [PLAY] pour écouter les notes enregistrées.

Page | 13
Appuyez sur le bouton [PROGRAM] pour entrer dans la fonction de modification du rythme. L'écran LCD affiche alors un drapeau près de [REC/PROG]. Vous pouvez modifier une section du rythme en appuyant sur l'un des 8 types de percussion du panneau du clavier. La capacité d'enregistrement maximale est de 16 sons de percussion. Appuyez sur le bouton [PLAYBACK] pour écouter les sons programmés en séquence. Vous pouvez également ajuster le tempo pour un effet optimal. Chaque fois que vous appuyez sur le bouton [PROGRAM], la mémoire précédente est effacée et le clavier retourne en mode programmation.
Écouter un morceau de démonstration
Appuyez sur le bouton [DEMO] pour écouter un morceau de démonstration. L'écran LCD affiche SONG [XX], où xx est le numéro du morceau de démonstration. En appuyant plusieurs fois sur le bouton [SELECT], vous pouvez sélectionner le morceau de démonstration que vous souhaitez. Vous pouvez choisir parmi 8 morceaux au total. Le clavier termine alors le morceau sélectionné, puis se met à jouer le morceau suivant. Appuyez de nouveau sur le bouton [DEMO] pour quitter le mode démonstration.
Modes d'apprentissage
Apprentissage 1 :
Appuyez sur le bouton [LEARN 1] pour entrer dans le mode d'apprentissage à une touche. Un drapeau près de [GUIDE 1] apparaît sur l'écran LCD. Ce mode convient aux débutants afin de les aider à se familiariser avec le rythme et le tempo du morceau. L'écran LCD affiche SONG [XX], où xx est le numéro du morceau de démonstration sélectionné. Sélectionnez un morceau différent en appuyant sur la touche [SELECT]. Le point de battement clignote sur l'écran LCD pour indiquer le tempo. Le clavier joue alors automatiquement la mélodie principale. L'écran LCD indique alors quelles touches doivent être appuyées.

Page | 14
Apprentissage 2 :
Appuyez sur le bouton [LEARN 2] pour entrer dans le mode d'apprentissage synchronisé. Un drapeau près de [GUIDE 2] apparaît sur l'écran LCD. Ce mode convient à des utilisateurs plus avancés. L'écran LCD affiche SONG [XX], où xx est le numéro du morceau de démonstration sélectionné. Sélectionnez un morceau différent en appuyant sur la touche [SELECT]. Le point de battement clignote sur l'écran LCD pour indiquer le tempo. La bonne touche à appuyer en suivant est indiquée sur l'écran LCD. Jouez en rythme en vous assurant que vous appuyez sur les bonnes touches tel qu'indiqué.

Page | 15
Annexe I : Tableau des rythmes
No. Name of Rhythm
No. Name of Rhythm
No. Name of Rhythm
No. Name of Rhythm
00 Rumba 25 Classic Polka 50 Brazil Mambo 75 Jazz Rumba
01 Samba 26 Country Bossa nova
51 Europe 8 Beat 76 Jazz Samba
02 Disco 27 Hot Salsa 52 Country Cha Cha 77 Classic Disco
03 Tango 28 Pop 16 Beat 53 India blue Grass 78 Brazil Tango
04 Rock 29 Blue Leigui 54 Blue slow Rock 79 Europe Rock
05 Swing 30 Pop Mambo 55 Europe Rumba 80 Jazz Swing
06 Country 31 Pop 8 Beat 56 Rock Samba 81 Blue Country
07 waltz 32 Jazz Cha Cha 57 Rock Disco 82 Pop Waltz
08 Beguine 33 Emotion Pop 58 Classic Tango 83 Jazz Beguine
09 Latin 34 Country Rock 59 Unitary Rock 84 Pattern Latin
10 March polka 35 Blue Rumba 60 Europe Swing 85 Jazz Polka
11 Bossa nova 36 Classic Samba 61 Classic Country 86 Jazz Bossa nova
12 Salsa 37 Europe Disco 62 Argentina Waltz 87 Latin Salsa
13 16 Beat 38 Blue Tango 63 Rock Beguine 88 Jazz 16 Beat
14 Leigui 39 Emotion Rock 64 Jazz Latin 89 Pop Leigui
15 Mambo 40 Classic Swing 65 South Africa Polka 90 Jazz Mambo
16 8 Beat 41 South Africa Country
66 Pattern Bossa nova
91 Classic 8 Beat
17 Cha Cha 42 Country Waltz 67 Blue Salsa 92 Brazil Cha-Cha
18 Pop 43 Classic Beguine 68 16 Beat Swing 93 Blue Grass
19 Slow Rock 44 Brazil Latin 69 Europe Leigui 94 Jazz slow Rock
20 Blue Swing 45 Blue Polka 70 Pattern Mambo 95 Classic Rumba
21 Country Jazz 46 Mix Bossa nova 71 Jazz 8 Beat 96 Europe Samba
22 Classic Waltz 47 Rock Salsa 72 Blue Cha Cha 97 Jazz Disco
23 Blue Beguine 48 Unitary 16 Beat 73 Indonesia Dance 98 Jazz Tango
24 Rock Latin 49 Classic Leigui 74 Classic slow Rock 99 Blue Rock

Page | 16
Annexe II : Tableau des sons
No. Name of Tone
No. Name of Tone
No. Name of Tone
No. Name of Tone
00 Acoustic Grand Piano
25 Short E-Guitar 50 Sustain Harp 75 Bassoon
01 Electric Grand Piano
26 Fx 2 51 String Ensemble 3
76 Lead 4
02 Celesta 27 Fx 3 52 Tuba 77 Pad 4
03 Vibraphone 28 Synth Bass 2 53 Synth Brass 3 78 Fx 7
04 Jazz E-Guitar 29 Sustain Ocarina 54 Middle Sax 79 Lead 5
05 Muted E-Guitar 30 Vib Harp 55 Sustain Clarinet 80 Echo Piano
06 Acoustic Bass 31 String Ensemble 2 56 Lead 3 81 Bright Piano
07 Guitare électrique 32 Trombone 57 Pad 3 82 Short Celesta
08 Synth Bass 1 33 Synth Brass 2 58 Sustain Koto 83 Bright Vibraphone
09 Ocarina 34 Soprano Sax 59 Kalimba 84 Jazz Guitar 2
10 Harp 35 Vib Clarinet 60 Fx 4 85 Clean E-Guitar
11 String Ensemble 1 36 Lead 2 61 Sustain E-Piano 86 Acoustic Bass(finger)
12 Trumpet 37 Pad 2 62 Echo Celesta 87 Vib E-Bass
13 Synth Brass 1 38 Sitar 63 Fx 5 88 Synth Bass 5
14 Alto Sax 39 Short Shanai 64 Fretless Bass 89 Short Ocarina
15 Clarinet 40 Echo Violin 65 Baritone E-Guitar
90 Bright Harp
16 Lead 1 41 Vib E-Piano 66 Acoustic Bass(pick)
91 String Ensemble 5
17 Pad 1 42 Bright Celesta 67 Baritone E-Bass 92 Echo Trumpet
18 Koto 43 Sustain Vibraphone
68 Synth Bass 4 93 Synth Brass 5
19 Shanai 44 Wood Bass 69 Fx 6 94 Tenor Sax
20 Violin 45 Sustain E-Guitar 70 Echo Harp 95 Fx 8
21 Piccolo 46 Echo Acoustic Bass
71 String Ensemble 4
96 Lead 6
22 Sustain Celesta 47 Sustain E-Bass 72 French Horn 97 Pad 5
23 Fx 1 48 Synth Bass 3 73 Synth Brass 4 98 Banjo
24 Vib Viola 49 Whistle 74 Baritone Sax 99 Vib Shanai

Page | 17
Annexe III : Tableau des morceaux de
démonstration
No. Name of Song No. Name of Song
01 Horse Race 05 My Heart Must Go On
02 Flying Song on the Earth 06 Unchained Melody
03 The Girls from TianZhu 07 Roundabout Moon
04 Toasting Song 08 Hang with Hand
Annexe IV : Dépannage
Problème Raison / solution possible
On entend un léger bruit quand on met l'appareil sous ou hors tension.
Cela est normal et il n'y a pas de quoi s'inquiéter.
Après avoir allumé le clavier, il n'y a pas de son lorsqu'on appuie sur les touches.
Vérifiez que le volume maître est correctement réglé. Vérifiez qu'il n'y a pas de casque ou d'autre équipement branché sur le clavier car cela coupe automatiquement le système de haut-parleurs intégrés.
Le son est déformé ou interrompu et le clavier ne fonctionne pas correctement.
Utilisation d'un adaptateur de courant inadapté. Utilisez l'adaptateur d'alimentation fourni ou bien remplacez les piles.
Il y a une légère différence dans le timbre de certaines notes.
Cela est normal et la cause est les nombreuses gammes de sons différents du clavier.
Lorsqu'on utilise la fonction Sustain, certains sons ont une résonance longue, d'autres une résonance courte.
Cela est normal. La meilleure longueur de résonance pour les différents sons a été prédéfinie.
Le volume maître ou le volume de l'accompagnement n'est pas correct.
Vérifiez que le volume maître et le volume d'accompagnement sont correctement réglés.
En statut SYNC, l'accompagnement automatique ne fonctionne pas.
Assurez-vous que le mode Single Finger (accord à un doigt) ou Fingered (accord à plusieurs doigts) a bien été sélectionné, puis jouez une note parmi les 19 premières notes du côté gauche du clavier.
Le ton de la note n'est pas correct. Vérifiez que la transposition est bien à 00.
Le clavier semble s'éteindre tout seul.
Il s'agit du fonctionnement de la fonction d'économie d'énergie. Voir page 6.

Page | 18
Annexe V : Tableau des accords
Accords à un doigt

Page | 19
Accords à plusieurs doigts
Page | 20
Annexe VI : Spécifications Techniques,
• Affichage Écran LCD avec affichage de la portée et de la touche
• Son 100 sons différents
• Rythme 100 rythmes différents
• Démonstration 8 différents morceaux de démonstration
• Contrôle des effets Résonance, vibrato, transposition
• Enregistrement et programmation Mémoire d'enregistrement de 41 notes, playback, programmation de rythme à 16 battements
• Percussions 8 types d'instruments à percussions sur le panneau
• Contrôle de l'accompagnement Start / Stop, Sync, Fill in, Tempo
• Apprentissage intelligent 2 Modes d'apprentissage
• Jacks externes Entrée de courant CD 9 V, sortie pour casque / haut-parleur externe, entrée microphone
• Diapason (gamme de clavier) C2- F6
• Intonation <3 cent
• Poids 3,9 kg
• Entrée CD CD 9V
• Adaptateur d'alimentation CD 9V, 500 mA
• Courant de sortie 3W x 2
• Accessoires Adaptateur secteur, support, guide utilisateur
Page | 21
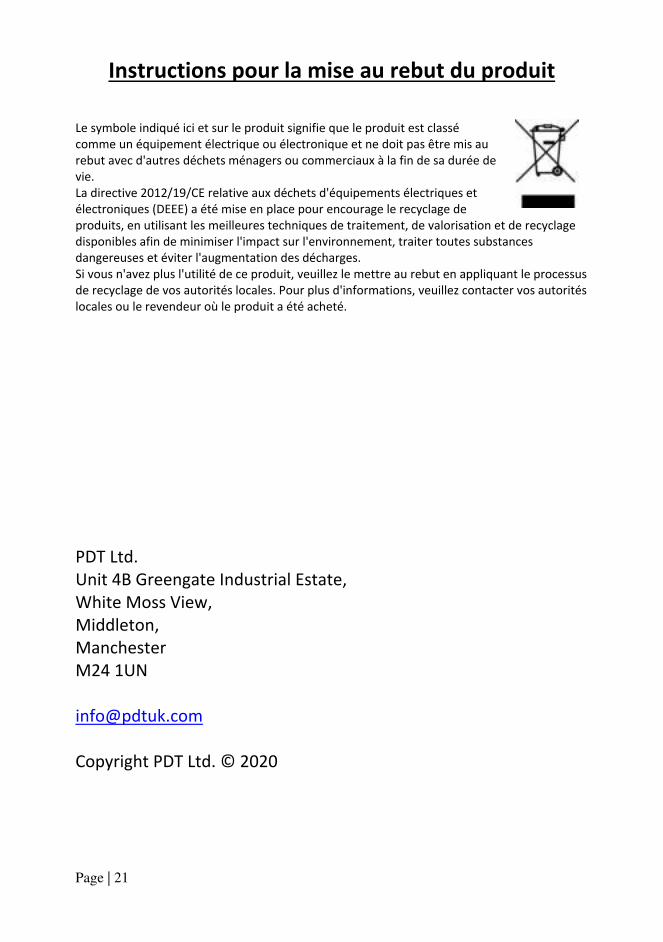
Instructions pour la mise au rebut du produit
Le symbole indiqué ici et sur le produit signifie que le produit est classé comme un équipement électrique ou électronique et ne doit pas être mis au rebut avec d'autres déchets ménagers ou commerciaux à la fin de sa durée de vie. La directive 2012/19/CE relative aux déchets d'équipements électriques et électroniques (DEEE) a été mise en place pour encourage le recyclage de produits, en utilisant les meilleures techniques de traitement, de valorisation et de recyclage disponibles afin de minimiser l'impact sur l'environnement, traiter toutes substances dangereuses et éviter l'augmentation des décharges. Si vous n'avez plus l'utilité de ce produit, veuillez le mettre au rebut en appliquant le processus de recyclage de vos autorités locales. Pour plus d'informations, veuillez contacter vos autorités locales ou le revendeur où le produit a été acheté.
PDT Ltd. Unit 4B Greengate Industrial Estate, White Moss View, Middleton, Manchester M24 1UN [email protected] Copyright PDT Ltd. © 2020

54 Tasten Multifunktions-
Keyboard
Bedienungsanleitung

Page | 1
Wichtige Information
Beachten Sie folgende Informationen, damit Sie nicht sich selbst oder andere verletzen oder dieses
Instrument oder weitere externe Einrichtungen beschädigen.
Stromadapter: • Bitte verwenden Sie nur den mitgelieferten AC-Netzadapter: Ansonsten kann das
elektronische Keyboard beschädigt werden.
• Installieren Sie den AC-Netzadapter oder das Stromkabel nicht in der Nähe von
Wärmequellen wie Heizungskörpern, oder anderen Wärmespeichern.
• Um nicht das Stromkabel zu beschädigen, stellen Sie sicher, dass keine schweren
Gegenstände darauf gestellt werden und dass dieses nicht beansprucht oder stark gebogen
ist.
• Regelmäßig Netzstecker prüfen und ihn stets frei von Verschmutzungen halten. Unterlassen
Sie das Einstecken oder Abziehen des Netzsteckers mit nassen Händen.
Öffnen Sie niemals das elektronische Keyboard: • Öffnen Sie niemals das elektronische Keyboard und versuchen Sie nicht, es selbst
auseinanderzubauen. Falls das Gerät nicht richtig funktioniert, so benutzen Sie es bitte
nicht mehr und senden Sie es bitte an eine vereinbarte Serviceniederlassung zur Reparatur.
Anwendung des elektronischen Keyboards: • Um nicht das Aussehen des elektronischen Keyboards zu beeinträchtigen oder die internen
Teile zu beschädigen, setzen Sie das elektronische Keyboard nicht einer staubigen Umgebung,
direkter Sonneneinstrahlung oder sehr hohen oder niedrigen Temperaturen aus.
• Stellen Sie das elektronische Keyboard nicht auf eine unebene Oberfläche. Um nicht die
internen Teile zu beschädigen, stellen Sie keine Behälter auf das Gerät, die mit Flüssigkeiten
gefüllt sind, da die Flüssigkeit verschüttet werden könnte.
Wartung: • Zur äußeren Reinigung des elektronischen Keyboards, wischen Sie es nur mit einem weichen,
trockenen Tuch ab.
Anschließen: • Um jegliche Schäden an den Lautsprecher des elektronischen Keyboards zu vermeiden, regeln
Sie bitte die Lautstärke aller Peripheriegeräte auf die leiseste Einstellung und regeln Sie
während die Musik spielt stufenweise die Lautstärke bis Sie das passende Niveau erreichen.
Beim Betrieb: • Benutzen Sie das Keyboard nicht mit maximaler Lautstärke während einer sehr langen Zeit.
• Legen Sie keine schweren Gegenstände auf das Keyboard und drücken Sie nicht mit Wucht auf
das Keyboard.
• Das Öffnen der Verpackung soll nur durch einen verantwortlichen Erwachsenen erfolgen und
Plastik-Verpackungen müssen ordnungsgemäß gelagert oder entsorgt werden.
Spezifikationen • Alle Spezifikationen können ohne Vorankündigung geändert werden.

Page | 2
Inhalt
Frontplatte und externe Anschlüsse ............................................................................... 4
Frontplatte ................................................................................................................... 4
Externer Anschluss ...................................................................................................... 4
LCD-Anzeige ................................................................................................................. 5
Vorbereitung vor der ersten Inbetriebnahme ................................................................. 5
Strom ........................................................................................................................... 5
Verwendung eines AC/DC-Netzadapters ................................................................ 5
Batteriebetrieb: ....................................................................................................... 6
Auto Power Off: ....................................................................................................... 6
Jacks und Zubehör ....................................................................................................... 6
Kopfhörer oder externe Lautsprecher verwenden: ................................................ 6
Anschließen eines Mikrofons: ................................................................................. 6
Grundlegende Bedienung ................................................................................................ 7
Einschalten und Lautstärke ......................................................................................... 7
Einschalten: ............................................................................................................. 7
Einstellen der Masterlautstärke: ............................................................................. 7
Ton ............................................................................................................................... 7
Ton-Auswahl ............................................................................................................ 7
Effekt & Einstellung ..................................................................................................... 8
Sustain: .................................................................................................................... 8
Vibrato: .................................................................................................................... 8
Transponieren: ........................................................................................................ 8
Panel-Perkussionen Instrumente: ........................................................................... 9
Rhythmus ..................................................................................................................... 9
Rhythmus auswählen: ............................................................................................. 9
Start/Stopp: ........................................................................................................... 10
Synchronisierung: .................................................................................................. 10
Fill In: ..................................................................................................................... 10
Einstellung der Lautstärke des Rhythmus: ............................................................ 10

Page | 3
Tempoeinstellung: ................................................................................................. 11
Akkordbegleitung ...................................................................................................... 11
Einzelnoten Akkorde: ............................................................................................ 11
Fingered Akkorde: ................................................................................................. 12
Chord Off: .............................................................................................................. 12
Aufzeichnungsfunktion .............................................................................................. 12
Demo Song Playback ................................................................................................. 13
Unterricht-Modus ...................................................................................................... 13
UNTERRICHT 1: ...................................................................................................... 13
UNTERRICHT 2: ...................................................................................................... 14
Anhang I. Rhythmen-Tabelle ......................................................................................... 15
Anhang II. Tontabelle..................................................................................................... 16
Anhang III. Demo-Songs-Tabelle ................................................................................... 17
Anhang IV. Fehlerbehebung .......................................................................................... 17
Anhang V. Akkordtabelle ............................................................................................... 18
Einzelnote-Akkorde ................................................................................................... 18
Fingered Akkorde ...................................................................................................... 19
Anhang VI. Technische Spezifikationen ......................................................................... 20
Hinweise zur Entsorgung ............................................................................................... 21
Page | 4
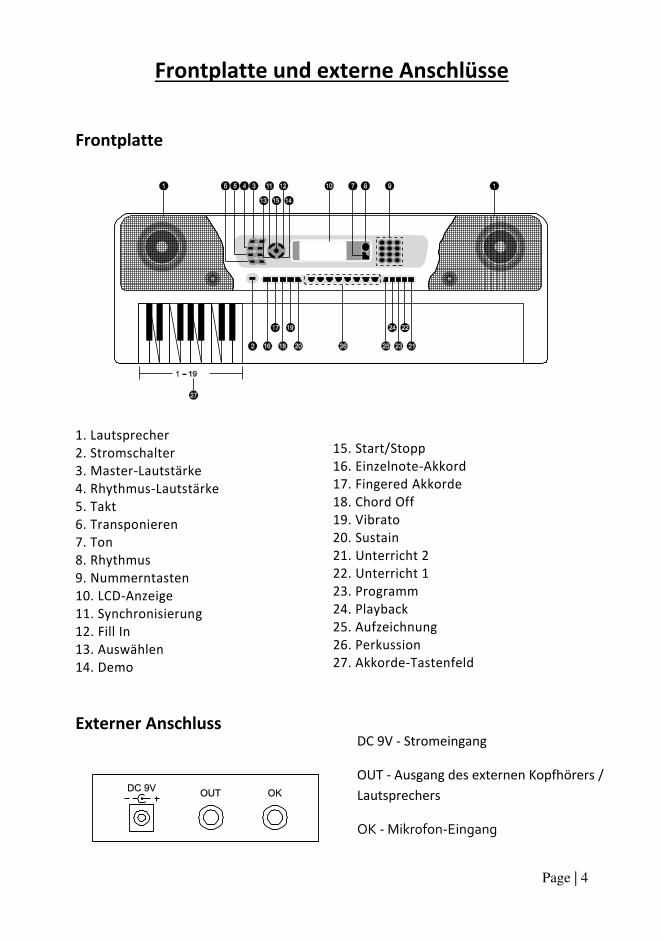
Frontplatte und externe Anschlüsse
Frontplatte
1. Lautsprecher
2. Stromschalter
3. Master-Lautstärke
4. Rhythmus-Lautstärke
5. Takt
6. Transponieren
7. Ton
8. Rhythmus
9. Nummerntasten
10. LCD-Anzeige
11. Synchronisierung
12. Fill In
13. Auswählen
14. Demo
Externer Anschluss
15. Start/Stopp
16. Einzelnote-Akkord
17. Fingered Akkorde
18. Chord Off
19. Vibrato
20. Sustain
21. Unterricht 2
22. Unterricht 1
23. Programm
24. Playback
25. Aufzeichnung
26. Perkussion
27. Akkorde-Tastenfeld
DC 9V - Stromeingang
OUT - Ausgang des externen Kopfhörers /
Lautsprechers
OK - Mikrofon-Eingang

Page | 5
LCD-Anzeige
1. Tempo-Wert des Rhythmus und der Musik (BPM)
2. Digitalanzeige der Musik, des Rhythmus und der Tonnummer
3. TON, RHYTHMUS oder DEMO Song
4. Lautstärken-Anzeige
5. Tonleiter-Anzeige
Vorbereitung vor der ersten Inbetriebnahme Strom
Verwendung eines AC/DC-Netzadapters
Bitte verwenden-Sie den speziellen AC/DC Netzadapter, der mit dem elektronischen
Keyboard mitgeliefert ist oder ein Netzadapter mit DC 9 V Ausgangsspannung und 500 mA
Ausgangsstrom mit einem Zentrum-positiven Stecker. Stecken Sie den DC-Stecker des
Netzadapters in die DC 9 V Buchse an der Hinterseite des Keyboards und stecken Sie das
andere Ende in die Wandsteckdose ein und schalten Sie das Keyboard ein.
Achtung: Wenn das Keyboard nicht verwendet werden sollte, ziehen Sie das Netzteil aus der
Steckdose.
Page | 6
Batteriebetrieb:
Öffnen-Sie das Batteriefach unterhalb des elektronischen Keyboards und legen Sie 6 x
1.5 V Alkalibatterien (Größe D) ein. Vergewissern Sie sich, dass die Batterien richtig herum
eingelegt sind und schließen Sie wieder das Batteriefach.
Achtung: Verwenden Sie nicht gleichzeitig alte und neue Batterien. Bei Nichtgebrauch des
Keyboards während längerer Zeit die Batterien aus dem Gerät entfernen. So können Sie
Schäden durch auslaufende Batterien vermeiden.
Auto Power Off:
Das Verstärkerteil des Keyboards geht in einen stromsparenden Standby-Modus,
wenn 3 Minuten lang keine Taste gedrückt wird. Drücken Sie eine Taste, um den
Stromsparenden Modus zu verlassen. Hinweis: das Keyboard geht nicht in den
stromsparenden Modus während des Spielens eines Demo-Stücks oder eines Rhythmus.
Jacks und Zubehör
Kopfhörer oder externe Lautsprecher verwenden:
Stecken Sie den 3.5 mm externen Kopfhörer- oder Lautsprecher-Stecker in den [OUT]
Jack an der Hinterseite des Keyboards. Der interne Lautsprecher des Keyboards schaltet dabei
aus. Anmerkung: Kopfhörer und externer Lautsprecher nicht enthalten.
Anschließen eines Mikrofons:
Stecken Sie den 3.5 mm Mikrofon-Stecker in den [OK] Jack an der Hinterseite des
Keyboards. Singen Sie mit der Musik mit. Anmerkung: Mikrofon nicht enthalten.

Page | 7
Grundlegende Bedienung Einschalten und Lautstärke
Einschalten:
Drücken Sie auf die [POWER] Taste, um das Gerät einzuschalten, und drücken Sie
nochmals auf diese Taste, um es auszuschalten.
Einstellen der Masterlautstärke:
Das Keyboard hat 10 Lautstärken-Niveaus von 1 bis 10. Die Standard Lautstärke,
wenn Sie das Keyboard einschalten, ist 7. Um die Lautstärke zu ändern, drücken Sie auf die
[MASTER VOLUME +/-] Tasten. Die Streifen auf dem LCD Display zeigen die Lautstärke an.
Wenn Sie gleichzeitig auf beide [MASTER VOLUME +/-] Tasten drücken, stellt sich die Master-
Lautstärke auf die Standard-Lautstärke zurück.
Ton
Ton-Auswahl
Wenn Sie das Keyboard einschalten, ist der Standard-Status TONE. Um den Ton zu
ändern, können Sie entweder auf die + oder - Tasten drücken, oder direkt die Nummer des
gewünschten Tons eintragen, indem Sie die passenden Stellen eintragen.

Page | 8
Effekt & Einstellung
Sustain:
Drücken Sie auf die [Sustain] Taste, um den Sustain-Modus einzuschalten. Die LCD
Anzeige zeigt dann einen Merker neben [SUS] an. Sobald dieser Modus ausgewählt ist, wird
der Ton jeder gespielten Note ausgedehnt. Wenn Sie nochmals auf die [Sustain] Taste
drücken, schaltet dieses den Sustain-Modus aus.
Vibrato:
Drücken Sie auf die [Vibrato] Taste, um den Vibrato-Modus einzuschalten. Die LCD
Anzeige zeigt dann einen Merker neben [VIB] an. Sobald dieser Modus ausgewählt ist, wird ein
zitternder Effekt am Ende jeder gespielten Note hinzugefügt. Wenn Sie nochmals auf die
[Vibrato] Taste drücken, schaltet dieses den Vibrato-Modus aus.
Transponieren:
Wenn Sie auf die [Transpose +/-] Taste drücken, ändert dieses die Tonleiter der
gespielten Note. Sie können die Tonleiter um 6 Töne aufwärts oder abwärts umstellen. Wenn
Sie gleichzeitig auf beide [Transpose +/-] Tasten drücken, stellt dieses die Tonleiter auf 0
zurück.

Page | 9
Panel-Perkussionen Instrumente:
Es gibt 8 Perkussionsarten, die Sie auswählen können. Drücken Sie auf die
entsprechende Taste, um das gewünschte Instrument auszuwählen. Sie können die
Schlaginstrumente verwenden, um Ihre Musik zu ergänzen und deren Leistung zu steigern.
Rhythmus
Rhythmus auswählen:
Sie haben die Wahl zwischen 100 integrierten Rhythmen. Wir verweisen auf unsere
Ausführungen im Anhang, für die ausführliche Rhythmen-Tabelle. Drücken Sie auf die
[RHYTHM] Taste, um die Rhythmus-Auswahlfunktion anzuzeigen. Die LCD Anzeige zeigt die
aktuelle Rhythmusnummer an. Sie können den gewünschten Rhythmus auswählen, indem Sie
auf die entsprechenden Stellen auf dem digitalen Tastenfeld drücken, oder indem Sie auf die +
/ - Tasten drücken.
Page | 10
Start/Stop:
Drücken Sie auf die [START / STOP] Taste, um den Rhythmus zu spielen. Drücken Sie
auf die [START / STOP] Taste, um das Abspielen des Rhythmus zu stoppen.
Synchronisierung:
Drücken Sie auf die [SYNC] Taste, um die Sync-Begleitungsfunktion auszuwählen.
Wenn Sie auf eine der 19 Tasten auf der linken Seite des Keyboards drücken, beginnt der
Rhythmus zu spielen. Drücken Sie auf die [SYNC] Taste nochmals, um den Rhythmus zu
stoppen und die Sync-Funktion zurückzusetzen. Drücken Sie nochmals auf die [SYNC] Taste,
um die Sync-Funktion auszuschalten.
Fill In:
Sie können eine Länge mit einem Zwischenspiel ausfüllen, indem Sie während des
Rhythmus-Abspielens auf die [FILL IN] Taste drücken. Nach dem Zwischenspiel, spielt der
Rhythmus normal weiter.
Einstellung der Lautstärke des Rhythmus:

Page | 11
Die Standardlautstärke des Rhythmus ist 7. Sie können diese ändern, indem Sie auf
die [RHYTHM VOLUME +/-] Tasten drücken. Die LCD Anzeige zeigt die Lautstärke an, während
Sie diese einstellen. Die Streifen auf dem LCD Display zeigen den Einstellbereich von 1 bis 10
an. Wenn Sie gleichzeitig auf beide [RHYTHM VOLUME +/-] Tasten drücken, stellt sich die
Rhythmuslautstärke auf die Standard-Lautstärke zurück.
Tempoeinstellung:
Drücken Sie auf die [TEMPO +/-] Tasten, um das spielende Tempo des Rhythmus, des
Metronoms und des Demo Songs einzustellen. Der Einstellbereich ist 40-240 BPM in 15er
Stufen. Wenn Sie gleichzeitig auf beide [TEMPO +/-] Tasten drücken, stellt dieses den Takt auf
120 Bpm zurück.
Akkordbegleitung
Einzelnoten Akkorde:
Drücken Sie auf die [SINGLE FINGER] Taste, um den Single Finger auto Chord Modus
einzustellen. Die LCD Anzeige zeigt dann einen Merker neben [SINGLE] an. Akkorde werden
gespielt, indem man manche Tasten im Akkordbereich auf der linken Seite des Keyboards
spielt (Tasten 1-19). Die zu verwendenden Fingermuster finden Sie in Anhang V. Die gespielten
Akkorde werden in der linken oberen Ecke des LCD Displays angezeigt. Drücken Sie auf die
[START / STOP] Taste, um die Akkordbegleitung zu starten oder zu stoppen.
Page | 12
Fingered Akkorde:
Drücken Sie auf die [FINGERED CHORD] Taste, um den Fingered auto Chord Modus
einzustellen. Die LCD Anzeige zeigt dann einen Merker neben [FINGER] an. Indem Sie manche
Tasten im Akkordbereich auf der linken Seite des Keyboards spielen (Tasten 1-19), können Sie
verschiedene Begleitungen hören. Die zu verwendenden Fingermuster finden Sie in Anhang V.
Die gespielten Akkorde werden in der linken oberen Ecke des LCD Displays angezeigt. Drücken
Sie auf die [START / STOP] Taste, um die Akkordbegleitung zu starten oder zu stoppen.
Chord Off:
In jedem Akkord-Modus, drücken Sie auf die [CHORD OFF] Taste, um den
Akkordbegleitungston zu stoppen und den Akkordmodus auszuschalten. Der Rhythmus spielt
weiter.
Aufzeichnungsfunktion
Drücken Sie auf die [RECORD] Taste, um den Aufzeichnung-Modus einzuschalten. Die
LCD Anzeige zeigt dann einen Merker neben [REC/PROG] an. Drücken Sie eine beliebige Taste,
um die Aufnahme zu starten. Die maximale Aufnahmekapazität ist 41 Noten. Jedes Mal, wenn
Sie die [RECORD] Taste drücken, wird die vorherige Aufzeichnung gelöscht und das Keyboard
schaltet wieder in den Aufzeichnungsmodus.

Page | 13
Bevor der Speicher voll ist, drücken Sie die [PLAY] Taste, um die gespeicherten Noten
wiederzuspielen.
Drücken Sie auf die [PROGRAM] Taste, um den Rhythmus-Bearbeitungsmodus
anzuzeigen. Die LCD Anzeige zeigt dann einen Merker neben [REC/PROG] an. Sie können eine
Rhythmussektion bearbeiten indem Sie einen der 8 Panel-Perkussionstypen auf dem Keyboard
drücken. Die maximale Aufnahmelänge ist 16 Perkussionstöne. Drücken Sie die [PLAYBACK]
Taste, um die programmierten Töne hintereinander anzuhören. Für eine optimale Wirkung,
können Sie ebenfalls das Tempo einstellen. Jedes Mal, wenn Sie die [PROGRAM] Taste
drücken, wird die vorherige Aufzeichnung gelöscht und das Keyboard schaltet wieder in den
Programmiermodus.
Demo Song Playback
Drücken Sie die [DEMO] Taste, um ein Demo Song zu spielen. Die LCD Anzeige zeigt
SONG [XX] an, indem xx die Nummer des Demo Songs ist. Indem Sie mehrmals die [SELECT]
Taste drücken, können Sie den Demo Song auswählen, den Sie möchten. Sie können insgesamt
zwischen 8 Songs wählen. Das Keyboard spielt das ausgewählte Lied zu Ende und startet dann
das nächste Lied. Drücken Sie nochmals auf die [DEMO] Taste, um den Demo-Modus
auszuschalten.
Unterricht-Modus
UNTERRICHT 1:
Drücken Sie die [LEARN 1] Taste, um den Einzeltasten-Kurs zu starten. Die LCD
Anzeige zeigt dann einen Merker neben [GUIDE 1] an. Dieser Modus ist für Anfänger geeignet,
damit Sie sich mit dem Rhythmus und das Tempo des Lieds vertraut machen können. Die LCD

Page | 14
Anzeige zeigt SONG [XX] an, indem xx die Nummer des ausgewählten Demo Songs ist. Wählen
Sie anhand der [SELECT] Taste ein verschiedenes Lied aus. Der Takt leuchtet auf der LCD
Anzeige auf, um das Tempo anzuzeigen. Das Keyboard spielt dann automatisch die
Hauptmelodie. Die LCD Anzeige zeigt an, welche Tasten gedrückt werden müssen.
UNTERRICHT 2:
Drücken Sie die [LEARN 2] Taste, um den Synchronisierten-Kurs zu starten. Die LCD
Anzeige zeigt dann einen Merker neben [GUIDE 2] an. Dieser Modus ist für fortgeschrittene
Benutzer gedacht. Die LCD Anzeige zeigt SONG [XX] an, indem xx die Nummer des
ausgewählten Demo Songs ist. Wählen Sie anhand der [SELECT] Taste ein verschiedenes Lied
aus. Der Takt leuchtet auf der LCD Anzeige auf, um das Tempo anzuzeigen. Die Taste, die Sie
als nächstes drücken sollen, leuchtet auf dem LCD Display auf. Spielen Sie mit und
vergewissern Sie sich, dass Sie die richtigen Tasten wie angezeigt drücken.

Page | 15
Anhang I. Rhythmen-Tabelle
No. Name of Rhythm
No. Name of Rhythm
No. Name of Rhythm
No. Name of Rhythm
00 Rumba 25 Classic Polka 50 Brazil Mambo 75 Jazz Rumba
01 Samba 26 Country Bossa
nova
51 Europe 8 Beat 76 Jazz Samba
02 Disco 27 Hot Salsa 52 Country Cha Cha 77 Classic Disco
03 Tango 28 Pop 16 Beat 53 India blue Grass 78 Brazil Tango
04 Rock 29 Blue Leigui 54 Blue slow Rock 79 Europe Rock
05 Swing 30 Pop Mambo 55 Europe Rumba 80 Jazz Swing
06 Country 31 Pop 8 Beat 56 Rock Samba 81 Blue Country
07 waltz 32 Jazz Cha Cha 57 Rock Disco 82 Pop Waltz
08 Beguine 33 Emotion Pop 58 Classic Tango 83 Jazz Beguine
09 Latin 34 Country Rock 59 Unitary Rock 84 Pattern Latin
10 March polka 35 Blue Rumba 60 Europe Swing 85 Jazz Polka
11 Bossa nova 36 Classic Samba 61 Classic Country 86 Jazz Bossa nova
12 Salsa 37 Europe Disco 62 Argentina Waltz 87 Latin Salsa
13 16 Beat 38 Blue Tango 63 Rock Beguine 88 Jazz 16 Beat
14 Leigui 39 Emotion Rock 64 Jazz Latin 89 Pop Leigui
15 Mambo 40 Classic Swing 65 South Africa Polka 90 Jazz Mambo
16 8 Beat 41 South Africa
Country
66 Pattern Bossa
nova
91 Classic 8 Beat
17 Cha Cha 42 Country Waltz 67 Blue Salsa 92 Brazil Cha-Cha
18 Pop 43 Classic Beguine 68 16 Beat Swing 93 Blue Grass
19 Slow Rock 44 Brazil Latin 69 Europe Leigui 94 Jazz slow Rock
20 Blue Swing 45 Blue Polka 70 Pattern Mambo 95 Classic Rumba
21 Country Jazz 46 Mix Bossa nova 71 Jazz 8 Beat 96 Europe Samba
22 Classic Waltz 47 Rock Salsa 72 Blue Cha Cha 97 Jazz Disco
23 Blue Beguine 48 Unitary 16 Beat 73 Indonesia Dance 98 Jazz Tango
24 Rock Latin 49 Classic Leigui 74 Classic slow Rock 99 Blue Rock

Page | 16
Anhang II. Tontabelle
No. Name of Tone
No. Name of Tone
No. Name of Tone
No. Name of Tone
00 Acoustic Grand
Piano
25 Short E-Guitar 50 Sustain Harp 75 Bassoon
01 Electric Grand
Piano
26 Fx 2 51 String Ensemble
3
76 Lead 4
02 Celesta 27 Fx 3 52 Tuba 77 Pad 4
03 Vibraphone 28 Synth Bass 2 53 Synth Brass 3 78 Fx 7
04 Jazz E-Guitar 29 Sustain Ocarina 54 Middle Sax 79 Lead 5
05 Muted E-Guitar 30 Vib Harp 55 Sustain Clarinet 80 Echo Piano
06 Acoustic Bass 31 String Ensemble 2 56 Lead 3 81 Bright Piano
07 Elektrische
Gitarre
32 Trombone 57 Pad 3 82 Short Celesta
08 Synth Bass 1 33 Synth Brass 2 58 Sustain Koto 83 Bright
Vibraphone
09 Ocarina 34 Soprano Sax 59 Kalimba 84 Jazz Guitar 2
10 Harp 35 Vib Clarinet 60 Fx 4 85 Clean E-Guitar
11 String Ensemble 1 36 Lead 2 61 Sustain E-Piano 86 Acoustic
Bass(finger)
12 Trumpet 37 Pad 2 62 Echo Celesta 87 Vib E-Bass
13 Synth Brass 1 38 Sitar 63 Fx 5 88 Synth Bass 5
14 Alto Sax 39 Short Shanai 64 Fretless Bass 89 Short Ocarina
15 Clarinet 40 Echo Violin 65 Baritone E-
Guitar
90 Bright Harp
16 Lead 1 41 Vib E-Piano 66 Acoustic
Bass(pick)
91 String Ensemble
5
17 Pad 1 42 Bright Celesta 67 Baritone E-Bass 92 Echo Trumpet
18 Koto 43 Sustain
Vibraphone
68 Synth Bass 4 93 Synth Brass 5
19 Shanai 44 Wood Bass 69 Fx 6 94 Tenor Sax
20 Violin 45 Sustain E-Guitar 70 Echo Harp 95 Fx 8
21 Piccolo 46 Echo Acoustic
Bass
71 String Ensemble
4
96 Lead 6
22 Sustain Celesta 47 Sustain E-Bass 72 French Horn 97 Pad 5
23 Fx 1 48 Synth Bass 3 73 Synth Brass 4 98 Banjo
24 Vib Viola 49 Whistle 74 Baritone Sax 99 Vib Shanai
Page | 17
Anhang III. Demo-Songs-Tabelle
No. Name of Song No. Name of Song
01 Horse Race 05 My Heart Must Go On
02 Flying Song on the Earth 06 Unchained Melody
03 The Girls from TianZhu 07 Roundabout Moon
04 Toasting Song 08 Hang with Hand
Anhang IV. Fehlerbehebung
Fehler Mögliche Ursache / Lösung
Beim An- und Ausschalten ist ein kleines
Geräusch zu hören.
Dies ist normal und es gibt keinen Grund,
sich Sorgen zu machen.
Nachdem das Keyboard eingeschaltet
wurde, gab es keinen Ton, wenn die Tasten
gedrückt wurden.
Überprüfen Sie, dass die Master-Lautstärke
richtig eingestellt ist. Überprüfen Sie, dass
keine Kopfhörer oder andere Geräte im
Keyboard eingesteckt sind, da dies den
integrierten Lautsprecher automatisch
ausschaltet.
Der Ton ist verzerrt oder unterbrochen und
das Keyboard funktioniert nicht richtig.
Verwendung eines falschen Netzadapters.
Verwenden Sie den mitgelieferten
Netzadapter oder wechseln Sie die
Batterien.
Manche Noten weisen ein leicht
unterschiedliches Timbre auf.
Dies ist normal und kommt von den vielen
verschiedenen Sampling-Tonlagen des
Keyboards.
Wenn die Sustain-Funktion aktiviert ist,
haben manche töne ein langes Sustain und
andere ein kurzes Sustain.
Das ist normal. Die beste Sustain-Länge ist
für jede Note eingestellt worden.
Die Master-Lautstärke oder Begleitung-
Lautstärke ist nicht richtig.
Überprüfen Sie, dass die Master-Lautstärke
und Begleitung-Lautstärke richtig
eingestellt sind.
Im SYNC-Status funktioniert die
automatische Begleitung nicht.
Überprüfen Sie, dass Single Finger oder
Fingered Modus ausgewählt wurde und
spielen Sie eine Note auf den 19 ersten
Tasten auf der linken Seite des Keyboards.
Die Tonhöhe der Note stimmt nicht. Überprüfen Sie, dass die Transpose-
Funktion auf 00 steht.
Das Keyboard scheint von alleine
auszuschalten.
Es handelt sich dabei um die
stromsparende Funktion, die umschaltet.
Siehe Seite 6.
Page | 18
Anhang V. Akkordtabelle
Einzelnote-Akkorde

Page | 19
Fingered Akkorde

Page | 20
Anhang VI. Technische Spezifikationen
• Anzeige LCD Anzeige mit Tonleiter- und Notenanzeige
• Ton 100 verschiedene Töne
• Rhythmus 100 verschiedene Rhythmen
• Demo 8 verschiedene Demo Songs
• Effekt-Regelung Sustain, Vibrato, Transponieren
• Aufzeichnung und Programmierung 41 Noten Aufzeichnung, Playback, 16 Takt Rhythmen Programmierung
• Perkussion 8 Arten Panel-Perkussionsinstrumente
• Begleitungseinstellung Start / Stopp, Sync, Fill in, Tempo
• Intelligentes Lernen 2 Unterricht-Modi
• Externe Jacks DC 9 V Stromeingang, externe Kopfhörer- / Lautsprecher-Ausgang, Mikrofon-Eingang
• Diapason (Keyboard-Palette) C2- F6
• Intonation <3 cent
• Gewicht 3,9 kg
• DC-Eingang DC 9 V
• Netzadapter DC 9 V, 500 mA
• Ausgangsleistung 3W x 2
• Zubehör Netzadapter, Notenständer, Bedienungsanleitung

Page | 21
Hinweise zur Entsorgung
Das auf dem Produkt vorhandene Symbol weist darauf hin, dass das Produkt als elektrisches
oder elektronisches Gerät klassifiziert ist und nicht zusammen mit dem normalen
Haushaltsmüll entsorgt werden darf.
Die Abfallrecht hinsichtlich elektrischer und elektronischer Geräte, EU-
Richtlinie 2012/19/EC (WEEE) wurde dafür hergestellt, um das Recycling von
Produkten zu fördern, indem man die besten verfügbaren
Recyclingtechniken einsetzt, um die Belastungen auf die Umwelt zu
minimieren, jegliche gefährliche Substanzen zu behandeln und die Erhöhung
von Mülldeponie zu vermeiden.
Falls Sie dieses Produkt nicht mehr verwenden können, bitte entsorgen Sie
es entsprechend des Recyclingverfahrens Ihrer örtlichen Behörden. Für weitere Informationen
wenden Sie sich bitte an Ihre Behörde vor Ort oder Ihren Händler, von dem Sie das Produkt
erworben haben.
PDT Ltd.
Unit 4B Greengate Industrial Estate,
White Moss View,
Middleton,
Manchester
M24 1UN
Copyright PDT Ltd. © 2020

Tastiera multifunzione a 54
tasti
Guida per l'utente

Pagina | 1
Informazioni importanti
Attenersi alle informazioni seguenti così da non nuocere a se stessi o ad altri né danneggiare questo strumento o altra apparecchiatura esterna. Adattatore
• Utilizzare solo con lo specifico adattatore CA fornito con il prodotto. Un adattatore sbagliato o difettoso può danneggiare la tastiera elettronica.
• Non posizionare l’adattatore CA o il cavo di alimentazione vicino a fonti di calore come radiatori o termosifoni.
• Per evitare di danneggiare il cavo di alimentazione, assicurarsi di non collocarvi sopra oggetti pesanti e di non sottoporlo a sollecitazione o sovra-flessione.
• Controllare regolarmente la spina di alimentazione e assicurarsi che sia priva di sporcizia superficiale. Non collegare o scollegare il cavo di alimentazione con le mani bagnate.
Non aprire il corpo della tastiera elettronica • Non aprire la tastiera elettronica né tentare di smontarne alcuna parte. Se il
dispositivo non funziona correttamente, sospenderne l’utilizzo e inviarlo a un servizio di assistenza qualificato per la riparazione.
Uso della tastiera elettronica
• Per evitare di danneggiare l’aspetto della tastiera elettronica o le parti interne, non collocare la tastiera elettronica in un ambiente polveroso, alla luce diretta del sole o in luoghi dove le temperature sono molto elevate o molto basse.
• Non posizionare la tastiera elettronica su una superficie non uniforme. Per evitare di danneggiare le parti interne, non collocare alcun serbatoio contenente liquido sulla tastiera elettronica poiché potrebbe verificarsi una fuoriuscita.
Manutenzione
• Per pulire il corpo della tastiera elettronica, utilizzare solo un panno morbido e asciutto.
Collegamento • Allo scopo di prevenire danni all’altoparlante della tastiera elettronica, impostare il
volume dei dispositivi periferici al minimo e regolarlo gradualmente a un livello adeguato una volta iniziata l’esecuzione musicale.
Durante il funzionamento
• Non utilizzare la tastiera al livello massimo di volume per lunghi periodi di tempo. • Non collocare oggetti pesanti sulla tastiera né esercitarvi una pressione eccessiva. • L’imballaggio deve essere aperto solo da un adulto responsabile e le confezioni in
plastica devono essere conservate o smaltite in modo appropriato. Specifiche Le specifiche sono soggette a modifica senza preavviso.

Pagina | 2
Indice
Pannello anteriore e collegamenti esterni ...................................................................... 4
Pannello anteriore ....................................................................................................... 4
Collegamenti esterni ................................................................................................... 4
Display LCD .................................................................................................................. 5
Preparazione antecedente il primo utilizzo ..................................................................... 5
Alimentazione .............................................................................................................. 5
Uso dell’adattatore CA/CC ....................................................................................... 5
Funzionamento della batteria ................................................................................. 6
Spegnimento automatico ........................................................................................ 6
Cavi Jack e Accessori .................................................................................................... 6
Utilizzando cuffie o altoparlanti esterni .................................................................. 6
Collegamento di un microfono ................................................................................ 6
Funzionamento di base ................................................................................................... 7
Alimentazione e volume .............................................................................................. 7
Controllo dell'alimentazione ................................................................................... 7
Regolazione del volume principale .......................................................................... 7
Tono ............................................................................................................................. 7
Selezione del tono ................................................................................................... 7
Effetti e controllo ......................................................................................................... 8
Sostegno .................................................................................................................. 8
Vibrato ..................................................................................................................... 8
Transpose ................................................................................................................ 8
Strumenti a percussione su pannello ...................................................................... 9
Ritmo ........................................................................................................................... 9
Selezione del ritmo .................................................................................................. 9
Start/Stop ................................................................................................................ 9
Sincronizzazione .................................................................................................... 10
Riempimento ......................................................................................................... 10
Regolazione del volume del ritmo ......................................................................... 10

Pagina | 3
Regolazione del tempo .......................................................................................... 11
Accompagnamento con accordi ................................................................................ 11
Accordi con diteggiatura ....................................................................................... 11
Senza accordo ........................................................................................................ 12
Funzione di registrazione .......................................................................................... 12
Riproduzione di brani dimostrativi ............................................................................ 13
Metodi di insegnamento ........................................................................................... 13
APPRENDIMENTO 1 ............................................................................................... 13
APPRENDIMENTO 2 ............................................................................................... 13
Appendix I. Rhythm Table ............................................................................................. 15
Appendix II. Tone Table ................................................................................................. 16
Appendix III. Demo Song Table ...................................................................................... 17
Allegato IV. Risoluzione dei problemi ............................................................................ 17
Allegato V. Tabelle degli accordi ................................................................................... 18
Accordi con diteggiatura singola ............................................................................... 18
Accordi con diteggiatura ........................................................................................... 19
Allegato VI. Specifiche tecniche .................................................................................... 20
Istruzioni per lo smaltimento del prodotto ................................................................... 21

Pagina | 4
Pannello anteriore e collegamenti esterni
Pannello anteriore
1. Altoparlante 2. Interruttore 3. Volume principale 4. Volume del ritmo 5. Tempo 6. Transpose 7. Tono 8. Ritmo 9. Pulsanti numerati 10. Display LCD 11. Sincronizzazione 12. Riempimento 13. Selezione 14. Dimostrativo
Collegamenti esterni
15. Start/Stop 16. Accordi con diteggiatura singola 17. Accordi con diteggiatura 18. Senza accordi 19. Vibrato 20. Sostegno 21. Apprendimento 2 22. Apprendimento 1 23. Programma 24. Riproduzione 25. Registrazione 26. Percussioni 27. Area tastiera accordi
Ingresso alimentazione CC 9V
OUT - Uscita cuffie / Altoparlante esterno
OK - Ingresso microfono

Pagina | 5
Display LCD
1. Valore velocità di ritmo e canzone (bpm) 2. Display digitale di brano, ritmo e numero di tono 3. TONE, RHYTHM o brano DEMO 4. Display del livello di volume 5. Visualizzazione pentagramma
Preparazione antecedente il primo utilizzo
Alimentazione
Uso dell’adattatore CA/CC
Utilizzare lo speciale adattatore CA/CC fornito con la tastiera elettronica o un adattatore con tensione di uscita CC 9V e corrente di uscita 500 mA con una spina con centro positivo. Collegare la spina CC dell’adattatore alla presa di corrente CC 9V sul retro della tastiera, poi collegare l’altra estremità alla presa di corrente e accendere.
Attenzione: Quando la tastiera non viene utilizzata, scollegare l'adattatore dalla presa di
corrente.
Pagina | 6
Funzionamento della batteria Aprire il coperchio del vano batterie sotto la tastiera elettronica e inserire 6 batterie alcaline formato D da 1,5 V. Assicurarsi che le batterie siano inserite rispettando la corretta polarità e riposizionare il coperchio. Attenzione: Non mescolare batterie vecchie e nuove. Non lasciare le batterie nella tastiera se questa non verrà utilizzata per un certo periodo di tempo, al fine di evitare possibili danni provocati dalla perdita di liquido dalla batterie.
Spegnimento automatico La sezione amplificatore della tastiera entra in modalità stand by a consumo ridotto se non si preme alcun tasto per 3 minuti. Premere un tasto qualsiasi per uscire dalla modalità a consumo ridotto. Si noti che la tastiera non entra in modalità consumo ridotto durante la riproduzione di un brano dimostrativo o di un ritmo.
Cavi Jack e Accessori
Utilizzando cuffie o altoparlanti esterni
Collegare il cavo delle cuffie da 3,5 mm o dell’altoparlante esterno al jack [OUT] sul retro della tastiera. Gli altoparlanti interni della tastiera saranno tagliati fuori. Nota: cuffie e altoparlante esterno non forniti. Collegamento di un microfono
Collegare la spina del microfono da 3,5 mm al jack [OK] sul retro della tastiera. Cantare a tempo con la musica. Nota: microfono non fornito.

Pagina | 7
Funzionamento di base
Alimentazione e volume
Controllo dell'alimentazione Premere il pulsante [POWER] per accendere e premere nuovamente per spegnere.
Regolazione del volume principale La tastiera ha 10 livelli di volume (1-10). Il livello predefinito quando è accesa è impostato su 7. Per modificare il volume, premere i pulsanti [MASTER VOLUME +/-]. Il livello del volume è indicato dalle barre sul display LCD. Premendo contemporaneamente i pulsanti [MASTER VOLUME +/-] il volume principale torna al livello predefinito.
Tono
Selezione del tono Quando la tastiera viene accesa per prima volta, l’impostazione predefinita è TONE. Per modificare il tono, si possono premere i pulsanti + o - sul tastierino numerico oppure immettere direttamente il numero del tono desiderato digitando le cifre corrispondenti da 0 a 9.

Pagina | 8
Effetti e controllo
Sostegno Premere il pulsante [Sustain] per entrare in modalità sostegno. Sul display LCD compare una bandiera accanto a [SUSTAIN]. Una volta selezionata questa modalità, il suono di ogni nota eseguita viene prolungato. Premere nuovamente il pulsante [Sustain] per disattivare la funzione e uscire da questa modalità. .
Vibrato Premere il pulsante [Vibrato] per entrare in modalità vibrato. Sul display LCD
compare una bandiera accanto a [VIBRATO]. Una volta selezionata questa modalità, ogni volta che si suona una nota si aggiunge un effetto tremolato alla fine della stessa. Premere nuovamente il pulsante [Vibrato] per disattivare la funzione e uscire da questa modalità.
Transpose
Premendo il pulsante [Transpose +/-] si altera la scala musicale della nota suonata. Si può regolare la scala di 6 livelli ascendenti o discendenti. Premendo contemporaneamente i pulsanti [Transpose +/-] la scala musicale torna a 0.
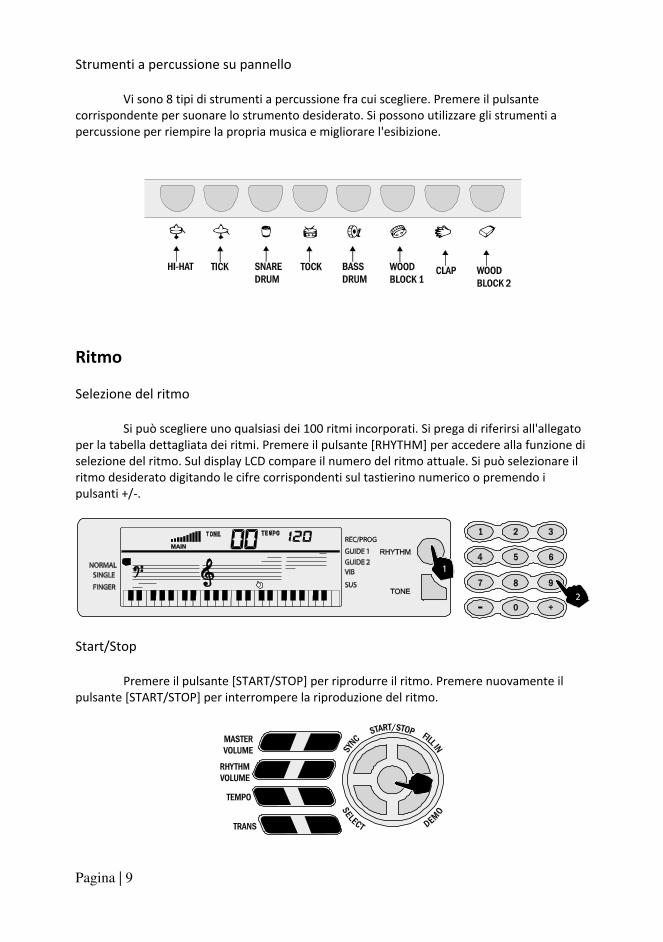
Pagina | 9
Strumenti a percussione su pannello Vi sono 8 tipi di strumenti a percussione fra cui scegliere. Premere il pulsante corrispondente per suonare lo strumento desiderato. Si possono utilizzare gli strumenti a percussione per riempire la propria musica e migliorare l'esibizione.
Ritmo
Selezione del ritmo Si può scegliere uno qualsiasi dei 100 ritmi incorporati. Si prega di riferirsi all'allegato per la tabella dettagliata dei ritmi. Premere il pulsante [RHYTHM] per accedere alla funzione di selezione del ritmo. Sul display LCD compare il numero del ritmo attuale. Si può selezionare il ritmo desiderato digitando le cifre corrispondenti sul tastierino numerico o premendo i pulsanti +/-.
Start/Stop Premere il pulsante [START/STOP] per riprodurre il ritmo. Premere nuovamente il pulsante [START/STOP] per interrompere la riproduzione del ritmo.

Pagina | 10
Sincronizzazione Premere il pulsante [SYNC] per selezionare la funzione di accompagnamento sincronizzato. La riproduzione del ritmo viene attivata premendo uno qualsiasi dei 19 tasti sul lato sinistro della tastiera. Premere nuovamente il pulsante [SYNC] per interrompere il ritmo e annullare la funzione di sincronizzazione. Premere un'altra volta il pulsante [SYNC] per uscire dalla funzione di sincronizzazione.
Riempimento Si può inserire un interludio premendo il pulsante [FILL IN] durante la riproduzione del ritmo. Dopodiché la riproduzione del ritmo prosegue normalmente.
Regolazione del volume del ritmo Il volume del ritmo predefinito è di livello 7 e si può regolare premendo i pulsanti [RHYTHM VOLUME +/-]. Il display LCD mostra il volume durante la regolazione. La gamma di regolazione va da 1 a 10 ed è indicata dalle barre sul display LCD. Premendo contemporaneamente i pulsanti [RHYTHM VOLUME +/-] il volume del ritmo torna al livello predefinito.

Pagina | 11
Regolazione del tempo
Premere i pulsanti [TEMPO +/-] per regolare il tempo di esecuzione del ritmo, il metronomo e il brano dimostrativo. La gamma di regolazione è 40-240 bpm in 15 fasi. Premendo contemporaneamente i pulsanti [TEMPO +/-] il tempo torna a 120 bpm.
Accompagnamento con accordi
Accordi con diteggiatura singola Premere il pulsante [SINGLE FINGER] per entrare nella modalità accordo con diteggiatura singola. Sul display LCD compare una bandiera accanto a SINGLE FINGER. Gli accordi vengono suonati premendo certi tasti nell’area accordi sul lato sinistro della tastiera (tasti da 1 a 19). Le posizioni delle dita sono indicate nell’Allegato V. L’accordo suonato è visualizzato nell’angolo in alto a sinistra del display LCD. Premere il pulsante [START/STOP] per avviare o interrompere l’accompagnamento con accordi.
Accordi con diteggiatura Premere il pulsante [FINGERED CHORD] per entrare nella modalità accordo
automatico con diteggiatura. Sul display LCD compare una bandiera accanto a FINGER. Premendo certi tasti nell'area accordi sul lato sinistro della tastiera (tasti da 1 a 19) si possono ascoltare diversi accompagnamenti con accordo. Le posizioni delle dita sono indicate nell'Allegato V. L'accordo suonato è visualizzato nell'angolo in alto a sinistra del display LCD. Premere il pulsante [START/STOP] per avviare o interrompere l'accompagnamento con accordi.

Pagina | 12
Senza accordo
In una qualsiasi modalità accordo, premere il pulsante [CHORD OFF] per interrompere l'accompagnamento musicale e uscire dalla modalità accordo. Il ritmo continuerà a essere riprodotto.
Funzione di registrazione
Premere il pulsante [RECORD] per entrare nella modalità di registrazione. Sul display LCD compare una bandiera accanto a REC/PROG. Premere qualsiasi tasto per iniziare la registrazione. La capacità massima di registrazione è di 41 note. Ogni volta che si preme il pulsante [RECORD], la memoria precedente viene cancellata e la tastiera ritorna alla modalità di registrazione.
Prima che la memoria si esaurisca, premere il pulsante [PLAY] per riprodurre le note registrate.
Premere il pulsante [PROGRAM] per entrare nella modalità di modificazione del ritmo. Sul display LCD compare una bandiera accanto a REC/PROG. Si può modificare una sezione di ritmo premendo uno qualsiasi degli 8 tipi di percussione su pannello della tastiera. La lunghezza massima di registrazione è di 16 suoni percussivi. Premere il pulsante [PLAYBACK] per ascoltare i suoni programmati in sequenza. Si può inoltre regolare il tempo per ottenere

Pagina | 13
un effetto ottimale. Ogni volta che si preme il pulsante [PROGRAM] la memoria precedente viene cancellata e la tastiera ritorna alla modalità di registrazione.
Riproduzione di brani dimostrativi
Premere il pulsante [DEMO] per eseguire un brano dimostrativo. Sul display LCD compare SONG [XX] dove xx è il numero del brano dimostrativo. Premendo il pulsante [SELECT] ripetutamente, si può selezionare il brano dimostrativo desiderato. Vi sono 8 canzoni in totale fra cui scegliere. La tastiera termina il brano selezionato, poi inizia a riprodurre quello successivo. Premere nuovamente il pulsante [DEMO] per uscire dalla modalità demo.
Metodi di insegnamento
APPRENDIMENTO 1
Premere il pulsante [LEARN 1] per accedere al metodo didattico a tasto singolo. Sul display LCD compare una bandiera accanto a GUIDE 1. Questo metodo è adatto ai principianti per familiarizzare con il ritmo e il tempo del brano. Sul display LCD compare SONG [XX] dove xx è il numero del brano dimostrativo selezionato. Selezionare un brano diverso con il tasto [SELECT]. Il punto di battuta lampeggia sul display LCD per indicare il tempo. La tastiera suona quindi la melodia principale automaticamente. Il display LCD indica quali tasti premere.
APPRENDIMENTO 2
Premere il pulsante [LEARN 2] per accedere al metodo didattico Sincronizzato. Sul display LCD compare una bandiera accanto a GUIDE 2. Questo metodo è adatto agli utilizzatori di livello più avanzato. Sul display LCD compare SONG [XX] dove xx è il numero del brano
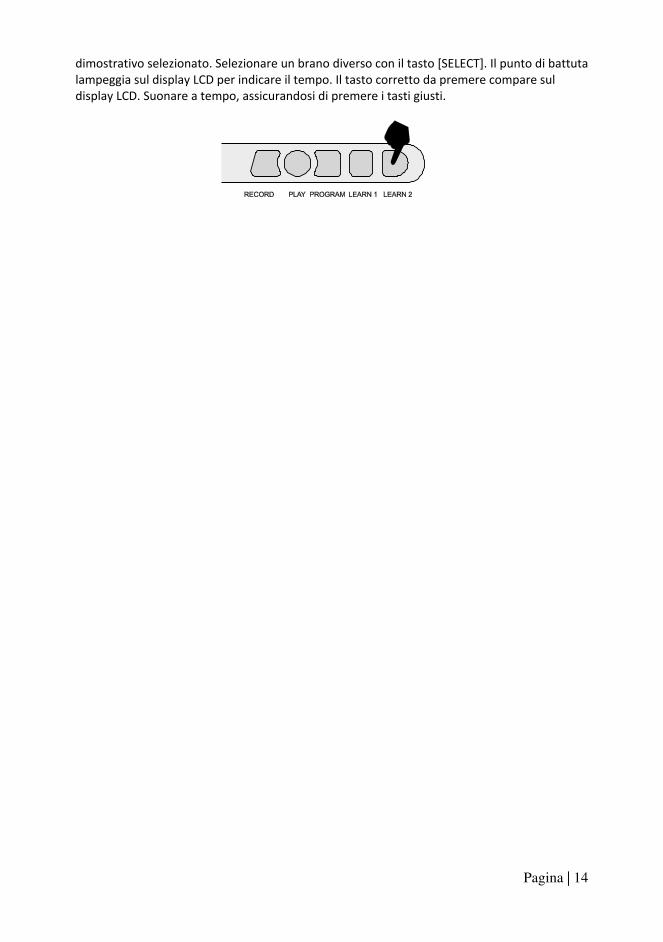
Pagina | 14
dimostrativo selezionato. Selezionare un brano diverso con il tasto [SELECT]. Il punto di battuta lampeggia sul display LCD per indicare il tempo. Il tasto corretto da premere compare sul display LCD. Suonare a tempo, assicurandosi di premere i tasti giusti.

Pagina | 15
Appendix I. Rhythm Table
No. Name of
Rhythm
No. Name of
Rhythm
No. Name of
Rhythm
No. Name of
Rhythm
00 Rumba 25 Classic Polka 50 Brazil Mambo 75 Jazz Rumba
01 Samba 26 Country Bossa nova
51 Europe 8 Beat 76 Jazz Samba
02 Disco 27 Hot Salsa 52 Country Cha Cha 77 Classic Disco
03 Tango 28 Pop 16 Beat 53 India blue Grass 78 Brazil Tango
04 Rock 29 Blue Leigui 54 Blue slow Rock 79 Europe Rock
05 Swing 30 Pop Mambo 55 Europe Rumba 80 Jazz Swing
06 Country 31 Pop 8 Beat 56 Rock Samba 81 Blue Country
07 waltz 32 Jazz Cha Cha 57 Rock Disco 82 Pop Waltz
08 Beguine 33 Emotion Pop 58 Classic Tango 83 Jazz Beguine
09 Latin 34 Country Rock 59 Unitary Rock 84 Pattern Latin
10 March polka 35 Blue Rumba 60 Europe Swing 85 Jazz Polka
11 Bossa nova 36 Classic Samba 61 Classic Country 86 Jazz Bossa nova
12 Salsa 37 Europe Disco 62 Argentina Waltz 87 Latin Salsa
13 16 Beat 38 Blue Tango 63 Rock Beguine 88 Jazz 16 Beat
14 Leigui 39 Emotion Rock 64 Jazz Latin 89 Pop Leigui
15 Mambo 40 Classic Swing 65 South Africa Polka 90 Jazz Mambo
16 8 Beat 41 South Africa Country
66 Pattern Bossa nova
91 Classic 8 Beat
17 Cha Cha 42 Country Waltz 67 Blue Salsa 92 Brazil Cha-Cha
18 Pop 43 Classic Beguine 68 16 Beat Swing 93 Blue Grass
19 Slow Rock 44 Brazil Latin 69 Europe Leigui 94 Jazz slow Rock
20 Blue Swing 45 Blue Polka 70 Pattern Mambo 95 Classic Rumba
21 Country Jazz 46 Mix Bossa nova 71 Jazz 8 Beat 96 Europe Samba
22 Classic Waltz 47 Rock Salsa 72 Blue Cha Cha 97 Jazz Disco
23 Blue Beguine 48 Unitary 16 Beat 73 Indonesia Dance 98 Jazz Tango
24 Rock Latin 49 Classic Leigui 74 Classic slow Rock 99 Blue Rock
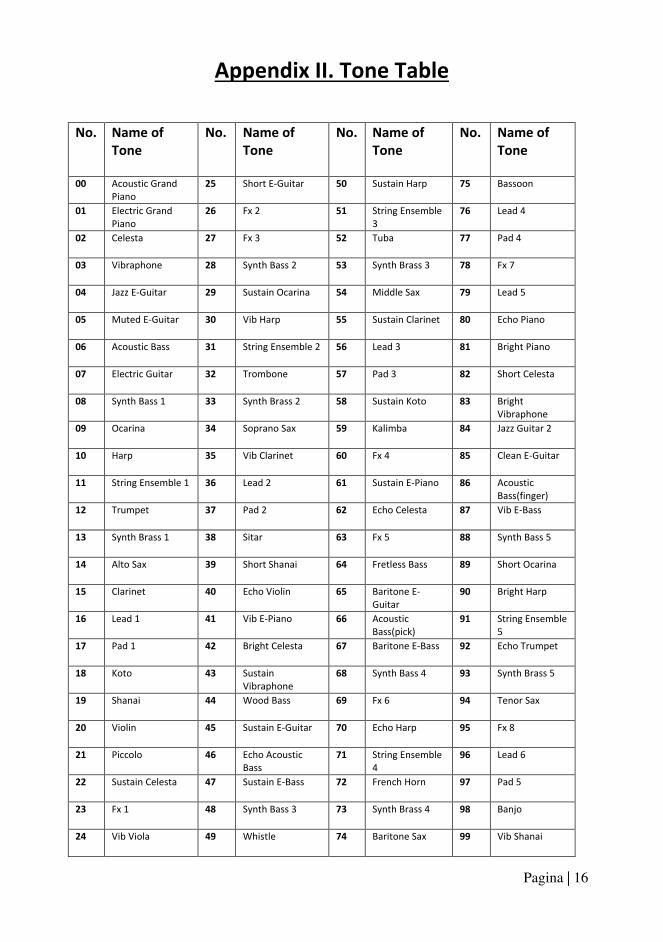
Pagina | 16
Appendix II. Tone Table
No. Name of
Tone
No. Name of
Tone
No. Name of
Tone
No. Name of
Tone
00 Acoustic Grand Piano
25 Short E-Guitar 50 Sustain Harp 75 Bassoon
01 Electric Grand Piano
26 Fx 2 51 String Ensemble 3
76 Lead 4
02 Celesta 27 Fx 3 52 Tuba 77 Pad 4
03 Vibraphone 28 Synth Bass 2 53 Synth Brass 3 78 Fx 7
04 Jazz E-Guitar 29 Sustain Ocarina 54 Middle Sax 79 Lead 5
05 Muted E-Guitar 30 Vib Harp 55 Sustain Clarinet 80 Echo Piano
06 Acoustic Bass 31 String Ensemble 2 56 Lead 3 81 Bright Piano
07 Electric Guitar 32 Trombone 57 Pad 3 82 Short Celesta
08 Synth Bass 1 33 Synth Brass 2 58 Sustain Koto 83 Bright Vibraphone
09 Ocarina 34 Soprano Sax 59 Kalimba 84 Jazz Guitar 2
10 Harp 35 Vib Clarinet 60 Fx 4 85 Clean E-Guitar
11 String Ensemble 1 36 Lead 2 61 Sustain E-Piano 86 Acoustic Bass(finger)
12 Trumpet 37 Pad 2 62 Echo Celesta 87 Vib E-Bass
13 Synth Brass 1 38 Sitar 63 Fx 5 88 Synth Bass 5
14 Alto Sax 39 Short Shanai 64 Fretless Bass 89 Short Ocarina
15 Clarinet 40 Echo Violin 65 Baritone E-Guitar
90 Bright Harp
16 Lead 1 41 Vib E-Piano 66 Acoustic Bass(pick)
91 String Ensemble 5
17 Pad 1 42 Bright Celesta 67 Baritone E-Bass 92 Echo Trumpet
18 Koto 43 Sustain Vibraphone
68 Synth Bass 4 93 Synth Brass 5
19 Shanai 44 Wood Bass 69 Fx 6 94 Tenor Sax
20 Violin 45 Sustain E-Guitar 70 Echo Harp 95 Fx 8
21 Piccolo 46 Echo Acoustic Bass
71 String Ensemble 4
96 Lead 6
22 Sustain Celesta 47 Sustain E-Bass 72 French Horn 97 Pad 5
23 Fx 1 48 Synth Bass 3 73 Synth Brass 4 98 Banjo
24 Vib Viola 49 Whistle 74 Baritone Sax 99 Vib Shanai

Pagina | 17
Appendix III. Demo Song Table
No. Name of Song No. Name of Song
01 Horse Race 05 My Heart Must Go On
02 Flying Song on the Earth 06 Unchained Melody
03 The Girls from TianZhu 07 Roundabout Moon
04 Toasting Song 08 Hang with Hand
Allegato IV. Risoluzione dei problemi
Problema Possibile causa/Soluzione
Si sente un leggero rumore quando si accende o spegne.
È normale e non c’è da preoccuparsi.
Dopo aver acceso la tastiera non si sente alcun suono premendo i tasti.
Controllare che il volume principale sia impostato correttamente. Controllare che le cuffie o altre apparecchiature non siano collegate alla tastiera, poiché questo causa lo spegnimento automatico del sistema di altoparlanti incorporati.
Il suono è distorto o interrotto e la tastiera non funziona correttamente.
Uso di un adattatore sbagliato. Utilizzare l’adattatore fornito o sostituire le batterie se necessario.
Vi è una leggera differenza di timbro tra alcune note.
È normale ed è dovuto alle molte e diverse gamme di campionamento vocale della tastiera.
Quando si utilizza la funzione di sostegno, alcuni toni hanno sostegno lungo e alcuni breve.
È normale. La migliore lunghezza di sostegno per toni differenti è predefinita.
Il volume principale o il volume di accompagnamento è sbagliato.
Controllare che il volume principale e il volume dell’accompagnamento siano impostati correttamente.
Nell’impostazione SYNC l’auto-accompagnamento non funziona.
Verificare di aver selezionato la modalità Single Finger o Fingered, poi suonare una nota sui primi 19 tasti sul lato sinistro della tastiera.
L’altezza della nota è sbagliata. Controllare che il pulsante transpose sia impostato su 00.
La tastiera sembra spegnersi automaticamente.
La funzione di risparmio energetico è attivata. Si veda pagina 6.

Pagina | 18
Allegato V. Tabelle degli accordi
Accordi con diteggiatura singola

Pagina | 19
Accordi con diteggiatura

Pagina | 20
Allegato VI. Specifiche tecniche
• Display
Display LCD con indicazione di pentagramma e tasto
• Tono
100 toni diversi
• Ritmo
100 ritmi diversi
• Dimostrativo
8 diversi brani dimostrativi
• Controllo degli effetti
Sostegno, vibrato, transpose
• Registrazione e programmazione
Memoria di registrazione 41 note, riproduzione, programmazione ritmo 16 battute
• Percussioni
8 tipi di strumenti a percussione su pannello
• Controllo dell'accompagnamento
Start/Stop, Sync, Fill in, Tempo
• Insegnamento intelligente
2 metodi didattici
• Jack esterni
Alimentatore DC 9V, Uscita cuffie/altoparlante esterno, Ingresso microfono
• Diapason (estensione della tastiera)
C2- F6
• Intonazione
<3cento
• Peso
3,9 kg
• Ingresso CC
CC 9V
• Adattatore
CC 9V, 500 mA
• Alimentazione di uscita
3 W x 2
• Accessori
Adattatore, leggio, guida per l'utente
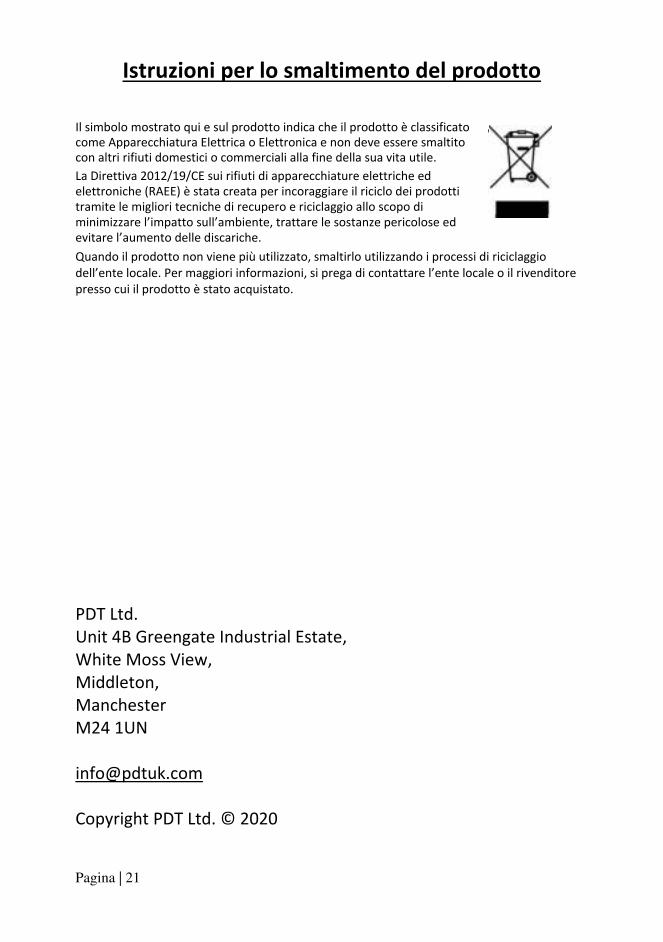
Pagina | 21
Istruzioni per lo smaltimento del prodotto
Il simbolo mostrato qui e sul prodotto indica che il prodotto è classificato come Apparecchiatura Elettrica o Elettronica e non deve essere smaltito con altri rifiuti domestici o commerciali alla fine della sua vita utile. La Direttiva 2012/19/CE sui rifiuti di apparecchiature elettriche ed elettroniche (RAEE) è stata creata per incoraggiare il riciclo dei prodotti tramite le migliori tecniche di recupero e riciclaggio allo scopo di minimizzare l’impatto sull’ambiente, trattare le sostanze pericolose ed evitare l’aumento delle discariche. Quando il prodotto non viene più utilizzato, smaltirlo utilizzando i processi di riciclaggio dell’ente locale. Per maggiori informazioni, si prega di contattare l’ente locale o il rivenditore presso cui il prodotto è stato acquistato.
PDT Ltd. Unit 4B Greengate Industrial Estate, White Moss View, Middleton, Manchester M24 1UN [email protected] Copyright PDT Ltd. © 2020

RJ654
Wielofunkcyjny instrument
klawiszowy
54 klawisze
Podręcznik użytkownika

Strona | 1
Ważne informacje
Prosimy zastosować się do informacji zawartych poniżej, aby nie zrobić krzywdy sobie lub innym, ani nie uszkodzić instrumentu lub innych podłączonych do niego urządzeń.
Zasilacz sieciowy:
• Prosimy używać wyłącznie specjalnego zasilacza AC dołączonego do wyrobu. Niewłaściwy lub wadliwy zasilacz może uszkodzić elektroniczny instrument klawiszowy.
• Nie umieszczaj zasilacza ani kabla zasilającego w pobliżu źródła ciepła, np. grzejnika lub kaloryfera.
• Aby uniknąć uszkodzenia kabla zasilającego, nie stawiaj na nim żadnych ciężkich przedmiotów i nie narażaj kabla na naprężenia ani zbyt mocne zagięcie.
• Regularnie sprawdzaj stan wtyczki i utrzymuj jej powierzchnie w czystości. Nie wkładaj ani nie wyciągaj kabla z gniazdka mokrymi rękami.
Nie otwieraj obudowy instrumentu:
• Nie otwieraj instrumentu klawiszowego, ani nie próbuj demontować żadnych jego części. Jeżeli urządzenie nie działa poprawnie, zaprzestań użytkowania i odeślij je do odpowiedniego
serwisu w celu naprawy.
Użytkowanie elektronicznego instrumentu klawiszowego:
• Aby uniknąć uszkodzenia powierzchni instrumentu lub jego wewnętrznych części, prosimy nie trzymać instrumentu w miejscu narażonym na pył, kurz, bezpośrednie oddziaływanie promieni słonecznych, ani w miejscach, w których występują bardzo wysokie lub bardzo niskie temperatury.
• Nie stawiaj instrumentu na nierównej powierzchni. Aby uniknąć uszkodzenia części wewnętrznych wskutek zalania, nie stawiaj żadnych naczyń z płynną zawartością na
instrumencie.
Konserwacja:
• Do czyszczenia obudowy instrumentu klawiszowego używaj wyłącznie suchej, miękkiej
ściereczki.
Podłączenie: • Aby zapobiec uszkodzeniu głośnika elektronicznego instrumentu klawiszowego, prosimy ustawić
dźwięk podłączonego urządzenia peryferyjnego na możliwie najniższy poziom i stopniowo regulować głośność, aż do uzyskania odpowiedniego poziomu grającej muzyki.
Podczas użytkowania: • Nie używaj instrumentu klawiszowego przy najwyższym poziomie głośności przez długi okres
czasu.
• Nie stawiaj ciężkich przedmiotów na instrumencie i nie naciskaj klawiszy z nadmierną siłą. • Opakowanie powinno być otwarte przez odpowiedzialną osobę dorosłą, a jego plastikowe
elementy zachowane lub odpowiednio usunięte.
Specyfikacja
• Specyfikacja instrumentu może ulec zmianie bez uprzedzenia.

Strona | 2
Spis treści Panel przedni i gniazda zewnętrzne ................................................................................ 4
Panel przedni ............................................................................................................... 4
Gniazda zewnętrzne .................................................................................................... 4
Wyświetlacz LCD .......................................................................................................... 5
Przygotowanie do pierwszego użycia .............................................................................. 5
Zasilanie ....................................................................................................................... 5
Korzystanie z transformatorowego zasilacza sieciowego: ...................................... 5
Praca na bateriach: .................................................................................................. 6
Automatyczne wyłączanie: ...................................................................................... 6
Gniazda typu jack i akcesoria....................................................................................... 6
Korzystanie ze słuchawek lub głośników zewnętrznych: ........................................ 6
Podłączenie mikrofonu: ........................................................................................... 6
Podstawowe funkcje ....................................................................................................... 7
Włączanie i poziom dźwięku ....................................................................................... 7
Włączanie i wyłączanie: ........................................................................................... 7
Regulacja ogólnego poziomu dźwięku: ................................................................... 7
Brzmienie ..................................................................................................................... 7
Wybór brzmienia: .................................................................................................... 7
Sterowanie i efekty ...................................................................................................... 8
Wybrzmiewanie: ...................................................................................................... 8
Vibrato: .................................................................................................................... 8
Transpozycja: ........................................................................................................... 8
Panel instrumentów perkusyjnych: ......................................................................... 9
Rytm............................................................................................................................. 9
Wybór schematu rytmicznego: ............................................................................... 9
Start / Stop: ............................................................................................................. 9
Synchroniczny start akompaniamentu: ................................................................. 10
Przebitka: ............................................................................................................... 10
Regulacja poziomu dźwięku rytmu: ....................................................................... 10

Strona | 3
Regulacja tempa: ................................................................................................... 11
Akompaniament z użyciem akordów ........................................................................ 11
Akompaniament jednym palcem: ......................................................................... 11
Akompaniament akordami: ................................................................................... 11
Wyłączenie funkcji akordu: ................................................................................... 12
Funkcja nagrywania ................................................................................................... 12
Odtwarzanie utworów demonstracyjnych ................................................................ 13
Tryby lekcji ................................................................................................................. 13
Tryb nauki 1: .......................................................................................................... 13
Tryb nauki 2: .......................................................................................................... 13
Załącznik I. Tabela schematów rytmicznych .................................................................. 14
Załącznik II. Tabela brzmień ........................................................................................... 15
Załącznik III. Tabela utworów demonstracyjnych ......................................................... 16
Załącznik IV. Rozwiązywanie problemów ...................................................................... 17
Załącznik V. Tabela akordów ......................................................................................... 18
Akordy grane jednym palcem .................................................................................... 18
Akordy grane wieloma palcami ................................................................................. 19
Załącznik VI. Dane techniczne ....................................................................................... 20
Instrukcja utylizacji wyrobu ........................................................................................... 21

Strona | 4
Panel przedni i gniazda zewnętrzne
Panel przedni
1. Głośnik
2. Wyłącznik zasilania
3. Regulacja ogólnego poziomu dźwięku 4. Regulacja poziomu dźwięku rytmu
5. Tempo
6. Transpozycja
7. Brzmienie
8. Rytm
9. Przyciski numeryczne
10. Wyświetlacz LCD
11. Synchroniczny start akompaniamentu
12. Przebitka
13. Wybór
14. Utwory demonstracyjne
Gniazda zewnętrzne
DC 9V - Wejście zasilacza 9V
OUT - Wyjście słuchawkowe/głośnika zewnętrznego
OK - Wejście mikrofonu elektretowego
15. Start / Stop
16. Akompaniament jednym palcem
17. Akompaniament akordami
18. Wyłączenie funkcji akordu
19. Vibrato
20. Wybrzmiewanie
21. Tryb nauki 2
22. Tryb nauki 1
23. Programowanie
24. Odtwarzanie
25. Nagrywanie
26. Perkusja
27. Obszar klawiatury do gry akordami

Strona | 5
Wyświetlacz LCD
1. Tempo rytmu i utworu (uderzenia na minutę)
2. Numer brzmienia, rytmu lub utworu
3. Brzmienie (TONE), rytm (RHYTHM) lub utwór demonstracyjny (DEMO)
4. Wskaźnik poziomu dźwięku
5. Wyświetlacz pięciolinii
Przygotowanie do pierwszego użycia
Zasilanie
Korzystanie z transformatorowego zasilacza sieciowego:
Prosimy używać specjalnego transformatorowego zasilacza sieciowego dołączonego do instrumentu klawiszowego, lub zasilacza sieciowego o napięciu wyjściowym 9V DC, prądzie
wyjściowym 500 mA, z wtykiem z plusem w środku. Podłącz wtyk prądu stałego (DC) do gniazda DC 9V na tylnej części obudowy instrumentu klawiszowego, a następnie podłącz wtyczkę sieciową do gniazdka i włącz instrument.
Uwaga: Gdy instrument jest nieużywany, należy odłączyć zasilacz od gniazdka sieciowego.

Strona | 6
Praca na bateriach:
Otwórz pokrywę baterii na spodzie instrumentu klawiszowego i włóż 6 szt. baterii alkalicznych
1,5 V typu D. Upewnij się, że baterie są włożone dobrą stroną i zamknij pokrywę.
Uwaga: Nie mieszaj starych baterii z nowymi. Nie pozostawiaj baterii w instrumencie, gdy nie
będzie używany przez dłuższy okres czasu. Pozwoli to uniknąć ewentualnych uszkodzeń spowodowanych przez wyciek z baterii.
Automatyczne wyłączanie:
Jeżeli żaden klawisz nie zostanie naciśnięty przez 3 minuty, sekcja wzmacniacza instrumentu przejdzie w tryb oczekiwania o niskim zapotrzebowaniu na energię. Aby wyjść z trybu oczekiwania, wciśnij dowolny klawisz. Zwracamy uwagę, że instrument nie przechodzi w tryb oczekiwania podczas odtwarzania utworów demonstracyjnych lub rytmów.
Gniazda typu jack i akcesoria
Korzystanie ze słuchawek lub głośników zewnętrznych: Podłącz słuchawki z wtykiem 3,5 mm lub zewnętrzny głośnik do gniazda OUT w tylnej części obudowy instrumentu. Wbudowane głośniki instrumentu zostaną odłączone. Uwaga: Słuchawki i głośnik zewnętrzny nie wchodzą w skład zestawu.
Podłączenie mikrofonu: Podłącz mikrofon elektretowy z wtykiem 3,5 mm do gniazda OK w tylnej części obudowy instrumentu. Dzięki temu możesz śpiewać do muzyki. Uwaga: Mikrofon nie wchodzi w skład zestawu.

Strona | 7
Podstawowe funkcje
Włączanie i poziom dźwięku
Włączanie i wyłączanie:
Wciśnij przycisk [POWER], aby włączyć zasilanie. Wciśnij go ponownie, aby wyłączyć instrument.
Regulacja ogólnego poziomu dźwięku:
Instrument ma 10 poziomów natężenia dźwięku od 1 do 10. Po włączeniu zasilania ustawiany
jest domyślny poziom 7. Aby zmienić głośność, wciśnij odpowiedni przycisk [MASTER VOLUME +/-]. Poziom natężenia dźwięku wskazywany jest słupkami na wyświetlaczu LCD. Wciśnięcie obydwu przycisków [MASTER VOLUME +/-] jednocześnie przywraca natężenie dźwięku do poziomu domyślnego.
Brzmienie
Wybór brzmienia:
Gdy instrument zostanie włączony po raz pierwszy, domyślnym wskazaniem wyświetlacza jest TONE (brzmienie). Aby zmienić brzmienie instrumentu, można użyć przycisków + i - na
klawiaturze numerycznej, lub wpisać bezpośrednio numer wybranego brzmienia, używając odpowiednich klawiszy numerycznych 0-9.
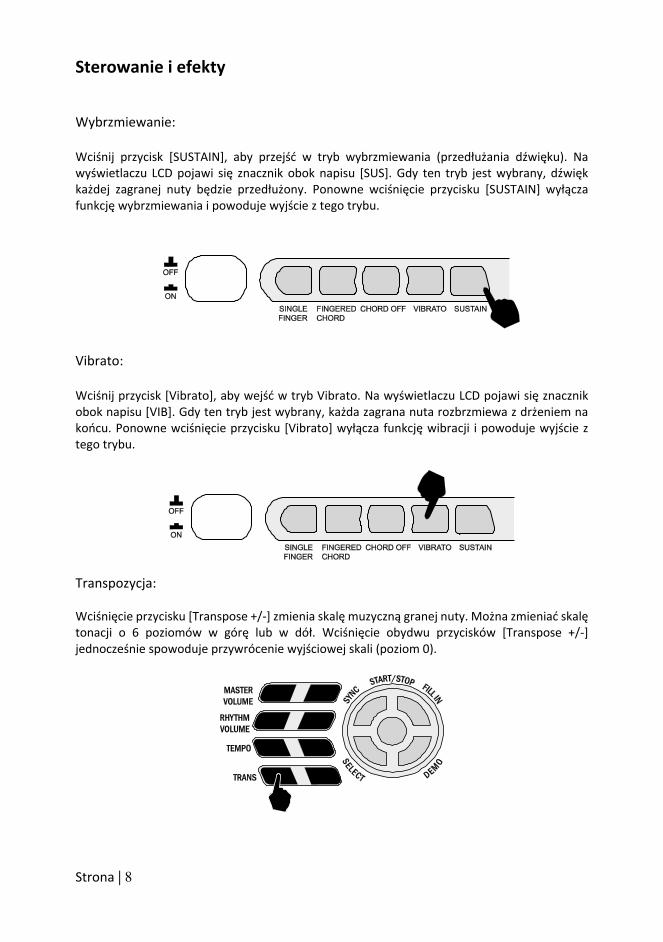
Strona | 8
Sterowanie i efekty
Wybrzmiewanie:
Wciśnij przycisk [SUSTAIN], aby przejść w tryb wybrzmiewania (przedłużania dźwięku). Na
wyświetlaczu LCD pojawi się znacznik obok napisu [SUS]. Gdy ten tryb jest wybrany, dźwięk każdej zagranej nuty będzie przedłużony. Ponowne wciśnięcie przycisku [SUSTAIN] wyłącza funkcję wybrzmiewania i powoduje wyjście z tego trybu.
Vibrato:
Wciśnij przycisk [Vibrato], aby wejść w tryb Vibrato. Na wyświetlaczu LCD pojawi się znacznik obok napisu [VIB]. Gdy ten tryb jest wybrany, każda zagrana nuta rozbrzmiewa z drżeniem na końcu. Ponowne wciśnięcie przycisku [Vibrato] wyłącza funkcję wibracji i powoduje wyjście z tego trybu.
Transpozycja:
Wciśnięcie przycisku [Transpose +/-] zmienia skalę muzyczną granej nuty. Można zmieniać skalę tonacji o 6 poziomów w górę lub w dół. Wciśnięcie obydwu przycisków [Transpose +/-]
jednocześnie spowoduje przywrócenie wyjściowej skali (poziom 0).

Strona | 9
Panel instrumentów perkusyjnych:
Do wyboru jest 8 rodzajów instrumentów perkusyjnych. Wciśnij odpowiedni przycisk, aby posłuchać wybranego instrumentu. Instrumentów perkusyjnych można używać do przebitek
podczas grania i urozmaicenia gry.
Rytm
Wybór schematu rytmicznego:
Można wybierać spośród 100 wbudowanych schematów rytmicznych. Szczegółowa tabela rytmów znajduje się w załączniku. Wciśnij przycisk [RHYTHM], aby włączyć funkcję wyboru
rytmu. Na wyświetlaczu LCD pojawi się numer aktualnie ustawionego rytmu. Można wybrać żądany rytm wciskając odpowiednie cyfry na klawiaturze numerycznej, lub za pomocą przycisków + / -.
Start / Stop:
Wciśnij przycisk [START / STOP], aby włączyć podkład rytmiczny. Wciśnij przycisk [START / STOP] ponownie, aby wyłączyć rytm.

Strona | 10
Synchroniczny start akompaniamentu:
Wciśnij przycisk [SYNC], aby wybrać funkcję synchronizacji akompaniamentu. Wciśnięcie dowolnego z pierwszych 19 klawiszy od lewej strony klawiatury spowoduje włączenie rytmu. Wciśnij [SYNC] ponownie, aby zatrzymać rytm i zresetować funkcję synchronicznego startu. Wciśnij [SYNC] ponownie, aby wyjść z tej funkcji.
Przebitka:
Wciskając przycisk [FILL IN], możesz wstawić pewnej długości przejście podczas odtwarzania rytmu. Po przebitce rytm będzie odtwarzany dalej normalnie.
Regulacja poziomu dźwięku rytmu:
Domyślny poziom natężenia dźwięku rytmu ustawiony jest na 7. Można go zmienić wciskając przyciski [RHYTHM VOLUME +/-]. Na wyświetlaczu LCD pojawi się poziom dźwięku podczas regulacji. Zakres regulacji 1-10 wskazywany jest słupkami na wyświetlaczu LCD. Wciśnięcie obydwu przycisków [RHYTHM VOLUME +/-] jednocześnie przywraca natężenie dźwięku odtwarzanego rytmu do poziomu domyślnego.

Strona | 11
Regulacja tempa:
Wciśnij odpowiedni przycisk [TEMPO +/-], aby wyregulować tempo odtwarzania rytmu, metrum lub utworu demonstracyjnego. Zakres regulacji wynosi od 40 do 240 uderzeń na minutę w 15 krokach. Wciśnięcie obydwu przycisków [TEMPO +/-] jednocześnie spowoduje przywrócenie tempa do poziomu 120 uderzeń na minutę.
Akompaniament z użyciem akordów
Akompaniament jednym palcem:
Wciśnij przycisk [SINGLE FINGER], aby wejść w tryb automatycznego akompaniamentu granego
za pomocą jednego palca. Na wyświetlaczu LCD pojawi się znacznik obok napisu [SINGLE].
Akordy grane są naciskając określone klawisze na obszarze akompaniamentu po lewej stronie
klawiatury (klawisze 1-19). Schematy palcowania zawiera Załącznik V. Grany akord wyświetlany jest w lewym górnym rogu wyświetlacza LCD. Wciśnij przycisk [START / STOP], aby uruchomić lub zatrzymać akompaniament z użyciem akordów.
Akompaniament akordami:
Wciśnij przycisk [FINGERED CHORD], aby wejść w tryb automatycznego akompaniamentu granego za pomocą wielu palców. Na wyświetlaczu LCD pojawi się znacznik obok napisu [FINGER]. Naciskając określone klawisze na obszarze akompaniamentu po lewej stronie klawiatury (klawisze 1-19) można posłuchać różnych rodzajów akompaniamentu akordowego. Wymagane schematy palcowania przedstawia Załącznik V. Grany akord wyświetlany jest w lewym górnym rogu wyświetlacza LCD. Wciśnij przycisk [START / STOP], aby uruchomić lub zatrzymać akompaniament z użyciem akordów.

Strona | 12
Wyłączenie funkcji akordu:
Podczas działania jednego z trybów akompaniamentu akordami wciśnij przycisk [CHORD OFF], aby zatrzymać akompaniament i wyjść z danego trybu. Rytm będzie odtwarzany dalej normalnie.
Funkcja nagrywania
Wciśnij przycisk [RECORD], aby wejść w tryb nagrywania. Na wyświetlaczu LCD pojawi się znacznik obok napisu [REC/PROG]. Naciśnij dowolny klawisz, aby rozpocząć nagrywanie. Maksymalna pojemność pamięci do nagrania wynosi 41 nut. Za każdym razem, gdy wciśniesz przycisk [RECORD], nagranie zapisane wcześniej w pamięci zostanie usunięte, a instrument przejdzie w tryb nagrywania ponownie.
Przed zapełnieniem pamięci wciśnij przycisk [PLAY], aby odtworzyć nagrane nuty.
Wciśnij przycisk [PROGRAM], aby wejść w tryb edycji schematu rytmicznego. Na wyświetlaczu LCD pojawi się znacznik obok napisu [REC/PROG]. Możesz edytować sekcję rytmu wciskając przycisk dowolnego spośród 8 różnych dźwięków perkusyjnych na instrumencie. Maksymalna
długość nagrania wynosi 16 dźwięków perkusyjnych. Wciśnij przycisk [PLAYBACK], aby
posłuchać zaprogramowanej sekwencji dźwięków. Dla uzyskania optymalnego efektu możesz zmienić też tempo. Za każdym razem, gdy wciśniesz przycisk [PROGRAM], nagranie zapisane wcześniej w pamięci zostanie usunięte, a instrument przejdzie w tryb programowania
ponownie.

Strona | 13
Odtwarzanie utworów demonstracyjnych
Wciśnij przycisk [DEMO], aby odtworzyć utwór demonstracyjny. Na wyświetlaczu LCD pojawi się napis SONG [XX], gdzie XX oznacza numer utworu. Wciskając kilkakrotnie przycisk [SELECT], możesz wybrać utwór demonstracyjny do odtworzenia. Do wyboru jest razem 8 utworów.
Instrument skończy odtwarzanie wybranego utworu i zacznie odtwarzać następny. Wciśnij przycisk [DEMO] ponownie, aby wyjść z trybu Demo.
Tryby lekcji
Tryb nauki 1:
Wciśnij przycisk [LEARN 1], aby wejść w tryb nauki grania jednym palcem. Na wyświetlaczu LCD pojawi się znacznik obok napisu GUIDE 1. Tryb ten jest odpowiedni dla początkujących, aby zapoznali się z rytmem i tempem utworu. Na wyświetlaczu LCD pojawi się napis SONG [XX], gdzie XX oznacza numer wybranego utworu demonstracyjnego. Aby wybrać inny utwór, wciśnij [SELECT]. Na wyświetlaczu LCD będzie migać wskaźnik tempa. Instrument będzie odtwarzać główną melodię automatycznie. Na wyświetlaczu LCD wskazywane będą klawisze, które należy naciskać.
Tryb nauki 2:
Wciśnij przycisk [LEARN 2], aby wejść w tryb nauki grania synchronicznego. Na wyświetlaczu LCD pojawi się znacznik obok napisu [GUIDE 2]. Ten tryb jest odpowiedni dla bardziej
zaawansowanych użytkowników. Na wyświetlaczu LCD pojawi się napis SONG [XX], gdzie XX oznacza numer wybranego utworu demonstracyjnego. Aby wybrać inny utwór, wciśnij [SELECT]. Na wyświetlaczu LCD będzie migać wskaźnik tempa. Właściwe klawisze do naciskania będą wskazywane na wyświetlaczu LCD. Graj do melodii naciskając właściwe klawisze.

Strona | 14
Załącznik I. Tabela schematów rytmicznych
Nr Nazwa
rytmu
Nr Nazwa
rytmu
Nr Nazwa rytmu Nr Nazwa rytmu
00 Rumba 25 Classic Polka 50 Brazil Mambo 75 Jazz Rumba
01 Samba 26 Country Bossa
nova
51 Europe 8 Beat 76 Jazz Samba
02 Disco 27 Hot Salsa 52 Country Cha Cha 77 Classic Disco
03 Tango 28 Pop 16 Beat 53 India blue Grass 78 Brazil Tango
04 Rock 29 Blue Leigui 54 Blue slow Rock 79 Europe Rock
05 Swing 30 Pop Mambo 55 Europe Rumba 80 Jazz Swing
06 Country 31 Pop 8 Beat 56 Rock Samba 81 Blue Country
07 Waltz 32 Jazz Cha Cha 57 Rock Disco 82 Pop Waltz
08 Beguine 33 Emotion Pop 58 Classic Tango 83 Jazz Beguine
09 Latin 34 Country Rock 59 Unitary Rock 84 Pattern Latin
10 March Polka 35 Blue Rumba 60 Europe Swing 85 Jazz Polka
11 Bossa nova 36 Classic Samba 61 Classic Country 86 Jazz Bossa nova
12 Salsa 37 Europe Disco 62 Argentina Waltz 87 Latin Salsa
13 16 Beat 38 Blue Tango 63 Rock Beguine 88 Jazz 16 Beat
14 Leigui 39 Emotion Rock 64 Jazz Latin 89 Pop Leigui
15 Mambo 40 Classic Swing 65 South Africa Polka 90 Jazz Mambo
16 8 Beat 41 South Africa
Country
66 Pattern Bossa
nova
91 Classic 8 Beat
17 Cha Cha 42 Country Waltz 67 Blue Salsa 92 Brazil Cha-Cha
18 Pop 43 Classic Beguine 68 16 Beat Swing 93 Blue Grass
19 Slow Rock 44 Brazil Latin 69 Europe Leigui 94 Jazz slow Rock
20 Blue Swing 45 Blue Polka 70 Pattern Mambo 95 Classic Rumba
21 Country Jazz 46 Mix Bossa nova 71 Jazz 8 Beat 96 Europe Samba
22 Classic Waltz 47 Rock Salsa 72 Blue Cha Cha 97 Jazz Disco
23 Blue Beguine 48 Unitary 16 Beat 73 Indonesia Dance 98 Jazz Tango
24 Rock Latin 49 Classic Leigui 74 Classic slow Rock 99 Blue Rock

Strona | 15
Załącznik II. Tabela brzmień
Nr Nazwa
brzmienia
Nr Nazwa
brzmienia
Nr Nazwa
brzmienia
Nr Nazwa
brzmienia
00 Acoustic Grand
Piano
25 Short E-Guitar 50 Sustain Harp 75 Bassoon
01 Electric Grand
Piano
26 Fx 2 51 String Ensemble
3
76 Lead 4
02 Celesta 27 Fx 3 52 Tuba 77 Pad 4
03 Vibraphone 28 Synth Bass 2 53 Synth Brass 3 78 Fx 7
04 Jazz E-Guitar 29 Sustain Ocarina 54 Middle Sax 79 Lead 5
05 Muted E-Guitar 30 Vib Harp 55 Sustain Clarinet 80 Echo Piano
06 Acoustic Bass 31 String Ensemble 2 56 Lead 3 81 Bright Piano
07 Electric Guitar 32 Trombone 57 Pad 3 82 Short Celesta
08 Synth Bass 1 33 Synth Brass 2 58 Sustain Koto 83 Bright
Vibraphone
09 Ocarina 34 Soprano Sax 59 Kalimba 84 Jazz Guitar 2
10 Harp 35 Vib Clarinet 60 Fx 4 85 Clean E-Guitar
11 String Ensemble 1 36 Lead 2 61 Sustain E-Piano 86 Acoustic
Bass(finger)
12 Trumpet 37 Pad 2 62 Echo Celesta 87 Vib E-Bass
13 Synth Brass 1 38 Sitar 63 Fx 5 88 Synth Bass 5
14 Alto Sax 39 Short Shanai 64 Fretless Bass 89 Short Ocarina
15 Clarinet 40 Echo Violin 65 Baritone E-
Guitar
90 Bright Harp
16 Lead 1 41 Vib E-Piano 66 Acoustic
Bass(pick)
91 String Ensemble
5
17 Pad 1 42 Bright Celesta 67 Baritone E-Bass 92 Echo Trumpet
18 Koto 43 Sustain
Vibraphone
68 Synth Bass 4 93 Synth Brass 5
19 Shanai 44 Wood Bass 69 Fx 6 94 Tenor Sax
20 Violin 45 Sustain E-Guitar 70 Echo Harp 95 Fx 8
21 Piccolo 46 Echo Acoustic
Bass
71 String Ensemble
4
96 Lead 6
22 Sustain Celesta 47 Sustain E-Bass 72 French Horn 97 Pad 5
23 Fx 1 48 Synth Bass 3 73 Synth Brass 4 98 Banjo
24 Vib Viola 49 Whistle 74 Baritone Sax 99 Vib Shanai

Strona | 16
Załącznik III. Tabela utworów demonstracyjnych
Nr Tytuł utworu Nr Tytuł utworu
01 Horse Race 05 My Heart Must Go On
02 Flying Song on the Earth 06 Unchained Melody
03 The Girls from TianZhu 07 Roundabout Moon
04 Toasting Song 08 Hang with Hand

Strona | 17
Załącznik IV. Rozwiązywanie problemów
Problem Możliwa przyczyna/Rozwiązanie
Podczas włączania lub wyłączania zasilania słychać jakiś cichy odgłos.
To normalne. Nie ma się czym martwić.
Po włączeniu zasilania instrumentu nie słychać żadnych dźwięków przy naciskaniu klawiszy.
Sprawdź czy ogólny poziom dźwięku jest ustawiony właściwie. Sprawdź czy do instrumentu nie są podłączone słuchawki lub inne urządzenie, ponieważ powoduje to automatyczne odłączenie wbudowanych głośników.
Występują zakłócenia lub przerwy w dźwięku i instrument nie działa poprawnie.
Podłączono niewłaściwy zasilacz sieciowy. Użyj dołączonego do zestawu zasilacza lub wymień baterie.
Występują niewielkie różnice w barwie niektórych nut.
To normalne. Wynika z zastosowania w
instrumencie wielu różnych zakresów próbkowania brzmień.
Podczas korzystania z funkcji
wybrzmiewania niektóre dźwięki są bardziej, a inne mniej przedłużone.
To normalne. Zaprogramowano
najlepsze długości dźwięków dla poszczególnych brzmień.
Niewłaściwy ogólny poziom natężenia dźwięku lub akompaniamentu.
Sprawdź czy ogólny poziom dźwięku i poziom dźwięku dla akompaniamentu
są ustawione właściwie. Nie działa akompaniament w trybie synchronicznego startu (SYNC).
Sprawdź czy wybrano któryś z trybów akompaniamentu (SINGLE FINGER/
FINGERED) i zagraj jakąś nutę używając jednego z pierwszych 19 klawiszy od
lewej strony klawiatury.
Niewłaściwa tonacja nuty. Sprawdź czy transpozycja jest ustawiona na 00.
Instrument wydaje się sam wyłączać. Działa funkcja oszczędzania energii. Patrz: strona 6.

Strona | 18
Załącznik V. Tabela akordów
Akordy grane jednym palcem
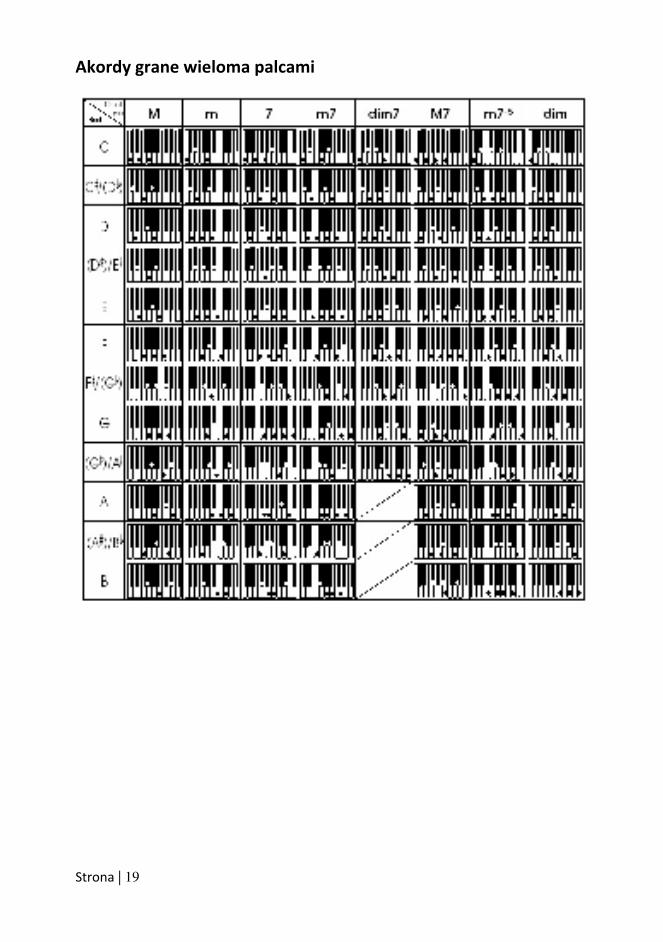
Strona | 19
Akordy grane wieloma palcami

Strona | 20
Załącznik VI. Dane techniczne
• Wyświetlacz
Wyświetlacz LCD z wyświetlaniem pięciolinii i klawiszy
• Brzmienie
100 różnych brzmień
• Rytm
100 różnych schematów rytmicznych
• Demo
8 różnych utworów demonstracyjnych
• Sterowanie efektami
Wybrzmiewanie, vibrato, transpozycja
• Nagrywanie i programowanie
Pamięć zapisu 41 nut, odtwarzanie, programowanie 16 rytmów
• Perkusja
8 rodzajów instrumentów perkusyjnych na panelu
• Sterowanie akompaniamentem
Start/stop, start synchroniczny, przebitka, tempo
• Inteligentny system nauki
2 tryby lekcji
• Gniazda zewnętrzne
Wejście zasilania 9V DC, wyjście słuchawkowe/głośnika zewnętrznego, wejście mikrofonu
• Liczba oktaw (zakres klawiatury)
C2 - F6
• Strojenie
< 3 centów
• Waga
3,9 kg
• Wejście zasilania prądem stałym 9V DC
• Zasilacz sieciowy
9V DC, 500 mA
• Moc wyjściowa
2 x 3 W
• Akcesoria
Zasilacz sieciowy, podstawka do nut, podręcznik użytkownika
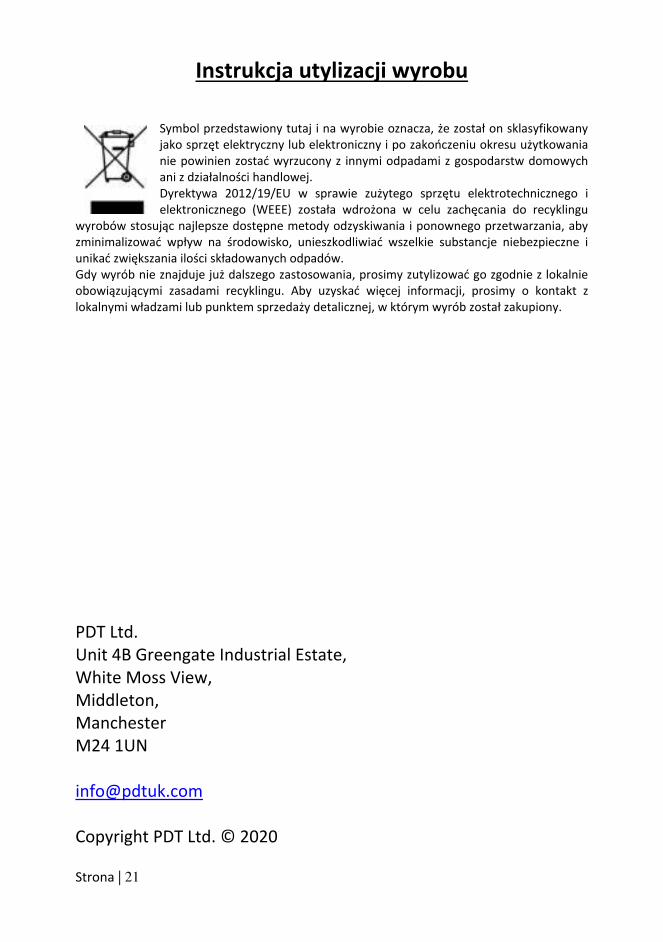
Strona | 21
Instrukcja utylizacji wyrobu
Symbol przedstawiony tutaj i na wyrobie oznacza, że został on sklasyfikowany jako sprzęt elektryczny lub elektroniczny i po zakończeniu okresu użytkowania nie powinien zostać wyrzucony z innymi odpadami z gospodarstw domowych ani z działalności handlowej. Dyrektywa 2012/19/EU w sprawie zużytego sprzętu elektrotechnicznego i elektronicznego (WEEE) została wdrożona w celu zachęcania do recyklingu
wyrobów stosując najlepsze dostępne metody odzyskiwania i ponownego przetwarzania, aby zminimalizować wpływ na środowisko, unieszkodliwiać wszelkie substancje niebezpieczne i unikać zwiększania ilości składowanych odpadów. Gdy wyrób nie znajduje już dalszego zastosowania, prosimy zutylizować go zgodnie z lokalnie obowiązującymi zasadami recyklingu. Aby uzyskać więcej informacji, prosimy o kontakt z
lokalnymi władzami lub punktem sprzedaży detalicznej, w którym wyrób został zakupiony.
PDT Ltd.
Unit 4B Greengate Industrial Estate,
White Moss View,
Middleton,
Manchester
M24 1UN
Copyright PDT Ltd. © 2020

Teclado Multifunción de 54 teclas
Manual de instrucciones
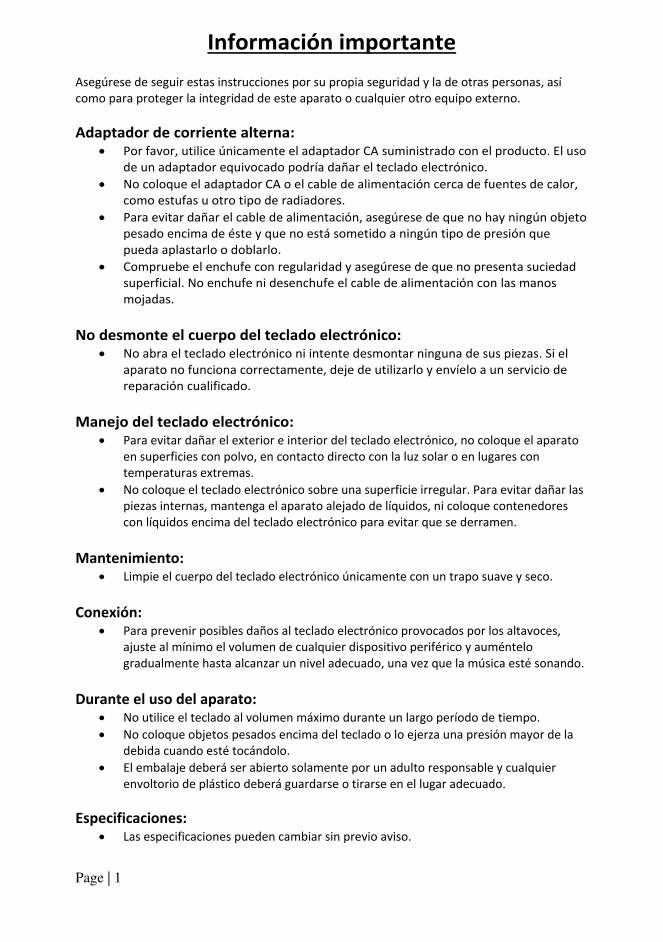
Page | 1
Información importante
Asegúrese de seguir estas instrucciones por su propia seguridad y la de otras personas, así
como para proteger la integridad de este aparato o cualquier otro equipo externo.
Adaptador de corriente alterna: • Por favor, utilice únicamente el adaptador CA suministrado con el producto. El uso
de un adaptador equivocado podría dañar el teclado electrónico.
• No coloque el adaptador CA o el cable de alimentación cerca de fuentes de calor,
como estufas u otro tipo de radiadores.
• Para evitar dañar el cable de alimentación, asegúrese de que no hay ningún objeto
pesado encima de éste y que no está sometido a ningún tipo de presión que
pueda aplastarlo o doblarlo.
• Compruebe el enchufe con regularidad y asegúrese de que no presenta suciedad
superficial. No enchufe ni desenchufe el cable de alimentación con las manos
mojadas.
No desmonte el cuerpo del teclado electrónico: • No abra el teclado electrónico ni intente desmontar ninguna de sus piezas. Si el
aparato no funciona correctamente, deje de utilizarlo y envíelo a un servicio de
reparación cualificado.
Manejo del teclado electrónico: • Para evitar dañar el exterior e interior del teclado electrónico, no coloque el aparato
en superficies con polvo, en contacto directo con la luz solar o en lugares con
temperaturas extremas.
• No coloque el teclado electrónico sobre una superficie irregular. Para evitar dañar las
piezas internas, mantenga el aparato alejado de líquidos, ni coloque contenedores
con líquidos encima del teclado electrónico para evitar que se derramen.
Mantenimiento: • Limpie el cuerpo del teclado electrónico únicamente con un trapo suave y seco.
Conexión: • Para prevenir posibles daños al teclado electrónico provocados por los altavoces,
ajuste al mínimo el volumen de cualquier dispositivo periférico y auméntelo
gradualmente hasta alcanzar un nivel adecuado, una vez que la música esté sonando.
Durante el uso del aparato: • No utilice el teclado al volumen máximo durante un largo período de tiempo.
• No coloque objetos pesados encima del teclado o lo ejerza una presión mayor de la
debida cuando esté tocándolo.
• El embalaje deberá ser abierto solamente por un adulto responsable y cualquier
envoltorio de plástico deberá guardarse o tirarse en el lugar adecuado.
Especificaciones: • Las especificaciones pueden cambiar sin previo aviso.

Page | 2
Contenido
Panel frontal y conexiones externas ............................................................................... 4
Panel frontal ................................................................................................................ 4
Conexiones externas ................................................................................................... 4
Pantalla LCD ................................................................................................................. 5
Antes del primer uso ....................................................................................................... 5
Corriente ...................................................................................................................... 5
Manejo del adaptador CA/CC: ................................................................................. 5
Uso de las pilas: ....................................................................................................... 6
Apagado automático: .............................................................................................. 6
Cables y Accesorios...................................................................................................... 6
Uso de Auriculares o Altavoces externos: ............................................................... 6
Conexión del micrófono: ......................................................................................... 6
Manejo básico ................................................................................................................. 7
Encendido y volumen .................................................................................................. 7
Control de potencia: ................................................................................................ 7
Ajuste del volumen principal ................................................................................... 7
Tono ............................................................................................................................. 7
Selección de tonos: .................................................................................................. 7
Efectos y control .......................................................................................................... 8
Nota tenida: ............................................................................................................. 8
Vibrato: .................................................................................................................... 8
Transposición: .......................................................................................................... 8
Panel de instrumentos de percusión: ...................................................................... 9
Ritmo ........................................................................................................................... 9
Selección de ritmo: .................................................................................................. 9
Encendido / Apagado: ............................................................................................. 9
Sincronizado: ......................................................................................................... 10
Relleno: .................................................................................................................. 10
Ajuste del volumen del ritmo: ............................................................................... 10
Ajuste del tempo: .................................................................................................. 11

Page | 3
Acompañamiento de acordes.................................................................................... 11
Acordes Single Finger: ........................................................................................... 11
Acordes Fingered: .................................................................................................. 11
Apagar acorde: ...................................................................................................... 11
Función de grabación ................................................................................................ 12
Reproducción de canciones de demostración .......................................................... 13
Modo estudio ............................................................................................................ 13
ESTUDIO 1: ............................................................................................................. 13
ESTUDIO 2: ............................................................................................................. 13
Apéndice I. Tabla de ritmos ........................................................................................... 14
Apéndice II. Tabla de tonos ........................................................................................... 15
Apéndice III. Tabla de canciones de demostración ....................................................... 16
Apéndice IV. Solución de problemas ............................................................................. 16
Apéndice V. Tablas de acordes ...................................................................................... 17
Acordes de Single Finger: .......................................................................................... 17
Acordes Fingered: ...................................................................................................... 18
Apéndice VI. Especificaciones técnicas ......................................................................... 19
Cómo deshacerse del aparato ....................................................................................... 20

Page | 4
Panel frontal y conexiones externas
Panel frontal
1. Altavoces
2. Interruptor de corriente
3. Volumen principal
4. Volumen del ritmo
5. Tempo
6. Transposición
7. Tono
8. Ritmo
9. Botones numéricos
10. Pantalla LCD
11. Sincronizado
12. Relleno
13. Selección
14. Canciones de demostración
Conexiones externas
15. Encendido / Apagado
16. Acordes Single Finger
17. Acordes Fingered
18. Apagado de acordes
19. Vibrato
20. Nota tenida
21. Estudio 2:
22. Estudio 1:
23. Programa
24. Reproducción
25. Grabación
26. Percusión
27. Zona de teclado de acordes
Entrada de alimentación 9V CC
OUT - Auriculares / Salida externa de
altavoces
OK- Entrada de micrófono

Page | 5
Pantalla LCD
1. Valor de velocidad de ritmo y canción (ppm.)
2. Pantalla digital de canción, ritmo y números de tono
3. TONO, RITMO o canción DEMO
4. Pantalla de nivel de volumen
5. Pantalla de pentagrama
Antes del primer uso
Corriente
Manejo del adaptador CA/CC:
Utilice el adaptador CA/CC especial que viene con su teclado electrónico o un
adaptador de corriente con salida de 9V CC y salida de 500mA con el positivo en la parte
central. Conecte el enchufe CC del adaptador de corriente a la toma de 9V CC de la parte
trasera del teclado, después conecte el otro extremo al enchufe de pared y encienda el
aparato.
Atención: Desenchufe el adaptador de corriente cuando el teclado no esté siendo utilizado.
Page | 6
Uso de las pilas:
Abra la tapa de las pilas que se encuentra en la parte inferior del teclado electrónico e
introduzca 6 pilas alcalinas de 1.5V tamaño D. Asegúrese de que las pilas están colocadas en la
posición correcta y vuelva a colocar la tapa.
Atención: No mezcle pilas nuevas y antiguas. Cámbielas todas a la vez. No deje las pilas en el
teclado si no lo va a utilizar por un tiempo prolongado. Esto evitará posibles daños provocados
por fugas en las pilas.
Apagado automático:
Si no pulsa ninguna tecla durante más de 3 minutos, la sección del amplificador del
teclado entrará en el modo de ahorro de energía. Para salir del modo de ahorro de energía,
presione cualquier tecla. Tenga en cuenta que el teclado no entrará en el modo de ahorro de
energía durante la reproducción de una canción de demostración o un ritmo.
Cables y Accesorios
Uso de Auriculares o Altavoces externos:
Conecte el cable de 3.5mm de los auriculares o los altavoces externos en la entrada
[OUT] en el reverso del teclado. Los altavoces internos del teclado serán desactivados. Nota:
los auriculares y altavoces externos no son suministrados.
Conexión del micrófono:
Conecte el cable del 3,5 mm. del micrófono en la entrada jack [OK] de la parte trasera
del teclado. Cante a tempo a la vez que la música. Nota: micrófono no incluido.

Page | 7
Manejo básico
Encendido y volumen
Control de potencia:
Presione el botón [POWER] para encender el equipo y vuelva a presionarlo para
apagarlo.
Ajuste del volumen principal
El teclado tiene 10 niveles de volumen que van del 1 al 10. El volumen que viene
fijado por defecto cuando se enciende el aparato es de nivel 7. Para cambiar el volumen,
presione los botones de [MASTER VOLUME +/-]. El nivel del volumen viene indicado por las
barras que aparecen en la pantalla LCD. Si presionamos a la vez ambos botones del [MASTER
VOLUME +/-], el nivel de volumen volverá al fijado por defecto.
Tono
Selección de tonos:
Cuando el teclado se enciende por primera vez, el modo por defecto es TONE. Para
cambiar el tono puede presionar los botones de + o - en el teclado numérico o directamente
introducir el número del tono deseado, apretando los dígitos correspondientes del 0 al 9.

Page | 8
Efectos y control
Nota tenida:
Presione el botón [Sustain] para entrar en el modo de nota tenida. La pantalla LCD
mostrará una bandera al lado de [SUS]. Una vez seleccionado este modo, se prolongará el
sonido de cada nota que usted toque. Si presiona de nuevo el botón [Sustain], saldrá del modo
nota tenida.
Vibrato:
Presione el botón de [Vibrato] para entrar en el modo de notas vibradas. La pantalla
LCD mostrará una bandera junto a [VIB]. Una vez seleccionado este modo, se añadirá un
efecto de vibración a cada nota que toque. Si presiona de nuevo el botón [Vibrato], saldrá del
modo nota vibrada.
Transposición:
Presionando el botón [Transpose +/-], se alterará y transportará la escala musical de
la nota que se esté tocando en ese momento. Puede ajustar la escala hasta 6 niveles hacia
arriba y hacia abajo. Si presionamos a la vez ambos botones del [Transpose +/-], el nivel de
transposición volverá a 0.
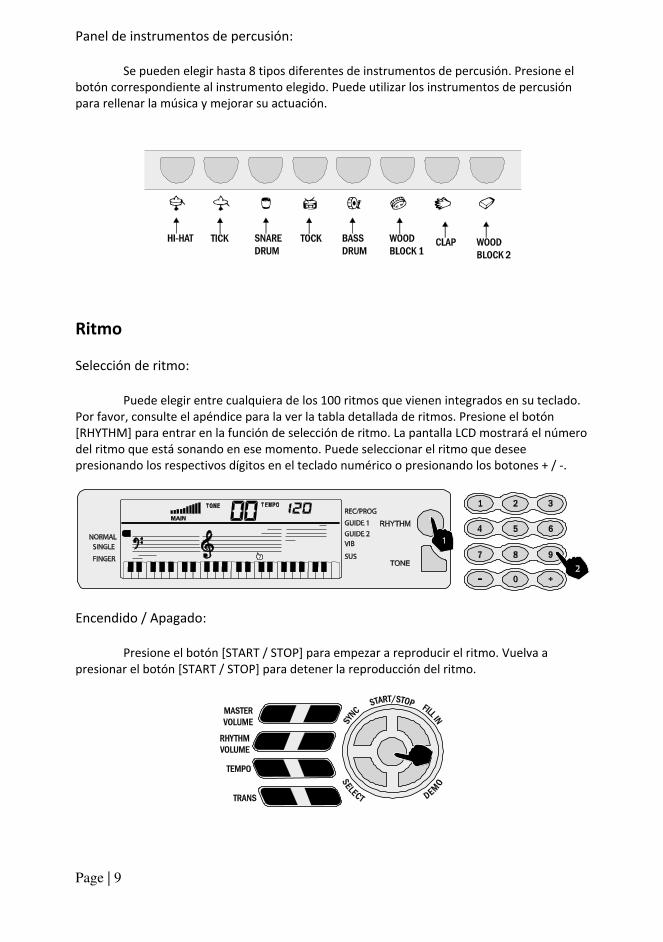
Page | 9
Panel de instrumentos de percusión:
Se pueden elegir hasta 8 tipos diferentes de instrumentos de percusión. Presione el
botón correspondiente al instrumento elegido. Puede utilizar los instrumentos de percusión
para rellenar la música y mejorar su actuación.
Ritmo
Selección de ritmo:
Puede elegir entre cualquiera de los 100 ritmos que vienen integrados en su teclado.
Por favor, consulte el apéndice para la ver la tabla detallada de ritmos. Presione el botón
[RHYTHM] para entrar en la función de selección de ritmo. La pantalla LCD mostrará el número
del ritmo que está sonando en ese momento. Puede seleccionar el ritmo que desee
presionando los respectivos dígitos en el teclado numérico o presionando los botones + / -.
Encendido / Apagado:
Presione el botón [START / STOP] para empezar a reproducir el ritmo. Vuelva a
presionar el botón [START / STOP] para detener la reproducción del ritmo.

Page | 10
Sincronizado:
Presione el botón [SYNC] para seleccionar la función de acompañamiento
sincronizado. Presione cualquiera de las 19 teclas de la parte izquierda del teclado para
empezar la reproducción del ritmo deseado. Presione de nuevo el botón [SYNC] para detener
la reproducción del ritmo y restablecer la función de sincronizado. Presione de nuevo el botón
[SYNC] para salir de la función de sincronizado.
Relleno:
Usted puede rellenar la música con un pequeño interludio si presiona la tecla [FILL IN]
durante la reproducción del ritmo. Después del relleno, el ritmo continuará reproduciéndose
normalmente.
Ajuste del volumen del ritmo:
El volumen del ritmo por defecto es 7. Puede ajustarlo presionando los botones
[RHYTHM VOLUME +/-]. La pantalla LCD mostrará el nivel del volumen según lo vaya usted
ajustando. El rango de ajuste es del 1 al 10 y viene indicado por las barras que aparecen la
pantalla LCD. Si presiona los botones de [RHYTHM VOLUME +/-] a la vez, el volumen del ritmo
volverá al fijado por defecto.

Page | 11
Ajuste del tempo:
Presione los botones [TEMPO +/-] para ajustar el tempo del ritmo, metrónomo o
canciones de demostración. El rango de ajuste está entre 40 y 240 ppm. (pulsaciones por
minuto) en 15 pasos. Si presiona a la vez los botones [TEMPO +/-], el tempo volverá a 120 ppm.
Acompañamiento de acordes
Acordes Single Finger:
Presione el botón [SINGLE FINGER] para entrar en el modo que le permitirá tocar
acordes de manera automática al presionar una sola tecla del teclado. Una bandera se
mostrará en la pantalla LCD al lado de [SINGLE]. Los acordes se tocan presionando
determinadas teclas en la zona de acordes del lado izquierdo del teclado (teclas de la 1 a la 19).
Podrá encontrar el patrón de dedos necesario para tocar cada acorde en el Apéndice V. El
acorde que se está tocando en cada momento se mostrará en la esquina superior izquierda de
la pantalla LCD. Presione el botón [START / STOP] para comenzar o detener la reproducción del
acompañamiento de acordes.
Acordes Fingered:
Presione el botón [FINGERED CHORD] para entrar en el modo que le permitirá tocar
acordes de manera automática. Una bandera se mostrará en la pantalla LCD al lado del texto
[FINGERED]. Si presiona determinadas teclas en la zona de acordes del lado izquierdo del
teclado (teclas de la 1 a la 19), podrá escuchar los diferentes acompañamientos de acordes.
Podrá encontrar el patrón de dedos requerido para tocar cada acorde en el Apéndice V. El
acorde que se está tocando en cada momento se mostrará en la esquina superior izquierda de
la pantalla LCD. Presione el botón [START / STOP] para comenzar o detener la reproducción del
acompañamiento de acordes.
Apagar acorde:
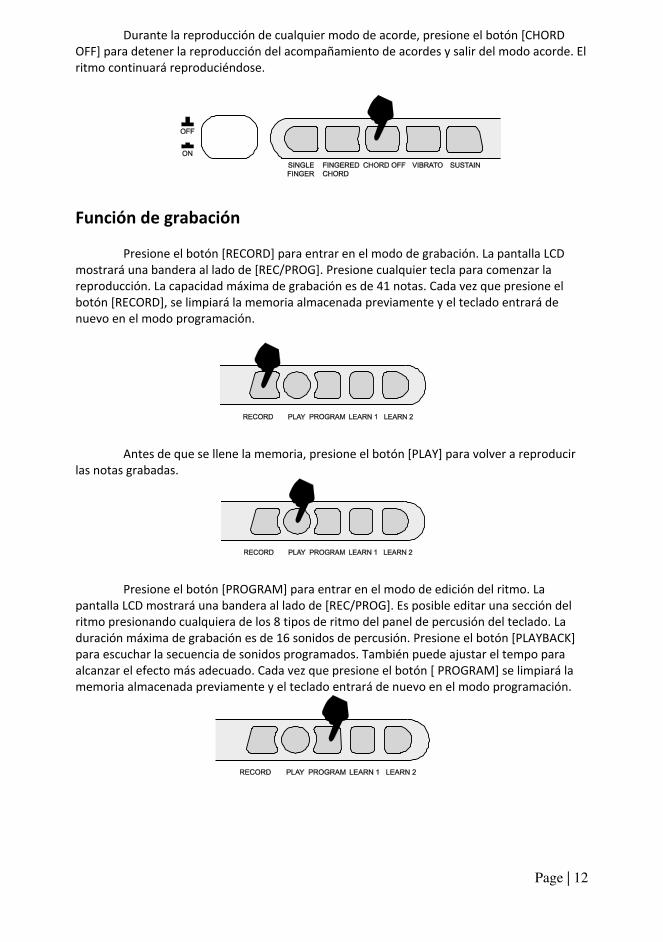
Page | 12
Durante la reproducción de cualquier modo de acorde, presione el botón [CHORD
OFF] para detener la reproducción del acompañamiento de acordes y salir del modo acorde. El
ritmo continuará reproduciéndose.
Función de grabación
Presione el botón [RECORD] para entrar en el modo de grabación. La pantalla LCD
mostrará una bandera al lado de [REC/PROG]. Presione cualquier tecla para comenzar la
reproducción. La capacidad máxima de grabación es de 41 notas. Cada vez que presione el
botón [RECORD], se limpiará la memoria almacenada previamente y el teclado entrará de
nuevo en el modo programación.
Antes de que se llene la memoria, presione el botón [PLAY] para volver a reproducir
las notas grabadas.
Presione el botón [PROGRAM] para entrar en el modo de edición del ritmo. La
pantalla LCD mostrará una bandera al lado de [REC/PROG]. Es posible editar una sección del
ritmo presionando cualquiera de los 8 tipos de ritmo del panel de percusión del teclado. La
duración máxima de grabación es de 16 sonidos de percusión. Presione el botón [PLAYBACK]
para escuchar la secuencia de sonidos programados. También puede ajustar el tempo para
alcanzar el efecto más adecuado. Cada vez que presione el botón [ PROGRAM] se limpiará la
memoria almacenada previamente y el teclado entrará de nuevo en el modo programación.

Page | 13
Reproducción de canciones de demostración
Presione el botón [DEMO] para tocar una canción de demostración. La pantalla LCD
mostrará el texto [SONG XX], del que xx es el número de la canción de demostración. Si
presiona el botón [SELECT] de manera repetida, podrá elegir la canción de demostración que
necesita reproducir. Hay un total de 8 canciones para elegir. Una vez terminada la
reproducción de la canción elegida, el teclado empezará a reproducir la siguiente canción.
Presione de nuevo el botón [DEMO] para salir del modo de demostración.
Modo estudio
ESTUDIO 1:
Presione el botón [LEARN 1] para entrar en el modo de estudio de Single Key. En la
pantalla LCD aparecerá una bandera al lado de [GUIDE 1]. Este modo es ideal para
principiantes que quieren familiarizarse con el ritmo y tempo de la canción. La pantalla LCD
mostrará el texto [SONG XX], del que xx es el número de la canción de demostración
seleccionada. Utilice el botón [SELECT] para seleccionar una canción diferente. El indicador de
pulsación parpadeará en la pantalla LCD para indicar el tempo. A partir de ese momento, el
teclado reproducirá automáticamente la melodía principal. La pantalla LCD le mostrará las
teclas que debería usted tocar.
ESTUDIO 2:
Presione el botón [LEARN 2] para entrar en el modo de estudio del Sincronizado. En la
pantalla LCD aparecerá una bandera al lado del texto [GUIDE 2]. Este modo también es
adecuado para usuarios más avanzados. La pantalla LCD mostrará el texto [SONG XX], del que
xx es el número de la canción de demostración seleccionada. Utilice el botón [SELECT] para
seleccionar una canción diferente. El indicador de pulsación parpadeará en la pantalla LCD
para indicar el tempo. La siguiente tecla que debe pulsar se mostrará en la pantalla LCD. Toque
a la vez y a tempo, asegurándose de que pulsa las teclas correctas.

Page | 14
Apéndice I. Tabla de ritmos
N.º Nombre del
ritmo
N.º Nombre del
ritmo
N.º Nombre del
ritmo
N.º Nombre del
ritmo
00 Rumba 25 Classic Polka 50 Brazil Mambo 75 Jazz Rumba
01 Samba 26 Country Bossa
nova
51 Europe 8 Beat 76 Jazz Samba
02 Disco 27 Hot Salsa 52 Country Cha Cha 77 Classic Disco
03 Tango 28 Pop 16 Beat 53 India blue Grass 78 Brazil Tango
04 Rock 29 Blue Leigui 54 Blue slow Rock 79 Europe Rock
05 Swing 30 Pop Mambo 55 Europe Rumba 80 Jazz Swing
06 Country 31 Pop 8 Beat 56 Rock Samba 81 Blue Country
07 waltz 32 Jazz Cha Cha 57 Rock Disco 82 Pop Waltz
08 Beguine 33 Emotion Pop 58 Classic Tango 83 Jazz Beguine
09 Latin 34 Country Rock 59 Unitary Rock 84 Pattern Latin
10 March polka 35 Blue Rumba 60 Europe Swing 85 Jazz Polka
11 Bossa nova 36 Classic Samba 61 Classic Country 86 Jazz Bossa nova
12 Salsa 37 Europe Disco 62 Argentina Waltz 87 Latin Salsa
13 16 Beat 38 Blue Tango 63 Rock Beguine 88 Jazz 16 Beat
14 Leigui 39 Emotion Rock 64 Jazz Latin 89 Pop Leigui
15 Mambo 40 Classic Swing 65 South Africa Polka 90 Jazz Mambo
16 8 Beat 41 South Africa
Country
66 Pattern Bossa
nova
91 Classic 8 Beat
17 Cha-cha 42 Country Waltz 67 Blue Salsa 92 Brazil Cha-Cha
18 Pop 43 Classic Beguine 68 16 Beat Swing 93 Blue Grass
19 Slow Rock 44 Brazil Latin 69 Europe Leigui 94 Jazz slow Rock
20 Blue Swing 45 Blue Polka 70 Pattern Mambo 95 Classic Rumba
21 Country Jazz 46 Mix Bossa nova 71 Jazz 8 Beat 96 Europe Samba
22 Classic Waltz 47 Rock Salsa 72 Blue Cha Cha 97 Jazz Disco
23 Blue Beguine 48 Unitary 16 Beat 73 Indonesia Dance 98 Jazz Tango
24 Rock Latin 49 Classic Leigui 74 Classic slow Rock 99 Blue Rock

Page | 15
Apéndice II. Tabla de tonos
N.º Nombre del
timbre
N.º Nombre del
timbre
N.º Nombre del
timbre
N.º Nombre
del timbre
00 Acoustic Grand
Piano
25 Short E-Guitar 50 Sustain Harp 75 Bassoon
01 Electric Grand
Piano
26 Fx 2 51 String Ensemble
3
76 Lead 4
02 Celesta 27 Fx 3 52 Tuba 77 Pad 4
03 Vibraphone 28 Synth Bass 2 53 Synth Brass 3 78 Fx 7
04 Jazz E-Guitar 29 Sustain Ocarina 54 Middle Sax 79 Lead 5
05 Muted E-Guitar 30 Vib Harp 55 Sustain Clarinet 80 Echo Piano
06 Acoustic Bass 31 String Ensemble 2 56 Lead 3 81 Bright Piano
07 Electric Guitar 32 Trombone 57 Pad 3 82 Short Celesta
08 Synth Bass 1 33 Synth Brass 2 58 Sustain Koto 83 Bright
Vibraphone
09 Ocarina 34 Soprano Sax 59 Kalimba 84 Jazz Guitar 2
10 Harp 35 Vib Clarinet 60 Fx 4 85 Clean E-Guitar
11 String Ensemble 1 36 Lead 2 61 Sustain E-Piano 86 Acoustic
Bass(finger)
12 Trumpet 37 Pad 2 62 Echo Celesta 87 Vib E-Bass
13 Synth Brass 1 38 Sitar 63 Fx 5 88 Synth Bass 5
14 Alto Sax 39 Short Shanai 64 Fretless Bass 89 Short Ocarina
15 Clarinet 40 Echo Violin 65 Baritone E-
Guitar
90 Bright Harp
16 Lead 1 41 Vib E-Piano 66 Acoustic
Bass(pick)
91 String Ensemble
5
17 Pad 1 42 Bright Celesta 67 Baritone E-
Guitar
92 Echo Trumpet
18 Koto 43 Sustain
Vibraphone
68 Synth Bass 4 93 Synth Brass 5
19 Shanai 44 Wood Bass 69 Fx 6 94 Tenor Sax
20 Violin 45 Sustain E-Guitar 70 Echo Harp 95 Fx 8
21 Piccolo 46 Echo Acoustic
Bass
71 String Ensemble
4
96 Lead 6
22 Sustain Celesta 47 Sustain E-Bass 72 French Horn 97 Pad 5
23 Fx 1 48 Synth Bass 3 73 Synth Brass 4 98 Banjo
24 Vib Viola 49 Whistle 74 Baritone Sax 99 Vib Shanai

Page | 16
Apéndice III. Tabla de canciones de demostración
N.º Nombre de la canción N.º Nombre de la canción
01 Horse Race 05 My Heart Must Go On
02 Flying Song on the Earth 06 Unchained Melody
03 The Girls from TianZhu 07 Roundabout Moon
04 Toasting Song 08 Hang with Hand
Apéndice IV. Solución de problemas
Problema Posibles causas / Solución
Se escucha un ligero ruido al apagar o
encender el aparato.
No hay por qué preocuparse, ya que es
algo normal.
El teclado, una vez encendido, no emite
ningún sonido cuando pulsamos las
teclas.
Compruebe que el volumen principal
tenga el ajuste correcto. Compruebe
que los auriculares o cualquier otro
equipo no están conectados al teclado,
ya que esto hará que el altavoz
integrado se desconecte
automáticamente.
El sonido está distorsionado o se
interrumpe y el teclado no funciona
adecuadamente.
Puede deberse a un uso incorrecto del
adaptador de corriente. Utilice el
adaptador de corriente que viene con
el equipo o pruebe a cambiar las pilas.
Hay una pequeña diferencia en el
timbre de algunas notas.
Esto es normal y puede deberse a la
gran cantidad de muestras de voz del
teclado.
Al utilizar la función de nota tenida,
algunos tonos se mantienen durante
más tiempo que otros.
Esto es algo normal. La duración de la
nota tenida más larga según las
diferentes notas viene establecido por
defecto.
El volumen principal o el del
acompañamiento no es el correcto.
Compruebe que el volumen principal y
el del acompañamiento están ajustados
correctamente.
El auto acompañamiento no funciona
en modo SYNC.
Compruebe que ha seleccionado el
modo Single Finger o Fingered y pruebe
a tocar una de las 19 teclas en el lado
izquierdo del teclado.
La altura de la nota no es la correcta. Compruebe que el modo transposición
está en 00.
Parece que el teclado se apaga solo. Esto significa que se ha activado el
modo de ahorro de energía. Consulte la
página 6.
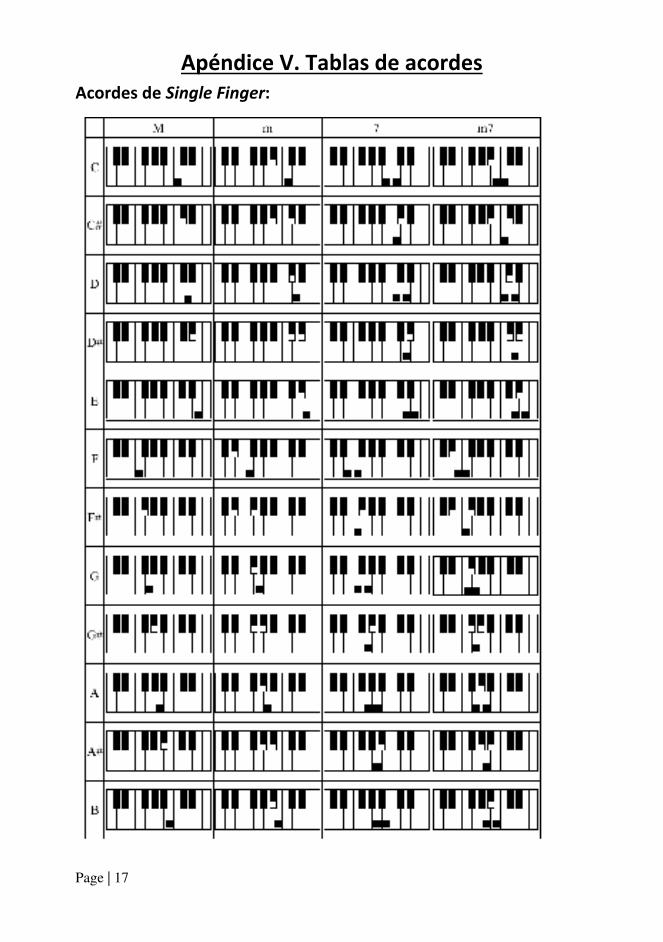
Page | 17
Apéndice V. Tablas de acordes
Acordes de Single Finger:
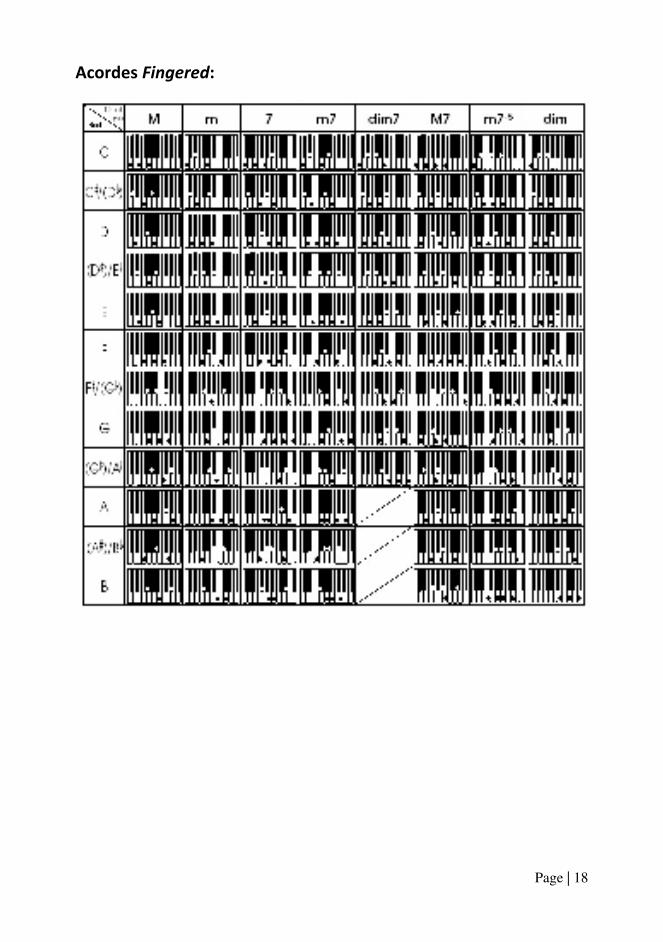
Page | 18
Acordes Fingered:

Page | 19
Apéndice VI. Especificaciones técnicas
• Pantalla
Pantalla LCD con indicación de pentagrama y tonalidad
• Tono
100 tonos diferentes
• Ritmo
100 ritmos diferentes
• Canciones de demostración
8 canciones de demostración diferentes
• Control de efectos
Nota tenida, vibrato y transposición
• Grabación y programación
Memoria de grabación de notas, reproducción, programación de ritmos de hasta 16 tiempos
• Percusión
8 tipos diferentes de instrumentos de percusión
• Control del acompañamiento
Inicio / Parada, Sincronizado, Relleno, Tempo
• Aprendizaje inteligente
2 Modos de estudio
• Jacks externos
DC 9V Entrada de corriente, Auricular / Salida de Altavoz externo, entrada de Micrófono
• Diapasón (rango del teclado)
C2- F6
• Entonación
<3cent
• Peso
3.9kg.
• Entrada CC
9V CC
• Adaptador de corriente
9V CC, 500mA
• Salida de corriente
3W x 2
• Accesorios
Adaptador de corriente, atril, manual de instrucciones
Page | 20
Cómo deshacerse del aparato
El símbolo mostrado aquí y en el producto indica que está clasificado
como equipo electrónico o eléctrico y no debería desecharse con otros
electrodomésticos o residuos industriales una vez terminada su vida útil.
La Directiva 2012/19/EC sobre Residuos de aparatos eléctricos y
electrónicos ha sido implementada para fomentar el reciclaje de
productos a través de la mejor recuperación posible y técnicas de
reciclado que reducen al mínimo el impacto sobre el medio ambiente, tratan sustancias
peligrosas y frenan el aumento de vertederos.
Cuando ya no sea posible el uso del aparato, haga uso del sistema de reciclado que su
autoridad local pone a su disposición para deshacerse del aparato. Si desea más información,
póngase en contacto con su autoridad local o con la tienda donde adquirió su producto.
PDT Ltd.
Unit 4B Greengate Industrial Estate,
White Moss View,
Middleton,
Manchester
M24 1UN
Reino Unido
Copyright PDT Ltd. © 2020