rtd 10000792 a a
TRANSCRIPT
7/25/2019 Rtd 10000792 a A
http://slidepdf.com/reader/full/rtd-10000792-a-a 1/4
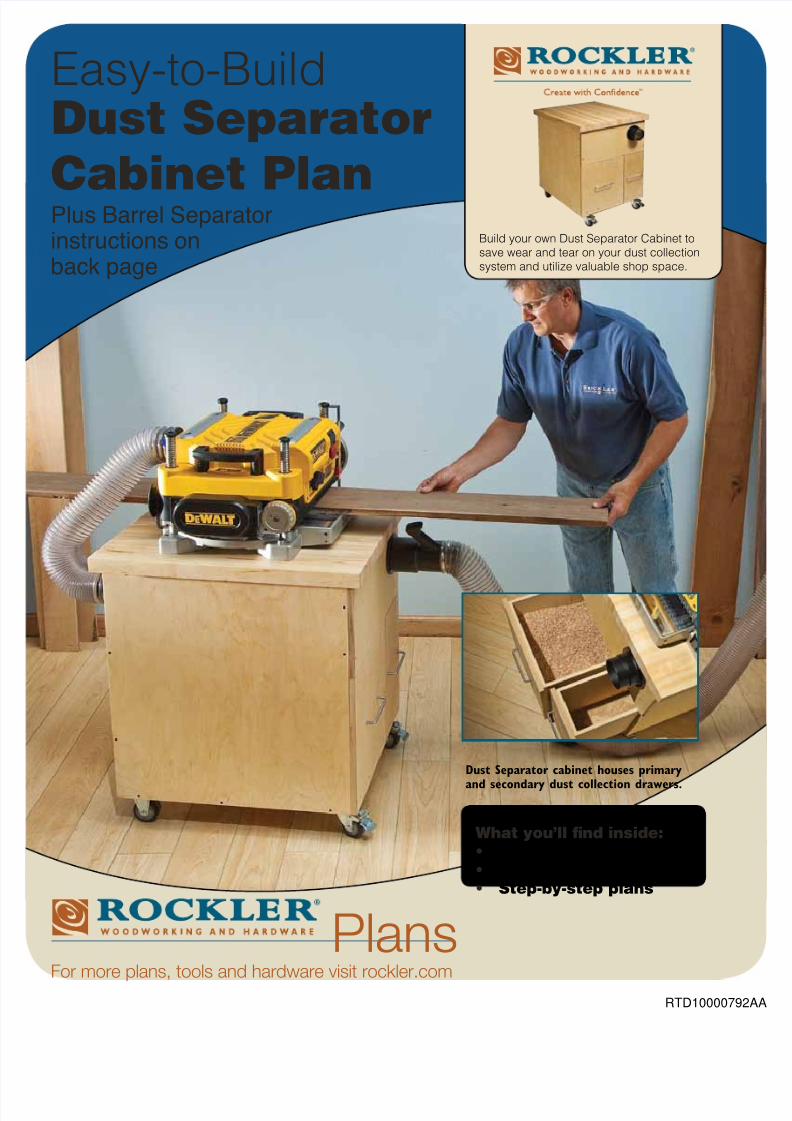
Dust Separator
Cabinet Plan
What you’ll find inside:
• Exploded view
• Complete materials list
• Step-by-step plans
Dust Separator cabinet houses primary
and secondary dust collection drawers.
RTD1000079
7/25/2019 Rtd 10000792 a A
http://slidepdf.com/reader/full/rtd-10000792-a-a 2/4
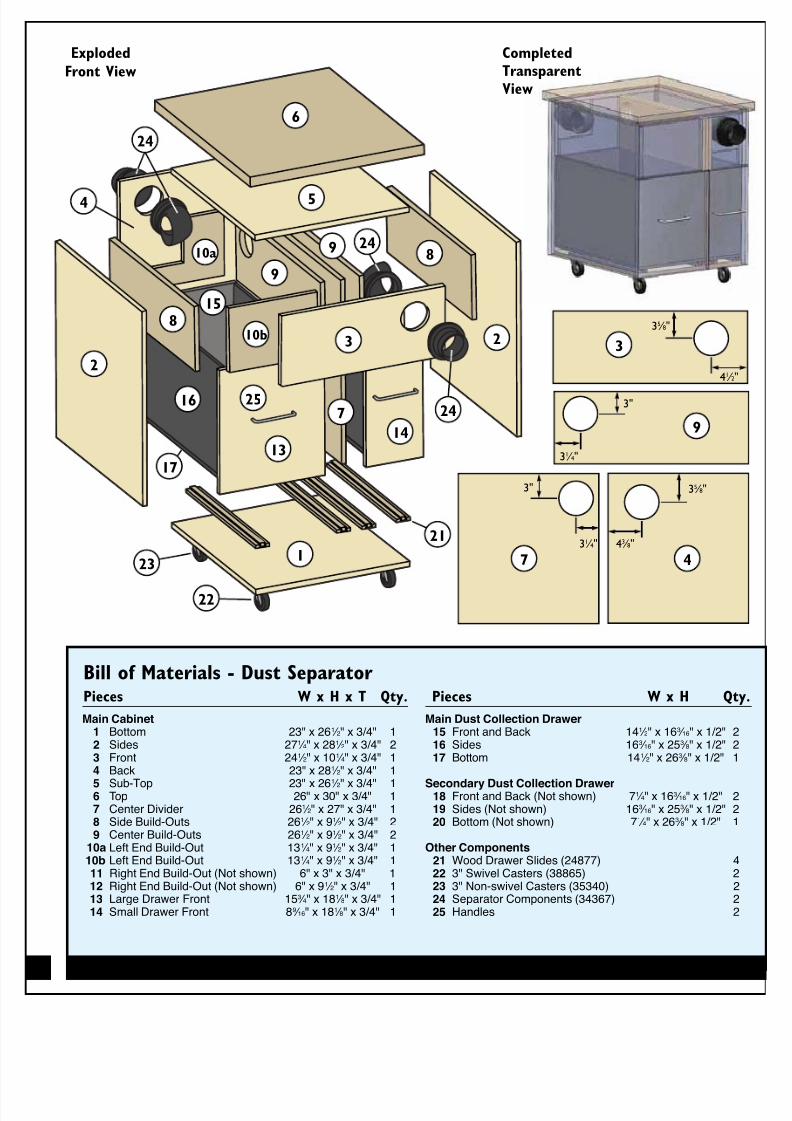
Bill of Materials - Dust Separator Pieces W x H x T Qty.
Pieces W x H Qty
1
6
5
2
8
8
22
1
21
7
1314
9
4
10b
10a
9
17
16
15
2524
3
Exploded
Front View
2
CompletedTransparentView
35 ⁄ 8"
43 ⁄ 8"31 ⁄ 4"
3"
31 ⁄ 4"
3"
35 ⁄ 8"
41 ⁄ 2"
24
3
9
47
24
23
7/25/2019 Rtd 10000792 a A
http://slidepdf.com/reader/full/rtd-10000792-a-a 3/4
2
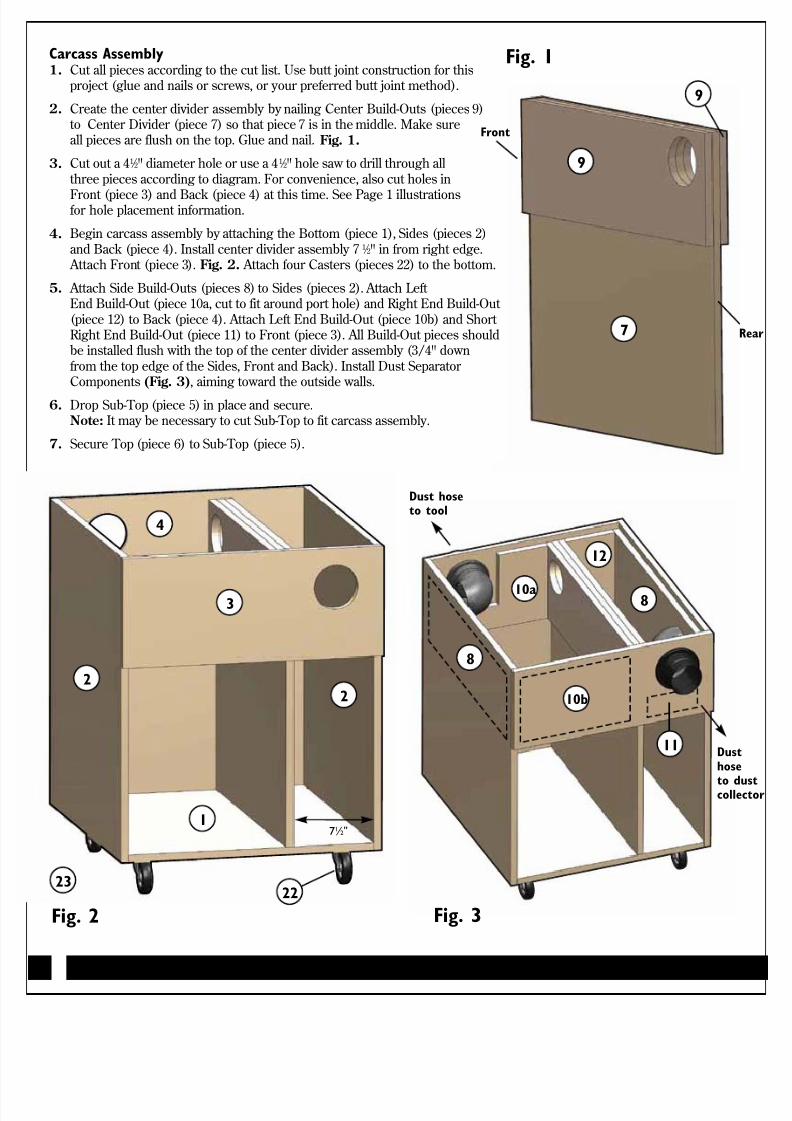
Carcass Assembly1. Cut all pieces according to the cut list. Use butt joint construction for this
project (glue and nails or screws, or your preferred butt joint method).
2. Create the center divider assembly by nailing Center Build-Outs (pieces 9)to Center Divider (piece 7) so that piece 7 is in the middle. Make sureall pieces are flush on the top. Glue and nail. Fig. 1.
3. Cut out a 41 ⁄ 2" diameter hole or use a 41 ⁄ 2" hole saw to drill through all
three pieces according to diagram. For convenience, also cut holes in
Front (piece 3) and Back (piece 4) at this time. See Page 1 illustrationsfor hole placement information.
4. Begin carcass assembly by attaching the Bottom (piece 1), Sides (pieces 2)
and Back (piece 4). Install center divider assembly 71 ⁄ 2" in from right edge. Attach Front (piece 3). Fig. 2. Attach four Casters (pieces 22) to the bottom.
5. Attach Side Build-Outs (pieces 8) to Sides (pieces 2). Attach LeftEnd Build-Out (piece 10a, cut to fit around port hole) and Right End Build-Out
(piece 12) to Back (piece 4). Attach Left End Build-Out (piece 10b) and ShortRight End Build-Out (piece 11) to Front (piece 3). All Build-Out pieces shouldbe installed flush with the top of the center divider assembly (3/4" down
from the top edge of the Sides, Front and Back). Install Dust SeparatorComponents (Fig. 3), aiming toward the outside walls.
6. Drop Sub-Top (piece 5) in place and secure.Note: It may be necessary to cut Sub-Top to fit carcass assembly.
7. Secure Top (piece 6) to Sub-Top (piece 5).
Fig. 1
Fig. 3Fig. 2
7
9
9
22
3
4
1
22
10b
10a
12
11
23
71 ⁄ 2"
8
8
Dusthose
to dcolle
Dust hoseto tool
Front
R
7/25/2019 Rtd 10000792 a A
http://slidepdf.com/reader/full/rtd-10000792-a-a 4/4
3
Attention Rockler Plan User
Before starting, please read the plan completely. CheckRockler.com for updates that may not be included on thiscopy. If you have further questions, please contact ourTechnical Support Department, 1-800-260-9663 [email protected]
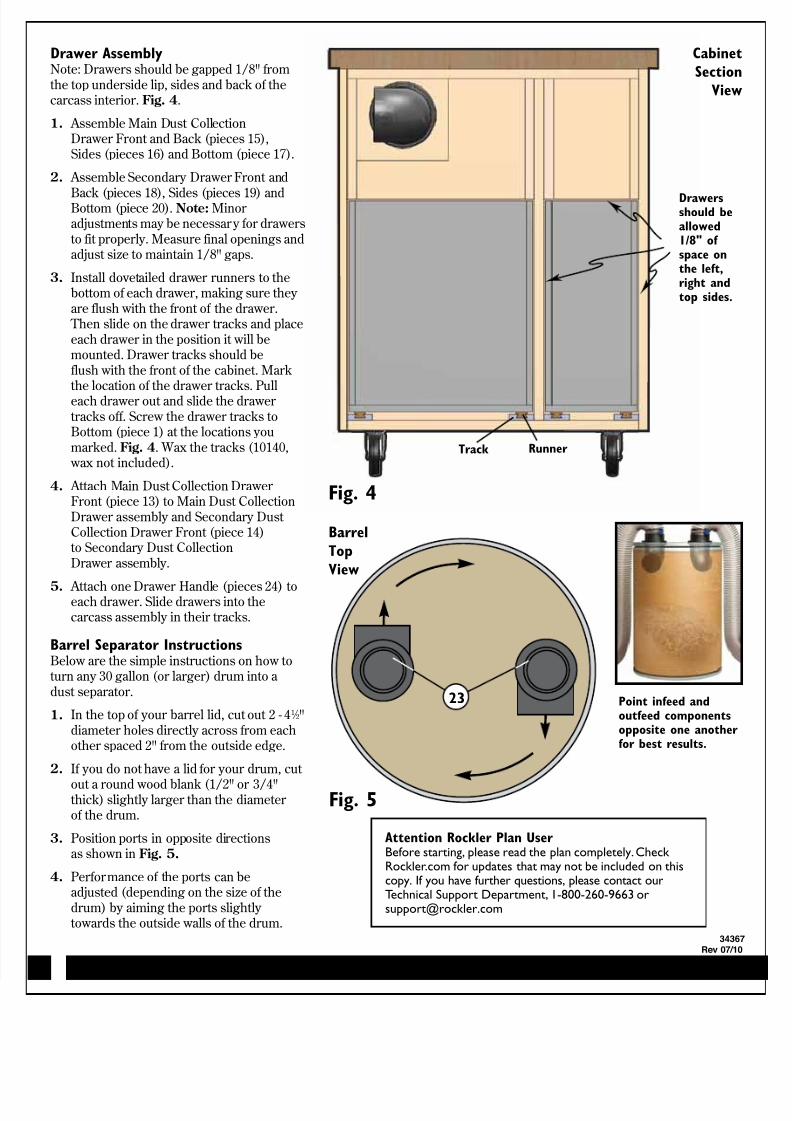
Barrel
Top
View
Drawer AssemblyNote: Drawers should be gapped 1/8" from
the top underside lip, sides and back of thecarcass interior. Fig. 4.
1. Assemble Main Dust CollectionDrawer Front and Back (pieces 15),Sides (pieces 16) and Bottom (piece 17).
2. Assemble Secondary Drawer Front and
Back (pieces 18), Sides (pieces 19) andBottom (piece 20). Note: Minoradjustments may be necessary for drawers
to fit properly. Measure final openings andadjust size to maintain 1/8" gaps.
3. Install dovetailed drawer runners to thebottom of each drawer, making sure they
are flush with the front of the drawer. Then slide on the drawer tracks and place
each drawer in the position it will bemounted. Drawer tracks should be
flush with the front of the cabinet. Markthe location of the drawer tracks. Pulleach drawer out and slide the drawer
tracks off. Screw the drawer tracks toBottom (piece 1) at the locations you
marked. Fig. 4. Wax the tracks (10140, wax not included).
4. Attach Main Dust Collection DrawerFront (piece 13) to Main Dust Collection
Drawer assembly and Secondary DustCollection Drawer Front (piece 14)to Secondary Dust Collection
Drawer assembly.
5. Attach one Drawer Handle (pieces 24) toeach drawer. Slide drawers into thecarcass assembly in their tracks.
Barrel Separator InstructionsBelow are the simple instructions on how toturn any 30 gallon (or larger) drum into a
dust separator.
1. In the top of your barrel lid, cut out 2 - 41 ⁄ 2"
diameter holes directly across from eachother spaced 2" from the outside edge.
2. If you do not have a lid for your drum, cut
out a round wood blank (1/2" or 3/4"thick) slightly larger than the diameterof the drum.
3. Position ports in opposite directionsas shown in Fig. 5.
4. Performance of the ports can beadjusted (depending on the size of the
drum) by aiming the ports slightlytowards the outside walls of the drum.
Fig. 5
Fig. 4
23 Point infeed andoutfeed componentsopposite one anotherfor best results.
Drawersshould beallowed1/8" ofspace onthe left,right andtop sides.
Track Runner
Cabinet
Section
View