sam towner radio ad write up
DESCRIPTION
Sam Towner Radio Ad Write UpTRANSCRIPT
Sam Towner
Keyboard
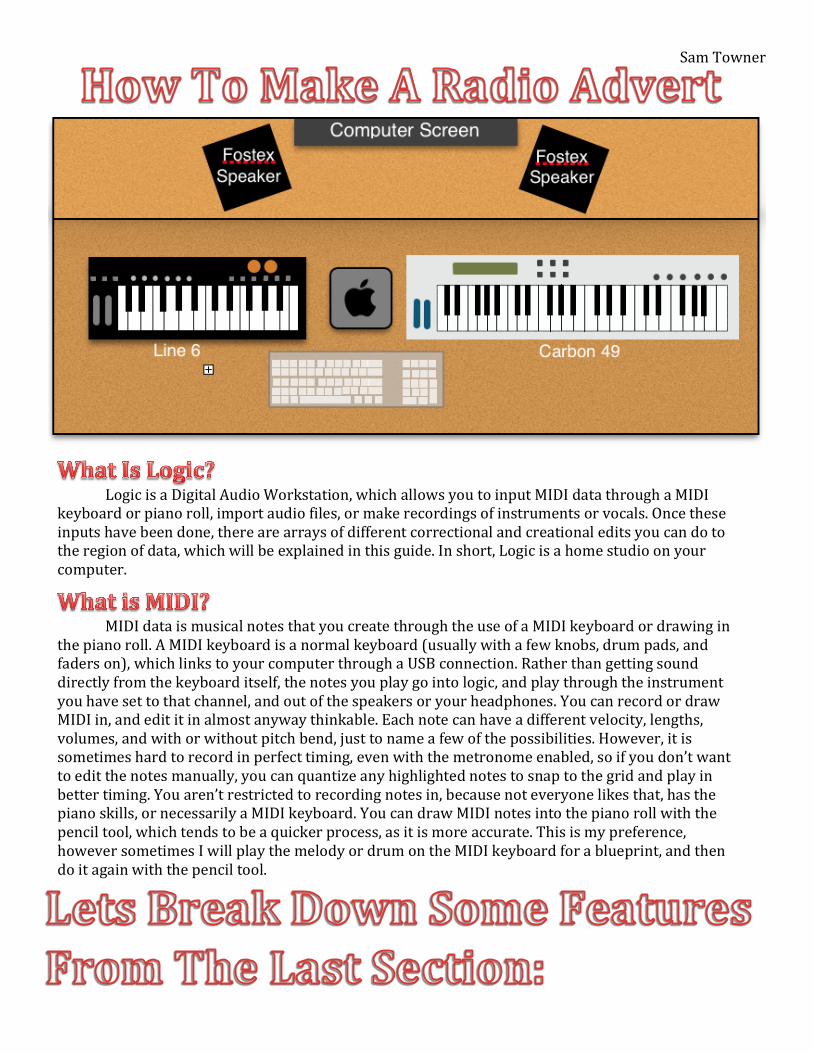
Logic is a Digital Audio Workstation, which allows you to input MIDI data through a MIDI keyboard or piano roll, import audio files, or make recordings of instruments or vocals. Once these inputs have been done, there are arrays of different correctional and creational edits you can do to the region of data, which will be explained in this guide. In short, Logic is a home studio on your computer.
MIDI data is musical notes that you create through the use of a MIDI keyboard or drawing in the piano roll. A MIDI keyboard is a normal keyboard (usually with a few knobs, drum pads, and faders on), which links to your computer through a USB connection. Rather than getting sound directly from the keyboard itself, the notes you play go into logic, and play through the instrument you have set to that channel, and out of the speakers or your headphones. You can record or draw MIDI in, and edit it in almost anyway thinkable. Each note can have a different velocity, lengths, volumes, and with or without pitch bend, just to name a few of the possibilities. However, it is sometimes hard to record in perfect timing, even with the metronome enabled, so if you don’t want to edit the notes manually, you can quantize any highlighted notes to snap to the grid and play in better timing. You aren’t restricted to recording notes in, because not everyone likes that, has the piano skills, or necessarily a MIDI keyboard. You can draw MIDI notes into the piano roll with the pencil tool, which tends to be a quicker process, as it is more accurate. This is my preference, however sometimes I will play the melody or drum on the MIDI keyboard for a blueprint, and then do it again with the pencil tool.

Sam Towner
Above is a screenshot of the piano roll with the MIDI data of a drumbeat on it. As we can see, to the far left of the piano roll, there is a keyboard, which indicates what note is being played. However, a drum kit has a different part of kit on the piano roll, such as kick, toms, cymbals, or high hats on different keys, as opposed to different notes. In a melody, chords tend to make a sound better, hence the overlay of three to four notes to make the chord. This is the same for a drumbeat; I find you get a better sound when you overlay different parts of the kit, as seen in the screenshot. The 4/4 bar layout is clear in the roll as well, so it is easy to organise the beat or melody. The different shades on the grid simply correspond to the notes on the piano to the far left of the window. The dark grey notes correspond to the sharp notes, and the lighter grey normal notes. In this specific example, all of the MIDI notes are one square in length, but this is only because it is a drumbeat, if it was a melody, the possible length of the notes are endless. The different colour notes indicate the velocity of the note. The lighter blues and purples indicate a low velocity, and the yellow, a higher velocity. It is also possible to have green notes for a middle velocity, and red for the highest velocity. In the top right of the window, is your toolbox specific to the piano roll. The pointer tool can move, highlight, shorten, or extend notes. The pencil tool is selected when wanting to draw a note onto the piano roll grid. The eraser tool deletes the note when it is clicked on. The finger tool isn’t too dissimilar to the pointer tool. If you wanted to cut a note, the scissor tool will allow you to do so. Glue tool can glue notes together to make one note. Mute will silence selected notes. Quantize will snap highlighted notes to the grid. Velocity will increase or decrease the velocity of highlighted notes by clicking on them and moving the mouse up or down. For increased accuracy, the zoom tool allows you to get a closer look at the MIDI data. Automation select will allow you to select which automation line you want to change, and the curve tool will allow you to bend the line however you need too.
Sam Towner
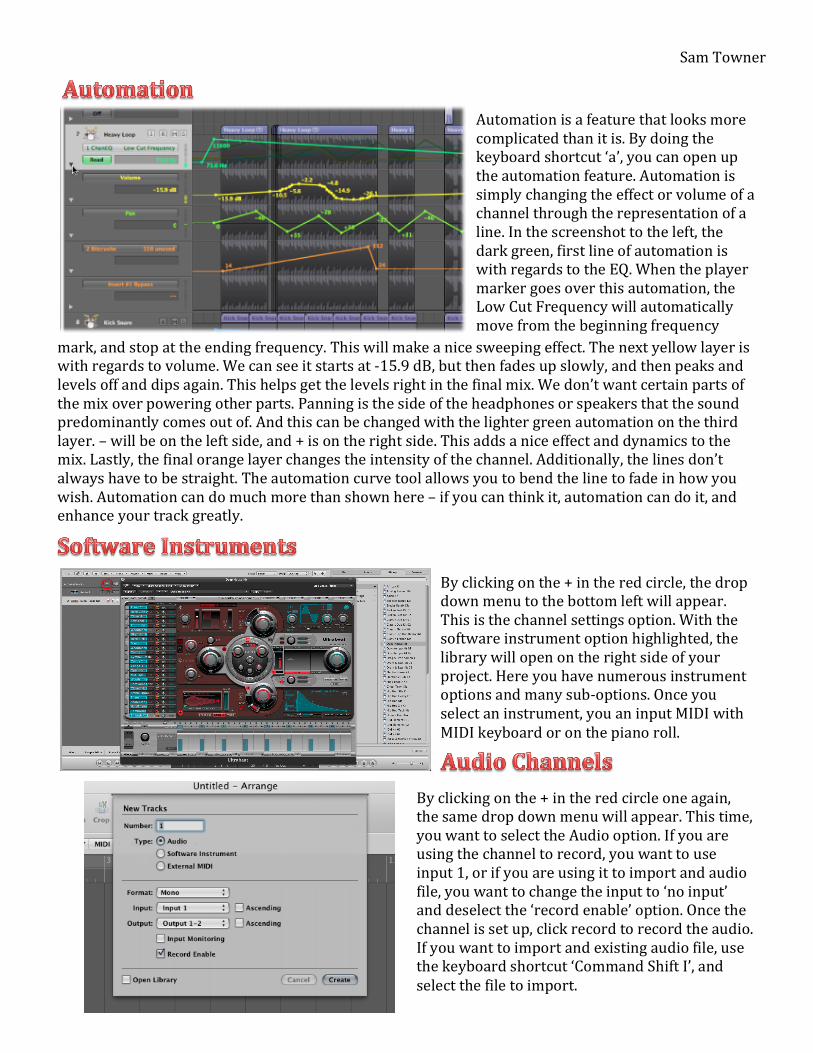
Automation is a feature that looks more complicated than it is. By doing the keyboard shortcut ‘a’, you can open up the automation feature. Automation is simply changing the effect or volume of a channel through the representation of a line. In the screenshot to the left, the dark green, first line of automation is with regards to the EQ. When the player marker goes over this automation, the Low Cut Frequency will automatically move from the beginning frequency
mark, and stop at the ending frequency. This will make a nice sweeping effect. The next yellow layer is with regards to volume. We can see it starts at -‐15.9 dB, but then fades up slowly, and then peaks and levels off and dips again. This helps get the levels right in the final mix. We don’t want certain parts of the mix over powering other parts. Panning is the side of the headphones or speakers that the sound predominantly comes out of. And this can be changed with the lighter green automation on the third layer. – will be on the left side, and + is on the right side. This adds a nice effect and dynamics to the mix. Lastly, the final orange layer changes the intensity of the channel. Additionally, the lines don’t always have to be straight. The automation curve tool allows you to bend the line to fade in how you wish. Automation can do much more than shown here – if you can think it, automation can do it, and enhance your track greatly.
By clicking on the + in the red circle, the drop down menu to the bottom left will appear. This is the channel settings option. With the software instrument option highlighted, the library will open on the right side of your project. Here you have numerous instrument options and many sub-‐options. Once you select an instrument, you an input MIDI with MIDI keyboard or on the piano roll.
By clicking on the + in the red circle one again, the same drop down menu will appear. This time, you want to select the Audio option. If you are using the channel to record, you want to use input 1, or if you are using it to import and audio file, you want to change the input to ‘no input’ and deselect the ‘record enable’ option. Once the channel is set up, click record to record the audio. If you want to import and existing audio file, use the keyboard shortcut ‘Command Shift I’, and select the file to import.
Sam Towner
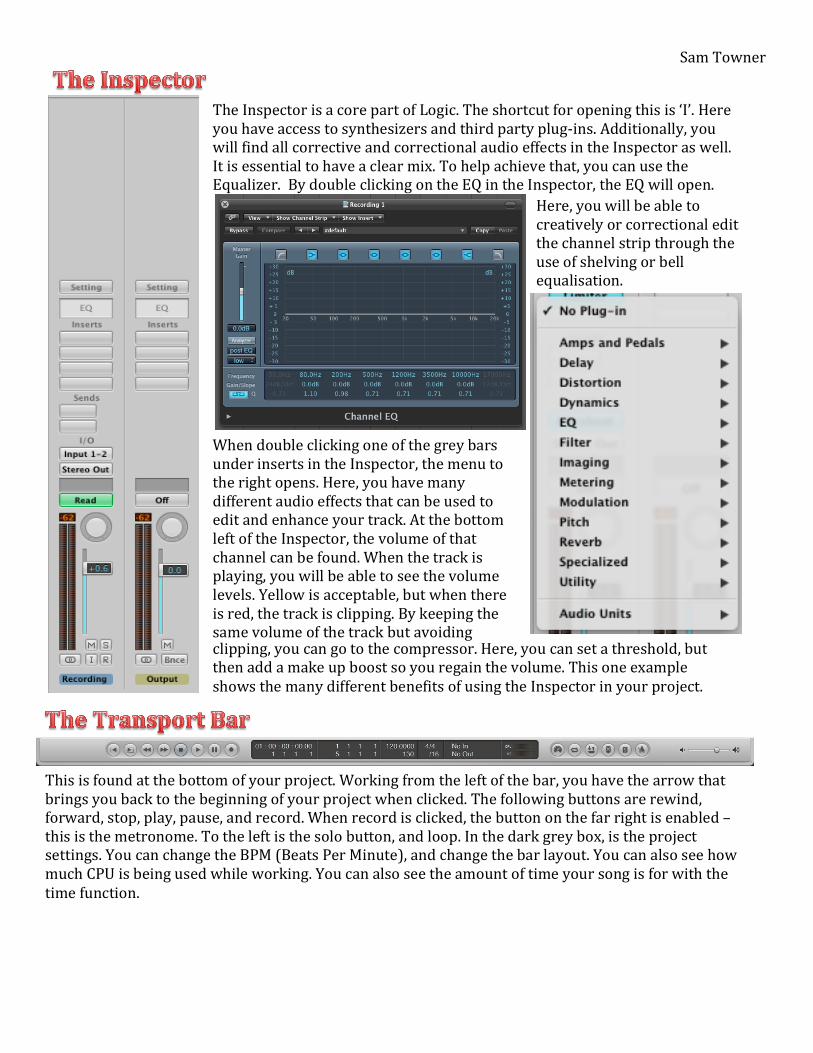
The Inspector is a core part of Logic. The shortcut for opening this is ‘I’. Here you have access to synthesizers and third party plug-‐ins. Additionally, you will find all corrective and correctional audio effects in the Inspector as well. It is essential to have a clear mix. To help achieve that, you can use the Equalizer. By double clicking on the EQ in the Inspector, the EQ will open.
Here, you will be able to creatively or correctional edit the channel strip through the use of shelving or bell equalisation.
When double clicking one of the grey bars under inserts in the Inspector, the menu to the right opens. Here, you have many different audio effects that can be used to edit and enhance your track. At the bottom left of the Inspector, the volume of that channel can be found. When the track is playing, you will be able to see the volume levels. Yellow is acceptable, but when there is red, the track is clipping. By keeping the same volume of the track but avoiding clipping, you can go to the compressor. Here, you can set a threshold, but then add a make up boost so you regain the volume. This one example shows the many different benefits of using the Inspector in your project.
This is found at the bottom of your project. Working from the left of the bar, you have the arrow that brings you back to the beginning of your project when clicked. The following buttons are rewind, forward, stop, play, pause, and record. When record is clicked, the button on the far right is enabled – this is the metronome. To the left is the solo button, and loop. In the dark grey box, is the project settings. You can change the BPM (Beats Per Minute), and change the bar layout. You can also see how much CPU is being used while working. You can also see the amount of time your song is for with the time function.
Sam Towner
I think we were told to make a radio advert because we had to incorporate most features in logic. We had to use existing audio files and record our own, and use software instruments as well. We had to think about how vocals could be cut and edited, and over lay them on top of music we made. We also had to balance the mix so that certain parts of the mix weren’t cancelled out by other dominating parts of the mix. On the whole, I think our advert went well: our ideas flowed well, and we were able to execute them to how we thought of them. Listening to them again after bouncing, I feel like we could have included vocal effects to make them pop and be a bit more interesting, but other than that I feel that we captured our product well, over an array of genres. I think I can improve my Logic skills by adding more variation in my work rather than sticking to a mental template and experiment a bit more rather than playing it safe. I also need to improve keeping my projects in key with each other.