synergy quick reference guide - 5-2-2012 - research...
TRANSCRIPT

Synergy Quick Reference Guide
T o p c o n M e d i c a l S y s t e m s P a g e 1
VIEWING EXAMS
1. Highlight the exam in the Exam list to be viewed and click on the or double click on the exam to display the images/reports. Repeat this step to view multiple exams. A separate tab appears for each exam.
2. The roller wheel on your mouse may be used to zoom in on the image and the and button on the tool bar may be used for panning and magnifying the image. The buttons on the toolbar may be used to filter, sort, print, annotate, export, resize, pan, magnify, change the brightness or color levels of the image.
3. To view a Proof Sheet, click on the [Proofsheet] button or drag an examination into the viewing area .

Synergy Quick Reference Guide
T o p c o n M e d i c a l S y s t e m s P a g e 2
4. To view OD|OS images/reports from the same exam side‐by‐side, click on the [OD/OS] button. If an image/report is not tagged as OD or OS, it will not be shown. To view these images, disable the OD|OS filter.
5. OD, OS filters may be selected to show that eye only. OD = , OS =

Synergy Quick Reference Guide
T o p c o n M e d i c a l S y s t e m s P a g e 3
COMPARINIG EXAMS
1. For a comparison by date of the same examination type, click on the [Historical Comparison] button.
2. Click on the media in the exam list to be compared and drag the exams into the viewing area.
3. To select an exam(s), click on the grey border of the image/report. Any selected image/report will
be highlighted orange. To deselect an image, click on it again.
Synergy Quick Reference Guide
T o p c o n M e d i c a l S y s t e m s P a g e 4
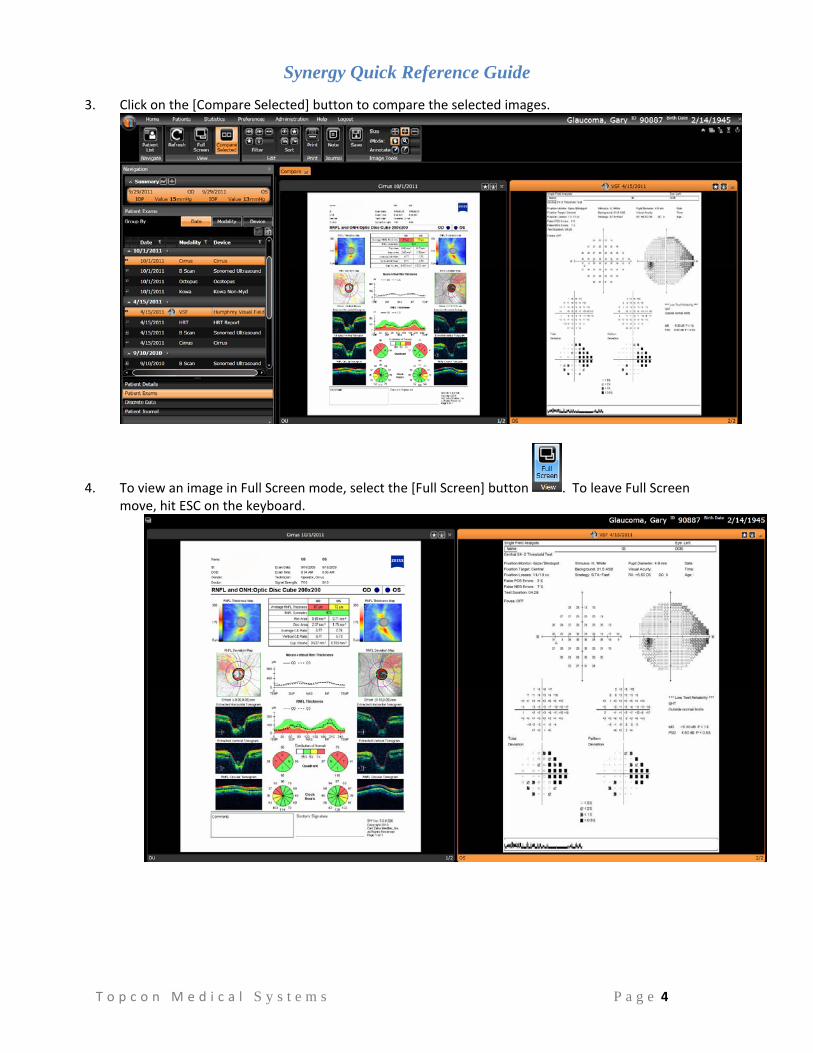
3. Click on the [Compare Selected] button to compare the selected images.
4. To view an image in Full Screen mode, select the [Full Screen] button . To leave Full Screen move, hit ESC on the keyboard.

Synergy Quick Reference Guide
T o p c o n M e d i c a l S y s t e m s P a g e 5
ISOLATED PATIENTS *If an examination is in Isolated Patients, it did not match up to the proper patient in Synergy. This tool allows end users to immediately manage patient exams. Patient data may be edited, or staled (removed from viewing).
1. Isolated patients may be accessed from within “Patient Exams” by clicking on the in the upper right hand corner to access isolated patients from within an exam. They may be added to the patient’s exams by clicking on the [Attach] button.
2. Isolated Patients may alternatively be accessed from the “Patient List” by clicking on the in the upper right hand corner to access isolated patients. The arrow keys and the buttons in the toolbar may be used to modify the patient record.

Synergy Quick Reference Guide
T o p c o n M e d i c a l S y s t e m s P a g e 6
EMR Link “What to Do” 1. Synergy doesn’t launch to Synergy patient list, opens to search window.
a. If patient shows up in patient list, check patient demographics to make sure they are
correct. Click on “Patient Chart” to view exams.

Synergy Quick Reference Guide
T o p c o n M e d i c a l S y s t e m s P a g e 7
b. If no patient is shown in the patient list, search by patient’s Last Name only.
Delete text in the First Name Field.
Uncheck the Birth Date field. Select “Search”.
c. If patient does not show up, select “Basic Search” and view patients from “Today.”
All patients who have had exams “Today” will be listed, default by Last Name.
Scroll through the list until you find the proper patient.

Synergy Quick Reference Guide
T o p c o n M e d i c a l S y s t e m s P a g e 8
Select the patient, and click on the “Patient Chart” button. Or, double click the
patient name.
***It is important to remember that the patient demographics from the device are
critical in properly adding to the correct patient chart. If the First Name, Last Name or
Date of Birth are not correct, a new patient will be created. They can be merged using
the Patient Isolation function described on page 5.