ts 200 250 cz en 04072014
TRANSCRIPT
HOLZMANN Maschinen Austria www.holzmann-maschinen.at Strana 1
Stolní pila / table saw TS 200 / TS 250
TS 200 / TS 250
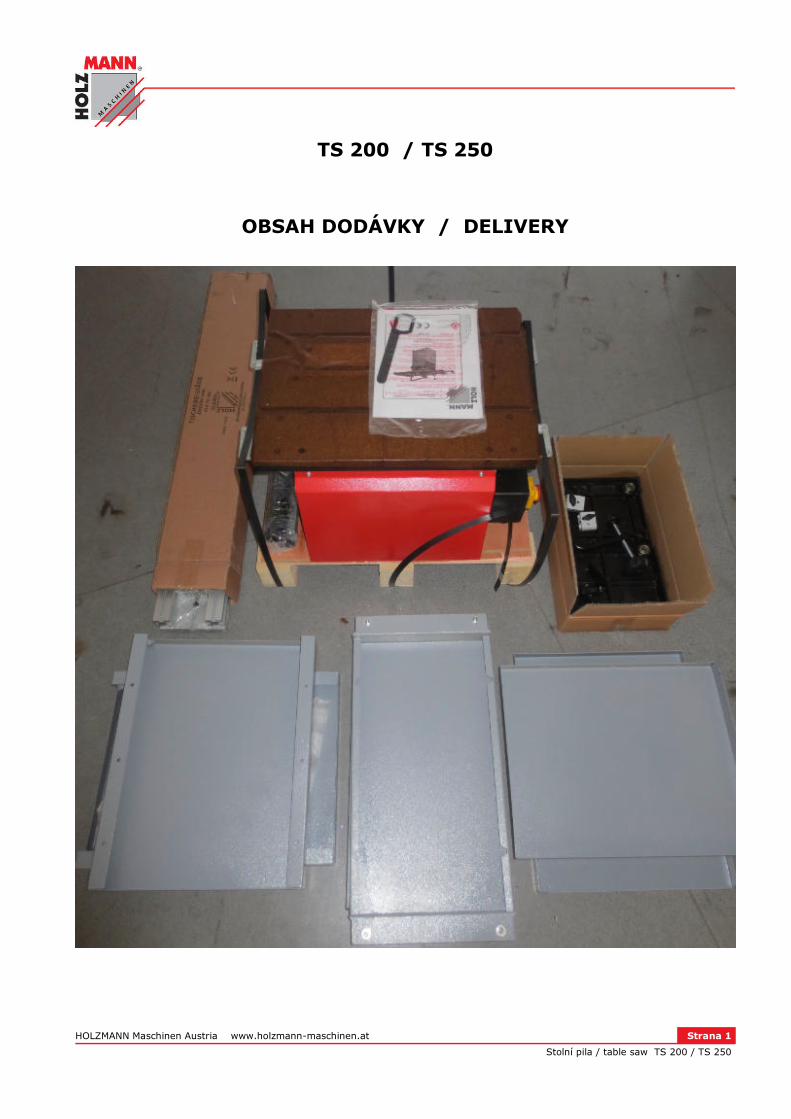
OBSAH DODÁVKY / DELIVERY

HOLZMANN Maschinen Austria www.holzmann-maschinen.at Strana 2
Stolní pila / table saw TS 200 / TS 250
CZ VÝZNAM BEZPEČNOSTNÍCH SYMBOLŮ
EN SAFETY SIGNS DEFINITION OF SYMBOLS
CZ POZOR! Dbejte na bezpečnostní symboly! Nedodržování pokynů a předpisů k provozu stroje může vést ke škodám a zraněním, končícím smrtí.
EN ATTENTION! Ignoring the safety signs and warnings applied on the ma-chine as well as ignoring the security and operating instructions can cause serious injuries and even lead to death.
CZ PŘEČTĚTE SI NÁVOD! Pozorně si přečtěte návod k použití a údržbě a dobře se seznamte s pokyny pro provoz, obsluhu a údržbu stroje. Předejdete tím možným škodám a zraněním.
EN READ THE MANUAL! Read the user and maintenance manual carefully and get familiar with the controls n order to use the machine correctly and to avoid injuries and machine defects.
CZ OCHRANNÉ POMŮCKY! Používejte ochranné pomůcky, bezpečnostní brýle, ochranu sluchu a bezpečnostní boty.
EN PROTECTIVE CLOTHING! The operator is obligated to wear proper ear protection, safety goggles and safety shoes
CZ CE-SHODNÉ – Tento stroj odpovídá směrnicím EU.
EN EC-CONFORM - This product complies with the EC-directives.

HOLZMANN Maschinen Austria www.holzmann-maschinen.at Strana 3
Stolní pila / table saw TS 200 / TS 250
MONTÁŽ
1 SESTAVENÍ
Stroj se dodává smontovaný. Je potřebné pouze namontovat posuvný stůl, rozšiřovací stůl, po-délné pravítko, úhlové pravítko a kryt kotouče.
1.1.1 Montáž podstavce
• Podstavec se skládá ze 2 + 2 různých desek. Desky se smontují s pomocí 3 šroubů, podložek a matek.
Dbejte přitom na to, aby závity pro nastavovací nožičky byly dole.
1.1.2 Demontáž dřevěného transportního podstavce
• Stroj obraťte a položte na kus kartónu. • Klíčem SW 10 odšroubujte transportní šrouby. • Pokud se matky ve stroji protáčejí, zachyťte je za strany stroje klíčem.

HOLZMANN Maschinen Austria www.holzmann-maschinen.at Strana 4
Stolní pila / table saw TS 200 / TS 250
Vyjměte ze stroje balíčky s příslušenstvím stroje (Odsávací hadice, úhlové pravítko, balíček se šrouby).
1.1.3 Montáž podstavce ke stroji
• Smontovaný podstavec přisaďte ke stroji a s pomocí dodaných šroubů, podložek a matek na čtyřech stranách sešroubujte.
4 nastavitelné nožičky našroubujte do závitů podstavce.

HOLZMANN Maschinen Austria www.holzmann-maschinen.at Strana 5
Stolní pila / table saw TS 200 / TS 250
1.1.4 Našroubování kola nastavení náklonu pily
• Plochou část hřídele nastavte proti imbus šroubu v kole
1.1.5 Montáž držáku posuvného stolu
• Do obou držáků našroubujte dva imbus šrouby. • 4x imbus šrouby nasaďte do odpovídajících závitů ve stole stroje.
• Držák posuvného stolu nasaďte pod stůl na straně stolu a dotáhněte pevně ze shora imbus
šrouby.
• Ruční kolo nasaďte na hřídel a im-busem dotáhněte

HOLZMANN Maschinen Austria www.holzmann-maschinen.at Strana 6
Stolní pila / table saw TS 200 / TS 250
1.1.6 Montáž spodního profilu posuvného stolu
• Našroubujte šrouby (8x) volně do obou držáků. • Spodní profil stolu nasuňte levou stranou podle obrázku do obou držáků.
• Ve střední poloze pak šrouby pevně dotáhněte.
1.1.7 Montáž stolu
Posuvný stůl má na spodní straně 2 vodící rolny, upevněné na excentrech. Tyto vodící rolny nasuňte ze strany do vodícího hliníkového. • Na horní straně stolu oba imbus šrouby lehce dotáhněte.
• Klíčem SW14 pootočte excentrem tak, že je rolna v největší vzdálenosti od profilu. • Posuňte stolem na základní hliníkové. • Klíčem dotáhněte excentr rolny tak, aby se horní deska stolu lehce, ale bez vůle pohybovala po
vodící desce. POZOR: Nedotahujte rolny příliš těsně, aby se stůl mohl lehce pohybovat!
• Oba horní imbus šrouby opět pevně dotáhněte, aby se stůl lehce a bez vůle pohyboval po vo-dící desce.

HOLZMANN Maschinen Austria www.holzmann-maschinen.at Strana 7
Stolní pila / table saw TS 200 / TS 250
1.1.8 Vyrovnání posuvného a pracovního stolu
• 4 matky na obou držácích lehce dotáhněte, aby se deska hliníkového profilu dala posouvat. • Vyrovnejte posuvný stůl s pomocí podélného pravítka do roviny s pracovním stolem.
• 4 matky na držácích dotáhněte pevněji. Celý postup opakujte na druhém držáku. Po vyrovnání stolu všech 8 matek na obou držácích pevně dotáhněte!
1.1.9 Našroubujte postranní vodící profily
• Uvolněte šrouby tak, aby se dal profil podélného pravítka lehce nasunout. • Profil nasuňte. • Nastavovacími šrouby je možné profil podélného pravítka nasta-
vit.
• Šrouby opět pevně dotáhněte.

HOLZMANN Maschinen Austria www.holzmann-maschinen.at Strana 8
Stolní pila / table saw TS 200 / TS 250
1.1.10 Montáž rozšíření stolu
• Šrouby na desce rozšíření uvolněte tak, aby se mohly zasunout do drážky hliníko-vého profilu vlevo a vpravo.
POZOR: • Po nasazení první desky můžete namonto-
vat držák odsávací hadice – viz 1.1.11
• Poté nasuňte 2. desku rozšíření a dotáh-něte všechny šrouby.
1.1.11 Držák odsávací hadice
• Držák odsávací hadice může být nasunut do drážky hliní-kového profilu zde nebo na jiném místě.
1.1.12 Montáž podélného pravítka
Našroubujte adaptér na hliníkový profil jako na obrázku a za-suňte do vodícího profilu podélného pravítka.

HOLZMANN Maschinen Austria www.holzmann-maschinen.at Strana 9
Stolní pila / table saw TS 200 / TS 250
1.1.13 Montáž krytu pilového kotouče
Nasaďte kryt kotouče na rozvírací klín, nastavte
správnou polohu a dotáhněte upevňovací šrouby.
1.1.14 Montáž odsávací hadice
Nasaďte odsávací hadici na odsávací otvor hubice a dotáhněte upevňovací pásku.
1.1.15 Montáž držáku odsávací hadica
Držák odsávací hadice může být našroubován na libovolné místo hliníkového profilu.

HOLZMANN Maschinen Austria www.holzmann-maschinen.at Strana 10
Stolní pila / table saw TS 200 / TS 250
2 PROVOZ
2.1 Nastavení stroje před uvedením do provozu
+ Před každým nastavováním stroje ho odpojte od přívodu elektřiny, abyste zamezili neočekáva-nému zapnutí stroje!
+ Používejte rukavice. + Zkontrolujte, zda nastavené otáčky nepřevyšují maximální dovolené otáčky pilového kotouče. + Používejte pouze pilové kotouče s předepsaným průměrem 200 (250) mm.
2.1.1 Nasstavení rozvíracího klínu
• Povolte matku na rozvíracím klínu klíčem SW 13 mm. • Nastavte rozvírací klín na vzdálenost ca. 3mm – 8mm od kotouče. • Matky opět pevně dotáhněte. • Podélným pravítkem zkontrolujte, zda je rozvírací klín v jedné rovině s kotoučem. • Na rozvírací klín upevněte kryt pilového kotouče.
POKYN: Tento postup proveďte vždy po výměně pilového kotouče.
2.1.2 Nastavení podélného pravítka
Nastavte podélné pravítko rovnoběžně s pilovým kotoučem.
• Posuňte pravítko až ke kotouči. • Pokud není zcela rovnoběžně s kotoučem, povolte zlehka upevňovací šroubyna vodícím hliníko-
vém profilu pravítka. • Nastavovacím imbusem (Einstellschraube) – Bod 6.2.8 – nastavte podélné pravítko rovno-
běžně s pilovým kotoučem. • Upevňovací šrouby na vodícím profilu opět dotáhněte.
HOLZMANN Maschinen Austria www.holzmann-maschinen.at Strana 11
Stolní pila / table saw TS 200 / TS 250
2.2 Obsluha
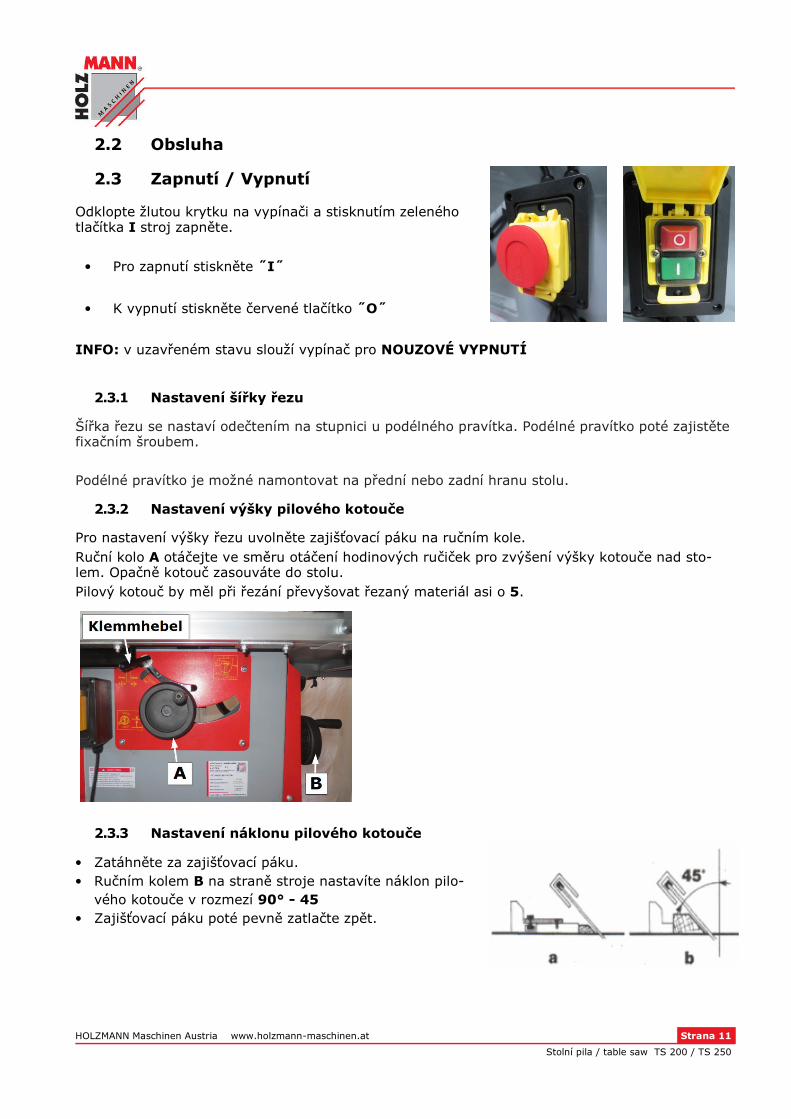
2.3 Zapnutí / Vypnutí
Odklopte žlutou krytku na vypínači a stisknutím zeleného tlačítka I stroj zapněte.
• Pro zapnutí stiskněte ˝I˝
• K vypnutí stiskněte červené tlačítko ˝O˝
INFO: v uzavřeném stavu slouží vypínač pro NOUZOVÉ VYPNUTÍ
2.3.1 Nastavení šířky řezu
Šířka řezu se nastaví odečtením na stupnici u podélného pravítka. Podélné pravítko poté zajistěte fixačním šroubem. Podélné pravítko je možné namontovat na přední nebo zadní hranu stolu.
2.3.2 Nastavení výšky pilového kotouče
Pro nastavení výšky řezu uvolněte zajišťovací páku na ručním kole. Ruční kolo A otáčejte ve směru otáčení hodinových ručiček pro zvýšení výšky kotouče nad sto-lem. Opačně kotouč zasouváte do stolu. Pilový kotouč by měl při řezání převyšovat řezaný materiál asi o 5.
2.3.3 Nastavení náklonu pilového kotouče
• Zatáhněte za zajišťovací páku. • Ručním kolem B na straně stroje nastavíte náklon pilo-
vého kotouče v rozmezí 90° - 45 • Zajišťovací páku poté pevně zatlačte zpět.

HOLZMANN Maschinen Austria www.holzmann-maschinen.at Strana 12
Stolní pila / table saw TS 200 / TS 250
2.4 Výměna pilového kotouče
POZOR: Při výměně a montáži pilového kotouče vždy noste rukavice!
• Nastavte maximální výšku pilového kotouče. • Vyšroubujte 2 imbus šrouby z vložky stolu a vložku vyjměte. • Zajistěte přírubu kotouče dodaným klíčem. • Uvolněte zajišťovací šroub klíčem SW13 vlevo! • Vřeteno pily a přírubu řádně vyčistěte od nečistot. • Nasaďte pilový kotouč na vřeteno. Dbejte na správný směr otáčení! • Očištěnou přírubu s čepy nasaďte otvorem na vřeteno. • Šroub s podložkou opět našroubujte na vřeteno a pevně dotáhněte.
POKYN: Dbejte na správný směr otáčení pilového kotouče.
• Vložte vložku stolu zpět na místo a přišroubujte.

HOLZMANN Maschinen Austria www.holzmann-maschinen.at Strana 13
Stolní pila / table saw TS 200 / TS 250
3 ASSEMBLY
3.1.1 Mounting base socket
• The reason base consists of 2 different disks. The plates are bolted together with 3 screws, wa-shers and nuts.
Make sure that the screw holes for the adjustment feet below.

HOLZMANN Maschinen Austria www.holzmann-maschinen.at Strana 14
Stolní pila / table saw TS 200 / TS 250
3.1.2 Dismantling timber transport base
• Overturn the machine on a cardboard backing. • Remove the transport bolts with a wrench -size 10-. • If rotate the nuts in the machine, can be passed laterally into the machine and the nuts are
secured against rotate.
Remove screws supplied as package, Suction and miter angles from the machine.
3.1.3 Mounting base socket on the machine

HOLZMANN Maschinen Austria www.holzmann-maschinen.at Strana 15
Stolní pila / table saw TS 200 / TS 250
3.1.4 Mounting handle for tilt angle adjustment
The flat side of the shaft should be exactly be with the screw in a line.
3.1.5 Mounting brackets sliding table
• Unscrew the two screws on each of the two sliding table holders. • Use 4x Allen screws in corresponding holes on both sides on worktable.
• Creating the sliding table holders laterally below the work table and top with Allen screw them on firmly.
• Place the pre-assembled base socket on the machine and screw 4x with the supplied screws, washers and nuts.
4 Plates Adjustable Screw in the screw holes.
• Push handwheel completely and tighten with allen screw

HOLZMANN Maschinen Austria www.holzmann-maschinen.at Strana 16
Stolní pila / table saw TS 200 / TS 250
3.1.6 Mounting sliding table base profile
• The screws (8 x) screws loose enough on both sliding table mounts. • Slide the sliding table base profile as shown on the left, starting with both sliding table mounts
in the screw grooves.
• In the central position tighten the screws not strong.
3.1.7 Mounting sliding table
The sliding table has centered on the bottom 2 eccentric bearings in the guide rollers. These are inserted outer side of the sliding table base (aluminum profile rail).
• On the table top, loosen the two Allen screws a little bit and not to much. • Turn eccentric bolt with wrench key -14- as far as the greatest width is reached.
• Sliding table on sliding base (aluminum profile rail) slide. • With wrench key to tighten the eccentric to the point that the plate can slide without play.
CAUTION: Do not over tighten so that the sliding table still move easily!
• Tighten the 2 Allen screws on the table top and back light backlash push the sliding table con-trol.
HOLZMANN Maschinen Austria www.holzmann-maschinen.at Strana 17
Stolní pila / table saw TS 200 / TS 250
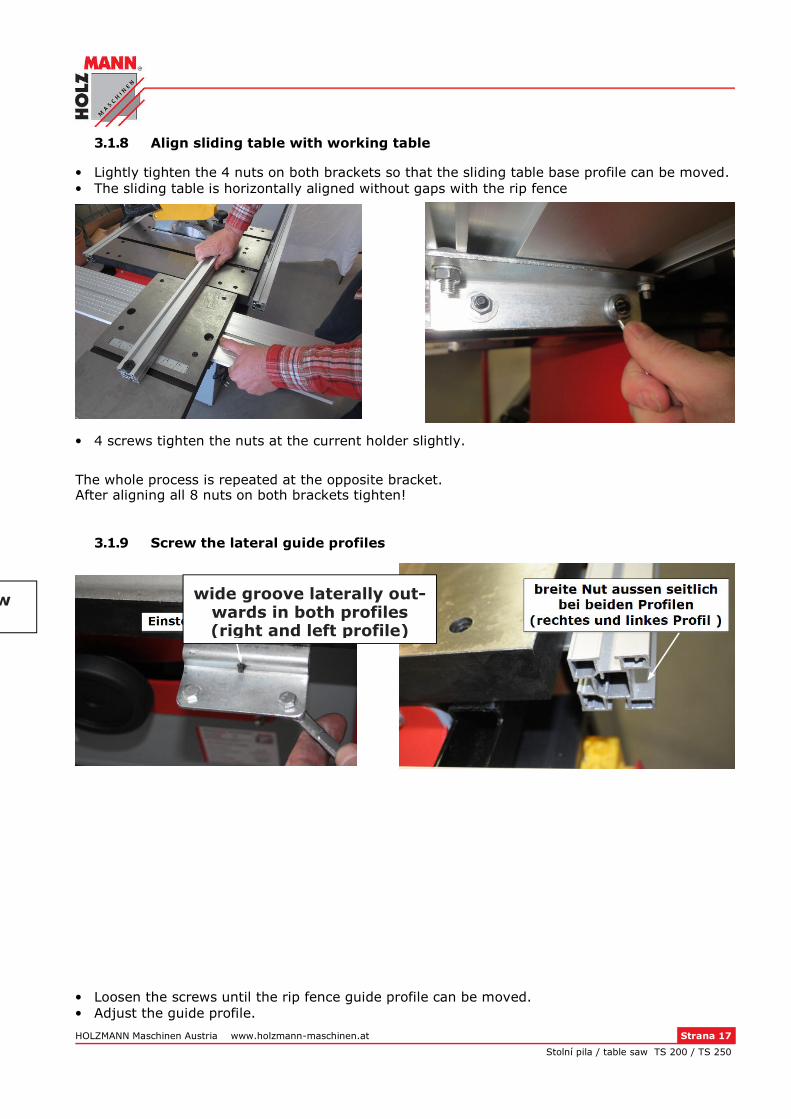
3.1.8 Align sliding table with working table
• Lightly tighten the 4 nuts on both brackets so that the sliding table base profile can be moved. • The sliding table is horizontally aligned without gaps with the rip fence
• 4 screws tighten the nuts at the current holder slightly. The whole process is repeated at the opposite bracket. After aligning all 8 nuts on both brackets tighten!
3.1.9 Screw the lateral guide profiles
• Loosen the screws until the rip fence guide profile can be moved. • Adjust the guide profile.
wide groove laterally out-wards in both profiles (right and left profile)
Adjustment screw

HOLZMANN Maschinen Austria www.holzmann-maschinen.at Strana 18
Stolní pila / table saw TS 200 / TS 250
• The adjusting screw can be adjusted subsequently the rip fence guide profile. • Tighten the screws again.
Adjustment screw -Allen screw-

HOLZMANN Maschinen Austria www.holzmann-maschinen.at Strana 19
Stolní pila / table saw TS 200 / TS 250
3.1.10 Table mount bracket plates
• Loosen the screws on the table kicker plate so far that they can be moved left and right in the groove of the aluminum profile.
CAUTION: • After insertion of the first plate, the suction hose bracket can be mounted. -see 6.2.11 -
• Otherwise, follow up on the 2nd plate and tighten all screws.
3.1.11 Screw the suction hose adapter
• The suction hose adapter here, or inserted elsewhere in the groove of the aluminum profile.
3.1.12 Assemble rip fence
Screw the adapter as shown on the aluminum profile and slide it into the rip fence guide profile.
HOLZMANN Maschinen Austria www.holzmann-maschinen.at Strana 20
Stolní pila / table saw TS 200 / TS 250
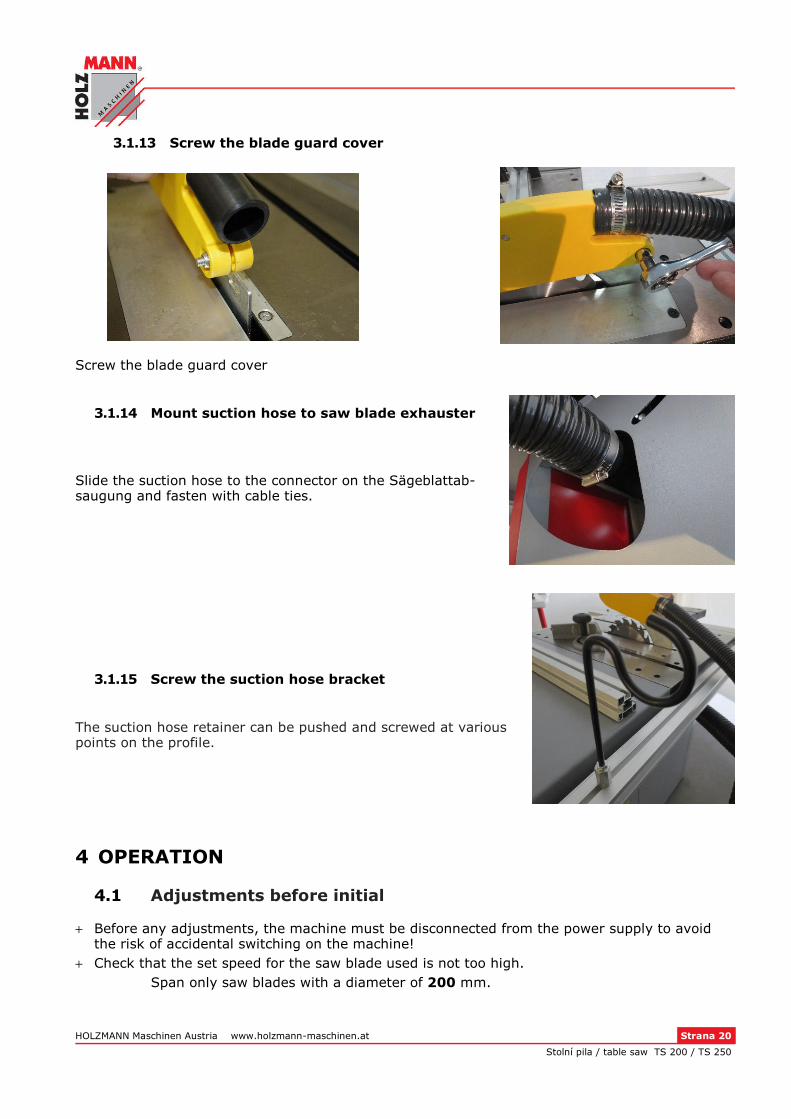
3.1.13 Screw the blade guard cover
Screw the blade guard cover
3.1.14 Mount suction hose to saw blade exhauster
Slide the suction hose to the connector on the Sägeblattab-saugung and fasten with cable ties.
3.1.15 Screw the suction hose bracket
The suction hose retainer can be pushed and screwed at various points on the profile.
4 OPERATION
4.1 Adjustments before initial
+ Before any adjustments, the machine must be disconnected from the power supply to avoid the risk of accidental switching on the machine!
+ Check that the set speed for the saw blade used is not too high. Span only saw blades with a diameter of 200 mm.

HOLZMANN Maschinen Austria www.holzmann-maschinen.at Strana 21
Stolní pila / table saw TS 200 / TS 250
4.1.1 Set the rip fence
• Easily unscrew the screws on the riving knife with a 13 mm wrench. • Ask the riving knife to a distance of about 3mm - 8mm a saw blade. • Pull out the gap wedge with the screws. • Check with the rip fence as to whether the riving knife is parallel with the blade. • Attach the blade guard cover back on the riving knife.
NOTE: This procedure should be repeated each time the when the blade is replaced.
HOLZMANN Maschinen Austria www.holzmann-maschinen.at Strana 22
Stolní pila / table saw TS 200 / TS 250
5 OPERATION
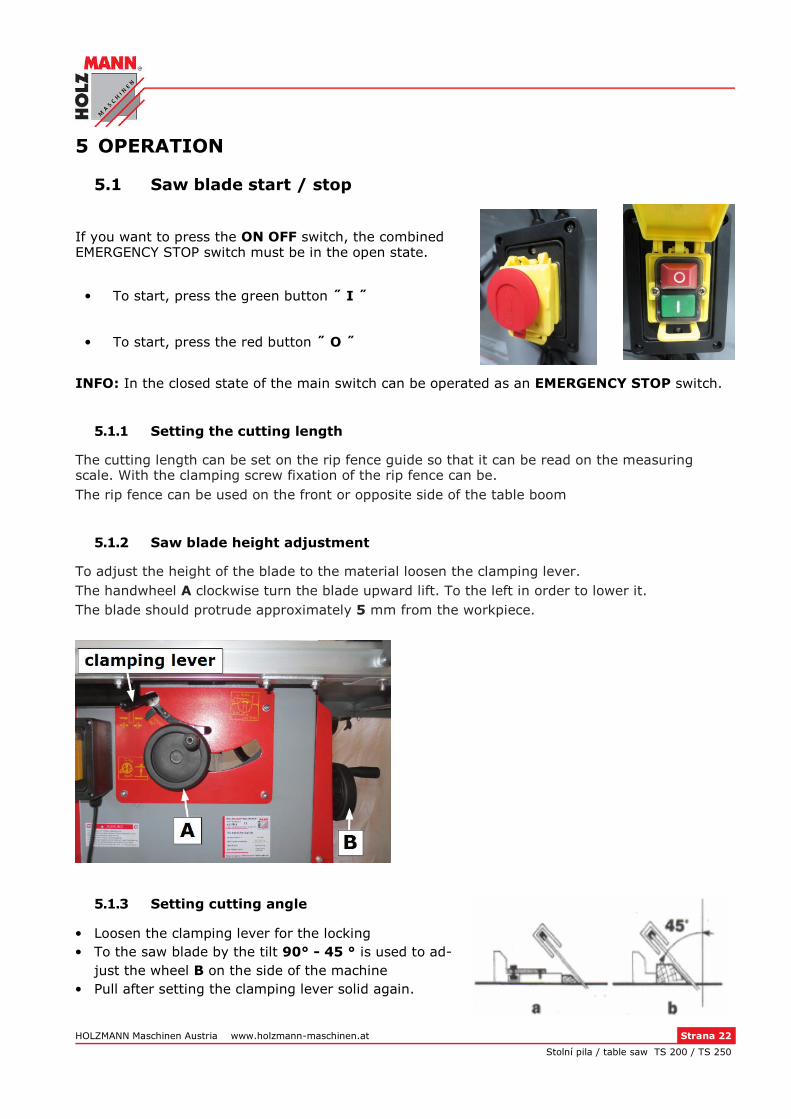
5.1 Saw blade start / stop
If you want to press the ON OFF switch, the combined EMERGENCY STOP switch must be in the open state.
• To start, press the green button ˝ I ˝
• To start, press the red button ˝ O ˝
INFO: In the closed state of the main switch can be operated as an EMERGENCY STOP switch.
5.1.1 Setting the cutting length
The cutting length can be set on the rip fence guide so that it can be read on the measuring scale. With the clamping screw fixation of the rip fence can be. The rip fence can be used on the front or opposite side of the table boom
5.1.2 Saw blade height adjustment
To adjust the height of the blade to the material loosen the clamping lever. The handwheel A clockwise turn the blade upward lift. To the left in order to lower it. The blade should protrude approximately 5 mm from the workpiece.
5.1.3 Setting cutting angle
• Loosen the clamping lever for the locking • To the saw blade by the tilt 90° - 45 ° is used to ad-
just the wheel B on the side of the machine • Pull after setting the clamping lever solid again.

HOLZMANN Maschinen Austria www.holzmann-maschinen.at Strana 23
Stolní pila / table saw TS 200 / TS 250
6 MAINTENANCE
6.1 saw blade change
CAUTION: When installing saw blade change and always use protective gloves !
• The 2 screws on the table insert Unscrew and remove the table insert. • Fix the blade to the flange with the supplied Flanschschlüssel. • The bolt with a wrench SW13 to the left of the shaft screws. • Clean the motor spindle and flange thoroughly of impurities. • Insert the blade with the correct rotation direction of the motor spindle. • Place the cleaned flange with pins into the hole on the motor shaft. • The screw with washer screw back into the shaft and tighten with wrench and Flange wrench.
NOTE: Observe direction of rotation arrow on the blade.
• Insert and tighten table insert again