unpacking, installation, and customization - - apc … · unpacking, installation, and...
TRANSCRIPT
Unpacking, Installation,and Customization
NetShelter®
Four-Post RackAR203AAR204A
This manual is available in English on the APC Web site (www.apc.com).
Dieses Handbuch ist in Deutsch auf der APC Webseite (www.apc.com) verfügbar.
Este manual está disponible en español en la página web de APC (www.apc.com).
Ce manuel est disponible en français sur le site internet d’APC (www.apc.com).
Questo manuale è disponibile in italiano sul sito web di APC (www.apc.com).本マニュアル<各国の言語に対応する>はAPCウェブサイト (www.apc.com)からダウ
ンロードできます。
Instrukcja obs³ugi w jêzyku polskim jest dostêpna na stronie internetowej APC (www.apc.com).
Este manual está disponível em português no site da APC (www.apc.com).
Данное руководство на русском языке доступно на сайте APC (www.apc.com )Bu kullanim klavuzunun Türkçesi APC web sayfasinda (www.apc.com) mevcuttur.
在 APC 公司的网站上 (www.apc.com) 有本手册的中文版。
Contents
Product Overview............................................................ 1Description . . . . . . . . . . . . . . . . . . . . . . . . . . . . . . . . . . . . . . . . . . . . . 1NetShelter Four-Post Rack models . . . . . . . . . . . . . . . . . . . . . . . . . . 1
Product Inventory . . . . . . . . . . . . . . . . . . . . . . . . . . . . . . . . . . . . . . . . . 2Components of the Four-Post Rack . . . . . . . . . . . . . . . . . . . . . . . . . 2
Before Installation........................................................... 3Tools. . . . . . . . . . . . . . . . . . . . . . . . . . . . . . . . . . . . . . . . . . . . . . . . . . . . 3
Tools (provided) . . . . . . . . . . . . . . . . . . . . . . . . . . . . . . . . . . . . . . . . . 3Other tools required (not provided) . . . . . . . . . . . . . . . . . . . . . . . . . 3
Hardware . . . . . . . . . . . . . . . . . . . . . . . . . . . . . . . . . . . . . . . . . . . . . . . . 3Hardware (provided) . . . . . . . . . . . . . . . . . . . . . . . . . . . . . . . . . . . . . . 3Please recycle . . . . . . . . . . . . . . . . . . . . . . . . . . . . . . . . . . . . . . . . . . . 4Disclaimer . . . . . . . . . . . . . . . . . . . . . . . . . . . . . . . . . . . . . . . . . . . . . . 4Inventory . . . . . . . . . . . . . . . . . . . . . . . . . . . . . . . . . . . . . . . . . . . . . . . 4
Install the Four-Post Rack . . . . . . . . . . . . . . . . . . . . . . . . . . . . . . . . . . 5Assemble the rack . . . . . . . . . . . . . . . . . . . . . . . . . . . . . . . . . . . . . . . 5Join the Four-Post Racks . . . . . . . . . . . . . . . . . . . . . . . . . . . . . . . . . 8Mount an APC Rack Power Distribution Unit (Rack PDU) . . . . . . . 8
Install Equipment ............................................................ 9Identify one U-space on the vertical mounting flange . . . . . . . . . . 9Install cage nuts . . . . . . . . . . . . . . . . . . . . . . . . . . . . . . . . . . . . . . . . . 9Remove cage nuts . . . . . . . . . . . . . . . . . . . . . . . . . . . . . . . . . . . . . . . 9Grounding locations . . . . . . . . . . . . . . . . . . . . . . . . . . . . . . . . . . . . . 10
Cable Management . . . . . . . . . . . . . . . . . . . . . . . . . . . . . . . . . . . . . . . 11Cable management options . . . . . . . . . . . . . . . . . . . . . . . . . . . . . . . 11
Specifications................................................................ 14
NetShelter Four-Post Rack—Installation i
Five-Year Factory Warranty . . . . . . . . . . . . . . . . . . . . . . . . . . . . . . . . 15Terms of warranty . . . . . . . . . . . . . . . . . . . . . . . . . . . . . . . . . . . . . . . 15Non-transferable warranty . . . . . . . . . . . . . . . . . . . . . . . . . . . . . . . . 15Exclusions . . . . . . . . . . . . . . . . . . . . . . . . . . . . . . . . . . . . . . . . . . . . . 15 Warranty claims . . . . . . . . . . . . . . . . . . . . . . . . . . . . . . . . . . . . . . . . 16
NetShelter Four-Post Rack—Installationii
Product OverviewDescription
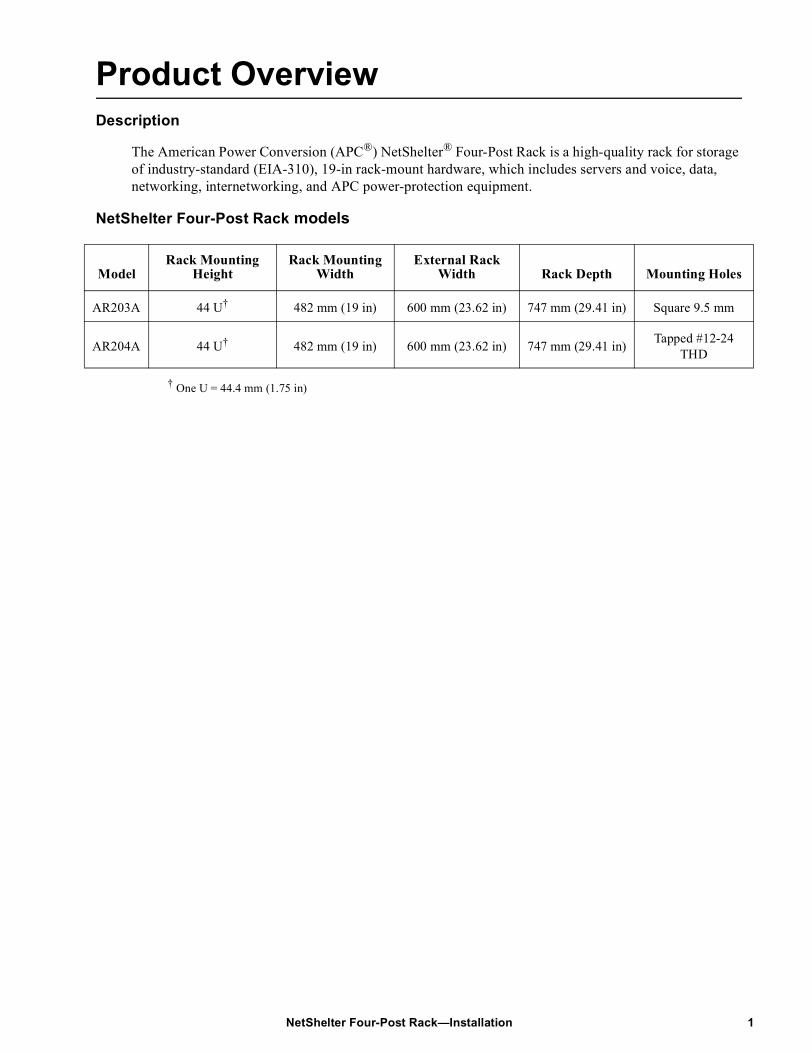
The American Power Conversion (APC®) NetShelter® Four-Post Rack is a high-quality rack for storage of industry-standard (EIA-310), 19-in rack-mount hardware, which includes servers and voice, data, networking, internetworking, and APC power-protection equipment.
NetShelter Four-Post Rack models
† One U = 44.4 mm (1.75 in)
ModelRack Mounting
HeightRack Mounting
WidthExternal Rack
Width Rack Depth Mounting Holes
AR203A 44 U† 482 mm (19 in) 600 mm (23.62 in) 747 mm (29.41 in) Square 9.5 mm
AR204A 44 U† 482 mm (19 in) 600 mm (23.62 in) 747 mm (29.41 in) Tapped #12-24 THD
1NetShelter Four-Post Rack—Installation
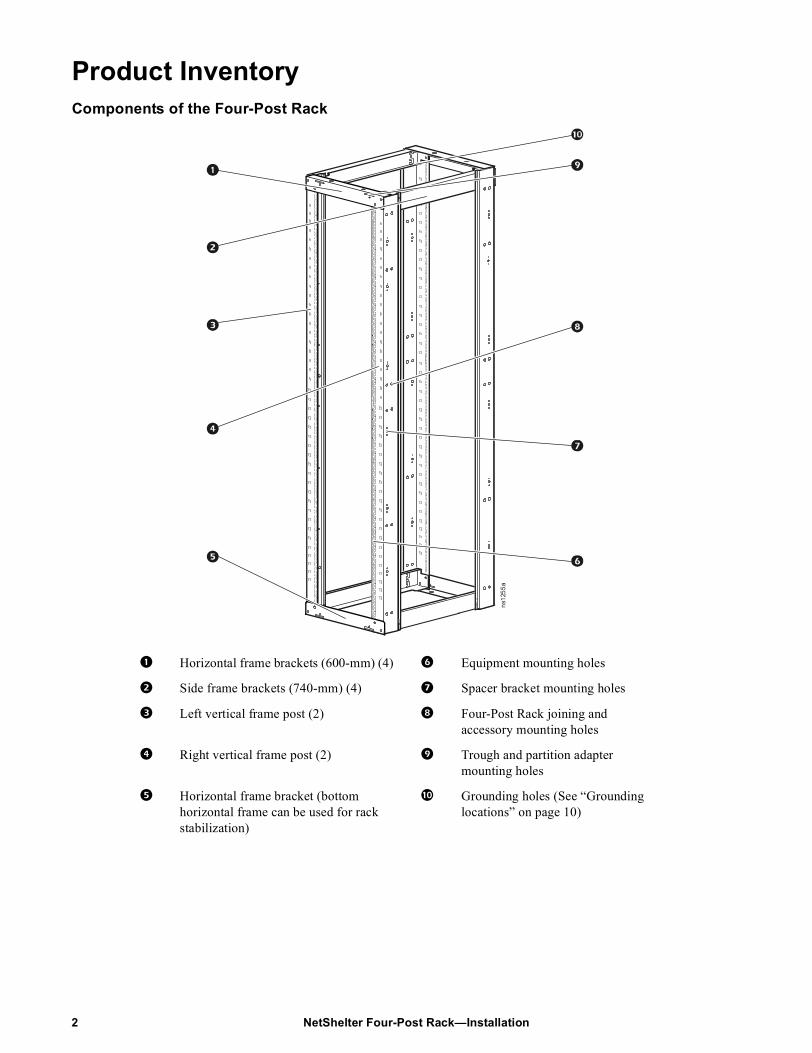
Product InventoryComponents of the Four-Post Rack
Horizontal frame brackets (600-mm) (4) Equipment mounting holes
Side frame brackets (740-mm) (4) Spacer bracket mounting holes
Left vertical frame post (2) Four-Post Rack joining and accessory mounting holes
Right vertical frame post (2) Trough and partition adapter mounting holes
Horizontal frame bracket (bottom horizontal frame can be used for rack stabilization)
Grounding holes (See “Grounding locations” on page 10)
ns12
55a
NetShelter Four-Post Rack—Installation2
Before Installation
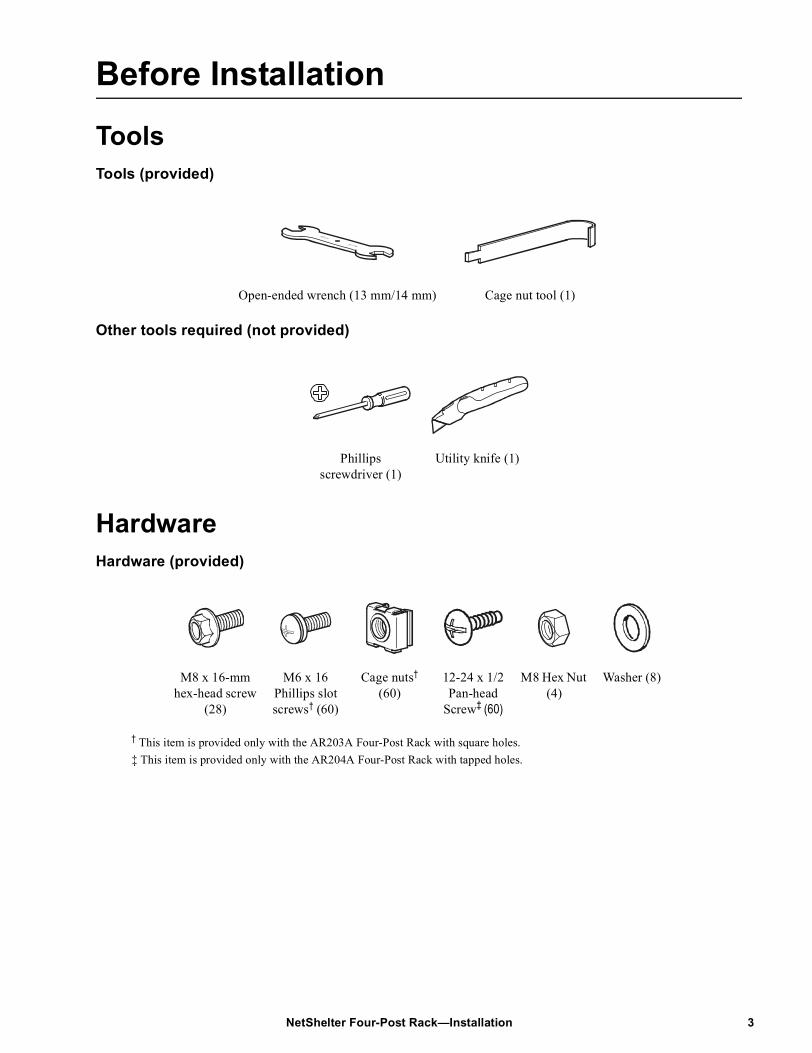
ToolsTools (provided)
Other tools required (not provided)
HardwareHardware (provided)
† This item is provided only with the AR203A Four-Post Rack with square holes.‡ This item is provided only with the AR204A Four-Post Rack with tapped holes.
Open-ended wrench (13 mm/14 mm) Cage nut tool (1)
Phillips screwdriver (1)
Utility knife (1)
M8 x 16-mm hex-head screw
(28)
M6 x 16 Phillips slot screws† (60)
Cage nuts† (60)
12-24 x 1/2 Pan-head
Screw‡ (60)
M8 Hex Nut (4)
Washer (8)
3NetShelter Four-Post Rack—Installation
4
NetShelter Four-Post Rack—InstallationWarning: Read all instructions thoroughly. Warning symbols indicate important instructions that must be followed to prevent injury or damage.
• Use at least two people to unpack and assemble the rack.
• To prevent the enclosure from tipping over, stabilize the rack before installing the equipment.
• Do not extend more than one piece of equipment from the rack at one time.
• Load the heaviest pieces of equipment first, and place them toward the bottom of the rack to prevent the rack from becoming top-heavy.
Please recycle
The shipping materials are recyclable. Save them for later use, or dispose of them appropriately.
Disclaimer
APC is not responsible for damage sustained during reshipment of this product.
Inventory
After unpacking the rack, verify that all required components and hardware have been shipped with the rack.
See the “Product Inventory” on page 2 for a list of components and “Hardware” on page 3 for a list of hardware provided with the Four-Post Rack.
Note: If any items are missing, contact APC Customer Support using the Web address listed on the back cover of this manual.
5
NetShelter Four-Post Rack—InstallationInstall the Four-Post RackAssemble the rack
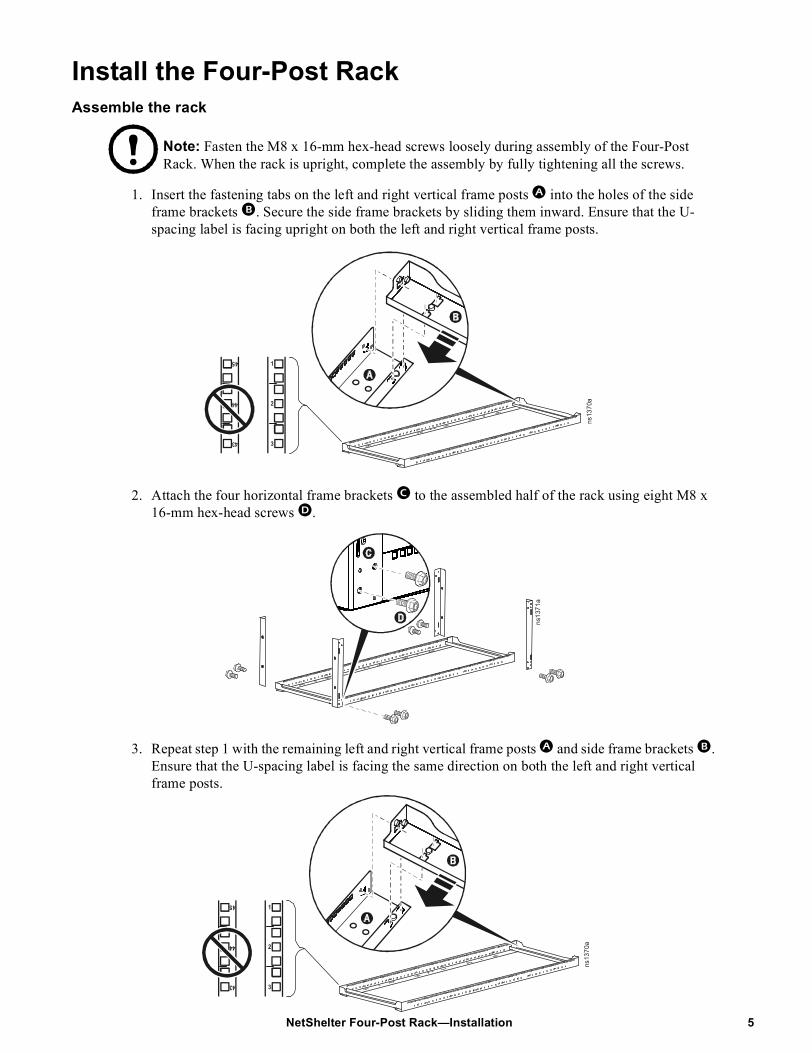
Note: Fasten the M8 x 16-mm hex-head screws loosely during assembly of the Four-Post Rack. When the rack is upright, complete the assembly by fully tightening all the screws.
1. Insert the fastening tabs on the left and right vertical frame posts into the holes of the side frame brackets . Secure the side frame brackets by sliding them inward. Ensure that the U-spacing label is facing upright on both the left and right vertical frame posts.
2. Attach the four horizontal frame brackets to the assembled half of the rack using eight M8 x 16-mm hex-head screws .
3. Repeat step 1 with the remaining left and right vertical frame posts and side frame brackets . Ensure that the U-spacing label is facing the same direction on both the left and right vertical frame posts.
ns13
70a
45
44
43
1
2
3
ns13
71a
ns13
70a
45
44
43
1
2
3
6
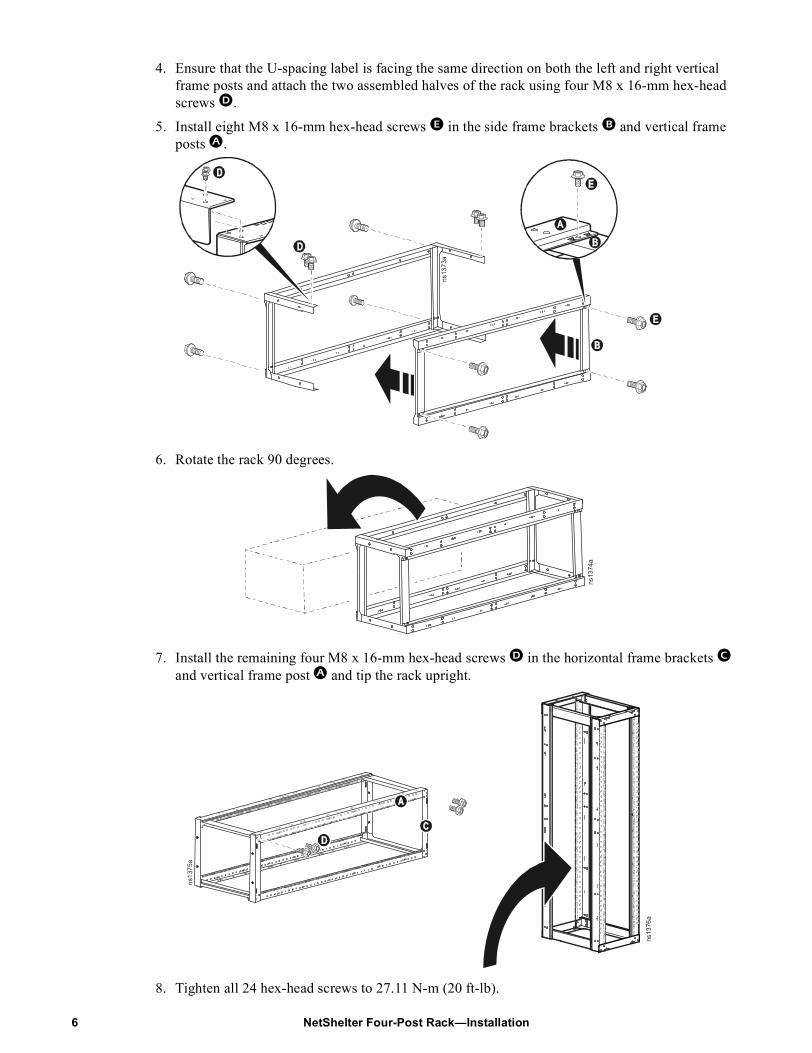
4. Ensure that the U-spacing label is facing the same direction on both the left and right vertical frame posts and attach the two assembled halves of the rack using four M8 x 16-mm hex-head screws .
5. Install eight M8 x 16-mm hex-head screws in the side frame brackets and vertical frame posts .
6. Rotate the rack 90 degrees.
7. Install the remaining four M8 x 16-mm hex-head screws in the horizontal frame brackets and vertical frame post and tip the rack upright.
8. Tighten all 24 hex-head screws to 27.11 N-m (20 ft-lb).
ns13
73a
ns13
74a
ns13
75a
ns13
76a
NetShelter Four-Post Rack—Installation
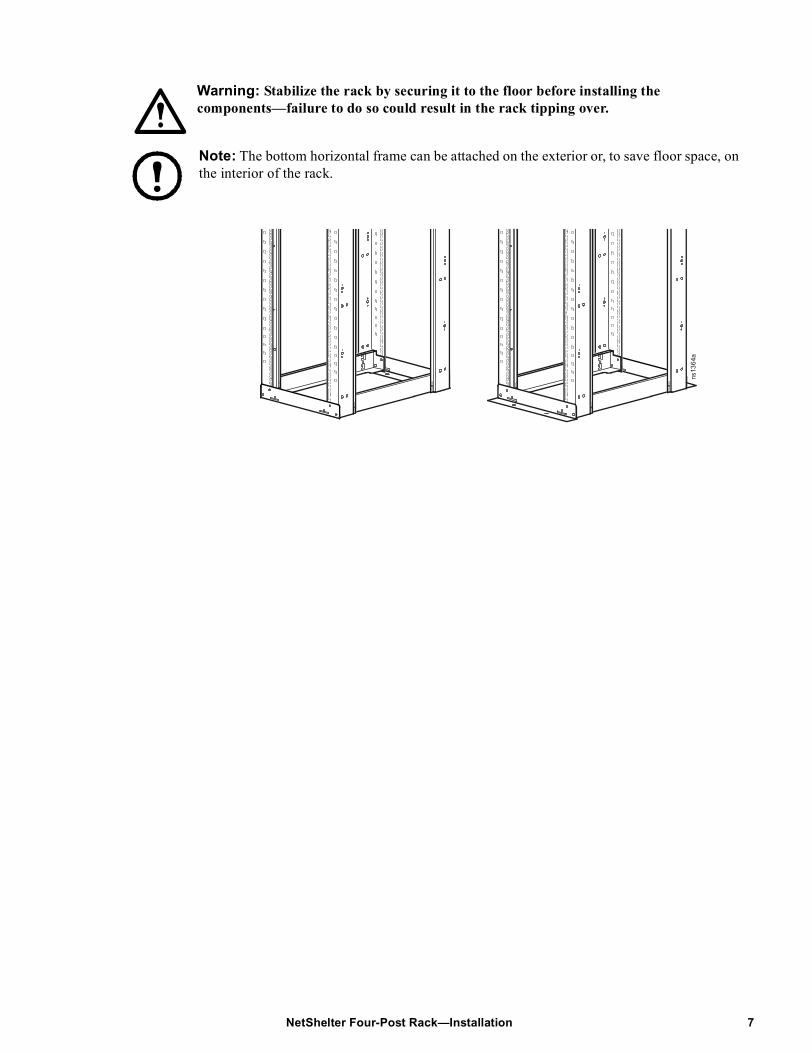
Warning: Stabilize the rack by securing it to the floor before installing the components—failure to do so could result in the rack tipping over.
Note: The bottom horizontal frame can be attached on the exterior or, to save floor space, on the interior of the rack.
ns13
64a
7NetShelter Four-Post Rack—Installation
8
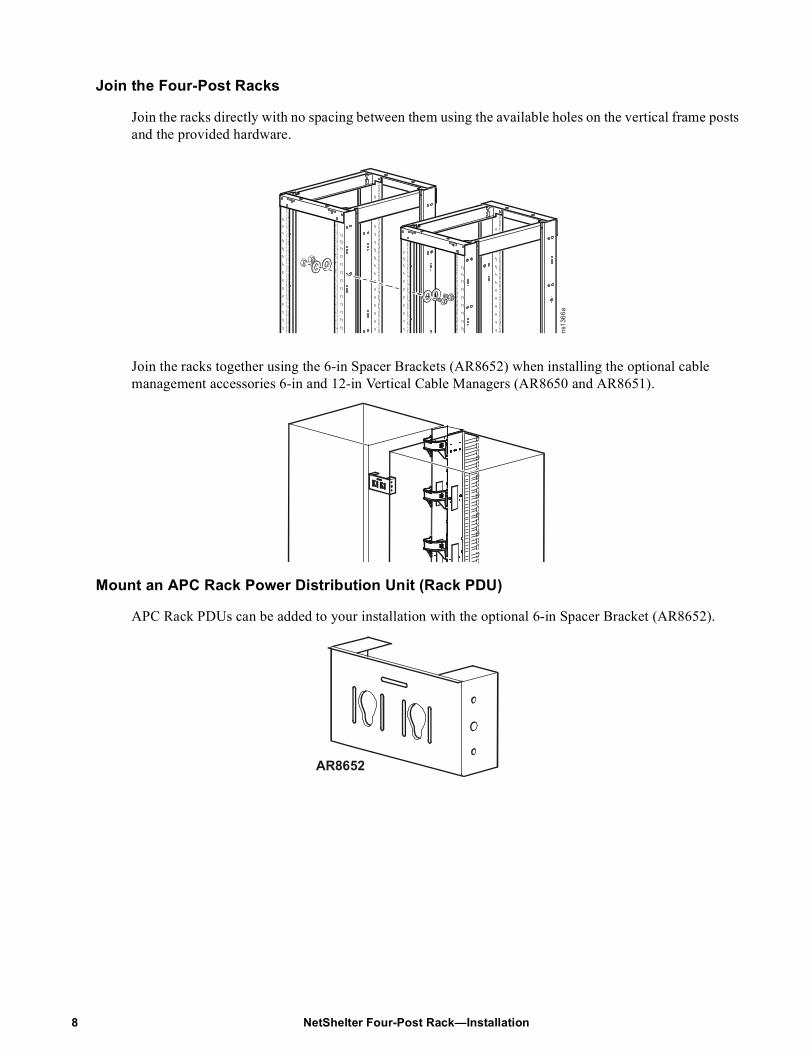
Join the Four-Post Racks
Join the racks directly with no spacing between them using the available holes on the vertical frame posts and the provided hardware.
Join the racks together using the 6-in Spacer Brackets (AR8652) when installing the optional cable management accessories 6-in and 12-in Vertical Cable Managers (AR8650 and AR8651).
Mount an APC Rack Power Distribution Unit (Rack PDU)
APC Rack PDUs can be added to your installation with the optional 6-in Spacer Bracket (AR8652).
ns13
66a
AR8652
NetShelter Four-Post Rack—Installation
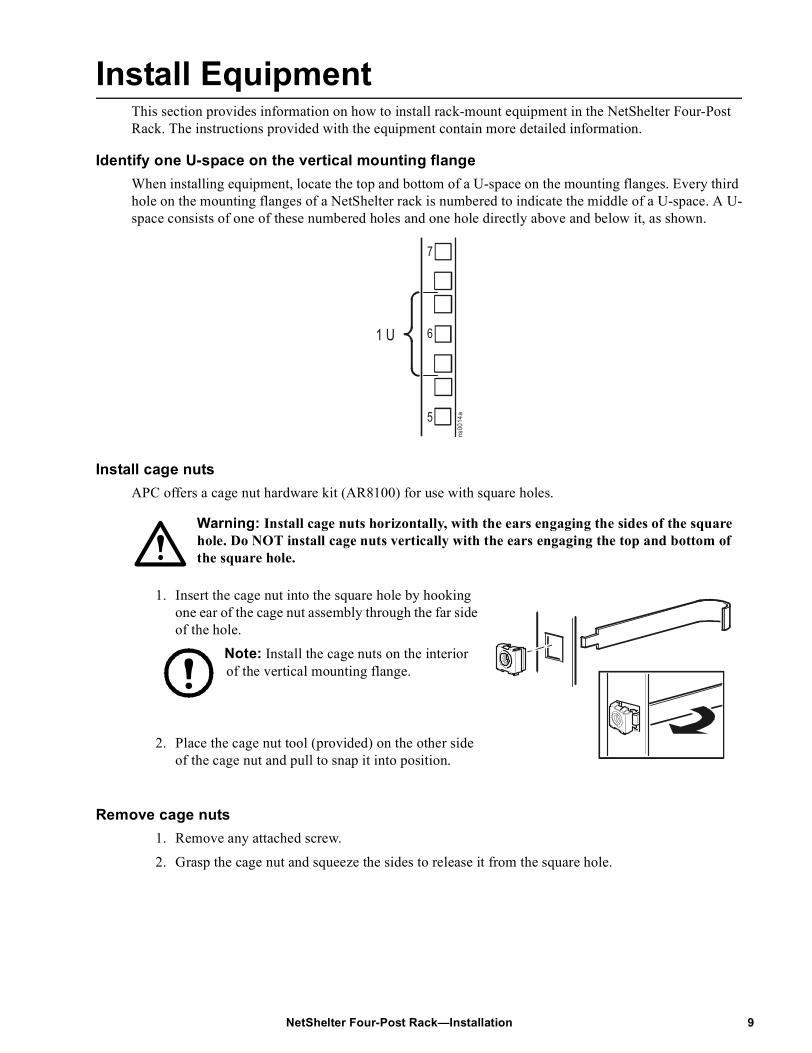
Install EquipmentThis section provides information on how to install rack-mount equipment in the NetShelter Four-Post Rack. The instructions provided with the equipment contain more detailed information.
Identify one U-space on the vertical mounting flangeWhen installing equipment, locate the top and bottom of a U-space on the mounting flanges. Every third hole on the mounting flanges of a NetShelter rack is numbered to indicate the middle of a U-space. A U-space consists of one of these numbered holes and one hole directly above and below it, as shown.
Install cage nutsAPC offers a cage nut hardware kit (AR8100) for use with square holes.
Warning: Install cage nuts horizontally, with the ears engaging the sides of the square hole. Do NOT install cage nuts vertically with the ears engaging the top and bottom of the square hole.
1. Insert the cage nut into the square hole by hooking one ear of the cage nut assembly through the far side of the hole.
Note: Install the cage nuts on the interior of the vertical mounting flange.
2. Place the cage nut tool (provided) on the other side of the cage nut and pull to snap it into position.
Remove cage nuts1. Remove any attached screw.
2. Grasp the cage nut and squeeze the sides to release it from the square hole.
1 U
7
6
5
ns00
14a
9NetShelter Four-Post Rack—Installation
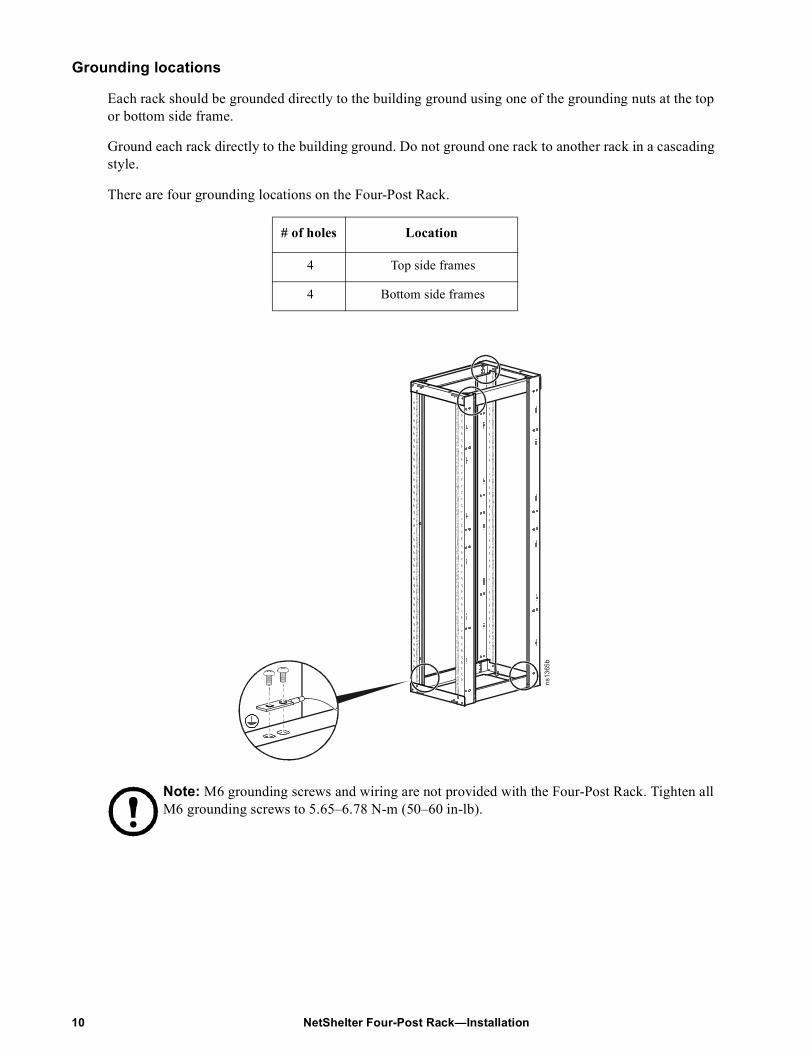
Grounding locations
Each rack should be grounded directly to the building ground using one of the grounding nuts at the top or bottom side frame.
Ground each rack directly to the building ground. Do not ground one rack to another rack in a cascading style.
There are four grounding locations on the Four-Post Rack.
Note: M6 grounding screws and wiring are not provided with the Four-Post Rack. Tighten all M6 grounding screws to 5.65–6.78 N-m (50–60 in-lb).
# of holes Location
4 Top side frames
4 Bottom side frames
ns13
65b
NetShelter Four-Post Rack—Installation10
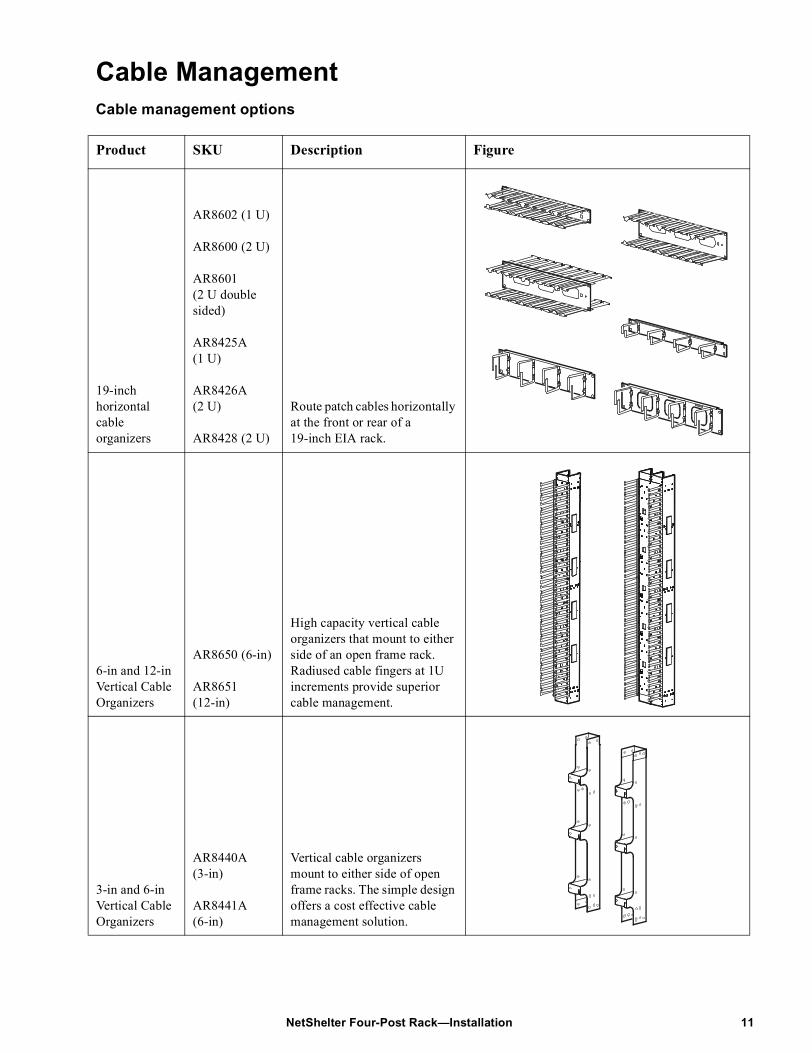
Cable ManagementCable management options
Product SKU Description Figure
19-inch horizontal cable organizers
AR8602 (1 U)
AR8600 (2 U)
AR8601 (2 U double sided)
AR8425A (1 U)
AR8426A (2 U)
AR8428 (2 U)
Route patch cables horizontally at the front or rear of a 19-inch EIA rack.
6-in and 12-in Vertical Cable Organizers
AR8650 (6-in)
AR8651 (12-in)
High capacity vertical cable organizers that mount to either side of an open frame rack. Radiused cable fingers at 1U increments provide superior cable management.
3-in and 6-in Vertical Cable Organizers
AR8440A (3-in)
AR8441A (6-in)
Vertical cable organizers mount to either side of open frame racks. The simple design offers a cost effective cable management solution.
11NetShelter Four-Post Rack—Installation
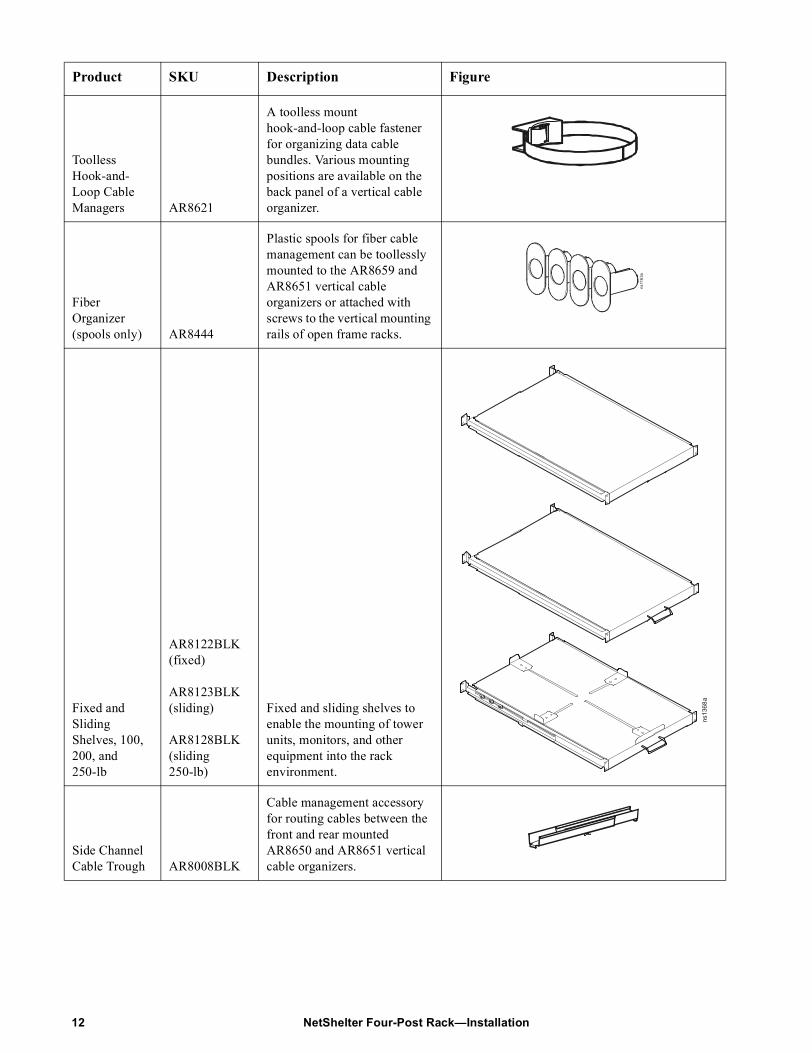
Toolless Hook-and-Loop Cable Managers AR8621
A toolless mount hook-and-loop cable fastener for organizing data cable bundles. Various mounting positions are available on the back panel of a vertical cable organizer.
Fiber Organizer (spools only) AR8444
Plastic spools for fiber cable management can be toollessly mounted to the AR8659 and AR8651 vertical cable organizers or attached with screws to the vertical mounting rails of open frame racks.
Fixed and Sliding Shelves, 100, 200, and 250-lb
AR8122BLK (fixed)
AR8123BLK (sliding)
AR8128BLK (sliding 250-lb)
Fixed and sliding shelves to enable the mounting of tower units, monitors, and other equipment into the rack environment.
Side Channel Cable Trough AR8008BLK
Cable management accessory for routing cables between the front and rear mounted AR8650 and AR8651 vertical cable organizers.
Product SKU Description Figure
ns11
63a
ns13
68a
NetShelter Four-Post Rack—Installation12

Spacer Bracket 2-in wide for Four-Post Racks AR8652
Spacer brackets mount to the sides, front, and rear of open frame racks. They are used together with AR8650 and AR8651 vertical cable organizers to connect the rear frames of open frame racks. The brackets can also be used to mount two APC Rack PDUs.
Trough and Partition Adapter AR8450A
Mounts to the top of theFour-Post open frame racks to allow mounting of the APC overhead troughs and partitions.
#12-24 Hardware Kit (quantity-24)
AR8400 (for AR204 and AR204A only)
#12-24 mounting screw hardware kit for Four-Post open frame rack with threaded holes.
#10-32 Hardware Kit (quantity-36)
AR8005(for AR203A only)
Cage nuts with #10-32 thread for mounting equipment in enclosures with square holes in the mounting rails. Accommodates devices using #10-32 mounting screws.
Product SKU Description Figure
13NetShelter Four-Post Rack—Installation

Specifications
600-mm Four-Post Rack
† One U = 44.4 mm (1.75 in)
Item Measurements
Dimensions AR203A and AR204A
Rack mounting height 44 U†
Exterior height 2130.40 mm (83.87 in)
Exterior width 600 mm (23.62 in)
Exterior depth 747 mm (29.41 in)
Weight
Net weight 40.32 kg (88.90 lb)
Weight capacity 907.18 kg (2,000 lb)
NetShelter Four-Post Rack—Installation14
Five-Year Factory WarrantyThe limited warranty provided by APC in this Statement of Limited Factory Warranty applies only to products you purchase for your commercial or industrial use in the ordinary course of your business.
Terms of warranty
APC warrants its products to be free from defects in materials and workmanship for a period of five years (two years in Japan) from the date of purchase. The obligation of APC under this warranty is limited to repairing or replacing, at its sole discretion, any such defective products. This warranty does not apply to equipment that has been damaged by accident, negligence, or misapplication or has been altered or modified in any way. Repair or replacement of a defective product or part thereof does not extend the original warranty period. Any parts furnished under this warranty may be new or factory- remanufactured.
Non-transferable warranty
This warranty extends only to the original purchaser who must have properly registered the product. The product may be registered at the APC Web site, www.apc.com.
Exclusions
APC shall not be liable under the warranty if its testing and examination disclose that the alleged defect in the product does not exist or was caused by end user’s or any third person’s misuse, negligence, improper installation or testing. Further, APC shall not be liable under the warranty for unauthorized attempts to repair or modify wrong or inadequate electrical voltage or connection, inappropriate on-site operation conditions, corrosive atmosphere, repair, installation, start-up by non-APC designated personnel, a change in location or operating use, exposure to the elements, Acts of God, fire, theft, or installation contrary to APC recommendations or specifications or in any event if the APC serial number has been altered, defaced, or removed, or any other cause beyond the range of the intended use.
THERE ARE NO WARRANTIES, EXPRESS OR IMPLIED, BY OPERATION OF LAW OR OTHERWISE, OF PRODUCTS SOLD, SERVICED OR FURNISHED UNDER THIS AGREEMENT OR IN CONNECTION HEREWITH. APC DISCLAIMS ALL IMPLIED WARRANTIES OF MERCHANTABILITY, SATISFACTION AND FITNESS FOR A PARTICULAR PURPOSE. APC EXPRESS WARRANTIES WILL NOT BE ENLARGED, DIMINISHED, OR AFFECTED BY AND NO OBLIGATION OR LIABILITY WILL ARISE OUT OF, APC RENDERING OF TECHNICAL OR OTHER ADVICE OR SERVICE IN CONNECTION WITH THE PRODUCTS. THE FOREGOING WARRANTIES AND REMEDIES ARE EXCLUSIVE AND IN LIEU OF ALL OTHER WARRANTIES AND REMEDIES. THE WARRANTIES SET FORTH ABOVE CONSTITUTE APC’S SOLE LIABILITY AND PURCHASER'S EXCLUSIVE REMEDY FOR ANY BREACH OF SUCH WARRANTIES. APC WARRANTIES EXTEND ONLY TO PURCHASER AND ARE NOT EXTENDED TO ANY THIRD PARTIES.
15NetShelter Four-Post Rack—Installation
IN NO EVENT SHALL APC, ITS OFFICERS, DIRECTORS, AFFILIATES OR EMPLOYEES BE LIABLE FOR ANY FORM OF INDIRECT, SPECIAL, CONSEQUENTIAL OR PUNITIVE DAMAGES, ARISING OUT OF THE USE, SERVICE OR INSTALLATION, OF THE PRODUCTS, WHETHER SUCH DAMAGES ARISE IN CONTRACT OR TORT, IRRESPECTIVE OF FAULT, NEGLIGENCE OR STRICT LIABILITY OR WHETHER APC HAS BEEN ADVISED IN ADVANCE OF THE POSSIBLY OF SUCH DAMAGES. SPECIFICALLY, APC IS NOT LIABLE FOR ANY COSTS, SUCH AS LOST PROFITS OR REVENUE, LOSS OF EQUIPMENT, LOSS OF USE OF EQUIPMENT, LOSS OF SOFTWARE, LOSS OF DATA, COSTS OF SUBSTITUENTS, CLAIMS BY THIRD PARTIES, OR OTHERWISE.
NO SALESMAN, EMPLOYEE OR AGENT OF APC IS AUTHORIZED TO ADD TO OR VARY THE TERMS OF THIS WARRANTY. WARRANTY TERMS MAY BE MODIFIED, IF AT ALL, ONLY IN WRITING SIGNED BY AN APC OFFICER AND LEGAL DEPARTMENT.
Warranty claims
Customers with warranty claims issues may access the APC customer support network through the Support page of the APC Web site, www.apc.com/support. Select your country from the country selection pull-down menu at the top of the Web page. Select the Support tab to obtain contact information for customer support in your region.
NetShelter Four-Post Rack—Installation16


03/2010990-3298B-001
APC Worldwide Customer SupportCustomer support for this or any other APC product is available at no charge in any of the following ways:
• Visit the APC Web site to access documents in the APC Knowledge Base and to submit customer support requests.– www.apc.com (Corporate Headquarters)
Connect to localized APC Web sites for specific countries, each of which provides customer support information.
– www.apc.com/support/Global support searching APC Knowledge Base and using e-support.
• Contact the APC Customer Support Center by telephone or e-mail.– Local, country-specific centers: go to www.apc.com/support/contact for contact information.
For information on how to obtain local customer support, contact the APC representative or other distributors from whom you purchased your APC product.
Entire contents copyright 2010 American Power Conversion Corporation. All rights reserved. Reproduction in whole or in part without permission is prohibited. APC, the APC logo, NetShelter, and InfraStruxure are
trademarks of American Power Conversion Corporation. All other trademarks, product names, and corporate names are the property of their respective owners and are used for informational purposes only.