vms portal
TRANSCRIPT

Conversant Solutions Pte Ltd: 8 Temasek Boulevard, Suntec Tower 3, #20-01, Singapore 038988 Tel: (+65) 6226 1138 Email: [email protected]
www.conversant.com.sg Company Registration No. 200201246G
VMS Portal
A Technical Guide
Version 7.3.0
16/08/2021

VMS Technical Guide v7.3.0
Page 2 of 46
Contents 1 Overview ......................................................................................................................................................... 4
2 Log In ............................................................................................................................................................... 5
3 Dashboard ....................................................................................................................................................... 6
3.1 Recent Jobs ............................................................................................................................................. 6
3.2 VMS Usage ........................................................................................................................................... 6
4 VOD Transcoding ............................................................................................................................................. 7
4.1 Create a Job ............................................................................................................................................. 7
Step 1: Tell us where your source video is located. ........................................................................................ 7
4.1.2 Step 2: Add output formats, protection settings. ............................................................................. 10
4.1.3 Step 3: Choose how and where to distribute your output. .............................................................. 13
4.1.4 Step 4: Tell us how to notify once your job is completed ................................................................. 15
4.2 Watch Folder ......................................................................................................................................... 16
4.2.1 + Add Watch Folder........................................................................................................................... 16
4.2.2 Uploading Files to the Watch Folder under strict mode ................................................................... 24
4.2.3 Uploading Files to the Watch Folder, under no-strict mode ............................................................ 27
4.3 Current Jobs .......................................................................................................................................... 27
4.3.1 Filter .................................................................................................................................................. 27
4.3.2 View ................................................................................................................................................... 28
4.3.3 Delete ................................................................................................................................................ 28
4.3.4 Transcoding progress ........................................................................................................................ 29
4.3.5 Re-send notification for VOD job ...................................................................................................... 29
4.3.6 Redo failed job .................................................................................................................................. 29
4.3.7 Filter .................................................................................................................................................. 30
4.3.8 View ................................................................................................................................................... 30
4.3.9 Delete ................................................................................................................................................ 30
4.4 Transcoding Presets .............................................................................................................................. 30
4.4.1 + Add Preset Group ........................................................................................................................... 31
4.4.2 View ................................................................................................................................................... 32
4.4.3 Delete ................................................................................................................................................ 33
5 Settings .......................................................................................................................................................... 34
5.1 SwiftServe CDN ..................................................................................................................................... 34
5.1.1 + New SwiftServe CDN ...................................................................................................................... 34
VMS Technical Guide v7.3.0
Page 3 of 46
5.1.2 Edit .................................................................................................................................................... 35
5.1.3 Delete ................................................................................................................................................ 35
5.2 File Transfer........................................................................................................................................... 35
5.2.1 + Add ................................................................................................................................................. 36
5.2.2 Edit .................................................................................................................................................... 36
5.2.3 Delete ................................................................................................................................................ 37
5.3 Verimatrix DRM ..................................................................................................................................... 37
5.3.1 Add Verimatrix DRM ......................................................................................................................... 37
5.3.2 Edit .................................................................................................................................................... 38
5.3.3 Delete ................................................................................................................................................ 38
5.4 Provisioning ........................................................................................................................................... 38
5.4.1 just-in-time transmuxing ................................................................................................................... 38
5.4.2 HLS/DASH Configuration ................................................................................................................... 38
5.4.3 Thumbnail Seeking Configuration ..................................................................................................... 39
5.4.4 Customized file name of manifest m3u8 for HLS or mpd for MPEG-DASH ...................................... 39
5.5 Notification ........................................................................................................................................... 39
5.5.1 Add Notification ................................................................................................................................ 40
5.5.2 List Notification ................................................................................................................................. 40
5.5.3 Remove Notification ......................................................................................................................... 40
6 Analytics ........................................................................................................................................................ 42
6.1 VOD Transcoding/Transmuxing Usage .................................................................................................. 42
7 HLS + FairPlay or DASH + Widevine ............................................................................................................... 43
8 Technical Support.......................................................................................................................................... 45
9 Copyright and Confidentiality ....................................................................................................................... 46
9.1 Copyright Statement ............................................................................................................................. 46
9.2 Confidentiality Statement ..................................................................................................................... 46

VMS Technical Guide v7.3.0
Page 4 of 46
1 Overview
The VMS Portal used to create and monitor jobs, and look at usage for the VMS cloud
transcoding service. Users can log in to VMS to transcode, DRM protect, and deliver
transcoded content through CDN services.
This guide will provide complete instructions on how to use the VMS Portal including the
modules; Dashboard, VOD Transcoding, Settings and Analytics.

VMS Technical Guide v7.3.0
Page 5 of 46
2 Log In
Open a web browser and navigate to https://portal.swiftfederation.com/. Enter a valid
Username & Password, and then press the Sign In button.
The SwiftFederation Portal will open on the Jobs module of the portal.
Click Services -> VMS on header of this portal to enter the service portal of VMS.
VMS Technical Guide v7.3.0
Page 6 of 46
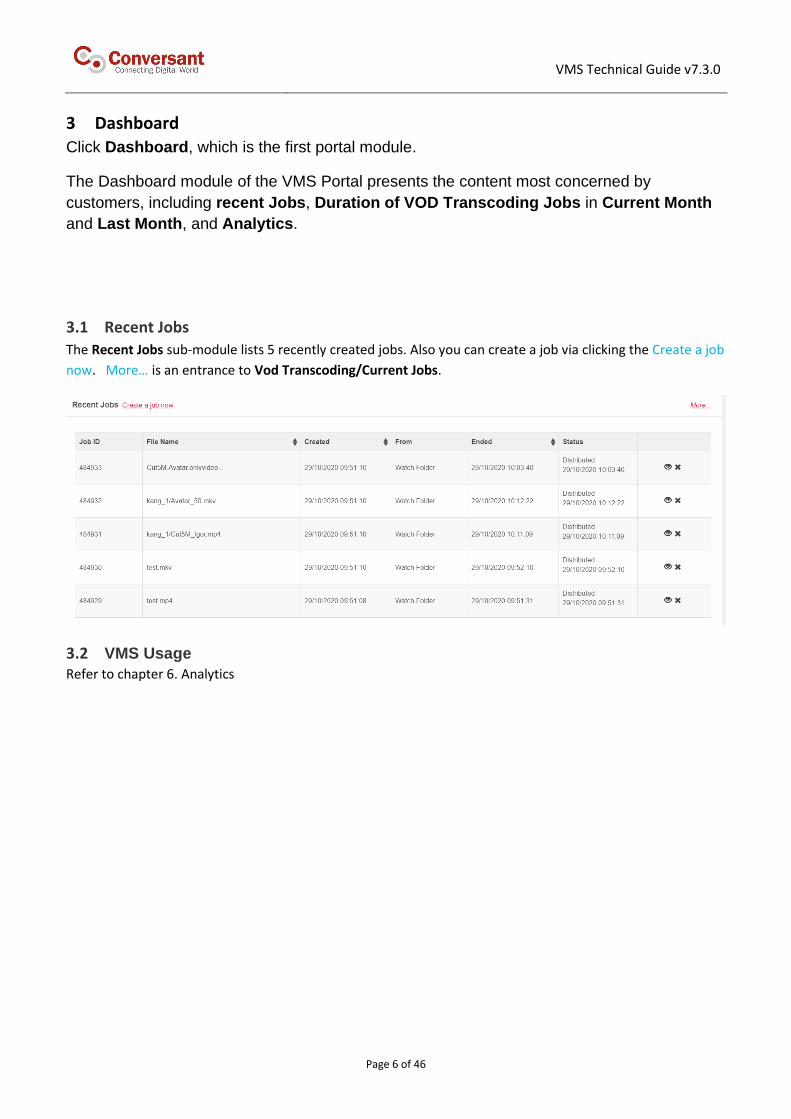
3 Dashboard
Click Dashboard, which is the first portal module.
The Dashboard module of the VMS Portal presents the content most concerned by
customers, including recent Jobs, Duration of VOD Transcoding Jobs in Current Month
and Last Month, and Analytics.
3.1 Recent Jobs
The Recent Jobs sub-module lists 5 recently created jobs. Also you can create a job via clicking the Create a job
now. More… is an entrance to Vod Transcoding/Current Jobs.
3.2 VMS Usage Refer to chapter 6. Analytics

VMS Technical Guide v7.3.0
Page 7 of 46
4 VOD Transcoding
Click VOD Transcoding, which is the second portal module.
The VOD Transcoding module of the VMS Portal has four sub-modules; Create a Job, Watch Folder, Current Jobs, and Transcoding Presets.
4.1 Create a Job
The + Create a Job sub-module has 4 steps that are needed to setup a new transcoding job.
Step 1: Tell us where your source video is located.
Click the + Create a Job tab under the Jobs listing. The first screen will be Step 1: Tell us
where your source video is located.
There are 5 options for Step 1; FTP, HTTP, SFTP, WebDAV and S3. In all options filling in
the required information will automatically fill the path information for source location that is in
the green outlined box above the FTP, HTTP, SFTP, WebDAV and S3 options. Please
prepare corresponding data transmission in Settings / Data Transmission ahead.
4.1.1.1 FTP
1. Click Pull from FTP.
2. Select an available configured FTP, or you may immediate add a FTP configuration
and select accordingly. All configured FTP’s are set up in Settings > Data
Transmission.

VMS Technical Guide v7.3.0
Page 8 of 46
4.1.1.2 HTTP
1. Click Pull from HTTP.
2. Select an available configured HTTP. All configured HTTP’s are set up in Settings >
Data Transmission.
4.1.1.3 SFTP
1. Click Pull from SFTP.
2. Select an available configured SFTP. All configured SFTP’s are set up in Settings >
Data Transmission.
4.1.1.4 WebDAV
1. Click Pull from WebDAV.
VMS Technical Guide v7.3.0
Page 9 of 46
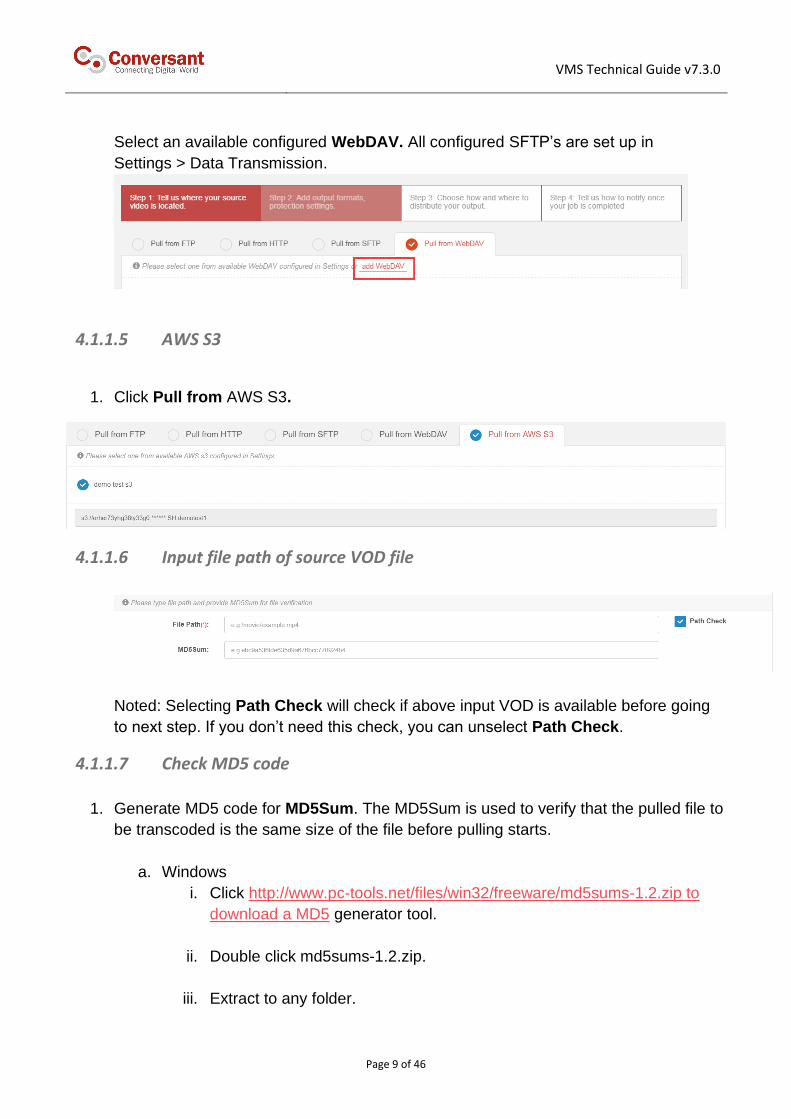
Select an available configured WebDAV. All configured SFTP’s are set up in
Settings > Data Transmission.
4.1.1.5 AWS S3
1. Click Pull from AWS S3.
4.1.1.6 Input file path of source VOD file
Noted: Selecting Path Check will check if above input VOD is available before going
to next step. If you don’t need this check, you can unselect Path Check.
4.1.1.7 Check MD5 code
1. Generate MD5 code for MD5Sum. The MD5Sum is used to verify that the pulled file to
be transcoded is the same size of the file before pulling starts.
a. Windows
i. Click http://www.pc-tools.net/files/win32/freeware/md5sums-1.2.zip to
download a MD5 generator tool.
ii. Double click md5sums-1.2.zip.
iii. Extract to any folder.

VMS Technical Guide v7.3.0
Page 10 of 46
iv. Open a command prompt and change directory to the folder you
extracted to in step iii.
v. Type md5sums *****. (**** must be the exact file path and name for the
file are having pulled for transcoding.)
b. Linux
i. Type which md5sum and hit Enter.
ii. Type /usr/bin/md5sum *****. (**** must be the exact file path and name
for the file are having pulled for transcoding.)
c. MAC
i. Type which md5 and hit Enter.
ii. Type /s/bin/md5 *****. (**** must be the exact file path and name for the
file are having pulled for transcoding.)
2. Enter or copy & paste the MD5 code into the MD5Sum box on VMS.
3. Enter the file path.
4. Add additional Audio or Subtitle track(s). Select type Audio or Subtitle, then select
the corresponding Language, and enter File Path of the track.
Click Next to proceed to Step 2.
4.1.2 Step 2: Add output formats, protection settings.
1. Select the Transcoding Preset Group. Transcoding Preset Groups can be created under
Settings > Transcoding Presets. Also you can enable transmuxing only option

VMS Technical Guide v7.3.0
Page 11 of 46
Transmuxing only: Transmuxing is a repackaging, packetizing, or rewrapping process. Without
changing the actual audio or video content, compressed audio and video is (re)packaged into different
delivery formats. For instance, you might have H.264 content, and by changing the container it’s
packaged in, you can deliver it as HTTP Live Streaming (HLS), Smooth Streaming, or Dynamic Adaptive
Streaming over HTTP (DASH).
Audio only: only audio tracks in raw VOD will be transmuxed into HLS or MP4. DASH will be
supported by further version.
2. Multiple select HLS or MPEG-DASH or Smooth Streaming or MP4
a) HLS: choose options.
i. Multiplex Video and Audio: By selecting Multiplex video and audio, it
meant that a video file and an audio track can be placed in a single .ts
file.
ii. 2 pass: 2 pass refers to transcoding a video in a 2-steps compression.
This process might take a longer duration however this results in a better
quality for the transcoded video. If this option is selected, 2 pass
transcoding will enable.
iii. Black frame removal: Black frame removal is a value-added service for
transcoding or transmuxing process. When enabled, it automatically
removes blank data/black frames (gaps that are previously created to
facilitate the insertion of advertisements) from the media files. This
option might incur additional fees, please contact your Account Manager
for more details.
iv. Choose Protection Settings; None, Verimatrix DRM, or AES
a. None: There will be any security protection for this transcoding
job meaning that the outputted file can be easily copied.
b. Verimatrix DRM: This transcoded job will have the added
security protection of Verimatrix DRM on HLS in order to prevent
unauthorized copying.

VMS Technical Guide v7.3.0
Page 12 of 46
c. AES: This transcoded job will be encrypted to help prevent
unauthorized copying.
b) MPEG-DASH: choose options:
i. 2 pass: 2 pass refers to transcoding a video in a 2-steps compression.
This process might take a longer duration however this results in a
better quality for the transcoded video. If this option is selected, 2 pass
transcoding will enable.
ii. Black frame removal: Black frame removal is a value-added service
for transcoding or transmuxing process. When enabled, it
automatically removes blank data/black frames (gaps that are
previously created to facilitate the insertion of advertisements) from
the media files. This option might incur additional fees, please contact
your Account Manager for more details.
c) Smooth Streaming: choose options
i. 2 pass: 2 pass refers to transcoding a video in a 2-steps compression.
This process might take a longer duration however this results in a
better quality for the transcoded video. If this option is selected, 2 pass
transcoding will enable.
ii. Black frame removal: Black frame removal is a value-added service
for transcoding or transmuxing process. When enabled, it automatically
removes blank data/black frames (gaps that are previously created to
facilitate the insertion of advertisements) from the media files. This
option might incur additional fees, please contact your Account
Manager for more details.
d) MP4: choose options
i. 2 pass: 2 pass refers to transcoding a video in a 2-steps compression.
This process might take a longer duration however this results in a
better quality for the transcoded video. If this option is selected, 2 pass
transcoding will enable.
ii. Fragmented MP4: Checked will have this transcoding job being
outputting a single fragmented MP4 which is able to be played during
downloading by players. Unchecked will have this transcoding job
being outputting a single common MP4 which is able to be played only
after completing downloading.
iii. Black frame removal: Black frame removal is a value-added service
for transcoding or transmuxing process. When enabled, it automatically
removes blank data/black frames (gaps that are previously created to

VMS Technical Guide v7.3.0
Page 13 of 46
facilitate the insertion of advertisements) from the media files. This
option might incur additional fees, please contact your Account
Manager for more details.
3. Enable or disable thumbnails for seeking
JPG is the supported format of thumbnails for seeking.
4. Enable or disable GPU Transcoding. If this option is unselected, CPU Transcoding is
as default.
Noted: GPU Transcoding is used for transcoding of high quality input and output
streams. e.g. 4K, 2K. GPU transcoding is different from CPU Transcoding is that it cost
the resource of individual Nvidia GPU graphics cards, rather than CPU resource of
server.
5. Click Next to proceed to Step 3.
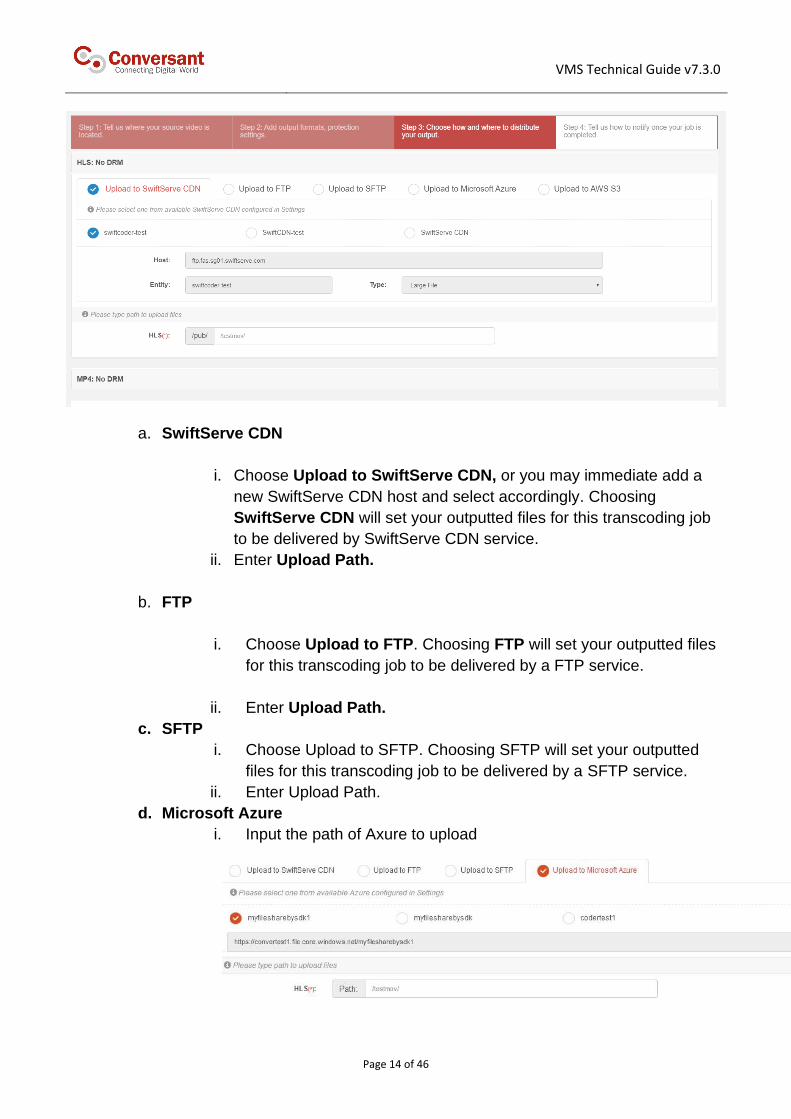
4.1.3 Step 3: Choose how and where to distribute your output.
Completed output can be delivered through either SwiftServe CDN or FTP or SFTP or
Microsoft Azure or AWS S3 for each combination of protocols and protections selected in
Step 2.
VMS Technical Guide v7.3.0
Page 14 of 46
a. SwiftServe CDN
i. Choose Upload to SwiftServe CDN, or you may immediate add a
new SwiftServe CDN host and select accordingly. Choosing
SwiftServe CDN will set your outputted files for this transcoding job
to be delivered by SwiftServe CDN service.
ii. Enter Upload Path.
b. FTP
i. Choose Upload to FTP. Choosing FTP will set your outputted files
for this transcoding job to be delivered by a FTP service.
ii. Enter Upload Path.
c. SFTP
i. Choose Upload to SFTP. Choosing SFTP will set your outputted
files for this transcoding job to be delivered by a SFTP service.
ii. Enter Upload Path.
d. Microsoft Azure
i. Input the path of Axure to upload

VMS Technical Guide v7.3.0
Page 15 of 46
Noted: This feature must be enabled at the backend by us and we also
need customer provide the information of their own Microsoft Azure offline.
e. AWS S3
i. Input the path of S3 to upload
Then click Next to proceed to Step 4.
4.1.4 Step 4: Tell us how to notify once your job is completed
Notification provides this function: After VMS has completed a Job, it will send a series of
information (status, playback URL and so on) to the User’s pre-configured Notification Host.
This Host is the API address of HTTP within Users’ own CMS system. When the Host
received the information from VMS, Users can then update the system’s internal data.
Click Finish to add your job to the queue for transcoding.

VMS Technical Guide v7.3.0
Page 16 of 46
4.2 Watch Folder
The Watch Folder sub-module has 2 functions in VMS; Configuration Settings, + Add
Watch Folder, Uploading Files to the Watch Folder.
Watch Dog of VMS will check the remotely folder on FTP, SFTP, or WebDAV for uploaded
files that are waiting to be ingested periodically, which is pre-configured in Watch Folder.
Watch Dog creates a job automatically according configuration settings of this Watch Folder.
Then media server of VMS starts the transcoding process for them. Default period is 1
minute.
4.2.1 + Add Watch Folder
Click + Add Watch Folder to launch the + New Watch Folder process window.
It has 4 steps that are needed to setup a new Watch Folder.
4.2.1.1 Step 1: Tell us where your source video is located.

VMS Technical Guide v7.3.0
Page 17 of 46
Enter a Name for the new Watch Folder.
⚫ FTP
1. Click Pull from FTP.
2. Select an available configured FTP. All configured FTP’s are set up in Settings > FTP.
3. Select strict mode or not.
Chapter 4.2.2 explains more detail under strict mode.
Chapter 4.2.3 explains more detail under no-strict mode.
4. Enter the file path.
⚫ WebDAV
1. Click Pull from WebDAV.
2. Select an available configured WebDAV, or you may immediately add a WebDAV
configuration and select accordingly. All configured WebDAV are set up in
Settings > Data Transmission.

VMS Technical Guide v7.3.0
Page 18 of 46
3. Select strict mode or not.
Chapter 4.2.2 explains more detail under strict mode.
Chapter 4.2.3 explains more detail under no-strict mode.
⚫ SFTP 1. Click Pull from SFTP.
2. Select an available configured SFTP, or you may immediate add a SFTP
configuration and select accordingly. All configured SFTP are set up in Settings >
Data Transmission.
3. Select strict mode or not.
Chapter 4.2.2 explains more detail under strict mode.
Chapter 4.2.3 explains more detail under no-strict mode.
Strict mode is mandatory for FairPlay or Widevine over Verimatrix Multi-rights DRM
⚫ AWS S3 1. Click Pull from AWS S3.
2. Select an available configured S3, or you may immediate add a S3 configuration
and select accordingly. All configured S3 are set up in Settings > Data
Transmission.
3. Select strict mode or not.
Chapter 4.2.2 explains more detail under strict mode.
Chapter 4.2.3 explains more detail under no-strict mode.
Strict mode is mandatory for FairPlay or Widevine over Verimatrix Multi-rights DRM
Click Next to proceed to Step 2.
Noted: Selecting Path Check will check if above input VOD is available before going to next
step. If you don’t need this check, you can unselect Path Check.

VMS Technical Guide v7.3.0
Page 19 of 46
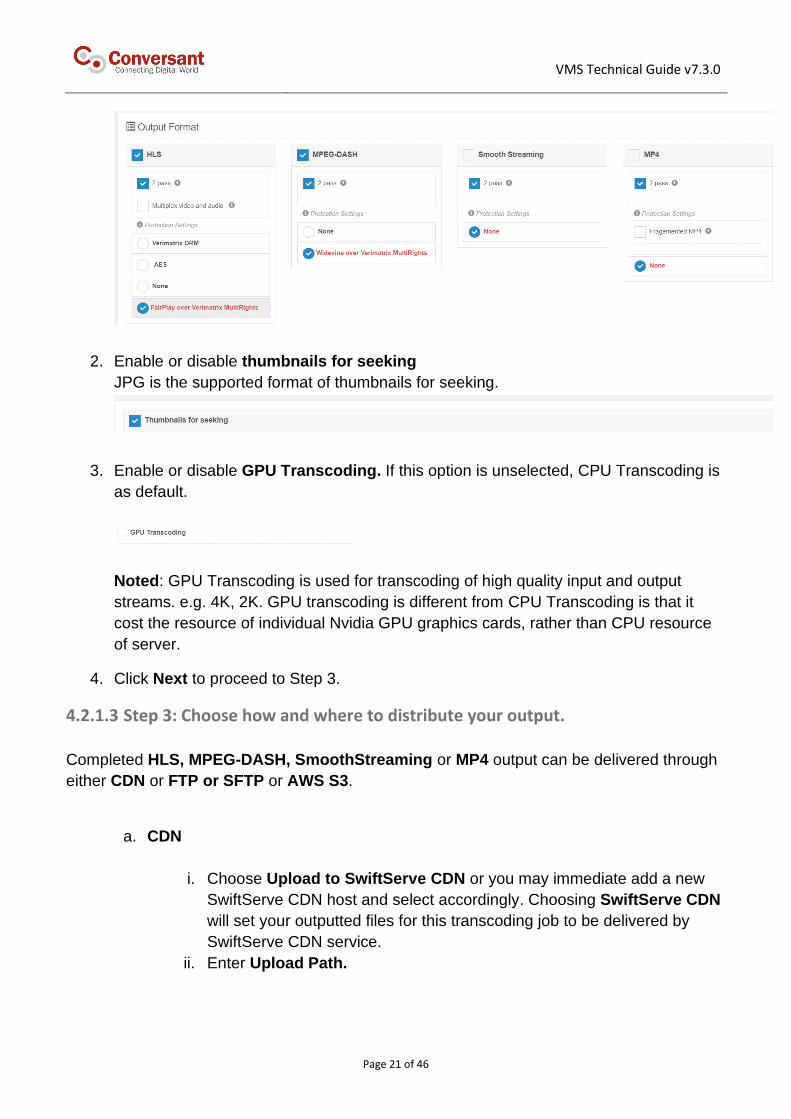
4.2.1.2 Step 2: Add output formats, protection settings.
1. Select at least a Transcoding Preset, or select Transmuxing Only. All available
Transcoding Presets can be created under VOD Transcoding > Transcoding Presets.
6. Multiple select HLS or MPEG-DASH or Smooth Streaming or MP4
a) HLS: choose options.
i. Multiplex Video and Audio: By selecting Multiplex video and audio, it
meant that a video file and an audio track can be placed in a single .ts file.
ii. 2 pass: 2 pass refers to transcoding a video in a 2-steps compression.
This process might take a longer duration however this results in a better
quality for the transcoded video. If this option is selected, 2 pass
transcoding will enable.
iii. Choose Protection Settings; None, Verimatrix DRM, or AES
a. None: There will be any security protection for this transcoding
job meaning that the outputted file can be easily copied.
b. Verimatrix DRM: This transcoded job will have the added
security protection of Verimatrix DRM on HLS in order to prevent
unauthorized copying.
c. AES: This transcoded job will be encrypted to help prevent
unauthorized copying.
d. FairPlay over Verimatrix Multi-Rights: This FairPlay is
integrated by Verimatrix MultiRights DRM service.
Noted: Strict mode is mandatory if FairPlay over Verimatrix
MultiRights is to select. All information required by FairPlay and
Verimatrix MultiRights will be collected via csv file.
VMS Technical Guide v7.3.0
Page 20 of 46
b) MPEG-DASH: choose options:
i. 2 pass: 2 pass refers to transcoding a video in a 2-steps compression.
This process might take a longer duration however this results in a
better quality for the transcoded video. If this option is selected, 2 pass
transcoding will enable.
ii. Choose Protection Settings; None, Verimatrix DRM, or AES
a. None: There will be any security protection for this transcoding
job meaning that the outputted file can be easily copied.
b. Widevine over Verimatrix Multi-Rights: This Widevine is
integrated by Verimatrix MultiRights DRM service.
c. PlayReady over Verimatrix Multi-Rights: This PlayReady is
integrated by Verimatrix MultiRights DRM service.
Noted: Strict mode is mandatory if either Widevine over Verimatrix
MultiRights or PlayReady over Verimatrix MultiRights is to select. All
information required by Widevine or PlayReady over Verimatrix
MultiRights will be collected via csv file.
c) Smooth Streaming: choose options
i. 2 pass: 2 pass refers to transcoding a video in a 2-steps compression.
This process might take a longer duration however this results in a
better quality for the transcoded video. If this option is selected, 2 pass
transcoding will enable.
d) MP4: choose options
i. 2 pass: 2 pass refers to transcoding a video in a 2-steps compression.
This process might take a longer duration however this results in a
better quality for the transcoded video. If this option is selected, 2 pass
transcoding will enable.
VMS Technical Guide v7.3.0
Page 21 of 46
2. Enable or disable thumbnails for seeking
JPG is the supported format of thumbnails for seeking.
3. Enable or disable GPU Transcoding. If this option is unselected, CPU Transcoding is
as default.
Noted: GPU Transcoding is used for transcoding of high quality input and output
streams. e.g. 4K, 2K. GPU transcoding is different from CPU Transcoding is that it
cost the resource of individual Nvidia GPU graphics cards, rather than CPU resource
of server.
4. Click Next to proceed to Step 3.
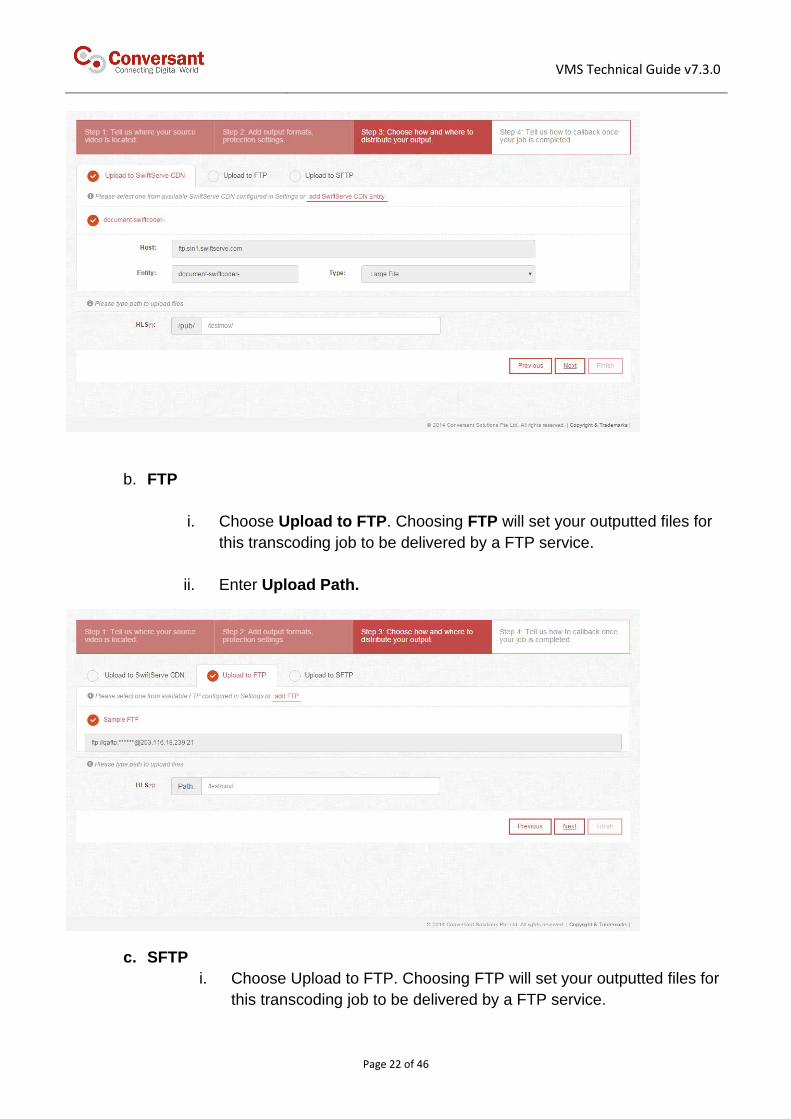
4.2.1.3 Step 3: Choose how and where to distribute your output.
Completed HLS, MPEG-DASH, SmoothStreaming or MP4 output can be delivered through
either CDN or FTP or SFTP or AWS S3.
a. CDN
i. Choose Upload to SwiftServe CDN or you may immediate add a new
SwiftServe CDN host and select accordingly. Choosing SwiftServe CDN
will set your outputted files for this transcoding job to be delivered by
SwiftServe CDN service.
ii. Enter Upload Path.
VMS Technical Guide v7.3.0
Page 22 of 46
b. FTP
i. Choose Upload to FTP. Choosing FTP will set your outputted files for
this transcoding job to be delivered by a FTP service.
ii. Enter Upload Path.
c. SFTP
i. Choose Upload to FTP. Choosing FTP will set your outputted files for
this transcoding job to be delivered by a FTP service.

VMS Technical Guide v7.3.0
Page 23 of 46
ii. Enter Upload Path.
d. AWS S3
i. Input the path of S3 to upload
Click Next to proceed to Step 4.
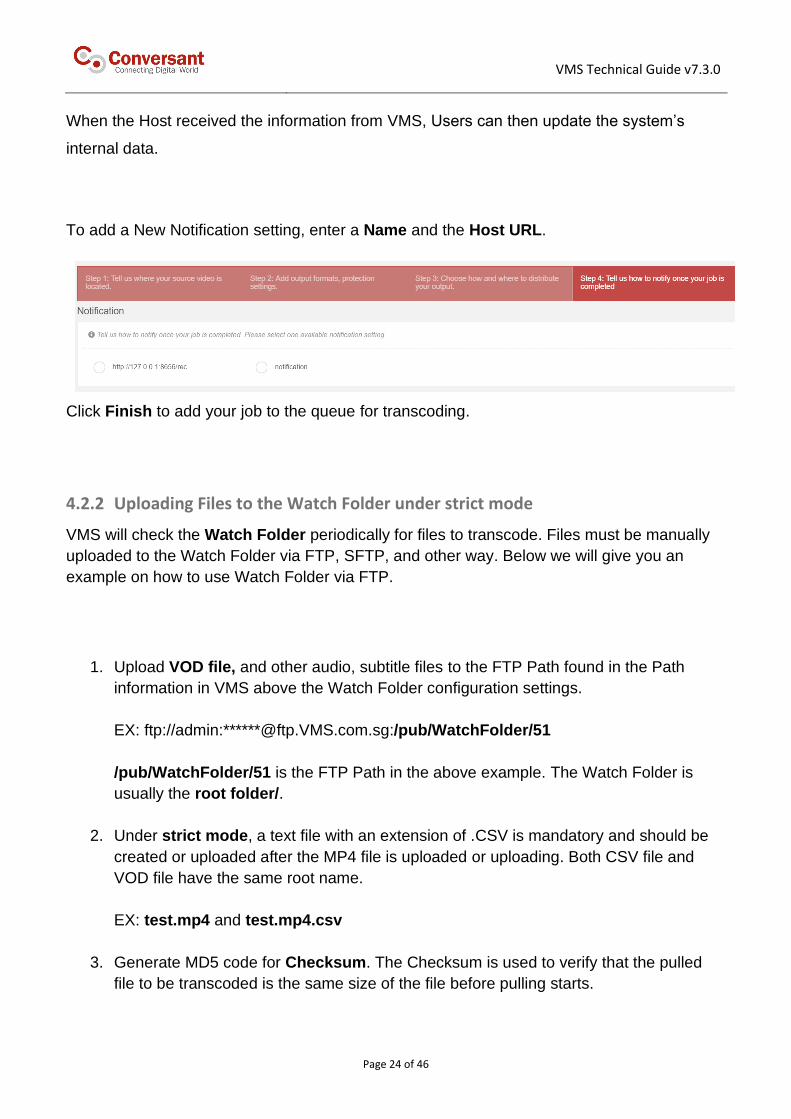
4.2.1.4 Step 4: Tell us how to notify once your job is completed
Notification provides this function: After VMS has completed creating a Job, it will send a
series of information (status, playback URL and so on) to the User’s pre-configured
Notification Host. This Host is the API address of HTTP within Users’ own CMS system.
VMS Technical Guide v7.3.0
Page 24 of 46
When the Host received the information from VMS, Users can then update the system’s
internal data.
To add a New Notification setting, enter a Name and the Host URL.
Click Finish to add your job to the queue for transcoding.
4.2.2 Uploading Files to the Watch Folder under strict mode
VMS will check the Watch Folder periodically for files to transcode. Files must be manually
uploaded to the Watch Folder via FTP, SFTP, and other way. Below we will give you an
example on how to use Watch Folder via FTP.
1. Upload VOD file, and other audio, subtitle files to the FTP Path found in the Path
information in VMS above the Watch Folder configuration settings.
EX: ftp://admin:******@ftp.VMS.com.sg:/pub/WatchFolder/51
/pub/WatchFolder/51 is the FTP Path in the above example. The Watch Folder is
usually the root folder/.
2. Under strict mode, a text file with an extension of .CSV is mandatory and should be
created or uploaded after the MP4 file is uploaded or uploading. Both CSV file and
VOD file have the same root name.
EX: test.mp4 and test.mp4.csv
3. Generate MD5 code for Checksum. The Checksum is used to verify that the pulled
file to be transcoded is the same size of the file before pulling starts.

VMS Technical Guide v7.3.0
Page 25 of 46
a. Windows
i. Click http://www.pc-tools.net/files/win32/freeware/md5sums-1.2.zip to
download a MD5 generator tool.
ii. Double click md5sums-1.2.zip.
iii. Extract to any folder.
iv. Open a command prompt and change directory to the folder you
extracted to in step iii.
v. Type md5sums *****. (**** must be the exact file path and name for the
file are having pulled for transcoding.)
b. Linux
i. Type which md5sum and hit Enter.
ii. Type /usr/bin/md5sum *****. (**** must be the exact file path and name
for the file are having pulled for transcoding.)
c. MAC
i. Type which md5 and hit Enter.
ii. Type /s/bin/md5 *****. (**** must be the exact file path and name for the
file are having pulled for transcoding.)
4. Enter or copy & paste [byte],[md5sum] into the CSV file.
e.g. 3900485, 7820efec216d85dd696974d81bf98d13
5. If you want to add external audio or subtitle into this transcoding job with VOD, please
add content under [byte], [md5sum] following below template
audio [audio_language]:[audio_file_path]:[audio_file_size]
subtitle [subtitle _language]:[ subtitle_file_path]:[ subtitle _file_size]
Noted: [audio_file_path] and [ subtitle_file_path] must be relative path according
the root folder of your FTP account or relative path according your VOD file.
e.g according root folder of ftp audio eng:/demo/sample_eng.mp3:3647456,chs:/demo/sample_chs.mp3: 36645468 subtitle eng:/demo/sample_eng.srt:23478,chs:/demo/sample_chs.srt:24565
e.g according VOD file audio eng: sample_eng.mp3:3647456,chs: sample_chs.mp3: 36645468
subtitle eng: sample_eng.srt:23478,chs: sample_chs.srt:24565

VMS Technical Guide v7.3.0
Page 26 of 46
6. If you want to add FairPlay over Verimatrix Multi-Rights DRM on HLS or Widevine
over Verimatrix Multi-Rights DRM into this transcoding job with VOD, please add
content [siteId], [contentId] following below template
audio [audio_language]:[audio_file_path]:[audio_file_size]
subtitle [subtitle _language]:[ subtitle_file_path]:[ subtitle _file_size]
drm [siteId], [contentId]
e.g.
path bytes
|-sample.mp4 83718758
|-sample.mp4.csv
|-sample_eng.mp3 6678507
|-sample_chi.mp3 6938910
|-sample_eng.srt 3786
|-sample_chi.srt 4516
$ md5sum sample.mp4
66ac44c0b91ec828d92462a9bf4f58e4 sample.mp4
$ cat sample.mp4.csv:
83718758,66ac44c0b91ec828d92462a9bf4f58e4
audio eng:sample_eng.mp3:6678507,chi:sample_chi.mp3:6938910
subtitle eng:sample_eng.srt:3786,chi:sample_chi.srt:4516
drm 2818,sample_content
Noted: Please refer to document of Verimatrix Multi-Rights for more information on
siteId and content Id.
7. Save CSV file and Upload CSV file to the FTP Path found in the Path information in
VMS above the Watch Folder configuration settings.
EX: ftp://admin:******@ftp.VMS.com.sg:/pub/WatchFolder/51
VMS Technical Guide v7.3.0
Page 27 of 46
/pub/WatchFolder/51 is the FTP Path in the above example.
8. A transcoding job will automatically be created for the VOD within 1 minute. This job
will be handled if you don't have any mistake. Otherwise you will find that job is failed
caused by something on portal also.
4.2.3 Uploading Files to the Watch Folder, under no-strict mode
There are 3 differences between strict mode and no-strict mode:
1. CSV file is not required any more.
2. VOD file, audio files, and subtitle files must be under the same folder.
3. Follow the naming rule of audio files and subtitle files
Naming rule of audio files: [VOD root name]_[language].[mp3 or aac]
Naming rule of subtitle files: [VOD root name]_[language].srt
Noted: [languge] reference to ISO 639-2 language code (3-letter lowercase code)
4.3 Current Jobs
The Current Jobs sub-module has 4 functions that may be available for a transcoding job that
was created within the last 30 days under View. The Current Jobs listing can also be filtered
down to a narrower listing of jobs by Status, From, Format, and Protection as well as down
to one job by searching by a distinct file name.
The Current Jobs listing shows Job ID, File Name, Output Format, Created, From,
Started, Ended, Distribution, Status, and Function Operation.
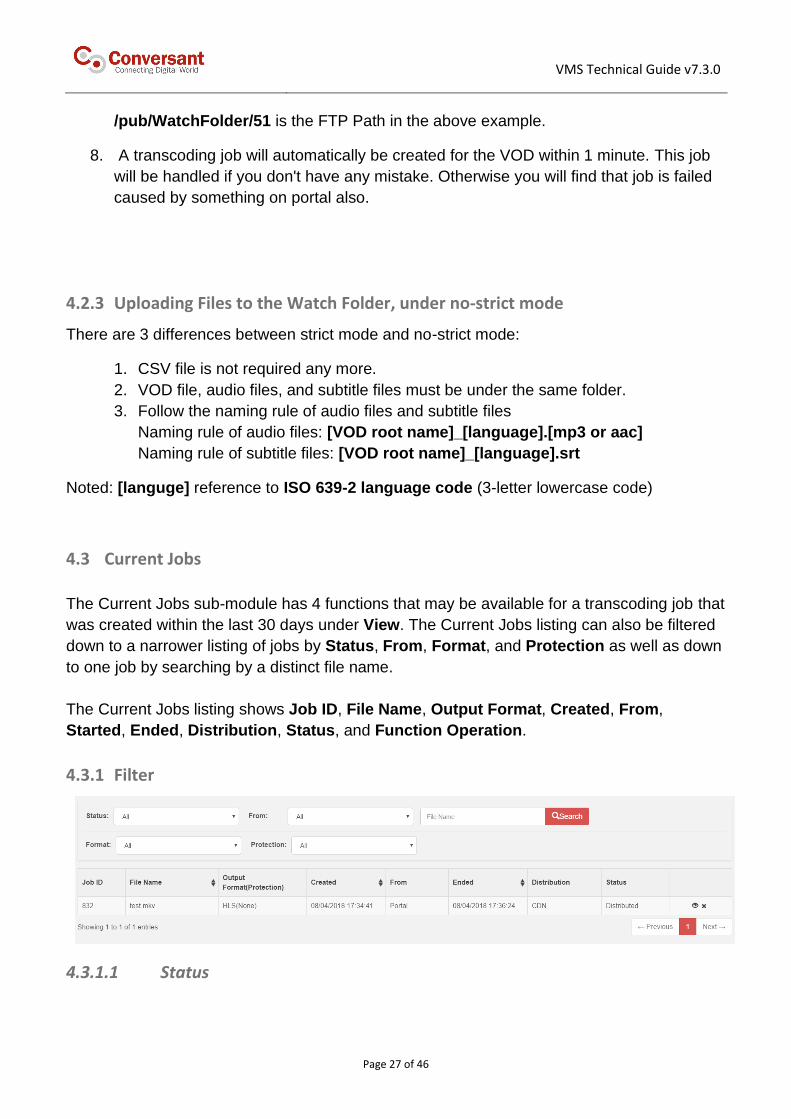
4.3.1 Filter
4.3.1.1 Status

VMS Technical Guide v7.3.0
Page 28 of 46
Click the Status dropdown arrow to choose which status (Success, Not Started, Pulling,
Pulled, Transcoding, Transcoded, Protecting, Protected, Uploading, and Failed) or All. The
Current Jobs listing will refresh based on the filter chosen.
4.3.1.2 From
Click the From dropdown arrow to choose which from (Portal, Watch Folder, and API) or All.
The Current Jobs listing will refresh based on the filter chosen.
4.3.1.3 Format
Click the Format dropdown arrow to choose which format (HLS, MP4, and HLS/MP4) or All.
The Current Jobs listing will refresh based on the filter chosen.
4.3.1.4 Search
Enter the file name in the File Name box and click Search. The Current Jobs listing will
refresh based on the file name entered if a file with that name is in the job listing.
4.3.2 View
Click the View icon on the right side of any job listed to view the job details of any job.
4.3.3 Delete
Click the Delete icon on the right side of any failed or successful job listed to delete.

VMS Technical Guide v7.3.0
Page 29 of 46
4.3.4 Transcoding progress
View the detail page of VOD job and the progress of transcoding is presented as below percentage.
4.3.5 Re-send notification for VOD job
Click the resend button to re-send the notification for current VOD job.
4.3.6 Redo failed job
Click the Sync icon to redo some failed jobs. It usually makes sense for these failed job
caused by network issue during ingestion or distribution.

VMS Technical Guide v7.3.0
Page 30 of 46
4.3.7 Filter
4.3.7.1 Period
Click the Period dropdown arrow to choose which time period (30-60 days, 61–90 days, > 90
days) or All. The Archived Jobs listing will refresh based on the filter chosen.
4.3.7.2 Status
Click the Status dropdown arrow to choose which status (Success, Not Started, Pulling,
Pulled, Transcoding, Transcoded, Protecting, Protected, Uploading, and Failed) or All. The
Archived Jobs listing will refresh based on the filter chosen.
4.3.7.3 Search
Enter the file name in the File Name box and click Search. The Archived Jobs listing will
refresh based on the file name entered if a file with that name is in the job listing.
4.3.8 View
Click the View icon on the right side of any job listed to view the job details of any job.
4.3.9 Delete
Click the Delete icon on the right side of any failed or successful job listed to delete.
4.4 Transcoding Presets
The Transcoding Format Presets sub-module has a listing where current Transcoding Preset
groups that are custom created by users can be viewed or deleted, and a function to create
Transcoding Preset group.
The Transcoding Presets listing shows Group Id, Name, Presets, Description, and
Function Operation.
VMS Technical Guide v7.3.0
Page 31 of 46
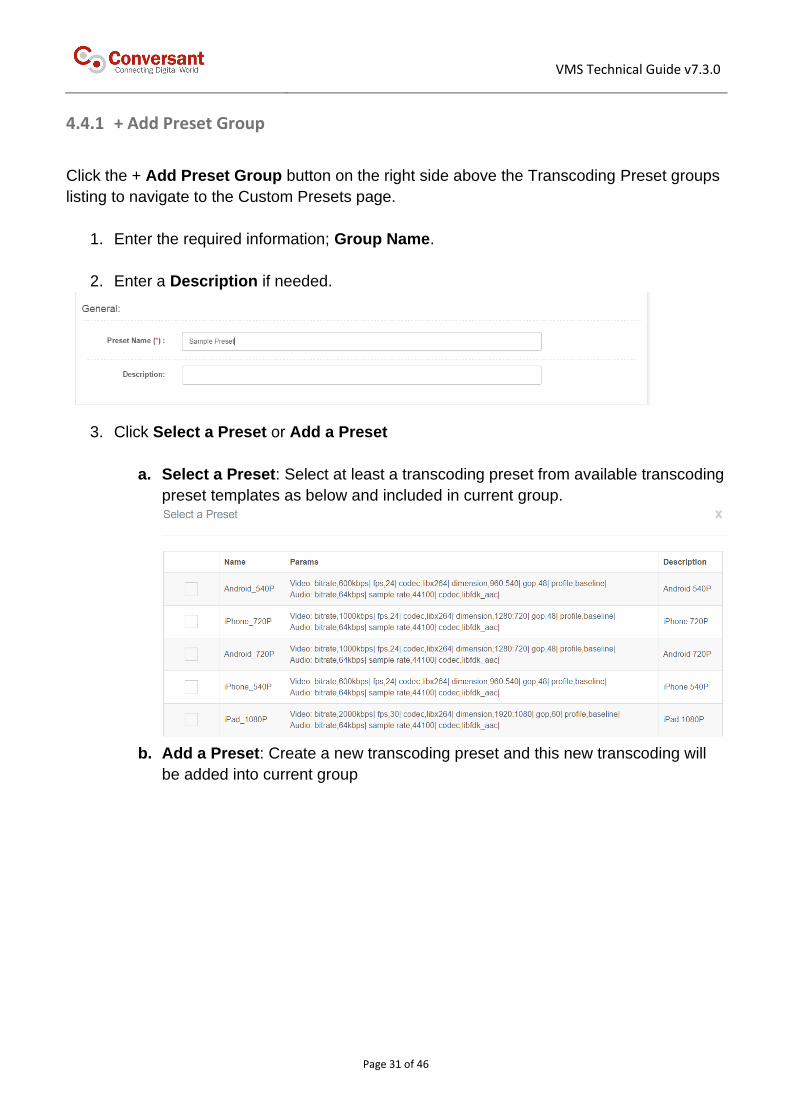
4.4.1 + Add Preset Group
Click the + Add Preset Group button on the right side above the Transcoding Preset groups
listing to navigate to the Custom Presets page.
1. Enter the required information; Group Name.
2. Enter a Description if needed.
3. Click Select a Preset or Add a Preset
a. Select a Preset: Select at least a transcoding preset from available transcoding
preset templates as below and included in current group.
b. Add a Preset: Create a new transcoding preset and this new transcoding will
be added into current group

VMS Technical Guide v7.3.0
Page 32 of 46
4. All transcoding presets in current group are listed in below table.
5. Click Submit when finished. Your Transcoding preset will show in Transcoding presets
table.
4.4.2 View
Click the View icon under Function Operation to view detailed information for any
Transcoding Preset.

VMS Technical Guide v7.3.0
Page 33 of 46
4.4.3 Delete
Click the Delete icon under Function Operation to permanently delete any Transcoding
Preset.

VMS Technical Guide v7.3.0
Page 34 of 46
5 Settings
Click Settings, which is the third portal module.
The Settings module of VMS has six sub-modules; File Transfer, SwiftServe CDN,
Verimatrix DRM, Notification
5.1 SwiftServe CDN
SwiftServe CDN profiles can be added, edited, or deleted. The SwiftServe CDN profiles set
up and listed here are the same ones that will be available for to be used for ingestion and
delivery of content.
5.1.1 + New SwiftServe CDN
Click the red + New SwiftServe CDN button in the upper right area to launch the New
SwiftServe CDN window.
1. Enter the required Name and Entity.
2. Choose the required Entity Type.
3. Enter the required FTP information; Username, Password, and Host. The green
outlined FTP box will automatically fill when this information is entered.
4. Enter the required URL address to access your own SwiftServe CDN.
5. Click Submit when finished to complete.

VMS Technical Guide v7.3.0
Page 35 of 46
5.1.2 Edit
Click the Edit icon under Function Operation to change detailed information for any
SwiftServe CDN profile.
1. Change any information.
2. Click Submit when finished to complete.
5.1.3 Delete
Click the Delete icon on the right side of a SwiftServe CDN profile in the listing to
permanently delete a SwiftServe CDN profile.
5.2 File Transfer
File Transfer can be added, edited, or deleted. The File Transfer set up and listed here are
the same ones that will be available for to be used for ingestion and delivery of content. Now
we support FTP, HTTP, SFTP, WebDAV, AWS S3 as File Transfer.

VMS Technical Guide v7.3.0
Page 36 of 46
5.2.1 + Add
Click the red + Add button in the upper right area to launch the New File Transfer window.
1. Select Type
2. Enter the required Name.
3. Enter the required information; Username, Password, Host and so on. The green
outlined FTP box will automatically fill when this information is entered.
4. Click Submit when finished to complete.
Noted: Please input all information from S3 as below for AWS S3 type of data transmission.
5.2.2 Edit
Click the Edit icon under Function Operation to change detailed information for any Data
Transmission profile.
1. Change any information.
VMS Technical Guide v7.3.0
Page 37 of 46
2. Click Submit when finished to complete.
5.2.3 Delete
Click the Delete icon on the right side of a File Transfer profile in the listing to permanently
delete a FTP profile.
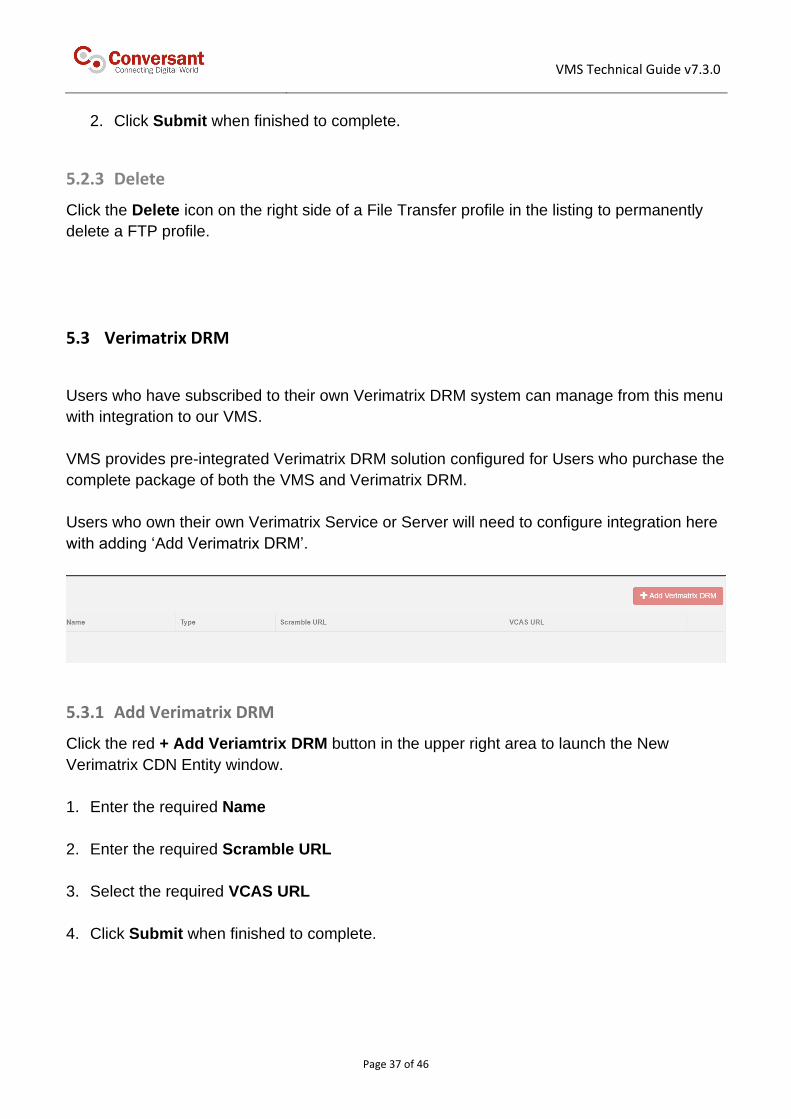
5.3 Verimatrix DRM
Users who have subscribed to their own Verimatrix DRM system can manage from this menu
with integration to our VMS.
VMS provides pre-integrated Verimatrix DRM solution configured for Users who purchase the
complete package of both the VMS and Verimatrix DRM.
Users who own their own Verimatrix Service or Server will need to configure integration here
with adding ‘Add Verimatrix DRM’.
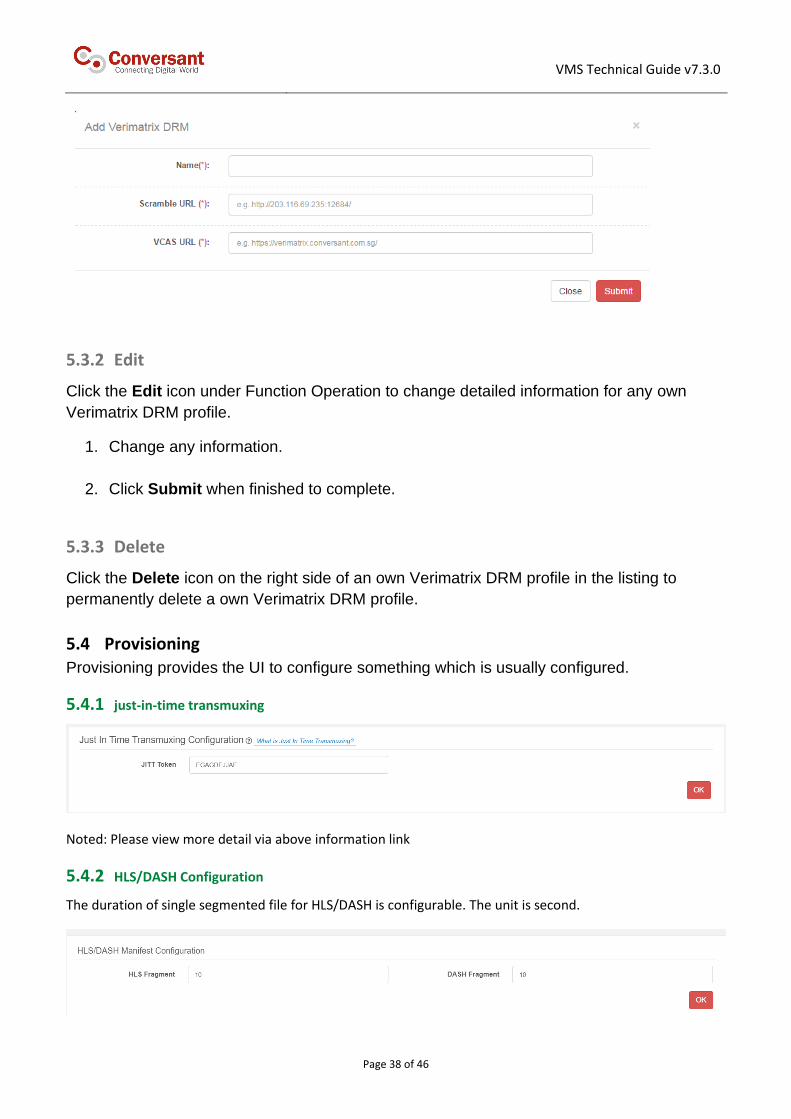
5.3.1 Add Verimatrix DRM
Click the red + Add Veriamtrix DRM button in the upper right area to launch the New
Verimatrix CDN Entity window.
1. Enter the required Name
2. Enter the required Scramble URL
3. Select the required VCAS URL
4. Click Submit when finished to complete.
VMS Technical Guide v7.3.0
Page 38 of 46
5.3.2 Edit
Click the Edit icon under Function Operation to change detailed information for any own
Verimatrix DRM profile.
1. Change any information.
2. Click Submit when finished to complete.
5.3.3 Delete
Click the Delete icon on the right side of an own Verimatrix DRM profile in the listing to
permanently delete a own Verimatrix DRM profile.
5.4 Provisioning Provisioning provides the UI to configure something which is usually configured.
5.4.1 just-in-time transmuxing
Noted: Please view more detail via above information link
5.4.2 HLS/DASH Configuration
The duration of single segmented file for HLS/DASH is configurable. The unit is second.

VMS Technical Guide v7.3.0
Page 39 of 46
Click OK button to submit this change.
5.4.3 Thumbnail Seeking Configuration
Input the interval for thumbnails. Unit is second.
Input the number of cell images in Sprite Image.
Input the width and height of Sprite Image.
Input the width and height for cell image.
Input the margin and padding for cell image.
Enable Sprite Image or Not.
Click OK button to submit this change.
5.4.4 Customized file name of manifest m3u8 for HLS or mpd for MPEG-DASH
Input the customized name and you can use the variable {file_name}.
Click OK button to submit.
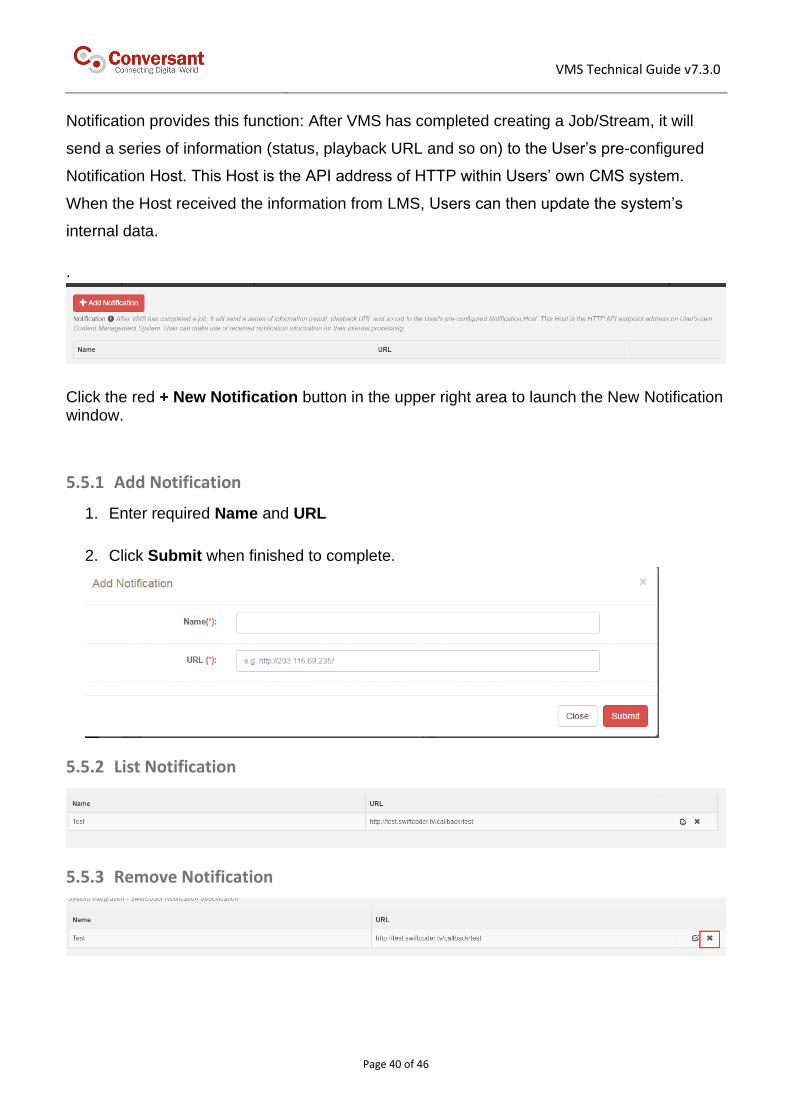
5.5 Notification
VMS Technical Guide v7.3.0
Page 40 of 46
Notification provides this function: After VMS has completed creating a Job/Stream, it will
send a series of information (status, playback URL and so on) to the User’s pre-configured
Notification Host. This Host is the API address of HTTP within Users’ own CMS system.
When the Host received the information from LMS, Users can then update the system’s
internal data.
.
Click the red + New Notification button in the upper right area to launch the New Notification window.
5.5.1 Add Notification
1. Enter required Name and URL
2. Click Submit when finished to complete.
5.5.2 List Notification
5.5.3 Remove Notification
VMS Technical Guide v7.3.0
Page 41 of 46

VMS Technical Guide v7.3.0
Page 42 of 46
6 Analytics
Click Analytics, which is the fourth portal module.
This module presents usage data for VOD Transcoding/Transmuxing.
6.1 VOD Transcoding/Transmuxing Usage
This usage consists all monthly usage of VOD transcoding/transmuxing for current customer
in last year or this year. You can find two different usage charts within two different
units(Hours and GB).
Both charts consist Transcoding usage for UHD presets, Transcoding usage for HD
presets, Transcoding usage for SD presets, Transmuxing usage for UHD presets,
Transmuxing usage for HD presets, and Transmuxing usage for SD presets within
different colour curves.
You can switch to monthly usage data for last year or this year. Also you can download all data as excel format

VMS Technical Guide v7.3.0
Page 43 of 46
7 Business Usage
Click Business Usage, which is the fifth module.
This module supports to export excel files for month-based usage reporting on VOD
transcoding.
1. Select month of usage report
2. Get the transcoding usage for above spec month as below
3. Click and download CSV report as below
VMS Technical Guide v7.3.0
Page 44 of 46
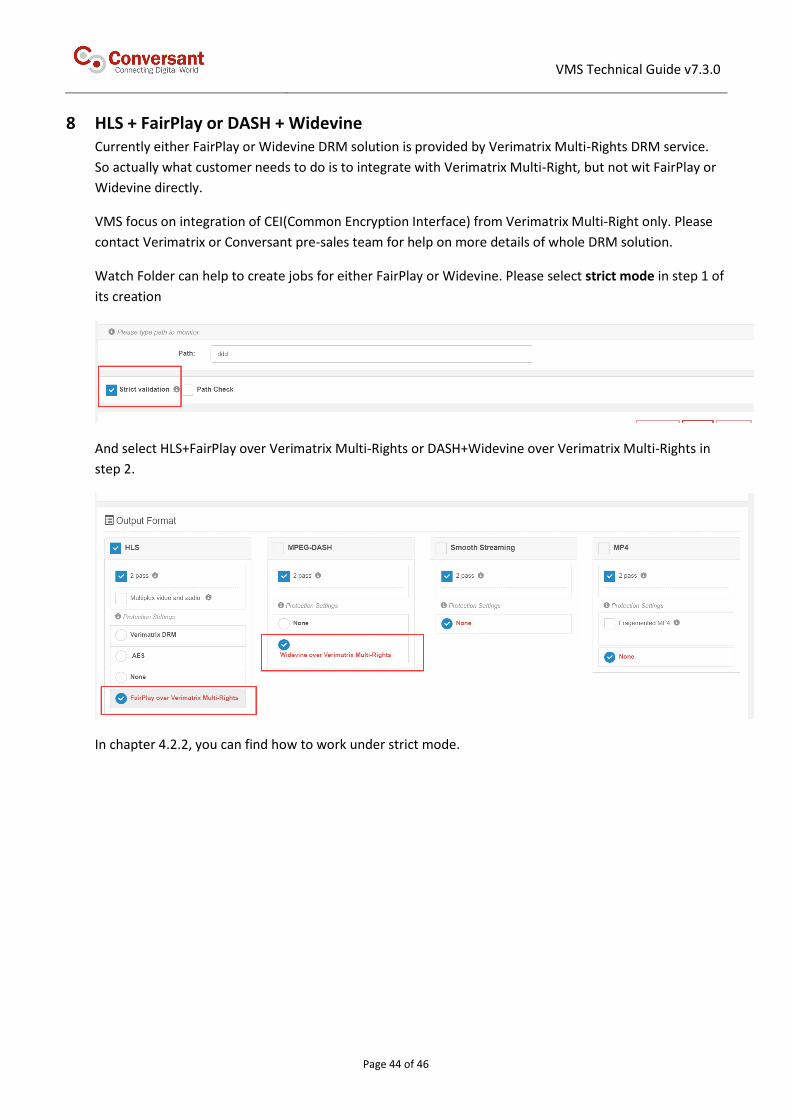
8 HLS + FairPlay or DASH + Widevine Currently either FairPlay or Widevine DRM solution is provided by Verimatrix Multi-Rights DRM service.
So actually what customer needs to do is to integrate with Verimatrix Multi-Right, but not wit FairPlay or
Widevine directly.
VMS focus on integration of CEI(Common Encryption Interface) from Verimatrix Multi-Right only. Please
contact Verimatrix or Conversant pre-sales team for help on more details of whole DRM solution.
Watch Folder can help to create jobs for either FairPlay or Widevine. Please select strict mode in step 1 of
its creation
And select HLS+FairPlay over Verimatrix Multi-Rights or DASH+Widevine over Verimatrix Multi-Rights in
step 2.
In chapter 4.2.2, you can find how to work under strict mode.

VMS Technical Guide v7.3.0
Page 45 of 46
9 Technical Support
Please contact VMS Technical Support at [email protected] if you need further
technical support.

VMS Technical Guide v7.3.0
Page 46 of 46
10 Copyright and Confidentiality
10.1 Copyright Statement
Copyright © Conversant Solutions Pte Ltd, 2021, all rights reserved.
No part of this documentation may be reproduced in any form or by any means or be used to make any
derivative work (including translation, transformation or adaptation) without explicit written consent of
Conversant Solutions Pte Ltd.
Registered address: 8 Temasek Boulevard, Suntec Tower 3, #20-01, Singapore 038988
Company Registration No. 201019734M
10.2 Confidentiality Statement
All information contained in this documentation is provided in commercial confidence for the sole purpose of
adjudication by Conversant Solutions Pte Ltd. The pages of this document shall not be copied published or
disclosed wholly or in part to any party without Conversant Solutions Pte Ltd prior permission in writing, and
shall be held in safe custody.