yarvik smartphone manual - amazon s3
TRANSCRIPT

Yarvik smartphone manual
file:///Users/elroy/Desktop/Yarvik/Manual/index.html[13-02-13 17:02:33]
ManualHandleidingAnleitungManuelManualManualeManualInstrukcja obsługiManuálManuálManualManuellHåndbokPriročnikPriručnikLeírásНаръчникManualРуководствоПосібник користувачаΟδηγίες Χρήσης

Yarvik smartphone manual
file:///Users/elroy/Desktop/Yarvik/Manual/manual_en.html[13-02-13 17:02:46]
Index SELECT LANGUAGE
1 Prior to first use2 Smartphone Startup3 Android HomeScreen3.1 Adding widgets andshortcuts to your HomeScreen3.2 Setting a Wallpaper3.3 Application Menu4 Setting up yourSmartphone4.1 Settings Menu4.2 WiFi & Bluetooth4.3 Audio Profiles4.4 Display4.5 Apps4.6 Storage & MicroSDmemory Access4.7 Language & input4.8 Date & time5 Apps6 Phone Calls7 Messaging8 Warranty Statement9 GNU/GPL LicensingInfo10 Important

Yarvik smartphone manual
file:///Users/elroy/Desktop/Yarvik/Manual/manual_en.html[13-02-13 17:02:46]
Information
1 Prior to first use
Dear user,
Thank you for purchasing our product.To ensure you a quick and convenient use of your new Yarvik Smartphone, please read these instructionscarefully prior to use.
We hope you will absolutely enjoy your Yarvik Smartphone for the longest time possible!
Please note:
• Your Yarvik Smartphone is ahigh precision electronicproduct, do not try todisassemble the Smartphone, asthis will void your warranty andmay result in malfunctioning ofthe device;
• Avoid strong beating of or tothe product;
• Avoid using the Smartphone ina high or low temperatureenvironment, or in anyenvironment where the devicecan get in contact with moisture,dust or magnetic fields;
• Do not expose the Smartphoneto strong sunlight for anextended period of time;
• Don’t operate the touch screenof the Smartphone with sharpobjects, as this may result inscratching the screen surface;
• Using connected headphoneson the Smartphone for too longand/or setting the audio volumeup too high when usingheadphones may cause serioushearing damage;

Yarvik smartphone manual
file:///Users/elroy/Desktop/Yarvik/Manual/manual_en.html[13-02-13 17:02:46]
• Do not cross the road, drive amotor vehicle or bicycle whileusing the Smartphone withheadphones to avoid trafficaccidents;
• Only use permitted batteries,chargers and accessories withyour Yarvik Smartphone. Theuse of any other products withthe Smartphone can bedangerous and may violate thewarranty regulations;
• Only use a slightly wet cottoncloth to clean the Smartphone,and only use water to wetten thecotton cloth. The Smartphoneshould not be cleaned with anysort of (glass) cleaning aid.
You may go ahead and use your Yarvik Smartphone right out of the box, without charging the battery first.It is best for the battery to first run on the charge left in it, and to be fully recharged once it’s completelydrained for the first time.If the Smartphone isn’t switching on right out of the box, the battery is already completely drained and youshould of course recharge it first.
Return to index
2 SmartphoneStartup
When you first power on your Yarvik Smartphone, you will be presented the startup sequence.The very first startup may take a while, approximately 2-3 minutes.After the startup sequence the Smartphone has completed starting up and you will be presented the AndroidLock Screen.

Yarvik smartphone manual
file:///Users/elroy/Desktop/Yarvik/Manual/manual_en.html[13-02-13 17:02:46]
Android Lock Screen
Slide the lock bar (A) to the right to unlock the Smartphone. You will then be taken to the Android HomeScreen.
Return to index
3 Android Home Screen

Yarvik smartphone manual
file:///Users/elroy/Desktop/Yarvik/Manual/manual_en.html[13-02-13 17:02:46]
Android Home Screen
On top of the Smartphone’s screen you can always find the status bar.The status bar displays system information, while the lower menu bar contains the function buttons.
1 - Wi-Fi Signal Indicator2 - Cellular network reception for SIM1 and SIM2 and Battery Level Indicator3 - System Time4 - App Shortcuts5 - Widget (analog clock)6 - Back button - brings you back to the previous screen, or previous website when using the Browser7 - Home - brings you back to the Android Home Screen8 - App and widget menu9 - Multitask button
The home screen consists of multiple pages which can be accessed by swiping the home screen left/right.
To see what apps are running in the background, you can access the multitasking view by pressing themultitask button (9).

Yarvik smartphone manual
file:///Users/elroy/Desktop/Yarvik/Manual/manual_en.html[13-02-13 17:02:46]
Click on a running app in the multitask view to quickly switch to it. You can close running apps by longpressing it and clicking "Remove from list".
Return to index
3.1
Adding widgetsandshortcuts toyourHome Screen
To add a widget, press the app and widget button in the bottom center of your Home Screen:
In the following screen, you can find all the installed apps and widgets, both seperately viewable by pressing"Apps" or "Widgets" on top of the screen respectively.Press "Widgets" to view all available widgets. When showing all widgets, you can swipe the screen tobrowse to the next page (if available).Press and hold the desired widget to have the Home Screen show up and release the widget to any emptyspot on the home screen.
To add a shortcut to any app, press the app and widget button in the bottom center of your Home Screen:

Yarvik smartphone manual
file:///Users/elroy/Desktop/Yarvik/Manual/manual_en.html[13-02-13 17:02:46]
In the following screen, you can find all the installed apps and widgets, both seperately viewable by pressing"Apps" or "Widgets" on top of the screen respectively.Press "Apps" to view all installed apps.Press and hold the desired app to have the home screen show up and release the shortcut to any emptyspot on the Home Screen.
To remove widgets and/or app shortcuts from your Home Screen, press and hold them and drag them to theappeared "Remove" dustbin icon on top of your Home Screen.
Return to index
3.2 Setting aWallpaper
To change the Home Screen wallpaper, press and hold the Home Screen until the “Select Wallpaper from”menu comes up.You can choose from "Live Wallpapers" (animated wallpapers), "Gallery" (photo/video gallery) or"Wallpapers" (default static images).
Return to index
3.3 Application Menu
Press the app and widget button in the bottom center of your Home Screen:
When the system displays the widgets, press "Apps" to view all installed apps.
Here you can find all the pre-installed programs or “apps” as well as additional apps that you install.You can launch any app by just pressing the corresponding icon.

Yarvik smartphone manual
file:///Users/elroy/Desktop/Yarvik/Manual/manual_en.html[13-02-13 17:02:46]
Application Screen
Return to index
4Setting up yourYarvikSmartphone
4.1 Settings Menu
Press the Settings icon in the Application Menu to enter the Settings menu. In the Settings menu youcan find the options to set up your Yarvik Smartphone.

Yarvik smartphone manual
file:///Users/elroy/Desktop/Yarvik/Manual/manual_en.html[13-02-13 17:02:46]
Settings Menu
We will go through the most important parts:
Return to index
4.2 WiFi &Bluetooth
Wi-Fi
Set up a connection with a wireless Wi-Fi network.Slide the On/Off button to "On" to activate Wi-Fi.

Yarvik smartphone manual
file:///Users/elroy/Desktop/Yarvik/Manual/manual_en.html[13-02-13 17:02:46]
The available Wi-Fi networks appear in the network list at the right screen. Tap the network of your choice. Ifthe network is secured, you’re prompted to enter the network security key.
Press the “Connect” button and the Smartphone is connecting to the network.Once “Connected” appears underneath the network name and the wireless reception icon is shown in thebottom status bar, you’re successfully connected to the wireless network.
Viewing your Yarvik Smartphone's Wi-Fi MAC address
While in the Wi-Fi settings screen, click on the menu button in the bottom right corner.
Press "Advanced" in the unfolding menu.
Your Wi-Fi MAC address is displayed in the following "Advanced Wi-Fi" screen under "MAC address".
Bluetooth
Your Yarvik Smartphone is equipped with a built-in Bluetooth module for connecting with Bluetoothcompatible peripherals, like keyboards, speakers and headphones, but also with Bluetooth handsfreeheadsets and carkits.Slide the Bluetooth On/Off button to "On" to activate Bluetooth.
Once activated, your Yarvik Smartphone will automatically start searching for nearby Bluetooth devices. Youcan always manually search for Bluetooth devices by clicking "Search for Devices" in the top right corner ofthe screen.It may be required for the to be connected peripherals to be put in "pairing mode". Please refer to theinstructions manual of the concerning peripherals for this.
All discovered devices will appear in the "Available Devices" list:

Yarvik smartphone manual
file:///Users/elroy/Desktop/Yarvik/Manual/manual_en.html[13-02-13 17:02:46]
Click on the discovered Bluetooth device to pair your Yarvik Smartphone with it.The "Bluetooth pairing request" window will appear:
Most Bluetooth devices require a pin code to connect. This code usually is 0000 or 1234. Please refer to theinstructions manual of your Bluetooth device if the pin code is different.After you have entered the correct pin code, press "OK".
Your Yarvik Smartphone will now start pairing with your Bluetooth device, and after a few seconds theconnection will be completed, showing a "Connected" message underneath the concerning Bluetooth devicein the "Available Devices" list:
You can connect multiple Bluetooth devices to your Yarvik Smartphone for use at the same time (e.g.headset and keyboard).
Return to index
4.3 Audio Profiles
Here you can change the audio volume of the Smartphone, like only vibration or vibration and ringnotification for incoming calls/messages.
Return to index

Yarvik smartphone manual
file:///Users/elroy/Desktop/Yarvik/Manual/manual_en.html[13-02-13 17:02:46]
4.4 Display
Here you can change the brightness of the display, font sizes and the auto sleep time.Please note that the higher the display brightness, the higher the energy consumption. This will drain yourbattery substantially faster.If you don’t want the display to auto rotate as you tilt the Smartphone, you can enable/disable thisfunctionality in the Auto-rotate screen setting.
Return to index
4.5 Apps
Here you can manage applications that are installed on your Yarvik Smartphone.You can click apps that you have installed to see the app info and uninstall them if needed by using the“Uninstall” button.Please note that the preinstalled default applications (like e.g. the calculator) cannot be uninstalled.
Return to index
4.6
Storage &MicroSDmemoryAccess
Shows you the internal memory information. When a MicroSD card is present, you can also find the memoryinformation of the inserted card here.
Connecting your Yarvik Smartphone to a PC or Mac by USB
You can connect your Yarvik Smartphone to a PC or Mac using the provided USB cable.When connected to a computer, you can access the Smartphone's internal memory and, if present, aninserted MicroSD card as standard USB Mass Storage Device.
Please refer to the printed Quick Start Guide of your Yarvik Smartphone to determine the location of theSmartphone's USB port. Connect the USB cable to the USB port of your Yarvik Smartphone and to a freeUSB port on your computer.In the top side of your Smartphone's screen, two messages will appear shortly after each other:

Yarvik smartphone manual
file:///Users/elroy/Desktop/Yarvik/Manual/manual_en.html[13-02-13 17:02:46]
Once the second message "USB connected" appears, click on it.The following screen will appear:
Click on the button "Turn on USB storage".A notification window will appear:
Click on "OK" to confirm.The internal memory of your Yarvik Smartphone will now appear as Mass Storage Drive in your computer'sfile system, and can be used e.g. to copy files from and to your Yarvik Smartphone.If you have a MicroSD card in your Smartphone, the card will be recognized by the computer as a secondMass Storage Drive.
To stop using the Mass Storage Device function, click on the "Turn off USB storage" button and remove theUSB cable.

Yarvik smartphone manual
file:///Users/elroy/Desktop/Yarvik/Manual/manual_en.html[13-02-13 17:02:46]
Note: There are no hardware drivers needed to access the Yarvik Smartphone's memory. In the case yourcomputer prompts for any driver installation, you can simply ignore it.
Access your MicroSD cardin ES File Explorer
If you have inserted a MicroSD card in your Yarvik Smartphone, you can access its contents as following:
Open the ES File Explorer app and click on the Favorites button (with the blue star icon).
The Favorites menu now unfolds. Click on the "root" icon labeled with "/":
You will now reach the "root" of the Smartphone's file system, containing several files and folders.Locate and click on the "mnt" folder:
The "mnt" folder now opens, showing several folders:
The "sdcard" folder is the internal memory of your Yarvik Smartphone.

Yarvik smartphone manual
file:///Users/elroy/Desktop/Yarvik/Manual/manual_en.html[13-02-13 17:02:46]
The "sdcard2" folder is your MicroSD card (when inserted in the Smartphone's MicroSD slot).
You can, when available, also use the microsd2 shortcut in the earlier mentioned Favorites menu for quickaccess to your MicroSD card memory.
Return to index
4.7 Language &input
Use “Select language” to select the display language of your Yarvik Smartphone. This applies to all thescreen texts in the entire system.Under “Android keyboard” you may setup the onscreen keyboard of your Smartphone.
Return to index
4.8 Date & time
Here you can setup the date and the time for your Yarvik Smartphone.
Return to index
5 Apps
The Yarvik Smartphone will come with pre-installed Apps (see below examples):

Yarvik smartphone manual
file:///Users/elroy/Desktop/Yarvik/Manual/manual_en.html[13-02-13 17:02:46]
The appearance of app icons may change without prior notice.
Return to index6 Phone Calls
Making phone callsTo make a phone call with your Yarvik Smartphone, open the "Phone" application from your application
menu or Android home screen: Use the numeric phone keypad to enter the telephone number.

Yarvik smartphone manual
file:///Users/elroy/Desktop/Yarvik/Manual/manual_en.html[13-02-13 17:02:46]
Phone keypad.
To make international phone calls, requiring the '+' prefix, press and hold the '0' on the keypad until the '+'appears.
Press the call handling button to engage the phone call.
Press the call handling button to disengage the phone call.You can also make phone calls directly from your contacts from within the "People" application.
Recent calls are stored in the Call Log screen, accessible by pressing the Log button in the top ofPhone screen.Your contacts (from the earlier mentioned "People" app) can also be accessed directly from within the Phone
screen by pressing the button.
Incoming phone calls
When you receive a phone call on your Yarvik Smartphone, you will be presented with 3 options:
1 - Slide the circle up to ignore the incoming phone call and send an automated repsonse by text message;2 - Ignore the incoming phone call;3 - Answer the incoming phone call.

Yarvik smartphone manual
file:///Users/elroy/Desktop/Yarvik/Manual/manual_en.html[13-02-13 17:02:46]
Options during a phone call
1 - Show the phone keypad (e.g. for DTMF option menu's);2 - Enable/disable loud speaker function;3 - Mute microphone;4 - Put phone call on hold;5 - Menu with more options: add an additional phone call (conversation call) or record the phone call.
Call forwarding
You can set the call forwarding feature to forward all incoming phone calls to a specific phone number.
In the "Phone" app , press the menu button and select "Call settings".Select "Voice call", in which you can choose for "Call forwarding" to adjust your forwarding options.
Caller ID/Call waiting
With the Caller ID function of your Yarvik Smartphone, you can choose whether you want to send yournumber along with outgoing phone calls.
To adjust this, start the "Phone" app , press the menu button and select "Settings" - "Voice call" -"Additional settings" - "Caller ID".Within this same menu you can also enable/disable incoming phone calls when already engaged in a phoneconversation.
Return to index
7 Messaging
Your Yarvik Smartphone is capable of sending SMS and MMS messages. Please refer to your mobileservice provider for involved costs and additional costs for sending messages to or from foreign countries.
Sending SMS/MMS messages
Yarvik smartphone manual
file:///Users/elroy/Desktop/Yarvik/Manual/manual_en.html[13-02-13 17:02:46]
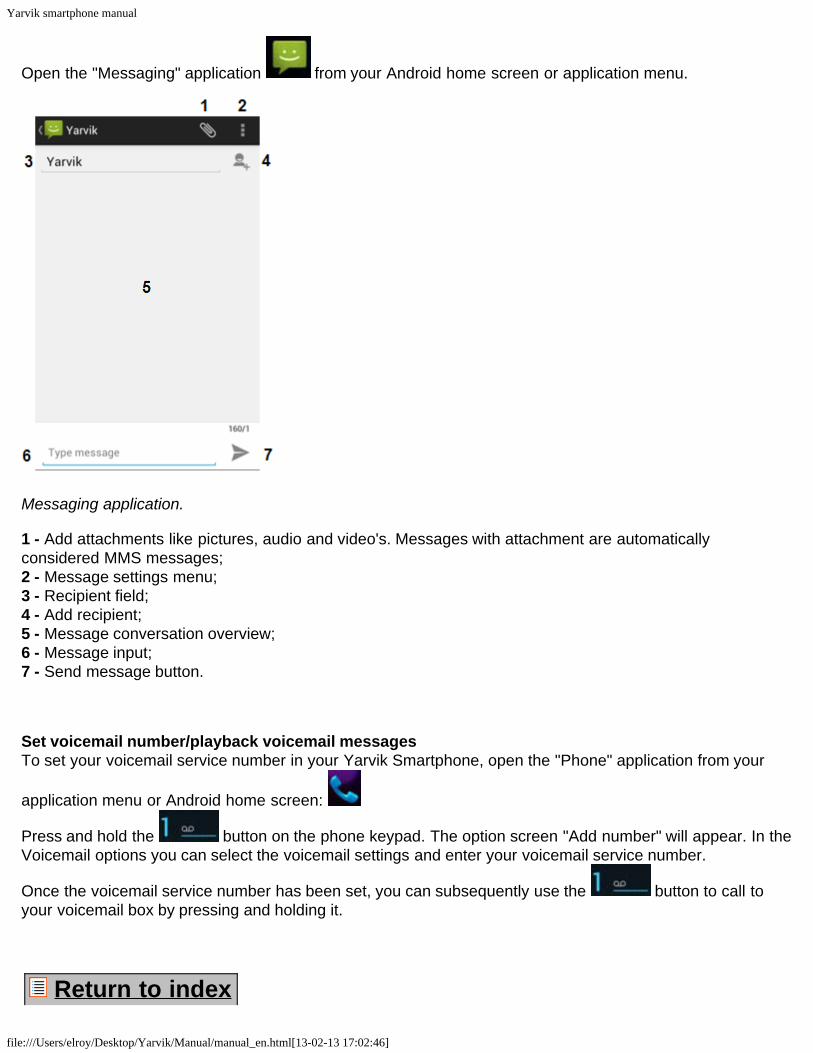
Open the "Messaging" application from your Android home screen or application menu.
Messaging application.
1 - Add attachments like pictures, audio and video's. Messages with attachment are automaticallyconsidered MMS messages;2 - Message settings menu;3 - Recipient field;4 - Add recipient;5 - Message conversation overview;6 - Message input;7 - Send message button.
Set voicemail number/playback voicemail messagesTo set your voicemail service number in your Yarvik Smartphone, open the "Phone" application from your
application menu or Android home screen:
Press and hold the button on the phone keypad. The option screen "Add number" will appear. In theVoicemail options you can select the voicemail settings and enter your voicemail service number.
Once the voicemail service number has been set, you can subsequently use the button to call toyour voicemail box by pressing and holding it.
Return to index
Yarvik smartphone manual
file:///Users/elroy/Desktop/Yarvik/Manual/manual_en.html[13-02-13 17:02:46]
8 WarrantyStatement
Yarvik warrants that the product purchased by Customer shall be free from defects in workmanship ormaterials for a period of 2 years from the date of purchase by Customer. If, at any time during the warrantyperiod, the product has a defect in workmanship or material, Customer should return the product to thedealer where the product has been purchased. Dealer shall repair or replace it (at Yarvik's sole option) withina reasonable period of time. An original invoice is required as proof of the purchase date. Yarvik's option withrespect to this matter shall be final.
This warranty does not cover defects or malfunctions resulting from software transfers, misuse, abusiveoperation, tampering, negligence, improper use, insufficient care or any act beyond the control of Yarvik.
IMPORTANT: When you buy a Smartphone from Yarvik, your Smartphone will be provided to you with thelatest stable firmware available for this specific model, at the time the unit was manufactured. Yarvik will notprovide support to products that have otherwise been modified by the end user, nor does Yarvik supportprogramming modifications to the firmware and software used in its products, and if any such modificationshave been made, all warranties shall be automatically void.
To avoid invalidating the warranty offered hereunder, Customer should use only the official software,applications and upgrades available from Yarvik's website at www.yarvik.com.No other software or firmware should be used, as such use will automatically void all warranties and support.Yarvik does not support the use of any software or firmware other than the software or firmware that wasinstalled on the product by the manufacturer or that is available from Yarvik's official web site atwww.yarvik.com. Yarvik explicitly declines to respond to any inquiries regarding unauthorized modifications,unauthorized software, and unauthorized firmware.
Return to index
9 GNU/GPL LicensingInformation
Please consult the legal information available on your Yarvik Smartphone under Settings – AboutSmartphone – Legal information (internet connection required) or visithttp://source.android.com/source/licenses.html for more information.
Return to index
10 ImportantInformation
Wireless LAN-Regulatory information
Depending on the model, the wireless LAN built-in into Smartphone devices can only be used in thefollowing countries: Austria, Belgium, Bulgaria, Czech Republic, Denmark, Finland, France, Germany,

Yarvik smartphone manual
file:///Users/elroy/Desktop/Yarvik/Manual/manual_en.html[13-02-13 17:02:46]
Greece, Hungary, Iceland, Ireland, Italy, Luxembourg, the Netherlands, Norway, Poland, Portugal, Romania,Slovakia, Slovenia, Spain, Sweden, Switzerland, Turkey and the United Kingdom.
Conditions of use
When using the IEEE 802.11b/g/n Wireless LAN standard, channels 1 to 13 (2.4 GHz...2.4835 GHz) areselectable for both indoor and outdoor use, however with restrictive conditions applying in France, Italy andNorway, as follows:
• France: When using this product indoor, all channels can be used without restrictions. Outdoor onlychannels 1 to 6 are allowed. This means that in Peer-to-Peer, the WLAN feature can only be used outside ifthe peer sets up the communication on an authorized channel (i.e., between 1 & 6). In infrastructure mode,please make sure the access point is configured to a channel from 1 to 6 before setting up the connection.
• Italy: Use of the RLAN network is governed: Disposal of Old Electrical & Electronic- with respect to private use, by the Legislative Decree of 1.8.2003, no. 259 (“Code of ElectronicCommunications”). In particular Article 104 indicates when the prior obtainment of a general authorization isrequired and Art. 105 indicates when free use is permitted;- with respect to the supply to the public of the WLAN access to telecom networks and services, by theMinisterial Decree 28.5.2003, as amended, and Art. 25 (general authorization for electronic communicationsnetworks and services) of the Code of electronic communications.
• Norway: Use of this radio equipment is not allowed in the geographical area within a radius of 20 km fromthe centre of Ny-Ålesund, Svalbard.
WEEESymbolInformation
Correct Disposal of This product (Waste Electrical & Electronic Equipment).
(Applicable in the European Union and other European countries with separate collection systems).
This marking shown on the product or its literature indicates that it should not be disposed with otherhousehold wasted at the end of its working life. To prevent possible harm to the environment or humanhealth from uncontrolled waste disposal, please separate this from other types of wastes and recycle itresponsibly to promote the sustainable reuse of material resources.Household users should contact either the retailer where they purchased this product, or their localgovernment office, for details of where and how they can take this item for environmentally safe recycling.Business users should contact their supplier and check the terms and conditions of the purchase contract.This product should not be mixed with other commercial wastes of disposal.
Disposal of waste batteries (applicable in the European Union and other European countries withseparate collection systems)
Yarvik smartphone manual
file:///Users/elroy/Desktop/Yarvik/Manual/manual_en.html[13-02-13 17:02:46]
Either of the symbols shown next may appear on the battery or on the packaging to indicate that the batteryprovided with this product shall not be treated as household waste. On certain batteries this symbol might beused in combination with a chemical symbol. The chemical symbols for mercury (Hg) or lead (Pb) are addedif the battery contains more than 0.0005% mercury or 0.004% lead. By ensuring these batteries are disposedof correctly, you will help prevent potentially negative consequences for the environment and human healthwhich could otherwise be caused by inappropriate waste handling of the battery. The recycling of thematerials will help to conserve natural resources. In case of products that for safety, performance or dataintegrity reasons require a permanent connection with an incorporated battery, this battery should bereplaced by qualified service staff only. To ensure that the battery will be treated properly, hand over theproduct at end-of-life to the applicable collection point for the recycling of electrical and electronicequipment.
For all other batteries, please view the section on how to remove the battery from the product safely. Handthe battery over to the applicable collection point for the recycling of waste batteries. For more detailedinformation about recycling of this product or battery, please contact your local Local government Office,your household waste disposal service or the shop where you purchased the product.
When travelling to and within the United States of America, please be aware that the U.S. Department ofTransportation (DOT) recently published new regulations that apply to passengers travelling with lithiummetal batteries and lithium-ion batteries.For detailed information, visit http://safetravel.dot.gov/whats_new_batteries.html.
Safety Information
Yarvik Smartphone device
• Yarvik is not responsible for any interference that you may experience or that may be caused whenoperating this device.
• Warning: This apparatus must be earthed.
Opening or dismantling the main unit or any of its accessories, for whatever reason, could lead to damagesthat are not covered by the guarantee.
• To avoid electrical shock, do not open the cabinet. Refer servicing to qualified personnel only.
• To prevent fire or shock hazard, do not expose your Smartphone device or any of its accessories to rain ormoisture.
• Do not use or store your Smartphone device in a location subject to heat sources, such as radiators or airducts; direct sunlight; excessive dust; moisture or rain; mechanical vibration or shock; strong magnets orspeakers that are not magnetically shielded; excessively high and low temperatures; and high humidity.

Yarvik smartphone manual
file:///Users/elroy/Desktop/Yarvik/Manual/manual_en.html[13-02-13 17:02:46]
• Turning off your Smartphone device with the power button does not disconnect the device completely frommains voltage. To disconnect it completely, unplug the AC adapter or the power cord from mains. Thesocket-outlet shall be installed near the equipment and shall be easily accessible.
• Audio and picture distortion may occur if this equipment is positioned in close proximity to any equipmentemitting electromagnetic radiation.
• This apparatus is also designed for IT power system with phase to phase voltage 230V, for customers inNorway.
• Observe the following precautions to provide adequate air circulation and to ensure normal reliableoperation:- Do not use the Smartphone device and/or the AC adapter while covered or wrapped in cloth. Ensure theAC adapter operates in a clear environment.- Turn off the Smartphone device before putting the device into a bag or a carrying case.
• Do not use your Smartphone device directly on your lap. The temperature of the base of the unit will riseduring normal operation and over time could result in discomfort or burns.
• Do not use your Smartphone device while walking. Listening to music with headphones or watching theLCD screen while walking may lead to an unexpected accident and result in personal injuries.
• Using connected headphones on the Smartphone device for too long and/or setting the audio volume uptoo high when using headphones may cause serious hearing damage.
• Avoid strong beating of or to the product.
• Don’t operate the touch screen of the Smartphone device with sharp objects, as this may result inscratching the screen surface.
• Only use permitted batteries, chargers and accessories with your Smartphone device. The use of any otherproducts with the device can be dangerous and may violate the warranty regulations.
• Only use a slightly wet cotton cloth to clean the device, and only use water to wetten the cotton cloth. TheSmartphone device should not be cleaned with any sort of (glass) cleaning aid.
Wireless functionality
• If radio interference with other devices occurs while using your Smartphone device, do not use the wirelessfunctionality. Use of the wireless functionality may cause a malfunction of the devices, resulting in anaccident.
• In some situations or environments, the use of the wireless functionality might be restricted by theproprietor of the building or responsible representatives of the organization, for example on board airplanes,in hospitals or in any other environment where the risk of interference with other devices or services isperceived or identified as harmful. If you are uncertain about the policy applying to the use of wirelessfunctionality in a specific organization or environment, you are encouraged to first ask for authorization priorto switching it on. Consult your physician or the manufacturer of personal medical devices (pacemakers,hearing aids, etc.) regarding any restrictions on the use of wireless functionality.
• If using wireless functionality near a pacemaker, make sure it is at least 19 inches / 50 cm away from the

Yarvik smartphone manual
file:///Users/elroy/Desktop/Yarvik/Manual/manual_en.html[13-02-13 17:02:46]
pacemaker.
• Due to the transmission and reception properties of wireless communications, data can occasionally be lostor delayed. This can be due to the variation in radio signal strength that results from changes in thecharacteristics of the radio transmission path. Yarvik will not be held responsible for damages of any kindresulting from the delays or errors in data transmitted or received via wireless functionality, or failure ofwireless functionality to transmit or receive such data.
• If the equipment does cause harmful interference to radio/TV reception, which can be determined by turningthe equipment off and on, the user is encouraged to try to correct the interference by one or more of thefollowing measures: reorient or relocate the receiving antenna, increase the distance between the senderand the receiver, consult the dealer or an experienced radio/TV technician for help. Yarvik will not beresponsible for any radio/TV interference nor for any other undesired effect.
Wireless LAN Security
Creating security settings for the Wireless LAN is extremely important. Yarvik assumes no responsibility forany security problems that may arise from the use of the Wireless LAN.
Battery pack
Do not charge the battery pack in any way other than as described in the Start guide or as designated byYarvik in writing.
AC adapter
• It is highly recommended that you use a genuine Yarvik AC adapter supplied by Yarvik for your product.
• This AC adapter is intended for use with the Smartphone device IT products only.
• Do not place the AC adapter in contact with your skin. Remove the AC adapter away from your body if itbecomes warm and causes discomfort.
RoHS
This products has been certified as RoHS Compliant.

Yarvik smartphone manual
file:///Users/elroy/Desktop/Yarvik/Manual/manual_en.html[13-02-13 17:02:46]
YARVIK.COM
Return to index

Yarvik smartphone manual
file:///Users/elroy/Desktop/Yarvik/Manual/manual_nl.html[13-02-13 17:03:00]
Index SELECT LANGUAGE
1 Voor het eerstegebruik2 Smartphone Start3 Android Homescherm3.1 Widgets ensnelkoppelingentoevoegen3.2 Achtergrondinstellen3.3 Applicatiemenu4 Uw smartphoneinstellen4.1 Instellingenmenu4.2 WiFi & Bluetooth4.3 Audioprofielen4.4 Scherm4.5 Apps4.6 Opslag & MicroSDtoegang4.7 Taal & toetsenbord4.8 Datum & tijd5 Apps6 Telefoongesprekken7 Berichten8 Garantieverklaring9 GNU/GPL

Yarvik smartphone manual
file:///Users/elroy/Desktop/Yarvik/Manual/manual_nl.html[13-02-13 17:03:00]
Licentieinfo10 ImportantInformation
1 Voor het eerste gebruik
Geachte gebruiker,
Bedankt dat u ons product hebt aangeschaft.Lees deze instructies zorgvuldig voor gebruik, zodat u uw Yarvik Smartphone snel en goed kunt gebruiken.
We hopen dat u lang kunt genieten van uw Yarvik Smartphone!
Let op:
• Uw Yarvik Smartphone is eenfijngevoelig elektronisch product.Probeer de Smartphone niet uitelkaar te halen. Hierdoor vervaltuw garantie en het kan leiden tothet disfunctioneren van hetapparaat;
• Vermijd klappen op of tegenhet product;
• Gebruik de Smartphone niet ineen omgeving met hoge of lagetemperatuur of in een omgevingwaar het apparaat in contact kankomen met vocht, stof ofmagnetische velden;
• Stel de Smartphone niet voorlangere tijd bloot aan sterkzonlicht;
• Gebruik het touch screen vande Smartphone niet met scherpeobjecten, dit kan hetschermoppervlak beschadigen;
• Gebruik de aangeslotenkoptelefoon op de Smartphoneniet te lang en zet het volumeniet te hard, dit kan leiden toternstige gehoorschade;

Yarvik smartphone manual
file:///Users/elroy/Desktop/Yarvik/Manual/manual_nl.html[13-02-13 17:03:00]
• Voorkom verkeersongelukkenen gebruik de Smartphone nietterwijl u een motorvoertuig ofeen fiets bestuurt;
• Gebruik alleen toegestaneaccu's, opladers en accessoiresvoor uw Yarvik Smartphone. Hetgebruik van andere productenkan gevaarlijk zijn en kan degarantievoorwaarden schenden;
• Maak de Smartphone schoonmet een vochtige katoenen doeken gebruik alleen water om dedoek nat te maken. DeSmartphone mag niet gereinigdworden met een (glas) reiniger.
U kunt de Yarvik Smartphone direct gebruiken, zonder de accu eerst op te laden.Het is het beste voor de accu om deze eerst leeg te maken en deze daarna volledig op te laden. Als de Smartphone niet direct aan gaat als u deze uit de doos haalt, dan is de accu al volledig leeg en dient udeze eerst geheel op te laden.
Terug naarindex
2 Smartphone Start
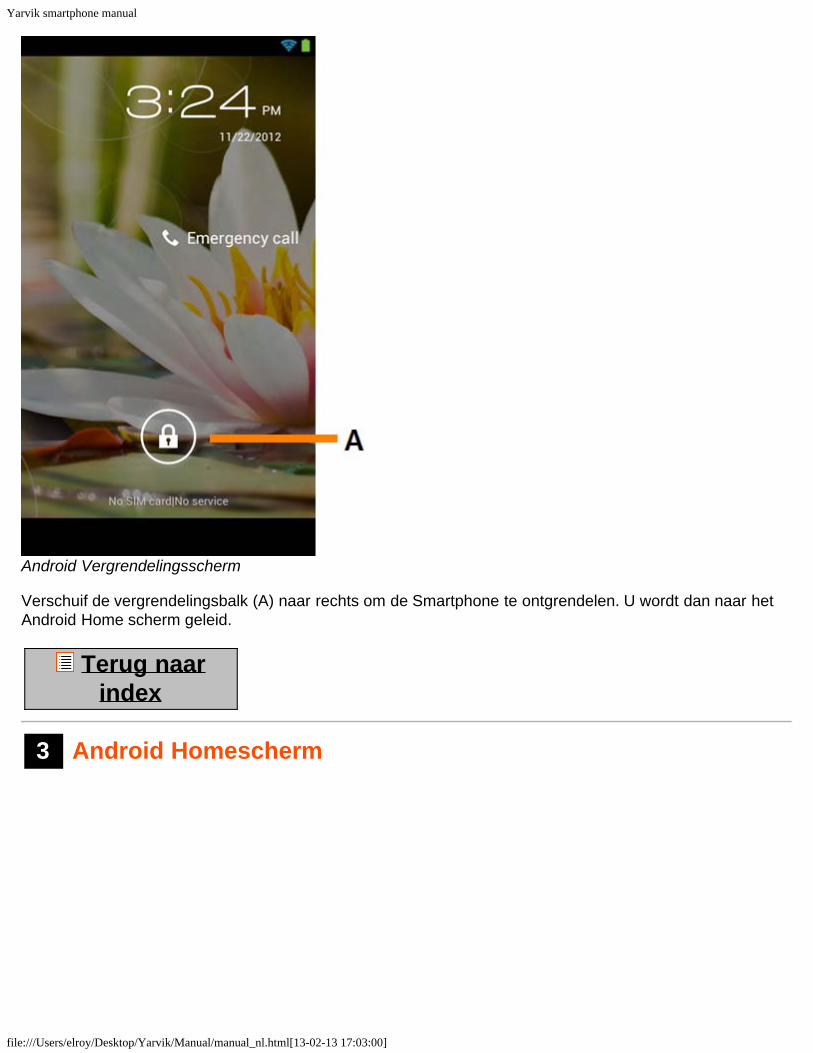
Als u uw Yarvik Smartphone voor het eerst opstart, krijgt u een opstartscherm te zien.De eerste keer opstarten kan even duren, gemiddeld 2 tot 3 minuten.Als het opstartscherm verdwijnt, is de Smartphone helemaal opgestart en krijgt u het AndroidVergrendelingsscherm te zien.
Yarvik smartphone manual
file:///Users/elroy/Desktop/Yarvik/Manual/manual_nl.html[13-02-13 17:03:00]
Android Vergrendelingsscherm
Verschuif de vergrendelingsbalk (A) naar rechts om de Smartphone te ontgrendelen. U wordt dan naar hetAndroid Home scherm geleid.
Terug naarindex
3 Android Homescherm

Yarvik smartphone manual
file:///Users/elroy/Desktop/Yarvik/Manual/manual_nl.html[13-02-13 17:03:00]
Android Homescherm
De statusbalk is altijd te vinden bovenin het Smartphone scherm.In de statusbalk vindt u systeeminformatie en functieknoppen.
1 - Indicatie Wi-Fi-signaal2 - Mobiel telefoonsignaal voor SIM1 en SIM2 en indicatie batterijniveau3 - Systeemtijd4 - App-snelkoppelingen5 - Widget (analoge klok)6 - Terug knop - brengt u terug naar het vorige scherm of de vorige website, als u de browser gebruikt7 - Home - brengt u terug naar het Android Homescherm8 - App en widget menu9 - Multitaskknop
Het Home scherm bestaat uit meerdere pagina's die kunnen worden geopend door over het scherm naarlinks of rechts te vegen.
Om te bekijken welke apps op de achtergrond worden uitgevoerd, kunt u met de multitask-knop (9) demultitask-weergave openen.

Yarvik smartphone manual
file:///Users/elroy/Desktop/Yarvik/Manual/manual_nl.html[13-02-13 17:03:00]
Klik op een actieve app in de multitask-weergave om snel naar deze app over te gaan. U kunt actieve appssluiten door deze apps ingedrukt te houden en te klikken op "Remove from list" (Uit lijst verwijderen).
Terug naarindex
3.1
Widgets ensnelkoppelingentoevoegen aanuw Homescherm
Om een widget toe te voegen, drukt u op de App/widget-knop rechtsboven in het Home scherm:
In het volgende scherm kunt u alle geïnstalleerde apps en widgets vinden. U kunt ze ook afzonderlijkbekijken door te drukken op "Apps" of "Widgets" bovenin het scherm.Druk op "Widgets" om alle beschikbare widgets te bekijken. Wanneer alle widgets worden weergegeven,kunt u over het scherm vegen om naar de volgende pagina te gaan (indien beschikbaar).Druk op de gewenste widget totdat het Home scherm verschijnt en laat de widget los op een lege plek op hetbeginscherm.
Om een snelkoppeling aan een app toe te voegen, drukt u op de knop app en widget rechtsboven in het

Yarvik smartphone manual
file:///Users/elroy/Desktop/Yarvik/Manual/manual_nl.html[13-02-13 17:03:00]
Home scherm:
In het volgende scherm kunt u alle geïnstalleerde apps en widgets vinden. U kunt ze ook afzonderlijkbekijken door te drukken op "Apps" of "Widgets" bovenin het scherm.Druk op "Apps" om alle geïnstalleerde apps te bekijken.Druk op de gewenste app totdat het Home scherm verschijnt en laat de snelkoppeling los op een lege plekop het Home scherm.
Om widgets en/of apps van uw Home scherm te verwijderen, drukt u er op en houdt u deze vast. Sleep hetitem vervolgens naar het icoontje van de prullenbak bovenin het Home scherm.
Terug naarindex
3.2 Achtergrondinstellen
Om de achtergrond van het Home scherm te wijzigen, houdt u het Home scherm ingedrukt tot het menu“Select Wallpaper from” ("Achtergrond selecteren uit") verschijnt.U kunt kiezen uit "Live Wallpapers" (achtergrond met animatie), "Galerij" (foto/video-gallerij) of "Wallpapers"(standaard statische afbeeldingen).
Terug naarindex
3.3 Applicatiemenu
Druk op de App/widget-knop rechtsboven in het Home scherm:
Zodra het systeem de widgets weergeeft, drukt u op "Apps" om alle geïnstalleerde apps te bekijken.
Hier kunt u de voorgeïnstalleerde programma's of “apps” vinden, maar ook andere apps die u zelfgeïnstalleerd hebt.Start een app op door op het icoontje te klikken.

Yarvik smartphone manual
file:///Users/elroy/Desktop/Yarvik/Manual/manual_nl.html[13-02-13 17:03:00]
Applicatiescherm
Terug naarindex
4 Uw smartphoneinstellen
4.1 Instellingenmenu
Klik op het Instellingen icoontje in het Applicatie scherm om naar het Instellingen menu te gaan. In hetInstellingen menu vindt u de opties om uw Yarvik Smartphone in te stellen.

Yarvik smartphone manual
file:///Users/elroy/Desktop/Yarvik/Manual/manual_nl.html[13-02-13 17:03:00]
Instellingenmenu
We nemen de belangrijkste onderdelen door:
Terug naarindex
4.2 WiFi &Bluetooth
Wi-Fi
Stel een verbinding in met een draadloos Wi-Fi netwerk.

Yarvik smartphone manual
file:///Users/elroy/Desktop/Yarvik/Manual/manual_nl.html[13-02-13 17:03:00]
Schuif de Wi-Fi aan/uit-knop op "AAN" om Wi-Fi te activeren.
De beschikbare Wi-Fi-netwerken verschijnen in de netwerklijst in het rechtervenster. Selecteer het netwerkvan uw keuze. Als het netwerk beveiligd is, dient u eerst een wachtwoord in te voeren.
Selecteer de knop “Connect” ("Verbinden") en de Smartphone maakt verbinding met het netwerk.Zodra “Connected” ("Verbonden") onder de netwerknaam verschijnt en het icoontje van draadloze ontvangstin de onderste statusbalk verschijnt, bent u verbonden met het draadloze netwerk.
Uw Yarvik Smartphone's Wi-Fi MAC-adres bekijken
Klik in het scherm Wi-Fi-instellingen rechtsboven op de menuknop.
Druk op "Advanced" (Geavanceerd) in het menu dat wordt uitgevouwen.
Uw Wi-Fi MAC-adres wordt weergegeven in het volgende scherm "Advanced Wi-Fi" (Geavanceerde WiFi-instellingen) onder "MAC address" (MAC-adres).
Bluetooth
Uw Yarvik smartphone is uitgerust met een ingebouwde Bluetooth-module voor het verbinden met draadlozeBluetooth-compatibele randapparatuur, zoals toetsenborden, speakers en hoofdtelefoons.Schuif de Bluetooth aan/uit-knop op "AAN" om Bluetooth te activeren.
Wanneer geactiveerd, zal de Yarvik smartphone automatisch beginnen met het zoeken naar dichtbijzijndeBluetooth-apparaten. U kunt ook altijd handmatig zoeken naar Bluetooth-apparaten door op "Apparatenzoeken" rechtsboven in het scherm te klikken.Het kan nodig zijn om de te verbinden apparatuur in "pairingstand" te zetten. Raadpleeg hiervoor dehandleiding van de betreffende randapparatuur.
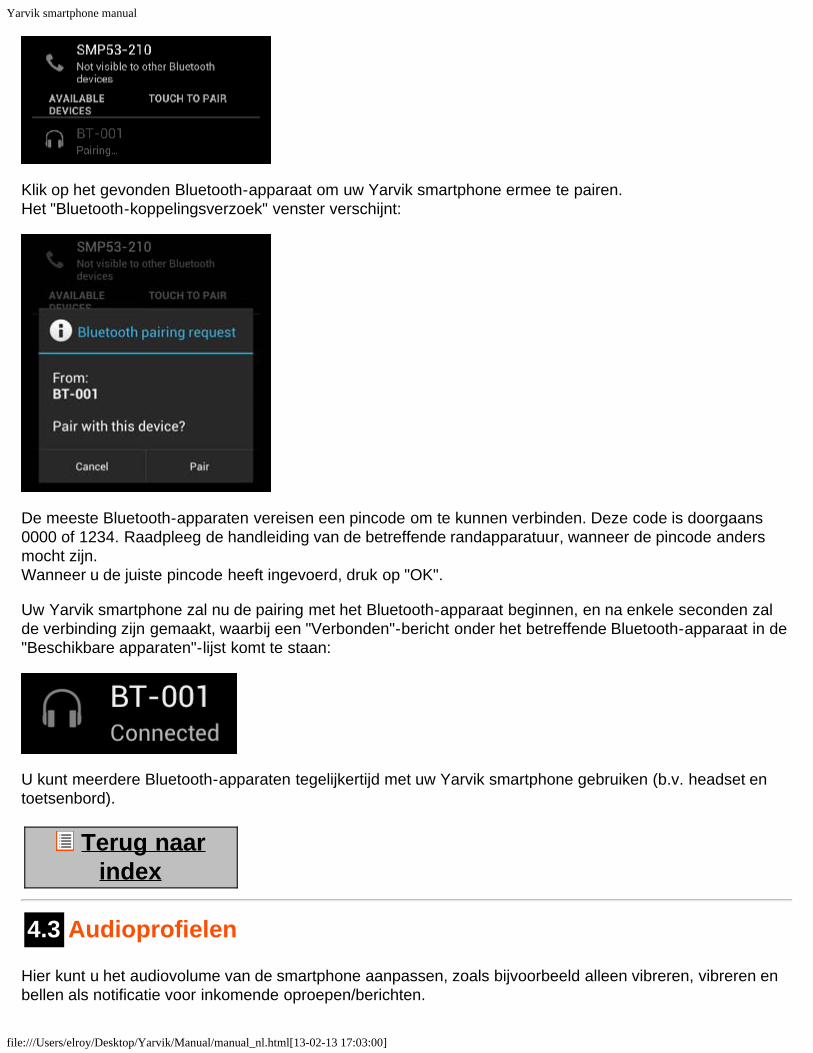
Alle gevonden apparaten zullen verschijnen in de "Beschikbare apparaten"-lijst:
Yarvik smartphone manual
file:///Users/elroy/Desktop/Yarvik/Manual/manual_nl.html[13-02-13 17:03:00]
Klik op het gevonden Bluetooth-apparaat om uw Yarvik smartphone ermee te pairen.Het "Bluetooth-koppelingsverzoek" venster verschijnt:
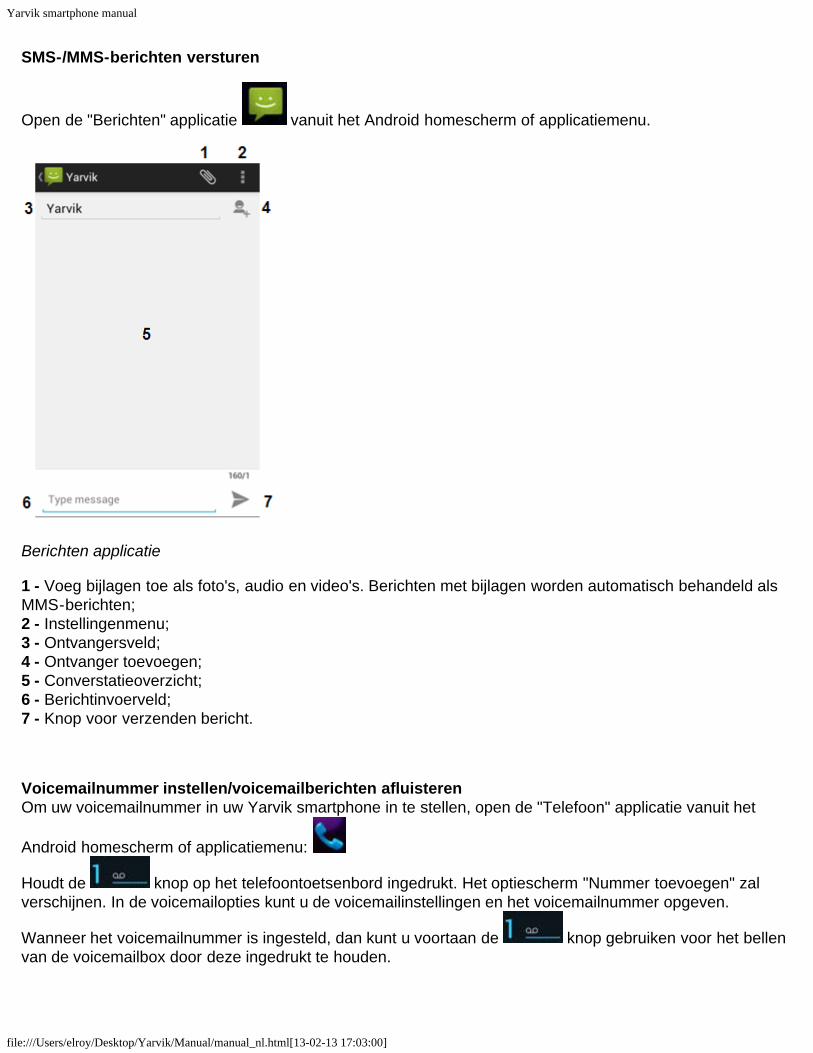
De meeste Bluetooth-apparaten vereisen een pincode om te kunnen verbinden. Deze code is doorgaans0000 of 1234. Raadpleeg de handleiding van de betreffende randapparatuur, wanneer de pincode andersmocht zijn.Wanneer u de juiste pincode heeft ingevoerd, druk op "OK".
Uw Yarvik smartphone zal nu de pairing met het Bluetooth-apparaat beginnen, en na enkele seconden zalde verbinding zijn gemaakt, waarbij een "Verbonden"-bericht onder het betreffende Bluetooth-apparaat in de"Beschikbare apparaten"-lijst komt te staan:
U kunt meerdere Bluetooth-apparaten tegelijkertijd met uw Yarvik smartphone gebruiken (b.v. headset entoetsenbord).
Terug naarindex
4.3 Audioprofielen
Hier kunt u het audiovolume van de smartphone aanpassen, zoals bijvoorbeeld alleen vibreren, vibreren enbellen als notificatie voor inkomende oproepen/berichten.

Yarvik smartphone manual
file:///Users/elroy/Desktop/Yarvik/Manual/manual_nl.html[13-02-13 17:03:00]
Terug naarindex
4.4 Scherm
Hier kunt u de helderheid van het display, de grootte van lettertypen en de auto slaapstand wijzigen.Let op: des te helderder het scherm, des te meer energie verbruikt wordt. Hierdoor is uw accu veel snellerleeg.Als u niet wilt dat het scherm automatisch meedraait als u de Smartphone kantelt, schakel dezefunctionaliteit dan uit in het Auto-rotatie instellingenscherm.
Terug naarindex
4.5 Apps
Hier kunt u geïnstalleerde applicaties beheren.Klik op de geïnstalleerde apps om de informatie te bekijken en deïnstalleer ze met behulp van de “Uninstall”("Deïnstalleren") knop.Let op: voorgeïnstalleerde standaardapplicaties (zoals de calculator) kunnen niet gedeïnstalleerd worden.
Terug naarindex
4.6Opslag &MicroSDtoegang
Toont informatie over het interne geheugen. Als een MicroSD-kaart aanwezig is, ziet u hier ook de informatieover de kaart.
Uw Yarvik Smartphone via USB op een PC of Mac aansluiten
Met de meegeleverde USB-kabel kunt u de Yarvik Smartphone op een PC of Mac aansluiten.Zodra het apparaat is aangesloten op een computer kunt u het interne geheugen van de Smartphoneopenen en, indien aanwezig, een geplaatste MicroSD-kaart als standaard USB-apparaat voor massaopslagopenen.
Raadpleeg de bij uw Yarvik Smartphone geleverde gids Aan de slag om te bepalen wat de USB slave-poortvan de smartphone is. Sluit de USB-kabel aan op de USB slave-poort van uw Yarvik Smartphone en op eenvrije USB-poort van uw computer.

Yarvik smartphone manual
file:///Users/elroy/Desktop/Yarvik/Manual/manual_nl.html[13-02-13 17:03:00]
Rechtsonder in het scherm van uw Smartphone verschijnen vlak achter elkaar twee berichten:
Zodra het tweede bericht "USB connected" (USB verbonden) verschijnt, klikt u hier op.Het volgende scherm verschijnt:
Klik op de knop "Turn on USB storage" (USB-opslag inschakelen).Er verschijnt een berichtvenster:
Klik op "OK" om te bevestigen.Het interne geheugen van uw Yarvik Smartphone verschijnt nu als apparaat voor massaopslag in hetbestandssyteem van uw computer en kan bijvoorbeeld worden gebruikt voor het kopiëren van bestanden vanen naar uw Yarvik Smartphone.Als u een MicroSD-kaart in uw smartphone hebt geplaatst, wordt de kaart door de computer herkend als eentweede apparaat voor massaopslag.

Yarvik smartphone manual
file:///Users/elroy/Desktop/Yarvik/Manual/manual_nl.html[13-02-13 17:03:00]
Om de functie van apparaat voor massaopslag te stoppen, klikt u op de knop "Turn off USB storage" (USB-opslag uitschakelen) en verwijdert u de USB-kabel.
NB: Er is geen hardwarestuurprogramma nodig voor toegang tot het geheugen van de Yarvik Smartphone.In het geval dat uw computer vraagt om de installatie van een stuurprogramma, kunt u dit gewoon negeren.
Benader uw MicroSD-kaart ofUSB-stick in ES File Explorer
Wanneer u een MicroSD-kaart in uw Yarvik smartphone heeft zitten, dan kunt u deze als volgt benaderen:
Open de ES File Explorer app en klik op de Favoriet-knop (met als icoon de blauwe ster).
Het Favoriet-menu opent zich. Klik op "root"-icoon met de naam "/":
U komt nu in de "root" van uw smartphone's bestandssysteem, welke een aantal bestanden en mappenbevat.Zoek en klik op de "mnt"-map:
De "mnt"-map opent, en u vindt daarin de volgende mappen:

Yarvik smartphone manual
file:///Users/elroy/Desktop/Yarvik/Manual/manual_nl.html[13-02-13 17:03:00]
De "extsd"-map is uw MicroSD-kaart card (indien aanwezig in uw smartphone's MicroSD-slot).De "sdcard"-map is het interne geheugen van uw Yarvik smartphone.
U kunt, indien aanwezig, ook gebruik maken van de extsd1-snelkoppeling in het eerder beschrevenFavoriet-menu, voor snelle toegang tot een MicroSD-kaart.
Terug naarindex
4.7 Taal &toetsenbord
Gebruik “Select language” ("Selecteer Taal") om de displaytaal voor uw Yarvik Smartphone te selecteren. Ditis van toepassing op alle teksten op het scherm.Gebruik “Android keyboard” ("Android toetsenbord") om het onscreen toetsenbord van uw Smartphone teinstalleren.
Terug naarindex
4.8 Datum & tijd
Hier kunt u de datum en tijd instellen van uw Yarvik Smartphone.
Terug naarindex
5 Apps
De Yarvik Smartphone wordt geleverd met de volgende voorgeïnstalleerde Apps (zie voorbeelden

Yarvik smartphone manual
file:///Users/elroy/Desktop/Yarvik/Manual/manual_nl.html[13-02-13 17:03:00]
hieronder):
Het uiterlijk van de appiconen kan veranderen zonder voorafgaande kennisgeving.
Terug naarindex
6 Telefoongesprekken
Het maken van telefoongesprekken
Om een telefoongesprek met uw Yarvik smartphone te maken, opent u de "Telefoon" applicatie vanaf uw
applicatiescherm of Android homescherm: Gebruik het numerieke telefoontoetsenbord om een telefoonnummer in te voeren.

Yarvik smartphone manual
file:///Users/elroy/Desktop/Yarvik/Manual/manual_nl.html[13-02-13 17:03:00]
Telefoontoetsenbord.
Om internationale telefoongesprekken te voeren welke de '+'-prefix gebruiken, houdt de '0'-toets ingedrukttot het '+'-teken verschijnt.
Druk op de toets om een uitgaande oproep te starten.
Druk tijdens een gesprek op de toets om de oproep te beëindigen.U kunt tevens direct telefoongesprekken starten vanuit uw contactpersonen vanuit de "Personen"-applicatie.
Recente oproepen worden opgeslagen in het logscherm, welke te benaderen is via het logicoon bovenin het telefoonscherm.Uw contactpersonen (uit de eerder genoemde "Personen" app) kunnen ook direct vanuit het
telefooonscherm benaderd worden door op de knop te drukken.
Inkomende telefoongesprekken
Wanneer u een inkomende oproep ontvangt op uw Yarvik smartphone, dan heeft u 3 mogelijkheden:
1 - Veeg omhoog om de oproep te weigeren en met een geautomatiseerd tekstbericht te antwoorden;2 - Weiger de oproep;3 - Beantwoord de oproep.

Yarvik smartphone manual
file:///Users/elroy/Desktop/Yarvik/Manual/manual_nl.html[13-02-13 17:03:00]
Opties tijdens een telefoongesprek
1 - Toon het telefoontoetsenbord (b.v. voor DTMF-keuzemenu's);2 - Schakel de luidspreker in/uit;3 - Demp de microfoon (ruggespraak);4 - Zet het gesprek in de wacht;5 - Menu met meer opties: voeg een telefoongesprek toe (conferentiegesprek) of neem het gesprek op.
Gesprekken doorschakelen
U kunt deze functie gebruiken om alle inkomende oproepen door te schakelen naar een specifiektelefoonnummer.
In de "Telefoon" app , kiest u voor de menu knop en kiest u voor "Instellingen".Selecteer "Spraakoproep", waarin u voor "Doorschakelen" kunt kiezen.
Beller ID/wisselgesprek
Met de beller ID functie van uw Yarvik Smartphone, kiest u of u uw telefoonnummer wilt meezenden bijuitgaande oproepen.
Om dit aan te passen, start u de "Telefoon" app , drukt u op de menu knop en kiest u voor"Instellingen" - "Spraakoproep" - "Extra instellingen" - "Beller ID".Vanuit ditzelfde menu kunt u ook opgeven of u wisselgesprekken wilt kunnen ontvangen wanneer u reeds ingesprek bent.
Terug naarindex
7 Berichten
Uw Yarvik smartphone kan SMS- en MMS-berichten versturen. Raadpleeg a.u.b. de informatie van uwmobiele aanbieder voor de kosten van het versturen van berichten vanuit en naar het buitenland.
Yarvik smartphone manual
file:///Users/elroy/Desktop/Yarvik/Manual/manual_nl.html[13-02-13 17:03:00]
SMS-/MMS-berichten versturen
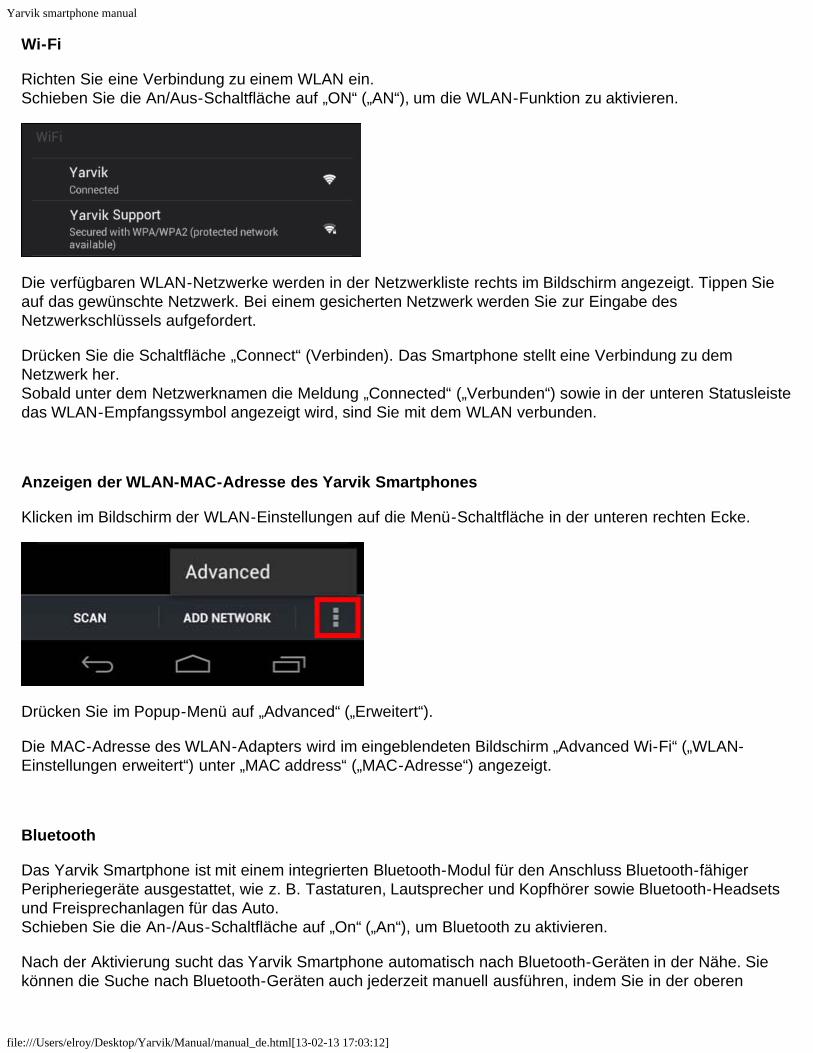
Open de "Berichten" applicatie vanuit het Android homescherm of applicatiemenu.
Berichten applicatie
1 - Voeg bijlagen toe als foto's, audio en video's. Berichten met bijlagen worden automatisch behandeld alsMMS-berichten;2 - Instellingenmenu;3 - Ontvangersveld;4 - Ontvanger toevoegen;5 - Converstatieoverzicht;6 - Berichtinvoerveld;7 - Knop voor verzenden bericht.
Voicemailnummer instellen/voicemailberichten afluisterenOm uw voicemailnummer in uw Yarvik smartphone in te stellen, open de "Telefoon" applicatie vanuit het
Android homescherm of applicatiemenu:
Houdt de knop op het telefoontoetsenbord ingedrukt. Het optiescherm "Nummer toevoegen" zalverschijnen. In de voicemailopties kunt u de voicemailinstellingen en het voicemailnummer opgeven.
Wanneer het voicemailnummer is ingesteld, dan kunt u voortaan de knop gebruiken voor het bellenvan de voicemailbox door deze ingedrukt te houden.

Yarvik smartphone manual
file:///Users/elroy/Desktop/Yarvik/Manual/manual_nl.html[13-02-13 17:03:00]
Terug naarindex
8 Garantieverklaring
Yarvik garandeert dat het product dat door de Klant gekocht is gedurende 2 jaar na aankoopdatum vrij blijftvan fabricage- of materiaalfouten. Als gedurende deze garantieperiode zich toch defecten voor doen die temaken hebben met de fabricage of het materiaal, dan dient de Klant het product terug te brengen naar dedealer die het product verkocht heeft. De dealer repareert of vervangt (keuze is uitsluitend aan Yarvik) hetproduct binnen een redelijk tijdsbestek. Hiervoor is een originele factuur nodig als aankoopbewijs. Yarvik'sopinie hierin is doorslaggevend.
Deze garantie geldt niet voor fouten of storingen die zich voordoen als een gevolg van softwareoverdracht,misbruik, abusievelijk gebruik, nalatigheid, verkeerd gebruik, slechte zorg of enige andere oorzaak die buitenYarvik ligt.
BELANGRIJK: Als u een smartphone van Yarvik koopt, krijgt u de laatste stabiele firmware die voor ditspecifieke model beschikbaar is, op het moment dat het product geproduceerd is. Yarvik biedt geenondersteuning aan producten die door de eindgebruiker op een andere manier gewijzigd zijn en Yarvikondersteunt ook geen wijzigingen in de firmware en software die op de producten gebruikt wordt. Als dit hetgeval is, vervalt per direct alle garantie.
Om te voorkomen dat de garantie vervalt, gebruikt de Klant alleen officiële software, applicaties en upgradesdie verkrijgbaar zijn via de website van Yarvik, www.yarvik.com. Geen andere software of firmware dient gebruikt te worden, aangezien in dat geval direct alle garanties enondersteuning vervallen. Yarvik ondersteunt het gebruik van software of firmware die niet door Yarvikgefabriceerd of geleverd is via de officiële website, www.yarvik.com, niet. Yarvik weigert nadrukkelijk tereageren op aanvragen met betrekking tot niet-geautoriseerde wijzigingen, niet-geautoriseerde software enniet-geautoriseerde firmware.
Terug naarindex
9 GNU/GPL Licentieinformatie
Lees de juridische informatie die beschikbaar is op uw Yarvik Smartphone via Instellingen - Over de telefoon- Juridische informatie (internetverbinding vereist) of bezoek http://source.android.com/source/licenses.htmlvoor meer informatie.
Terug naarindex

Yarvik smartphone manual
file:///Users/elroy/Desktop/Yarvik/Manual/manual_nl.html[13-02-13 17:03:00]
10 ImportantInformation
Wireless LAN-Regulatory information
Depending on the model, the wireless LAN built-in into Smartphone devices can only be used in thefollowing countries: Austria, Belgium, Bulgaria, Czech Republic, Denmark, Finland, France, Germany,Greece, Hungary, Iceland, Ireland, Italy, Luxembourg, the Netherlands, Norway, Poland, Portugal, Romania,Slovakia, Slovenia, Spain, Sweden, Switzerland, Turkey and the United Kingdom.
Conditions of use
When using the IEEE 802.11b/g/n Wireless LAN standard, channels 1 to 13 (2.4 GHz...2.4835 GHz) areselectable for both indoor and outdoor use, however with restrictive conditions applying in France, Italy andNorway, as follows:
• France: When using this product indoor, all channels can be used without restrictions. Outdoor onlychannels 1 to 6 are allowed. This means that in Peer-to-Peer, the WLAN feature can only be used outside ifthe peer sets up the communication on an authorized channel (i.e., between 1 & 6). In infrastructure mode,please make sure the access point is configured to a channel from 1 to 6 before setting up the connection.
• Italy: Use of the RLAN network is governed: Disposal of Old Electrical & Electronic- with respect to private use, by the Legislative Decree of 1.8.2003, no. 259 (“Code of ElectronicCommunications”). In particular Article 104 indicates when the prior obtainment of a general authorization isrequired and Art. 105 indicates when free use is permitted;- with respect to the supply to the public of the WLAN access to telecom networks and services, by theMinisterial Decree 28.5.2003, as amended, and Art. 25 (general authorization for electronic communicationsnetworks and services) of the Code of electronic communications.
• Norway: Use of this radio equipment is not allowed in the geographical area within a radius of 20 km fromthe centre of Ny-Ålesund, Svalbard.
WEEESymbolInformation
Correct Disposal of This product (Waste Electrical & Electronic Equipment).
(Applicable in the European Union and other European countries with separate collection systems).
This marking shown on the product or its literature indicates that it should not be disposed with otherhousehold wasted at the end of its working life. To prevent possible harm to the environment or humanhealth from uncontrolled waste disposal, please separate this from other types of wastes and recycle itresponsibly to promote the sustainable reuse of material resources.Household users should contact either the retailer where they purchased this product, or their local

Yarvik smartphone manual
file:///Users/elroy/Desktop/Yarvik/Manual/manual_nl.html[13-02-13 17:03:00]
government office, for details of where and how they can take this item for environmentally safe recycling.Business users should contact their supplier and check the terms and conditions of the purchase contract.This product should not be mixed with other commercial wastes of disposal.
Disposal of waste batteries (applicable in the European Union and other European countries withseparate collection systems)
Either of the symbols shown next may appear on the battery or on the packaging to indicate that the batteryprovided with this product shall not be treated as household waste. On certain batteries this symbol might beused in combination with a chemical symbol. The chemical symbols for mercury (Hg) or lead (Pb) are addedif the battery contains more than 0.0005% mercury or 0.004% lead. By ensuring these batteries are disposedof correctly, you will help prevent potentially negative consequences for the environment and human healthwhich could otherwise be caused by inappropriate waste handling of the battery. The recycling of thematerials will help to conserve natural resources. In case of products that for safety, performance or dataintegrity reasons require a permanent connection with an incorporated battery, this battery should bereplaced by qualified service staff only. To ensure that the battery will be treated properly, hand over theproduct at end-of-life to the applicable collection point for the recycling of electrical and electronicequipment.
For all other batteries, please view the section on how to remove the battery from the product safely. Handthe battery over to the applicable collection point for the recycling of waste batteries. For more detailedinformation about recycling of this product or battery, please contact your local Local government Office,your household waste disposal service or the shop where you purchased the product.
When travelling to and within the United States of America, please be aware that the U.S. Department ofTransportation (DOT) recently published new regulations that apply to passengers travelling with lithiummetal batteries and lithium-ion batteries.For detailed information, visit http://safetravel.dot.gov/whats_new_batteries.html.
Safety Information
Yarvik Smartphone device
• Yarvik is not responsible for any interference that you may experience or that may be caused whenoperating this device.
• Warning: This apparatus must be earthed.
Opening or dismantling the main unit or any of its accessories, for whatever reason, could lead to damagesthat are not covered by the guarantee.

Yarvik smartphone manual
file:///Users/elroy/Desktop/Yarvik/Manual/manual_nl.html[13-02-13 17:03:00]
• To avoid electrical shock, do not open the cabinet. Refer servicing to qualified personnel only.
• To prevent fire or shock hazard, do not expose your Smartphone device or any of its accessories to rain ormoisture.
• Do not use or store your Smartphone device in a location subject to heat sources, such as radiators or airducts; direct sunlight; excessive dust; moisture or rain; mechanical vibration or shock; strong magnets orspeakers that are not magnetically shielded; excessively high and low temperatures; and high humidity.
• Turning off your Smartphone device with the power button does not disconnect the device completely frommains voltage. To disconnect it completely, unplug the AC adapter or the power cord from mains. Thesocket-outlet shall be installed near the equipment and shall be easily accessible.
• Audio and picture distortion may occur if this equipment is positioned in close proximity to any equipmentemitting electromagnetic radiation.
• This apparatus is also designed for IT power system with phase to phase voltage 230V, for customers inNorway.
• Observe the following precautions to provide adequate air circulation and to ensure normal reliableoperation:- Do not use the Smartphone device and/or the AC adapter while covered or wrapped in cloth. Ensure theAC adapter operates in a clear environment.- Turn off the Smartphone device before putting the device into a bag or a carrying case.
• Do not use your Smartphone device directly on your lap. The temperature of the base of the unit will riseduring normal operation and over time could result in discomfort or burns.
• Do not use your Smartphone device while walking. Listening to music with headphones or watching theLCD screen while walking may lead to an unexpected accident and result in personal injuries.
• Using connected headphones on the Smartphone device for too long and/or setting the audio volume uptoo high when using headphones may cause serious hearing damage.
• Avoid strong beating of or to the product.
• Don’t operate the touch screen of the Smartphone device with sharp objects, as this may result inscratching the screen surface.
• Only use permitted batteries, chargers and accessories with your Smartphone device. The use of any otherproducts with the device can be dangerous and may violate the warranty regulations.
• Only use a slightly wet cotton cloth to clean the device, and only use water to wetten the cotton cloth. TheSmartphone device should not be cleaned with any sort of (glass) cleaning aid.
Wireless functionality
• If radio interference with other devices occurs while using your Smartphone device, do not use the wirelessfunctionality. Use of the wireless functionality may cause a malfunction of the devices, resulting in anaccident.

Yarvik smartphone manual
file:///Users/elroy/Desktop/Yarvik/Manual/manual_nl.html[13-02-13 17:03:00]
• In some situations or environments, the use of the wireless functionality might be restricted by theproprietor of the building or responsible representatives of the organization, for example on board airplanes,in hospitals or in any other environment where the risk of interference with other devices or services isperceived or identified as harmful. If you are uncertain about the policy applying to the use of wirelessfunctionality in a specific organization or environment, you are encouraged to first ask for authorization priorto switching it on. Consult your physician or the manufacturer of personal medical devices (pacemakers,hearing aids, etc.) regarding any restrictions on the use of wireless functionality.
• If using wireless functionality near a pacemaker, make sure it is at least 19 inches / 50 cm away from thepacemaker.
• Due to the transmission and reception properties of wireless communications, data can occasionally be lostor delayed. This can be due to the variation in radio signal strength that results from changes in thecharacteristics of the radio transmission path. Yarvik will not be held responsible for damages of any kindresulting from the delays or errors in data transmitted or received via wireless functionality, or failure ofwireless functionality to transmit or receive such data.
• If the equipment does cause harmful interference to radio/TV reception, which can be determined by turningthe equipment off and on, the user is encouraged to try to correct the interference by one or more of thefollowing measures: reorient or relocate the receiving antenna, increase the distance between the senderand the receiver, consult the dealer or an experienced radio/TV technician for help. Yarvik will not beresponsible for any radio/TV interference nor for any other undesired effect.
Wireless LAN Security
Creating security settings for the Wireless LAN is extremely important. Yarvik assumes no responsibility forany security problems that may arise from the use of the Wireless LAN.
Battery pack
Do not charge the battery pack in any way other than as described in the Start guide or as designated byYarvik in writing.
AC adapter
• It is highly recommended that you use a genuine Yarvik AC adapter supplied by Yarvik for your product.
• This AC adapter is intended for use with the Smartphone device IT products only.
• Do not place the AC adapter in contact with your skin. Remove the AC adapter away from your body if itbecomes warm and causes discomfort.
RoHS
This products has been certified as RoHS Compliant.

Yarvik smartphone manual
file:///Users/elroy/Desktop/Yarvik/Manual/manual_nl.html[13-02-13 17:03:00]
YARVIK.COM
Terug naarindex

Yarvik smartphone manual
file:///Users/elroy/Desktop/Yarvik/Manual/manual_de.html[13-02-13 17:03:12]
Inhalt SELECT LANGUAGE
1 Vor dem erstenGebrauch2 Erstes Einschaltendes Smartphones3 AndroidStartbildschirm3.1 Hinzufügen vonWidgets undVerknüpfungen zumStartbildschirm3.2 Festlegen einesHintergrundes3.3 Anwendungsmenü4 Einrichten desSmartphones4.1 Menü Settings(Einstellungen)4.2 WiFi und Bluetooth4.3 Audio Profiles4.4 Display4.5 Apps4.6 Storage (Speicher)und Zugriff auf denMicroSD-Speicher4.7 Language & input(Sprache & Eingabe)4.8 Date & time (Datum& Uhrzeit)

Yarvik smartphone manual
file:///Users/elroy/Desktop/Yarvik/Manual/manual_de.html[13-02-13 17:03:12]
5 Apps6 Telefonate7 Messaging(Nachrichten)8 Garantieerklärung9 GNU/GPL-Lizenzinformationen10 Importantinformation
1 Vor dem ersten Gebrauch
Sehr geehrte Benutzerin, sehr geehrter Benutzer,
vielen Dank, dass Sie sich zum Kauf unseres Produkts entschieden haben!Lesen Sie diese Anleitung sorgfältig durch, um Ihr neues Yarvik Smartphone schnell und mühelosverwenden zu können.
Wir hoffen, dass Sie an Ihrem Yarvik Smartphone sehr lange Freude haben!
Bitte beachten:
• Das Yarvik Smartphone ist einhochpräzises elektronischesProdukt. Versuchen Sie nicht,das Smartphone zu zerlegen, dadies zum Erlöschen derGarantie und zu Fehlfunktionendes Geräts führt.
• Vermeiden SieSchlageinwirkung oder einHerunterfallen des Produkts.
• Verwenden Sie dasSmartphone nicht inUmgebungen mit hohen oderniedrigen Temperaturen, undvermeiden Sie den Kontakt mitFeuchtigkeit, Staub oderMagnetfeldern.
• Setzen Sie das Smartphone

Yarvik smartphone manual
file:///Users/elroy/Desktop/Yarvik/Manual/manual_de.html[13-02-13 17:03:12]
nicht für einen längerenZeitraum starkerSonneneinstrahlung aus.
• Bedienen Sie denTouchscreen nicht mit spitzenGegenständen, da er zerkratztwerden könnte.
• Längeres Verwenden vonKopfhörern mit demSmartphone bzw. eine zu hoheLautstärke der Kopfhörer kannzu schweren Hörschädigungenführen.
• Um Verkehrsunfälle zuvermeiden, überqueren Sie nichtdie Straße, führen Sie keineMotorfahrzeuge oder fahren Sienicht Fahrrad, während Sie dasSmartphone mit Kopfhörernverwenden.
• Verwenden Sie mit dem YarvikSmartphone nur die zulässigenAkkus, Ladegeräte undZubehör. Die Verwendunganderer Produkte mit demSmartphone kannGefährdungen verursachen unddie Garantiebedingungenverletzen.
• Reinigen Sie das Smartphoneausschließlich mit einemBaumwolltuch, das mit Wasserleicht angefeuchtet wurde. DasSmartphone darf nicht mitReinigungsmitteln gereinigtwerden.
Das Yarvik Smartphone ist sofort nach dem Auspacken einsatzbereit und muss nicht zuerst aufgeladenwerden.Der Akku sollte zunächst mit seiner ursprünglichen Ladung verwendet und vollständig entladen werden,bevor er zum ersten Mal aufgeladen wird.Wenn sich das Smartphone nach dem Auspacken nicht einschalten lässt, ist der Akku bereits vollständigentladen und muss in diesem Fall zunächst aufgeladen werden.

Yarvik smartphone manual
file:///Users/elroy/Desktop/Yarvik/Manual/manual_de.html[13-02-13 17:03:12]
Zurück zumInhalt
2ErstesEinschalten desSmartphones
Nach dem ersten Einschalten des Yarvik Smartphones durchläuft dieser eine Startsequenz.Der erste Start kann mit ca. 2-3 Minuten einige Zeit in Anspruch nehmen.Nach der Startsequenz ist das Smartphone einsatzbereit, und es wird der Android Sperrbildschirmangezeigt.
Android Sperrbildschirm
Ziehen Sie das Sperrsymbol (A) nach rechts, um das Smartphone zu entsperren. Anschließend wird derAndroid Startbildschirm angezeigt.
Zurück zumInhalt

Yarvik smartphone manual
file:///Users/elroy/Desktop/Yarvik/Manual/manual_de.html[13-02-13 17:03:12]
3 Android Startbildschirm
Android Startbildschirm
Am oberen Rand des Smartphone-Bildschirms wird die Statusleiste angezeigt.Die Statusleiste enthält Systeminformationen, die Menüleiste darunter die Funktionsschaltflächen.
1 – WLAN-Signalanzeige2 – Mobilfunknetz-Empfang für SIM1 und SIM2 und Akku-Ladestandsanzeige3 – Systemzeit4 – App-Verknüpfungen5 – Widget (analoge Uhr)6 – Zurück-Schaltfläche – Hiermit kehren Sie zum vorherigen Bildschirm oder, bei Verwendung desBrowsers, zur vorherigen Webseite zurück7 – Start – Hiermit kehren Sie zum Android Startbildschirm zurück8 – App- und Widget-Menü9 – Multitasking-Schaltfläche
Der Startbildschirm besteht aus mehreren Seiten, die durch Wischgesten nach links bzw. rechts durchblättertwerden können.

Yarvik smartphone manual
file:///Users/elroy/Desktop/Yarvik/Manual/manual_de.html[13-02-13 17:03:12]
Die im Hintergrund ausgeführten Apps können Sie anzeigen, indem Sie mit der Multitasking-Schaltfläche (9)die Multitasking-Ansicht aufrufen.
Um schnell zu einem ausgeführten App zu wechseln, tippen Sie in der Multitasking-Ansicht auf dieses. Siekönnen ausgeführte Apps schließen, indem Sie diese gedrückt halten und auf „Remove from list“ („Aus Listeentfernen“) tippen.
Zurück zumInhalt
3.1
Hinzufügen vonWidgetsundVerknüpfungenzumStartbildschirm
Um Widgets hinzuzufügen, halten Sie die App- und Widget-Schaltfläche gedrückt, die sich am unteren Rand
des Startbildschirms in der Mitte befindet:
Im anschließenden Bildschirm sehen Sie alle installierten Apps und Widgets. Diese können auch getrenntangezeigt werden, wenn Sie am oberen Bildschirmrand auf „Apps“ bzw. „Widgets“ drücken.

Yarvik smartphone manual
file:///Users/elroy/Desktop/Yarvik/Manual/manual_de.html[13-02-13 17:03:12]
Drücken Sie auf „Widgets“, um alle verfügbaren Widgets anzuzeigen. In der Anzeige aller Widgets könnenSie mit einer Wischgeste zur nächsten Seite wechseln (sofern vorhanden).Halten Sie das gewünschte Widget gedrückt, um den Startbildschirm aufzurufen und das Widget dort aneiner leeren Stelle abzulegen.
Um Verknüpfungen für Apps hinzuzufügen, halten Sie die App- und Widget-Schaltfläche gedrückt, die sich
am unteren Rand des Startbildschirms in der Mitte befindet:
Im anschließenden Bildschirm sehen Sie alle installierten Apps und Widgets. Diese können auch getrenntangezeigt werden, wenn Sie am oberen Bildschirmrand auf „Apps“ bzw. „Widgets“ drücken.Drücken Sie auf „Apps“, um alle installierten Apps anzuzeigen.Halten Sie die gewünschte App gedrückt, um den Startbildschirm aufzurufen und die Verknüpfung dort aneiner leeren Stelle abzulegen.
Um Widgets bzw. App-Verknüpfungen vom Startbildschirm zu entfernen, halten Sie diese gedrückt undziehen sie zum angezeigten „Remove“-Papierkorbsymbol („Entfernen“) am oberen Rand desStartbildschirms.
Zurück zumInhalt
3.2 Festlegen einesHintergrundes
Halten Sie zum Ändern des Hintergrundbildes den Startbildschirm gedrückt, bis das Menü „Select Wallpaperfrom“ („Hintergrund auswählen“) angezeigt wird.Sie können aus „Live Wallpapers“ („Live-Hintergründe“, animierte Hintergründe), „Super-HD Player“ („Super-HD Player“, Foto-/Videogalerie) oder „Wallpapers“ („Hintergründe“, statische Standardbilder) auswählen.
Zurück zumInhalt
3.3 Anwendungsmenü
Drücken Sie die App- und Widget-Schaltfläche, die sich am unteren Rand des Startbildschirms in der Mitte
befindet:
Wenn das System die Widgets anzeigt, drücken Sie „Apps“, um alle installierten Apps anzuzeigen.
Hier finden Sie die vorinstallierten Programme oder „Apps“ sowie zusätzliche, von Ihnen installierte Apps.Die Apps werden durch Drücken des entsprechenden Symbols geöffnet.

Yarvik smartphone manual
file:///Users/elroy/Desktop/Yarvik/Manual/manual_de.html[13-02-13 17:03:12]
Anwendungsbildschirm
Zurück zumInhalt
4Einrichten desYarvikSmartphones
4.1 Menü Settings(Einstellungen)
Drücken Sie im Anwendungsmenü auf das Symbol , um das Menü „Settings“ („Einstellungen“)aufzurufen. Das Menü Settings (Einstellungen) enthält Optionen für die Einrichtung des Yarvik Smartphones.

Yarvik smartphone manual
file:///Users/elroy/Desktop/Yarvik/Manual/manual_de.html[13-02-13 17:03:12]
Menü Settings (Einstellungen)
Die wichtigsten Abschnitte werden im Folgenden behandelt:
Zurück zumInhalt
4.2 Wi-Fi undBluetooth
Yarvik smartphone manual
file:///Users/elroy/Desktop/Yarvik/Manual/manual_de.html[13-02-13 17:03:12]
Wi-Fi
Richten Sie eine Verbindung zu einem WLAN ein.Schieben Sie die An/Aus-Schaltfläche auf „ON“ („AN“), um die WLAN-Funktion zu aktivieren.
Die verfügbaren WLAN-Netzwerke werden in der Netzwerkliste rechts im Bildschirm angezeigt. Tippen Sieauf das gewünschte Netzwerk. Bei einem gesicherten Netzwerk werden Sie zur Eingabe desNetzwerkschlüssels aufgefordert.
Drücken Sie die Schaltfläche „Connect“ (Verbinden). Das Smartphone stellt eine Verbindung zu demNetzwerk her.Sobald unter dem Netzwerknamen die Meldung „Connected“ („Verbunden“) sowie in der unteren Statusleistedas WLAN-Empfangssymbol angezeigt wird, sind Sie mit dem WLAN verbunden.
Anzeigen der WLAN-MAC-Adresse des Yarvik Smartphones
Klicken im Bildschirm der WLAN-Einstellungen auf die Menü-Schaltfläche in der unteren rechten Ecke.
Drücken Sie im Popup-Menü auf „Advanced“ („Erweitert“).
Die MAC-Adresse des WLAN-Adapters wird im eingeblendeten Bildschirm „Advanced Wi-Fi“ („WLAN-Einstellungen erweitert“) unter „MAC address“ („MAC-Adresse“) angezeigt.
Bluetooth
Das Yarvik Smartphone ist mit einem integrierten Bluetooth-Modul für den Anschluss Bluetooth-fähigerPeripheriegeräte ausgestattet, wie z. B. Tastaturen, Lautsprecher und Kopfhörer sowie Bluetooth-Headsetsund Freisprechanlagen für das Auto.Schieben Sie die An-/Aus-Schaltfläche auf „On“ („An“), um Bluetooth zu aktivieren.
Nach der Aktivierung sucht das Yarvik Smartphone automatisch nach Bluetooth-Geräten in der Nähe. Siekönnen die Suche nach Bluetooth-Geräten auch jederzeit manuell ausführen, indem Sie in der oberen

Yarvik smartphone manual
file:///Users/elroy/Desktop/Yarvik/Manual/manual_de.html[13-02-13 17:03:12]
rechten Ecke des Bildschirms „Search for Devices“ („Nach Geräten suchen“) antippen.Um die Peripheriegeräte mit dem Smartphone verbinden zu können, müssen sich diese im „Pairing-Modus“befinden. Weitere Informationen hierzu können Sie der Bedienungsanleitung des entsprechendenPeripheriegeräts entnehmen.
Alle erkannten Geräte werden in der Liste „Available Devices“ („Verfügbare Geräte“) angezeigt:
Klicken Sie auf das gewünschte Bluetooth-Gerät, um das Yarvik Smartphone mit diesem zu verbinden.Daraufhin öffnet sich das Fenster „Bluetooth pairing request“ („Bluetooth-Kopplungsanforderung“):
Die meisten Bluetooth-Geräte fragen einen PIN-Code für die Verbindung ab. Dieser Code lautetüblicherweise 0000 oder 1234. Schlagen Sie bei einem anderen PIN-Code in der Bedienungsanleitung desBluetooth-Geräts nach.Wenn Sie den richtigen PIN-Code eingegeben haben, drücken Sie „OK“.
Das Yarvik Smartphone nimmt nun den Pairing-Vorgang mit dem Bluetooth-Gerät auf. Die Verbindung wirdnach wenigen Sekunden hergestellt, und in der Liste „Available Devices“ („Verfügbare Geräte“) wird unterdem entsprechenden Bluetooth-Gerät die Meldung „Connected“ („Verbunden“) angezeigt:
Sie können mehrere Bluetooth-Geräte gleichzeitig mit dem Yarvik Smartphone verbinden und verwenden (z.B. Headset und Tastatur).
Zurück zum

Yarvik smartphone manual
file:///Users/elroy/Desktop/Yarvik/Manual/manual_de.html[13-02-13 17:03:12]
Inhalt
4.3 Audio Profiles
Hier können Sie die Lautstärke des Smartphone-Tons für eingehende Anrufe und Nachrichten einstellen, z.B. nur Vibration oder Vibration und Klingeln.
Zurück zumInhalt
4.4 Display
Hier können Sie die Helligkeit des Bildschirms, die Schriftgrößen und das Zeitlimit für den Ruhezustandändern.Bitte beachten Sie, dass der Energieverbrauch umso höher ist, je heller der Bildschirm ist. Hierdurch wirdder Akku wesentlich schneller entladen.Wenn der Bildschirm nicht automatisch mit dem Smartphone mitdrehen soll, können Sie diese Funktion inder Einstellung Auto-rotate screen (Bildschirm automatisch drehen) ändern.
Zurück zumInhalt
4.5 Apps
Hier können Sie die Anwendungen verwalten, die auf dem Yarvik Smartphone installiert sind.Tippen Sie auf die installierten Apps, um die zugehörigen Informationen anzuzeigen, oder deinstallieren Siesie mit der Schaltfläche „Uninstall“ („Deinstallieren“), falls gewünscht.Beachten Sie, dass vorinstallierte Standardanwendungen (z. B. der Rechner) nicht deinstalliert werdenkönnen.
Zurück zumInhalt
4.6
Storage(Speicher)und Zugriffauf denMicroSD-Speicher

Yarvik smartphone manual
file:///Users/elroy/Desktop/Yarvik/Manual/manual_de.html[13-02-13 17:03:12]
Zeigt Informationen über den internen Speicher an. Wenn eine MicroSD-Karte eingelegt ist, sind dieentsprechenden Speicherinformationen ebenfalls hier zu finden.
Anschließen des Yarvik Smartphones an einem PC oder Mac über USB
Sie können das Yarvik Smartphone über das mitgelieferte USB-Kabel an einen PC oder Mac anschließen.Nachdem die Verbindung zum Computer hergestellt wurde, können Sie von dort auf den internen Speicherdes Smartphones bzw. auf eine gegebenenfalls eingelegte MicroSD-Karte wie auf ein normales USB-Massenspeichergerät zugreifen.
Die Lage des USB-Anschlusses am Smartphone können Sie der gedruckten Schnellstartanleitung für dasYarvik Smartphone entnehmen. Schließen Sie das USB-Kabel an den USB-Anschluss des YarvikSmartphones und an einen freien USB-Anschluss des Computers an.Am oberen Bildschirmrand des Smartphones werden in kurzer Folge zwei Meldungen angezeigt:
Sobald die zweite Meldung „USB connected“ („USB-Verbindung“) angezeigt wird, klicken Sie auf diese.Der folgende Bildschirm wird angezeigt:
Tippen Sie auf die Schaltfläche „Turn on USB storage“ („USB-Speicher aktivieren“).Ein Meldefenster wird eingeblendet:

Yarvik smartphone manual
file:///Users/elroy/Desktop/Yarvik/Manual/manual_de.html[13-02-13 17:03:12]
Tippen Sie zur Bestätigung auf „OK“.Der interne Speicher des Yarvik Smartphones wird nun im Dateisystem des Computers alsMassenspeichergerät angezeigt und kann z. B. für die Übertragung von Dateien vom und zum YarvikSmartphone verwendet werden.Wenn sich eine MicroSD-Karte im Smartphone befindet, wird diese vom Computer als zweitesMassenspeichergerät erkannt.
Um die Massenspeichergerätfunktion zu deaktivieren, tippen Sie auf die Schaltfläche „Turn off USB storage“(„USB-Speicher deaktivieren“), und ziehen Sie das USB-Kabel ab.
Hinweis: Für den Zugriff auf den Yarvik Smartphone-Speicher sind keine Hardwaretreiber erforderlich. WennSie in einer Computermeldung zur Treiberinstallation aufgefordert werden, können Sie dies einfachignorieren.
Zugriff auf die MicroSD-Kartemit dem ES File Explorer
Wenn Sie eine MicroSD-Karte in das Yarvik Smartphone eingelegt haben, können Sie wie folgt auf derenInhalt zugreifen:
Öffnen Sie die App ES File Explorer, und tippen Sie auf die Schaltfläche Favorites (Favoriten, mit demblauen Sternsymbol).
Daraufhin öffnet sich das Menü Favorites (Favoriten). Tippen Sie auf das mit einem „/“ bezeichneteSymbol für das Stammverzeichnis:
Sie gelangen daraufhin zum „Stammverzeichnis“ des Smartphone-Dateisystems, das mehrere Dateien undOrdner enthält.Suchen Sie den Ordner „mnt“, und tippen Sie auf diesen:

Yarvik smartphone manual
file:///Users/elroy/Desktop/Yarvik/Manual/manual_de.html[13-02-13 17:03:12]
Daraufhin öffnet sich der Ordner „mnt“, der mehrere Unterordner enthält:
Der Ordner „sdcard“ ist der interne Speicher des Yarvik Smartphones.Der Ordner „sdcard2“ ist die MicroSD-Karte (sofern in den MicroSD-Einschub des Smartphones eingelegt).
Sofern vorhanden, können Sie für einen schnellen Zugriff auf den microSD-Kartenspeicher auch dieVerknüpfung microsd2 im zuvor genannten Menü Favorites (Favoriten) verwenden.
Zurück zumInhalt
4.7Language &input (Sprache& Eingabe)
Über „Select language“ („Sprache auswählen“) können Sie die Sprache für das Display des YarvikSmartphones bestimmen. Diese gilt für alle Bildschirmtexte im gesamten System.Unter „Android keyboard“ („Android-Tastatur“) können Sie die Bildschirmtastatur des Smartphoneseinrichten.
Zurück zumInhalt
4.8Date & time(Datum &

Yarvik smartphone manual
file:///Users/elroy/Desktop/Yarvik/Manual/manual_de.html[13-02-13 17:03:12]
Uhrzeit)Hier können Sie das Datum und die Uhrzeit für das Yarvik Smartphone einstellen.
Zurück zumInhalt
5 Apps
Das Yarvik Smartphone wird mit vorinstallierten Apps ausgeliefert (siehe nachstehende Beispiele):
Das Erscheinungsbild der App-Symbole kann sich ohne Vorankündigung ändern.
Zurück zumInhalt
6 Telefonate
TelefonierenUm mit dem Yarvik Smartphone zu telefonieren, öffnen Sie die Anwendung „Phone“ („Telefon“)im

Yarvik smartphone manual
file:///Users/elroy/Desktop/Yarvik/Manual/manual_de.html[13-02-13 17:03:12]
Anwendungsmenü oder auf dem Android Startbildschirm: Geben Sie die Telefonnummer auf der numerischen Telefontastatur ein.
Telefontastatur
Um Auslandsgespräche mit der Vorwahl „+“ zu führen, halten Sie auf der Tastatur die „0“ gedrückt, bis das„+“ eingeblendet wird.
Drücken Sie Schaltfläche um den Hörer für den Anruf abzuheben.
Drücken Sie Schaltfläche um den Hörer nach dem Anruf aufzulegen.Mit der App „People“ („Kontakte“) können Sie Telefonate direkt von Ihren Kontakten aus führen.
Die letzten Anrufe sind im Bildschirm Call Log (Anruf-Protokoll) gespeichert, der über die Schaltfläche Log
(Protokoll) an der Oberseite des Phone-Bildschirms (Telefon-Bildschirms) aufgerufen werden kann.Ihre Kontakte aus der zuvor genannten App „People“ („Kontakte“) können im Bildschirm Phone (Telefon)
auch direkt über die Schaltfläche aufgerufen werden.
Eingehende Anrufe
Wenn auf dem Yarvik Smartphone ein Anruf eingeht, stehen Ihnen 3 Möglichkeiten zur Verfügung:
1 - Kreis nach oben schieben, um den eingehenden Anruf abzulehnen und eine automatische Antwort-SMSzu versenden2 - Eingehenden Anruf ablehnen

Yarvik smartphone manual
file:///Users/elroy/Desktop/Yarvik/Manual/manual_de.html[13-02-13 17:03:12]
3 - Eingehenden Anruf annehmen
Optionen während eines Telefonats
1 - Telefontastatur (z. B. für Auswahlmenüs per Tonwahl)2 - Lautsprecherfunktion aktivieren/deaktivieren3 - Mikrofon stummschalten4 - Telefonat in die Warteschleife legen5 - Menü mit weiteren Optionen: Zusätzliches Telefonat (Konferenzschaltung) oder Anruf aufzeichnen
Anrufweiterleitung
Mit dem Einrichten der Weiterleitungsfunktion können Sie alle eingehenden Anrufe an eine bestimmteRufnummer weiterleiten.
Drücken Sie in der App „Phone“ („Telefon“) auf die Menüschaltfläche , und wählenSie „Callsettings“ (Anrufeinstellungen) aus.Wählen Sie „Voice call“ („Anruf“) aus. Dort können Sie über „Call forwarding“ („Anrufweiterleitung“) dieWeiterleitungsoptionen ändern.
Caller ID (Anruferkennung)/Call waiting (Anruf bei besetzt)
Mit der Yarvik Smartphone-Funktion Caller ID (Anruferkennung) können Sie bestimmen, ob Ihre Rufnummerbei ausgehenden Telefonaten mit übertragen werden soll.
Um die Einstellung zu ändern, starten Sie die App „Phone“ („Telefon“) , drücken Sie die
Menüschaltfläche , und wählen Sie „Settings“ („Einstellungen“) – „Voice call“ („Anruf“) – „Additionalsettings“ („Erweiterte Einstellungen“) – „Caller ID“ („Anruferkennung“) aus.In demselben Menü können Sie auch die Annahme eingehender Anrufe für den Fall aktivieren bzw.deaktivieren, dass Sie sich bereits in einem Telefongespräch befinden.
Zurück zum

Yarvik smartphone manual
file:///Users/elroy/Desktop/Yarvik/Manual/manual_de.html[13-02-13 17:03:12]
Inhalt
7 Messaging(Nachrichten)
Mit dem Yarvik Smartphone können Sie SMS- und MMS-Nachrichten versenden. Wenden Sie sich an IhrenMobilfunkanbieter, um Informationen zu den Standardtarifen und zu zusätzlichen Kosten bei der Versendungbzw. dem Empfang im oder in das Ausland zu erhalten.
Versenden von SMS/MMS-Nachrichten
Öffnen Sie die App „Messaging“ im Android Startbildschirm oder im Anwendungsmenü.
Messaging-Anwendung (Nachrichten)
1 - Anhänge hinzufügen, wie z. B. Bilder, Audio und Video Nachrichten mit Anhang gelten automatisch alsMMS-Nachrichten2 - Menü für Nachrichteneinstellungen3 - Empfängerfeld4 - Empfänger hinzufügen5 - Nachrichtenliste6 - Nachrichtentext-Eingabefeld7 - Schaltfläche Nachricht versenden
Einstellen der Mailbox-Nummer/Abhören von Mailbox-Nachrichten

Yarvik smartphone manual
file:///Users/elroy/Desktop/Yarvik/Manual/manual_de.html[13-02-13 17:03:12]
Um die Nummer Ihres Mailbox-Dienstes in das Yarvik Smartphone einzugeben, öffnen Sie die App „Phone“
(„Telefon“) im Anwendungsmenü oder im Android Startbildschirm:
Halten Sie die Schaltfläche auf der Telefontastatur gedrückt. Auf dem Popup-Bildschirm wird „Addnumber“ („Nummer hinzufügen“) angezeigt. In den Mailbox-Optionen können Sie die Mailbox-Einstellungenauswählen und die Nummer des Mailbox-Dienstes angeben.Nachdem die Nummer des Mailbox-Dienstes eingerichtet wurde, können Sie Ihre Mailbox zukünftig anrufen,
indem Sie die Schaltfläche gedrückt halten.
Zurück zumInhalt
8 Garantieerklärung
Yarvik garantiert für einen Zeitraum von 2 Jahren ab dem Kaufdatum, dass das vom Kunden erworbeneProdukt frei von material- und herstellungsbedingten Fehlern ist. Wenn zu einem beliebigen Zeitpunktinnerhalb des Garantiezeitraums ein material- oder herstellungsbedingter Fehler des Produkts auftritt, ist dasProdukt vom Kunden an den Händler zurückzugeben, bei dem das Produkt erworben wurde. Der Händlerrepariert oder ersetzt dieses (in alleinigem Ermessen von Yarvik) innerhalb eines angemessenen Zeitraums.Als Nachweis des Kaufdatums ist ein Kaufbeleg im Original vorzulegen. Es gilt ausschließlich YarviksEntscheidung in dieser Angelegenheit.
Diese Garantie erstreckt sich nicht auf Mängel oder Fehlfunktionen, die sich aus der Übertragung vonSoftware, falscher Handhabung, grobem Umgang, Manipulation, Fahrlässigkeit, unsachgemäßerVerwendung, ungenügender Sorgfalt oder jedweder anderen Handlung ergeben, die Yarvik nicht zuvertreten hat.
WICHTIG: Beim Erwerb eines Smartphones von Yarvik erhalten Sie das Smartphone mit der aktuellstenstabilen Firmware, die zum Zeitpunkt der Herstellung des Geräts für das betreffende Modell verfügbar war.Yarvik bietet keine Unterstützung für Produkte an, die vom Endbenutzer anderweitig geändert wurden, nochunterstützt Yarvik Programmänderungen an der in seinen Produkten verwendeten Firmware und Software.Falls solche Änderungen vorgenommen wurden, erlischt automatisch jegliche Garantie.
Um ein Verfallen der hier dargelegten Garantieansprüche zu vermeiden, ist der Kunde gehalten, nur dieoffizielle Software sowie Anwendungen und Upgrades zu nutzen, die auf der Website von Yarvik unterwww.yarvik.com verfügbar sind.Die Verwendung jeglicher anderer Software oder Firmware ist untersagt und führt zum Erlöschen derGarantie- und Supportansprüche. Yarvik unterstützt in keinem Fall die Verwendung jeglicher andererSoftware oder Firmware als derjenigen Software oder Firmware, die vom Hersteller auf dem Produktinstalliert wurde oder auf der offiziellen Website von Yarvik unter www.yarvik.com verfügbar ist. Yarvik lehnteine Beantwortung von Fragen bezüglich nicht genehmigter Änderungen, nicht genehmigter Software undnicht genehmigter Firmware ausdrücklich ab.
Zurück zum

Yarvik smartphone manual
file:///Users/elroy/Desktop/Yarvik/Manual/manual_de.html[13-02-13 17:03:12]
Inhalt
9 GNU/GPL-Lizenzinformationen
Rufen Sie die rechtlichen Hinweise auf dem Yarvik Smartphone unter Settings – About device – Legalinformation (Einstellungen – Über das Smartphone – Rechtliche Hinweise; hierzu ist eine Internetverbindungerforderlich) auf, oder besuchen Sie http://source.android.com/source/licenses.html, um weitereInformationen zu erhalten.
Zurück zumInhalt
10 ImportantInformation
Wireless LAN-Regulatory information
Depending on the model, the wireless LAN built-in into Smartphone devices can only be used in thefollowing countries: Austria, Belgium, Bulgaria, Czech Republic, Denmark, Finland, France, Germany,Greece, Hungary, Iceland, Ireland, Italy, Luxembourg, the Netherlands, Norway, Poland, Portugal, Romania,Slovakia, Slovenia, Spain, Sweden, Switzerland, Turkey and the United Kingdom.
Conditions of use
When using the IEEE 802.11b/g/n Wireless LAN standard, channels 1 to 13 (2.4 GHz...2.4835 GHz) areselectable for both indoor and outdoor use, however with restrictive conditions applying in France, Italy andNorway, as follows:
• France: When using this product indoor, all channels can be used without restrictions. Outdoor onlychannels 1 to 6 are allowed. This means that in Peer-to-Peer, the WLAN feature can only be used outside ifthe peer sets up the communication on an authorized channel (i.e., between 1 & 6). In infrastructure mode,please make sure the access point is configured to a channel from 1 to 6 before setting up the connection.
• Italy: Use of the RLAN network is governed: Disposal of Old Electrical & Electronic- with respect to private use, by the Legislative Decree of 1.8.2003, no. 259 (“Code of ElectronicCommunications”). In particular Article 104 indicates when the prior obtainment of a general authorization isrequired and Art. 105 indicates when free use is permitted;- with respect to the supply to the public of the WLAN access to telecom networks and services, by theMinisterial Decree 28.5.2003, as amended, and Art. 25 (general authorization for electronic communicationsnetworks and services) of the Code of electronic communications.
• Norway: Use of this radio equipment is not allowed in the geographical area within a radius of 20 km fromthe centre of Ny-Ålesund, Svalbard.

Yarvik smartphone manual
file:///Users/elroy/Desktop/Yarvik/Manual/manual_de.html[13-02-13 17:03:12]
WEEESymbolInformation
Correct Disposal of This product (Waste Electrical & Electronic Equipment).
(Applicable in the European Union and other European countries with separate collection systems).
This marking shown on the product or its literature indicates that it should not be disposed with otherhousehold wasted at the end of its working life. To prevent possible harm to the environment or humanhealth from uncontrolled waste disposal, please separate this from other types of wastes and recycle itresponsibly to promote the sustainable reuse of material resources.Household users should contact either the retailer where they purchased this product, or their localgovernment office, for details of where and how they can take this item for environmentally safe recycling.Business users should contact their supplier and check the terms and conditions of the purchase contract.This product should not be mixed with other commercial wastes of disposal.
Disposal of waste batteries (applicable in the European Union and other European countries withseparate collection systems)
Either of the symbols shown next may appear on the battery or on the packaging to indicate that the batteryprovided with this product shall not be treated as household waste. On certain batteries this symbol might beused in combination with a chemical symbol. The chemical symbols for mercury (Hg) or lead (Pb) are addedif the battery contains more than 0.0005% mercury or 0.004% lead. By ensuring these batteries are disposedof correctly, you will help prevent potentially negative consequences for the environment and human healthwhich could otherwise be caused by inappropriate waste handling of the battery. The recycling of thematerials will help to conserve natural resources. In case of products that for safety, performance or dataintegrity reasons require a permanent connection with an incorporated battery, this battery should bereplaced by qualified service staff only. To ensure that the battery will be treated properly, hand over theproduct at end-of-life to the applicable collection point for the recycling of electrical and electronicequipment.
For all other batteries, please view the section on how to remove the battery from the product safely. Handthe battery over to the applicable collection point for the recycling of waste batteries. For more detailedinformation about recycling of this product or battery, please contact your local Local government Office,your household waste disposal service or the shop where you purchased the product.
When travelling to and within the United States of America, please be aware that the U.S. Department ofTransportation (DOT) recently published new regulations that apply to passengers travelling with lithium
Yarvik smartphone manual
file:///Users/elroy/Desktop/Yarvik/Manual/manual_de.html[13-02-13 17:03:12]
metal batteries and lithium-ion batteries.For detailed information, visit http://safetravel.dot.gov/whats_new_batteries.html.
Safety Information
Yarvik Smartphone device
• Yarvik is not responsible for any interference that you may experience or that may be caused whenoperating this device.
• Warning: This apparatus must be earthed.
Opening or dismantling the main unit or any of its accessories, for whatever reason, could lead to damagesthat are not covered by the guarantee.
• To avoid electrical shock, do not open the cabinet. Refer servicing to qualified personnel only.
• To prevent fire or shock hazard, do not expose your Smartphone device or any of its accessories to rain ormoisture.
• Do not use or store your Smartphone device in a location subject to heat sources, such as radiators or airducts; direct sunlight; excessive dust; moisture or rain; mechanical vibration or shock; strong magnets orspeakers that are not magnetically shielded; excessively high and low temperatures; and high humidity.
• Turning off your Smartphone device with the power button does not disconnect the device completely frommains voltage. To disconnect it completely, unplug the AC adapter or the power cord from mains. Thesocket-outlet shall be installed near the equipment and shall be easily accessible.
• Audio and picture distortion may occur if this equipment is positioned in close proximity to any equipmentemitting electromagnetic radiation.
• This apparatus is also designed for IT power system with phase to phase voltage 230V, for customers inNorway.
• Observe the following precautions to provide adequate air circulation and to ensure normal reliableoperation:- Do not use the Smartphone device and/or the AC adapter while covered or wrapped in cloth. Ensure theAC adapter operates in a clear environment.- Turn off the Smartphone device before putting the device into a bag or a carrying case.
• Do not use your Smartphone device directly on your lap. The temperature of the base of the unit will riseduring normal operation and over time could result in discomfort or burns.
• Do not use your Smartphone device while walking. Listening to music with headphones or watching theLCD screen while walking may lead to an unexpected accident and result in personal injuries.
• Using connected headphones on the Smartphone device for too long and/or setting the audio volume uptoo high when using headphones may cause serious hearing damage.
• Avoid strong beating of or to the product.
• Don’t operate the touch screen of the Smartphone device with sharp objects, as this may result in

Yarvik smartphone manual
file:///Users/elroy/Desktop/Yarvik/Manual/manual_de.html[13-02-13 17:03:12]
scratching the screen surface.
• Only use permitted batteries, chargers and accessories with your Smartphone device. The use of any otherproducts with the device can be dangerous and may violate the warranty regulations.
• Only use a slightly wet cotton cloth to clean the device, and only use water to wetten the cotton cloth. TheSmartphone device should not be cleaned with any sort of (glass) cleaning aid.
Wireless functionality
• If radio interference with other devices occurs while using your Smartphone device, do not use the wirelessfunctionality. Use of the wireless functionality may cause a malfunction of the devices, resulting in anaccident.
• In some situations or environments, the use of the wireless functionality might be restricted by theproprietor of the building or responsible representatives of the organization, for example on board airplanes,in hospitals or in any other environment where the risk of interference with other devices or services isperceived or identified as harmful. If you are uncertain about the policy applying to the use of wirelessfunctionality in a specific organization or environment, you are encouraged to first ask for authorization priorto switching it on. Consult your physician or the manufacturer of personal medical devices (pacemakers,hearing aids, etc.) regarding any restrictions on the use of wireless functionality.
• If using wireless functionality near a pacemaker, make sure it is at least 19 inches / 50 cm away from thepacemaker.
• Due to the transmission and reception properties of wireless communications, data can occasionally be lostor delayed. This can be due to the variation in radio signal strength that results from changes in thecharacteristics of the radio transmission path. Yarvik will not be held responsible for damages of any kindresulting from the delays or errors in data transmitted or received via wireless functionality, or failure ofwireless functionality to transmit or receive such data.
• If the equipment does cause harmful interference to radio/TV reception, which can be determined by turningthe equipment off and on, the user is encouraged to try to correct the interference by one or more of thefollowing measures: reorient or relocate the receiving antenna, increase the distance between the senderand the receiver, consult the dealer or an experienced radio/TV technician for help. Yarvik will not beresponsible for any radio/TV interference nor for any other undesired effect.
Wireless LAN Security
Creating security settings for the Wireless LAN is extremely important. Yarvik assumes no responsibility forany security problems that may arise from the use of the Wireless LAN.
Battery pack
Do not charge the battery pack in any way other than as described in the Start guide or as designated byYarvik in writing.

Yarvik smartphone manual
file:///Users/elroy/Desktop/Yarvik/Manual/manual_de.html[13-02-13 17:03:12]
AC adapter
• It is highly recommended that you use a genuine Yarvik AC adapter supplied by Yarvik for your product.
• This AC adapter is intended for use with the Smartphone device IT products only.
• Do not place the AC adapter in contact with your skin. Remove the AC adapter away from your body if itbecomes warm and causes discomfort.
RoHS
This products has been certified as RoHS Compliant.
YARVIK.COM
Zurück zumInhalt

Yarvik smartphone manual
file:///Users/elroy/Desktop/Yarvik/Manual/manual_fr.html[13-02-13 17:03:21]
Index SELECT LANGUAGE
1 Avant la premièreutilisation2 Démarrage duSmartphone3 Page d'accueilAndroid3.1 Ajouter des widgetset des raccourcis survotre page d'accueil3.2 Choisir un fondd'écran3.3 Menu d'applications4 Configuration devotre Smartphone4.1 Menu deconfiguration4.2 WiFi et Bluetooth4.3 Profils audio4.4 Affichage4.5 Applications4.6 Stockage et accèsmémoire MicroSD4.7 Affichage de lalangue4.8 Date et heure5 Applications6 Appelstéléphoniques

Yarvik smartphone manual
file:///Users/elroy/Desktop/Yarvik/Manual/manual_fr.html[13-02-13 17:03:21]
7 Messagerie8 Déclaration degarantie9 Informations delicence GNU/GPL10 Importantinformation
1 Avant la première utilisation
Madame, Monsieur,
Nous vous remercions d'avoir choisi ce produit.Pour garantir une utilisation rapide et pratique de votre Smartphone Yarvik, veuillez lire attentivement cesinstructions avant son utilisation.
Nous vous souhaitons de profiter pleinement, et le plus longtemps possible, de cet appareil.
Remarque :
• Votre Smartphone Yarvik estun appareil électronique dehaute précision. N'essayez pasde le démonter car celaannulera la garantie et peutcauser un dysfonctionnement del'appareil.
• Évitez toute choc ou chute del'appareil.
• Évitez d'utiliser l'appareil dansun environnement à températurebasse ou élevée ou tout autreenvironnement dans lequel ilpeut entrer en contact avecl'humidité, la poussière ou leschamps magnétiques.
• N'exposez pas l'appareilpendant une longue période àune forte exposition au soleil.
• N'utilisez pas d'objet pointu sur

Yarvik smartphone manual
file:///Users/elroy/Desktop/Yarvik/Manual/manual_fr.html[13-02-13 17:03:21]
l'écran tactile car cela pourraitprovoquer des rayures.
• L'utilisation prolongée del'appareil avec un casque et/ouavec le volume élevé peutcauser des pertes auditivessévères.
• Pour éviter un accident de lacirculation, ne traversez pas laroute, ne conduisez pas devéhicule motorisé ou ne roulezpas à vélo lors de l'utilisation decet appareil avec un casque.
• Utilisez seulement desbatteries, chargeurs etaccessoires destinés à cetappareil. L'utilisation de toutautre accessoire avec cetappareil peut être dangereuse etpeut annuler toutes lesconditions de garanties.
• Utilisez seulement un chiffonen coton légèrement humidifié àl'eau pour nettoyer l'appareil.L'appareil ne doit pas êtrenettoyé avec n'importe quelproduit nettoyant.
Vous pouvez utiliser votre appareil dès la sortie de l'emballage sans avoir à charger la batterie.Il est recommandé, lors de la première utilisation, d'utiliser d'abord l'énergie restant dans la batterie puis de larecharger complètement.Si l'appareil ne s'allume pas dès sa sortie de l'emballage, la batterie est déjà complètement vidée et vousdevez donc d'abord la recharger.
Retour à l'index
2 Démarrage duSmartphone
Une présentation s'affichera au premier démarrage de l'appareil.Le premier démarrage peut prendre environ 2 à 3 minutes.Après cette présentation, le démarrage est terminé et l'écran de verrouillage Android s'affichera.

Yarvik smartphone manual
file:///Users/elroy/Desktop/Yarvik/Manual/manual_fr.html[13-02-13 17:03:21]
Écran de verrouillage Android
Glissez la barre de verrouillage (A) vers la droite pour déverrouiller l'appareil. Puis la page d'accueil Androids'affichera.
Retour à l'index
3 Page d'accueil Android

Yarvik smartphone manual
file:///Users/elroy/Desktop/Yarvik/Manual/manual_fr.html[13-02-13 17:03:21]
Page d'accueil Android
Vous trouverez la barre d'état en haut de l'écran de l'appareil.La barre d'état affiche les informations du système et la barre de menu située en bas de l'écran contient lestouches de fonction.
1 - Indicateur de signal WiFi2 - Réception du réseau cellulaire pour SIM1 et SIM2 et indicateur du niveau de batterie3 - Heure du système4 - Raccourcis des applications5 - Widget (horloge analogique)6 - Bouton arrière - vous ramène à l'écran précédent ou au site précédent lors de l'utilisation du navigateur7 - Accueil - vous ramène à la page d'accueil Android8 - Menu d'application et de widgets9 - Bouton multitâches
La page d'accueil se compose de plusieurs pages accessibles en faisant défiler la page d'accueil de gaucheà droite.
Pour visualiser les applications fonctionnant en arrière-plan, vous pouvez accéder à l'affichage multitâche enappuyant sur le bouton multitâche (9).

Yarvik smartphone manual
file:///Users/elroy/Desktop/Yarvik/Manual/manual_fr.html[13-02-13 17:03:21]
Pour effectuer un changement rapide, cliquez sur une application en cours dans l'affichage multitâche. Vouspouvez fermer une application en cours en appuyant longtemps sur celle-ci et en cliquant sur « Remove fromlist » (supprimer de la liste).
Retour à l'index
3.1
Ajouter deswidgets etdes raccourcissur votrepage d'accueil
Pour ajouter un widget, appuyez sur le bouton d'applications et de widgets en bas au milieu de votre page
d'accueil :
Dans l'écran suivant, vous trouverez tous les widgets et applications installés qui sont visiblesindividuellement en appuyant respectivement sur « Apps » ou sur « Widgets » en haut de l'écran.Appuyez sur « Widgets » pour visualiser tous les widgets disponibles. Lorsqu'ils sont tous affichés, vouspouvez faire glisser l'écran pour passer à la page suivante (le cas échéant).Appuyez longuement sur le widget souhaité pour afficher la page d'accueil et le coller à un emplacementvide de la page d'accueil.

Yarvik smartphone manual
file:///Users/elroy/Desktop/Yarvik/Manual/manual_fr.html[13-02-13 17:03:21]
Pour ajouter un raccourci à une application, appuyez sur le bouton d'applications et de widgets en bas au
milieu de la page d'accueil :
Dans l'écran suivant, vous trouverez tous les widgets et applications installés qui sont visiblesindividuellement en appuyant respectivement sur « Apps » ou sur « Widgets » en haut de l'écran.Appuyez sur « Apps » pour visualiser toutes les applications installées.Appuyez longuement sur l'application souhaitée pour afficher la page d'accueil et coller le raccourci à unemplacement vide de la page d'accueil.
Pour supprimer des widgets et/ou des raccourcis d'applications de votre page d'accueil, appuyez longuementdessus et faites-les glisser dans l'icone corbeille « Remove » (supprimer) qui apparaîtra en haut de la paged'accueil.
Retour à l'index
3.2 Choisir un fondd'écran
Pour modifier le fond d'écran de la page d'accueil, appuyez longuement sur la page d'accueil jusqu'à ce quele menu « Select Wallpaper from » (sélectionner fond d'écran à partir de) apparaisse.Vous pouvez sélectionner un fond d'écran à partir de « Live Wallpapers » (fonds d'écran animés), « Gallery »(galerie de photos et vidéos) ou « Wallpapers » (images fixes par défaut).
Retour à l'index
3.3 Menud'applications
Appuyez sur le bouton d'applications et de widgets en bas au milieu de votre page d'accueil :
Lorsque le système affiche les widgets, appuyez sur « Apps » pour visualiser toutes les applicationsinstallées.
Vous trouverez tous les programmes ou « apps » (applications) préinstallés ainsi que les applicationssupplémentaires que vous aurez vous-même installées.Il suffit d'appuyer sur l'icone correspondant pour lancer l'application.

Yarvik smartphone manual
file:///Users/elroy/Desktop/Yarvik/Manual/manual_fr.html[13-02-13 17:03:21]
Écran d'applications
Retour à l'index
4
Configuration devotreSmartphoneYarvik
4.1 Menu deconfiguration
Appuyez sur l'icone dans le menu d'applications pour accéder au menu de configuration. Dans le menu« Settings » (paramètres), vous trouverez les options pour configurer votre Smartphone Yarvik.

Yarvik smartphone manual
file:///Users/elroy/Desktop/Yarvik/Manual/manual_fr.html[13-02-13 17:03:21]
Menu de configuration
Voici un aperçu des principaux paramètres :
Retour à l'index
4.2 WiFi etBluetooth
WiFi

Yarvik smartphone manual
file:///Users/elroy/Desktop/Yarvik/Manual/manual_fr.html[13-02-13 17:03:21]
Installez une connexion avec un réseau WiFi sans fil.Faites glisser le bouton marche/arrêt en appuyant sur « On » (marche) pour activer la WiFi.
Les réseaux WiFi disponibles apparaissent dans la liste située à droite de l'écran. Entrez le nom du réseaude votre choix. Si le réseau est sécurisé, vous devez entrer la clé de sécurité.
Appuyez sur le bouton « Connect » (connexion) et le Smartphone se connectera au réseau.Vous êtes connecté au réseau sans fil après que « Connected » (connecté) s'affiche sous le nom du réseauet que l'icone de réception sans fil apparaît dans la barre d'état située en bas de l'écran.
Affichage de l'adresse MAC WiFi
Dans l'écran des paramètres WiFi, cliquez sur la touche menu située dans le coin inférieur droit.
Appuyez sur « Advanced » (avancé) dans le menu déroulant.
Votre adresse MAC WiFi s'affiche dans l'écran « Advanced WiFi » (WiFi avancée) suivant sous « MACaddress » (adresse MAC).
Bluetooth
Votre Smartphone Yarvik est équipé d'un module Bluetooth intégré pour la connexion à des périphériquescompatibles Bluetooth : clavier, haut-parleur, casque, kit mains libres et kit véhicule.Faites glisser le bouton marche/arrêt Bluetooth en appuyant sur « On » pour activer la Bluetooth.
Après activation, votre Smartphone Yarvik se mettra automatiquement à chercher les périphériquesBluetooth à proximité. Vous pouvez rechercher manuellement les périphériques Bluetooth en cliquant sur «Search for Devices » (Rechercher les périphériques) dans le coin supérieur droit de l'écran.Il peut être nécessaire de mettre l'appareil en « pairing mode » (mode d'appairage). Pour plus d'informations,veuillez consulter le manuel d'instructions pour les périphériques concernés.
Tous les périphériques détectés apparaîtront dans la liste « Available Devices » (Périphériques détectés) :

Yarvik smartphone manual
file:///Users/elroy/Desktop/Yarvik/Manual/manual_fr.html[13-02-13 17:03:21]
Cliquez sur le périphérique Bluetooth détecté pour apparier votre Smartphone Yarvik à celui-ci.La fenêtre « Bluetooth pairing request » (demande d'appariement Bluetooth) apparaîtra :
La plupart des périphériques Bluetooth nécessitent un code PIN pour se connecter. Ce code estgénéralement 0000 or 1234. Veuillez consulter le manuel d'instructions de votre appareil Bluetooth si le codePIN est différent.Après avoir saisi le code PIN, appuyez sur « OK ».
Votre Smartphone Yarvik va maintenant s'appairer avec votre périphérique Bluetooth et, au bout de quelquessecondes, la connexion sera faite et un message « Connected » (connecté) sous le périphérique Bluetoothcorrespondant s'affichera dans la liste des « Available Devices » (périphériques disponibles) :
vous pouvez connecter plusieurs périphériques Bluetooth à votre Smartphone Yarvik pour une utilisationsimultanée (par exemple casque et clavier).
Retour à l'index
4.3 Profils audio
Cette fonction vous permet de régler le volume sonore de l'appareil ainsi que le mode vibreur ou lanotification par vibration et sonnerie pour les appels/messages entrants.

Yarvik smartphone manual
file:///Users/elroy/Desktop/Yarvik/Manual/manual_fr.html[13-02-13 17:03:21]
Retour à l'index
4.4 Affichage
Cette fonction vous permet de changer la luminosité de l'écran, la taille de police et le temps de veilleautomatique.Attention, plus l'écran est lumineux, plus la consommation d'énergie est importante. La batterie sedéchargera donc plus rapidement.Si vous ne souhaitez pas le pivotement automatique de l'écran lorsque vous inclinez l'appareil, vous pouvezactiver/désactiver cette fonctionnalité dans le paramètre « Auto-rotate screen » (pivotement automatique del'écran).
Retour à l'index
4.5 Applications
Cette fonction vous permet de gérer vos applications installées sur votre Smartphone Yarvik.Vous pouvez cliquer sur les applications que vous avez installées pour voir les informations correspondanteset les désinstaller, le cas échéant, en utilisant le bouton « Uninstall » (désinstaller)Attention, il est impossible de désinstaller les applications préinstallées par défaut (par exemple lacalculette).
Retour à l'index
4.6
Stockage etaccèsmémoireMicroSD
Cette fonction vous permet d'afficher les informations sur la mémoire interne. Lorsqu'une carte MicroSD estinsérée dans l'appareil, vous y trouverez également les informations de cette mémoire.
Connexion USB à un PC ou un Mac
Vous pouvez raccorder votre Smartphone Yarvik à un PC ou à un Mac à l'aide du câble USB fourni.Lorsqu'il est connecté à un ordinateur, vous pouvez accéder à la mémoire interne du Smartphone et, le caséchéant, de la carte microSD insérée en tant que périphérique USB de stockage de masse standard.
Veuillez consulter le guide de démarrage rapide imprimé de votre Smartphone Yarvik afin de déterminerl'emplacement du port USB de l'appareil. Branchez le câble USB au port USB de votre Smartphone Yarvik età un port USB disponible sur votre ordinateur.En haut de l'écran de l'appareil, deux messages apparaîtront l'un à la suite de l'autre :
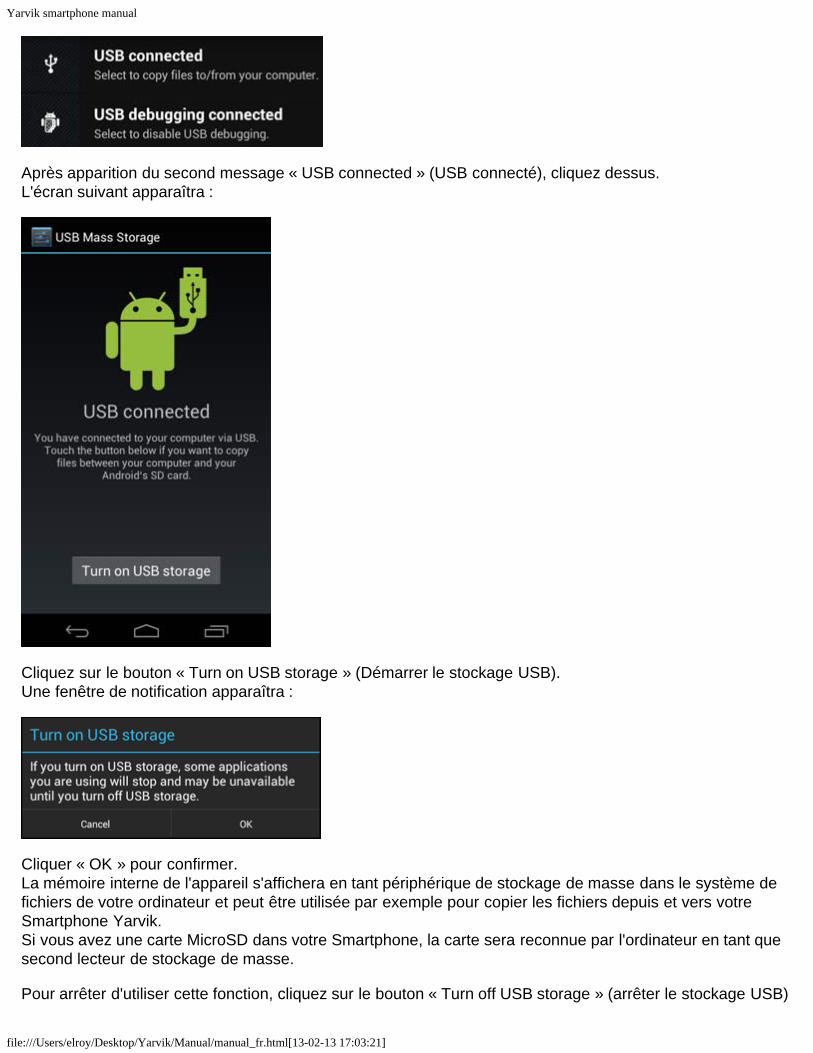
Yarvik smartphone manual
file:///Users/elroy/Desktop/Yarvik/Manual/manual_fr.html[13-02-13 17:03:21]
Après apparition du second message « USB connected » (USB connecté), cliquez dessus.L'écran suivant apparaîtra :
Cliquez sur le bouton « Turn on USB storage » (Démarrer le stockage USB).Une fenêtre de notification apparaîtra :
Cliquer « OK » pour confirmer.La mémoire interne de l'appareil s'affichera en tant périphérique de stockage de masse dans le système defichiers de votre ordinateur et peut être utilisée par exemple pour copier les fichiers depuis et vers votreSmartphone Yarvik.Si vous avez une carte MicroSD dans votre Smartphone, la carte sera reconnue par l'ordinateur en tant quesecond lecteur de stockage de masse.
Pour arrêter d'utiliser cette fonction, cliquez sur le bouton « Turn off USB storage » (arrêter le stockage USB)

Yarvik smartphone manual
file:///Users/elroy/Desktop/Yarvik/Manual/manual_fr.html[13-02-13 17:03:21]
et retirez le câble USB.
Remarque : aucun pilote matériel n'est requis pour accéder à la mémoire de votre Smartphone Yarvik. Sivotre ordinateur vous invite à installer le pilote, vous pouvez l'ignorer.
Accéder à votre carte MicroSDdans l'explorateur de fichierES
Si vous avez inséré une carte MicroSD dans votre SmartphoneYarvik, vous pouvez accéder à son contenude la manière suivante :
Ouvrez l'application ES File Explorer (navigateur de fichiers) et cliquez sur le bouton Favorites (favoris)(avec l'icone bleu en forme d'étoile).
Le menu Favorites s'ouvre maintenant. Cliquez sir l'icone « root » appelé « / » :
Vous accéderez maintenant à la racine du système de fichiers du Smartphone, contenant plusieurs fichierset dossiers.Localisez le dossier « mnt » et cliquez dessus :
Le dossier « mnt » s'ouvre et affiche plusieurs dossiers :

Yarvik smartphone manual
file:///Users/elroy/Desktop/Yarvik/Manual/manual_fr.html[13-02-13 17:03:21]
Le fichier « sdcard » correspond à la mémoire interne de votre Smartphone Yarvik.Le dossier « sdcard2 » correspond à votre carte MicroSD (si insérée dans l'emplacement MicroSD duSmartphone).
Lorsqu'il est disponible, vous pouvez donc utiliser le raccourci microsd2 dans le menu Favorites mentionnéprécédemment pour un accès rapide à votre carte mémoire MicroSD.
Retour à l'index
4.7 Sélection de lalangue
Utilisez « Select language » (choix de la langue) pour choisir la langue sur votre appareil. Cette fonctions'applique à tout le texte d'écran de l'ensemble du système.Dans « Android keyboard » (clavier Android), vous pouvez installer le clavier à l'écran de votre Smartphone.
Retour à l'index
4.8 Date et heure
Cette fonction vous permet de régler l'heure et la date de votre appareil.
Retour à l'index
5 Applications
Le Smartphone Yarvik est livré avec des applications préinstallées (cf. exemples ci-dessous).

Yarvik smartphone manual
file:///Users/elroy/Desktop/Yarvik/Manual/manual_fr.html[13-02-13 17:03:21]
L'affichage des icones d'applications peut être modifié sans préavis.
Retour à l'index
6 Appelstéléphoniques
Passer un appel téléphoniquePour passer un appel avec votre Smartphone Yarvik, ouvrez l'application « Phone » (téléphone) à partir de
votre menu d'application ou de la page d'accueil Android : Utilisez le clavier numérique du téléphone pour entrer le numéro.

Yarvik smartphone manual
file:///Users/elroy/Desktop/Yarvik/Manual/manual_fr.html[13-02-13 17:03:21]
Clavier du téléphone.
Pour passer un appel international nécessitant le préfixe +, appuyez longuement sur « 0 » sur le claviernumérique jusqu'à ce que "+" apparaisse.
Appuyez sur la touche de gestion des appels pour lancer l'appel.
Appuyez sur la touche de gestion des appels pour cesser l'appel.Vous pouvez également passer des appels téléphoniques directement à partir de vos contacts dansl'application « People » (personnes).
Les appels récents sont conservés dans l'écran « Call Log » (historique des appels) accessibles en appuyant
sur le bouton « Log » (connexion) en haut de l'écran.Vos contacts (depuis l'application « People » mentionnée précédemment) sont directement accessibles
depuis l'écran du téléphone en appuyant sur la touche .
Appels entrants
Lorsque vous recevez un appel sur votre Smartphone Yarvik, 3 options vous seront proposées :
1 - Faites glisser le cercle vers le haut pour ignorer l'appel entrant et envoyer un message automatique parSMS2 - Ignorer l'appel entrant3 - Répondre à l'appel entrant

Yarvik smartphone manual
file:///Users/elroy/Desktop/Yarvik/Manual/manual_fr.html[13-02-13 17:03:21]
Options lors d'un appel
1 - Afficher le clavier numérique du téléphone (par exemple pour les menus d'options DTMF)2 - Activer/désactiver la fonction haut-parleur3 - Désactiver le micro4 - Mettre un appel en attente5 - Menu avec plus d'options : ajouter un appel supplémentaire (conversation téléphonique) ou enregistrerl'appel.
Transfert d'appels
Vous pouvez définir la fonction de transfert d'appel pour transférer tous les appels entrants vers un autrenuméro.
Dans l'application « Phone » (téléphone), appuyez sur la touche du menu et sélectionnez « Callsettings » (paramètres d'appels).Sélectionner « Voice call » pour sélectionner le « transfert d'appels » et modifier les options de transfert.
Identifiant du correspondant/appel en attente
Grâce à la fonction de l'identifiant du correspondant, vous pouvez choisir si vous souhaitez que votre numéros'affiche lors de vos appels sortants.
Pour modifier cette option, démarrez l'application « Phone » (téléphone), appuyez sur la touche du menu et sélectionnez « Settings » (paramètres) - « Voice call » (appel vocal) - « Additional settings »(paramètres supplémentaires) - « Caller ID » (identifiant du correspondant).Dans ce menu, vous pouvez également activer/désactiver les appels entrants lorsque vous avez déjà enconversation avec un correspondant.
Retour à l'index
7 Messagerie

Yarvik smartphone manual
file:///Users/elroy/Desktop/Yarvik/Manual/manual_fr.html[13-02-13 17:03:21]
Votre Smartphone Yarvik peut envoyer des SMS et des MMS. Veuillez consulter votre fournisseur deservices mobiles pour obtenir des informations sur les tarifs standard et les coûts supplémentaires lors del'envoi de messages vers et depuis des pays étrangers.
Envoi de SMS/MMS
Ouvrez l'application « Messaging » (messagerie) depuis la page d'accueil Android ou le menud'applications.
Application de la messagerie.
1 - Ajouter des pièces jointes telles que des images, des fichiers audio et vidéo. Les messages avec unepièce jointe sont automatiquement pris en compte comme des MMS.2 - Menu de configuration de la messagerie3 - Champ destinataire4 - Ajouter un destinataire5 - Aperçu de la conversation du message6 - Entrée du message7 - Touche d'envoi du message.
Paramétrer le numéro/les messages de la boîte vocalePour paramétrer le numéro d'accès à la boîte vocale dans votre Smartphone Yarvik, ouvrez l'application «
Phone » depuis le menu d'applications ou la page d'accueil Android :
Appuyer longuement sur la touche sur le clavier de votre téléphone. « Add number » (ajouternuméro) apparaîtra sur l'écran Options. Dans les options de la boîte vocale, vous pouvez sélectionner les

Yarvik smartphone manual
file:///Users/elroy/Desktop/Yarvik/Manual/manual_fr.html[13-02-13 17:03:21]
paramètres et entrer le numéro d'accès à votre messagerie vocale.
Après réglage du numéro d'accès à la boîte vocale, vous pouvez ensuite utiliser la touche pourappeler votre boîte vocale en maintenant la touche appuyée.
Retour à l'index
8 Déclaration degarantie
Yarvik garantit que le produit acheté par le client est exempt de défauts de matériaux et de fabrication,pendant une période de deux ans à compter de la date d'achat du produit par le client. Si, à tout momentpendant la période de garantie, le produit présente un défaut de fabrication ou un défaut matériel, le clientdoit retourner le produit au magasin où il a été acheté. Le distributeur doit le réparer ou le remplacer (à laseule discrétion de Yarvik) dans un délai raisonnable. La facture originale sera requise comme preuve de ladate d'achat. La décision finale reviendra à Yarvik.
Cette garantie ne couvre pas les défauts ou dysfonctionnements résultant de transferts de logiciels, d'unemauvaise utilisation, d'une exploitation abusive, d'une altération, d'une négligence, d'une utilisationinappropriée, d'un mauvais soin ou de tout acte en dehors du contrôle de Yarvik.
IMPORTANT : lorsque vous achetez un Smartphone Yarvik, l'appareil vous sera fourni avec le derniermicrologiciel disponible pour ce modèle, au moment de la fabrication de l'appareil. Yarvik ne fournira aucuneassistance aux produits qui ont été modifiés autrement par l'utilisateur final ni aucune modification deprogrammation au micrologiciel ou logiciel utilisé dans ses produits, et si ces modifications ont été faites,toutes les garanties seront considérées comme nulles de plein droit.
Pour éviter l'annulation de la garantie offerte aux termes des présentes, le client doit utiliser uniquement lelogiciel officiel ainsi que les applications et mises à jour mis à disposition sur le site Internet www.yarvik.com.Aucun autre logiciel ou micrologiciel ne doit être utilisé sinon cela annulera automatiquement toutes lesgaranties et l'assistance client. Yarvik ne prend pas en charge l'utilisation d'un autre logiciel ou micrologicielque celui installé sur l'appareil par le fabricant ou celui disponible sur le site Internet officiel de Yarvikwww.yarvik.com. Yarvik refuse explicitement de répondre à toute demande concernant des modifications,logiciels et micrologiciels non autorisés.
Retour à l'index
9 Informations delicence GNU/GPL
Veuillez consulter les informations légales disponibles sur votre Smartphone Yarvik dans « Settings »(Paramètres) - « About Smartphone » (À propos de l'appareil) - « Legal information » (Informations légales)(connexion Internet requise) ou le site http://source.android.com/source/licenses.html pour plusd'informations.

Yarvik smartphone manual
file:///Users/elroy/Desktop/Yarvik/Manual/manual_fr.html[13-02-13 17:03:21]
Retour à l'index
10 ImportantInformation
Wireless LAN-Regulatory information
Depending on the model, the wireless LAN built-in into Smartphone devices can only be used in thefollowing countries: Austria, Belgium, Bulgaria, Czech Republic, Denmark, Finland, France, Germany,Greece, Hungary, Iceland, Ireland, Italy, Luxembourg, the Netherlands, Norway, Poland, Portugal, Romania,Slovakia, Slovenia, Spain, Sweden, Switzerland, Turkey and the United Kingdom.
Conditions of use
When using the IEEE 802.11b/g/n Wireless LAN standard, channels 1 to 13 (2.4 GHz...2.4835 GHz) areselectable for both indoor and outdoor use, however with restrictive conditions applying in France, Italy andNorway, as follows:
• France: When using this product indoor, all channels can be used without restrictions. Outdoor onlychannels 1 to 6 are allowed. This means that in Peer-to-Peer, the WLAN feature can only be used outside ifthe peer sets up the communication on an authorized channel (i.e., between 1 & 6). In infrastructure mode,please make sure the access point is configured to a channel from 1 to 6 before setting up the connection.
• Italy: Use of the RLAN network is governed: Disposal of Old Electrical & Electronic- with respect to private use, by the Legislative Decree of 1.8.2003, no. 259 (“Code of ElectronicCommunications”). In particular Article 104 indicates when the prior obtainment of a general authorization isrequired and Art. 105 indicates when free use is permitted;- with respect to the supply to the public of the WLAN access to telecom networks and services, by theMinisterial Decree 28.5.2003, as amended, and Art. 25 (general authorization for electronic communicationsnetworks and services) of the Code of electronic communications.
• Norway: Use of this radio equipment is not allowed in the geographical area within a radius of 20 km fromthe centre of Ny-Ålesund, Svalbard.
WEEESymbolInformation
Correct Disposal of This product (Waste Electrical & Electronic Equipment).
(Applicable in the European Union and other European countries with separate collection systems).
This marking shown on the product or its literature indicates that it should not be disposed with otherhousehold wasted at the end of its working life. To prevent possible harm to the environment or humanhealth from uncontrolled waste disposal, please separate this from other types of wastes and recycle it

Yarvik smartphone manual
file:///Users/elroy/Desktop/Yarvik/Manual/manual_fr.html[13-02-13 17:03:21]
responsibly to promote the sustainable reuse of material resources.Household users should contact either the retailer where they purchased this product, or their localgovernment office, for details of where and how they can take this item for environmentally safe recycling.Business users should contact their supplier and check the terms and conditions of the purchase contract.This product should not be mixed with other commercial wastes of disposal.
Disposal of waste batteries (applicable in the European Union and other European countries withseparate collection systems)
Either of the symbols shown next may appear on the battery or on the packaging to indicate that the batteryprovided with this product shall not be treated as household waste. On certain batteries this symbol might beused in combination with a chemical symbol. The chemical symbols for mercury (Hg) or lead (Pb) are addedif the battery contains more than 0.0005% mercury or 0.004% lead. By ensuring these batteries are disposedof correctly, you will help prevent potentially negative consequences for the environment and human healthwhich could otherwise be caused by inappropriate waste handling of the battery. The recycling of thematerials will help to conserve natural resources. In case of products that for safety, performance or dataintegrity reasons require a permanent connection with an incorporated battery, this battery should bereplaced by qualified service staff only. To ensure that the battery will be treated properly, hand over theproduct at end-of-life to the applicable collection point for the recycling of electrical and electronicequipment.
For all other batteries, please view the section on how to remove the battery from the product safely. Handthe battery over to the applicable collection point for the recycling of waste batteries. For more detailedinformation about recycling of this product or battery, please contact your local Local government Office,your household waste disposal service or the shop where you purchased the product.
When travelling to and within the United States of America, please be aware that the U.S. Department ofTransportation (DOT) recently published new regulations that apply to passengers travelling with lithiummetal batteries and lithium-ion batteries.For detailed information, visit http://safetravel.dot.gov/whats_new_batteries.html.
Safety Information
Yarvik Smartphone device
• Yarvik is not responsible for any interference that you may experience or that may be caused whenoperating this device.
• Warning: This apparatus must be earthed.
Opening or dismantling the main unit or any of its accessories, for whatever reason, could lead to damages

Yarvik smartphone manual
file:///Users/elroy/Desktop/Yarvik/Manual/manual_fr.html[13-02-13 17:03:21]
that are not covered by the guarantee.
• To avoid electrical shock, do not open the cabinet. Refer servicing to qualified personnel only.
• To prevent fire or shock hazard, do not expose your Smartphone device or any of its accessories to rain ormoisture.
• Do not use or store your Smartphone device in a location subject to heat sources, such as radiators or airducts; direct sunlight; excessive dust; moisture or rain; mechanical vibration or shock; strong magnets orspeakers that are not magnetically shielded; excessively high and low temperatures; and high humidity.
• Turning off your Smartphone device with the power button does not disconnect the device completely frommains voltage. To disconnect it completely, unplug the AC adapter or the power cord from mains. Thesocket-outlet shall be installed near the equipment and shall be easily accessible.
• Audio and picture distortion may occur if this equipment is positioned in close proximity to any equipmentemitting electromagnetic radiation.
• This apparatus is also designed for IT power system with phase to phase voltage 230V, for customers inNorway.
• Observe the following precautions to provide adequate air circulation and to ensure normal reliableoperation:- Do not use the Smartphone device and/or the AC adapter while covered or wrapped in cloth. Ensure theAC adapter operates in a clear environment.- Turn off the Smartphone device before putting the device into a bag or a carrying case.
• Do not use your Smartphone device directly on your lap. The temperature of the base of the unit will riseduring normal operation and over time could result in discomfort or burns.
• Do not use your Smartphone device while walking. Listening to music with headphones or watching theLCD screen while walking may lead to an unexpected accident and result in personal injuries.
• Using connected headphones on the Smartphone device for too long and/or setting the audio volume uptoo high when using headphones may cause serious hearing damage.
• Avoid strong beating of or to the product.
• Don’t operate the touch screen of the Smartphone device with sharp objects, as this may result inscratching the screen surface.
• Only use permitted batteries, chargers and accessories with your Smartphone device. The use of any otherproducts with the device can be dangerous and may violate the warranty regulations.
• Only use a slightly wet cotton cloth to clean the device, and only use water to wetten the cotton cloth. TheSmartphone device should not be cleaned with any sort of (glass) cleaning aid.
Wireless functionality
• If radio interference with other devices occurs while using your Smartphone device, do not use the wirelessfunctionality. Use of the wireless functionality may cause a malfunction of the devices, resulting in an

Yarvik smartphone manual
file:///Users/elroy/Desktop/Yarvik/Manual/manual_fr.html[13-02-13 17:03:21]
accident.
• In some situations or environments, the use of the wireless functionality might be restricted by theproprietor of the building or responsible representatives of the organization, for example on board airplanes,in hospitals or in any other environment where the risk of interference with other devices or services isperceived or identified as harmful. If you are uncertain about the policy applying to the use of wirelessfunctionality in a specific organization or environment, you are encouraged to first ask for authorization priorto switching it on. Consult your physician or the manufacturer of personal medical devices (pacemakers,hearing aids, etc.) regarding any restrictions on the use of wireless functionality.
• If using wireless functionality near a pacemaker, make sure it is at least 19 inches / 50 cm away from thepacemaker.
• Due to the transmission and reception properties of wireless communications, data can occasionally be lostor delayed. This can be due to the variation in radio signal strength that results from changes in thecharacteristics of the radio transmission path. Yarvik will not be held responsible for damages of any kindresulting from the delays or errors in data transmitted or received via wireless functionality, or failure ofwireless functionality to transmit or receive such data.
• If the equipment does cause harmful interference to radio/TV reception, which can be determined by turningthe equipment off and on, the user is encouraged to try to correct the interference by one or more of thefollowing measures: reorient or relocate the receiving antenna, increase the distance between the senderand the receiver, consult the dealer or an experienced radio/TV technician for help. Yarvik will not beresponsible for any radio/TV interference nor for any other undesired effect.
Wireless LAN Security
Creating security settings for the Wireless LAN is extremely important. Yarvik assumes no responsibility forany security problems that may arise from the use of the Wireless LAN.
Battery pack
Do not charge the battery pack in any way other than as described in the Start guide or as designated byYarvik in writing.
AC adapter
• It is highly recommended that you use a genuine Yarvik AC adapter supplied by Yarvik for your product.
• This AC adapter is intended for use with the Smartphone device IT products only.
• Do not place the AC adapter in contact with your skin. Remove the AC adapter away from your body if itbecomes warm and causes discomfort.
RoHS

Yarvik smartphone manual
file:///Users/elroy/Desktop/Yarvik/Manual/manual_fr.html[13-02-13 17:03:21]
This products has been certified as RoHS Compliant.
YARVIK.COM
Retour à l'index

Yarvik smartphone manual
file:///Users/elroy/Desktop/Yarvik/Manual/manual_es.html[13-02-13 17:03:26]
Índice SELECT LANGUAGE
1 Antes de usar eldispositivo porprimera vez2 Inicio delsmartphone3 Pantalla de inicio deAndroid3.1 Cómo añadirwidgets y accesosdirectos a la pantalla deinicio3.2 Ajuste de un fondode pantalla3.3 Menú Application(Aplicaciones)4 Configuración delsmartphone4.1 Menú Settings(Configuración)4.2 Wi-Fi y Bluetooth4.3 Perfiles de audio4.4 Display (Pantalla)4.5 Aplicaciones4.6 Almacenamiento yacceso a la memoriaMicroSD4.7 Language & input(Idioma y entrada)

Yarvik smartphone manual
file:///Users/elroy/Desktop/Yarvik/Manual/manual_es.html[13-02-13 17:03:26]
4.8 Date & time (Fechay hora)5 Apps (Aplicaciones)6 Llamadas deteléfono7 Mensajería8 Declaración degarantía9 Información de lalicencia GNU/GPL10 Importantinformation
1 Antes de usar el dispositivo por primera vez
Estimado usuario:
Le agradecemos que haya decidido comprar nuestro producto.Para asegurarse un uso rápido y cómodo de su nuevo Smartphone Yarvik, lea detenidamente estasinstrucciones antes de utilizarlo.
Esperamos que pueda disfrutar de su Smartphone Yarvik durante el máximo tiempo posible.
Aviso:
• Su Smartphone Yarvik es unproducto electrónico de granprecisión. No intente desmontarel smartphone, ya que anularásu garantía y podría provocarfallos de funcionamiento deldispositivo;
• Evite golpear y dejar caer eldispositivo.
• Evite usar el smartphone enentornos de temperaturasdemasiado altas o demasiadobajas, así como en cualquierentorno en el que el dispositivo

Yarvik smartphone manual
file:///Users/elroy/Desktop/Yarvik/Manual/manual_es.html[13-02-13 17:03:26]
pueda entrar en contacto conhumedad, polvo o camposmagnéticos.
• No someta el smartphone a laluz solar directa duranteperiodos de tiempoprolongados.
• No accione la pantalla táctilcon objetos afilados, ya que estopodría provocar arañazos.
• Utilizar el smartphone conauriculares durante periodos detiempo prolongados y/o con elvolumen demasiado alto podríaprovocar daños graves sobre sucapacidad auditiva.
• Para evitar accidentes detráfico, no cruce la carretera,conduzca un vehículo a motor niuna bicicleta mientras usa elsmartphone.
• Utilice únicamente las baterías,los cargadores y los accesoriosautorizados con su SmartphoneYarvik. El uso de cualquier otroproducto con el smartphonepodría ser peligroso e infringirlas leyes de garantía.
• Utilice únicamente un paño dealgodón ligeramentehumedecido para limpiar elsmartphone, y use solo aguapara humedecer el paño dealgodón. El smartphone no debelimpiarse con ningún tipo deproducto de limpieza.
Puede comenzar a utilizar su Smartphone Yarvik nada más sacarlo de la caja, sin cargar primero la batería.Se recomienda agotar primero la carga que tiene la batería, y recargarla en su totalidad una vez se agotepor completo.Si su Smartphone no se enciende nada más sacarlo de la caja, la batería ya se habrá agotado por completoy deberá, obviamente, recargarla primero.

Yarvik smartphone manual
file:///Users/elroy/Desktop/Yarvik/Manual/manual_es.html[13-02-13 17:03:26]
Volver al índice
2 Inicio delsmartphone
Cuando encienda por primera vez su Smartphone Yarvik aparecerá la secuencia de inicio.El primer arranque del dispositivo podría llevar cierto tiempo, aproximadamente entre 2 y 3 minutos.Tras la secuencia de inicio, el smartphone habrá finalizado el proceso de arranque y se mostrará la pantallade bloqueo de Android.
Pantalla de bloqueo de Android
Deslice la barra de bloqueo (A) hacia la derecha para desbloquear el smartphone. Se le trasladará a lapantalla de inicio de Android.
Volver al índice
3 Pantalla de inicio de Android

Yarvik smartphone manual
file:///Users/elroy/Desktop/Yarvik/Manual/manual_es.html[13-02-13 17:03:26]
Pantalla de inicio de Android
En la parte superior de la pantalla del smartphone se encuentra siempre la barra de estado.La barra de estado muestra información del sistema, mientras que la barra de menú inferior contiene losbotones de funciones.
1 - Indicador de señal Wi-Fi2 - Recepción de red móvil de la SIM 1 y la SIM 2 e indicador de nivel de batería3 - Hora del sistema4 - Accesos directos a aplicaciones5 - Widget (reloj analógico)6 - Botón Atrás: le lleva a la pantalla anterior, o al sitio web anterior mientras usa el navegador7 - Inicio: le lleva de nuevo a la pantalla de inicio de Android8 - Menú de aplicaciones y widgets9 - Botón Multitarea
La pantalla de inicio está compuesta por varias páginas, a las que puede acceder desplazando la pantalla aizquierda o derecha.
Para ver las aplicaciones que se encuentran en ejecución en segundo plano puede acceder a la vista demultitarea pulsando el botón de multitarea (9).
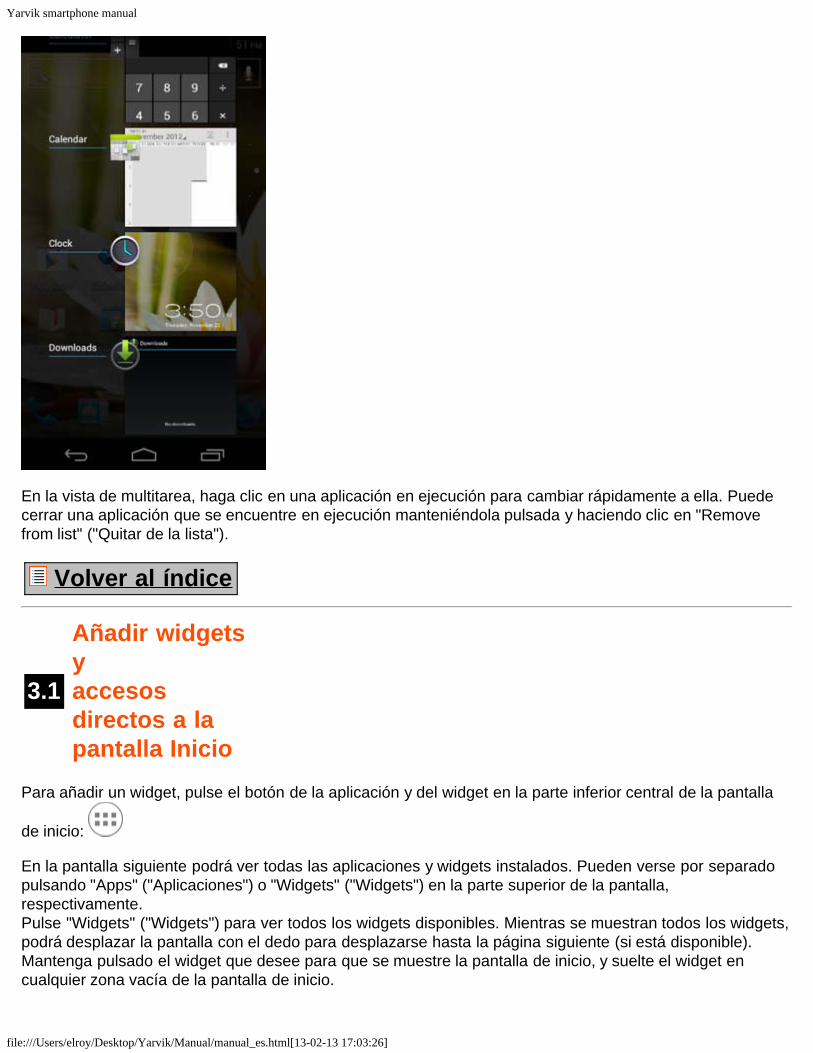
Yarvik smartphone manual
file:///Users/elroy/Desktop/Yarvik/Manual/manual_es.html[13-02-13 17:03:26]
En la vista de multitarea, haga clic en una aplicación en ejecución para cambiar rápidamente a ella. Puedecerrar una aplicación que se encuentre en ejecución manteniéndola pulsada y haciendo clic en "Removefrom list" ("Quitar de la lista").
Volver al índice
3.1
Añadir widgetsyaccesosdirectos a la pantalla Inicio
Para añadir un widget, pulse el botón de la aplicación y del widget en la parte inferior central de la pantalla
de inicio:
En la pantalla siguiente podrá ver todas las aplicaciones y widgets instalados. Pueden verse por separadopulsando "Apps" ("Aplicaciones") o "Widgets" ("Widgets") en la parte superior de la pantalla,respectivamente.Pulse "Widgets" ("Widgets") para ver todos los widgets disponibles. Mientras se muestran todos los widgets,podrá desplazar la pantalla con el dedo para desplazarse hasta la página siguiente (si está disponible).Mantenga pulsado el widget que desee para que se muestre la pantalla de inicio, y suelte el widget encualquier zona vacía de la pantalla de inicio.

Yarvik smartphone manual
file:///Users/elroy/Desktop/Yarvik/Manual/manual_es.html[13-02-13 17:03:26]
Para añadir un acceso directo a una aplicación, pulse el botón de la aplicación y del widget en la parte
inferior central de la pantalla de inicio:
En la pantalla siguiente podrá ver todas las aplicaciones y widgets instalados. Pueden verse por separadopulsando "Apps" ("Aplicaciones") o "Widgets" ("Widgets") en la parte superior de la pantalla,respectivamente.Pulse "Apps" ("Aplicaciones") para ver todas las aplicaciones instaladas.Mantenga pulsada la aplicación que desee para que se muestre la pantalla de inicio, y suéltela en cualquierzona vacía de la pantalla de inicio.
Si desea eliminar accesos directos a widgets y aplicaciones de la pantalla de inicio, manténgalos pulsados yarrástrelos hasta el icono de papelera "Remove" ("Quitar") que aparecerá en la parte superior de su pantallade inicio.
Volver al índice
3.2 Ajuste de unfondo de pantalla
Si desea cambiar el fondo de pantalla de la pantalla de inicio, mantenga pulsada la pantalla de inicio hastaque aparezca el menú "Select Wallpaper from" ("Seleccionar fondo de pantalla desde").Podrá elegir entre "Live Wallpapers" (fondos de pantalla animados), "Gallery" (galería de fotos y vídeos) o"Wallpapers" (imágenes estáticas predeterminadas).
Volver al índice
3.3 Menú Application(Aplicaciones)
Mantenga pulsado el botón de la aplicación y del widget en la parte inferior central de la pantalla de inicio:
Cuando el sistema muestre los widgets, pulse "Apps" ("Aplicaciones)" para ver todas las aplicacionesinstaladas.
Aquí podrá encontrar todos los programas preinstalados o "apps", así como aplicaciones adicionales queusted hubiera instalado.Podrá ejecutar cualquier aplicación pulsando el icono correspondiente.

Yarvik smartphone manual
file:///Users/elroy/Desktop/Yarvik/Manual/manual_es.html[13-02-13 17:03:26]
Pantalla Application (Aplicaciones)
Volver al índice
4
Configuraciónde suSmartphoneYarvik
4.1 Menú Settings(Configuración)
Pulse el icono Settings (Configuración) del menú Application (Aplicación) para acceder al menúSettings (Configuración). En el menú Settings (Configuración) podrá encontrar opciones de configuración desu Smartphone Yarvik.

Yarvik smartphone manual
file:///Users/elroy/Desktop/Yarvik/Manual/manual_es.html[13-02-13 17:03:26]
Menú Settings (Configuración)
Recorreremos las secciones más importantes:
Volver al índice
4.2 Wi-Fi yBluetooth

Yarvik smartphone manual
file:///Users/elroy/Desktop/Yarvik/Manual/manual_es.html[13-02-13 17:03:26]
Wi-Fi
En este apartado podrá configurar una conexión con una red Wi-Fi inalámbrica.Deslice el botón "On/Off" ("Activado/Desactivado") hasta "On" ("Activado") para activar el Wi-Fi.
Las redes Wi-Fi disponibles aparecerán en la lista de redes de la parte derecha de la pantalla. Pulse la redque desee. Si la red está protegida, se le pedirá que introduzca la clave de seguridad de la red.
Pulse el botón "Connect" ("Conectar") y el Smartphone comenzará a establecer conexión con la red.Cuando aparezca “Connected” ("Conectado") bajo el nombre de la red y se muestre el icono de recepcióninalámbrica en la barra de estado inferior estará conectado correctamente a la red inalámbrica.
Cómo ver la dirección MAC de la conexión Wi-Fi de su Smartphone Yarvik
Mientras se encuentra en la pantalla de configuración de la conexión Wi-Fi, haga clic en el botón de menúque se encuentra en la esquina inferior derecha.
Pulse "Advanced" ("Avanzadas") en el menú desplegable.
Se mostrará la dirección MAC de la conexión Wi-Fi en la pantalla "Advanced Wi-Fi" ("Opciones avanzadasde Wi-Fi"), bajo "MAC address" ("Dirección MAC").
Bluetooth
Su Smartphone Yarvik cuenta con un módulo Bluetooth integrado que permite conectarse a periféricoscompatibles con la conexión Bluetooth, como por ejemplo teclados, altavoces y auriculares, pero tambiéncon kits manos libres y kits manos libres de automóviles.Deslice el botón "On/Off" ("Activado/Desactivado") de Bluetooth hasta "On" ("Activado") para activar laconexión Bluetooth.
Cuando active la función, el Smartphone Yarvik comenzará a buscar automáticamente dispositivosBluetooth cercanos. Además, también puede buscar manualmente dispositivos Bluetooth haciendo clic en

Yarvik smartphone manual
file:///Users/elroy/Desktop/Yarvik/Manual/manual_es.html[13-02-13 17:03:26]
"Search for Devices" ("Buscar dispositivos") en la esquina superior derecha de la pantalla.Es posible que tenga que establecer los periféricos que desea conectar con el smartphone en el "modo deemparejamiento". Consulte el manual de instrucciones del dispositivo en cuestión para obtener másinformación.
Todos los dispositivos detectados aparecerán en la lista "Available Devices" ("Dispositivos disponibles"):
Haga clic en el dispositivo Bluetooth detectado para emparejar su Smartphone Yarvik con él.Aparecerá la ventana "Bluetooth pairing request" ("Solicitud de emparejado Bluetooth"):
La mayoría de dispositivos Bluetooth requieren un código PIN para establecer conexión. Este código sueleser 0000 o 1234. Consulte el manual de instrucciones del dispositivo Bluetooth para saber si el código PINes otro.Cuando haya introducido el código PIN correcto, pulse "OK" ("Aceptar").
El Smartphone Yarvik comenzará el proceso de emparejado con su dispositivo Bluetooth, y cuandotranscurran unos segundos se completará la conexión, mostrando el mensaje "Connected" ("Conectado")bajo el dispositivo Bluetooth correspondiente en la lista "Available Devices" ("Dispositivos disponibles"):
Puede conectar varios dispositivos Bluetooth al Smartphone Yarvik para utilizarlos de forma simultánea (p.ej. un kit manos libres y un teclado).
Volver al índice

Yarvik smartphone manual
file:///Users/elroy/Desktop/Yarvik/Manual/manual_es.html[13-02-13 17:03:26]
4.3 Perfiles deaudio
En esta sección puede cambiar el volumen de audio del smartphone, las notificaciones con vibración o convibración y timbre para llamadas y mensajes entrantes.
Volver al índice
4.4 Display(Pantalla)
En esta sección puede cambiar el brillo de la pantalla, el tamaño de las fuentes y el tiempo de inactividadautomática.Debe tener en cuenta que, cuanto mayor sea el ajuste de brillo de la pantalla, más elevado será el consumoenergético. Esto provocará que su batería se agote notablemente más rápido.Si no desea que la pantalla gire automáticamente al inclinar el smartphone, puede habilitar y deshabilitaresta función en el ajuste "Auto-rotate screen" ("Girar pantalla automáticamente").
Volver al índice
4.5 Apps(Aplicaciones)
Desde esta sección puede gestionar las aplicaciones instaladas en su Smartphone Yarvik.Podrá hacer clic en aquellas aplicaciones que tenga instaladas para ver la información de la aplicación, ydesinstalarlas si le resulta necesario con el botón "Uninstall” ("Desinstalar").Debe tener en cuenta que las aplicaciones predeterminadas preinstaladas (como, por ejemplo, lacalculadora) no pueden desinstalarse.
Volver al índice
4.6
Almacenamientoy acceso a lamemoriaMicroSD
Muestra información de la memoria interna. Si se encuentra insertada una tarjeta MicroSD, también podráencontrar aquí información de la tarjeta de memoria insertada.
Conexión del Smartphone Yarvik a un PC o Mac mediante la conexión USB

Yarvik smartphone manual
file:///Users/elroy/Desktop/Yarvik/Manual/manual_es.html[13-02-13 17:03:26]
Puede conectar su Smartphone Yarvik a un PC o Mac usando el cable USB incluido.Cuando conecte el dispositivo a un ordenador, podrá acceder a la memoria interna del Smartphone, y sitiene una insertada, a la tarjeta MicroSD, como si se tratara de un dispositivo de almacenamiento masivoUSB convencional.
Consulte la Guía de inicio rápido impresa del Smartphone Yarvik para saber cuál es el puerto esclavo USBdel smartphone. Conecte el cable USB al puerto USB del Smartphone Yarvik y a uno de los puertos USBlibres de su equipo.En la esquina inferior derecha de la pantalla del smartphone aparecerán dos mensajes uno tras otro:
Cuando aparezca el segundo mensaje "USB connected" ("USB conectado"), haga clic en él.Aparecerá la siguiente pantalla:
Haga clic en el botón "Turn on USB storage" ("Activar almacenamiento USB).Aparecerá una ventana de notificación:

Yarvik smartphone manual
file:///Users/elroy/Desktop/Yarvik/Manual/manual_es.html[13-02-13 17:03:26]
Haga clic en "OK" ("Aceptar") para confirmar.La memoria interna del Smartphone Yarvik aparecerá como unidad de almacenamiento masivo en elsistema de archivos del ordenador, y podrá utilizarla, por ejemplo, para copiar archivos entre el ordenador yel Smartphone Yarvik.Si tiene insertada una tarjeta MicroSD en el smartphone, el ordenador reconocerá la tarjeta como segundaunidad de almacenamiento masivo.
Para dejar de usar la función de almacenamiento masivo, haga clic en el botón "Turn off USB storage"("Desactivar almacenamiento USB") y desconecte el cable USB.
Nota: No se necesitan controladores de hardware para acceder a la memoria del Smartphone Yarvik. Si suordenador le solicita la instalación de controladores, simplemente puede ignorarla.
Acceder a la tarjeta MicroSDdesde ES File Explorer
Si ha introducido una tarjeta MicroSD o ha conectado una USB al Smartphone Yarvik, podrá acceder a sucontenido de la forma siguiente:
Abra la aplicación ES File Explorer y haga clic en el botón Favorites (Favoritos) (con el icono de estrellaazul).
Se desplegará el menú Favorites (Favoritos). Haga clic en el icono "root" etiquetado como "/":
Accederá al directorio "root" del sistema de archivos del smartphone, en el que podrá encontrar variosarchivos y carpetas.Busque la carpeta "mnt" y haga clic en ella:

Yarvik smartphone manual
file:///Users/elroy/Desktop/Yarvik/Manual/manual_es.html[13-02-13 17:03:26]
Se abrirá la carpeta "mnt", que contiene varias carpetas:
La carpeta "sdcard" es la memoria interna del Smartphone Yarvik.La carpeta "sdcard2" corresponde a la tarjeta MicroSD (siempre que se encuentre introducida en la ranurapara tarjetas MicroSD del smartphone).
Podrá, siempre que esté disponible, usar el acceso directo miscrosd del menú Favorites (Favoritos) paraacceder rápidamente a su tarjeta MicroSD.
Volver al índice
4.7Language &input (Idioma yentrada)
Use "Select language" ("Seleccionar idioma") para seleccionar el idioma en pantalla de su SmartphoneYarvik. Esto se aplica a todos los textos en pantalla de todo el sistema.En "Android keyboard" ("Teclado Android") podrá configurar el teclado en pantalla de su smartphone.
Volver al índice
4.8 Date & time(Fecha y hora)
En esta sección puede configurar la fecha y la hora de su Smartphone Yarvik.

Yarvik smartphone manual
file:///Users/elroy/Desktop/Yarvik/Manual/manual_es.html[13-02-13 17:03:26]
Volver al índice
5 Apps(Aplicaciones)
El Smartphone Yarvik incluye aplicaciones preinstaladas (vea los ejemplos mencionados a continuación).
La apariencia de los iconos de las aplicaciones podría cambiar sin previo aviso.
Volver al índice
6 Llamadas deteléfono
Realizar llamadas de teléfonoPara realizar una llamada de teléfono con su Smartphone Yarvik, abra la aplicación "Phone" ("Teléfono") del
menú de aplicaciones o de la pantalla de inicio de Android: Use el teclado numérico para introducir el número de teléfono.
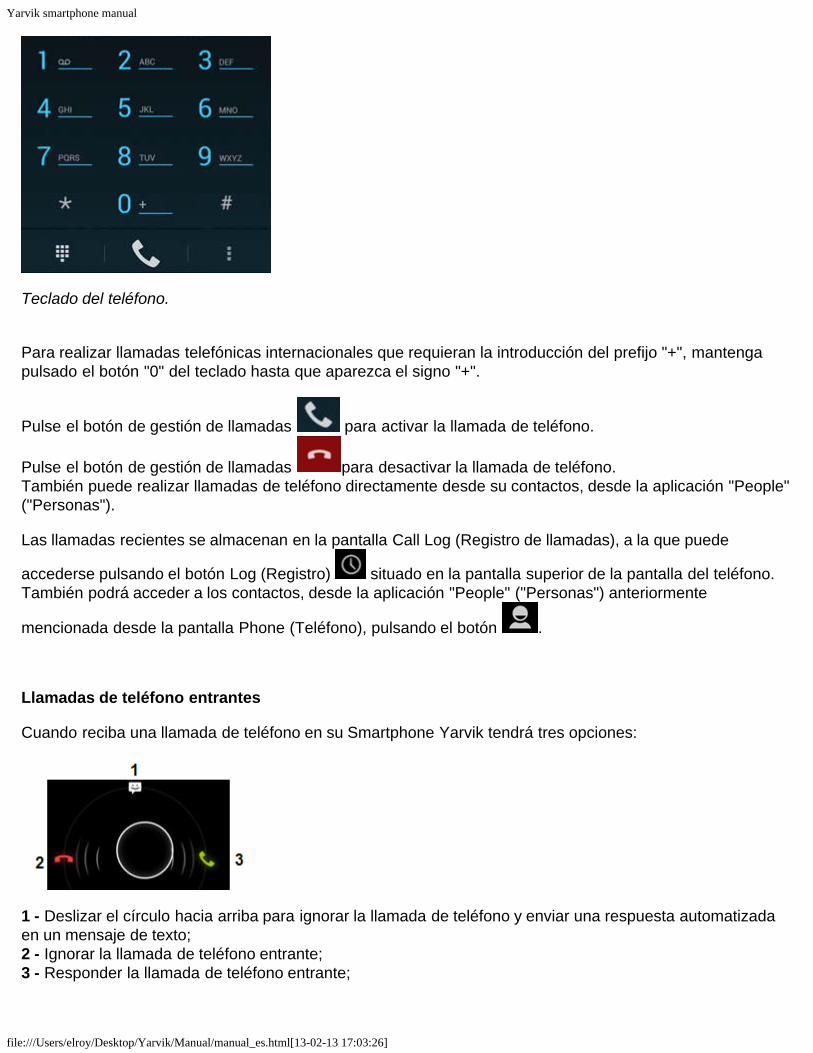
Yarvik smartphone manual
file:///Users/elroy/Desktop/Yarvik/Manual/manual_es.html[13-02-13 17:03:26]
Teclado del teléfono.
Para realizar llamadas telefónicas internacionales que requieran la introducción del prefijo "+", mantengapulsado el botón "0" del teclado hasta que aparezca el signo "+".
Pulse el botón de gestión de llamadas para activar la llamada de teléfono.
Pulse el botón de gestión de llamadas para desactivar la llamada de teléfono.También puede realizar llamadas de teléfono directamente desde su contactos, desde la aplicación "People"("Personas").
Las llamadas recientes se almacenan en la pantalla Call Log (Registro de llamadas), a la que puede
accederse pulsando el botón Log (Registro) situado en la pantalla superior de la pantalla del teléfono.También podrá acceder a los contactos, desde la aplicación "People" ("Personas") anteriormente
mencionada desde la pantalla Phone (Teléfono), pulsando el botón .
Llamadas de teléfono entrantes
Cuando reciba una llamada de teléfono en su Smartphone Yarvik tendrá tres opciones:
1 - Deslizar el círculo hacia arriba para ignorar la llamada de teléfono y enviar una respuesta automatizadaen un mensaje de texto;2 - Ignorar la llamada de teléfono entrante;3 - Responder la llamada de teléfono entrante;

Yarvik smartphone manual
file:///Users/elroy/Desktop/Yarvik/Manual/manual_es.html[13-02-13 17:03:26]
Opciones durante una llamada de teléfono
1 - Mostrar el teclado del teléfono (p. ej. para menús de opciones DTMF);2 - Habilitar/deshabilitar la función de altavoz;3 - Silenciar el micrófono;4 - Retener la llamada de teléfono;5 - Mostrar un menú con más opciones: Añadir una llamada de teléfono adicional (llamada de conferencia) ograbar la llamada de teléfono.
Desvío de llamadas
Es posible activar la función de desvío de llamadas para desviar todas las llamadas de teléfono entrantes aun número de teléfono concreto.
En la aplicación "Phone" ("Teléfono") , pulse el botón de menú y seleccione "Call settings"("Configuración de llamada").Seleccione "Voice call" ("Llamada de voz") y, a continuación, "Call forwarding" ("Desvío de llamadas") paracambiar las opciones de desvío de llamadas.
Id. del interlocutor/Llamada en espera
Con la función Caller ID (Id. del interlocutor) de su Smartphone Yarvik podrá elegir si desea enviar sunúmero al realizar llamadas de teléfono salientes.
Para cambiar este ajuste, inicie la aplicación "Phone" ("Teléfono") , pulse el botón de menú yseleccione "Settings" ("Configuración") - "Voice call" ("Llamada de voz") - "Additional settings" ("Ajustesadicionales") - "Caller ID" ("Id. del interlocutor").Desde este menú también puede habilitar y deshabilitar las llamadas de teléfono entrantes mientrasmantiene una conversación de teléfono.
Volver al índice

Yarvik smartphone manual
file:///Users/elroy/Desktop/Yarvik/Manual/manual_es.html[13-02-13 17:03:26]
7 Mensajería
Su Smartphone Yarvik le permite enviar mensajes SMS y MMS. Póngase en contacto con su proveedor deservicios para móvil para obtener más información sobre el coste que tiene el envío y la recepción demensajes con países del extranjero.
Envío de mensajes SMS/MMS
Abra la aplicación "Messaging" ("Mensajería") desde la pantalla de inicio de Android o desde el menúde aplicaciones.
Aplicación Messaging (Mensajería).
1 - Añada adjuntos como imágenes, audio y vídeos. Los mensajes que incluyan adjuntos se consideraránautomáticamente mensajes MMS;2 - Menú Message settings (Configuración del mensaje);3 - Campo Recipient (Destinatario);4 - Add recipient (Añadir Destinatario);5 - Visión general de la conversación;6 - Introducción del mensaje;7 - Botón Send message (Enviar mensaje).
Establecer el número del buzón de voz/Reproducir mensajes del buzón de vozPara definir el número del servicio buzón de voz en su Smartphone Yarvik, abra la aplicación "Phone"
("Teléfono") desde el menú de aplicaciones o desde la pantalla de inicio de Android:

Yarvik smartphone manual
file:///Users/elroy/Desktop/Yarvik/Manual/manual_es.html[13-02-13 17:03:26]
Mantenga pulsado el botón del teclado del teléfono. "Add number" ("Añadir número") aparecerá enla pantalla de opciones. En las opciones del buzón de voz podrá seleccionar la configuración de buzón devoz, e introducir el número del servicio de buzón de voz.
Una vez establecido el número de servicio del buzón de voz, podrá utilizar el botón para llamar albuzón de voz manteniendo el botón pulsado.
Volver al índice
8 Declaración degarantía
Yarvik garantiza que el producto adquirido por el Cliente estará libre de defectos en la mano de obra y en losmateriales durante un periodo de 2 años a partir de la fecha de compra por parte del Cliente. Si durante elperiodo de garantía el producto presenta defectos en la mano de obra o en los materiales, el Cliente deberádevolver el producto al distribuidor en el que se compró el producto. El distribuidor reparará o sustituirá launidad (según el criterio de Yarvik) dentro de un periodo de tiempo razonable. Se requiere una facturaoriginal como prueba de la fecha de compra. La decisión de Yarvik en este sentido será definitiva.
Esta garantía no cubre defectos ni fallos de funcionamiento provocados por transferencias de software, usoincorrecto, utilización abusiva, modificaciones, negligencias, uso inadecuado, cuidado insuficiente o todoaquel acto que esté fuera del control de Yarvik.
IMPORTANTE: Al comprar un smartphone Yarvik, este incluirá el firmware estable más reciente disponiblepara este modelo en el momento de su fabricación. Yarvik no proporcionará asistencia técnica alguno aproductos que el usuario final hubiera modificado, ni tampoco Yarvik respalda las modificaciones deprogramación del software y del software utilizado en sus productos. En caso de realizarse alguna de estasmodificaciones, todas las garantías quedarán, de forma automática, anuladas.
Para evitar la anulación de la garantía ofrecida en virtud del presente documento, el Cliente debe utilizarúnicamente el software, las aplicaciones y las actualizaciones oficiales disponibles en el sitio web de Yarvik,www.yarvik.com.No deberá utilizarse ningún otro software o firmware, dado que dicho uso anulará de forma automática todaslas garantías y asistencia técnica. Yarvik no respalda el uso de ningún software o firmware que no sean elsoftware y el firmware instalados en el producto por parte del fabricante, o aquel software o firmware queesté disponible para su descarga en el sitio web oficial de Yarvik, www.yarvik.com. Yarvik declina de formaexplícita responder a consultas relacionadas con modificaciones no autorizadas, software no autorizado yfirmware no autorizado.
Volver al índice
9 Información de lalicencia GNU/GPL

Yarvik smartphone manual
file:///Users/elroy/Desktop/Yarvik/Manual/manual_es.html[13-02-13 17:03:26]
Consulte la información legal disponible en su Smartphone Yarvik, bajo Settings (Configuración) – AboutSmartphone (Acerca del smartphone) – Legal information (Información legal) (se necesita conexión aInternet) o visite http://source.android.com/source/licenses.html para obtener más información.
Volver al índice
10 ImportantInformation
Wireless LAN-Regulatory information
Depending on the model, the wireless LAN built-in into Smartphone devices can only be used in thefollowing countries: Austria, Belgium, Bulgaria, Czech Republic, Denmark, Finland, France, Germany,Greece, Hungary, Iceland, Ireland, Italy, Luxembourg, the Netherlands, Norway, Poland, Portugal, Romania,Slovakia, Slovenia, Spain, Sweden, Switzerland, Turkey and the United Kingdom.
Conditions of use
When using the IEEE 802.11b/g/n Wireless LAN standard, channels 1 to 13 (2.4 GHz...2.4835 GHz) areselectable for both indoor and outdoor use, however with restrictive conditions applying in France, Italy andNorway, as follows:
• France: When using this product indoor, all channels can be used without restrictions. Outdoor onlychannels 1 to 6 are allowed. This means that in Peer-to-Peer, the WLAN feature can only be used outside ifthe peer sets up the communication on an authorized channel (i.e., between 1 & 6). In infrastructure mode,please make sure the access point is configured to a channel from 1 to 6 before setting up the connection.
• Italy: Use of the RLAN network is governed: Disposal of Old Electrical & Electronic- with respect to private use, by the Legislative Decree of 1.8.2003, no. 259 (“Code of ElectronicCommunications”). In particular Article 104 indicates when the prior obtainment of a general authorization isrequired and Art. 105 indicates when free use is permitted;- with respect to the supply to the public of the WLAN access to telecom networks and services, by theMinisterial Decree 28.5.2003, as amended, and Art. 25 (general authorization for electronic communicationsnetworks and services) of the Code of electronic communications.
• Norway: Use of this radio equipment is not allowed in the geographical area within a radius of 20 km fromthe centre of Ny-Ålesund, Svalbard.
WEEESymbolInformation
Correct Disposal of This product (Waste Electrical & Electronic Equipment).

Yarvik smartphone manual
file:///Users/elroy/Desktop/Yarvik/Manual/manual_es.html[13-02-13 17:03:26]
(Applicable in the European Union and other European countries with separate collection systems).
This marking shown on the product or its literature indicates that it should not be disposed with otherhousehold wasted at the end of its working life. To prevent possible harm to the environment or humanhealth from uncontrolled waste disposal, please separate this from other types of wastes and recycle itresponsibly to promote the sustainable reuse of material resources.Household users should contact either the retailer where they purchased this product, or their localgovernment office, for details of where and how they can take this item for environmentally safe recycling.Business users should contact their supplier and check the terms and conditions of the purchase contract.This product should not be mixed with other commercial wastes of disposal.
Disposal of waste batteries (applicable in the European Union and other European countries withseparate collection systems)
Either of the symbols shown next may appear on the battery or on the packaging to indicate that the batteryprovided with this product shall not be treated as household waste. On certain batteries this symbol might beused in combination with a chemical symbol. The chemical symbols for mercury (Hg) or lead (Pb) are addedif the battery contains more than 0.0005% mercury or 0.004% lead. By ensuring these batteries are disposedof correctly, you will help prevent potentially negative consequences for the environment and human healthwhich could otherwise be caused by inappropriate waste handling of the battery. The recycling of thematerials will help to conserve natural resources. In case of products that for safety, performance or dataintegrity reasons require a permanent connection with an incorporated battery, this battery should bereplaced by qualified service staff only. To ensure that the battery will be treated properly, hand over theproduct at end-of-life to the applicable collection point for the recycling of electrical and electronicequipment.
For all other batteries, please view the section on how to remove the battery from the product safely. Handthe battery over to the applicable collection point for the recycling of waste batteries. For more detailedinformation about recycling of this product or battery, please contact your local Local government Office,your household waste disposal service or the shop where you purchased the product.
When travelling to and within the United States of America, please be aware that the U.S. Department ofTransportation (DOT) recently published new regulations that apply to passengers travelling with lithiummetal batteries and lithium-ion batteries.For detailed information, visit http://safetravel.dot.gov/whats_new_batteries.html.
Safety Information
Yarvik Smartphone device
• Yarvik is not responsible for any interference that you may experience or that may be caused when
Yarvik smartphone manual
file:///Users/elroy/Desktop/Yarvik/Manual/manual_es.html[13-02-13 17:03:26]
operating this device.
• Warning: This apparatus must be earthed.
Opening or dismantling the main unit or any of its accessories, for whatever reason, could lead to damagesthat are not covered by the guarantee.
• To avoid electrical shock, do not open the cabinet. Refer servicing to qualified personnel only.
• To prevent fire or shock hazard, do not expose your Smartphone device or any of its accessories to rain ormoisture.
• Do not use or store your Smartphone device in a location subject to heat sources, such as radiators or airducts; direct sunlight; excessive dust; moisture or rain; mechanical vibration or shock; strong magnets orspeakers that are not magnetically shielded; excessively high and low temperatures; and high humidity.
• Turning off your Smartphone device with the power button does not disconnect the device completely frommains voltage. To disconnect it completely, unplug the AC adapter or the power cord from mains. Thesocket-outlet shall be installed near the equipment and shall be easily accessible.
• Audio and picture distortion may occur if this equipment is positioned in close proximity to any equipmentemitting electromagnetic radiation.
• This apparatus is also designed for IT power system with phase to phase voltage 230V, for customers inNorway.
• Observe the following precautions to provide adequate air circulation and to ensure normal reliableoperation:- Do not use the Smartphone device and/or the AC adapter while covered or wrapped in cloth. Ensure theAC adapter operates in a clear environment.- Turn off the Smartphone device before putting the device into a bag or a carrying case.
• Do not use your Smartphone device directly on your lap. The temperature of the base of the unit will riseduring normal operation and over time could result in discomfort or burns.
• Do not use your Smartphone device while walking. Listening to music with headphones or watching theLCD screen while walking may lead to an unexpected accident and result in personal injuries.
• Using connected headphones on the Smartphone device for too long and/or setting the audio volume uptoo high when using headphones may cause serious hearing damage.
• Avoid strong beating of or to the product.
• Don’t operate the touch screen of the Smartphone device with sharp objects, as this may result inscratching the screen surface.
• Only use permitted batteries, chargers and accessories with your Smartphone device. The use of any otherproducts with the device can be dangerous and may violate the warranty regulations.
• Only use a slightly wet cotton cloth to clean the device, and only use water to wetten the cotton cloth. TheSmartphone device should not be cleaned with any sort of (glass) cleaning aid.

Yarvik smartphone manual
file:///Users/elroy/Desktop/Yarvik/Manual/manual_es.html[13-02-13 17:03:26]
Wireless functionality
• If radio interference with other devices occurs while using your Smartphone device, do not use the wirelessfunctionality. Use of the wireless functionality may cause a malfunction of the devices, resulting in anaccident.
• In some situations or environments, the use of the wireless functionality might be restricted by theproprietor of the building or responsible representatives of the organization, for example on board airplanes,in hospitals or in any other environment where the risk of interference with other devices or services isperceived or identified as harmful. If you are uncertain about the policy applying to the use of wirelessfunctionality in a specific organization or environment, you are encouraged to first ask for authorization priorto switching it on. Consult your physician or the manufacturer of personal medical devices (pacemakers,hearing aids, etc.) regarding any restrictions on the use of wireless functionality.
• If using wireless functionality near a pacemaker, make sure it is at least 19 inches / 50 cm away from thepacemaker.
• Due to the transmission and reception properties of wireless communications, data can occasionally be lostor delayed. This can be due to the variation in radio signal strength that results from changes in thecharacteristics of the radio transmission path. Yarvik will not be held responsible for damages of any kindresulting from the delays or errors in data transmitted or received via wireless functionality, or failure ofwireless functionality to transmit or receive such data.
• If the equipment does cause harmful interference to radio/TV reception, which can be determined by turningthe equipment off and on, the user is encouraged to try to correct the interference by one or more of thefollowing measures: reorient or relocate the receiving antenna, increase the distance between the senderand the receiver, consult the dealer or an experienced radio/TV technician for help. Yarvik will not beresponsible for any radio/TV interference nor for any other undesired effect.
Wireless LAN Security
Creating security settings for the Wireless LAN is extremely important. Yarvik assumes no responsibility forany security problems that may arise from the use of the Wireless LAN.
Battery pack
Do not charge the battery pack in any way other than as described in the Start guide or as designated byYarvik in writing.
AC adapter
• It is highly recommended that you use a genuine Yarvik AC adapter supplied by Yarvik for your product.
• This AC adapter is intended for use with the Smartphone device IT products only.
• Do not place the AC adapter in contact with your skin. Remove the AC adapter away from your body if itbecomes warm and causes discomfort.

Yarvik smartphone manual
file:///Users/elroy/Desktop/Yarvik/Manual/manual_es.html[13-02-13 17:03:26]
RoHS
This products has been certified as RoHS Compliant.
YARVIK.COM
Volver al índice

Yarvik smartphone manual
file:///Users/elroy/Desktop/Yarvik/Manual/manual_it.html[13-02-13 17:03:31]
Indice SELECT LANGUAGE
1 Prima del primoutilizzo2 Avvio delloSmartphone3 Schermata Home diAndroid3.1 Aggiunta di widget escorciatoie allaschermata Home3.2 Impostazione di unwallpaper3.3 Menudell'applicazione4 Configurazione delloSmartphone4.1 Menu Settings(Impostazioni)4.2 WiFi & Bluetooth4.3 Audio Profiles(Profili audio)4.4 Display (Display)4.5 Apps4.6 Memorizzazione eaccesso alla memoriaMicroSD4.7 Language & input(Lingua e inserimenti)4.8 Date & time (Data e

Yarvik smartphone manual
file:///Users/elroy/Desktop/Yarvik/Manual/manual_it.html[13-02-13 17:03:31]
ora)5 App6 Telefonate7 Messaging8 Garanzia9 Informazioni sullalicenza GNU/GPL10 Importantinformation
1 Prima del primo utilizzo
Gentile utente,
grazie per avere acquistato il nostro prodotto.Per garantire un utilizzo comodo e rapido del nuovo Smartphone Yarvik, leggere attentamente questeistruzioni prima dell'uso.
Ci auguriamo che utilizzerà lo Smartphone Yarvik il più a lungo possibile.
Nota
• Lo Smartphone Yarvik è unprodotto elettronico ad altaprecisione. Non tentare didisassemblare lo Smartphone,poiché tale operazione annulleràla garanzia e potrebbe causare ilmalfunzionamento deldispositivo.
• Evitare di colpire o far cadere ilprodotto.
• Evitare di utilizzare loSmartphone in un ambiente contemperature elevate o basseoppure in ambienti in cui ildispositivo possa entrare acontatto con umidità, polvere ocampi magnetici.

Yarvik smartphone manual
file:///Users/elroy/Desktop/Yarvik/Manual/manual_it.html[13-02-13 17:03:31]
• Non esporre lo Smartphonealla luce solare diretta per unperiodo di tempo prolungato.
• Non azionare il touch screencon oggetti appuntiti poichépotrebbero graffiare lo schermo.
• L'utilizzo prolungato delloSmartphone con cuffie e/o con ilvolume troppo alto potrebbecausare gravi danni all'udito.
• Non attraversare la strada,guidare la moto né andare inbicicletta mentre si utilizza loSmartphone con le cuffie, al finedi evitare incidenti stradali.
• Con lo Smartphone Yarvikutilizzare solo batterie, caricatorie accessori consentiti. L'utilizzodi qualsiasi altro prodotto con loSmartphone può esserepericoloso e annullare lecondizioni di garanzia.
• Per pulire lo Smartphone,utilizzare solamente un panno dicotone leggermente inumiditoesclusivamente con acqua. Nonpulire lo Smartphone conprodotti detergenti.
È possibile utilizzare lo Smartphone Yarvik direttamente appena estratto dalla confezione, senza doverprecaricare la batteria.È meglio che all'inizio la batteria funzioni con la carica presente e che venga ricaricata completamente alprimo scaricamento completo.Se lo Smartphone non si accende appena estratto dalla confezione, significa che la batteria è giàcompletamente scarica ed è ovviamente necessario ricaricarla.
Torna all'indice
2 Avvio delloSmartphone
Alla prima accensione dello Smartphone Yarvik, apparirà la sequenza di avvio.
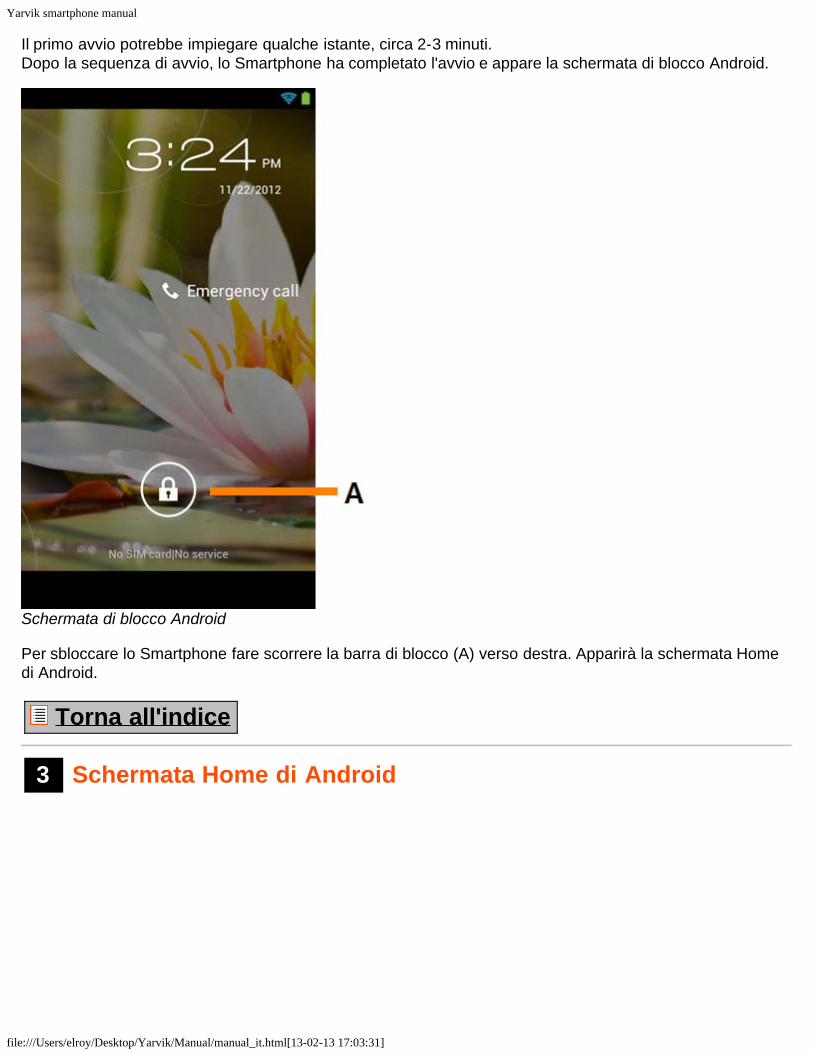
Yarvik smartphone manual
file:///Users/elroy/Desktop/Yarvik/Manual/manual_it.html[13-02-13 17:03:31]
Il primo avvio potrebbe impiegare qualche istante, circa 2-3 minuti.Dopo la sequenza di avvio, lo Smartphone ha completato l'avvio e appare la schermata di blocco Android.
Schermata di blocco Android
Per sbloccare lo Smartphone fare scorrere la barra di blocco (A) verso destra. Apparirà la schermata Homedi Android.
Torna all'indice
3 Schermata Home di Android

Yarvik smartphone manual
file:///Users/elroy/Desktop/Yarvik/Manual/manual_it.html[13-02-13 17:03:31]
Schermata Home di Android
Nella parte superiore dello schermo dello Smartphone è possibile trovare la barra di stato.La barra di stato visualizza le informazioni del sistema, mentre la barra di menu inferiore contiene i pulsantifunzione.
1 - Indicatore del segnale Wi-Fi2 - Ricezione della rete cellulare per SIM1 e SIM2 e indicatore del livello batteria3 - Orario del sistema4 - Scorciatoie della app5 - Widget (orologio analogico)6 - Pulsante indietro - riporta alla schermata precedente o al sito Web precedente quando si utilizza ilBrowser7 - Home - riporta alla schermata Home di Android8 - Menu delle app e dei widget9 - Pulsante multifunzione
La schermata Home comprende più pagine a cui è possibile accedere facendo scorrere la schermata Homea destra/sinistra.
Per vedere quali sono le app in esecuzione in background, è possibile accedere alla visualizzazionemultitasking premendo il pulsante multifunzione (9).

Yarvik smartphone manual
file:///Users/elroy/Desktop/Yarvik/Manual/manual_it.html[13-02-13 17:03:31]
Fare clic su una app in esecuzione nella visualizzazione multitasking per passare rapidamente ad essa. Èpossibile chiudere un'app in esecuzione premendola a lungo e facendo clic su "Remove from list" (Rimuovida elenco).
Torna all'indice
3.1
Aggiunta diwidget escorciatoie allaschermataHome
Per aggiungere un widget, premere il pulsante della app e del widget al centro della parte inferiore della
schermata Home:
Nella schermata successiva è possibile trovare tutte le app e tutti i widget installati, visualizzabiliseparatamente premendo rispettivamente "Apps" o "Widgets" nella parte superiore della schermata.Premere "Widgets" per visualizzare tutti i widget disponibili. Durante la visualizzazione di tutti i widget, èpossibile far scorrere la schermata per passare alla pagina successiva (se disponibile).Tenere premuto il widget desiderato per visualizzarlo nella schermata Home e rilasciare il widget in qualsiasipunto vuoto della schermata Home.

Yarvik smartphone manual
file:///Users/elroy/Desktop/Yarvik/Manual/manual_it.html[13-02-13 17:03:31]
Per aggiungere una scorciatoia a qualsiasi app, premere il pulsante della app e del widget al centro della
parte inferiore della schermata Home:
Nella schermata successiva è possibile trovare tutte le app e tutti i widget installati, visualizzabiliseparatamente premendo rispettivamente "Apps" o "Widgets" nella parte superiore della schermata.Premere "Apps" per visualizzare tutte le app installate.Tenere premuta la app desiderata per visualizzarla nella schermata Home e rilasciare la scorciatoia inqualsiasi punto vuoto della schermata Home.
Per rimuovere i widget e/o le scorciatoie app dalla schermata Home, tenerli premuti e trascinarli nell'iconadel cestino "Remove" (Rimuovi) visualizzata nella parte superiore della schermata Home.
Torna all'indice
3.2 Impostazione diun wallpaper
Per cambiare il wallpaper della schermata Home, tenere premuta la schermata Home finché non appare ilmenu "Select Wallpaper from" (Seleziona wallpaper da).È possibile selezionare tra "Live Wallpapers" (wallpaper animati), "Gallery" (galleria foto/video) o"Wallpapers" (immagini statiche predefinite).
Torna all'indice
3.3 Menudell'applicazione
Premere il pulsante della app e del widget al centro della parte inferiore della schermata Home:
Quando il sistema visualizza i widget, premere "Apps" per visualizzare tutte le app installate.
Qui è possibile trovare tutti i programmi o le "app" preinstallati, nonché le app aggiuntive installate dall'utente.È possibile lanciare le app premendo l'icona corrispondente.

Yarvik smartphone manual
file:///Users/elroy/Desktop/Yarvik/Manual/manual_it.html[13-02-13 17:03:31]
Schermata dell'applicazione
Torna all'indice
4
ConfigurazionedelloSmartphoneYarvik
4.1 Menu Settings(Impostazioni)
Premere l'icona Settings (Impostazioni) nel menu dell'applicazione per entrare nel menu Settings(Impostazioni). Nel menu Settings (Impostazioni) è possibile trovare le opzioni per configurare loSmartphone Yarvik.
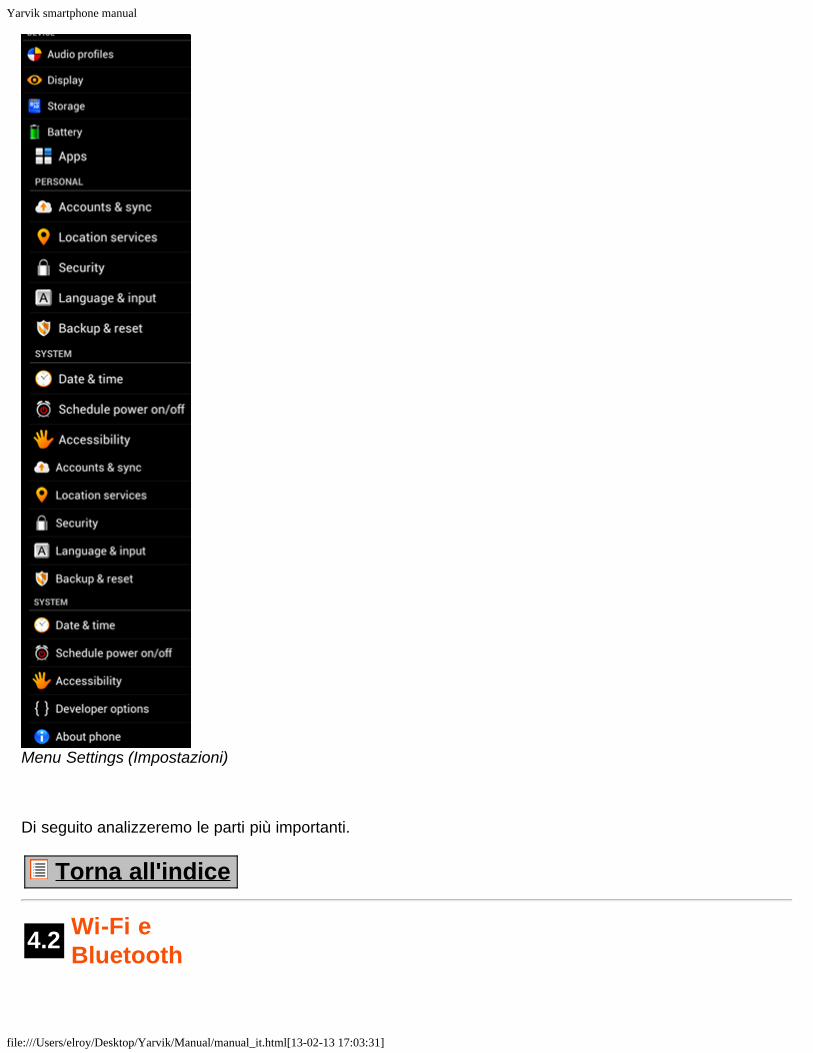
Yarvik smartphone manual
file:///Users/elroy/Desktop/Yarvik/Manual/manual_it.html[13-02-13 17:03:31]
Menu Settings (Impostazioni)
Di seguito analizzeremo le parti più importanti.
Torna all'indice
4.2 Wi-Fi eBluetooth

Yarvik smartphone manual
file:///Users/elroy/Desktop/Yarvik/Manual/manual_it.html[13-02-13 17:03:31]
Wi-Fi
Impostare una connessione con una rete Wi-Fi wireless.Fare scorrere il pulsante On/Off su "On" per attivare il Wi-Fi.
Le reti Wi-Fi disponibili appaiono nell'elenco di reti a destra della schermata. Selezionare la rete che sidesidera. Se la rete è protetta, sarà richiesto l'inserimento del codice di sicurezza della rete.
Premere il pulsante "Connect" (Connetti); lo Smartphone si collega alla rete.Una volta apparsa l'indicazione "Connected" (Connesso) sotto il nome della rete e l'icona di ricezionewireless nella barra di stato inferiore, significa che la connessione alla rete wireless è stata effettuata consuccesso.
Visualizzazione dell'indirizzo MAC Wi-Fi dello Smartphone Yarvik
Con la schermata delle impostazioni Wi-Fi visualizzata, fare clic sul pulsante di menu nell'angolo inferioredestro.
Premere "Advanced" (Avanzato) nel menu visualizzato.
L'indirizzo MAC Wi-Fi appare nella schermata "Advanced Wi-Fi" (Wi-Fi avanzato) successiva sotto "MACaddress" (Indirizzo MAC).
Bluetooth
Lo Smartphone Yarvik è dotato di un modulo Bluetooth incorporato per la connessione alle perifericheBluetooth compatibili, come tastiere, altoparlanti e cuffie, ma anche a cuffie e kit vivavoce per auto Bluetooth.Per attivare Bluetooth, far scorrere il pulsante di accensione Bluetooth su "On".
Una volta attivato, lo Smartphone Yarvik inizierà automaticamente a cercare i dispositivi Bluetooth presentinelle vicinanze. È sempre possibile cercare manualmente i dispositivi Bluetooth facendo clic su "Search forDevices" (Cerca dispositivi) nell'angolo superiore destro dello schermo.

Yarvik smartphone manual
file:///Users/elroy/Desktop/Yarvik/Manual/manual_it.html[13-02-13 17:03:31]
Potrebbe essere necessario che lo Smartphone a cui collegare le periferiche debba trovarsi in modalità"pairing" (accoppiamento). Per ulteriori informazioni fare riferimento al manuale di istruzioni per le perifericheinteressate.
Tutti i dispositivi rilevati appariranno nell'elenco "Available Devices" (Dispositivi disponibili):
Fare clic sul dispositivo Bluetooth rilevato con cui accoppiare lo Smartphone Yarvik.Appare la finestra "Bluetooth pairing request" (Richiesta di accoppiamento Bluetooth):
Quasi tutti i dispositivi Bluetooth necessitano di un codice pin per connettersi. Normalmente tale codice è0000 o 1234. Fare riferimento al manuale di istruzioni del dispositivo Bluetooth se il codice pin è diverso.Dopo aver inserito il codice pin corretto, premere "OK".
Ora lo Smartphone Yarvik inizierà ad accoppiarsi con il dispositivo Bluetooth e, dopo alcuni secondi, laconnessione sarà completata, per cui apparirà il messaggio "Connected" (Connesso) sotto il dispositivoBluetooth in questione, nell'elenco "Available Devices" (Dispositivi disponibili):
Al proprio Smartphone Yarvik è possibile collegare più dispositivi Bluetooth da usare contemporaneamente(es. cuffie e tastiera).
Torna all'indice
Audio Profiles

Yarvik smartphone manual
file:///Users/elroy/Desktop/Yarvik/Manual/manual_it.html[13-02-13 17:03:31]
4.3 (Profili audio)Qui è possibile cambiare il volume audio dello Smartphone, ad esempio solo vibrazione o vibrazione esegnale acustico per le chiamate/i messaggi in entrata.
Torna all'indice
4.4 Display(Display)
Qui è possibile cambiare la luminosità del display, la dimensione dei font e il tempo sleep automatico.Non dimenticare che più intensa è la luminosità del display, maggiore è il consumo energetico. Taleimpostazione farà scaricare la batteria molto più velocemente.Se si desidera che il display non ruoti automaticamente quando si inclina lo Smartphone, è possibileattivare/disattivare questa funzione nell'impostazione della schermata Auto-rotate (Rotazione automatica).
Torna all'indice
4.5 Apps
Qui è possibile gestire le applicazioni installate sullo Smartphone Yarvik.È possibile fare clic sulle app installate dall'utente per vederne le informazioni e disinstallarle se lo sidesidera, ricorrendo al pulsante "Uninstall" (Disinstalla).Non dimenticare che le applicazioni predefinite preinstallate (come la calcolatrice) non possono esseredisinstallate.
Torna all'indice
4.6
Memorizzazionee accessoalla memoriaMicroSD
Visualizza le informazioni sulla memoria interna. In presenza di una scheda MicroSD, qui è possibile trovareanche le informazioni memoria per la scheda inserita.
Collegamento dello Smartphone Yarvik ad un PC o un Mac tramite USB
È possibile collegare lo Smartphone Yarvik ad un PC o un Mac tramite il cavo USB fornito.Una volta eseguito il collegamento ad un computer, è possibile accedere alla memoria interna delloSmartphone e, se presente, ad una scheda MicroSD inserita come dispositivo di memoria di massa USBstandard.

Yarvik smartphone manual
file:///Users/elroy/Desktop/Yarvik/Manual/manual_it.html[13-02-13 17:03:31]
Fare riferimento alla Guida rapida di avvio stampata dello Smartphone Yarvik al fine di determinare laposizione della porta USB dello Smartphone. Collegare il cavo USB alla porta USB dello Smartphone Yarvike ad una porta USB libera del computer.Nella parte superiore dello schermo dello Smartphone, appariranno brevemente due messaggi, uno dopol'altro:
Una volta apparso il secondo messaggio ("USB connected", USB collegato), fare clic su di esso.Apparirà la seguente schermata.
Fare clic sul pulsante "Turn on USB storage" (Attiva memoria USB).Apparirà una finestra di notifica.
Fare clic su "OK" per confermare.

Yarvik smartphone manual
file:///Users/elroy/Desktop/Yarvik/Manual/manual_it.html[13-02-13 17:03:31]
La memoria interna dello Smartphone Yarvik ora appare come unità di memoria di massa nel file system delcomputer e potrà essere utilizzata, ad esempio, per copiare i file dallo e nello Smartphone Yarvik.Se nello Smartphone è presente una scheda MicroSD, questa sarà riconosciuta dal computer come secondaunità di memoria di massa.
Per interrompere l'utilizzo della funzione Mass Storage Device (Dispositivo di memoria di massa), fare clicsul pulsante "Turn off USB storage" (Disattiva memoria USB) e scollegare il cavo USB.
Nota: per accedere alla memoria dello Smartphone Yarvik non sono necessari driver di hardware. Qualora ilcomputer richieda l'installazione di driver, basta ignorarlo.
Accesso alla scheda MicroSDin ES File Explorer
Se è stata inserita una scheda MicroSD nello Smartphone Yarvik, è possibile accedere al suo contenutocome segue.
Aprire l'app ES File Explorer e fare clic sul pulsante Favorites (Preferiti) (quello con l'icona della stellaazzurra).
Si apre il menu Favorites (Preferiti). Fare clic sull'icona "root", contrassegnata da una "/":
Ora ci si trova nella "root" del file system dello Smartphone, che contiene numerosi file e cartelle.Individuare e fare clic sulla cartella "mnt":
La cartella "mnt" si apre mostrando numerose altre cartelle:

Yarvik smartphone manual
file:///Users/elroy/Desktop/Yarvik/Manual/manual_it.html[13-02-13 17:03:31]
La cartella "sdcard" corrisponde alla memoria interna dello Smartphone Yarvik.La cartella "sdcard2" corrisponde alla scheda MicroSD (se questa è inserita nello slot MicroSD delloSmartphone).
Quando disponibile, è possibile utilizzare anche la scorciatoia microsd2 nel menu Favorites (Preferiti)precedentemente indicato per accedere rapidamente alla memoria della scheda MicroSD.
Torna all'indice
4.7Language &input (Lingua einserimenti)
Utilizzare "Select language" (Seleziona lingua) per selezionare la lingua di visualizzazione dello SmartphoneYarvik. Tale selezione si applica a tutti i testi delle schermate dell'intero sistema.In "Android keyboard" (Tastiera Android) è possibile impostare la tastiera visualizzata sullo schermo delloSmartphone.
Torna all'indice
4.8 Date & time(Data e ora)
Qui è possibile impostare la data e l'ora per lo Smartphone Yarvik.
Torna all'indice
5 Apps
Lo Smartphone Yarvik viene fornito con delle app preinstallate (vedere gli esempi sotto riportati).

Yarvik smartphone manual
file:///Users/elroy/Desktop/Yarvik/Manual/manual_it.html[13-02-13 17:03:31]
L'aspetto delle icone app potrebbe cambiare senza preavviso.
Torna all'indice6 Telefonate
Fare una telefonataPer fare una telefonata con lo Smartphone Yarvik, aprire l'applicazione "Phone" (Telefono) dal menu
dell'applicazione o dalla schermata Home di Android: Utilizzare il tastierino telefonico numerico per inserire il numero di telefono.

Yarvik smartphone manual
file:///Users/elroy/Desktop/Yarvik/Manual/manual_it.html[13-02-13 17:03:31]
Tastierino telefonico
Per fare una telefonata internazionale che richiede il prefisso "+", tenere premuto lo "0" sul tastierino finchénon appare "+".
Premere il pulsante di gestione chiamate per avviare la telefonata.
Premere il pulsante di gestione chiamate per interrompere la telefonata.Inoltre, è possibile effettuare le telefonate direttamente dai contatti all'interno dell'applicazione "People"(Persone).
Le chiamate recenti vengono memorizzate nella schermata Call Log (Registro chiamate), accessibile
premendo il pulsante Log (Registro) nella parte superiore dello schermo del telefono.È possibile accedere ai contatti (dall'applicazione precedentemente indicata "People", Persone) direttamente
dalla schermata Phone (Telefono) premendo il pulsante .
Telefonate in entrata
Quando si riceve una telefonata sullo Smartphone Yarvik, appariranno 3 opzioni:
1 - Fare scorrere il cerchio verso l'alto per ignorare la telefonata in entrata e inviare una risposta automaticatramite messaggio di testo.2 - Ignorare la telefonata in entrata.3 - Rispondere alla telefonata in entrata.

Yarvik smartphone manual
file:///Users/elroy/Desktop/Yarvik/Manual/manual_it.html[13-02-13 17:03:31]
Opzioni durante una telefonata
1 - Visualizzare il tastierino telefonico (ad es. per i menu di opzione DTMF).2 - Attivare/disattivare la funzione di altoparlante.3 - Tacitare il microfono.4 - Mettere la telefonata in attesa.5 - Menu con altre opzioni: aggiungere un'ulteriore telefonata (in effetto conferenza) o registrare latelefonata.
Inoltro della chiamata
È possibile impostare la funzione di inoltro della chiamata per inoltrare tutte le telefonate in entrata ad unnumero di telefono specifico.
Nell'applicazione "Phone" (Telefono) , premere il pulsante di menu e selezionare "Call settings"(Impostazioni chiamata).Selezionare "Voice call" (Chiamata vocale), in cui è possibile scegliere "Call forwarding" (Inoltro chiamata)per cambiare le opzioni di inoltro.
ID utente chiamante/Chiamata in attesa
Con la funzione Caller ID (ID utente chiamante) dello Smartphone Yarvik è possibile scegliere se si desiderainviare il proprio numero unitamente alle telefonate in uscita.
Per cambiare questa opzione, avviare l'applicazione "Phone" (Telefono) , premere il pulsante di menu
e selezionare "Settings" (Impostazioni) - "Voice call" (Chiamata vocale) - "Additional settings" (Ulterioriimpostazioni) - "Caller ID" (ID utente chiamante).All'interno di questo stesso menu è possibile anche attivare/disattivare le telefonate in entrata quando si ègià impegnati in una conversazione telefonica.
Torna all'indice

Yarvik smartphone manual
file:///Users/elroy/Desktop/Yarvik/Manual/manual_it.html[13-02-13 17:03:31]
7 Messaging
Lo Smartphone Yarvik è in grado di inviare messaggi SMS ed MMS. Consultare il proprio mobile serviceprovider per informazioni sugli addebiti standard e su costi aggiuntivi per l'invio di messaggi verso o da altripaesi.
Invio di messaggi SMS/MMS
Aprire l'applicazione "Messaging" (Messaggi) dalla schermata Home di Android o dal menudell'applicazione.
Applicazione di messaging
1 - Aggiungere allegati come immagini, audio e video. I messaggi con un allegato sono consideratiautomaticamente messaggi MMS.2 - Menu delle impostazioni messaggio.3 - Campo destinatario.4 - Aggiugere il destinatario.5 - Descrizione della conversazione del messaggio.6 - Input del messaggio.7 - Pulsante di invio messaggio.
Impostazione del numero per la registrazione dei messaggi vocali/riproduzione dei messaggi vocaliPer impostare il numero di servizio per la registrazione dei messaggi vocali nello Smartphone Yarvik, aprire
l'applicazione "Phone" (Telefono) dal menu dell'applicazione o dalla schermata Home di Android:

Yarvik smartphone manual
file:///Users/elroy/Desktop/Yarvik/Manual/manual_it.html[13-02-13 17:03:31]
Tenere premuto il pulsante sul tastierino telefonico. Nella schermata delle opzioni apparirà "Addnumber" (Aggiungi numero). Nelle opzioni Voicemail (Registrazione messaggi vocali) è possibile selezionarele impostazioni per la registrazione dei messaggi vocali e inserire il numero di servizio per la registrazionedei messaggi vocali.Una volta impostato il numero di servizio per la registrazione dei messaggi vocali, è possibile utilizzare
successivamente il pulsante per chiamare la segreteria dei messaggi vocali tenendolo premuto.
Torna all'indice
8 Garanzia
Yarvik garantisce che il prodotto acquistato dal Cliente è privo di difetti di lavorazione e materiali per unperiodo di 2 anni a partire dalla data di acquisto da parte del Cliente. Se, in qualsiasi momento durante ilperiodo di garanzia, il prodotto dovesse presentare un difetto di lavorazione o materiale, il Cliente è tenuto arestituire il prodotto al rivenditore presso cui lo ha acquistato. Il rivenditore lo riparerà o lo sostituirà (aesclusiva discrezione di Yarvik) entro un periodo di tempo ragionevole. Per comprovare la data di acquisto ènecessaria la prova di acquisto originale. Il giudizio di Yarvik relativamente a tale questione è consideratofinale.
La presente garanzia non copre difetti o malfunzionamenti derivati da trasferimenti software, cattivo utilizzo,abuso, manomissioni, incuria, utilizzo errato, cura insufficiente o qualsiasi operazione fuori dal controllo diYarvik.
IMPORTANTE: quando si acquista uno Smartphone Yarvik, lo Smartphone sarà fornito con l'ultimo firmwarestabile disponibile per questo modello specifico, al momento in cui è stata prodotta l'unità. Yarvik nonfornisce supporto a prodotti che sono stati diversamente modificati dall'utente finale, né supporta lemodifiche di programmazione al firmware e al software utilizzati nei suoi prodotti e, se sono state effettuatetali modifiche, tutte le garanzie saranno automaticamente annullate.
Al fine di evitare l'annullamento della garanzia offerta qui di seguito, il Cliente è tenuto a utilizzare solamenteil software, le applicazioni e gli aggiornamenti ufficiali disponibili sul sito Web di Yarvik www.yarvik.com.Non deve essere utilizzato alcun altro software o firmware, poiché tale utilizzo annulla automaticamente tuttele garanzie e supporti. Yarvik non supporta l'uso di alcun software o firmware diversi dal software o dalfirmware installato sul prodotto dal produttore o che è disponibile sul sito Web ufficiale di Yarvik suwww.yarvik.com. Yarvik si rifiuta esplicitamente di rispondere alle richieste relative a modifiche nonautorizzate, software non autorizzato e firmware non autorizzato.
Torna all'indice
9 Informazioni sullalicenza GNU/GPL
Consultare le informazioni legali disponibili sullo Smartphone Yarvik in Settings (Impostazioni) – About

Yarvik smartphone manual
file:///Users/elroy/Desktop/Yarvik/Manual/manual_it.html[13-02-13 17:03:31]
Smartphone (Info su Smartphone) – Legal information (Informazioni legali) (è necessaria una connessionead Internet) oppure visitare il sito http://source.android.com/source/licenses.html per ulteriori informazioni.
Torna all'indice
10 ImportantInformation
Wireless LAN-Regulatory information
Depending on the model, the wireless LAN built-in into Smartphone devices can only be used in thefollowing countries: Austria, Belgium, Bulgaria, Czech Republic, Denmark, Finland, France, Germany,Greece, Hungary, Iceland, Ireland, Italy, Luxembourg, the Netherlands, Norway, Poland, Portugal, Romania,Slovakia, Slovenia, Spain, Sweden, Switzerland, Turkey and the United Kingdom.
Conditions of use
When using the IEEE 802.11b/g/n Wireless LAN standard, channels 1 to 13 (2.4 GHz...2.4835 GHz) areselectable for both indoor and outdoor use, however with restrictive conditions applying in France, Italy andNorway, as follows:
• France: When using this product indoor, all channels can be used without restrictions. Outdoor onlychannels 1 to 6 are allowed. This means that in Peer-to-Peer, the WLAN feature can only be used outside ifthe peer sets up the communication on an authorized channel (i.e., between 1 & 6). In infrastructure mode,please make sure the access point is configured to a channel from 1 to 6 before setting up the connection.
• Italy: Use of the RLAN network is governed: Disposal of Old Electrical & Electronic- with respect to private use, by the Legislative Decree of 1.8.2003, no. 259 (“Code of ElectronicCommunications”). In particular Article 104 indicates when the prior obtainment of a general authorization isrequired and Art. 105 indicates when free use is permitted;- with respect to the supply to the public of the WLAN access to telecom networks and services, by theMinisterial Decree 28.5.2003, as amended, and Art. 25 (general authorization for electronic communicationsnetworks and services) of the Code of electronic communications.
• Norway: Use of this radio equipment is not allowed in the geographical area within a radius of 20 km fromthe centre of Ny-Ålesund, Svalbard.
WEEESymbolInformation
Correct Disposal of This product (Waste Electrical & Electronic Equipment).
(Applicable in the European Union and other European countries with separate collection systems).

Yarvik smartphone manual
file:///Users/elroy/Desktop/Yarvik/Manual/manual_it.html[13-02-13 17:03:31]
This marking shown on the product or its literature indicates that it should not be disposed with otherhousehold wasted at the end of its working life. To prevent possible harm to the environment or humanhealth from uncontrolled waste disposal, please separate this from other types of wastes and recycle itresponsibly to promote the sustainable reuse of material resources.Household users should contact either the retailer where they purchased this product, or their localgovernment office, for details of where and how they can take this item for environmentally safe recycling.Business users should contact their supplier and check the terms and conditions of the purchase contract.This product should not be mixed with other commercial wastes of disposal.
Disposal of waste batteries (applicable in the European Union and other European countries withseparate collection systems)
Either of the symbols shown next may appear on the battery or on the packaging to indicate that the batteryprovided with this product shall not be treated as household waste. On certain batteries this symbol might beused in combination with a chemical symbol. The chemical symbols for mercury (Hg) or lead (Pb) are addedif the battery contains more than 0.0005% mercury or 0.004% lead. By ensuring these batteries are disposedof correctly, you will help prevent potentially negative consequences for the environment and human healthwhich could otherwise be caused by inappropriate waste handling of the battery. The recycling of thematerials will help to conserve natural resources. In case of products that for safety, performance or dataintegrity reasons require a permanent connection with an incorporated battery, this battery should bereplaced by qualified service staff only. To ensure that the battery will be treated properly, hand over theproduct at end-of-life to the applicable collection point for the recycling of electrical and electronicequipment.
For all other batteries, please view the section on how to remove the battery from the product safely. Handthe battery over to the applicable collection point for the recycling of waste batteries. For more detailedinformation about recycling of this product or battery, please contact your local Local government Office,your household waste disposal service or the shop where you purchased the product.
When travelling to and within the United States of America, please be aware that the U.S. Department ofTransportation (DOT) recently published new regulations that apply to passengers travelling with lithiummetal batteries and lithium-ion batteries.For detailed information, visit http://safetravel.dot.gov/whats_new_batteries.html.
Safety Information
Yarvik Smartphone device
• Yarvik is not responsible for any interference that you may experience or that may be caused whenoperating this device.

Yarvik smartphone manual
file:///Users/elroy/Desktop/Yarvik/Manual/manual_it.html[13-02-13 17:03:31]
• Warning: This apparatus must be earthed.
Opening or dismantling the main unit or any of its accessories, for whatever reason, could lead to damagesthat are not covered by the guarantee.
• To avoid electrical shock, do not open the cabinet. Refer servicing to qualified personnel only.
• To prevent fire or shock hazard, do not expose your Smartphone device or any of its accessories to rain ormoisture.
• Do not use or store your Smartphone device in a location subject to heat sources, such as radiators or airducts; direct sunlight; excessive dust; moisture or rain; mechanical vibration or shock; strong magnets orspeakers that are not magnetically shielded; excessively high and low temperatures; and high humidity.
• Turning off your Smartphone device with the power button does not disconnect the device completely frommains voltage. To disconnect it completely, unplug the AC adapter or the power cord from mains. Thesocket-outlet shall be installed near the equipment and shall be easily accessible.
• Audio and picture distortion may occur if this equipment is positioned in close proximity to any equipmentemitting electromagnetic radiation.
• This apparatus is also designed for IT power system with phase to phase voltage 230V, for customers inNorway.
• Observe the following precautions to provide adequate air circulation and to ensure normal reliableoperation:- Do not use the Smartphone device and/or the AC adapter while covered or wrapped in cloth. Ensure theAC adapter operates in a clear environment.- Turn off the Smartphone device before putting the device into a bag or a carrying case.
• Do not use your Smartphone device directly on your lap. The temperature of the base of the unit will riseduring normal operation and over time could result in discomfort or burns.
• Do not use your Smartphone device while walking. Listening to music with headphones or watching theLCD screen while walking may lead to an unexpected accident and result in personal injuries.
• Using connected headphones on the Smartphone device for too long and/or setting the audio volume uptoo high when using headphones may cause serious hearing damage.
• Avoid strong beating of or to the product.
• Don’t operate the touch screen of the Smartphone device with sharp objects, as this may result inscratching the screen surface.
• Only use permitted batteries, chargers and accessories with your Smartphone device. The use of any otherproducts with the device can be dangerous and may violate the warranty regulations.
• Only use a slightly wet cotton cloth to clean the device, and only use water to wetten the cotton cloth. TheSmartphone device should not be cleaned with any sort of (glass) cleaning aid.
Wireless functionality

Yarvik smartphone manual
file:///Users/elroy/Desktop/Yarvik/Manual/manual_it.html[13-02-13 17:03:31]
• If radio interference with other devices occurs while using your Smartphone device, do not use the wirelessfunctionality. Use of the wireless functionality may cause a malfunction of the devices, resulting in anaccident.
• In some situations or environments, the use of the wireless functionality might be restricted by theproprietor of the building or responsible representatives of the organization, for example on board airplanes,in hospitals or in any other environment where the risk of interference with other devices or services isperceived or identified as harmful. If you are uncertain about the policy applying to the use of wirelessfunctionality in a specific organization or environment, you are encouraged to first ask for authorization priorto switching it on. Consult your physician or the manufacturer of personal medical devices (pacemakers,hearing aids, etc.) regarding any restrictions on the use of wireless functionality.
• If using wireless functionality near a pacemaker, make sure it is at least 19 inches / 50 cm away from thepacemaker.
• Due to the transmission and reception properties of wireless communications, data can occasionally be lostor delayed. This can be due to the variation in radio signal strength that results from changes in thecharacteristics of the radio transmission path. Yarvik will not be held responsible for damages of any kindresulting from the delays or errors in data transmitted or received via wireless functionality, or failure ofwireless functionality to transmit or receive such data.
• If the equipment does cause harmful interference to radio/TV reception, which can be determined by turningthe equipment off and on, the user is encouraged to try to correct the interference by one or more of thefollowing measures: reorient or relocate the receiving antenna, increase the distance between the senderand the receiver, consult the dealer or an experienced radio/TV technician for help. Yarvik will not beresponsible for any radio/TV interference nor for any other undesired effect.
Wireless LAN Security
Creating security settings for the Wireless LAN is extremely important. Yarvik assumes no responsibility forany security problems that may arise from the use of the Wireless LAN.
Battery pack
Do not charge the battery pack in any way other than as described in the Start guide or as designated byYarvik in writing.
AC adapter
• It is highly recommended that you use a genuine Yarvik AC adapter supplied by Yarvik for your product.
• This AC adapter is intended for use with the Smartphone device IT products only.
• Do not place the AC adapter in contact with your skin. Remove the AC adapter away from your body if itbecomes warm and causes discomfort.

Yarvik smartphone manual
file:///Users/elroy/Desktop/Yarvik/Manual/manual_it.html[13-02-13 17:03:31]
RoHS
This products has been certified as RoHS Compliant.
YARVIK.COM
Torna all'indice

Yarvik smartphone manual
file:///Users/elroy/Desktop/Yarvik/Manual/manual_pt.html[13-02-13 17:03:37]
Índice SELECT LANGUAGE
1 Antes da primeirautilização2 Arranque doSmartphone3 Ecrã principal doAndroid3.1 Adicionar widgets eatalhos ao seu Ecrãprincipal3.2 Definir uma Imagemde fundo3.3 Menu de aplicações4 Configurar o seuSmartphone4.1 Menu de definições4.2 WiFi e Bluetooth4.3 Audio Profiles(Perfis de Áudio)4.4 Display (Visor)4.5 Apps (Aplicações)4.6 Storage(Armazenamento) eMicroSD memoryAccess (Acesso amemória MicroSD)4.7 Language & input(Idioma e teclado)4.8 Date & time (Data e

Yarvik smartphone manual
file:///Users/elroy/Desktop/Yarvik/Manual/manual_pt.html[13-02-13 17:03:37]
Hora)5 Apps (Aplicações)6 ChamadasTelefónicas7 Mensagens8 Declaração degarantia9 Informações sobrelicenciamentoGNU/GPL10 Importantinformation
1 Antes da primeira utilização
Caro utilizador,
Obrigado por adquirir o nosso produto.Para garantir uma utilização rápida e adequada do seu novo Smartphone Yarvik, leia atentamente estasinstruções antes de utilizá-lo.
Esperamos que desfrute em pleno do seu Smartphone Yarvik durante o máximo de tempo possível!
Tenha em atenção:
• O seu Smartphone Yarvik éum produto eletrónico de altaprecisão. Não tente desmontar osmartphone, pois causará aanulação da sua garantia epoderá causar falhas nofuncionamento do equipamento.
• Evite bater ou deixar cair oequipamento.
• Evite a utilização dosmartphone em ambientes comtemperaturas demasiadoelevadas ou baixas, ou emqualquer ambiente em que o

Yarvik smartphone manual
file:///Users/elroy/Desktop/Yarvik/Manual/manual_pt.html[13-02-13 17:03:37]
equipamento possa entrar emcontacto com humidade, pó oucampos magnéticos
• Não exponha o smartphone aluz solar intensa duranteperíodos prolongados de tempo.
• Não utilize o ecrã táctil comobjetos pontiagudos, poispoderá riscar o ecrã.
• O uso prolongado deauscultadores ligados aosmartphone e/ou com o volumedemasiado alto pode causarproblemas auditivos graves.
• Para evitar acidentes detrânsito, não atravesse a rua,nem conduza veículosmotorizados ou bicicletaenquanto utiliza o smartphonecom auscultadores.
• Utilize apenas baterias,carregadores e acessóriosautorizados no SmartphoneYarvik. A utilização de quaisqueroutros produtos no smartphonepode ser perigosa e violar ascondições da garantia.
• Utilize apenas um pano dealgodão ligeiramentehumedecido só em água paralimpar o smartphone. Osmartphone não deve ser limpocom qualquer tipo de produto delimpeza.
Pode começar a utilizar o seu Smartphone Yarvik assim que o retira da embalagem, sem ter de carregarprimeiro a bateria.É melhor para a bateria ser utilizada pela primeira vez com a carga de que ainda dispõe e ser depoiscompletamente recarregada, uma vez esgotada toda a carga inicial.Se o smartphone não ligar quando o retira da embalagem, a bateria já está completamente descarregada edeve então recarregá-la primeiro.

Yarvik smartphone manual
file:///Users/elroy/Desktop/Yarvik/Manual/manual_pt.html[13-02-13 17:03:37]
Voltar ao índice
2 Arranque doSmartphone
Quando liga pela primeira vez o seu Smartphone Yarvik, é-lhe apresentada a sequência de arranque.O primeiro arranque pode demorar um pouco, aproximadamente 2 a 3 minutos.Após a sequência de arranque, o Smartphone concluiu o arranque e é-lhe apresentado o Ecrã de bloqueiodo Android.
Ecrã de bloqueio do Android
Arraste o cadeado (A) para a direita para desbloquear o Smartphone. Será então transferido para o Ecrãprincipal do Android.
Voltar ao índice
3 Ecrã principal do Android

Yarvik smartphone manual
file:///Users/elroy/Desktop/Yarvik/Manual/manual_pt.html[13-02-13 17:03:37]
Ecrã principal do Android
No topo do ecrã do Smartphone, pode sempre encontrar a barra de estado.A barra de estado contém informações do sistema, enquanto a barra inferior do menu inclui os botões defuncionalidades.
1 - Indicador de Sinal Wi-Fi2 - Receção de rede móvel para o SIM1 e SIM2 e Indicador de nível da bateria3 - Hora do sistema4 - Atalhos para aplicações5 - Widget (relógio analógico)6 - Botão de retrocesso - para voltar ao ecrã anterior ou ao website anterior quanto está a utilizar o Browser(Navegador)7 - Ecrã principal - para voltar ao Ecrã principal do Android8 - Menu de aplicações e widgets9 - Botão multifunções
O ecrã principal é composto por várias páginas a que pode aceder deslizando o ecrã principal para aesquerda ou para a direita.
Para ver quais as aplicações em execução em segundo plano, pode aceder à vista multifunções premindo obotão multifunções (9).

Yarvik smartphone manual
file:///Users/elroy/Desktop/Yarvik/Manual/manual_pt.html[13-02-13 17:03:37]
Clique numa aplicação em execução na vista multifunções para mudar rapidamente para ela. Pode fecharuma aplicação em execução premindo-a durante alguns segundos e clicando em "Remove from list"("Remover da lista").
Voltar ao índice
3.1 Adicionarwidgets eatalhos ao seuEcrã principal
Para adicionar um widget, prima o botão de aplicações e widgets na parte inferior central do seu Ecrã
principal:
No ecrã seguinte, pode encontrar todas as aplicações e widgets instalados, que poderá visualizar emseparado premindo respetivamente "Apps" ("Aplicações") ou "Widgets" no topo do ecrã.Prima Widgets" para ver todos os widgets disponíveis. Quando são apresentados todos os widgets, podedeslizar o ecrã para ir para a página seguinte (se estiver disponível).Mantenha premido o widget desejado para surgir o Ecrã principal e liberte-o em qualquer ponto livre do Ecrãprincipal.

Yarvik smartphone manual
file:///Users/elroy/Desktop/Yarvik/Manual/manual_pt.html[13-02-13 17:03:37]
Para adicionar um atalho para qualquer aplicação, prima o botão de aplicações e widgets na parte inferior
central do seu Ecrã principal:
No ecrã seguinte, pode encontrar todas as aplicações e widgets instalados, que poderá visualizar emseparado premindo respetivamente "Apps" ("Aplicações") ou "Widgets" no topo do ecrã.Prima "Apps" ("Aplicações") para ver todas as aplicações instaladas.Mantenha premida a aplicação desejada para surgir o Ecrã principal e liberte o atalho em qualquer pontolivre do Ecrã principal.
Para remover widgets e/ou atalhos de aplicações do seu Ecrã principal, mantenha-os premidos e arraste-ospara o ícone do lixo "Remove" ("Remover") que surge no topo do Ecrã principal.
Voltar ao índice
3.2 Definir umaImagem de fundo
Para alterar a imagem de fundo do Ecrã principal, mantenha premido o Ecrã principal até surgir o menu“Select Wallpaper from” (“Selecionar imagem de fundo a partir de").Pode escolher entre "Live Wallpapers" ("Imagens de fundo ativas") (imagens de fundo animadas), "Gallery"(galeria de fotos e vídeos) ou "Wallpapers" ("Imagens de fundo") (imagens estáticas predefinidas).
Voltar ao índice
3.3 Menu deaplicações
Prima o botão de aplicações e widgets na parte inferior central do seu Ecrã principal:
Quando o sistema apresenta os widgets, prima "Apps" ("Aplicações") para ver todas as aplicaçõesinstaladas.
Aí, pode encontrar todos os programas ou "aplicações" pré-instalados, bem como as aplicações adicionaisinstaladas por si.Pode lançar qualquer aplicação premindo simplesmente o ícone correspondente.

Yarvik smartphone manual
file:///Users/elroy/Desktop/Yarvik/Manual/manual_pt.html[13-02-13 17:03:37]
Ecrã de aplicações
Voltar ao índice
4Configurar o seuSmartphoneYarvik
4.1 Menu dedefinições
Prima o ícone Settings (Definições) no Menu de aplicações para entrar no Menu de definições. NoMenu de definições, pode encontrar as opções para configurar o seu Smartphone Yarvik.

Yarvik smartphone manual
file:///Users/elroy/Desktop/Yarvik/Manual/manual_pt.html[13-02-13 17:03:37]
Menu de definições
Vamos analisar as partes mais importantes:
Voltar ao índice
4.2 Wi-Fi eBluetooth
Wi-Fi
Configure uma ligação a uma rede WI-FI sem fios.

Yarvik smartphone manual
file:///Users/elroy/Desktop/Yarvik/Manual/manual_pt.html[13-02-13 17:03:37]
Deslize o botão On/Off (Ligar/Desligar) para a posição "On" ("Ligado") para ativar o Wi-Fi.
As redes Wi-Fi disponíveis aparecem na lista de redes à direita do ecrã. Toque numa rede à sua escolha.Se a rede estiver protegida, é-lhe solicitado que introduza a chave de segurança da rede.
Prima o botão “Connect” ("Ligar") e o Smartphone irá iniciar a ligação à rede.Após surgir a indicação “Connected” ("Ligado") debaixo do nome da rede e o ícone de receção na barra deestado na parte inferior do ecrã, a ligação à rede sem fios foi estabelecida com êxito.
Visualizar o endereço MAC Wi-FI do seu Smartphone Yarvik
No ecrã de definições de Wi-Fi, clique no botão de menu no canto inferior direito.
Prima "Advanced" ("Avançadas") no menu desdobrável.
O seu endereço MAC Wi-Fi é visualizado no ecrã "Advanced Wi-Fi" ("Wi-Fi avançadas") em "MAC address"("Endereço MAC").
Bluetooth
O seu Smartphone Yarvik vem equipado com um módulo Bluetooth integrado para ligação a periféricosBluetooth compatíveis, como teclados, altifalantes e auscultadores, mas também auriculares Bluetooth e kitsmãos livres para automóvel.Deslize o botão Bluetooth On/Off (Ligar/Desligar Bluetooth) para a posição "On" ("Ligado") para ativar oBluetooth.
Uma vez ativado, o seu Smartphone Yarvik começa automaticamente a procurar dispositivos Bluetooth nasproximidades. Poderá sempre procurar dispositivos Bluetooth manualmente, clicando em "Search forDevices" (" Procurar Dispositivos") no canto superior direito do ecrã.Poderá ser necessário colocar os periféricos a que pretende ligar o smartphone em "modo deemparelhamento. Para mais informações, consulte o manual de instruções dos periféricos em questão.

Yarvik smartphone manual
file:///Users/elroy/Desktop/Yarvik/Manual/manual_pt.html[13-02-13 17:03:37]
Todos os dispositivos encontrados são apresentados na lista "Available Devices" (" DispositivosDisponíveis"):
Clique no dispositivo Bluetooth encontrado para emparelhá-lo com o seu Smartphone Yarvik.Surge a janela "Bluetooth pairing request" ("Pedido de emparelhamento Bluetooth"):
A maioria dos dispositivos Bluetooth requer um código PIN para estabelecer a ligação. Normalmente, estecódigo é 0000 ou 1234. Consulte o manual de instruções do seu dispositivo Bluetooth se o código PIN fordiferente.Após inserir o código PIN correto, prima "OK".
O Smartphone Yarvik inicia então o emparelhamento com o seu dispositivo Bluetooth e, após algunssegundos, a ligação fica concluída, sendo apresentada a mensagem "Connected" ("Ligado") por baixo dorespetivo dispositivo Bluetooth na lista "Available Devices" ("Dispositivos Disponíveis"):
Pode ligar vários dispositivos Bluetooth ao seu Smartphone Yarvik para utilizá-los em simultâneo (p. ex. umauricular e um teclado).
Voltar ao índice
4.3Audio Profiles(Perfis de

Yarvik smartphone manual
file:///Users/elroy/Desktop/Yarvik/Manual/manual_pt.html[13-02-13 17:03:37]
Áudio)Aqui pode alterar o volume de áudio do smartphone, como só vibração ou vibração e toque para anotificação de chamadas ou mensagens.
Voltar ao índice
4.4 Display (Visor)
Aqui, pode alterar o brilho do ecrã, os tamanhos de letra e o tempo limite do ecrã.Tenha em atenção que quanto maior o brilho do ecrã, maior o consumo de energia. Essa opção esgotasubstancialmente mais depressa a sua bateria.Se não pretende que o ecrã rode automaticamente à medida que vira o smartphone, pode ativar/desativaressa funcionalidade na definição Auto-rotate screen (Rodar ecrã automaticamente).
Voltar ao índice
4.5 Apps(Aplicações)
Aqui, pode gerir as aplicações que estão instaladas no seu Smartphone Yarvik.Pode clicar nas aplicações que instalou para ver informações sobre cada uma delas e para desinstalá-las,se necessário, utilizando o botão “Uninstall” ("Desinstalar").Tenha em atenção que as aplicações predefinidas pré-instaladas (p. ex. a calculadora) não podem serdesinstaladas.
Voltar ao índice
4.6
Storage(Armazenamento)e MicroSDmemory Access(Acesso amemóriaMicroSD)
Mostra-lhe informações sobre a memória interna. Quando está um cartão MicroSD inserido, pode tambémver aqui informações sobre a memória do cartão inserido.
Ligar o seu Smartphone Yarvik a um PC ou Mac através de USB

Yarvik smartphone manual
file:///Users/elroy/Desktop/Yarvik/Manual/manual_pt.html[13-02-13 17:03:37]
Pode ligar o seu Smartphone Yarvik a um PC ou Mac utilizando o cabo USB fornecido.Uma vez ligado a um computador, pode aceder à memória interna do smartphone e, caso esteja inserido, aum cartão MicroSD como um Dispositivo de armazenamento de massa USB normal.
Consulte o Guia de Iniciação Rápida impresso do seu Smartphone Yarvik para determinar a localização daporta USB do smartphone. Ligue o cabo USB à porta USB do seu Smartphone Yarvik e a uma porta USBlivre no seu computador.Na zona superior do ecrã do seu smartphone, surgem duas mensagens consecutivas com um breveintervalo entre elas:
Quando surgir a segunda mensagem ("USB connected") ("Ligado através de USB"), clique nela.Surge o seguinte ecrã:
Clique no botão "Turn on USB storage" ("Ativar armazenamento USB").Surge uma janela de notificação:

Yarvik smartphone manual
file:///Users/elroy/Desktop/Yarvik/Manual/manual_pt.html[13-02-13 17:03:37]
Clique em "OK" para confirmar.A memória interna do seu Smartphone Yarvik surge então como Dispositivo de armazenamento de massano sistema de ficheiros do seu computador e pode ser utilizada, por exemplo, para copiar ficheiros de e parao seu Smartphone Yarvik.Se tiver um cartão MicroSD inserido no seu smartphone, o cartão será reconhecido pelo computador comoum segundo Dispositivo de armazenamento de massa.
Para deixar de utilizar a função de Dispositivo de armazenamento de massa, clique no botão "Turn off USBstorage" ("Desativar armazenamento USB") e desligue o cabo USB.
NOTA: não são necessários quaisquer controladores de hardware para aceder à memória do SmartphoneYarvik. Caso o seu computador solicite a instalação de qualquer controlador, pode simplesmente ignorá-lo.
Aceder ao seu cartão MicroSDnoES File Explorer
Se tiver um cartão um cartão MicroSD inserido no seu Smartphone Yarvik, pode aceder aos seus conteúdosda seguinte forma:
Abra a app ES File Explorer e clique no botão Favorites (Favoritos) (identificado pelo ícone da estrelaazul).
Abre-se então o menu Favorites (Favoritos). Clique no ícone " raiz" identificado pela barra "/":
Chega então à "raiz" do sistema de ficheiros do smartphone, que contém diversas pastas e ficheiros.Localize e clique na pasta "mnt":

Yarvik smartphone manual
file:///Users/elroy/Desktop/Yarvik/Manual/manual_pt.html[13-02-13 17:03:37]
A pasta "mnt" abre-se então, apresentando diversas pastas:
A pasta "sdcard" é a memória interna do seu Smartphone Yarvik.A pasta "sdcard2" corresponde ao seu cartão MicroSD (quando está inserido no compartimento paracartões MicroSD do Smartphone).
Quando disponível, pode também utilizar o atalho microsd2 no menu Favorites (Favoritos), anteriormentemencionado, para acesso rápido à memória do seu cartão MicroSD.
Voltar ao índice
4.7Language &input (Idioma eteclado)
Utilize “Select language” ("Selecionar idioma") para selecionar o idioma de visualização no SmartphoneYarvik. Isto aplica-se a todo o texto dos ecrãs de todo o sistema.Em “Android keyboard” ("Teclado do Android") pode configurar o teclado do ecrã do seu smartphone.
Voltar ao índice
4.8 Date & time(Data e Hora)
Aqui, pode definir a data e a hora do seu Smartphone Yarvik.

Yarvik smartphone manual
file:///Users/elroy/Desktop/Yarvik/Manual/manual_pt.html[13-02-13 17:03:37]
Voltar ao índice
5 Apps(Aplicações)
O seu Smartphone Yarvik vem com aplicações pré-instaladas (ver exemplos abaixo).
A aparência dos ícones das aplicações podem ser alteradas sem aviso prévio.
Voltar ao índice
6 Chamadastelefónicas
Fazer chamadas telefónicasPara efetuar uma chamada com o seu Smartphone Yarvik, abra a aplicação "Phone" ("Telefone") no seu
menu de aplicações ou no ecrã principal do Android: Utilize o teclado de marcação numérico para digitar o número telefónico pretendido.

Yarvik smartphone manual
file:///Users/elroy/Desktop/Yarvik/Manual/manual_pt.html[13-02-13 17:03:37]
Teclado de marcação.
Para fazer chamadas telefónicas internacionais que requerem o prefixo "+", prima e mantenha premido odígito "0" no teclado até surgir o símbolo "+".
Prima o botão de gestão de chamadas para iniciar a chamada telefónica.
Prima o botão de gestão de chamadas para terminar a chamada telefónica.Também pode fazer chamadas telefónicas diretamente a partir dos seus contactos guardados na aplicação"People" ("Pessoas").
As chamadas recentes são guardadas no ecrã Call Log (Registo de chamadas), acessível ao premir o botão
Log (Registos) visível no topo do ecrã Phone (Telefone).Também pode aceder aos seus contactos (da aplicação "People" ("Pessoas") anteriormente referida)
diretamente a partir do ecrã Phone (Telefone), premindo o botão .
Chamadas recebidas
Ao receber uma chamada telefónica no seu Smartphone Yarvik, são apresentadas 3 opções:
1 - Deslize o círculo para cima a fim de ignorar a chamada recebida e enviar uma resposta automatica pormensagem de texto;2 - Ignorar a chamada recebida;3 - Atender a chamada recebida;

Yarvik smartphone manual
file:///Users/elroy/Desktop/Yarvik/Manual/manual_pt.html[13-02-13 17:03:37]
Opções durante uma chamada telefónica
1 - Mostrar o teclado de marcação (p. ex. para menus de opções de tons DTMF);2 - Ativar/desativar a função de alta voz;3 - Silenciar o microfone;4 - Deixar a chamada em espera;5 - Menu com mais opções: adicionar uma chamada telefónica (chamada de conversação) ou gravar achamada.
Reencaminhamento de chamadas
Pode definir a função de reencaminhamento de chamadas para reencaminhar todas as chamadas recebidaspara um determinado número telefónico.
Na aplicação "Phone" ("Telefone") , prima o botão do menu e selecione "Call settings"("Definições de chamadas").Selecione "Voice call" ("Chamada de voz"), onde pode escolher a opção "Call forwarding" ("Reencaminharchamadas") para alterar as suas opções de reencaminhamento.
Identificação de chamadas/Chamada em espera
Através da função de identificação de chamadas do seu Smartphone Yarvik, pode escolher se quer enviar oseu número ao efetuar chamadas.
Para alterar isto, inicie a aplicação "Phone" ("Telefone") , prima o botão do menu e selecione"Settings" ("Definições") - "Voice call" ("Chamada de voz") - "Additional settings" ("Definições adicionais") -"Caller ID" ("Identificação de chamadas").Dentro deste mesmo menu, pode também atender/rejeitar chamadas telefónicas recebidas, quando já seencontra numa conversação telefónica.
Voltar ao índice

Yarvik smartphone manual
file:///Users/elroy/Desktop/Yarvik/Manual/manual_pt.html[13-02-13 17:03:37]
7 Mensagens
O seu Smartphone Yarvik tem a capacidade de enviar mensagens SMS e MMS. Informe-se junto da suaoperadora móvel sobre as tarifas normais e os custos adicionais para o envio de mensagens de e parapaíses estrangeiros.
Enviar mensagens SMS/MMS
Abra a aplicação "Messaging" ("Mensagens") no ecrã principal do seu Android ou no menu daaplicação.
Aplicação Messaging (Mensagens).
1 - Adicionar anexos como fotos, áudio e vídeos. Mensagens com um anexo são consideradasautomaticamente mensagens de MMS;2 - Definição do menu de mensagens;3 - Campo de destinatário;4 - Adicionar destinatário;5 - Descrição geral de mensagens;6 - Entrada de mensagens;7 - Botão de enviar mensagem.
Definir número de correio de voz/reprodução de mensagens de correio de vozPara definir o número do seu serviço de correio de voz no Smartphone Yarvik, abra a aplicação "Phone"
("Telefone") a partir do menu da aplicação ou do ecrã principal do Android:

Yarvik smartphone manual
file:///Users/elroy/Desktop/Yarvik/Manual/manual_pt.html[13-02-13 17:03:37]
Mantenha premido o botão no teclado de marcação. "Add number" ("Adicionar número") surge noecrã de opções. Nas opções do Correio de voz pode selecionar as definições do correio de voz e inserir onúmero do seu serviço de correio de voz.
Após definir o número do serviço do correio de voz, pode utilizar de imediato o botão mantendo-opremido para ligar à sua caixa de correio de voz.
Voltar ao índice
8 Declaração degarantia
A Yarvik garante que o produto adquirido pelo Cliente se encontra livre de defeitos de fabrico e dos materiaisdurante um período de 2 anos após a data de compra pelo Cliente. Se, a qualquer momento, durante operíodo de garantia, o produto apresentar um defeito de fabrico ou do material, o Cliente deve devolver oproduto ao revendedor onde foi comprado. O Revendedor procederá à sua reparação ou substituição (umadecisão exclusiva da Yarvik) num prazo de tempo razoável. É necessária a apresentação da fatura originalcomo prova de data de compra. A decisão da Yarvik sobre esta matéria é final.
Esta garantia não cobre defeitos ou anomalias resultantes de transferências de software, da utilizaçãoincorreta, abusiva, adulteração, negligência, uso indevido, cuidados insuficientes ou de qualquer outro atofora do controlo da Yarvik.
IMPORTANTE: quando adquire um smartphone da Yarvik, o seu smartphone vem equipado com o firmwareestável mais recente, disponível especificamente para este modelo, à data do fabrico do aparelho. A Yarviknão disponibiliza assistência a produtos que tenham sido modificados pelo utilizador final, nem apoiamodificações de programação do firmware e do software utilizado nos seus produtos, e se quaisquermodificações forem realizadas, todas as garantias serão automaticamente anuladas.
Para evitar a anulação da garantia adiante oferecida, o Cliente deve utilizar apenas o software oficial, asaplicações e atualizações disponibilizadas no website da Yarvik, em www.yarvik.com.Não deve ser utilizado qualquer outro software ou firmware, uma vez que tal utilização anularáautomaticamente todas as garantias e o direito a assistência. A Yarvik não apoia a utilização de qualqueroutro software ou firmware que não seja o software ou firmware instalado pelo fabricante no produto ou queesteja disponibilizado no website oficial da Yarvik em www.yarvik.com. A Yarvik recusa-se explicitamente aresponder a quaisquer questões relacionadas com modificações não autorizadas, software não autorizado efirmware não autorizado.
Voltar ao índice
9Informações sobrelicenciamentoGNU/GPL

Yarvik smartphone manual
file:///Users/elroy/Desktop/Yarvik/Manual/manual_pt.html[13-02-13 17:03:37]
Consulte as informações legais disponíveis no seu Smartphone Yarvik em Settings – About device – Legalinformation (Definições – Acerca do dispositivo – Informações legais) (é necessária uma ligação à internet)ou visite http://source.android.com/source/licenses.html para obter mais informações.
Voltar ao índice
10 ImportantInformation
Wireless LAN-Regulatory information
Depending on the model, the wireless LAN built-in into Smartphone devices can only be used in thefollowing countries: Austria, Belgium, Bulgaria, Czech Republic, Denmark, Finland, France, Germany,Greece, Hungary, Iceland, Ireland, Italy, Luxembourg, the Netherlands, Norway, Poland, Portugal, Romania,Slovakia, Slovenia, Spain, Sweden, Switzerland, Turkey and the United Kingdom.
Conditions of use
When using the IEEE 802.11b/g/n Wireless LAN standard, channels 1 to 13 (2.4 GHz...2.4835 GHz) areselectable for both indoor and outdoor use, however with restrictive conditions applying in France, Italy andNorway, as follows:
• France: When using this product indoor, all channels can be used without restrictions. Outdoor onlychannels 1 to 6 are allowed. This means that in Peer-to-Peer, the WLAN feature can only be used outside ifthe peer sets up the communication on an authorized channel (i.e., between 1 & 6). In infrastructure mode,please make sure the access point is configured to a channel from 1 to 6 before setting up the connection.
• Italy: Use of the RLAN network is governed: Disposal of Old Electrical & Electronic- with respect to private use, by the Legislative Decree of 1.8.2003, no. 259 (“Code of ElectronicCommunications”). In particular Article 104 indicates when the prior obtainment of a general authorization isrequired and Art. 105 indicates when free use is permitted;- with respect to the supply to the public of the WLAN access to telecom networks and services, by theMinisterial Decree 28.5.2003, as amended, and Art. 25 (general authorization for electronic communicationsnetworks and services) of the Code of electronic communications.
• Norway: Use of this radio equipment is not allowed in the geographical area within a radius of 20 km fromthe centre of Ny-Ålesund, Svalbard.
WEEESymbolInformation
Correct Disposal of This product (Waste Electrical & Electronic Equipment).

Yarvik smartphone manual
file:///Users/elroy/Desktop/Yarvik/Manual/manual_pt.html[13-02-13 17:03:37]
(Applicable in the European Union and other European countries with separate collection systems).
This marking shown on the product or its literature indicates that it should not be disposed with otherhousehold wasted at the end of its working life. To prevent possible harm to the environment or humanhealth from uncontrolled waste disposal, please separate this from other types of wastes and recycle itresponsibly to promote the sustainable reuse of material resources.Household users should contact either the retailer where they purchased this product, or their localgovernment office, for details of where and how they can take this item for environmentally safe recycling.Business users should contact their supplier and check the terms and conditions of the purchase contract.This product should not be mixed with other commercial wastes of disposal.
Disposal of waste batteries (applicable in the European Union and other European countries withseparate collection systems)
Either of the symbols shown next may appear on the battery or on the packaging to indicate that the batteryprovided with this product shall not be treated as household waste. On certain batteries this symbol might beused in combination with a chemical symbol. The chemical symbols for mercury (Hg) or lead (Pb) are addedif the battery contains more than 0.0005% mercury or 0.004% lead. By ensuring these batteries are disposedof correctly, you will help prevent potentially negative consequences for the environment and human healthwhich could otherwise be caused by inappropriate waste handling of the battery. The recycling of thematerials will help to conserve natural resources. In case of products that for safety, performance or dataintegrity reasons require a permanent connection with an incorporated battery, this battery should bereplaced by qualified service staff only. To ensure that the battery will be treated properly, hand over theproduct at end-of-life to the applicable collection point for the recycling of electrical and electronicequipment.
For all other batteries, please view the section on how to remove the battery from the product safely. Handthe battery over to the applicable collection point for the recycling of waste batteries. For more detailedinformation about recycling of this product or battery, please contact your local Local government Office,your household waste disposal service or the shop where you purchased the product.
When travelling to and within the United States of America, please be aware that the U.S. Department ofTransportation (DOT) recently published new regulations that apply to passengers travelling with lithiummetal batteries and lithium-ion batteries.For detailed information, visit http://safetravel.dot.gov/whats_new_batteries.html.
Safety Information
Yarvik Smartphone device
• Yarvik is not responsible for any interference that you may experience or that may be caused when

Yarvik smartphone manual
file:///Users/elroy/Desktop/Yarvik/Manual/manual_pt.html[13-02-13 17:03:37]
operating this device.
• Warning: This apparatus must be earthed.
Opening or dismantling the main unit or any of its accessories, for whatever reason, could lead to damagesthat are not covered by the guarantee.
• To avoid electrical shock, do not open the cabinet. Refer servicing to qualified personnel only.
• To prevent fire or shock hazard, do not expose your Smartphone device or any of its accessories to rain ormoisture.
• Do not use or store your Smartphone device in a location subject to heat sources, such as radiators or airducts; direct sunlight; excessive dust; moisture or rain; mechanical vibration or shock; strong magnets orspeakers that are not magnetically shielded; excessively high and low temperatures; and high humidity.
• Turning off your Smartphone device with the power button does not disconnect the device completely frommains voltage. To disconnect it completely, unplug the AC adapter or the power cord from mains. Thesocket-outlet shall be installed near the equipment and shall be easily accessible.
• Audio and picture distortion may occur if this equipment is positioned in close proximity to any equipmentemitting electromagnetic radiation.
• This apparatus is also designed for IT power system with phase to phase voltage 230V, for customers inNorway.
• Observe the following precautions to provide adequate air circulation and to ensure normal reliableoperation:- Do not use the Smartphone device and/or the AC adapter while covered or wrapped in cloth. Ensure theAC adapter operates in a clear environment.- Turn off the Smartphone device before putting the device into a bag or a carrying case.
• Do not use your Smartphone device directly on your lap. The temperature of the base of the unit will riseduring normal operation and over time could result in discomfort or burns.
• Do not use your Smartphone device while walking. Listening to music with headphones or watching theLCD screen while walking may lead to an unexpected accident and result in personal injuries.
• Using connected headphones on the Smartphone device for too long and/or setting the audio volume uptoo high when using headphones may cause serious hearing damage.
• Avoid strong beating of or to the product.
• Don’t operate the touch screen of the Smartphone device with sharp objects, as this may result inscratching the screen surface.
• Only use permitted batteries, chargers and accessories with your Smartphone device. The use of any otherproducts with the device can be dangerous and may violate the warranty regulations.
• Only use a slightly wet cotton cloth to clean the device, and only use water to wetten the cotton cloth. TheSmartphone device should not be cleaned with any sort of (glass) cleaning aid.

Yarvik smartphone manual
file:///Users/elroy/Desktop/Yarvik/Manual/manual_pt.html[13-02-13 17:03:37]
Wireless functionality
• If radio interference with other devices occurs while using your Smartphone device, do not use the wirelessfunctionality. Use of the wireless functionality may cause a malfunction of the devices, resulting in anaccident.
• In some situations or environments, the use of the wireless functionality might be restricted by theproprietor of the building or responsible representatives of the organization, for example on board airplanes,in hospitals or in any other environment where the risk of interference with other devices or services isperceived or identified as harmful. If you are uncertain about the policy applying to the use of wirelessfunctionality in a specific organization or environment, you are encouraged to first ask for authorization priorto switching it on. Consult your physician or the manufacturer of personal medical devices (pacemakers,hearing aids, etc.) regarding any restrictions on the use of wireless functionality.
• If using wireless functionality near a pacemaker, make sure it is at least 19 inches / 50 cm away from thepacemaker.
• Due to the transmission and reception properties of wireless communications, data can occasionally be lostor delayed. This can be due to the variation in radio signal strength that results from changes in thecharacteristics of the radio transmission path. Yarvik will not be held responsible for damages of any kindresulting from the delays or errors in data transmitted or received via wireless functionality, or failure ofwireless functionality to transmit or receive such data.
• If the equipment does cause harmful interference to radio/TV reception, which can be determined by turningthe equipment off and on, the user is encouraged to try to correct the interference by one or more of thefollowing measures: reorient or relocate the receiving antenna, increase the distance between the senderand the receiver, consult the dealer or an experienced radio/TV technician for help. Yarvik will not beresponsible for any radio/TV interference nor for any other undesired effect.
Wireless LAN Security
Creating security settings for the Wireless LAN is extremely important. Yarvik assumes no responsibility forany security problems that may arise from the use of the Wireless LAN.
Battery pack
Do not charge the battery pack in any way other than as described in the Start guide or as designated byYarvik in writing.
AC adapter
• It is highly recommended that you use a genuine Yarvik AC adapter supplied by Yarvik for your product.
• This AC adapter is intended for use with the Smartphone device IT products only.
• Do not place the AC adapter in contact with your skin. Remove the AC adapter away from your body if itbecomes warm and causes discomfort.

Yarvik smartphone manual
file:///Users/elroy/Desktop/Yarvik/Manual/manual_pt.html[13-02-13 17:03:37]
RoHS
This products has been certified as RoHS Compliant.
YARVIK.COM
Voltar ao índice

Yarvik smartphone manual
file:///Users/elroy/Desktop/Yarvik/Manual/manual_pl.html[13-02-13 17:03:42]
Spistreści
SELECT LANGUAGE
1 Przed pierwszymuruchomieniem2 Uruchomieniesmartfona3 Ekran domowysystemu operacyjnegoAndroid3.1 Dodawaniewidgetów i skrótów doekranu domowego3.2 Ustawianie tapety3.3 Menu Apps(Aplikacje)4 Konfigracjasmartfona4.1 Menu Settings(Ustawienia)4.2 WiFi i Bluetooth4.3 Audio profiles(Profile dźwiękowe)4.4 Display(Wyświetlacz)4.5 Apps (Aplikacje)4.6 Storage (Pamięć) idostęp do pamięci kartyMicroSD4.7 Language & input

Yarvik smartphone manual
file:///Users/elroy/Desktop/Yarvik/Manual/manual_pl.html[13-02-13 17:03:42]
(Język i sposobywprowadzania)4.8 Date & time (Data igodzina)5 Apps (Aplikacje)6 Połączeniatelefoniczne7 Wiadomości8 Oświadczeniegwarancyjne9 Informacjelicencyjne GNU/GPL10 Importantinformation
1 Przed pierwszym uruchomieniem
Drogi użytkowniku,
Dziękujemy za zakup produktu naszej firmy.Aby móc szybko i wygodnie użytkować nowy smartfon Yarvik, prosimy przed pierwszym uruchomieniemdokładnie zapoznaj się z niniejszymi instrukcjami.
Mamy nadzieję, że użytkowanie smartfona Yarvik będzie Ci przez długi czas przynosiło wiele radość!
Zwróć uwagę:
• Smartfon Yarvik to produkelektroniki precyzyjnej. Niepodejmuj prób demontażusmartfona, gdyż będzie toskutkowało unieważnieniemgwarancji i może być przyczynąawarii urządzenia.
• Chroń urządzenie przeduderzeniami lub upuszczeniem.
• Unikaj użytkowania smartfona

Yarvik smartphone manual
file:///Users/elroy/Desktop/Yarvik/Manual/manual_pl.html[13-02-13 17:03:42]
w otoczeniu, w którym panujewysoka lub niska temepraturalub w jakimkoliwek otoczeniu, wktórym urządzenie może miećkontakt z wilgocią, kurzem lubpolem magnetycznym.
• Nie wystawiaj smartfona przezdłuższy czas na działaniepromieni słonecznych.
• Nie obsługuj ekranudotykowego ostro zakończonymiprzedmiotami, gdyż może być toprzyczyną powstawaniazarysowań.
• Zbyt długie użytkowaniesmartfona z podłączonymisłuchawkami i/lub ze zbytwysoko ustawionym poziomemgłośności może spowodowaćpoważne uszkodzenie słuchu.
• Aby zapobieć ewwentualnymwypadkom drogowym, w czasieużytkowania smartfona zpodłączonymi słuchawkami niewolno przekraczać jezdni aniprowadzić pojazdów silnikowychlub rowerów.
• Użytkując smartfon Yarvikkorzystaj tylko z dozwolonychbaterii, ładowarek i akcesoriów.Wykorzystywanie jakichkolwiekinnych produktów podczasużytkowania smartfona możestwarzać niebezpieczeństwo iłamać postanowienia gwarancji.
• Do czyszczenia urządzeniaużywaj tylko delikatnie zwilżonej– wyłącznie wodą – bawełnianejściereczki. Do czyszczeniasmartfona nie należy używaćśrodków czyszczących.
Użytkowanie smartfona Yarvik można rozpocząć zaraz po wyjęciu go z opakowania, bez uprzedniegoładowania baterii.

Yarvik smartphone manual
file:///Users/elroy/Desktop/Yarvik/Manual/manual_pl.html[13-02-13 17:03:42]
Zaleca się, aby nie doładowywać baterii przed pierwszym uruchomieniu urządzenia, ale naładować ją wpełni dopiero wtedy, gdy zostanie po raz pierwszy całkowicie wyczerpana.Jeżeli smartfon nie uruchamia się zaraz po wyjęciu z opakowania, oznacza to, że bateria jest już całkowiciewyczerpana i powinna zostać w pierwszej kolejności naładowana.
Powrót doindeksu
2 Uruchamianiesmartfona
Podczas pierwszego uruchomienia smartfona Yarvik na ekranie wyświetlona zostanie sekwencjauruchamiania.Pierwsze uruchomienie po wyjęciu z opakowania może trwać dość długo – około 2-3 minuty.Zakończenie sekwencji uruchamiania będzie jednoznaczne z zakończeniem uruchamiania smartfona ijednocześnie wyświetlony zostanie ekran blokady systemu operacyjnego Android.
Ekran blokady systemu operacyjnego Android
Przeciągnij pasek blokady (A) w prawo, aby odblokować smartfon. Wyświetlony zostanie wtedy ekran

Yarvik smartphone manual
file:///Users/elroy/Desktop/Yarvik/Manual/manual_pl.html[13-02-13 17:03:42]
domowy systemu operacyjnego Android.
Powrót doindeksu
3 Ekran domowy systemuoperacyjnego Android
Ekran domowy systemu operacyjnego Android
U góry ekranu smartfona zawsze wyświetlany jest pasek stanu.Na pasku stanu wyświetlane są informacje systemowe, a na dolnym pasku menu – przyciski funkcyjne.
1 - Wskaźnik mocy sygnału Wi-Fi2 - Wskaźnik mocy sygnału sieci SIM1 i SIM2 oraz wskaźnik poziomu naładowania baterii3 - Czas systemowy4 - Skróty do aplikacji5 - Widget (zegar analogowy)6 - Przycisk powrotu - umożliwia przechodzenie do poprzedniego ekranu lub poprzedniej strony internetowej,gdy korzystasz z przeglądarki7 - Przycisk Home - umożliwia przejście do ekranu domowego systemu operacyjnego Android8 - Menu aplikacji i widgetów

Yarvik smartphone manual
file:///Users/elroy/Desktop/Yarvik/Manual/manual_pl.html[13-02-13 17:03:42]
9 - Przycisk menedżera zadań
Ekran domowy składa się z wielu stron, do których dostęp można uzyskać poprzez wykonywanie gestówswipe w lewo/prawo na ekranie domowym.
Aby sprawdzić, które aplikacje działają w tle, należy przejść do menedżera zadań, naciskając odpowiedniprzycisk (9).
W widoku menedżera zadań wystarczy kliknąć działającą aplikację, aby szybko się do niej przełączyć.Działającą aplikacją można zamknąć poprzez naciśnięcie i przytrzymanie jej i kliknięcie polecenia „Removefrom list” („Usuń z listy”).
Powrót doindeksu
3.1
Dodawaniewidgetówi skrótów doekranudomowego

Yarvik smartphone manual
file:///Users/elroy/Desktop/Yarvik/Manual/manual_pl.html[13-02-13 17:03:42]
Aby dodać widget, naciśnij przycisk aplikacji i widgetów, który znajduje się po środku u dołu ekranu
domowego:
Na ekranie zostaną wyświetlone wszystkie zainstalowane aplikacje i widgety; każda z grup programów możebyć przeglądania oddzielnie, po naciśnięciu jednego z przycisków znajdujących się u góry ekranu: „Apps”(„Aplikacje”) lub „Widgets” („Widgety”).Naciśnij „Widgets” („Widgety”), aby przeglądać wszystkie dostępne widgety. Gdy wszystkie widgety zostanąwyświetlone, możesz przejść do kolejnego ekranu (jeżeli jest dostępny) za pomocą gestu swipe.Naciśnij i przytrzymaj wybrany widget, aż wyświetlony zostanie ekran domowy, po czym upuść widget nawybranym, wolnym obszarze ekranu domowego.
Aby dodać skrót jakiejkolwiek aplikacji, naciśnij przycisk menu aplikacji i widgetów, który znajduje się w
prawym górnym rogu ekranu domowego:
Na ekranie zostaną wyświetlone wszystkie zainstalowane aplikacje i widgety; każda z grup programów możebyć przeglądania oddzielnie, po naciśnięciu jednego z przycisków znajdujących się u góry ekranu: „Apps”(„Aplikacje”) lub „Widgets” („Widgety”).Naciśnij „Apps” („Aplikacje”), aby przeglądać wszystkie dostępne aplikacje.Naciśnij i przytrzymaj ikonę wybranej aplikacji, aż wyświetlony zostanie ekran domowy, po czym upuść skrótna wybranym, wolnym obszarze ekranu domowego.
Aby usunąć widgety i/lub skróty aplikacji z ekranu domowego, naciśnij i przytrzymaj je, po czym przeciągnijdo wyświetlonej u góry ekranu domowego ikony kosza „Remove” („Usuń”).
Powrót doindeksu
3.2 Ustawianie tapety
Aby zmienić tapetę ekranu domowego, naciśnij i przytrzymaj dowolny obszar ekranu domowego, aż dowyświetlenia menu „Select Wallpaper from” („Wybierz tapetę spośród”).Wyboru można dokonać spośród: „Live Wallpapers” („Tapety na żywo”) (tapety animowane), „Gallery”(„Galeria”) (galeria zdjęć/filmów) lub „Wallpapers” („Tapety”) (domyślne obrazy).
Powrót doindeksu
3.3 Menu Apps(Aplikacje)
Naciśnij przycisk aplikacji i widgetów, który znajduje się po środku u dołu ekranu domowego:
Gdy system wyświetli widgety, naciśnij „Apps” („Aplikacje”), aby przeglądać zainstalowane aplikacje.

Yarvik smartphone manual
file:///Users/elroy/Desktop/Yarvik/Manual/manual_pl.html[13-02-13 17:03:42]
W tym menu znajdują się wszystkie fabrycznie zainstalowane programy lub „aplikacje”, jak równieżdodatkowe aplikacje, które użytkownik zainstalował.Możesz uruchomić dowolną aplikację, naciskając odpowiednią ikonę.
Ekran aplikacji
Powrót doindeksu
4 Konfiguracjasmartfona Yarvik
4.1 Menu Settings(Ustawienia)
Do menu Settings (Ustawienia) możesz przejść naciskając ikonę ustawień , która znajduje się w menuaplikacji. W menu Settings (Ustawienia) znajduje się lista opcji, w ramach których smartfon Yarvik możezostać skonfigurowany.
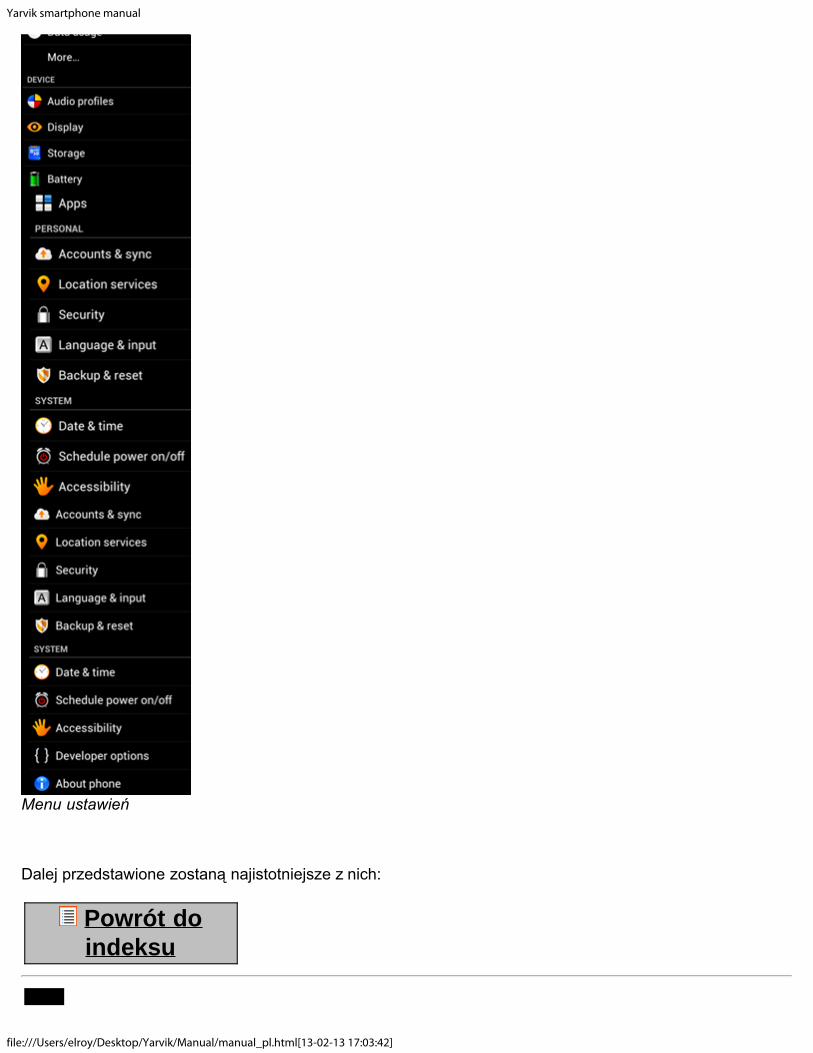
Yarvik smartphone manual
file:///Users/elroy/Desktop/Yarvik/Manual/manual_pl.html[13-02-13 17:03:42]
Menu ustawień
Dalej przedstawione zostaną najistotniejsze z nich:
Powrót doindeksu

Yarvik smartphone manual
file:///Users/elroy/Desktop/Yarvik/Manual/manual_pl.html[13-02-13 17:03:42]
4.2 Wi-Fi i Bluetooth
Wi-Fi
Nawiąż połączenie z bezprzewodową siecią Wi-Fi.Przestaw wyłącznik do położenia „On” („Wł.”), aby aktywować połączenie Wi-Fi.
Dostępne sieci Wi-Fi zostaną wyświetlone na liście sieci po prawej stronie ekranu. Dotknij wybranej sieci.Jeżeli sieć jest zabezpieczona, wyświetlony zostanie komunikat informujący o konieczności wprowadzeniasieciowego klucza bezpieczeństwa.
Naciśnij przycisk „Connect” („Połącz”) – smartfon rozpocznie łączenie z siecią.Gdy pod nazwą sieci wyświetlony zostanie komunikat „Connected” („Połączono”), a ikona siły sygnałubezprzewodowego zostanie wyświetlona na dolnym pasku stanu, nawiązanie połączenia z bezprzewodowąsiecią zakończyło się powodzeniem.
Wyświetlanie adresu MAC Wi-Fi smartfona Yarvik
Na ekranie ustawień Wi-Fi kliknij przycisk menu, który znajduje się w prawym górnym rogu.
Naciśnij przycisk „Advanced” („Zaawansowane”) w rozwiniętym menu.
Adres MAC Wi-Fi zostanie wyświetlony na ekranie „Advanced Wi-Fi” („Zaawansowane ustawienia Wi-Fi”) wczęści „MAC address” („Adres MAC”).
Bluetooth
Smartfon Yarvik jest wyposażony we wbudowany moduł Bluetooth, służący do nawiązywania połączenia zurządzeniami perfyferyjnymi, kompatybilnymi z Bluetooth, takimi jak: klawiatury, głośnki i słuchawki, a także zzestawami głośnomówiącymi i zestawami samochodowymi kompatybilnymi z Bluetooth.Przesuń przełącznik On/Off (Wł./Wył.) modułu Bluetooth do położenia „On” („Wł.”), aby włączyć Bluetooth.

Yarvik smartphone manual
file:///Users/elroy/Desktop/Yarvik/Manual/manual_pl.html[13-02-13 17:03:42]
Po włączeniu smartfon Yarvik automatycznie rozpocznie wyszukiwanie pobliskich urządzeń Bluetooth.Urządzenia Bluetooth można zawsze wyszukać ręcznie, klikając przycisk „Search for Devices” („Wyszukajurządzenia”), który znajduje się w prawym górnym rogu ekranu.W tym celu niezbędne może być przełączenie podłączonych urządzeń peryferyjnych do „trybu parowania”.Więcej informacji na ten temat znajduje się w instrukcjach obsługi urądzeń peryferyjnych.
Wszystkie wykryte urządzenia zostaną wyświetlone na liście „Available Devices” („Dostępne urządzenia”):
Kliknij wykryte urządzenie Bluetooth, aby sparować je ze smartfonem Yarvik.Wyświetlone zostanie okno komunikatu „Bluetooth pairing request” („Żądanie parowania Bluetooth”):
W celu przeprowadzenia parowania większość urządzeń Bluetooth wymaga podania kodu PIN. Ten kod tozwykle 0000 lub 1234. Jeżeli kod PIN jest inny, informacje na ten temat znajdują się w instrukcjach obsługiodpowiednich urządzeń Bluetooth.Po wprowadzeniu właściwego kodu pin, naciśnij „OK”.
Smartfon Yarvik rozpocznie proces parowania z urządzeniem Bluetooth, a samo połączenie zostanienawiązane po kilku sekundach; pod urządzeniem Bluetooth wybranym z listy „Available Devices” („Dostępneurządzenia”) wyświetlony zostanie komunikat „Connected” („Połączenie nawiązane”):
Smartfon Yarvik umożliwia nawiązanie wielu połączeń z urządzeniami Bluetooth i użytkowanie ich w tymsamym czasie (np. zestaw słuchawkowy i klawiatura).
Powrót do

Yarvik smartphone manual
file:///Users/elroy/Desktop/Yarvik/Manual/manual_pl.html[13-02-13 17:03:42]
indeksu
4.3Audio profiles(Profiledźwiękowe)
Z poziomu tego menu możesz zmienić poziom głośności dźwięku smartfona, lub ustawić tylko wibracje, bądźwibracje i dzwonek dla przychodzących połączeń/wiadomości.
Powrót doindeksu
4.4 Display(Wyświetlacz)
Z poziomu tego menu możesz wprowadzić zmiany poziomu jasności wyświetlacza, rozmiaru czcionek iczasu automatycznego uśpienia.Pamiętaj, że im wyższy poziom jasności wyświetlacza, tym wyższy pobór energii. Wysoki poziom jasnościmoże spowodować znacznie szybsze wyczerpanie baterii.Jeżeli nie chcesz, aby obraz na wyświetlaczu obracał się automatycznie przy pochyleniu smartfona, możeszwłączyć/wyłączyć tą funkcję, modyfikując ustawienie Auto-rotate screen (Automatyczny obrót obrazu nawyświetlaczu).
Powrót doindeksu
4.5 Apps(Aplikacje)
Z poziomu tego menu możesz zarządzać aplikacjami zainstalowanymi na smartfonie Yarvik.Możesz wyświetlić informacje o zainstalowanych aplikacjach, dotykając wybranej aplikacji lub w raziepotrzeby odinstalować wybrane aplikacje, korzystając w tym celu z przycisku „Uninstall” („Odinstaluj”).Pamiętaj, że fabrycznie zainstalowane aplikacje domyślne (takie jak, np. kalkulator) nie mogą zostaćodinstalowane.
Powrót doindeksu
Storage(Pamięć) i

Yarvik smartphone manual
file:///Users/elroy/Desktop/Yarvik/Manual/manual_pl.html[13-02-13 17:03:42]
4.6 dostęp dopamięci kartyMicroSD
Wyświetlanie informacji na temat pamięci wewnętrznej. Jeżeli w urządzeniu umieszczona jest karta MicroSD,w tym miejscu wyświetlane będą także informacje na temat pamięci umieszczonej karty.
Podłączanie smartfona Yarvik do komputera PC lub Mac za pośredictwem USB
Smartfon Yarvik można podłączyć do komputera PC lub Mac za pomocą dostarczonego kabla USB.Po podłączeniu do komputera możesz uzyskać dostęp do pamięci wewnętrznej smartfona oraz do pamięcikarty MicroSD (jeżeli jest umieszczona w smartfonie), tak jak w przypadku standardowych urządzeń pamięcimasowej USB.
Informacje o tym, gdzie znajduje się port USB smartfona można znaleźć w Szybkim przewodnikuuruchamiania smartfona Yarvik. Podłącz kabel USB do portu USB smartfona Yarvik oraz do portu USBkomputera.U góry ekranu smartfona wyświetlone zostaną, jeden po drugim, dwa komunikaty:
Gdy wyświetlony zostanie drugi komunikat: „USB connected” („USB podłączone”), należy go kliknąć.Wyświetlony zostanie ekran:

Yarvik smartphone manual
file:///Users/elroy/Desktop/Yarvik/Manual/manual_pl.html[13-02-13 17:03:42]
Kliknij przycisk „Turn on USB storage” („Uruchom pamięć masową USB”).Wyświetlone zostanie okno z komunikatem:
Kliknij „OK”, aby potwierdzić.Pamięć wewnętrzna smartfona Yarvik zostanie wyświetlona w systemie plików komputera jako urządzeniepamięci masowej i może zostać wykorzystana w celu, np. kopiowania plików z i na smartfon Yarvik.Jeżeli w smartfonie umieszczona jest karta MicroSD, zostanie ona rozpoznana przez komputer jako kolejneurządzenie pamięci masowej.
Aby wyłączyć funkcję pracy jako urządzenie pamięci masowej, kliknij przycisk „Turn off USB storage”(„Wyłącz pamięć USB”) i odłącz kabel USB.
Uwaga: Aby uzyskać dostęp do pamięci smartfona Yarvik nie potrzebujesz sterowników sprzętowych. Jeżelikomputer wyświetli komunikat informujący o konieczności instalacji sterowników, możesz ten komunikatzignorować.
Dostęp do karty MicroSDw ES File Explorer (Eksplorator

Yarvik smartphone manual
file:///Users/elroy/Desktop/Yarvik/Manual/manual_pl.html[13-02-13 17:03:42]
plików)
Jeżeli w smartfonie Yarvik umieszczona została karta MicroSD, dostęp do jej zawartości można uzyskać wsposób nastepujący:
Otwórz aplikację ES File Explorer (Eksplorator plików) i kliknij przycisk Favorites (Ulubione) (oznaczonyikoną niebieskiej gwiazdki).
Wyświetlone zostanie menu Favorites (Ulubione). Kliknij ikonę „katalogu głównego”, oznaczoną jako „/”:
W ten sposób uzyskasz dostęp do „katalogu głównego” systemu plików smartfona, w którym znajduje siękilka plików i folderów.Odnajdź folder „mnt” i kliknij go:
Otwarty zostanie katalog „mnt”, w którym znajduje się kilka folderów:
Folder „sdcard” to pamięć wewnętrzna smartfona Yarvik.Folder „sdcard2” to folder karty MicroSD (gdy jest ona umieszczona w gnieździe karty MicroSD wsmartfonie).

Yarvik smartphone manual
file:///Users/elroy/Desktop/Yarvik/Manual/manual_pl.html[13-02-13 17:03:42]
Jeżeli jest on dostępny, możesz także skorzystać ze skrótu microsd2, który znajduje się we wspomnianymwcześniej menu Favorites (Ulubione). Umożliwia on szybki dostęp do pamięci karty MicroSD.
Powrót doindeksu
4.7
Language &input (Język isposobywprowadzania)
Za pośrednictwem opcji „Select language” („Wybierz język”) możesz wybrać język wyświetlacza smartfonaYarvik. Ustawienie to będzie obowiązywało dla wszystkich ekranów tekstowych w systemie.Opcja „Android keyboard” („Klawiatura systemu operacyjnego Android”) umożliwia konfigurację klawiaturyekranowej smartfona.
Powrót doindeksu
4.8 Date & time(Data i godzina)
W tym menu możesz ustawić datę i godzinę smartfona Yarvik.
Powrót doindeksu
5 Apps(Aplikacje)
Smartfon Yarvik dostarczony jest z domyślnie zainstalowanymi aplikacjami (patrz poniższe przykłady):

Yarvik smartphone manual
file:///Users/elroy/Desktop/Yarvik/Manual/manual_pl.html[13-02-13 17:03:42]
Wygląd ikon aplikacji może ulec zmianie bez uprzedniego powiadomienia.
Powrót doindeksu
6 Połączeniatelefonicze
Wykonywanie połączeń telefonicznychAby wykonać połączenie telefoniczne smartfonem Yarvik, z poziomu menu aplikacji lub ekranu domowego
systemu operacyjnego Android otwórz aplikację „Phone” („Telefon”): Za pomocą klawiatury numerycznej wybierz numer telefonu.

Yarvik smartphone manual
file:///Users/elroy/Desktop/Yarvik/Manual/manual_pl.html[13-02-13 17:03:42]
Klawiatura telefonu.
Aby wykonać międzynarodowe połączenie telefoniczne wymagające prefiksu „+”, wciśnij i przytrzymajprzycisk „0” na klawiaturze, aż do wyświetlenia symbolu „+”.
Naciśnij przycisk połączenia , aby nawiązać połączenie.
Naciśnij przycisk połączenia , aby zakończyć połączenie.Połączenia telefoniczne można także nawiązywać bezpośrednio z poziomu listy kontaktów aplikacji „People”(„Kontakty”).
Dostęp do informacji o ostatnich połączeniach można uzyskać z poziomu ekranu rejestru. Aby otworzyć
rejestr, kliknij przycisk rejestru znajdujący się u góry ekranu Phone (Telefon).Dostęp do kontaktów (ze wspomnianej wcześniej aplikacji „People” („Kontakty”)) można także uzyskać
bezpośrednio z ekranu Phone (Telefon), naciskając przycisk .
Połączenia przychodzące
W przypadku połączenia przychodzącego na smartfon Yarvik masz do wyboru 3 opcje:
1 - Przesunąć okręg w górę, aby odrzucić przychodzące połączenie telefoniczne i wysłać automatycznąwiadomość tekstową;2 - Odrzucić przychodzące połączenie telefoniczne;3 - Odebrać przychodzące połączenie telefoniczne.

Yarvik smartphone manual
file:///Users/elroy/Desktop/Yarvik/Manual/manual_pl.html[13-02-13 17:03:42]
Opcje do wyboru w czasie rozmowy telefonicznej
1 - Wyświetlanie klawiatury telefonu (np. dla menu opcji sygnalizacji tonowej DTMF);2 - Włączanie/wyłączanie funkcji głośnika;3 - Wyciszanie mikrofonu;4 - Zawieszanie połączenia;5 - Wyświetlanie menu z większą ilością opcji: dodawanie dodatkowego połączenia telefonicznego(połączenie konferencyjne) lub nagrywanie połączenia telefoniczna.
Przekazywanie połączeń
Funkcja przekazywania połączeń umożliwia przekazywanie przychodzących połączeń telefonicznych naokreślony numer telefonu.
W aplikacji „Phone” (Telefon) naciśnij przycisk menu i wybierz „Call settings” („Ustawieniapołączeń”).Wybierz „Voice call” („Połączenia głosowe”), a następnie opcję „Call forwarding” („Przekazywanie połączeń”),aby zmienić opcje przekazywania.
Identyfikacja numeru/Połączenia oczekujące
Smartfon Yarvik posiada funkcję identyfikacji numeru, która umożliwia określenie, czy Twój numer telefonuma być wyświetlany w chwili nawiązywania połączeń telefonicznych.
Aby zmodyfikować to ustawienie, uruchom aplikację „Phone” (Telefon) , naciśnij przycisk menu iwybierz „Settings” (Ustawienia) - „Voice call” („Połączenia glosowe”) - „Additional settings” (Ustawieniadodatkowe) - „Caller ID” (Identyfikacja numeru).Z poziomu tego samego menu możesz skonfigurować funkcję odpowiadającą za przyjęcie/odrzuceniepołączenia telefonicznego przychodzącego w czasie trwającej już rozmowy telefonicznej.
Powrót doindeksu

Yarvik smartphone manual
file:///Users/elroy/Desktop/Yarvik/Manual/manual_pl.html[13-02-13 17:03:42]
7 Wiadomości
Smartfon Yarvik umożliwia wysyłanie wiadomości SMS i MMS. W celu uzyskania informacji na tematstandardowych opłat za wysyłanie wiadomości i dodatkowych opłat za wysyłanie wiadomości do i z obcychkrajów należy skontaktować się z operatorem telefonii komórkowej.
Wysyłanie wiadomości SMS/MMS
Otwórz aplikację „Messaging” („Wiadomości”) z poziomu ekranu domowego systemu operacyjnegoAndroid lub menu aplikacji.
Aplikacja do wysyłania wiadomości.
1 - Dodawanie załączników, np.: zdjęć, plików audio i wideo. Wiadomości z załącznikiem stają sięautomatycznie wiadomościami MMS;2 - Menu ustawień wiadomości;3 - Pole odbiorcy;4 - Dodawanie odbiorcy;5 - Pole podglądu wiadomości;6 - Pole wprowadzania wiadomości;7 - Przycisk wysyłania wiadomości.
Ustawianie numeru poczty głosowej/odtwarzanie wiadomości poczty glosowejAby ustawić numer usługi poczty głosowej w smartfonie Yarvik, z poziomu menu aplikacji lub ekranu
domowego systemu operacyjnego Android otwórz aplikację „Phone” (Telefon):
Yarvik smartphone manual
file:///Users/elroy/Desktop/Yarvik/Manual/manual_pl.html[13-02-13 17:03:42]
Na klawiaturze telefonu wciśnij i przytrzymaj przycisk . Na ekranie opcji wyświetlony zostaniekomunikat „Add number” („Dodaj numer”). W opcjach poczty głosowej możesz określić ustawienia pocztygłosowej i wprowadzić numer usługi poczty głosowej.
Po ustawieniu numeru usługi poczty głosowej możesz korzystać z przycisku , aby wykonaćpołączenie ze skrzynką poczty głosowej. W tym celu wciśnij i przytrzymaj ten przycisk.
Powrót doindeksu
8 Oświadczeniegwarancyjne
Firma Yarvik, przez okres 2 lat od daty dokonania przez Klienta zakupu, gwarantuje, że produkt zakupionyprzez Klienta będzie wolny od wad materiałowych i jakości wykonania. Jeżeli w dowolnym momencie wczasie trwania okresu gwarancyjnego w produkcie ujawnione zostaną wady materiałowe lub jakościwykonania, Klient powinien zwrócić produkt do punktu handlowego, w którym produkt został zakupiony.Przedstawiciel handlowy dokona naprawy lub wymiany (wedle decyzji firmy Yarvik) urządzenia w rozsądnymokresie czasu. Oryginał faktury jest niezbędny w celu potwierdzenia daty zakupu. Decyzja firmy Yarvikodnośnie do tej kwestii jest ostateczna.
Niniejsza gwarancja nie obejmuje uszkodzeń lub nieprawidłowości w działaniu, będących wynikiemprzenoszenia oprogramowania, użytkowania niezgodnego z przeznaczeniem, niedozwolonegoeksploatowania, manipulowania, zaniedbania, niewłaściwego użytkowania, nierozwagi lub jakiegokolwiekinnego działania będącego poza kontrolą firmy Yarvik.
WAŻNE: Z chwilą zakupu smartfona firmy Yarvik urządzenie zostanie przekazane z najnowszą stabilnąwersją oprogramowania firmowego, dostępną dla konkretnego modelu w chwili wytworzenia urządzenia.Firma Yarvik nie udziela wsparcia użytkownikom, których urządzenia zostały w jakikolwiek sposóbzmodyfikowane; firma Yarvik nie wspiera również modyfikacji oprogramowania firmowego anioprogramowania użytkowego wykorzystanego w jej produktach. W razie dokonania jakichkolwiek modyfikacjitego rodzaju, wszelkie gwarancje automatycznie wygasną.
Aby uniknąć niespełnienia wymogów niniejszej gwarancji, Klient powinien korzystać tylko z oficjalnegooprogramowania, aplikacji i aktualizacji dostępnych na witrynie internetowej firmy Yarvik, pod adresemwww.yarvik.com.Żadne inne oprogramowanie użytkowe ani firmowe nie powinno być użytkowane, gdyż takie użytkowaniespowoduje automatycznie wygaśnięcie wszelkich gwarancji i wyeliminuje możliwość korzystania ze wsparcia.Firma Yarvik nie udziela wsparcia dla użytkowania oprogramowania użytkowego ani firmowego, innego niżoprogramowanie użytkowe lub firmowe zainstalowane w urządzeniu przez producenta lub, które jestdostępne na oficjalnej witrynie internetowej firmy Yarvik, pod adresem www.yarvik.com. Firma Yarvikniniejszym nie udziela odpowiedzi na jakiekolwiek zapytania odnośnie nieautoryzowanych modyfikacji,korzystania z nieautoryzowanego oprogramowania użytkowego i korzystania z nieautoryzowanegooprogramowania firmowego.

Yarvik smartphone manual
file:///Users/elroy/Desktop/Yarvik/Manual/manual_pl.html[13-02-13 17:03:42]
Powrót doindeksu
9 Informacje olicencji GNU/GPL
Zapoznaj się z informacjami odnoszącymi się do kwestii prawnych, do których dostęp możesz uzyskaćprzechodzą w smartfonie Yarvik do Settings (Ustawienia) – About device (Informacje o urządzeniu) – Legalinformation (Informacje odnoszące się do kwestii prawnych) (niezbędne jest połączenie internetowe) lubodwiedź stronę internetową http://source.android.com/source/licenses.html, aby uzyskać więcej informacji.
Powrót doindeksu
10 ImportantInformation
Wireless LAN-Regulatory information
Depending on the model, the wireless LAN built-in into Smartphone devices can only be used in thefollowing countries: Austria, Belgium, Bulgaria, Czech Republic, Denmark, Finland, France, Germany,Greece, Hungary, Iceland, Ireland, Italy, Luxembourg, the Netherlands, Norway, Poland, Portugal, Romania,Slovakia, Slovenia, Spain, Sweden, Switzerland, Turkey and the United Kingdom.
Conditions of use
When using the IEEE 802.11b/g/n Wireless LAN standard, channels 1 to 13 (2.4 GHz...2.4835 GHz) areselectable for both indoor and outdoor use, however with restrictive conditions applying in France, Italy andNorway, as follows:
• France: When using this product indoor, all channels can be used without restrictions. Outdoor onlychannels 1 to 6 are allowed. This means that in Peer-to-Peer, the WLAN feature can only be used outside ifthe peer sets up the communication on an authorized channel (i.e., between 1 & 6). In infrastructure mode,please make sure the access point is configured to a channel from 1 to 6 before setting up the connection.
• Italy: Use of the RLAN network is governed: Disposal of Old Electrical & Electronic- with respect to private use, by the Legislative Decree of 1.8.2003, no. 259 (“Code of ElectronicCommunications”). In particular Article 104 indicates when the prior obtainment of a general authorization isrequired and Art. 105 indicates when free use is permitted;- with respect to the supply to the public of the WLAN access to telecom networks and services, by theMinisterial Decree 28.5.2003, as amended, and Art. 25 (general authorization for electronic communicationsnetworks and services) of the Code of electronic communications.
• Norway: Use of this radio equipment is not allowed in the geographical area within a radius of 20 km fromthe centre of Ny-Ålesund, Svalbard.

Yarvik smartphone manual
file:///Users/elroy/Desktop/Yarvik/Manual/manual_pl.html[13-02-13 17:03:42]
WEEESymbolInformation
Correct Disposal of This product (Waste Electrical & Electronic Equipment).
(Applicable in the European Union and other European countries with separate collection systems).
This marking shown on the product or its literature indicates that it should not be disposed with otherhousehold wasted at the end of its working life. To prevent possible harm to the environment or humanhealth from uncontrolled waste disposal, please separate this from other types of wastes and recycle itresponsibly to promote the sustainable reuse of material resources.Household users should contact either the retailer where they purchased this product, or their localgovernment office, for details of where and how they can take this item for environmentally safe recycling.Business users should contact their supplier and check the terms and conditions of the purchase contract.This product should not be mixed with other commercial wastes of disposal.
Disposal of waste batteries (applicable in the European Union and other European countries withseparate collection systems)
Either of the symbols shown next may appear on the battery or on the packaging to indicate that the batteryprovided with this product shall not be treated as household waste. On certain batteries this symbol might beused in combination with a chemical symbol. The chemical symbols for mercury (Hg) or lead (Pb) are addedif the battery contains more than 0.0005% mercury or 0.004% lead. By ensuring these batteries are disposedof correctly, you will help prevent potentially negative consequences for the environment and human healthwhich could otherwise be caused by inappropriate waste handling of the battery. The recycling of thematerials will help to conserve natural resources. In case of products that for safety, performance or dataintegrity reasons require a permanent connection with an incorporated battery, this battery should bereplaced by qualified service staff only. To ensure that the battery will be treated properly, hand over theproduct at end-of-life to the applicable collection point for the recycling of electrical and electronicequipment.
For all other batteries, please view the section on how to remove the battery from the product safely. Handthe battery over to the applicable collection point for the recycling of waste batteries. For more detailedinformation about recycling of this product or battery, please contact your local Local government Office,your household waste disposal service or the shop where you purchased the product.
When travelling to and within the United States of America, please be aware that the U.S. Department of

Yarvik smartphone manual
file:///Users/elroy/Desktop/Yarvik/Manual/manual_pl.html[13-02-13 17:03:42]
Transportation (DOT) recently published new regulations that apply to passengers travelling with lithiummetal batteries and lithium-ion batteries.For detailed information, visit http://safetravel.dot.gov/whats_new_batteries.html.
Safety Information
Yarvik Smartphone device
• Yarvik is not responsible for any interference that you may experience or that may be caused whenoperating this device.
• Warning: This apparatus must be earthed.
Opening or dismantling the main unit or any of its accessories, for whatever reason, could lead to damagesthat are not covered by the guarantee.
• To avoid electrical shock, do not open the cabinet. Refer servicing to qualified personnel only.
• To prevent fire or shock hazard, do not expose your Smartphone device or any of its accessories to rain ormoisture.
• Do not use or store your Smartphone device in a location subject to heat sources, such as radiators or airducts; direct sunlight; excessive dust; moisture or rain; mechanical vibration or shock; strong magnets orspeakers that are not magnetically shielded; excessively high and low temperatures; and high humidity.
• Turning off your Smartphone device with the power button does not disconnect the device completely frommains voltage. To disconnect it completely, unplug the AC adapter or the power cord from mains. Thesocket-outlet shall be installed near the equipment and shall be easily accessible.
• Audio and picture distortion may occur if this equipment is positioned in close proximity to any equipmentemitting electromagnetic radiation.
• This apparatus is also designed for IT power system with phase to phase voltage 230V, for customers inNorway.
• Observe the following precautions to provide adequate air circulation and to ensure normal reliableoperation:- Do not use the Smartphone device and/or the AC adapter while covered or wrapped in cloth. Ensure theAC adapter operates in a clear environment.- Turn off the Smartphone device before putting the device into a bag or a carrying case.
• Do not use your Smartphone device directly on your lap. The temperature of the base of the unit will riseduring normal operation and over time could result in discomfort or burns.
• Do not use your Smartphone device while walking. Listening to music with headphones or watching theLCD screen while walking may lead to an unexpected accident and result in personal injuries.
• Using connected headphones on the Smartphone device for too long and/or setting the audio volume uptoo high when using headphones may cause serious hearing damage.
• Avoid strong beating of or to the product.

Yarvik smartphone manual
file:///Users/elroy/Desktop/Yarvik/Manual/manual_pl.html[13-02-13 17:03:42]
• Don’t operate the touch screen of the Smartphone device with sharp objects, as this may result inscratching the screen surface.
• Only use permitted batteries, chargers and accessories with your Smartphone device. The use of any otherproducts with the device can be dangerous and may violate the warranty regulations.
• Only use a slightly wet cotton cloth to clean the device, and only use water to wetten the cotton cloth. TheSmartphone device should not be cleaned with any sort of (glass) cleaning aid.
Wireless functionality
• If radio interference with other devices occurs while using your Smartphone device, do not use the wirelessfunctionality. Use of the wireless functionality may cause a malfunction of the devices, resulting in anaccident.
• In some situations or environments, the use of the wireless functionality might be restricted by theproprietor of the building or responsible representatives of the organization, for example on board airplanes,in hospitals or in any other environment where the risk of interference with other devices or services isperceived or identified as harmful. If you are uncertain about the policy applying to the use of wirelessfunctionality in a specific organization or environment, you are encouraged to first ask for authorization priorto switching it on. Consult your physician or the manufacturer of personal medical devices (pacemakers,hearing aids, etc.) regarding any restrictions on the use of wireless functionality.
• If using wireless functionality near a pacemaker, make sure it is at least 19 inches / 50 cm away from thepacemaker.
• Due to the transmission and reception properties of wireless communications, data can occasionally be lostor delayed. This can be due to the variation in radio signal strength that results from changes in thecharacteristics of the radio transmission path. Yarvik will not be held responsible for damages of any kindresulting from the delays or errors in data transmitted or received via wireless functionality, or failure ofwireless functionality to transmit or receive such data.
• If the equipment does cause harmful interference to radio/TV reception, which can be determined by turningthe equipment off and on, the user is encouraged to try to correct the interference by one or more of thefollowing measures: reorient or relocate the receiving antenna, increase the distance between the senderand the receiver, consult the dealer or an experienced radio/TV technician for help. Yarvik will not beresponsible for any radio/TV interference nor for any other undesired effect.
Wireless LAN Security
Creating security settings for the Wireless LAN is extremely important. Yarvik assumes no responsibility forany security problems that may arise from the use of the Wireless LAN.
Battery pack
Do not charge the battery pack in any way other than as described in the Start guide or as designated byYarvik in writing.

Yarvik smartphone manual
file:///Users/elroy/Desktop/Yarvik/Manual/manual_pl.html[13-02-13 17:03:42]
AC adapter
• It is highly recommended that you use a genuine Yarvik AC adapter supplied by Yarvik for your product.
• This AC adapter is intended for use with the Smartphone device IT products only.
• Do not place the AC adapter in contact with your skin. Remove the AC adapter away from your body if itbecomes warm and causes discomfort.
RoHS
This products has been certified as RoHS Compliant.
YARVIK.COM
Powrót doindeksu

Yarvik smartphone manual
file:///Users/elroy/Desktop/Yarvik/Manual/manual_cz.html[13-02-13 17:03:47]
Rejstřík SELECTLANGUAGE
1 Před prvnímpoužitím2 Spouštění chytréhotelefonu3 Domovskáobrazovka Androidu3.1 Přidávání nástrojů azástupců na domovskouobrazovku3.2 Nastavení tapety3.3 Nabídka Apps(Aplikace)4 Nastavení chytréhotelefonu4.1 Nabídka Settings(Nastavení)4.2 WiFi a Bluetooth4.3 Audio profiles(Zvukové profily)4.4 Display (Displej)4.5 Apps (Aplikace)4.6 Storage (Paměť) apřístup k pamětiMicroSD karty4.7 Language & input(Jazyk a zadávání)4.8 Date & time (Datum

Yarvik smartphone manual
file:///Users/elroy/Desktop/Yarvik/Manual/manual_cz.html[13-02-13 17:03:47]
a čas)5 Apps (Aplikace)6 Hovory7 Zprávy8 Záruka9 Informace ovšeobecné veřejnélicenci GNU10 Importantinformation
1 Před prvním použitím
Vážený uživateli,
Děkujeme vám za zakoupení tohoto výrobku.Abychom zajistili rychlé a pohodlné používání nového chytrého telefonu od společnosti Yarvik, přečtěte siprosím před použitím výrobku řádně tyto pokyny.
Doufáme, že s tímto chytrým telefonem Yarvik budete po co nejdelší dobu naprosto spokojeni!
Upozornění:
• Tento chytrý telefon Yarvik jevelmi přesný elektronickývýrobek. Nesnažte se telefonrozmontovat, zneplatníte takzáruku a můžete zařízeníporouchat.
• Nenechte výrobek spadnoutani jej nevystavujte nárazům.
• Chytrý telefon nepoužívejte přivysokých nebo nízkýchteplotách, případně v jakémkolijiném prostředí, kde se můžezařízení dostat do kontaktu svlhkostí, prachem nebomagnetickým polem.
• Chytrý telefon nevystavujte po

Yarvik smartphone manual
file:///Users/elroy/Desktop/Yarvik/Manual/manual_cz.html[13-02-13 17:03:47]
delší dobu silnému slunečnímuzáření.
• Dotykovou obrazovkuneovládejte ostrými objekty,mohli byste ji poškrábat.
• Používání chytrého telefonu podlouhou dobu se sluchátkyanebo s nastavenou přílišvysokou hlasitostí můžezpůsobit vážné poškozenísluchu.
• Při použití sluchátekpřipojených k chytrému telefonunepřecházejte vozovku, neřiďtemotorové vozidlo ani nejezdětena kole, předejdete takdopravním nehodám.
• S chytrým telefonem Yarvikpoužívejte pouze povolenébaterie, nabíječky apříslušenství. Použití jakýchkolijiných výrobků s chytrýmtelefonem vede k pozbytí zárukya může být nebezpečné.
• Chytrý telefon čistěte pouzezlehka namočenou bavlněnouutěrkou ve vodě. Chytrý telefonse nesmí čistit jakýmkoli čisticímprostředkem.
Chytrý telefon Yarvik můžete okamžitě používat po vyjmutí z krabice, není třeba nejprve nabíjet baterii.Ideální pro provoz baterie je nejprve zapnout zařízení s připojenou nabíječkou a po prvním vybití nechatbaterii zcela nabít.Pokud nelze chytrý telefon přímo po vyjmutí z krabice zapnout, baterie je vybitá a je třeba ji pochopitelněnejprve nabít.
Návrat dorejstříku
2 Spouštěníchytrého telefonu

Yarvik smartphone manual
file:///Users/elroy/Desktop/Yarvik/Manual/manual_cz.html[13-02-13 17:03:47]
Po prvním zapnutí chytrého telefonu Yarvik vám bude představena úvodní scéna.Úplně první spuštění může trvat o něco déle, přibližně 2-3 minuty.Po úvodní scéně se dokončí spuštění chytrého telefonu a bude vám představena zamykací obrazovkaAndroidu.
Zamykací obrazovka Androidu
Přetažením lišty zámku (A) doprava odemknete chytrý telefon. Následně se dostanete na domovskouobrazovku Androidu.
Návrat dorejstříku
3 Domovská obrazovkaAndroidu

Yarvik smartphone manual
file:///Users/elroy/Desktop/Yarvik/Manual/manual_cz.html[13-02-13 17:03:47]
Domovská obrazovka Androidu
Nahoře na obrazovce chytrého telefonu bude vždy zobrazena stavová lišta.Stavová lišta zobrazuje informace o systému, zatímco na dolní liště nabídky naleznete funkční tlačítka.
1 - Ukazatel Wi-Fi signálu2 - Příjem mobilní sítě pro SIM1 a SIM2 a ukazatel stavu baterie3 - Systémový čas4 - Zástupce aplikací5 - Nástroj (analogové hodiny)6 - Tlačítko Zpět – vrátí vás na předchozí obrazovku nebo, pokud používáte prohlížeč, na předchozíwebovou stránku7 - Domů – vrátí vás na domovskou obrazovku Androidu8 - Nabídka aplikací a nástrojů9 - Multifunkční tlačítko
Domovská obrazovka se skládá z několika stránek, které lze otevřít posunutím obrazovky doleva nebodoprava.
Pokud si přejete zjistit, které aplikace jsou spuštěny na pozadí, můžete spustit multifunkční náhled stisknutímmultifunkčního tlačítka (9).

Yarvik smartphone manual
file:///Users/elroy/Desktop/Yarvik/Manual/manual_cz.html[13-02-13 17:03:47]
Na tuto aplikaci rychle přepnete kliknutím na spuštěnou aplikaci v multifunkčním náhledu. Spuštěné aplikacemůžete zavřít dlouhým stisknutím a kliknutím na „Remove from list“ („Odebrat ze seznamu“).
Návrat dorejstříku
3.1
Přidávánínástrojů aa zástupců nadomovskouobrazovku
Nástroj přidáte stisknutím tlačítka pro aplikace a nástroje, které je umístěno dole uprostřed domovské
obrazovky:
Na následující obrazovce naleznete všechny nainstalované aplikace a nástroje, které je možné jednotlivězobrazit stisknutím položky „Apps“ („Aplikace“), případně „Widgets“ („Nástroje“) v horní části příslušnéobrazovky.Stisknutím položky „Widgets“ („Nástroje“) zobrazíte všechny dostupné nástroje. Během prohlížení nástrojů jemožné klepnutím na obrazovku přejít na další stránku (je-li k dispozici).Stisknutím a přidržením požadovaného nástroje zobrazíte domovskou obrazovku, pokud si přejete mít tentonástroj na domovské obrazovce, pusťte jej na kterékoli prázdné místo na domovské obrazovce.

Yarvik smartphone manual
file:///Users/elroy/Desktop/Yarvik/Manual/manual_cz.html[13-02-13 17:03:47]
Zástupce přidáte k jakékoli aplikaci stisknutím tlačítka pro aplikace a nástroje, které je umístěno dole
uprostřed domovské obrazovky:
Na následující obrazovce naleznete všechny nainstalované aplikace a nástroje, které je možné jednotlivězobrazit stisknutím položky „Apps“ („Aplikace“), případně „Widgets“ („Nástroje“) v horní části příslušnéobrazovky.Stisknutím „Apps“ („Aplikace“) zobrazíte všechny nainstalované aplikace.Stisknutím a přidržením požadované aplikace zobrazíte domovskou obrazovku, pokud si přejete mít tutoaplikaci na domovské obrazovce, pusťte ji na kterékoli prázdné místo na domovské obrazovce.
Zástupce nástroje anebo aplikace vyjmete z domovské obrazovky jeho stisknutím a přidržením a následnýmpřesunutím do ikony koše „Remove“ („Vyjmout“), která se zobrazí nahoře na domovské obrazovce.
Návrat dorejstříku
3.2 Nastavení tapety
Tapetu domovské obrazovky změníte stisknutím a přidržením domovské obrazovky, dokud se nevyvolánabídka „Select Wallpaper from“ (Vybrat tapetu z).Můžete zvolit „Live Wallpapers“ („Živé tapety“) (animované tapety), „Gallery“ („Galerie“) (galerii fotografiínebo videí), případně „Wallpapers“ („Tapety“) (výchozí statické obrázky).
Návrat dorejstříku
3.3 Nabídka Apps(Aplikace)
Stiskněte tlačítko pro aplikace a nástroje, které je umístěno dole uprostřed domovské obrazovky:
Jakmile systém zobrazí nástroje, stisknutím „Apps“ („Aplikace“) zobrazíte nainstalované aplikace.
Zde naleznete všechny předem nainstalované programy nebo „aplikace“ a také další aplikace, které jstenainstalovali.Jakoukoli aplikaci je možné spustit stisknutím odpovídající ikony.

Yarvik smartphone manual
file:///Users/elroy/Desktop/Yarvik/Manual/manual_cz.html[13-02-13 17:03:47]
Obrazovka aplikací
Návrat dorejstříku
4Nastaveníchytréhotelefonu Yarvik
4.1NabídkaSettings(Nastavení)
Stisknutím ikony nastavení v nabídka aplikace vstoupíte do nabídky Settings (Nastavení). V nabídceSettings (Nastavení) naleznete možnosti pro nastavení chytrého telefonu Yarvik.

Yarvik smartphone manual
file:///Users/elroy/Desktop/Yarvik/Manual/manual_cz.html[13-02-13 17:03:47]
Nabídka Nastavení
Ukážeme si ty nejdůležitější části:
Návrat dorejstříku
4.2 Wi-Fi a

Yarvik smartphone manual
file:///Users/elroy/Desktop/Yarvik/Manual/manual_cz.html[13-02-13 17:03:47]
BluetoothWi-Fi
Připojení nastavte pomocí bezdrátové Wi-Fi sítě.Přetažením tlačítka Vypnout/Zapnout na „On“ („Zapnout“) aktivujete Wi-Fi.
V seznamu sítí vpravo na obrazovce se zobrazí dostupné Wi-Fi sítě. Klepněte na požadovanou síť. Pokud jesíť zabezpečena, budete vyzváni k zadání klíče zabezpečení sítě.
Po stisknutí tlačítka „Connect“ (Připojit) se chytrý telefon připojí k síti.Jakmile se zobrazí pod názvem sítě „Connected“ („Připojeno“) a dole na stavové liště se objeví ikona příjmubezdrátové sítě, jste úspěšně připojeni k bezdrátové síti.
Zobrazení adresy MAC Wi-Fi sítě chytrého telefonu Yarvik
Na obrazovce pro nastavení Wi-Fi sítě klikněte v pravém dolním rohu na tlačítko nabídky.
V otevřené nabídce stiskněte „Advanced“ („Rozšířené“).
Adresa MAC Wi-Fi sítě se zobrazí na následující obrazovce „Advanced Wi-Fi“ („Rozšířené Wi-Fi“) podpoložkou „MAC address“ („Adresa MAC“).
Bluetooth
Tento chytrý telefon Yarvik je vybaven vestavěným Bluetooth modulem pro spojení s periferními zařízenímikompatibilními s Bluetooth, jako jsou například klávesnice, reproduktory a sluchátka, ale také napříkladBluetooth hadsfree a sady do automobilů.Bluetooth aktivujete přetažením tlačítka Bluetooth On/Off (Zap/Vyp) do polohy „On“ („Zap“).
Po aktivaci spustí chytrý telefon Yarvik automatické vyhledávání okolních Bluetooth zařízení. Bluetoothzařízení je možné také vyhledávat ručně v pravém horním rohu obrazovky kliknutím na „Search for Devices“

Yarvik smartphone manual
file:///Users/elroy/Desktop/Yarvik/Manual/manual_cz.html[13-02-13 17:03:47]
(„Vyhledat zařízení“).U chytrých telefonů, které mají být připojeny k periferním zařízením, může být vyžadováno uvedení do„režimu spárování“. Více informací naleznete v návodu k obsluze odpovídajícího periferního zařízení.
Všechna nalezená zařízení se zobrazí v seznamu „Available Devices“ („Dostupná zařízení“):
Bluetooth zařízení spárujete s chytrým telefonem Yarvik kliknutím na toto zařízení.Zobrazí se okno „Bluetooth pairing request“ („Požadavek na Bluetooth spárování“):
Většina Bluetooth zařízení vyžaduje k připojení zadání PIN kódu. Tento kód je obvykle 0000 nebo 1234.Pokud je PIN kód jiný, naleznete jej v návodu k obsluze Bluetooth zařízení.Po zadání správného PIN kódu stiskněte „OK“.
Chytrý telefon Yarvik nyní spustí párování s Bluetooth zařízením. Po několika sekundách se připojenídokončí, následně se pod příslušným Bluetooth zařízením v přehledu „Available Devices“ („Dostupnázařízení“) zobrazí hlášení „Connected“ („Připojeno“):
K chytrému telefonu Yarvik je možné připojit více Bluetooth zařízení, a využívat je tak současně (napříkladsluchátka a klávesnici).
Návrat dorejstříku

Yarvik smartphone manual
file:///Users/elroy/Desktop/Yarvik/Manual/manual_cz.html[13-02-13 17:03:47]
4.3Audio profiles(Zvukovéprofily)
Zde můžete měnit hlasitost zvuku chytrého telefonu, můžete například nastavit při příchozím hovoru nebo připříchozí zprávě pouze vibrace nebo vibrace s vyzváněním.
Návrat dorejstříku
4.4 Display(Displej)
Zde je možné změnit jas displeje, velikost písma a automatickou dobu spánku.Upozorňujeme, že čím vyšší jas displeje nastavíte, tím vyšší bude spotřeba energie. Baterie se tak vybijepodstatně rychleji.Pokud si nepřejete, aby se displej automaticky otáčel po naklopení chytrého telefonu, je možné povolit /zakázat tuto funkci v nastavení Auto-rotate screen (Automatické otočení obrazovky).
Návrat dorejstříku
4.5 Apps(Aplikace)
Zde je možné spravovat aplikace, které jste nainstalovali do chytrého telefonu Yarvik.Klinutím na nainstalovanou aplikaci můžete zobrazit informace o aplikaci a v případě potřeby ji odinstalovatpomocí tlačítka „Uninstall“ (Odinstalovat).Upozorňujeme, že předem nainstalované výchozí aplikace (například kalkulačku) není možné odinstalovat.
Návrat dorejstříku
4.6
Storage(Paměť) apřístupk pamětiMicroSD karty
Zobrazuje informace o vnitřní paměti. Pokud je přednastavena MicroSD karta, informace o paměti vložené

Yarvik smartphone manual
file:///Users/elroy/Desktop/Yarvik/Manual/manual_cz.html[13-02-13 17:03:47]
paměťové karty je možné nalézt zde.
Připojení chytrého telefonu Yarvik k počítači nebo k Mac pomocí USB
Tento chytrý telefon Yarvik je možné připojit k počítači nebo k Macintoshi pomocí dodaného USB kabelu.Po připojení k počítači můžete otevřít vnitřní paměť chytrého telefonu, a pokud je k dispozici, vloženouMicroSD kartu jako standardní velkokapacitní paměťové zařízení USB.
Kde se nachází USB port chytrého telefonu, zjistíte v tištěné Rychlé příručce spuštěním tohoto chytréhotelefonu Yarvik. Připojte USB kabel k USB portu chytrého telefonu Yarvik a k volnému USB portu počítače.Nahoře na obrazovce chytrého telefonu se krátce po sobě zobrazí dvě zprávy:
Jakmile se zobrazí druhá zpráva („USB connected“ („USB je připojeno“)), klikněte na ni.Zobrazí se následující obrazovka:
Klikněte na tlačítko „Turn on USB storage“ („Zapnout paměť USB“).Zobrazí se okno s oznámením:

Yarvik smartphone manual
file:///Users/elroy/Desktop/Yarvik/Manual/manual_cz.html[13-02-13 17:03:47]
Potvrďte kliknutím na „OK“.Vnitřní paměť chytrého telefonu Yarvik se nyní v systému souborů počítače zobrazí jako velkokapacitnípaměťové zařízení. Lze ji využívat například ke kopírování souborů z chytrého telefonu Yarvik a obráceně.Pokud je v chytrém telefonu vložena MicroSD karta, počítač ji rozpozná jako druhé velkokapacitní paměťovézařízení.
Pokud si přejete ukončit používání funkce velkokapacitní paměťové zařízení, klikněte na tlačítko „Turn offUSB storage“ („Vypnout USB paměť“) a odpojte USB kabel.
Poznámka: K přístupu do paměti chytrého telefonu Yarvik nejsou vyžadovány žádné ovladače hardwaru.Pokud vás počítač vyzve k instalaci jakéhokoli ovladače, výzvu můžete jednoduše ignorovat.
Přístup k MicroSD kartěv ES File Explorer (Průzkumníksouborů ES)
Pokud jste do chytrého telefonu Yarvik vložili MicroSD kartu, můžete přejít na její obsah následujícímzpůsobem:
Otevřete aplikaci ES File Explorer (Průzkumník souborů ES) a klikněte na tlačítko Favorites (Oblíbenépoložky) (ikonka s modrou hvězdičkou).
Nyní se otevře nabídka Favorites (Oblíbené položky). Klikněte na ikonu „kořenového adresáře“ označenou„/“:
Nyní jste v „kořenovém adresáři“ systému souborů chytrého telefonu, který obsahuje několik souborů asložek.Najděte složku „mnt“ a klikněte na ni:

Yarvik smartphone manual
file:///Users/elroy/Desktop/Yarvik/Manual/manual_cz.html[13-02-13 17:03:47]
Nyní se otevře složka „mnt“, která rozevře několik složek:
Složka „sdcard“ je vnitřní paměť tohoto chytrého telefonu Yarvik.Složka „sdcard2“ je vaše MicroSD karta (pokud je vložena do MicroSD slotu chytrého telefonu).
K rychlému přístupu do paměťové MicroSD karty (pokud je k dispozici) můžete také použít zástupcemicrosd2 v dříve zmiňované nabídce Favorites (Oblíbené položky).
Návrat dorejstříku
4.7Language &input (Jazyk azadávání)
Pomocí volby „Select language“ (Vybrat jazyk) vyberte jazyk displeje chytrého telefonu Yarvik. Totonastavení se použije na všechny texty obrazovky v celém systému.V „Android keyboard“ (Klávesnice Android) můžete nastavit klávesnici na obrazovce chytrého telefonu.
Návrat dorejstříku
4.8 Date & time(Datum a čas)

Yarvik smartphone manual
file:///Users/elroy/Desktop/Yarvik/Manual/manual_cz.html[13-02-13 17:03:47]
Zde je možné v chytrém telefonu Yarvik nastavit datum a čas.
Návrat dorejstříku
5 Apps (Aplikace)
Chytrý telefon Yarvik se dodává s již nainstalovanými aplikacemi (příklady jsou uvedeny níže):
Zobrazení ikon aplikací se může změnit bez předchozího upozornění.
Návrat dorejstříku
6 Hovory
Uskutečnění hovoruAbyste mohli uskutečnit hovor, v nabídce aplikací nebo na domovské obrazovce Android otevřete aplikaci
„Phone“ („Telefon“):

Yarvik smartphone manual
file:///Users/elroy/Desktop/Yarvik/Manual/manual_cz.html[13-02-13 17:03:47]
Telefonní číslo zadejte pomocí numerické klávesnice telefonu.
Klávesnice telefonu.
Abyste mohli volat do zahraničí, je třeba zadat předvolbu „+“ a stisknout a přidržet „0“ na klávesnici, dokud senezobrazí „+“.
Hovor zahájíte stisknutím tlačítka .
Hovor zavěsíte stisknutím tlačítka .Hovory můžete uskutečnit přímo z kontaktů v aplikaci „People“ („Lidé“);
Poslední hovory jsou uloženy na obrazovce protokoly hovorů, vstoupíte do ní stisknutím tlačítka protokoly
, které je umístěno na obrazovce Phone (Telefon).K vašim kontaktům (z dříve zmiňované aplikace „People“ („Lidé“)) se také dostanete přímo z obrazovky
Phone (Telefon) stisknutím tlačítka .
Příchozí hovory
Jakmile vám někdo volá na chytrý telefon Yarvik, máte 3 možnosti:
1 - Příchozí hovor můžete ignorovat přetažením kolečka nahoru, kontaktu se současně odešle automatickátextová zpráva;2 - Příchozí hovor můžete ignorovat bez odeslání automatické zprávy;3 - Příchozí hovor můžete přijmout.

Yarvik smartphone manual
file:///Users/elroy/Desktop/Yarvik/Manual/manual_cz.html[13-02-13 17:03:47]
Možnosti, které máte během příchozího hovoru
1 - Zobrazit klávesnici telefonu (například pro nabídky možností DTMF);2 - Aktivovat nebo zrušit funkci reproduktoru;3 - Ztlumit mikrofon;4 - Přidržet hovor;5 - Nabídka s více možnostmi: konferenční hovor nebo záznam hovoru.
Přesměrování hovoru
Můžete nastavit funkci přesměrování hovoru a přesměrovat všechny příchozí hovory na jiné číslo.
V aplikaci „Phone“ („Telefon“) stiskněte tlačítko nabídky a vyberte „Call settings“ („Nastaveníhovoru“).Vyberte „Voice call“ („Hlasový hovor“), kde můžete volbou „Call forwarding“ („Přesměrování hovorů“) změnitmožnosti přesměrování.
ID volajícího / další hovor na lince
Díky funkci chytrého telefonu Yarvik Caller ID (ID volajícího) můžete zvolit, zda si přejete zobrazit vaše číslopři odchozím hovoru.
Pokud si přejete toto nastavení změnit, spusťte aplikaci „Phone“ („Telefon“) , stiskněte tlačítko nabídky
a vyberte „Settings“ („Nastavení“) - „Voice call“ („Hlasový hovor“) - „Additional settings“ („Dalšínastavení“) - „Caller ID“ („ID volajícího“).V této nabídce můžete také povolit nebo zakázat příchozí hovory při probíhajícím hovoru.
Návrat dorejstříku
7 Zprávy

Yarvik smartphone manual
file:///Users/elroy/Desktop/Yarvik/Manual/manual_cz.html[13-02-13 17:03:47]
Chytrý telefon Yarvik je schopen odesílat SMS a MMS zprávy. Informace o standardních poplatcích adodatečných nákladech za odesílání zpráv do a ze zahraničí vám poskytne váš poskytovatel mobilníchslužeb.
Odesílání SMS / MMS zpráv
Na domovské obrazovce Android nebo v nabídce aplikace otevřete aplikaci „Messaging“ („Zprávy“) .
Aplikace zpráv.
1 - Přidávání příloh, například obrázků, hudby nebo videa. Zprávy s přílohou se automaticky změní na MMSzprávy;2 - Nabídka nastavení zpráv;3 - Pole příjemce;4 - Přidat příjemce;5 - Přehled konverzace zpráv;6 - Pole pro psaní zprávy;7 - Tlačítko pro odeslání zprávy.
Nastavení čísla hlasové schránky / přehrávání hlasových zprávAbyste mohli nastavit číslo hlasové schránky do chytrého telefonu Yarvik, v nabídce aplikace nebo na
domovské stránce Android otevřete aplikaci „Phone“ („Telefon“):
Stiskněte a přidržte tlačítko na klávesnici telefonu. Na obrazovce s možnostmi se zobrazí „Addnumber“ („Přidat číslo“). V možnostech Voicemail (Hlasová schránka) můžete nastavit hlasovou schránku a

Yarvik smartphone manual
file:///Users/elroy/Desktop/Yarvik/Manual/manual_cz.html[13-02-13 17:03:47]
zadat číslo hlasové schránky.
Jakmile nastavíte číslo hlasové schránky, můžete následně použít tlačítko a jeho stisknutím apřidržením zavolat do hlasové schránky.
Návrat dorejstříku
8 Záruka
Společnost Yarvik ručí za to, že výrobek zakoupený zákazníkem je zhotoven bez závad na zpracování amateriálu, tato záruka platí 2 roky od data pořízení výrobku zákazníkem. Pokud se v průběhu záruční dobyobjeví defekt na zpracování nebo materiálu, zákazník musí výrobek vrátit prodejci, u kterého výrobekzakoupil. Prodejce je povinen v rozumném čase výrobek opravit nebo jej vyměnit (na základě uváženíspolečností Yarvik). K ověření data koupě bude vyžadována originální faktura. Vyjádření společnosti Yarvik kdané reklamaci je konečné.
Tato záruka nepokrývá defekty ani poruchy vzniklé důsledkem softwarového přenosu, nesprávnéhopoužívání, hrubé manipulace, záměrného poškození, nedbalosti, zneužití, nedostatečné péče či jiné činnosti,na kterou společnost Yarvik nemá vliv.
DŮLEŽITÉ: Při koupi chytrého telefonu Yarvik je chytrý telefon vybaven posledním stabilním firmwarem,který je v době výroby zařízení k danému modelu k dispozici. Společnost Yarvik neposkytuje podporuvýrobkům, které byly jakkoli změněny koncovým uživatelem ani nepodporuje změny programů u firmwaru čisoftwaru používaných ve výrobcích. Pokud byly učiněny takové změny, všechny záruky automatickypozbývají platnosti.
Pokud si zákazník nepřeje, aby došlo ke zrušení platnosti uvedené záruky, musí používat pouze oficiálnísoftware, aplikace a aktualizace dostupné na webové stránce společnosti Yarvik www.yarvik.com.Neměl by být používán žádný jiný software a firmware, takové použití způsobí automatické pozbytí platnostizáruky a podpory. Společnost Yarvik nepodporuje používání jiného softwaru nebo firmwaru, než který bylnainstalován do výrobku výrobcem nebo který je k dispozici na oficiálních webových stránkách společnostiYarvik www.yarvik.com. Společnost Yarvik výslovně odmítá odpovídat na jakékoli požadavky vztahující se kneoprávněným změnám, neschválenému softwaru a firmwaru.
Návrat dorejstříku
9Informace olicencích GNU /GPL
Přečtěte si právní informace, které se vztahují k chytrému telefonu Yarvik, v části Settings (Nastavení) –About Smartphone (O chytrém telefonu) – Legal information (Právní informace) (vyžadováno internetové

Yarvik smartphone manual
file:///Users/elroy/Desktop/Yarvik/Manual/manual_cz.html[13-02-13 17:03:47]
připojení) nebo navštivte http://source.android.com/source/licenses.html, kde se dozvíte podrobnějšíinformace.
Návrat dorejstříku
10 ImportantInformation
Wireless LAN-Regulatory information
Depending on the model, the wireless LAN built-in into Smartphone devices can only be used in thefollowing countries: Austria, Belgium, Bulgaria, Czech Republic, Denmark, Finland, France, Germany,Greece, Hungary, Iceland, Ireland, Italy, Luxembourg, the Netherlands, Norway, Poland, Portugal, Romania,Slovakia, Slovenia, Spain, Sweden, Switzerland, Turkey and the United Kingdom.
Conditions of use
When using the IEEE 802.11b/g/n Wireless LAN standard, channels 1 to 13 (2.4 GHz...2.4835 GHz) areselectable for both indoor and outdoor use, however with restrictive conditions applying in France, Italy andNorway, as follows:
• France: When using this product indoor, all channels can be used without restrictions. Outdoor onlychannels 1 to 6 are allowed. This means that in Peer-to-Peer, the WLAN feature can only be used outside ifthe peer sets up the communication on an authorized channel (i.e., between 1 & 6). In infrastructure mode,please make sure the access point is configured to a channel from 1 to 6 before setting up the connection.
• Italy: Use of the RLAN network is governed: Disposal of Old Electrical & Electronic- with respect to private use, by the Legislative Decree of 1.8.2003, no. 259 (“Code of ElectronicCommunications”). In particular Article 104 indicates when the prior obtainment of a general authorization isrequired and Art. 105 indicates when free use is permitted;- with respect to the supply to the public of the WLAN access to telecom networks and services, by theMinisterial Decree 28.5.2003, as amended, and Art. 25 (general authorization for electronic communicationsnetworks and services) of the Code of electronic communications.
• Norway: Use of this radio equipment is not allowed in the geographical area within a radius of 20 km fromthe centre of Ny-Ålesund, Svalbard.
WEEESymbolInformation
Correct Disposal of This product (Waste Electrical & Electronic Equipment).

Yarvik smartphone manual
file:///Users/elroy/Desktop/Yarvik/Manual/manual_cz.html[13-02-13 17:03:47]
(Applicable in the European Union and other European countries with separate collection systems).
This marking shown on the product or its literature indicates that it should not be disposed with otherhousehold wasted at the end of its working life. To prevent possible harm to the environment or humanhealth from uncontrolled waste disposal, please separate this from other types of wastes and recycle itresponsibly to promote the sustainable reuse of material resources.Household users should contact either the retailer where they purchased this product, or their localgovernment office, for details of where and how they can take this item for environmentally safe recycling.Business users should contact their supplier and check the terms and conditions of the purchase contract.This product should not be mixed with other commercial wastes of disposal.
Disposal of waste batteries (applicable in the European Union and other European countries withseparate collection systems)
Either of the symbols shown next may appear on the battery or on the packaging to indicate that the batteryprovided with this product shall not be treated as household waste. On certain batteries this symbol might beused in combination with a chemical symbol. The chemical symbols for mercury (Hg) or lead (Pb) are addedif the battery contains more than 0.0005% mercury or 0.004% lead. By ensuring these batteries are disposedof correctly, you will help prevent potentially negative consequences for the environment and human healthwhich could otherwise be caused by inappropriate waste handling of the battery. The recycling of thematerials will help to conserve natural resources. In case of products that for safety, performance or dataintegrity reasons require a permanent connection with an incorporated battery, this battery should bereplaced by qualified service staff only. To ensure that the battery will be treated properly, hand over theproduct at end-of-life to the applicable collection point for the recycling of electrical and electronicequipment.
For all other batteries, please view the section on how to remove the battery from the product safely. Handthe battery over to the applicable collection point for the recycling of waste batteries. For more detailedinformation about recycling of this product or battery, please contact your local Local government Office,your household waste disposal service or the shop where you purchased the product.
When travelling to and within the United States of America, please be aware that the U.S. Department ofTransportation (DOT) recently published new regulations that apply to passengers travelling with lithiummetal batteries and lithium-ion batteries.For detailed information, visit http://safetravel.dot.gov/whats_new_batteries.html.
Safety Information
Yarvik Smartphone device
• Yarvik is not responsible for any interference that you may experience or that may be caused when

Yarvik smartphone manual
file:///Users/elroy/Desktop/Yarvik/Manual/manual_cz.html[13-02-13 17:03:47]
operating this device.
• Warning: This apparatus must be earthed.
Opening or dismantling the main unit or any of its accessories, for whatever reason, could lead to damagesthat are not covered by the guarantee.
• To avoid electrical shock, do not open the cabinet. Refer servicing to qualified personnel only.
• To prevent fire or shock hazard, do not expose your Smartphone device or any of its accessories to rain ormoisture.
• Do not use or store your Smartphone device in a location subject to heat sources, such as radiators or airducts; direct sunlight; excessive dust; moisture or rain; mechanical vibration or shock; strong magnets orspeakers that are not magnetically shielded; excessively high and low temperatures; and high humidity.
• Turning off your Smartphone device with the power button does not disconnect the device completely frommains voltage. To disconnect it completely, unplug the AC adapter or the power cord from mains. Thesocket-outlet shall be installed near the equipment and shall be easily accessible.
• Audio and picture distortion may occur if this equipment is positioned in close proximity to any equipmentemitting electromagnetic radiation.
• This apparatus is also designed for IT power system with phase to phase voltage 230V, for customers inNorway.
• Observe the following precautions to provide adequate air circulation and to ensure normal reliableoperation:- Do not use the Smartphone device and/or the AC adapter while covered or wrapped in cloth. Ensure theAC adapter operates in a clear environment.- Turn off the Smartphone device before putting the device into a bag or a carrying case.
• Do not use your Smartphone device directly on your lap. The temperature of the base of the unit will riseduring normal operation and over time could result in discomfort or burns.
• Do not use your Smartphone device while walking. Listening to music with headphones or watching theLCD screen while walking may lead to an unexpected accident and result in personal injuries.
• Using connected headphones on the Smartphone device for too long and/or setting the audio volume uptoo high when using headphones may cause serious hearing damage.
• Avoid strong beating of or to the product.
• Don’t operate the touch screen of the Smartphone device with sharp objects, as this may result inscratching the screen surface.
• Only use permitted batteries, chargers and accessories with your Smartphone device. The use of any otherproducts with the device can be dangerous and may violate the warranty regulations.
• Only use a slightly wet cotton cloth to clean the device, and only use water to wetten the cotton cloth. TheSmartphone device should not be cleaned with any sort of (glass) cleaning aid.

Yarvik smartphone manual
file:///Users/elroy/Desktop/Yarvik/Manual/manual_cz.html[13-02-13 17:03:47]
Wireless functionality
• If radio interference with other devices occurs while using your Smartphone device, do not use the wirelessfunctionality. Use of the wireless functionality may cause a malfunction of the devices, resulting in anaccident.
• In some situations or environments, the use of the wireless functionality might be restricted by theproprietor of the building or responsible representatives of the organization, for example on board airplanes,in hospitals or in any other environment where the risk of interference with other devices or services isperceived or identified as harmful. If you are uncertain about the policy applying to the use of wirelessfunctionality in a specific organization or environment, you are encouraged to first ask for authorization priorto switching it on. Consult your physician or the manufacturer of personal medical devices (pacemakers,hearing aids, etc.) regarding any restrictions on the use of wireless functionality.
• If using wireless functionality near a pacemaker, make sure it is at least 19 inches / 50 cm away from thepacemaker.
• Due to the transmission and reception properties of wireless communications, data can occasionally be lostor delayed. This can be due to the variation in radio signal strength that results from changes in thecharacteristics of the radio transmission path. Yarvik will not be held responsible for damages of any kindresulting from the delays or errors in data transmitted or received via wireless functionality, or failure ofwireless functionality to transmit or receive such data.
• If the equipment does cause harmful interference to radio/TV reception, which can be determined by turningthe equipment off and on, the user is encouraged to try to correct the interference by one or more of thefollowing measures: reorient or relocate the receiving antenna, increase the distance between the senderand the receiver, consult the dealer or an experienced radio/TV technician for help. Yarvik will not beresponsible for any radio/TV interference nor for any other undesired effect.
Wireless LAN Security
Creating security settings for the Wireless LAN is extremely important. Yarvik assumes no responsibility forany security problems that may arise from the use of the Wireless LAN.
Battery pack
Do not charge the battery pack in any way other than as described in the Start guide or as designated byYarvik in writing.
AC adapter
• It is highly recommended that you use a genuine Yarvik AC adapter supplied by Yarvik for your product.
• This AC adapter is intended for use with the Smartphone device IT products only.
• Do not place the AC adapter in contact with your skin. Remove the AC adapter away from your body if itbecomes warm and causes discomfort.

Yarvik smartphone manual
file:///Users/elroy/Desktop/Yarvik/Manual/manual_cz.html[13-02-13 17:03:47]
RoHS
This products has been certified as RoHS Compliant.
YARVIK.COM
Návrat dorejstříku

Yarvik smartphone manual
file:///Users/elroy/Desktop/Yarvik/Manual/manual_sk.html[13-02-13 17:03:51]
Register SELECTLANGUAGE
1 Pred prvým použitím2 Spustenie smartfónu3 Domovskáobrazovka Android3.1 Pridávanieminiaplikácií a odkazovna domovskú obrazovku3.2 Nastavenie tapety3.3 Ponuka Apps(Aplikácie)4 Nastavenie vášhosmartfónu4.1 Ponuka Settings(Nastavenia)4.2 WiFi a Bluetooth4.3 Audio Profiles(Audio profily)4.4 Display (Displej)4.5 Apps (Aplikácie)4.6 Storage (Pamäť) aprístup k pamätiMicroSD4.7 Language & input(Jazyk a vstup)4.8 Date & time (Dátuma čas)5 Apps (Aplikácie)

Yarvik smartphone manual
file:///Users/elroy/Desktop/Yarvik/Manual/manual_sk.html[13-02-13 17:03:51]
6 Telefónne hovory7 Odosielanie správ8 Záručné podmienky9 Licenčné informácieGNU/GPL10 Importantinformation
1 Pred prvým použitím
Vážený používateľ,
ďakujeme vám za kúpu nášho výrobku.Aby ste zabezpečili rýchle a pohodlné používanie vášho nového smartfónu Yarvik, prečítajte si pred jehopoužitím tieto pokyny.
Veríme, že budete s vašim smartfónom Yarvik spokojní veľmi dlhý čas!
NEZABUDNITE PROSÍM:
• Váš smartfón Yarvik je veľmipresný elektronický produkt.Nepokúšajte sa smartfónrozoberať, pretože by toznamenalo stratu záruky a môžeto spôsobiť poruchu zariadenia.
• Na produkt neudierajte, ani honenechajte spadnúť.
• Nepoužívajte smartfón vprostredí s vysokými alebonízkymi teplotami, alebo vprostredí, v ktorom môže prísťzariadenie do kontaktu svlhkosťou, prachom alebomagnetickými poliami.
• Smartfón nevystavujtedlhšiemu silnému slnečnémužiareniu.
• Dotykovú obrazovkuneobsluhujte ostrými predmetmi,
Yarvik smartphone manual
file:///Users/elroy/Desktop/Yarvik/Manual/manual_sk.html[13-02-13 17:03:51]
pretože by to mohlo spôsobiť jejpoškriabanie.
• Príliš dlhé používaniesmartfónu so slúchadlamia/alebo s hlasitosťounastavenou na príliš vysokúúroveň môže spôsobiť vážnepoškodenie sluchu.
• Aby ste predišli dopravnýmnehodám, neprechádzajte cezcestu, nejazdite v motorovomvozidle alebo na bicykli, keďpoužívate smartfón soslúchadlami.
• So svojim smartfónom Yarvikpoužívajte iba povolené batérie,nabíjačky a príslušenstvo.Používanie iných výrobkov sosmartfónom môže byťnebezpečné a môže znamenaťporušenie záručnýchpodmienok.
• Na čistenie smartfónupoužívajte len mierne navlhčenúbavlnenú handričku a na jejnavlhčenie používajte len čistúvodu. Smartfón sa nesmie čistiťžiadnymi čistiacimiprostriedkami.
Váš smartfón Yarvik môžete použiť ihneď po vybalení bez toho, aby ste najprv museli nabíjať batériu.Pre batériu je lepšie použiť výrobok so zvyšným stavom nabitia batérie a úplne ju nabiť až po jej úplnomvybití.Ak sa smartfón nedá zapnúť okamžite po vybalení, batéria je úplne vybitá a mali by ste ju najskôr nabiť.
Návrat doindexu
2 Spusteniesmartfónu
Keď prvýkrát zapnete váš smartfón Yarvik, spustí sa úvodná sekvencia.

Yarvik smartphone manual
file:///Users/elroy/Desktop/Yarvik/Manual/manual_sk.html[13-02-13 17:03:51]
Úplne prvé spustenie môže chvíľu trvať, približne 2-3 minúty.Po úvodnej sekvencii smartfón dokončil spúšťanie a na obrazovke sa zobrazí uzamknutá obrazovka systémuAndroid.
Uzamknutá obrazovka Android
Posuňte lištu uzamknutia (A) smerom doprava a odomknite smartfón. Potom prejdete na domovskúobrazovku Android.
Návrat doindexu
3 Domovská obrazovkaAndroid

Yarvik smartphone manual
file:///Users/elroy/Desktop/Yarvik/Manual/manual_sk.html[13-02-13 17:03:51]
Domovská obrazovka Android
Na hornej strane obrazovky smartfónu vždy nájdete stavovú lištu.Stavová lišta zobrazuje systémové informácie a spodná lišta menu obsahuje funkčné tlačidlá.
1 - Indikátor signálu Wi-Fi2 - Indikátor signálu mobilnej siete pre SIM1 a SIM2 a indikátor stavu nabitia batérie3 - Systémový čas4 - Skratky aplikácií5 - Miniaplikácia (analógové hodiny)6 - Tlačidlo Späť - prepne zobrazenie späť na predchádzajúcu obrazovku alebo na predchádzajúcu webovústránku, keď používate prehliadač7 - Domov - prepne zobrazenie späť na domovskú obrazovku Android8 - Ponuka aplikácií a miniaplikácií9 - Viacúčelové tlačidlo
Domovská obrazovka pozostáva z viacerých strán, do ktorých môžete vstúpiť posunutím prsta na domovskejobrazovke doľava/doprava.
Ak sa chcete pozrieť, ktoré aplikácie sú spustené v pozadí, môžete vojsť do zobrazenia viacerých úlohstlačením viacúčelového tlačidla (9).

Yarvik smartphone manual
file:///Users/elroy/Desktop/Yarvik/Manual/manual_sk.html[13-02-13 17:03:51]
Ak chcete rýchlo prepnúť na spustenú aplikáciu, kliknite na ňu v zobrazení viacerých úloh. Spustenéaplikácie môžete zatvoriť ich dlhším stlačením a kliknutím na „Remove from“ („Odstrániť z“).
Návrat doindexu
3.1
Pridávanieminiaplikácií aodkazov nadomovskúobrazovku
Ak chcete pridať miniaplikáciu, stlačte tlačidlo aplikácie a miniaplikácie v strede dolu na domovskej
obrazovke:
Na nasledovnej obrazovke nájdete všetky nainštalované aplikácie a miniaplikácie. Obe môžete zobraziťsamostatne, stlačením „Apps“ („Aplikácie“) alebo „Widgets“ („Miniaplikácie“) na hornej strane obrazovky.Stlačte „Widgets“ („Miniaplikácie“) a pozrite si všetky dostupné miniaplikácie. Pri zobrazení všetkýchminiaplikácií môžete posunúť prst po obrazovke a pozrieť si nasledujúcu stranu (ak je k dispozícii).Stlačte a podržte požadovanú miniaplikáciu a zobrazí sa domovská obrazovka, potom miniaplikáciu pustitena akékoľvek voľné miesto na domovskej obrazovke.

Yarvik smartphone manual
file:///Users/elroy/Desktop/Yarvik/Manual/manual_sk.html[13-02-13 17:03:51]
Ak chcete pridať odkaz na ktorúkoľvek aplikáciu, stlačte tlačidlo aplikácie a miniaplikácie v pravom hornom
rohu na domovskej obrazovke:
Na nasledovnej obrazovke nájdete všetky nainštalované aplikácie a miniaplikácie. Obe môžete zobraziťsamostatne, stlačením „Apps“ („Aplikácie“) alebo „Widgets“ („Miniaplikácie“) na hornej strane obrazovky.Stlačte „Apps“ („Aplikácie“) a pozrite si všetky nainštalované aplikácie.Stlačte a podržte požadovanú miniaplikáciu a zobrazí sa domovská obrazovka, potom miniaplikáciu pustitena akékoľvek voľné miesto na domovskej obrazovke.
Ak chcete z domovskej obrazovky odstrániť odkazy na miniaplikácie a/alebo aplikácie, stlačte ich a podržte apotom ich potiahnite do zobrazenej ikony koša „Remove“ („Odstrániť“) na hornej strane domovskejobrazovky.
Návrat doindexu
3.2 Nastavenie tapety
Ak chcete zmeniť tapetu domovskej obrazovky, stlačte a podržte domovskú obrazovku, až kým sa nezobrazíponuka „Select Wallpaper from“ („Vybrať tapetu z“).Môžete si vybrať z možností „Live Wallpapers“ („Živé tapety“) (animované tapety), „Gallery“ („Galéria“)(galéria s fotografiami/videami) alebo „Wallpapers“ („Tapety“) (predvolené statické obrázky).
Návrat doindexu
3.3 Ponuka Apps(Aplikácie)
Stlačte tlačidlo aplikácie a miniaplikácie v strede dolu na domovskej obrazovke:
Keď systém zobrazí miniaplikácie, stlačte „Apps“ („Aplikácie“) a pozrite si nainštalované aplikácie.
Tu si nájdete vopred nainštalované programy alebo „aplikácie“ a ďalšie aplikácie, ktoré ste si nainštalovali vy.Ktorúkoľvek aplikáciu môžete spustiť jednoduchým stlačením príslušnej ikony.

Yarvik smartphone manual
file:///Users/elroy/Desktop/Yarvik/Manual/manual_sk.html[13-02-13 17:03:51]
Obrazovka s aplikáciami
Návrat doindexu
4
NastavenievášhosmartfónuYarvik
4.1PonukaSettings(Nastavenia)
Ak sa chcete dostať do ponuky Settings (Nastavenia), stlačte ikonu nastavenia v ponuke Aplikácie. Vponuke Settings (Nastavenia) nájdete možnosti nastavenia vášho smartfónu Yarvik.

Yarvik smartphone manual
file:///Users/elroy/Desktop/Yarvik/Manual/manual_sk.html[13-02-13 17:03:51]
Ponuka Nastavenia
Prejdeme si najdôležitejšími časťami:
Návrat doindexu
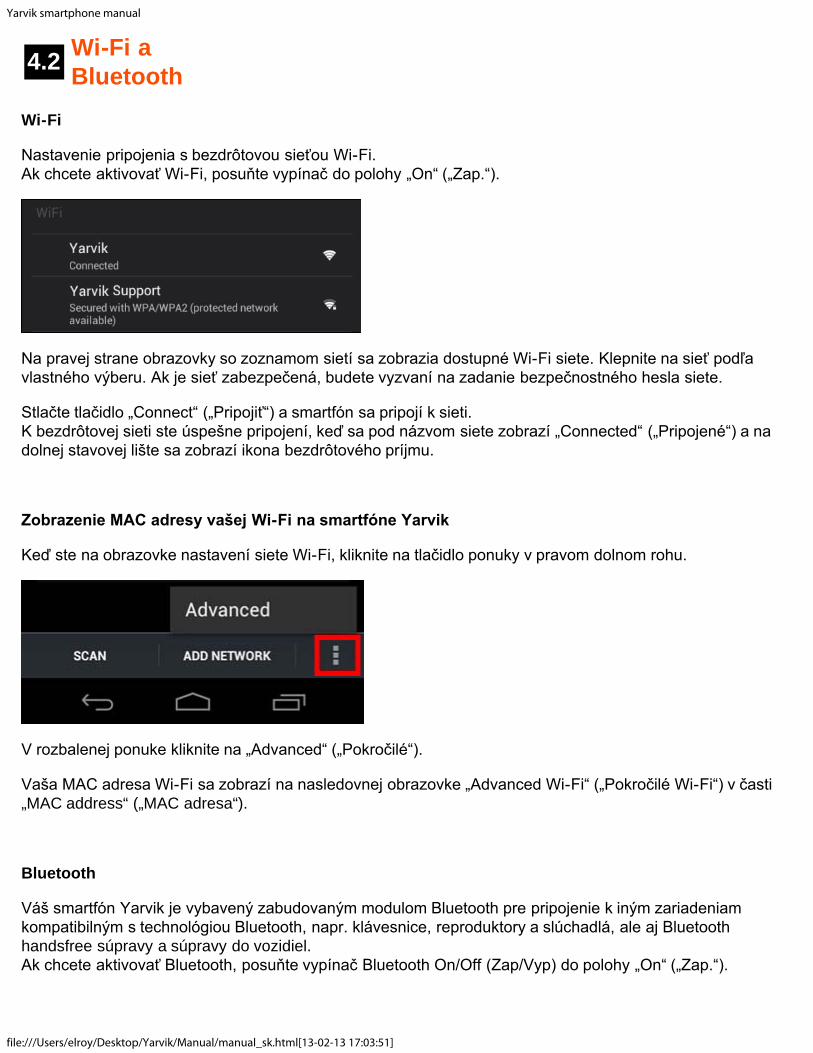
Yarvik smartphone manual
file:///Users/elroy/Desktop/Yarvik/Manual/manual_sk.html[13-02-13 17:03:51]
4.2 Wi-Fi aBluetooth
Wi-Fi
Nastavenie pripojenia s bezdrôtovou sieťou Wi-Fi.Ak chcete aktivovať Wi-Fi, posuňte vypínač do polohy „On“ („Zap.“).
Na pravej strane obrazovky so zoznamom sietí sa zobrazia dostupné Wi-Fi siete. Klepnite na sieť podľavlastného výberu. Ak je sieť zabezpečená, budete vyzvaní na zadanie bezpečnostného hesla siete.
Stlačte tlačidlo „Connect“ („Pripojiť“) a smartfón sa pripojí k sieti.K bezdrôtovej sieti ste úspešne pripojení, keď sa pod názvom siete zobrazí „Connected“ („Pripojené“) a nadolnej stavovej lište sa zobrazí ikona bezdrôtového príjmu.
Zobrazenie MAC adresy vašej Wi-Fi na smartfóne Yarvik
Keď ste na obrazovke nastavení siete Wi-Fi, kliknite na tlačidlo ponuky v pravom dolnom rohu.
V rozbalenej ponuke kliknite na „Advanced“ („Pokročilé“).
Vaša MAC adresa Wi-Fi sa zobrazí na nasledovnej obrazovke „Advanced Wi-Fi“ („Pokročilé Wi-Fi“) v časti„MAC address“ („MAC adresa“).
Bluetooth
Váš smartfón Yarvik je vybavený zabudovaným modulom Bluetooth pre pripojenie k iným zariadeniamkompatibilným s technológiou Bluetooth, napr. klávesnice, reproduktory a slúchadlá, ale aj Bluetoothhandsfree súpravy a súpravy do vozidiel.Ak chcete aktivovať Bluetooth, posuňte vypínač Bluetooth On/Off (Zap/Vyp) do polohy „On“ („Zap.“).

Yarvik smartphone manual
file:///Users/elroy/Desktop/Yarvik/Manual/manual_sk.html[13-02-13 17:03:51]
Po aktivovaní začne váš smartfón Yarvik automaticky vyhľadávať Bluetooth zariadenia v blízkosti. Bluetoothzariadenia môžete stále vyhľadať manuálne kliknutím na „Search for Devices“ (Vyhľadať zariadenie) vpravom hornom rohu na obrazovke.Na pripojenie periférnych zariadení budete možno musieť smartfón prepnúť do režimu „pairing mode“ (režimpárovania). Viac informácií nájdete v návode na použitie príslušných periférnych zariadení.
Všetky objavené zariadenia sa objavia v zozname „Available Devices“ (Dostupné zariadenia):
Kliknite na objavené Bluetooth zariadenie a spárujte s ním váš smartfón Yarvik.Zobrazí sa okno „Bluetooth pairing request“ (Požiadavka na spárovanie s Bluetooth):
Väčšina Bluetooth zariadení si vyžaduje na pripojenie PIN kód. Zvyčajne je tento kód 0000 alebo 1234. Ak jePIN kód iný, pozrite si návod na použitie vášho zariadenia Bluetooth.Po zadaní správneho PIN kódu stlačte „OK“.
Váš smartfón Yarvik sa teraz začne párovať so zariadením Bluetooth. Pripojenie sa po niekoľkýchsekundách dokončí a pod príslušným zariadením Bluetooth v zozname „Available Devices“ („Dostupnézariadenia“) sa zobrazí správa „Connected“ („Pripojené“):
k svojmu smartfónu Yarvik môžete pripojiť viacero zariadení Bluetooh a používať ich naraz (napr. myš aklávesnicu).
Návrat do
Yarvik smartphone manual
file:///Users/elroy/Desktop/Yarvik/Manual/manual_sk.html[13-02-13 17:03:51]
indexu
4.3 Audio Profiles(Audio profily)
Tu môžete zmeniť hlasitosť zvuku vášho smartfónu, napr. len vibrácie alebo vibrácie a zvonenie súčasne presignalizáciu prichádzajúcich hovorov/správ.
Návrat doindexu
4.4 Display(Displej)
Tu môžete zmeniť jas displeja, veľkosť písma a čas automatického spánku.Nezabudnite, že čím vyšší je jas displeja, tým vyššia je spotreba energie. Toto vašu batériu vybije podstatnerýchlejšie.Ak nechcete, aby sa zobrazenie po naklonení smartfónu automaticky otočilo, môžete túto funkciuaktivovať/deaktivovať v nastavení Auto-rotate screen (Automatické otočenie obrazovky).
Návrat doindexu
4.5 Apps(Aplikácie)
Tu môžete spravovať aplikácie, ktoré sú nainštalované vo vašom smartfóne Yarvik.Môžete kliknúť na aplikácie, ktoré ste si nainštalovali a pozrieť si informácie o aplikáciách a ak je to potrebné,môžete ich odinštalovať pomocou tlačidla „Uninstall“ („Odinštalovať“).Nezabudnite, že vopred nainštalované predvolené aplikácie (napríklad kalkulačka) nie je možnéodinštalovať.
Návrat doindexu
4.6
Storage(Pamäť) aprístup kpamätiMicroSD

Yarvik smartphone manual
file:///Users/elroy/Desktop/Yarvik/Manual/manual_sk.html[13-02-13 17:03:51]
Zobrazí informácie o internej pamäti. Ak sa v zariadení nachádza karta MicroSD, môžete tu nájsť informácieo pamäti vloženej karty.
Pripojenie vášho smartfónu Yarvik k počítaču alebo k zariadeniu Mac pomocou USB
Váš smartfón Yarvik môžete pripojiť k počítaču alebo k zariadeniu Mac pomocou dodaného USB kábla.Po pripojení k počítaču môžete vojsť do internej pamäte smartfónu a ak sa tam nachádza, môžete použiťvloženú kartu MicroSD ako štandardné veľkokapacitné pamäťové USB zariadenie.
Pre určenie USB portu smartfónu si pozrite vytlačený Stručný návod na obsluhu vášho smartfónu Yarvik.USB kábel pripojte k USB portu vášho smartfónu Yarvik a k voľnému USB portu na vašom počítači.V hornej časti obrazovky vášho smartfónu sa krátko po sebe zobrazia dve správy:
Keď sa zobrazí druhá správa („USB connected“ („USB pripojené“)); kliknite na ňu.Zobrazí sa nasledovná obrazovka:
Kliknite na tlačidlo „Turn on USB storage“ (Zapnúť USB pamäť“).Zobrazí sa okno s oznámením:

Yarvik smartphone manual
file:///Users/elroy/Desktop/Yarvik/Manual/manual_sk.html[13-02-13 17:03:51]
Kliknite na „OK“ a potvrďte ho.Interná pamäť vášho smartfónu Yarvik sa teraz zobrazí ako veľkokapacitné pamäťové zariadenie v systémesúborov vášho počítača a vy ju môžete používať, napr. na kopírovanie súborov z a do vášho smartfónuYarvik.Ak máte vo vašom smartfóne kartu MicroSD, bude rozpoznaná počítačom ako druhé veľkokapacitnépamäťové zariadenie.
Ak chcete prestať používať veľkokapacitné pamäťové zariadenie, kliknite na tlačidlo „Turn off USB storage“(„Vypnúť USB pamäť“) a odpojte USB kábel.
Poznámka: Na prístup k pamäti smartfónu Yarvik nie sú potrebné žiadne hardvérové ovládače. V prípade, ževás váš počítač vyzve na inštaláciu ovládača, môžete to jednoducho ignorovať.
Prístup k vašej MicroSD kartev programe ES File Explorer
Ak ste do svojho smartfónu Yarvik vložili MicroSD kartu, môžete do ich obsahu vstupovať nasledovne:
Otvorte aplikáciu ES File Explorer a kliknite na tlačidlo Favorites (Obľúbené) (s ikonou modrej hviezdy).
Rozbalí sa ponuka Favorites (Obľúbené). Kliknite na ikonu „korene“, ktorá je označená „/“:
Teraz vstúpite ku „koreňom“ systému súborov smartfónu, ktorý obsahuje niekoľko súborov a adresárov.Nájdite a kliknite na adresár „mnt“:

Yarvik smartphone manual
file:///Users/elroy/Desktop/Yarvik/Manual/manual_sk.html[13-02-13 17:03:51]
Adresár „mnt“ sa otvorí a zobrazí sa niekoľko adresárov:
Adresár „sdcard“ je interná pamäť vášho smartfónu Yarvik.Adresár „sdcard2“ je vaša karta MicroSD (ak je vložená do slotu MicroSD v smartfóne).
Ak je k dispozícii, môžete použiť aj odkaz microsd2 vo vyššie uvedenej ponuke Favorites (Obľúbené) prerýchly prístup k pamäti vašej MicroSD karty.
Návrat doindexu
4.7Language &input (Jazyk avstup)
Pomocou „Select language“ („Vybrať jazyk“) vyberte jazyk zobrazenia vášho smartfónu. Toto sa vzťahuje natexty všetkých obrazoviek v celom systéme.V položke „Android keyboard“ („Klávesnica systému Android“) môžete nastaviť klávesnicu zobrazenú naobrazovke vášho smartfónu.
Návrat doindexu
4.8 Date & time(Dátum a čas)
Tu môžete nastaviť dátum a čas vášho smartfónu Yarvik.
Návrat doindexu

Yarvik smartphone manual
file:///Users/elroy/Desktop/Yarvik/Manual/manual_sk.html[13-02-13 17:03:51]
5 Apps(Aplikácie)
Smartfón Yarvik sa dodáva s vopred nainštalovanými aplikáciami (pozri nižšie uvedené príklady):
Vzhľad jednotlivých ikon aplikácií sa môže zmeniť bez predchádzajúceho upozornenia.
Návrat doindexu
6 Telefónne hovory
Uskutočnenie telefonických hovorovPre uskutočnenie telefonického hovoru na vašom smartfóne Yarvik otvorte aplikáciu „Phone“ („Telefón“) z
ponuky aplikácií alebo z domovskej obrazovky Android: Pomocou numerickej klávesnice telefónu zadajte telefónne číslo.

Yarvik smartphone manual
file:///Users/elroy/Desktop/Yarvik/Manual/manual_sk.html[13-02-13 17:03:51]
Klávesnica telefónu.
Pri medzinárodných hovoroch, ktoré si vyžadujú predvoľbu „+“, stlačte a podržte stlačené tlačidlo „0“ naklávesnici, pokým sa neobjaví znamienko „+“.
Stlačte tlačidlo vybavenia hovoru , aby ste aktivovali volanie.
Stlačte tlačidlo vybavenia hovoru , aby ste zrušili volanie.Telefonické hovory môžete uskutočňovať priamo z vašich kontaktov v rámci aplikácie „People“ („Ľudia“).
Posledné hovory sú zaznamenané na obrazovke záznamu hovorov, ktorá sa objaví po stlačení tlačidla
záznamu , ktoré sa nachádza v hornej časti obrazovky Phone (Telefón).K vašim kontaktom (z vyššie uvedenej aplikácie „People“ („Ľudia“)) môžete vstúpiť aj priamo z obrazovky
Phone (Telefón) stlačením tlačidla .
Prichádzajúce hovory
Keď prijmete hovor na vašom smartfóne Yarvik, zobrazia sa vám 3 možnosti:
1 - Posuňte kruh nahor, aby ste ignorovali prichádzajúci hovor a odoslali automatizovanú odozvuprostredníctvom textovej správy;2 - Ignorujte prichádzajúci hovor;3 - Zdvihnite prichádzajúci hovor.

Yarvik smartphone manual
file:///Users/elroy/Desktop/Yarvik/Manual/manual_sk.html[13-02-13 17:03:51]
Možnosti počas telefonického hovoru
1 - Zobrazenie klávesnice telefónu (napr. pre ponuky možností DTMF);2 - Aktivovanie/deaktivovanie funkcie hlasitého reproduktora;3 - Stíšenie mikrofónu;4 - Podržanie hovoru;5 - Ponuka s viacerými možnosťami: pridajte ďalší telefonický hovor (konferenčný hovor) alebozaznamenajte telefonický hovor.
Presmerovanie volania
Môžete nastaviť funkciu presmerovania volania, aby ste presmerovali prichádzajúce hovory na špecifickételefónne číslo.
V aplikácii „Phone“ („Telefón“) , stlačte tlačidlo ponuky a zvoľte možnosť „Call settings“(„Nastavenia hovoru“).Zvoľte „Voice call“ („Hlasové volanie“), v ktorom môžete zvoliť „Call forwarding“ („Presmerovanie hovoru“),aby ste mohli zmeniť možnosti presmerovania.
ID volajúceho/Čakajúci hovor
Pomocou funkcie ID volajúceho na vašom smartfóne Yarvik si môžete zvoliť, či chcete odosielať vaše číslospolu s odchádzajúcimi hovormi.
Ak chcete toto nastavenie zmeniť, spustite aplikáciu „Phone“ („Telefón“) , stlačte tlačidlo ponuky a zvoľte možnosť „Settings“ („Nastavenia“) - „Voice call“ („Hlasové volanie“) - „Additional settings“ („Ďalšienastavenia“) - „Caller ID“ („ID volajúceho“).V rámci tejto ponuky môžete tiež aktivovať/deaktivovať prichádzajúce hovory počas prebiehajúceho hovoru.
Návrat doindexu
7 Odosielanie

Yarvik smartphone manual
file:///Users/elroy/Desktop/Yarvik/Manual/manual_sk.html[13-02-13 17:03:51]
správVáš smartfón Yarvik dokáže odosielať SMS a MMS správy. Poraďte sa s poskytovateľom vašich mobilnýchslužieb, ktorý vám poskytne informácie o štandardných cenách a ďalších nákladoch pri odosielaní správ doalebo zo zahraničia.
Odosielanie SMS/MMS správ
Otvorte aplikáciu „Messaging“ („Odosielanie správ“) z vašej domovskej obrazovky Android alebo zponuky aplikácií.
Aplikácia pre odosielanie správ.
1 - Pridajte prílohy, napr. obrázky, zvuk a videá. Správy s prílohou sa automaticky považujú za MMS správy;2 - Ponuka nastavení správy;3 - Pole pre zadanie prijímateľa;4 - Pridajte prijímateľa;5 - Prehľad konverzácie prostredníctvom správ;6 - Zadanie textu správy;7 - Tlačidlo odoslania správy.
Nastavenie čísla schránky hlasových správ/prehratie hlasových správPre nastavenie čísla služby hlasových správ vo vašom smartfóne Yarvik otvorte aplikáciu „Phone“ („Telefón“)
z vašej ponuky aplikácií alebo z domovskej obrazovky Android:
Stlačte a podržte stlačené tlačidlo na klávesnici telefónu. Na obrazovke možností sa zobrazí „Add

Yarvik smartphone manual
file:///Users/elroy/Desktop/Yarvik/Manual/manual_sk.html[13-02-13 17:03:51]
number“ („Pridať číslo“). V možnostiach hlasových správ môžete zvoliť nastavenia hlasových správ a zadaťčíslo vašej služby hlasových správ.
Po zadaní čísla služby hlasových správ môžete následne použiť tlačidlo pre zavolanie do vašejschránky hlasových správ tak, že ho stlačíte a podržíte.
Návrat doindexu
8 Záručnépodmienky
Spoločnosť Yarvik garantuje, že výrobok zakúpený používateľom bude bez výrobných alebo materiálnychzávad počas obdobia 2 rokov od dátumu zakúpenia zákazníkom. Ak bude mať výrobok kedykoľvek počaszáručného obdobia výrobnú alebo materiálnu závadu, zákazník môže vrátiť výrobok predajcovi, od ktoréhoho zakúpil. Predajca výrobok opraví alebo vymení (výhradná voľba spoločnosti Yarvik) v rámci primeranéhočasového obdobia. Ako doklad o dátume zakúpenia je požadovaný účet. Voľba spoločnosti Yarvik sohľadom na túto záležitosť je konečná.
Táto záruka nepokrýva závady alebo poruchy spôsobené prenosmi softvéru, zneužívaním, protiprávnoučinnosťou, robením zmien, nedbalosťou, nesprávnym používaním, nedostatočnou starostlivosťou alebočímkoľvek mimo kontroly spoločnosti Yarvik.
DÔLEŽITÉ: Po zakúpení smartfónu od spoločnosti Yarvik, bude váš smartfón obsahovať najnovší stabilnýfirmvér, ktorý je dostupný pre tento špecifický model v čase výroby zariadenia. Yarvik neposkytne podporupre výrobky, ktoré boli nejakým spôsobom upravované konečným používateľom a Yarvik nepodporuje aniprogramové úpravy firmvéru a softvéru, ktoré sú použité vo výrobku, a ak boli takéto úpravy vykonané,všetky záruky budú automaticky neplatné.
Aby ste sa vyhli zrušeniu poskytnutej záruky, zákazník môže používať iba oficiálny softvér, aplikácie avylepšenia, ktoré sú dostupné na internetovej stránke spoločnosti Yarvik na www.yarvik.com.Nesmiete používať žiadny iný softvér alebo firmvér, pretože to automaticky bude viesť k zrušeniu všetkýchzáruk a podpory. Spoločnosť Yarvik nepodporuje používanie žiadneho iného softvéru alebo firmvéru, okremtých, ktoré boli nainštalované výrobcom alebo tých, ktoré sú dostupné na oficiálnej internetovej stránkespoločnosti Yarvik na www.yarvik.com. Yarvik otvorene odmieta reagovať na akékoľvek požiadavky ohľadomneautorizovaných úprav, neautorizovaného softvéru a neautorizovaného firmvéru.
Návrat doindexu
9LicenčnéinformácieGNU/GPLi

Yarvik smartphone manual
file:///Users/elroy/Desktop/Yarvik/Manual/manual_sk.html[13-02-13 17:03:51]
Právne informácie dostupné pre váš smartfón Yarvik nájdete v položke Settings (Nastavenia) – AboutSmartphone (O zariadení) – Legal information (Právne informácie) (požaduje sa internetové pripojenie),alebo navštívte http://source.android.com/source/licenses.html, kde nájdete viac informácií.
Návrat doindexu
10 ImportantInformation
Wireless LAN-Regulatory information
Depending on the model, the wireless LAN built-in into Smartphone devices can only be used in thefollowing countries: Austria, Belgium, Bulgaria, Czech Republic, Denmark, Finland, France, Germany,Greece, Hungary, Iceland, Ireland, Italy, Luxembourg, the Netherlands, Norway, Poland, Portugal, Romania,Slovakia, Slovenia, Spain, Sweden, Switzerland, Turkey and the United Kingdom.
Conditions of use
When using the IEEE 802.11b/g/n Wireless LAN standard, channels 1 to 13 (2.4 GHz...2.4835 GHz) areselectable for both indoor and outdoor use, however with restrictive conditions applying in France, Italy andNorway, as follows:
• France: When using this product indoor, all channels can be used without restrictions. Outdoor onlychannels 1 to 6 are allowed. This means that in Peer-to-Peer, the WLAN feature can only be used outside ifthe peer sets up the communication on an authorized channel (i.e., between 1 & 6). In infrastructure mode,please make sure the access point is configured to a channel from 1 to 6 before setting up the connection.
• Italy: Use of the RLAN network is governed: Disposal of Old Electrical & Electronic- with respect to private use, by the Legislative Decree of 1.8.2003, no. 259 (“Code of ElectronicCommunications”). In particular Article 104 indicates when the prior obtainment of a general authorization isrequired and Art. 105 indicates when free use is permitted;- with respect to the supply to the public of the WLAN access to telecom networks and services, by theMinisterial Decree 28.5.2003, as amended, and Art. 25 (general authorization for electronic communicationsnetworks and services) of the Code of electronic communications.
• Norway: Use of this radio equipment is not allowed in the geographical area within a radius of 20 km fromthe centre of Ny-Ålesund, Svalbard.
WEEESymbolInformation

Yarvik smartphone manual
file:///Users/elroy/Desktop/Yarvik/Manual/manual_sk.html[13-02-13 17:03:51]
Correct Disposal of This product (Waste Electrical & Electronic Equipment).
(Applicable in the European Union and other European countries with separate collection systems).
This marking shown on the product or its literature indicates that it should not be disposed with otherhousehold wasted at the end of its working life. To prevent possible harm to the environment or humanhealth from uncontrolled waste disposal, please separate this from other types of wastes and recycle itresponsibly to promote the sustainable reuse of material resources.Household users should contact either the retailer where they purchased this product, or their localgovernment office, for details of where and how they can take this item for environmentally safe recycling.Business users should contact their supplier and check the terms and conditions of the purchase contract.This product should not be mixed with other commercial wastes of disposal.
Disposal of waste batteries (applicable in the European Union and other European countries withseparate collection systems)
Either of the symbols shown next may appear on the battery or on the packaging to indicate that the batteryprovided with this product shall not be treated as household waste. On certain batteries this symbol might beused in combination with a chemical symbol. The chemical symbols for mercury (Hg) or lead (Pb) are addedif the battery contains more than 0.0005% mercury or 0.004% lead. By ensuring these batteries are disposedof correctly, you will help prevent potentially negative consequences for the environment and human healthwhich could otherwise be caused by inappropriate waste handling of the battery. The recycling of thematerials will help to conserve natural resources. In case of products that for safety, performance or dataintegrity reasons require a permanent connection with an incorporated battery, this battery should bereplaced by qualified service staff only. To ensure that the battery will be treated properly, hand over theproduct at end-of-life to the applicable collection point for the recycling of electrical and electronicequipment.
For all other batteries, please view the section on how to remove the battery from the product safely. Handthe battery over to the applicable collection point for the recycling of waste batteries. For more detailedinformation about recycling of this product or battery, please contact your local Local government Office,your household waste disposal service or the shop where you purchased the product.
When travelling to and within the United States of America, please be aware that the U.S. Department ofTransportation (DOT) recently published new regulations that apply to passengers travelling with lithiummetal batteries and lithium-ion batteries.For detailed information, visit http://safetravel.dot.gov/whats_new_batteries.html.
Safety Information
Yarvik Smartphone device

Yarvik smartphone manual
file:///Users/elroy/Desktop/Yarvik/Manual/manual_sk.html[13-02-13 17:03:51]
• Yarvik is not responsible for any interference that you may experience or that may be caused whenoperating this device.
• Warning: This apparatus must be earthed.
Opening or dismantling the main unit or any of its accessories, for whatever reason, could lead to damagesthat are not covered by the guarantee.
• To avoid electrical shock, do not open the cabinet. Refer servicing to qualified personnel only.
• To prevent fire or shock hazard, do not expose your Smartphone device or any of its accessories to rain ormoisture.
• Do not use or store your Smartphone device in a location subject to heat sources, such as radiators or airducts; direct sunlight; excessive dust; moisture or rain; mechanical vibration or shock; strong magnets orspeakers that are not magnetically shielded; excessively high and low temperatures; and high humidity.
• Turning off your Smartphone device with the power button does not disconnect the device completely frommains voltage. To disconnect it completely, unplug the AC adapter or the power cord from mains. Thesocket-outlet shall be installed near the equipment and shall be easily accessible.
• Audio and picture distortion may occur if this equipment is positioned in close proximity to any equipmentemitting electromagnetic radiation.
• This apparatus is also designed for IT power system with phase to phase voltage 230V, for customers inNorway.
• Observe the following precautions to provide adequate air circulation and to ensure normal reliableoperation:- Do not use the Smartphone device and/or the AC adapter while covered or wrapped in cloth. Ensure theAC adapter operates in a clear environment.- Turn off the Smartphone device before putting the device into a bag or a carrying case.
• Do not use your Smartphone device directly on your lap. The temperature of the base of the unit will riseduring normal operation and over time could result in discomfort or burns.
• Do not use your Smartphone device while walking. Listening to music with headphones or watching theLCD screen while walking may lead to an unexpected accident and result in personal injuries.
• Using connected headphones on the Smartphone device for too long and/or setting the audio volume uptoo high when using headphones may cause serious hearing damage.
• Avoid strong beating of or to the product.
• Don’t operate the touch screen of the Smartphone device with sharp objects, as this may result inscratching the screen surface.
• Only use permitted batteries, chargers and accessories with your Smartphone device. The use of any otherproducts with the device can be dangerous and may violate the warranty regulations.
• Only use a slightly wet cotton cloth to clean the device, and only use water to wetten the cotton cloth. TheSmartphone device should not be cleaned with any sort of (glass) cleaning aid.

Yarvik smartphone manual
file:///Users/elroy/Desktop/Yarvik/Manual/manual_sk.html[13-02-13 17:03:51]
Wireless functionality
• If radio interference with other devices occurs while using your Smartphone device, do not use the wirelessfunctionality. Use of the wireless functionality may cause a malfunction of the devices, resulting in anaccident.
• In some situations or environments, the use of the wireless functionality might be restricted by theproprietor of the building or responsible representatives of the organization, for example on board airplanes,in hospitals or in any other environment where the risk of interference with other devices or services isperceived or identified as harmful. If you are uncertain about the policy applying to the use of wirelessfunctionality in a specific organization or environment, you are encouraged to first ask for authorization priorto switching it on. Consult your physician or the manufacturer of personal medical devices (pacemakers,hearing aids, etc.) regarding any restrictions on the use of wireless functionality.
• If using wireless functionality near a pacemaker, make sure it is at least 19 inches / 50 cm away from thepacemaker.
• Due to the transmission and reception properties of wireless communications, data can occasionally be lostor delayed. This can be due to the variation in radio signal strength that results from changes in thecharacteristics of the radio transmission path. Yarvik will not be held responsible for damages of any kindresulting from the delays or errors in data transmitted or received via wireless functionality, or failure ofwireless functionality to transmit or receive such data.
• If the equipment does cause harmful interference to radio/TV reception, which can be determined by turningthe equipment off and on, the user is encouraged to try to correct the interference by one or more of thefollowing measures: reorient or relocate the receiving antenna, increase the distance between the senderand the receiver, consult the dealer or an experienced radio/TV technician for help. Yarvik will not beresponsible for any radio/TV interference nor for any other undesired effect.
Wireless LAN Security
Creating security settings for the Wireless LAN is extremely important. Yarvik assumes no responsibility forany security problems that may arise from the use of the Wireless LAN.
Battery pack
Do not charge the battery pack in any way other than as described in the Start guide or as designated byYarvik in writing.
AC adapter
• It is highly recommended that you use a genuine Yarvik AC adapter supplied by Yarvik for your product.
• This AC adapter is intended for use with the Smartphone device IT products only.
• Do not place the AC adapter in contact with your skin. Remove the AC adapter away from your body if it

Yarvik smartphone manual
file:///Users/elroy/Desktop/Yarvik/Manual/manual_sk.html[13-02-13 17:03:51]
becomes warm and causes discomfort.
RoHS
This products has been certified as RoHS Compliant.
YARVIK.COM
Návrat doindexu

Yarvik smartphone manual
file:///Users/elroy/Desktop/Yarvik/Manual/manual_da.html[13-02-13 17:03:55]
Indeks SELECT LANGUAGE
1 Før første brug2 Smartphone start3 Skærmen AndroidHome [Hjem]3.1 Tilføjelse af widgetsog genveje til skærmenHome [Hjem]3.2 Indstilling af tapet3.3 Menuen Application[Applikation]4 Indstilling afsmartphonen4.1 Menuen Settings[Indstillinger]4.2 WiFi & Bluetooth4.3 Lydprofiler4.4 Skærm4.5 App'er4.6 Opbevaring &MicroSD-hukommelsesadgang4.7 Sprog & input4.8 Dato & klokkeslæt5 App'er6 Telefonopkald7 Messaging8 Garantierklæring

Yarvik smartphone manual
file:///Users/elroy/Desktop/Yarvik/Manual/manual_da.html[13-02-13 17:03:55]
9 GNU/GPL-licensoplysninger10 Importantinformation
1 Før første brug
Kære bruger
Tak, fordi du har købt vores produkt.Læs disse instruktioner omhyggeligt før brug for at sikre hurtig og bekvem brug af din nye YarvikSmartphone.
Vi håber, at du vil nyde din Yarvik Smartphone så længe som muligt!
Bemærk:
• Din Yarvik Smartphone er etelektroniskhøjpræcisionsprodukt. Forsøgikke at adskille smartphonen, dadette vil ophæve garantien ogmuligvis føre til fejlfunktioner ienheden.
• Undgå at slå på eller tabeproduktet.
• Undgå at bruge smartphonen imiljøer med høj eller lavtemperatur eller i et miljø, hvorenheden kan komme i kontaktmed fugt, støv ellermagnetfelter.
• Udsæt ikke smartphonen forkraftigt sollys i lang tid.
• Betjen ikke berøringsskærmenmed skarpe genstande, da detkan resultere i ridser.
• Brug af smartphonen medhovedtelefoner for længeog/eller lydstyrken indstillet forhøjt kan forårsage alvorlig

Yarvik smartphone manual
file:///Users/elroy/Desktop/Yarvik/Manual/manual_da.html[13-02-13 17:03:55]
høreskade.
• Kryds ikke en vej, kør ikke etmotorkøretøj eller en cykel,mens du bruger smartphonenmed høretelefoner, så du undgårtrafikulykker.
• Brug kun tilladte batterier,opladere og tilbehør til dinYarvik Smartphone. Brugen afandre produkter sammen medsmartphonen kan være farligt ogkan overtrædegarantibetingelserne.
• Brug kun en lidt vådbomuldsklud til at rengøresmartphonen, og brug kun vandtil at fugte kluden med.Smartphonen må ikke rengøresmed et rengøringsprodukt.
Du kan bruge din Yarvik Smartphone med det samme uden at oplade batteriet først.Det er bedst for batteriet at lade det løbe tør for den tilstedeværende opladning og derefter blive fuldtopladet, når det er blevet helt tømt første gang.Hvis smartphonen ikke tændes, når du tager den ud af æsken, er batteriet allerede helt drænet, og så duselvfølgelig oplade det først.
Returner tilindeks
2 Smartphone start
Når du tænder din Yarvik Smartphone første gang, vil du blive præsenteret for en startsekvens.Første start varer lidt dvs. 2-3 minutter.Efter startsekvensen har smartphonen udført sin start, og du vil blive præsenteret for Android Lock Screen[låseskærm].

Yarvik smartphone manual
file:///Users/elroy/Desktop/Yarvik/Manual/manual_da.html[13-02-13 17:03:55]
Skærmen Android Lock [Android-lås]
Glid låsebjælken (A) til højre for at låse smartphonen op. Du føres derefter til skærmen Android Home[Android Hjem].
Returner tilindeks
3 Skærmen Android Home[Android Hjem]

Yarvik smartphone manual
file:///Users/elroy/Desktop/Yarvik/Manual/manual_da.html[13-02-13 17:03:55]
Skærmen Android Home [Android Hjem]
I toppen af smartphonens skærm kan du altid finde statuslinjen.Statuslinjen viser systeminformation, mens den nedre menubjælke indeholder funktionsknapperne.
1 - Wi-Fi-signalindikator2 - Cellulær netværksmodtagelse for SIM1 og SIM2 og batteriniveauindikator3 - Systemtid4 - App-genveje5 - Widget (analogt ur)6 - Tilbageknap - fører dig til den forrige skærm eller forrige websted ved brug af browseren7 - Home [Hjem] - fører dig tilbage til Android Home Screen8 - App- og widgetmenu9 - Multitaskingknap
Hjemmeskærmen består af flere sider, som der er adgang til ved at vippe skærmen til venstre/højre.
Hvis du vil se, hvilke apps der kører i baggrunden, kan du åbne multitaskingvisningen ved at trykke påmultitaskingknappen (9).

Yarvik smartphone manual
file:///Users/elroy/Desktop/Yarvik/Manual/manual_da.html[13-02-13 17:03:55]
Klik på en kørende app i multitaskingvisningen for hurtigt at skifte til den. Du kan lukke en kørende app vedat trykke på den længe og klikke på "Remove from list" [Fjern fra liste].
Returner tilindeks
3.1
Tilføjelse afwidgets oggenveje tilskærmenHome [Hjem]
Hvis du vil tilføje en widget, skal du trykke på app- og widgetknappen i bunden af skærmen Home [Hjem]:
I den følgende skærm kan du finde alle de installerede apps og widgets, der kan ses opdelt ved at trykke påhhv. "Apps" eller "Widgets" i toppen af skærmen .Tryk på "Widgets" for at se alle tilgængelige widgets. Når du viser alle widgets, kan du vippe skærmen for atgennemse næste side (hvis til rådighed).Tryk på, og hold den ønskede widget nede for at vise skærmen Home [Hjem], og slip din widget på et tomtsted på skærmen Home [Hjem].

Yarvik smartphone manual
file:///Users/elroy/Desktop/Yarvik/Manual/manual_da.html[13-02-13 17:03:55]
Hvis du vil føje en genvej til en app, skal du trykke på hhv. app- og widgetknappen i midten nederst på
skærmen Home [Hjem]:
I den følgende skærm kan du finde alle de installerede apps og widgets, der kan ses opdelt ved at trykke påhhv. "Apps" eller "Widgets" i toppen af skærmen .Tryk på "Apps" {App'er] for at vise alle de installerede apps.Tryk på, og hold den ønskede app nede for at vise skærmen Home [Hjem], og slip genvejen på et tomt stedpå skærmen Home [Hjem].
Hvis du vil fjerne widgets- og/eller app-genveje fra skærmen Home [Hjem], skal du trykke på og holde demnede og trække dem til papirkurvsikonet "Remove" [Fjern], der vises i toppen af skærmen Home [Hjem].
Returner tilindeks
3.2 Indstilling af tapet
Hvis du vil ændre tapetet på skærmen Home [Hjem], skal du trykke på og holde skærmen Home [Hjem]nede, indtil menuen “Select Wallpaper from” [Vælg tapet fra] vises.Du kan vælge mellem "Live Wallpapers" [Levende tapeter] (animerede tapeter), "Gallery" [Galleri] (foto-/videogalleri) eller "Wallpapers" [Tapeter] (statiske standardbilleder).
Returner tilindeks
3.3MenuenApplication[Applikation]
Tryk på app- og widget-knappen i midten nederst på skærmen Home [Hjem]:
Når systemet viser widgets, skal du trykke på "Apps" for at vise alle installerede apps.
Her kan du finde alle de forindstillede programmer eller “apps” foruden yderligere apps, som du installerer.Du kan åbne enhver app ved blot at trykke på det tilsvarende ikon .

Yarvik smartphone manual
file:///Users/elroy/Desktop/Yarvik/Manual/manual_da.html[13-02-13 17:03:55]
Skærmen Application [Applikation]
Returner tilindeks
4
Opsætning afdin YarvikSmartphone
4.1 Menuen Settings[Indstillinger]
Tryk på ikonet Settings [Indstillinger] i menuen Application [Applikation] for at åbne menuen Settings[Indstillinger]. I menuen Settings [Indstillinger] kan du finde indstillinger til opsætning af din YarvikSmartphone.

Yarvik smartphone manual
file:///Users/elroy/Desktop/Yarvik/Manual/manual_da.html[13-02-13 17:03:55]
Menuen Settings [Indstillinger]
Vi vil gennemgå de vigtigste dele:
Returner tilindeks
Wi-Fi &

Yarvik smartphone manual
file:///Users/elroy/Desktop/Yarvik/Manual/manual_da.html[13-02-13 17:03:55]
4.2 BluetoothWi-Fi
Opsæt en forbindelse med et trådløst Wi-Fi-netværk.Glid knappen On/Off [Til/fra] til "On" [Til] for at aktivere Wi-Fi.
De tilgængelige Wi-Fi-netværk vises i netværkslisten til højre på skærmen. Tap på det ønskede netværk.Hvis netværket er sikret, bliver du bedt om at indtaste netværkssikkerhedsnøglen.
Tryk på knappen “Connect” [Tilslut], og smartphonen tilsluttes netværket.Når “Connected” [Tilsluttet] vises under netværksnavnet, og det trådløse modtagelsesikon vises ibundstatuslinjen, er du tilsluttet det trådløse netværk.
Visning af din Yarvik Smartphones Wi-Fi MAC-adresse
Mens du er i Wi-Fi-indstillingsskærmen, skal du klikke på menuknappen i nederste højre hjørne.
Tryk på "Advanced" [Avanceret] i menuen, der åbnes.
Din Wi-Fi MAC-adresse vises i den følgende skærm "Advanced Wi-Fi" [Avanceret Wi-Fi] under "MACaddress" [MAC-adresse].
Bluetooth
Din Yarvik Smartphone er forsynet med et indbygget Bluetooth-modul til tilslutning til Bluetooth-kompatibleydre enheder som tastaturer, højttalere og hovedtelefoner, men også til håndfri Bluetooth-hovedsæt ogbilsæt.Glid Bluetooth-knappen On/Off [Til/fra] til "On" [Til] for at aktivere Bluetooth.
Når det er aktiveret, vil din Yarvik Smartphone automatisk begynde at søge efter nærliggende Bluetooth-

Yarvik smartphone manual
file:///Users/elroy/Desktop/Yarvik/Manual/manual_da.html[13-02-13 17:03:55]
enheder. Du kan altid manuelt søge efter Bluetooth-enheder ved at klikkke på "Search for Devices" [Søgefter enheder] i øverste højre hjørne af skærmen.Det kan kræves at de ydre enheder, der skal tilsluttes, sættes i "parringstilstand". Der henvises tilvejledningen til de pågældende ydre enheder for yderligere oplysninger.
Alle fundne enheder vil blive vist i listen "Available Devices" [Tilgængelige enheder]:
Klik på den detekterede Bluetooth-enhed for at parre din Yarvik Smartphone med den.Vinduet "Bluetooth pairing request" [Bluetooth-parringsanmodning] vises:
De fleste Bluetooth-enheder kræver en pinkode for at kunne tilsluttes. Koden er normalt 0000 eller 1234. Derhenvises til betjeningsvejledningen til Bluetooth-enheden, hvis PIN-koden er anderledes.Når du har indtastet den korrekte pinkode, skal du trykke på "OK".
Din Yarvik Smartphone vil nu begynde parring med Bluetooth-enheden, og efter nogle få sekunder viltilslutningen være udført, hvor der vises meddelelsen "Connected" [Tilsluttet] under den pågældendeBluetooth-enhed i listen "Available Devices" [Tilgængelige enheder]:
Du kan slutte flere Bluetooth-enheder til din Yarvik Smartphone til brug på samme tid (f. eks. hovedsæt ogtastatur).
Returner tilindeks

Yarvik smartphone manual
file:///Users/elroy/Desktop/Yarvik/Manual/manual_da.html[13-02-13 17:03:55]
4.3 Lydprofiler
Her kan du ændre smartphonens lydstyrke som f. eks. kun vibration eller vibration og ringelyd for indgåendeopkald/meddelelser.
Returner tilindeks
4.4 Skærm
Her kan du ændre skærmens lysstyrke, skrifttypestørrelser og auto-dvaletid.Bemærk, at jo højere lysstyrke des højere energiforbrug. Dette vil dræne batteriet væsentligt hurtigere.Hvis du ikke ønsker automatisk rotation af skærmen, når du vipper tabletten, kan du aktivere/deaktiverefunktionen i autorotationsskærmindstillingen.
Returner tilindeks
4.5 App'er
Her kan du administrere applikationer, der er installeret på din Yarvik Smartphone.Du kan klikke på app'er, som du har installeret, for at se app-oplysningerne og afinstallere dem medknappen “Uninstall” [Afinstaller].Bemærk, at de forudinstallerede standardapplikationer (som f. eks. lommeregneren) ikke kan afinstalleres.
Returner tilindeks
4.6Opbevaring &MicroSD-hukommelsesadgang
Viser oplysninger om den interne hukommelse. Når der findes et MicroSD-kort, kan du også findehukommelsesoplysninger om det indsatte kort her.
Tilslutning af din Yarvik Smartphone til en pc eller Mac via USB
Du kan slutte din Yarvik Smartphone til en pc eller Mac med det medfølgende USB-kabel.Når den er sluttet til en computer, har du adgang til den interne hukommelse i smartphonen, og hvis detfindes, et indsat MicroSD-kort som en USB-masselagringsenhed.

Yarvik smartphone manual
file:///Users/elroy/Desktop/Yarvik/Manual/manual_da.html[13-02-13 17:03:55]
Der henvises til den trykte lynvejledning til din Yarvik Smartphone for at fastlægge placeringen afsmartphonens USB-port. Slut USB-kablet til USB-porten på din Yarvik Smartphone og til en ledig USB-portpå computeren.I toppen af smartphonens skærm vises to meddelelser kort efter hinanden:
Når den anden meddelelse ("USB connected") [USB tilsluttet] vises, skal du klikke på den.Den følgende skærm vises:
Klik på knappen "Turn on USB storage" [Aktiver USB-lagring].Der vises et beskedvindue:
Klik på "OK" for at bekræfte.Den interne hukommelse i din Yarvik Smartphone vises nu som masselagringsdrev i computerens filsystemog kan f. eks. bruges til at kopiere fra og til din Yarvik Smartphone.

Yarvik smartphone manual
file:///Users/elroy/Desktop/Yarvik/Manual/manual_da.html[13-02-13 17:03:55]
Hvis du har et MicroSD-kort i smartphonen, vil kortet blive genkendt af computeren som et andetmasselagringsdrev.
Hvis du vil ophøre med at bruge masselagringsfunktionen, skal du klikke på knappen "Turn off USB storage"[Deaktiver USB-lagring] og fjerne USB-kablet.
Bemærk: Der kræves ingen hardwaredrivere for adgangen til hukommelsen i Yarvik Smartphone. Hviscomputeren beder om en driverinstallation, skal du blot ignorere den.
Få adgang til MicroSD-korti ES File Explorer
Hvis du har indsat et MicroSD-kort i din Yarvik Smartphone, kan du åbne indholdet som følger:
Åbn app'en ES File Explorer, og klik på knappen Favorites [Favoritter] (med det blå stjerneikon).
Menuen Favorites [Favoritter] åbnes nu. Klik på "rod-"ikonet "/":
Du vil nu komme til "roden" af smartphonens filsystem, der indeholder flere filer og mapper.Find, og klik på mappen "mnt":
Mappen "mnt" åbnes nu og viser flere mapper:

Yarvik smartphone manual
file:///Users/elroy/Desktop/Yarvik/Manual/manual_da.html[13-02-13 17:03:55]
Mappen "sdcard" er den interne hukommelse i din Yarvik Smartphone.Mappen "sdcard2" er MicroSD-kortet (når indsat i smartphonens MicroSD-stik).
Når den er til rådighed, kan du også bruge genvejen microsd2 i den tidligere nævnte menu Favorites[Favoritter] til hurtig adgang til MicroSD-korthukommelsen.
Returner tilindeks
4.7 Sprog & input
Brug “Select language” [Vælg sprog] for at vælge sproget i din Yarvik Smartphone. Dette gælder for alleskærmteksterne i hele systemet.Under “Android keyboard” [Android-tastatur] kan du muligvis se smartphonens skærmtastatur.
Returner tilindeks
4.8 Dato &klokkeslæt
Her kan du indstille datoen og klokkeslættet i din Yarvik Smartphone.
Returner tilindeks
5 App'er
Yarvik Smartphone leveres med forinstallerede app'er (se eksempler nedenfor):

Yarvik smartphone manual
file:///Users/elroy/Desktop/Yarvik/Manual/manual_da.html[13-02-13 17:03:55]
Udseendet af app-ikoner kan ændres uden varsel.
Returner tilindeks
6 Telefonopkald
Foretagelse af telefonopkaldHvis du vil foretage et telefonopkald med din Yarvik Smartphone, skal du åbne applikationen "Phone" fra
applikationsmenuen eller hjemmeskærmen på din Android: Brug det numeriske telefontastatur til at indtaste telefonnummeret.

Yarvik smartphone manual
file:///Users/elroy/Desktop/Yarvik/Manual/manual_da.html[13-02-13 17:03:55]
Telefontastatur.
Hvis du vil foretage internationale opkald, der kræver præfikset "+", skal du trykke på og holde "0" påtastaturet nede, indtil "+" vises.
Tryk på opkaldshåndteringsknappen for at aktivere telefonopkaldet.
Tryk på opkaldshåndteringsknappen for at deaktivere telefonopkaldet.Du kan også foretage telefonopkald direkte fra dine kontakter i applikationen "People".
Nylige opkald gemmes i skærmen Call Log [Opkaldslog], som der er adgang til ved tryk på knappen Log
[Log] i toppen af skærmen Phone [Telefon].Der er også adgang til dine kontakter (fra den tidligere nævnte app "People") direkte fra skærmen Phone
[Telefon] ved tryk på knappen .
Indgående opkald
Når du modtager et opkald på din Yarvik Smartphone, bliver du præsenteret for 3 muligheder:
1 - Glid cirklen op for at ignorere det indgående telefonopkald og sende et automatisk svar via entekstmeddelelse2 - Ignorere det indgående opkald3 - Besvare det indgående opkald.

Yarvik smartphone manual
file:///Users/elroy/Desktop/Yarvik/Manual/manual_da.html[13-02-13 17:03:55]
Muligheder under et opkald
1 - Vise telefontastaturet (f. eks. for DTMF-indstillingsmenuer)2 - Aktivere/deaktivere højttalerfunktion3 - Afbryde mikrofonen4 - Sætte opkaldet i venteposition5 - Menu med flere muligheder: tilføje et yderligere telefonopkald (samtale) eller optage opkaldet.
Videresendelse
Du kan indstille videresendelsesfunktionen til at videresende alle indgående opkald til et specifikttelefonnummer.
I app'en "Phone" skal du trykke på menuknappen og vælge "Call settings" [Opkaldsindstillinger].Væg "Voice call" [Taleopkald], hvor du kan vælge "Call forwarding" [Videresendelse] for at ændre dinevideresendelsesindstillinger.
Opkalds-id/ventende opkald
Med din Yarvik Smartphones opkalds-id-funktion kan du vælge, om du vil sende dit nummer sammen medudgående opkald.
Hvis du vil ændre dette, skal du starte app'en "Phone" , trykke på menuknappen og vælge"Settings" [Indstillinger] - "Voice call" [Taleopkald] - "Additional settings" [Yderligere indstillinger] - "Caller ID"[Opkalds-id}.I den samme menu kan du også aktivere/deaktivere indgående opkald, når du allerede er i gang med entelefonsamtale.
Returner tilindeks
7 Messaging

Yarvik smartphone manual
file:///Users/elroy/Desktop/Yarvik/Manual/manual_da.html[13-02-13 17:03:55]
Din Yarvik Smartphone kan sende SMS- og MMS-meddelelser. Kontakt din mobile tjenesteudbyder forinformation om standardgebyrer og yderligere omkostninger ved afsendelse af meddelelser til eller frafremmede lande.
Afsendelse af SMS-/MMS-meddelelser
Åbn applikationen "Messaging" fra din Android-hjemmeskærm eller applikationsmenu.
Applikationen Messaging.
1 - Tilføj vedhæftninger som billeder, lyd og videoer. Meddelelser med en vedhæftning betragtes som MMS-meddelelser2 - Medddelsesindstillingsmenu3 - Modtagerfelt4 - Tilføj modtager5 - Meddelsessamtaleoversigt6 - Meddelsesinput7 - Knappen Send meddelelse.
Indstil telefonsvarernummer/afspil telefonsvarHvis du vil indstille dit telefonsvarnummer i din Yarvik Smartphone, skal du åbne applikationen "Phone" fra
applikationsmenuen eller Android hjemmeskærm:
Tryk på, og hold knappen nede på tastaturet. "Add number" [Tilføj nummer] vises påindstillingsskærmen. I telefonsvarerindstillingerne kan du vælge telefonsvarerindstillingerne og indtaste dittelefonsvarnummer.

Yarvik smartphone manual
file:///Users/elroy/Desktop/Yarvik/Manual/manual_da.html[13-02-13 17:03:55]
Når telefonsvarernummeret er indstillet, kan du efterfølgende bruge knappen til at ringe til dintelefonsvarer ved at trykke på den og holde den nede.
Returner tilindeks
8 Garantierklæring
Yarvik garanterer, at produktet, der er købt af kunden, er fri for fejl i konstruktioner eller materialer i 2 år frakundens købsdato. Hvis produktet i garantiperioden har fejl i konstruktion eller materialer, skal kundenreturnere produktet til forhandleren, hvor produktet blev købt. Forhandleren skal reparere eller udskifte det(efter Yarviks valg) inden for rimelig tid. Der kræves en original faktura som bevis for købsdatoen. Yarviksvalg i denne forbindelse vil være endeligt.
Garantien dækker ikke fejl eller fejlfunktioner, der stammer fra softwareoverførsler, misbrug, manipulation,forsømmelighed, forkert brug eller andre handlinger uden for Yarviks kontrol.
VIGTIGT: Når du køber en smartphone fra Yarvik, vil smartphonen være udstyret med den nyestetilgængelige, stabile firmware til den specifikke model, på tidspunktet, hvor enheden blev produceret. For atundgå ugyldighed af den angivne garanti må kunden kun bruge den officielle software, applikationer ogopgraderinger, der er tilgængelige fra Yarviks websted på www.yarvik.com.
Ingen anden software eller firmware må bruges, da en sådan brug automatisk vil annullere alle garantier ogsupport.Ingen anden software eller firmware må bruges, da en sådan brug automatisk vil annullere alle garantier ogsupport. Yarvik afviser udtrykkeligt at besvare forespørgsler om uautoriserede ændringer, uautoriseretsoftware og uautoriseret firmware. Yarvik afviser udtrykkeligt at besvare forespørgsler om uautoriseredeændringer, uautoriseret software og uautoriseret firmware.
Returner tilindeks
9 GNU/GPL-licensoplysninger
Konsulter de juridiske oplysninger på din Yarvik Smartphone under Settings [Indstillinger] – AboutSmartphone [Om Smartphone] – Legal information [Juridiske oplysninger] (internetforbindelse kræves), ellerbesøg http://source.android.com/source/licenses.html for mere information.
Returner tilindeks

Yarvik smartphone manual
file:///Users/elroy/Desktop/Yarvik/Manual/manual_da.html[13-02-13 17:03:55]
10 ImportantInformation
Wireless LAN-Regulatory information
Depending on the model, the wireless LAN built-in into Smartphone devices can only be used in thefollowing countries: Austria, Belgium, Bulgaria, Czech Republic, Denmark, Finland, France, Germany,Greece, Hungary, Iceland, Ireland, Italy, Luxembourg, the Netherlands, Norway, Poland, Portugal, Romania,Slovakia, Slovenia, Spain, Sweden, Switzerland, Turkey and the United Kingdom.
Conditions of use
When using the IEEE 802.11b/g/n Wireless LAN standard, channels 1 to 13 (2.4 GHz...2.4835 GHz) areselectable for both indoor and outdoor use, however with restrictive conditions applying in France, Italy andNorway, as follows:
• France: When using this product indoor, all channels can be used without restrictions. Outdoor onlychannels 1 to 6 are allowed. This means that in Peer-to-Peer, the WLAN feature can only be used outside ifthe peer sets up the communication on an authorized channel (i.e., between 1 & 6). In infrastructure mode,please make sure the access point is configured to a channel from 1 to 6 before setting up the connection.
• Italy: Use of the RLAN network is governed: Disposal of Old Electrical & Electronic- with respect to private use, by the Legislative Decree of 1.8.2003, no. 259 (“Code of ElectronicCommunications”). In particular Article 104 indicates when the prior obtainment of a general authorization isrequired and Art. 105 indicates when free use is permitted;- with respect to the supply to the public of the WLAN access to telecom networks and services, by theMinisterial Decree 28.5.2003, as amended, and Art. 25 (general authorization for electronic communicationsnetworks and services) of the Code of electronic communications.
• Norway: Use of this radio equipment is not allowed in the geographical area within a radius of 20 km fromthe centre of Ny-Ålesund, Svalbard.
WEEESymbolInformation
Correct Disposal of This product (Waste Electrical & Electronic Equipment).
(Applicable in the European Union and other European countries with separate collection systems).
This marking shown on the product or its literature indicates that it should not be disposed with otherhousehold wasted at the end of its working life. To prevent possible harm to the environment or humanhealth from uncontrolled waste disposal, please separate this from other types of wastes and recycle itresponsibly to promote the sustainable reuse of material resources.Household users should contact either the retailer where they purchased this product, or their local

Yarvik smartphone manual
file:///Users/elroy/Desktop/Yarvik/Manual/manual_da.html[13-02-13 17:03:55]
government office, for details of where and how they can take this item for environmentally safe recycling.Business users should contact their supplier and check the terms and conditions of the purchase contract.This product should not be mixed with other commercial wastes of disposal.
Disposal of waste batteries (applicable in the European Union and other European countries withseparate collection systems)
Either of the symbols shown next may appear on the battery or on the packaging to indicate that the batteryprovided with this product shall not be treated as household waste. On certain batteries this symbol might beused in combination with a chemical symbol. The chemical symbols for mercury (Hg) or lead (Pb) are addedif the battery contains more than 0.0005% mercury or 0.004% lead. By ensuring these batteries are disposedof correctly, you will help prevent potentially negative consequences for the environment and human healthwhich could otherwise be caused by inappropriate waste handling of the battery. The recycling of thematerials will help to conserve natural resources. In case of products that for safety, performance or dataintegrity reasons require a permanent connection with an incorporated battery, this battery should bereplaced by qualified service staff only. To ensure that the battery will be treated properly, hand over theproduct at end-of-life to the applicable collection point for the recycling of electrical and electronicequipment.
For all other batteries, please view the section on how to remove the battery from the product safely. Handthe battery over to the applicable collection point for the recycling of waste batteries. For more detailedinformation about recycling of this product or battery, please contact your local Local government Office,your household waste disposal service or the shop where you purchased the product.
When travelling to and within the United States of America, please be aware that the U.S. Department ofTransportation (DOT) recently published new regulations that apply to passengers travelling with lithiummetal batteries and lithium-ion batteries.For detailed information, visit http://safetravel.dot.gov/whats_new_batteries.html.
Safety Information
Yarvik Smartphone device
• Yarvik is not responsible for any interference that you may experience or that may be caused whenoperating this device.
• Warning: This apparatus must be earthed.
Opening or dismantling the main unit or any of its accessories, for whatever reason, could lead to damagesthat are not covered by the guarantee.

Yarvik smartphone manual
file:///Users/elroy/Desktop/Yarvik/Manual/manual_da.html[13-02-13 17:03:55]
• To avoid electrical shock, do not open the cabinet. Refer servicing to qualified personnel only.
• To prevent fire or shock hazard, do not expose your Smartphone device or any of its accessories to rain ormoisture.
• Do not use or store your Smartphone device in a location subject to heat sources, such as radiators or airducts; direct sunlight; excessive dust; moisture or rain; mechanical vibration or shock; strong magnets orspeakers that are not magnetically shielded; excessively high and low temperatures; and high humidity.
• Turning off your Smartphone device with the power button does not disconnect the device completely frommains voltage. To disconnect it completely, unplug the AC adapter or the power cord from mains. Thesocket-outlet shall be installed near the equipment and shall be easily accessible.
• Audio and picture distortion may occur if this equipment is positioned in close proximity to any equipmentemitting electromagnetic radiation.
• This apparatus is also designed for IT power system with phase to phase voltage 230V, for customers inNorway.
• Observe the following precautions to provide adequate air circulation and to ensure normal reliableoperation:- Do not use the Smartphone device and/or the AC adapter while covered or wrapped in cloth. Ensure theAC adapter operates in a clear environment.- Turn off the Smartphone device before putting the device into a bag or a carrying case.
• Do not use your Smartphone device directly on your lap. The temperature of the base of the unit will riseduring normal operation and over time could result in discomfort or burns.
• Do not use your Smartphone device while walking. Listening to music with headphones or watching theLCD screen while walking may lead to an unexpected accident and result in personal injuries.
• Using connected headphones on the Smartphone device for too long and/or setting the audio volume uptoo high when using headphones may cause serious hearing damage.
• Avoid strong beating of or to the product.
• Don’t operate the touch screen of the Smartphone device with sharp objects, as this may result inscratching the screen surface.
• Only use permitted batteries, chargers and accessories with your Smartphone device. The use of any otherproducts with the device can be dangerous and may violate the warranty regulations.
• Only use a slightly wet cotton cloth to clean the device, and only use water to wetten the cotton cloth. TheSmartphone device should not be cleaned with any sort of (glass) cleaning aid.
Wireless functionality
• If radio interference with other devices occurs while using your Smartphone device, do not use the wirelessfunctionality. Use of the wireless functionality may cause a malfunction of the devices, resulting in anaccident.

Yarvik smartphone manual
file:///Users/elroy/Desktop/Yarvik/Manual/manual_da.html[13-02-13 17:03:55]
• In some situations or environments, the use of the wireless functionality might be restricted by theproprietor of the building or responsible representatives of the organization, for example on board airplanes,in hospitals or in any other environment where the risk of interference with other devices or services isperceived or identified as harmful. If you are uncertain about the policy applying to the use of wirelessfunctionality in a specific organization or environment, you are encouraged to first ask for authorization priorto switching it on. Consult your physician or the manufacturer of personal medical devices (pacemakers,hearing aids, etc.) regarding any restrictions on the use of wireless functionality.
• If using wireless functionality near a pacemaker, make sure it is at least 19 inches / 50 cm away from thepacemaker.
• Due to the transmission and reception properties of wireless communications, data can occasionally be lostor delayed. This can be due to the variation in radio signal strength that results from changes in thecharacteristics of the radio transmission path. Yarvik will not be held responsible for damages of any kindresulting from the delays or errors in data transmitted or received via wireless functionality, or failure ofwireless functionality to transmit or receive such data.
• If the equipment does cause harmful interference to radio/TV reception, which can be determined by turningthe equipment off and on, the user is encouraged to try to correct the interference by one or more of thefollowing measures: reorient or relocate the receiving antenna, increase the distance between the senderand the receiver, consult the dealer or an experienced radio/TV technician for help. Yarvik will not beresponsible for any radio/TV interference nor for any other undesired effect.
Wireless LAN Security
Creating security settings for the Wireless LAN is extremely important. Yarvik assumes no responsibility forany security problems that may arise from the use of the Wireless LAN.
Battery pack
Do not charge the battery pack in any way other than as described in the Start guide or as designated byYarvik in writing.
AC adapter
• It is highly recommended that you use a genuine Yarvik AC adapter supplied by Yarvik for your product.
• This AC adapter is intended for use with the Smartphone device IT products only.
• Do not place the AC adapter in contact with your skin. Remove the AC adapter away from your body if itbecomes warm and causes discomfort.
RoHS
This products has been certified as RoHS Compliant.

Yarvik smartphone manual
file:///Users/elroy/Desktop/Yarvik/Manual/manual_da.html[13-02-13 17:03:55]
YARVIK.COM
Returner tilindeks

Yarvik smartphone manual
file:///Users/elroy/Desktop/Yarvik/Manual/manual_sw.html[13-02-13 17:04:09]
Innehållsförteckning SELECTLANGUAGE
1 Före förstaanvändningen2 Starta dinsmartphone3 Android Startskärm3.1 Att lägga till widgetsoch genväger till dinStartskärm3.2 Att ställa in enbakgrund3.3 Applikationsmeny4 Ställa in dinsmartphone4.1 Inställningar-meny4.2 WiFi & Bluetooth4.3 Ljudprofiler4.4 Bildskärm4.5 Appar4.6 Komma åtlagringsytan & microSD-minne4.7 Språk & inmatning4.8 Datum & tid5 Appar6 Telefonsamtal7 Meddelanden8 Garantiredogörelse

Yarvik smartphone manual
file:///Users/elroy/Desktop/Yarvik/Manual/manual_sw.html[13-02-13 17:04:09]
9 GNU/GPL-licensinformation10 Importantinformation
1 Före det första användandet
Kära användare,
Tack för att du köpt vår produkt.För att försäkra dig om ett snabbt och bekvämt användande av din nya Yarvik-smartphone, läs dessainstruktioner noggrant före användningen.
Vi hoppas att du kommer att ha stor nytta av din Yarvik-smartphone så länge som möjligt!
OBS!
• Din Yarvik-smartphone är enelektroniskhögprecisionsprodukt. Försökinte montera isär telefonen, dådetta kommer att göra garantinogiltig och kan orsaka attapparaten går sönder.
• Undvik att slå på eller tappaprodukten.
• Undvik att använda dinsmartphone i miljöer med högaeller låga temperaturer, eller imiljöer där enheten kan komma ikontakt med fukt, damm ellermagnetfält.
• Utsätt inte telefonen för direktsolljus under långa perioder;
• Använd inte touchskärmenmed vassa föremål, då detta kanresultera i repor.
• Användning av telefonen medhörlurar under lång tid och/ellermed volymen satt för högt kanorsaka allvarlig hörselskada.

Yarvik smartphone manual
file:///Users/elroy/Desktop/Yarvik/Manual/manual_sw.html[13-02-13 17:04:09]
• För att undvika trafikolyckor, gåinte över gatan, och åk inte ettmotorfordon eller cykel vidanvändning av en telefon medhörlurar.
• Använd bara tillåtna batterier,laddare och tillbehör till dinYarvik-smartphone. Användningav andra produkter tillsammansmed telefonen kan vara farligtoch kan bryta motgarantivillkoren;
• Använd endast en något fuktadbomullstrasa för att rengöra dintelefonen och använd endastvatten för att fuktabomullstrasan. Telefonen skallinte rengöras med någonrengöringsprodukt.
Du kan börja använda din Yarvik-smartphone direkt när du packat upp den ur lådan, utan att först laddabatteriet.Det är bäst för batteriet att först laddas ur helt och att sedan laddas fullt när det är slut för första gången.Om det inte går att sätta på telefonen direkt när du packar upp den ur lådan, är batteriet redan tömt och dubör därför förstås ladda det först.
Återgå tillinnehållsförteckning
2 Starta dinsmartphone
När du första gången slår på din Yarvik-smartphone, presenteras en startsekvens.Den allra första starten kan ta ett tag, cirka 2-3 minuter.Efter startsekvensen har din telefon startat klart och Android-låsskärmen visas.

Yarvik smartphone manual
file:///Users/elroy/Desktop/Yarvik/Manual/manual_sw.html[13-02-13 17:04:09]
Android-låsskärm
Dra låsfältet (A) till höger för att låsa upp telefonen. Du kommer nu till Android-startskärmen.
Återgå tillinnehållsförteckning
3 Android Startskärm

Yarvik smartphone manual
file:///Users/elroy/Desktop/Yarvik/Manual/manual_sw.html[13-02-13 17:04:09]
Android Startskärm
Längst ner på telefonens skärm finner du alltid statusfältet.Statuslisten visar systeminformation, medan den nedre menyraden innehåller funktionsknappar.
1 - Wi-Fi-signalindikator2 - Mobil nätverksmottagning för SIM1 och SIM2 och batterinivåindikator3 - Systemtid4 - App-genvägar5 - Widget (analog klocka)6 - Bakåt-knappen - går tillbaka till föregående skärm, eller tidigare websida när du använder webläsaren 7 - Hem - går tillbaka till Android-startskärmen8 - App- och widgetmeny9 - Fleraktivitetsknapp
Startskärmen består av åtskilliga sidor som man får tillgång till genom att dra startskärmen till vänster/höger.
För att se vilka appar som körs i bakgrunden kan du gå in i fleraktivitetsöverblicken genom att trycka påfleraktivitetsknappen (9).

Yarvik smartphone manual
file:///Users/elroy/Desktop/Yarvik/Manual/manual_sw.html[13-02-13 17:04:09]
Klicka på en app som körs i fleraktivitetsöverblicken för att snabbt gå över till den. Du kan stänga en appsom körs genom att trycka länge på den och klicka på "Remove from list" (Ta bort från lista).
Återgå tillinnehållsförteckning
3.1
Att lägga tillwidgets ochgenväger till din startskärm
För att lägga till en widget, tryck på app- och widgetknappen längst ner i mitten på startskärmen:
På följande skärm finner du alla installerade appar och widgets, båda kan ses var för sig om du trycker påantingen "Apps" eller "Widgets" högst upp på skärmen.Tryck på "Widgets" för att se alla tillgängliga widgets. När alla widgets visas, kan du dra skärmen för att gå tillnästa skärm (om tillgänglig).Tryck på och håll nere den widget du valt för att startskärmen ska visas och släpp den sedan på vilken tomplats som helst på startskärmen.
För att lägga till en genväg till en app, tryck på app- och widgetknappen nedtill i mitten på startskärmen:

Yarvik smartphone manual
file:///Users/elroy/Desktop/Yarvik/Manual/manual_sw.html[13-02-13 17:04:09]
På följande skärm finner du alla installerade appar och widgets, båda kan ses var för sig om du trycker påantingen "Apps" eller "Widgets" högst upp på skärmen.Tryck på "Apps" för att se alla tillgängliga appar.Tryck på och håll nere den app du valt tills startskärmen visas, och släpp sedan genvägen på valfri tom platspå startskärmen.
För att ta bort widget- och/eller app-genvägar från startskärmen, tryck på och håll dem nere och dra dem tillsoptunna-ikonen "Remove" (Ta bort) som framträder upptill på startskärmen.
Återgå tillinnehållsförteckning
3.2 Att ställa in enbakgrund
För att ändra Startskärmens bakgrund, tryck på och håll nere Startskärmen tills dess att menyn “SelectWallpaper from” ("Välj bakgrund från") visar sig.Du kan välja bland "Levande bakgrunder" (Animerade bakgrunder), "Gallery" (Foto/video-galleri) eller"Bakgrunder" (Statiska standardbilder).
Återgå tillinnehållsförteckning
3.3 Applikationsmeny
Tryck på app- och widget-knappen i mitten nedtill av hemskärmen:
När systemet visar widgets, tryck på "Apps" för att se alla installerade appar.
Här finner du alla förinstallerade program eller appar och även de ytterligare appar som du själv installerar.Du kan starta vilken app som helst genom att bara trycka på den tillhörande ikonen.

Yarvik smartphone manual
file:///Users/elroy/Desktop/Yarvik/Manual/manual_sw.html[13-02-13 17:04:09]
Applikationsskärm
Återgå tillinnehållsförteckning
4 Ställa in Yarvik-telefonen
4.1 Menyn Settings(inställningar)
Tryck på Settings (inställningar)-ikonen i Applikations-menyn för att komma till Inställningar-menyn. IInställningar-menyn finns valmöjligheten att ställa in din Yarvik telefon.

Yarvik smartphone manual
file:///Users/elroy/Desktop/Yarvik/Manual/manual_sw.html[13-02-13 17:04:09]
Menyn Settings (inställningar)
Vi kommer att gå igenom de viktigaste delarna:
Återgå tillinnehållsförteckning
4.2 Wi-Fi &Bluetooth
Wi-Fi

Yarvik smartphone manual
file:///Users/elroy/Desktop/Yarvik/Manual/manual_sw.html[13-02-13 17:04:09]
Konfigurera en trådlös WiFi-nätverksanslutning.Dra Av/På-knappen till "On" för att aktivera WiFi.
De tillgängliga WiFi-nätverken visar sig i nätverkslistan till höger på skärmen. Tryck snabbt på det utvaldanätverket. Om nätverket är säkrat måste du skriva i nätverkets säkerhetsnyckel.
Tryck på "Connect"("Anslut")-knappen och telefonen kopplar upp sig mot nätverket.När "Connected"("Ansluten") visas under nätverksnamnet och den trådlösa mottagningsikonen visas istatusfältet längst ner, är du uppkopplad mot det trådlösa nätverket.
Att se Yarvik-telefonens WiFi MAC-adress
När du befinner dig på WiFi-inställningsskärmen, klicka på menyknappen nere till höger.
Tryck på "Advanced" (Avancerat) i menyn som kommer fram.
Din WiFi MAC-adress visar sig på följande skärmen "Advanced Wi-Fi" (Avancerat WiFi) under "MAC-address".
Bluetooth
Din Yarvik-smartphone är utrustad med en inbyggd Bluetooth-modul för att ansluta till Bluetooth-kompatibelkringutrustning, som tangentbord, högtalare och hörlurar, men även till Bluetooth-handsfree ochbilinstallationssatser.För Bluetooth-knappen På/Av till "On" för att aktivera Bluetooth.
När det är aktiverat kommer Yarvik-telefonen automatiskt att börja söka efter närliggande Bluetooth-enheter.Du kan alltid söka efter Bluetooth-enheter manuellt genom att klicka på "Search for Devices" (Sök efterenheter) längst upp till höger på skärmen.Det kan bli nödvändigt för kringutrustning som ska anslutas att sättas i "pairing mode" (Parkopplingsläge). Seinstruktionsmanualen för kringutrustningen för mer information.

Yarvik smartphone manual
file:///Users/elroy/Desktop/Yarvik/Manual/manual_sw.html[13-02-13 17:04:09]
Alla funna enheter kommer att visas i listan "Available Devices" (Tillgängliga enheter):
Klicka på den funna Bluetooth-enheten för att para ihop Yarvik-telefonen med den.Fönstret "Bluetooth pairing request" (Bluetooth parkopplingsförfrågan) visas:
De flesta Bluetooth-enheter kräver en PIN-kod för att ansluta. Denna kod är vanligen 0000 eller 1234. Seinstruktionsmanualen för dina Bluetooth-enheter om PIN-koden är annorlunda.Då du har angivit korrekt PIN-kod, tryck på "OK".
Yarvik-telefonen kommer nu att börja parkoppla med din Bluetooth-enhet och efter några sekunder kommeranslutningen att vara färdig och visa ett meddelande "Connected" (Ansluten) under respektive Bluetooth-enhet i listan "Available Devices" (Tillgängliga enheter):
Du kan ansluta flera Bluetooth-enheter till din Yarvik-telefon för användning samtidigt (t.ex. headset ochtangentbord).
Återgå tillinnehållsförteckning
4.3 Ljudprofiler
- Här kan du förändra ljudvolymen på telefonen, som endast vibration eller både vibration och ringsignal för

Yarvik smartphone manual
file:///Users/elroy/Desktop/Yarvik/Manual/manual_sw.html[13-02-13 17:04:09]
inkommande samtal/meddelanden.
Återgå tillinnehållsförteckning
4.4 Bildskärm
Här kan du ändra bildskärmens ljusstyrka, teckensnittstorlek och den automatiska vilolägestiden.Observera att ju högre bildskärmens ljusstyrka är, desto högre blir energikonsumtionen. Det här kommer atttömma ditt batteri avsevärt snabbare.Om du inte vill att bildskärmen automatiskt roterar när du lutar telefonen, kan du aktivera/inaktivera dennafunktion genom skärminställningen Auto-rotate (rotera automatiskt).
Återgå tillinnehållsförteckning
4.5 Appar
Här kan du hantera de applikationer som är installerade på din Yarvik-telefon.Du kan klicka på de appar som du har installerat för att se app-infon och avinstallera dem vid behov medknappen "Uninstall" ("Avinstallera").Observera att de förinstallerade standardapplikationerna (t.ex. miniräknaren) inte kan avinstalleras.
Återgå tillinnehållsförteckning
4.6
Komma åtlagringsytan& microSD-minne
Visar den interna minnesinformationen. När det finns ett MicroSD-kort hitar du även det insatta kortetsminnesinformationen här.
Att ansluta din Yarvik-smartphone till en PC eller Mac genom ett USB
Du kan ansluta Yarvik-telefonen till en PC eller Mac genom att använda den medföljande USB-kabeln.När den är ansluten till en dator kan du komma åt telefonens interna minne och, om det finns, ett insattMicroSD-kort som en vanlig USB-masslagringsenhet.
Se den tryckta Snabb-startguiden för din Yarvik-smartphone för att fastställa var telefonens USB-port sitter.Anslut USB-kabeln till Yarvik-telefonens USB-port och till en ledig USB-port på datorn.

Yarvik smartphone manual
file:///Users/elroy/Desktop/Yarvik/Manual/manual_sw.html[13-02-13 17:04:09]
Högst upp på telefonens skärm kommer två meddelanden att visas kort efter varandra:
När det andra meddelandet "USB connected" (USB anslutet) visas, klicka på det.Följande skärm kommer att visas:
Klicka på knappen "Turn on USB storage" (Sätt på USB-enhet).Ett meddelandefönster öppnas:
Klicka på "OK" för att bekräfta.Yarvik-telefonens interna minne kommer nu visas som en masslagringsenhet i dators filsystem och kan t.ex.användas för att kopiera filer från och till Yarvik-telefonen.Om du har ett MicroSD-kort i telefonen kommer kortet att känna igen datorn som en andramasslagringsenhet.

Yarvik smartphone manual
file:///Users/elroy/Desktop/Yarvik/Manual/manual_sw.html[13-02-13 17:04:09]
För att sluta använda funktionen för masslagringsenheten, klicka på "Turn off USB storage" (Stäng av USB-lagring) och koppla från USB-kabeln.
OBS! Det behövs inga drivrutiner för att få tillgång till Yarvik-telefonens minne. Om din dator ber om endrivrutin kan du bara ignorera det.
Kom åt microSD-korteti ES-filutforskaren
Om du har satt i ett microSD-kort i Yarvik-telefonen, kan du komma åt dess innehåll enligt följande:
Öppna appen ES File Explorer och klicka på knappen Favorites (med en ikon med en blå stjärna).
Menyn Favorites visas nu. Klicka på ikonen "root" (rot) märkt med "/":
Du kommer att komma till "roten" av telefonens filsystem, som innehåller flera filer och mappar.Leta upp och klicka på mappen "mnt":
Mappen "mnt" öppnas nu och visar flera mappar:

Yarvik smartphone manual
file:///Users/elroy/Desktop/Yarvik/Manual/manual_sw.html[13-02-13 17:04:09]
Mappen "sdcard" är det interna minnet på Yarvik-telefonen.Mappen "sdcard2" är ditt MicroSD-kort (när det är isatt i telefonens MicroSD-fack).
När den är tillgänglig, kan du också använda microSD-genvägsikonen i ovannämnda Favorites-meny försnabb åtkomst till microSD-kortminnet.
Återgå tillinnehållsförteckning
4.7 Språk &inmatning
Använd "Select language" (välj språk) för att välja visningsspråk för Yarvik-telefonen. Det här gäller allskärmtext i hela systemet.Under “Android-keyboard” kan du göra inställningar för telefonens skärmtangentbord.
Återgå tillinnehållsförteckning
4.8 Datum & tid
Här kan du konfigurera Yarvik-telefonens datum- och tidinställningar.
Återgå tillinnehållsförteckning
5 Appar
Din Yarvik-smartphone levereras med förinstallerade appar (se exempel nedan):

Yarvik smartphone manual
file:///Users/elroy/Desktop/Yarvik/Manual/manual_sw.html[13-02-13 17:04:09]
Utseendet på app-ikoner kan förändras utan föravisering.
Återgå tillinnehållsförteckning6 Telefonsamtal
RingaFör att ringa med Yarvik-telefonen, öppna "Telefon"-applikationen på applikationsmenyn eller Android-
startskärmen: Använd telefonens numeriska knappsats för att skriva in telefonnummer.

Yarvik smartphone manual
file:///Users/elroy/Desktop/Yarvik/Manual/manual_sw.html[13-02-13 17:04:09]
Telefonens knappsats.
För att ringa internationella telefonsamtal krävs prefixet "+". Tryck och håll in "0" på tangentbordet tills "+"visas.
Tryck på samtalshanteringsknappen för att svara på telefonsamtalet.
Tryck på samtalshanteringsknappen för att avböja telefonsamtalet.Du kan också ringa telefonsamtal direkt från dina kontakter i applikationen "People" (personer).
Samtal lagras på samtalsloggskärmen, som man kommer åt genom att trycka på Log-knappen högstupp på Telefon-skärmen.Dina kontakter (från tidigare nämnda app "People") kan också kommas åt direkt från Telefon-skärmen
genom att trycka på -knappen.
Inkommande telefonsamtal
När du får ett telefonsamtal på din Yarvik-smartphone, har du 3 alternativ:
1 - Skjut cirkeln uppåt för att ignorera det inkommande samtalet och sända ett automatiskt svar via SMS;2 - Ignorera det inkommande samtalet;3 - Svara på det inkommande samtalet.
Alternativ under ett samtal

Yarvik smartphone manual
file:///Users/elroy/Desktop/Yarvik/Manual/manual_sw.html[13-02-13 17:04:09]
1 - Visa telefonens knappsats. (t.ex. för DTMF-alternativmenyer);2 - Aktivera/inaktivera högtalarfunktion;3 - Stäng av mikrofon;4 - Parkera samtal;5 - Meny med fler alternativ: lägg till ytterligare ett telefonsamtal (konversationssamtal) eller spela insamtalet.
Vidarekoppling av samtal
Du kan ställa in funktionen samtalsvidarebefordran till att vidarebefordra alla inkommande telefonsamtal tillett specifikt telefonnummer.
I "Telefon"-appen , tryck på menyknappen och välj "Call settings" (Samtalsinställningar).Välj "Voice call" (Röstsamtal), i vilket du kan välja "Call forwarding" (Vidarekoppling av samtal) för att ändraalternativen för vidarebefordran.
Uppringar-ID/Samtal väntar
Med Yarvik-telefonfunktionen Uppringar-ID kan du välja om du vill visa ditt nummer vid utgående samtal.
För att ändra detta, starta "Telefon"-appen , tryck på menyknappen och välj "Settings"(Inställningar) - "Voice call" (Röstsamtal) - "Additional settings" (Ytterligare inställningar) - "Caller ID"(Uppringar-ID).Inom samma meny kan du också aktivera/inaktivera inkommande telefonsamtal när du redan är upptagen ien telefonkonversation.
Återgå tillinnehållsförteckning
7 Meddelanden
Din Yarvik-smartphone kan skicka SMS- och MMS-meddelanden. Konsultera din mobiloperatör förinformation om standardkostnader och extrakostnader för att skicka meddelanden till eller från främmande

Yarvik smartphone manual
file:///Users/elroy/Desktop/Yarvik/Manual/manual_sw.html[13-02-13 17:04:09]
länder.
Skicka SMS/MMS-meddelanden
Öppna applikationen "Messaging" (Meddelanden) från Android-startskärmen eller applikationsmenyn.
Meddelandeapplikation.
1 - Lägg till bilagor som bilder, ljud och video. Meddelanden med en bilaga betraktas automatiskt MMS-meddelanden;2 - Menyn meddelandeinställningar;3 - Mottagarfält;4 - Lägg till mottagare;5 - Översikt meddelandekonversation;6 - Meddelandeinmatning;7 - Skicka meddelande-knapp.
Ställ in röstbrevlådenummer/uppspelning av röstbrevlådemeddelandenFör att ställa in numret till röstbrevlådefunktionen i Yarvik-telefonen, öppna "Telefon"-applikationen från
applikationsmenyn eller Android-startskärmen:
Tryck och håll in -knappen på telefonens knappsats. "Add number" (Ange nummer) visas påalternativskärmen. Bland röstbrevlådealternativen kan du välja röstbrevlådeinställningar och angeröstbrevlådans servicenummer.
När röstbrevlådans servicenummer har angetts, kan du använda -knappen för att ringa upp

Yarvik smartphone manual
file:///Users/elroy/Desktop/Yarvik/Manual/manual_sw.html[13-02-13 17:04:09]
röstbrevlådan genom att trycka ner och hålla in den.
Återgå tillinnehållsförteckning
8 Garantiredogörelse
Yarvik garanterar att den av kunden köpta produkten skall vara fri från defekter i utförande eller materialunder en period av 2 år från det datum kunden inhandlar produkten. Om, under garantiperioden, produktenhar en defekt i utförande eller material, ska kunden lämna tillbaka produkten till den återförsäljare därprodukten köptes. Återförsäljaren ska reparera eller ersätta den (efter Yarviks gottfinnande) inom en skäligtidsperiod. En orginalfaktura krävs som bevis för inköpsdatum. Yarviks beslut i frågan kommer att varaslutgiltigt.
Garantin täcker inte defekter och funktionsfel som är resultat av mjukvaruöverföringar, felanvändande,vårdslöst användande, manipulation, försumlighet, oriktigt användande, otillräcklig skötsel eller allahandlingar utanför Yarviks kontroll.
VIKTIGT:När du köper en telefon från Yarvik, kommer en telefonen att tillhandahållas dig med den senastestabila inbyggda programvaran tillgänglig för den här specifika modellen, vid den tid då enheten tillverkades.Yarvik kommer inte att erbjuda support för produkter som har modifierats av slutanvändaren, Yarvik stödjerinte heller programmeringsmodifieringar av den inbyggda programvaran och mjukvaran som används i dessprodukter och har några sådan modifieringar ägt rum, kommer alla garantier att anses ogiltiga.
För att undvika att göra den erbjudna garantin ogiltig, ska kunden endast använda officiella mjukvaror,applikationer och uppgraderingar tillgängliga via Yarviks webbplats www.yarvik.com.Ingen annan mjukvara eller inbyggd programvara bör användas eftersom det automatiskt kommer att göraalla garantier och all support ogiltiga. Yarvik stödjer inte användning av någon annan mjukvara eller inbyggdprogramvara förutom mjukvaran eller maskinvaran som installerats på produkten av tillverkaren eller somfinns tillgänglig på Yarviks officiella webbplats www.yarvik.com. Yarvik avvisar uttryckligen att svara på allaförfrågningar gällande obehöriga modifieringar, obehörig mjukvara och obehörig maskinvara.
Återgå tillinnehållsförteckning
9 GNU/GPLLicensinformation
Konsultera den juridiska information som finns tillgänglig på Yarvik-telefon under Settings [Inställningar] –About Smartphone [Om telefonen]– Legal information [Juridisk information] (internetanslutning krävs) ellerbesök http://source.android.com/source/licenses.html för mer information.
Återgå till

Yarvik smartphone manual
file:///Users/elroy/Desktop/Yarvik/Manual/manual_sw.html[13-02-13 17:04:09]
innehållsförteckning
10 ImportantInformation
Wireless LAN-Regulatory information
Depending on the model, the wireless LAN built-in into Smartphone devices can only be used in thefollowing countries: Austria, Belgium, Bulgaria, Czech Republic, Denmark, Finland, France, Germany,Greece, Hungary, Iceland, Ireland, Italy, Luxembourg, the Netherlands, Norway, Poland, Portugal, Romania,Slovakia, Slovenia, Spain, Sweden, Switzerland, Turkey and the United Kingdom.
Conditions of use
When using the IEEE 802.11b/g/n Wireless LAN standard, channels 1 to 13 (2.4 GHz...2.4835 GHz) areselectable for both indoor and outdoor use, however with restrictive conditions applying in France, Italy andNorway, as follows:
• France: When using this product indoor, all channels can be used without restrictions. Outdoor onlychannels 1 to 6 are allowed. This means that in Peer-to-Peer, the WLAN feature can only be used outside ifthe peer sets up the communication on an authorized channel (i.e., between 1 & 6). In infrastructure mode,please make sure the access point is configured to a channel from 1 to 6 before setting up the connection.
• Italy: Use of the RLAN network is governed: Disposal of Old Electrical & Electronic- with respect to private use, by the Legislative Decree of 1.8.2003, no. 259 (“Code of ElectronicCommunications”). In particular Article 104 indicates when the prior obtainment of a general authorization isrequired and Art. 105 indicates when free use is permitted;- with respect to the supply to the public of the WLAN access to telecom networks and services, by theMinisterial Decree 28.5.2003, as amended, and Art. 25 (general authorization for electronic communicationsnetworks and services) of the Code of electronic communications.
• Norway: Use of this radio equipment is not allowed in the geographical area within a radius of 20 km fromthe centre of Ny-Ålesund, Svalbard.
WEEESymbolInformation
Correct Disposal of This product (Waste Electrical & Electronic Equipment).
(Applicable in the European Union and other European countries with separate collection systems).
This marking shown on the product or its literature indicates that it should not be disposed with otherhousehold wasted at the end of its working life. To prevent possible harm to the environment or humanhealth from uncontrolled waste disposal, please separate this from other types of wastes and recycle it

Yarvik smartphone manual
file:///Users/elroy/Desktop/Yarvik/Manual/manual_sw.html[13-02-13 17:04:09]
responsibly to promote the sustainable reuse of material resources.Household users should contact either the retailer where they purchased this product, or their localgovernment office, for details of where and how they can take this item for environmentally safe recycling.Business users should contact their supplier and check the terms and conditions of the purchase contract.This product should not be mixed with other commercial wastes of disposal.
Disposal of waste batteries (applicable in the European Union and other European countries withseparate collection systems)
Either of the symbols shown next may appear on the battery or on the packaging to indicate that the batteryprovided with this product shall not be treated as household waste. On certain batteries this symbol might beused in combination with a chemical symbol. The chemical symbols for mercury (Hg) or lead (Pb) are addedif the battery contains more than 0.0005% mercury or 0.004% lead. By ensuring these batteries are disposedof correctly, you will help prevent potentially negative consequences for the environment and human healthwhich could otherwise be caused by inappropriate waste handling of the battery. The recycling of thematerials will help to conserve natural resources. In case of products that for safety, performance or dataintegrity reasons require a permanent connection with an incorporated battery, this battery should bereplaced by qualified service staff only. To ensure that the battery will be treated properly, hand over theproduct at end-of-life to the applicable collection point for the recycling of electrical and electronicequipment.
For all other batteries, please view the section on how to remove the battery from the product safely. Handthe battery over to the applicable collection point for the recycling of waste batteries. For more detailedinformation about recycling of this product or battery, please contact your local Local government Office,your household waste disposal service or the shop where you purchased the product.
When travelling to and within the United States of America, please be aware that the U.S. Department ofTransportation (DOT) recently published new regulations that apply to passengers travelling with lithiummetal batteries and lithium-ion batteries.For detailed information, visit http://safetravel.dot.gov/whats_new_batteries.html.
Safety Information
Yarvik Smartphone device
• Yarvik is not responsible for any interference that you may experience or that may be caused whenoperating this device.
• Warning: This apparatus must be earthed.
Opening or dismantling the main unit or any of its accessories, for whatever reason, could lead to damages
Yarvik smartphone manual
file:///Users/elroy/Desktop/Yarvik/Manual/manual_sw.html[13-02-13 17:04:09]
that are not covered by the guarantee.
• To avoid electrical shock, do not open the cabinet. Refer servicing to qualified personnel only.
• To prevent fire or shock hazard, do not expose your Smartphone device or any of its accessories to rain ormoisture.
• Do not use or store your Smartphone device in a location subject to heat sources, such as radiators or airducts; direct sunlight; excessive dust; moisture or rain; mechanical vibration or shock; strong magnets orspeakers that are not magnetically shielded; excessively high and low temperatures; and high humidity.
• Turning off your Smartphone device with the power button does not disconnect the device completely frommains voltage. To disconnect it completely, unplug the AC adapter or the power cord from mains. Thesocket-outlet shall be installed near the equipment and shall be easily accessible.
• Audio and picture distortion may occur if this equipment is positioned in close proximity to any equipmentemitting electromagnetic radiation.
• This apparatus is also designed for IT power system with phase to phase voltage 230V, for customers inNorway.
• Observe the following precautions to provide adequate air circulation and to ensure normal reliableoperation:- Do not use the Smartphone device and/or the AC adapter while covered or wrapped in cloth. Ensure theAC adapter operates in a clear environment.- Turn off the Smartphone device before putting the device into a bag or a carrying case.
• Do not use your Smartphone device directly on your lap. The temperature of the base of the unit will riseduring normal operation and over time could result in discomfort or burns.
• Do not use your Smartphone device while walking. Listening to music with headphones or watching theLCD screen while walking may lead to an unexpected accident and result in personal injuries.
• Using connected headphones on the Smartphone device for too long and/or setting the audio volume uptoo high when using headphones may cause serious hearing damage.
• Avoid strong beating of or to the product.
• Don’t operate the touch screen of the Smartphone device with sharp objects, as this may result inscratching the screen surface.
• Only use permitted batteries, chargers and accessories with your Smartphone device. The use of any otherproducts with the device can be dangerous and may violate the warranty regulations.
• Only use a slightly wet cotton cloth to clean the device, and only use water to wetten the cotton cloth. TheSmartphone device should not be cleaned with any sort of (glass) cleaning aid.
Wireless functionality
• If radio interference with other devices occurs while using your Smartphone device, do not use the wirelessfunctionality. Use of the wireless functionality may cause a malfunction of the devices, resulting in an

Yarvik smartphone manual
file:///Users/elroy/Desktop/Yarvik/Manual/manual_sw.html[13-02-13 17:04:09]
accident.
• In some situations or environments, the use of the wireless functionality might be restricted by theproprietor of the building or responsible representatives of the organization, for example on board airplanes,in hospitals or in any other environment where the risk of interference with other devices or services isperceived or identified as harmful. If you are uncertain about the policy applying to the use of wirelessfunctionality in a specific organization or environment, you are encouraged to first ask for authorization priorto switching it on. Consult your physician or the manufacturer of personal medical devices (pacemakers,hearing aids, etc.) regarding any restrictions on the use of wireless functionality.
• If using wireless functionality near a pacemaker, make sure it is at least 19 inches / 50 cm away from thepacemaker.
• Due to the transmission and reception properties of wireless communications, data can occasionally be lostor delayed. This can be due to the variation in radio signal strength that results from changes in thecharacteristics of the radio transmission path. Yarvik will not be held responsible for damages of any kindresulting from the delays or errors in data transmitted or received via wireless functionality, or failure ofwireless functionality to transmit or receive such data.
• If the equipment does cause harmful interference to radio/TV reception, which can be determined by turningthe equipment off and on, the user is encouraged to try to correct the interference by one or more of thefollowing measures: reorient or relocate the receiving antenna, increase the distance between the senderand the receiver, consult the dealer or an experienced radio/TV technician for help. Yarvik will not beresponsible for any radio/TV interference nor for any other undesired effect.
Wireless LAN Security
Creating security settings for the Wireless LAN is extremely important. Yarvik assumes no responsibility forany security problems that may arise from the use of the Wireless LAN.
Battery pack
Do not charge the battery pack in any way other than as described in the Start guide or as designated byYarvik in writing.
AC adapter
• It is highly recommended that you use a genuine Yarvik AC adapter supplied by Yarvik for your product.
• This AC adapter is intended for use with the Smartphone device IT products only.
• Do not place the AC adapter in contact with your skin. Remove the AC adapter away from your body if itbecomes warm and causes discomfort.
RoHS
Yarvik smartphone manual
file:///Users/elroy/Desktop/Yarvik/Manual/manual_sw.html[13-02-13 17:04:09]
This products has been certified as RoHS Compliant.
YARVIK.COM
Återgå tillinnehållsförteckning

Yarvik smartphone manual
file:///Users/elroy/Desktop/Yarvik/Manual/manual_no.html[13-02-13 17:04:19]
Indeks SELECT LANGUAGE
1 Før førstegangsbruk2 Oppstart avsmarttelefon3 Android-hjemmeskjerm3.1 Legge til widgeterog snarveier frahjemmeskjermen3.2 Innstilling avbakgrunn3.3 Applikasjonsmeny4 Konfigureresmarttelefonen4.1 Innstillingsmeny4.2 Wi-Fi og Bluetooth4.3 Lydprofiler4.4 Skjerm4.5 Apper4.6 Lagring og tilgang tilmicroSD-minne4.7 Språk & inndata4.8 Dato & tid5 Apper6 Telefonsamtaler7 Meldinger8 Garantierklæring

Yarvik smartphone manual
file:///Users/elroy/Desktop/Yarvik/Manual/manual_no.html[13-02-13 17:04:19]
9 GNU/GPLlisensinformasjon10 Importantinformation
1 Før førstegangs bruk
Kjære bruker,
Takk for at du har kjøpt dette produktet.For å være sikker på at du raskt og bekvemt får tatt i bruk din nye Yarvik Smartphone, les disse instruksenenøye før bruk.
Vi håper at du har glede av din Yarvik Smartphone så lenge som mulig!
Vennligst merk:
• Yarvik Smartphone er etelektronisk produkt med høypresisjon. Du må ikke forsøke ådemontere smarttelefonen,siden dette vil være et brudd pågarantien og kan føre til at detoppstår feil på enheten.
• Unngå at produktet utsettes forstøt eller mistes.
• Unngå å bruke smarttelefonenunder høye og lave temperaturereller i miljøer der den kan bliutsatt for fuktighet, støv ellermagnetfelt;
• Ikke utsett smarttelefonen forsterkt sollys over en lengreperiode;
• Ikke betjen berøringsskjermenmed skarpe objekter, sidendette kan føre til riper.
• Bruk av smarttelefonen medhodetelefoner for lenge ellermed for høyt volum kan føre tilalvorlig hørselsskade.

Yarvik smartphone manual
file:///Users/elroy/Desktop/Yarvik/Manual/manual_no.html[13-02-13 17:04:19]
• Ikke gå tvers over veien, kjørbil eller sykkel mens du brukerenheten med hodetelefoner, forå unngå trafikkulykker
• Bruk bare batterier, ladere ogtilbehør som er tillatt med YarvikSmartphone.Bruk av andreprodukter med smarttelefonenkan være farlig, og det kan brytegarantivilkårene
• Bruk kun en lett fuktig klut til årengjøre smarttelefonen, og brukbare vann til å fukte kluten.Smarttelefonen må ikkerengjøres medrengjøringsprodukter.
Du kan ta i bruk Yarvik Smartphone rett etter at du har pakket den ut av boksen, uten at du trenger å ladebatteriet først.Det beste for batteriet er at det går helt tomt med den ladingen det leveres med og så lades helt opp igjen.Dersom smarttelefonen ikke slår seg på rett etter at du har pakket den ut, er batteriet allerede helt utladet.Da må du selvsagt lade det helt opp først.
Tilbake tilindeks
2 Oppstart avsmarttelefon
Når du slår på din Yarvik Smartphone første gang, vises en oppstartssekvens.Den første oppstarten kan ta litt tid, omtrent 2-3 minutter.Etter at oppstartssekvensen er ferdig, er smarttelefonen klar til bruk og du blir presentert for Androidslåseskjerm.

Yarvik smartphone manual
file:///Users/elroy/Desktop/Yarvik/Manual/manual_no.html[13-02-13 17:04:19]
Android låseskjerm
Trekk låselinjen (A) til høyre for å låse opp Smartphone. Du vil da komme til Androids hjemmeskjerm.
Tilbake tilindeks
3 Android hjemmeskjerm

Yarvik smartphone manual
file:///Users/elroy/Desktop/Yarvik/Manual/manual_no.html[13-02-13 17:04:19]
Android hjemmeskjerm
Øverst på skjermen til smarttelefonen finner du alltid statuslinjen.Statuslinjen viser systeminformasjon, mens den nedre menylinjen inneholder funksjonsknappene.
1 - Wi-Fi-signalindikator2 - Mobilnettmottak for SIM1 og SIM2 og batterinivåindikator3 - Systemtid4 - App-snarveier5 - Widget (analog klokke)6 - Tilbake-knapp - bringer deg tilbake til forrige skjermbilde, eller forrige nettsted ved bruk av nettleseren7 - Hjem - bringer deg tilbake til Android-hjemmeskjermen8 - Programmer og widget-menyen9 - Fleroppgave-knappen
Hjemmeskjermen har flere sider som kan hentes frem ved å sveipe til venstre eller høyre overhjemmeskjermen.
For å se hvilke apper som kjører i bakgrunnen, kan du få frem visningen for fleroppgavekjøring ved å trykkepå knappen for fleroppgavekjøring (9).

Yarvik smartphone manual
file:///Users/elroy/Desktop/Yarvik/Manual/manual_no.html[13-02-13 17:04:19]
Klikk på en app som kjører i vinduet for fleroppgavekjøring for å bytte raskt over til den. Du kan lukke en appsom kjører ved å klikke på og holde nede lenge, og å så klikke på "Fjern fra liste".
Tilbake tilindeks
3.1
Legge tilwidgeter ogsnarveier frahjemmeskjermen
For å legge til en widget, trykk på app- og widgetknappen nederst i midten på hjemmeskjermen:
På skjermen som kommer opp, finner du alle installerte apper og widgeter, og de kan vises separat ved åvelge enten "Apper" eller "Widgeter" øverst på skjermen.Trykk på "Widgeter" for å vise alle tilgjengelige widgeter. Når alle widgeter vises, kan du sveipe overskjermen for å gå til neste side (dersom den finnes).Trykk på og hold nede den ønskede widgeten for å få frem hjemmeskjermen og slipp widgeten ned på entom plass på hjemmeskjermen.
For å lage en snarvei til en app, trykk på app- og widgettasten nederst i midten på hjemmeskjermen:

Yarvik smartphone manual
file:///Users/elroy/Desktop/Yarvik/Manual/manual_no.html[13-02-13 17:04:19]
På skjermen som kommer opp, finner du alle installerte apper og widgeter, og de kan vises separat ved velgeenten "Apper" eller "Widgeter" øverst på skjermen.Trykk på "Apper" for å se alle apper som er installert.Trykk på og hold nede den ønskede appen for å få frem hjemmeskjermen og slipp snarveien ned på en tomplass på hjemmeskjermen.
For å fjerne snarveier til widgeter eller apper fra hjemmeskjermen, trykk på dem, hold nede og dra dem tilavfallsbøtten "Fjern" som vises øverst på hjemmeskjermen.
Tilbake tilindeks
3.2 Innstilling avbakgrunn
For å bytte bakgrunn på hjemmeskjermen, trykk på og hold nede hjemmeskjermen til menyen "Velg bakgrunnfra" vises.Du kan velge "Live-bakgrunner" (animerte bakgrunner), "Galleri" (foto-/videogalleri eller "Bakgrunn"(standard stillbilder).
Tilbake tilindeks
3.3 Applikasjonsmeny
Trykk på Programmer og widgeter-knappen nederst i midten på hjemmeskjermen:
Når systemet viser widgeter, trykk på "Apper" for å se alle installerte apper.
Her finner du alle forhåndsinstallerte programmer eller "apper" du installerer.Du kan starte enhver app kun ved å trykke på ikonet til appen.

Yarvik smartphone manual
file:///Users/elroy/Desktop/Yarvik/Manual/manual_no.html[13-02-13 17:04:19]
Applikasjonsskjerm
Tilbake tilindeks
4Oppsett avYarvikSmartphone
4.1 Innstillingsmeny
Trykk på innstillingsikonet i applikasjonsmenyen for å komme inn i Innstillingsmenyen. Iinnstillingsmenyen finnes de relevante alternativene for å sette opp Yarvik Smartphone.

Yarvik smartphone manual
file:///Users/elroy/Desktop/Yarvik/Manual/manual_no.html[13-02-13 17:04:19]
Innstillingsmeny
La oss gå gjennom de viktigste delene:
Tilbake tilindeks
4.2 Wi-Fi &Bluetooth
Wi-Fi

Yarvik smartphone manual
file:///Users/elroy/Desktop/Yarvik/Manual/manual_no.html[13-02-13 17:04:19]
Opprette en forbindelse via trådløst Wi-Fi-nettverk.Skyv På/Av-tasten til "På" for å aktivere Wi-Fi.
De tilgjengelige Wi-Fi-nettverkene vises i nettverkslisten på høyre side av skjermen. Berør det nettverket duvil velge . Dersom nettverket er sikret, vil du få en melding som ber deg om å legge inn sikkerhetsnøkkelen.
Trykk på “Koble til”-knappen og smarttelefonen vil koble seg til nettverket.Når “Tilkoblet” vises under nettverksnavnet om mottaksikonet vises i statuslinjen nederst, er du vellykketkoblet til det trådløse nettverket.
Vise Wi-Fi MAC-addresse for Yarvik Smartphone
Mens du er i Wi-Fi-innstillingsskjermen, klikk på menyknappen nederst i høyre hjørne.
Trykk på "Avansert" i menyen som folder seg ut.
Din Wi-Fi MAC-addresse vises i den følgende "Avansert Wi-Fi"-skjermen under "MAC-addresser".
Bluetooth
Yarvik Smartphone er utstyrt med en innebygd Bluetooth-modul for å koble til Bluetooth-kompatibeltekstrautstyr, som for eksempel tastaturer, høyttalere og hodetelefoner, men også med håndfrie Bluetooth-hodetelefoner og bilsett.Skyv på/av-knappen for Bluetooth til "På" for å aktivere Bluetooth..
Når Bluetooth er aktivert, vil Yarvik Smartphone automatisk begynne å søke etter Bluetooth-enheter innenrekkevidde. Du kan også søke manuelt etter Bluetooth-enheter ved å klikke "Search for devices" (søk etterenheter).Utstyr som skal kobles til smarttelefonen må muligens settes i parkoblingsmodus. Se bruksanvisningen fordet aktuelle utstyret for mer informasjon.
Alle oppdagede enheter vil dukke opp i listen "Available Devices" (tilgjengelige enheter):

Yarvik smartphone manual
file:///Users/elroy/Desktop/Yarvik/Manual/manual_no.html[13-02-13 17:04:19]
Klikk på ønsket Bluetooth-enhet for å parkoble den med Yarvik Smartphone.Det vil nå dukke opp et Bluetooth parkoblingsvindu:
De fleste Bluetooth-enheter krever en PIN-kode ved tilkobling. Denne koden er vanligvis 0000 eller 1234. Sebruksanvisningen for Bluetooth-enheten dersom PIN-koden er en annen.Etter du har lagt inn korrekt PIN-kode, klikk "OK".
Yarvik Smartphone vil nå starte parkobling med Bluetooth-enheten, og etter et par sekunder er parkoblingenferdig og gir en melding om at enheten er tilkoblet, like under tilkoblet enhet i listen "Available devices"(tilgjengelige enheter):
Du kan koble flere Bluetooth-enheter til Yarvik Smartphone og bruke dem samtidig (f.eks. headset ogtastatur).
Tilbake tilindeks
4.3 Lydprofiler
Her kan du endre lydvolumet for smarttelefonen, som for eksempel kun vibrering eller vibrering og ringetonefor innkommende anrop/meldinger.
Yarvik smartphone manual
file:///Users/elroy/Desktop/Yarvik/Manual/manual_no.html[13-02-13 17:04:19]
Tilbake tilindeks
4.4 Skjerm
Her kan du forandre lysstyrken på skjermen, skriftstørrelse og auto sovetid.Husk at jo mer lysstyrke på skjermen, destor mer strøm vil du bruke. Da vil også batteriet bli betydeligraskere utladet.Hvis du ikke vil at skjermen skal rotere seg automatisk når du vrir på smarttelefonen, kan du aktivere/deaktivere denne funksjonen med skjerminnstillingen Auto-roter.
Tilbake tilindeks
4.5 Apper
Her kan du administrere applikasjonene du har installert på din Yarvik Smartphone.Du kan klikke på apper du har installert slik at du kan se info om appen og avinstallere dem dersom du vil detmed "Avinstaller"-knappen.Vennligst merk deg at de forhåndsinstallerte standardapplikasjonene (som f.eks. kalkulatoren) ikke kanavinstalleres.
Tilbake tilindeks
4.6
Lagring ogtilgang tilmicroSD-minne
Viser informasjon om internminnet. Når du har satt inn et microSD-kort, finner du også informasjon om kortether.
Koble Yarvik Smartphone til en PC eller Mac via USB
Du kan koble din Yarvik Smartphone til en PC eller Mac ved å bruke den medfølgende USB-kabelen.Når du er tilkoblet en datamaskin, kan du få tilgang til smarttelefonens internminne og, dersom du har det,microSD-kortet som standard USB-masselagringsenhet.
Slå opp i Hurtigstartveiledningen for Yarvik Smartphone for å finne ut hvor smarttelefonens USB-port er.Koble USB-kabelen til USB-porten til din Yarvik Smartphone og til en ledig USB-inngang på datamaskinen
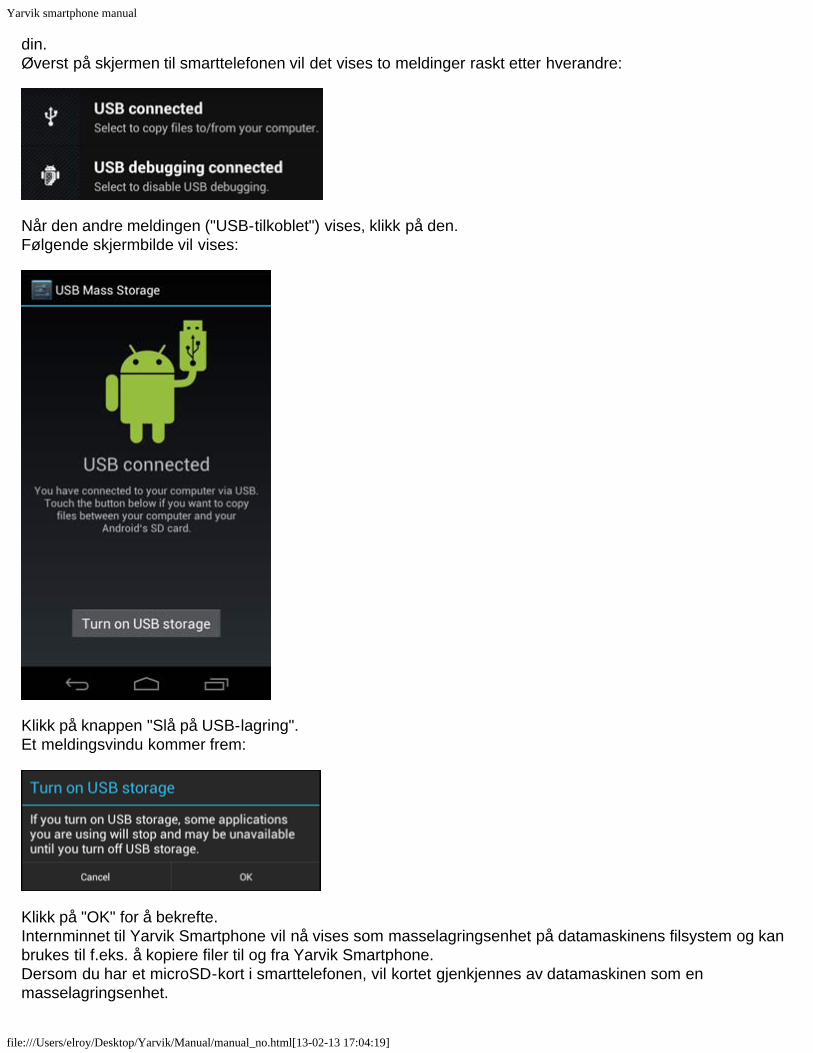
Yarvik smartphone manual
file:///Users/elroy/Desktop/Yarvik/Manual/manual_no.html[13-02-13 17:04:19]
din.Øverst på skjermen til smarttelefonen vil det vises to meldinger raskt etter hverandre:
Når den andre meldingen ("USB-tilkoblet") vises, klikk på den.Følgende skjermbilde vil vises:
Klikk på knappen "Slå på USB-lagring".Et meldingsvindu kommer frem:
Klikk på "OK" for å bekrefte.Internminnet til Yarvik Smartphone vil nå vises som masselagringsenhet på datamaskinens filsystem og kanbrukes til f.eks. å kopiere filer til og fra Yarvik Smartphone.Dersom du har et microSD-kort i smarttelefonen, vil kortet gjenkjennes av datamaskinen som enmasselagringsenhet.
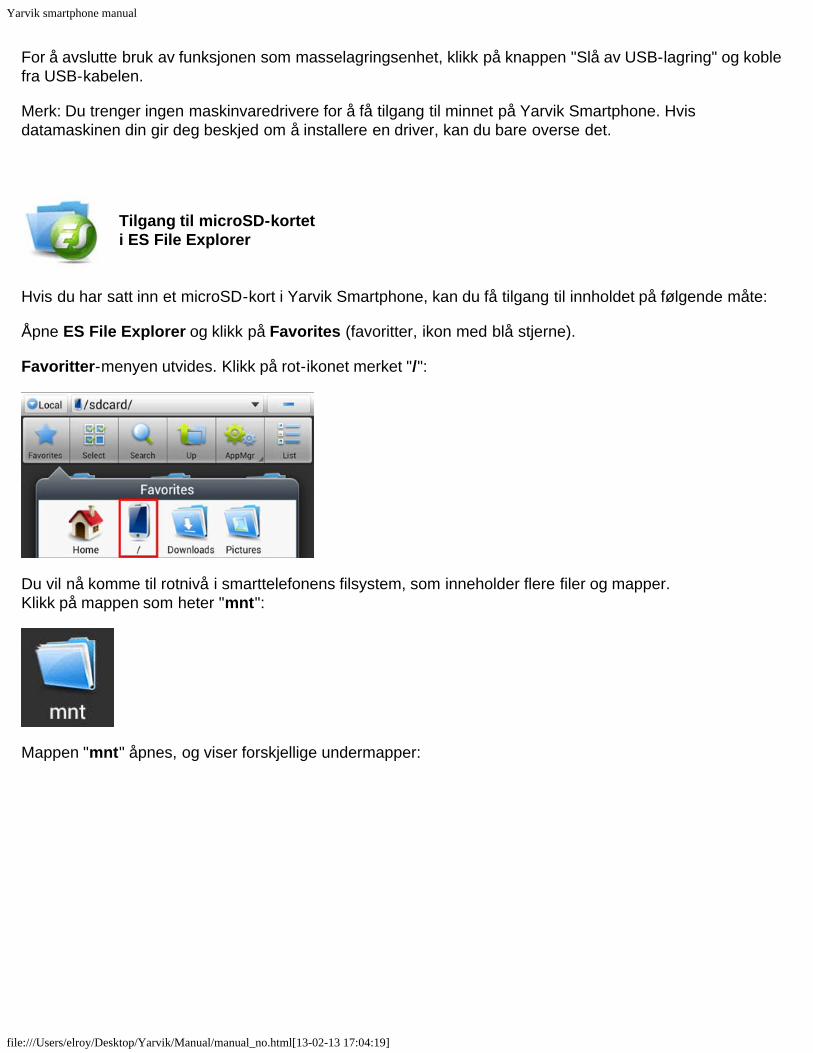
Yarvik smartphone manual
file:///Users/elroy/Desktop/Yarvik/Manual/manual_no.html[13-02-13 17:04:19]
For å avslutte bruk av funksjonen som masselagringsenhet, klikk på knappen "Slå av USB-lagring" og koblefra USB-kabelen.
Merk: Du trenger ingen maskinvaredrivere for å få tilgang til minnet på Yarvik Smartphone. Hvisdatamaskinen din gir deg beskjed om å installere en driver, kan du bare overse det.
Tilgang til microSD-korteti ES File Explorer
Hvis du har satt inn et microSD-kort i Yarvik Smartphone, kan du få tilgang til innholdet på følgende måte:
Åpne ES File Explorer og klikk på Favorites (favoritter, ikon med blå stjerne).
Favoritter-menyen utvides. Klikk på rot-ikonet merket "/":
Du vil nå komme til rotnivå i smarttelefonens filsystem, som inneholder flere filer og mapper.Klikk på mappen som heter "mnt":
Mappen "mnt" åpnes, og viser forskjellige undermapper:

Yarvik smartphone manual
file:///Users/elroy/Desktop/Yarvik/Manual/manual_no.html[13-02-13 17:04:19]
Mappen "sdcard" er det interne minnet i Yarvik Smartphone.Mappen "sdcard2" er microSD-kortet (når det er satt inn i smarttelefonens microSD-leser).
Når det er tilgjengelig, kan du også bruke microsd2-snarveien i den tidligere nevnte Favorites-menyen forrask tilgang til microSD-kortminnet.
Tilbake tilindeks
4.7 Språk & inndata
Bruk “Velg språk” for å velge brukerspråk på Yarvik Smartphone. Dette gjelder teksten på alle skjermbildene ihele systemet.Under “Android-tastatur” kan du sette opp skjermtastaturet på smarttelefonen.
Tilbake tilindeks
4.8 Dato & tid
Her kan du konfigurere dato og tid på Yarvik Smartphone.
Tilbake tilindeks
5 Apper
Yarvik Smartphone leveres med forhåndsinstallerte apper (se eksempler under).

Yarvik smartphone manual
file:///Users/elroy/Desktop/Yarvik/Manual/manual_no.html[13-02-13 17:04:19]
Utseendet på app-ikonene kan endres uten forhåndsvarsel.
Tilbake tilindeks
6 Telefonsamtaler
Utføre anropFor å utføre et telefonanrop med Yarvik Smartphone, åpne "Telefon"-appen fra Programmer-menyen eller
Android-hjemmeskjermen: Bruk talltastaturet for å taste inn telefonnummeret.

Yarvik smartphone manual
file:///Users/elroy/Desktop/Yarvik/Manual/manual_no.html[13-02-13 17:04:19]
Talltastatur.
For å utføre internasjonale anrop som krever prefikset "+", trykk og hold inne "0" på tastaturet til "+"-symboletvises.
Trykk på knappen for rør av for å ringe .
Trykk på knappen for rør på for å legge på .Du kan også utføre anrop direkte fra kontaktene dine med "Personer"-appen.
Nylige samtaler er lagret i samtaleloggen, som er tilgjengelig ved å trykke på Logger-knappen øverst på
skjermen .Kontaktene dine (fra den tidligere nevnte "Personer"-appen) er også tilgjengelig direkte fra Telefonskjermen
ved å trykke på -knappen.
Innkommende anrop
Når du mottar et anrop på Yarvik Smartphone, vil du få tre alternativer:
1 - Skyv sirkelen opp for å avvise det innkommende anropet og sende et automatisert svar med tekstmelding2 - Avvise det innkommende anropet3 - Svare på det innkommende anropet

Yarvik smartphone manual
file:///Users/elroy/Desktop/Yarvik/Manual/manual_no.html[13-02-13 17:04:19]
Alternativer under en telefonsamtale
1 - Vis talltastaturet (f.eks. for å sende DTMF-toner i menyer)2 - Aktiver/deaktiver høyttalerfunksjonen3 - Demp mikrofonen4 - Plasser samtalen på vent5 - Meny med flere alternativer: legg til ytterligere en samtalepartner (konferanse) eller spill inn samtalen.
Viderekobling
Du kan sette opp viderekoblingsfunksjonen til å viderekoble alle innkommende anrop til ett bestemttelefonnummer.
I "Telefon"-appen trykk på menyknappen og velg "Anropsinnstillinger".Velg "Taleanrop", og der kan du velge "Viderekobling" for å endre viderekoblingsalternativene.
Anrops-ID / samtale venter
Med Yarvik Smartphones "Anrops-ID"-funksjon kan du velge om du vil sende ut nummeret ditt når du ringerut.
For å endre dette, start "Telefon"-appen , trykk på menyknappen og velg "Innstillinger" -"Taleanrop" - "Ekstra innstillinger" - "Anrops-ID".I den samme menyen kan du også aktivere/deaktivere innkommende anrop når du allerede er i en annensamtale.
Tilbake tilindeks
7 Meldinger
Yarvik Smartphone kan sende SMS- og MMS-meldinger. Ta kontakt med mobilnettleverandøren forinformasjon om standardkostnadene og eventuelle ekstrakostnader for å sende tekstmeldinger til eller frautlandet.

Yarvik smartphone manual
file:///Users/elroy/Desktop/Yarvik/Manual/manual_no.html[13-02-13 17:04:19]
Sende SMS/MMS-meldinger
Åpne "Meldinger"-appen fra Android-hjemmeskjermen eller programmenyen.
Meldinger-app.
1 - Legg til vedlegg som bilder, lyd og videoer. Meldinger med vedlegg regnes automatisk som MMS-meldinger2 - Meldingsinnstillinger-meny3 - Mottaker-felt4 - Legg til mottaker5 - Oversikt over meldingssamtaler6 - Meldingsinntasting7 - Send melding-knapp
Stille inn mobilsvarnummer / spille av mobilsvarmeldingerFor å konfigurere mobilsvarnummeret i Yarvik Smartphone, åpne "Telefon"-appen fra applikasjonsmenyen
eller Android-hjemmeskjermen:
Trykk og hold nede -knappen på telefontastaturet. "Legg til nummer" vil vises på alternativskjermen.I mobilsvaralternativene kan du velge mobilsvarinnstillingene og taste inn mobilsvarnummeret.
Etter at mobilsvarnummeret er stilt inn, kan du bruke -knappen til å ringe mobilsvar ved å trykke påog hold den nede.

Yarvik smartphone manual
file:///Users/elroy/Desktop/Yarvik/Manual/manual_no.html[13-02-13 17:04:19]
Tilbake tilindeks
8 Garantierklæring
Yarvik garanterer at produktet som er kjøpt av kunden er fritt for feil i arbeid som er utført og i materialer i enperiode på 2 år fra datoen kunden har kjøpt produktet. Dersom det på noe tidspunkt i løpet av toårsperiodenforekommer feil i arbeid som er utført og i materialet, må kunden returnere produktet til forhandleren derproduktet ble kjøpt. Forhandlere skal reparere feilen eller erstatte enheten (dette er fullt og helt Yarviks valg)innenfor rimelig tid. Originalfaktura må fremvises som bevis på kjøpsdato. Yarviks skjønn av hva som trengså gjøres i saken er endelig..
Garantien dekker ikke defekter og feil som skyldes overføring av programvare, feil bruk, aggressiv bruk,tukling, mislighold, utilsiktet bruk, utilstrekkelig pleie eller andre handlinger som er utenfor Yarviks kontroll.
VIKTIG: Når du kjøper en smarttelefon fra Yarvik, blir smarttelefon levert med den siste stabile fastvaren fordenne spesielle modellen på produksjonstidspunktet. Yarvik vil ikke tilby støtte for produkter som ellers erblitt modifisert av brukeren. Yarvik vil heller ikke støtte programmeringsmodifikasjoner i fastvare ogprogramvare som er brukt i produktene, og hvis det er blitt gjort slike modifikasjoner, vil all garanti automatiskopphøre.
For å unngå å bryte disse garantibestemmelsene, bør kunden bare benytte programvare, applikasjoner ogoppgraderinger som er tilgjengelige fra Yarviks nettside www.yarvik.com.Det skal ikke brukes annen programvare eller fastvare da dette vil føre til at alle garantibestemmelser og allstøtte vil opphøre. Yarvik støtter ikke annen programvare eller fastvare enn den som er blitt installert avprodusenten eller som er tilgjengelig fra Yarviks offisielle nettside www.yarvik.com. Yarvik frasier seguttrykkelig å svare på henvendelser som gjelder uautoriserte modifikasjoner, uautorisert programvare oguautorisert fastvare.
Tilbake tilindeks
9 GNU/GPLlisensinformasjon
Vennligst les den juridiske informasjonen på Yarvik Smartphone under Innstillinger – Om Smartphone –Juridisk informasjon (du trenger Internett-forbindelse) eller gå inn påhttp://source.android.com/source/licenses.html for nærmere informasjon.
Tilbake tilindeks
Important

Yarvik smartphone manual
file:///Users/elroy/Desktop/Yarvik/Manual/manual_no.html[13-02-13 17:04:19]
10 InformationWireless LAN-Regulatory information
Depending on the model, the wireless LAN built-in into Smartphone devices can only be used in thefollowing countries: Austria, Belgium, Bulgaria, Czech Republic, Denmark, Finland, France, Germany,Greece, Hungary, Iceland, Ireland, Italy, Luxembourg, the Netherlands, Norway, Poland, Portugal, Romania,Slovakia, Slovenia, Spain, Sweden, Switzerland, Turkey and the United Kingdom.
Conditions of use
When using the IEEE 802.11b/g/n Wireless LAN standard, channels 1 to 13 (2.4 GHz...2.4835 GHz) areselectable for both indoor and outdoor use, however with restrictive conditions applying in France, Italy andNorway, as follows:
• France: When using this product indoor, all channels can be used without restrictions. Outdoor onlychannels 1 to 6 are allowed. This means that in Peer-to-Peer, the WLAN feature can only be used outside ifthe peer sets up the communication on an authorized channel (i.e., between 1 & 6). In infrastructure mode,please make sure the access point is configured to a channel from 1 to 6 before setting up the connection.
• Italy: Use of the RLAN network is governed: Disposal of Old Electrical & Electronic- with respect to private use, by the Legislative Decree of 1.8.2003, no. 259 (“Code of ElectronicCommunications”). In particular Article 104 indicates when the prior obtainment of a general authorization isrequired and Art. 105 indicates when free use is permitted;- with respect to the supply to the public of the WLAN access to telecom networks and services, by theMinisterial Decree 28.5.2003, as amended, and Art. 25 (general authorization for electronic communicationsnetworks and services) of the Code of electronic communications.
• Norway: Use of this radio equipment is not allowed in the geographical area within a radius of 20 km fromthe centre of Ny-Ålesund, Svalbard.
WEEESymbolInformation
Correct Disposal of This product (Waste Electrical & Electronic Equipment).
(Applicable in the European Union and other European countries with separate collection systems).
This marking shown on the product or its literature indicates that it should not be disposed with otherhousehold wasted at the end of its working life. To prevent possible harm to the environment or humanhealth from uncontrolled waste disposal, please separate this from other types of wastes and recycle itresponsibly to promote the sustainable reuse of material resources.Household users should contact either the retailer where they purchased this product, or their localgovernment office, for details of where and how they can take this item for environmentally safe recycling.

Yarvik smartphone manual
file:///Users/elroy/Desktop/Yarvik/Manual/manual_no.html[13-02-13 17:04:19]
Business users should contact their supplier and check the terms and conditions of the purchase contract.This product should not be mixed with other commercial wastes of disposal.
Disposal of waste batteries (applicable in the European Union and other European countries withseparate collection systems)
Either of the symbols shown next may appear on the battery or on the packaging to indicate that the batteryprovided with this product shall not be treated as household waste. On certain batteries this symbol might beused in combination with a chemical symbol. The chemical symbols for mercury (Hg) or lead (Pb) are addedif the battery contains more than 0.0005% mercury or 0.004% lead. By ensuring these batteries are disposedof correctly, you will help prevent potentially negative consequences for the environment and human healthwhich could otherwise be caused by inappropriate waste handling of the battery. The recycling of thematerials will help to conserve natural resources. In case of products that for safety, performance or dataintegrity reasons require a permanent connection with an incorporated battery, this battery should bereplaced by qualified service staff only. To ensure that the battery will be treated properly, hand over theproduct at end-of-life to the applicable collection point for the recycling of electrical and electronicequipment.
For all other batteries, please view the section on how to remove the battery from the product safely. Handthe battery over to the applicable collection point for the recycling of waste batteries. For more detailedinformation about recycling of this product or battery, please contact your local Local government Office,your household waste disposal service or the shop where you purchased the product.
When travelling to and within the United States of America, please be aware that the U.S. Department ofTransportation (DOT) recently published new regulations that apply to passengers travelling with lithiummetal batteries and lithium-ion batteries.For detailed information, visit http://safetravel.dot.gov/whats_new_batteries.html.
Safety Information
Yarvik Smartphone device
• Yarvik is not responsible for any interference that you may experience or that may be caused whenoperating this device.
• Warning: This apparatus must be earthed.
Opening or dismantling the main unit or any of its accessories, for whatever reason, could lead to damagesthat are not covered by the guarantee.
• To avoid electrical shock, do not open the cabinet. Refer servicing to qualified personnel only.

Yarvik smartphone manual
file:///Users/elroy/Desktop/Yarvik/Manual/manual_no.html[13-02-13 17:04:19]
• To prevent fire or shock hazard, do not expose your Smartphone device or any of its accessories to rain ormoisture.
• Do not use or store your Smartphone device in a location subject to heat sources, such as radiators or airducts; direct sunlight; excessive dust; moisture or rain; mechanical vibration or shock; strong magnets orspeakers that are not magnetically shielded; excessively high and low temperatures; and high humidity.
• Turning off your Smartphone device with the power button does not disconnect the device completely frommains voltage. To disconnect it completely, unplug the AC adapter or the power cord from mains. Thesocket-outlet shall be installed near the equipment and shall be easily accessible.
• Audio and picture distortion may occur if this equipment is positioned in close proximity to any equipmentemitting electromagnetic radiation.
• This apparatus is also designed for IT power system with phase to phase voltage 230V, for customers inNorway.
• Observe the following precautions to provide adequate air circulation and to ensure normal reliableoperation:- Do not use the Smartphone device and/or the AC adapter while covered or wrapped in cloth. Ensure theAC adapter operates in a clear environment.- Turn off the Smartphone device before putting the device into a bag or a carrying case.
• Do not use your Smartphone device directly on your lap. The temperature of the base of the unit will riseduring normal operation and over time could result in discomfort or burns.
• Do not use your Smartphone device while walking. Listening to music with headphones or watching theLCD screen while walking may lead to an unexpected accident and result in personal injuries.
• Using connected headphones on the Smartphone device for too long and/or setting the audio volume uptoo high when using headphones may cause serious hearing damage.
• Avoid strong beating of or to the product.
• Don’t operate the touch screen of the Smartphone device with sharp objects, as this may result inscratching the screen surface.
• Only use permitted batteries, chargers and accessories with your Smartphone device. The use of any otherproducts with the device can be dangerous and may violate the warranty regulations.
• Only use a slightly wet cotton cloth to clean the device, and only use water to wetten the cotton cloth. TheSmartphone device should not be cleaned with any sort of (glass) cleaning aid.
Wireless functionality
• If radio interference with other devices occurs while using your Smartphone device, do not use the wirelessfunctionality. Use of the wireless functionality may cause a malfunction of the devices, resulting in anaccident.
• In some situations or environments, the use of the wireless functionality might be restricted by theproprietor of the building or responsible representatives of the organization, for example on board airplanes,
Yarvik smartphone manual
file:///Users/elroy/Desktop/Yarvik/Manual/manual_no.html[13-02-13 17:04:19]
in hospitals or in any other environment where the risk of interference with other devices or services isperceived or identified as harmful. If you are uncertain about the policy applying to the use of wirelessfunctionality in a specific organization or environment, you are encouraged to first ask for authorization priorto switching it on. Consult your physician or the manufacturer of personal medical devices (pacemakers,hearing aids, etc.) regarding any restrictions on the use of wireless functionality.
• If using wireless functionality near a pacemaker, make sure it is at least 19 inches / 50 cm away from thepacemaker.
• Due to the transmission and reception properties of wireless communications, data can occasionally be lostor delayed. This can be due to the variation in radio signal strength that results from changes in thecharacteristics of the radio transmission path. Yarvik will not be held responsible for damages of any kindresulting from the delays or errors in data transmitted or received via wireless functionality, or failure ofwireless functionality to transmit or receive such data.
• If the equipment does cause harmful interference to radio/TV reception, which can be determined by turningthe equipment off and on, the user is encouraged to try to correct the interference by one or more of thefollowing measures: reorient or relocate the receiving antenna, increase the distance between the senderand the receiver, consult the dealer or an experienced radio/TV technician for help. Yarvik will not beresponsible for any radio/TV interference nor for any other undesired effect.
Wireless LAN Security
Creating security settings for the Wireless LAN is extremely important. Yarvik assumes no responsibility forany security problems that may arise from the use of the Wireless LAN.
Battery pack
Do not charge the battery pack in any way other than as described in the Start guide or as designated byYarvik in writing.
AC adapter
• It is highly recommended that you use a genuine Yarvik AC adapter supplied by Yarvik for your product.
• This AC adapter is intended for use with the Smartphone device IT products only.
• Do not place the AC adapter in contact with your skin. Remove the AC adapter away from your body if itbecomes warm and causes discomfort.
RoHS
This products has been certified as RoHS Compliant.
Yarvik smartphone manual
file:///Users/elroy/Desktop/Yarvik/Manual/manual_no.html[13-02-13 17:04:19]
YARVIK.COM
Tilbake tilindeks

Yarvik smartphone manual
file:///Users/elroy/Desktop/Yarvik/Manual/manual_sl.html[13-02-13 17:04:28]
Kazalo SELECT LANGUAGE
1 Pred prvo uporabo2 Zagon pametnegatelefona3 Domači zaslonAndroid3.1 Dodajanjepripomočkov in bližnjicna vaš domači zaslon3.2 Nastavitev ozadja3.3 Meni Apps(Aplikacije)4 Nastavitev vašegapametnega telefona4.1 Meni Settings(Nastavitve)4.2 WiFi in Bluetooth4.3 Audio Profiles(Zvočni profili)4.4 Display (Zaslon)4.5 Apps (Aplikacije)4.6 Storage(Shranjevanje) in dostopdo pomnilnika MicroSD4.7 Language & input(Jezik in vnosa)4.8 Date & time (Datumin ura)5 Apps (Aplikacije)

Yarvik smartphone manual
file:///Users/elroy/Desktop/Yarvik/Manual/manual_sl.html[13-02-13 17:04:28]
6 Telefonski klici7 Pošiljanje sporočil8 Garancijska izjava9 Informacije o splošnijavni licenci GNU10 Importantinformation
1 Pred prvo uporabo
Dragi uporabnik,
Hvala, ker ste kupili naš izdelek.Za hitro in preprosto uporabo svojega novega pametnega telefona Yarvik pred uporabo natančno preberiteta navodila.
Upamo, da vam bo vaš pametni telefon Yarvik karseda dolgo v veliko veselje!
Opomba:
• Pametni telefon Yarvik jevisokonatančen elektronskiizdelek. Pametnega telefona neposkušajte razstaviti, sajgarancija v tem primeru ne velja,naprava pa se lahko pokvari.
• Pazite, da izdelka s čim neudarite in da vam ne pade iz rok.
• Pametnega telefona neuporabljajte v okolju z visokimiali nizkimi temperaturami ali vokolju, kjer lahko naprava pridev stik z vlago, prahom alimagnetnimi polji.
• Pametnega telefona neizpostavljajte močni sončnisvetlobi dlje časa.
• Zaslona na dotik ne upravljajtez ostrimi predmeti, saj ga lahkoopraskate.

Yarvik smartphone manual
file:///Users/elroy/Desktop/Yarvik/Manual/manual_sl.html[13-02-13 17:04:28]
• Zaradi predolge uporabepametnega telefona s slušalkamiin/ali prevelike jakosti zvokalahko pride do hude okvaresluha.
• Ko pametni telefon uporabljates slušalkami, ne prečkajte cestein ne vozite motornega vozila alikolesa, saj lahko povzročiteprometno nesrečo.
• S pametnim telefonom Yarvikuporabljajte le dovoljenebaterije, polnilnike in dodatke.Uporaba katerih koli drugihizdelkov je lahko nevarna inlahko pomeni kršitevgarancijskih pogojev.
• Za čiščenje pametnegatelefona uporabljajte le rahlonavlaženo bombažno krpico, kiste jo zmočili le z vodo.Pametnega telefona ne smetečistiti s čistilnimi sredstvi.
Pametni telefon Yarvik lahko začnete uporabljati takoj, ko ga vzamete iz škatle, ne da bi morali najprejnapolniti baterijo.Najbolje je, da baterijo uporabljate, dokler je mogoče, in jo popolnoma napolnite šele, ko se prvič popolnomaizprazni.Če pametnega telefona, ko ga vzamete iz škatle, ne morete vklopiti, je baterija že popolnoma izpraznjena injo morate seveda najprej napolniti.
Vrni se nakazalo
2 Zagon pametnegatelefona
Ko pametni telefon Yarvik prvikrat vklopite, se prikaže zagonsko zaporedje.Prvi zagon lahko traja nekaj časa, približno 2-3 minute.Po zagonskem zaporedju je pametni telefon dokončno zagnan. Zagledali boste zaklenjeni zaslon Android.

Yarvik smartphone manual
file:///Users/elroy/Desktop/Yarvik/Manual/manual_sl.html[13-02-13 17:04:28]
Zaklenjeni zaslon Android
Pametni telefon odklenete tako, da zaklepno vrstico (A) povlečete v desno. Nato se boste znašli nadomačem zaslonu Android.
Vrni se nakazalo
3 Domači zaslon Android

Yarvik smartphone manual
file:///Users/elroy/Desktop/Yarvik/Manual/manual_sl.html[13-02-13 17:04:28]
Domači zaslon Android
Na vrhu zaslona pametnega telefona lahko vedno najdete vrstico stanja.V vrstici stanja so prikazane sistemske informacije, spodnja menijska vrstica pa vsebuje funkcijske gumbe.
1 – indikator signala Wi-Fi2 – signal brezžičnega omrežja za SIM1 in SIM2 ter indikator stanja baterije3 – sistemski čas4 – bližnjice do aplikacij5 – pripomoček (analogna ura)6 – gumb "Nazaj" – vrne vas na prejšnjo zaslonsko sliko ali prejšnjo spletno stran, ko uporabljate brskalnik7 – gumb "Domov" – vrne vas na domači zaslon Android8 – meni aplikacij in pripomočkov9 – večopravilnostni gumb
Domači zaslon vsebuje več strani, do katerih lahko dostopate tako, da potegnete domači zaslon vlevo/desno.
Če želite videti katere aplikacije delujejo v ozadju, lahko dostopate do večopravilnega pogleda, tako dapritisnete večopravilnostni gumb (9).

Yarvik smartphone manual
file:///Users/elroy/Desktop/Yarvik/Manual/manual_sl.html[13-02-13 17:04:28]
Kliknite na delujočo aplikacijo v večopravilnostnem pogledu in hitro prkelopite nanjo. Delujočo aplikacijolahko zaprete tako, da jo pritisnete in nekaj časa držite ter kliknete "Remove from list" ("Odstrani sseznama").
Vrni se nakazalo
3.1
Dodajanjepripomočkov inbližnjic nadomači zaslon
Če želite dodati pripomoček, pritisnite gumb za aplikacije in pripomočke spodaj na sredini domačega
zaslona:
Na naslednjem zaslonu najdete bodisi vse nameščene aplikacije ali pripomočke. Ogledate si jih lahko spritiskom na "Apps" ("Aplikacije") oz. "Widgets" ("Pripomočki") na vrhu zaslona.Pritisnite "Widgets" ("Pripomočki") in si poglejte vse razpoložljive pripomočke. Med ogledom vsehpripomočkov lahko potegnete zaslon in brskate po naslednji strani (če je na voljo).Pritisnite in držite želeni pripomoček, da se prikaže domači zaslon, nato pa pripomoček spustite na katerokoli prazno mesto na domačem zaslonu.

Yarvik smartphone manual
file:///Users/elroy/Desktop/Yarvik/Manual/manual_sl.html[13-02-13 17:04:28]
Če želite dodati bližnjico do aplikacije, pritisnite gumb za aplikacije in pripomočke, ki ga najdete spodaj na
sredini domačega zaslona:
Na naslednjem zaslonu najdete bodisi vse nameščene aplikacije ali pripomočke. Ogledate si jih lahko spritiskom na "Apps" ("Aplikacije") oz. "Widgets" ("Pripomočki") na vrhu zaslona.Pritisnite "Apps" ("Aplikacije") in si oglejte vse nameščene aplikacije.Pritisnite in držite želeno aplikacijo, da se prikaže domači zaslon, nato pa bližnjico spustite na katero koliprazno mesto na domačem zaslonu.
Če želite pripomočke in/ali bližnjice do aplikacij odstraniti z domačega zaslona, jih pritisnite in držite terpovlecite na ikono koša "Remove" ("Odstrani"), ki se prikaže v zgornjem delu domačega zaslona.
Vrni se nakazalo
3.2 Nastavitev ozadja
Če želite spremeniti ozadje domačega zaslona, pritisnite in držite domači zaslon, dokler se ne pojavi meni"Select Wallpaper from" ("Izbira ozadja iz").Izberete lahko med "Live Wallpapers" ("Živa ozadja") (tj. animiranimi ozadji), "Gallery" ("Galerija") (tj.foto/video galerijo) ali "Wallpapers" ("Ozadja") (tj. privzetimi statičnimi slikami).
Vrni se nakazalo
3.3 Meni Apps(Aplikacije)
Pritisnite gumb za aplikacije in pripomočke spodaj v sredini domačega zaslona:
Ko sistem prikaže pripomočke, pritisnite "Apps" ("Aplikacije") in si oglejte vse nameščene aplikacije.
Tukaj lahko najdete vse predhodno nameščene programe ali "aplikacije", kot tudi dodatne aplikacije, ki ste jihnamestili sami.Aplikacijo lahko zaženete tako, da samo pritisnete pripadajočo ikono.

Yarvik smartphone manual
file:///Users/elroy/Desktop/Yarvik/Manual/manual_sl.html[13-02-13 17:04:28]
Zaslon aplikacij
Vrni se nakazalo
4
Nastavitevvašegapametnegatelefona Yarvik
4.1 Meni Settings(Nastavitve)
Pritisnite ikono nastavitev v meniju aplikacij in vstopite v meni Settings (Nastavitve). V meniju Settings(Nastavitve) lahko najdete možnosti za nastavitev svojega pametnega telefona Yarvik.

Yarvik smartphone manual
file:///Users/elroy/Desktop/Yarvik/Manual/manual_sl.html[13-02-13 17:04:28]
Meni nastavitev
Poglejmo si najbolj pomembne dele:
Vrni se nakazalo
4.2 Wi-Fi in

Yarvik smartphone manual
file:///Users/elroy/Desktop/Yarvik/Manual/manual_sl.html[13-02-13 17:04:28]
BluetoothWi-Fi
Nastavite povezavo z brezžičnim omrežjem Wi-Fi.Povlecite gumb On/Off (vklop/izklop) na "On" ("Vklop") in aktivirajte Wi-Fi.
Razpoložljiva omrežja Wi-Fi se prikažejo na seznamu omrežij na desni strani zaslona. Dotaknite se želenegaomrežja. Če je omrežje zavarovano, boste morali vnesti omrežni varnostni ključ.
Pritisnite gumb "Connect" ("Poveži") in pametni telefon se bo povezal v omrežje.Ko se pod imenom omrežja pojavi "Connected" ("Povezano") in se na spodnji vrstici stanja prikaže ikona zabrezžični sprejem, ste uspešno povezani na brezžično omrežje.
Ogled ethernetnega naslova vašega pametnega telefona Yarvik
Ko imate odprt zaslon z nastavitvami Wi-Fi, kliknite menijski gumb v spodnjem desnem kotu.
Pritisnite "Advanced" ("Napredno") v odvitem meniju.
Ethernetni naslov vašega Wi-Fi se prikaže na naslednjem zaslonu "Advanced Wi-Fi" ("Napredno Wi-Fi") pod"MAC address" ("Ethernetni naslov").
Bluetooth
Vaš pametni telefon Yarvik je opremljen z vgrajenim modulom Bluetooth za povezovanje z združljivimizunanjimi napravami Bluetooth, kot so tipkovnice, zvočniki in slušalke, pa tudi slušalke in avtomobilskikompleti Bluetooth za prostoročno telefoniranje.Povlecite gumb vklop/izklop Bluetooth na "Vklop" in aktivirajte Bluetooth.
Ko je Bluetooth vklopljen, bo vaš pametni telefon Yarvik samodejno začel iskati naprave Bluetooth v bližini.Vedno lahko ročno iščete Bluetooth naprave, tako da kliknete na "Search for Devices" ("Išči naprave") v

Yarvik smartphone manual
file:///Users/elroy/Desktop/Yarvik/Manual/manual_sl.html[13-02-13 17:04:28]
zgornjem desnem kotu zaslona.Za vzpostavitev povezave med pametnim telefonom in zunanjimi napravami bo te naprave morda trebapreklopiti v "način vzpostavljanja povezave". Za več informacij glejte navodila za uporabo zadevne zunanjenaprave.
Vse odkrite naprave se bodo pojavile v seznamu "Available Devices" ("Razpoložljive naprave"):
Za vzpostavitev povezave med vašim pametnim telefonom Yarvik in najdeno napravo Bluetooth napravokliknite.Pojavilo se bo okno "Bluetooth pairing request" ("Zahteva za povezovanje Bluetooth"):
Večina naprav Bluetooth zahteva pin kodo za povezavo. Ta koda je običajno 0000 ali 1234. Če je koda PINdrugačna, glejte navodila za uporabo svoje naprave Bluetooth.Ko ste vnesli ustrezno pin kodo, pritisnite "OK" ("V redu").
Pametni telefon Yarvik bo začel vzpostavljati povezavo z napravo Bluetooth in po nekaj sekundah se bopovezava vzpostavila, pod zadevno napravo Bluetooth na seznamu "Available Devices" ("Razpoložljivenaprave") pa se bo prikazalo sporočilo "Connected" ("Povezano"):
S svojim pametnim telefonom Yarvik lahko povežete več naprav Bluetooth (npr. miško in tipkovnico) hkrati.
Vrni se nakazalo

Yarvik smartphone manual
file:///Users/elroy/Desktop/Yarvik/Manual/manual_sl.html[13-02-13 17:04:28]
4.3 Audio Profiles(Zvočni profili)
Tukaj lahko spremenite jakost zvoka pametnega telefona, npr. samo vibriranje ali vibriranje in zvočnoobvestilo o dohodnih klicih/sporočilih.
Vrni se nakazalo
4.4 Display(Zaslon)
Tukaj lahko spremenite svetlost zaslona, velikost črk in samodejni čas spanja.Višja kot je svetlost zaslona, večja je poraba energije. To bo veliko hitreje izpraznilo vašo baterijo.Če ne želite, da se zaslon samodejno zavrti, ko pametni telefon nagnete, lahko to funkcijoomogočite/onemogočite v nastavitvi Auto-rotate screen (Samodejno vrtenje zaslona).
Vrni se nakazalo
4.5 Apps(Aplikacije)
Tukaj lahko upravljate aplikacije, ki so nameščene v vašem pametnem telefonu Yarvik.Aplikacije, ki ste jih namestili, lahko kliknete in si ogledate informacije o njih, z gumbom "Uninstall"("Odstrani") pa jih lahko po želji tudi odstranite.Predhodno nameščenih privzetih aplikacij (npr. računala) ni mogoče odstraniti.
Vrni se nakazalo
4.6
Storage(Shranjevanje)in dostop dopomnilnikaMicroSD
Pokaže vam informacije o notranjem pomnilniku. Ko je vstavljena kartica MicroSD, lahko tukaj najdete tudiinformacije o pomnilniku te kartice.
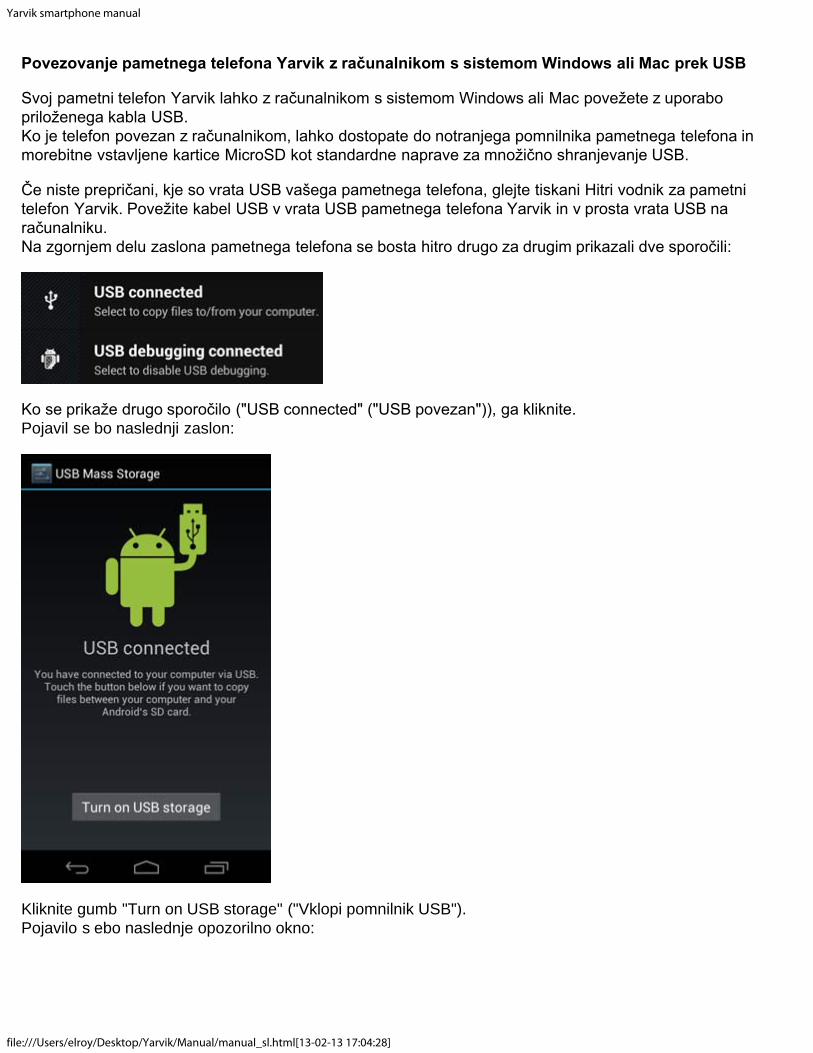
Yarvik smartphone manual
file:///Users/elroy/Desktop/Yarvik/Manual/manual_sl.html[13-02-13 17:04:28]
Povezovanje pametnega telefona Yarvik z računalnikom s sistemom Windows ali Mac prek USB
Svoj pametni telefon Yarvik lahko z računalnikom s sistemom Windows ali Mac povežete z uporabopriloženega kabla USB.Ko je telefon povezan z računalnikom, lahko dostopate do notranjega pomnilnika pametnega telefona inmorebitne vstavljene kartice MicroSD kot standardne naprave za množično shranjevanje USB.
Če niste prepričani, kje so vrata USB vašega pametnega telefona, glejte tiskani Hitri vodnik za pametnitelefon Yarvik. Povežite kabel USB v vrata USB pametnega telefona Yarvik in v prosta vrata USB naračunalniku.Na zgornjem delu zaslona pametnega telefona se bosta hitro drugo za drugim prikazali dve sporočili:
Ko se prikaže drugo sporočilo ("USB connected" ("USB povezan")), ga kliknite.Pojavil se bo naslednji zaslon:
Kliknite gumb "Turn on USB storage" ("Vklopi pomnilnik USB").Pojavilo s ebo naslednje opozorilno okno:

Yarvik smartphone manual
file:///Users/elroy/Desktop/Yarvik/Manual/manual_sl.html[13-02-13 17:04:28]
Za potrditev kliknite "OK" ("V redu").Notranji pomnilnik pametnega telefona Yarvik se bo v datotečnem sistemu vašega računalnika prikazal kotpogon za množično shranjevanje. Uporabite ga lahko npr. za kopiranje datotek iz pametnega telefona Yarvikin v njega.Če je v vašem pametnem telefonu vstavljena kartica MicroSD, bo računalnik kartico prepoznal kot drugipogon za množično shranjevanje.
Če želite prenehati uporabljati funkcijo naprave za množično shranjevanje, kliknite gumb "Turn off USBstorage" ("Izklopi pomnilnik USB") in odstranite kabel USB.
Opomba: za dostop do pomnilnika pametnega telefona Yarvik gonilniki strojne opreme niso potrebni. Če vašračunalnik zahteva namestitev kakršnega koli gonilnika, lahko poziv preprosto prezrete.
Dostop do kartice MicroSDv aplikaciji ES File Explorer
Če ste v pametni telefon Yarvik vstavili kartico MicroSD, lahko do njene vsebine dostopate tako, kot jeopisano v nadaljevanju.
Odprite aplikacijo ES File Explorer in kliknite gumb Favorites (Priljubljene) (z ikono modre zvezde).
Prikaže se meni Favorites (Priljubljene). Kliknite ikono "korenskega imenika", ki je označena z "/":
Tako boste prišli do "korenskega imenika" datotečnega sistema pametnega telefona, ki vsebuje številnedatoteke in mape.Poiščite in kliknite mapo "mnt":

Yarvik smartphone manual
file:///Users/elroy/Desktop/Yarvik/Manual/manual_sl.html[13-02-13 17:04:28]
Mapa "mnt" se odpre in pokaže številne mape:
Mapa "sdcard" je notranji pomnilnik vašega pametnega telefona Yarvik.Mapa "sdcard2" je vaša kartica MicroSD (ko je vstavljena v režo za kartico MicroSD na pametnem telefonu).
Ko je kartica na voljo, lahko za hiter dostop do pomnilnika kartice MicroSD uporabite tudi bližnjico microsd2v prej omenjenem meniju Favorites (Priljubljene).
Vrni se nakazalo
4.7Language &input (Jezik invnosa)
Za izbiro jezika prikaza pametnega telefona Yarvik uporabite "Select language" ("Izbira jezika"). Izbrani jezikvelja za vsa zaslonska besedila v celotnem sistemu.V možnosti "Android keyboard" ("Tipkovnica Android") lahko nastavite zaslonsko tipkovnico svojegapametnega telefona.
Vrni se nakazalo
4.8 Date & time(Datum in ura)
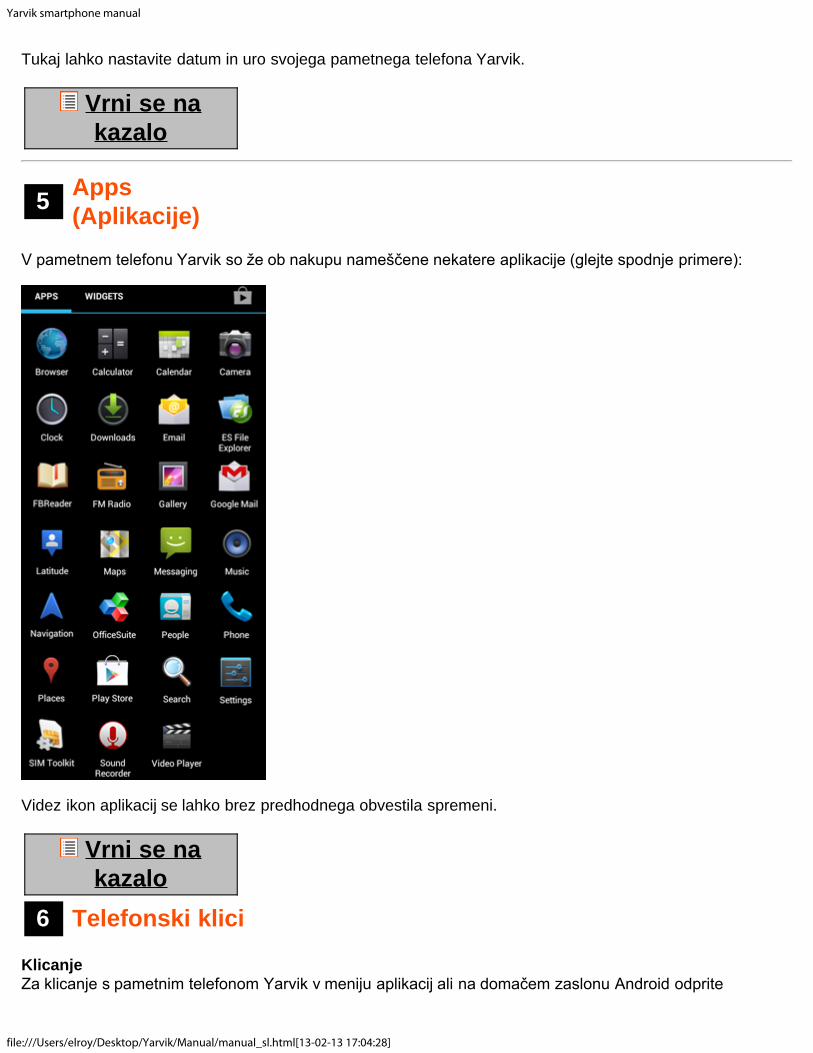
Yarvik smartphone manual
file:///Users/elroy/Desktop/Yarvik/Manual/manual_sl.html[13-02-13 17:04:28]
Tukaj lahko nastavite datum in uro svojega pametnega telefona Yarvik.
Vrni se nakazalo
5 Apps(Aplikacije)
V pametnem telefonu Yarvik so že ob nakupu nameščene nekatere aplikacije (glejte spodnje primere):
Videz ikon aplikacij se lahko brez predhodnega obvestila spremeni.
Vrni se nakazalo
6 Telefonski klici
KlicanjeZa klicanje s pametnim telefonom Yarvik v meniju aplikacij ali na domačem zaslonu Android odprite

Yarvik smartphone manual
file:///Users/elroy/Desktop/Yarvik/Manual/manual_sl.html[13-02-13 17:04:28]
aplikacijo "Phone" ("Telefon"): Za vnos telefonske številke uporabite številčno tipkovnico telefona.
Telefonska tipkovnica
Za mednarodne klice, ki zahtevajo predpono "+", na tipkovnici pritisnite in držite tipko "0", dokler se ne pojavi"+".
Za vzpostavitev klica pritisnite gumb za klicanje .
Za prekinitev klica pritisnite gumb za prekinitev .Kličete lahko tudi neposredno iz stikov v aplikaciji "People" ("Osebe").
Nedavni klici so shranjeni na zaslonu Dnevnik klicev, ki ga lahko odprete s pritiskom na gumb Dnevnik na vrhu zaslona "Phone" ("Telefon").Do svojih stikov (v prej omenjeni aplikaciji "People" ("Osebe")) lahko dostopate tudi neposredno z zaslona
"Phone" ("Telefon"), in sicer tako, da pritisnete gumb .
Dohodni telefonski klici
Ko na pametni telefon Yarvik prejmete klic, imate 3 možnosti:
1 – Če želite klic prezreti in poslati samodejni odgovor v obliki besedilnega sporočila, povlecite krog navzgor.2 – Prezri dohodni telefonski klic.3 – Sprejmi dohodni telefonski klic.

Yarvik smartphone manual
file:///Users/elroy/Desktop/Yarvik/Manual/manual_sl.html[13-02-13 17:04:28]
Možnosti med telefonskim klicem
1 – Prikaži telefonsko tipkovnico (npr. za menije z možnostjo DTMF).2 – Omogoči/onemogoči funkcijo zvočnika.3 – Utišaj mikrofon.4 – Daj telefonski klic na čakanje.5 – Meni z dodatnima možnostma: dodaj dodatni telefonski klic (konferenčni klic) ali snemaj telefonski klic.
Posredovanje klicev
Za posredovanje vseh dohodnih telefonskih klicev na določeno telefonsko številko lahko nastavite funkcijoposredovanja klicev.
V aplikaciji "Phone" ("Telefon") pritisnite menijski gumb in izberite "Call settings" ("Nastavitveklica").Izberite "Voice call" ("Glasovni klic"), kjer lahko možnosti posredovanja spremenite tako, da izberete "Callforwarding" ("Posredovanje klicev").
ID klicatelja/čakajoči klic
S funkcijo ID klicatelja svojega pametnega telefona Yarvik lahko izberete, ali želite z izhodnimi telefonskimiklici poslati svojo številko.
Če želite to nastavitev spremeniti, zaženite aplikacijo "Phone" ("Telefon") , pritisnite menijsko tipko
in izberite "Settings" ("Nastavitve") - "Voice call" ("Glasovni klic") - "Additional settings" ("Dodatnenastavitve") - "Caller ID" ("ID klicatelja").Poleg tega lahko v tem meniju med telefonskim pogovorom omogočite/onemogočite dohodne telefonskeklice.
Vrni se nakazalo

Yarvik smartphone manual
file:///Users/elroy/Desktop/Yarvik/Manual/manual_sl.html[13-02-13 17:04:28]
7 Pošiljanjesporočil
S svojim pametnim telefonom Yarvik lahko pošiljate sporočila SMS in MMS. Za standardne tarife in dodatnestroške pošiljanja sporočil v tuje države ali iz njih se obrnite na svojega mobilnega operaterja.
Pošiljanje sporočil SMS/MMS
Na domačem zaslonu Android ali v meniju aplikacij odprite aplikacijo "Messaging" ("Pošiljanje sporočil")
.
Aplikacija za pošiljanje sporočil
1 – Dodajanje prilog, kot so slike, zvočne datoteke in videi. Sporočila s prilogo se samodejno štejejo zasporočila MMS.2 – Meni "Nastavitve sporočil".3 – Polje prejemnika.4 – Dodaj prejemnika.5 – Pregled pogovora s sporočili.6 – Vnos sporočila.7 – Gumb "Pošlji sporočilo".
Nastavitev številke glasovne pošte/predvajanje sporočil glasovne pošteČe želite v svojem pametnem telefonu Yarvik nastaviti storitev glasovne pošte, v meniju aplikacij ali na
domačem zaslonu Android odprite aplikacijo "Phone" ("Telefon"):

Yarvik smartphone manual
file:///Users/elroy/Desktop/Yarvik/Manual/manual_sl.html[13-02-13 17:04:28]
Na telefonski tipkovnici pritisnite in držite gumb . Na zaslonu možnosti se bo prikazalo "Add number"("Dodaj številko"). V možnostih glasovne pošte lahko izberete nastavitve glasovne pošte in vnesete številkostoritve glasovne pošte.
Ko je številka storitve glasovne pošte nastavljena, lahko za klicanje glasovne pošte uporabite gumb , in sicer tako, da ga pritisnete in držite.
Vrni se nakazalo
8 Garancijska izjava
Podjetje Yarvik jamči, da bo kupljeni izdelek v obdobju 2 let od datuma nakupa brez napak v izdelavi inmaterialu. Če se kadar koli v času garancije na izdelku pojavi napaka v izdelavi ali materialu, mora kupecizdelek vrniti prodajalcu, pri katerem ga je kupil. Prodajalec ga bo v razumnem času popravil ali zamenjal (popresoji podjetja Yarvik). Potreben je originalni račun, kot dokazilo o datumu nakupa. Mnenje podjetja Yarvik vzvezi s tem je dokončno.
Ta garancija ne pokriva okvar ali napak, ki so posledica prenosa programske opreme, zlorabe, nepravilnegadelovanja, nedovoljenih posegov, malomarnosti, neustrezne uporabe, nezadostne nege ali kakršnega kolidejanja, ki je izven nadzora podjetja Yarvik.
POMEMBNO: ob nakupu pametnega telefona podjetja Yarvik bo v njem nameščena najnovejša stabilnarazličica strojne programske opreme, ki je bila za ta model na voljo v času, ko je bil enota proizvedena.Podjetje Yarvik ne bo nudilo podpore za izdelke, ki so bili kakor koli prirejeni s strani končnega uporabnika, inprav tako Yarvik ne podpira programskih sprememb na strojni opremi in programski opremi, ki se uporabljatav tem izdelku. Če je prišlo do kakršne koli takšne modifikacije, bodo vse garancije samodejno neveljavne.
Kupec mora uporabljati le uradne aplikacije, programsko opremo in nadgradnje, ki so dostopne na spletnemmestu podjetja Yarvik na www.yarvik.com, sicer tukaj ponujena garancija ne velja.Uporabljati ne smete nobene druge programske ali strojne opreme, saj bo takšna uporaba samodejnoizničila vse garancije in podporo. Podjetje Yarvik ne podpira uporabe nobene druge programske ali strojneprogramske opreme, razen tiste, ki jo je v izdelek namestil proizvajalec ali ki je dostopna na uradnemspletnem mestu podjetja Yarvik na www.yarvik.com. Podjetje Yarvik eksplicitno zavrača odgovor na kakršnokoli poizvedbo v zvezi z nepooblaščenimi modifikacijami in nepooblaščeno programsko ali strojno opremo.
Vrni se nakazalo
9 Informacije osplošni javni licenci
Preberite pravne informacije, ki so v vašem pametnem telefonu Yarvik dostopne v Settings (Nastavitve) –
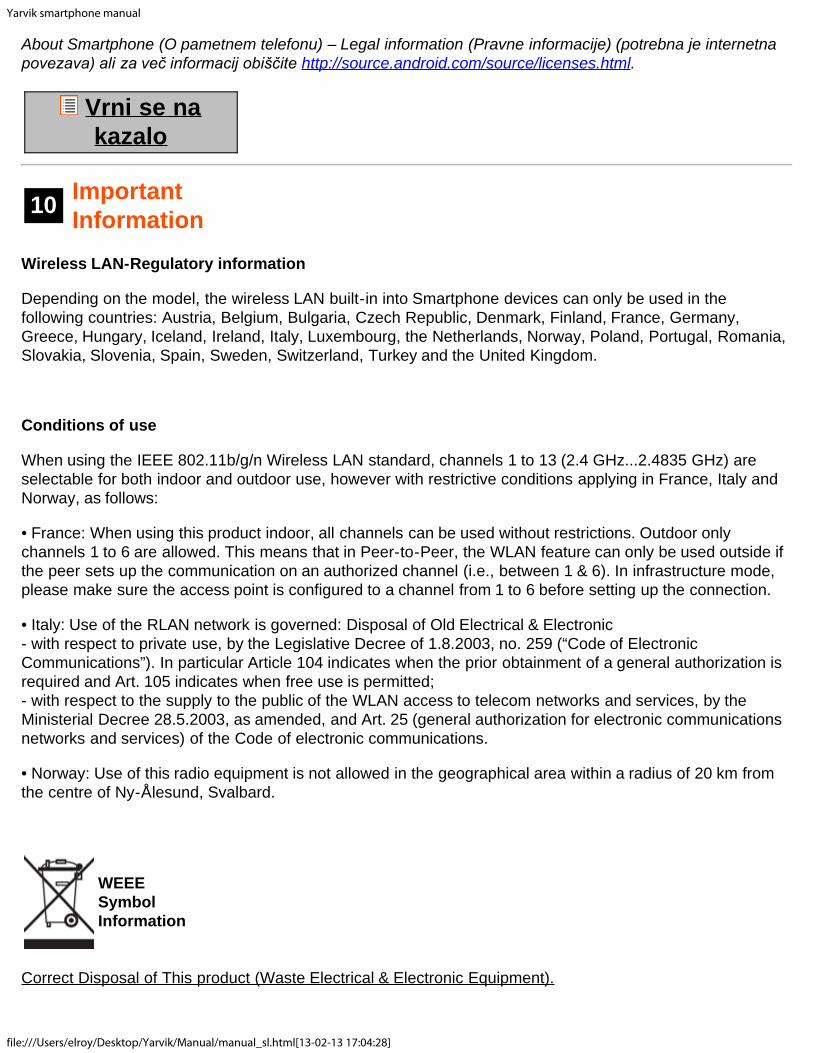
Yarvik smartphone manual
file:///Users/elroy/Desktop/Yarvik/Manual/manual_sl.html[13-02-13 17:04:28]
About Smartphone (O pametnem telefonu) – Legal information (Pravne informacije) (potrebna je internetnapovezava) ali za več informacij obiščite http://source.android.com/source/licenses.html.
Vrni se nakazalo
10 ImportantInformation
Wireless LAN-Regulatory information
Depending on the model, the wireless LAN built-in into Smartphone devices can only be used in thefollowing countries: Austria, Belgium, Bulgaria, Czech Republic, Denmark, Finland, France, Germany,Greece, Hungary, Iceland, Ireland, Italy, Luxembourg, the Netherlands, Norway, Poland, Portugal, Romania,Slovakia, Slovenia, Spain, Sweden, Switzerland, Turkey and the United Kingdom.
Conditions of use
When using the IEEE 802.11b/g/n Wireless LAN standard, channels 1 to 13 (2.4 GHz...2.4835 GHz) areselectable for both indoor and outdoor use, however with restrictive conditions applying in France, Italy andNorway, as follows:
• France: When using this product indoor, all channels can be used without restrictions. Outdoor onlychannels 1 to 6 are allowed. This means that in Peer-to-Peer, the WLAN feature can only be used outside ifthe peer sets up the communication on an authorized channel (i.e., between 1 & 6). In infrastructure mode,please make sure the access point is configured to a channel from 1 to 6 before setting up the connection.
• Italy: Use of the RLAN network is governed: Disposal of Old Electrical & Electronic- with respect to private use, by the Legislative Decree of 1.8.2003, no. 259 (“Code of ElectronicCommunications”). In particular Article 104 indicates when the prior obtainment of a general authorization isrequired and Art. 105 indicates when free use is permitted;- with respect to the supply to the public of the WLAN access to telecom networks and services, by theMinisterial Decree 28.5.2003, as amended, and Art. 25 (general authorization for electronic communicationsnetworks and services) of the Code of electronic communications.
• Norway: Use of this radio equipment is not allowed in the geographical area within a radius of 20 km fromthe centre of Ny-Ålesund, Svalbard.
WEEESymbolInformation
Correct Disposal of This product (Waste Electrical & Electronic Equipment).

Yarvik smartphone manual
file:///Users/elroy/Desktop/Yarvik/Manual/manual_sl.html[13-02-13 17:04:28]
(Applicable in the European Union and other European countries with separate collection systems).
This marking shown on the product or its literature indicates that it should not be disposed with otherhousehold wasted at the end of its working life. To prevent possible harm to the environment or humanhealth from uncontrolled waste disposal, please separate this from other types of wastes and recycle itresponsibly to promote the sustainable reuse of material resources.Household users should contact either the retailer where they purchased this product, or their localgovernment office, for details of where and how they can take this item for environmentally safe recycling.Business users should contact their supplier and check the terms and conditions of the purchase contract.This product should not be mixed with other commercial wastes of disposal.
Disposal of waste batteries (applicable in the European Union and other European countries withseparate collection systems)
Either of the symbols shown next may appear on the battery or on the packaging to indicate that the batteryprovided with this product shall not be treated as household waste. On certain batteries this symbol might beused in combination with a chemical symbol. The chemical symbols for mercury (Hg) or lead (Pb) are addedif the battery contains more than 0.0005% mercury or 0.004% lead. By ensuring these batteries are disposedof correctly, you will help prevent potentially negative consequences for the environment and human healthwhich could otherwise be caused by inappropriate waste handling of the battery. The recycling of thematerials will help to conserve natural resources. In case of products that for safety, performance or dataintegrity reasons require a permanent connection with an incorporated battery, this battery should bereplaced by qualified service staff only. To ensure that the battery will be treated properly, hand over theproduct at end-of-life to the applicable collection point for the recycling of electrical and electronicequipment.
For all other batteries, please view the section on how to remove the battery from the product safely. Handthe battery over to the applicable collection point for the recycling of waste batteries. For more detailedinformation about recycling of this product or battery, please contact your local Local government Office,your household waste disposal service or the shop where you purchased the product.
When travelling to and within the United States of America, please be aware that the U.S. Department ofTransportation (DOT) recently published new regulations that apply to passengers travelling with lithiummetal batteries and lithium-ion batteries.For detailed information, visit http://safetravel.dot.gov/whats_new_batteries.html.
Safety Information
Yarvik Smartphone device
• Yarvik is not responsible for any interference that you may experience or that may be caused when

Yarvik smartphone manual
file:///Users/elroy/Desktop/Yarvik/Manual/manual_sl.html[13-02-13 17:04:28]
operating this device.
• Warning: This apparatus must be earthed.
Opening or dismantling the main unit or any of its accessories, for whatever reason, could lead to damagesthat are not covered by the guarantee.
• To avoid electrical shock, do not open the cabinet. Refer servicing to qualified personnel only.
• To prevent fire or shock hazard, do not expose your Smartphone device or any of its accessories to rain ormoisture.
• Do not use or store your Smartphone device in a location subject to heat sources, such as radiators or airducts; direct sunlight; excessive dust; moisture or rain; mechanical vibration or shock; strong magnets orspeakers that are not magnetically shielded; excessively high and low temperatures; and high humidity.
• Turning off your Smartphone device with the power button does not disconnect the device completely frommains voltage. To disconnect it completely, unplug the AC adapter or the power cord from mains. Thesocket-outlet shall be installed near the equipment and shall be easily accessible.
• Audio and picture distortion may occur if this equipment is positioned in close proximity to any equipmentemitting electromagnetic radiation.
• This apparatus is also designed for IT power system with phase to phase voltage 230V, for customers inNorway.
• Observe the following precautions to provide adequate air circulation and to ensure normal reliableoperation:- Do not use the Smartphone device and/or the AC adapter while covered or wrapped in cloth. Ensure theAC adapter operates in a clear environment.- Turn off the Smartphone device before putting the device into a bag or a carrying case.
• Do not use your Smartphone device directly on your lap. The temperature of the base of the unit will riseduring normal operation and over time could result in discomfort or burns.
• Do not use your Smartphone device while walking. Listening to music with headphones or watching theLCD screen while walking may lead to an unexpected accident and result in personal injuries.
• Using connected headphones on the Smartphone device for too long and/or setting the audio volume uptoo high when using headphones may cause serious hearing damage.
• Avoid strong beating of or to the product.
• Don’t operate the touch screen of the Smartphone device with sharp objects, as this may result inscratching the screen surface.
• Only use permitted batteries, chargers and accessories with your Smartphone device. The use of any otherproducts with the device can be dangerous and may violate the warranty regulations.
• Only use a slightly wet cotton cloth to clean the device, and only use water to wetten the cotton cloth. TheSmartphone device should not be cleaned with any sort of (glass) cleaning aid.

Yarvik smartphone manual
file:///Users/elroy/Desktop/Yarvik/Manual/manual_sl.html[13-02-13 17:04:28]
Wireless functionality
• If radio interference with other devices occurs while using your Smartphone device, do not use the wirelessfunctionality. Use of the wireless functionality may cause a malfunction of the devices, resulting in anaccident.
• In some situations or environments, the use of the wireless functionality might be restricted by theproprietor of the building or responsible representatives of the organization, for example on board airplanes,in hospitals or in any other environment where the risk of interference with other devices or services isperceived or identified as harmful. If you are uncertain about the policy applying to the use of wirelessfunctionality in a specific organization or environment, you are encouraged to first ask for authorization priorto switching it on. Consult your physician or the manufacturer of personal medical devices (pacemakers,hearing aids, etc.) regarding any restrictions on the use of wireless functionality.
• If using wireless functionality near a pacemaker, make sure it is at least 19 inches / 50 cm away from thepacemaker.
• Due to the transmission and reception properties of wireless communications, data can occasionally be lostor delayed. This can be due to the variation in radio signal strength that results from changes in thecharacteristics of the radio transmission path. Yarvik will not be held responsible for damages of any kindresulting from the delays or errors in data transmitted or received via wireless functionality, or failure ofwireless functionality to transmit or receive such data.
• If the equipment does cause harmful interference to radio/TV reception, which can be determined by turningthe equipment off and on, the user is encouraged to try to correct the interference by one or more of thefollowing measures: reorient or relocate the receiving antenna, increase the distance between the senderand the receiver, consult the dealer or an experienced radio/TV technician for help. Yarvik will not beresponsible for any radio/TV interference nor for any other undesired effect.
Wireless LAN Security
Creating security settings for the Wireless LAN is extremely important. Yarvik assumes no responsibility forany security problems that may arise from the use of the Wireless LAN.
Battery pack
Do not charge the battery pack in any way other than as described in the Start guide or as designated byYarvik in writing.
AC adapter
• It is highly recommended that you use a genuine Yarvik AC adapter supplied by Yarvik for your product.
• This AC adapter is intended for use with the Smartphone device IT products only.
• Do not place the AC adapter in contact with your skin. Remove the AC adapter away from your body if itbecomes warm and causes discomfort.

Yarvik smartphone manual
file:///Users/elroy/Desktop/Yarvik/Manual/manual_sl.html[13-02-13 17:04:28]
RoHS
This products has been certified as RoHS Compliant.
YARVIK.COM
Vrni se nakazalo

Yarvik smartphone manual
file:///Users/elroy/Desktop/Yarvik/Manual/manual_cr.html[13-02-13 17:04:39]
Sadržaj SELECTLANGUAGE
1 Prije prve uporabe2 Pokretanjepametnog telefona3 Androidov početnizaslon3.1 Dodavanje malihprograma i prečaca napočetni zaslon3.2 Postavljanje tapete3.3 Izbornik s Apps(Aplikacije)4 Podešavanje Vašegpametnog telefona4.1 Izbornik s Settings(Postavke)4.2 WiFi i Bluetooth4.3 Audio Profiles(Audio profili)4.4 Display (Zaslon)4.5 Apps (Aplikacije)4.6 Storage (Pohrana) iMicroSD memorijskipristup4.7 Language & input(Jezik i način unosa)4.8 Date & time (Datumi vrijeme)

Yarvik smartphone manual
file:///Users/elroy/Desktop/Yarvik/Manual/manual_cr.html[13-02-13 17:04:39]
5 Apps (Aplikacije)6 Telefonski pozivi7 Poruke8 Izjava o jamstvu9 Informacije oGNU/GPL licenci10 Importantinformation
1 Prije prve uporabe
Poštovani korisniče,
Hvala Vam što ste kupili naš proizvod.Kako bismo Vam pomogli da brzo i lako počnete koristiti svoj novi Yarvik telefon, molimo Vas da prije prveuporabe pažljivo pročitate ove upute.
Nadamo se da ćete vrlo dugo uživati u svom Yarvik pametnom telefonu!
Imajte na umu:
• Vaš Yarvik pametni telefon jeproizvod vrlo precizneelektronike. Ne pokušavajte garastaviti, jer će to poništitijamstvo i može uzrokovati kvaruređaja.
• Izbjegavajte udarce ili padproizvoda.
• Ne koristite telefon uokruženjima s vrlo visokom iliniskom temperaturom, ili uokruženjim u kojima može doći ukontakt s vlagom, prašinom ilimagnetskim poljima.
• Telefon nemojte na duževrijeme izlagati jakom sunčevomzračenju;
• Ne koristite dodirni zaslon s

Yarvik smartphone manual
file:///Users/elroy/Desktop/Yarvik/Manual/manual_cr.html[13-02-13 17:04:39]
oštrim predmetima, jer ga takomožete ogrebati.
• Predugo korištenje telefona saslušalicama i/ili s prejakopodešenom glasnoćom možeuzrokovati ozbiljno oštećenjesluha.
• Dok koristite telefon saslušalicama ne prelazite cestu,ne upravljajte motornim vozilimaniti biciklima kako biste izbjegliprometne nesreće.
• Za svoj Yarvik telefon koristitesamo dozvoljene baterije,punjače i pribor. Uporaba drugihproizvoda zajedno s telefonommože biti opasna i može poništitijamstvo.
• Za čišćenje telefona koristitesamo lagano navlaženupamučnu krpu, a za vlaženjekrpe koristite isključivo vodu.Telefon se ne smije čistitinikakvim sredstvima za čišćenje.
Yarvik pametni telefon možete početi koristiti odmah, čim ga izvadite iz kutije, bez da prethodno napunitebateriju.Najbolje je najprije pustiti da se baterija isprazni, te je potom, nakon što se prvi put potpuno ispraznila,napuniti do kraja.Ako ne možete uključiti telefon odmah nakon što ga izvadite iz kutije, to znači da je baterija već potpunoispražnjena. U tom ju slučaju, naravno, treba prvo napuniti.
Povratak nasadržaj
2Pokretanjepametnogtelefona
Kada prvi put uključite svoj Yarvik pametni telefon, prikazat će se početna sekvenca.Prvotno pokretanje može potrajati nešto duže, otprilike 2-3 minute.

Yarvik smartphone manual
file:///Users/elroy/Desktop/Yarvik/Manual/manual_cr.html[13-02-13 17:04:39]
Nakon početne sekvence, telefon je završio s pokretanjem, te će se prikazati Androidov zaključani zaslon.
Androidov zaključani zaslon
Kako biste otključali telefon, prstom kliznite kvadratić (A) udesno. Nakon toga će Vam se prikazati Androidovpočetni zaslon.
Povratak nasadržaj
3 Androidov početni zaslon

Yarvik smartphone manual
file:///Users/elroy/Desktop/Yarvik/Manual/manual_cr.html[13-02-13 17:04:39]
Androidov početni zaslon
Na vrhu zaslona telefona uvijek možete vidjeti traku stanja.Traka stanja prikazuje informacije o sustavu, dok donja traka izbornika sadrži funkcijske tipke.
1 - Indikator Wi-Fi signala2 - Jačina mobline mreže za SIM1 i SIM2 te indikator napunjenosti baterije3 - Vrijeme sustava4 - Prečaci za aplikacije5 - Widget (analogni sat)6 - Tipka nazad - vraća Vas na prethodni zaslon, ili na prethodnu internetsku stranicu dok koristite preglednik7 - Home - vraća Vas na Androidov početni zaslon8 - Izbornik aplikacija i widgeta9 - Tipka Multitask
Početni se zaslon sastoji od više stranica kojima možete pristupiti ako prstom kliznete po zaslonu lijevo ilidesno.
Kako biste vidjeli koje se sve aplikacije izvode u pozadini, pritisnite Multitask tipku (9).

Yarvik smartphone manual
file:///Users/elroy/Desktop/Yarvik/Manual/manual_cr.html[13-02-13 17:04:39]
Kako biste odmah prebacili na neku od aktivnih aplikacija, jednostavno kliknite na nju na zaslonu s aktivnimaplikacijama. Aktivne aplikacije možete zatvoriti ako duže zadržite prst na njima, te zatim odaberete„Remove from list“ („Ukloni s popisa“).
Povratak nasadržaj
3.1
Dodavanje malihprograma(widgets)i prečaca napočetni zaslon
Kako biste dodali widget, pritisnite tipku za aplikacije i widgete u desnom gornjem uglu početnog zaslona:
Na sljedećem zaslonu možete vidjeti sve instalirane aplikacije i male programe (widgets), koji su prikazaniodvojeno, a pristupiti im možete pritiskom na „Apps“ („Aplikacije“) ili „Widgets“ („Mali programi“).Pritisnite „Widgets“ („Mali program“) kako biste vidjeli sve dostupne male programe. Dok su prikazani svi maliprogrami možete prstom kliznuti po zaslonu kako biste prikazali sljedeću stranicu (ako je dostupna).Pritisnite i držite željeni mali program kako bi se prikazao početni zaslon, te ga zatim pustite na praznomjesto na početnom zaslonu.

Yarvik smartphone manual
file:///Users/elroy/Desktop/Yarvik/Manual/manual_cr.html[13-02-13 17:04:39]
Kako biste dodali prečac za bilo koju aplikaciju, pritisnite tipku za aplikacije i male programe u donjem
središnjem dijelu početnog zaslona:
Na sljedećem zaslonu možete vidjeti sve instalirane aplikacije i male programe (widgets), koji su prikazaniodvojeno, a pristupiti im možete pritiskom na „Apps“ („Aplikacije“) ili „Widgets“ („Mali programi“).Pritisnite „Apps“ („Aplikacije“) kako biste vidjeli sve instalirane aplikacije.Pritisnite i držite željenu aplikaciju kako bi se prikazao početni zaslon, te je zatim pustite na prazno mjesto napočetnom zaslonu.
Za uklanjanje malih programa i/ili prečaca za aplikacije s početnog zaslona pritisnite ih i držite, te ih povucitena ikonu koša za smeće (s nazivom „Remove“ („Ukloni“)) koja se pritom pojavila na vrhu početnog zaslona.
Povratak nasadržaj
3.2 Postavljanjetapete
Za promjenu tapete na početnom zaslonu pritisnite i držite početni zaslon dok se ne pojavi izbornik „SelectWallpaper from“ („Odaberi tapetu iz“).Možete birati između „Live Wallpapers“ („Živih tapeta“) (animiranih „živih“ tapeta), „Gallery“ („Galerije“)(foto/video galerije) ili „Wallpapers“ („Tapete“) (obične statične slike).
Povratak nasadržaj
3.3 Izbornik s Apps(Aplikacije)
Pritisnite tipku za aplikacije i widgete u desnom donjem uglu početnog zaslona:
Kada sustav prikaže male programe, pritisnite „Apps“ („Aplikacije“) kako biste vidjeli sve instalirane aplikacije.
Ovdje možete vidjeti sve prethodno instalirane programe ili “aplikacije” kao i dodatne aplikacije koje samiinstalirate.Bilo koju aplikaciju možete pokrenuti pritiskom na odgovarajuću ikonu.

Yarvik smartphone manual
file:///Users/elroy/Desktop/Yarvik/Manual/manual_cr.html[13-02-13 17:04:39]
Zaslon s aplikacijama
Povratak nasadržaj
4PodešavanjeYarvik pametnogtelefona
4.1Izbornik sSettings(Postavke)
Kako biste otvorili izbornik s postavkama, u izborniku s aplikacijama pritisnite ikonu Settings (Postavke) .U izborniku Settings (Postavke) možete vidjeti opcije za podešavanje Yarvik telefona.

Yarvik smartphone manual
file:///Users/elroy/Desktop/Yarvik/Manual/manual_cr.html[13-02-13 17:04:39]
Izbornik postavki
Proći ćemo kroz najvažnije dijelove:
Povratak nasadržaj
4.2 Wi-Fi i Bluetooth

Yarvik smartphone manual
file:///Users/elroy/Desktop/Yarvik/Manual/manual_cr.html[13-02-13 17:04:39]
Wi-Fi
Uspostavljanje veze s bežičnom WiFi mrežom.Povucite tipku On/Off (Uklj/Iskl) u položaj „On“ („Uklj“) kako biste aktivirali bežičnu mrežu.
U popisu mreža s desne strane zaslona pojavit će se dostupne bežične mreže. Dodirnite naziv mreže poizboru. Ako je mreža osigurana, sustav će zatražiti unos sigurnosnog ključa za tu mrežu.
Pritisnite tipku „Connect“ („Spoji“) i telefon će se početi spajati na mrežu.Kad se ispod naziva mreže pojavi riječ „Connected“ („Spojen“) a u statusnom retku ikona za bežični prijam,to znači da ste se uspješno spojili na bežičnu mrežu.
Prikaz bežične MAC adrese Yarvik telefona
Na zaslonu s postavkama bežične mreže kliknite na tipku izbornika u desnom donjem uglu.
U prikazanom izborniku pritisnite „Advanced“ („Napredno“).
Vaša bežična MAC adresa prikazana je na sljedećem zaslonu „Advanced Wi-Fi“ („Napredna bežičnamreža“) pod „MAC address“ („MAC adresa“).
Bluetooth
Vaš Yarvik telefon opremljen je ugrađenim Bluetooth modulom za povezivanje s Bluetooth kompatibilnimperifernim uređajima, kao što su tipkovnice, zvučnici i slušalice, ali i Bluetooth handsfree slušalice i audiosustavi u automobilima.Povucite tipku Bluetooth On/Off (Uklj/Iskl) na „On“ („Uklj“) aktivirate Bluetooth.
Nakon što je aktiviran, Vaš Yarvik telefon će automatski početi tražiti Bluetooth uređaje u blizini. Uvijekmožete ručno tražiti Bluetooth uređaje klikon na „Search for Devices“ („Traženje uređaja“) u gornjem desnomkutu zaslona.Može biti potrebno staviti periferijske uređaje u „režim uparivanja“. Za više informacija molimo pogledajte

Yarvik smartphone manual
file:///Users/elroy/Desktop/Yarvik/Manual/manual_cr.html[13-02-13 17:04:39]
upute za uporabu periferijskih uređaja.
Svi otkriveni uređaji pojaviće se na popisu „Available Devices“ („Dostupni uređaji“):
Kliknite na otkriveni Bluetooth uređaj da uparite Vaš Yarvik telefon s njim.Pojavit će se prozor „Bluetooth pairing request“ („Zahtjev za Bluetooth uparivanje“):
Većina Bluetooth uređaja zahtijeva PIN kod za spajanje. Ovaj kod je obično 0000 ili 1234. Molimo pogledajteupute za uporabu Bluetooth uređaja ako se PIN kod razlikuje.Nakon što ste unijeli ispravan PIN kod, pritisnite „OK“.
Vaš Yarvik telefon će sada početi uparivanje s Bluetooth uređajem, i nakon par sekundi veza će bitiuspostavljena; vidjet ćete poruku „Connected“ („Spojeno“) ispod odgovarajućeg Bluetooth uređaja na popisu„Available Devices“ („Dostupni uređaji“):
Možete spojiti više Bluetooth uređaja na Yarvik telefon za uporabu u isto vrijeme (npr. slušalice i tipkovnica).
Povratak nasadržaj
4.3 Audio Profiles(Audio profili)

Yarvik smartphone manual
file:///Users/elroy/Desktop/Yarvik/Manual/manual_cr.html[13-02-13 17:04:39]
Ovdje možete promijeniti glasnoću zvuka telefona, npr. samo vibriranje ili vibriranje i zvuk za dolaznepozive/poruke.
Povratak nasadržaj
4.4 Display(Zaslon)
Ovdje možete promijeniti svjetlinu zaslona, veličine fontova i vrijeme za automatski odlazak u stanjemirovanja.Imajte na umu da jača svjetlina zaslona znači i veću potrošnju energije, pa će se baterija prazniti znatnobrže.Ako ne želite da se zaslon automatski rotira kad zaokrenete telefon, tu funkciju možete isključiti podpostavkom Auto-rotate screen (Automatski rotiraj zaslon).
Povratak nasadržaj
4.5 Apps(Aplikacije)
Ovdje možete upravljati aplikacijama koje su instalirane na Vašem Yarvik telefonu.Možete kliknuti na instalirane aplikacije kako biste vidjeli informacije o toj aplikaciji i, ako je potrebno,deinstalirati ih pritiskom na gumb „Uninstall“ („Deinstaliraj“).Imajte na umu da unaprijed instalirane zadane aplikaciju (kao npr. kalkulator) nije moguće deinstalirati.
Povratak nasadržaj
4.6
Storage(Pohrana) iMicroSDmemorijskipristup
Prikazuje informacije o internoj memoriji. Kad je umetnuta MicroSD kartica, prikazat će se i podaci o memorijiumetnute kartice.
Spajanje Yarvik telefona na PC ili Mac putem USB priključka

Yarvik smartphone manual
file:///Users/elroy/Desktop/Yarvik/Manual/manual_cr.html[13-02-13 17:04:39]
Svoj Yarvik telefon možete na PC ili Mac priključiti pomoću isporučenog USB kabela.Kad je telefon spojen na računalo, njegovoj internoj memoriji i, ako je umetnuta, MicroSD kartici možetepristupiti kao standardnim USB uređajima za masovnu pohranu podataka.
Pogledajte tiskani primjerak brzog priručnika za Yarvik telefon kako biste odredili položaj USB priključka natelefonu. USB kabel spojite na USB priključak na Vašem Yarvik telefonu i slobodni USB priključak na Vašemračunalu.U gornjem dijelu zaslona na telefonu jedna za drugom će se kratko prikazati sljedeće dvije poruke:
Kad se pojavi druga poruka „USB connected“ („USB spojen“) kliknite na nju.Prikazat će se sljedeća slika:
Kliknite na gumb „Turn on USB storage“ („Uključi USB pohranu“).Prikazat će se obavijest:

Yarvik smartphone manual
file:///Users/elroy/Desktop/Yarvik/Manual/manual_cr.html[13-02-13 17:04:39]
Kliknite na „OK“ za potvrdu.Interna memorija Vašeg Yarvik telefona sada će se prikazati kao disk za masovnu pohranu podataka upodatkovnom sustavu Vašeg računala, i možete je koristiti primjerice za kopiranje datoteka sa Vašeg Yarviktelefona na njega.Ako je u telefon umetnuta MicroSD kartica, računalo će karticu prepoznati kao drugi disk za masovnupohranu podataka.
Za prestanak korištenja funkcije uređaja za masovnu pohranu podataka, kliknite na „Turn off USB storage“(„Isključi USB pohranu podataka“) i uklonite USB kabel.
Napomena: Za pristup memoriji Yarvik telefona nisu potrebni hardverski upravljački programi (drivers). Akoračunalo od Vas zatraži instalaciju bilo kakvog upravljačkog programa, taj zahtjev možete ignorirati.
Pristupite svojoj MicroSDkarticiu programu ES File Explorer(ES Pretraga datoteka)
Ako ste umetnuli MicroSD karticu u Vaš Yarvik telefon, možete pristupiti sadržaju na njoj možete pristupiti nasljedeći način:
Otvorite aplikaciju ES File Explorer (ES Pretraga datoteka) i kliknite na gumb Favorites (Favoriti) (s plavomzvjezdicom).
Otvara se izbornik Favorites (Favoriti). Kliknite na „korijensku“ ikonu sa oznakom „/“:
Doći ćete do „korijena“ datotečnog sustava telefona, koji sadrži nekoliko datoteka i mapa.Pronađite i kliknite na mapu „mnt“:

Yarvik smartphone manual
file:///Users/elroy/Desktop/Yarvik/Manual/manual_cr.html[13-02-13 17:04:39]
Mapa „mnt“ se otvara i pokazuje nekoliko mapa:
Mapa „sdcard“ je interna memorija Vašeg Yarvik telefona.Mapa „sdcard2“ je Vaša MicroSD kartica (kada je umetnuta u MicroSD utor na telefonu).
Kada je dostupan, možete koristiti i microsd2prečac u ranije spomenutom izborniku Favorites (Favoriti) zabrzi pristup Vašoj microSD memorijskoj kartici.
Povratak nasadržaj
4.7Language &input (Jezik inačin unosa)
Pomoću stavke „Select language“ („Odaberi jezik“) možete odabrati jezik prikaza na svom Yarvik telefonu.Ovo se odnosi na sav tekst na zaslonima u cijelom sustavu.Pod „Android keyboard“ („Android tipkovnica“) možete podesiti tipkovnicu na zaslonu telefona.
Povratak nasadržaj
4.8Date & time(Datum i

Yarvik smartphone manual
file:///Users/elroy/Desktop/Yarvik/Manual/manual_cr.html[13-02-13 17:04:39]
vrijeme)Ovdje možete podesiti datum i vrijeme za svoj Yarvik telefon.
Povratak nasadržaj
5 Apps(Aplikacije)
Yarvik telefon dolazi s unaprijed instaliranim aplikacijama (vidi primjere u nastavku):
Prikaz ikona aplikacija može se promijenit bez prethodne najave.
Povratak nasadržaj
6 Telefonski pozivi
Pozivanje

Yarvik smartphone manual
file:///Users/elroy/Desktop/Yarvik/Manual/manual_cr.html[13-02-13 17:04:39]
Kako biste telefonirali na svom Yarvik pametnom telefonu, otvorite aplikaciju „Phone“ („Telefon“) na izborniku
s aplikacijama ili na početnom zaslonu Androida: Pomoću numeričke tipkovnice unesite telefonski broj.
Tipkovnica telefona.
Za pozivanje međunarodnih brojeva koji zahtijevaju „+“ ispred broja, pritisnite i držite „0“ na tipkovnici sve dokse ne pojavi „+“.
Pritisnite tipku za upravljanje pozivima kako biste započeli poziv.
Pritisnite tipku za upravljanje pozivima kako biste završilipoziv.Pozive također možete uspostaviti izravno iz popisa kontakata unutar aplikacije „People“ („Kontakti“).
Nedavni pozivi pohranjeni su u popisu poziva, a dostupni su pritiskom na gumb popisu na vrhu zaslonutelefona.Vašim kontaktima (iz prethodno spomenute aplikacije „People“ („Kontakti“)) možete pristupiti izravno sa
zaslona telefona pritiskom na tipku .
Dolazni telefonski pozivi
Kada primite telefonski poziv na svom Yarvik telefonu, ponudit će Vam 3 opcije:
1 -Povucite krug prema gore kako biste ignorirali poziv i poslali automatski odgovor putem SMS poruke;2 -Ignorirajte dolazni telefonski poziv;

Yarvik smartphone manual
file:///Users/elroy/Desktop/Yarvik/Manual/manual_cr.html[13-02-13 17:04:39]
3 -Preuzmite dolazni telefonski poziv.
Opcije tijekom telefonskog poziva
1 -Prikaži tipkovnicu telefona (npr. za tonske opcije izbornika);2 -Omogući/onemogući funkciju zvučnika;3 -Isključi mikrofon;4 -Stavi poziv na čekanje;5 -Izbornik s više mogućnosti: dodaj još jedan telefonski poziv (konferencijski poziv) ili snimi telefonski poziv.
Preusmjeravanje poziva
Možete postaviti preusmjeravanje poziva za sve dolazne pozive na određeni telefonski broj.
U aplikaciji „Phone“ („Telefon“) , pritisnite tipku izbornika i odaberite „Call settings“ („Postavkepoziva“).Odaberite „Voice call“ („Glasovni poziv“), u kojem možete odabrati „Call forwarding“ („Preusmjeravanjepoziva“) za promjenu opcija preusmjeravanja.
Prikaz broja/Poziv na čekanju
Pomoću funkcije prikaza broja na svom Yarvik telefonu možete odabrati želite li poslati svoj broj uz odlaznetelefonske pozive ili ne.
Kako biste promijenili ovu postavku, pokrenite aplikaciju „Phone“ („Telefon“) , pritisnite tipku izbornika
i odaberite „Settings“ („Postavke“) - „Voice call“ („Glasovni poziv“) - „Additional settings“ („Dodatnepostavke“) - „Caller ID“ („Prikaz broja“).Unutar tog istog izbornika također možete omogućiti/onemogućiti dolazne telefonske pozive ako je poziv veću tijeku.
Povratak nasadržaj

Yarvik smartphone manual
file:///Users/elroy/Desktop/Yarvik/Manual/manual_cr.html[13-02-13 17:04:39]
7 Poruke
Vaš Yarvik telefon može slati SMS i MMS poruke. Molimo obratite se pružatelju mobilnih usluga zainformacije o standardnim troškovima i dodatnim troškovima za slanje poruka u ili iz stranih zemalja.
Slanje SMS/MMS poruka
Otvorite aplikaciju „Messaging“ („Poruke“) sa Androidovog početnog zaslona ili izbornika saplikacijama.
Aplikacija Poruke.
1 -Dodaj privitke kao što su slike, audio i video. Poruke s privitkom automatski se smatraju MMS porukama;2 -Izbornik s postavkama poruka;3 -Polje za unos primatelja;4 -Dodaj primatelja;5 -Pregled razgovora porukama;6 -Polje za unos poruke;7 -Tipka za slanje poruke.
Podešavanje broja govorne pošte/preslušavanje govornih porukaDa biste u svom Yarvik telefonu podesili broj govorne pošte, otvorite aplikaciju „Phone“ („Telefon“) na
izborniku s aplikacijama, ili na početnom zaslonu Androida:
Pritisnite i držite tipku na tipkovnici telefona. Na zaslonu s opcijama pojavit će se „Add number“

Yarvik smartphone manual
file:///Users/elroy/Desktop/Yarvik/Manual/manual_cr.html[13-02-13 17:04:39]
(„Dodaj broj“). U postavkama govorne pošte možete odabrati postavke govorne pošte i unijeti broj uslugeVaše govorne pošte.
Jednom kada podesite broj govorne pošte, tipku možete koristiti za pozivanje govorne pošte takošto ćete ju pritisnuti i držati.
Povratak nasadržaj
8 Izjava o jamstvu
Yarvik na proizvod koji je kupac kupio, na nedostatke uzrokovane obradom ili materijalima daje jamstvo utrajanju od 2 godine od datuma kupnje. Ako se u bilo kojem trenutku za vrijeme trajanja jamstvo ukaženedostatak uzrokovan obradom ili nedostatak korištenih materijala, kupac proizvod treba vratiti zastupnikukod kojeg je proizvod kupljen. Zastupnik će u razumnom vremenskom roku popraviti ili zamijeniti proizvod(prema odluci tvrtke Yarvik). Kao dokaz datuma kupnje potreban je originalni račun. Način djelovanja kojiodabere tvrtka Yarvik u tom će slučaju biti konačan.
Ovo jamstvo ne pokriva greške ili neispravan rad uzrokovane prijenosom softvera, zloporabom,neovlaštenom izmjenom, nemarom, nepravilnom uporabom, nedostatnom njegom ili bilo kojim drugimdjelovanjem nad kojim Yarvik nema kontrolu.
VAŽNO: Kada od tvrtke Yarvik kupite telefon, Vaš će telefon biti isporučen s najnovijom stabilnom verzijomopreme dostupnom za taj model u trenutku u kojem je uređaj proizveden. Tvrtka Yarvik ne pruža podršku zaproizvode koji je krajnji korisnik modificirao na druge načine, niti podržava programske izmjene opreme(firmware) i softvera koji se koristi u njezinim proizvodima. Ako su takve izmjene izvedene, automatski će seponištiti sva jamstva.
Kako biste izbjegli poništavanje ovdje ponuđenog jamstva, kupac mora koristiti samo službeni softver,aplikacije i nadogradnje dostupne na internetskoj stranici tvrtke Yarvik na adresi www.yarvik.com.Ne smije se koristiti nikakav drugi softver ili oprema (firmware), jer se njihovom uporabom automatskiponištavaju sva jamstva i podrška. Tvrtka Yarvik ne podupire korištenje softvera ili opreme (firmware) koje naproizvod nije instalirao proizvođač, a nisu dostupni na službenoj internetskoj stranici tvrtke Yarvik na adresiwww.yarvik.com. Tvrtka Yarvik izričito odbija odgovoriti na bilo kakve upite koji se odnose na neovlašteneizmjene, neovlašteni softver i neovlaštenu opremu (firmware).
Povratak nasadržaj
9 Informacije oGNU/GPL licenci
Molimo Vas da za više informacija pročitate pravne informacije dostupne na Vašem Yarvik telefonu podSettings (Postavke) – About Smartphone (O telefonu) – Legal information (Pravne informacije) (potrebna je

Yarvik smartphone manual
file:///Users/elroy/Desktop/Yarvik/Manual/manual_cr.html[13-02-13 17:04:39]
veza s internetom) ili posjetite http://source.android.com/source/licenses.html.
Povratak nasadržaj
10 ImportantInformation
Wireless LAN-Regulatory information
Depending on the model, the wireless LAN built-in into Smartphone devices can only be used in thefollowing countries: Austria, Belgium, Bulgaria, Czech Republic, Denmark, Finland, France, Germany,Greece, Hungary, Iceland, Ireland, Italy, Luxembourg, the Netherlands, Norway, Poland, Portugal, Romania,Slovakia, Slovenia, Spain, Sweden, Switzerland, Turkey and the United Kingdom.
Conditions of use
When using the IEEE 802.11b/g/n Wireless LAN standard, channels 1 to 13 (2.4 GHz...2.4835 GHz) areselectable for both indoor and outdoor use, however with restrictive conditions applying in France, Italy andNorway, as follows:
• France: When using this product indoor, all channels can be used without restrictions. Outdoor onlychannels 1 to 6 are allowed. This means that in Peer-to-Peer, the WLAN feature can only be used outside ifthe peer sets up the communication on an authorized channel (i.e., between 1 & 6). In infrastructure mode,please make sure the access point is configured to a channel from 1 to 6 before setting up the connection.
• Italy: Use of the RLAN network is governed: Disposal of Old Electrical & Electronic- with respect to private use, by the Legislative Decree of 1.8.2003, no. 259 (“Code of ElectronicCommunications”). In particular Article 104 indicates when the prior obtainment of a general authorization isrequired and Art. 105 indicates when free use is permitted;- with respect to the supply to the public of the WLAN access to telecom networks and services, by theMinisterial Decree 28.5.2003, as amended, and Art. 25 (general authorization for electronic communicationsnetworks and services) of the Code of electronic communications.
• Norway: Use of this radio equipment is not allowed in the geographical area within a radius of 20 km fromthe centre of Ny-Ålesund, Svalbard.
WEEESymbolInformation
Correct Disposal of This product (Waste Electrical & Electronic Equipment).
(Applicable in the European Union and other European countries with separate collection systems).

Yarvik smartphone manual
file:///Users/elroy/Desktop/Yarvik/Manual/manual_cr.html[13-02-13 17:04:39]
This marking shown on the product or its literature indicates that it should not be disposed with otherhousehold wasted at the end of its working life. To prevent possible harm to the environment or humanhealth from uncontrolled waste disposal, please separate this from other types of wastes and recycle itresponsibly to promote the sustainable reuse of material resources.Household users should contact either the retailer where they purchased this product, or their localgovernment office, for details of where and how they can take this item for environmentally safe recycling.Business users should contact their supplier and check the terms and conditions of the purchase contract.This product should not be mixed with other commercial wastes of disposal.
Disposal of waste batteries (applicable in the European Union and other European countries withseparate collection systems)
Either of the symbols shown next may appear on the battery or on the packaging to indicate that the batteryprovided with this product shall not be treated as household waste. On certain batteries this symbol might beused in combination with a chemical symbol. The chemical symbols for mercury (Hg) or lead (Pb) are addedif the battery contains more than 0.0005% mercury or 0.004% lead. By ensuring these batteries are disposedof correctly, you will help prevent potentially negative consequences for the environment and human healthwhich could otherwise be caused by inappropriate waste handling of the battery. The recycling of thematerials will help to conserve natural resources. In case of products that for safety, performance or dataintegrity reasons require a permanent connection with an incorporated battery, this battery should bereplaced by qualified service staff only. To ensure that the battery will be treated properly, hand over theproduct at end-of-life to the applicable collection point for the recycling of electrical and electronicequipment.
For all other batteries, please view the section on how to remove the battery from the product safely. Handthe battery over to the applicable collection point for the recycling of waste batteries. For more detailedinformation about recycling of this product or battery, please contact your local Local government Office,your household waste disposal service or the shop where you purchased the product.
When travelling to and within the United States of America, please be aware that the U.S. Department ofTransportation (DOT) recently published new regulations that apply to passengers travelling with lithiummetal batteries and lithium-ion batteries.For detailed information, visit http://safetravel.dot.gov/whats_new_batteries.html.
Safety Information
Yarvik Smartphone device
• Yarvik is not responsible for any interference that you may experience or that may be caused whenoperating this device.

Yarvik smartphone manual
file:///Users/elroy/Desktop/Yarvik/Manual/manual_cr.html[13-02-13 17:04:39]
• Warning: This apparatus must be earthed.
Opening or dismantling the main unit or any of its accessories, for whatever reason, could lead to damagesthat are not covered by the guarantee.
• To avoid electrical shock, do not open the cabinet. Refer servicing to qualified personnel only.
• To prevent fire or shock hazard, do not expose your Smartphone device or any of its accessories to rain ormoisture.
• Do not use or store your Smartphone device in a location subject to heat sources, such as radiators or airducts; direct sunlight; excessive dust; moisture or rain; mechanical vibration or shock; strong magnets orspeakers that are not magnetically shielded; excessively high and low temperatures; and high humidity.
• Turning off your Smartphone device with the power button does not disconnect the device completely frommains voltage. To disconnect it completely, unplug the AC adapter or the power cord from mains. Thesocket-outlet shall be installed near the equipment and shall be easily accessible.
• Audio and picture distortion may occur if this equipment is positioned in close proximity to any equipmentemitting electromagnetic radiation.
• This apparatus is also designed for IT power system with phase to phase voltage 230V, for customers inNorway.
• Observe the following precautions to provide adequate air circulation and to ensure normal reliableoperation:- Do not use the Smartphone device and/or the AC adapter while covered or wrapped in cloth. Ensure theAC adapter operates in a clear environment.- Turn off the Smartphone device before putting the device into a bag or a carrying case.
• Do not use your Smartphone device directly on your lap. The temperature of the base of the unit will riseduring normal operation and over time could result in discomfort or burns.
• Do not use your Smartphone device while walking. Listening to music with headphones or watching theLCD screen while walking may lead to an unexpected accident and result in personal injuries.
• Using connected headphones on the Smartphone device for too long and/or setting the audio volume uptoo high when using headphones may cause serious hearing damage.
• Avoid strong beating of or to the product.
• Don’t operate the touch screen of the Smartphone device with sharp objects, as this may result inscratching the screen surface.
• Only use permitted batteries, chargers and accessories with your Smartphone device. The use of any otherproducts with the device can be dangerous and may violate the warranty regulations.
• Only use a slightly wet cotton cloth to clean the device, and only use water to wetten the cotton cloth. TheSmartphone device should not be cleaned with any sort of (glass) cleaning aid.
Wireless functionality

Yarvik smartphone manual
file:///Users/elroy/Desktop/Yarvik/Manual/manual_cr.html[13-02-13 17:04:39]
• If radio interference with other devices occurs while using your Smartphone device, do not use the wirelessfunctionality. Use of the wireless functionality may cause a malfunction of the devices, resulting in anaccident.
• In some situations or environments, the use of the wireless functionality might be restricted by theproprietor of the building or responsible representatives of the organization, for example on board airplanes,in hospitals or in any other environment where the risk of interference with other devices or services isperceived or identified as harmful. If you are uncertain about the policy applying to the use of wirelessfunctionality in a specific organization or environment, you are encouraged to first ask for authorization priorto switching it on. Consult your physician or the manufacturer of personal medical devices (pacemakers,hearing aids, etc.) regarding any restrictions on the use of wireless functionality.
• If using wireless functionality near a pacemaker, make sure it is at least 19 inches / 50 cm away from thepacemaker.
• Due to the transmission and reception properties of wireless communications, data can occasionally be lostor delayed. This can be due to the variation in radio signal strength that results from changes in thecharacteristics of the radio transmission path. Yarvik will not be held responsible for damages of any kindresulting from the delays or errors in data transmitted or received via wireless functionality, or failure ofwireless functionality to transmit or receive such data.
• If the equipment does cause harmful interference to radio/TV reception, which can be determined by turningthe equipment off and on, the user is encouraged to try to correct the interference by one or more of thefollowing measures: reorient or relocate the receiving antenna, increase the distance between the senderand the receiver, consult the dealer or an experienced radio/TV technician for help. Yarvik will not beresponsible for any radio/TV interference nor for any other undesired effect.
Wireless LAN Security
Creating security settings for the Wireless LAN is extremely important. Yarvik assumes no responsibility forany security problems that may arise from the use of the Wireless LAN.
Battery pack
Do not charge the battery pack in any way other than as described in the Start guide or as designated byYarvik in writing.
AC adapter
• It is highly recommended that you use a genuine Yarvik AC adapter supplied by Yarvik for your product.
• This AC adapter is intended for use with the Smartphone device IT products only.
• Do not place the AC adapter in contact with your skin. Remove the AC adapter away from your body if itbecomes warm and causes discomfort.
Yarvik smartphone manual
file:///Users/elroy/Desktop/Yarvik/Manual/manual_cr.html[13-02-13 17:04:39]
RoHS
This products has been certified as RoHS Compliant.
YARVIK.COM
Povratak nasadržaj

Yarvik smartphone manual
file:///Users/elroy/Desktop/Yarvik/Manual/manual_hu.html[13-02-13 17:04:49]
Tárgymutató SELECTLANGUAGE
1 Első használat előtt2 Az okostelefonelindítása3 AndroidKezdőképernyő3.1 Vezérlőelemek ésparancsikonokhozzáadása aKezdőképernyőhöz3.2 Háttérkép beállítása3.3 Apps (Alkalmazási)menü4 Az okostelefonbeállításai4.1 Settings (Beállítási)menü4.2 WiFi és Bluetooth4.3 Audio Profiles(Audioprofilok)4.4 Display (Kijelző)4.5 Apps(Alkalmazások)4.6 A Storage (Tárolási)és a MicroSD memóriaelérése4.7 Language & input(Nyelv és bemenet)

Yarvik smartphone manual
file:///Users/elroy/Desktop/Yarvik/Manual/manual_hu.html[13-02-13 17:04:49]
4.8 Date & time (Dátumés idő)5 Apps (Alkalmazások)6 Telefonhívások7 Üzenetküldés8 Szavatosságinyilatkozat9 GNU/GPLlicencinformációk10 Importantinformation
1 Első használat előtt
Tisztelt Felhasználó!
Köszönjük, hogy a termékünket vásárolta meg!Új Yarvik okostelefonja gyors és kényelmes használata érdekében gondosan olvassa át a jelen útmutatóthasználat előtt.
Reméljük, a legteljesebb mértékben és a lehető leghosszabb ideig élvezi majd Yarvik okostelefonját!
Szíveskedjen figyelembe venni:
• Yarvik okostelefonja egyprecíziós elektronikai termék. Nepróbálja meg szétszerelniokostelefonját, mert azzalérvényét veszti a jótállás és akészülék meghibásodásátokozhatja.
• Ügyeljen arra, hogy ne üsseoda semmihez vagy ne ejtse le aterméket.
• Ne használja az okostelefontmagas vagy alacsonyhőmérsékleten, vagy olyankörnyezetben, ahol a készüléketnedvesség vagy por érheti,

Yarvik smartphone manual
file:///Users/elroy/Desktop/Yarvik/Manual/manual_hu.html[13-02-13 17:04:49]
illetve mágneses mező hatásaalá kerülhet.
• Ne tegye ki az okostelefonterős napsütésnek hosszabbideig.
• Ne használja azérintőképernyőt hegyestárgyakkal, mert megkarcolhatja.
• Súlyos halláskárosodástszenvedhet, ha túl sokáighasználja az okostelefontfejhallgatóval, és/vagy túl nagyraállítja a hangerőt.
• Közlekedési balesetekmegelőzése érdekében azokostelefon fejhallgatóvaltörténő használatakor ne keljenát úttesten, nemotorkerékpározzon vagykerékpározzon.
• Csak az engedélyezettakkumulátorokat, töltőket éstartozékokat használja azokostelefonnal. Bármely mástermék használata azokostelefonnal veszélyes lehetés sértheti a jótállási feltételeket.
• Az okostelefont csak enyhénnedves pamut ronggyal tisztítsa,és a pamutot csak vízzelnedvesítse. Az okostelefont nemszabad tisztítószerrel tisztítani.
Kicsomagolás után rögtön használhatja Yarvik okostelefonját az akkumulátor töltése nélkül.Az akkumulátor számára a legjobb, ha először a benne lévő töltéssel üzemel, először teljesen lemerül, majdteljesen feltölti.Ha az okostelefon kicsomagolás után nem indul, akkor az akkumulátor már teljesen le van merülve, ekkortermészetesen először fel kell töltenie.
Vissza azindexhez

Yarvik smartphone manual
file:///Users/elroy/Desktop/Yarvik/Manual/manual_hu.html[13-02-13 17:04:49]
2 Az okostelefonelindítása
A Yarvik okostelefon első bekapcsolásakor az indítási folyamatot látja majd.A legelső bekapcsolás időbe telhet, kb. 2-3 percbe.Az indítási folyamat után az okostelefon kész az indulással, és az Android Zárolási Képernyő jelenik meg.
Android Zárolási Képernyő
Csúsztassa a záróreteszt (A) jobbra az okostelefon feloldásához. Ekkor az Android Kezdőképernyő jelenikmeg.
Vissza azindexhez
3 Android Kezdőképernyő

Yarvik smartphone manual
file:///Users/elroy/Desktop/Yarvik/Manual/manual_hu.html[13-02-13 17:04:49]
Android Kezdőképernyő
Az állapotsávot mindig megtalálja az okostelefon kezdőképernyőjének tetején.Az állapotsáv rendszerinformációkat, míg az alsó menüsáv a funkciógombokat tartalmazza.
1 - Wi-Fi jelerősség2 - Mobilhálózati vétel erőssége a SIM1 és SIM2 kártyához és az akkumulátor töltöttsége3 - Rendszeridő4 - Alkalmazások parancsikonjai5 - Widget (analóg óra)6 - Vissza gomb - vissza az előző képernyőhöz, böngészőnél az előző honlaphoz7 - Kezdő - vissza az Android Kezdőképernyőhöz8 - Alkalmazás és widget menü9 - Többalkalmazás gomb
A Kezdőképernyő több oldalt tartalmaz, amelyek a Kezdőképernyőt balra / jobbra végighúzva jelennek meg.
A háttérben futó alkalmazások megtekintéséhez nyomja meg a többalkalmazás gombot (9) atöbbalkalmazási képernyő megjelenítésére.

Yarvik smartphone manual
file:///Users/elroy/Desktop/Yarvik/Manual/manual_hu.html[13-02-13 17:04:49]
Kattintson a többalkalmazás nézetben a futó alkalmazásra annak gyors eléréséhez. Bezárhat egy futóalkalmazást, ha hosszan nyomva tartja és közben a „Remove from list” („Eltávolítás listából”) lehetőségrekattint.
Vissza azindexhez
3.1
Vezérlőelemek ésparancsikonokhozzáadása akezdőképernyőhöz
Egy widget hozzáadásához nyomja meg az alkalmazás és widget gombot a Kezdőképernyő aljának
közepén:
A következő képernyőn megtalál minden telepített alkalmazást és widgetet. Mindkettő külön látható az„Apps” („Alkalmazások”) vagy „Widgets” („Vezérlőelemek”) gombot megnyomva a képernyő tetején.Nyomjon „Widgets” („Vezérlőelemek”) az összes elérhető widget megtekintéséhez. Az összes widgetmegjelenítésekor végighúzhatja a képernyőt a következő oldal böngészéséhez (ha van).A Kezdőképernyő megnyitásához tartsa lenyomva a kívánt widgetet, majd engedje el a widgetet aKezdőképernyő bármely üres helyén.

Yarvik smartphone manual
file:///Users/elroy/Desktop/Yarvik/Manual/manual_hu.html[13-02-13 17:04:49]
Ha parancsikont szeretne adni egy alkalmazáshoz, nyomja meg az alkalmazás és widget gombot a
Kezdőképernyő aljának közepén:
A következő képernyőn megtalál minden telepített alkalmazást és widgetet. Mindkettő külön látható az„Apps” („Alkalmazások”) vagy „Widgets” („Vezérlőelemek”) gombot megnyomva a képernyő tetején.Nyomjon „Apps” („Alkalmazások”) minden telepített alkalmazás megtekintéséhez.A Kezdőképernyő megnyitásához tartsa lenyomva a kívánt alkalmazást, majd engedje el a parancsikont aKezdőképernyő bármely üres helyén.
Ha el szeretne távolítani egy widgetet és/vagy egy alkalmazás parancsikonját a Kezdőképernyőről, tartsalenyomva, és húzza a „Remove” („Eltávolítás”) lomtár ikonra, amely a Kezdőképernyő tetején jelenik majdmeg.
Vissza azindexhez
3.2 Háttérképbeállítása
A Kezdőképernyő háttérképének megváltoztatásához tartsa lenyomva a Kezdőképernyőt, amíg meg nemjelenik a „Select Wallpaper from” („Háttérkép kiválasztásának helye”) menü.A következőkből választhat: „Live Wallpapers” („Mozgó képek”) (mozgó háttérképek), „Gallery” („Galéria”)(fénykép-/videógaléria) vagy „Wallpapers” („Háttérképek”) (alapértelmezett állóképek).
Vissza azindexhez
3.3Apps(Alkalmazási)menü
Nyomja meg az alkalmazás és widget gombot a Kezdőképernyő aljának közepén:
Amikor a rendszer mutatja a widgeteket, nyomjon „Apps” („Alkalmazások”) az összes telepített alkalmazásmegtekintéséhez.
Itt megtalál minden előre telepített programot vagy „alkalmazást”, valamint az Ön által telepített továbbialkalmazásokat.Bármely alkalmazást a megfelelő ikon megnyomásával indíthat el.

Yarvik smartphone manual
file:///Users/elroy/Desktop/Yarvik/Manual/manual_hu.html[13-02-13 17:04:49]
Alkalmazási képernyő
Vissza azindexhez
4A Yarvikokostelefonbeállítása
4.1Settings(Beállítások)menü
Nyomja meg a Beállítások ikont az Alkalmazások menüben, ekkor belép a Settings (Beállítások)menübe. A Settings (Beállítások) menüben találja meg a Yarvik okostelefon beállítási lehetőségeit.

Yarvik smartphone manual
file:///Users/elroy/Desktop/Yarvik/Manual/manual_hu.html[13-02-13 17:04:49]
Beállítások menü
Megnézzük a legfontosabb részeket:
Vissza azindexhez
4.2 Wi-Fi és

Yarvik smartphone manual
file:///Users/elroy/Desktop/Yarvik/Manual/manual_hu.html[13-02-13 17:04:49]
BluetoothWi-Fi
Csatlakozás beállítása drótnélküli Wi-Fi hálózatra.Csúsztassa a Be / Ki gombot ide: „On” („Be”) a Wi-Fi aktiválásához.
Az elérhető Wi-Fi hálózatok a hálózatok listájában jelennek meg a képernyő jobb oldalán. Érintse meg aválasztani kívánt hálózatot. Védett hálózat esetén kéri a hálózat biztonsági kulcsát.
Nyomja meg a „Connect” („Csatlakozás”) gombot, és az okostelefon csatlakozik a hálózathoz.Amikor a „Connected” („Csatlakozva”) megjelenik a hálózat neve alatt, illetve a drótnélküli vétel ikonja az alsóállapotsávon, a csatlakozás sikeres.
A Yarvik okostelefon Wi-Fi MAC címének megtekintése
A Wi-Fi beállítások képernyőn belül kattintson a menü gombra a jobb alsó sarokban.
Nyomjon „Advanced” („Speciális”) a megnyíló menüben.
Az Ön Wi-Fi MAC címe megjelenik a következő „Advanced Wi-Fi” („Speciális Wi-Fi”) képernyőn ez alatt:„MAC address” („MAC cím”).
Bluetooth
Yarvik okostelefonját a Bluetooth-kompatibilis perifériák (például billentyűzet, hangszóró, fejhallgató)csatlakoztatására beépített Bluetooth-modullal, valamint a kezét szabaddá tévő Bluetooth headsettel ésautós készlettel szerelték fel.A Bluetooth aktiválásához állítsa a Bluetooth On/Off (Be/Ki) gombot „On” („Be”) állásba.
Miután aktiválta, a Yarvik okostelefon automatikusan elkezdi keresni a közelben található Bluetooth-eszközöket. A Bluetooth-eszközök keresése bármikor kézzel is végrehajtható a képernyő jobb felső

Yarvik smartphone manual
file:///Users/elroy/Desktop/Yarvik/Manual/manual_hu.html[13-02-13 17:04:49]
sarkában lévő „Search for Devices” („Eszközök keresése”) feliratra kattintva.Lehet, hogy az okostelefonhoz csatlakoztatni kívánt perifériákat „párosítás módba” kell állítania. Továbbiinformációért tekintse meg a szóban forgó periféria használati útmutatóját.
A talált eszközök mindegyike megjelenik az „Available Devices” („Választható eszközök”) listájában:
A találati listában szereplő Bluetooth-eszközt és a Yarvik okostelefont az eszközre kattintva párosíthatja.Megjelenik a „Bluetooth pairing request” („Bluetooth párosítási kérelem”) ablaka:
A legtöbb Bluetooth-eszköz csatlakoztatása PIN-kódot igényel. A kód rendszerint 0000 vagy 1234. Akérdéses periféria használati útmutatójában nézzen utána, nincs-e az eszköznek ettől eltérő PIN-kódja.A helyes PIN-kód megadása után kattintson az „OK” gombra.
Elkezdődik a Yarvik okostelefon és a Bluetooth-eszköz párosítása, néhány másodperc után létrejön akapcsolat, és az „Available Devices” („Választható eszközök”) listában az érintett Bluetooth-eszköz alatt a„Connected” („Csatlakoztatva”) felirat jelenik meg:
Egyidejűleg több Bluetooth-eszköz is csatlakoztatható a Yarvik okostelefonhoz (például fejhallgató ésbillentyűzet).
Vissza azindexhez

Yarvik smartphone manual
file:///Users/elroy/Desktop/Yarvik/Manual/manual_hu.html[13-02-13 17:04:49]
4.3 Audio Profiles(Audioprofilok)
Itt módosíthatja az okostelefon hangerejét. A bejövő hívásokhoz/üzenetekhez választhat a csak rezgés vagya rezgés és csörgés között.
Vissza azindexhez
4.4 Display(Kijelző)
Itt a kijelző fényerejét, betűméreteket és az automatikus alvó mód idejét tudja változtatni.Legyen tudatában, hogy a nagyobb fényerő nagyobb energiafogyasztást jelent. Ekkor lényegesengyorsabban lemerül az akkumulátor.Ha nem akarja, hogy az okostelefon megdöntésekor automatikusan forogjon a képernyő, akkor ezt a funkciótaz Auto-rotate screen (Képernyő automatikus forgatása) beállításnál tudja engedélyezni/letiltani.
Vissza azindexhez
4.5 Apps(Alkalmazások)
Itt tudja kezelni a Yarvik okostelefonra telepített alkalmazásokat.A telepített alkalmazásokra kattintva látja azok információit, illetve az „Uninstall” („Eltávolítás”) gombbaleltávolíthatja az alkalmazásokat, ha kívánja.Figyelem, az előre telepített alapértelmezett alkalmazások (pl. számológép) nem távolíthatók el.
Vissza azindexhez
4.6
A Storage(Tárolási) és aMicroSDmemóriaelérése
Mutatja a belső memória adatait. Ha a telefonban van MicroSD kártya, akkor annak memóriaadatait is itttalálja.

Yarvik smartphone manual
file:///Users/elroy/Desktop/Yarvik/Manual/manual_hu.html[13-02-13 17:04:49]
A Yarvik okostelefon csatlakoztatása PC-hez vagy Mac-hez USB-n keresztül
Yarvik okostelefonját a kapott USB-kábellel csatlakoztathatja PC-hez vagy Mac-hez.Számítógéphez csatlakoztatva szabványos USB háttértárként férhet hozzá az okostelefon belsőmemóriájához, illetve - ha van - a behelyezett MicroSD kártyához.
Az okostelefon USB-portja helyének meghatározásához olvassa el a Yarvik okostelefon rövid használatiútmutatóját. Csatlakoztassa az USB-kábelt a Yarvik okostelefon USB-portjához, és egy szabad USB-porthoza számítógépén.Az okostelefon képernyőjének tetején két üzenet jelenik meg röviddel egymás után:
Amikor a második üzenet („USB connected” („USB csatlakoztatva”)) megjelenik, kattintson rá.Az alábbi képernyő jelenik meg:
Kattintson a „Turn on USB storage” („USB tár bekapcsolása”) gombra.Egy üzenetablak jelenik meg:

Yarvik smartphone manual
file:///Users/elroy/Desktop/Yarvik/Manual/manual_hu.html[13-02-13 17:04:49]
Megerősítésül kattintson az „OK” gombra.A Yarvik okostelefon belső memóriája a számítógép fájlrendszerében háttértárként jelenik meg, éssegítségével pl. fájlokat lehet a Yarvik okostelefonra vagy arról másolni.Ha MicroSD kártya van az okostelefonban, azt a számítógép egy második háttértárként fogja felismerni.
A háttértár funkció leállításához kattintson a „Turn off USB storage” („USB tár kikapcsolása”) gombra, éshúzza ki az USB-kábelt.
Megjegyzés: A Yarvik okostelefon memóriájának eléréséhez nincs szükség hardver-illesztőprogramokra. Haa számítógép illesztőprogram telepítését kéri, akkor egyszerűen hagyja ezt figyelmen kívül.
A MicroSD kártya eléréseaz ES File Explorerfájlkezelőből
Ha MicroSD kártyát helyezett a Yarvik okostelefonjába, az alábbiak szerint férhet annak tartalmához:
Indítsa el az ES File Explorer alkalmazást, majd kattintson a Favorites (Kedvencek) gombra (kék csillag azikonja).
A Favorites (Kedvencek) menü kibomlik. Kattintson a „/” jellel címkézett „gyökér” ikonra:
Ekkor az okostelefon fájlrendszerének számos fájlt és mappát tartalmazó „gyökérkönyvtárába” jut.Keresse meg az „mnt” mappát, és kattintson rá:
A „mnt” mappa kinyílik, és mappák jelennek meg:

Yarvik smartphone manual
file:///Users/elroy/Desktop/Yarvik/Manual/manual_hu.html[13-02-13 17:04:49]
Az „sdcard” mappa a Yarvik okostelefon belső memóriája.Az „sdcard2” mappa a MicroSD kártya (amennyiben behelyezte az okostelefon MicroSD feliratú nyílásába).
Ha létezik ilyen, a microsd2 parancsikont is használhatja az előbb említett Favorites (Kedvencek) menübena MicroSD kártyamemória gyors eléréséhez.
Vissza azindexhez
4.7Language &input (Nyelv ésbemenet)
Használja a „Select language” („Válasszon nyelvet”) opciót a Yarvik okostelefon képernyőnyelvénekkiválasztásához. Ez az egész rendszer minden képernyőszövegére érvényes.Az „Android keyboard” („Android billentyűzet”) alatt állíthatja be okostelefonja képernyőn lévő billentyűzetét.
Vissza azindexhez
4.8 Date & time(Dátum és idő)
Itt állíthatja be a Yarvik okostelefon dátumát és óráját.
Vissza azindexhez

Yarvik smartphone manual
file:///Users/elroy/Desktop/Yarvik/Manual/manual_hu.html[13-02-13 17:04:49]
5 Apps(Alkalmazások)
A Yarvik okostelefont előre telepített alkalmazásokkal szállítjuk (lásd az alábbi példát):
Az alkalmazások ikonjainak kinézete előzetes értesítés nélkül változhat.
Vissza azindexhez
6 Telefonhívások
HíváskezdeményezésHa telefonhívást szeretne kezdeményezni Yarvik okostelefonján, nyissa meg a „Phone” („Telefon”)
alkalmazást az alkalmazási menüből vagy az Android kezdőképernyőn: A telefonszám megadásához használja a számbillentyűzetet.
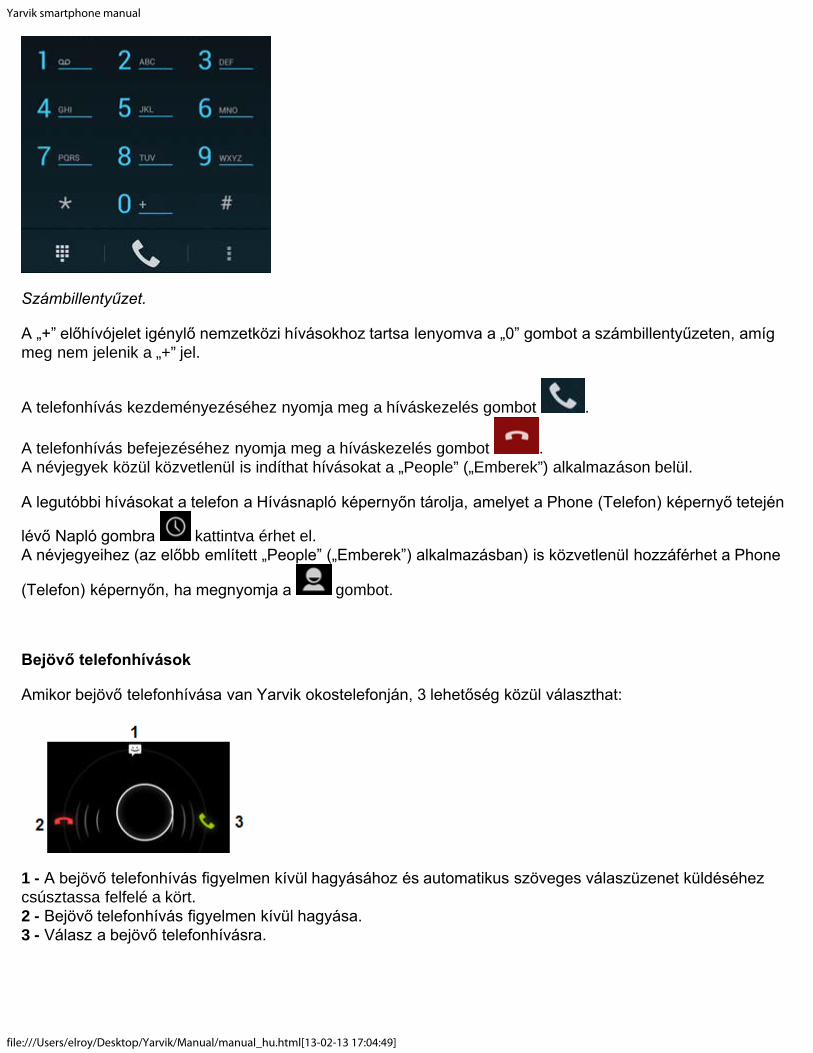
Yarvik smartphone manual
file:///Users/elroy/Desktop/Yarvik/Manual/manual_hu.html[13-02-13 17:04:49]
Számbillentyűzet.
A „+” előhívójelet igénylő nemzetközi hívásokhoz tartsa lenyomva a „0” gombot a számbillentyűzeten, amígmeg nem jelenik a „+” jel.
A telefonhívás kezdeményezéséhez nyomja meg a híváskezelés gombot .
A telefonhívás befejezéséhez nyomja meg a híváskezelés gombot .A névjegyek közül közvetlenül is indíthat hívásokat a „People” („Emberek”) alkalmazáson belül.
A legutóbbi hívásokat a telefon a Hívásnapló képernyőn tárolja, amelyet a Phone (Telefon) képernyő tetején
lévő Napló gombra kattintva érhet el.A névjegyeihez (az előbb említett „People” („Emberek”) alkalmazásban) is közvetlenül hozzáférhet a Phone
(Telefon) képernyőn, ha megnyomja a gombot.
Bejövő telefonhívások
Amikor bejövő telefonhívása van Yarvik okostelefonján, 3 lehetőség közül választhat:
1 - A bejövő telefonhívás figyelmen kívül hagyásához és automatikus szöveges válaszüzenet küldéséhezcsúsztassa felfelé a kört.2 - Bejövő telefonhívás figyelmen kívül hagyása.3 - Válasz a bejövő telefonhívásra.

Yarvik smartphone manual
file:///Users/elroy/Desktop/Yarvik/Manual/manual_hu.html[13-02-13 17:04:49]
Lehetőségek telefonhívás közben
1 - A számbillentyűzet megjelenítése (pl. DTMF opció menükhöz).2 - Hangszóró funkció be-/kikapcsolása.3 - Mikrofon elnémítása.4 - Telefonhívás várakoztatása.5 - További lehetőségeket tartalmazó menü: újabb telefonhívás hozzáadása (konferenciahívás) vagy atelefonhívás rögzítése.
Hívásátirányítás
A hívásátirányítás funkció segítségével az összes bejövő telefonhívást átirányíthatja egy meghatározotttelefonszámra.
A „Phone” („Telefon”) alkalmazásban , nyomja meg a menü gombot, és válassza a „Call settings”(„Hívásbeállítások”) lehetőséget.Válassza a „Voice call” („Hanghívás”) lehetőséget, amelyben a „Call forwarding” („Hívásátirányítás”)lehetőséget választva módosíthatja az átirányítási beállításokat.
Hívóazonosító/hívásvárakoztatás
A Yarvik okostelefon hívóazonosító funkciója segítségével megadhatja, hogy el szeretné-e küldeni a számáta kimenő telefonhívásai alkalmával.
A beállítás módosításához indítsa el a „Phone” („Telefon”) alkalmazást , nyomja meg a menü gombot, és válassza a „Settings” („Beállítások”) - „Voice call” („Hanghívás”) - „Additional settings” („Továbbibeállítások”) - „Caller ID” („Hívóazonosító”) lehetőséget.Ugyanebben a menüben kapcsolhatja be/ki a bejövő hívásokat arra az esetre, ha már beszélgetést folytat.
Vissza azindexhez
7 Üzenetküldés

Yarvik smartphone manual
file:///Users/elroy/Desktop/Yarvik/Manual/manual_hu.html[13-02-13 17:04:49]
Yarvik okostelefonja SMS és MMS üzenetek küldésére képes. A külföldről és külföldre történőüzenetküldéssel kapcsolatos díjakra és egyéb költségekre vonatkozó információért forduljonmobilszolgáltatójához.
SMS/MMS üzenetek küldése
Nyissa meg a „Messaging” („Üzenetküldés”) alkalmazást az Android kezdőképernyőn vagy azalkalmazási menüből.
Üzenetküldő alkalmazás.
1 - Csatolmányok, pl. képek, hang és videó hozzáadása. A csatolmánnyal rendelkező üzeneteket a telefonautomatikusan MMS üzenetként kezeli.2 - Üzenetbeállítások menü.3 - Címzett mező.4 - Címzett hozzáadása.5 - Üzenet beszélgetési felülete.6 - Üzenet beírása.7 - Üzenet küldése gomb.
Hangposta számának beállítása/hangposta üzeneteinek lejátszásaHa be szeretné állítani hangposta szolgáltatásának számát Yarvik okostelefonján, akkor nyissa meg a
„Phone” („Telefon”) alkalmazást az alkalmazási menüből vagy az Android kezdőképernyőn:
Tartsa lenyomva a számbillentyűzeten lévő gombot. A beállítási képernyőn megjelenik az „Addnumber” („Szám hozzáadása”). A Hangposta beállításokban megadhatja a hangpostával kapcsolatos
Yarvik smartphone manual
file:///Users/elroy/Desktop/Yarvik/Manual/manual_hu.html[13-02-13 17:04:49]
beállításokat és megadhatja hangposta szolgáltatásának számát.
Miután beállította hangposta szolgáltatásának számát, a hangpostafiók hívásához a gombot (tartsalenyomva) használhatja.
Vissza azindexhez
8 Szavatosságinyilatkozat
A Yarvik szavatolja, hogy a Vásárló által megvásárolt termék a Vásárló általi vásárlás naptól számított 2 éviggyártási és anyaghibától mentes lesz. Ha a szavatossági idő alatt bármikor a termékben gyártási vagyanyaghiba keletkezik, a Vásárlónak ahhoz a kereskedőhöz kell visszavinnie a terméket, akitől vásárolta. Akereskedő ésszerű időn belül megjavítja vagy kicseréli azt (a Yarvik kizárólagos döntése szerint). Eredetiszámlára szükség lesz a vásárlás időpontja igazolására. A Yarvik döntése az ügyben végleges.
Jelen szavatosság szoftver átadásából, helytelen használatából, szabálytalan használatból, belenyúlásból,hanyagságból, helytelen használatból, elégtelen gondozásból vagy bármely más, Yarvik ellenőrzésén kívülicselekedetből eredő hibákra vagy hibás működésre nem terjed ki.
FONTOS: Amikor okostelefont vásárol a Yarviktól, okostelefonján az ehhez a konkrét modellhez elérhető, akészülék gyártásakor létező legfrissebb stabil belső vezérlőprogram fut. Yarvik nem ad támogatásttermékekhez, amelyeket egyéb módon megváltoztatott a végfelhasználó, és a Yarvik nem támogatja atermékeiben alkalmazott firmver és szoftver programozási változtatásait, és ilyen módosítások eseténminden szavatosság automatikusan érvénytelenné válik.
Jelen szavatosság érvénytelenségének elkerülése érdekében a Vásárlónak csak a Yarvik weboldalán(www.yarvik.com) elérhető hivatalos szoftvert, alkalmazásokat és frissítéseket szabad használnia.Semmilyen más szoftvert vagy firmvert nem szabad használni, mivel az automatikusan megszüntet mindenszavatosságot és támogatást. A Yarvik nem támogatja semmilyen más szoftver vagy firmver használatát,kivéve amelyet a gyártó telepített a termékre, vagy amely elérhető a Yarvik hivatalos weboldalán:www.yarvik.com. Yarvik kifejezetten elutasít minden igényt, amely nem engedélyezett módosítással,szoftverrel vagy firmverrel függ össze.
Vissza azindexhez
9 GNU/GPLlicencinformációk
Kérjük, olvassa át a Yarvik okostelefonján elérhető jogi információkat a Settings (Beállítások) – AboutSmartphone (Az okostelefon névjegye) – Legal information (Jogi információk) (internetkapcsolat szükséges),vagy látogasson el a http://source.android.com/source/licenses.html címre több információért.

Yarvik smartphone manual
file:///Users/elroy/Desktop/Yarvik/Manual/manual_hu.html[13-02-13 17:04:49]
Vissza azindexhez
10 ImportantInformation
Wireless LAN-Regulatory information
Depending on the model, the wireless LAN built-in into Smartphone devices can only be used in thefollowing countries: Austria, Belgium, Bulgaria, Czech Republic, Denmark, Finland, France, Germany,Greece, Hungary, Iceland, Ireland, Italy, Luxembourg, the Netherlands, Norway, Poland, Portugal, Romania,Slovakia, Slovenia, Spain, Sweden, Switzerland, Turkey and the United Kingdom.
Conditions of use
When using the IEEE 802.11b/g/n Wireless LAN standard, channels 1 to 13 (2.4 GHz...2.4835 GHz) areselectable for both indoor and outdoor use, however with restrictive conditions applying in France, Italy andNorway, as follows:
• France: When using this product indoor, all channels can be used without restrictions. Outdoor onlychannels 1 to 6 are allowed. This means that in Peer-to-Peer, the WLAN feature can only be used outside ifthe peer sets up the communication on an authorized channel (i.e., between 1 & 6). In infrastructure mode,please make sure the access point is configured to a channel from 1 to 6 before setting up the connection.
• Italy: Use of the RLAN network is governed: Disposal of Old Electrical & Electronic- with respect to private use, by the Legislative Decree of 1.8.2003, no. 259 (“Code of ElectronicCommunications”). In particular Article 104 indicates when the prior obtainment of a general authorization isrequired and Art. 105 indicates when free use is permitted;- with respect to the supply to the public of the WLAN access to telecom networks and services, by theMinisterial Decree 28.5.2003, as amended, and Art. 25 (general authorization for electronic communicationsnetworks and services) of the Code of electronic communications.
• Norway: Use of this radio equipment is not allowed in the geographical area within a radius of 20 km fromthe centre of Ny-Ålesund, Svalbard.
WEEESymbolInformation
Correct Disposal of This product (Waste Electrical & Electronic Equipment).
(Applicable in the European Union and other European countries with separate collection systems).

Yarvik smartphone manual
file:///Users/elroy/Desktop/Yarvik/Manual/manual_hu.html[13-02-13 17:04:49]
This marking shown on the product or its literature indicates that it should not be disposed with otherhousehold wasted at the end of its working life. To prevent possible harm to the environment or humanhealth from uncontrolled waste disposal, please separate this from other types of wastes and recycle itresponsibly to promote the sustainable reuse of material resources.Household users should contact either the retailer where they purchased this product, or their localgovernment office, for details of where and how they can take this item for environmentally safe recycling.Business users should contact their supplier and check the terms and conditions of the purchase contract.This product should not be mixed with other commercial wastes of disposal.
Disposal of waste batteries (applicable in the European Union and other European countries withseparate collection systems)
Either of the symbols shown next may appear on the battery or on the packaging to indicate that the batteryprovided with this product shall not be treated as household waste. On certain batteries this symbol might beused in combination with a chemical symbol. The chemical symbols for mercury (Hg) or lead (Pb) are addedif the battery contains more than 0.0005% mercury or 0.004% lead. By ensuring these batteries are disposedof correctly, you will help prevent potentially negative consequences for the environment and human healthwhich could otherwise be caused by inappropriate waste handling of the battery. The recycling of thematerials will help to conserve natural resources. In case of products that for safety, performance or dataintegrity reasons require a permanent connection with an incorporated battery, this battery should bereplaced by qualified service staff only. To ensure that the battery will be treated properly, hand over theproduct at end-of-life to the applicable collection point for the recycling of electrical and electronicequipment.
For all other batteries, please view the section on how to remove the battery from the product safely. Handthe battery over to the applicable collection point for the recycling of waste batteries. For more detailedinformation about recycling of this product or battery, please contact your local Local government Office,your household waste disposal service or the shop where you purchased the product.
When travelling to and within the United States of America, please be aware that the U.S. Department ofTransportation (DOT) recently published new regulations that apply to passengers travelling with lithiummetal batteries and lithium-ion batteries.For detailed information, visit http://safetravel.dot.gov/whats_new_batteries.html.
Safety Information
Yarvik Smartphone device
• Yarvik is not responsible for any interference that you may experience or that may be caused whenoperating this device.

Yarvik smartphone manual
file:///Users/elroy/Desktop/Yarvik/Manual/manual_hu.html[13-02-13 17:04:49]
• Warning: This apparatus must be earthed.
Opening or dismantling the main unit or any of its accessories, for whatever reason, could lead to damagesthat are not covered by the guarantee.
• To avoid electrical shock, do not open the cabinet. Refer servicing to qualified personnel only.
• To prevent fire or shock hazard, do not expose your Smartphone device or any of its accessories to rain ormoisture.
• Do not use or store your Smartphone device in a location subject to heat sources, such as radiators or airducts; direct sunlight; excessive dust; moisture or rain; mechanical vibration or shock; strong magnets orspeakers that are not magnetically shielded; excessively high and low temperatures; and high humidity.
• Turning off your Smartphone device with the power button does not disconnect the device completely frommains voltage. To disconnect it completely, unplug the AC adapter or the power cord from mains. Thesocket-outlet shall be installed near the equipment and shall be easily accessible.
• Audio and picture distortion may occur if this equipment is positioned in close proximity to any equipmentemitting electromagnetic radiation.
• This apparatus is also designed for IT power system with phase to phase voltage 230V, for customers inNorway.
• Observe the following precautions to provide adequate air circulation and to ensure normal reliableoperation:- Do not use the Smartphone device and/or the AC adapter while covered or wrapped in cloth. Ensure theAC adapter operates in a clear environment.- Turn off the Smartphone device before putting the device into a bag or a carrying case.
• Do not use your Smartphone device directly on your lap. The temperature of the base of the unit will riseduring normal operation and over time could result in discomfort or burns.
• Do not use your Smartphone device while walking. Listening to music with headphones or watching theLCD screen while walking may lead to an unexpected accident and result in personal injuries.
• Using connected headphones on the Smartphone device for too long and/or setting the audio volume uptoo high when using headphones may cause serious hearing damage.
• Avoid strong beating of or to the product.
• Don’t operate the touch screen of the Smartphone device with sharp objects, as this may result inscratching the screen surface.
• Only use permitted batteries, chargers and accessories with your Smartphone device. The use of any otherproducts with the device can be dangerous and may violate the warranty regulations.
• Only use a slightly wet cotton cloth to clean the device, and only use water to wetten the cotton cloth. TheSmartphone device should not be cleaned with any sort of (glass) cleaning aid.
Wireless functionality

Yarvik smartphone manual
file:///Users/elroy/Desktop/Yarvik/Manual/manual_hu.html[13-02-13 17:04:49]
• If radio interference with other devices occurs while using your Smartphone device, do not use the wirelessfunctionality. Use of the wireless functionality may cause a malfunction of the devices, resulting in anaccident.
• In some situations or environments, the use of the wireless functionality might be restricted by theproprietor of the building or responsible representatives of the organization, for example on board airplanes,in hospitals or in any other environment where the risk of interference with other devices or services isperceived or identified as harmful. If you are uncertain about the policy applying to the use of wirelessfunctionality in a specific organization or environment, you are encouraged to first ask for authorization priorto switching it on. Consult your physician or the manufacturer of personal medical devices (pacemakers,hearing aids, etc.) regarding any restrictions on the use of wireless functionality.
• If using wireless functionality near a pacemaker, make sure it is at least 19 inches / 50 cm away from thepacemaker.
• Due to the transmission and reception properties of wireless communications, data can occasionally be lostor delayed. This can be due to the variation in radio signal strength that results from changes in thecharacteristics of the radio transmission path. Yarvik will not be held responsible for damages of any kindresulting from the delays or errors in data transmitted or received via wireless functionality, or failure ofwireless functionality to transmit or receive such data.
• If the equipment does cause harmful interference to radio/TV reception, which can be determined by turningthe equipment off and on, the user is encouraged to try to correct the interference by one or more of thefollowing measures: reorient or relocate the receiving antenna, increase the distance between the senderand the receiver, consult the dealer or an experienced radio/TV technician for help. Yarvik will not beresponsible for any radio/TV interference nor for any other undesired effect.
Wireless LAN Security
Creating security settings for the Wireless LAN is extremely important. Yarvik assumes no responsibility forany security problems that may arise from the use of the Wireless LAN.
Battery pack
Do not charge the battery pack in any way other than as described in the Start guide or as designated byYarvik in writing.
AC adapter
• It is highly recommended that you use a genuine Yarvik AC adapter supplied by Yarvik for your product.
• This AC adapter is intended for use with the Smartphone device IT products only.
• Do not place the AC adapter in contact with your skin. Remove the AC adapter away from your body if itbecomes warm and causes discomfort.

Yarvik smartphone manual
file:///Users/elroy/Desktop/Yarvik/Manual/manual_hu.html[13-02-13 17:04:49]
RoHS
This products has been certified as RoHS Compliant.
YARVIK.COM
Vissza azindexhez

Наръчник за таблет Yarvik
file:///Users/elroy/Desktop/Yarvik/Manual/manual_bg.html[13-02-13 17:05:00]
Индекс SELECTLANGUAGE
1 Предипървоначалнаупотреба2 Стартиране наСмартфон3 Начален екран наAndroid3.1 Добавяне награфични компонентии преки пътища въввашия Начален екран3.2 Задаване на тапет3.3 Меню Apps(Приложения)4 Първоналачнанастройка на вашиясмартфон4.1 Меню Settings(Настройки)4.2 WiFi и Bluetooth4.3 Audio Profiles(Аудио профили)4.4 Display (Дисплей)4.5 Apps (Приложения)4.6 Storage(Съхранение) и достъпдо MicroSD памет
Наръчник за таблет Yarvik
file:///Users/elroy/Desktop/Yarvik/Manual/manual_bg.html[13-02-13 17:05:00]
4.7 Language & input(Език и въвеждане)4.8 Date & time (Дата ичас)5 Apps (Приложения)6 Телефонниразговори7 Съобщения8 Гаранционноизложение9 GNU/GPLЛицензионнаинформация10 Importantinformation
1 Преди първоначална употреба
Уважаеми потребител,
Благодарим ви за закупуването на нашия продукт.За да осигурите бързото и удобно ползване на вашия нов смартфон Yarvik, моля, прочететевнимателно тези инструкции преди употребата му.
Надяваме се, че ще се радвате вашия смартфон Yarvik дълго време!
Моля отбележете:
• Вашият смартфон Yarvik еелектронен продукт с високапрецизност. Не се опитвайтеда разглобявате смартфона,тъй като това ще анулиравашата гаранция и може дадоведе до повреди вустройството.
• Избягвайте удрянето иизпускането на продукта.

Наръчник за таблет Yarvik
file:///Users/elroy/Desktop/Yarvik/Manual/manual_bg.html[13-02-13 17:05:00]
• Избягвайте използването насмартфона при високи илиниски температури, или всреда, където устройствотоможе да влезе в контакт свлага, прах или магнитниполета.
• Не излагайте смартфона насилна слънчева светлина задълъг период от време;
• Не работете със сензорнияекран с остри предмети,защото това може да надраскаекрана.
• Използването на смартфонасъс слушалки прекаленодълго време и/или спрекалено силен звук може дапричини сериозни уврежданияна слуха.
• За да избегнете инциденти втрафика не пресичайте път, некарайте моторно превозносредство или велосипед,докато използвате смартфонасъс слушалки.
• Използвайте с вашиясмартфон Yarvik, самоодобрени батерии, зарядниустройства и аксесоари.Употребата на други продуктисъс смартфона може да бъдеопасно и може да анулирагаранцията;
• Използвайте само леконавлажнен памучен плат, зада почистите смартфона исамо вода за овлажняване напамучния плат. Смартфона нетрябва да бъде почистван скаквито и да е почистващипрепарати.

Наръчник за таблет Yarvik
file:///Users/elroy/Desktop/Yarvik/Manual/manual_bg.html[13-02-13 17:05:00]
Можете да започнете да използвате своя смартфон Yarvik веднага щом го извадите от кутията, безпървоначално да зареждате батерията.Най-добре за батерията е първо да изразходвате нейния заряд и да я заредите напълно, след като ебила изтощена напълно за първи път.Ако смартфонът не се включва веднага след изваждане от кутията, батерията е вече напълноизтощена и разбира се, вие първо трябва да я заредите.
Връщане къминдекса
2 Стартиране насмартфона
Когато за първи път включите вашия смартфон Yarvik ще бъдете преведен през първоначалнатанастройка.Първото стартиране може да отнеме доста, приблизително 2-3 минути.След първоначалното стартиране и настройка на смартфона се отваря Екран за заключване наAndroid.
Екран за заключване на Android

Наръчник за таблет Yarvik
file:///Users/elroy/Desktop/Yarvik/Manual/manual_bg.html[13-02-13 17:05:00]
Плъзнете лентата за заключване (A) надясно, за да отключите смартфона. След това ще бъдетепренасочен към началния екран на Android.
Връщане къминдекса
3 Начален екран на Android
Начален екран на Android
В долната част на екрана на смартфона винаги можете да намерите лентата за състояние.Лентата за състояние показва системна информация, докато долната лента с менюта съдържафункционални бутони.
1 - Индикатор за Wi-Fi сигнал2 - Индикатор за приемане на клетъчен сигнал за SIM1 и SIM2 и Индикатор за заряд на батериятаBattery Level Indicator3 - Системно време4 - Кратки пътища към приложения5 - Графични елементи (аналогов часовник)6 - Бутон Обратно - връща ви обратно предишния уебсайт, когато използвате браузъра7 - Начало - връща ви обратно към началния екран на Android

Наръчник за таблет Yarvik
file:///Users/elroy/Desktop/Yarvik/Manual/manual_bg.html[13-02-13 17:05:00]
8 - Меню за Приложения и графични елементи9 - Многофункционален бутон
Началният екран съдържа много страници, които могат да бъдат достъпни чрез плъзгане на началнияекран наляво/надясно.
За да видите какви приложения работят във фонов режим, можете да влезете в многозадачен режимкато натиснете многофункционалния бутон (9).
Щракнете върху работещо приложение в многозадачен режим, за да превключите бързо към него.Можете да затворите работещо приложение като натиснете продължително и щракнете върху„Remove from list” („Отстрани от списъка”);.
Връщане къминдекса
3.1
Добавяне награфичникомпонентии преки пътищавъв вашия

Наръчник за таблет Yarvik
file:///Users/elroy/Desktop/Yarvik/Manual/manual_bg.html[13-02-13 17:05:00]
Начален екранЗа да добавите графичен елемент, натиснете бутона за приложение и графични елементи долу в
средата на началния екран:
В следващия екран можете да намерите всички инсталирани приложения и графични елементи,видими отделно с натискане съответно на „Apps” („Приложения”) или „Widgets” („Графичиниелементи”) съответно в горната част на екрана.Натиснете „Widgets” („Графични елементи”), за да видите всички налични графични елементи. Когатопоказвате всички графични елементи, можете да прелистите екраните, за да прегледате следващатастраница (ако има).Натиснете и задръжте искания графичен елемент, за да се покаже Началния екран, а след товаосвободете графичния елемент на което и да е свободно пространство на Началния екран.
За да добавите кратък път към което и да е приложение, натиснете бутона за приложение и графични
елементи долу в средата на началния екран:
В следващия екран можете да намерите всички инсталирани приложения и графични елементи,видими отделно с натискане съответно на „Apps” („Приложения”) или „Widgets” („Графичиниелементи”) съответно в горната част на екрана.Натиснете „Apps” („Приложения”), за да видите всички налични приложения.Натиснете и задръжте исканото приложение, за да се покаже Началния екран и краткия път на което ида е свободно пространство на Началния екран.
За да отстраните графичен елемент и/или кратък път към приложение от своя Начален екран,натиснете ги и ги задръжте, а след това ги изтеглете до иконата на кошчето „Remove”(„Отстраняване”), която ще се появи на вашия Начален екран.
Връщане къминдекса
3.2 Задаване натапет
За да смените тапета на вашия Начален екран, натиснете и задръжте Началния екран, докато не сепояви менюто „Select Wallpaper from” („Избор на тапет от”).Можете да изберете между „Live Wallpapers” („Живи тапети”) (анимирани тапети), „Gallery” („Галерия”)(фото/видео галерия) или „Wallpapers” („Тапети”) (статични изображения по подразбиране).
Връщане къминдекса
3.3 Меню Apps

Наръчник за таблет Yarvik
file:///Users/elroy/Desktop/Yarvik/Manual/manual_bg.html[13-02-13 17:05:00]
(Приложения)Натиснете и задръжте бутона за приложение и графични елементи долу в средата на началния
екран:
Когато системата визуализира графичните елементи, натиснете „Apps” („Приложения”), за да видитевсички инсталирани приложения.
Тук можете да намерите всички предварително инсталирани програми или „apps” („Приложения”),както и допълнителните приложения, които сте инсталирани вие.Можете да стартирате всяко приложение като натиснете съответната икона.
Екран Приложения
Връщане къминдекса
4
Настройка навашиясмартфонYarvik
4.1 Меню Settings
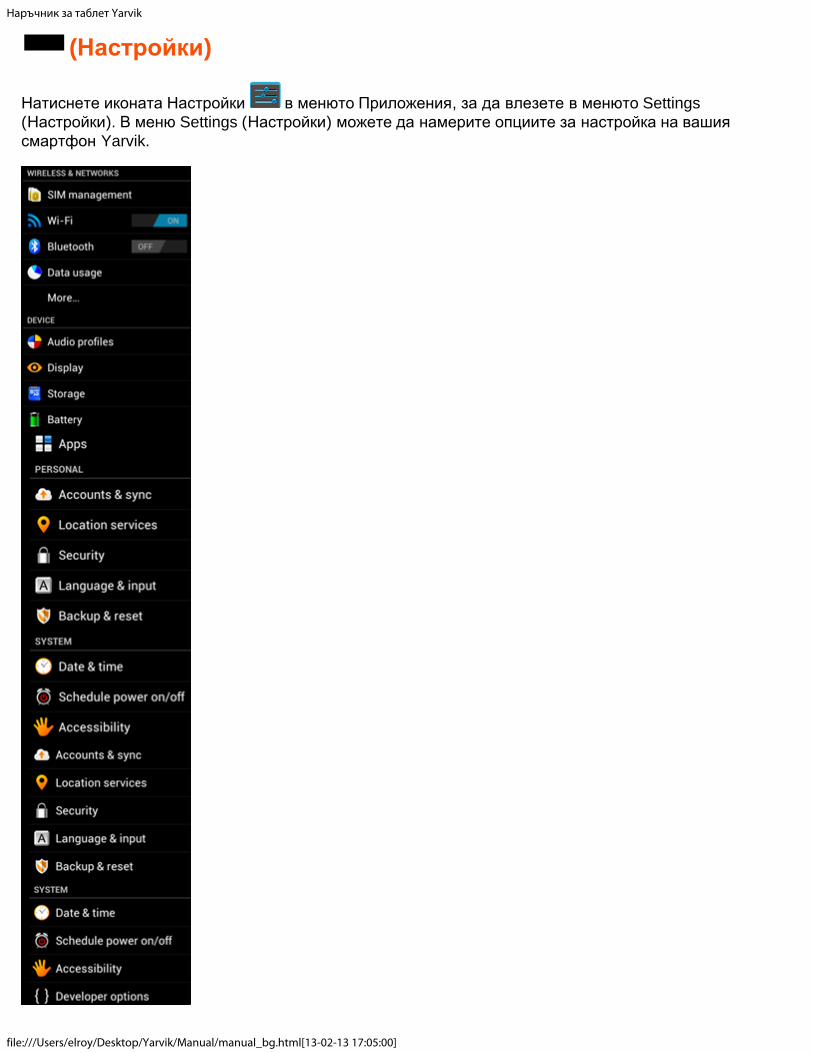
Наръчник за таблет Yarvik
file:///Users/elroy/Desktop/Yarvik/Manual/manual_bg.html[13-02-13 17:05:00]
(Настройки)
Натиснете иконата Настройки в менюто Приложения, за да влезете в менюто Settings(Настройки). В меню Settings (Настройки) можете да намерите опциите за настройка на вашиясмартфон Yarvik.

Наръчник за таблет Yarvik
file:///Users/elroy/Desktop/Yarvik/Manual/manual_bg.html[13-02-13 17:05:00]
Меню настройки
Ще преминем през най-важните части:
Връщане къминдекса
4.2 Wi-Fi иBluetooth
Wi-Fi
Настройка на връзка към безжична Wi-Fi мрежа.Плъзнете бутона On/Off (Вкл/Изкл) към „On” („Вкл”), за да активирате Wi-Fi.
Наличните Wi-Fi мрежи се появяват в списък с мрежи в дясно на екрана. Натиснете върху мрежата поваш избор. Ако мрежата е защитена ще бъдете поканен да въведете ключ за мрежова защита.
Натиснете бутона „Connect” („Свързване”) и смартфона се свързва към мрежата.След като „Connected” („Свързан”) се появи под името на мрежата и иконата за безжична свързаностсе покаже в лентата за състояние отдолу, вие сте се свързали успешно към безжичната мрежа.
Преглед на Wi-Fi МАС адреса на вашия смартфон Yarvik
Докато сте в екрана за Wi-Fi настройки, щракнете върху бутона за менюто в долния десен ъгъл.
Натиснете „Advanced” („Разширени”) в разгърнатото меню.

Наръчник за таблет Yarvik
file:///Users/elroy/Desktop/Yarvik/Manual/manual_bg.html[13-02-13 17:05:00]
Машият Wi-Fi MAC адрес се показва в следния екран „Advanced Wi-Fi” („Разширени Wi-Fi”) в „MACaddress” („МАС адрес”).
Bluetooth
Вашият смартфон Yarvik е оборудван с вграден Bluetooth модул за свързване на Bluetoothсъвместими периферни устройства като клавиатури, високоговорители и слушалки, а освен това иBluetooth устройства свободни ръце и комплекти за кола.Плъзнете бутона Bluetooth On/Off (Вкл/Изк), за да активирате („On”) Bluetooth.
След като бъде активиран, вашият смартфон Yarvik автоматично ще стартира търсене на близкиBluetooth устройства. Винаги можете да търсите ръчно Bluetooth устройства като щракнете „Search forDevices” (Търсене на устройства) в горния десен ъгъл на екрана.Може да е необходимо с цел свързване на периферия, смартфона да бъде поставен в „pairing mode”(„режим свързване”). Моля, направете справка в наръчника с инструкции на съответното периферноустройство.
Всички намерени устройства ще бъдат показани в списъка „Available Devices” („Налични устройства”):
Щракнете върху намереното Bluetooth устройство, за да свържете с него своя смартфон Yarvik.Ще се отвори прозорец „Bluetooth pairing request” („Заявки за Bluetooth свързване”):
Повечето Bluetooth устройства изискват пин код за осъществяване на свързване. Този код обикновеное 0000 или 1234. Ако пин кодът е различен, моля, направете справка в инструкциите за експлоатацияна своето Bluetooth устройство.След като сте въвели правилният пин код, натиснете „OK”.
Сега вашият смартфон Yarvik ще стартира процедура за свързване с вашето Bluetooth устройство, а

Наръчник за таблет Yarvik
file:///Users/elroy/Desktop/Yarvik/Manual/manual_bg.html[13-02-13 17:05:00]
след няколко секунди, връзката ще бъде осъществена, показвайки съобщение „Connected”(„Свързан”) под съответното Bluetooth устройство в списъка „Available Devices” („Наличниустройства”):
Към вашият самартфон Yarvik можете да свържете няколко Bluetooth устройства, които да използватеедновременно (напр. мишка и клавиатура).
Връщане къминдекса
4.3Audio Profiles(Аудиопрофили)
Тук можете да промените силата на звука на смартфона, напр. само вибрация, звънене за входящиобаждания/съобщения.
Връщане къминдекса
4.4 Display(Дисплей)
Тук можете да смените яркостта на дисплея, големината на шрифта и времето за автоматичнозаспиване.Моля, отбележете, че по-голямата яркост на дисплея, води до по-висока консумация на енергия.Това ще източи заряда на вашата батерията по-бързо.Ако не искате дисплея да се върти автоматично, когато накланяте своя смартфон, можете даактивирате/деактивирате тази функционалност в менюто за настройки Auto-rotate screen(Автоматично въртене екрана).
Връщане къминдекса
4.5 Apps(Приложения)
Тук можете да управлявате приложенията, които са инсталирани на вашия смартфон Yarvik.

Наръчник за таблет Yarvik
file:///Users/elroy/Desktop/Yarvik/Manual/manual_bg.html[13-02-13 17:05:00]
Можете да щракнете върху приложение, което искате да бъде инсталирано, за да видитеинформация за него и да го деинсталирате, ако е необходимо като използвате бутона „Uninstall”(„Деинсталиране”).Моля, отбележете, че предварително инсталираните приложения по подразбиране (като напр.калкулатор) не могат да бъдат деинсталирани.
Връщане къминдекса
4.6
Storage(Съхранение)и достъп доMicroSDпамет
Показва информация за вътрешната памет. Когато е поставена MicroSD карта, информация за неяможете да намерите тук.
Свързване на вашия смартфон Yarvik към компютър - PC или Mac чрез USB
Можете да свържете своя смартфон Yarvik към компютър - PC или Mac чрез USB кабел.Когато свързвате към компютър, можете да влезете във вътрешната памет на самртфона и ако иматакава, в поставената MicroSD карта като към стандартно USB устройство за съхранение на данни.
Моля, направете справка в разпечатания Наръчник за бърз старт на вашия смартфон Yarvik, за даопределите местоположението на USB порта. Свържете USB кабела към USB порт на вашиясмартфон Yarvik и към свободен USB порт на вашия компютър.В долния десен ъгъл на екрана на вашия смартфон за кратко едно след друго ще се появят двесъобщения:
След като се появи второто съобщение („USB connected” („Свързване чрез USB”)), щракнете върхунего.Появява се следния екран:

Наръчник за таблет Yarvik
file:///Users/elroy/Desktop/Yarvik/Manual/manual_bg.html[13-02-13 17:05:00]
Щракнете върху бутона „Turn on USB storage” („Включване на USB памет”).Ще се появи прозорец за съобщение:
Щракнете върху „OK”, за да потвърдите.Сега вътрешната памет на вашия смартфон Yarvik ще се появи като устройство за съхранение наданни във файловата система на вашия компютър и може да бъде използван, напр. за копиране нафайлове от и към вашия смартфон Yarvik.Ако във вашия смартфон имате MicroSD карта, тя ще бъде разпозната от компютъра като второустройство за съхранение на данни.
За да спрете ползването на функцията Устройство за съхранение на данни, щракнете върху бутона„Turn off USB storage” („Изключване на USB съхранение на данни”) и отстранете USB кабела.
Забележка: Не са необходими хардуерни драйвери за достъп до паметта на смартфона Yarvik. Аковашият компютър пита за инсталация на драйвери, можете да ги игнорирате.
Достъпете вашата MicroSDкарта

Наръчник за таблет Yarvik
file:///Users/elroy/Desktop/Yarvik/Manual/manual_bg.html[13-02-13 17:05:00]
в ES File Explorer
Ако сте поставили MicroSD карта във вашия смартфон Yarvik, можете да получите достъп до неякакто следва:
Отворете приложението ES File Explorer и щракнете върху бутона Favorites (Предпочитани) (с иконакато синя звезда).
Сега менюто Favorites (Предпочитани) се разгръща. Щракнете върху иконата „основна директория”, сетикет „/”:
Сега сте достигнали до „основна директория” файлова система на смартфона, съдържаща редицафайлове и папки.Намете и щракнете върху папка „mnt”:
Папката „mnt” се отваря и се виждат редица папки:
Папката „sdcard” е вътрешната памет на вашия смартфон Yarvik.Папката „sdcard2” е вашата MicroSD карта (когато е поставена в слота за MicroSD на смартфона).

Наръчник за таблет Yarvik
file:///Users/elroy/Desktop/Yarvik/Manual/manual_bg.html[13-02-13 17:05:00]
Когато е наличен, можете да използвате и краткия път microsd2 в споменатото по-горе менюFavorites (Предпочитани), за да получите бърз достъп до вашата MicroSD карта памет.
Връщане къминдекса
4.7Language &input (Език ивъвеждане)
Използвайте „Select language” („Избор на език”), за да изберете език за дисплея на вашия смартфонYarvik. Това се прилага на всички екранни текстове в цялата система.В „Android keyboard” („Клавиатура на Android”) можете да настроите екранната клавиатура на вашиясмартфон.
Връщане къминдекса
4.8 Date & time(Дата и час)
Тук можете да настроите датата и часа на вашия смартфон Yarvik.
Връщане къминдекса
5 Apps(Приложения)
Смартфонът Yarvik ще бъде доставен с предварително инсталирани приложения (вижте примеритепо-долу):

Наръчник за таблет Yarvik
file:///Users/elroy/Desktop/Yarvik/Manual/manual_bg.html[13-02-13 17:05:00]
Изгледът на иконите на приложенията може да бъде променен без предизвестие.
Връщане къминдекса
6 Телефонниобаждания
Провеждане на телефонни обажданияЗа да проведете телефонно обаждане с вашия смартфон Yarvik, отворете приложението „Phone”
(„Телефон”) от менюта за приложения на началния екран на Android: Използвайте цифровата телефонна клавиатура, за да въведете телефонния номер.

Наръчник за таблет Yarvik
file:///Users/elroy/Desktop/Yarvik/Manual/manual_bg.html[13-02-13 17:05:00]
Телефонна клавиатура.
За да проведете международни телефонни обаждания, изискващи префикс „+”, натиснете и задръжте„0” на клавиатурата, докато не се появи „+”.
Натиснете бутона на инициализация на разговор , за да започнете повикване.
Натиснете бутона на инициализация на разговор , за да прекратите повикване.Освен това можете да проведете телефонни разговори директно от вашите контакти с приложението„People” („Хора”).
Последните обаждания се съхраняват в екран Дневник на обаждания, достъпен чрез натискане на
бутона Дневник в горната част на телефонния екран.Вашите контакти (от преди това споменатото приложение „People” („Хора”)) също са достъпни
директно от Phone (Телефон) екран с натискане на бутона .
Входящи телефонни обаждания
Когато получавате телефонно обаждане на вашия смартфон Yarvik ще имате 3 опции:
1 - Плъзнете кръгчето нагоре, за да игнорирате входящо обаждане и да изпратите автоматиченотговор с текстово съобщение;2 - Игнорира входящо телефонно обаждане;3 - Отговаря на входящо телефонно обаждане.

Наръчник за таблет Yarvik
file:///Users/elroy/Desktop/Yarvik/Manual/manual_bg.html[13-02-13 17:05:00]
Опции по време на телефонно обаждане
1 - Показване на телефонната клавиатура (напр. за менюта с DTMF опция);2 - Активиране/деактивиране на високоговорителя;3 - Заглушаване на микрофона;4 - Задържане на телефонно обаждане;5 - Меню с повече опции: добавяне на допълнително телефонно обаждане (конферентен разговор)или запис на телефонен разговор.
Препращане на разговор
Можете да настроите функцията за препращане на разговор за препращане на всички телефонниразговори към определен номер.
В приложението „Phone” („Телефон”) , натиснете бутона на менюто и изберете „Call settings”(„Настройки на обаждания”).Изберете „Voice call” („Гласови обаждания”) където можете да изберете „Call forwarding”(„Препращане на обаждане”), променяйки тези опции.
ИД на обаждащия се/Изчакване на обаждане
С функцията на вашия смартфон Yarvik ИД на обаждащия се можете да изберете дали искате даизпращате своя номер при провеждане на телефонно обаждане или не.
За да промените това, стартирайте приложението „Phone” (Телефон) , натиснете бутона за
менюто и изберете „Settings” („Настройки”) - „Voice call” („Гласови обаждания”)- „Additionalsettings” („Допълнителни настройки”)- „Caller ID” („ИД на обаждащия се”).В същото това меню можете да активирате/деактивирате входящите обаждания при вече започнаттелефонен разговор.
Връщане къминдекса

Наръчник за таблет Yarvik
file:///Users/elroy/Desktop/Yarvik/Manual/manual_bg.html[13-02-13 17:05:00]
7 Съобщения
Вашият смартфон Yarvik има възможност за изпращане на SMS и MMS съобщения. Моля,консултирайте се със своя доставчик на мобилни услуги за информация относно стандартните цени идопълнителните разходи за изпращане на съобщения от чужди държави.
Изпращане на SMS/MMS съобщения
Отворете приложението „Messaging” („Съобщения”) от началния екран на Android или менютоза приложения.
Приложение Съобщения.
1 - Добавете приложения като снимки, аудио и видео. Съобщенията с прикачени файловеавтоматично се преобразуват в MMS съобщения;2 - Меню за настройка на съобщения;3 - Поле за получател;4 - Добавете получател;5 - Меню за преглед на разговор;6 - Въвеждане на съобщение;7 - Бутон за изпращане на съобщение.
Настройка на номер за гласова поща/възпроизвеждане на съобщения в гласова пощаЗа да настроите своят номер за гласова поща в смартфона Yarvik, отворете приложението „Phone”
(„Телефон”) от менюто с приложения или началния екран на Android:

Наръчник за таблет Yarvik
file:///Users/elroy/Desktop/Yarvik/Manual/manual_bg.html[13-02-13 17:05:00]
Натиснете и задръжте бутона на телефонната клавиатура. „Add number” („Добави номер”) щесе появи на екрана с опции. В опциите за Гласова поща можете да изберете настройките за гласовапоща и да въведете сервизен номер за гласова поща.
След като задали сервизен номер за гласова поща, можете да използвате бутон за данаправите обаждане до своята кутия за гласова поща като го натиснете и задържите.
Връщане къминдекса
8 Гаранционноизложение
Yarvik гарантира, че продуктът закупен от клиента няма да има дефекти в изработката илиматериалите за период от 2 години от датата на закупуване от клиента. Ако по което и да е времепрез този период, в продукта бъде открит дефект в изработката или материалите, клиентът трябва давърне продукта на дилъра, от където го е закупил. Дилърът трябва да го ремонтира или подмени (поусмотрение на Yarvik) в разумен срок. Необходима е оригинална фактура като доказателство задатата на закупуване. Изборът на Yarvik за това ще бъде краен.
Тази гаранция не покрива дефекти или неизправности в резултата от софтуерни трансфери,неправилна употреба, неправилна работа, манипулиране, небрежност, неуместна употреба, недобросъхранение или каквото и да е действие извън контрола на Yarvik.
ВАЖНО: Когато закупувате смартфон от Yarvik, вашият смартфон ще бъде снабден с последниястабилен фърмуер за този модел, към момента на производство на устройството. Yarvik няма дапредостави поддръжка на продукти, които са били модифицирани по друг начин от крайнияпотребител, нито пък Yarvik поддържа софтуерни програмни модификации на фърмуера и софтуера,използвани в този продукт и ако такива модификации са били направени, всички гаранцииавтоматично се анулират.
За избягване анулиране на гаранцията, предложена тук, Клиентът трябва да използва самоофициалната софтуерна версия, приложения и актуализации, предлагани на уебсайта на Yarvik наадрес www.yarvik.com.Не трябва да бъдат използвани друг софтуер или фърмуер, тъй като това автоматично ще анулиравсички гаранции и поддръжка. Yarvik не поддържа употребата на софтуер или фърмуер, различни оттези, които са инсталирани на продукта от производителя или налични на официалния уебсайт наYarvik на адрес www.yarvik.com. Yarvik недвусмислено отказва отговор на каквито и да е въпросиотносно неоторозирани модификации, неоторизиран софтуер и неоторизиран фърмуер.
Връщане къминдекса
GNU/GPL

Наръчник за таблет Yarvik
file:///Users/elroy/Desktop/Yarvik/Manual/manual_bg.html[13-02-13 17:05:00]
9 Лицензионнаинформация
Моля, консултирайте се с правната информация, налична на вашия смартфон Yarvik в Settings(Настройки) – About Smartphone (Относно смартфона) – Legal information (Правна информация)(необходима е Интернет връзка) или за повече информация, посететеhttp://source.android.com/source/licenses.html.
Връщане къминдекса
10 ImportantInformation
Wireless LAN-Regulatory information
Depending on the model, the wireless LAN built-in into Smartphone devices can only be used in thefollowing countries: Austria, Belgium, Bulgaria, Czech Republic, Denmark, Finland, France, Germany,Greece, Hungary, Iceland, Ireland, Italy, Luxembourg, the Netherlands, Norway, Poland, Portugal, Romania,Slovakia, Slovenia, Spain, Sweden, Switzerland, Turkey and the United Kingdom.
Conditions of use
When using the IEEE 802.11b/g/n Wireless LAN standard, channels 1 to 13 (2.4 GHz...2.4835 GHz) areselectable for both indoor and outdoor use, however with restrictive conditions applying in France, Italy andNorway, as follows:
• France: When using this product indoor, all channels can be used without restrictions. Outdoor onlychannels 1 to 6 are allowed. This means that in Peer-to-Peer, the WLAN feature can only be used outside ifthe peer sets up the communication on an authorized channel (i.e., between 1 & 6). In infrastructure mode,please make sure the access point is configured to a channel from 1 to 6 before setting up the connection.
• Italy: Use of the RLAN network is governed: Disposal of Old Electrical & Electronic- with respect to private use, by the Legislative Decree of 1.8.2003, no. 259 (“Code of ElectronicCommunications”). In particular Article 104 indicates when the prior obtainment of a general authorization isrequired and Art. 105 indicates when free use is permitted;- with respect to the supply to the public of the WLAN access to telecom networks and services, by theMinisterial Decree 28.5.2003, as amended, and Art. 25 (general authorization for electronic communicationsnetworks and services) of the Code of electronic communications.
• Norway: Use of this radio equipment is not allowed in the geographical area within a radius of 20 km fromthe centre of Ny-Ålesund, Svalbard.
WEEE

Наръчник за таблет Yarvik
file:///Users/elroy/Desktop/Yarvik/Manual/manual_bg.html[13-02-13 17:05:00]
SymbolInformation
Correct Disposal of This product (Waste Electrical & Electronic Equipment).
(Applicable in the European Union and other European countries with separate collection systems).
This marking shown on the product or its literature indicates that it should not be disposed with otherhousehold wasted at the end of its working life. To prevent possible harm to the environment or humanhealth from uncontrolled waste disposal, please separate this from other types of wastes and recycle itresponsibly to promote the sustainable reuse of material resources.Household users should contact either the retailer where they purchased this product, or their localgovernment office, for details of where and how they can take this item for environmentally safe recycling.Business users should contact their supplier and check the terms and conditions of the purchase contract.This product should not be mixed with other commercial wastes of disposal.
Disposal of waste batteries (applicable in the European Union and other European countries withseparate collection systems)
Either of the symbols shown next may appear on the battery or on the packaging to indicate that the batteryprovided with this product shall not be treated as household waste. On certain batteries this symbol might beused in combination with a chemical symbol. The chemical symbols for mercury (Hg) or lead (Pb) are addedif the battery contains more than 0.0005% mercury or 0.004% lead. By ensuring these batteries are disposedof correctly, you will help prevent potentially negative consequences for the environment and human healthwhich could otherwise be caused by inappropriate waste handling of the battery. The recycling of thematerials will help to conserve natural resources. In case of products that for safety, performance or dataintegrity reasons require a permanent connection with an incorporated battery, this battery should bereplaced by qualified service staff only. To ensure that the battery will be treated properly, hand over theproduct at end-of-life to the applicable collection point for the recycling of electrical and electronicequipment.
For all other batteries, please view the section on how to remove the battery from the product safely. Handthe battery over to the applicable collection point for the recycling of waste batteries. For more detailedinformation about recycling of this product or battery, please contact your local Local government Office,your household waste disposal service or the shop where you purchased the product.
When travelling to and within the United States of America, please be aware that the U.S. Department ofTransportation (DOT) recently published new regulations that apply to passengers travelling with lithiummetal batteries and lithium-ion batteries.
Наръчник за таблет Yarvik
file:///Users/elroy/Desktop/Yarvik/Manual/manual_bg.html[13-02-13 17:05:00]
For detailed information, visit http://safetravel.dot.gov/whats_new_batteries.html.
Safety Information
Yarvik Smartphone device
• Yarvik is not responsible for any interference that you may experience or that may be caused whenoperating this device.
• Warning: This apparatus must be earthed.
Opening or dismantling the main unit or any of its accessories, for whatever reason, could lead to damagesthat are not covered by the guarantee.
• To avoid electrical shock, do not open the cabinet. Refer servicing to qualified personnel only.
• To prevent fire or shock hazard, do not expose your Smartphone device or any of its accessories to rain ormoisture.
• Do not use or store your Smartphone device in a location subject to heat sources, such as radiators or airducts; direct sunlight; excessive dust; moisture or rain; mechanical vibration or shock; strong magnets orspeakers that are not magnetically shielded; excessively high and low temperatures; and high humidity.
• Turning off your Smartphone device with the power button does not disconnect the device completely frommains voltage. To disconnect it completely, unplug the AC adapter or the power cord from mains. Thesocket-outlet shall be installed near the equipment and shall be easily accessible.
• Audio and picture distortion may occur if this equipment is positioned in close proximity to any equipmentemitting electromagnetic radiation.
• This apparatus is also designed for IT power system with phase to phase voltage 230V, for customers inNorway.
• Observe the following precautions to provide adequate air circulation and to ensure normal reliableoperation:- Do not use the Smartphone device and/or the AC adapter while covered or wrapped in cloth. Ensure theAC adapter operates in a clear environment.- Turn off the Smartphone device before putting the device into a bag or a carrying case.
• Do not use your Smartphone device directly on your lap. The temperature of the base of the unit will riseduring normal operation and over time could result in discomfort or burns.
• Do not use your Smartphone device while walking. Listening to music with headphones or watching theLCD screen while walking may lead to an unexpected accident and result in personal injuries.
• Using connected headphones on the Smartphone device for too long and/or setting the audio volume uptoo high when using headphones may cause serious hearing damage.
• Avoid strong beating of or to the product.
• Don’t operate the touch screen of the Smartphone device with sharp objects, as this may result inscratching the screen surface.

Наръчник за таблет Yarvik
file:///Users/elroy/Desktop/Yarvik/Manual/manual_bg.html[13-02-13 17:05:00]
• Only use permitted batteries, chargers and accessories with your Smartphone device. The use of any otherproducts with the device can be dangerous and may violate the warranty regulations.
• Only use a slightly wet cotton cloth to clean the device, and only use water to wetten the cotton cloth. TheSmartphone device should not be cleaned with any sort of (glass) cleaning aid.
Wireless functionality
• If radio interference with other devices occurs while using your Smartphone device, do not use the wirelessfunctionality. Use of the wireless functionality may cause a malfunction of the devices, resulting in anaccident.
• In some situations or environments, the use of the wireless functionality might be restricted by theproprietor of the building or responsible representatives of the organization, for example on board airplanes,in hospitals or in any other environment where the risk of interference with other devices or services isperceived or identified as harmful. If you are uncertain about the policy applying to the use of wirelessfunctionality in a specific organization or environment, you are encouraged to first ask for authorization priorto switching it on. Consult your physician or the manufacturer of personal medical devices (pacemakers,hearing aids, etc.) regarding any restrictions on the use of wireless functionality.
• If using wireless functionality near a pacemaker, make sure it is at least 19 inches / 50 cm away from thepacemaker.
• Due to the transmission and reception properties of wireless communications, data can occasionally be lostor delayed. This can be due to the variation in radio signal strength that results from changes in thecharacteristics of the radio transmission path. Yarvik will not be held responsible for damages of any kindresulting from the delays or errors in data transmitted or received via wireless functionality, or failure ofwireless functionality to transmit or receive such data.
• If the equipment does cause harmful interference to radio/TV reception, which can be determined by turningthe equipment off and on, the user is encouraged to try to correct the interference by one or more of thefollowing measures: reorient or relocate the receiving antenna, increase the distance between the senderand the receiver, consult the dealer or an experienced radio/TV technician for help. Yarvik will not beresponsible for any radio/TV interference nor for any other undesired effect.
Wireless LAN Security
Creating security settings for the Wireless LAN is extremely important. Yarvik assumes no responsibility forany security problems that may arise from the use of the Wireless LAN.
Battery pack
Do not charge the battery pack in any way other than as described in the Start guide or as designated byYarvik in writing.

Наръчник за таблет Yarvik
file:///Users/elroy/Desktop/Yarvik/Manual/manual_bg.html[13-02-13 17:05:00]
AC adapter
• It is highly recommended that you use a genuine Yarvik AC adapter supplied by Yarvik for your product.
• This AC adapter is intended for use with the Smartphone device IT products only.
• Do not place the AC adapter in contact with your skin. Remove the AC adapter away from your body if itbecomes warm and causes discomfort.
RoHS
This products has been certified as RoHS Compliant.
YARVIK.COM
Връщане къминдекса

Yarvik smartphone manual
file:///Users/elroy/Desktop/Yarvik/Manual/manual_ro.html[13-02-13 17:05:12]
Cuprins SELECTLANGUAGE
1 Înainte de primautilizare2 Pornire Smartphone3 Ecran de începutAndroid3.1 Adăugarea unorwidgets şi scurtături laecranul de început3.2 Setarea imaginii defundal3.3 Meniu Apps(Aplicaţii)4 ConfigurareaSmartphone-ului4.1 Meniu Settings(Setări)4.2 WiFi şi Bluetooth4.3 Audio Profiles(Profiluri audio)4.4 Display (Afişaj)4.5 Apps (Aplicaţii)4.6 Storage (Stocare) şiacces memorie MicroSD4.7 Language & input(Limbă şi taste)4.8 Date & time (Data şiora)

Yarvik smartphone manual
file:///Users/elroy/Desktop/Yarvik/Manual/manual_ro.html[13-02-13 17:05:12]
5 Apps (Aplicaţii)6 Apeluri7 Mesaje8 Declaraţie degaranţie9 Informaţii privindlicenţa GNU/GPL10 Importantinformation
1 Înainte de prima utilizare
Stimate utilizator,
Vă mulţumim că aţi cumpărat produsul nostru.Pentru a asigura o utilizare uşoară şi rapidă a noului dumneavoastră Smartphone Yarvik, vă rugăm caînainte de a îl folosi, să citiţi cu atenţie prezentele instrucţiuni.
Sperăm că vă veţi bucura din plin şi cât mai mult timp posibil de Smartphone-ul dumneavoastră Yarvik!
Vă rugăm să reţineţi:
• Smartphone-ul dumneavoastrăYarvik este un produs electronicde înaltă precizie. Nu încercaţisă dezasamblaţi smartphone-ul,deoarece acest lucru va anulagaranţia şi poate duce ladefectarea dispozitivului.
• Evitaţi lovirea sau scăpareaprodusului.
• Evitaţi utilizarea smartphone-ului într-un mediu cu temperaturiînalte sau scăzute sau în caredispozitivul poate intra încontact cu umezeala, praful saucâmpurile magnetice.
• Nu expuneţi timp îndelungatsmartephone-ul la lumina solarăputernică.

Yarvik smartphone manual
file:///Users/elroy/Desktop/Yarvik/Manual/manual_ro.html[13-02-13 17:05:12]
• Nu operaţi touch screen-ul cuobiecte ascuţite, deoareceacesta s-ar putea zgâria.
• Utilizarea smartphone-ului cucăştile şi / sau cu volumul datprea tare, pe o perioadă preaîndelungată, poate producedeteriorarea auzului.
• Pentru a evita accidentelerutiere, nu traversaţi strada, nuconduceţi un vehicul motorizat şinu rulaţi cu bicicleta în timp ceutilizaţi smartphone-ul cu căşti.
• Folosiţi numai baterii,încărcătoare şi accesoriicompatibile cu smartphone-ulYarvik. Utilizarea cu acestsmartphone a oricărui alt produspoate fi periculoasă şi poateîncălca prevederile garanţiei.
• Pentru a curăţa smartphone-ul,utilizaţi numai o cârpă dinbumbac uşor umezită, iar pentrua o umezi folosiţi numai apă.Smartphone-ul nu trebuiecurăţat cu produse de curăţare.
Puteţi folosi Smartphone-ul Yarvik direct din cutie, fără a încărca mai întâi bateria.Se recomandă ca mai întâi bateria să funcţioneze până la epuizarea energiei rămase în ea, după care să fiecomplet reîncărcată pentru prima dată.În cazul în care Smartphone-ul nu se aprinde imediat după scoaterea din cutie, înseamnă că bateria estedeja complet descărcată şi prin urmare, trebuie să o reîncărcaţi mai întâi.
Revenire lacuprins
2 PornireSmartphone
La prima pornire a Smartphone-ului Yarvik, vi se va prezenta secvenţa de pornire.Prima activare poate dura aproximativ 2-3 minute.

Yarvik smartphone manual
file:///Users/elroy/Desktop/Yarvik/Manual/manual_ro.html[13-02-13 17:05:12]
După secvenţa de pornire, Smartphone-ul îşi finalizează pornirea şi afişează (ecranul de blocare Android).
Ecranul de blocare Android
Glisaţi bara de blocare (A) spre dreapta pentru a debloca Smartphone-ul. Apoi, veţi reveni la ecranul deînceput Android.
Revenire lacuprins
3 Ecran de început Android

Yarvik smartphone manual
file:///Users/elroy/Desktop/Yarvik/Manual/manual_ro.html[13-02-13 17:05:12]
Ecran de început Android
În partea inferioară a ecranului Smartphone-ului găsiţi întotdeauna bara de stare.Bara de stare afişează informaţiile despre sistem, în timp ce bara meniu inferioară conţine butoanele cufuncţii.
1 - Indicator semnal Wi-Fi2 - Recepţie reţea celular pentru SIM1 şi SIM2 şi Indicatorul nivelului bateriei3 - Oră sistem4 - Scurtături pentru aplicaţii5 - Widget (ceas analogic)6 - Buton Înapoi - vă conduce înapoi la ecranul sau website-ul anterior când utilizaţi Browser-ul7 - Acasă - vă readuce la ecranul de început Android8 - Aplicaţii şi meniu widget9 - Buton sarcini multiple
Ecranul de început constă din pagini multiple care pot fi accesate prin atingerea ecranului de început lastânga/dreapta.
Pentru a vedea ce aplicaţii sunt executate în fundal, puteţi accesa vederea aplicaţiilor care rulează simultanapăsând butonul sarcini multiple (9).

Yarvik smartphone manual
file:///Users/elroy/Desktop/Yarvik/Manual/manual_ro.html[13-02-13 17:05:12]
Daţi clic pe o aplicaţie în funcţiune, în vizulizare sarcini multiple, pentru a comuta rapid la aceasta. Puteţiînchide aplicaţia în funcţiune apăsând îndelungat pe ea şi dând clic pe „Remove from list” („Ştergere de pelistă”).
Revenire lacuprins
3.1
Adăugarea unorwidgets şiscurtături laecranul deînceput
Pentru a adăuga un widget, apăsaţi butonul aplicaţii şi widget din partea centrală jos a ecranului de început:
Apăsând pe „Apps” („Aplicaţii”) sau, respectiv, pe „Widgets” („Widget-uri”) din partea superioară a ecranului,puteţi găsi în următorul ecran aplicaţiile şi widgets instalate, vizibile separat.Apăsaţi pe („Widget-uri”) pentru a vedea toate widget-urile disponibile. După afişarea tuturor widget-urilor,puteţi lovi uşor ecranul pentru a naviga spre următoarea pagină (dacă este disponibilă).Apăsaţi şi ţineţi de widget-ul dorit pentru a se afişa ecranul de început şi eliberaţi widget-ul spre orice loc golde pe ecranul de început.

Yarvik smartphone manual
file:///Users/elroy/Desktop/Yarvik/Manual/manual_ro.html[13-02-13 17:05:12]
Pentru a adăuga o scurtătură spre orice aplicaţie, apăsaţi pe butonul aplicaţii şi widget din partea centrală
jos a ecranului de început:
Apăsând pe „Apps” („Aplicaţii”) sau, respectiv, pe „Widgets” („Widget-uri”) din partea superioară a ecranului,puteţi găsi în următorul ecran aplicaţiile şi widgets instalate, vizibile separat.Pentru a vizualiza toate aplicaţiile instalate, apăsaţi pe „Apps” („Aplicaţii”).Apăsaţi şi ţineţi de aplicaţia dorită pentru a se afişa ecranul de început şi eliberaţi scurtătura spre orice locgol de pe ecranul de început.
Pentru a şterge un widget şi/sau scurtături de aplicaţii de pe ecranul de început, apăsaţi şi ţineţi de acestea,şi apoi glisaţi-le spre pictograma coşului de gunoi afişată în partea superioară a ecranului de început,„Remove” („Eliminare”).
Revenire lacuprins
3.2 Setarea uneiimagini de fundal
Pentru a modifica imaginea de fundal a ecranului de început, apăsaţi pe ecranul de început până la apariţiameniului „Select Wallpaper from” („Selectaţi o imagine de fundal din”).Puteţi opta pentru „Live Wallpapers” („Imagini de fundal animate”) (imagini de fundal animate), „Gallery”(„Galeria”) (galeria foto/video) sau „Wallpapers” („Imagini de fundal”) (imagini statice implicite).
Revenire lacuprins
3.3 Meniu Apps(Aplicaţii)
Apăsaţi pe butonul de aplicaţii şi widget din partea centrală jos a ecranului de început:
Când sistemul afişează widget-urile, apăsaţi pe „Apps” („Aplicaţii”) pentru a vizualiza toate aplicaţiileinstalate.
Aici găsiţi toate programele preinstalate sau „aplicaţii”, precum şi aplicaţii suplimentare pe care le puteţiinstala.Pentru a lansa orice aplicaţie este suficient să apăsaţi pe pictograma corespunzătoare.

Yarvik smartphone manual
file:///Users/elroy/Desktop/Yarvik/Manual/manual_ro.html[13-02-13 17:05:12]
Ecran de aplicaţii
Revenire lacuprins
4ConfigurareaSmartphone-uluiYarvik
4.1 Meniul Settings(Setări)
Apăsaţi pictograma Setare din meniul de aplicaţii pentru a intra în meniul Settings (Setări). În meniulSettings (Setări) puteţi găsi opţiunile care vă permit configurarea Smartphone-ului Yarvik.

Yarvik smartphone manual
file:///Users/elroy/Desktop/Yarvik/Manual/manual_ro.html[13-02-13 17:05:12]
Meniul Setări
Vom trece în revistă cele mai importante părţi:
Revenire lacuprins
4.2 Wi-Fi şiBluetooth

Yarvik smartphone manual
file:///Users/elroy/Desktop/Yarvik/Manual/manual_ro.html[13-02-13 17:05:12]
Wi-Fi
Setaţi o conexiune la o reţea fără fir Wi-Fi.Glisaţi butonul On/Off (activat/dezactivat) spre „On” („Activat”) pentru a activa Wi-Fi.
Reţelele Wi-Fi disponibile sunt afişate în lista reţelelor din partea dreaptă a ecranului. Atingeţi reţeauapentru care optaţi. În cazul în care reţeaua este securizată, trebuie să introduceţi parola de securitate înreţea.
Apăsaţi pe butonul „Connect” („Conectare”) şi Smartphone-ul se va conecta la reţea.V-aţi conectat cu succes la reţeaua fără fir dacă sub numele reţelei apare „Connected” („Conectat”), iar înbara de stare din partea inferioară, se afişează pictograma de recepţie fără fir.
Vizualizarea adresei MAC Wi-Fi a Smartphone-ului Yarvik
În ecranul de setări Wi-Fi, daţi clic pe butonul de meniu din colţul dreapta-jos.
Apăsaţi pe „Advanced” („Avansat”) din meniul desfăşurat.
Adresa dumneavoastră MAC Wi-Fi este afişată în următorul ecran „Advanced Wi-Fi” („Wi-Fi avansat”) sub„MAC address” („Adresa MAC”).
Bluetooth
Smartphone-ul Yarvik este echipat cu un modul Bluetooth încorporat pentru conectarea la perifericeBluetooth compatibile, cum ar fi tastaturile, difuzoarele şi căştile şi de asemenea cu seturile handsfree cuBluetooth şi kit-urile pentru maşini.Glisaţi butonul Bluetooth On/Off (Activat/Dezactivat) către „On” („Activat”) pentru a activa caracteristicaBluetooth.
Odată activat, Smartphone-ul Yarvik începe automat să caute dispozitivele Bluetooth apropiate. Aveţipermanent posibilitatea de a căuta dispozitivele Bluetooth dând clic pe „Search for Devices” („Căutare
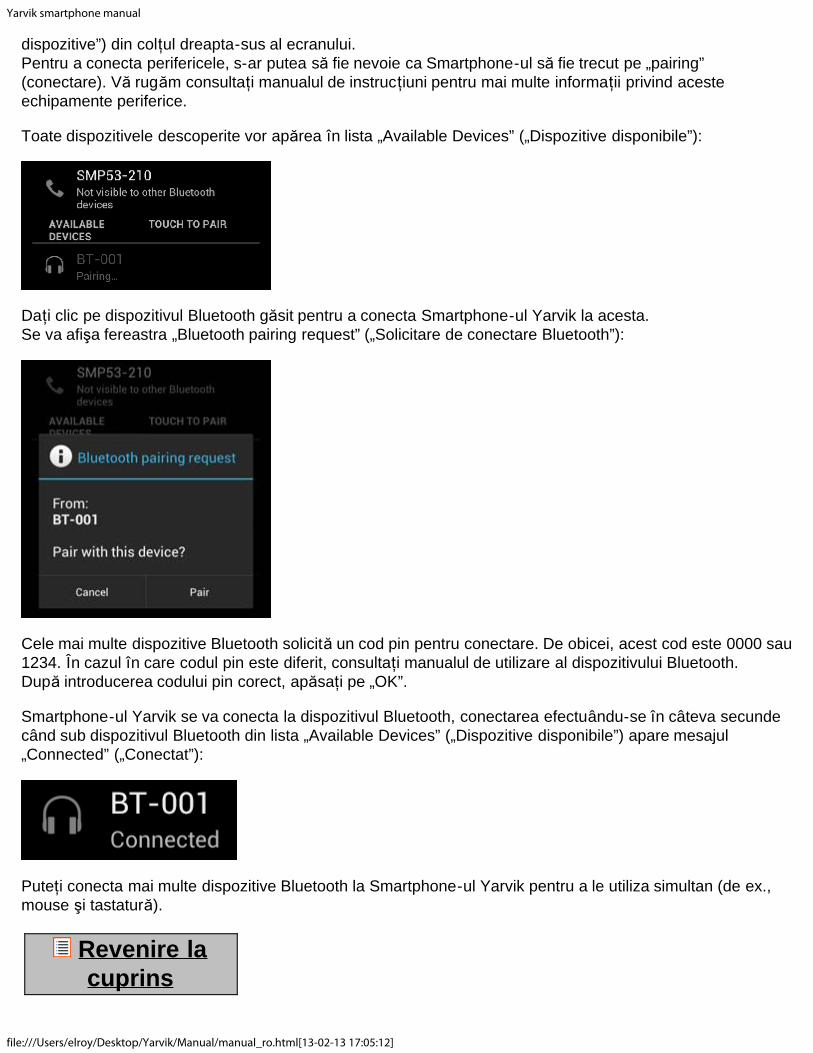
Yarvik smartphone manual
file:///Users/elroy/Desktop/Yarvik/Manual/manual_ro.html[13-02-13 17:05:12]
dispozitive”) din colţul dreapta-sus al ecranului.Pentru a conecta perifericele, s-ar putea să fie nevoie ca Smartphone-ul să fie trecut pe „pairing”(conectare). Vă rugăm consultaţi manualul de instrucţiuni pentru mai multe informaţii privind acesteechipamente periferice.
Toate dispozitivele descoperite vor apărea în lista „Available Devices” („Dispozitive disponibile”):
Daţi clic pe dispozitivul Bluetooth găsit pentru a conecta Smartphone-ul Yarvik la acesta.Se va afişa fereastra „Bluetooth pairing request” („Solicitare de conectare Bluetooth”):
Cele mai multe dispozitive Bluetooth solicită un cod pin pentru conectare. De obicei, acest cod este 0000 sau1234. În cazul în care codul pin este diferit, consultaţi manualul de utilizare al dispozitivului Bluetooth.După introducerea codului pin corect, apăsaţi pe „OK”.
Smartphone-ul Yarvik se va conecta la dispozitivul Bluetooth, conectarea efectuându-se în câteva secundecând sub dispozitivul Bluetooth din lista „Available Devices” („Dispozitive disponibile”) apare mesajul„Connected” („Conectat”):
Puteţi conecta mai multe dispozitive Bluetooth la Smartphone-ul Yarvik pentru a le utiliza simultan (de ex.,mouse şi tastatură).
Revenire lacuprins
Yarvik smartphone manual
file:///Users/elroy/Desktop/Yarvik/Manual/manual_ro.html[13-02-13 17:05:12]
4.3Audio Profiles(Profiluriaudio)
Aici puteţi modifica volumul audio al smartphone-ului, îl puteţi configura să vă anunţe de apeluri / mesajesosite prin vibraţii sau prin vibraţii şi sunet.
Revenire lacuprins
4.4 Display(Afişaj)
Această funcţie vă permite să modificaţi luminozitatea ecranului, dimensiunea fontului şi perioada automatăde veghe.Vă rugăm să reţineţi: cu cât ecranul este mai luminos, cu atât creşte consumul de energie. Bateria se vadescărca substanţial mai repede.În cazul în care nu doriţi ca afişajul să se rotească automat când înclinaţi smartphone-ul, puteţi săactivaţi/dezactivaţi această funcţie din setarea Auto-rotate screen (Rotire automată a ecranului).
Revenire lacuprins
4.5 Apps(Aplicaţii)
Funcţia vă permite să gestionaţi aplicaţiile instalate pe Smartphone-ul Yarvik.Puteţi da clic pe aplicaţiile pe care le-aţi instalat pentru a vedea informaţiile corespunzătoare aplicaţiilor şi săle dezinstalaţi, când este cazul, cu ajutorul butonului „Uninstall” („Dezinstalare”).Vă rugăm să reţineţi că aplicaţiile implicite preinstalate (de ex., calculatorul) nu pot fi dezinstalate.
Revenire lacuprins
4.6
Storage(Stocare) şiaccesmemorieMicroSD

Yarvik smartphone manual
file:///Users/elroy/Desktop/Yarvik/Manual/manual_ro.html[13-02-13 17:05:12]
Funcţia vă arată informaţii despre memoria internă. Dacă este introdusă o cartelă MicroSD, veţi găsi şiinformaţii privind memoria cartelei inserate.
Conectarea Smartphone-ului Yarvik la un PC sau Mac prin USB
Puteţi conecta Smartphone-ul Yarvik la un PC sau Mac cu ajutorul cablului USB furnizat.Când este conectat la un calculator, puteţi accesa memoria internă a smartphone-ului şi, dacă există, ocartelă MicroSD inserată ca dispozitiv standard de stocare masivă USB.
Vă rugăm să consultaţi Ghidul de pornire rapidă al Smartphone-ului Yarvik pentru a stabili locaţia portuluiUSB al smartphone-ului. Conectaţi cablul USB la portul USB al Smartphone-ului Yarvik şi la un port USBliber de pe calculatorul dumneavoastră.În partea superioară a ecranului smartphone-ului, vor apărea două mesaje, la scurt timp unul după altul:
Când apare al doilea mesaj „USB connected” („USB conectat”), daţi clic pe el.Va apărea următorul ecran:
Daţi clic pe butonul „Turn on USB storage” („Activare stocare USB”).Apare o fereastră de notificare:

Yarvik smartphone manual
file:///Users/elroy/Desktop/Yarvik/Manual/manual_ro.html[13-02-13 17:05:12]
Daţi clic pe „OK” pentru a confirma.În sistemul de fişiere al calculatorului, memoria internă a smartphone-ului Yarvik va fi afişată ca driver destocare masivă şi poate fi utilizată, de ex., pentru a copia fişiere din şi pe smartphone-ul Yarvik.Dacă aveţi un card MicroSD în smartphone, cartela va fi recunoscută de calculator drept un al doilea drive destocare masivă.
Pentru a anula funcţia de dispozitiv de stocare masivă, daţi clic pe butonul „Turn off USB storage”(„Dezactivare stocare USB”) şi îndepărtaţi cablul USB.
Notă: Nu sunt necesare drivere pentru a accesa memoria Smartphone-ului Yarvik. În cazul în carecalculatorul dumneavoastră afişează un mesaj de atenţionare privind instalarea unui driver, puteţi pur şisimplu să ignoraţi mesajul.
Accesaţi cardul MicroSDîn ES File Explorer (Explorarefişiere ES)
Dacă aţi introdus un card MicroSD în Smartphone-ul Yarvik, îi puteţi accesa conţinutul după cum urmează:
Deschideţi aplicaţia ES File Explorer (Explorare fişiere ES) şi daţi clic pe butonul Favorites (Preferinţe)(având ca simbol o stea).
Se desfăşoară meniul Favorites (Preferinţe). Daţi clic pe simbolul „rădăcina” etichetat cu „/„:
În acest moment, puteţi accesa „rădăcina” sistemului de fişiere al smartphone-ului, care conţine mai multefişiere şi dosare.Localizaţi-o şi daţi clic pe dosarul „mnt” folder:

Yarvik smartphone manual
file:///Users/elroy/Desktop/Yarvik/Manual/manual_ro.html[13-02-13 17:05:12]
Dosarul „mnt” se deschide afişând mai multe dosare:
Dosarul „sdcard” reprezintă memoria internă a Smartphone-ului Yarvik.Dosarul „sdcard2” reprezintă cardul MicroSD (dacă acesta este inserat în fanta pentru MicroSD aSmartphone-ului).
Când este disponibilă, puteţi utiliza şi scurtătura microsd2 din meniul Favorites (Preferinţe) pentru accesrapid la cardul de memorie MicroSD.
Revenire lacuprins
4.7Language &input (Limbă şitaste)
Utilizaţi „Select language” („Selectarea limbii”) pentru a selecta limba de afişare a Smartphone-ului Yarvik.Funcţia se aplică tuturor textelor de pe ecran din întregul sistem.Sub „Android keyboard” („Tastatură Android”) vă puteţi configura tastatura virtuală a smartphone-ului.
Revenire lacuprins
4.8 Date & time(Data şi ora)
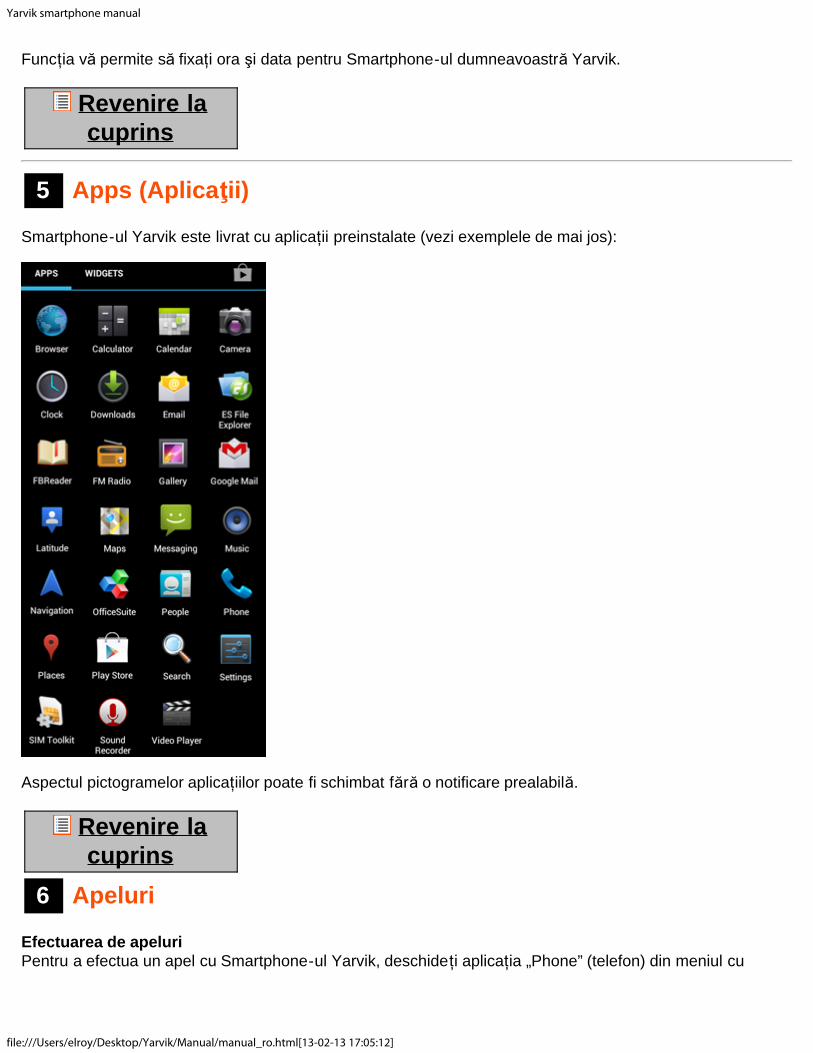
Yarvik smartphone manual
file:///Users/elroy/Desktop/Yarvik/Manual/manual_ro.html[13-02-13 17:05:12]
Funcţia vă permite să fixaţi ora şi data pentru Smartphone-ul dumneavoastră Yarvik.
Revenire lacuprins
5 Apps (Aplicaţii)
Smartphone-ul Yarvik este livrat cu aplicaţii preinstalate (vezi exemplele de mai jos):
Aspectul pictogramelor aplicaţiilor poate fi schimbat fără o notificare prealabilă.
Revenire lacuprins
6 Apeluri
Efectuarea de apeluriPentru a efectua un apel cu Smartphone-ul Yarvik, deschideţi aplicaţia „Phone” (telefon) din meniul cu
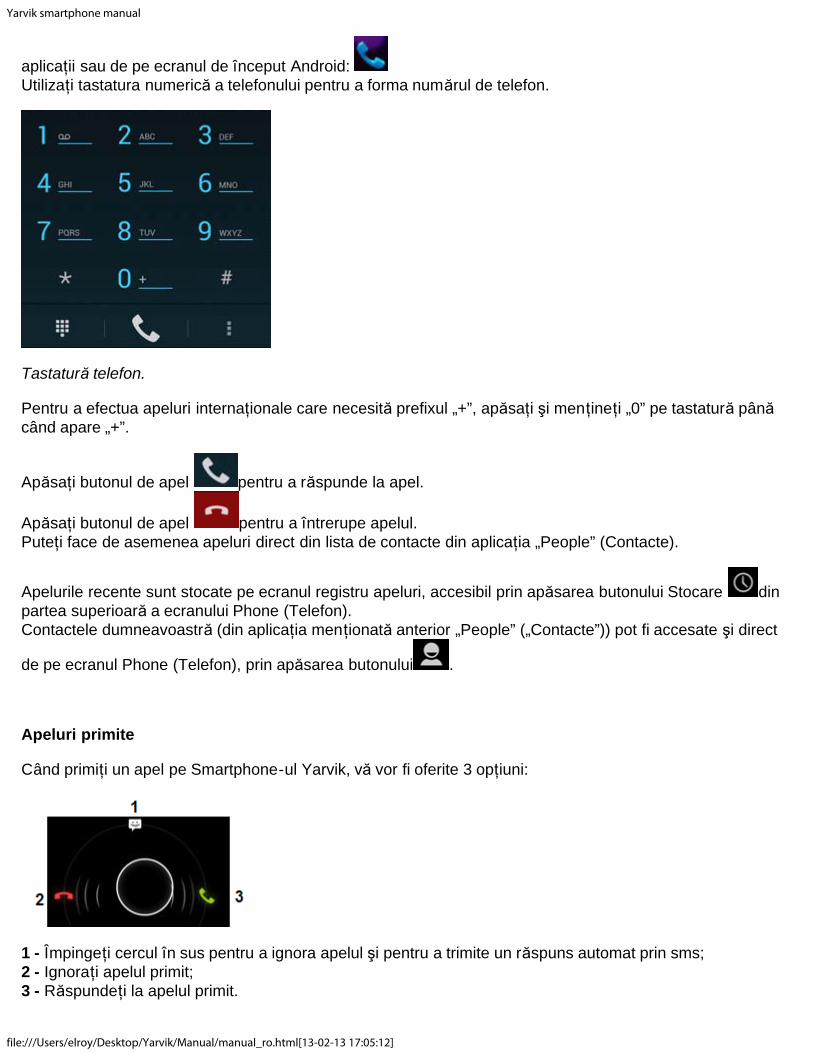
Yarvik smartphone manual
file:///Users/elroy/Desktop/Yarvik/Manual/manual_ro.html[13-02-13 17:05:12]
aplicaţii sau de pe ecranul de început Android: Utilizaţi tastatura numerică a telefonului pentru a forma numărul de telefon.
Tastatură telefon.
Pentru a efectua apeluri internaţionale care necesită prefixul „+”, apăsaţi şi menţineţi „0” pe tastatură pânăcând apare „+”.
Apăsaţi butonul de apel pentru a răspunde la apel.
Apăsaţi butonul de apel pentru a întrerupe apelul.Puteţi face de asemenea apeluri direct din lista de contacte din aplicaţia „People” (Contacte).
Apelurile recente sunt stocate pe ecranul registru apeluri, accesibil prin apăsarea butonului Stocare dinpartea superioară a ecranului Phone (Telefon).Contactele dumneavoastră (din aplicaţia menţionată anterior „People” („Contacte”)) pot fi accesate şi direct
de pe ecranul Phone (Telefon), prin apăsarea butonului .
Apeluri primite
Când primiţi un apel pe Smartphone-ul Yarvik, vă vor fi oferite 3 opţiuni:
1 - Împingeţi cercul în sus pentru a ignora apelul şi pentru a trimite un răspuns automat prin sms;2 - Ignoraţi apelul primit;3 - Răspundeţi la apelul primit.

Yarvik smartphone manual
file:///Users/elroy/Desktop/Yarvik/Manual/manual_ro.html[13-02-13 17:05:12]
Opţiuni în timpul unui apel
1 - Afişaţi tastatura telefonului (ex. pentru meniurile opţionale DTMF);2 - Activaţi / dezactivaţi funcţia difuzor;3 - Puneţi microfonul pe mut;4 - Puneţi apelul în aşteptare;5 - Meniu cu mai multe opţiuni: adăugaţi un apel suplimentar (conversaţie) sau înregistraţi apelul.
Înaintare apeluri
Puteţi configura caracteristica de înaintare a apelurilor pentru a înainta toate apelurile primite pe un anumitnumăr de telefon.
Din aplicaţia „Phone” (Telefon) , apăsaţi butonul meniu şi selectaţi „Call settings” (Setări apel).Selectaţi „Voice call” (Apel voce), de unde puteţi alege „Call forwarding” (Înaintare apel) pentru a modificaopţiunile de înaintare.
Identificare apel / Apel în aşteptare
Cu ajutorul funcţiei Identificare apel al Smartphone-ului Yarvik, puteţi alege dacă doriţi să transmiteţi şinumărul dumneavoastră de telefon împreună cu apelurile efectuate.
Pentru a modifica acest lucru, lansaţi aplicaţia „Phone” („Telefon”) , apăsaţi butonul meniu şiselectaţi „Settings” („Setări”) - „Voice call” („Apel voce”) - „Additional settings” („Setări suplimentare”) - „CallerID” („Identificare apel”).Tot în cadrul acestui meniu, puteţi activa / dezactiva apelurile primite când sunteţi deja într-o conversaţietelefonică.
Revenire lacuprins

Yarvik smartphone manual
file:///Users/elroy/Desktop/Yarvik/Manual/manual_ro.html[13-02-13 17:05:12]
7 Mesaje
Smartphone-ul dumneavoastră Yarvik poate trimite mesaje SMS şi MMS. Vă rugăm să consultaţi furnizorulde telefonie mobilă cu referire la tarifele standard şi la costurile adiţionale pentru trimiterea de mesaje cătresau din ţări străine.
Trimiterea de mesaje SMS / MMS
Deschideţi aplicaţia „Messaging” (Mesaje) de pe ecranul de început Android sau din meniul cuaplicaţii.
Aplicaţia mesaje.
1 - Adăugaţi ataşamente cum ar fi poze, fişiere audio şi video. Mesajele cu ataşament sunt considerateautomat mesaje MMS;2 - Meniu configurare mesaje;3 - Câmp destinatar;4 - Adăugaţi un destinatar;5 - Vedere de ansamblu mesaje;6 - Introducere mesaj;7 - Buton trimitere mesaj.
Fixare număr mesaje voce / redare mesaje vocePentru a configura numărul serviciului pentru mesajele voce pe Smartphone-ul Yarvik, deschideţi meniul
aplicaţiei „Phone” („Telefon”) sau de pe ecranul de început Android:

Yarvik smartphone manual
file:///Users/elroy/Desktop/Yarvik/Manual/manual_ro.html[13-02-13 17:05:12]
Apăsaţi şi menţineţi butonul de pe tastatura telefonului. Ecranul cu opţiuni va afişa „Add number”(„Adaugă număr”). În cadrul opţiunilor mesaje voce puteţi selecta configurările mesajelor voce şi puteţiintroduce numărul serviciului mesaje voce.
După configurarea numărului serviciului mesaje voce, puteţi utiliza apoi butonul pentru a apelacăsuţa de mesaje voce, prin apăsarea şi menţinerea acestuia.
Revenire lacuprins
8 Declaraţie degaranţie
Yarvik garantează că produsul cumpărat de client nu prezintă defecte de fabricaţie sau defecte materialepentru o perioadă de 2 ani de la data achiziţionării lui de către client. Dacă, în orice moment al perioadei degaranţie, produsul prezintă un defect de fabricaţie sau un defect material, clientul va returna produsul ladistribuitorul de la care l-a cumpărat. Distribuitorul este obligat să repare sau să înlocuiască produsul (lalibera alegere a lui Yarvik) într-un termen rezonabil. Se solicită prezentarea facturii originale ca dovadă adatei de achiziţionare. Yarvik va lua decizia finală asupra acestei probleme.
Prezenta garanţie nu acoperă defectele sau funcţionarea defectuoasă rezultând din transfer de software,utilizare eronată, exploatare abuzivă, modificare neautorizată, neglijenţă, utilizare improprie, neatenţie sauorice act care nu poate fi controlat de Yarvik.
IMPORTANT: La cumpărare, Smartphone-ul produs de Yarvik, vă va fi furnizat cu ultima versiune stabilă defirmware disponibilă pentru acest model specific, la data fabricării. Yarvik nu acordă asistenţă pentruprodusele care au fost modificate de utilizatorul final, nici pentru modificări de programare firmware şisoftware utilizate în aceste produse şi, în cazul efectuării unei astfel de modificări, orice garanţie este în modautomat anulată.
Pentru a evita anularea garanţiei oferită în prezentele condiţii, clientul are obligaţia de a folosi un softwareoficial, precum şi aplicaţii şi versiuni actualizate puse la dispoziţie pe site-ul web Yarvik, la adresawww.yarvik.com.Nu se va utiliza alt software sau firmware, întrucât o astfel de utilizare anulează automat orice garanţie şiasistenţă. Yarvik nu sprijină utilizarea unui software sau firmware diferit de software-ul sau firmware-ulinstalat pe produs de către producător sau care este disponibil pe web site-ul oficial Yarvik, la adresawww.yarvik.com. Yarvik refuză în mod explicit să dea curs unei reclamaţii privind modificări, software şifirmware neautorizate.
Revenire lacuprins
9 Informaţii privind

Yarvik smartphone manual
file:///Users/elroy/Desktop/Yarvik/Manual/manual_ro.html[13-02-13 17:05:12]
licenţa GNU/GPLPentru informaţii suplimentare, consultaţi informaţiile juridice privind Smartphone-ul Yarvik disponibile înSettings (Setări) – About Smartphone (Despre Smartphone) – Legal information (Informaţii juridice)(conexiunea la internet este obligatorie) sau vizitaţi http://source.android.com/source/licenses.html.
Revenire lacuprins
10 ImportantInformation
Wireless LAN-Regulatory information
Depending on the model, the wireless LAN built-in into Smartphone devices can only be used in thefollowing countries: Austria, Belgium, Bulgaria, Czech Republic, Denmark, Finland, France, Germany,Greece, Hungary, Iceland, Ireland, Italy, Luxembourg, the Netherlands, Norway, Poland, Portugal, Romania,Slovakia, Slovenia, Spain, Sweden, Switzerland, Turkey and the United Kingdom.
Conditions of use
When using the IEEE 802.11b/g/n Wireless LAN standard, channels 1 to 13 (2.4 GHz...2.4835 GHz) areselectable for both indoor and outdoor use, however with restrictive conditions applying in France, Italy andNorway, as follows:
• France: When using this product indoor, all channels can be used without restrictions. Outdoor onlychannels 1 to 6 are allowed. This means that in Peer-to-Peer, the WLAN feature can only be used outside ifthe peer sets up the communication on an authorized channel (i.e., between 1 & 6). In infrastructure mode,please make sure the access point is configured to a channel from 1 to 6 before setting up the connection.
• Italy: Use of the RLAN network is governed: Disposal of Old Electrical & Electronic- with respect to private use, by the Legislative Decree of 1.8.2003, no. 259 (“Code of ElectronicCommunications”). In particular Article 104 indicates when the prior obtainment of a general authorization isrequired and Art. 105 indicates when free use is permitted;- with respect to the supply to the public of the WLAN access to telecom networks and services, by theMinisterial Decree 28.5.2003, as amended, and Art. 25 (general authorization for electronic communicationsnetworks and services) of the Code of electronic communications.
• Norway: Use of this radio equipment is not allowed in the geographical area within a radius of 20 km fromthe centre of Ny-Ålesund, Svalbard.
WEEESymbolInformation

Yarvik smartphone manual
file:///Users/elroy/Desktop/Yarvik/Manual/manual_ro.html[13-02-13 17:05:12]
Correct Disposal of This product (Waste Electrical & Electronic Equipment).
(Applicable in the European Union and other European countries with separate collection systems).
This marking shown on the product or its literature indicates that it should not be disposed with otherhousehold wasted at the end of its working life. To prevent possible harm to the environment or humanhealth from uncontrolled waste disposal, please separate this from other types of wastes and recycle itresponsibly to promote the sustainable reuse of material resources.Household users should contact either the retailer where they purchased this product, or their localgovernment office, for details of where and how they can take this item for environmentally safe recycling.Business users should contact their supplier and check the terms and conditions of the purchase contract.This product should not be mixed with other commercial wastes of disposal.
Disposal of waste batteries (applicable in the European Union and other European countries withseparate collection systems)
Either of the symbols shown next may appear on the battery or on the packaging to indicate that the batteryprovided with this product shall not be treated as household waste. On certain batteries this symbol might beused in combination with a chemical symbol. The chemical symbols for mercury (Hg) or lead (Pb) are addedif the battery contains more than 0.0005% mercury or 0.004% lead. By ensuring these batteries are disposedof correctly, you will help prevent potentially negative consequences for the environment and human healthwhich could otherwise be caused by inappropriate waste handling of the battery. The recycling of thematerials will help to conserve natural resources. In case of products that for safety, performance or dataintegrity reasons require a permanent connection with an incorporated battery, this battery should bereplaced by qualified service staff only. To ensure that the battery will be treated properly, hand over theproduct at end-of-life to the applicable collection point for the recycling of electrical and electronicequipment.
For all other batteries, please view the section on how to remove the battery from the product safely. Handthe battery over to the applicable collection point for the recycling of waste batteries. For more detailedinformation about recycling of this product or battery, please contact your local Local government Office,your household waste disposal service or the shop where you purchased the product.
When travelling to and within the United States of America, please be aware that the U.S. Department ofTransportation (DOT) recently published new regulations that apply to passengers travelling with lithiummetal batteries and lithium-ion batteries.

Yarvik smartphone manual
file:///Users/elroy/Desktop/Yarvik/Manual/manual_ro.html[13-02-13 17:05:12]
For detailed information, visit http://safetravel.dot.gov/whats_new_batteries.html.
Safety Information
Yarvik Smartphone device
• Yarvik is not responsible for any interference that you may experience or that may be caused whenoperating this device.
• Warning: This apparatus must be earthed.
Opening or dismantling the main unit or any of its accessories, for whatever reason, could lead to damagesthat are not covered by the guarantee.
• To avoid electrical shock, do not open the cabinet. Refer servicing to qualified personnel only.
• To prevent fire or shock hazard, do not expose your Smartphone device or any of its accessories to rain ormoisture.
• Do not use or store your Smartphone device in a location subject to heat sources, such as radiators or airducts; direct sunlight; excessive dust; moisture or rain; mechanical vibration or shock; strong magnets orspeakers that are not magnetically shielded; excessively high and low temperatures; and high humidity.
• Turning off your Smartphone device with the power button does not disconnect the device completely frommains voltage. To disconnect it completely, unplug the AC adapter or the power cord from mains. Thesocket-outlet shall be installed near the equipment and shall be easily accessible.
• Audio and picture distortion may occur if this equipment is positioned in close proximity to any equipmentemitting electromagnetic radiation.
• This apparatus is also designed for IT power system with phase to phase voltage 230V, for customers inNorway.
• Observe the following precautions to provide adequate air circulation and to ensure normal reliableoperation:- Do not use the Smartphone device and/or the AC adapter while covered or wrapped in cloth. Ensure theAC adapter operates in a clear environment.- Turn off the Smartphone device before putting the device into a bag or a carrying case.
• Do not use your Smartphone device directly on your lap. The temperature of the base of the unit will riseduring normal operation and over time could result in discomfort or burns.
• Do not use your Smartphone device while walking. Listening to music with headphones or watching theLCD screen while walking may lead to an unexpected accident and result in personal injuries.
• Using connected headphones on the Smartphone device for too long and/or setting the audio volume uptoo high when using headphones may cause serious hearing damage.
• Avoid strong beating of or to the product.
• Don’t operate the touch screen of the Smartphone device with sharp objects, as this may result inscratching the screen surface.

Yarvik smartphone manual
file:///Users/elroy/Desktop/Yarvik/Manual/manual_ro.html[13-02-13 17:05:12]
• Only use permitted batteries, chargers and accessories with your Smartphone device. The use of any otherproducts with the device can be dangerous and may violate the warranty regulations.
• Only use a slightly wet cotton cloth to clean the device, and only use water to wetten the cotton cloth. TheSmartphone device should not be cleaned with any sort of (glass) cleaning aid.
Wireless functionality
• If radio interference with other devices occurs while using your Smartphone device, do not use the wirelessfunctionality. Use of the wireless functionality may cause a malfunction of the devices, resulting in anaccident.
• In some situations or environments, the use of the wireless functionality might be restricted by theproprietor of the building or responsible representatives of the organization, for example on board airplanes,in hospitals or in any other environment where the risk of interference with other devices or services isperceived or identified as harmful. If you are uncertain about the policy applying to the use of wirelessfunctionality in a specific organization or environment, you are encouraged to first ask for authorization priorto switching it on. Consult your physician or the manufacturer of personal medical devices (pacemakers,hearing aids, etc.) regarding any restrictions on the use of wireless functionality.
• If using wireless functionality near a pacemaker, make sure it is at least 19 inches / 50 cm away from thepacemaker.
• Due to the transmission and reception properties of wireless communications, data can occasionally be lostor delayed. This can be due to the variation in radio signal strength that results from changes in thecharacteristics of the radio transmission path. Yarvik will not be held responsible for damages of any kindresulting from the delays or errors in data transmitted or received via wireless functionality, or failure ofwireless functionality to transmit or receive such data.
• If the equipment does cause harmful interference to radio/TV reception, which can be determined by turningthe equipment off and on, the user is encouraged to try to correct the interference by one or more of thefollowing measures: reorient or relocate the receiving antenna, increase the distance between the senderand the receiver, consult the dealer or an experienced radio/TV technician for help. Yarvik will not beresponsible for any radio/TV interference nor for any other undesired effect.
Wireless LAN Security
Creating security settings for the Wireless LAN is extremely important. Yarvik assumes no responsibility forany security problems that may arise from the use of the Wireless LAN.
Battery pack
Do not charge the battery pack in any way other than as described in the Start guide or as designated byYarvik in writing.

Yarvik smartphone manual
file:///Users/elroy/Desktop/Yarvik/Manual/manual_ro.html[13-02-13 17:05:12]
AC adapter
• It is highly recommended that you use a genuine Yarvik AC adapter supplied by Yarvik for your product.
• This AC adapter is intended for use with the Smartphone device IT products only.
• Do not place the AC adapter in contact with your skin. Remove the AC adapter away from your body if itbecomes warm and causes discomfort.
RoHS
This products has been certified as RoHS Compliant.
YARVIK.COM
Revenire lacuprins

Yarvik smartphone manual
file:///Users/elroy/Desktop/Yarvik/Manual/manual_ru.html[13-02-13 17:05:23]
Указатель SELECTLANGUAGE
1 Перед началомэксплуатации2 Включениесмартфона3 Главный экранАndroid3.1 Добавлениевиджетов и ярлыков наглавный экран3.2 Установкафонового рисунка3.3 Меню Apps(Приложения)4 Настройкасмартфона4.1 Меню Settings(Настройки)4.2 WiFi и Bluetooth4.3 Audio Profiles(Конфигурации звука)4.4 Display (Экран)4.5 Apps (Приложения)4.6 Storage (Память) идоступ к карте MicroSD4.7 Language & input(Язык и ввод)4.8 Date & time (Дата и

Yarvik smartphone manual
file:///Users/elroy/Desktop/Yarvik/Manual/manual_ru.html[13-02-13 17:05:23]
время)5 Apps (Приложения)6 Телефонныезвонки7 Сообщения8 Гарантийныеобязательства9 Информация олицензиях GNU/GPL10 Importantinformation
1 Перед началом эксплуатации
Уважаемый пользователь,
Благодарим Вас за приобретение нашего продукта.С целью быстрого и удобного использования Вашего нового смартфона Yarvik внимательноознакомьтесь с инструкциями до начала эксплуатации.
Мы надеемся, что Вы будете в полной мере наслаждаться смартфоном Yarvik как можно дольше!
Обратите внимание:
• Смартфон Yarvik являетсявысокоточным электроннымустройством. Не пытайтесьразбирать смартфон, так какэто приведет к аннулированиюгарантии и может привести кнеисправной работеустройства.
• Не ударяйте и не роняйтеустройство.
• Избегайте использованиясмартфона при высокой илинизкой температуре, либо влюбой среде, в которойустройство может

Yarvik smartphone manual
file:///Users/elroy/Desktop/Yarvik/Manual/manual_ru.html[13-02-13 17:05:23]
контактировать с влагой,пылью или магнитнымиполями.
• Избегайте попадания насмартфон прямых солнечныхлучей в течениепродолжительного периодавремени.
• Не используйте дляуправления сенсорнымэкраном острые предметы, таккак это может привести кпоявлению царапин.
• Использование наушников,подключенных к смартфону втечение продолжительноговремени, и/или слишкомвысокая громкость могутнанести серьезный вредслуху.
• Не переходите дорогу, несадитесь за руль автомобиляили велосипеда во времяиспользования смартфонавместе с наушниками воизбежаниедорожно-транспортныхпроисшествий.
• Используйте толькосовместимые со смартфономYarvik аккумуляторы,зарядные устройства иаксессуары. Использованиекаких-либо других устройствсо смартфоном можетпредставлять опасность ипривести к нарушениюгарантийных условий.
• Используйте слегка влажнуюхлопчатобумажную ткань дляочистки смартфона, дляувлажненияхлопчатобумажной тканииспользуйте только воду.Смартфон нельзя очищатькаким-либо видом чистящих

Yarvik smartphone manual
file:///Users/elroy/Desktop/Yarvik/Manual/manual_ru.html[13-02-13 17:05:23]
средств.
Вы можете приступать к использованию смартфона Yarvik сразу же, достав его из упаковки, безпервичной зарядки батареи.Желательно сначала полностью разрядить батарею, после чего полностью зарядить ее.Если смартфон не включается при извлечении из упаковки, значит, батарея уже полностьюразряжена и, следовательно, сначала необходимо ее зарядить.
Вернуться куказателю
2 Включениесмартфона
При первом включении смартфона Yarvik необходимо будет выполнить ряд настроек.Первое включение может занять некоторое время, около 2-3 минут.После завершения ряда настроек смартфона появится экран блокировки Android.

Yarvik smartphone manual
file:///Users/elroy/Desktop/Yarvik/Manual/manual_ru.html[13-02-13 17:05:23]
Экран блокировки Android
Передвиньте замок (A) вправо для разблокирования смартфона. После чего появится главный экранAndroid.
Вернуться куказателю
3 Главный экран Android
Главный экран Android
Вверху экрана смартфона всегда расположена строка состояния.Строка состояния содержит системную информацию, а на нижней панели меню размещеныфункциональные кнопки.
1 - Индикатор сигнала Wi-Fi2 - Прием сети сотовой связи для SIM1 и SIM2, а также индикатор уровня заряда батареи3 - Системное время4 - Ярлыки приложений5 - Виджет (аналоговые часы)6 - С помощью кнопки «Назад» можно вернуться к предыдущему экрану или предыдущему веб-сайтупри использовании браузера

Yarvik smartphone manual
file:///Users/elroy/Desktop/Yarvik/Manual/manual_ru.html[13-02-13 17:05:23]
7 - Нажав кнопку «Главный экран», Вы перемещаетесь на главный экран Android8 - Меню приложений и виджетов9 - Многозадачная кнопка
Главный экран состоит из различных страниц, доступ к которым возможен с помощью перемещенияглавного экрана вправо/влево.
Для просмотра приложений, запущенных в фоновом режиме, перейдите к многозадачномупросмотру, нажав многозадачную кнопку (9).
Нажмите на запущенное приложение в многозадачном просмотре, чтобы быстро переключиться нанее. Вы можете закрыть запущенные приложения, нажав на них и удерживая, затем выбрав «Removefrom list» («Удалить из списка»).
Вернуться куказателю
3.1
Добавлениевиджетов иярлыков наглавный экран

Yarvik smartphone manual
file:///Users/elroy/Desktop/Yarvik/Manual/manual_ru.html[13-02-13 17:05:23]
Для добавления виджета нажмите приложение и кнопку виджета внизу по центру главного экрана:
На следующем экране появятся все установленные приложения и виджеты, которые можно отдельнопросмотреть, нажав «Apps» («Приложения») или «Widgets» («Виджеты») вверху экранасоответственно.Нажмите «Widgets» («Виджеты») для просмотра всех доступных виджетов. После отображения всехвиджетов Вы можете переместиться по экрану для перехода на другую страницу (при наличии).Нажмите и удерживайте необходимый виджет для отображения главного экрана, переместите его налюбое свободное место главного экрана.
Для добавления ярлыка какого-либо приложения нажмите на кнопку приложений и виджетов внизу по
центру главного экрана:
На следующем экране появятся все установленные приложения и виджеты, которые можно отдельнопросмотреть, нажав «Apps» («Приложения») или «Widgets» («Виджеты») вверху экранасоответственно.Нажмите «Apps» («Приложения») для просмотра всех установленных приложений.Нажмите и удерживайте необходимое приложение для отображения главного экрана и переместитеярлык на любое свободное место главного экрана.
Для удаления виджетов и/или ярлыков приложений с главного экрана нажмите и удерживайте их,после чего перетащите в корзину «Remove» («Удалить»), появившуюся вверху главного экрана.
Вернуться куказателю
3.2Установкафоновогорисунка
Чтобы изменить фоновый рисунок главного экрана, нажмите и удерживайте главный экран допоявления меню «Select Wallpaper from» («Выбрать фоновый рисунок из»).Вы можете выбрать из «Live Wallpapers» («Живых фоновых рисунков») (анимированные обои),«Gallery» («Галереи») (галерея фото/видео) или «Wallpapers» («Фоновых рисунков») (статическиеобои по умолчанию).
Вернуться куказателю
3.3 Меню Apps(Приложения)

Yarvik smartphone manual
file:///Users/elroy/Desktop/Yarvik/Manual/manual_ru.html[13-02-13 17:05:23]
Нажмите кнопку приложений и виджетов внизу по центру главного экрана:
После того, как система отобразит вижеты, нажмите «Apps» («Приложения») для просмотра всехустановленных приложений.
Здесь расположены все предустановленные программы или приложения, а также дополнительныеприложения, установленные Вами.Вы можете запустить любое приложение, просто нажав на соответствующий значок.
Экран приложений
Вернуться куказателю
4НастройкасмартфонаYarvik
4.1Меню«Settings»(«Настройки»)
Нажмите значок настроек в меню приложений для входа в меню «Settings» («Настройки»). В

Yarvik smartphone manual
file:///Users/elroy/Desktop/Yarvik/Manual/manual_ru.html[13-02-13 17:05:23]
меню «Settings» («Настройки») имеются опции для настройки смартфона Yarvik.
Меню настроек

Yarvik smartphone manual
file:///Users/elroy/Desktop/Yarvik/Manual/manual_ru.html[13-02-13 17:05:23]
Мы рассмотрим наиболее важные части:
Вернуться куказателю
4.2 Wi-Fi иBluetooth
Wi-Fi
Установите подключение к беспроводной сети Wi-Fi.Нажмите кнопку вкл./выкл. в положение «On» («вкл.») для активации Wi-Fi.
Доступные сети Wi-Fi появятся в списке сетей на экране справа. Нажмите на выбранную сеть. Еслисеть защищена, необходимо ввести ключ контроля доступа.
Нажмите кнопку «Connect» («Соединить») и смартфон будет подсоединен к сети.После появления статуса «Connected» («Соединено») под названием сети и появления значкаприема беспроводной сети на нижней строке состояния соединение с беспроводной сетью прошлоуспешно.
Просмотр Wi-Fi МАС-адреса смартфона Yarvik
На экране настроек Wi-Fi нажмите на кнопку меню в правом нижнем углу.
Нажмите «Addvanced» («Дополнительно») в развертывающемся меню.
Ваш Wi-Fi MAC-адрес отображается на следующем экране «Advanced Wi-Fi» («Дополнительно Wi-Fi») под «MAC address» («MAC-адресом»).

Yarvik smartphone manual
file:///Users/elroy/Desktop/Yarvik/Manual/manual_ru.html[13-02-13 17:05:23]
Bluetooth
Смартфон Yarvik оснащен встроенным модулем Bluetooth для соединения с периферийнымиустройствами, совместимыми с Bluetooth, такими как клавиатуры, динамики и наушники, а также сгарнитурой беспроводной связи и автомобильными комплектами громкой связи по Bluetooth.Перетяните кнопку On/Off (Выкл./Вкл.) на «On» («Вкл.») для активации функции Bluetooth.
После активации смартфон Yarvik автоматически начнет поиск ближайших устройств Bluetooth. Вы влюбой момент можете осуществить поиск устройств Bluetooth вручную, нажав «Search for Devices»(«Поиск устройств») в правом верхнем углу экрана.Для подключения периферийных устройств к смартфону может потребоваться их перевод в «режимсоединения». См. руководство пользователя соответствующих периферийных устройств дляполучения дополнительной информации.
Все обнаруженные устройства появятся в списке «Available Devices» («Доступные устройства»):
Нажмите на обнаруженное устройство Bluetooth, чтобы соединить с ним смартфон Yarvik.Появится окно «Bluetooth pairing request» («Попытка подключения Bluetooth»):
Для подключения большинства устройств Bluetooth необходимо ввести ПИН-код. Обычноиспользуется код «0000» или «1234». Если ПИН-код отличается от указанных выше, см. руководствопользователя устройства Bluetooth.После введения правильного ПИН-кода нажмите «OK».
Начнется соединение смартфона Yarvik с устройством Bluetooth, а затем через несколько секундподключение будет завершено, под соответствующим устройством Bluetooth в списке «AvailableDevices» («Доступные устройства») появится сообщение «Connected» («Подключено»):

Yarvik smartphone manual
file:///Users/elroy/Desktop/Yarvik/Manual/manual_ru.html[13-02-13 17:05:23]
Вы можете подключить и одновременно использовать со смартфоном Yarvik несколько устройствBluetooth (например, клавиатуру и гарнитуру громкой связи).
Вернуться куказателю
4.3Audio Profiles(Конфигурациизвука)
Здесь можно изменить громкость звука смартфона, выбрать, например, только вибрацию иливибрацию и мелодию для уведомления о входящих звонках/сообщениях.
Вернуться куказателю
4.4 Display(Экран)
Здесь можно изменить яркость экрана, размер шрифта и время автоматического режима сна.Обратите внимание, что чем выше яркость экрана, тем выше потребление энергии. Это приведет кбыстрому расходу энергии батареи.Если Вы не хотите, чтобы экран автоматически вращался при переворачивании смартфона, Выможете включить/отключить данную функцию в настройках «Auto-rotate screen» («Автоматическоговращения экрана»).
Вернуться куказателю
4.5 Apps(Приложения)
Здесь можно управлять приложениями, установленными на смартфон Yarvik.Вы можете нажать на установленное приложение для просмотра информации о нем, принеобходимости удалить с помощью кнопки «Uninstall» («Удалить»).Обратите внимание, что приложения, предустановленные по умолчанию (такие как, например,калькулятор), не могут быть удалены.

Yarvik smartphone manual
file:///Users/elroy/Desktop/Yarvik/Manual/manual_ru.html[13-02-13 17:05:23]
Вернуться куказателю
4.6
Storage(Память) идоступ ккартеMicroSD
Отображается информация о внутренней памяти. При наличии карты MicroSD в данном разделе Вытакже можете ознакомиться с информацией о памяти вставленной карты.
Подключение смартфона Yarvik к ПК или Mac через USB
Вы можете подсоединить смартфон Yarvik к ПК или Mac с помощью USB-кабеля, которыйпоставляется в комплекте.Во время соединения с компьютером Вы имеете доступ к внутренней памяти смартфона и, приналичии, к вставленной карте MicroSD в качестве стандартного запоминающего устройства USB.
См. печатное «Руководство по быстрому запуску» к смартфону Yarvik для определения USB-портасмартфона. Подсоедините USB-кабель к порту USB смартфона Yarvik и к свободному USB-портукомпьютера.Вверху экрана смартфона одно за другим появятся два сообщения:
Сразу после появления второго сообщения о «USB connected» («подключении USB-кабеля»),нажмите на него.Появится следующий экран:

Yarvik smartphone manual
file:///Users/elroy/Desktop/Yarvik/Manual/manual_ru.html[13-02-13 17:05:23]
Нажмите на кнопку «Turn on USB storage» («Включить память USB»).Появится окно уведомления:
Нажмите «OK» для подтверждения.Внутренняя память смартфона Yarvik появится в качестве запоминающего устройства в файловойсистеме Вашего компьютера и готова к использованию, например, для копирования файлов сосмартфона Yarvik и наоборот.Если в смартфон вставлена карта MicroSD, она будет опознана компьютером в качестве второгозапоминающего устройства.
Чтобы отключить функцию запоминающего устройства, нажмите кнопку «Turn off USB storage»(«Отключить память USB») и отсоедините USB-кабель.
Примечание: Для доступа к памяти смартфона Yarvik аппаратные драйверы не требуются. Есликомпьютер запрашивает установку какого-либо драйвера, следует просто игнорировать данноесообщение.
Доступ к карте MicroSD

Yarvik smartphone manual
file:///Users/elroy/Desktop/Yarvik/Manual/manual_ru.html[13-02-13 17:05:23]
с помощью приложения ESFile Explorer
Если в смартфон Yarvik вставлена карта MicroSD, Вы можете получить доступ к ее содержимомуследующим образом:
Откройте приложение ES File Explorer и нажмите кнопку Favorites (Избранное) (значок в виде синейзвезды).
Развернется меню Favorites (Избранное). Нажмите значок «корневой папки», который обозначаетсясимволом «/»:
Теперь открыт доступ к «корневой» папке файловой системы смартфона, в которой находятсянесколько файлов и папок.Найдите и щелкните папку «mnt»:
Откроется папка «mnt» , в которой находятся несколько папок:
Папка «sdcard» предоставляет доступ к внутренней памяти смартфона Yarvik.Папка «sdcard2» предоставляет доступ к карте памяти MicroSD (если вставлена в разъем MicroSD

Yarvik smartphone manual
file:///Users/elroy/Desktop/Yarvik/Manual/manual_ru.html[13-02-13 17:05:23]
смартфона).
Если доступно, Вы также можете использовать ярлык microsd2 в упомянутом ранее меню Favorites(Избранное) для быстрого доступа к карте памяти MicroSD.
Вернуться куказателю
4.7Language &input (Язык иввод)
Используйте кнопку «Select language» («Выбрать язык») для выбора языка интерфейса смартфонаYarvik. Этот язык будет использоваться для всего текста всей системы.В разделе «Android keyboard» («Клавиатура Android») Вы можете настроить экранную клавиатурусмартфона.
Вернуться куказателю
4.8 Date & time(Дата и время)
Здесь можно настроить дату и время смартфона Yarvik.
Вернуться куказателю
5 Apps(Приложения)
Смартфон Yarvik поставляется с заранее установленными приложениями (см. примеры далее).

Yarvik smartphone manual
file:///Users/elroy/Desktop/Yarvik/Manual/manual_ru.html[13-02-13 17:05:23]
Вид значков приложений может изменяться без предварительного уведомления.
Вернуться куказателю
6 Телефонныезвонки
Осуществление телефонных звонковДля осуществления телефонного звонка с помощью смартфона Yarvik, откройте приложение «Phone»
(«Телефон») в меню приложений или на главном экране Android: Для ввода телефонного номера используйте цифровую клавиатуру телефона.

Yarvik smartphone manual
file:///Users/elroy/Desktop/Yarvik/Manual/manual_ru.html[13-02-13 17:05:23]
Клавиатура телефона.
Для международных звонков, при необходимости ввода знака «+», нажмите и удерживайте «0» наклавиатуре до появления «+».
Нажмите кнопку вызова для начала телефонного звонка.
Нажмите кнопку вызова для завершения телефонного звонка.Вы также можете осуществлять телефонные звонки непосредственно со списка контактов вприложении «People» («Контакты»).
Недавно осуществленные звонки хранятся на экране журнала звонков, доступ к которому
осуществляется нажатием кнопки журнала вверху экрана Phone (Телефон).Доступ к Вашим контактам (из упомянутого приложения «People» («Контакты»)) также
осуществляется непосредственно с экрана Phone (Телефон), нажатием кнопки .
Входящие телефонные звонки
При входящем звонке на смартфон Yarvik доступны 3 опции:
1 - передвинуть круг вверх, чтобы игнорировать входящий телефонный звонок и отправитьавтоматический ответ в текстовом сообщении;2 - игнорировать входящий телефонный звонок;3 - ответить на входящий телефонный звонок.

Yarvik smartphone manual
file:///Users/elroy/Desktop/Yarvik/Manual/manual_ru.html[13-02-13 17:05:23]
Опции, доступные во время телефонного звонка
1 - показать клавиатуру телефона (например, для меню опций DTMF-сигналов);2 - включить/отключить функцию громкой связи;3 - выключить микрофон;4 - перевести телефонный звонок в режим удержания;5 - меню дополнительных опций: добавить еще один телефонный звонок (конференц-звонок) илизаписать телефонный звонок.
Переадресация звонков
Можно настроить функцию переадресации всех входящих телефонных звонков на указанный номертелефона.
В приложении «Phone» («Телефон») , нажмите кнопку меню и выберите «Callsettings».(«Настройки звонка»).Выберите «Voice call» («Голосовой вызов»), в котором можно выбрать «Call forwarding»(«Переадресация звонков») для изменения настроек переадресации.
Номер вызывающего абонента/ожидание вызова
С помощью функции смартфона Yarvik «Номер вызывающего абонента» Вы можете настроитьфункцию отображения Вашего номера при исходящем звонке.
Для изменения войдите в приложение «Phone» («Телефон») , нажмите кнопку меню ивыберите «Settings» («Настройки») - «Voice call» («Голосовой вызов») - «Additional settings»(«Дополнительные настройки») - «Caller ID» («Номер вызывающего абонента»).В этом же меню Вы также можете включить/отключить входящие звонки, поступающие в моменттелефонного разговора.
Вернуться куказателю

Yarvik smartphone manual
file:///Users/elroy/Desktop/Yarvik/Manual/manual_ru.html[13-02-13 17:05:23]
7 Сообщения
С помощью смартфона Yarvik можно отправлять SMS и MMS-сообщения. Для получения информациио стандартных тарифах и дополнительной стоимости отправки сообщений заграницу свяжитесь споставщиком услуг мобильной связи.
Отправка SMS/MMS-сообщений
Откройте приложение «Messaging» («Сообщения») на главном экране Android или в менюприложений.
Приложение сообщений.
1 - Добавить изображение, аудио и видео. Сообщения с приложениями автоматически считаютсяMMS-сообщениями.2 - Меню настроек сообщения.3 - Поле получателя.4 - Добавить получателя.5 - Просмотр истории сообщений.6 - Ввод сообщения.7 - Кнопка отправки сообщения.
Установка номера голосовой почты/воспроизведение сообщений голосовой почтыДля установки номера голосовой почты на смартфоне Yarvik откройте приложение «Phone»
(«Телефон») в меню приложений или на главном экране Android:

Yarvik smartphone manual
file:///Users/elroy/Desktop/Yarvik/Manual/manual_ru.html[13-02-13 17:05:23]
Нажмите и удерживайте кнопку на клавиатуре телефона. На экране опций появится «Addnumber» («Добавить номер»). В опциях голосовой почты можно выбрать настройки голосовой почты иввести номер голосовой почты.
После установки номера голосовой почты Вы можете, соответственно, использовать кнопку ,чтобы позвонить на номер голосовой почты, нажав и удерживая ее.
Вернуться куказателю
8 Гарантийныеобязательства
В течение 2 лет от даты приобретения покупателем Yarvik гарантирует, что приобретенный товар несодержит каких-либо производственных дефектов или дефектов материалов. Если в какое-либовремя на протяжении периода действия гарантии в устройстве будет обнаружен производственныйдефект или дефект материалов, покупатель должен вернуть его дистрибьютору, у которого он былприобретен. Дистрибьютор должен отремонтировать или заменить его (на усмотрение Yarvik) втечение разумного периода времени. Необходимо предоставить оригинал счета-фактуры дляподтверждения даты приобретения. Решение Yarvik в отношении данного вопроса являетсяокончательным.
Настоящая гарантия не распространяется на дефекты или неполадки, возникающие в результатепереустановки ПО, нарушения правил эксплуатации, неправильного использования, разборки,халатности, ненадлежащего использования, недостаточного ухода или какого-либо действия,находящегося за пределами контроля Yarvik.
ВАЖНАЯ ИНФОРМАЦИЯ: При покупке смартфон Yarvik поставляется с последней на моментизготовления устройства версией встроенного ПО для определенной модели. Yarvik непредоставляет поддержку продуктов, которые каким-либо образом были модифицированы конечнымпользователем, а также Yarvik не предоставляет поддержку модифицированного встроенного ПО иПО, используемого в продуктах, так как в этом случае все гарантии автоматически аннулируются.
Во избежание аннулирования предоставленной гарантии покупатель должен использовать толькоофициальное ПО, приложения и обновления, доступные на веб-сайте Yarvik: www.yarvik.com.Запрещается использовать какое-либо прочее ПО или встроенное ПО, так как такое использованиеавтоматически аннулирует гарантии и поддержку. Yarvik не поддерживает использование какого-либоПО или встроенного ПО, помимо ПО или встроенного ПО, установленного в продукте производителемили доступного на официальном веб-сайте Yarvik: www.yarvik.com. Yarvik безоговорочно отклоняетвсе запросы в отношении несанкционированных модификаций, ПО или встроенного ПО.
Вернуться куказателю

Yarvik smartphone manual
file:///Users/elroy/Desktop/Yarvik/Manual/manual_ru.html[13-02-13 17:05:23]
9Информация олицензияхGNU/GPL
Пожалуйста, ознакомьтесь с юридической информацией, доступной на смартфоне Yarvik под«Settings» («Настройками») – «About Smartphone» («О смартфоне») – «Legal information»(«Юридическая информация») (необходимо подключение к Интернету) или посетитеhttp://source.android.com/source/licenses.html для получения дополнительной информации.
Вернуться куказателю
10 ImportantInformation
Wireless LAN-Regulatory information
Depending on the model, the wireless LAN built-in into Smartphone devices can only be used in thefollowing countries: Austria, Belgium, Bulgaria, Czech Republic, Denmark, Finland, France, Germany,Greece, Hungary, Iceland, Ireland, Italy, Luxembourg, the Netherlands, Norway, Poland, Portugal, Romania,Slovakia, Slovenia, Spain, Sweden, Switzerland, Turkey and the United Kingdom.
Conditions of use
When using the IEEE 802.11b/g/n Wireless LAN standard, channels 1 to 13 (2.4 GHz...2.4835 GHz) areselectable for both indoor and outdoor use, however with restrictive conditions applying in France, Italy andNorway, as follows:
• France: When using this product indoor, all channels can be used without restrictions. Outdoor onlychannels 1 to 6 are allowed. This means that in Peer-to-Peer, the WLAN feature can only be used outside ifthe peer sets up the communication on an authorized channel (i.e., between 1 & 6). In infrastructure mode,please make sure the access point is configured to a channel from 1 to 6 before setting up the connection.
• Italy: Use of the RLAN network is governed: Disposal of Old Electrical & Electronic- with respect to private use, by the Legislative Decree of 1.8.2003, no. 259 (“Code of ElectronicCommunications”). In particular Article 104 indicates when the prior obtainment of a general authorization isrequired and Art. 105 indicates when free use is permitted;- with respect to the supply to the public of the WLAN access to telecom networks and services, by theMinisterial Decree 28.5.2003, as amended, and Art. 25 (general authorization for electronic communicationsnetworks and services) of the Code of electronic communications.
• Norway: Use of this radio equipment is not allowed in the geographical area within a radius of 20 km fromthe centre of Ny-Ålesund, Svalbard.

Yarvik smartphone manual
file:///Users/elroy/Desktop/Yarvik/Manual/manual_ru.html[13-02-13 17:05:23]
WEEESymbolInformation
Correct Disposal of This product (Waste Electrical & Electronic Equipment).
(Applicable in the European Union and other European countries with separate collection systems).
This marking shown on the product or its literature indicates that it should not be disposed with otherhousehold wasted at the end of its working life. To prevent possible harm to the environment or humanhealth from uncontrolled waste disposal, please separate this from other types of wastes and recycle itresponsibly to promote the sustainable reuse of material resources.Household users should contact either the retailer where they purchased this product, or their localgovernment office, for details of where and how they can take this item for environmentally safe recycling.Business users should contact their supplier and check the terms and conditions of the purchase contract.This product should not be mixed with other commercial wastes of disposal.
Disposal of waste batteries (applicable in the European Union and other European countries withseparate collection systems)
Either of the symbols shown next may appear on the battery or on the packaging to indicate that the batteryprovided with this product shall not be treated as household waste. On certain batteries this symbol might beused in combination with a chemical symbol. The chemical symbols for mercury (Hg) or lead (Pb) are addedif the battery contains more than 0.0005% mercury or 0.004% lead. By ensuring these batteries are disposedof correctly, you will help prevent potentially negative consequences for the environment and human healthwhich could otherwise be caused by inappropriate waste handling of the battery. The recycling of thematerials will help to conserve natural resources. In case of products that for safety, performance or dataintegrity reasons require a permanent connection with an incorporated battery, this battery should bereplaced by qualified service staff only. To ensure that the battery will be treated properly, hand over theproduct at end-of-life to the applicable collection point for the recycling of electrical and electronicequipment.
For all other batteries, please view the section on how to remove the battery from the product safely. Handthe battery over to the applicable collection point for the recycling of waste batteries. For more detailedinformation about recycling of this product or battery, please contact your local Local government Office,your household waste disposal service or the shop where you purchased the product.
When travelling to and within the United States of America, please be aware that the U.S. Department ofTransportation (DOT) recently published new regulations that apply to passengers travelling with lithiummetal batteries and lithium-ion batteries.

Yarvik smartphone manual
file:///Users/elroy/Desktop/Yarvik/Manual/manual_ru.html[13-02-13 17:05:23]
For detailed information, visit http://safetravel.dot.gov/whats_new_batteries.html.
Safety Information
Yarvik Smartphone device
• Yarvik is not responsible for any interference that you may experience or that may be caused whenoperating this device.
• Warning: This apparatus must be earthed.
Opening or dismantling the main unit or any of its accessories, for whatever reason, could lead to damagesthat are not covered by the guarantee.
• To avoid electrical shock, do not open the cabinet. Refer servicing to qualified personnel only.
• To prevent fire or shock hazard, do not expose your Smartphone device or any of its accessories to rain ormoisture.
• Do not use or store your Smartphone device in a location subject to heat sources, such as radiators or airducts; direct sunlight; excessive dust; moisture or rain; mechanical vibration or shock; strong magnets orspeakers that are not magnetically shielded; excessively high and low temperatures; and high humidity.
• Turning off your Smartphone device with the power button does not disconnect the device completely frommains voltage. To disconnect it completely, unplug the AC adapter or the power cord from mains. Thesocket-outlet shall be installed near the equipment and shall be easily accessible.
• Audio and picture distortion may occur if this equipment is positioned in close proximity to any equipmentemitting electromagnetic radiation.
• This apparatus is also designed for IT power system with phase to phase voltage 230V, for customers inNorway.
• Observe the following precautions to provide adequate air circulation and to ensure normal reliableoperation:- Do not use the Smartphone device and/or the AC adapter while covered or wrapped in cloth. Ensure theAC adapter operates in a clear environment.- Turn off the Smartphone device before putting the device into a bag or a carrying case.
• Do not use your Smartphone device directly on your lap. The temperature of the base of the unit will riseduring normal operation and over time could result in discomfort or burns.
• Do not use your Smartphone device while walking. Listening to music with headphones or watching theLCD screen while walking may lead to an unexpected accident and result in personal injuries.
• Using connected headphones on the Smartphone device for too long and/or setting the audio volume uptoo high when using headphones may cause serious hearing damage.
• Avoid strong beating of or to the product.
• Don’t operate the touch screen of the Smartphone device with sharp objects, as this may result inscratching the screen surface.

Yarvik smartphone manual
file:///Users/elroy/Desktop/Yarvik/Manual/manual_ru.html[13-02-13 17:05:23]
• Only use permitted batteries, chargers and accessories with your Smartphone device. The use of any otherproducts with the device can be dangerous and may violate the warranty regulations.
• Only use a slightly wet cotton cloth to clean the device, and only use water to wetten the cotton cloth. TheSmartphone device should not be cleaned with any sort of (glass) cleaning aid.
Wireless functionality
• If radio interference with other devices occurs while using your Smartphone device, do not use the wirelessfunctionality. Use of the wireless functionality may cause a malfunction of the devices, resulting in anaccident.
• In some situations or environments, the use of the wireless functionality might be restricted by theproprietor of the building or responsible representatives of the organization, for example on board airplanes,in hospitals or in any other environment where the risk of interference with other devices or services isperceived or identified as harmful. If you are uncertain about the policy applying to the use of wirelessfunctionality in a specific organization or environment, you are encouraged to first ask for authorization priorto switching it on. Consult your physician or the manufacturer of personal medical devices (pacemakers,hearing aids, etc.) regarding any restrictions on the use of wireless functionality.
• If using wireless functionality near a pacemaker, make sure it is at least 19 inches / 50 cm away from thepacemaker.
• Due to the transmission and reception properties of wireless communications, data can occasionally be lostor delayed. This can be due to the variation in radio signal strength that results from changes in thecharacteristics of the radio transmission path. Yarvik will not be held responsible for damages of any kindresulting from the delays or errors in data transmitted or received via wireless functionality, or failure ofwireless functionality to transmit or receive such data.
• If the equipment does cause harmful interference to radio/TV reception, which can be determined by turningthe equipment off and on, the user is encouraged to try to correct the interference by one or more of thefollowing measures: reorient or relocate the receiving antenna, increase the distance between the senderand the receiver, consult the dealer or an experienced radio/TV technician for help. Yarvik will not beresponsible for any radio/TV interference nor for any other undesired effect.
Wireless LAN Security
Creating security settings for the Wireless LAN is extremely important. Yarvik assumes no responsibility forany security problems that may arise from the use of the Wireless LAN.
Battery pack
Do not charge the battery pack in any way other than as described in the Start guide or as designated byYarvik in writing.

Yarvik smartphone manual
file:///Users/elroy/Desktop/Yarvik/Manual/manual_ru.html[13-02-13 17:05:23]
AC adapter
• It is highly recommended that you use a genuine Yarvik AC adapter supplied by Yarvik for your product.
• This AC adapter is intended for use with the Smartphone device IT products only.
• Do not place the AC adapter in contact with your skin. Remove the AC adapter away from your body if itbecomes warm and causes discomfort.
RoHS
This products has been certified as RoHS Compliant.
YARVIK.COM
Вернуться куказателю

Yarvik smartphone manual
file:///Users/elroy/Desktop/Yarvik/Manual/manual_uk.html[13-02-13 17:05:35]
Покажчик SELECTLANGUAGE
1 До початкувикористання2 Увімкненнясмартфону3 Головний екранАndroid3.1 Додавання віджетівта ярликів на головнийекран3.2 Налаштуванняфонового рисунка3.3 Меню Apps(Програми)4 Налаштуваннясмартфону4.1 Меню Settings(Налаштування)4.2 WiFi та Bluetooth4.3 Audio Profiles(Конфігурація звуку)4.4 Display (Екран)4.5 Apps (Програми)4.6 Storage (Пам’ять)та доступ до картиMicroSD4.7 Language & input(Мова та ввід)

Yarvik smartphone manual
file:///Users/elroy/Desktop/Yarvik/Manual/manual_uk.html[13-02-13 17:05:35]
4.8 Date & time (Датата час)5 Apps (Програми)6 Телефонні дзвінки7 Повідомлення8 Гарантійнізобов’язання9 Інформація проліцензії GNU/GPL10 Importantinformation
1 До початку використання
Шановний користувачу,
дякуємо за придбання нашого продукту.З метою швидкого та зручного використання Вашого нового смартфону Yarvik просимо уважноознайомитись з цим посібником до початку експлуатації.
Ми сподіваємось, що Ви в повній мірі насолоджуватиметесь смартфоном Yarvik якомога довше!
Необхідно прийняти до уваги:
• Смартфон Yarvik євисокоточним електроннимприладом. Не намагайтесьрозбирати смартфон, тому щоце призведе до анулюваннягарантії і може призвести донесправного функціонуванняприладу.
• Не вдаряйте і не кидайтепристрій.
• Уникайте використаннясмартфону при високій абонизькій температурі, або вбудь-якому середовищі, вякому пристрій може

Yarvik smartphone manual
file:///Users/elroy/Desktop/Yarvik/Manual/manual_uk.html[13-02-13 17:05:35]
потрапити в контакт звологою, пилом абомагнітними полями.
• Уникайте потрапляння насмартфон прямих сонячнихпроменів протягом тривалогочасу.
• Не використовуйте дляуправління сенсорнимекраном гострі предмети, боце може призвести до появиподряпин.
• Використання навушників,підключених до смартфонупротягом тривалого часута/або занадто висока гучністьможуть завдати серйозноїшкоди слуху.
• Не переходьте дорогу, несідайте за кермо автомобіляабо велосипеда під часвикористання смартфонаразом з навушниками, щобуникнутидорожньо-транспортнихпригод.
• Використовуйте тількивідповідні батарейки, зарядніпристрої та аксесуари зісмартфоном Yarvik.Використання будь-яких іншихпристроїв зі смартфоном можестановити небезпеку тапризвести до порушеннягарантійних умов.
• Використовуйте трохи вологубавовняну тканину дляочищення смартфона, длязволоження бавовняноїтканини використовуйте тількиводу. Смартфон не можнаочищати будь-яким видомзасобів для чищення.

Yarvik smartphone manual
file:///Users/elroy/Desktop/Yarvik/Manual/manual_uk.html[13-02-13 17:05:35]
Ви можете приступати до використання смартфона Yarvik відразу ж, діставши його з упаковки, безпервинної зарядки батареї.Бажано спочатку повністю розрядити батарею, після чого повністю зарядити її.Якщо смартфон не вмикається після діставання з упаковки, батарея вже повністю розряджена, отжеспочатку необхідно її зарядити.
Назад допокажчика
2 Увімкненнясмартфону
Під час першого включення смартфону Yarvik необхідно виконати ряд налаштувань.Перше налаштування може зайняти деякий час, близько 2-3 хвилин.Після завершення ряду налаштувань смартфона на екрані з’явиться екран блокування Android.
Екран блокування Android
Перемістіть замок (A) праворуч для розблокування смартфона. Після чого з’явиться головний екранAndroid.

Yarvik smartphone manual
file:///Users/elroy/Desktop/Yarvik/Manual/manual_uk.html[13-02-13 17:05:35]
Назад допокажчика
3 Головний екран Android
Головний екран Android
Вгорі екрана смартфону завжди розташований рядок стану.Рядок стану містить системну інформацію, а на нижній панелі меню розміщені функціональні кнопки.
1 - Індикатор сигналу Wi-Fi2 - Прийом мережі стільникового зв’язку для SIM1 і SIM2, а також індикатор рівня заряду батареї3 - Системний час4 - Ярлики додатків5 - Віджет (аналоговий годинник)6 - За допомогою кнопки «Назад» можна повернутись до попереднього екрана або до попередньоговеб-сайта при використанні браузера7 - Натиснувши «Головний екран» Ви переміщуєтесь на головний екран Android8 - Меню додатків та віджетів9 - Багатоцільова кнопка
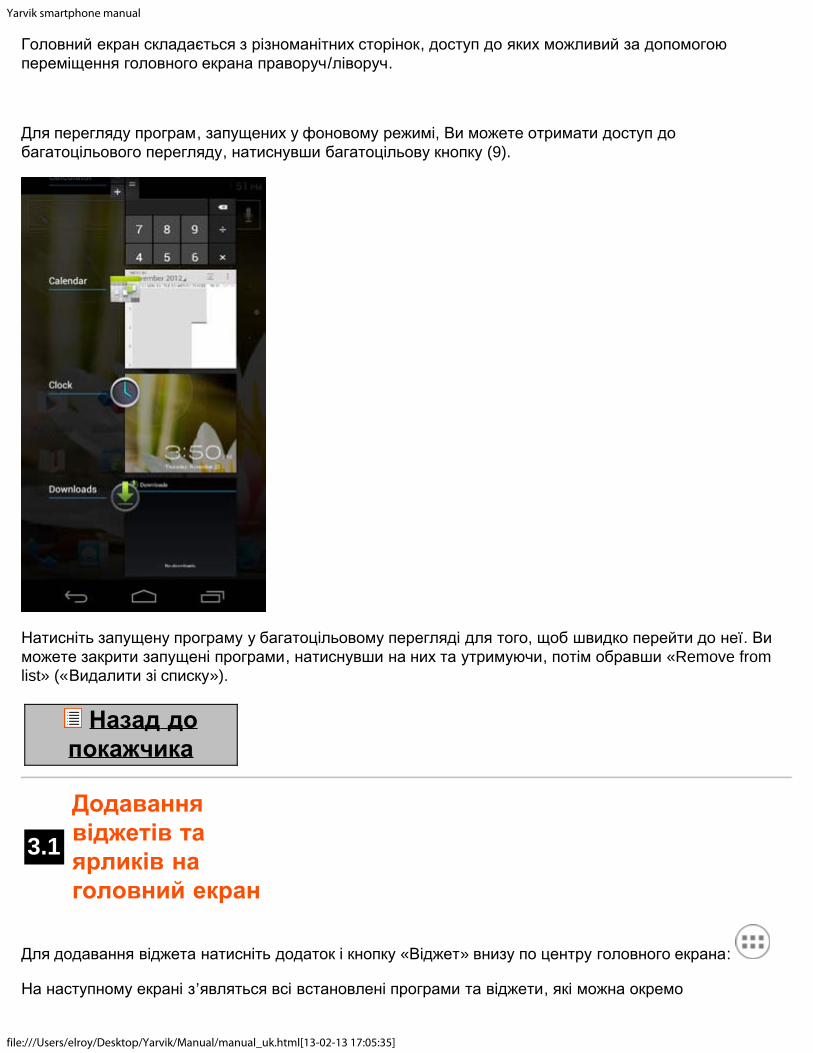
Yarvik smartphone manual
file:///Users/elroy/Desktop/Yarvik/Manual/manual_uk.html[13-02-13 17:05:35]
Головний екран складається з різноманітних сторінок, доступ до яких можливий за допомогоюпереміщення головного екрана праворуч/ліворуч.
Для перегляду програм, запущених у фоновому режимі, Ви можете отримати доступ добагатоцільового перегляду, натиснувши багатоцільову кнопку (9).
Натисніть запущену програму у багатоцільовому перегляді для того, щоб швидко перейти до неї. Виможете закрити запущені програми, натиснувши на них та утримуючи, потім обравши «Remove fromlist» («Видалити зі списку»).
Назад допокажчика
3.1
Додаваннявіджетів таярликів наголовний екран
Для додавання віджета натисніть додаток і кнопку «Віджет» внизу по центру головного екрана:
На наступному екрані з’являться всі встановлені програми та віджети, які можна окремо

Yarvik smartphone manual
file:///Users/elroy/Desktop/Yarvik/Manual/manual_uk.html[13-02-13 17:05:35]
передивитись, натиснувши «Apps» («Програми») чи «Widgets» («Віджети») угорі екрана, відповідно.Натисніть «Widgets» («Віджети») для перегляду усіх доступних віджетів. Після відображення всіхвіджетів Ви можете перемістити екран для переходу на іншу сторінку (за наявності).Натисніть та утримуйте необхідний віджет для відображення головного екрана, перемістіть віджет набудь-яке вільне місце головного екрана.
Для додавання ярлика до будь-якої програми натисніть кнопку програми та віджета внизу по центру
головного екрана:
На наступному екрані з’являться всі встановлені програми та віджети, які можна окремопередивитись, натиснувши «Apps» («Програми») чи «Widgets» («Віджети») угорі екрана, відповідно.Натисніть «Apps» («Програми») для перегляду всіх встановлених програм.Натисніть і утримуйте потрібну програму для відображення головного екрана і перемістіть ярлик набудь-яке вільне місце головного екрана.
Для видалення віджетів та/або ярликів програм з головного екрана натисніть та утримуйте їх, післячого перетягніть до кошика «Remove» («Видалити»), що з’явиться угорі головного екрана.
Назад допокажчика
3.2Налаштуванняфоновогорисунка
Для того, щоб змінити фоновий рисунок головного екрана, натисніть та утримуйте головний екран допояви меню «Select Wallpaper from» («Обрати фоновий рисунок»).Ви можете обрати з «Live Wallpapers» («Живих рисунків») (анімовані шпалери), «Gallery» («Галерея»)(галерея фото/відео) чи «Wallpapers» («Фонові рисунки») (статичні шпалери за замовчуванням).
Назад допокажчика
3.3 Меню Apps(Програми)
Натисніть кнопку програм і віджетів внизу по центру головного екрана:
Після того, як система відобразить віджети, натисніть «Apps» («Програми») для перегляду всіхвстановлених програм.
Тут розміщені всі встановлені програми чи застосунки, а також додаткові програми, встановлені Вами.Ви можете запустити будь-яку програму, натиснувши відповідний значок.
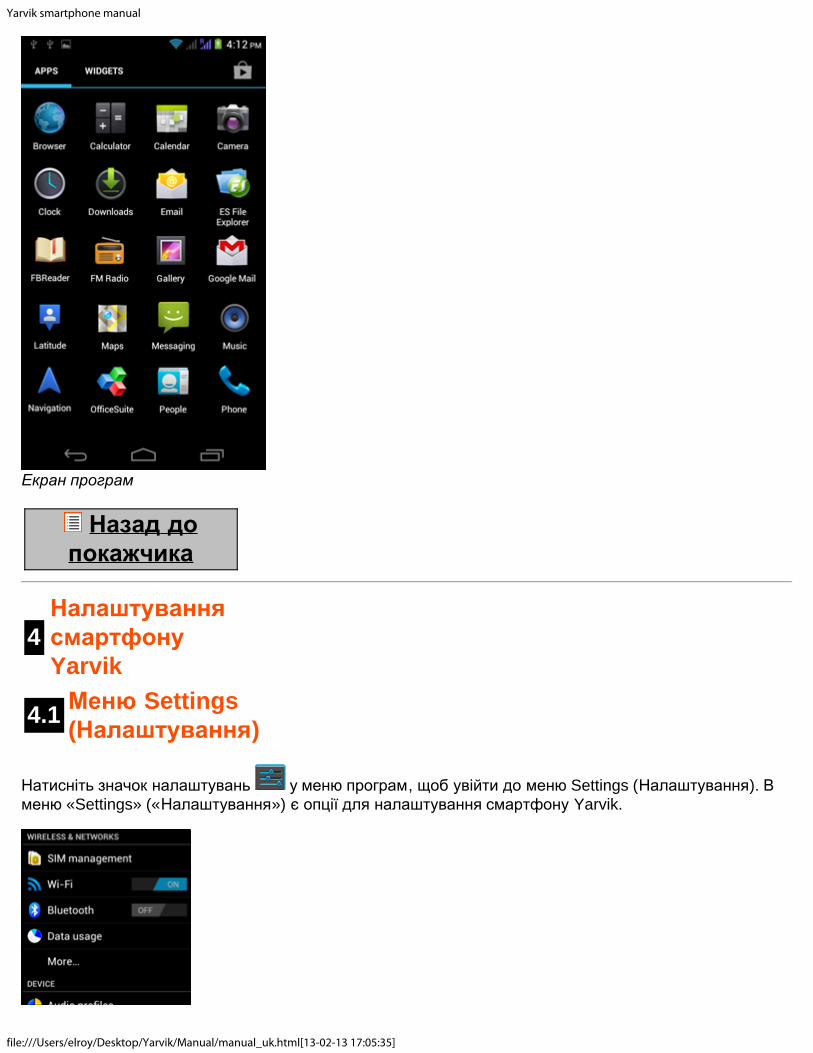
Yarvik smartphone manual
file:///Users/elroy/Desktop/Yarvik/Manual/manual_uk.html[13-02-13 17:05:35]
Екран програм
Назад допокажчика
4НалаштуваннясмартфонуYarvik
4.1 Меню Settings(Налаштування)
Натисніть значок налаштувань у меню програм, щоб увійти до меню Settings (Налаштування). Вменю «Settings» («Налаштування») є опції для налаштування смартфону Yarvik.

Yarvik smartphone manual
file:///Users/elroy/Desktop/Yarvik/Manual/manual_uk.html[13-02-13 17:05:35]
Меню налаштувань
Ми розглянемо найважливіші частини:
Назад допокажчика
4.2 Wi-Fi таBluetooth

Yarvik smartphone manual
file:///Users/elroy/Desktop/Yarvik/Manual/manual_uk.html[13-02-13 17:05:35]
Wi-Fi
Встановіть підключення до безпроводової мережі Wi-Fi.Натисніть кнопку увімк./вимк. у положення «On» («увімк.») для активації Wi-Fi.
Доступні мережі Wi-Fi з’являться у списку на екрані праворуч. Натисніть обрану мережу. Якщо мережазахищена, Вам потрібно буде ввести мережний ключ безпеки.
Натисніть кнопку «Connect» («З’єднати») і смартфон буде з’єднаний з мережею.Після появи статусу «Connected» («З’єднано») під назвою мережі та появи значка прийомубезпроводової мережі у нижньому рядку статусу з’єднання з безпроводовою мережею пройшлоуспішно.
Перегляд Wi-Fi МАС-адреси смартфону Yarvik
На екрані налаштувань Wi-Fi натисніть кнопку меню у правому нижньому куті.
Натисніть «Advanced» («Додатково») у меню, що розгортається.
Ваша Wi-Fi MAC-адреса відображається на наступному екрані «Advanced Wi-Fi» («Додатково Wi-Fi»)під «MAC address» («MAC-адресою»).
Bluetooth
Смартфон Yarvik оснащений вбудованим модулем Bluetooth для з’єднання з периферійнимипристроями, сумісними з Bluetooth, такими як клавіатури, динаміки і навушники, а також з гарнітурою«вільні руки» та автомобільними комплектами гучного зв’язку по Bluetooth.Перетягніть клавішу On/Off (Вимк./Увімк.) на «On» («Увімк.») для активації функції Bluetooth.
Після завершення активації смартфон Yarvik автоматично розпочне пошук розташованих поручпристроїв Bluetooth. Ви можете у будь-який час знайти пристрій Bluetooth вручну, натиснувши «Searchfor Devices» («Пошук пристроїв») у верхньому правому куті екрана.

Yarvik smartphone manual
file:///Users/elroy/Desktop/Yarvik/Manual/manual_uk.html[13-02-13 17:05:35]
Щоб підключити периферійні пристрої, може бути необхідно перевести їх у «режим з’єднання». Див.керівництво користувача відповідних периферійних пристроїв для отримання додаткової інформації.
Усі знайдені пристрої з’являться у списку «Available Devices» («Доступні пристрої»):
Натисніть знайдений пристрій Bluetooth, щоб з’єднати з ним смартфон Yarvik.З’явиться вікно «Bluetooth pairing request» («Спроба підключення Bluetooth»):
Для підключення більшості пристроїв Bluetooth необхідно ввести PIN-код. Зазвичай використовуютькод «0000» або «1234». Якщо PIN-код відрізняється від зазначених вище, див. посібник користувачапристрою Bluetooth.Після введення правильного PIN-коду натисніть «OK».
Розпочнеться з’єднання смартфону Yarvik з пристроєм Bluetooth, а потім через декілька секундпідключення буде завершено, нижче відповідного пристрою Bluetooth у списку «Available Devices»(«Доступні пристрої») з’явиться повідомлення «Connected» («Підключено»):
Ви можете підключити та одночасно використовувати зі смартфоном Yarvik декілька пристроївBluetooth (наприклад, клавіатуру та гарнітуру зв’язку).
Назад допокажчика

Yarvik smartphone manual
file:///Users/elroy/Desktop/Yarvik/Manual/manual_uk.html[13-02-13 17:05:35]
4.3Audio Profiles(Конфігураціязвуку)
Тут можна змінити гучність звуку смартфону, вибрати, наприклад, тільки вібрацію або вібрацію імелодію для повідомлення про вхідні дзвінки/повідомлення.
Назад допокажчика
4.4 Display(Екран)
Тут можна змінити яскравість екрана, розмір шрифту та час автоматичного режиму сну.Необхідно врахувати, що чим яскравіше екран, тим вище поглинання енергії. Це призведе до значногоприскорення виснаження батареї.Якщо Ви не бажаєте, щоб екран автоматично обертався під час повертання смартфону, Ви можетеувімкнути/вимкнути цю функцію в налаштуваннях «Auto-rotate screen» (Автоматичного обертанняекрана).
Назад допокажчика
4.5 Apps(Програми)
Тут можна управляти програмами, встановленими на смартфон Yarvik.Ви можете натиснути програму, яку Ви встановили, щоб переглянути інформацію про неї, та занеобхідності видалити за допомогою кнопки «Uninstall» («Видалити»).Необхідно врахувати, що програми, встановлені за замовчуванням (такі як, наприклад, калькулятор)не можна видалити.
Назад допокажчика
4.6
Storage(Пам’ять) тадоступ докартиMicroSD

Yarvik smartphone manual
file:///Users/elroy/Desktop/Yarvik/Manual/manual_uk.html[13-02-13 17:05:35]
Відображення інформації про внутрішню пам’ять. За наявності карти MicroSD у цьому розділі Ви такожможете ознайомитись з інформацією про пам’ять вставленої карти.
Підключення смартфону Yarvik до ПК або Mac через USB
Ви можете під’єднати смартфон Yarvik до ПК чи Mac за допомогою USB-кабелю, який постачається укомплекті.Під час з’єднання з комп’ютером Ви маєте доступ до внутрішньої пам’яті смартфону та, за наявності,до вставленої карти MicroSD в якості стандартного пристрою збереження USB.
Див. друковане «Керівництво по швидкому запуску» до смартфону Yarvik для визначення USB-портусмартфону. Під’єднайте USB-кабель до порту USB смартфону Yarvik, а також до вільного USB-портуВашого комп’ютера.Вгорі екрана смартфону одне за іншим з’являться два повідомлення:
Відразу після появи другого повідомлення про «USB connected» («підключення USB»), натисніть нанього.З’явиться наступний екран:
Натисніть на кнопку «Turn on USB storage» («Увімкнути пам’ять USB»).

Yarvik smartphone manual
file:///Users/elroy/Desktop/Yarvik/Manual/manual_uk.html[13-02-13 17:05:35]
З’явиться вікно повідомлення:
Натисніть «OK» для підтвердження.Внутрішня пам’ять смартфону Yarvik з’явиться в якості пристрою збереження у файловій системіВашого комп’ютера та придатна до використання, наприклад, для копіювання файлів зі смартфонуYarvik і навпаки.Якщо в смартфоні є карта MicroSD, вона буде розпізнана Вашим комп’ютером в якості другогопристрою збереження.
Для того, щоб вимкнути функцію пристрою збереження, натисніть кнопку «Turn off USB storage»(«Вимкнути пам’ять USB») та від’єднайте USB-кабель.
Примітка: Для доступу до пам’яті смартфону Yarvik апаратні драйвери не потрібні. Якщо Вашкомп’ютер запитує установку якогось драйвера, Вам слід просто ігнорувати дане повідомлення.
Доступ до карти MicroSDчерез ES File Explorer
Якщо у Ваш смартфон Yarvik вставлена карта MicroSD, Ви можете отримати доступ до її вмісту втакий спосіб:
Відкрийте додаток ES File Explorer та натисніть кнопку Favorites («Уподобання») (із значком у виглядісиньої зірки).
Розгорнеться меню Favorites (Уподобання). Натисніть значок «кореня», який позначено символом«/»:
Зараз відкрито доступ до «кореневої» папки файлової системи смартфону, де знаходяться декількафайлів та папок.Знайдіть та клацніть папку «mnt»:

Yarvik smartphone manual
file:///Users/elroy/Desktop/Yarvik/Manual/manual_uk.html[13-02-13 17:05:35]
Відкриється папка «mnt», у якій знаходяться декілька папок:
Папка «sdcard» дає доступ до внутрішньої пам’яті смартфона Yarvik.Папка «sdcard2» дає доступ до карти пам’яті MicroSD (якщо вона встановлена у роз’єм MicroSDсмартфона).
Якщо доступно, Ви також можете використовувати ярлик «microsd2» в згаданому раніше меню«Favorites» («Уподобання») для швидкого доступу до карти пам’яті MicroSD.
Назад допокажчика
4.7Language &input (Мова таввід)
Використовуйте кнопку «Select language» («Обрати мову») для обрання мови екрана смартфонуYarvik. Ця мова буде використана для усіх текстів всієї системі.У розділі «Android keyboard» («Клавіатура Android») Ви можете налаштувати екранну клавіатурусмартфона.
Назад допокажчика
4.8 Date & time

Yarvik smartphone manual
file:///Users/elroy/Desktop/Yarvik/Manual/manual_uk.html[13-02-13 17:05:35]
(Дата та час)Тут Ви можете встановити дату та час смартфона Yarvik.
Назад допокажчика
5 Apps(Програми)
Смартфон Yarvik поставляється із заздалегідь встановленими додатками (див. приклади далі).
Вид піктограм додатків може змінюватися без попереднього повідомлення.
Назад допокажчика
6 Телефоннідзвінки

Yarvik smartphone manual
file:///Users/elroy/Desktop/Yarvik/Manual/manual_uk.html[13-02-13 17:05:35]
Здійснення телефонних дзвінківДля здійснення телефонного дзвінка за допомогою смартфону Yarvik, відкрийте додаток «Phone»
(«Телефон») у меню додатків чи на головному екрані Android: Для введення телефонного номера використовуйте цифрову клавіатуру телефону.
Клавіатура телефону.
Для міжнародних дзвінків за необхідності введення знаку «+», натисніть і утримуйте «0» на клавіатурідо появи «+».
Натисніть кнопку виклику для початку телефонного дзвінка.
Натисніть кнопку виклику для завершення телефонного дзвінка.Ви також можете здійснювати телефонні дзвінки безпосередньо зі списку контактів у додатку «People»(«Контакти»).
Нещодавно здійснені дзвінки зберігаються на екрані журналу дзвінків, доступ до якого здійснюється
натисканням кнопки журналу вгорі екрана Phone (Телефон).Доступ до Ваших контактів (зі згаданого додатка «People» («Контакти»)) також здійснюється
безпосередньо з екрана Phone (Телефон), натисканням кнопки .
Вхідні телефонні дзвінки
При вхідному дзвінку на смартфон Yarvik Вам будуть доступні 3 опції:

Yarvik smartphone manual
file:///Users/elroy/Desktop/Yarvik/Manual/manual_uk.html[13-02-13 17:05:35]
1 - Пересунути коло вгору, щоб ігнорувати вхідний телефонний дзвінок і відправити автоматичнувідповідь у текстовому повідомленні.2 - Ігнорувати вхідний телефонний дзвінок.3 - Відповісти на вхідний телефонний дзвінок.
Опції, доступні під час телефонного дзвінка
1 - Показати клавіатуру телефону (наприклад, для меню опцій DTMF-сигналів).2 - Увімкнути/вимкнути функцію гучного зв’язку.3 - Вимкнути мікрофон.4 - Перевести телефонний дзвінок у режим утримання.5 - Меню додаткових опцій: додати ще один телефонний дзвінок (конференц-дзвінок) або записатителефонний дзвінок.
Переадресація дзвінків
Можна налаштувати функцію переадресації всіх вхідних телефонних дзвінків на вказаний номертелефону.
В додатку «Phone» («Телефон») натисніть кнопку меню та оберіть «Call settings»(«Налаштування дзвінка»).Оберіть «Voice call» («Голосовий виклик»), в якому можна обрати «Call forwarding» («Переадресаціядзвінків») для зміни опцій переадресації.
Номер абонента/очікування виклику
За допомогою функції смартфону Yarvik «Номер абонента» Ви можете налаштувати функцію показуВашого номера при вихідному дзвінку.
Для зміни увійдіть до додатку «Phone» («Телефон») , натисніть кнопку меню та оберіть«Settings» («Налаштування») - «Voice call» («Голосовий виклик») - «Additional settings» («Додатковіналаштування») - «Caller ID» («Номер абонента»).У цьому ж меню Ви також можете включити/відключити вхідні дзвінки, що надходять в моменттелефонної розмови.

Yarvik smartphone manual
file:///Users/elroy/Desktop/Yarvik/Manual/manual_uk.html[13-02-13 17:05:35]
Назад допокажчика
7 Повідомлення
За допомогою смартфону Yarvik можна відправляти SMS та MMS-повідомлення. Для отриманняінформації про стандартні тарифи та додаткову вартість відправки повідомлень за кордон, зв’яжітьсяз провайдером послуг мобільного зв’язку.
Відправка SMS/MMS-повідомлень
Відкрийте додаток «Messaging» («Повідомлення») на головному екрані Android або в менюдодатків.
Додаток повідомлень.
1 - Додайте зображення, аудіо та відео. Повідомлення з додатками автоматично вважаютьсяMMS-повідомленнями.2 - Меню налаштувань повідомлення.3 - Поле одержувача.4 - Додати одержувача.5 - Перегляд історії повідомлень.6 - Введення тексту повідомлення.7 - Кнопка відправлення повідомлення.

Yarvik smartphone manual
file:///Users/elroy/Desktop/Yarvik/Manual/manual_uk.html[13-02-13 17:05:35]
Установка номера голосової пошти/відтворення повідомлень голосової поштиДля установки номера голосової пошти на смартфоні Yarvik відкрийте додаток «Phone» («Телефон») у
меню додатків або на головному екрані Android:
Натисніть та утримуйте кнопку на клавіатурі телефону. На екрані опцій з’явиться «Addnumber» («Додати номер»). В опціях голосової пошти Ви можете обрати налаштування голосовоїпошти та ввести номер голосової пошти.
Після установки номера голосової пошти Ви можете, відповідно, використовувати кнопку , щобподзвонити на номер голосової пошти, натиснувши та утримуючи її.
Назад допокажчика
8 Гарантійнізобов’язання
Протягом 2 років з моменту придбання Yarvik гарантує, що придбаний продукт не має жоднихвиробничих дефектів чи дефектів матеріалу. Якщо у будь-який час протягом терміну дії гарантії впродукті буде виявлений виробничий дефект чи дефект матеріалу, покупець повинен повернутипродукт агенту з продажу, у якого він був придбаний. Агент з продажу повинен полагодити абозамінити його (на розсуд Yarvik) протягом розумного періоду часу. Необхідно надати оригінал рахункадля підтвердження дати придбання. Рішення Yarvik стосовно цього питання є кінцевим.
Ця гарантія не розповсюджується на дефекти чи несправності, що виникли у результатіперевстановлення ПЗ, порушення правил експлуатації, неправильного використання, розбирання,недбалості, неналежного використання, недостатнього догляду чи будь-якої іншої дії, що виходить зарамки контролю Yarvik.
ВАЖЛИВА ІНФОРМАЦІЯ: Під час придбання смартфон Yarvik постачається з найновішою на часвиготовлення пристрою версією ПЗ для цієї моделі. Yarvik не надає підтримку продуктам, якібудь-яким чином були модифіковані кінцевим користувачем, а також Yarvik не надає підтримкумодифікованому програмуванню системного ПЗ та ПЗ, що використане в продукті, тому що черезстворення будь-яких таких модифікацій всі гарантії автоматично анулюються.
Аби уникнути анулювання наданої гарантії, покупець повинен використовувати тільки офіційне ПЗ,програми та оновлення, доступні на веб-сайті Yarvik: www.yarvik.com.Будь-яке інше ПЗ чи вбудоване ПЗ використовувати не можна, тому що його використанняавтоматично анулює гарантії та підтримку. Yarvik не підтримує використання будь-якого ПЗ чивбудованого ПЗ, окрім ПЗ чи вбудованого ПЗ, встановленого в продукті виробником чи доступного наофіційному сайті Yarvik: www.yarvik.com. Yarvik недвозначно відхиляє усі запити стосовнонесанкційованих модифікацій, ПЗ чи вбудованого ПЗ.
Назад допокажчика

Yarvik smartphone manual
file:///Users/elroy/Desktop/Yarvik/Manual/manual_uk.html[13-02-13 17:05:35]
9 Інформація проліцензії GNU/GPL
Необхідно ознайомитись з юридичною інформацією, доступною в смартфоні Yarvik під Settings(Налаштуваннями) – About Smartphone (Про смартфон) – Legal information (Юридична інформація)(необхідне з’єднання з Інтернетом) або відвідайте http://source.android.com/source/licenses.html дляотримання додаткової інформації.
Назад допокажчика
10 ImportantInformation
Wireless LAN-Regulatory information
Depending on the model, the wireless LAN built-in into Smartphone devices can only be used in thefollowing countries: Austria, Belgium, Bulgaria, Czech Republic, Denmark, Finland, France, Germany,Greece, Hungary, Iceland, Ireland, Italy, Luxembourg, the Netherlands, Norway, Poland, Portugal, Romania,Slovakia, Slovenia, Spain, Sweden, Switzerland, Turkey and the United Kingdom.
Conditions of use
When using the IEEE 802.11b/g/n Wireless LAN standard, channels 1 to 13 (2.4 GHz...2.4835 GHz) areselectable for both indoor and outdoor use, however with restrictive conditions applying in France, Italy andNorway, as follows:
• France: When using this product indoor, all channels can be used without restrictions. Outdoor onlychannels 1 to 6 are allowed. This means that in Peer-to-Peer, the WLAN feature can only be used outside ifthe peer sets up the communication on an authorized channel (i.e., between 1 & 6). In infrastructure mode,please make sure the access point is configured to a channel from 1 to 6 before setting up the connection.
• Italy: Use of the RLAN network is governed: Disposal of Old Electrical & Electronic- with respect to private use, by the Legislative Decree of 1.8.2003, no. 259 (“Code of ElectronicCommunications”). In particular Article 104 indicates when the prior obtainment of a general authorization isrequired and Art. 105 indicates when free use is permitted;- with respect to the supply to the public of the WLAN access to telecom networks and services, by theMinisterial Decree 28.5.2003, as amended, and Art. 25 (general authorization for electronic communicationsnetworks and services) of the Code of electronic communications.
• Norway: Use of this radio equipment is not allowed in the geographical area within a radius of 20 km fromthe centre of Ny-Ålesund, Svalbard.
Yarvik smartphone manual
file:///Users/elroy/Desktop/Yarvik/Manual/manual_uk.html[13-02-13 17:05:35]
WEEESymbolInformation
Correct Disposal of This product (Waste Electrical & Electronic Equipment).
(Applicable in the European Union and other European countries with separate collection systems).
This marking shown on the product or its literature indicates that it should not be disposed with otherhousehold wasted at the end of its working life. To prevent possible harm to the environment or humanhealth from uncontrolled waste disposal, please separate this from other types of wastes and recycle itresponsibly to promote the sustainable reuse of material resources.Household users should contact either the retailer where they purchased this product, or their localgovernment office, for details of where and how they can take this item for environmentally safe recycling.Business users should contact their supplier and check the terms and conditions of the purchase contract.This product should not be mixed with other commercial wastes of disposal.
Disposal of waste batteries (applicable in the European Union and other European countries withseparate collection systems)
Either of the symbols shown next may appear on the battery or on the packaging to indicate that the batteryprovided with this product shall not be treated as household waste. On certain batteries this symbol might beused in combination with a chemical symbol. The chemical symbols for mercury (Hg) or lead (Pb) are addedif the battery contains more than 0.0005% mercury or 0.004% lead. By ensuring these batteries are disposedof correctly, you will help prevent potentially negative consequences for the environment and human healthwhich could otherwise be caused by inappropriate waste handling of the battery. The recycling of thematerials will help to conserve natural resources. In case of products that for safety, performance or dataintegrity reasons require a permanent connection with an incorporated battery, this battery should bereplaced by qualified service staff only. To ensure that the battery will be treated properly, hand over theproduct at end-of-life to the applicable collection point for the recycling of electrical and electronicequipment.
For all other batteries, please view the section on how to remove the battery from the product safely. Handthe battery over to the applicable collection point for the recycling of waste batteries. For more detailedinformation about recycling of this product or battery, please contact your local Local government Office,your household waste disposal service or the shop where you purchased the product.
When travelling to and within the United States of America, please be aware that the U.S. Department ofTransportation (DOT) recently published new regulations that apply to passengers travelling with lithiummetal batteries and lithium-ion batteries.

Yarvik smartphone manual
file:///Users/elroy/Desktop/Yarvik/Manual/manual_uk.html[13-02-13 17:05:35]
For detailed information, visit http://safetravel.dot.gov/whats_new_batteries.html.
Safety Information
Yarvik Smartphone device
• Yarvik is not responsible for any interference that you may experience or that may be caused whenoperating this device.
• Warning: This apparatus must be earthed.
Opening or dismantling the main unit or any of its accessories, for whatever reason, could lead to damagesthat are not covered by the guarantee.
• To avoid electrical shock, do not open the cabinet. Refer servicing to qualified personnel only.
• To prevent fire or shock hazard, do not expose your Smartphone device or any of its accessories to rain ormoisture.
• Do not use or store your Smartphone device in a location subject to heat sources, such as radiators or airducts; direct sunlight; excessive dust; moisture or rain; mechanical vibration or shock; strong magnets orspeakers that are not magnetically shielded; excessively high and low temperatures; and high humidity.
• Turning off your Smartphone device with the power button does not disconnect the device completely frommains voltage. To disconnect it completely, unplug the AC adapter or the power cord from mains. Thesocket-outlet shall be installed near the equipment and shall be easily accessible.
• Audio and picture distortion may occur if this equipment is positioned in close proximity to any equipmentemitting electromagnetic radiation.
• This apparatus is also designed for IT power system with phase to phase voltage 230V, for customers inNorway.
• Observe the following precautions to provide adequate air circulation and to ensure normal reliableoperation:- Do not use the Smartphone device and/or the AC adapter while covered or wrapped in cloth. Ensure theAC adapter operates in a clear environment.- Turn off the Smartphone device before putting the device into a bag or a carrying case.
• Do not use your Smartphone device directly on your lap. The temperature of the base of the unit will riseduring normal operation and over time could result in discomfort or burns.
• Do not use your Smartphone device while walking. Listening to music with headphones or watching theLCD screen while walking may lead to an unexpected accident and result in personal injuries.
• Using connected headphones on the Smartphone device for too long and/or setting the audio volume uptoo high when using headphones may cause serious hearing damage.
• Avoid strong beating of or to the product.
• Don’t operate the touch screen of the Smartphone device with sharp objects, as this may result inscratching the screen surface.

Yarvik smartphone manual
file:///Users/elroy/Desktop/Yarvik/Manual/manual_uk.html[13-02-13 17:05:35]
• Only use permitted batteries, chargers and accessories with your Smartphone device. The use of any otherproducts with the device can be dangerous and may violate the warranty regulations.
• Only use a slightly wet cotton cloth to clean the device, and only use water to wetten the cotton cloth. TheSmartphone device should not be cleaned with any sort of (glass) cleaning aid.
Wireless functionality
• If radio interference with other devices occurs while using your Smartphone device, do not use the wirelessfunctionality. Use of the wireless functionality may cause a malfunction of the devices, resulting in anaccident.
• In some situations or environments, the use of the wireless functionality might be restricted by theproprietor of the building or responsible representatives of the organization, for example on board airplanes,in hospitals or in any other environment where the risk of interference with other devices or services isperceived or identified as harmful. If you are uncertain about the policy applying to the use of wirelessfunctionality in a specific organization or environment, you are encouraged to first ask for authorization priorto switching it on. Consult your physician or the manufacturer of personal medical devices (pacemakers,hearing aids, etc.) regarding any restrictions on the use of wireless functionality.
• If using wireless functionality near a pacemaker, make sure it is at least 19 inches / 50 cm away from thepacemaker.
• Due to the transmission and reception properties of wireless communications, data can occasionally be lostor delayed. This can be due to the variation in radio signal strength that results from changes in thecharacteristics of the radio transmission path. Yarvik will not be held responsible for damages of any kindresulting from the delays or errors in data transmitted or received via wireless functionality, or failure ofwireless functionality to transmit or receive such data.
• If the equipment does cause harmful interference to radio/TV reception, which can be determined by turningthe equipment off and on, the user is encouraged to try to correct the interference by one or more of thefollowing measures: reorient or relocate the receiving antenna, increase the distance between the senderand the receiver, consult the dealer or an experienced radio/TV technician for help. Yarvik will not beresponsible for any radio/TV interference nor for any other undesired effect.
Wireless LAN Security
Creating security settings for the Wireless LAN is extremely important. Yarvik assumes no responsibility forany security problems that may arise from the use of the Wireless LAN.
Battery pack
Do not charge the battery pack in any way other than as described in the Start guide or as designated byYarvik in writing.

Yarvik smartphone manual
file:///Users/elroy/Desktop/Yarvik/Manual/manual_uk.html[13-02-13 17:05:35]
AC adapter
• It is highly recommended that you use a genuine Yarvik AC adapter supplied by Yarvik for your product.
• This AC adapter is intended for use with the Smartphone device IT products only.
• Do not place the AC adapter in contact with your skin. Remove the AC adapter away from your body if itbecomes warm and causes discomfort.
RoHS
This products has been certified as RoHS Compliant.
YARVIK.COM
Назад допокажчика
Yarvik smartphone manual
file:///Users/elroy/Desktop/Yarvik/Manual/manual_gr.html[13-02-13 17:05:46]
Ευρετήριο SELECTLANGUAGE
1 Πριν από την πρώτηχρήση2 Εκκίνηση τουSmartphone3 Η Αρχική Οθόνη τουAndroid (Home)3.1 Προσθήκη γραφικώνστοιχείων (widgets) καισυντομεύσεων στηνΑρχική Οθόνη3.2 ΟρισμόςΤαπετσαρίας3.3 Μενού Εφαρμογών4 Διαμόρφωση τουSmartphone4.1 Μενού Settings(Ρυθμίσεις)4.2 WiFi & Bluetooth4.3 Audio Profiles(Προφίλ Ήχου)4.4 Display (Οθόνη)4.5 Apps (Εφαρμογές)4.6 Storage(Αποθήκευση) &Προσπέλαση τηςμνήμης MicroSD4.7 Language & input

Yarvik smartphone manual
file:///Users/elroy/Desktop/Yarvik/Manual/manual_gr.html[13-02-13 17:05:46]
(Γλώσσα & είσοδος)4.8 Date & time(Ημερομηνία & ώρα)5 Apps (Εφαρμογές)6 Τηλεφωνήματα7 ΑνταλλαγήΜηνυμάτων8 Δήλωση Εγγύησης9 ΠληροφορίεςΑδειοδότησηςGNU/GPL10 Importantinformation
1 Πριν από την πρώτη χρήση
Αγαπητέ χρήστη,
Σας ευχαριστούμε που αγοράσατε το προϊόν μας.Για να μπορέσετε να χρησιμοποιήσετε το νέο σας Smartphone Yarvik γρήγορα και εύκολα, διαβάστε πρώταπροσεκτικά αυτές τις οδηγίες.
Ελπίζουμε ότι θα απολαύσετε τη χρήση του Smartphone Yarvik για όσο το δυνατόν μεγαλύτερο διάστημα!
Σημαντική σημείωση:
• Το Smartphone Yarvik είναιένα ηλεκτρονικό προϊόν υψηλήςακρίβειας. Μην προσπαθήσετενα αποσυναρμολογήσετε τοsmartphone, επειδή αυτή ηενέργεια θα ακυρώσει τηνεγγύησή σας, ενώ ενδέχεται ναπροκαλέσει δυσλειτουργία τηςσυσκευής.
• Αποφύγετε τις κρούσεις ήπτώσεις του προϊόντος.
• Αποφύγετε τη χρήση του

Yarvik smartphone manual
file:///Users/elroy/Desktop/Yarvik/Manual/manual_gr.html[13-02-13 17:05:46]
smartphone σε περιβάλλον μευψηλή ή χαμηλή θερμοκρασία, ήσε οποιοδήποτε περιβάλλον στοοποίο η συσκευή ενδέχεται ναέρθει σε επαφή με υγρασία,σκόνη ή μαγνητικά πεδία.
• Μην εκθέτετε το smartphoneσε ισχυρό ηλιακό φως γιαμεγάλο χρονικό διάστημα.
• Μην χειρίζεστε την οθόνη αφήςμε αιχμηρά αντικείμενα, επειδήμπορεί να προκληθούνγρατσουνιές.
• Η χρήση του smartphone μεακουστικά για μεγάλο χρονικόδιάστημα ή με πολύ υψηλήένταση ήχου ενδέχεται ναπροκαλέσει σοβαρή βλάβη τηςακοής.
• Για να αποφύγετε ενδεχόμεναατυχήματα, μην διασχίζετεδρόμους και μην οδηγείτεμηχανοκίνητα οχήματα ήποδήλατο όταν χρησιμοποιείτετο smartphone με ακουστικά.
• Να χρησιμοποιείτε μόνοσυνιστώμενες μπαταρίες,φορτιστές και αξεσουάρ με τοSmartphone Yarvik. Η χρήσηάλλων προϊόντων με τοsmartphone ενδέχεται να είναιεπικίνδυνη και να παραβιάζειτους όρους της εγγύησης.
• Για τον καθαρισμό τουsmartphone χρησιμοποιήστεμόνο ένα βαμβακερό ύφασμα,το οποίο θα υγράνετε ελαφρώςμόνο με νερό. Το smartphoneδεν πρέπει να καθαρίζεται μεοποιοδήποτε προϊόνκαθαρισμού.
Μπορείτε να ξεκινήσετε τη χρήση Smartphone Yarvik αμέσως μόλις το βγάλετε από τη συσκευασία, χωρίςνα φορτίσετε πρώτα την μπαταρία.

Yarvik smartphone manual
file:///Users/elroy/Desktop/Yarvik/Manual/manual_gr.html[13-02-13 17:05:46]
H μπαταρία είναι καλύτερο να χρησιμοποιηθεί αρχικά με όσο φορτίο έχει και να φορτιστεί πλήρως αργότερα,αφού εκφορτιστεί ολοκληρωτικά για πρώτη φορά.Εάν δεν μπορείτε να ενεργοποιήσετε το Smartphone αμέσως μόλις το βγάλετε από τη συσκευασία, ημπαταρία είναι ήδη πλήρως εκφορτισμένη και πρέπει, προφανώς, να τη φορτίσετε πρώτα.
Επιστροφή στοευρετήριο
2 Εκκίνηση τουSmartphone
Όταν ενεργοποιήσετε για πρώτη φορά Smartphone Yarvik, θα δείτε τη διαδικασία εκκίνησης .Η πρώτη διαδικασία εκκίνησης μπορεί να απαιτήσει αρκετό χρόνο, περίπου 2-3 λεπτά.Όταν τελειώσει η διαδικασία εκκίνησης, το Smartphone έχει πλέον ολοκληρώσει την έναρξη της λειτουργίαςκαι θα εμφανιστεί η Οθόνη Κλειδώματος του Android.
Οθόνη Κλειδώματος Android
Σύρετε τη γραμμή κλειδώματος (A) προς τα δεξιά για να ξεκλειδώσετε το Smartphone. Θα μεταφερθείτε στηνΑρχική Οθόνη του Android (Home).
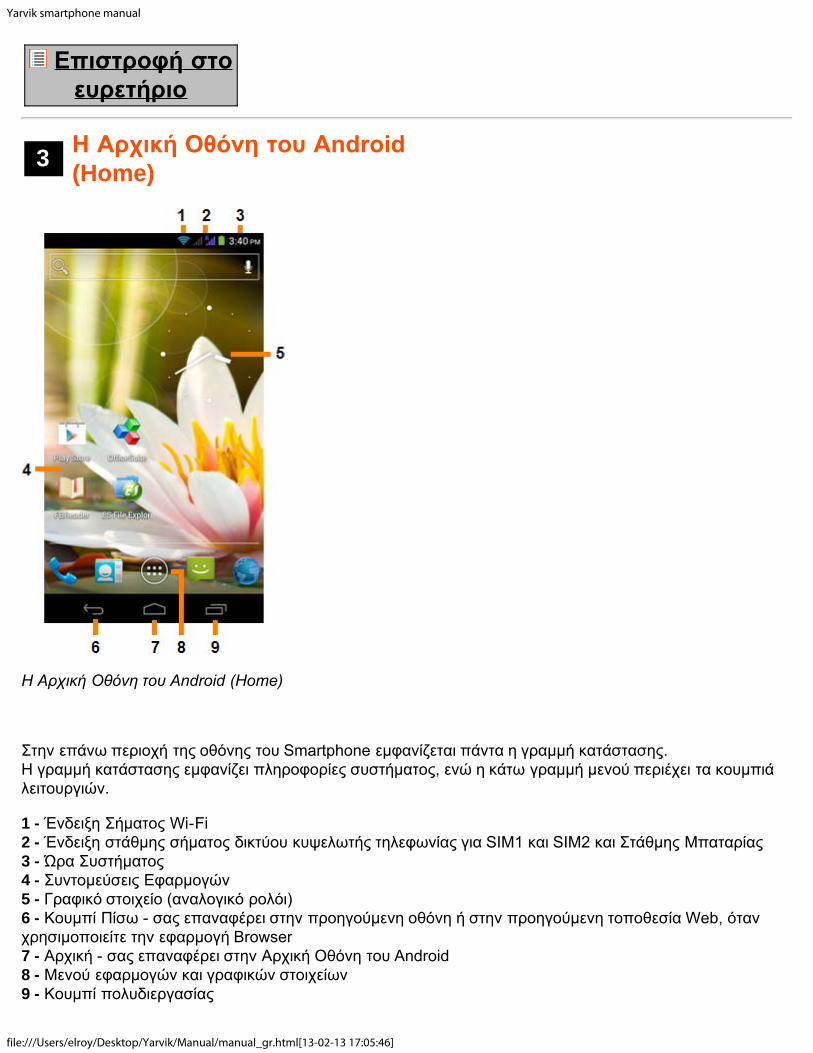
Yarvik smartphone manual
file:///Users/elroy/Desktop/Yarvik/Manual/manual_gr.html[13-02-13 17:05:46]
Επιστροφή στοευρετήριο
3 Η Αρχική Οθόνη του Android(Home)
Η Αρχική Οθόνη του Android (Home)
Στην επάνω περιοχή της οθόνης του Smartphone εμφανίζεται πάντα η γραμμή κατάστασης.Η γραμμή κατάστασης εμφανίζει πληροφορίες συστήματος, ενώ η κάτω γραμμή μενού περιέχει τα κουμπιάλειτουργιών.
1 - Ένδειξη Σήματος Wi-Fi2 - Ένδειξη στάθμης σήματος δικτύου κυψελωτής τηλεφωνίας για SIM1 και SIM2 και Στάθμης Μπαταρίας3 - Ώρα Συστήματος4 - Συντομεύσεις Εφαρμογών5 - Γραφικό στοιχείο (αναλογικό ρολόι)6 - Κουμπί Πίσω - σας επαναφέρει στην προηγούμενη οθόνη ή στην προηγούμενη τοποθεσία Web, ότανχρησιμοποιείτε την εφαρμογή Browser7 - Αρχική - σας επαναφέρει στην Αρχική Οθόνη του Android8 - Μενού εφαρμογών και γραφικών στοιχείων9 - Κουμπί πολυδιεργασίας

Yarvik smartphone manual
file:///Users/elroy/Desktop/Yarvik/Manual/manual_gr.html[13-02-13 17:05:46]
Η αρχική οθόνη αποτελείται από πολλαπλές σελίδες, τις οποίες μπορείτε να προσπελάσετε σέρνοντας στηναρχική οθόνη προς τα αριστερά/δεξιά.
Για να δείτε ποιες εφαρμογές εκτελούνται στο παρασκήνιο, μπορείτε να εμφανίσετε την προβολήπολυδιεργασίας πατώντας το κουμπί πολυδιεργασίας (9).
Κάντε κλικ σε μια από τις εκτελούμενες εφαρμογές στην προβολή πολυδιεργασίας για να μεταβείτε άμεσα σ'αυτήν. Μπορείτε να κλείσετε μια εφαρμογή που εκτελείται πατώντας παρατεταμένα πάνω της καιεπιλέγοντας "Remove from list" (Αφαίρεση από τη λίστα).
Επιστροφή στοευρετήριο
3.1
Προσθήκηγραφικώνστοιχείων(widgets) καισυντομεύσεωνστην

Yarvik smartphone manual
file:///Users/elroy/Desktop/Yarvik/Manual/manual_gr.html[13-02-13 17:05:46]
Αρχική ΟθόνηΓια να προσθέσετε ένα γραφικό στοιχείο, πατήστε το κουμπί εφαρμογών και γραφικών στοιχείων στο κέντρο
της κάτω περιοχής της Αρχικής Οθόνης:
Στην επόμενη οθόνη θα δείτε όλες τις εγκατεστημένες εφαρμογές και τα γραφικά στοιχεία. Εμφανίζονταιξεχωριστά, επιλέγοντας "Apps" (Εφαρμογές) ή "Widgets" (Γραφικά Στοιχεία), αντίστοιχα, στο επάνω τμήματης οθόνης.Πατήστε "Widgets" (Γραφικά Στοιχεία) για να εμφανίσετε όλα τα διαθέσιμα γραφικά στοιχεία. Ότανεμφανίζονται όλα τα γραφικά στοιχεία, μπορείτε να σύρετε στην οθόνη για να εμφανίσετε την επόμενη σελίδα(εάν υπάρχει).Πατήστε παρατεταμένα το επιθυμητό γραφικό στοιχείο για να εμφανίσετε την Αρχική Οθόνη και ελευθερώστετο γραφικό στοιχείο σε ένα ελεύθερο σημείο στην Αρχική οθόνη.
Για να προσθέσετε μια συντόμευση προς οποιαδήποτε εφαρμογή, πατήστε το κουμπί εφαρμογών και
γραφικών στοιχείων στο κέντρο της κάτω περιοχής της Αρχικής Οθόνης:
Στην επόμενη οθόνη θα δείτε όλες τις εγκατεστημένες εφαρμογές και τα γραφικά στοιχεία. Εμφανίζονταιξεχωριστά, επιλέγοντας "Apps" (Εφαρμογές) ή "Widgets" (Γραφικά Στοιχεία), αντίστοιχα, στο επάνω τμήματης οθόνης.Πατήστε "Apps" (Εφαρμογές) για να εμφανίσετε όλες τις εγκατεστημένες εφαρμογές.Πατήστε παρατεταμένα την επιθυμητή εφαρμογή για να εμφανίσετε την αρχική οθόνη και ελευθερώστε τησυντόμευση σε ένα ελεύθερο σημείο στην Αρχική Οθόνη.
Για να αφαιρέσετε γραφικά στοιχεία ή/και συντομεύσεις εφαρμογών από την Αρχική Οθόνη, πατήστε πάνωτους παρατεταμένα και σύρετέ τα στο εικονίδιο καλάθου αχρήστων "Remove" (Αφαίρεση) που θα εμφανιστείστην επάνω περιοχή της Αρχικής Οθόνης.
Επιστροφή στοευρετήριο
3.2 ΟρισμόςΤαπετσαρίας
Για να αλλάξετε την ταπετσαρία της Αρχικής Οθόνης, πατήστε παρατεταμένα στην Αρχική Οθόνη μέχρι ναεμφανιστεί το μενού “Select Wallpaper from” (Επιλογή Ταπετσαρίας από).Μπορείτε να επιλέξετε μεταξύ "Live Wallpapers" (ταπετσαρίες με κίνηση), "Gallery" (συλλογή φωτογραφιών/βίντεο) και "Wallpapers" (προεπιλεγμένες στατικές εικόνες).
Επιστροφή στοευρετήριο
3.3 ΜενούΕφαρμογών

Yarvik smartphone manual
file:///Users/elroy/Desktop/Yarvik/Manual/manual_gr.html[13-02-13 17:05:46]
Πατήστε το κουμπί εφαρμογών και γραφικών στοιχείων στο κέντρο της κάτω περιοχής της Αρχικής Οθόνης:
Όταν το σύστημα εμφανίσει τα γραφικά στοιχεία, πατήστε "Apps" (Εφαρμογές) για να εμφανίσετε όλες τιςεγκατεστημένες εφαρμογές.
Εδώ θα βρείτε όλα τα προεγκατεστημένα προγράμματα, ή “εφαρμογές” (apps), καθώς και τις πρόσθετεςεφαρμογές που εγκαθιστάτε εσείς.Μπορείτε να εκκινήσετε οποιαδήποτε εφαρμογή πατώντας απλώς στο εικονίδιό της.
Οθόνη Εφαρμογών
Επιστροφή στοευρετήριο
4
ΔιαμόρφωσητουSmartphoneYarvik
4.1 Μενού Settings(Ρυθμίσεις)

Yarvik smartphone manual
file:///Users/elroy/Desktop/Yarvik/Manual/manual_gr.html[13-02-13 17:05:46]
Πατήστε το εικονίδιο Settings (Ρυθμίσεις) στο Μενού Εφαρμογών για να εμφανίσετε το μενού Settings.Στο μενού Settings (Ρυθμίσεις) θα βρείτε επιλογές για τη διαμόρφωση του Smartphone Yarvik.
Μενού Settings (Ρυθμίσεις)

Yarvik smartphone manual
file:///Users/elroy/Desktop/Yarvik/Manual/manual_gr.html[13-02-13 17:05:46]
Θα περιγράψουμε τα σημαντικότερα μέρη:
Επιστροφή στοευρετήριο
4.2 Wi-Fi &Bluetooth
Wi-Fi
Διαμόρφωση της σύνδεσης με ένα ασύρματο δίκτυο Wi-Fi.Σύρετε το κουμπί On/Off στη θέση "On" για να ενεργοποιήσετε την επικοινωνία Wi-Fi.
Τα διαθέσιμα δίκτυα Wi-Fi εμφανίζονται στη λίστα δικτύων, στα δεξιά της οθόνης. Αγγίξτε το επιθυμητόδίκτυο. Εάν το δίκτυο είναι ασφαλές, θα σας ζητηθεί να εισάγετε το κλειδί ασφάλειας του δικτύου.
Πατήστε το κουμπί “Connect” (Σύνδεση) και το Smartphone θα συνδεθεί στο δίκτυο.Όταν εμφανιστεί το μήνυμα “Connected” (Συνδέθηκε) κάτω από το όνομα του δικτύου και το εικονίδιοασύρματης λήψης στο κάτω τμήμα της γραμμής κατάστασης, έχετε συνδεθεί επιτυχώς στο ασύρματο δίκτυο.
Εμφάνιση της Διεύθυνσης MAC Wi-Fi του Smartphone Yarvik
Στην οθόνη ρυθμίσεων Wi-Fi, κάντε κλικ στο κουμπί μενού, στην κάτω δεξιά γωνία.
Πατήστε "Advanced" (Για Προχωρημένους) στο αναπτυσσόμενο μενού.
Η διεύθυνση MAC Wi-Fi αναφέρεται στο πεδίο "MAC address" (Διεύθυνση MAC) της οθόνης "Advanced Wi-Fi" (Ρυθμίσεις Wi-Fi για Προχωρημένους) που εμφανίζεται κατόπιν.

Yarvik smartphone manual
file:///Users/elroy/Desktop/Yarvik/Manual/manual_gr.html[13-02-13 17:05:46]
Bluetooth
Το Smartphone Yarvik διαθέτει ενσωματωμένη μονάδα Bluetooth για σύνδεση σε περιφερειακά συμβατά μεBluetooth, όπως πληκτρολόγια, ηχεία και ακουστικά, αλλά και σε κιτ Bluetooth ανοικτής συνομιλίας καιαυτοκινήτου.Σύρετε το κουμπί Bluetooth On/Off στη θέση "On" για να ενεργοποιήσετε την επικοινωνία Bluetooth.
Μόλις ενεργοποιηθεί, το Smartphone Yarvik θα ξεκινήσει αυτόματα την αναζήτηση κοντινών συσκευώνBluetooth. Μπορείτε να αναζητήσετε χειροκίνητα συσκευές Bluetooth οποιαδήποτε στιγμή κάνοντας κλικστην επιλογή "Search for Devices" (Αναζήτηση για Συσκευές) στην επάνω δεξιά γωνία της οθόνης.Τα προς σύνδεση περιφερειακά ενδέχεται να πρέπει να τεθούν σε "κατάσταση ζεύξης" (pairing). Γιαπερισσότερες πληροφορίες, ανατρέξτε στο εγχειρίδιο οδηγιών του περιφερειακού που σας ενδιαφέρει.
Όλες οι συσκευές που θα εντοπιστούν θα εμφανιστούν στη λίστα "Available Devices" (Διαθέσιμες Συσκευές):
Κάντε κλικ σε μία από τις συσκευές Bluetooth που εντοπίστηκαν για να εκκινήσετε τη ζεύξη του SmartphoneYarvik με τη συγκεκριμένη συσκευή.Θα εμφανιστεί το παράθυρο "Bluetooth pairing request" (Αίτηση ζεύξης Bluetooth):
Οι περισσότερες συσκευές Bluetooth απαιτούν έναν κωδικό PIN για τη σύνδεση. Αυτός ο κωδικός είναισυνήθως 0000 ή 1234. Εάν ο κωδικός PIN είναι διαφορετικός, ανατρέξτε στο εγχειρίδιο οδηγιών τηςσυσκευής Bluetooth.Αφού εισάγετε τον σωστό κωδικό PIN, πατήστε "OK".
Το Smartphone Yarvik θα ξεκινήσει τη ζεύξη με τη συσκευή Bluetooth. Μετά από μερικά δευτερόλεπτα, ησύνδεση θα ολοκληρωθεί και θα εμφανιστεί το μήνυμα "Connected" (Συνδέθηκε) κάτω από τη συγκεκριμένησυσκευή Bluetooth στη λίστα "Available Devices" (Διαθέσιμες Συσκευές):

Yarvik smartphone manual
file:///Users/elroy/Desktop/Yarvik/Manual/manual_gr.html[13-02-13 17:05:46]
Μπορείτε να συνδέσετε πολλές συσκευές Bluetooth στο Smartphone Yarvik και να τις χρησιμοποιείτεταυτόχρονα (π.χ. σετ ακουστικών και πληκτρολόγιο).
Επιστροφή στοευρετήριο
4.3Audio Profiles(ΠροφίλΉχου)
Εδώ μπορείτε να αλλάξετε την ένταση διάφορων ήχων του smartphone. Για παράδειγμα, να επιλέξετε μόνοδόνηση ή δόνηση και κουδουνισμό για την ειδοποίηση για εισερχόμενες κλήσεις/μηνύματα.
Επιστροφή στοευρετήριο
4.4 Display(Οθόνη)
Εδώ μπορείτε να αλλάξετε τη φωτεινότητα της οθόνης, τα μεγέθη του κειμένου και τον χρόνο αυτόματηςμετάβασης σε κατάσταση αναστολής λειτουργίας.Να έχετε υπόψη ότι όσο μεγαλύτερη είναι η φωτεινότητα της οθόνης, τόσο υψηλότερη είναι η κατανάλωσηενέργειας. Αυτό επιταχύνει σημαντικά την εκφόρτιση της μπαταρίας.Εάν δεν θέλετε το περιεχόμενο της οθόνης να περιστρέφεται αυτόματα καθώς αλλάζετε την κλίση τουSmartphone, μπορείτε να ενεργοποιήσετε/απενεργοποιήσετε τη συγκεκριμένη λειτουργία μέσω της ρύθμισηςAuto-rotate screen (Αυτόματη περιστροφή οθόνης).
Επιστροφή στοευρετήριο
4.5 Apps(Εφαρμογές)
Εδώ έχετε τη δυνατότητα να διαχειρίζεστε τις εφαρμογές που είναι εγκατεστημένες στο Smartphone Yarvik.Μπορείτε να κάνετε κλικ σε εφαρμογές που έχετε εγκαταστήσει για να εμφανίσετε πληροφορίες γι' αυτές,καθώς και να τις καταργήσετε (αν θέλετε) χρησιμοποιώντας το κουμπί “Uninstall” (ΚατάργησηΕγκατάστασης).

Yarvik smartphone manual
file:///Users/elroy/Desktop/Yarvik/Manual/manual_gr.html[13-02-13 17:05:46]
Σημειώστε ότι οι προεγκατεστημένες και προεπιλεγμένες εφαρμογές (όπως π.χ. η αριθμομηχανή) δενμπορούν να καταργηθούν.
Επιστροφή στοευρετήριο
4.6
Storage(Αποθήκευση)&Προσπέλασητης μνήμηςMicroSD
Εμφανίζει πληροφορίες για την εσωτερική μνήμη. Όταν υπάρχει κάρτα MicroSD στη συσκευή, εδώ μπορείτεεπίσης να δείτε πληροφορίες σχετικά με τη μνήμη της εγκατεστημένης κάρτας.
Σύνδεση του Smartphone Yarvik σε PC ή Mac μέσω USB
Μπορείτε να συνδέσετε το Smartphone Yarvik σε έναν υπολογιστή PC ή Mac χρησιμοποιώντας τοπαρεχόμενο καλώδιο USB.Όταν το Smartphone είναι συνδεδεμένο σε υπολογιστή, μπορείτε να προσπελάσετε την εσωτερική μνήμητου, καθώς και την κάρτα MicroSD (αν υπάρχει), ως τυπική Συσκευή Μαζικής Αποθήκευσης USB.
Για να προσδιορίσετε τη θέση της θύρας USB του Smartphone Yarvik, ανατρέξτε στον έντυπο ΟδηγόΓρήγορης Έναρξης του smartphone. Συνδέστε το καλώδιο USB στη θύρα USB του Smartphone Yarvik και σεμια ελεύθερη θύρα USB του υπολογιστή σας.Στην επάνω πλευρά της οθόνης του smartphone θα εμφανιστούν δύο μηνύματα, σε γρήγορη διαδοχή:
Μόλις εμφανιστεί το δεύτερο μήνυμα, "USB connected" (Ολοκλήρωση σύνδεσης USB), κάντε κλικ πάνω του.Θα εμφανιστεί η ακόλουθη οθόνη:

Yarvik smartphone manual
file:///Users/elroy/Desktop/Yarvik/Manual/manual_gr.html[13-02-13 17:05:46]
Κάντε κλικ στο κουμπί "Turn on USB storage" (Ενεργοποίηση θέσης αποθήκευσης USB).Θα εμφανιστεί ένα ενημερωτικό παράθυρο:
Κάντε κλικ στο "OK" για επιβεβαίωση.Η εσωτερική μνήμη του Smartphone Yarvik θα εμφανιστεί ως Δίσκος Μαζικής Αποθήκευσης στο σύστημααρχείων του υπολογιστή σας και μπορεί να χρησιμοποιηθεί, για παράδειγμα, για την αντιγραφή αρχείων απόκαι προς το Smartphone Yarvik.Εάν έχετε τοποθετήσει μια κάρτα MicroSD στο smartphone, η κάρτα θα αναγνωριστεί από τον υπολογιστήως δεύτερος Δίσκος Μαζικής Αποθήκευσης.
Για να τερματίσετε τη χρήση της λειτουργίας Συσκευής Μαζικής Αποθήκευσης, κάντε κλικ στο κουμπί "Turnoff USB storage" (Απενεργοποίηση θέσης αποθήκευσης USB) και αποσυνδέστε το καλώδιο USB.
Σημείωση: Δεν απαιτούνται προγράμματα οδήγησης υλικού για την προσπέλαση της μνήμης τουSmartphone Yarvik. Εάν ο υπολογιστής ζητήσει την εγκατάσταση προγραμμάτων οδήγησης, αγνοήστεαπλώς την προτροπή.
Προσπέλαση κάρτας MicroSD

Yarvik smartphone manual
file:///Users/elroy/Desktop/Yarvik/Manual/manual_gr.html[13-02-13 17:05:46]
από την εφαρμογή ES FileExplorer
Εάν εισάγετε μια κάρτα MicroSD στο Smartphone Yarvik, μπορείτε να προσπελάζετε το περιεχόμενό τηςόπως περιγράφεται παρακάτω:
Ανοίξτε την εφαρμογή ES File Explorer και κάντε κλικ στο κουμπί Favorites (Αγαπημένα - αυτό με τοεικονίδιο μπλε αστεριού).
Θα ανοίξει το μενού Favorites (Αγαπημένα). Κάντε κλικ στο εικονίδιο "ρίζας", με την ένδειξη "/":
Θα μεταβείτε στη "ρίζα" του συστήματος αρχείων του smartphone, που περιέχει διάφορα αρχεία καιφακέλους.Εντοπίστε τον φάκελο "mnt" και κάντε κλικ πάνω του:
Θα ανοίξει ο φάκελος "mnt", εμφανίζοντας διάφορους φακέλους:
Ο φάκελος "sdcard" αντιπροσωπεύει την εσωτερική μνήμη του Smartphone Yarvik.Ο φάκελος "sdcard2" αντιπροσωπεύει την κάρτα MicroSD (εφόσον έχει εισαχθεί στην υποδοχή MicroSD τουSmartphone).

Yarvik smartphone manual
file:///Users/elroy/Desktop/Yarvik/Manual/manual_gr.html[13-02-13 17:05:46]
Όταν είναι διαθέσιμη, μπορείτε επίσης να χρησιμοποιείτε τη συντόμευση microsd2 στο μενού Favorites(Αγαπημένα) που αναφέρθηκε παραπάνω για γρήγορη προσπέλαση της κάρτας MicroSD.
Επιστροφή στοευρετήριο
4.7Language &input (Γλώσσα& είσοδος)
Χρησιμοποιήστε την επιλογή “Select language” (Επιλογή γλώσσας) για να επιλέξετε τη γλώσσα για τοπεριεχόμενο που εμφανίζεται στην οθόνη του Smartphone Yarvik. Αυτή η ρύθμιση ισχύει για όλα τα κείμεναπου εμφανίζονται στην οθόνη, σε ολόκληρο το σύστημα.Με την επιλογή “Android keyboard” (Πληκτρολόγιο Android) μπορείτε να διαμορφώσετε το πληκτρολόγιοοθόνης του smartphone.
Επιστροφή στοευρετήριο
4.8Date & time(Ημερομηνία &ώρα)
Εδώ μπορείτε να διαμορφώσετε την ημερομηνία και την ώρα για το Smartphone Yarvik.
Επιστροφή στοευρετήριο
5 Apps(Εφαρμογές)
Το Smartphone Yarvik περιλαμβάνει προ-εγκατεστημένες Εφαρμογές (δείτε παραδείγματα παρακάτω):

Yarvik smartphone manual
file:///Users/elroy/Desktop/Yarvik/Manual/manual_gr.html[13-02-13 17:05:46]
Η μορφή των εικονιδίων των εφαρμογών ενδέχεται να αλλάξει χωρίς προειδοποίηση.
Επιστροφή στοευρετήριο
6 Τηλεφωνήματα
Πραγματοποίηση τηλεφωνημάτωνΓια να κάνετε ένα τηλεφώνημα κλήση με το Smartphone Yarvik, ανοίξτε την εφαρμογή "Phone" (Τηλέφωνο)
από το μενού εφαρμογών ή από την αρχική οθόνη του Android: Χρησιμοποιήστε το αριθμητικό πληκτρολόγιο τηλεφώνου για να εισάγετε τον αριθμό τηλεφώνου.

Yarvik smartphone manual
file:///Users/elroy/Desktop/Yarvik/Manual/manual_gr.html[13-02-13 17:05:46]
Πληκτρολόγιο τηλεφώνου.
Για διεθνή τηλεφωνήματα που απαιτούν το πρόθεμα "+", κρατήστε πατημένο το "0" στο πληκτρολόγιο μέχρινα εμφανιστεί το σύμβολο "+".
Πατήστε το κουμπί χειρισμού κλήσης για να κάνετε το τηλεφώνημα.
Πατήστε το κουμπί χειρισμού κλήσης για να τερματίσετε το τηλεφώνημα.Μπορείτε επίσης να κάνετε τηλεφωνήματα απευθείας από τις επαφές σας, μέσω της εφαρμογής "People"(Άνθρωποι).
Τα πρόσφατα τηλεφωνήματα καταγράφονται στην οθόνη Call Log (Ιστορικό Κλήσεων), η οποία
προσπελάζεται πατώντας το κουμπί Log (Ιστορικό) στην επάνω περιοχή της οθόνης Phone(Τηλέφωνο).Μπορείτε επίσης να προσπελάζετε τις επαφές σας (που είναι καταχωρισμένες στην εφαρμογή "People"(Τηλέφωνο) η οποία αναφέρθηκε παραπάνω) απευθείας από την οθόνη Phone (Τηλέφωνο) πατώντας το
κουμπί .
Εισερχόμενα τηλεφωνήματα
Όταν λάβετε ένα τηλεφώνημα στο Smartphone Yarvik, θα εμφανιστούν 3 επιλογές:
1 - Σύρετε τον κύκλο προς τα επάνω για να αγνοήσετε το εισερχόμενο τηλεφώνημα και να στείλετε ένααυτοματοποιημένο μήνυμα κειμένου.2 - Αγνόηση του εισερχόμενου τηλεφωνήματος.

Yarvik smartphone manual
file:///Users/elroy/Desktop/Yarvik/Manual/manual_gr.html[13-02-13 17:05:46]
3 - Απάντηση στο εισερχόμενο τηλεφώνημα.
Επιλογές κατά τη διάρκεια ενός τηλεφωνήματος
1 - Εμφάνιση του πληκτρολογίου τηλεφώνου (π.χ. για επιλογές σε μενού μέσω τόνων DTMF).2 - Ενεργοποίηση/απενεργοποίηση της λειτουργίας ανοικτής ακρόασης.3 - Απενεργοποίηση (σίγαση) μικροφώνου.4 - Τοποθέτηση του τηλεφωνήματος σε αναμονή.5 - Μενού με περισσότερες επιλογές: προσθήκη νέου συνομιλητή (συνδιάσκεψη) ή ηχογράφηση τουτηλεφωνήματος.
Προώθηση κλήσης
Μπορείτε να διαμορφώσετε τη λειτουργία προώθησης κλήσεων ώστε όλα τα εισερχόμενα τηλεφωνήματα ναπροωθούνται σε κάποιον συγκεκριμένο αριθμό τηλεφώνου.
Στην εφαρμογή "Phone" (Τηλέφωνο) , πατήστε το κουμπί μενού και επιλέξτε "Call settings"(Ρυθμίσεις κλήσης).Επιλέξτε "Voice call" (Φωνητική κλήση) και κατόπιν επιλέξτε "Call forwarding" (Προώθηση κλήσεων) για νααλλάξετε τις επιλογές προώθησης.
Αναγνώριση κλήσης/Αναμονή κλήσης
Η λειτουργία Caller ID (Αναγνώριση κλήσης) του Smartphone Yarvik σας δίνει τη δυνατότητα να επιλέξετεεάν θα αποστέλλεται ο αριθμός σας όταν κάνετε τηλεφωνήματα.
Για να αλλάξετε αυτή την επιλογή, ξεκινήστε την εφαρμογή "Phone" (Τηλέφωνο) , πατήστε το κουμπί
μενού και επιλέξτε "Settings" (Ρυθμίσεις) - "Voice call" (Φωνητική κλήση) - "Additional settings"(Πρόσθετες ρυθμίσεις) - "Caller ID" (Αναγνώριση κλήσης).Στο ίδιο μενού μπορείτε επίσης να ενεργοποιήσετε/απενεργοποιήσετε τη δυνατότητα λήψης εισερχόμενωντηλεφωνημάτων όταν η γραμμή σας είναι κατειλημμένη.
Επιστροφή στο

Yarvik smartphone manual
file:///Users/elroy/Desktop/Yarvik/Manual/manual_gr.html[13-02-13 17:05:46]
ευρετήριο
7 ΑνταλλαγήΜηνυμάτων
Το Smartphone Yarvik έχει δυνατότητα αποστολής μηνυμάτων SMS και MMS. Για πληροφορίες σχετικά μετις πάγιες και τις πρόσθετες χρεώσεις αποστολής μηνυμάτων προς ή από το εξωτερικό, επικοινωνήστε μετον πάροχο κινητής τηλεφωνίας που χρησιμοποιείτε.
Αποστολή μηνυμάτων SMS/MMS
Ανοίξτε την εφαρμογή "Messaging" (Μηνύματα) από την αρχική οθόνη του Android ή από το μενούεφαρμογών.
Εφαρμογή Messaging (Μηνύματα).
1 - Προσθήκη συνημμένων, όπως εικόνες, ήχος και βίντεο. Τα μηνύματα με συνημμένα θεωρούνταιαυτόματα μηνύματα MMS.2 - Μενού ρυθμίσεων μηνυμάτων.3 - Πεδίο παραλήπτη.4 - Προσθήκη παραλήπτη.5 - Σύνοψη επικοινωνίας μέσω μηνυμάτων.6 - Εισαγωγή μηνύματος.7 - Κουμπί αποστολής μηνύματος.

Yarvik smartphone manual
file:///Users/elroy/Desktop/Yarvik/Manual/manual_gr.html[13-02-13 17:05:46]
Ορισμός αριθμού φωνητικού ταχυδρομείου/αναπαραγωγή μηνυμάτων φωνητικού ταχυδρομείουΓια να ορίσετε τον αριθμό της υπηρεσίας φωνητικού ταχυδρομείου στο Smartphone Yarvik, ανοίξτε την
εφαρμογή "Phone" (Τηλέφωνο) από το μενού εφαρμογών ή την αρχική οθόνη του Android:
Κρατήστε πατημένο το κουμπί στο πληκτρολόγιο τηλεφώνου. Στην οθόνη επιλογών θα εμφανιστεί ηεπιλογή "Add number" (Προσθήκη αριθμού). Στις επιλογές Voicemail (Φωνητικό ταχυδρομείο) μπορείτε ναεπιλέξετε ρυθμίσεις για το φωνητικό ταχυδρομείο, καθώς και να εισάγετε τον αριθμό της υπηρεσίαςφωνητικού ταχυδρομείου.Αφού οριστεί ο αριθμός της υπηρεσίας φωνητικού ταχυδρομείου, μπορείτε να συνδέεστε στην προσωπική
σας θυρίδα κρατώντας πατημένο το κουμπί .
Επιστροφή στοευρετήριο
8 ΔήλωσηΕγγύησης
Η Yarvik εγγυάται ότι το προϊόν που αγοράστηκε από τον Πελάτη δεν θα παρουσιάσει ελαττώματαοφειλόμενα στην εργασία και στα υλικά για διάστημα 2 ετών από την ημερομηνία αγοράς του από τονΠελάτη. Εάν, οποιαδήποτε στιγμή κατά τη διάρκεια της εγγύησης, το προϊόν παρουσιάσει κάποιο ελάττωμαοφειλόμενο στην εργασία ή στα υλικά, ο Πελάτης οφείλει να επιστρέψει το προϊόν στον μεταπωλητή από τονοποίο το αγόρασε. Ο Μεταπωλητής θα το επισκευάσει ή θα το αντικαταστήσει (κατά την απόλυτη διακριτικήευχέρεια της Yarvik) εντός εύλογου χρονικού διαστήματος. Ως αποδεικτικό της ημερομηνίας αγοράςαπαιτείται το πρωτότυπο παραστατικό αγοράς. Η γνώμη της Yarvik αναφορικά με αυτό το θέμα θα είναιτελική.
Η εγγύηση δεν καλύπτει ελαττώματα ή προβλήματα λειτουργίας λόγω μεταφοράς λογισμικού, εσφαλμένηςχρήσης, καταχρηστικού χειρισμού, τροποποίησης, αμέλειας, ακατάλληλης χρήσης, ανεπαρκούς προστασίαςή οποιασδήποτε άλλης πράξης εκτός ελέγχου της Yarvik.
ΣΗΜΑΝΤΙΚΟ: Όταν αγοράζετε ένα smartphone από την Yarvik, το smartphone θα σας παραδοθεί με τονεότερο σταθερό firmware για το συγκεκριμένο μοντέλο κατά την περίοδο που κατασκευάστηκε η συσκευή. ΗYarvik δεν παρέχει υποστήριξη για προϊόντα τα οποία τροποποιήθηκαν με οποιονδήποτε τρόπο από τοντελικό χρήστη, ούτε υποστηρίζει προγραμματιστικές τροποποιήσεις του firmware και του λογισμικού πουχρησιμοποιούνται στα προϊόντα της, ενώ εάν γίνουν τέτοιες τροποποιήσεις, όλες οι εγγυήσεις καθίστανταιαυτόματα άκυρες.
Για να αποτραπεί η ακύρωση της προσφερόμενης στο παρόν εγγύησης, ο Πελάτης πρέπει να χρησιμοποιείμόνο επίσημο λογισμικό, εφαρμογές και αναβαθμίσεις, που είναι διαθέσιμα από την τοποθεσία Web τηςYarvik, στη διεύθυνση www.yarvik.com.Δεν πρέπει να χρησιμοποιείται άλλο λογισμικό ή firmware, καθώς αυτό θα ακυρώσει αυτόματα όλες τιςεγγυήσεις και την υποστήριξη. Η Yarvik δεν υποστηρίζει τη χρήση οποιουδήποτε λογισμικού ή firmwareεκτός του λογισμικού ή του firmware που εγκαταστάθηκε στο προϊόν από τον κατασκευαστή ή είναι διαθέσιμοαπό την επίσημη τοποθεσία Web της Yarvik, www.yarvik.com. Η Yarvik δηλώνει ρητά ότι δεν θα αποκρίνεταισε οποιαδήποτε αιτήματα σχετικά με τροποποιήσεις που έγιναν χωρίς εξουσιοδότηση, καθώς και σχετικά με

Yarvik smartphone manual
file:///Users/elroy/Desktop/Yarvik/Manual/manual_gr.html[13-02-13 17:05:46]
λογισμικό και firmware που χρησιμοποιείται χωρίς εξουσιοδότηση.
Επιστροφή στοευρετήριο
9ΠληροφορίεςΑδειοδότησηςGNU/GPL
Για περισσότερες πληροφορίες, συμβουλευτείτε τις νομικές πληροφορίες που είναι διαθέσιμες στοSmartphone Yarvik επιλέγοντας Settings (Ρυθμίσεις) – About Smartphone (Σχετικά με το Smartphone) –Legal information (Νομικές πληροφορίες) (απαιτείται σύνδεση στο Internet) ή επισκεφτείτε την τοποθεσίαhttp://source.android.com/source/licenses.html.
Επιστροφή στοευρετήριο
10 ImportantInformation
Wireless LAN-Regulatory information
Depending on the model, the wireless LAN built-in into Smartphone devices can only be used in thefollowing countries: Austria, Belgium, Bulgaria, Czech Republic, Denmark, Finland, France, Germany,Greece, Hungary, Iceland, Ireland, Italy, Luxembourg, the Netherlands, Norway, Poland, Portugal, Romania,Slovakia, Slovenia, Spain, Sweden, Switzerland, Turkey and the United Kingdom.
Conditions of use
When using the IEEE 802.11b/g/n Wireless LAN standard, channels 1 to 13 (2.4 GHz...2.4835 GHz) areselectable for both indoor and outdoor use, however with restrictive conditions applying in France, Italy andNorway, as follows:
• France: When using this product indoor, all channels can be used without restrictions. Outdoor onlychannels 1 to 6 are allowed. This means that in Peer-to-Peer, the WLAN feature can only be used outside ifthe peer sets up the communication on an authorized channel (i.e., between 1 & 6). In infrastructure mode,please make sure the access point is configured to a channel from 1 to 6 before setting up the connection.
• Italy: Use of the RLAN network is governed: Disposal of Old Electrical & Electronic- with respect to private use, by the Legislative Decree of 1.8.2003, no. 259 (“Code of ElectronicCommunications”). In particular Article 104 indicates when the prior obtainment of a general authorization isrequired and Art. 105 indicates when free use is permitted;- with respect to the supply to the public of the WLAN access to telecom networks and services, by theMinisterial Decree 28.5.2003, as amended, and Art. 25 (general authorization for electronic communications
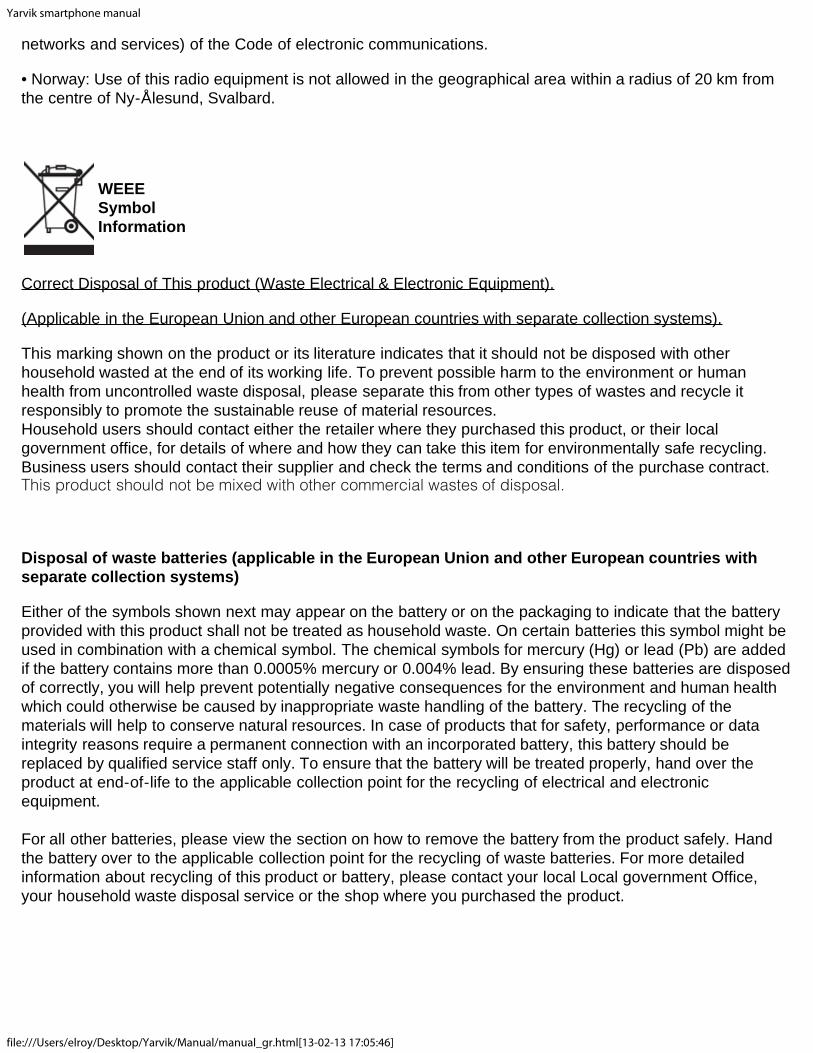
Yarvik smartphone manual
file:///Users/elroy/Desktop/Yarvik/Manual/manual_gr.html[13-02-13 17:05:46]
networks and services) of the Code of electronic communications.
• Norway: Use of this radio equipment is not allowed in the geographical area within a radius of 20 km fromthe centre of Ny-Ålesund, Svalbard.
WEEESymbolInformation
Correct Disposal of This product (Waste Electrical & Electronic Equipment).
(Applicable in the European Union and other European countries with separate collection systems).
This marking shown on the product or its literature indicates that it should not be disposed with otherhousehold wasted at the end of its working life. To prevent possible harm to the environment or humanhealth from uncontrolled waste disposal, please separate this from other types of wastes and recycle itresponsibly to promote the sustainable reuse of material resources.Household users should contact either the retailer where they purchased this product, or their localgovernment office, for details of where and how they can take this item for environmentally safe recycling.Business users should contact their supplier and check the terms and conditions of the purchase contract.This product should not be mixed with other commercial wastes of disposal.
Disposal of waste batteries (applicable in the European Union and other European countries withseparate collection systems)
Either of the symbols shown next may appear on the battery or on the packaging to indicate that the batteryprovided with this product shall not be treated as household waste. On certain batteries this symbol might beused in combination with a chemical symbol. The chemical symbols for mercury (Hg) or lead (Pb) are addedif the battery contains more than 0.0005% mercury or 0.004% lead. By ensuring these batteries are disposedof correctly, you will help prevent potentially negative consequences for the environment and human healthwhich could otherwise be caused by inappropriate waste handling of the battery. The recycling of thematerials will help to conserve natural resources. In case of products that for safety, performance or dataintegrity reasons require a permanent connection with an incorporated battery, this battery should bereplaced by qualified service staff only. To ensure that the battery will be treated properly, hand over theproduct at end-of-life to the applicable collection point for the recycling of electrical and electronicequipment.
For all other batteries, please view the section on how to remove the battery from the product safely. Handthe battery over to the applicable collection point for the recycling of waste batteries. For more detailedinformation about recycling of this product or battery, please contact your local Local government Office,your household waste disposal service or the shop where you purchased the product.

Yarvik smartphone manual
file:///Users/elroy/Desktop/Yarvik/Manual/manual_gr.html[13-02-13 17:05:46]
When travelling to and within the United States of America, please be aware that the U.S. Department ofTransportation (DOT) recently published new regulations that apply to passengers travelling with lithiummetal batteries and lithium-ion batteries.For detailed information, visit http://safetravel.dot.gov/whats_new_batteries.html.
Safety Information
Yarvik Smartphone device
• Yarvik is not responsible for any interference that you may experience or that may be caused whenoperating this device.
• Warning: This apparatus must be earthed.
Opening or dismantling the main unit or any of its accessories, for whatever reason, could lead to damagesthat are not covered by the guarantee.
• To avoid electrical shock, do not open the cabinet. Refer servicing to qualified personnel only.
• To prevent fire or shock hazard, do not expose your Smartphone device or any of its accessories to rain ormoisture.
• Do not use or store your Smartphone device in a location subject to heat sources, such as radiators or airducts; direct sunlight; excessive dust; moisture or rain; mechanical vibration or shock; strong magnets orspeakers that are not magnetically shielded; excessively high and low temperatures; and high humidity.
• Turning off your Smartphone device with the power button does not disconnect the device completely frommains voltage. To disconnect it completely, unplug the AC adapter or the power cord from mains. Thesocket-outlet shall be installed near the equipment and shall be easily accessible.
• Audio and picture distortion may occur if this equipment is positioned in close proximity to any equipmentemitting electromagnetic radiation.
• This apparatus is also designed for IT power system with phase to phase voltage 230V, for customers inNorway.
• Observe the following precautions to provide adequate air circulation and to ensure normal reliableoperation:- Do not use the Smartphone device and/or the AC adapter while covered or wrapped in cloth. Ensure theAC adapter operates in a clear environment.- Turn off the Smartphone device before putting the device into a bag or a carrying case.
• Do not use your Smartphone device directly on your lap. The temperature of the base of the unit will riseduring normal operation and over time could result in discomfort or burns.

Yarvik smartphone manual
file:///Users/elroy/Desktop/Yarvik/Manual/manual_gr.html[13-02-13 17:05:46]
• Do not use your Smartphone device while walking. Listening to music with headphones or watching theLCD screen while walking may lead to an unexpected accident and result in personal injuries.
• Using connected headphones on the Smartphone device for too long and/or setting the audio volume uptoo high when using headphones may cause serious hearing damage.
• Avoid strong beating of or to the product.
• Don’t operate the touch screen of the Smartphone device with sharp objects, as this may result inscratching the screen surface.
• Only use permitted batteries, chargers and accessories with your Smartphone device. The use of any otherproducts with the device can be dangerous and may violate the warranty regulations.
• Only use a slightly wet cotton cloth to clean the device, and only use water to wetten the cotton cloth. TheSmartphone device should not be cleaned with any sort of (glass) cleaning aid.
Wireless functionality
• If radio interference with other devices occurs while using your Smartphone device, do not use the wirelessfunctionality. Use of the wireless functionality may cause a malfunction of the devices, resulting in anaccident.
• In some situations or environments, the use of the wireless functionality might be restricted by theproprietor of the building or responsible representatives of the organization, for example on board airplanes,in hospitals or in any other environment where the risk of interference with other devices or services isperceived or identified as harmful. If you are uncertain about the policy applying to the use of wirelessfunctionality in a specific organization or environment, you are encouraged to first ask for authorization priorto switching it on. Consult your physician or the manufacturer of personal medical devices (pacemakers,hearing aids, etc.) regarding any restrictions on the use of wireless functionality.
• If using wireless functionality near a pacemaker, make sure it is at least 19 inches / 50 cm away from thepacemaker.
• Due to the transmission and reception properties of wireless communications, data can occasionally be lostor delayed. This can be due to the variation in radio signal strength that results from changes in thecharacteristics of the radio transmission path. Yarvik will not be held responsible for damages of any kindresulting from the delays or errors in data transmitted or received via wireless functionality, or failure ofwireless functionality to transmit or receive such data.
• If the equipment does cause harmful interference to radio/TV reception, which can be determined by turningthe equipment off and on, the user is encouraged to try to correct the interference by one or more of thefollowing measures: reorient or relocate the receiving antenna, increase the distance between the senderand the receiver, consult the dealer or an experienced radio/TV technician for help. Yarvik will not beresponsible for any radio/TV interference nor for any other undesired effect.
Wireless LAN Security
Creating security settings for the Wireless LAN is extremely important. Yarvik assumes no responsibility for

Yarvik smartphone manual
file:///Users/elroy/Desktop/Yarvik/Manual/manual_gr.html[13-02-13 17:05:46]
any security problems that may arise from the use of the Wireless LAN.
Battery pack
Do not charge the battery pack in any way other than as described in the Start guide or as designated byYarvik in writing.
AC adapter
• It is highly recommended that you use a genuine Yarvik AC adapter supplied by Yarvik for your product.
• This AC adapter is intended for use with the Smartphone device IT products only.
• Do not place the AC adapter in contact with your skin. Remove the AC adapter away from your body if itbecomes warm and causes discomfort.
RoHS
This products has been certified as RoHS Compliant.
YARVIK.COM
Επιστροφή στοευρετήριο