zenith_12-xp
TRANSCRIPT
8/6/2019 zenith_12-xp
http://slidepdf.com/reader/full/zenith12-xp 1/13
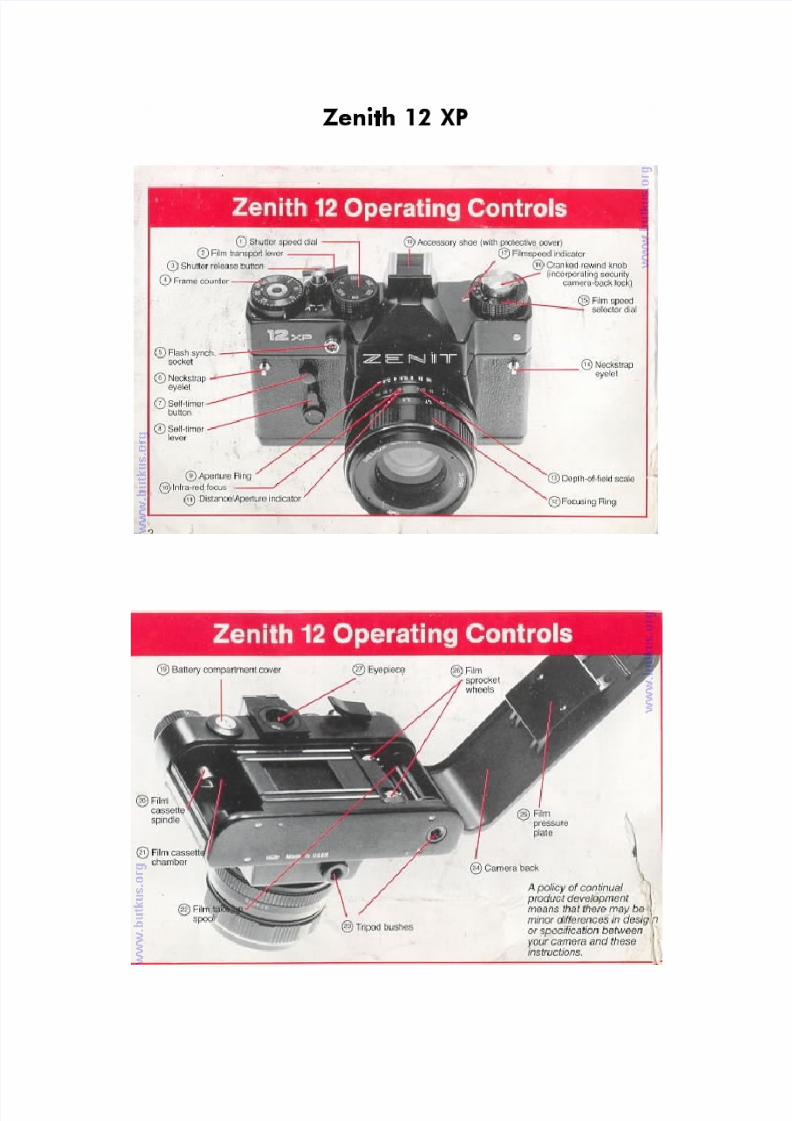
Zenith 12 XP

8/6/2019 zenith_12-xp
http://slidepdf.com/reader/full/zenith12-xp 2/13
To get the best results from your Zenith study these instructions thoroughly to makesure you are familiar with the essential features of the camera before you starttaking pictures. It is suggested that before loading the first film you sit down withthe instructions in front of you and try out all the controls to generally 'get the feel'of the camera. It is also recommended that a 'test' film be shot and the resultsexamined before taking further pictures. This will enable any early operator errors
to be corrected and will give you confidence for the future.
As a 'system' camera your Zenith will accept a large number of different lenses andadditional accessories; we particularly recommend as most suitable those from theHellos range which will enable you to cope with almost any photographic situation.
Your Zenith is sturdily built to work happily under widely varying conditions but itshould always be remembered that as a precision optical instrument it must at alltimes be treated with due care and consideration and protected from shock, damp,dust, sand and sudden changes of temperature. With care it will give many years of reliable service - and ; brilliant pictures.
This booklet has been provided to enable you to get the best results as quickly aspossible and is not intended to be a comprehensive manual of photography. Thereare many good inexpensive books on photographic technique available and your dealer will be pleased to recommend one suitable for your particular need.
Format: 24 x 36mm;using standard 35mm cassettes of 12, 20, 24 or 36 exposurecolor or black and white film.
Shutter: Horizontal traveling Focal Plane type, speeded 1/30,1/60,1/125, 1/250and 1/500th second plus B (brief time). Linked to self-timer giving approximately 7
seconds delay.Flash Synchronization: Electronic flash at 1/30th sec. through 'Hot-shoe' or standard 3mm co-axial socket
Viewing/Focusing system: Eye-level pentaprism/instant return mirror shows uprightlaterally correct image. Bright Fresnel focusing screen with central microprism spot. 4
Exposure meter: Zenith 12. Built-in CdS cell with L.E.D. indicators in the viewfinder.
Power source: two Mallory D386 cells. (These should be replaced once a year.) Zenith 11 Selenium cell with match-needle read out. Both meters calibrated for 16-500 ASA/13-28 DIN. 4
Frame counter: Additive 0-36 manual resetting type
Standard Lens: Helio 44M-4, 58mm focal lengthConstruction: 6 elements in 4 groupsDiaphragm type: Fully automatic instantly re-open.
Aperture range F2-F16 with click stops at full and half apertures (except betweenF11 and F16)Distance scale: 0.5 to infinity Filter size: 52mm screw Lens mount: 42mm thread, accepts standard single pin automatic lenses andaccessories

8/6/2019 zenith_12-xp
http://slidepdf.com/reader/full/zenith12-xp 3/13
Loading the Camera - Step by step instructions
Always load the camera in subdued light; if outdoorsshield from direct sunlight.
Make sure that the indicator on the Shutter Release Button[3] is facing towards the front of the camera.
Depress Shutter Release Button [3] - if shutter does not fire
advance Transport Lever [2] in short strokes until it stopsand press Shutter Release Button [3] again.
Lift Rewind Knob [16] to open back.
Insert film cassette into Film Chamber [21] projection of cassette to bottom.Push Rewind Knob [16] down turning slightly to seat intocassette.Draw out enough film to insert tip of leader into any of
Take-up Spool's

8/6/2019 zenith_12-xp
http://slidepdf.com/reader/full/zenith12-xp 4/13
[22] slots ensuring that the second hole engages with atooth on the spool. Ease film forward by swat strokes of Transport Lever [2] until it stops. The lower Sprocket Teeth[26] should be properly engaged.
Fire shutter. Advance film by short strokes of transportlever until both top and bottom sprockets are engaged. If necessary tighten film on Take-up Spool [22] by turningthe flange at the base of the spool anti-clockwise with thefinger and in the cassette by gently turning the RewindKnob [16] in the direction of the arrow on the lever untilresistance is felt. This is especially necessary with twelve
exposure films.
Close the back of the camera until it clicks shut. Complete wind-on if necessary until Transport Lever [2] stops.
Fire shutter. Advance film Transport Lever [2] using shortstrokes until it stops. The Rewind Knob [16] should revolve
while this is being done.
Fire shutter and advance film again. Set Frame Counter [4]to zero.
Set Film Speed Selector Dial [15] against Indicator [17]appropriate to the speed of the film to be used. There aretwo scales for films rated in ASA and DIN. Only click-stopped numbered or intermediate positions may be used.Intermediate positions are proportional. If using 1000 ASA film set the selector to 500 ASA but use the next faster shutter speed than indicated by the meter or close the
aperture ring by one full stop.

8/6/2019 zenith_12-xp
http://slidepdf.com/reader/full/zenith12-xp 5/13
Using the Camera
Set the Speed Dial [1 ] appropriately according to thesubject. The dial is marked in figures that represent
fractions of a second-i.e. "60" is 1/60th second. It may beturned in either direction but not between "500" and "B"and must not be between marked speeds.
Initially we suggest that outdoors the speed set should notbe less than 1/125th sec.
Focusing. Look through the Viewfinder [27] and roughly decide what you wish to take remembering you areactually looking through the lens. Focus by turning the
Focusing Ring [11] clockwise for close and anti-clockwisefor far distance until the subject is sharp and clear on thelarge viewing screen.
For critical focusing using the inner of the two rings in thecenter and adjust until the image is clear and undistorted.Since you are viewing and focusing through the actual lensthat takes the finished picture you can feel safe in theknowledge that there will be no parallax problems (no
more cut-off heads in close-up
portraits and the like). There's a built-in safety margin of course, in common with many other modern single lensreflex cameras, the viewfinder showing an overall areasomewhat smaller than the total film area. this ensuresthat everything you see in the viewfinder appears in thefinished picture despite the fact that slide mounts andmasks in printing equipment cover part of the film's image.
8/6/2019 zenith_12-xp
http://slidepdf.com/reader/full/zenith12-xp 6/13
Depth of Field
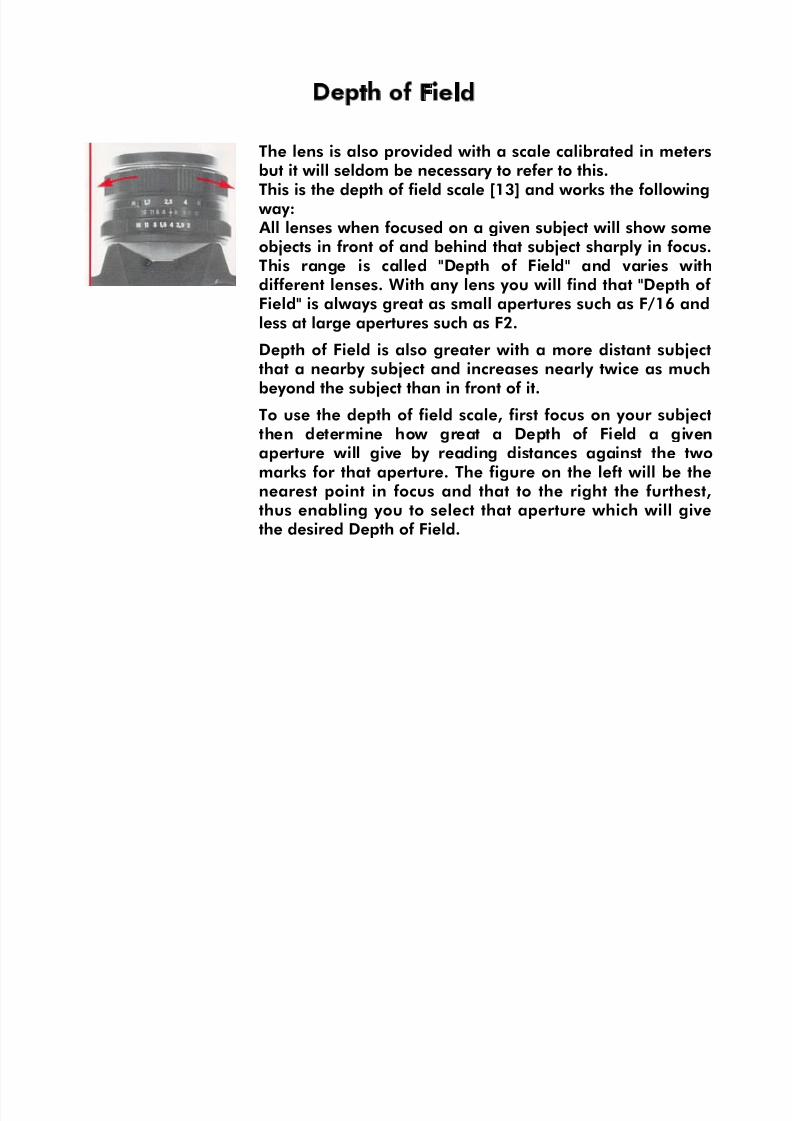
The lens is also provided with a scale calibrated in metersbut it will seldom be necessary to refer to this.
This is the depth of field scale [13] and works the following way: All lenses when focused on a given subject will show someobjects in front of and behind that subject sharply in focus.This range is called "Depth of Field" and varies withdifferent lenses. With any lens you will find that "Depth of Field" is always great as small apertures such as F/16 andless at large apertures such as F2.
Depth of Field is also greater with a more distant subjectthat a nearby subject and increases nearly twice as much
beyond the subject than in front of it.To use the depth of field scale, first focus on your subjectthen determine how great a Depth of Field a givenaperture will give by reading distances against the twomarks for that aperture. The figure on the left will be thenearest point in focus and that to the right the furthest,thus enabling you to select that aperture which will givethe desired Depth of Field.
8/6/2019 zenith_12-xp
http://slidepdf.com/reader/full/zenith12-xp 7/13
Using the meter
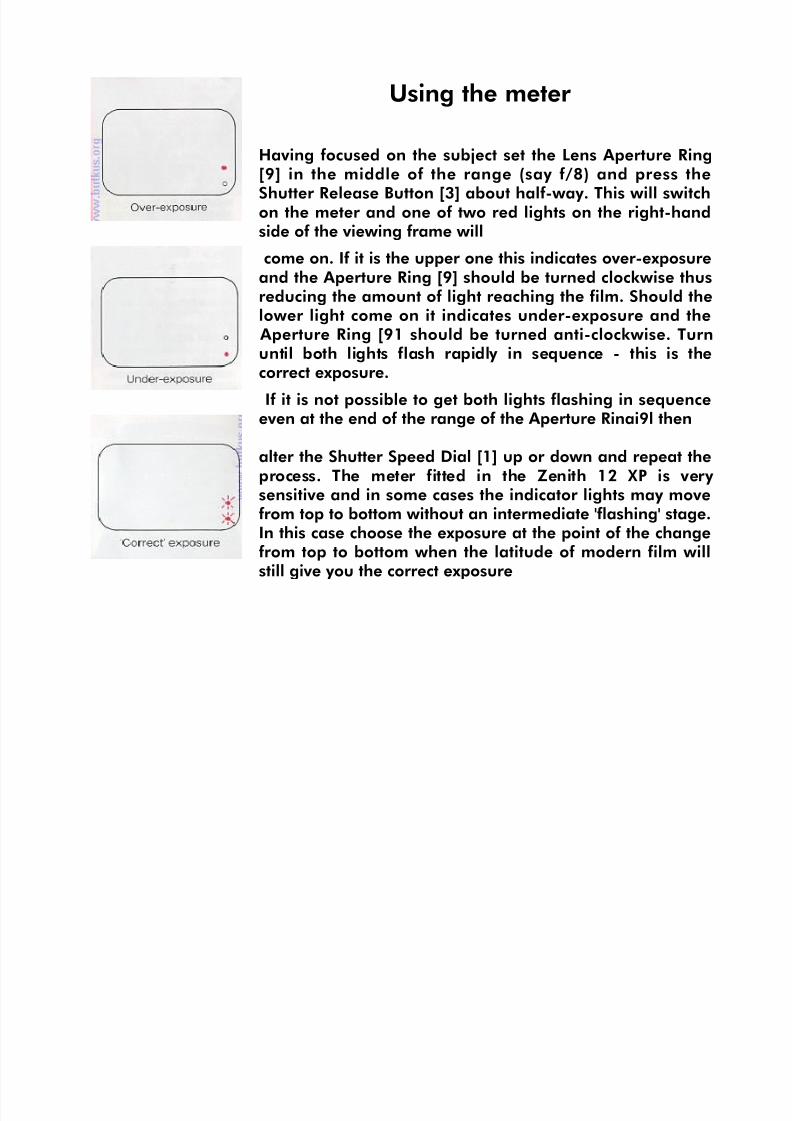
Having focused on the subject set the Lens Aperture Ring[9] in the middle of the range (say f/8) and press the
Shutter Release Button [3] about half-way. This will switchon the meter and one of two red lights on the right-handside of the viewing frame will
come on. If it is the upper one this indicates over-exposureand the Aperture Ring [9] should be turned clockwise thusreducing the amount of light reaching the film. Should thelower light come on it indicates under-exposure and the
Aperture Ring [91 should be turned anti-clockwise. Turnuntil both lights flash rapidly in sequence - this is thecorrect exposure.
If it is not possible to get both lights flashing in sequenceeven at the end of the range of the Aperture Rinai9l then
alter the Shutter Speed Dial [1] up or down and repeat theprocess. The meter fitted in the Zenith 12 XP is very sensitive and in some cases the indicator lights may movefrom top to bottom without an intermediate 'flashing' stage.In this case choose the exposure at the point of the changefrom top to bottom when the latitude of modern film willstill give you the correct exposure
8/6/2019 zenith_12-xp
http://slidepdf.com/reader/full/zenith12-xp 8/13
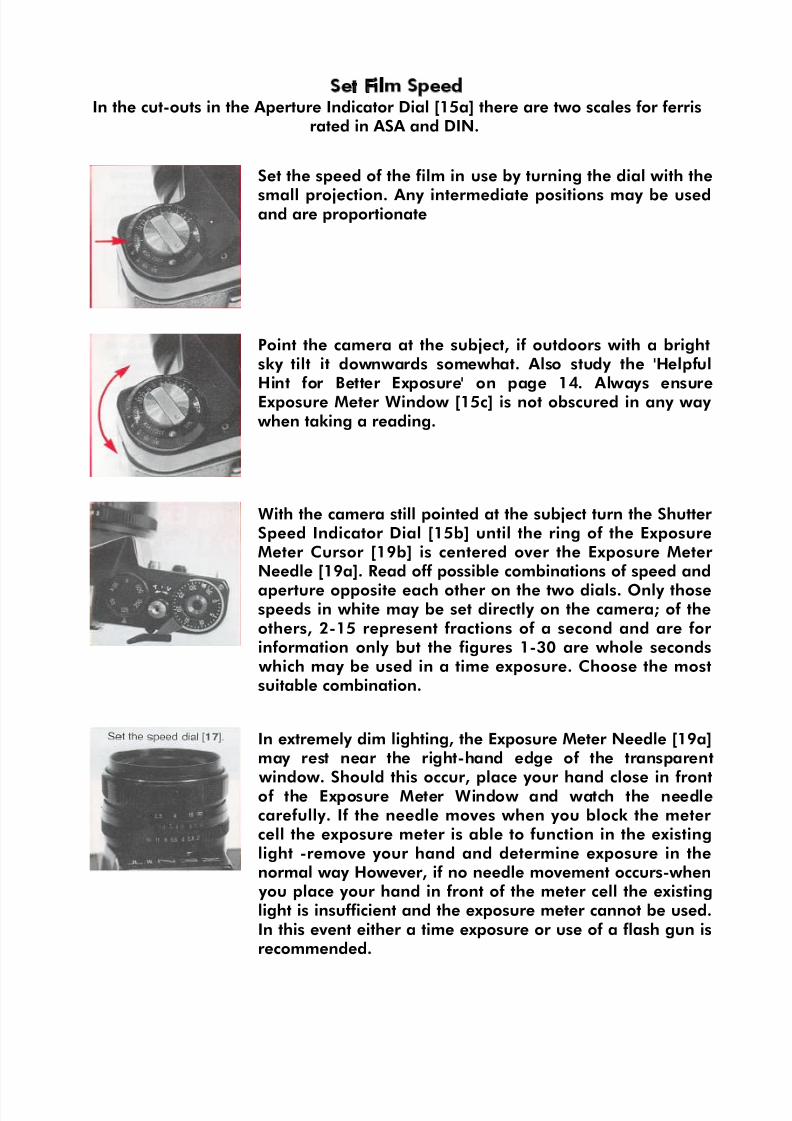
Set Film SpeedIn the cut-outs in the Aperture Indicator Dial [15a] there are two scales for ferris
rated in ASA and DIN.
Set the speed of the film in use by turning the dial with the
small projection. Any intermediate positions may be usedand are proportionate
Point the camera at the subject, if outdoors with a brightsky tilt it downwards somewhat. Also study the 'HelpfulHint for Better Exposure' on page 14. Always ensureExposure Meter Window [15c] is not obscured in any way
when taking a reading.
With the camera still pointed at the subject turn the Shutter Speed Indicator Dial [15b] until the ring of the ExposureMeter Cursor [19b] is centered over the Exposure Meter Needle [19a]. Read off possible combinations of speed and
aperture opposite each other on the two dials. Only thosespeeds in white may be set directly on the camera; of theothers, 2-15 represent fractions of a second and are for information only but the figures 1-30 are whole seconds
which may be used in a time exposure. Choose the mostsuitable combination.
In extremely dim lighting, the Exposure Meter Needle [19a]may rest near the right-hand edge of the transparent
window. Should this occur, place your hand close in frontof the Exposure Meter Window and watch the needlecarefully. If the needle moves when you block the meter cell the exposure meter is able to function in the existinglight -remove your hand and determine exposure in thenormal way However, if no needle movement occurs-when
you place your hand in front of the meter cell the existinglight is insufficient and the exposure meter cannot be used.In this event either a time exposure or use of a flash gun isrecommended.
8/6/2019 zenith_12-xp
http://slidepdf.com/reader/full/zenith12-xp 9/13
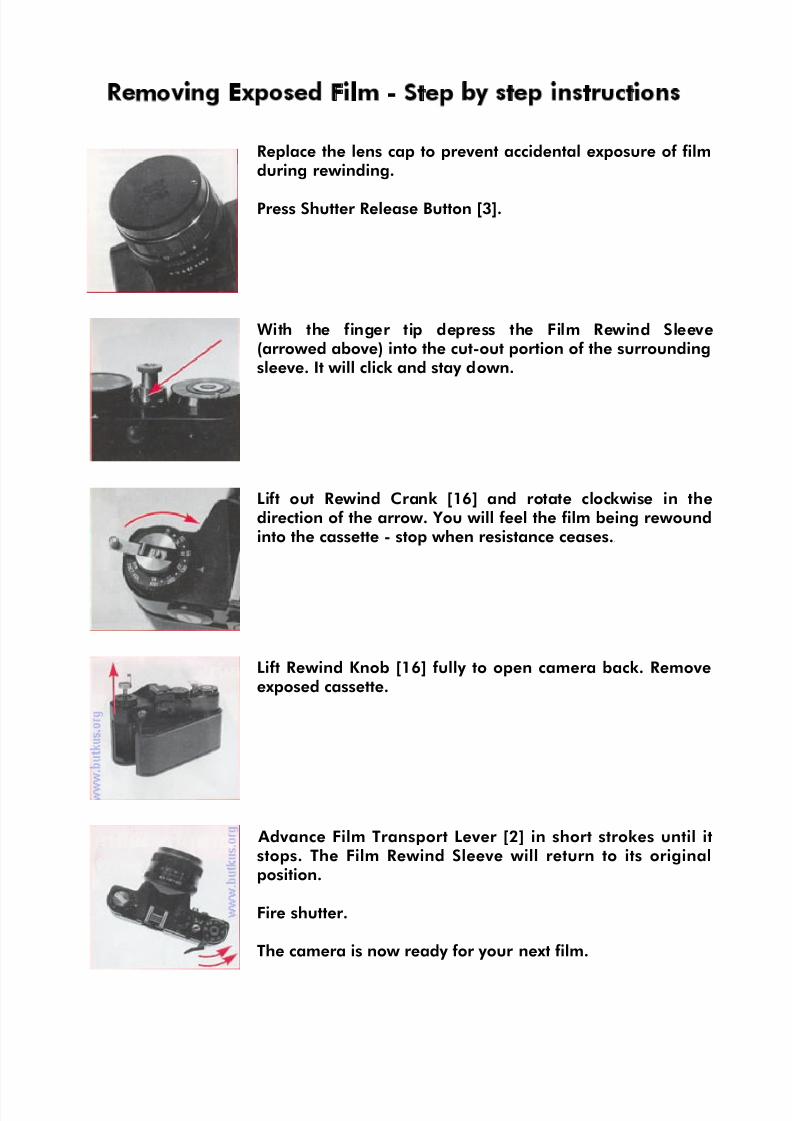
Removing Exposed Film - Step by step instructions
Replace the lens cap to prevent accidental exposure of filmduring rewinding.
Press Shutter Release Button [3].
With the finger tip depress the Film Rewind Sleeve(arrowed above) into the cut-out portion of the surroundingsleeve. It will click and stay down.
Lift out Rewind Crank [16] and rotate clockwise in thedirection of the arrow. You will feel the film being rewoundinto the cassette - stop when resistance ceases.4
Lift Rewind Knob [16] fully to open camera back. Removeexposed cassette.
Advance Film Transport Lever [2] in short strokes until itstops. The Film Rewind Sleeve will return to its originalposition.
Fire shutter.
The camera is now ready for your next film.

8/6/2019 zenith_12-xp
http://slidepdf.com/reader/full/zenith12-xp 10/13
Photography with Flash
The meter cannot be used when taking flash pictures as theburst of light is too short. In all cases the Speed Dial [1]must be set to, "30-X", the aperture being determined by
the camera-to-subject distance. Tables or calculators for this are given in the instructions for the flashgun oftenbeing incorporated into the gun itself. Some flashguns havebuilt-in computers which allow the aperture to be left atone setting regardless of camera-to-subject distance.
Set the Speed Dial to "30-X".
Remove square shield from Accessory Shoe [18] and put in
a safe place.
A lightweight compact gun may be slid into the accessory shoe. If there is a lead connect the plug to Flash Sync.Socket [5].
A large or heavy gun must be fitted to a flash bracketscrewed into one of the Tripod Bushes [23] on the camerabase. Connect the lead to the Flash Sync. Socket [5].
Set Aperture Ring [9] in accordance with the flashgun'sinstructions.
Switch gun on, wait for "ready" light, focus and proceed.
Remember to replace the accessory shoe cover after removing gun.

8/6/2019 zenith_12-xp
http://slidepdf.com/reader/full/zenith12-xp 11/13
For exposures longer than the meter range (1/30th at f/2)the "B" setting on the Speed Dial [1] must be used. Theexposure should be determined by using a hand-heldmeter such as the Leningrad or by experience/estimation.
Although the camera may be rested on a firm surface thebest results will be obtained by the use of a tripod butavoid those of a flimsy nature. A Hellos Tripod or HellosMini-Tripod (illustrated) is ideal.
Set the Speed Dial to "B"
Set the Aperture Ring [9]. Focus and cock shutter by advancing Film Transport Lever [2] in short strokes until itstops.
Fit a short cable release (obtainable from any good dealer)into the screwed portion of the camera's Shutter ReleaseButton [3]. Depress the cable release and the shutter willstay open until pressure is released. Some cable releaseshave a screw lock which avoids the need for holding itduring a lengthy exposure.
If you do not have a cable release depress the camera'sShutter Release Button until the shutter opens and turn itfully anti-clockwise to the "T" position. The shutter willremain open until the button is returned to the normalposition. We recommend the use of a cable release wherepossible as this will reduce the chance of "camera shake"during the exposure.

8/6/2019 zenith_12-xp
http://slidepdf.com/reader/full/zenith12-xp 12/13
The Self Timer [7j provides about a seven second delay inthe firing of the shutter and enables you to get into thepicture yourself. Flash can be used.
Place camera preferably on a tripod, otherwise on a firmsurface.
Set speed and aperture. Frame area In Viewfinder [27j andfocus. Cock Shutter by advancing Film Transport Lever [2]in short strokes until it stops.
Depress Shutter Release button [3] halfway until lens closesdown and turn it fully clockwise to the "V" position.
IMPORTANT- Do not leave the Shutter Release locked in the'V' position longer than necessary in order to minimizebattery drain.
Turn the Self-Timer Lever [8] down until it will go nofurther. The "V" that is revealed is just a reminder that youshould have set the Release Button [3] to its "V" position.
Press the Self-Timer Release Button p1 and move into thepicture area as quickly as possible. The Lever [8] will slowly return firing the shutter during its travel.

8/6/2019 zenith_12-xp
http://slidepdf.com/reader/full/zenith12-xp 13/13
Changing the Batteries
The Meter is powered by two Mallory D386 cells whichshould be changed every twelve months.
To remove. Place coin in slot of Battery Cover [19] and turnanticlockwise until slot is horizontal. Remove cover and oldbatteries
Fit two new batteries both with "+" outwards. Replacebattery cover with slot horizontal locating the two cover arms in the camera body slots. With a coin edge pushinwards and turn to lock in vertical position.
Use a clean linen cloth when handling batteries -the greasefrom bare fingers can adversely affect the electrical
contacts.
To extend the range of your photography
. . . many accessories are available from your dealer suitable for your Zenith including an exciting range under the Hellos name.
Alternative Lenses.The Zenith lens has a 42mm screw mount and may beremoved from the camera body by grasping the whole lensbarrel and fuming it anticlockwise. Other 42mm screw lenses of a different focal length may then be fittedproviding they are of the single-pin operating type.
Lenses may be interchanged at any point without losing any
frames.4 In the Hellos range specially computed to suit theZenith - are Wide-angle 28mm and 1 35mm Telephotolenses, together with a range of Zoom Lenses some withMacro or Close-Focusing facility.From the USSR come the well-known Mirror Lenses, MTO3M5A and MTO 1 000A. All lenses (except Mirror type)operate in the same way as the standard lens.