zoom 707ii
TRANSCRIPT

Operation Manual
CONTENTSUSAGE AND SAFETY PRECAUTIONS • • • • • • • • • • • • • • • • • • • • • • • • • • • • 2Introduction • • • • • • • • • • • • • • • • • • • • • • • • • • • • • • • • • • • • • • • • • • • • • • • • • • • • • • • • • 3Controls and Functions • • • • • • • • • • • • • • • • • • • • • • • • • • • • • • • • • • • • • • • • • • • • 4
Top Panel • • • • • • • • • • • • • • • • • • • • • • • • • • • • • • • • • • • • • • • • • • • • • • • • • • • • • • • • • • • 4Rear Panel • • • • • • • • • • • • • • • • • • • • • • • • • • • • • • • • • • • • • • • • • • • • • • • • • • • • • • • • • • 4
Preparations • • • • • • • • • • • • • • • • • • • • • • • • • • • • • • • • • • • • • • • • • • • • • • • • • • • • • • • • 6Inserting Batteries and a SmartMedia card • • • • • • • • • • • • • • • • • • • • • • • • • • • 6Getting Connected • • • • • • • • • • • • • • • • • • • • • • • • • • • • • • • • • • • • • • • • • • • • • • • • • • 7
Quick Guide (Let's Play) • • • • • • • • • • • • • • • • • • • • • • • • • • • • • • • • • • • • • • • • • • • 8Listening to Patches (Play Mode Operation) • • • • • • • • • • • • • • • • • • • • 10
Panel Display in Play Mode • • • • • • • • • • • • • • • • • • • • • • • • • • • • • • • • • • • • • • • • • 10Selecting a Patch • • • • • • • • • • • • • • • • • • • • • • • • • • • • • • • • • • • • • • • • • • • • • • • • • • 10Using the Tuner Function • • • • • • • • • • • • • • • • • • • • • • • • • • • • • • • • • • • • • • • • • • 11Using the Easy Edit Function • • • • • • • • • • • • • • • • • • • • • • • • • • • • • • • • • • • • • • • 12Using the Sampler Function • • • • • • • • • • • • • • • • • • • • • • • • • • • • • • • • • • • • • • • • 13Using the Rhythm Function • • • • • • • • • • • • • • • • • • • • • • • • • • • • • • • • • • • • • • • • 16
Changing the Sound of a Patch (Edit Mode) • • • • • • • • • • • • • • • • • • • • 18Patch Configuration • • • • • • • • • • • • • • • • • • • • • • • • • • • • • • • • • • • • • • • • • • • • • • • • 18Basic Edit Mode Steps • • • • • • • • • • • • • • • • • • • • • • • • • • • • • • • • • • • • • • • • • • • • • 18Storing and Swapping Patches • • • • • • • • • • • • • • • • • • • • • • • • • • • • • • • • • • • • • 20
Other Functions • • • • • • • • • • • • • • • • • • • • • • • • • • • • • • • • • • • • • • • • • • • • • • • • • • • 21Using the Hold Delay Function • • • • • • • • • • • • • • • • • • • • • • • • • • • • • • • • • • • • • 21Changing the Patch Call Method • • • • • • • • • • • • • • • • • • • • • • • • • • • • • • • • • • • 23Using the Pedal to Control an Effect • • • • • • • • • • • • • • • • • • • • • • • • • • • • • • • • • 23Adjusting the Expression Pedal • • • • • • • • • • • • • • • • • • • • • • • • • • • • • • • • • • • • • 25Storing Rhythm Patterns and Samples as Part of a Patch • • • • • • • • • • • • 26
Assigning a rhythm pattern to a patch • • • • • • • • • • • • • • • • • • • • • • • • • • • • • • • • 26Assigning a sample to a patch • • • • • • • • • • • • • • • • • • • • • • • • • • • • • • • • • • • • • • • 27
Using a SmartMedia card (Utility Mode) • • • • • • • • • • • • • • • • • • • • • • • • • • • • • 28Basic utility mode operation steps • • • • • • • • • • • • • • • • • • • • • • • • • • • • • • • • • • • 28Utility mode functions • • • • • • • • • • • • • • • • • • • • • • • • • • • • • • • • • • • • • • • • • • • • 29
All Initialize/Factory Recall • • • • • • • • • • • • • • • • • • • • • • • • • • • • • • • • • • • • • • • • • • 32
Effect Types and Parameters • • • • • • • • • • • • • • • • • • • • • • • • • • • • • • • • • • • • 33BOOSTER Module • • • • • • • • • • • • • • • • • • • • • • • • • • • • • • • • • • • • • • • • • • • • • • • • • 33ISOLATOR/COMP (Isolator/Compressor) Module • • • • • • • • • • • • • • • • • • • • 33DRIVE Module • • • • • • • • • • • • • • • • • • • • • • • • • • • • • • • • • • • • • • • • • • • • • • • • • • • • • 33EQ (Equalizer) Module • • • • • • • • • • • • • • • • • • • • • • • • • • • • • • • • • • • • • • • • • • • • • • 34ZNR/D GATE (ZOOM Noise Reduction/D Gate) Module • • • • • • • • • • • • • • 35CABINET Module • • • • • • • • • • • • • • • • • • • • • • • • • • • • • • • • • • • • • • • • • • • • • • • • • • 35MODULATION Module • • • • • • • • • • • • • • • • • • • • • • • • • • • • • • • • • • • • • • • • • • • • • 35DLY/REV (Delay/Reverb) Module • • • • • • • • • • • • • • • • • • • • • • • • • • • • • • • • • • • 37TOTAL Module • • • • • • • • • • • • • • • • • • • • • • • • • • • • • • • • • • • • • • • • • • • • • • • • • • • • • 38
Troubleshooting • • • • • • • • • • • • • • • • • • • • • • • • • • • • • • • • • • • • • • • • • • • • • • • • • • • 39Specifications • • • • • • • • • • • • • • • • • • • • • • • • • • • • • • • • • • • • • • • • • • • • • • • • • • • • • 39
Patch List • • • • • • • • • • • • • • • • • • • • • • • • • • • • • • • • • • • • • • • • • • • • • • • • • • • • • • • • • 40
US
AG
EA
ND
SA
FETYP
REC
AU
TION
S
USAGE AND SAFETY PRECAUTIONS
2 ZOOM 707II GUITAR
In this manual, symbols are used to highlight warnings andcautions for you to read so that accidents can be prevented.The meanings of these symbols are as follows:
Please observe the following safety tips and precautions toensure hazard-free use of the 707II.
• Power requirements
Since power consumption of this unit is fairly high, werecommend the use of an AC adapter whenever possible.When powering the unit from a battery, use only an alkalinetype.
[AC adapter operation]
• Be sure to use only an AC adapter which supplies 9 V DC, 300mA and is equipped with a "center minus" plug (Zoom AD-0006). The use of an adapter other than the specified type maydamage the unit and pose a safety hazard.
• Connect the AC adapter only to an AC outlet that supplies therated voltage required by the adapter.
• When disconnecting the AC adapter from the AC outlet,always grasp the adapter itself and do not pull at the cable.
• When not using the unit for an extended period, disconnect theAC adapter from the AC outlet.
[Battery operation]
• Use four conventional IEC R6 (size AA) batteries (alkaline). • The 707II cannot be used for recharging.
Pay close attention to the labelling of the battery to make sureyou choose the correct type.
• When not using the unit for an extended period, remove thebatteries from the unit.
• If battery leakage has occurred, wipe the battery compartmentand the battery terminals carefully to remove all remnants ofbattery fluid.
• While using the unit, the battery compartment cover should beclosed.
• Environment
Avoid using your 707II in environments where it will beexposed to:
• Extreme temperature • High humidity or moisture • Excessive dust or sand • Excessive vibration or shock
• Handling
Since the 707II is a precision electronic device, avoidapplying excessive force to the switches and buttons. Alsotake care not to drop the unit, and do not subject it to shockor excessive pressure.
• Alterations
Never open the case of the 707II or attempt to modify theproduct in any way since this can result in damage to theunit.
• Connecting cables and input and outputjacks
You should always turn off the power to the 707II and allother equipment before connecting or disconnecting anycables. Also make sure to disconnect all cables and the ACadapter before moving the 707II.
• Electrical interference
For safety considerations, the 707II has been designed toprovide maximum protection against the emission ofelectromagnetic radiation from inside the device, andprotection from external interference. However, equipmentthat is very susceptible to interference or that emits powerfulelectromagnetic waves should not be placed near the 707II,as the possibility of interference cannot be ruled out entirely.
With any type of digital control device, the 707II included,electromagnetic interference can cause malfunctioning andcan corrupt or destroy data. Care should be taken tominimize the risk of damage.
• Cleaning
Use a soft, dry cloth to clean the 707II. If necessary, slightlymoisten the cloth. Do not use abrasive cleanser, wax, orsolvents (such as paint thinner or cleaning alcohol), sincethese may dull the finish or damage the surface.
Please keep this manual in a convenient placefor future reference.
Usage Precautions
SAFETY PRECAUTIONS
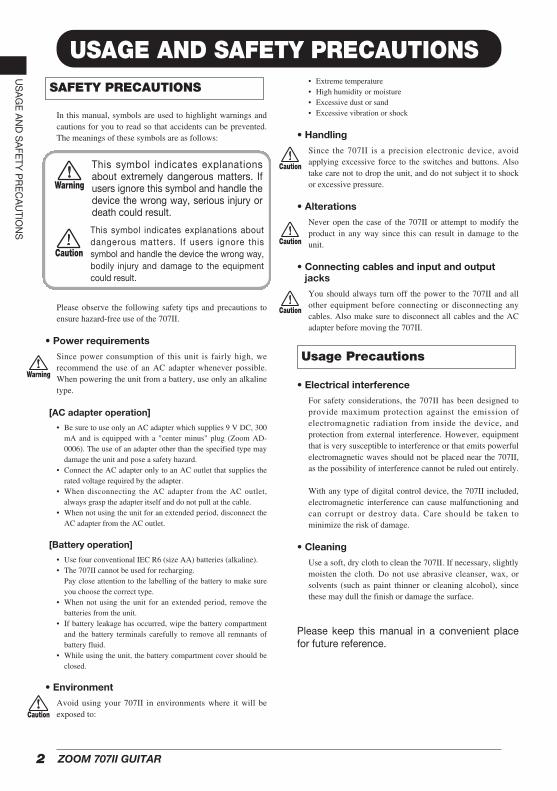
Warning
Warning
Caution
This symbol indicates explanationsabout extremely dangerous matters. Ifusers ignore this symbol and handle thedevice the wrong way, serious injury ordeath could result.
Caution
This symbol indicates explanations aboutdangerous matters. If users ignore thissymbol and handle the device the wrong way,bodily injury and damage to the equipmentcould result.
Caution
Caution
Caution

3ZOOM 707II GUITAR
● Versatile effects The Variable Architecture Modeling System(VAMS) adapts the internal configuration of the unit toachieve exactly the desired sound. The wide range of choices includes distortion effects, modulationeffects such as chorus and flanger, reverb and delay effects, as well as a booster and cabinetsimulator. A total of 74 effects are available.
● 120 great sounding patches Effect module setting combinations can be stored as patches. The 707II offers 60 patches which canbe freely modified by the user, plus 60 preset patches. These settings will let you make great musicstraight away.
● Full complement of distortion effects 33 distortion type effects not only recreate the characteristics of famous guitar amps but alsoduplicate the sound and operation of renowned compact effects and pedals. Dedicated knobs andkeys assure quick and easy operation.
● Designed for use on stage The 707II can be powered from an AC adapter or batteries. With one set of alkaline batteries, theunit will operate continuously for up to 11 hours. The large display showing patch names, and thebuilt-in expression pedal for fine-tuning the sound are great for live performances.
● Knobs provide direct editing feel Various aspects (effect parameters) that control the sound of a module can be directly modified withthree handy knobs. The Easy Edit feature lets you tweak the knobs for adjusting parameters alsoduring play. Of course, you can store the results in your own patch.
● Sampling feature for recording A guitar phrase or the signal from an input source such as a CD player can be sampled for up to 6seconds and stored in the internal memory. When using a 16 MB SmartMedia card, you can recordup to 60 samples or 4 minutes of music. A recorded sample can even be played back at a slowerspeed without altering the pitch. This is a great tool for enhancing a live performance or for copyinga lick or fast-played phrase.
● SmartMedia card allows unlimited number of patches and samples Patches and samples can be stored on separately available SmartMedia cards (up to 60 patches x 5groups / 60 samples per card). Stored data can be read back into the unit at any time. This gives youunlimited potential for building a library of patches and samples.
● Integrated rhythm function 60 built-in rhythm patterns using natural-sounding PCM sources are available, which is great forpractice or a quick jam session.
● Link samples, rhythm, pedal settings to patches The selection of rhythm patterns and samples can be stored for each patch individually, allowingsynchronized operation when switching patches. Even the pedal adjustment range can be memorizedfor a patch.
In order to get the most out of this sophisticated product, please read this manual carefully beforeuse. We recommend that you keep the manual at hand for future reference.
Introduction
Introduction Thank you for purchasing the ZOOM 707II GUITAR (subsequently referred to as "the 707II"). The 707II is a sophisticated multi-effect processor for guitar with the following attractive features.

POWER A0
[W]/[Q] foot switches Expression pedal
[AUX IN] jack
[INPUT] jack
[DC 9V] (AC adapter) jack [POWER] switch
[OUTPUT] knob
Cable hook
[OUTPUT/PHONES] jack
[DRIVE VARIATION] LEDs
[DRIVE VARIATION] key[DRIVE] knob
This section identifies the parts of the 707II and describes preparations for use.
Controls
andFunctions
Controls and Functions
Top Panel
4 ZOOM 707II GUITAR
Rear Panel

POWER A0
DisplayModule LEDs
MODULE [E]/[R] keys
[BANK/PATCH] indicator
[STORE/EXECUTE] key
[CANCEL/EXIT] key
[PLAY] key
[PEDAL] (pedal assign) key
[PEDAL] (pedal assign) LEDs
[EDIT] key Parameter knob 1
Parameter knob 2Parameter knob 3
TYPE [W]/[Q] (type/bank) keys
[SAMPLER] key
[A→B] (A→B repeat) key
[SMART MEDIA] LED
[UTILITY] key
[PATCH SYNC] key
[RHYTHM] LED
[R/P] (play/stop) key
5ZOOM 707II GUITAR
Controls
andFunctions
Loop the cable of the AC adapteraround the hook as shown in thediagram before connecting it to the[DC 9V] jack. This will prevent theplug from being disconnected if thecable is accidentally pulled.
DC9V
POWER
UTIN)
300mA
OFFON

Preparations
Preparations
Inserting Batteries and a SmartMedia card
6 ZOOM 707II GUITAR
1. Turn the unit over and open thebattery compartment cover.
2. Insert four fresh IEC R6 (size AA)batteries into the battery compartment.The use of alkaline batteries isrecommended.
The correct battery orientation is indicatedinside the battery compartment.
3. To store patch and sample data,insert a SmartMedia card into thecard slot, as shown above.
◆ Caution ◆
● If the card is inserted upside down orwith wrong orientation, it does not goall the way in. Do not try to force thecard in, because this will damage thecard.
● Never insert or remove theSmartMedia card while power to theunit is turned on. Otherwise all data onthe card may be lost.
● Standard SmartMedia cards (designedfor 3.3V) with a capacity from 16 – 128MB can be used.
● When wishing to use a SmartMediacard that has been formatted in otherequipment such as a computer ordigital camera, you must format thecard again in the 707II, as describedon page 31.
● To store the contents of a SmartMediacard in a computer, a SmartMediacard reader/writer is required.
4. Close the battery compartment cover.
• If the indication "BATT" appears on the display,the batteries are exhausted. Replace thebatteries as soon as possible.
• When not using the unit for an extended period,remove the batteries to prevent the possibility ofdamage by leaking battery fluid.
PATCH NAME
NOTESmartMedia card
Four IEC R6(size AA) batteries
When wishing to power the 707II from batteries, insert them as shown below. When wishingto store patch data or sample data on a SmartMedia card, insert the card as shown below.

7ZOOM 707II GUITAR
1. Make sure that the amplifier and the707II are off.
Turn the volume at the amplifier to minimum.
2. To power the unit from the ACadapter, insert the small plug of theadapter cable into the [DC 9V] jack onthe 707II. Then plug the adapter intoan outlet.
3. Connect the guitar to the [INPUT] jackof the 707II, using a mono cable.
4. Connect the [OUTPUT/PHONES] jackof the 707II to the guitar amplifier,using a mono cable.
You can also use a Y cable to supply the signalin stereo to two amplifiers.
5. To monitor the sound with headphones,plug the phones into the [OUTPUT/PHONES] jack.
6. Turn power on in the following order:707II → amplifier.
If you turn the 707II on while the amplifier isalready powered up, damage to the speaker mayresult. Always turn power to the amplifier on last.
7. Raise the volume setting of theinstrument and amplifier, and adjustthe [OUTPUT] knob on the rear panelof the 707II.
NOTE
Preparations
AC adapter
Guitar amplifier
Guitar
CD player or similarHeadphones
Getting Connected

POW
PRESET groupUSER group
BANK F
PATCH 1
BANK bPATCH 0
PATCH 2PATCH 3PATCH 4PATCH 5PATCH 6PATCH 7PATCH 8PATCH 9
PATCH 1
BANK APATCH 0
PATCH 2PATCH 3PATCH 4PATCH 5PATCH 6PATCH 7PATCH 8PATCH 9
BANK 5
PATCH 1
BANK 1PATCH 0
PATCH 2PATCH 3PATCH 4PATCH 5PATCH 6PATCH 7PATCH 8PATCH 9
PATCH 1
BANK 0PATCH 0
PATCH 2PATCH 3PATCH 4PATCH 5PATCH 6PATCH 7PATCH 8PATCH 9
Selecting a patch In play mode, press one of the [W]/[Q] foot switches.
In play mode, the information shown at right appears on the display and the [BANK/PATCH] indicator.
To directly switch the bank, press one of the TYPE [W]/[Q] keys.
Each push of a key switches to the next bank.
Patches, groups and banks
A combination of 707II effects, each with distinct parameter settings, is called a patch. Patches are organized in banks (A - F, 0 - 5) and patch numbers (0 - 9). It is also possible to assign a name of up to six characters to a patch. The patches of the 707II are stored in two different groups: the USER group (banks A - F) for read-and-write patches that can be freely overwritten by the user, and the PRESET group (0 - 5) for read-only patches that cannot be changed by the user. There are 60 patches in each group, resulting in a total of 120 patches.
To alter an effect in real time, move the expression pedal while playing your instrument.The effect depth or volume changes as you move the pedal. Which parameter changes depends on the patch.
To switch the effect module on or off, push the expression pedal fully down.
The expression pedal also incorporates a push-down switch that allows on/off control of a specific effect module.
Move back and forth
Altering an effect with the pedal
Push down all the way
◆ For details on selecting the effect module to be controlled by the pedal, see p. 23.
◆ For a detailed explanation of patch switching, see p. 10. ◆ To set up the unit so that the patch sound is switched only after
confirmation, see p. 23.
A0
BankPatch namePatch number
1
2
1
2
Quick
Guide
(Let'sP
lay)
Quick Guide (Let's Play)
8 ZOOM 707II GUITAR
Immediately after being turned on, the 707II is in the so-called "play mode". The Quick Guideexplains the basic steps in play mode. This will let you use the unit right away.

WER A0
While playing your instrument, operate the knobs on the panel.
Each knob controls a certain parameter, as indicated below.
Selects the distortion type for the DRIVE module.
Adjusts the modulation rate of chorus, flanger, and similar effects. For some patches, the knob adjusts the echo level.
◆ For a list of parameters adjusted with the knobs, see p. 33 – 38.
◆ To edit a patch more in detail, see p. 18.
◆ For a detailed explanation of patch storing, see p. 20. ◆ For information on how to return the USER group
patches to the factory default condition, see p. 32.
Parameter knob 1 Adjusts the distortion level of the DRIVE module.
Adjusts the reverb and echo level. Press the [STORE/EXECUTE] key.
The 707II goes into store standby mode.
If a patch from the PRESET group was selected, "A0" in the USER group is automatically selected as store target. Use the [W]/[Q] foot switches to select the store target bank and patch number.
To carry out the store operation, press the [STORE/EXECUTE] key once more.
To cancel the process, press the [CANCEL/ EXIT] key.
[DRIVE VARIATION] key
Parameter knob 2
Changing the sound of a patch
Storing an effect
A0
Parameter knob 3
[DRIVE] knob
1
2
3
1
9ZOOM 707II GUITAR
Quick
Guide
(Let'sP
lay)

Listeningto
Patches
(Play
Mode
Operation)
Listening to Patches (Play Mode Operation)
Panel Display in Play Mode
Selecting a Patch
10 ZOOM 707II GUITAR
1. In play mode, press one of the[W]/[Q] foot switches.
Pressing the [Q] foot switch moves to the nexthigher patch, and pressing the [W] foot switchmoves to the next lower patch.
2. To directly switch the bank, use theTYPE [W]/[Q] keys.
Pressing the TYPE [Q] key moves to the nexthigher bank, and pressing the TYPE [W] keymoves to the next lower bank.
While playing a rhythm pattern, direct bankselection is not available.
3. It is also possible to set up the unit sothat only patches from the USERgroup or from the PRESET group areswitched. To do this, press both TYPE[W]/[Q] keys together.
With each push, the group from which patchescan be selected is toggled as follows.
To set up the unit so that the patch sound isswitched only after confirmation, see p. 23.
HINT
02 A2 02
Both groups USER group only
PRESET group only
NOTE
A0 A1 A9 B0 F9
5900 01 09 10
USER group
PRESET group
The condition where you call up patches stored in the memory of the 707II and use them forplaying your instrument is called "play mode". This is the condition the unit is in when youturn the power on. The various operations possible in play mode are described in thissection.
In play mode, the panel shows the following information.
A0
Patch nameBank (A - F, 0 - 5)
Patch number (0 - 9)
When a dot (.) is shown here, an effect parameter has been changed.
When a dot (.) is shown here, patches can be selected from either the USER group or the PRESET group.
Module LEDs corresponding to modules that are ON in the currently selected patch are lit.

11ZOOM 707II GUITAR
1. To set the 707II to the bypass (mute)condition, press and release both[W]/[Q] foot switches in play mode.
When you press and immediately release bothfoot switches, the 707II goes into bypass mode.
While the 707II is in the bypass condition, alleffects are off and only the direct sound isoutput. The expression pedal works as a volumepedal.
When you press and hold both foot switches forat least 1 second and then release them, the707II goes into mute mode.
While the 707II is in the mute condition, there isno sound output from the [OUTPUT/PHONES]jack.
2. Play the open string you want to tune.
The [BANK/PATCH] indicator shows the notewhich is closest to the current pitch. Tune yourinstrument until the note indication shows thedesired note.
3. To change the reference pitch of thetuner, use the TYPE [W]/[Q] keys.
The current reference pitch is briefly shown onthe display. The default setting after power-on iscenter A = 440 Hz.
4. While the reference pitch is shown,you can change the pitch by pressingthe TYPE [W]/[Q] keys.
The available setting range is 435 – 445 Hz in1-Hz steps. When the 707II is turned off and onagain, it will be reset to 440 Hz.
5. Press one of the [W]/[Q] foot switches.
The 707II returns to the play mode.
440HZ
Reference pitch value
A8
A
ABCC
D
D
G
GEFF
The more the pitch is off, the faster the indicator rotates
The note is shown on the left part of the indicator
Pitch is sharp Correct pitch Pitch is flat
To the right of the note, a symbol indicates by how much the tuning is off.
**MUTE
Press and release after at least 1 second
**BYPASS
Release immediately
Listeningto
Patches
(Play
Mode
Operation)
Using the Tuner Function
The 707II incorporates an auto-chromatic tuner for guitar. To use the tuner function, the built-in effects must be bypassed (temporarily turned off) or muted (direct sound and effect soundturned off).
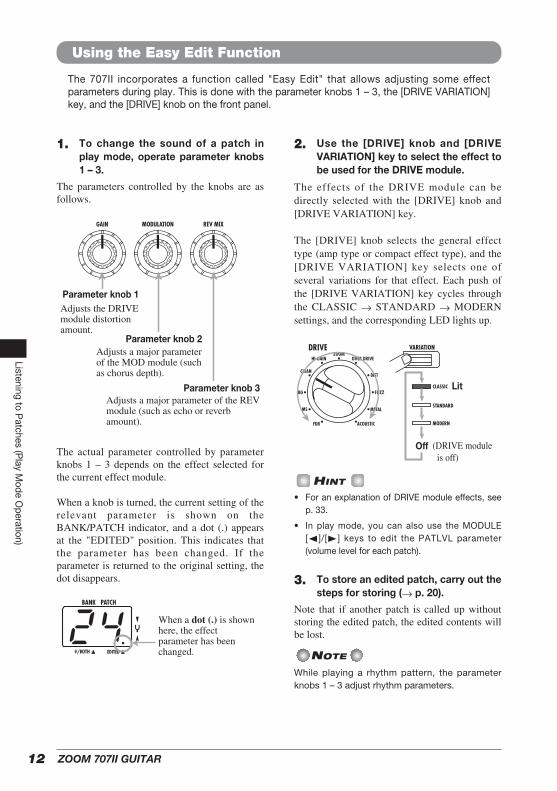
Using the Easy Edit Function
12
1. To change the sound of a patch inplay mode, operate parameter knobs1 – 3.
The parameters controlled by the knobs are asfollows.
The actual parameter controlled by parameterknobs 1 – 3 depends on the effect selected forthe current effect module.
When a knob is turned, the current setting of therelevant parameter is shown on theBANK/PATCH indicator, and a dot (.) appearsat the "EDITED" position. This indicates thatthe parameter has been changed. If theparameter is returned to the original setting, thedot disappears.
2. Use the [DRIVE] knob and [DRIVEVARIATION] key to select the effect tobe used for the DRIVE module.
The effects of the DRIVE module can bedirectly selected with the [DRIVE] knob and[DRIVE VARIATION] key.
The [DRIVE] knob selects the general effecttype (amp type or compact effect type), and the[DRIVE VARIATION] key selects one ofseveral variations for that effect. Each push ofthe [DRIVE VARIATION] key cycles throughthe CLASSIC → STANDARD → MODERNsettings, and the corresponding LED lights up.
• For an explanation of DRIVE module effects, seep. 33.
• In play mode, you can also use the MODULE[E]/[R] keys to edit the PATLVL parameter(volume level for each patch).
3. To store an edited patch, carry out thesteps for storing (→ p. 20).
Note that if another patch is called up withoutstoring the edited patch, the edited contents willbe lost.
While playing a rhythm pattern, the parameterknobs 1 – 3 adjust rhythm parameters.
NOTE
HINT
Lit
Off (DRIVE module is off)
24 When a dot (.) is shown here, the effect parameter has been changed.
Parameter knob 1Adjusts the DRIVE module distortion amount.
Parameter knob 2Adjusts a major parameter of the MOD module (such as chorus depth).
Parameter knob 3 Adjusts a major parameter of the REV module (such as echo or reverb amount).
ZOOM 707II GUITAR
The 707II incorporates a function called "Easy Edit" that allows adjusting some effectparameters during play. This is done with the parameter knobs 1 – 3, the [DRIVE VARIATION]key, and the [DRIVE] knob on the front panel.
Listeningto
Patches
(Play
Mode
Operation)
ZOOM 707II GUITAR 13
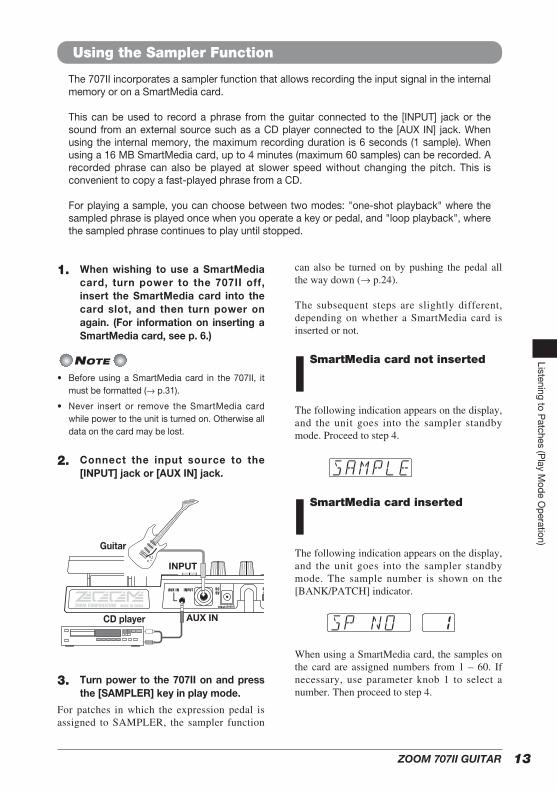
1. When wishing to use a SmartMediacard, turn power to the 707II off,insert the SmartMedia card into thecard slot, and then turn power onagain. (For information on inserting aSmartMedia card, see p. 6.)
• Before using a SmartMedia card in the 707II, itmust be formatted (→ p.31).
• Never insert or remove the SmartMedia cardwhile power to the unit is turned on. Otherwise alldata on the card may be lost.
2. Connect the input source to the[INPUT] jack or [AUX IN] jack.
3. Turn power to the 707II on and pressthe [SAMPLER] key in play mode.
For patches in which the expression pedal isassigned to SAMPLER, the sampler function
can also be turned on by pushing the pedal allthe way down (→ p.24).
The subsequent steps are slightly different,depending on whether a SmartMedia card isinserted or not.
SmartMedia card not inserted
The following indication appears on the display,and the unit goes into the sampler standbymode. Proceed to step 4.
SmartMedia card inserted
The following indication appears on the display,and the unit goes into the sampler standbymode. The sample number is shown on the[BANK/PATCH] indicator.
When using a SmartMedia card, the samples onthe card are assigned numbers from 1 – 60. Ifnecessary, use parameter knob 1 to select anumber. Then proceed to step 4.
1SP NO
SAMPLE
AUX IN
INPUT
Guitar
CD player
NOTE
Using the Sampler Function
The 707II incorporates a sampler function that allows recording the input signal in the internalmemory or on a SmartMedia card.
This can be used to record a phrase from the guitar connected to the [INPUT] jack or thesound from an external source such as a CD player connected to the [AUX IN] jack. Whenusing the internal memory, the maximum recording duration is 6 seconds (1 sample). Whenusing a 16 MB SmartMedia card, up to 4 minutes (maximum 60 samples) can be recorded. Arecorded phrase can also be played at slower speed without changing the pitch. This isconvenient to copy a fast-played phrase from a CD.
For playing a sample, you can choose between two modes: "one-shot playback" where thesampled phrase is played once when you operate a key or pedal, and "loop playback", wherethe sampled phrase continues to play until stopped.
Listeningto
Patches
(Play
Mode
Operation)
14
• If the indication "NO" is followed by a "*", asample is recorded in that number.
• If you select a number in which a sample hasalready been recorded, the previous sample willbe overwritten. Be careful not to overwrite asample that you wish to keep.
• For information on how to assign a sample to apatch when storing, see p. 27.
• For information on how to delete unwantedsamples from a SmartMedia card, see p. 31
4. Use the TYPE [W]/[Q] keys to select"GT" or "AUX" as input source.
When you press one of the TYPE [W]/[Q]keys, the currently selected input source isshown on the display. Select one of thefollowing two sources.
● GT Signal from [INPUT] jack ● AUX Signal from [AUXI IN] jack
• If "GT" is selected, the signal after passing theeffects is sampled. If "AUX" is selected, theeffects are bypassed.
• When recording from the [AUX IN] jack, you canminimize noise and distortion by turning the[OUTPUT] knob up past the midway point andadjusting the output level of the external sourceso that the volume is about equal to that of aguitar.
• After recording, you can use the SP LVLparameter to control the playback level of thesample.
5. Press the [Q] foot switch and play thephrase you want to record (or startplayback at the external sourcecomponent).
During sampling, the indication "REC" isshown on the display. The module LEDs on thepanel show the elapsed sampling time.
• When sampling to internal memory, samplingends when all module LEDs are lit.
• When sampling to SmartMedia card, the moduleLEDs go through the cycle repeatedly.
6. To stop sampling, press the [W] footswitch.
If you do not press any key after starting tosample, sampling automatically ends when themaximum sampling time is up (6 seconds withinternal memory, 4 minutes with a 16 MBSmartMedia card).
7. Use parameter knob 2 to select thesample playback mode.
When you operate parameter knob 2, theindication "SPMODE" appears on the display.The [BANK/PATCH] indicator shows theplayback mode. The following settings areavailable.
● n1 Normal speed playback ● n2 Half tempo, half pitch playback ● P2 Half tempo, normal pitch playback ● n4 Quarter tempo, quarter pitch playback ● P4 Quarter tempo, normal pitch playback
8. Use the foot switches and panel keysto control sample playback (start/stop/rewind/fast-forward).
While the sampler function is on, you can usethe foot switches and panel keys for one-shotplayback.
SPMODE N1
NOTE
6 seconds
HINT
HINT
NOTE
2SP NO
ZOOM 707II GUITAR
Listeningto
Patches
(Play
Mode
Operation)

15
9. If necessary, you can adjust thesample playback level with parameterknob 3.
When you operate parameter knob 3, theindication "SP LVL" appears on the display.The [BANK/PATCH] indicator shows the inputsignal level, using a range from 0 – 30. Adjustthe level to obtain a suitable playback volume.
You can also adjust the playback level with theexpression pedal.
10. To carry out loop playback of aspecific interval, play the sample andpress the [A→B] key at the desiredstart point.
The [A→B] LED flashes and loop playback isenabled. The point at which you pressed the[A→B] key is taken as the loop start point. If noend point has been set, the end of the sample istaken as the end point.
11. If you wish to set the loop end point,press the [A→B] key once moreduring loop playback of the sample.
The [A→B] LED now stays constantly lit, andthe point at which you pressed the [A→B] keyis taken as the loop end point. When the end point has been set, loop playbackis carried out between the start and end points.
12. To cancel loop playback, press the[A→B] key once more (or change thesample number).
The [A→B] LED goes out, and the unit returnsto normal one-shot playback.
13. To terminate the sampler function,press the [SAMPLER] key while thesampler is stopped, or push theexpression pedal all the way down.
The unit returns to normal play mode.
• The start point and end point settings are resetwhen you change the sample nunber or switchthe sampler function off or on.
• The sampler function cannot be used togetherwith the rhythm pattern function.
• While the sampler function is on, the MODmodule and REV module cannot be used. (Theyare automatically set to OFF.)
• When sampling to a SmartMedia card, thesampled data are stored on the SmartMedia cardautomatically. There is no need for the user toperform any steps for storing.
NOTE
Playback
Start point End point
Playback
Start point
HINT
SP LVL 30
MODULE [E] KeyRewind
MODULE [R] KeyFast-forward
[W] foot switchPlay/Stop
[Q] foot switchStart sampling
Press both keys to return to the start of the sample
ZOOM 707II GUITAR
Listeningto
Patches
(Play
Mode
Operation)
Using the Rhythm Function
16 ZOOM 707II GUITAR
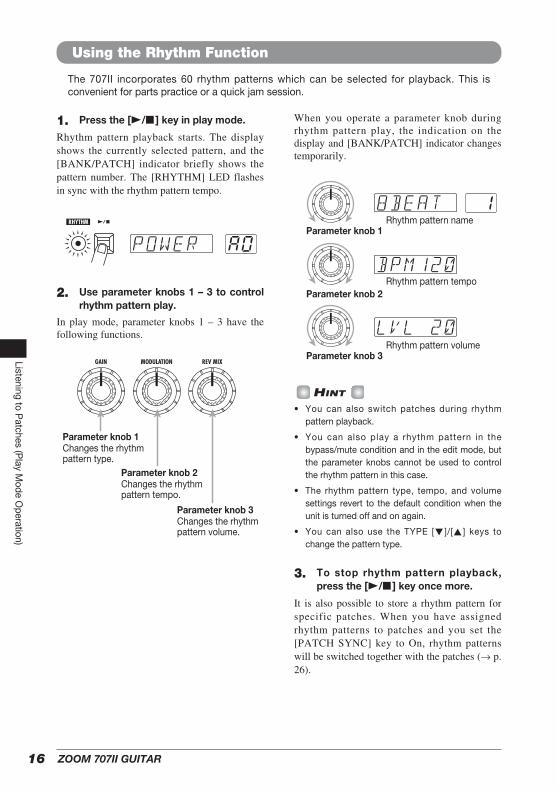
The 707II incorporates 60 rhythm patterns which can be selected for playback. This isconvenient for parts practice or a quick jam session.
1. Press the [R/P] key in play mode.
Rhythm pattern playback starts. The displayshows the currently selected pattern, and the[BANK/PATCH] indicator briefly shows thepattern number. The [RHYTHM] LED flashesin sync with the rhythm pattern tempo.
2. Use parameter knobs 1 – 3 to controlrhythm pattern play.
In play mode, parameter knobs 1 – 3 have thefollowing functions.
When you operate a parameter knob duringrhythm pattern play, the indication on thedisplay and [BANK/PATCH] indicator changestemporarily.
• You can also switch patches during rhythmpattern playback.
• You can also play a rhythm pattern in thebypass/mute condition and in the edit mode, butthe parameter knobs cannot be used to controlthe rhythm pattern in this case.
• The rhythm pattern type, tempo, and volumesettings revert to the default condition when theunit is turned off and on again.
• You can also use the TYPE [W]/[Q] keys tochange the pattern type.
3. To stop rhythm pattern playback,press the [R/P] key once more.
It is also possible to store a rhythm pattern forspecific patches. When you have assignedrhythm patterns to patches and you set the[PATCH SYNC] key to On, rhythm patternswill be switched together with the patches (→ p.26).
HINT
8BEAT 1
BPM120
LVL 20
Parameter knob 1
Parameter knob 2
Parameter knob 3
Rhythm pattern name
Rhythm pattern tempo
Rhythm pattern volume
Parameter knob 1Changes the rhythm pattern type.
Parameter knob 2Changes the rhythm pattern tempo.
Parameter knob 3Changes the rhythm pattern volume.
POWER A0
Listeningto
Patches
(Play
Mode
Operation)
ZOOM 707II GUITAR 17
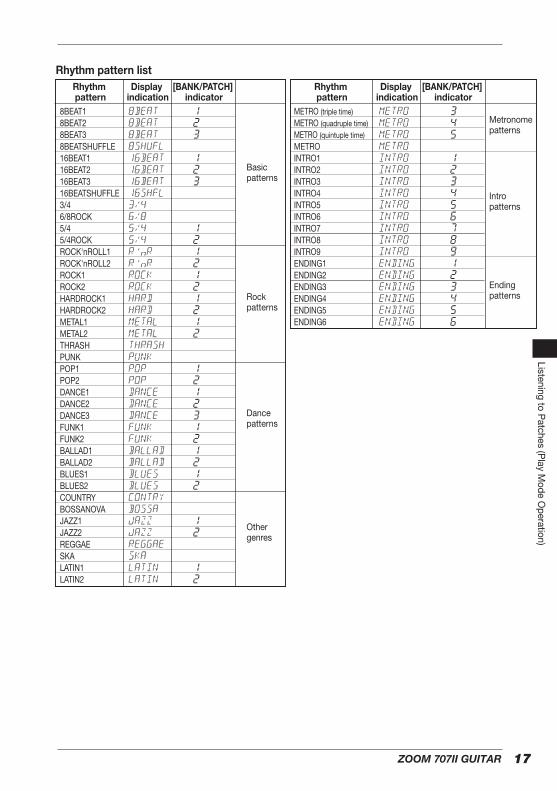
8BEAT18BEAT28BEAT38BEATSHUFFLE 16BEAT116BEAT216BEAT316BEATSHUFFLE 3/4 6/8ROCK 5/45/4ROCKROCK'nROLL1ROCK'nROLL2ROCK1ROCK2HARDROCK1HARDROCK2METAL1METAL2THRASH PUNK POP1POP2DANCE1DANCE2DANCE3FUNK1FUNK2BALLAD1BALLAD2BLUES1BLUES2COUNTRY BOSSANOVAJAZZ1JAZZ2REGGAE SKA LATIN1LATIN2
8BEAT
8BEAT
8BEAT
8SHUFL
16BEAT
16BEAT
16BEAT
16SHFL
3/4
6/8
5/4
5/4
Rc R
Rc R
ROCK
ROCK
HARD
HARD
METAL
METAL
THRASH
PUNK
POP
POP
DANCE
DANCE
DANCE
FUNK
FUNK
BALLAD
BALLAD
BLUES
BLUES
CONTRY
BOSSA
JAZZ
JAZZ
REGGAE
SKA
LATIN
LATIN
1
2
3
1
2
3
1
2
1
2
1
2
1
2
1
2
1
2
1
2
3
1
2
1
2
1
2
1
2
1
2
METRO (triple time)METRO (quadruple time)METRO (quintuple time)METROINTRO1INTRO2INTRO3INTRO4INTRO5INTRO6INTRO7INTRO8INTRO9ENDING1ENDING2ENDING3ENDING4ENDING5ENDING6
METRO
METRO
METRO
METRO
INTRO
INTRO
INTRO
INTRO
INTRO
INTRO
INTRO
INTRO
INTRO
ENDING
ENDING
ENDING
ENDING
ENDING
ENDING
3
4
5
1
2
3
4
5
6
7
8
9
1
2
3
4
5
6
Rhythm pattern listRhythm pattern
Display indication
[BANK/PATCH] indicator
Rhythm pattern
Display indication
[BANK/PATCH] indicator
Basic patterns
Rock patterns
Dance patterns
Other genres
Metronome patterns
Intro patterns
Ending patterns
Listeningto
Patches
(Play
Mode
Operation)
Changing
theS
oundofa
Patch
(EditMode)
Changing the Sound of a Patch (Edit Mode)
Patch Configuration
Basic Edit Mode Steps
18 ZOOM 707II GUITAR
Within each module, there are several different but related effects which are called effect types. Forexample, the MODULATION module comprises effect types such as CHORUS, PHASER, and WAH.
The elements that determine the sound of a patch are called effect parameters. Each module has severaleffect parameters, whose value can be adjusted with the parameter knobs 1 – 3, the [DRIVE] knob,[DRIVE VARIATION] key, etc.
Also within the same module, different effect types will have different parameters.
NOTE
The edit mode allows you to freely alter the parameters that make up a patch, so that youcan create your own patches. This section describes how to edit patches and how to storeedited patches.
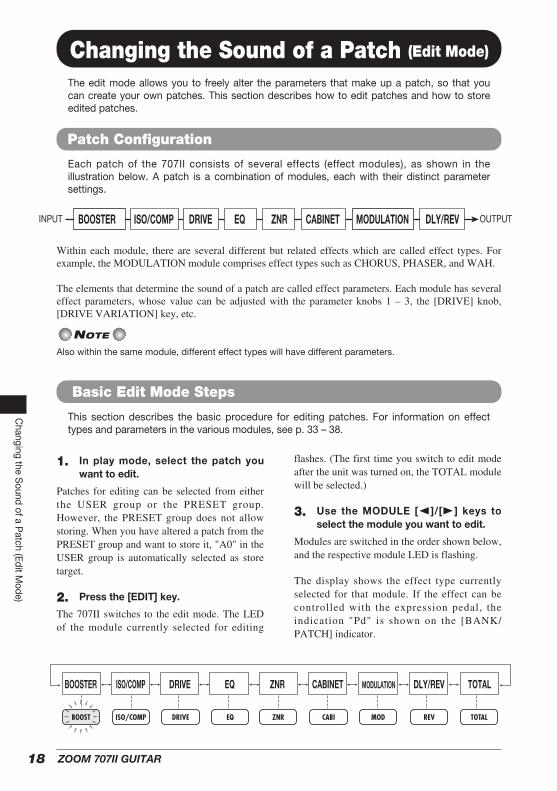
Each patch of the 707II consists of several effects (effect modules), as shown in theillustration below. A patch is a combination of modules, each with their distinct parametersettings.
BOOSTERINPUT OUTPUTISO/COMP DRIVE EQ ZNR CABINET MODULATION DLY/REV
This section describes the basic procedure for editing patches. For information on effecttypes and parameters in the various modules, see p. 33 – 38.
1. In play mode, select the patch youwant to edit.
Patches for editing can be selected from eitherthe USER group or the PRESET group.However, the PRESET group does not allowstoring. When you have altered a patch from thePRESET group and want to store it, "A0" in theUSER group is automatically selected as storetarget.
2. Press the [EDIT] key.
The 707II switches to the edit mode. The LEDof the module currently selected for editing
flashes. (The first time you switch to edit modeafter the unit was turned on, the TOTAL modulewill be selected.)
3. Use the MODULE [E]/[R] keys toselect the module you want to edit.
Modules are switched in the order shown below,and the respective module LED is flashing.
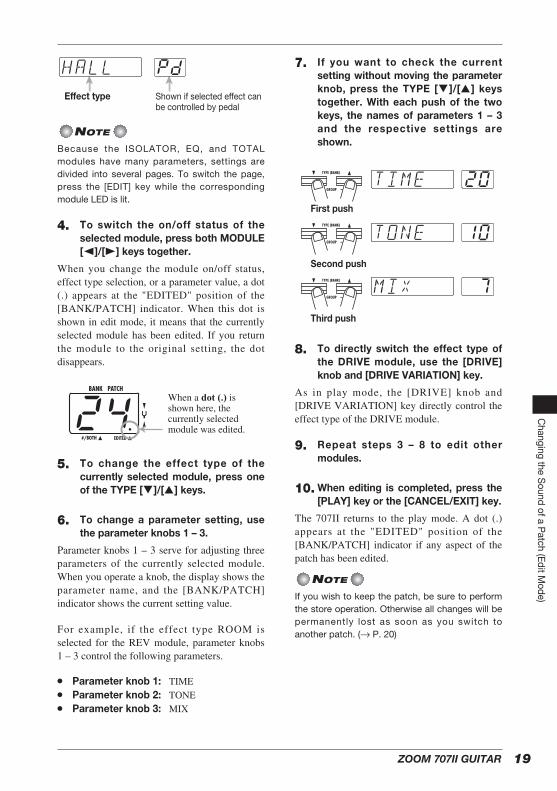
The display shows the effect type currentlyselected for that module. If the effect can becontrolled with the expression pedal, theindication "Pd" is shown on the [BANK/PATCH] indicator.
BOOSTER ISO/COMP DRIVE EQ ZNR CABINET MODULATION DLY/REV TOTAL
19ZOOM 707II GUITAR
Because the ISOLATOR, EQ, and TOTALmodules have many parameters, settings aredivided into several pages. To switch the page,press the [EDIT] key while the correspondingmodule LED is lit.
4. To switch the on/off status of theselected module, press both MODULE[E]/[R] keys together.
When you change the module on/off status,effect type selection, or a parameter value, a dot(.) appears at the "EDITED" position of the[BANK/PATCH] indicator. When this dot isshown in edit mode, it means that the currentlyselected module has been edited. If you returnthe module to the original setting, the dotdisappears.
5. To change the effect type of thecurrently selected module, press oneof the TYPE [W]/[Q] keys.
6. To change a parameter setting, usethe parameter knobs 1 – 3.
Parameter knobs 1 – 3 serve for adjusting threeparameters of the currently selected module.When you operate a knob, the display shows theparameter name, and the [BANK/PATCH]indicator shows the current setting value.
For example, if the effect type ROOM isselected for the REV module, parameter knobs1 – 3 control the following parameters.
● Parameter knob 1: TIME ● Parameter knob 2: TONE ● Parameter knob 3: MIX
7. If you want to check the currentsetting without moving the parameterknob, press the TYPE [W]/[Q] keystogether. With each push of the twokeys, the names of parameters 1 – 3and the respective settings areshown.
8. To directly switch the effect type ofthe DRIVE module, use the [DRIVE]knob and [DRIVE VARIATION] key.
As in play mode, the [DRIVE] knob and[DRIVE VARIATION] key directly control theeffect type of the DRIVE module.
9. Repeat steps 3 – 8 to edit othermodules.
10. When editing is completed, press the[PLAY] key or the [CANCEL/EXIT] key.
The 707II returns to the play mode. A dot (.)appears at the "EDITED" position of the[BANK/PATCH] indicator if any aspect of thepatch has been edited.
If you wish to keep the patch, be sure to performthe store operation. Otherwise all changes will bepermanently lost as soon as you switch toanother patch. (→ P. 20)
NOTE
TIME 20
TONE 10
MIX 7
First push
Second push
Third push
24When a dot (.) is shown here, the currently selected module was edited.
NOTE
HALL PD
Effect type Shown if selected effect can be controlled by pedal
Changing
theS
oundofa
Patch
(EditMode)

Changing
theS
oundofa
Patch
(EditMode)
20 ZOOM 707II GUITAR
Storing and Swapping Patches
This section describes how to store an edited patch in memory, and how to swap patches inthe USER group.
1. In play mode or edit mode, press the[STORE/EXECUTE] key.
The 707II enters the store standby condition.The patch name and the indications "SAVE"and "SWAP" are shown alternately on thedisplay. The [BANK/PATCH] indicator showsthe bank and patch number.
To change the name of an edited patch, see p. 38.
2. Use the MODULE [E]/[R] keys toselect either "SAVE" or "SWAP".
If the original patch is from the PRESET group,"SWAP" cannot be selected.
3. Use the TYPE [W]/[Q] keys or the[W]/[Q] foot switches to select thetarget patch for storing.
The name of the newly selected patch and theindication "STORE?" are shown alternately onthe display. The bank and patch number flash onthe [BANK/PATCH] indicator.
The PRESET group cannot be selected as storetarget. If you press the [STORE/EXECUTE] keywhile a patch from the PRESET group is selected,the selection automatically changes to "A0" in theUSER group.
4. To carry out the store or swapoperation, press the [STORE/EXECUTE] key once more.
The store or swap operation is performed, andthen the unit returns to the original mode. If thepatch in step 1 was being edited, the editingchanges are stored.
If you press the [CANCEL/EXIT] key insteadof the [STORE/EXECUTE] key, the store/swapoperation is canceled and the unit returns to theoriginal mode.
NOTE
NOTE
HINT
STORE? E3

Other Functions
Using the Hold Delay Function
21
1. In play mode, select the patch to usewith hold delay.
2. Press the [EDIT] key to activate editmode, and select "HLDDLY" as effecttype for the DLY/REV module.
3. Use parameter knob 1 to set the TIMEparameter.
The TIME parameter determines the length ofthe recording interval for hold delay. Turningthe knob changes the value as follows.
● 1 – 99: 10 – 990 milliseconds (10-ms units) ● 1.0 – 2.0: 1.0 – 2.0 seconds (100-ms units)
● Mn (Manual): Recording starts when youpress the [Q] foot switch and ends when youpress the [Q ] foot switch again (max. 2seconds).
4. Use parameter knob 2 to set theMODE parameter.
The MODE parameter determines how therecorded phrase is played back. The followingthree modes are available.
● nL (Normal): Normal direction playback
● So (Sound-on-sound): Recorded contentsare played back repeatedly to create an overlay.
If you press the [Q] foot switch, the phraseplayed until the switch is pressed again is addedto the sound.
● rS (Reverse): Reverse direction playback.
5. Use parameter knob 3 to set the MIXparameter.
The MIX parameter controls the mixing ratio ofthe delayed sound. A setting of 30 results inequal levels of direct sound and delayed sound.
6. Press the [PEDAL] key a few timesuntil the [PEDAL] LED of the REVmodule flashes.
The expression pedal can now be used to switchthe hold delay function on and off.
7. Store the patch and return to playmode.
When a patch in which hold delay can be usedis selected in play mode, the DLY/REV moduleLED and the [PEDAL] LED are flashing.
8. Push the expression pedal all the waydown.
The hold delay function is switched on and theunit is in recording standby mode. Theindication "STOP" is shown on the display.
9. While playing your guitar, press the[Q] foot switch to start recording.
The indication "REC" is shown on the display.The actual operation depends on the TIMEparameter set in step 3.
STOP
OtherFunctions
The 707II also incorporates various other convenient functions which are described in thissection.
ZOOM 707II GUITAR
The DLY/REV module comprises a hold delay effect that allows recording and playing aguitar phrase of up to 2 seconds. You can also play the phrase in reverse or perform loopplayback to create interesting "sound-on-sound" layers.
OtherFunctions
22
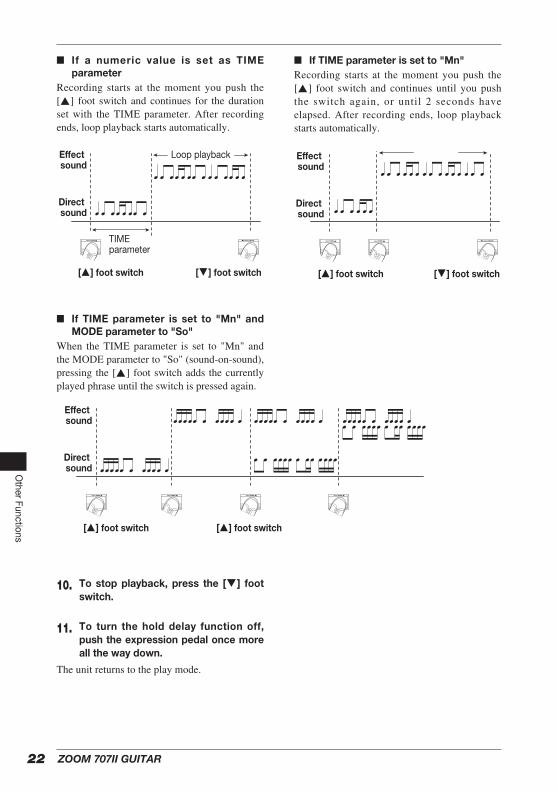
■ If a numeric value is set as TIMEparameter
Recording starts at the moment you push the[Q] foot switch and continues for the durationset with the TIME parameter. After recordingends, loop playback starts automatically.
■ If TIME parameter is set to "Mn" Recording starts at the moment you push the[Q] foot switch and continues until you pushthe switch again, or until 2 seconds haveelapsed. After recording ends, loop playbackstarts automatically.
[Q] foot switch
Effect sound
Direct sound
[W] foot switch
Effect sound
Direct sound
[Q] foot switch [W] foot switch
Loop playback
TIME parameter
ZOOM 707II GUITAR
Effect sound
Direct sound
[Q] foot switch [Q] foot switch
10. To stop playback, press the [W] footswitch.
11. To turn the hold delay function off,push the expression pedal once moreall the way down.
The unit returns to the play mode.
■ If TIME parameter is set to "Mn" andMODE parameter to "So"
When the TIME parameter is set to "Mn" andthe MODE parameter to "So" (sound-on-sound),pressing the [Q] foot switch adds the currentlyplayed phrase until the switch is pressed again.
ZOOM 707II GUITAR 23
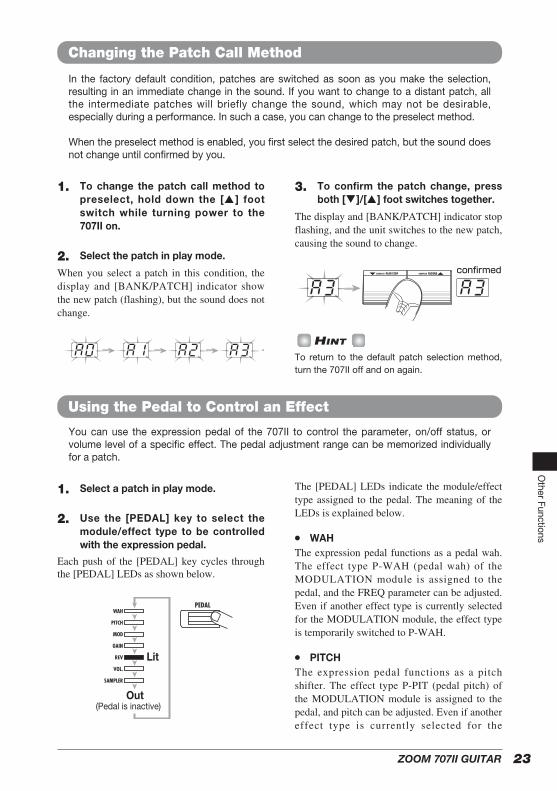
1. To change the patch call method topreselect, hold down the [Q] footswitch while turning power to the707II on.
2. Select the patch in play mode.
When you select a patch in this condition, thedisplay and [BANK/PATCH] indicator showthe new patch (flashing), but the sound does notchange.
3. To confirm the patch change, pressboth [W]/[Q] foot switches together.
The display and [BANK/PATCH] indicator stopflashing, and the unit switches to the new patch,causing the sound to change.
To return to the default patch selection method,turn the 707II off and on again.
HINT
confirmed
A3 A3
A0 A1 A2 A3
OtherFunctions
Changing the Patch Call Method
In the factory default condition, patches are switched as soon as you make the selection,resulting in an immediate change in the sound. If you want to change to a distant patch, allthe intermediate patches will briefly change the sound, which may not be desirable,especially during a performance. In such a case, you can change to the preselect method.
When the preselect method is enabled, you first select the desired patch, but the sound doesnot change until confirmed by you.
Using the Pedal to Control an Effect
You can use the expression pedal of the 707II to control the parameter, on/off status, orvolume level of a specific effect. The pedal adjustment range can be memorized individuallyfor a patch.
1. Select a patch in play mode.
2. Use the [PEDAL] key to select themodule/effect type to be controlledwith the expression pedal.
Each push of the [PEDAL] key cycles throughthe [PEDAL] LEDs as shown below.
The [PEDAL] LEDs indicate the module/effecttype assigned to the pedal. The meaning of theLEDs is explained below.
● WAH The expression pedal functions as a pedal wah.The effect type P-WAH (pedal wah) of theMODULATION module is assigned to thepedal, and the FREQ parameter can be adjusted.Even if another effect type is currently selectedfor the MODULATION module, the effect typeis temporarily switched to P-WAH.
● PITCH The expression pedal functions as a pitchshifter. The effect type P-PIT (pedal pitch) ofthe MODULATION module is assigned to thepedal, and pitch can be adjusted. Even if anothereffect type is currently selected for the
Lit
Out(Pedal is inactive)

ZOOM 707II GUITAR24
MODULATION module, the effect type istemporarily switched to P-PIT.
● MOD The effect type currently selected for theMODULATION module is adjusted by thepedal. Which parameter is controlled dependson the effect type.
● GAIN The distortion gain is adjusted by the pedal. TheGAIN parameter of the DRIVE module (forsome effect types the RESONANCE/TOPparameter) is assigned to the pedal.
● REV The effect type currently selected for theDLY/REV module is adjusted by the pedal.Which parameter is controlled depends on theeffect type.
● VOL The master volume is adjusted by the pedal.
● SAMPLER The sampler function is switched on/off by thepedal. Pushing the pedal all the way downtoggles between sampler on ([PEDAL] LED lit)and sampler off ([PEDAL] LED flashed).
Also if a module is currently off, selecting itwith the [PEDAL] key will cause its [PEDAL]LED to light and the module will temporarilycome on. If a patch is stored in this condition,the module will be stored as ON.
The actual parameter that is controlled by thepedal depends on the effect type. For details, seep. 33 – 38.
The above procedure for assigning a module/effecttype to the expression pedal can be carried out alsoin edit mode.
3. Press the [EDIT] key to activate theedit mode.
4. Use the MODULE [E]/[R] keys toselect the TOTAL module.
5. Press the [EDIT] key once more.
The key lights up in green. In this condition,parameter knobs 2 and 3 have the followingfunctions.
6. Use parameter knobs 2 and 3 to setthe PDLMIN value (when pedal is fullyraised) and PDLMAX value (whenpedal is fully lowered). The settingrange for both values is 0 – 10.
When you operate parameter knob 2, theindication "PDLMIN" appears on the display.When you operate parameter knob 3, theindication "PDLMAX" appears on the display.The 0 – 10 value is shown on the [BANK/PATCH] indicator.
Setting PDLMIN or PDLMAX to 0 means thatthe parameter assigned to the pedal will be atthe minimum value. Setting PDLMIN orPDLMAX to 10 means that the parameterassigned to the pedal will be at the maximumvalue.
When the 707II is in the default condition,PDLMIN is set to 0 and PDLMAX is set to 10.As the pedal is depressed, the parameter valuegradually increases from minimum tomaximum.
MAX=10
MIN=0
Lit Parameter knob 2Sets the value for the fully raised position of the pedal.
Parameter knob 3Sets the value for the fully lowered position of the pedal.
HINT
OtherFunctions

25
For example, when PDLMIN is set to 4 andPDLMAX to 8, the parameter adjustment rangewill be limited as shown in the illustrationbelow.
When PDLMIN is set to 7 and PDLMAX to 2,pushing the pedal decreases the parametervalue, and the range is as shown below.
7. Press the [STORE/EXECUTE] key tostore the patch.
The module which is assigned to the pedal willautomatically be stored as ON.
8. In play mode, move the pedal whileplaying your guitar.
The parameter assigned to the pedal changes.
9. Push the pedal fully down.
The module which is assigned to the pedal isswitched between on and off. If the pedal isassigned to the sampler, the sampler function isswitched on or off.
If the pedal is assigned to the volume, pushingthe pedal fully down does not perform anyswitching action.
NOTE
MAX=2
MIN=7
MAX=8
MIN=4
ZOOM 707II GUITAR
Adjusting the Expression Pedal
The expression pedal is adjusted for optimum operation at the factory, but sometimes,readjustment may be necessary. If pushing the pedal fully down does not have a strongeffect, or if the volume or sound changes excessively even when the pedal is only lightlypushed, adjust the pedal as follows.
1. Turn power to the 707II on whilekeeping the [PEDAL] key depressed.
The indication "MIN" appears on the display.
2. With the expression pedal fully raised,press the [STORE/EXECUTE] key.
The display indication changes to "MAX".
3. Push the expression pedal fully downand then lift your foot off the pedal.
The pedal goes back a little.
4. Press the [STORE/EXECUTE] key.
The adjustment is completed, and the unitreturns to the play mode.
• The position of the pedal in step 3 determines theon/off switching point. If you want the pedal toperform on/off switching with a lighter touch, setthe pedal to a somewhat higher position.
• If the indication "ERROR" appears, return to step2 and repeat the procedure.
HINT
Push strongly, so that pedal touches here.
When foot is lifted, pedal returns slightly.
MAX
OtherFunctions

Storing Rhythm Patterns and Samples as Part of a Patch
26
By assigning rhythm patterns to patches, youcan have the rhythm change in sync with thepatches.
1. In play mode, select the patch towhich you want to assign a rhythmpattern, and press the [EDIT] key.
2. Use the MODULE [E]/[R] keys toselect the TOTAL module.
3. Press the [EDIT] key once more.
The [EDIT] key lights up in green. You cannow use parameter knob 1 to select the rhythmpattern to assign to the patch.
4. Use parameter knob 1 to select thedesired rhythm pattern.
The pattern name appears on the display. Youcan play the pattern by pressing the [R/P] key.
Depending on the rhythm pattern type selectedhere (intro, ending, other), the pattern playbackoperation when switching patches will differ.
5. Press the [STORE/EXECUTE] key tostore the patch.
Assign other rhythm patterns to other patches inthe same way.
6. When all patches have been prepared,press the [PATCH SYNC] key so thatthe LED of the key is lit.
When the [PATCH SYNC] key is set to ON,patches and rhythm patterns are switched insync.
When the [PATCH SYNC] key is set to OFF, therhythm pattern assignment to the patches has noeffect.
7. Call up the patch to which the desiredrhythm pattern was assigned.
When the [PATCH SYNC] key is set to ON, theoperation when switching patches depends onthe type of rhythm pattern that has beenassigned.
● Intro rhythm pattern (INTRO 1 – 9) When a patch is switched, rhythm pattern playstarts automatically. The pattern continues toplay until the [R/P] key is pressed or until youswitch to another patch.
● Ending rhythm pattern (ENDING 1 – 6) After switching a patch, rhythm pattern playbegins if you press the [R/P] key. The patternautomatically stops at the end of the pattern.
● Other rhythm pattern After switching a patch, rhythm pattern playbegins if you press the [R/P] key. The patterncontinues to play until the [R/P]key is pressedagain or until you switch to another patch.
NOTE
HINT
Lit Parameter knob 1Selects the rhythm pattern to assign to the patch
Assigning a rhythm pattern toa patch
ZOOM 707II GUITAR
The patches of the 707II can contain not only information about effect type and parametersettings but also about rhythm patterns and samples stored on a SmartMedia card. Usingthis capability, you can quickly switch rhythm patterns on the fly, or you can have the samesample play every time you call up a certain patch.
OtherFunctions
27
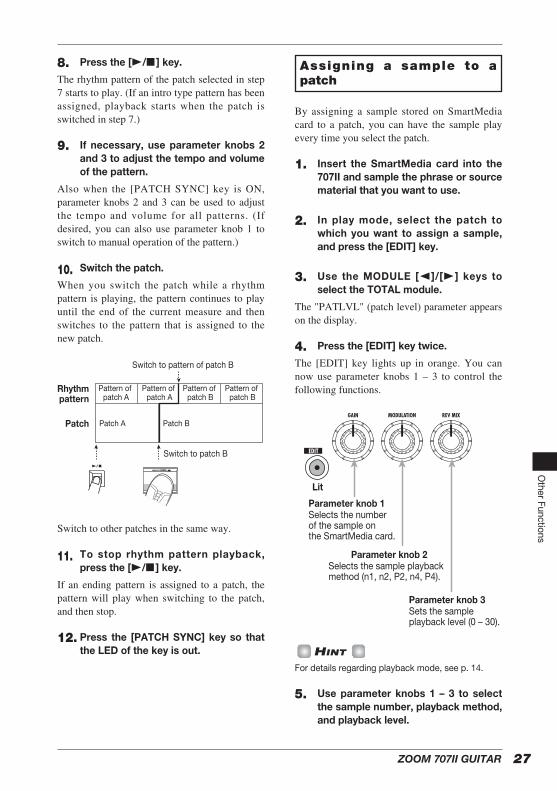
8. Press the [R/P] key.
The rhythm pattern of the patch selected in step7 starts to play. (If an intro type pattern has beenassigned, playback starts when the patch isswitched in step 7.)
9. If necessary, use parameter knobs 2and 3 to adjust the tempo and volumeof the pattern.
Also when the [PATCH SYNC] key is ON,parameter knobs 2 and 3 can be used to adjustthe tempo and volume for all patterns. (Ifdesired, you can also use parameter knob 1 toswitch to manual operation of the pattern.)
10. Switch the patch.
When you switch the patch while a rhythmpattern is playing, the pattern continues to playuntil the end of the current measure and thenswitches to the pattern that is assigned to thenew patch.
Switch to other patches in the same way.
11. To stop rhythm pattern playback,press the [R/P] key.
If an ending pattern is assigned to a patch, thepattern will play when switching to the patch,and then stop.
12. Press the [PATCH SYNC] key so thatthe LED of the key is out.
By assigning a sample stored on SmartMediacard to a patch, you can have the sample playevery time you select the patch.
1. Insert the SmartMedia card into the707II and sample the phrase or sourcematerial that you want to use.
2. In play mode, select the patch towhich you want to assign a sample,and press the [EDIT] key.
3. Use the MODULE [E]/[R] keys toselect the TOTAL module.
The "PATLVL" (patch level) parameter appearson the display.
4. Press the [EDIT] key twice.
The [EDIT] key lights up in orange. You cannow use parameter knobs 1 – 3 to control thefollowing functions.
For details regarding playback mode, see p. 14.
5. Use parameter knobs 1 – 3 to selectthe sample number, playback method,and playback level.
HINT
Lit
Parameter knob 2Selects the sample playback method (n1, n2, P2, n4, P4).
Parameter knob 1Selects the number of the sample on the SmartMedia card.
Parameter knob 3Sets the sample playback level (0 – 30).
Assigning a sample to apatch
Rhythmpattern
Patch
Switch to pattern of patch B
Switch to patch B
Pattern of patch A
Patch A Patch B
Pattern of patch A
Pattern of patch B
Pattern of patch B
ZOOM 707II GUITAR
OtherFunctions

Using SmartMedia card (Utility Mode)
28
If you want to check out the sample, press the[SAMPLER] key to activate the sampler mode,and press the [W] foot switch to play thecurrently selected sample.
6. Press the [STORE/EXECUTE] key tostore the patch.
Assign other samples to other patches in thesame way.
7. When all patches have been prepared,select a patch in play mode to which asample was assigned.
8. Press the [SAMPLER] key to activatethe sampler mode.
For a patch where the expression pedal isassigned to SAMPLER, you can also push theexpression pedal fully down to set the samplerfunction to ON.
9. Press the [W] foot switch.
The sample assigned to the patch is played.
10. Use the MODULE [E]/[R] keys, and[W]/[Q] foot switches to control play/stop/rewind/fast-forward.
11. Press the [SAMPLER] key to turn thesampler mode off.
ZOOM 707II GUITAR
A SmartMedia card inserted in the 707II can hold up to five groups of patches and 60samples. This section describes the utility mode that provides various SmartMedia cardrelated functions.
The steps for various utility mode functions aresimilar, as described below.
1. Verify that a SmartMedia card isinserted in the card slot.
When a SmartMedia card is inserted, the[SMART MEDIA] LED is lit. (For informationon how to insert a SmartMedia card, see p. 6.)
2. In play mode, press the [UTILITY] key.
The 707II enters the utility mode. Theindication "LOAD" appears on the display.
3. Use the TYPE [W]/[Q] keys to call upthe desired function.
The utility mode comprises the followingfunctions.
● LOAD (Load patch) Loads a single patch stored on a SmartMediacard into the memory of the unit (USER group).
● SAVE (Save patch) Stores a single patch from the memory of theunit (USER group) on a SmartMedia card.
● ALLOAD (Load patch group) Loads an entire patch group stored on aSmartMedia card into the memory of theunit (USER group).
● ALSAVE (Save patch group) Stores all patches of the USER group from thememory of the unit on a SmartMedia card.
● P DEL (Delete patch group) Deletes a patch group stored on a SmartMedia card.
● SP DEL (Delete sample) Deletes a sample stored on a SmartMediacard.
● FORMAT Formats a SmartMedia card card.
LOAD
Basic utility mode operationsteps
OtherFunctions

29
4. Press the [STORE/EXECUTE] key.
The setting screen for the function selected instep 3 appears.
The subsequent steps depend on the selectedfunction. For details, see the respective sections.
Storing a single patch on aSmartMedia card
You can store a single patch from the internalmemory of the 707II on a SmartMedia card.
1. In play mode, select the patch frominternal memory that you want tostore.
A patch that is currently being edited cannot bestored on the SmartMedia card. You must storethe patch in internal memory first.
2. Activate utility mode and select"SAVE". Then press the [STORE/EXECUTE] key.
The indication "GROUP" appears on thedisplay, and the [BANK/PATCH] indicatorshows the group number (1 – 5) for storing. If a"*" is shown after "GROUP", there are patchesstored in that group.
3. Use the TYPE [W]/[Q] keys to selectthe patch group (1 – 5) for storing, andthen press the [STORE/EXECUTE]key.
One SmartMedia card can hold up to five patchgroups (with 60 patches per group). Pressing the[STORE/EXECUTE] key confirms the storetarget group. The indication "SAVE" appears onthe display, and the [BANK/PATCH] indicatorshows the store target bank (A – F) and patchnumber (0 – 9).
4. Use the TYPE [W ]/[Q ] keys and[W]/[Q] foot switches to select thedesired bank (A – F) and patchnumber (0 – 9) in the patch group.
5. Press the [STORE/EXECUTE] key.
The indication "SURE?" appears on the display.
6. To carry out the operation, press the[STORE/EXECUTE] key once more.
The single patch is stored on the SmartMediacard. When the process is completed, the unitreverts to play mode.
If you press the [CANCEL/EXIT] key insteadof the [STORE/EXECUTE] key, the storeoperation is canceled.
• Any patch that is present in the target location onthe SmartMedia card will be overwritten. Takecare not to accidentally overwrite a patch thatyou want to keep.
• Never insert or remove the SmartMedia cardwhile power to the unit is turned on. Otherwise alldata on the card may be lost.
• If the target group is empty, all patches of theUSER group are stored.
Loading a single patch from aSmartMedia card
You can load a single patch from a SmartMediacard into the internal memory of the 707II.
1. In play mode, select the patch ininternal memory into which you wantto load the patch.
2. Activate utility mode and select"LOAD". Then press the [STORE/EXECUTE] key.
The indication "GROUP" appears on thedisplay, and the [BANK/PATCH] indicatorshows the group number (1 – 5) from which toload.
3. Use the TYPE [W]/[Q] keys to selectthe patch group (1 – 5) on theSmartMedia card from which to load,and then press the [STORE/EXECUTE] key.
The indication "LOAD" appears on the display,
NOTE
Utility mode functions
ZOOM 707II GUITAR
OtherFunctions

30
and the [BANK/PATCH] indicator shows theload source bank (A – F) and patch number (0 –9).
4. Press the [STORE/EXECUTE] key.
The indication "SURE?" appears on the display.
5. To carry out the operation, press the[STORE/EXECUTE] key once more.
The single patch is loaded from the SmartMediacard into the memory of the unit. When theprocess is completed, the unit reverts to playmode.
If you press the [CANCEL/EXIT] key insteadof the [STORE/EXECUTE] key, the loadoperation is canceled.
• Any patch that is present in the target locationwill be overwritten. Take care not to accidentallyoverwrite a patch that you want to keep.
• Never insert or remove the SmartMedia cardwhile power to the unit is turned on. Otherwise alldata on the card may be lost.
Storing a group on a SmartMediacard
You can store the USER group of the 707II on aSmartMedia card as a patch group.
1. In utility mode, select "ALSAVE" andpress the [STORE/EXECUTE] key.
The indication "GROUP" appears on thedisplay, and the [BANK/PATCH] indicatorshows the group number (1 – 5) for storing.
2. Use the TYPE [W]/[Q] keys to selectthe patch group (1 – 5) for storing, andthen press the [STORE/EXECUTE]key.
The indication "SURE?" appears on the display.
3. To carry out the operation, press the[STORE/EXECUTE] key once more.
The entire USER group of the 707II is stored onthe SmartMedia card. When the process iscompleted, the unit reverts to play mode.
If you press the [CANCEL/EXIT] key insteadof the [STORE/EXECUTE] key, the storeoperation is canceled.
Any patch group that was stored on theSmartMedia card in that position wil l beoverwritten. Be careful not to overwrite a groupthat you wish to keep.
Loading a group from aSmartMedia card
You can load a patch group stored on aSmartMedia card into the memory of the unit.
1. In utility mode, select "ALLOAD" andpress the [STORE/EXECUTE] key.
The indication "GROUP" appears on thedisplay, and the [BANK/PATCH] indicatorshows the group number (1 – 5) for loading.
2. Use the TYPE [W]/[Q] keys to selectthe patch group (1 – 5) for loading,and then press the [STORE/EXECUTE] key.
The indication "SURE?" appears on the display.
3. To carry out the operation, press the[STORE/EXECUTE] key once more.
The entire selected patch group is loaded fromthe SmartMedia card into the USER group ofthe 707II. When the process is completed, theunit reverts to play mode.
If you press the [CANCEL/EXIT] key insteadof the [STORE/EXECUTE] key, the loadoperation is canceled.
All patches currently stored in the USER group ofthe unit will be overwritten. Take care not toaccidentally overwrite patches that you want tokeep.
NOTE
NOTE
NOTE
ZOOM 707II GUITAR
OtherFunctions
31
Deleting a group from aSmartMedia card
You can delete any group stored on aSmartMedia card.
1. In utility mode, select "P DEL" andpress the [STORE/EXECUTE] key.
The indication "GROUP" appears on thedisplay, and the [BANK/PATCH] indicatorshows the group number (1 – 5) for deleting.
2. Use the TYPE [W]/[Q] keys to selectthe patch group (1 – 5) for deleting.
3. Press the [STORE/EXECUTE] key.
The indication "SURE?" appears on the display.
4. To carry out the operation, press the[STORE/EXECUTE] key once more.
The entire selected patch group is deleted fromthe SmartMedia card. When the process iscompleted, the unit reverts to play mode.
If you press the [CANCEL/EXIT] key insteadof the [STORE/EXECUTE] key, the deleteoperation is canceled.
A deleted group cannot be restored. Take carenot to accidentally delete a group that you wantto keep.
Deleting a sample from aSmartMedia card
You can delete any sample that was stored on aSmartMedia card while using the samplerfunction.
No special steps must be performed by the userfor storing samples on a SmartMedia card.Samples are stored automatically when theSmartMedia card is inserted and the samplerfunction is used.
1. In utility mode, select "SP DEL" andpress the [STORE/EXECUTE] key.
The indication "SP NO" appears on the display,and the [BANK/PATCH] indicator shows thesample number (1 – 60) for deleting.
2. Use the TYPE [W]/[Q] keys to selectthe sample to erase from theSmartMedia card.
3. Press the [STORE/EXECUTE] key.
The indication "SURE?" appears on the display.
4. To carry out the operation, press the[STORE/EXECUTE] key once more.
The selected sample is deleted from theSmartMedia card. When the process iscompleted, the unit reverts to play mode.
If you press the [CANCEL/EXIT] key insteadof the [STORE/EXECUTE] key, the deleteoperation is canceled.
A deleted sample cannot be restored. Take carenot to accidentally delete a sample that you wantto keep.
Formatting a SmartMedia card
"Formatting" is the process of preparing amedium such as SmartMedia card for readingand writing data. Before an off-the-shelfSmartMedia card can be used in the 707II, itmust first be formatted in the unit.
1. In utility mode, select "FORMAT" andpress the [STORE/EXECUTE] key.
The indication "EXEC?" appears on the display.
2. Press the [STORE/EXECUTE] keyonce more.
The indication "SURE?" appears on the display.
NOTE
NOTE
NOTE
ZOOM 707II GUITAR
OtherFunctions
32
3. To carry out the operation, press the[STORE/EXECUTE] key once more.
The formatting process starts. When the processis completed, the unit reverts to play mode. If you press the [CANCEL/EXIT] key insteadof the [STORE/EXECUTE] key, the formattingoperation is canceled.
Formatting erases all data that may be present onthe SmartMedia card. Take care not toaccidentally format a card which already containsdata that you want to keep.
SmartMedia card error messages
While using a SmartMedia card, one of thefollowing error indications may appear. Themeaning is explained below.
● [SMART MEDIA] LED does not light A SmartMedia card with a capacity of lessthan 8 MB may have been inserted.
● ERROR • The card was removed or inserted (during
sampler operation). • The card was removed (in utility mode).
● WP ERR A write protect seal is attached to theSmartMedia card. This prevents writing tothe card.
● FULL There is not enough free capacity on theSmartMedia card.
● NODATA • There are no sampler data (during sampler
operation). • There are no patch data or sampler data (in
utility mode). ● NO USR
Loading cannot be performed, because theload target is not the USER group (in utilitymode).
● NO CARD SmartMedia card is not inserted.
● CD ERR The card is defective, not inserted correctly,or not properly formatted.
NOTE
ZOOM 707II GUITAR
All Initialize/Factory Recall
The patches in the USER group can be returned to the original condition at any time, even ifyou have changed them. The All Initialize function returns all patches in the USER group to the default condition.Factory Recall can be used to reset only specific patches in the USER group to the defaultsettings.
1. Turn power to the 707II on whilepressing the [STORE/EXECUTE] key.
The indication "ALINIT" appears on the display.
● To perform All Initialize, proceed to step 2.
● To perform Factory Recall, use the TYPE[W]/[Q] keys and [W]/[Q] foot switches toselect the patch that you want to return to thefactory default condition. (The bank and patchnumber are shown on the [BANK/PATCH]indicator.)
2. Press the [STORE/EXECUTE] keyonce more.
All Initialize or Factory Recall is carried out. IfAll Initialize was carried out, the unitautomatically returns to the play mode.
The contents of patches stored by the user willbe lost when the defaults are restored. To cancelAll Initialize/Factory Recall, press the[CANCEL/EXIT] key before step 2.
OtherFunctions

ZOOM 707II GUITAR
Effect Types and Parameters
33
Universal type compressor that controls attack rate intwo stages.
ATTACK(FAST/SLOW) FS, SL
Adjusts time interval from signal onset to start ofcompression.
SENS 0 – 10
Adjusts compressor sensitivity.
LEVEL 1 – 8
Adjusts signal level after passing module.
Isolator that allows cutting or emphasizing a particularband. There are two pages with parameters. Use the[EDIT] key to switch between pages.
■ PAGE 1HIGH OFF, -12 – 12
Adjusts high-range mix.
MID OFF, -12 – 12
Adjusts midrange mix.
LOW OFF, -12 – 12
Adjusts low-range mix.
■ PAGE 2FREQ L 5 – 8.0, 0.0
(5=50Hz, 8.0=8kHz, 0.0=10kHz)
Adjusts crossover frequency for low and mid range.
FREQ H 5 – 8.0, 0.0
Adjusts crossover frequency for mid and high range.
LEVEL 1 – 8
Adjusts signal level after passing module.Parameter 3
Parameter 2
Parameter 1
Parameter 3
Parameter 2
Parameter 1
ISOLTR (Isolator) TYPE 2
Parameter 3
Parameter 2
Parameter 1
COMP (Compressor) TYPE 1
EffectTypesand
Param
eters
In this section, all effect types and parameters of the modules in the 707II are explained. The symbol indicates a parameter that is assigned to the expression pedal and can bechanged by moving the pedal (→ p. 23). The symbols – indicate the parameters thatcan be controlled by parameter knobs 1 – 3 in play mode.
BOOSTER Module
ISOLATOR/COMP (Isolator/Compressor) Module
DRIVE Module
GAIN 1, 2
Selects boost setting. Parameter 1BOOSTERTYPE 1
The isolator allows cutting or emphasizing a particular band. The compressor serves to reduce excessive signal levels.
This module amplifies the input signal. The amount of boost can be set to Low (1) or High (2).
Classic bluesy sound of a built-in tube amp
Clean sound of a built-in tube amp
Drive sound of a built-in tube amp
Old-style sound of a British tube stack amp
Crunch sound of a British tube stack amp
Drive sound of a British tube stack amp
Old-style sound of a tube combo amp with gutsymidrange
Drive sound of a tube stack amp with gutsy midrange
Metal sound of a tube stack amp with gutsy midrange
Old-style crunch sound
Clean and bright combo amp sound
Warm and powerful combo amp sound MACHMODERN
JAZZ CSTANDARD
VX CRUCLASSICCLEANTYPE 4
BG MTLMODERN
BG DRVSTANDARD
BG OLDCLASSICBGTYPE 3
MS DRVMODERN
MS CRUSTANDARD
MS OLDCLASSICMSTYPE 2
FD DRVMODERN
FD CLNSTANDARD
FD BLUCLASSICFDRTYPE 1
This module comprises 30 types of distortion and acoustic simulator effects. The [DRIVE] knob allows choosing theamplifier or compact effect type, and the [DRIVE VARIATION] key allows choosing the tone or distortion variation.

ZOOM 707II GUITAR
EffectTypesand
Param
eters
EQ (Equalizer) Module
34
High-gain tube preamp sound
Tube stack amp sound for heavy metal
Warm and modern tube stack amp sound
ZOOM's original 9002 type sound
ZOOM's traditional rich lead sound
ZOOM's original powerful amp type sound
Dry overdrive sound
Overdrive sound with cabinet character
Overdrive sound with wide application range, frombooster to hard distortion
Characteristic dry distortion sound
Distortion sound with extreme signal boost
Extreme distortion sound * Parameters for TYPE 1 - 8 are the same.
GAIN 1 – 30
Adjusts distortion intensity.
TONE 0 – 10
Adjusts tone.
LEVEL 1 – 8
Adjusts signal level after passing module.
Older-style, high-gain aggressive fuzz sound
Nostalgic sixties style standard fuzz sound
ZOOM original fuzz sound with oscillation control * For this type, the action of parameter 2 differs for
WILDFZ/FUZZ and UF 1.
GAIN 1 – 30
Adjusts distortion intensity.
(WILDFZ/FUZZ) TONE 0 – 10
Adjusts tone.
(UF1) RESO 0 – 10
Adjusts sound character.
LEVEL 1 – 8
Adjusts signal level after passing module.
Traditional metal style sound with prominent midrange
ZOOM's original metal sound with low range and highrange boost
Metal sound for 7-string guitar
GAIN 1 – 30
Adjusts distortion intensity.
TONE 0 – 10
Adjusts tone.
LEVEL 1 – 8
Adjusts signal level after passing module.
Changes the sound of an electric guitar to that of anacoustic guitar. The [DRIVE VARIATION] keyswitches the tone (fat, standard, bright).
TOP 1 – 10
Adjusts characteristic acoustic guitar string sound.
BODY 1 – 10
Adjusts body resonance.
LEVEL 1 – 8
Adjusts signal level after passing module. Parameter 3
Parameter 2
Parameter 1
AC BRIMODERNAC STDSTANDARDAC FATCLASSIC
ACOUSTIC (Acoustic Simulator) TYPE 11
Parameter 3
Parameter 2
Parameter 1
MT 7THMODERN
METALSTANDARD
MTZCLASSIC
METALTYPE 10
Parameter 3
Parameter 2
Parameter 2
Parameter 1
UF 1MODERN
FUZZSTANDARD
WILDFZCLASSIC
FUZZTYPE 9
Parameter 3
Parameter 2
Parameter 1
HP DSTMODERN
TB DSTSTANDARD
V-DISTCLASSICDISTTYPE 8
PD 1MODERN
ODSTANDARD
V-ODCLASSICOVER DRIVETYPE 7
Z PWRMODERN
Z LEADSTANDARD
9002CLASSICZOOM (ZOOM original effects) TYPE 6
SL DRVMODERN
PV DRVSTANDARD
MP 1CLASSICHI-GAINTYPE 5
This is a 4-band equalizer. There are two pages with parameters. Use the [EDIT] key to switch between pages.
■ PAGE 1PRESEN -12 – 12
Adjusts boost/cut in high range (center frequency 8 kHz).
HIGH -12 – 12
Adjusts boost/cut in mid-high range (center frequency3.125 kHz).
MIDDLE -12 – 12
Adjusts boost/cut in midrange (center frequency 800 Hz).
■ PAGE 2LOW F 1, 2
Selects center frequency for low range. 1 = 63 Hz, 2 =125 Hz.
Parameter 1
Parameter 3
Parameter 2
Parameter 1
ZOOM 707II GUITAR 35
LOW G -12 – 12
Adjusts boost/cut in low range selected with LOW F. LEVEL 1 – 8
Adjusts signal level after passing equalizer module. Parameter 3Parameter 2
EffectTypesand
Param
eters
ZNR/D GATE (ZOOM Noise Reduction/D Gate) Module
CABINET Module
MODULATION Module
This module serves for cutting noise during play pauses. It offers a choice of noise reduction that lowers only noise and anoise gate that cuts the sound off completely.
The original noise reduction developed by ZOOM cutsnoise during performance pauses without impairing thesound quality.
Vintage type noise gate with distinctive closurecharacteristics.
1 – 8
Adjusts sensitivity. Set the value for maximum noisereduction without producing an unnatural cut of theinstrument sound.
Parameter 1
D GATE TYPE 2ZNR (ZOOM Noise Reduction) TYPE 1
Simulates a small amp cabinet.
Simulates a cabinet with ZOOM's original soundcharacter.
Simulates a bright combo amp cabinet.
Simulates a conventional combo amp cabinet.
Simulates an EV speaker in a combo amp cabinet.
Simulates a stack amp cabinet.
Simulates an EV speaker in a stack amp cabinet.* Parameters for TYPE 1 - 7 are the same.
DEPTH 0 – 10
Adjusts the intensity of the cabinet effect. Parameter 1
STK+EV (Stack + EV) TYPE 7
STK (Stack) TYPE 6
CMB+EV (Combo + EV) TYPE 5
CMB (Combo) TYPE 4
BR CMB (Bright Combo) TYPE 3
Z BOX (ZOOM Box) TYPE 2
BOX TYPE 1
Simulates the sound of a speaker cabinet.
Adds vibration and spaciousness to the sound.
DEPTH 0 – 10
Adjusts modulation intensity.
RATE 1 – 30
Adjusts modulation speed.
MIX 0 – 30
Adjusts mixing balance of direct sound and effect sound.
Simulates the warm sound of a vintage effect.
DEPTH 0 – 10
Adjusts modulation intensity.
RATE 1 – 30
Adjusts modulation speed.
MIX 0 – 30
Adjusts mixing balance of direct sound and effectsound.
Produces a unique, undulating sound.
DEPTH 0 – 10
Adjusts modulation intensity.
RATE 1 – 30
Adjusts modulation speed.
FB -10 – 10
Adjusts feedback ratio. Higher values in positive ornegative direction result in stronger characteristics.
Produces a swooshing sound.
POSI AF, bF
Selects connection point of MOD module. • AF: After CABINET module • bF: Before DRIVE module
RATE 1 – 30
Adjusts modulation speed. Parameter 2
Parameter 1
PHASE (Phaser) TYPE 4
Parameter 3
Parameter 2
Parameter 1
FLANGE (Flanger) TYPE 3
Parameter 3
Parameter 2
Parameter 1
V-CHO (Vintage Chorus) TYPE 2
Parameter 3
Parameter 2
Parameter 1
CHORUS TYPE 1
This module contains modulation type effects such as chorus and flanger, effects that drastically change the sound suchas wow, filter, and ring modulator, and pitch altering effects such as pitch shift and vibrato.
ZOOM 707II GUITAR36
COLOR 1 – 4
Selects sound character.
Periodically varies the level of the sound.
DEPTH 0 – 10
Adjusts modulation intensity.
RATE 1 – 30
Adjusts modulation speed.
CLIP 0 – 10
Adjusts modulation waveform clip. Larger values resultin more intense modulation.
This stereo panning effect periodically moves the soundback and forth between right and left when twoamplifiers are used. When one amplifier is used, theeffect is a tremolo effect.
WIDTH 0 – 10
Adjusts effect width.
RATE 1 – 30
Adjusts modulation speed.
CLIP 0 – 10
Adjusts modulation waveform clip. Larger values resultin more intense modulation.
This effect gives a varying wah sound that depends onthe picking intensity.
POSI AF, bF
Selects connection point of MOD module. • AF: After CABINET module • bF: Before DRIVE module
RESO 1 – 10
Adjusts wah effect intensity
SENS -10 – -1, 1 – 10
Adjusts sensitivity. Negative values result in downwardwah.
This effect lets you control wah with the expression pedal.
POSI AF, bF
Selects connection point of MOD module. • AF: After CABINET module • bF: Before DRIVE module
FREQ 1 – 10
Adjusts wah effect center frequency.
DIRMIX 0 – 10
Adjusts direct sound mix.
This is a special effect with step-like filter characteristics.
DEPTH 0 – 10
Adjusts modulation intensity.
RATE 1 – 30
Adjusts modulation speed.
RESO 0 – 10
Adjusts wah effect intensity.
This is a pitch shifter with a range of 2 octave up and 1octaves down.
SHIFT -12 – 1, dt, 1 – 12, 24
Sets the pitch shift amount. The "dt" setting results in adetune effect.
TONE 0 – 10
Adjusts effect tone.
BAL 0 – 30
Adjusts balance between direct sound and effect sound.Higher values emphasize effect sound.
This effect lets you vary the pitch in real time, using theexpression pedal.
TYPE 1 – 16
Selects the pedal pitch type. Depending on the type, thepitch differs when pushing the pedal down or whenraising it.
TONE 0 – 10
Adjusts effect tone.
Produces a metallic sound.
POSI AF, bF
Selects connection point of MOD module. • AF: After CABINET module • bF: Before DRIVE module
RATE 1 – 30
Sets frequency for ring modulation effect. The tone changes depending on the frequency setting.
BAL 0 – 30
Adjusts balance between direct sound and effect sound.
This effect automatically creates a "violin playing"sound.
POSI AF, bF
Selects connection point of MOD module. • AF: After CABINET module • bF: Before DRIVE module
TIME 1 – 30
Adjusts attack speed.
CURVE 1 – 10
Adjusts attack curve. Parameter 3
Parameter 2
Parameter 1
SLOW-A (Slow Attack) TYPE 13
Parameter 3
Parameter 2
Parameter 1
RING M (Ring Modulator) TYPE 12
Parameter 2
123456789
10111213141516
-100 cent Original sound only
DOUBLING Detune + DRY
0 cent +1 octave
0 cent -2 octaves
-1 octave + DRY +1 octave + DRY -700 cent + DRY 500 cent + DRY
-∞ (0 Hz) + DRY +1 octave
-∞ (0 Hz) + DRY +1 octave + DRY
Original sound only -100 cent
Detune + DRY DOUBLING
+1 octave 0 cent
-2 octaves 0 cent
+1 octave + DRY -1 octave + DRY 500 cent + DRY -700 cent + DRY
+1 octave -∞ (0 Hz) + DRY +1 octave + DRY -∞ (0 Hz) + DRY
Pedal minimum value
Pedal maximum value
P-PITTYPE
Parameter 1
P-PIT (Pedal Pitch) TYPE 11
Parameter 3
Parameter 2
Parameter 1
PITCH (Pitch Shifter) TYPE 10
Parameter 3
Parameter 2
Parameter 1
STEPTYPE 9
Parameter 3
Parameter 2
Parameter 1
P-WAH (Pedal Wah) TYPE 8
Parameter 3
Parameter 2
Parameter 1
A-WAH (Auto Wah) TYPE 7
Parameter 3
Parameter 2
Parameter 1
A-PAN (Auto-Pan) TYPE 6
Parameter 3
Parameter 2
Parameter 1
TREMOL (Tremolo) TYPE 5
Parameter 3
EffectTypesand
Param
eters
ZOOM 707II GUITAR 37
This effect tracks the picking action and controls filteropening accordingly.
POSI AF, bF
Selects connection point of MOD module. • AF: After CABINET module • bF: Before DRIVE module
TIME 1 – 30
Adjusts filter attack speed.
RANGE 1 – 10
Sets adjustable filter range.
Delay effect with a delay time of up to 500 milliseconds.
TIME 1 – 50
Adjusts delay time in 10-ms steps.
FB 0 – 10
Adjusts number of repeat cycles (feedback) for delaysound.
MIX 0 – 30
Adjusts effect sound level.
Long delay effect (up to 2 seconds) with warm sound.
TIME 1 – 50
Adjusts delay time in 10-ms steps up to 1 second and in100-ms steps up to 2 seconds.
FB 0 – 10
Adjusts number of repeat cycles (feedback) for delay sound.
MIX 0 – 30
Adjusts effect sound level.
This delay effect varies the delay time according to thepicking intensity.
SENS 1 – 50
Adjusts effect sensitivity.
FB -10 – 10
Adjusts number of repeat cycles (feedback) for delaysound.
BAL 0 – 30
Adjusts balance between direct sound and effect sound.
This is a combined tremolo and chorus effect.
TRMRAT 1 – 30
Adjusts tremolo speed.
CHORAT 1 – 30
Adjusts modulation speed of chorus effect.
CHOMIX 0 – 30
Adjusts chorus sound mix.
This is a combined ring modulator and vibrato effect.
RINRAT 1 – 30
Adjusts ring modulation effect frequency.
VIBRAT 1 – 30
Adjusts vibrato effect speed.
VIBDEP 0 – 10
Adjusts vibrato effect depth.
This is an automatic vibrato effect.
DEPTH 0 – 10
Adjusts effect depth.
RATE 1 – 30
Adjusts effect speed.
BAL 0 – 30
Adjusts balance between direct sound and effect sound. Parameter 3
Parameter 2
Parameter 1
VIBE (Vibrato) TYPE 20
Parameter 3
Parameter 2
Parameter 1
RINVIB (Ring Modulator + Vibrato) TYPE 19
Parameter 3
Parameter 2
Parameter 1
TRMCHO (Tremolo + Chorus) TYPE 18
Parameter 3
Parameter 2
Parameter 1
T-TRIP (Time Trip) TYPE 17
Parameter 3
Parameter 2
Parameter 1
ECHOTYPE 16
Parameter 3
Parameter 2
Parameter 1
DELAY TYPE 15
Parameter 3
Parameter 2
Parameter 1
FILTER TYPE 14
DLY/REV (Delay/Reverb) Module
This module comprises various spatial effects including delay and reverb.
This is a reverb effect which simulates the acoustics of aconcert hall.
This is a reverb effect which simulates the acoustics of aroom.
This is a reverb effect which simulates a spring typereverb machine. * Parameters for TYPE 1 - 3 are the same.
TIME 1 – 30
Adjusts reverb duration (reverb time).
TONE 0 – 10
Adjusts effect tone.
MIX 0 – 30
Adjusts reverb sound mix.
This is a monaural delay with a duration of up to 1.5seconds.
When two amplifiers are used, this serves as a ping-pong delay effect with a duration of up to 1.5 seconds.When one amplifier is used, the effect is a mono delay. * Parameters for TYPE 4 and 5 are the same.
TIME 1 – 99, 1.0 – 1.5
Adjusts delay time from 10 ms to 990 ms in 10-ms steps(1 - 99), and over 1 second in 100-ms steps (1.0 - 1.5).
Parameter 1
PP-DLY (Ping-Pong Delay) TYPE 5
MN-DLY (Mono delay) TYPE 4
Parameter 3
Parameter 2
Parameter 1
SPRING (Spring Reverb) TYPE 3
ROOM (Room Reverb) TYPE 2
HALL (Hall Reverb) TYPE 1
EffectTypesand
Param
eters

ZOOM 707II GUITAR38
FB 0 – 10
Adjusts number of repeat cycles (feedback) for delaysound.
MIX 0 – 30
Adjusts delay sound level.
This is a combined delay and hall reverb effect.
This is a combined delay and room reverb effect. * Parameters for DLYHAL and DLYROM are the same.
DLYTIM 1 – 50
Adjusts delay time in 10-ms steps.
DLYMIX 0 – 15
Adjusts delay sound mix.
REVMIX 0 – 15
Adjusts reverb sound mix.
This is a hold delay effect that lets you record a phraseof up to 2 seconds during a performance and play itback repeatedly. When "Mn" (Manual) is selected and a foot switch ispressed, recording is carried out until the switch ispressed again or until 2 seconds have elapsed.
TIME 1 – 99, 1.0 – 2.0, Mn
Adjusts recording time from 10 ms to 990 ms in 10-mssteps (1 - 99), and from 1.0 to 2.0 seconds in 100-mssteps (1.0 - 2.0). When "Mn" (Manual) is selected,recording is carried out for as long as a foot switch isdepressed (up to the maximum of 2 seconds).
MODE nL, So, rS
Selects playback mode for recorded phrase. • nL (Normal): Normal direction playback • So (Sound-on-sound): Recorded contents are played back
repeatedly to create an overlay. • rS (Reverse): Reverse direction playback
MIX 0 – 30
Adjusts effect sound mix. Parameter 3
Parameter 2
Parameter 1
HLDDLY (Hold Delay) TYPE 8
Parameter 3
Parameter 2
Parameter 1
DLYROM (Delay + Room Reverb) TYPE 7
DLYHAL (Delay + Hall Reverb) TYPE 6
Parameter 3
Parameter 2
TOTAL ModuleThe TOTAL module is not an independent effect module. Rather it serves to set parameters that affect all patches or theentire 707II. There are three pages with parameters. Use the [EDIT] key to switch between pages.
■ PAGE 1PATLVL 1 – 30
Sets final patch level. A setting of 25 means that inputsignal and output signal levels are equal.
Specifies input position.
Selects a character. Parameter knobs 2 and 3 let you input or edit a patchname. Knob 2 specifies the character input position, andknob 3 selects the alphanumeric character to be input atthat position.
■ PAGE 1PTN Pattern name
Selects rhythm pattern to be assigned to a patch. Fordetails on how to assign rhythm patterns to a patch, seep. 26.
PDLMIN 0 – 10
Sets minimum parameter value when expression pedalis fully raised.
PDLMAX 0 – 10
Sets maximum parameter value when expression pedalis fully lowered. For details on how to set the pedal range for each patch,see p. 23.
■ PAGE 3SP NO 1 – 60
Selects a sample to assign to a patch. For details on howto assign a sample to a patch, see p. 27.
SPMODE n1, n2, P2, n4, P4
Selects the sample playback mode, as follows. • n1 Normal speed playback • n2 Half tempo, half pitch playback • P2 Half tempo, normal pitch playback • n4 Quarter tempo, quarter pitch playback • P4 Quarter tempo, normal pitch playback
SP LVL 0 – 30
Adjusts sample playback level. Parameter 3
Parameter 2
Parameter 1
Parameter 3
Parameter 2
Parameter 1
' ( ) * + - / 0 1 2 3 4
5 6 7 8 9 < = > ? @ A B C
D E F G H I J K L M N O P
Q R S T U V W X Y Z \
(Space)
(Space)
Parameter 3
Parameter 2
Parameter 1
EffectTypesand
Param
eters
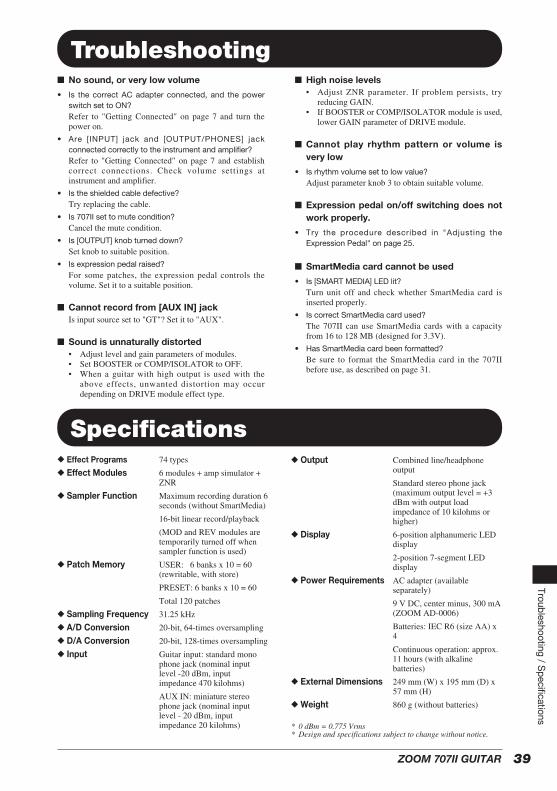
ZOOM 707II GUITAR 39
■ No sound, or very low volume
• Is the correct AC adapter connected, and the powerswitch set to ON?Refer to "Getting Connected" on page 7 and turn thepower on.
• Are [INPUT] jack and [OUTPUT/PHONES] jackconnected correctly to the instrument and amplifier?Refer to "Getting Connected" on page 7 and establishcorrect connections. Check volume settings atinstrument and amplifier.
• Is the shielded cable defective?Try replacing the cable.
• Is 707II set to mute condition?Cancel the mute condition.
• Is [OUTPUT] knob turned down?Set knob to suitable position.
• Is expression pedal raised?For some patches, the expression pedal controls thevolume. Set it to a suitable position.
■ Cannot record from [AUX IN] jack Is input source set to "GT"? Set it to "AUX".
■ Sound is unnaturally distorted • Adjust level and gain parameters of modules. • Set BOOSTER or COMP/ISOLATOR to OFF. • When a guitar with high output is used with the
above effects, unwanted distortion may occurdepending on DRIVE module effect type.
■ High noise levels • Adjust ZNR parameter. If problem persists, try
reducing GAIN. • If BOOSTER or COMP/ISOLATOR module is used,
lower GAIN parameter of DRIVE module.
■ Cannot play rhythm pattern or volume isvery low
• Is rhythm volume set to low value?Adjust parameter knob 3 to obtain suitable volume.
■ Expression pedal on/off switching does notwork properly.
• Try the procedure described in "Adjusting theExpression Pedal" on page 25.
■ SmartMedia card cannot be used
• Is [SMART MEDIA] LED lit?Turn unit off and check whether SmartMedia card isinserted properly.
• Is correct SmartMedia card used?The 707II can use SmartMedia cards with a capacityfrom 16 to 128 MB (designed for 3.3V).
• Has SmartMedia card been formatted?Be sure to format the SmartMedia card in the 707IIbefore use, as described on page 31.
Troubleshooting/S
pecifications
Troubleshooting
Specifications ◆ Effect Programs 74 types
◆ Effect Modules 6 modules + amp simulator +ZNR
◆ Sampler Function Maximum recording duration 6seconds (without SmartMedia)
16-bit linear record/playback
(MOD and REV modules aretemporarily turned off whensampler function is used)
◆ Patch Memory USER: 6 banks x 10 = 60(rewritable, with store)
PRESET: 6 banks x 10 = 60
Total 120 patches
◆ Sampling Frequency 31.25 kHz
◆ A/D Conversion 20-bit, 64-times oversampling
◆ D/A Conversion 20-bit, 128-times oversampling
◆ Input Guitar input: standard monophone jack (nominal inputlevel -20 dBm, inputimpedance 470 kilohms)
AUX IN: miniature stereophone jack (nominal inputlevel - 20 dBm, inputimpedance 20 kilohms)
◆ Output Combined line/headphoneoutput
Standard stereo phone jack(maximum output level = +3dBm with output loadimpedance of 10 kilohms orhigher)
◆ Display 6-position alphanumeric LEDdisplay
2-position 7-segment LEDdisplay
◆ Power Requirements AC adapter (availableseparately)
9 V DC, center minus, 300 mA(ZOOM AD-0006)
Batteries: IEC R6 (size AA) x4
Continuous operation: approx.11 hours (with alkalinebatteries)
◆ External Dimensions 249 mm (W) x 195 mm (D) x57 mm (H)
◆ Weight 860 g (without batteries)
* 0 dBm = 0.775 Vrms * Design and specifications subject to change without notice.
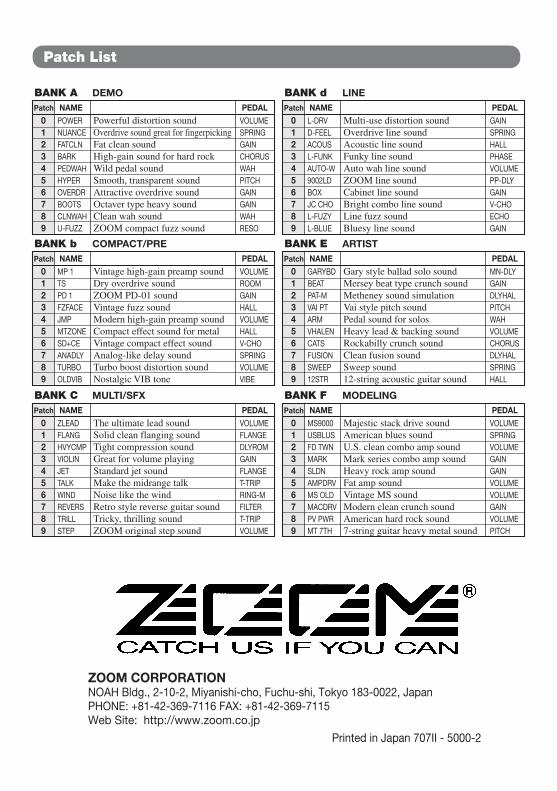
Patch List
ZOOM CORPORATIONNOAH Bldg., 2-10-2, Miyanishi-cho, Fuchu-shi, Tokyo 183-0022, JapanPHONE: +81-42-369-7116 FAX: +81-42-369-7115Web Site: http://www.zoom.co.jp
Printed in Japan 707II - 5000-2
Powerful distortion sound Overdrive sound great for fingerpicking Fat clean sound High-gain sound for hard rock Wild pedal sound Smooth, transparent sound Attractive overdrive sound Octaver type heavy sound Clean wah sound ZOOM compact fuzz sound
BANK APatch NAME PEDAL
DEMO
VOLUMESPRINGGAINCHORUSWAHPITCHGAINGAINWAHRESO
POWERNUANCEFATCLNBARKPEDWAHHYPEROVERDRBOOTSCLNWAHU-FUZZ
0123456789
Vintage high-gain preamp sound Dry overdrive sound ZOOM PD-01 sound Vintage fuzz sound Modern high-gain preamp sound Compact effect sound for metal Vintage compact effect sound Analog-like delay sound Turbo boost distortion sound Nostalgic VIB tone
BANK bPatch NAME PEDAL
COMPACT/PRE
VOLUMEROOMGAINHALLVOLUMEHALLV-CHOSPRINGVOLUMEVIBE
MP 1TS PD 1FZFACEJMPMTZONESD+CEANADLYTURBOOLDVIB
0123456789
The ultimate lead sound Solid clean flanging sound Tight compression sound Great for volume playing Standard jet sound Make the midrange talk Noise like the wind Retro style reverse guitar sound Tricky, thrilling sound ZOOM original step sound
BANK CPatch NAME PEDAL
MULTI/SFX
VOLUMEFLANGEDLYROMGAINFLANGET-TRIPRING-MFILTERT-TRIPVOLUME
ZLEADFLANGHVYCMPVIOLINJETTALKWINDREVERSTRILLSTEP
0123456789
Multi-use distortion sound Overdrive line sound Acoustic line sound Funky line sound Auto wah line sound ZOOM line sound Cabinet line sound Bright combo line sound Line fuzz sound Bluesy line sound
BANK dPatch NAME PEDAL
LINE
GAINSPRINGHALLPHASEVOLUMEPP-DLYGAINV-CHOECHOGAIN
L-DRVD-FEELACOUSL-FUNKAUTO-W9002LDBOXJC CHOL-FUZYL-BLUE
0123456789
Gary style ballad solo sound Mersey beat type crunch sound Metheney sound simulation Vai style pitch sound Pedal sound for solos Heavy lead & backing sound Rockabilly crunch sound Clean fusion sound Sweep sound 12-string acoustic guitar sound
BANK EPatch NAME PEDAL
ARTIST
MN-DLYGAINDLYHALPITCHWAHVOLUMECHORUSDLYHALSPRINGHALL
GARYBDBEATPAT-MVAI PTARMVHALENCATSFUSIONSWEEP12STR
0123456789
Majestic stack drive sound American blues sound U.S. clean combo amp sound Mark series combo amp sound Heavy rock amp sound Fat amp sound Vintage MS sound Modern clean crunch sound American hard rock sound 7-string guitar heavy metal sound
BANK FPatch NAME PEDAL
MODELING
VOLUMESPRINGVOLUMEGAINGAINVOLUMEVOLUMEGAINVOLUMEPITCH
MS9000USBLUSFD TWNMARKSLDNAMPDRVMS OLDMACDRVPV PWRMT 7TH
0123456789