˜ ˇ - amazon web servicessoundcraft.com.s3.amazonaws.com/downloads/user-guides/ghost-user... ·...
TRANSCRIPT

����������
� ����������
�����������������������������
�������� �������� !�������"!�� ###
$�����%&�������'�!
(�����)�&��!���%��)�&���*��!����������*�����!��������!��!��*����
(���+���,�- ./
�����0
���!���)��������!�%�!�'������)������� �������� !�������"!�
)���������&���������������1������&�%����&���������!�!��������*��2
���������������&��*����)�&��'�!�������!���)��&����������������)��
��������!���%���&����'��������%�)����&�������)��)���������������������2
���!���&���������
+��*����)�&������������������*��!���!3�����!����������'��������3�������2
���!3������)�����������������3���������3����������3����&�����3��*����3
�&������3�����!�%�*&����*��%��!������!�%3�)������*��*������&���&�
�4*����������*����������)����!���)�
�����������!�!�&���������������!����'������&��*��!����&���!�������2
���!����������!���)���������&�����!��%�������!���)���������*�������2
�������&����'���)��������������!���%�������!�������'���3��������������*���
������&�����!�*�������
������ �������� !�������"����!�
�������������3
��������5��!3
�������� !�������6���3
(�����7��3
�����3
6+.�8�+
9:�
���;��- <-<�..0---
��4;��- <-<�..-=/�
>

���������� �
����������������
������������ ���
���������)��&����!��&���"6 �8
������������� ��
�*������������!%� ��8
9������!�)����������&�� ��=
������� ��<
���������� ��/
�����*����%���� ��#
�������� �� �
���������������� ���
������5����������% 8�.
��!���������% 8�<
$!!�%�6))�����!�(��������� 8�#
�������������� ���
7��������%����64*����� =�8
��%������� =�.
�'��'�����)�������%���(�&� =� �
������������������������������� ���
7����(���� 0��
�!������������������ ��
�&������ *����!��� .��
��*���!������������ .� 0
"�#������ "��
���������������� <��
��!���������% <�/
������

�� ����������
$�%����������&���� $��
�'��'��� /��
'�(�)�%�������������� '��
?+���$((" �$7"6����������"6@
�*�#��+���,������ �*��
������ -��
��������&���%��&�� -�8
�������-������� ����
� �������. � ��
%������/�%� %��
+����)������&�������� $��
%������/�� ���
� � ����������+������ 7��
%������/�( (��
� � �+���+����������������'�������&�� ���
� � �+���+���������64*�!����������'�������&�� ��8
� � �+���+�������������'� ��=
%������/�� ���
� � � �*���������&�� ���
%������/�0 0��
9*%��!�%�&����)���� 6��

GHOST Introduction 1.1
GGHHOOSSTT
IInnttrroodduuccttiioonn1

1.2 GHOST Introduction
IInnttrroodduuccttiioonn
Thank you for purchasing the Soundcraft Ghost Music Production console. It hasbeen designed to give you many years of trouble-free service. Please read thisentire guide before using the console and then retain it for future reference. Theterms console, mixer, and board are used interchangeably throughout this guide.This guide covers two versions of the Ghost console, namely Ghost (with a CPUsection containing a Timecode reader/generator, MIDI Machine Control, MIDIMute Automation, and MIDI Controller Faders) and Ghost LE (with no CPU sec-tion). Both Ghost and Ghost LE are identical, except that Ghost LE does not havea CPU section above the Group faders. The top panel views in this guide some-times show Ghost and sometimes Ghost LE. Except for the sections dealing withthe CPU, which applies to Ghost only, everything else in this guide applies to bothGhost and Ghost LE.This guide is composed of a Table of Contents, 12 chapters, 5 appendices, and anindex. Following is an overview of the guide:
Chapter Title Description
- Table of Contents Allows you to find broad topics easily.
1 Introduction What you are currently reading. Contains basic information about Ghost.
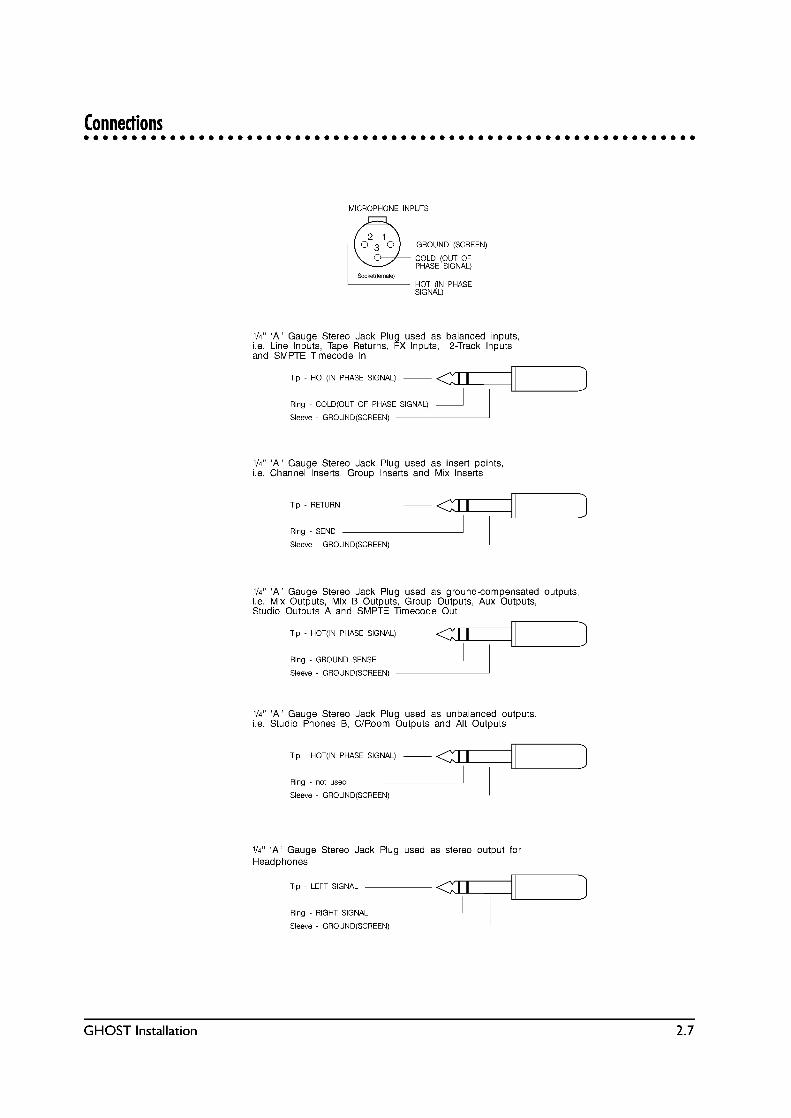
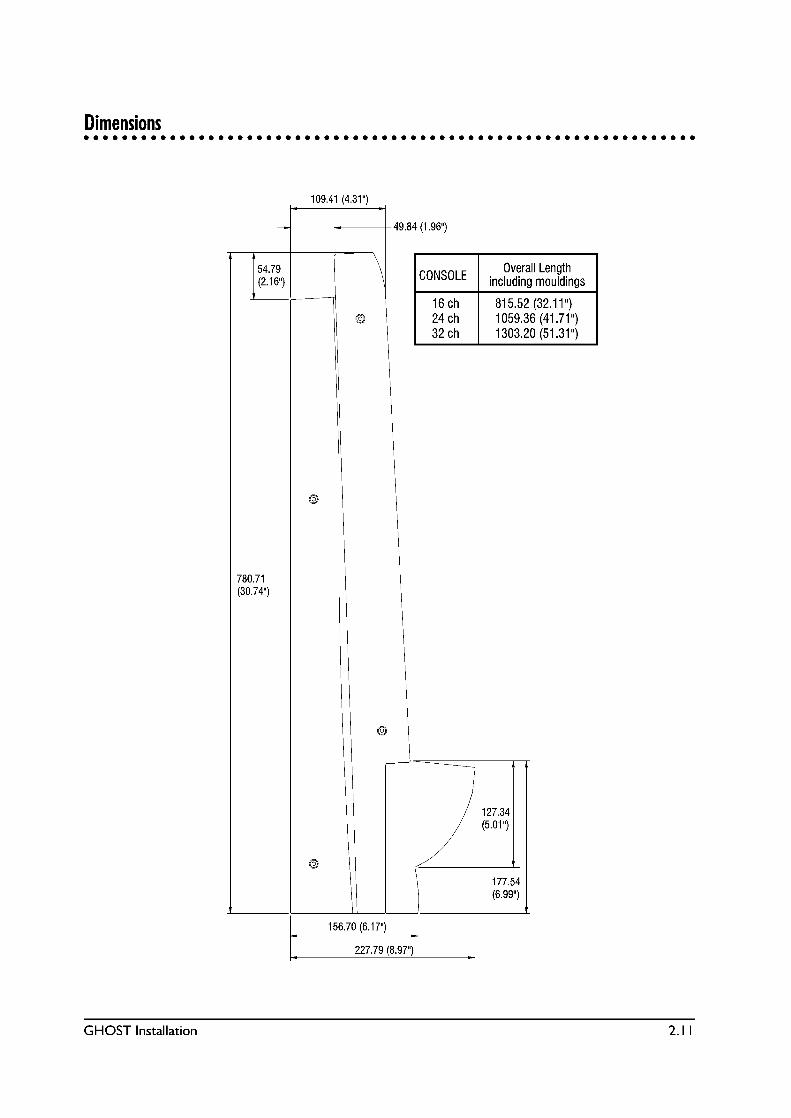
2 Installation Contains information about installingGhost and modifying some of its default settings. Also has detailed hookup and connections diagrams.
3 Quick Start Allows you to quickly get up and running Guide with Ghost.
4 Block Diagram Contains a standard pictorial block diagram,as well as a plain English signal flow explanation of that diagram.
5 Back and Rear Contains a detailed description of all of Panel Description Ghost�s back and rear panel jacks.
6 Functional Contains a detailed description of all of Description Ghost�s controls.
7 Tutorial Explains in detail how to use Ghost for tracking, overdubbing, monitoring, adding effects and processors, punching in/out, bouncing tracks, and mixing down.
8 Application Explains some of Ghost�s more advanced Notes uses.
9 CPU Application Explains how to use the CPU section of Guide Ghost. (Not Applicable to Ghost LE.)

GHOST Introduction 1.3
10 Troubleshooting Contains some common problems, causes, and solutions.
11 Specifications Lists complete specifications of Ghost.
12 Glossary Contains some common audio terms and their definitions.
- Appendices Contain information on MIDI Machine A through E: Control, Controller Numbers, Note
Numbers, MIDI Implementation Chart, andupgrading Ghost�s software.
- Index Contains a detailed index, which allows you to find a specific topic.
It is suggested that you read this entire manual. If you�re the type that doesn�t liketo read manuals, then we suggest the following:For Advanced Users: Read the Introduction (up to "The Basics of In-LineConsoles"), Installation, Block Diagram, Back and Rear Panel Description, andFunctional Description chapters, and the Appendices.For Intermediate Users: Read the Introduction (up to "The Basics of In-LineConsoles"), Installation, Quick Start Guide, Block Diagram, Back and Rear PanelDescription, Functional Description, and Application Notes chapters, and theAppendices.For Beginning Users: You should read the entire manual, but at the very least youshould read the entire Introduction, Installation, Block Diagram, Back and RearPanel Description, Functional Description, Tutorial, Application Notes chapters,and the Appendices. Refer to the Troubleshooting and Glossary chapters, as need-ed.For All Users: If you have the Ghost console with the CPU (not Ghost LE), thenyou should also read the CPU Application Guide chapter.

1.4 GHOST Introduction
FFeeaattuurreess ooff GGhhoosstt aanndd GGhhoosstt LLEE
Ghost is a professional 8-bus mixing console, primarily designed for multitrackrecording and music production applications. It is an In-Line console, having a maininput path and a secondary Mix B input path on each channel. This doubles thenumber of inputs at mixdown, yet the console remains compact. Following aresome of Ghost�s features:
l Soundcraft�s ProMic ultra-low-noise mic preamp, with +60dBu input sensi-tivity, is included on every channel.
l Every channel features a mic input, a line input, individually switchedphatom power, mic/line switch, phase reverse, and 100Hz Low-Cut Filter.
l Multi-busing on every channel allows Direct Outs on each channel to alsobe used as Group Outs, allowing you to send a signal from any channel toany of 32 tape tracks (24 tape tracks with 24 channel Ghost).
l Powerful 4-band "British" EQ, featuring high/low shelving EQ and two fully-parametric mid EQs, with continuously variable Q (bandwidth) control andEQ In/Out switch.
l 6 mono (4 usable at once per channel) and 2 stereo auxiliary sends. Sends1/2 are switchable as a pair between pre-fader and post-fader. Sends 3/4can be routed as a pair to Sends 5/6.
l 100mm faders and inserts for channels, groups, and main L/R mix.
l Variable brightness Signal Present LED for each channel.
l Peak LED for each channel.
l Automated/Manual Mutes (Cut) for each channel. (Mutes cannot be auto-mated on Ghost LE.)
l Solo (either PFL or Solo-in-Place) for each channel.
l Mix B section on each channel features a line input, source select (tape orchannel), rotary fader, pan, PFL Solo, and automated/manual Mutes (Cut).(Mutes cannot be automated on Ghost LE.)
l Tape Input Trim pot for the Mix B line input.
l High/Low shelving EQ and Auxs 3/4 (5/6) may be switched into the Mix Bpath.
l Reverse switch allows you to route the channel input to the Mix B path andthe Mix B input to the channel path.
l 8 Group buses with AFL solo and routing to the L/R bus.
l 4 stereo effects returns, each with PFL Solo and routing to the L/R bus orany of the group buses.
l 2 separate Studio Foldback monitoring sections with AFL Solo.
l Control Room monitoring section with headphone jack, mono check, pro-visions for two stereo line inputs (DAT deck, two-track deck, CD player,etc.), and two sets of control room monitors.
l A 2-frequency oscillator.
l Talkback section with built-in mic.
l 8 Aux Send Master pots with AFL Solo.
GHOST Introduction 1.5
l Mix B Master pot with provision for routing Mix B to the L/R bus.
l PFL/AFL Trim pot with Solo LED and Solo-in-place switch with LED.
l 12-segment vertical peak LED meters for the 8 Groups and for the ControlRoom/Solo outputs.
l By using the channel inputs, Mix B inputs, and 4 stereo FX returns at mix-down, you have a total of 56 inputs from the 24 channel Ghost and a totalof 72 inputs from the 32 channel Ghost.
l Optional 24 channel expander module is available.
l Optional meterbridge is available.
AAddddiittiioonnaall ffeeaattuurreess ooff GGhhoosstt ((NNoott FFoouunndd oonn GGhhoosstt LLEE))
l MIDI In/Out/Thru jacks.
l SMPTE timecode In/Out jacks and Sony 9-pin connector.
l SMPTE/MTC timecode reader/generator/converter.
l MIDI Machine Control transport control buttons with jog/shuttle wheel forcontrolling external tape machines, video machines, hard disk recorders,and MIDI sequencers.
l 4 mute groups.
l 128 snapshots for MIDI muting, which may be recalled manually, fromtimecode, or from MIDI Program Change Messages.
l Dynamic Mute Automation (with an external MIDI sequencer).
l 4 MIDI Controller Faders for controlling external MIDI effects and otherMIDI parameters by transmitting MIDI Control Change data.
FFrraammee SSiizzeess && EExxppaannddeerr MMoodduullee
Ghost is available in two frames sizes:
l 24 Input Channels
l 32 Input ChannelsThere is also an optional 24 channel expander module available, which allows youto expand Ghost to 48 channels or 56 channels. With the 4 stereo FX returns, thiswill give you either 104 or 120 inputs at mixdown.
MMeetteerrbbrriiddggee
There is an optional meterbridge for each console size and for the expander mod-ule. The meterbridge contains a vertical 12 segment peak LED meter for eachchannel, which can be internally configured to show either the Mix B (tape) inputsor the channel inputs. It also includes two 20-segment LED VU meters for the Control Room/Solo outputs.
PPoowweerr SSuuppppllyy
Use only the power supply that comes with the console and make sure it is config-ured for the country you will be using it in.

1.6 GHOST Introduction
CCoonnttaacctt IInnffoorrmmaattiioonn
You may write, phone, fax, or EMAIL Soundcraft at the following places:
In Europe:Soundcraft Telephone: +44 (0) 1707 665000Harman International Industries LTD. FAX: +44 (0) 1707 660742Cranborne House, Cranborne Rd., EMAIL: [email protected] Bar, Herts, EN6 3JN, UK.
In the United States:Soundcraft USA Telephone: 1(615) 360-04711449 Donelson Pike FAX: 1(615) 360-0273Nashville, Tennessee 37217
TThhee BBaassiiccss ooff IInn--LLiinnee CCoonnssoolleess
When using a console for traditional multitrack recording, it is necessary to be ableto record the console�s channel inputs to tape, while at the same time monitoringpreviously recorded tape tracks. When you�re finished recording, you must beable to play the finished multitrack master tape through the console, make adjust-ments to the tape tracks, and then record your mix to your 2-track mixdowndeck. This means that the outputs of the mixer (group outs or direct outs) have tobe connected to the inputs of the multitrack deck for recording purposes, while atthe same time the outputs of the multitrack deck have to be connected to theinputs of the mixer (tape returns) for monitoring and mixdown purposes.However, the requirements for simply monitoring tape tracks while overdubbingare different than what is needed when mixing down those tracks.Before in-line consoles, split console designs were used. Since this is not a primeron split consoles, just the basics will be given here. With split consoles the channelstrips and the tape returns were split, with the channels on the left side and thetape returns located above the group masters on the right side of the board. Whiletracking and overdubbing, the channel outputs were routed to the multitrackinputs and the multitrack outputs were routed to the tape returns. The channelswere used for recording and the tape returns were simply used to monitor previ-ously recorded tape tracks. This meant that if you wanted to monitor 32 tapetracks, you had to have 32 separate tape returns located apart from the channelstrips. And those returns might have only provided level and pan controls for eachtrack. Since the tape returns didn�t offer all the features of the channel strip (suchas EQ and Aux Sends), and didn�t provide a way to route the tape tracks to themixdown deck, when it came time for mixdown, the multitrack outputs had to berepatched from the tape returns to the channel strip inputs. This allowed you touse all of the features of the channel strip and to route the tape tracks to the 2-track deck during mixdown. While this is an oversimplification of the process, itis sufficient to illustrate the point.The drawbacks of a split console design are as follows: the console usually has tobe very wide to accommodate all the tape returns; as the number of tape returnsincreases on a console, so do the number of channel strips, so if you need 32 tapereturns, you might have to buy a console with 64 or more channel strips; you haveto repatch when you want to mixdown and then repatch again when you want totrack and overdub; while mixing down, the tape returns are unused; and split con-sole designs cost more than an equivalent in-line design.An in-line console solves these problems, while remaining compact and affordable.With today�s digital multitrack recorders, hard disk recorders, and MIDIsequencers, many studios have 24 or more tracks (whether tape, disk, orsequenced) that need to be monitored, yet not as many channel inputs are neededfor recording purposes. With an in-line console, the tape return controls are physi-cally located right in the channel strip, or "in-line" with the channel strip, hence,

GHOST Introduction 1.7
the name. You have as many tape returns as you have channel strips, yet no extrawidth is added to the console regardless of the number of returns, although thereis a slight increase in the depth of the console.As mentioned, Ghost is an in-line console. There are 2 separate inputs for eachchannel strip. The main channel input is called "Channel" and the tape return inputis called "Mix B." Note that you can connect any line level source to Mix B; it does-n�t have to be the output of a tape deck. Normally, whatever is connected to themic or line input on the rear panel is routed to the channel strip and you use thechannel strip�s controls to process that input. And whatever is connected to theMix B/Tape Ret jack on the rear panel is routed to the Mix B section, located with-in the same channel strip, and you use Mix B�s controls to process the Mix B inputseparately from the channel input.Generally speaking, while recording basic tracks and overdubbing, you connect thesources you want to record to the channel inputs and you connect the sourcesyou want to monitor to the Mix B inputs. You�ll usually want to monitor previouslyrecorded tape tracks, hard disk tracks, and MIDI sequenced tracks. At mixdown,you�ll press the Reverse switch on each channel, which will route the Mix B inputsto the channel strip and the channel inputs to Mix B. You�ll also be able to route allof the Mix B outputs as a group to the L/R bus for mixdown to a 2-track recorder.This is how you double the number of inputs at mixdown. By doing this, all of yourtape tracks are now routed to the channel strips, with the full complement ofchannel strip controls available to the tape tracks for mixdown, while at the sametime allowing you to connect sources, such as MIDI tracks, that don�t need asmuch processing, to the Mix B inputs, which can also be recorded to the 2-trackdeck. This means that Mix B, which is normally used as a tape return, can also beused for recording during mixdown. In addition, Mix B has access to some of thechannel EQ and Aux Sends.Complete descriptions of all the features, a Quick Start Guide, and a Tutorial fol-low later in this guide.

1.8 GHOST Introduction


GHOST Quick Start Guide 3.1
GGHHOOSSTT
QQuuiicckk SSttaarrtt GGuuiiddee3
3.2 GHOST Quick Start Guide
QQuuiicckk SSttaarrtt GGuuiiddee
We suggest that you read this entire manual before using Ghost; but for those whowant to get started right away, we have provided this QUICK START GUIDE.This will get you up and running quickly. The basic procedures given here aretaken from the TUTORIAL chapter, which contains much more detailed informa-tion. If you don�t understand something in this chapter, then refer to the TUTORI-AL. However, to get the full benefit of Ghost�s many features, it is suggested thatat some point you read this entire manual.
RReeccoorrddiinngg BBaassiicc TTrraacckkss ((TTrraacckkiinngg))
Procedure:
1. Reset Console. "Zero Out" or reset the console. That means to set allcontrols to their off or neutral positions.
2. Connections. Connect your input sources to the channel MIC and LINEinputs.
3. Select Inputs. Use the MIC/LINE switch to select the appropriate inputfor each channel. Press the 48V switch for condenser mics, whererequired. Make sure the REV switch is not depressed.
4. Recording methods. There are 3 methods you can use to send the chan-nel signal to a multitrack tape recorder (MT), and they are outlined below:
a. Using the Group Output jacks. Use this method if the GRP 1-8 outputjacks are connected to the inputs of your multitrack recorder. The groupnumber should match the tape input number. In the channel strip, press theassign switch for the tape track(s) you want to record on. Next, use thepan pot to send the signal to the Group output jack for the track(s) youwish to record on. Pan left for odd-numbered tracks; right for even-num-bered tracks; and centre for both tracks. Then, turn up the channel faderto its nominal position, as indicated by the fader marking 3/4 of the way up.Finally, turn up the appropriate Group fader(s) to its nominal position.
b. Using the DIR/TAPE SND jack as a Group Output. Use this method ifthe DIR/TAPE SND jacks are connected to the inputs of your multitrackrecorder, and you wish to use the Groups for recording. The channel num-ber should match the tape input number.
First, press the DIR/GRP n switch (on the rear connector panel) on thechannel that represents the tape track you wish to record on. Then notethe GRP n number on the switch. For instance, both channels 2 and 10 willhave a switch that reads DIR/GRP 2. This means that the channel 2 andchannel 10 DIR/TAPE SND jacks will act as Group 2 output jacks, whentheir DIR/GRP 2 switches are pressed.
Next assign all the inputs you�re recording to the appropriate Group num-ber(s) and use the pan pot to send the signal to the appropriate Group bus.Pan left for odd-numbered groups; right for even-numbered groups; andcentre for both groups.
Then, turn up the channel fader to its nominal position, as indicated by thefader marking 3/4 of the way up. Finally, turn up the Group fader(s) to itsnominal position.
c. Using the DIR/TAPE SND jack as a Direct Output: Use this method if theDIR/TAPE SND jacks are connected to the inputs of your multitrackrecorder, and you wish to record directly from the channel outputs. Thechannel number should match the tape input number.

GHOST Quick Start Guide 3.3
This method differs from method (b), above, because you�re using theDIR/TAPE SND jack as a Direct Output from the channel and the Groupbuses are not involved at all. The channel signal, post-fader and post-mute,will be routed to this jack for direct recording to your multitrack.
To use this method, first make sure the DIR/GRP n switch (on the rear con-nector panel) is in the DIR (UP) position for all channels that you wish torecord. Then, turn up the channel fader to its nominal position, as indicatedby the fader marking 3/4 of the way up. The pan pot and assign switches willhave no effect on the Direct Output signal.
Select one of the above three recording methods and then proceed to step 5.
5. Setting Up The MT. On the MT, insert a tape, wind to where you wish tobegin recording, set the counter to zero, put the appropriate tracks intoRECORD-READY mode, and set the recording level controls of the MT, ifany, to their nominal positions.
6. Monitoring. To learn how to listen to the sound you are recording, see thesection below entitled, "Control Room Monitoring." To learn how to send thesound you are recording to the musicians in the studio, see the section belowentitled, "Studio Monitoring."
With the musicians playing, set up preliminary monitor mixes for the ControlRoom and Studio.
7. Gain Structure. If you have the optional meterbridge and it�s set for channelinput monitoring, then gradually turn up the Input Sensitivity knob until themeterbridge channel input meter indicates 0.
In all other instances, press the channel SOLO switch. Make sure the SIPswitch in the master section is off. This will display the channel signal on theCRM/SOLO-L/R meters in the master section. Gradually turn up the InputSensitivity knob until the meters indicate 0, then turn the SOLO switch off.
In either case, the Signal Present LED should be brightly lit, and the PK LEDshould light only occasionally, if at all.
8) LCF & Phase. Use the Low-Cut Filter (LCF) switch to get rid of low fre-quency noise. The Phase switch should be in the up position, unless youknow your input cables are wired incorrectly or if you�re employing M-Srecording techniques.
9. EQ. If you want to add EQ to the channel inputs, first press the EQ IN switchand make sure the EQ MIX B button is up. Then apply the EQ as needed.The HF/LF shelving EQ can be boosted or cut 15dB. The HMF/LMF EQ aretrue parametrics and allow you to select the centre frequency, the bandwidthof that frequency (with the Q control), and apply boost or cut of 15dB.
10. Effects & Processing. If you want to add effects or processing, then see thesection below, entitled, "Adding Effects and Processors."
11. Adjust Faders. Adjust the channel and group faders, as required, so that themultitrack�s meters display the desired recording level.
12. Recording. Set up your final monitor mixes, and then have the musiciansstop playing. Put the MT into RECORD mode and have the musicians play thesong. When the song is over, STOP the multitrack and rewind the tape tozero.
13. Playback. Play back the tracks you have just recorded. To let the musiciansin the Studio hear the take, select CRM as the Source in the appropriateStudio Foldback section.

3.4 GHOST Quick Start Guide
14. Record Another Take. If dissatisfied, record over the first take or addanother take after it. Before recording again, remember to unselect CRMand select AUX 1-2 as the Studio Foldback Source, if necessary.
15. Proceed With Overdubbing. When you are satisfied with the take of thebasic tracks, you can proceed to "Overdubbing," below.
OOvveerrdduubbbbiinngg
Procedure:
1. Tape Channels. On all channels that contain the outputs of previouslyrecorded tape tracks, press the REV switch and set the MIX B SRCE switchto CHAN. This routes the Tape Returns to both the Channel and MIX Bpaths. These are your Tape channels and are for monitoring purposes only.
2. Connections. Connect your input sources for the overdub to the channelMIC and LINE inputs. Do not connect them to any Tape channels. Theseare your Input channels.
3. Select Inputs. On the Input channels, use the MIC/LINE switch to selectthe appropriate input for each channel. Press the 48V switch for condensermics, where required. Make sure the REV switch is not depressed and setthe MIX B SRCE switch to TAPE.
4. Select Recording Method. Select one of the 3 recording methods, fromabove, and follow the directions for signal routing and channel/group faderpositioning for each Input channel.
5. Setting Up The MT. On the MT, rewind the tape to the beginning of thesong, or to a point before the overdub will be recorded, set the counter tozero, and put the appropriate track(s) into RECORD-READY mode. Makesure that all previously recorded tracks are not in RECORD-READY mode.Then set the recording level controls of the MT, if any, to their nominalpositions and start playing the tape.
6. Monitoring And Gain Structure. With the musicians playing along withthe tape, set up Control Room and Studio preliminary monitor mixes of theoverdub being recorded and of previously recorded tape tracks. (SeeControl Room/Studio Monitoring, below.) Then use the INPUT SENSITIVI-TY knob to set your input gain structure for the overdub, using the optionalmeterbridge or the CRM/SOLO-L/R meters, and the SIG and PK LEDs.(See "Recording Basic Tracks," above.)
7. LCF & Phase. Use the LCF and PHASE switches, as required. (See above.)
8. EQ. Apply EQ, as required. (See above.)
9. Effects & Processing. If you want to add effects or processing, then seethe section below, entitled, "Adding Effects and Processors."
10. Adjust Faders. Adjust the channel and group faders, as required, so thatthe multitrack�s meters display the desired recording level.
11. Recording. Set up your final monitor mixes, of both the live signal and ofpreviously recorded tape tracks, and then have the musicians stop playing.Put the MT into RECORD mode and have the musicians play the overdub.When the overdub is over, STOP the multitrack and rewind the tape tozero or to a point right before the overdub.
12. Playback. Play back the overdub you have just recorded. To let the musi-cians in the Studio hear the take, select CRM as the Source in the appropri-ate Studio Foldback section.
GHOST Quick Start Guide 3.5
13. Record Another Take. If dissatisfied, record over the first take of theoverdub. Before recording again, remember to unselect CRM and selectAUX 1-2 as the Studio Foldback Source, if necessary.
14. Proceed With Overdubs & Mixing Down. When you are satisfied withthe take of the overdub, proceed to record the next overdub. When you�resatisfied with all the tracks on the tape, you can proceed to "Mixing Down",below.
MMiixxiinngg DDoowwnn
Procedure:
1. Inputs. "Zero Out" the console and then press the REV switches to routeall your tape tracks to the channel path. Channel inputs on those channelswill be routed to the MIX B path. If you have additional input sources, suchas MIDI tracks, and extra channels available (that are not being used fortape tracks), then route the additional sources to the channel path. If youhave more input sources than channels, then connect some to the channelinputs and some to the MIX B inputs. Then decide where best to routethose extra sources, between the channel and MIX B paths. You can alsouse the Effects Returns as line level source inputs, but remember that you�llprobably also need inputs for the outputs of your effects devices. Makesure the MIX B SRCE switch is set to TAPE (UP) on all channels, unless youwish to use it as a pre-fader send for the channel path.
2. Assignment & Master Levels. Assign all channels and Effects Returns thatare in use to the L/R MIX by pressing the L/R assign switch on the channelsand the MIX assign switch on the Effects Returns. Press the MIX B TO MIXswitch in Ghost�s MIX B master section and set the MIX B rotary masterfader about 75% up. Set the MIX L/R master fader to the top of its travel.
3. Using Groups. If you�re grouping some sources, assign them to the appro-priate Group buses and then assign the Group buses to the L/R MIX, usingthe TO MIX- L, R, and L+R switches in the Group master section. Turnthe appropriate Group faders about 75% up.
4. Monitoring. Set the CRM SRCE to monitor MIX A only, turn up the levelcontrol, and make sure MONO CHECK is off. To send the mix to the stu-dio, select CRM as the source in the appropriate Studio Foldback sectionand turn up its level control.
5. Input Gain. Adjust the INPUT SENSITIVITY and TAPE TRIM knobs, ifneeded. (See above.)
6. Setting Up The MT. Rewind the MT tape, set the counter to zero, andstart playback. If the MT has an output level control, set it to its nominalposition. If you�re syncing a sequencer to the tape, make sure it�s set upproperly, so that the MIDI tracks are also playing.
7. Practice The Mix. As the tape plays, set the relative levels of thetape/MIDI tracks using the channel and MIX B faders, (and the FX levelcontrols, if they are being used as inputs). Use the PAN and BAL controlsto set the stereo perspective. USE EQ, effects, and processors, as needed.(See "Effects and Processors," below.) Use the MUTE Automation system,as needed. (Not Ghost LE). (See the "CPU Application Guide" in this manu-al.) Use the MONO CHECK switch periodically to check for mono com-patibility. Listen to the mix through your main speakers, your alternatespeakers, if any, and headphones. Keep practicing the mix, until you�rehappy with it, then rewind the MT tape to the beginning of the song.

3.6 GHOST Quick Start Guide
8. Setting Up The 2-Track. Insert a new tape in your 2-track recorder andrewind it to the beginning. Roll about one minute into the tape and use theTO TAPE switches in the Talkback and Oscillator sections to record anyannouncements and tones that are needed. Allow the tape to roll a bit pastthe tones, stop the 2-track, and set the counter to zero. Then, set the deckto RECORD-READY mode and set its input level control to its nominalposition.
9. Setting Levels. Play the MT tape again, and adjust the MIX L/R Masterfader, MIX B Master fader, and Group Master faders, to retain the properbalance of your mix, while at the same time, achieving the proper level onyour 2-track recorder�s meters. The proper recording level should beachieved with the 2-track�s input control at its nominal position. Thenrewind the MT tape to the beginning of the song.
10. Recording The Mix. To commit your final mix to tape, start the 2-track inRECORD mode and then start playback of the MT tape. Make any mixmoves that are necessary and when the song is completed, stop the 2-track, then stop the MT. Press the appropriate 2-TK switch in the CRMSRCE section, unselect MIX A, and then rewind and play back the 2-tracktape. If you�re not satisfied with the final mix, then unselect the 2-TK CRMSRCE switch, select MIX A, and try the mix again. If you are satisfied withthe mix, then make a dub of the 2-track master and play the dub on asmany systems as you can. If you�re not satisfied, then mix it again. If the mixmeets with your approval on these other systems, then make a backupcopy of the 2-track master and label everything. This final 2-track stereomaster tape is now ready for mastering and/or duplication.
GHOST Quick Start Guide 3.7
CCoonnttrrooll RRoooomm MMoonniittoorriinngg
CCRRMM SSiiggnnaall MMoonniittoorriinngg
Procedure:
1. Follow the procedures under "Recording Basic Tracks" to send your livesignals to the MT for recording.
2. On Ghost, make sure all CUT and SOLO/PFL/AFL switches are off, andthat the REV switch is OFF (UP) in the MIX B channel(s) you will use formonitoring.
3. On the MT, press the RECORD-READY switches for the track(s) you wishto record on and set the record level control, if any, to its nominal position.
4. In the CRM SRCE section, make sure that only MIX B is pressed and thatMONO CHECK is off. Turn the CRM LEVEL knob about 75% up.
5. Turn the MIX B master fader in Ghost�s master section about 75% up.
6. On the appropriate MIX B section that corresponds to the track you arerecording on, make sure the SRCE switch is set to monitor TAPE (UPPosition).
7. With the performers playing their parts, (there should be a reading on theMT�s meters for the track(s) you are recording), adjust the TAPE TRIMknob in the appropriate channel strip�s input section, if necessary. Thenturn up the appropriate MIX B level control to attain the volume you wantand use its pan pot to determine the stereo placement. You will now bemonitoring all signals sent to the appropriate tape track.
8. The Channel faders, Group faders (if you�re recording with the Groupbuses), TAPE TRIM knob, MIX B master fader, MIX B level control, CRMLEVEL knob, and the MT record level control, if any, will all affect the vol-ume of the monitored signal.
CCRRMM TTaappee MMoonniittoorriinngg
Procedure:
1. On Ghost, make sure all CUT and SOLO/PFL/AFL switches are off, andthat the REV switch is ON (Down) in the MIX B channel(s) you will use formonitoring tape playback.
2. In the CRM SRCE section, make sure that only MIX B is pressed and thatMONO CHECK is off. Turn the CRM LEVEL knob about 75% up.
3. Turn the MIX B master fader in Ghost�s master section about 75% up.
4. On the appropriate MIX B section that corresponds to the tape track youwish to monitor, make sure the SRCE switch is set to monitor CHAN(DOWN Position). You are really monitoring TAPE, since the channel andMIX B paths have been reversed.
5. Set the output level control on the MT, if any, to its nominal position, andwith the MT tape playing, adjust the TAPE TRIM knob in the channel strip�sinput section, if necessary. Then turn up the appropriate MIX B level con-trol to attain the volume you want and use its pan pot to determine thestereo placement. You will now be monitoring the tape playback of theappropriate track.
6. The TAPE TRIM knob, MIX B master fader, MIX B level control, CRMLEVEL knob, and the MT output level control, if any, will all affect the vol-ume of the monitored signal.

3.8 GHOST Quick Start Guide
SSttuuddiioo MMoonniittoorriinngg
SSttuuddiioo SSiiggnnaall MMoonniittoorriinngg
Procedure:
1. Follow the procedures under "Recording Basic Tracks" to send your livesignals to the MT for recording.
2. On Ghost, make sure all CUT and SOLO/PFL/AFL switches are off, andthat the REV switch is OFF (UP) in the channel(s) that you are going tomonitor.
3. In the STUDIO FOLDBACK section, decide whether you are using STU-DIO A or STUDIO B/PHONES and make sure that only AUX 1-2 ispressed. Turn the STUDIO LEVEL knob about 75% up.
4. Turn the AUX 1 and AUX 2 master fader pots in Ghost�s master sectionabout 75% up and make sure their AFL switches are off.
5. On the appropriate channels that correspond to the channel inputs you areabout to record, make sure the AUX 1-2 PRE switches are depressed, sothat you are monitoring Pre-Fader.
6. With the performers playing their parts, turn up the AUX 1-2 level con-trols, on all channels whose signals you want to monitor, to attain the vol-ume (and balance) you want. AUX 1 will be sent to the left headphone(speaker) and AUX 2 will be sent to the right headphone (speaker). Youwill now be monitoring all channel input signals.
7. The AUX 1-2 master faders, AUX 1-2 level controls, and STUDIO LEVELknob, will all affect the volume of the monitored signal.
SSttuuddiioo TTaappee MMoonniittoorriinngg
Procedure:
1. On Ghost, make sure all CUT and SOLO/PFL/AFL switches are off, andthat the REV switch is ON (Down) in the channel(s) you will use for moni-toring tape playback.
2. In the STUDIO FOLDBACK section, decide whether you are using STU-DIO A or STUDIO B/PHONES and make sure that only AUX 1-2 ispressed. Turn the STUDIO LEVEL knob about 75% up.
3. Turn the AUX 1 and AUX 2 master fader pots in Ghost�s master sectionabout 75% up and make sure their AFL switches are off.
4. On the appropriate MIX B sections that correspond to the tape tracks youwish to monitor (in the control room), make sure the SRCE switch is set tomonitor CHAN (DOWN Position). You are really monitoring TAPE, sincethe channel and MIX B paths have been reversed. This has no effect onStudio Tape Monitoring, but must be done in order to use MIX B for CRMTape Monitoring.
5. On the appropriate channels that correspond to the tape tracks you wishto monitor, make sure the AUX 1-2 PRE switches are depressed, so thatyou are monitoring Pre-Fader.
6. Set the output level control on the MT, if any, to its nominal position, andwith the MT tape playing, adjust the TAPE TRIM knob in the appropriatechannel strip�s input section, if necessary. Then turn up the AUX 1-2 levelcontrols, on all channels that correspond to the tape tracks you want tomonitor, to attain the volume (and balance) you want. AUX 1 will be sent

GHOST Quick Start Guide 3.9
to the left headphone (speaker) and AUX 2 will be sent to the right head-phone (speaker). You will now be monitoring the tape playback of theappropriate tracks.
7. The TAPE TRIM knob, AUX 1-2 master faders, AUX 1-2 level controls,STUDIO LEVEL knob, and the MT output level control, if any, will all affectthe volume of the monitored signal.
MMoonniittoorriinngg SSuummmmaarryyTo sum up, if tracks 1 and 2 were already recorded and you were currentlyrecording on track 3 through the channel 10 input, then for control room moni-toring, you would use the MIX B sections of channels 1 and 2 to monitor the tapeplayback of tracks 1 and 2, and you would use the MIX B section of channel 3 tomonitor what you were currently recording to track 3. For studio monitoring, youwould use AUX 1-2 of channels 1 and 2 to monitor the tape playback of tracks 1and 2, and you would use AUX 1-2 of channel 10 (where the input is located) tomonitor what you were currently recording to track 3.

3.10 GHOST Quick Start Guide
AAddddiinngg EEffffeeccttss aanndd PPrroocceessssoorrss
1. External Treatment. With this method you alter the signal before itreaces Ghost. It is commonly used by guitarists, when using "stomp boxes."For example, you connect a guitar cable to the input of a delay box, thenyou connect the output of the box to one of Ghost�s LINE inputs. You usethe effect�s mix control to determine the balance of wet and dry signals thatenters Ghost. External treatment does not require using any of Ghost�scontrols. You simply plug the treated signal into one of Ghost�s inputs.
2. Using Processors. Outboard processors are connected to Ghost using asend/return Y-cable connected to one of Ghost�s Insert jacks. The signalfrom Ghost is sent to the outboard device, processed, and then theprocessed signal is returned to Ghost. You use this method when you wantto treat the entire signal, as opposed to blending the wet and dry signals.You�ll generally use outboard EQ or dynamics processors with the Inserts.
Ghost has Inserts on all Channels, Groups, and the L/R Mix. Using proces-sors with Ghost just requires that you connect them properly to Ghost�sInsert jacks. It does not require using any of Ghost�s controls.
3. Using Effects. To use effects with Ghost, you can use the AUX system.This method involves sending a copy of a channel/MIX B signal to the out-board effect, processing it, and then returning it to Ghost. This wet signal isthen combined with the dry signal within Ghost.
NNoottee aabboouutt SSttuuddiioo MMoonniittoorriinngg aanndd EEffffeeccttssThe FX Returns were designed to add effects during mixdown, or while multi -tracking in the control room and only using the control room monitor section.When using the FX Returns, you cannot monitor the wet signal in the StudioFoldback sections. However, you can record the wet signal to the multitrack orthe mixdown deck and you can monitor it in the Control Room. If you�re record-ing the effect and the performers don�t care if they hear the effect while perform-ing, then you can use the FX Returns. However, if the performers want to hearthe effect while recording, or if you want to record dry, but monitor wet, thenyou should not use the FX Returns. You should connect the stereo outputs ofyour effects device to 2 channel inputs and use those channels to route the wetsignal to the Group or L/R buses for recording, if desired, and to the ControlRoom and Studio monitoring sections.For connecting effects devices to the FX Returns. Studio Monitoring is notpossibleProcedure:
1. First, select which AUX Send you wish to use, based on whether you wishto use it with a Channel or MIX B input and whether your effect has monoor stereo inputs. Let�s say you want to use AUX 1. (If you use AUX 1 or 2,make sure the PRE switch is not pressed.) Connect the AUX 1 output jackto the input of your effects device. Connect the L/R outputs of your effectsdevice to the FX 1-L/R jacks. (Note that you can use any FX RETURN.)
2. On the effects device, set the input level and output level controls to theirnominal positions. Make sure the effects unit is set for 100% wet outputand select the effect you wish to use.
3. Turn the AUX 1 rotary master fader control about 75% up. With a signalpresent, turn the AUX 1 Send controls about 75% up on all channels thatyou wish to be treated with the effect. This sends the channel signals to theeffects device.

GHOST Quick Start Guide 3.11
4) There should be a reading on the input meter of the effects device, showingthat there is a signal present. If you�re recording to a multitrack deck, thenset the Control Room Source to MIX B. If you�re mixing down, then set theControl Room Source to MIX A. Turn the Control Room Level knob 75%up. You cannot monitor the effect in the Studio Foldback sections.
5. Use the Channel ASSIGN switches and PAN Pots to route the dry signals tothe appropriate buses, as usual. Use the FX 1 ASSIGN switches and BALknob to route the wet signal to the appropriate buses. You can record thewet signal on the same tape tracks as the dry signals or on their own tapetracks. Turn the appropriate Group Faders about 75% of the way up (if mul-titracking) and set the MIX fader to the top of its travel (if mixing down).This sends the wet and dry signals to the buses.
6. In the control room, to monitor the effect while you�re recording to a multi-track deck, you use the MIX B section in the channel strip that representsthe tape track the effect is being recorded on. To monitor the effect whilemixing down, you should assign the FX Return to the L/R Mix by pressing theMIX switch, and then monitor MIX A in the control room, as usual. Torecord dry and monitor wet, assign the FX Return to the L/R Mix by pressingthe MIX switch, but don�t assign it to the Groups. Set the Control RoomSource to monitor both MIX A and MIX B. MIX B is what you normally usefor control room monitoring and MIX A would be used to monitor theeffect.
7. Turn the FX 1 level control about 75% up. This returns the wet signal fromthe effects device to Ghost.
8. With a signal present in the channels you�re using, you should be able to hearthe effect. Adjust the AUX 1 Send controls to determine how prevalent theeffect will be for each channel. For instance, all other things being equal, ifthe AUX 1 Send control is turned 75% up for one channel and 50% up foranother channel, you will hear the effect more for the former channel.
9. After setting the AUX 1 Send levels for all the channels, press the AUX 1Master Fader AFL switch. This will send all AUX 1 levels, post-AUX 1 mas-ter fader, to the CRM/SOLO-L/R meters. Adjust the AUX 1 Master Fader sothat the meters read 0, then turn AFL off.
10. Adjust the input level of the effects device to achieve the meter reading onthe effects device, suggested by the device�s manual.
11. Then press the PFL switch in the FX 1 section. This will display the effectssignal returned to Ghost, pre-FX 1 level control, on the CRM/SOLO-L/Rmeters. Adjust the output level of the effects device so that the meters read0, then turn PFL off.
12. Finally, adjust the FX 1 level control, together with the channel faders, toachieve the blend of wet/dry signals that you desire. The channel faders con-trol the dry signal and the FX 1 level knob controls the wet signal. TheGroup/MIX faders control the overall signal sent to the Group/MIX buses.Remember that the individual AUX 1 Send knobs and AUX 1 master faderdetermine the level of the signal sent to the effects device and the FX 1 levelknob determines the level of the signal returned to Ghost.

3.12 GHOST Quick Start Guide
For connecting effects devices to 2 Channel LINE Inputs (ChannelReturns).Studio Monitoring is possible.Procedure:
1. First, select which AUX Send you wish to use, based on whether you wishto use it with a Channel or MIX B input and whether your effect has monoor stereo inputs. Let�s say you want to use AUX 1. (If you use AUX 1 or 2,make sure the PRE switch is not pressed.) Connect the AUX 1 output jackto the input of your effects device. Connect the L/R outputs of your effectsdevice to any 2 adjacent Channel LINE inputs. Make sure their REV switch-es are not engaged and set their MIX B SRCE switches to CHAN (Down).
2. On the effects device, set the input level and output level controls to theirnominal positions. Make sure the effects unit is set for 100% wet outputand select the effect you wish to use.
3. Turn the AUX 1 rotary master fader control about 75% up. With a signalpresent, turn the AUX 1 Send controls about 75% up on all channels thatyou wish to be treated with the effect. This sends the channel signals to theeffects device.
4. There should be a reading on the input meter of the effects device, show-ing that there is a signal present. If you�re recording to a multitrack deck,then set the Control Room Source to MIX B. If you�re mixing down, thenset the Control Room Source to MIX A. Turn the Control Room Levelknob 75% up. For multitrack recording, select AUX 1-2 as the StudioFoldback Source and turn its level control 75% up.
5. Use the Channel ASSIGN switches and PAN Pots to route the dry signalsto the appropriate buses. If you want to record the wet signal, then usingthe Channel Returns, set their ASSIGN switches and PAN Pots to route thewet signals to the appropriate buses. You can record the wet signals on thesame tape tracks as the dry signals or on their own tape tracks. Turn theappropriate Group Faders about 75% of the way up (if multitracking) andset the MIX fader to the top of its travel (if mixing down). This sends thewet and dry signals to the buses.
6. In the control room, to monitor the effect while you�re recording to a mul-titrack deck, you use the MIX B section in the channel strip that representsthe tape track the effect is being recorded on. To monitor the effect whilemixing down, you should assign the Channel Returns to the L/R Mix bypressing the L/R switch, and then monitor MIX A in the control room, asusual. To record dry and monitor wet, don�t assign the effect to the Groupsand use the MIX B sections in the Channel Returns to monitor the effect.
7. Set the Channel Return Faders to their nominal positions. This returns thewet signal from the effects device to Ghost.
8. With a signal present in the channels you�re using, you should be able tohear the effect. Adjust the AUX 1 Send controls to determine how preva-lent the effect will be for each channel. For instance, all other things beingequal, if the AUX 1 Send control is turned 75% up for one channel and50% up for another channel, you will hear the effect more for the formerchannel.
9. To send the effect to the performers in the Studio, whether or not you arerecording the effect, use the AUX 1-2 Sends on the Channel Returns.These AUX 1-2 controls should be set up as Pre-Fader Sends by pressingthe PRE switch.

GHOST Quick Start Guide 3.13
10. After setting the AUX 1 Send levels for all the channels, press the AUX 1Master Fader AFL switch. This will send all AUX 1 levels, post-AUX 1 mas-ter fader, to the CRM/SOLO-L/R meters. Adjust the AUX 1 Master Faderso that the meters read 0, then turn AFL off.
11. Adjust the input level of the effects device to achieve the meter reading onthe effects device, suggested by the device�s manual.
12. Then press the SOLO switches (with SIP Off) in the Channel Returns. Thiswill display the effects signal returned to Ghost, pre-channel fader, on theCRM/SOLO-L/R meters. Adjust the output level of the effects device sothat the meters read 0, then turn SOLO off.
13. Finally, adjust the Channel Faders and Channel Return Faders for the wetand dry signals, to achieve the wet/dry recording mix that you desire.Adjust the MIX B level controls and AUX 1-2 Sends to achieve the wet/drymonitoring mix that you desire for the control room and studio, respective-ly. The Channel Faders that contain the signal sources control the dry signaland the Channel Return Faders control the wet signal. The Group/MIXfaders control the overall signal sent to the Group/MIX buses. The MIX Bcontrols are used for control room monitoring and the AUX 1-2 controlsare used for studio monitoring. Remember that the individual AUX 1 Sendknobs and AUX 1 master fader determine the level of the signal sent to theeffects device and the 2 Channel Return Faders determine the level of thesignal returned to Ghost.

3.14 GHOST Quick Start Guide

GHOST Block Diagram 4.1
GGHHOOSSTT
BBlloocckk DDiiaaggrraamm4

4.2 GHOST Block Diagram
BBlloocckk DDiiaaggrraamm
PA
NL-
R
1-2
3-4
5-6
7-8
AU
X 7
(ST
ER
EO
)
AU
X 8
(ST
ER
EO
)
AU
X 1
AU
X 3
PR
E
MO
N
AU
X 2
AU
X 4
MIX
BFA
DE
R
CU
T
PF
L
PA
N
5-6
LEF
T
RIG
HT
CU
T
SOLO CUTSOLO DETECT
PFL DETECTPFL/AFL LPFL/AFL R
AUX 1
GRP 1GRP 2GRP 3GRP 4GRP 5GRP 6GRP 7GRP 8
GRP O/P BUS (1-8)
CPU MUTE BUS ACPU MUTE BUS B
MIX L
MIX B LMIX R
MIX B R
AUX 2AUX 3AUX 4AUX 5AUX 6
AUX 7 L
AUX 8 LAUX 7 R
AUX 8 R
SO
LO
PE
AK
PF
L
MU
TE
SO
UR
CE
MU
TE
100m
mC
HA
NN
EL
FAD
ER
100m
mM
AS
TE
RFA
DE
R
MIX
BM
AS
TE
RFA
DE
R
AU
X7
MA
ST
ER
FAD
ER
PF
L
AF
L
PF
L
LEV
EL
BA
L
AU
X 8
CIR
CU
ITIS
SIM
ILA
RT
O A
UX
7
EQ
TO
MO
N
INS
ER
TP
OIN
T
LF/H
FE
Q
EQ
IN/O
UT
EQ
IN/O
UT
GR
OU
P N
/D
IRE
CT
LMF
/HM
FE
Q
MIX
LE
FT
INS
ER
TC
PU
MIX
RIG
HT
INS
ER
T
MIX
BT
O M
IX
MIX
LE
FT
OU
TP
UT
MIX
B L
EF
TO
UT
PU
T
AU
X7
LEF
TO
UT
PU
T
TB
MIC
TALK
BA
CK
1k/1
0k
AU
X1
OU
TP
UT
AU
X2
TO
AU
X6
CIR
CU
ITS
AR
E S
IMIL
AR
TO
AU
X1
ST
UD
IO B
OU
TP
UT
IS S
IMIL
AR
TO
ST
UD
IO A
OU
TP
UT
MIX
RIG
HT
OU
TP
UT
MIX
B R
IGH
TO
UT
PU
T
AU
X7
RIG
HT
OU
TP
UT
AF
L
DIR
EC
TO
UT
PU
T
PE
AK
DE
TE
CT
SIG
NA
LD
ET
EC
T
MIC
I/P
LIN
E I/
P
TAP
E I/
P
+4/
-10
(SN
IP R
ES
ISTO
RS
TO
SE
LEC
T-1
0dB
V)
48V
PH
AN
TP
OW
ER
FR
OM
48V
LIN
EP
HA
SE
INP
UT
SE
NS
LCF
LCF
-20
RE
VTA
PE
TR
IM
LEF
T
RIG
HT
FX
INP
UT
1
FX
INP
UT
S 2
TO
4A
RE
SIM
ILA
R T
OF
X IN
PU
T 1
SIP
AF
L/P
FL
TR
IM
AU
X 1
SO
LOL R
MA
ST
ER
ME
TE
R
AF
L/P
FL
OV
ER
RID
E
2-T
RA
CK
B L
2-T
RA
CK
A L
2-T
RA
CK
B R
-10d
BV
+4d
Bu
2-T
RA
CK
A R
SIP
LF/H
FE
Q
2TK
B
2TK
A
MIX
B
MIX
A
CO
NT
RO
L-R
OO
MS
OU
RC
E S
ELE
CT
CR
M
MIX
B
AU
X 1
-2
ST
UD
IO A
SO
UR
CE
SE
LEC
T
TAP
E
OS
C T
OTA
PE
DIM
CT
L
ST
U
OS
CO
SC A
UX
1-2
TALK
BA
CK
RO
UT
ING
DIM
MO
NO
CH
EC
K
CR
MLE
VE
L
ST
UD
IO A
HE
AD
PH
ON
ES
ALT
R
CR
M R
ALT
L
ALT
CR
M L
LEF
T
RIG
HT
ST
UD
IO A
OU
TP
UT
MIX
1-2
3-4
5-6
7-8
L+R
AF
L
MIX
R
100m
mG
RO
UP
FAD
ER
GR
OU
P 2
INS
ER
T
GR
OU
P 2
OU
TP
UT
GR
OU
PS
4, 6
& 8
AR
E S
IMIL
AR
TO
GR
OU
P 2
ME
TE
R
L+R
AF
L
MIX
L
100m
mG
RO
UP
FAD
ER
GR
OU
P 1
INS
ER
T
GR
OU
P 1
OU
TP
UT
GR
OU
PS
3, 5
& 7
AR
E S
IMIL
AR
TO
GR
OU
P 1
ME
TE
R
OP
TIO
NA
LIN
PU
T M
ET
ER
+4
-10
INT
ER
NA
LJU
MP
ER
S
+4
-10
INT
ER
NA
LJU
MP
ER
S

GHOST Block Diagram 4.3
BBlloocckk DDiiaaggrraamm EExxppllaannaattiioonn
A Block Diagram of Ghost appears on the previous page. What follows is a plainEnglish explanation of that diagram. It is primarily intended for those who areunfamiliar with how to read a Block Diagram, but can also be useful for the moreexperienced user. You can follow the diagram as you read the explanation, but justreading the explanation alone will also be helpful.
TThhee BBaassiiccss
If you want to follow along, first position the diagram so that the top of the page isfacing to the right. The diagram is read from left to right, but not necessarily fromtop to bottom. The diagram is a pictorial representation of Ghost�s signal flow.Generally, the inputs are on the left and the outputs are on the right. You�ll noticevertical lines in the middle of the diagram. These represent the various buses inGhost. A bus is a signal path that can contain many signals.The pictures in the diagram represent all the controls and the input/output jacks ofGhost, as well as some internal circuits. Most of the pictures and the buses arelabeled. We won�t discuss the unlabeled pictures, such as summing amplifiers(which appear as unlabeled triangles), but will concentrate instead on the labeledpictures. For instance, if a connection is actually to a summing amplifier and thento a control, we will describe the connection as being to the control and not to thesumming amplifier. This should not present a problem in understanding Ghost�ssignal flow.The other lines with the black dots represent the signal flow within Ghost. Theblack dots indicate a connection with either a control, a jack, another signal flowline, or a bus. If a lines crosses a control, a jack, a signal flow line, or a bus in thediagram, but is not connected by a black dot, then there is no connection betweenthem.Generally, the signals enter Ghost through the input diagrams on the left, travel tothe buses in the middle, and then continue to the output diagrams on the right.There are exceptions, however. For instance, the Direct Output jacks appear onthe left of the diagram and the 2-Track Inputs appear on the right, because it isclearer to represent them in this fashion.To save space when there a number of identical controls, the diagram usually onlyshows the signal flow for one of them and makes a note that the other controlsare similar (meaning that they function in an identical manner). For instance, thediagram only shows the signal flow for one channel and for one FX Input, but allchannels are the same and all FX Inputs are the same.
TThhee BBuusseess
NNootteeTo read the labels for the buses, you should temporarily turn the diagram so thetop of the page is facing up.
Ghost has 31 buses represented by the 31 lines in the middle of the diagram. Theyare labeled on the left. A bus is a circuit where similar signals are sent to, so thatthese signals can be sent as a group to their next destination within Ghost. Forinstance, all signals assigned to Group 1 are sent to the GRP 1 bus. Usually, thebuses are connected on both the input side and output side of the diagram. Mostbuses carry audio signals, but some buses are used for other purposes.Following is a brief description of each bus, starting from the bottom of thediagram. The input side and output side of the buses are described separately.Note that some buses are described together, such as the GRP buses and any L/Rbuses, even though they are labeled separately in the diagram.
4.4 GHOST Block Diagram
SSoolloo CCuutt
Input: This bus is connected to the channel mute circuits and operatesonly when SIP is engaged. When SIP is on, if a channel SOLO switch isengaged, it mutes all channels that don�t have their SOLO switchesengaged.
Output: This bus is connected to the SIP switch.
SSoolloo DDeetteecctt
Input: This bus is connected to the channel SOLO switches and it detectswhen the switch has been engaged.
Output: This bus is connected to the SIP switch, the Master SOLO LED inthe Master section, and to the AFL/PLF Override circuit.
PPFFLL DDeetteecctt
Input: This bus is connected to all PFL/AFL switches and it detects whenthe switch has been engaged. (It is more accurately called PFL/AFL Detect.)
Output: This bus is connected to the Master SOLO LED in the Mastersection and to the AFL/PLF Override circuit.
PPFFLL//AAFFLL LL//RR..((22 bbuusseess))--
Input: These buses are connected to all channel SOLO switches and to allPFL/AFL switches. Whenever any PFL/AFL switch is engaged, its signal issent to this stereo bus. If SIP is off, then whenever any channel SOLOswitch is engaged, its signal is also sent to this stereo bus. If SIP is on, thenthe channel SOLO switches operate in conjunction with the SOLO CUTbus.
Output: These buses are connected to the AFL/PFL TRIM control in theMaster section.
AAUUXX 11--22:: ((22 bbuusseess))--
Input: These buses are connected to the AUX Send 1 and AUX Send 2level controls. Turning up these controls, respectively, sends signals tothese buses. They are also connected to the AUX 1-2 routing switch in theTALKBACK section.
Output: These buses are respectively connected to the AUX 1 and AUX 2Master level controls in the Master section. They are also connected to theAUX 1-2 Source Select switches in the STUDIO A and STUDIO B sections.
AAUUXX 33--66:: ((44 bbuusseess))--
Input: These buses are connected to the 5-6 switch which is connected tothe AUX Send 3 and AUX Send 4 level controls. If the 5/6 switch is notengaged, then the AUX Send 3 and AUX Send 4 level controls send thesignal to the AUX 3 and AUX 4 buses. If the 5/6 switch is engaged, then theAUX Send 3 and AUX Send 4 level controls send the signal to the AUX 5and AUX 6 buses.
Output: These buses are respectively connected to the AUX 3-6 Masterlevel controls in the Master section.

GHOST Block Diagram 4.5
AAUUXX 77 LL//RR:: ((22 bbuusseess))--
Input: These buses are connected to the AUX 7 (Stereo) level control.Turning up this control sends signals to both buses simultaneously.
Output: These buses are connected to the AUX 7 (Stereo) Master levelcontrol in the Master section.
AAUUXX 88 LL//RR:: ((22 bbuusseess))--
Input: These buses are connected to the AUX 8 (Stereo) level control.Turning up this control sends signals to both buses simultaneously.
Output: These buses are connected to the AUX 8 (Stereo) Master levelcontrol in the Master section.
GGRRPP 11--88:: ((88 bbuusseess))--
Input: These buses are connected to the 1/2, 3/4, 5/6, 7/8 Routing Matrixswitches in the channel fader section and in the effects return section. Theyare also connected to the TO TAPE switches in the OSCILLATOR andTALKBACK Routing sections.
Output: These buses are respectively connected to the Group 1-8 Insertjacks in the Master section rear connector panel and to their respectiveGroup Master Faders.
MMIIXX LL//RR:: ((22 bbuusseess))--
Input: These buses are connected to the L/R Routing Matrix switches inthe channel fader section and to the MIX Routing Matrix switches in theeffects return section. They are also connected to the following switches:the TO TAPE switches in the OSCILLATOR and TALKBACK Routingsections; the MIX B TO MIX switch in the MIX B Master section; and theTO MIX-L and TO MIX-R switches in the GROUP MASTER FADERsection. They represent the MAIN MIX or MIX A.
Output: These buses are respectively connected to the MIX L/R Insertjacks in the Master section rear connector panel and to the Stereo MIXMaster Fader.
MMIIXX BB LL//RR:: ((22 bbuusseess))--
Input: These buses are connected to the pan controls in the MIX Bsection. They represent MIX B.
Output: These buses are connected to the MIX B Rotary Master Fader inthe MIX B Master section. They are also connected to the MIX B SOURCESELECT switches in the Studio A and Studio B sections.
GGRRPP OOPP BBUUSS ((11--88)):: ((22 bbuusseess))--
Input: Signal is sent to these buses from a point directly before the GRP 1-8 Output Jacks.
Output: These buses are connected to the DIR/GRP n switches locatedabove the DIR/TAPE SND jacks on the Input rear connector panel.
CCPPUU MMUUTTEE BBUUSS AA:: ((NNoott GGhhoosstt LLEE))--
Input: This bus is connected to Ghost�s CPU and controls the MuteAutomation for the channel mutes.
Output: This bus is connected to the channel mute circuits.

4.6 GHOST Block Diagram
CCPPUU MMUUTTEE BBUUSS BB:: ((NNoott GGhhoosstt LLEE))--
Input: This bus is connected to Ghost�s CPU and controls the MuteAutomation for the MIX B mutes.
Output: This bus is connected to the MIX B mute circuits.
SSiiggnnaall FFllooww
We will now trace the signal flow through Ghost. You�ll see that in many placesthe signal branches off to a number of destinations. If we were to discuss all thesignal branches in detail as they appeared in the signal flow, you might lose sight ofthe main signal path. So instead, we will mention when the signal branches off, butcontinue with the main signal path flow. Then we will go back and trace thebranches in detail.We will trace the input sides and output sides separately. For the inputs, we willtrace the Channel inputs, MIX B inputs, and Effects Returns inputs separately,tracing them from their input jacks to the buses. For the outputs, we will tracethem from the buses to the output jacks. Then at the end, we will provide a quickoverview of the complete signal path from input to output. There are also someitems in the diagram that don�t fit neatly into input/output categories, so we willdiscuss them at the most appropriate points. Two of those items are the CUTswitches and the SOLO/PFL/AFL switches, so we will start with them, since theyare very common throughout Ghost. Then, when we encounter a CUT orSOLO/PFL/AFL switch in a signal path, we will mention it, but not have to trace itspath each time.

GHOST Block Diagram 4.7
SSiiggnnaall FFllooww
MMuuttee aanndd SSoolloo
CCUUTT SSwwiittcchheessThere is one Cut (Mute) switch for each channel and each MIX B section. All ofthem are connected to a Mute Circuit. The channel Mute Circuits are connectedto CPU Mute Bus A and the MIX B Mute Circuits are connected to CPU MuteBus B. Both Mute Buses are connected to Ghost�s CPU, which controls theautomation. (Not Ghost LE). In addition, the channel Mute Circuit is connected tothe Solo Cut Bus.Engaging any Cut switch will mute the signal beyond the Mute Circuit. You engagethe Cut switch manually, by pressing it, or automatically, either with Solo-In-Place(SIP) or by using Ghost�s Mute Automation. With Automation, the CPU will sendsignals to the Mute Circuits, via the Mute Buses, to automatically engage the Cutswitches. Solo-In-Place is discussed below.
SSOOLLOO//PPFFLL//AAFFLL SSwwiittcchheessAll channels have Solo switches and all MIX B sections have PFL (Pre-Fader-Listen) switches. There are also numerous other PFL and AFL (After-Fader-Listen) switches throughout Ghost. The channel Solo switches will function asSolo-In-Place (SIP) switches (if SIP is on) or as PFL switches (if SIP is off). PFLswitches come before the fader or level control, so that the faders have no effecton the switches, and signal will be sent, even if the fader is at its minimum level.AFL switches come after the fader or level control, so that the faders will have aneffect on the switches, and no signal will be sent, if the fader is at its minimumlevel.On the channels only, if SIP is on, it sends a signal to the Solo Detect bus, tellingGhost that when a channel Solo switch is engaged, the Solo Cut Bus shouldengage the mute circuits for all channels that do not have their Solo switchesengaged. For the rest of this discussion, we will assume that SIP is off. If SIP is off,then Ghost treats the channel Solos as PFL switches. The channel Solo switches are connected to the Solo Detect and PFL/AFL-L/Rbuses. The MIX B PFL switches and all other PFL/AFL switches are connected tothe PFL Detect bus and to the PFL/AFL-L/R buses. When SIP is off, the SoloDetect bus functions identically to the PFL Detect bus. (For the rest of thissection, we will use the term solo to refer to all SOLO, PFL, and AFL switches.)Both Detect buses are connected to the Global Solo LED in the Master Solosection and when either bus detects that a solo switch has been pressed, it lightsthe LED.Both of the detect buses are connected to the AFL/PFL Override Circuit, which inturn, is connected to the CRM/SOLO-L/R meters and then the CRM level control.The PFL/AFL-L/R signal buses are connected to the AFL/PFL Trim Control, whichis also connected to the AFL/PFL Override Circuit. The Control Room section willbe covered in more detail below, but the point to note here is that whenever anysolo switch is depressed, the detect circuit sends a notice to the override circuittelling it to mute the selected Control Room Source, and in its place, send thesignals from the AFL/PFL Trim Control to the Control Room Outputs.What all of this means is that if you press any solo switch, the Global Solo LED willlight and all soloed signals (from the PFL/AFL-L/R bus) will be sent to the soloTrim Control, where you can adjust the level of the soloed signals, and then to thecontrol room meters and headphones/control room outputs.

4.8 GHOST Block Diagram
IInnppuuttss
CChhaannnneellssThe channel has 2 inputs: an XLR mic input and a ¼" line input. (They are locatedin the upper-left of the diagram). The Mic input is connected to the 48V (phantompower) switch and then to the Mic/Line switch. The line input is connected to theMic/Line switch. The Mic input has the 48V option and then you select the channelinput with the Mic/Line switch. From that point on, both inputs are treatedidentically.The channel signal then goes to the Phase switch, the Input Sensitivity knob, andthe Low-Cut Filter (LCF) switch and circuit. The last switch determines whetherthe signal goes through the LCF circuit or not.The signal continues to the Signal Present LED, the Peak Detect LED, and theReverse switch. This switch determines whether the signal continues down thechannel path or MIX B path. Note that even if Reverse is pressed, the channelsignal will still have passed through all the pre-Reverse points above. If Reverse ispressed, then the channel signal will follow the MIX B path that comes after theswitch, as explained in the MIX B section below. We will continue tracing thechannel path, as if Reverse was not pressed.The signal continues to the Channel Insert jack. If a send/return plug is inserted,the signal will be sent to the outboard device, processed by it, and then returnedto the Insert jack. If nothing is connected, the signal proceeds from the Insert jack.If you have the optional meterbridge and it�s set to monitor channel inputs, thenfrom the Insert jack the signal goes to the meterbridge input meter.Next, the signal goes to the EQ MIX B switch, to the LF/HF EQ and LMF/HMF EQcircuits, and to the EQ In/Out switch. If MIX B is pressed, the LF/HF EQ isswitched into the MIX B path and is not available to the channel. The EQ In/Outswitch is used to switch all 4 bands of EQ in or out of the signal path and it affectsthe LF/HF EQ, whether that EQ is in the channel path or MIX B path. The outputsof the 2 separate EQ circuits also go to the Peak Detect LED.From this point, the pre-fader signal goes to the following 3 places: the channelSolo switch, the Pre switch in the Aux 1/2 section, and the Source switch in theMIX B section. These signals will be routed to the above destinations, regardless ofthe level of the channel fader. This is the signal that will appear if you use thechannel Solo as a PFL, if you press the Pre switch in the Aux 1/2 section, or if youselect channel as the Source in the MIX B section.The signal also travels to the channel fader, which will affect its level, and to themute circuit. Now the signal is a post-fader signal. If you press the Cut switch, thesignal will be muted beyond this point. If not muted, the signal goes to thefollowing 5 places: the Dir/Grp n switch (which is connected to the Dir/Tape Sndjack), the channel pan knob, the Pre button in Aux 1/2, the Mix B button in Aux3/4 (5/6), and the Peak Detect LED. If the Dir/Grp n switch is up, then the signalcontinues to the Dir/Tape Snd jack as a Direct Output. If the Pre switch in Aux 1/2is not depressed, then it is this post-fader signal that is routed there. If the Mix Bswitch in Aux 3/4 is not pressed, then it is this post-fader signal that is routedthere.Regardless of the above switch settings, the signal passes to the channel pan knob,which is used to route the signal to the L/Odd signal path, R/Even signal path, orboth signal paths. These signal paths then go to the channel Routing Matrix (Assign)switches and to the stereo Aux 7 level control. The signal from the Aux 7 controlgoes to the Aux 7 L/R buses and the signal flow from the Routing Matrix switchesis as follows: the L/R switch goes to the Mix L/R buses, the 1/2 switch goes to theGrp 1/2 buses, the 3/4 switch goes to the Grp 3/4 buses, the 5/6 switch goes tothe Grp 5/6 buses, and the 7/8 switch goes to the Grp 7/8 buses.The pan control determines to which bus or buses the signal is routed. The signalsfrom the L/Odd path go to the Aux 7 L, Mix L, and Grp 1, 3, 5, 7 buses. Thesignals from the R/Even path go to the Aux 7 R, Mix R, and Grp 2, 4, 6, 8 buses.That is, if you pan full left, the signal goes to the left buses and odd groups and ifyou pan right, it goes to the right buses and even groups. If the pan control is at its

GHOST Block Diagram 4.9
centre detent position, the signal goes to the L/R buses and Odd/Even groupsequally. You can also select intermediate settings with the pan knob. You turn upthe Aux 7 level knob or press the assign switches to route the signals to theappropriate buses.At this point you have the channel input signal available as a source for the MIX Bsection, and it is also available at Aux 1-4 (5/6) and Aux 7, the Solo switch, theDir/Tape Snd output jack, and the Mix L/R and Group 1-8 buses.
MMIIXX BBMIX B has a ¼" line input jack. If you have the optional meterbridge and it�s set fortape monitoring, then the signal goes from the input jack to the meterbridge inputmeter. It also goes to the Tape Trim knob and then the Reverse switch. Ifdepressed, the Reverse switch can send MIX B to the channel path and thechannel to the MIX B path. If you reverse the signal, the MIX B input is stillmonitored by the meterbridge, as described above, and controlled by the TapeTrim knob. We will assume Reverse has not been pressed.Next, the signal goes to the MIX B Source switch. As described above, the pre-fader signal from the channel also appears here. The source switch determines ifthe MIX B signal is routed to the MIX B path, or if the pre-fader channel signal isrouted there.If the LF/HF EQ has been assigned to MIX B, then the signal is routed there andthen to the PFL switch. Note that the EQ In/Out switch must be engaged for theEQ to function. This is where the MIX B pre-fader signal ends.The signal is also routed to the MIX B rotary fader and the mute circuit. From thispoint on, it is a post-fader signal. If you press the Cut switch, the signal will bemuted beyond this point. If not muted, the signal goes to the MIX B switch in Aux3/4 (5/6). Pressing the switch makes Aux 3/4 (5/6) available to the MIX B path.The signal continues to the MIX B pan knob and from there it goes to the MIX BL/R buses and to the stereo Aux 8 Send knob. From the knob it�s routed to theAux 8 L/R buses.At this point you have the MIX B input signal available as a source for the MIX Bsection, and it is also available at Aux 3-4 (5/6) and Aux 8, the PFL switch, and theMIX B L/R buses.
EEffffeeccttss RReettuurrnnssThere are 4 stereo effects returns. The output from an effects device is usuallyconnected to an FX L and FX R ¼" line jack. From there the signal goes to the PFLswitch and to the effects return level control and balance knob. It is then sent tothe effects return routing matrix (assign) switches. The balance knob works justlike the channel pan knob, described above, and sends the signal to the L/Oddsignal path, the R/Even signal path, or both. The Mix switch sends signals to theMIX L/R buses, the 1/2 switch to the Grp 1-2 buses, the 3/4 switch to the Grp 3-4buses, the 5/6 switch to the Grp 5-6 buses, and the 7/8 switch to the Grp 7-8buses. As with the channel, you press an assign switch to send the effects returnsignal to the appropriate Group buses or to the MIX L/R bus.At this point the effects return signal is available to the MIX L/R buses and to theGroup 1-8 buses.
22--TTrraacckkThe 2-Track inputs are located to the right of the buses in the diagram, near thecentre of the page. There are 2 pairs of stereo inputs. The inputs are on ¼" linejacks. You normally connect the outputs of your 2-Track recorders here, but youcan connect any line level signal. The 2-Track A L/R inputs are routed directly tothe 2TK A Control Room Source Select switch and the 2-Track B L/R inputs are routed directly to the 2TK B Control Room SourceSelect switch. You press either switch to hear its signal in the headphones/controlroom monitors.
4.10 GHOST Block Diagram
OOtthheerr IInnppuuttssWhile not technically inputs (there are no input jacks), Ghost has some controlsthat send signals to the buses. They will be covered here. For our purposes, weare generally treating signals sent to the buses as inputs. In the next section(Outputs), we will trace the signal flow from the buses to Ghost�s outputs.
TTaallkkbbaacckkThe TB MIC is connected to the Talkback level control, which sets the level of thesignal, and then to the Talkback routing switches. There are switches for TOTAPE, TO AUX 1-2, and TO STU. When you press the TO TAPE switch, thesignal from Ghost�s mic passes through the Oscillator�s TO TAPE switch, and ifthat switch is not depressed, the signal is sent to the MIX-L/R and GRP 1-8 buses.The Oscillator TO TAPE switch takes precedence over the Talkback TO TAPEswitch. When you press the TO AUX 1-2 switch, the signal is sent to the AUX 1/2buses. When you press the TO STU switch, the signal goes to a point directly afterthe Studio source select switches and before the Studio level control, so that theTB signal can be monitored in the Studio outputs. Note that whenever anyTalkback switch is engaged, it automatically engages the DIM circuit, which islocated directly after the Control Room level control. This will attenuate the levelof the control room outputs.
OOsscciillllaattoorrThe Oscillator is connected to the 1k/10k switch, which allows you to select thefrequency of the oscillator. The selected frequency is then routed to the OSCLEVEL control, which sets the level of the signal, and then to the TO TAPE switch.When you press the Oscillator�s TO TAPE switch, the signal from the oscillator issent to the MIX-L/R and GRP 1-8 buses. Pressing this switch takes precedenceover the TO TAPE switch in the Talkback section. This means that if bothswitches are pressed simultaneously, only the signal from the oscillator goes to theMIX and Group buses.
OOuuttppuuttss
GGrroouuppssThe block diagram only shows the outputs of Groups 1 and 2, using 1 asrepresentative of the odd Groups and 2 as representative of the even Groups.However, the signal paths of both the odd and even Groups are the same. Theonly difference is the TO MIX- L or R switch in the Group Master Output section.They route the odd Groups to the Mix L bus and the even Groups to the Mix Rbus. Therefore, we will discuss the odd and even Group buses together.The Group buses are routed to the Group Insert jacks for outboard processingand then to the 100mm Group Fader. From there, the signal is sent to the L+Rswitch, the To MIX- L switch (for odd buses) or the To MIX- R switch (for evenbuses), and to the AFL switch, in the Group Master Output section. The L+Rswitch affects both the AFL and the Mix routing. If AFL is pressed and the L+Rswitch is not pressed, then the post-fader Group signal is sent to the PFL/AFL-Lbus for odd groups and the PFL/AFL-R bus for even groups. If AFL is pressed andthe L+R switch is pressed, then the post-fader Group signal is sent to thePFL/AFL-L+R buses. For Mix routing, for odd groups, if Mix L is pressed, thesignal is sent to the Mix L bus, and if both Mix L and L+R are pressed, the signal issent to the Mix L/R buses. For even buses, if Mix R is pressed, the signal is sent tothe Mix R bus, and if both Mix R and L+R are pressed, the signal is sent to the MixL/R buses. The signal is also sent to the Group output meters in Ghost�s Mastersection. Then, the signal is sent to the GRP OP BUS (1-8) (more on that below)and finally to the Group Output jack. Whatever is connected to the Group Outputjack will receive all the signals that have been sent to that Group bus. These jackscan be connected to the inputs of a multitrack tape machine for recordingpurposes. However, if you have more than 8 tracks on your recorder, you mightwant to connect your recorder�s inputs to the channel DIR/TAPE SND jacks.

GHOST Block Diagram 4.11
DDiirr//TTaappee SSnnddThese output jacks can carry either the Direct Output of the channel or functionas a Group Output. You decide which by using the DIR/GRP n switch. The GRPOP BUS (1-8), mentioned above, should not be confused with the regular Group 1through Group 8 buses. Those buses send signals to the Group Output jacks onGhost�s Master Rear Connector Panel. The GRP OP BUS (1-8) are 2 buses thatcarry all 8 Groups and send them to the DIR/GRP n switch. The switch isconnected to the DIR/TAPE SND output jack. The post-fader channel signal is alsoconnected to the DIR/GRP n switch. If the switch is up, then the jack is used as aDirect Output for the post-fader channel signal. If the switch is depressed, thenone of the 8 Group Bus signals (from the GRP OP BUS (1-8)) is sent to the jack.The Group Bus 1 signal is only sent to the 1, 9, 17, 25 DIR/TAPE SND jacks;Group Bus 2 signal is only sent to 2, 10, 18, 26; Group Bus 3 signal is only sent to3, 11, 19, 27, etc.The GRP 1-8 output jacks and the DIR/TAPE SND jacks, when used as TapeSends, carry the same signals. For instance, if you press the DIR/GRP 8 switch forchannel 8, then its DIR/TAPE SND jack will output all signals that are on theGroup 8 bus. The Group 8 bus signals will also be sent to the GRP 8 output jack.Or to look at it another way, if you want to use one of the DIR/TAPE SND jacksas the Group 8 output, then you can press the DIR/GRP 8 switch for eitherchannel 8, 16, 24, or 32, and its DIR/TAPE SND jack will carry the Group 8output. You might use this method if the DIR/TAPE SND jacks were connected tothe inputs of a multitrack recorder and you wanted to send a number of signals toone track of that recorder. In this example, you would press the DIR/GRP 8 switchon the channel that matched the tape track you wanted to record on: channel 8for track 8; channel 16 for track 16; channel 24 for track 24; or channel 32 fortrack 32.
MMaaiinn MMiixxThe Mix L/R buses are sent to the MIX Left Insert and MIX Right Insert jacks, andthen to the 100mm MIX Master Fader on the top panel. It is one fader thatcontrols both the Left and Right MIX buses. From there, the signal is sent to theMIX A Control Room Source Select switch and also to the MIX Left Output andMIX Right Output jacks.
MMIIXX BBThe MIX B L/R buses are sent to the rotary MIX B Master Fader on the top panel.It is one rotary fader that controls both the Left and Right MIX B buses. Fromthere, the signal is sent to the MIX B Control Room Source Select switch and alsoto the MIX B TO MIX switch in the MIX B Master section and to the MIX B LeftOutput and MIX B Right Output jacks. The MIX B TO MIX switch, if depressed,will combine the MIX B L/R signals with the MIX L/R signals right before the MIXLeft Insert and MIX Right Insert jacks and from that point on the MIX B L/R signalswill be combined with the MIX L/R signals and appear at the MIX L/R output jacks.The MIX B L/R buses are also sent directly to the MIX B Source Select switchesfor Studio A and Studio B, without passing through the MIX B master fader.Normally, the MIX B signal path is separate from the Main MIX signal path, andeach has its own stereo output jacks. The Main MIX outputs are normallyconnected to a stereo recorder, such as a DAT deck, for mixdown purposes. Ifyou also want to record the MIX B signals to the DAT recorder during mixdown,then you press the MIX B TO MIX switch and now all channel inputs and MIX Binputs can be recorded to DAT. The MIX B signals will also be able to use the MixL/R Insert jacks and will pass through the MIX L/R Master Fader before appearingat the MIX L/R Output jacks. Even if the MIX B TO MIX switch is depressed, theMIX B signals will also appear at the MIX B-L/R output jacks.

4.12 GHOST Block Diagram
AAuuxxiilliiaarriieessThe mono AUX buses 1-6 are sent to the same-numbered AUX Master levelcontrol in Ghost�s Master section. They are then sent to the Master AUX AFLswitch and then to the same-numbered AUX output.The stereo AUX buses 7-L/R and 8-L/R are sent to the same-numbered AUXMaster level control in Ghost�s Master section. The level control is one knob thatcontrols the L/R buses. The signal is then sent to the Master AUX AFL switch andthen to the same-numbered AUX-L/R outputs.The AUX outputs are normally connected to the inputs of outboard effectsdevices. The outputs of the effects devices are then connected to the effectsreturns or to the channel inputs. Generally, the channel AUX Sends are used tosend and balance all the signals that are going to the same-numbered AUX bus,and the AUX Master level control is used to set the overall level going to theeffects device.
CCoonnttrrooll RRoooomm//HHeeaaddpphhoonneessThis section is used to provide monitoring for the engineer (recordist) in thecontrol room. The Headphones jack, the CRM O/P L/R jacks, and the ALT O/PL/R jacks all carry the same signals. What is heard in these outputs is determinedby the Control Room Source Select switches. There are Source Select switchesfor MIX A, MIX B, 2 TK A, and 2 TK B. As explained previously, the appropriatebuses are connected to the MIX A and MIX B switches and both pairs of 2-Trackstereo input jacks are connected directly to the 2 TK switches. More than oneswitch can be depressed at once, and you will hear a combination of all yourselections.The combined output of the Control Room Source Select switches is sent to theStudio A and Studio B CRM Source Select switches. (Pressing the CRM switchsends the Control Room output to the Studio outputs.) The combined output isalso sent to the AFL/PFL Override Circuit. Whenever any AFL/PFL switch onGhost is pressed, it will override what you have selected with the Control RoomSource Select switches, and the AFL/PFL signal wil l be heard in theheadphones/control room monitors instead. From the Override Circuit the signalcontinues to the CRM/SOLO-L/R meters in Ghost�s Master section. (If you havethe optional meterbridge, the signal is also sent to its L/R Master meters.)The signal continues to the CRM level control, the DIM circuit, the MONOswitch, the headphones jack, and the ALT switch. The ALT switch is connected tothe CRM L/R outputs and the ALT L/R outputs. The level control sets the outputlevel, the MONO switch sums the output to mono, and the ALT switch sends thesignal to the ALT L/R outputs, instead of the CRM L/R outputs. Normally youconnect the CRM L/R outputs to one set of studio monitors (such as your mainmonitors), and you connect the ALT L/R outputs to a second set of studiomonitors, such as nearfields. By using the ALT switch you can select whichmonitors you wish to hear. If headphones are plugged into the headphones jack, itdisconnects the signal beyond that point. This means there will be no output in theCRM or ALT monitors, if headphones are plugged in. Make sure the headphonesare unplugged, when you want to listen to the CRM or ALT monitors.The DIM circuit is connected to the TALKBACK Routing switches. Whenever oneof those switches is pressed, the DIM circuit dims (lowers the volume of) thesignal sent to the headphones/control room monitors.
SSttuuddiiooThis section is used to provide monitoring for the musicians in the studio(performing space). Ghost has two stereo Studio outputs, called Studio A andStudio B/Phones. They are identical, except that the Studio A outputs are groundcompensated and the Studio B outputs are unbalanced and suitable for drivingheadphones, with the proper cable. Normally, you connect one set of outputs to aheadphone amp in the studio or directly to a set of headphones. The other Studiooutputs are connected to a power amp/monitor setup in the studio.

GHOST Block Diagram 4.13
What is heard in these outputs is determined by the Studio Source Select switches.There are Source Select switches for AUX 1-2, MIX B, and CRM. As explainedpreviously, the appropriate buses are connected to the AUX 1-2 and MIX Bswitches and the output of the Control Room Source Select switches is sent to theCRM switch. More than one switch can be depressed at once, and you will hear acombination of all your selections.The combined output of the Studio Source Select switches is sent to the Studiolevel control and then to the Studio AFL switch and the Studio Output L/R jacks.

4.14 GHOST Block Diagram
OOvveerrvviieeww ooff MMaaiinn SSiiggnnaall PPaatthhss
As a summary, below is an overview of Ghost�s main signal paths, without theexplanations.
IInnppuuttss
CChhaannnneellss:: SSiiggnnaall CCoonnnneeccttiioonnss
MIC I/P to 48V switch to LINE switch.
LINE I/P to LINE switch.
LINE switch to PHASE switch to Input Sensitivity knob to LCF switch.
LCF switch to SIGNAL DETECT LED and PEAK DETECT LED.
LCF switch to REV switch.
REV switch (UP) to Channel INSERT JACK.
Channel INSERT JACK to optional meterbridge INPUT METER (if channelinput monitoring is selected).
Channel INSERT JACK to EQ MIX B switch to LF/HF EQ to LMF/HMF EQto EQ IN switch.
LF/HF EQ to PEAK DETECT LED.
LMF/HMF EQ to PEAK DETECT LED.
EQ IN switch to SOLO switch.
EQ IN switch to AUX 1-2 PRE switch.
EQ IN switch to MIX B SOURCE switch.
EQ IN switch to Channel FADER to Channel CUT switch.
Channel CUT switch to DIR/GRP n switch to DIR/TAPE SND jack.
Channel CUT switch to PEAK DETECT LED.
Channel CUT switch to AUX 1-2 PRE switch.
Channel CUT switch to AUX 3-4 MIX B switch.
Channel CUT switch to Channel PAN POT.
Channel PAN POT to AUX 7 stereo SEND knob.
Channel PAN POT to Channel ROUTING MATRIX switches (L-R, 1-2, 3-4, 5-6, 7-8).
BBuuss CCoonnnneeccttiioonnss
CUT switch to SOLO CUT bus and CPU MUTE BUS A.
SOLO switch to SOLO DETECT bus and PFL/AFL L/R bus.
DIR/GRP n switch to GRP OP BUS (1-8).
ROUTING MATRIX switches:
L-R to MIX L/R bus.
GHOST Block Diagram 4.15
1-2 to GRP 1/2 bus.
3-4 to GRP 3/4 bus.
5-6 to GRP 5/6 bus.
7-8 to GRP 7/8 bus.
MMIIXX BB:: SSiiggnnaall CCoonnnneeccttiioonnss
MIX B/TAPE RET jack to optional meterbridge INPUT METER (if tapeinput monitoring is selected).
MIX B/TAPE RET jack to TAPE TRIM knob to REV switch.
REV switch (UP) to MIX B SOURCE switch to EQ MIX B switch.
EQ MIX B switch to MIX B PFL switch.
EQ MIX B switch to MIX B FADER to MIX B CUT switch.
MIX B CUT switch to AUX 3-4 MIX B switch.
MIX B CUT switch to MIX B PAN POT.
MIX B PAN POT to AUX 8 stereo SEND knob.
BBuuss CCoonnnneeccttiioonnss
CUT switch to CPU MUTE BUS B.
PFL switch to PFL DETECT bus and PFL/AFL L/R bus.
PAN POT to MIX B L/R bus.
AAuuxxss:: SSiiggnnaall aanndd BBuuss CCoonnnneeccttiioonnss
Pre-fader channel signal and post-fader channel signal to AUX 1-2 PREswitch to AUX 1-2 SEND knobs to AUX 1/2 buses.
Post-fader channel signal and post-fader MIX B signal to AUX 3-4 MIX Bswitch to AUX 3-4 SEND knobs to AUX 3-4 "5-6" switch.
AUX 3-4 "5-6" switch to AUX 3/4/5/6 buses.
Channel post-fader, post-pan signal to AUX 7 stereo SEND knob to AUX 7L/R buses.
MIX B post-fader, post-pan signal to AUX 8 stereo SEND knob to AUX 8L/R buses.
EEffffeeccttss RReettuurrnnss
SSiiggnnaall CCoonnnneeccttiioonnss
FX L/R jacks to FX PFL switch.
FX L/R jacks to FX stereo LEVEL knob to FX BALANCE knob to FXROUTING MATRIX switches (MIX, 1-2, 3-4, 5-6, 7-8).

4.16 GHOST Block Diagram
BBuuss CCoonnnneeccttiioonnss
ROUTING MATRIX switches:
MIX to MIX L/R bus.
1-2 to GRP 1/2 bus.
3-4 to GRP 3/4 bus.
5-6 to GRP 5/6 bus.
7-8 to GRP 7/8 bus.
OOuuttppuuttss
MMIIXX AA
MIX L/R buses to MIX INSERT jacks to MIX MASTER FADER.
MIX MASTER FADER to MIX A Control Room Source Select switch.
MIX MASTER FADER to MIX L/R outputs.
MMIIXX BB
MIX B L/R buses to MIX B Studio A and B Source Select switches.
MIX B L/R buses to MIX B MASTER FADER.
MIX B MASTER FADER to MIX B Control Room Source Select switch.
MIX B MASTER FADER to "MIX B TO MIX" switch.
MIX B MASTER FADER to MIX B L/R outputs.
AAUUXX 11--66
AUX 1-6 buses to AUX 1-6 MASTER FADERS.
AUX 1-6 MASTER FADERS to AUX 1-6 AFL switches.
AUX 1-6 MASTER FADERS to AUX 1-6 outputs.
AAUUXX 77--88
AUX 7 L/R and AUX 8 L/R buses to AUX 7-8 stereo MASTER FADERS.
AUX 7-8 stereo MASTER FADERS to AUX 7-8 AFL switches.
AUX 7-8 stereo MASTER FADERS to AUX 7-8 L/R outputs.
GGRROOUUPPSS
GRP 1-8 buses to Group 1-8 INSERT jacks to Group 1-8 MASTER FADERS.
Group 1-8 MASTER FADERS to Group 1-8 AFL switches.
Group 1-8 MASTER FADERS to Group 1-8 L+R switches.
Group 1, 3, 5, 7 MASTER FADERS to Group 1, 3, 5, 7 TO MIX-L switches.
Group 2, 4, 6, 8 MASTER FADERS to Group 2, 4, 6, 8 TO MIX-R switches.
Group 1-8 MASTER FADERS to Group 1-8 OUTPUT METERS.
Group 1-8 OUTPUT METERS to GRP OP BUS (1-8).
Group 1-8 OUTPUT METERS to GRP 1-8 outputs.

GHOST Back and Rear Panel Description 5.1
GGHHOOSSTT
BBaacckk aanndd RReeaarrPPaanneell DDeessccrriippttiioonn5

5.2 GHOST Back and Rear Panel Description
BBaacckk aanndd RReeaarr PPaanneell DDeessccrriippttiioonn
BBaacckk PPaanneell
1. Power Connector. Used to connect the Power Supply Unit (PSU) toGhost. Place the PSU away from the console, preferably in a rack. Makesure the voltage and fuse are correct for the country you will be using it in.Connect one end of the supplied PSU cable to the PSU by lining up the pinsin the cable with the holes in the PSU and pushing in. Then hand-tightenthe ring around the cable. Connect the other end of the cable to the powerconnector on back of Ghost, using the same procedure. Then attach oneend of the supplied AC cable to the back of the PSU and plug the other endinto a mains (AC) outlet. Use the power switch on the front of the PSU toturn Ghost�s power on and off.
2. MIDI Jacks. (Not Ghost LE). Used to connect Ghost to a tape recorderfor MIDI Machine Control (MMC) and MIDI TimeCode (MTC) or to con-nect Ghost to a computer MIDI sequencer via a MIDI interface.
A. MIDI IN is connected to MIDI Out of another device. You can connect itto MIDI Out of a tape recorder to provide Ghost with tallyback confirma-tion of the recorder�s transport status and to send MTC messages toGhost. You can also connect it to MIDI Out of a MIDI sequencer in orderto send MTC, MIDI messages, such as program change and MIDI Mutedata, to Ghost, and to load the contents of Ghost�s snapshot memory intoGhost after you have saved it to a sequencer.
B. MIDI Out is connected to MIDI In of another device. You can connect it toMIDI In of a tape recorder in order to control the recorder�s transportcontrols via MMC and to send MTC messages to the recorder. You canalso connect it to MIDI In of a MIDI sequencer for MTC purposes; to sendMIDI Mute data to the sequencer for dynamic mute automation; and tosave the contents of the Ghost�s snapshot memory to the sequencer.
C. MIDI THRU simply echoes whatever is plugged into Ghost�s MIDI In jack.For instance, if you plug MIDI Out from a tape recorder into Ghost�s MIDIIn, you can then connect Ghost�s MIDI Thru jack to the MIDI In of asequencer, so that the MIDI Out of the recorder will send the same mes-sages to Ghost and the sequencer.
3. SMPTE IN/OUT Jacks. (Not Ghost LE). Used to send SMPTE timecodeto and from Ghost. Connect SMPTE In of Ghost to the SMPTE Out of yourtimecode source and connect SMPTE Out of Ghost to SMPTE In of thereceiving device.
4. SONY Jack. (Not Ghost LE). Used to connect Ghost to a video taperecorder or other device that uses the standard Sony 9-pin protocol.
5. C3 Link & TO EXPANDER CONSOLE Jacks. Used to connect theoptional 24-channel expander module to Ghost. Further instructions areincluded with the expander module.

GHOST Back and Rear Panel Description 5.3
IInnppuutt RReeaarr CCoonnnneeccttoorr PPaanneell
The Input Rear Connector Panel is located directly above the channel strips,behind the optional meterbridge, if installed. This panel contains the main inputsand outputs for each channel of the console. The top and bottom of each panel isnumbered with the channel number that it represents and is directly above itsassociated channel. For instance, if you plug a microphone into input panel 7, thenyou use the controls of channel strip 7 to control that signal source.
1. 48V. When this switch is depressed it applies +48V phantom power to itsassociated MIC I/P. Use this switch for condenser microphones thatrequire phantom power. Make sure this switch is in the up position formicrophones, such as dynamics, that do not require phantom power.
2. MIC I/P. This XLR jack provides a balanced microphone input to its associ-ated channel. Microphones and direct boxes should be connected here andwill be routed to the channel, if the REV(ERSE) switch is not pressed. If theREV switch is pressed, then this input will be routed to MIX B. Regardlessof the position of the REV switch, the input gain is controlled by the INPUTSENS knob on the top panel.
The XLR jack is wired as follows:Pin 1: GndPin 2: Signal +Pin 3: Signal -
3. LINE. This ¼" jack provides a balanced line level input to its associatedchannel. Line level inputs, such as synths and samplers, should be connect-ed here and will be routed to the channel, if the REV switch is not pressed.If the REV switch is pressed, then this input will be routed to MIX B.Regardless of the position of the REV switch, the input gain is controlled bythe INPUT SENS knob on the top panel.
Note that while you can have both the MIC I/P and LINE I/P connected atthe same time, only one input will be active and pass its signal to the chan-nel. The LINE switch on the top panel channel strip determines which ofthe two inputs is active.
The ¼" jack is wired as follows:Tip: Signal+Ring: Signal-Sleeve: Gnd
4. INS. This ¼" jack provides an unbalanced line level Insert Point for its asso-ciated channel. It is used (instead of the Aux Send/Return system) when youwant to process just one channel and you want to process the entire signal(instead of having a wet/dry mix of the signal). Line level inputs and outputs,such as compressors/limiters and outboard EQ, should be connected here.The INS jack is located after the REV switch. The channel input signal willbe routed to this jack, if the REV switch is not pressed. If the REV switch ispressed, then the MIX B input signal will be routed to this jack.
The jack acts as a send and return, which are normalled together. If nothingis plugged into the jack, the input signal continues uninterrupted throughthe Ghost�s circuitry. You normally use an Insert Y-cable, readily available atmost electronics stores, with this jack. This Y-cable consists of one TRS(Tip-Ring-Sleeve) ¼" plug connected to two TS (Tip-Sleeve) ¼" plugs. TheTRS ¼" plug should be connected to Ghost�s Insert Jack, the Send ¼" TSplug should be connected to the input of the outboard device, and theReturn ¼" TS plug should be connected to the output of the outboarddevice. You can also use a regular TS cable, if you want to use this jack as aline level input to the channel.

5.4 GHOST Back and Rear Panel Description
The ¼" Insert jack is wired as follows:Tip: ReturnRing: SendSleeve: Gnd
5. MIX B/TAPE RET. This ¼" jack provides a balanced line level input to itsassociated channel�s MIX B path. You normally connect the outputs of yourmultitrack recorder to these jacks, but any line level outputs, such as synthsand samplers, can be connected here. This input will be routed to the MIXB path, if the REV switch is not pressed. If the REV switch is pressed, thenthis input will be routed to the channel path. Regardless of the position ofthe REV switch, the input gain is controlled by the TAPE TRIM knob on thetop panel.
Just as the MIC I/P and LINE jacks serve as inputs for the channel path, theMIX B/TAPE RET jacks serve as the inputs for the MIX B path. The reasonfor the dual designation for this jack is that normally you would connectyour Tape Returns (outputs of your multitrack recorder) here. However,you can connect any line level source here, such as virtual tracks from aMIDI sound module, and it will be routed to the MIX B path.
Also note that since Ghost is an in-line console, two inputs per channel canbe active at the same time; one channel input (controlled by the channelstrip) and the MIX B input (controlled by the MIX B controls for that chan-nel). The LINE switch on the top panel channel strip determines which ofthe two channel inputs, MIC I/P or LINE, is active for the channel, while atthe same time, whatever is plugged into the MIX B/TAPE RET jack is theactive input for the MIX B path, if REV is not pressed.
The ¼" jack is wired as follows:Tip: Signal+Ring: Signal-Sleeve: Gnd
6. DIR/TAPE SND. This ¼" jack provides either a Direct Output from itsassociated channel or acts as a Group Output 1-8, depending on the settingof the DIR/GRP n switch, described below. This jack should be connectedto the input of another device. In a common scenario, 8 or more of thesejacks would be connected to the inputs of a multitrack recorder and theoutputs of that recorder would be connected to the MIX B/TAPE RETjacks of Ghost.
When used as a Direct Output (DIR/GRP n switch in the up position), thechannel input (either MIC I/P or LINE) will be routed to this jack, if the REVswitch is not pressed. If the REV switch is pressed, then the MIX B inputwill be routed to this jack. In both cases, the Direct Output is post-channelfader, post-channel mute.
Instead of a Direct Output, this jack can also be used as a Group Output,when the DIR/GRP n switch is in the down position. The "n" represents aGroup number from 1 to 8, and when the switch is depressed its associat-ed jack will carry the output of Group n. In that case, any channel that isrouted to Group n will appear at this jack, in addition to appearing at theseparate GRP n jack on the Master Section Rear Connector Panel.
When used as a Group Output, this jack has no relationship to its associat-ed channel�s input. The channel input will only be routed to its associatedGroup Output jack if it is assigned to the Group indicated by the DIR/GRP nswitch for that jack and the switch is depressed. Since there are only 8Group Buses, one reason to use this method, known as multi-busing, is ifyou want to record on more than 8 tracks without repatching. You couldconnect all 32 (or 24) DIR/TAPE SND jacks to 32 (or 24) inputs of a multi-

GHOST Back and Rear Panel Desription 5.5
track recorder or 4 (or 3) digital 8-track recorders. Then, you could sendany channel to any of the 32 (or 24) Group Output jacks, for recordingonto 32 (or 24) tape tracks.
For instance, if you press the DIR/GRP 2 switch for channel 10, then anychannel that is assigned to Group 2 will appear at channel 10�s DIR/TAPESND jack, and that jack will no longer carry the Direct Output of channel10. More information on multi-busing and on using the DIR/TAPE SNDjacks is given later in this manual.
This jack is an unbalanced output when DIRECT is selected, and groundcompensated when GROUP n is selected. The ¼" jack is wired as follows:
DIRECT GROUP n
Tip: Signal Signal
Ring: Gnd Gnd Sense
Sleeve: Gnd Gnd
7. DIR/GRP n. This switch determines whether its associated DIR/TAPESND jack functions as a Direct Output from the channel fader (switch up)or carries the Group Output of GRP n (switch down). The letter "n" does-n�t actually appear on the switch, but represents a number from 1 to 8, andeach switch is labeled from DIR/GRP 1 to DIR/GRP 8. The GRP numberson the switches start with GRP 1 for channel 1, are numbered sequentiallyto GRP 8, and then repeat. So on the 32-channel Ghost, GRP 1 appears onChannels 1, 9, 17, 25; GRP 2 appears on Channels 2, 10, 18, 26, etc. Moreinformation on using the DIR/GRP n switches and DIR/TAPE SND jacks isgiven later in this manual.

5.6 GHOST Back and Rear Panel Desription
Following is the Group number for the DIR/GRP n switch and for theGroup Output for its associated DIR/TAPE SND jack for each channel:
Group # for DIR/GRP n SwitchChannel and DIR/TAPE SND Jack
1 1
2 2
3 3
4 4
5 5
6 6
7 7
8 8
Group # for DIR/GRP n SwitchChannel and DIR/TAPE SND Jack
9 1
10 2
11 3
12 4
13 5
14 6
15 7
16 8
17 1
18 2
19 3
20 4
21 5
22 6
23 7
24 8
25 1
26 2
27 3
28 4
29 5
30 6
31 7
32 8

GHOST Back and Rear Panel Description 5.7
MMaasstteerr SSeeccttiioonn RReeaarr CCoonnnneeccttoorr PPaanneell
1. TO METERBRIDGE. This connector is used to connect the optionalmeterbridge to Ghost. After installing the meterbridge, insert the D-typeplug from the meterbridge into this connector.
NNootteeAll jacks on this panel are ¼" jacks.
IINNPPUUTTSS
2. FX 1 L/R � FX 4 L/R. Ghost has 4 identical stereo effects returns, num-bered 1 through 4. Generally, you will use the Aux Sends to route signals toyour outboard effects devices, such as reverb and chorus, and then connectthe outputs of those devices to one of the effects returns inputs. Someeffects are mono in/stereo out and others are stereo in/stereo out. In eithercase, the stereo L/R outputs of the effects device are connected to one ofthese 4 L/R inputs. Mono output devices can also be used by connecting theoutput to either the L or R input. It doesn�t matter which of the 4 effectsreturns you use.
Signals connected here are controlled by the same numbered FX 1 � FX 4controls in the master section on the top panel. That is, if you return a sig-nal to the FX 3 L/R input, it is controlled by the FX 3 controls on the toppanel. You can also use these jacks as regular line inputs to the mixer,although you won�t have as much control as when using the channel inputs.By using these 4 stereo inputs, together with the channel and Mix B inputs,you can have 72 inputs from a 32-channel Ghost and 56 inputs from a 24-channel Ghost, during mixdown. Note that you don�t have to connect theoutputs of your effects devices to these effects returns. You can connectthem to the channel inputs, while recording or mixing down, or to the MIXB inputs during mixdown.
3. 2TKA I/P L/R � 2TKB I/P L/R. These 2 pairs of stereo inputs are used toconnect the outputs of 2 tape recorders or any other line level stereodevices. You�ll usually connect the outputs of a DAT recorder, 2-track ana-log open reel or cassette deck, or a CD player here. These inputs are sentto the 2 TK A and 2 TK B switches in the CRM SRCE section on the toppanel. Pressing either of those switches routes the appropriate input to thecontrol room monitors.

5.8 GHOST Back and Rear Panel Description
OOUUTTPPUUTTSS
4. GRP 1 � GRP 8. These jacks carry the outputs of group buses 1�8. Youcan assign the channel inputs and the 4 effects returns to any of the 8 busesin odd/even pairs. You generally use the group bus outputs for recording,by connecting them to the same-numbered inputs of a multitrack recorder.That is, GRP 1 output to tape input 1, GRP 2 output to tape input 2, etc.For example, if you want to record on tape track 4, you assign a channelinput or effects return input to bus 4, pan fully right, and the signal will berouted to the GRP 4 output, which is connected to tape input 4. Note thatif you have the DIR/GRP n switch depressed on the input rear connectorpanel, then all signals assigned to GRP n will be routed to that switch�sDIR/TAPE SND jack as well as to the GRP n jack.
5. AUX 1 � AUX 6. These jacks carry the outputs of AUX Sends 1-6. Theyare generally used to send a channel or MIX B signal to the inputs of an out-board effects device for processing. The outputs of the effects device arethen returned to Ghost, either via one of the 4 effects returns or via thechannel or MIX B inputs, and mixed with the original, dry signal. You usethe AUX 1 � AUX 6 level controls in the channel strips and the AUX 1-6master level controls, in the master section on the top panel, to control thelevel of these outputs. Note that to use the AUX 5 and AUX 6 outputs,you must press the 5-6 switch on the top panel channel strip for each chan-nel you want to route to these outputs.
6. AUX 7 L/R � AUX 8 L/R. These jacks carry the outputs of stereo AUXSends 7-8. They operate in the same manner as AUX 1-6, except theywork with the AUX 7 and AUX 8 controls on the top panel and their out-puts are stereo.
7. MIX O/P L/R. These are the stereo outputs for the Main Mix (L/R) bus.They are normally connected to the stereo inputs of a mixdown deck, suchas a DAT deck, 2-track open-reel deck, cassette deck, hard disk recorder,or CD-R recorder. After you have finished recording all tracks on your mul-titrack deck, you assign them, together with any hard disk or MIDI virtualtracks, to the L/R bus for mixdown. All channel inputs, Mix B inputs, 4stereo effects returns, and the 8 group outputs can be assigned to the Main(L/R) Mix. The output of these jacks is controlled by the Stereo MIX masterfader on the top panel.
8. MIX B O/P L/R. These are the stereo outputs for the Mix B bus. Mix Bcan be thought of as a separate 32x2 (or 24x2) mixer within Ghost. All MixB inputs (connected via the MIX B/TAPE RET jacks) are routed here auto-matically, if the REV switch is not pressed. If the REV switch is pressed on achannel, then that channel�s MIC or LINE input is routed here automatical-ly. The Mix B outputs can be used to provide a separate stereo mix of yourtape returns, or provide a separate pre-fader stereo mix of your channels,if the SRCE switch in the Mix B section in the channel strip is set to CHAN.You use the Mix B rotary faders in the channel strips and the Mix B masterrotary fader in the master section on the top panel to control the level ofthese outputs.
9. CRM O/P L/R. These are the stereo outputs for the main control roommonitors. They are connected to the power amp for those monitors. Thisis generally what the engineer listens to while tracking, overdubbing, andmixing down. You use the CRM SRCE buttons, in the master section on thetop panel, to control what is sent to these outputs. If the MONO CHECKbutton is depressed in the master section, then a mono sum of the L/R con-trol room signals will be sent to these outputs. The CRM LEVEL pot in themaster section controls the level of these outputs.
The CRM/SOLO�L/R Meters on the top panel and the Master Meters onthe optional meterbridge, monitor the control room signal.
GHOST Back and Rear Panel Description 5.9
The same stereo outputs also appear at the headphones jack under thefront armrest. If headphones are plugged into that jack, then the controlroom outputs will be disconnected.
10. ALT O/P L/R. These are the stereo outputs for the alternate controlroom monitors. They are connected to the power amp for those monitors.They function identically to the CRM L/R outputs above, but cannot beused simultaneously with them. The ALT switch in the control room sec-tion on the top panel switches the control room output from the CRM L/Routputs to these outputs. For instance, you could connect your main moni-tors to the CRM L/R outputs above, and connect a set of nearfield monitorsto the ALT L/R outputs, and then switch between them by pressing theALT switch.
11. HEADPHONES. (Not pictured). The Headphones jack is located under-neath the front armrest. It carries the same signal as the CRM L/R outputs.If headphones are plugged in here, the CRM Outputs (or ALT Outputs) areautomatically disconnected.
12. STU O/P A L/R. These are the stereo outputs for the Studio A Foldbacksection in the master section on the top panel. The outputs are ¼" groundcompensated outputs, suitable for connection to a power amp/monitors ora headphone amp located in the studio (performing space). They are usedto send a different mix than the control room mix to the performers in thestudio, while tracking and overdubbing. You use the STUDIO A SRCE but-tons, in the master section, to control what is sent to these outputs. TheSTUDIO A pot in the master section controls the level of these outputs.
13. STU PHNS B L/R. These are the stereo outputs for the Studio B/PhonesFoldback section in the master section on the top panel. The outputs are¼" unbalanced outputs, suitable for connection to an amp, and are alsocapable of directly driving headphones, with a suitable lead (cable). Detailson how to make a lead (cable) for connecting headphones to these outputsare given at the end of this chapter. These outputs are used in the samemanner as the STUDIO A Outputs above. You use the STUDIOB/PHONES SRCE buttons, in the master section, to control what is sent tothese outputs. The STUDIO B/PHONES pot in the master section controlsthe level of these outputs.
IINNSSEERRTTSS
14. GRP INS 1-8. These are the INSERT POINTS for the 8 Group Outputs.They are used in the same manner as the Channel Inserts, described above,but are used to connect outboard processors to the 8 Group Outputs. Thismakes it easy to process a number of signals at once. For instance, if youhave all of your drum inputs assigned to 2 Groups, you can process yourdrum mix as a whole by using the INSERT POINTS for those 2 Groups.(See 4. INS: under "Input Rear Connector Panel", above, for further detailson how to connect the GRP INS 1-8 jacks.)
15. MIX INS L/R. These are the INSERT POINTS for the MAIN (L/R) MIX.They are used in the same manner as the Channel Inserts, described above,but are used to connect outboard processors to the MAIN (L/R) MIX. Thismakes it easy to process the entire MAIN (L/R) MIX during mixdown, andrecord the processed mix to your mixdown recorder. For instance, youcould compress the MAIN (L/R) MIX as you record it to a DAT deck. (See4. INS: under "Input Rear Connector Panel", above, for further details onhow to connect the MIX INS L/R jacks.)

5.10 GHOST Back and Rear Panel Description
IInnppuuttssAll of the Inputs are balanced:FX1 L & FX1 RFX2 L & FX2 RFX3 L & FX3 RFX4 L & FX4 R2TKA I/P L & 2TKA I/P R2TKB I/P L & 2TKB I/P R
The connections are:Tip Signal +Ring Signal -Sleeve Gnd
IInnsseerrtt PPooiinnttssAll of the Insert Points areunbalanced:MIX INS L & MIX INS RGRP1 INSGRP2 INSGRP3 INSGRP4 INSGRP5 INSGRP6 INSGRP7 INSGRP8 INS
The connections are:Tip ReturnRing SendSleeve Gnd
OOuuttppuuttssThe following outputs are allground compensated:STU O/P A L & STU O/P A RAUX 1AUX 2AUX 3AUX 4AUX 5AUX 6AUX 7 L & AUX 7 RAUX 8 L & AUX 8 RMIX B O/P L & MIX B O/P RMIX O/P L & MIX O/P RGRP 1GRP 2GRP 3GRP 4GRP 5GRP 6GRP 7GRP 8
The connections are:Tip Signal +Ring Gnd SenseSleeve Gnd
The following outputs are allunbalanced:ALT O/P L & ALT O/P RCRM O/P L & CRM O/P RSTU PHNS B L & STU PHNS B R
The connections are:Tip Signal +Ring Not UsedSleeve Gnd
MMaasstteerr SSeeccttiioonn RReeaarr CCoonnnneeccttoorr PPaanneell �� JJaacckk WWiirriinngg


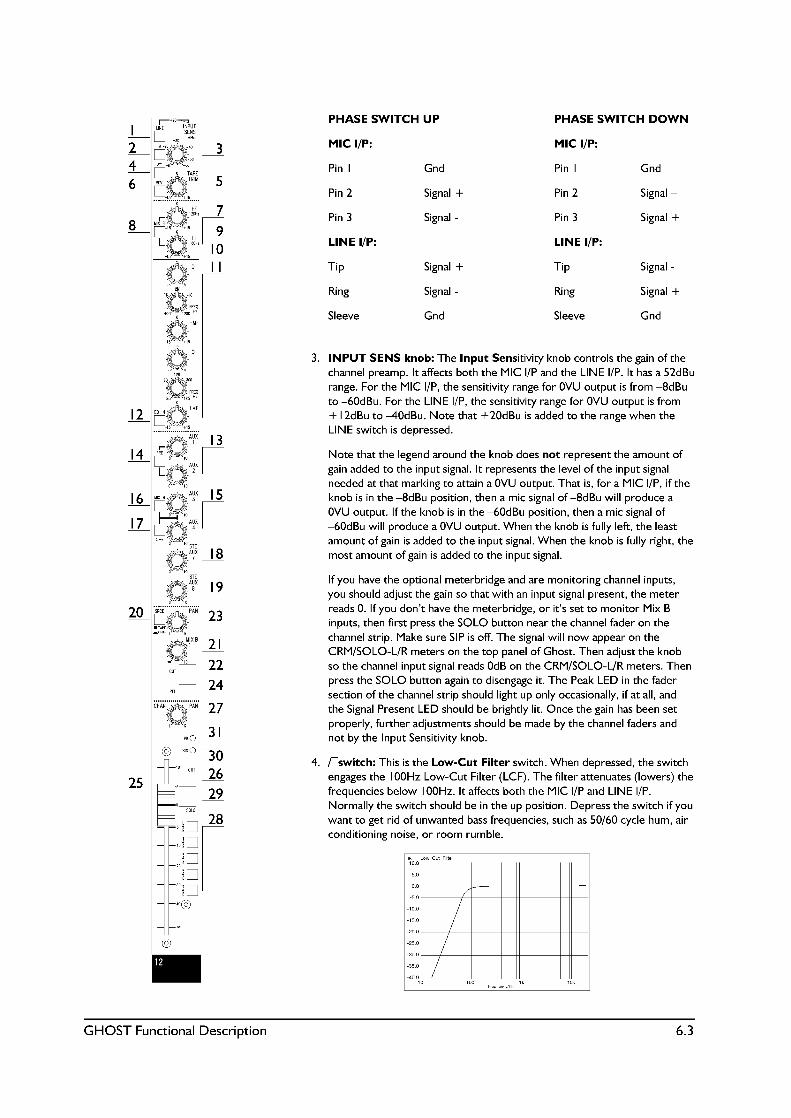


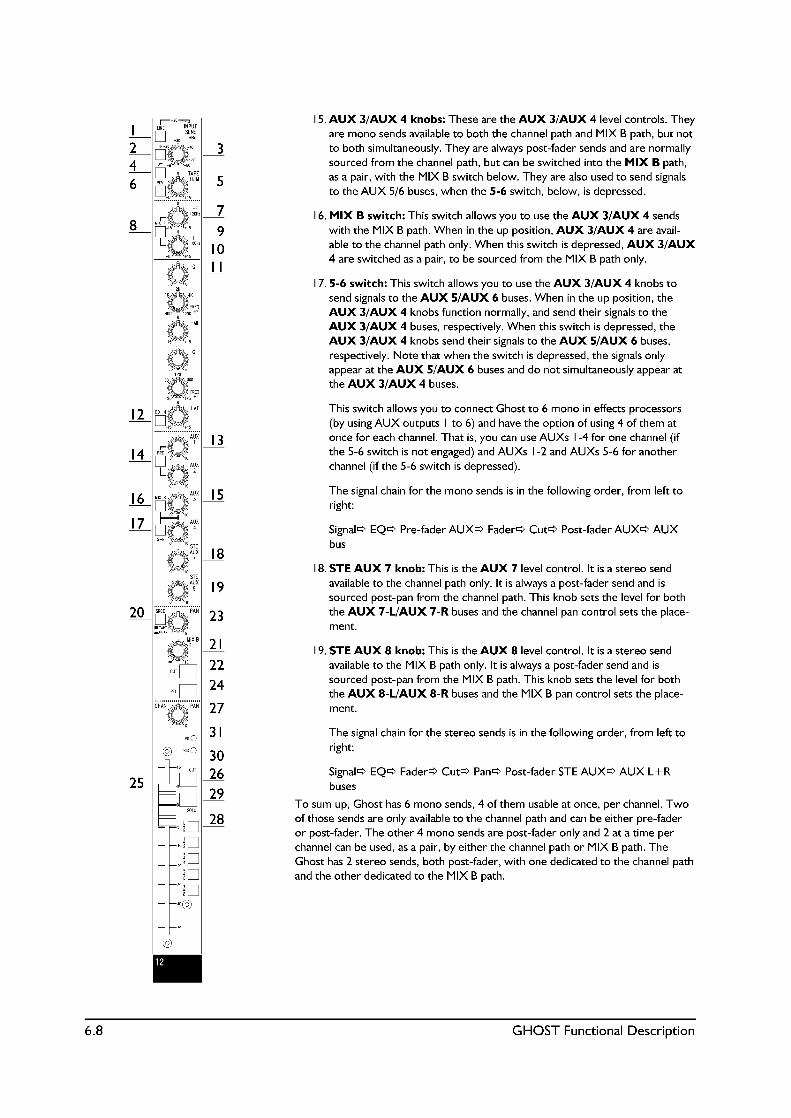

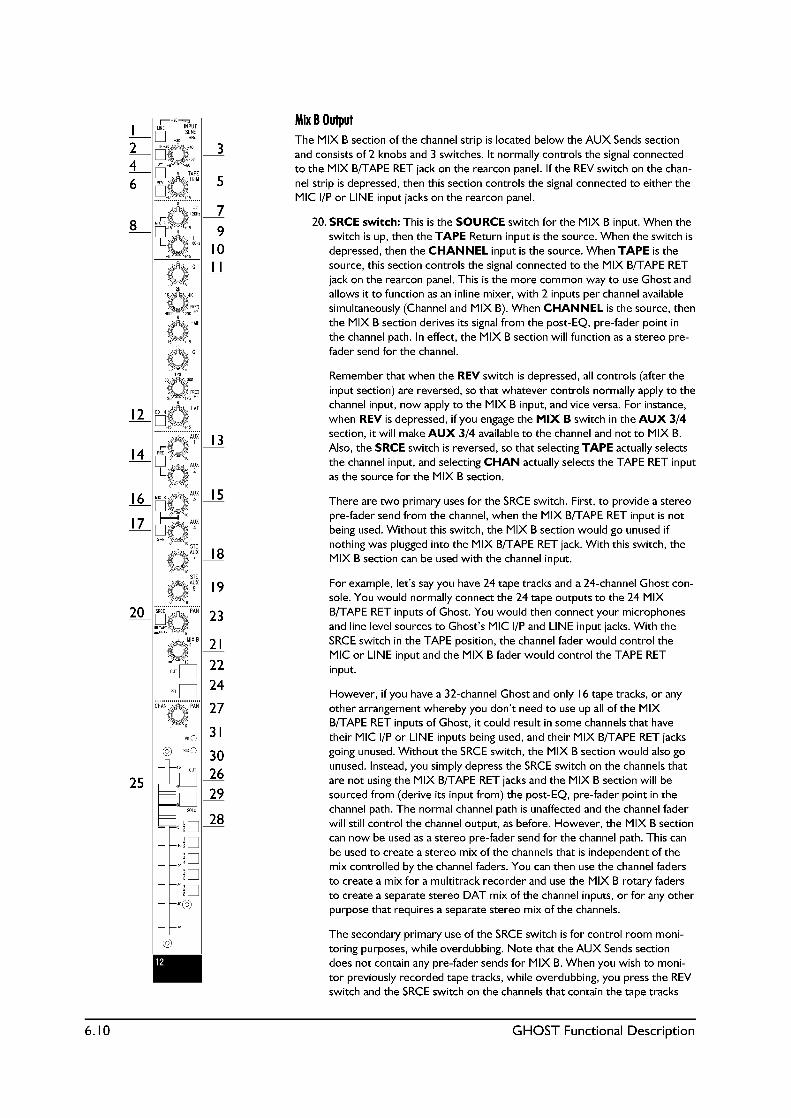


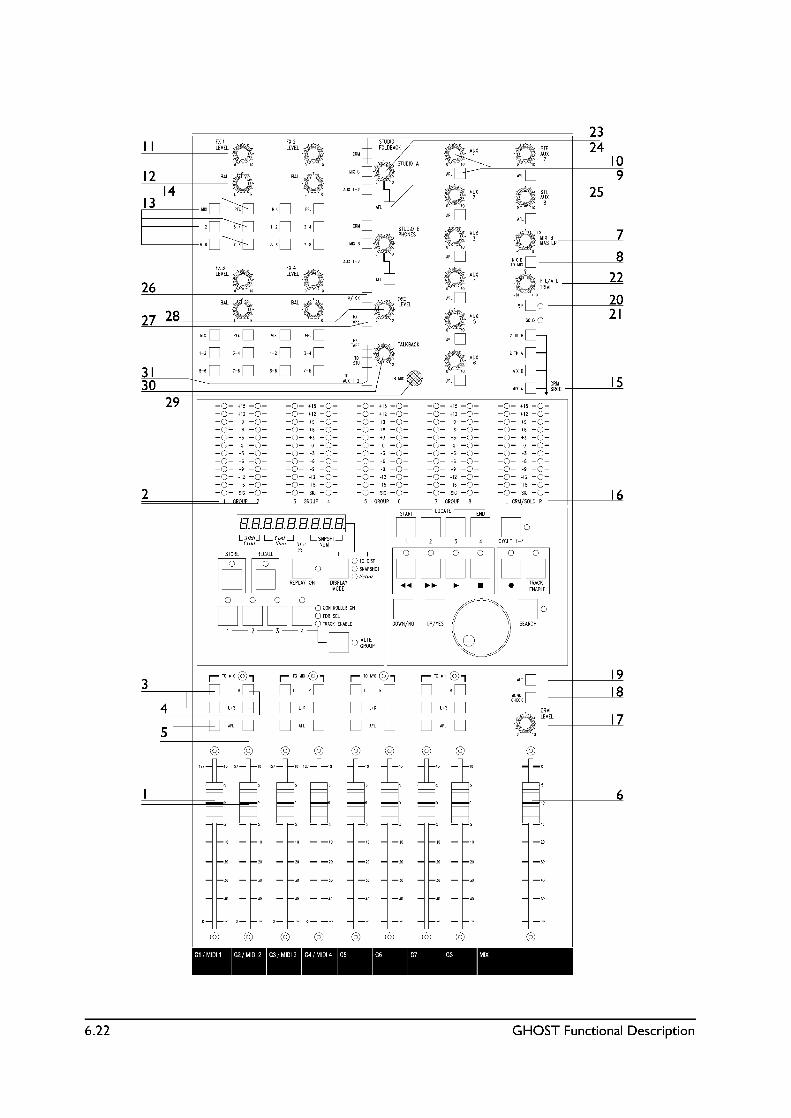


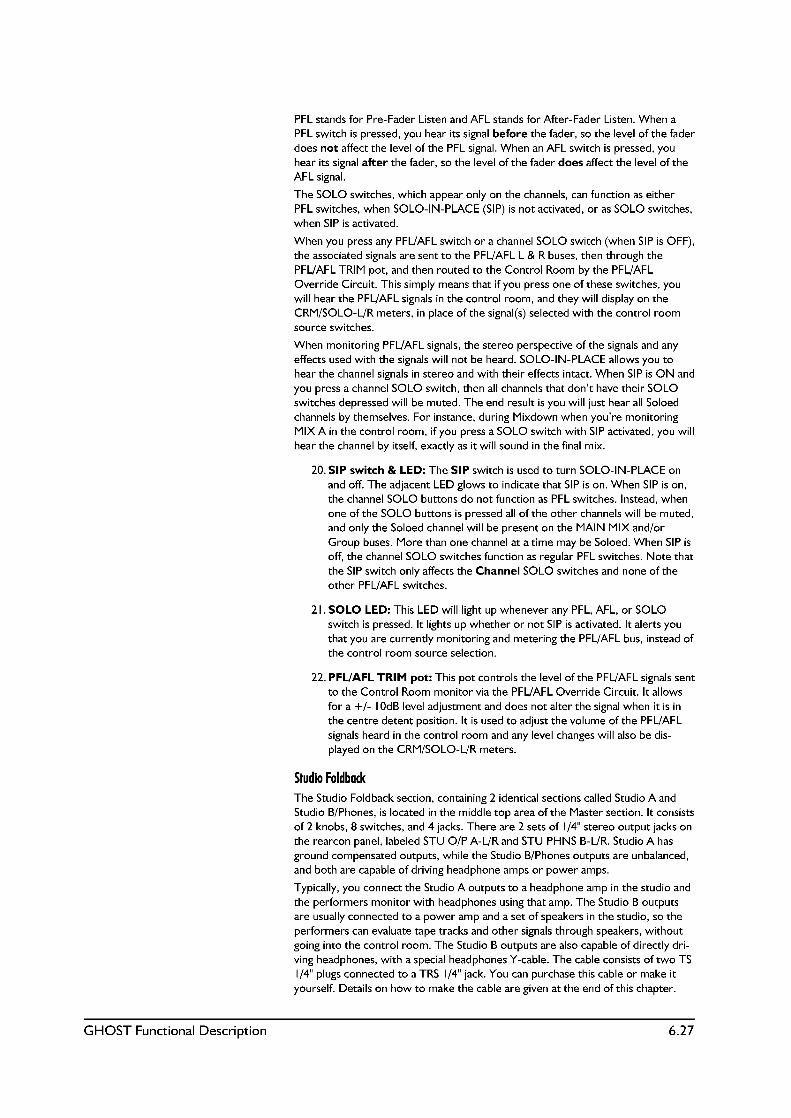


GHOST Tutorial 7.1
GGHHOOSSTT
TTuuttoorriiaall7

7.2 GHOST Tutorial
MMuullttiittrraacckk TTuuttoorriiaall
OOvveerrvviieeww
This Multitrack Tutorial will present step-by-step procedures on how to useGhost in a multitrack recording environment. See the Installation section in thismanual to set up Ghost for multitrack sessions. But first we�ll start with anoverview of how mixers work.
OOvveerrvviieeww ooff MMiixxeerrssAll mixers, no matter what their size, perform the same basic functions. Theyaccept a number of inputs, allow you to process them in various ways, and thencombine and route them to various outputs. Every switch, knob, and fader on amixer performs at least one of three basic functions, as follows:
1. A control can select where the signal is coming from. These are known assource controls and they determine the input or source of the signal. AMIC/LINE switch is an example of this control since it selects the source ofthe channel input.
2. A control can process the signal in some way. These are generallydescribed according to the function they perform. EQ and gain controls areexamples of this type of control because they alter the frequency responseor set the gain of a signal, as opposed to determining its input or output.
3. A control can route where the signal is going to. These are known as assignor routing switches and they route signals to different buses or outputs.Channel ROUTING switches are an example of this type of controlbecause they route the channel signal to the Main Mix or Group buses.
Sometimes a control can perform more than one function. Pan controlsdetermine to which of 2 buses a signal is routed (routing) and the relativelevel of the signal sent to each bus (processing).
It will make it easier to use Ghost if you ask yourself which of the above 3 func-tions a control is performing: Is it selecting the signal source, processing the signal,or routing the signal to a bus or output?
Following is a chart showing all of Ghost�s controls grouped according to which ofthe 3 basic functions they perform. The left side indicates the section of Ghostwhere the control is found and the right side indicates the name of the control.
SSoouurrccee CCoonnttrroollss
GGhhoosstt SSeeccttiioonn CCoonnttrrooll NNaammeeChannel Input LINE switchesTape Input REV switchesHF/LF EQ MIX B switchesEQ EQ IN switchesAUX 1-2 Sends PRE switchesAUX 3-4 Sends MIX B switchesMIX B SRCE switchesStudio Foldback A/B AUX 1-2/MIX B/CRM switchesOscillator 1k/10k switchTalkback TB MICControl Room MIX A/MIX B/2 TK A/2 TK B switches

GHOST Tutorial 7.3
PPrroocceessssiinngg CCoonnttrroollss
GGhhoosstt SSeeccttiioonn CCoonnttrrooll NNaammeeRearcon Panel 48V switchesChannel Input Phase-Reverse switchesChannel Input Low-cut filter switchesChannel Input INPUT SENS knobsTAPE Input TAPE TRIM knobsEQ HF/LF/HMF-FREQ-Q/LMF-FREQ-Q knobsAUX Sends AUX 1-4/STE AUX 7/STE AUX 8 Level knobsMIX B MIX B Rotary Faders/CUT switchesChannel Channel Faders/CUT switchesFX Returns FX 1-4 LEVEL knobsStudio Foldback STUDIO A-STUDIO B/PHONES Level knobsOscillator OSC LEVEL knobTalkback Talkback Level knobAUX Masters AUX 1-8 Rotary Master FadersMIX B Master MIX B Rotary Master FaderPFL/AFL Master PFL/AFL TRIM knob/SIP switchControl Room CRM LEVEL knob/MONO CHECK switchGroups 1-8 Group Master FadersMIX Stereo MIX Master Fader
RRoouuttiinngg CCoonnttrroollss
GGhhoosstt SSeeccttiioonn CCoonnttrrooll NNaammeeRearcon Panel DIR/GRP n switchesAUX 3-4 Sends 5-6 switchesMIX B PFL switchesChannel SOLO switchesChannel L-R/1-2/3-4/5-6/7-8 switchesFX Returns MIX/1-2/3-4/5-6/7-8 switches, PFL switchesStudio Foldback A-B AFL switchesOscillator TO TAPE switchTalkback TO AUX 1-2/TO STU/TO TAPE switchesAUX Masters AFL switchesMIX B Master MIX B TO MIX switchControl Room ALT switchGroups 1-8 TO MIX- L/R/L+R switches, AFL switches
PPrroocceessssiinngg aanndd RRoouuttiinngg CCoonnttrroollss
GGhhoosstt SSeeccttiioonn CCoonnttrrooll NNaammeeMIX B PAN knobsChannel PAN knobsFX Returns BAL knobs

7.4 GHOST Tutorial
MMuullttiittrraacckk RReeccoorrddiinnggNot all of Ghost�s users will have a traditional studio with a control room for therecording engineer on one side of the glass and a studio (performance space) onthe other side of the glass. Many project and home studios use just one room forboth functions. And many times the person performing is also doing the recording.In those instances you might not need all the monitor mixes outlined here. Justchoose the methods that work best for your situation. With recording and moni-toring, as with many of Ghost�s other procedures, there is more than one way toaccomplish something. We generally outline one set of procedures throughout thismanual, but as you come to understand Ghost�s signal flow, you may come upwith other procedures of your own.When we talk about recording to tape, you can use the same procedures forrecording to other media, such as a hard disk in a Digital Audio Workstation(DAW). And when we speak of previously recorded tape tracks, for the mostpart, you can use the same procedures with virtual MIDI tracks. Those are tracksrecorded in a MIDI sequencer that are synchronized to the multitrack tape orDAW, while overdubbing, and are not committed to tape until mixdown.Generally, the multitrack procedure is as follows: You record your basic tracks(backing/rhythm tracks), such as drums, bass, keyboards, and rhythm guitars first.At this time, you only need to monitor the instruments you are recording.Everything you record after this is known as overdubbing. With overdubbing, younot only need to monitor the overdubs, but you also need to monitor previouslyrecorded tape tracks. You will want separate monitor mixes for the musicians inthe studio and the engineer in the control room. After you have completed yourrecording, then you mix all the tape/hard disk/MIDI tracks and record them to a 2-track recorder, such as a DAT deck. This is known as mixdown. While recordingor during mixdown, you might want to add effects or processors to the tape/harddisk tracks. You�ll also need to know how to configure Ghost when you arepunching in/out and when you bounce tracks. All of these procedures areexplained below. We�ll start with Monitoring, since you need to know how tomonitor signals before you begin recording.
CCoonnttrrooll RRoooomm MMoonniittoorriinngg
MMoonniittoorriinngg OOvveerrvviieewwDuring multitrack recording you have to provide 4 different monitor mixes. Youhave to monitor both the current inputs you are recording (signal) and previouslyrecorded tape tracks (tape); and you need to provide these mixes to both the con-trol room and the studio. This means you have to provide signal and tape monitor-ing for the control room (CRM) and separate signal and tape monitoring for thestudio.The purpose of CRM monitoring is to allow the engineer to hear the signal he�ssending to tape. If there is a problem with the signal going to tape, the engineerneeds to hear it. If the engineer presses the Solo switch, he needs to hear just thatsignal. If the engineer rides gain (moves the channel faders while recording), heneeds to hear its effect on the signal going to tape. In short, the CRM monitor mixmay change in level or contain soloed channels. On the other hand, the perform-ers in the studio don�t want to hear these changes because it might distract them.They want to hear a consistent monitor mix that helps them perform better andthey are not concerned with the actual signal going to tape. And many times theperformers want to hear reverb in the headphones, although you�re not recordingthe reverb to tape. In short, the Studio monitor mix has to be tailored to the pref-erences of the performers in the studio. That�s why you need separate monitormixes for the CRM and Studio.Control Room Monitoring is covered in this section and Studio Monitoring is cov-ered in the next section. In each section we will detail how to monitor the signalsbeing recorded and then how to monitor previously recorded tape tracks. Thebottom line is that you use the MIX B section for CRM monitoring and AUX 1-2for Studio monitoring.

GHOST Tutorial 7.5
CCRRMM SSiiggnnaall MMoonniittoorriinngg
OOvveerrvviieewwThis section details how to monitor in the control room, the signals being recorded totape. You use the CRM section and the MIX B section for this purpose. The outputsof your multitrack recorder (MT) should be connected to the MIX B/TAPE RET jacksof Ghost. There should be a direct correlation between Ghost�s channel numbersand the tape tracks. Channel 1 represents tape track 1, channel 2 represents tapetrack 2, etc. This is the essence of an inline console. You use the MIX B section of thechannel to monitor the appropriate tape track. It doesn�t matter which of Ghost�soutputs are connected to the MT. The signal monitoring method described hereapplies regardless of which method you use to record. (See "Recording Basic Tracks",below, for more information on the 3 recording methods.) What you will actually bemonitoring is the output of your multitrack deck. It doesn�t matter how you send thesignals to it.You can monitor through the front panel headphones jack, in which case, your speak-ers will be disconnected. If you want to monitor through speakers, then make surethat headphones are not connected to the headphones jack. To monitor through yourmain speakers, make sure the ALT button is not engaged, or press ALT to monitorthrough your alternate speakers.You will use the MIX B section on the channel strip to monitor the signals you arerecording. This method assumes that when you place a track in RECORD-READYmode on your MT, whatever signal is sent to that track for recording, will appear atthe output jack for that track. The MIX B section you use depends on which trackyou are recording on. You use the MIX B section of the channel number that corre-sponds to the tape track you are recording on.For instance, with a tape in the MT deck, and the deck in Stop mode, if you press theTrack 3 RECORD-READY button, then any signal sent to the track 3 input jack of theMT, will appear at the track 3 output jack of the MT. And the track 3 output jack ofthe MT should be connected to the channel 3 MIX B/TAPE RET jack of Ghost. In thatinstance, you would use channel 3�s MIX B section to monitor all signals sent to track3 of the MT.
NNootteeThe MIX B/TAPE RET jacks are set for +4dBu nominal input levels and if your MToutputs are +4dBu, then the TAPE TRIM knobs can be left in their centre detentpositions. However, the jacks can be internally changed to �10dBV nominal input lev-els. If your tape outputs don�t match the input level of the jacks, you may need toadjust the TAPE TRIM knobs. With a signal entering the MIX B/TAPE RET jack, pressthe corresponding MIX B PFL switch. This will display the MIX B signal on theCRM/SOLO-L/R meters in the master section. Gradually adjust the TAPE TRIM knobuntil the meters indicate 0, then turn the PFL switch off. This is the procedure to usewhether or not you have the optional meterbridge, since even if the meterbridge isset for tape input monitoring, it monitors the tape input before the TAPE TRIM knob.
7.6 GHOST Tutorial
PPrroocceedduurree::
1. Follow the procedures under "Recording Basic Tracks", below, to sendyour live signals to the MT for recording.
2. On Ghost, make sure all CUT and SOLO/PFL/AFL switches are off, andthat the REV switch is OFF (UP) in the channel strips of the MIX B sectionsyou will use for monitoring.
3. On the MT, insert a tape and press the RECORD-READY switches for thetrack(s) you wish to record on and set the record level controls, if any, totheir nominal positions.
4. In the CRM SRCE section, make sure that only MIX B is pressed and thatMONO CHECK is off. Turn the CRM LEVEL knob about 75% up.
5. Turn the MIX B master fader in Ghost�s master section about 75% up.
6. On the appropriate MIX B section that corresponds to the track you arerecording on, make sure the SRCE switch is set to monitor TAPE (UPPosition).
7. With the performers playing their parts, (there should be a reading on theMT�s meters for the track(s) you will be recording on), adjust the TAPETRIM knob, as described above, in the appropriate channel strip�s inputsection, if necessary. Then turn up the appropriate MIX B level control toattain the volume you want and use its pan pot to determine the stereoplacement. You will now be monitoring all signals sent to the appropriatetape track.
8. The Channel faders, Group faders (if you�re recording with the Groupbuses), TAPE TRIM knob, MIX B master fader, MIX B level control, CRMLEVEL knob, and the MT record level control, if any, will all affect the vol-ume of the monitored signal.
Even once you start the tape running in Record mode, you will not actually behearing the playback of the tape, after the new signal has been recorded, as youwould on a standard 3-head deck. You are simply hearing all the signals sent to theMT deck�s inputs being echoed through the deck�s output jacks. You will hear anychanges in the signal being sent to or coming from the MT. The individual channelfaders determine the levels that are actually sent to the MT. If you change a faderlevel or an EQ setting, you will hear it. This is desirable because you will hear thechanges you make. If you press any SOLO or PFL button, you will hear its signal,but it won�t affect what�s being recorded. If you don�t hear a particular signal, itcould either mean it�s not being recorded or that you are not monitoring it prop-erly. Keep in mind that what you hear while monitoring may not necessarily bewhat�s going to tape; such as when a SOLO switch is pressed.
SSuummmmaarryyIn the control room, to monitor the sources you are recording, send the signal tothe MT, put the proper track in RECORD-READY mode, and turn up the record-ing level control on the MT. On Ghost, make sure REV, CUT, and SOLO/PFL/AFLswitches are off, and that TAPE is selected as the MIX B source. Select MIX B asthe CRM Source, turn MONO CHECK off, and turn up the CRM level control.Monitor through headphones or speakers. Turn up the MIX B master fader andusing the MIX B section on the channel that corresponds to the track you arerecording on, turn up its level control to the desired volume and use its pan pot todetermine its stereo placement.

GHOST Tutorial 7.7
CCRRMM TTaappee MMoonniittoorriinngg
OOvveerrvviieewwThis section details how to monitor in the control room, previously recorded tapetracks. The procedure is very similar to CRM Signal Monitoring, above. You usethe MIX B sections of the channels that correspond to the tracks you wish tomonitor. That is, channel 1 monitors tape track 1, channel 2 monitors tape track 2,etc.For instance, if tracks 1 and 2 were already recorded and you were currentlyrecording on track 3, you would use the MIX B sections of channels 1 and 2 tomonitor the tape playback of tracks 1 and 2, and you would use the MIX B sectionof channel 3 to monitor what you were currently recording to track 3.Basically, you use the same procedure used for signal monitoring, except you�ll bemonitoring tape playback from the MT. However, there are two changes thatshould be made before you monitor tape signals.The two changes are necessary so that AUX 1-2 can be used for Studio TapeMonitoring (see below). On the channel that corresponds to the tape track youwish to monitor, you must press the REV switch. The reason for doing this is thatby reversing the signal path, the signal from the MIX B/TAPE RET jack is sent tothe channel path. This is done so that AUX 1-2 (which is only in the channel path)can be used with the Studio Foldback section of Ghost. Then, in the same chan-nel�s MIX B section you must press the SRCE switch so that CHAN is selected. Asa result of reversing the signal paths, you had to select CHAN as the Source forMIX B, so that the MIX B section would also be carrying the tape playback signal.(Since the channel is reversed, selecting CHAN as the source means you areselecting TAPE as the source.) If you didn�t select CHAN as the MIX B source,then the channel inputs (MIC I/P or LINE) would be the source for MIX B, andthat�s not what we want.
PPrroocceedduurree
1. On Ghost, make sure all CUT and SOLO/PFL/AFL switches are off, andthat the REV switch is ON (Down) in the channel strips of the MIX B sec-tions you will use for monitoring tape playback.
2. In the CRM SRCE section, make sure that only MIX B is pressed and thatMONO CHECK is off. Turn the CRM LEVEL knob about 75% up.
3. Turn the MIX B master fader in Ghost�s master section about 75% up.
4. On the appropriate MIX B section that corresponds to the tape track youwish to monitor, make sure the SRCE switch is set to monitor CHAN(DOWN Position). You are really monitoring TAPE, since the channel andMIX B paths have been reversed.
5. Set the output level control on the MT, if any, to its nominal position, andwith the MT tape playing, adjust the TAPE TRIM knob in the channel strip�sinput section, if necessary. Then turn up the appropriate MIX B level con-trol to attain the volume you want and use its pan pot to determine thestereo placement. You will now be monitoring the tape playback of theappropriate track.
6. The TAPE TRIM knob, MIX B master fader, MIX B level control, CRMLEVEL knob, and the MT output level control, if any, will all affect the vol-ume of the monitored signal.

7.8 GHOST Tutorial
SSttuuddiioo MMoonniittoorriinngg
SSttuuddiioo SSiiggnnaall MMoonniittoorriinngg
OOvveerrvviieewwThis section details how to monitor in the studio, the signals being recorded totape. You use one of the 2 Studio Foldback sections, either STUDIO A or STU-DIO B/PHONES, and AUX 1-2 in the channel strip for this purpose. You use thechannels that have the inputs you wish to monitor. For instance, if you are mikinga drum kit and you have 8 mics connected to channels 1-8, then you use the AUX1-2 controls in channels 1-8 to monitor the 8 mics. This allows you complete con-trol in determining the contribution each input signal source will have in the overallmonitor mix. Note that the AUX 1-2 PRE button must be depressed so that yourmonitored signals come before the channel fader. This means that moving thefader will not affect the AUX 1-2 send.With PRE pressed, the AUX 1 knob sends the pre-fader channel input signal to theStudio left output and AUX 2 sends the same signal to the Studio right output.This means the AUX 1 signal will only appear in the left headphone (speaker) andthe AUX 2 signal will only appear in the right one. This affords tremendous flexi-bility in tailoring your mix. If the performers want to hear the signal equallythrough both sides of the headphones, simply set the AUX 1-2 knobs to the samelevel. But you can provide many different types of monitor mixes by sending somesignals only to the left, some only to the right, and some to both left/right.For instance, many musicians like to hear the tape tracks on one side of the moni-tor mix and the overdub they are about to record on the other side of the moni-tor mix. So it is a simple matter to use just AUX 1 for all the tape tracks (see thenext section for studio tape monitoring), sending them to the left side of the mix,and use just AUX 2 for the current signal, sending it to the right side of the mix.
PPrroocceedduurree
1. Follow the procedures under "Recording Basic Tracks", below, to sendyour live signals to the MT for recording.
2. On Ghost, make sure all CUT and SOLO/PFL/AFL switches are off, andthat the REV switch is OFF (UP) in the channels that you are going to moni-tor.
3. In the STUDIO FOLDBACK section, decide whether you are using STU-DIO A or STUDIO B/PHONES and make sure that only AUX 1-2 ispressed. Turn the STUDIO LEVEL knob about 75% up.
4. Turn the AUX 1 and AUX 2 master fader pots in Ghost�s master sectionabout 75% up and make sure their AFL switches are off.
5. On the appropriate channels that correspond to the channel inputs you areabout to record, make sure the AUX 1-2 PRE switches are depressed, sothat you are monitoring Pre-Fader.
6. With the performers playing their parts, turn up the AUX 1-2 level con-trols, on all channels whose signals you want to monitor, to attain the vol-ume (and balance) you want. AUX 1 will be sent to the left headphone(speaker) and AUX 2 will be sent to the right headphone (speaker). Youwill now be monitoring all channel input signals.
7. The AUX 1-2 master faders, AUX 1-2 level controls, and STUDIO LEVELknob, will all affect the volume of the monitored signal.
GHOST Tutorial 7.9
SSttuuddiioo TTaappee MMoonniittoorriinngg
OOvveerrvviieewwThis section details how to monitor in the studio, previously recorded tape tracks.The procedure is very similar to Studio Signal Monitoring, above. You use theAUX 1-2 controls of the channels that correspond to the tracks you wish to moni-tor. That is, channel 1 monitors tape track 1, channel 2 monitors tape track 2, etc.Basically, you use the same procedure used for signal monitoring, except you�ll bemonitoring tape playback from the MT. However, there are two changes thatmust be made before you can monitor tape signals. On the channel that corre-sponds to the tape track you wish to monitor, you must press the REV switch. Byreversing the signal path, the signal from the MIX B/TAPE RET jack is sent to thechannel path. This is done so that AUX 1-2 (which is only in the channel path) canbe used with the Studio Foldback section of Ghost. Then, in the same channel�sMIX B section you must press the SRCE switch so that CHAN is selected. As aresult of reversing the signal paths, you had to select CHAN as the Source for MIXB, so that the MIX B section would also be carrying the tape playback signal. (Sincethe channel is reversed, selecting CHAN as the source means you are selectingTape as the source.) Selecting CHAN as the MIX B Source is not necessary forStudio Tape Monitoring. It is done so that MIX B can be used for CRM TapeMonitoring.
PPrroocceedduurree
1. On Ghost, make sure all CUT and SOLO/PFL/AFL switches are off, andthat the REV switch is ON (Down) in the channel(s) you will use for moni-toring tape playback.
2. In the STUDIO FOLDBACK section, decide whether you are using STU-DIO A or STUDIO B/PHONES and make sure that only AUX 1-2 ispressed. Turn the STUDIO LEVEL knob about 75% up.
3. Turn the AUX 1 and AUX 2 master fader pots in Ghost�s master sectionabout 75% up and make sure their AFL switches are off.
4. On the appropriate MIX B sections that correspond to the tape tracks youwish to monitor (in the control room), make sure the SRCE switch is set tomonitor CHAN (DOWN Position). You are really monitoring TAPE, sincethe channel and MIX B paths have been reversed. This has no effect onStudio Tape Monitoring, but must be done in order to use MIX B for CRMTape Monitoring.
5. On the appropriate channels that correspond to the tape tracks you wishto monitor, make sure the AUX 1-2 PRE switches are depressed, so thatyou are monitoring Pre-Fader.
6. Set the output level control on the MT, if any, to its nominal position, andwith the MT tape playing, adjust the TAPE TRIM knob in the appropriatechannel strip�s input section, if necessary. Then turn up the AUX 1-2 levelcontrols, on all channels that correspond to the tape tracks you want tomonitor, to attain the volume (and balance) you want. AUX 1 will be sentto the left headphone (speaker) and AUX 2 will be sent to the right head-phone (speaker). You will now be monitoring the tape playback of theappropriate tracks.
7. The TAPE TRIM knob, AUX 1-2 master faders, AUX 1-2 level controls,STUDIO LEVEL knob, and the MT output level control, if any, will all affectthe volume of the monitored signal.
7.10 GHOST Tutorial
MMoonniittoorriinngg SSuummmmaarryyTo sum up, if tracks 1 and 2 were already recorded and you were currentlyrecording on track 3 through the channel 10 input, then for control room moni-toring, you would use the MIX B sections of channels 1 and 2 to monitor the tapeplayback of tracks 1 and 2, and you would use the MIX B section of channel 3 tomonitor what you were currently recording to track 3. For studio monitoring, youwould use AUX 1-2 of channels 1 and 2 to monitor the tape playback of tracks 1and 2, and you would use AUX 1-2 of channel 10 (where the input is located) tomonitor what you were currently recording to track 3.
RReeccoorrddiinngg BBaassiicc TTrraacckkss
NNootteeFirst, you should "zero out" the console. That means to turn all faders and levelcontrols fully off, to centre any knobs that have centre detents, to make sure allswitches are in the UP position, and to make sure all SOLO/PFL/AFL and CUTswitches are off.
OOvveerrvviieewwBasic tracks are the first things recorded on the multitrack tape. Recording basictracks or backing tracks means that you are going to record a number of musiciansat once, such as for the rhythm section of a song. For this tutorial we will record asong containing drums, bass guitar, keyboards, electric rhythm guitar, electric leadguitar, background vocals, and lead vocals. For the basic tracks you would recorddrums, bass, keyboards, and rhythm guitar at the same time.Sometimes the singer will record "scratch" vocals while the basic tracks are beingrecorded. This is done so that the musicians can keep their place in the song, with-out having to count to themselves. Then the "scratch" vocals on tape are used tohelp the musicians find their place in the song during overdubs. "Scratch" vocalsare temporary and are meant to be replaced when the singer overdubs the finalvocals after all the instruments are overdubbed. However, sometimes the"scratch" vocals are better than any of the vocal overdubs and they end up beingused as the final vocal.
NNootteeIf you�re using MIDI virtual tracks as your backing tracks, then you should monitorthem as if they were previously recorded tape tracks, and proceed to the sectionon Overdubbing, below.
CCoonnnneeccttiioonnssConnect your input sources (microphones and line inputs) to the channel MIC I/Pand LINE jacks. Do not connect two sources to the same channel. For drums, youwould mike the drum kit and connect the mics to the channel MIC inputs. You canconnect keyboards directly to a LINE input. Bass guitar can go direct, but youshould connect the bass to a Direct Box and then connect the box to a MIC input.For rhythm guitar, you can place a mic in front of the amp and then connect it to achannel MIC input; or you could record with a direct box; or you could do both.You should use the scribble strip section below the channel faders to label all thechannel inputs. It�s best to place non-residue adhesive tape to the strip and thenlabel the tape.
MMoonniittoorriinnggTo learn how to listen to the sound you are recording, see the section above enti-tled, "Control Room Monitoring." To learn how to send the sound you are record-ing to the performers in the studio, see the section above entitled, "StudioMonitoring."

GHOST Tutorial 7.11
GGaaiinn SSttrruuccttuurreeNext, you need to set the input gain for your sources. The top section of the chan-nel strip contains the input gain controls. For each channel that has an inputsource, if the source is a MIC input, then leave the LINE switch in the up position.If the mic requires phantom power, then press the 48V switch on the rear con-nector panel. For a LINE input, press the LINE switch. Make sure the REV switchis up, then play the instrument or sing so a signal is entering the input jack.If you don�t have the optional meterbridge or it�s set for tape monitoring, then usethe following procedure. Press the channel SOLO switch. Make sure the SIPswitch in the master section is off. This will display the channel signal on theCRM/SOLO-L/R meters in the master section. Gradually turn up the InputSensitivity knob until the meters indicate 0, then turn the SOLO switch off.If you have the optional meterbridge and it�s set for channel input monitoring, thengradually turn up the Input Sensitivity knob until the meterbridge channel inputmeter indicates 0.In either case, the Signal Present LED should be brightly lit, and the PK LEDshould light only occasionally, if at all. Once the input gain is set properly, youshouldn�t change it. You should use the channel fader to make changes. Note thatthe Input sensitivity knob controls the input of the signal as it enters Ghost. Thechannel fader controls the output of the signal to the buses. If either is set toohigh, then distortion can occur. If the level is too low, you will hear noise. Yourgoal is to get as hot an input signal as possible, without distortion.Nominal level is the normal working level that Ghost is designed to work with andcorresponds to 0 on the meters. However, you can raise the signal above nominallevel quite a bit before distortion sets in. The difference between nominal leveland the onset of distortion represents the available headroom. That�s why it�s bestto initially set Ghost for nominal input/output levels, so that you can raise or lowerthe faders, as needed, without worrying about distortion or too low a signal level.Generally, nominal level is attained by setting Ghost�s faders and knobs 75% of theway up. The nominal level is represented by a heavy line indicating 0 next to thefaders and a large dot indicating 7 next to the rotary knobs. One exception is theMIX L/R fader, where nominal level is at the top of the fader�s travel.
LLCCFF && PPhhaasseeAfter setting the input gain, if the signal has a muddy low end or you hear rumble,air conditioner noise, or AC hum, then press the Low-Cut Filter (LCF) switch tosee if it helps. You should keep the LCF switch in the position that sounds best.The Phase switch should be in the up position, unless you know your input cablesare wired incorrectly or if you�re employing M-S recording techniques.
EEQQIf you want to add EQ to the channel inputs, first press the EQ IN switch andmake sure the EQ MIX B button is up. Then apply the EQ as needed. (See thesection on EQ elsewhere in this manual.)
EEffffeeccttss && PPrroocceessssiinnggIf you want to add effects or processing, then see the section below, entitled,"Adding Effects and Processors."

7.12 GHOST Tutorial
RReeccoorrddiinngg mmeetthhooddssThere are 3 methods you can use to send the channel signal to a multitrack taperecorder, and they are outlined below:
1. Using the Group Output jacks: Use this method if the GRP 1-8 outputjacks are connected to the inputs of your multitrack recorder. The groupnumber should match the tape input number. For instance, connect Groupoutput 1 to tape input 1, etc. This way, the Group number represents thetape track number you want to record on. In the channel strip, press theassign switches for the tape tracks you want to record on. For instance, ifyou want to record on tape track 1 or track 2 or both tracks 1 and 2, thenpress the 1-2 switch. Next, use the pan pot to send the signal to the Groupbuses for the tracks you wish to record on. Pan left for odd-numberedtracks; right for even-numbered tracks; and centre for both tracks. Forinstance, pan fully left to record on tape track 1; fully right for track 2; andkeep the pan pot at its centre detent position, if you wish to record onboth tracks 1 and 2. Then, turn up the channel fader to its nominal position,as indicated by the fader marking 3/4 of the way up next to 0. You must fol-low this procedure for all of the inputs that you wish to record. Finally, turnup the appropriate Group faders to their nominal positions, 3/4 of the wayup. For instance, turn up Group fader 1, if you�re recording on track 1, viathe GRP 1 output jack.
2. Using the DIR/TAPE SND jacks as Group Outputs: Use this method ifthe DIR/TAPE SND jacks are connected to the inputs of your multitrackrecorder and you wish to use them as Group outputs. The channel numbershould match the tape input number. For instance, connect the DIR/TAPESND jack of channel 1 to tape input 1, jack 2 to input 2, etc. If you have a24-track recorder, then Ghost channels 1 to 24 will be connected to tapeinputs 1 to 24. If you have 3 or 4 digital 8-track recorders, then jacks 1-8 goto inputs 1-8 of the first deck; jacks 9-16 go to inputs 1-8 of the seconddeck; jacks 17-24 go to inputs 1-8 of the third deck; and jacks 25-32 go toinputs 1-8 of the fourth deck.
This way, the channel number represents the tape track you want torecord on. For digital multitracks, you should add 8, 16, and 24 to the tracknumber for the 2nd, 3rd, and 4th decks, respectively. That is, deck 1 hastracks 1-8, deck 2 has tracks 9-16, deck 3 has tracks 17-24, and deck 4 hastracks 25-32. If you think of it this way, then using channel 10 will recordon tape track 10, since channel 10�s DIR/TAPE SND jack is connected toeither tape input 10 on a true 24-track recorder, or to tape input 2 of thesecond deck in a multi-machine digital multitrack setup.
First, press the DIR/GRP n switch (on the rear connector panel) on thechannel that represents the tape track you wish to record on. For instance,press the switch on channel 2 to record on tape track 2 or press the switchon channel 10 to record on tape track 10. Then note the GRP n number onthe switch. In the above example, both channels 2 and 10 will have a switchthat reads DIR/GRP 2. This means that the channel 2 and channel 10DIR/TAPE SND jacks will act as Group 2 output jacks, when their DIR/GRP2 switches are pressed.
Next, assign all the inputs you�re recording to the appropriate Group num-bers. For instance, if you want to record on tape track 2, then press chan-nel 2�s DIR/GRP 2 switch and assign all your inputs to Group 2, by pressingthe 1-2 assign switch and panning full right. If you wish to record on morethan one track, then press the DIR/GRP n switch on the channels repre-senting the additional track numbers. For instance, to record on tape tracks1 and 2, press the DIR/GRP n switch for channels 1 and 2. The switches willbe labeled DIR/GRP 1 and DIR/GRP 2, respectively. The jacks will nowcarry the outputs of Groups 1 and 2. You then use the assign switches andpan pots for each channel input to determine if the signal is routed toGroup 1, 2, or both.

GHOST Tutorial 7.13
Note that when you press the DIR/GRP n switch for a channel, that chan-nel�s input will not appear at its DIR/TAPE SND jack, unless you also assignit to the GRP n bus. In the above example, you would have to press the 1-2assign switches in channels 1 and 2 to send their inputs to their DIR/TAPESND jacks.
Next, use the pan pot to send the signal to the appropriate Group bus. Panleft for odd-numbered groups; right for even-numbered groups; and centrefor both groups. For instance, if the 1-2 assign switch is pressed, then panfully left to assign the signal to Group 1; fully right for Group 2; and keepthe pan pot at its centre detent position, for Groups 1 and 2.
Then, turn up the channel fader to its nominal position, as indicated by thefader marking 3/4 of the way up. You must follow this procedure for all ofthe inputs that you wish to record. Finally, turn up the Group faders totheir nominal positions. For instance, turn up Group fader 1, if you�rerecording on track 1, via channel 1�s DIR/GRP 1 output. You would also usethe Group 1 fader if you were recording on tracks 9, 17, or 25, via channels9, 17, or 25, since the output jacks of those channels are also labeledDIR/GRP 1.
3. Using the DIR/TAPE SND jacks as Direct Outputs: Use this method ifthe DIR/TAPE SND jacks are connected to the inputs of your multitrackrecorder and you want to use them as Direct Outputs. The channel num-ber should match the tape input number. For instance, connect theDIR/TAPE SND jack of channel 1 to tape input 1, jack 2 to input 2, etc.(See using this jack as a Group Output in #2, above, for more informationabout connections.)
This method differs from method 2, above, because you�re using theDIR/TAPE SND jack as a Direct Output from the channel and the Groupbuses are not involved at all. The channel signal, post-fader and post-mute,will be routed to this jack for direct recording to your multitrack. With thismethod, you can only record one channel per track, and the channel mustbe recorded on whatever tape input the Direct Output jack is connectedto. If you match channel numbers with the tape input numbers, then chan-nel 1 can only be recorded on tape track 1; channel 2 on track 2, etc.
To use this method, first make sure the DIR/GRP n switch (on the rearconnector panel) is in the DIR (UP) position for all channels that you wishto record. Then, turn up the channel fader to its nominal position, as indi-cated by the fader marking 3/4 of the way up. The pan pot and assignswitches will have no effect on the Direct Output signal.
RReeccoorrddiinnggWith all 3 of the above methods, you should then proceed as follows. On yourmultitrack recorder, insert a tape, wind to where you wish to begin recording, setthe counter to zero, and put all the tracks you wish to record on in RECORDREADY mode. If the multitrack has input level controls, set them to their nominalpositions. With the performers playing, adjust the channel/group faders so that themultitrack�s meters display the desired recording level, as indicated by the multi -track�s manual. When you�re ready to record, put the multitrack into RECORDmode and have the musicians play the song. When the song is over, press STOPon the multitrack and rewind the tape to the beginning of the song.

7.14 GHOST Tutorial
PPllaayybbaacckkIf you set up the control room monitoring as suggested in this chapter, then if youplay back the MT tape at this point, you will hear the tape tracks you just recordedin the control room. To let the musicians in the studio hear what was just record-ed, you should select CRM as the source in the Studio Foldback section that youare using.If you are dissatisfied with the take, then either record over it or record anothertake after the first take. Remember to unselect CRM as a source in the StudioFoldback section, if necessary. When you are satisfied with the recording, you canmove on to the next stage, Overdubbing.
PPrroocceedduurree
1. "Zero Out" the console.
2. Connect your input sources to the channel MIC and LINE inputs.
3. Use the MIC/LINE switch to select the appropriate input for each channel.Press the 48V switch for condenser mics, where required. Make sure theREV switch is not depressed.
4. Select one of the 3 recording methods, from above, and follow the direc-tions for signal routing and channel/group fader positioning for each chan-nel.
5. On the MT, insert a tape, wind to where you wish to begin recording, setthe counter to zero, put the appropriate tracks into RECORD-READYmode, and set the recording level control of the MT, if any, to its nominalposition.
6. With the musicians playing, set up preliminary monitor mixes for theControl Room and Studio (see above). Then use the INPUT SENSITIVITYknob to set your input gain structure, using the optional meterbridge or theCRM/SOLO-L/R meters, and the SIG and PK LEDs.
7. Use the LCF and PHASE switches, as required.
8. Apply EQ, as required.
9. Add effects and processing, as required.
10. Adjust the channel and group faders, as required, so that the multitrack�smeters display the desired recording level.
11. Set up your final monitor mixes, and then have the musicians stop playing.Put the MT into RECORD mode and have the musicians play the song.When the song is over, STOP the multitrack and rewind the tape to zero.
12. Play back the tracks you have just recorded. To let the musicians in theStudio hear the take, select CRM as the Source in the appropriate StudioFoldback section.
13. If dissatisfied, record over the first take or add another take after it. Beforerecording again, remember to unselect CRM and select AUX 1-2 as theStudio Foldback Source, if necessary.
14. When you are satisfied with the take of the basic tracks, you can beginoverdubbing.

GHOST Tutorial 7.15
OOvveerrdduubbbbiinngg
OOvveerrvviieewwOverdubbing is similar to the procedure used for Recording Basic Tracks, exceptthat in addition to monitoring the new tracks you are recording, you must alsomonitor previously recorded tape tracks. Usually, you overdub one instrument orgroup of instruments at a time. During overdubbing, the musician in the studio (orcontrol room) listens to previously recorded tape tracks, through headphones, andthen adds a new part, which he also hears in his headphones. In our example, wewould overdub the lead guitar, to add guitar riffs and a guitar solo. We might alsooverdub a keyboard solo. Then we would overdub the lead vocals, and finally thebackground vocals.The recording procedure for overdubs is the same as the procedure for recordingbasic tracks. However, while you are recording the overdubs, you must also pro-vide a monitor mix of previously recorded tape tracks. While recording (eitherbasic tracks or overdubs), on the channels that contain the input sources you arerecording, and on the channels for which you are using the MIX B sections forcontrol room monitoring of those sources, the REV switch should not bedepressed and the MIX B SRCE switch should be set to TAPE. After you are satis-fied with your recording of the basic tracks and after you finish recording eachoverdub, on the channels representing the tape tracks you wish to keep, youshould press the REV switch and the MIX B SRCE switch should be set to CHAN.For example, assume tracks 1 and 2 are already recorded and you are currentlyoverdubbing a guitar solo on track 3 through channel input 10. On channels 1 and2, the REV switch should be pressed and the MIX B SRCE switch set to CHAN.This routes the tape returns to both the channel and MIX B paths so you can mon-itor previously recorded tape tracks using the channel 1-2 MIX B sections for con-trol room tape monitoring and AUX 1-2 sections for studio tape monitoring.On channels 3 and 10, the REV switch should not be pressed and the MIX B SRCEswitch should be set to TAPE. This routes the track 3 tape return to channel 3�sMIX B path and the guitar input to channel 10�s channel path. This is done so thatyou can monitor the input signal currently being recorded. The MIX B section ofchannel 3 is used for control room monitoring of the guitar signal being sent totape track 3, and the AUX 1-2 section of channel 10 is used for studio monitoringof the guitar input.After you are finished recording on track 3, then channel 3�s REV switch should bepressed and its MIX B SRCE switch set to CHAN, since track 3 is now considereda previously recorded tape track. This will route the track 3 tape return to boththe channel and MIX B paths of channel 3. This is done to set up tape monitoringof track 3 for the next overdub. (See the Sections on "Control Room Monitoring"and "Studio Monitoring", above.)
7.16 GHOST Tutorial
PPrroocceedduurree
1. On all channels that contain the outputs of previously recorded tape tracks,press the REV switch and set the MIX B SRCE switch to CHAN. Thisroutes the Tape Returns to both the Channel and MIX B paths. These areyour Tape channels and are for monitoring purposes only.
2. Connect your input sources for the overdub to the channel MIC and LINEinputs. These are your Input channels.
3. On the Input channels, use the MIC/LINE switch to select the appropriateinput for each channel. Press the 48V switch for condenser mics, whererequired. Make sure the REV switch is not depressed and set the MIX BSRCE switch to TAPE.
4. Select one of the 3 recording methods, from "Recording Basic Tracks",above, and follow the directions for signal routing and channel/group faderpositioning for each Input channel.
5. On the MT, rewind the tape to the beginning of the song, or to a pointbefore the overdub will be recorded, and put the appropriate tracks intoRECORD-READY mode. Make sure that all previously recorded tracks arenot in RECORD-READY mode. Then set the recording level controls of theMT, if any, to their nominal positions and start playing the tape.
6. With the musicians playing along with the tape, set up Control Room andStudio preliminary monitor mixes of the overdub being recorded and ofpreviously recorded tape tracks (see Control Room/Studio Monitoring,above). Then use the INPUT SENSITIVITY knob to set your input gainstructure for the overdub, using the optional meterbridge or theCRM/SOLO-L/R meters, and the SIG and PK LEDs.
7. Use the LCF and PHASE switches, as required.
8. Apply EQ, as required.
9. Add effects and processing, as required.
10. Adjust the channel and group faders, as required, so that the multitrack�smeters display the desired recording level.
11. Set up your final monitor mixes, of both the live signal and of previouslyrecorded tape tracks, and then have the musicians stop playing. Put the MTinto RECORD mode and have the musicians play the overdub. When theoverdub is over, STOP the MT and rewind the tape to zero or to a pointright before the overdub.
12. Play back the overdub you have just recorded. To let the musicians in theStudio hear the take, select CRM as the Source in the appropriate StudioFoldback section.
13. If dissatisfied, record over the first take of the overdub. Before recordingagain, remember to unselect CRM and select AUX 1-2 as the StudioFoldback Source, if necessary.
14. When you are satisfied with the take of the overdub, proceed to record thenext overdub. If there are any mistakes on the overdub that need fixing,and you don�t want to record the entire track over again, then see"Punching In/Out", below. If you run out of tracks on the multitrack, youmight want to bounce tracks to create more empty tracks. See "BouncingTracks", below. When you�re satisfied with all the tracks on the tape, pro-ceed to "Mixing Down", below.

GHOST Tutorial 7.17
PPuunncchhiinngg IInn//OOuutt
OOvveerrvviieewwPunching in and punching out is a procedure you use when you want to correct aperformance on a tape track, without having to record the entire track over again.It allows you to selectively record over just a portion of a tape track. For instance,you might want to fix a guitar solo with one bad note in the middle. Rather thanrecord the solo over again, you can have the guitarist just play over the pointwhere the bad note occurs. Besides punching in/out manually, some multitrackslet you automate the process and even have a rehearsal mode, where you canpractice the punch, without actually committing it to tape. (See your Multitrack(MT) manual.)On the MT, you must select a pre-roll point, a punch-in point, a punch-out point,and a post-roll point. The pre-roll point occurs before the bad note and gives theguitarist, in our example, some time to play along with the song before the badnote occurs. The punch-in point is where you actually start recording. The punch-out point is where you stop recording, but the tape continues to play. The post-roll point is where the tape stops.The procedure is as follows: The multitrack starts in PLAY mode at the pre-rollpoint. The guitarist plays along with the song, but it is not recorded. At the punch-in point, the MT changes from PLAY mode to RECORD mode. At this point, theguitarist is being recorded. He plays over a small section of the solo, including thepoint where the bad note is. At the punch-out point, the MT switches fromRECORD mode back to PLAY mode. At this point recording is no longer takingplace. The MT continues in PLAY mode until the post-roll point, where the MTgoes into STOP mode.Here�s a diagram illustrating the procedure:
PRE-ROLL(PLAY)ð P-IN(REC)ð�BAD NOTE�ð P-OUT(PLAY)ð POST-ROLL(STOP)The procedure is very similar to overdubbing. While performing the punch, theperformer can listen to any previously recorded tape tracks. The issue is what theperformer will hear on the track that�s being used for the punch. Between thePunch-In and Punch�Out points, it is only possible to hear the new part beingrecorded, since the original part is being erased. Note that you will still be able tohear all the tracks that are not being used in the punch. But you must determinewhat the performer wants to hear on the punched track, during pre-roll and post-roll. Does he just want to hear himself playing the new part, does he just want tohear the old part and only hear himself during the punch, or does he want to hearhimself playing along with the old part?What the performer hears during pre-/post-roll is determined by the MT.Normally, when the MT is in PLAY mode, you will hear tape playback, unless atrack is armed and in RECORD-READY mode, in which case you will hear theinput signal for that track, instead of tape playback. Since the punch track will be inRECORD-READY mode during pre-/post-roll, the performer would just hear thenew performance during this time. Most MTs will have an INSERT mode, thatallows the performer to hear tape playback during the roll points, even though thepunch track is armed. Some MTs also have a MIX mode that allows the performerto hear both the old and new material during the roll points. Your MT may use dif-ferent terms for these functions.If you select neither INSERT nor MIX on the MT, this is what you will hear:
Pre-Roll: New material
Punch-In to Punch-Out: New material
Post-Roll: New material
This means the performer will never hear the original punch track. The performerwill play along with the other tracks that are not involved in the punch.

7.18 GHOST Tutorial
If you select INSERT, this is what you will hear:
Pre-Roll: Old Material
Punch-In to Punch-Out: New material
Post-Roll: Old materialThis most closely approximates what the final punch will sound like. The per-former will hear the old material before Punch-In, then hear his new part whenthe MT goes into record mode between the Punch points, and then hear the oldmaterial again.If you select MIX, this is what you will hear:
Pre-Roll: Old and New material
Punch-In to Punch-Out: New material
Post-Roll: Old and New material
This allows the performer to play along with the old material before and after thePunch points.It�s better if you perform the punch right after the track has been recordedbecause it will be easier to get the same sound for the punched part that you hadon the original part. If you perform the punch at a later date, it�s important to tryto get the same sound from the source instrument or voice, as you had when yourecorded the original part. If the sound is different, it will be easier to detectwhere the punch points are.The manual for your multitrack recorder should detail how to set up the MT forpunching in/out. This section describes how to set up Ghost for punching in/out.
PPrroocceedduurree
1. On all channels that contain the outputs of previously recorded tape tracks,press the REV switch and set the MIX B SRCE switch to CHAN. Thisincludes the track you will use for the punch. This routes the Tape Returnsto both the Channel and MIX B paths.
2. Then proceed as normal to set up the channel input you will use for punch-ing in the new part. Make sure REV is not pressed and that the MIX BSRCE is set for TAPE. For instance, if you�re punching in on a guitar track,then plug in the same guitar to one of the channels. (See Overdubbing,above.) Assign the guitar to the track you want to punch in on. Try to getthe same sound you used when recording the original part. Play along withthe MT tape a few times and use the Input Sensitivity knob, channel/groupfaders, and other controls to get the same sound and level you have on thetrack you�re using for the punch. Make sure the meters of the MT registerthe same for the new part and the original material on the punch track.
3. Select MIX B as the only source in the Control Room section and selectAUX 1-2 as the only source in the Studio Foldback section.
4. Set up your MT for punch in/out recording. (See your MT manual.) Then,rewind the tape to the pre-roll point. Make sure none of the non-punchtracks are in RECORD-READY mode. Then initiate auto punch in/outrecording on the MT. If your MT only has manual punching, then you�llhave to manually punch in/out at the appropriate times. The performershould start playing along with the tape until it stops.

GHOST Tutorial 7.19
5. For the control room, you should use the MIX B section to monitor thepunched track, as well as all previously recorded tape tracks. For instance,if tracks 1-4 are filled and you are punching in on track 5, then use the MIXB section on channels 1-5. Channels 1-4 will continuously monitor tapetracks 1-4 throughout the process. However, what you hear on channel 5during pre-roll and post-roll depends on the settings selected on the MT.(You will hear only the new part, or only the old part, or both the new andold parts.) Between the Punch-In and Punch-Out points you will only hearthe new material being recorded, because the MT will be in RECORDmode.
6. For studio monitoring, you should use the AUX 1-2 knobs, in PRE mode, tosend previously recorded tape tracks, including the punch track, to the per-former. For instance, if tracks 1-4 are filled and you are punching in ontrack 5, you would use the AUX 1-2 knobs on channels 1-5. Just as withcontrol room monitoring, channels 1-4 will continuously monitor tapetracks 1-4 throughout the process. However, what the performer hears onchannel 5 during pre-roll and post-roll depends on the settings selected onthe MT. (The performer will hear only the new part, or only the old part,or both the new and old parts.) Let the performer decide which method heprefers. Between the Punch-In and Punch-Out points the performer willonly hear the new material being recorded, because the MT will be inRECORD mode
7. When the punch is completed, rewind the tape to the pre-roll point, andplay it back. To let the performer in the Studio hear the take, make surethe AUX 1-2 knobs are turned up on the channel that represents thepunched track.
8. If dissatisfied, try the punch again until you are satisfied with the results.
7.20 GHOST Tutorial
BBoouunncciinngg TTrraacckkss
OOvveerrvviieewwBouncing tracks is a procedure whereby you mix previously recorded tape tracksand then record that mix to an open track or tracks on the MT, thereby freeing upthe tracks you mixed. This procedure is also known as "Ping-Ponging." Forinstance, on an 8-track deck, if you have tracks 1-6 filled, that only leaves tracks 7-8 available for overdubs. If you need more than those 2 remaining tracks for over-dubs, you could bounce tracks 1-6 to tracks 7-8, and then erase tracks 1-6, sonow you would have 6 tracks left for overdubs. You can also record new sourcesto tracks 7-8, while you are bouncing tracks 1-6 to tracks 7-8. The tracks you wishto bounce are known as source tracks and the empty tracks you are bouncing toare known as destination tracks.
Using the above example, the procedure involves playing back tracks 1-6 throughGhost and then mixing them to stereo by assigning them to tracks 7-8. On theMT, only tracks 7-8 would be armed for recording. Then, when you play back thetracks, the stereo mix is recorded to tracks 7-8. At this point, tracks 1-6 wouldstill be intact, and tracks 7-8 would contain the stereo mix of tracks 1-6. If you�renot satisfied with the bounce, you can try it again. The drawback to this method isthat you cannot change the mix recorded on tracks 7-8, after you�ve erased tracks1-6. The advantage is that you now have 6 tracks for overdubs, instead of 2.The owner�s manual for your multitrack recorder should explain how to set up theMT for bouncing tracks. However, you still need to know how to configure Ghostwhen you are bouncing tracks, and that procedure is detailed below.
PPrroocceedduurree
To bounce tracks without adding a new part:
1. On the channels representing the tracks you want to bounce, press theREV switch and set the MIX B SRCE switch to CHAN. This routes theTape Returns to both the Channel and MIX B paths. These are the sourcechannels.
2. To simply let the musicians in the studio listen while you bounce the tracks,select CRM as the only source in the Studio Foldback section.
3. Assign all the source channels to the destination track(s) by using the assignswitches and pan pots. The channel faders of the source channels will con-trol the output levels of the source tracks. Then set the appropriate Groupfaders to their nominal levels, ¾ of the way up. For instance, if you�rebouncing tracks 1-6 to tracks 7-8, then press the 7-8 assign switches onchannels 1-6 and use the pan pots on 1-6 to create the desired stereo per-spective. Then turn up the Group 7-8 faders.
4. On the MT, rewind the tape to the beginning of the song and put the desti-nation track(s) into RECORD-READY mode. Make sure that the sourcetracks are not in RECORD-READY mode. Then set the recording levelcontrol of the MT, if any, to its nominal position and start playing the tape.Make sure the MT is in PLAY mode and not in RECORD mode at thispoint. You just want to listen to the source tracks so you can mix them onGhost, but you don�t want to record anything yet. The reason that the des-tination tracks are armed is so you can monitor them through the MIX Bsection.
5. Set up a Control Room preliminary monitor mix of the bounce using theMIX B section(s) on the channel(s) that correspond to the destinationtracks. For instance, if you�re bouncing to tracks 7-8, then use the MIX Bsection of channels 7-8 to monitor the bounce. You will be able to hear allthe source tracks since they are assigned to tracks 7-8 and those tracks arein RECORD-READY mode.
GHOST Tutorial 7.21
6. While listening to the tape, adjust the source channel faders to create themix of tape tracks that you desire. Apply EQ and effects/processing, asdesired. Using the Group faders make sure that the multitrack�s meters dis-play the desired recording level.
7. Set up your final monitor mix, and then stop the tape and rewind it to thebeginning of the song. Then put the MT into RECORD mode and play thesong to the end. The source tracks will be routed to Ghost and then sentto the destination tracks, where they will be recorded on tape. When thesong is over, STOP the multitrack and rewind the tape to the beginning ofthe song.
8. Take the destination tracks out of RECORD-READY mode and play backthe song. At this point, you�ll just be monitoring the destination tracks youjust recorded. If you�re not satisfied with the results, rewind the tape to thebeginning, re-arm the destination tracks, put the MT in PLAY mode, and trymixing the tracks again. When you think you have the mix you want, thenrewind the tape and start the MT in RECORD mode to try the bounceagain.
9. When you are absolutely sure you are satisfied with the destination tracks,then you can erase the source tracks and use them for overdubs. Be care-ful, because after you erase the source tracks, you must use the mix ofthose tracks that you recorded on the destination tracks.
If you want to add a new part as you�re bouncing tracks:
10. If you are going to add a new part while you bounce the tracks, then followthe above procedure for bouncing the tracks, but make these changes.Select AUX 1-2 as the only source in the Studio Foldback section. Thenproceed as normal to set up the channel inputs you will use for recordingthe new part. Assign the new part to the destination track(s) and use AUX1-2 (in PRE mode) for Studio monitoring of both the part you�re adding andpreviously recorded tape tracks, including the tracks being bounced. (SeeOverdubbing, above.) For instance, if you�re bouncing tracks 1-6 to tracks7-8 and you�re also adding a new guitar part to tracks 7-8, and the guitar isplugged into channel 10, then you would proceed as follows. Channel 10should not have its REV switch depressed. You would assign channel 10 toGroups 7-8, use its pan pot for stereo placement, and turn up its channelfader. Then you would use AUX 1-2 on channels 1-6 for Studio monitoringof the tape tracks and you would use AUX 1-2 on channel 10 for Studiomonitoring of the new guitar part.

7.22 GHOST Tutorial
AAddddiinngg EEffffeeccttss aanndd PPrroocceessssoorrss
OOvveerrvviieewwThere are basically 3 ways to add effects or processors to a signal: add it beforethe signal reaches Ghost; add it using Ghost�s Insert jacks; or add it using Ghost�sAUX Send/Return system. For purposes of this discussion, this is how we willdefine the following terms:
Outboard: An effects device or processor, that is not part of Ghost, whichis used to alter a signal.
External Treatment: Using outboard gear on a signal before it entersGhost.
Processor: Outboard gear connected to an Insert jack, in which the entiresignal is processed and then returned to Ghost.
Effect: Outboard gear used by the AUX Send/Return system, in which wetand dry signals are combined within Ghost.
Dry: The unprocessed or original signal.
Wet: The processed signal (the signal that has been treated by the out-board gear).
It is important to understand the distinction between a processor and an effect.With a processor, you want to treat the entire signal and only use this wet signal.Examples of processors are outboard EQ, compressors, limiters, expanders, andnoise gates. The latter 4 are collectively known as "dynamics processors." Forinstance, with outboard EQ, the signal would enter the EQ, be altered by the EQ,and then exit the EQ. You only want to use the EQ�ed signal. You do not want tocombine it with the non-EQ�ed signal.With an effect, you want to combine the dry signal and wet signal. Examples ofeffects are outboard reverb, delay, chorus, flangers, phasers, and echo. The origi-nal signal is split in two when it enters the effect. One signal is processed by theeffect and the other signal is not. You then blend the wet and dry signals togetherto create the effect. For instance, if you run a signal through a delay, the originalsignal is delayed by a certain amount of time. If you just listen to the original signalby itself or the delayed signal by itself, you won�t hear the delay effect. The effectis achieved by combining both signals so that first you hear the original signal andthen a short time later you hear the delayed signal.Effects devices have a mix control that allows you to determine the blend of wetand dry signals that will appear at the unit�s output jacks. For instance, 0% couldmean all dry signal; 100% could mean all wet signal; and 50% could mean half drysignal and half wet signal. When you use an effects device for external treatmentoutside of Ghost, you use the effects unit�s mix control to determine the wet/drymix. When you use it with Ghost�s AUX Send/Return system, you set the effectfor 100% wet signal, and determine the wet/dry mix using Ghost�s controls.The different methods for treating a signal are described below.
1. External Treatment: With this method you alter the signal before itreaches Ghost. You can use either an effect or a processor. It is commonlyused by guitarists, when using "stomp boxes." For example, you connect aguitar cable to the input of a delay box (an effect), then you connect theoutput of the box to one of Ghost�s LINE inputs. Or, you connect a guitarto a compressor box (a processor), then you connect the output of the boxto one of Ghost�s LINE inputs. In either instance, the signal is processedbefore it reaches the Input jack. The effect will usually have a mix control,that allows you to mix the balance of wet and dry signals. It is this blendedsignal that enters Ghost. With the processor, only the wet signal entersGhost.
External treatment does not require using any of Ghost�s controls. Yousimply plug the treated signal into one of Ghost�s inputs.

GHOST Tutorial 7.23
2. Using Processors: Outboard processors are connected to Ghost using asend/return Y-cable connected to one of Ghost�s Insert jacks. The signalfrom Ghost is sent to the outboard device, processed, and then theprocessed signal is returned to Ghost. You use this method when you wantto treat the entire signal, as opposed to blending the wet and dry signals.You�ll generally use outboard EQ or dynamics processors with the Inserts.
Ghost has Inserts on all Channels, Groups, and the L/R Mix. You use theChannel Inserts when you want to process just the input of one channel;for instance, to use compression on a vocal input. You use the GroupInserts when you want to process a group of signals at once. For instance, ifyou have all your drum tracks assigned to Groups 1-2, then you couldprocess them all by inserting a stereo compressor into Group Inserts 1-2.You use the L/R Inserts when you want to process the entire Main Mix dur-ing mixdown; for instance, to use stereo compression on the Main Mixbefore it�s recorded to a DAT tape.
Using processors with Ghost just requires that you connect them properlyto Ghost�s Insert jacks. (See Chapter 5 � 4. INS:). It does not requireusing any of Ghost�s controls.
3. Using Effects: To use effects with Ghost, you can use the AUXSend/Return system. This method involves sending a copy of a channel/MIXB signal to the outboard effect, processing it, and then returning it toGhost. This wet signal is then combined with the dry signal within Ghost.
You connect an AUX output jack to the device�s input. The signal is treatedand then returned to Ghost, either through an Effects Return or one ormore Channels. If you use an Effects Return, you won�t be able to send thesignal to the Studio Foldback for monitoring by the performers; so it�s bestto use the Effects Returns during mixdown, when Studio monitoring is notimportant.
Sometimes, you will want to record the effect to tape and other times youwill want to record dry, but monitor wet. This means that you want to hearthe wet signal in the Control Room and Studio monitoring systems, but youonly want to record the dry signal. In this instance, you must connect thestereo outputs of the effects device to 2 Channel LINE inputs.
Generally, it doesn�t matter which AUX Send you use, but you should beaware of the differences between them. AUX 1-2 are mono channel sendsand can be Pre/Post-fader. AUX 3-6 are mono post-fader sends fromeither the channel or MIX B paths. (You can only use either AUX 3-4 orAUX 5-6 at one time, per channel/MIX B path.) AUX 7 is a stereo post-fader channel send. AUX 8 is a stereo post-fader MIX B send. When youuse AUX 1-2 for effects, make sure the PRE switch is not pressed, so theyact as post-fader sends.
You use the appropriate AUX Send level control and AUX rotary masterfader to send a copy of the signal to the AUX jack. The original signal con-tinues down the Channel/MIX B path. Then after selecting an effect andsetting the parameters for it in the outboard device, you must make surethat the device is set to 100% wet signal. You only want the wet signal atthe effects unit�s output jacks. Then you can connect the stereo outputs toone of Ghost�s Stereo Effects Returns or to 2 Channel inputs. If you�rerecording the effect, you then assign this wet signal to either the Groupbuses or to the L/R Mix. You also assign the original, dry signal to theGroup buses or L/R Mix. (MIX B can only be assigned to the L/R Mix, usual-ly during mixdown.) The Channel/MIX B faders will determine the amountof dry signal on the buses and the Effects Returns level controls (or Channelfaders if you returned the wet signal to the Channel inputs) will determinethe amount of wet signal on the buses. This is why you must set the effectsdevice to 100% wet signal. You determine the blend of wet/dry signalswith Ghost�s controls.

7.24 GHOST Tutorial
NNoottee AAbboouutt SSttuuddiioo MMoonniittoorriinngg aanndd EEffffeeccttssThe FX Returns were designed to add effects during mixdown, or while multi-tracking in the control room and only using the control room monitor section.When using the FX Returns, you cannot monitor the wet signal in the StudioFoldback sections. However, you can record the wet signal to the multitrack orthe mixdown deck and you can monitor it in the Control Room. If you�re record-ing the effect and the performers don�t care if they hear the effect while perform-ing, then you can use the FX Returns. However, if the performers want to hearthe effect while recording, or if you want to record dry, but monitor wet, thenyou should not use the FX Returns. You should connect the stereo outputs ofyour effects device to 2 channel inputs and use those channels to route the wetsignal to the Group or L/R buses for recording, if desired, and to the ControlRoom and Studio monitoring sections.It is suggested that you return the outputs of a stereo effects device to anFX Return only under the following conditions:
1. During mixdown, when studio monitoring is not important.
2. When you�re recording yourself or the performers while in the controlroom, you�re using the control room monitor section, and don�t need tosend the effect to the Studio Foldback.
3. The performers are in the studio, you�re recording the effect, but the per-formers don�t care if they hear the effect.
You should return the outputs of a stereo effects device to 2 adjacent ChannelLINE inputs (Channel Returns) under the following conditions:
1. The performers are in the studio, you�re recording the effect, and the per-formers want to hear the effect.
2. The performers are in the studio, you�re not recording the effect, but theperformers want to hear the effect to make them perform better.
CCoonnttrrooll RRoooomm MMoonniittoorriinngg WWhhiillee UUssiinngg EEffffeeccttss
a. Monitoring while recording the effect: (This applies whether you arereturning the effect to an FX Return or to 2 Channel inputs.)
1. Recording the effect to a multitrack deck: Assign the effect to theappropriate Groups, set the Control Room Source to MIX B, and use theMIX B section in the channel strip that represents the tape track the effectis being recorded on.
2. Recording the effect during mixdown: Assign the effect to the L/R MIXand follow the usual procedure of setting the Control Room Source to MIXA and simply monitor MIX A in the control room.
a. Recording Dry and Monitoring Wet while multitracking: (You don�twish to record the effect, but you want to monitor it.)
1. Using 2 Channel LINE Inputs as Returns: Don�t assign the effect to theGroups, set the Control Room Source to MIX B, and use the MIX B sec-tions in the 2 channel strips where the effect is being returned. Make surethe Channel Return REV switches are not engaged and set their MIX BSRCE switches to CHAN (Down).
2. Using an FX Return: Assign the FX Return to the L/R Mix by pressing theMIX switch, but don�t assign it to the Groups. Set the Control RoomSource to monitor both MIX A and MIX B. MIX B is what you normally usefor control room monitoring and MIX A would be used to monitor theeffect. You would normally only use this last method if the performerswere recording in the control room using the control room monitor sec-tion, and you wished to record dry, but monitor wet.

GHOST Tutorial 7.25
SSttuuddiioo MMoonniittoorriinngg WWhhiillee UUssiinngg EEffffeeccttss::
a. Whether or not you�re recording the effect, if you want to monitor it in theStudio, then you should connect the stereo outputs of your effects deviceto 2 adjacent Channel LINE inputs. Make sure their REV switches are notengaged and set their MIX B SRCE switches to CHAN (Down). This routesthe effect to both the channel and MIX B paths. We�ll call these ChannelReturns. Set the Studio Foldback Source to AUX 1-2 and use the AUX 1-2Send knobs in the Channel Returns to monitor the effect. These AUX 1-2controls are used for monitoring and should be set up as Pre-Fader Sendsby pressing the PRE switch. Note that any AUX 1-2 controls that are beingused to send signals to the effects device should be set up as Post-FaderSends by making sure the PRE switch is not pressed.
Next, we will outline the procedure to use with the FX Returns, which will allowyou to record effects and monitor them in the Control Room, but not monitorthem in the Studio. Then, we will outline the procedure to be used with 2 ChannelLINE inputs, which will allow you to record effects and monitor them in both theControl Room and the Studio.For connecting effects devices to the FX Returns. Studio Monitoring is notpossible.
PPrroocceedduurree
1. First, select which AUX Send you wish to use, based on whether you wishto use it with a Channel or MIX B input and whether your effect has monoor stereo inputs. Let�s say you want to use AUX 1. (If you use AUX 1 or 2,make sure the PRE switch is not pressed.) Connect the AUX 1 output jackto the input of your effects device. Connect the L/R outputs of your effectsdevice to the FX 1-L/R jacks. (Note that you can use any FX RETURN.)
2. On the effects device, set the input level and output level controls to theirnominal positions. Make sure the effects unit is set for 100% wet outputand select the effect you wish to use.
3. Turn the AUX 1 rotary master fader control about 75% up. With a signalpresent, turn the AUX 1 Send controls about 75% up on all channels thatyou wish to be treated with the effect. This sends the channel signals to theeffects device.
4. There should be a reading on the input meter of the effects device, show-ing that there is a signal present. If you�re recording to a multitrack deck,then set the Control Room Source to MIX B. If you�re mixing down, thenset the Control Room Source to MIX A. Turn the Control Room Levelknob 75% up. You cannot monitor the effect in the Studio Foldback sec-tions.
5. Use the Channel ASSIGN switches and PAN Pots to route the dry signalsto the appropriate buses, as usual. Use the FX 1 ASSIGN switches and BALknob to route the wet signal to the appropriate buses. You can record thewet signal on the same tape tracks as the dry signals or on their own tapetracks. Turn the appropriate Group Faders about 75% of the way up (ifmultitracking) and set the MIX fader to the top of its travel (if mixingdown). This sends the wet and dry signals to the buses.
6. In the control room, to monitor the effect while you�re recording to a mul-titrack deck, you use the MIX B section in the channel strip that representsthe tape track the effect is being recorded on. To monitor the effect whilemixing down, you should assign the FX Return to the L/R Mix by pressingthe MIX switch, and then monitor MIX A in the control room, as usual. Torecord dry and monitor wet, assign the FX Return to the L/R Mix by press-ing the MIX switch, but don�t assign it to the Groups. Set the ControlRoom Source to monitor both MIX A and MIX B. MIX B is what you nor-mally use for control room monitoring and MIX A would be used to moni-tor the effect.

7.26 GHOST Tutorial
7. Turn the FX 1 level control about 75% up. This returns the wet signal fromthe effects device to Ghost.
8. With a signal present in the channels you�re using, you should be able tohear the effect. Adjust the AUX 1 Send controls to determine how preva-lent the effect will be for each channel. For instance, all other things beingequal, if the AUX 1 Send control is turned 75% up for one channel and50% up for another channel, you will hear the effect more for the formerchannel.
9. After setting the AUX 1 Send levels for all the channels, press the AUX 1Master Fader AFL switch. This will send all AUX 1 levels, post-AUX 1 mas-ter fader, to the CRM/SOLO-L/R meters. Adjust the AUX 1 Master Faderso that the meters read 0, then turn AFL off.
10.Adjust the input level of the effects device to achieve the meter reading onthe effects device, suggested by the device�s manual.
11. Then press the PFL switch in the FX 1 section. This will display the effectssignal returned to Ghost, pre-FX 1 level control, on the CRM/SOLO-L/Rmeters. Adjust the output level of the effects device so that the metersread 0, then turn PFL off.
12. Finally, adjust the FX 1 level control, together with the channel faders, toachieve the blend of wet/dry signals that you desire. The channel faderscontrol the dry signal and the FX 1 level knob controls the wet signal. TheGroup/MIX faders control the overall signal sent to the Group/MIX buses.Remember that the individual AUX 1 Send knobs and AUX 1 master faderdetermine the level of the signal sent to the effects device and the FX 1level knob determines the level of the signal returned to Ghost.
For connecting effects devices to 2 Channel LINE Inputs (ChannelReturns). Studio Monitoring is possible.
PPrroocceedduurree
1. First, select which AUX Send you wish to use, based on whether you wishto use it with a Channel or MIX B input and whether your effect has monoor stereo inputs. Let�s say you want to use AUX 1. (If you use AUX 1 or 2,make sure the PRE switch is not pressed.) Connect the AUX 1 output jackto the input of your effects device. Connect the L/R outputs of your effectsdevice to any 2 adjacent Channel LINE inputs. Make sure their REV switch-es are not engaged and set their MIX B SRCE switches to CHAN (Down).
2. On the effects device, set the input level and output level controls to theirnominal positions. Make sure the effects unit is set for 100% wet outputand select the effect you wish to use.
3. Turn the AUX 1 rotary master fader control about 75% up. With a signalpresent, turn the AUX 1 Send controls about 75% up on all channels thatyou wish to be treated with the effect. This sends the channel signals to theeffects device.
4. There should be a reading on the input meter of the effects device, show-ing that there is a signal present. If you�re recording to a multitrack deck,then set the Control Room Source to MIX B. If you�re mixing down, thenset the Control Room Source to MIX A. Turn the Control Room Levelknob 75% up. For multitrack recording, select AUX 1-2 as the StudioFoldback Source and turn its level control 75% up.

GHOST Tutorial 7.27
5. Use the Channel ASSIGN switches and PAN Pots to route the dry signalsto the appropriate buses. If you want to record the wet signal, then usingthe Channel Returns, set their ASSIGN switches and PAN Pots to route thewet signals to the appropriate buses. You can record the wet signals on thesame tape tracks as the dry signals or on their own tape tracks. Turn theappropriate Group Faders about 75% of the way up (if multitracking) andset the MIX fader to the top of its travel (if mixing down). This sends thewet and dry signals to the buses.
6. In the control room, to monitor the effect while you�re recording to a mul-titrack deck, you use the MIX B section in the channel strip that representsthe tape track the effect is being recorded on. To monitor the effect whilemixing down, you should assign the Channel Returns to the L/R Mix bypressing the L/R switch, and then monitor MIX A in the control room, asusual. To record dry and monitor wet, don�t assign the effect to the Groupsand use the MIX B sections in the Channel Returns to monitor the effect.
7. Set the Channel Return Faders to their nominal positions. This returns thewet signal from the effects device to Ghost.
8. With a signal present in the channels you�re using, you should be able tohear the effect. Adjust the AUX 1 Send controls to determine how preva-lent the effect will be for each channel. For instance, all other things beingequal, if the AUX 1 Send control is turned 75% up for one channel and50% up for another channel, you will hear the effect more for the formerchannel.
9. To send the effect to the performers in the Studio, whether or not you arerecording the effect, use the AUX 1-2 Sends on the Channel Returns.These AUX 1-2 controls should be set up as Pre-Fader Sends by pressingthe PRE switch.
10. After setting the AUX 1 Send levels for all the channels, press the AUX 1Master Fader AFL switch. This will send all AUX 1 levels, post-AUX 1 mas-ter fader, to the CRM/SOLO-L/R meters. Adjust the AUX 1 Master Faderso that the meters read 0, then turn AFL off.
11. Adjust the input level of the effects device to achieve the meter reading onthe effects device, suggested by the device�s manual.
12. Then press the SOLO switches (with SIP Off) in the Channel Returns. Thiswill display the effects signal returned to Ghost, pre-channel fader, on theCRM/SOLO-L/R meters. Adjust the output level of the effects device sothat the meters read 0, then turn SOLO off.
13. Finally, adjust the Channel Faders and Channel Return Faders for the wetand dry signals, to achieve the wet/dry recording mix that you desire.Adjust the MIX B level controls and AUX 1-2 Sends to achieve the wet/drymonitoring mix that you desire for the control room and studio, respective-ly. The Channel Faders that contain the signal sources control the dry signaland the Channel Return Faders control the wet signal. The Group/MIXfaders control the overall signal sent to the Group/MIX buses. The MIX Bcontrols are used for control room monitoring and the AUX 1-2 controlsare used for studio monitoring. Remember that the individual AUX 1 Sendknobs and AUX 1 master fader determine the level of the signal sent to theeffects device and the 2 Channel Return Faders determine the level of thesignal returned to Ghost.
7.28 GHOST Tutorial
MMiixxiinngg DDoowwnn
OOvveerrvviieewwAfter you have recorded all your tracks, you must mix them down to a 2-trackrecorder, such as a DAT deck, open-reel machine, cassette deck, or CD-Rrecorder. There are two reasons for doing this. First, the completed MT tape(s)are only playable on the same-format MT deck. If you want to distribute yourrecordings to others, you must have it on media that you can send to a duplica-tor/replicator (for large quantities) or that you can distribute yourself (for smallquantities). Second, as you mix down to 2-track, you are able to set the levels andbalance among the various tape tracks, as well as add EQ, processors, and effectsto the tracks.The completed MT tape is known as the multitrack master tape. Especially withdigital media, you should make backup or safety copies of this tape, before youbegin mixdown. The completed 2-track tape is known as the stereo master tapeor 2-track master tape. You should also make backup or safety copies of this tape.In a home or project studio, if you only need very limited distribution of the finalproduct, you might duplicate the stereo master tape yourself. For instance, dubthe master to cassette tapes or CD-Rs, and then distribute those. But for largescale distribution, you must have a duplicator/replicator do the job for you. Today,they will accept DAT, CD-R, open-reel tape, and to a limited extent, cassettetapes from you, and make the required number of copies in the format you speci-fy. You can also send your tape to a mastering house for last minute refinementsbefore duplication. With the proper setup, some people can master the tapethemselves.
NNootteeToday some people use the term "mastering" to refer to the act of mixing down atape and they refer to the 2-track mixdown deck as a "mastering deck." To avoidthe confusion caused by those who are now using a well-established term ("mas-tering") to also refer to another procedure for which there is a well-establishedterm ("mixing down"), we will use the term "mixing down" to refer to the act ofcreating a stereo master tape, and use the term "mastering" in its traditional sense.That is, to apply final tweaks to the stereo master tape before duplication.When you are ready for mixdown, you should route all tape/hard disk/MIDI tracksto Ghost�s channel path, so that they come up on the long-throw faders and sothat you will have the extra features of the channel path available to you. If youhave more sources than channels, you�ll have to decide which sources you want toroute to the channels and which sources you want to route to MIX B. You canalso use Ghost�s 4 stereo effects returns as inputs, but as a practical matter, youshould only connect one signal source to each effects return. If you connect stereosources, you�ll have an additional 8 inputs, and if you connect mono sources, you�llonly have 4 additional inputs. So, if possible, try to connect stereo sources to theeffects returns, in order to maximize the number of inputs you�ll have. Also, keepin mind that if you want to add effects during mixdown (and you usually will), you�llhave to return the effects to either the effects returns, the channels, or MIX B sec-tions. If they are all handling your signal sources, then it will be difficult to add anyeffects during mixdown.Once you�ve decided what your sources will be for the channels, MIX B sections,and Effects Returns, you should zero out the console. Then, press the REV switchon all channels where you want to route the MIX B/TAPE RET inputs to the chan-nel path, and leave the switch up, if you want the channel inputs routed to thechannel path. Generally, it�s a good idea to route all your tape tracks to the chan-nel path first, and if you run out of channels, then route your hard disk/MIDI tracksto the MIX B path. If you have 2 sources for a channel, make sure the MIX B SRCEswitch is set to TAPE (UP). If you only have one source for a channel, and youwish to use MIX B as a pre-fader send for the channel path, then set the MIX BSRCE switch to CHAN (DOWN).

GHOST Tutorial 7.29
Next, you should assign all channels and effects returns that are in use to the L/RMIX by pressing the L/R switch on the channels and the MIX switch on the effectsreturns. To globally assign the MIX B bus to the L/R Mix, press the MIX B TO MIXswitch in Ghost�s MIX B master section. Set the MIX B rotary master fader about75% up. Set the L/R master fader to the top of its travel.If you want to group some of your sources, then you should assign them to theappropriate Group buses and not to the L/R Mix. Then assign, the appropriateGroup buses to the L/R MIX, using the TO MIX- L, R, and L+R switches in theGroup master section. Turn the appropriate Group faders about 75% up.Set the CRM SRCE to monitor MIX A only and turn up the level control. Makesure MONO CHECK is off. You should usually monitor through the CRM speak-ers and use the headphones sparingly. If you want to send the mix to the perform-ers in the studio, select CRM as the source in the appropriate Studio Foldback sec-tion and turn up its level control.At this point, the INPUT SENSITIVITY and TAPE TRIM knobs should already beset for your sources. If not, then adjust them accordingly. (See "Control RoomMonitoring" and "Recording Basic Tracks � Gain Structure", above.)Now you�re ready to practice the mix. Rewind the MT tape, set the counter tozero, and start playback. If the MT has an output level control, set it to its nominalposition. If you�re syncing a sequencer/hard disk to the tape, make sure they�re setup properly, so that the MIDI/hard disk tracks are also playing.As the tape plays, set the relative levels of the tape/hard disk/MIDI tracks. Use thechannel faders for channel sources, MIX B faders for MIX B sources, and the FXlevel controls for the Effects Returns sources. Use the PAN and BAL controls toset the stereo perspective. USE EQ, effects, and processors, as needed. (See"Effects and Processors", above.) Use the MUTE Automation system, as needed(not Ghost LE). (See "CPU Application Guide.") Use the MONO CHECK switchperiodically to check for mono compatibility, if that is important to you. Listen tothe mix through your main speakers, your alternate speakers, if any, and head-phones. Keep practicing the mix, until you�re happy with it, then rewind the tapeto the beginning of the song.Insert a new tape in your 2-track recorder and rewind it to the beginning. Thenplay about one minute into the tape, so you don�t start at the very beginning of thetape. Then, use the TO TAPE switches in the Talkback and Oscillator sections torecord any announcements and tones that are needed. Allow the tape to roll a bitpast the tones, stop the 2-track, and set the counter to zero. Then, set the deckto RECORD-READY mode and set its input level control to its nominal position.Play the MT tape again, and adjust the MIX-L/R Master fader, MIX B Master fader,and Group Master faders, to retain the proper balance of your mix, while at thesame time, achieving the proper level on your 2-track recorder�s meters. Theproper recording level should be achieved with the 2-track�s input control at itsnominal position. Then rewind the MT tape to the beginning of the song.You�re now ready to commit your final mix to tape. Start the 2-track in RECORDmode and then start playback of the MT tape. Make any mix moves that are nec-essary as the tape plays. When the song is completed, stop the 2-track, then stopthe MT. Press the appropriate 2-TK switch in the CRM SRCE section, unselectMIX A, and then rewind and play back the 2-track tape. If you�re not satisfied withthe final mix, then unselect the 2-TK CRM SRCE switch (make sure only MIX A isselected), and try the mix again. If you are satisfied with the mix of the first song,then proceed to mix down the next song on the MT. When you are satisfied withthe mixes of all the songs, then make a dub of the 2-track master to cassette orCD-R, for instance, and play it back on as many systems as you can; such as ahome stereo system, boombox, portable stereo, and car stereo. If the mix doesn�tsound the way you want on these other systems, then mix it again. If the mixmeets with your approval, then the multitrack recording process is completed.Make a backup or safety copy of the 2-track master and label everything. This final2-track stereo master tape is now ready for mastering and/or duplication.
7.30 GHOST Tutorial
PPrroocceedduurree
1. "Zero Out" the console and then use the REV switches to route your tapetracks to the channel path. If you have additional tracks, such as harddisk/MIDI tracks, and extra channels, then route the additional tracks to thechannels. If you have more inputs than channels, then decide where best toroute those extra inputs, among the channel and MIX B paths and theEffects Returns inputs. Make sure the MIX B SRCE switch is set to TAPE(UP), unless you wish to use MIX B as a pre-fader send for the channelpath.
2. Assign all channels and Effects Returns that are in use to the L/R MIX bypressing the L/R assign switch on the channels and the MIX assign switch onthe Effects Returns. Press the MIX B TO MIX switch in Ghost�s MIX Bmaster section and set the MIX B rotary master fader about 75% up. Setthe MIX-L/R master fader to the top of its travel.
3. If you�re grouping some sources, assign them to the appropriate Groupbuses and then assign the Group buses to the L/R MIX, using the TO MIX-L, R, and L+R switches in the Group master section. Turn the appropriateGroup faders about 75% up.
4. Set the CRM SRCE to monitor MIX A only, turn up the level control, andmake sure MONO CHECK is off. To send the mix to the studio, selectCRM as the source in the appropriate Studio Foldback section and turn upits level control.
5. Adjust the INPUT SENSITIVITY and TAPE TRIM knobs, if needed.
6. Rewind the MT tape, set the counter to zero, and start playback. If the MThas an output level control, set it to its nominal position. If you�re syncing asequencer/hard disk to the tape, make sure they�re set up properly, so thatthe MIDI/hard disk tracks are also playing.
7. As the tape plays, set the relative levels of the tape/hard disk/MIDI tracksusing the channel and MIX B faders, and the FX level controls. Use thePAN and BAL controls to set the stereo perspective. USE EQ, effects, andprocessors, as needed. (See "Effects and Processors", above.) Use theMUTE Automation system, as needed (not Ghost LE) and use the MONOCHECK switch periodically to check for mono compatibility. Listen to themix through your main speakers, your alternate speakers, if any, and head-phones. Keep practicing the mix, until you�re happy with it, then rewind thetape to the beginning of the song.
8. Insert a new tape in your 2-track recorder and rewind it to the beginning.Roll about one minute into the tape and use the TO TAPE switches in theTalkback and Oscillator sections to record any announcements and tonesthat are needed. Allow the tape to roll a bit past the tones, stop the 2-track, and set the counter to zero. Then, set the deck to RECORD-READYmode and set its input level control to its nominal position.
9. Play the MT tape again, and adjust the MIX-L/R Master fader, MIX BMaster fader, and Group Master faders, to retain the proper balance ofyour mix, while at the same time, achieving the proper level on your 2-track recorder�s meters. The proper recording level should be achievedwith the 2-track�s input control at its nominal position. Then rewind theMT tape to the beginning of the song.

GHOST Tutorial 7.31
10. To commit your final mix to tape, start the 2-track in RECORD mode andthen start playback of the MT tape. Make any mix moves that are necessaryand when the song is completed, stop the 2-track, then stop the MT. Pressthe appropriate 2-TK switch in the CRM SRCE section, unselect MIX A,and then rewind and play back the 2-track tape. If you�re not satisfied withthe final mix, then unselect the 2-TK CRM SRCE switch, select MIX A, andtry the mix again. If you are satisfied with the mix, then proceed to mix thenext song on the MT. When you are satisfied with the mixes of all the songson the MT, then make a dub of the 2-track master and play the dub on asmany systems as you can. If you�re not satisfied, then mix it again. If the mixmeets with your approval on these other systems, then make a backupcopy of the 2-track master tape and label everything. This final 2-trackstereo master tape is now ready for mastering and/or duplication.

7.32 GHOST Tutorial

GHOST Application Notes 8.1
GGHHOOSSTT
AApppplliiccaattiioonn NNootteess8

8.2 GHOST Application Notes
AApppplliiccaattiioonn NNootteess
OOvveerrvviieewwGhost is primarily intended to be used as a multitrack/music production console.However, it can also be used for other purposes. Once you understand Ghost�ssignal flow and the layout and functions of its controls, you will be able to adapt itto your needs.Most of the information contained here can also be found throughout the othersections of this manual. However, in order to provide the information in a usefulreference list, summarized below are some key points about Ghost that make ituseful in a wide variety of applications.
IInnppuutt SSeeccttiioonn
1. Both the MIC and LINE inputs are affected by the PHASE switch and theLOW-CUT FILTER.
2. If REV is pressed, the channel insert jack is available to the tape input andnot the channel input.
MMeetteerriinngg aanndd SSiiggnnaall//PPeeaakk LLEEDDss
3. If you have the optional meterbridge and it�s set for tape input monitoring,it will monitor the signal right after the MIX B/TAPE RET jack, regardless ofthe position of the REV switch. The TAPE TRIM control will have no effecton the meter.
4. If you have the optional meterbridge and it�s set for channel input monitor-ing, then the following applies:
l If REV is not pressed, the channel input is monitored after the channelinsert jack. The INPUT SENS knob and LCF switch will affect the meterreading.
l If REV is pressed, the tape input is monitored after the channel insert jack.Only the TAPE TRIM knob will affect the meter reading.
5. Regardless of the position of the REV switch, the SIGNAL PRESENT LEDalways monitors the channel input.
6. If the REV switch is not pressed and all EQ is assigned to the channel, thenthe PEAK LED will only monitor the channel path. If REV is pressed or ifthe HF/LF EQ is assigned to MIX B, then the PEAK LED will monitor boththe channel and MIX B paths.
7. The output of the EQ can trigger the PEAK LED, even if the EQ IN switchis not depressed.
8. The CRM/SOLO-L/R meters are not just for displaying the levels of theMain Mix. They will display any sources selected in the control room sec-tion, as well as all PFL/AFL signals. Therefore, in addition to displaying thelevels of MIX A, MIX B, and the outputs of your 2-track recorders, you candisplay any signal that passes through a PFL/AFL switch. This includes allchannel and tape (MIX B) inputs, the AUX Sends master levels, the FXReturns, the Studio Foldback, and the Groups. The meters are before thecontrol room level control and are not affected by it.
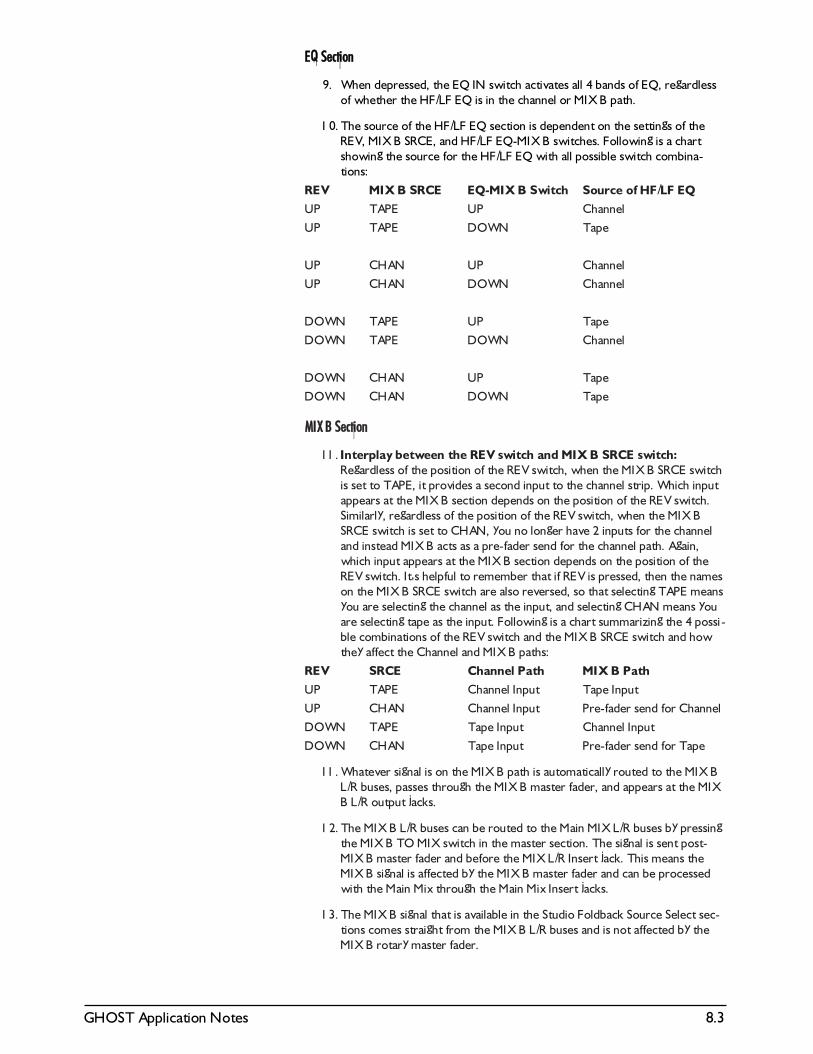
GHOST Application Notes 8.3
EEQQ SSeeccttiioonn
9. When depressed, the EQ IN switch activates all 4 bands of EQ, regardlessof whether the HF/LF EQ is in the channel or MIX B path.
10. The source of the HF/LF EQ section is dependent on the settings of theREV, MIX B SRCE, and HF/LF EQ-MIX B switches. Following is a chartshowing the source for the HF/LF EQ with all possible switch combina-tions:
REV MIX B SRCE EQ-MIX B Switch Source of HF/LF EQ UP TAPE UP ChannelUP TAPE DOWN Tape
UP CHAN UP ChannelUP CHAN DOWN Channel
DOWN TAPE UP TapeDOWN TAPE DOWN Channel
DOWN CHAN UP TapeDOWN CHAN DOWN Tape
MMIIXX BB SSeeccttiioonn
11. Interplay between the REV switch and MIX B SRCE switch:Regardless of the position of the REV switch, when the MIX B SRCE switchis set to TAPE, it provides a second input to the channel strip. Which inputappears at the MIX B section depends on the position of the REV switch.Similarly, regardless of the position of the REV switch, when the MIX BSRCE switch is set to CHAN, you no longer have 2 inputs for the channeland instead MIX B acts as a pre-fader send for the channel path. Again,which input appears at the MIX B section depends on the position of theREV switch. It�s helpful to remember that if REV is pressed, then the nameson the MIX B SRCE switch are also reversed, so that selecting TAPE meansyou are selecting the channel as the input, and selecting CHAN means youare selecting tape as the input. Following is a chart summarizing the 4 possi-ble combinations of the REV switch and the MIX B SRCE switch and howthey affect the Channel and MIX B paths:
REV SRCE Channel Path MIX B PathUP TAPE Channel Input Tape InputUP CHAN Channel Input Pre-fader send for ChannelDOWN TAPE Tape Input Channel InputDOWN CHAN Tape Input Pre-fader send for Tape
11. Whatever signal is on the MIX B path is automatically routed to the MIX BL/R buses, passes through the MIX B master fader, and appears at the MIXB L/R output jacks.
12. The MIX B L/R buses can be routed to the Main MIX L/R buses by pressingthe MIX B TO MIX switch in the master section. The signal is sent post-MIX B master fader and before the MIX L/R Insert jack. This means theMIX B signal is affected by the MIX B master fader and can be processedwith the Main Mix through the Main Mix Insert jacks.
13. The MIX B signal that is available in the Studio Foldback Source Select sec-tions comes straight from the MIX B L/R buses and is not affected by theMIX B rotary master fader.
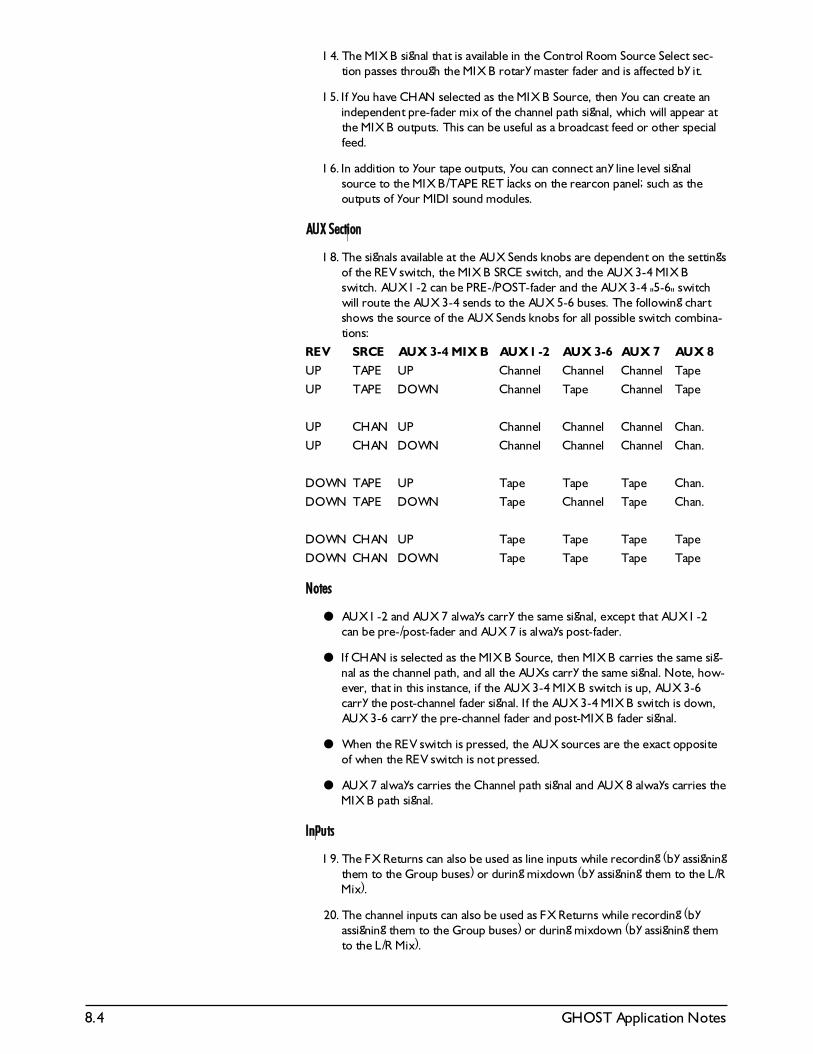
8.4 GHOST Application Notes
14. The MIX B signal that is available in the Control Room Source Select sec-tion passes through the MIX B rotary master fader and is affected by it.
15. If you have CHAN selected as the MIX B Source, then you can create anindependent pre-fader mix of the channel path signal, which will appear atthe MIX B outputs. This can be useful as a broadcast feed or other specialfeed.
16. In addition to your tape outputs, you can connect any line level signalsource to the MIX B/TAPE RET jacks on the rearcon panel; such as theoutputs of your MIDI sound modules.
AAUUXX SSeeccttiioonn
18. The signals available at the AUX Sends knobs are dependent on the settingsof the REV switch, the MIX B SRCE switch, and the AUX 3-4 MIX Bswitch. AUX 1-2 can be PRE-/POST-fader and the AUX 3-4 "5-6" switchwill route the AUX 3-4 sends to the AUX 5-6 buses. The following chartshows the source of the AUX Sends knobs for all possible switch combina-tions:
REV SRCE AUX 3-4 MIX B AUX 1-2 AUX 3-6 AUX 7 AUX 8UP TAPE UP Channel Channel Channel TapeUP TAPE DOWN Channel Tape Channel Tape
UP CHAN UP Channel Channel Channel Chan.UP CHAN DOWN Channel Channel Channel Chan.
DOWN TAPE UP Tape Tape Tape Chan.DOWN TAPE DOWN Tape Channel Tape Chan.
DOWN CHAN UP Tape Tape Tape TapeDOWN CHAN DOWN Tape Tape Tape Tape
NNootteess
l AUX 1-2 and AUX 7 always carry the same signal, except that AUX 1-2can be pre-/post-fader and AUX 7 is always post-fader.
l If CHAN is selected as the MIX B Source, then MIX B carries the same sig-nal as the channel path, and all the AUXs carry the same signal. Note, how-ever, that in this instance, if the AUX 3-4 MIX B switch is up, AUX 3-6carry the post-channel fader signal. If the AUX 3-4 MIX B switch is down,AUX 3-6 carry the pre-channel fader and post-MIX B fader signal.
l When the REV switch is pressed, the AUX sources are the exact oppositeof when the REV switch is not pressed.
l AUX 7 always carries the Channel path signal and AUX 8 always carries theMIX B path signal.
IInnppuuttss
19. The FX Returns can also be used as line inputs while recording (by assigningthem to the Group buses) or during mixdown (by assigning them to the L/RMix).
20. The channel inputs can also be used as FX Returns while recording (byassigning them to the Group buses) or during mixdown (by assigning themto the L/R Mix).

GHOST Application Notes 8.5
21. The MIX B inputs can also be used as FX Returns (for recording the effect),but during mixdown only, since they can only be assigned to the Main Mixbus.
22. The Groups can also be used as FX Returns while recording (using theGroup buses) or during mixdown (by assigning the Group buses to the L/RMix), if you use the Group Inserts to connect the line level outputs of yourFX devices. (See #24, below.)
OOuuttppuuttss
23. Each channel has a DIR/GRP n switch, where n is a Group number from 1to 8, and an associated DIR/TAPE SND jack on the rear connector(rearcon) panel. Any signals assigned to the Group n bus will automaticallyappear at the appropriate DIR/GRP n switch. If the switch is set to DIR(UP), then its DIR/TAPE SND jack will carry the direct output of its chan-nel. If the switch is set to GRP n (DOWN), then its DIR/TAPE SND jackwill carry all signals assigned to the Group n bus.
24. If you use a cable with a TS (Tip-Sleeve) plug, you can connect line levelsources to the Group Insert jacks. This will allow you to record thosesources using the shortest possible signal path to the Group outputs.
25. In the Control Room Source section, the switches are generally used as fol-lows:
MIX A � for monitoring during mixdown.
MIX B � for monitoring during tracking and overdubbing.
2-TK A � for monitoring the playback of your mixdown deck.
2-TK B � for monitoring the playback of your dubbing deck.
NNootteeYou can also use 2-TK A, instead of MIX A, to monitor the outputs of your 2-trackmixdown deck during mixdown.Normally, you would connect the control room outputs to the main amp/speakersin the control room and you would connect the ALT outputs to the nearfieldamp/speakers in the control room. However, if you�re not using the ALT outputsfor monitors, you can use them to send a feed of the control room sources toanother device. For instance, with headphones disconnected, MONO CHECK off,and the ALT switch pressed, any source that you select will be sent out the ALTL/R jacks. This can come in handy if you need an extra set of MIX A outputs duringmixdown, or if you want a set of outputs for either 2-track deck for dubbing pur-poses. You can also use the ALT jacks as an output for your PFL/AFL signals, sincepressing any PFL/AFL switch will override your control room source selections. Ifyou use the ALT outputs as an extra feed, then you�ll have to monitor that feed atthe destination.
26. In the Studio Foldback Source section, the switches are generally used asfollows:
AUX 1-2 � for monitoring during tracking and overdubbing.
MIX B � for monitoring MIX B, before the MIX B master fader.
CRM � for monitoring the control room source.Just as with the control room outputs, you can also use the studio outputs to senda feed of the studio sources to another device. If you�re only using one set ofStudio outputs, then the other set is available without repatching. If you�re alsousing the control room outputs as an extra feed, and you select CRM as the studiosource, then you can have 2 sets of outputs for your control room source.

8.6 GHOST Application Notes

����������� ������� ���
������������������������ ������������������������������������������������������������������
�
����������
��� ����������� �������
�������������������� ���� ����
������������ ������� ����
������� ���� ����
����������������������� ����
���������� �� ����
��������������������� �� ����
�� ������� ���!
�� ������ �� ���!
"#������� ���� ��� �� ���$
�%"%���� �����&���� ���'
����������� ���������� ����
������ �(����������� ���)
�� �(�*����� ������ ���+���������� ���)
,�#�-����� �(���.��������������� ���"�/�� ����
�� �(����������� ���������&������� � ���0
�������� ��� ���� �� ����
* �(� ���1��� �������#���2� �� ����
����(�����"�����(3������4 ����
"�����(������������%�������� ��-������� ����
������ ������!����� ����
�� �(�*���� ������� ����
����� �(��� ������� ����
�����(��� ������� ����
����������"�������� ���#
�� �(�*���� ������ �� ���!
�����11����� �� ���!
�����(����� �� ������# ���$
��((���(����� �� �&����������� ���$
���� �(���������5��� �������� �� ���'
5�6�(�����7� �(�������������5����&��������� �� ���'
�����(���������5��� �&�������� �� ���'
78������-��#��������� �(�9���������&���
�� ��� ������� �� ����� ���)
��((���(����� �� �* �(�9��(��������(� ���)

����������� ������� ���
������ �������������������� ���$
��6�������� �����&���� �������� �����������������3��&���� ���0
�� �(�*��������� �����&���� ���0
�6 ���(���� ���� ���������-- ����
* �(����� �� ����� ������� �����&�����9����� �� ����
������!�����%������"&�� �������'��(� ����
����(����� ����
��6��� ��%�-���� ���% ����� � �����������/���:#���� ����
�� �(�������2���8��8��%"%������� ����
;� � ������ �(�*������78 �������.������ ����
��(���������)������� ����������(��' ���#
"����(����������# ���!
������(����������# ���!
��3� � �(����������# ���$

������ ������ ������ ����������������
����-��� ������ ��/����� ��-����4�#����� �<���2�� ���-��� ���2�/�����6�(=>
!!���� �������� �������������������� ����""##$$##%%##&&��
�� ������ � � ��� ��� �2� �� �� �-���������� � ���������� ?����9?�&���
&��@��"?��7@%;"?�91�+������7���"��������,�7;�:17����2��2� ��
��6 � ���4 ���������� ��������� ��2�� 6 ����� ��������3����#����������
A���@�771�����2��� ���6 ����� ��������� � ����� ���B�(����� �� ��-���3
�� ��&����1����7�2� �� ��������+�17��3��2� �����6�2� ���� ���� �����
�#��(� ��2�� � ����
''((����))**�� ���� ��������++����,,��
���3�( �17"�� ��#� � 6 ���2�� ������ ��� ���� �������� ��#?�������
��� �� ����2������/���� � # ���������(����2��6� ���� ��#��� �� ���3
�� � � ���/���� ������� �� �6��������� ��#������� ��������
!!������������ ������ ����������������--��������������''��
��2��4��-�-���� 6 ��� ������ ���-����--���� �-��� �� ��������(� �� ���������
� �(��-� ���"%�91�+���"7� 6 ��?���� ����� ���������������4�7��2�
6 ��� �������B���� �����#��-� �����17" ����� � � ��������� �-��� ����-� �� �
6 ��� �
������ -��� ������� � 6 ��� ������ ���-��� ���-��6�(�-��� �� >��%"%
��� �����-���������--� 6 ���(����� �(����%"%���� �����-�����6���� � �(
��������� �� ��� ���������� /� ���������3����#���� ����-��8 ����� ���
������ �
���� �� ���� ��� 6 ��� �<�?)?�?�0=���� �� 6 ��� ������ ���-��� ���(����
�����(��� �� ��� �� ����� # ��������� �� ?�����-������2�(��� ��� �
����#��-� ��� �� � �� �������
��� ����������� �������
MidiChan
ContNum Mach
Sel
Setup

����������� ������� ��!
.. ����������������
�����9*� �� ����-� ������ �(/� �#�����6�������-��� ��� #��� ��/��2����
��#�� ������� ����� � ��� ��* �(� ������ �� ��/��2����� ����9*?�#������>
� ���� �#���� ��� ���������� ?������� 4��������� ������%"%
�.������ ?� �(� ������� ��� ���� �� ����� �������� ��#�
� ���� ����� ��-������ ��(���� ?�(/�(�#������������3 �������� ����-
�� �(�-������� /���--�� ����(���� ��-������� �
� � ������� ����)� ��� �� ��-���� ����� �� � � ���������� ����� ���
�����#?��� ��� ��#��(�� � ������?�������� �#�/���%"%����(���
����(���� �(� �
� ���������������#� ������ �� ��� � ��#�����#��(�� � ������?�� �(
����8 ������%"%� �.�������<�� � �����=�
� ���� � ��%"%���� ���� ���� ������� ��-������#��-� ���-�����%"%����3
�����-���� �3� �� ���� ����������/������(� �� ���� �.�������-����83
��6�?�������� �#���� ���-8��� ������� �� ������� �������(����8�
������)� ��� �� ������ ��2��� ��� �� ����� �-�����-(��� �� ��-����3
�����-����� � ���
������� � ��� ���� �����-��2�������� ��� � �� ����� �����)��� �� ��� ��
��� �����-� �3���?�����6� ����-������ ����� � �( ������6��3�--��% � �� �
�� 2�� ����6����� ������ �� ��-� ���� ����������#�/���%"%� # ����8��3
/��2�43����?� ���� � �2�� ���(����/��?�-���2��4����������/�(������ � �

��$ ����������� �������
!!��������������������������������������������������
!!���� �������� ��������
�������������� ��� �� �����4� ���� � ��� ������� ��������-�#���� ����2#
���2�(�#���� ����������?������� 4���������?�5�������%"%� �.������� ��2�
�����?� �� ��?���� ����������������������� ��-�������?���-���� ������ ��
�� ����-� ������ ��?������(� �� �#������ ���/�� ����/��-���� ����8�(
C 6�� �� C�
������� � �- ���6 �� 6��� ���� /�� #�� ��-����������� ���� ��-���?�����
6 �������� ��.����� � ���� >��%"%����������� ���<���=?�6����� � ��� ��3
������%"%������� ��?��������#��3��?����9�?�6����� � ����3���"3 #��������
���������� ����%-�#�������������� ��� � ����� �� �����-� �� �� 6��� ��-���?
���#�2���� 2�� ��� ���� ����� �� #������ ����� �6�����������/�� �������
�3���������� � �� ��� ���-��� ��-������.�����2#�#������������"��� ��/���3
�� ��� ���6�#��--���� ������������-�� ���� ������� ����������3��
���� ����� ��?� � ����� ��#� �����-(������� � ���� ��� ������ �����������
#�������� �(���� � ��� #����������� D � � �����(�?���������� � �6�2�����3
�� �����-� �����?��� � � ���2��� �#�����(������� ��� ���-����--����
������?�-����8�����
���� ��-� ����� ��������� � �� �-��6 ���� ���#�2������ ���-���� ��� �
���6������6������� �������� �� ������4� ����- 6������(���� �6�2������
�/��2�?� ����� � ��������< ���*�(����(� �����- 6���=��
������ ��
������/�
1����� ��
1�����/�
&� �8��3���� �<���=
&� �8��3���� �<���=
&� �8��"3)�<1��=
��������� ���1��������<���=
��������� ���1��������<1��=
���������1����<���=
�� ��"���6 ���%3�
�� ��"���6 ��:���<���=
�� ����"�3))�<���=
�� ����"�3))�<1��=
���#�*5@�)00��3����� �"�3))����� ���4����2�
���#������9��<�)� ���4�����������2�=
���#��3���9��<�������������2�=�,�%�"���"�)�<���=
;� �>� ���-� �-���� �� ��� ����2�/�� ������� ������� �� � ���?�2� � ������
(����� �����������(����� ?�6������6� ������ � ��� ������ �� ����� ��
������?�(����� �(��������1���6���� � ��� ��� ���� �� �������� ��?� �
6����� ���������� �����2�� #������ ��?������ �� ��� �/�?�6����� ��� ��� ���
��� �� ����������� /�?����� ������ ��� ��#�� ��# ������(������< ��6���
�� �� ��� �� �����2��-���?�-���.����=�
����� ���������� ��� ��� �(�����#���6� ����� ����-�6�� ���� ��� �����
���1���� � ��� #������ � �������������� ���������/���� ?�2���� �� �
��� � �����6�� ��� �����%"%���2� �� ���-��� ��� ��� ���� ��?�2� ���#� �--��
-���� ��(������ �-� ����%"%��� �� �����2����� ��/�������?�6����� �1���
������-���� � �2� ���.��� ��� ����� �� (�����2��-���� ��������� � ������
�� �� � ����� D �1������ ��
���������1���������� ��� ��� (����-���(������� ��6 �������� �6���
��#��� �2�� ��?�����%"%� �.������ ���� ��--�� �-���� ���� ���������� ��
�� �� � ���� � ���.���� ���������� �� ����2��4� �#��-���� ��� �����-��� ��
��� �����/��������� ����� ���� ��� ����% � ��- ��� � ���� ��-� ��������
6���� ��--���� �-������������-�� ����� ����� ���?����� ����-���� �������
1������ ���6��- ���6��4�-��--�� #� ��8���������6 ������6������ ��
�����������������1������ ��� �� ��������������-���� ��6 ����.������

����������� ������� ��'
���4�(� �6����(�����#������ � ����2��4���#� �#��-���� ����%-� ������ D
��� ��� ���� �� �2�(�� ��-� ��6������� ��?����� ���� ��2�� ��4?� � ���3
�� � � �� � ��#������8��� �(� ������/�� �� �-���� �����������%�� � ��� �?
� ���� ��� � ��������� �������?���� �#� ��������1������ ���
����**����������//��������00���� ����������
� ���� ��-� ������������� ��?���� ������ �������� ��� �������� ��#?
<�� >��> �� >-���� =����2�(� ������ ��� ��2����� ������/���-� ���������
�-� ��� �/ 2���% �� ������ � �� ���� ��������/��� ��6��1��� �������#��
-��� �� ?����� �(������#��� � � ��������-�����2�4#���������/���� � ���
����������� ���������������� ��2��(����� ���2#���� ?�������������� ����-
��� ��� ��� �2� �� ?� �� �� � ������ ��������� �� ����� ���������?� ���#�(
�����-������������-���� ������/�� ��� ��� ��������� �������(����� ���6���
��1��������< ���2��6=�����2��� ���-��� ���(� ����<�������3�������(��� ����
���4�6 �� �������-��� #������ �(������ � =�
&��#?� �������2 #��-������(��8 ����� �����������2��� ��� ��-������3 �
�� �� ��� �� ������� �� ���� ������ ��� ����� ���
��� D � �������������� ������� �� �� �������� ����3-������<������00� ����6���
6��4�(�� ��!&9�=�
��� �(����� � ��������� � 6�� #�� ��-� ������>
� 1��?����1��( ����� ������?�6���� ��������� (��������� ��� �����
-���� ������ ���2#����C���2�������B��4� ��4� �
� ���?�����%"%� ������?� ��� ���� ��(��-���� ���� �1��?�2� � ��� 3
� �������/���� ����/�� ����%"%�� ��-���?�6����� � �� ����/���6 �
� �����%"%��� �� ����� ����?����(��������(� ������� �3����--�
���� ���������/���� � ����1��?�� � ��� ������2� �����2��� ��� ������#� ��(
�������������� ����-���� ��?�2� � ���#��� �2��� ������� ������(������ ����
������-� ����%"%������� ���-������� ��� ��������� ���� ��-���2((����%"%
����6��������� ?�-���� ����?��� �.�������(����� �(���(������� ��-��%"%
�-���� ����&��� � ���� ��� � �2� ��� ��4���� ������������� �������-�����-
�.��������� ��-��� 2��
:� �� #�� ��-� �����������2��(����� ���������� ������� ��������-������� � >
� ���&9�
� �!�&9�
� �0�&9��<���3����=
� �0�&9��<����3-����=
������ �������#�� ����� ���� ���*,� ��!&9�?�6����� ���*��� � ��0�����3
-�������� ��--������� �-���� �������� �� ?�2� ������ ����--���� �������
-��.����� �<!0�����$0�E��� ��� /�#=�
������ ����-������� �� � � �-���2� ��(����� ��������������� ���(�2�������� ��?
� �(���� D ��� �����(�?���������� � �6�2�������2������� ����--���� �-����
�� �� ���.�����

��) ����������� �������
!!��������������������
������ ������� �-�� ������6 �-����8 ������� / #�������� ���6�����8�(?�(/3
�(�#����--�� /�#� �/�����8 ������ ��-����� �F
&������ ����� ��������2� �� �����2�����(������� ��� �� #��� ����#����3
2�� ����-���� ������������8�:��� � ?�6������� �������� # ��� � ����-���
������������� ��?�2� ���/�� ��� ��8 ����#�� �-�?�� �6��� �2��(��� #����
.��4� ������� ���
&����8����?��� ��������2� ����������2�����(������� ���� ���������� ?� �
�� � ������ �������2������� �#��� �������� �� ���2�(���(��-� ����� ��< �
��������� �?�� �=����� ������� ��-��� ��������2� �����6� ����� �� #
���� ���� ��������� ?�2��(�(� ����� ��������#?����������� ��������2� ��
�������2�����(������� ���� ���� ���/��� ?��� ��������2� ����� ���� �� ��
����� ���4 ?�� ������� �� ������2����� �������(� ����8� ��2��(� �� �������
����#��������� ��-� ����8�� ���.�����
7�����-� ���-������ ��(���� �����2������� ���� ������� ��6�?���������2��3
���6 ��� ��� ��@��������� ��� �(� ���?� ����� ��(���� ��--�� /�#����
�(� ���>
��(�� %-��� ������������ ������� ��?�?�?��%-��� ������������ ������� �
�?�?!?$�<�� ��������� ���������������2� ���� ��(���� =9�� �(�2� ��
�� ����������������2� �� �6��� �������� ��?�?�?�?!?$�
������ ����������� ��-���� D ��� ���� ��� �������� � ������ �#�������3
��� #��-� �����)��� �� ��� �� � # ���< ���2��6=?�� ���(���� ��(���� ����
�� #�2�� ��� -������ ����#��-� �����)� ��� �� �-���.�����
����C* �(� ����� ������� C� �� ���-����� � ��-���6� �����(��������� �� ��
�� ������� �
!!���������� ������������
%����� ��� �� ��� ������������ �������� # ����� ��2����2�/�?���� �� �
�� ����������6��-�� # ���-��� ���(����������(�/���� ����2�� �� ��-
������������83:��� � �
*�� ����)� ��� �� ��-� ������ �� ������� ��� �� � � �����2�� �������� ����
�����#?����������������#��-� ���-��6�(�6�# >
� �����#?�2#� ��� �(� �����.����� ��� �� ����2������� ������� �(��
�����2� ��
� �� ��� ��#?��(�� ������(����� ����#�(����� ��� �������
� ���� �#?�2#� ����(����%"%����(��������(���� �(�� ����� D ��%"%
��� ���������(��������(�����2���6������ ����� �� ��� ��� �� ����3
2���
!! ������//������
�� � �� ������ ��2��� ���� �����8 �� ��� �� ����� ��(����� # ��?� �� �� �-
����� ����-������ ��(���� �������.����?���� �������2�� �� ��-��� � ����
2�� ������� ��� ��� �� ������#?������������� � �����.���������� �

����������� ������� ���
��������**������//������������������**��������
�� ���6��-��-�� ������6 ���� � � ��2������ ��?���� �(��-�/���� ��� �
���2�� �� �6������#�2����.�����-����--���� � �� �� ��-� ����� ��3������
����� �����(� ��� ��3�/�� �3����� ?�� ���-��� ��(?����-��8�(��� �� ���� ���?
��/���� � ���� ����� ����� � ��������� ����--3��?�<��6 ��� � ��� ���������(=
� �(� �����)� ��� �� ����������� ��?��������� � � ��� �� ����� ����2������ 3
����� �������/����<�����3 ���6 �� ��� ���������(?�����--3��=�6������-��
������ ��� ����� ��6���� ��� ��� �� �6�2���� ��� ��#��������
��������� ��?� ��� �������/����� (���� ������� ��� �� �����2������(���-
��.����?�2#��� ���(������ �����?���6�(� ����� ��� ������� ��2�� ������ �
���3-������������#���� ���� 6 �����6 � ����� ��� �������-�� #� ��2�
�������������--?���4�(� ���� �� ��� ��� ���������� ��� �2����������#�(
6������ ���.������������ �� ���� ������ ����-��������(� ��� �������/���
-������#�(/��� ��� �� ?������� ������
//��**��������++��11����!!.. ..��������))��**������ ))��
@����� ���6 ������8 ������%"%� �.������?� � ���6 ���� � ��������--����
�� �� ��� �� �� � ���-��� �� ����(�������� �� ��� �.�������
������/�� �(���-� � ��� ���� � �� � ��� �.������ �(��������� �(�� ��-�������
2��� ��� ������ �#���� ��� ����� ����-� ������(��������(���/�� ?����� ��
����8�� � ����-� ��� ��� �� ������
� ���� �� �� ��� � ����(��������(� �6������ ��� �� � ������#��������2#
��� �(� ��������2� ��?� ������(��������(���/�� �����2�� ��� � ��� �� ��
�.������������� ��?�� � ����� �� ���#�(�������8�� � ��(����� ����2���� ��
��� ��� �.�������� ��� ��2����2�/���
++ **����!!����������������**������
% � ����� �� � ������� ���� ����--�������2� 6������ ��� ���� �� ��� ��
������(�� � �������<� ��� ��2����� ���� � �� ��=����� �����#������� �
�� ��� ��������-��������.��� ��� �� ��� �� � ��2�� � ��������/����?����
�������� ����� �������/����6��� ��� ���� ����(?���������-��� ��� ��� ��
�� �2 �.��� #�2����#���2��4��� ��� ��#������� �����6 ���/����������
��2���� ����������� ���� �6?�����(����� � ����(�� ��� ��(?�6 ���� ��
6 ������ � �2��(���������������� ����9�#2��4�6� ���������������8�� #
�����/������ ������� �� �� � ����(� �������� ����� ��
��� ���� ��� ���/�� �������2 #�-����#������� ���� ��� ���� �(� ��6�
� ����������#?�2� � ���� ���6� � � ��2������/���2#�� �(�����8 ������%"%
�.�������� � ��� ���(����/���
����6�#� � �6��4 � � �� ������������������83:��� �� 6 ������ ������ ��
(����� � ����%"%��� �3����� �(��6����/��� ��� 6 ��� ���� ����*�3�� �(
����������(����� � ����� �3���6 ��/��� #���'?�6����� �(� ����������(��3
��� � � ��� ������ �3���2� �6 ��/��� #��-��������.����� �����2��� ����� ��
��������� �� 6 ������ ������ ������ ��%"%��� �� � �� ��� ��-���� D ��%"%
�� ���� �6����/������� �� 6 ��� ���� ��?��������� �� �2��-��� ���� �.������
6����� �����2��������������������� ��� ���4��@���� ��� �.������� ���4�
��#���2��4?� ��� ������ �3����-���� ���6�2�� ��� � ���2��4� ����� D
�%"%������ ?�����6� �((��� �����/������ �� 6 ��� ����� #����� ����3� ��
�� ��� ��� �����/��?����� ��� �.�������(��������� � ����� �����2��� ��� �
� ��� ��� ��( ��-���/������ � ?���������������/���� ���/�� ��

���0 ����������� �������
������ �� 6 ��� �(����� ���%"%��� ���/�� �6����/��� ��#�������� ��?
��(���� ��-�6�� �� �� ��������(���� ������ ���<��(�?����������� ��?��� �
(���� ?��� �� ��� �� ?�� �=����� � ��-���� ��� � ��� � �����������/�����
������ D �(�2���%"%������������� �����%"%�������� �� ��� ���-������(���
����(���� �(� �<�� ��2������/�� #=�
��-�� ������� � ���� �� � �� ���������-��� ��� �.������� ��4��6� ��������� � �3
� ��-����� �� 6 ��� �6�����������(� � �� ��?�2� ���� 6 ��� ���/��#� �2���
��� ��?���� ��� ��� ��#� ��� ��� ���2�� ��-��� �3����� ����� ���(��� ��
������ ��� �� 6 ��� � � ?�6���� �����#�2� ������ ��� ��� ��� ���� ��� �� ��
���� ������ ��� �2�����������2#� ��� �.�������� � ���2�(���(��-� ����8�
!!.. ..������ ��������������������������
��� D �� ��9*�-�� ���� ���.��������#��������(���� ����� ��� >�&���
�00���-���� ��������/����6�������� ��� � ��%"%���� ���� ���� ������-��3
�� ���/�� ����%"%��� ���� ���� ����� ������6�������(���-���� ����� 2 � ?
����-�� ������������ ������ �� ��--�� /��� �� � ������ ��������-� ��� ����
7����-���������2�� � ������/���#� �� ��� � ���#��-���)��--���� � #�� ��-����3
������-���� ��?������#��-��$��%"%������� ?����� �� �� � �� �������-(��� ��
����2�� ������� ������ �� � ��� �� ������� �
����� � �-��� � �-�� ����������� ����2�>
� �8�(��/� ��-����3������������ �������%"%� �.������?�� �(���� D
�%"%�-���� � �� ��� � ��/������(� �6����6�2������������ �� ��
���4 ���� ��� �.���������� �6���������#���/�� ��2�������� �(��
��� �� �����(������3 ������-��������������6��
� ����(�(������� �� ��-��� 2������--�� ��� ?� ����� ����#� ��?���/��2
����#?��������� ����/�?�-���� ������ ��?�-��� ������--�� �����(��83
��6����� ���4��#�(�
� ���� �#���� ���(� #� ����� ������������ �� ������� ��?�-��� ����
�--�� �����(����8��&����8����?� ���- ���-��.����#������2�� 6�� �-���
������ ��?�� ����� ���/���--�� ?�������������� ���� �.��������<��
� ��� � �� � ��� #� �������� �� �����2������ ���� �(���� ���� ����3
���� �3���#�� �� # 3�8��� �(� �-���� �������� �� ?����� ������� �2�
��� �����2#���� D ���� �����-���� =��
% � �����2���� ��� �� � ������ D ��%"%�-���� ��������3 �����#�3 ��#���#� ��� 3
� ��%"%��-���� ���6���� ��#�������# ��#���/��?����� ���/��� � �� �������
���2��6 ��� ������ �������#�6�#��
���������#���� �� �� ��� �� ���� ������ �����-����� � �� ����� ������6 �
����� �� ��� �� ?�2� � �������������(����� �� �<��)=� ����6� ���� ��2�
� ���-����� � ?����� ����-������ �����-���� ��&����8����?� ���� ��)� ��� ��
�����2��� ���-������ ����� � �� ?����� ���-� ��00�-����� �� ��� �� ���� �
��� �� �������� �����-����� � �� ������ ��2�� ����� �(� ������ ��� ���
��� ��?�-���.�����
%�������� �� �/�� �������� ������ ��?� ����%"%���� �����-���� ����� ������6 �
���-� �-�����-� ������ �� ������(�����-���� ��% � �� ����� �� � ����%"%����3
���� �6��� ������ ��2��� ���� � ��� ���� ���� �(���� ��3���@����(���� ��3�
�������� ��2��� ���-�������?� ����%"%���� ���� �����2���� #� 6 ������--� �
�/��������� ��#� ��� � ����-��� ���;� �� �� � ��� ������-���������(����
-���� �<!3)=������6�# ��/��2��-��������� �?� �� �� � ��#������2��� ���-�������
�2(���� �����(��8��6�?�6��� ���-� �-����-���� �6����� ���� ��%"%����3
���� ��

����������� ������� ����
������ ))����������!!���� �������� ��������
���� ������ ))����������!!���� ��
"������(����6����4����-�������� �2��(�� ��?� ��������� 6��6�# ��-����3
��� �(� ���� ����� >
� �6�� ��������%"%���2� ?��� ��� ����� �� ���������2��-�� �(�1���
� ���3���"3 #��� ������2�?��� � ����� �� ���������2��
���� ���������2��<-�������=�6������������B��4���(�����������?� �������� � �
��� D �1������ ?������� � �2�������� ������ ���� �������� ���� ��� ��
������D � ��������� �� �
�����3���"3 #�����2�� �����3 �3�����2��6 �����3���"3 #��������� ���� �����
����
&����� � ��-������� �� ������-���� ����2�� �������������� �� ����/����
����� ��������� ?���� �� ���� ��������8���3C;� � �-������������� ��C?��
���2��4��-� � �������
���������� ))��������������������������!!������22��������!!���� ��
�������������� ���� ��-���������� ��� � ��2�����-(����� ���� ��� ��� #����-
�������#�������� �(�
9�� � �����"�*�+��,�- 2� ���<$=������ ��#��� � ����� ���17"���8 � �� ��
6 ��� ����� ������ � 6 ��� ���� D � �������� ��#� �� ��6� � �������3
�� �� ?�� �����-� �������
9�� � �����.�,%/ 2� �� �<�=������ ��#��� � ��� ������( ���� ����(�
����� ����-� ���� ��#�<�2�������� �� �;��2��=� �� � ��-� ���
;� ��� �� ��������� ��-� �����.�,%/ 2� �� ���� � ����--���� � � ��-��(
�� ���� ��#� �� �� �-� ��(?���������� � ��-��( ���� �� ����--���� ������� ��?
� ��� ��2���2#� ����(���������� ���� ��#�������� 2� �����/� � ����(�� ��
������ �� � �� ����(� ?�6��� ����,%/ 2� �����/� � �� ����- ��9�� � ���*9
����,%/ ����-�#��� � ������� �� �;��2��� �-� ��(�
����� ���0���%� <�=���� �������� ����� � ���-� ��(����� �� �;��2���� 3
��# � ���� �� ��1��
�������������������� ��������������������������������������������������������
�������������������������������������� !!��"!#����������������$������������������
��������������������������%��������������
������� ��� ���6�����2���� ���������%�� � �����?� ����������� �� �����2�
� >
� ������2���%"%� 8��8�������?�� ���-����� �3����������(�����(���� ��
< ���� ��=
� ����&������� ���-� ��� ��������������(����� ����< �����8 � �� ��=
� ���� #����-��������2��(���� �����2#���� D � ��� ��� � 6 ��� �
��� ��� � �����.��������������� �����/��?���� � ����,%/ 2� �������?
6����6� ��� � �����������<����������� =�-����� ���� ��#��<%-� ����������
-������ ��� �-� �?���� ���� ����� � ���*9����"�@;�2� �� ��� � � �-� �3
�(=�

���� ����������� �������
���������� ���� ��#����� �����������-��� ��������6��������� �� � ����--��3
�� ��/��2��������� #�� ������������ �� ����(��-����0� �������� ����� �� ��
� �� ��?�2?�?�?�?&?(?�?����2�(��)��--���� �������� #�� � ��2������� �� �������
��-������� ?� �(� ����6 ��6���������� ��� �� ��� �� ��� � ���?� � ��6�
2��6��;�6� ���� ���0���%� ������(�� ��������� ���� ��#����� �������
���-����� � ��� ��� � ���������.�����-��� ����������#�������� �(�
@���� �����.����������� ����� �2���� ��� ��?���� � �����"�*�+��,�- 2� 3
�������>� ���'3 �(��� �� ��#���/�� � �� �������� ��#�< ��� ����"� 17"
���� � =����� ����� �(��C� ���(���C� �� ��#���2��-#?����� �(� �� � ��
������� � ����� �2��������� ������ � � �(�6�2���� ������� � � �����(��
�(���2#������ �(� ����2�/������������
33��++�������������������� ))��//��44������������!!���� �������� ���������� ����55������
�� ��� 12��(��� ��
������ �� 0�
������/� ��
1����� �� ��
1�����/� ��
&� �8��3���� �<���= ��
&� �8��3���� �<���= !
&� �8��"3)�<1��= $�
��������� ���1��������<���= '�
��������� ���1��������<1��= )�
���������1����<���= ��
�� ��"���6 ���%3� ��
�� ��"���6 ��:���<���= 2�
�� ����"�3))�<���= ��
�� ����"�3))�<1��= ��
���#�*5@�)00��3����� �"�3))����� ���4����2� ��
���#������9��<�)� ���4�����������2�= &�
���#��3���9��<�������������2�= (�
�,�%�"���"�)�<���= �
/���3
��������1����� ������� ������ ��� ����4�� ������ �2���/��� ���/� ��
������?�(����� �(� �������6����91�+� ���� ��?� ��6����� �����.�����
����2�� #������ ���
1����� �������� �� �-��-��� ���(� ����
��������1�����/������ ������ ��� ���� /� ����� D � �������������� ������
�8 ����#�(����� ��� ������?� �� �� ��� �� ��� �� ��������(��������(� ����
2��-������ #���6 ���8 ������.����� ������ ��� ��� ���� �� ����������� /���
�� ������ �
���������1����<���=� �� �-��-��������� �6��������� � ���� ��� ��� � �#
�-���� ���2��4� �� ������ ������ ���#�2�� ���2� ��� ���6����� �(����
������ �6���������� � ����2�/��
���� �����/��� �� ��-����#��3������ ����--�����#��� ��������� � ����-
����������2��

����������� ������� ����
���������� ))����������������������������**��������������**����//����
��� D �� ����� �������(����� ������������������� ��2�� � � �� ���������
-������� �?��������� �� #������ ��������#�6 ��� �����.����� ��� ��� ����
:� ��(����� �������������� ��������������-������� ����B� ��� ?�6��������2�
� � �� ���-��6�(�/��� >
���&9��
�!�&9��
�0�&9��
�0�&9��<����3-����=
����-������� �� � � �� � ���-�� ��#� ������-�� �/�����-��!�&9�?� ��-�#�����.���
� ��� �?� ����� ��������� �� �4����#�-�� ������ ����%-�#�����������--���� �-����
�� �?���������� �-��6 >
����-������� �� � � �2#����� �(���2���� �������?��� ��� ����6�#�� � ��
���������� �����/��� � � �
9�� � �����"�*�+��,�- 2� ���<$=������ ��#��� � ���"��� 17"���8 � �
��� 6 ��� ����� ������ � 6 ��� ���� D � �������� ��#� �� ��6� � ��
������ �� ?�� �����-� �������
9�� � �����.�,%/ 2� �� �<�=������ ��#��� � ��� ������( ���� ����(�
����� ����-� ���� ��#�<�2�������� �� �;��2��=� �� � ��-� ��
��������������������&������������ ��������������&&����������&���������
�����������������&������������������&������������������&&���������������
����������������������������������������$����� ���������%������������������'
�������������������������������� ���������%�����������&���(��������� �������
���&���������������)���������������&������
����� ���0���%� <�=���� �������� ����� � ���-� ��(����� �� �;��2���� 3
��# � ���� �� ��1��
;� ��� �� �� � ���A�(�@���� � ���������46 �?� ������2����� ���� ��#�
����(��� ����(�� ������(���?��?��?�!?�������)?��11?��1�?� ��������� ���������(
�� ���46 ������(� � ������2�� ��� �����/�� ������ ���
������� ��� ���6�����2���� ���������
��� ��� � �����.�����-������� �?���� � ����,%/ 2� ��� 6��?�6����6
��� � ������ �;���<��� �����;��2��=�-����� ���� ��#?����� �6� ��
-� ��(��<�� �-��� ��� ��#�� ���-���&������� �� � �(�����2���� �������?
2� � ��� ��(������� � ������� ���-��� ������-��� ��� #=��%-� ������ �;���-��
��� ��� �-� �?���� ���� ����� � ����� ����,%/ 2� �� ��� � � �-� ��(�
���� 6�3�( ����2���� ��#����� ������ �;���-��� ��6 � ��������� #� ��� 3
���-������� ���
;�6� ���� ���0���%�� ������(�� ������2���� ��#����� ������ �;���-��
�� � � ��6 � �����.�����-������� ��
@���� �����.������� ���� �2���� ��� ��?���� � �����"�*�+��,�- 2� ��
����>� ���'3� �(��� �� ��#���/�� � �� �������� ��#�< ��� ����"� 17"��3
��� � =����� ����� �(��C� ���(����C� �� ��#���2��-#?����� �(� �� � ���-����
�� ���� �2��������� ������ � � �(�6�2���� ������� � � �����(����(���2#
����� �(� ����2�/������������
� ���(�����.�������2� ���/��2���������� ���< ���������8��=?���� D
��� ��� �2� �� � �������6������ �� ���������?����� ��� �������� ��#
����������� #������ ��� �������2��(�����/���-���� ����������

���� ����������� �������
������������ ���������������� ����������
���� ��� ��� ���� �� �-��6� ������� ��������������/�� �� ��� �����#�� ?
6 �� ���������" ,�4��*�+4�)-%�/�4���" ��,)%�)� ����)-�,)�
�����(���������6�6 ������ ���17" ��2�/������� 6 ��������17" ����� �� �
��6�� ���� ��� ���� � ���-� ��������� ����������<� �(� �#� (�� �6 ��� ��
���������� ������ ���=������������ ������#����� �-���� ��� ��� ���
6 ��� �<�����1�������������� ������ ��������� ������� ���#=�����
)��5�-/�6*- 2� �����B���� � �� ����������2� ��� �� ��� ��������/���
���4 ������ ��������(�� ���������������8�� �����������-��� � ������ ?�����3
�(�� ���-� ����7���"�2� ��� ���/�������C����(�����"�����(3������4 C
< ���� ��=�
:��6� ��������� ��� ��� �2� �� � � ���0���%� <�=�6 �� ���� ��� ��
"-�)�7 2� ���<�=������A�(�@������������ � ���2� 3���� �� 6 ��������A�(
@��������2��� ��� ����� ����������� ����������-� ���������� �-� �����
� �-��� ������ �(�����#������ ��� ������� �� �(� ������#��3������ ���?
2� �-�6������� �� �(����������� #� ����� �B�(� �� ��
����"-�)�7 2� ��� �� ��� ���� ������ ���������-������ ����-� ���A�(
@����36����������� ���� ��?����� �17"����� ��?� ���A�(�@���� ����2��
-������������� �������� � ?�����-��� �� �� ���B�(� �� ��6�����9�� �(���6�
��� ���A�(�@���� 6 ��� � ��������-����8�� <-�����2#�-�������/������-� ��
������=� ������� </���2��-� �6���-����E������� ���0� �� ���#� ����=�
��� ������� ����� ���2#�-� ��(�������� 6 ���17"?�6�����B�(������ ��
17"� ����� ������ �� #�
������������������� �2������ ����?� �������#�2����������2#���� �(����9?
������ ���� ��� ��� ������ 6 ����9�� �(���������(���6� � �17"� ���3
�� ����� � 6���--���� ��� � ��������(����6�� ����B�(���� �� ������� ��� /�
� � ��� ��>
� %��A�(������<�������17"��� �-� ��(=?���� �(�������� 6 ��� � ���A�(
@����� ����� �������<�������17"�6���6� �� �-� ��(=�
� %����� �������<�������17"�-� ��(=?���� �(��������6��� � � ��� ��� 3
�������� ��-�-� �6���2��4� ��E���?�6�����/�� ���/�(� �� ���� ���A�(
@������ � ��������� ������� � �-�����
@���������������� ��� � ��� ��?� ���A�(�@������ �����--�� ���� ��������� ��
������?����� �-��� �� �� ����� ����� ���� �#�6����-��� ��� �� ������ ���
������ �� ��*����������&���������������������������&������������&����������
������������������������������������)����������������������������+�
������ ))�������������������� ������++���������������� ��
��� ��������� � ���2� ���� ���� ���� ���� ��-� ������������� ��� �� ������
����� � �-����1����7��3��2� �� �<!=����� ����+�17��3�� 6 ���<!=?����� 3
���������� �#��2�/�� ������� ��� ��� � 6 ��� �
7�����-� ���-������� ��2� �� �����2��� (������#� �������/��������� �����(
������.����� ���� ��(��� �������#����� ����2����� ���� ���#� ��� ��� � ���
��� ���������4���� ��������� ������������� �(/� �.��4���������� �2������
����� ��-����������� �6 ��� ����� ���������� ��2� �� ������ ��2��� ��
6���� ������ ��� ����-(������ ��� ��������� ��?�����6�6��4�� �� �� �C��
�� �������GC�4�# �
1��� ����� �����������/�� ������ ����-�� ���� �� � ��#�����2��� ��� ����-��
��� �� ������������ ��-������ ��� ���#�������

����������� ������� ���!
������))��****�� ))��������������������66�������� ��
������6�� ����� ���" ,)- 2� ���<)=�6� ���22�(� ������ ���*,�� -
2� ��������1����7�2� ���6�2��� (���� ��� �������/����6���� ���� ��
� � ��� ����������������� ?����(����� ����� �� �� � �������� � ������ ��2� 3
��� ���22��?����� ����� �(��C� ���(���C�6�2��� ��#���2��-#���� ���'3 �(3
��� �� ��#���� �����2���������� ���-#�-����� ��#�<����6 �� ��� ����������3
��(=�
*������������&���������������������������&��������,)���������,���������������
�����������������������������-��������+�
����6� �������/��������2��� (����� ���#� ���-�����#���� ��2� ���2#������ 3
�(� ����2�/�>� �����6�/����6�������� ������/�� �����
��������(������?� ���1��� ��2� �� �6��� ��� ���� �������/��� �6���� ��
��� ��� ���6������--?������ �����6�/���� ����(�������
������77�� ))��������������**����������11�������������������������������� ����
��������(������?��������� ��2� �������2��� ����(� ��� ��� ��#� ����� ��
�������/�����9�� �����������6�� ���" ,� ��� ��� �2� ��?� ����� �����
����������6�� �����.�����*,�� - 2� ��������'3 �(��� �� ��#�6�����(�
�� ��6� ��� �������/����� (���� �� ������ ��2� ��?��/�����(� ������/��
� ��#�-���� ���(�� � ��� 6��2� �� �����������6���% � ��� ��� 2�� ��� ����3
(� �� ���1��� ��2� �� �6� � ��� ������� ������� ������(�
���������� ))��������++��������������
9�� �(� ����' ��2� 2� ���<���� ���2#� ���#����� ����-� �17"=�6
��� �� ������ �� ��������� ���������� ���#����� ��� ��#�2� 6������� �
��� ���������<� ���(������� �� �� �����7���-������ #=���� ������ ���� ���
�� ��#����3�� ��� ��� ���2#���� �(� ���2� ����(����<�#������� >���6����
������� ?�(��� ����#�� � �� ���� =�
���� ���� /������� ��� /� ���2#����2�3��4�(� ����#����3��2� ��?�����
���� ���2#�-� ��(��-� ����#����3��17"��%�� � ������ ����������6���6��� �
���� �� �6���� ���7������ � ��������?�2� �6����4�� � ��� �� ���� �������� (�
� ����#���� ������ �� �-��6��������� ��� ��������2� 6������ � �< ���� �
�������(��� �����.����� � � �( �-����8����=�������� ���� ��#��(�6���
2����������#�(F
����**�� ))���� ���� ���������� ))((�� ������77��
����**�� ))��.. ����55����������������������������������������77��
9�� � ��� )��5�-/�6*- 2� ���3 �����17"�6����� �� ���#�����
����4�7��2��17"���8 � �� ���-��������9�� ������ ���:�� �� <'=�6�� �
���� �?� ��6�(� �� � �� �� 6 ��� �������6�������4�7��2�������
� � � ���� ?� ���'3 �(��� �� ��#�6� ��6� ����(����C����3�C���� ��� �� ��
2��4����� ���-��� ���-������ -��� ��� ��� � 6 ��� ?����� ��6 � �� � �� �
-���� 6 ��� ���6���� ��� ��������������#�<�����=� � � ��-� ���4 ��3����� ��
������ ����������
%-���#��-� ���4 ��3��������.����� ��2�� � � �������������#�<�����=?���� � ������3
�� �����(��� -��� ��� ��� � 6 ������ �6���� �� ��� 6 �� �17"� �� ��
-� ��(?����� ����������� ���������� ��2�� �� � �� ����������/�� ���������
���������� ���� ��-����<��������3��=�

���$ ����������� �������
%-�� ���� ���4 �������.����?���� � �����.�,%/ 2� �� � �� ���� ����(�� ��
2��4 ��-�-���� ���4 ?�� ��#���2#� ��!3)?� ���3��?� ����3�$?� ���'3�0?� ����3��?� �
�!3��?�� �?���� ���)��@ ��������2��4?���/���� ���4 �����2��������� �(� ��
-���� ��� � 6 ��� �
@��������.����� ���4 ����������?���� � ��� )��5�-/�6*- 2� �������
�(��� ���8 � ���4����2��������*$�����������������&����.����&�������������������'
������������&���������&��������'�����������������������./0/��������������������
����%�����������������&��������1'������������+� ;� �� �� � �������4�7��2�
2� ��D �17"�6���� ���� ��-� �?�� ����������� �� � ���4 ���/��2������ �� �
�����������
�������������� ))��.. ����55����������������������������������������77��
%������ � ?���� �(� ����� -��� ��� ��� � 6 ���������� � ��� ���4�� �������
����?�������� �(��(�������� ������������������ ��� ���/���� ���4 ?� ��
������ �2��4��� �-� �2�� ��� ���� �(� ���*9�"�@;�2� �� ?����� ���� ��
��� � 6 ��� �� ��� ���� ��� � ��� ���4�
����--�� ����22������33 ��--������������������77��..��������**������..����..������66 77��..������������������������������ ����������''((����))**�� �� ��������++88
��������,�7;�:17�2� ��D �17"�6�-� ��� � ����� ���#� ���4 ������������
����������?�����6���� ���� ��-� ���� � ���� � ���4� ��� ��� ���-���
�������������� � ��/� �� ����������� �� � ��� ��(� ������� ���6������
��� # ����%-����� ��#?��� ���4 �����2���� ��� ���-����������6 ��� � ����(
����(��2��4 �3 ���2��6�
���������� ))��������������77��������������**������!!������
�� ��� �� � ��/��2��6����6� � ��� ���4 �<��8��)=� ������������2��<�����=
�����6 ��� ���/�(� �� ���� ����(��2��4 ��-�-���� ���4 ��9�� ��������� ��
)��5�-/�6*- 2� ��?� ������2� ���*9�+-" 2� ������������,�7;�:17
17"�6� �� �-� ��(?����� �(� �� � ���4 ����� � � �������������
�������������� ))��������������77������������������������
9�� ��������� ��� )��5�-/�6*- 2� ��?� ������2� ���"�@;�/, 2� ���
���� ���4����2��17"�6� ���-� ��(�����(���� ?����� �(� �� ��� ���4 ���/�
2������ ��� ���-������������������ ����/�� ���.��4����� ����6�#��-���4�(
���� �� ��� ��(� � � � �������������#?�6 ��� ���/�(� �� ���� ����(��2��4 ��-
-���� ���4 ���4�(�-���-� ��(� ��� � 6 ���17" �
���������� ))����������!!���� ����.. ���� ������������������//��������
��/�(�����������.����� ���4 �-��������������#?� ��������� ����������
��������� ���������� �(� ����7���"� ��� ��� �2� ���
���������� ))��..
9�� �����������6�� ���91�+�2� ����@� �����(� ���91�+�2� ��?���2� ��
�7���"�2� ���������������6��� ����������� � �������� � ����7���"
2� ��� � �������
���������� ))��������
9�� ���#�� ���� ��� ��� �2� ���� ���� �����7���"��;����#?���� �(�91�+�
�����������?�� � ����� � ��� ����4��� ���/�(�� � ��� ���� ��������� ��
��8� � � �����������-��� ��� ������3�� �

����������� ������� ���'
������ ))����������!!��������������������
������ ������� �-�� #������� �(/� �#�����/���2�� ���-���(��� ������3 ��
��� �������(����8��*�� ��-����(���� ��-� ����� �<� ������������������8�:
��� =�����2������ �������� (���� ������ ����� ��2� ����"���(� ����8?
�� ��2� �� �����2��� ��� ��2��(� ��� ��� ��� ����� ��������� ��-� ����8?�6 �
��� �����--�� �� �-� ������/������ ��2� �� �����2������� ���
��2(���/�� �(���-�� �(��� ������� � � �� � ��#�����2�� � ��������� ���/��#
.��4#?�6 ��� � ���������/�/������(�����(����� ��#�-����� ��� ��� ���3
�� ����-�#��#������� ���� ��� ��H� ��#����� ����-��������-������ ���(
��� �6������#�� ���2�����(�������� �� ����� ��� ���-�������� �2 #�
���������� ))��������!!��������������������
9�� � ����� -�!),�� 2� ���<'=���� ��� /� � ��� ������������?�6���
��6 � ���-������ -��� ��� ��� � 6 ��� � ��2��� ���� ��� ���� ���2� �� �
�� �� �����.����������������83:���� �2#���� �(� ������/������ ��2� 3
�� ��<��������17"�� �������� 6 ������� � �6������ ��=�
9�� �����������6�� ����� ���" ,)- 2� ���<)=����� ������2������-� ���-���
�� -��� ��� ��� � 6 ��� �<'=�6���� � ��2�� ����� ���� ���2� ���-��� �
(������-� ����� �
���� �� ���" ,)- 2� ���������� �(��C� ���(���C������� �2��-#���� ���'3 �(3
��� �� ��#�
�� ������ �����2������� ���-������ �� ����������(���� ��-� ����� ?���� �(��
�--���� ��� -��� ��� ��� �2� ���-��������(������������ �������2�������/�(
��#���������� ��� (���� ������� ���������� ��(�����
������������ ))��!!��������������������
����� � ����� ��2�/�?���� �(���#��-� ����� ���� ���2� �� �6� �((�� ��
��� ��������� ���������--�
����� ���������� ���� ���2� �������2���� /� ���� � ��� ���� ���3�� � ��� �
����� � �6�2�� �� ��� ��������� ���� �� ���������� ��(�����6��� �
�(� ����
���������� ))��!!��������������������
������������ �������?�-��6� ��� ��������������-��� � �(�������� ��(����
<�2�/�=?�2� ���4�� ������������ ��������� ���2�-�������(� ���" ,)- �����3
���

���) ����������� �������
������ ))��!!���������� ������������
������ �� ��� �� � # ��������� ���6 ���� ����)��--���� � ��� �� ��-� ��
��� ����� �� � � �<��������������83:��� � =� ��2�� �������� ���������3
�#?������ ����������������#?��� ��� ��#��(�� � �������������� �#�2#
����(����%"%����(��������(�� �� ������ ���
���������� ))��������!!���������� ������������
�� � �2� ������6 �� ��� ������� ������� ������
9�� � �����"�*�+��,�- 2� ���<$=������ ��#��� � ���"/��"7, 17"
��8 � �� ��� 6 ��� ����� ������ �����(� � ���'3 �(��� �� ��#� �� ��6��
��� �� ����2��?�������6 � � � ��2������(���
* ��� ���� �����.�,%/ 2� �� �<�=���� ���0���%� <�=� �� ��� ������-� ��
��)��/��2�� ��� �� ����2�� ���� ���� ��#�<��(��� �#� ��� ����2����=�
<;� ��� �� � ������2���� ��#���6�2�(�� ��-� ��� � ����� � ��� �2���
����(��=��
;�6� � ���� �����.��������-(��� ����-��� � ���� ������ ��?����� �������
����� ���" ,)- 2� ���<)=�������� �(��C� ����3 ��� �� ����2��3�+7��;�C
������ ��� ���� ��#��9�� � ���*9�+-" 2� ��� �����-��� ��� ��������� ���
������ �(��� ���(� ��3 ��� �� ����2��3������� �2��-#?����� ��� ��� �� ����3
2���6� ������������?�2� �6 ��� �-� ��(�������� �����-(��� ��� ���6� ����
�� ��� �� ���
�����������������������������������������������������������������������&����'
����������������������������'����������������������������&����������������'
��������������������&���������������)$#23��������
;�6� ������� ���� ��� �� ?� ��� �(����--���� � ��� �� ����2�������6 �����-3
-���� ����-(��� ����-��� � ?�� �(� ����2�/��������������� ������ ������2�
��� ������� ��� �����)� ��� �� ����2�� ���/��2����� ����������� ������ �
���-(��� �������2�� ����� ������� �������� ��� �� �-���.�����
/���3
� ������� ���6��� �������)� ��� �� ���� ����������#?��/���6���
��6��� � �������--�
� ;�6� ��� �� �����2�� ������/����8 �(���� ?�����6�������� ����
������� ��� � ������-���� ���-�� ��#�6 ���� ��� �� ���� ���(�C�
��C����-(��� ���<�?��� ��(��� ��=�
� ������-� ��(��� �6�2�� ������ ��� ��� �� ����2���� ��#�6����/��
��������� ��� �� � � ��-� ������ ��������(�������� ���� �6 �� ����
������� ��� �� ��<����%-�#���������� ��� �� ����� ������� � ������ �
2� �� ?� ���-� ��(��� �6�������� ������ �� �� � ��� ��(���
����(���=
������������������ ����������
�����11� ��� �� � ��� ����� ��� �� ����2���6����6�2��-�����2� 6�������3
2�����)��������2����?�6���� ����(� ����(�� ��� ��� �� ����2�� �6 �� ���A�(
@���������.�,%/ 2� �� �
����������� ������� ����
% ������ �� � �����/�����.��4�6�#��-� ���(� ��� ������ �����-(��� ��� ���
��)� ��� �� �� � ��� ���� ��?������������ ������ �6����2��� �-��6���� �
��.����� ��������� ��� ��� �� � ����C����C����C���� ��C� � �?� �����/����
2� ��-����6���� �����(��������6� � ��-� ��� �� ��:#��� ���?� ���(� �� ����11
��� �� �6���� ������)��8 �(� ��� �� ?� �� � �� �� �� �� � ���������
�����#���� �� � �2��4������-�#�������� ��4������#��-� ����8 �(� ��� ��
</���%"%��� �������3 ���� ��=?�2�-����� �(��11?�
&��6� ��� ��������������� �-���C�� �(�*���� ������ �� C?��2�/�?�2� � ���
�11�� � ��� ��� �� ����2���2�-������� �(�����7��;� ��� �� ������� ���
�-� #��� �(��C"�� I���C������� ��- ��� ��� ��������� ��� ����-�����2#���� 3
�(�*9�+7���9�� �*9�+7���(���� � � � �(�� �����-��� ��� ���� ���11������3
��?����"�@;�;�� ���2�� � �������� ���
//�������� ))���� ��������������!! ������++
���������� ��� �� ?���4�� ���� ���" ��#������ � � � ��"/��"7, ����
<��� � �����"�*�+��,�- 2� ����� � �����B���� �17"����� � � � =�
* ��� ���� �����.�,%/ 2� �� �<�=���� ���0���%� <�=� �� ��� ��� ��� ��
���2������ ���� ��#��*��������������������������������������������&�������
�������������������$�����������������������������&�������������������
�������������������������������������/&����������������������������������
&���������+� 9�� � ����7��11�2� ���<�=������ ��� ��� ��� �� �6�� �� #
2��������?����� ����� � � ���������(�� � ���������(#�
���� ���� /������?�-� ��� �� ������ ��2�����������.��4� ���� ��?� � �
��� �����������6�� ���)-��** 2� ��?����� ����������� � ��� ��� �� ����3
2��?�� �(�� ���� �����.�,%/ 2� �� ?���� ���0���%���%�� � ��� �?� ��
��� �� �6�2���������� � ����� � ����2��������� ��� ���� ��#�
��� ����-�� ���� � �� �-� ��� ��� �� ����2����� �2��������(��?�2� � �����6
���2����� ��� �#� �2����������?�#�������B����2��4� �� �����(������2���2#
��� �(���6����� ���A�(�@����
&��#?�6����� �(� ����� �����,%/ 2� �� � ������(�� ��� ��� �� ����2��?
��� ������ �6���� ������2��� �����(�������2������� ���2#�����(���6�� ��
��.�����*9����"�@;�2� ��?� ������� �(���������(� ������� �
2� ���*����4��&��������������������������������������������������������5(
�����������������������������0# ����������(���������������������������������
����������&���������������������+
������))))������ ))���� ��������������������**������**��������
������� �� ��� �� ���/��2���� ����?� ��#�����2�����(������� ��������� �3
�� ��#�� ���� � � �� ���� � ������2#����� �(��� �������/���� ������� ���3
�� ���� ����� ����-� �����������2�������6 �� ��� �������������� ������
� ���������(���� � ����#�
% � ����� �� � ���� �� �� � ��� �� � �����2������ ���-� �� ��� ����� �� � 4?
2�-�������� �(� �������/��� ?�� ���(������� �������/��� ���/��2������3
�� ��?� ����� �� � � ��-��� ��� �� �����2������(���<�� ��=�� ���2#� ���(����-3
-���� ��� �� � � �� �� ��� ��� �� ?�6 ��� ��--�� �(� ��� �������/����
���� ��������-� � � �� ���-����� �((� ���6�#��-�� �(� ����� ��� �� ������
�����-�� ����
���0 ����������� �������
������������ ))������**����������11������������������ ������������
9�� � �����"�*�+��,�- 2� ����� �"/��"7, ����� � ��� ����* �� ��
�� ����,%/ 2� �� ���� ���A�(�6���� �� ��� � �����.����� ��� �� ����2��
�� ���� ��#�
9�� � �����"�*�+��,�- 2� ����� � ����"�*�+ ����� � ��� ���
���� ��� ������� ��������� � �����.����� ���������� � ��������?� �������
���" ,)- 2� ���� � ����� ��������� ������ �������/����� � ��������
�������7�2� ��� ���� ���6�2�� �/������(�6 �� ������/�� #� ������� �
� �( ?�-��� �� � ��� �� �
����4�6����������������,)���������,�����������������������������������������'���
������-�����7(5��&&�����������%������������������������������������������
�� ������ �����2������� ���-���� ���� ��� �� �2#� ��� �(� �����.����� ���3
�� ����2���6��� ��� ������������ ������(�������� �(�����7�� � ��
��.���������� ����/���� ��� �� �����2�� ��� ����� ���� ���������/�� ��3
�����/��� ����� ���3 ����� ��������� �� ��� ��� ����2� 6��������������
9�� � ���)-�*�+�,/ 2� ���<�0=� �����2����#2��4��-� ��� ��� �� ��(��
�������
11����--�� ))���� ����99�������� ))��������������**����������11���������������������� ����������
����� ��� �������/��� ���/��2�������� �����3 ��3-#�� ��� ��2����2�/�?� �
� �-�� ��2���2�� ��� ����(� ������� ��� �� � �� ���6�� � � �������/���� ?
����-����� ��#�����(�� ���� ������ � �������--3��?�����6 �� ��� ������� ��3
����� ������
���� � �����.����� ��� �� �� �(� �����.�,%/ 2� �� ����0���%���<���
" ��#�������� �2�� � � ���;�9���������� ����� � =��9�� � ���)-��**
2� ��� ������� ��� ��� �� ������ ����"%�9�� �(� �����"�*�+��,�- 2� ���
"��2�3��4� ���)-�*�+�,/ 2� ��>� �17"� �� �-� ��(���� � ���
��������7� �����������'3 �(��� �� ��#���6� ��6 � ��� �������/�������3
��� #�� (���� �� ���������� ��� �� ��%-���� �������/������ �2�������� ��?
���� ��#�6� ��6�00>00>00>00�
����� � ��� �������/���?�� �� �����.�,%/ 2� �� � ����/�� ���-� ��(��(3
� �� ����- �����(� � �� �� ����� ?���� � ?� ����� ����-���� �����2�� ��� ���
����������������&����&��������������������������������8�����'&�����$������
������������������8���������������������������������������9����������������
������8������&�����������%�����$��������%��������������������&������������'
����������
����� ���0���%� ���� � ���/�������� �/�� �������(� ?���� � ���)-�*�+
,/ 2� ��� ���8 � ��������� ������3 ����� �(��C� ���(���C������� �2��-#�
���������� ))������**����������11����������������**���� ������������
�� � ������2#����� �(��� �������/�����-�E���� �� ��� ��� �� ��%��/���
��� �� �����2�� ��� ������� ���/��������(��� ��00>00>00>00�� �(��������
7� ������� ��� ��2����2�/�?���� ����11� ��� �� �����2�� ��� ��?���6������ �
����)� ��� �� �6���/����#� �������/��� ���������������� ��� � �����
-���� ���-�� ��#�6 ����� �������/��� �� (���� ����#� ��� �� �

����������� ������� ����
99::**����������������++�������������������� ))������������������������������������**���������� ������������//������
�� �((� ���6�#��-�� �(� ��� ��� �� � �((���(��(�� � ������� �� �-��6 >
�� 1 ��� ���� ��������(�� ��� �� �� �� �6����������--���� ��� �� ���3
�� ��<��(�?�� ��?�/�� ��?�2��(�?������ ?�/�� ���?�2��(�?������ ?�� �=�
�� @� ���� �������1 ?� ��6�(� ��� �� �� ���.������������� �(��� ���3
�� ����2��� ��������;� �� �� �-� ��� ������ �����-(� ������������
����������� ��� ��(�<��(��-��� �������� � =?�����6� ��� �� ����2���6
2����.�����-������������������?�2���� ���������� �������� ������
/��������2������ ��� ����(/��� ��� �� �
�� @ �� ��� ���� �����?����(������ �����.����� ��� �� �6 �� ������3
/�� ��� �����-(��� �� �< ���C�� �(�*���� ������ �� C=��&��� �� ��
6��������� ��� ������ �����-(��� �������� ����������� ��� ��(?� �
�� #� �� ���� �/���� ��� �� �6 ���--���� ����2�� ?�6 ��� �����(�(
����� �� � �( ��%-��� 2�?�4���� ������������������-� ��� �� ��
�.������ ����(��� � ��� ��(�3� � �6���4�� ��� ���6�������� �(
�������/��� �
�� ;�6����� ��� ��������6��� ���(� �� ����� �?����� �� ��� ������
/��� �2#� ��� �(� ��� ��� �� ����2���������� �(�����7�� � ����� �
���(�� � ������� ��#������ �����2�� � � ��C���� �� C� �� ������2��
����2�� ����
!� 9�� � �������#����2� ��?����� ���2��4� �� ����� ����������4� �� � ��
��� �� ����� �((���(�� � ����� ���� ����%-� ��� ��(��-���#� ��� ��
���� � ��2�������� ����������(��?�� ��������� ��� �������/����-���
�� � ��� �� ?��������� ��� �����(��?����� �(� ��������� � �������/���
2#���� �(�����7?������ ���C��������7� �����C�<���2�3��4��791�+
�;=�������B� � ��� �������/����� �(� ���A�(�@����
$� %-��� ��� �������/��� �����6���(?��������6� ��(��� � ��2�� �� ��?�����
�� ��� �������/��� �2#� ��� �(� ����11� ��� �� ����� ���(��� ��3
�����/�����-�E�����<��4�� �����������#�������� �2���������-�#�������
��4���� ����8 �(� � ���3� ���C"����(�����������(�����%� ����
�����#C=�
������))))������ ))���� �������������������� ))��������))��**������ ))����
� ����� ���� /�� �� �((���(� ��� �� �-���� �������� �(���� D ��6��� ����
# ��?��%"%����(��������(���� �(� �����2��� ����7�����-� ������ D ���)
��� �� ��� �������� �����(����(��������(�����2������� ��� �� �3 � � � ��
�������2���� � ��� ��� �� ����2��������� ��-������(��������(���� �(���
����%"%������ �6��� ��� ��#� ��� ���������� �������� �����(� ��� �� �
������#� � �(������.���������� � � ����4�� ���� ��������� ��%"%��������
��� ���-�������� ����-����(��������(� ���� � ������� �-��6 >
9�� � �����"�*�+��,�- 2� ���<$=������ ��#��� � ������ 17"���8 � �
��� 6 ��� ����� ������ � 6 ��� ���� D � �������� ��#� �� ��6� � ��
������ �� ?�� �����-� �������
9�� � �����.�,%/ 2� �� �<�=������ ��#��� � ��� ������( ���� ����(�
����� ����-� ���� ��#�<�2����"/��"7���/��:7�=� �� � ��-� ��
��������������������&������������ ��������������&&����������&���������
�����������������&������������������&������������������&&���������������
����������������������������������������$����� ���������%������������������'
�������������������������������� ���������%�����������&���(��������� �������
���&���������������)���������������&������

���� ����������� �������
����� ���0���%� <�=���� �������� ����� � ���-� ��(����� �� �;��2���� 3
��# � ���� �� ��1��
�������������������� ��������������������������������������������������������
�������������������������������������� !!��"!#����������������$������������������
��������������������������%��������������
������� ��� ���6���C��2���� ��C�������
��� ��� � �����.�����(�2���%"%�������?���� � ����,%/ 2� ��� ����� �� ?
6����6� ��� � ��� �������� -����� ���� ��#?����� �6� �� �-� ��(��%-� ��
�������� -������ ��� �-� �?���� ���� ����� � ����� ����,%/ 2� �� ���
� �-� ��(�
�������2���<�3�$=�� ��#����� ��� �������� -��� ��6 � ��������� #� ��� ��
(�2���%"%��������-��� ��� � ������������ ����-����(��������(� ������� �3
����� ��
;�6� ���� ���0���%� ������(�� ������2���� ��#����� �����������-��
�� � � ��6 � �����.������������
@���� �����.�������������� �2���� ��� ��?���� � �����"�*�+��,�- 2� 3
�������>� ���'3� �(��� �� ��#���/�� � �� �������� ��#�< ��� ����"� 17"
���� � =����� ����� �(��C� ���(���C� �� ��#���2��-#?����� �(� �� �������
�� �2��������� ������ � � �(�6�2���� ������� � � �����(����(���2#
����� �(� ����2�/������������

����������� ������� ����
������ ))����������!!.. ..������ ��������������������������
��� ��� �-����-���� �6��������2��� ��� �� ��� � ��%"%���� ������� ���7�����-
�� ��-���� �����2�� � ���� �� ��� � ���� ��6���%"%�������?�������/�� ��6�
��� ��������2����%����� ��������-������� ����� ��� �������--� 6 ���6���
����2��� ��� ��� �2�� ���-����?���������3������� �����-������ ������ ���/����
�����%"%��������������� ��������2���-��������-���������2�� ���������#��-
�����)� ��� �� ������� ?����(�6 ����� ����� �� �?���������� �� ��� �� �
�����%"%���� �����-���� ������� ��� ��� �������� � �2��3 ��#������ ������-��
���3 ��������� ����-������� �� �����������(��/������(� � ���� �.�������
;� �� �� � ����� ����-� ���-����� ��� � ������� ��� ��� �� ������#?���#� ��
� ��������� �� �
����--�������������� ������������������������������������//��������������������������������������""((;;������������
����-� �-�����-� ��������(�����-���� ����2��� � ����%"%���� �����-���� ����
��/�� 6�� ���4 �3�������� ���4��������� �� ���4�������%"%���� �����-��� ����-
�����-���������2�� ��������������--�� ���.����?�2� � �� �/�������� ��������� 3
#� 6 ���(?� ����������� ��-� ���-����� ��6�# ������� ����/���6���� ���-����
�2��(�� ���-����%"%��@����� �(� ���-���� �� ��%"%���� ���� � ����-���?��/��
��� �(���#������-���� ������ ������� � �� ���-� �-����(���� ����������� �!3)
�����6�# ��/��2��-���� ��� ������ �2(���� �����������(��� �� �
���������� ))�������������������� ��������������������������
&� �������6���� ��� �� ����2���6�2��� ���-��� �/�(� ������ �����-����
������ �� ���� ������ ����2�������/�������2��?���?�-���#����� � ����-� ��
-����-���� � ���.������� ��� ��?� ��� � �������2�� ����� ���11� ��� ��� ��
�� �6��� �����(��
9�� � �����"�*�+��,�- 2� ���<$=������ ��#��� � ������ 17"���8 � �
��� 6 ��� ����� ������ � 6 ��� ���� D � �������� ��#� �� ��6� � ��
������ �� ?�� �����-� �������
9�� � �����.�,%/ 2� �� �<�=������ ��#��� � ��� ������( ���� ����(�
����� ����-� ���� ��#�<�2����"/��"7���/��:7�=� �� � ��-� ��
��������������������&������������ ��������������&&����������&���������
�����������������&������������������&������������������&&���������������
����������������������������������������$���5(����������%������������������'
�������������������������������� ���������%�����������&���(��������� �������
���&���������������)���������������&������
����� ���0���%� <�=���� �������� ����� � ���-� ��(����� �� �;��2���� 3
��# � �����.����������#���� ���-��������� ��� ���(����� �6�� ����2����
��/�������2��?����C�11C?��������(���� ����� ������ ��2����2�/��
�������������������� ��������������������������������������������������������
�������������������������������������� !!��"!#����������������$������������������
��������������������������%���������������*0������������"!#��������������������
������������������������������+�
������� ��� ���6���C�� ��C�������

���� ����������� �������
;� �� �� � ���17"���8 � �� ���-������ -��� ��� ��� � 6 ��� � ��6 � �� � �� �
6 ��� �������6��� ��� ��#�����)�"-* <-����� ��� =��������� ����� � ��
�� �� 6 ��� ������ ������� �������� �� ��� ������-� ���-����-���� �-�������3
�� �����B� ��� ������ ��#���� ���'3 �(��� �� ��#����#������-� ���-���
-���� �����2�� ��� ���� ���#� ����9�� ������-� ��� ��� � 6 ��� � �� ��� � ��
��.�����-�����< ���17"��2�/�� ��� 6 ������� � � �� ��6� � � ��� ��=�
��� � ���� ������ ���� ?���� � ����,%/ 2� ��� 6��?�6����6� ��� � ��
������� <��� �����;��2��=�-����� ���� ��#?����� �6� �� �-� ��(��%-� ��
������� -������ ��� �-� �?���� ���� ����� � ����� ����,%/ 2� �� ���
� �-� ��(�
;�6� ���� ���0���%� ������(�� ������2���� ��#����� ������ �;���-��
�� � � ��6 � �����.�����/�����< ���������8�:>�1 ��-��%"%���� ���� ?���� ��
����2��4�-��� ����.����� �#���������� ���(=�
9�� ��,%/ �(��� �� ��� � ��� �������� -���-�����B� ��� ?������ �� ���0��
%� �� � � �����.������������
����-� �-����� ���6� � ���?�����-���/���6� ��� � ��� ���������(#��+������
�8������ �6 ���--���� ���� ��������2�� �� ������ �������?�6 ��� ���/�(
�� ������# ��(�3� � ����� � ������2�� ���������� ���� ��#?� ������ ����
-���� ���������� ������ � � ���� ?�#�������� ���� ���� � �-���� � � �(����
�8 � � �������?���� ��� ���� ����-������������ ���� � �(���������� �� ����
��� ���� � �(���?���� ������-� ����� -��� ��� ��� � 6 ��� � �� ��� ����-3
-���� �-����?���������� � ����2�/�� �� �
@���� ������ ��������2��< =������%"%�������< =���/��2���� ��� ���-����
��.�����-���� ?���� � �����"�*�+��,�- 2� �������>� ���'3 �(��� �� ��#
��/�� � �� �������� ��#�< ��� ����"� 17"����� � =����� ����� �(�
C� ���(���C� �� ��#���2��-#?����� �(� �� � ��� � ����� �2��������� ������
� ���6�2���� ������� � � �����(����(���2#������ �(� ����2�/������������
��--�������� ))������ �������������������� �� ����������
;� �� �� ��- ����8 �(��� �������?� ���17"���8 � �� ���-������ -��� ��
6 ��� ����� � � �� � ��#���/����6��� ��� ��#�����(��� ���,/ ),**-)
,/ -��� ������ � � �����-�� �-��� ���-��� �� �� 6 ��� �6����/����� �������
�;��� ��� ����<�����8��� ��� �� � � �6��������4�7��2������� � ��� ���3
� � �4� ����� #��/������ �������� =�
%���,/ ),**-)�,/ ����?� ����� -��� ��� ��� � 6 ��� �6��4�� �����--
6 ��� �-��� ����%"%���� �����-���� ���6 ���(��������� �������6 � ���-����
�� �����%"%��� �?������ ������� ��#� ��� � � ������ �����/���������3
�����(� �� ���-����D ������� ��� �������� � �(��-� ��� 6 ��� �<�������--=�
� �� �����6 �� ��� ��� �� ����(�6 �� ���� ������� ����������� �� �-�������
-�����

����������� ������� ���!
������ ))���� ������������������������������������ ������������������������������**����������
���������� �� �-����������� �����-��������� ��������� ��� �� ������#����3
���� ���� ��-� ��� � ��������������� ��2������ ������/�� ���(� ��������������
����� ��� ��� �� �-������ ����� � �� �3 ��#� ����� ��� ���� ��� �� �� �� ��
-��� ������ ����� � ��
����-��6�(����� �((� �� �-�����6� ����(�� ���� ��������� ����� ��� �� ?
�������(���� �������� ��>
�����������8������&���.����������������7�����������������8���������������&
��������������������������4
� ������ �� ��� �� �� ���.����?� ������.�������� ����� � ��� ���11� ���3
�� ��<;� �>� ���(���� ����� � �� � ���11���� ��� ��--�� ���#��� � ������#
����?�����/���/�� �=�
.������������8�������������������������7����������&�����������8������&������
����������4�
� ������ � �������� �����-����� � �� � �� ��� ���� ����� �
.����)��������8������&��������������%�����7�����������������8������&�����&&��'
������4
� ������ �� ��� �� � �� ��� �� ��3�00?� ������� �����-����� � �� � �� ���3
�� ��0�3��)�<-����8����=�
���$ ����������� �������
������ ))��������������<<����������������44���� �������������� ++ **����!!����������������**������
� ���(����� ���6 ��� ��� ����-��� �� ��� �� �/�� ��6��� ������9*?�-�
���3 ����#������� ��� ����-���/������ � ���.��� � ���� ���-�����8 ����
�%"%� �.������� ���� �� � ����������(����� ���(����/���
��� ��� �2������ (���� ����6�������� �� 6 ��� �� ��� � ��%"%��� ���� ��
-�����-��� �3����� �(� ?�6��������2��������������������� ��� ���4��� ��
�.����������( ���<���� ����-���� #������ ��� �=��������� �� ���4 ����
��#2��4��-� ��� �.�����?���� �6�����/�� ����� ���� ������6����/�� � �2��4
����/������ ���/�� �
����--��!!��������.. ������**������ ��..�������� ��**�������������� ����//������55������66++������������
���������������2����-� ��( � ��2����������6����� �(� ������ ���6 ���
�.��������� � �6�#>
� ��� � ��� � ����� �3���6 ��/��� #��-���6������������� ��� ��?����
���� �3���6 ��/��� #��-���'�6���� ���������� ����� ���
� 7����������������83:��� �� 6 ��� ��� � ��6����.����� �����2��?
6����6�2���� ������(��03$��<���03����-�#�����/�� ������������
78��������� ��=�
� ��� ��� ��� ��#� ��� � ��� ��� �� ��-� ��������� � � � ��-����� �
6 ��� ?�6���� ���91�+� ��� ��� �2� ��� ���� �������� �.���������
������� � � ��� �� �� � ���2�(���(��-�����6��8?� ���� ���� �� � ������3
� ����� D ��� � ������� #������#2��4���� � ��� �� ���� ��-��
2�� ��-��� �3����� ������� �����(� �� ���� ���� �� � � �
� ������ �3����%"%��� �(� ����� ��� � �����������/������ ������ ��
��2���%"%��������< ��� ����������� �� ��� ���-��� ����(���������/3
�(����(��������(� =�
���������� ))������������������������::00//::��!!.. ..������ ����
9�� � �����"�*�+��,�- 2� ���<$=������ ��#��� � ������ 17"���8 � �
��� 6 ��� ����� ������ � 6 ��� ���� D � �������� ��#� �� ��6� � ��
������ �� ?�� �����-� �������
9�� � �����.�,%/ 2� �� �<�=������ ��#��� � ��� ������( ���� ����(�
����� ����-� ���� ��#�<�2����"/��"7� �/��:7�=� �� � ��-� ��
����� ���0���%� <�=���� �������� ����� � ���-� ��(����� �� �;��2���� 3
��# � ���� �� �C�1�C�
�������������������� ��������������������������������������������������������
�������������������������������������� !!��"!#����������������$������������������
��������������������������%��������������
������� ��� ���6���C��2���� ��C�������
��� ��� � �����.�������2���%"%�������?���� � ����,%/ 2� ��� ����
�� ?�6����6� ��� � ��� �������� -����� ���� ��#?����� �6� �� �-� ��(�
%-� ��� �������� -������ ��� �-� �?���� ���� ����� � ����� ����,%/ 2� 3
�� ��� � � �-� ��(�
����������� ������� ���'
;�6� ���� ���0���%� ������(�� ������2���� ��#����� ��� �������� -��
�� � � ��6 � �����.������������<�--?�3�$=��@���� ���������� � � � ��J�--K?
������ �6��� � ��� � ��������/����#��� �����������(��������(���� ��
@���� �����.�������������� �2���� ��� ��?���� � �����"�*�+��,�- 2� 3
�������>� ���'3� �(��� �� ��#���/�� � �� �������� ��#�< ��� ����"� 17"
���� � =����� ����� �(��C� ���(���C� �� ��#���2��-#?����� �(� �� �������
�� �2��������� ������ � � �(�6�2���� ������� � � �����(����(���2#
����� �(� ����2�/������������
�������������� ������������ ))����������������99::������ ��������44���� ����
� �%"%���2� �������.�����-������� D ��%"%��� � �� ��� �.������D ��%"%
�?�����-���� ��� �.������D ��%"%��� � ����� D ��%"%���
� ���� �.������� �����2�� � � ��C������--C����C�%"%� �����--C?���� �������3
���2��(�� ���-��� ������ ��?� ���/������2�� ��9��(��������(���� 3
�(� ������ �����6���� �����%"%�C��63�����C�-� �� �������� ��
����(�� ��� �.�������-���� ��%"%��� ���� ?�6 ����� ������� ����
� ����4� �� � ����%"%��������-��� ��� �.������� ���4��� ��� ���� D
��2�� 8��8��������
� ����4� �� � ��� �.������� � � � �� ������ � ��������� ��� ��/��� �6����
� �� ���� ���#���� �����(� ��� ��(��<��(������2� �?� � � ������2#
���2�(� ������ ��7/�� ��� ��=��%-� � � ��� �����?���� �6��� �2���2�
��4���� ���4��-� ��� �.�������-� � � �� �����36�#� ����(���� ��(�
� ����4� �� �C�� �3.��� �C?����C.��� �����������C����#���� �.�������
6 ������--�
� ;� �� �� �6���� ��� �.������� ��� �� ���������� � ��� �� ��-� ����8?� ��
91�+�2� ����� �2����� ��������� ��������� �� ������ ��� �� ��-� ��
� ���� �� � � � �� ��� �.��������%-� � � ��� �����?� ��� �.�������6
�� �������� ��� �� ��-� ����8�
����������&��������������������������������8������������������-�����
./0/���������������������"�������.$7�.����������7���������2���������'
������������8�������'������������������������������������������������&��
�����������&����������������������(���(! 6����"�������������8�����������
������������������������������������������������������������������$��
���������8������������������������&�������������������������������������
��-������;� �>�6�����������(��� � �6�#?�#����� ���4�� ���� �� � ��
�- ��������(����4����� ��� �.������� � � � �� ��� ��������( ��
;���:���'������������������(�<�9��(��%-� � � ��� �����?�����#��
�#� �� �� ��������(����8�-������ �������/����6���� ��� �E���?� ��
�.�������6�������� ���� �� ��� �� �-������� �� � ������ �� �6���
����- �����������4��� ������� #� � >�6���� �� ��#��� �� ��E�����@���
#������ ��� �� 6 ��� ?� �� ��6�2������������� ��������� �����?�2�
#����� �� ��� �� �6��� �2�>� �6�2��2��4�� � ���2�(���(� ���3
6������� ������� ��� ��� ����� ��#�-�#��������#�����������(�-���
E���?����-�#��������� � #������ �(� ��� �.������� ���8 ����� ������
6���� �(����� ���-������� �
� �/����8 �������/���� ��-� �/�����%"%���� �����-���� �6� �� ���
�������(������#�(�2��4��� � �� �� ��� �.���������� �6���(���� ��
����� ���6 ���%"%���� ������� ������6��� � ��� ��(������ �6 �
����� � �
� %-�#����8�����������2�� ���#�����%"%� � ���6 �� ���������� �2��(
�((�����2#� ����� � ���� ������ ���<��(�?�6���� ���91�+�2� ���
��� ������� ��� ��� �� � � �� ��� =� �#� ����(� ����%"%�������� ��L�--M
� ��� ��2���� � ��� ����-� � ���(���+���6��-����� ������� �� ���� �2��4
����(���6����#���6�� � ������� ��� ����8�(�
���) ����������� �������
��**���� ))���� ����//���������� ))����������.. ������ ����!!��**����++
������� D �� �����-� �3������� ��� ����� ��-��� �����)� ��� �� ?��%"%����3
����������������� ��� � �� ���� ������#��� ����#�2��C������C�� ����
�8 ����� ���(����/��� �� �� ���� ���� � ��-���)� ��� �� �����2�����(������
��6� ��� ���(���2��4����-� �����(����� ����� � ������2#�� �(� ����%"%
�# ���*�/�� ��:�4�"������ �����5���� ���/�� ������/��2�����6���� �
���� ������������ �>� �� �������� ���3������%"%�2�43������������� ?����
���#� �.����������4�(� ����� ����� �
��**���� ))����������!!��**����++
� ������ ��%"%��*���-���� � ���%"%�%;��-� ����� �����������
� �� � ����� ����������� ��2������#� ������/����2�4������
� 9�� �������� ���� ������ ���" ,)- 2� ��������� ?� ������2� ��
��"�*�+��,�- 2� �������� �� ���" ,)- 2� ���
� ������ �(��C �/�(��C�6���������� ���'3 �(��� �� ��#?����� �(� ��
��� D ������#� �2��(� ��� � ����@������ ����� ���� �2���� ��� � 3
��?� ���� ��#�6���/�� � �� ����/�� � � ��
//���������� ))����������!!��**����++
� ��=�����'�����;�����'��� =�������� ������((��'� ��2
������9�!����4��9�'���:�������=����4������������:�������� ��2
����((��'>>
� ������ ��%"%��*���-� ����� ����������� ���%"%�%;��-���� �
� 9�� �������� ���� ������ ���)-��** 2� ��������� ?� ������2� ��
��"�*�+��,�- 2� �������� �� ���)-��** 2� ���
� ������ �(��C����(��C�6���������� ���'3 �(��� �� ��#?����� �(� ��
��� � �����#� ������/���������#��������<% �6���6�6� �-����� �� �
���/��2�-�������(���# ��(=�
� �� � ����� ����������� �� ��� � � ��������#��� ��
� @���� ��� ��� � ��� �-� ���?� ���'3 �(��� �� ��#�6���/�� � ��
���/�� ������
� %-������ �� �����/��?���� � ������ ��� �����2#������� ?� ���6� �(
���������2����������2#������ �(� ���)-��**?��"�*�+��,�-
�.������� ��2�/��

����������� ������� ����
//��((�� �������������� ))����������!!��**����++
%���8��� ������ � ?�-����2�� �������6 �� ������ ��9*�6������� �� � �� ��
�� �����(� ����� �� ?�������� ��2���/���� ��8��������?� � ��� 2�� ����3�3
� �� ����9*����6�/��?�2�-������ �� �(� �� � ����������?� � ������������
�� � �����6��� ���#�2�� �������--���������(��?�� � � ���#������ ������2����%-
����(��--���������� �����--�� ?� ���-��6�(�����2�� ���?�2� ��� �� �� � � �6
��� ����� D ������#��-���#� ��� �� �������� ����� � ����� ��
�������6����--�
������6��" ,)-4�)-��** ������.+-" 2� �� �� � ��� ���� ���
����������6��?� �����(���6���2�/��2� �� �
@���� ����� �(��C� ���(���C� � ���?� ���2� �� �����2������ ���

���0 ����������� �������

����������� ������� ����
������������������������ ����
����������

���� ����������� �������
������������������������
��� ������ ������������������ � � ����������������� ������������������
�������� ������������������� ������ � ����������������� ������ ��� ���
���!�� ������ ������������������������������������ ���������� �������������� ��
�� �������� ������������������� ������������ ������
��������������
� "�#�� ������ ��� ��������������������������������� ���������$%�&'
����� ��� ��������� �(����������%�&�� � ��� ���������������)������� ������
������(��������������%�&�� ����������������������������#��������������
�������������
� "�#�� �����!��� ������������������� (�������������� ��������� ����(
������������������ �������������������������������*��# ������� ��

�������
��� �����������
�'�������� ���� ������ ������"�+������
�'�������� ���� ������ ������,�-.
�����
/'�"�+����,�-.� ����� � ���������
0'�"�+����,�-.� ����� ������� ���������
��� ��
1'�"�+����,�-.� ����� ��������#������
������ ��2����� �
3'�"�+����,�-.����� ��������������
"�4�5� �������
������������
6'����������7���� ������� ���������
��� ��
8'����������7���� ��������������
+�������9�����
:'�����7.;� ������� �&%������������
7���� ����!������������������
�����������������
��'�������� ��������� ��������94
7���� �
����
��'�����,9<�9�.=��� ����� ����������
"�+<,�-.� ����� �
��'�����,"9<�"9�.=��� ����� ������
����"�+<,�-.� ����� �
�/'�����,9<�9�.=��� ����� ����������
"�4�5� ����� �
�0'�����,"9<�"9�.=��� ����� ������
����"�4�5� ����� �
����������� ������� ���/
������������������������ ��������
��������� ���
��'�%�������%������ ��
�'�"�+<,�-.� ������� � ������,�-.�
�'�"�+<,�-.� ������� � ������"�+�
/'�����%�>�.� ������� � ���������
�������� ������
0'���������������� ����� ������������
1'�����,�?@+&��9�,�.7�$,+9'��
��������
3�'�����7.;� �������� ���)�� ������
+�����������"�4�5�����
3'�����"�4�5��7+.� ������� � �����
+�>-�
6'������>%.��7�"�� ����� ������������
8'�����7.;� �������� ���)�� ������
"�4�5�����+����������� �
:'�����"�4�5��7+.� ������� � ��� ��
+�>-�
���'�������)���� ������
��'�����7������ ������ ������������
� �
���'�����.=�� ��������� ���
��'�����.=�� �� ���������"�4�5�
��'�����.=�� ��������� ���
�/�'�����.=�� ��������� ���
�/'�����.=�� �� ������������
+������������
�0'�����,"9<�"9�.=���������# ���
����+�������%����
����������� �������
��'�� ���!��� ������������ ������
��2�����������������������������
����!"# ��������������������������
�'�"�#�� �������$�%� ������� ���
����&%��� ������
�'�"�#�� �������$�%� ������� �������
A�?-��� ������
/'�"�#�� ��������&� � ������� ���
����&%��� ���������� �������� ���
����������)����������� ��� ����������
0'�& �������%�'( �% #���� ��@
������������� ������� ������� �������
������ ���������� ��� ����������������
1'�"�#�� �������$�� ������� �������
&%��� ������
3�'�"�#�� ���������# ������� �������
&%��� ������
3'�"�#�� �������"�4�5��7+.� �����
� � �������>%.�$&%'�
6'�& ������(���(��� #���� �����@
���������� ������� ������� �������� �
���� ���������� ��� ����������������
8'�"�#�� ���������# ������� �������
&%��� ������
:'�"�#�� �������"�4�5��7+.� �����
� � �������>%.�$&%'�
���'�7�� ��������$�#�$ #���
��'�> ��������7�������������� ����
� �� ���������)'(�%* ������
������$ #���
���'�"�#�� ����������% ������� ���
����A�?-��� ������
��'�"�#�� ������������� �����
� ��������&%��� ������
��'�"�#�� ����������% ������� ���
����A�?-��� ������
�/�'�"�#�� ����������% ������� ���
����A�?-��� ������
�/'�"�#�� ������������� �����
� ��������A�?-��� ��������������# �
&%�������������� ��� �������
�������>%.�$&%'�
�0'�����$��+&���� ��������
� �������������"�4�5���������������
������� ��������������"�4�5� �������
��� ���������# �������������A�?-
�� ����������������)�� �������
+�����������"�4�5����� �

���0 ����������� �������
�)�������
�1'��!�������������������������
���������������+����������"�4�5
���� �
�3'������!��������A����������� ���
����+�������A�7<�>%.��-A�*��#�
�6'������!������������������ ���
����+�������A�7<�>%.��-A�*��#�
�8'�������� ����������������>&4
�����*��# �
�:'�������� ��������� ��������">�-
"�4��"�4�5������7�&%������*��# �
��'�>������� ������ ������ �������������
������"�+<,�-.����� ����!��������
�������">�-�"�4���7�&%����
A�7.+������ �
��������,�
��'�����"�+<,�-.����� ���������� @
�������������������������������
��'������>%.����� ���������� �������
�����������������������
�/'���������� ����� ���������� ����
��������7�&%�"���� �
�0'�����">�-�"�4� ����� ���������� @
������������+7"<��,�@,<7��"���� �
* �����)�������
�1'������� ����!����������������������
���� �
�1�'����� ������� ������
�1'���������)����� ������ ������
�1�'������� ���� ������ ������
�1�'�9�������+������ ������ ��������
��������� ������������� � �
�3'�����*��#�� ������ ���� �������
�����
�6'�����*��#�� ������ ���� ���A�����
�����
�8'�����>&4����� ����>&4�"� ���
���������
�:'������������������� ���� ������
�����
���'�>������ ����������������+�>-@
-.,��">�-�"�4������7�&%��� ���
*��#������������������� �����������
������������������������ �����'����
�� ��������<7����������� ��������@
�����������������������������
��)����� ����� ��������������
��'����������������� � ��� ����>%.
�-%&��".�.7�-��
��'����������������� � ��� ���+�>-@
-.,��-%&��".�.7�-��
�/'����������9���� ����������
�0'�����+7"<��,�@,<7������ ���
������������������� ���������">�-
"�4� ����� (�������� ���������+������
7���������� ����� �
�1�'�B�!��� ��������������������&@
A���9�,A5>+C� ������������ ���)��
��������� �������1'�-�������������
�� ����� �������������� ������� ��)���@
����������� �������� �����
�1�'�"�#�� ��������'( ������� ����
��������
�1'�7�� �������������������� ���� ��
���������-
�1�'�9�������+������D�7�� ���������
���<����7%��@8��� (������� -
9���"�4�5D�7�� ������������ (��
�����-
�1�'�> ��������+������� ������ �������
+�������������,� ���. ������ ����
��% #���
�3'�"�#�� �������� �����������+*��
� ������� � ������A�7�$&%'�
�6'�"�#�� �������� �����������+*��
� ������� � �������7%���$A�?-'�
�8'�"�#�� ��������������������'�
���� #�� ������ ���������'�
� ����� ���� ������������
�:'�7�� ���������/����/ ���<���*01
"�� (������� -
���'�"�#�� ��������������� ������� ���@
�����������&�%%�$/���%���/ ��
*�)'��% ��( *��#����� ������ �
��� ����������������� ���������� ��@
����
��'�"�#�� �������������� ����������
��������������������������)���!
�����*��#����������� ����7������ ����@
����������������)���! ������*��#�����
�������������<����������� �������)���
� ���������� ������>� ���� ������� ��� ����
��������������������������#�� ������
���������7���������� �����-��������
����������������
��'�� ������������������������+������
���� �� ��������� ������� ������� ����@
��� ���������� ������������������ ��
�&�%%�$�%�'(��(���%*-
��'�� �������������������������>%.
���� �$������ ���'�� ��������� �������
������ ������� ���������� ������������@
������ ���(����%�'(��(���%*-
�/'�7�� ��������)���� �����*�)'�
����� - �����7�&%������ ����
��������� ���������7�&%�9���� �
�0'������������"�4�>� ����������������
��� �������
�1�'�& ������ ('��)� ������� ������
(')+�� *��# ����� �� ('��)
�+�&)%� ������� ('�&% �
*��# ��������#�� �����������)����������
������������

����������� ������� ���1
&�����������)�������
�3'������� ����!����������������
+�������7�������� �
�6'�������� �����������������������
�������� ������������+�������7���
���� �
�8'�����+�������7�����������)��
����������� �
�:'�����+�������7�������� �������
"�-��
���$+��$+ )$)�
/�'������ ���%9,<>9,<��,�� ������
�������!�����������������������+������
7�������������)���� �����
/�'�?��������� ���+���������,�
�����������%9,<>9,������#����� ���
� ����
�3�'�����+�������7����,�)����������
� ������
�3'�-��+�������7������������
���� �������������� ������� ��)������
������� �������� �����
�3�'���������� ��������������������
���������� ��*��#�
�3�'�����>,�� ������� � ���������������
�3�'��������������%9,<>9,<��,�
������ ���������� ������ ������
������������������� �����
��� ����$%���D����� )$) ������
�������� �%9,� ������ ��������%��
� �'
�6'��������������%9,<>9,<��,�
������ ���������� ���$%���D����
)$) ������ � �������� �%9,
������ ��������%�� �� �'
�8'�>��>,C5>+C�������� �������
����� ���
�:'�����"�-��+�.+C� ������� ����
/�'�����%9,<>9,��������������� � �����
��������)���$%���D����� )$) �����@
� � �������� �%9,� ������ ��������%��
� �'
/�'���,�@�-@%,>+.�$��%'�� �����)�����
�1'����������������'�012/����/
������ � ����� ��������������������@
���� ('��)�)$����3 ���������
��� �������'�012 �������/ ��#�
��������)�� ���� ����� ������� �
� ��� ���� �������������#�� �����
������ ������� ��)��������������+������
7����"������� �������
�3�'��������������$�#�$ #���
�3'�������������������/����/
2(3������2(3� ������������
��� ������ ��� ���� ���������� ��
��������#�� ��������)�� ���� ��@
��� ������� �� � �����������������
���������� (������� ���
����������� �����)������ ���� �����
�������2(3����2(3�����#�� ��
�������� �� �����������������������#
���������������������� ��������������#
���� ���������������������,�)������@
���� �������������
�3�'�&���������&� ������� � ���
���������� ���������������������� ��
�$( ������� �
�3�'�"�#�� ��������$( ������� �&%�
� ���!����������������������������
�<%�*��# (�������#�� ��������$(
������� �A�?-��� ���!�������������
������������$( �<%�*��# �
�3�'�"�#�� ���������$+��$+ )$)
������ ��������������������� ���
������������������ ��������� ������
�6'�?����������$+��$+ )$) �����
� ������ ������������������� �� �������
�������������+�������7���������������
���� ��������+�������7���� ��������
��������� ��������+�������7���
���������#�� ��������$+��$+ )$)
������ �������������
�8'�?����)�������(�$3���3
7������ ������� ������ �������
+�������7�������� ������������@
�������������
�:'�"�#�� ��������)%)�&��3
������� �� �$&%'�
/�'�������$+��$(��� #����� ��
E<@�����5����������������#�������#@
�� ����������� ��������)���� ����
%9,<>9,� ����� �
/�'�?���� �� � ��������������+������
)$) ������ �������� �������� �%9,
������ ����������������������������
������$+��$(��� #���

���3 ����������� �������
/�'�?��������� ���+���������,�
�������������������%9,<>9,� ��������
���!�����������+�����������)���������
4�'� �����
//'�����>&4����� ����� ����������� @
������ ��������������F�����
3)����� ���5( �6� �6�
/0'�?��������� ������ ��������! ���
�>%.� ������������!����������������
/1'�?��������� ������ ��������#��#
7������� ������ �������!����������
)�����
/3'�?��������� ���������>%.� �����
������������ ����������������#��#
������ ����������������������� ���������
$���%����
/6'�?��������� �����������"�4@
,E7� ���������������� ������� ����
�����������">�-�"�4�
/�'���,�@�-@%,>+.�$��%'�� �����)�����
//'�������������� �����7.;��"�4�5
�7+.�����>&4�/@0�"�4�5� ������ ��
���������������
/0'�������+�,.;.,�#���� ������
�����
/1'������>,C5>+C�,�)���#����
�����������
/3'���� �� ��������������������
/6'�������������������������"�4@,
���7� ������� ���������� ���
/�'�?���� �� � ���������������)�����
+������� )$) �����������+������� ��@
����� ����� �����������%9,<>9,� � �
�� ����������&-@��,�.A�+������ ����
�����������������������,�.A
+������ �� �����+�������7���� �����
.�������������������%9,<>9,� �����
�)������ �����+�������7���� ��������
������������%9,<>9,� � ��� ������
//'�>&4��@��������.�>&4�6������ ���
���� �������������������+�����������
���������7.;� ����������
?����������# ������&%��>&4�/@0<1@3
����� �������� ������ ��������+������
���������������>&4�/@0�����
������� ��������&%��� ��������������� ���
���� ������ ��������"�4�5����������
����>&4�/@0�"�4�5� ������� �������
A�?-��� ��������������"�4�� ���
������� � ������(��� $&%'��>������ ��
��)�� ��������������# �������
����� ��������
��.�>&4�8������ �������� ������� �����
�������"�4�5������
/0'���������) �$�#�$ #�������#@
�� ����������� �������������)���� ����
� ���������
/1'���������(�$3���3 ,�)���#��
����#�� ����������� �������������)��
� �����(������������#�� ����������
� ����#���������5�"�+�
/3'�?��������()(��� �������
��� ��������������) ��$$�()� ���
(�$3���3 ������ ������� ��������
�� ���������������������������������
�� � ��������������������5�"�+����#�
�������� ��������! �����>%.� �������
� �$&%'�
/6'����������()���1$7� �����
�� ����� �����������">�-�"�4�������
�������� ������� �� ��$����-����'���
��������@����������� �������
">�-�"�4@,� ����� ��� �()���1$
��������������������)��@������
���� ��������">�-�"�4@7� �����
�� �()���1� ������������������
������������">�-�"�4�,E7� � �
��� ��� �()���1$ ���� ������������
� ��������()���1$7� ������%���D
����()���1$7� �������� �������@
���� �� ���������� ������������������
�������%9,<>9,� � ����"������
��������������� �� ����������$ �����
� ���� ���

����������� ������� ���6
/8'������������"�4�5� ����� �������
">�-�"�4�
/8'�����"�4�5����"�4� �������
��� ���
/8'�?������������()��� �����
� ���� ������������ ���� �����������
"�4�5� ����� ������������������">�-
"�4��������)������� ����#�� ������
����()��� ������� ��������&%
�� ������

���8 ����������� �������

����������� ��� ����
����������
�������������� ������
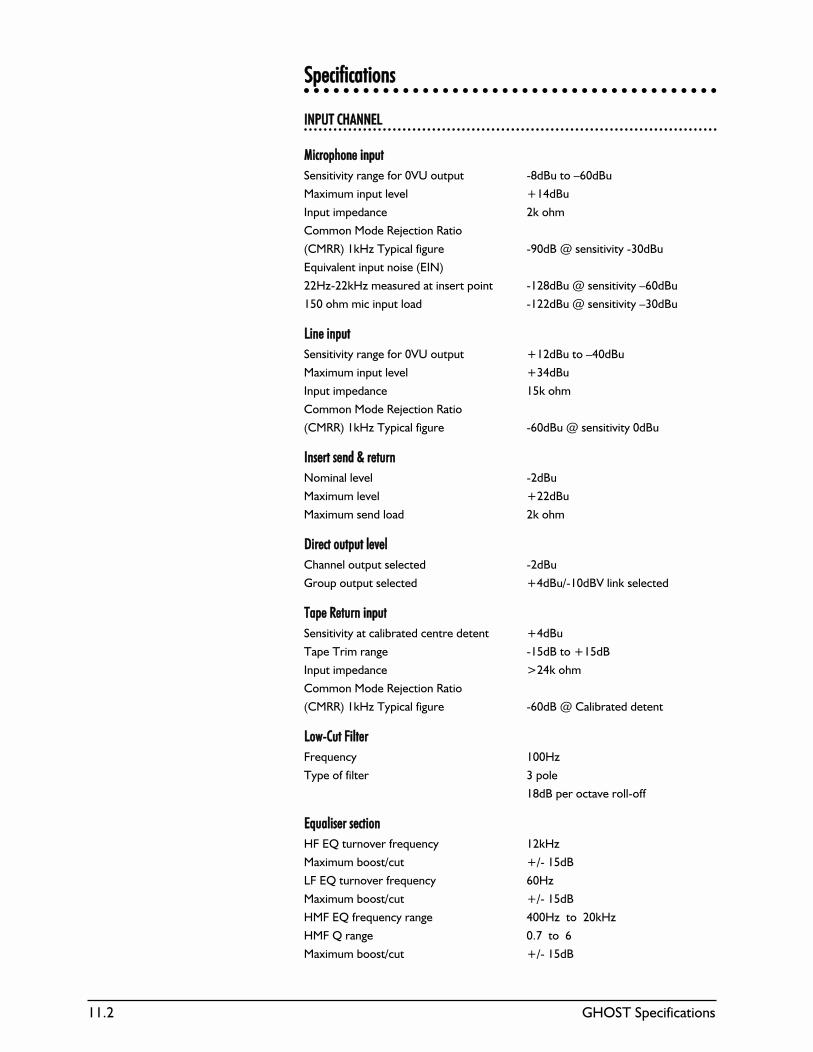
���� ����������� ���
�������������� ����
��������������������������
������ ���� ��������������
���� � ������������������ �� ������ �� !����
"�#$�$���� �%���% &�'���
(��� �$������ �)��*$
+�$$���"����,�-� ���,� �
.+",,/��)�0�����%������ �1����2����� � ���3����
45���%�� ���� ������.4(6/
���0���)�0�$��������� ����� ���� ��������2����� � �� !����
�7���*$�$���� �%��� ��������2����� � �� 3����
����������������
���� � ������������������ �� &������ �� '����
"�#$�$���� �%���% &3'���
(��� �$������ �7)��*$
+�$$���"����,�-� ���,� �
.+",,/��)�0�����%������ �!�����2����� � ������
����������������������������������������
6�$��%�%���% �����
"�#$�$�%���% &�����
"�#$�$������%��� �)��*$
������������ ������������ ��!!��
+*����%��� �� ���%� �� �����
�������� �� ���%� �� &'���8�������%�)���%� ��
����������""��������������������
���� � ��� ��%9�� ����� ����� �� &'���
�������$������ ��7��� ��&�7��
(��� �$������ :�')��*$
+�$$���"����,�-� ���,� �
.+",,/��)�0�����%������ �!����2�+�%9�� ����� ��
�� ##$$��������%% ������
;��5���� ����0
���������% �� 3���%�
���������� ������%%����
��&&���� ���������������� ��
�;�4<� �����������5���� ��)�0
"�#$�$�9��� 8� &8���7��
=;�4<� �����������5���� !��0
"�#$�$�9��� 8� &8���7��
�";�4<����5���������� '���0�� �����)�0
�";�<������ ��>�� ���!
"�#$�$�9��� 8� &8���7��

����������� ��� ���3
=";�4<����5���������� �7�0�� �����7)�0
=";�<������ ��>�� ���!
"�#$�$�9��� 8� &8���7��
������ ���� ��
��)�0�������)�0?�����9%��%���%� �� ��&�7���
����������""����������������
�� ''���� �� ��!!�� ��
�������� �� �%���% &'���8�������%�)���%� ��
���������� �%���% �����
@�#��� �� �%���% &'���
"#��� �� �%���% &'���
"#����� �%���% �����
"#����� �� �%���% &'���
+,"8@=�8�����*�����%���% &�'����� �$�#$�$
� ������ �� � &'���
�����)���� � &'���
� ������� ������� � &'���
�� ���� ��������������((����������������������������))������
4%� ����%%��9�%�������� �A "���*���?�=��?�"#��?�
� �����,� ���?������)
��9�%�����>7�*$������ �A +*����%?������?�"#
��9�%�����>7�*$���� �� �A +*����%�B�� ?�+�� ��%�
,��$?�@=�?�� �����
�������+�$����� ���>7�*$���� �� �A �����?�� ����@?�@�#?�"#?�
"#��
��**��������������������������������""%%��""����������
���������������� ����++�� ��������,,--��..//
=����;������ ���� ��
���$� ��� ��9� �$ �1���
"#����� ����������� ���� ��
���$�$�#� ��$� �>���
"� ��� ���� ���+*����%�C�"#�� �����
D�����%� ��?����$�%�� � ����* �>���
������00����++�� ���� ��������'' ������������ ���� ����00���� ����//
����9�%�E�%����?��)�0
"8=��� ��B�� ��� �� �����F�4<���
����3F�4<��
"#��� ��B�� ��� �.,4���������/ �����F
������������ �������������� ����
���0���)�0�"����� ���2������
+*����%�������� ��� � �17����4<���
�13����4<��

���' ����������� ���
%%����&&��������))���������� ������
"8=������ � �������� �� ���0�����)�0��.&�8���7��/
���� � ��2�3���
���� �������� --
"���� � ��=������ ����� �%) �������2��)�0
=������ � ��"���� ����� �%) �1����2��)�0
"#��� ��+*����%����� �%) ������2��)�0
+*����%� ��"#������� �%) �>7���2��)�0
11�������� ������++���� ������������22�� ������������//
���0���)�0�+*����%����������E�
&'���8���������%� ��� ��&'���
���� ������ ��������������,,���� ��33
������������� ��� �?��� *������ �� �1����
�!�*����%����� ��?�*����%����������E� ������
�'�*����%����� ��?�*����%����������E� ������
3��*����%����� ��?�*����%����������E� �>����
��22�� ����������������������""
"#�������� ��� �?��� *������ �� �1����
�!�*����%����� ��?�*����%����������E� ������
�'�*����%����� ��?�*����%����������E� ������
3��*����%����� ��?�*����%����������E� �>����
��''������ ��������������##��44������
;��$���0� �����%%�E� * G��* .)�8%9/
�' ��71�3!$$�.'��>�H/ ''��81>
3� �3�3���$$�.7��3�H/ 73�!8���
�'�4#������ ��7�7�$$�.3����H/ 33��8>3

����������� ��
����������
��������������

��� �����������
������������
������������������������������������������������������������������������
���������������������������������
�������� �������� !����"�����������#��������������������������������
������������$������������%��������!���&�'���()�����������*������
�����������������������������������+�����������������$���
����� ��� �����������������+��������$���
������ �����������+����+�������������������$���������������'����������
�����
������������ ����������������$���������+�������$��+�����������������
$�������������*�����������������������������������,����������-#�
�������� ���#����������������&�����������������������������.������
�������&���������&������������$�����&#�/�����.���0�����������.��������$�
��������������������.��������������������&������&���1�������������!��
�������������������������.����������222�0��������&���1���������������������
���.������������ �322�0������322�0�����������&���������� �222�0�
���������� ���������'����������������������������������'���������$
������������������������������'�������������&��'��&��������$�����
�� ���������� ������������������������$��+�������+��������������
�������'�&����������$�����������������������������'�������������������
���+������������������'���������&��������������$���
� � ������������$�������������������������������������+�����$������
���&�����&������������������������4��#
� ���� ������� ��������������$����������������������()�������$��
������&�����
� ������ � �������������$���������������������������4���������
&�����
� ����������� ��������������$������������������$��������������*�/5
*/)�������&�����
� �������� �������������$����������������������$������������*/)�4����
������&�����
����� ��/���������������������������������������������$�����������
6�����������
��������� ��/�������������$�����������*/61"/57����*/)�4�/�����
�$�����������6���������������879�������
�������� ����������������������������&��������$��������������$�����
��������������������������������������������������$������$����'��$�����+��
��&&��$��/�����������������������������������!���&�'��������
������ ��/��������������������������6���������*/)�4�����������
���+���������������������:�������+����������$�������%����������������
�������������������'�������*(�7�������#
������ ����4#����������������������&�������������������+����!��������
���������������������+����������������������+������-;�4����������������
�������+������� 2�49�
��� �����������������+��������$����/��������������������������������������
��������������������+������'&�'�������$�����������������
������� �� � �������������'�������������������������������������
&�������������������$���������������������������$������������������
����879�������������������6���������*�<�4����������&�������������=�����
�������>�'��������������&���������������������>�'�
���������� ����������������$�������$���������������$��������
�����������+����

����������� ��?
������������ ��8�������$���$�����������������$����������������
��+��&#�������
������������ ����������������������4��&�������������������������������
��+�������?@���=���������������=��������#��������$�� �� 5��� 8���
��58#���������+��&���������������������������������$�����������+����
�� ��������������������������������
����� ����&����$�������&�������()�����18���������������������$��
�����������������������������������������&�������������������$���
�� ��������� ���������������������������������������$��%����.�����
�������
�� ������ �����$����������$���+��������������$���������.������������
�������������$�������������
�� ������������� ������.���0����$����������������������+�����������
������������������������������������$����<�������������.�������������������
&����������������$������������������$�$�+���$�������������������������
�������$����.����������������������������+���$�������.���0���
�� ����������������� ������.���0��������������������+��&����������
������������������.���������A��&�������#�����&���1����������������
&���1���������������������������������+����������������������������.������
����������������������&���1������������������������.�����������������&�����
�����$��������A�������������������������������.���0������������������
�&������*!����"*!�
�� ��������������� ������.���0��������������+��&�����������
&���1������������.�������&�+�����&����������.���0��%���<������.�������/�����
�������&���1����'��&�����������<������.���������������������+��$��.���0��
�����������������&������!����"!�
�� ����������������� ��������������������� ���������#�����.���0��
�����������������+��&�����������������������������.����������&���1�������
������&������A��&�������#��������������&���1������������������������������
��+����������������������������.�����������������������������&���1�������������
����������.������&���$���<����/���������������&���7A���������������������
7A��&���������������A��&�������#���������
������������������ �(��$����&����$��������$���&�����������$��
�����������
������� �4�$�����$����������$�&��$�����������$�������+������$�������
������ � ��7����$����������$�&��$��������������$�������+������$�������
����� ����+��&�����+������������/����������������� 22���+����������������
��#���������6����������������������*���*�<��������������������
�'��&#�����*/)�4��*/)�4�����������()������
������������� ������$������������������������������������+����������$��
�����������/�����������������������������������������*�/5�*/)��*/)�4����
�()��������
���������������� ��������������$������������������+����������&���������
.�����������������$�����������������$�������.������������������&�����/�%
����������������5�����!������#
����������� � �������'������"�� ,�#������������������������
.����������������������$�����������&�+���������������.�������!����������
�������������������.�������� 2'�0������������������������������������.�������&����
2'�0�������������������.��������� 2'�0����&�+��
������������ � �������'��������$� ,�#�������������������$�����
.����������������������$�����������&������������������.�������/�����������
"�: 6(��!/"�78��"6!#��������������������������������������������.��������
22�0�������������������������������.�������&�+�� 22�0�������������������.���
������ 22�0����&�����
����������� ��������������$���������������������+����������&���������
.���������/�%�����������������4����!������#
������� �����6���������

��; �����������
���� ��� ���������&�������������������������������+������������
����0����&&��+������0�
���� ������������ ����$�������������������������������$��%���+��
���������#��+�������.��������$��������������������������-1 �?�4���$���/���
�����������������������������������������$����������2�0�����2'�0�
����������� ��*�������>����$�����$��������$��������&������$���������
��$���������������������������������������$��
������� ����������������������4��&�������������������������$���+�������
�������+�������?@���=���������������=��������#��5�������������$���+��
�����������������.����������������$��
���� ����0#��6����������������(���������������.������
�������������� �������������������������������������������������
�������������������������������������������� ��������������������������
��� ��� �� ����� �� �������'����������6������������#�������� ����
�����������$��������������������������������������������������������������
���$�����������
��� ��/����1�������
���� ���������<��&&��+�����'�������$���������!����������� 2'�0��.��
2�222��0�
����� ��������������������$�����<�������������&���
���� ������������"����"�+�����������������6�����������+��� 1;B�>�'�������
�����
���������� ����������������������+����������������C�������������������
���������������������+�����-;�4������������������������+�����
� 2�49�������������&������+���
������������ ���*�� �����8�������$�#�������������������������������.���
�������������������������������������*��������#������������������������
����������������������������������������������!�$��� D�������������������#
����������������������������$���������1��$���<�������������������
��������� ����������������������������������������������������!��
��������������������������$���������������������'��������������
���������&�������������������������&��������������&�������$�������������
����������������$���������������$���������������������������+������������
�.�����������������������������������.�������<��������7���������������$��
�����$�����������7A�����������������&�����������������������+��������
����������������������+�������������$������$�
(����������������������������������������$����������������<��$��������
�����$������������$��������� ���'����'�����������<�������������$����'�
�����������������������:���������������������������������������&�
����&�������������������$��������#���������������������������������
��$��4�������������������������������'����'������������������$�����������'#
��������������������������������'���������$��������������������������$�
4���������������������������������������������������������������
���%��'��������������������<���������������'����������������������$��&�����
�����$�����������������������������������<����������������������������������
���������������/�������������������������&���������������������������������
����������������������$����������$�������������$���<��������������������
����������������$�����#��!�����������������������������������B��<��$
����B���������������$�����������������������$�����������������������
���������B������$B����������������������
������������� ��������� ���������������������������+����$�+������
���������������������������*�<�&������������������������������������()
����18���������'&�'���������������������
����������� ��3
����������� ��������������������������������������������������������
�������������������������������������������/���������������������������
����������������E�������������'������������������������ ���'#������
������������'��������������������$������������$���������������'�������/�
��������������$������������<������������� ���'����'��������=������'�
�������$����=������������������������
������������������� �������������������������������������'����
�$��������'�������,�'�,��$���*������,,*#�
�������� ������������������������+��$����+��������$������$�9�����
(�����9(#�
��������������������� ���*��������#��/���������������������$����
������������������������������������+�������������+���
����������������� ���**6#��5������&���������������*�6��*/=/
����6���#��&������**6����*/=/�������������������������+��������������
���������+�����+���*/=/��&����:���������������������������������������
������6,(������������������"7#���������������$������������'�����������������'
�������������*/=/��.�����������������
������������ ���*�6#��5������&���������������**6��*/=/�*�����
6������#��&�+����������������������+���������*,�7�����6��������
�<�������������������������E*�����E������E!���E��& !��������*,�7
����6�������*�6����+����������.������������+�����*,�7��6����*�6��������
���+�����������������������������*,�7�����6����8����1���������
���������������"7#�����*,�7�����6����8����1��������16��+�����������
6,(��������
����� �/��������������������������������������������������������6�����
������/���������������������������������������������������������'����������
��������� �/�������������$�����������*/61"/57����*/)�4�/�������$������
*/)�4����������879�������
������� ���������������������$�����������������������'��������'����
������'1*/=/����'#������$��������������������������$�������&����$
��������<��$����������#�����������'�������������$��������� ���'��������
������=������'�������$����� ��������'�
�� �����*/=/�*������6�������
������� ���#���������'��������������������������������&#�������������
������������������������������������
�������� ���*���#���������������������������������$���������
��������$���������������������������������*�5��6�76F�������������
���&����������������������$���������������������������*����
�� �����*/=/�����6����
� ������� ��!��������������������������������'�����������������
�����������������������������;������������'��&����������$� ������������'��
����������������������$�������������$#����+������������������'�
� �� �����6����������
����������� �������������+���������������+�������������$�����������/�����
��������+��������$�����&���������������������������+���%�����������&�������
�������������������������������������������+���&�+�����������������
������������� ����������������������������������$���+������������
�������+�����������
���������� ��������������'����������������������'������+���������
&����������������
��������� �����$���$�������������������������������+�������%�����
����������������� '�0���� 2'�0����.�������
� ������������ ��/������������������������<��������+����������
����������������%��$���
� ������ ������������$��'������������������'�������������$���$����&������

��G �����������
����� ����� ���������������������������������'�������������'
�����������������������$�������+����������������������'�������������������
����������������'���������������'������$���������������������$�����
��������������������'������������������������'�����������+������������
����������'�������������
�������� ���6������$#���������������������������������$����<��������
�<��������������+���������+�����/������������6������,F�"7=��������$���G�4
&�������������$�
������� ���,�������,������������#����'��&��������+��������������������
��������$��������������������������������!�������������������������
6���������$�����������"18�&�������6��������������������������6�������$
����������"����*/)�&�������8�$���*/)�&����.������������"�������8�$���*/)
&������������������&�������
������� ������+������������������������������������0����������������
����������>�'���������������������6��������������������$������������
��������>�'��H�����������������������������>�'������$���������$��������
������� ������������$�������&������������$���������$����������&��
��������� ������������>�'����������&�������������������������������
�$���������$��������
����� ������������������$����+����������������������$���
�������� ��,�� !����"�����������#������������������&���������������
������������$������������%�6�������������/,����#��*/)�4�����!)�8�����
���������������������������������������������������$���
�������������� ���� �����������������������������������$�������
����������������������������.��������������������������������������������
�������������������������������$�����������������������������$���
���� ��!����������������������������������������������&����������
��������$����:�������������$��������������������������������������
&��B�������B�:����������������������������������������������&��B������
����B������������������������������<�����������&��������$������
����������������������BI2���$���������������B���������,���7����������
��������������+�������������������6�������������/��������������B�������B����
������������'�����B�����������B�/��������������B�����������B���������������
�'�����B�������B
�������� ��!��������������������������������+�������$��+�������������
�����������$���
���������� ����������������������!�78����������������$�������������
�����������������+���$���$����������������
��������� �!���������������������������������.������������$����������'
�����������������������������������,���� �������������������������%�����
&���������$������������,���� ����������
��������� ��������������������47!�87����������������$������������������
5���������������+���$���$����������������
�������� ��!���������������������������������.������&�$�����$����&�'���
���������'����������������&����������,���� /������������������������������
����������$�����������������'�&����������,���� /���'�������
�������� ����&����$������������������/�����>�'���������������������
�$��������������������������������������
� ������� ������������.�����������$����������'��*�#����������������
������,�� 8��������������������+��$����������������������$��������������$�����
,���� /�����,���� �����������&������������������������,�� 8��������������
,���� /��,�����������������*��������������$�������������������������
��������������������$������������.�����������������������'���������
���'�����������+��$������ ���������������������'�
����������� ��J
� ������ � �����������.�����������$����������'��*�#�����������
�����������,�� 8��������������������+��$����������������������$��������
�����$������,���� /�����,���� �����������&������������������������,�� 8���
�����������,���� ����,�����������������*��������������$������������������
���������������������������$������������.�����������������������'�����
�������'�����������+��$������ ���������������������'�
� ��/�������������.���0����A������������������������.��������+�����&�����
&���������!���������������������������.��������� 222�0���������&���������
322�0�����������A����C�����������&���������� 222�0�����������A��� �
�������������������������A�+���������$����������&����������������������A
����������������*!����"*!�7A����������+��&���&�������2�J����G�2�����2�J
������������������'���#������&���������������������G�2������������'���#�����
&������������������
��������������� ������+������������������������$�����+��������
�����������������������������������������������$������$���������$����.�����
������������$������'�������6�������*�<����4����������������(�F�#�=�'�
������������� ������$������.������������������������������������
���������������&�$�����$�����������������������$���������������������
������������&�'��������������
������������ ��!��������������������'���������������������������
��������������������,������$ /�����,������$ �����������������������������$
������$��������
������������� ���8�+��&#��5�����������������������������$������
&�����������������������������#��+��������
������� ��/����������������879#��������6�������������������������������
�����������6������/������������*/)�4�������������*/)�4��������������6�����
�����/�������������������$���<�������������������*/)�4�����8������������
"��$ ������������������6����������
� ���� ��(��������������.�������$���������������������&��������
���+�&���������������"6!��������������6������/������������������
���$�����������������&���
������������ �������&���������������������������������������&�����
�������$�&���������������������$�
��������� ���� ��/��������������������������$��$������+�����&���
���$�&���$����������������'��&�
��������������������� ����58#����������������������4��&���������������
������������������+������������������������$���+�������������������&������
�����58�����������������$���������������+��&��������������������+����
������� ��8�������$���������������������������$������������'�����
&����������&�$�����$�������������$�������������'�����
����� ������������������������������������*������,��������������+����
7�$����������������������B�/*, �77B�
������������� ����������������������������������������������������
�������������������������������E*�����E������E!��������������������
&�����*,�7����������8����1�������������������&��������������&����
��������6,(�����������$������������*,�7�/5�����(��>�'���������������
����������"7#��!����������������*,�7����������������������������0��$
��������'���������������+�������������������������'��������������*/=/
�.������������������������&�����+�����$��*,�7��6����*�6��/����������
��������������*/=/�*��������������
���� ��:��������$�������������������������������������������$�����
������!�����������������������������������>�����������������$�����������
�������
������������ ����/,#�������������������$�����������$�����<������������
&���$�������������������������$������������������������B��������B���������
��������������������������������������/,����&��������������������������%
*�����������

��D �����������
��������� ��:�������������������6�������+����"�������������������
����������������&���������,!"�����!"���������:�����/,���������$$���
���������6��������"�������������������������,!"���������:�����/,��
��$$���������������6��������"������������$$�������6�������������������
��"�����������$$�������������H��������"���������������6��������
�����
���������� ���������#���������������������.�����$��������������
���������������������'���������������������������
�� ����������� �����6���������
� �������� ������������������������������������!����<�����������
���������������������������������������������������������������'�����
������& *����
���� ������������������������������������������'�����
�������������� �����������������������������&������������������
�����'��������������������������������+��������������!���&�'����������
��������������������������� ����
������� ����������$�������������������$�����������������������������
���������������&������������������������$���&���$�������������������������
������������!�F�������!�F���*,�7��������������*/=/�����6�����*�6#�
����� ��!�����������������������+������������������������������'�����
!�������������D ���'����������������������������������D�����������������
�������������������������$��������������+�����������'�
������� ��!������������������������������������$�&����������'�����
��$����������'���������$������
������������� ����������������$�����������������������&���$������+�
��������������$�������/�%�������������������������$����������������������������
��+��$������$������
��������� ��5��$������������������������$������������������������+��
�.���������������+���
��� ��� ��� ���9(#������������������������������������+��$����+�����
������������$���������������������'���+��������$���
������������ ��8�������$���$�����$��������������������������+��&#�
������������ ������������������$��������������������������������
�����������������+������������������������<��&����I2 ?3���$����������
������
��������� �����E ��&����������������������������$������&�����������
�����$���
������ � ��������������������������������������������������������
����C������������'��&��������������������������������������C������������
���������������������������