basic redhat enterprise linux (1)
TRANSCRIPT
8/8/2019 Basic Redhat Enterprise Linux (1)
http://slidepdf.com/reader/full/basic-redhat-enterprise-linux-1 1/28
REDH
rainer
AT E: Mr.
MSc.IICT MPart ‐T
TERP
Kao Se (SMU, Indinager, Sam
ime Compu
RISE
reyrata), BSc.IT (Nic Microfiner lecturer,
INUX
U) nce Norton Uni
5 T
versity
AINI G
Updated Ye
ar 2010
8/8/2019 Basic Redhat Enterprise Linux (1)
http://slidepdf.com/reader/full/basic-redhat-enterprise-linux-1 2/28
8/8/2019 Basic Redhat Enterprise Linux (1)
http://slidepdf.com/reader/full/basic-redhat-enterprise-linux-1 3/28
3
HISTORY OF REDHAT ENTERPRISE LINUX
Starting in 2001 , Red Hat, Inc. began offering Red Hat Enterprise Linux in addition to their original
consumer operating system, Red Hat Linux. In 2003 , Red Hat started the Fedora Project to release
the Fedora Core operating system instead of Red Hat Linux. The Fedora Project progresses at a rapid rate, releasing a new version of Fedora every four to six
months. This allows new technologies to be tested by millions of users, which in turn decreases the
amount of time it takes for these technologies to stabilize into production ‐ ready software. Each
release of Red Hat Enterprise Linux is based on a Fedora operating system release. The kernel and all
of the other software in Red Hat Enterprise Linux are specifically configured and tested for
enterprise ‐level usage.
Both Red Hat Enterprise Linux and Fedora are based on open source software developed by the open
source community, some of whom are members of the Red Hat engineering team. The term open
source means that the programming code is freely available to anyone and that anyone can submit
code to an existing open source project as long as the code stays open source. New projects or
programs can be created based on a different open source project or program. Open source
developers live all over the world, and they collaborate on projects every day together.
8/8/2019 Basic Redhat Enterprise Linux (1)
http://slidepdf.com/reader/full/basic-redhat-enterprise-linux-1 4/28
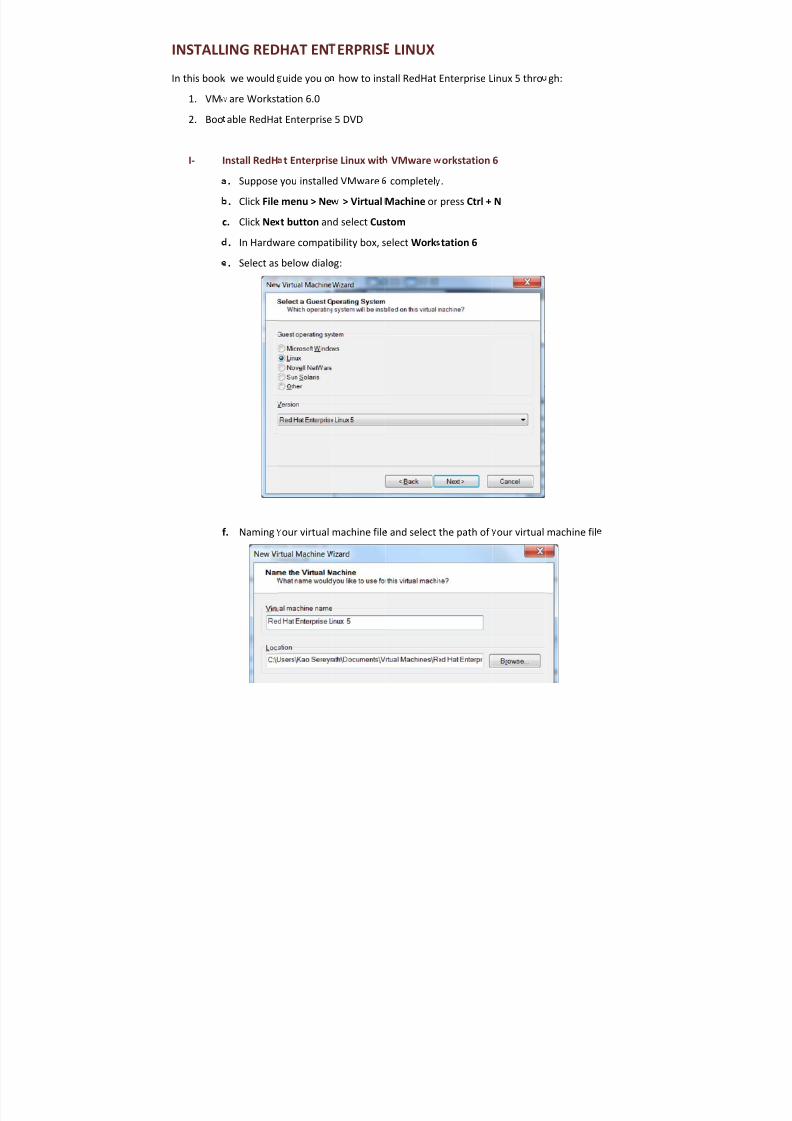
INSTALL
In this book
1. VM
2. Boo
I‐ I
c
f
ING RED
we would
are Workst
able RedHa
nstall RedH
. Suppose
. Click File
. Click Ne
. In Hardw
. Select as
. Naming
HAT EN
uide you o
ation 6.0
t Enterprise
t Enterpris
you installe
menu > Ne
t button an
are compat
below dialo
our virtual
ERPRIS
how to ins
5 DVD
e Linux wit
d VMware
> Virtual
d select Cus
ibility box, s
g:
machine file
LINUX
tall RedHat
VMware
completel
Machine or
tom
elect Work
and select
Enterprise L
orkstation
.
press Ctrl +
tation 6
the path of
inux 5 thro
6
N
our virtual
gh:
machine fil
8/8/2019 Basic Redhat Enterprise Linux (1)
http://slidepdf.com/reader/full/basic-redhat-enterprise-linux-1 5/28
i
j
l
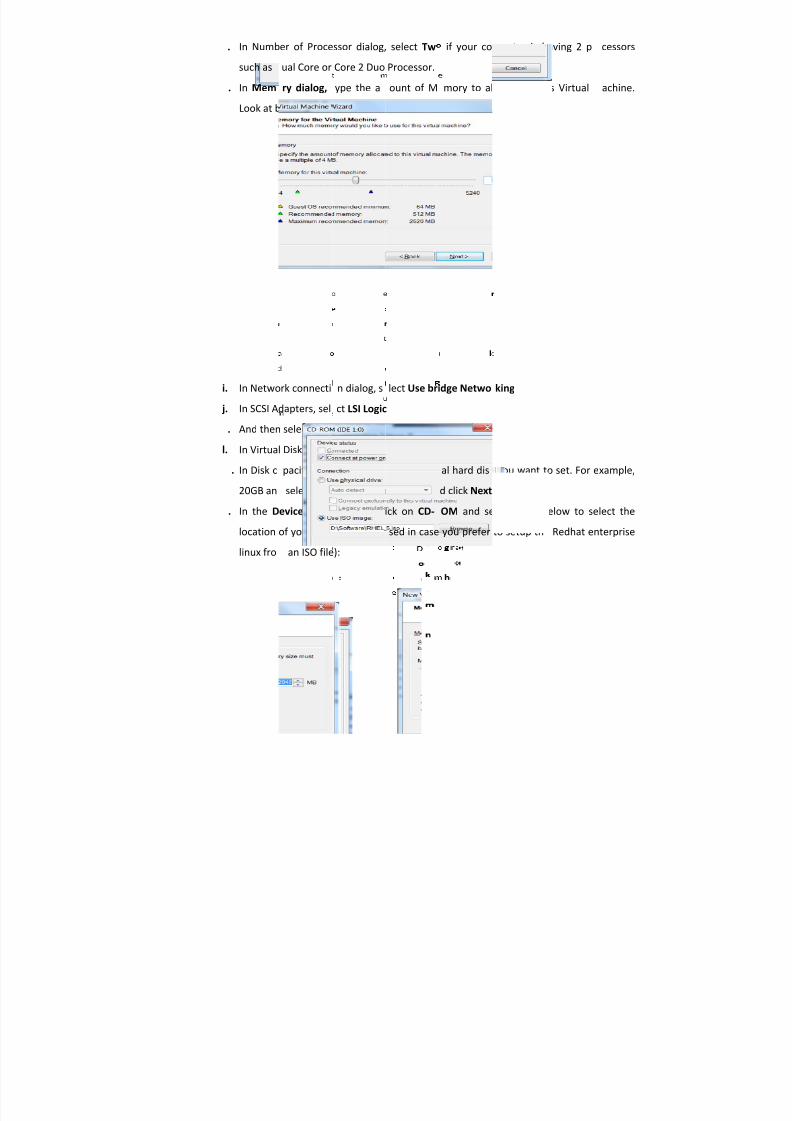
. In Numb
such as
. In Mem
Look at b
. In Netwo
. In SCSI A
. And then
. In Virtua
. In Disk c
20GB an
. In the D
location
linux fro
er of Proce
ual Core or
ry dialog,
elow sampl
rk connecti
dapters, sel
select Crea
l Disk
type
d
pacity dial
select Allo
evice panel
of your ISO
an ISO file
ssor dialog,
Core 2 Duo
ype the a
e:
n dialog, s
ct LSI Logic
te a new vi
ialog, selec
g, type the
cate disk sp
, double cl
file (this is
):
select Tw
Processor.
ount of M
lect Use bri
tual disk
SCSI
size of virtu
ace now an
ick on CD‐
sed in case
if your co
mory to al
dge Netwo
al hard dis
d click Next
OM and se
you prefer
mputer is h
locate in th
king
you want t
and Finish
e sample b
to setup th
aving 2 pr
is Virtual
o set. For e
elow to se
Redhat en
cessors
achine.
xample,
lect the
terprise
8/8/2019 Basic Redhat Enterprise Linux (1)
http://slidepdf.com/reader/full/basic-redhat-enterprise-linux-1 6/28
II‐ Install from
. You nee
. Make su
. Press En
. Press OK
. In Welco
. Select En
Bootable R
to have a
e your BIOS
er to install
to test you
me Messag
glish (Englis
dHat Enter
ootable DV
setting is c
in Graphic
DVD befor
dialog, clic
h) language
prise Linux
D
onfigured to
ode or typ
e installatio
k Next butt
DVD
boot off C
e linux text
, or Press S
n
ROM devic
and Enter t
kip
e
o install tex
mode
8/8/2019 Basic Redhat Enterprise Linux (1)
http://slidepdf.com/reader/full/basic-redhat-enterprise-linux-1 7/28
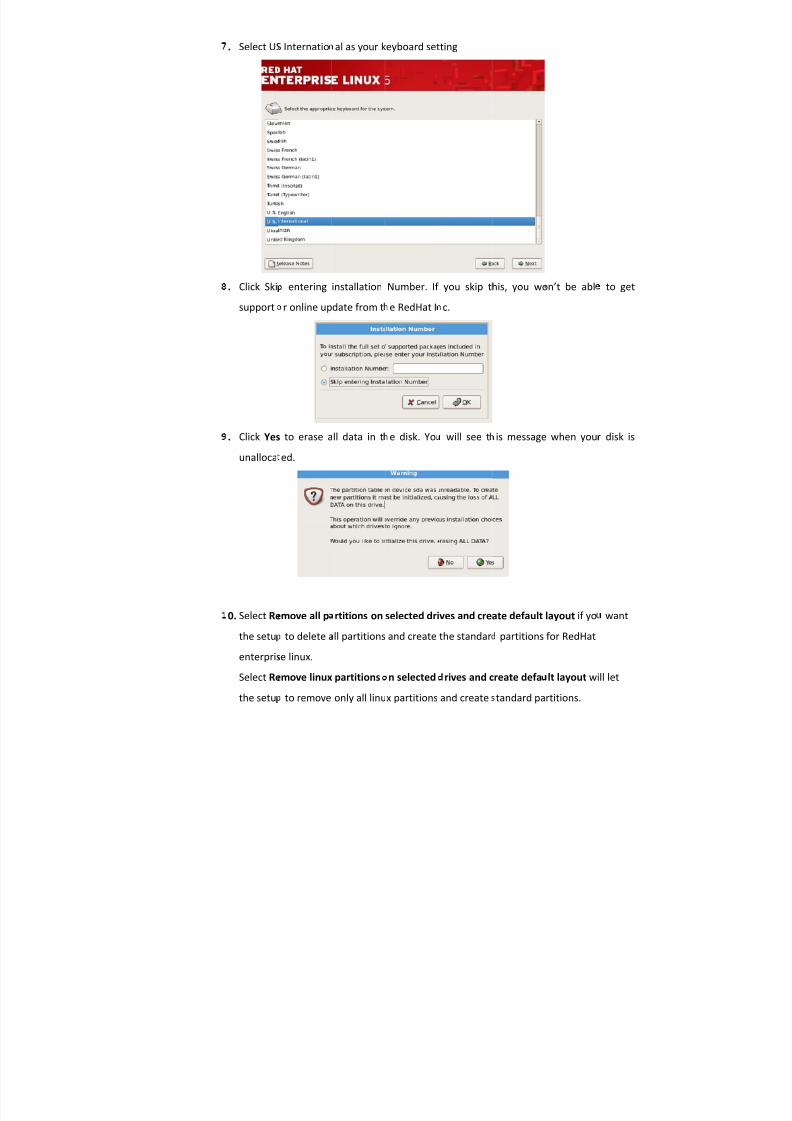
. Select US
. Click Ski
support
. Click Yes
unalloca
0. Select Re
the setu
enterpris
Select Re
the setu
Internatio
entering
r online up
to erase a
ed.
move all p
to delete a
e linux.
move linux
to remove
al as your k
installation
date from t
ll data in t
rtitions on
ll partitions
partitions
only all linu
eyboard set
Number. If
e RedHat I
e disk. Yo
selected dri
and create
n selected
x partitions
ting
you skip t
c.
will see t
ves and cre
the standar
rives and c
and create
his, you wo
is message
ate default
partitions
reate defa
tandard pa
n’t be abl
when you
layout if yo
for RedHat
lt layout wi
rtitions.
to get
disk is
want
ll let
8/8/2019 Basic Redhat Enterprise Linux (1)
http://slidepdf.com/reader/full/basic-redhat-enterprise-linux-1 8/28
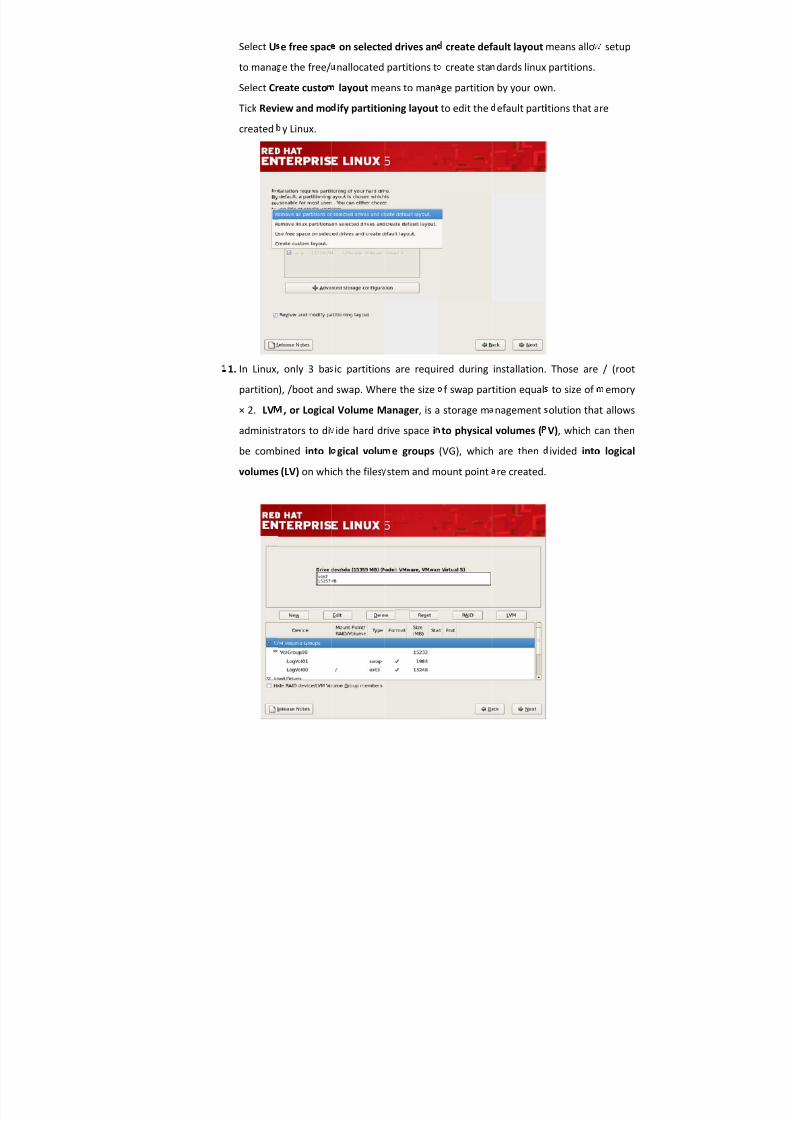
Select U
to mana
Select Cr
Tick Revi
created
1. In Linux,
partition
× 2. LV
administ
be comb
volumes
e free spac
e the free/
eate custo
ew and mo
y Linux.
only 3 ba
), /boot and
, or Logica
rators to di
ined into
l
(LV) on whi
on selecte
nallocated
layout me
ify partitio
ic partition
swap. Whe
l Volume M
ide hard dr
gical volu
ch the files
d drives an
partitions t
ans to man
ning layout
s are requi
re the size
anager , is a
ive space i
e groups
stem and m
create def
create sta
ge partition
to edit the
red during
f swap par
storage m
to physical
(VG), which
ount point
ault layout
dards linux
by your ow
efault part
installation.
tition equal
nagement
volumes (
are
then
re created.
means allo
partitions.
n.
itions that a
Those are
to size of
olution tha
V), which c
ivided into
setup
re
/ (root
emory
t allows
an then
logical
8/8/2019 Basic Redhat Enterprise Linux (1)
http://slidepdf.com/reader/full/basic-redhat-enterprise-linux-1 9/28
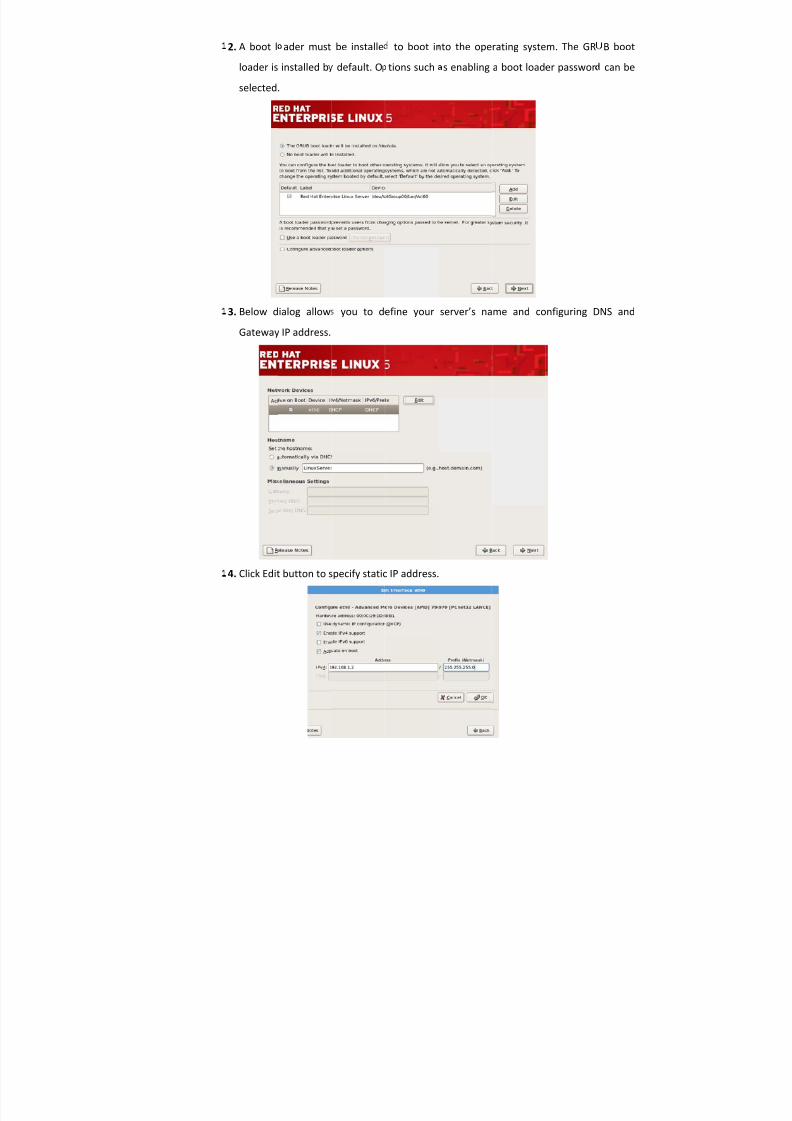
2. A boot l
loader is
selected.
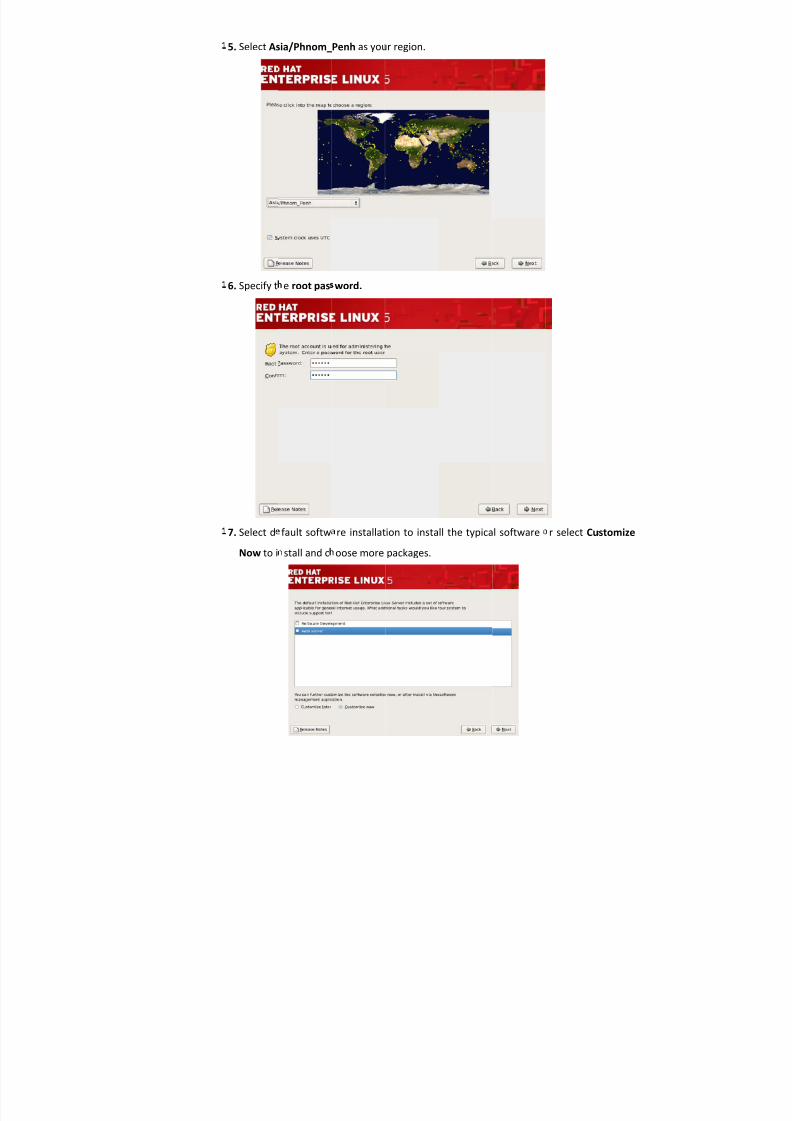
3. Below d
Gateway
4. Click Edit
ader must
installed b
ialog allow
IP address.
button to s
be installe
default. O
you to d
pecify static
to boot in
tions such
efine your
IP address.
to the ope
s enabling
server’s na
rating syste
a boot load
me and co
m. The GR
er passwor
nfiguring D
B boot
can be
NS and
8/8/2019 Basic Redhat Enterprise Linux (1)
http://slidepdf.com/reader/full/basic-redhat-enterprise-linux-1 10/28
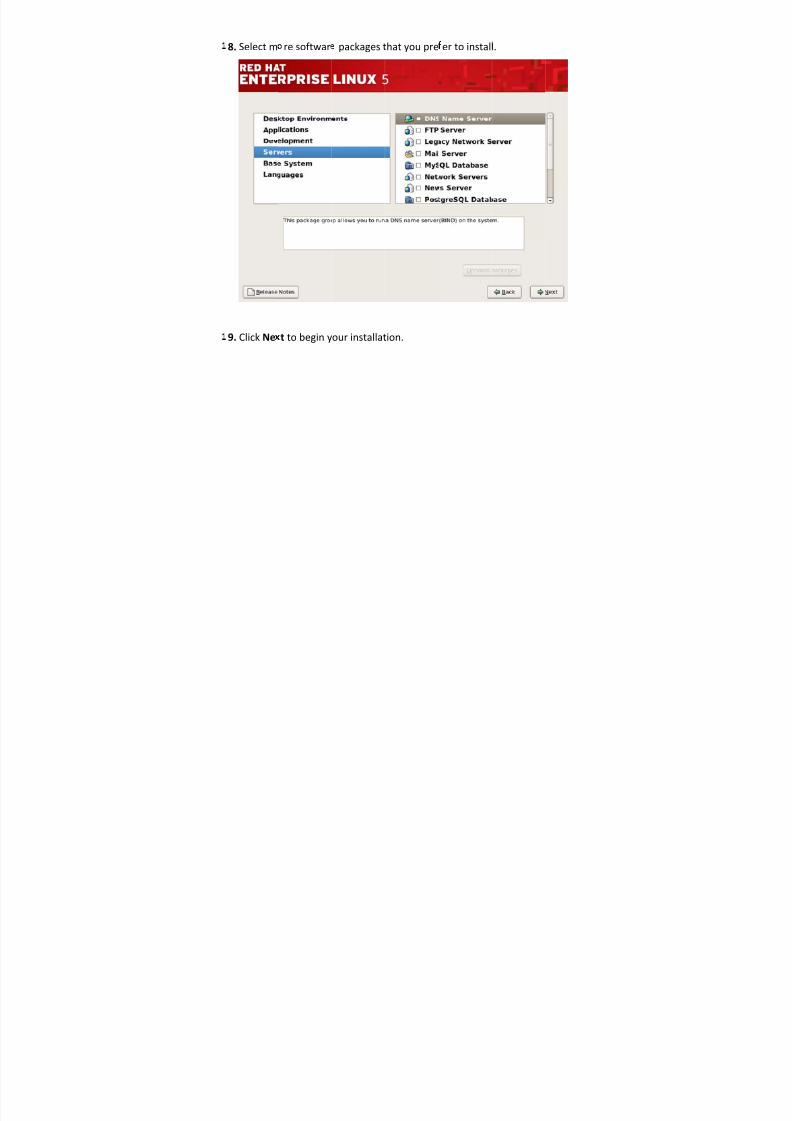
5. Select As
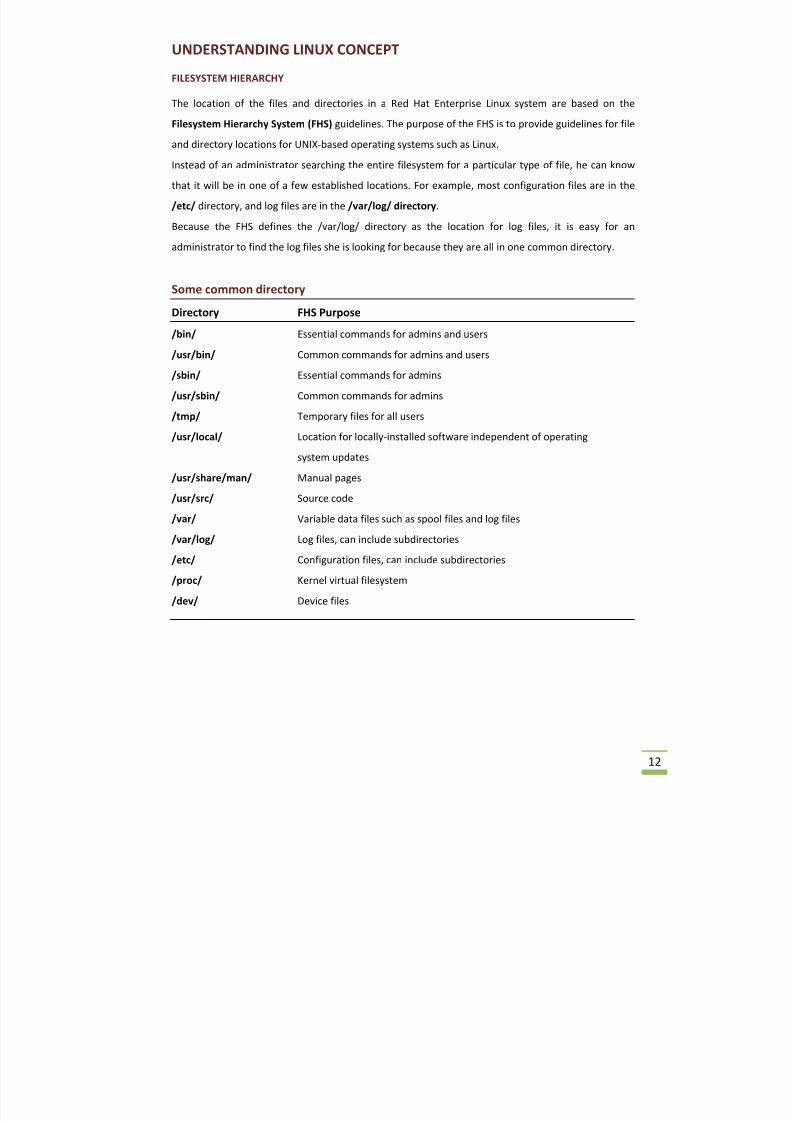
6. Specify t
7. Select d
Now to i
ia/Phnom_
e root pas
fault softw
stall and c
Penh as you
word.
re installat
oose more
r region.
ion to insta
packages.
ll the typical software r select Customize
8/8/2019 Basic Redhat Enterprise Linux (1)
http://slidepdf.com/reader/full/basic-redhat-enterprise-linux-1 11/28
8. Select m
9. Click Ne
re softwar
t to begin y
packages t
our installat
hat you pre
ion.
er to install.
8/8/2019 Basic Redhat Enterprise Linux (1)
http://slidepdf.com/reader/full/basic-redhat-enterprise-linux-1 12/28
12
UNDERSTANDING LINUX CONCEPT
FILESYSTEM HIERARCHY
The location of the files and directories in a Red Hat Enterprise Linux system are based on the
Filesystem Hierarchy System (FHS) guidelines. The purpose of the FHS is to provide guidelines for file
and directory locations for UNIX‐based operating systems such as Linux.
Instead of an administrator searching the entire filesystem for a particular type of file, he can know
that it will be in one of a few established locations. For example, most configuration files are in the
/etc/ directory, and log files are in the /var/log/ directory .
Because the FHS defines the /var/log/ directory as the location for log files, it is easy for an
administrator to find the log files she is looking for because they are all in one common directory.
Some common directory
Directory FHS Purpose
/bin/ Essential commands for admins and users
/usr/bin/ Common commands for admins and users
/sbin/ Essential commands for admins
/usr/sbin/ Common commands for admins
/tmp/ Temporary files for all users
/usr/local/ Location for locally‐installed software independent of operating
system updates /usr/share/man/ Manual pages
/usr/src/ Source code
/var/ Variable data files such as spool files and log files
/var/log/ Log files, can include subdirectories
/etc/ Configuration files, can include subdirectories
/proc/ Kernel virtual filesystem
/dev/ Device files
8/8/2019 Basic Redhat Enterprise Linux (1)
http://slidepdf.com/reader/full/basic-redhat-enterprise-linux-1 13/28
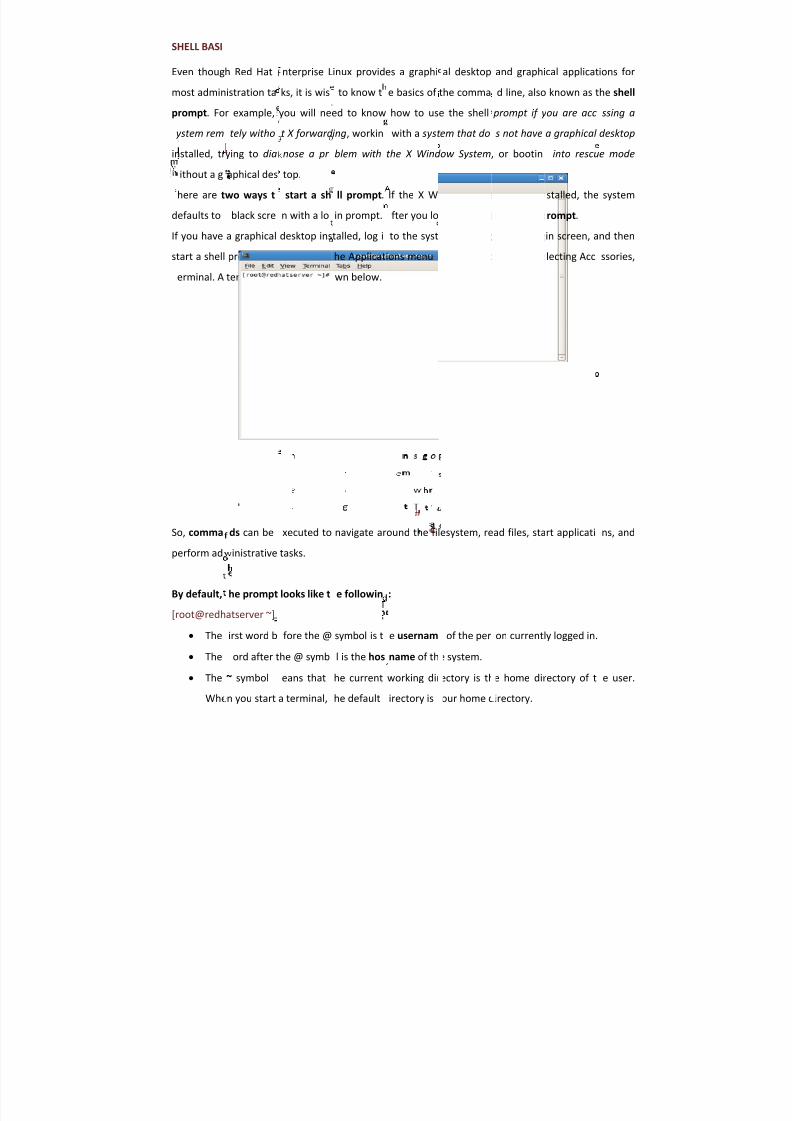
SHELL BASI
Even thoug
most admin
prompt . Fo
ystem rem
installed, tr
ithout a g
here are t
defaults to
If you have
start a shell
erminal. A
So, comma
perform ad
By default,
[root@redh
The
The
The
Whe
h Red Hat
istration ta
r example,
tely witho
ying to dia
aphical des
wo ways t
black scre
a graphical
prompt by
terminal wi
ds can be
inistrative
he prompt
atserver ~]
irst word b
ord after t
~ symbol
n you start
nterprise L
ks, it is wis
you will ne
t X forward
nose a pr
top.
start a sh
n with a lo
desktop ins
clicking on
ndow as sh
xecuted to
tasks.
looks like t
fore the @
he @ symb
eans that
a terminal,
inux provid
to know t
ed to know
ing , workin
blem with
ll prompt .
in prompt.
talled, log i
he Applicat
wn below.
navigate ar
e followin
symbol is t
l is the hos
he current
he default
es a graphi
e basics of
how to us
with a syst
the X Wind
If the X Wi
fter you lo
to the syst
ions menu
ound the fil
:
e usernam
name of th
working dir
irectory is
al desktop
the comma
e the shell
em that do
ow System ,
ndow Syste
g in, you are
em at the g
n the top p
esystem, re
of the per
e system.
ectory is th
our home d
and graphi
d line, also
prompt if y
s not have
or bootin
m is not in
at a shell p
raphical log
anel and se
ad files, sta
on currentl
e home dir
irectory.
cal applicat
known as t
ou are acc
a graphical
into rescu
stalled, the
rompt .
in screen, a
lecting Acc
rt applicati
y logged in.
ectory of t
ions for
he shell
ssing a
desktop
e mode
system
nd then
ssories,
ns, and
e user.
8/8/2019 Basic Redhat Enterprise Linux (1)
http://slidepdf.com/reader/full/basic-redhat-enterprise-linux-1 14/28
14
Some basic command you should know:
To change to a different directory, use the cd <directory> command.
cd ../httpd takes you up one directory and then down into the httpd directory.
To create a directory, use the mkdir <directory> command. The directory will be created in
current directory. If you want to create project1 directory in /home/rath you can type mkdir
/home/rath/project1 To remove an empty directory, invoke the rmdir <directory> command.
To force the removal of a directory with all the files and subdirectories within that directory,
use the rm ‐rf <directory> command.
To remove a file, use the rm <file> command.
Use the ls <directory> command to view the contents of <directory>.
To list all the OpenOffice.org text documents, use the ls *.odt command, or the ls status* to
find all files whose filename begins with status. Multiple wildcards can be used such as ls
*status* to list all files that have status somewhere in their name.
To copy a file from one location to another, use the cp <from> <to>. For example: cp
status.txt dir1/.
The mv <from> <to> command is similar to the cp command. The only difference is that the
original <from> file will no longer exist after the move operation.
Instead of typing the entire command, you can type the first few characters of it and press the
Tab key, then it will show the possibilities message as below:
Display all 112 possibilities? (y or n)
Press the Y key to display all the results, or press the N key to go back to the prompt and
type a few more characters to the desired command.
If you have ever forgotten a recently used command or forgotten which command line
arguments you used for a particular command, you can use history command. Or if you want
to filter some part of command you can use: history | grep ‘part of the command’ The command clear to clear the screen and place the prompt at the top of the screen.
locate .odt to find all OpenOffice.org text files or locate compare to find all filenames that
contain the word compare. The only catch to this command is that it relies on the generation
of a database file so it can quickly display results. The locate command is provided by the
mlocate package, which also provides the cron script /etc/cron.daily/mlocate.cron to
automatically generate this database daily.
8/8/2019 Basic Redhat Enterprise Linux (1)
http://slidepdf.com/reader/full/basic-redhat-enterprise-linux-1 15/28
15
The find command is a bit more complicated to use and takes longer to produce results
because it does not rely on a database to produce results. Because it takes longer, it is
possible to specify a specific directory to look in. The basic syntax is as follows:
find <directory> ‐name <filename>. To search in the current directory and below, replace
<directory> with a dot (.) character such as find . ‐name guidelines.txt
If you know a command exists on the system but keep getting the error message command not found, check to make sure you are typing the command correctly. Otherwise, it might not
be in your PATH environment variable. To view the value of your PATH, execute the command
echo $PATH from the command line. As you can see, your PATH is a list of directories. When
you execute a command without providing its full path, it must be in one of the directories
listed in your PATH.
You can provide the full path to the command if you know it, such as /sbin/lspci to execute
the command to list the PCI devices.
To add the /usr/sbin/ and /sbin/ directories to your PATH, add the following line:
export PATH=:$PATH:/usr/sbin:/sbin
To verify which command you are executing, type the command which <command> . If a
match to the command is found in the directories from your PATH, the full path to the
command is displayed.
To read a text file such as a configuration file without having to open a text editor. This is
possible with the less, more, and cat command ‐line utilities.
You can type less output.txt , more /var/log/messages, or cat /etc/sysconfig/network.
With the less command, the Page Up and Page Down keys can be used to scroll up and down
the contents of the file. The more command only allows you to scroll down the file using the
spacebar to advance. The cat command outputs the contents of the file to the command line and then exits, so if the file is longer than the number of lines in your terminal, you will only
see the last part of the file.
For example, to view only the kernel messages in the system log file, use the following
command:
cat /var/log/messages | grep kernel
8/8/2019 Basic Redhat Enterprise Linux (1)
http://slidepdf.com/reader/full/basic-redhat-enterprise-linux-1 16/28
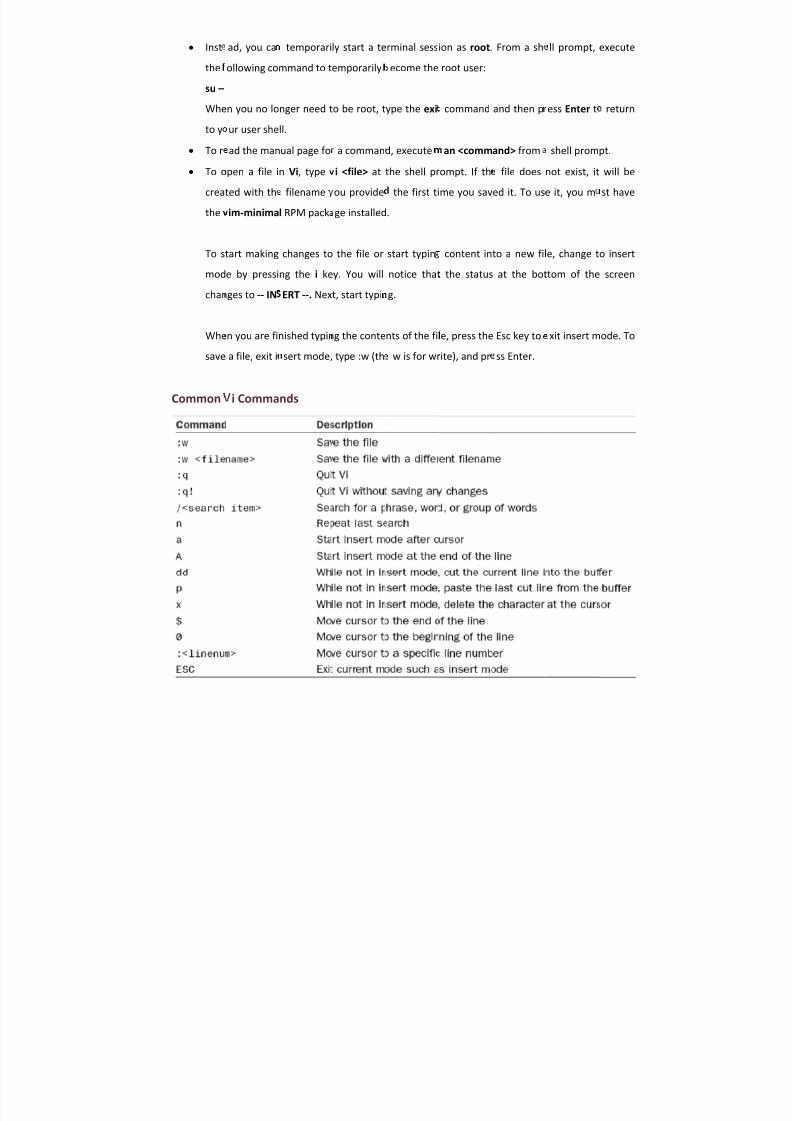
Inst
the
su –
Whe
to y
To r To o
crea
the
To s
mod
chan
Whe
save
Common
ad, you ca
ollowing co
n you no lo
ur user she
ad the manpen a file i
ted with th
im‐minima
tart making
e by pressi
ges to ‐‐ IN
n you are fi
a file, exit i
i Comma
temporari
mmand to t
nger need t
ll.
ual page fon Vi, type
filename
l RPM pack
changes to
ng the i ke
ERT‐‐. Nex
nished typin
sert mode,
nds
ly start a te
emporarily
o be root, t
a commani <file> at
ou provide
ge installed
the file or
y. You will
t, start typi
g the conte
type :w (th
rminal sess
ecome the
ype the exi
d, execute the shell pr
the first ti
.
start typin
notice that
g.
nts of the fil
w is for wr
ion as root .
root user:
command
an <commompt. If th
me you sav
content in
the status
e, press the
ite), and pr
From a sh
and then p
and> from file does
ed it. To us
to a new fil
at the bot
Esc key to
ss Enter.
ll prompt,
ess Enter t
shell promnot exist, it
e it, you m
e, change t
tom of the
xit insert m
execute
return
pt. will be
st have
o insert
screen
ode. To
8/8/2019 Basic Redhat Enterprise Linux (1)
http://slidepdf.com/reader/full/basic-redhat-enterprise-linux-1 17/28
17
FILE PERMISSION
Every file on your system has an accompanying set of permissions based on ownership.
You can examine the default permissions for a file you create by:
$ touch file
$ ls ‐l file ‐rw ‐r‐‐r‐‐ 1 root root 0 2009 ‐04‐01 23:46 file
The first character of the field is the type of file created: A dash is for a plain file, d is for
directory , c for character device (such as a serial communications Ex: /dev/ttys0) and b for
block device (a device that transfers and caches data in block Ex: blocks/dev/hda).
Permissions —Read, Write, and eXecute permission for the owner , group , and other users on
the system.
Number of links to the file—The number one (1) designates that there is only one file,
whereas any other number indicates that there might be one or more linked files. Links are
created with the ln command.
The owner —The account that created or owns the file; you can change this designation by
using the chown command.
The group —The group of users allowed to access the file; you can change this designation by
using the chgrp command.
File size and creation/modification date— The last two elements indicate the size of the file in
bytes and the date the file was created or last modified.
Assigning Permissions
Under Linux, permissions are grouped by owner, group, and others, with read, write, and execute
permission assigned to each, like so:
Owner Group Others
rwx rwx rwx
4+2+1=7 4+2+1=7 4+2+1=7
r = open and read file = 4
w = open and write file = 2
x = execute the file or read directory = 1

8/8/2019 Basic Redhat Enterprise Linux (1)
http://slidepdf.com/reader/full/basic-redhat-enterprise-linux-1 18/28
18
Using chmod command to modify permission
$chmod a‐w readme.txt
$ ls ‐l readme.txt
‐r‐‐r‐‐r‐‐ 1 andrew andrew 12 Jan 2 16:48 readme.txt
Some option you could use with chmod command: u—Adds or removes user (owner) permission
g—Adds or removes group permission
o—Adds or removes for others not in a file’s group
a—Adds or removes for all users
r—Adds or removes read permission
w—Adds or removes write permission
x—Adds or removes execution permission
Ex:
$ chmod u+rw readme.txt
$ ls ‐l readme.txt
‐rw‐‐‐‐‐‐‐1 andrew andrew 0 2007 ‐10‐23 19:08 readme.txt
Or
$ chmod 600 readme.txt
INITIALIZATION SCRIPT
Network services such as the Apache HTTP Server and DHCP along with other programs such as cron
and syslog require a daemon to be running at all times. The daemon performs actions such as
listening for connections to a service on specific ports, making sure commands are executed at
specific times, and capturing data such as log messages when they are sent out by other
programs.Programs that require a daemon to be started have an initialization script in the
/etc/rc.d/init.d/ directory.
This program first executes the /etc/rc.d/rc.sysinit script to perform actions such as loading kernel
modules for hardware support, loading the default keymap, and setting the hostname. The
8/8/2019 Basic Redhat Enterprise Linux (1)
http://slidepdf.com/reader/full/basic-redhat-enterprise-linux-1 19/28
19
/etc/inittab script is run next, which then tells init which runlevel to start. The runlevel defines which
services to start at boot time, or which initialization scripts to execute.
Lastly, the /etc/rc.d/rc.local script is executed. Commands can be added to this file for custom
initialization.
The initialization scripts can also be used to start, stop, and restart services after the system has booted . These actions are performed with the service command as the root user.
To perform an action, use the following syntax:
service <service> <action>
For example, the following starts the OpenSSH service:
service sshd start
RUNLEVELS
How does the system know which initialization scripts to run so that only the desired services are
started at boot time? Linux uses the concept of runlevels to define which services to start at boot
time.
There are 7 runlevels , with each having its own general purpose:
0 Halt the system
1 Single‐user mode or rescue mode
2 Not used
3 Multi ‐user mode with text login
4 Not used
5 Multi ‐user mode with graphical login
6 Reboot Each runlevel has its own directory named rcX.d in /etc/rc.d/, where X is the runlevel number . Each
of these directories contains symbolic links to the actual initialization scripts in /etc/rc.d/init.d/ . Each
symbolic link start with the letter S or K followed by a number. The S stands for start, and the K
stands for kill, which means to stop a process. When a runlevel is initialized, all the services starting
with K are stopped first, and then all the services starting with S are started.
8/8/2019 Basic Redhat Enterprise Linux (1)
http://slidepdf.com/reader/full/basic-redhat-enterprise-linux-1 20/28
20
Changing the Default Runlevel
By default, Red Hat Enterprise Linux boots into runlevel 5 with a graphical login screen and a
graphical desktop once the user successfully authenticates. Runlevel 3 is essentially the same except
the text login is used.
The default runlevel is configured on the following line from the /etc/inittab file: id:5:initdefault:
To change to a different runlevel without rebooting the system, please type the command:
init <runlevel>
Configuring runlevel
To configuring which services are started for a runlevel, use one of three programs: chkconfig
(command line only), ntsysv (simple text ‐based application that doesn’t require a graphical desktop),
or the Service Configuration Tool (graphical application).
The chkconfig command can be used to configure runlevels and list the current runlevel
configuration. It must be run as root if modifying a runlevel.
To list the status of all services, execute the chkconfig ‐‐list command.
httpd 0:off 1:off 2:off 3:off 4:off 5:off 6:off
To list the status for just one service, provide the name of the service:
chkconfig ‐‐list <service>
To modify whether the service is turned on or off for the runlevel, specify the service name and then
on, off, or reset . Set it to on to have the service started at boot time. Set it to off to have the service
stopped at boot time. Setting it to reset resets the values of all runlevels to the defaults from the initialization script. The syntax is as follows:
chkconfig <service> [on|off|reset]
OR
chkconfig ‐‐level <levels> <service> [on|off|reset]
8/8/2019 Basic Redhat Enterprise Linux (1)
http://slidepdf.com/reader/full/basic-redhat-enterprise-linux-1 21/28
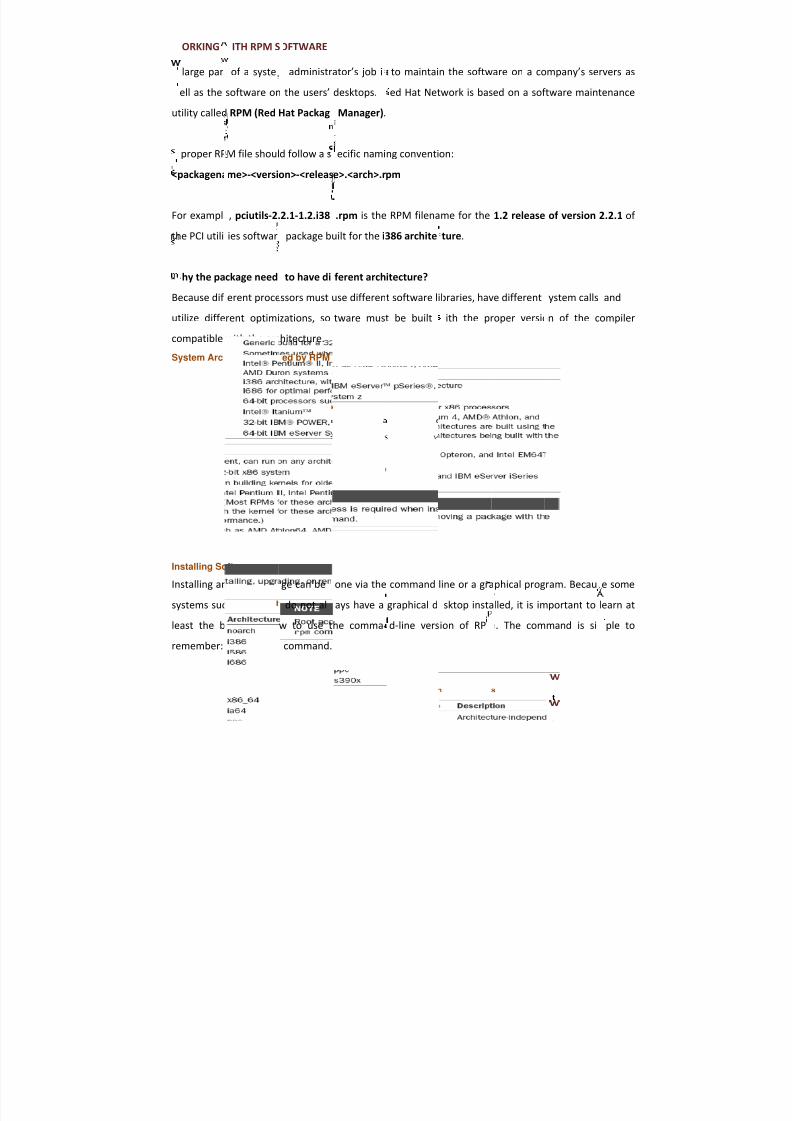
ORKING
large par
ell as the
utility called
proper RP
<packagena
For exampl
the PCI utili
hy the pa
Because dif
utilize diffe
compatible
System Arc
Installing So
Installing an
systems sucleast the b
remember:
ITH RPM S
of a syste
software on
RPM (Red
M file shoul
me> ‐<versi
, pciutils ‐2.
ies softwar
ckage need
erent proce
rent optimi
with the arc
itectures U
ftware
RPM pack
h as serverasics of ho
It is the rpm
OFTWARE
administr
the users’
Hat Packag
d follow a s
on> ‐<releas
2.1 ‐1.2.i38
package b
to have di
ssors must
zations, so
hitecture.
ed by RPM
ge can be
do not alw to use t
command.
ator’s job i
desktops.
Manager) .
ecific nami
e>.<arch>.r
.rpm is the
uilt for the i
ferent arch
use differen
tware mus
one via the
ays have a he comma
to maintai
ed Hat Net
ng conventi
pm
RPM filena
386 archite
itecture?
t software li
t be built
command
graphical dd‐line vers
n the softw
work is bas
on:
me for the
ture .
braries, hav
ith the pr
line or a gra
sktop instaion of RP
are on a co
ed on a sof
1.2 release
e different
oper versio
phical prog
lled, it is im. The com
mpany’s se
tware main
of version
ystem calls
n of the c
ram. Becau
portant to mand is si
rvers as
tenance
2.2.1 of
and
ompiler
e some
learn at ple to
8/8/2019 Basic Redhat Enterprise Linux (1)
http://slidepdf.com/reader/full/basic-redhat-enterprise-linux-1 22/28
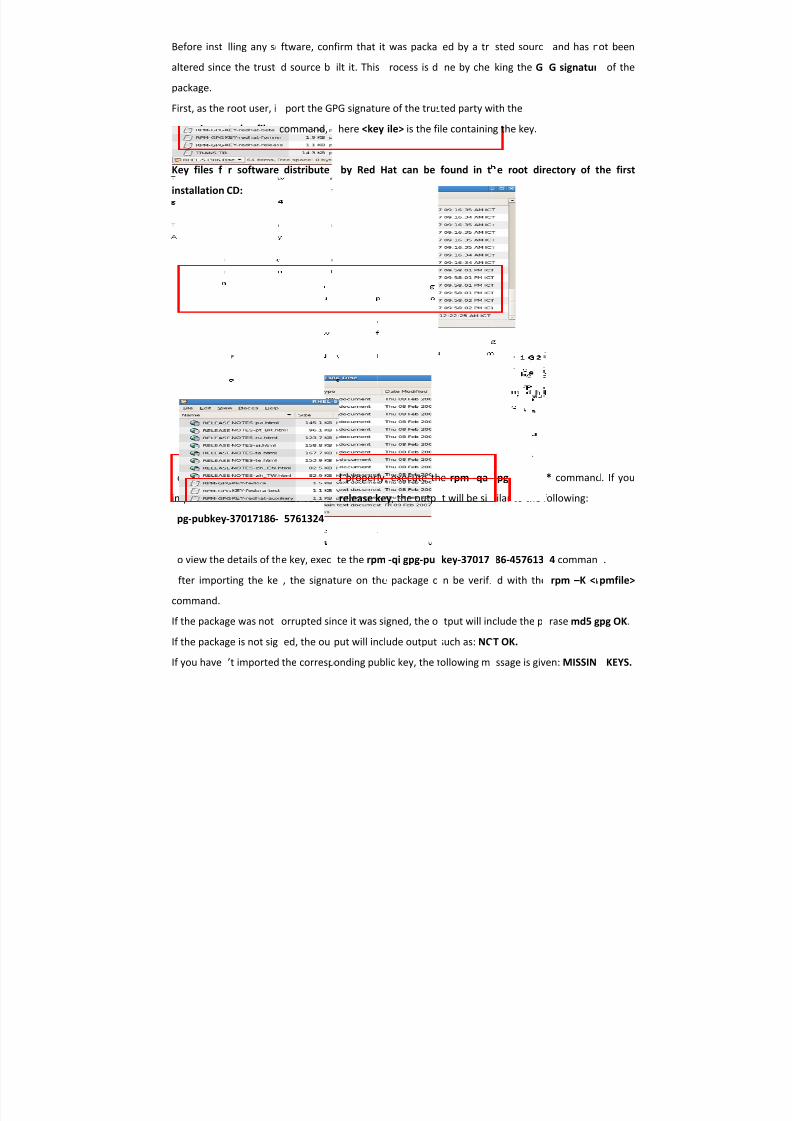
Before inst
altered sinc
package.
First, as the
rpm ‐‐impo
Key files f
installation
o verify th
imported th
pg‐pubkey
o view the
fter impor
command.
If the packa
If the packa
If you have
lling any so
e the truste
root user, i
t <keyfile>
r software
CD:
at the key
e RPM‐GPG
‐37017186 ‐
details of th
ting the ke
ge was not
ge is not sig
’t imported
ftware, con
d source b
port the G
command,
distribute
as import
‐KEY‐redha
5761324
e key, exec
, the signa
orrupted si
ed, the ou
the corresp
firm that it
ilt it. This
PG signatur
here <key
by Red H
d properly,
‐release ke
te the rpm
ture on the
nce it was si
put will incl
onding pub
was packa
rocess is d
e of the trus
ile> is the fi
at can be
execute th
y, the outp
‐qi gpg ‐pu
package c
gned, the o
ude output
lic key, the f
ed by a tr
ne by che
ted party w
le containin
found in t
e rpm ‐qa
t will be si
key ‐37017
n be verifi
tput will in
such as: NO
ollowing m
sted sourc
king the G
ith the
g the key.
e root dir
pg‐pubkey
ilar to the f
86 ‐457613
d with the
clude the p
T OK.
ssage is giv
and has n
G signatur
ectory of t
* command
ollowing:
4 comman
rpm –K <r
rase md5 g
en: MISSIN
ot been
of the
he first
. If you
.
pmfile>
pg OK.
KEYS.
8/8/2019 Basic Redhat Enterprise Linux (1)
http://slidepdf.com/reader/full/basic-redhat-enterprise-linux-1 23/28
fter verifyi
rpm ‐Uvh <
he ‐Uvh ar
about the i
For exampl1. You
cd /
2. So if
Sometimes
o solve thi
same time:
rpm ‐Uvh <
If the packa
instead:
rpm ‐Fvh <
ng that the
pmfile>
guments tel
stallation (
: To install need to cha
edia/RHE
you want t
a package r
s problem,
pmfile1> <r
ge is alread
ackagenam
package is t
l the rpm co
), and displ
ome packange to the p
‐5 i386 Disc
install tftp
quires addi
Download
pmfile2>
y installed
e>‐<versio
rustworthy,
mmand to i
ay the prog
es in RedHackage dire
/Server
packages:
tional RPM
he addition
and you onl
_number>.
install it wit
nstall the p
ress of the i
t Linux Entctory in the
packages to
al package
y want to
<arch>.rpm
h this com
ackage (U),
nstallation
rprise DVDDVD by:
be installed
as well and
pgrade the
and:
display ver
(h) with ha
.
or updated
install all t
package, u
ose inform
h marks (#)
.
he package
se the ‐F ar
ation
.
s at the
gument
8/8/2019 Basic Redhat Enterprise Linux (1)
http://slidepdf.com/reader/full/basic-redhat-enterprise-linux-1 24/28
24
Optional rpm Arguments When Installing or Updating
Argument Description
‐‐nodeps Install or upgrade the package without checking for dependencies.
The software will most likely not function properly without the
software dependencies installed. If you contact Red Hat support with problems, they will most likely ask you to reproduce the problem on
a system where all package dependencies have been satisfied.
‐‐excludedocs Do not install packages marked as documentation files such as man
pages.
‐‐oldpackage Allow a package to be replaced with an older version.
‐‐test Check for potential conflicts such as package dependencies but do
not install the package.
To remove a package, issue the following command:
rpm ‐e <packagename>
Notice that this time, only <packagename> is used, not the full name of the file used to install the
software.
If multiple versions of a package are installed, you can use:
rpm ‐e <packagename> ‐<version> ‐<release>
If the package that depends on the package you are trying to remove is still needed on the system,
you should not try to remove the package. If the package that depends on the package you are trying
to remove is also not needed, both must be removed at the same time to resolve the dependency:
rpm ‐e <packagename1> <packagename1>
If a configuration file is part of the package being removed but it has been modified, the file will be
renamed instead of removed with the .rpmsave extension, and a message similar to the following is
displayed:
warning: /etc/sysconfig/samba saved as /etc/sysconfig/samba.rpmsave
What if you want to verify that the files associated with a package haven’t been corrupted?
if you suspect your system has been accessed by a non ‐authorized user, you can verify that the files
from a package have not been changed with the RPM verify feature.
8/8/2019 Basic Redhat Enterprise Linux (1)
http://slidepdf.com/reader/full/basic-redhat-enterprise-linux-1 25/28
25
If the verify function is used, file properties such as file size, MD5 sum, file permissions, file type, and
file ownership are compared to the original values stored in the RPM database.
To verify that the files are associated with a package, use the following command:
rpm ‐V <packagename>
If no output is returned, the files from the package have not been modified since installation. If a file,
such as a configuration file, has been modified, the output is similar to: .M.....T /etc/httpd/conf/httpd.conf
RPM Verification Codes
Code Explanation
S File size has changed
M Mode has changed, including file permissions and file type
5 MD5 sum has changed
D Device major or minor number has changed
L The path of the symbolic link has changed
U The owner of the file has changed
G The group of the file has changed
T The last modified time has changed
Querying Package Files
How do you know which files are associated with which RPM packages? You can query the RPM database and find out:
rpm ‐qf <filename>
The <filename> must be the full path to the file. If the file is associated with an RPM package
installed, the name of the package and the version installed is displayed.
To query the package of the command, you could use:
rpm ‐qf `which <filename>`
To retrieve a list of configuration files from a package installed, use the following command: rpm ‐qc <packagename>
A similar query can be performed to list any documentation files installed with a package:
rpm ‐qd <packagename>
Note: Documentation files include man pages and text or HTML formatted files in /usr/share/doc/
installed by the package.
8/8/2019 Basic Redhat Enterprise Linux (1)
http://slidepdf.com/reader/full/basic-redhat-enterprise-linux-1 26/28
26
SYSTEM ADMINISTRATION
Managing user and group
Each user on a Red Hat Enterprise Linux system is assigned a unique user identification number, also
known as a UID. UIDs below 500 are reserved for system users such as the root user.
By default in Red Hat Enterprise Linux, when a user is added, a private user group is created. By default, the directory /home/<username>/ is created as the user’s home directory.
Adding/modifying/deleting user
The basic syntax to create new user is useradd <option> <username> .
Some options you can use along with useradd command:
Command ‐Line option Description
‐c <fullname> Full name of the user (or a comment about the user). If more thanone word is needed, place quotation marks around the value
‐d <directory> Home directory for the user. The default value is /home/ <username>/
‐e <date> Date on which the user account will expire and be disabled. Use the format YYYY‐MM‐DD (default: never expire or disable).
‐g <group> Default group for the user specified as a group name or group IDnumber.
‐G <group> Comma ‐separated list of additional group names or GIDs to which the user will be a member.
‐p <password> Specify an encrypted password for the user
‐s <shell> Specify the user login shell for the user. The default shell if notspecified is /bin/bash.
‐u <uid> Integer to use for the user ID. Values less than 500 are reserved for system users.
To modify the user usermod <options> <username> .
To create a password for the user, use the command passwd <username> . To delete user userdel <username>. To remove the user’s home directory and mail spool, use the
userdel ‐r <username> command.
8/8/2019 Basic Redhat Enterprise Linux (1)
http://slidepdf.com/reader/full/basic-redhat-enterprise-linux-1 27/28
27
Managing Group A unique integer known as a GID is associated with each group. GIDs below 500 are reserved for
system groups just like UIDs below 500 are reserved for system users.
The basic syntax to create new user is groupadd <groupname>.
To specify a GID, use the groupadd ‐g <gid> <groupname> command. The modify the group such as changing the GID of a group, use the
groupmod ‐g <gid> <groupname> command.
To change the name of the group, use the groupmod ‐n <newname> <groupname> command. To delete an existing group, use the groupdel <groupname> command.
Where they store?
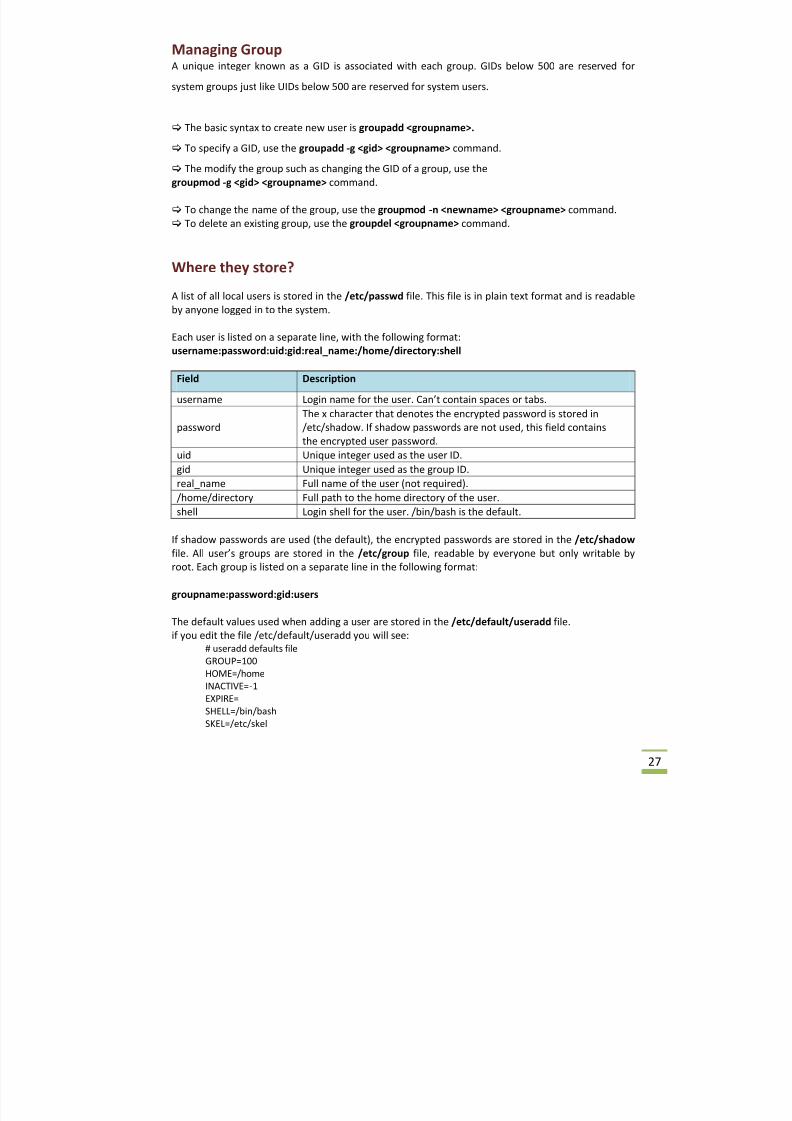
A list of all local users is stored in the /etc/passwd file. This file is in plain text format and is readable by anyone logged in to the system.
Each user is listed on a separate line, with the following format: username:password:uid:gid:real_name:/home/directory:shell
Field Description
username Login name for the user. Can’t contain spaces or tabs.
password The x character that denotes the encrypted password is stored in /etc/shadow. If shadow passwords are not used, this field contains the encrypted user password.
uid Unique integer used as the user ID.gid Unique integer used as the group ID.real_name Full name of the user (not required). /home/directory Full path to the home directory of the user.shell Login shell for the user. /bin/bash is the default.
If shadow passwords are used (the default), the encrypted passwords are stored in the /etc/shadow file. All user’s groups are stored in the /etc/group file, readable by everyone but only writable by root. Each group is listed on a separate line in the following format:
groupname:password:gid:users
The default values used when adding a user are stored in the /etc/default/useradd file. if you edit the file /etc/default/useradd you will see:
# useradd defaults file GROUP=100 HOME=/home INACTIVE=‐1 EXPIRE= SHELL=/bin/bash SKEL=/etc/skel
8/8/2019 Basic Redhat Enterprise Linux (1)
http://slidepdf.com/reader/full/basic-redhat-enterprise-linux-1 28/28