biz fax client user manual en
TRANSCRIPT
Client User Manual
(English)
Yeastar Technology Co., Ltd.

BizFAX Client User Manual
Table of Contacts 0 1. Introduction····················································································· 4 2. Operating Environment ····································································· 5
2.1 Hardware Environment······························································· 5 2.2 Software Environment································································ 5
3. Install BizFAX Client·········································································· 6 4. Usage of BizFAX Client ·····································································11
4.1 Log in Client ············································································11 4.2 Send FAX ················································································12
4.2.1 Sending fax from application programs ·······························12 4.2.2 Sending fax from Client software········································14 4.2.3 Description of ‘Create a New Fax’ Menu ·······························15
4.2.3.1 Receiver (Fax number) ·············································15 4.2.3.2 FAX Subject ····························································16 4.2.3.3 Fax Content ····························································16
4.2.4 Delay to Send FAX····························································16 4.2.5 FAX Broadcast ·································································17 4.2.6 Forward Fax ····································································19 4.2.7 Reply FAX ·······································································20 4.2.8 Check Results··································································20
4.3 Receive Fax·············································································21 4.4 Forward Fax to Email (FAX to Mail) ·············································21 4.5 Manage Fax·············································································22
4.5.1 Edit Subject ····································································22 4.5.2 Group Managment····························································22 4.5.3 Delete Fax·······································································23 4.5.4 Print Fax ·········································································23
4.6 Fax Editor ···············································································24 4.6.1 Veiw FAX ········································································25 4.6.2 Remark FAX ····································································25 4.6.3 Seal & Signature ······························································27
4.6.3.1 Get seal and signature··············································27 4.6.3.2 Set Stamp Image·····················································29 4.6.3.3 Set Password ··························································29 4.6.3.4 Application of Stamp ················································30
4.7 SMS Module ············································································31 4.8 Fax Extension Management ·······················································32 4.9 Contacts Management·······························································33
4.9.1 Contacts Group Management ·············································33
www.yeastar.com Page 2
BizFAX Client User Manual
4.9.2 Add New Contact ·····························································34 4.9.3 Edit & Delete Contact························································35 4.9.4 Send Contact···································································35 4.9.5 Import Contact ································································36
4.10 Internal Communications among extensions·······························38 4.10.1 Voice Talk······································································38 4.10.2 Text Chat ······································································38
4.11 Personal Profile ······································································39 4.12 Change Password ···································································40 4.13 Change Language···································································40 4.14 Audio Settings········································································40 4.15 Sign out & Exit ·······································································41
5. FAX to Mail & Mail to FAX··································································42 5.1 FAX to Mail··············································································42 5.2 Mail to FAX··············································································43
Appendix A How to make fax file in TIFF format? ·····································45
www.yeastar.com Page 3

BizFAX Client User Manual
Introduction 1 BizFAX paperless fax system is an intelligent fax server that combines the traditional fax technology and network technology. After connected the PSTN telephone line and built up the connetion with the LAN or internet, by using the BizFAX Client software on their computers, users can easily to create a safe, efficient and affordable fax system for enterprise. Moreover, all of these are electronic processing on computer without a piece of paper. Through BizFAX Client software, every user is able to get the auto-receive, auto-fax and management features. When sending a fax, users only need to submit file to BizFAX server, and then system will auto fax the files in order. Back up the faxes automatically and allow users to easily manage them. It’s helpful to improve the progress of company internal approval, add personal signature, make company seal, and Mail to FAX and FAX to Mail. The advanced integration of BizFAX with internet, email and SMS help users to send and receive faxes at any time any where.
www.yeastar.com Page 4

BizFAX Client User Manual
Operating Environment 2 2.1 Hardware Environment
CPU:Recommend to use more a CPU that power than INTELPIII500 Memory:Recommend to use more than 128MB RAM Hard Disk:At least 1 G
2.2 Software Environment
Operating system:Windows XP, Windows 2000, Windows 2003, Windows Vista,
Widows 2008, Windows 7.
www.yeastar.com Page 5

BizFAX Client User Manual
Install BizFAX Client 3 This section shows how to install BizFAX Client software on the PC. 1. Download Client software from
http://www.yeastar.com/download/BizFAXClientSetup.exe 2. Doube-click the ‘BizFAXClientSetup.exe’, Welcome to the BizFAXClient Installation screen will come up.
Figure 3-1
3. Click Next to continue.
www.yeastar.com Page 6

BizFAX Client User Manual
Figure 3-2
4. Read through the software License Agreement, select ‘I agree with the above terms and conditions’, and then click Next to continue. See Figure3-3.
Figure 3-3
www.yeastar.com Page 7

BizFAX Client User Manual
5. Click ‘Next’ after going over the provisions
Figure 3-4
6. The Destination folder screen will offer you the option where you would
like BizFAXClient to be stored on your computer. Click Next to continue.
Figure 3-5
www.yeastar.com Page 8

BizFAX Client User Manual
7. A screen pop-up to notify you that: (1)Launch BizFAXClient after installation. (2)Create desktop shortcut; (3)Start BizFAXClient when I start Windows
Enable the options by your own demands, and then click Next.
Figure 3-6
8. Enter into the Installing Files,system begin to installation step, which will last for a while.
www.yeastar.com Page 9

BizFAX Client User Manual
Figure 3-7
9. When the installation is complete, a screen pop-up to notify you that the software is installed successfully. Click Finish.
Figure 3-8
www.yeastar.com Page 10

BizFAX Client User Manual
Usage of BizFAX Client 4 4.1 Log in Client
After the installation, you can enjoy the powerful functions BizFAXClient offers.
Double-click shortcut and launch BizFAXClient. Please enter your Ext. number and password and then click ‘Sign In’, see Figure 4-1.
Please pay attention when you
login at first time:
Please click ‘Tools’ on
menuOptions, and enter the IP
address of BizFAX Server on Figure
4-2. You can get this IP from Admin.
About Ext. and Password
To obtain the Extension and
Password from your system Admin
before you log in BizFAXClient.
Figue 4-1
www.yeastar.com Page 11

BizFAX Client User Manual
Figure 4-2
4.2 Send FAX
After installed the BizFAXClient software, system will create a virtual fax
printer that named as ‘BizFAX ’ in printer folder in the control panel.
4.2.1 Sending fax from application programs
Application programs adopt the ‘Virtual Print’ way to realize the fax function. All the programs are able to send fax by BizFAX Fax Printer as long as they support print function. Open any type of document that supports print, select ‘Print’ and see a prompt dialog box as Figure 4-3:
www.yeastar.com Page 12

BizFAX Client User Manual
Figure 4-3
Select ‘BizFAX’ on printer list and click ‘OK’. System will generate a ‘Create new fax’ window and the file would be printed as TIFF to add into task list.
Figure 4-4
www.yeastar.com Page 13

BizFAX Client User Manual
4.2.2 Sending fax from Client software
(1) Enter into FAX tag, click ‘Create’ to create a new fax. (2) Click ‘add file’ to select the file you want to fax from computer.
Note: Only the file in *.bmp、*.dib、*.jpg、*.jpeg、*.png、*.doc、*.docx、*.xls、*.xlsx、*.pdf、*.tif、*.tiff、*.txt or *.rtf format can be added in this way. The
files in other formats could be opened by the application programs and sent out through ‘Prinit’.
Figure 4-5
Merge multiple files to fax once If user wants to fax multiple files at the same time, he can click the ‘Add file’ button again to add other files into task list, or he can use the application programs to open the files at first and choose ‘Print’to send them into fax list. Beside the adding option, user is also able to delete the unnecessary files from list after clicked ‘Delete File’button.
www.yeastar.com Page 14

BizFAX Client User Manual
Figure 4-6
4.2.3 Description of ‘Create a New Fax’ Menu
4.2.3.1 Receiver (Fax number) There are two ways to enter receiver (fax number): 1. Enter the numbers directly as Figure 4-7
The right way of entering fax number: for example here a company in Xiamen city of China, city area code is 0592 and country code is 0086 :
(1)local fax number in this company:5503307
(2)doemstic long distance fax number:05925503307
(3)international long distance fax number: 00865925503307
Note: 9+5503307 or 0+5503307 When an ext. user sends a fax, he needs to plus a prefix number 0 or 9 that usually required by the PBX phone system before dialing the receiver’s fax number.
Figure 4-7
2. Click on ‘Receiver’ and select contacts from address book.
www.yeastar.com Page 15

BizFAX Client User Manual
Figure 4-8
Select contacts’ fax number and click ‘Add’, it shows the selected number on right box, click ‘OK’ to finish.
4.2.3.2 FAX Subject Mark the faxes for easy manageable and searchable.
4.2.3.3 Fax Content Fax File List
1)Add Fax:Select one or multiple files from computer to fax out once 2)Delete Fax: Delete file(s) from fax file list
Preview:
User is able to view and check the selected fax file through ‘Preview’.
Edite:
User is able to add signature or make notes on selected file. Click ‘Edit Fax’ to amend contents, seal and add signature directly.
4.2.4 Delay to Send FAX
BizFAX is able to send fax in specific time that set up by users. User can set up an idle time or the most cheapest call rate period to delivery fax and this function is specially useful to send the international fax because of the time difference.
www.yeastar.com Page 16
BizFAX Client User Manual
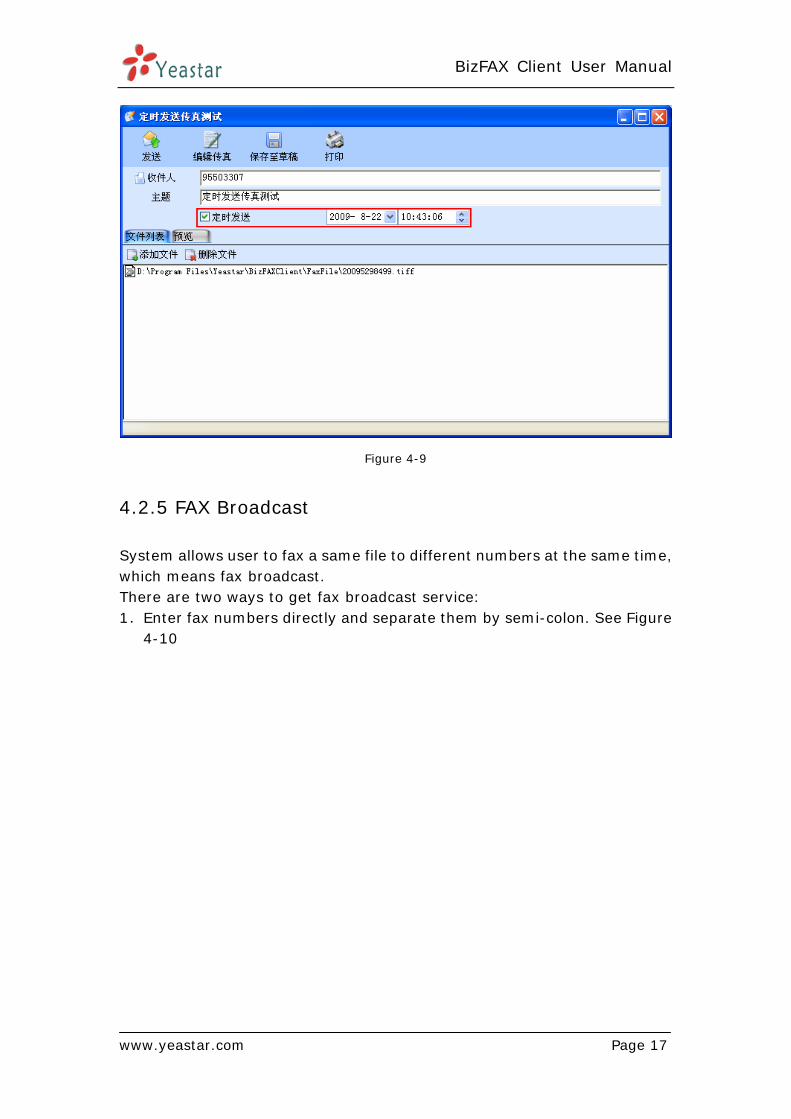
Figure 4-9
4.2.5 FAX Broadcast
System allows user to fax a same file to different numbers at the same time, which means fax broadcast. There are two ways to get fax broadcast service: 1.Enter fax numbers directly and separate them by semi-colon. See Figure
4-10
www.yeastar.com Page 17

BizFAX Client User Manual
Figure 4-10
2.Click ‘Receiver’ and select multiple contacts from address book to add into right box as Figure 4-11.
Figure 4-11
www.yeastar.com Page 18

BizFAX Client User Manual
4.2.6 Forward Fax
User can transfer the received faxes to both internal extension users and external contacts.
1.Forward to internal extensions
Click the right mouse on the selected fax and choose ‘Forward’ from the pull-down menu. Click on ‘To’ to select receivers from ‘Fax Extensions’ as Figure 4-12. Double click on the extension names or click ‘Add’ to add the selected extensions into right list.
Figure 4-12
2.Forward to external contacts
Click the right mouse on the selected fax and choose ‘Forward’ from the pull-down menu. Click on ‘To’ to select receivers from ‘Contacts’ as Figure 4-13. Double click on the extension names or click ‘Add’ to add the selected contacts into right list.
www.yeastar.com Page 19

BizFAX Client User Manual
Figure 4-13
4.2.7 Reply FAX
User can reply to the sender directly for the received fax. Click on the right mouse on the selected fax, choose ‘Reply’ on pull-down menu, system will pop up a window where user can edit the fax for remark, seal and signature. After the above edition, user can reply the modified fax file to sender.
4.2.8 Check Results
Once sent out from Client, the fax task sumbmitted to Server side. If the fax file is waiting in line for processing or is sending fax, the file will be saved in the ‘Outbox’. If fax sent successfully, the file file will forward to the ‘Sent Items’. User can check the recipients, subject, created time and status in this window. If user fails to send, the fax file will be saved on ‘Outbox’. System shows the failure reason on the ‘Statu’ of Client, such as busy, no answer, and dead number. If user wants to resend the failure fax, just click on selected file; choose ‘Send’ on menu, submit failure number to server side again. Status:
Waiting process – file is waiting in line for faxing
www.yeastar.com Page 20

BizFAX Client User Manual
Sending – system is sending fax Sent successfully - fax is successfully delivered. Resending- fax is being resend. Waiting for idle trunk – trunks are busy, system is waiting for an idle trunk. Transmission failure, waiting to try again Have no valid line - User dialed a wrong access number. For example, the trunk correct access number is ‘9’, but user dialed ‘7’ that led to the unavailable of valid trunk. Wrong router, calls can not pass through – Send fax to an invalid number. The callee is busy, waiting to try again. The callee is busy, system will not try again. – The callee is busy, the retry times has reached the number that configured in server. Transmission failure, system will not try again. – After the several retry times that configured for failure fax, system still fails to send out, so will not try again. Transmission over time, system will not try again. – After the several retry times that configured for failure fax, system still fails to send out, so will not try again.
4.3 Receive Fax
After enabled Client, BizFAX will pop up a prompted interface on the lower right corner for the newly received fax.
Figure 4-14
Click ‘Check Fax’ to view contents by the fax editor directly. Click ‘Close’ to close the interface and user can login Client to check.
4.4 Forward Fax to Email (FAX to Mail)
Send incoming fax to email. In order to auto forward all the incoming faxes to an appointed email addrss, user requires to pre-setup the email server on BizFAX Server side. On Client side, user also needs to do the operation: click ‘File’ ‘Edit Profile’ enable ‘Sending incoming fax to the Email’, please see Figure 4-15
www.yeastar.com Page 21
BizFAX Client User Manual
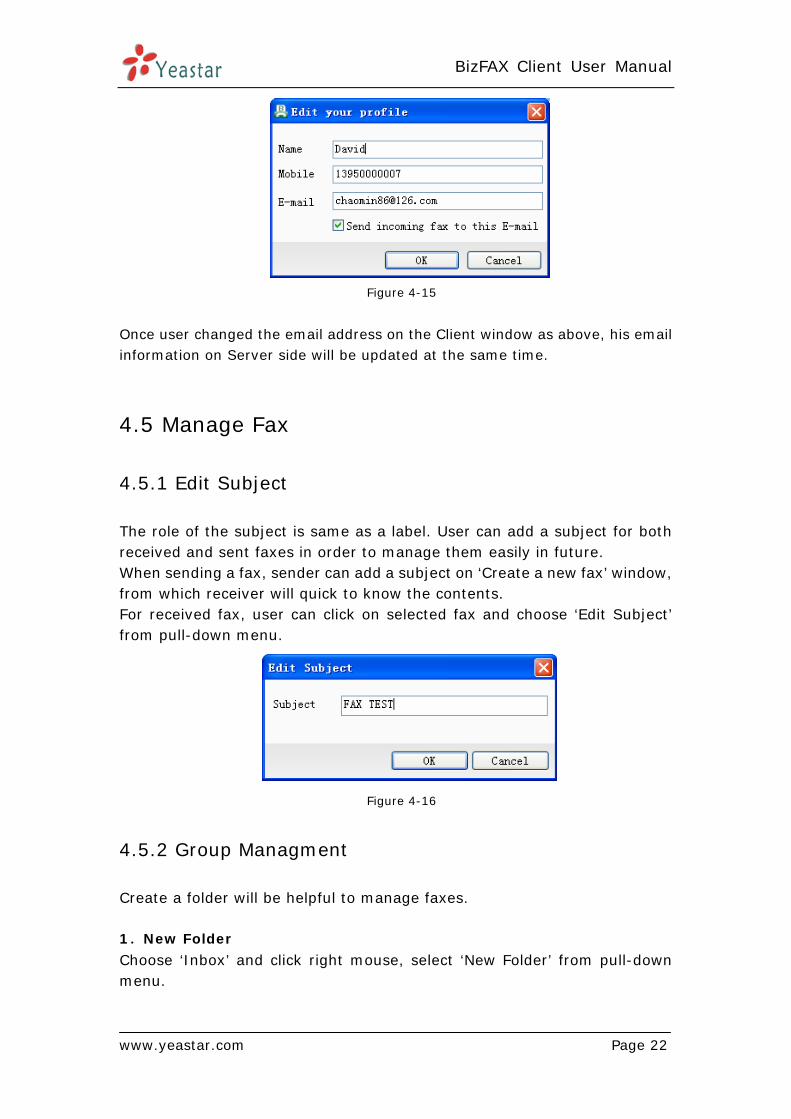
Figure 4-15
Once user changed the email address on the Client window as above, his email information on Server side will be updated at the same time.
4.5 Manage Fax
4.5.1 Edit Subject
The role of the subject is same as a label. User can add a subject for both received and sent faxes in order to manage them easily in future. When sending a fax, sender can add a subject on ‘Create a new fax’ window, from which receiver will quick to know the contents. For received fax, user can click on selected fax and choose ‘Edit Subject’ from pull-down menu.
Figure 4-16
4.5.2 Group Managment
Create a folder will be helpful to manage faxes.
1.New Folder
Choose ‘Inbox’ and click right mouse, select ‘New Folder’ from pull-down menu.
www.yeastar.com Page 22

BizFAX Client User Manual
Figure 4-17
Create a name for this folder on the following box
Figure 4-18
2.Drag fax to folder
Click on the selected fax file and hold down the mouse, drag it into required folder.
4.5.3 Delete Fax
After clicked ‘Delete’ button, it will prompt a check window ‘Are you sure to move the fax(s) to deleted items folder’.
1. Click ‘Yes’ The deleted items will be saved on trash folder temporary. Users can easily to restore the miss deleted file from trash folder to origital position. If need to permanently delete the fax, on trash folder, click ‘Delete’ on selected fax will be OK.
2. Click ‘No’ Will not to delete the fax.
4.5.4 Print Fax
If user wants to print out the fax, only open it and click ‘Print’ button, system
will prompt a window as Figure 4-18.
www.yeastar.com Page 23

BizFAX Client User Manual
Figure 4-19
4.6 Fax Editor
The fax editior co-works with BizFAXClient to view, edit and make remark on fax file. Option 1: Double click on a fax file in Client, click ‘Reply’ or ‘Forward’, and click ‘Edit Fax’ on the pop window to access fax editor. Option 2: Click ‘Create’, and add the file you want to fax on pop window, finally click ‘Edit’ to access fax editor.
www.yeastar.com Page 24

BizFAX Client User Manual
4.6.1 Veiw FAX
Figure 4-20
:from left to right: fit width, fit height, fit visible, actual size
:from left to right:Rotate Counterclockwise 90°, Rotate 180°, Rotate
Clockwise 90°
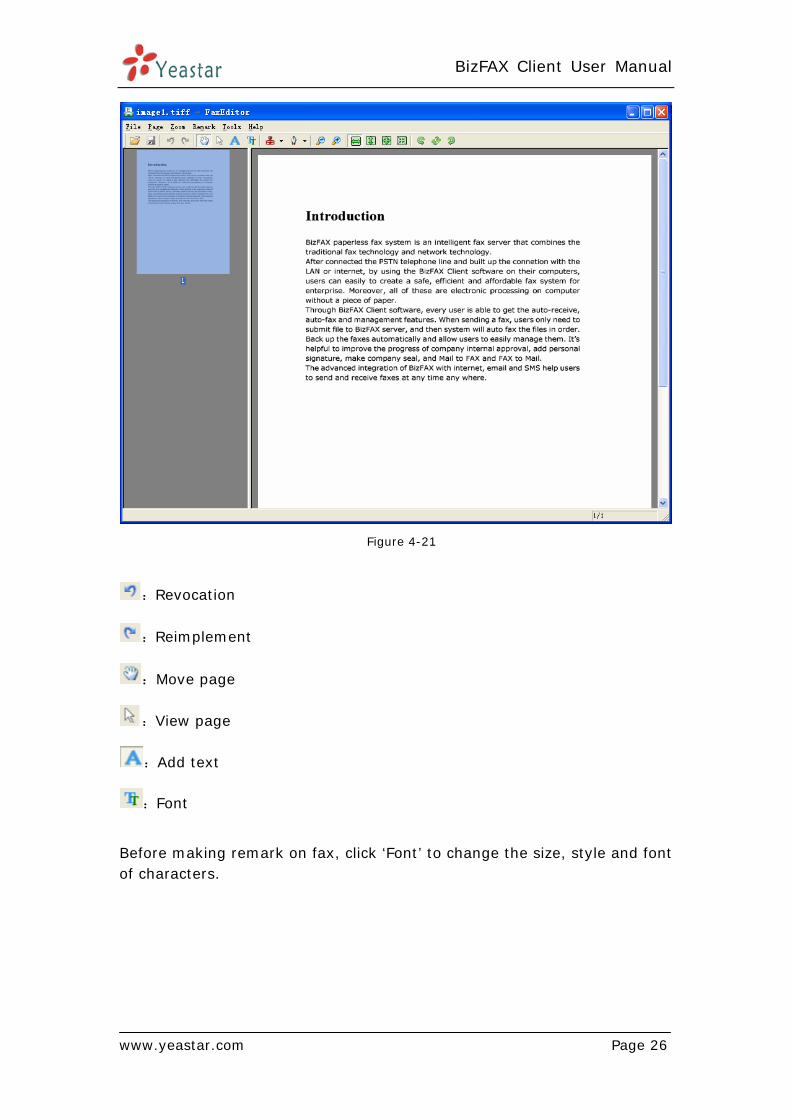
4.6.2 Remark FAX
It helps user to modify the file contents.
www.yeastar.com Page 25
BizFAX Client User Manual
Figure 4-21
:Revocation
:Reimplement
:Move page
:View page
:Add text
:Font
Before making remark on fax, click ‘Font’ to change the size, style and font of characters.
www.yeastar.com Page 26

BizFAX Client User Manual
Figure 4-22
4.6.3 Seal & Signature
4.6.3.1 Get seal and signature Step 1:Save a paper with a seal or a signature into computer.
Method 1: Send the paper from physical fax machine to virtual fax extension, and login this virtual fax extension and download the paper to computer. Method 2: Scan the paper by a scanner and save it on computer; Click right mouse on the newly scanned file and choose ‘Print’ to conver it into TIFF format file by ‘BizFAX’ virtual printer. The purpose of this step is to convert file into editable TIFF format.
Step 2: Use the FaxEditor to open the saved file. Click on the saved file, click right mouse and chose ‘Open’ ‘Program’, and click ‘View’ on pop-up window, select the FaxEditor.exe that under the BizFAXClient installation path, click ‘Open’ to edit file.
www.yeastar.com Page 27

BizFAX Client User Manual
Figure 4-23
Step 3:On the opened FaxEditor, click ‘Remark’ ‘Get Stamp’, drag mouse to
choose on stamp or signature, and then release mouse to extract the stamp or signature image from paper. Enter a name on the pop-up window as Figure 4-23 The stamp and sigunature images will be saved as BMP & TIFF format.
Figure 4-24
www.yeastar.com Page 28

BizFAX Client User Manual
Step 4:After clicked ‘Save’, the extracted images will be saved into manager as
Figure 4-25
Figure 4-25
Step 5:Click ‘OK’ to finish the operation of extracting stamp and signature.
4.6.3.2 Set Stamp Image There are two methods to set stamp image:
1.Import Stamp
Click ‘Remark’ -> ‘Stamp Image’ -> ‘Set Stamp’; on the prompt ‘Set Stamp Image’ window -> click ‘Import Stamp’. User can import the BMP and TIF formart pictures that already saved in computer. The accuracy is better around 100dpi.
2.Signature
Click ‘Remark’ -> ‘Signature Image’ ->’Set Signature’; on the prompt ‘Set Signuature Image’ window click ‘Add Image’.
4.6.3.3 Set Password Cick ‘Remark’ ‘Set Stamp’, open the following figure:
www.yeastar.com Page 29
BizFAX Client User Manual
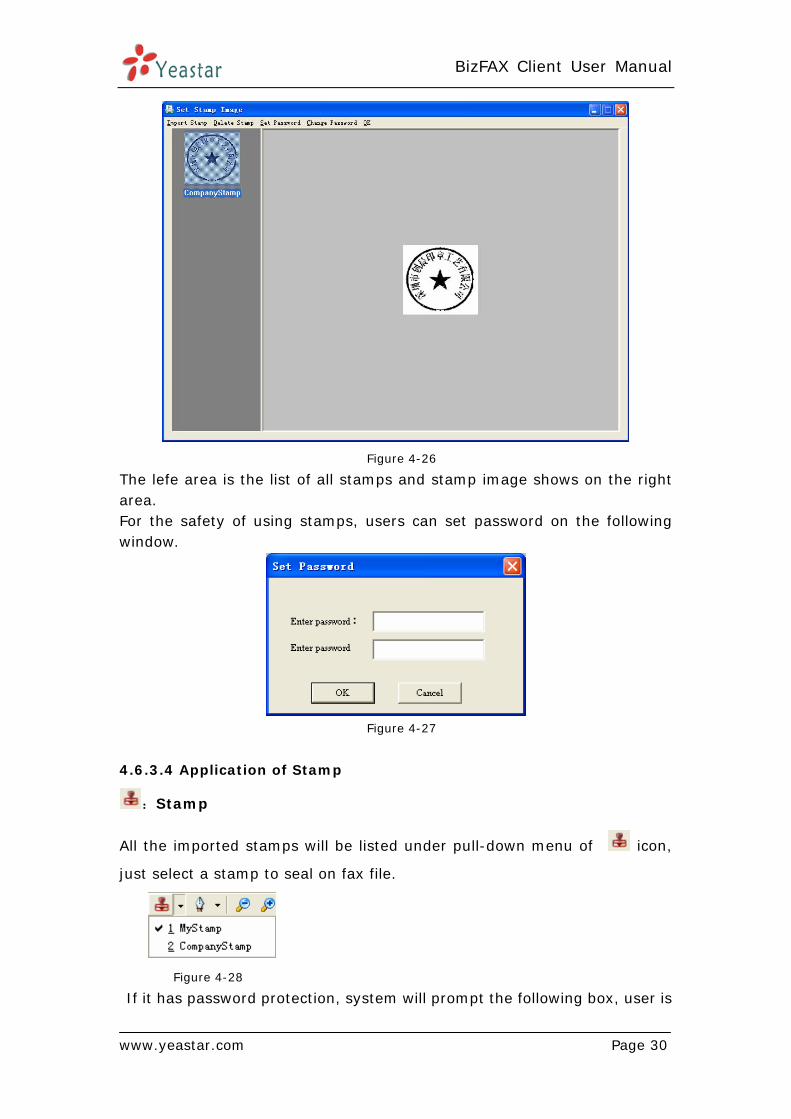
Figure 4-26
The lefe area is the list of all stamps and stamp image shows on the right area. For the safety of using stamps, users can set password on the following window.
Figure 4-27
4.6.3.4 Application of Stamp
:Stamp
All the imported stamps will be listed under pull-down menu of icon,
just select a stamp to seal on fax file.
Figure 4-28
If it has password protection, system will prompt the following box, user is
www.yeastar.com Page 30
BizFAX Client User Manual
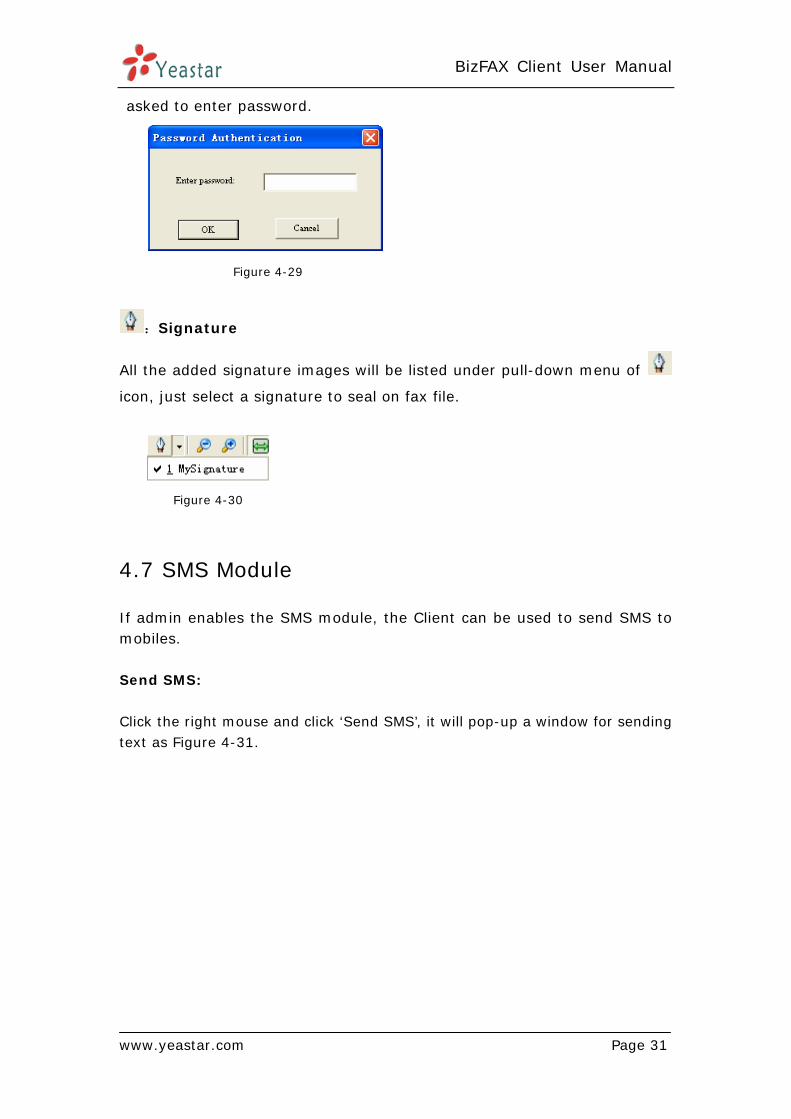
asked to enter password.
Figure 4-29
:Signature
All the added signature images will be listed under pull-down menu of
icon, just select a signature to seal on fax file.
Figure 4-30
4.7 SMS Module
If admin enables the SMS module, the Client can be used to send SMS to mobiles.
Send SMS:
Click the right mouse and click ‘Send SMS’, it will pop-up a window for sending text as Figure 4-31.
www.yeastar.com Page 31

BizFAX Client User Manual
www.yeastar.com Page 32
Figure 4-31
Enter the recipient’s mobile number directly or choose the contact’s mobile number from address book. Write the messages on the SMS context and click ‘Send’, short message will be sent via server. Message will be listed on the history after being sent out successfully. It shows the time, receiver’s number, content details and status. User can send SMS to multiple receipients. Please separate mobile numbers by semi-colon.
4.8 Fax Extension Management
Fax extension refers to all users that using fax system. They are able to check each other’s information (ext. number, email address and mobile number) and forward faxes and send SMS among extensions. There are two types of fax extensions: physical fax extension and virtual fax extension. Physical fax extension means the real fax machine, and virtual fax ext. stands for the ext. registered by BizFAX Client to manage faxes.
Extension Status:
It means the virtual fax extension is offline.
It means the virtual fax extension is available.
It stands for a physical fax machine.
Number:Enter recipient’s
mobile number.
SMS context:Enter the
text here. Each message
can not be more than 300
characters.
History:User can check
the SMS history.

BizFAX Client User Manual
Extensions Group:
Through clicking ‘View’ ‘Show Extensions Group’ to see all groups of
extensions.
All members in this
group
Figure 4-32
4.9 Contacts Management
After signed in BizFAXClient, you can see Contacts tag. Here, you are possible to add, edit, delete, rename, send, import and export contacts.
4.9.1 Contacts Group Management
Before editing contact’s profile, you can classify it into group at first, which will be easier to manage and send fax by group at once. You can see contacts in group way thorugh ‘View’ ‘Show Contacts Group’ (see Figure 4-33)
www.yeastar.com Page 33

BizFAX Client User Manual
Figure 4-33
4.9.2 Add New Contact
You can add new contact through MenuAdd New Contact or click the mouse to open the adding screen. Please edit contact’s profile on following screen, such as name, office phone, and company name and so on.
www.yeastar.com Page 34

BizFAX Client User Manual
Figure 4-34
4.9.3 Edit & Delete Contact
Select contact and click on mouse right to choose edit or delete from pop-up menu.
4.9.4 Send Contact
Contacts information are shareable among extensions. Click on the selected contact, click on mouse right click ‘Send Contact’ on menu Open the window as Figure 4-34 to select the extension.
Note: You can select all through Ctrl+A or click on Ctrl or Shift to choose multiple contacts.
www.yeastar.com Page 35

BizFAX Client User Manual
Figure 4-35
4.9.5 Import Contact
User can import contacts in quantity from menu ‘Contacts’--> ‘Import Contact’.
Step:
1. Select the file (.csv) you want to import and click ‘Open’button (figure 4-36)
Figure 4-36
2. Double click the item to select corresponding address, see Figure 4-37
www.yeastar.com Page 36

BizFAX Client User Manual
Figure 4-37
3. Click ‘OK’ to finish this step.
4.9.6 Export Contacts
You can export contacts to save up on computer as well.
Step:
1. Select the routing that you want to save, and then click ‘Save’ to finish as Figure 4-38
Figure 4-38
2. Enter the file name and click ‘Save’ button to export contacts into csv file.
www.yeastar.com Page 37
BizFAX Client User Manual
4.10 Internal Communications among extensions
For the convenience of communications among extensions, BizFAX embedded an instant talk system allow users to get voice calls or text chat with other members.
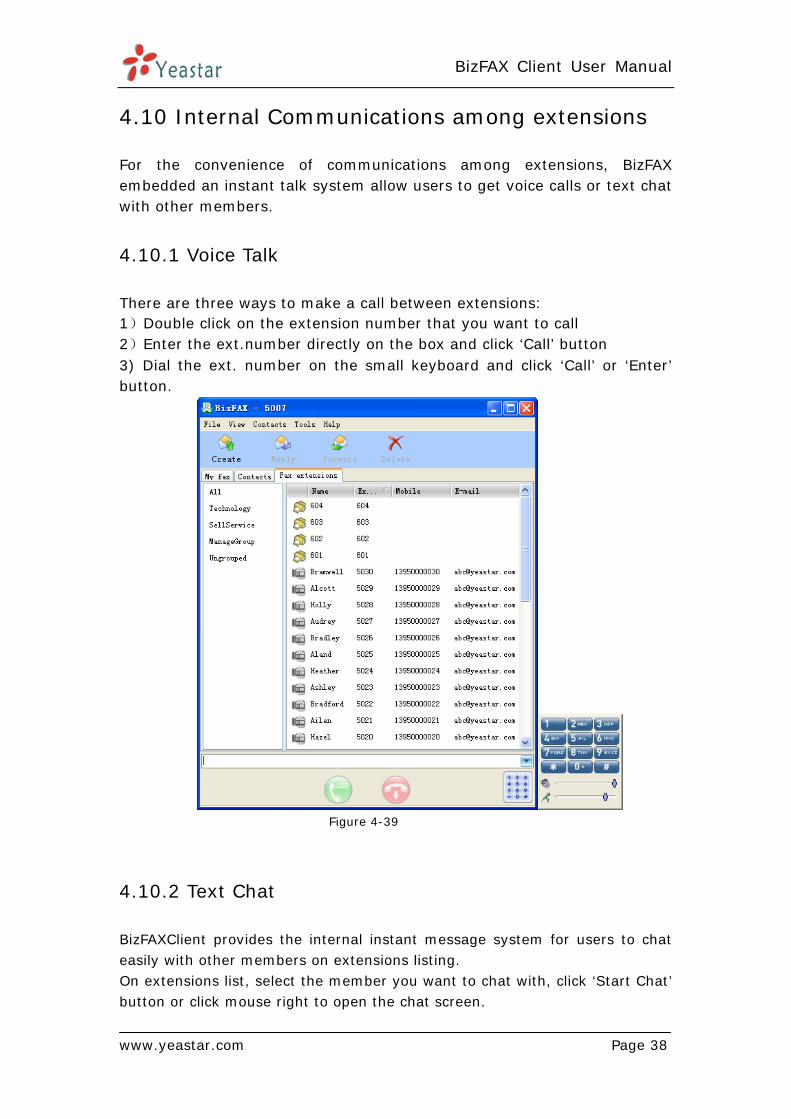
4.10.1 Voice Talk
There are three ways to make a call between extensions: 1)Double click on the extension number that you want to call 2)Enter the ext.number directly on the box and click ‘Call’ button 3) Dial the ext. number on the small keyboard and click ‘Call’ or ‘Enter’ button.
Figure 4-39
4.10.2 Text Chat
BizFAXClient provides the internal instant message system for users to chat easily with other members on extensions listing. On extensions list, select the member you want to chat with, click ‘Start Chat’ button or click mouse right to open the chat screen.
www.yeastar.com Page 38

BizFAX Client User Manual
Figure 4-40
4.11 Personal Profile
For the convenience communication with your colleagues and friends, BizFAXClient provides personal information management, so that you can update profile at any time.
After signed on BizFAXClient, click ‘File’ ‘Edit profile’ to open personal information screen.
Figure 4-41
Here you are allowed to change name, mobile phone number and Email address. When receive a fax, auto forward to this email: After received a fax, system will auto transfer it to the pre-arranged Email addess.
www.yeastar.com Page 39

BizFAX Client User Manual
4.12 Change Password
User can change password through ‘File’ ‘Change Password’ setting, open the chat box as Figure 4-42 to change password.
Figure 4-42
4.13 Change Language
BizFAXClient has multiple language versions. You can change the Client language through ‘Tools’ ‘Change Language’.
4.14 Audio Settings
You can open the screen as Figure 4-43 to set up audio device and adjust audio volume. Click on menu ‘Tools’ - ‘Options’ ‘Audio Settings’.
www.yeastar.com Page 40

BizFAX Client User Manual
Figure 4-43
4.15 Sign out & Exit
Sign Out:
You can sign out BizFAXClient on menu ‘File’ ‘Sign Out’
Exit:
You can exit from BizFAXClient on menu ‘File’ ‘Exit’ or you can click on BizFAX icon on right tray and click ‘Exit’ to exit as Figure 4-44.
Figure 4-44
www.yeastar.com Page 41

BizFAX Client User Manual
FAX to Mail & Mail to FAX 5 The human-based design that fax to email & email to fax ensures faxes with timeliness. Users don’t have to worry about their fax when they are out of office in business trip or in holidays. With this powerful function, users can send and receive fax at any time, any place.
5.1 FAX to Mail
Fax to Email means to receive fax through email, system will auto forward the received faxes to user’s pre-set email account. In order to realize this feature, it requires Admin firsly to set up a public email account on BizFAX Server for the purpose of forwarding, and then users can configure a email account on his or her BizFAX Client for the purpose of receiving fax. The setting on BizFAX Client is as following: 1) Choose ‘File’ ‘Edit Profile’, it will pop-up a window 2) Fill in the Email Account directly 3) Enable ‘Send incoming fax to this E-mail’ function
Figure 5-1
After the above settings, all the incoming faxes of this user will be auto forwarded to his/her appointed Email account.
www.yeastar.com Page 42

BizFAX Client User Manual
5.2 Mail to FAX
When taking use of the email to fax, users just need to add the required document as an attachment of email, and then send the email in a required pattern to the public email account that pre-configured on BizFAX Server. Please follow the pattern as: Receiver: fill in the public email account on BizFAX Server Subject: enter the extension number on BizFAX- Authentication code-destination fax number (Attention: Please use the connect extension number, code and fax number with a hyphen marke ‘-‘) For example: User’s extension number is 5007 on BizFAX, and the authentication code is 123456, and the destination fax number is 05925503307. So the subjust format must be: 5007-123456-05925503307 1) Fax Mass, please separate multiple fax numbers by semicolon mark ‘;’ like
05925503307;01054321000. 2 ) If the destination fax number takes with an extension number like
05925503307 Ext.301, please seperate the fax number and extension number by comma mark ‘,’ and generally 3~4 comma marks will be ok, such as 05925503307,,,,301. Attachment: Users are allowed to enclose only 1 file as attachment and the file’s format must be tif. Now let’s creat an email to send fax:
www.yeastar.com Page 43

BizFAX Client User Manual
Figure 5-2
When the qualified emails reach to the public emal account on BizFAX Server, they will be sent out directly to destination fax number. The fax result will be returned to the sender’s email through the public email account. If the received email is not fit the prescribed pattern, BizFAX Email server will delete the email directly to not make the email box full.
www.yeastar.com Page 44

BizFAX Client User Manual
Appendix A How to make fax file in TIFF format?
Here, we take use of BizFAX’s virtual fax printer (BizFAX) to make .TIFF fax file. Take an example of a Word format file: Step 1: Open the Word format file, click ‘File’ –‘Print’. Step 2: Select the ‘BizFAX’ on pop-up screen and click ‘OK’, BizFAX will transfer the word file into TIFF format file.
Figure A-1
Step 3: Open the installation routing of BizFAXClient, there is a FaxFile folder, where is the transferred TIFF files saved. For example, BizFAXClient was installed on D:\Program Files\Yeastar\BizFAXClient, as Figure A-2
www.yeastar.com Page 45

BizFAX Client User Manual
www.yeastar.com Page 46
Figure A-2
Figure A-3
<Finish>