开发人员演练 - files-cdn.cnblogs.com · sharepoint 2010 开发人员演练 第 4 页 练习 1...
TRANSCRIPT

第 1 页
开发人员演练
本文档“按原样”提供。本文档中表述的信息和观点(包括 URL 和其他 Internet 网站引用)如有变更,恕
不另行通知。使用本文档的风险由您承担。
此处所述的某些示例仅为说明起见而提供,纯属虚构。不存在真实关联或连接,请勿妄加推测。
本文档未向您提供对任何 Microsoft 产品的任意知识产权的任何法律权利。您可以出于内部参考目的复制和
使用本文档。
© 2010 Microsoft。保留所有权利。
Microsoft、SharePoint、Visual Studio、InfoPath 和 Visio 是 Microsoft 集团公司的商标。所有其他商标均
归其各自所有者所有。

SharePoint 2010 开发人员演练
第 2 页
目录
练习 1 ― Web 部件和 Linq 演练 ............................................................................................................................. 4
任务 1 ― 创建新 SharePoint 项目 ...................................................................................................................... 4
任务 2 ― 生成 LINQ-to-SharePoint 代理类以访问列表数据 .............................................................................. 7
任务 3 ― 在可视化 Web 部件中访问 SharePoint 列表数据 ............................................................................... 9
任务 4 ― 生成并部署可视化 Web 部件 ............................................................................................................ 11
练习 2 ― 生成 BCS 外部内容类型 ........................................................................................................................ 16
任务 1 ― 创建业务数据目录模型项目 .............................................................................................................. 16
任务 2 ― 更新 Entity 类的架构 ......................................................................................................................... 18
任务 3 ― 更新 Service 代码 ............................................................................................................................. 28
任务 4 ― 生成并部署 ........................................................................................................................................ 30
练习 3 ― 为 SharePoint 客户端对象模型创建 Silverlight 应用程序 ...................................................................... 34
任务 1 ― 创建 Silverlight 应用程序项目 ........................................................................................................... 34
任务 2 ― 编写代码以访问并呈现 SharePoint 列表数据 ................................................................................... 37
任务 3 ― 使用 SharePoint Silverlight Web 部件进行部署并测试 ..................................................................... 42
练习 4 ― 使用 SharePoint 对象模型和 Silverlight 绘图控件创建图形 .................................................................. 45
任务 1 ― 创建 Silverlight 应用程序项目 ........................................................................................................... 45
任务 2 ― 编写代码以访问 Employee SharePoint 列表数据并将其显示在 Silverlight 图形控件中 ................... 49
任务 3 ― 使用 SharePoint Silverlight 图表 Web 部件进行部署并测试 ............................................................ 53
练习 5 ― 为沙盒解决方案创建 Web 部件 ............................................................................................................. 57
任务 1 ― 创建含有 Web 部件的沙盒解决方案项目 .......................................................................................... 57
任务 2 ― 添加代码以提供查询和呈现功能 ....................................................................................................... 59
任务 3 ― 生成并部署沙盒解决方案 .................................................................................................................. 62
练习 6 ― 创建要在 SharePoint Designer 工作流中使用的活动 ........................................................................... 67
任务 1 ― 创建和准备项目 ................................................................................................................................ 67
任务 2 ― 创建供可重用工作流使用的新工作流活动 ........................................................................................ 69
任务 3 ― 添加代码以基于传递给活动的参数创建文档库 ................................................................................. 71
任务 4 ― 配置活动以进行部署。 ..................................................................................................................... 73
任务 5 ― 添加要与 SPCHOL305Ex1 一起部署的 SPDActivityDemo 活动 ...................................................... 77
任务 6 ― 使用功能设计器配置功能 .................................................................................................................. 79
任务 7 ― 添加功能接收器并编写代码 .............................................................................................................. 79
任务 8 ― 使用 SharePoint Designer 创建可重用工作流 .................................................................................. 80
任务 9 ― 将可重用工作流导入 Visual Studio ................................................................................................... 88
任务 10 ― 将工作流与 SharePoint 列表相关联 ............................................................................................... 95
演练摘要 ............................................................................................................................................................... 98

SharePoint 2010 开发人员演练
第 3 页
以下六个演练是精选方案的 C# 演练,专业开发人员将使用 Visual Studio 2010 在 SharePoint 2010 中执
行这些演练。
在这些演练中提供了足够的屏幕快照,在阅读文档时无需动手操作软件。这些开发人员演练还在以下联
机电子学习课程中作为动手实验提供:http://msdn.microsoft.com/zh-cn/sharepoint/ee513147.aspx。在
该课程中还提供了其他实验,以及视频、代码示例和联机虚拟实验环境,动手实验提供 C# 和 VB.NET
两个版本。
若要提供有关本指南的反馈,请发送电子邮件至 [email protected]。

SharePoint 2010 开发人员演练
第 4 页
练习 1 ― Web 部件和 Linq 演练
预计完成此练习所需的时间:10 分钟
在此练习中,您将开发和部署从列表中读取数据并显示在 DataGrid 中的可视化 Web 部件。在此练习中,
您将执行以下操作:
1. 创建可视化 Web 部件。
2. 生成 Linq 代理代码。
3. 使用 Linq 提供程序从 SharePoint 列表读取数据。
4. 使用 SPDataGrid Web 控件呈现数据。
任务 1 ― 创建新 SharePoint 项目
在此任务中,将创建一个解决方案和项目。它将包含此实验的练习 1 中的剩余开发工作。
1. 转到“开始”菜单 |“所有程序”|“Microsoft Visual Studio 2010”|
“Microsoft Visual Studio 2010”,以打开 Visual Studio 2010。
2. 从菜单中,选择“文件”|“新建”|“项目”。
3. 在“新建项目”对话窗口中,从“已安装的模板”中选择“Visual C#”|
“SharePoint”|“2010”。
4. 从“项目项”中选择“可视 Web 部件”。
图 1 - SharePoint 2010 可视化 Web 部件项目

SharePoint 2010 开发人员演练
第 5 页
5. 在“名称”文本框中输入 SPCHOL200-Ex1
6. 在“位置”文本框中输入 C:\SPHOLS\SPCHOL200\CS\Ex1。
7. 取消选中“创建解决方案的目录”。
8. 单击“确定”。
9. 在“SharePoint 自定义向导”中:
输入 http://intranet.contoso.com/ 作为本地网站。
将信任级别设置为“部署为场解决方案”。
单击“完成”按钮。
图 2 - SharePoint 自定义向导
10. Visual Studio 将创建新 SPCHOL200-Ex1 项目并添加所需的文件。

SharePoint 2010 开发人员演练
第 6 页
图 3 - SPCHOL200-Ex1 项目
11. 请注意,Visual Studio 还创建名为 VisualWebPart1 的可视化 Web 部件。在解决方案资源管理器
中,展开“VisualWebPart1”并打开“VisualWebPart1.webpart”。
图 4 - 可视化 Web 部件

SharePoint 2010 开发人员演练
第 7 页
12. 将 name 属性值为 Title 的 property 元素的值更改为 SPLinqDemoTitle,将 name 属性值为
Description 的 property 元素的值更改为 SPLinqDemoPart Description。这将在部署可视化 Web
部件后更改其 Title 和 Description 属性。保存该文件。
<properties>
<property name="Title" type="string">SPLinqDemoTitle</property>
<property name="Description" type="string">SPLinqDemoPart Description</property>
</properties>
任务 2 ― 生成 LINQ-to-SharePoint 代理类以访问列表数据
在此任务中,您将使用新的 spmetal.exe 代码生成实用程序并生成 Linq-to-SharePoint 代理代码。
1. 在解决方案资源管理器中,右键单击“SPCHOL200-Ex1”,然后选择“在 Windows 资源管理器
中打开文件夹”。
2. 按住 Shift 键并在资源管理器窗口中的任意位置右键单击,然后选择“在此处打开命令窗口”以在
当前项目目录中打开命令提示符窗口:
图 5 - 在此处打开命令窗口
3. 在命令提示符下键入以下命令并按 Enter,以设置 SharePoint 2010 文件夹的路径:
set path=%path%;c:\program files\common files\microsoft shared\web server
extensions\14\bin
4. 在命令提示符下键入以下命令并按 Enter,以生成 Linq-to-SharePoint 代理代码。
spmetal.exe /web:http://intranet.contoso.com /namespace:SPCHOL200_Ex1.VisualWebPart1
/code:SPLinq.cs
注意 – 您可能收到有关“表单模板”列表的内容类型的警告。您可以放心地忽略此警告并继续
5. 关闭命令窗口并切换回 Visual Studio。
6. 在 Visual Studio 中,右键单击“SPCHOL200-Ex1”项目,然后选择“添加”|“现有项”。

SharePoint 2010 开发人员演练
第 8 页
图 6 - 添加现有项
7. 从“添加现有项”对话窗口中选择“SPLinq.cs”,然后单击“添加”:
图 7 - 添加 SPLinq.cs 文件
8. 在解决方案资源管理器中,右键单击“引用”并选择“添加引用”。
9. 切换到“浏览”选项卡,然后在“文件名”文本框中输入 C:\Program Files\Common
Files\Microsoft Shared\Web Server Extensions\14\ISAPI。按 Enter 以更改目录。
您的“添加引用”窗口现在应该如图 8 所示。

SharePoint 2010 开发人员演练
第 9 页
10. 选择“Microsoft.SharePoint.Linq.dll”。
图 8 - 添加引用
11. 单击“确定”向项目添加引用。
任务 3 ― 在可视化 Web 部件中访问 SharePoint 列表数据
在此任务中,您将向解决方案添加允许可视化 Web 部件检索 SharePoint 列表数据的代码。
1. 在解决方案资源管理器中,展开“VisualWebPart1”并双击
“VisualWebPart1UserControl.ascx”。
2. Visual Studio 将打开可视化 Web 部件用户控件。
3. 向用户控件添加以下代码以构造网格视图。

SharePoint 2010 开发人员演练
第 10 页
<%@ Import Namespace="Microsoft.SharePoint.WebControls" %>
<SharePoint:SPGridView id="spGridView" runat="server"
AutoGenerateColumns="false">
<HeaderStyle HorizontalAlign="Left" ForeColor="Navy" Font-Bold="true" />
<Columns>
<SharePoint:SPBoundField DataField="Title"
HeaderText="Title"></SharePoint:SPBoundField>
<SharePoint:SPBoundField DataField="JobTitle"
HeaderText="JobTitle"></SharePoint:SPBoundField>
<SharePoint:SPBoundField DataField="ProjectTitle"
HeaderText="ProjectTitle"></SharePoint:SPBoundField>
<SharePoint:SPBoundField DataField="DueDate"
HeaderText="DueDate"></SharePoint:SPBoundField>
</Columns>
</SharePoint:SPGridView>
代码段:ASP.NET | spchol200_ex1_spgridview
4. 在添加上面的代码后,可视化 Web 部件用户控件应该如下所示:
图 9 - 可视化 Web 部件用户控件
5. 在解决方案资源管理器中,右键单击“VisualWebPart1UserControl.ascx”并选择“查看代码”。
6. 向代码隐藏添加以下 using 语句:
using Microsoft.SharePoint.Linq;
using Microsoft.SharePoint;
using System.Linq;
代码段:My Code Snippets | spchol200_ex1_namespaces

SharePoint 2010 开发人员演练
第 11 页
7. 在 Page_Load 方法中插入以下代码:
var dc = new SPLinqDataContext(SPContext.Current.Web.Url);
var Employees = dc.GetList<EmployeesItem>("Employees");
var empQuery = from emp in Employees
where emp.Project.DueDate <
DateTime.Now.AddMonths(6)
select new
{
emp.Title,
emp.JobTitle,
ProjectTitle = emp.Project.Title,
DueDate =
emp.Project.DueDate.Value.ToShortDateString()
};
spGridView.DataSource = empQuery;
spGridView.DataBind();
代码段:My Code Snippets | spchol200_ex1_pageload
任务 4 ― 生成并部署可视化 Web 部件
1. 在解决方案资源管理器中,右键单击“SPCHOL200-Ex1”并选择“部署”。这将生成可视化
Web 部件并将其部署到本地 SharePoint 网站:http://intranet.contoso.com
图 10 - 部署 VisualWebPart
2. 打开 Internet Explorer 并浏览到以下网站:
http://intranet.contoso.com
3. 提示进行身份验证时,输入以下详细信息。
用户名:Administrator
密码:pass@word1
4. 单击顶部菜单中的“编辑”图标,以打开 SharePoint 功能区的“编辑工具”。

SharePoint 2010 开发人员演练
第 12 页
图 11 - SharePoint“编辑”图标
图 12 - SharePoint 功能区 - 编辑页面
5. 切换到功能区中的“插入”选项卡并单击“Web 部件”,以向页面插入 Web 部件。

SharePoint 2010 开发人员演练
第 13 页
图 13 - SharePoint 功能区 - 插入 Web 部件
6. 在“类别”下,选择“自定义”。
7. 在“Web 部件”下,选择“SPLinqDemoTitle”Web 部件。
图 14 - 选择 SPlinqDemoTitle Web 部件

SharePoint 2010 开发人员演练
第 14 页
将光标置于您希望显示 Web 部件的页面区域。该区域必须是接受 Web 部件的区域。在此示例中,
将光标置于“共享文档”控件下方的区域中。
图 15 - 布局区域
8. 单击“添加”,将 Web 部件添加到页面中。此操作会将 SPLinqDemoTitle Web 部件添加到所选
的布局区域。

SharePoint 2010 开发人员演练
第 15 页
图 16 - 添加到布局区域的 SPLinqDemoTitle Web 部件
9. 单击“页面”,单击“保存并关闭”按钮上的下箭头并选择“停止编辑”,以保存页面并停止编
辑。提示保存所做的更改时单击“是”。
图 17 - SharePoint 功能区 - 停止编辑
10. 关闭 Internet Explorer。
11. 关闭 Visual Studio 2010。
在刚才的练习中,您生成并部署了一个使用 LINQ to SharePoint 从 SharePoint 列表检索数据的可视化
Web 部件。

SharePoint 2010 开发人员演练
第 16 页
练习 2 ― 生成 BCS 外部内容类型
此练习将指导您使用 Visual Studio 2010 BDC 模型项目模板创建外部内容类型并扩展该外部内容类型。
任务 1 ― 创建业务数据目录模型项目
1. 转到“开始”菜单 |“所有程序”|“Microsoft Visual Studio 2010”|“Microsoft Visual Studio
2010”以打开 Visual Studio 2010,然后从菜单中选择“文件”|“新建”|“项目”。
2. 选择“Visual C#”|“SharePoint”|“2010”|“业务数据连接模型”项目模板。
3. 在“名称”文本框中输入 BDCEx1。
图 18 - “新建项目”对话框
4. 在“位置”文本框中输入 C:\SPHOLS\SPCHOL304\CS\Ex1。
5. 单击“确定”。

SharePoint 2010 开发人员演练
第 17 页
6. 将 URL 更改为 http://intranet.contoso.com。
7. 选择“部署为场解决方案”单选按钮。
图 19 - SharePoint 自定义向导
8. 单击“完成”。

SharePoint 2010 开发人员演练
第 18 页
任务 2 ― 更新 Entity 类的架构
1. 从顶部菜单中,选择“视图”|“解决方案资源管理器”。在“解决方案资源管理器”中,将
Entity1.cs 重命名为 Customer.cs,然后将 Entity1Service.cs 重命名为 CustomerService.cs。
出现下面的提示时单击“是”:
图 20 - Visual Studio 文件重命名提示
2. 如果尚未打开,请在解决方案资源管理器中双击 Customer.cs。使用以下代码替换 Customer 类
主体中的代码。此操作将添加另外两个属性并将第三个的类型更改为我们在 BDC 定义中添加和修
改的类型描述符的映射。
请注意,将 Identifier1 更改为 CustomerId 时,可以使用编辑器中显示的标志符号重命名对字段
Identifier1 的所有引用。这在此示例中没有什么帮助,但却是一种不错的做法。
public Int32 CustomerId { get; set; }
public string Message { get; set; }
public string FirstName { get; set; }
public string LastName { get; set; }
代码段:My Code Snippets | spchol304_ex1_customer
图 21 - 更改主体后的 Customer 类

SharePoint 2010 开发人员演练
第 19 页
任务 3 ― 扩展外部内容类型的 BCS 元数据
1. 在解决方案资源管理器中,如果 BDC 设计器尚未打开,请打开“BdcModel1.bdcm”。
图 22 - 在 BDC 设计器中显示 BDCModel1.bdcm 的解决方案资源管理器。
2. 在设计器中,通过单击标题选择 Entity1 实体。
图 23 - Entity1 实体
3. 通过以下方式将 Entity1 重命名为 Customer:在设计器中单击“Entity1”名称并按 F2(也可以
在“属性”网格中更改名称)。
4. 在 Entity 设计器中突出显示 Identifier1 并按 F4,以打开“属性”网格。使用“属性”网格将
Identifier1 重命名为 CustomerId 并将其“类型名称”更改为 System.Int32。

SharePoint 2010 开发人员演练
第 20 页
图 24 - “类型名称”更改后的“属性”面板
5. 在 Visual Studio 的 BDC 资源管理器中,展开“模型”|“BDCModel1”|“BDCModel1”|
“Customer”|“ReadList”|“returnParameter”。单击 Entity1List 以打开其“属性”网格。
图 25 - 突出显示 Entity1List 的 BDC 资源管理器
6. 使用“属性”网格,将 Entity1List 重命名为 CustomerList。
7. 在 BDC 资源管理器中,展开 CustomerList。

SharePoint 2010 开发人员演练
第 21 页
图 26 - 突出显示 Entity1 的 BDC 资源管理器
8. 使用“属性”网格,将 Entity1 重命名为 Customer。
在“BDC 资源管理器中”,展开“Customer”并使用“属性”网格将 Identifier1 重命名为
CustomerId,将“类型名称”设置为 System.Int32。
图 27 - 更改 Identifier1 后的“属性”网格

SharePoint 2010 开发人员演练
第 22 页
9. 在“BDC 资源管理器”中,右键单击“Customer”并选择“添加类型描述符”。
图 28 - Customer 实体上下文菜单
10. 选择“TypeDescriptor”,然后使用“属性”网格将“名称”更改为 FirstName。
11. 在“BDC 资源管理器”中,右键单击“Customer”并选择“添加类型描述符”。
12. 选择“TypeDescriptor”,然后使用“属性”网格将“名称”更改为 LastName。
图 29 - 添加 FirstName 和 LastName 类型描述符后 BDC 资源管理器中的 Customer 实体
13. 在“BDC 资源管理器”中,右键单击“Customer”并选择“复制”。
图 30 - Customer 实体上下文菜单

SharePoint 2010 开发人员演练
第 23 页
14. 在“BDC 资源管理器”中,展开“ReadItem”方法,右键单击“returnParameter”并选择
“粘贴”。
图 31 - returnParameter 上下文菜单
15. 单击“是”。
图 32 - 替换类型描述符提示

SharePoint 2010 开发人员演练
第 24 页
16. 展开“returnParameter”|“Customer”并确认已成功复制 FirstName 和 LastName 类型描述符。
图 33 - 经过任务 1 的步骤 1 到步骤 18 更改后的 BDC 资源管理器
17. 在“BDC 资源管理器”中,展开“ReadItem”|“id”并选择“Identifier1”。

SharePoint 2010 开发人员演练
第 25 页
18. 使用“属性”网格,将 Identifier1 重命名为 CustomerId,将“类型名称”设置为 System.Int32。
图 34 - 更改 Identifier1 后的“属性”网格
19. 使用“BDC 方法详细信息”窗格添加 update 方法
图 35 - 正在添加 Update 方法的“BDC 方法详细信息”

SharePoint 2010 开发人员演练
第 26 页
20. 添加一个参数并将其命名为 id
图 36 - 向 Update 方法添加 id 参数
21. 在“BDC 资源管理器”窗口中打开新的 Update 方法
22. 将 ReadItem 方法中 @id 参数的 CustomerId 类型描述中的类型描述符复制到 Update 方法中的
@id 参数

SharePoint 2010 开发人员演练
第 27 页
23. 将 id 参数的 Pre-Updater 属性更改为 True。
图 37 - 将 Pre-Updater 字段更新为 True

SharePoint 2010 开发人员演练
第 28 页
任务 3 ― 更新 Service 代码
1. 在“解决方案资源管理器”中,打开“CustomerService.cs”。
2. 使用以下代码替换 CustomerService 类的主体。这将基于给定 id 返回一个客户并根据请求返回
一组客户。
public static Dictionary<Int32, Customer> d = null;
public static Customer ReadItem(Int32 id)
{
// take a copy for SharePoint
Customer c = new Customer();
Customer e = d[id];
c.CustomerId = e.CustomerId;
c.FirstName = e.FirstName;
c.LastName = e.LastName;
c.Message = e.Message;
return c;
}
public static IEnumerable<Customer> ReadList()
{
// this is usually the first method called so check for null
if (d == null)
{
d = new Dictionary<Int32, Customer>();
for (int i = 0; i < 10; i++)
{
Customer e = new Customer();
e.CustomerId = i;
e.Message = i + " Item Data";
e.FirstName = i + " First Name";
e.LastName = i + " Last Name";
d.Add(i, e);
}
}
return d.Values;
}
public static void Update(Customer customer, Int32 id)
{
d[id].FirstName = customer.FirstName;
d[id].LastName = customer.LastName;
d[id].Message = customer.Message;
}
代码段: My Code Snippets | spchol304_ex1_customerservice

SharePoint 2010 开发人员演练
第 29 页
图 38 – 更改后的 CustomerService 类
3. 在解决方案资源管理器中,展开 Features 文件夹并双击 Feature1.feature 节点。这将打开功能设
计器。
4. 单击功能设计器底部的“清单”选项卡。
5. 单击“编辑选项”旁边的 + 标志符号,打开模板编辑器。
6. 添加一个代表网站 URL 的新 Property
<Property Key="SiteUrl" Value="http://intranet.contoso.com" />

SharePoint 2010 开发人员演练
第 30 页
功能设计器现在应该如 图 39 所示。
图 39 - 添加了 SiteUrl 属性的功能设计器
任务 4 ― 生成并部署
1. 从菜单中,选择“生成”|“部署 BDCEx1”。
2. 在浏览器会话中打开 http://intranet.contoso.com。
3. 单击左侧导航区域中的“列表”
图 40 - “列表”链接
4. 单击“创建”。
图 41 - “创建”链接

SharePoint 2010 开发人员演练
第 31 页
在“创建”对话框中,选择“外部列表”并选择“创建”。
图 42 - “创建外部列表”对话框
5. 在“名称”文本框中输入 My Contacts。
6. 单击“外部内容类型”文本框右侧的第二个按钮(工具提示为“选择外部内容类型”的按钮)。
图 43 - “创建新外部列表”页

SharePoint 2010 开发人员演练
第 32 页
7. 选择“BDCEx1.BDCModel1.Customer”并单击“确定”。
图 44 - 业务数据类型选取器 - 网页对话框
图 45 - 新外部列表页面

SharePoint 2010 开发人员演练
第 33 页
8. 单击“创建”。
9. 您刚刚创建了一个外部内容类型以及一个承载该内容类型的列表。
图 46 - 以列表形式显示的外部内容类型(BDC 模型)

SharePoint 2010 开发人员演练
第 34 页
练习 3 ― 为 SharePoint 客户端对象模型创建 Silverlight 应用程序
在此练习中,我们将创建一个在数据网格中显示 SharePoint 列表的基本 Silverlight 应用程序。列表的数
据从服务器检索,因此可用于使用 SharePoint 客户端对象模型的 Silverlight。我们将使用 Visual Studio
2010 解决方案并将其部署到本地 SharePoint 服务器。
任务 1 ― 创建 Silverlight 应用程序项目
我们将首先创建一个标准 Silverlight 应用程序项目。
1. 从“开始”|“所有程序”|“Microsoft Visual Studio 2010”|“Microsoft Visual Studio 2010”打开
Visual Studio 2010。
2. 从菜单中,选择“文件”|“新建”|“项目”。
3. 在“新建项目”对话框中,展开“已安装的模板”左侧菜单的“其他项目类型”|“Visual Studio 解
决方案”|“空白解决方案”。
4. 选择“.NET Framework 3.5”
5. 将解决方案命名为 Begin。
6. 在“位置”文本框中输入 C:\SPHOLS\SPCHOL306\CS\Ex1\。
图 47 - “新建项目”对话框

SharePoint 2010 开发人员演练
第 35 页
7. 按“确定”继续。
8. 从菜单中,选择“文件”|“添加”|“新项目”。
9. 在“添加新项目”对话框中,展开“已安装的模板”左侧菜单的“Visual C#”|“Silverlight”,
然后在屏幕中间部分的项目类型列表中选择“Silverlight 应用程序”项目类型。
10. 选择“.NET Framework 3.5”
11. 将项目命名为 SPSilverlightExample。
12. 位置保留不变。
图 48 - “添加新项目”对话框
13. 按“确定”继续。

SharePoint 2010 开发人员演练
第 36 页
图 49 - 添加 Silverlight 应用程序对话框
14. 按“确定”创建项目。
15. 在 SPSilverlightExample 项目中,我们现在将添加 SharePoint Silverlight 客户端对象模型的引用程
序集。右键单击 SPSilverlightExample 项目中的“引用”,然后选择“添加引用”。
16. 浏览到“C:\Program Files\Common Files\Microsoft Shared\Web Server Extensions\14\TEMPLATE\
LAYOUTS\ClientBin”文件夹。
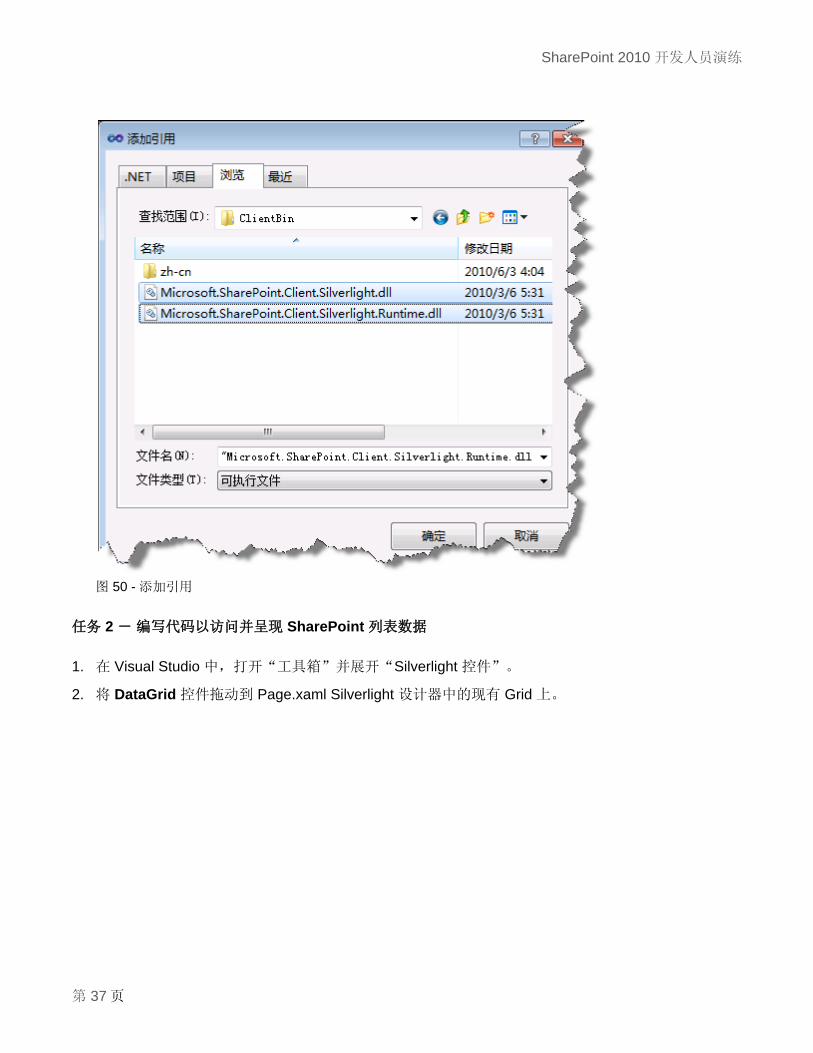
17. 选择“Microsoft.SharePoint.ClientSilverlight.dll”和
“Microsoft.SharePoint.Client.Silverlight.Runtime.dll”(按住 Ctrl 可以选择多个文件)
18. 按“确定”添加所选 dll 的引用。
SharePoint 2010 开发人员演练
第 37 页
图 50 - 添加引用
任务 2 ― 编写代码以访问并呈现 SharePoint 列表数据
1. 在 Visual Studio 中,打开“工具箱”并展开“Silverlight 控件”。
2. 将 DataGrid 控件拖动到 Page.xaml Silverlight 设计器中的现有 Grid 上。

SharePoint 2010 开发人员演练
第 38 页
图 51 - Silverlight 控件工具箱
3. 通过以下方式扩展 DataGrid,使其占据整个页面:转到“属性”网格并将“Width”和“Height”
属性设置为“Auto”,将“HoriztonalAlignment”和“VerticalAlignment”属性设置为“Stretch”,
将“Margin”设置为 0。

SharePoint 2010 开发人员演练
第 39 页
图 52 - DataGrid 属性
4. 另外,务必选中“AutoGenerateColumns”(或在 XAML 中将其值设置为 true)。
图 53 - AutoGenerate Columns 属性
5. 打开 App.xaml.cs,将以下 using 语句添加到文件顶部:
using Microsoft.SharePoint.Client;
using System.Threading;
代码段:My Code Snippets | spchol306_ex1_app_namespaces

SharePoint 2010 开发人员演练
第 40 页
6. 将以下代码添加到 Application_Startup 方法的开头。
ApplicationContext.Init(e.InitParams, SynchronizationContext.Current);
代码段:My Code Snippets | spchol306_ex1_ application_startup
7. 打开 MainPage.xaml.cs,将以下 using 语句添加到文件顶部:
using Microsoft.SharePoint.Client;
代码段:My Code Snippets | spchol306_ex1_page_namespaces
8. 将以下类添加到 MainPage 类之前:
public class Project
{
public string Title { get; set; }
public DateTime DueDate { get; set; }
public string Description { get; set; }
}
代码段:My Code Snippets | spchol306_ex1_ classes
9. 将以下变量添加到 MainPage 类中:
private ListItemCollection _projects;
代码段:My Code Snippets | spchol306_ex1_ property
10. 将以下代码添加到 Page 构造函数中 InitializeComponent 调用的下方:

SharePoint 2010 开发人员演练
第 41 页
ClientContext context = new ClientContext(ApplicationContext.Current.Url);
context.Load(context.Web);
List Projects = context.Web.Lists.GetByTitle("Projects");
context.Load(Projects);
CamlQuery query = new Microsoft.SharePoint.Client.CamlQuery();
string camlQueryXml = "<View><Query><Where><Gt>" +
"<FieldRef Name='Due_x0020_Date' />" +
"<Value Type='DateTime'>2008-01-1T00:00:00Z</Value>" +
"</Gt></Where></Query><ViewFields>" +
"<FieldRef Name=\"Title\" /><FieldRef Name=\"Description\" />" +
"<FieldRef Name=\"Due_x0020_Date\" />" +
"</ViewFields></View>";
query.ViewXml = camlQueryXml;
_projects = Projects.GetItems(query);
context.Load(_projects);
context.ExecuteQueryAsync(new
ClientRequestSucceededEventHandler(OnRequestSucceeded), null);
代码段:My Code Snippets | spchol306_ex1_initializecomponent
11. 将以下代码添加到构造函数之后:
private void OnRequestSucceeded(Object sender, ClientRequestSucceededEventArgs
args)
{
// this is not called on the UI thread
Dispatcher.BeginInvoke(BindData);
}
private void BindData()
{
List<Project> projects = new List<Project>();
foreach (ListItem li in _projects)
{
projects.Add(new Project()
{
Title = li["Title"].ToString(),
DueDate = Convert.ToDateTime(li["Due_x0020_Date"].ToString()),
Description = li["Description"].ToString()
});
}
dataGrid1.ItemsSource = projects; // must be on UI thread
}
代码段:My Code Snippets | spchol306_ex1_methods
此代码将初始化 SharePoint Silverlight 客户端对象模型上下文 (ClientContext)。然后获取对 Projects 列
表的引用,并对列表运行简单的 CAML 查询以提取截止日期晚于 1/1/2008 的所有项目。结果将转换为
Projects 列表并绑定到 Silverlight DataGrid 控件。

SharePoint 2010 开发人员演练
第 42 页
任务 3 ― 使用 SharePoint Silverlight Web 部件进行部署并测试
若要将解决方案部署到 SharePoint,Silverlight 项目创建的结果 .xap 文件需要位于
C:\Program Files\Common Files\Microsoft Shared\Web Server
Extensions\14\TEMPLATE\LAYOUTS\ClientBin 文件夹中。
1. 右键单击“SPSilverlightExample”项目,选择“属性”并选择“生成”选项卡。
2. 将输出路径更改为 C:\Program Files\Common Files\Microsoft Shared\Web Server
Extensions\14\TEMPLATE\LAYOUTS\ClientBin。
图 54 - 项目属性
3. 生成解决方案。.xap 文件已复制到所需 SharePoint 目录,您可以将 Silverlight Web 部件添加到
SharePoint 网站。
4. 打开 Internet Explorer 并浏览到 http://intranet.contoso.com。

SharePoint 2010 开发人员演练
第 43 页
5. 选择页面顶部的“编辑”图标。
6. 选择“插入”选项卡,然后单击“Web 部件”。
7. 从“类别”列表中选择“媒体和内容”,从 Web 部件列表中选择“Silverlight Web 部件”,
然后单击“添加”。
8. 在弹出的“Silverlight Web 部件”对话框中,输入
/_layouts/ClientBin/SPSilverlightExample.xap 作为 URL。
图 55 - Silverlight Web 部件 Url 对话框
9. 单击“确定”保存 Silverlight Web 部件。
10. 退出编辑模式。
11. 最终 Web 部件在 SharePoint 页面上将如下所示:

SharePoint 2010 开发人员演练
第 44 页
图 56 - 完成的 Silverlight Web 部件
在此练习中,您已经创建了一个在数据网格中显示 SharePoint 列表的基本 Silverlight 应用程序。
列表的数据从服务器检索,因此可用于使用 SharePoint 客户端对象模型的 Silverlight。

SharePoint 2010 开发人员演练
第 45 页
练习 4 ― 使用 SharePoint 对象模型和 Silverlight 绘图控件创建图形
在练习 2 中,我们将再次使用 SharePoint 对象模型访问 SharePoint 列表数据,但是这次我们将使用
LINQ 和 Silverlight 图表控件在图形中显示数据。
任务 1 ― 创建 Silverlight 应用程序项目
1. 从“开始”|“所有程序”|“Microsoft Visual Studio 2010”|“Microsoft Visual Studio 2010”打开
Visual Studio 2010。
2. 从菜单中,选择“文件”|“新建”|“项目”。
3. 在“新建项目”对话框中,展开“已安装的模板”左侧菜单的“其他项目类型”|“Visual Studio 解
决方案”|“空白解决方案”。
4. 将解决方案命名为 Begin。
5. 将位置更改为 C:\SPHOLS\SPCHOL306\CS\Ex2\
图 57 - “新建项目”对话框

SharePoint 2010 开发人员演练
第 46 页
6. 按“确定”继续。
7. 从菜单中,选择“文件”|“添加”|“新项目”。
8. 在“添加新项目”对话框中,展开“已安装的模板”左侧菜单的“Visual C#”|“Silverlight”,
然后在屏幕中间部分的项目类型列表中选择“Silverlight 应用程序”项目类型。
9. 将项目命名为 SilverlightEmployeeContributionsGraph。
10. 位置保留不变。
图 58 - “添加新项目”对话框

SharePoint 2010 开发人员演练
第 47 页
11. 单击“确定”。
图 59 - 添加 Silverlight 应用程序对话框
12. 按“确定”创建项目。
13. 在 SPSilverlightExample 项目中,我们现在将添加 SharePoint Silverlight 客户端对象模型的引用程
序集。右键单击 SilverlightEmployeeContributionsGraph 项目中的“引用”,然后选择“添加
引用”。
14. 浏览到 C:\Program Files\Common Files\Microsoft Shared\Web Server Extensions\14\TEMPLA
TE\LAYOUTS\ClientBin 文件夹。
15. 选择“Microsoft.SharePoint.ClientSilverlight.dll”和
“Microsoft.SharePoint.Client.Silverlight.Runtime.dll”(按住 Ctrl 可以选择多个文件)
16. 按“确定”添加所选 dll 的引用。

SharePoint 2010 开发人员演练
第 48 页
图 60 - 添加引用
12. 添加对 Silverlight 图表控件程序集的引用。它位于“.NET”选项卡上,名为
System.Windows.Controls.DataVisualization.Toolkit。

SharePoint 2010 开发人员演练
第 49 页
图 61 - 添加 DataVisualization 引用
任务 2 ― 编写代码以访问 Employee SharePoint 列表数据并将其显示在 Silverlight 图形控件中
1. 在解决方案资源管理器中,右键单击 App.xaml 文件并选择“查看代码”。在打开的
App.xaml.cs 中,将以下 using 语句添加到文件顶部:
using Microsoft.SharePoint.Client;
using System.Threading;
代码段:My Code Snippets | spchol306_ex2_app_namespaces
2. 将以下代码添加到 Application_Startup 方法的开头。
ApplicationContext.Init(e.InitParams, SynchronizationContext.Current);
代码段:My Code Snippets | spchol306_ex2_application_startup
3. 在 MainPage.xaml 文件的 XAML 视图中,在 UserControl 元素中添加以下 XML 命名空间:

SharePoint 2010 开发人员演练
第 50 页
xmlns:chartingToolkit="clr-
namespace:System.Windows.Controls.DataVisualization.Charting;assembly=System.Win
dows.Controls.DataVisualization.Toolkit"
4. 在 Grid 元素中添加以下 Silverlight 图表控件:
<chartingToolkit:Chart x:Name="chart" Width="350" Height="250" Title="Team
Contributions">
<chartingToolkit:Chart.Series>
<chartingToolkit:ColumnSeries ItemsSource="{Binding}"
DependentValuePath="Contributions"
IndependentValuePath="Name"
AnimationSequence="FirstToLast"
Title="Contributions" IsSelectionEnabled="True" />
</chartingToolkit:Chart.Series>
</chartingToolkit:Chart>
图 62 - Silverlight 图表 XAML
5. 打开 MainPage.xaml.cs,将以下 using 语句添加到文件顶部:
using Microsoft.SharePoint.Client;
代码段:My Code Snippets | spchol306_ex2_page_namespaces

SharePoint 2010 开发人员演练
第 51 页
6. 将以下类添加到 MainPage 类之前:
public class EmployeeContributions
{
public string Name { get; set; }
public string TeamName { get; set; }
public decimal Contributions { get; set; }
}
public class TeamContributions
{
public string Name { get; set; }
public decimal Contributions { get; set; }
}
代码段:My Code Snippets | spchol306_ex2_classes
7. 将以下变量添加到 MainPage 类中:
private ListItemCollection _employees;
代码段:My Code Snippets | spchol306_ex2_property
8. 将以下代码添加到 Page 构造函数中 InitializeComponent 调用的下方:
ClientContext context = new ClientContext(ApplicationContext.Current.Url);
context.Load(context.Web);
List employees = context.Web.Lists.GetByTitle("Employees");
context.Load(employees);
CamlQuery query = new CamlQuery();
string camlQueryXml = null;
query.ViewXml = camlQueryXml;
_employees = employees.GetItems(query);
context.Load(_employees);
context.ExecuteQueryAsync(new
ClientRequestSucceededEventHandler(OnRequestSucceeded), null);
代码段:My Code Snippets | spchol306_ex2_initializecomponent

SharePoint 2010 开发人员演练
第 52 页
9. 将以下代码添加到构造函数之后: private void OnRequestSucceeded(Object sender, ClientRequestSucceededEventArgs
args) { // this is not called on the UI thread Dispatcher.BeginInvoke(BindData); } private void BindData() { List<EmployeeContributions> employees = new List<EmployeeContributions>(); // get list item values into a strongly typed class foreach (ListItem li in _employees) { employees.Add(new EmployeeContributions { Name = li["Title"].ToString(), TeamName = li["Team"].ToString(), Contributions = Convert.ToDecimal(li["Contribution_x0020__x0028_in_x00"]) }); } // use linq to group employees on team name and then total team contributions List<TeamContributions> teams = employees .GroupBy(e => e.TeamName) .Select(t => new TeamContributions { Name = t.Key, Contributions = t.Sum(e => e.Contributions) }).ToList(); chart.DataContext = teams; // must be on UI thread }
代码段:My Code Snippets | spchol306_ex2_methods
10. 与上一练习相同,使用 SharePoint Silverlight 客户端对象模型从 SharePoint 列表检索数据。将员
工捐款项填充到列表中后,会使用 LINQ 将员工分成几个工作组并计算其总和。然后将工作组捐款
设置为图表的数据源。

SharePoint 2010 开发人员演练
第 53 页
任务 3 ― 使用 SharePoint Silverlight 图表 Web 部件进行部署并测试
若要将解决方案部署到 SharePoint,Silverlight 项目创建的结果 .xap 文件需要位于
C:\Program Files\Common Files\Microsoft Shared\Web Server
Extensions\14\TEMPLATE\LAYOUTS\ClientBin 文件夹中。
1. 右键单击“SilverlightEmployeeContributionsGraph”项目,选择“属性”并选择“生成”选项卡。
2. 将输出路径更改为 C:\Program Files\Common Files\Microsoft Shared\Web Server
Extensions\14\TEMPLATE\LAYOUTS\ClientBin。
图 63 - Silverlight 项目属性
3. 生成解决方案。.xap 文件已复制到所需 SharePoint 目录,您可以将 Silverlight Web 部件添加到
SharePoint 网站。
4. 打开 Internet Explorer 并浏览到 http://intranet.contoso.com。

SharePoint 2010 开发人员演练
第 54 页
5. 我们将更新在上一练习中添加的 Silverlight Web 部件,使其指向我们刚刚创建的新 Silverlight 图
表控件。单击 Silverlight Web 部件右上角的下拉箭头图标,然后选择“编辑 Web 部件”。
图 64 - Silverlight Web 部件属性
6. 单击“配置”按钮(可能必须向右滚动窗口才能看到“配置”按钮),然后在“Silverlight Web 部
件”对话框中输入 /_layouts/ClientBin/SilverlightEmployeeContributionsGraph.xap。

SharePoint 2010 开发人员演练
第 55 页
图 65 - Silverlight Web 部件 URL
7. 单击“确定”。
8. 单击“Silverlight Web 部件”侧栏底部的“确定”。

SharePoint 2010 开发人员演练
第 56 页
9. 最终 Web 部件将如下所示:
图 66 - 完成的 Silverlight 图表 Web 部件

SharePoint 2010 开发人员演练
第 57 页
练习 5 ― 为沙盒解决方案创建 Web 部件
在此练习中,我们将创建用于呈现并更新部署为沙盒解决方案的列表数据的 Web 部件。
任务 1 ― 创建含有 Web 部件的沙盒解决方案项目
我们将首先创建一个标准 Silverlight 应用程序项目。
1. 从“开始”|“所有程序”|“Microsoft Visual Studio 2010”|“Microsoft Visual Studio 2010”打开
Visual Studio 2010。
2. 从菜单中,选择“文件”|“新建”|“项目”。
3. 在“新建项目”对话框中,展开“已安装的模板”左侧菜单的“Visual C#”|“SharePoint”|“2010”
|“空白 SharePoint 项目”。
4. 将项目命名为 SBSolutionDemo。
5. 将位置更改为 C:\SPHOLS\SPCHOL307\CS\Ex1\
图 67 - “新建项目”对话框

SharePoint 2010 开发人员演练
第 58 页
6. 按“确定”继续。
7. 在“SharePoint 自定义向导”中,将用于调试的本地网站更改为 http://intranet.contoso.com/。
8. 将 SharePoint 解决方案的信任级别保留为“部署为沙盒解决方案”。
图 68 - SharePoint 自定义向导步骤 1
9. 按“完成”继续。Visual Studio 将创建新项目并添加所需的文件。
10. 右键单击解决方案资源管理器中的“SBSolutionDemo”项目,然后选择“添加”|“新项”。
11. 确保在“已安装的模板”窗格中选择了“Visual C#”|“SharePoint”|“2010”。
12. 在“添加新项”对话框中,进行选择以添加一个新 Web 部件,然后将其命名为 SBWebPart。

SharePoint 2010 开发人员演练
第 59 页
图 69 - “添加新项”对话框
13. 按“添加”将 Web 部件添加到项目中。
任务 2 ― 添加代码以提供查询和呈现功能
1. 打开 SBWebPart.cs,在其他 using 语句之后添加以下 using 语句:
using System.Web.UI.HtmlControls;
代码段:My Code Snippets | spchol307_ex1_webpart_namespaces
2. 将以下变量添加到 SBWebPart 类中:
DropDownList _ddlProjects = new DropDownList();
TextBox _tbDescription = new TextBox();
TextBox _tbDueDate = new TextBox();
代码段:My Code Snippets | spchol307_ex1_webpart_variables

SharePoint 2010 开发人员演练
第 60 页
3. 将以下新方法添加到 SBWebPart 类中:
protected override void OnLoad(EventArgs e)
{
base.OnLoad(e);
if (!Page.IsPostBack)
GetProjectDetails();
}
/* Populate the text boxes with the selected project details */
private void GetProjectDetails()
{
EnsureChildControls();
if (_ddlProjects.SelectedValue != "-- Select a Project --")
{
SPList pList = SPContext.Current.Web.Lists["Projects"];
int nProjectID = Convert.ToInt32(_ddlProjects.SelectedValue);
SPListItem spliProject = pList.GetItemById(nProjectID);
_tbDescription.Text = spliProject["Description"].ToString();
DateTime dueDate = Convert.ToDateTime(spliProject["Due_x0020_Date"]);
_tbDueDate.Text = dueDate.ToShortDateString();
}
else
{
_tbDescription.Text = String.Empty;
_tbDueDate.Text = String.Empty;
}
}
代码段:My Code Snippets | spchol307_ex1_webpart_getprojectdetails

SharePoint 2010 开发人员演练
第 61 页
4. 使用以下代码替换现有 CreateChildControls 方法:
protected override void CreateChildControls()
{
base.CreateChildControls();
Panel parent = new Panel();
parent.Style.Add("border", "solid 1px Navy");
parent.Style.Add("background-color", "#EEEEEE");
parent.Style.Add("width", "250px");
_ddlProjects.ID = "ddlProjects";
_ddlProjects.AutoPostBack = true;
_ddlProjects.SelectedIndexChanged += new
EventHandler(ddlProjects_SelectedIndexChanged);
PopulateProjects();
parent.Controls.Add(_ddlProjects);
Panel panel = new Panel();
Label label = new Label();
label.Text = "Description";
panel.Controls.Add(label);
parent.Controls.Add(panel);
panel = new Panel();
panel.Controls.Add(_tbDescription);
parent.Controls.Add(panel);
label = new Label();
label.Text = "Due Date";
panel = new Panel();
panel.Controls.Add(label);
parent.Controls.Add(panel);
panel = new Panel();
panel.Controls.Add(_tbDueDate);
parent.Controls.Add(panel);
panel = new Panel();
Button bUpdateProject = new Button();
bUpdateProject.Text = "Update Project";
bUpdateProject.Click += new EventHandler(bUpdateProject_Click);
panel.Controls.Add(bUpdateProject);
parent.Controls.Add(panel);
Controls.Add(parent);
}
代码段:My Code Snippets | spchol307_ex1_webpart_createchildcontrols

SharePoint 2010 开发人员演练
第 62 页
5. 在 CreateChildControls 下方添加以下方法:
private void PopulateProjects()
{
SPList splProjects = SPContext.Current.Web.Lists["Projects"];
_ddlProjects.Items.Add("-- Select a Project --");
foreach (SPListItem spli in splProjects.Items)
{
_ddlProjects.Items.Add(new ListItem(spli.Title, spli.ID.ToString()));
}
}
void ddlProjects_SelectedIndexChanged(object sender, EventArgs e)
{
GetProjectDetails();
}
/* Update the current project */
void bUpdateProject_Click(object sender, EventArgs e)
{
EnsureChildControls();
int nProjectID = Convert.ToInt32(_ddlProjects.SelectedValue);
SPListItem spliProject =
SPContext.Current.Web.Lists["Projects"].GetItemById(nProjectID);
spliProject["Description"] = _tbDescription.Text;
spliProject["Due_x0020_Date"] = _tbDueDate.Text;
spliProject.Update();
}
代码段:My Code Snippets | spchol307_ex1_webpart_populateprojects
任务 3 ― 生成并部署沙盒解决方案
使用 SharePoint 网站部署沙盒解决方案。
1. 右键单击“SBSolutionDemo”项目并选择“程序包”,以创建一个 .wsp 文件。
2. 打开 Internet Explorer 并浏览到 http://intranet.contoso.com。
3. 打开“网站操作”菜单并选择“网站设置”。
4. 在“库”部分,选择“解决方案”。

SharePoint 2010 开发人员演练
第 63 页
图 70 - 解决方案库
5. 选择“解决方案”选项卡。
6. 在“解决方案”选项卡上,选择“上载解决方案”。
7. 在弹出的“上载文档”对话框中,浏览到位于以下位置的 .wsp 文件:
C:\SPHOLs\SPCHOL307\CS\Ex1\SBSolutionDemo\SBSolutionDemo\bin\Debug\SBSolution
Demo.wsp。
8. 单击“确定”将 SBSolutionDemo.wsp 上载到 SharePoint。保持“覆盖现有文件”框处于选中
状态。
9. 在“解决方案库 ― 激活解决方案”对话框中,单击“激活”。沙盒解决方案 Web 部件现在已经可
以使用。
10. 打开“网站操作”菜单并选择“其他选项”。
11. 在“创建”对话框的“页”部分,选择“Web 部件页”。单击“创建”。

SharePoint 2010 开发人员演练
第 64 页
12. 将新 Web 部件页命名为 SBSolutionDemoPage,将“布局”设置为“整页, 垂直”。将“保存
位置”设置为“共享文档”。
图 71 - 新建 Web 部件页
13. 单击“创建”,创建新 Web 部件页。
14. 选择新 Web 部件页的中间区域,然后单击显示在顶部工具栏中的新“插入”选项卡。
15. 选择“Web 部件”,然后在“类别”|“自定义”的“Web 部件”下选择“SBWebPart”。
16. 单击“添加”将沙盒解决方案 Web 部件添加到页面中。

SharePoint 2010 开发人员演练
第 65 页
17. 在功能区中,单击“页面”。接下来,单击工具栏中的“停止编辑”
图 72 - SBWebPart
18. 选择位于页面右上角工具栏中的“系统帐户”,然后选择“以其他用户身份登录”。
19. 对于“用户名”,输入 andyj;对于“密码”,输入 pass@word1。
图 73 - Windows 登录对话框

SharePoint 2010 开发人员演练
第 66 页
20. 单击“确定”。
21. 沙盒解决方案 Web 部件现在已经可以使用。从下拉菜单中选择不同内容进行查看。完成后,关闭
Internet Explorer。
图 74 - 沙盒解决方案 Web 部件

SharePoint 2010 开发人员演练
第 67 页
练习 6 ― 创建要在 SharePoint Designer 工作流中使用的活动
此练习演示如何创建供 SharePoint Designer 可重用工作流使用的自定义工作流活动并将它们一起部署为
单个 *.WSP。还演示如何将这个工作流导入 Visual Studio 2010。
任务 1 ― 创建和准备项目
在此任务中,您将创建一个空项目解决方案并使用 SharePoint 用户控件。
1. 转到“开始”|“所有程序”|“Microsoft Visual Studio 2010”|“Microsoft Visual Studio 2010”,
以打开 Visual Studio 2010。
2. 在 Visual Studio 2010 中,转到“文件”|“新建”|“项目”以创建一个新项目。
3. 选择“Visual C#”|“SharePoint”|“2010”|“空白 SharePoint 项目”项目模板。
4. 在“名称”文本框中,输入 SPCHOL305Ex1,在“位置”文本框中输入
C:\SPHOLS\SPCHOL305\CS\Ex1。
图 75 - “新建项目”对话框

SharePoint 2010 开发人员演练
第 68 页
5. 单击“确定”。
6. 在“SharePoint 自定义向导”中,将 URL 更改为 http://intranet.contoso.com 并选择“部署为
场解决方案”。然后单击“完成”。
图 76 - SharePoint 自定义向导
7. Visual Studio 将创建新 SPCHOL305Ex1 项目并添加所需的文件。

SharePoint 2010 开发人员演练
第 69 页
任务 2 ― 创建供可重用工作流使用的新工作流活动
1. 在 Visual Studio 2010 中,转到“文件”|“添加”|“新项目”以添加一个新项目。
2. 将 Framework 更改为 .NET Framework 3.5
图 77 - 设置 .NET Framework 版本
3. 选择“Visual C#”|“Workflow”|“工作流程活动库”项目模板。
4. 在“名称”文本框中,输入 SPDActivityDemo,然后单击“确定”。
图 78 - “新建项目”对话框
5. 在“解决方案资源管理器”中,右键单击“SPDActivityDemo”项目并选择“添加引用”。
6. 切换到“浏览”选项卡。在“文件名”文本框中输入 C:\Program Files\Common Files\Microsoft
Shared\Web Server Extensions\14\ISAPI,然后按 Enter。

SharePoint 2010 开发人员演练
第 70 页
7. 选择“Microsoft.SharePoint.dll”和“Microsoft.SharePoint.WorkflowActions.dll”,然后单击
“确定”。
图 79 - “添加引用”对话框
8. 右键单击解决方案资源管理器中的“Activity1.cs”并选择“重命名”。
9. 将 Activity1.cs 重命名为 CreateDocumentLibrary.cs。

SharePoint 2010 开发人员演练
第 71 页
任务 3 ― 添加代码以基于传递给活动的参数创建文档库
1. 右键单击解决方案资源管理器中的“CreateDocumentLibrary.cs”文件,然后选择“查看代码”。
2. 将 CreateDocumentLibrary 基类从 SequenceActivity 更改为 Activity,如下所示。
public partial class CreateDocumentLibrary :Activity
3. 在文件顶部的现有 using 语句下添加以下 using 语句:
using Microsoft.SharePoint;
using Microsoft.SharePoint.Workflow;
using Microsoft.SharePoint.WorkflowActions;
代码段:My Code Snippets | spchol305_ex1_createdoclib_namespace
4. 向 CreateDocumentLibrary 类添加名为 UrlProperty 的新 DependencyProperty。
这将是文档库的创建位置。
public static DependencyProperty UrlProperty = DependencyProperty.Register("Url",
typeof(string), typeof(CreateDocumentLibrary), new PropertyMetadata(""));
[DescriptionAttribute("Url of base site")]
[BrowsableAttribute(true)]
[DesignerSerializationVisibilityAttribute(DesignerSerializationVisibility.Visibl
e)]
[ValidationOption(ValidationOption.Optional)]
public string Url
{
get
{
return ((string)(base.GetValue(CreateDocumentLibrary.UrlProperty)));
}
set
{
base.SetValue(CreateDocumentLibrary.UrlProperty, value);
}
}
代码段:My Code Snippets | spchol305_ex1_createdoclib_urlproperty
5. 向 CreateDocumentLibrary 类添加名为 DocLibNameProperty 的 DependencyProperty。
这将是活动创建的 DocumentLibrary 的名称。

SharePoint 2010 开发人员演练
第 72 页
public static DependencyProperty DocLibNameProperty =
DependencyProperty.Register("DocLibName", typeof(string),
typeof(CreateDocumentLibrary), new PropertyMetadata(""));
[DescriptionAttribute("Used as doc lib name")]
[BrowsableAttribute(true)]
[DesignerSerializationVisibilityAttribute(DesignerSerializationVisibility.Visibl
e)]
[ValidationOption(ValidationOption.Optional)]
public string DocLibName
{
get
{
return ((string)(base.GetValue(CreateDocumentLibrary.DocLibNameProperty)));
}
set
{
base.SetValue(CreateDocumentLibrary.DocLibNameProperty, value);
}
}
代码段:My Code Snippets | spchol305_ex1_createdoclib_doclibproperty
6. 在 CreateDocumentLibrary 构造函数下添加以下代码:
protected override ActivityExecutionStatus Execute(ActivityExecutionContext
executionContext)
{
CreateDocLib();
return ActivityExecutionStatus.Closed;
}
private void CreateDocLib()
{
using (SPSite sps = new SPSite(Url))
{
using (SPWeb spw = sps.RootWeb)
{
Guid ID = spw.Lists.Add(DocLibName, DocLibName + " Document Library",
SPListTemplateType.DocumentLibrary);
SPList spdl = spw.Lists[ID];
spdl.OnQuickLaunch = true;
spdl.Update();
}
}
}
代码段:My Code Snippets | spchol305_ex1_createdoclib_execute

SharePoint 2010 开发人员演练
第 73 页
任务 4 ― 配置活动以进行部署。
1. 为活动配置强名称。将 SPDActivityDemo.snk 从 Resources 文件夹(本手册的开头列出了该位置)添加到 SPDActivityDemo 项目。
图 80 - 添加现有项
2. 在解决方案资源管理器中右键单击 SPDActivityDemo 项目,然后选择“属性”。
3. 单击“签名”选项卡,选中“为程序集签名”,然后选择“SPDActivityDemo.snk”。
图 81 - 签名
4. 生成项目 (CTRL-SHIFT-B) 并修正所有错误。

SharePoint 2010 开发人员演练
第 74 页
5. 右键单击“SPCHOL305Ex1”项目,然后依次单击“添加”和“SharePoint 映射文件夹”
图 82 - SharePoint 映射文件夹
6. 在“添加 SharePoint 映射文件夹”对话框中选择“Template\2052\Workflow”,然后选择
“确定”。

SharePoint 2010 开发人员演练
第 75 页
图 83 - “添加 SharePoint 映射文件夹”对话框
7. 在解决方案资源管理器中,展开新添加的“Workflow”文件夹。
8. 右键单击“SPCHOL305Ex1”文件夹(如果存在)并选择“删除”。
9. 右键单击“Workflow”文件夹并选择“添加”|“新项”。
10. 选择“XML 文件”模板并将文件命名为 SPDActivityDemo.ACTIONS,然后单击“添加”。

SharePoint 2010 开发人员演练
第 76 页
图 84 - “添加新项”对话框

SharePoint 2010 开发人员演练
第 77 页
7. 使用以下代码替换 SPDActivityDemo.ACTIONS 的内容
<?xml version="1.0" encoding="utf-8"?>
<WorkflowInfo>
<Actions Sequential="then" Parallel="and">
<Action Name="Create Document Library"
ClassName="SPDActivityDemo.CreateDocumentLibrary"
Assembly="SPDActivityDemo, Version=1.0.0.0,
Culture=neutral, PublicKeyToken=a66e91d2ee2fa8f8"
AppliesTo="all"
Category="Labs">
<RuleDesigner Sentence="Document Library Name %1 to site %2.">
<FieldBind Field="DocLibName" Text="Document Library Name"
DesignerType="TextArea" Id="1"/>
<FieldBind Field="Url" Text="Url of base site" Id="2"
DesignerType="TextArea"/>
</RuleDesigner>
<Parameters>
<Parameter Name="DocLibName" Type="System.String, mscorlib"
Direction="In" />
<Parameter Name="Url" Type="System.String, mscorlib"
Direction="In" />
</Parameters>
</Action>
</Actions>
</WorkflowInfo>
代码段: My XML Snippets | spchol305_ex1_workflowactions_xml
8. 生成 SPDActivityDemo 项目
任务 5 ― 添加要与 SPCHOL305Ex1 一起部署的 SPDActivityDemo 活动
1. 在解决方案资源管理器中,展开“SPCHOL305Ex1”项目下的“Package”文件夹。
2. 双击 Package.package 文件以显示包设计器。
3. 单击设计器底部的“高级”选项卡
图 85 - “高级”包选项卡
4. 单击“添加”按钮并选择“从项目输出添加程序集”。
SharePoint 2010 开发人员演练
第 78 页
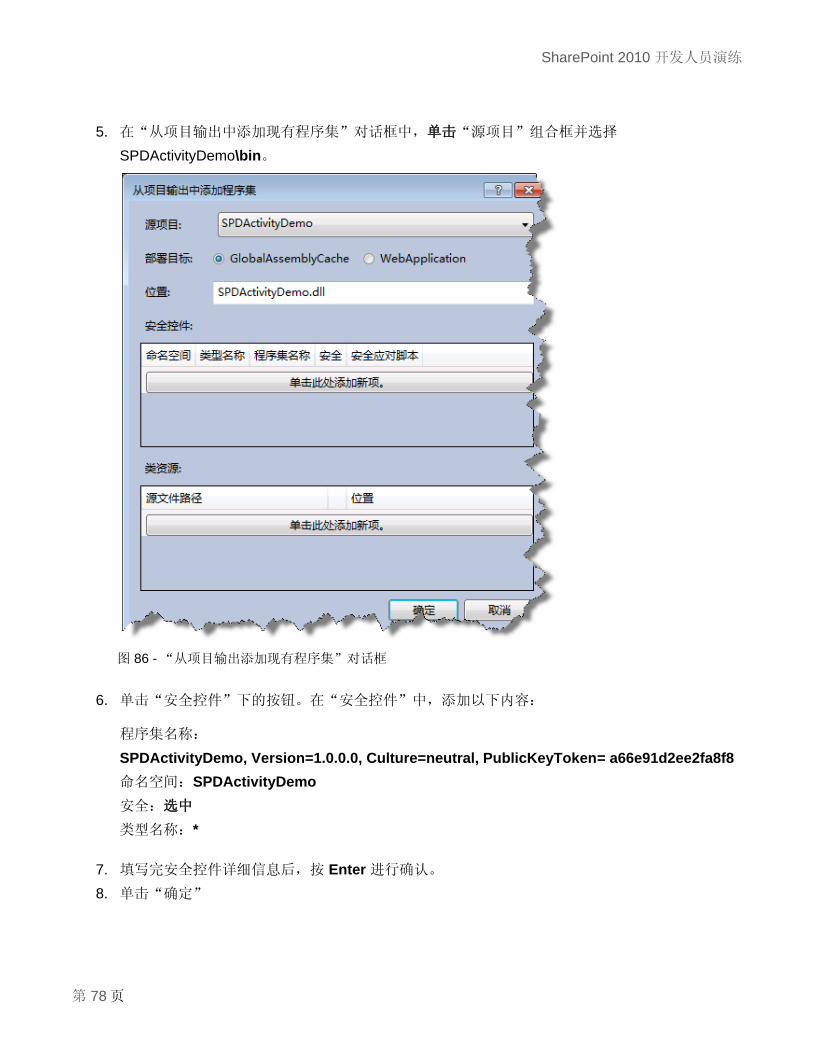
5. 在“从项目输出中添加现有程序集”对话框中,单击“源项目”组合框并选择
SPDActivityDemo\bin。
图 86 - “从项目输出添加现有程序集”对话框
6. 单击“安全控件”下的按钮。在“安全控件”中,添加以下内容:
程序集名称:
SPDActivityDemo, Version=1.0.0.0, Culture=neutral, PublicKeyToken= a66e91d2ee2fa8f8
命名空间:SPDActivityDemo
安全:选中
类型名称:*
7. 填写完安全控件详细信息后,按 Enter 进行确认。
8. 单击“确定”

SharePoint 2010 开发人员演练
第 79 页
任务 6 ― 使用功能设计器配置功能
1. 右键单击解决方案资源管理器中 SPCHOL305Ex1 项目下的 Features 文件夹,并选择
“添加功能”。
2. 右键单击“Feature1”,然后将其重命名为 SPCHOL305Ex1Feature。
3. 在功能设计器中,将 SPCHOL305Ex1Feature 的作用域更改为“WebApplication”。
图 87 - 功能设计器
任务 7 ― 添加功能接收器并编写代码
1. 右键单击解决方案资源管理器中的“SPCHOL305Ex1Feature”功能,然后选择“添加事件接
收器”
2. 在代码的顶部添加 using 语句:
using Microsoft.SharePoint.Administration;

SharePoint 2010 开发人员演练
第 80 页
3. 将以下代码添加到 FeatureReceiver 类声明中:
public override void FeatureActivated(SPFeatureReceiverProperties properties)
{
SPWebApplication wappCurrent = (SPWebApplication)properties.Feature.Parent;
SPWebConfigModification modAuthorizedType = new SPWebConfigModification();
modAuthorizedType.Name = "AuthType";
modAuthorizedType.Owner = "SPDActivityDemo";
modAuthorizedType.Path =
"configuration/System.Workflow.ComponentModel.WorkflowCompiler/authorizedTypes";
modAuthorizedType.Type =
SPWebConfigModification.SPWebConfigModificationType.EnsureChildNode;
modAuthorizedType.Value = "<authorizedType Assembly=\"SPDActivityDemo, "
+ "Version=1.0.0.0, Culture=neutral, PublicKeyToken=a66e91d2ee2fa8f8\" "
+ "Namespace=\"SPDActivityDemo\" TypeName=\"*\" Authorized=\"True\" />";
wappCurrent.WebConfigModifications.Add(modAuthorizedType);
wappCurrent.WebService.ApplyWebConfigModifications();
}
代码段: My Code Snippets | spchol305_ex1_spchol305feature_receiver
4. 通过右键单击 SPCHOL305Ex1Feature 项目名称并选择“部署”来生成并部署该项目。
图 88 - 部署解决方案
任务 8 ― 使用 SharePoint Designer 创建可重用工作流
1. 转到“开始”|“所有程序”|“SharePoint”|“Microsoft SharePoint Designer 2010”,以打开
SharePoint Designer 2010

SharePoint 2010 开发人员演练
第 81 页
2. 单击“网站”,然后单击“打开网站”。
图 89 - SharePoint Designer 2010 中的“网站”菜单按钮
如果要求提供凭据,请使用:
用户名:Administrator
密码:pass@word1

SharePoint 2010 开发人员演练
第 82 页
3. 将“网站名称”更改为 http://intranet.contoso.com,然后选择“打开”
图 90 - “打开网站”对话框

SharePoint 2010 开发人员演练
第 83 页
5. 单击“可重用工作流”按钮,出现提示时将工作流命名为 SPDWorkflow,然后单击“确定”按
钮以创建可重用工作流。
图 91 - 创建可重用工作流

SharePoint 2010 开发人员演练
第 84 页
6. 单击功能区中的“操作”按钮,然后向下滚动到“实验室”并单击“创建文档库”。注释:这是
我们先前在 Visual Studio 中创建的活动。
图 92 - 添加“创建文档库”操作

SharePoint 2010 开发人员演练
第 85 页
7. 单击“步骤 1”。在“文档库名称”旁边的框中,单击“Fx”按钮。
8. 选择“当前项目”作为“数据源”,并选择“标题”作为“源中的域”的值。然后按“确定”。
图 93 - “查找字符串”对话框
9. 键入 http://intranet.contoso.com 作为基本网站的 URL。
10. 单击功能区上的“保存”。
图 94 - 配置工作流操作

SharePoint 2010 开发人员演练
第 86 页
11. 保存后,单击功能区中的“发布”按钮。等待工作流发布。
图 95 - 发布工作流
12. 保存后,单击左侧导航栏中的“工作流”。
13. 在“可重用工作流”下再次单击该工作流,以显示工作流属性。单击“另存为模板”,
将 .WSP 文件保存在网页附件库 SharePoint 列表中。
图 96 - 另存为模板
14. 打开 Web 浏览器并导航到 http://intranet.contoso.com

SharePoint 2010 开发人员演练
第 87 页
15. 单击“网站操作”->“查看所有网站内容”->“网页附件库”。
图 97 - 网页附件库
16. 单击“SPDWorkflow”下拉菜单,然后单击“发送到”->“下载副本”。
图 98 - 下载 WSP

SharePoint 2010 开发人员演练
第 88 页
17. 将 WSP 保存到可以在后续步骤中访问的位置(如桌面)
图 99 - “另存为”对话框
任务 9 ― 将可重用工作流导入 Visual Studio
1. 返回 Visual Studio 2010,右键单击解决方案资源管理器窗口中的 SPCHOL305Ex1 解决方案,
然后单击“添加”|“新项目”。
2. 选择“Visual C#”|“SharePoint”|“2010”|“导入可重用工作流”项目模板。

SharePoint 2010 开发人员演练
第 89 页
3. 将“名称”更改为 SPDWorkflowImport。
图 100 - “新建项目”对话框
4. 单击“确定”。

SharePoint 2010 开发人员演练
第 90 页
5. 确保 URL 为 http://intranet.contoso.com。单击“下一步”。
图 101 - SharePoint 自定义向导

SharePoint 2010 开发人员演练
第 91 页
6. 提示选择要导入的 .WSP 文件时,浏览到先前保存的 SPDWorkflow.wsp 文件。单击“下一步”。
图 102 - SharePoint 自定义向导

SharePoint 2010 开发人员演练
第 92 页
7. 单击“完成”。
图 103 - SharePoint 自定义向导

SharePoint 2010 开发人员演练
第 93 页
8. 双击“SPCHOL305Ex1”项目中的“Package”,然后向“Package”添加“已转换工作流”
功能。
图 104 - SharePoint 包资源管理器

SharePoint 2010 开发人员演练
第 94 页
9. 右键单击“SPDWorkflowImport”项目,然后选择“添加引用”
10. 选择项目引用“SPDActivityDemo”,然后单击“确定”。
图 105 - 添加程序集引用
11. 在“SPDWorkflowImport”项目下,展开“Workflows\SPDWorkflowFT”节点。
12. 打开“Elements.xml”

SharePoint 2010 开发人员演练
第 95 页
13. 将工作流名称更改为 SPDWorkflowFT
图 106 - 设置导入的工作流的名称
14. 保存项目,生成解决方案并部署 SPCHOL305Ex1 项目。
任务 10 ― 将工作流与 SharePoint 列表相关联
1. 浏览到 http://intranet.contoso.com。
2. 单击“网站操作”|“其他选项”
3. 从项目列表中选择“自定义列表”。
4. 将列表命名为 Customers 并按“创建”。
5. 打开“列表设置”
图 107 - 列表设置
6. 在“权限和管理”下,单击“工作流设置”。

SharePoint 2010 开发人员演练
第 96 页
7. 按如下所示配置列表工作流设置:
选择工作流模板:SPDWorkflowFT
键入此工作流的唯一名称:Create Doc Lib for Customer
选择任务列表:任务
选择历史记录列表:工作流历史记录
启动选项:新建项目时启动此工作流
图 108 - 工作流设置
8. 单击“确定”

SharePoint 2010 开发人员演练
第 97 页
9. 导航到“Customers”列表并选择“项目”|“新建项目”。
图 109 - 创建新项目
10. 输入 Northwind 作为新客户的名称,然后在出现“Customers – 新建项目”对话框时按
“保存”。
图 110 - “新建项目”对话框
11. 自动创建一个新的同名文档库时,请等待。

SharePoint 2010 开发人员演练
第 98 页
演练摘要
在本演练文档中,演练了六个适用于 SharePoint 2010 的开发人员方案。以下位置提供了这些演练所基
于的动手实验:http://msdn.microsoft.com/zh-cn/sharepoint/ee513147.aspx