f20 - manuals.coolblue.nl
TRANSCRIPT
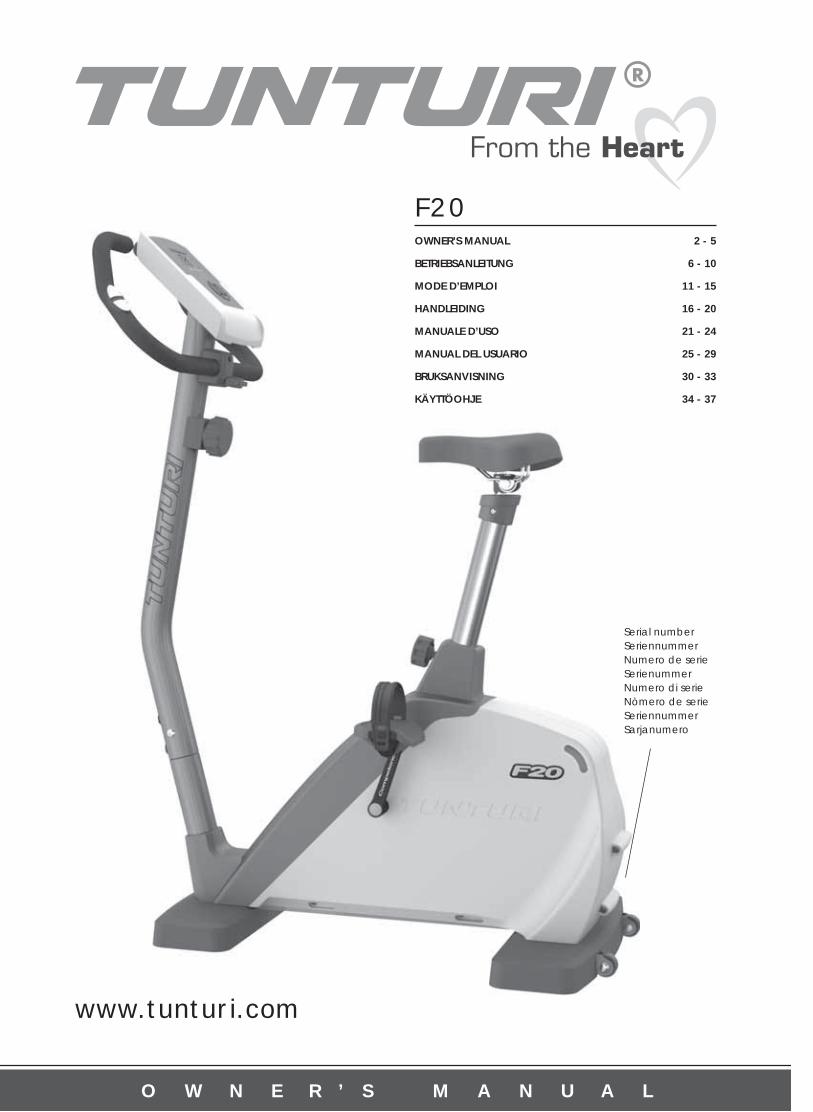
F20OWNER’S MANUAL 2 - 5
BETRIEBSANLEITUNG 6 - 10
MODE D’EMPLOI 11 - 15
HANDLEIDING 16 - 20
MANUALE D’USO 21 - 24
MANUAL DEL USUARIO 25 - 29
BRUKSANVISNING 30 - 33
KÄYTTÖOHJE 34 - 37
Serial number SeriennummerNumero de serieSerienummerNumero di serieNòmero de serieSeriennummerSarjanumero
O W N E R ’ S M A N U A L
www.tunturi.com
CONTENTSASSEMBLY 41ADJUSTMENTS 2,3EXERCISING 3HEART RATE 3CONSOLE 4MAINTENANCE 4MALFUNCTIONS 4TRANSPORT AND STORAGE 5TECHNICAL SPECIFICATIONS 5
WELCOME TO THE WORLD OF TUNTURI EXERCISING! Your choice shows that you really want to invest in your well being and condition; it also shows you really value high quality and style. With Tunturi Fitness Equipment, you’ve chosen a high quality, safe and motivating product as your training partner. Whatever your goal in training, we are certain this is the training equipment to get you there. You’ll fi nd information about using your exercise equipment and what makes for effi cient training at Tunturi’s website at WWW.TUNTURI.COM.
IMPORTANT SAFETY INSTRUCTIONS
Read this guide through carefully before assembling, using or servicing your fi tness equipment. Please keep the guide somewhere safe; it will provide you now and in the future with the information you need to use and maintain your equipment. Always follow these instructions with care.
NOTE ABOUT YOUR HEALTH• Before you start any training, consult a physician to
check your state of health.• If you experience nausea, dizziness or other abnormal
symptoms while exercising, stop your workout at once and consult a physician.
• To avoid muscular pain and strain, begin each workout by warming up and end it by cooling down (slow pedaling at low resistance). Don’t forget to stretch at the end of the workout.
NOTE ABOUT THE EXERCISE ENVIRONMENT• The equipment is not to be used outdoors.• Place the equipment on a fi rm, level surface. Place the
equipment on a protective base to avoid any damages to the fl oor beneath the equipment.
• Make sure that the exercising environment has adequate ventilation. To avoid catching cold, do not exercise in a draughty place.
• In training, the equipment tolerates an environment measuring +10°C to +35°C. The equipment can be stored in temperatures ranging between -15°C and +40°C. Air humidity in the training or storage environment must never exceed 90%.
NOTE ABOUT USING THE EQUIPMENT• If children are allowed to use the equipment, they
2
ENGLISH should be supervised and taught to use the equipment properly, keeping in mind the child’s physical and mental development and their personality.
• Before you start using the equipment, make sure that it functions correctly in every way. Do not use faulty equipment.
• Press the keys with the tip of the fi nger; your nails may damage the key membrane.
• Never lean on the interface. • Never remove the side covers. Do not step on the frame
casing.• Only one person may use the equipment at a time.• Hold the stationary handlebar for support when getting
on or off the equipment.• Wear appropriate clothing and shoes when exercising.• Protect the meter from sunlight and always dry the
surface of the meter if there are any drops of sweat on it.• Further information on warranty terms can be found in
the warranty booklet included with the product. • Please note that the warranty does not cover damage
due to shipping or negligence of adjustment or maintenance instructions described in this manual.
• The equipment must not be used by persons weighing over 135 kg.
• Make sure the equipment is unplugged before carrying out any assembly or maintenance procedures.
• Do not attempt any servicing or adjustments other than those described in this guide. Everything else must be left to someone familiar with the maintenance of electromechanical equipment and authorized under the laws of the country in question to carry out maintenance and repair work.
NOTE ABOUT ASSEMBLING THE EQUIPMENTStart by unpacking the equipment. The detailed assembly instructions can be found at the back of this guide. Follow the instructions in given order.
Before assembly, check the contents of the package. If a part is missing, please contact your dealer with the model, equipment serial no. and spare part no. of the missing part. You’ll fi nd a spare part list at the back of this guide. The hardware kit contents are marked with * in the spare parts list. The directions left, right, front and back are defi ned as seen from the exercising position. Keep the assembly tools, as you may need them e.g. for adjusting the equipment. Note that two people are needed for the assembly.The packaging includes a silicate bag for absorbing moisture during storage and transportation. Please dispose of the bag once you have unpacked the equipment. Allow at least 100 cm of clearance around the equipment. We also recommend opening the package and assembling the product on a protective base. After assembling the equipment, insert the batteries on the backside of the console.
SAVE THIS INSTRUCTION MANUAL
ADJUSTMENTSSEAT ADJUSTMENTSet the right height for you; the basic rule is that the arch of the foot reaches reaches the the pedal at its lowest point with the leg almost straight. Adjust the seat height by loosening the seat locking knob. Hold on to the seat with one hand and, using your other hand, pull the

3 F20 - OWNER’S MANUAL ENGLISH
locking knob outwards in order to enable free seat tube movement upwards and downwards. Once the height is right, let go of the knob and the seat locks into place. Turn the locking knob clockwise to tighten.
NOTE! Always make sure that the locking knob is properly fastened before starting to exercise!
HANDLEBAR SETUPLoosen the locking knob on the front of the handlebar support and fi nd the right angle at which to position the handlebar. Tighten the locking knob. The design of the handlebar allows you to exercise either in an upright position or with the upper body leaning forward. Remember, however, always to keep your back straight.
NOTE! Always make sure that the locking knob is properly fastened before starting to exercise!
CONSOLE INCLINATION ADJUSTMENTSet the inclination of the meter so that itcorresponds to your height and exercise position.
ADJUSTMENT OF SUPPORT FEETIf the equipment is not stable, adjust the adjustment screws below the support feet as necessary.
EXERCISINGWorking out with this device is excellent aerobic exercise, the principle being that the exercise should be suitably light, but of long duration. Aerobic exercise is based on improving the body’s maximum oxygen upteke, which in turn improves endurance and fi tness. The ability of the body to burn fat as a fuel is directly dependent on its oxygen-uptake capacity. Aerobic exercise should be above all pleasant. You should work up a light sweat but you should not get out of breath during the workout.
You should exercise at least three times a week, 30 minutes at a time, to reach a basic fi tness level. Maintaining this level requires a few exercise sessions each week. Once the basic condition has been reached, it is easily improved, simply by increasing the number of exercise sessions. You should start slowly at a low pedalling speed and low resistance, because for an overweight person strenuous exercise may subject the heart and circulatory system to excessive strain. As fi tness improves, resistance and pedalling speed can be increased gradually.
ADJUSTING RESISTANCETo increase or decrease resistance, turn the adjustment knob at the top of the handlebar support tube clockwise (+ direction) to increase resistance and counterclockwise (- direction) to decrease resistance. The scale above the knob (1-8) helps you fi nd and reset a suitable resistance.
HEART RATENo matter what your goal, you’ll get the best results by training at the right level of effort, and the best measure is your own heart rate.
PULSE MEASUREMENT WITH HANDGRIP SENSORSHand pulse is measured using the sensors located on the handlebars. The sensors measure electric impulses, which are formed when the person’s heart is beating. Measurement is started by touching both handlebar sensors simultaneously. To ensure reliable pulse measurement, skin must be slightly moist and skin contact with sensors must be continuous. If skin is too dry or too wet, the hand pulse measurement operation is less reliable. Try to keep your upper body and palms relaxed and still.
First fi nd your maximum heart rate i.e. where the rate doesn’t increase with added effort. If you don’t know your maximum heart rate, please use the following formula as a guide:
220 - AGE
These are average values and the maximum varies from person to person. The maximum heart-rate diminishes on average by one point per year. If you belong to a risk group, ask a doctor to measure your maximum heart rate for you.
We have defi ned three different heart-rate zones to help you with targeted training.
BEGINNER: 50-60 % of maximum heart-rate
Also suitable for weight-watchers, convalescents and those who haven’t exercised for a long time. Three sessions a week of at least a half-hour each is recommended. Regular exercise considerably improves beginners’ respiratory and circulatory performance and you will quickly feel your improvement.
TRAINER: 60-70 % of maximum heart-rate
Perfect for improving and maintaining fi tness. Even reasonable effort develops the heart and lungs effectively, training for a minimum of 30 minutes at least three times a week. To improve your condition still further, increase either frequency or effort, but not both at the same time!
ACTIVE TRAINER: 70-80 % of maximum heart-rate
Exercise at this level suits only the fi ttest and presupposes long-endurance workouts.
4
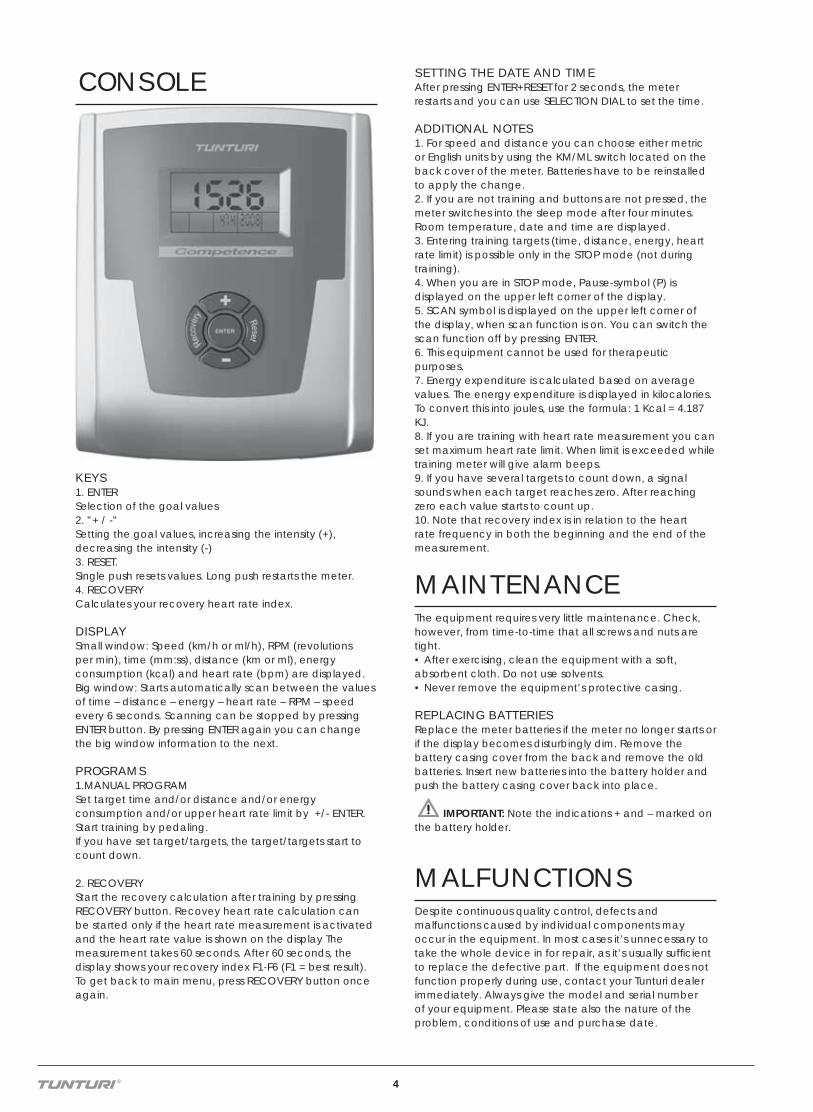
CONSOLE
KEYS1. ENTERSelection of the goal values2. ”+ / -”Setting the goal values, increasing the intensity (+), decreasing the intensity (-)3. RESET.Single push resets values. Long push restarts the meter. 4. RECOVERYCalculates your recovery heart rate index.
DISPLAYSmall window: Speed (km/h or ml/h), RPM (revolutions per min), time (mm:ss), distance (km or ml), energy consumption (kcal) and heart rate (bpm) are displayed. Big window: Starts automatically scan between the values of time – distance – energy – heart rate – RPM – speed every 6 seconds. Scanning can be stopped by pressing ENTER button. By pressing ENTER again you can change the big window information to the next.
PROGRAMS1.MANUAL PROGRAM Set target time and/or distance and/or energy consumption and/or upper heart rate limit by +/- ENTER. Start training by pedaling.If you have set target/targets, the target/targets start to count down.
2. RECOVERYStart the recovery calculation after training by pressing RECOVERY button. Recovey heart rate calculation can be started only if the heart rate measurement is activated and the heart rate value is shown on the display The measurement takes 60 seconds. After 60 seconds, the display shows your recovery index F1-F6 (F1 = best result). To get back to main menu, press RECOVERY button once again.
SETTING THE DATE AND TIME After pressing ENTER+RESET for 2 seconds, the meter restarts and you can use SELECTION DIAL to set the time.
ADDITIONAL NOTES1. For speed and distance you can choose either metric or English units by using the KM/ML switch located on the back cover of the meter. Batteries have to be reinstalled to apply the change. 2. If you are not training and buttons are not pressed, the meter switches into the sleep mode after four minutes. Room temperature, date and time are displayed. 3. Entering training targets (time, distance, energy, heart rate limit) is possible only in the STOP mode (not during training).4. When you are in STOP mode, Pause-symbol (P) is displayed on the upper left corner of the display.5. SCAN symbol is displayed on the upper left corner of the display, when scan function is on. You can switch the scan function off by pressing ENTER. 6. This equipment cannot be used for therapeutic purposes.7. Energy expenditure is calculated based on average values. The energy expenditure is displayed in kilocalories. To convert this into joules, use the formula: 1 Kcal = 4.187 KJ.8. If you are training with heart rate measurement you can set maximum heart rate limit. When limit is exceeded while training meter will give alarm beeps.9. If you have several targets to count down, a signal sounds when each target reaches zero. After reaching zero each value starts to count up.10. Note that recovery index is in relation to the heart rate frequency in both the beginning and the end of the measurement.
MAINTENANCEThe equipment requires very little maintenance. Check, however, from time-to-time that all screws and nuts are tight.• After exercising, clean the equipment with a soft, absorbent cloth. Do not use solvents. • Never remove the equipment’s protective casing.
REPLACING BATTERIESReplace the meter batteries if the meter no longer starts or if the display becomes disturbingly dim. Remove the battery casing cover from the back and remove the old batteries. Insert new batteries into the battery holder and push the battery casing cover back into place.
IMPORTANT: Note the indications + and – marked on the battery holder.
MALFUNCTIONSDespite continuous quality control, defects and malfunctions caused by individual components may occur in the equipment. In most cases it’s unnecessary to take the whole device in for repair, as it’s usually suffi cient to replace the defective part. If the equipment does not function properly during use, contact your Tunturi dealer immediately. Always give the model and serial number of your equipment. Please state also the nature of the problem, conditions of use and purchase date.
5 F20 - OWNER’S MANUAL ENGLISH
If you require spare parts, always give the model, serial number of your equipment and the spare part number for the part you need. The spare part list is at the back of this manual. Use only spare parts mentioned in the spare part list.
TRANSPORT AND STORAGEPlease follow these instructions when carrying and moving the cycle about, because lifting it incorrectly may strain your back or risk other accidents:
Stand behind the equipment. Grip the seat with one hand and the handlebar with the other, and set your foot on the rear support. Tilt the equipment so that it rests on its transport wheels. Wheel the equipment to move it, on these transport wheels. Lower the equipment while holding on to the handlebar and remain behind the equipment all the time. NOTE! Transport the equipment with caution over uneven surfaces, for example over a step. The equipment should never be transported upstairs using the wheels over the steps, instead it must be carried. We recommend that you use a protective base when transporting the equipment.
To prevent the equipment malfunctioning, store in a dry place with as little temperature variation as possible and protected from dust.
TECHNICAL SPECIFICATIONSLength: 98 cmWidth: 56 cmHeight: 138 cmWeight: 31 kg
This product meets the requirements of the EU’s EMC Directives on electromagnetic compatibility (89/336/EEC) and electrical equipment designed for use within certain voltage limits (73/23/EEC). This product therefore carries the CE label.
This product meets EN precision and safety standards (Class HB, EN-957, parts 1 and 5).Due to our continuous policy of product development, Tunturi reserves the right to change specifi cations without notice.
NOTE! The instructions must be followed carefully in the assembly, use and maintenance of your equipment. The warranty does not cover damage due to negligence of the assembly, adjustment and maintenance instructions described herein. Changes or modifi cations not expressly approved by Tunturi Oy Ltd will void the user’s authority to operate the equipment!
WE WISH YOU MANY ENJOYABLE TRAININGS WITH YOUR NEW TUNTURI TRAINING PARTNER!
38

39
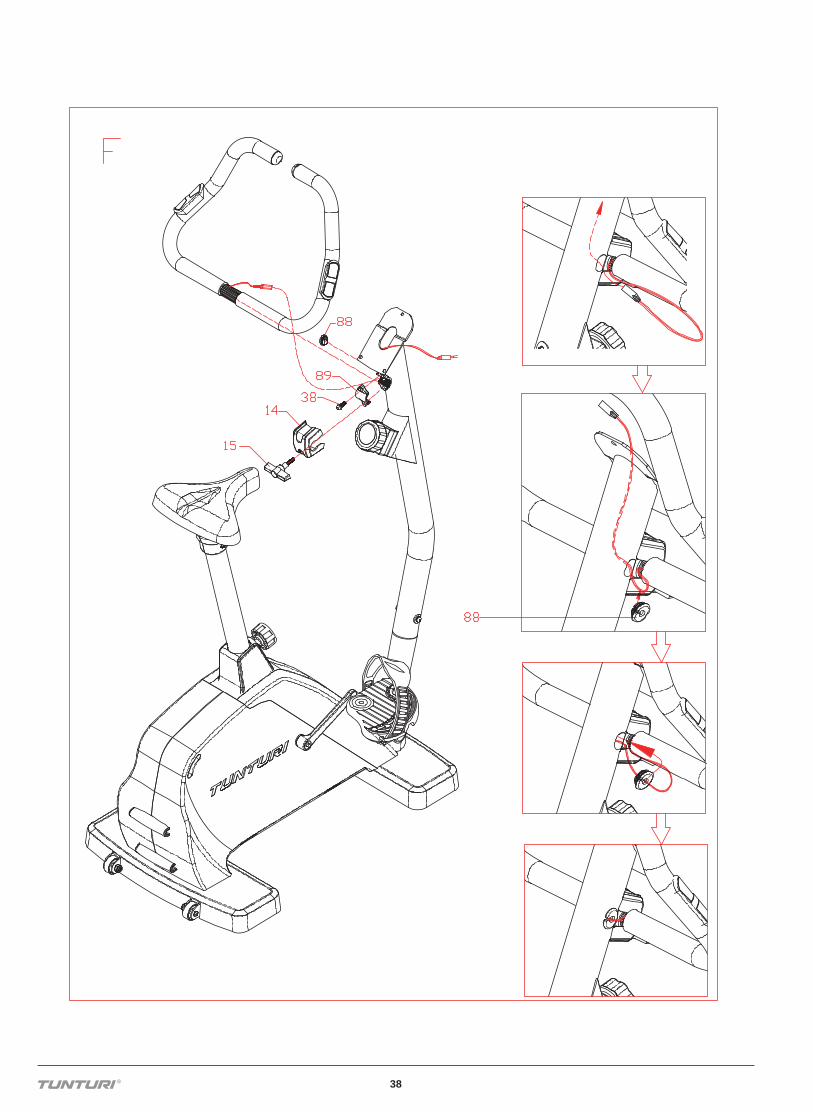
part 17 D IN 7985A M 5*15 SC R EW

40
F20 EXPLODED VIEW 09TUF20X00
41
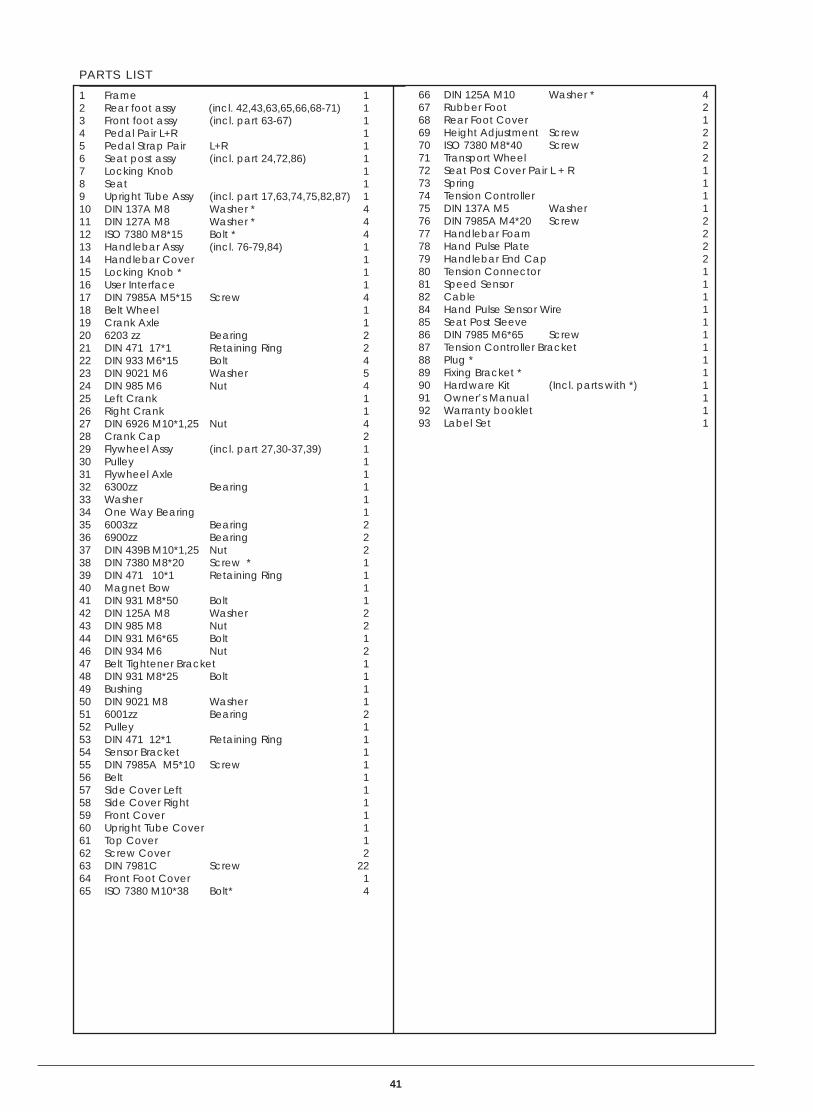
PARTS LIST
1 Frame 12 Rear foot assy (incl. 42,43,63,65,66,68-71) 13 Front foot assy (incl. part 63-67) 14 Pedal Pair L+R 15 Pedal Strap Pair L+R 16 Seat post assy (incl. part 24,72,86) 17 Locking Knob 18 Seat 19 Upright Tube Assy (incl. part 17,63,74,75,82,87) 110 DIN 137A M8 Washer * 411 DIN 127A M8 Washer * 412 ISO 7380 M8*15 Bolt * 413 Handlebar Assy (incl. 76-79,84) 114 Handlebar Cover 115 Locking Knob * 116 User Interface 117 DIN 7985A M5*15 Screw 418 Belt Wheel 119 Crank Axle 120 6203 zz Bearing 221 DIN 471 17*1 Retaining Ring 222 DIN 933 M6*15 Bolt 423 DIN 9021 M6 Washer 524 DIN 985 M6 Nut 425 Left Crank 126 Right Crank 127 DIN 6926 M10*1,25 Nut 428 Crank Cap 229 Flywheel Assy (incl. part 27,30-37,39) 130 Pulley 131 Flywheel Axle 132 6300zz Bearing 133 Washer 134 One Way Bearing 135 6003zz Bearing 236 6900zz Bearing 237 DIN 439B M10*1,25 Nut 238 DIN 7380 M8*20 Screw * 139 DIN 471 10*1 Retaining Ring 140 Magnet Bow 141 DIN 931 M8*50 Bolt 142 DIN 125A M8 Washer 243 DIN 985 M8 Nut 244 DIN 931 M6*65 Bolt 146 DIN 934 M6 Nut 247 Belt Tightener Bracket 148 DIN 931 M8*25 Bolt 149 Bushing 150 DIN 9021 M8 Washer 151 6001zz Bearing 252 Pulley 153 DIN 471 12*1 Retaining Ring 154 Sensor Bracket 155 DIN 7985A M5*10 Screw 156 Belt 157 Side Cover Left 158 Side Cover Right 159 Front Cover 160 Upright Tube Cover 161 Top Cover 162 Screw Cover 263 DIN 7981C Screw 2264 Front Foot Cover 165 ISO 7380 M10*38 Bolt* 4
66 DIN 125A M10 Washer * 467 Rubber Foot 268 Rear Foot Cover 169 Height Adjustment Screw 270 ISO 7380 M8*40 Screw 271 Transport Wheel 272 Seat Post Cover Pair L + R 173 Spring 174 Tension Controller 175 DIN 137A M5 Washer 176 DIN 7985A M4*20 Screw 277 Handlebar Foam 278 Hand Pulse Plate 279 Handlebar End Cap 280 Tension Connector 181 Speed Sensor 182 Cable 184 Hand Pulse Sensor Wire 185 Seat Post Sleeve 186 DIN 7985 M6*65 Screw 187 Tension Controller Bracket 188 Plug * 189 Fixing Bracket * 190 Hardware Kit (Incl. parts with *) 191 Owner’s Manual 192 Warranty booklet 193 Label Set 1

42

43

44O W N E R ’ S M A N U A L
BeneluxAccell Fitness Benelux
Koningsbeltweg 511329 AE ALMEREThe Netherlands
Tel: +31 36 5460050Fax: + 31 36 5460055
Scandinavia Accell Fitness Scandinavia
Varusmestarintie 2620361 TURKU
FinlandTel: +358 10 2733 200Fax: +358 2513 313
GermanyAccell Fitness Deutschland
P/a Koningsbeltweg 511329 AE ALMEREThe Netherlands
Tel: +31 36 5460050Fax: + 31 36 5460055
United KingdomAccell Fitness United Kingdom
Boland HouseNottingham South Industrial Estate
Ruddington Lane Wilford
Nottingham NG11 7EPUnited Kingdom
Tel: +44 115 9822844Fax: +44 115 9817784
North AmericaAccell Fitness North America Inc.
130 Hayward Ave, Suite 2 N2C 2E4
Kitchener, ON Canada Tel. 1-888-388-6887Fax: 1-519-576-2521
www.accellfi tness.comwww.tunturi.com