kody błędów sprzętu - · pdf filezimtech piotr zimny ul. przy bażantarni 13/31a...
TRANSCRIPT

ZimTech Piotr Zimny ul. Przy Bażantarni 13/31A
02-793 Warszawa
tel. 666-551-662
www.zimtech.com.pl
Copyright © 2017 Serwis RTV ZimTech Piotr Zimny. All Rights Reserved
Kody błędów sprzętu
AGD
UWAGA:
Podane kody błędów mają charakter orientacyjny.
Wykonanie naprawy zleć wykwalifikowanemu specjaliście.
Nie ponosimy odpowiedzialności za skutki związane z samodzielną próbą napraw sprzętu.
Pamiętaj, iż wyświetlany kod błędu nie zawsze dotyczy uszkodzonego elementu, urządzenie
może wyświetlić pierwszy napotkany kod błędu.
Naprawa sprzętu bez zachowania należytej staranności, może przyczynić się do pogłębienia
uszkodzenia lub destrukcji urządzenia.
Naprawa urządzenia pod napięciem sieciowym 230V, może przyczynić się do trwałego
kalectwa a nawet utraty życia!!!

ZimTech Piotr Zimny ul. Przy Bażantarni 13/31A
02-793 Warszawa
tel. 666-551-662
www.zimtech.com.pl
Copyright © 2017 Serwis RTV ZimTech Piotr Zimny. All Rights Reserved
Firma ZimTech Piotr Zimny.
Kompleksowa naprawa programatorów oraz modułów sterowania – pralki, zmywarki, okapu,
lodówki, płyty indukcyjnej, innych modułów występujących w sprzęcie AGD.
Kompleksowa naprawa sterowników do pieców gazowych – wszystkich marek oraz typów.
Naprawa programatorów pralki Whirlpool
Naprawa programatorów pralki Bosch
Naprawa programatorów pralki Polar
Naprawa programatora pralki Beko
Naprawa programatora pralki Samsung
Naprawa programatorów pralki Amica
Naprawa programatorów pralki Candy
Naprawa programatorów pralki Miele
Naprawa programatorów pralki Electrolux
Naprawa programatorów pralki Indesit - Ariston
Naprawa modułów sterowania do pieców gazowych
Naprawa błędu E15 – pralki Hoover oraz Candy
Naprawa błędu F12 – pralki Indesit / Ariston
Wymiana procesorów i ponowne programowanie modułu
Gwarancja 6 miesięcy.
Więcej informacji znajdą Państwo na stronie:
http://www.zimtech.com.pl/agd.html
ZAPRASZAMY!!!
ZimTech Piotr Zimny ul. Przy Bażantarni 13/31A
02-793 Warszawa
tel. 666-551-662
www.zimtech.com.pl
Copyright © 2017 Serwis RTV ZimTech Piotr Zimny. All Rights Reserved
Spis treści
1. Kody błędów pralki AMICA seria PAxxxx .................................................................................................................................................... 4
2. Kody błędów pralki AMICA z wyświetlaczem LCD ....................................................................................................................................... 5
3. Kody błędów pralki BOSCH SIEMENS........................................................................................................................................................ 5
4. Kody błędów pralki Candy Smart 180/100/130/840/1040 .......................................................................................................................... 13
5. Kody błędów pralki INDESIT ARISTON wraz z poradą ............................................................................................................................. 14
6. Kody błędów pralki ELECTROLUX wraz z poradą .................................................................................................................................... 17
7. Kody błędów zmywarek Hotpoint (bez LCD) ............................................................................................................................................. 19
8. Kody błędów lodówek Samsung ............................................................................................................................................................... 19
9. Kody błędów lodówek Hotpoint ARISTON ................................................................................................................................................. 21
10. Kody błędów zmywarek Hotpoint - LCD. ................................................................................................................................................... 21
11. Kody błędów lodówek Whirlpool ................................................................................................................................................................ 21
12. Kody błędów piekarnika SAMSUNG ......................................................................................................................................................... 22
13. Kody błędów zmywarki BOSCH ................................................................................................................................................................ 24
14. Kody błędów zmywarek BEKO .................................................................................................................................................................. 26
15. Kody błędów zmywarki WHIRPOOL ......................................................................................................................................................... 28
16. Kody błędów pralek Ariston, Hotpoint Indesit ............................................................................................................................................ 29
17. Kody błędów piekarnika WHIRPOOL ........................................................................................................................................................ 31
18. Kody błędów zmywarek BEKO .................................................................................................................................................................. 35
19. Kody błędów piekarnika Hotpoint Ariston .................................................................................................................................................. 35
20. Kody błędów zmywarek Hotpoint & Ariston (bez LCD) .............................................................................................................................. 36
21. Kody błędów płyt indukcyjnych WHIRPOOL.............................................................................................................................................. 38
22. Kody błędów płyty indukcyjnej BOSCH ..................................................................................................................................................... 39
23. Kody błędów pralek GORENJE, WA-101/121/132/162/162Р .................................................................................................................... 41
24. Kody błędów zmywarki HAIER .................................................................................................................................................................. 41
25. Kody błędów płyt indukcyjnych / ceramicznych ELECTROLUX ................................................................................................................. 41
26. Kody błędów pralek LG ............................................................................................................................................................................. 42
27. Kody błędów pralek ARDO (FLN… TLN…) ............................................................................................................................................... 43
28. Kody błędów pralek HAIER ....................................................................................................................................................................... 43
29. Kody błędów zmywarki SAMSUNG ........................................................................................................................................................... 44
30. Kody błędów pralek SAMSUNG ................................................................................................................................................................ 45
31. Kody błędów pralek ASKO ........................................................................................................................................................................ 48
32. Kody błędów pralek MIELE ....................................................................................................................................................................... 49
33. Kody błędów lodówek, lodówko – zamrażarek LG..................................................................................................................................... 51
34. Dodatek bonusowy ................................................................................................................................................................................... 53
Tryb serwisowy pralki SAMSUNG ............................................................................................................................................................. 53
Hotpoint Indesit – schemat silnika indukcyjnego. ...................................................................................................................................... 53
Tryb sprawdzania błędów w pralce BEKO ................................................................................................................................................. 54
Tryb serwisowy AMICA PAxxxxxxxx ......................................................................................................................................................... 54
Odczytywanie kodów błędów pralki ELECTROLUX. ................................................................................................................................. 55
Indesit – opis wyprowadzeń modułu. ......................................................................................................................................................... 56
KONTROLA MODUŁU INDUKCYJNEGO płyty indukcyjnej ...................................................................................................................... 57
TRYB DIAGNOSTYCZNY PRALKI ELECTROLUX ................................................................................................................................... 58

ZimTech Piotr Zimny ul. Przy Bażantarni 13/31A
02-793 Warszawa
tel. 666-551-662
www.zimtech.com.pl
Copyright © 2017 Serwis RTV ZimTech Piotr Zimny. All Rights Reserved
1. Kody błędów pralki AMICA seria PAxxxx
Liczba błyśnięć Błąd Możliwe powody wystąpienia błędu
1 Problem z blokadą drzwi
Jeśli błąd pojawia się po 10 sekundach od naciśnięcia guzika start - problem jest z
blokada drzwi lub drzwi nie są domknięte. Jeśli błąd występuje ok 1 s. po rozpoczęciu
programu - uszkodzony jest programator i nie podaje napięcia blokowania na blokadę.
2 Brak wody
Błąd pojawia się po 3 minutach od rozpoczęcia napełniania i jeśli pralka nie uzyska sygnału
napełnienia w ciągu następnych 3 minut program jest przerywany. Sprawdź dopływ
wody, zawory wody. Jeśli są sprawne - uszkodzony programator.
3 Nie można wypompować wody. Zatkany wąż pralki, uszkodzona pompa wody,
uszkodzony zawór przesterowania, uszkodzony presostat
4 Przepełnienie – za wysoki
poziom wody Uszkodzony zawór, uszkodzony programator,
uszkodzony presostat
5 Problem z grzaniem Uszkodzona grzałka, uszkodzony presostat,
uszkodzony czujnik temp, uszkodzony programator
7 Brak obrotów Uszkodzony silnik, uszkodzony programator,
zablokowany silnik
8 Przerywany sygnał obrotów Uszkodzony silnik, przewody silnika
10 Problem z zasilaniem Problemy z zasilaniem, uszkodzony
programator
11 Zwarcie Triaka sterującego
silnikiem Uszkodzony programator
12 AquaStop Woda na dnie pralki, uszkodzony programator
14 Uszkodzona pamięć
tymczasowa Wykonać pełny reset pralki, jeśli nie pomaga
wymienić programator
15 Uszkodzona pamięć stała Uszkodzony programator
ZimTech Piotr Zimny ul. Przy Bażantarni 13/31A
02-793 Warszawa
tel. 666-551-662
www.zimtech.com.pl
Copyright © 2017 Serwis RTV ZimTech Piotr Zimny. All Rights Reserved
2. Kody błędów pralki AMICA z wyświetlaczem LCD
E01 DRZWI PRALKI NIE SĄ DOBRZE DOMKNIĘTE E02 NISKIE CIŚNIENIE WODY E03 ZAPCHANY FILTR POMPY E04 PRALKA PRZEPEŁNIONA E05 BRAK WODY W PRALCE E06 PRALKA NIE ODPOMPOWAŁA WODY E07 NIESZCZELNA PRALKA WODA DOSTAJE SIĘ NA SPÓD PRALKI E09 NADMIAR PIANY ZAKOŃCZENIE WIROWANIA
3. Kody błędów pralki BOSCH SIEMENS
F01 The door of the loading hatch is not closed Check the tightness of the door closing or once again place the washing laundry in the drum so that no object is clamped by the door
F02 Water is not supplied Closed faucet for tap water in the SM. Low water pressure in the tap or water is turned off. Clogged mesh in the water supply hose to the machine.
F03 Problems with draining the water (water does not drain) An error occurs if the Siemens washing machine did not drain the water from the tank within 10 minutes. Clean the filter, make sure there are no blockages in the nozzles and hoses. Check the operation of the drain pump. The impeller of the drain pump must be free running when turning to the right / left. If this is not the case, the pump must be replaced (the resistance of the pump coil is about 200 ohms). The cause of the defect can also be caused by a malfunction of the electronic CM controller
F04 Water leakage occurred Look for the source and check the tightness of the connections.
F16 The hatch door is not closed The wash program does not start. Run the program again, if possible. Close the door.
F17 Time of water intake exceeded
the water tap is closed;
the filter at the water inlet is clogged;
pressure when water enters less than 1 bar. Open the water tap. The program will stop, the pump will start draining after 5 minutes. It is possible to start the program again.
F18 Water drain time exceeded
the drain pump is defective or clogged;
the N1 level is not reached;
the switch of the pressure switch is blocked;
malfunction of the water level controller. Clean the drain pump. The program is canceled and the "IMPORTANT FAULT" mode is activated, if there is no drain for 90 seconds.
F19 Water heating time exceeded
malfunction of the heating system;
the thermostop is not reached;
low voltage in the network;
lime run on the TEN or malfunction of the TET. Check the heater and its connecting circuits. The program will be completed without heating.
ZimTech Piotr Zimny ul. Przy Bażantarni 13/31A
02-793 Warszawa
tel. 666-551-662
www.zimtech.com.pl
Copyright © 2017 Serwis RTV ZimTech Piotr Zimny. All Rights Reserved
F20 Unexpected heating
the temperature sensor (NTC) is defective;
the TEN relay is faulty;
heating occurs during a period when there should be no heating. The program is canceled and the "IMPORT TROUBLE" mode is activated.
F21 Control system malfunction - CRITICAL ERROR Uneven operation of the drive motor, the drive motor does not rotate the drum
short-circuit of triacs;
malfunction of tachogenerator;
the reverse relay is defective. After several attempts to start the motor, the program is canceled and the "IMPORTANT TROUBLE" mode is activated. Attempts to start the motor occur before the end of the program.
F22 NTC sensor fault (temperature sensor)
short circuit NTC;
NTC sensor malfunction;
breakage of connecting chains. The program will be completed without heating.
F23 Aquastop activated
the water was collected in the washing machine sump;
breakage of connecting chains. Check the water system for leaks. Check the aquastope. Check the connection circuits for an open
F25 Malfunction of the Aqua sensor (turbidity sensor)
limescale on the aqua sensor;
failure of the pressure switch;
the water drainage system is clogged. The program will be completed without rinsing.
F26 Analog pressure sensor malfunction (protects against voltage errors) - CRITICAL ERROR
malfunction of the pressure sensor (pressure switch). Canceling the program, the pump removes water, the door is blocked, monitoring processes are blocked, the indication is blocked. 1. Press ON / OFF to reset. 2. Check the pressure sensor. 3. Check the connecting chains for an open.
F27 Error setting pressure sensor
Malfunction of the pressure sensor (pressure switch). Tuning is not performed, work on old values. 1. Check the pressure switch. 2. Check the wiring.
F28 Flow sensor malfunction (gives an impossible value) The flow of water volume per unit time. 1. Check the flow sensor. 2. Check the wiring.
F29 No water flow in the flow sensor detected
the water tap is closed; pressure on water intake <1 bar;
the filter at the water inlet is clogged;
malfunction of the magnetic valve; malfunction of the magnetic valve akvastop;
pressure sensor malfunction. Stopping the washing program, the pump will start draining after 5 minutes, it is possible to restart the program.
1. Open the water tap. 2. Check the components. 3. Check the wiring.
ZimTech Piotr Zimny ul. Przy Bażantarni 13/31A
02-793 Warszawa
tel. 666-551-662
www.zimtech.com.pl
Copyright © 2017 Serwis RTV ZimTech Piotr Zimny. All Rights Reserved
F31 Maximum water level exceeded
the pump is blocked;
the water drain hose is blocked;
malfunction of the magnetic valve;
improper adjustment of the pressure sensor;
malfunction of the pressure sensor (pressure switch);
blocking the water removal system. Removal of water to an acceptable level, the program will be extended.
1. Check the water supply valves. 2. Check the pump. 3. Check the pressure sensor (pressure switch). 4. Check the water removal system. 5. Check the wiring.
F34 The door lock does not close - CRITICAL ERROR
malfunction of the lock;
the tongue is stuck;
the door is stuck;
the gasket is inelastic. Canceling the program, the door is locked, monitoring processes are blocked, the indication is blocked. 1. Press ON / OFF to reset. 2. Check the door lock. 3. Check the mechanics. 4. Check the wiring.
F36 The lock system is faulty - CRITICAL ERROR
module failure (triac fault or relay faulty). Canceling the program, the door is locked, monitoring processes are blocked, the indication is blocked. 1. Press ON / OFF to reset. 2. Check the control module. 3. Check the wiring.
F37 Faulty NTC (temperature sensor) The program is terminated without heating. 1. Check the NTC. 2. Check the wiring
F38 Fault NTC (temperature sensor) short circuit The program ends without heating. 1. Check the NTC. 2. Check the wiring
F40 Synchronization error
the values of the supply network do not correspond to the permissible values.
F42 Uncontrolled high engine speed - CRITICAL ERROR
module failure - triac faulty.
Canceling the program, the door is locked, monitoring processes are blocked, the indication is blocked.
1. To reset, run the test program.
2. Check the module.
F43 CRITICAL ERROR Canceling the program, the door is locked, monitoring processes are blocked, the indication is blocked. 1. To reset, run the test program. 2. Check the module. CRITICAL ERROR Canceling the program, the door is locked, monitoring processes are blocked, the indication is blocked. 1. To reset, you need to run the test program. 2. Check the load level. 3. Check the tachometer. 4. Check the module. 5. Check the wiring.

ZimTech Piotr Zimny ul. Przy Bażantarni 13/31A
02-793 Warszawa
tel. 666-551-662
www.zimtech.com.pl
Copyright © 2017 Serwis RTV ZimTech Piotr Zimny. All Rights Reserved
F44 No reverse rotation occurs - CRITICAL ERROR Module malfunction:
a triac is faulty;
the reverse relay is faulty. Canceling the program, the door is locked, monitoring processes are blocked, the indication is blocked. 1. To reset, you need to run the test program. 2. Check the module.
F59 3D Sensor: measurement error too high or too low value
a break in the wiring;
failure of the power module;
malfunction of the 3D sensor;
SoftWare error. Decreasing speed. 1. Check the wiring. 2. Check the 3D sensor. 3. Check the position of the magnet. 4. Check the module.
F60 Flow sensor, too high or too low
malfunction of the flow sensor;
a turbulent turbulence in the sensor or in tubes. The passage of the volume of water per unit time. 1. Check the flow sensor. 2. Check the filter in the priming valve. 3. Check the wiring.
F61 Wrong door signal - CRITICAL ERROR
the door is open or closed;
the security lock is activated. Canceling the program, the door is locked, monitoring processes are blocked, the indication is blocked. 1. Press ON / OFF to reset. 2. Check the door lock. 3. Check the mechanics. 4. Check the wiring.
F63 Functional protection problem - CRITICAL ERROR
the processor is defective;
software error. Canceling the program, the door is locked, monitoring processes are blocked, the indication is blocked. 1. Press ON / OFF to reset. 2. Check the power module.
F67 Card encoding error - CRITICAL ERROR
the encoding between the power module and the control module is not correct;
software between the power and control module is inappropriate. Canceling the program, the door is locked, monitoring processes are blocked, the indication is blocked. 1. Press ON / OFF to reset. 2. Re-encode the card. 3. Replace the card.
E02 Motor problem (motor) Check the motor brushes. 1. Check the motor resistance. 2. Check the contacts of the connections. 3. Check the motor module or main module.
E67 Incorrect module encoding The firmware may have failed. 1. Call the master, reprogram the module. 2. Or replace the module, with a new one or a similar one.
ZimTech Piotr Zimny ul. Przy Bażantarni 13/31A
02-793 Warszawa
tel. 666-551-662
www.zimtech.com.pl
Copyright © 2017 Serwis RTV ZimTech Piotr Zimny. All Rights Reserved
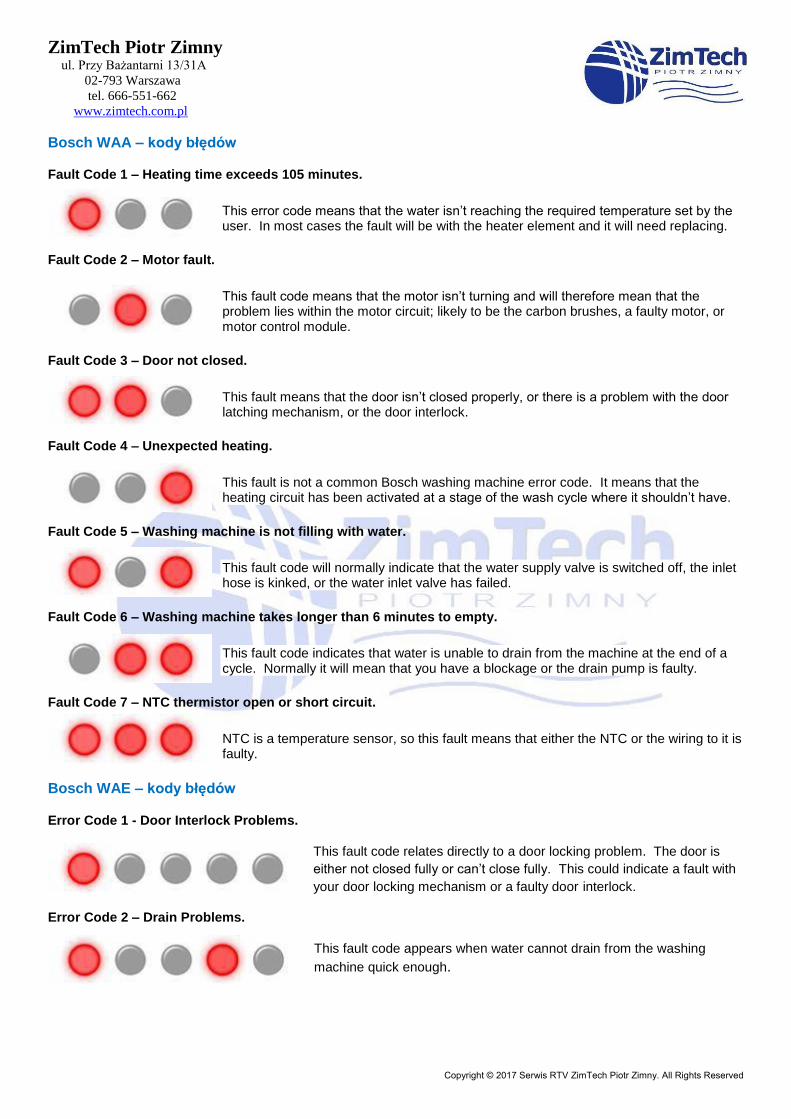
Bosch WAA – kody błędów
Fault Code 1 – Heating time exceeds 105 minutes.
This error code means that the water isn’t reaching the required temperature set by the user. In most cases the fault will be with the heater element and it will need replacing.
Fault Code 2 – Motor fault.
This fault code means that the motor isn’t turning and will therefore mean that the problem lies within the motor circuit; likely to be the carbon brushes, a faulty motor, or motor control module.
Fault Code 3 – Door not closed.
This fault means that the door isn’t closed properly, or there is a problem with the door latching mechanism, or the door interlock.
Fault Code 4 – Unexpected heating.
This fault is not a common Bosch washing machine error code. It means that the heating circuit has been activated at a stage of the wash cycle where it shouldn’t have.
Fault Code 5 – Washing machine is not filling with water.
This fault code will normally indicate that the water supply valve is switched off, the inlet hose is kinked, or the water inlet valve has failed.
Fault Code 6 – Washing machine takes longer than 6 minutes to empty.
This fault code indicates that water is unable to drain from the machine at the end of a cycle. Normally it will mean that you have a blockage or the drain pump is faulty.
Fault Code 7 – NTC thermistor open or short circuit.
NTC is a temperature sensor, so this fault means that either the NTC or the wiring to it is faulty.
Bosch WAE – kody błędów
Error Code 1 - Door Interlock Problems.
This fault code relates directly to a door locking problem. The door is
either not closed fully or can’t close fully. This could indicate a fault with
your door locking mechanism or a faulty door interlock.
Error Code 2 – Drain Problems.
This fault code appears when water cannot drain from the washing
machine quick enough.
ZimTech Piotr Zimny ul. Przy Bażantarni 13/31A
02-793 Warszawa
tel. 666-551-662
www.zimtech.com.pl
Copyright © 2017 Serwis RTV ZimTech Piotr Zimny. All Rights Reserved
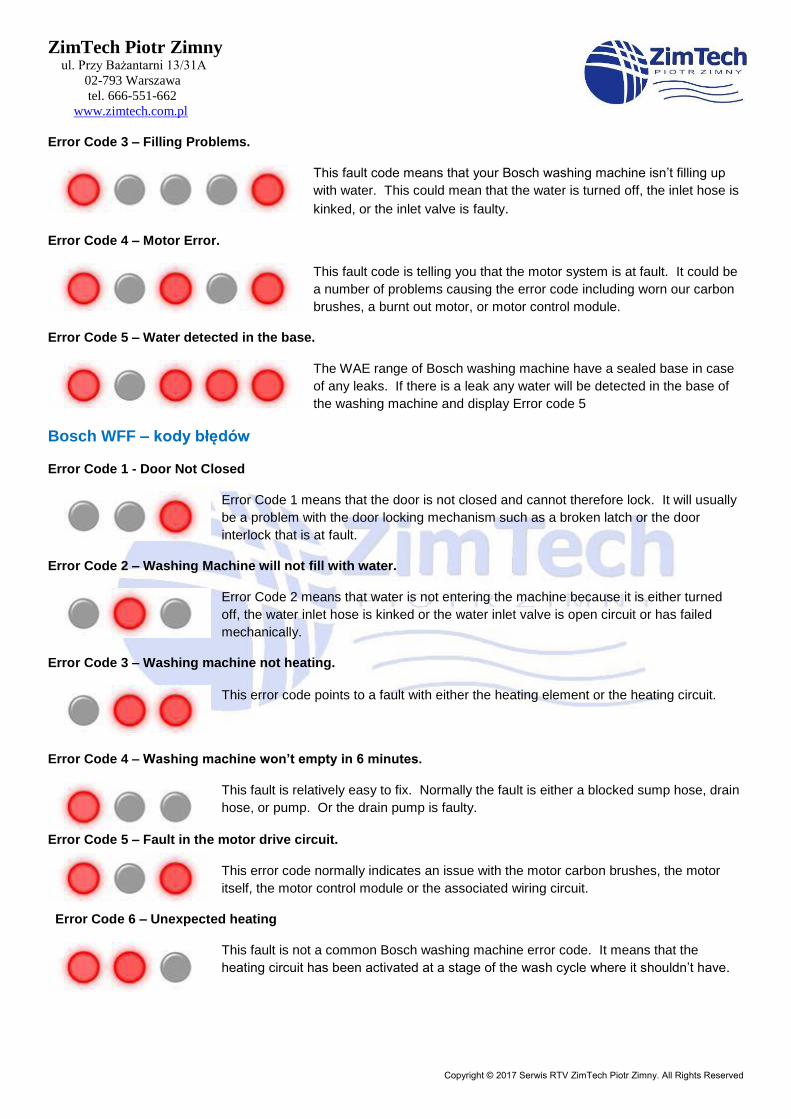
Error Code 3 – Filling Problems.
This fault code means that your Bosch washing machine isn’t filling up
with water. This could mean that the water is turned off, the inlet hose is
kinked, or the inlet valve is faulty.
Error Code 4 – Motor Error.
This fault code is telling you that the motor system is at fault. It could be
a number of problems causing the error code including worn our carbon
brushes, a burnt out motor, or motor control module.
Error Code 5 – Water detected in the base.
The WAE range of Bosch washing machine have a sealed base in case
of any leaks. If there is a leak any water will be detected in the base of
the washing machine and display Error code 5
Bosch WFF – kody błędów
Error Code 1 - Door Not Closed
Error Code 1 means that the door is not closed and cannot therefore lock. It will usually
be a problem with the door locking mechanism such as a broken latch or the door
interlock that is at fault.
Error Code 2 – Washing Machine will not fill with water.
Error Code 2 means that water is not entering the machine because it is either turned
off, the water inlet hose is kinked or the water inlet valve is open circuit or has failed
mechanically.
Error Code 3 – Washing machine not heating.
This error code points to a fault with either the heating element or the heating circuit.
Error Code 4 – Washing machine won’t empty in 6 minutes.
This fault is relatively easy to fix. Normally the fault is either a blocked sump hose, drain
hose, or pump. Or the drain pump is faulty.
Error Code 5 – Fault in the motor drive circuit.
This error code normally indicates an issue with the motor carbon brushes, the motor
itself, the motor control module or the associated wiring circuit.
Error Code 6 – Unexpected heating
This fault is not a common Bosch washing machine error code. It means that the
heating circuit has been activated at a stage of the wash cycle where it shouldn’t have.

ZimTech Piotr Zimny ul. Przy Bażantarni 13/31A
02-793 Warszawa
tel. 666-551-662
www.zimtech.com.pl
Copyright © 2017 Serwis RTV ZimTech Piotr Zimny. All Rights Reserved
Error Code 7 - NTC thermistor open or short circuit.
NTC is a temperature sensor, so this fault means that either the NTC or the wiring to it is
faulty.
Bosch WFL – kody błędów
Error Code 1 – Door is not closed
Error Code 1 means that the door is not closed and cannot therefore lock. It will usually
be a problem with the door locking mechanism such as a broken latch or the door
interlock that is at fault.
Error Code 2 – Washing Machine will not fill with water.
Error Code 2 means that water is not entering the machine because it is either turned
off, the water inlet hose is kinked or the water inlet valve is open circuit or has failed
mechanically.
Error Code 3 – Washing machine not heating.
This error code points to a fault with either the heating element or the heating circuit.
Error Code 4 – Washing machine won’t empty in 6 minutes.
This fault is relatively easy to fix. Normally the fault is either a blocked sump hose, drain
hose, or pump. Or the drain pump is faulty.
Error Code 5 – Fault in the motor drive circuit.
This error code normally indicates an issue with the motor carbon brushes, the motor
itself, the motor control module or the associated wiring circuit.
Error Code 6 – Unexpected heating
This fault is not a common Bosch washing machine error code. It means that the
heating circuit has been activated at a stage of the wash cycle where it shouldn’t have.
Error Code 7 - NTC thermistor open or short circuit.
NTC is a temperature sensor, so this fault means that either the NTC or the wiring to it is
faulty.
Bosch WOK – kody błędów
Error Code 1 – Door open when program started.
This Error code will normally mean that the door is simply not closed properly, or
it is unable to latch. The latching mechanism could be at fault or the door
interlock.
ZimTech Piotr Zimny ul. Przy Bażantarni 13/31A
02-793 Warszawa
tel. 666-551-662
www.zimtech.com.pl
Copyright © 2017 Serwis RTV ZimTech Piotr Zimny. All Rights Reserved
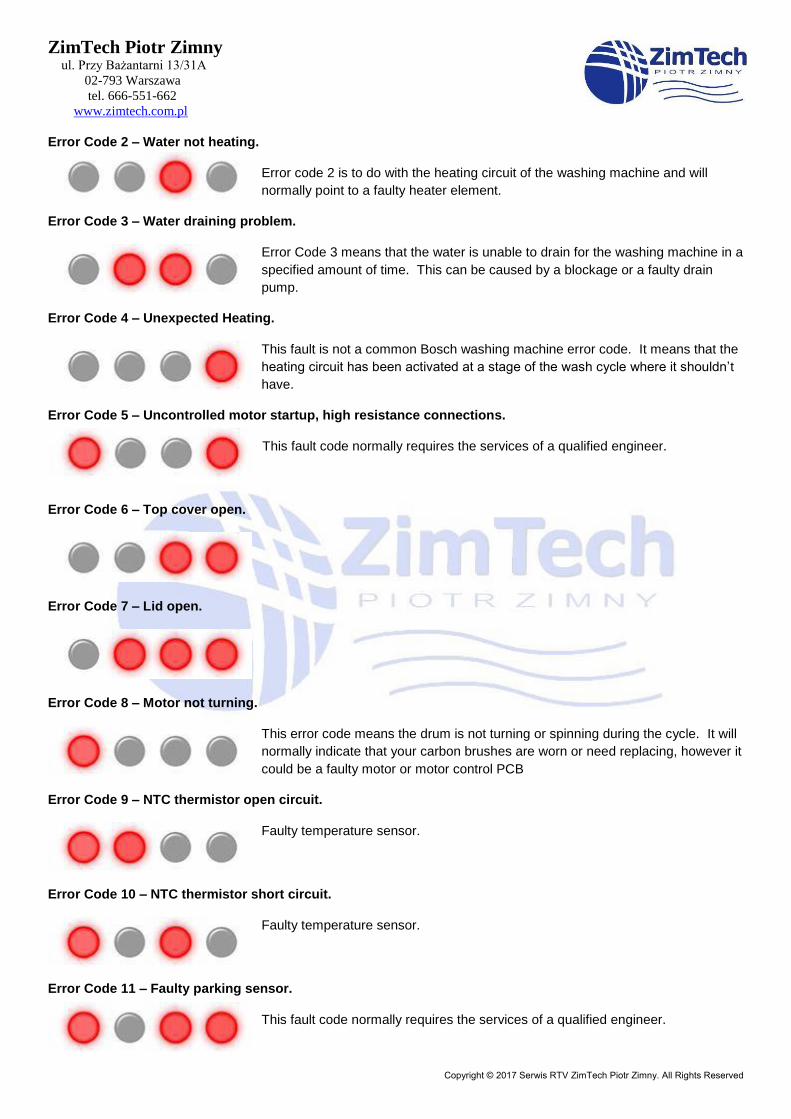
Error Code 2 – Water not heating.
Error code 2 is to do with the heating circuit of the washing machine and will
normally point to a faulty heater element.
Error Code 3 – Water draining problem.
Error Code 3 means that the water is unable to drain for the washing machine in a
specified amount of time. This can be caused by a blockage or a faulty drain
pump.
Error Code 4 – Unexpected Heating.
This fault is not a common Bosch washing machine error code. It means that the
heating circuit has been activated at a stage of the wash cycle where it shouldn’t
have.
Error Code 5 – Uncontrolled motor startup, high resistance connections.
This fault code normally requires the services of a qualified engineer.
Error Code 6 – Top cover open.
Error Code 7 – Lid open.
Error Code 8 – Motor not turning.
This error code means the drum is not turning or spinning during the cycle. It will
normally indicate that your carbon brushes are worn or need replacing, however it
could be a faulty motor or motor control PCB
Error Code 9 – NTC thermistor open circuit.
Faulty temperature sensor.
Error Code 10 – NTC thermistor short circuit.
Faulty temperature sensor.
Error Code 11 – Faulty parking sensor.
This fault code normally requires the services of a qualified engineer.
ZimTech Piotr Zimny ul. Przy Bażantarni 13/31A
02-793 Warszawa
tel. 666-551-662
www.zimtech.com.pl
Copyright © 2017 Serwis RTV ZimTech Piotr Zimny. All Rights Reserved
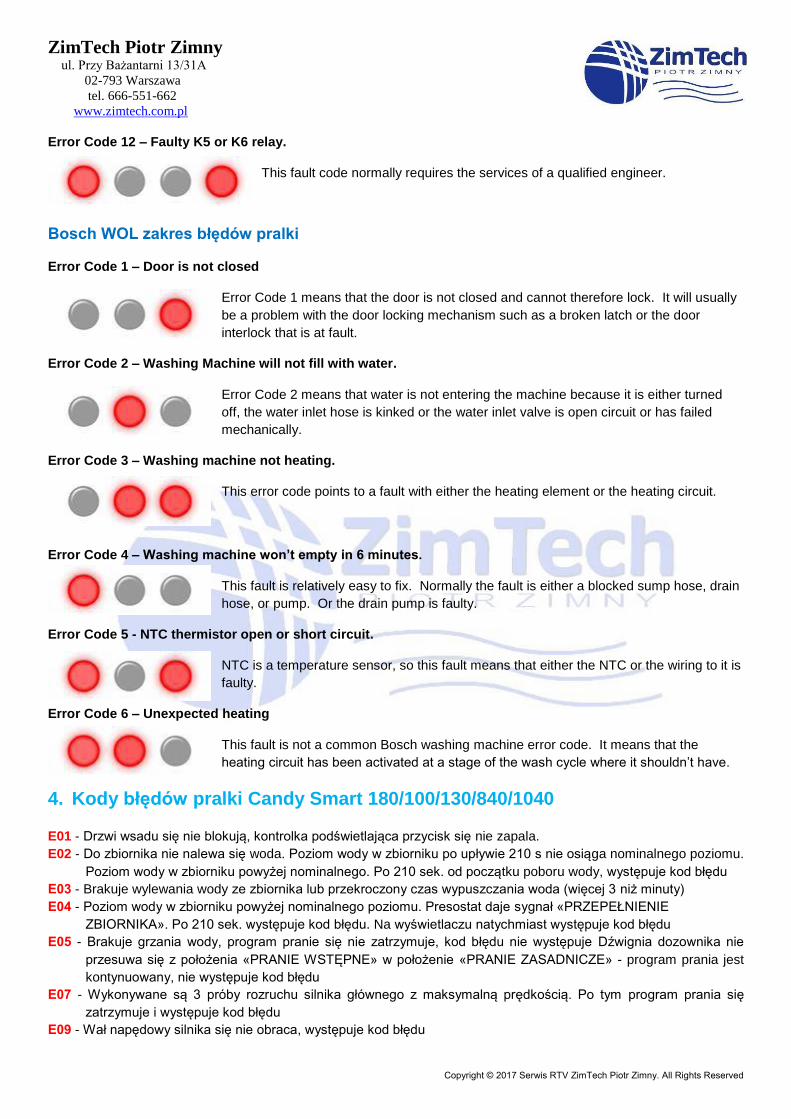
Error Code 12 – Faulty K5 or K6 relay.
This fault code normally requires the services of a qualified engineer.
Bosch WOL zakres błędów pralki
Error Code 1 – Door is not closed
Error Code 1 means that the door is not closed and cannot therefore lock. It will usually
be a problem with the door locking mechanism such as a broken latch or the door
interlock that is at fault.
Error Code 2 – Washing Machine will not fill with water.
Error Code 2 means that water is not entering the machine because it is either turned
off, the water inlet hose is kinked or the water inlet valve is open circuit or has failed
mechanically.
Error Code 3 – Washing machine not heating.
This error code points to a fault with either the heating element or the heating circuit.
Error Code 4 – Washing machine won’t empty in 6 minutes.
This fault is relatively easy to fix. Normally the fault is either a blocked sump hose, drain
hose, or pump. Or the drain pump is faulty.
Error Code 5 - NTC thermistor open or short circuit.
NTC is a temperature sensor, so this fault means that either the NTC or the wiring to it is
faulty.
Error Code 6 – Unexpected heating
This fault is not a common Bosch washing machine error code. It means that the
heating circuit has been activated at a stage of the wash cycle where it shouldn’t have.
4. Kody błędów pralki Candy Smart 180/100/130/840/1040
E01 - Drzwi wsadu się nie blokują, kontrolka podświetlająca przycisk się nie zapala.
E02 - Do zbiornika nie nalewa się woda. Poziom wody w zbiorniku po upływie 210 s nie osiąga nominalnego poziomu.
Poziom wody w zbiorniku powyżej nominalnego. Po 210 sek. od początku poboru wody, występuje kod błędu
Е03 - Brakuje wylewania wody ze zbiornika lub przekroczony czas wypuszczania woda (więcej 3 niż minuty)
Е04 - Poziom wody w zbiorniku powyżej nominalnego poziomu. Presostat daje sygnał «PRZEPEŁNIENIE
ZBIORNIKA». Po 210 sek. występuje kod błędu. Na wyświetlaczu natychmiast występuje kod błędu
Е05 - Brakuje grzania wody, program pranie się nie zatrzymuje, kod błędu nie występuje Dźwignia dozownika nie
przesuwa się z położenia «PRANIE WSTĘPNE» w położenie «PRANIE ZASADNICZE» - program prania jest
kontynuowany, nie występuje kod błędu
Е07 - Wykonywane są 3 próby rozruchu silnika głównego z maksymalną prędkością. Po tym program prania się
zatrzymuje i występuje kod błędu
Е09 - Wał napędowy silnika się nie obraca, występuje kod błędu
ZimTech Piotr Zimny ul. Przy Bażantarni 13/31A
02-793 Warszawa
tel. 666-551-662
www.zimtech.com.pl
Copyright © 2017 Serwis RTV ZimTech Piotr Zimny. All Rights Reserved
5. Kody błędów pralki INDESIT ARISTON wraz z poradą
Rodzaj błędu może zostać zasygnalizowany w różny sposób:
w modelach AVD błąd może zostać wyświetlony bezpośrednio na wyświetlaczu urządzenia
w modelach AVL błąd jest sygnalizowany przez diody.
Lista BŁĘDÓW EVO2
F01 - Triak silnika - spięcie
Sprawdzić ewentualną nieszczelność - woda może dostawać się do łącznika J9 powodując spięcie styków
Sprawdzić skrzynię zaciskową silnika (ewentualny problem wynikający z agresywnego działania pozostałości
środków chemicznych na styki, co może powodować spięcie)
Wymienić płytę elektroniki
F02 - Blokada silnika, prądniczki tachometru- Spięcie/Otwarta
Sprawdzić, czy silnik nie jest zablokowany
Sprawdzić wydajność styków łącznika J9 na płycie
Sprawdzić uzwojenie prądniczki tachometru upewnić się, czy na łączniku przewodów J9 między pin 1 a 2
odczytuje się wartość rezystancji w zakresie od 115 Ω do 170 Ω. W razie spięcia, otwartego obwodu, sprawdzić
okablowanie między pin 1 a 2 na łączniku J9 - dot. Prądniczki tachometru. W przypadku silnika trójfazowego,
sprawdzić, czy między pin 6 a 7 w łączniku J9 jest stała ciągła rezystancja.
Wymienić silnik
Wymienić płytę elektroniki
F03 - Wykryto Otwarty obwód lub spięcie NTC, bądź sklejony przekaźnik elementu grzejnego prania
(sygnalizowanie obecności napełnienia)
Sprawdzić wydajność styków łącznika J8 na płycie
Sprawdzić NTC upewniając się, czy na łączniku przewodów J8 w pin 11 i 12 wartość rezystancji przy
temperaturze otoczenia 20°C wynosi ok. 20 kΩ.
Jeśli wyniki pomiaru będą nieprawidłowe, sprawdzić ciągłość przewodów między J8/NTC
Sprawdzić ten sam parametr bezpośrednio na NTC
Wymienić NTC
Wymienić płytę elektroniki
F04 - Obecność równoczesna wskaźnika pustego i przepływu (presostat sklejony na pustym).
Jeśli styk presostatu jest sklejony na wskazaniu pusty, pralka pobiera wodę do osiągnięcia poziomu przepływu.
Pompa spustowa zostanie automatycznie uruchomiona przez styk na presostacie przepływu.
Sprawdzić wydajność styków łącznika J3 na płycie
Sprawdzić stan presostatu upewniając się, czy na łączniku przewodów J3 między pin 2 i 4 jest ciągłość
rezystancji (powinna być jedynie przy pustym bębnie), między pin 2 i 3 ciągłość rezystancji (powinna być
jedynie przy wodzie w bębnie), oraz między pin 2 i 1 ciągłość rezystancji (powinna być jedynie, jeśli woda jest w
bębnie na poziomie wyższym niż standardowy, tj. powyżej połowy drzwiczek).
Sprawdzić przewody między łącznikiem J3 a presostatem
Wymienić presostat
Wymienić płytę elektroniki
F05 - Wykryto blokadę pompy bez osiągnięcia stanu pustego przez presostat
Sprawdzić wydajność styków łącznika J9 na płycie, aby upewnić się, że między pin 8 a 9 jest napięcie 230V
Sprawdzić pompę: czy dociera zasilanie
Sprawdzić filtr pompy + odpływ w ścianie
Wymienić pompę
Wymienić płytę elektroniki
ZimTech Piotr Zimny ul. Przy Bażantarni 13/31A
02-793 Warszawa
tel. 666-551-662
www.zimtech.com.pl
Copyright © 2017 Serwis RTV ZimTech Piotr Zimny. All Rights Reserved
F06 - Nie w AVD i AVL. Uszkodzony panel obsługi, uszkodzona taśma łącząca moduły
F07 - Wykryto brak absorpcji elementu grzewczego prania (błąd jest sygnalizowany, gdy presostat jest w
stanie pustym)
Sprawdzić wydajność styków łącznika J3 na płycie
Sprawdzić na łączniku J3, pin 5 i 6, ciągłość elementu grzejnego prania. Element grzejny o mocy 1800W 230V
posiada rezystancję 25 Ω.
Sprawdzić podłączenie presostatu z łącznikiem J3, pin 2 i 3: nie powinno tam być ciągłości rezystancji (ciągłość
wymagana standardowo przy stanie pełnym).
Sprawdzić podłączenie presostatu z łącznikiem J3, pin 2 i 4: nie powinno tam być rezystancji.
Wymienić element grzewczy
Wymienić presostat
Wymienić płytę
F08 - Przekaźnik elementu grzewczego prania sklejony (sygnalizacja w stanie pustym) lub sklejony presostat
w stanie pełnym (równocześnie stan pusty i pełny)
Sprawdzić wydajność styków łącznika J3 na płycie
Sprawdzić stan presostatu upewniając się, czy na łączniku przewodów J3 między pin 2 i 4 jest ciągłość
rezystancji (powinna być jedynie przy pustym bębnie), między pin 2 i 3 ciągłość rezystancji (powinna być
jedynie przy wodzie w bębnie), oraz między pin 2 i 1 ciągłość rezystancji (powinna być jedynie, jeśli woda jest w
bębnie na poziomie wyższym niż standardowy, tj. powyżej połowy drzwiczek).
Sprawdzić przewody między łącznikiem J3 a presostatem.
Sprawdzić podłączenie elementu grzejnego z łącznikiem J3, pin 5 i 6.
Wymienić presostat.
Wymienić płytę elektroniki.
F09 - Wykryto błąd ustawień urządzenia (błąd eeprom)
W przypadku płyty produkcyjnej ze spawanym eeprom: wymienić płytę i eeprom
W przypadku płyty i eeprom zamiennych, sprawdzić prawidłowość położenia eeprom w obsadzie płyty
F10 - Brak sygnału stanu pełnego i pustego
Sprawdzić wydajność styków łącznika J3 na płycie
Sprawdzić stan presostatu upewniając się, czy na łączniku przewodów J3 między pin 2 i 4 jest ciągłość
rezystancji (powinna być jedynie przy pustym bębnie), między pin 2 i 3 ciągłość rezystancji (powinna być
jedynie przy wodzie w bębnie), oraz między pin 2 i 1 ciągłość rezystancji (powinna być jedynie, jeśli woda jest w
bębnie na poziomie wyższym niż standardowy, tj. powyżej połowy drzwiczek).
Sprawdzić przewody między łącznikiem J3 a presostatem.
Wymienić presostat, wymienić płytę elektroniki.
F11 - Wykryty brak odpowiedzi zwrotnej pompy (pompa spustowa odłączona lub przerwane uzwojenie)
Sprawdzić wydajność styków łącznika J9 na płycie.
Sprawdzić na łączniku J15, pin 1 i 2 (w przypadku pralki z blokadą drzwiczek EasyDoor) lub na łączniku J9, pin
8 i 9 (w przypadku tradycyjnej blokady drzwiczek) ciągłość pompy, sprawdzając jednocześnie, czy wartość
oporu czynnego wynosi 170 Ω.
Sprawdzić przewody między łącznikiem J15 (lub J9) a pompą.
Wymienić pompę.
Wymienić płytę elektroniki.
ZimTech Piotr Zimny ul. Przy Bażantarni 13/31A
02-793 Warszawa
tel. 666-551-662
www.zimtech.com.pl
Copyright © 2017 Serwis RTV ZimTech Piotr Zimny. All Rights Reserved
F12 - Brak komunikacji między płytą wyświetlacza / diodami a płytą główną
Sprawdzić wydajność styków łącznika J11 na płycie
Sprawdzić ciągłość między łącznikiem J11 a łącznikiem 5-drożnym poprzez płytę wyświetlacza
Wymienić płytę elektroniki
Wymienić płytę wyświetlacza/diod
F13 - Sonda NTC suszenia otwarta / Przewody NTC układu suszenia rozłączone
Sprawdzić wydajność styków łącznika J10 na płycie
Sprawdzić NTC na łączniku J10, pin 7 i 8, aby upewnić się, czy wartość rezystancji sondy w temperaturze
otoczenia 20°C wynosi ok. 20 kΩ.
Sprawdzić ciągłość przewodów od łączników J10 do NTC
Wymienić NTC.
Wymienić płytę elektroniki.
F14 - Element grzejny suszenia - otwarty obwód lub niepodłączony
Sprawdzić wydajność styków łącznika J2 na płycie.
Sprawdzić na przewodach łącznika J2, pin 1 i 2, czy zapewniają ciągłość elementu grzejnego suszenia oraz czy
wartość rezystancji dla elementu 1300W 230V wynosi ok. 40 kΩ.
Ponownie podłączyć przewody między łącznikiem J10 a elementem grzejnym suszenia
Wymienić grzałkę.
Wymienić płytę elektroniki
F15 - Element grzejny suszenia jest ciągle aktywny (styk przekaźnika suszenia jest sklejony lub triak suszenia
uległ spięciu)
Sprawdzić wydajność styków łącznika J2 na płycie.
Sprawdzić przewody między łącznikiem J2 a elementem grzejnym suszenia.
Sprawdzić przewody między łącznikiem J3 a presostatem.
Wymienić płytę elektroniki
F16 - Blokada bębna (tylko ładowane od góry)
F17 - Blokada drzwiczek - odłączenie zasilania/otwarty obwód (model z Easy Door)
Sprawdzić przewodach łącznika J4, na płycie, między pin 3 i 4, czy jest zasilanie sieciowe 230V, (brak w
urządzeniu w trybie czuwania), a pomiędzy pin 3 i 5, czy jest zasilanie na wyjściu blokady drzwiczek 230 V
Sprawdzić na łączniku J4 na płycie, między pin 1 a 2, czy jest ciągłość rezystancji mikro wyłącznika drzwiczek
(przy zamkniętych drzwiczkach on otwartych off)
Sprawdzić ciągłość przewodów od łącznika J4 do blokady drzwiczek.
Sprawdzić zaczep drzwiczek, wymienić blokadę drzwiczek, wymienić płytę elektroniki
F17 - Blokada drzwiczek - odłączenie zasilania/otwarty obwód (tradycyjna blokada drzwiczek, nie Easy Door)
Sprawdzić przewodach łącznika J4, na płycie, między pin 2 i 3, czy jest zasilanie sieciowe 230V, (brak w
urządzeniu w trybie czuwania), a pomiędzy pin 3 i 1, czy jest zasilanie na wyjściu blokady drzwiczek 230 V.
Sprawdzić zaczep drzwiczek.
Wymienić blokadę drzwiczek.
Wymienić płytę elektroniki
F18 - Błąd komunikacji mikroprocesora / DSP (Digital Signal Processor)
Wymienić płytę elektroniki
ZimTech Piotr Zimny ul. Przy Bażantarni 13/31A
02-793 Warszawa
tel. 666-551-662
www.zimtech.com.pl
Copyright © 2017 Serwis RTV ZimTech Piotr Zimny. All Rights Reserved
6. Kody błędów pralki ELECTROLUX wraz z poradą
E10 E11 Brak dopływu wody Główny zawór doprowadzający wodę zamknięty, elektrozawór nie otwiera się, przerwy w dopływie wody, za mała ilość wody, komora powietrza wadliwa, niesprawne okablowanie, płyta główna elektr. – uszkodzona główny zawór otworzyć, wymienić elektrozawór, oczyścić sitko, komora powietrza do wymiany, sprawdzić okablowanie wymienić czujnik ciśnienia, spr. i ew. wym. płytę elektroniki
E13 Za mało wody - przewód doprowadzający wodę źle ułożony, za mała ilość wody, elektrozawór uszkodzony, czujnik ciśnienia uszkodzony, nieszczelny lub zapchany obwód wody do czujnika
ciśnienia przepływu, przewód odprowadzający poprawnie ułożyć, oczyścić sitko w zaworze, zawór dopuszczający wodę wymienić, czujnik ciśnienia wymienić, sprawdzić obwód hydrauliki
E20 E21 Brak odprowadzenia wody Pompa blokuje się, nie pracuje poprawnie, przerywa, wydajność pompy
niewystarczająca, czujnik ciśnienia uszkodzony, płyta główna niesprawna, obce ciała usunąć, pompę wymienić dopływ wody sprawdzić, wymienić czujnik ciśnienia, wymienić płytę elektroniki
E23 Brak synchronizacji między pompą a układem sterowania - pompę wymienić, wymienić płytę elektroniki, sprawdzić podłączenie pompy
E24 Układ czujnika obwodu triaka i pompy-powinno być 0V lub 5V- wymienić płytę elektroniki E30 E31 Czujnik ciśnienia uszkodzony, częstotliwości czujników poza wartościami granicznymi, wiązka przewodów uszkodzona - wymienić czujnik ciśnienia, okablowanie sprawdzić/wymienić
E32 Błąd ustawienia czujnika ciśnienia, po ponownym dopływie poziom wody przekracza przedział 0-60mm, czujnik ciśnienia nie otwiera obwodu zabezpieczenia przed suszeniem zawór dopuszczający otworzyć, zawór wymienić, sitko oczyścić, komorę powietrza - wymienić, wymienić czujnik ciśnienia
E33 Brak komunikacji między czujnikiem ciśnienia a obwodem zabezpieczenia‘ przed suszeniem, Błąd musi pojawiać się częściej niż 60s wymienić czujnik ciśnienia, wiązkę przewodów wymienić, komorę powietrza-wymienić
E33 Brak współpracy między czujnikiem ciśnienia poziomu 1, a obwodem zabezpieczenia“ 1“ przed suszeniem, Błąd musi pojawiać się częściej niż 3s - wymienić czujnik ciśnienia, grzałkę wymienić, okablowanie sprawdzić, wymienić płytę elektroniki
E34 Brak współpracy miedzy czujnikiem ciśnienia poziomu a obwodem zabezpieczenia“ 2“ przed suszeniem, Błąd musi pojawiać się częściej niż 60s - wymienić czujnik ciśnienia, okablowanie wymienić, komorę powietrza wymienić
E35 Zabezpieczenie poziomu wyższego niż 300mm dla czasu większego niż 15s, pompa opróżniająca będzie uruchamiana od poziomu niższego niż 120 mm - wymienić czujnik ciśnienia, okablowanie wymienić, komorę powietrza wymienić
E35 Zabezpieczenie poziomu wyższego niż 300mm dla czasu większego niż 15s zawór wymienić, sprawdzić układ hydrauliki, wymienić czujnik ciśnienia, sprawdzić okablowanie, wymienić płytę elektroniki
E36 Układ czujnika zabezpieczenia suszenia 1 zawsze 0V - wymienić płytę elektroniki E37 Układ czujnika zabezpieczenia suszenia 2 zawsze 0V lub 5V - wymienić płytę elektroniki
E37 Układ czujnika ciśnienia poziomu 1 zawsze 0V lub 5V - wymienić płytę elektroniki E38 Komora powietrza zapchana Brak zmian ciśnienia przy prędkości obrotowej Komorę powietrza-wymienić lub przeczyścić E39 Układ czujnika HV ciśnienia poziomu 1 zawsze 0V - wymienić płytę elektroniki E3A Przekaźnik grzałki uszkodzony - wymienić płytę elektroniki E40 E41 Pokrywa otwarta Blokada pokrywy uszkodzona, połączenia uszkodzone, płyta elektroniki uszkodzona, blokada drzwiczek - wymiana, przewody wymienić, wymienić płytę elektroniki
E42 Blokada pokrywy, pokrywa jest odryglowana w czasie trwania programu dłużej niż 15s Pokrywa nie jest odryglowana po upływie 4 min od zakończenia programu Blokada drzwiczek - wymiana, przewody wymienić, wymienić płytę elektroniki
E43 Uszkodzony triak blokady pokrywy/drzwiczek - blokada drzwiczek, przewody - wymiana, wymienić płytę elektroniki
E44 Układ czujnika blokady drzwiczek zawsze 0V lub 5V - wymienić płytę elektroniki E45 Układ czujnika triaka blokady zawsze 0V lub 5V - wymienić płytę elektroniki
ZimTech Piotr Zimny ul. Przy Bażantarni 13/31A
02-793 Warszawa
tel. 666-551-662
www.zimtech.com.pl
Copyright © 2017 Serwis RTV ZimTech Piotr Zimny. All Rights Reserved
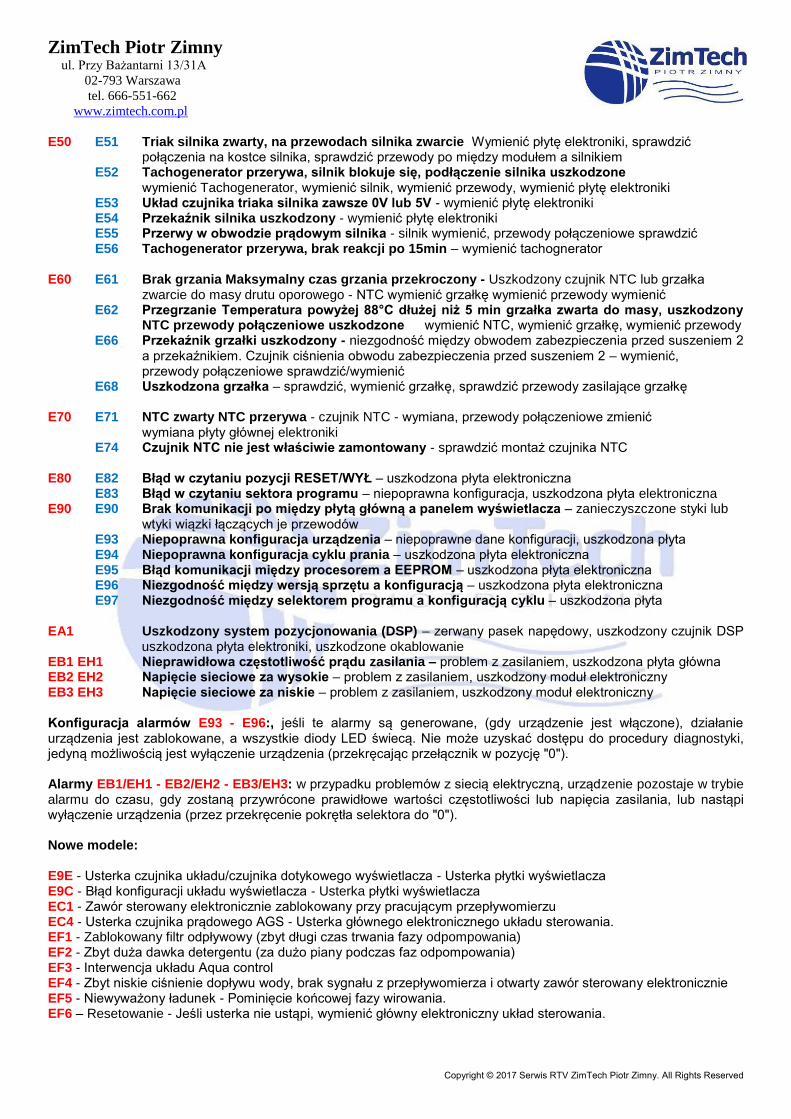
E50 E51 Triak silnika zwarty, na przewodach silnika zwarcie Wymienić płytę elektroniki, sprawdzić połączenia na kostce silnika, sprawdzić przewody po między modułem a silnikiem
E52 Tachogenerator przerywa, silnik blokuje się, podłączenie silnika uszkodzone wymienić Tachogenerator, wymienić silnik, wymienić przewody, wymienić płytę elektroniki E53 Układ czujnika triaka silnika zawsze 0V lub 5V - wymienić płytę elektroniki E54 Przekaźnik silnika uszkodzony - wymienić płytę elektroniki E55 Przerwy w obwodzie prądowym silnika - silnik wymienić, przewody połączeniowe sprawdzić E56 Tachogenerator przerywa, brak reakcji po 15min – wymienić tachognerator E60 E61 Brak grzania Maksymalny czas grzania przekroczony - Uszkodzony czujnik NTC lub grzałka
zwarcie do masy drutu oporowego - NTC wymienić grzałkę wymienić przewody wymienić E62 Przegrzanie Temperatura powyżej 88°C dłużej niż 5 min grzałka zwarta do masy, uszkodzony
NTC przewody połączeniowe uszkodzone wymienić NTC, wymienić grzałkę, wymienić przewody E66 Przekaźnik grzałki uszkodzony - niezgodność między obwodem zabezpieczenia przed suszeniem 2
a przekaźnikiem. Czujnik ciśnienia obwodu zabezpieczenia przed suszeniem 2 – wymienić, przewody połączeniowe sprawdzić/wymienić
E68 Uszkodzona grzałka – sprawdzić, wymienić grzałkę, sprawdzić przewody zasilające grzałkę
E70 E71 NTC zwarty NTC przerywa - czujnik NTC - wymiana, przewody połączeniowe zmienić wymiana płyty głównej elektroniki
E74 Czujnik NTC nie jest właściwie zamontowany - sprawdzić montaż czujnika NTC E80 E82 Błąd w czytaniu pozycji RESET/WYŁ – uszkodzona płyta elektroniczna E83 Błąd w czytaniu sektora programu – niepoprawna konfiguracja, uszkodzona płyta elektroniczna E90 E90 Brak komunikacji po między płytą główną a panelem wyświetlacza – zanieczyszczone styki lub wtyki wiązki łączących je przewodów E93 Niepoprawna konfiguracja urządzenia – niepoprawne dane konfiguracji, uszkodzona płyta E94 Niepoprawna konfiguracja cyklu prania – uszkodzona płyta elektroniczna E95 Błąd komunikacji między procesorem a EEPROM – uszkodzona płyta elektroniczna E96 Niezgodność między wersją sprzętu a konfiguracją – uszkodzona płyta elektroniczna E97 Niezgodność między selektorem programu a konfiguracją cyklu – uszkodzona płyta EA1 Uszkodzony system pozycjonowania (DSP) – zerwany pasek napędowy, uszkodzony czujnik DSP
uszkodzona płyta elektroniki, uszkodzone okablowanie EB1 EH1 Nieprawidłowa częstotliwość prądu zasilania – problem z zasilaniem, uszkodzona płyta główna EB2 EH2 Napięcie sieciowe za wysokie – problem z zasilaniem, uszkodzony moduł elektroniczny EB3 EH3 Napięcie sieciowe za niskie – problem z zasilaniem, uszkodzony moduł elektroniczny Konfiguracja alarmów E93 - E96:, jeśli te alarmy są generowane, (gdy urządzenie jest włączone), działanie urządzenia jest zablokowane, a wszystkie diody LED świecą. Nie może uzyskać dostępu do procedury diagnostyki, jedyną możliwością jest wyłączenie urządzenia (przekręcając przełącznik w pozycję "0"). Alarmy EB1/EH1 - EB2/EH2 - EB3/EH3: w przypadku problemów z siecią elektryczną, urządzenie pozostaje w trybie alarmu do czasu, gdy zostaną przywrócone prawidłowe wartości częstotliwości lub napięcia zasilania, lub nastąpi wyłączenie urządzenia (przez przekręcenie pokrętła selektora do "0"). Nowe modele: E9E - Usterka czujnika układu/czujnika dotykowego wyświetlacza - Usterka płytki wyświetlacza E9C - Błąd konfiguracji układu wyświetlacza - Usterka płytki wyświetlacza EC1 - Zawór sterowany elektronicznie zablokowany przy pracującym przepływomierzu EC4 - Usterka czujnika prądowego AGS - Usterka głównego elektronicznego układu sterowania. EF1 - Zablokowany filtr odpływowy (zbyt długi czas trwania fazy odpompowania) EF2 - Zbyt duża dawka detergentu (za dużo piany podczas faz odpompowania) EF3 - Interwencja układu Aqua control EF4 - Zbyt niskie ciśnienie dopływu wody, brak sygnału z przepływomierza i otwarty zawór sterowany elektronicznie EF5 - Niewyważony ładunek - Pominięcie końcowej fazy wirowania. EF6 – Resetowanie - Jeśli usterka nie ustąpi, wymienić główny elektroniczny układ sterowania.
ZimTech Piotr Zimny ul. Przy Bażantarni 13/31A
02-793 Warszawa
tel. 666-551-662
www.zimtech.com.pl
Copyright © 2017 Serwis RTV ZimTech Piotr Zimny. All Rights Reserved
7. Kody błędów zmywarek Hotpoint (bez LCD)
F10 - Fill or empty time out. Check that the hoses are not kinked, that the taps are on or whether the drain pump or hose is blocked. F11 - Heater timed out. The heater has not reached the required level F20 - Temperature under range F21 - Temperature over range
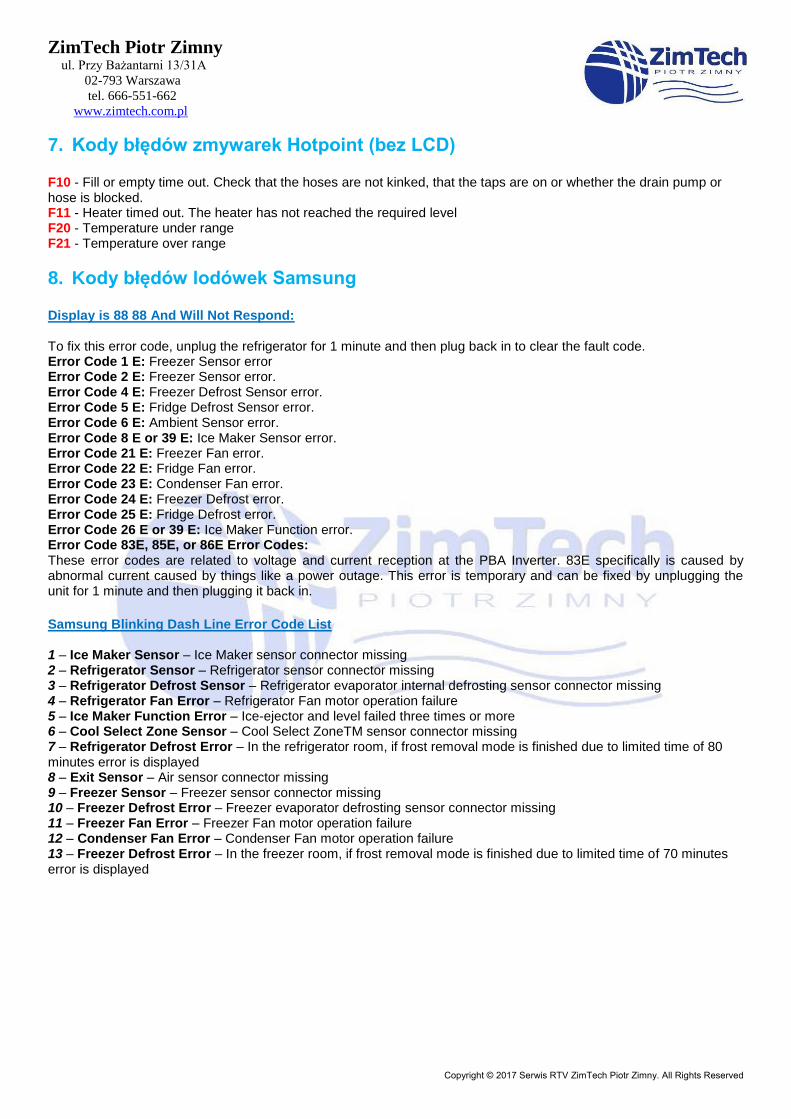
8. Kody błędów lodówek Samsung
Display is 88 88 And Will Not Respond:
To fix this error code, unplug the refrigerator for 1 minute and then plug back in to clear the fault code. Error Code 1 E: Freezer Sensor error Error Code 2 E: Freezer Sensor error. Error Code 4 E: Freezer Defrost Sensor error. Error Code 5 E: Fridge Defrost Sensor error. Error Code 6 E: Ambient Sensor error. Error Code 8 E or 39 E: Ice Maker Sensor error. Error Code 21 E: Freezer Fan error. Error Code 22 E: Fridge Fan error. Error Code 23 E: Condenser Fan error. Error Code 24 E: Freezer Defrost error. Error Code 25 E: Fridge Defrost error. Error Code 26 E or 39 E: Ice Maker Function error. Error Code 83E, 85E, or 86E Error Codes: These error codes are related to voltage and current reception at the PBA Inverter. 83E specifically is caused by abnormal current caused by things like a power outage. This error is temporary and can be fixed by unplugging the unit for 1 minute and then plugging it back in.
Samsung Blinking Dash Line Error Code List
1 – Ice Maker Sensor – Ice Maker sensor connector missing 2 – Refrigerator Sensor – Refrigerator sensor connector missing 3 – Refrigerator Defrost Sensor – Refrigerator evaporator internal defrosting sensor connector missing 4 – Refrigerator Fan Error – Refrigerator Fan motor operation failure 5 – Ice Maker Function Error – Ice-ejector and level failed three times or more 6 – Cool Select Zone Sensor – Cool Select ZoneTM sensor connector missing 7 – Refrigerator Defrost Error – In the refrigerator room, if frost removal mode is finished due to limited time of 80 minutes error is displayed 8 – Exit Sensor – Air sensor connector missing 9 – Freezer Sensor – Freezer sensor connector missing 10 – Freezer Defrost Error – Freezer evaporator defrosting sensor connector missing 11 – Freezer Fan Error – Freezer Fan motor operation failure 12 – Condenser Fan Error – Condenser Fan motor operation failure 13 – Freezer Defrost Error – In the freezer room, if frost removal mode is finished due to limited time of 70 minutes error is displayed

ZimTech Piotr Zimny ul. Przy Bażantarni 13/31A
02-793 Warszawa
tel. 666-551-662
www.zimtech.com.pl
Copyright © 2017 Serwis RTV ZimTech Piotr Zimny. All Rights Reserved

ZimTech Piotr Zimny ul. Przy Bażantarni 13/31A
02-793 Warszawa
tel. 666-551-662
www.zimtech.com.pl
Copyright © 2017 Serwis RTV ZimTech Piotr Zimny. All Rights Reserved
9. Kody błędów lodówek Hotpoint ARISTON
F1 - Freezer thermistor open circuit F2 - Freezer thermistor short circuit F3 - Fridge thermistor open circuit F4 - Fridge thermistor short circuit F7 - Evaporator thermistor open circuit F8 - Evaporator thermistor short circuit F9 - Temperature set switch open circuit FA - No feedback from baffle FB - Fridge baffle motor operating continuously FE - Defrost time out
10. Kody błędów zmywarek Hotpoint - LCD.
A01 - Float switch operated A02 - Open/Short circuit heater relay A03 - Short circuit on thermistor or Time-out drain- Check filter for blockages then book a dishwasher repair if the problem persists. A04 - Unable to reach or sense temperature within 70 minutes A05 - Pressure switch has not been reset A07 - Open/Short circuit wash motor triac A08 - Open/Short circuit auxiliary wash motor triac A09 - Open/Short circuit with main wash triac A10 - Open/Short circuit fill valve triac A11 - Half load valve triac or alternating motor action A12 - Open circuit heater relay A13 - Open/Short circuit dispenser triac A14 - Drain hose too low causing syphoning. Check drain hose and re-adjust. H20 - Check tap and pressure of incoming water.
11. Kody błędów lodówek Whirlpool
Flashing 6 on the fridge display
Condition: The 6th Sense technology is activated – If you put warm food in the refrigerator or leave the door open, the
6th Sense technology kicks on to return the refrigerator to the set temperature. The flashing 6 should go away once it
gets back to the right temperature.
Part or Parts: Allow fridge to get back to temp on its own (no parts required)
6 on the fridge display
Condition: Computer error
Check: Remove power for 5 minutes
Part or Parts: If code returns replace mother board
d on the fridge display
Condition: Air damper is stuck
Check: Unplug the refrigerator and the air damper that controls air flow from the freezer compartment to the
refrigerator compartment for damage. If the air damper is broken, replace it. Part or Parts: Air damper
C on the fridge display
Condition: Refrigerator compartment thermistor (temperature sensor) failure
Check: Unplug the refrigerator and reconnect the refrigerator thermistor wire harness if loose. Replace the wire
harness if damaged. If the wire harness is okay, replace the refrigerator compartment thermistor.
Part or Parts: Refrigerator compartment thermistor

ZimTech Piotr Zimny ul. Przy Bażantarni 13/31A
02-793 Warszawa
tel. 666-551-662
www.zimtech.com.pl
Copyright © 2017 Serwis RTV ZimTech Piotr Zimny. All Rights Reserved
C on the freezers display
Condition: Freezer compartment thermistor failure Unplug the refrigerator and reconnect the freezer thermistor wire
harness if loose.
Check: Replace the wire harness if damaged. If the wire harness is okay, replace the freezer compartment thermistor.
Part or Parts: Freezer compartment thermistor
CF on the freezers display
Condition: Communication failure between main control board and user interface control
Check: Unplug the refrigerator and check the wire harness connections on the user interface control and the main
control board. Reconnect any loose wires. If the wire harness connections are okay, replace the user interface control.
If the problem persists, replace the main control board.
Part or Parts: User interface control, Main control board
18F degrees temperature reading on the freezers display
Condition: Over-temperature condition
Check: Make sure that the refrigerator power cord is plugged into the electrical outlet securely. The over-temperature
condition is usually caused by a power failure.
Part or Parts: Press the freezer temperature keypad to reset the freezer temperature display once the freezer cools
to its normal temperature.
12. Kody błędów piekarnika SAMSUNG
How to Display Error Codes Because powering off the range clears the error codes from the display, follow this procedure to display the error codes: 1. Plug the range into the wall outlet or reset the house circuit breaker for the range to restore power. 2. Press the Clock AM/PM button twice and then select AM. 3. Press 1, 2, 3, 4 on the numeric keypad. 4. Press SET/START. 5. Press and hold CUSTOM COOK and 0 (zero) at the same time, for 2 full seconds. The most recent error code is displayed. 6. Either press 0 (zero) to scroll through the previous 4 error codes or press CLEAR/OFF to exit the error code display mode.
E27 Oven temperature sensor is defective (electrically open) - Unplug the range, disconnect the oven temperature sensor and check the resistance of the oven temperature sensor using a volt/ohm meter. The oven temperature sensor should measure around 1080 ohms at room temperature. If the resistance is more than 2950 ohms, replace the oven temperature sensor.
E28 Oven temperature sensor is defective (electrically shorted) - Unplug the range, disconnect the oven temperature sensor and check the resistance of the oven temperature sensor using a volt/ohm meter. The oven temperature sensor should measure around 1080 ohms at room temperature. If the resistance is less than 930 ohms, replace the oven temperature sensor.
E-08 Oven not heating - Unplug the range. Check the bake and broil elements for damage. If an oven element is damaged, replace it. Disconnect the oven temperature sensor and check the resistance of the oven temperature sensor using a volt/ohm meter. The oven temperature sensor should measure around 1080 ohms at room temperature. If the resistance is off by more than 200 ohms, replace the oven temperature sensor. Check the wiring between the oven electronic control board and the oven elements for damage and replace any damaged wiring.
E-OA Oven overheating - Unplug the range, disconnect the oven temperature sensor and check the resistance of the oven temperature sensor using a volt/ohm meter. The oven temperature sensor should measure around 1080 ohms at room temperature. If the resistance is off by more than 200 ohms, replace the oven temperature sensor. Check the oven electronic control board for burns or melted wires. If the electronic control board is damaged, replace it.

ZimTech Piotr Zimny ul. Przy Bażantarni 13/31A
02-793 Warszawa
tel. 666-551-662
www.zimtech.com.pl
Copyright © 2017 Serwis RTV ZimTech Piotr Zimny. All Rights Reserved
SE Defective key on the control panel - Unplug the range. Open the control console and make sure that the wire harness is plugged into the oven electronic control board properly. Check the wire harness for damage. If the wire harness is okay, replace the control panel. If the problem persists, replace the electronic control board.
E-OE or FL Oven door lock error - Unplug the range. Make sure the wiring harness connections on the oven door lock assembly are secure. Check the oven door lock assembly for damage. Replace the oven door lock assembly if damaged.
LE Low DC voltage error (below 9 volts DC) - Unplug the range and reconnect any loose wires between the low-voltage transformer and the electronic control board.. Replace the wire harness if damaged. If the wiring is okay, replace the transformer. If the problem persists, replace the electronic control board.
E-54 Oven electronic control board communication error - Unplug the range and secure any loose wiring connections between the oven electronic control board and the main cooktop control board. Replace the wire harness if damaged. If the wire harness is okay, replace the oven electronic control board. If the problem persists, replace the main cooktop control board.
E-55 Oven electronic control board communication error with touch panel - Unplug the range and secure any loose wiring connections between the oven electronic control board and the control panel. If the connections are secure, replace the control panel and wire harness assembly. If the problem persists, replace the oven electronic control board.
E-56 Cooktop has an error code - Check the cooktop display for error codes. Once the cooktop is repaired, this code should clear.
cE56 Internal oven electronic control board error - Unplug the range for 3 minutes to reset the oven electronic control board. If the code appears after you plug the range in, unplug the range and secure any loose wiring connections. Replace any damaged wire harnesses. If the problem persists, replace the oven electronic control board.
to Cooktop top temperature sensor error (sensor is electrically open) - Unplug the range and make sure the wire connections between the top temperature sensor and the main cooktop control board are secure. Replace the sensor if the wire harness is damaged. If the wire harness connection is okay, replace the top temperature sensor. If the problem persists, replace the main cooktop control board.
ts Cooktop top temperature sensor error (sensor is electrically short) - Unplug the range and make sure the wire connections between the top temperature sensor and the main cooktop control board are secure. Replace the sensor if the wire harness is damaged. If the wire harness connection is okay, replace the top temperature sensor. If the problem persists, replace the main cooktop control board.
bo or bs Cooktop element inverter control board error - An inverter control board sensor is defective (these sensors monitor the inverter control boards that convert AC voltage to DC voltage for induction element heating. Unplug the range and secure the wire harness connection for the inverter control board sensor. Replace the sensor if the wire harness is damaged. If the wire harness is okay, replace the sensor. If the problem persists, replace the inverter control board for the element.
ot Cooktop over-temperature error - Allow the cooktop to cool and then unplug the range to reset the electronic control boards. If the cooktop continues to overheat, replace the main cooktop control board.
0 Pan detection error - Use the correct size of iron-containing cookware
ZimTech Piotr Zimny ul. Przy Bażantarni 13/31A
02-793 Warszawa
tel. 666-551-662
www.zimtech.com.pl
Copyright © 2017 Serwis RTV ZimTech Piotr Zimny. All Rights Reserved
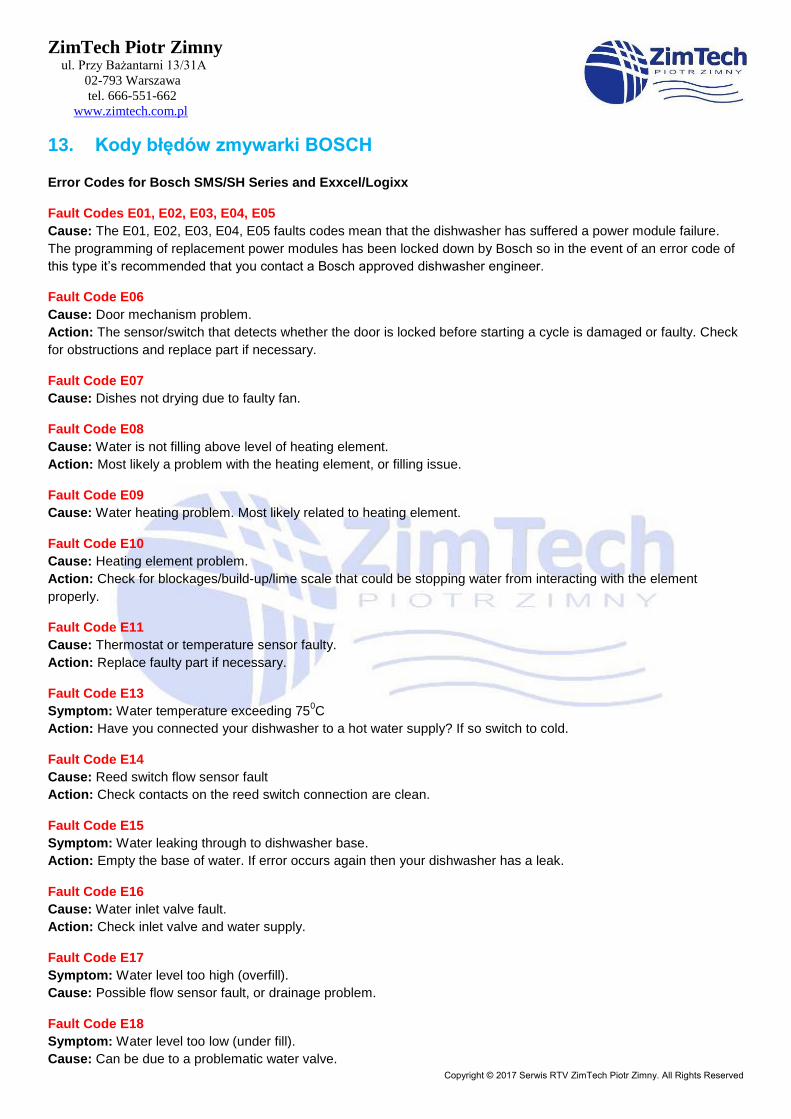
13. Kody błędów zmywarki BOSCH
Error Codes for Bosch SMS/SH Series and Exxcel/Logixx
Fault Codes E01, E02, E03, E04, E05
Cause: The E01, E02, E03, E04, E05 faults codes mean that the dishwasher has suffered a power module failure.
The programming of replacement power modules has been locked down by Bosch so in the event of an error code of
this type it’s recommended that you contact a Bosch approved dishwasher engineer.
Fault Code E06
Cause: Door mechanism problem.
Action: The sensor/switch that detects whether the door is locked before starting a cycle is damaged or faulty. Check
for obstructions and replace part if necessary.
Fault Code E07
Cause: Dishes not drying due to faulty fan.
Fault Code E08
Cause: Water is not filling above level of heating element.
Action: Most likely a problem with the heating element, or filling issue.
Fault Code E09
Cause: Water heating problem. Most likely related to heating element.
Fault Code E10
Cause: Heating element problem.
Action: Check for blockages/build-up/lime scale that could be stopping water from interacting with the element
properly.
Fault Code E11
Cause: Thermostat or temperature sensor faulty.
Action: Replace faulty part if necessary.
Fault Code E13
Symptom: Water temperature exceeding 750C
Action: Have you connected your dishwasher to a hot water supply? If so switch to cold.
Fault Code E14
Cause: Reed switch flow sensor fault
Action: Check contacts on the reed switch connection are clean.
Fault Code E15
Symptom: Water leaking through to dishwasher base.
Action: Empty the base of water. If error occurs again then your dishwasher has a leak.
Fault Code E16
Cause: Water inlet valve fault.
Action: Check inlet valve and water supply.
Fault Code E17
Symptom: Water level too high (overfill).
Cause: Possible flow sensor fault, or drainage problem.
Fault Code E18
Symptom: Water level too low (under fill).
Cause: Can be due to a problematic water valve.

ZimTech Piotr Zimny ul. Przy Bażantarni 13/31A
02-793 Warszawa
tel. 666-551-662
www.zimtech.com.pl
Copyright © 2017 Serwis RTV ZimTech Piotr Zimny. All Rights Reserved
Fault Code E19
Symptom: No response to the control keyboard.
Cause: Corrupted maintenance module, damaged software.
Fault Code E20
Symptom: Electrical short or break.
Cause: Short or break causing incorrect resistance in winding of the circulation pump or the motor.
Fault Code E21
Symptom: Circulating pump blocked.
Cause: A blockage between the motor or the pump resulting in insufficient water flow.
Fault Code E23
Cause: As error code E20, but this time the electrical problem is with the drain pump.
Action: Replace drain pump if necessary.
Fault Code E24
Symptom: Dishwasher not draining properly.
Cause: Drain filters blocked.
Action: Clean the filters.
Fault Code E25
Symptom: Dishwasher not draining properly.
Cause: Possibly blocked filters, as above. Otherwise this fault code could indicate a blocked drain pump.
Fault Code E26
Cause: Water switch/regulator problem.
Action: Check water switch and replace if required.
Fault Code E28
Cause: Fault detected with turbidity sensor.
Symptom: Dishes not getting clean. Dirty water in the tub.
Alternative error codes for Bosch dishwashers:
If your Bosch dishwasher displays fault codes in a different format than E00 (such as on models with a full LCD
display) then you might be shown the following fault codes instead.
Fault code A or B
Cause: Fault with the water sensor.
Action: Inspect dishwasher for evidence of leaks. Ascertain whether anti-flood protection has been activated.
Fault Code C
Cause: Motor tacho fault.
Action: Check motor and motor tacho wiring for problems.
Fault Code D
Cause: Wiring/electrical fault related to motor triac.
Action: Check wiring on/to PCB and motor. Check the triac (on the PCB).
Fault Code E
Cause: Diverter valve fault.
What is the diverter valve?: The diverter valve is used to send water to only the top or bottom rack when the half load
option has been selected.
Action: Inspect diverter valve and its wiring for problems.

ZimTech Piotr Zimny ul. Przy Bażantarni 13/31A
02-793 Warszawa
tel. 666-551-662
www.zimtech.com.pl
Copyright © 2017 Serwis RTV ZimTech Piotr Zimny. All Rights Reserved
Fault Code F
Cause: Fill timeout. The required water level is not sufficient within six minutes of the start of the programmer.
Fault Code G
Cause: Diverter triac fault.
Action: Check diverter triac (on PCB) and its wiring.
Fault Code H
Symptom: Dishwasher not heating.
Cause: Possible problem with heating element or thermostat, or wiring issue.
Fault Code K
Cause: Faulty thermostat sensor (NTC).
Action: Inspect the NTC and thermostat, and their wiring.
Fault Code 0
Cause: Pressure sensor fault.
Action: Check the pressure sensor and its wiring.
14. Kody błędów zmywarek BEKO
If you’re experiencing problems with your Beko dishwasher you can run a test cycle, which can help you diagnose and
troubleshoot the fault. The test cycle will run through each of the dishwashers functions in short order to try and pin
down the source of the malfunction.
To initiate the test cycle do the following:
Ensure the dishwasher is switched off.
Press and hold down the start button and the programmer button for three seconds.
All of the lights on the control panel should flash.
If a fault has already been detected it will be displayed (see the error code list below).
Otherwise press the start button to commence the test cycle.
No lights lit
Symptom: No power, or no fault detected.
Action: Check dishwasher is switched on. Check mains power.
First light lit
Symptom: Dishwasher not filling sufficiently before timeout.
ZimTech Piotr Zimny ul. Przy Bażantarni 13/31A
02-793 Warszawa
tel. 666-551-662
www.zimtech.com.pl
Copyright © 2017 Serwis RTV ZimTech Piotr Zimny. All Rights Reserved
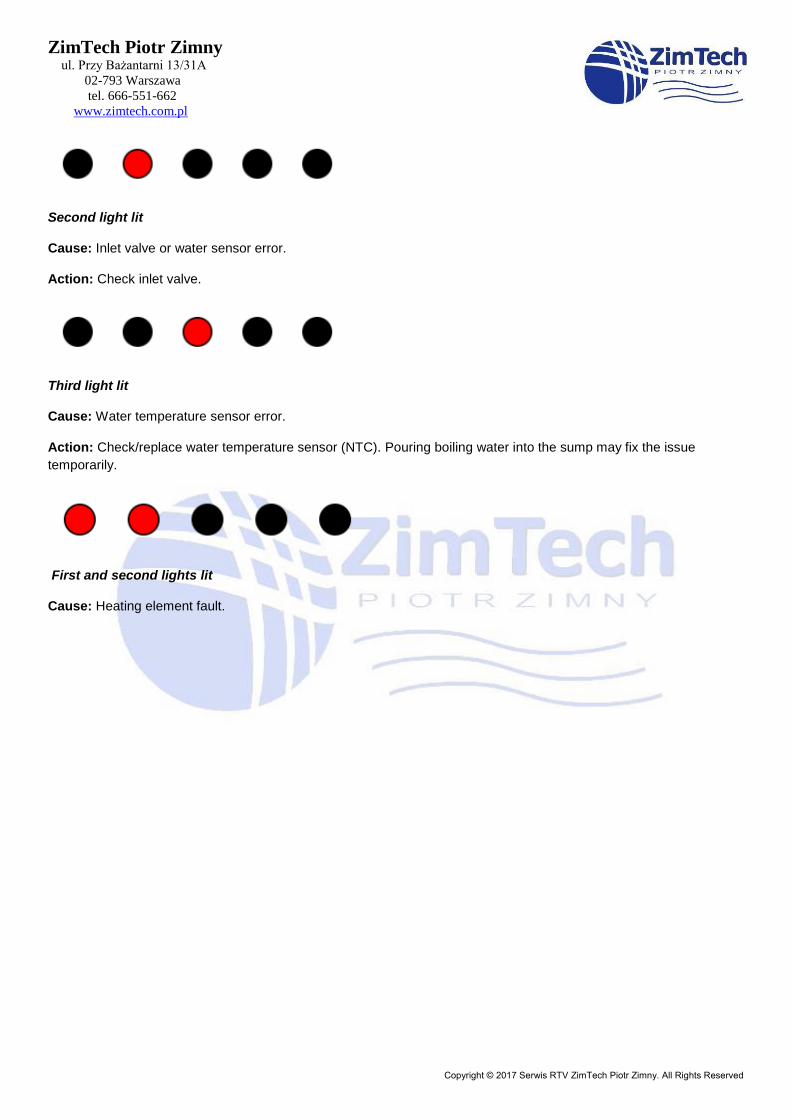
Second light lit
Cause: Inlet valve or water sensor error.
Action: Check inlet valve.
Third light lit
Cause: Water temperature sensor error.
Action: Check/replace water temperature sensor (NTC). Pouring boiling water into the sump may fix the issue
temporarily.
First and second lights lit
Cause: Heating element fault.

ZimTech Piotr Zimny ul. Przy Bażantarni 13/31A
02-793 Warszawa
tel. 666-551-662
www.zimtech.com.pl
Copyright © 2017 Serwis RTV ZimTech Piotr Zimny. All Rights Reserved
15. Kody błędów zmywarki WHIRPOOL
Fault Code F1 or One Flash Cause: Problem with the NTC (temperature sensor) or thermistor. This fault code will appear if the sensor is reading a temperature outside of the dishwashers operating window (-3°C to +85°C). The most common cause is a faulty NTC. Action: In most cases replacing the NTC will solve the problem. In winter it is possible that the dishwasher has frozen (and thus the NTC isn’t faulty – correctly detecting that it is too cold for the dishwasher to operate). You can remedy this by adding some warm (not boiling water) to the dishwasher to thaw it out, then try running a program again. Fault Code F2 or Two Flashes Cause: A water leak has been detected Action: In most cases you’ll need to find origin of the leak and repair as necessary. As long as the leak continues to be detected the water valve won’t open, preventing the dishwasher from filling with water. If there is no evidence of a leak then the error could potentially be caused by a faulty float switch, inlet valve or drain pump. Fault Code F3 or Three Flashes Cause: Issue with water heating system. This fault will be displayed if the dishwasher is unable to heat water to the required temperature with 25 minutes of the start of the wash cycle. Action: This fault is typical of a heating element failure, so check that first using a multimeter possible. Other possible culprits include the NTC and thermostat. Fault Code F4 or Four Flashes Cause: The dishwasher isn’t draining. Action: Check the filters in the dishwasher basin for any blockages and this could be a simple fix. If that doesn’t help then the problem most likely lies with the drain pump which is either blocked or faulty. Fault Code F5 or Five Flashes Cause: Spray arms are blocked/clogged or otherwise malfunctioning. Action: Spray arms are easily removed so take them out of the dishwasher and wash in the sink to clear out any gunk (using descale should help shift any stubborn debris). Whilst doing this run the dishwasher on a short program without the spray arms to clear any further blockages. Fault Code F6 or Six Flashes Cause: The fault occurs when the dishwasher does not detect any incoming water despite the water inlet valve being open. Action: Check your water supply is on. Ensure the water inlet hose has no kinks or blockages. Beyond that you could be looking at a faulty inlet valve or flow meter. Fault Code F7 or Seven Flashes Cause: Fault with flow meter detected. Action: Flow meter failure is not unusual on Whirlpool dishwashers so it may well require replacing (you’ll usually find it behind the right hand side panel). Before replacing the flow meter check the inlet valve and inlet hose to ensure this is not a simple water supply problem. Fault Code F8 or Eight Flashes Cause: Water Turbidity Fault. Your dishwasher is detecting that the turbidity of the water is too high, which basically means it is too dirty. Action: Most models have both a mechanical water indicator and an optical water indicator to measure turbidity. Give everything a thorough clean around and below the filters in the dishwasher basin. You’ll find the optical indicator in the dishwasher basin (it looks like a small black grid) – give it a gentle clean, taking care not to damage it. Fault Code F9 or Nine Flashes Cause: Water inlet is staying open (dishwasher is overfilling). Action: Check the water inlet valve – is it jammed open for some reason? It may be defective and need replacing. If it seems OK then problem is likely being caused by a faulty control board instead. Fault Code F0 or Ten Flashes Cause: Sensor fault or failure. This code is only shown in the service test programmer and thus it’s unlikely you’ll see it unless you’re a service engineer!

ZimTech Piotr Zimny ul. Przy Bażantarni 13/31A
02-793 Warszawa
tel. 666-551-662
www.zimtech.com.pl
Copyright © 2017 Serwis RTV ZimTech Piotr Zimny. All Rights Reserved
Fault Code FA or Eleven Flashes Cause: The optical water indicator is detecting high levels of water turbidity. Action: See fault code F8 for further information. Fault Code FB or Twelve Flashes Cause: Motorized diverter valve fault detected. Fault Code FC or Thirteen Flashes Cause: Water hardness sensor failure.
16. Kody błędów pralek Ariston, Hotpoint Indesit
Basic type
F10 No cold fill. Check that the taps are on or if the drain hoses are kinked.
F11 No hot fill. The ambient temperature is likely to be below freezing possibly due to the pipes being frozen.
Also check that the taps are on or if the drain hoses are kinked.
F12 No mixed fill. It is likely that the water is not turned on at the taps.
F13 Check the water supply, inlet valve and hot and cold hose connections.
F14 A fault with the water heating has occurred*
F15 Water is not being pumped out and a flood condition could occur. Check that the drainage hose is raised
to the recommended minimum height and that the pipe is not blocked.
F16 Extremely high water level. Disconnect or turn off the water supply and ensure that the water level does
not rise any more*
F17 Door not closed properly. Close door firmly at the 3 o’clock position.
F20/1 The thermistor resistance has drifted or the temperature scanning sequence is incorrect. The ambient
temperature could be below freezing
ZimTech Piotr Zimny ul. Przy Bażantarni 13/31A
02-793 Warszawa
tel. 666-551-662
www.zimtech.com.pl
Copyright © 2017 Serwis RTV ZimTech Piotr Zimny. All Rights Reserved
F30/31 A motor drive problem has occurred. Try running the programmer again. If the problem persists, book an
engineer.
F40 Water below protection level during a heat step
F41 Water level detect sequence incorrect
F50/51 Customer language and wash programmer have not been saved. The system will run with default
conditions (1000rpm max and English language)
All error codes starting with F01 to F11 are valid for Indesit and Ariston 2000 washing machines.
Starting from F01 to F12 - for washing machines Indesit, a new series of "Evolution".
From F01 to F15 - for washing machines with drying.
If your washing machine has only one indicator light (EVO-I control system), then the error code is determined by the
number of flashes in one cycle, after a pause. Thus, if the indicator flashes eight times, then a pause, then another 8
times, and so on, is a code of error for F08, similarly for other errors. The decoding of the codes is the same as for the
other series of washing machines Indesit and Ariston.
Error code Error code interpretation Probable malfunction of the washing machine
F01 Short circuit in the control circuit of the CM drive motor.
F02 The drive motor does not work, the tachogenerator circuit is short-circuited or in the break.
F03 The NTC temperature sensor circuit is closed, either in the open circuit or "stuck" in the TEN relay.
F04 The water level sensor simultaneously generates the signals "EMPTY TANK" and "FREQUENCY".
F05 The drain pump is blocked (does not work) or the level sensor generates a signal EMPTY TANK after the
completion of the water draining procedure.
F06 Button Error.
F07 After completing the water fill operation, the level sensor does not remove the signal "EMPTY TANK".
F08 The TEN relay on the module has turned on permanently (its contact group is "flooded") or the level
sensor simultaneously generates signals "EMPTY TANK" and "FULL TANK".
F09 Error (crash) of the contents of non-volatile EEPROM memory, program error.
F10 After the start of the water filling process (for the time allotted for this), the level sensor does not
generate a FULL TANK signal (provided that the BLANK TANK signal is passive, that is, there is already
water in the tank).
F11 There is no feedback signal about the operation of the drain pump.
F12 No communication between the indicating module and the electronic module.
F13 The drying temperature control circuit is faulty (for "Margarita 2000" CM with drying, EVO-I controller).
F14 Drying does not start (for "Margarita 2000" CM with drying, EVO-I controller).
F15 Drying is not switched off (for SM "Margarita 2000" with drying, controller EVO-I).
F16 Drum blocked (only in CM with vertical loading) Check the lock of the drum (power circuit of the lock
solenoid).
F17 There is no locking of the door of the hatch or the door is open (for SM with Easy Door function)
F18 Communication error between the controller ICs and the DSP (Asynchronous Drive Motor Control
Processor) on the main electronic module. Replace the main electronic module.

ZimTech Piotr Zimny ul. Przy Bażantarni 13/31A
02-793 Warszawa
tel. 666-551-662
www.zimtech.com.pl
Copyright © 2017 Serwis RTV ZimTech Piotr Zimny. All Rights Reserved
17. Kody błędów piekarnika WHIRPOOL
Whirlpool Oven/Range/Stove Fault Codes (Including 2 and 4 digit codes)
Note: Depending upon the brand of appliance, there can be many different names for the 'clock' component. Electronic Range Control, ERC, Electronic Oven Control, EOC, control board, and clock all refer to the same part.
F1-E0 EEPROM Communication Error - Disconnect power for at least 30 seconds and then reconnect. Allow at least a minute after power has been restored and if error code reappears, replace control board (clock).
F1-E1 EEPROM Checksum Error - Disconnect power for at least 30 seconds and then reconnect. Allow at least a minute after power has been restored and if error code reappears, replace control board (clock).
F1-E2 UL A/D Error(s) - Disconnect power for at least 30 seconds and then reconnect. Allow at least a minute after power has been restored and if error code reappears, replace control board (clock).
F1-E4 Model ID Error - Disconnect power for at least 30 seconds and then reconnect. Allow at least a minute after power has been restored and if error code reappears, replace control board (clock).
F1-E5 Calibration Shifted - Disconnect power for at least 30 seconds and then reconnect. Allow at least a minute after power has been restored and if error code reappears, replace control board (clock).
F1-E6 Latch Signal Mismatch Error - Disconnect power for at least 30 seconds and then reconnect. Allow at least a minute after power has been restored and if error code reappears, replace control board (clock).
F1-E9 Stack Overflow - Disconnect power for at least 30 seconds and then reconnect. Allow at least a minute after power has been restored and if error code reappears, replace control board (clock).
F1-E3 Wiring Harness Cavity Size Does Not Match Stored Value - Check the jumpers in the harness to make sure they agree with the actual oven size.
F2-E0 Shorted Touch Pad (Keypad) - Check the connection between the touch pad (keypad) and control board (clock) to make sure it is secure. Select the 'cancel' function and wait 60 seconds. If error code reappears then replace the touch pad, or touch pad and control board (clock) if all one assembly.
F2-E1 Touch Pad (Keypad) Cable Unplugged - Check the connection between the touch pad (keypad) and control board (clock) to make sure it is secure. Select the 'cancel' function and wait 60 seconds. If error code reappears then replace the touch pad, or touch pad and control board (clock) if all one assembly.
F2-E5 Cancel Key Line Open - Check the connection between the touch pad (keypad) and control board (clock) to make sure it is secure. Select the 'cancel' function and wait 60 seconds. If error code reappears then replace the touch pad, or touch pad and control board (clock) if all one assembly.
F2-E6 Cancel Key Line Open - Check the connection between the touch pad (keypad) and control board (clock) to make sure it is secure. Select the 'cancel' function and wait 60 seconds. If error code reappears then replace the touch pad, or touch pad and control board (clock) if all one assembly.
All F3-E Codes
Oven Temperature Sensor (RTD) or Warming Drawer Defect - Replace oven temperature sensor (RTD).
F4-E1 Meat Probe Defect - This error indicates a problem with the probe, receptacle, or probe circuit. Check the probe for pinched wires and make sure there is no condensation or contamination on receptacle. If ok, replace probe.
All F5-E Codes
Door Switch Defect - This occurs when the door switches do not match. If door is latched, disconnect power from unit and check wires and connections. If damage is found, replace appropriate part. If connections are not damaged, reconnect power and hold down any key until the F5 error clears. Once the F2 code appears, select 'cancel' and observe for one minute for errors. If door is NOT latched, disconnect power from unit and check wires and connections. If damage is found, replace appropriate part. If connections are not damaged, measure door switch (door open = latch open) and latch switch (unlatch = switch open) and replace either if defective. If corrections are made during any step, power should be reconnected and the unit should be tested. Press and hold any key to clear the error code and F2 code should appear. Select 'cancel' and observe for one minute for errors. If error continues, disconnect power and replace control.
F6-E0 Return Line Not Connected - This error should appear within 60 seconds after power up to appliance. Replace control board (clock).
ZimTech Piotr Zimny ul. Przy Bażantarni 13/31A
02-793 Warszawa
tel. 666-551-662
www.zimtech.com.pl
Copyright © 2017 Serwis RTV ZimTech Piotr Zimny. All Rights Reserved
F7-E1 Common Switch Wire Is Defective - This error occurs when common wire to latch switch and door switch is shorted. Check all connections at control board and at the latch switch and door switch. If connections are ok, then check individual switches as outlined for the F5 error code. Note: Double ovens will have two of each switch and one common wire.
2 Digit Failure Codes
F0 Control Board Failure - Replace control board (clock).
F1 Control Board Failure - Replace control board (clock).
F2 Oven Temperature Is Too High - Check for welded contacts on bake and broil relays. If present, replace control board (clock). For SELF CLEAN models, check door lock operation. Check sensor, sensor harness, and the sensor harness connection at sensor and oven control. Also check for any causes of high resistance in the oven temperature sensor circuit. Remember: The oven control board (clock) measures resistance of sensor circuit, not actual oven temperature.
F3 Open Oven Temperature Sensor (RTD) - Replace oven temperature sensor (RTD).
F4 Shorted Oven Temperature Sensor (RTD) - Replace oven temperature sensor (RTD).
F5 Control Board Failure - Replace control board (clock).
F7 Function Key Stuck - Replace control board (clock).
F8 Control Board Failure - Replace control board (clock).
F9 Oven Door Lock Failure - Check door lock switches and wiring. Check for stuck lock switch.
Whirpool Duet Front Loading Automatic Washer Fault Codes
FH Detects No Water Entering Machine or No Pressure Switch Trip - Select 'cancel' twice to clear this code. If there is NO water in the unit, make sure the valves are turned on all the way. Check for plugged or kinked inlet hoses, as well as plugged screens in the inlet valves. Verify that the inlet valve is operational. If there is water in the unit, verify the drain pump is working and the pressure switch hose is in good condition and properly connected. Make sure there is not a siphon problem and check all hoses for possible leaks. Unplug the unit and disconnect the power to check all wire harness connections to the inlet valve, pressure switch, drain pump, flow meter, and Central Control Unit (CCU). Reconnect the unit and power to verify the pressure switch is operational, as well as the flow meter (blow air through the flow meter and measure resistance). Check CCU is also operational by performing a diagnostic test or any cycle. Replace failed component.
F02 Long Drain (Drain Exceeds 8 Minutes) - Select 'cancel' twice to clear error code. Note: You may see a "SUD" error code appear first during this failure. This should change to the F02 error code after a few minutes. Proceed by checking the drain hoses for proper connection and kinks. Unplug unit and disconnect power. Check the electrical connections at the pump and make sure it is operational with no debris or blockage. Reconnect power and plug unit in. If problem has not been corrected, replace the pump.
F05 Water Temperature Sensor Error - Unplug and disconnect power to the unit and check all connections to the water temperature sensor, heating element and element relay. Also check all components for defects. Replace failed component.
F06 Drive Motor Tachometer Error (Unable to Detect Motor Speed) - Disconnect power and unplug unit. Check wire harness connections between drive motor and Motor Control Unit (MCU), and between MCU and the Central Control Unit (CCU). Reconnect power and plug unit in. Check the MCU by looking for operations of the drive motor, and check drive motor for powered rotations. Replace failed component. Note: If this failure occurs during high-speed spin, the door will be unlocked after three minutes.
ZimTech Piotr Zimny ul. Przy Bażantarni 13/31A
02-793 Warszawa
tel. 666-551-662
www.zimtech.com.pl
Copyright © 2017 Serwis RTV ZimTech Piotr Zimny. All Rights Reserved
F09 Overflow Condition (Pressure Switch Closed Too Long) - Check to make sure drain hose is not plugged or kinked and unplug the unit and disconnect power. Check wire harness connections to pressure switch, drain pump, and Central Control Unit (CCU). Check for drain pump failure and clean it of any debris. Check the inlet valve and pressure switch for proper shut off and operation. Replace failed component. Note: If this error occurs, the door will remain locked and the drain pump will run constantly even if 'cancel' is selected. Turn off hot and cold water to faucets and unplug the unit before proceeding.
F10 Motor Control Unit (MCU) Heat Kink Thermal Trip (Too Hot) - Check for proper installation and ventilation, and make sure unit is not located near a heat source. Disconnect power and unplug the unit to check wire harness connections to the motor, MCU, and Central Control Unit (CCU). Check the drive system for any worn or failed components and reconnect power and plug unit in. Check MCU by looking for operations of the drive motor and check drive motor for powered rotations. Replace failed component.
F11 Serial Communication Error between MCU and CCU - Disconnect power and unplug unit. Check wire harness connections to the motor, Motor Control Unit (MCU), and Central Control Unit (CCU). Check the drive system for any worm or failed components and reconnect power and plug unit in. Verify CCU is working by performing diagnostic test or any cycle. Check MCU by looking for operations of the drive motor and check drive motor for powered rotations. Also check the motor and wire harness. Replace defective part.
F13 Dispenser Circuit Error - Disconnect power and unplug unit to check mechanical linkage from dispenser motor to top of dispenser. Check wire harness connections to the Central Control Unit (CCU) and the dispenser motor. Check dispenser motor for powered rotations. Replace failed component.
F14 EEPROM Error - Disconnect power and unplug unit. Verify Central Control Unit (CCU) is operating properly by running a diagnostic test or any cycle. Replace is defective. Note: A power glitch may cause this error. Try unplugging unit for two minutes to see if that fixes error.
F15 Motor Control Unit (MCU) Error - Disconnect power and unplug unit to check wire harness connections to the motor, MCU, and Central Control Unit (CCU). Check the drive belt and reconnect power and plug unit in. Check the MCU by looking for operations of the drive motor and check the drive motor for powered rotations. Replace failed component.
FdU Door Unlock Error - It is possible the door lock mechanism is broken or the door switch/lock unit has failed. Check the door switch/lock for any debris or foreign objects. Disconnect power and unplug unit to check wire harness connections to the Central Control Unit (CCU) and the door switch/lock unit. Note: Unit will attempt to unlock itself during this error six times before displaying this error code. To manually unlock the unit, unplug the power cord from the outlet and remove the toe panel. Reach up along the inside of the front panel and locate the bottom of the door latch assembly, where there should be a tear-drop shaped tab. Gently pull the tab down approximately 1/4 inch or until a 'click' is heard. The door should now be unlocked.
FdL Door Lock Error - It is possible the door lock mechanism is broken or removed, or the door switch/lock unit has failed. Disconnect power and unplug unit to check door switch/lock unit. Check the wire harness connections to the Central Control Unit (CCU) and the door switch/lock unit. Note: Unit will attempt to lock itself during this error six times before displaying the error code.
SUD Suds Lock (Too Much Detergent Detected) - Make sure drain hose is not plugged or kinked and disconnect power and unplug unit. Check wire harness connections to pressure switch, drain pump, and Central Control Unit (CCU). Make sure the drain pump is free from debris or foreign objects and then reconnect power and plug unit in. Check drain pump and pressure switch and verify CCU operation by running a diagnostic test or any cycle. Note: This error may signify a bad pump, an extra heavy load, excessive detergent, or excessive suds. If too much detergent was used, run the unit through a Rinse/Spin cycle, and then run a Normal cycle without adding detergent.
Whirpool Duet Front Loading Gas and Electric Dryer Fault Codes
PF Power Failure - PF error code indicates a power failure during the dryer's cycle. Press and HOLD start to continue the cycle, or press off/pause to clear display.
E1 Open Thermistor - Replace thermistor.
E2 Shorted Thermistor - Replace thermistor.

ZimTech Piotr Zimny ul. Przy Bażantarni 13/31A
02-793 Warszawa
tel. 666-551-662
www.zimtech.com.pl
Copyright © 2017 Serwis RTV ZimTech Piotr Zimny. All Rights Reserved
Whirpool Calypso Automatic Washer Fault Codes
PF Power Failure - PF error code indicates a power failure during the dryer's cycle. Press and HOLD start to continue the cycle, or press 'Stop/Cancel' to clear display and cancel cycle.
FL Flood Condition - FL error code will appear when the unit detects an overfill, or excessive amounts of water in tub. When this error occurs, the pump should be cycled in drain mode for 30 seconds on and 30 seconds off until the switch resets. Press 'Stop/Cancel' to clear display.
Er Processor Reset Error - This error will only occur if the unit fails to save cycle information during a power outage. Press 'Stop/Cancel' to clear display.
LF Long Fill - If the water fill time exceeds ten minutes, the water valves will be shut off and this error code will display. Press 'Stop/Cancel' to clear display.
CE Communication Error - Disconnect power and unplug unit. Check for conformal coating on serial communication pins between the machine controller and the motor controller. Make sure the harness does not have a faulty connection by checking the resistance values between serial communication pins with the connectors in place.
Ld Long Drain - This error code will appear if unit takes longer than 5 minutes to pump out water to the point where the pressure switch resets. Press 'Stop/Cancel' to clear display.
CA / CI Average Current Limit / Instantaneous Current Limit - This error code may signify a problem with the drive motor, thermal protector, or motor controller. Overloading the unit may also cause this problem.
ob Off Balance - The lid switch must be opened at least once before resetting the cycle. Opening the lid will allow you to redistribute the load to avoid a further off balance error. Press 'Stop/Cancel' to clear display.
Sr Stuck Relay - The machine control board may have a bad relay and may need to be replaced. Check pins 1 and 5 of P16 of the machine controller and pins 1 and 2 of P1 of the motor controller. This should have AC line voltage when the motor controller is powered. Press 'Stop/Cancel' to clear display.
LS Lid Switch Error - This error will occur if unit cannot detect the lid switch opening or closing. It is also possible this error code will appear is there is a disagreement between the motor and machine controllers. Open the lid or press 'Stop/Cancel' to clear display.
Flashing Display Time
Open Lid - This will only occur if the lid is opened during a running cycle. Close the lid and press 'Start' to continue.
SL Suds Lock - This error will occur if the unit detects suds but is unable to clean them out. The unit will attempt the clean out the suds three times before displaying this error. It can also indicate a bad pump, an extra heavy load, excessive detergent, or excessive suds. Press 'Stop/Cancel' to clear the display
ZimTech Piotr Zimny ul. Przy Bażantarni 13/31A
02-793 Warszawa
tel. 666-551-662
www.zimtech.com.pl
Copyright © 2017 Serwis RTV ZimTech Piotr Zimny. All Rights Reserved
18. Kody błędów zmywarek BEKO
H2 Dishwasher turbidity sensor error
The turbidity sensor is the sensor in the sump that detects the presence of detergent.
H3 Dishwasher diverter valve position error
The diverter valve is the valve that controls the water flow to the either the top or bottom spray arms or to both at the same time.
H4 NTC Error
The dishwasher cannot read the temperature sensor.
H5 Uninterruptable water inlet error
The electronic controller of the dishwasher monitors the water counter pulses during every step of the wash program.
If the pulses received from the counter at any stage except when the dishwasher is supposed to be filling, and if the received pulses exceed 0.6 lt. of water then this error will be displayed. When the fault detected, software drives the drain pump with 1 minute intervals (1 min ON, 1 min. OFF). During this interval if counter pulses stop (the dishwasher ceases to fill) then program will continue.
Malfunction of Water-Inlet Valve (stuck as open)
Malfunction of T7 triac on the electronic board
H6 Water inlet fault
No water is detected to teh dishwasher or, it fails to fill.
H7 Heating fault
The dishwasher cannot detect the heater or reach the correct temperature.
19. Kody błędów piekarnika Hotpoint Ariston
F0 Stuck touch pad
Usually means that either the touch pad or the oven control (also called clock or ERC) is defective and needs to be replaced
If this fault code cannot be cancelled, replace the oven control, touch pad, or both
F1 Stuck touch pad
Usually means that either the touch pad or the oven control is defective and needs to be replaced
If this fault code cannot be cancelled, replace the oven control, touch pad, or both
F2 Overheating detected during baking
If actual over temperature condition occurred: Look for welded relay contacts on bake or broil relays. If this happens, replace oven control
If no over temperature condition occurred: Look for a high resistance connection or any other cause of high resistance in the oven temperature sensor circuit
Check sensor, sensor harness and sensor harness connection at sensor and oven control. Replace sensor if found defective
Remember: Oven control (ERC) measures resistance of sensor circuit, not actual oven temperature.
ZimTech Piotr Zimny ul. Przy Bażantarni 13/31A
02-793 Warszawa
tel. 666-551-662
www.zimtech.com.pl
Copyright © 2017 Serwis RTV ZimTech Piotr Zimny. All Rights Reserved
F2 Overheating detected during cleaning cycle
If actual over temperature condition occurred: Look for welded relay contacts. If this happens, replace oven control
If no over temperature condition occurred: Look for a high resistance connection or any other cause of high resistance in the oven temperature sensor circuit
Check sensor, sensor harness and sensor harness connection at sensor and oven control. Replace sensor if found defective.
Check door lock switches
Remember: Oven control (ERC) measures resistance of sensor circuit , not actual oven temperature.
F3 Shorted or open circuit oven temperature sensor
Check sensor harness and harness connection between oven sensor and oven control
Replace oven temperature sensor if wiring is ok
F4 Shorted or open circuit oven temperature sensor
Check sensor harness and harness connection between oven sensor and oven control
Replace oven temperature sensor if wiring is ok
F7 Stuck touch pad or faulty clock
Usually means that either the touch pad or the oven control is defective and needs to be replaced
If this fault code cannot be cancelled, replace the oven control, touch pad, or both.
F9 Lock switch fault detected
Check wiring to door lock switch; the wire harness may be connected wrong
Check for stuck lock switch
20. Kody błędów zmywarek Hotpoint & Ariston (bez LCD)
F01 Anti-flood sensor fault
LED 1: ON LED 2: OFF LED 3: OFF LED 4: OFF
Action: We recommend you check for leaks
F02 Water fill solenoid valve, impeller jug or water chamber failure
LED 1: OFF LED 2: ON LED 3: OFF LED 4: OFF
Action: We recommend you check that water is going to the dishwasher, the valve is working correctly, the impeller
jug is functioning correctly, also check the water chamber has no restrictions on the flow rate, if the dishwasher can’t
fill in the correct amount of time the you will get an error.
F03 Water drain failure/ timeout pump problem
LED 1: ON LED 2: ON LED 3: OFF LED 4: OFF
Action: We recommend you check for blockages in the system and if fitted to your sink unit there may be a restriction
there. Debri in the pump housing, faulty pump

ZimTech Piotr Zimny ul. Przy Bażantarni 13/31A
02-793 Warszawa
tel. 666-551-662
www.zimtech.com.pl
Copyright © 2017 Serwis RTV ZimTech Piotr Zimny. All Rights Reserved
F04 Thermostat fault
LED 1: OFF LED 2: OFF LED 3: ON LED 4: OFF
Action: We recommend you check wiring connection and thermostat
F06 Water fill timeout fault
LED 1: OFF LED 2: ON LED 3: ON LED 4: OFF
Action: Please check that the water supply is present and of sufficient pressure, also that the tap is fully on and that
the fill hose is not restricted or kinked. Check that water is going to the dishwasher, the valve is working correctly, and
the impeller jug is functioning correctly, and also check the water chamber has no restrictions on the flow rate, if the
dishwasher can’t fill in the correct amount of time the you will get an error.
F07 Water turbine damaged or fault
LED 1: ON LED 2: ON LED 3: ON LED 4: OFF
Action: Replace water turbine (impeller jug)
F08 Temperature timeout fault
LED 1: OFF LED 2: OFF LED 3: OFF LED 4: ON
Action: We recommend you check heating system element, thermostat, NTC sensor
F09 Software error fault
LED 1: ON LED 2: OFF LED 3: OFF LED 4: ON
Action: this is a fault with the board and normally need reprograming or replacing
F10 Heating element fault
LED 1: OFF LED 2: ON LED 3: OFF LED 4: ON
Action: We recommend you check the element and replace if faulty see our videos on this.
F11 Wash pump motor failure
LED 1: ON LED 2: ON LED 3: OFF LED 4: ON
Action: We recommend you check the motor and replace if it is faulty. Also check the capacitor for the motor if fitted.
Sometimes the motor can seize due to the seal on the main pump failing.
F12 Main board & Display communication error fault
LED 1: OFF LED 2: OFF LED 3: ON LED 4: ON
Action: We recommend you check the wiring for loose connections or you may have faulty board.
F13 Main board fault
LED 1: ON LED 2: OFF LED 3: ON LED 4: ON
Action: We recommend you check the wiring for loose connections or you may have faulty board.

ZimTech Piotr Zimny ul. Przy Bażantarni 13/31A
02-793 Warszawa
tel. 666-551-662
www.zimtech.com.pl
Copyright © 2017 Serwis RTV ZimTech Piotr Zimny. All Rights Reserved
F15 Virtual sensor error fault
LED 1: ON LED 2: ON LED 3: ON LED 4: ON
21. Kody błędów płyt indukcyjnych WHIRPOOL
There are 3 types of failures associated with the Cooktop. The description of these failures and the impact
they will have on the rest of the Cooktop are listed in the following.
Failure – Type 1 Failure type 1 comes from the power control board. This failure will affect only one burner. The user may continue to use the other burners. Failure – Type 2 Failure type 2 usually comes from the power control board (there could be some exceptions). These failures affect all burners associated with that power control board; the user may continue to use the burners that belong to the other power control board. Failure – Type 3 Failure type 3 comes from the User Interface. This failure disables the entire Cooktop. When this type of failure occurs, all the burners are switched Off by the User Interface.
F‐12 Coil under current Type 1
Check for 240 volts at connection T2A ‐ T2B or T3A ‐ T3B on the power control board (whichever connection the
burner is plugged into). If voltage is not correct, disconnect power and replace the power control board.
F‐21 Supply power frequency Type 2
Replace the power control board
F‐25 Stuck fan on power control board Type 2
Check that the cooling fan connector is firmly plugged in. Problem persists‐Replace the cooling fan
F‐36, F37 Temperature sensor is not working Type 1
Check that the temperature sensor is 1000 Ω at room temperature and is firmly plugged in. Problem
persists‐replace the non-working coil and the control board.
F‐40 Power control board failure Type 1 or Type 2
Check that the cable between the User Interface and the power control board is good and properly connected.
Problem persists‐ Replace the power control board.
F‐42 Power supply Type 2
Check for 240 volts AC at the main incoming power supply and check for an open fuse on the EMI filter board.
Problem persists‐Replace the power control board.
ZimTech Piotr Zimny ul. Przy Bażantarni 13/31A
02-793 Warszawa
tel. 666-551-662
www.zimtech.com.pl
Copyright © 2017 Serwis RTV ZimTech Piotr Zimny. All Rights Reserved
F‐47 Power supply from power control board to User Interface is missing or WIDE communication error
between UI and power control board or an open fuse on the filter board Type 2
Check the continuity between L1 on the terminal block and both L1 terminals on the EMI filter board. If there is not
continuity on one or both of these lines, replace the thermos fuse harness. Check the continuity of the fuses on the
EMI board. If either of the fuses is blown, replace with a new one. Problem persists‐Change both control boards.
F‐56 Wrong or invalid UI configuration. Type 3
Reconfigure the cooktop following the directions in “Manual Configuration Mode.” Problem persists‐ Replace the User
Interface.
F‐58 Wrong or invalid power control board configuration Type 2
Reconfigure the Cooktop following the directions in “Manual Configuration Mode.” Problem persists‐Replace the
power control board.
F‐60 UI does not work Type 3
Replace the User Interface.
F‐61 Power control board does not work
Check that the cables between the User Interface and the power control board are not damaged and are firmly
plugged in. Check for 240 Volts AC at the J1 connector on the power control board. Reconnect power and confirm
voltage reading. If voltage is not correct, disconnect power and have a qualified electrician check the home power
supply. Problem persists‐Replace the cable between the User Interface and the power control board.
C‐81, C‐82 Temporarily over temperature Type 2
Not enough ventilation: Check the Cooktop installation
22. Kody błędów płyty indukcyjnej BOSCH
Please Note that before every repair you should disconnect the appliance from the mains for at least 30
seconds and then reconnect. If a fault display is still present, carry out diagnosis and troubleshooting.
General fault codes Glass ceramic is damp in the area of the touch key Dry and clean the glass ceramic ƒ
Object on the touch key Æ Remove the object
E Continuous operation of touch key See operating instructions (no fault). Childproof lock was inadvertently activated by the user Æ Press the childproof lock key until the signal sounds (appliance ready for operation again) Automatic childproof lock is switched on Æ Switch off the childproof lock in the basic settings (c1)
N Key symbol childproof lock See operating instructions (no fault). Basic settings were not restored Æ Run customer service programmer P2
h / H (resetting to factory settings) or 0 immediately after switching on Virtual residual heat indicator Time shown in the residual heat indicator (prior to a mains reset) had not yet completely expired Residual heat indicator goes out of its own accord after a maximum of 60 minutes: h / H or 0 after activation and setting of frying sensor Frying sensor can be activated and set; settings are not applied, however Defective component Æ Replace faulty components ƒ Faulty wiring (discontinuity, short circuit, contact resistance, incorrectly plugged) Æ Check all lines and plug connections between electronic components.
F01. Gray code rotary selector communication error 2. Cooking/frying sensor module communication error 3. Island master/slave communication error Defective component Æ Replace faulty components
ZimTech Piotr Zimny ul. Przy Bażantarni 13/31A
02-793 Warszawa
tel. 666-551-662
www.zimtech.com.pl
Copyright © 2017 Serwis RTV ZimTech Piotr Zimny. All Rights Reserved
F1 Touch Control NTC fault (only for Pagenaud) The NTC in the intrinsic temperature monitoring system is sending illogical measurement values Æ Replace Touch Control Æ Allow appliance to cool down. Æ Cancel fault message by pressing a touch key.
F2 Touch Control switching off due to overheating Touch Control temperature above 105 °C See operating instructions (no fault). ƒ
F3 Cooking sensor fault, Faulty wiring Check all lines and plug connections Defective cooking sensor Æ Replace cooking sensor Defective cooking sensor module Æ Replace cooking sensor module See operating instructions
F4 Touch Control switching off due to overheating Touch Control temperature above 120 °C Allow appliance to cool down. Æ Cancel fault message by pressing a touch key. See operating instructions (no fault).
F6 Temperature increase at the sensor does not correspond to the selected values Defective regulator module Deep fryer: No oil, or too little (protector switched off) Æ Fill with oil and switch protector on Defective heater Æ Check heater and replace if necessary No power supply to the heater (defective leads or electronics) Æ Check power supply and if necessary repair leads or replace electronics Sensor defective or not correctly fixed in place Æ Check sensor and replace if necessary Defective regulator module Æ Check regulator module and replace if necessary Teppan yaki: Defective heater Æ Check heater and replace if necessary No power supply to the heater (defective leads or electronics) Æ Check power supply and if necessary repair leads or replace electronics Sensor defective or not correctly fixed in place Æ Check sensor and replace if necessary Æ Check regulator module and replace if necessary, IH5 PH Fault code Description Cause Inspection/rectification/comment Frying sensor temperature too high Æ Allow frying sensor cooking zone to cool Faulty wiring Æ Check all lines and plug connections Defective frying sensor Æ Replace cooking zone frying sensor Defective frying sensor module Æ Replace frying sensor module See operating instructions Teppan yaki and deep fryer Sensor open/short-circuit or incorrect value Æ Replace sensor
F7 Frying sensor fault Faulty wiring Æ Check all lines and plug connections Frying sensor temperature too high Æ Allow frying sensor cooking zone to cool Faulty wiring Æ Check all lines and plug connections Defective frying sensor Æ Replace cooking zone frying sensor Defective frying sensor module Æ Replace frying sensor module See operating instructions Tappan yak and deep fryer Sensor open/short-circuit or incorrect value Æ Replace sensor
F8 Cooking time limiter after a while, the cooking zone was switched off automatically by the cooking time limiter the cooking zone can be operated again immediately. The time depends on the selected heat setting (1 to 10 hours without setting change). See User manual (no faults). Æ Check all lines and plug connections
F9 Piezo Control fault Æ Replace Piezo Panel Data transfer fault between Piezo Panel and control/display module Æ Replace control/display module 1.2 Touch Control fault codes Æ Replace the electronics module
ErXY Internal Touch Control fault not relevant for fault rectification XY corresponds to a number from 00 to 99 Æ Note the following special cases Cooking zones next to the control module in Æ Allow appliance to cool down. operation for long periods and using high power
Er21 and signal Control module overheating Æ Press the touch key to switch off the acoustic signal ƒ Electrical link between two touch keys Æ Remove electronics and check all touch keys (visual inspection). Refit electronics correctly
Er22 Touch key fault, Electrical link between two touch keys Æ Remove electronics and check all touch keys (visual inspection). Refit electronics correctly, Defective touch key Æ If the fault is still present, replace the Defective touch key Æ If the fault is still present, replace the electronics
Er25 Faulty electronics connection Faulty electronics connection Æ Check the connections 1. Flat conductor between Touch Control and relay circuit board incorrectly plugged Æ Check that flat conductor is plugged straight
Er26 Relay circuit board fault and firmly 1. Flat conductor between Touch Control and relay circuit board incorrectly plugged Æ Check that flat conductor is plugged straight 2. Defective relay circuit board Æ Replace complete Touch Control

ZimTech Piotr Zimny ul. Przy Bażantarni 13/31A
02-793 Warszawa
tel. 666-551-662
www.zimtech.com.pl
Copyright © 2017 Serwis RTV ZimTech Piotr Zimny. All Rights Reserved
Er38 Hall sensor fault at TwistPad/TipPad, Control knob incorrectly positioned Æ Fit the control knob in the correct position TipPad incorrectly operated (TipPad turning handle pushed like TwistPad turning handle) Æ Operate TipPad correctly (tip function) – see operating instructions (not a fault) Defective TwistPad/TipPad Æ Disconnect the appliance from the mains for 30 seconds and then switch on again Æ If the fault has still not been rectified, replace the TwistPad/TipPad Defective TwistPad/TipPad Æ Disconnect the appliance from the mains for 30 seconds and then switch on again Æ If the fault has still not been rectified, replace the TwistPad/TipPad Æ Check the mains connections
Er42 Power supply fault Faulty voltage Æ Replace the electronics module Disconnect the appliance from the mains immediately Excess voltage in the electronics due to a faulty connection or wiring fault
U240, U400
Excess voltage Æ Check the mains connection and wiring Disconnect the appliance from the mains immediately Æ Check the mains connection and wiring No display or function when the main switch is activated ƒ Excess voltage in the electronics due to a Safety switch-off due to excess voltage faulty connection or wiring fault ƒ No mains voltage The safety switch-off function protects the appliance in the event of a faulty connection
23. Kody błędów pralek GORENJE, WA-101/121/132/162/162Р
F1 Przerwa lub zwarcie w obwodzie czujnika temperatury
F2 Przy poborze wody w wyznaczonym czasie w zbiorniku nie został osiągnięty zadany poziom
F31 Problemy z tacho - nie dociera z niego do elektronicznego sterownika sygnał sterowania
F32 Wadliwe połączenia sterowania silnikiem napędowym
F4 Temperatura wody w zbiorniku nie osiąga zadanej wartości w wyznaczonym czasie
F41 Wyższa niż dopuszczalna temperatura wody w zbiorniku
F43 Szybkość narastania temperatury wody w zbiorniku pralki wyższa od dopuszczalnej
F5 Brakuje odprowadzenia wody ze zbiornika lub w trybie wypuszczania wody poziom wody w przeznaczonym czasie nie osiągnął położenia - PUSTY ZBIORNIK
F61 Niskie obroty bębna w trybie wirowania
F63 Brak komunikacji między sterownikiem elektronicznym i układem elektronicznej regulacji silnika napędowego
24. Kody błędów zmywarki HAIER
E1 The door is NOT closed properly.
E2 The temperature of inlet water is out of range.
E3 The water in the dishwasher is not to the correct level.
E4 Open the dishwasher door and remove the filters and check the filters in the bottom of the dishwasher are clear of debris.
E5 Low or no water pressure. Check the water supply is turned on and has sufficient pressure.
E6 Locate the water supply valve, and shut off the supply, which will prevent any more water from flowing to the dishwasher.
25. Kody błędów płyt indukcyjnych / ceramicznych ELECTROLUX
E0 Configuration Error of Interface - Exchange Interfaces
E1 Compatibility failure - Exchange Interfaces
E2 N/A
E3 Overvoltage; wrong connection - Check power supply

ZimTech Piotr Zimny ul. Przy Bażantarni 13/31A
02-793 Warszawa
tel. 666-551-662
www.zimtech.com.pl
Copyright © 2017 Serwis RTV ZimTech Piotr Zimny. All Rights Reserved
E4 Temperature sensor coil defect - The zone with the defect sensor displays “E” or “?” Change the Coil of
the displayed zone
E5 Supply voltage out of range - 1. Check Voltage and Frequency 2. Exchange module left side
E6 Induction module defect - Change module left with power supply
E7 “E7” in Timer display + “E” or “?”in the left zones - Change induction module on the left side
“E7” in Timer display + “E” or “?”in the right zones - Change induction module on the right side
E8 Communication error with the power board - 1. Check supply connection 2. Check wiring between
interface and power board 3. Change induction module
E9 Internal interface error - Exchange interface with silicone carrier
Remark for hobs with left and right interface: If an Error occurs the hob switches off automatically. Switch the hob on again the error is displayed again. Afterwards the Error disappears and the defect side is shown by the displays “?” for barograph or “E” in the 7-segment displays. E0 Configuration Error of Interface - Exchange Interfaces
E1 Compatibility failure - Exchange Interfaces
E2 Pot detection error - If pot detection is available change Pot detection electronic
E3 N/A
E4 N/A
E5 Supply voltage out of range, one phase missing 1. Check Voltage and Frequency 2. Exchange module right side
E6 Induction module defect - Change module left with power supply
E7 “E7” in Timer display + “E” or “?”in the left zone - Exchange displayed heater with pot detection senor and calibrate new
E8 Communication error with the power board 1. Check supply connection 2. Check wiring between interface and power board 3. Change induction module
E9 Internal interface error Liquid blocks interface - Exchange interface with silicone carrier
26. Kody błędów pralek LG
PE Błąd czujnika poziomu wody (presostatu)
FE Przepełnienie zbiornika
dE Niezamknięte drzwiczki wsadu
IE Zbiornik nie napełnia się wodą
OE Brakuje odprowadzenia wody
UE Wystąpiło niewyważenie bębna
tE Niedopuszczalna temperatura wody
LE Błąd blokady
CE Przeciążenie silnika napędowego
Е3 Błąd określenia załadunku

ZimTech Piotr Zimny ul. Przy Bażantarni 13/31A
02-793 Warszawa
tel. 666-551-662
www.zimtech.com.pl
Copyright © 2017 Serwis RTV ZimTech Piotr Zimny. All Rights Reserved
АЕ Błąd auto wyłączenia
Е1 Wyciek wody pod pralkę
HE Uszkodzona grzałka wody
SE Błąd czujnika Halla silnika napędowego
27. Kody błędów pralek ARDO (FLN… TLN…)
E00, E01 Drain from washing machine
The filter of the filter of the washing machine.
E02 Incorrect drain / fill of water and spin
Incorrect drain hose position - system malfunction.
E03 There is no discharge of water from the tank or the drainage time has been exceeded (more than 3 minutes) A technical malfunction, which in any case should be addressed to the service center for household appliances maintenance
F2 Temperature sensor Problems in the temperature sensor, in the control module or in the heating element
F4 There is no water drain Problems in connecting the drain hose, malfunction in the drain pump. It is necessary to replace it.
F5 Simultaneous drain and set of water The drain hose is not properly connected, there are problems in the water supply filter.
F6, F12 There was a water overflow in the tank of the washing machine. Malfunction of the module or motor.
F8 Excessive water level in the tank Problems in the water level sensor - problems with the solenoid valve.
F13, F14 Problems in the water level sensor - problems with the solenoid valve. Critical errors, inform about the malfunction of the electronic control module.
28. Kody błędów pralek HAIER
bLoC PunP Water not draining out / No drain - Check for clogs in the house drain for the washer, Be sure there are no clogs or bends in the washer drain hose, Check the filter in the drain pump for a clog, If the drain pump is not working it will need to be replaced.
no tAPS Not filling up with water - Make sure water supply valves behind the washer are fully open, Check for a siphon problem, If the water inlet valve assembly is bad then replace it.
Err1 Washing machine door error detected = Not closed - Check that door is closed, Cycle power to the machine, Check wiring to door lock, Check PCB.
Err2 Water has not drained from the washer - Check drain pump, Check wiring, Check water level sensor, Check connections to water valve & PCB.
Err3 Detected washer temperature sensor error - Check connections to washer temperature sensor, Check temperature sensor.
Err4 Washer heating element fail - Clothing overload of washer, Check washer heating element, Check wiring, and Check thermistor.
Err5 Water level not reached expected level - Check for leaks, Check water supply, Check water inlet valve, Check wiring to water inlet valve, Check wiring to PCB & PCB
Err6 Washing machine motor speed incorrect - Check motor connection, Check motor tachometer unit, abnormal load condition, Check wiring to motor.
Err7 Motor speed error detected - Unplug washer, reconnect loose wires on drive motor, Replace the wire harness if faulty, If wire harness connection good then replace the drive motor.
ZimTech Piotr Zimny ul. Przy Bażantarni 13/31A
02-793 Warszawa
tel. 666-551-662
www.zimtech.com.pl
Copyright © 2017 Serwis RTV ZimTech Piotr Zimny. All Rights Reserved
Err8 Washer has overfilled with water - Unplug the washer, Replace the water inlet valve assembly if the washer keeps filling when unplugged.
ErLC Door lock has failed - Unplug the washer, Reconnect loose wire harness connections to the door lock assembly, Replace the wire harness if damaged, if the wire harness is okay, replace the door lock assembly.
ErUL Door lock failure - Unplug the washer and reconnect any loose wire harness connections on the door lock assembly, Replace the wire harness if damaged, if the wire harness is good, replace the door lock assembly.
EUAr Communication failure between display board and power board - Unplug the washer, reconnect any loose wire harness connections between the display board and the power board, Replace the wire harness if bad, If the wire harness is good, replace the display board, If the problem does not go away then replace the power board.
Unb Unbalanced wash load - Redistribute the washer clothing load and restart the wash.
PF Voltage is less than 93 Volts AC - Unplug the washer and inspect the power cord, if the power cord is okay, have electrician fix power supply to the washing machine.
CLrF Too much detergent suds - Use the right amount of high efficiency HE detergent to not have excessive suds.
29. Kody błędów zmywarki SAMSUNG
0E OVER-FLOW ERROR Overflow error
4E WATER SUPPLY ERROR No water detected in the tub for 5 minutes after start of dishwasher
4E1 Water entering the dishwasher is more than 175 degrees
5E WATER DRAIN ERROR Not draining or not draining fast enough
6E WATER DRAIN ERROR Not draining or not draining fast enough
9E Low water level error
bE2 Stuck button on the control panel
HE WATER HEATER ERROR Heater failure
HE1 The thermistor (temperature sensor) detects 176 degree water or above in the tub
Flashing “Heavy” Water leak
Lights Highlighted – Heavy, Delicate and Quick Temperature Sensor error
Lights Highlighted above Delicate and Quick Dishwasher thinks that the door is open.
LE Water leak detected
oE Overflow error
PE Half-load error
SE WATER DRAIN ERROR Not draining or not draining fast enough
tE1 Thermistor (temperature sensor) error
ZimTech Piotr Zimny ul. Przy Bażantarni 13/31A
02-793 Warszawa
tel. 666-551-662
www.zimtech.com.pl
Copyright © 2017 Serwis RTV ZimTech Piotr Zimny. All Rights Reserved
30. Kody błędów pralek SAMSUNG
1E or E7 Cause: Water level sensor issue Solution: Please check the pressure hose system for any blockages, splits, or deterioration. If no damage is
found, and the connection is ok, we recommend replacing the pressure sensor. 3E, 3E1, 3E2, 3E3, 3E4, EA, EB Cause: Motor defect Solution: Could be an open/short circuit (please check wind resistence), a PCB fault, or a loose connector. 3E1 Cause: Motor Overload Solution: Ensure there isn’t too much laundry in the appliance, the hall sensor terminal isn’t connected, or a
possible PCB fault. 3E2 Cause: Motor Driving Error Solution: The motor driving error from the PBA is weak, unstable relay operation. We recommend replacing the
Motor PCB. 3E3 Cause: Quiet-Drive Motor Error Solution: Faulty motor hall sensor, faulty PCB connection, or the Quiet Drive motor cover is out of place. 3E4 Cause: Quiet-Drive Motor Defect Solution: The PCB Housing terminal is not connected, there’s a PCB fault, or the Quiet-Motor drive is faulty. 4E, E1 Cause: Water Supply Error (only occurs after 10 mins when the pressure sensor is not detecting the unit filling
with water) Solution: Check the water supply is turned on and has adequate water pressure (Samsung recommends
minimum of 0.5bar, and a maximum of 8bar), check for any kinks in the hoses, check inlet filters inside end of Water Valve, check water valve coil resistance, should be 4~5kΩ, check hose from the drum to the sensor. If this is split or cracked it MUST be replaced.
4E1, 4ED Cause: Water Temperature Issue Solution: Check to ensure the waster hose is connected to a cold supply. It must NOT be connected to a hot
supply. 4E2 Cause: Water Temperature Error Solution: The water is too hot for the selected wash. 5E, E2 Cause: Water Drain Error (only occurs after 10 mins when water is not draining from the appliance) Solution: Check the drain pump filter for any blockages (for e.g. coins, hair clips, lint,etc.), check the drain hose
and connection for any blockages or kinks. 6E Cause: Water Heater Not Functioning Solution: Check the heater resistance which should be around ~27Ω. 8E Cause: Over Current Error Solution: Switch the appliance off at the mains and wait 30 seconds. Switch the appliance on and try again, if
the appliance has an inverter motor check windings are not open circuit- causes juddering.
ZimTech Piotr Zimny ul. Przy Bażantarni 13/31A
02-793 Warszawa
tel. 666-551-662
www.zimtech.com.pl
Copyright © 2017 Serwis RTV ZimTech Piotr Zimny. All Rights Reserved
8E1 Cause: MEMS Sensor Error Solution: Check the connections to the MEMS sensor which is mounted on top of the tub. All they’re all secure
then replace the sensor. 9E1, 9E2, PH1, Plo Cause: Power Error Solution: Check the supply voltage, check for loose power connectors or any with contact defects, check for
defective noise filter and fuse. AE, 13E Cause: Signal Communication Error (between the Main PCB and Sub PCB’s) Solution: Check all the connectors on the Main PCB and Sub PCB’s. bE Cause: Motor TRIAC Short Error Solution: Swich off the power and then reconnect and try again. If the error persists then replace the PCB. bE1, 12E Cause: Power Button Fault Solution: Power button held in for more than 13 seconds. bE2, 14E Cause: Control Button Fault Solution: Any button (other than the power button) held in for more than 30 seconds. bE3, 18E Cause: Switch Error Solution: There is a relay fault. CE, E8 Cause: Cooling Error (temperature of water has not dropped below 55°C in 30 minutes after the washer
cooling operation) Solution: Check if water supply is connected to hot and if so change to cold only feed, check that the hot/cold
water supply is not switched over, if the first two are OK then check the heater temperature sensor. dE, Ed Cause: Door Open Error (door not closed correctly/properly) Solution: Check that the door is closed securely, check that the door switch is making contact. dE1 Cause: Door Lock Switch Error Solution: Check that the door is closed, check the switch for any damage and if so please replace. dE2 Cause: On/Off Switch Error Solution: Excessive heat build up in the coil due to button being operated continuously FE Cause: Fan Error (Dryer or Air Refresh fan fault) Solution: Check start condenser/capacitor and fan motor connections, check to see if the fan is hammed, if no
other fault then replace replace the start condenser/capacitor. H1 Cause: Incorrect Water Temperature/Water Temperature rises quickly Solution: Check the temperature sensor, check the pressure switch and hose. HE Cause: Abnormal water temperature Solution: The temperature sensor has detected temperature over 100°C.

ZimTech Piotr Zimny ul. Przy Bażantarni 13/31A
02-793 Warszawa
tel. 666-551-662
www.zimtech.com.pl
Copyright © 2017 Serwis RTV ZimTech Piotr Zimny. All Rights Reserved
HE1, E5 Cause: Water Heater Error (this occurs if the water temperature has not reached 50°C in 20 minutes or does
not rise more than 2°C) Solution: Check the heater resistance which should be ~27Ω. HE2 Cause: Dryer Heater Error (occurs if the dryer heater circuit is open circuit) Solution: Check heater TCOs. One is resettable. if it needs to be reset; check fan for correct operation, check
condenser water valve operation, check condenser for blockages. HE3 Cause: Steam Function Fault Solution: Check steam function and TCOs. HOT Cause: Appliance Too Hot (occurs if dryer is turned off early) Solution: This is not a fault’ the appliance fan will continue to run until the appliance is cool enough for the
washing to be removed. The door will unlock when it is safe. LE, LE1, E9, 11E Cause: Water Leak (low water level detected during cycle) Solution: Check that the level of the drain hose is not lower than the base of the Samsung washing machine. OE, E3 Cause: Overflow Error (too much water/foam has entered into the appliance) Solution: Too much washing power/liquid may have been added. Turn the power off to the appliance, wait 30
seconds, and then turn on again. The drain pump should kick into action to drain the appliance. Also check the pressure system for any debris/foam.
OF Cause: Overflow Abnormal (water has reached the overflow level) Solution: Check for any water valves which have stuck in the open position, check for debris/foam in the
pressure system. Sud Cause: Excess Foam Detected Solution: This is normal operation. The appliance will normally cure this condition on it’s own however if it
doesn’t then run either an “Eco drum clean” or a 90°C cotton cycle with no detergent and no washing inside. If the problem persists then please check the pressure system and sump for any debris.
t1, t2, tSt Cause: Appliance In Test Mode Solution: Switch the appliance off at the mains and wait 30 seconds. Then, switch it back on and try again. tE, EC Cause: Temperature Sensor Abnormal Issue Solution: Switch off the power and reconnect and try again. Check all the temperature sensors for relative
continuity. tE1 Cause: Water Heater Temp Sensor Defective Solution: Check the connections to the sensor and PCB, check resistance which should be ~12.8kΩ tE2 Cause: Fan Housing Duct Sensor Defective Solution: Check the connections to the sensor and PCB, check resistance which should be ~12.8kΩ tE3 Cause: Condenser Duct Sensor Defective Solution: Check the connections to the sensor and PCB, check resistance which should be ~12.8kΩ
ZimTech Piotr Zimny ul. Przy Bażantarni 13/31A
02-793 Warszawa
tel. 666-551-662
www.zimtech.com.pl
Copyright © 2017 Serwis RTV ZimTech Piotr Zimny. All Rights Reserved
UC Cause: Excessuve Fluctuation In The Supply Voltage (voltage has fluctuated outside 176-286vAC) Solution: Check that the supply voltage is within specifications, reset the power supply to clear the error. If the
error cannot be reset then please replace the main PCB. UE, E4 Cause: Unbalanced Error (the washing load in the drum is unbalanced i.e. clothes may have got trapped
inside a large towel and resting on one side of the drum) Solution: This could be normal operation where the washing machine is stopping the spin for safety reasons.
Please distribute washing more evenly. Check the weights and balancers for condition, check the shock absorbers for condition, check the springs for condition.
31. Kody błędów pralek ASKO
Е01 dla modeli W401/421/501/521/531 - Motor fault dla modeli W640/650/660 - Problemy w działaniu silnika napędowego (błąd ogólny)
Е02 dla modeli W401/421/501/521/531 - Water inlet fault
dla modeli W640/650/660 - Problemy przy poborze wody Е03 dla modeli W401/421/501/521/531 - Draining fault
dla modeli W640/650/660 - Problemy przy wypuszczaniu wody Е04 dla modeli W401/421/501/521/531 - Niskie ciśnienie wody zasilającej Е05 dla modeli W401/421/501/521/531 - Problemy z grzaniem wody Е06 dla modeli W401/421/501/521/531 - Problemy z grzaniem wody Door lock fault dla modeli W6651/6661
Usterka blokady (niedokładnie zamknięta lub otwarte drzwiczki wsadu) Floaming nie dla wszystkich modyfikacji modeli W6651/6661
Zasygnalizowana podwyższona ilość piany Over flov dla modeli W6651/6661 Overfilling dla modeli W640/650/660
Zasygnalizowany poziom przelewania wody w zbiorniku Termistor fault dla modeli W640/650/660
Niesprawny czujnik temperatury Pressure sensor error dla modeli W640/650/660
Niesprawny czujnik poziomu

ZimTech Piotr Zimny ul. Przy Bażantarni 13/31A
02-793 Warszawa
tel. 666-551-662
www.zimtech.com.pl
Copyright © 2017 Serwis RTV ZimTech Piotr Zimny. All Rights Reserved
32. Kody błędów pralek MIELE
F01 Short circuit NTC (temperature sensor) - The water will be turned off after this error occurs.
Cause and Solution:
The connecting circuits and / or the NTC temperature sensor probably blew. Check wiring, temperature sensor,
connectors. If necessary, replace the faulty components.
F02 The temperature sensor (NTC) - The water will be turned off after this error occurs.
Cause and Solution:
Probably, the temperature sensor and / or its connecting wires were open. Check the connectors, the temperature
sensor and the wiring. If necessary, replace the faulty parts.
F03 Short circuit of NTC (drying temperature sensor)
Cause and Solution:
The drying temperature sensor may be defective. Check the sensor, connection and connectors. If necessary, replace
them.
F04 The NTC drying temperature sensor is open
Cause and Solution:
The drying temperature sensor or connecting wires is defective. Replace worn or defective items.
F10 Error taking water to tank
F11 Error informs the user about filter clogging or waste water discharge system
Cause and Solution:
The drain system components may be faulty. Clean the tubes, filter, hose. Check that the water tap is open.
F15 Hot water is added to the washing machine tank
F16 Notifies about excessive foaming
Cause and Solution:
Keep track of the amount of detergent.
F19 Water sensor blocked
Cause and Solution:
The sensor or the control module may be defective. If necessary, replace the mentioned elements.
F20 heating element (heating element SM) defective
Cause and Solution:
Probably, calcareous deposits on the heating element.

ZimTech Piotr Zimny ul. Przy Bażantarni 13/31A
02-793 Warszawa
tel. 666-551-662
www.zimtech.com.pl
Copyright © 2017 Serwis RTV ZimTech Piotr Zimny. All Rights Reserved
F29 Faulty heating element
F34 The hatch door is not locked
F35 The door is not unlocked
F39 Defective electronics (main module and control panel module)
F41 EEPROM memory malfunction (invalid data)
F43 Model type not programmed
F45 RAM memory is defective (incorrect data)
F46 Defective display connection
F47 BAE / SLT interface defective
F49 The interface SLT (relay of the additional module) is faulty
F50 Control error
F51 Notifies of a pressure sensor failure or a worn out relay
Cause and Solution:
Diagnose the elements and replace them with new ones, if necessary.
F53 Defective speed sensor
F55 Time control sensor defective
F56 Spin speeds <400 rpm
F62 Defective program selector
F63 The water path control unit is defective
F64 Path sensor defective
F65 There is no lighting in the drum of the washing machine
F81 Faulty drying unit SM
F83 Overheating drying, too high temperature
F92 Risk of infection with fungus and mold
F93 Faulty auxiliary module relay
F96 Alternative water supply failure
F100 Communication failure with IK6 (faulty / interrupted)

ZimTech Piotr Zimny ul. Przy Bażantarni 13/31A
02-793 Warszawa
tel. 666-551-662
www.zimtech.com.pl
Copyright © 2017 Serwis RTV ZimTech Piotr Zimny. All Rights Reserved
33. Kody błędów lodówek, lodówko – zamrażarek LG
1F or F1 = Error is Ice Blower Fan or Ice Maker Motor = Repair or Check Ice Blower Fan or Ice Maker
Motor = Part or parts that need to be checked or replaced are… Ice Blower Fan, Main Power Board, or Ice Maker
Motor
Er FR = Error is an abnormality with the refrigerator’s fan motor = Check or Repair refrigerator fan motor = Part
or parts that need to be checked or replaced are… Refrigerator fan motor
Er IF = Error is The Fan for the Ice Compartment Failed = Repair or Check Ice Fan Blocked, Ice Fan Motor is
Defective, Wiring in the Circuit is Defective, Control Board has Failed, or Ice Fan Motor = Part or parts that need to be
checked or replaced are… Wiring Harness, Power Control Board
Er 1F = Error is The Fan for the Ice Compartment Failed = Repair or Check Ice Fan Blocked, Ice Fan Motor is
Defective, Wiring in the Circuit is Defective, Control Board has Failed, or Ice Fan Motor = Part or parts that need to be
checked or replaced are… Wiring Harness or Power Control Board
Er 15 = Error is Ice Maker Fan Motor = Repair or Check Ice Maker Fan Motor = Part or parts that need to be
checked or replaced are… Ice Maker Fan Motor
Er dH = Error is Defrost Heater or PCB or Fuse = Repair or Check Defrost Heater or PCB or Fuse = Part or parts
that need to be checked or replaced are… Defrost Heater or PCB or Fuse
Er FS = Error is Freezer Sensor Error = Repair or Check Sensor and Wiring Connector Problem = Part or parts
that need to be checked or replaced are… Thermistor, Wiring Harness, or Main Power Control Board
Er rF = Error is Fan Motor Abnormality = Repair or Check Fan Motor = Part or parts that need to be checked or
replaced are… Fan Motor or Main Control Board
Er rS = Error is Refrigerator Sensor Error = Repair or Check Sensor and Wiring and Connections = Part or parts
that need to be checked or replaced are… Thermistor, Wiring Harness, or Main Power Control Board
FF = Error is Freezer Fan Motor = Repair or Check Freezer Fan Motor = Part or parts that need to be checked or
replaced are… Freezer Fan Motor
F dS = Error is Freezer Defrost Sensor = Repair or Check Sensor Short or Wiring Issue = Part or parts that need to
be checked or replaced are… Controller Assembly (component that has the defrost thermistor and the fuse for the
defrost system)
r dS = Error is Refrigerator Defrost Sensor = Repair or Check Sensor Short or Wiring Issue = Part or parts that
need to be checked or replaced are… Controller Assembly (component that has the defrost thermistor and the fuse for
the defrost system)
Er HS = Error is Humidity Sensor = Repair or Check Sensor Short or Wiring Issue = Part or parts that need to be
checked or replaced are… Humidity Sensor
Er IS = Error is Ice Maker Sensor = Repair or Check Sensor Short or Wiring Issue = Part or parts that need to be
checked or replaced are… Ice Maker Assembly
Er SS = Error is Pantry Sensor = (pantry is the deli drawer) Repair or Check Short in Sensor or Wiring Issue = Part
or parts that need to be checked or replaced are… Pantry Temperature Sensor

ZimTech Piotr Zimny ul. Przy Bażantarni 13/31A
02-793 Warszawa
tel. 666-551-662
www.zimtech.com.pl
Copyright © 2017 Serwis RTV ZimTech Piotr Zimny. All Rights Reserved
Er rt = Error is Room Temperature Sensor = Repair or Check Short in Sensor or Wiring Issue = Part or parts that
need to be checked or replaced are… Room Temperature Sensor
Er It = Error is System Error Inside Ice Maker = Repair or Check Self-Test Ice Maker = Part or parts that need to
be checked or replaced are… Ice Maker Assembly
Er gF = Error is Flow Meter Error Code = Repair or Check Water Pressure = Part or parts that need to be checked
or replaced are… Flow Meter
F dH = Error is Sensor didn’t get over 40F in Defrost = Repair or Check Faulty Fuse, Heater, or Control
Board = Part or parts that need to be checked or replaced are… Controller Assembly, Defrost Heater, or Relay on
Control Board
r dH = Error is Sensor didn’t get over 40F = Repair or Check Faulty Fuse, Heater, and Control Board = Part or
parts that need to be checked or replaced are… Controller Assembly, Defrost Heater, or Relay on Control Board
Er FF = Error is Evaporator Fan Failed = Repair or Check Fan Motor, Control Board, and Wiring Harness = Part or
parts that need to be checked or replaced are… Evaporator Fan Motor, Power Control Board, or Wiring Harness
Er CF = Error is Condenser Fan Motor is Defective = Repair or Check Condenser Fan Motor, Wiring, or Control
Board = Part or parts that need to be checked or replaced are… Condenser Fan Motor, Power Control Board, or
Wiring Harness
Er CO = Error is Communication Error = Repair or Check Communication Error between Main Board & Display
Board = Part or parts that need to be checked or replaced are… Display Control Board, Power Control Board, or
Wiring Harness
22 = Error is Clicking Sound = Repair or Check Compressor Relay = Part or parts that need to be checked or
replaced are… Compressor Relay
67 = Error is Gap in Door or Fully Packed Fridge = Repair or Check Door = Part or parts that need to be checked
or replaced are… Check Door Gap/Seal or Unplug Fridge and Plug Back In
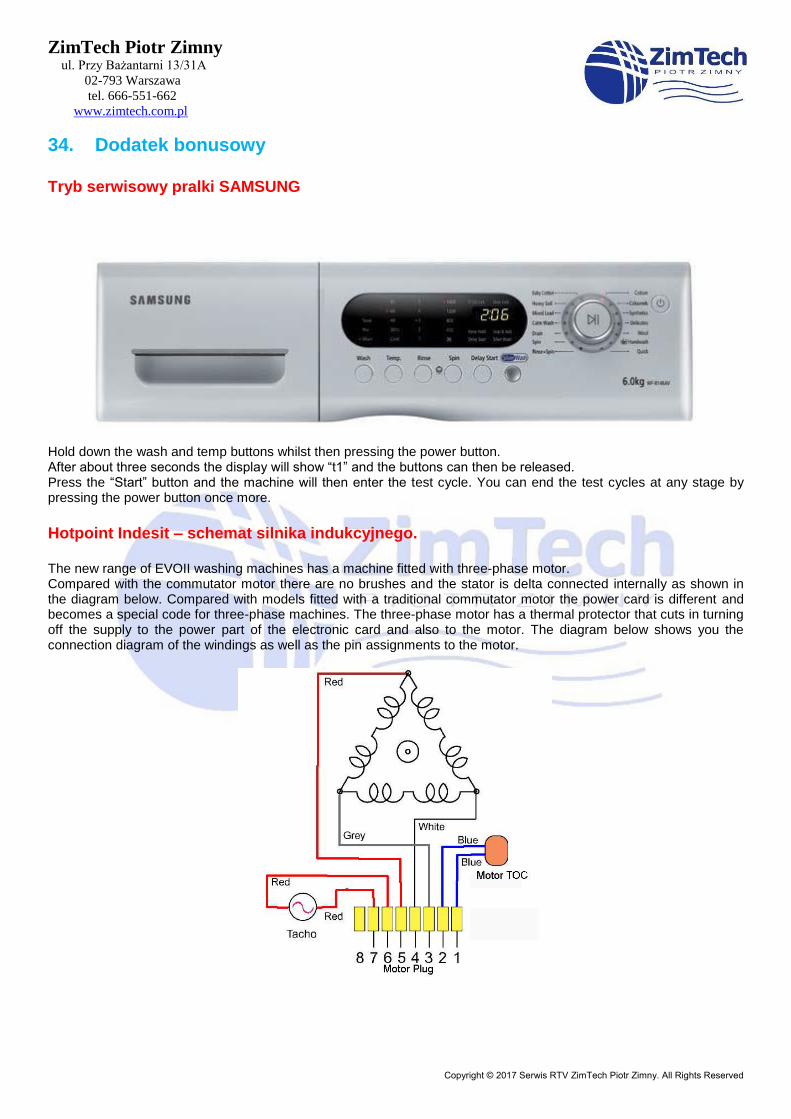
ZimTech Piotr Zimny ul. Przy Bażantarni 13/31A
02-793 Warszawa
tel. 666-551-662
www.zimtech.com.pl
Copyright © 2017 Serwis RTV ZimTech Piotr Zimny. All Rights Reserved
34. Dodatek bonusowy
Tryb serwisowy pralki SAMSUNG
Hold down the wash and temp buttons whilst then pressing the power button. After about three seconds the display will show “t1” and the buttons can then be released. Press the “Start” button and the machine will then enter the test cycle. You can end the test cycles at any stage by pressing the power button once more.
Hotpoint Indesit – schemat silnika indukcyjnego.
The new range of EVOII washing machines has a machine fitted with three-phase motor. Compared with the commutator motor there are no brushes and the stator is delta connected internally as shown in the diagram below. Compared with models fitted with a traditional commutator motor the power card is different and becomes a special code for three-phase machines. The three-phase motor has a thermal protector that cuts in turning off the supply to the power part of the electronic card and also to the motor. The diagram below shows you the connection diagram of the windings as well as the pin assignments to the motor.
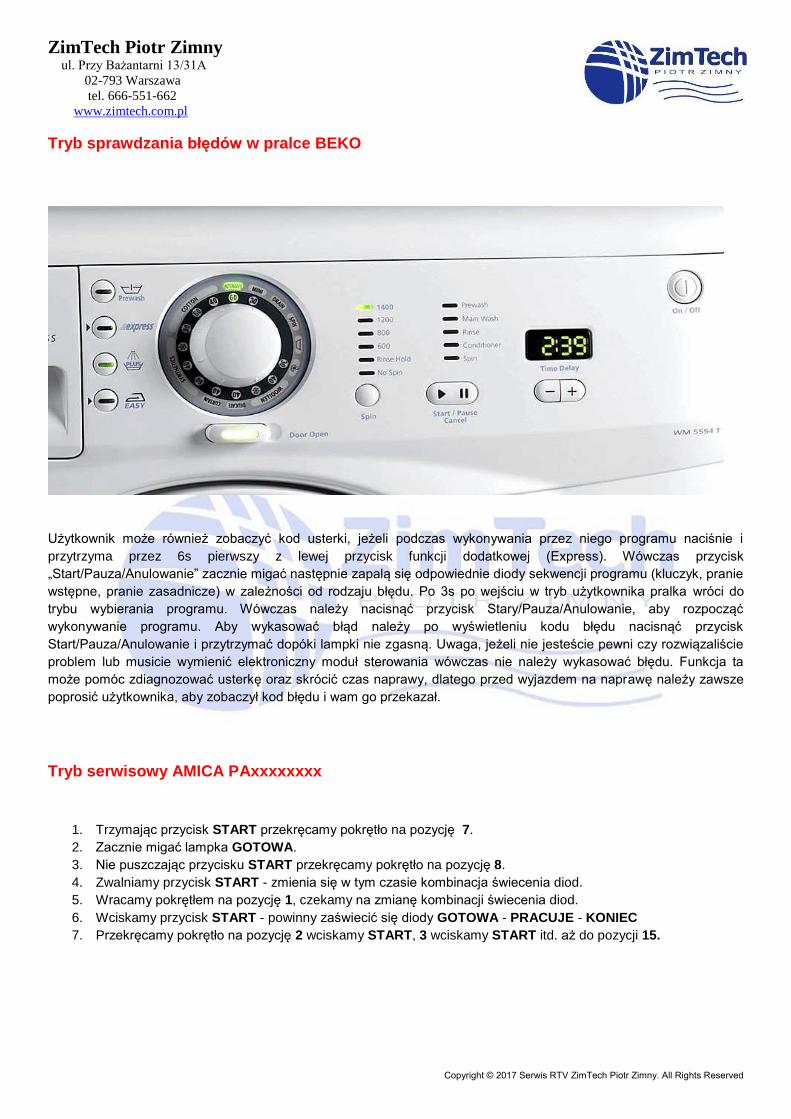
ZimTech Piotr Zimny ul. Przy Bażantarni 13/31A
02-793 Warszawa
tel. 666-551-662
www.zimtech.com.pl
Copyright © 2017 Serwis RTV ZimTech Piotr Zimny. All Rights Reserved
Tryb sprawdzania błędów w pralce BEKO
Użytkownik może również zobaczyć kod usterki, jeżeli podczas wykonywania przez niego programu naciśnie i
przytrzyma przez 6s pierwszy z lewej przycisk funkcji dodatkowej (Express). Wówczas przycisk
„Start/Pauza/Anulowanie” zacznie migać następnie zapalą się odpowiednie diody sekwencji programu (kluczyk, pranie
wstępne, pranie zasadnicze) w zależności od rodzaju błędu. Po 3s po wejściu w tryb użytkownika pralka wróci do
trybu wybierania programu. Wówczas należy nacisnąć przycisk Stary/Pauza/Anulowanie, aby rozpocząć
wykonywanie programu. Aby wykasować błąd należy po wyświetleniu kodu błędu nacisnąć przycisk
Start/Pauza/Anulowanie i przytrzymać dopóki lampki nie zgasną. Uwaga, jeżeli nie jesteście pewni czy rozwiązaliście
problem lub musicie wymienić elektroniczny moduł sterowania wówczas nie należy wykasować błędu. Funkcja ta
może pomóc zdiagnozować usterkę oraz skrócić czas naprawy, dlatego przed wyjazdem na naprawę należy zawsze
poprosić użytkownika, aby zobaczył kod błędu i wam go przekazał.
Tryb serwisowy AMICA PAxxxxxxxx
1. Trzymając przycisk START przekręcamy pokrętło na pozycję 7.
2. Zacznie migać lampka GOTOWA.
3. Nie puszczając przycisku START przekręcamy pokrętło na pozycję 8.
4. Zwalniamy przycisk START - zmienia się w tym czasie kombinacja świecenia diod.
5. Wracamy pokrętłem na pozycję 1, czekamy na zmianę kombinacji świecenia diod.
6. Wciskamy przycisk START - powinny zaświecić się diody GOTOWA - PRACUJE - KONIEC
7. Przekręcamy pokrętło na pozycję 2 wciskamy START, 3 wciskamy START itd. aż do pozycji 15.

ZimTech Piotr Zimny ul. Przy Bażantarni 13/31A
02-793 Warszawa
tel. 666-551-662
www.zimtech.com.pl
Copyright © 2017 Serwis RTV ZimTech Piotr Zimny. All Rights Reserved
Odczytywanie kodów błędów pralki ELECTROLUX.
Ostatni alarm jest zapisywany w pamięci elektroniki pralki. Aby go odczytać, należy wejść do programu diagnostycznego: WERSJA Z PRZYCISKAMI W POZIOMIE: - trzymając wciśnięte Start/Pauza i inny przycisk opcji, przekręcić pokrętło selektora ( z pozycji „wyłączony”) na 1 pozycję w prawo ( zgodnie z ruchem wskazówek zegara). WERSJA Z PRZYCISKAMI W KOLUMNACH: - trzymając wciśnięte 2 lewe górne przyciski, przekręcić pokrętło selektora ( z pozycji „wyłączony”) na 1 pozycję w prawo ( zgodnie z ruchem wskazówek zegara). Dalsze postępowanie jest wspólne dla wszystkich pralek: - przytrzymać przyciski jeszcze ok.2s, aż diody zaczną migać - następnie przekręcić selektor w prawo na 10 pozycję.
Miganie diody przycisku start odpowiada drugiej cyfrze kodu usterki ( jedności)
Miganie diody „koniec programu” odpowiada pierwszej cyfrze kodu usterki
( dziesiątki=grupa usterek – jak dla użytkownika).
Obydwie diody migają w taki sam sposób: świecenie=0,4s, zgaszona=0,4s i 2,5s
przerwy między sekwencjami.
Cyfry reprezentowane w kodzie heksadecymalnym ( szesnastkowym) przez litery:
A=10 (mignięć)
B=11 (mignięć)
C=12 (mignięć)
D=13 (mignięć)
E=14 (mignięć)
F=15 (mignięć)
Błędy konfiguracji pralki wyświetlane są za pomocą migających wszystkich diod panelu obsługi, co może
jednoznacznie wskazywać na uszkodzenie modułu elektroniki.
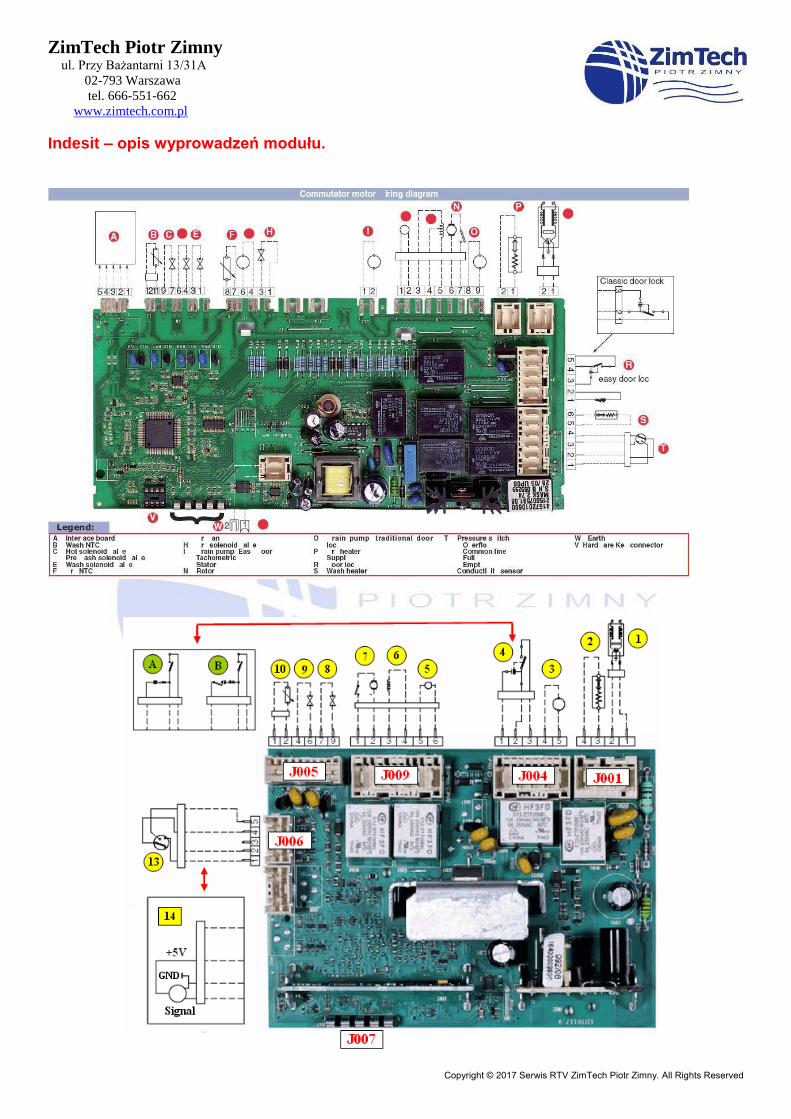
ZimTech Piotr Zimny ul. Przy Bażantarni 13/31A
02-793 Warszawa
tel. 666-551-662
www.zimtech.com.pl
Copyright © 2017 Serwis RTV ZimTech Piotr Zimny. All Rights Reserved
Indesit – opis wyprowadzeń modułu.
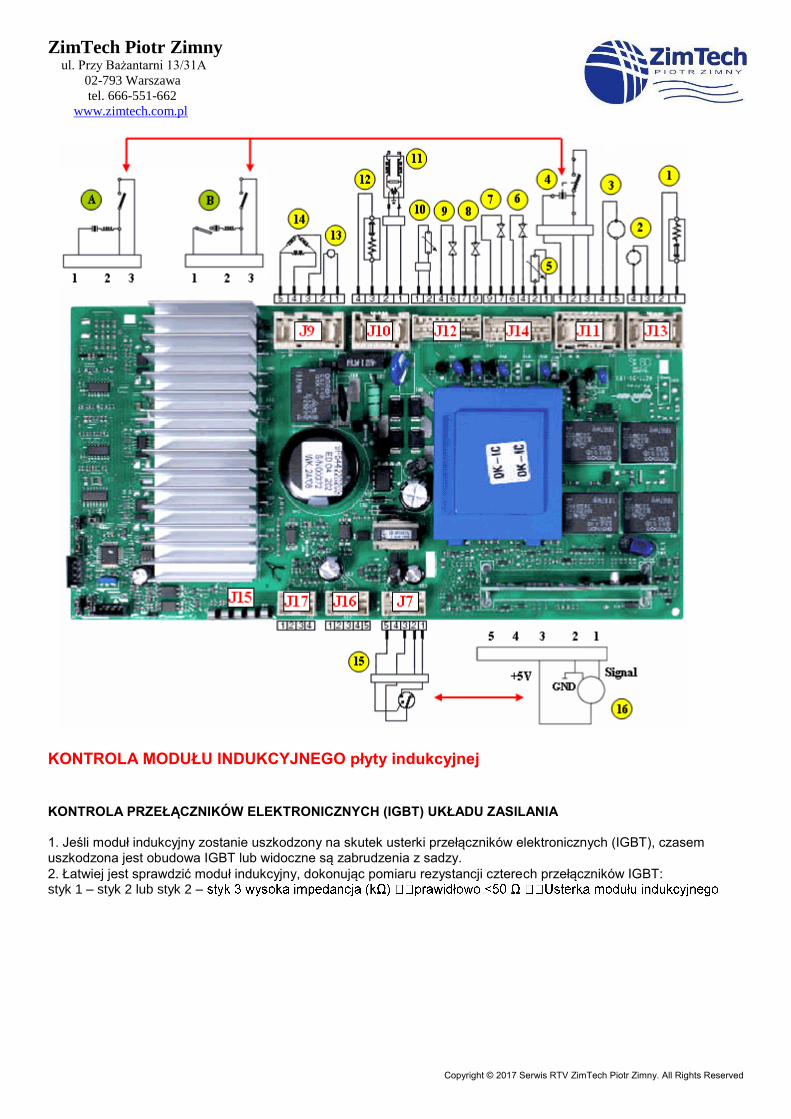
ZimTech Piotr Zimny ul. Przy Bażantarni 13/31A
02-793 Warszawa
tel. 666-551-662
www.zimtech.com.pl
Copyright © 2017 Serwis RTV ZimTech Piotr Zimny. All Rights Reserved
KONTROLA MODUŁU INDUKCYJNEGO płyty indukcyjnej
KONTROLA PRZEŁĄCZNIKÓW ELEKTRONICZNYCH (IGBT) UKŁADU ZASILANIA 1. Jeśli moduł indukcyjny zostanie uszkodzony na skutek usterki przełączników elektronicznych (IGBT), czasem uszkodzona jest obudowa IGBT lub widoczne są zabrudzenia z sadzy.
2. Łatwiej jest sprawdzić moduł indukcyjny, dokonując pomiaru rezystancji czterech przełączników IGBT: styk 1 – styk 2 lub styk 2 –

ZimTech Piotr Zimny ul. Przy Bażantarni 13/31A
02-793 Warszawa
tel. 666-551-662
www.zimtech.com.pl
Copyright © 2017 Serwis RTV ZimTech Piotr Zimny. All Rights Reserved
TRYB DIAGNOSTYCZNY PRALKI ELECTROLUX
Exiting diagnostics mode
→ To exit the diagnostics cycle, switch the appliance off, then on, and then off again.
Szybki odczyt alarmów Ostatni alarm można wyświetlić nawet jeśli pokrętło wyboru programów nie znajduje się w położeniu jedenastym (diagnostyka) lub jeśli urządzenie działa w normalnym trybie roboczym (np. podczas wykonywania programu prania): - 10 sekund po włączeniu urządzenia dotknąć równocześnie czujnik START/PAUZA oraz najbliższą opcję czujnika - Alarm nadal będzie wyświetlany przez wymagany czas, a następnie powróci do normalnej funkcji lub przełączy się po dotknięciu czujnika. - Podczas wyświetlania alarmu urządzenie kontynuuje wykonywanie cyklu lub, jeśli znajduje się w fazie wyboru
programu, zachowuje wcześniej wybrane opcje w pamięci.